Page 1 of 38 A Beam Position Indicator Project Versions 12.4 (4*40 LCD, hardware clock, I 2 C Hbridge, PWM) Version 12.1b (2*16 LCD, Hardware Clock, I 2 C Hbridge, PWM) September 2013 John Drew VK5DJ http://www.vk5dj.com This project describes a complete azimuth and elevation readout system that outputs to array driving motors. Motor movement may be initiated by either front panel switches, internal calculations of moon or sun positions or by external computer control. The system interfaces to the satellite prediction program ‘Orbitron’ and VK3UM’s EME Planner. A GPS may be used to enter Date/Time and Lat/Long. Currently the system works with the following different position sensors: Home made encoder using either an AS5040 (10 bit) or AS5045 (12 bit) A screwjack The MA3-12 series from US Digital HH-05 and HH-12 from DF1SR Megatron’s MAB25 (10 bit), while the MAB25A (10/12 bit) and the MAB36A (12 bit) should work but are untested The A2 and A2T encoders from US Digital through the SEI to RS232 adapter AD2-B Linear potentiometers The COA1E8C16 encoder (10,12,14,16 bit versions) SCA61T inclinometer chip (see my website for details) Yaesu AZ/EL rotator with or without the GS232A computer control Output modes supported are: Relay mode A works the relays in pairs. One relay is set to reverse the connections to a motor (for example to operate CW or CCW) while its partner switches on the power once the relay has settled. This is a safe way to wire things and completely avoids possible brief short circuits. The PCB LEDs are wired for this mode. Relay mode B works four relays, each relay operates a direction (Up, Down, CW, or CCW. In this mode the PCB LED connections are ignored and the LEDs are operated from spare contacts on the relay. Care is needed to avoid short circuits. Hbridge is the latest addition and this provides direction and proportional control of the motors. This mode may only be used in the Hardware Clock version. PWM three modes, see Appendix 3 for setup and features (currently available from Version 12). A PWM signal is made available on the ‘menu switch’ line that can be used for speed control. The relays operate in ModeA and can be used for power and direction switching. I have ceased development of the software clock version from Version 8.40 to minimise my workload. Supported versions will be the versions 12.1+ for 2*16 and 4*40 displays both with hardware clocks (DS1307 from Futurlec). At this point (September 2013) both versions offer identical facilities except for the type of display. If you use V12 please read Appendix 8 for important information – a simple hardware modification is needed for PWM.

Welcome message from author
This document is posted to help you gain knowledge. Please leave a comment to let me know what you think about it! Share it to your friends and learn new things together.
Transcript

Page 1 of 38
A Beam Position Indicator Project Versions 12.4 (4*40 LCD, hardware clock, I
2C Hbridge, PWM)
Version 12.1b (2*16 LCD, Hardware Clock, I2C Hbridge, PWM)
September 2013
John Drew VK5DJ
http://www.vk5dj.com
This project describes a complete azimuth and elevation readout system that outputs to array
driving motors. Motor movement may be initiated by either front panel switches, internal
calculations of moon or sun positions or by external computer control. The system interfaces
to the satellite prediction program ‘Orbitron’ and VK3UM’s EME Planner. A GPS may be
used to enter Date/Time and Lat/Long. Currently the system works with the following
different position sensors:
Home made encoder using either an AS5040 (10 bit) or AS5045 (12 bit)
A screwjack
The MA3-12 series from US Digital
HH-05 and HH-12 from DF1SR
Megatron’s MAB25 (10 bit), while the MAB25A (10/12 bit) and the MAB36A (12 bit)
should work but are untested
The A2 and A2T encoders from US Digital through the SEI to RS232 adapter AD2-B
Linear potentiometers
The COA1E8C16 encoder (10,12,14,16 bit versions)
SCA61T inclinometer chip (see my website for details)
Yaesu AZ/EL rotator with or without the GS232A computer control
Output modes supported are:
Relay mode A works the relays in pairs. One relay is set to reverse the connections to
a motor (for example to operate CW or CCW) while its partner switches on the power
once the relay has settled. This is a safe way to wire things and completely avoids
possible brief short circuits. The PCB LEDs are wired for this mode.
Relay mode B works four relays, each relay operates a direction (Up, Down, CW, or
CCW. In this mode the PCB LED connections are ignored and the LEDs are operated
from spare contacts on the relay. Care is needed to avoid short circuits.
Hbridge is the latest addition and this provides direction and proportional control of
the motors. This mode may only be used in the Hardware Clock version.
PWM three modes, see Appendix 3 for setup and features (currently available from
Version 12). A PWM signal is made available on the ‘menu switch’ line that can be
used for speed control. The relays operate in ModeA and can be used for power and
direction switching.
I have ceased development of the software clock version from Version 8.40 to minimise my
workload. Supported versions will be the versions 12.1+ for 2*16 and 4*40 displays both
with hardware clocks (DS1307 from Futurlec). At this point (September 2013) both versions
offer identical facilities except for the type of display. If you use V12 please read Appendix 8
for important information – a simple hardware modification is needed for PWM.

Page 2 of 38
Introduction The traditional method of determining the direction of a beam is to use a linear potentiometer
driven by a gearing system to convert 360 degrees to the 270 degree motion of the
potentiometer. A bridge circuit with a calibrated meter enables the direction to be read out.
The potentiometer method has the advantage of providing an ‘absolute’ reading. That is, on
power up it will immediately provide a beam heading without calibration. If you’re careful
with your choice of potentiometer you might achieve 2-5 degree accuracy.
Originally the project was not designed to support incremental encoders but many requests
led to support for the screwjack. ‘Incremental’ indicators rely on calibration each time the
unit is turned on. See the separate manual “Manual for Screwjack Solution.pdf”. The same
boards are used but a different program is used in the antenna unit and interfacing is modified
to suit the screwjack. One advantage is that the AZ/EL boards can be placed in the shack. A
major disadvantage is that calibration requires patience and a PIC programmer.
A common method used by those who require greater precision than that provided with a
potentiometer system the use of a Gray coded wheel. The Gray code is a binary code that
unlike the standard binary count changes just one binary digit at a time. For example in
standard binary a count proceeds : 0000, 0001, 0010, 0011, 1000, 1001, 1010, 1011 etc.
In Gray code the count proceeds: 0000, 0001, 0011, 0010, 0110, 0111, 0101, 0100 etc
A Gray coded wheel may have any number of bits - in practice <=16 and in practical terms
for amateurs <13 bits. The lines on the perimeter need to be very fine once 12 bits is reached,
and for amateur constructors may require a fairly large diameter wheel (eg 150-300mm). A
Gray coded wheel has LEDs and photosensitive detectors to read out the active bits. The light
source and detectors must be well aligned and use a fine slot to overcome ambiguous
readings (hence the use of Gray code to overcome ambiguities). They are not a trivial device
to make.
When first drafted, this manual described the application of the new
AS5040 chip from AustriaMicrosystems. The AS5040 uses 1024
hall affect sensors to determine the location of a magnetic field and
thereby provides a 10 bit output that equates to 0.34 degree
definition. A special diametral (2 * 2 poles) magnet produced by
Swiss Company Bomatec AG is the rotary component of the system.
The AS5040 was produced to provide the radial location of steering
wheels, accelerator pedals etc in fly by wire applications. The chip is capable of providing
accurate readouts without missing a location on a shaft rotating at 600RPM. It is not
anticipated that the capabilities of the chip will be stressed by beam rotation speeds! The chip
samples each location at 12KHz.
Position is determined by a rotating, small diametral magnet (6mm * 2.5mm) using NdFeB
alloy. It is nickel coated as the material is quite brittle. The magnet is placed 1-3mm
above/below the AS5040 chip with an alignment better than 0.25mm. Fortunately the chip
supports a calibrate mode to allow fine adjustment. The AS5040 is a small surface mount
device and measures about 6mm*5mm. The chip manufacturer’s website is
http://www.austriamicrosystems.com/04segments/industry/AS5040.htm

Page 3 of 38
Originally designed to use the AS5040 encoder and as an electronic solution to beam
indicators, the project has since grown to cater for a variety of encoders and thanks to the
separate AZ/EL boards considerable flexibility in encoder choice is available.
The AS5040 (10 bit =1024 positions) has been superseded in some respects by the AS5045
(12 bit = 4084 positions) but a number of commercial encoders now use one of the two chips
to provide 10 or 12 bit options. Frankly, using one of the commercial units makes
construction and alignment much easier. See my website for comments on accuracy for each
encoder and the moon/sun calculations.
I continually update my website with new encoders and the software is also in constant
BETA as my enjoyment comes from experimenting with and improving it.
How the masthead encoders are physically connected to the antenna system is for your own
ingenuity as every system is different. The general project description is the same for all
encoders, the differences are in the programs for the AZ/EL units. The Shack Unit is menu
adjustable for the different definitions provided by the encoders.
Although primarily designed as a moderately high definition system for EME work, as the
project developed it became obvious that it would also be useful for those amateurs using
terrestrial communication and whose rotator control unit was missing or unsuitable.
See my website http://www.vk5dj.com/beam.html for further information on the use of all
encoders. This manual uses the AS5040/45 solution for explanation but is relevant for all
encoders. Some use the AS5040/45 internally.
So what is it and how does it work? The beam indicator system displays azimuth and elevation headings for an antenna system. It
calculates the position of the sun for antenna calibration and the moon for EME experiments.
The system can either auto track from internally developed data or from a computer with
appropriate interface software. Tracking may also be manually controlled from front panel
switches. The tracking accuracy is better than 0.5 degree using the described encoder chips.
With the aid of software averaging, the readout in the shack unit is 0.1 degree increments
even for the AS5040 but less precise and less steady readout than the AS5045 with its native
0.1 resolution. Note that averaging for the system in motion must be different from that when
stationary. This is catered for in menu items 28 and 29 antenna. Disregard the ‘catch up’
nature of the display during the bench testing phase – this is averaging at work when it would
normally be off. The AS5045 will allow much smaller settings for hysterisis than will the
AS5040.
The unit has a control box located in the shack and one or two masthead boxes.
The unit(s) at the masthead measures the position of the antenna to an accuracy of 1:1024 or
about 1/3 of a degree for an AS5040 or 1:4096 or about 0.1 of a degree for the AS5045. The
reading is ‘absolute’ meaning that the antenna does not have to be sent back to a starting
point in order to recalibrate if the power disappears. Readers who want more information on
accuracy are urged to read my website for further detail.

Page 4 of 38
On receiving a request from the shack unit the masthead unit sends its data to the control unit
in 9600 baud ASCII. If elevation measurements are required, a separate elevation unit sends
serial data to the shack unit upon reception of a controller poll.
The shack located, control unit has a PIC controller chip that receives the serial input from
the masthead units and displays the azimuth and elevation positions. The control unit can
operate in either manual (local control) or auto (computer control) mode as determined by a
front panel switch. Further switches determine if the position calculated is that of the sun or
moon and whether it is calculated internally or externally. External calculations enable
satellite tracking (driver support for Orbitron is provided). The control unit may be set to
delay antenna movement when the direction reverses to avoid undue stress on antenna
elements and the rotator itself. Software travel stops are also provided.
The output of the PIC18F4682/85 drives five transistors (4 directions and a brake) which in
turn drive five relays that provide power, direction control and a brake.
In addition to receiving signals from a serial source, the project is designed to accept input
from a potentiometer like those in most rotators. The variable voltage from a potentiometer
wiper is directed to A/D converters that may be translated to a beam heading. Some rotators
use a rheostat so some modification may be required to produce the voltage divider effect. A
reference of ground and regulated +5V is available on each DB9 for potentiometers.
The unit may be setup to allow for readings below the horizon, whether there are one or two
sensors, presence of a brake, variable delay before direction change, input type (serial or pot),
whether the pot sensors cover more than 180 or 360 degrees and crossover points. After
initial programming the operational conditions can be varied by accessing menu mode from
the front panel switch.
The masthead unit The masthead unit uses a 16F628 PIC to query 10 bit data from the AS5040 (12 bit from an
AS5045), which it then assembles into a packet of information and sends to the shack unit
serially using 9600 baud, 8 data bits, 1 stop bit ASCII.
The antenna azimuth and elevation units are identical.
For those interested in making their own encoder a separate board is required for the
AS5040/45 chip. I no longer supply this board. The potentiometer systems require no other
hardware at the antenna, while all other encoder systems such as HH-12, inclinometer, MA3-
12 etc require only the AZ/EL board. The no longer supplied AS5040/45 board is deliberately
made as small as possible to allow for different mounting methods of the AS5040 and its
rotating magnet. The board contained a socket, the encoder chip and two capacitors. The
magnet spins above the chip and is the only moving part. The construction makes for a device
that has little to wear and is highly resistant to dust and other pollutants. See photos 2 and 3
for construction details. This board should be mounted so that its position beneath the magnet
can be adjusted in the X, Y, and Z planes.
The masthead unit (AZ/EL unit) contains a PIC16F628 while an LM78L05 provides the 5V
regulated power. An original plan to include a MAX232 chip to convert TTL levels to those
more suited for serial data transfer was found unnecessary. Experiments using a 100m length
of Cat 5 twisted pair cable showed TTL worked fine at the data rate chosen. Remember that if

Page 5 of 38
you choose to add an external MAX232 at the antenna end you will need to use another at the
controller end (see later). Initially DO NOT install IC4 in the shack unit.
The Azimuth and Elevation programs for the 16F628s are the same. For those who built their
own AS5040/45 encoder unit the AZ/EL units may be placed into calibrate mode (SW1
momentarily on, then off when using AS5040 but SW1 left on for AS5045). In this mode the
AS5040 outputs a number that may be used to position the board under the magnet. The
controller unit in the shack will display “Magnet=” followed by a number. As the magnet
revolves the displayed number should vary by less than 30 for a 360 degree rotation.
Fortunately this seems to be less critical than the datasheet suggests but could be an important
determinant of tracking accuracy.
The masthead unit has another switch (SW2) supporting a ‘terminal’ mode providing you add
a temporary inverter transistor and modify the connections on the DB9. Having done this
place SW2 in the on position and connect the serial output to a computer running
Hyperterminal at 9600 baud, 8 data bits, one stop bit and no parity. The unit will display
“Azimuth = XX degrees” where XX is the bearing. I used this feature to provide a
demonstration at GippsTech in July 2005 before the construction of the controller unit. See
Appendix 1 for connections because a computer serial port requires inverted data to operate.
SW3 on the masthead unit allows the count to be reversed to suit different mounting methods
resulting in clockwise or anti-clockwise movement.
Power consumption of the antenna unit is a few milliamps. The antenna unit has four
connections: Ground, 9600 baud ASCII out, handshake in, 12V power in. The recommended
cable is CAT5 network cable. Cat5 has three pairs. Pair each active lead with an earth wire.
Note that the DB9 overlay is correct for a socket DB9. If you use a plug DB9 place it on
the bottom of the board.
The Controller This shack based unit utilises 12V at up to 400mA to power relays and the board. The board
has:
LM7805 derived 5V regulated supply
PIC 18F4682 or 18F4685 (a 40 pin device with 40K or 49K of 16 bit program
memory, RAM for variables and long term data storage in EEDATA memory)
4066B CMOS switch to steer the incoming serial data from three sources to the
USART input port on the PIC
1 or 2 MAX232 chips depending whether you require the second for the antenna
units. Each Max232 can support two inputs and outputs. One for the computer
interface is mandatory to ensure reliable comms and correct data sense. The second
MAX232 is required for some computers or the SEI interface. The AZ/EL unit does
not need IC4 to be installed.
5 TIP31C NPN power transistors to switch the relays (smaller transistors would be
acceptable for relay switching).
5 relays with 12V coils, DPDT 10 A contacts to provide the heavy duty switching.
For each of azimuth and elevation, one relay switches the windings to determine
direction while the second switches power. The power relay in Mode A closes 50ms
after the direction relay.

Page 6 of 38
General description of the controller operation The PIC operates at a frequency of 32MHz determined by the 8 Mhz crystal using an internal
4* multiply mode. This frequency is used for internal timing and must NOT be substituted.
The PIC sends a low active handshake signal to the masthead unit, clears its receive buffer,
switches on the appropriate gate of the 4066 to transfer the data from pin 3 of the DB9 and
checks the data stream for an “A” or an “M” then loads the value from the masthead unit and
the checksum. If the checksum confirms the data is correct, the value is converted to degrees
with one decimal place and displayed on the LCD.
In the process of conversion of the elevation raw number, the controller will allow for any
below horizon measurements. This is a setup option that may be altered at any time.
However, most of us won’t be in that wonderful position of living on hill tops!
Assuming that both azimuth and elevation sensors are present or activated in setup, the PIC
will next check the elevation sensor in a similar manner to the azimuth process.
If the front panel switch is in Auto position, the device automatically tracks the antenna,
switching data as appropriate through the 4066B. If external calculations are requested then
computer data becomes available. In my “Remote” software and VK3UM’s Autotrack the
CTS is now unused and the computer software relies on a software interrupt informing the
computer of the arrival of data, on completion of received packets this in turn triggers the
sent data.
A simple check sum is used for all data inputs and, if confirmed, sends the information to the
decode section for triggering the relays. See the comments above on menu item 42.
If the front panel switch is in the manual position the relay operation is controlled by the 4
spring loaded front panel switches – up/down, left/right. The switches do not directly control
the relays but are used to inform the PIC of required moves. This enables the use of a delay
function to prevent too rapid a changeover of direction motors in the interests of beam
survival to avoid a short circuit if Mode B relay control is used. The delay is configurable
from 0 to 6 seconds. Hysterisis may be added in ‘Auto’ mode to minimise hunting.
The 2 line LCD display usually displays the azimuth and elevation on the top lines while
tracking information appears at the bottom. A star is appended in delay mode when the
controller is waiting for the beam to come to rest. See Appendix 3 for information on the 4
line LCD display.
The LCD is also used to display the configuration states. These are accessed by putting the
device in ‘Menu mode’ by putting the Menu switch in the ‘ON’ position. NOTE: the menu
access is different from Version 7.00 as the Park Switch has been renamed ‘Menu’ and Park
is now accessed from a menu setting. Once ‘Sec=’ shows, the various options may be
accessed using the UP/DOWN buttons, while LEFT/RIGHT increases or decreases values.
Note that for values showing decimal points the normal increment and decrement is 0.01 but
by putting the Calibrate Switch in the ‘on’ position the reading increments by whole
numbers.
NOTE: the fast mode switch is different from Version 7.00 as the Park Switch has been
renamed ‘Menu’ this required a change to the switch governing speed.

Page 7 of 38
The memory is updated ONLY if data is changed and for some items ONLY when the menu
moves to the next item with the ‘Up’ or ‘Down’ buttons. Returning the ‘Menu’ switch to
manual leaves the menu and returns to normal operation. Be sure to return the “Calibrate”
switch to the OFF position before returning to normal mode or you will incorrectly calibrate
the system.
The order of display is: Seconds, Minutes, Hours, Day, Month, Year, Brake/limit, AZ/EL
mode, Delay, AZ spread, EL spread, AZ offset, EL offset, AZ hysterisis, EL hysterisis, AZ
low stop, AZ high stop, EL low stop, EL high stop, HT ASL, Longitude, Latitude, Park AZ,
Park EL, AZ resolution device, EL resolution device, Inclinometer calibrate, Averaging
static, Averaging moving, Offset direction AZ and EL, external VGA mode (requires
additional hardware), Time offset from UTC, RS232 or TTL levels for CTS and DTR, Input
type, Refraction ON/OFF, Relay mode, Maximum motor speed, Minimum motor speed,
Hbridge address, Doppler frequency, Run on for azimuth, Run on for elevation, Checksum
on/off, Declination type, Display difference, Park. The menu system wraps. SCA61T
calibrate,
(1,2,3,4,5,6) Seconds, Minutes, Hours, Day, Month, Year
With the introduction of a hardware clock the method of setting the clock has changed.
The clock will ONLY be UPDATED when the SECS reading has been manually changed OR
if GPS or external computer is used.
Choose a date/time in the future using perhaps your computer clock or a GPS as the standard.
For example if the current date is 5 September 2009 and the current time is 15:43:10, choose
15:45:00 which gives you about two minutes to perform the time/date setting.
Bring up the Menu and using the Up switch move through to ‘Year’ at item 6 and change if
necessary with the left/right buttons. Use the down button to go back to ‘Month’ at item 5 and
again change if necessary. Work your back through the items changing where necessary to
the future date/time chosen above. Once the seconds are set to the future time, stay in menu
item 1 (seconds) and watch your external clock. When it indicates the future time (15:45:00
in our example) click the down switch. The time will now be saved to the hardware clock and
be accurately set. You will be advised that the memory has been updated.
The clock may alternately be set using a GPS connection, VK3UM’s EME Planner or when
using the REMOTE interface.
(7) Brake/Limit – a stop must be set and affects motor direction and ‘limit stops’
Options are:
1. No brake, north stop
2. Brake, north stop
3. No brake, south stop
4. Brake, south stop
Generally Southern Hemisphere stations will use a south stop for EME work. See later for a
description of the Brake function.
(8) AZ/EL mode
Because the program is counting from 0 to 15 the unavailable combinations show In=?/?
The options cycle through in the following order with azimuth first:

Page 8 of 38
In=None (No serial encoder or potentiometer attached)
In=Pot/None (Potentiometer on azimuth and nothing on elevation)
In=None/Pot (Nothing on azimuth and a potentiometer on elevation)
In=Pot/Pot (etc)
In=Serial/None
In=Serial/Pot
In=None/Serial
In=Pot/Serial (Pot on azimuth, serial AZ/EL unit on Elevation)
In=Serial/Serial (Serial AZ/EL unit on both ports - default)
These labels identify the value of a variable in the background and non permissible numeric
combinations of 4,6,8,9,12,13,14 are shown as In=?/? for internal programming reasons.
(9) Delay
Delay in seconds before swapping directions to protect the antenna mechanisms. Default is 2
seconds.
(10,11) AZ (and El) spread
Usable for any input device, it is the number of degrees covered by the maximum coverage of
any input device. These two menu items enable scaling. Generally there is no point in scaling
serial input devices unless you have gearing at the antenna to change the coverage of the
encoder.
The value supports fractions of a degree to allow accurate adjustment. Remember that when
in the menu system placing the calibrate switch ON will allow increases of whole numbers
when adjusting decimal values. With the calibrate switch off small changes may be made.
Increasing the number increases the spread. Clearly the number to be used depends on the
gearing. Experiment to find the correct value.
Both AZ and EL default settings are 360.00 .
This function enables greater accuracy to be obtained from your encoder data by suitable
gearing of the encoding device. For example an AS5045 geared up 4:1 at the antenna with EL
spread set to 9 (i.e. 90 degrees), would provide an accuracy better than 0.1 degree but a
maximum range of antenna movement of 90 degrees.
(12) Azimuth Offset
This menu item (12) allows the range of any azimuth input system to begin at or above zero.
This item works in conjunction with menu items (10 and 29). Because moon and sun
calculations only cover from 0-359.999 antenna readings are normalized to this same range
and cannot be <0 or >360. Default 0 degrees.
(13) Elevation Offset As for menu item (12). It may be used to set negative (below horizon) degrees for any input
system. For example with a potentiometer you may choose to set Elevation Spread (see
above) to 100 degrees, set Elevation Offset to 10 degrees and Menu item (30) to ‘Sub EL
offset’ to provide a cover of -10, -9, .. 0,1,2…90.
For auto tracking reasons it is critical that you set software stops to avoid damage with your
beam rotating beyond set bounds. Default is 10 degrees and with ‘direction of EL offset” set
to subtract you would establish a lower limit of -10 degrees for your readout.

Page 9 of 38
(14,15) Azimuth/Elevation hysteresis
The mechanical realities of moving antennas require hysteresis to be built into the system to
avoid hunting in auto tracking mode. Numbers in this item represent 0.1 degree increments so
a value of 10 will cause the motor to switch off when it reaches the computed position. The
system will not move the antenna again in auto mode until the tracked object moves outside
the value set for hysteresis. Default is 10 = 1 degree. If RunOn menu items 39, 40 are set to
0.0 the motors switch off when the antenna reaches the AZ or EL of the object and then
remain off until the antenna or the object move outside the hysteresis limits set in items
14,15.
(16,17) Azimuth High Stop/Azimuth Low Stop – software limit switches
Note that azimuth and elevation behave differently. Azimuth stores half values in the eedata
of the PIC, while elevation stores true values. Together, “Azimuth High Stop and “Azimuth
Low Stop” work together to determine the sector that allows automatic or manual movement
both ways.
North stop rotators (menu 7): the two stops allow movement within and back into the sector
defined by Low through to High Stops, that is, not through north. Movement out of the area is
stopped.
South stop rotators (menu 7): the two stops allow movement within and back into the sector
that does not go through south. Movement out of the area is stopped.
Through selection of Limit (menu 7) and these two stops any combination can be selected.
You may need to experiment a little.
Low stop must be the lower of the two values.
Because the information is stored in a byte (0-255) each unit represents 2 degrees. To stop the
antenna going beyond 180 degrees you must enter half of this value i.e. 90. If the moon or
sun is outside the permitted range, the LED (if installed on SW3) will light and motor actions
to move further are prevented. Motor movement to shift the antenna into safe territory is
permitted. A value of 255 disables this function.
(18) Elevation High Stop – a software limit switch
This is the setting above which the automatic and manual switching will not allow movement
in the elevation direction. It is a software implementation of a limit switch at the antenna.
Because the information is stored in a byte (0-255) each unit represents 1 degree. To stop the
antenna going above 70 degrees you must enter a value of 70. If the moon or sun is inside the
forbidden range, the LED (if installed on SW3) will light and motor actions further into that
range are prevented. A value of 255 disables the function.
(19) Elevation Low Stop – a software limit switch
This is the setting below which the automatic and manual switching will not allow movement
in a disallowed elevation direction. It is a software implementation of a limit switch at the
antenna. Each unit represents 1 degree. The item in memory is stored as a real number so can
go below or above zero and unlike the other stops a fractional value can be entered. If the
moon or sun is inside the forbidden range, the LED (if installed on SW3) will light and motor
actions further into the forbidden area are prevented. A value >= 91.00 disables the function.
Default 91.00

Page 10 of 38
When setting this in the menu, remember that switching ‘calibrate’ ON will speed your edit
by changing readings in whole degrees.
(20) Height above sea level
In metres, used by the sun and moon routines. Default = 10.0 metres.
(21) Longitude in degrees for home location
Use positive for degrees east of Greenwich, negative for west. Once in this menu item,
putting the Calibrate switch into the “Calibrate” position increments and decrements in units
rather than 0.1 (10* faster). Default is VK5DJ’s QTH. Don’t forget to return the Calibrate
switch to its normal position before leaving the menu or you’ll recalibrate your system.
(22) Latitude in degrees for home location
Negative for south, positive for north. Once in this menu item, closing the Calibrate switch
increments and decrements in units rather than 0.1 (10* faster). Default is VK5DJ’s QTH.
(23,24) Park Az and El
The parking positions for the antenna. The ‘Park’ menu item parks the antenna to this
position when in ‘Auto’ mode. Default = 0.0 degrees.
(25) AZ resolution 10 bit, 12 bit, 14 bit, 16 bit and SCA61T inclinometer
Since adding facility for 14 and 16 bit encoders it has been necessary to change the display
method. Options are:
1. 10 bit
2. 12 bit
3. 14 bit
4. 16 bit
5. SCA61T mode
The LCD reading cycles through the available options. The item affects the maths calculating
the conversion of the numbers from the serial AZ/EL unit or from the A/D Converter in the
PIC.
This setting is ignored when “AZ/EL Mode” is set for pot input in which case it will use 10
bit as this is the resolution of the A/D converter. Default = 12 bit.
(26) EL resolution 10 bit, 12 bit, 14 bit, 16 bit, SCA61T
Elevation resolution - see the previous explanation substituting ‘EL’ for ‘AZ’
Default = 10 bit. The option SCA61T correctly interprets the numbers coming from the
AZ/EL board using an SCA61T inclinometer chip.
(27) SCA61T Calibrate
The default value is 124. This equates to 1024 as 900 is added internally to derive the correct
offset for calculations. The value may be changed using the left and right arrow keys. The
data sheet suggests the use of 1024 but in the device I used it was found that a better offset
was 1035 (135 in the menu). It seems that individual devices vary so I included this item to
allow fine adjustment. My website provides further information regarding calibration but
effectively it involves pointing the arrow of the sensor up and checking for a reading of 90
degrees. If the device reads +90 degrees before vertical and it then flips to -89 then you need
to increase this calibration number. If on the other hand you cannot reach +90 degrees at any
point then you need to decrease it. The SCA61T is very inaccurate as it approaches 90
degrees. See my website for using elevation offset (menu item 12 and 30) to add 45 degrees

Page 11 of 38
and use the most accurate part of the SCA61T curve from -45 to +45 degrees by putting the
sensor on a 45 degree slope inside the antenna box or sloping the box itself.
(28) Encoder Averaging - Static
Both the shack unit and the AZ/EL units on the tower do some averaging. The AZ/EL unit
does it in between polls: in addition, when an AS5045 is used, there is some built in
averaging within the chip. All this serves to reduce flicker and provide improved readout
definition.
The shack unit averages readings over the number of cycles set in this item (28) when the
beam is not being moved. Note that a value of 1 equates to NO averaging. A value of two
would average over two inputs and so on. A value of 15 would equate to 15 cycles and
provides a substantially improved readout when using an AS5040 and simulates 0.1 degree
readouts. (Note: I didn’t say ‘accuracy’). The menu system enables the shack unit’s averaging
process to be disabled using a value of 0 or 1. Most users will leave averaging ON as it will
help overcome flicker caused by minor flexing of the antenna system.
(29) Encoder averaging - Moving
When the antenna is moving the same degree of averaging as in menu Item 28 cannot be used
as there would be too large a lag.
This item allows a smaller average to be determined during movement (or more correctly
when the PIC is actuating movement either by operation of the front panel switches or by
automatic operation). I find that a value of 2 is an improvement without causing undue lag.
A value of 0 or 1 equates to NO averaging.
(30) Direction of AZ offset
This menu item makes it possible to either add or subtract the offset in menu item (12).
Most antenna pointing requirements can be met by judicious arrangement of ‘spread’, ‘offset’
and ‘direction of offset’. Experimentation is the best solution. If you have a non geared serial
system leave the AZ and EL spread settings at 36 (360 degrees), if not, set ‘spread’ for the
total number of degrees needed, then decide if you want zero start, or above zero start.
‘Offset’ gives the number of degrees above zero start. Direction (menu 30) determines if the
readout is increased or decreased by the offset in (12). There are no negative readouts
permitted in azimuth – all readings are corrected to 0-360 degrees. Over-run from
357,358,359…0,1,2 or reverse is only permitted in a ‘south system’ while
178,179,180…181,182 or reverse is only permitted in a ‘north system’.
(31) Direction of EL offset (voltage sources using A/D only)
As per (30) but worked in conjunction with menu items (11) and (13) for elevation control.
For example, if a pot is attached to an input and the spread set for 100 degrees, an offset of
>=10 degrees, and ‘Sub EL offset’ (in this menu) then the pot will provide readings from -10
degrees to +90 degrees. Alternately, if the ‘Add EL offset’ is set then the pot will read from
10 degrees to 110 degrees. This function is very helpful when using a SCA61T and sloping
the device by about 45 degrees to use the most accurate part of the conversion curve.
Note that for Elevation Low Stop to work below the horizon this item, menu 30, must be
setup to allow negative movement of at least the value in ‘Elevation Lostop’.

Page 12 of 38
(32) VGA ON/OFF
This feature has been added to provide an output for use with a secondary project using the
Dontronics Micro uVGA-640 board.
http://www.dontronics-shop.com/product.php?productid=16145&cat=262&page=1
This feature allows the beam indicator project to display AZ, EL, Moon/Sun position in large
numerals to a VGA monitor thus avoiding a computer. The website has details. If you’re not
using this feature turn it off (Default OFF).
(33) Time ON/OFF
In the 2*16 display and when the unit is in ‘External mode’ (front panel switch off), you can
choose to show the incoming AZ/EL information for the object being tracked or view the
time.
For the 4*40 LCD display version this menu item becomes the UTC offset from local in
decimal hours * 10. For example 90 = + 9.0 hours, 95=+9.50 hours. For those East of the
Dateline you will need to do some simple arithmetic. For example if you are 10 hours behind
UTC you will subtract your hours from 24, multiply by 10 and enter 140. E.g. Hawaii is UTC
-10 hours, therefore 24-10 = 14. You would enter 140 in the time offset. The local time will
read correctly. The local date is not used in any way so is not computed.
(34) CTS
Used to change the sense of the CTS signal, this setting is almost redundant as I have chosen
to use software interrupts to trigger the reception and sending of data in my REMOTE
software. However some third party software may require CTS. So for the moment this
software switch remains. Mostly this menu item will not be used and can be left at default.
Some computers may not interface well to a CTS signal at 0-5V (TTL) levels, one of the
reasons I chose to ignore it in my software. As designed, the shack unit uses a MAX232 to
convert data levels between TTL and RS232 levels (+/-10V or thereabouts) but the CTS line
is not channeled through the MAX232. As a result the CTS has 0-5V levels only, unless you
install the second MAX232.
The latest version of VK3UM’s EME tracking program, or my Remote program for use with
Orbitron for satellite work, does not require CTS. If you are using other third party software
you MAY find that your computer does not respond to 0-5V on the CTS line. If this happens
you will need to cut two traces near J1 and run 4 jumpers around the MAX232. See later
section on “Interfacing to a computer”.
This (34) command defaults to TTL levels but if you choose to make the change to RS232
levels for CTS computer interfacing then you will need to change this to: “CTS RS232 level”
rather than the default “CTS set for +5V”. This command inverts the CTS lines to counteract
the inversion in the MAX232.
(35) Input Device (In=Normal, In=SEI, In=Yaesu232)
This item allows use of different input devices.
Normal accesses the standard devices
(a) Analogue inputs on AZ and/or EL sockets
(b) AZ/EL board which plugs into the AZ and/or EL sockets which may be connected
to HH05/12, MA3-P12, SCA61T, other encoders

Page 13 of 38
SEI accesses the SEI interface by US-Digital to match the AD2-B interface with encoders A2
and A2T. The SEI interface must be plugged into the Elevation DB9 socket. Use of the SEI
interface also involves some rewiring of the elevation DB9. See the separate ‘Optical’ page
on my website for the manual with details. When set this item accesses both the A2 and A2T
encoders through the SEI interface by sequentially polling the elevation port. In this mode the
azimuth port is unused. AZ/EL mode (item 8) should be set to Serial/Serial. A second
MAX232 is required.
Yaesu accesses the Yaesu GS232A computer interface. The Elevation DB9 must be rewired
to this: Pin 3 of J3 to pin 2 of the elevation DB9, Pin 4 of J3 to Pin 3 of elevation DB9, Pin 6
of J3 to Pin 5 of the elevation DB9. Note that the Azimuth port is unused. Communication is
at 9600baud, N, 8, 1.
Note that the GS232A is not needed to use the Yaesu G5500 satellite AZ/EL rotator with this
project. The standard controller on the Yaesu outputs a variable voltage (adjustable) which
will interface directly to the “Shack Unit” making use of the A/D converters available on pin
8 of the DB9s and setting the input device on menu item 8 to Pot/Pot. Some adjustment of
items 10-13 may be needed to cover the range. The adjustment on the Yaesu controller
should be set to achieve 0-5V range if possible, otherwise as high as it will get towards 5V
will work fine – you will need to adjust the spread item in menu 10,11 to achieve the full
coverage range. Set menu item 35 to “Normal” if you use the G5500 controller without the
GS232A. The controller relays will need to be wired appropriately to the G5500 controller
motor controls.
The system should work without a GS232A for the G-800DXA/G-1000DXA/G-2800DXA
Azimuth Rotator, G-800DXC/G-1000DXC/G-2800DXC Azimuth Rotator, G-400 Azimuth
Rotator, G-500A/G-550 ElevationRotator, G-5400B/G-5600B/G-5500AZ-EL Rotator. You
will need to determine the connections for each.
(36) Refraction ON/OFF
There is some discussion on whether refraction should be taken into account in the positions
of the sun and moon for radio work. The shack unit program now allows you to choose. The
default is ON. When refraction is ON the refraction calculation is NOT taken into account
when the moon’s true position is below the horizon by more than 5 deg. I have assumed an
atmospheric pressure of 1000 mBar and a temperature of 20 degrees C. Clearly this is an
approximation but is the only practical solution.
(37) Relay, Hbridge and PWM modes for motor control This item enables selection of either of two relay solutions or a speed controlled system using
an Hbridge (I2C) or PWM for motor control. Please read Appendix 8 for a hardware mod.
Relay Mode A is the original mode where two relays work in tandem for azimuth and another
two relays work in tandem for elevation. In mode A one of the relays exchanges the
connections on the motor while the second relay switches the power on a short time later.
Relay B has each relay control a separate direction, one for up, one for down etc.
This second method is probably the most common although the first method is less likely to
result in a short circuit due to the make and release time of relays. Both methods work well,
both require 4 relays. The wiring circuits are shown in Appendix 2. Note that the original

Page 14 of 38
PCB caters only for mode A LEDs. See the appendix for relay wiring details including a
modification of the LED wiring to cater for Mode B.
Hbridge mode works in association with menu items 38 and 39. The recommended Hbridge
is the MD22 from http://www.robot-electronics.co.uk/htm/md22tech.htm as the system has
not been tested with others. This menu item must be set to Hbridge before menu items 38 and
39 have any effect. In Hbridge mode the user may choose to leave relays in place or omit
them entirely. The anodes of the direction LEDs may be wired to a source of voltage (through
a resistor) and the cathodes wired in place of the relays at the collectors of the TIP31
transistors. If you do not intend to use relays or use any heavy current switching, a small
NPN transistor could be substituted for the TIP31s. Motor connections to the Hbridge are up
to you. The I2C bus connections (SCL and SDA) are put in parallel with those going to the
hardware clock. There needs to be excellent electrical separation of the motor connections
and the +5V power for the bridge itself. I recommend making the +5V and earth connections
completely separate wires than those going to the hardware clock. Bypass generously.
PWM modes are the 4th
, 5th
and 6th
options in Version 12.0 for the DS1307 clock. A
hardware modification is ESSENTIAL as the PWM signal is output on the menu switch pin.
Although I would like to have used the brake switch it was necessary to use PORTC.2 of the
PIC because of limitations on the pins that can output the PIC’s internal PWM generator.
In Version 12.0 the menu operation is affected by PWM mode. Once PWM mode is selected
the menu system can only be activated on ‘power on’. If you don’t do the hardware mod in
Appendix 8, you WILL destroy the PIC if you use the menu switch after the startup sequence.
In PWM mode the relays operate in ModeA. In this mode the direction and application of
power is done through the relays as usual, but the PWM is used to control a separate outboard
circuit that regulates the motor speed. The PWM output has a frequency of 20kHz (0-5V).
Menu selections:
PWM : both azimuth and elevation affect the PWM frequency. Because both directions must
run from one PWM output the lowest speed of the two is always selected until one direction
finds its target at which time the speed resets to the correct speed for the second motor.
PWM az: only the azimuth affects the PWM frequency. Full speed (100% mark/space ratio)
is present when the antenna is further than 10 degrees from its target, from 10 to 1 degree the
speed is decreased to the minimum set in menu item 39 and this speed is maintained until the
motors hit target.
PWM el: only the elevation affects the PWM frequency. Speeds are as described above and
minimum speed is as set in menu item 39.
Note the above apply in Auto mode. See menu item 38 for Manual mode.
(38) Man Mtr This sets the motor speed when in Manual PWM mode. The number entered should be
between 0 and 100 and is the percentage of full speed required when using the manual
switches to move the antenna. This is a compromise setting between speed and accuracy.
(39 Min Mtr This sets the minimum motor speed when in Auto mode, it is a figure from 0 to 100 and
should be set to a minimum speed for reliable operation of the rotating system. This

Page 15 of 38
adjustment allows most accurate placement of the antenna. This setting affects the minimum
auto speed when in PWM or I2C operation with an H-bridge.
(40) Hbridge address The Hbridge sits on the I
2C bus and shares the bus with the hardware clock. The address for
the Hbridge is set as default 176 decimal (B0 hex). Most bridges have provision for changing
the address. This menu item allows for different devices/addresses. Note that the hardware
clock uses 208 decimal (D0 hex) on the I2C bus, so the value 208 is illegal in this menu item.
(41) Doppler This item enables display of Doppler shift for the frequency chosen. If Doppler frequency is
set to anything other than “Doppler Off” and providing the moon is above the horizon, a
Doppler reading will appear on line 2 of the display every five seconds for one second.
A calculation of Doppler is made based on the rotation of the earth for your latitude and a
calculation that takes into account the velocity of the moon as it moves between apogee and
perigee. The display is for Home/Home Doppler shift in Hz.
(42) RunOn mode azimuth Most systems have some run on affect once the motors cut and the antenna comes to rest. The
auto function normally switches a motor off when it reaches the object’s AZ and then stays
there until the antenna or object move outside the hysteresis limits set in items 14. The
RunOn feature enables the auto function to turn a motor off before it reaches the object’s AZ
and then coast to the object’s AZ. This will need to be set experimentally and the value will
depend on the mechanical construction of your antenna rotator and on the accuracy of your
AZ encoder system.
Important: the value set in RunOn must NOT exceed the value of the hysteresis set in item
14. So if you have hysteresis of 0.5 degrees then RunOn must be <=0.5 degrees.
(43) RunOn mode elevation As per item 39 but for the Elevation system. This must be set in conjunction with item 15
(hysteresis elevation). Important: the value set in RunOn for Elevation must NOT exceed
the value of the hysteresis set in item 15. So if you have hysteresis of 0.5 degrees elevation
then RunOn must be <=0.5 degrees.
(44) Checksum From version 8.40 a checksum option has been added to the computer interface. This was
introduced primarily to support the internet mode provided by my program “Remote.exe” and
Doug VK3UM’s AutoTrack. My “Remote” program provides an interface to Orbitron, or a
computer generated moon position (using vk5dj_sunmoon.dll). This interface may operate
either through the normal RS232 port of a computer, through an Ethernet cable connected to
a WIZ100SR (ethernet to serial interface), or through the internet from a remote location
courtesy of the WIZ100SR and “Remote.exe”. Choosing “Check ON” accesses an input
string from the computer which contains a checksum. If “Check OFF” the shack unit utilizes
the old input string method without a checksum. The checksum ensures only good data gets
to the shack unit from external sources and is the preferred setting. Some software from other
sources may not support the checksum mode. This will reveal itself as slow or nonexistent
communication with the computer.

Page 16 of 38
(45) Declination calculation Some users want the Apparent Declination while others want Topocentric Declination. I have
added a menu item to allow you to choose. The initial setting is now Apparent – it was
previously Topocentric without a choice. Go to the menu item and using the left/right
direction choose the declination you want displayed. This becomes the new default.
(46) Display mode This menu item provides an option to display the difference between the antenna and the
object’s azimuth and elevation and the normal situation where the antenna’s true azimuth and
elevation is displayed. When set to ‘difference’ the numbers will display 0,0 when the
antenna is tracking the object.
(47) Park mode From Version 7.0 the Park has moved from a switch to a menu item. This enables the old
Park switch to be used for menu selection. It is most easily accessed by accessing the menu
with the menu switch, then pressing the ‘Down Switch’ once. Use the left or right switches to
change the setting. When Park is ON it effectively sets the Moon’s or Sun’s AZ and EL to the
setting in your park menu (see item 23,24). If the Auto/Manual switch is moved to the Auto
position the beam moves to the Park position and after 5 seconds the brake (if installed) is set.
Park status is not stored. Once power is removed from the unit the Park item returns to PARK
OFF on restart.
Choice of components The interfaces use DB25 (computer I/O J1), DB9 (Azimuth J2), DB9 (elevation J3), chosen
to avoid accidental confusion of sockets. The LCD is a HD44780 compatible, character based
LCD. I used a two line backlit device purchased on VK-Ham, manufactured by Plotech 1
94V-0. Most are 14 or 16 pin devices. Rockby electronics often have suitable displays. I
suggest the following sites for further information regarding 2line 16 character LCDs.
http://home.iae.nl/users/pouweha/lcd/lcd.shtml
http://www.repairfaq.org/filipg/LINK/F_Tech_LCD.html
Sources of 4 line by 40 character LCDs are available from
(1) HDM40416L from http://www.futurlec.com
(2) http://www.lcdmodkit.com/lcd/LKC-4004-A2.html (I use this one)
See Appendix 3 for information on connecting a 4 line display using Version 9.51.
The rear box photo shows the 8 connectors for rotator power/ground and motor leads. Two
are unused and were a ‘just in case’ for the prototype. By mounting the connector strip on a
small L shaped bracket I was able to provide a convenient feedthrough from the inside and
solid connections for the motor leads.
You may choose to put fuse holders for the motor power and for the main 12V power supply.
Next time, I probably will. Not shown in the circuit diagram is a diode wired in series
between the +12V and the switch to guard against accidental reversal of power.
The prototype’s front panel direction switches are spring loaded SPST push buttons. All other
switches need only be SPST.

Page 17 of 38
The choice of a 16F628 or a 16F628A in the AZ/EL board doesn’t matter; just remember that
the programmer for the PIC must be set accordingly as the two varieties use slightly different
programmer timings. 16F648A also work. The crystals in all cases determine critical timings,
no substitution of frequency is allowed. The AZ/EL board uses a 10MHz crystal while the
shack unit uses an 8MHz unit.
General construction I have a stock of boards. Check my website for details. All boards are double sided, plated
through holes, silk screened design. Someone else might like to convert this to a single sided
design if they have the ‘knowhow’ and the time. The project design is copyright and no
portion may be commercially manufactured without my permission.
The photos illustrate major construction methods but there is nothing very critical in layout
terms. Just use sound amateur design, avoid overheating components and socket your chips.
Note that if required the encoder board (if used) and AZ/EL board will fasten together in
piggy back fashion providing appropriate connectors and standoffs are used.
Depending on the LCD choice you may need to run the backlight from +12V via a resistor
R14, adjust for best results around 100 ohms. Some backlit LCDs have resistors on board that
enable 5 volt operation from the normal +5V to the unit, in which case omit R14. Use J8 if
the backlight needs +5V on pins 15/16. If you choose to run the backlight from the +5V
voltage regulator you will need to heat sink the LM7805 or even mount it externally. If
necessary, adjust your LCD connections to match those in the circuit diagram (See Appendix
3 at the end of this document)
For wiring the DS1307 battery backed hardware clock see Appendix 5 at the end of this
document and do NOT install the 32768Hz crystal and its bypass caps on the main board.
All switches are active when earthed so a common earth lead can be run to these. The active
sides of S1, S2 on the board are nearest the LCD plug. The active side of S3 is away from
RV1. DO NOT use the second S3 pin nearest RV1 for the calibrate switch, it mistakenly
goes to +5V instead of 0V, take the S3 earth from another switch. If you would like an
indicator when the moon or sun is outside the movement limits of your system, the software
is set up to lower S3 in this circumstance. See below how to wire this feature.
Relay 4 is the power switching relay for Up/Down while relay one is the direction relay for
Up/Down
Relay 2 is the power switching relay for Left/Right and relay three is the direction relay for
Left/Right
Relay 5 is the brake relay
LEDs
L1 LED indicates down (cathode nearest board corner)
L2 LED indicates up (anode nearest board corner)
L3 LED indicates left (anode nearest board corner)
L4 LED indicates right (cathode nearest board corner)
L5 LED if added indicates moon or sun is outside software limits of antenna.
L5 LED is on the Rev8 circuit diagram shown as external components. This LED can be
optionally added to the connector for SW3. The anode of the LED should be connected to the
Page 18 of 38
point nearest the corner of connector S3– this is +5V. A 1K ohm resistor can be wired
between the cathode of the LED and the SW3 connection on S3. Connect a series resistor of
270 ohms between the active of the calibrate switch and S3. This is a precaution in the
unlikely event of a software glitch being shorted to earth by SW3. If an attempt to drive the
system below a software limit switch, this LED will light.
For best calibration the calibrate switch should be used in manual operation mode.
The Max232 (IC3) is mandatory. However the second Max232 (IC4) was designed into the
board but is normally only required for the SEI interface. It has been found that 9600 baud
works quite well over 100 metres of Cat 5 cable to the antenna units but in the unlikely event
there are problems, there is provision to use -10V to +10V levels by installing the second
Max232 chip. Note that if the chip is used with the AZ/EL boards, it will be necessary to
create another board at the antenna unit for a matching Max232. Probably one board could
service both AZ and El sender units as the Max232 is a dual channel device. The Max232
chips must always work in pairs or the data direction will be inverted and communication
will not be possible.
Most users will not install IC4 and should therefore install two bridges joining pins 12/13
of IC4 and pins 8/9 of IC4. Capacitors C12, C13, C14, and C15 should be omitted.
Note the Appendix 2 for wiring the relays and the associated LEDs. Note that if Relay Mode
B is used then the board connections for LEDs must be ignored and the LEDs connected as
per the instructions in Appendix 2.
Adjusting the encoder unit and magnet distances (if using AS5040/5045) The encoder board has a small hole in the centre of the board. Before soldering the
AS5040/45 into position, the location of the encoder board may be determined initially by
sighting through the hole to a centre mark on the magnet. This hole is also at the physical
centre of the board as referenced to the 4 mounting holes. Once the board has been centred
using the sighting hole, the mounting holes can be marked and drilled slightly oversize to
allow for some final adjustment.
When the unit is complete and power applied, the distance between the AS5040 and the
magnet should be adjusted in the centre of the range where both LEDs L3 and L4 are ON, in
my case a distance of about 1.5 to 2.0mm. If L3 is off and L4 on, the magnet is moving away
from the chip, if L3 is on and L4 is off, the magnet is moving towards the chip. If both LEDs
are OFF the magnetic flux is outside tolerance.
Once the AZ/EL unit is plugged into the Azimuth DB9 on the shack unit and providing a
reading, put SW3 into the ON position and rotate the magnet. It should be possible to adjust
the position of the AS5040 by moving the board to a point where the maximum difference in
the readings is 30 or better. This indicates optimum positioning. LEDs 3 and 4 will also light
for 360 degrees at this point. If you cannot achieve the less than 30 difference just make it as
good as you can. There seems to be a reasonable tolerance to misalignment but there will be
some nonlinearity across the 360 degree rotation.

Page 19 of 38
AZ/EL board switches (HH-10, HH-12, AS5040, AS5045) Switch Off function On function
SW1 Normal operation Test magnet only if using
AS5040/45
SW2 Normal operation Sends ASCII values as test
function to Hyperterminal
SW3 Clockwise rotation count Anti-clockwise count
AZ/EL board switches (16bit, Gray, PWM, MA3-P12) Switch Off function On function
SW1 Unused Unused
SW2 Normal operation Sends ASCII values as test
function to Hyperterminal
SW3 Clockwise rotation count Anti-clockwise count
AZ/EL board switches (SCA61T) Switch Off function On function
SW1 Normal operation Continuous send for testing
SW2 Normal operation Sends ASCII values as test
function to Hyperterminal
SW3 Unused Unused
AZ/EL board switches (Screwjack) Switch Off function On function
SW1 Normal operation Reset count to zero
SW2 No offset added Add an offset
SW3 Clockwise rotation count Anti-clockwise count
Programming the PICs The HEX files are available from my website http://www.vk5dj.com
I used WinPic as the programming software and a P16Pro40 programmer until recently. I
have now changed to a PICkit3 and I find this works very well. If you use Winpic ensure you
have the latest version and have parameters for the PIC18F4682 or PIC18F4685 created in
the Devices.ini file.
Initial test setup Step 1:
Initially install two 10K pots (ideally linear but for the test it doesn’t matter) on flying leads
to DB9 plugs for the azimuth and elevation ports. Pin 4 (+5V) and 5 (Earth) to the outer
connections of the pot and Pin 8 to the wiper.
Step 2:
Operate the “Menu” switch. You are now in the configuration menu.
Step 3:
Use the ‘Up’ or ‘Down’ buttons to locate the item ‘AZ/EL mode’. Use the ‘Right’ or ‘Left’
button to increase or decrease the value to 3. Press the ‘Up’ button and a message ‘Memory

Page 20 of 38
updated’ appears, you may now reset the auto/manual switch to the manual position to exit
the menu system.
Step 4:
Adjustment of the pots will result in changed readings on the LCD.
Step 5:
If you have an AS5040/45 unit ready you could repeat steps (1), (2) and (3) but this time set
AZ/EL mode to 7. Make sure the resolution settings in the menu (items 10,11) are set to suit
your device. Now plug the serial device into the azimuth port and again you should have
readout, but this time azimuth will be driven by the AS5040/45 system and elevation by the
potentiometer.
If you are using a rotator and a pre-existing resistive element some experimentation will be
necessary to find the right solution. E.g. If your rotator uses a rheostat rather than a
potentiometer you will need to convert it to the latter by earthing the open end, alternatively
install a potentiometer.
Socket connections (SEI uses only J1 and J3 and uses different connections for J3, see
the separate SEI document)
Pin of J1 Pin of DB25 to computer
1 9600 baud IN from comp 2
2 9600 baud OUT to comp 3
3 not used usually or CTS
4 second enable pin of 4*40 LCD
5 Earth 7
Pin of J2 (Azimuth) and J3 (Elevation) Pin of AZ DB9 and EL DB9
1 +12V to antenna unit VR 1
2 Handshake out to ant unit 7
3 9600 baud data IN 3
4 Wiper of pot in 8 if used
5 +5V to top of pot 4 if used
6 Earth 5
J6 switches (earth to activate)
1 manual/auto operation (near pin 26 of PIC)
2 right direction
3 left direction
4 up direction
5 down direction
6 menu
7 earth (near pin 32 of PIC)
S1 Moon off/Sun on
S2 Calculations internal on/external off
S3 Calibrate function, momentary action sets encoder to the current sun/moon position.
Values saved to memory. On for >3 secs clears offset.

Page 21 of 38
J8 5 volt back light for LCD
LCDs vary considerably in their contrast and backlight connections. Some LCD units require
the contrast control to be earthed for correct contrast (they might even appear blank if not at
0V) while others require the potentiometer RV1 to be adjusted to a critical position. Many
LCDs have a separate set of connections for the LEDs (usually pins 15,16) but often no
connection is required because an internal system supplies the backlight voltage from the
+5V input on pin2. When connecting LCDs with backlights, firstly omit jumper 8 and R14
until you observe whether the backlight is active.
If no backlight is observed check your specification sheet if possible. Otherwise try either
jumper 8 to provide 5V or use R14 to +12V.
Omit jumper if running from +12V via R14 or bad things will happen when 12 V
appears on the 5V regulated line.
A word on accuracy Tracking programs for the moon involve many variables and are quite complex, there are for
example over fifty orbital corrections considered in calculating the longitude of the moon and
a similar number for the right ascension. Don’t expect an accuracy much better than +/-0.2
degree for the moon from most programs, including the one in this project. The number of
digits displayed after the decimal place by a program is often no indication of accuracy. I use
AA.EXE as my standard for checking moon/sun calculations – it is available from
http://www.moshier.net/aadoc.html and claims an accuracy of 0.5 arc second as checked
against the Astronomical Almanac. AA corrects for light refraction if the object is higher than
1 degree below the horizon. The program in the ‘shack unit’ may be enabled to correct for
refraction above -5 deg EL and assumes 20 deg C and 1013mB pressure.
The position of the sun is relatively easily calculated and the sun program in this project is
accurate to better than 0.1 degree so use it for the alignment of antennas.
Encoders whether magnetic or optical all have errors and are susceptible to temperature
and/or transition point issues. The topic of measurements and mechanical limitations of
pointing large antenna systems warrants another article in itself. This project won’t put
Parkes (a large Australian radio telescope) in your backyard but hopefully will aid many in
improving their tracking to better than 0.5 degree at reasonable cost.
Default settings in the supplied HEX file – a guide only, some may change Seconds: 0
Minutes: 12
Hours: 12
Day: 15
Month: 6
Year: 2008
Brake: none, north stop
AZ/EL modes: serial AZ and EL
Delay before opposite switch: 0 secs
Azimuth pot spread: 360.00 (equates to 360 degrees)
Elevation pot spread:360.00 (equates to 360 degrees)
AZ offset: 0
EL offset: 10
AZ hysterisis: 10 – each unit represents 0.1 degree

Page 22 of 38
EL hysterisis: 10 – each unit represents 0.1 degree
AZ software stop high:255 –each unit represents 2 degrees (255 = no stop)
AZ software stop low: 255 –each unit represents 2 degrees (255 = no stop)
EL software stop high:255 –each unit represents 1 degrees (255 = no stop)
EL software stop low:-5.00 (>=91.0 = no stop)
Ht in metres: 10
Longitude: 140.35 (+ represents east)
Latitude: -37.58 (- represents south)
Park AZ:1.0 in degrees
Park EL:1. 0 in degrees
AZ 10 bit resolution
EL 10 bit resolution
SCA61T cal:135
Averaging stationary = 16
Averaging moving = 1
Sub AZ offset
Sub EL offset
VGA off
Time off in External mode (2*16 show AZ/EL on lower line of display), 95 for 4*40
TTL levels +5V for CTS
In=Normal
Refraction ON
Relay mode A
Max motor speed 90
Min motor speed 30
Hbridge address 176
Doppler 1296
RunOnAZ 0.0
RunOnEL 0.0
Check ON
DecA (declination apparent)
Display Normal
Park OFF
Using the Calibrate Function The calibrate switch works over a wide range and is setup as follows.
Align the antenna system to the noise from the moon or the sun as best you can and then
make mechanical adjustments so that the antenna sensors read as close as practical to the
calculated moon or sun readout on the second line of the screen.
Press the calibrate switch for a moment (<1 second). The system is now calibrated and you
will see that the encoder readings match the calculated position. The offset values are stored
in permanent memory. If you wish to clear the memory hold the calibrate switch down for at
least 3 seconds and the offset will be removed and you will see the true readout on the top
line.
Remember that the Calibrate switch has a dual role, when in menu mode it causes some items
to update at 10* the speed. Ensure the calibrate switch is off before exiting the menu system
or you will accidentally re-calibrate your system.
Interfacing to a computer Interfacing can be a problem primarily because of the RS232 levels provided or expected by
a computer serial port.
Page 23 of 38
This project uses 9600 baud, 8 data bits, 1 stop bit and no parity for all communication to the
antenna units and the computer
Here are some scenarios:
Scenario 1: You want to use VK3UMs EME Planner or Orbitron for Satellite tracking
(Remote.exe)
Because this is the simplest option I suggest you start here.
Do not install the CTS line to the DB25.
Scenario 2: Your computer needs RS232 levels on CTS, and you want to use third party software. Wire
in the CTS line on pin 4 of J1 to the DB25. Set menu item 34 to CTS +5v.
If this does not work try:
This modification converts the CTS line to work with RS232 levels.
Examine photo “Cut for RS232.jpg”. The two white marks indicate where you should cut the
traces going to pins 3 and 4 of J1.
Examine photo “RS232 mod.jpg” and install the 4 jumpers shown in the photo.
Fixing the CTS
Pin 3 of J1 goes to pin 7 of the MAX232,
Pin 10 of the MAX232 goes to the other side of the cut trace
Make sure that command (33) is set for “CTS RS232 level”.
Scenario 3: You want to use the VGA option for display
Your shack unit should be set for TTL levels (Command 33) and the CTS from J1 should
connect to pin 5 of the DB25 while the DTR line should connect to pin 20 of the DB25.
Interfacing with the VK3UM Autotrack/EME Planner
With version 8.40, 9.51, 10.10 and 12.0 the auto/manual switch is software controlled by the
AutoTrack program. Leave Auto/Manual in the Manual position.
Put the Int/Ext switch in External mode.
When Autotrack boots it sets the shack unit to external mode and does all the controlling
from the computer.
Doug’s program provides necessary software stops to protect the antenna.
Effectively the VK5DJ shack unit is providing antenna information to Doug’s program while
Doug’s program provides object AZ/EL to the shack unit and switching information to the
relays.
The program “Remote” uses a similar strategy but lets you decide whether to automatically or
manually control the beam movement or have no control at all in which case the
Auto/Manual Switch can be used on the shack unit which causes the shack unit to control
things based on the positional data being sent by the computer. See the separate Remote
Manual.
Page 24 of 38
Setting the time using the computer
The VK3UM planner updates the time in your shack unit to UTC. It does this automatically
whenever the program opens. My Orbitron interface also does this.
Communication between EME Planner and the Shack Unit
Ensure your correct serial port is set with a configuration of 9600,8,1,N. In the event of a
communication problem check the com port set up.
Check Doug’s software for further operational information, mostly the ‘hints’ are all that are
needed. Doug plans a Help File for the future.
If for some reason the computer locks up and the shack unit is left in EME Planner mode
(the * is still showing at the right hand end of the bottom row) you can drop out by switching
the shack unit from External mode back to Internal mode. Normally this reset is performed
automatically by EME Planner.
Using Orbitron Orbitron is a very nice satellite tracking program. The author (Sebastian Stoff) has provided
external access to many of the program’s outputs. I have accessed the azimuth and elevation
output and arranged for this to be used to track the antennae using the software and hardware
of the shack unit. The interface screen also shows the current location of the antenna.
For setup of the REMOTE interface software read the separate file (Using Orbitron.pdf).
The Orbitron interface has the capacity to update the time in your shack unit to UTC. Click
the ‘Update time’ button to set the clock in the shack unit. All information is drawn internally
from the computer including the current UTC offset.
Brake Operation If a brake is available and it is activated in the menu system then it works in the following
manner. When the mode switch is in the ‘manual’ position the brake is immediately released
when a direction switch is activated. Five seconds after the beam comes to a stop the brake is
set. In automatic mode the brake works in the same fashion. The Park operation works in the
same manner but due to an ambiguity at exactly 0.0 degrees and 180 degrees azimuth, it is
better to make the parked position a small rotation from 0.0 or 180.0, for example 1.0 degrees
or 181 degrees.
GPS setting of the time, date, latitude and longitude The system may be set from a GPS attached to the computer port of the shack unit. The data
should be on pin 2 of the DB25 and the earth pin 7. Because both the shack unit and the GPS
are DCE devices, if you choose to use purchased cables you will need a null modem adapter
or cable for the connection between the GPS and the shack unit so that pins 2 and 3 are
crossed over.
Currently the software only supports 4800baud, so if your GPS does not provide NMEA data
at 4800 baud you will be unable to use this feature.
The NMEA string is anything but standard in all GPS units so I have included some strategies
that hopefully work for all NMEA "$GPRMC" strings.

Page 25 of 38
To use the GPS activate the “UP” button on the shack unit then turn the unit on. Hold the
button active for at least 1 second, at which point the button (switch) may be released and the
welcome screen will remain on the screen. If the GPS is already on and satellites are found
you will see the welcome screen change to a display of the UTC time while the second line
will display the latitude and longitude. This display will remain for three seconds before
changing to the normal tracking screen. No further readings are taken from the GPS and it
may now be turned off or disconnected. The Latitude and Longitude are saved to Eprom
memory but the time and date are lost if the power is removed.
Note that if the welcome screen seems to be locked on, it is probably because the satellites
are not yet acquired (the program tests for acquisition) or your GPS is not compatible.
The system was tested on my system with a Garmin GPS 12 and a Magellan GPS310.
Due to a shortage of memory the program does not offer a speed change. Most of the better
GPS units can change baud rate while the rest seem to use 4800. I know that a number of
amateurs have GPS frequency standards available that output at 4800 baud.
Summary The construction allows various sensors to be used. US Digital manufacture an encoder in a
pot style case (MA3-P12) that outputs a PWM signal. I have provided a new HEX file for the
AZ/EL unit to allow the use of this encoder. The file is on my website. Another option is the
MA2 system from US-Digital that provides a 0-5V variable output that could be used with
the ‘Potentiometer mode’. A European option, the HH-05 is a AS5040 (10 bit) solution for
direct use with the original AZ/EL software, while the HH-12 is an AS5045 (12 bit) solution
and works directly with the AS5045 hex file for the AZ/EL unit. As of January 2008 the unit
also supports use of US-Digital’s A2-B SEI interface for using with the A2/A2T encoders. A
recent option is a Gray code system for those who have 16 bit gray coded encoders. I have
written code for the AZ/EL unit to interface to serial gray code out of a simple interface using
two 74HC165 chips. See my web site.
I would like to thank Russell Lemke VK3ZQB for his work in turning my pencil drawings
into professional looking circuit diagrams yet again and also developing the board layouts.
Without him it would not have been the same quality project. Also thanks to Doug VK3UM
who has linked the project to his well respected EME tracking software. I am happy to
answer any questions via email but firstly please check my website for any documentation
updates.
Note that the new package on the website now includes a modified circuit diagram of the
shack unit showing the external parts for the out of range LED.
John VK5DJ
Updated 30thth
September 2013
http://www.vk5dj.com

Page 26 of 38
Appendix 1 Some example settings
(note that SEI connection has less options – see SEI manual)
Scene 1
User has AS5040 on both azimuth and elevation inputs. His antenna can be moved in azimuth from 0
to 360 and his elevation unit from 0-90 degrees and both encoder systems represent 1:1 movement of
the antenna (that is there is no gearing to increase the movement of the encoder relative to the
movement of the antenna). He has no brake and the rotator stop is South. He wants a 2 sec delay when
swapping direction. His beam has little slack and the motors start and stop quickly so hysterisis is
small so set for ½ degree. Height, Lat, Long are 123 metres, East 130.34 and South 37.01 His beam
parks on its back at 0 deg AZ. He wants averaging on.
Scene 2
User has AS5045 on azimuth (as it is direct drive its range is 360 even if it is not allowed the full
travel) and potentiometer on elevation input. His antenna can be moved in azimuth from 95 through 0
to 280 and his elevation unit from
-10 to 100 degrees. He can see one degree below horizon. The azimuth encoder is direct coupled and
moves in a 1:1 relationship while the potentiometer on elevation is geared to produce 150 degrees
from end to end. He has a brake and a south rotator stop. He wants no delay when swapping direction
(he’s good at welding). His beam has a fair bit of slack and the motors are fast and tend to run on so
hysterisis is large and set for 2 degrees. Height, Lat, Long are 3 m, West 130.3 and South 18.0. His
beam parks at 0 AZ and 0 EL. He wants averaging on.
Scene 3
This user has an as5045 on azimuth and a screwjack on the elevation. His antenna has a north stop
because he lives in the northern hemisphere and can rotate seamlessly over 360 degrees. Mechanically
elevation can go from -5 degrees to 95 degrees with the screwjack and he has set the AZ/EL unit for
elevation to a spread of 110 degrees (see screwjack manual). It will therefore be necessary to set the
shack unit to spread 110 degrees to match it. His station cannot see below the horizon so wants the
elevation to stop at -1 degree. He doesn’t have a brake. Hysterisis AZ is 0.8 degree and EL is 0.4. He
wants a 1 sec delay before swapping direction. Park is at 180.0 degrees AZ and 0.5 deg EL. Height,
Lat, Long are 75 m, West 23.11 and North 32.12.
He wants averaging off.
Scene 4
This user is almost surrounded by trees except for a smallish window in the north-east. She has
arranged a 6:1 quality gearing system to her azimuth AS5040 decoder to get better accuracy from her
AS5040 10 bit decoder. She only needs to cover 60 degrees in azimuth starting at 24 to 84 degrees
(must be even numbers).
A 4:1 quality gearing system for her elevation encoder means she covers 90 degrees elevation. She
cannot see below the horizon. She has no brake but a north stop. Other issues are already dealt with in
other examples so the table shows those relevant to this scenario. Because of her small window a
north rotator stop will work even though she is in the southern hemisphere.
Scene 5
This user has two MA-2 (analogue output 0-5V) by US-Digital, one to cover 360 degrees AZ and 120
degrees EL (geared to achieve this by 3:1). The elevation unit may travel from -10 degrees to 110
degrees but the below horizon set to -5 degrees. The rotator is limited at south, no brake. It is probably
not wise to put a stop at the real mechanical limit of 110 degrees, so I’ve set it 1 degree down.
Scene 6
This user has two potentiometers geared to produce 0-5V over a range of 370 degrees in a commercial
rotator. We set AZ and EL spreads by entering 37 in each spread. No below horizon tracking required
and the elevation doesn’t go below zero, North stop with brake.

Page 27 of 38
Scene 7
This user wants to go beyond 360 degrees as his rotator allows 370o travel in Azimuth, 10 degrees
beyond 360. This is not possible with the shack software.
Menu Sc1 Sc2 Sc3 Sc4 Sc5 Sc6 Description
7 2 3 0 0 2 1 Brake / limit
8 15 7 15 15 3 3 AZ/EL mode
9 2 0 1 Delay
10 36 36 36 6 36 37 AZ spread
11 36 15 11 9 12 37 EL spread
12 0 0 0 0 AZ offset
13 0 10 5 0 10 EL offset
14 5 20 8 AZ hysterisis
15 5 20 4 EL hysterisis
16 255 140 255 42 255 255 AZ high stop
17 255 48 255 12 255 255 AZ low stop
18 255 100 47 0 109 180 EL high stop
19 91.0 -1.0 -1.0 45 -5.0 0 EL low stop
20 123 3 75 Height ASL
21 130.34 -130.3 -23.11 Longitude
22 -37.01 -18.0 32.12 Latitude
23 0 0 180.0 Park AZ
24 90 0 0.50 Park EL
25 10bit 12 bit 12 bit 10bit 10bit AZ 10 or 12 bit
26 10bit 10 bit 12 bit 10bit 10bit AZ 10 or 12 bit
27 X X X X X X SCA61T calibration
28 On on off Averaging
29 X X X X X X Direction AZ offset
30 X subt subt X subt Direction EL offset
Notes:
X= don’t care
These are examples developed without full testing, there may be a mistake. Check all operations
thoroughly and assume I MAY have an error in the table. Use as a guide. Final settings are your
responsibility and thorough testing with the manual switches should be done before putting the
unit over to automatic.
Because the software and the manual progress, there may be small inconsistencies. I try to keep
them matched but forgive small slips and send email to me if you want clarifications. Version 4.9
dropped the DegBelHorz menu item and introduced a negative offset.

Page 28 of 38
Appendix 2 Wiring the Relays and the LEDs
When I originally designed the board I opted for a relay system that I thought offered an
advantage. I made it harder than it should have been. From Version 5.90, I offer an
alternative relay operation through menu item 36.
Original design (Mode A) default and settable in menu 36
A pair of relays run the up/down system, and another pair of relays run the left/right
(CCW/CW) system.
My original idea was that one relay determined direction and the other relay turned on the
power 50mS later.
The LEDs are wired in a somewhat complex AND gate method. This wiring is available on
the board. Follow the original instructions.
Unfortunately there is also a labelling problem on the board with regard to which relay
should be connected so there was some inconsistency. Use the following if you plan to use
my original relay switching method use the screen printed information on the top of the
board:
Relay 4 is the power switching relay for Up/Down while relay one is the direction relay for
Up/Down
Relay 2 is the power switching relay for Left/Right and relay three is the direction relay for
Left/Right
Relay 5 is the brake relay
Relay wiring for original relay scheme:
The left/right (CCW/CW) direction is the same circuit with relays 2 and 3.

Page 29 of 38
Mode B (from Version 5.90) set via menu 37:
Four relays each represent a direction. Use the screen print information on board.
Relay 1 is UP
Relay 2 is DOWN
Relay 3 is LEFT or CCW
Relay 4 is RIGHT or CW
Relay 5 is BRAKE
The relay wiring for DC motor control should be:
The LED wiring on the board should be omitted or ignored.
To wire the LEDs for this new circuit disregard the wiring on the main board and instead:
Connect the anode of each LED through a 470 ohm resistor to +12V.
Connect the cathode of each LED to the respective switched relay coil connection. This could
be at the relay itself or use the board pins on the main PCB near the driver transistors Q1, Q2,
Q3, Q4.
Stan, LZ2STO reports that in ModeB the LEDs are not protected from reverse voltage
generated by the relay coil, the solution is to add on each relay another diode, cathode to
+12V, anode to collector of transistor.
To speed up the inputs from the antennas when the antenna is moving in Version 9 I have
removed an existing delay in ModeB relay operation. Originally the delay was put there to
ensure a direction relay had time to switch off before the opposite direction relay fired to
avoid short circuits on the output switching to the rotator. The ‘Delay’ menu item 9 should
solve this race problem. Set delay for a minimum of 1 second, preferably two seconds to
avoid problems of slow release relays and to give an antenna time to settle mechanically
before moving in the reverse direction.
If shorts do occur (and I can’t see why that should happen if you use ‘Delay’) you will need
to look at some relay wiring that provides an interlock function.

Page 30 of 38
Appendix 3 Wiring the LCD
Some LCDs have the connections along the bottom and some along the top. This will result
in some LCDs following the sequence of the pins on the board and in others it will result in
the complete reversal of order.
I have both LCD types. It can be confusing.
I recommend that before you cut the hole in the front panel for the LCD that you wire up the
LCD with the bare bones board (see my photo) to check it. The LCD will run with a
programmed PIC and no other connections (apart from +12V and Gnd to the board of
course). This will prevent the embarrassing mistake of installing the LCD upside down! Yes,
I did this once before learning my lesson and having to make another front panel.
LCD connections
For a standard HD44780 2 line display
Pins on main board P1
Pin 1 is nearest the
contrast pot.
P1 function
1 E
2 +5V
3 Contrast pot
4 RS
5 R/W (usually earthed to write)
6 Enable
7 D0 unused
8 D1 unused
9 D2 unused
10 D3 unused
11 D4 (4 bit input from D4-D7)
12 D5
13 D6
14 D7
15 Backlight +ve (usually +5V depends on what the lcd has
on board)
16 Backlight –ve (usually earth)
Wire most LCDs
pin 1 of P1 to pin 1 of LCD,
pin 2 of P1 to pin 2 of LCD etc
Wiring a 4 line display with “Version 12.1four.hex”
The four line displays used in this version of the project are really two displays in one. There
are two enable pins and the system works by enabling the top two lines, writing the
information, then disabling the top display and enabling the bottom two lines then writing the
information there. It all works quite well.

Page 31 of 38
You will need to check the data sheet for the display you buy. It must be HD44780
compatible. Locate the two enable pins. The first enable pin goes to the usual pin 6 on P1 of
the main board. The second enable pin goes to pin 4 of J1. In the original version this pin 4
was the DTR connection to the computer, this is no longer used for that purpose and has been
programmed in the four line LCD version to be a second enable pin.
The above connections are for the 4*40 LCD used in my controller.
It is type No LKC-4004-A2 and purchased from
http://www.lcdmodkit.com/lcd/LKC-4004-A2.html
Notice they quote in HKD, the conversion is about HKD1=AUS$0.125
The beam controller uses 4 bit data on the high nibble so LCD pins 1,2,3,4 are used while
LCD pins 5,6,7,8 are unused
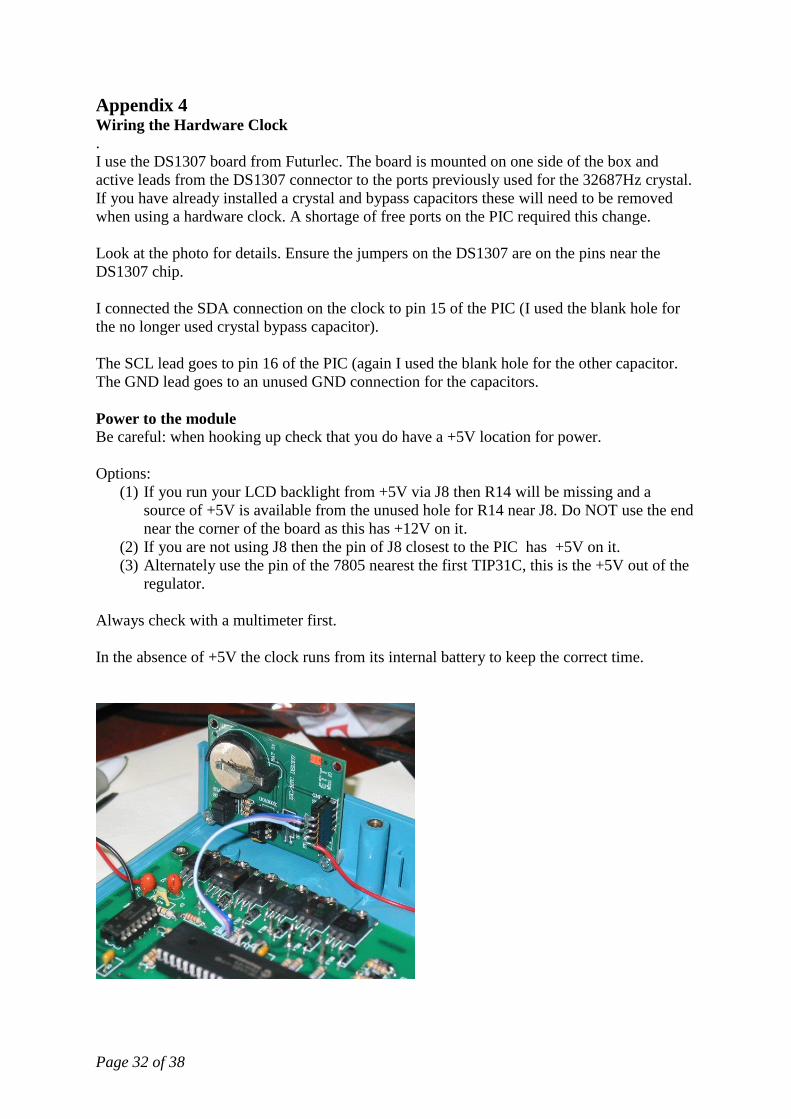
Page 32 of 38
Appendix 4 Wiring the Hardware Clock
.
I use the DS1307 board from Futurlec. The board is mounted on one side of the box and
active leads from the DS1307 connector to the ports previously used for the 32687Hz crystal.
If you have already installed a crystal and bypass capacitors these will need to be removed
when using a hardware clock. A shortage of free ports on the PIC required this change.
Look at the photo for details. Ensure the jumpers on the DS1307 are on the pins near the
DS1307 chip.
I connected the SDA connection on the clock to pin 15 of the PIC (I used the blank hole for
the no longer used crystal bypass capacitor).
The SCL lead goes to pin 16 of the PIC (again I used the blank hole for the other capacitor.
The GND lead goes to an unused GND connection for the capacitors.
Power to the module
Be careful: when hooking up check that you do have a +5V location for power.
Options:
(1) If you run your LCD backlight from +5V via J8 then R14 will be missing and a
source of +5V is available from the unused hole for R14 near J8. Do NOT use the end
near the corner of the board as this has +12V on it.
(2) If you are not using J8 then the pin of J8 closest to the PIC has +5V on it.
(3) Alternately use the pin of the 7805 nearest the first TIP31C, this is the +5V out of the
regulator.
Always check with a multimeter first.
In the absence of +5V the clock runs from its internal battery to keep the correct time.

Page 33 of 38
Appendix 5: Using a computer as a testbed for AZ/EL unit
In the original prototype the AZ/EL unit had an additional transistor used as a data inverter to
enable a direct connection to a computer serial port for testing purposes. I omitted this
transistor when the final design was made. If you want to test your AZ/EL boards prior to
building the main unit (or wish to narrow down a fault condition) it is possible to connect the
AZ/EL board to a computer providing that you
make a simple inverter (I mount the transistor directly on the DB9, the collector and emitter
of the transistor) and connect up two resistors as per the diagram. The resistors just float in
midair.
You will also need to put SW2 in the ON position (0V) and ground the handshaking line that
normally goes to pin 7 of the DB9.
Note that data in to a computer is on pin 2 of a DB9 whereas the shack unit expects the data on pin 3.
From Version 6.00 of the shack software I have compiled the AZ/EL units to expect a hardwired to
0V handshake line when in the SW2 ON position. If you use an old version of the software you will
receive only one line of input to Hyperterm and the display will stop. This is because the old software
waited for the handshake line to go high in between data outputs. It is not necessary to update AZ/EL
software if you don’t plan to make this direct connection to a computer serial port.
Note: Hyperterm should be set to: 9600,8,1,N and no handshaking
Trouble shooting the main PIC (18F4620, 18F4680, 18F4682, 18F4685)
With CRO set to 5msec sweep and 0.2V per division and probe set to 10* (effectively 2V/div) the
following is observed on my working unit.
Pin number Approx freq Approx voltage of wave
9 (handshake to Elev) 5 / sec with 5th pulse missing 0 volt pulse from +5V
23 (handshake to Az) 5/ sec with 5th pulse mssing 0 volt pulse from +5V
13,14 (8MHz xtal) 8MHz 4.8V P to P
15,16 (32 KHz xtal) 32768 Hz 1.8V P to P
19 (switch 4066 Elev) 5 / sec with 5th pulse missing +5V pulse
21 (switch 4066 Az) 5 / sec with 5th pulse missing +5V pulse
26 (9600 baud data in) 10KHz data +5V data
36-40 (data to LCD) High frequency not measured 5V
Handshaking is approximately 5Hz with the 5th pulse missing as the PIC is calculating moon position
in this gap.

Page 34 of 38
Appendix 6: Multimeter readings, negative to ground
Pin number Function Level
1 MCLR PIC reset +5V
2 A/D input A/D input from pot Elevation Variable 0-5V with pot
3 A/D input A/D input from pot Azimuth Variable 0-5V with pot
4 Motor 3 relay 0V to +5V when active
5 Calibrate switch Off is +5V
6 External/internal switch External +5V
7 Motor 2 relay 0 to 5V when active
8 Motor 4 relay 0 to 5V when active
10 DTR (an input from comp) +5V when inactive
11 Vdd Power +5 Volt
12 Vss power (gnd) 0 Volt
17 Menu switch 5V when off
18 CTS (an output to comp) 0 V computer not used
20 Motor 1 relay 0 to 5V when active
22 Keydata 4066 gate - comp 0 V computer not used
24 Auto/Man switch 0 V on manual
25 Data OUT MAX232 + 5V computer not used
26 Data IN from 4066 Varying depending on data
27 Switch right Right off +5V
28 Switch left Left off +5V
29 Switch up Up off +5V
30 Switch down Down off +5V
31 Vss power (gnd) 0 Volt
32 Vdd power +5Volt
33 Brake relay 0 to +5V when active
34 Sun/Moon switch Sun is 0V, Moon +V
35 Enable LCD 0 V
36 RS pin on LCD High speed switching

Page 35 of 38
Appendix 7: Using the system with a Yaesu G5500 AZ/EL rotator
With no modification the unit will work with a G5500 by direct connection to the rotator box. No
GS232A computer interface is necessary. The rotator controller box (supplied with the rotator) has an
8 pin connector on the rear. It outputs a varying voltage for each of the AZ and EL directions. It is
actually the output of an opamp in the controller box and is therefore less likely to cause RF problems.
It may or may not be necessary to put chokes or filters on the A/D converter lines (pin 8 of the DB9s).
Use Mode B for the relay wiring and use the appropriate menu item 37 to set Mode B. The LEDs
should be wired to run from the relays not the board in Mode B
Connections for a G5500 connected without a GS232A.
Pin Function 8 pin socket on G5500
8 on AZ DB9 AZ voltage from ‘pot’ 6 on G5500
8 on EL DB9 EL voltage from ‘pot’ 1 on G5500
5 on AZ/EL DB9 Ground 8 on G5500
Up relay Ground this to turn up 5 on G5500
Down relay Ground this to turn down 3 on G5500
Left relay (CCW) Ground this to turn left 4 on G5500
Right relay (CW) Ground this to turn right 2 on G5500
Use menu items 10, 11 to set the appropriate spread to scale the readings from 0-360 for azimuth and
0-180 for elevation.
General Yaesu usage without a GS232A
Note that the GS232A is not needed to use the Yaesu G5500 satellite AZ/EL rotator with this
project. The standard controller on the Yaesu outputs a variable voltage (adjustable) which
will interface directly to the “Shack Unit” making use of the A/D converters available on pin
8 of the DB9s and setting the input device on menu item 8 to Pot/Pot. Some adjustment of
items 10-13 may be needed to cover the range. The adjustment on the Yaesu controller
should be set to achieve 0-5V range if possible, otherwise as high as it will get towards 5V
will work fine – you will need to adjust the spread item in menu 10,11 to achieve the full
coverage range. Set menu item 35 to “Normal” if you use the G5500 controller without the
GS232A. The controller relays will need to be wired appropriately to the G5500 controller
motor controls.
The system should work without a GS232A for the G-800DXA/G-1000DXA/G-2800DXA
Azimuth Rotator, G-800DXC/G-1000DXC/G-2800DXC Azimuth Rotator, G-400 Azimuth
Rotator, G-500A/G-550 ElevationRotator, G-5400B/G-5600B/G-5500AZ-EL Rotator. You
will need to determine the connections for each.
Using a Yaesu GS232A
Yaesu in menu item 35 accesses the Yaesu GS232A computer interface. The Elevation DB9
must be rewired to this: Pin 3 of J3 to pin 2 of the elevation DB9, Pin 4 of J3 to Pin 3 of
elevation DB9, Pin 6 of J3 to Pin 5 of the elevation DB9. Note that the Azimuth port is
unused. Communication is at 9600baud, N, 8, 1.
If you use GS232A mode you will not need the relays but use ModeB in menu 37 and wire your
LEDs with +ve lead to 5V via 470 ohm resistors and the cathode of each LED to the appropriate
TIP31C to provide direction indication.

Page 36 of 38
Appendix 8: Setting up for PWM speed control of motors
There is one significant limitation of my implementation of PWM, and that is that I have only one
PWM output to be shared by both azimuth and elevation. More later. In addition because I have used
the ‘menu switch port’ it is
(a) necessary to make a small above board hardware modification and
(b) once PWM mode is selected the menu is ONLY accessible on power up. To access the menu
put the menu switch on, then apply power. Do your adjustments, then turn the menu switch
off (normal operation resumes) and don’t use the menu switch again until after you power off.
First the hardware modifications:
Pin 6 of J6 normally goes to the active of the menu switch. I have programmed this lead to operate as
an input during switch on but thereafter it is programmed as an output. To ensure safety for the PIC it
is necessary to
(a) remove the switch lead from J6 (b) solder two 470 ohm resistors to pin 6 of the J6 (where you just removed the wire) (c) the menu switch wire is attached to the free lead of one of the resistors (d) the PWM output is taken from the other resistor’s free lead and goes to your hardware that
controls speed. You have in effect isolated the two functions, enough to protect the PIC. Without this modification if the menu switch is operated it could put a direct short across a
port of the PIC causing it to destroy itself. You have been warned.
Once you have set menu item number 37 to one of the PWM modes a PWM signal of 20kHz
(0-5volts) will appear on the end of the resistor in (d) when the relays are active.
The on time of the PWM depends on the distance of the beam encoder reading from the
desired position of the antenna.
For example: If the beam azimuth is at 45 deg and the moon is at 10 degrees then there is a
35 deg difference. The beam motor will run at full speed until it reaches 10 degrees
difference at which point it will begin to slow until it is at 1 deg difference when it will be at
the minimum speed set in menu item 39. Note menu 39 is a % figure (0-100) and will be
different from installation to installation. Do NOT enter a number greater than 100. It should
be a figure that allows the motor to start and run reliably at its slowest. There is a modest
software speed boost to get it started by virtue of the hysteresis settings if these are set
beyond 1 degree.
Because there is only one PWM output the AZ/EL and Up/Dn motors must share the same
speed control. The PWM software is arranged that if two directions are active simultaneously
then the PWM will operate at the slowest speed of the two. Once one direction has found the
mark the other motor will accelerate to its computed speed.

Page 37 of 38
By choosing “PWM az” or “PWM el” you may choose to control only one direction with the
PWM. In which case the chosen direction will control the PWM without interference from
the other.
Wiring your motors
This should be done as per “Relay modeA” and, in addition, you will need an external circuit
that converts the PWM signal to a motor speed controller – probably some heavy power
transistors are called for. This part I will leave to you.
A couple of users are establishing this system, when available I will publish their circuits for
interfacing.
Note that Relay mode B is not available in PWM mode.
Use of menu
To recap, once the hardware modification is made the menu switch will only operate at power
up if you are in a PWM mode. However if you revert to standard modes (RelayA, RelayB or
HBridge) the menu can be accessed at any time.
Once the hardware mod has been done the PIC is perfectly safe even if the menu switch is
accidentally operated when the port is being used by PWM, it just won’t work and does result
in a slight reduction of the PWM voltage so it’s not a bad idea to do the hardware mod
anyway just in case you decide to use PWM in future.

Page 38 of 38
Appendix 9: Things to watch out for
When using a computer program with the shack unit in external mode and if the program uses
an offset from the direction shown by your encoders, ensure that the calibrate function in the
shack unit is cancelled (hold down the calibrate switch for 5 seconds or until the ‘Calibrate
Off’ message appears).
Generally I recommend not using the offset of the external program but using the ‘Calibrate’
function in the ‘Shack unit, you might like to try both alternatives and make your own
decision on this.
Setting the clock is tricky. I chose to allow update of time ONLY when the seconds are
updated. See the information in Menu Items 1-6 for the sequence.
Make sure you read the manual thoroughly but if you still can’t understand how something
works I will answer emails and do my best to help.
Using ModeB wiring does open up the possibility of shorts across the switching to the motor
in some instances. Read the section on wiring the relays carefully and ensure you use the
Delay menu item 9 to use at least one second delay.
If you cannot achieve communication with your computer change the setting of item 34 in the
menu. This will probably sort it out. Also check that you have wired the DTR signal to pin 7
of the DB25 rather than pin 20 (see notes under Interfacing to a Computer). Computers do
seem to vary with their needs.
If you plan to use PWM for speed control you MUST make the hardware change in
Appendix 8
Related Documents