Community Experience Distilled Develop professional enterprise Java EE applications quickly and easily with this popular IDE Java EE 7 Development with NetBeans 8 David R. Heffelfinger Free Sample

Welcome message from author
This document is posted to help you gain knowledge. Please leave a comment to let me know what you think about it! Share it to your friends and learn new things together.
Transcript

C o m m u n i t y E x p e r i e n c e D i s t i l l e d
Develop professional enterprise Java EE applications quickly and easily with this popular IDE
Java EE 7 Development with NetBeans 8
David R
. Heffelfi nger
Java EE 7 Development with NetBeans 8
NetBeans has several features that greatly simplify Java EE development, but with many features and great fl exibility, Java developers can become overwhelmed by the options available in NetBeans.
Java EE 7 Development with NetBeans 8 takes you through the most important parts of Java EE programming and shows you how to use the features of NetBeans that will improve your development experience through clear, careful instructions and screenshots. This book will take you through the major Java EE APIs and how to get them working in the NetBeans environment.
This is a practical guide that covers how to leverage NetBeans 8 functionality to quickly and easily develop enterprise applications compliant with the Java EE 7 standard.
Who this book is written forThe book is aimed at Java developers who wish to develop Java EE applications while taking advantage of NetBeans functionality to automate repetitive tasks. Familiarity with NetBeans or Java EE is not assumed.
$ 49.99 US£ 30.99 UK
Prices do not include local sales tax or VAT where applicable
David R. Heffelfi nger
What you will learn from this book
Develop Java web applications by leveraging NetBeans' functionality
Build standard JSF applications by taking advantage of NetBeans' features
Develop aesthetically pleasing JSF web applications by leveraging JSF component libraries
Integrate NetBeans with a third-party RDBMS
Quickly and easily develop applications taking advantage of the Java Persistence API
Take advantage of NetBeans' functionality to easily develop Enterprise JavaBeans, including confi guring transaction management via annotations
Utilize NetBeans to easily add messaging functionality to enterprise applications, through the Java Messaging Service API and through message-driven EJBs
Develop SOAP-based and RESTful web services using NetBeans, including exposing EJBs' functionality as web services
Java EE 7 Developm
ent w
ith NetB
eans 8P U B L I S H I N GP U B L I S H I N G
community experience dist i l led
Visit www.PacktPub.com for books, eBooks, code, downloads, and PacktLib.
Free Sample

In this package, you will find: The author biography
A preview chapter from the book, Chapter 1 'Getting Started with NetBeans'
A synopsis of the book’s content
More information on Java EE 7 Development with NetBeans 8
About the Author David R. Heffelfinger is the Chief Technology Officer (CTO) at Ensode Technology,
LLC, a software consulting firm based in the Greater Washington DC area. He has been
architecting, designing, and developing software professionally since 1995. He has been
using Java as his primary programming language since 1996. He has worked on many
large-scale projects for several clients, including the U.S. Department of Homeland
Security, Freddie Mac, Fannie Mae, and the U.S. Department of Defense. He has a
master's degree in software engineering from Southern Methodist University, Dallas,
Texas. David is the editor-in-chief of Ensode. net ( ), a
website on Java, Linux, and other technologies. David is a frequent speaker at Java
conferences such as JavaOne. You can follow David on Twitter at .
Java EE 7 Development with NetBeans 8 Java EE 7, the latest version of the Java EE specification, adds several new features to
simplify enterprise application development. New versions of existing Java EE APIs have
been included in this latest version of Java EE. JSF 2.2 has been updated to better support
wizard-like interfaces via FacesFlows and has been enhanced to better support HTML5.
NetBeans supports JPA 2.1 features such as Bean Validation and many others. EJB
session beans can be automatically generated by NetBeans, allowing us to easily leverage
EJB features such as transactions and concurrency. CDI advanced features such as
qualifiers, stereotypes, and others can be easily implemented via NetBeans' wizards. JMS
2.0 has been greatly simplified, allowing us to quickly and easily develop messaging
applications. Java EE includes a new Java API for JSON Processing (JSON-P), allowing
us to quickly and easily process JSON data. NetBeans includes several features to allow
us to quickly and easily develop both RESTful and SOAP-based web services.
This book will guide you through all the NetBeans features that make the development of
enterprise Java EE 7 applications a breeze.
What This Book Covers Chapter 1, Getting Started with NetBeans, provides an introduction to NetBeans, giving
time-saving tips and tricks that will result in more efficient development of Java
applications.
Chapter 2, Developing Web Applications Using JavaServer Faces 2.2, explains how
NetBeans can help us easily develop web applications that take advantage of the
JavaServer Faces 2.2 framework.
Chapter 3, JSF Component Libraries, covers how NetBeans can help us easily develop
JSF applications using popular component libraries such as PrimeFaces, RichFaces, and
ICEfaces.
Chapter 4, Interacting with Databases through the Java Persistence API, explains how
NetBeans allows us to easily develop applications taking advantage of the Java
Persistence API (JPA), including how to automatically generate JPA entities from
existing schemas. This chapter also covers how complete web-based applications can be
generated with a few clicks from an existing database schema.
Chapter 5, Implementing the Business Tier with Session Beans, discusses how NetBeans
simplifies EJB 3.1 session bean development.
Chapter 6, Contexts and Dependency Injection, discusses how the CDI API introduced in
Java EE 6 can help us integrate the different layers of our application.

Chapter 7, Messaging with JMS and Message-driven Beans, explains Java EE messaging
technologies such as the Java Message Service (JMS) and Message-driven Beans (MDB),
covering NetBeans' features that simplify application development taking advantage of
these APIs.
Chapter 8, Java API for JSON Processing, explains how to process JSON data using the
new JSON-P Java EE API.
Chapter 9, Java API for WebSocket, explains how to use the new Java API for
WebSocket to develop web-based applications featuring full duplex communication
between the browser and the server.
Chapter 10, RESTful Web Services with JAX-RS, covers RESTful web services with the
Java API for RESTful Web Services, including coverage of how NetBeans can
automatically generate RESTful web services and both Java and JavaScript RESTful web
service clients.
Chapter 11, SOAP Web Services with JAX-WS, explains how NetBeans can help us easily
develop SOAP web services based on the Java API for the XML Web Services (JAX-
WS) API.
Getting Started with NetBeans
In this chapter, we will learn how to get started with NetBeans. The following topics are covered in this chapter:
• Introduction• Obtaining NetBeans• Installing NetBeans• Starting NetBeans for the fi rst time• Confi guring NetBeans for Java EE development• Deploying our fi rst application• NetBeans tips for effective development
IntroductionNetBeans is an Integrated Development Environment (IDE) and platform. Although initially, the NetBeans IDE could only be used to develop Java applications, as of version 6, NetBeans supports several programming languages, either through built-in support, or by installing additional plugins. Programming languages natively supported by NetBeans include Java, C, C++, PHP, HTML, and JavaScript. Groovy, Scala, and others are supported via additional plugins.
In addition to being an IDE, NetBeans is also a platform. Developers can use NetBeans' APIs to create both NetBeans plugins and standalone applications.
Getting Started with NetBeans
[ 8 ]
For a brief history of NetBeans, see http://netbeans.org/about/history.html.
Although the NetBeans IDE supports several programming languages, because of its roots as a Java only IDE it is more widely used and known within the Java community. As a Java IDE, NetBeans has built-in support for Java SE (Standard Edition) applications, which typically run on a user's desktop or notebook computer; Java ME (Micro Edition) applications, which typically run on small devices such as cell phones or PDAs; and for Java EE (Enterprise Edition) applications, which typically run on "big iron" servers and can support thousands of concurrent users.
In this book, we will be focusing on the Java EE development capabilities of NetBeans, and how to take advantage of NetBeans' features to help us develop Java EE applications more effi ciently.
Some of the features we will cover include how NetBeans can help us speed up web application development using JavaServer Faces (JSF), the standard Java EE component based web framework by providing a starting point for these kinds of artifacts. We will also see how NetBeans can help us generate Java Persistence API (JPA) entities from an existing database schema (JPA is the standard object-relational mapping tool included with Java EE).
In addition to web development, we will see how NetBeans allows us to easily develop Enterprise JavaBeans (EJBs); and how to easily develop web services. We will also cover how to easily write both EJB and web service clients by taking advantage of some very nice NetBeans features.
Before taking advantage of all of the aforementioned NetBeans features, we of course need to have NetBeans installed, as covered in the next section.

Chapter 1
[ 9 ]
Obtaining NetBeansNetBeans can be obtained by downloading it from http://www.netbeans.org.

Getting Started with NetBeans
[ 10 ]
To download NetBeans, we need to click on the Download button. Clicking on this button will take us to a page displaying all NetBeans' download bundles.
NetBeans' downloads include different NetBeans bundles that provide different levels of functionality. The following table summarizes the different NetBeans bundles available and describes the functionalities they provide.
NetBeans Bundle DescriptionJava SE Allows development of Java desktop applications.Java EE Allows development of Java Standard Edition (typically
desktop) applications, and Java Enterprise Edition applications (enterprise applications running on "big iron" servers).
C/C++ Allows development of applications written in the C or C++ languages.

Chapter 1
[ 11 ]
NetBeans Bundle DescriptionHTML5 and PHP Allows development of web applications using HTML5 and/or
the popular open source PHP programming language.All Includes functionalities of all NetBeans bundles.
To follow the examples in this book, either the Java EE or the All bundle is needed.
The screenshots in this book were taken with the Java EE bundle. NetBeans may look slightly different if the All bundle is used, particularly, some additional menu items might be seen.
The following platforms are offi cially supported by NetBeans:
• Windows• Linux (x86/x64)• Mac OS X
Additionally, NetBeans can be executed on any platform containing Java 7 or newer version. To download a version of NetBeans to be executed in one of these platforms, an OS independent of NetBeans is available.
Although the OS independent version of NetBeans can be executed in all the supported platforms, it is recommended to obtain the platform specifi c version of NetBeans for your platform.
The NetBeans download page should detect the operating system being used to access it, and the appropriate platform should be selected by default. If this is not the case, or if you are downloading NetBeans with the intention of installing it in another workstation on another platform, the correct platform can be selected from the drop down labeled appropriately enough as Platform.
Once the correct platform has been selected, we need to click on the appropriate Download button for the NetBeans bundle we wish to install; for Java EE development, we need either the Java EE, or the All bundle. NetBeans will then be downloaded to a directory of our choice.

Getting Started with NetBeans
[ 12 ]
Java EE applications need to be deployed on an application server. Several application servers exist in the market; both the Java EE and the All NetBeans bundles come with GlassFish and Tomcat bundled. Tomcat is a popular open source servlet container, which can be used to deploy applications using JSF. However, it does not support other Java EE technologies such as EJBs or JPA. GlassFish is a 100 percent Java EE compliant application server. We will be using the bundled GlassFish application server to deploy and execute our examples.
Installing NetBeansNetBeans requires a Java Development Kit (JDK) Version 1.7 or newer to be available before it can be installed.
Since this book is aimed at experienced Java developers, we will not spend much time explaining how to install and confi gure the JDK. We can safely assume that the target market for the book is more than likely to have a JDK installed. Installation instructions for the Java Development Kit can be found at http://docs.oracle.com/javase/7/docs/webnotes/install/index.html.
NetBeans installation varies slightly between the supported platforms. In the following few sections we explain how to install NetBeans on each supported platform.
Microsoft WindowsFor Microsoft Windows platforms, NetBeans is downloaded as an executable fi le named something like netbeans-8.0-javaee-windows.exe (exact name depends on the version of NetBeans and the NetBeans bundle that was selected for download). To install NetBeans on Windows platforms, simply navigate to the folder where NetBeans was downloaded and double-click on the executable fi le.
Mac OS XFor Mac OS X, the downloaded fi le is called something like netbeans-8.0-javaee-macosx.dmg (exact name depends on the NetBeans version and the NetBeans bundle that was selected for download). In order to install NetBeans, navigate to the location where the fi le was downloaded and double-click on it.

Chapter 1
[ 13 ]
LinuxFor Linux, NetBeans is downloaded in the form of a shell script. The name of the fi le will be similar to netbeans-8.0-javaee-linux.sh (exact name will depend on the version of NetBeans and the selected NetBeans bundle).
Before NetBeans can be installed on Linux, the downloaded fi le needs to be made executable, which can be done using a command line—by navigating to the directory where the NetBeans installer was downloaded and executing the following command:
chmod +x filename.sh
Substitute filename.sh in the preceding command with the appropriate fi lename for the platform and NetBeans bundle. Once the fi le is executable it can be installed from the command line as follows:
./filename.sh
Other platformsFor other platforms, NetBeans can be downloaded as a platform independent ZIP fi le. The name of the ZIP fi le will be something like netbeans-8.0-201403101706-javaee.zip (exact fi lename may vary, depending on the exact version of NetBeans downloaded and the NetBeans bundle that was selected).
To install NetBeans on one of these platforms, simply extract the ZIP fi le to any suitable directory.
Installation procedureEven though the way to execute the installer varies slightly between platforms, the installer behaves in a similar way between most of them.
One exception is the platform independent ZIP fi le, in which there is essentially no installer. Installing this version of NetBeans consists of extracting the ZIP fi le to any suitable directory.

Getting Started with NetBeans
[ 14 ]
After executing the NetBeans installation fi le for our platform, we should see a window similar to the one illustrated in the following screenshot.
The pack shown may vary depending on the NetBeans bundle that was downloaded. The preceding screenshot is for the Java EE bundle.
At this point, we should click on the button labeled Next> to continue the installation.

Chapter 1
[ 15 ]
NetBeans is dual licensed, licenses for NetBeans include the GNU Public License (GPL) Version 2 with the classpath exception, and the Common Development and Distribution License (CDDL). Both of these licenses are approved by the Open Source Initiative (OSI).
To continue installing NetBeans, click on the checkbox labeled I accept the terms in the license agreement and click on the button labeled Next>.

Getting Started with NetBeans
[ 16 ]
NetBeans comes bundled with JUnit, a popular Java unit testing framework. JUnit's license differs from the NetBeans license, so it needs to be accepted separately. Clicking the Next> button takes us to the next step in the installation wizard:
At this point the installer will prompt us for a NetBeans installation directory, and for a JDK to use with NetBeans. We can either select new values for these or retain the provided defaults.
Once we have selected the appropriate installation directory and JDK, we need to click on the button labeled Next> to continue the installation.
NetBeans uses the JAVA_HOME environment variable to populate the JDK's directory location.

Chapter 1
[ 17 ]
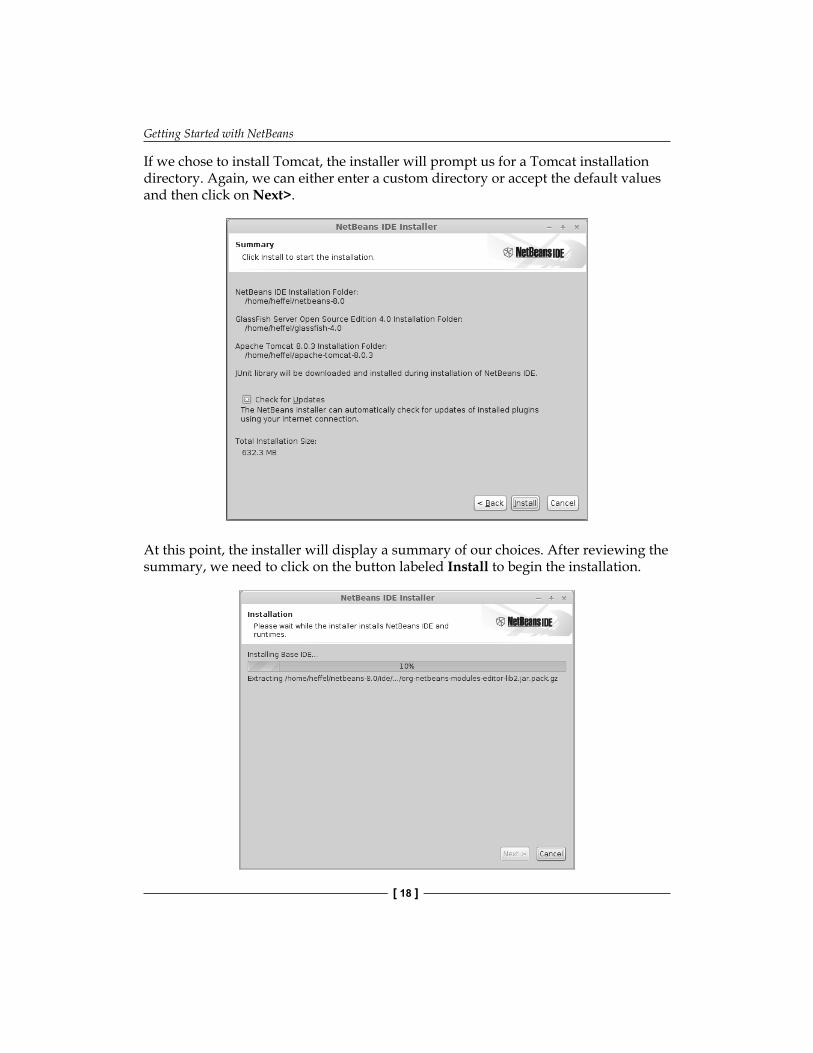
The installer will now prompt us for an installation directory for the GlassFish application server, as well as for the JDK to use for GlassFish; we can either enter a custom directory or accept the default values and then click on Next>.
Getting Started with NetBeans
[ 18 ]
If we chose to install Tomcat, the installer will prompt us for a Tomcat installation directory. Again, we can either enter a custom directory or accept the default values and then click on Next>.
At this point, the installer will display a summary of our choices. After reviewing the summary, we need to click on the button labeled Install to begin the installation.
Chapter 1
[ 19 ]
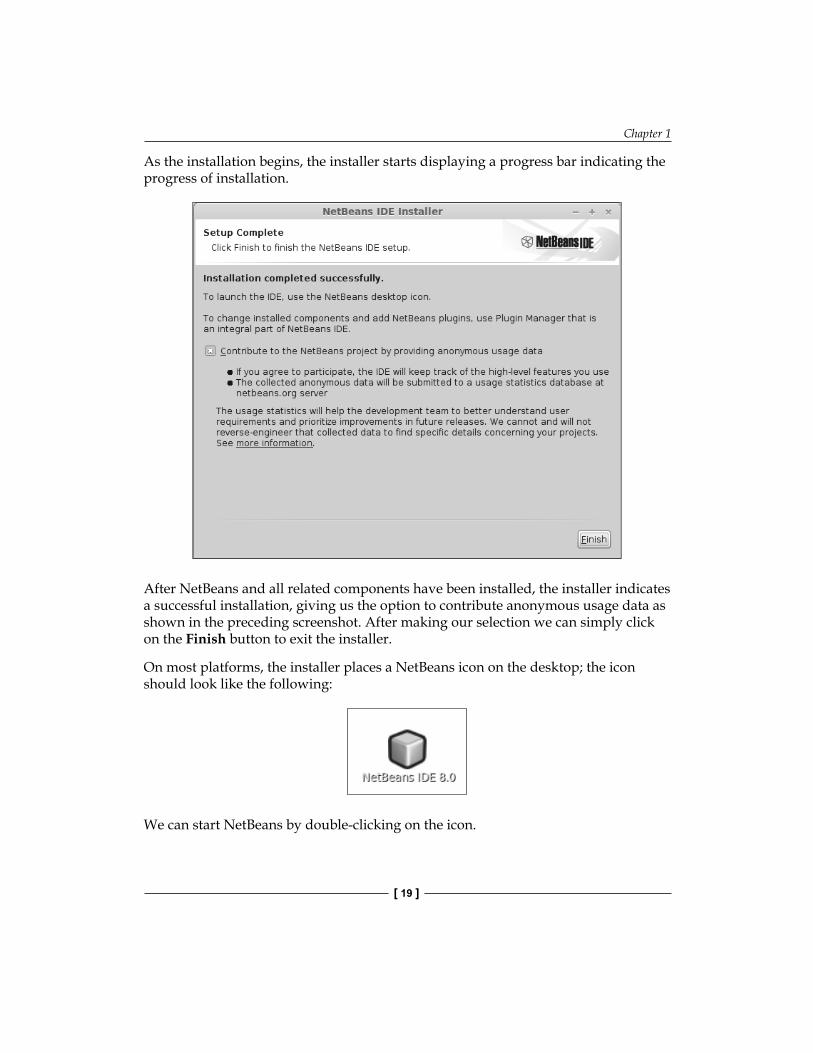
As the installation begins, the installer starts displaying a progress bar indicating the progress of installation.
After NetBeans and all related components have been installed, the installer indicates a successful installation, giving us the option to contribute anonymous usage data as shown in the preceding screenshot. After making our selection we can simply click on the Finish button to exit the installer.
On most platforms, the installer places a NetBeans icon on the desktop; the icon should look like the following:
We can start NetBeans by double-clicking on the icon.
Getting Started with NetBeans
[ 20 ]
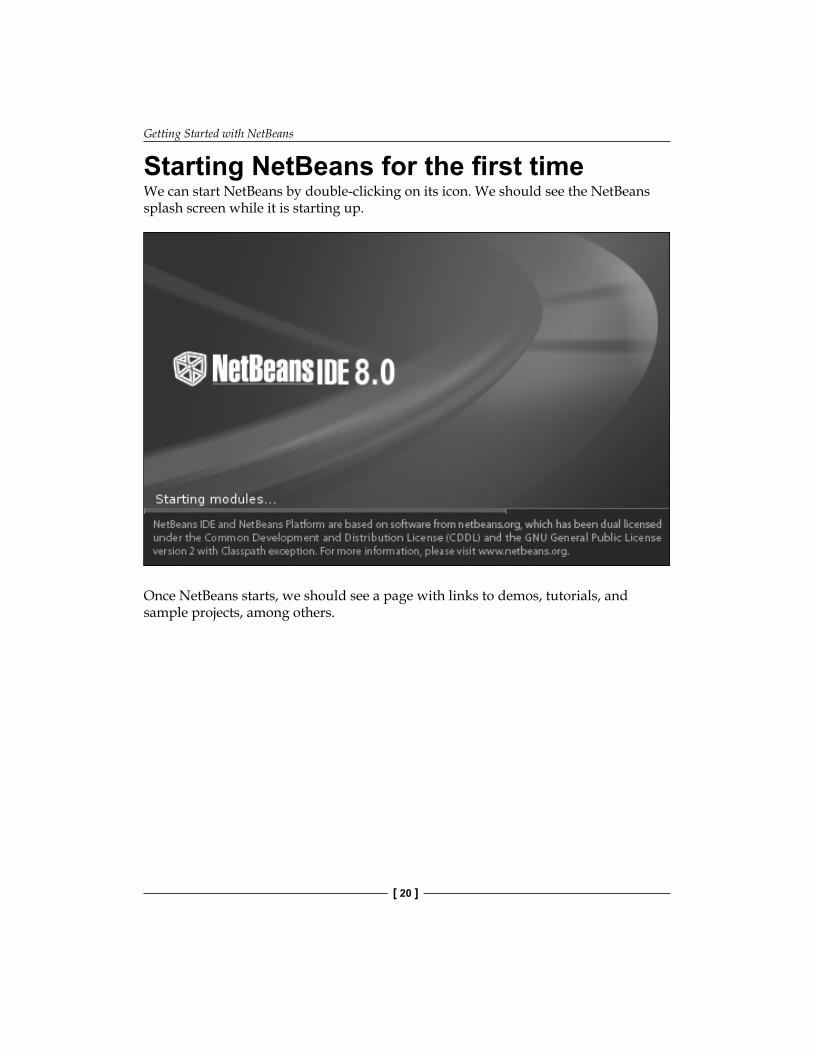
Starting NetBeans for the fi rst timeWe can start NetBeans by double-clicking on its icon. We should see the NetBeans splash screen while it is starting up.
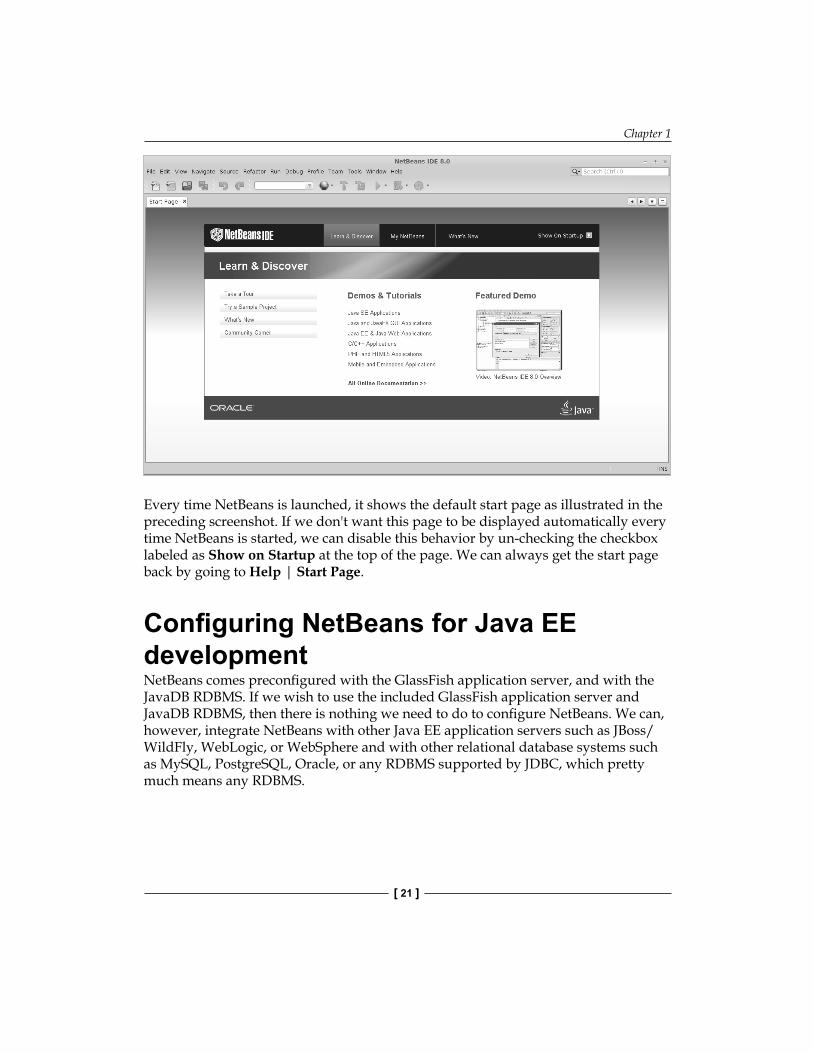
Once NetBeans starts, we should see a page with links to demos, tutorials, and sample projects, among others.
Chapter 1
[ 21 ]
Every time NetBeans is launched, it shows the default start page as illustrated in the preceding screenshot. If we don't want this page to be displayed automatically every time NetBeans is started, we can disable this behavior by un-checking the checkbox labeled as Show on Startup at the top of the page. We can always get the start page back by going to Help | Start Page.
Confi guring NetBeans for Java EE developmentNetBeans comes preconfi gured with the GlassFish application server, and with the JavaDB RDBMS. If we wish to use the included GlassFish application server and JavaDB RDBMS, then there is nothing we need to do to confi gure NetBeans. We can, however, integrate NetBeans with other Java EE application servers such as JBoss/WildFly, WebLogic, or WebSphere and with other relational database systems such as MySQL, PostgreSQL, Oracle, or any RDBMS supported by JDBC, which pretty much means any RDBMS.

Getting Started with NetBeans
[ 22 ]
Integrating NetBeans with a third-party application serverIntegrating NetBeans with an application server is very simple. To do so, we need to perform the following steps:
In this section, we will illustrate how to integrate NetBeans with JBoss, the procedure is very similar for other application servers or servlet containers.
1. First, we need to click on Window | Services.

Chapter 1
[ 23 ]
2. Next, we need to right-click on the node labeled Servers in the tree inside the Services window, and then select Add Server... from the resulting pop-up menu.
3. Then we need to select the server to install from the list in the resulting window, and click on the button labeled Next>.

Getting Started with NetBeans
[ 24 ]
4. We then need to enter a location in the fi lesystem where the application server is installed and click Next>.
5. Finally, we need to select a domain, host, and port for our application server, then click on the Finish button.

Chapter 1
[ 25 ]
The Services window should now display our newly added application server:
That's it! We have successfully integrated NetBeans with a third-party application server.
Integrating NetBeans with a third-party RDBMSNetBeans comes with built-in integration with the JavaDB RDBMS system. Additionally, it comes with JDBC drivers for other RDBMS systems such as Oracle, MySQL, and PostgreSQL.
To integrate NetBeans with a third-party RDBMS, we need to tell NetBeans the location of its JDBC driver.
In this section, we will create a connection to HSQLDB, an open source RDBMS written in Java, to illustrate how to integrate NetBeans with a third-party RDBMS; the procedure is very similar for other RDBMS systems such as Oracle, Sybase, SQL Server, among others.

Getting Started with NetBeans
[ 26 ]
Adding a JDBC driver to NetBeansBefore we can connect to a third-party RDBMS, we need to add its JDBC driver to NetBeans. To add the JDBC driver, we need to right-click on the Drivers node under the Databases node in the Services tab.
We then need to select a JAR fi le containing the JDBC driver for our RDBMS, NetBeans guesses the name of the driver class containing the JDBC driver. If more than one driver class is found in the JAR fi le, the correct one can be selected from the drop-down menu labeled Driver Class. We need to click on the OK button to add the driver to NetBeans as shown in the following screenshot:

Chapter 1
[ 27 ]
Once we have followed the preceding procedure, our new JDBC driver is displayed in the list of registered drivers.
Connecting to a third-party RDBMSOnce we have added the JDBC driver for our RDBMS into NetBeans, we are ready to connect to the third-party RDBMS.
To connect to our third-party RDBMS, we need to right-click on its driver under the Services tab, then click on Connect Using... on the resulting pop-up menu as shown in the following screenshot:

Getting Started with NetBeans
[ 28 ]
Then we need to enter the JDBC URL, username, and password for our database.
After clicking on the Next> button, NetBeans will ask us to select a database schema. In this case, we select PUBLIC from the drop-down menu.

Chapter 1
[ 29 ]
In the next step in the wizard, we are allowed to enter a user-friendly name for our database connection, or we can simply accept the default value.
After clicking on the Finish button, our database is shown in the list of databases in the Services window. We can connect to it by right-clicking on it, selecting Connect from the resulting pop-up menu, then entering our username and password for the database (if we chose not to allow NetBeans to remember the password when we added the database).
We have now successfully connected NetBeans to a third party RDBMS.

Getting Started with NetBeans
[ 30 ]
Deploying our fi rst applicationNetBeans comes pre-confi gured with a number of sample applications. To make sure everything is confi gured correctly, we will now deploy one of the sample applications to the integrated GlassFish application server that comes bundled with NetBeans.
To open the sample project, we need to go to File | New Project, then select Samples | Java EE from the Categories list in the resulting pop-up window. Once we have selected Java EE from the categories list, a list of projects is displayed in the Projects list; for this example we need to select the JavaServer Faces CDI project. This sample is a simple project involving both JSF and Contexts and Dependency Injection (CDI).
Chapter 1
[ 31 ]
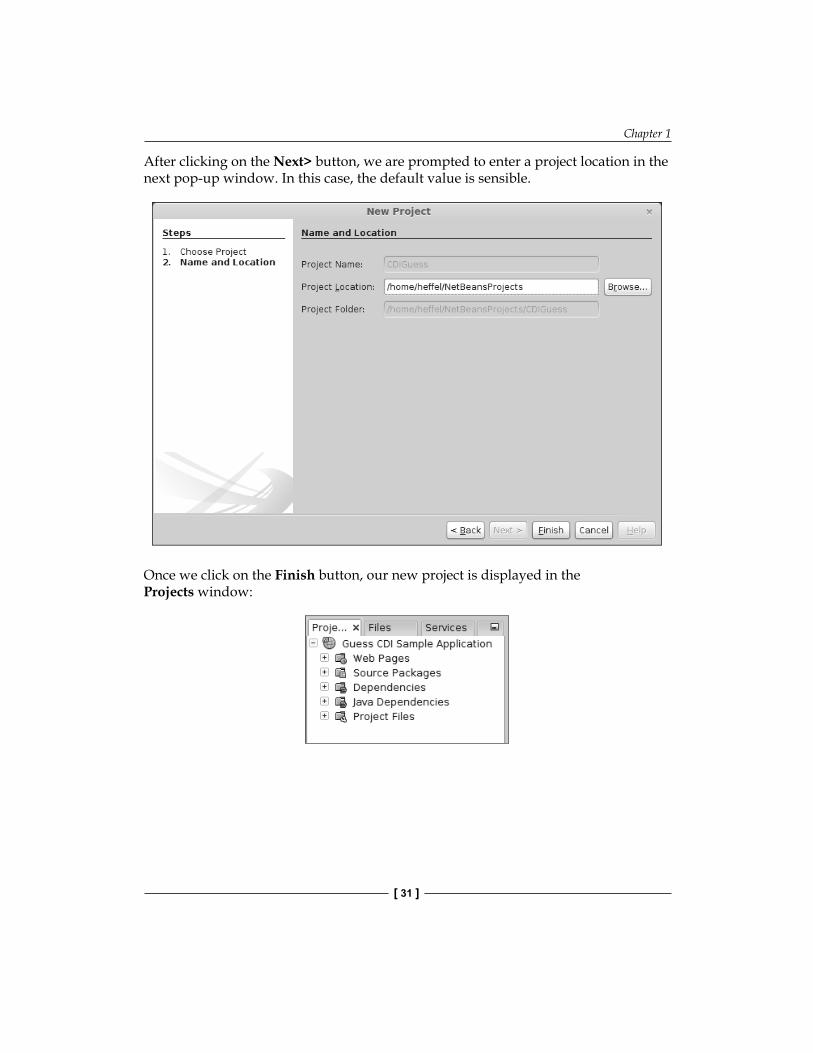
After clicking on the Next> button, we are prompted to enter a project location in the next pop-up window. In this case, the default value is sensible.
Once we click on the Finish button, our new project is displayed in the Projects window:
Getting Started with NetBeans
[ 32 ]
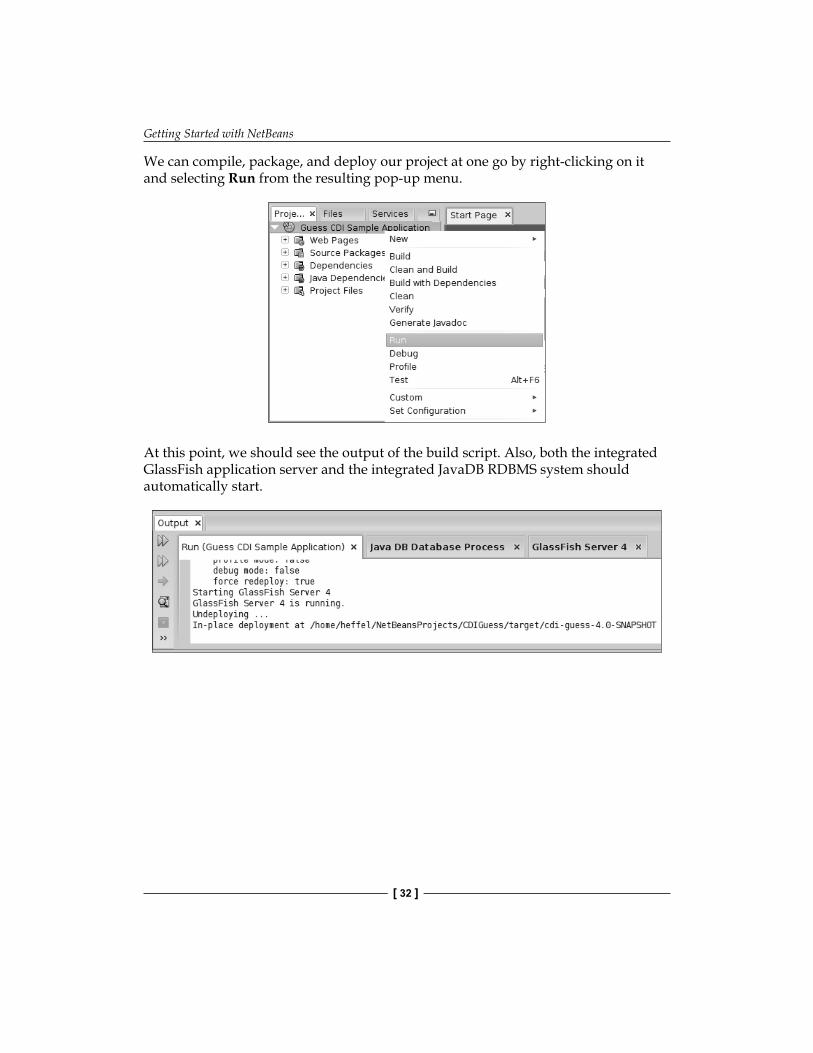
We can compile, package, and deploy our project at one go by right-clicking on it and selecting Run from the resulting pop-up menu.
At this point, we should see the output of the build script. Also, both the integrated GlassFish application server and the integrated JavaDB RDBMS system should automatically start.
Chapter 1
[ 33 ]
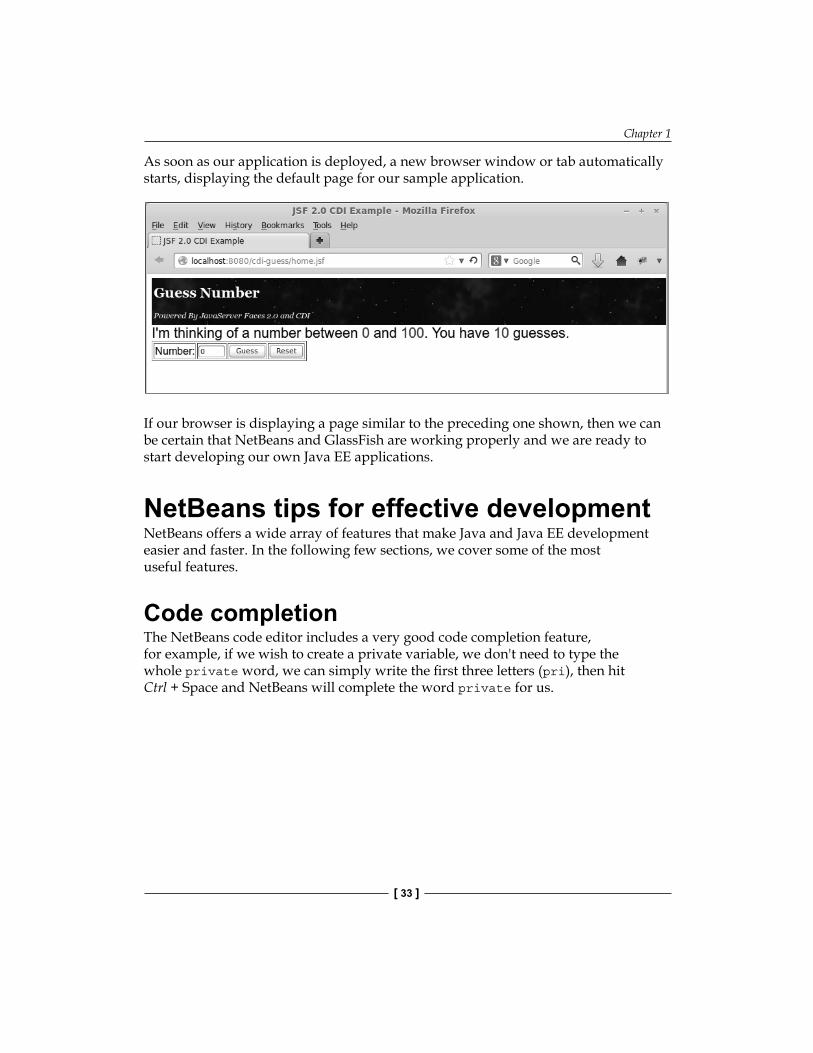
As soon as our application is deployed, a new browser window or tab automatically starts, displaying the default page for our sample application.
If our browser is displaying a page similar to the preceding one shown, then we can be certain that NetBeans and GlassFish are working properly and we are ready to start developing our own Java EE applications.
NetBeans tips for effective developmentNetBeans offers a wide array of features that make Java and Java EE development easier and faster. In the following few sections, we cover some of the most useful features.
Code completionThe NetBeans code editor includes a very good code completion feature, for example, if we wish to create a private variable, we don't need to type the whole private word, we can simply write the fi rst three letters (pri), then hit Ctrl + Space and NetBeans will complete the word private for us.
Getting Started with NetBeans
[ 34 ]
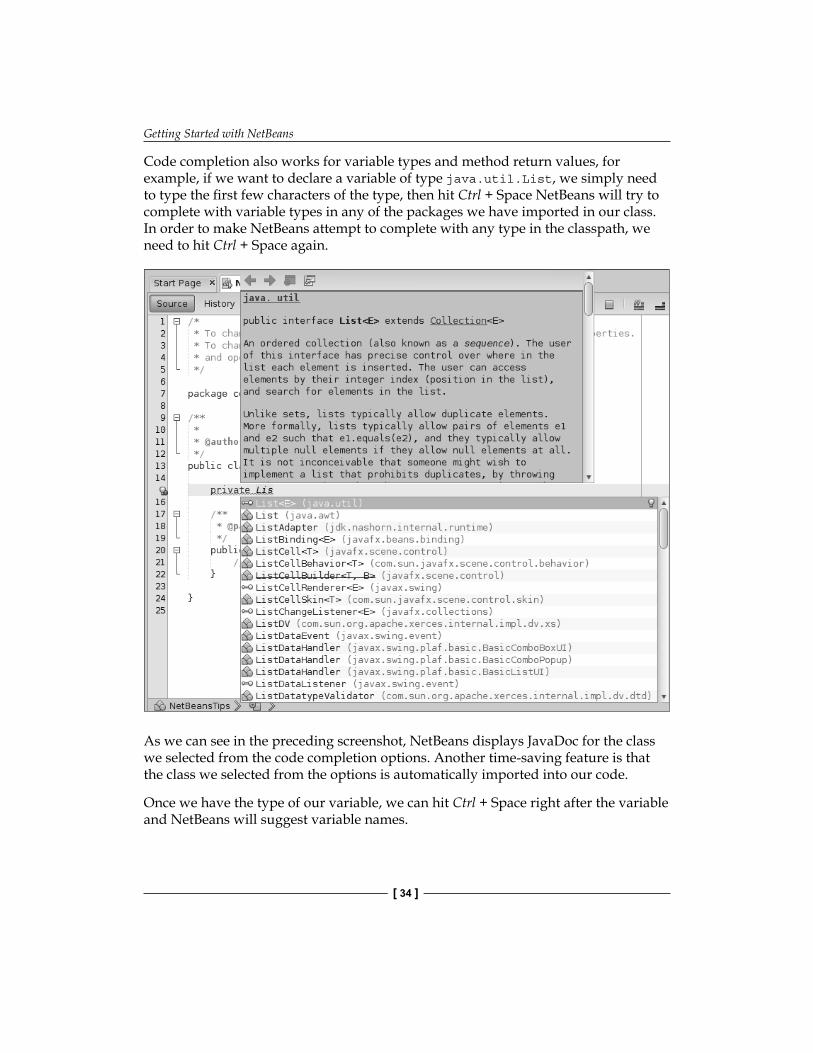
Code completion also works for variable types and method return values, for example, if we want to declare a variable of type java.util.List, we simply need to type the fi rst few characters of the type, then hit Ctrl + Space NetBeans will try to complete with variable types in any of the packages we have imported in our class. In order to make NetBeans attempt to complete with any type in the classpath, we need to hit Ctrl + Space again.
As we can see in the preceding screenshot, NetBeans displays JavaDoc for the class we selected from the code completion options. Another time-saving feature is that the class we selected from the options is automatically imported into our code.
Once we have the type of our variable, we can hit Ctrl + Space right after the variable and NetBeans will suggest variable names.

Chapter 1
[ 35 ]
When we want to initialize our variable to a new value, we can simply hit Ctrl + Space again and a list of valid types is shown as options for code completions as demonstrated in the following screenshot:

Getting Started with NetBeans
[ 36 ]
In our example, our type (java.util.List) is an interface, therefore, all classes implementing this interface are shown as possible candidates for code completion. Had our type been a class, both our class and all of its subclasses would have been shown as code completion candidates.
When we are ready to use our variable, we can simply type the fi rst few characters of the variable name, then hit Ctrl + Space.
Chapter 1
[ 37 ]
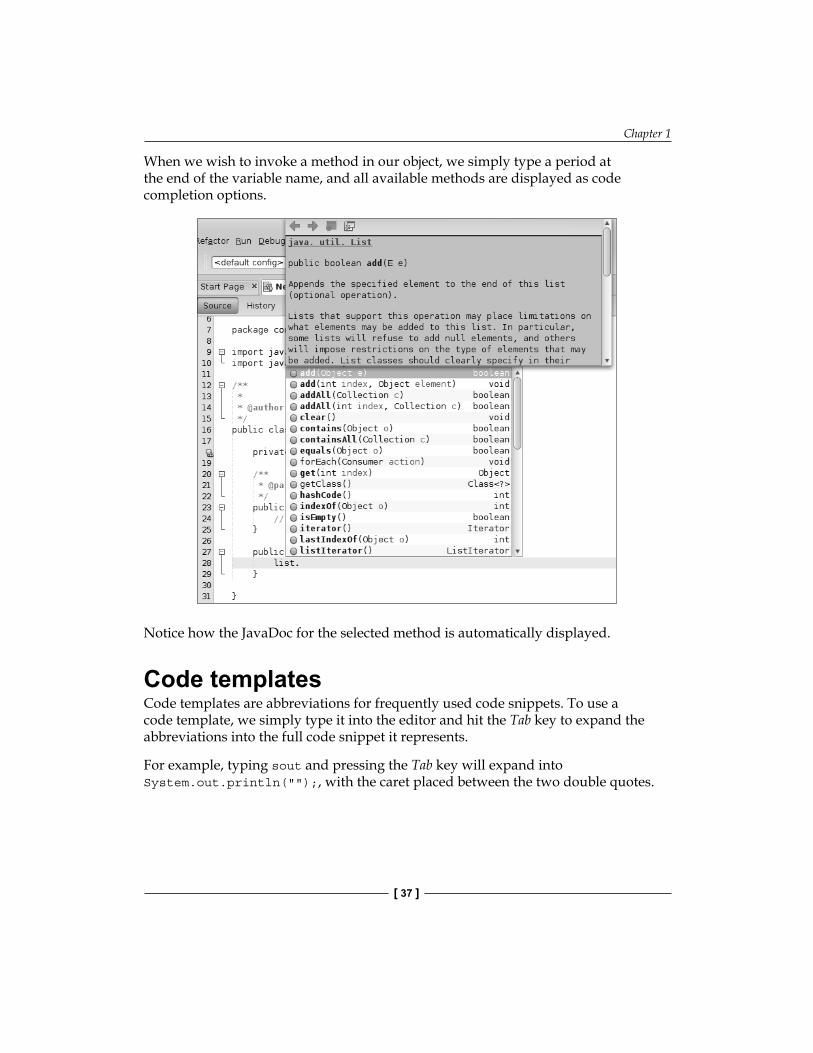
When we wish to invoke a method in our object, we simply type a period at the end of the variable name, and all available methods are displayed as code completion options.
Notice how the JavaDoc for the selected method is automatically displayed.
Code templatesCode templates are abbreviations for frequently used code snippets. To use a code template, we simply type it into the editor and hit the Tab key to expand the abbreviations into the full code snippet it represents.
For example, typing sout and pressing the Tab key will expand into System.out.println("");, with the caret placed between the two double quotes.
Getting Started with NetBeans
[ 38 ]
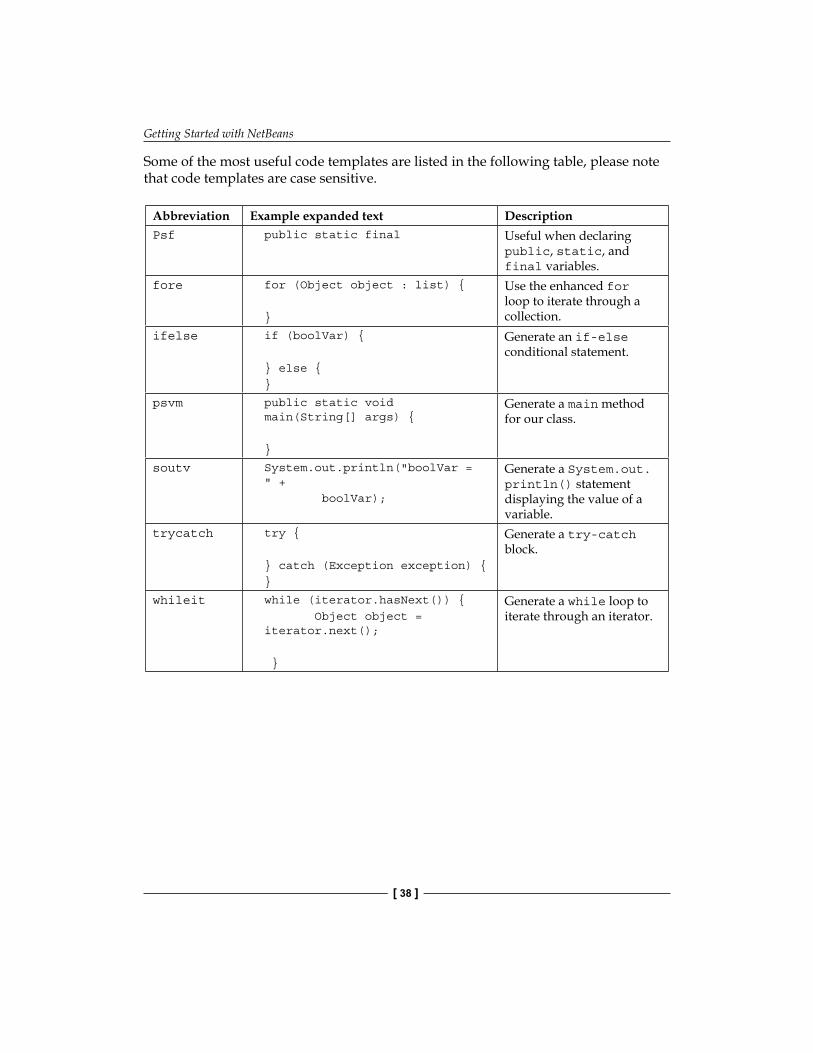
Some of the most useful code templates are listed in the following table, please note that code templates are case sensitive.
Abbreviation Example expanded text DescriptionPsf public static final Useful when declaring
public, static, and final variables.
fore for (Object object : list) {
}
Use the enhanced for loop to iterate through a collection.
ifelse if (boolVar) {
} else {}
Generate an if-else conditional statement.
psvm public static void main(String[] args) {
}
Generate a main method for our class.
soutv System.out.println("boolVar = " + boolVar);
Generate a System.out.println() statement displaying the value of a variable.
trycatch try {
} catch (Exception exception) {}
Generate a try-catch block.
whileit while (iterator.hasNext()) { Object object = iterator.next();
}
Generate a while loop to iterate through an iterator.

Chapter 1
[ 39 ]
To see the complete list of code templates, click on Tools | Options, click on the Editor icon, then on the Code Templates tab.
We can add our own templates by clicking on the New button. We will be prompted for the template's abbreviation. Once we enter it, our new template will be added to the template list and will automatically be selected. We can then enter the expanded text for our template in the Expanded Text tab.

Getting Started with NetBeans
[ 40 ]
Code templates can be used not only for Java but for HTML, CSS, and all other editors in NetBeans. To view/edit templates for other languages, simply select the desired language from the Language drop-down menu under the Code Templates tab as indicated in the following screenshot:
Keyboard shortcutsNetBeans offers several keyboard shortcuts that allow very fast navigation between source fi les. Memorizing these keyboard shortcuts allows us to develop code a lot more effectively than relying on the mouse.
Some of the most useful NetBeans' keyboard shortcuts are listed in this section, but this list is by no means exhaustive. The complete list of NetBeans' keyboard shortcuts can be obtained by clicking on Help | Keyboard Shortcuts Card.

Chapter 1
[ 41 ]
One useful keyboard shortcut that allows us to quickly navigate within a large Java fi le is Ctrl + F12. This keyboard shortcut switches focus to the Navigator window, which displays an outline of the current Java fi le and shows all its methods and member variables.
When the Navigator window has focus, we can simply start typing to narrow down the list of member variables and methods shown. This keyboard shortcut makes it very fast to navigate through large fi les.
Hitting Alt + F12 will open the Hierarchy window, which outlines the class hierarchy of the current Java class.
We can use the previous shortcut to quickly navigate to a superclass or a subclass of the current class.
Getting Started with NetBeans
[ 42 ]
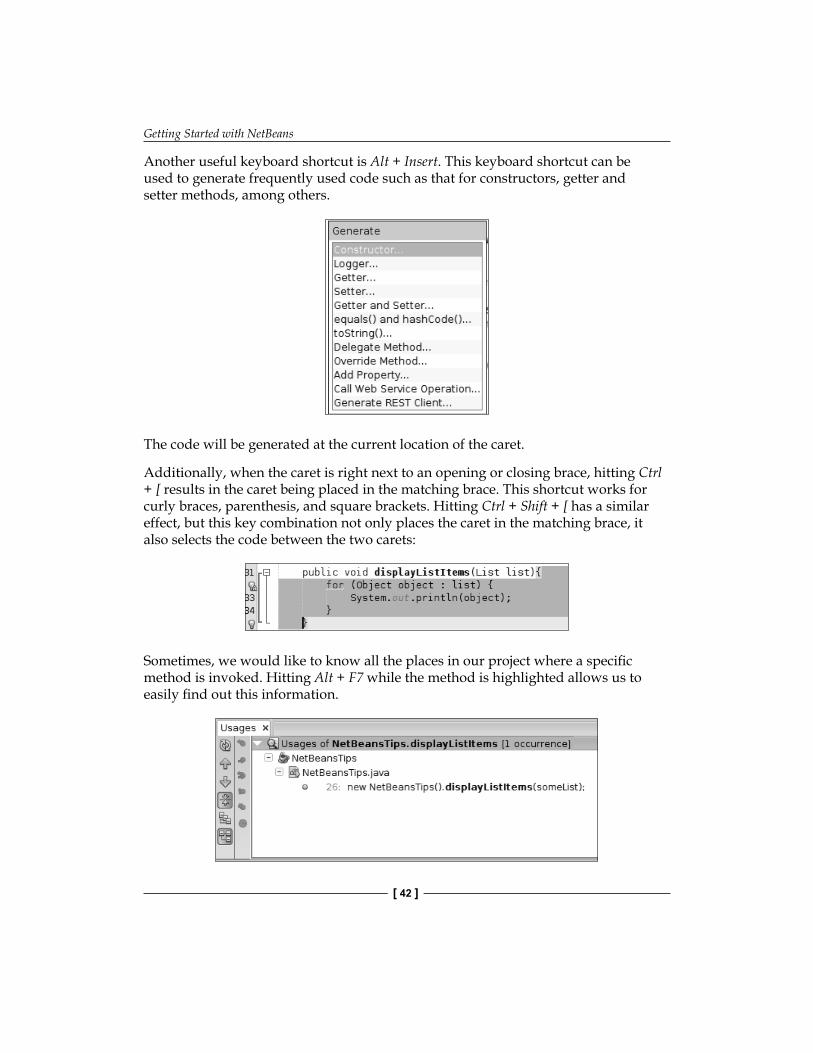
Another useful keyboard shortcut is Alt + Insert. This keyboard shortcut can be used to generate frequently used code such as that for constructors, getter and setter methods, among others.
The code will be generated at the current location of the caret.
Additionally, when the caret is right next to an opening or closing brace, hitting Ctrl + [ results in the caret being placed in the matching brace. This shortcut works for curly braces, parenthesis, and square brackets. Hitting Ctrl + Shift + [ has a similar effect, but this key combination not only places the caret in the matching brace, it also selects the code between the two carets:
Sometimes, we would like to know all the places in our project where a specifi c method is invoked. Hitting Alt + F7 while the method is highlighted allows us to easily fi nd out this information.

Chapter 1
[ 43 ]
The keyboard shortcuts works with variables as well.
NetBeans will indicate compilation errors in our code by underlining the erroneous line with a squiggly red line as shown in the following screenshot. Placing the caret over the offending code and hitting Alt + Enter will allow us to select from a series of suggestions to fi x our code:
Sometimes navigating through all the fi les in a project can be a bit cumbersome, especially if we know the name of the fi le we want to open but we are not sure of its location. Luckily, NetBeans provides the Shift + Alt + O keyboard shortcut that allows us to quickly open any fi le in our project:
Additional useful keyboard shortcuts include Shift + Alt + F to quickly format our code, Ctrl + E (Cmd + E on Mac OS) to erase the current line, much faster than highlighting the line and hitting backspace. Sometimes we import a class into our code and later decide not to use it. Frequently, the lines where the class is used are deleted but we forget to delete the import line at the top of the source fi le. NetBeans will generate a warning about the unused import; hitting Ctrl + Shift + I will delete all unused imports in one fell swoop, plus it will attempt to add any missing imports.

Getting Started with NetBeans
[ 44 ]
One last thing worth mentioning, even though it is not strictly a keyboard shortcut, a very useful feature of the NetBeans editor is that left-clicking on a method or variable while pressing Ctrl will turn the method or variable into a hyperlink. Clicking on this hyperlink will result in NetBeans taking us to the method or variable declaration.
Understanding NetBeans visual cuesIn addition to offering keyboard shortcuts, code templates, and code completion, NetBeans offers a number of visual cues that allow us to better understand our code at a glance. Some of the most useful cues are illustrated in the following screenshot:
When there is a warning in our code, NetBeans will alert us in two ways, it will underline the offending line with a squiggly yellow line, and it will place the following icon in the left margin of the offending line:
The light bulb in the icon indicates that NetBeans has a suggestion on how to fi x the problem. Moving the caret to the offending line and hitting Alt + Enter, as discussed in the previous section, will result in NetBeans offering one or more ways of fi xing the problem.
Chapter 1
[ 45 ]
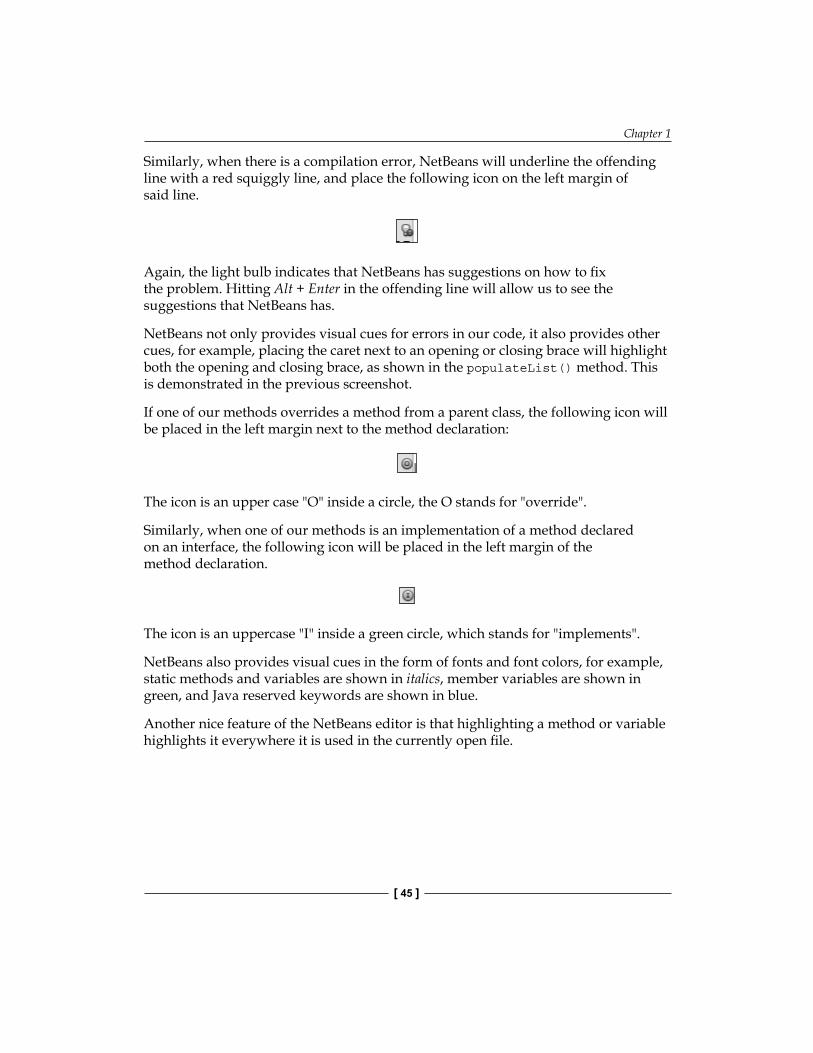
Similarly, when there is a compilation error, NetBeans will underline the offending line with a red squiggly line, and place the following icon on the left margin of said line.
Again, the light bulb indicates that NetBeans has suggestions on how to fi x the problem. Hitting Alt + Enter in the offending line will allow us to see the suggestions that NetBeans has.
NetBeans not only provides visual cues for errors in our code, it also provides other cues, for example, placing the caret next to an opening or closing brace will highlight both the opening and closing brace, as shown in the populateList() method. This is demonstrated in the previous screenshot.
If one of our methods overrides a method from a parent class, the following icon will be placed in the left margin next to the method declaration:
The icon is an upper case "O" inside a circle, the O stands for "override".
Similarly, when one of our methods is an implementation of a method declared on an interface, the following icon will be placed in the left margin of the method declaration.
The icon is an uppercase "I" inside a green circle, which stands for "implements".
NetBeans also provides visual cues in the form of fonts and font colors, for example, static methods and variables are shown in italics, member variables are shown in green, and Java reserved keywords are shown in blue.
Another nice feature of the NetBeans editor is that highlighting a method or variable highlights it everywhere it is used in the currently open fi le.
Getting Started with NetBeans
[ 46 ]
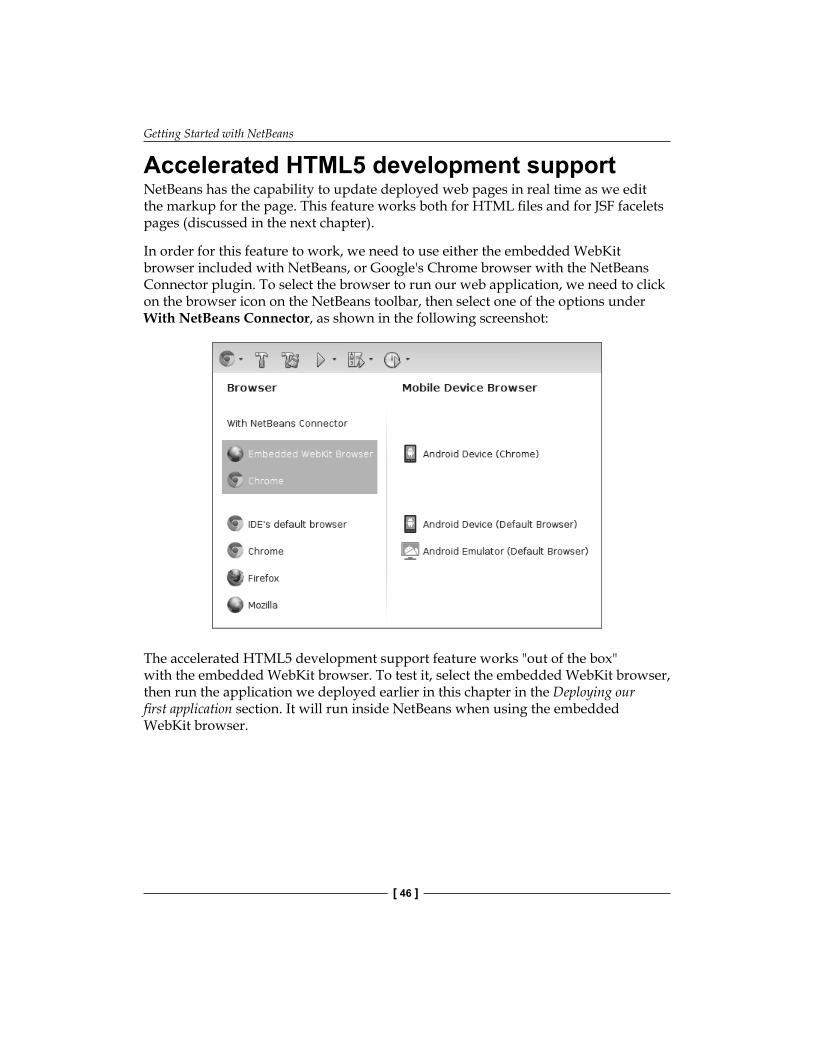
Accelerated HTML5 development supportNetBeans has the capability to update deployed web pages in real time as we edit the markup for the page. This feature works both for HTML fi les and for JSF facelets pages (discussed in the next chapter).
In order for this feature to work, we need to use either the embedded WebKit browser included with NetBeans, or Google's Chrome browser with the NetBeans Connector plugin. To select the browser to run our web application, we need to click on the browser icon on the NetBeans toolbar, then select one of the options under With NetBeans Connector, as shown in the following screenshot:
The accelerated HTML5 development support feature works "out of the box" with the embedded WebKit browser. To test it, select the embedded WebKit browser, then run the application we deployed earlier in this chapter in the Deploying our fi rst application section. It will run inside NetBeans when using the embedded WebKit browser.

Chapter 1
[ 47 ]
To test the accelerated HTML5 development functionality, let's make a simple change to one of the pages on the application. Open the fi le called home.xhtml and look for a line containing the text N umber.
<h:panelGrid border="1" columns="5" style="font-size: 18px;">
Number:
<h:inputText id="inputGuess" value="#{game.guess}" required="true" size="3" disabled="#{game.number eq game.guess}" validator="#{game.validateNumberRange}"> </h:inputText> <h:commandButton id="GuessButton" value="Guess" action="#{game.check}" disabled="#{game.number eq game.guess}"/> <h:commandButton id="RestartButton" value="Reset" action="#{game.reset}" immediate="true" /> <h:outputText id="Higher" value="Higher!"
Getting Started with NetBeans
[ 48 ]
rendered="#{game.number gt game.guess and game.guess ne 0}" style="color: red"/> <h:outputText id="Lower" value="Lower!" rendered="#{game.number lt game.guess and game.guess ne 0}" style="color: red"/> </h:panelGrid>
Replace the string Number with the string Your Guess, so that the markup now looks like this:
<h:panelGrid border="1" columns="5" style="font-size: 18px;">
Your Guess:
<h:inputText id="inputGuess" value="#{game.guess}" required="true" size="3" disabled="#{game.number eq game.guess}" validator="#{game.validateNumberRange}"> </h:inputText> <h:commandButton id="GuessButton" value="Guess" action="#{game.check}" disabled="#{game.number eq game.guess}"/> <h:commandButton id="RestartButton" value="Reset" action="#{game.reset}" immediate="true" /> <h:outputText id="Higher" value="Higher!" rendered="#{game.number gt game.guess and game.guess ne 0}" style="color: red"/> <h:outputText id="Lower" value="Lower!" rendered="#{game.number lt game.guess and game.guess ne 0}" style="color: red"/> </h:panelGrid>
Save the fi le, and without redeploying the application or reloading the page, go back to the embedded browser window. Our change will be refl ected on the rendered page.

Chapter 1
[ 49 ]
In order for the accelerated HTML5 development feature to work in Chrome, we need to install the NetBeans Connector plugin from the Chrome Web Store. If we select Chrome as our web browser (under the With NetBeans Connector section on the menu) and attempt to run our application, NetBeans will prompt us to install the plugin.

Getting Started with NetBeans
[ 50 ]
Clicking on the button labeled Go to Chrome Web Store takes us directly to the download page for the NetBeans Connector plugin:
Clicking on the button labeled Free at the upper-right corner results in a pop-up window displaying the permissions for the NetBeans connector plugin:
Chapter 1
[ 51 ]
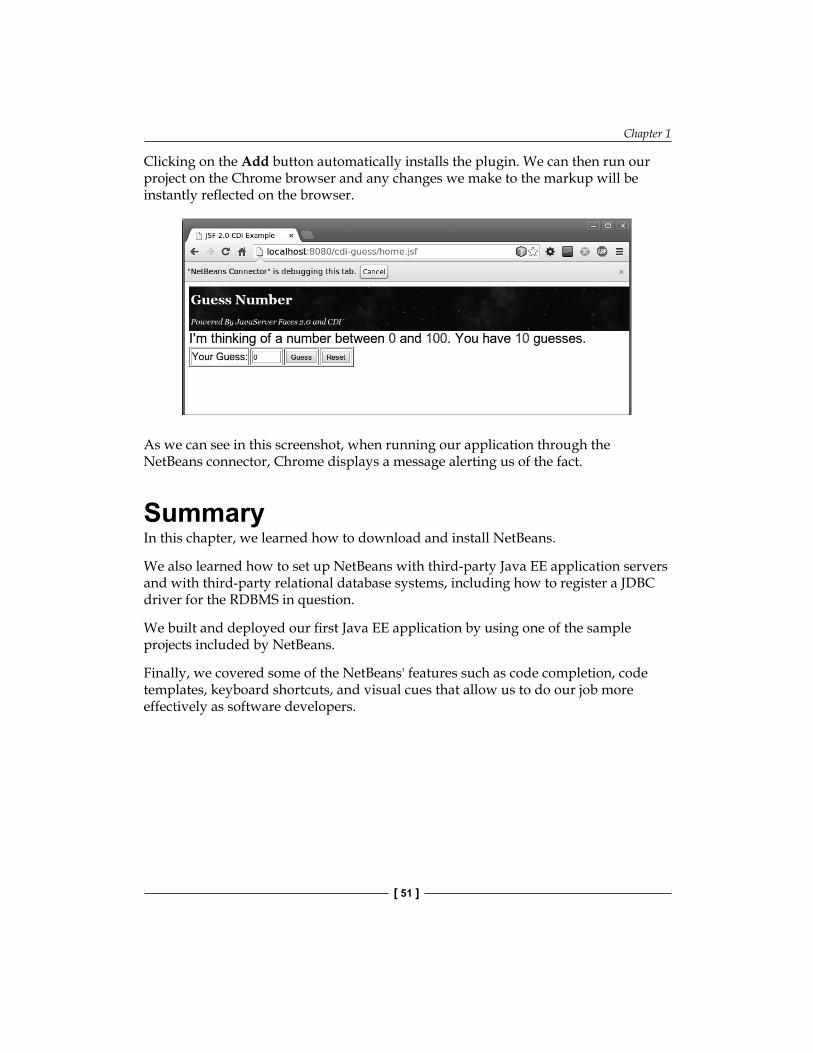
Clicking on the Add button automatically installs the plugin. We can then run our project on the Chrome browser and any changes we make to the markup will be instantly refl ected on the browser.
As we can see in this screenshot, when running our application through the NetBeans connector, Chrome displays a message alerting us of the fact.
SummaryIn this chapter, we learned how to download and install NetBeans.
We also learned how to set up NetBeans with third-party Java EE application servers and with third-party relational database systems, including how to register a JDBC driver for the RDBMS in question.
We built and deployed our fi rst Java EE application by using one of the sample projects included by NetBeans.
Finally, we covered some of the NetBeans' features such as code completion, code templates, keyboard shortcuts, and visual cues that allow us to do our job more effectively as software developers.

Where to buy this book You can buy Java EE 7 Development with NetBeans 8 from the Packt Publishing
website.
Alternatively, you can buy the book from Amazon, BN.com, Computer Manuals and most internet
book retailers.
Click here for ordering and shipping details.
www.PacktPub.com
Stay Connected:
Get more information Java EE 7 Development with NetBeans 8