9700A Mobile Computer Android™ 6.0, Marshmallow Version 1.00

Welcome message from author
This document is posted to help you gain knowledge. Please leave a comment to let me know what you think about it! Share it to your friends and learn new things together.
Transcript
9700A Mobile Computer
Android™ 6.0, Marshmallow
Version 1.00

Copyright © 2017 CIPHERLAB CO., LTD.
All rights reserved
The software contains proprietary information of its owner; it is provided under a license
agreement containing restrictions on use and disclosure and is also protected by copyright
law. Reverse engineering of the software is prohibited.
Due to continued product development, this information may change without notice. The
information and intellectual property contained herein is confidential between the owner
and the client and remains the exclusive property of the owner. If having any problems in
the documentation, please report them to us in writing. The owner does not warrant that
this document is error-free.
No part of this publication may be reproduced, stored in a retrieval system, or transmitted
in any form or by any means, electronic, mechanical, photocopying, recording or otherwise
without the prior written permission of the owner.
For product consultancy and technical support, please contact the local sales representative.
Also, visit our website for more information.
All brand, logo, product and service, and trademark names are the property of their
registered owners.
Google, Google Play, Android and other marks are trademarks of Google Inc.
The editorial use of these names is for identification as well as to the benefit of the owners,
with no intention of infringement.
CIPHERLAB logo is a registered trademark of CIPHERLAB CO., LTD.. All other brands,
products and services, and trademark names are the property of their registered owners.
The editorial use of these names is for identification as well as to the benefit of the owners,
with no intention of infringement.
CIPHERLAB CO., LTD.
Website: http://www.CipherLab.com

FOR HAND-HELD PRODUCT WITH RF FUNCTIONS
This equipment complies with FCC radiation exposure limits set forth for an uncontrolled
environment. This equipment should be installed and operated with minimum distance 20
cm between the radiator and your body.
FOR CANADA
This digital apparatus does not exceed the Class B limits for radio noise emissions from
digital apparatus as set out in the interference-causing equipment standard entitled "Digital
Apparatus," ICES-003 of Industry Canada.
This device complies with Part 15 of the FCC Rules. Operation is subject to the following two
conditions: (1) This device may not cause harmful interference, and (2) this device must
accept any interference received, including interference that may cause undesired
operation.
Cet appareil numerique respecte les limites de bruits radioelectriques applicables aux
appareils numeriques de Classe B prescrites dans la norme sur le material brouilleur:
"Appareils Numeriques," NMB-003 edictee par l'Industrie.
FOR UNITED STATES
This equipment has been tested and found to comply with the limits for a Class B digital
device, pursuant to Part 15 of the FCC Rules. These limits are designed to provide
reasonable protection against harmful interference in a residential installation. This
equipment generates, uses and can radiate radio frequency energy and, if not installed and
used in accordance with the instructions, may cause harmful interference to radio
communications. However, there is no guarantee that interference will not occur in a
particular installation. If this equipment does cause harmful interference to radio or
television reception, which can be determined by turning the equipment off and on, the user
is encouraged to try to correct the interference by one or more of the following measures:
Reorient or relocate the receiving antenna.
Increase the separation between the equipment and receiver.
Connect the equipment into an outlet on a circuit different from that to which the receiver is connected.
Consult the dealer or an experienced radio/TV technician for help.
This device complies with Part 15 of the FCC Rules. Operation is subject to the following two
conditions: (1) This device may not cause harmful interference, and (2) this device must
accept any interference received, including interference that may cause undesired
operation.
IMPORTANT NOTICES

FOR PRODUCT WITH LASER
CAUTION
This laser component emits FDA / IEC Class 2 laser light at the exit port. Do not
stare into beam.
SAFETY PRECAUTIONS
RISK OF EXPLOSION: IF BATTERY IS REPLACED BY AN INCORRECT TYPE.
DISPOSE OF USED BATTERIES ACCORDING TO THE INSTRUCTIONS.
The use of any batteries or charging devices which are not originally sold or manufactured
by CipherLab will void your warranty and may cause damage to human body or the product itself.
DO NOT disassemble, incinerate or short circuit the battery.
DO NOT expose the scanner or the battery to any flammable sources.
For green-environment issue, it's important that batteries should be recycled in a proper way.
Under no circumstances, internal components are self-serviceable.
The charging and communication cradle uses an AC power adapter. A socket outlet shall be
installed near the equipment and shall be easily accessible. Make sure there is stable power
supply for the mobile computer or its peripherals to operate properly.
CARE & MAINTENANCE
This mobile computer is intended for industrial use. The mobile computer is rated IP65,
however, the mobile computer can get damaged when being exposed to extreme
temperatures or soaked wet.
When the enclosure of the mobile computer gets dirty, use a clean and wet cloth to wipe off the dust. DO NOT use/mix any bleach or cleaner. Always keep the LCD dry.
For a liquid crystal display (LCD) or touch screen, use a clean, non-abrasive, lint-free cloth to wipe dust off the screen. DO NOT contact the surface with any pointed or sharp object.
If you want to put away the mobile computer for a period of time, download the collected
data to a host computer, and then take out the battery pack. Store the mobile computer and
battery pack separately.
When the mobile computer resumes its work, it takes some time for the main and backup batteries to become fully charged.
If you shall find the mobile computer malfunctioning, write down the specific scenario and consult the sales representative in your local area.
Keep the mobile computer away from any magnets and magnetic fields to prevent the laser engine from malfunctioning.

DECLARATION OF CONFORMITY

Version Date Notes
1.00 Apr. 07, 2017 First Release
RELEASE NOTES
CONTENTS
IMPORTANT NOTICES..................................................................................................................... - 3 -
For Hand-held Product with RF Functions ................................................................................... - 3 - For Canada .................................................................................................................................... - 3 - For United States ........................................................................................................................... - 3 - For Product with Laser .................................................................................................................. - 4 - Safety Precautions ........................................................................................................................ - 4 - Care & Maintenance ..................................................................................................................... - 4 - Declaration of Conformity ............................................................................................................. - 5 -
RELEASE NOTES ............................................................................................................................ - 6 -
INTRODUCTION ................................................................................................................................. 1
About This Document ........................................................................................................................ 1 Related Documentation .................................................................................................................... 1 Features ............................................................................................................................................. 2 Inside This Package .......................................................................................................................... 2 Accessories ........................................................................................................................................ 2
USE MOBILE COMPUTER .................................................................................................................. 3
1.1 Take a Tour .............................................................................................................. 4 1.1.1 Overview ................................................................................................................... 4
1.2 Power On/Off Mobile Computer ............................................................................. 5 1.2.1 Homescreen Selection ............................................................................................ 6
1.3 Notifications ............................................................................................................. 7 1.4 Battery ...................................................................................................................... 9
1.4.1 Install/Remove Main Battery ................................................................................ 10 1.4.2 Charge Batteries .................................................................................................... 11 1.4.3 Battery Status Indicators....................................................................................... 14 1.4.4 Monitor Battery Level ............................................................................................ 16 1.4.5 Replace Main Battery ............................................................................................ 20 1.4.6 Power Management .............................................................................................. 21
1.5 Language & Keypad .............................................................................................. 22 1.5.1 Change display Language ..................................................................................... 22 1.5.2 Floating Software Keys .......................................................................................... 23 1.5.3 Physical keypad ..................................................................................................... 24 1.5.4 On-screen Keyboard .............................................................................................. 35
1.6 Touch Screen ......................................................................................................... 43 1.6.1 Use Touch screen .................................................................................................. 43 1.6.2 Screen Brightness ................................................................................................. 44 1.6.3 Screen Rotation ..................................................................................................... 45 1.6.4 Screen Timeout Settings ....................................................................................... 47 1.6.5 Text Size ................................................................................................................. 48
1.7 Memory .................................................................................................................. 49 1.7.1 Insert SD Card ........................................................................................................ 50 1.7.2 Check Memory Usage ............................................................................................ 51
1.8 Direct Data Communication .................................................................................. 52
1.8.1 Connect Snap-on Cable ......................................................................................... 53 1.8.2 Use Cradle .............................................................................................................. 54
1.9 Volume and Audio .................................................................................................. 55 1.9.1 Audio Playback ....................................................................................................... 55 1.9.2 Sounds and Vibration ............................................................................................ 56
BASIC OPERATION .......................................................................................................................... 57
2.1. Date and Time ....................................................................................................... 58 2.1.1. Set Date, Time and Time Zone ............................................................................. 58
2.2. Data Capture .......................................................................................................... 59 2.2.1. Barcode Reader ..................................................................................................... 59
2.3. Home Screen ......................................................................................................... 60 2.3.1. Customize Home Screen ....................................................................................... 62
2.4. Status Bar .............................................................................................................. 69 2.4.1. Icons on Status Bar ............................................................................................... 69 2.4.2. Open Quick Setting Menu ..................................................................................... 71 2.4.3. Open Notifications Panel....................................................................................... 72
2.5. Manage Applications ............................................................................................. 74 2.5.1. Application Menu ................................................................................................... 74 2.5.2. Current Applications .............................................................................................. 75
2.6. Suspend & Lock ..................................................................................................... 76 2.6.1. Suspend Device ..................................................................................................... 76 2.6.2. Lock Device ............................................................................................................ 76
2.7. OS Update .............................................................................................................. 78
WIRELESS RADIOS .......................................................................................................................... 80
3.1. Use Wireless Local Area Network (Wi-Fi) ............................................................. 81 3.1.1. Connect to Wi-Fi Network ...................................................................................... 81 3.1.2. Manually Add Wi-Fi Network ................................................................................. 82 3.1.3. Advanced Wi-Fi Settings ........................................................................................ 83 3.1.4. Configure Proxy Server .......................................................................................... 84 3.1.5. Use Static IP Address ............................................................................................ 84 3.1.6. Connect With Wi-Fi Protected Setup (WPS) ......................................................... 84 3.1.7. Modify Wi-Fi Network ............................................................................................. 85 3.1.8. Disconnect Wi-Fi Network ..................................................................................... 85
3.2. Use Bluetooth ........................................................................................................ 86 3.2.1. Bluetooth Profiles .................................................................................................. 86 3.2.2. Turn On Bluetooth ................................................................................................. 87 3.2.3. Change Bluetooth Name ....................................................................................... 88 3.2.4. Pair Bluetooth Devices .......................................................................................... 89 3.2.5. Unpair Bluetooth Device ....................................................................................... 90
USING READER CONFIGURATION UTILITY ...................................................................................... 91
4.1 Configure Reader ...................................................................................................................... 92 4.1.1 General Settings .................................................................................................... 93 4.1.2 Symbology ............................................................................................................ 100 4.1.3 Miscellaneous ...................................................................................................... 103 4.1.4 Reader Config Option Menu ................................................................................ 104
4.2 Read Printed Barcodes ....................................................................................... 111
- 9 -
SPECIFICATIONS ........................................................................................................................... 113
Platform, Processor & Memory..................................................................................................... 113 Communications & Data Capture ................................................................................................ 113 Electrical Characteristics .............................................................................................................. 114 Physical Characteristics ................................................................................................................ 115 Environmental Characteristics ..................................................................................................... 116 Programming Support ................................................................................................................... 116 Accessories .................................................................................................................................... 117
SCAN ENGINE SETTINGS .............................................................................................................. 118
LASER (SE955) ............................................................................................................................. 125
Symbology Settings ....................................................................................................................... 125 Miscellaneous .......................................................................................................................... 130 AIM Code ID – Code Characters .............................................................................................. 130 AIM Code ID – Modifier Characters......................................................................................... 130
EXTENDED RANGE LASER (SE1524) ............................................................................................ 134
Symbology Settings ....................................................................................................................... 134 Miscellaneous .......................................................................................................................... 138
2D IMAGER (SE4500DL) .............................................................................................................. 139
Symbology Settings ....................................................................................................................... 139 1D Symbologies ....................................................................................................................... 139 2D Symbologies ....................................................................................................................... 145 Miscellaneous .......................................................................................................................... 146
NEAR/FAR 2D IMAGER (EX25) ..................................................................................................... 147
Symbology Settings ....................................................................................................................... 147 1D Symbologies ....................................................................................................................... 147 2D Symbologies ....................................................................................................................... 152 Miscellaneous .......................................................................................................................... 152
PHYSICAL KEYPAD REFERENCE TABLE ........................................................................................ 153
Numeric Keypad (30 Keys) ........................................................................................................... 153 Using Alpha, Shift & Fn Keys ................................................................................................... 153
Numeric & Function Keypad (38 Keys) ........................................................................................ 155 Using Alpha, Shift & Fn Keys ................................................................................................... 155
Alphanumeric Keypad (53 Keys) .................................................................................................. 157 Using Alpha, Shift & Fn Keys ................................................................................................... 157

1
Thank you for choosing CipherLab products. CipherLab welcomes another Android product
by introducing 9700A Mobile Computer. Powered by Android 6.0 Marshmallow, the mobile
computer delivers better user experience and advances enterprise mobile computing.
The mobile computer has transflective LCD to hold up the readability in a wide range of light
conditions, courtesy of the supplementary backlight enabled by a built-in ambient light
sensor. Also on board is a G-sensor to save power according to the mobile computer’s
motion and posture. G-sensor also enables screen orientation when the device is posed
sideways or upright.
The series sports satisfactory data connections by integrating a communication port for
direct data exchange. For wireless data connection, it hosts a Bluetooth and
802.11a/b/g/n/ac module.
Dedicated to data capture, the mobile computer has essential 1D (laser) reader or 2D
imager. Rated with IP65, the rugged 9700A is light-weighted and easy to cradle in your
hand, and will be your good help on field works.
ABOUT THIS DOCUMENT
This guide distills the information about 9700A mobile computer. Subjects discussed
include the mobile computer’s physical features, platform basics, software and applications,
and part of the accessories to boost the mobile computer’s performance.
We recommend that you keep one copy of this manual at hand for the quick reference for
necessary maintenance.
RELATED DOCUMENTATION
Log in to GoBetween to access related documentation about the 9700A mobile computer
from the CipherLab Central Service (CCS) platform. Download the GoBetween desktop or
mobile device application, or launch the GoBetween Lite web application from the following
site: http://ccs.cipherlab.com/.
INTRODUCTION
2
9700A Mobile Computer (Android)) Reference Manual
FEATURES
Rugged yet smoothened outlined, with hand strap for secure hold
IP65-rated tough form to survive drop, shock, heat, cold, and impervious to moisture/dust
Android 6.0 Marshmallow OS, MT6755 A53 Octa-core 2GHz CPU
2GB LPDDR3 RAM to run application programs
16GB NAND flash to store OS, applications, settings and so on
Storage expansion: Up to 128 GB MicroSDHC
Sunlight-readable screen to enhance the viewability of outdoor use
Ambient light sensor to enable supplementary backlight for LCD and keypad
G-sensor for power management and screen orientation
2 symmetric side-triggers for ambidextrous scanning
Total data solution — supports Bluetooth, 802.11a/b/g/n/ac
INSIDE THIS PACKAGE
The mobile computer ships with the following items. Save the box and packaging material
in case of future need to store or deliver the mobile computer.
Mobile Computer
Rechargeable Li-ion battery pack (standard/high capacity)
Stylus
Hand strap
Quick Start Guide
ACCESSORIES
Optional accessories to enhance the mobile computer’s performance are:
Snap-on Charging and Communication Cable (USB or RS-232)
Charging & Communication Cradle
Pistol Grip
Snap-On Car Charger
4-Slot Charging Cradle
4-Slot Battery Charger
Vehicle Cradle
Belt Holster
3
9700A Mobile Computer (Android)) Reference Manual
Before the mobile computer takes part in your work, get to know it first. This chapter
includes the basic features of the mobile computer including the power supply, memory,
and the units that bridge users with the mobile computer. This chapter helps you set the
mobile computer to work at the earliest.
1. IN THIS CHAPTER
1.1 Take a Tour .................................................................. 4
1.2 Power On/Off Mobile Computer ....................................... 5
1.3 Notifications ................................................................. 7
1.4 Battery ........................................................................ 9 1.5 Important Notices ....................................................... 22 1.6 Touch ....................................................................... 43
1.7 Memory ..................................................................... 49
1.8 Direct Data Communication .......................................... 52
1.9 Volume and Audio ....................................................... 55
Chapter 1
USE MOBILE COMPUTER
4
9700A Mobile Computer (Android)) Reference Manual
1.1 TAKE A TOUR
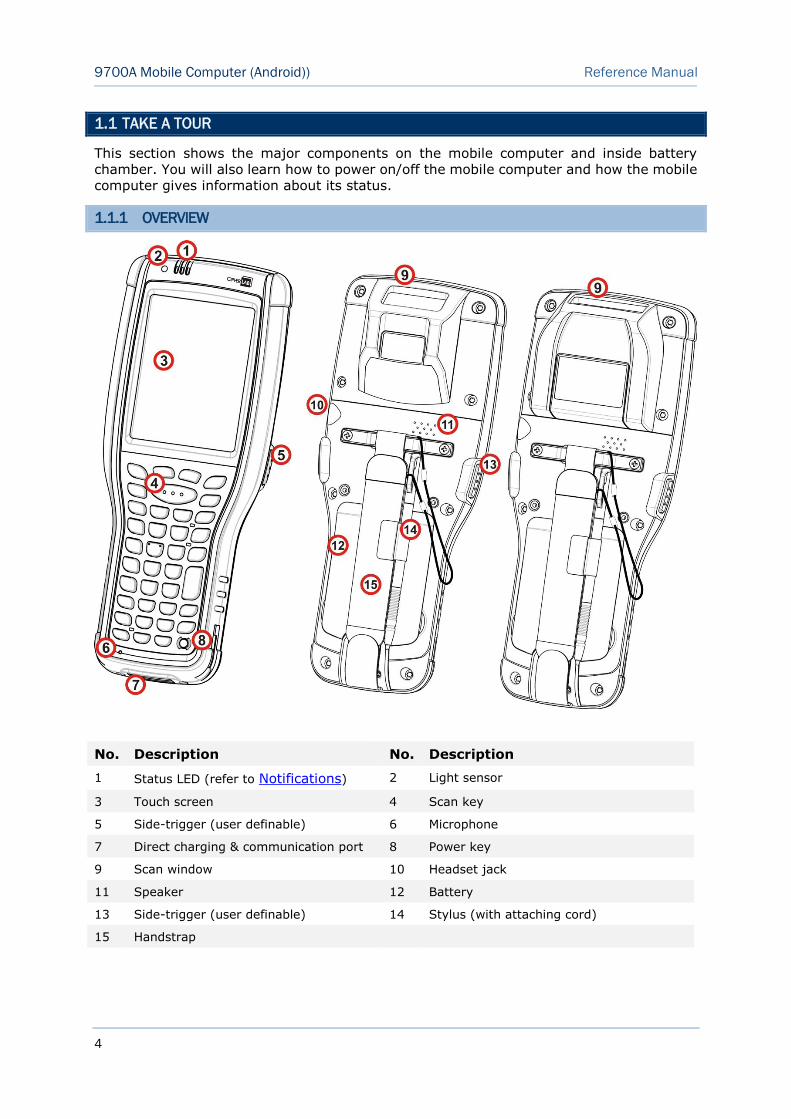
This section shows the major components on the mobile computer and inside battery
chamber. You will also learn how to power on/off the mobile computer and how the mobile
computer gives information about its status.
1.1.1 OVERVIEW
No. Description No. Description
1 Status LED (refer to Notifications) 2 Light sensor
3 Touch screen 4 Scan key
5 Side-trigger (user definable) 6 Microphone
7 Direct charging & communication port 8 Power key
9 Scan window 10 Headset jack
11 Speaker 12 Battery
13 Side-trigger (user definable) 14 Stylus (with attaching cord)
15 Handstrap
5
Chapter 1 Use Mobile Computer
1.2 POWER ON/OFF MOBILE COMPUTER
POWER ON
To power on the mobile computer, press and hold the power button located on the
upper right side of the device. The mobile computer will turn on and show the Home screen
after splash screen.
Note:
For the mobile computer to power on, the battery cover must be secured in place.
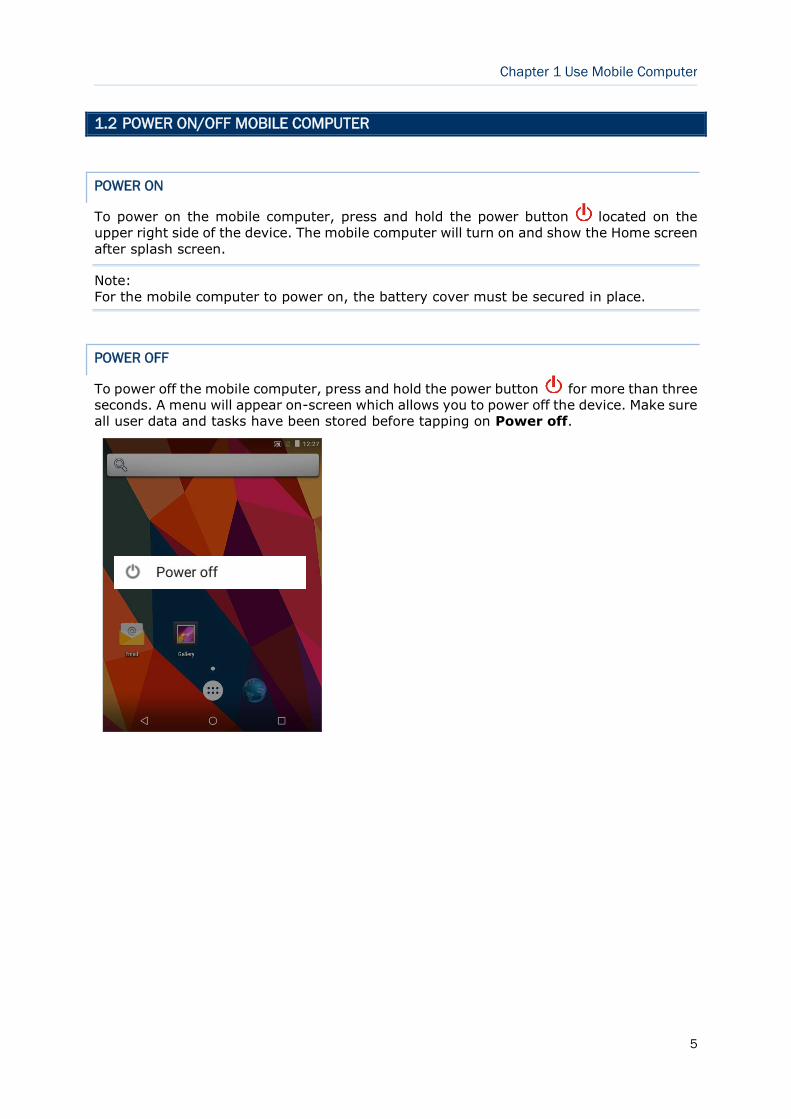
POWER OFF
To power off the mobile computer, press and hold the power button for more than three
seconds. A menu will appear on-screen which allows you to power off the device. Make sure
all user data and tasks have been stored before tapping on Power off.
6
9700A Mobile Computer (Android)) Reference Manual
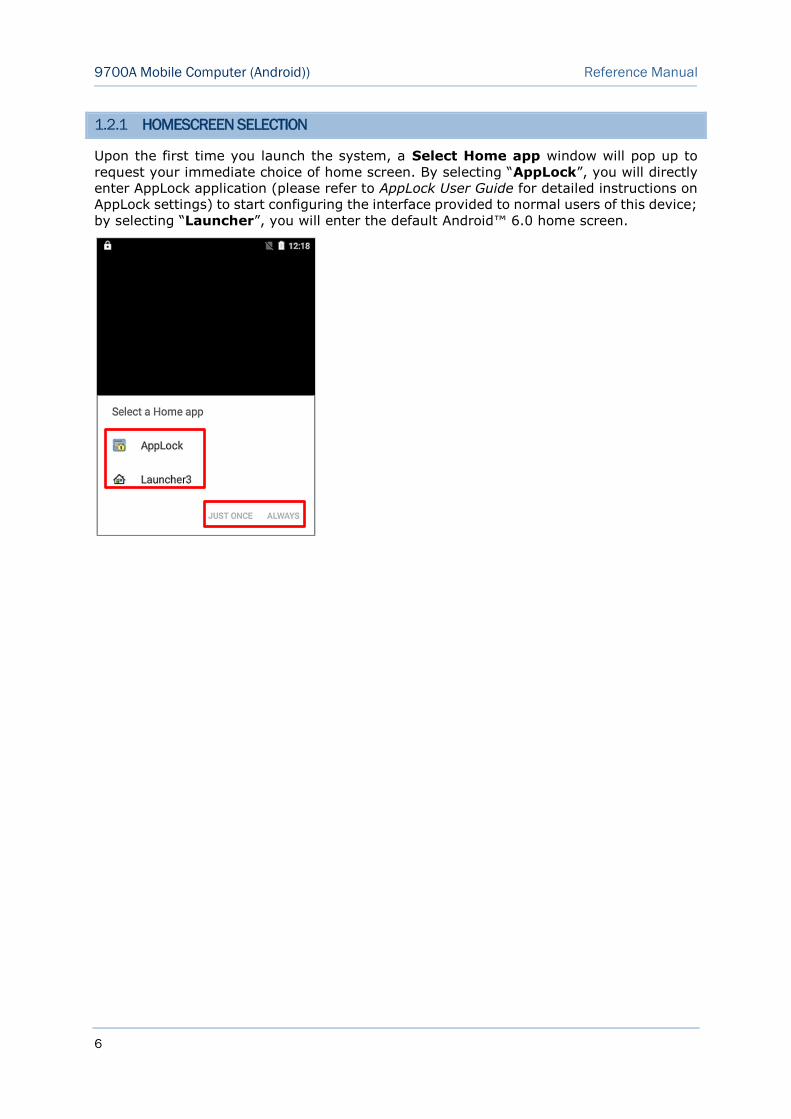
1.2.1 HOMESCREEN SELECTION
Upon the first time you launch the system, a Select Home app window will pop up to
request your immediate choice of home screen. By selecting “AppLock”, you will directly
enter AppLock application (please refer to AppLock User Guide for detailed instructions on
AppLock settings) to start configuring the interface provided to normal users of this device;
by selecting “Launcher”, you will enter the default Android™ 6.0 home screen.
7
Chapter 1 Use Mobile Computer
1.3 NOTIFICATIONS
The mobile computer features visible, audible, and tactile feedback to draw users’ prompt
awareness of the mobile computer’s contiguous events such as barcode reading,
wireless/mobile data connections, and battery charging.
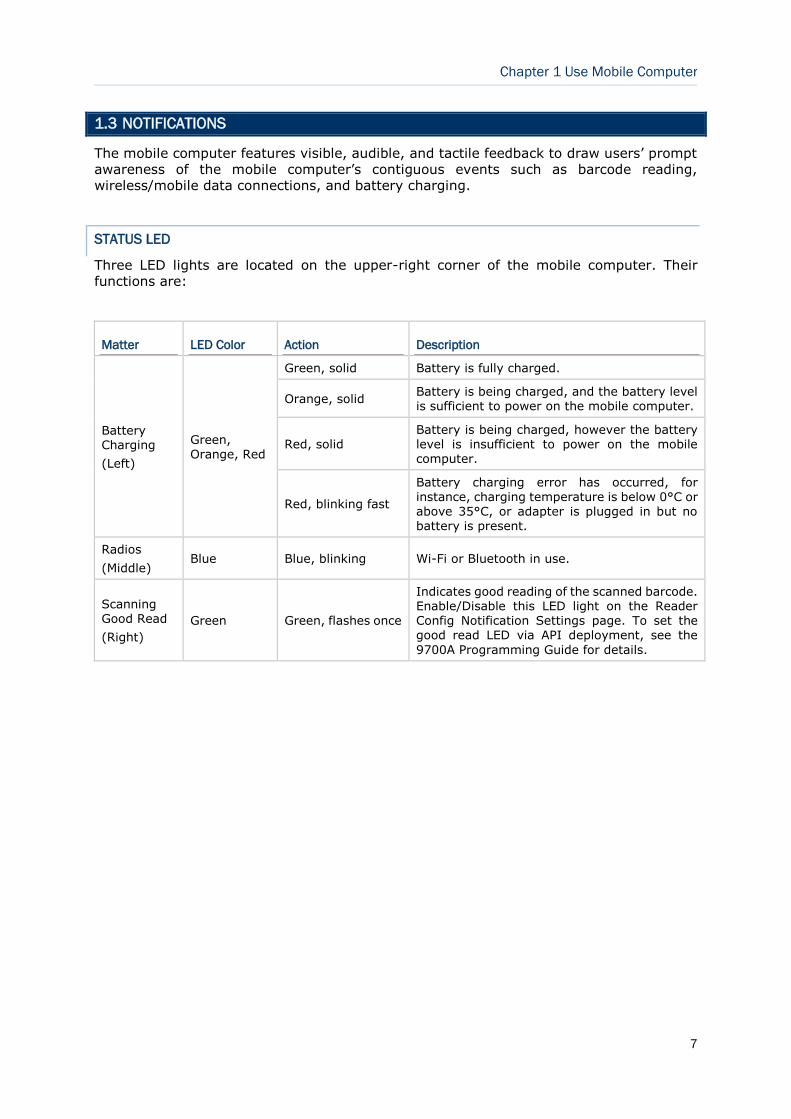
STATUS LED
Three LED lights are located on the upper-right corner of the mobile computer. Their
functions are:
Matter LED Color Action Description
Battery Charging
(Left)
Green, Orange, Red
Green, solid Battery is fully charged.
Orange, solid Battery is being charged, and the battery level is sufficient to power on the mobile computer.
Red, solid Battery is being charged, however the battery level is insufficient to power on the mobile computer.
Red, blinking fast
Battery charging error has occurred, for instance, charging temperature is below 0°C or above 35°C, or adapter is plugged in but no battery is present.
Radios
(Middle) Blue Blue, blinking Wi-Fi or Bluetooth in use.
Scanning Good Read
(Right)
Green Green, flashes once
Indicates good reading of the scanned barcode. Enable/Disable this LED light on the Reader Config Notification Settings page. To set the good read LED via API deployment, see the
9700A Programming Guide for details.

8
9700A Mobile Computer (Android)) Reference Manual
SPEAKER
The mobile computer has a speaker on the back for audio signaling and playback.
The speaker sounds for system events, application warnings, on-screen item selection and
physical keypad stroke. In noisy environments, the speaker remains efficacious with the
help of a Bluetooth headset. To control sound volume, see Sounds and Vibration
The speaker also sounds for successful barcode reading, which can be controlled on the
Reader Config Notification Settings page.
VIBRATOR
The mobile computer owes its tactile feedback to the vibrator built inside. Vibration
delivered to the mobile computer alerts users of its currents status.
Working based on user’s sense, the vibrator is particularly helpful when the mobile
computer is serving in a noisy environment.
Same as the speaker and LED light, the vibrator also works for good barcode reading.
Enable/disable vibration and set its duration on the Reader Config Notification Settings page.
Alternatively, program the vibrator through API deployment to have it vibrate when a
successful reading occurs. See the 9700A Programming Guide for details.
9
Chapter 1 Use Mobile Computer
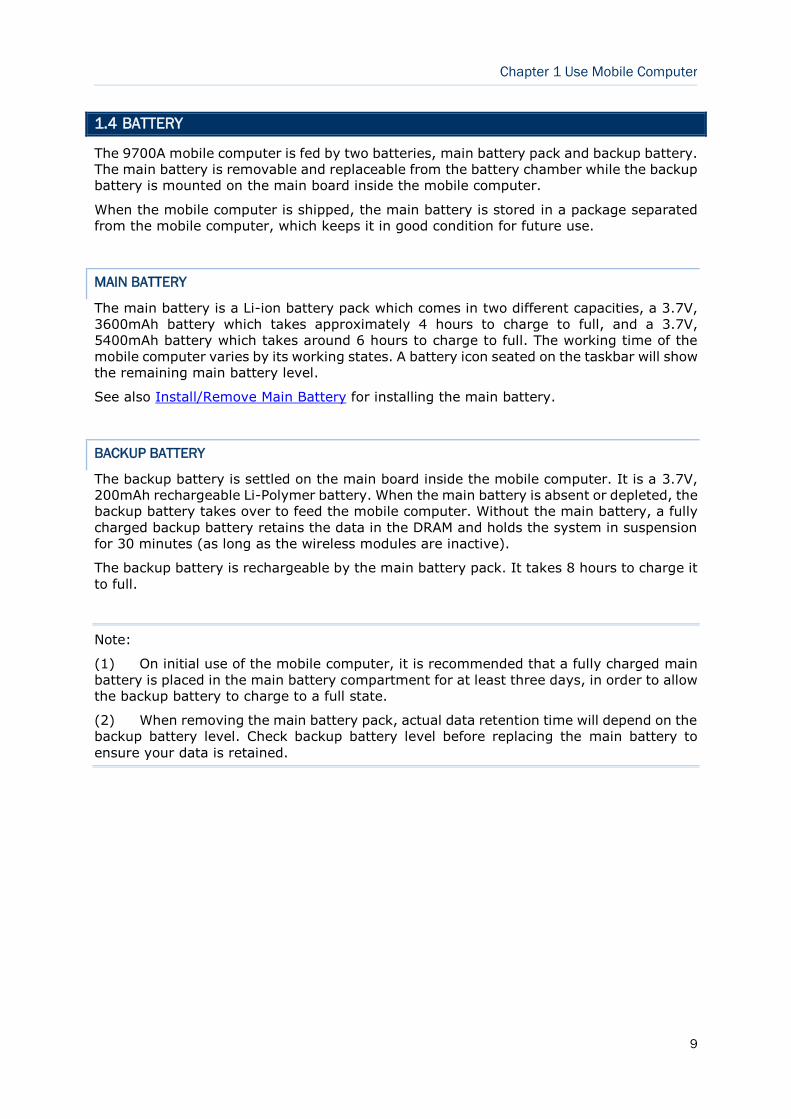
1.4 BATTERY
The 9700A mobile computer is fed by two batteries, main battery pack and backup battery.
The main battery is removable and replaceable from the battery chamber while the backup
battery is mounted on the main board inside the mobile computer.
When the mobile computer is shipped, the main battery is stored in a package separated
from the mobile computer, which keeps it in good condition for future use.
MAIN BATTERY
The main battery is a Li-ion battery pack which comes in two different capacities, a 3.7V,
3600mAh battery which takes approximately 4 hours to charge to full, and a 3.7V,
5400mAh battery which takes around 6 hours to charge to full. The working time of the
mobile computer varies by its working states. A battery icon seated on the taskbar will show
the remaining main battery level.
See also Install/Remove Main Battery for installing the main battery.
BACKUP BATTERY
The backup battery is settled on the main board inside the mobile computer. It is a 3.7V,
200mAh rechargeable Li-Polymer battery. When the main battery is absent or depleted, the
backup battery takes over to feed the mobile computer. Without the main battery, a fully
charged backup battery retains the data in the DRAM and holds the system in suspension
for 30 minutes (as long as the wireless modules are inactive).
The backup battery is rechargeable by the main battery pack. It takes 8 hours to charge it
to full.
Note:
(1) On initial use of the mobile computer, it is recommended that a fully charged main
battery is placed in the main battery compartment for at least three days, in order to allow
the backup battery to charge to a full state.
(2) When removing the main battery pack, actual data retention time will depend on the
backup battery level. Check backup battery level before replacing the main battery to
ensure your data is retained.
10
9700A Mobile Computer (Android)) Reference Manual
1.4.1 INSTALL/REMOVE MAIN BATTERY
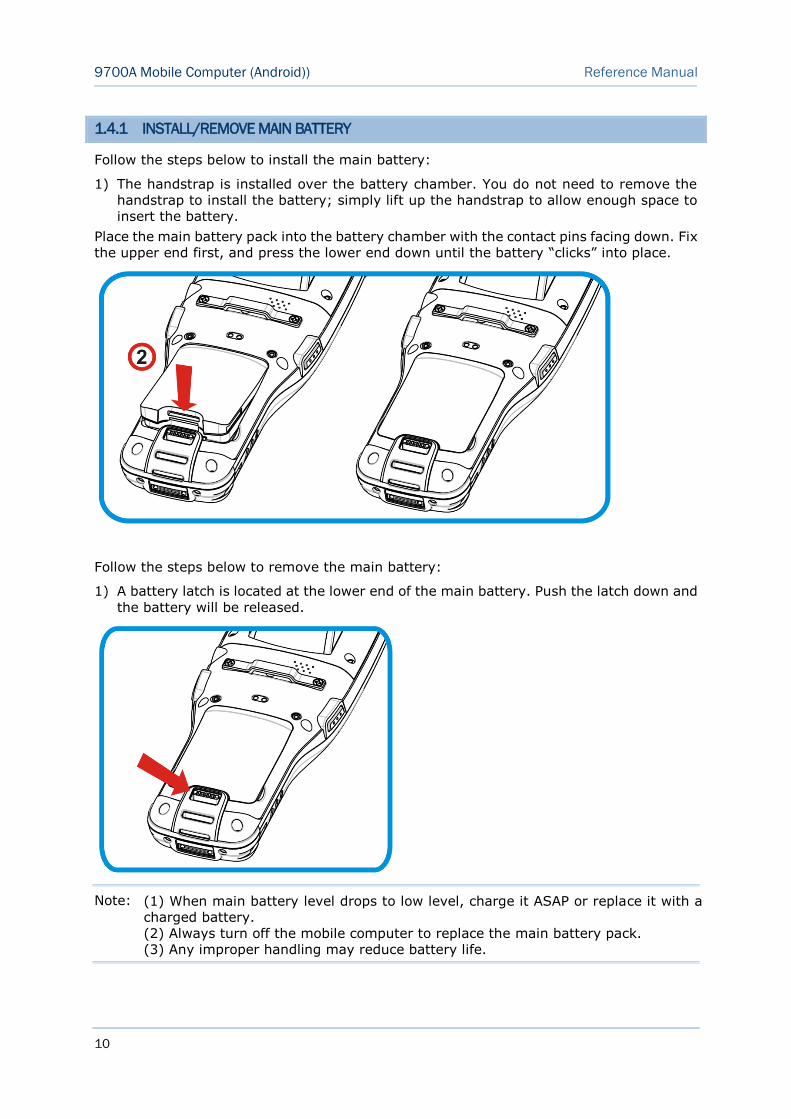
Follow the steps below to install the main battery:
The handstrap is installed over the battery chamber. You do not need to remove the 1)
handstrap to install the battery; simply lift up the handstrap to allow enough space to
insert the battery.
Place the main battery pack into the battery chamber with the contact pins facing down. Fix
the upper end first, and press the lower end down until the battery “clicks” into place.
Follow the steps below to remove the main battery:
A battery latch is located at the lower end of the main battery. Push the latch down and 1)
the battery will be released.
Note:
(1) When main battery level drops to low level, charge it ASAP or replace it with a
charged battery.
(2) Always turn off the mobile computer to replace the main battery pack.
(3) Any improper handling may reduce battery life.
11
Chapter 1 Use Mobile Computer
1.4.2 CHARGE BATTERIES
Due to shipment, it is likely that the main battery and backup battery won’t be fully charged
when you receive the package. Before setting the mobile computer to work, charge the
main battery to full by direct charging via a power adapter (with the help of a Snap-on
Charging & Communication Cable or Charging & Communication Cradle).
Some key facts about charging batteries:
Charging Time
Main battery: It takes approximately 4 hours to charge the 3.7V, 3600mAh main battery, and
approximately 6 hours to charge the 3.7V, 5400mAh main battery. The battery charging LED above the touch screen lights red or orange during charging (depending on the battery level at the
moment), and lights green when the mobile computer is completely charged. See Status LED for
details about the LED indicator.
Backup battery: The backup battery is a 3.7V, 200mAh Li-Polymer battery which is rechargeable
by the main battery. It takes around 8 hours to charge it to full, however it does not need to be fully charged for the mobile computer to work.
Charging Temperature
It is recommended that batteries be charged at room temperature (18°C~25°C) for optimal performance.
Charging stops when temperature drops below 0°C or exceeds 35°C. In this case the battery charging LED will be continuously blinking in red.
Power Consumption
When all radios (802.11 a/b/g/n/ac, Bluetooth) are active on battery power, main battery level will drop substantially.
In order to prevent the system from shutting down due to depletion of the main battery, we suggest that you keep a fully charged battery for replacement or have the mobile computer access the radios on external power.
The following guides how to charge batteries:
12
9700A Mobile Computer (Android)) Reference Manual
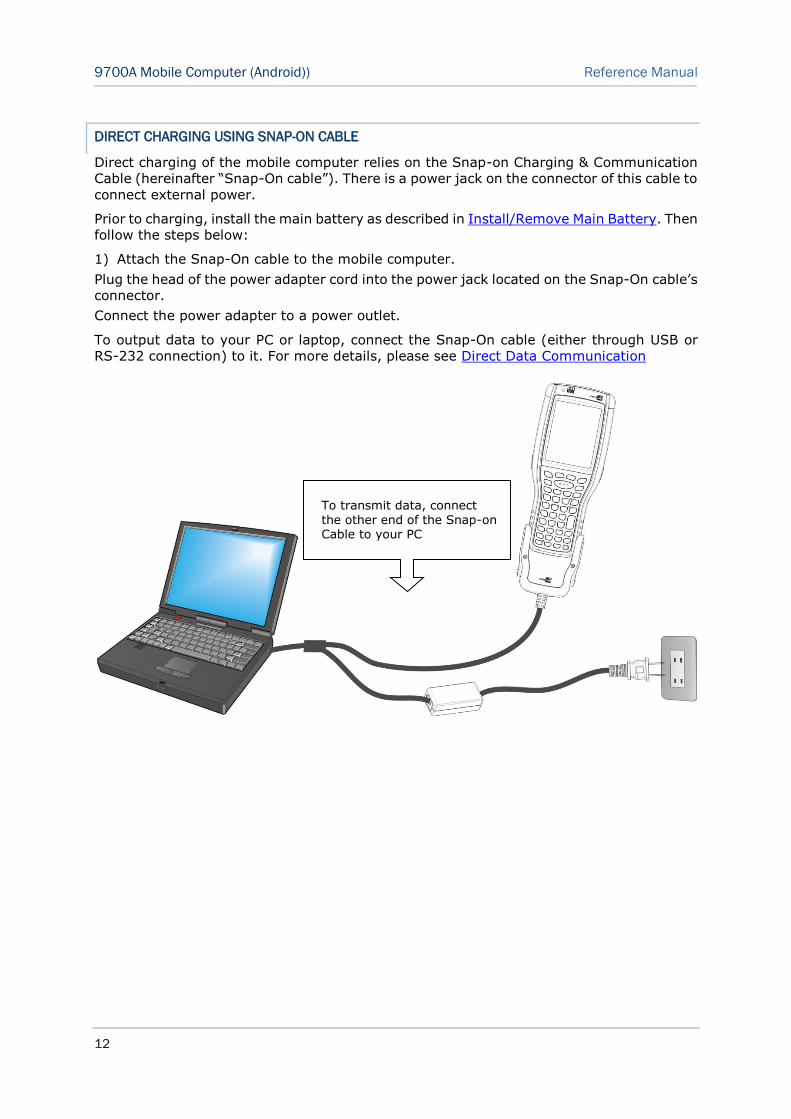
DIRECT CHARGING USING SNAP-ON CABLE
Direct charging of the mobile computer relies on the Snap-on Charging & Communication
Cable (hereinafter “Snap-On cable”). There is a power jack on the connector of this cable to
connect external power.
Prior to charging, install the main battery as described in Install/Remove Main Battery. Then
follow the steps below:
Attach the Snap-On cable to the mobile computer. 1)
Plug the head of the power adapter cord into the power jack located on the Snap-On cable’s
connector.
Connect the power adapter to a power outlet.
To output data to your PC or laptop, connect the Snap-On cable (either through USB or
RS-232 connection) to it. For more details, please see Direct Data Communication
To transmit data, connect the other end of the Snap-on Cable to your PC
13
Chapter 1 Use Mobile Computer
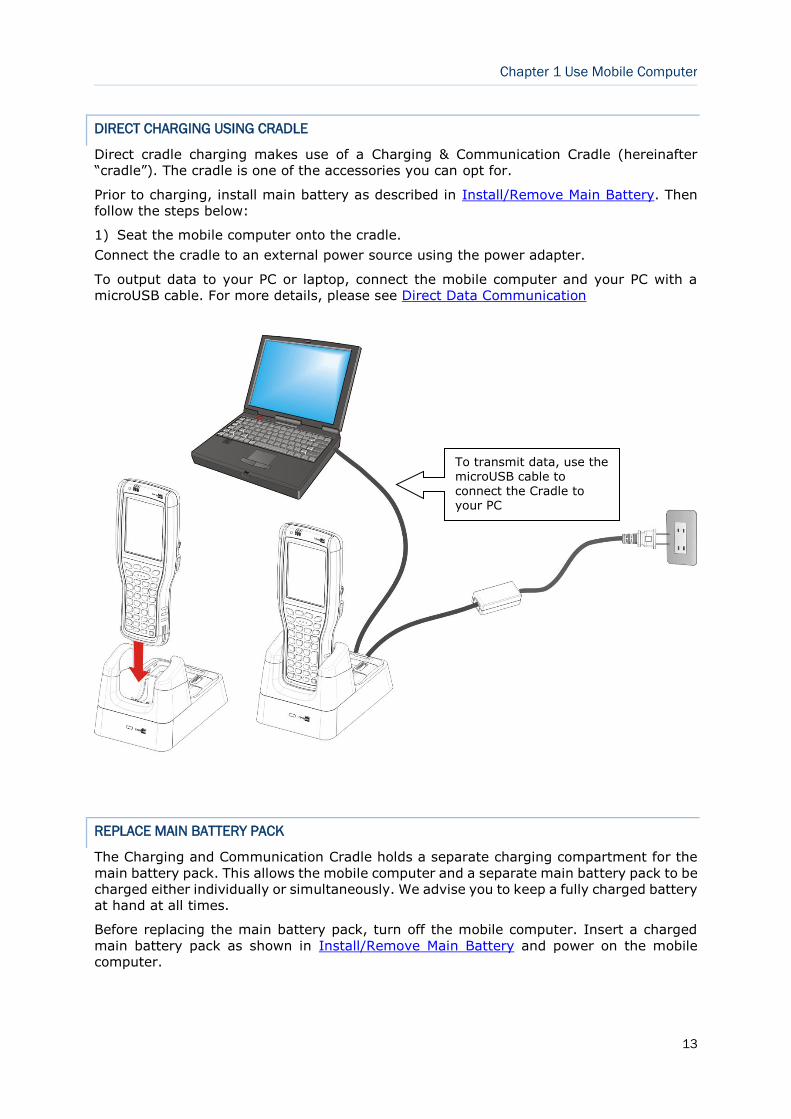
DIRECT CHARGING USING CRADLE
Direct cradle charging makes use of a Charging & Communication Cradle (hereinafter
“cradle”). The cradle is one of the accessories you can opt for.
Prior to charging, install main battery as described in Install/Remove Main Battery. Then
follow the steps below:
Seat the mobile computer onto the cradle. 1)
Connect the cradle to an external power source using the power adapter.
To output data to your PC or laptop, connect the mobile computer and your PC with a
microUSB cable. For more details, please see Direct Data Communication
REPLACE MAIN BATTERY PACK
The Charging and Communication Cradle holds a separate charging compartment for the
main battery pack. This allows the mobile computer and a separate main battery pack to be
charged either individually or simultaneously. We advise you to keep a fully charged battery
at hand at all times.
Before replacing the main battery pack, turn off the mobile computer. Insert a charged
main battery pack as shown in Install/Remove Main Battery and power on the mobile
computer.
To transmit data, use the microUSB cable to connect the Cradle to your PC
14
9700A Mobile Computer (Android)) Reference Manual
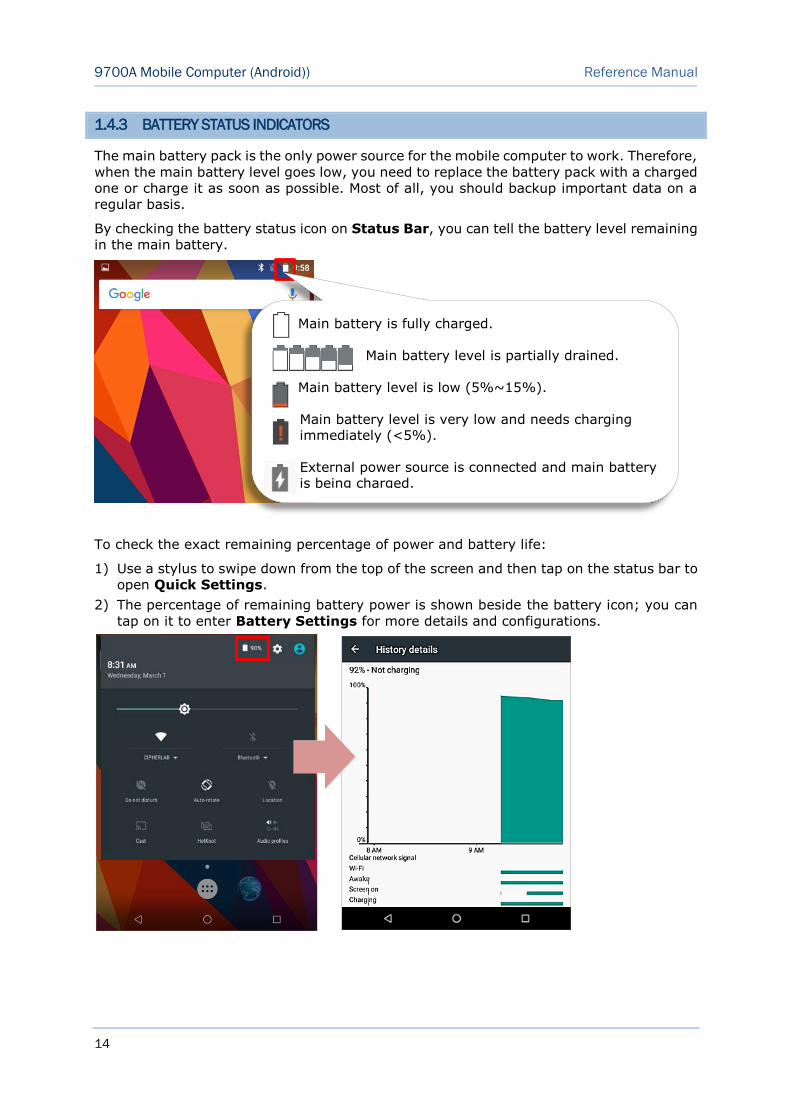
1.4.3 BATTERY STATUS INDICATORS
The main battery pack is the only power source for the mobile computer to work. Therefore,
when the main battery level goes low, you need to replace the battery pack with a charged
one or charge it as soon as possible. Most of all, you should backup important data on a
regular basis.
By checking the battery status icon on Status Bar, you can tell the battery level remaining
in the main battery.
To check the exact remaining percentage of power and battery life:
Use a stylus to swipe down from the top of the screen and then tap on the status bar to 1)
open Quick Settings.
The percentage of remaining battery power is shown beside the battery icon; you can 2)
tap on it to enter Battery Settings for more details and configurations.
Main battery is fully charged.
Main battery level is partially drained. Main battery level is low (5%~15%). Main battery level is very low and needs charging immediately (<5%). External power source is connected and main battery is being charged.
15
Chapter 1 Use Mobile Computer
Note:
When the mobile computer is fully charged and battery level reaches 100%, the battery
icon will change from to to indicate charging is completed.
Warning:
(1) Once the battery level drops below 15%, the low battery notification will be displayed on the screen.
(2) Data loss with RAM may occur when battery level is low. Always save data before the battery runs
out of power or keep a fresh battery for replacement.
(3) Constant usage of the mobile computer at low battery level can affect battery life. For maximum
performance, recharge the battery periodically to avoid battery drain out and maintain good battery health.
16
9700A Mobile Computer (Android)) Reference Manual
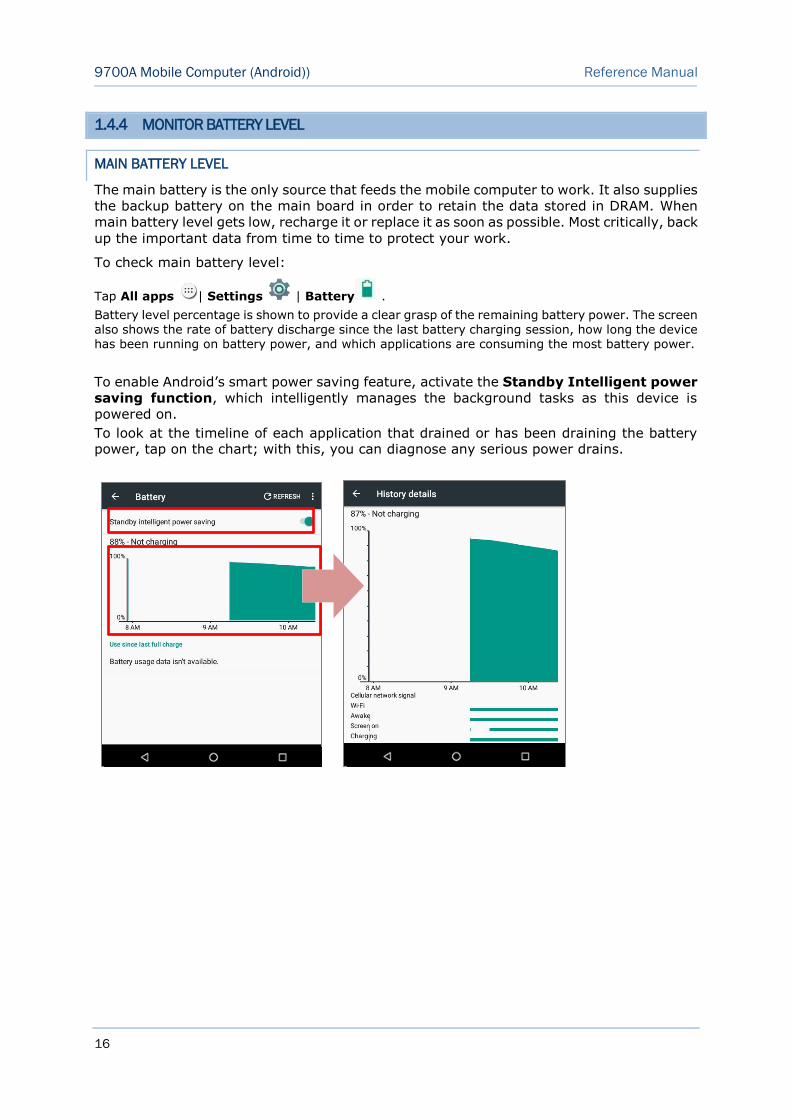
1.4.4 MONITOR BATTERY LEVEL
MAIN BATTERY LEVEL
The main battery is the only source that feeds the mobile computer to work. It also supplies
the backup battery on the main board in order to retain the data stored in DRAM. When
main battery level gets low, recharge it or replace it as soon as possible. Most critically, back
up the important data from time to time to protect your work.
To check main battery level:
Tap All apps | Settings | Battery .
Battery level percentage is shown to provide a clear grasp of the remaining battery power. The screen
also shows the rate of battery discharge since the last battery charging session, how long the device has been running on battery power, and which applications are consuming the most battery power.
To enable Android’s smart power saving feature, activate the Standby Intelligent power
saving function, which intelligently manages the background tasks as this device is
powered on.
To look at the timeline of each application that drained or has been draining the battery power, tap on the chart; with this, you can diagnose any serious power drains.
17
Chapter 1 Use Mobile Computer
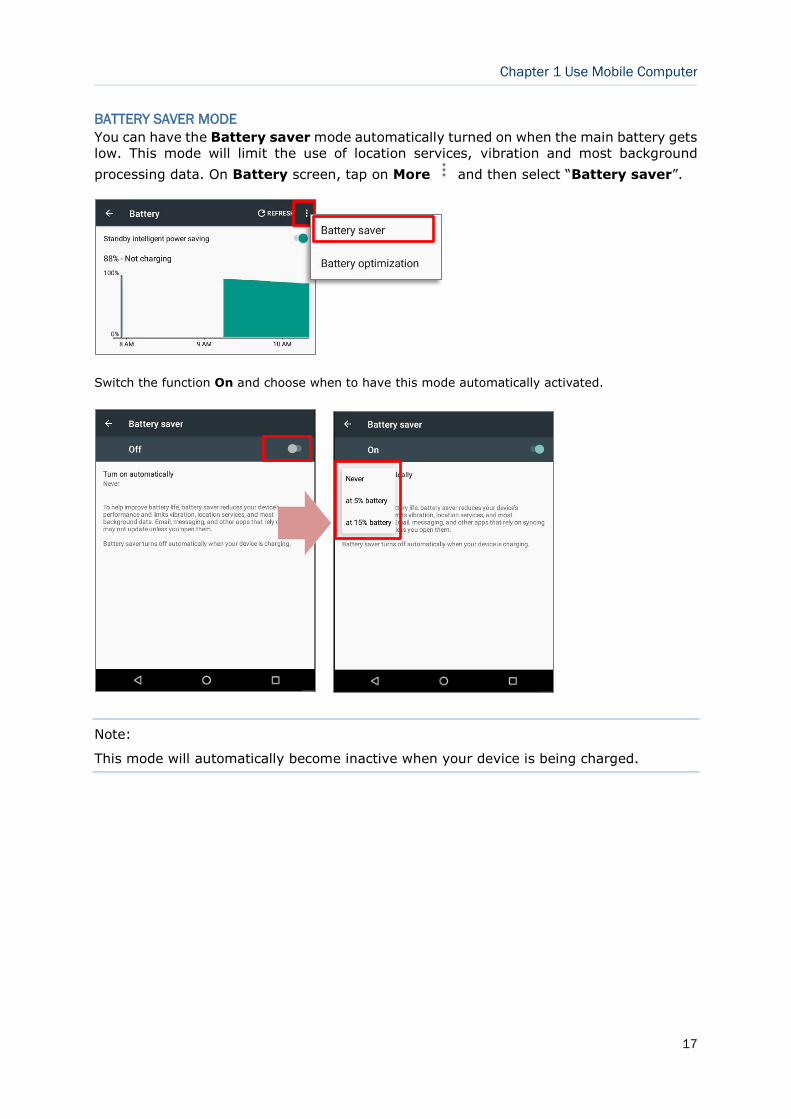
BATTERY SAVER MODE
You can have the Battery saver mode automatically turned on when the main battery gets
low. This mode will limit the use of location services, vibration and most background
processing data. On Battery screen, tap on More and then select “Battery saver”.
Switch the function On and choose when to have this mode automatically activated.
Note:
This mode will automatically become inactive when your device is being charged.
18
9700A Mobile Computer (Android)) Reference Manual
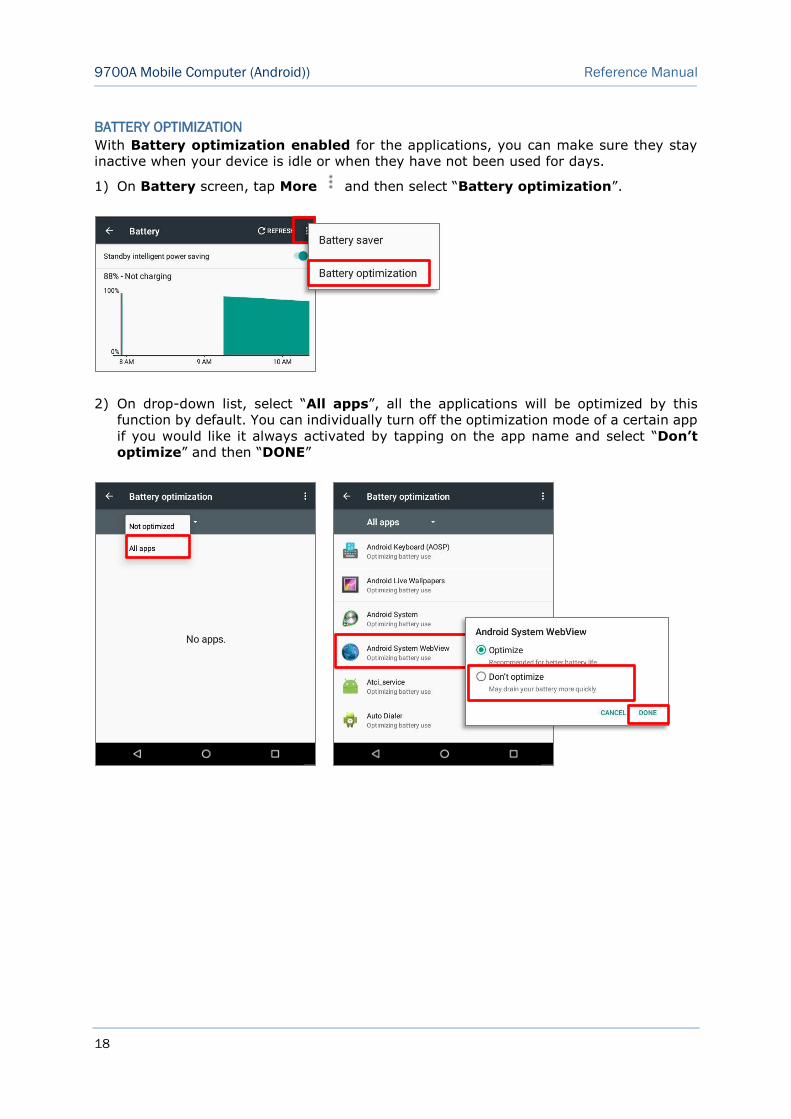
BATTERY OPTIMIZATION
With Battery optimization enabled for the applications, you can make sure they stay
inactive when your device is idle or when they have not been used for days.
On Battery screen, tap More and then select “Battery optimization”. 1)
On drop-down list, select “All apps”, all the applications will be optimized by this 2)
function by default. You can individually turn off the optimization mode of a certain app
if you would like it always activated by tapping on the app name and select “Don’t
optimize” and then “DONE”
19
Chapter 1 Use Mobile Computer
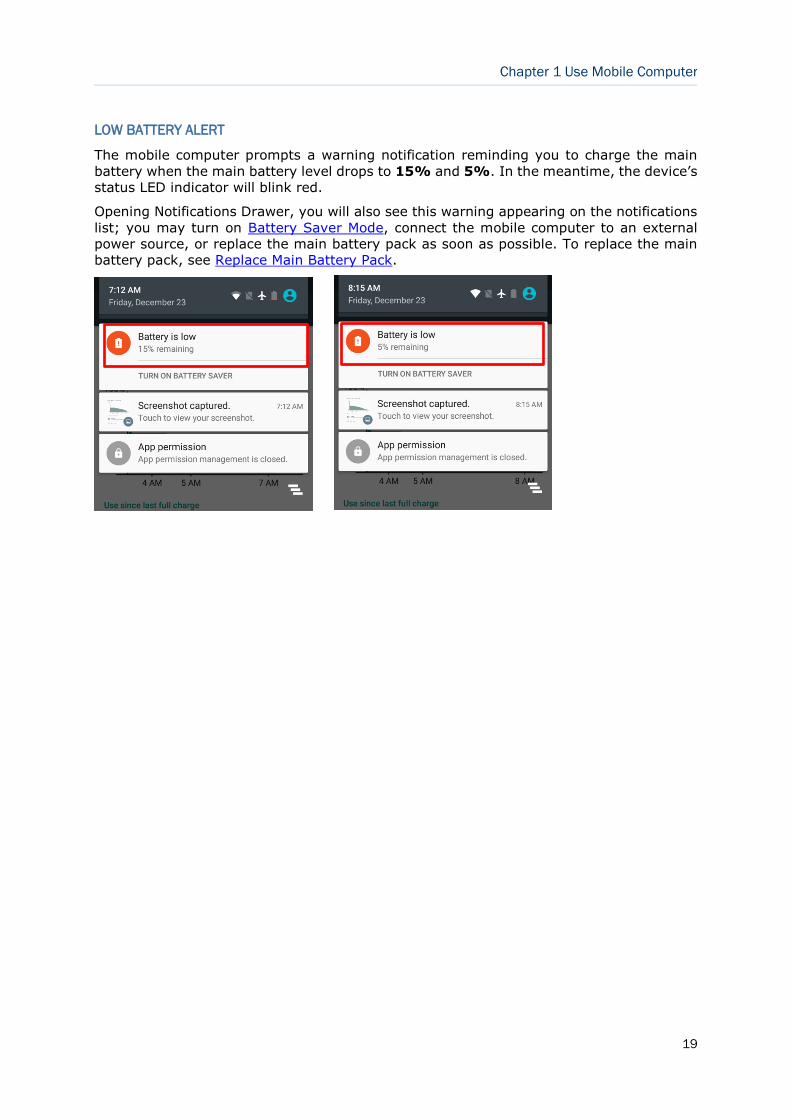
LOW BATTERY ALERT
The mobile computer prompts a warning notification reminding you to charge the main
battery when the main battery level drops to 15% and 5%. In the meantime, the device’s
status LED indicator will blink red.
Opening Notifications Drawer, you will also see this warning appearing on the notifications
list; you may turn on Battery Saver Mode, connect the mobile computer to an external
power source, or replace the main battery pack as soon as possible. To replace the main
battery pack, see Replace Main Battery Pack.
20
9700A Mobile Computer (Android)) Reference Manual
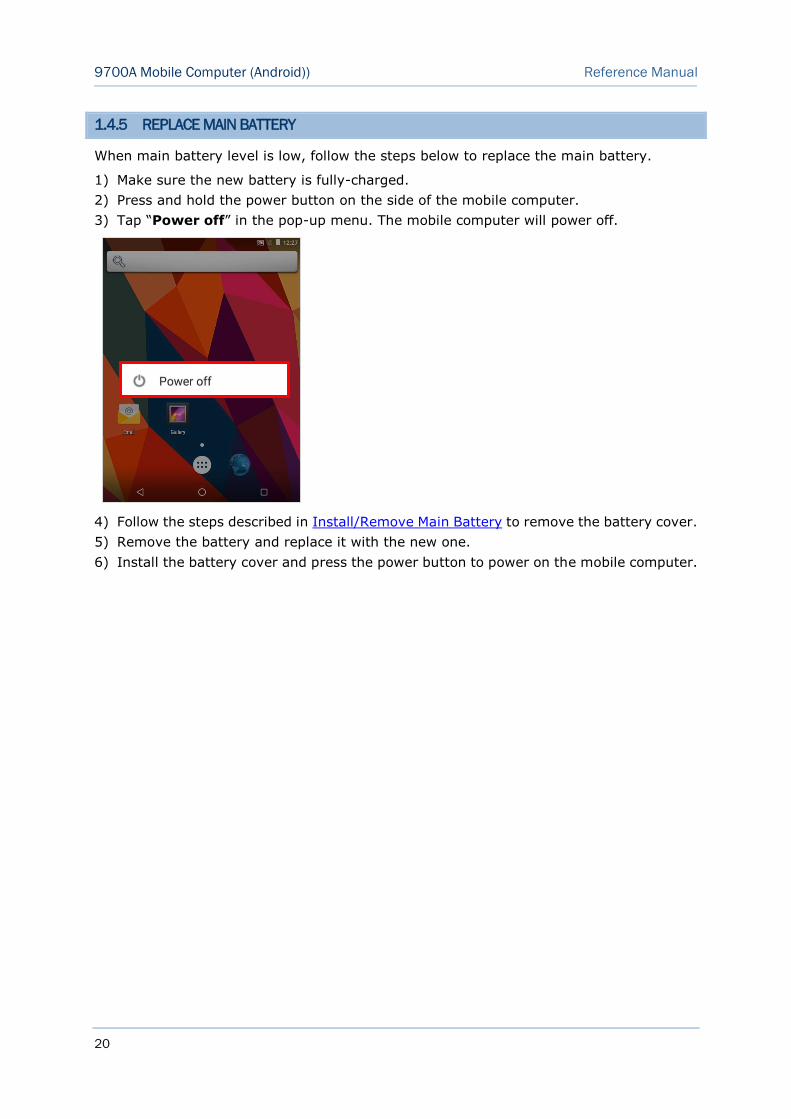
1.4.5 REPLACE MAIN BATTERY
When main battery level is low, follow the steps below to replace the main battery.
Make sure the new battery is fully-charged. 1)
Press and hold the power button on the side of the mobile computer. 2)
Tap “Power off” in the pop-up menu. The mobile computer will power off. 3)
Follow the steps described in Install/Remove Main Battery to remove the battery cover. 4)
Remove the battery and replace it with the new one. 5)
Install the battery cover and press the power button to power on the mobile computer. 6)

21
Chapter 1 Use Mobile Computer
1.4.6 POWER MANAGEMENT
For any portable device, power management is a critical issue especially when you are on
the road. Below are some tips to help you save battery power.
Warning:
Using backlight, wireless connectivity, and peripheral devices while on battery power will
substantially reduce battery power.
Bring an additional main battery pack with you on the road.
End wireless connections (such as Bluetooth transmission, wireless connection, and GPS) which are not in use.
Shorten the screen turn off time. See Screen Timeout Settings.
Reduce the screen brightness level, see Screen Brightness.
Enable Battery saver mode and Battery optimization mode. See Battery Saver Mode and Battery Optimization.
If Wi-Fi or Bluetooth isn’t in use, turn it off.
22
9700A Mobile Computer (Android)) Reference Manual
1.5 LANGUAGE & KEYPAD
The mobile computer has a physical keypad and a touch screen to receive user’s input.
Between the two, the touch screen provides more intuitiveness in interacting with the
device.
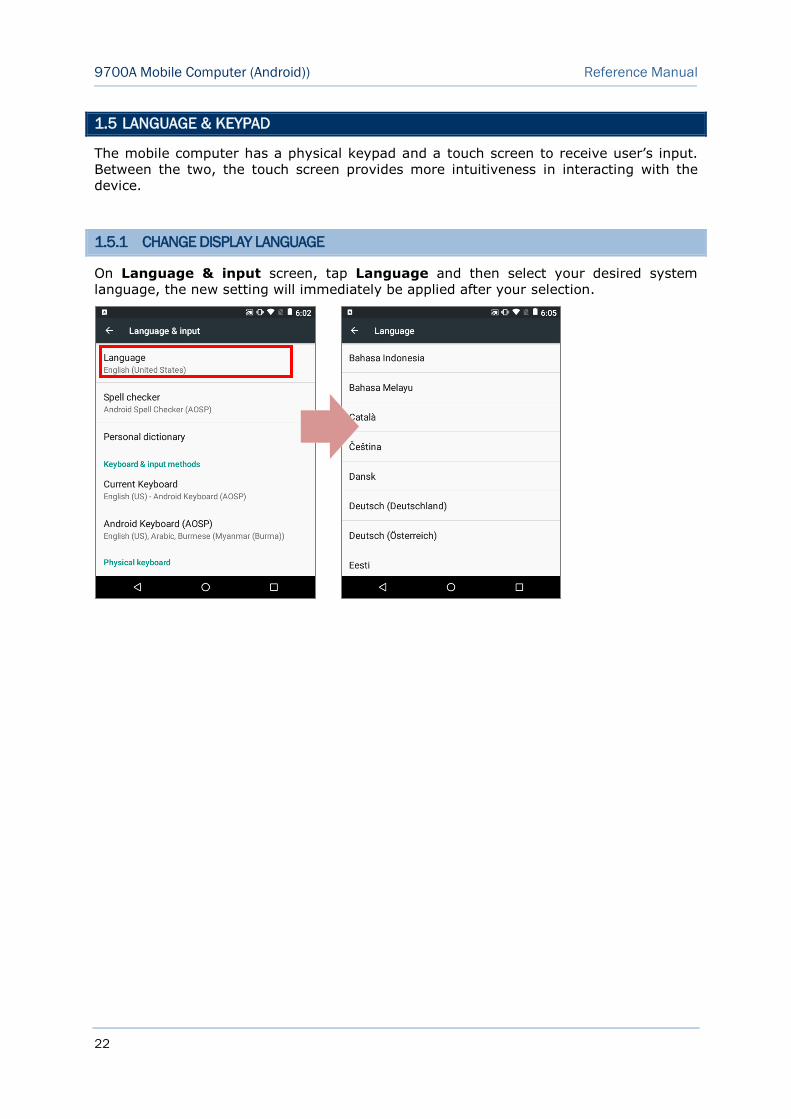
1.5.1 CHANGE DISPLAY LANGUAGE
On Language & input screen, tap Language and then select your desired system
language, the new setting will immediately be applied after your selection.

23
Chapter 1 Use Mobile Computer
1.5.2 FLOATING SOFTWARE KEYS
On the bottom of the handy terminal are three hardware
buttons that deliver the following functions
Button Function Description
Back button Returns to the previous screen or
closes the active window or keyboard.
Home button Displays the Home screen.
Recent apps
button
Opens a list of recently used
applications.
24
9700A Mobile Computer (Android)) Reference Manual
1.5.3 PHYSICAL KEYPAD
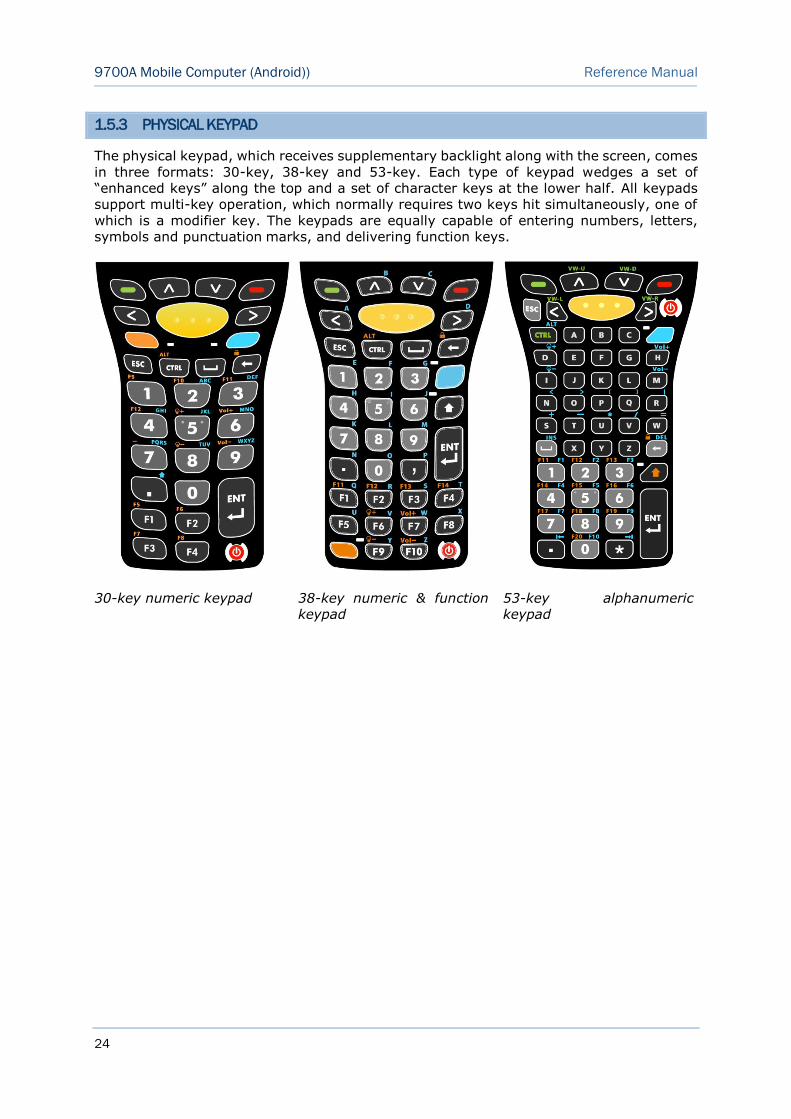
The physical keypad, which receives supplementary backlight along with the screen, comes
in three formats: 30-key, 38-key and 53-key. Each type of keypad wedges a set of
“enhanced keys” along the top and a set of character keys at the lower half. All keypads
support multi-key operation, which normally requires two keys hit simultaneously, one of
which is a modifier key. The keypads are equally capable of entering numbers, letters,
symbols and punctuation marks, and delivering function keys.
30-key numeric keypad 38-key numeric & function
keypad
53-key alphanumeric
keypad
25
Chapter 1 Use Mobile Computer
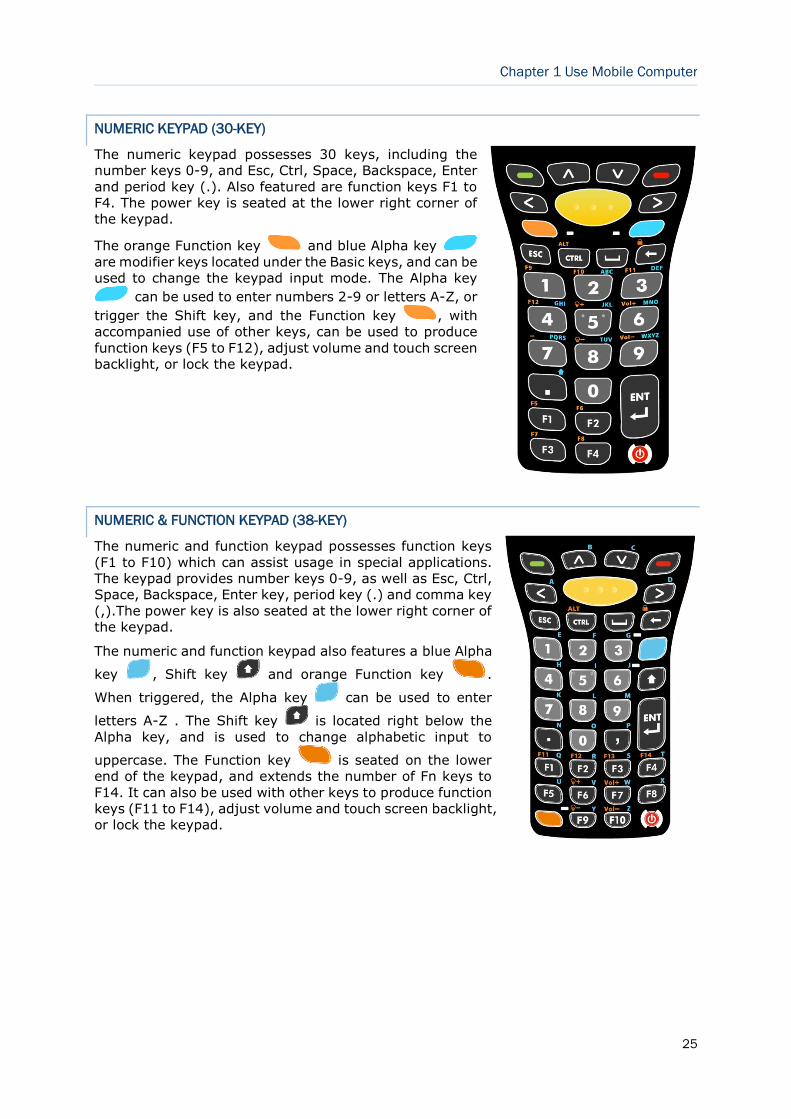
NUMERIC KEYPAD (30-KEY)
The numeric keypad possesses 30 keys, including the
number keys 0-9, and Esc, Ctrl, Space, Backspace, Enter
and period key (.). Also featured are function keys F1 to
F4. The power key is seated at the lower right corner of
the keypad.
The orange Function key and blue Alpha key
are modifier keys located under the Basic keys, and can be
used to change the keypad input mode. The Alpha key
can be used to enter numbers 2-9 or letters A-Z, or
trigger the Shift key, and the Function key , with
accompanied use of other keys, can be used to produce
function keys (F5 to F12), adjust volume and touch screen
backlight, or lock the keypad.
NUMERIC & FUNCTION KEYPAD (38-KEY)
The numeric and function keypad possesses function keys
(F1 to F10) which can assist usage in special applications.
The keypad provides number keys 0-9, as well as Esc, Ctrl,
Space, Backspace, Enter key, period key (.) and comma key
(,).The power key is also seated at the lower right corner of
the keypad.
The numeric and function keypad also features a blue Alpha
key , Shift key and orange Function key .
When triggered, the Alpha key can be used to enter
letters A-Z . The Shift key is located right below the
Alpha key, and is used to change alphabetic input to
uppercase. The Function key is seated on the lower
end of the keypad, and extends the number of Fn keys to
F14. It can also be used with other keys to produce function
keys (F11 to F14), adjust volume and touch screen backlight,
or lock the keypad.
26
9700A Mobile Computer (Android)) Reference Manual
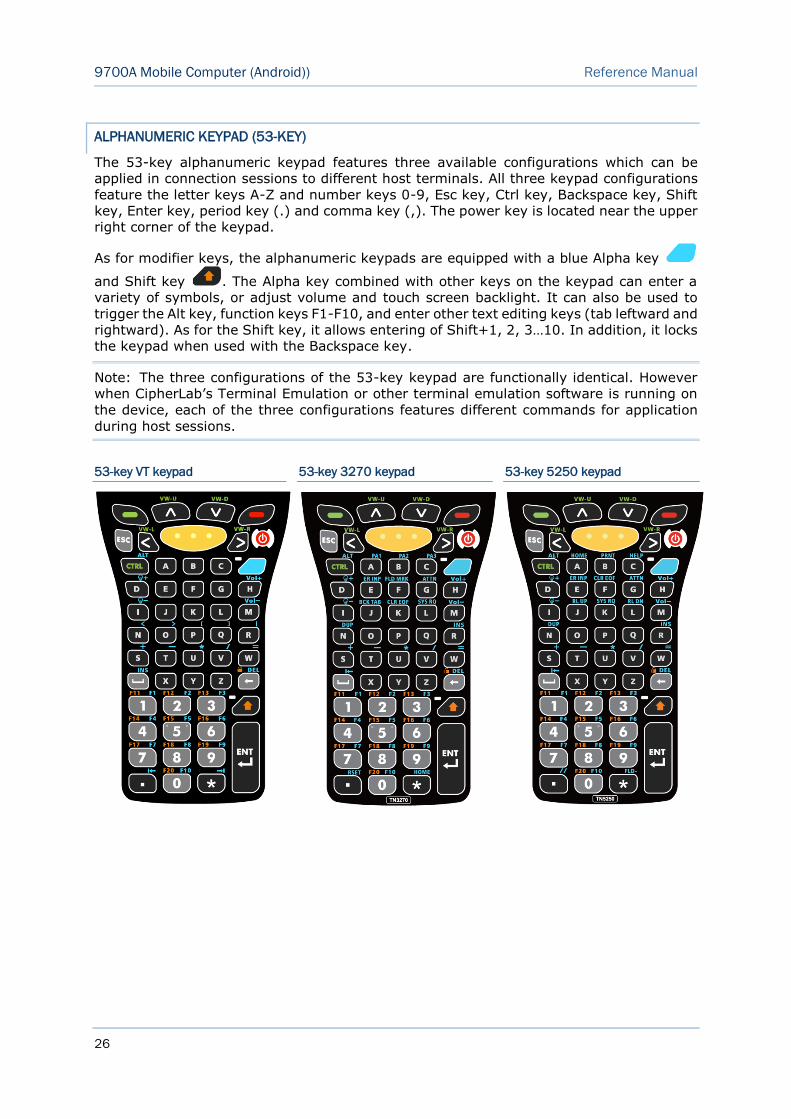
ALPHANUMERIC KEYPAD (53-KEY)
The 53-key alphanumeric keypad features three available configurations which can be
applied in connection sessions to different host terminals. All three keypad configurations
feature the letter keys A-Z and number keys 0-9, Esc key, Ctrl key, Backspace key, Shift
key, Enter key, period key (.) and comma key (,). The power key is located near the upper
right corner of the keypad.
As for modifier keys, the alphanumeric keypads are equipped with a blue Alpha key
and Shift key . The Alpha key combined with other keys on the keypad can enter a
variety of symbols, or adjust volume and touch screen backlight. It can also be used to
trigger the Alt key, function keys F1-F10, and enter other text editing keys (tab leftward and
rightward). As for the Shift key, it allows entering of Shift+1, 2, 3…10. In addition, it locks
the keypad when used with the Backspace key.
Note: The three configurations of the 53-key keypad are functionally identical. However
when CipherLab’s Terminal Emulation or other terminal emulation software is running on
the device, each of the three configurations features different commands for application
during host sessions.
53-key VT keypad 53-key 3270 keypad 53-key 5250 keypad

27
Chapter 1 Use Mobile Computer
BASIC KEYS
These are a set of keys kept at the top of the keypad throughout all three keypad types.
Basic keys
Basic keys deliver the following functions:
Key Description
SCAN KEY
Press the scan key to read a barcode in place.
ARROW KEYS
The arrow keys are circled around the center scan key. These can be used to move the cursor up, down, left or right during text input, or move between items in certain applications.
GREEN/RED KEY
By default, these two keys input the functions F14 and F15. You may also define their new key functions using CipherLab’s Button Assignment.
28
9700A Mobile Computer (Android)) Reference Manual
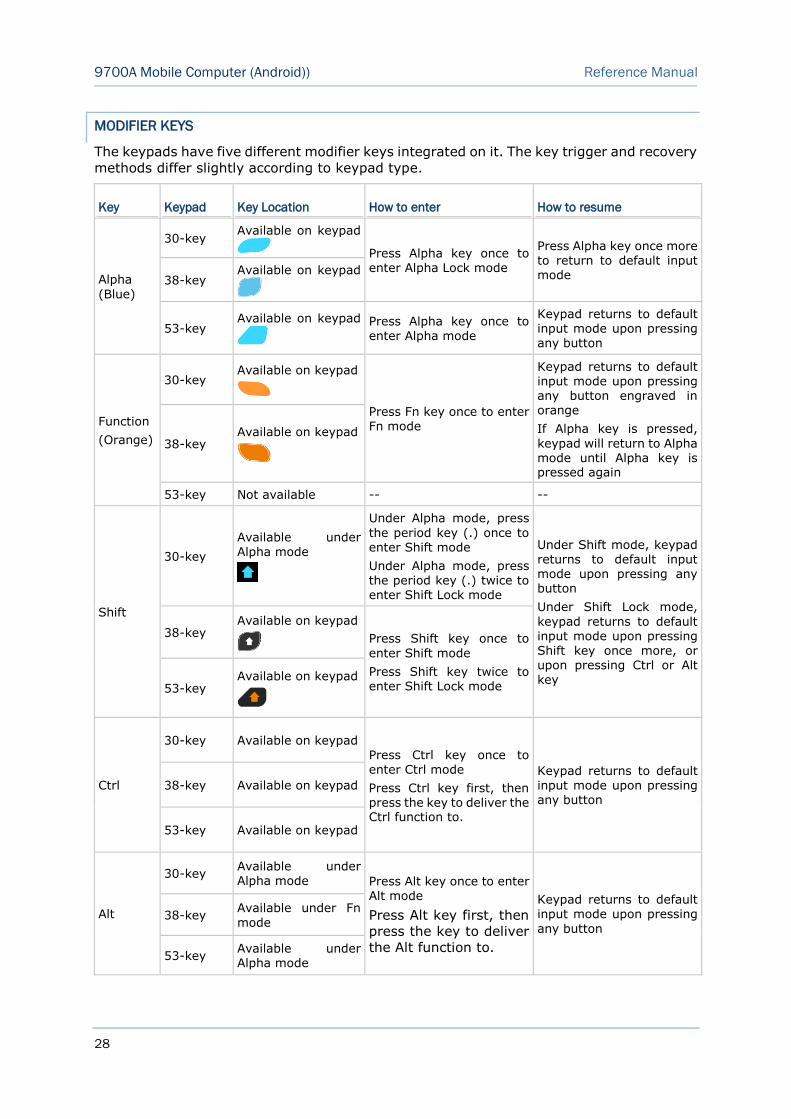
MODIFIER KEYS
The keypads have five different modifier keys integrated on it. The key trigger and recovery
methods differ slightly according to keypad type.
Key Keypad Key Location How to enter How to resume
Alpha
(Blue)
30-key Available on keypad
Press Alpha key once to enter Alpha Lock mode
Press Alpha key once more to return to default input mode 38-key
Available on keypad
53-key Available on keypad
Press Alpha key once to
enter Alpha mode
Keypad returns to default
input mode upon pressing any button
Function
(Orange)
30-key Available on keypad
Press Fn key once to enter Fn mode
Keypad returns to default input mode upon pressing any button engraved in orange
If Alpha key is pressed,
keypad will return to Alpha mode until Alpha key is pressed again
38-key Available on keypad
53-key Not available -- --
Shift
30-key
Available under
Alpha mode
Under Alpha mode, press
the period key (.) once to
enter Shift mode
Under Alpha mode, press the period key (.) twice to enter Shift Lock mode
Under Shift mode, keypad returns to default input mode upon pressing any button
Under Shift Lock mode,
keypad returns to default input mode upon pressing Shift key once more, or upon pressing Ctrl or Alt key
38-key Available on keypad
Press Shift key once to
enter Shift mode
Press Shift key twice to enter Shift Lock mode 53-key
Available on keypad
Ctrl
30-key Available on keypad Press Ctrl key once to
enter Ctrl mode
Press Ctrl key first, then press the key to deliver the Ctrl function to.
Keypad returns to default input mode upon pressing any button
38-key Available on keypad
53-key Available on keypad
Alt
30-key Available under Alpha mode Press Alt key once to enter
Alt mode
Press Alt key first, then
press the key to deliver
the Alt function to.
Keypad returns to default input mode upon pressing
any button 38-key
Available under Fn
mode
53-key Available under Alpha mode

29
Chapter 1 Use Mobile Computer
ALPHA KEY
The Alpha key is equipped with an LED indicator. When the Alpha key is pressed, the LED
will light up in blue to indicate that Alpha key is activated. The 30-key and 38-key keypads
enter Alpha lock mode when Alpha key is pressed, and only when Alpha key is pressed once
more will the LED go off, and thus the keypad returns to default input mode. The 53-key
keypad enters Alpha mode when Alpha key is pressed, and the Alpha key LED goes off and
the keypad returns to default input mode once another key is pressed.
The Alpha key delivers the following functions on each of the keypads:
Keypad Alpha key Key Function
30-key Under Alpha mode, press number keys 2-9 to enter lowercase letters
a-z
Under Alpha mode, press number keys 0 and 1 to enter punctuation marks
Under Alpha mode, press period key to enter Shift mode, in which pressing number keys 2-9 enters uppercase letters A-Z, and pressing arrow keys moves the cursor up, down, left and right
38-key
Under Alpha mode, press arrow keys, number keys 0-9, Function keys F1-F10 and punctuation keys to enter lowercase letters a-z
Under Alpha mode, press Shift key to enter Shift mode, in which pressing arrow keys, number keys 0-9, Function keys F1-F10 and punctuation keys enters uppercase letters A-Z
53-key
Under Alpha mode, press letter keys A-Z to enter symbols, adjust volume or touch screen backlight
Under Alpha mode, press Ctrl key to trigger Alt mode
Under Alpha mode, press Space/Backspace key to Insert/Delete
Under Alpha mode, press number keys 0-9 to trigger function keys F1-F10
Under Alpha mode, press period key (.) or asterisk key (*) to move to the previous or next tab spot
Note: Alpha mode can coexist with Function mode. When both modes are active, the
dominant mode depends on the last pressed key. If you press Function key and then press
Alpha key, Alpha mode will be the effective for the next pressed key.
30
9700A Mobile Computer (Android)) Reference Manual
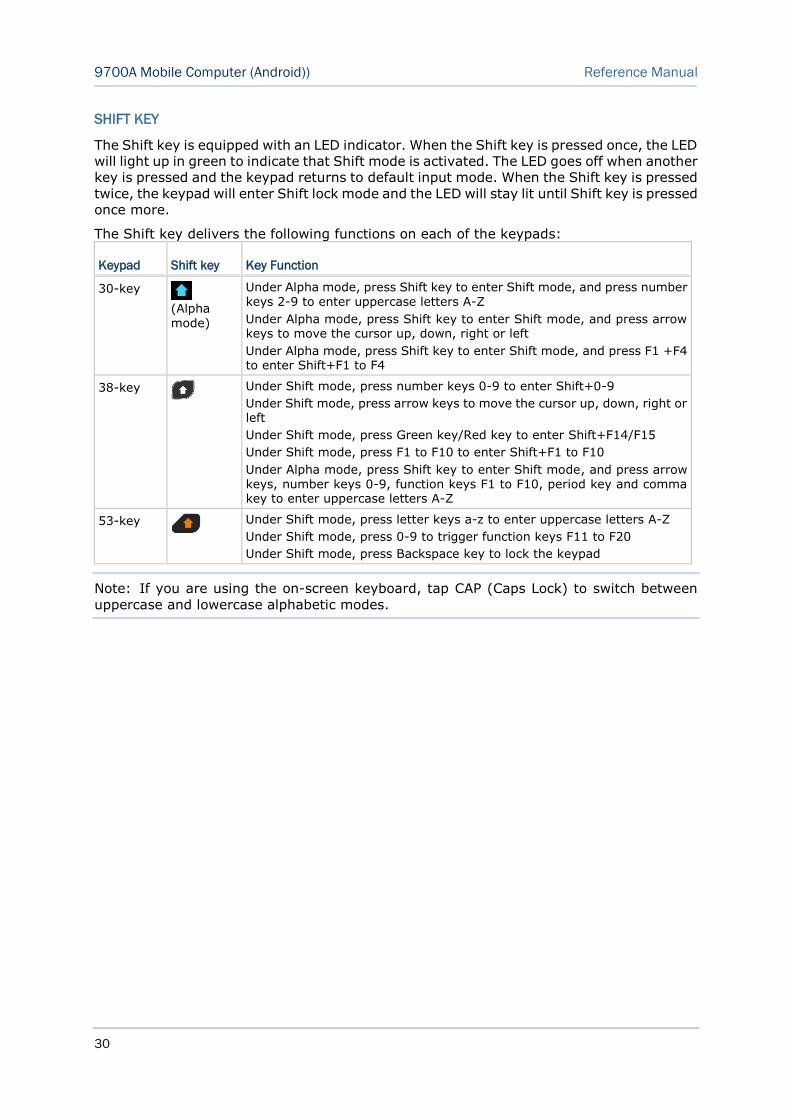
SHIFT KEY
The Shift key is equipped with an LED indicator. When the Shift key is pressed once, the LED
will light up in green to indicate that Shift mode is activated. The LED goes off when another
key is pressed and the keypad returns to default input mode. When the Shift key is pressed
twice, the keypad will enter Shift lock mode and the LED will stay lit until Shift key is pressed
once more.
The Shift key delivers the following functions on each of the keypads:
Keypad Shift key Key Function
30-key
(Alpha
mode)
Under Alpha mode, press Shift key to enter Shift mode, and press number keys 2-9 to enter uppercase letters A-Z
Under Alpha mode, press Shift key to enter Shift mode, and press arrow keys to move the cursor up, down, right or left
Under Alpha mode, press Shift key to enter Shift mode, and press F1 +F4 to enter Shift+F1 to F4
38-key
Under Shift mode, press number keys 0-9 to enter Shift+0-9
Under Shift mode, press arrow keys to move the cursor up, down, right or left
Under Shift mode, press Green key/Red key to enter Shift+F14/F15
Under Shift mode, press F1 to F10 to enter Shift+F1 to F10
Under Alpha mode, press Shift key to enter Shift mode, and press arrow keys, number keys 0-9, function keys F1 to F10, period key and comma key to enter uppercase letters A-Z
53-key
Under Shift mode, press letter keys a-z to enter uppercase letters A-Z
Under Shift mode, press 0-9 to trigger function keys F11 to F20
Under Shift mode, press Backspace key to lock the keypad
Note: If you are using the on-screen keyboard, tap CAP (Caps Lock) to switch between
uppercase and lowercase alphabetic modes.
31
Chapter 1 Use Mobile Computer
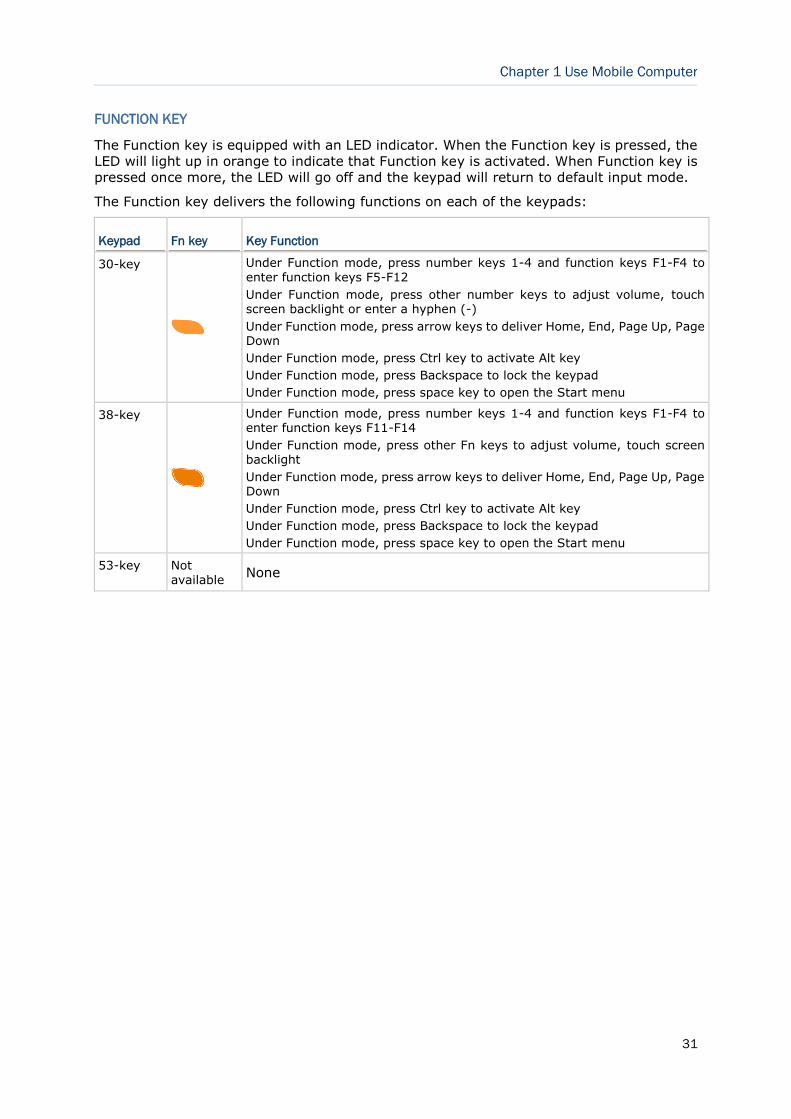
FUNCTION KEY
The Function key is equipped with an LED indicator. When the Function key is pressed, the
LED will light up in orange to indicate that Function key is activated. When Function key is
pressed once more, the LED will go off and the keypad will return to default input mode.
The Function key delivers the following functions on each of the keypads:
Keypad Fn key Key Function
30-key
Under Function mode, press number keys 1-4 and function keys F1-F4 to enter function keys F5-F12
Under Function mode, press other number keys to adjust volume, touch screen backlight or enter a hyphen (-)
Under Function mode, press arrow keys to deliver Home, End, Page Up, Page Down
Under Function mode, press Ctrl key to activate Alt key
Under Function mode, press Backspace to lock the keypad
Under Function mode, press space key to open the Start menu
38-key
Under Function mode, press number keys 1-4 and function keys F1-F4 to enter function keys F11-F14
Under Function mode, press other Fn keys to adjust volume, touch screen backlight
Under Function mode, press arrow keys to deliver Home, End, Page Up, Page Down
Under Function mode, press Ctrl key to activate Alt key
Under Function mode, press Backspace to lock the keypad
Under Function mode, press space key to open the Start menu
53-key Not available
None
32
9700A Mobile Computer (Android)) Reference Manual
Note: Function mode can coexist with Alpha mode. When both modes are active, the
dominant mode depends on the last pressed key. If you press Alpha key and then press
Function key, Function mode will be the effective for the next pressed key.
KEYPAD LOCK
All three keypads feature a keypad lock mode, which can be triggered by pressing a hot key
combination. When the keypad lock mode is triggered, all keys on the keypad will become
locked to prevent any accidental pressing of keys. A keypad lock icon will appear on the
taskbar to indicate keys are currently locked.
To release the keypad lock mode, press the keypad lock hot key combination again. The
input mode on the mobile computer will return to default state.
To trigger or release keypad lock mode:
On the 30-key keypad, press the Function key followed by the backspace key
On the 38-key keypad, press the Function key followed by the backspace key
On the 53-key keypad, press the Shift key followed by the backspace key
Note: Under keypad lock mode, the only available keys aside from the keypad lock button
itself are the power key and scan keys.
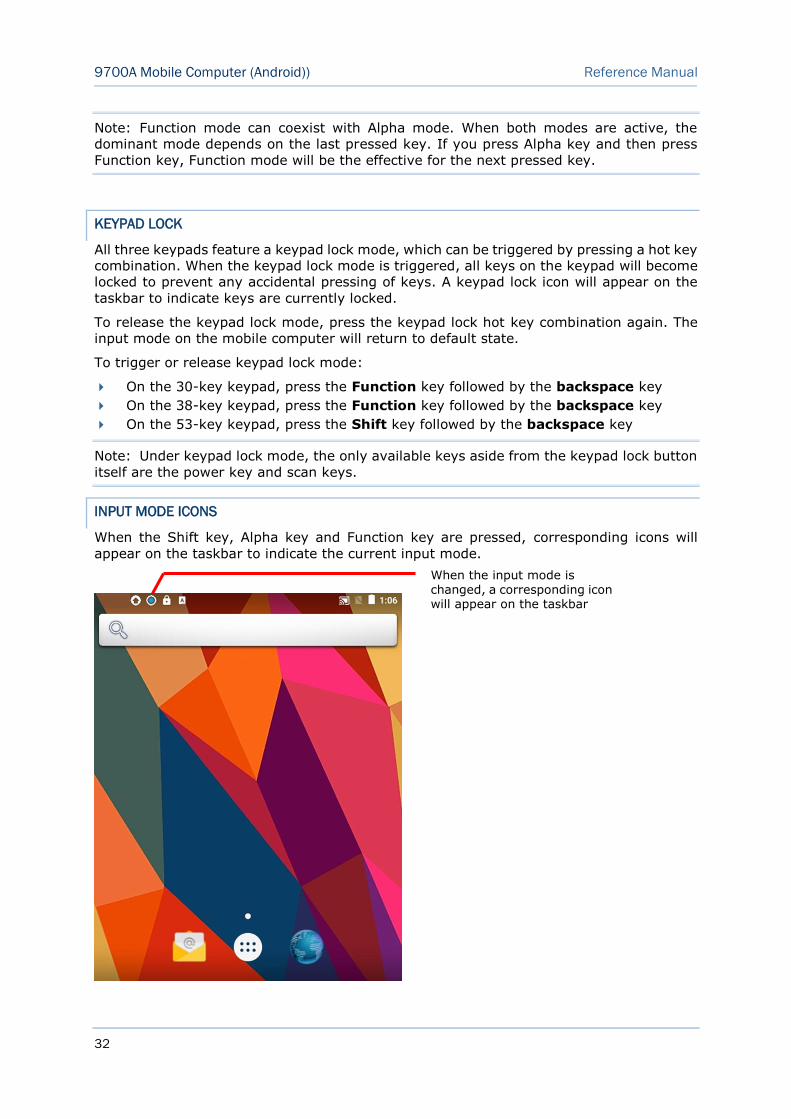
INPUT MODE ICONS
When the Shift key, Alpha key and Function key are pressed, corresponding icons will
appear on the taskbar to indicate the current input mode.
When the input mode is changed, a corresponding icon will appear on the taskbar
33
Chapter 1 Use Mobile Computer
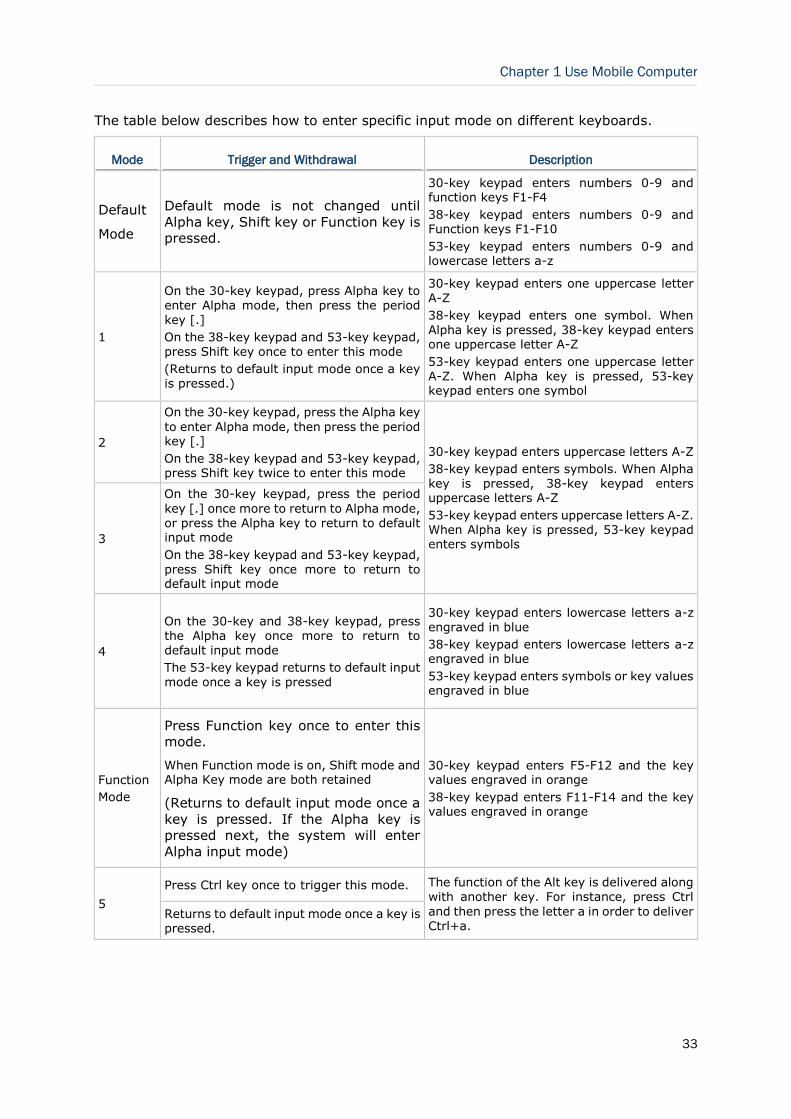
The table below describes how to enter specific input mode on different keyboards.
Mode Trigger and Withdrawal Description
Default
Mode
Default mode is not changed until
Alpha key, Shift key or Function key is
pressed.
30-key keypad enters numbers 0-9 and function keys F1-F4
38-key keypad enters numbers 0-9 and Function keys F1-F10
53-key keypad enters numbers 0-9 and lowercase letters a-z
1
On the 30-key keypad, press Alpha key to enter Alpha mode, then press the period key [.]
On the 38-key keypad and 53-key keypad, press Shift key once to enter this mode
(Returns to default input mode once a key is pressed.)
30-key keypad enters one uppercase letter A-Z
38-key keypad enters one symbol. When
Alpha key is pressed, 38-key keypad enters one uppercase letter A-Z
53-key keypad enters one uppercase letter A-Z. When Alpha key is pressed, 53-key keypad enters one symbol
2
On the 30-key keypad, press the Alpha key
to enter Alpha mode, then press the period key [.]
On the 38-key keypad and 53-key keypad, press Shift key twice to enter this mode
30-key keypad enters uppercase letters A-Z
38-key keypad enters symbols. When Alpha key is pressed, 38-key keypad enters uppercase letters A-Z
53-key keypad enters uppercase letters A-Z. When Alpha key is pressed, 53-key keypad enters symbols 3
On the 30-key keypad, press the period
key [.] once more to return to Alpha mode, or press the Alpha key to return to default input mode
On the 38-key keypad and 53-key keypad, press Shift key once more to return to default input mode
4
On the 30-key and 38-key keypad, press the Alpha key once more to return to default input mode
The 53-key keypad returns to default input mode once a key is pressed
30-key keypad enters lowercase letters a-z engraved in blue
38-key keypad enters lowercase letters a-z engraved in blue
53-key keypad enters symbols or key values engraved in blue
Function
Mode
Press Function key once to enter this
mode.
When Function mode is on, Shift mode and Alpha Key mode are both retained
(Returns to default input mode once a
key is pressed. If the Alpha key is
pressed next, the system will enter
Alpha input mode)
30-key keypad enters F5-F12 and the key values engraved in orange
38-key keypad enters F11-F14 and the key values engraved in orange
5
Press Ctrl key once to trigger this mode. The function of the Alt key is delivered along with another key. For instance, press Ctrl
and then press the letter a in order to deliver Ctrl+a.
Returns to default input mode once a key is pressed.

34
9700A Mobile Computer (Android)) Reference Manual
6
On the 30-key and 38-key keypad, press
the Function key first, then press the Ctrl key
On the 53-key keypad, press the Shift key first, then press the Ctrl key
(Returns to default input mode once a key is pressed.)
The function of the Alt key is delivered along with another key. For instance, press Alt and
then press the letter a in order to deliver Alt+a.
35
Chapter 1 Use Mobile Computer
1.5.4 ON-SCREEN KEYBOARD
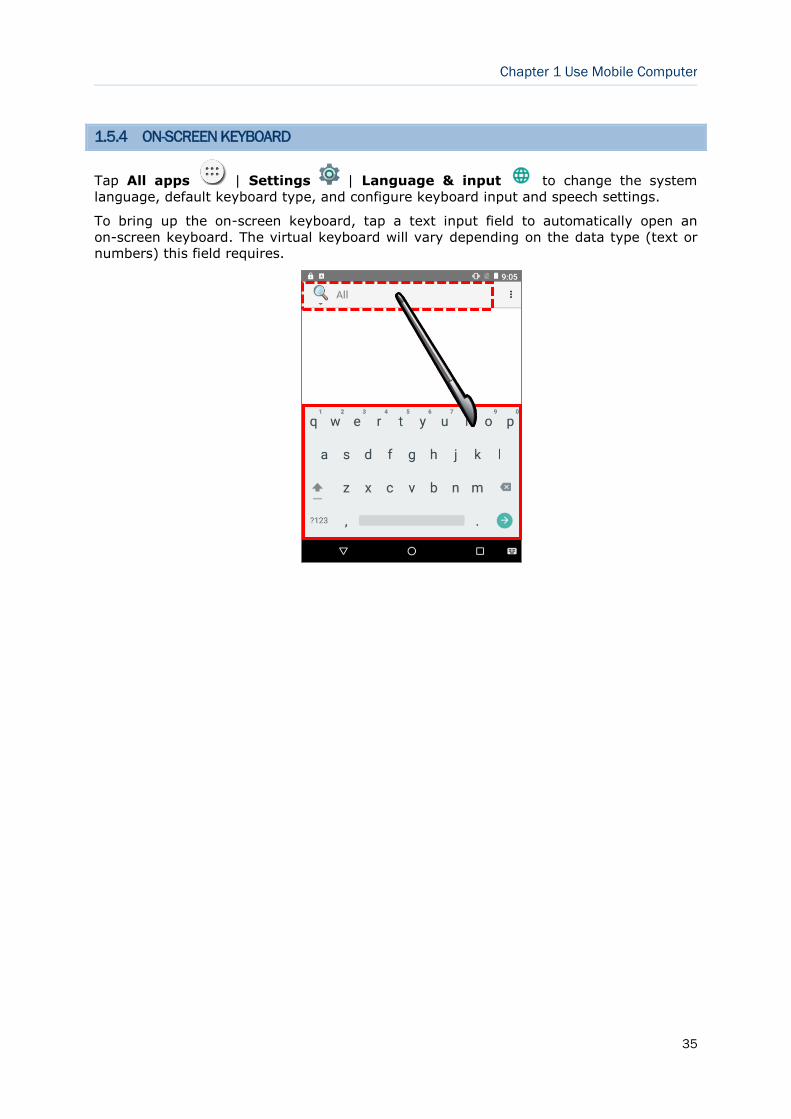
Tap All apps | Settings | Language & input to change the system
language, default keyboard type, and configure keyboard input and speech settings.
To bring up the on-screen keyboard, tap a text input field to automatically open an
on-screen keyboard. The virtual keyboard will vary depending on the data type (text or
numbers) this field requires.
36
9700A Mobile Computer (Android)) Reference Manual
KEYBOARD & INPUT METHODS
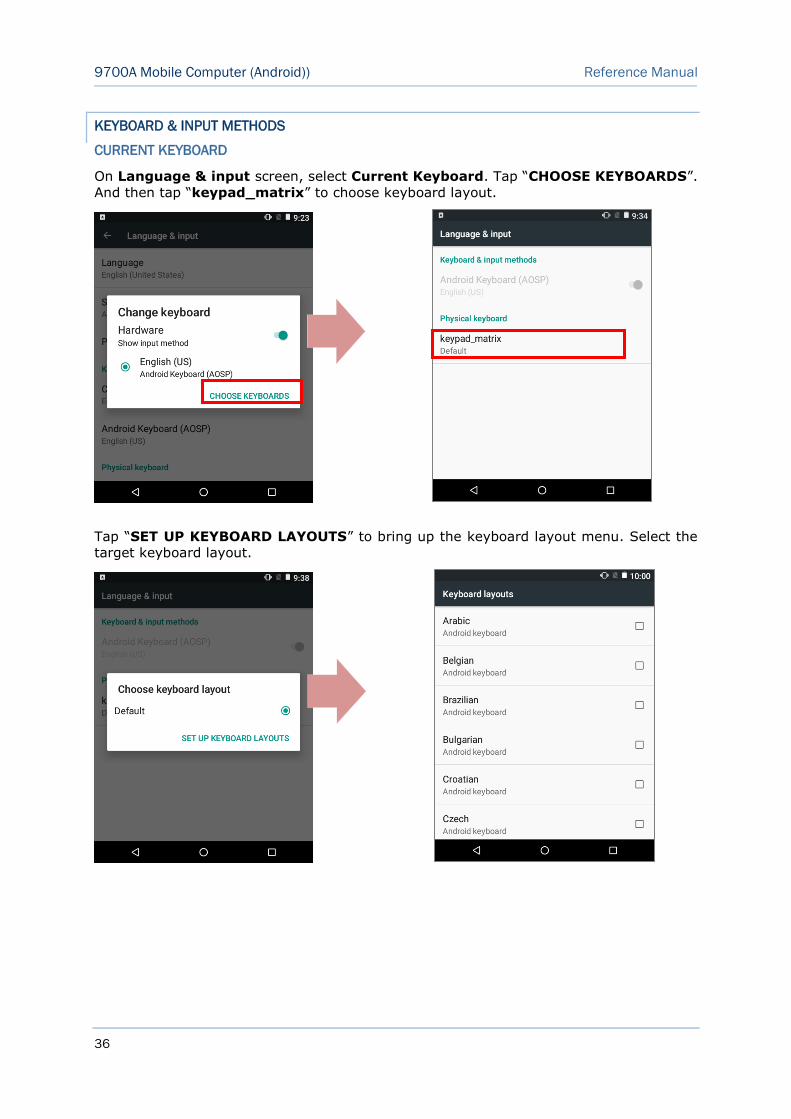
CURRENT KEYBOARD
On Language & input screen, select Current Keyboard. Tap “CHOOSE KEYBOARDS”.
And then tap “keypad_matrix” to choose keyboard layout.
Tap “SET UP KEYBOARD LAYOUTS” to bring up the keyboard layout menu. Select the
target keyboard layout.
37
Chapter 1 Use Mobile Computer
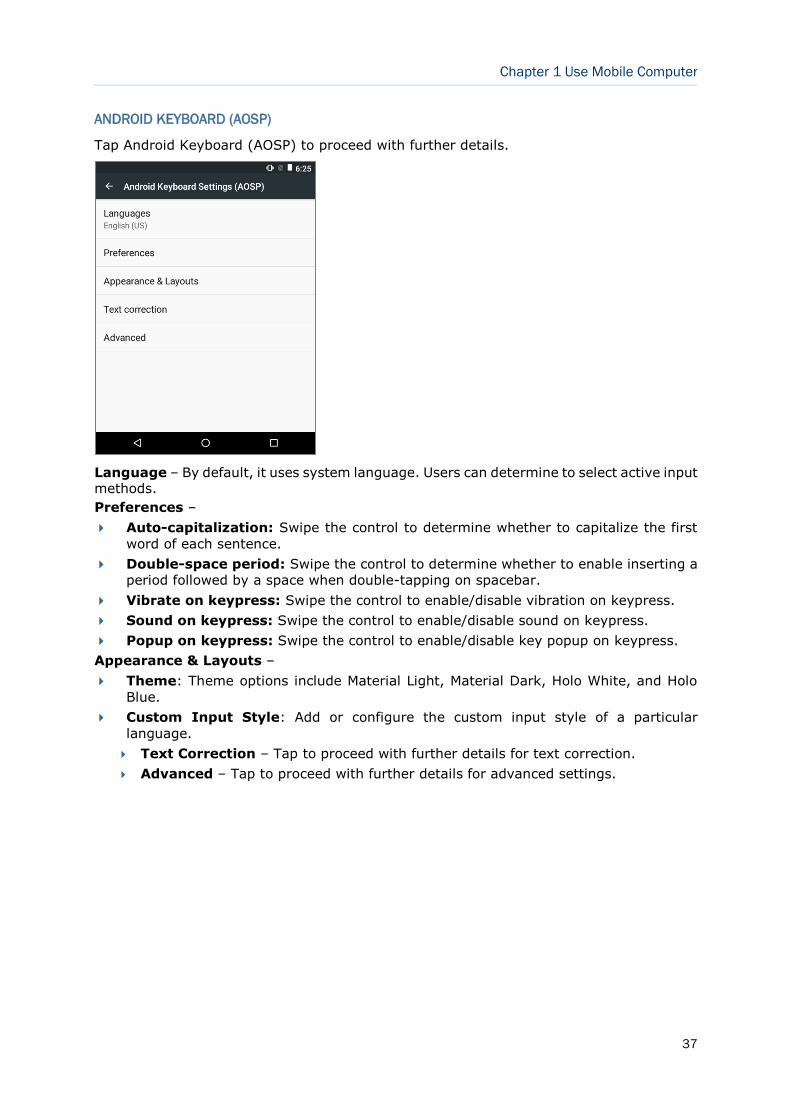
ANDROID KEYBOARD (AOSP)
Tap Android Keyboard (AOSP) to proceed with further details.
Language – By default, it uses system language. Users can determine to select active input methods.
Preferences –
Auto-capitalization: Swipe the control to determine whether to capitalize the first
word of each sentence.
Double-space period: Swipe the control to determine whether to enable inserting a
period followed by a space when double-tapping on spacebar.
Vibrate on keypress: Swipe the control to enable/disable vibration on keypress.
Sound on keypress: Swipe the control to enable/disable sound on keypress.
Popup on keypress: Swipe the control to enable/disable key popup on keypress.
Appearance & Layouts –
Theme: Theme options include Material Light, Material Dark, Holo White, and Holo
Blue.
Custom Input Style: Add or configure the custom input style of a particular
language.
Text Correction – Tap to proceed with further details for text correction.
Advanced – Tap to proceed with further details for advanced settings.
38
9700A Mobile Computer (Android)) Reference Manual
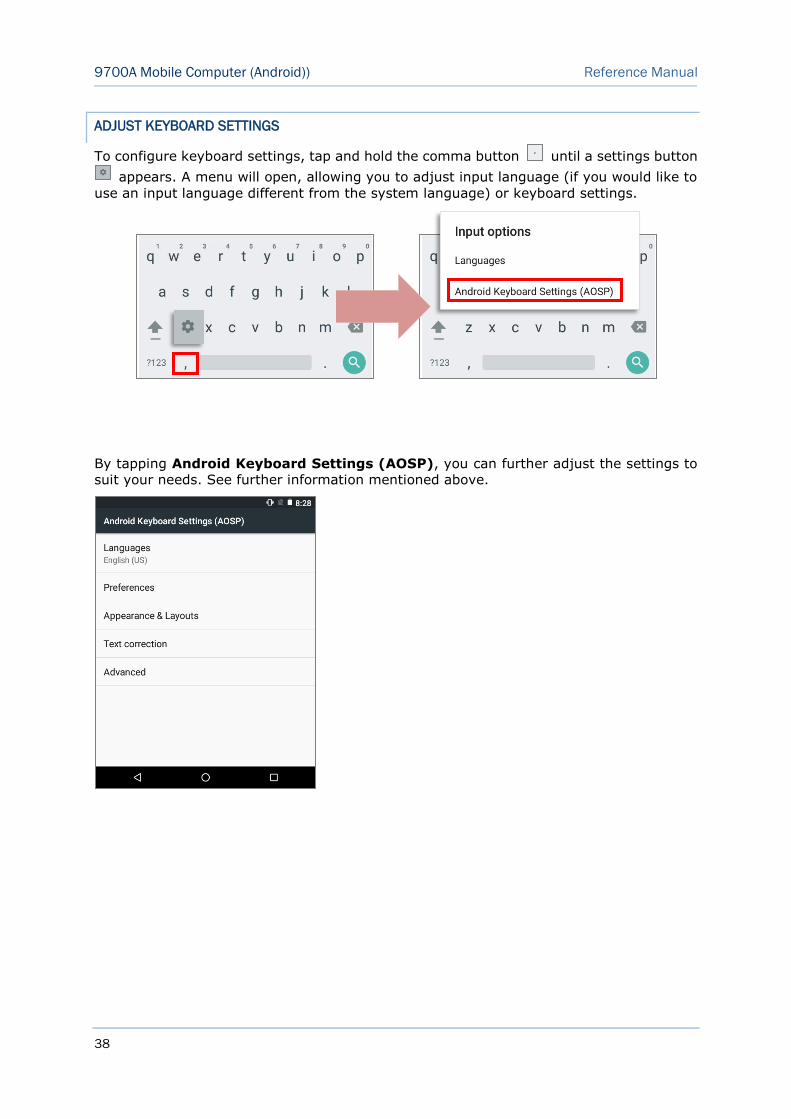
ADJUST KEYBOARD SETTINGS
To configure keyboard settings, tap and hold the comma button until a settings button
appears. A menu will open, allowing you to adjust input language (if you would like to
use an input language different from the system language) or keyboard settings.
By tapping Android Keyboard Settings (AOSP), you can further adjust the settings to
suit your needs. See further information mentioned above.
39
Chapter 1 Use Mobile Computer
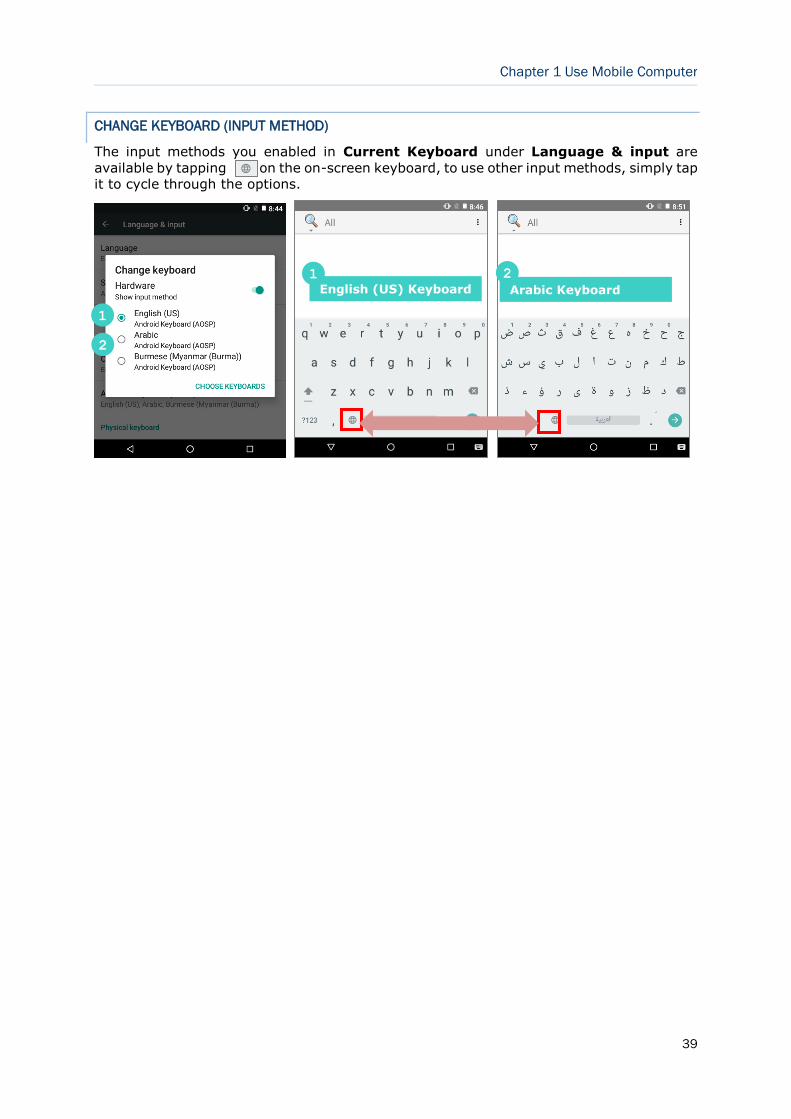
CHANGE KEYBOARD (INPUT METHOD)
The input methods you enabled in Current Keyboard under Language & input are
available by tapping on the on-screen keyboard, to use other input methods, simply tap
it to cycle through the options.
English (US) Keyboard Arabic Keyboard
1 2
1
2
40
9700A Mobile Computer (Android)) Reference Manual
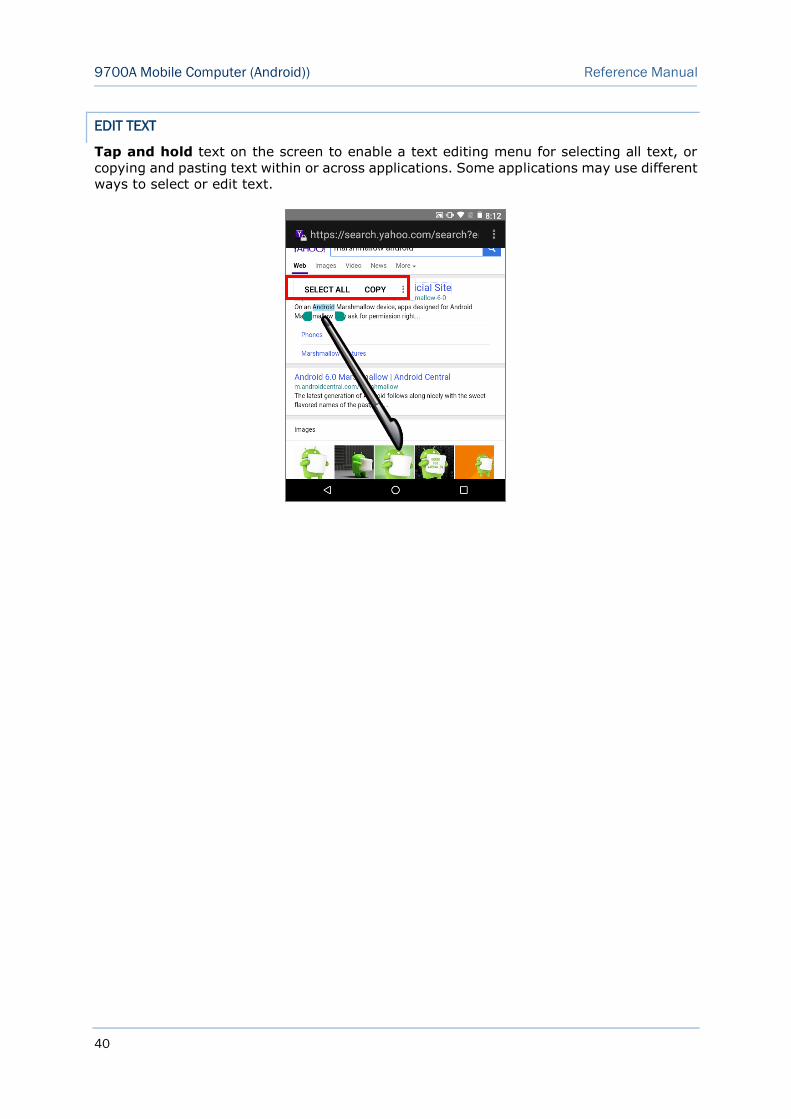
EDIT TEXT
Tap and hold text on the screen to enable a text editing menu for selecting all text, or
copying and pasting text within or across applications. Some applications may use different
ways to select or edit text.
41
Chapter 1 Use Mobile Computer
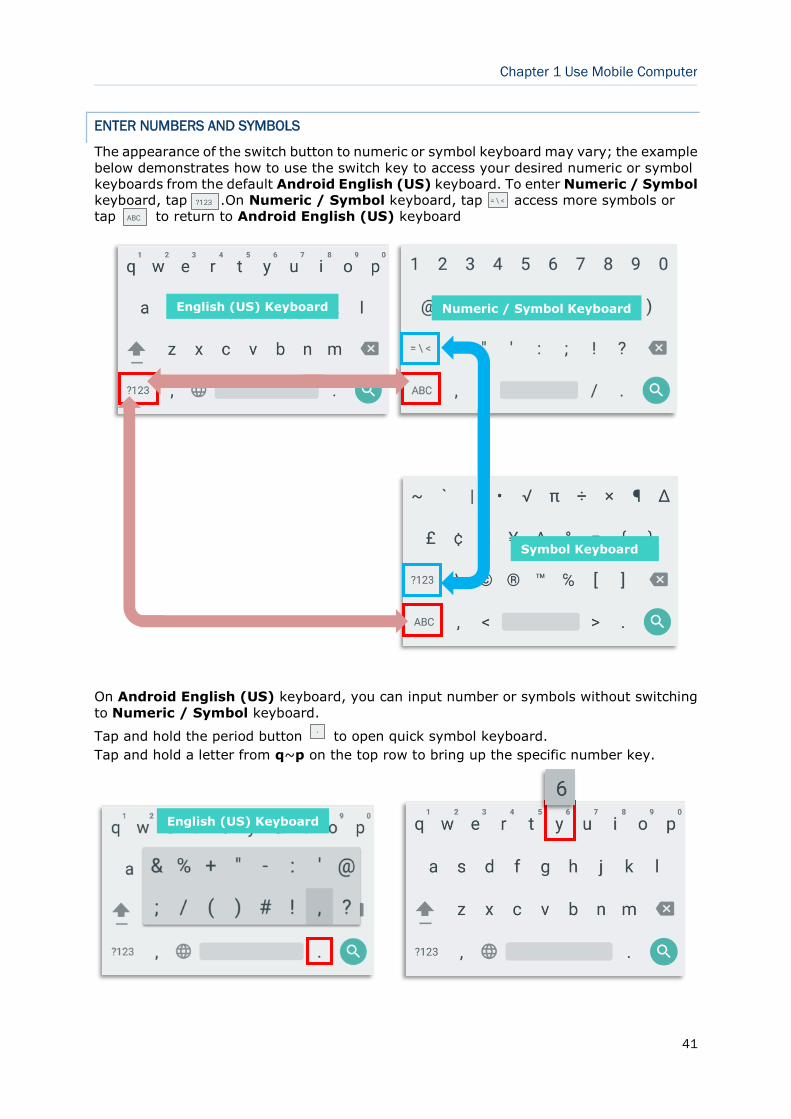
ENTER NUMBERS AND SYMBOLS
The appearance of the switch button to numeric or symbol keyboard may vary; the example
below demonstrates how to use the switch key to access your desired numeric or symbol
keyboards from the default Android English (US) keyboard. To enter Numeric / Symbol
keyboard, tap .On Numeric / Symbol keyboard, tap t access more symbols or
tap to return to Android English (US) keyboard
On Android English (US) keyboard, you can input number or symbols without switching
to Numeric / Symbol keyboard.
Tap and hold the period button to open quick symbol keyboard.
Tap and hold a letter from q~p on the top row to bring up the specific number key.
English (US) Keyboard Numeric / Symbol Keyboard
Symbol Keyboard
English (US) Keyboard
42
9700A Mobile Computer (Android)) Reference Manual
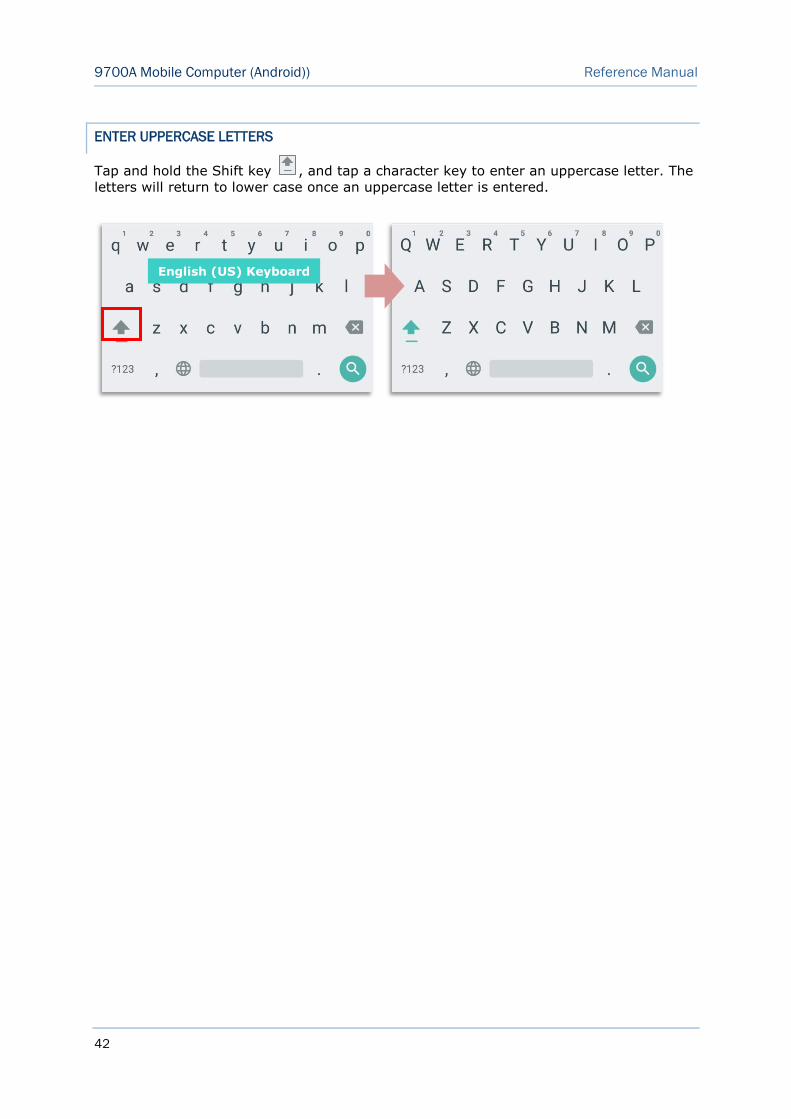
ENTER UPPERCASE LETTERS
Tap and hold the Shift key , and tap a character key to enter an uppercase letter. The
letters will return to lower case once an uppercase letter is entered.
English (US) Keyboard
43
Chapter 1 Use Mobile Computer
1.6 TOUCH SCREEN
The mobile computer’s LCD is overlaid by a resistive touch panel and thus forms a resistive
touch screen. Since a resistive touch screen locates the user’s touch by the force applied on
it, by operating with the stylus one can apply minimum force to trigger actions from the
touch screen.
Touch control is one of the main ways to interact with the mobile computer. It provides the
ability to manipulate icons, buttons, menu commands, the on-screen keyboard, or any
on-screen items.
1.6.1 USE TOUCH SCREEN
The mobile computer comes with a stylus. Use it to touch-operate the mobile computer.
Apply the gestures below to work on the touch screen:
Tap – Touch any item on the screen such as an application icon or a setting icon to work on
it, or touch any key on the on-screen keyboard to type it.
Tap and hold – Touch an item on the screen and do not release until an action occurs.
Drag – Touch and hold an item for a moment and then, without release, move the item
on-screen until you reach the target.
Double-tap – Touch quickly twice on certain screens to zoom. For example, double-tap a
section of a webpage in a web browser to zoom that section so it fits the width of the screen. Some applications such as map-info applications support picture zooming with double-tap.
Rotate screen – On most screens, the screen rotates as the mobile computer changes its orientations between upright and sideways.
44
9700A Mobile Computer (Android)) Reference Manual
1.6.2 SCREEN BRIGHTNESS
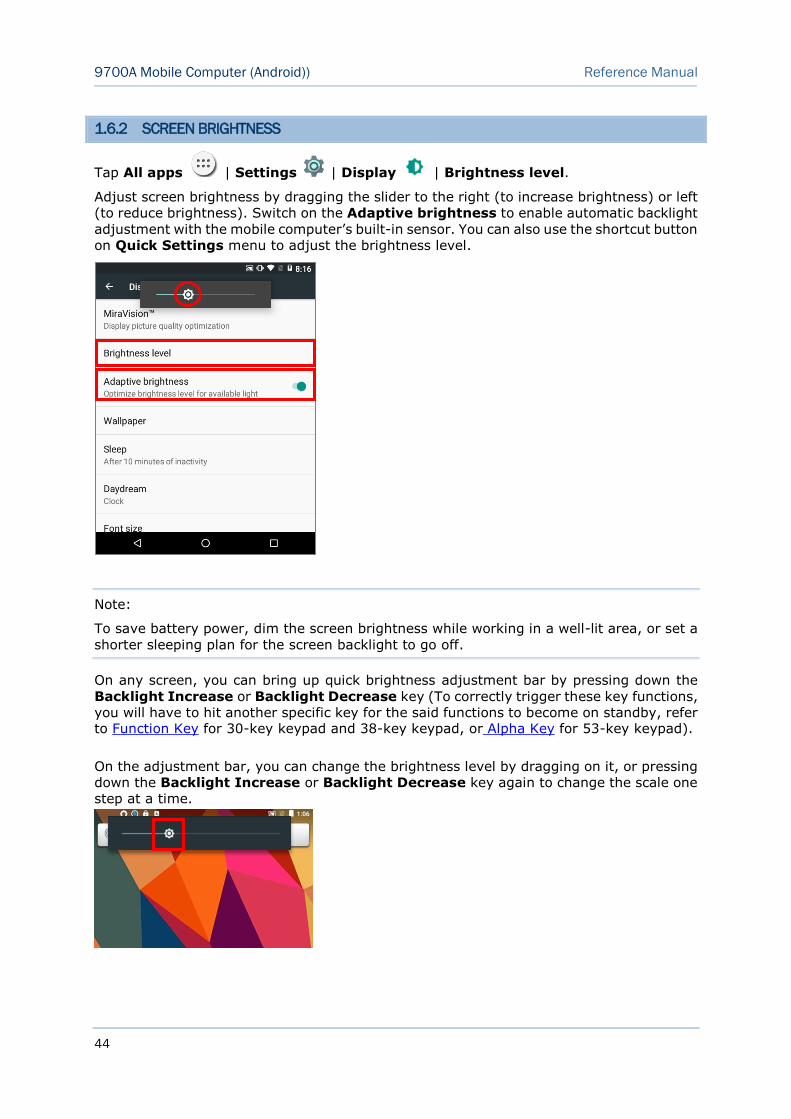
Tap All apps | Settings | Display | Brightness level.
Adjust screen brightness by dragging the slider to the right (to increase brightness) or left
(to reduce brightness). Switch on the Adaptive brightness to enable automatic backlight
adjustment with the mobile computer’s built-in sensor. You can also use the shortcut button
on Quick Settings menu to adjust the brightness level.
Note:
To save battery power, dim the screen brightness while working in a well-lit area, or set a
shorter sleeping plan for the screen backlight to go off.
On any screen, you can bring up quick brightness adjustment bar by pressing down the
Backlight Increase or Backlight Decrease key (To correctly trigger these key functions,
you will have to hit another specific key for the said functions to become on standby, refer to Function Key for 30-key keypad and 38-key keypad, or Alpha Key for 53-key keypad).
On the adjustment bar, you can change the brightness level by dragging on it, or pressing
down the Backlight Increase or Backlight Decrease key again to change the scale one
step at a time.
45
Chapter 1 Use Mobile Computer
1.6.3 SCREEN ROTATION
By default, the device automatically rotates the screen to when you turn the device
sideways. To switch this function on or off:
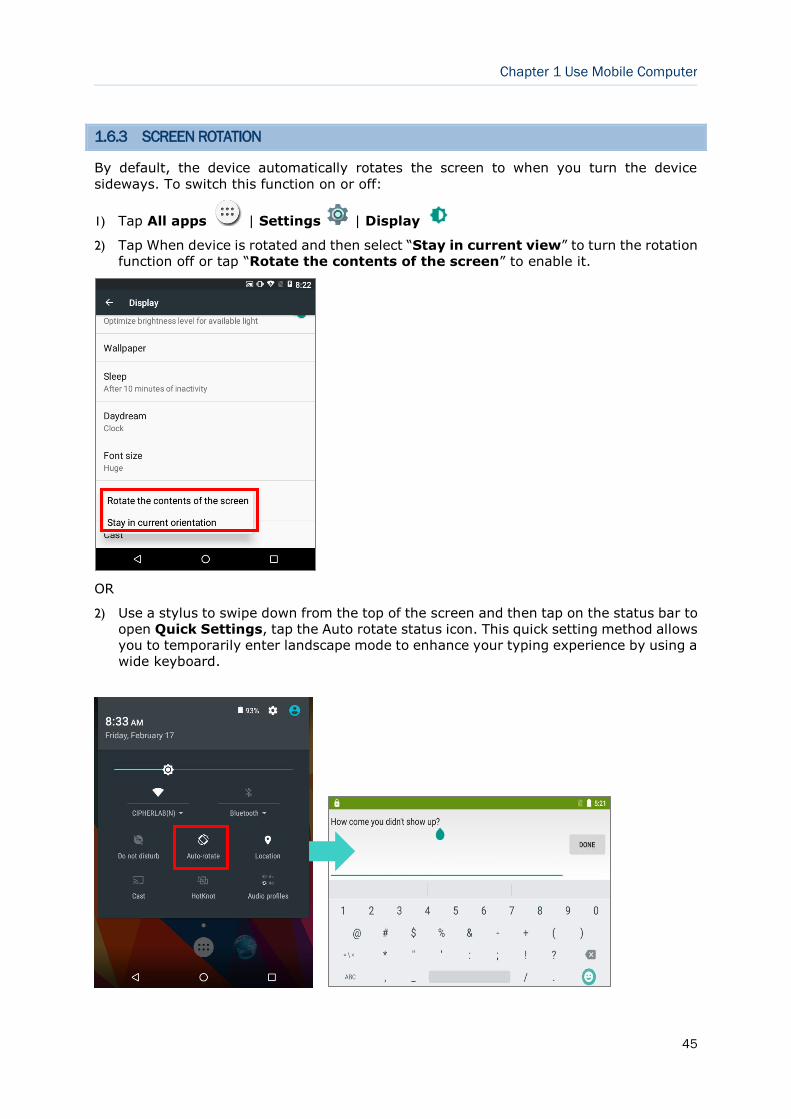
1) Tap All apps | Settings | Display
2) Tap When device is rotated and then select “Stay in current view” to turn the rotation
function off or tap “Rotate the contents of the screen” to enable it.
OR
2) Use a stylus to swipe down from the top of the screen and then tap on the status bar to
open Quick Settings, tap the Auto rotate status icon. This quick setting method allows
you to temporarily enter landscape mode to enhance your typing experience by using a
wide keyboard.
46
9700A Mobile Computer (Android)) Reference Manual
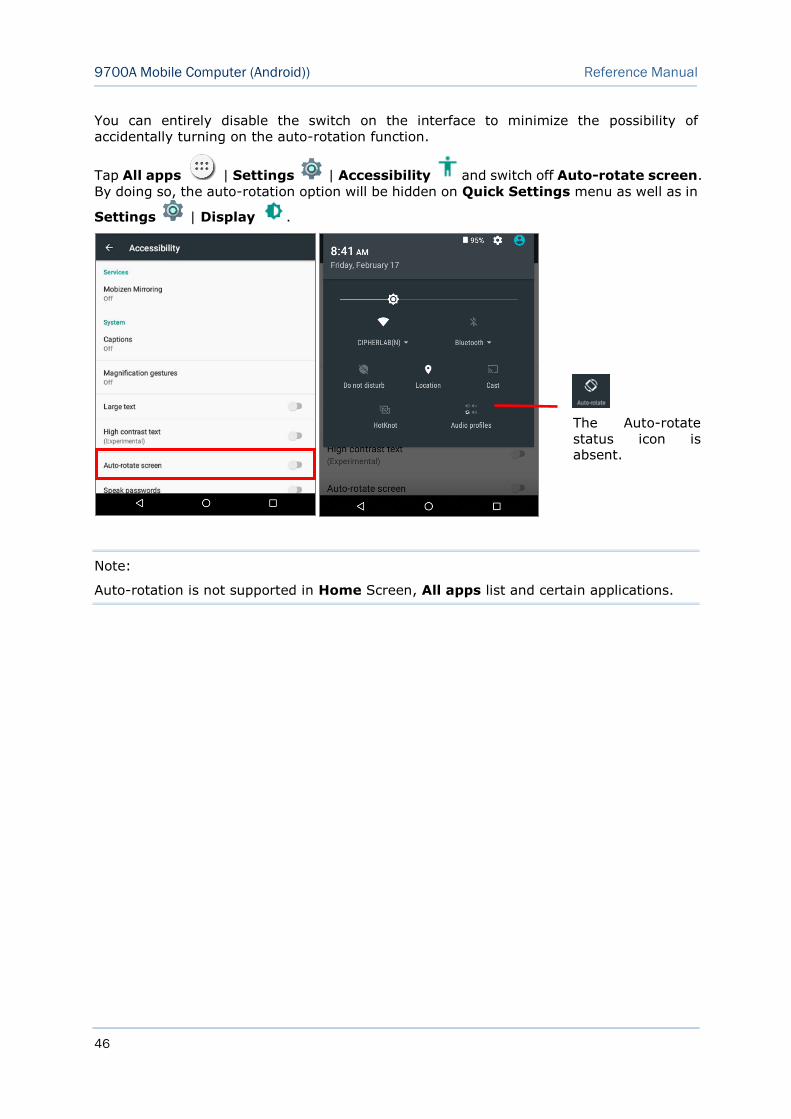
You can entirely disable the switch on the interface to minimize the possibility of
accidentally turning on the auto-rotation function.
Tap All apps | Settings | Accessibility and switch off Auto-rotate screen.
By doing so, the auto-rotation option will be hidden on Quick Settings menu as well as in
Settings | Display .
Note:
Auto-rotation is not supported in Home Screen, All apps list and certain applications.
The Auto-rotate
status icon is absent.
47
Chapter 1 Use Mobile Computer
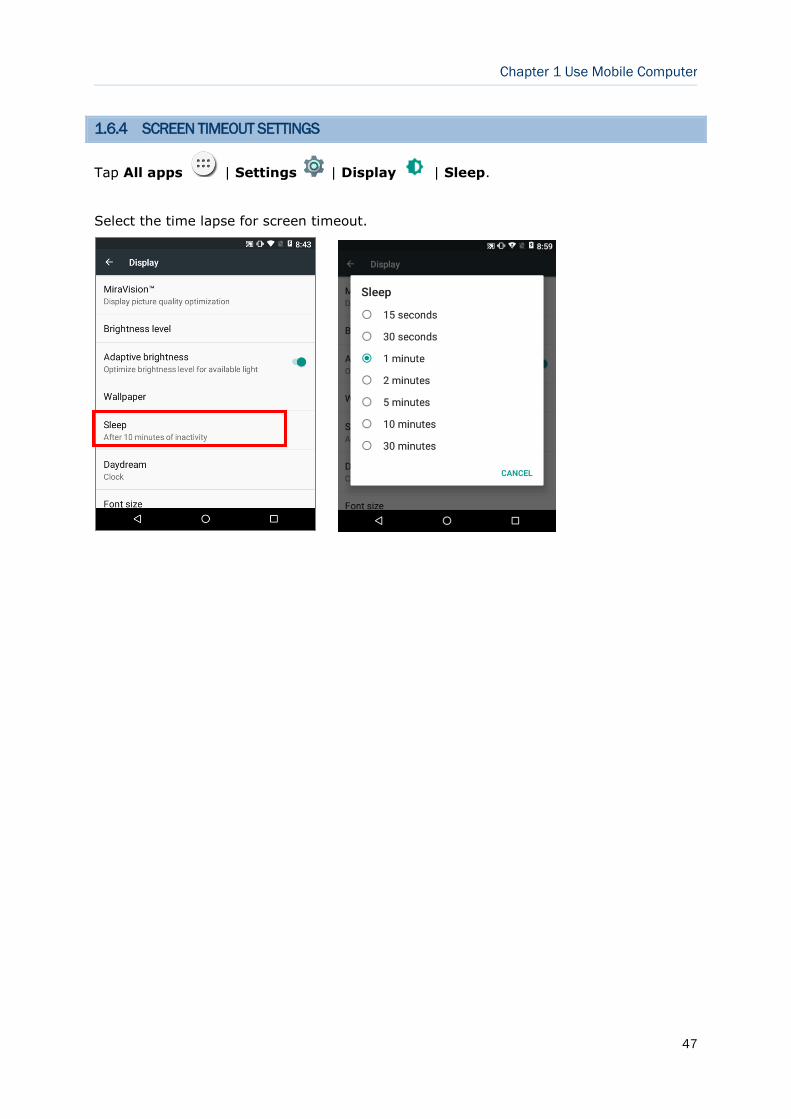
1.6.4 SCREEN TIMEOUT SETTINGS
Tap All apps | Settings | Display | Sleep.
Select the time lapse for screen timeout.

48
9700A Mobile Computer (Android)) Reference Manual
1.6.5 TEXT SIZE
Tap All apps | Settings | Display | Font size. Select the font size between
Small, Normal, Large and Huge.
.
49
Chapter 1 Use Mobile Computer
1.7 MEMORY
Flash Memory (ROM)
16GB flash memory for storing the OS (Android™ 6.0 Marshmallow and custom application programs.
Random-access Memory (RAM)
2GB LPDDR3 RAM for storing and running programs, as well as storing program data.
Expansion Slot
The mobile computer is equipped with one SD card slot which can accommodate a
micro SD card, a microSDHC or a microSDXC card. When choosing an SD card for best
compatibility and performance with 9700A, please make sure of the capacity you need.
For the use of SDXC card, please use a new card and make sure it has not been used in other host devices (computers, cameras, or readers).
CAUTION OF DATA LOSS
When the main battery is removed or drained, the backup battery on the main board takes
over to supply the mobile computer and keep it in suspension. A fully charged backup
battery will retain the data in the RAM for 30 minutes. When the backup battery is drained
out as well, the mobile computer will shut down, and only the contents of RTC will be
retained. All other unsaved data will be lost.
If you want to put away the mobile computer for a couple of days, you should be aware that
data loss occurs when the main battery and backup battery discharges completely.
Therefore, it is necessary to backup data and files before putting away the mobile computer.
50
9700A Mobile Computer (Android)) Reference Manual
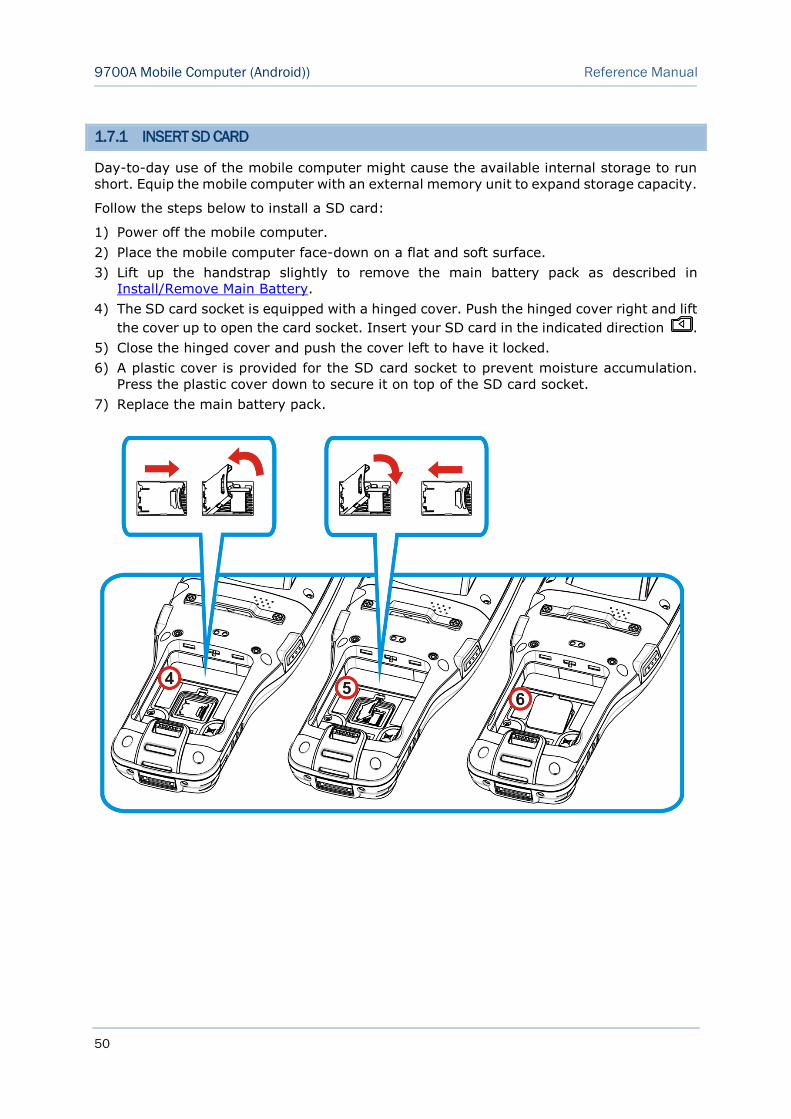
1.7.1 INSERT SD CARD
Day-to-day use of the mobile computer might cause the available internal storage to run
short. Equip the mobile computer with an external memory unit to expand storage capacity.
Follow the steps below to install a SD card:
Power off the mobile computer. 1)
Place the mobile computer face-down on a flat and soft surface. 2)
Lift up the handstrap slightly to remove the main battery pack as described in 3)
Install/Remove Main Battery.
The SD card socket is equipped with a hinged cover. Push the hinged cover right and lift 4)
the cover up to open the card socket. Insert your SD card in the indicated direction .
Close the hinged cover and push the cover left to have it locked. 5)
A plastic cover is provided for the SD card socket to prevent moisture accumulation. 6)
Press the plastic cover down to secure it on top of the SD card socket.
Replace the main battery pack. 7)
51
Chapter 1 Use Mobile Computer
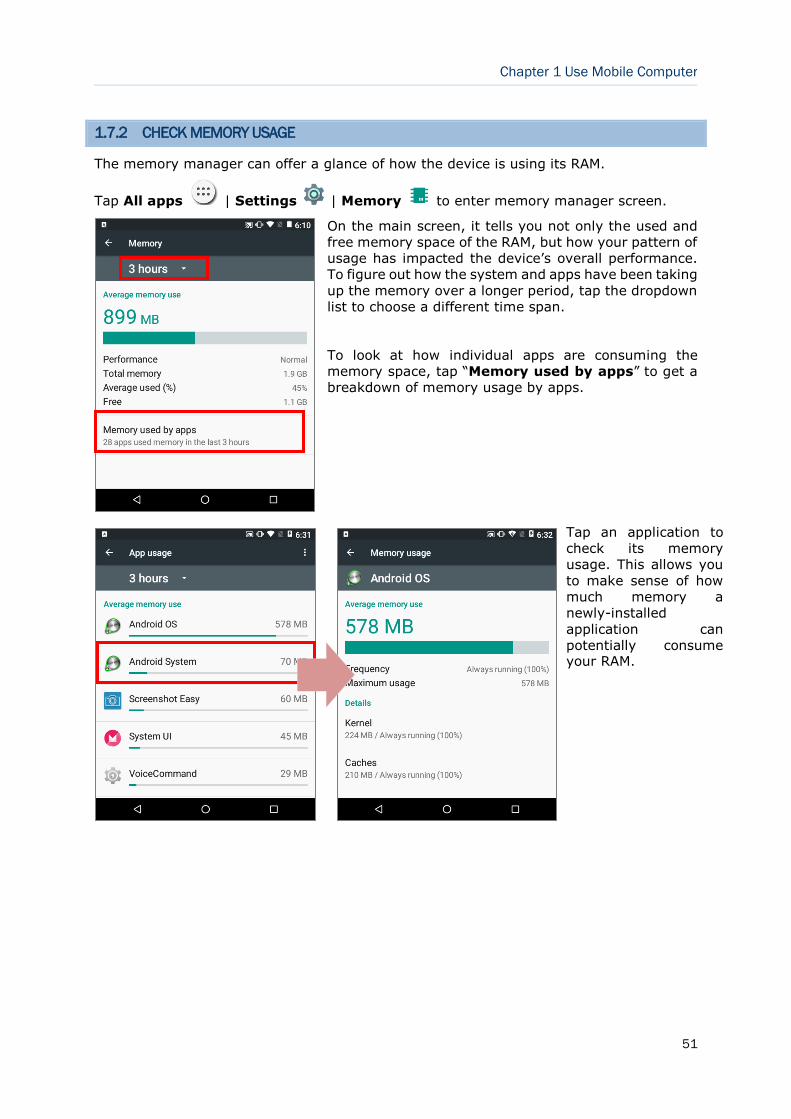
1.7.2 CHECK MEMORY USAGE
The memory manager can offer a glance of how the device is using its RAM.
Tap All apps | Settings | Memory to enter memory manager screen.
On the main screen, it tells you not only the used and
free memory space of the RAM, but how your pattern of
usage has impacted the device’s overall performance.
To figure out how the system and apps have been taking
up the memory over a longer period, tap the dropdown
list to choose a different time span.
To look at how individual apps are consuming the
memory space, tap “Memory used by apps” to get a
breakdown of memory usage by apps.
Tap an application to
check its memory
usage. This allows you
to make sense of how
much memory a
newly-installed
application can
potentially consume your RAM.

52
9700A Mobile Computer (Android)) Reference Manual
1.8 DIRECT DATA COMMUNICATION
“Direct” data connection means “hardwired” data connection between the mobile
computer and a Windows-based PC as opposed to wireless connection. Direct data
connection relies on a RS-232 cable or a USB cable (sometimes plus an auxiliary cradle)
between the two mentioned devices. Once the mobile computer and PC are “directly”
connected with each other by a RS-232 or USB-cable, they can sync data with each other.
53
Chapter 1 Use Mobile Computer
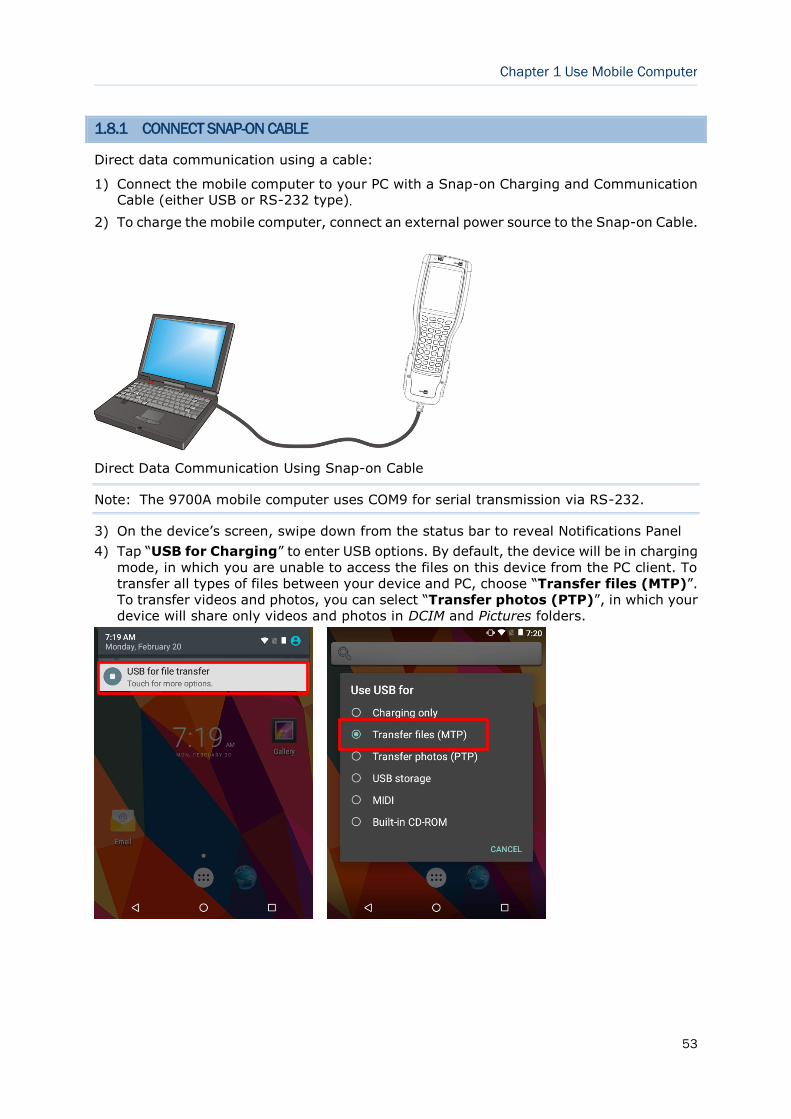
1.8.1 CONNECT SNAP-ON CABLE
Direct data communication using a cable:
Connect the mobile computer to your PC with a Snap-on Charging and Communication 1)Cable (either USB or RS-232 type).
To charge the mobile computer, connect an external power source to the Snap-on Cable. 2)
Direct Data Communication Using Snap-on Cable
Note: The 9700A mobile computer uses COM9 for serial transmission via RS-232.
On the device’s screen, swipe down from the status bar to reveal Notifications Panel 3)
Tap “USB for Charging” to enter USB options. By default, the device will be in charging 4)
mode, in which you are unable to access the files on this device from the PC client. To
transfer all types of files between your device and PC, choose “Transfer files (MTP)”.
To transfer videos and photos, you can select “Transfer photos (PTP)”, in which your
device will share only videos and photos in DCIM and Pictures folders.
54
9700A Mobile Computer (Android)) Reference Manual
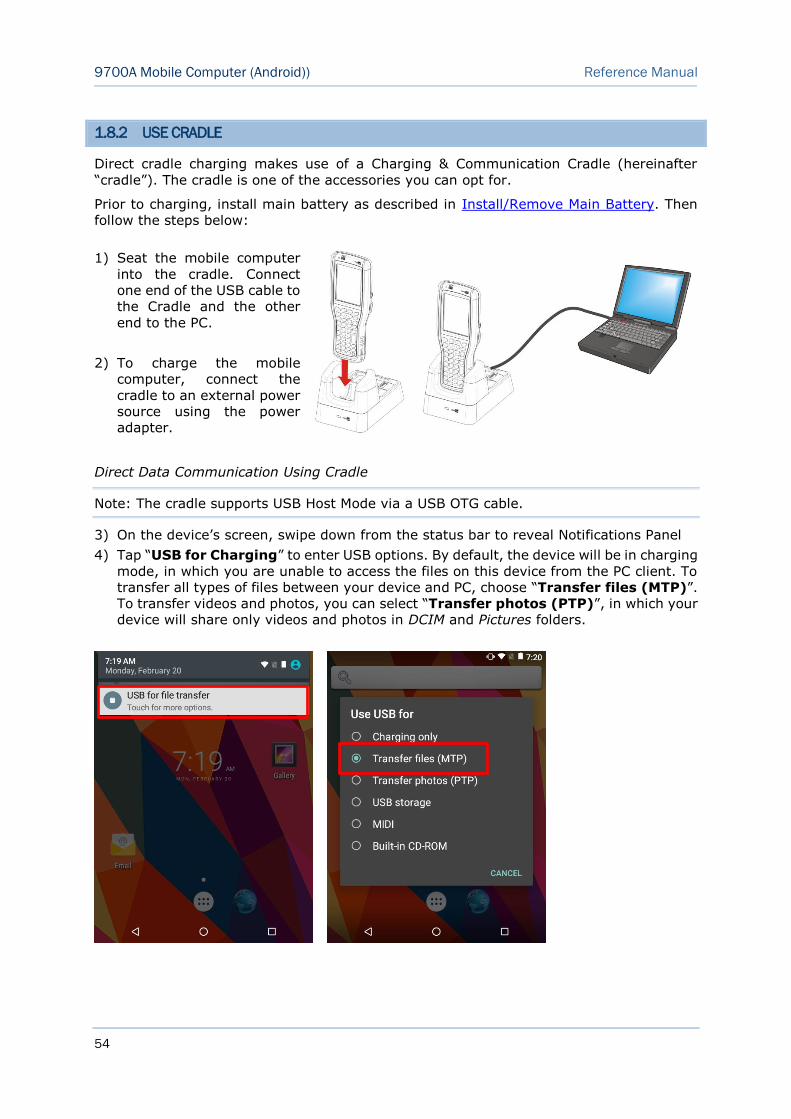
1.8.2 USE CRADLE
Direct cradle charging makes use of a Charging & Communication Cradle (hereinafter
“cradle”). The cradle is one of the accessories you can opt for.
Prior to charging, install main battery as described in Install/Remove Main Battery. Then
follow the steps below:
Seat the mobile computer 1)
into the cradle. Connect
one end of the USB cable to
the Cradle and the other
end to the PC.
To charge the mobile 2)
computer, connect the
cradle to an external power
source using the power
adapter.
Direct Data Communication Using Cradle
Note: The cradle supports USB Host Mode via a USB OTG cable.
On the device’s screen, swipe down from the status bar to reveal Notifications Panel 3)
Tap “USB for Charging” to enter USB options. By default, the device will be in charging 4)
mode, in which you are unable to access the files on this device from the PC client. To
transfer all types of files between your device and PC, choose “Transfer files (MTP)”.
To transfer videos and photos, you can select “Transfer photos (PTP)”, in which your
device will share only videos and photos in DCIM and Pictures folders.
55
Chapter 1 Use Mobile Computer
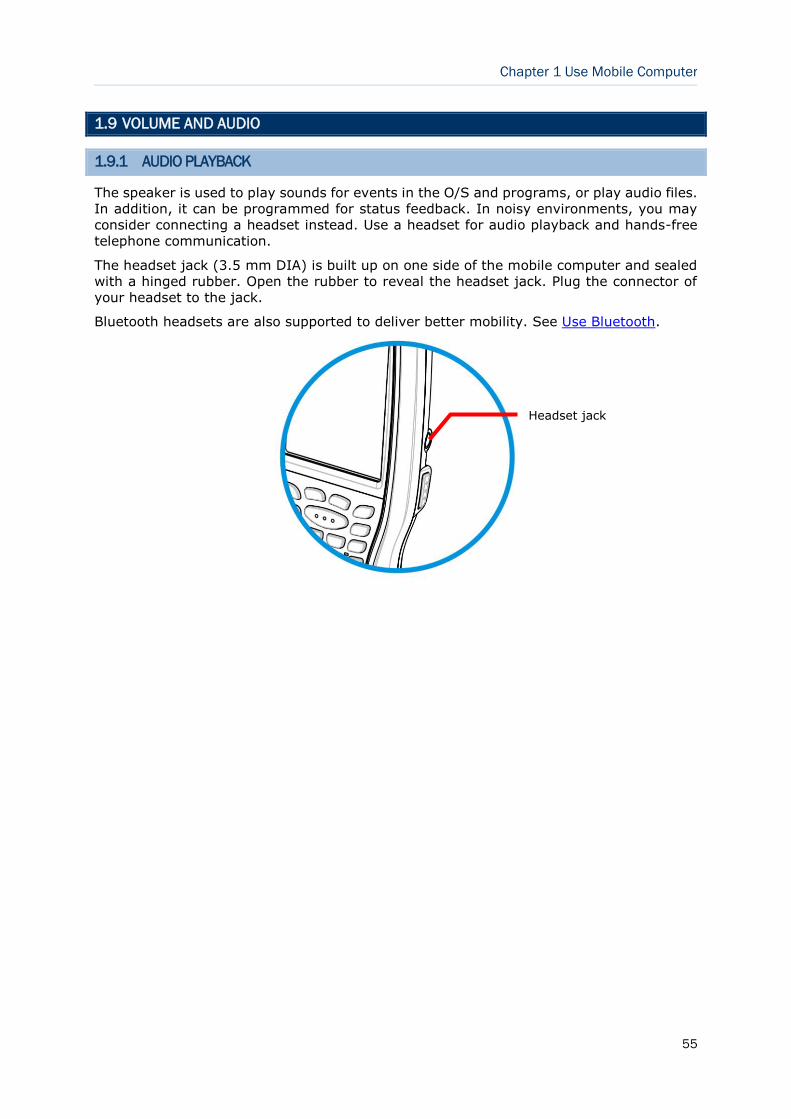
1.9 VOLUME AND AUDIO
1.9.1 AUDIO PLAYBACK
The speaker is used to play sounds for events in the O/S and programs, or play audio files.
In addition, it can be programmed for status feedback. In noisy environments, you may
consider connecting a headset instead. Use a headset for audio playback and hands-free
telephone communication.
The headset jack (3.5 mm DIA) is built up on one side of the mobile computer and sealed
with a hinged rubber. Open the rubber to reveal the headset jack. Plug the connector of
your headset to the jack.
Bluetooth headsets are also supported to deliver better mobility. See Use Bluetooth.
Headset jack
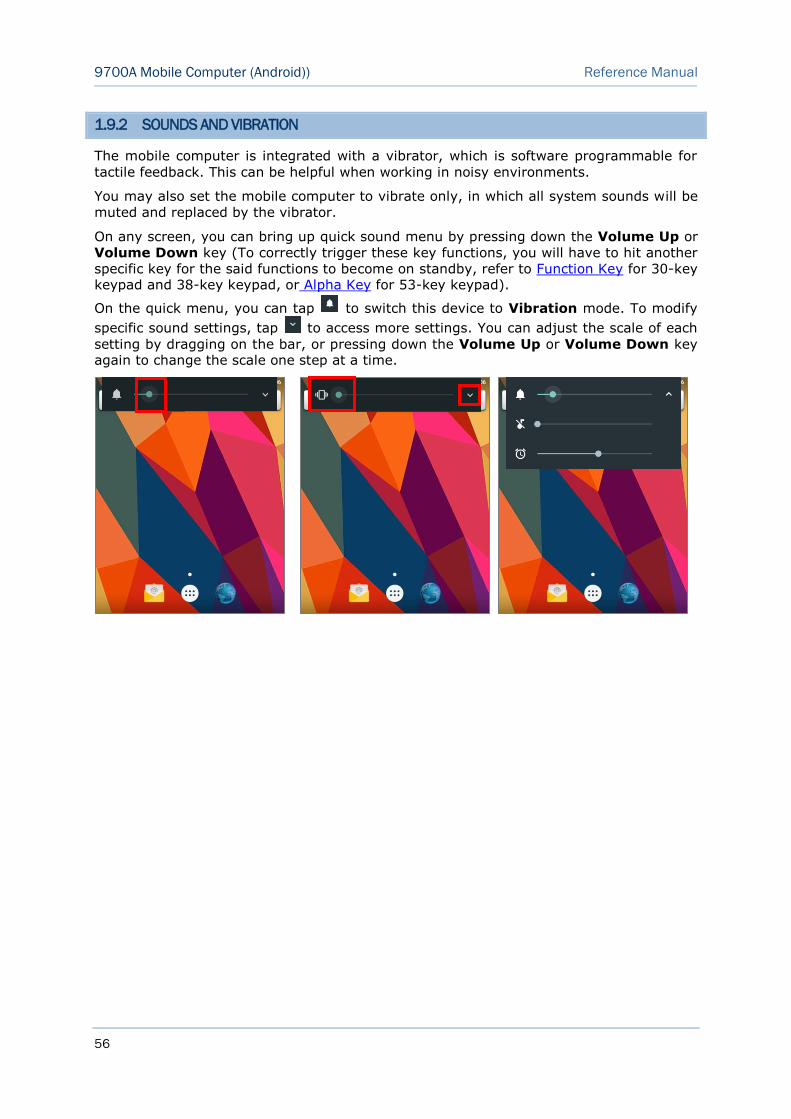
56
9700A Mobile Computer (Android)) Reference Manual
1.9.2 SOUNDS AND VIBRATION
The mobile computer is integrated with a vibrator, which is software programmable for
tactile feedback. This can be helpful when working in noisy environments.
You may also set the mobile computer to vibrate only, in which all system sounds will be
muted and replaced by the vibrator.
On any screen, you can bring up quick sound menu by pressing down the Volume Up or
Volume Down key (To correctly trigger these key functions, you will have to hit another
specific key for the said functions to become on standby, refer to Function Key for 30-key keypad and 38-key keypad, or Alpha Key for 53-key keypad).
On the quick menu, you can tap to switch this device to Vibration mode. To modify
specific sound settings, tap to access more settings. You can adjust the scale of each
setting by dragging on the bar, or pressing down the Volume Up or Volume Down key again to change the scale one step at a time.
57
9700A Mobile Computer (Android)) Reference Manual
BASIC OPERATION
This chapter describes the basic skills to work with this mobile computer, for instance how
to operate the home screen, check system statuses and manage notifications. The add-on
utilities for applications regarding data collection, processing, and transmission are
introduced in the following chapters.
IN THIS CHAPTER
2.1 Date and Time ............................................................ 58
2.2 Data Capture .............................................................. 59
2.3 Home Screen .............................................................. 60
2.4 Status Bar .................................................................. 69
2.5 Manage Applications .................................................... 74
2.6 Suspend & Lock .......................................................... 76
2.7 OS Update ................................................................. 78
Chapter 2
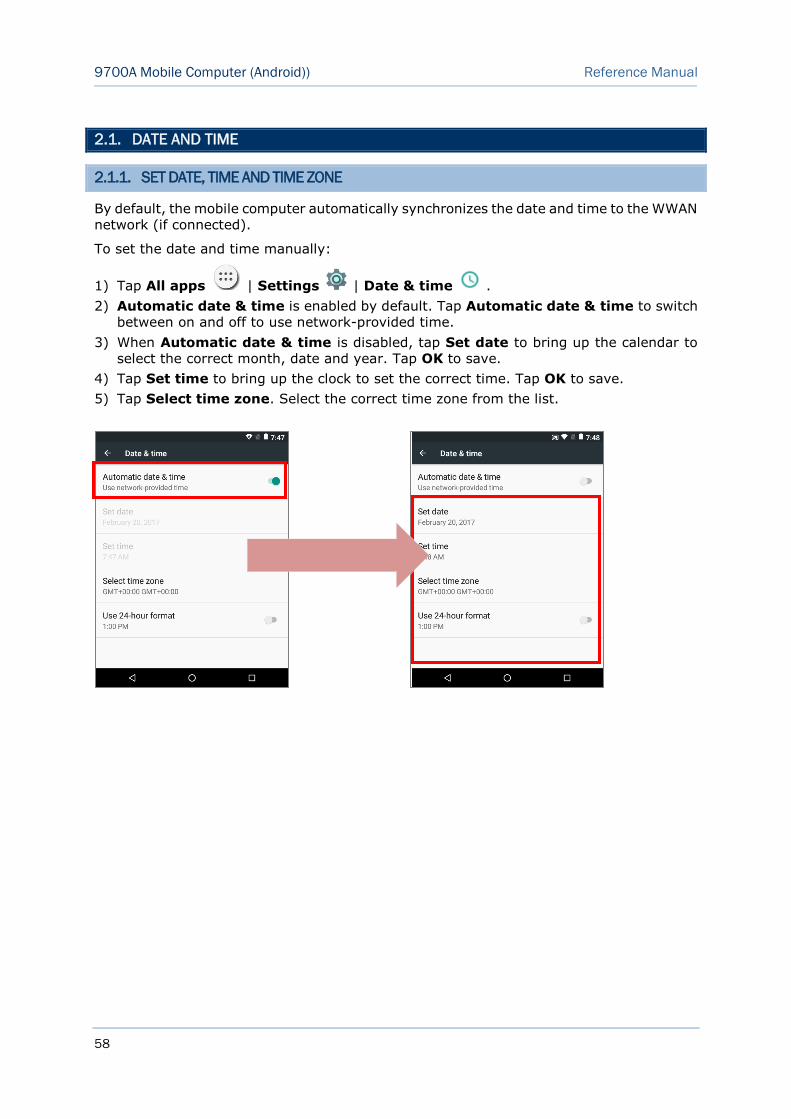
58
9700A Mobile Computer (Android)) Reference Manual
2.1. DATE AND TIME
2.1.1. SET DATE, TIME AND TIME ZONE
By default, the mobile computer automatically synchronizes the date and time to the WWAN
network (if connected).
To set the date and time manually:
Tap All apps | Settings | Date & time . 1)
Automatic date & time is enabled by default. Tap Automatic date & time to switch 2)
between on and off to use network-provided time.
When Automatic date & time is disabled, tap Set date to bring up the calendar to 3)
select the correct month, date and year. Tap OK to save.
Tap Set time to bring up the clock to set the correct time. Tap OK to save. 4)
Tap Select time zone. Select the correct time zone from the list. 5)

59
Chapter 2 Basic Operation
2.2. DATA CAPTURE
2.2.1. BARCODE READER
A selection of scan engines is available for delivering flexibility to meet different
requirements. Depending on the scan engine integrated, the mobile computer is capable of
scanning barcodes of a number of symbologies that are enabled by default while running
the ReaderConfig.exe utility. If you need to scan barcodes that are encoded in a different
symbology, enable the symbology first.
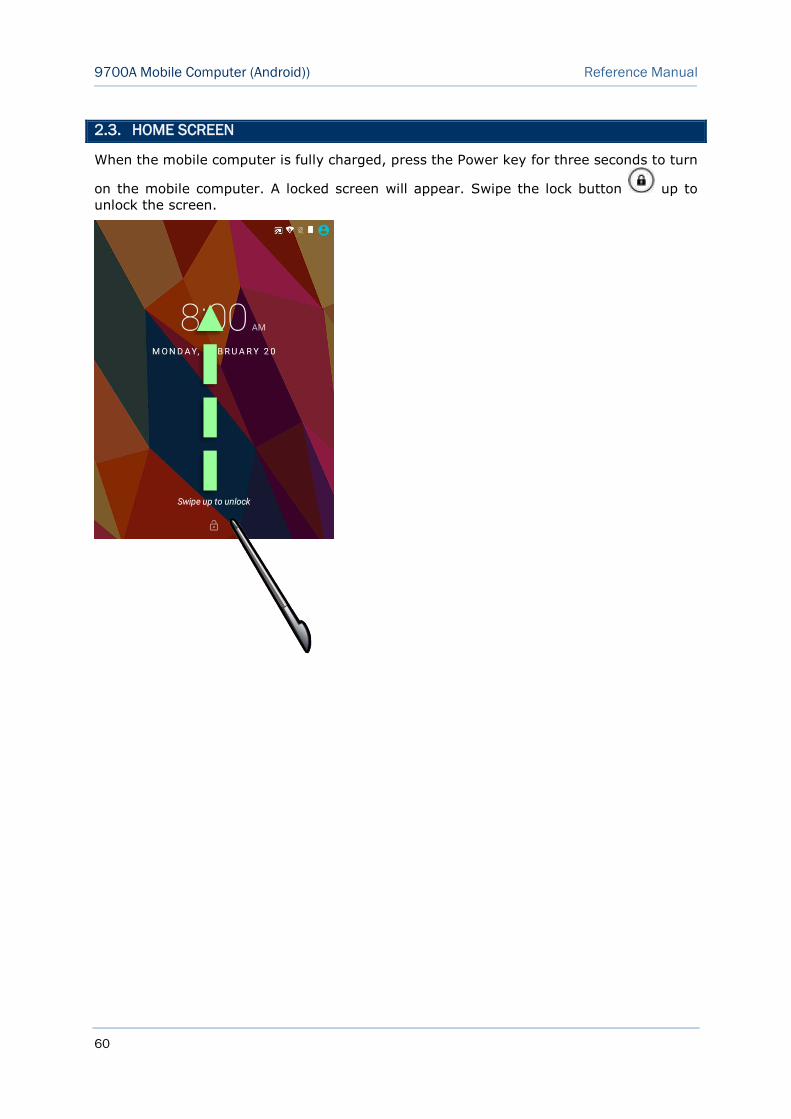
60
9700A Mobile Computer (Android)) Reference Manual
2.3. HOME SCREEN
When the mobile computer is fully charged, press the Power key for three seconds to turn
on the mobile computer. A locked screen will appear. Swipe the lock button up to
unlock the screen.
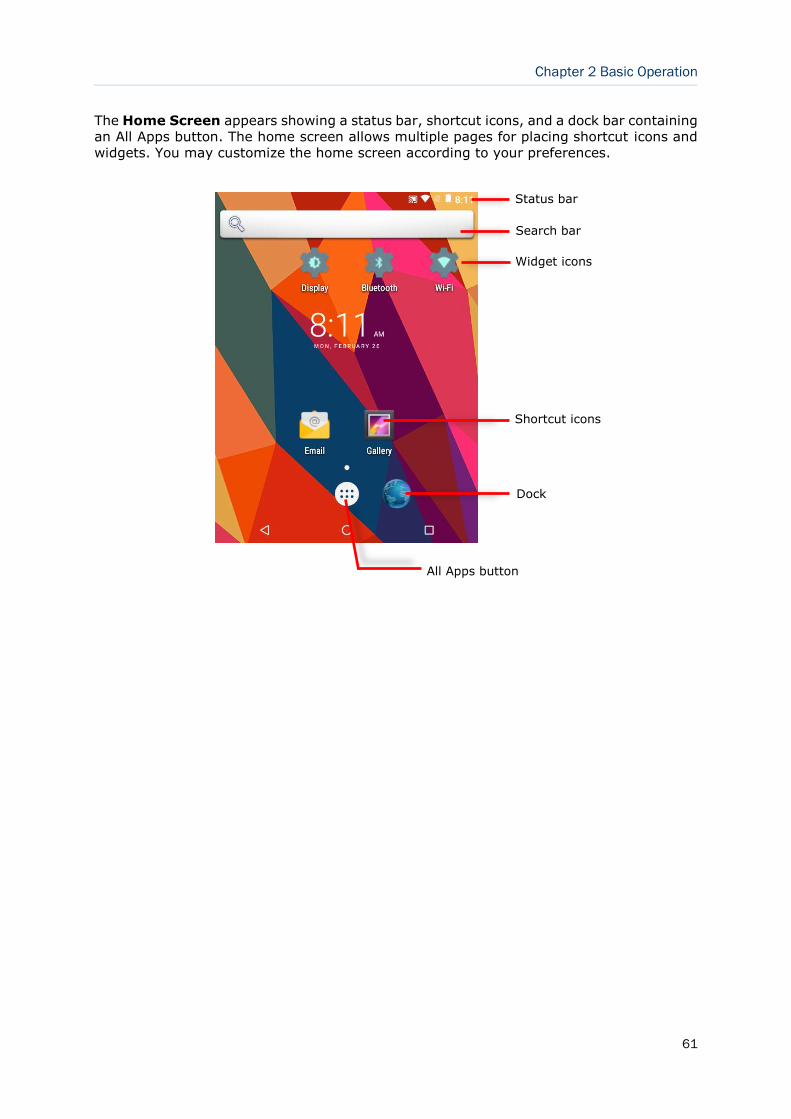
61
Chapter 2 Basic Operation
The Home Screen appears showing a status bar, shortcut icons, and a dock bar containing
an All Apps button. The home screen allows multiple pages for placing shortcut icons and
widgets. You may customize the home screen according to your preferences.
Shortcut icons
Dock
All Apps button
Status bar
Search bar
Widget icons

62
9700A Mobile Computer (Android)) Reference Manual
2.3.1. CUSTOMIZE HOME SCREEN
ADD APPLICATION SHORTCUT TO HOME SCREEN
On the home screen you would like to customize, tap . 1)
Locate the application to add, tap and hold the application icon. 2)
The home screen will appear. Drag the application icon to your preferred position and 3)
release to have it placed.
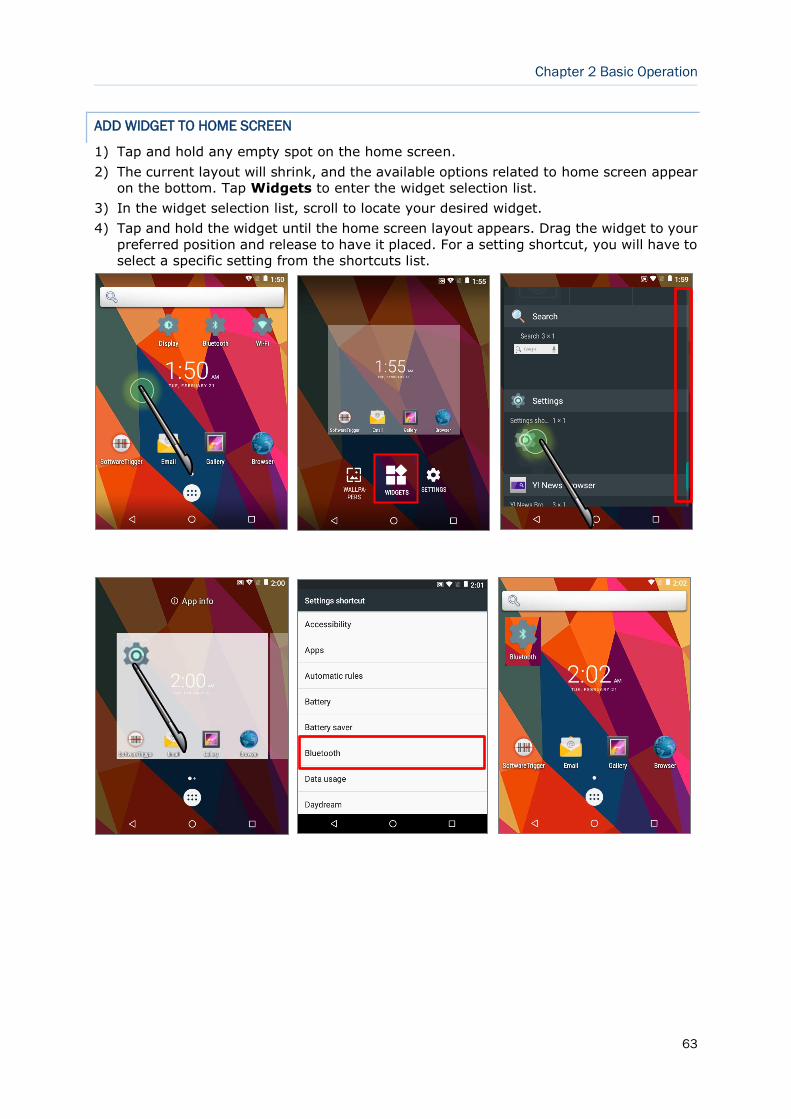
63
Chapter 2 Basic Operation
ADD WIDGET TO HOME SCREEN
Tap and hold any empty spot on the home screen. 1)
The current layout will shrink, and the available options related to home screen appear 2)
on the bottom. Tap Widgets to enter the widget selection list.
In the widget selection list, scroll to locate your desired widget. 3)
Tap and hold the widget until the home screen layout appears. Drag the widget to your 4)
preferred position and release to have it placed. For a setting shortcut, you will have to
select a specific setting from the shortcuts list.
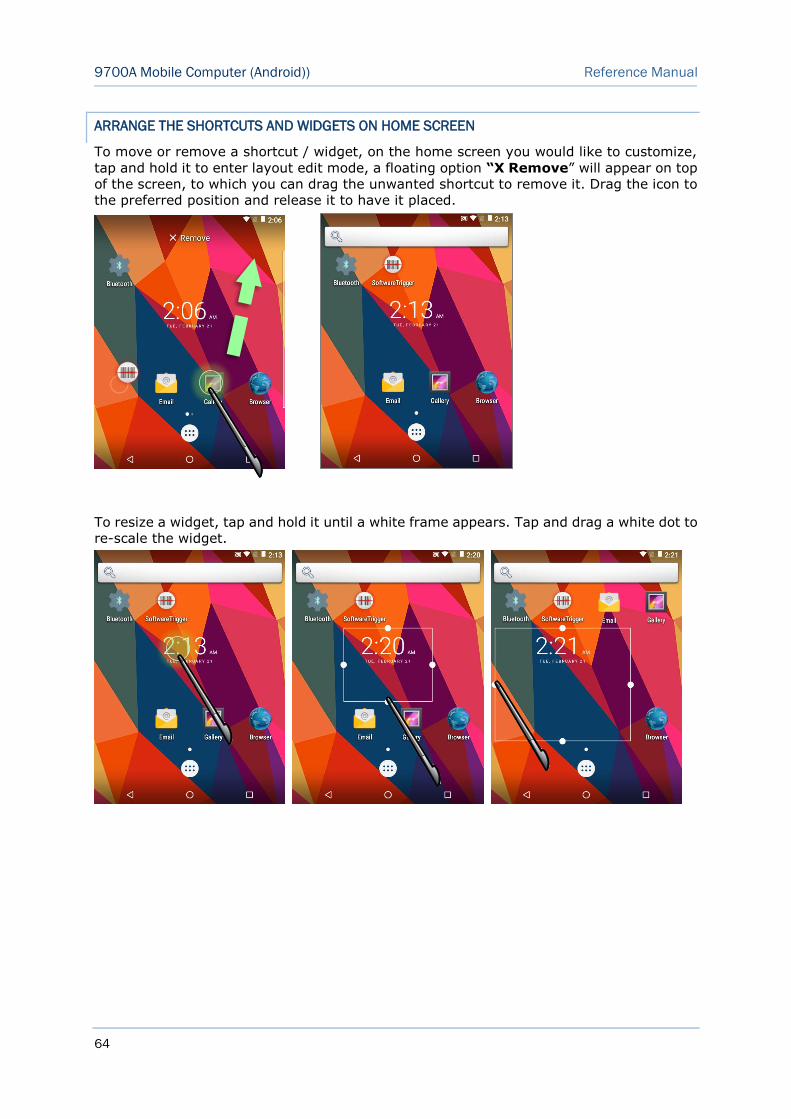
64
9700A Mobile Computer (Android)) Reference Manual
ARRANGE THE SHORTCUTS AND WIDGETS ON HOME SCREEN
To move or remove a shortcut / widget, on the home screen you would like to customize,
tap and hold it to enter layout edit mode, a floating option “X Remove” will appear on top
of the screen, to which you can drag the unwanted shortcut to remove it. Drag the icon to
the preferred position and release it to have it placed.
To resize a widget, tap and hold it until a white frame appears. Tap and drag a white dot to
re-scale the widget.
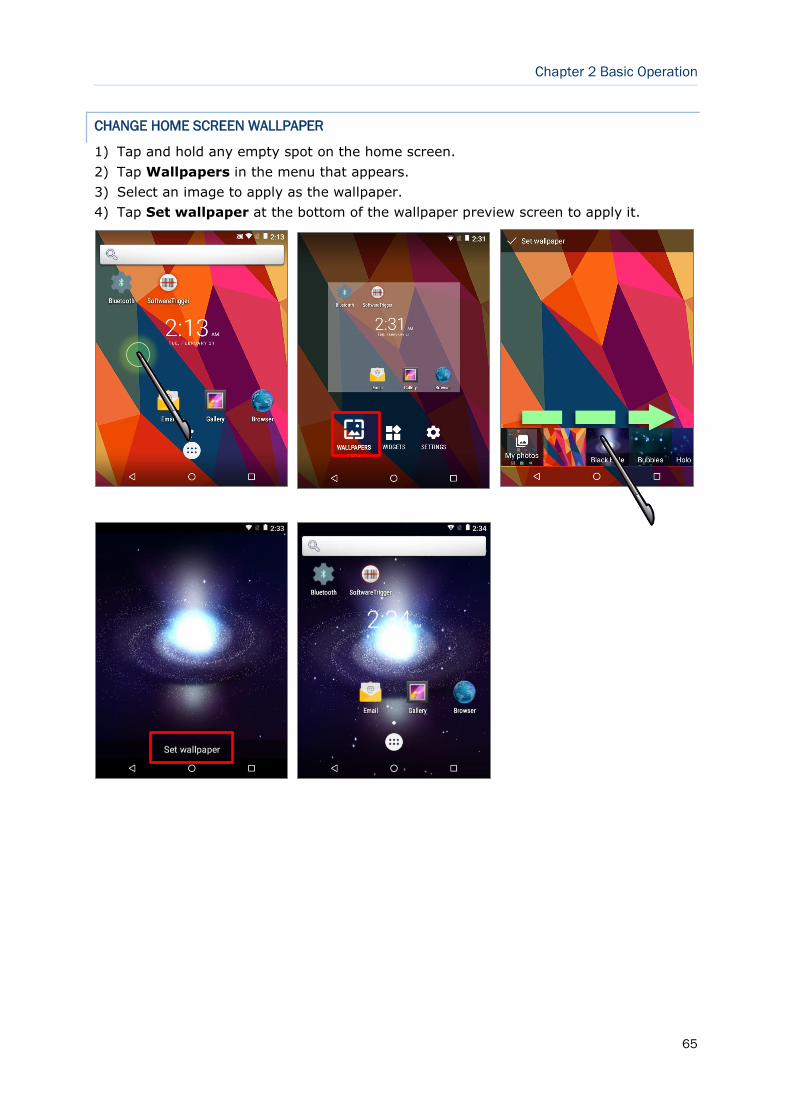
65
Chapter 2 Basic Operation
CHANGE HOME SCREEN WALLPAPER
Tap and hold any empty spot on the home screen. 1)
Tap Wallpapers in the menu that appears. 2)
Select an image to apply as the wallpaper. 3)
Tap Set wallpaper at the bottom of the wallpaper preview screen to apply it. 4)
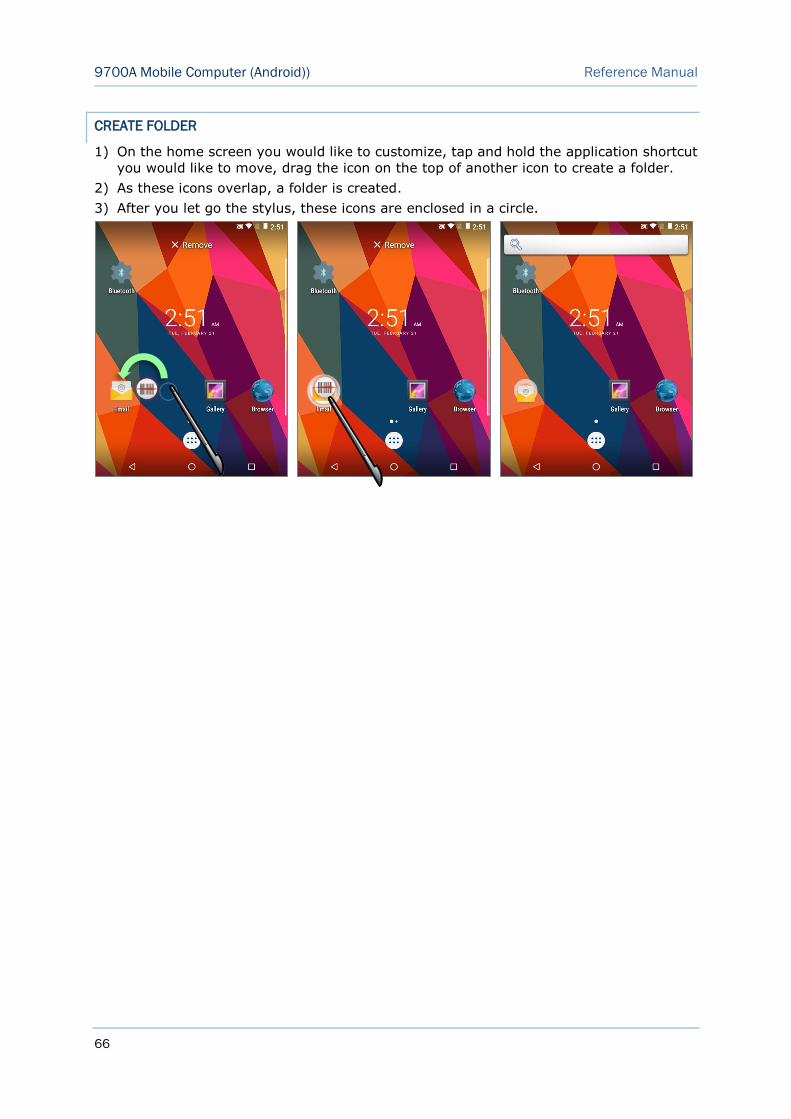
66
9700A Mobile Computer (Android)) Reference Manual
CREATE FOLDER
On the home screen you would like to customize, tap and hold the application shortcut 1)
you would like to move, drag the icon on the top of another icon to create a folder.
As these icons overlap, a folder is created. 2)
After you let go the stylus, these icons are enclosed in a circle. 3)
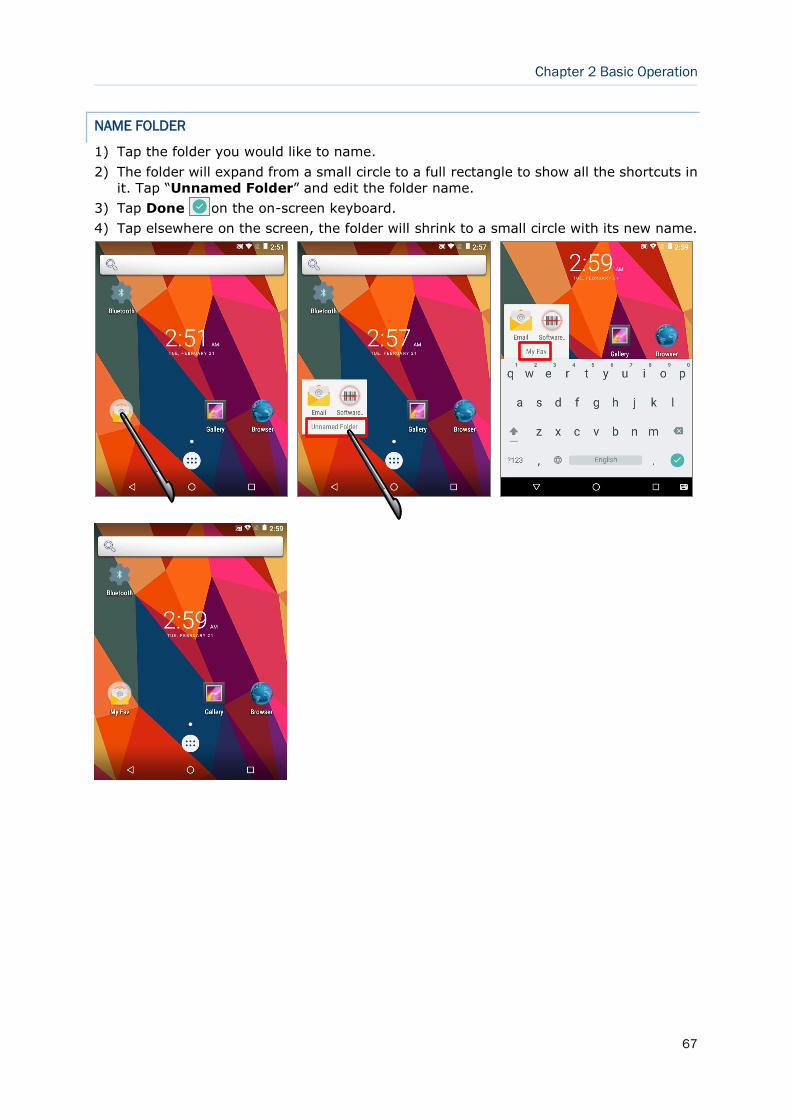
67
Chapter 2 Basic Operation
NAME FOLDER
Tap the folder you would like to name. 1)
The folder will expand from a small circle to a full rectangle to show all the shortcuts in 2)
it. Tap “Unnamed Folder” and edit the folder name.
Tap Done on the on-screen keyboard. 3)
Tap elsewhere on the screen, the folder will shrink to a small circle with its new name. 4)
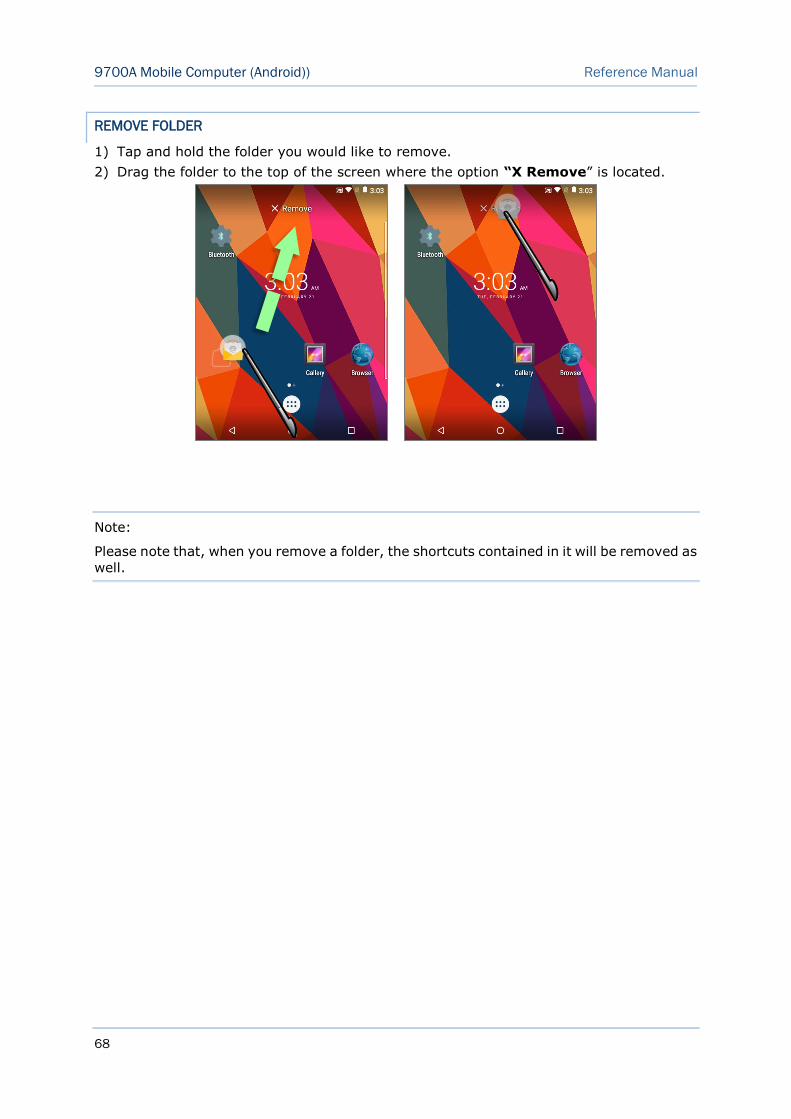
68
9700A Mobile Computer (Android)) Reference Manual
REMOVE FOLDER
Tap and hold the folder you would like to remove. 1)
Drag the folder to the top of the screen where the option “X Remove” is located. 2)
Note:
Please note that, when you remove a folder, the shortcuts contained in it will be removed as
well.
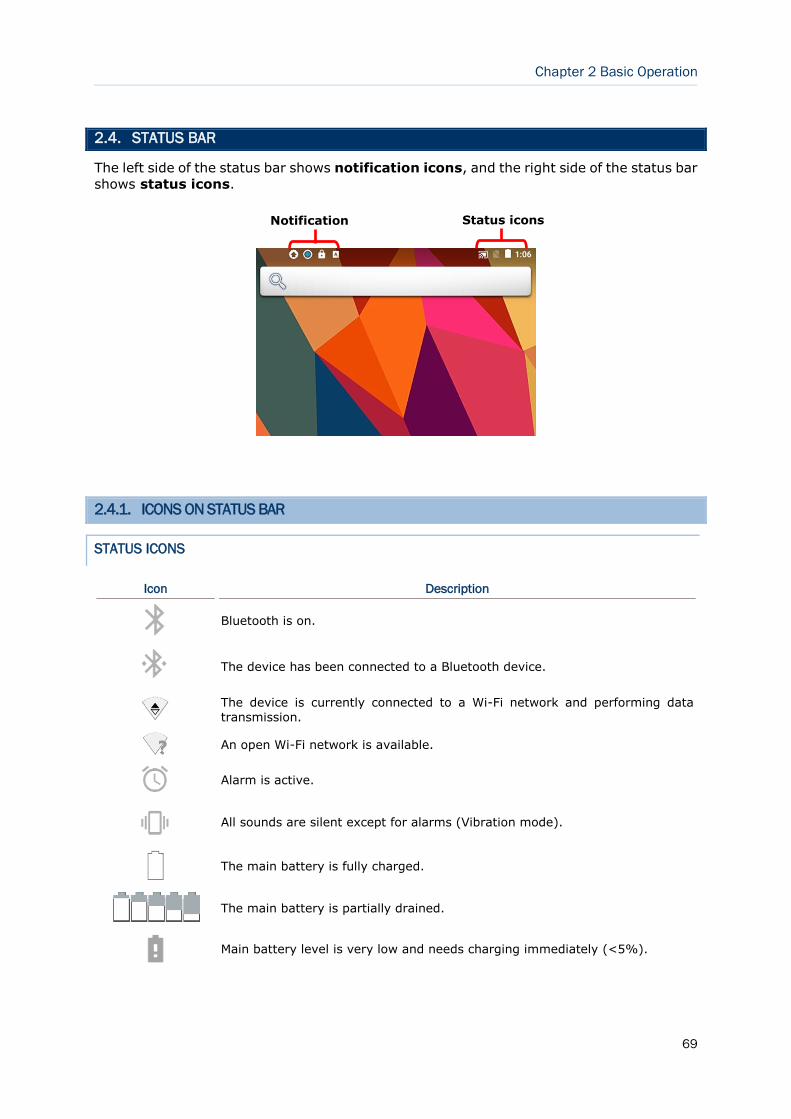
69
Chapter 2 Basic Operation
2.4. STATUS BAR
The left side of the status bar shows notification icons, and the right side of the status bar
shows status icons.
2.4.1. ICONS ON STATUS BAR
STATUS ICONS
Icon Description
Bluetooth is on.
The device has been connected to a Bluetooth device.
The device is currently connected to a Wi-Fi network and performing data
transmission.
An open Wi-Fi network is available.
Alarm is active.
All sounds are silent except for alarms (Vibration mode).
The main battery is fully charged.
The main battery is partially drained.
Main battery level is very low and needs charging immediately (<5%).
Status icons Notification icons
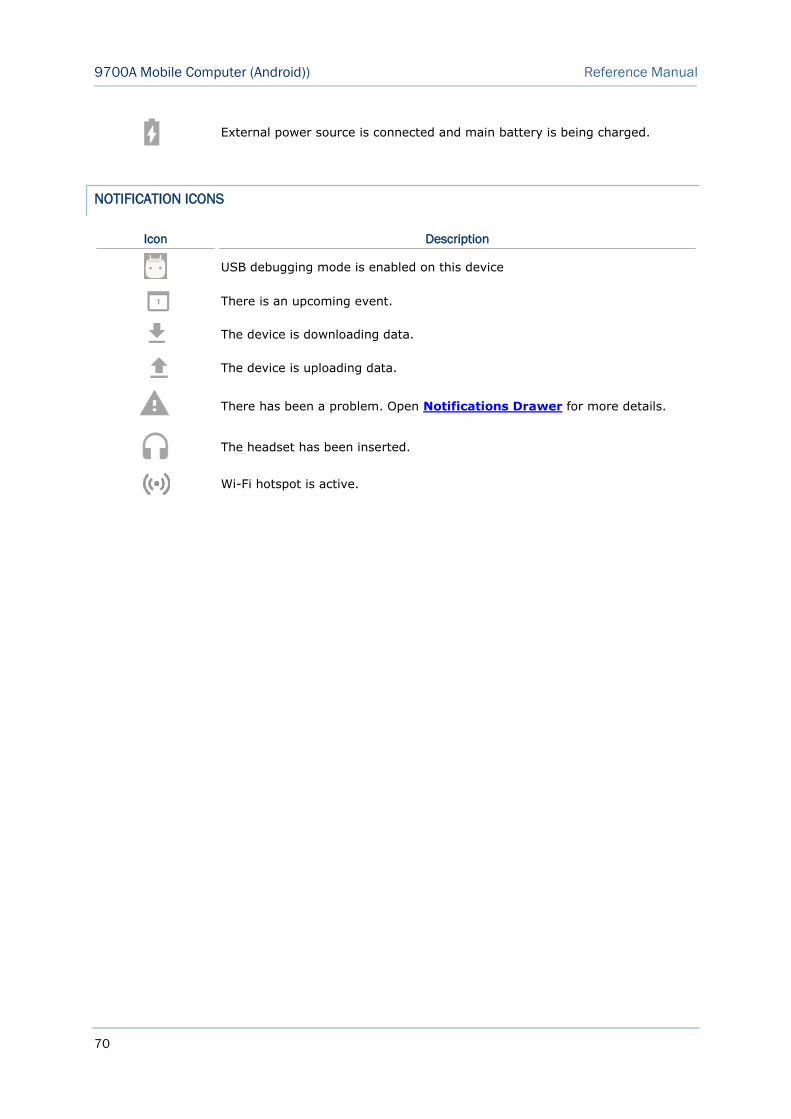
70
9700A Mobile Computer (Android)) Reference Manual
External power source is connected and main battery is being charged.
NOTIFICATION ICONS
Icon Description
USB debugging mode is enabled on this device
There is an upcoming event.
The device is downloading data.
The device is uploading data.
There has been a problem. Open Notifications Drawer for more details.
The headset has been inserted.
Wi-Fi hotspot is active.
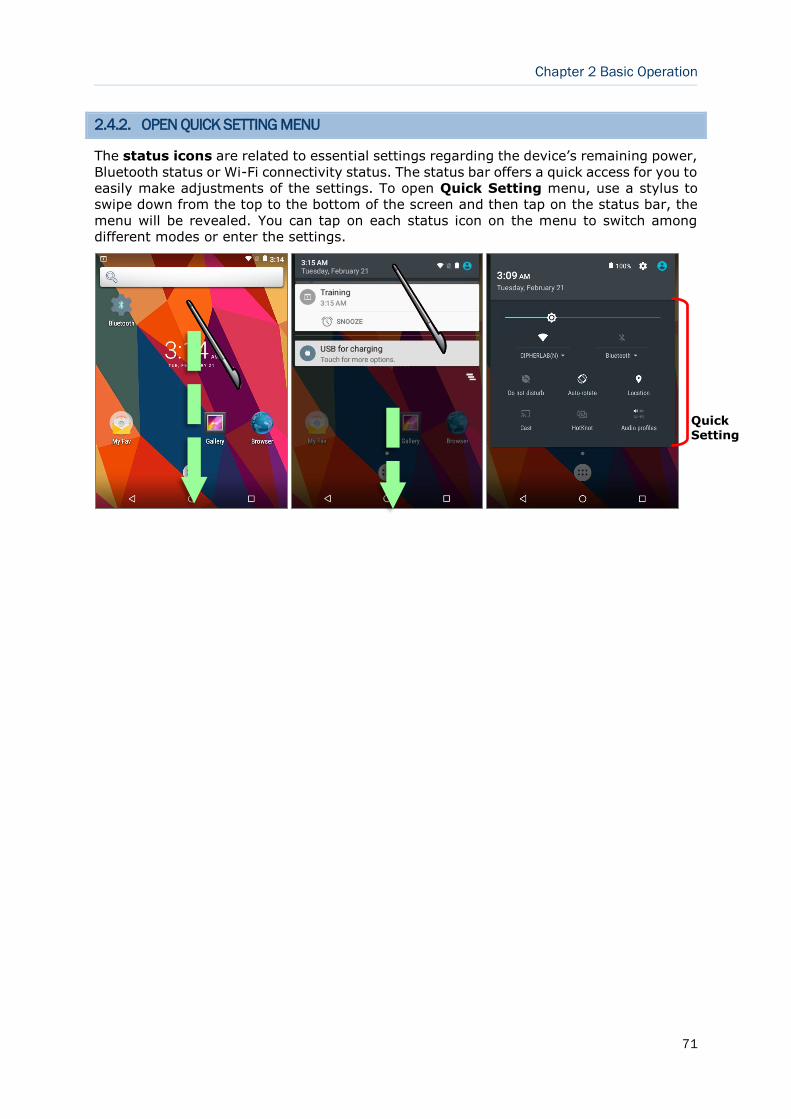
71
Chapter 2 Basic Operation
2.4.2. OPEN QUICK SETTING MENU
The status icons are related to essential settings regarding the device’s remaining power,
Bluetooth status or Wi-Fi connectivity status. The status bar offers a quick access for you to
easily make adjustments of the settings. To open Quick Setting menu, use a stylus to
swipe down from the top to the bottom of the screen and then tap on the status bar, the
menu will be revealed. You can tap on each status icon on the menu to switch among
different modes or enter the settings.
Quick Setting
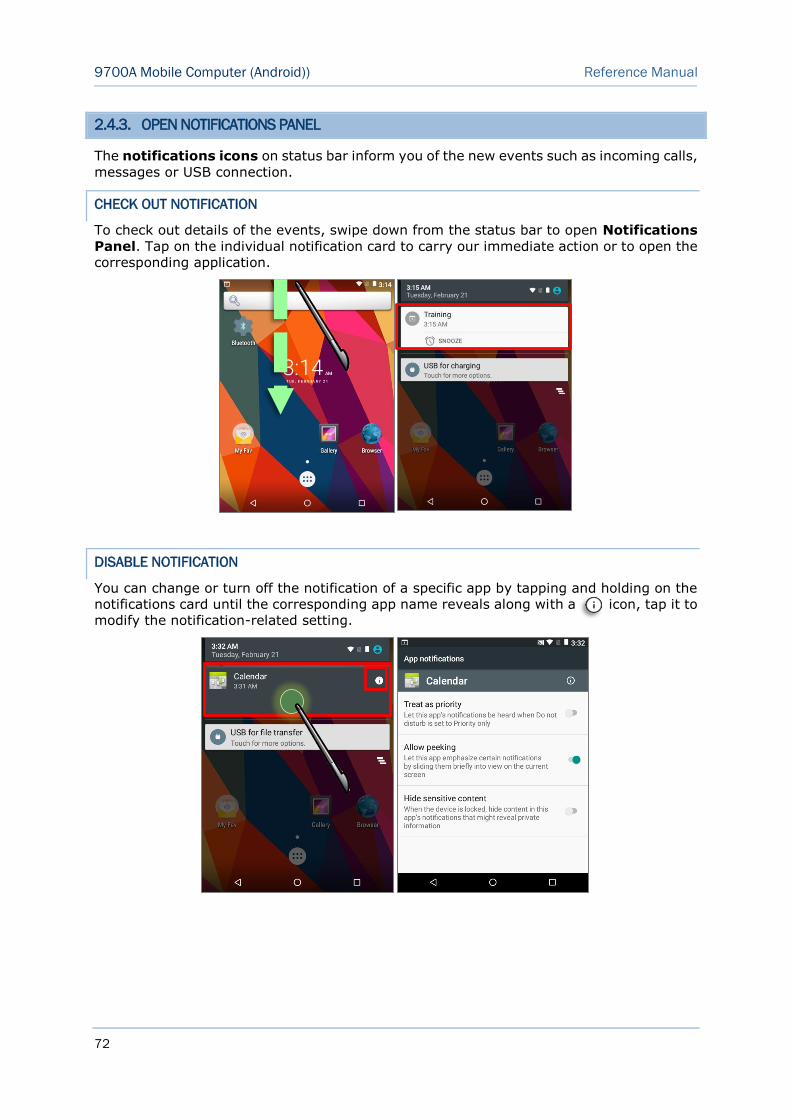
72
9700A Mobile Computer (Android)) Reference Manual
2.4.3. OPEN NOTIFICATIONS PANEL
The notifications icons on status bar inform you of the new events such as incoming calls,
messages or USB connection.
CHECK OUT NOTIFICATION
To check out details of the events, swipe down from the status bar to open Notifications
Panel. Tap on the individual notification card to carry our immediate action or to open the
corresponding application.
DISABLE NOTIFICATION
You can change or turn off the notification of a specific app by tapping and holding on the
notifications card until the corresponding app name reveals along with a icon, tap it to
modify the notification-related setting.
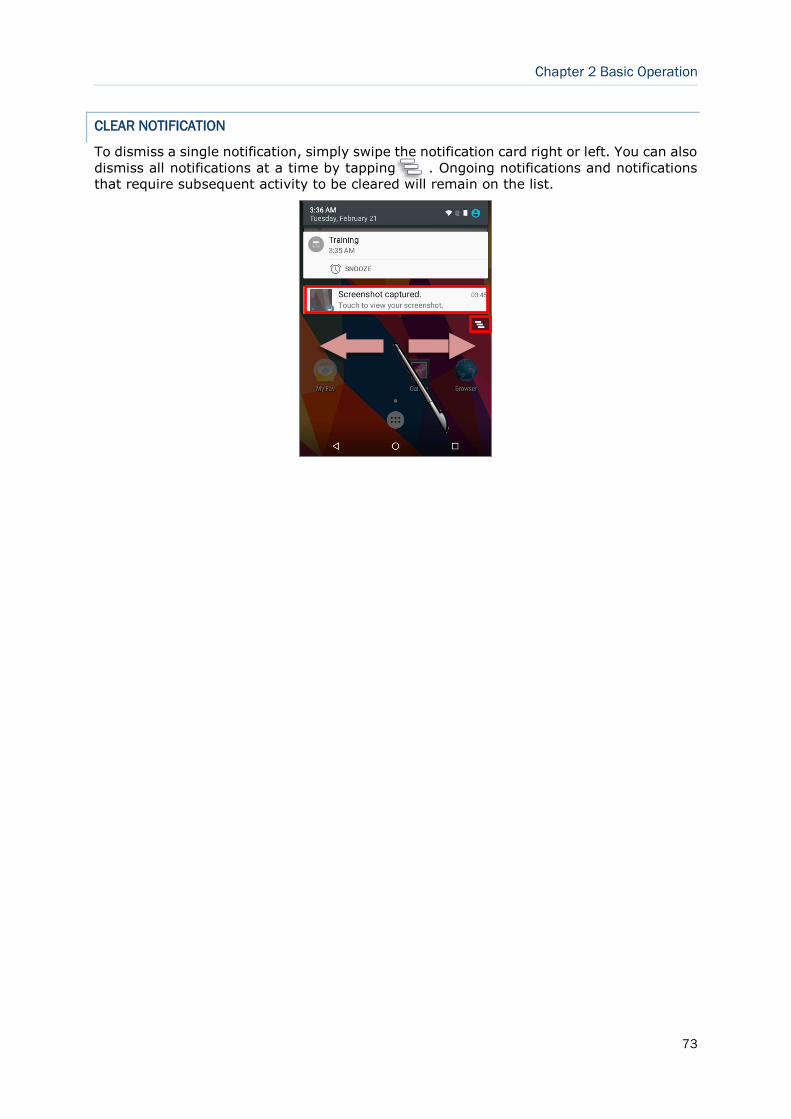
73
Chapter 2 Basic Operation
CLEAR NOTIFICATION
To dismiss a single notification, simply swipe the notification card right or left. You can also
dismiss all notifications at a time by tapping . Ongoing notifications and notifications
that require subsequent activity to be cleared will remain on the list.
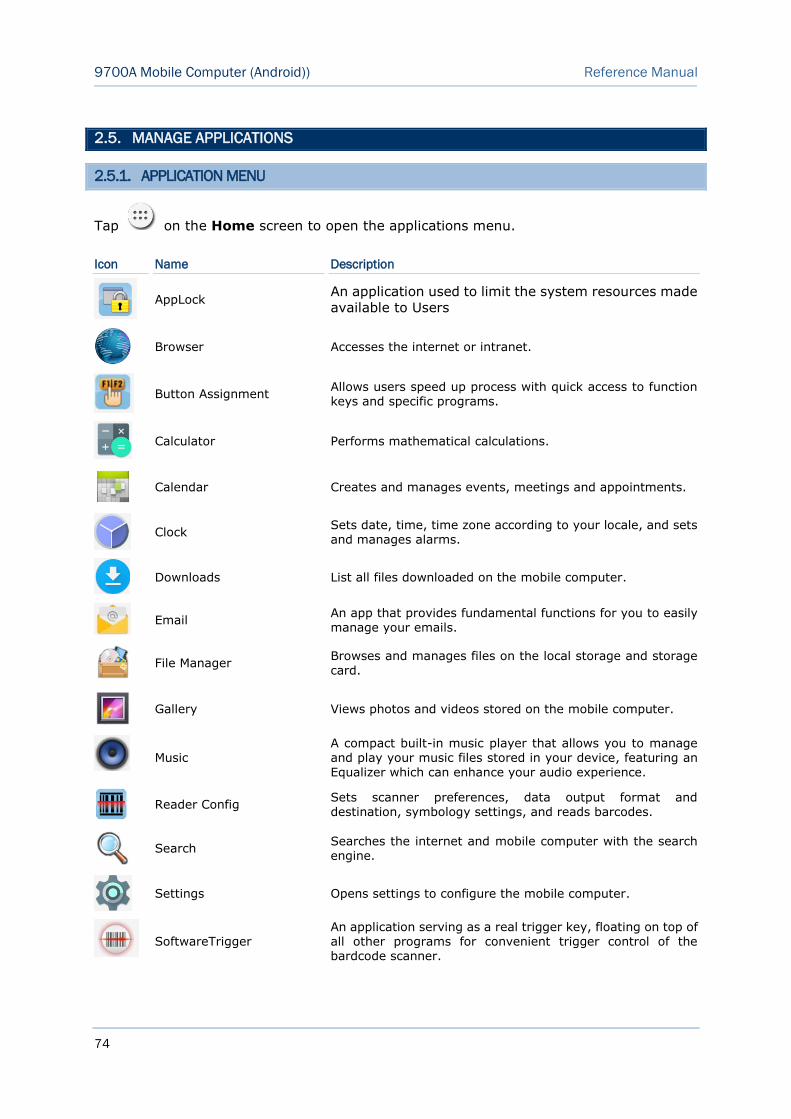
74
9700A Mobile Computer (Android)) Reference Manual
2.5. MANAGE APPLICATIONS
2.5.1. APPLICATION MENU
Tap on the Home screen to open the applications menu.
Icon Name Description
AppLock An application used to limit the system resources made
available to Users
Browser Accesses the internet or intranet.
Button Assignment Allows users speed up process with quick access to function keys and specific programs.
Calculator Performs mathematical calculations.
Calendar Creates and manages events, meetings and appointments.
Clock
Sets date, time, time zone according to your locale, and sets and manages alarms.
Downloads List all files downloaded on the mobile computer.
An app that provides fundamental functions for you to easily manage your emails.
File Manager
Browses and manages files on the local storage and storage card.
Gallery Views photos and videos stored on the mobile computer.
Music
A compact built-in music player that allows you to manage and play your music files stored in your device, featuring an
Equalizer which can enhance your audio experience.
Reader Config
Sets scanner preferences, data output format and destination, symbology settings, and reads barcodes.
Search
Searches the internet and mobile computer with the search engine.
Settings Opens settings to configure the mobile computer.
SoftwareTrigger
An application serving as a real trigger key, floating on top of all other programs for convenient trigger control of the bardcode scanner.
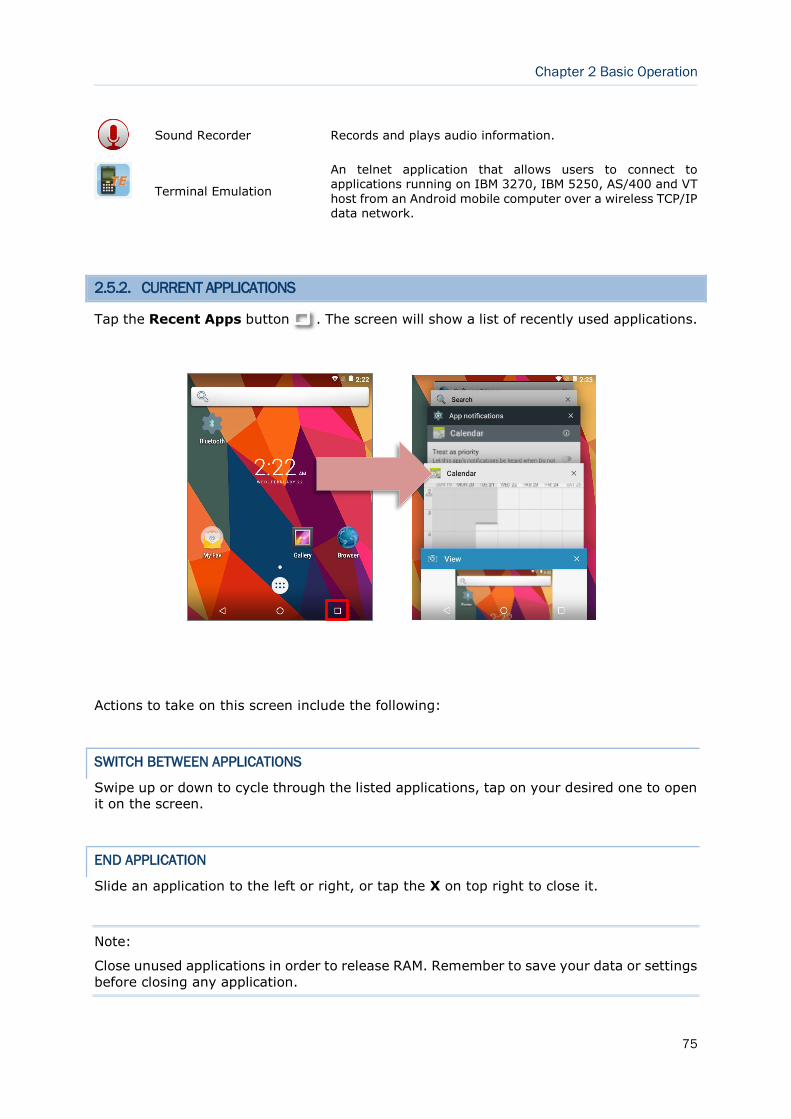
75
Chapter 2 Basic Operation
Sound Recorder Records and plays audio information.
Terminal Emulation
An telnet application that allows users to connect to applications running on IBM 3270, IBM 5250, AS/400 and VT
host from an Android mobile computer over a wireless TCP/IP data network.
2.5.2. CURRENT APPLICATIONS
Tap the Recent Apps button . The screen will show a list of recently used applications.
Actions to take on this screen include the following:
SWITCH BETWEEN APPLICATIONS
Swipe up or down to cycle through the listed applications, tap on your desired one to open
it on the screen.
END APPLICATION
Slide an application to the left or right, or tap the X on top right to close it.
Note:
Close unused applications in order to release RAM. Remember to save your data or settings
before closing any application.
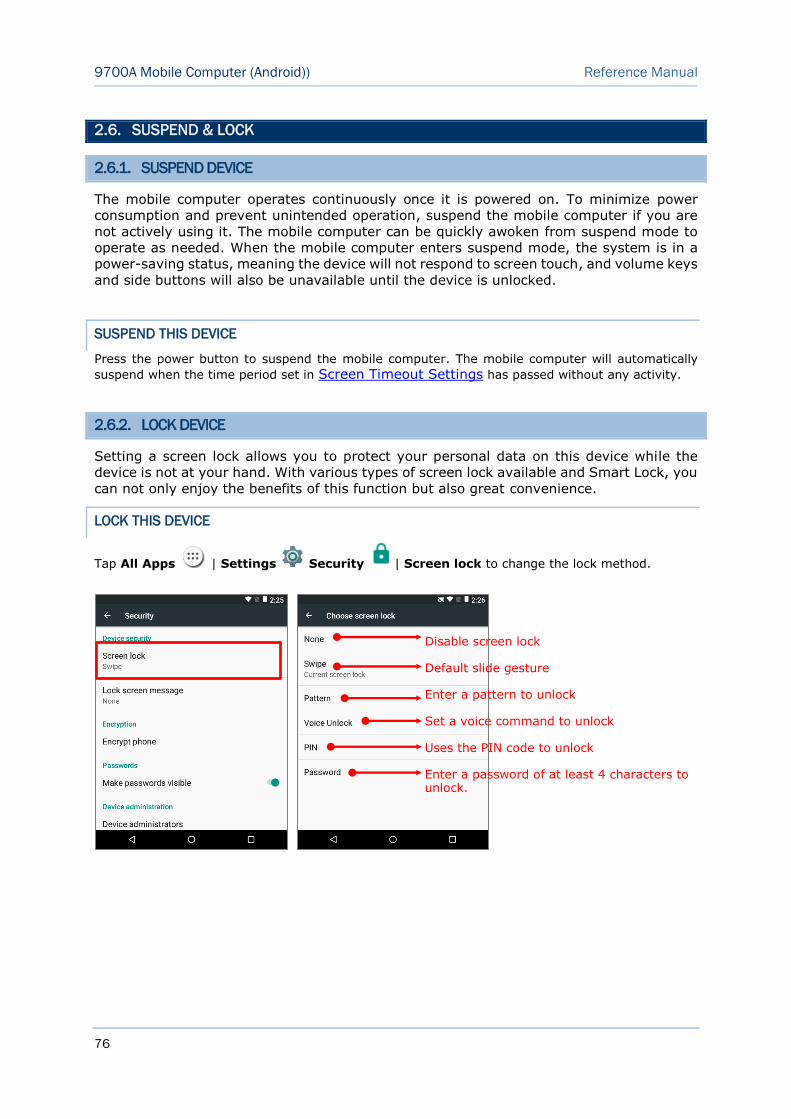
76
9700A Mobile Computer (Android)) Reference Manual
2.6. SUSPEND & LOCK
2.6.1. SUSPEND DEVICE
The mobile computer operates continuously once it is powered on. To minimize power
consumption and prevent unintended operation, suspend the mobile computer if you are
not actively using it. The mobile computer can be quickly awoken from suspend mode to
operate as needed. When the mobile computer enters suspend mode, the system is in a
power-saving status, meaning the device will not respond to screen touch, and volume keys
and side buttons will also be unavailable until the device is unlocked.
SUSPEND THIS DEVICE
Press the power button to suspend the mobile computer. The mobile computer will automatically
suspend when the time period set in Screen Timeout Settings has passed without any activity.
2.6.2. LOCK DEVICE
Setting a screen lock allows you to protect your personal data on this device while the
device is not at your hand. With various types of screen lock available and Smart Lock, you
can not only enjoy the benefits of this function but also great convenience.
LOCK THIS DEVICE
Tap All Apps | Settings Security | Screen lock to change the lock method.
Disable screen lock Default slide gesture Enter a pattern to unlock Set a voice command to unlock Uses the PIN code to unlock Enter a password of at least 4 characters to unlock.
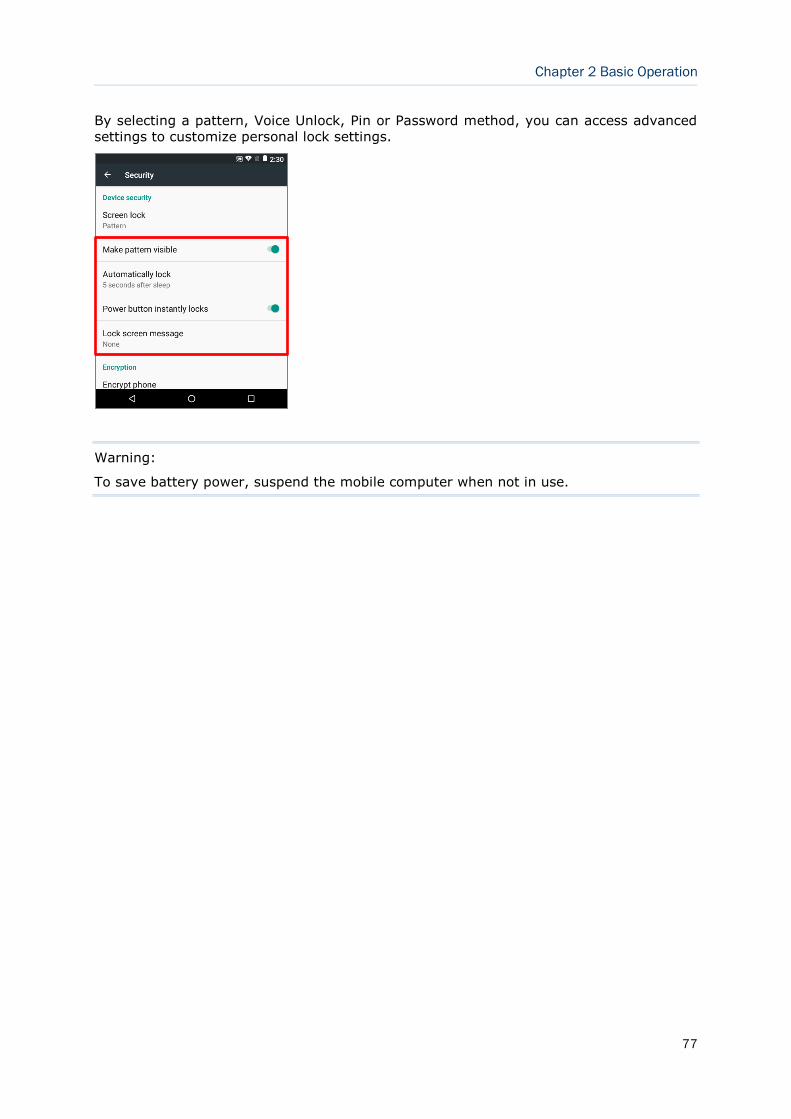
77
Chapter 2 Basic Operation
By selecting a pattern, Voice Unlock, Pin or Password method, you can access advanced
settings to customize personal lock settings.
Warning:
To save battery power, suspend the mobile computer when not in use.
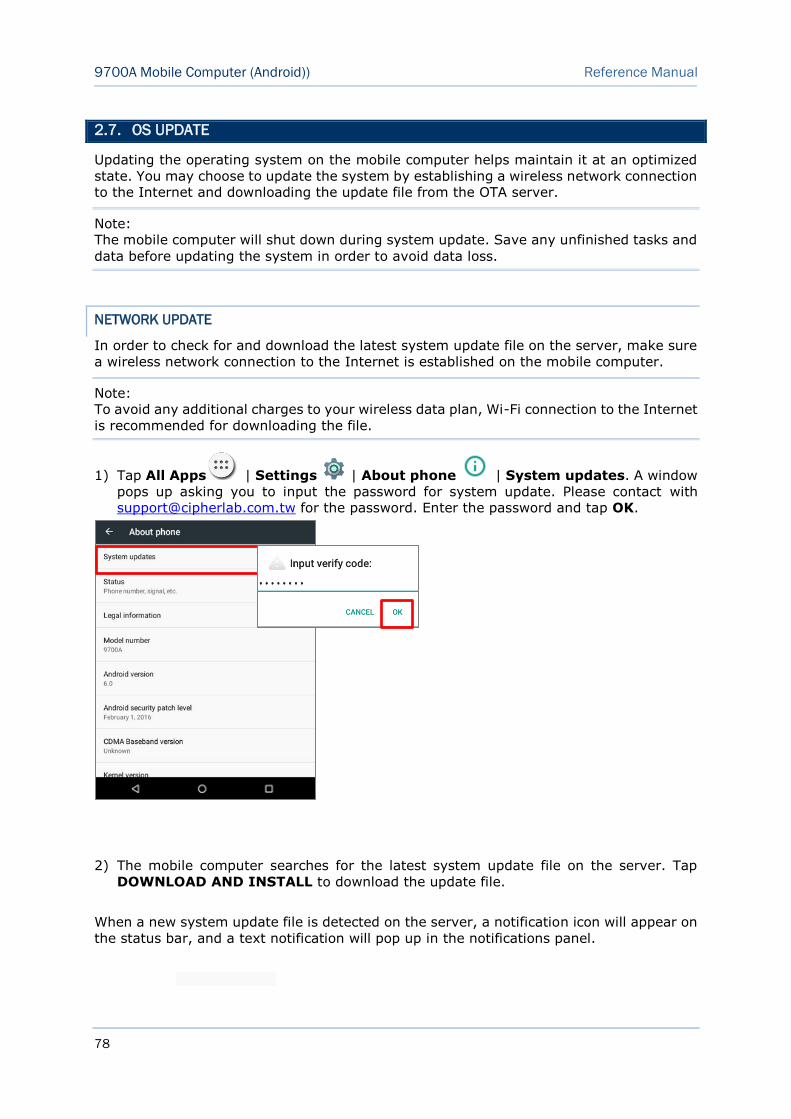
78
9700A Mobile Computer (Android)) Reference Manual
2.7. OS UPDATE
Updating the operating system on the mobile computer helps maintain it at an optimized
state. You may choose to update the system by establishing a wireless network connection
to the Internet and downloading the update file from the OTA server.
Note:
The mobile computer will shut down during system update. Save any unfinished tasks and
data before updating the system in order to avoid data loss.
NETWORK UPDATE
In order to check for and download the latest system update file on the server, make sure
a wireless network connection to the Internet is established on the mobile computer.
Note:
To avoid any additional charges to your wireless data plan, Wi-Fi connection to the Internet
is recommended for downloading the file.
Tap All Apps | Settings | About phone | System updates. A window 1)
pops up asking you to input the password for system update. Please contact with
[email protected] for the password. Enter the password and tap OK.
The mobile computer searches for the latest system update file on the server. Tap 2)
DOWNLOAD AND INSTALL to download the update file.
When a new system update file is detected on the server, a notification icon will appear on
the status bar, and a text notification will pop up in the notifications panel.
79
Chapter 2 Basic Operation
SD CARD UPDATE
Obtain the latest system update file, and copy the file onto the root storage of your SD 1)
card.
Insert the SD card into the memory card slot on the mobile computer. Press the power 2)
button to power it on.
Tap All Apps | Settings | About phone | System updates. 3)
A window pops up asking you to input the password for system update. Please contact
with [email protected] for the password. Enter the password and tap OK.
The mobile computer searches for an available system update file on the SD card. 4)
Note:
Make sure the SD card is inserted in the mobile computer. If not, the screen will show that
your system is currently up to date.
Tap INSTALL to open an “Install update” confirmation window. Tap Install in the 5)
confirmation window to begin the installation.
Once complete, a notification will appear showing that the system has been updated
successfully. Tap OK to show the Home screen.
80
9700A Mobile Computer (Android)) Reference Manual
Chapter 3
WIRELESS RADIOS
The Wi-Fi module integrated on the mobile computer lets you configure and connect to
network wirelessly.
IN THIS CHAPTER
3.1 Use Wireless Local Area Network (Wi-Fi) ...................... 81
3.2 Use Bluetooth ........................................................... 86
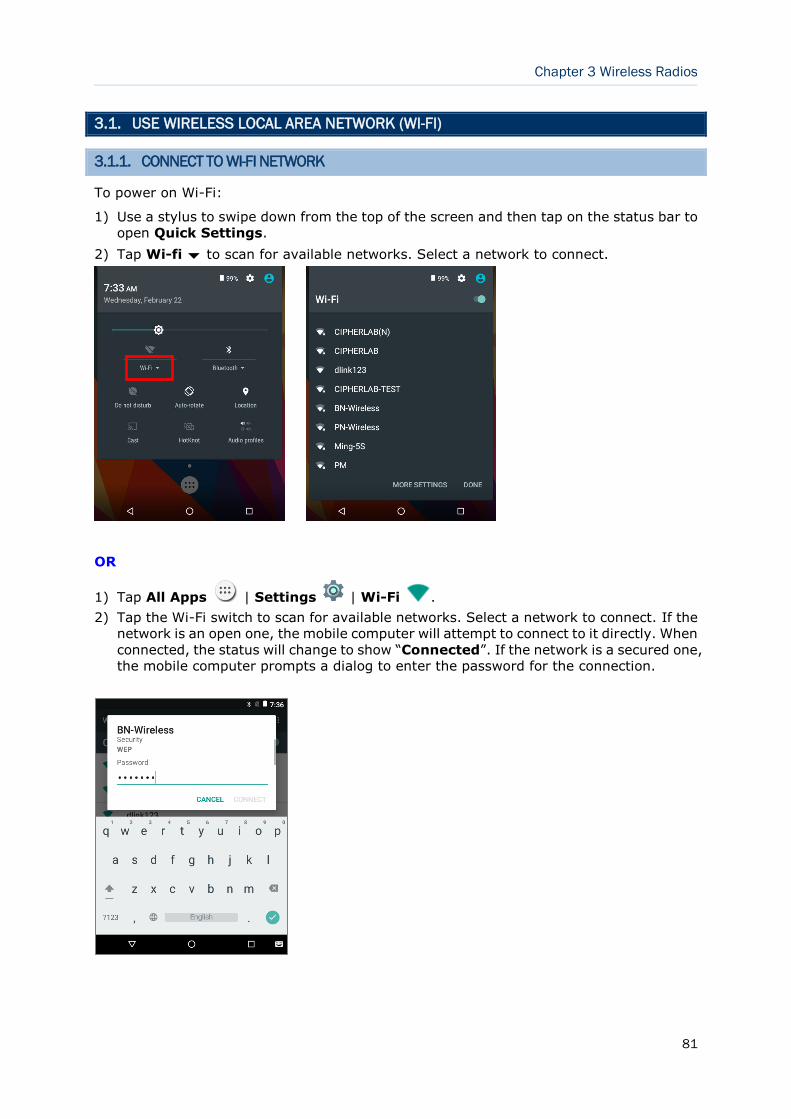
81
Chapter 3 Wireless Radios
3.1. USE WIRELESS LOCAL AREA NETWORK (WI-FI)
3.1.1. CONNECT TO WI-FI NETWORK
To power on Wi-Fi:
Use a stylus to swipe down from the top of the screen and then tap on the status bar to 1)
open Quick Settings.
Tap Wi-fi to scan for available networks. Select a network to connect. 2)
OR
Tap All Apps | Settings | Wi-Fi . 1)
Tap the Wi-Fi switch to scan for available networks. Select a network to connect. If the 2)
network is an open one, the mobile computer will attempt to connect to it directly. When
connected, the status will change to show “Connected”. If the network is a secured one,
the mobile computer prompts a dialog to enter the password for the connection.
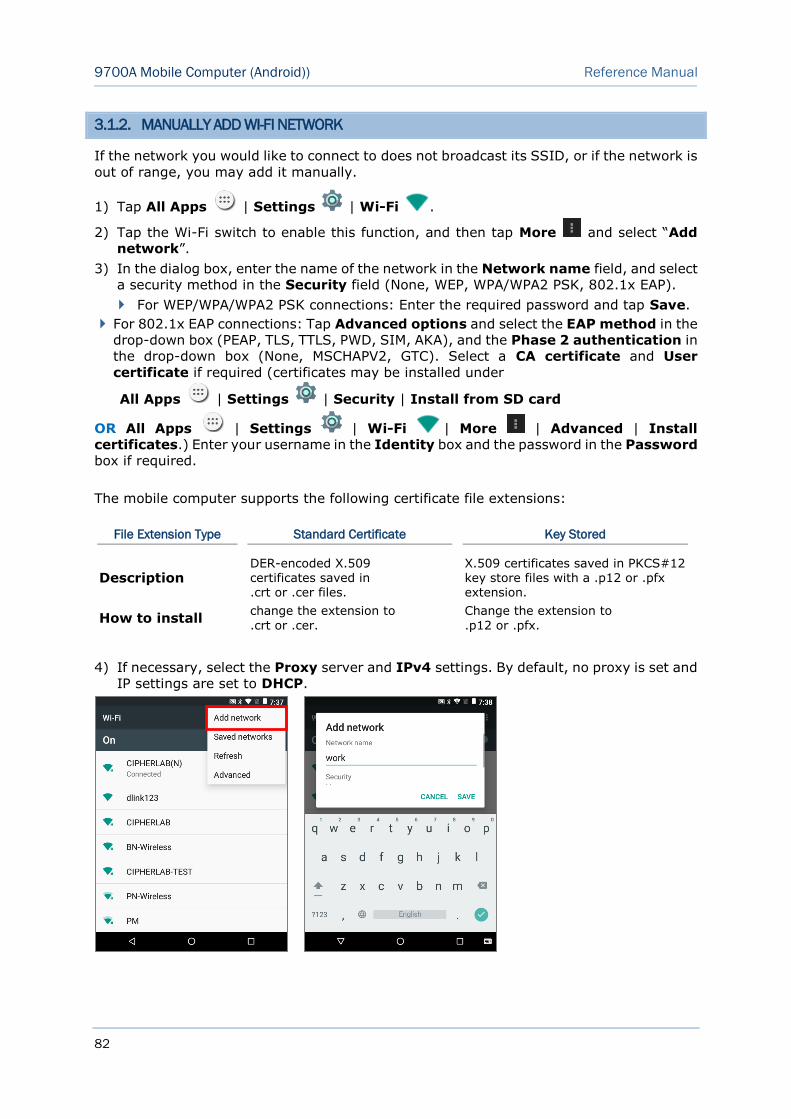
82
9700A Mobile Computer (Android)) Reference Manual
3.1.2. MANUALLY ADD WI-FI NETWORK
If the network you would like to connect to does not broadcast its SSID, or if the network is
out of range, you may add it manually.
Tap All Apps | Settings | Wi-Fi . 1)
Tap the Wi-Fi switch to enable this function, and then tap More and select “Add 2)
network”.
In the dialog box, enter the name of the network in the Network name field, and select 3)
a security method in the Security field (None, WEP, WPA/WPA2 PSK, 802.1x EAP).
For WEP/WPA/WPA2 PSK connections: Enter the required password and tap Save.
For 802.1x EAP connections: Tap Advanced options and select the EAP method in the
drop-down box (PEAP, TLS, TTLS, PWD, SIM, AKA), and the Phase 2 authentication in
the drop-down box (None, MSCHAPV2, GTC). Select a CA certificate and User
certificate if required (certificates may be installed under
All Apps | Settings | Security | Install from SD card
OR All Apps | Settings | Wi-Fi | More | Advanced | Install
certificates.) Enter your username in the Identity box and the password in the Password
box if required.
The mobile computer supports the following certificate file extensions:
If necessary, select the Proxy server and IPv4 settings. By default, no proxy is set and 4)
IP settings are set to DHCP.
File Extension Type Standard Certificate Key Stored
Description DER-encoded X.509 certificates saved in .crt or .cer files.
X.509 certificates saved in PKCS#12 key store files with a .p12 or .pfx extension.
How to install change the extension to
.crt or .cer.
Change the extension to
.p12 or .pfx.
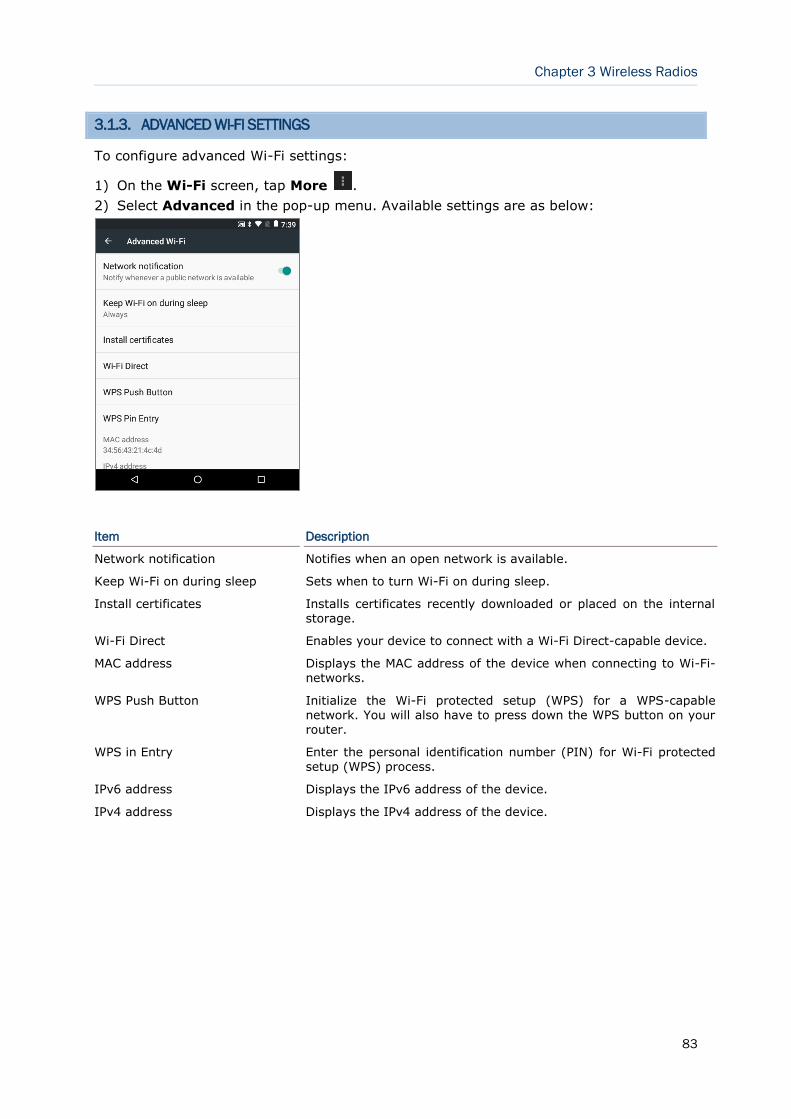
83
Chapter 3 Wireless Radios
3.1.3. ADVANCED WI-FI SETTINGS
To configure advanced Wi-Fi settings:
On the Wi-Fi screen, tap More . 1)
Select Advanced in the pop-up menu. Available settings are as below: 2)
Item Description
Network notification Notifies when an open network is available.
Keep Wi-Fi on during sleep Sets when to turn Wi-Fi on during sleep.
Install certificates Installs certificates recently downloaded or placed on the internal storage.
Wi-Fi Direct Enables your device to connect with a Wi-Fi Direct-capable device.
MAC address Displays the MAC address of the device when connecting to Wi-Fi- networks.
WPS Push Button Initialize the Wi-Fi protected setup (WPS) for a WPS-capable network. You will also have to press down the WPS button on your router.
WPS in Entry Enter the personal identification number (PIN) for Wi-Fi protected
setup (WPS) process.
IPv6 address Displays the IPv6 address of the device.
IPv4 address Displays the IPv4 address of the device.
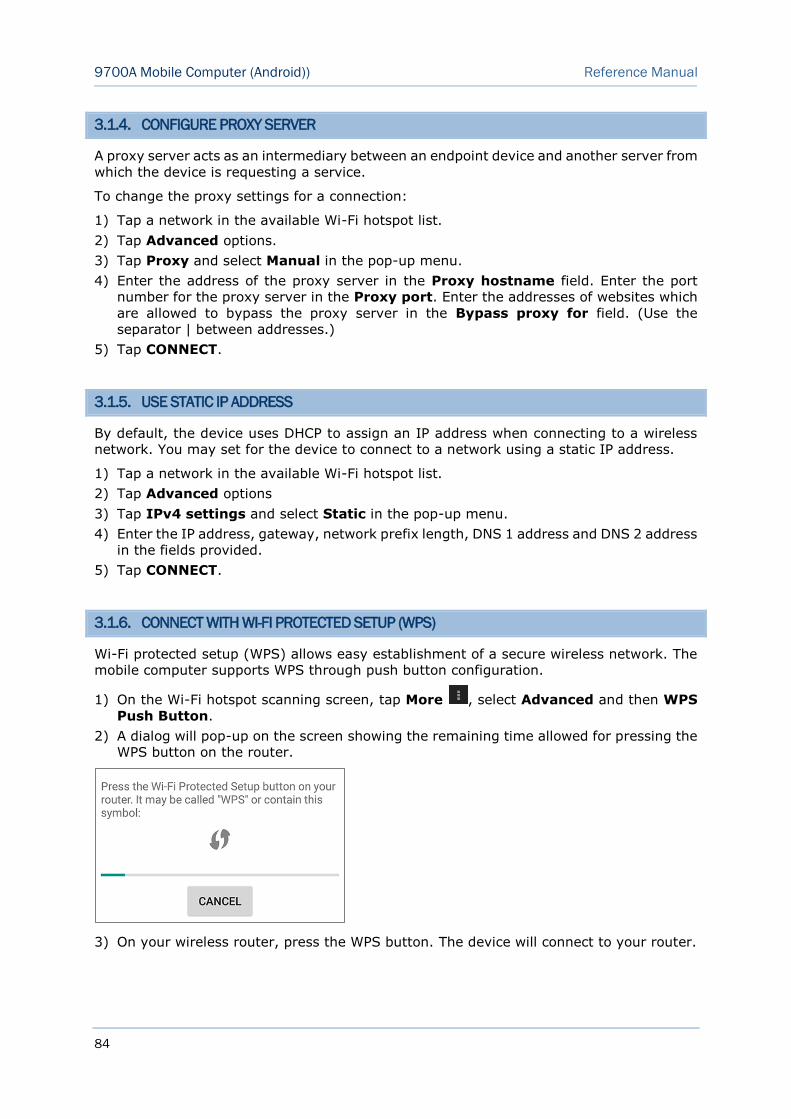
84
9700A Mobile Computer (Android)) Reference Manual
3.1.4. CONFIGURE PROXY SERVER
A proxy server acts as an intermediary between an endpoint device and another server from
which the device is requesting a service.
To change the proxy settings for a connection:
Tap a network in the available Wi-Fi hotspot list. 1)
Tap Advanced options. 2)
Tap Proxy and select Manual in the pop-up menu. 3)
Enter the address of the proxy server in the Proxy hostname field. Enter the port 4)
number for the proxy server in the Proxy port. Enter the addresses of websites which
are allowed to bypass the proxy server in the Bypass proxy for field. (Use the
separator | between addresses.)
Tap CONNECT. 5)
3.1.5. USE STATIC IP ADDRESS
By default, the device uses DHCP to assign an IP address when connecting to a wireless
network. You may set for the device to connect to a network using a static IP address.
Tap a network in the available Wi-Fi hotspot list. 1)
Tap Advanced options 2)
Tap IPv4 settings and select Static in the pop-up menu. 3)
Enter the IP address, gateway, network prefix length, DNS 1 address and DNS 2 address 4)
in the fields provided.
Tap CONNECT. 5)
3.1.6. CONNECT WITH WI-FI PROTECTED SETUP (WPS)
Wi-Fi protected setup (WPS) allows easy establishment of a secure wireless network. The
mobile computer supports WPS through push button configuration.
On the Wi-Fi hotspot scanning screen, tap More , select Advanced and then WPS 1)
Push Button.
A dialog will pop-up on the screen showing the remaining time allowed for pressing the 2)
WPS button on the router.
On your wireless router, press the WPS button. The device will connect to your router. 3)

85
Chapter 3 Wireless Radios
3.1.7. MODIFY WI-FI NETWORK
To change the settings for a connected network:
Tap and hold a connected network in the Wi-Fi hotspot list. 1)
Tap Modify network in the pop-up menu. 2)
In the dialog box that opens, modify the network settings, and tap Save. 3)
3.1.8. DISCONNECT WI-FI NETWORK
To disconnect a connected network:
Tap and hold a connected network in the Wi-Fi hotspot list. 1)
Tap Forget network in the pop-up menu. 2)
86
9700A Mobile Computer (Android)) Reference Manual
3.2. USE BLUETOOTH
The mobile computer lets you configure Bluetooth settings and manage Bluetooth services
provided on remote devices.
3.2.1. BLUETOOTH PROFILES
Bluetooth Profiles Supported
Generic Access Profile (GAP) For device discovery and authentication.
Service Discovery Access Profile (SDAP) Discovers services on remote devices.
Headset Profile (HSP) Describes how a Bluetooth enabled headset should communicate with a Bluetooth enabled device
Serial Port Profile (SPP) Sets up a virtual serial port to connect two Bluetooth devices.
Human Interface Device Profile (HID) Provides a low latency Bluetooth connection with keyboards, pointing devices, etc.
Object Push Profile (OPP) Pushes and pulls objects to and from a push server.
Hands-Free Profile (AG1.5) (HFP) Allows using a hands-free device to place and receive calls.
Advanced Audio Distribution Profile
(A2DP) Streams stereo-quality audio to a wireless headset or speaker.
Audio/Video Remote Control
Profile
(AVRCP) Allows controlling of television and Hi-Fi equipment.
Generic Object Exchange Profile (GOEP) Provides a basis for other data profiles.
Personal Area Networking Profile
(PAN) Uses Bluetooth Network Encapsulation Protocol for Bluetooth transmission.
General Audio/Video Distribution Profile
(GAVDP) Provides a basis for A2DP and VDP.
Phone Book Access Profile (PBAP) Transfers Phone Book Objects to a car kit to display the
information of an incoming call received on the mobile computer, or initiate a call.
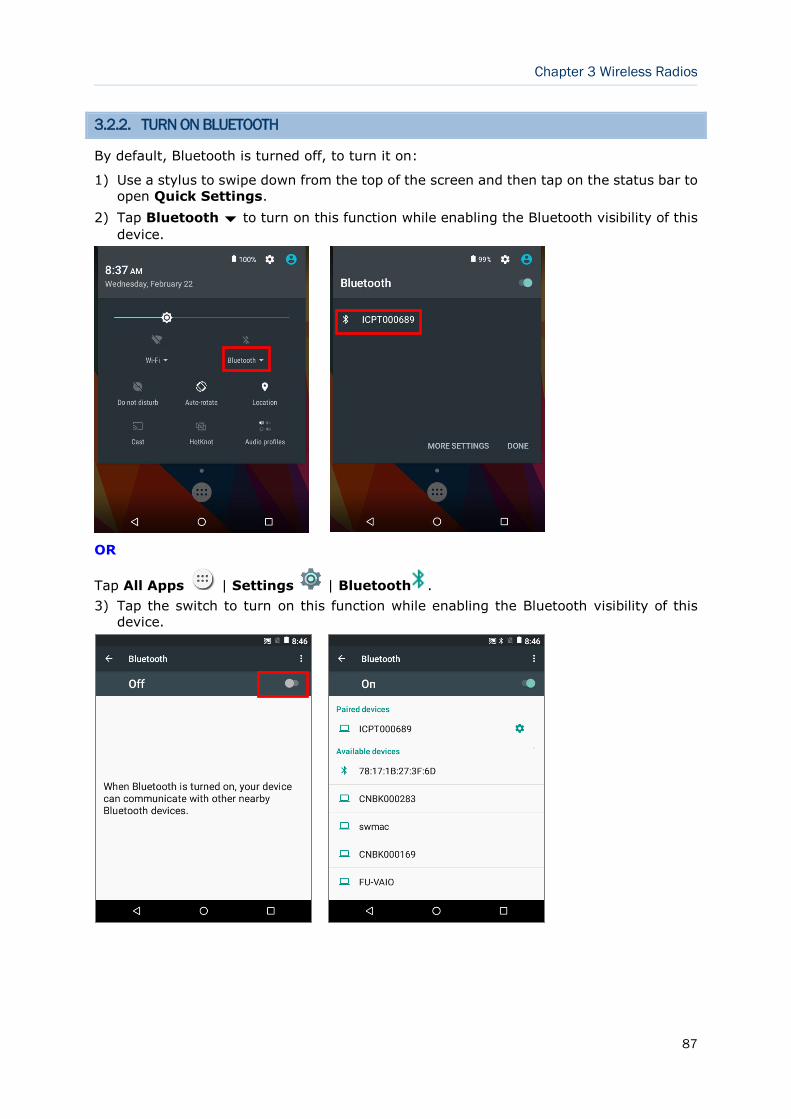
87
Chapter 3 Wireless Radios
3.2.2. TURN ON BLUETOOTH
By default, Bluetooth is turned off, to turn it on:
Use a stylus to swipe down from the top of the screen and then tap on the status bar to 1)
open Quick Settings.
Tap Bluetooth to turn on this function while enabling the Bluetooth visibility of this 2)
device.
OR
Tap All Apps | Settings | Bluetooth .
Tap the switch to turn on this function while enabling the Bluetooth visibility of this 3)
device.
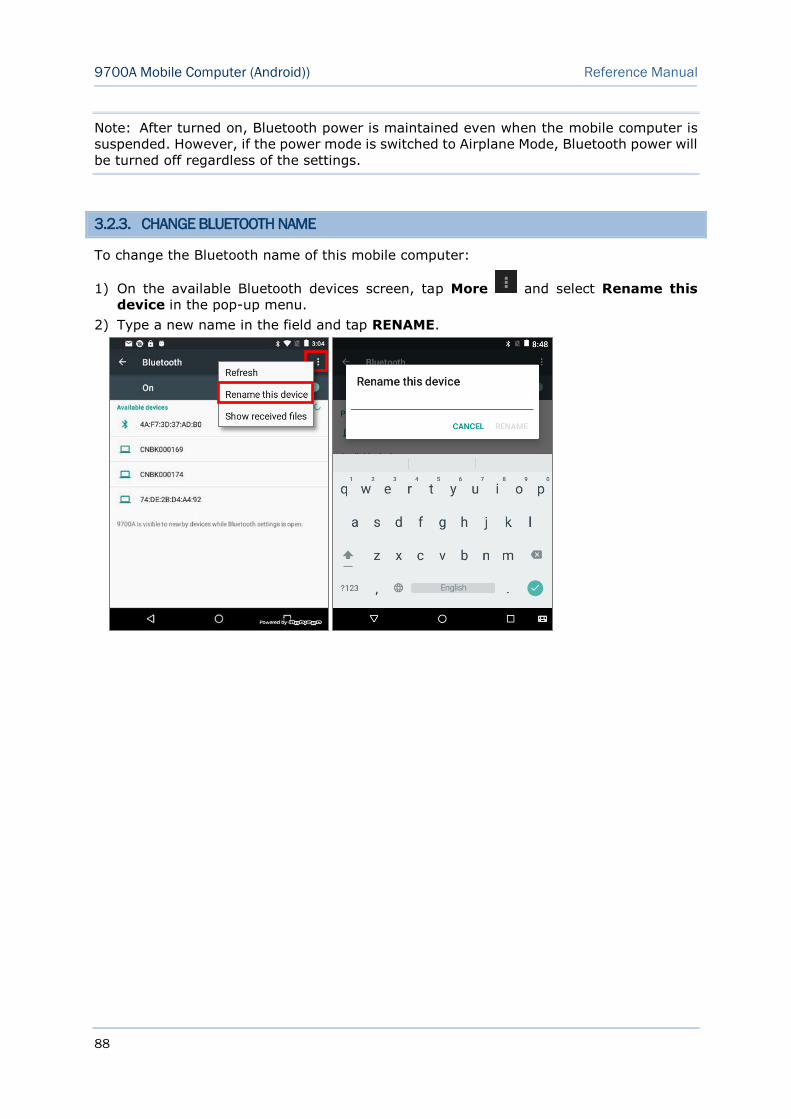
88
9700A Mobile Computer (Android)) Reference Manual
Note: After turned on, Bluetooth power is maintained even when the mobile computer is
suspended. However, if the power mode is switched to Airplane Mode, Bluetooth power will
be turned off regardless of the settings.
3.2.3. CHANGE BLUETOOTH NAME
To change the Bluetooth name of this mobile computer:
On the available Bluetooth devices screen, tap More and select Rename this 1)
device in the pop-up menu.
Type a new name in the field and tap RENAME. 2)

89
Chapter 3 Wireless Radios
3.2.4. PAIR BLUETOOTH DEVICES
Tap All Apps | Settings | Bluetooth .Tap the switch to On position to scan 1)
for available Bluetooth devices nearby. Scroll through the list and tap the device you
would like to pair.
The Bluetooth pairing request window opens. Depending on the pairing settings of 2)
the Bluetooth device, you may need to enter a passkey, or confirm the assigned passkey
on the device to pair if a smart pairing method is applied. Enter/confirm the passkey on
the device to pair.
Once pairing is done, the Bluetooth device will be listed in the Paired Devices list. 3)
Note: If the device you would like to pair with is not listed, make sure Bluetooth visibility is
enabled on the device.
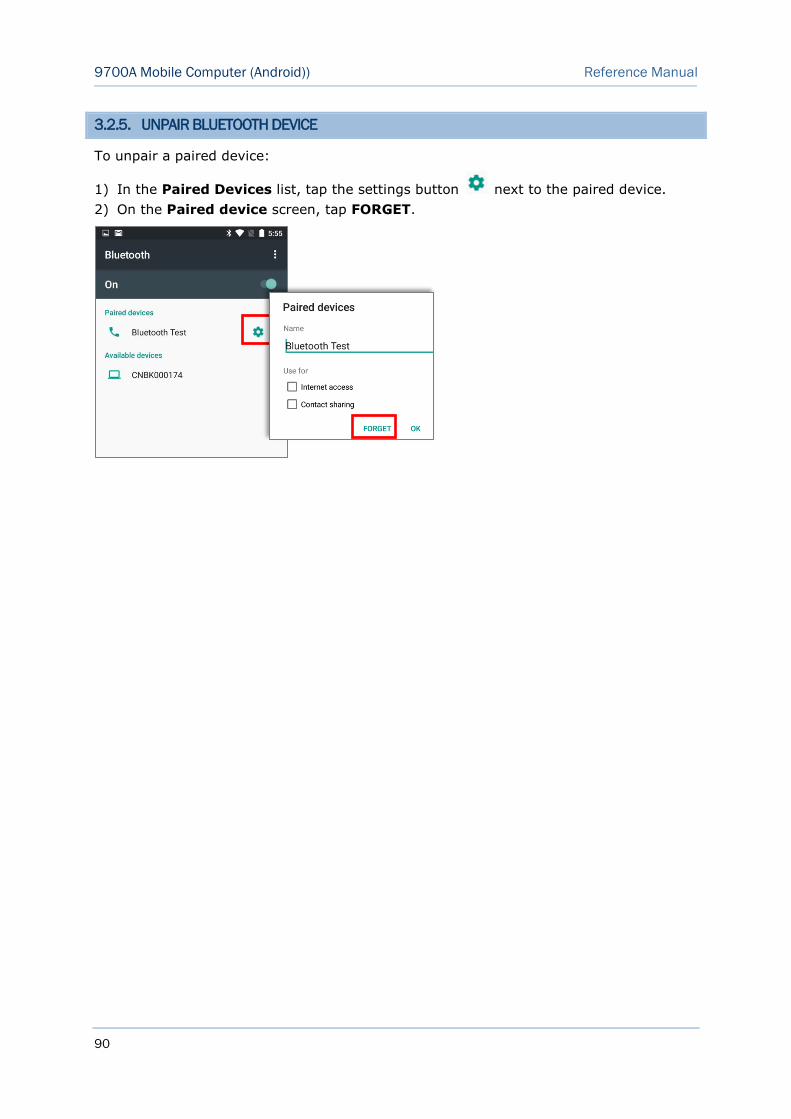
90
9700A Mobile Computer (Android)) Reference Manual
3.2.5. UNPAIR BLUETOOTH DEVICE
To unpair a paired device:
In the Paired Devices list, tap the settings button next to the paired device. 1)
On the Paired device screen, tap FORGET. 2)

91
Chapter 4 Using Reader Configuration Utility
Chapter 4
USING READER CONFIGURATION UTILITY
The Reader Configuration utility allows you to manage the barcode reader integrated on
the mobile computer.
IN THIS CHAPTER
4.1 Configure Reader ........................................................ 92
4.2 Read Printed Barcodes ............................................... 111
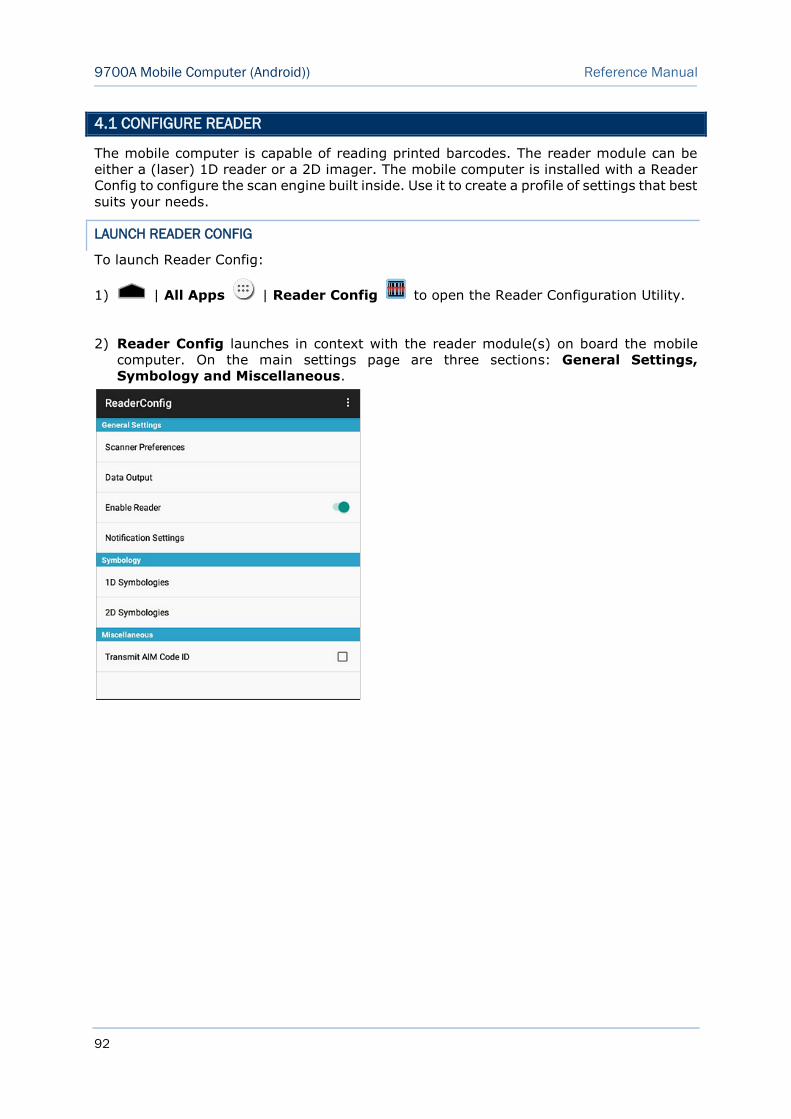
92
9700A Mobile Computer (Android)) Reference Manual
4.1 CONFIGURE READER
The mobile computer is capable of reading printed barcodes. The reader module can be
either a (laser) 1D reader or a 2D imager. The mobile computer is installed with a Reader
Config to configure the scan engine built inside. Use it to create a profile of settings that best
suits your needs.
LAUNCH READER CONFIG
To launch Reader Config:
| All Apps | Reader Config to open the Reader Configuration Utility. 1)
Reader Config launches in context with the reader module(s) on board the mobile 2)
computer. On the main settings page are three sections: General Settings,
Symbology and Miscellaneous.
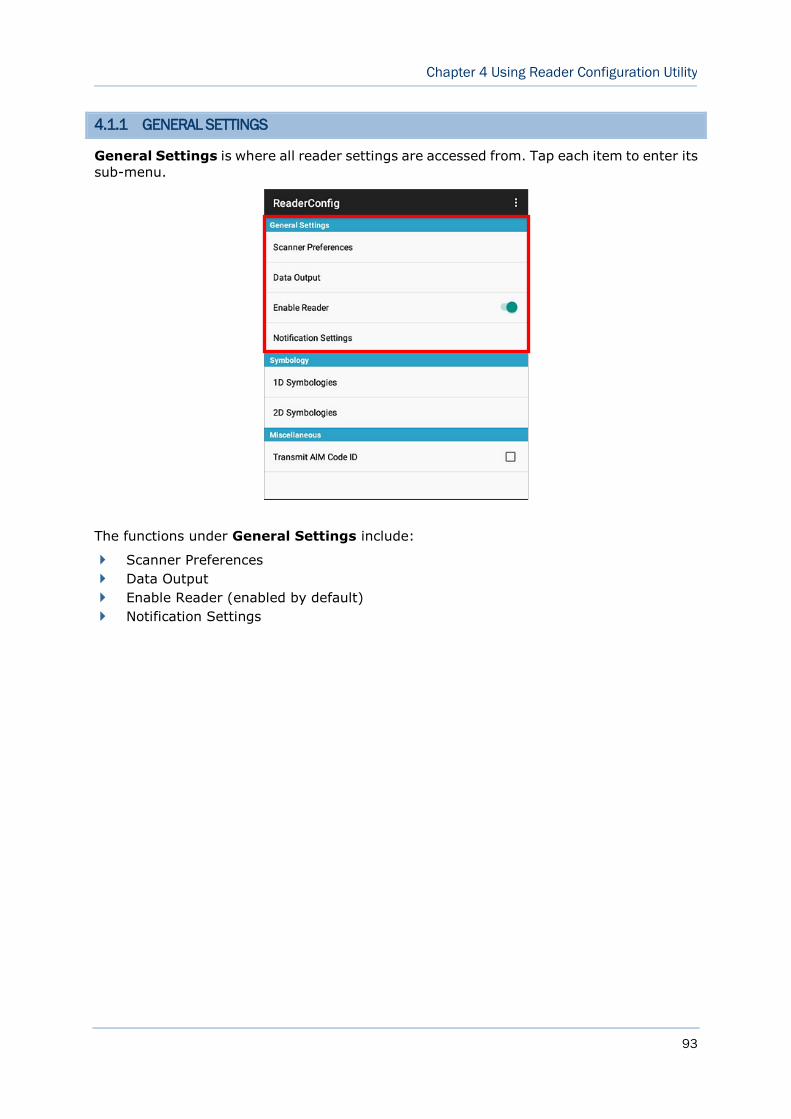
93
Chapter 4 Using Reader Configuration Utility
4.1.1 GENERAL SETTINGS
General Settings is where all reader settings are accessed from. Tap each item to enter its
sub-menu.
The functions under General Settings include:
Scanner Preferences
Data Output
Enable Reader (enabled by default)
Notification Settings
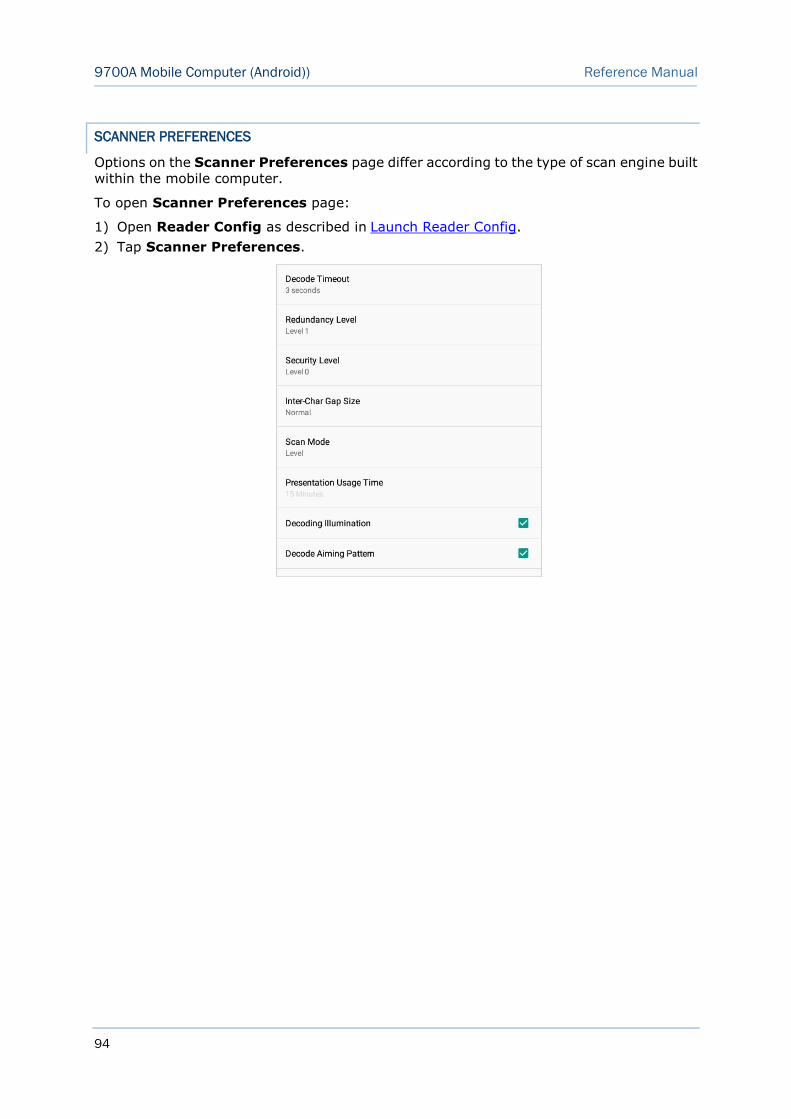
94
9700A Mobile Computer (Android)) Reference Manual
SCANNER PREFERENCES
Options on the Scanner Preferences page differ according to the type of scan engine built
within the mobile computer.
To open Scanner Preferences page:
Open Reader Config as described in Launch Reader Config. 1)
Tap Scanner Preferences. 2)
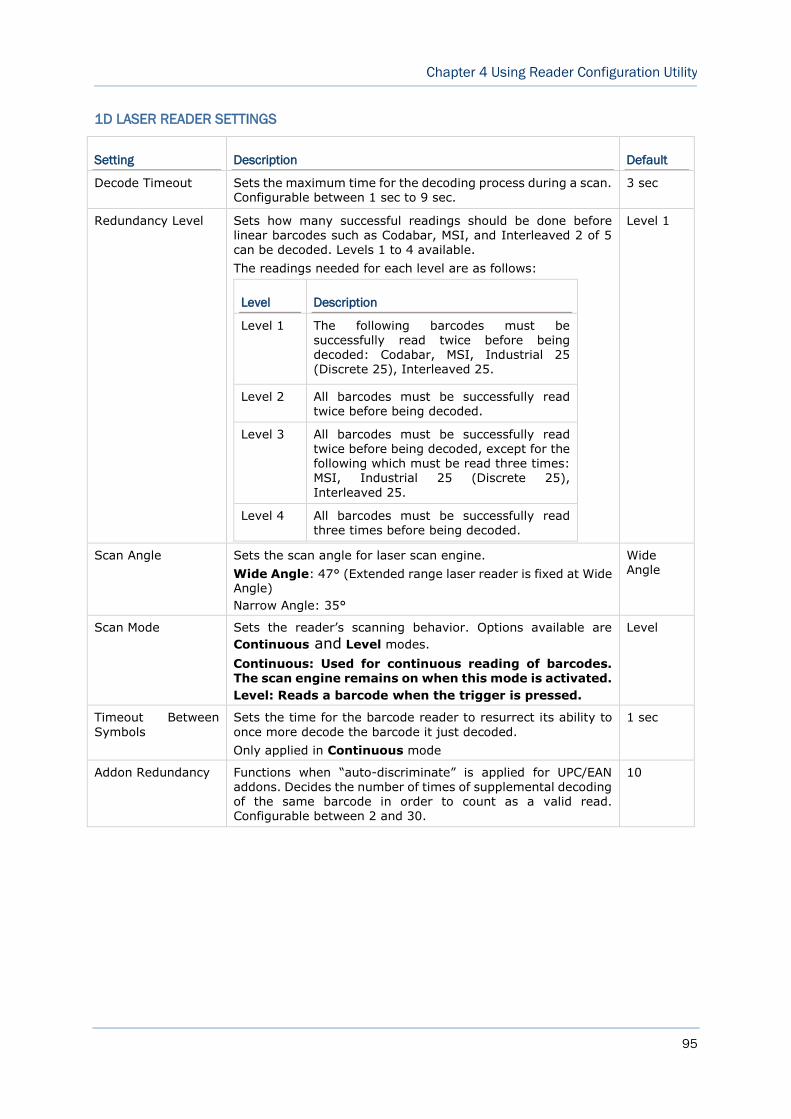
95
Chapter 4 Using Reader Configuration Utility
1D LASER READER SETTINGS
Setting Description Default
Decode Timeout Sets the maximum time for the decoding process during a scan. Configurable between 1 sec to 9 sec.
3 sec
Redundancy Level Sets how many successful readings should be done before linear barcodes such as Codabar, MSI, and Interleaved 2 of 5 can be decoded. Levels 1 to 4 available.
The readings needed for each level are as follows:
Level Description
Level 1 The following barcodes must be successfully read twice before being decoded: Codabar, MSI, Industrial 25 (Discrete 25), Interleaved 25.
Level 2 All barcodes must be successfully read twice before being decoded.
Level 3 All barcodes must be successfully read twice before being decoded, except for the following which must be read three times: MSI, Industrial 25 (Discrete 25),
Interleaved 25.
Level 4 All barcodes must be successfully read three times before being decoded.
Level 1
Scan Angle Sets the scan angle for laser scan engine.
Wide Angle: 47° (Extended range laser reader is fixed at Wide Angle)
Narrow Angle: 35°
Wide Angle
Scan Mode Sets the reader’s scanning behavior. Options available are
Continuous and Level modes.
Continuous: Used for continuous reading of barcodes. The scan engine remains on when this mode is activated.
Level: Reads a barcode when the trigger is pressed.
Level
Timeout Between
Symbols
Sets the time for the barcode reader to resurrect its ability to
once more decode the barcode it just decoded.
Only applied in Continuous mode
1 sec
Addon Redundancy Functions when “auto-discriminate” is applied for UPC/EAN addons. Decides the number of times of supplemental decoding of the same barcode in order to count as a valid read. Configurable between 2 and 30.
10
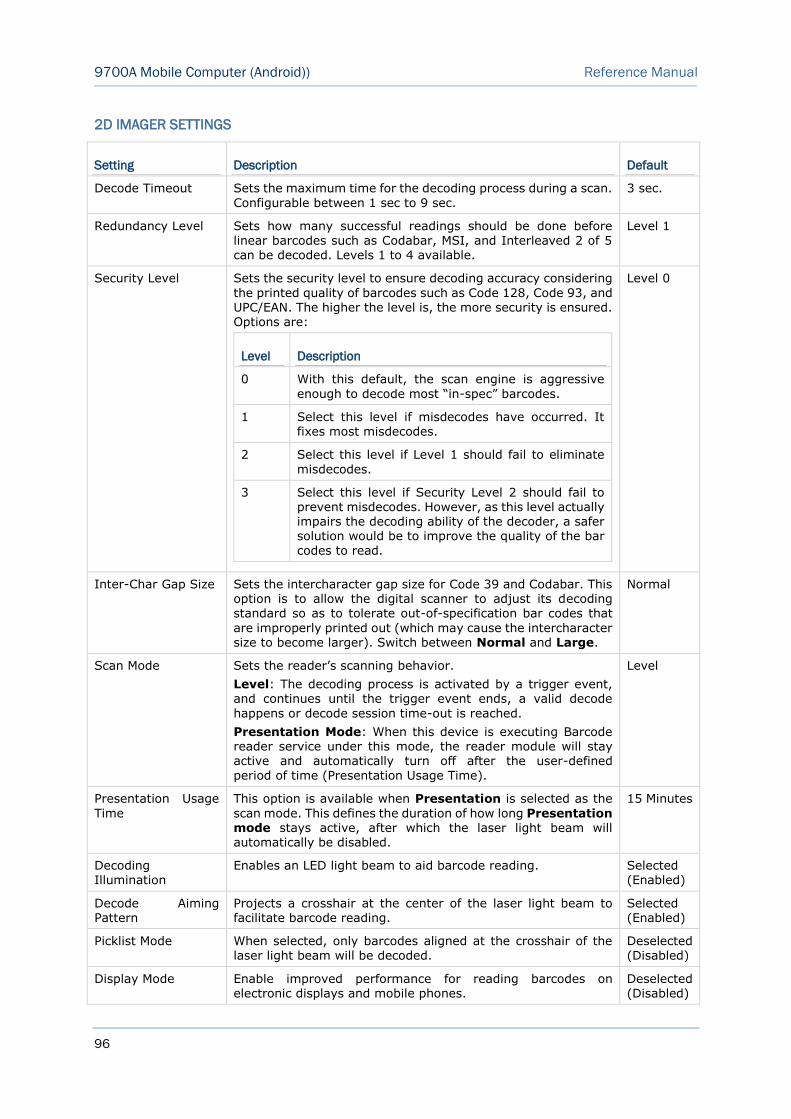
96
9700A Mobile Computer (Android)) Reference Manual
2D IMAGER SETTINGS
Setting Description Default
Decode Timeout Sets the maximum time for the decoding process during a scan.
Configurable between 1 sec to 9 sec.
3 sec.
Redundancy Level Sets how many successful readings should be done before linear barcodes such as Codabar, MSI, and Interleaved 2 of 5 can be decoded. Levels 1 to 4 available.
Level 1
Security Level Sets the security level to ensure decoding accuracy considering
the printed quality of barcodes such as Code 128, Code 93, and UPC/EAN. The higher the level is, the more security is ensured. Options are:
Level Description
0 With this default, the scan engine is aggressive
enough to decode most “in-spec” barcodes.
1 Select this level if misdecodes have occurred. It fixes most misdecodes.
2 Select this level if Level 1 should fail to eliminate
misdecodes.
3 Select this level if Security Level 2 should fail to prevent misdecodes. However, as this level actually impairs the decoding ability of the decoder, a safer solution would be to improve the quality of the bar
codes to read.
Level 0
Inter-Char Gap Size Sets the intercharacter gap size for Code 39 and Codabar. This option is to allow the digital scanner to adjust its decoding standard so as to tolerate out-of-specification bar codes that
are improperly printed out (which may cause the intercharacter size to become larger). Switch between Normal and Large.
Normal
Scan Mode Sets the reader’s scanning behavior.
Level: The decoding process is activated by a trigger event, and continues until the trigger event ends, a valid decode
happens or decode session time-out is reached.
Presentation Mode: When this device is executing Barcode reader service under this mode, the reader module will stay active and automatically turn off after the user-defined
period of time (Presentation Usage Time).
Level
Presentation Usage
Time
This option is available when Presentation is selected as the
scan mode. This defines the duration of how long Presentation mode stays active, after which the laser light beam will automatically be disabled.
15 Minutes
Decoding Illumination
Enables an LED light beam to aid barcode reading. Selected (Enabled)
Decode Aiming Pattern
Projects a crosshair at the center of the laser light beam to facilitate barcode reading.
Selected (Enabled)
Picklist Mode When selected, only barcodes aligned at the crosshair of the laser light beam will be decoded.
Deselected (Disabled)
Display Mode Enable improved performance for reading barcodes on
electronic displays and mobile phones.
Deselected
(Disabled)
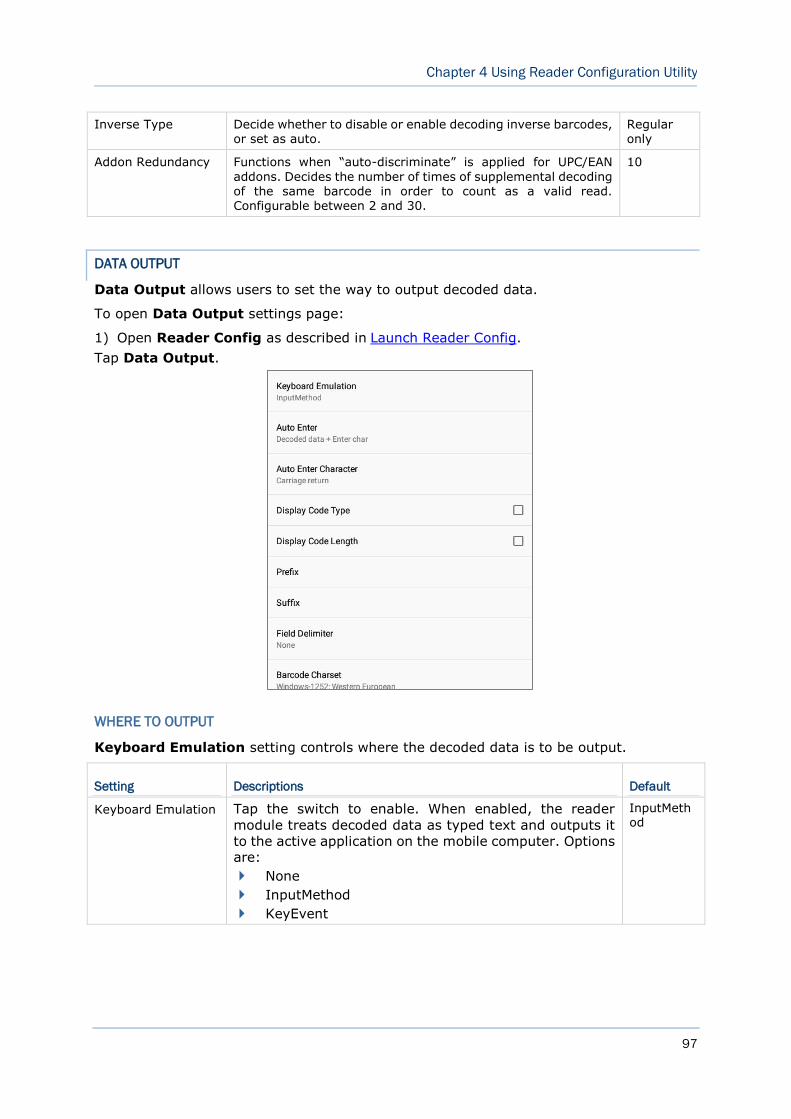
97
Chapter 4 Using Reader Configuration Utility
Inverse Type Decide whether to disable or enable decoding inverse barcodes, or set as auto.
Regular only
Addon Redundancy Functions when “auto-discriminate” is applied for UPC/EAN
addons. Decides the number of times of supplemental decoding of the same barcode in order to count as a valid read. Configurable between 2 and 30.
10
DATA OUTPUT
Data Output allows users to set the way to output decoded data.
To open Data Output settings page:
Open Reader Config as described in Launch Reader Config. 1)
Tap Data Output.
WHERE TO OUTPUT
Keyboard Emulation setting controls where the decoded data is to be output.
Setting Descriptions Default
Keyboard Emulation Tap the switch to enable. When enabled, the reader
module treats decoded data as typed text and outputs it
to the active application on the mobile computer. Options are:
None
InputMethod
KeyEvent
InputMethod
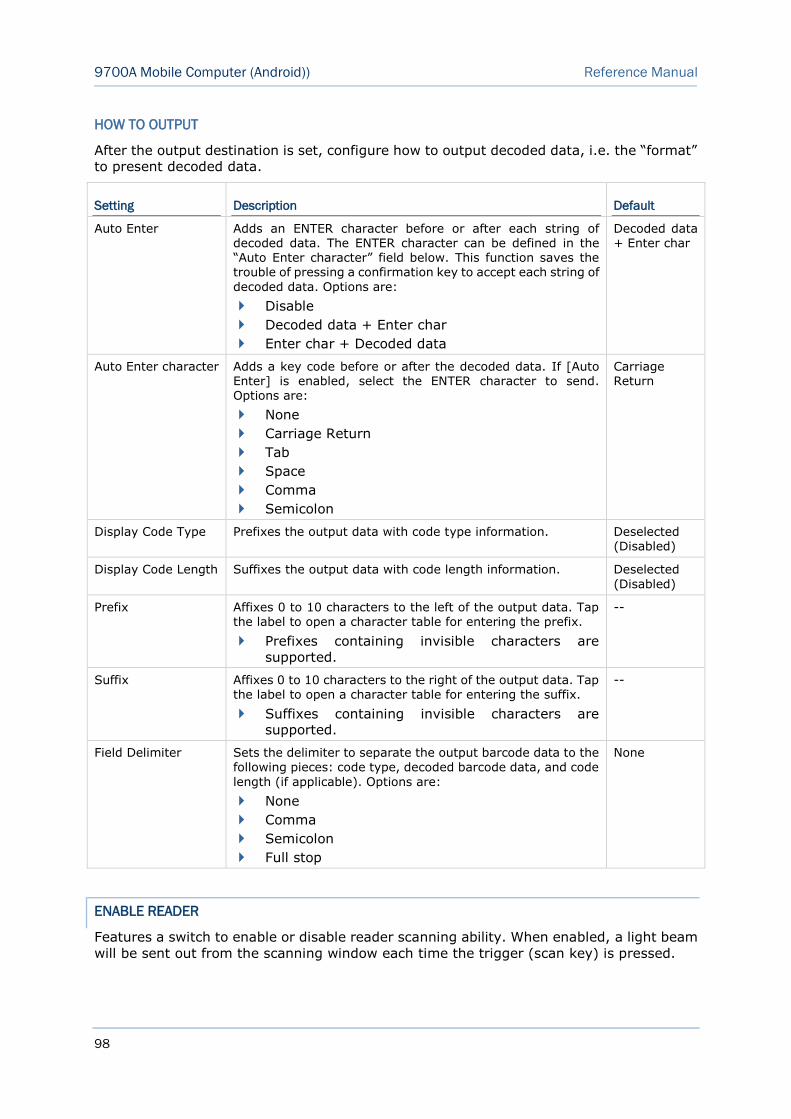
98
9700A Mobile Computer (Android)) Reference Manual
HOW TO OUTPUT
After the output destination is set, configure how to output decoded data, i.e. the “format”
to present decoded data.
Setting Description Default
Auto Enter Adds an ENTER character before or after each string of decoded data. The ENTER character can be defined in the “Auto Enter character” field below. This function saves the trouble of pressing a confirmation key to accept each string of
decoded data. Options are:
Disable
Decoded data + Enter char
Enter char + Decoded data
Decoded data + Enter char
Auto Enter character Adds a key code before or after the decoded data. If [Auto Enter] is enabled, select the ENTER character to send. Options are:
None
Carriage Return
Tab
Space
Comma
Semicolon
Carriage Return
Display Code Type Prefixes the output data with code type information. Deselected
(Disabled)
Display Code Length Suffixes the output data with code length information. Deselected
(Disabled)
Prefix Affixes 0 to 10 characters to the left of the output data. Tap the label to open a character table for entering the prefix.
Prefixes containing invisible characters are
supported.
--
Suffix Affixes 0 to 10 characters to the right of the output data. Tap the label to open a character table for entering the suffix.
Suffixes containing invisible characters are supported.
--
Field Delimiter Sets the delimiter to separate the output barcode data to the
following pieces: code type, decoded barcode data, and code
length (if applicable). Options are:
None
Comma
Semicolon
Full stop
None
ENABLE READER
Features a switch to enable or disable reader scanning ability. When enabled, a light beam
will be sent out from the scanning window each time the trigger (scan key) is pressed.
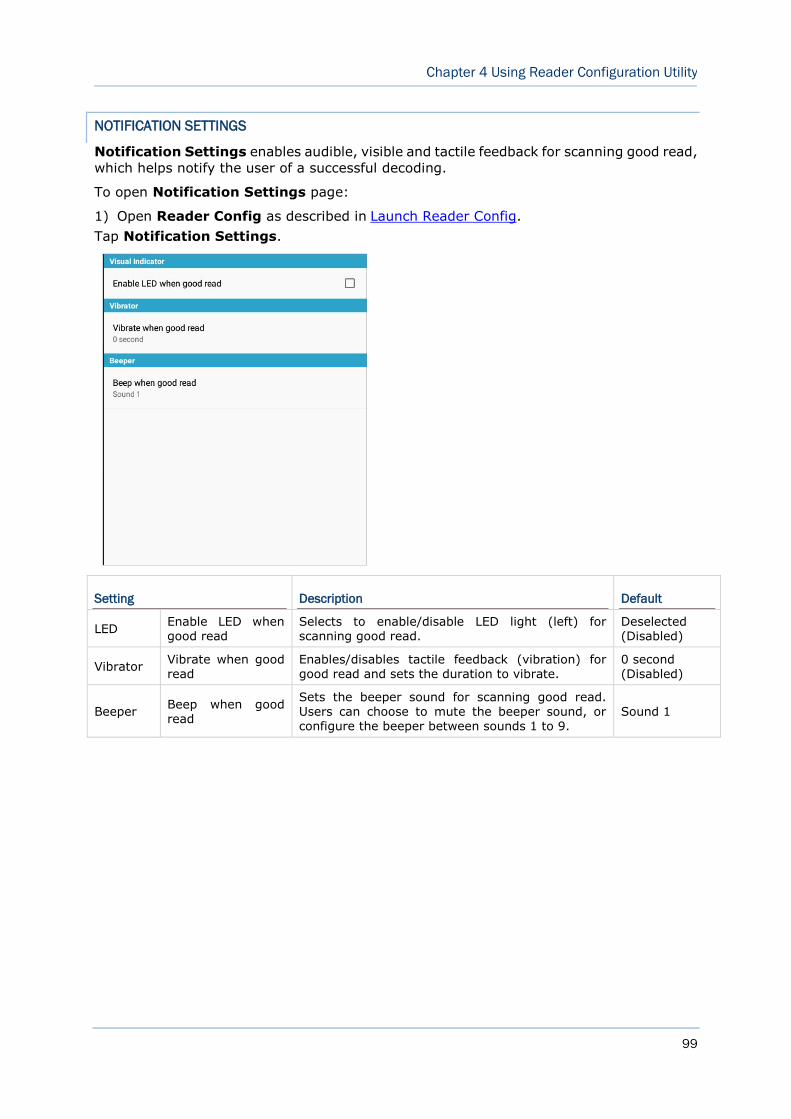
99
Chapter 4 Using Reader Configuration Utility
NOTIFICATION SETTINGS
Notification Settings enables audible, visible and tactile feedback for scanning good read,
which helps notify the user of a successful decoding.
To open Notification Settings page:
Open Reader Config as described in Launch Reader Config. 1)
Tap Notification Settings.
Setting Description Default
LED Enable LED when good read
Selects to enable/disable LED light (left) for scanning good read.
Deselected (Disabled)
Vibrator Vibrate when good read
Enables/disables tactile feedback (vibration) for good read and sets the duration to vibrate.
0 second (Disabled)
Beeper Beep when good read
Sets the beeper sound for scanning good read. Users can choose to mute the beeper sound, or configure the beeper between sounds 1 to 9.
Sound 1
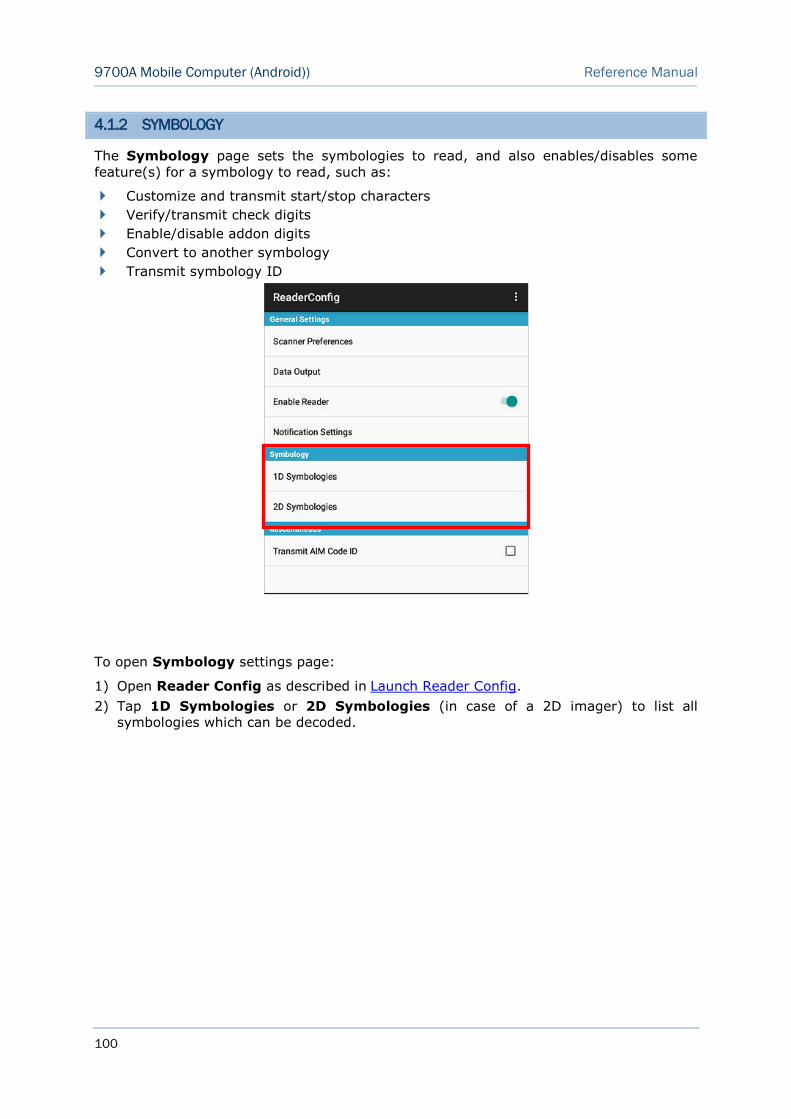
100
9700A Mobile Computer (Android)) Reference Manual
4.1.2 SYMBOLOGY
The Symbology page sets the symbologies to read, and also enables/disables some
feature(s) for a symbology to read, such as:
Customize and transmit start/stop characters
Verify/transmit check digits
Enable/disable addon digits
Convert to another symbology
Transmit symbology ID
To open Symbology settings page:
Open Reader Config as described in Launch Reader Config. 1)
Tap 1D Symbologies or 2D Symbologies (in case of a 2D imager) to list all 2)
symbologies which can be decoded.
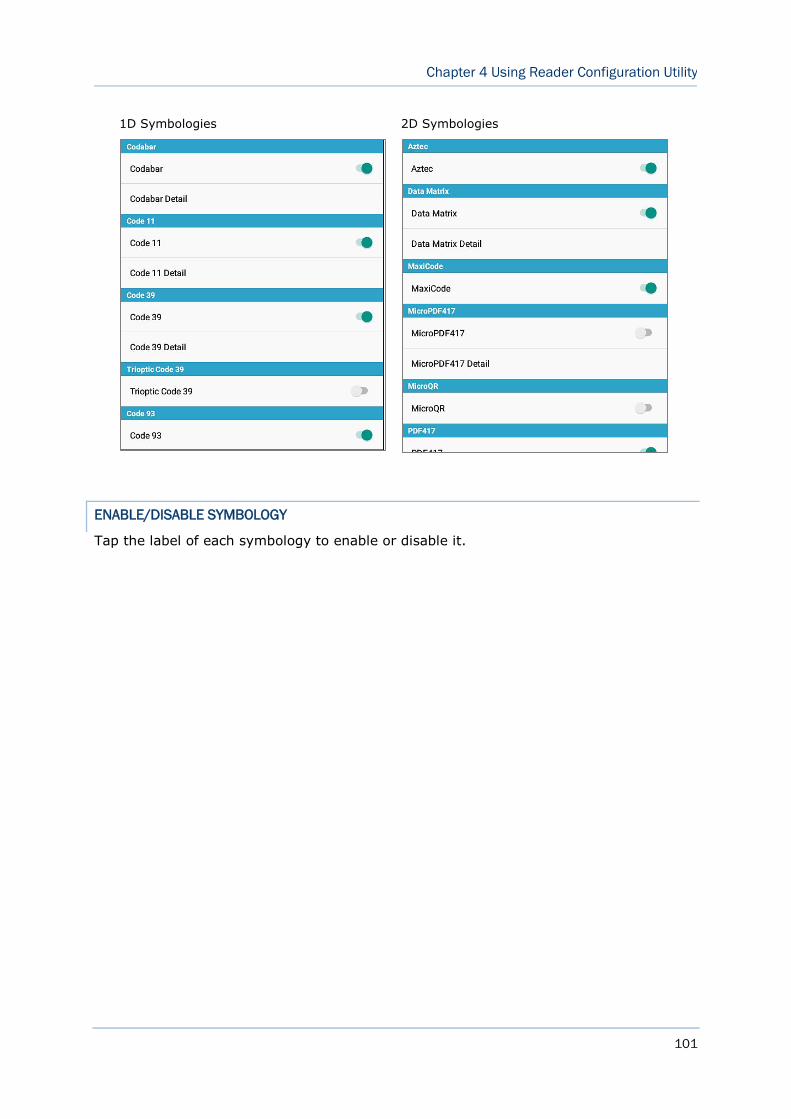
101
Chapter 4 Using Reader Configuration Utility
1D Symbologies 2D Symbologies
ENABLE/DISABLE SYMBOLOGY
Tap the label of each symbology to enable or disable it.
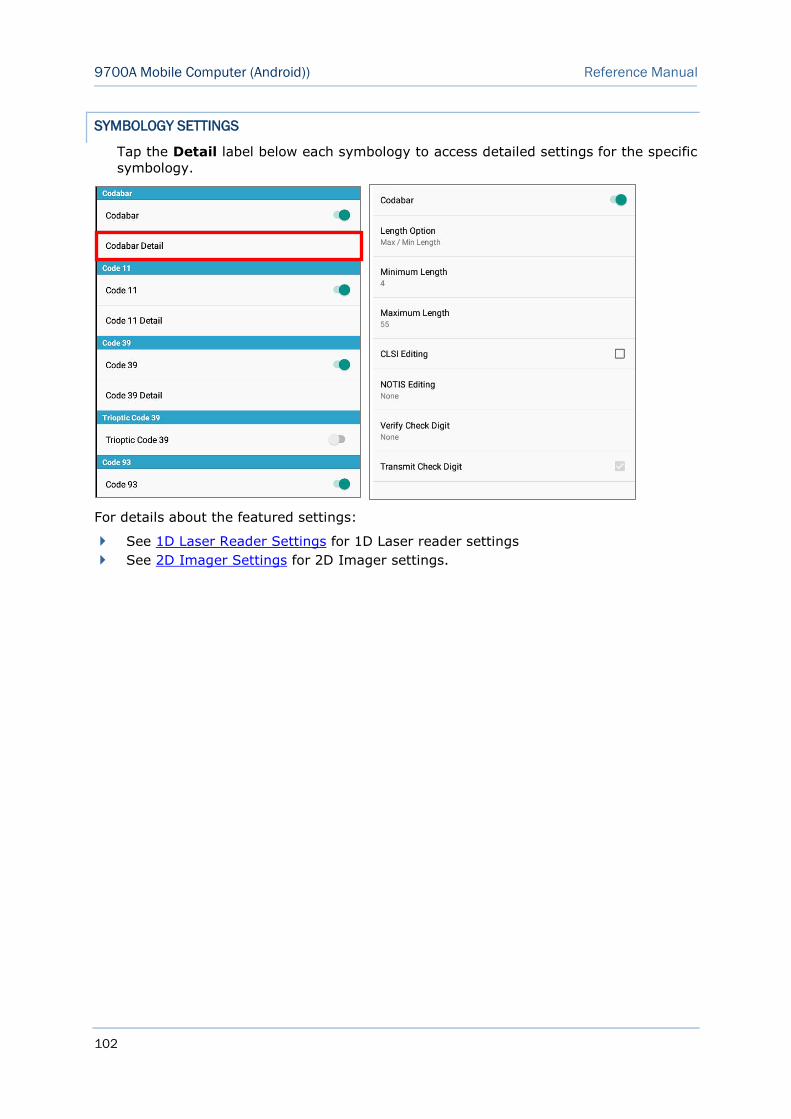
102
9700A Mobile Computer (Android)) Reference Manual
SYMBOLOGY SETTINGS
Tap the Detail label below each symbology to access detailed settings for the specific
symbology.
For details about the featured settings:
See 1D Laser Reader Settings for 1D Laser reader settings
See 2D Imager Settings for 2D Imager settings.
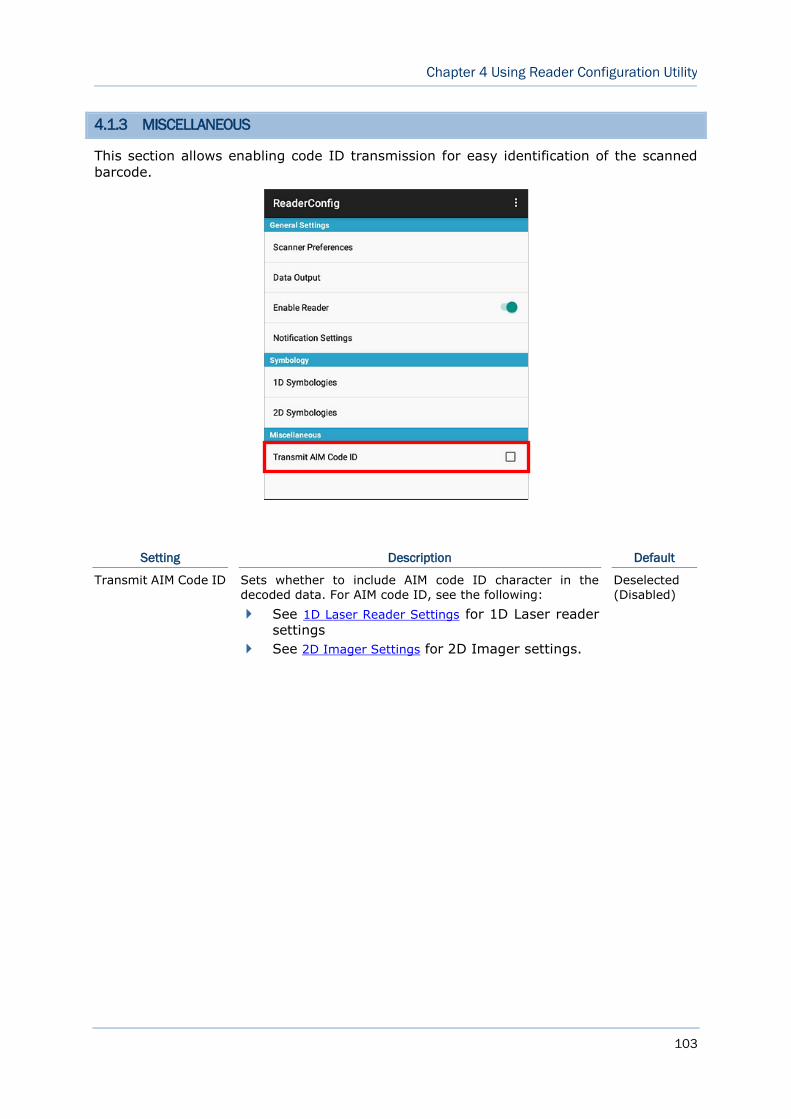
103
Chapter 4 Using Reader Configuration Utility
4.1.3 MISCELLANEOUS
This section allows enabling code ID transmission for easy identification of the scanned
barcode.
Setting Description Default
Transmit AIM Code ID Sets whether to include AIM code ID character in the
decoded data. For AIM code ID, see the following:
See 1D Laser Reader Settings for 1D Laser reader settings
See 2D Imager Settings for 2D Imager settings.
Deselected
(Disabled)
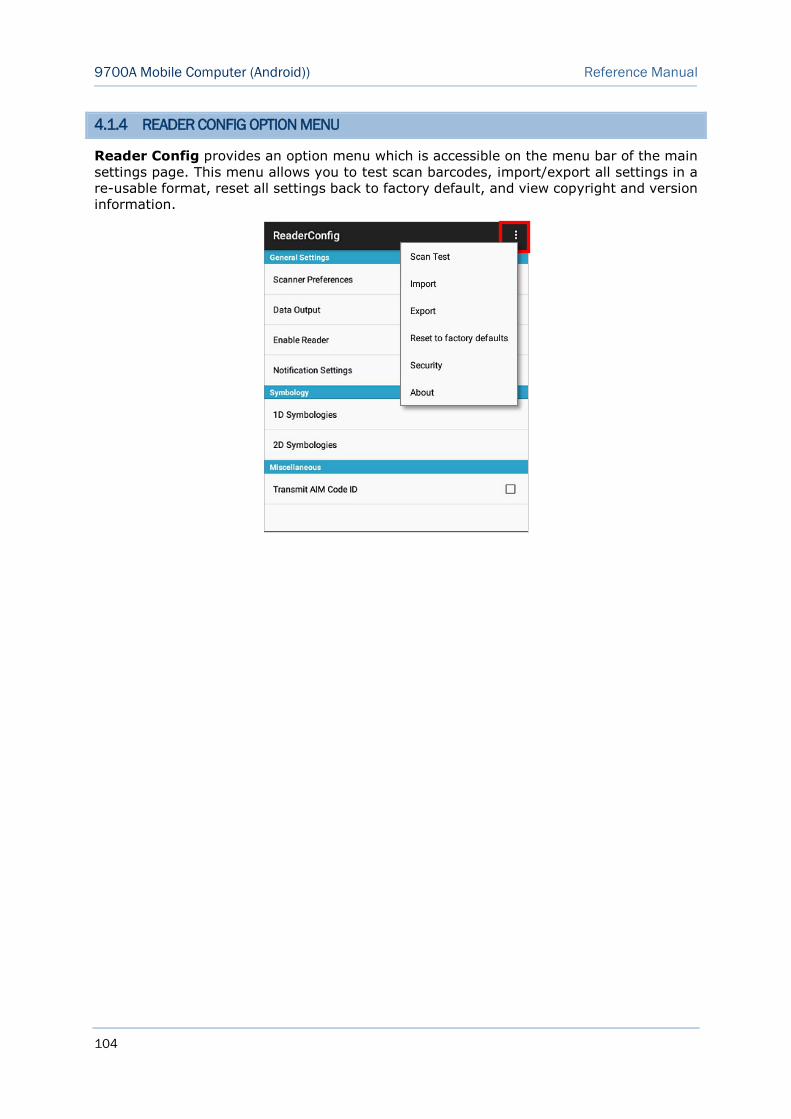
104
9700A Mobile Computer (Android)) Reference Manual
4.1.4 READER CONFIG OPTION MENU
Reader Config provides an option menu which is accessible on the menu bar of the main
settings page. This menu allows you to test scan barcodes, import/export all settings in a
re-usable format, reset all settings back to factory default, and view copyright and version
information.
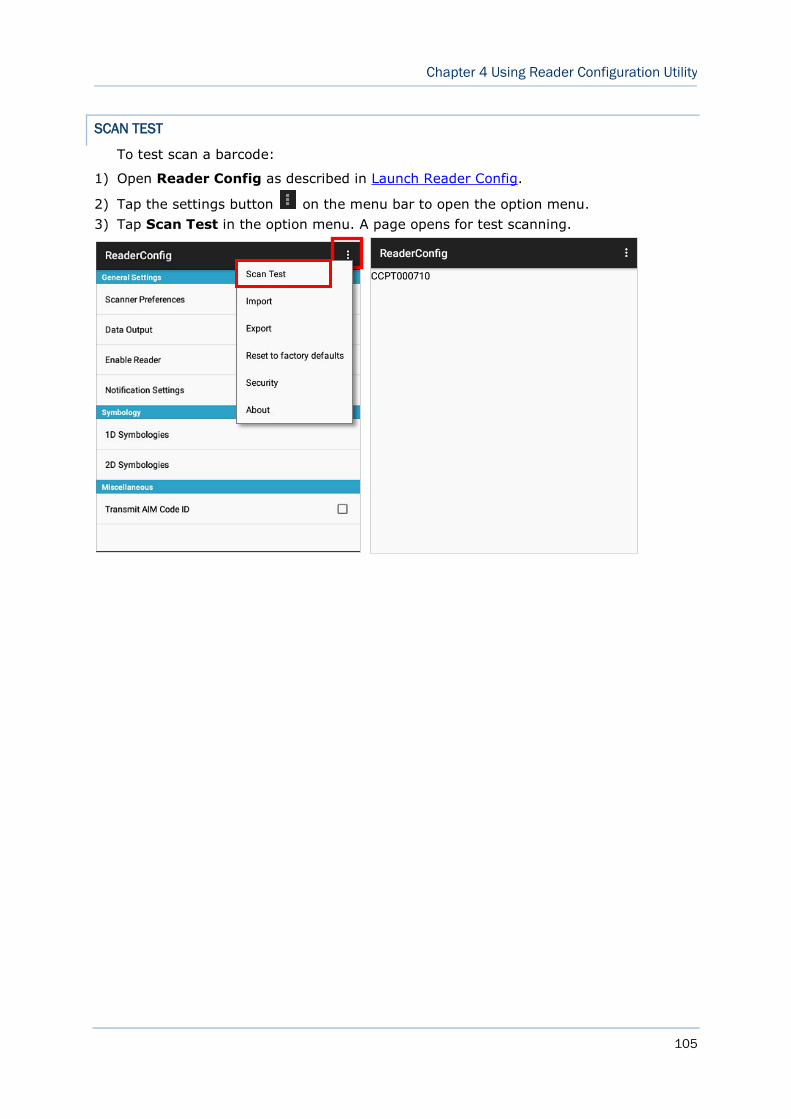
105
Chapter 4 Using Reader Configuration Utility
SCAN TEST
To test scan a barcode:
Open Reader Config as described in Launch Reader Config. 1)
Tap the settings button on the menu bar to open the option menu. 2)
Tap Scan Test in the option menu. A page opens for test scanning. 3)
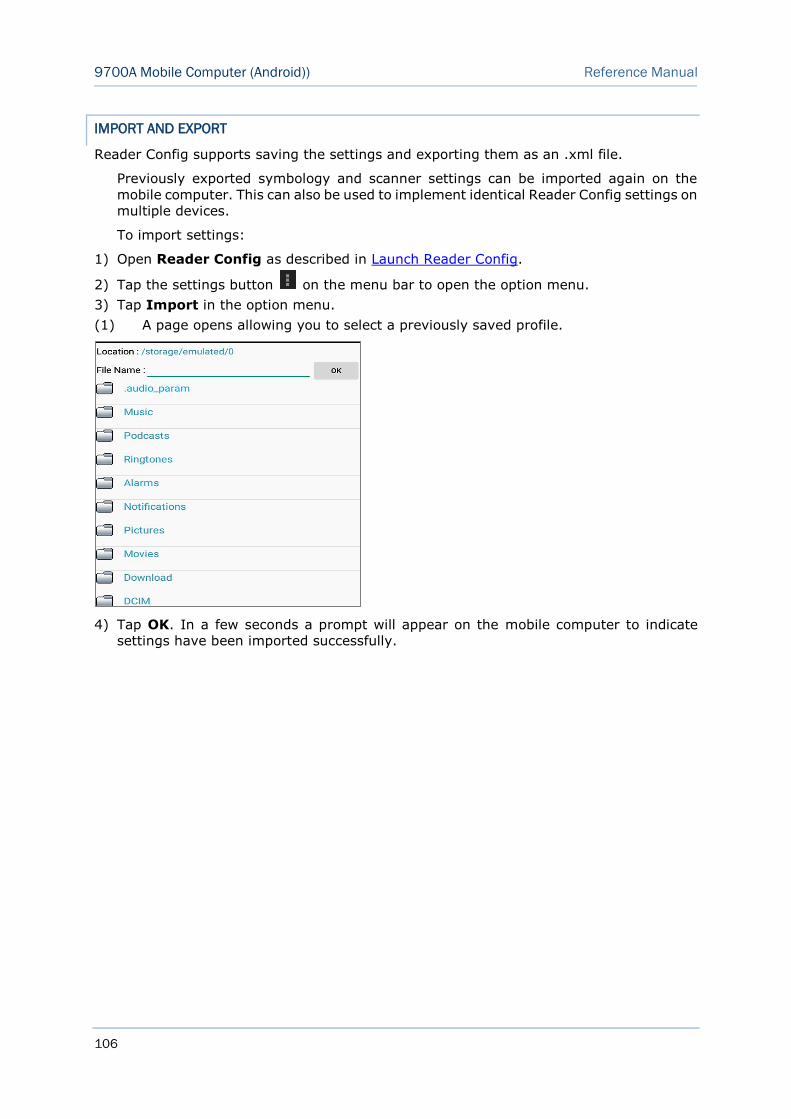
106
9700A Mobile Computer (Android)) Reference Manual
IMPORT AND EXPORT
Reader Config supports saving the settings and exporting them as an .xml file.
Previously exported symbology and scanner settings can be imported again on the
mobile computer. This can also be used to implement identical Reader Config settings on
multiple devices.
To import settings:
Open Reader Config as described in Launch Reader Config. 1)
Tap the settings button on the menu bar to open the option menu. 2)
Tap Import in the option menu. 3)
(1) A page opens allowing you to select a previously saved profile.
Tap OK. In a few seconds a prompt will appear on the mobile computer to indicate 4)
settings have been imported successfully.
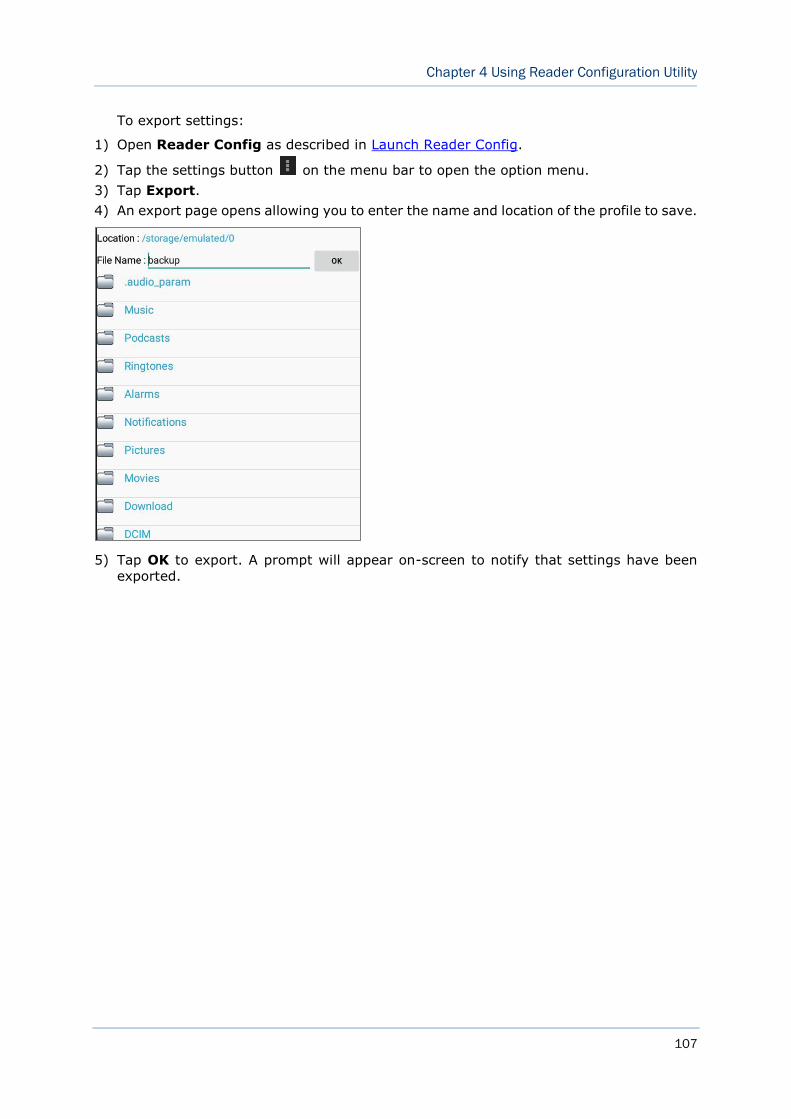
107
Chapter 4 Using Reader Configuration Utility
To export settings:
Open Reader Config as described in Launch Reader Config. 1)
Tap the settings button on the menu bar to open the option menu. 2)
Tap Export. 3)
An export page opens allowing you to enter the name and location of the profile to save. 4)
Tap OK to export. A prompt will appear on-screen to notify that settings have been 5)
exported.
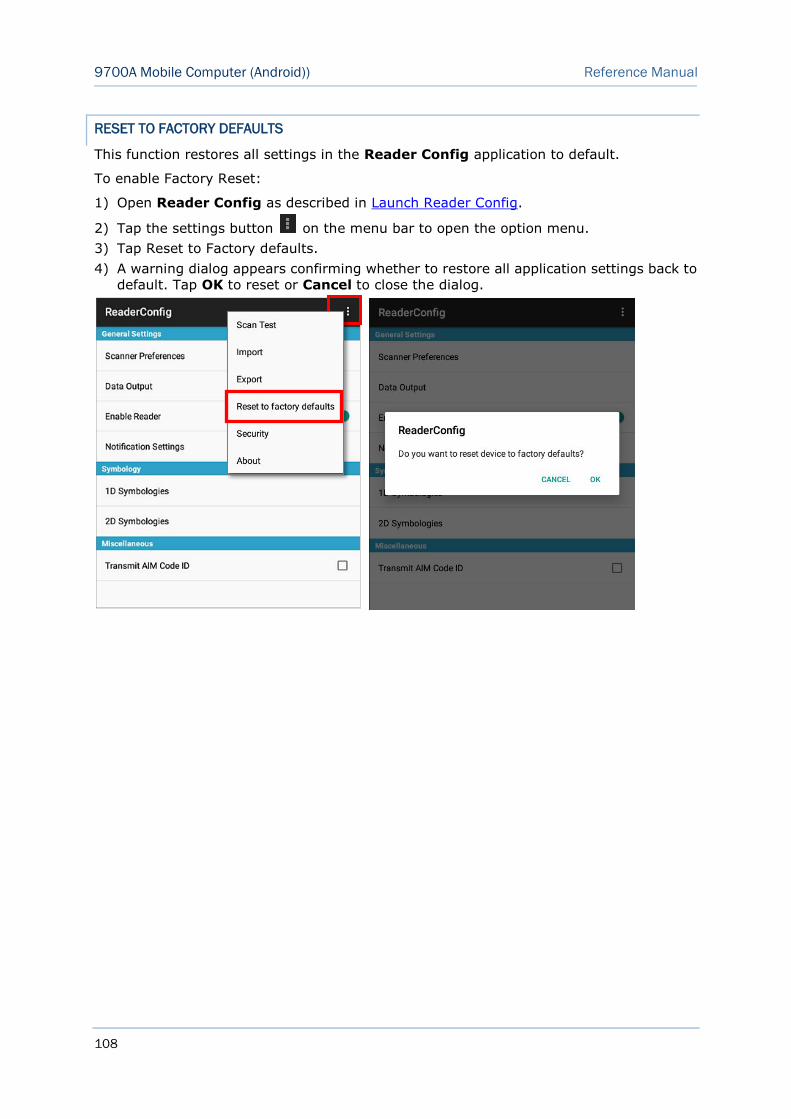
108
9700A Mobile Computer (Android)) Reference Manual
RESET TO FACTORY DEFAULTS
This function restores all settings in the Reader Config application to default.
To enable Factory Reset:
Open Reader Config as described in Launch Reader Config. 1)
Tap the settings button on the menu bar to open the option menu. 2)
Tap Reset to Factory defaults. 3)
A warning dialog appears confirming whether to restore all application settings back to 4)
default. Tap OK to reset or Cancel to close the dialog.
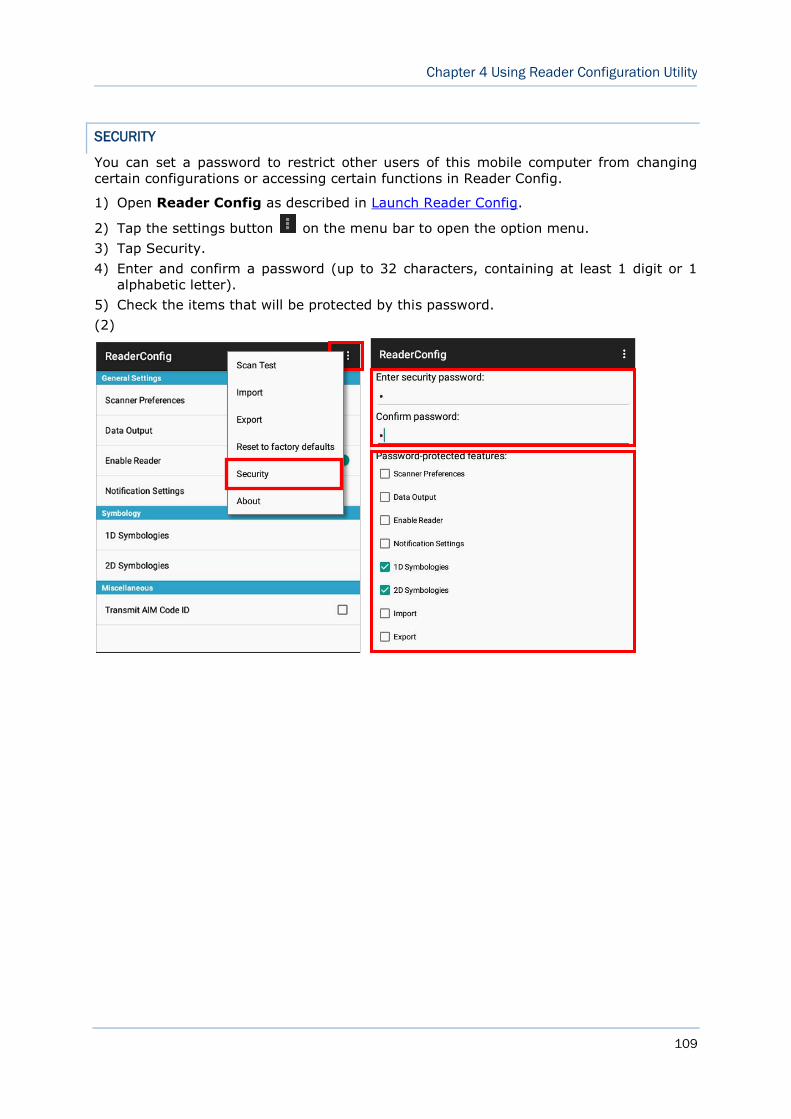
109
Chapter 4 Using Reader Configuration Utility
SECURITY
You can set a password to restrict other users of this mobile computer from changing
certain configurations or accessing certain functions in Reader Config.
Open Reader Config as described in Launch Reader Config. 1)
Tap the settings button on the menu bar to open the option menu. 2)
Tap Security. 3)
Enter and confirm a password (up to 32 characters, containing at least 1 digit or 1 4)
alphabetic letter).
Check the items that will be protected by this password. 5)
(2)
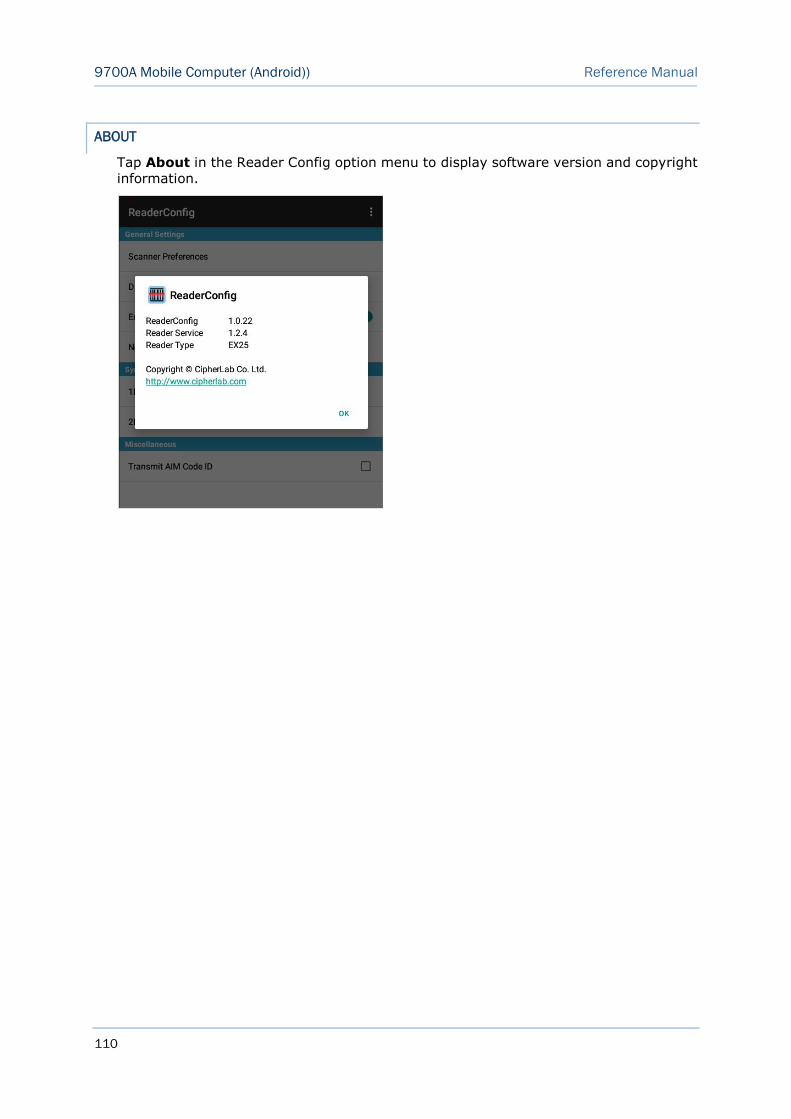
110
9700A Mobile Computer (Android)) Reference Manual
ABOUT
Tap About in the Reader Config option menu to display software version and copyright
information.
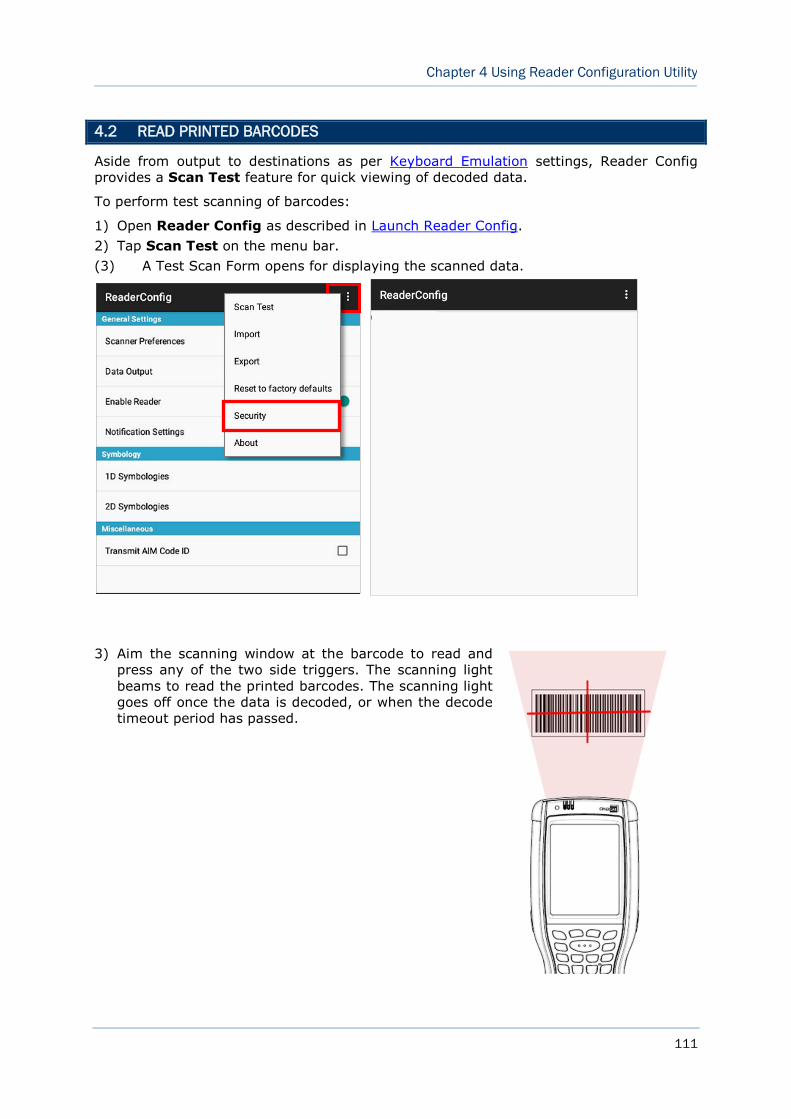
111
Chapter 4 Using Reader Configuration Utility
4.2 READ PRINTED BARCODES
Aside from output to destinations as per Keyboard Emulation settings, Reader Config
provides a Scan Test feature for quick viewing of decoded data.
To perform test scanning of barcodes:
Open Reader Config as described in Launch Reader Config. 1)
Tap Scan Test on the menu bar. 2)
(3) A Test Scan Form opens for displaying the scanned data.
Aim the scanning window at the barcode to read and 3)
press any of the two side triggers. The scanning light
beams to read the printed barcodes. The scanning light
goes off once the data is decoded, or when the decode
timeout period has passed.
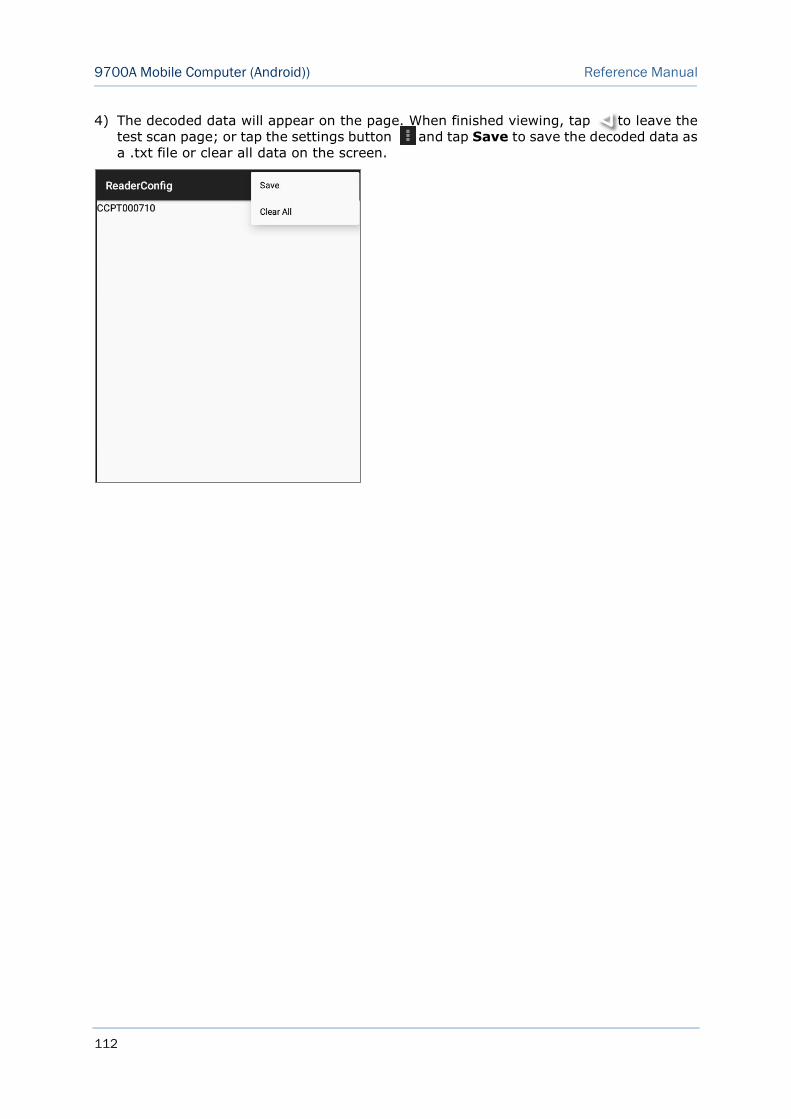
112
9700A Mobile Computer (Android)) Reference Manual
The decoded data will appear on the page. When finished viewing, tap to leave the 4)
test scan page; or tap the settings button and tap Save to save the decoded data as
a .txt file or clear all data on the screen.
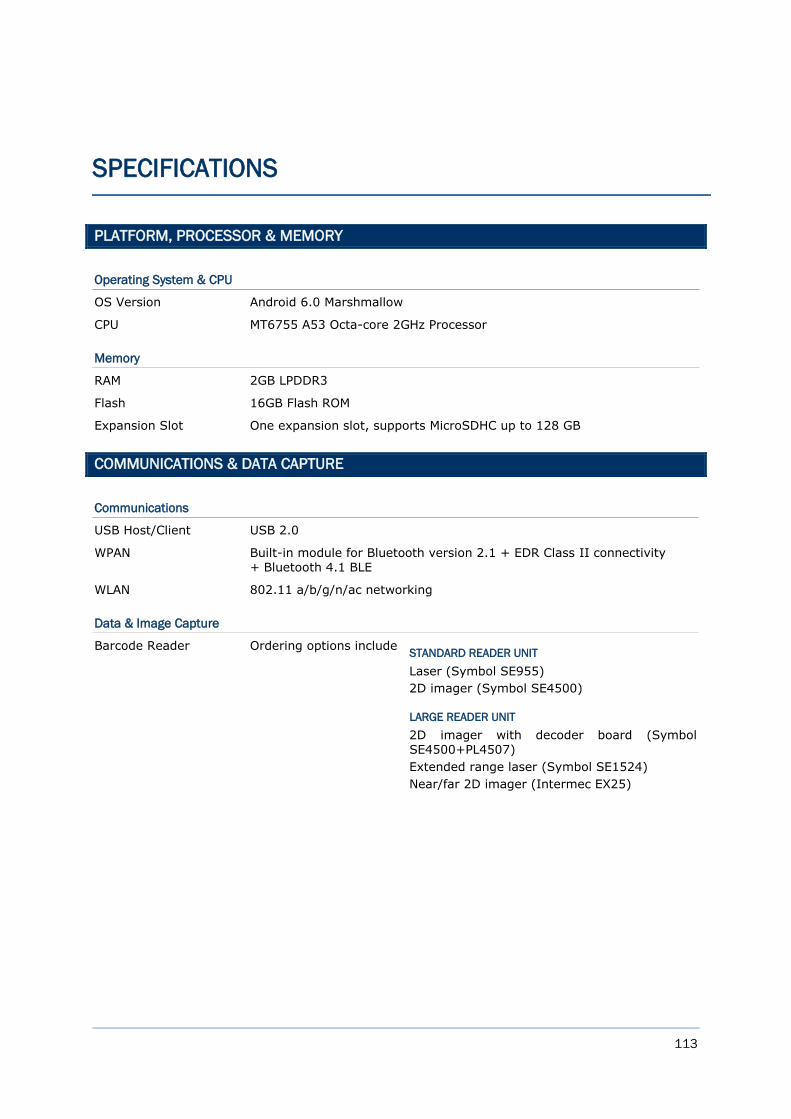
113
PLATFORM, PROCESSOR & MEMORY
Operating System & CPU
OS Version Android 6.0 Marshmallow
CPU MT6755 A53 Octa-core 2GHz Processor
Memory
RAM 2GB LPDDR3
Flash 16GB Flash ROM
Expansion Slot One expansion slot, supports MicroSDHC up to 128 GB
COMMUNICATIONS & DATA CAPTURE
Communications
USB Host/Client USB 2.0
WPAN Built-in module for Bluetooth version 2.1 + EDR Class II connectivity + Bluetooth 4.1 BLE
WLAN 802.11 a/b/g/n/ac networking
Data & Image Capture
Barcode Reader Ordering options include
STANDARD READER UNIT
Laser (Symbol SE955)
2D imager (Symbol SE4500)
LARGE READER UNIT
2D imager with decoder board (Symbol SE4500+PL4507)
Extended range laser (Symbol SE1524)
Near/far 2D imager (Intermec EX25)
SPECIFICATIONS
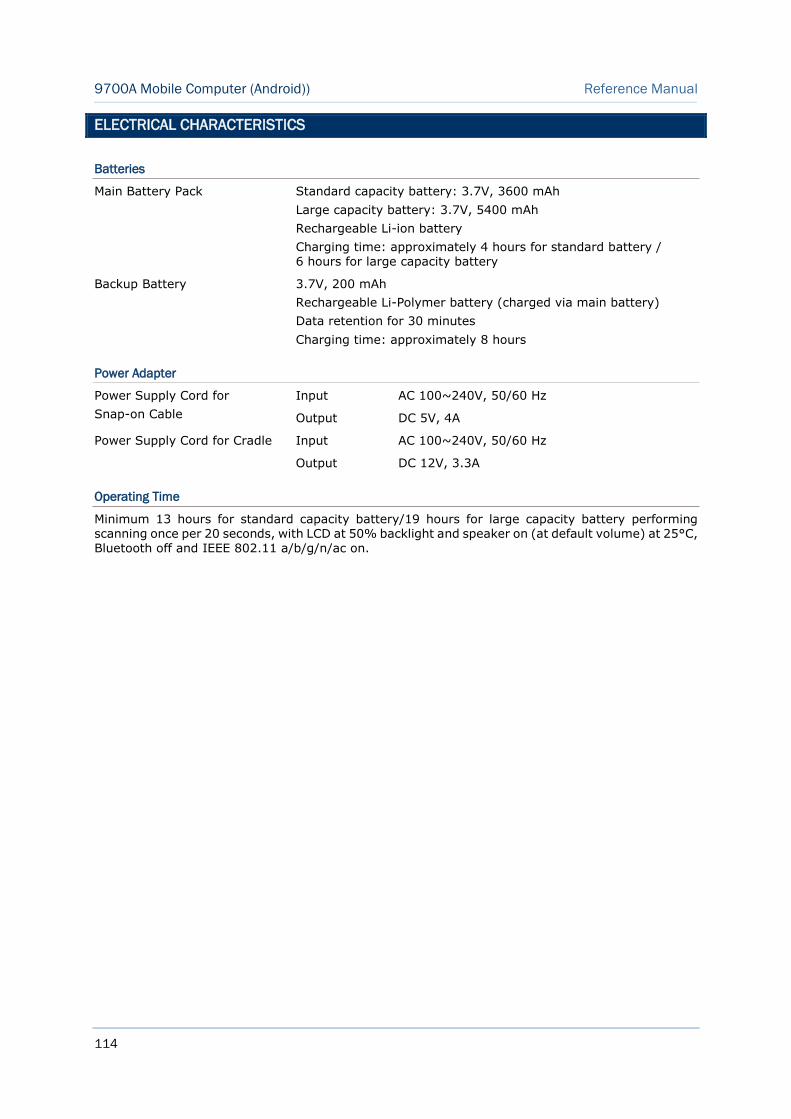
114
9700A Mobile Computer (Android)) Reference Manual
ELECTRICAL CHARACTERISTICS
Batteries
Main Battery Pack Standard capacity battery: 3.7V, 3600 mAh
Large capacity battery: 3.7V, 5400 mAh
Rechargeable Li-ion battery
Charging time: approximately 4 hours for standard battery / 6 hours for large capacity battery
Backup Battery 3.7V, 200 mAh
Rechargeable Li-Polymer battery (charged via main battery)
Data retention for 30 minutes
Charging time: approximately 8 hours
Power Adapter
Power Supply Cord for
Snap-on Cable
Input AC 100~240V, 50/60 Hz
Output DC 5V, 4A
Power Supply Cord for Cradle Input AC 100~240V, 50/60 Hz
Output DC 12V, 3.3A
Operating Time
Minimum 13 hours for standard capacity battery/19 hours for large capacity battery performing scanning once per 20 seconds, with LCD at 50% backlight and speaker on (at default volume) at 25°C,
Bluetooth off and IEEE 802.11 a/b/g/n/ac on.
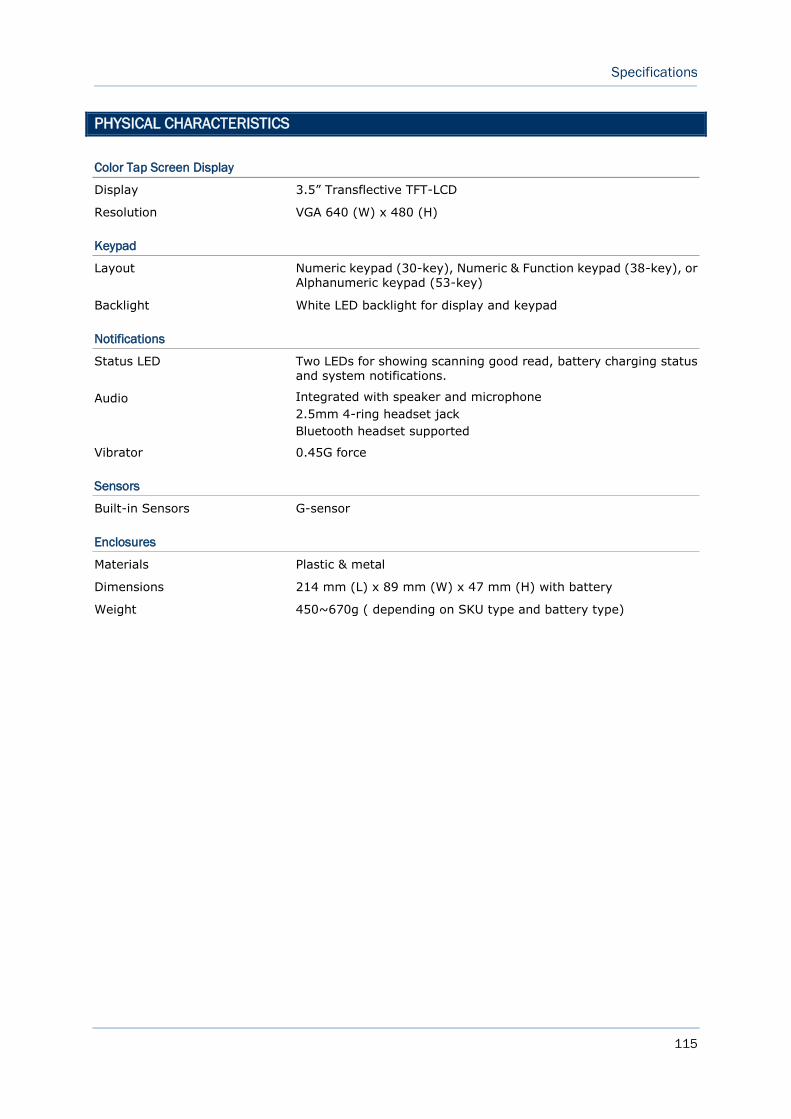
115
Specifications
PHYSICAL CHARACTERISTICS
Color Tap Screen Display
Display 3.5” Transflective TFT-LCD
Resolution VGA 640 (W) x 480 (H)
Keypad
Layout Numeric keypad (30-key), Numeric & Function keypad (38-key), or Alphanumeric keypad (53-key)
Backlight White LED backlight for display and keypad
Notifications
Status LED Two LEDs for showing scanning good read, battery charging status and system notifications.
Audio Integrated with speaker and microphone
2.5mm 4-ring headset jack
Bluetooth headset supported
Vibrator 0.45G force
Sensors
Built-in Sensors G-sensor
Enclosures
Materials Plastic & metal
Dimensions 214 mm (L) x 89 mm (W) x 47 mm (H) with battery
Weight 450~670g ( depending on SKU type and battery type)
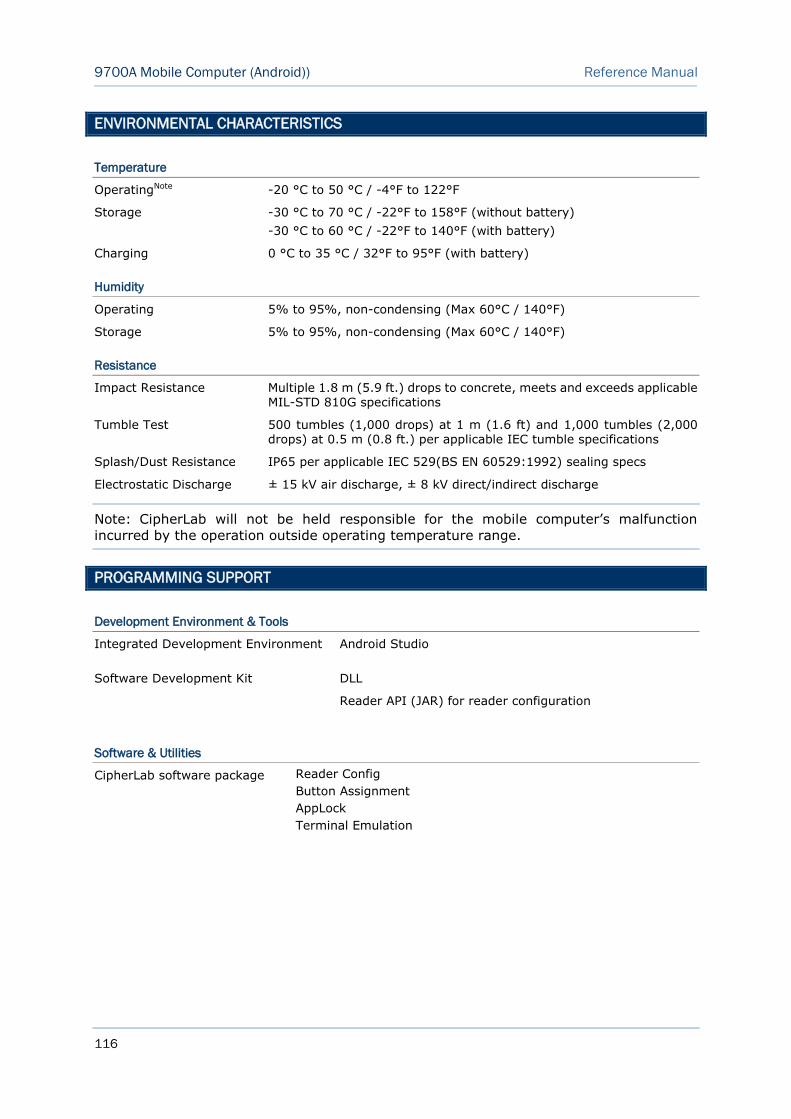
116
9700A Mobile Computer (Android)) Reference Manual
ENVIRONMENTAL CHARACTERISTICS
Temperature
OperatingNote -20 °C to 50 °C / -4°F to 122°F
Storage -30 °C to 70 °C / -22°F to 158°F (without battery)
-30 °C to 60 °C / -22°F to 140°F (with battery)
Charging 0 °C to 35 °C / 32°F to 95°F (with battery)
Humidity
Operating 5% to 95%, non-condensing (Max 60°C / 140°F)
Storage 5% to 95%, non-condensing (Max 60°C / 140°F)
Resistance
Impact Resistance Multiple 1.8 m (5.9 ft.) drops to concrete, meets and exceeds applicable MIL-STD 810G specifications
Tumble Test 500 tumbles (1,000 drops) at 1 m (1.6 ft) and 1,000 tumbles (2,000 drops) at 0.5 m (0.8 ft.) per applicable IEC tumble specifications
Splash/Dust Resistance IP65 per applicable IEC 529(BS EN 60529:1992) sealing specs
Electrostatic Discharge ± 15 kV air discharge, ± 8 kV direct/indirect discharge
Note: CipherLab will not be held responsible for the mobile computer’s malfunction
incurred by the operation outside operating temperature range.
PROGRAMMING SUPPORT
Development Environment & Tools
Integrated Development Environment Android Studio
Software Development Kit DLL
Reader API (JAR) for reader configuration
Software & Utilities
CipherLab software package Reader Config
Button Assignment
AppLock
Terminal Emulation

117
Specifications
ACCESSORIES
Accessory Options
Snap-on Charging and Communication Cable (USB or RS-232)
Charging & Communication Cradle
Pistol Grip
Snap-on Car Charger
4-Slot Battery Charger
4-Slot Charging Cradle
Vehicle Cradle
Belt Holster

118
9700A Mobile Computer supports the following reader types. Reader availability depends on
the hardware integrated on the mobile computer.
Scan Engine ID
1D Laser SE955
1D Extended Range Laser (ER Laser) SE1524
2D 2D Imager SE4500
SE4500 + PL4507
2D Near/far 2D Imager (N/F 2D) EX25
Reader combination allowed is either 1D or 2D. When you hit a physical scan key, the
mobile computer reads a printed barcode which is in position.
Note: 1D and 2D scan engines don’t coexist on the mobile computer because they are both
barcode readers and the mobile computer allows only one barcode reader on board.
IN THIS CHAPTER
Symbologies Supported ................................................... 119
Configurable Properties Supported .................................... 120
Appendix I
SCAN ENGINE SETTINGS
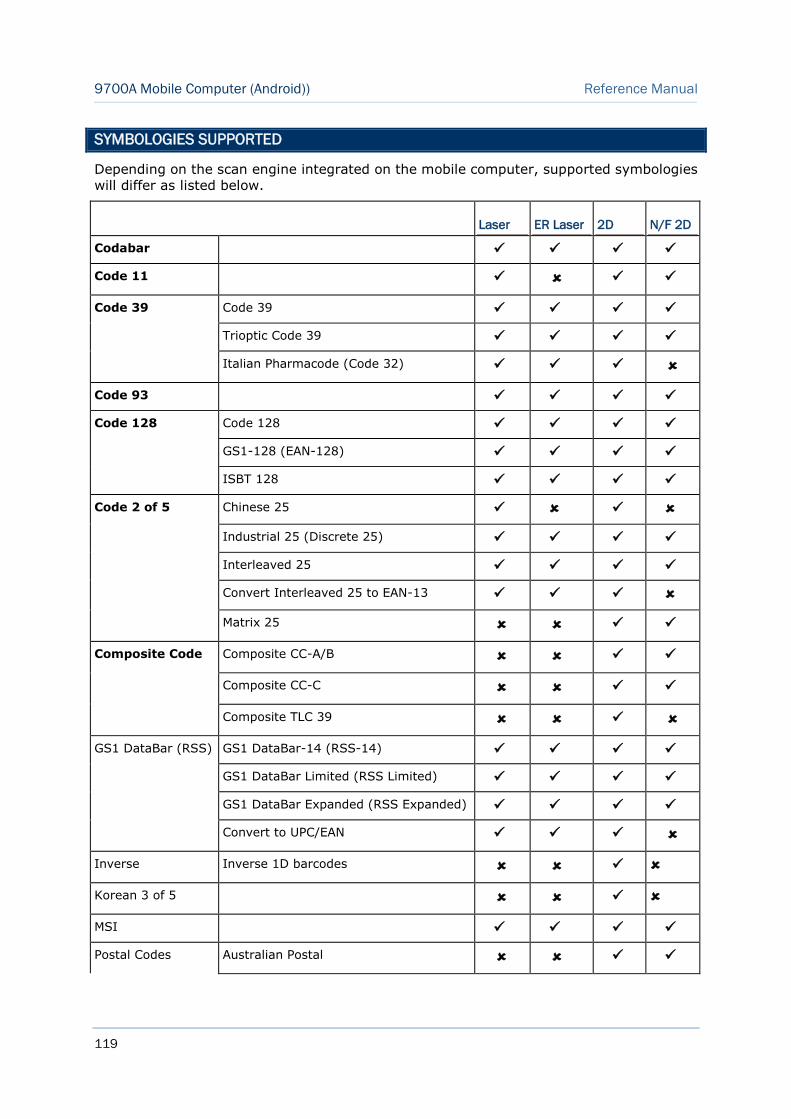
119
9700A Mobile Computer (Android)) Reference Manual
SYMBOLOGIES SUPPORTED
Depending on the scan engine integrated on the mobile computer, supported symbologies
will differ as listed below.
Laser ER Laser 2D N/F 2D
Codabar
Code 11
Code 39 Code 39
Trioptic Code 39
Italian Pharmacode (Code 32)
Code 93
Code 128 Code 128
GS1-128 (EAN-128)
ISBT 128
Code 2 of 5 Chinese 25
Industrial 25 (Discrete 25)
Interleaved 25
Convert Interleaved 25 to EAN-13
Matrix 25
Composite Code Composite CC-A/B
Composite CC-C
Composite TLC 39
GS1 DataBar (RSS) GS1 DataBar-14 (RSS-14)
GS1 DataBar Limited (RSS Limited)
GS1 DataBar Expanded (RSS Expanded)
Convert to UPC/EAN
Inverse Inverse 1D barcodes
Korean 3 of 5
MSI
Postal Codes Australian Postal
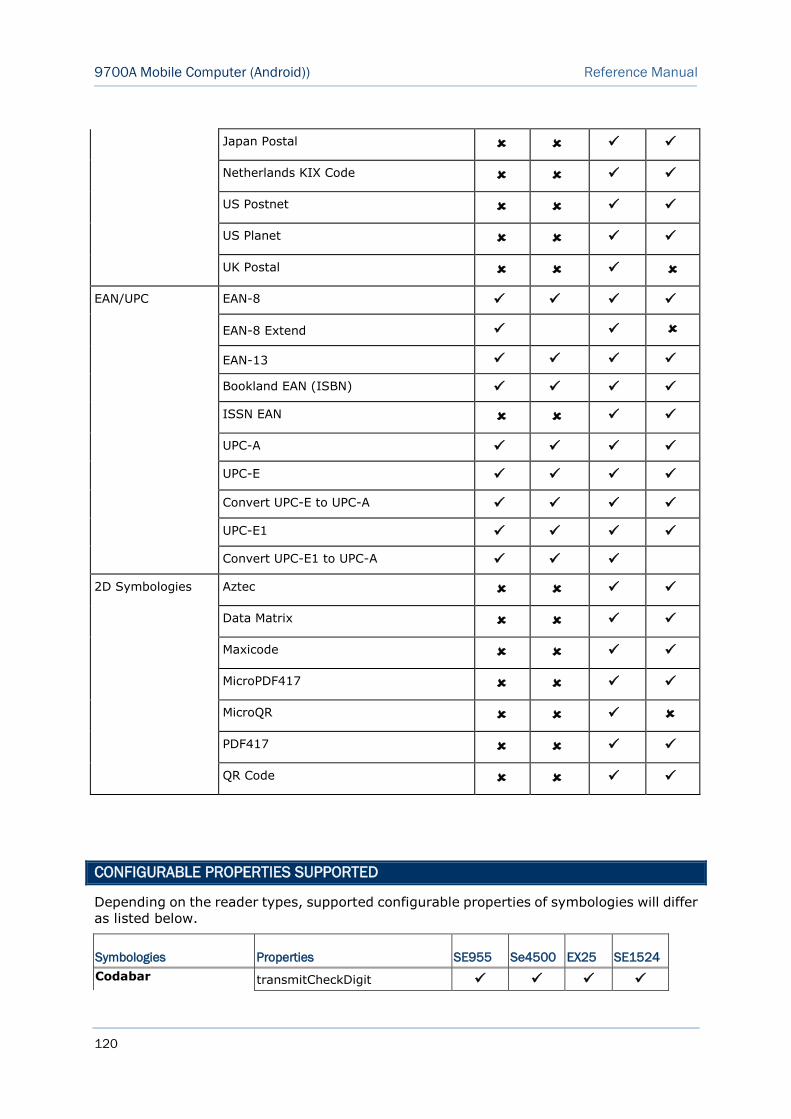
120
9700A Mobile Computer (Android)) Reference Manual
Japan Postal
Netherlands KIX Code
US Postnet
US Planet
UK Postal
EAN/UPC EAN-8
EAN-8 Extend
EAN-13
Bookland EAN (ISBN)
ISSN EAN
UPC-A
UPC-E
Convert UPC-E to UPC-A
UPC-E1
Convert UPC-E1 to UPC-A
2D Symbologies Aztec
Data Matrix
Maxicode
MicroPDF417
MicroQR
PDF417
QR Code
CONFIGURABLE PROPERTIES SUPPORTED
Depending on the reader types, supported configurable properties of symbologies will differ
as listed below.
Symbologies Properties SE955 Se4500 EX25 SE1524
Codabar
transmitCheckDigit

121
Scan Engine Settings
verifyCheckDigit
notisEditingType
enable
length1
length2
clsiEditing
notisEditing
Code11
enable
length1
length2
numberOfCheckDigits (1)
transmitCheckDigit
Code39
enable
length1
length2
checkDigitVerification
transmitCheckDigit
fullASCII
convertToCode32
convertToCode32Prefix
TriopticCode39 enable
Korean3Of5 enable
Code93
enable
length1
length2
Code128 enable
GS1128 enable
fieldSeparator
ISBT128
enable
concatenation
concatenationRedundancy
Chinese2Of5 enable
Industrial2Of5
enable
length1
length2
Interleaved2Of5 enable
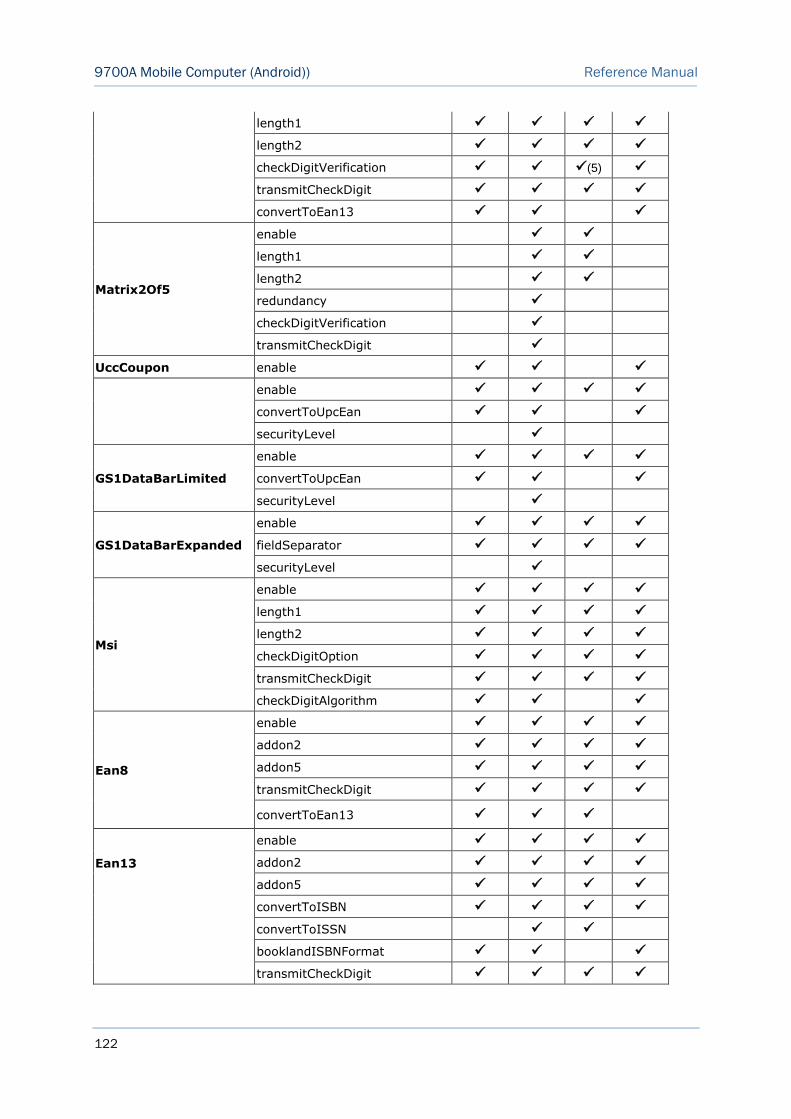
122
9700A Mobile Computer (Android)) Reference Manual
length1
length2
checkDigitVerification (5)
transmitCheckDigit
convertToEan13
Matrix2Of5
enable
length1
length2
redundancy
checkDigitVerification
transmitCheckDigit
UccCoupon enable
enable
convertToUpcEan
securityLevel
GS1DataBarLimited
enable
convertToUpcEan
securityLevel
GS1DataBarExpanded
enable
fieldSeparator
securityLevel
Msi
enable
length1
length2
checkDigitOption
transmitCheckDigit
checkDigitAlgorithm
Ean8
enable
addon2
addon5
transmitCheckDigit
convertToEan13
Ean13
enable
addon2
addon5
convertToISBN
convertToISSN
booklandISBNFormat
transmitCheckDigit
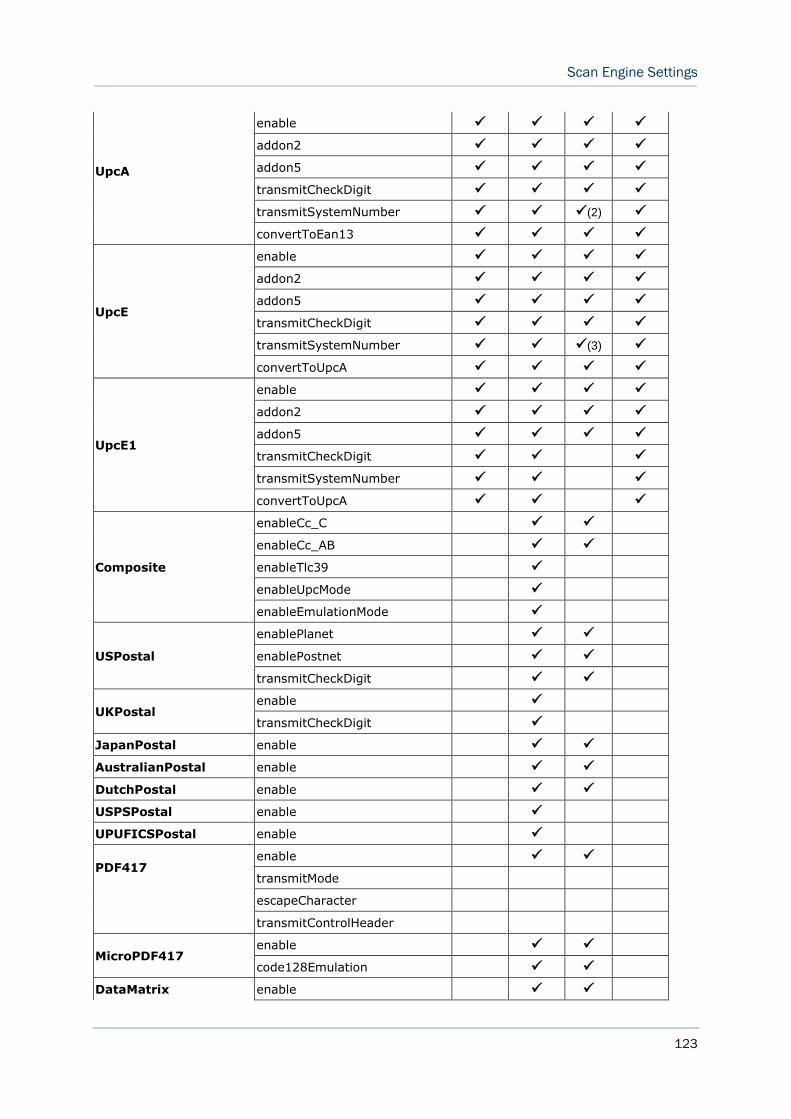
123
Scan Engine Settings
UpcA
enable
addon2
addon5
transmitCheckDigit
transmitSystemNumber (2)
convertToEan13
UpcE
enable
addon2
addon5
transmitCheckDigit
transmitSystemNumber (3)
convertToUpcA
UpcE1
enable
addon2
addon5
transmitCheckDigit
transmitSystemNumber
convertToUpcA
Composite
enableCc_C
enableCc_AB
enableTlc39
enableUpcMode
enableEmulationMode
USPostal
enablePlanet
enablePostnet
transmitCheckDigit
UKPostal enable
transmitCheckDigit
JapanPostal enable
AustralianPostal enable
DutchPostal enable
USPSPostal enable
UPUFICSPostal enable
PDF417
enable
transmitMode
escapeCharacter
transmitControlHeader
MicroPDF417 enable
code128Emulation
DataMatrix enable
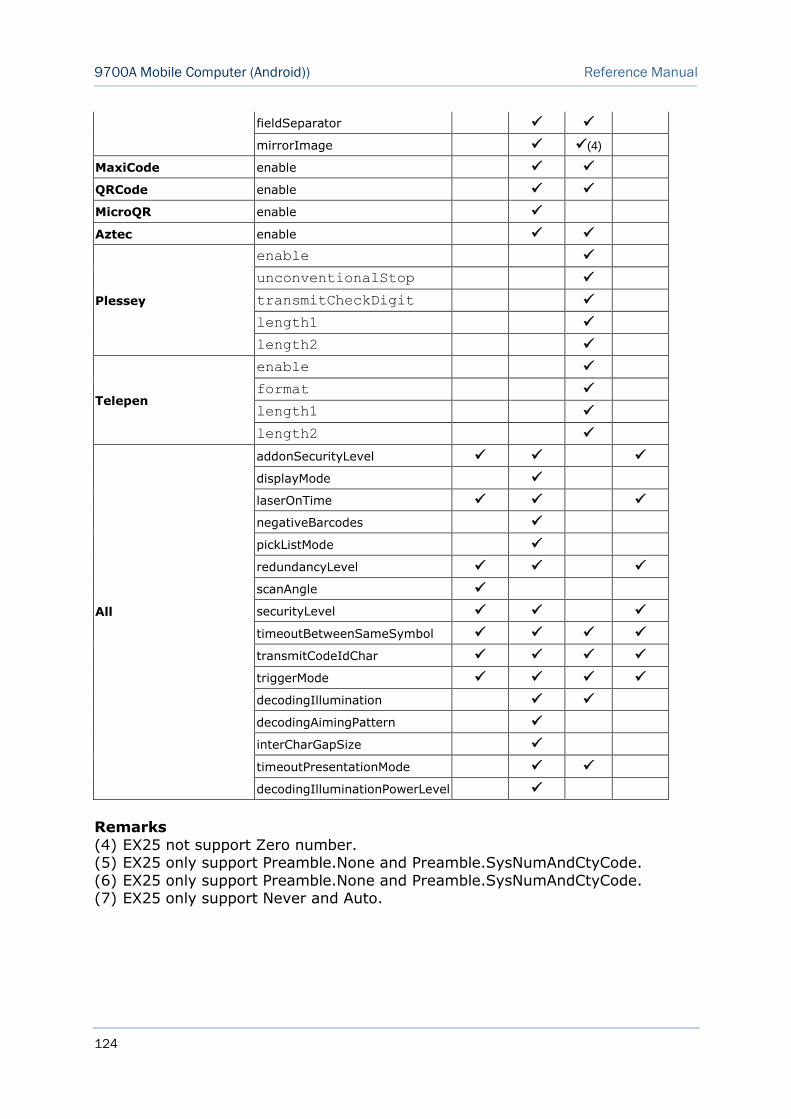
124
9700A Mobile Computer (Android)) Reference Manual
fieldSeparator
mirrorImage
(4)
MaxiCode enable
QRCode enable
MicroQR enable
Aztec enable
Plessey
enable
unconventionalStop
transmitCheckDigit
length1
length2
Telepen
enable
format
length1
length2
All
addonSecurityLevel
displayMode
laserOnTime
negativeBarcodes
pickListMode
redundancyLevel
scanAngle
securityLevel
timeoutBetweenSameSymbol
transmitCodeIdChar
triggerMode
decodingIllumination
decodingAimingPattern
interCharGapSize
timeoutPresentationMode
decodingIlluminationPowerLevel
Remarks
(4) EX25 not support Zero number. (5) EX25 only support Preamble.None and Preamble.SysNumAndCtyCode.
(6) EX25 only support Preamble.None and Preamble.SysNumAndCtyCode. (7) EX25 only support Never and Auto.
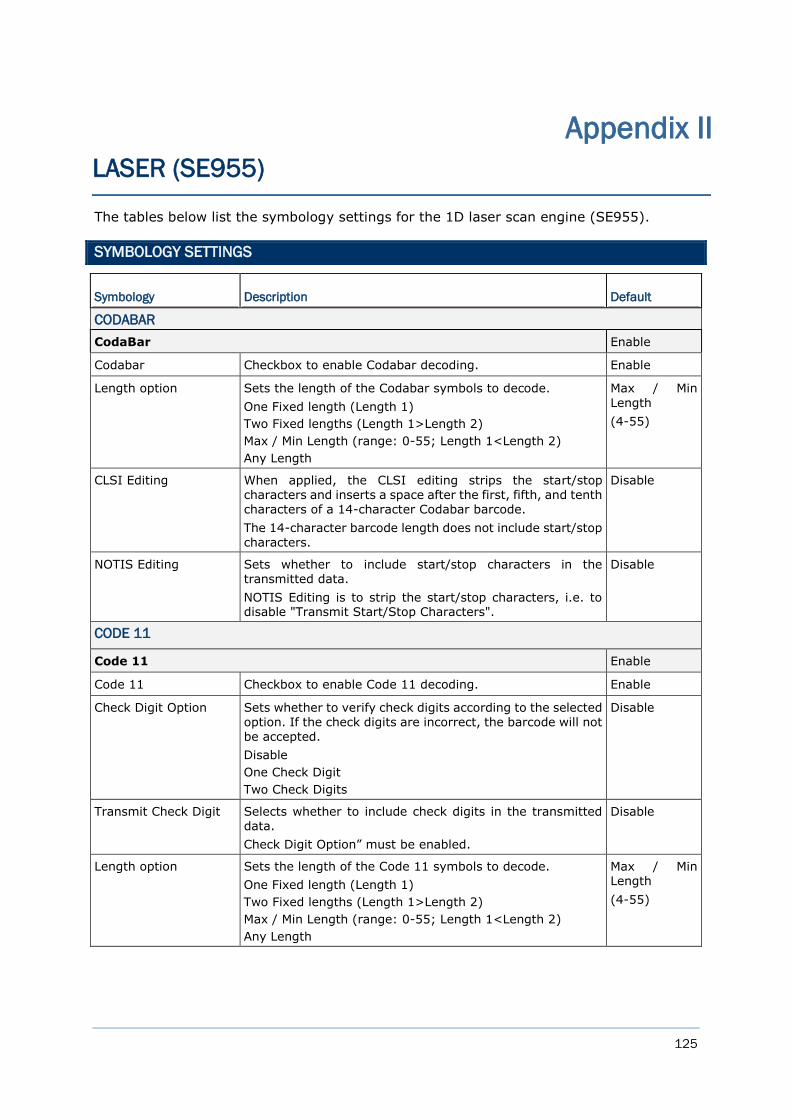
125
The tables below list the symbology settings for the 1D laser scan engine (SE955).
SYMBOLOGY SETTINGS
Symbology Description Default
CODABAR
CodaBar Enable
Codabar Checkbox to enable Codabar decoding. Enable
Length option Sets the length of the Codabar symbols to decode.
One Fixed length (Length 1)
Two Fixed lengths (Length 1>Length 2)
Max / Min Length (range: 0-55; Length 1<Length 2)
Any Length
Max / Min
Length
(4-55)
CLSI Editing When applied, the CLSI editing strips the start/stop characters and inserts a space after the first, fifth, and tenth characters of a 14-character Codabar barcode.
The 14-character barcode length does not include start/stop
characters.
Disable
NOTIS Editing Sets whether to include start/stop characters in the transmitted data.
NOTIS Editing is to strip the start/stop characters, i.e. to disable "Transmit Start/Stop Characters".
Disable
CODE 11
Code 11 Enable
Code 11 Checkbox to enable Code 11 decoding. Enable
Check Digit Option Sets whether to verify check digits according to the selected option. If the check digits are incorrect, the barcode will not be accepted.
Disable
One Check Digit
Two Check Digits
Disable
Transmit Check Digit Selects whether to include check digits in the transmitted data.
Check Digit Option” must be enabled.
Disable
Length option Sets the length of the Code 11 symbols to decode.
One Fixed length (Length 1)
Two Fixed lengths (Length 1>Length 2)
Max / Min Length (range: 0-55; Length 1<Length 2)
Any Length
Max / Min Length
(4-55)
Appendix II
LASER (SE955)
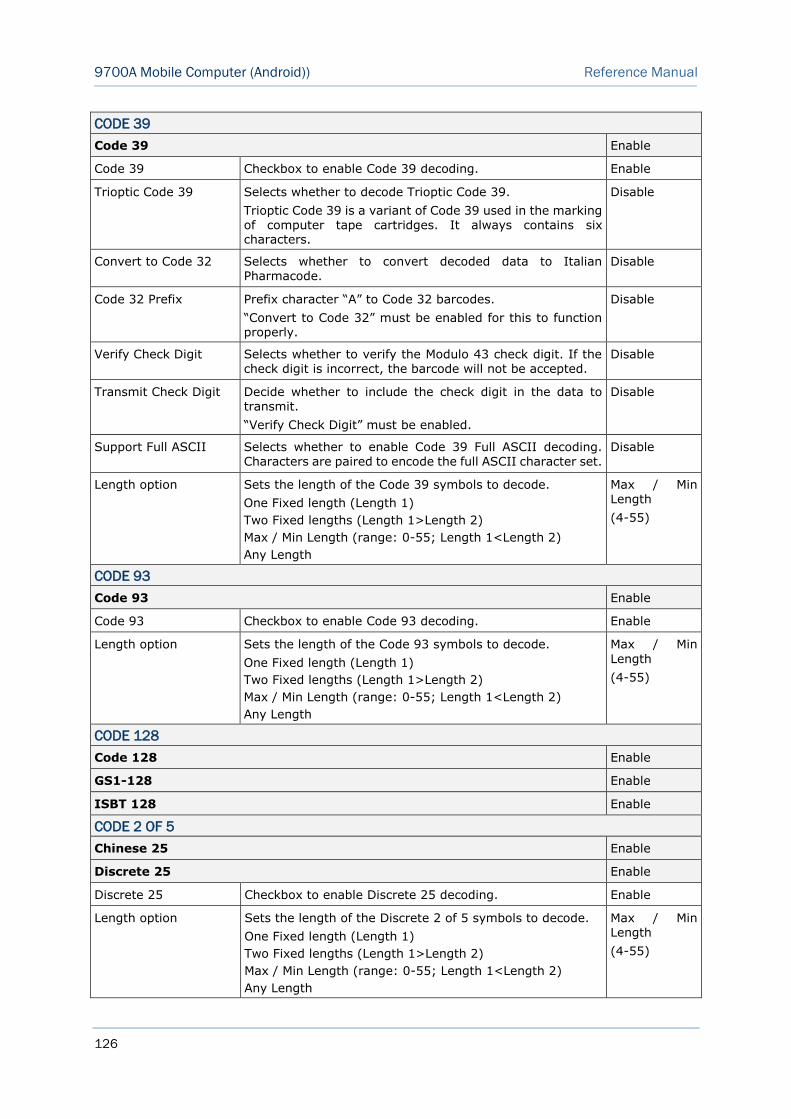
126
9700A Mobile Computer (Android)) Reference Manual
CODE 39
Code 39 Enable
Code 39 Checkbox to enable Code 39 decoding. Enable
Trioptic Code 39 Selects whether to decode Trioptic Code 39.
Trioptic Code 39 is a variant of Code 39 used in the marking of computer tape cartridges. It always contains six characters.
Disable
Convert to Code 32 Selects whether to convert decoded data to Italian Pharmacode.
Disable
Code 32 Prefix Prefix character “A” to Code 32 barcodes.
“Convert to Code 32” must be enabled for this to function properly.
Disable
Verify Check Digit Selects whether to verify the Modulo 43 check digit. If the check digit is incorrect, the barcode will not be accepted.
Disable
Transmit Check Digit Decide whether to include the check digit in the data to transmit.
“Verify Check Digit” must be enabled.
Disable
Support Full ASCII Selects whether to enable Code 39 Full ASCII decoding. Characters are paired to encode the full ASCII character set.
Disable
Length option Sets the length of the Code 39 symbols to decode.
One Fixed length (Length 1)
Two Fixed lengths (Length 1>Length 2)
Max / Min Length (range: 0-55; Length 1<Length 2)
Any Length
Max / Min Length
(4-55)
CODE 93
Code 93 Enable
Code 93 Checkbox to enable Code 93 decoding. Enable
Length option Sets the length of the Code 93 symbols to decode.
One Fixed length (Length 1)
Two Fixed lengths (Length 1>Length 2)
Max / Min Length (range: 0-55; Length 1<Length 2)
Any Length
Max / Min
Length
(4-55)
CODE 128
Code 128 Enable
GS1-128 Enable
ISBT 128 Enable
CODE 2 OF 5
Chinese 25 Enable
Discrete 25 Enable
Discrete 25 Checkbox to enable Discrete 25 decoding. Enable
Length option Sets the length of the Discrete 2 of 5 symbols to decode.
One Fixed length (Length 1)
Two Fixed lengths (Length 1>Length 2)
Max / Min Length (range: 0-55; Length 1<Length 2)
Any Length
Max / Min Length
(4-55)
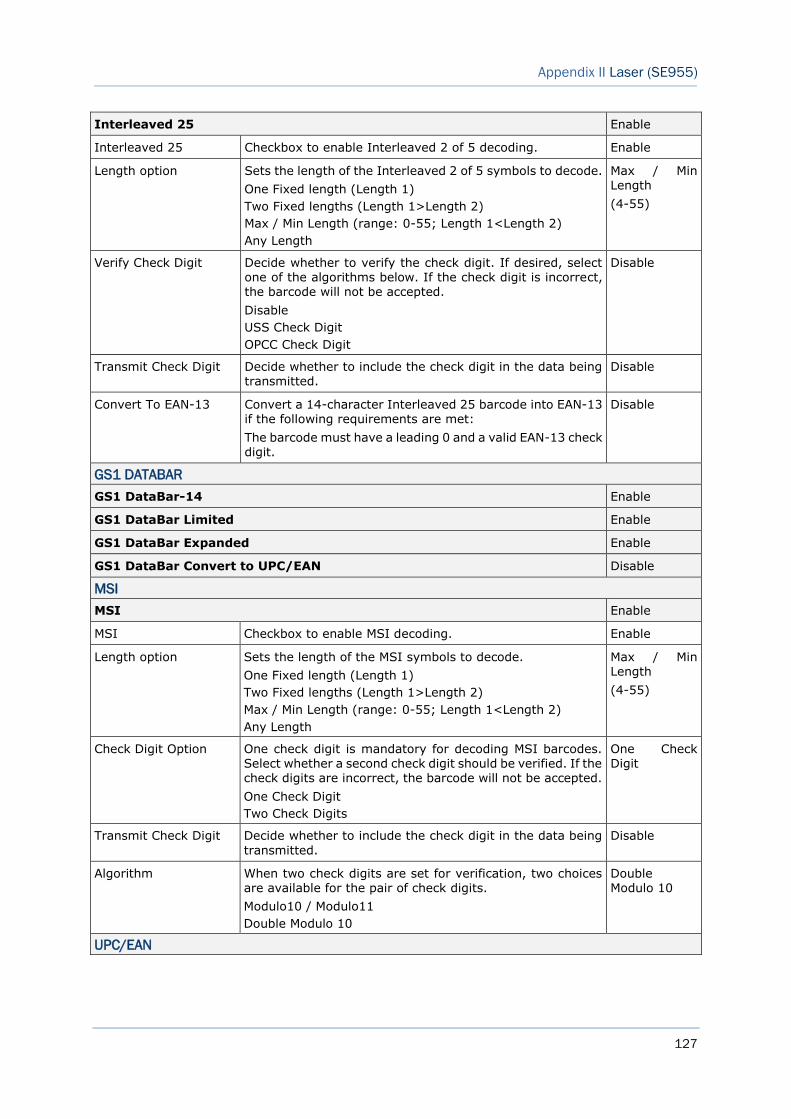
127
Appendix II Laser (SE955)
Interleaved 25 Enable
Interleaved 25 Checkbox to enable Interleaved 2 of 5 decoding. Enable
Length option Sets the length of the Interleaved 2 of 5 symbols to decode.
One Fixed length (Length 1)
Two Fixed lengths (Length 1>Length 2)
Max / Min Length (range: 0-55; Length 1<Length 2)
Any Length
Max / Min Length
(4-55)
Verify Check Digit Decide whether to verify the check digit. If desired, select one of the algorithms below. If the check digit is incorrect, the barcode will not be accepted.
Disable
USS Check Digit
OPCC Check Digit
Disable
Transmit Check Digit Decide whether to include the check digit in the data being transmitted.
Disable
Convert To EAN-13 Convert a 14-character Interleaved 25 barcode into EAN-13 if the following requirements are met:
The barcode must have a leading 0 and a valid EAN-13 check digit.
Disable
GS1 DATABAR
GS1 DataBar-14 Enable
GS1 DataBar Limited Enable
GS1 DataBar Expanded Enable
GS1 DataBar Convert to UPC/EAN Disable
MSI
MSI Enable
MSI Checkbox to enable MSI decoding. Enable
Length option Sets the length of the MSI symbols to decode.
One Fixed length (Length 1)
Two Fixed lengths (Length 1>Length 2)
Max / Min Length (range: 0-55; Length 1<Length 2)
Any Length
Max / Min Length
(4-55)
Check Digit Option One check digit is mandatory for decoding MSI barcodes.
Select whether a second check digit should be verified. If the check digits are incorrect, the barcode will not be accepted.
One Check Digit
Two Check Digits
One Check
Digit
Transmit Check Digit Decide whether to include the check digit in the data being
transmitted.
Disable
Algorithm When two check digits are set for verification, two choices are available for the pair of check digits.
Modulo10 / Modulo11
Double Modulo 10
Double Modulo 10
UPC/EAN
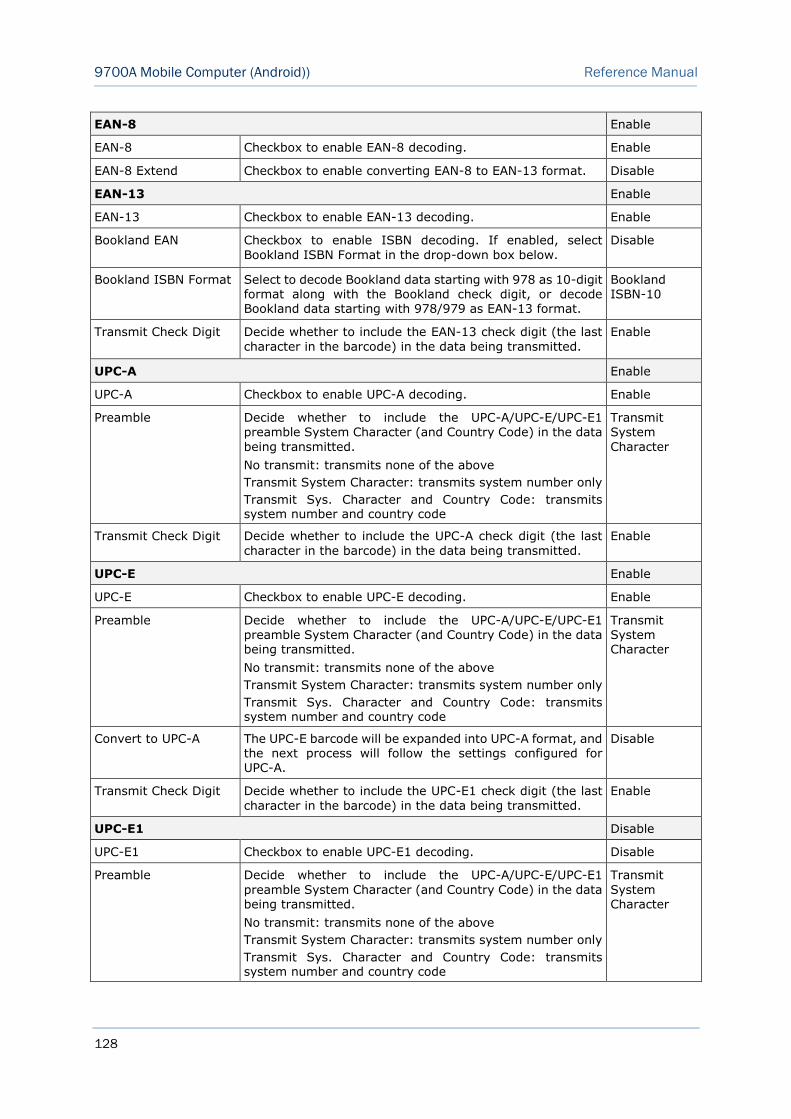
128
9700A Mobile Computer (Android)) Reference Manual
EAN-8 Enable
EAN-8 Checkbox to enable EAN-8 decoding. Enable
EAN-8 Extend Checkbox to enable converting EAN-8 to EAN-13 format. Disable
EAN-13 Enable
EAN-13 Checkbox to enable EAN-13 decoding. Enable
Bookland EAN Checkbox to enable ISBN decoding. If enabled, select
Bookland ISBN Format in the drop-down box below.
Disable
Bookland ISBN Format Select to decode Bookland data starting with 978 as 10-digit format along with the Bookland check digit, or decode Bookland data starting with 978/979 as EAN-13 format.
Bookland ISBN-10
Transmit Check Digit Decide whether to include the EAN-13 check digit (the last
character in the barcode) in the data being transmitted.
Enable
UPC-A Enable
UPC-A Checkbox to enable UPC-A decoding. Enable
Preamble Decide whether to include the UPC-A/UPC-E/UPC-E1 preamble System Character (and Country Code) in the data
being transmitted.
No transmit: transmits none of the above
Transmit System Character: transmits system number only
Transmit Sys. Character and Country Code: transmits system number and country code
Transmit System
Character
Transmit Check Digit Decide whether to include the UPC-A check digit (the last
character in the barcode) in the data being transmitted.
Enable
UPC-E Enable
UPC-E Checkbox to enable UPC-E decoding. Enable
Preamble Decide whether to include the UPC-A/UPC-E/UPC-E1 preamble System Character (and Country Code) in the data being transmitted.
No transmit: transmits none of the above
Transmit System Character: transmits system number only
Transmit Sys. Character and Country Code: transmits system number and country code
Transmit System Character
Convert to UPC-A The UPC-E barcode will be expanded into UPC-A format, and the next process will follow the settings configured for
UPC-A.
Disable
Transmit Check Digit Decide whether to include the UPC-E1 check digit (the last
character in the barcode) in the data being transmitted.
Enable
UPC-E1 Disable
UPC-E1 Checkbox to enable UPC-E1 decoding. Disable
Preamble Decide whether to include the UPC-A/UPC-E/UPC-E1
preamble System Character (and Country Code) in the data being transmitted.
No transmit: transmits none of the above
Transmit System Character: transmits system number only
Transmit Sys. Character and Country Code: transmits system number and country code
Transmit
System Character
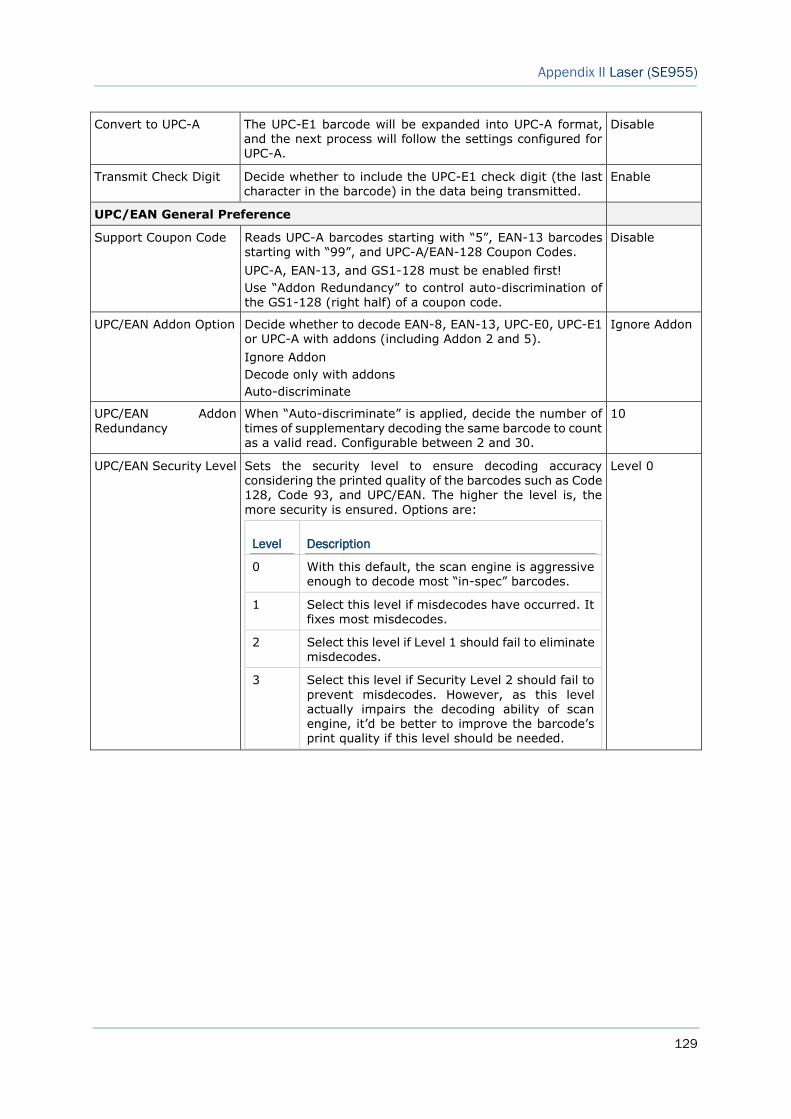
129
Appendix II Laser (SE955)
Convert to UPC-A The UPC-E1 barcode will be expanded into UPC-A format, and the next process will follow the settings configured for UPC-A.
Disable
Transmit Check Digit Decide whether to include the UPC-E1 check digit (the last character in the barcode) in the data being transmitted.
Enable
UPC/EAN General Preference
Support Coupon Code Reads UPC-A barcodes starting with “5”, EAN-13 barcodes starting with “99”, and UPC-A/EAN-128 Coupon Codes.
UPC-A, EAN-13, and GS1-128 must be enabled first!
Use “Addon Redundancy” to control auto-discrimination of the GS1-128 (right half) of a coupon code.
Disable
UPC/EAN Addon Option Decide whether to decode EAN-8, EAN-13, UPC-E0, UPC-E1 or UPC-A with addons (including Addon 2 and 5).
Ignore Addon
Decode only with addons
Auto-discriminate
Ignore Addon
UPC/EAN Addon
Redundancy
When “Auto-discriminate” is applied, decide the number of
times of supplementary decoding the same barcode to count as a valid read. Configurable between 2 and 30.
10
UPC/EAN Security Level Sets the security level to ensure decoding accuracy considering the printed quality of the barcodes such as Code 128, Code 93, and UPC/EAN. The higher the level is, the
more security is ensured. Options are:
Level Description
0 With this default, the scan engine is aggressive enough to decode most “in-spec” barcodes.
1 Select this level if misdecodes have occurred. It fixes most misdecodes.
2 Select this level if Level 1 should fail to eliminate misdecodes.
3 Select this level if Security Level 2 should fail to
prevent misdecodes. However, as this level actually impairs the decoding ability of scan engine, it’d be better to improve the barcode’s print quality if this level should be needed.
Level 0
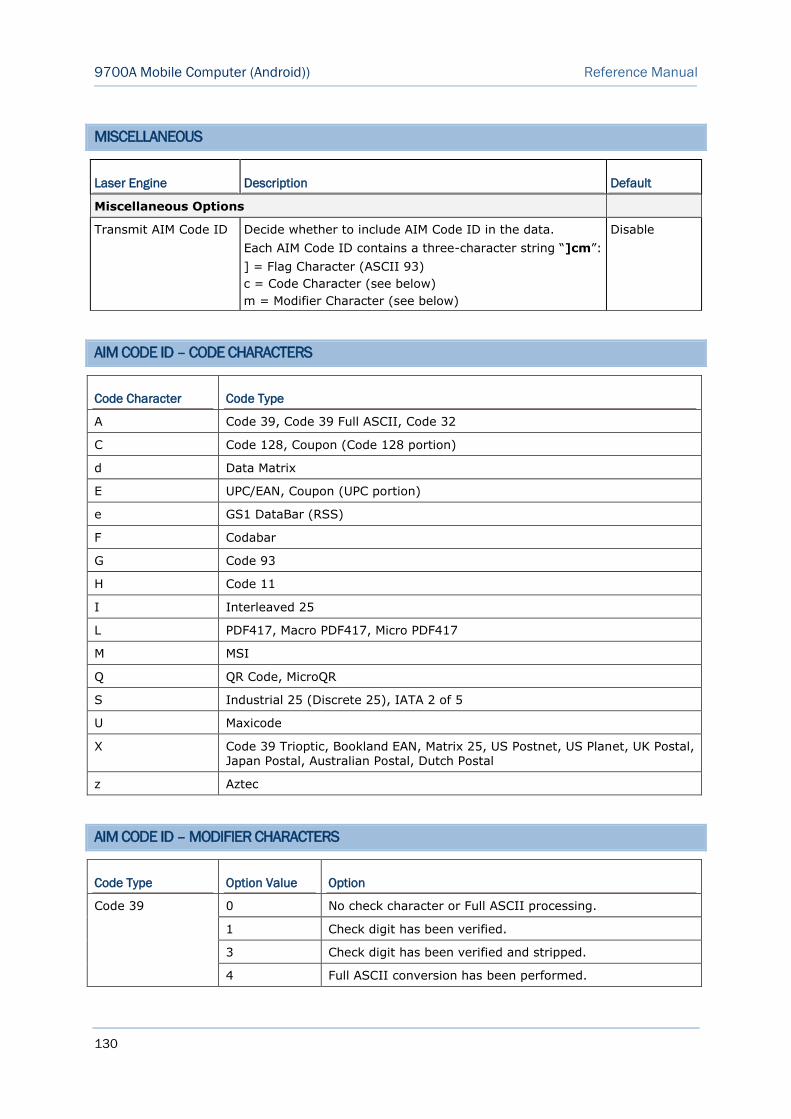
130
9700A Mobile Computer (Android)) Reference Manual
MISCELLANEOUS
Laser Engine Description Default
Miscellaneous Options
Transmit AIM Code ID Decide whether to include AIM Code ID in the data.
Each AIM Code ID contains a three-character string “]cm”:
] = Flag Character (ASCII 93)
c = Code Character (see below)
m = Modifier Character (see below)
Disable
AIM CODE ID – CODE CHARACTERS
Code Character Code Type
A Code 39, Code 39 Full ASCII, Code 32
C Code 128, Coupon (Code 128 portion)
d Data Matrix
E UPC/EAN, Coupon (UPC portion)
e GS1 DataBar (RSS)
F Codabar
G Code 93
H Code 11
I Interleaved 25
L PDF417, Macro PDF417, Micro PDF417
M MSI
Q QR Code, MicroQR
S Industrial 25 (Discrete 25), IATA 2 of 5
U Maxicode
X Code 39 Trioptic, Bookland EAN, Matrix 25, US Postnet, US Planet, UK Postal, Japan Postal, Australian Postal, Dutch Postal
z Aztec
AIM CODE ID – MODIFIER CHARACTERS
Code Type Option Value Option
Code 39 0 No check character or Full ASCII processing.
1 Check digit has been verified.
3 Check digit has been verified and stripped.
4 Full ASCII conversion has been performed.
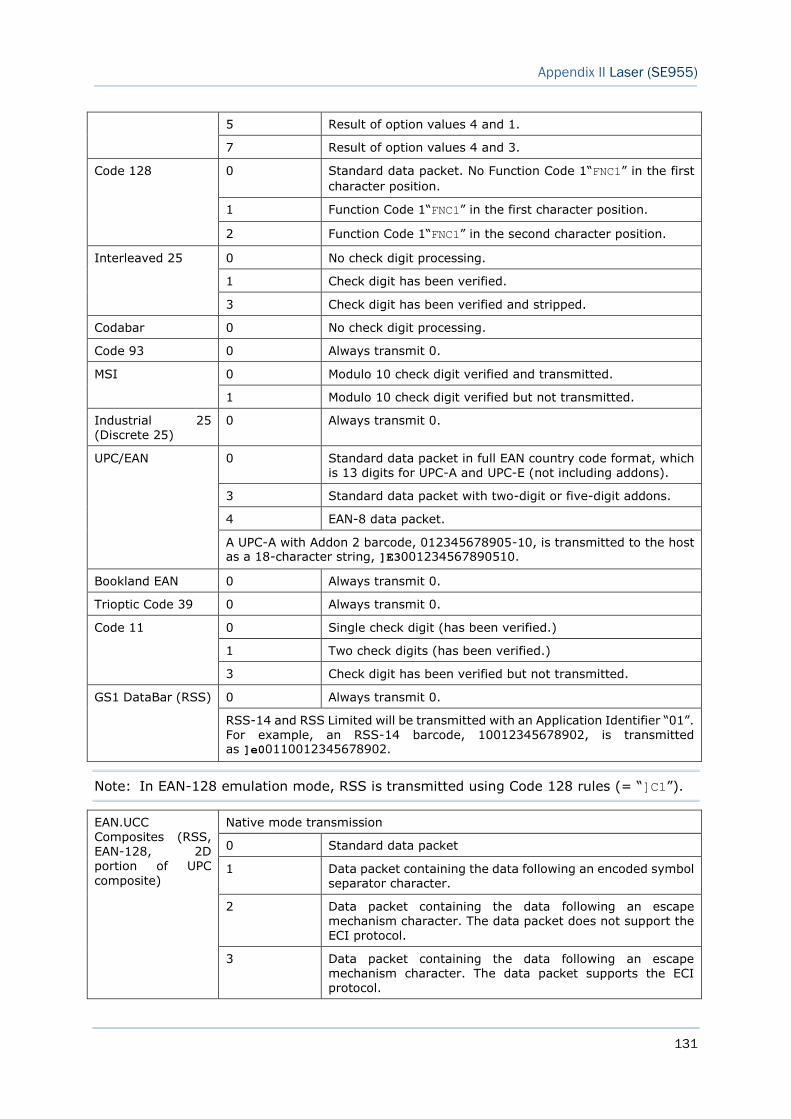
131
Appendix II Laser (SE955)
5 Result of option values 4 and 1.
7 Result of option values 4 and 3.
Code 128 0 Standard data packet. No Function Code 1“FNC1” in the first
character position.
1 Function Code 1“FNC1” in the first character position.
2 Function Code 1“FNC1” in the second character position.
Interleaved 25 0 No check digit processing.
1 Check digit has been verified.
3 Check digit has been verified and stripped.
Codabar 0 No check digit processing.
Code 93 0 Always transmit 0.
MSI 0 Modulo 10 check digit verified and transmitted.
1 Modulo 10 check digit verified but not transmitted.
Industrial 25 (Discrete 25)
0 Always transmit 0.
UPC/EAN 0 Standard data packet in full EAN country code format, which is 13 digits for UPC-A and UPC-E (not including addons).
3 Standard data packet with two-digit or five-digit addons.
4 EAN-8 data packet.
A UPC-A with Addon 2 barcode, 012345678905-10, is transmitted to the host as a 18-character string, ]E3001234567890510.
Bookland EAN 0 Always transmit 0.
Trioptic Code 39 0 Always transmit 0.
Code 11 0 Single check digit (has been verified.)
1 Two check digits (has been verified.)
3 Check digit has been verified but not transmitted.
GS1 DataBar (RSS) 0 Always transmit 0.
RSS-14 and RSS Limited will be transmitted with an Application Identifier “01”. For example, an RSS-14 barcode, 10012345678902, is transmitted as ]e00110012345678902.
Note: In EAN-128 emulation mode, RSS is transmitted using Code 128 rules (= “]C1”).
EAN.UCC Composites (RSS, EAN-128, 2D portion of UPC
composite)
Native mode transmission
0 Standard data packet
1 Data packet containing the data following an encoded symbol separator character.
2 Data packet containing the data following an escape mechanism character. The data packet does not support the ECI protocol.
3 Data packet containing the data following an escape mechanism character. The data packet supports the ECI
protocol.
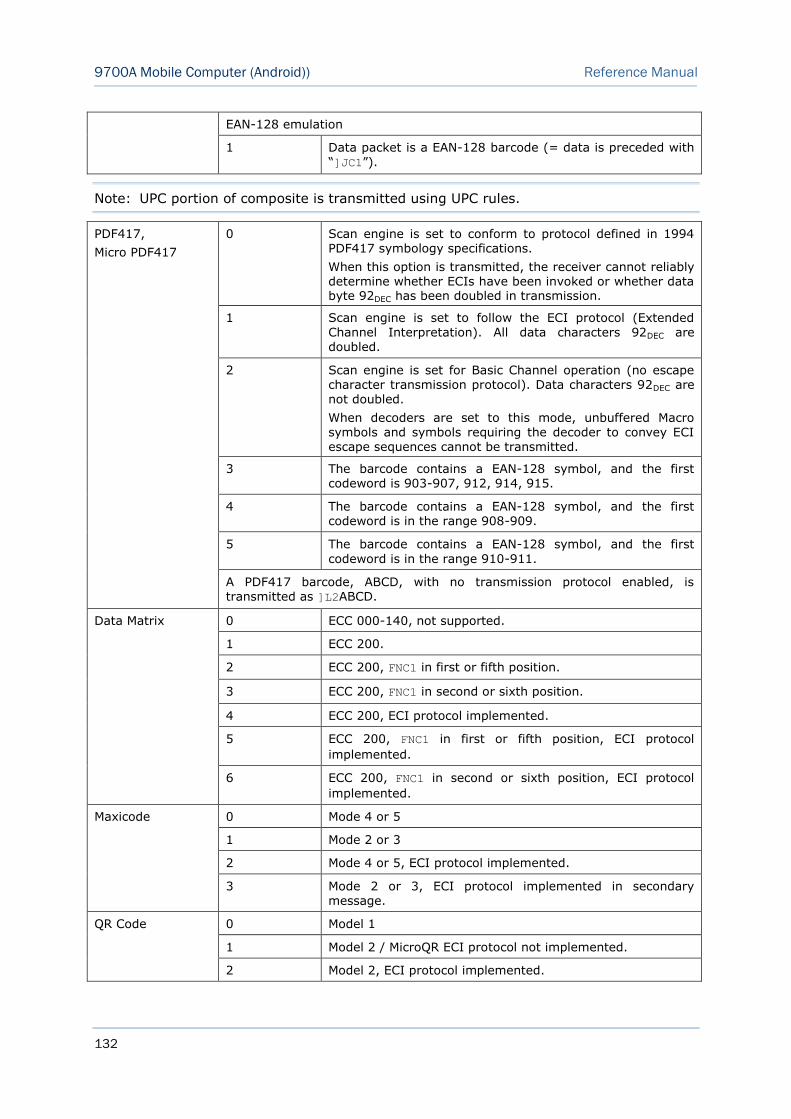
132
9700A Mobile Computer (Android)) Reference Manual
EAN-128 emulation
1 Data packet is a EAN-128 barcode (= data is preceded with “]JC1”).
Note: UPC portion of composite is transmitted using UPC rules.
PDF417,
Micro PDF417
0 Scan engine is set to conform to protocol defined in 1994 PDF417 symbology specifications.
When this option is transmitted, the receiver cannot reliably determine whether ECIs have been invoked or whether data byte 92DEC has been doubled in transmission.
1 Scan engine is set to follow the ECI protocol (Extended
Channel Interpretation). All data characters 92DEC are doubled.
2 Scan engine is set for Basic Channel operation (no escape character transmission protocol). Data characters 92DEC are not doubled.
When decoders are set to this mode, unbuffered Macro symbols and symbols requiring the decoder to convey ECI escape sequences cannot be transmitted.
3 The barcode contains a EAN-128 symbol, and the first codeword is 903-907, 912, 914, 915.
4 The barcode contains a EAN-128 symbol, and the first codeword is in the range 908-909.
5 The barcode contains a EAN-128 symbol, and the first
codeword is in the range 910-911.
A PDF417 barcode, ABCD, with no transmission protocol enabled, is transmitted as ]L2ABCD.
Data Matrix 0 ECC 000-140, not supported.
1 ECC 200.
2 ECC 200, FNC1 in first or fifth position.
3 ECC 200, FNC1 in second or sixth position.
4 ECC 200, ECI protocol implemented.
5 ECC 200, FNC1 in first or fifth position, ECI protocol
implemented.
6 ECC 200, FNC1 in second or sixth position, ECI protocol
implemented.
Maxicode 0 Mode 4 or 5
1 Mode 2 or 3
2 Mode 4 or 5, ECI protocol implemented.
3 Mode 2 or 3, ECI protocol implemented in secondary message.
QR Code 0 Model 1
1 Model 2 / MicroQR ECI protocol not implemented.
2 Model 2, ECI protocol implemented.
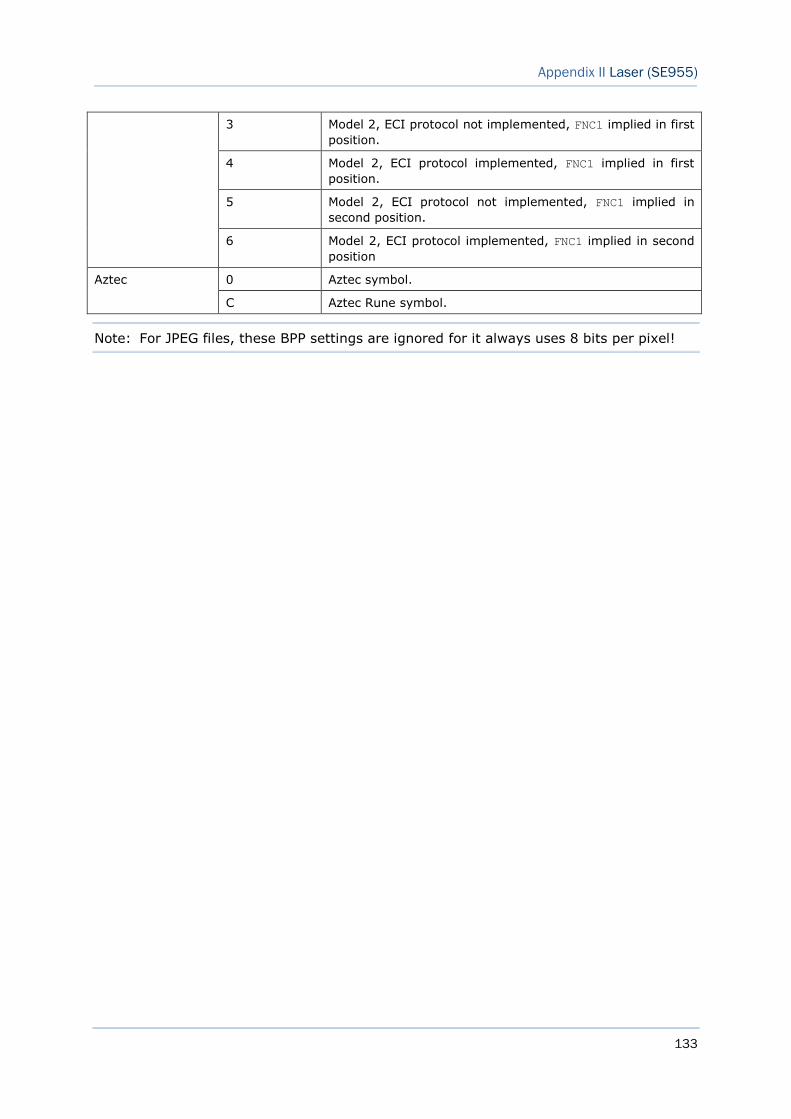
133
Appendix II Laser (SE955)
3 Model 2, ECI protocol not implemented, FNC1 implied in first
position.
4 Model 2, ECI protocol implemented, FNC1 implied in first
position.
5 Model 2, ECI protocol not implemented, FNC1 implied in
second position.
6 Model 2, ECI protocol implemented, FNC1 implied in second
position
Aztec 0 Aztec symbol.
C Aztec Rune symbol.
Note: For JPEG files, these BPP settings are ignored for it always uses 8 bits per pixel!
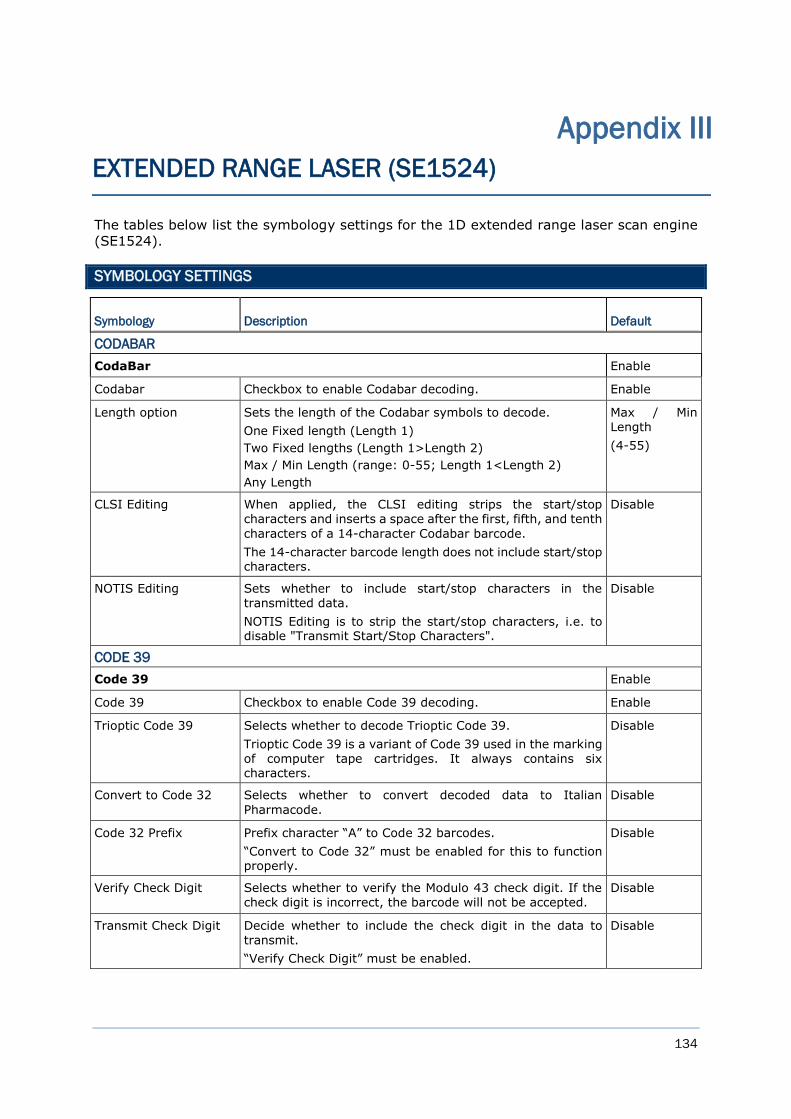
134
The tables below list the symbology settings for the 1D extended range laser scan engine
(SE1524).
SYMBOLOGY SETTINGS
Symbology Description Default
CODABAR
CodaBar Enable
Codabar Checkbox to enable Codabar decoding. Enable
Length option Sets the length of the Codabar symbols to decode.
One Fixed length (Length 1)
Two Fixed lengths (Length 1>Length 2)
Max / Min Length (range: 0-55; Length 1<Length 2)
Any Length
Max / Min Length
(4-55)
CLSI Editing When applied, the CLSI editing strips the start/stop characters and inserts a space after the first, fifth, and tenth
characters of a 14-character Codabar barcode.
The 14-character barcode length does not include start/stop characters.
Disable
NOTIS Editing Sets whether to include start/stop characters in the transmitted data.
NOTIS Editing is to strip the start/stop characters, i.e. to disable "Transmit Start/Stop Characters".
Disable
CODE 39
Code 39 Enable
Code 39 Checkbox to enable Code 39 decoding. Enable
Trioptic Code 39 Selects whether to decode Trioptic Code 39.
Trioptic Code 39 is a variant of Code 39 used in the marking of computer tape cartridges. It always contains six characters.
Disable
Convert to Code 32 Selects whether to convert decoded data to Italian
Pharmacode.
Disable
Code 32 Prefix Prefix character “A” to Code 32 barcodes.
“Convert to Code 32” must be enabled for this to function properly.
Disable
Verify Check Digit Selects whether to verify the Modulo 43 check digit. If the check digit is incorrect, the barcode will not be accepted.
Disable
Transmit Check Digit Decide whether to include the check digit in the data to transmit.
“Verify Check Digit” must be enabled.
Disable
Appendix III
EXTENDED RANGE LASER (SE1524)
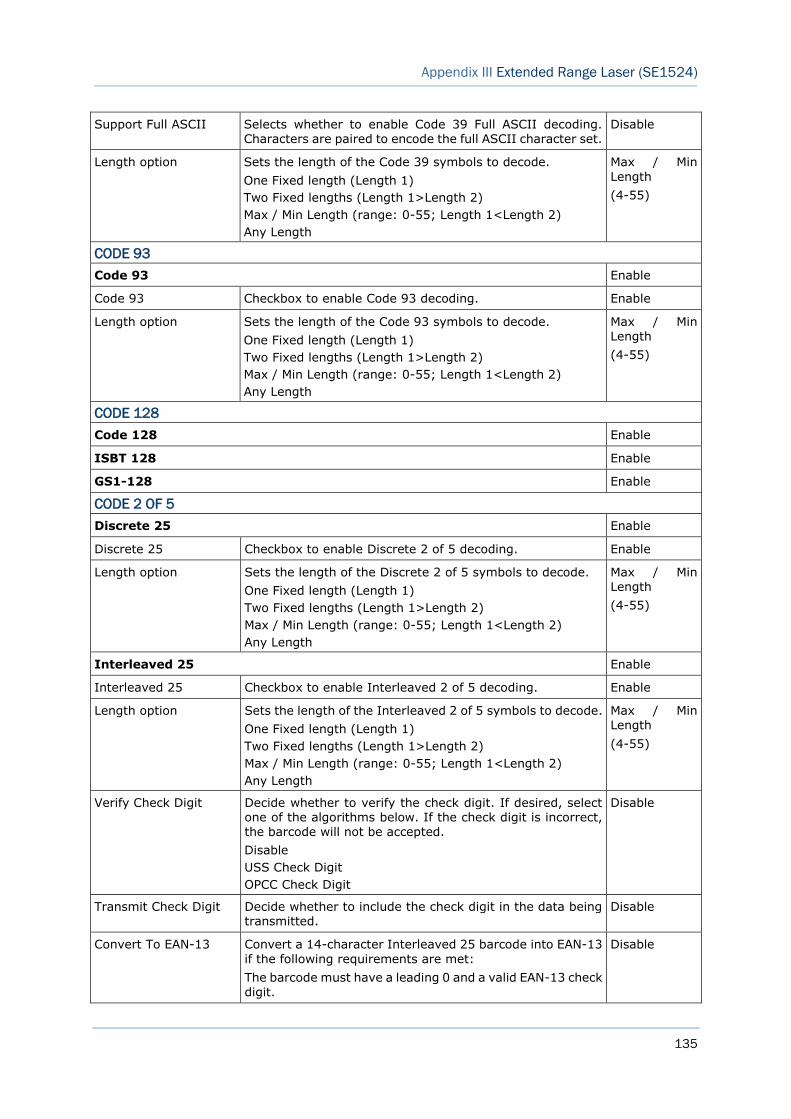
135
Appendix III Extended Range Laser (SE1524)
Support Full ASCII Selects whether to enable Code 39 Full ASCII decoding. Characters are paired to encode the full ASCII character set.
Disable
Length option Sets the length of the Code 39 symbols to decode.
One Fixed length (Length 1)
Two Fixed lengths (Length 1>Length 2)
Max / Min Length (range: 0-55; Length 1<Length 2)
Any Length
Max / Min
Length
(4-55)
CODE 93
Code 93 Enable
Code 93 Checkbox to enable Code 93 decoding. Enable
Length option Sets the length of the Code 93 symbols to decode.
One Fixed length (Length 1)
Two Fixed lengths (Length 1>Length 2)
Max / Min Length (range: 0-55; Length 1<Length 2)
Any Length
Max / Min
Length
(4-55)
CODE 128
Code 128 Enable
ISBT 128 Enable
GS1-128 Enable
CODE 2 OF 5
Discrete 25 Enable
Discrete 25 Checkbox to enable Discrete 2 of 5 decoding. Enable
Length option Sets the length of the Discrete 2 of 5 symbols to decode.
One Fixed length (Length 1)
Two Fixed lengths (Length 1>Length 2)
Max / Min Length (range: 0-55; Length 1<Length 2)
Any Length
Max / Min Length
(4-55)
Interleaved 25 Enable
Interleaved 25 Checkbox to enable Interleaved 2 of 5 decoding. Enable
Length option Sets the length of the Interleaved 2 of 5 symbols to decode.
One Fixed length (Length 1)
Two Fixed lengths (Length 1>Length 2)
Max / Min Length (range: 0-55; Length 1<Length 2)
Any Length
Max / Min Length
(4-55)
Verify Check Digit Decide whether to verify the check digit. If desired, select one of the algorithms below. If the check digit is incorrect, the barcode will not be accepted.
Disable
USS Check Digit
OPCC Check Digit
Disable
Transmit Check Digit Decide whether to include the check digit in the data being transmitted.
Disable
Convert To EAN-13 Convert a 14-character Interleaved 25 barcode into EAN-13
if the following requirements are met:
The barcode must have a leading 0 and a valid EAN-13 check
digit.
Disable
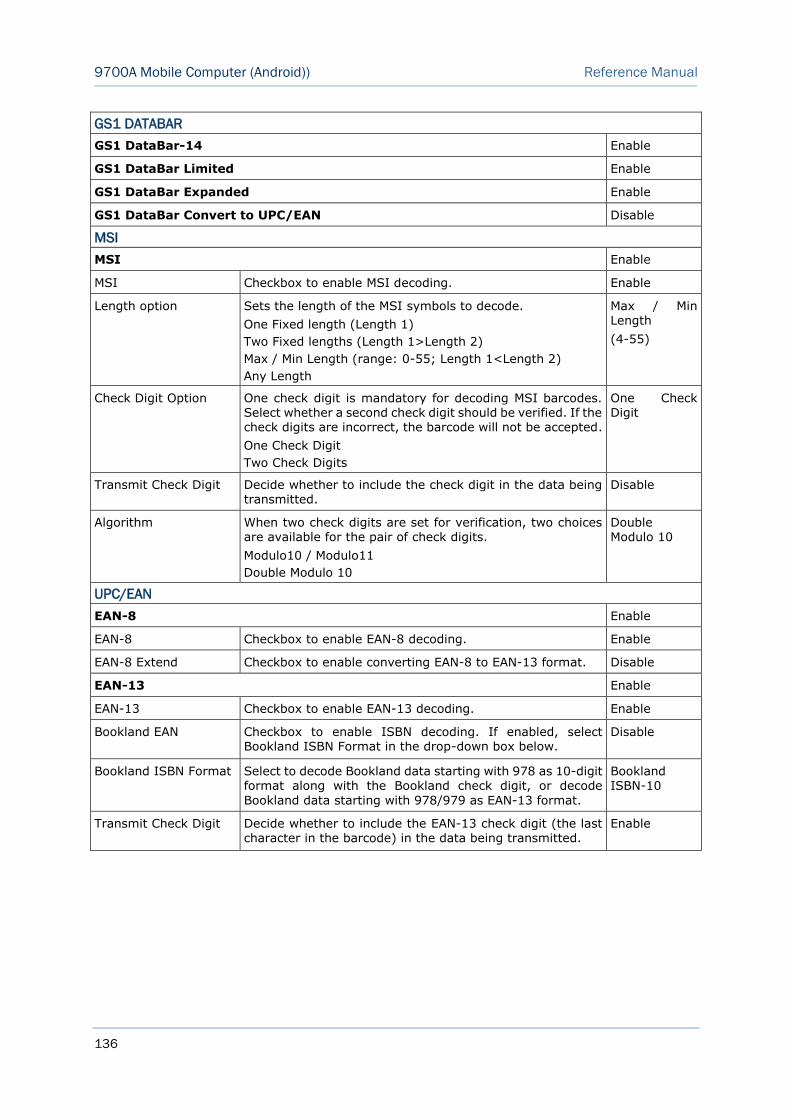
136
9700A Mobile Computer (Android)) Reference Manual
GS1 DATABAR
GS1 DataBar-14 Enable
GS1 DataBar Limited Enable
GS1 DataBar Expanded Enable
GS1 DataBar Convert to UPC/EAN Disable
MSI
MSI Enable
MSI Checkbox to enable MSI decoding. Enable
Length option Sets the length of the MSI symbols to decode.
One Fixed length (Length 1)
Two Fixed lengths (Length 1>Length 2)
Max / Min Length (range: 0-55; Length 1<Length 2)
Any Length
Max / Min Length
(4-55)
Check Digit Option One check digit is mandatory for decoding MSI barcodes. Select whether a second check digit should be verified. If the check digits are incorrect, the barcode will not be accepted.
One Check Digit
Two Check Digits
One Check Digit
Transmit Check Digit Decide whether to include the check digit in the data being transmitted.
Disable
Algorithm When two check digits are set for verification, two choices are available for the pair of check digits.
Modulo10 / Modulo11
Double Modulo 10
Double Modulo 10
UPC/EAN
EAN-8 Enable
EAN-8 Checkbox to enable EAN-8 decoding. Enable
EAN-8 Extend Checkbox to enable converting EAN-8 to EAN-13 format. Disable
EAN-13 Enable
EAN-13 Checkbox to enable EAN-13 decoding. Enable
Bookland EAN Checkbox to enable ISBN decoding. If enabled, select Bookland ISBN Format in the drop-down box below.
Disable
Bookland ISBN Format Select to decode Bookland data starting with 978 as 10-digit format along with the Bookland check digit, or decode
Bookland data starting with 978/979 as EAN-13 format.
Bookland ISBN-10
Transmit Check Digit Decide whether to include the EAN-13 check digit (the last character in the barcode) in the data being transmitted.
Enable
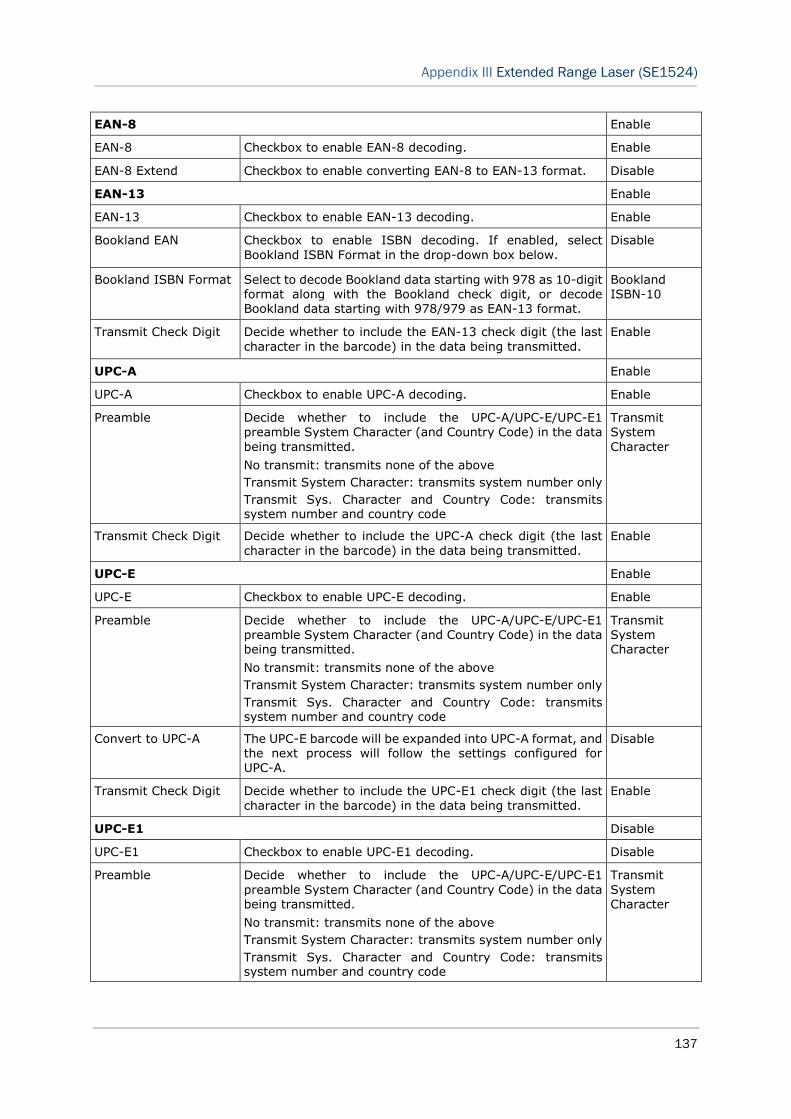
137
Appendix III Extended Range Laser (SE1524)
EAN-8 Enable
EAN-8 Checkbox to enable EAN-8 decoding. Enable
EAN-8 Extend Checkbox to enable converting EAN-8 to EAN-13 format. Disable
EAN-13 Enable
EAN-13 Checkbox to enable EAN-13 decoding. Enable
Bookland EAN Checkbox to enable ISBN decoding. If enabled, select
Bookland ISBN Format in the drop-down box below.
Disable
Bookland ISBN Format Select to decode Bookland data starting with 978 as 10-digit format along with the Bookland check digit, or decode Bookland data starting with 978/979 as EAN-13 format.
Bookland ISBN-10
Transmit Check Digit Decide whether to include the EAN-13 check digit (the last
character in the barcode) in the data being transmitted.
Enable
UPC-A Enable
UPC-A Checkbox to enable UPC-A decoding. Enable
Preamble Decide whether to include the UPC-A/UPC-E/UPC-E1 preamble System Character (and Country Code) in the data
being transmitted.
No transmit: transmits none of the above
Transmit System Character: transmits system number only
Transmit Sys. Character and Country Code: transmits system number and country code
Transmit System
Character
Transmit Check Digit Decide whether to include the UPC-A check digit (the last
character in the barcode) in the data being transmitted.
Enable
UPC-E Enable
UPC-E Checkbox to enable UPC-E decoding. Enable
Preamble Decide whether to include the UPC-A/UPC-E/UPC-E1 preamble System Character (and Country Code) in the data being transmitted.
No transmit: transmits none of the above
Transmit System Character: transmits system number only
Transmit Sys. Character and Country Code: transmits system number and country code
Transmit System Character
Convert to UPC-A The UPC-E barcode will be expanded into UPC-A format, and the next process will follow the settings configured for
UPC-A.
Disable
Transmit Check Digit Decide whether to include the UPC-E1 check digit (the last
character in the barcode) in the data being transmitted.
Enable
UPC-E1 Disable
UPC-E1 Checkbox to enable UPC-E1 decoding. Disable
Preamble Decide whether to include the UPC-A/UPC-E/UPC-E1
preamble System Character (and Country Code) in the data being transmitted.
No transmit: transmits none of the above
Transmit System Character: transmits system number only
Transmit Sys. Character and Country Code: transmits system number and country code
Transmit
System Character
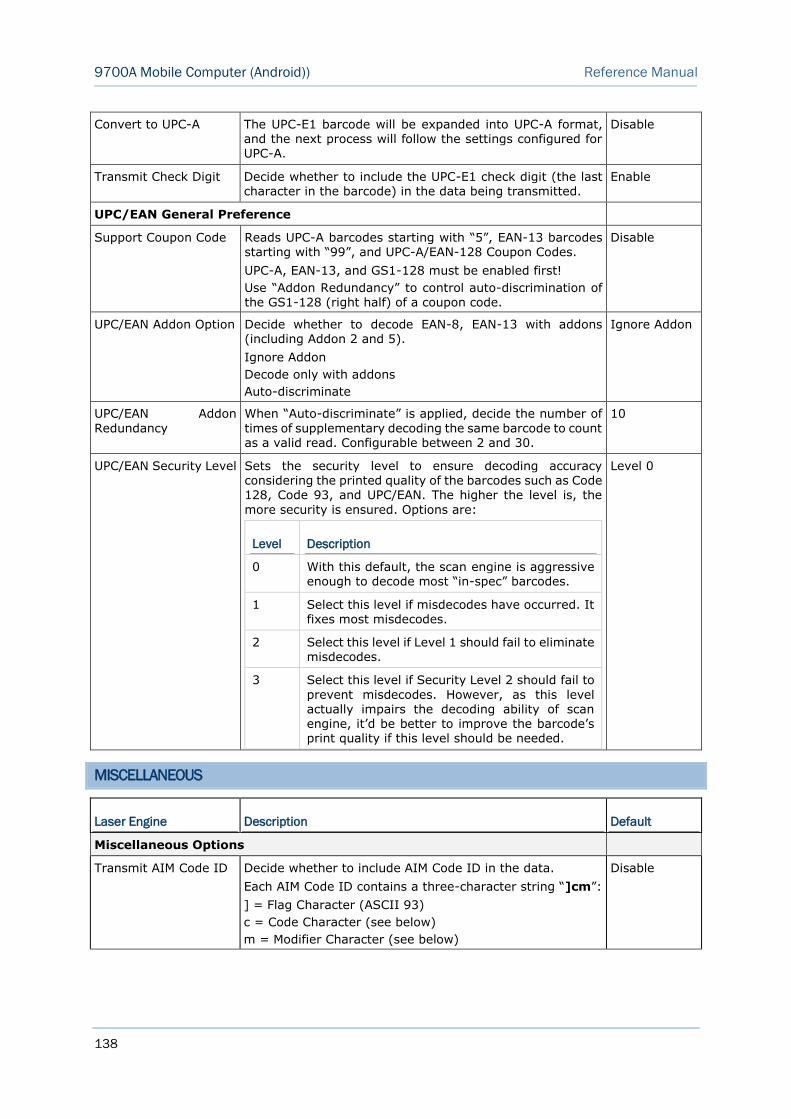
138
9700A Mobile Computer (Android)) Reference Manual
Convert to UPC-A The UPC-E1 barcode will be expanded into UPC-A format, and the next process will follow the settings configured for UPC-A.
Disable
Transmit Check Digit Decide whether to include the UPC-E1 check digit (the last character in the barcode) in the data being transmitted.
Enable
UPC/EAN General Preference
Support Coupon Code Reads UPC-A barcodes starting with “5”, EAN-13 barcodes starting with “99”, and UPC-A/EAN-128 Coupon Codes.
UPC-A, EAN-13, and GS1-128 must be enabled first!
Use “Addon Redundancy” to control auto-discrimination of the GS1-128 (right half) of a coupon code.
Disable
UPC/EAN Addon Option Decide whether to decode EAN-8, EAN-13 with addons (including Addon 2 and 5).
Ignore Addon
Decode only with addons
Auto-discriminate
Ignore Addon
UPC/EAN Addon
Redundancy
When “Auto-discriminate” is applied, decide the number of
times of supplementary decoding the same barcode to count as a valid read. Configurable between 2 and 30.
10
UPC/EAN Security Level Sets the security level to ensure decoding accuracy considering the printed quality of the barcodes such as Code 128, Code 93, and UPC/EAN. The higher the level is, the
more security is ensured. Options are:
Level Description
0 With this default, the scan engine is aggressive enough to decode most “in-spec” barcodes.
1 Select this level if misdecodes have occurred. It fixes most misdecodes.
2 Select this level if Level 1 should fail to eliminate misdecodes.
3 Select this level if Security Level 2 should fail to
prevent misdecodes. However, as this level actually impairs the decoding ability of scan engine, it’d be better to improve the barcode’s print quality if this level should be needed.
Level 0
MISCELLANEOUS
Laser Engine Description Default
Miscellaneous Options
Transmit AIM Code ID Decide whether to include AIM Code ID in the data.
Each AIM Code ID contains a three-character string “]cm”:
] = Flag Character (ASCII 93)
c = Code Character (see below)
m = Modifier Character (see below)
Disable
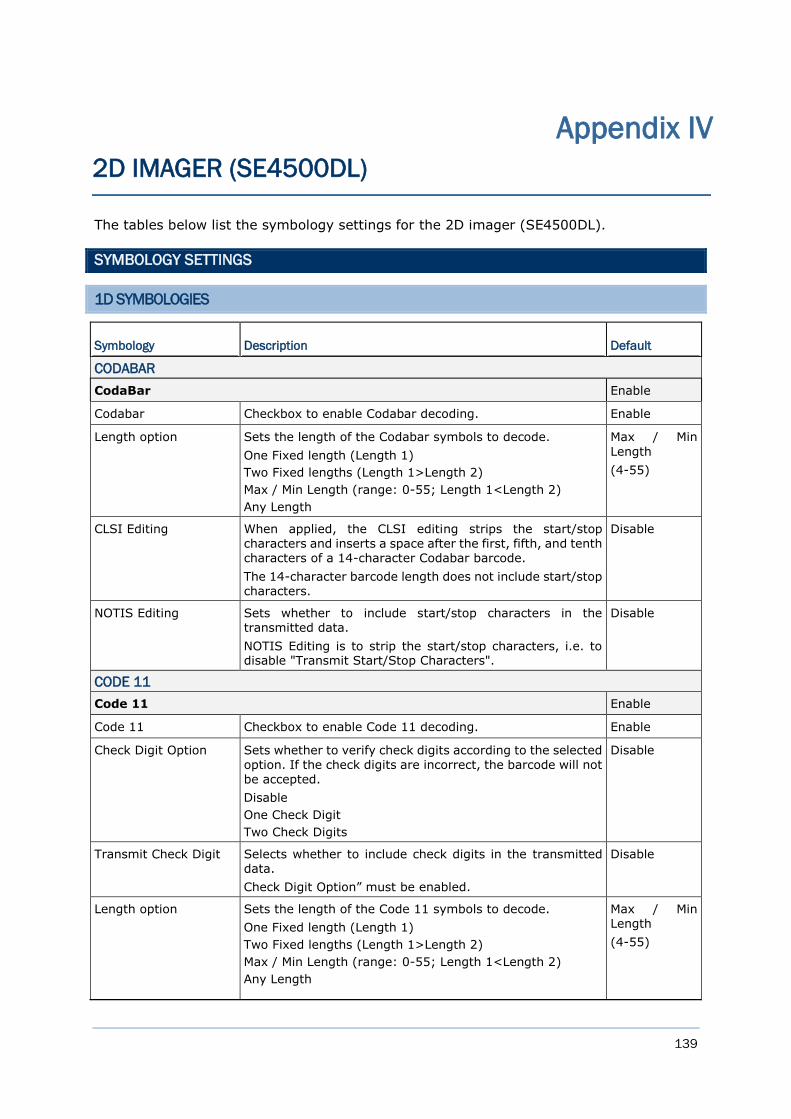
139
The tables below list the symbology settings for the 2D imager (SE4500DL).
SYMBOLOGY SETTINGS
1D SYMBOLOGIES
Symbology Description Default
CODABAR
CodaBar Enable
Codabar Checkbox to enable Codabar decoding. Enable
Length option Sets the length of the Codabar symbols to decode.
One Fixed length (Length 1)
Two Fixed lengths (Length 1>Length 2)
Max / Min Length (range: 0-55; Length 1<Length 2)
Any Length
Max / Min
Length
(4-55)
CLSI Editing When applied, the CLSI editing strips the start/stop
characters and inserts a space after the first, fifth, and tenth characters of a 14-character Codabar barcode.
The 14-character barcode length does not include start/stop characters.
Disable
NOTIS Editing Sets whether to include start/stop characters in the transmitted data.
NOTIS Editing is to strip the start/stop characters, i.e. to disable "Transmit Start/Stop Characters".
Disable
CODE 11
Code 11 Enable
Code 11 Checkbox to enable Code 11 decoding. Enable
Check Digit Option Sets whether to verify check digits according to the selected
option. If the check digits are incorrect, the barcode will not be accepted.
Disable
One Check Digit
Two Check Digits
Disable
Transmit Check Digit Selects whether to include check digits in the transmitted data.
Check Digit Option” must be enabled.
Disable
Length option Sets the length of the Code 11 symbols to decode.
One Fixed length (Length 1)
Two Fixed lengths (Length 1>Length 2)
Max / Min Length (range: 0-55; Length 1<Length 2)
Any Length
Max / Min Length
(4-55)
Appendix IV
2D IMAGER (SE4500DL)
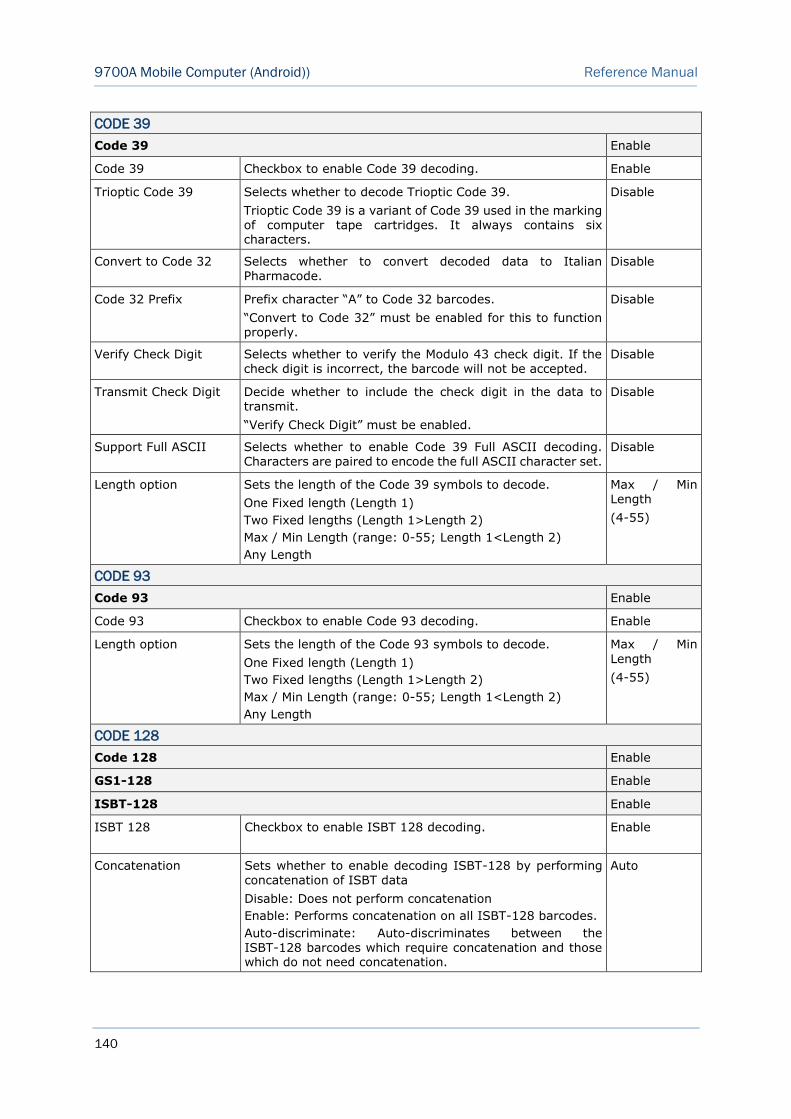
140
9700A Mobile Computer (Android)) Reference Manual
CODE 39
Code 39 Enable
Code 39 Checkbox to enable Code 39 decoding. Enable
Trioptic Code 39 Selects whether to decode Trioptic Code 39.
Trioptic Code 39 is a variant of Code 39 used in the marking of computer tape cartridges. It always contains six characters.
Disable
Convert to Code 32 Selects whether to convert decoded data to Italian Pharmacode.
Disable
Code 32 Prefix Prefix character “A” to Code 32 barcodes.
“Convert to Code 32” must be enabled for this to function properly.
Disable
Verify Check Digit Selects whether to verify the Modulo 43 check digit. If the check digit is incorrect, the barcode will not be accepted.
Disable
Transmit Check Digit Decide whether to include the check digit in the data to transmit.
“Verify Check Digit” must be enabled.
Disable
Support Full ASCII Selects whether to enable Code 39 Full ASCII decoding. Characters are paired to encode the full ASCII character set.
Disable
Length option Sets the length of the Code 39 symbols to decode.
One Fixed length (Length 1)
Two Fixed lengths (Length 1>Length 2)
Max / Min Length (range: 0-55; Length 1<Length 2)
Any Length
Max / Min Length
(4-55)
CODE 93
Code 93 Enable
Code 93 Checkbox to enable Code 93 decoding. Enable
Length option Sets the length of the Code 93 symbols to decode.
One Fixed length (Length 1)
Two Fixed lengths (Length 1>Length 2)
Max / Min Length (range: 0-55; Length 1<Length 2)
Any Length
Max / Min
Length
(4-55)
CODE 128
Code 128 Enable
GS1-128 Enable
ISBT-128 Enable
ISBT 128 Checkbox to enable ISBT 128 decoding. Enable
Concatenation Sets whether to enable decoding ISBT-128 by performing concatenation of ISBT data
Disable: Does not perform concatenation
Enable: Performs concatenation on all ISBT-128 barcodes.
Auto-discriminate: Auto-discriminates between the ISBT-128 barcodes which require concatenation and those which do not need concatenation.
Auto
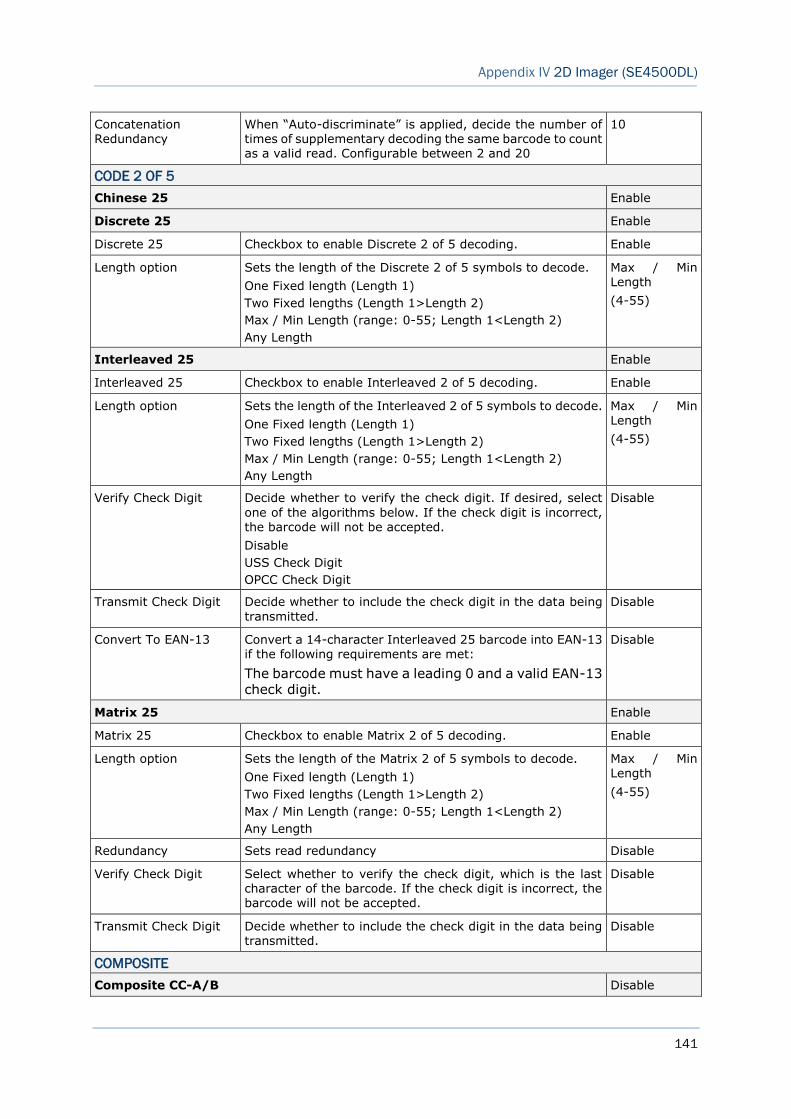
141
Appendix IV 2D Imager (SE4500DL)
Concatenation Redundancy
When “Auto-discriminate” is applied, decide the number of times of supplementary decoding the same barcode to count as a valid read. Configurable between 2 and 20
10
CODE 2 OF 5
Chinese 25 Enable
Discrete 25 Enable
Discrete 25 Checkbox to enable Discrete 2 of 5 decoding. Enable
Length option Sets the length of the Discrete 2 of 5 symbols to decode.
One Fixed length (Length 1)
Two Fixed lengths (Length 1>Length 2)
Max / Min Length (range: 0-55; Length 1<Length 2)
Any Length
Max / Min Length
(4-55)
Interleaved 25 Enable
Interleaved 25 Checkbox to enable Interleaved 2 of 5 decoding. Enable
Length option Sets the length of the Interleaved 2 of 5 symbols to decode.
One Fixed length (Length 1)
Two Fixed lengths (Length 1>Length 2)
Max / Min Length (range: 0-55; Length 1<Length 2)
Any Length
Max / Min Length
(4-55)
Verify Check Digit Decide whether to verify the check digit. If desired, select
one of the algorithms below. If the check digit is incorrect, the barcode will not be accepted.
Disable
USS Check Digit
OPCC Check Digit
Disable
Transmit Check Digit Decide whether to include the check digit in the data being
transmitted.
Disable
Convert To EAN-13 Convert a 14-character Interleaved 25 barcode into EAN-13 if the following requirements are met:
The barcode must have a leading 0 and a valid EAN-13 check digit.
Disable
Matrix 25 Enable
Matrix 25 Checkbox to enable Matrix 2 of 5 decoding. Enable
Length option Sets the length of the Matrix 2 of 5 symbols to decode.
One Fixed length (Length 1)
Two Fixed lengths (Length 1>Length 2)
Max / Min Length (range: 0-55; Length 1<Length 2)
Any Length
Max / Min
Length
(4-55)
Redundancy Sets read redundancy Disable
Verify Check Digit Select whether to verify the check digit, which is the last character of the barcode. If the check digit is incorrect, the barcode will not be accepted.
Disable
Transmit Check Digit Decide whether to include the check digit in the data being transmitted.
Disable
COMPOSITE
Composite CC-A/B Disable
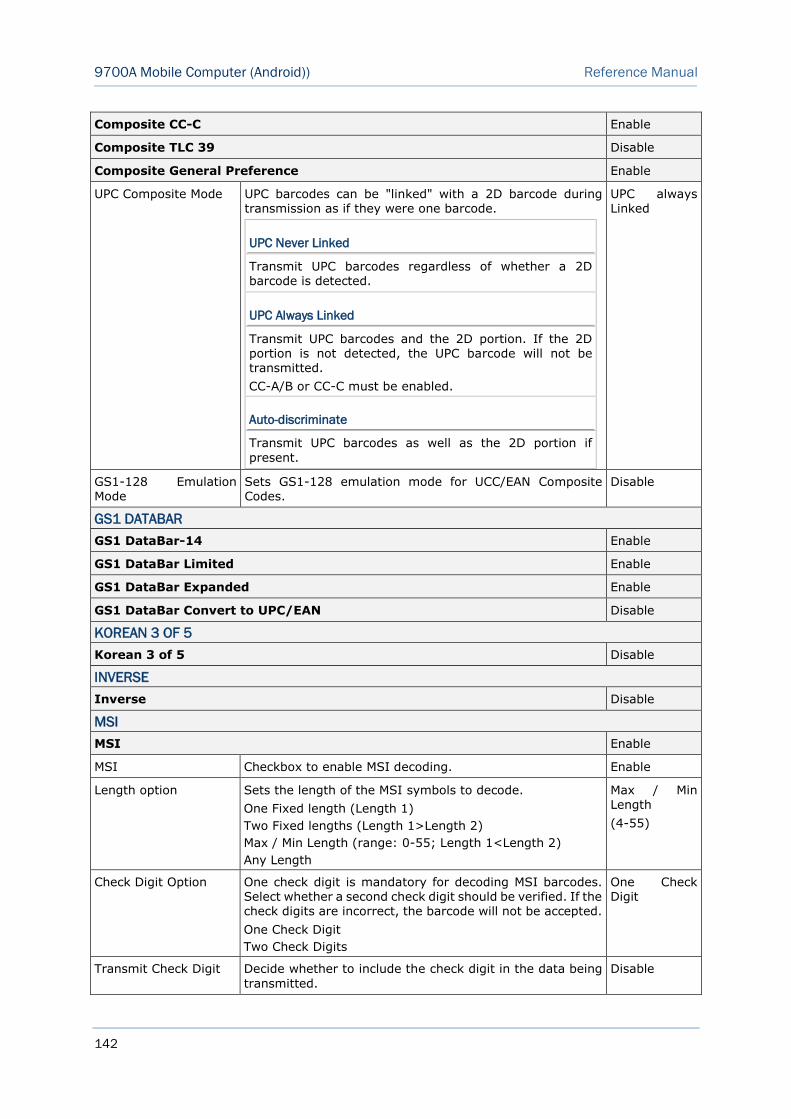
142
9700A Mobile Computer (Android)) Reference Manual
Composite CC-C Enable
Composite TLC 39 Disable
Composite General Preference Enable
UPC Composite Mode UPC barcodes can be "linked" with a 2D barcode during transmission as if they were one barcode.
UPC Never Linked
Transmit UPC barcodes regardless of whether a 2D barcode is detected.
UPC Always Linked
Transmit UPC barcodes and the 2D portion. If the 2D portion is not detected, the UPC barcode will not be transmitted.
CC-A/B or CC-C must be enabled.
Auto-discriminate
Transmit UPC barcodes as well as the 2D portion if
present.
UPC always Linked
GS1-128 Emulation Mode
Sets GS1-128 emulation mode for UCC/EAN Composite Codes.
Disable
GS1 DATABAR
GS1 DataBar-14 Enable
GS1 DataBar Limited Enable
GS1 DataBar Expanded Enable
GS1 DataBar Convert to UPC/EAN Disable
KOREAN 3 OF 5
Korean 3 of 5 Disable
INVERSE
Inverse Disable
MSI
MSI Enable
MSI Checkbox to enable MSI decoding. Enable
Length option Sets the length of the MSI symbols to decode.
One Fixed length (Length 1)
Two Fixed lengths (Length 1>Length 2)
Max / Min Length (range: 0-55; Length 1<Length 2)
Any Length
Max / Min Length
(4-55)
Check Digit Option One check digit is mandatory for decoding MSI barcodes. Select whether a second check digit should be verified. If the check digits are incorrect, the barcode will not be accepted.
One Check Digit
Two Check Digits
One Check Digit
Transmit Check Digit Decide whether to include the check digit in the data being
transmitted.
Disable
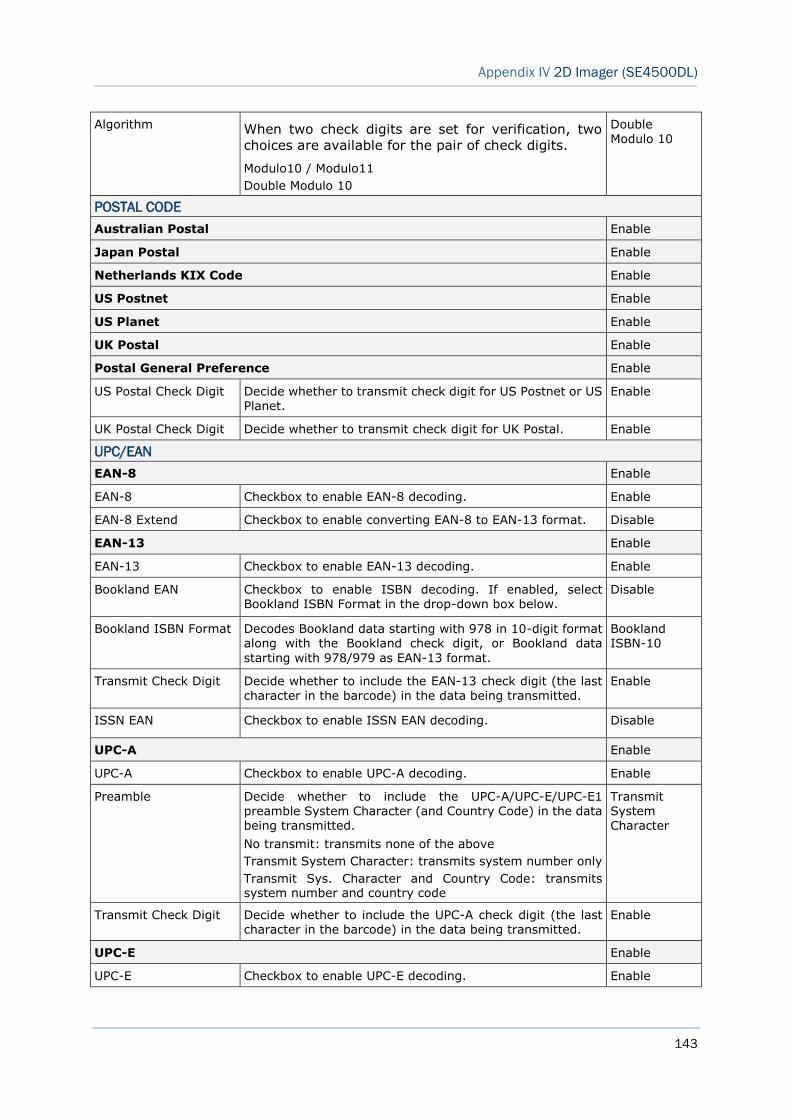
143
Appendix IV 2D Imager (SE4500DL)
Algorithm When two check digits are set for verification, two
choices are available for the pair of check digits.
Modulo10 / Modulo11
Double Modulo 10
Double Modulo 10
POSTAL CODE
Australian Postal Enable
Japan Postal Enable
Netherlands KIX Code Enable
US Postnet Enable
US Planet Enable
UK Postal Enable
Postal General Preference Enable
US Postal Check Digit Decide whether to transmit check digit for US Postnet or US Planet.
Enable
UK Postal Check Digit Decide whether to transmit check digit for UK Postal. Enable
UPC/EAN
EAN-8 Enable
EAN-8 Checkbox to enable EAN-8 decoding. Enable
EAN-8 Extend Checkbox to enable converting EAN-8 to EAN-13 format. Disable
EAN-13 Enable
EAN-13 Checkbox to enable EAN-13 decoding. Enable
Bookland EAN Checkbox to enable ISBN decoding. If enabled, select Bookland ISBN Format in the drop-down box below.
Disable
Bookland ISBN Format Decodes Bookland data starting with 978 in 10-digit format along with the Bookland check digit, or Bookland data
starting with 978/979 as EAN-13 format.
Bookland ISBN-10
Transmit Check Digit Decide whether to include the EAN-13 check digit (the last character in the barcode) in the data being transmitted.
Enable
ISSN EAN Checkbox to enable ISSN EAN decoding. Disable
UPC-A Enable
UPC-A Checkbox to enable UPC-A decoding. Enable
Preamble Decide whether to include the UPC-A/UPC-E/UPC-E1 preamble System Character (and Country Code) in the data being transmitted.
No transmit: transmits none of the above
Transmit System Character: transmits system number only
Transmit Sys. Character and Country Code: transmits system number and country code
Transmit System Character
Transmit Check Digit Decide whether to include the UPC-A check digit (the last character in the barcode) in the data being transmitted.
Enable
UPC-E Enable
UPC-E Checkbox to enable UPC-E decoding. Enable
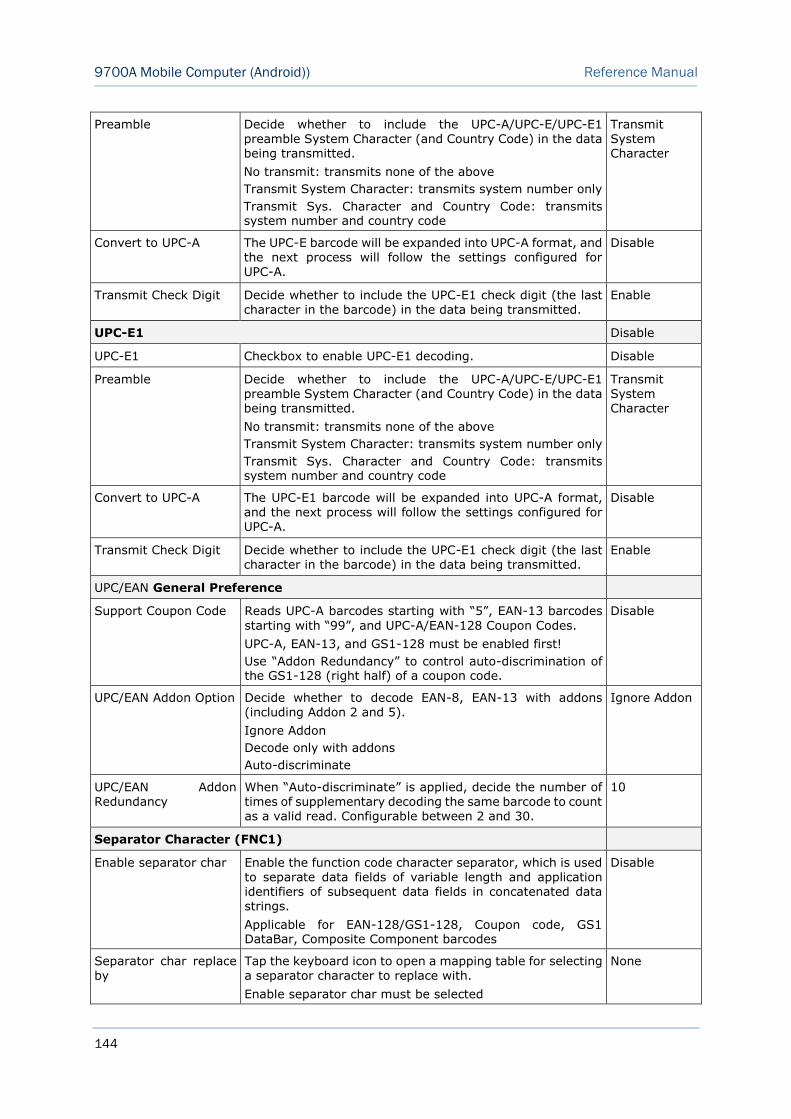
144
9700A Mobile Computer (Android)) Reference Manual
Preamble Decide whether to include the UPC-A/UPC-E/UPC-E1 preamble System Character (and Country Code) in the data being transmitted.
No transmit: transmits none of the above
Transmit System Character: transmits system number only
Transmit Sys. Character and Country Code: transmits system number and country code
Transmit System Character
Convert to UPC-A The UPC-E barcode will be expanded into UPC-A format, and the next process will follow the settings configured for UPC-A.
Disable
Transmit Check Digit Decide whether to include the UPC-E1 check digit (the last character in the barcode) in the data being transmitted.
Enable
UPC-E1 Disable
UPC-E1 Checkbox to enable UPC-E1 decoding. Disable
Preamble Decide whether to include the UPC-A/UPC-E/UPC-E1 preamble System Character (and Country Code) in the data being transmitted.
No transmit: transmits none of the above
Transmit System Character: transmits system number only
Transmit Sys. Character and Country Code: transmits system number and country code
Transmit System Character
Convert to UPC-A The UPC-E1 barcode will be expanded into UPC-A format, and the next process will follow the settings configured for UPC-A.
Disable
Transmit Check Digit Decide whether to include the UPC-E1 check digit (the last character in the barcode) in the data being transmitted.
Enable
UPC/EAN General Preference
Support Coupon Code Reads UPC-A barcodes starting with “5”, EAN-13 barcodes
starting with “99”, and UPC-A/EAN-128 Coupon Codes.
UPC-A, EAN-13, and GS1-128 must be enabled first!
Use “Addon Redundancy” to control auto-discrimination of the GS1-128 (right half) of a coupon code.
Disable
UPC/EAN Addon Option Decide whether to decode EAN-8, EAN-13 with addons (including Addon 2 and 5).
Ignore Addon
Decode only with addons
Auto-discriminate
Ignore Addon
UPC/EAN Addon Redundancy
When “Auto-discriminate” is applied, decide the number of times of supplementary decoding the same barcode to count as a valid read. Configurable between 2 and 30.
10
Separator Character (FNC1)
Enable separator char Enable the function code character separator, which is used to separate data fields of variable length and application identifiers of subsequent data fields in concatenated data strings.
Applicable for EAN-128/GS1-128, Coupon code, GS1 DataBar, Composite Component barcodes
Disable
Separator char replace by
Tap the keyboard icon to open a mapping table for selecting a separator character to replace with.
Enable separator char must be selected
None

145
Appendix IV 2D Imager (SE4500DL)
2D SYMBOLOGIES
Symbology Description Default
Aztec Enable
Aztec Selects whether to enable Aztec decoding. Enable
Data Matrix Enable
Data Matrix Selects whether to enable Data Matrix decoding. Enable
Decode Mirror Image Selects whether to enable decode mirror images.
Never
Does not decode Data Matrix barcodes that are mirror images.
Always
Decodes Data Matrix barcodes that are mirror images.
Auto
Decodes both mirrored and unmirrored Data Matrix barcodes.
Never
Maxicode Enable
MicroPDF417 Disable
MicroPDF417 Selects whether to enable MicroPDF417 decoding. Disable
Code 128 Emulation Transmit data from certain Micro PDF 417 barcodes as if it was encoded in Code 128 barcodes.
Transmit AIM code ID character in Miscellaneous options must be enabled first.
When applied, the MicroPDF417 barcodes are transmitted
with one of these prefixes:
The first codeword of MicroPDF417 is 903-905:
The original Code ID "]L3" will be changed to "]C1".
The first codeword of MicroPDF417 is 908 or 909:
The original Code ID "]L4" will be changed to "]C2".
The first codeword of MicroPDF417 is 910 or 911:
The original Code ID "]L5" will be changed to "]C0".
Disable
MicroQR Enable
PDF417 Enable
QR Code Enable
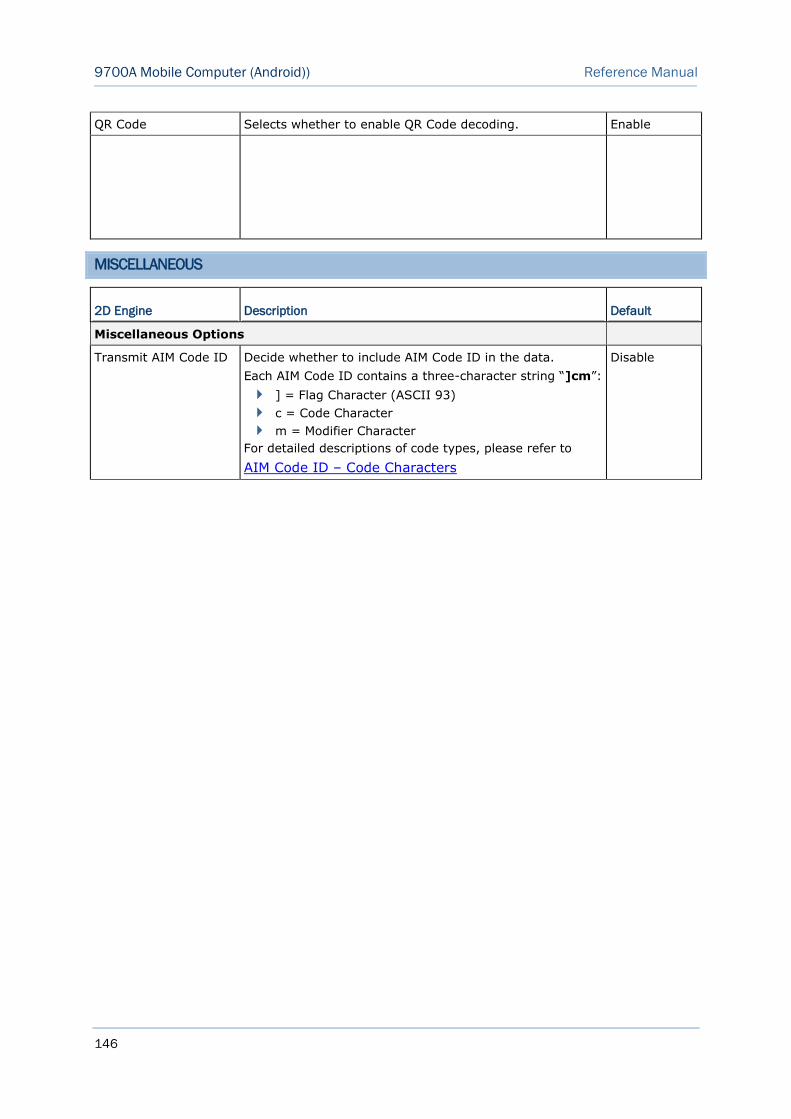
146
9700A Mobile Computer (Android)) Reference Manual
QR Code Selects whether to enable QR Code decoding. Enable
MISCELLANEOUS
2D Engine Description Default
Miscellaneous Options
Transmit AIM Code ID Decide whether to include AIM Code ID in the data.
Each AIM Code ID contains a three-character string “]cm”:
] = Flag Character (ASCII 93)
c = Code Character
m = Modifier Character
For detailed descriptions of code types, please refer to
AIM Code ID – Code Characters
Disable
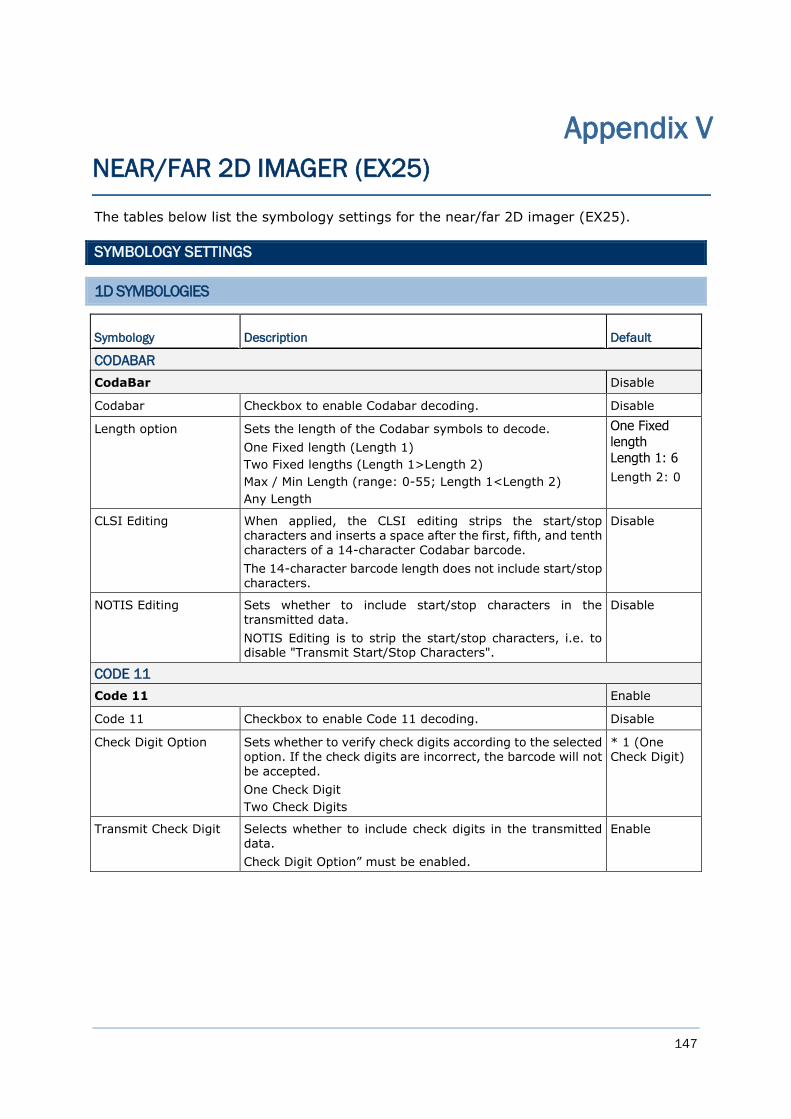
147
The tables below list the symbology settings for the near/far 2D imager (EX25).
SYMBOLOGY SETTINGS
1D SYMBOLOGIES
Symbology Description Default
CODABAR
CodaBar Disable
Codabar Checkbox to enable Codabar decoding. Disable
Length option Sets the length of the Codabar symbols to decode.
One Fixed length (Length 1)
Two Fixed lengths (Length 1>Length 2)
Max / Min Length (range: 0-55; Length 1<Length 2)
Any Length
One Fixed
length
Length 1: 6
Length 2: 0
CLSI Editing When applied, the CLSI editing strips the start/stop characters and inserts a space after the first, fifth, and tenth
characters of a 14-character Codabar barcode.
The 14-character barcode length does not include start/stop characters.
Disable
NOTIS Editing Sets whether to include start/stop characters in the transmitted data.
NOTIS Editing is to strip the start/stop characters, i.e. to disable "Transmit Start/Stop Characters".
Disable
CODE 11
Code 11 Enable
Code 11 Checkbox to enable Code 11 decoding. Disable
Check Digit Option Sets whether to verify check digits according to the selected option. If the check digits are incorrect, the barcode will not
be accepted.
One Check Digit
Two Check Digits
* 1 (One Check Digit)
Transmit Check Digit Selects whether to include check digits in the transmitted data.
Check Digit Option” must be enabled.
Enable
Appendix V
NEAR/FAR 2D IMAGER (EX25)
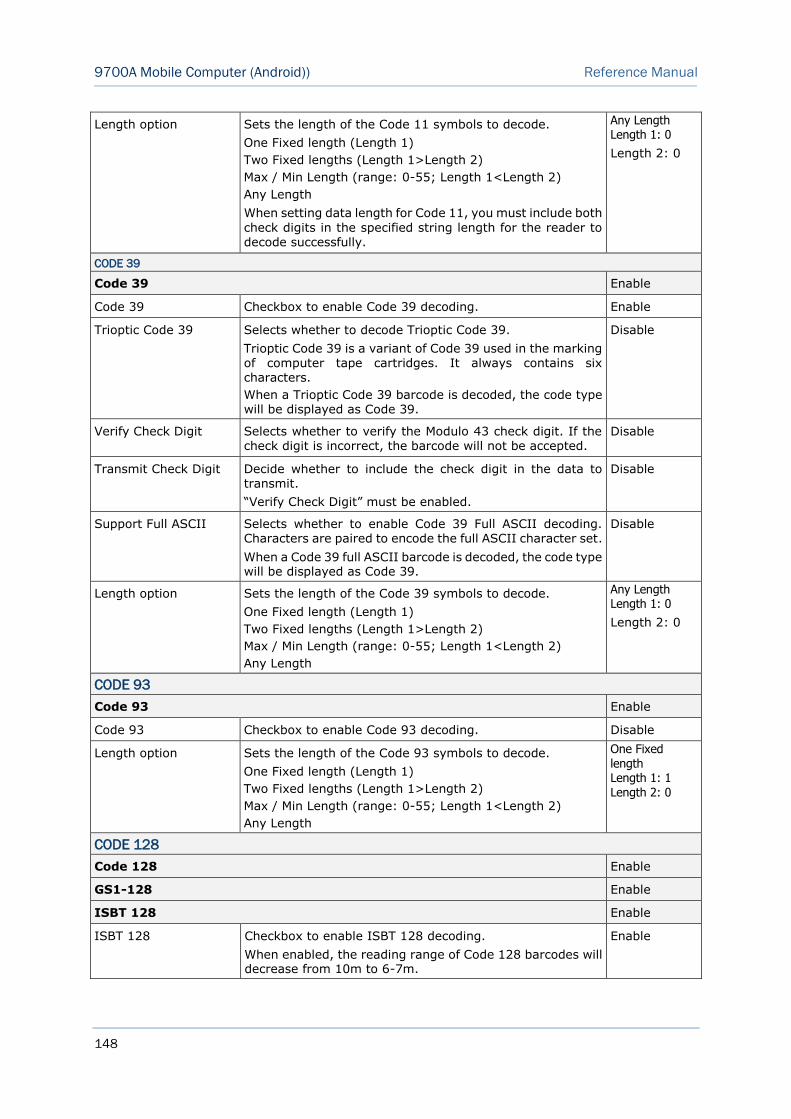
148
9700A Mobile Computer (Android)) Reference Manual
Length option Sets the length of the Code 11 symbols to decode.
One Fixed length (Length 1)
Two Fixed lengths (Length 1>Length 2)
Max / Min Length (range: 0-55; Length 1<Length 2)
Any Length
When setting data length for Code 11, you must include both
check digits in the specified string length for the reader to decode successfully.
Any Length Length 1: 0
Length 2: 0
CODE 39
Code 39 Enable
Code 39 Checkbox to enable Code 39 decoding. Enable
Trioptic Code 39 Selects whether to decode Trioptic Code 39.
Trioptic Code 39 is a variant of Code 39 used in the marking of computer tape cartridges. It always contains six characters.
When a Trioptic Code 39 barcode is decoded, the code type will be displayed as Code 39.
Disable
Verify Check Digit Selects whether to verify the Modulo 43 check digit. If the check digit is incorrect, the barcode will not be accepted.
Disable
Transmit Check Digit Decide whether to include the check digit in the data to transmit.
“Verify Check Digit” must be enabled.
Disable
Support Full ASCII Selects whether to enable Code 39 Full ASCII decoding. Characters are paired to encode the full ASCII character set.
When a Code 39 full ASCII barcode is decoded, the code type will be displayed as Code 39.
Disable
Length option Sets the length of the Code 39 symbols to decode.
One Fixed length (Length 1)
Two Fixed lengths (Length 1>Length 2)
Max / Min Length (range: 0-55; Length 1<Length 2)
Any Length
Any Length Length 1: 0
Length 2: 0
CODE 93
Code 93 Enable
Code 93 Checkbox to enable Code 93 decoding. Disable
Length option Sets the length of the Code 93 symbols to decode.
One Fixed length (Length 1)
Two Fixed lengths (Length 1>Length 2)
Max / Min Length (range: 0-55; Length 1<Length 2)
Any Length
One Fixed
length Length 1: 1 Length 2: 0
CODE 128
Code 128 Enable
GS1-128 Enable
ISBT 128 Enable
ISBT 128 Checkbox to enable ISBT 128 decoding.
When enabled, the reading range of Code 128 barcodes will decrease from 10m to 6-7m.
Enable
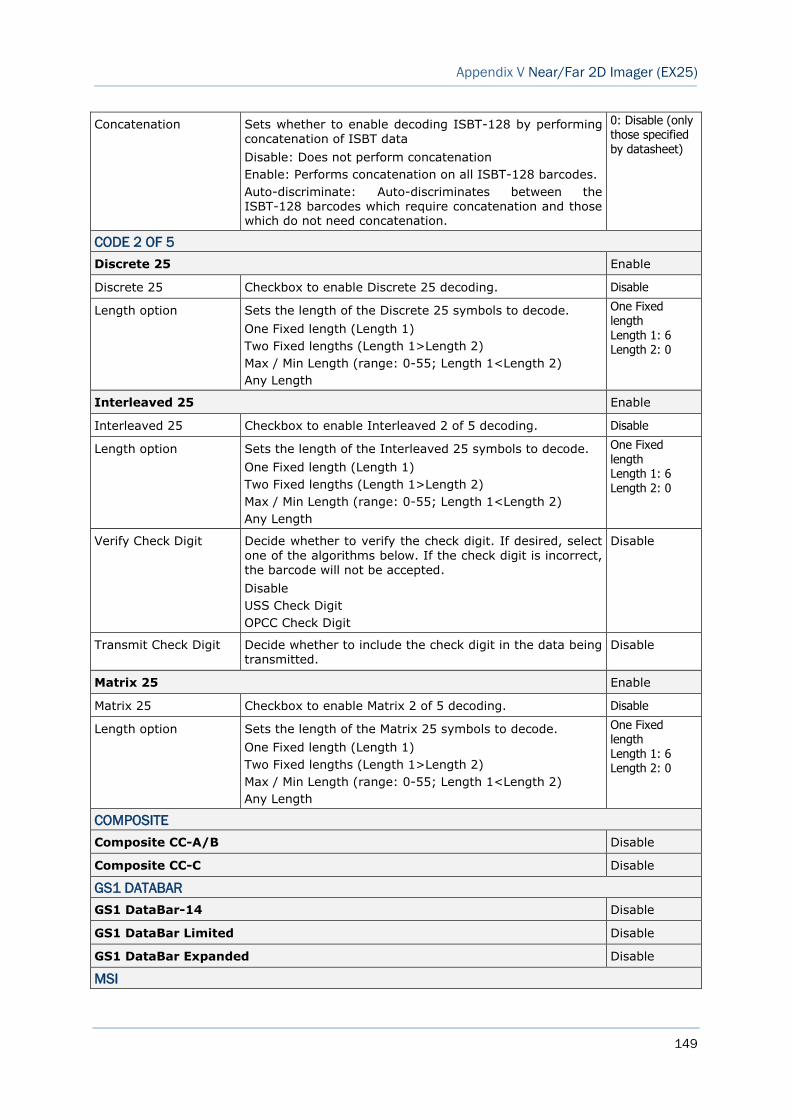
149
Appendix V Near/Far 2D Imager (EX25)
Concatenation Sets whether to enable decoding ISBT-128 by performing concatenation of ISBT data
Disable: Does not perform concatenation
Enable: Performs concatenation on all ISBT-128 barcodes.
Auto-discriminate: Auto-discriminates between the ISBT-128 barcodes which require concatenation and those which do not need concatenation.
0: Disable (only those specified by datasheet)
CODE 2 OF 5
Discrete 25 Enable
Discrete 25 Checkbox to enable Discrete 25 decoding. Disable
Length option Sets the length of the Discrete 25 symbols to decode.
One Fixed length (Length 1)
Two Fixed lengths (Length 1>Length 2)
Max / Min Length (range: 0-55; Length 1<Length 2)
Any Length
One Fixed length
Length 1: 6 Length 2: 0
Interleaved 25 Enable
Interleaved 25 Checkbox to enable Interleaved 2 of 5 decoding. Disable
Length option Sets the length of the Interleaved 25 symbols to decode.
One Fixed length (Length 1)
Two Fixed lengths (Length 1>Length 2)
Max / Min Length (range: 0-55; Length 1<Length 2)
Any Length
One Fixed length Length 1: 6 Length 2: 0
Verify Check Digit Decide whether to verify the check digit. If desired, select
one of the algorithms below. If the check digit is incorrect, the barcode will not be accepted.
Disable
USS Check Digit
OPCC Check Digit
Disable
Transmit Check Digit Decide whether to include the check digit in the data being transmitted.
Disable
Matrix 25 Enable
Matrix 25 Checkbox to enable Matrix 2 of 5 decoding. Disable
Length option Sets the length of the Matrix 25 symbols to decode.
One Fixed length (Length 1)
Two Fixed lengths (Length 1>Length 2)
Max / Min Length (range: 0-55; Length 1<Length 2)
Any Length
One Fixed length Length 1: 6 Length 2: 0
COMPOSITE
Composite CC-A/B Disable
Composite CC-C Disable
GS1 DATABAR
GS1 DataBar-14 Disable
GS1 DataBar Limited Disable
GS1 DataBar Expanded Disable
MSI
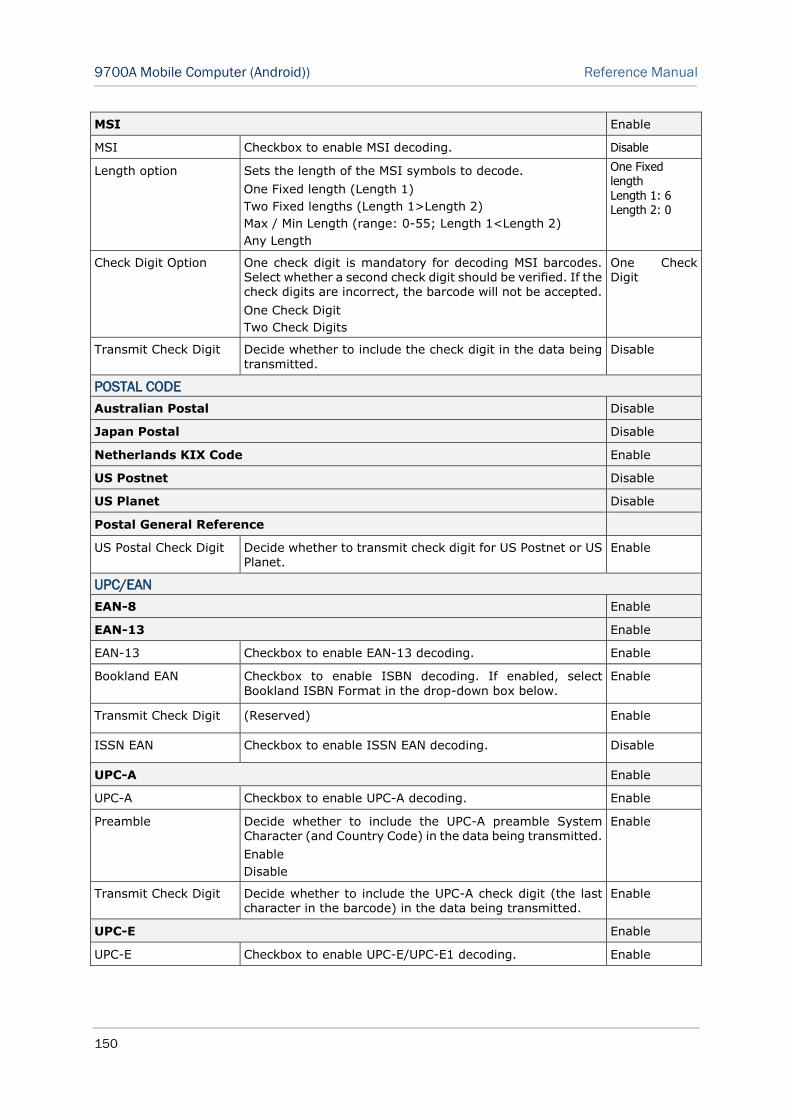
150
9700A Mobile Computer (Android)) Reference Manual
MSI Enable
MSI Checkbox to enable MSI decoding. Disable
Length option Sets the length of the MSI symbols to decode.
One Fixed length (Length 1)
Two Fixed lengths (Length 1>Length 2)
Max / Min Length (range: 0-55; Length 1<Length 2)
Any Length
One Fixed length Length 1: 6 Length 2: 0
Check Digit Option One check digit is mandatory for decoding MSI barcodes. Select whether a second check digit should be verified. If the check digits are incorrect, the barcode will not be accepted.
One Check Digit
Two Check Digits
One Check Digit
Transmit Check Digit Decide whether to include the check digit in the data being
transmitted.
Disable
POSTAL CODE
Australian Postal Disable
Japan Postal Disable
Netherlands KIX Code Enable
US Postnet Disable
US Planet Disable
Postal General Reference
US Postal Check Digit Decide whether to transmit check digit for US Postnet or US Planet.
Enable
UPC/EAN
EAN-8 Enable
EAN-13 Enable
EAN-13 Checkbox to enable EAN-13 decoding. Enable
Bookland EAN Checkbox to enable ISBN decoding. If enabled, select
Bookland ISBN Format in the drop-down box below.
Enable
Transmit Check Digit (Reserved) Enable
ISSN EAN Checkbox to enable ISSN EAN decoding. Disable
UPC-A Enable
UPC-A Checkbox to enable UPC-A decoding. Enable
Preamble Decide whether to include the UPC-A preamble System Character (and Country Code) in the data being transmitted.
Enable
Disable
Enable
Transmit Check Digit Decide whether to include the UPC-A check digit (the last character in the barcode) in the data being transmitted.
Enable
UPC-E Enable
UPC-E Checkbox to enable UPC-E/UPC-E1 decoding. Enable
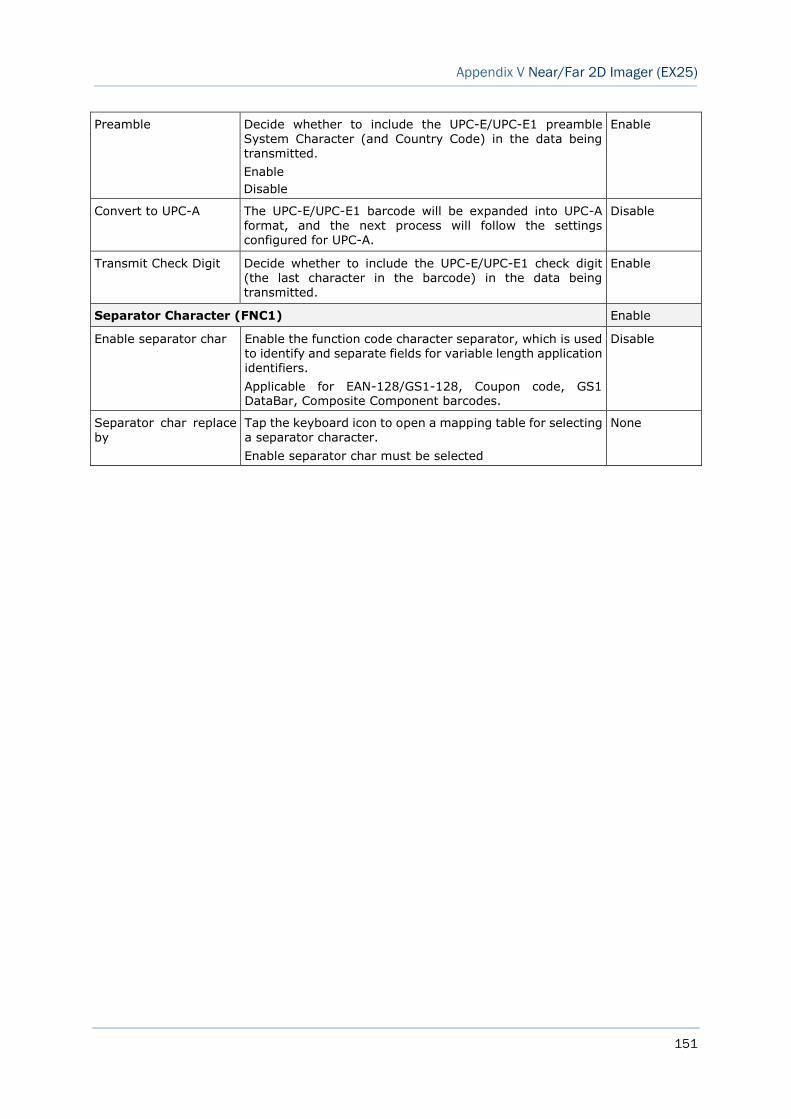
151
Appendix V Near/Far 2D Imager (EX25)
Preamble Decide whether to include the UPC-E/UPC-E1 preamble System Character (and Country Code) in the data being transmitted.
Enable
Disable
Enable
Convert to UPC-A The UPC-E/UPC-E1 barcode will be expanded into UPC-A format, and the next process will follow the settings configured for UPC-A.
Disable
Transmit Check Digit Decide whether to include the UPC-E/UPC-E1 check digit (the last character in the barcode) in the data being transmitted.
Enable
Separator Character (FNC1) Enable
Enable separator char Enable the function code character separator, which is used to identify and separate fields for variable length application identifiers.
Applicable for EAN-128/GS1-128, Coupon code, GS1 DataBar, Composite Component barcodes.
Disable
Separator char replace by
Tap the keyboard icon to open a mapping table for selecting a separator character.
Enable separator char must be selected
None
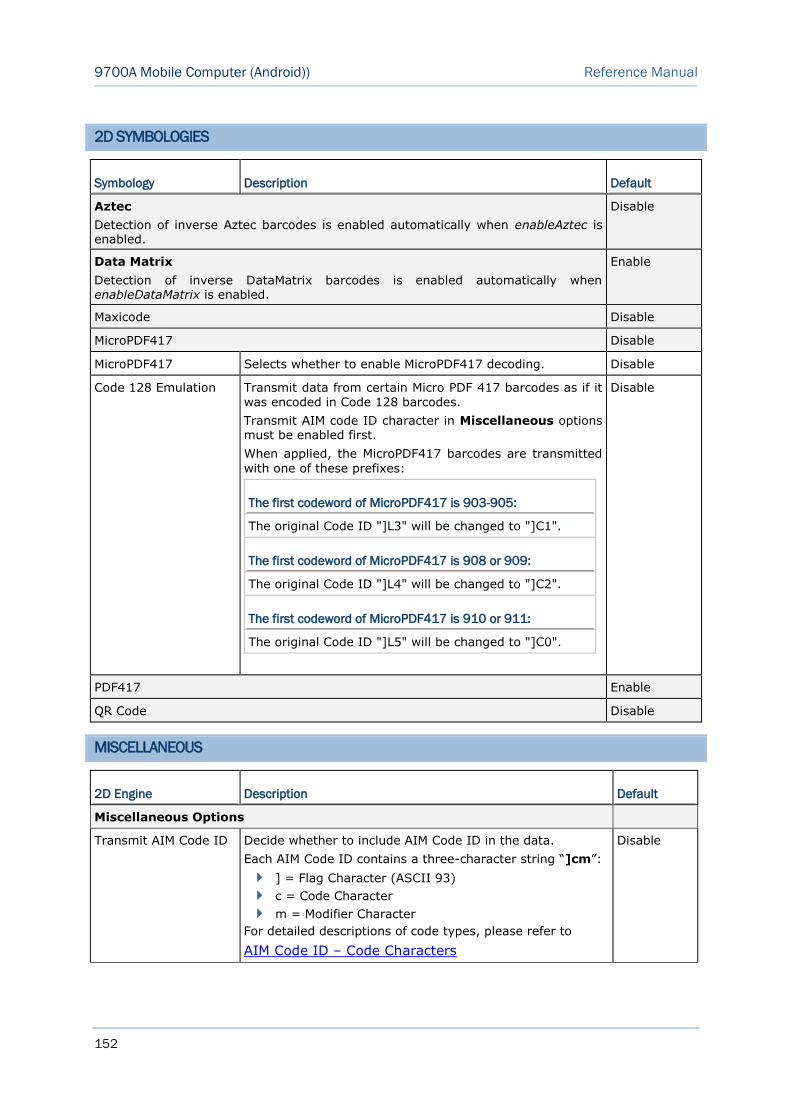
152
9700A Mobile Computer (Android)) Reference Manual
2D SYMBOLOGIES
Symbology Description Default
Aztec
Detection of inverse Aztec barcodes is enabled automatically when enableAztec is enabled.
Disable
Data Matrix
Detection of inverse DataMatrix barcodes is enabled automatically when enableDataMatrix is enabled.
Enable
Maxicode Disable
MicroPDF417 Disable
MicroPDF417 Selects whether to enable MicroPDF417 decoding. Disable
Code 128 Emulation Transmit data from certain Micro PDF 417 barcodes as if it was encoded in Code 128 barcodes.
Transmit AIM code ID character in Miscellaneous options must be enabled first.
When applied, the MicroPDF417 barcodes are transmitted
with one of these prefixes:
The first codeword of MicroPDF417 is 903-905:
The original Code ID "]L3" will be changed to "]C1".
The first codeword of MicroPDF417 is 908 or 909:
The original Code ID "]L4" will be changed to "]C2".
The first codeword of MicroPDF417 is 910 or 911:
The original Code ID "]L5" will be changed to "]C0".
Disable
PDF417 Enable
QR Code Disable
MISCELLANEOUS
2D Engine Description Default
Miscellaneous Options
Transmit AIM Code ID Decide whether to include AIM Code ID in the data.
Each AIM Code ID contains a three-character string “]cm”:
] = Flag Character (ASCII 93)
c = Code Character
m = Modifier Character
For detailed descriptions of code types, please refer to
AIM Code ID – Code Characters
Disable
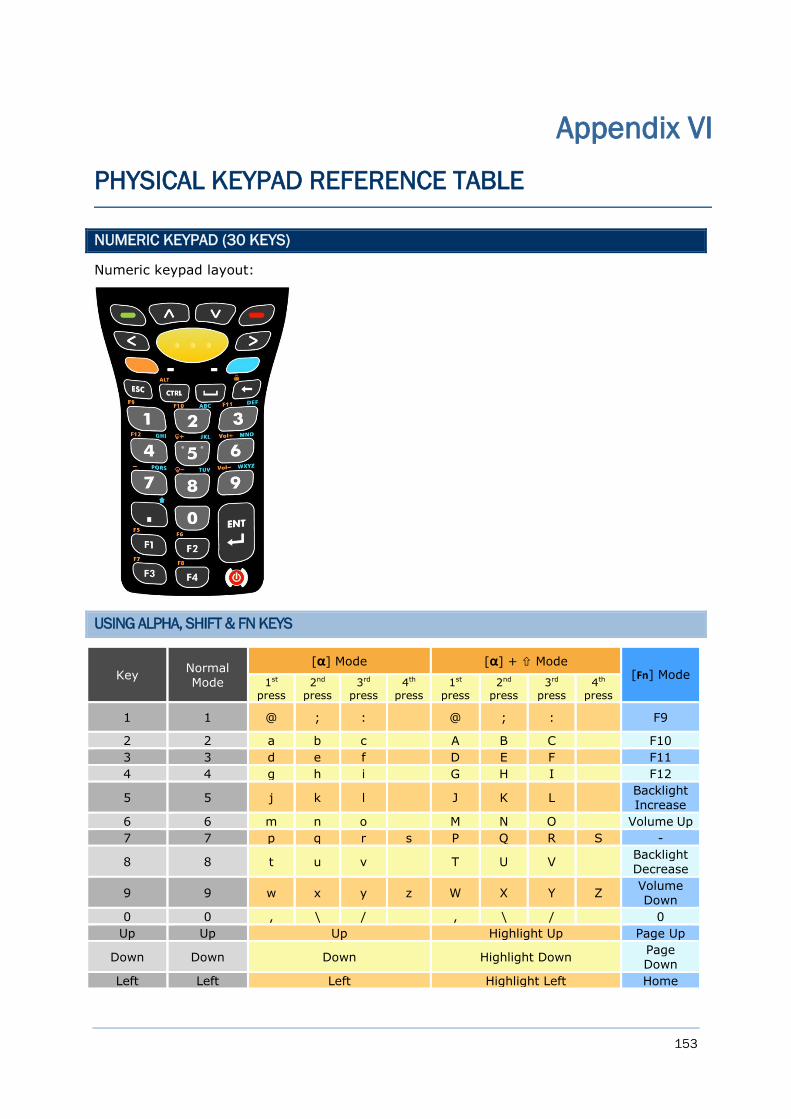
153
NUMERIC KEYPAD (30 KEYS)
Numeric keypad layout:
USING ALPHA, SHIFT & FN KEYS
Key Normal Mode
[α] Mode [α] + Mode [Fn] Mode
1st press
2nd press
3rd press
4th
press 1st
press 2nd
press 3rd
press 4th
press
1 1 @ ; : @ ; : F9
2 2 a b c A B C F10
3 3 d e f D E F F11
4 4 g h i G H I F12
5 5 j k l J K L Backlight Increase
6 6 m n o M N O Volume Up
7 7 p q r s P Q R S -
8 8 t u v T U V Backlight Decrease
9 9 w x y z W X Y Z Volume Down
0 0 , \ / , \ / 0
Up Up Up Highlight Up Page Up
Down Down Down Highlight Down Page Down
Left Left Left Highlight Left Home
Appendix VI
PHYSICAL KEYPAD REFERENCE TABLE
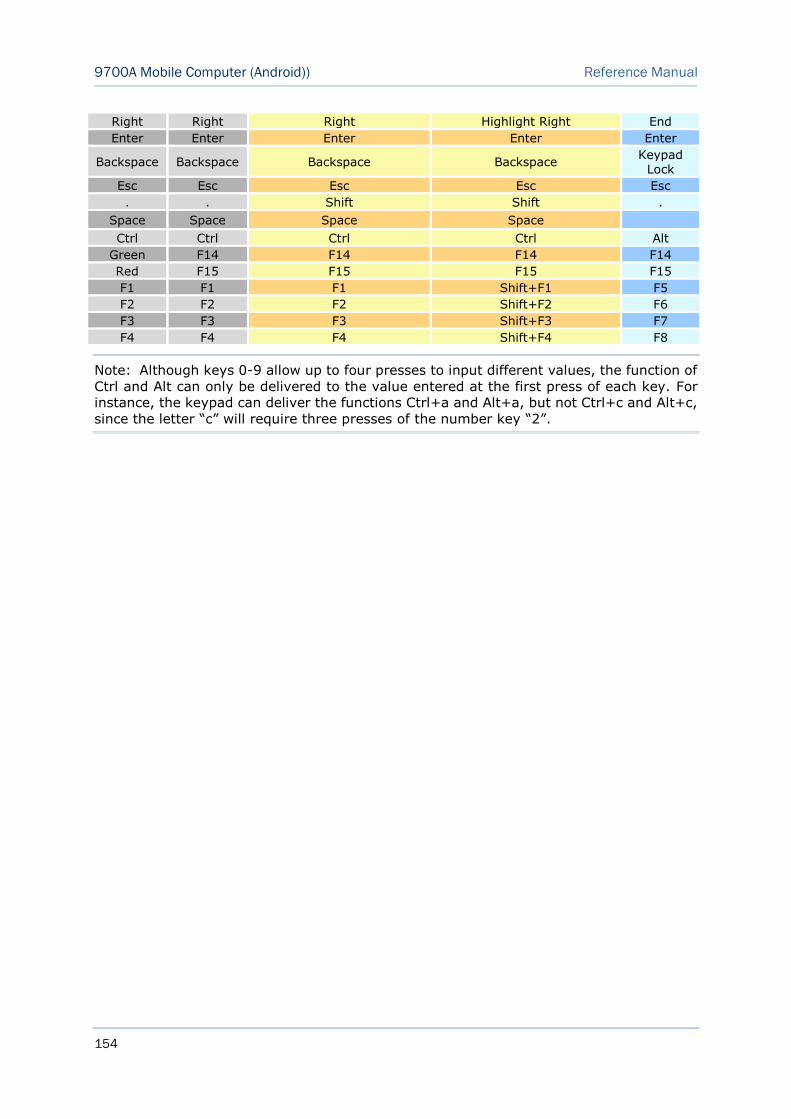
154
9700A Mobile Computer (Android)) Reference Manual
Right Right Right Highlight Right End
Enter Enter Enter Enter Enter
Backspace Backspace Backspace Backspace Keypad
Lock
Esc Esc Esc Esc Esc
. . Shift Shift .
Space Space Space Space
Ctrl Ctrl Ctrl Ctrl Alt
Green F14 F14 F14 F14
Red F15 F15 F15 F15
F1 F1 F1 Shift+F1 F5
F2 F2 F2 Shift+F2 F6
F3 F3 F3 Shift+F3 F7
F4 F4 F4 Shift+F4 F8
Note: Although keys 0-9 allow up to four presses to input different values, the function of
Ctrl and Alt can only be delivered to the value entered at the first press of each key. For
instance, the keypad can deliver the functions Ctrl+a and Alt+a, but not Ctrl+c and Alt+c,
since the letter “c” will require three presses of the number key “2”.

155
Appendix VI Physical Keypad Reference Table
NUMERIC & FUNCTION KEYPAD (38 KEYS)
Numeric and Function keypad layout:
USING ALPHA, SHIFT & FN KEYS
Key Normal Mode [α] Mode [α] + Mode Mode [Fn] Mode
1 1 e E Shift+1 1
2 2 f F Shift+2 2
3 3 g G Shift+3 3
4 4 h H Shift+4 4
5 5 i I Shift+5 5
6 6 j J Shift+6 6
7 7 k K Shift+7 7
8 8 l L Shift+8 8
9 9 m M Shift+9 9
0 0 o O Shift+0 0
Up Up b B Highlight Up Page Up
Down Down c C Highlight Down Page Down
Left Left a A Highlight Left Home
Right Right d D Highlight Right End
Enter Enter Enter Enter Enter Enter
Backspace Backspace Backspace Backspace Backspace Keypad Lock
Esc Esc Esc Esc Esc Esc
. . n N . .
, , p P , ,
Space Space Space Space Space
Ctrl Ctrl Ctrl Ctrl Ctrl Alt
Green F14 F14 Shift+F14 Shift+F14 F14
Red F15 F15 Shift+F15 Shift+F15 F15
F1 F1 q Q Shift+F1 F11
F2 F2 r R Shift+F2 F12

156
9700A Mobile Computer (Android)) Reference Manual
F3 F3 s S Shift+F3 F13
F4 F4 t T Shift+F4 F14
F5 F5 u U Shift+F5 F5
F6 F6 v V Shift+F6 Backlight Increase
F7 F7 w W Shift+F7 Volume Up
F8 F8 x X Shift+F8 F8
F9 F9 y Y Shift+F9 Backlight Decrease
F10 F10 z Z Shift+F10 Volume Down
Shift Shift Shift Shift N/A Shift
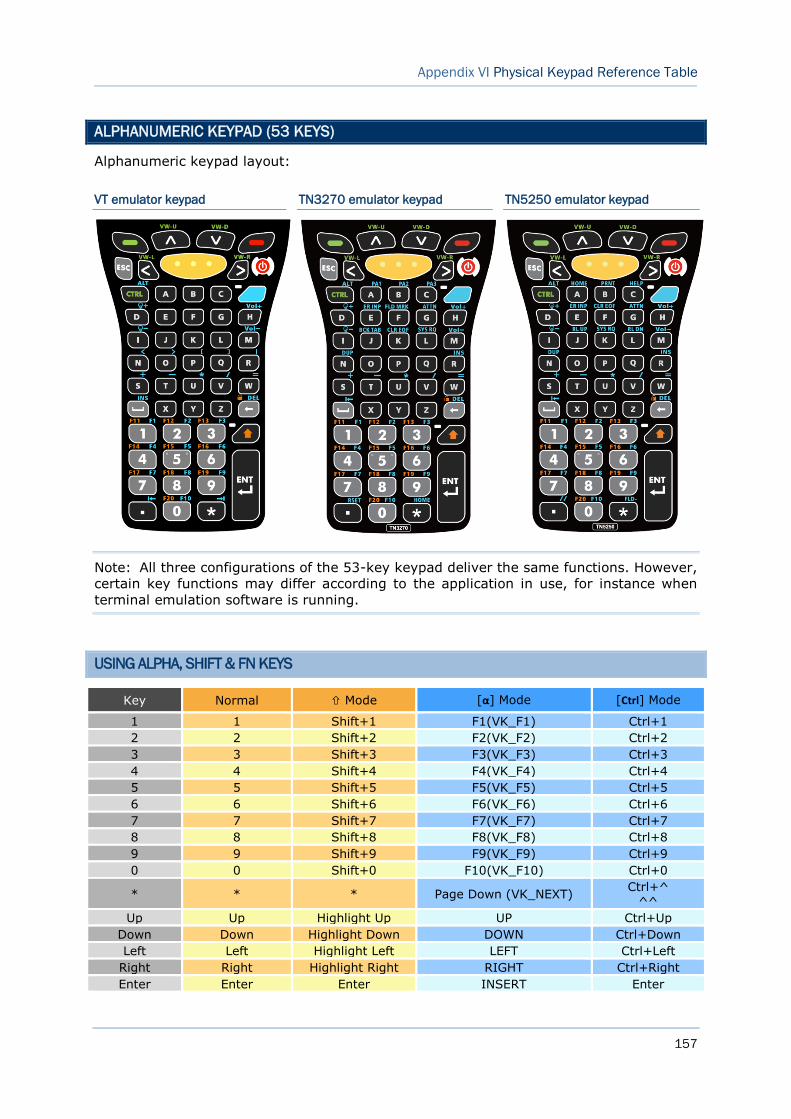
157
Appendix VI Physical Keypad Reference Table
ALPHANUMERIC KEYPAD (53 KEYS)
Alphanumeric keypad layout:
VT emulator keypad TN3270 emulator keypad TN5250 emulator keypad
Note: All three configurations of the 53-key keypad deliver the same functions. However,
certain key functions may differ according to the application in use, for instance when
terminal emulation software is running.
USING ALPHA, SHIFT & FN KEYS
Key Normal Mode [α] Mode [Ctrl] Mode
1 1 Shift+1 F1(VK_F1) Ctrl+1
2 2 Shift+2 F2(VK_F2) Ctrl+2
3 3 Shift+3 F3(VK_F3) Ctrl+3
4 4 Shift+4 F4(VK_F4) Ctrl+4
5 5 Shift+5 F5(VK_F5) Ctrl+5
6 6 Shift+6 F6(VK_F6) Ctrl+6
7 7 Shift+7 F7(VK_F7) Ctrl+7
8 8 Shift+8 F8(VK_F8) Ctrl+8
9 9 Shift+9 F9(VK_F9) Ctrl+9
0 0 Shift+0 F10(VK_F10) Ctrl+0
* * * Page Down (VK_NEXT) Ctrl+^
^^
Up Up Highlight Up UP Ctrl+Up
Down Down Highlight Down DOWN Ctrl+Down
Left Left Highlight Left LEFT Ctrl+Left
Right Right Highlight Right RIGHT Ctrl+Right
Enter Enter Enter INSERT Enter
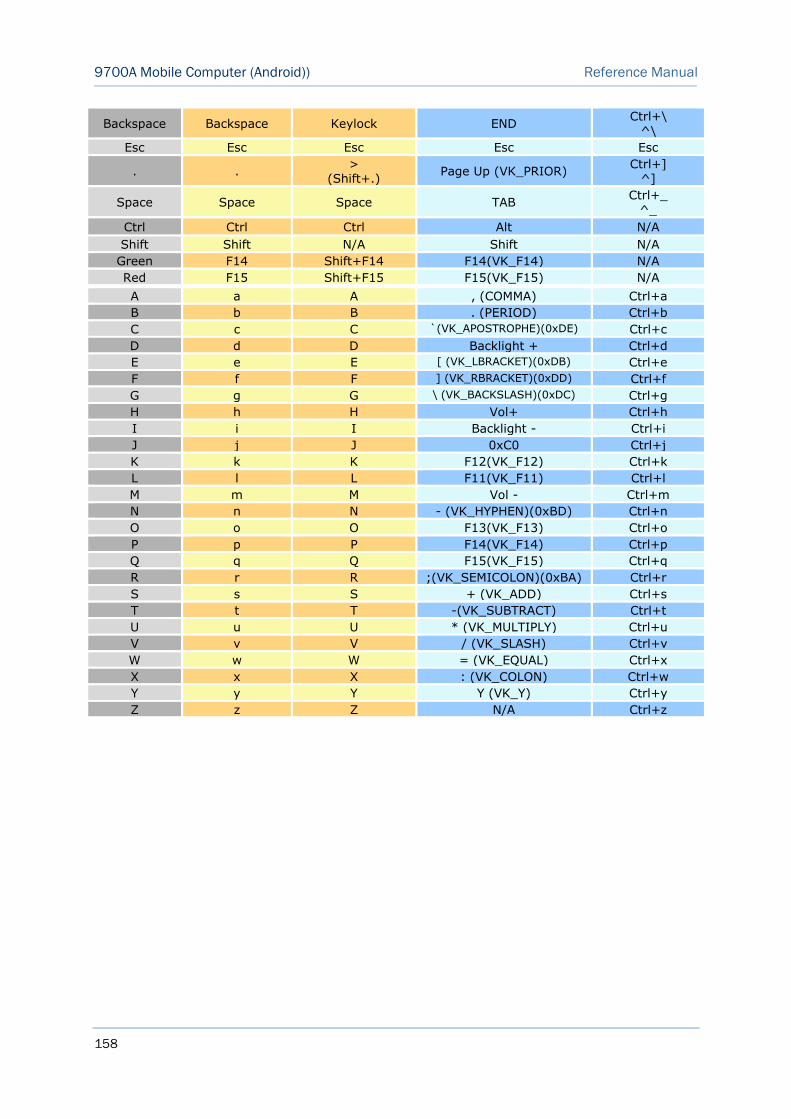
158
9700A Mobile Computer (Android)) Reference Manual
A a A , (COMMA) Ctrl+a
B b B . (PERIOD) Ctrl+b
C c C `(VK_APOSTROPHE)(0xDE) Ctrl+c
D d D Backlight + Ctrl+d
E e E [ (VK_LBRACKET)(0xDB) Ctrl+e
F f F ] (VK_RBRACKET)(0xDD) Ctrl+f
G g G \ (VK_BACKSLASH)(0xDC) Ctrl+g
H h H Vol+ Ctrl+h
I i I Backlight - Ctrl+i
J j J 0xC0 Ctrl+j
K k K F12(VK_F12) Ctrl+k
L l L F11(VK_F11) Ctrl+l
M m M Vol - Ctrl+m
N n N - (VK_HYPHEN)(0xBD) Ctrl+n
O o O F13(VK_F13) Ctrl+o
P p P F14(VK_F14) Ctrl+p
Q q Q F15(VK_F15) Ctrl+q
R r R ;(VK_SEMICOLON)(0xBA) Ctrl+r
S s S + (VK_ADD) Ctrl+s
T t T -(VK_SUBTRACT) Ctrl+t
U u U * (VK_MULTIPLY) Ctrl+u
V v V / (VK_SLASH) Ctrl+v
W w W = (VK_EQUAL) Ctrl+x
X x X : (VK_COLON) Ctrl+w
Y y Y Y (VK_Y) Ctrl+y
Z z Z N/A Ctrl+z
Backspace Backspace Keylock END Ctrl+\
^\
Esc Esc Esc Esc Esc
. . >
(Shift+.) Page Up (VK_PRIOR)
Ctrl+] ^]
Space Space Space TAB Ctrl+_
^_
Ctrl Ctrl Ctrl Alt N/A
Shift Shift N/A Shift N/A
Green F14 Shift+F14 F14(VK_F14) N/A
Red F15 Shift+F15 F15(VK_F15) N/A
Related Documents