ADJUSTABLE TOW BAR 5,000 LB. CAPACITY ASSEMBL Y AND OPERA TING INSTRUCTIONS WARNING! IMPORTANT INFORMATION This T ow Bar’s Hitch Cou pler MUST be properl y secured to the hitch ball of the towing vehicle. After assembly and attachment, pull up and down on the Hitch Coupler to make sure the hitch ball is tting snugly in the Hitch Coupler. There must be no play between the hitch ball and Hitch Coupler. If there is play, tighten the Adjustment Nut until no play is present. If the Adjustment Nut is too tight, the Handle will not lock. Carefully read and follow the complete instructions in this manual BEFORE setup or use. If the Coupler is not secured properly, the ball could come loose while the trailer is in motion, possibly causing property damage, SERIOUS PERSONAL INJURY, or DEATH. Please note: Most vehicles will require custom brackets. For front towing of some vehicles, the vehicle’ s bumper will have to be removed rst. If not experienced in setting up this type of equipment and installing brackets, assistance from a qualied service technician is recommended. Revised Manual 10e Visit our website at: http://www.harborfreight.com Read this material before using this product. Failure to do so can result in serious injury. SAVE THIS MANUAL. Copyright © 2006 by Harbor Freight Tools ® . All ri ghts reserved. No portion of this manual or any artwork contained herein may be reproduced in any shape or form without the express written consent of Harbor Freight T ools. Diagrams withi n this manual may not be draw n proportionally . Due to continuing improvements, actual product may dif fer slightly from the product descri bed herein. T ools required for assembly and service may not be included. For technical questions or replacement parts, please call 1-800-444-3353. Model 94696

Welcome message from author
This document is posted to help you gain knowledge. Please leave a comment to let me know what you think about it! Share it to your friends and learn new things together.
Transcript

8/15/2019 94696 Adjustable Tow Bar
http://slidepdf.com/reader/full/94696-adjustable-tow-bar 1/13
ADJUSTABLE TOW BAR5,000 LB. CAPACITY
ASSEMBLY AND OPERATING INSTRUCTIONS
WARNING!
IMPORTANT INFORMATIONThis Tow Bar’s Hitch Coupler MUST be properly
secured to the hitch ball of the towing vehicle. After assembly and attachment, pull up and
down on the Hitch Coupler to make sure the
hitch ball is tting snugly in the Hitch Coupler.
There must be no play between the hitch ball
and Hitch Coupler. If there is play, tighten the
Adjustment Nut until no play is present. If the
Adjustment Nut is too tight, the Handle will not
lock. Carefully read and follow the complete
instructions in this manual BEFORE setup
or use.
If the Coupler is not secured properly, the
ball could come loose while the trailer is in
motion, possibly causing property damage,SERIOUS PERSONAL INJURY, or DEATH.
Please note: Most vehicles will require custom brackets. For front towing of some
vehicles, the vehicle’s bumper will have to be removed rst. If not experienced
in setting up this type of equipment and installing brackets, assistance from a
qualied service technician is recommended.
Revised Manual 10e
Visit our website at: http://www.harborfreight.com
Read this material before using this product.
Failure to do so can result in serious injury.SAVE THIS MANUAL.
Copyright© 2006 by Harbor Freight Tools®. All rights reserved. No portion of this manual or any artwork
contained herein may be reproduced in any shape or form without the express written consent of
Harbor Freight Tools. Diagrams within this manual may not be drawn proportionally. Due to continuing
improvements, actual product may differ slightly from the product described herein. Tools required for
assembly and service may not be included.
For technical questions or replacement parts, please call 1-800-444-3353.
Model 94696
8/15/2019 94696 Adjustable Tow Bar
http://slidepdf.com/reader/full/94696-adjustable-tow-bar 2/13
Page 2SKU 94696 For technical questions, please call 1-800-444-3353.
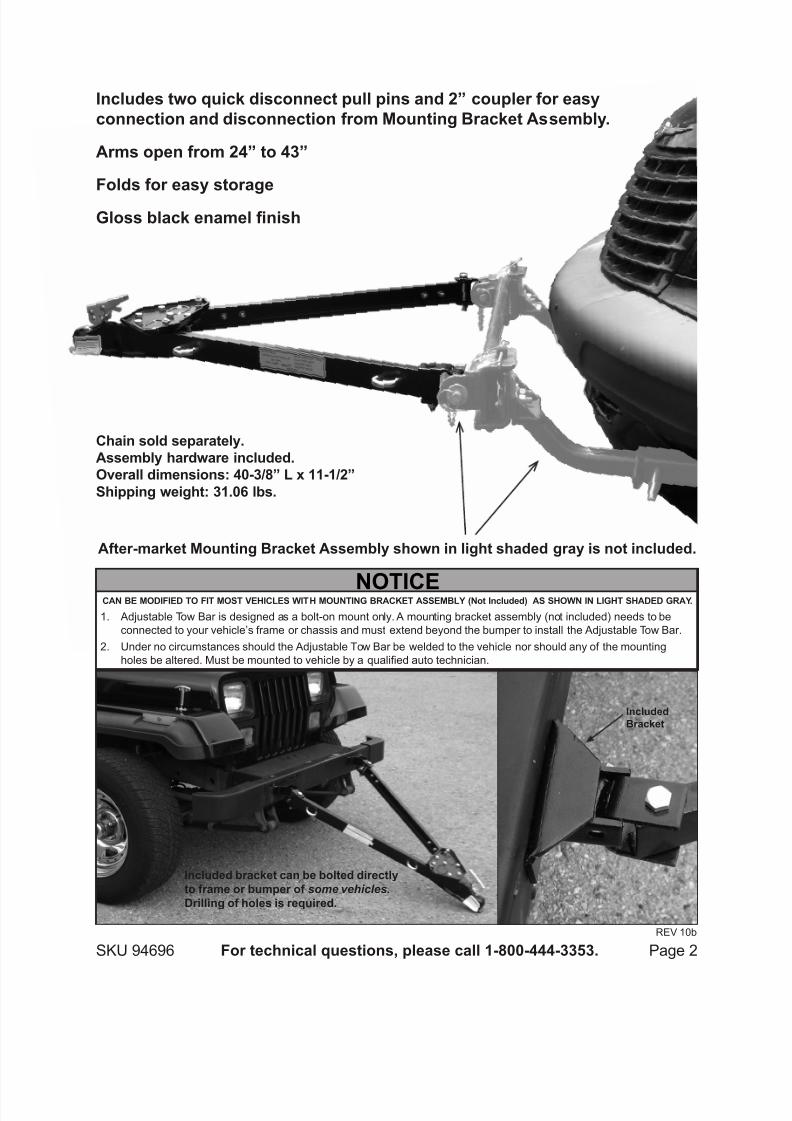
NOTICECAN BE MODIFIED TO FIT MOST VEHICLES WITH MOUNTING BRACKET ASSEMBLY (Not Included) AS SHOWN IN LIGHT SHADED GRAY.
Adjustable Tow Bar is designed as a bolt-on mount only. A mounting bracket assembly (not included) needs to be1.
connected to your vehicle’s frame or chassis and must extend beyond the bumper to install the Adjustable Tow Bar.
Under no circumstances should the Adjustable Tow Bar be welded to the vehicle nor should any of the mounting2.
holes be altered. Must be mounted to vehicle by a qualied auto technician.
Includes two quick disconnect pull pins and 2” coupler for easy
connection and disconnection from Mounting Bracket Assembly.
Arms open from 24” to 43”
Folds for easy storage
Gloss black enamel nish
After-market Mounting Bracket Assembly shown in light shaded gray is not included.
Chain sold separately.
Assembly hardware included.
Overall dimensions: 40-3/8” L x 11-1/2”
Shipping weight: 31.06 lbs.
Included
Bracket
Included bracket can be bolted directly
to frame or bumper of some vehicles.
Drilling of holes is required.
REV 10b

8/15/2019 94696 Adjustable Tow Bar
http://slidepdf.com/reader/full/94696-adjustable-tow-bar 3/13
Page 3SKU 94696 For technical questions, please call 1-800-444-3353.
PRODUCT SPECIFICATIONS
Independently tested to comply with SAE J684 and V5 standards.
Note: Four (4) sets of safety chains are required but not included with Kit. SKU 92450
Frame Chain, 3/8” - 5’ Length (4 sets required) can be used with this Adjustable Tow
Bar. This sku is sold separately at Harbor Freight Tools.
UNPACKINGWhen unpacking, make sure all the parts and hardware shown on the Parts List on page
11 are included. If any parts are missing or broken, please call Harbor Freight Tools at the
number shown on the cover of this manual as soon as possible.
SAVE THIS MANUAL
You will need this manual for the safety warnings and precautions, assembly, operating,
inspection, maintenance and cleaning procedures, parts list and assembly diagram. Keep
your invoice with this manual. Write the invoice number on the inside of the front cover.
Keep this manual and invoice in a safe and dry place for future reference.
GENERAL SAFETY RULES
WORK AREA
1. Keep work area clean and dry. Cluttered, damp, or wet work areas invite
injuries.
2. Keep children away from work area. Do not allow children to play with or climb
on this product.
IMPORTANT SAFETY INSTRUCTIONS
WARNING!
Read and adhere to the following instructions. Failure to read and obey all of
the following instructions COMPLETELY will void the warranty and can result in
damage to the Tow Bar, property damage, or SERIOUS PERSONAL INJURY.
SAVE THESE INSTRUCTIONS.
ITEM DESCRIPTION
Maximum Towing Capacity 5,000 lbs.
Coupler Ball Capacity 2”
Mounting Width Capacity 24” to 43”
Overall Dimensions 40-3/8” Long x 11-1/2” Wide
Unit Weight 29.20 lbs.
REV 07a; 07b; 09h

8/15/2019 94696 Adjustable Tow Bar
http://slidepdf.com/reader/full/94696-adjustable-tow-bar 4/13
Page 4SKU 94696 For technical questions, please call 1-800-444-3353.
3. Store idle equipment. When not in use, tools and equipment should be stored
in a dry location to inhibit rust. Always lock up tools and equipment, and keep out
of reach of children.
4. Do not use this product if under the inuence of alcohol or drugs. Read
warning labels on prescriptions to determine if your judgement or reexes are im-paired while taking drugs. If there is any doubt, do not attempt to use this prod-
uct.
5. Use eye protection. Wear ANSI approved safety impact eye goggles
when assembling this product. ANSI approved safety impact eye gog-
gles are available from Harbor Freight Tools.
6. Dress safely. Do not wear loose clothing or jewelry, as they can become caught
in moving parts. Wear a protective hair covering to prevent long hair from
becoming caught in moving parts. If wearing a long-sleeve shirt, roll sleeves up
above elbows.
7. Do not overreach. Keep proper footing and balance at all times to prevent
tripping, falling, back injury, etc.
8. Industrial applications must follow OSHA requirements.
9. Stay alert. Watch what you are doing at all times. Use common sense. Do not
use this product when you are tired or distracted from the job at hand.
EQUIPMENT USE AND CARE
1. Check for damaged parts. Before using this product, carefully check that it will
operate properly and perform its intended function. Check for damaged parts
and any other conditions that may affect the operation of this product. Replace
or repair damaged or worn parts immediately.
2. Replacement parts and accessories: When servicing, use only identical re-
placement parts. Only use accessories intended for use with this product. Ap-
proved accessories are available from Harbor Freight Tools.
3. Maintain this product with care. Keep this product clean and dry for better andsafer performance.
4. Maintenance: For your safety, service and maintenance should be performed
regularly by a qualied technician.
5. Use the right equipment for the job. Do not attempt to force small equipment

8/15/2019 94696 Adjustable Tow Bar
http://slidepdf.com/reader/full/94696-adjustable-tow-bar 5/13
Page 5SKU 94696 For technical questions, please call 1-800-444-3353.
to do the work of larger industrial equipment. There are certain applications for
which this product was designed. It will do the job better and more safely at the
capacity for which it was intended. Do not modify this product, and do not use
this product for a purpose for which it was not intended.
PRODUCT SERVICE
1. Equipment service must be performed only by qualied repair personnel.
Service or maintenance performed by unqualied personnel could result in a risk
of injury.
2. When servicing equipment, use only identical replacement parts. Follow
instructions in the “Inspection, Maintenance, and Cleaning” section of this
manual. Use of unauthorized parts or failure to follow maintenance instructions
may create a risk of personal injury.
SPECIFIC PRODUCT WARNINGS AND PRECAUTIONS
1. To avoid personal injury and/or property damage, do not exceed the Tow
Bar’s maximum towing capacity of 5,000 pounds or the maximum
tongue weight of 750 pounds. The towing capacity rating includes the towed
vehicle, additional towing equipment, etc. The tongue weight capacity rating
refers to the downward force exerted on the Hitch Ball (not included) by the
towed vehicle including cargo onboard.
2. Use a public, commercial scale to determine the actual weight of the towed
vehicle and its payload. Do not exceed the weight capacity of any towing
equipment.
3. Tow at your own risk. Failure to heed and follow all instructions and warnings
can result in a vehicle accident, personal injury and/or property damage. Harbor
Freight Tools cannot be held responsible for any damage incurred while using the
Tow Bar.
4. Make sure to read and fully understand the tow vehicle manufacturer’s
manual to determine the proper towing capacities.
5. Make sure to read and fully understand the towed vehicle manufacturer’s
manual to determine the proper additional towing equipment needed.
6. Before each use, always examine the Tow Bar for loose bolts and nuts,
structural cracks and bends, and any other condition that may affect its
safe operation. Do not use the Tow Bar even if minor damage appears.
REV 08i, 10e

8/15/2019 94696 Adjustable Tow Bar
http://slidepdf.com/reader/full/94696-adjustable-tow-bar 6/13
Page 6SKU 94696 For technical questions, please call 1-800-444-3353.
7. Before each use, always attach Safety Chains (not included) to the towing
vehicle and towed vehicle. Make sure the Safety Chains are attached to the
towing vehicle with the same length for each side. Do not allow the Safety
Chains to drag on the ground. Inspect the Safety Chains before every tow.
8. Make sure to connect the electrical system from the towing vehicle to thetowed vehicle. Never tow a vehicle without the running lights and brake lights
connected and in proper working condition.
9. Make sure the Coupler and the vehicle’s Hitch Ball (not included) are of
equal mating size (2”) and are rated equal to or greater than the weight
of the towed vehicle and its payload.
10. Do not exceed 55 miles per hour when using the Tow Bar. Excess speed is a
major cause of vehicular accidents.
11. CAUTION! Care must be taken when backing up a towed vehicle.Only back up the towed vehicle on a straight path. If the towed vehicle is
allowed to turn off the straight path while backing up, the vehicle could jackknife,
causing severe damage to the Tow Bar, towed vehicle, and towing vehicle.
12. Maintain labels and nameplates on the Tow Bar. These carry important
information. If unreadable or missing, contact Harbor Freight Tools for a
replacement.
13. Never drive the towed vehicle while the Tow Bar is attached to the front.
14. Never tow a vehicle with passengers or animals riding in the towed vehicle.
15. Contact your local Department of Motor Vehicles (or other regulatory
agency) for pertinent regulations before installation or use of this Tow Bar.
Always use this product in full accord with all federal, state, and local laws.
16. Connection of this Tow Bar must only be attempted on at, level ground.
17. WARNING! Use extreme caution if a vehicle suddenly sways while
being towed. A vehicle that sways is extremely dangerous and can cause loss
of control of the towing vehicle and towed vehicle. If swaying occurs, graduallyslow down and drive to a safe location of the road to correct the problem. Do not
brake suddenly or hard, as this will intensify the swaying and make the towing
vehicle and towed vehicle even more difcult to control. Turbulence from another
vehicle, wind gusts, downgrades, shifting cargo or tire failure also may be the
cause of swaying. It is the driver’s responsibility to assess the situation and take
appropriate action. If the swaying problem cannot be corrected, seek help from
a qualied towing professional.

8/15/2019 94696 Adjustable Tow Bar
http://slidepdf.com/reader/full/94696-adjustable-tow-bar 7/13
Page 7SKU 94696 For technical questions, please call 1-800-444-3353.
18. Before every tow, check all towing equipment. Repair or replace any damaged
equipment. When towing over a long distance recheck all equipment at short, regular
intervals. Make sure to check tire ination for both the towing vehicle and towed vehicle.
19. Drive safely. When the weight of a towed vehicle is coupled to a towing vehicle, the
effect of the additional weight will diminish the performance of the towing vehicle,
resulting in decreased acceleration of the towing vehicle and increased stoppingdistances. The added weight will also cause an adverse affect on the towing vehicle’s
handling characteristics. Always reduce speed when towing a vehicle.
20. WARNING! The warnings, precautions, and instructions discussed in this
manual cannot cover all possible conditions and situations that may occur. The
operator must understand that common sense and caution are factors, which
cannot be built into this product, but must be supplied by the operator.
ASSEMBLY INSTRUCTIONS
NOTE: Most vehicles will require an after market mounting bracket assembly (not
included), which then connects to the Tow Bar (see photos on page 2). Installing after-market mounting bracket assembly should be done by a qualied auto technician.
NOTE: On some vehicles the included Mounting Brackets (8A) can be bolted directly to frame
or bumper. Instructions below cover the assembly and set up of the Tow Bar in these instances.
1. Loosen the two Bolts (3B), and spread apart the Right Arm (4A) and Left Arm (5A).
(See Figure A.)
2. On the Right Arm (4A) and Left Arm (5A), unscrew the Lock Nuts (6B) and remove the
Bolt (5B). Then slide the Mounting Brackets (8A) off the Right and Left Arms.
(See Figure A.)
3. Select two locations in the front of the vehicle to be towed that t ALL of the following
criteria:
A. Can adequately support the entire towing weight of the vehicle without damage to the
vehicle.
B. Have less than 5/8” mounting surface thickness, and can each support two
REV 07a, 10b

8/15/2019 94696 Adjustable Tow Bar
http://slidepdf.com/reader/full/94696-adjustable-tow-bar 8/13
Page 8SKU 94696 For technical questions, please call 1-800-444-3353.
REV 07a; 08d
1/2” diameter holes drilled 3.3” apart.
C. Are less than 43” but more than 24” apart.
D. Can properly accomodate the protruding Bolts (8B), Support Plates (9A), and
Lock Nuts (6B) needed for installation; allowing all the hardware to t ushand level against a solid surface. (See Assy. Diagram.)
E. Are equally distant from the center of the vehicle, and are level.
F. Are free and clear from all electronics, sensors, or engine components.
G. Will not structurally weaken the vehicle.
3. After locations tting all of the aforementioned requirements are found, drill the
1/2” diameter holes, 3.3” apart horizontally. Then install the Mounting Brackets
(8A). (See Figure B.)
4. WARNING! If adequate mounting locations cannot be found or if there is
any doubt about the suitability of the locations, have a professional mechanic
install this product to the towed vehicle.
5. Re-attach the Tow Bar to the Mounting Brackets (8A). Re-tighten the two Bolts
(3B). Then inspect the entire Tow Bar and tighten all nuts and bolts securely.
(See Figure A.) OPERATING INSTRUCTIONS
1. Only use a 2” Hitch Ball (not included) on the towing vehicle.
(See Figure C, next page.)
FIGURE B

8/15/2019 94696 Adjustable Tow Bar
http://slidepdf.com/reader/full/94696-adjustable-tow-bar 9/13
Page 9SKU 94696 For technical questions, please call 1-800-444-3353.
R-PIN
SAFETY
PIN
HITCH
TRIGGER
HITCH
COUPLER
(1A)
SLOT
HANDLE
ADJUSTMENT
NUT
2” BALL
HITCHFIGURE C
WARNING!2.
3. NOTE: To reduce friction between the 2” Hitch Ball (not included) and Hitch
Coupler (1A), apply a layer of heavy grease over the Hitch Ball. (See Figure C.)
4. Temporarily remove the R-Pin and Safety Pin from the Hitch Coupler (1A). Then,
pull up on the Trigger and lift up on the Handle. (See Figure C.)
5. With assistance, place the Hitch Coupler (1A) over the vehicle’s Hitch Ball and
push down on the Handle until the Trigger locks in the slot. Pull up and down
on the Hitch Coupler to make sure the Hitch Ball is tting snugly in the Hitch
Coupler. (See Figure C.)
6. There should be no play between Hitch Ball and Hitch Coupler. If there is play,
tighten the Adjustment Nut with a 19MM socket (not included) until no play is
present. If the Nut is too tight, the Handle will not lock. (See Figure C.)
7. Re-install the Safety Pin and R-Pin. (See Figure C.)
8. Make sure to attach each side of an appropriate Safety Chains (not included)
equally from the front mounting U-Bolt (11B) to the towing vehicle’s rear
IMPORTANT INFORMATIONThis Tow Bar’s Hitch Coupler (1A) MUST be properly secured to the Hitch Ball of the towing
vehicle. After assembly and attachment, pull up and down on the Hitch Coupler to make sure the
Hitch Ball is tting snugly in the Hitch Coupler. There must be no play between the Hitch Ball
and Hitch Coupler. If there is play, tighten the Adjustment Nut until no play is present. If the Adjustment Nut is too tight, the Handle will not lock. Carefully read and follow the complete
instructions in this manual BEFORE setup or use.
If the Hitch Coupler is not secured properly, the Hitch Ball could come loose while the
towed vehicle is in motion, possibly causing property damage, SERIOUS PERSONAL
INJURY, or DEATH.
REV 07a; 09h
(not included) (not included)

8/15/2019 94696 Adjustable Tow Bar
http://slidepdf.com/reader/full/94696-adjustable-tow-bar 10/13
Page 10SKU 94696 For technical questions, please call 1-800-444-3353.
10. Connect the towing light wiring system (not included) according to its instructions.
NOTE: Make sure to consult the operator’s manual of the towing vehicle
for proper connection instructions.
11. CAUTION! Do not attempt to back up while using this Tow Bar. If the
towed vehicle is allowed to turn off the straight path while backing up, the towed
vehicle could jackknife, causing severe damage to the towed vehicle and to the
towing vehicle. Even if the towed vehicle does not jackknife, backing up may
damage the Tow Bar and towed vehicle, and the towed vehicle will not be able to
be controlled properly.
12. Disengage the parking brake of the vehicle to be towed. Set the transmission
to the neutral position. Steering wheel of towed vehicle must be free to turn. If
the towed vehicle is not properly prepared for towing, property damage orsevere personal injury may result.
13. When towing the vehicle over long distances stop and check the tightness of all
connections, at least every 100 miles.
bumper or frame crossing them underneath the Hitch Coupler, leaving just
enough slack to allow the vehicle to turn properly. (See Figure D.)
9. Attach another pair of Safety Chains (not included) from the rear mounting U-Bolt
(11B) underneath the Right and Left Arms (4A, 5A) to the frame of the towed
vehicle as close to the front as possible. Allow enough slack for the Tow Bar topivot, but that is all. (See Figure D.)
REV 09f; 10e
Safety Chains
(not included)Safety Chains
(not included)
8/15/2019 94696 Adjustable Tow Bar
http://slidepdf.com/reader/full/94696-adjustable-tow-bar 11/13
Page 11SKU 94696 For technical questions, please call 1-800-444-3353.
PLEASE READ THE FOLLOWING CAREFULLY
THE MANUFACTURER AND/OR DISTRIBUTOR HAS PROVIDED THE PARTS LIST AND
ASSEMBLY DIAGRAM IN THIS MANUAL AS A REFERENCE TOOL ONLY. NEITHER THE
MANUFACTURER OR DISTRIBUTOR MAKES ANY REPRESENTATION OR WARRANTY OF
ANY KIND TO THE BUYER THAT HE OR SHE IS QUALIFIED TO MAKE ANY REPAIRS TO
THE PRODUCT, OR THAT HE OR SHE IS QUALIFIED TO REPLACE ANY PARTS OF THE
PRODUCT. IN FACT, THE MANUFACTURER AND/OR DISTRIBUTOR EXPRESSLY STATES
THAT ALL REPAIRS AND PARTS REPLACEMENTS SHOULD BE UNDERTAKEN BY CERTIFIED
AND LICENSED TECHNICIANS, AND NOT BY THE BUYER. THE BUYER ASSUMES ALL RISK
AND LIABILITY ARISING OUT OF HIS OR HER REPAIRS TO THE ORIGINAL PRODUCT OR
REPLACEMENT PARTS THERETO, OR ARISING OUT OF HIS OR HER INSTALLATION OF
REPLACEMENT PARTS THERETO.
INSPECTION, MAINTENANCE, AND CLEANING
1. WARNING! Before driving a towed vehicle, always remove the Tow Bar.
Remove the Tow Bar from the towed vehicle before performing any inspection,
maintenance, or cleaning.
2. Before each use: Inspect the general condition of the Tow Bar. Check for
cracks and bends in the product, loose or improper mounting, loose Bolts or
Nuts, loose Hitch Coupler connection, and any other condition that may affect its
safe operation. If abnormal noise or vibration occurs, release the load from the
Tow Bar immediately and have the problem corrected before further use.
Do not use damaged equipment.
3. Do not use solvents to wipe off the Tow Bar, as damage may result. If necessary,
wipe with a damp cloth and mild detergent.
4. CAUTION! All maintenance, service, or repairs listed in this manual are
only to be attempted by a qualied service technician.

8/15/2019 94696 Adjustable Tow Bar
http://slidepdf.com/reader/full/94696-adjustable-tow-bar 12/13
Page 12SKU 94696 For technical questions, please call 1-800-444-3353.
REV 07a
PARTS LIST & ASSEMBLY DIAGRAM

8/15/2019 94696 Adjustable Tow Bar
http://slidepdf.com/reader/full/94696-adjustable-tow-bar 13/13
Page 13SKU 94696 For technical questions, please call 1-800-444-3353.
LIMITED 90 DAY WARRANTY
Harbor Freight Tools Co. makes every effort to assure that its products meet highquality and durability standards, and warrants to the original purchaser that this product
is free from defects in materials and workmanship for the period of 90 days from the dateof purchase. This warranty does not apply to damage due directly or indirectly, to misuse,abuse, negligence or accidents, repairs or alterations outside our facilities, criminal activity,improper installation, normal wear and tear, or to lack of maintenance. We shall in no eventbe liable for death, injuries to persons or property, or for incidental, contingent, specialor consequential damages arising from the use of our product. Some states do not allowthe exclusion or limitation of incidental or consequential damages, so the above limitation
of exclusion may not apply to you. THIS WARRANTY IS EXPRESSLY IN LIEU OF ALLOTHER WARRANTIES, EXPRESS OR IMPLIED, INCLUDING THE WARRANTIES OFMERCHANTABILITY AND FITNESS.
To take advantage of this warranty, the product or part must be returned to us withtransportation charges prepaid. Proof of purchase date and an explanation of the complaintmust accompany the merchandise. If our inspection verifies the defect, we will eitherrepair or replace the product at our election or we may elect to refund the purchase price
if we cannot readily and quickly provide you with a replacement. We will return repairedproducts at our expense, but if we determine there is no defect, or that the defect resultedfrom causes not within the scope of our warranty, then you must bear the cost of returningthe product.
This warranty gives you specific legal rights and you may also have other rightswhich vary from state to state.
3491 Mission Oaks Blvd. • PO Box 6009 • Camarillo, CA 93011 • (800) 444-3353
Related Documents


![Tow Manual [eBook]](https://static.cupdf.com/doc/110x72/577d2fb61a28ab4e1eb272f7/tow-manual-ebook.jpg)