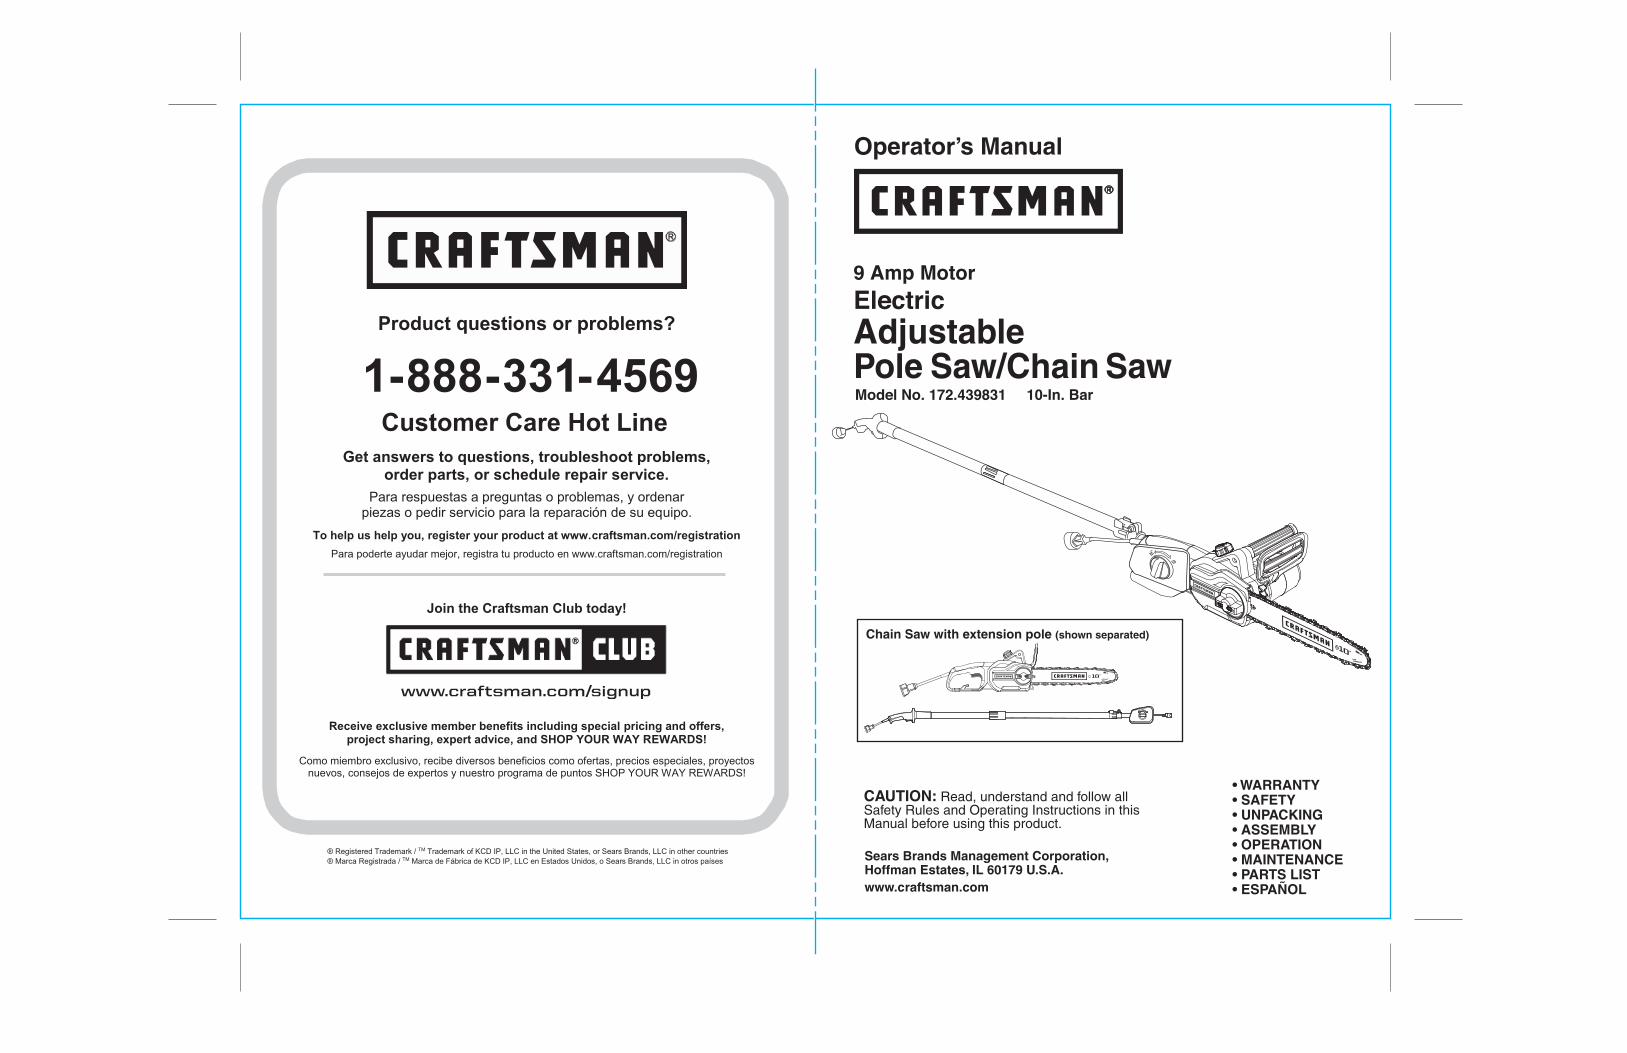
Operator’s Manual Model No. 172.439831 10-In. Bar 9 Amp Motor Electric Adjustable Pole Saw/Chain Saw • WARRANTY • SAFETY • UNPACKING • ASSEMBLY • OPERATION • MAINTENANCE • PARTS LIST • ESPAÑOL CAUTION: Read, understand and follow all Safety Rules and Operating Instructions in this Manual before using this product. Chain Saw with extension pole (shown separated)

Welcome message from author
This document is posted to help you gain knowledge. Please leave a comment to let me know what you think about it! Share it to your friends and learn new things together.
Transcript
Operator’s Manual
Model No. 172.439831 10-In. Bar
9 Amp MotorElectricAdjustablePole Saw/Chain Saw
• WARRANTY• SAFETY• UNPACKING• ASSEMBLY• OPERATION• MAINTENANCE• PARTS LIST• ESPAÑOL
CAUTION: Read, understand and follow all Safety Rules and Operating Instructions in this Manual before using this product.
Chain Saw with extension pole (shown separated)

3
SAFETY SYMBOLS
Warranty……………………………..........................................……………..Page 2Safety Symbols……………………..........................................……………..Page 3Safety Instructions……………………..........................................……….....Pages 4 - 13Unpacking..……………………………...........................………………….....Page 13 Description………………………………..........................................………..Pages 14 - 15 Assembly and Adjustments………………………………..............................Pages 16 - 20 Operation...................………………………..........................................…...Pages 20 - 27 Maintenance/Trouble Shooting..........………...............................………....Pages 27 - 30Parts Lists.......……………………..........................................……………....Pages 31 - 33
TABLE OF CONTENTS
SAVE THESE INSTRUCTIONS! READ ALL INSTRUCTIONS!
23025736
The purpose of safety symbols is to attract your attention to possible dangers. The safety symbols and the explanations with them deserve your careful attention and understanding. The symbol warnings do not, by themselves, eliminate any danger. The instructions and warnings they give are no substitutes for proper accident prevention measures.
WARNING: Be sure to read and understand all safety instructions in thismanual, including all safety alert symbols such as “DANGER,” “WARNING,” and “CAUTION” before using this rotary tool. Failure to follow all instructions listed in this manual may result in electric shock, fire and/or serious personal injury.
SYMBOL SIGNAL MEANING
SAFETY ALERT SYMBOL: Indicates DANGER, WARNING, OR CAUTION. May be used in conjunction with other symbols or pictographs.
DANGER: Indicates a hazardous situation which, if not avoided, will result in death or serious injury. This signal word is to be limited to the most extreme situations. Always follow the safety precautions to reduce the risk of fire, electric shock, and personal injury.
WARNING: Indicates a hazardous situation which, if not avoided, could result in death or serious injury. Always follow the safety precautions to reduce the risk of fire, electric shock, and personal injury.
CAUTION: Indicates a hazardous situation which, if not avoided, couldresult in minor or moderate injury.
Damage Prevention and Information MessagesThese inform the user of important information and/or instructions that could lead to equipment or other property damage if they are not followed. Each message is preceded by the word “NOTE,” as in the example below:NOTE: Equipment and/or property damage may result if these instructions are not followed.
WARNING: To ensure safety and reliability, all repairs should be performed by a qualified service technician.
WARNING: The operation of any power tools can result in foreign objects being thrown into your eyes, which can result in severe eye damage. Before beginning power tool operation, always wear safety goggles or safety glasses with side shield and a full face shield when needed. We recommend a Wide Vision Safety Mask for use over eyeglasses or standard safety glasses with side shields. Always use eye protection which is marked to comply with ANSI Z87.1 shields.
WARNING: Some dust particles created by lawn and garden tools contain chemicals known to the state of California to cause cancer, birth defectsor other reproductive harm. Some examples of these chemicals are:
!
• Compounds in fertilizers, herbicides, pesticides, and insecticides.• Arsenic and chromium from chemically treated lumber.
Your risk from these exposures varies, depending upon how often you do this type of work. To reduce your exposure to these chemicals: • Work in a well-ventilated area • Work with approved safety equipment, such as those dust masks that are specially designed to filter out microscopic particles.
NOTE: Chain and Bar Oil is not included. BEFORE using this Chain Saw, do not forget to purchase Craftsman Bar & Chain Oil, SAE30.
CRAFTSMAN LIMITED WARRANTY
FOR TWO YEARS from the date of sale, this product is warranted againstdefects in material or workmanship.
WITH PROOF OF SALE, a defective product will be replaced free of charge.
For warranty coverage details or to obtain free replacement,visit the web site: www.craftsman.com
This warranty does not cover the bar and chain, which are expendable parts thatcan wear out from normal use within the warranty period.
This warranty is void if this product is ever used while providing commercial servicesor if rented to another person.
This warranty gives you specific legal rights, and you may also have other rightswhich vary from state to state.
Sears Brands Management Corporation, Hoffman Estates, IL 60179

SAFETY INSTRUCTIONS cont.
5
SAFETY INSTRUCTIONS
4
WARNING: If correctly used, this electric Pole Saw/Chain Saw is an efficienttool to use; if used improperly or without the due precautions it could become adangerous tool. For pleasant and safe work, ALWAYS strictly comply with the safetyrules that are contained in this manual.
!
WARNING: BE SURE to read and understand all instructions in this manual before using this electric Pole Saw/Chain Saw. Failure to follow all instructions listedbelow may result in electric shock, fire and/or serious personal injury.
!
WARNING: To avoid mistakes that could cause serious injury, DO NOTconnect the Pole Saw/Chain Saw to the power source until the following instructionshave been read and understood.
!
SAVE ALL WARNINGS AND INSTRUCTIONS FOR FUTURE REFERENCE.The term power tool in the warnings refers to your electric (corded) power tool or battery-operated(cordless) power tool.WORK AREA SAFETY• Avoid Dangerous Environment - Don't use appliances in damp or wet locations.• Keep work area clean and well lit. Cluttered or dark areas invite accidents.• Do not operate power tools in explosive atmospheres, such as in the presence of flammable liquids, gases or dust. Power tools create sparks which may ignite the dust or fumes.• Keep children and bystanders away while operating a power tool. Distractions can cause you to lose control.
ELECTRICAL SAFETY• Power tool plugs must match the outlet. Never modify the plug in any way. Do not use any adapter plugs with grounded power tools. Unmodified plugs and matching outlets will reduce risk of electric shock.• Avoid body contact with grounded surfaces such as pipes, radiators, ranges and refrigerators. There is an increased risk of electric shock if your body is grounded.• Do not expose power tools to rain or wet conditions. Water entering a power tool will increase the risk of electric shock.• Do Not Abuse Cord - Never carry appliance by cord or yank it to disconnect from receptacle. Keep cord from heat, oil, and sharp edges. Damaged or entangled cords increase the risk of electric shock.• When operating a power tool outdoors, use an extension cord suitable for outdoor use. Use of a cord suitable for outdoor use reduces the risk of electric shock.• Operating a power tool in a damp location is unavoidable, use a ground fault circuit interrupter (GFCI) protected supply. Use of an GFCI reduces the risk of electric shock.
Safety HelmetProtection
EyeProtection
Heavy DutyGloves
HearingProtection
Safety Shoes
Safety Chaps
Snug FittingClothing
WARNING: Consider the work area environment. Use extreme cautionwhen cutting small size brush and saplings because the slender material may catchthe saw chain and be whipped toward you or pull you off balance. DO NOT operatea chain saw in a tree unless specifically trained to do so. When cutting a limb that isunder tension be alert for spring back so that you will not be struck when the tensionin the wood fibers is released.
!
GENERAL POWER TOOL SAFETY WARNINGS
WARNING: Read all safety warnings and instructions. Failure to follow thewarnings and instructions may result in electric shock, fire and/or serious injury.
!
• Stay alert, watch what you are doing and use common sense when operating a power tool. Do not use a power tool while you are tired or under the influence of drugs, alcohol or medication. A moment of inattention while operating power tools may result in serious personal injury.• Use personal protective equipment. Always wear eye protection. Protective equipment such as dust mask, non-skid safety shoes, hard hat, or hearing protection used for appropriate conditions will reduce personal injuries. • Avoid Unintentional Starting - Do not carry plugged-in appliance with finger on switch. Be sure switch is off when plugging in.• Remove any adjusting key or wrench before turning the power tool on. A wrench or a key left attached to a rotating part of the power tool may result in personal injury. • Do not overreach. Keep proper footing and balance at all times. This enables better control of the power tool in unexpected situations. • Dress properly. Do not wear loose clothing or jewelry. Keep your hair, clothing and gloves away from moving parts. Loose clothes, jewelry or long hair can be caught in moving parts.• If devices are provided for the connection of dust extraction and collection facilities, ensure these are connected and properly used. Use of dust collection can reduce dust-related hazards.
PERSONAL SAFETY
• Don't grasp the exposed cutting blades or cutting edges when picking up or holding the appliance r power tool. • Don't Force Appliance/Power Tool - It will do the job better and with less likelihood of a risk of injury at the rate for which it was designed.• Do not use the power tool if the switch does not turn it on and off. Any power tool that cannot be controlled with the switch is dangerous and must be repaired.• Disconnect the plug from the power source and/or the battery pack from the power tool before making any adjustments, changing accessories, or storing power tools. Such preventive safety measures reduce the risk of starting the power tool accidentally.• Store idle power tools out of the reach of children and do not allow persons unfamiliar with the power tool or these instructions to operate the power tool. Power tools are dangerous in the hands of untrained users.• Maintain power tools. Check for misalignment or binding of moving parts, breakage of parts and any other condition that may affect the power tools operation. If damaged, have the power tool repaired before use. Many accidents are caused by poorly maintained power tools.• Maintain Appliance With Care - Keep cutting edge sharp and clean for best performance and to reduce the risk of injury. Follow instructions for lubricating and changing accessories. Inspect appliance cord periodically, and if damaged, have it repaired by an authorized service facility. Inspect extension cords periodically and replace if damaged. Keep handles dry, clean, and free from oil and grease.• Use the power tool, accessories and tool bits etc., in accordance with these instructions and in the manner intended for the particular type of power tool, taking into account the working conditions and the work to be performed. Use of the power tool for operations different from those intended could result in a hazardous situation.• USE ONLY chains that are recommended for this Chain Saw. Chains that may be suitable for one Chain Saw may become hazardous when used on another Chain Saw.• Keep the pole saw/chain saw a sufficient distance away from electrical power lines.
POWER TOOL USE AND CARE
SERVICE• Have your power tool serviced by a qualified repair person using only identical replacement parts. This will ensure that the safety of the power tool is maintained.

7
SAFETY INSTRUCTIONS cont. SAFETY INSTRUCTIONS cont.
6
Remember, a smaller wire gauge size has greater capacity than a larger number (14-gauge wire has more capacity than 16-gauge wire; 12-gauge wire hasmore capacity than 14-gauge). When in doubt use the smaller number.
EXTENSION CORDSUse a proper extension cord. ONLY use cords listed by Underwriters Laboratories (UL). Other extension cords can cause a drop in line voltage, resulting in a loss of power and overheating of tool. For this tool an AWG (American Wire Gauge) size of a least 18-gauge is recommended for an extension cord of 25-ft. or less in length. Use 16-gauge for an extension cord of 50-ft. Use 14-gauge for an extension cord of 100-ft.
! CAUTION: Keep the extension cord clear of the work area. Position the cord so that it willnot get caught on bushes, hedges, tree trunks, lawnmowers or other obstructions while you areworking with the Chain Saw.
WARNING: GFCI (Ground Fault Circuit Interrupter) protection should be provided on all circuits or outlets to be used for electric chain saws and lawn andgarden power tools. Receptacles are available having built-in GFCI protection andshould be used for this measure of protection.• Double insulation DOES NOT take the place of normal safety precautions when operating this tool.• Guard against electric shock: Prevent body contact with grounded surfaces. For example: metal pipes, wire fences.
!
3. BEFORE plugging in the tool, BE SURE that the outlet voltage supplied is within the voltage marked on the tool’s data plate. DO NOT use “AC only” rated tools with a DC power supply. 4. DO NOT expose tools to rain or wet conditions or use electric tools in wet or damp locations. Water entering an electric tool will increase the risk of electric shock. 5. If operating an electric tool in damp locations is unavoidable, ALWAYS USE a Ground Fault Circuit Interrupter to supply power to your tool. ALWAYS WEAR electrician’s rubber gloves and footwear in damp conditions. 6. To reduce the risk of electric shock, use only with an extension cord intended for outdoor use, such as an extension cord of cord type: SW-A, SOW-A, STW-A, STOW-A, SJW-A, SJOW-A, SJTW-A. or SJTOW-A. 7. INSPECT tool cords for damage. Have damaged tool cords repaired at a Sears Service Center. BE SURE to stay constantly aware of the cord location and keep it well away from the cutting blade. 8. DO NOT abuse the extension cord. NEVER use the cord to carry the tool by or to pull the plug from the outlet. Keep cord away from heat, oil, sharp edges or moving parts. Replace damaged cords immediately. Damaged cords increase the risk of electric shock.
WARNING: Check extension cords before each use. If damaged replace immediately.Never use tool with a damaged cord since touching the damaged area could cause electricalshock, resulting in serious injury.
!
SAFETY SYMBOLS FOR YOUR TOOL
ELECTRICAL SAFETY
WARNING: Do not permit fingers to touch the terminals of plug when installing or removing the extension cord from the plug.
!
1. Double insulated tools are equipped with a polarized plug (one blade is wider than the other and will require the use of a polarized extension cord. The Chain Saw’s plug will fit into a polarized extension cord only one way. If the plug does not fit fully into the extension cord, reverse the plug. If the plug still does not fit, obtain a correct polarized extension cord. A polarized extension cord will require the use of a polarized wall outlet. This plug will fit into the polarized wall outlet only one way. If the plug does not fit fully into the wall outlet, reverse the plug. If the plug still does not fit, contact a qualified electrician to install the proper outlet. Do not change or alter the equipment plug, extension cord receptacle, or extension cord plug in any way.2. Double insulation eliminates the need for the three-wire grounded power cord and grounded power supply system. Applicable only to Class II (double-insulated) tools. This Chain Saw is a double insulated tool.
Minimum guage for extension cords
Method of securingextension cord
EXTENSION CORDS cont.
The label on your tool may includethe following symbols.
Remove plug from mains immediatelyif the cable is damaged or cut.
V................Volts A................Amps Hz..............Hertz W...............Watts min............Minutes .............Alternating current ...........Direct current no ............No-load speed .../min.......Revolutions or Strokes per minute ............. Indicates danger, warning or caution. It means attention! Your safety is involved.
Contact of the guide bar tip withany object should be avoided.
.........
Tip contact may cause the guide bar to move suddenly upward and backwards, which may cause serious injury to user.
.........
Read and follow all safety precautions in the owner’s manual Failure to follow to instruction could result in serious injury to user.
.........
Do not use one handed when operating the chain saw.
.........
.........Correct Direction of Cutting-Teeth.
.........Chain Stop
.........Protective goggles/visor, helmet & hearing protection.
.........Gloves with saw protection.
.........Boots with saw protection,steel-toe cap and non-slip sole.
.........Always use two hands when operating the chain saw.
.........The chain saw kickback angle is 10 , with a chain stop.
10º
..........Class II construction, Double-Insulation. When servicing, use only identical replacement parts.
......... Wear dust mask.
Do not expose to rain. .........
.........
Warning of danger from overheadelectric-power lines.
Chris Romanelli
SAFETY INSTRUCTIONS cont.
9
SAFETY INSTRUCTIONS cont.
8
WARNING: NEVER reach under the Chain Saw (chain area) until you haveunplugged POLE SAW/Chain Saw and the Chain has come to a complete stop.The Chain Saw’s chain will continue to rotate for a few seconds after it is switched off.
!
WARNING: BE SURE to read and understand all instructions. Failure to follow all instructions listed below may result in electric shock, fire and/or serious personal injury.
!
ADDITIONAL RULES FOR SAFE OPERATION
1. ALWAYS wear safety goggles or safety glasses with side shields, and a full-face shield when using this Pole SawChain Saw. We recommend a Wide Vision Safety Mask for use over eyeglasses or standard safety glasses with side-shield, available at Sears Stores or other Craftsman Outlets. 2. PROTECT your lungs. Wear a face mask, dust mask or respirator if the operation is dusty. 3. PROTECT your hearing. Wear appropriate personal hearing protection during use. Under some conditions noise from this product may contribute to hearing loss.
25. MAINTAIN pole saw/chain saw with care. 26. KEEP unit sharp and clean for better and safer performance. 27. FOLLOW INSTRUCTIONS for lubricating and changing accessories.28. UNPLUG the pole saw/chain saw from the power source when not in use, before servicing, and when changing accessories and attachments, such as saw chain and guard.29. CHECK FOR DAMAGED PARTS. Before further use of the pole saw/chain saw, a guard or other part that is damaged should be carefully checked to determine that it will operate properly and perform its intended function. CHECK for alignment of moving parts, binding of moving parts, breakage of parts, mounting and any other conditions that may affect its operation. A guard or other part that is damaged should be properly repaired or replaced by a qualified service dealer or repair center unless otherwise indicated elsewhere in the operator's manual.30. WHEN NOT IN USE, pole saw/chain saws should be stored in a dry, high or locked-up place out of the reach of children. 31. WHEN STORING POLE SAW/CHAIN SAW, unplug and use a bar sheath or carrying case.
SAFETY RULES FOR ELECTRICPOLE SAW/CHAIN SAWS cont.
5. ALWAYS remove objects such as sticks and debris from the cutting path that could become entangled in, or thrown by the Chain Saw.6. DO NOT start cutting until you have a clear work area, secure footing, especially if you are felling a tree, a retreat path. Keep work area clean.7. DO NOT operate with one hand. Serious injury to the operator, helpers, or bystanders may result from one handed operation. A pole saw/chain saw is intended for two-handed use.8. DO NOT operate pole saw/chain saw from a ladder or in a tree. 9. MAKE SURE the chain will not make contact with any object while starting the saw. NEVER start the saw when the guide bar is in a cut.10. DO NOT force chain saw. It will do the job better and safer at the rate for which it was intended.11. DO NOT put pressure on the saw, especially at the end of the cut. Doing so can cause you to lose control when the cut is completed.12. STOP the saw before setting it down. 13. Carry the chain saw by the front handle with the chain saw switched off and away from your body. When transporting or storing the chain saw always fit the guide bar cover. Proper handling of the chain saw will reduce the likelihood of accidental contact with the moving saw chain.14. Use the right tool, CUT WOOD ONLY. Don't use chain saw for purpose not intended; for example, don't use chain saw for cutting plastic, masonry, non-wood building materials.15. DO NOT operate a pole saw/chain saw that is damaged, improperly adjusted, or not completely and securely assembled. Always replace bar, chain, hand guard, or other parts immediately if they become damaged, broken, or are otherwise removed.16. Tool service should be performed at a Sears Parts and Repair Center or other qualified service dealer. Service or maintenance performed by unqualified personnel could result in a risk of injury.17. Keep all parts of the body away from the saw chain when the chain saw is operating. Before you start the chain saw, make sure the saw chain is not contacting anything. A moment of inattention while operating chain saws may cause entanglement of your clothing or body with the saw chain.
SERVICE SAFETY 1. If any part of this Pole Saw/Chain Saw is missing or should break, bend, or fail in any way; or should any electrical component fail to perform properly: SHUT OFF the power switch and remove the power cord from the Chain Saw and have the missing, damaged or failed parts replaced BEFORE resuming operation. 2. Tool service should be performed at a qualified service dealer or repair center. Service or maintenance performed by unqualified personnel could result in a risk of injury. 3. When servicing a tool, use only identical replacement parts. Follow instructions in the maintenance section of this manual. Use of unauthorized parts or failure to follow maintenance instructions may create a risk of electric shock or injury.
SAFETY RULES FOR ELECTRIC POLE SAW/CHAIN SAWS 1. KNOW your electric Pole Saw/Chain Saw. Read operator’s manual carefully. Learn the applications and limitations, as well as the specific potential hazards related to this tool. Following this rule will reduce the risk of electric shock, fire or serious injury. 2. DO NOT use the Pole Saw/Chain Saw without adequate lighting. ALWAYS make sure that you can see what you are cutting. 3. Use Chain Saw ONLY when wood is dry. 4. ALWAYS stand to the left of the Handle. Any debris thrown by the Chain Saw would be coming from the Blade Guard area on the right of the Chain Saw.
18. Always hold the chain saw with your right hand on the rear handle and your left hand on the front handle. Holding the chain saw with a reversed hand configuration increases the risk of personal injury and should never be done.19. Hold the power tool by insulated gripping surfaces only, because the saw chain may contact hidden wiring or its own cord. Saw chains contacting a “live wire” may make exposed metal parts of the power tool “live” and could give the operator an electric shock.20. Have all pole saw/chain saw service performed by a qualified service dealer or repair center except the items listed in the MAINTENANCE section of this manual.21. MAKE CERTAIN saw chain stops moving when trigger switch is released. 22. KEEP the handles dry and clean and free from oil and grease.23. KEEP oil cap and fasteners securely tightened.24. Nonconforming replacement components or the removal of safety devices may cause damage to the unit and possible injury to the operator or bystanders. Use only Craftsman accessories and replacement parts as recommended. Never modify your saw.

1110
SAFETY INSTRUCTIONS cont. SAFETY INSTRUCTIONS cont.ADDITIONAL RULESFOR SAFE OPERATION cont.
ADDITIONAL RULESFOR SAFE OPERATION cont.
4. Wear safety glasses and hearing protection. Further protective equipment for head, hands, legs and feet is recommended. Adequate protective clothing will reduce personal injury by flying debris or accidental contact with the saw chain. 5. ALL VISITORS AND BYSTANDERS MUST wear the same safety equipment that the operator of the tool wears. 6. ALWAYS check the tool for damaged parts. Check for misalignment or binding of moving parts, breakage of parts, and any other condition that may affect the tool’s operation. Before further use of the tool, a guard or other part that is damaged should be carefully checked to determine if it will operate properly and perform its intended function. A guard or other part that is damaged should be properly repaired or replaced at a qualified service dealer or repair center service dealer.7. Always keep proper footing and operate the chain saw only when standing on fixed, secure and level surface. Slippery or unstable surfaces such as ladders may cause a loss of balance or control of the chain saw.8. Use extreme caution when cutting brush and saplings. The slender material may catch the saw chain and be whipped toward you or pull you off balance.9. Follow instructions for lubricating, chain tensioning and changing accessories. Improperly tensioned or lubricated chain may either break or increase the chance for kickback.10. Only use replacement bars and chains specified by the manufacturer. Incorrect replacement bars and chains may cause chain breakage and/or kickback.11. Follow the manufacturer’s sharpening and maintenance instructions for the saw chain. Decreasing the depth gauge height can lead to increased kickback.
WARNING: Follow all safety rules to help prevent Kickback which can cause serious personal injury.
!
CAUSES AND OPERATOR PREVENTION OF KICKBACK:• Kickback may occur when the nose or tip of the guide bar touches an object, or when the wood closes in and pinches the saw chain in the cut.• Tip contact in some cases may cause a sudden reverse reaction, kicking the guide bar up and back towards the operator.• Pinching the saw chain along the top of the guide bar may push the guide bar rapidly back towards the operator.• Either of these reactions may cause you to lose control of the saw which could result in serious personal injury.• Do not rely exclusively upon the safety devices built into your saw.• As a chain saw user, you should take several steps to keep your cutting jobs free from accident or injury.• Kickback is the result of tool misuse and/or incorrect operating procedures or conditions and can be avoided by taking proper precautions as given below: - Maintain a firm grip, with thumbs and fingers encircling the chain saw handles, with both hands on the saw and position your body and arm to allow you to resist kickback forces. Kickback forces can be controlled by the operator, if proper precautions are taken. - Do not let go of the chain saw. - Do not overreach and do not cut above shoulder height. This helps prevent unintended tip contact and enables better control of the chain saw in unexpected situations.
4. PULL-IN can occur when the moving chain contacts a foreign object in the wood in the cut along the bottom of the guide bar and the saw chain is suddenly stopped. This sudden stopping pulls the saw forward and away from the operator and could easily cause the operator to lose control of the saw.
AVOID KICKBACK AND PULL-IN cont.
AVOID PINCH-KICKBACK 1. Be extremely aware of situations or obstructions that can cause material to pinch the top of or otherwise stop the chain. 2. Do not cut more than one log at a time. 3. Do not twist the saw as the bar is withdrawn from an undercut when bucking.
AVOID PULL-IN 1. Always begin cutting with the saw at full speed and the saw housing against wood. 2. Use wedges made of plastic or wood. Never use metal to hold the cut open.
WARNING: Follow all safety rules to help prevent Kickback which can cause serious personal injury.
!
1. KICKBACK is the backward, upward or sudden forward motion of the guide bar occurring when the saw chain near the upper tip of the guide bar contacts any object such as a log or branch, or when the wood closes in and pinches chain in the cut. Contacting a foreign object in the wood can also result in loss of chain saw control.2. ROTATIONAL KICKBACK can occur when the moving chain contacts an object at the upper tip of the guide bar. This contact can cause the chain to dig into the object, which stops the chain for an instant. The result is a lightning fast, reverse reaction which kicks the guide bar up and back toward the operator.3. PINCH-KICKBACK can occur when the wood closes in and pinches the moving saw chain in the cut along the top of the guide bar and the saw chain is suddenly stopped. This sudden stopping of the chain results in a reversal of the chain force used to cut wood and causes the saw to move in the opposite direction of the chain rotation. The saw is driven straight back toward the operator.
Clear TheWork Area
AvoidObstructions
Kickback Path
KICKBACK
AVOID KICKBACK AND PULL-IN (Using Chain Saw with or without Pole)
1312
SAFETY INSTRUCTIONS cont. ADDITIONAL RULESFOR SAFE OPERATION cont. SAFETY INSTRUCTIONS cont. ADDITIONAL RULES
FOR SAFE OPERATION cont.
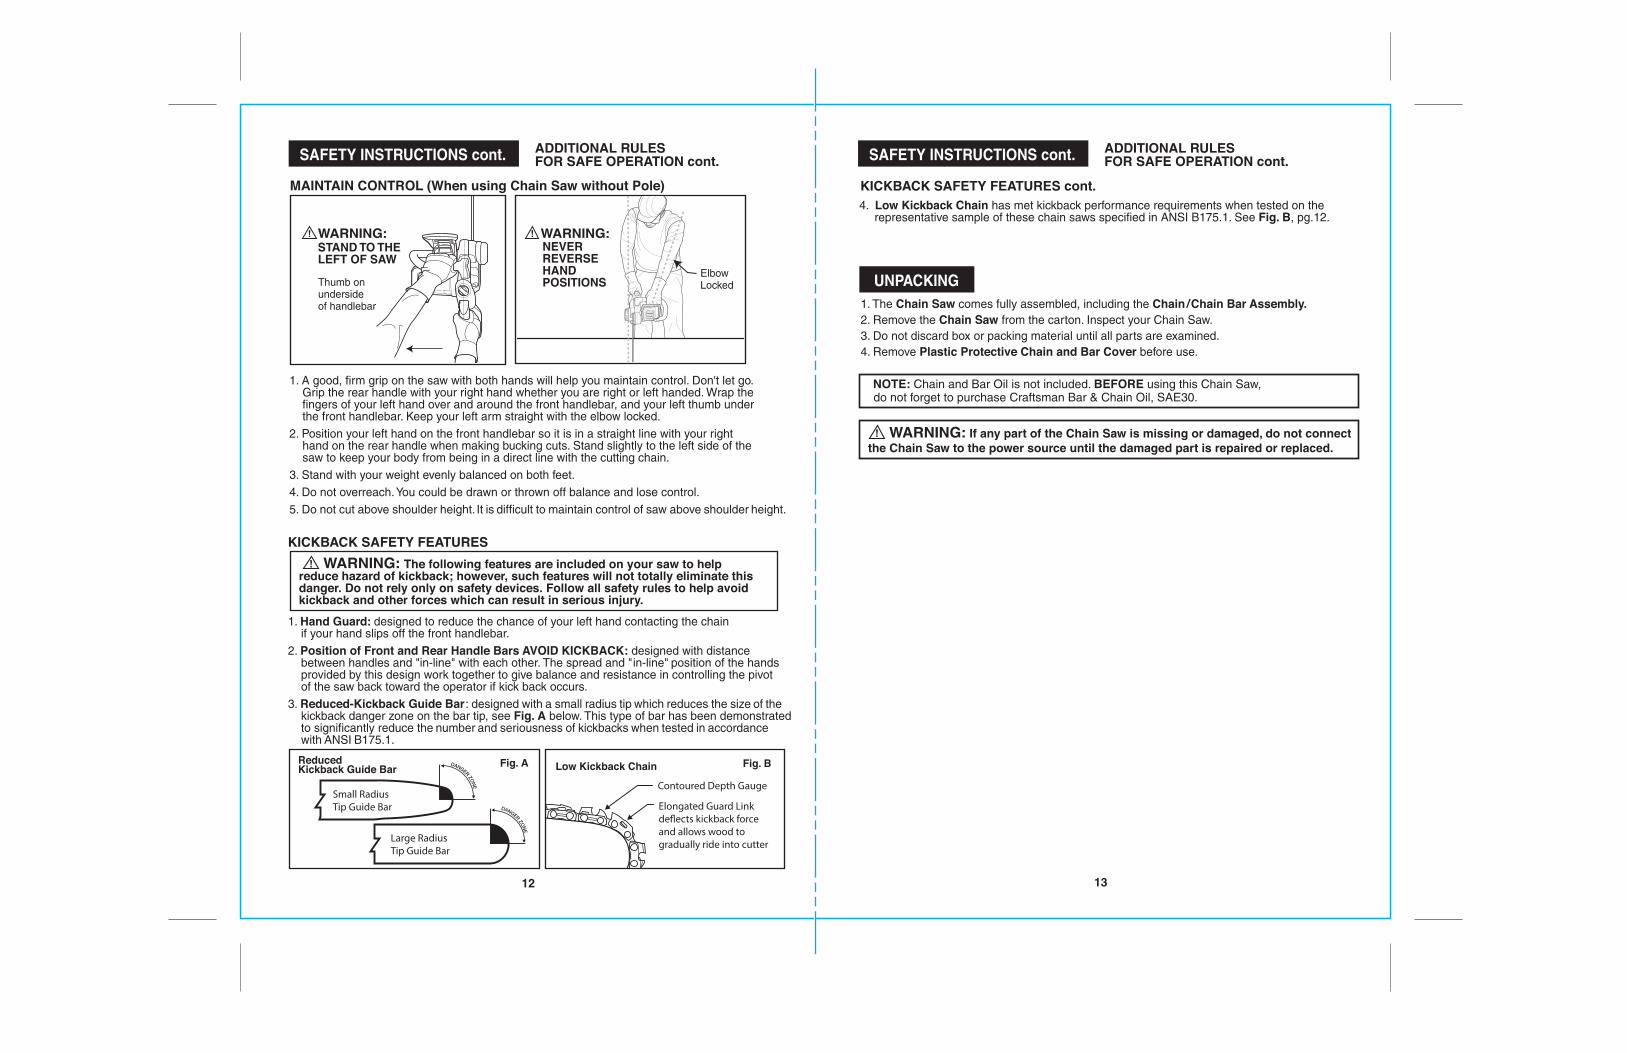
WARNING: The following features are included on your saw to helpreduce hazard of kickback; however, such features will not totally eliminate thisdanger. Do not rely only on safety devices. Follow all safety rules to help avoidkickback and other forces which can result in serious injury.
!
KICKBACK SAFETY FEATURES
1. Hand Guard: designed to reduce the chance of your left hand contacting the chain if your hand slips off the front handlebar.2. Position of Front and Rear Handle Bars AVOID KICKBACK: designed with distance between handles and "in-line" with each other. The spread and "in-line" position of the hands provided by this design work together to give balance and resistance in controlling the pivot of the saw back toward the operator if kick back occurs.3. Reduced-Kickback Guide Bar: designed with a small radius tip which reduces the size of the kickback danger zone on the bar tip, see Fig. A below. This type of bar has been demonstrated to significantly reduce the number and seriousness of kickbacks when tested in accordance with ANSI B175.1.
Fig. A
Large RadiusTip Guide Bar
ReducedKickback Guide Bar
Small RadiusTip Guide Bar
Fig. BLow Kickback Chain
Contoured Depth Gauge
Elongated Guard Linkde�ects kickback forceand allows wood to gradually ride into cutter
WARNING:!
MAINTAIN CONTROL (When using Chain Saw without Pole)
1. A good, firm grip on the saw with both hands will help you maintain control. Don't let go. Grip the rear handle with your right hand whether you are right or left handed. Wrap the fingers of your left hand over and around the front handlebar, and your left thumb under the front handlebar. Keep your left arm straight with the elbow locked. 2. Position your left hand on the front handlebar so it is in a straight line with your right hand on the rear handle when making bucking cuts. Stand slightly to the left side of the saw to keep your body from being in a direct line with the cutting chain. 3. Stand with your weight evenly balanced on both feet. 4. Do not overreach. You could be drawn or thrown off balance and lose control. 5. Do not cut above shoulder height. It is difficult to maintain control of saw above shoulder height.
STAND TO THELEFT OF SAW
Thumb onundersideof handlebar
ElbowLocked
WARNING:!NEVERREVERSEHANDPOSITIONS UNPACKING
1. The Chain Saw comes fully assembled, including the Chain /Chain Bar Assembly. 2. Remove the Chain Saw from the carton. Inspect your Chain Saw. 3. Do not discard box or packing material until all parts are examined. 4. Remove Plastic Protective Chain and Bar Cover before use.
WARNING: If any part of the Chain Saw is missing or damaged, do not connect the Chain Saw to the power source until the damaged part is repaired or replaced.
!
NOTE: Chain and Bar Oil is not included. BEFORE using this Chain Saw, do not forget to purchase Craftsman Bar & Chain Oil, SAE30.
4. Low Kickback Chain has met kickback performance requirements when tested on the representative sample of these chain saws specified in ANSI B175.1. See Fig. B, pg.12.
KICKBACK SAFETY FEATURES cont.

15
DESCRIPTION cont. KNOW YOUR CHAIN SAW cont.
CHAIN SAW CALL-OUTS cont. (Figures 1 and 2)
34
15
20
1718
19 21
16
23 24 292725 26 28
Fig 1.
Fig 2.
22
Chain Rotation
1
10
12
14
2
13
11
8
6 7
9
5
DESCRIPTION
14
KNOW YOUR CHAIN SAW
Your Chain Saw has a precision built electric motor and it should only be connected to a120-volt, 60 Hz AC ONLY power supply (normal household current). The electric Pole Saw/Chain Saw should always be used with a GFCI (Ground Fault Circuit Interrupter) outlet.DO NOT operate this Pole Saw/Chain Saw on direct current (DC). The large voltage dropwould cause a loss of power and the motor would overheat.If the Chain Saw does not operate when plugged into correct 120-volt, 60 Hz AC ONLY outlet, check the power supply. The Chain Saw comes with an electric plug and should be pluggedinto a proper extension cord.
SAW List1. Rear Handle2. On/Off Switch3. Lock-Off Button4. Oil Level Window5. Oil Filler Cap6. Front Handle7. Hand Guard8. Bumper Spike9. Guide Bar 10. Chain11. Chain Tensioning Knob
NOTE: Before attempting to use this product, familiarize yourself with all operating features and safety rules.
POLE SAW/CHAIN SAW CALL-OUTS (See Figures 1 and 2 on page 15)
POLE List23. Extension pole handle24. Locking collar25. Receptacle cord26. Inner pole
12. Chain Cover 13. Extension Cord Holder14. Rear Hand Guard15. Drive Sprocket16. Chain Direction Symbol17. Oil Outlet18. Bar Clamp19. Fastening Bar Bolt20. Bar Locating Tabs21. Bar And Chain Storage/Transportation Cover22. Bar Tensioning Plate
27. Handle bracket28. Knob29. Clamping lever
POLE SAW/CHAIN SAW FEATURES: • Power: 9 Amp motor • Bar length: 10” • Automatic lubrication system • Tool-less chain tension • Tool-less blade change • Oil tank with visible gauge • Front bumper • Weight 9.93 LBS (when filled with oil) • Pole (with extension)
TECHNICAL DATA: • Voltage: 120V/60Hz • Rated power: 9 Amp • Bar length: 10” • Oil tank capacity: 120ml • Chain Speed: 8.5 m/s • Chain pitch: 3/8” • Number of chain links: 40 • Chain gauge: 0.05” • Saw chain type: E&S®, ES 91VS40E Oregon®, 40 pitches (91PX040X) • Bar type: E&S®, ES100SDEA041 Oregon®, 10” (100SDEA041) • SAW: Weight (chain & bar included): 9.7 lbs • Protection class: / II

1716
ASSEMBLY & ADJUSTMENTS
The pole saw/chain saw is intended for wood: sawing of trees, tree trunks, branches,wooden beams, planks, etc. Cuts can be sawed with or across the grain.This product is not suitable for sawing mineral materials, plastics or non-wood building materials.
INTENDED USE
CHAIN AND CHAIN BAR ASSEMBLY/REPLACEMENT(See Figs. 3a, 3b, 3c, 3d, 3e and Pgs 14-15 for part reference)
CHAIN AND CHAIN BARASSEMBLY/REPLACEMENT cont.
ASSEMBLY & ADJUSTMENTS cont.
WARNING: Do not connect the chain saw to extension cord and power sourcebefore it is completely assembled. Always use gloves when handling the chain.
!
WARNING: The chain is not yet tensioned. Tensioning the chain appliesas described under “TENSIONING CHAIN”. The chain now needs to be inspectedto make sure it is properly tensioned.
!
Fig. 3b
1. Place the chain saw on any suitable flat surface.2. Slide the Chain(10) in the slot around the Guide Bar (9). Ensure the Chain is in correct running direction by comparing it to the Chain Direction Symbol (16) found on the saw body. Ensure the Bar Tensioning Plate (22) is facing outwards. (Fig. 3a).3. Fit the Chain onto the Drive Sprocket (15), so that the Fastening Bar Bolt (19) and the two Bar Locating Tabs (20) on the Bar Clamp (18) fit into the keyway of the opening on the Guide Bar (9), (See Fig. 3b).
4. Check to make sure all parts are seated properly and hold chain and guide bar in a level position. (See Fig. 3c)5. Fit the Chain Cover (12) (pg. 15, Fig. 1), and tighten the Chain Cover by turning the Chain Tensioning Knob (11) clockwise until it is tight. (pg. 15, Fig. 1),
ASSEMBLY
Fig. 3a
Fig. 3c
Fig. 3d
WARNING: Unplug chain saw frompower source before adjusting saw chaintension.
!
WARNING: Cutting edges on chainare sharp. Use protective gloves whenhandling chain.
!
WARNING: ALWAYS Maintain proper chain tension. A loose chain willincrease the risk of kickback. A loose chain may jump out of guide bar groove.This may injure operator and damage chain. A loose chain will cause chain, chainbar, and sprocket to wear rapidly. The chain life of the saw chain mainly dependsupon sufficient lubrication and correct tensioning. Avoid tensioning the chain if itis hot, as this will cause the chain to become over tensioned when it cools down.
!
TENSIONING CHAIN/LOCKING KNOBAlways check the chain tension before use,
after the first cuts and regularly during use. Upon initial operation, new chains can lengthen considerably.
NOTE: New saw chains will stretch. Check thechain tension frequently when first used andtighten when the Chain (10) becomes loosearound the Guide Bar (9). (See Fig. 3e)
1. Place the chain saw on any suitable flat surface.2. Turn the Chain Tensioning Knob (11) clockwise until it is hand tight. The tension is automatically set while the Chain Tensioning Knob is being tightened. The ratchet mechanism prevents the chain tension from loosening.3. Double check the tension set by the automatic Chain Tensioning Knob. The correct chain tension is reached when the Chain (10) can be raised approx. 0.12– 0.24” (3-6mm) from the Guide Bar (9) in the center. This should be done by using one hand to raise the chain against the weight of the machine. (See Fig. 4)4. The Chain will stretch from use and lose proper tension. To turn knob counter clockwise (3x), secure the chain cover, and retension the chain simply repeat steps 1 - 3 listed above.
10 9
22
20
18
1915
12 116. Press the cover plate firmly onto the machine and screw on the cover plate (12) with the locking knob (11). (See Fig. 3d)
Fig. 3e
Fig. 4
0.12-0.24”(3-6mm)
EN: Bar / F: Bar ES: Barra de guía
16

1918
ASSEMBLY & ADJUSTMENTS cont. ASSEMBLY & ADJUSTMENTS cont.
CAUTION: The chain saw is NOT supplied filled with oil. It is essential to fill with oilbefore use. Never operate the chain saw without chain oil or at an empty oil tank level, asthis will result in extensive damage to the product. Chain life and cutting capacity depends onoptimum lubrication. Therefore, the chain is automatically oiled during operation via oil outlet
!
LUBRICATIONASSEMBLING THE EXTENSION POLE
Filling oil tank: (See Figs. 5a and 5b)1. Set chain saw on any suitable surface with oil filler cap facing upward.2. Clean area around the Oil Filler Cap with cloth and unscrew the cap by turning it counter clockwise.3. Add bar and chain oil (Craftsman Bar & Chain Oil, SAE30) until reservoir is full.
4. Avoid dirt or debris entering oil tank, re-screw oil filler cap and tighten.
Align and insert the handle of extension pole into the shaft.Rotate the locking collar clockwise to lock. (See Figs. 6a and 6b)Note: Make sure that the shaft is firmly locked in place.
ASSEMBLING THE EXTENSION POLETO THE MACHINE1. Insert the pole bracket into the saw. (See Fig. 7)
Note: Pole bracket holds trigger in “ON” position.2. Slide the handle bracket onto clamping bolt.3. Screw the knob tightly. 4. Plug saw power cord into receptacle cord at end of inner pole. (See Fig. 8)
CAUTION: To allow venting of the oil reservoir, small breather channels areprovided between the oil filler cap and the strainer. To prevent leakage, ensure machine isleft in a horizontal position (oil filler cap uppermost) when not in use.It is important to use only the recommended oil to avoid damage to the chain saw.Never use recycled/old oil. Use of non approved oil will invalidate the warranty.
!
Fig. 5a
Oil Filler Cap
Oil Reservoir
Fig. 5b
Checking the Automatic OilerProper functioning of the automatic oiler can be checked by running the chain saw andpointing the tip of the Guide chain bar (7) towards a piece of cardboard or paper on theground. If an increasing oil pattern develops on the cardboard, the automatic oiler isoperating fine. If there is no oil pattern, despite a full oil reservoir, contact customer serviceagent or approved service agent.
Caution: Do not touch the ground with the chain. Ensure safety clearance of 12”.
Fig. 6a Fig. 6b
1
2
1
2
Fig. 7
Fig. 8
WARNING: • Before attaching the powercord of the machine to the power cord of theExtension Pole, make sure that the tool isswitched off and unplugged from the powersupply. • When using this machine with theExtension Pole, make sure to first attach thepower cord of the machine to the power cordof the extension pole, and then attach thepower cord of the extension pole to power supply.• ELECTROCUTION HAZARD:Never use the Saw or Extension Pole in anarea with overhead power lines or where thebranch being cut can come into contact withoverhead power lines.
!

2120
ASSEMBLY & ADJUSTMENTS cont.
ADJUSTING POLE LENGTH
OPERATION
POWER ON/OFF
A cam levered collet is used to hold the pole in position at any extended length.
1. To extend the pole, loosen the clamping lever as shown in Fig. 9. Pole will slide freely.
2. Pull inner pole section out to desired length of extension. Note: only extend pole to minimum length required to reach limb that is being cut.
3. To lock pole in position, tighten clamping lever as shown in Fig. 9.
The pole saw has a telescoping pole assembly that will extend from 89.7 inches(fully retracted) to 119.4 inches (fully extended).
1. Switching on and off (See Fig. 10)
For switching on the tool,press the Lock-off Button (3),then fully press the On/Off Switch (2)and hold in this position.
The Lock-Off Button can now be released.
For switching off, release the On/Off Switch.
ATTENTION: Check the voltage and current supply: The voltage and current supplymust comply with the ratings on the product plate.
!
1
2
3
Fig. 9
3
2
Fig. 10
OPERATION cont.
CUTTING WITH CHAINSAW
1. Connect saw to extension cord. Connect extension cord to power supply. (See Fig. 12)2. Make sure section of log to be cut is not laying on the ground. This will keep the chain from touching the ground as it cuts through the log. Touching the ground while the Chain is moving is dangerous and will dull the Chain.3. Use both hands to grip saw. Always use left hand to grip Front Handle and right hand to grip Rear Handle. Use a firm grip. Thumbs and fingers must wrap around saw handles (See Fig. 13 ). 4. Make sure your footing is firm. Keep shoulder width feet apart. Divide your weight evenly on both feet.5. When ready to make a cut, push the Lock-off Button (3) completely in with the right thumb and squeeze the trigger. This will turn saw on. Releasing the trigger will turn the saw off. Make sure the saw is running at full speed before starting a cut.6. When starting a cut, slowly place moving chain against the wood. Hold saw firmly in place to avoid possible bouncing or skating (sideways movement) of saw.7. Guide the saw using light pressure and do not put excessive force on the saw. The motor will overload and can burn out. It will do the job better and safer at the rate for which it was intended.8. Remove the saw from a cut with the saw running at full speed. Stop the saw by releasing the On/off Switch (2). Make sure the chain has stopped before setting the saw down.9. Keep practicing on scrap logs in a secure working area until you get the hang of it and can saw with ease, using a fluid motion and a steady cutting rate.
IMPORTANT: Be sure the oil reservoir is filled. Check the Oil Level Window (see Fig. 11)prior to starting and regularly during operation. Refill oil when oil level is low.A full oil tank will last approx. 12 minutes depending on sawing intensity and stops.
Check recent replaced chain tension about every 10 minutes during operation.
!
Oil Reservoir
Fig. 11
Fig. 12
Fig. 13
2322
OPERATION cont. OPERATION cont.
KICKBACK SAFETY DEVICES ON THIS SAW(see also pages 10 and 11 for details)This saw has a low-kickback chain and reduced kickback Guide Bar. Both items reducethe chance of kickback. However, kickback can still occur with this saw.The following steps will reduce the risk of kickback.• Use both hands to grip saw while saw is running. Use firm grip. Thumbs and fingers must wrap around saw handles.• Keep all safety items in place on saw. Make sure they work properly.• Do not overreach or cut above shoulder height.• Keep solid footing and balance at all times.• Stand slightly to left side of saw. This keeps your body from being in direct line with chain.• Do not let Guide Bar nose touch anything when chain is moving.• Never try cutting through two logs at same time. Only cut one log at a time.• Do not bury the Guide Bar nose or try plunge cut (boring into wood using Guide Bar nose).• Watch for shifting of wood or other forces that may pinch chain.• Use extreme caution when reentering a previous cut.• Use only the low-kickback chain and Guide Bar(9) that were supplied with this chain saw. • Never use a dull or loose chain. Keep chain sharp with proper tension.
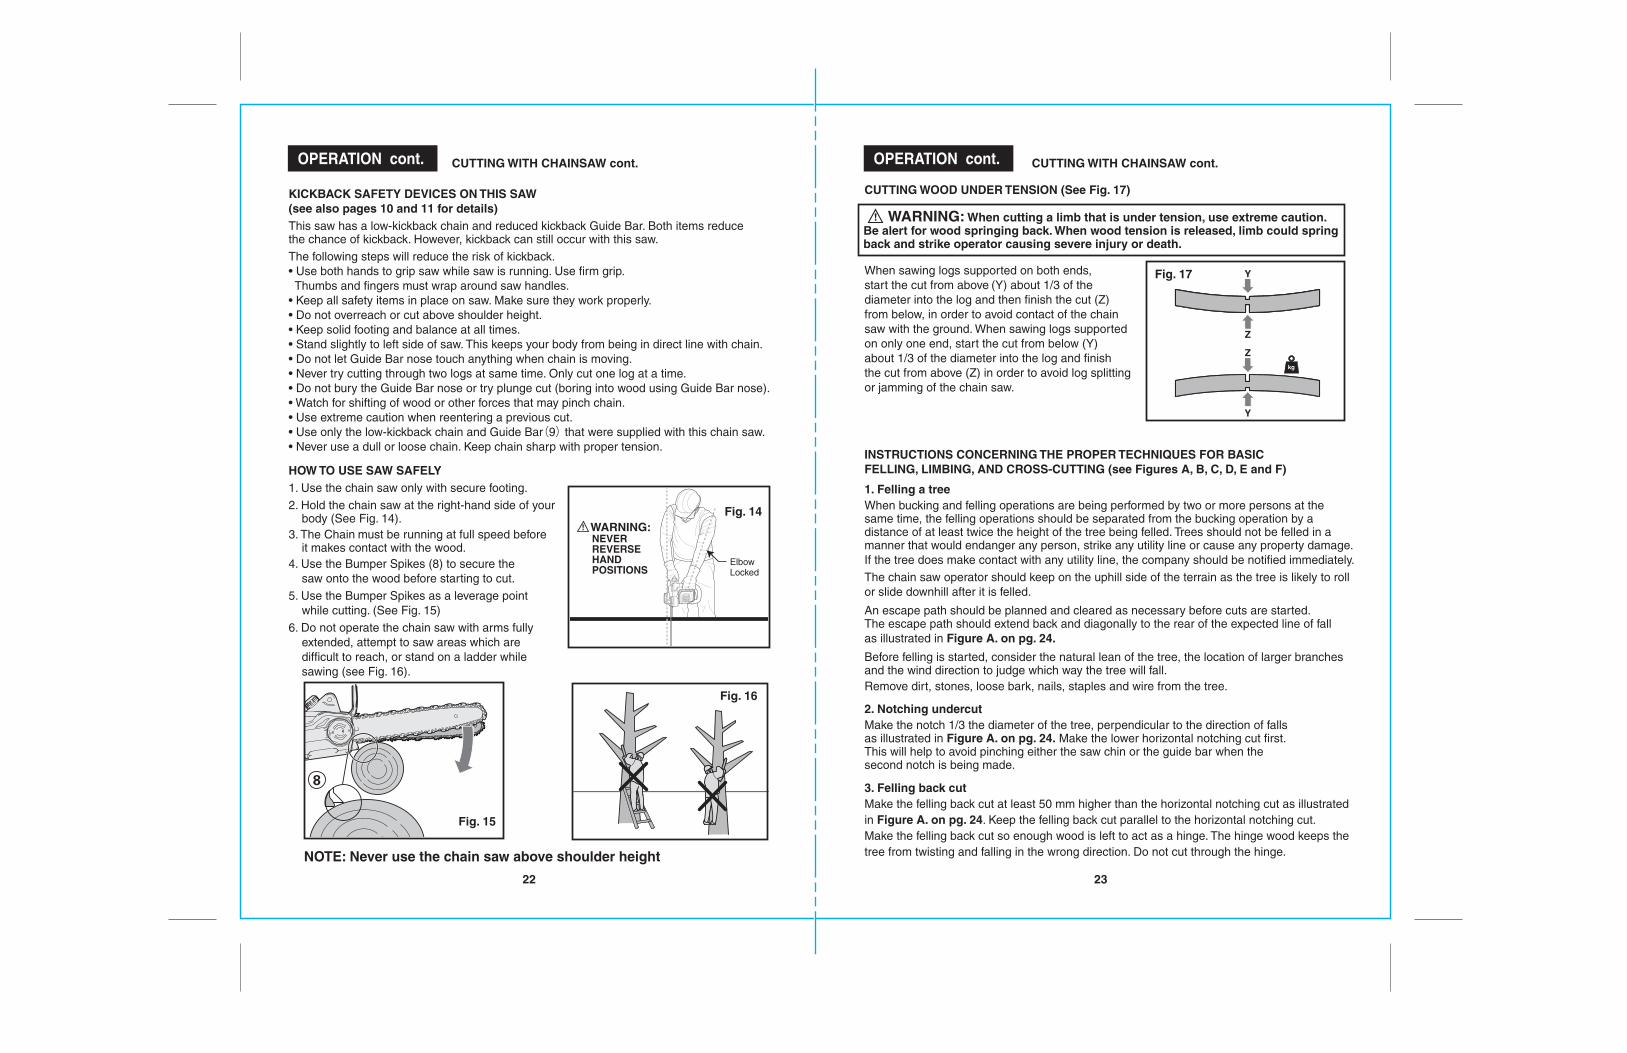
CUTTING WOOD UNDER TENSION (See Fig. 17)
INSTRUCTIONS CONCERNING THE PROPER TECHNIQUES FOR BASICFELLING, LIMBING, AND CROSS-CUTTING (see Figures A, B, C, D, E and F)
When sawing logs supported on both ends,start the cut from above (Y) about 1/3 of thediameter into the log and then finish the cut (Z)from below, in order to avoid contact of the chainsaw with the ground. When sawing logs supportedon only one end, start the cut from below (Y)about 1/3 of the diameter into the log and finishthe cut from above (Z) in order to avoid log splittingor jamming of the chain saw.
1. Felling a treeWhen bucking and felling operations are being performed by two or more persons at thesame time, the felling operations should be separated from the bucking operation by adistance of at least twice the height of the tree being felled. Trees should not be felled in amanner that would endanger any person, strike any utility line or cause any property damage.If the tree does make contact with any utility line, the company should be notified immediately.The chain saw operator should keep on the uphill side of the terrain as the tree is likely to rollor slide downhill after it is felled.
An escape path should be planned and cleared as necessary before cuts are started.The escape path should extend back and diagonally to the rear of the expected line of fallas illustrated in Figure A. on pg. 24.
Before felling is started, consider the natural lean of the tree, the location of larger branchesand the wind direction to judge which way the tree will fall.Remove dirt, stones, loose bark, nails, staples and wire from the tree.
2. Notching undercutMake the notch 1/3 the diameter of the tree, perpendicular to the direction of fallsas illustrated in Figure A. on pg. 24. Make the lower horizontal notching cut first.This will help to avoid pinching either the saw chin or the guide bar when thesecond notch is being made.
3. Felling back cutMake the felling back cut at least 50 mm higher than the horizontal notching cut as illustratedin Figure A. on pg. 24. Keep the felling back cut parallel to the horizontal notching cut.Make the felling back cut so enough wood is left to act as a hinge. The hinge wood keeps thetree from twisting and falling in the wrong direction. Do not cut through the hinge.
HOW TO USE SAW SAFELY1. Use the chain saw only with secure footing.2. Hold the chain saw at the right-hand side of your body (See Fig. 14).3. The Chain must be running at full speed before it makes contact with the wood.4. Use the Bumper Spikes (8) to secure the saw onto the wood before starting to cut.5. Use the Bumper Spikes as a leverage point while cutting. (See Fig. 15)6. Do not operate the chain saw with arms fully extended, attempt to saw areas which are difficult to reach, or stand on a ladder while sawing (see Fig. 16).
ElbowLocked
WARNING:!NEVERREVERSEHANDPOSITIONS
Fig. 14
8
Fig. 15
Fig. 16
NOTE: Never use the chain saw above shoulder height
WARNING: When cutting a limb that is under tension, use extreme caution.Be alert for wood springing back. When wood tension is released, limb could springback and strike operator causing severe injury or death.
!
Z
Y
kg
Z
Y Fig. 17
CUTTING WITH CHAINSAW cont. CUTTING WITH CHAINSAW cont.

2524
OPERATION cont. OPERATION cont.
INSTRUCTIONS CONCERNING THE PROPER TECHNIQUES FOR BASICFELLING, LIMBING, AND CROSS-CUTTING (see Figures A, B, C, D, E and F) cont.
INSTRUCTIONS CONCERNING THE PROPER TECHNIQUES FOR BASICFELLING, LIMBING, AND CROSS-CUTTING (see Figures A, B, C, D, E and F) cont.
3. Felling back cut cont.As the felling gets close to thehinge, the tree should begin to fall.
If there is any chance that the treemay not fall in desired direction orit may rock back and bind the sawchain, stop cutting before the fellingback cut is complete and use wedgesof wood, plastic or aluminium toopen the cut and drop the tree alongthe desired line of fall.
When the tree begins to fall remove the chain saw from the cut, stop the motor, put the chainsaw down, then use the retreat path planned.Be alert for overhead limbs falling and watch your footing.
Fig. A.
4. Limbing a tree Limbing is removing the branchesfrom a fallen tree. When limbing leavelarger lower limbs to support the logoff the ground. Remove the smalllimbs in one cut as illustrated inFig. B. Branches under tensionshould be cut from the bottom upto avoid binding the chain saw.
Fig. B.
5. Bucking a logBucking is cutting a log into lengths. It is important to makesure your footing is firm and your weight is evenly distributedon both feet. When possible, the log should be raised andsupported by the use of limbs, logs or chocks.Follow the simple directions for easy cutting. When the log is supported along its entire lengthas illustrated in Fig. C., it is cut from the top (overbuck).
Fig. C.
Bucking a log cont.
When the log is supported on one end,as illustrated in Fig. D., cut 1/3 the diameter fromthe underside (underbuck).
Then make the finished cut by overbuckingto meet the first cut.
When the log is supported on both ends,as illustrated in Fig. E, cut 1/3 the diameter from thetop (overbuck).
Then make the finished cut by underbuckingthe lower 2/3 to meet the first cut.
Fig. D.
Fig. E.
When bucking on a slope always stand on theuphill side of the log, as illustrated in Fig. F.
When “cutting through”, to maintain completecontrol release the cutting pressure near the endof the cut without relaxing your grip on the chainsaw handles. Don’t let the chain contact the ground.
After completing the cut, wait for the saw chain tostop before you move the chain saw.
Always stop the motor before moving from treeto tree.
Fig. F.
CUTTING WITH CHAINSAW cont.CUTTING WITH CHAINSAW cont.

2726
OPERATION FOR POLE SAW cont.
2. Use both hands to grip Pole Saw. Use only designated grip areas when operating Pole Saw (See Fig. 19). Use firm grip. Thumbs and fingers must wrap around Pole Saw handle and pole.3. Make sure your footing is firm. Keep feet apart. Divide your weight evenly on both feet.4. When ready to make a cut, press the Lock-off Button, then fully press the On/off Switch (See Fig. 20). This will turn Pole Saw on. Releasing On/off Switch will turn Pole Saw off. Make sure saw is running at full speed before starting a cut.5. When starting a cut, place moving chain against wood. Hold Pole Saw firmly in place to avoid possible bouncing or skating (sideways movement) of saw.6. Guide Pole Saw using light pressure. Do not force Pole Saw. The motor will overload and can burn out. It will do the job better and safer at the rate for which it was intended.7. Remove Pole Saw from a cut with saw running at full speed. Stop Pole Saw by releasing trigger. Make sure chain has stopped before setting Pole Saw down.
SAW MAINTENANCE
Follow maintenance instructions in this manual. Proper cleaning of saw and chain and GuideBar maintenance can reduce chances of kickback. Inspect and maintain saw after each use.This will increase the service life of your saw. Note: Even with proper sharpening, risk of kickback can increase with each sharpening.
MAINTENANCE AND STORAGE OF CHAIN SAWIf the replacement of the supply cord is necessary, this has to be done by the manufactureror his agent in order to avoid a safety hazard.1. Unplug chain saw from power source• When not in use • Before moving from one place to another• Before servicing • Before changing accessories or attachments, such as saw chain and guard2. Inspect chain saw before and after each use. Check saw closely if guard or other part has been damaged. Check for any damage that may affect operator safety or operation of saw. Check for alignment or binding of moving parts. Check for broken or damaged parts. Do not use chain saw if damage affects safety or operation. Have damage repaired by authorized service center.
Fig. 19 Fig. 20
1
2
TRIMMING A TREE (PRUNING)
WARNING: Avoid kickback. Kickback can result in severe injury or death.See Kickback, to avoid risk of kickback.
!
WARNING: Do not extend arms above shoulders when using Pole Saw.!
CAUTION: Seek professional help if facing conditions beyond your ability.!
WARNING: Do not operate Pole Saw while: • in a tree • on a ladder or anyother unstable surface • in any awkward positionYOU MAY LOSE CONTROL OF POLE SAW CAUSING SEVERE INJURY.
!
Trimming a tree is the process of cutting limbs from a living tree. Make sure your footing is firm.Keep feet apart. Divide your weight evenly on both feet.Follow directions below to trim a tree.1. Make first cut six inches from tree trunk on underside of limb. Use top of guide bar to make this cut. Cut 1/3 through diameter of limb (See Fig. 21).2. Move two to four inches farther out on limb. Make second cut from above limb. Continue cut until you cut limb off.3. Make third cut as close to tree trunk as possible on underside of limb stub. Use top of guide bar to make this cut. Cut 1/3 through diameter of stub.4. Make fourth cut directly above third cut. Cut down to meet third cut. This will remove limb stub.
OPERATION FOR POLE SAW Cutting with extension pole
1. Connect saw to extension cord. Connect extension cord to power supply.Before cutting a high branch, consider all the same points detailed in the previous sectionbut pay particular attention to the likely path of the falling branch.
WARNING: Do not stand directly below a branch being cut. Keep bystandersfar away. Do not stand on a ladder or other type of unstable support while usingthe tool. Do not use the tool near cable, electrical power or telephone lines.Keep 10 ft (3m) away from all power lines. (See Figs. 18a, b, c, and d)
!
Fig. 18a
Fig. 18c
Fig. 18b
Fig. 18d
2" to 4"(5 a 10 cm)
6"(15 cm)
W
Y
Z X
Y
1/3
Fig. 21

2928
MAINTENANCE AND STORAGE OF CHAIN SAW cont. MAINTENANCE AND STORAGE OF CHAIN SAW cont.
3. Maintain chain saw with care. • Never expose saw to rain. • Keep chain sharp, clean, and lubricated for better and safer performance. • Follow steps outlined in this manual to sharpen chain. • Keep handles dry, clean, and free of oil and grease. • Keep all screws and nuts tight. • Inspect power cord often. If damaged, have repaired by authorized service center. • Never carry chain saw by power cord. • Never yank power cord to unplug it. • Keep power cord from heat, oil, and sharp edges. • Inspect extension cords often and replace if damaged.
4. When servicing, use only identical replacement parts.
5. When not in use, always store chain saw • in a high or locked place, out of children’s reach • in a dry place
BAR MAINTENANCETo maximize bar life, the following bar maintenance is recommended.The bar rails that carry the chain should be cleaned before storing the tool or if the baror chain appear to be dirty. The rails should be cleaned every time the chain is removed.Turn the bar over, top rail becoming bottom and bottom rail becoming top,around every 5 hours of use.
Keep chain sharp. Your saw will cut faster and more safely.A dull chain will cause undue sprocket, Guide Bar, chain, and motor wear.If you must force chain into wood and cutting creates only sawdust with few large chips,chain is dull.
SHARPENING SAW CHAIN
TO CLEAN THE BAR RAILS:1. Remove chain cover and bar and chain. (see section ASSEMBLY)2. Using a wire brush, screwdriver or similar tool, clear the residue from the inner groove of the bar. (See Fig. 22)3. Make sure to clean oil passages thoroughly.
CONDITIONS WHICH REQUIRE GUIDE BARMAINTENANCE• Saw cuts to one side or at an angle.• Saw has to be forced through the cut.• Inadequate supply of oil to the bar and chain.Check the condition of the Guide Bar each time the chain is sharpened.A worn Guide Bar will damage the chain andmake cutting difficult. After each use, with unitdisconnected from power source, clean all sawdust from the Guide Bar and sprocket hole.
Replace the Guide Bar when the groove is worn, the Guide Bar is bent or cracked, or whenexcess heating or burring of the rails occurs. If replacement is necessary, use only the GuideBar specified for your saw in the repair parts list or on the decal located on the chain saw.
Fig. 22
When rail top is uneven, use a flat file to restoresquare edges and sides.
WARNING: Unplug chain saw from power source before servicing.Severe injury or death could occur from electrical shock or body contact withmoving chain. Cutting edges on chain are sharp. Use protective gloves whenhandling chain.
!
Note:It is not necessary to remove the chain or bar when lubricating the sprocket 1. Clean the bar and sprocket.2. Using a grease gun, insert the tip of the gun into the lubrication hole and inject grease until it appears at the outside edge of the sprocket tip. (See Fig. 24 )3. To rotate the sprocket release the chain stop and pull the chain by hand until the ungreased side of the sprocket is in line with the grease hole. Repeat the lubrication procedure.
LUBRICATE SPROCKET
WARNING: Wear heavy duty gloves when performing any maintenanceor service to this tool. Always unplug the tool before performing any serviceor maintenance on this tool.
!
EN: Injecting grease to lubricateES: Inyectando grasa para lubricar
Fig. 24
Worn Groove Correct Groove
File Rail Edgesand Sides
REPLACING BAR & CHAINReplace chain when cutters are too worn to sharpen or when chain stops.Only use replacement chain noted in this manual.
Always include new Drive Sprocket (call-out 15 on Fig.1), when replacing chain.This will maintain proper driving of chain.
Inspect Guide Bar before replacing chain.A worn or damaged Guide Bar is unsafe.A worn or damaged Guide Bar will damage chain.It will also make cutting harder. Fit the Bar Tensioning Plate catch (call-out 22 on Fig.1)into the new bar by tightening the screw clockwise.
The catch protrude (a) must be fitted into the bar hole.(See Fig. 23)
Fig. 23
a

30 31
TROUBLE SHOOTING
SYMPTOM POSSIBLE CAUSEChain saw fails to operate No power
Mains socket faultyExtension cord damaged
Check powerUse another socketCheck cord, replace
Chain saw operatesintermittently
Extension cord damagedLoose connectionInternal wiring defectiveOn/Off defective
Check cord, replaceContact service agentContact service agentContact service agent
Dry chain No oil in reservoir
Oil passage cloggedClean capClean oil passage outlet
Chain/chain bar overheats No oil in reservoir
Oil passage cloggedChain is over tensionedDull chain
Clean capClean oil passage outletAdjust locking knobSharpen chain or replace
Chain saw rips, vibrates,does not saw properly
Chain tension too looseDull chainChain worn outChain teeth are facing in the wrong direction
Adjust locking knobSharpen chain or replaceReplace chainReassemble with chain in correct direction
Vent in oil filler cap cloggedRefill oil
Refill oilVent in oil filler cap clogged
The following table gives checks and actions that you can perform if your machine does notoperate correctly. If these do not identify/remedy the problem, contact your service agent.WARNING: Switch off and remove plug from mains before investigating fault.
PARTS LIST
The
mod
el n
umbe
r will
be fo
und
on th
e na
mep
late
of t
he P
ole
Saw
/Cha
in S
aw.
Alw
ays
men
tion
the
mod
el n
umbe
r whe
n re
ques
ting
parts
and
ser
vice
fo
r you
r too
l. To
ord
er p
arts
, cal
l 1-8
00-4
69-4
663
Mod
el N
o. 1
72.4
3983
1 1
0-In
. Bar
9 A
mp
Mo
tor
Elec
tric
Adj
usta
ble
Pol
e S
aw/C
hain
Saw
Par
ts N
o.
P
art
Des
crip
tio
n
Q
ty.
Pos
ition
No.
GC
S2
50
U-1
GC
S2
50
U-2
GC
S2
50
U-3
GC
S2
50
U-5
GC
S2
50
U-6
GC
S2
50
U-7
GC
S2
50
U-8
GC
S2
50
U-9
GC
S2
50
U-1
1G
CS
25
0U
-12
GC
S2
50
U-1
5G
CS
25
0U
-16
GC
S2
50
U-2
0G
CS
25
0U
-22
GC
S2
50
U-2
3G
CS
25
0U
-24
GC
S2
50
U-2
6G
CS
25
0U
-28
GC
S2
50
U-2
9G
CS
25
0U
-30
GC
S2
50
U-3
1G
CS
25
0U
-32
GC
S2
50
U-3
3G
CS
25
0U
-34
GC
S2
50
U-3
5G
CS
25
0U
-36
GC
S2
50
U.1
-37
1 2 3 5 6 7 8 9 11
12
15
16
20
22
23
24
26
28
29
30
31
32
33
34
35
36
37
Prot
ect P
late
Self
tapp
ing
scre
wM
otor
Cov
erTo
rsio
nal S
prin
gCa
rbon
Bru
sh (p
air)
Rear
bra
cket
Stat
orLe
ft/Ri
ght h
ousin
gBe
arin
gRo
tor
Oil E
xitFr
ont b
rack
etTi
ghte
n Bo
ltPi
nion
Was
her
Reta
inin
g Ri
ngO
il Bot
tle C
apDu
ck B
illO
il Bot
tleBi
g G
ear
Bear
ing
Was
her
Bar S
pace
rSe
lf Ta
ppin
g Sc
rew
E-rin
gSe
lf Ta
ppin
g Sc
rew
Gui
de B
ar
1 16 1 2 1 1 1 1 1 1 2 1 1 1 1 1 1 1 1 1 2 1 1 3 1 1 1
Par
ts N
o.
Par
t D
escr
ipti
on
Qty
. P
ositi
on N
o.
39
40
42
43
44
45
46
47
48
49
50
51
52
53
54
56
57
58
59
60
61
62
65
66
67
69
70
Pres
s Bl
ock
Saw
Chai
nBu
shCa
mse
lf ta
ppin
g sc
rew
Flan
geCh
ain
Gua
rdCo
mpr
essio
n Sp
ring
Tens
ion
Whe
elBo
ltKn
ob B
ody
Inne
r Wire
Inne
r Wire
Micr
o Pi
ece
Cord
& P
lug
Blad
e Sh
eath
Switc
hBe
arin
g Sl
eeve
Scre
w an
d wa
sher
ass
embl
ySe
lf Ta
ppin
g Sc
rew
Was
her
Bear
ing
Sprin
g W
ireTe
lesc
ope
Tube
ILe
ft/Ri
ght P
ole
Hand
leTh
read
Sle
eve
Scre
w
1 1 1 1 2 1 1 1 1 1 1 1 1 2 1 1 1 1 2 2 1 1 1 1 1 1 1
GC
S2
50
U-3
9G
CS
25
0U
.1-4
0G
CS
25
0U
-42
GC
S2
50
U-4
3G
CS
25
0U
-44
GC
S2
50
U-4
5G
CS
25
0U
-46
GC
S2
50
U-4
7G
CS
25
0U
-48
GC
S2
50
U-4
9G
CS
25
0U
-50
GC
S2
50
U-5
1G
CS
25
0U
-52
GC
S2
50
U-5
3G
CS
25
0U
-54
GC
S2
50
U-5
6G
CS
25
0U
-57
GC
S2
50
U-5
8G
CS
25
0U
-59
GC
S2
50
U-6
0G
CS
25
0U
-61
GC
S2
50
U-6
2G
CS
25
0U
-65
GC
S2
50
U-6
6G
CS
25
0U
-67
GC
S2
50
U-6
9G
CS
25
0U
-70

32 33
PARTS LISTModel No. 172.439831 10-In. Bar
9 Amp MotorElectricAdjustable Pole Saw/Chain SawPARTS LIST
The
mod
el n
umbe
r will
be fo
und
on th
e na
mep
late
of t
he P
ole
Saw
/Cha
in S
aw.
Alw
ays
men
tion
the
mod
el n
umbe
r whe
n re
ques
ting
parts
and
ser
vice
fo
r you
r too
l. To
ord
er p
arts
, cal
l 1-8
00-4
69-4
663
Mod
el N
o. 1
72.4
3983
1 1
0-In
. Bar
9 A
mp
Mo
tor
Elec
tric
Adj
usta
ble
Pol
e S
aw/C
hain
Saw
Par
ts N
o.
P
art
Des
crip
tio
n
Q
ty.
Pos
ition
No.
P
arts
No
.
Par
t D
escr
ipti
on
Q
ty.
Pos
ition
No.
71
72
73
74
75
76
77
78
79
80
81
82
83
84
10
11
02
10
31
04
10
81
09
12
01
21
12
21
23
12
41
25
12
6
12
71
28
12
91
30
14
01
41
14
22
01
20
22
03
20
4
GC
S2
50
U-1
27
GC
S2
50
U-1
28
GC
S2
50
U-1
29
GC
S2
50
U-1
30
GC
S2
50
U-1
40
GC
S2
50
U-1
41
GC
S2
50
U-1
42
GC
S2
50
U.1
-20
1G
CS
25
0U
-20
2G
CS
25
0U
-20
3G
CS
25
0U
-20
4
Safe
ty H
elm
et B
Tube
Ass
embl
y II
Nut
Nut
Sprin
g Pi
nTu
be A
ssem
bly
IIILo
ck K
nob
Scre
wW
ashe
rNu
tCo
mpr
essio
n sp
ring
Butto
nHa
ndle
Cov
erKn
ob B
ody
Left/
Righ
t hou
sing
asse
mbl
yRo
tor S
etFr
ont b
rack
et a
ssem
bly
Pum
p Se
tSp
ring
wash
erFe
lt se
alO
il Tub
e I
Oil T
ube
IICo
mpr
essio
n Sp
ring
Stee
l bal
lPu
mp
Hous
ing
O R
ing
Pum
p
O R
ing
Was
her
Com
pres
sin S
prin
gPu
mp
Rod
Powe
r cor
dPo
le H
andl
e Bo
dyLo
ck k
nob
kitG
uide
Bar
Oil B
ottle
Cap
Set
Clut
ch C
over
Ass
embl
yEx
tens
ion
Supp
ort
1 1 1 1 1 1 1 1 3 2 1 1 1 1 1 1 1 1 1 1 1 1 1 1 1 1 1
1 1 1 1 1 1 1 1 1 1 1
GC
S2
50
U-7
1G
CS
25
0U
-72
GC
S2
50
U-7
3G
CS
25
0U
-74
GC
S2
50
U-7
5G
CS
25
0U
-76
GC
S2
50
U-7
7G
CS
25
0U
-78
GC
S2
50
U-7
9G
CS
25
0U
-80
GC
S2
50
U-8
1G
CS
25
0U
-82
GC
S2
50
U-8
3G
CS
25
0U
-84
GC
S2
50
U-1
01
GC
S2
50
U-1
02
GC
S2
50
U-1
03
GC
S2
50
U-1
04
GC
S2
50
U-1
08
GC
S2
50
U-1
09
GC
S2
50
U-1
20
GC
S2
50
U-1
21
GC
S2
50
U-1
22
GC
S2
50
U-1
23
GC
S2
50
U-1
24
GC
S2
50
U-1
25
GC
S2
50
U-1
26
Related Documents