Microsoft Technology Associate Series Software Development Fundamentals COURSEWARE 8361‑1 EXAM 98‑361

8361-1 Software Dev Fund EVAL
Jan 03, 2016
Software Development
Welcome message from author
This document is posted to help you gain knowledge. Please leave a comment to let me know what you think about it! Share it to your friends and learn new things together.
Transcript

Microsoft Technology Associate Series
Software Development FundamentalsCOURSEWARE 8361‑1 EXAM 98‑361

For E
valu
atio
n Onl
y

September 2010
Microsoft Technology Associate Series
© CCI Learning Solutions Inc.
For E
valu
atio
n Onl
y

Preface About This Courseware
8361‐1 v1.00 © CCI Learning Solutions Inc. ii
Software Development Fundamentals
Developer: Neil Barnett
Editors: Jill McKenna, Deryck Nutley, Sue Wong
This courseware is one in a series prepared by CCI Learning Solutions Inc. for use by students and instructors in courses on computer
software applications. CCI designed these materials to assist students and instructors in making the learning process both effective and
enjoyable.
This training manual is copyrighted and all rights are reserved by CCI Learning Solutions, Inc. No part of this publication may be
reproduced, transmitted, stored in a retrieval system, modified, or translated into any language or computer language, in any form or by
any means, electronic, mechanical, magnetic, optical, chemical, manual or otherwise without written permission of CCI Learning
Solutions, Canada: 1‐800‐668‐1669.
The information in this courseware is distributed on an “as is” basis, without warranty. While every precaution has been taken in the
preparation of this courseware, neither the author nor CCI Learning Solutions Inc. shall have any liability to any person or entity with
respect to any liability, loss, or damage caused or alleged to be caused directly or indirectly by the instructions contained in this
courseware or by the computer software and hardware products described therein.
CCI Learning Solutions Inc. would like to acknowledge the financial support of the Government of Canada through the Book Publishing
Industry Development Program for our publishing activities.
CCI Learning Solutions Inc. is independent from Microsoft Corporation, and not affiliated with Microsoft in any manner. While this
publication may be used in assisting individuals to prepare for a Microsoft Business Certification exam, Microsoft, its designated
program administrator, and CCI Learning Solutions Inc. do not warrant that use of this publication will ensure passing a Microsoft
Business Certification exam.
© 2010 CCI Learning Solutions Inc. All rights reserved. ISBN: 978‐1‐55332‐286‐3 Printed in Canada
Working With the Data Files The exercises in this courseware require you to use the data files provided for the book. Follow the instructions shown to download the data files for this courseware.
1 Launch your browser and navigate to the CCI Web site location http://www.ccilearning.com/data.
2 Enter: 8361 in the Courseware # box and click .
3 Select the 8361‐1‐student‐data.exe file then click Run. Click Run again in the Internet Explorer – Security Warning window, if necessary.
4 In the WinZip Self‐Extractor dialog box, use the Browse button to specify the Windows Desktop as the location to unzip the file and then click Unzip.
5 The 8361 Student Files folder containing the required student work files has now been downloaded to your desktop. It is recommended that you rename the folder using your own name before starting the exercises in this courseware. You can reinstall and use the work files as many times as you like.
For E
valu
atio
n Onl
y

About This Courseware Preface
8361‐1 v1.00 © CCI Learning Solutions Inc. iii
What is the Microsoft Technology Associate Certification?
The Microsoft Technology Associate (MTA) certification validates fundamental technology knowledge, allows you to explore possible career paths, and helps prepare you for advanced studies and certifications. You can choose which exam(s) you want to take according to which knowledge area(s) you want to validate. Some of the benefits of MTA Certification include:
Build a foundation for a technology career
Validate fundamental knowledge with an official Microsoft certification
Explore different career paths
Get access to the Microsoft Certified Professional (MCP) online community
Get an edge for college admissions or prepare for internships and entry‐level jobs
Earn a Microsoft certification right in the classroom.*
The currently available Microsoft Technology Associate exams include*:
Software Developer Fundamentals
Windows Developer Fundamentals
Web Developer Fundamentals
Database Administration Fundamentals
Windows Server Administration Fundamentals
Networking Fundamentals
Security Fundamentals
What does the Microsoft Technology Associate Approved Courseware logo represent?
The logo indicates that this courseware has been approved by Microsoft to cover the course objectives that will be included in the relevant exam. It also means that after utilizing this courseware, you will be better prepared to pass the exam required to become a certified Microsoft Technology Associate.
For more information:
To learn more about Microsoft Technology Associate exams, visit http://www.microsoft.com/learning/en/us/certification/mta.aspx
To learn about other Microsoft approved courseware from CCI Learning Solutions Inc., visit www.ccilearning.com/mta The availability of Microsoft Technology Associate certification exams varies by Microsoft program, program version and language. MTA exams are only available
at academic institutions that have purchased an MTA Campus License or MTA vouchers. Contact your school administrator to find out if your school is an approved
MTA testing center. Visit www.certiport.com/mta for exam availability.
Microsoft is a trademark or registered trademark of Microsoft Corporation in the United States and/or other countries.
CCI Learning Solutions Inc. is independent from Microsoft Corporation, and not affiliated with Microsoft in any manner. While this publication may be used in
assisting end users to prepare for a Microsoft Technology Associate exam, Microsoft, its designated program administrator, and CCI Learning Solutions Inc. do not
warrant that use of this publication will ensure passing a Microsoft Technology Associate exam.
Fo
r Eva
luat
ion
Only

Preface Table of Contents
iv 8361‐1 v1.00 © CCI Learning Solutions Inc.
Table of Contents About This Courseware Courseware Description ................................................................................................................................................................... vi
Course Series ..................................................................................................................................................................... vi Course Prerequisites ......................................................................................................................................................... vi Classroom Setup .............................................................................................................................................................. vii
Course Design .................................................................................................................................................................................. vii Course Objectives ........................................................................................................................................................................... viii Conventions and Graphics ................................................................................................................................................................ ix
Lesson 1: Understanding Core Programming Lesson Objectives ............................................................................................................................................................................. 1 Computer Storage and Data Types ................................................................................................................................................... 1
Computer Memory ........................................................................................................................................................... 1 Memory Stacks ................................................................................................................................................................. 3 Heaps ................................................................................................................................................................................ 3 Data Types ........................................................................................................................................................................ 4
Understand Computer Decision Structures ...................................................................................................................................... 7 Overview ........................................................................................................................................................................... 7 Flowcharts ......................................................................................................................................................................... 7 Pseudo‐Code ..................................................................................................................................................................... 9 Syntax ................................................................................................................................................................................ 9 If Decision Structures ...................................................................................................................................................... 10 Multiple Decision Structures Such As Switch/Select Case .............................................................................................. 12 Decision Tables ............................................................................................................................................................... 15 Evaluating Expressions .................................................................................................................................................... 15
Identify the Appropriate Method for Handling Repetition ............................................................................................................. 18 Overview ......................................................................................................................................................................... 18 Loops ............................................................................................................................................................................... 18 While Loops .................................................................................................................................................................... 19 Do...While Loops ............................................................................................................................................................. 20 Recursion (Collection‐Controlled Loops) Versus Iterative............................................................................................... 20
Understand Error (Exception) Handling .......................................................................................................................................... 24 Types of Errors ................................................................................................................................................................ 24 Exception Handling ......................................................................................................................................................... 24
Lesson Summary ............................................................................................................................................................................. 26 Review Questions ........................................................................................................................................................................... 26
Lesson 2: Introduction to Object‐Oriented Programming Lesson Objectives ........................................................................................................................................................................... 29 Imperative Programming vs. Functional Programming .................................................................................................................. 29
Object‐Oriented Programming ....................................................................................................................................... 30 Understanding Class Fundamentals ................................................................................................................................................ 31
Overview ......................................................................................................................................................................... 31 Class Properties ............................................................................................................................................................... 32 Methods .......................................................................................................................................................................... 36 Events .............................................................................................................................................................................. 37 Constructors .................................................................................................................................................................... 39 How to Create and Use a Class ....................................................................................................................................... 39
Abstraction ..................................................................................................................................................................................... 42 Overview ......................................................................................................................................................................... 42
Understanding Inheritance ............................................................................................................................................................. 43 Overview ......................................................................................................................................................................... 43 Base and Derived Classes ................................................................................................................................................ 43 Good Programming: Designing an Inheritance Hierarchy ............................................................................................... 46
For E
valu
atio
n Onl
y

Table of Contents Preface
8361‐1 v1.00 © CCI Learning Solutions Inc. v
Understanding Polymorphism ........................................................................................................................................................ 47 Inheritance‐based Polymorphism ................................................................................................................................... 47 Interface‐Based Polymorphism ....................................................................................................................................... 50 Overriding Methods in the Derived Class ....................................................................................................................... 53
Understanding Encapsulation ......................................................................................................................................................... 57 Interfaces ........................................................................................................................................................................ 58 Access Modifiers ............................................................................................................................................................. 61
Review Questions ........................................................................................................................................................................... 63 Lesson Summary ............................................................................................................................................................................. 63
Lesson 3: Understanding General Software Development Lesson Objectives ........................................................................................................................................................................... 65 Application Lifecycle Management ................................................................................................................................................. 65
Governance ..................................................................................................................................................................... 66 Development .................................................................................................................................................................. 66 Operations ...................................................................................................................................................................... 71
Software Requirements Specification ............................................................................................................................................. 72 Application Specifications ............................................................................................................................................... 73 Software Coding .............................................................................................................................................................. 74
Algorithms ...................................................................................................................................................................................... 75 Sorting Algorithms .......................................................................................................................................................... 75
Data Structures ............................................................................................................................................................................... 78 The Array ......................................................................................................................................................................... 78 The Stacks ....................................................................................................................................................................... 79 The Queues ..................................................................................................................................................................... 79 The Linked List ................................................................................................................................................................ 79 Performance and Selection of Data Structures ............................................................................................................... 80
Review Questions ........................................................................................................................................................................... 81 Lesson Summary ............................................................................................................................................................................. 81
Lesson 4: Understanding Web Applications Lesson Objectives ........................................................................................................................................................................... 83 Understand Web Page Development ............................................................................................................................................. 83
Hypertext Markup Language (HTML) .............................................................................................................................. 83 Creating a Web Page ....................................................................................................................................................... 86
Styles ............................................................................................................................................................................................... 91 Inline Formatting ............................................................................................................................................................. 91 Local Styles ...................................................................................................................................................................... 91 Cascading Style Sheets .................................................................................................................................................... 91
JavaScript ........................................................................................................................................................................................ 95 Additional Programming Features of JScript ................................................................................................................... 95 Compiling a JScript file from the Command Line ............................................................................................................ 96
Understanding Microsoft ASP.NET Web Application Development ............................................................................................... 98 ASP.NET Overview........................................................................................................................................................... 98 ASP.NET Page Life Cycle ................................................................................................................................................ 100 Event Model .................................................................................................................................................................. 100 State Management ....................................................................................................................................................... 103
Web Hosting ................................................................................................................................................................................. 105 Virtual Directories ......................................................................................................................................................... 105 Virtual Web Sites ........................................................................................................................................................... 106 Deploying Web Applications ......................................................................................................................................... 106 Internet Information Services ....................................................................................................................................... 106
Web Services ................................................................................................................................................................................ 107 Web Services ................................................................................................................................................................. 107 REST .............................................................................................................................................................................. 109
Lesson Summary ........................................................................................................................................................................... 110 Review Questions ......................................................................................................................................................................... 110 Fo
r Eva
luat
ion
Only

Preface Table of Contents
vi 8361‐1 v1.00 © CCI Learning Solutions Inc.
Lesson 5: Desktop Applications Lesson Objectives ......................................................................................................................................................................... 113 Windows Form Applications ......................................................................................................................................................... 113
Overview ....................................................................................................................................................................... 113 Windows Forms Event Model ....................................................................................................................................... 116 Visual Inheritance ......................................................................................................................................................... 119 Inherit Windows Forms Using the Inheritance Picker Dialog Box ................................................................................. 123 User Interface Design .................................................................................................................................................... 124 Multiple Document Interface ........................................................................................................................................ 125
Console‐Based Applications .......................................................................................................................................................... 127 Overview ....................................................................................................................................................................... 127 Characteristics ............................................................................................................................................................... 127 Capabilities .................................................................................................................................................................... 127
Windows Services ......................................................................................................................................................................... 129 Overview ....................................................................................................................................................................... 129
Lesson Summary ........................................................................................................................................................................... 131 Review Questions ......................................................................................................................................................................... 132
Lesson 6: Understanding Databases Lesson Objectives ......................................................................................................................................................................... 133 Database Management Systems .................................................................................................................................................. 133
Flat‐File Databases ........................................................................................................................................................ 134 Relational Databases ..................................................................................................................................................... 134 Entity Relationship Diagrams (ERDs) ............................................................................................................................. 139 Normalization ............................................................................................................................................................... 141
Database Query Methods ............................................................................................................................................................. 145 Structured Query Language (SQL) ................................................................................................................................. 145 Selecting Data ............................................................................................................................................................... 145 Updating Data ............................................................................................................................................................... 154 Stored Procedures ........................................................................................................................................................ 154
Database Connection Methods .................................................................................................................................................... 161 Connecting to Data ....................................................................................................................................................... 161 In‐Memory Object ......................................................................................................................................................... 166 Resource Optimization .................................................................................................................................................. 170
Lesson Summary ........................................................................................................................................................................... 174 Review Questions ......................................................................................................................................................................... 174
Appendices Appendix A: Courseware Mapping ................................................................................................................................................ A2 Appendix B: Index .......................................................................................................................................................................... A3
For E
valu
atio
n Onl
y

About This Courseware Preface
8361‐1 v1.00 © CCI Learning Solutions Inc. vii
Course Description Software Development Fundamentals provides students with fundamental software development concepts. Students who complete this course will have reviewed all of the exam objectives and be on their way to preparing for Microsoft Technology Associate Exam #98‐361. It can also serve as a stepping stone to the Microsoft Certified Technology Specialist exams.
Course Series This Software Development Fundamentals courseware is one of seven courses in the Microsoft Technology Associate Series. Other courses available in the series include:
Database Administration Fundamentals
Windows Development Fundamentals
Web Development Fundamentals
Networking Fundamentals
Security Fundamentals
Windows Server Administration Fundamentals
The Microsoft Technology Associate Series contains exercises that students can use to learn each of the features discussed. Additional resources to practice and apply the skill sets are available from the CCI Technology Associate Microsite. Students are encouraged to register at http://mta.ccilearning.com in order access these additional activities both during and after completing the course.
Instructor Resources are available and are produced specifically to help and assist an instructor in preparing to deliver the course using the CCI materials. Contact your coordinator or administrator, or call your CCI Account Manager for information on how to access these resources.
Course Prerequisites Prior to taking this course, students must possess the following basic computer literacy and Windows skills.
Turn the computer and monitor on
Recognize input devices (keyboard, printer, mouse)
Perform a warm and cold boot
System Requirements Supported Architecture x86 x64 (WOW)
Supported Operating Systems Microsoft® Windows® XP (x86) Service Pack 3 Microsoft® Windows® Vista (x86 & x64) with Service Pack 2 Microsoft® Windows® Server 2003 (x86 & x64) Service Pack 2 Microsoft® Windows® Server 2003 R2 (x86 & x64) Microsoft® Windows® Server 2008 (x86 & x64) with Service Pack 2 Microsoft® Windows® Server 2008 R2 (x64) Microsoft® Windows® 7
Software Visual Studio 2008 Express, including: Visual Basic 2008 Express Edition Visual C# 2008 Express Edition Visual C++ 2008 Express Edition Visual Web Developer 2008 Express Edition
Microsoft Office 2007, specifically the following applications Microsoft Office Access 2007 Microsoft Office Excel 2007 Microsoft Office Word 2007
For E
valu
atio
n Onl
y

Preface About This Courseware
viii 8361‐1 v1.00 © CCI Learning Solutions Inc.
Classroom Setup
Computer Setup:
The student will find that a larger monitor (17” and up), a regular keyboard, and a mouse will help in the creation of exercises in this book.
Each computer should have all of the software installed (see above for list of specific software).
Each computer needs to have a folder created to store both the original student files and new files created by the student during the exercises in this book.
All of the student files must be copied into the newly created folder in the previous step.
Course Design This course book was developed for instructor‐led training and will assist you during class. Together with comprehensive instructional text and objectives checklists, this course book provides easy‐to‐follow hands‐on lab exercises and a glossary of course‐specific terms.
This course book is organized in the following manner:
Software Development Fundamentals
Table of Contents
Lessons
Lesson Objectives Narrative Text
Graphics
Tips and Tricks
Tech Notes
Exercises Graphics
Tips and Tricks
Tech Notes
Lesson Summary
Lesson Review Appendices
Courseware Mapping
Index
When you return to your home or office, you will find this course book to be a valuable resource for reviewing exercises and applying the skills you have learned. Each lesson concludes with questions that review the material. Lesson review questions are provided as a study resource only and in no way guarantee a passing score on a certification exam. Appendixes in the back of this course book provide additional information, resources, and answers to review questions.
For E
valu
atio
n Onl
y
About This Courseware Preface
8361‐1 v1.00 © CCI Learning Solutions Inc. ix
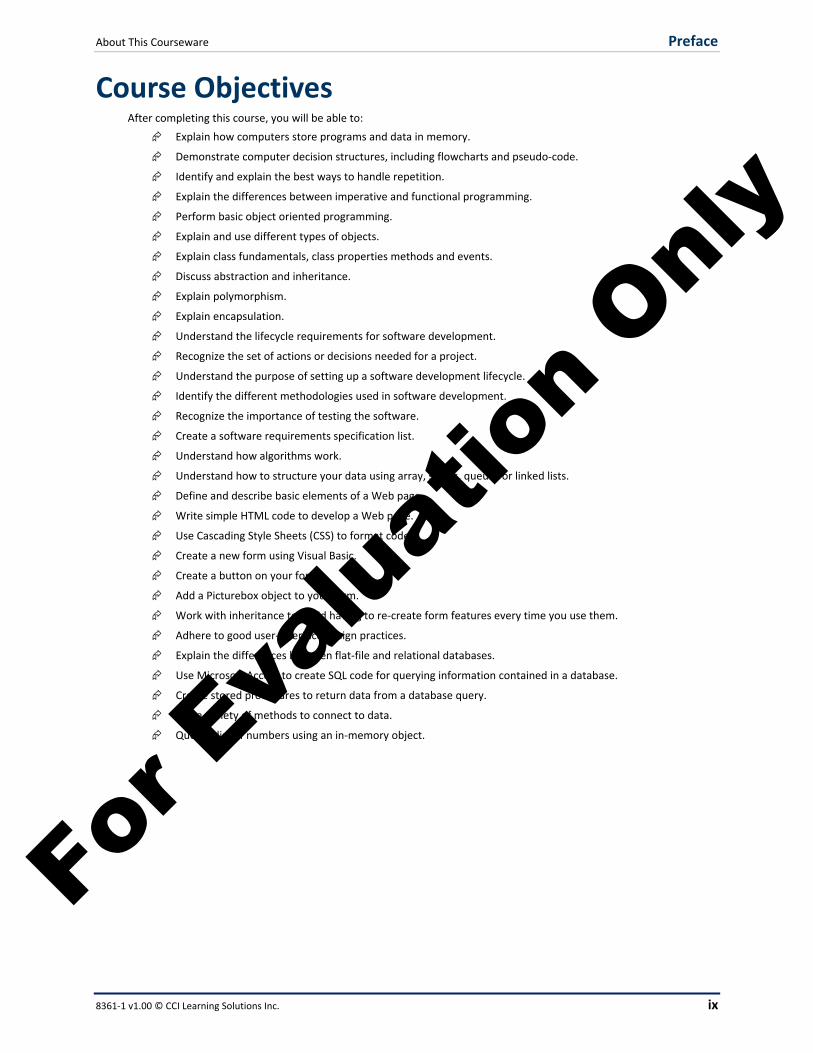
Course Objectives After completing this course, you will be able to:
Explain how computers store programs and data in memory.
Demonstrate computer decision structures, including flowcharts and pseudo‐code.
Identify and explain the best ways to handle repetition.
Explain the differences between imperative and functional programming.
Perform basic object oriented programming.
Explain and use different types of objects.
Explain class fundamentals, class properties methods and events.
Discuss abstraction and inheritance.
Explain polymorphism.
Explain encapsulation.
Understand the lifecycle requirements for software development.
Recognize the set of actions or decisions needed for a project.
Understand the purpose of setting up a software development lifecycle.
Identify the different methodologies used in software development.
Recognize the importance of testing the software.
Create a software requirements specification list.
Understand how algorithms work.
Understand how to structure your data using array, stacks, queues or linked lists.
Define and describe basic elements of a Web page.
Write simple HTML code to develop a Web page.
Use Cascading Style Sheets (CSS) to format code.
Create a new form using Visual Basic.
Create a button on your form.
Add a Picturebox object to your form.
Work with inheritance to avoid having to re‐create form features every time you use them.
Adhere to good user‐interface design practices.
Explain the differences between flat‐file and relational databases.
Use Microsoft Access to create SQL code for querying information contained in a database.
Create stored procedures to return data from a database query.
Use a variety of methods to connect to data.
Query a list of numbers using an in‐memory object.
For E
valu
atio
n Onl
y
Preface About This Courseware
x 8361‐1 v1.00 © CCI Learning Solutions Inc.
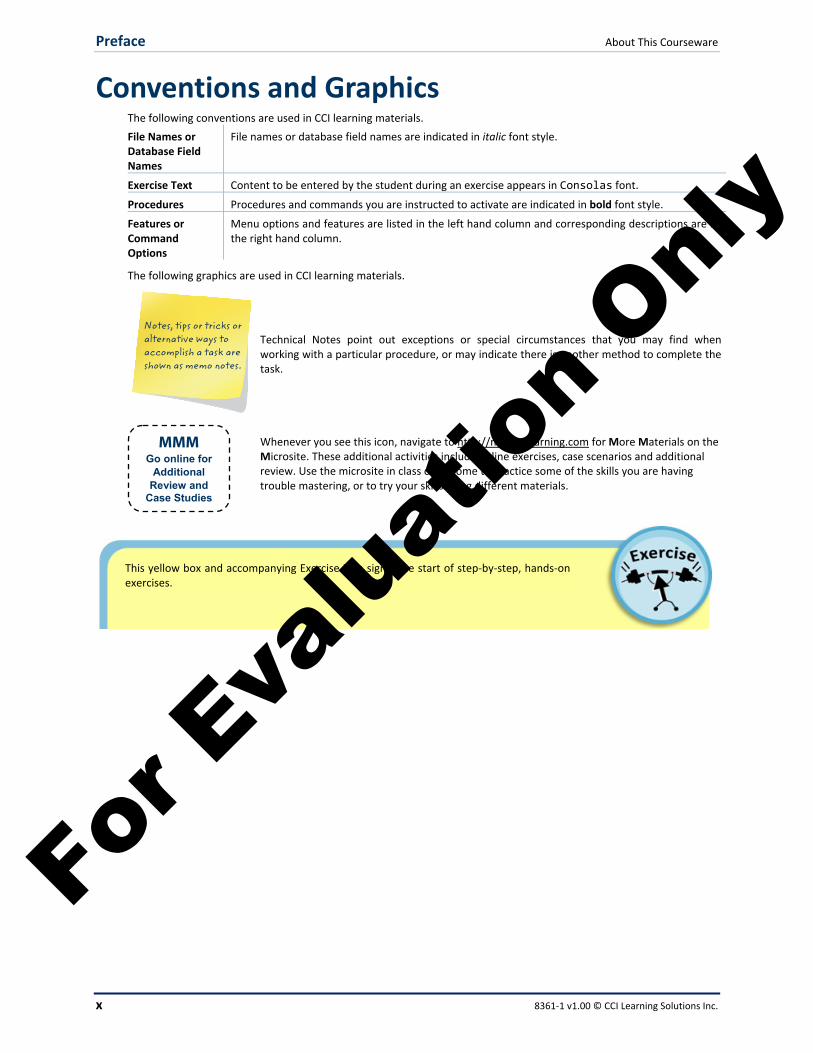
Conventions and Graphics The following conventions are used in CCI learning materials.
File Names or Database Field Names
File names or database field names are indicated in italic font style.
Exercise Text Content to be entered by the student during an exercise appears in Consolas font.
Procedures Procedures and commands you are instructed to activate are indicated in bold font style.
Features or Command Options
Menu options and features are listed in the left hand column and corresponding descriptions are in the right hand column.
The following graphics are used in CCI learning materials.
Technical Notes point out exceptions or special circumstances that you may find when working with a particular procedure, or may indicate there is another method to complete the task.
Whenever you see this icon, navigate to http://mta.ccilearning.com for More Materials on the Microsite. These additional activities include online exercises, case scenarios and additional review. Use the microsite in class or at home to practice some of the skills you are having trouble mastering, or to try your skills using different materials.
MMM Go online for
Additional Review and
Case Studies
Notes, tips or tricks or alternative ways to accomplish a task are shown as memo notes.
This yellow box and accompanying Exercise icon signal the start of step‐by‐step, hands‐on exercises.
For E
valu
atio
n Onl
y

8361‐1 v1.00 © CCI Learning Solutions Inc. 83
Understanding Web Applications
Lesson Objectives By the end of this lesson, you will be able to:
Define and describe basic elements of a Web page.
Write simple HTML code to develop a Web page.
Use Cascading Style Sheets (CSS) to format code.
Understand Web Page Development Hypertext Markup Language (HTML)
HTML stands for Hypertext Markup Language. Most Web pages on the Internet are written in HTML. Other technologies such as bots and Flash may be used, but the underlying Web page is usually written in some form of HTML. Because HTML is based on ASCII text, it can be viewed and edited in an ASCII text editor such as Microsoft Notepad. More powerful and user‐friendly tools such as Microsoft Visual Web Developer are often used to create Web applications. A Web application is an extension of a single Web page into many interconnected pages with the functionality of a computer‐based application such as Visual Basic.
Creating well‐constructed HTML code involves full and correct use of various components, including elements, attributes, character and entity references, data types, and document type declaration.
1. Open Notepad and type the following code:
<html> <body> <p>Hello World!</p> </body> </html>
2. Navigate to where the student data files are located for this course. Then click File and change Save as type to All Files.
For E
valu
atio
n Onl
y

84 8361‐1 v1.00 © CCI Learning Solutions Inc.
3. Change the file name to: MyFirstWebpage.htm.
If you save it with the .htm extension, it will open perfectly in your browser. However, when you start creating larger, more complex Web pages, it can lead to poorly constructed code, which loads and runs slowly.
4. Close Notepad.
5. From Windows Explorer, navigate to where you saved MyFirstWebpage.htm.
6. Double‐click to open the file.
Your Web browser (usually Internet Explorer) should open with the following display:
You have now created a well‐constructed Web page.
Note: Because modern browsers are very forgiving with code, all you are required do is to type the following: Hello World!
For E
valu
atio
n Onl
y

8361‐1 v1.00 © CCI Learning Solutions Inc. 85
Elements
An HTML document is made up entirely of elements, which can also be called tag‐pairs (or simply tags).
HTML Syntax: An HTML element in simplest form (sometimes called a raw‐text element):
<tag>content</tag>
HTML Example: Using a single tag‐pair to modify text
<b>Hello</b>
This code would produce:
Hello
The parts in the above example are:
<b> ‐ the start‐tag to begin displaying upcoming text in bold
Hello – the contents, which in this example is the text to be bold </b> ‐ the end‐tag to stop the bolding process.
You can embed tags within other tags.
HTML Example: Using multiple tags to modify text
<b>Hello<i> World</i></b>
This code would create:
Hello World
In spoken English, the above example code would read, “Start bolding; print ‘Hello’; start italicizing; print ‘World’ end italicizing; end bolding.”
Another way some tags can be displayed is with the start and end tags included into a single tag. These tags are used for actions that do not include text.
HTML Syntax: An HTML element in a single tag sometimes called a void element:
<tag />
HTML Example: Using a single tag to modify text
<b>Hello</b> <br /> World
This code would produce:
Hello
World
In the above example the <br /> tag performs a line break.
In the interest of readability, this could be coded as follows:
<b>Hello</b> <br /> World
Therefore, the following code:
Hello World
Produces the following:
Hello World
Another item that can make up an element is a set of attributes. An attribute is a modifier or specifier of the element and is located in the start tag.
HTML Syntax: An HTML element using attributes (sometimes called a normal element):
<tag attribute1="value1" attribute2="value2">content</tag>
An attribute has three parts:
1. The attribute name.
2. An equal sign (=).
3. The attribute value, which is surrounded by double quotation marks (“”).
1) A tag is surrounded by angle brackets <>
2) The end tag includes a forward slash / which can be read as the word “end”.
HTML compilers do not read line breaks in code as line breaks on the screen.
For E
valu
atio
n Onl
y

86 8361‐1 v1.00 © CCI Learning Solutions Inc.
HTML Example: Using attributes:
<div style="background-color: green" > Hello World </div>
This code would produce the following:
Hello World
In the above example, the tag <div> is used to create a division of code with the same format; in this case, everything in this division has the attribute of a background color of green.
Two attributes set in one void element looks like the following:
<input type="checkbox" checked="checked"/> Happy
Which produces the following:
Happy
In spoken English the example code states, “create an input object of type ‘checkbox’, and make it pre‐checked,” then print “happy.”
Creating a Web Page At the top of a Web page, which is more accurately called a document, there is often a document type declaration (or simply DOCTYPE). This DOCTYPE usually identifies the Document Type Definition (DTD), which explains permitted and non‐permitted content in the document. The DTD is written in computer language and is not read by the browser.
Example: document type declaration of a DTD:
<!DOCTYPE html PUBLIC "-//W3C//DTD XHTML 1.0 Transitional//EN" "http://www.w3.org/TR/xhtml1/DTD/xhtml1-transitional.dtd">
Document elements can be grouped by their functions. Some of these functional groups include: document structure elements, document head elements and document body elements.
Document Structure Elements
Three structural elements identify the different sections (also called containers) of the document.
<html>…</html>
This element is the root element of the document. The start tag <html> is the first line of code, and the end tag </html>is the last line of code in the entire document.
Attributes are available to this element to describe what version of HTML was used to code the document.
Example: HTML tag
<html xmlns="http://www.w3.org/1999/xhtml"> Entire document goes here </html>
<head>...</head>
This element contains the header information for the document. The header does not add any text to the document; instead, it describes common elements of the document including: <base>, <link>, <meta>, <object>, <script>, <style> and <title>.
<body>...</body>
This element contains the information displayed on the page. The subtypes of elements inside the body include: block elements, inline elements, images and objects, forms, and tables.
For E
valu
atio
n Onl
y
8361‐1 v1.00 © CCI Learning Solutions Inc. 87
Document Head Elements
<base> Specifies the base URL for links in the document. A base URL allows for relative URL references in the code (/photos/dog.jpg) instead of having to specify a full absolute URL each time (http://www.mywebsites.Europe.com/websites/animal/domestic/photos/dog.jpg).
<link> Specifies names and locations of external style sheets. Also specifies locations for previous and next links.
<meta> Specifies information about the document. Short for metadata, this element specifies “data about data.” It includes information about the author, publication date, page title and other information as needed.
<object> Specifies generic objects contained in the header.
<script> Specifies locations of scripts, which are external programs that are given control over the current document. An example is JavaScript.
<style> Specifies the style for the document, especially with respect to internal styles, or external style sheets.
<title> Specifies the title of the document. It is required and is used for the name on the title bar in the browser.
Document Body Elements
The majority of elements found in a document are usually body elements. Because of the quantity and functionality of these elements, they can be assembled into the following groups.
Block elements
Block elements can be subdivided into the following groupings:
Basic text
<p>…</p> Specifies a paragraph.
<h1>…</h1> Specifies a heading and is used in conjunction with styles which specify how the content is formatted. The maximum heading level is <h6>…</h6>
Lists
Definition List
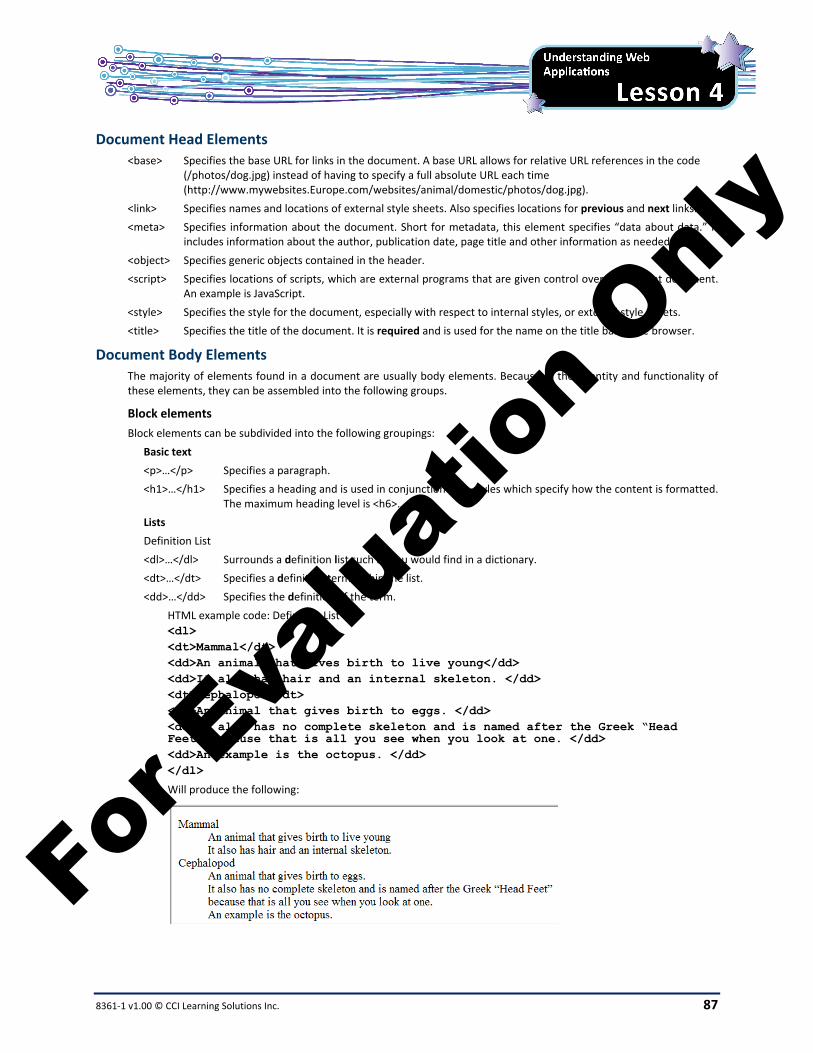
<dl>…</dl> Surrounds a definition list such as you would find in a dictionary.
<dt>…</dt> Specifies a definition term within the list.
<dd>…</dd> Specifies the definition of the term.
HTML example code: Definition List
<dl> <dt>Mammal</dt> <dd>An animal that gives birth to live young</dd> <dd>It also has hair and an internal skeleton. </dd> <dt>Cephalopod</dt> <dd>An animal that gives birth to eggs. </dd> <dd>It also has no complete skeleton and is named after the Greek “Head
Feet” because that is all you see when you look at one. </dd> <dd>An example is the octopus. </dd> </dl>
Will produce the following:
For E
valu
atio
n Onl
y

88 8361‐1 v1.00 © CCI Learning Solutions Inc.
Ordered List (enumerated list):
<ol>…</ol> Specifies a numbered or “lettered” list.
The style is usually controlled by style sheets.
<li>…</li> Specifies an item in the list.
HTML example code: Ordered List
<ol> <li>dog</li> <li>cat</li> <li>mouse</li> </ol>
Will produce the following:
Unordered List (non‐enumerated list):
<ul>…</ul> Specifies a bulleted list.
The style is usually controlled by style sheets.
<li>…</li> Specifies an item in the list (same as Ordered List)
HTML example code: Unordered List
<ul> <li>dog</li> <li>cat</li> <li>mouse</li> </ul>
Will produce the following:
Other block elements include:
Block Quote
<blockquote>…</blockquote > Specifies a block of text that is indented from both left and right. It is used when including a long quote in the document.
Division <div>…</div> Specifies a logical division in text.
Script <script>…</ script > Specifies the use of an external script language. This is the same tag as found in the header.
Inline elements
Inline elements cannot be placed directly inside the body element; they must be wholly nested within block‐level elements.
Anchor
<a>…</a> Specifies the position for an anchor point, which is usually used for creating hyperlinks.
HTML example code: Anchor
<a href="http://www.ccilearning.com" title="CCI Learning web"> CCI Learning site</a>
For E
valu
atio
n Onl
y

8361‐1 v1.00 © CCI Learning Solutions Inc. 89
Phrase elements
These elements specify how various text types appear in the document. They are usually controlled by style sheets.
<abbr>…</abbr> Marks an abbreviation
HTML example code: Abbreviation
<abbr title="abbrev">abbreviation</abbr>
<acronym>…</acronym> ‐ Marks an acronym
HTML example code: Acronym
<acronym title="Hyper-Text Markup Language">HTML</acronym>
<dfn>…</dfn> Inline definition of a single term
<em>…</em> Emphasis
<strong>…</strong> strong emphasis
<code>…</code> code
<samp>…</samp> sample output
<kbd>…</kbd> keyboard key strokes
<var>…</var> variable
Presentation
Presentation refers to customizing individual pieces of text, which is better controlled by style sheets.
<b>…</b> bold formatting
<i>…</i> italic formatting
<big>…<big> increase the relative size of text
<small>…</small> decrease the relative size of text
<tt>…</tt> teletype formatting
Other Inline elements
<bdo>…</bdo> backward‐direction orientation; used for reading text from right to left
<br> line break
<cite>…</cite> citation formatting
<del>…</del> deleted text formatting
<ins>…</ins> inserted text formatting
<q>…</q> quotation formatting in line
<sub>…</sub> subscript formatting
<sup>…</sup> superscript formatting
Images and objects
<img> Specifies an image. The source of the image is defined in the attribute in the tag.
<map>…</map> Specifies a client‐side map.
<object>…</object> Specifies an object. The type and source of the object are defined in the attributes in the tag.
Forms
A form is an element that contains a group of other elements. This element can display a user entry form and its controls.
Elements in a form include:
<form action=”URL goes here>…</form> ‐ Specifies the start and end of the form.
<button>…</button > Specifies a button.
<fieldset>…</fieldset > Specifies a subgroup of elements on the form surrounding the elements with a box.
For E
valu
atio
n Onl
y
90 8361‐1 v1.00 © CCI Learning Solutions Inc.
<input> Specifies a standard form control. The type of control is specified by the attribute including:
Type=“checkbox” ‐ a checkbox.
Type=“radio” ‐ a radio button.
Type=“button” ‐ a standard button.
Type=“submit” ‐ a submit button.
Type=“image” ‐ an image.
Type=“reset” ‐ a reset button.
Type=“text” ‐ a text box.
Type=“password” ‐ a text box that displays masked text.
Type=“hidden” ‐ a hidden input available for coding purposes, but unseen by the user.
<Label for= “idOfObject”>…<label> Specifies text of the input element specified by the “for” attribute. This element allows you to click the text and activate the input element.
<legend>…</legend> The title shown of a fieldset.
<optgroup>…</optgroup> Specifies a group of options in a select dropdown list.
<option value=“x”> Specifies an option in an option group.
<Select name=“x”>…</select> Specifies a single selection list.
<textarea cols= “25” rows= “10”>…<textarea> Specifies a multiple selection list whose columns are 25 characters wide and 10 rows.
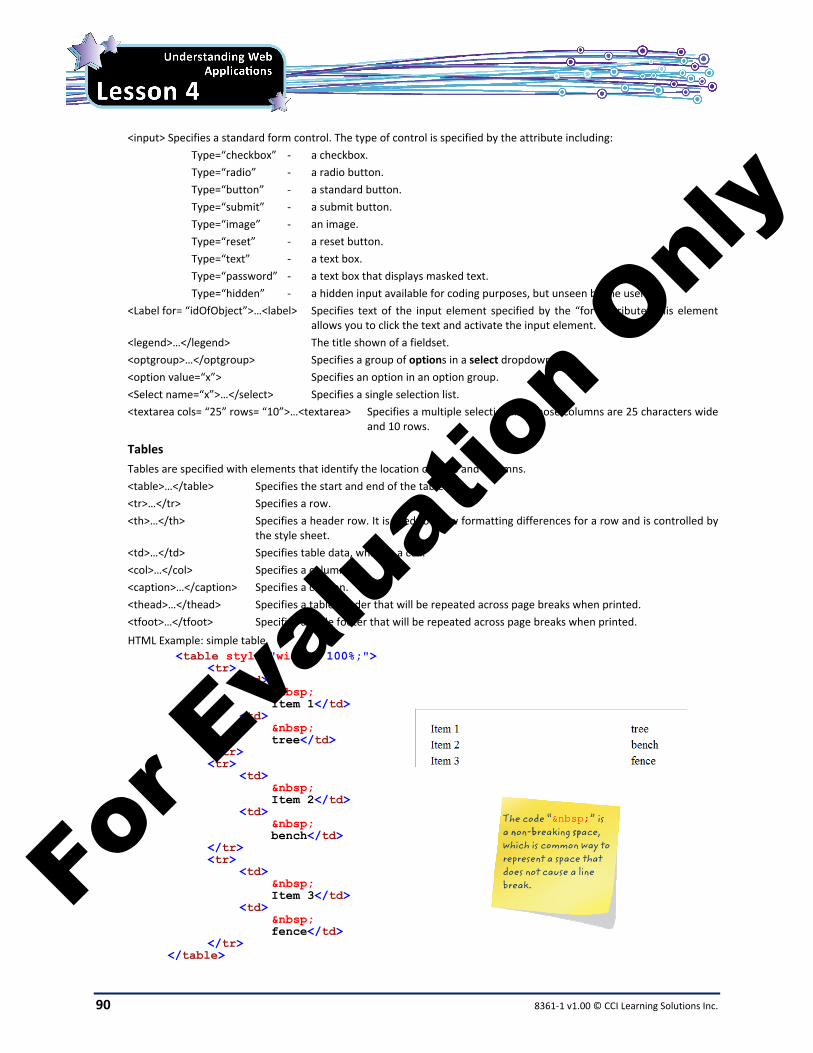
Tables
Tables are specified with elements that identify the location of rows and columns.
<table>…</table> Specifies the start and end of the table.
<tr>…</tr> Specifies a row.
<th>…</th> Specifies a header row. It is used to allow formatting differences for a row and is controlled by the style sheet.
<td>…</td> Specifies table data, which is a cell.
<col>…</col> Specifies a column.
<caption>…</caption> Specifies a caption.
<thead>…</thead> Specifies a table header that will be repeated across page breaks when printed.
<tfoot>…</tfoot> Specifies a table footer that will be repeated across page breaks when printed.
HTML Example: simple table
<table style="width: 100%;"> <tr> <td> Item 1</td> <td> tree</td> </tr> <tr> <td> Item 2</td> <td> bench</td> </tr> <tr> <td> Item 3</td> <td> fence</td> </tr> </table>
The code “ ” is a non-breaking space, which is common way to represent a space that does not cause a line break. Fo
r Eva
luat
ion
Only

8361‐1 v1.00 © CCI Learning Solutions Inc. 91
Styles The three ways to control the formatting inside an HTML document are: inline formatting, local styles and external Cascading Style Sheets.
Inline Formatting Inline formatting elements are located directly around the content to be formatted, as in <b> Hello </b>. This way of formatting forces the HTML designer to specify every format of every piece of content, which can be time consuming. For each new document created, the formatting must be recreated. Also, if changes are to be made to the formatting, the designer/coder must go through the entire document manually and make the changes. For these reasons, inline formatting is discouraged.
Local Styles Styles can be defined in the document header. This method has the advantage over inline formatting because the styles for the document are entered only once and the entire document’s formatting can be adjusted by editing the style name in the header
HTML example: Local Styles
<head> <title> Local Styles</title> <style type="text/css"> h1 { color: white; background-color: red ; } h2 { color: yellow; background-color: blue ; } </style> </head> <body> <h1>Hello</h1> <br /> <h2>World</h2> </body>
The above code would produce the following formatted text:
Cascading Style Sheets A Cascading Style Sheet (CSS) is a separate file that stores the formatting of elements in documents. Unlike local styles, in a CSS, styles are defined (or redefined) once for many documents. Only a reference to the desired CSS is needed in the document itself.
Throughout the examination of HTML documents in the previous section, there were many references to style sheets. A style sheet describes the formatting styles used in a document. A hierarchy exists as to which style will be used. Most Web pages on the Internet currently use CSS to control the styles of the Web pages. For E
valu
atio
n Onl
y

92 8361‐1 v1.00 © CCI Learning Solutions Inc.
The content will be formatted based on the following hierarchy:
1. Inline style (inside an HTML element): if none is found, go to the next level.
2. Local styles (in the head section): if none is found, go to the next level.
3. External style sheet: if none is found, go to the next level.
4. Browser default.
How styles are applied:
Because the application of styles follows this cascading hierarchy, the style sheet is given its common name of Cascading Style Sheet (CSS). CSSs are written in the style sheet language, which is ASCII text. Therefore, they can be read in an ASCII text reader such as Microsoft Notepad; they have the file extension .css.
CSS Syntax:
Selector.SubDivision {Property1: valueA, valueB; property2: valueC}
Separating code into different lines does not affect CSSs functionality; however it does make them more readable.
Example: A partial CSS body
{
font‐family: Segoe UI, Tahoma, Verdana, Arial, Sans serif;
font‐size: 9pt;
color: #444444;
}
table.main
{
border‐style: none;
table‐layout: auto;
padding: 0px 0px 0px 0px;
width: 400px;
}
a
{
font‐size: 9pt;
text‐decoration: none;
vertical‐align: middle;
text‐align: right;
}
a:visited
{
Inline Style
External Style (CSS)
Local Style
Browser Default
For E
valu
atio
n Onl
y

8361‐1 v1.00 © CCI Learning Solutions Inc. 93
text‐decoration: none;
}
a:hover,a:active
{
text‐decoration: underline;
}
tr.header
{
background‐image:url(authapp_header.jpg);
}
td.nonepadding
{
padding:0px 0px 0px 0px;
}
input.checkbox
{
width: 15px;
vertical‐align: middle;
}
label.checkbox
{
font‐size:9pt;
vertical‐align: middle;
}
table.tile
{
padding: 0px 0px 0px 3px;
width: 100%;
vertical‐align: top;
height: 70px;
}
input.uppercase
{
font‐size:9pt;
font‐family: Sans‐Serif;
text‐transform: uppercase;
width: 180px;
height: auto;
border‐style:solid;
border‐width:1;
border‐color:#666666;
}
For E
valu
atio
n Onl
y
94 8361‐1 v1.00 © CCI Learning Solutions Inc.
input.password
{
font‐size:9pt;
font‐family: Tahoma;
width: 180px;
height: auto;
border‐style:solid;
border‐width:1;
border‐color:#666666;
}
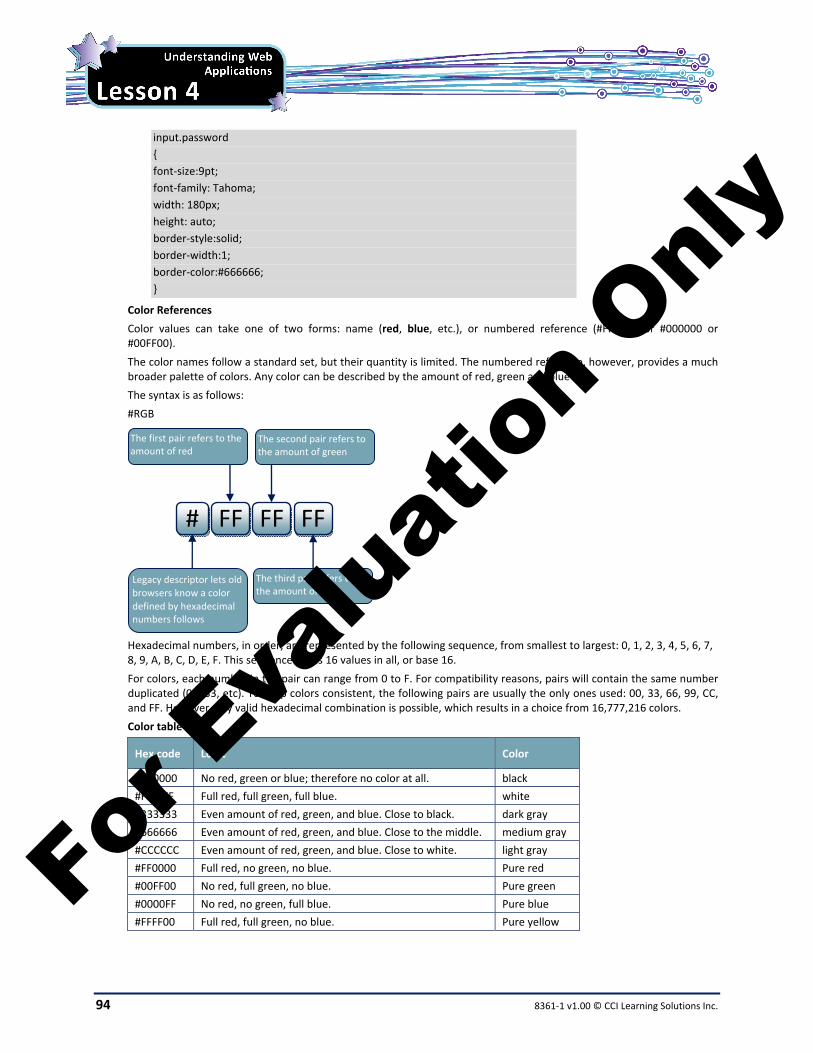
Color References
Color values can take one of two forms: name (red, blue, etc.), or numbered reference (#FFFFFF, or #000000 or #00FF00).
The color names follow a standard set, but their quantity is limited. The numbered reference, however, provides a much broader palette of colors. Any color can be described by the amount of red, green and blue in it.
The syntax is as follows:
#RGB
Hexadecimal numbers, in order, are represented by the following sequence, from smallest to largest: 0, 1, 2, 3, 4, 5, 6, 7, 8, 9, A, B, C, D, E, F. This sequence totals 16 values in all, or base 16.
For colors, each number in the pair can range from 0 to F. For compatibility reasons, pairs will contain the same number duplicated (00, 33, etc). To keep colors consistent, the following pairs are usually the only ones used: 00, 33, 66, 99, CC, and FF. However, any valid hexadecimal combination is possible, which results in a choice from 16,777,216 colors.
Color table
Hex code Logic Color
#000000 No red, green or blue; therefore no color at all. black
#FFFFFF Full red, full green, full blue. white
#333333 Even amount of red, green, and blue. Close to black. dark gray
#666666 Even amount of red, green, and blue. Close to the middle. medium gray
#CCCCCC Even amount of red, green, and blue. Close to white. light gray
#FF0000 Full red, no green, no blue. Pure red
#00FF00 No red, full green, no blue. Pure green
#0000FF No red, no green, full blue. Pure blue
#FFFF00 Full red, full green, no blue. Pure yellow
# FF FF FF
Legacy descriptor lets old
browsers know a color
defined by hexadecimal numbers follows
The first pair refers to the amount of red
The second pair refers to the amount of green
The third pair refers to the amount of blue
For E
valu
atio
n Onl
y
8361‐1 v1.00 © CCI Learning Solutions Inc. 95
Using Cascading Style Sheets
A document must contain a reference to a CSS in order to use the styles contained in that CSS. This reference is located in the header:
HTML example: external CSS reference
<head> <title></title> <link rel="stylesheet" type="text/css" href="mystyle.css" /> </head>
The above code will access the styles in the CSS file mystyle.css and allow them to be used in the current document.
JavaScript A script language is one that controls an HTML document. JavaScript, also known as ECMAScript or JScript, is a true object‐oriented programming (OOP) language. The most recent version of JavaScript runs on the server via the .NET framework.
Like Visual Basic, Jscript 8.0 uses classes, data types, data structures and other OOP objects.
The Hello World program in JScript is a good starting place to examine the language
Example: JScript version of “Hello World”.
// the "Hello World!" program in JScript print("Hello World!");
The preceding code shows several features of JScript:
It has very low overhead; that is, very little information is required in a header or footer.
The code is very readable.
Each line of code finishes with a semi‐colon (;), although this is not mandatory.
Remarks (comments) start with a double forward slash (//). Like VB 2008, remarks can take up an entire line, or can finish a line.
print("Hello World!"); // the "Hello World!" program in JScript
Additional Programming Features of JScript Multiline Comments begin with /* and finish with */.
Example: multiline comments in JScript
/* At times, you might want to add a chunk of comments that take up more than one line. You can do this with the multiline comments marks */
Code in a JScript file is CASE SENSITIVE.
Code is written in ASCII text, so Microsoft Notepad can be used to create or edit a JScript file. When saving the file, use the extension .js.
To easily create JScript, you can use the Visual Studio JScript editor.
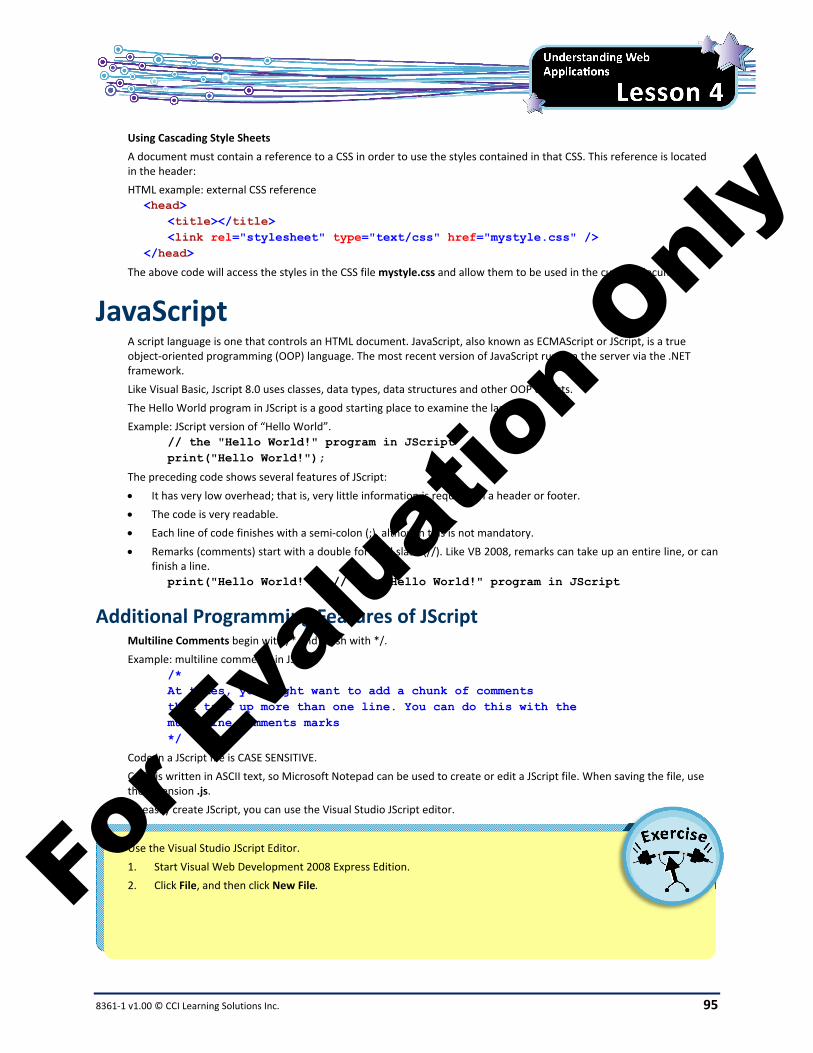
Use the Visual Studio JScript Editor.
1. Start Visual Web Development 2008 Express Edition.
2. Click File, and then click New File. For E
valu
atio
n Onl
y

96 8361‐1 v1.00 © CCI Learning Solutions Inc.
3. From Categories, click Script.
4. From Templates, click JScript File. Then click Open.
5. Select all the code created, remember the / code represents comments.
6. Type the following code:
print("Hello World!");
7. From File, select Save JScript.js As…. Navigate to the location where your data files are located (for example C:\Data\) and then type: HelloW.js.
8. Click the Save button.
Your screen should look like this:
Once created, if the JScript code is to be run from the Command Prompt, it must be compiled into an .exe file. JScript can also be compiled into a .dll file for use as a dynamic link library.
Compiling a JScript file from the Command Line The compiler for JScript (jsc.exe) is part of the .NET framework. When a .js file is compiled, a new file is created with the same name, but with an .exe extension.
The compiler (jsc.exe) must be listed in the path for the computer. You will now add it.
1. From Windows Explorer, search for jsc.exe. Record this path; you will need it in a later step.
Example search and find in Windows 7 (or Windows Vista):
i. Open the Computer.
ii. In the Search box, type: jsc.exe.
iii. Sort by Date Modified.
iv. Record the path to the most recent version of jsc.exe.
In the above example, the path is “C:\Windows\Microsoft.NET\Framework\v4.0.30319”.
2. On the desktop, right‐click Computer, then click Properties.
For E
valu
atio
n Onl
y

8361‐1 v1.00 © CCI Learning Solutions Inc. 97
3. Click Advanced system settings in the resulting Control Panel window.
4. Now click Environment Variables.
5. Under System variables, select Path from the list and click Edit.
6. In the Edit System Variable dialog box, move to the end of the current string in the Variable Value box and type a semicolon (;) followed by the full directory name that you recorded in Step 1. Click OK to leave all dialog boxes.
7. Test the path by opening a command prompt.
8. Type: jsc /help, then press ENTER.
9. If you do not see this text, carefully repeat the previous steps.
10. Navigate to the location where you saved HelloW.js.
a. To get the root of the C drive, type: cd \ and press ENTER. This code is short for “change the directory to the root of the current drive.”
b. Type: cd [path name where your file is located], then press ENTER.
11. In the command prompt, type: jsc HelloW.js and press ENTER.
The HelloW.js file is now compiled into the HelloW.exe file located in the same folder.
12. From the command prompt, type: HelloW.exe (or hellow.exe because it is not case sensitive) and press ENTER. Fo
r Eva
luat
ion
Only

98 8361‐1 v1.00 © CCI Learning Solutions Inc.
13. Close the Command Prompt window
14. To test the executable file from outside the Command Prompt: switch to the Computer window and navigate to the location of your HelloW.js file. Then double‐click the HelloW.exe file.
15. Running this executable file briefly opens a Command Prompt displaying the text “Hello World!” (It is so quick on some computers that you might not be able to read it).
Understanding Microsoft ASP.NET Web Application Development ASP.NET Overview
ASP.NET is a system of programs working together to produce Web solutions. One of the cornerstones of ASP.NET is that it limits the amount of hand coding required to create complex Web solutions. The basis of ASP.NET is the .NET Framework, which is supported by the Microsoft programming languages Visual Basic, Visual C# and JScript.
ASP.NET includes:
A page and controls framework.
The ASP.NET compiler.
Security infrastructure.
State‐management facilities.
Application configuration.
Health monitoring and performance features.
Debugging support.
An XML Web services framework.
Extensible hosting environment and application life cycle management.
An extensible designer environment.
Page and Controls Framework
The ASP.NET page and controls framework runs on a Web server to produce and render ASP.NET Web pages. When a browser requests a markup from this framework, the framework customizes the markup based on the requesting browser. The ASP.NET solution can also be customized to display different content to different browsers, including mobile devices.
Because ASP.NET Web pages are completely object oriented, they can handle all HTML objects, including properties, methods and events.
ASP.NET framework presents a unified model for the client‐server environment, which includes client calls using standard and customizable controls on forms. Those controls, objects like option buttons, text boxes and combo boxes, can be reused to boost the efficiency of Web page creation and maintenance.
Skins and themes used by the framework allow developers to offer the end user a consistent look and feel, thereby improving product and company branding. Similar to PowerPoint, master pages can be used to set a basis for all Web pages in the site; only the items unique to a particular page need be entered. Efficiency is achieved because only the master and unique page items are stored; they are merged when the browser requests the page.
ASP.NET Compiler
The ASP.NET framework comes with the compiler because the code must be compiled. This architecture produces accurate, efficient code.
For E
valu
atio
n Onl
y
8361‐1 v1.00 © CCI Learning Solutions Inc. 99
Security Infrastructure
ASP.Net uses a security infrastructure that can authenticate users either through IIS certificates or directly. If a direct method is desired, user credentials can be stored in a user‐created database, which can include NTFS Access Control Lists (ACLs).
Users can be put into groups, which are then given permissions. This method is efficient because users can be added and removed from groups easily. In ASP.NET these groups are called roles.
State Management Facilities
User information can be stored even when the user navigates away from the Web page (see State Management). This persistence of information is useful when such actions as adding items to a shopping cart, or pressing the back button to correct information on the previous page of a multi‐page employment application are performed.
Information can be stored on the client side or server side, and can include the follow types of data:
Application‐specific
Session‐specific
Page‐specific
User‐specific
Developer customized
Data not linked to a control
ASP.NET Configuration
ASP.Net can define configuration settings for a Web farm, individual Web server, Web site or individual application. These configurations can be created or modified before, during or after deployment
The configuration settings are stored in and ASCII text file, specifically an XML file, which can be edited with an ASCII text editor such as Microsoft Notepad.
Health Monitoring and Performance Features
ASP.NET includes features to help monitor the health and performance of your ASP.NET application.
Health‐centered diagnostics and monitoring characteristics can be logged and configured to report key events and errors.
Two performance counters are accessible to the application:
The ASP.NET system performance counter group.
The ASP.NET application performance counter group.
Debugging Support
The included runtime debugging features function across languages and across computers. ASP.NET allows the debugging of both managed and unmanaged objects. In trace mode, instrumentation messages can be inserted into your ASP.NET Web pages.
XML Web Services Framework
ASP.NET supports XML Web services. An XML Web service can use HTTP and XML messaging to transport information and calls to remote applications.
XML Web services are independent of programming language, so programs written in any language, using any component model, and running on any operating system can use XML Web services.
Extensible Hosting Environment and Application Life‐Cycle Management
Applications, like pages and events, have life cycles. ASP.NET includes an Extensible Hosting Environment for Application Life‐Cycle Management. ASP.Net has control over the entire application life cycle, from the user’s first access to a resource (page) until the application is shut down
While it does rely on a Web server as the host, ASP.NET does most hosting functionality itself. Fo
r Eva
luat
ion
Only

100 8361‐1 v1.00 © CCI Learning Solutions Inc.
Extensible Designer Environment
ASP.NET includes a high level of support for Web server controls. These controls can be created and modified with the designer inside ASP.NET, or through designer environments such as Visual Studio.
ASP.NET Page Life Cycle When a Web page is requested by a browser, it goes through a life cycle. Although different information sources tend to use of a variety of steps and terms to describe the life cycle of an ASP.Net page, the following description uses a widely accepted structure. Because code can be written for each step, it is important to understand these steps.
From birth to death, the life cycle can be described in the following way:
Pre‐Stage Page Request. Although strictly outside the page life cycle, this step occurs when ASP.NET receives a page request from a browser. It must determine if the browser can use a cached version of the page (which means no page life cycle is needed or initiated) or if the page needs to be compiled (which would initiate the page life cycle).
Stage 1 Start. After ASP.NET has determined that the page needs to be compiled, the request and response page properties are set. Also, the page determines whether it is a repost (using the Back button) or if it is a brand‐new rendering, and consequently sets the IsPostBack property. This stage represents the “birth” of the page.
Stage 2 Initialization. During page initialization, controls on the page are given unique runtime IDs (through the UniqueID property) and any theme is applied from the master.
Stage 3 Load. At this time, if the IsPostBack property is set to true, the stored data and settings for the controls on the page are (re)loaded. This step allows the user to use the Back button (during filling a form spread over a series of pages) and have previously filled‐in data return to the page.
Stage 4 Validation. At this time, the validate method is called for all validator controls which check the validity of user input.
Stage 5 Event Handling. A true value of the IsPostBack property triggers an event which can be handled by developer code.
Stage 6 Rendering. The settings for all controls are saved as a view state. The render method for each control is called. The page is now ready for any permitted user control.
Post Stage Unload. Either by action (the user closes the browser) or by code (an unload event), the unload stage represents the end of the page life cycle. The page and all its settings are removed from memory. This stage represents the “death” of the page.
Event Model Events in ASP.NET function in much the same way as events in an object‐oriented programming language such as Visual Basic. In each case, an event is a change in state (such as the On_Load event) or a user input (such as the Mouse_Click event). Once an event is raised (occurs), the program can run code, which is known as event handling. It is an action‐reaction interaction, in which the event is the action, and the event handler’s running of code is the reaction. The discussion below will focus on the similarities and differences of these two event models.
Events, as well as pages, have life cycles. Many of the page life-cycle stages can raise events. For each of these events, a programmer can write event handlers and thereby run code.
For E
valu
atio
n Onl
y

8361‐1 v1.00 © CCI Learning Solutions Inc. 101
You will use some ASP.NET event handlers in this exercise.
1. Open Microsoft Visual Web Developer 2008 Express Edition.
2. From the File menu, select New Project.
3. Inside the Project types section, select Web inside Visual Basic.
4. From the Templates section, select ASP.NET Web Application.
5. Navigate to where your data files are located. Then in the Name text box, type: ASP.NET Event Model.
6. Click OK.
For E
valu
atio
n Onl
y
102 8361‐1 v1.00 © CCI Learning Solutions Inc.
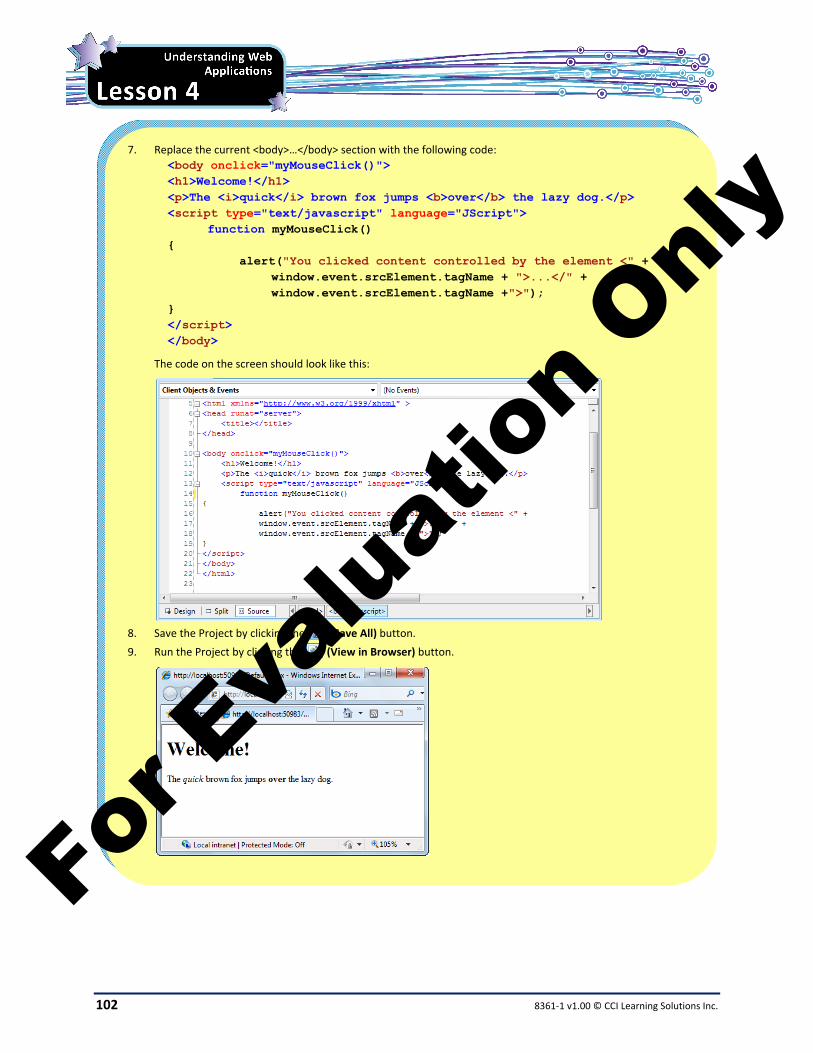
7. Replace the current <body>…</body> section with the following code:
<body onclick="myMouseClick()"> <h1>Welcome!</h1> <p>The <i>quick</i> brown fox jumps <b>over</b> the lazy dog.</p> <script type="text/javascript" language="JScript"> function myMouseClick() { alert("You clicked content controlled by the element <" + window.event.srcElement.tagName + ">...</" + window.event.srcElement.tagName +">"); } </script> </body>
The code on the screen should look like this:
8. Save the Project by clicking the (Save All) button.
9. Run the Project by clicking the (View in Browser) button.
For E
valu
atio
n Onl
y
8361‐1 v1.00 © CCI Learning Solutions Inc. 103
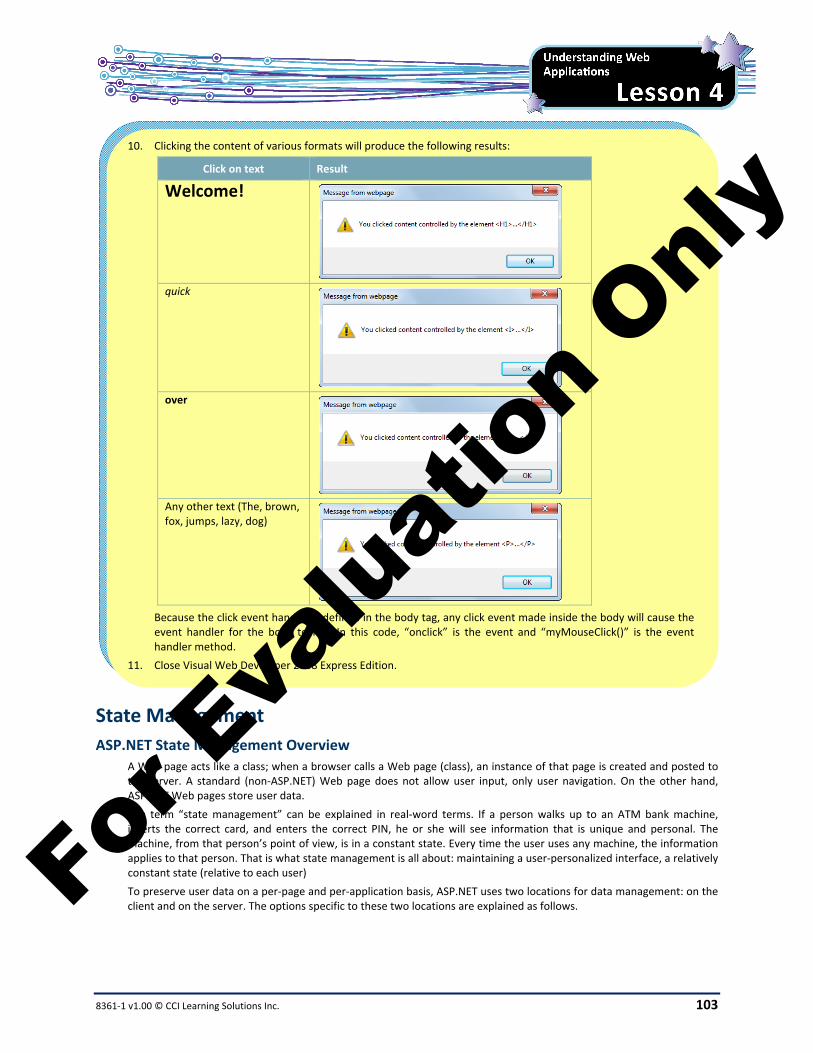
10. Clicking the content of various formats will produce the following results:
Click on text Result
Welcome!
quick
over
Any other text (The, brown, fox, jumps, lazy, dog)
Because the click event handler is defined in the body tag, any click event made inside the body will cause the event handler for the body to fire. In this code, “onclick” is the event and “myMouseClick()” is the event handler method.
11. Close Visual Web Developer 2008 Express Edition.
State Management
ASP.NET State Management Overview
A Web page acts like a class; when a browser calls a Web page (class), an instance of that page is created and posted to the server. A standard (non‐ASP.NET) Web page does not allow user input, only user navigation. On the other hand, ASP.NET Web pages store user data.
The term “state management” can be explained in real‐word terms. If a person walks up to an ATM bank machine, inserts the correct card, and enters the correct PIN, he or she will see information that is unique and personal. The machine, from that person’s point of view, is in a constant state. Every time the user uses any machine, the information applies to that person. That is what state management is all about: maintaining a user‐personalized interface, a relatively constant state (relative to each user)
To preserve user data on a per‐page and per‐application basis, ASP.NET uses two locations for data management: on the client and on the server. The options specific to these two locations are explained as follows.
Fo
r Eva
luat
ion
Only

104 8361‐1 v1.00 © CCI Learning Solutions Inc.
Client‐Based State Management Options
View state property
This property maintains a hidden list of the value of each object on the page between multiple requests for the same page. The user information is stored in a stack‐like data structure called a hash table. It gets its name from the (apparent) saving of what the page looks like between requests (even though only certain values of controls are saved). Developers can turn it off at the page level.
Control state
Beyond the user data that is stored in the view state, the control state saves the state of complex or custom controls. One thing that can be saved in this manner is which tab is open on a multi‐tabbed object on the page. This is a custom state and must be programmed by the developer. This state cannot be turned off at the page level.
Hidden fields
Developers can store data directly on the Web page in fields that are hidden from the user. While they are easy to use (they are just regular objects), they do carry certain limitations, as follows:
They pose somewhat of a security risk.
They are of a string data type.
They might adversely affect page loading and posting.
They might be culled by a firewall due to the field’s large size.
Cookies
Most people who have used the Web have heard of cookies. These are small files stored on the user’s computer; they are used to store information the user has previously entered on the Web page. They store things such user preferences, user IDs and passwords. Cookies prevent users from having to re‐enter the information every time they navigate to that Web page or site. They can pose security risks because they can store data‐mining code and can be hacked into from sites other than the one that created it.
Query strings
A query string is string of data that is added to the URL when the user navigates between pages. It transfers information between pages. It is called a query string because it is often used in a search function to retain the user’s query on the results page(s).
Example: if you open Google, navigate to the images page, type in happy dogs, then click Search Images. Look at the URL in the address box (scroll right if needed). The URL will look something like:
http://images.google.ca/images?hl=en&source=hp&q=happy+dogs&gbv=2&aq=f&aqi=g2g‐m1&aql=&oq=
The query string is shown to the right of the page URL; as follows:
?hl=en&source=hp&q=happy+dogs&gbv=2&aq=f&aqi=g2g‐m1&aql=&oq=
Not only does the string store the search words, but also the preferences found in the cookie (if you change the interface language from English to French, the query string changes from:
http://images.google.ca/images?hl=en&source=hp&q=happy+dogs&gbv=2&aq=f&aqi=g2g‐m1&aql=&oq=
To:
http://images.google.ca/images?hl=fr&source=hp&q=happy+dogs&btnG=Recherche+d%27images&gbv=2&aq=f&aqi=&aql=&oq=
Server‐Side State Management Options
Application state
ASP.NET uses application state to store variables that can be used throughout the application. In this sense, they are global variables.
Session state
ASP.NET uses session state to store variables that can be used as long as the session is running. A session is a finite time when a single browser has a page or pages open. When a session times out, the information stored in the session state is lost.
For E
valu
atio
n Onl
y

8361‐1 v1.00 © CCI Learning Solutions Inc. 105
Profile Properties
Profile properties, like session state, are specific to a single user. However, unlike session state, profile properties are persistent. The disadvantage of using profile properties is one of performance; not only do you have to store the data for a longer time, but you have to have a location for storing and retrieving it. It is up to the developer to call cleanup methods to remove the data when it becomes stale.
Database Support
The support of databases takes profile properties one step further. When a Web page has a database back end, it can store as much information as hardware and bandwidth allow. The database can be a protected by IDs, passwords, fobs, saved IP address or many other means. The support of databases is the highest, most powerful level of state management.
Web Hosting In this context, Web hosting is the act of making a Web site available to browsers throughout the Internet. Several factors must be taken into account when discussing Web hosting, including Virtual Directories, Application Deployment and Internet Information Services.
Virtual Directories A virtual directory is a representation of a Web application. It points to a physical folder in your computer. It is effectively a shortcut, a pointer to something real. The default virtual directory name is localhost. Virtual directories are used for naming consistency; regardless of where the application files are actually stored on the developer’s computer, the virtual directory will always remain consistent.
A Web application is accessed using the virtual directory name instead of the physical folder name.
By creating and running Web applications in the previous sections, you have already created and accessed virtual directories. To repeat the process, perform the following steps:
1. Open Visual Web Developer 2008 Express Edition.
2. From File, select New Project. In Project types, select Web. From the Templates section, select ASP.NET Web Application.
3. Ensure the location to save this project is the same as your other student data files. Name the application: Virtual Directory Test. and press ENTER.
4. On line 12 (a blank line in the body section), type: Hello World!! similar to the following:
5. Click Save All, then click View in Browser.
6. Look at the URL in the address field in the browser (expand if necessary).
Notice the URL reads http://localhost:#####/Default.aspx. The virtual direct is localhost:##### which points to the real directory where you saved the file. In each case the home page is called Default.aspx.
For E
valu
atio
n Onl
y

106 8361‐1 v1.00 © CCI Learning Solutions Inc.
Virtual Web Sites Whenever a user accesses a website, the Domain Name System (DNS) will route the request to the server that is hosting that website. Normally, a single server can only host one website. Unless that website is very popular, most websites are not very busy, leaving most of the computing power for that server unused for the majority of the time.
A more efficient method is to create virtual websites so that a single server can host multiple websites at the same time. There will be occasions when one website gets very busy, but the likelihood of several websites being busy at the same time will be very low, thereby making this a very viable alternative.
To create a virtual website, one must also create a virtual host with its own IP address. But each physical server – or more precisely each NIC (network interface card) inside the server – can only have a single IP address. IP aliasing is a technique used to map (or redirect) multiple IP addresses to a single actual IP address. As a result, the DNS server will be fooled into thinking that it is sending requests to different websites, but in reality these requests may actually route to a single physical server that is hosting several of these sites.
Deploying Web Applications A Web site can be made up of a single Web page, several linked pages, a single Web application or multiple Web applications. In this topic, the Web site is made of a single ASP.NET Web application.
When a Web site is created, it must be uploaded to the Web server before it can go live and be seen by browsers. The process of uploading the files to the server is called Web application deployment. The two steps to deploying an application are: Packaging and Distribution.
Packaging
Packaging is useful if the application is to be transported (either electronically or physically) from the developer’s computer to another computer before it is installed on the Web server; however, it is not required.
The following packaging methods are supported by the .NET framework:
A single assembly or collection of assemblies. This method involves the creation of .dll or .exe files.
A cabinet file(s). This method involves creation of one or more .cab files.
A Windows Installer file. This method involves the creation of an .msi (Microsoft installer) or similar file(s).
Distribution
Not all ASP.NET web applications need to be packaged, but they all need to be uploaded to the Web server. The only exception to this method would be if, against best practices, the application were created on the server.
Two ways to distribute the Web application include:
Copy or upload. This method takes advantage of the fact that Web applications are self sufficient; that is, they do not require registry entries. XCOPY (command line), windows copy (local Web server), or ftp (distant Web server) can be used.
Windows Installer 2.0. By running an .msi file, you are given the option of installation location; navigating to the appropriate Web server location allows distribution there.
Internet Information Services As stated throughout this chapter, for an application to be seen by Web browsers and function like a true Web site, the application must be located on a Web server. Internet Information Services (commonly referred to as IIS) from Microsoft is a flexible, secure and easy‐to‐use Web server. IIS can run on a local computer (usually for testing purposes), or a server (as the final version of a hosted Web application). Formerly this acronym (IIS) stood for the more restrictive Internet Information Server.
For E
valu
atio
n Onl
y

8361‐1 v1.00 © CCI Learning Solutions Inc. 107
Different versions of IIS run on different platforms. The following table summarizes this pairing.
Operating System IIS Version
Windows Server 2008 R2 and Windows 7 IIS 7.5
Windows Server 2008 and Windows Vista IIS 7.0
Windows Server 2003 and Windows XP Pro x64 IIS 6.0
Windows XP Professional and Media Center IIS 5.1
Windows 2000 Server
Windows 2000 Professional
IIS 5.0
Advantages of IIS 7:
Able to host multiple Web applications in multiple languages (ASP.NET and PHP support).
Allows legacy applications to use the same modules and handlers used by ASP.NET.
Can manage a single Web server and a server farm.
Provides and controls remote access to sophisticated management tools.
Can dynamically scale Web server farm capacity to divert resources to the most active areas.
Provides rich diagnostic tools.
Provides secure infrastructure and content including firewalls and user authentication.
Web Services Web services are components located on a Web server that a client application can call by making HTTP requests across the Web. These services are often application programming interfaces (API) or web APIs. By using ASP.NET, a developer can create custom Web services or use built‐in application services. The terminology for describing a specific service is with the WS‐ prefix. Examples include WS‐Security, WS‐Routing, and WS‐Attachments.
A consumer is a client application that has made a call to a Web service. Following that terminology, utilizing the Web service is, awkwardly, referred to as consuming the Web service. Consumption in its Web services perspective means it is fed by the service.
Web Services can be structured using by one of two distinct architectures: "Web Services" and REpresentational State Transfer (REST).
Web Services Web Services use Extensible Markup Language (XML) messages that follow the Simple Object Access Protocol (SOAP) standard. In standard enterprise systems, there is often a machine‐readable description of the operations offered by the service written in the Web Services Description Language (WSDL). The latter is not a requirement of a SOAP endpoint, but it is a prerequisite for automated client‐side code generation in many Java and .NET SOAP. Some industry organizations, such as the WS‐I, mandate both SOAP and WSDL in their definition of a Web service.
Service Broker Application
Service Provider Application
Service Requester Application
UDDI
SOAP
WSDL WSDL For E
valu
atio
n Onl
y

108 8361‐1 v1.00 © CCI Learning Solutions Inc.
SOAP
SOAP provides a common communication protocol which is independent of the type of application calling it or the transport mechanism. SOAP uses a simple, extensible and rich XML messaging framework. Although SOAP was originally intended to control objects (the O does stand for Object), it has specialized into a communication protocol. The SOAP message is unaffected by the transport protocol, which can be TCP, HTTP or SMTP. SOAP does not transport the message to its destination; it is the message.
Although no security is currently attached to the SOAP message, Microsoft has released an add‐on to Visual Studio called Web Services Enhancements 1.0 SP1 for Microsoft .NET (WSE), which includes security, encryption, routing and other features not native to XML.
Messages can be combined into a form of communication. SOAP allows several message exchange patterns (MEPs), including: request/response, solicit/response (the reverse of request/response), notifications, and extended peer‐to‐peer conversations.
Web Service Definition Language
Web Service Definition Language (WSDL) plays an important role in the overall Web services architecture because it describes the complete contract for application communication. Although other techniques exist for describing Web services, the WS‐I Basic Profile Version 1.0 mandates the use of WSDL and XML Schema (see Figure 4) for describing Web services. This helps ensure interoperability at the service description layer.
UDDI Service Discovery
WSDL Service Description
XSD
SOAP Messaging
XML 1.0 + Namespaces Figure 4
WSDL is a machine‐readable language (it is an ASCII‐text XML file), and tools and infrastructure can be easily built around it.
The Microsoft .NET Framework includes a command‐line utility named wsdl.exe that generates classes from WSDL definitions. Wsdl.exe can generate one class for consuming the service and another for implementing the service. Classes generated from the same WSDL definition will be able to communicate with each other through the WSDL‐provided interfaces, regardless of the programming languages in use (see Figure 5).
Figure 5
The elements of the WSDL are as follows:
types A container for abstract type definitions defined using XML Schema.
message A definition of an abstract message that may consist of multiple parts; each part may be of a different type.
portType An abstract set of operations supported by one or more endpoints (commonly known as an interface); operations are defined by an exchange of messages.
binding A concrete protocol and data format specification for a particular portType.
service A collection of related endpoints, where an endpoint is defined as a combination of a binding and an address (URL).
ASP.NET class (implements the service)
Java proxy class(consumes the service)
Communicate via WSDL interface
WSDL2Java
WSDL Definition
wsdl.exe /server
For E
valu
atio
n Onl
y

8361‐1 v1.00 © CCI Learning Solutions Inc. 109
Example: WSDL written in XML (structure only)
<!-- WSDL definition structure --> <definitions name="TestService" targetNamespace="http://nameone.com/test/" xmlns="http://schemas.xmlsoap.org/wsdl/" > <!-- abstract definitions --> <types> ... </types> <message name="n"> ... </message> <portType name="pt"> ... </portType> <!-- concrete definitions --> <binding name="b"> ... </binding> <service name="s"> ... </service> </definitions>
REST Use REpresentational State Transfer (REST) with the PUT, GET and DELETE HTTP methods, alongside POST, to better integrate with HTTP and Web browsers than SOAP‐based services. They do not require XML messages or WSDL service‐API definitions.
Service‐Oriented Architecture
User Services can be used and accessed through any device that hooks up to the Web.
Data as a Service e.g., addressing data, geodata or personal data (perhaps a list of client information).
Extra functionality
Platform as a Service e.g. , integrating with Salesforce.com’s CRM.
Mashups e.g., using Google Maps API as front end.
Stuck together
Software as a Service e.g., route optimizer software that uses the data to generate quickest routes. Maintained
in cloud For E
valu
atio
n Onl
y

110 8361‐1 v1.00 © CCI Learning Solutions Inc.
Lesson Summary You are now able to:
Define and describe basic elements of a Web page.
Write simple HTML code to develop a Web page.
Use Cascading Style Sheets (CSS) to format code.
Review Questions 1. What does HTML stand for?
a. Handheld Technical Multiplex Language
b. Hypertext Markup Language
c. Handheld Technical Modeling Language
d. Hypertext Modeling Language
2. What language is HTML based on? a. ASCII plain text b. Java c. S# d. Visual Basic
3. How will the following tags modify the text?
a. <b>Hello</b> __________________
b. <i>Hello</i> __________________
c. <h1>Hello</h1> __________________
d. <tt>Hello</tt> __________________
4. CSS Stands for:
a. Color Style Sheets
b. Common Simple Styles
c. Cascading Style Sheets
d. Common Selectable styles
5. Which one of the following is not a .NET framework application?
a. Visual Basic
b. C++
c. Visual C#
d. JavaScript
MMMGo online for
Additional Review and
Case Scenarios
For E
valu
atio
n Onl
y

8361‐1 v1.00 © CCI Learning Solutions Inc. 111
6. For the following code, match the blanks with the explanation. Note, not all letters (answers) are used.
<body onclick="myMouseClick()"> <h1>Welcome!</h1> <p>The <i>quick</i> brown fox jumps <b>over</b> the lazy dog.</p> <script type="text/javascript" language="JScript"> function myMouseClick() { alert("You clicked content controlled by the element <" + window.event.srcElement.tagName + ">...</" + window.event.srcElement.tagName +">"); } </script> </body>
a. begin big text b. begin bold text c. end big text
d. end bold text e. begin header 1 f. begin heading 1
g. event handler h. event i. end part
j. end paragraph k. text to display l. text to print
m. end body n. end section o. begin paragraph
7. What text will a virtual folder display in the address bar?
a. virtualhost
b. webhost
c. localhost
d. virtualdirectory
8. IIS is currently short for what?
a. Internet Information Services
b. Internet Information Server
c. Information on the Internet Server
d. Internet Infrastructure Services
9. SOAP is short for what?
a. Send Only Applicable Programs
b. Simple Object Access Protocol
c. Simple Object All Program
d. Send Over All Protocols
10. WSDL stands for what?
a. Web’s Simplest Defined Language
b. We Still Don’t Laugh
c. WinSock display Language
d. Web Service Description Language
For E
valu
atio
n Onl
y

112 8361‐1 v1.00 © CCI Learning Solutions Inc.
For E
valu
atio
n Onl
y

For E
valu
atio
n Onl
y

www.ccilearning.com
IT Starts Here.Microsoft Technology Associate Preparing Tomorrow’s Technology Workforce
Technology plays a role in virtually every business around the world. Possessing the fundamental knowledge of how technology works and understanding its impact on today’s academic and workplace environment is increasingly important—particularly for students interested in exploring professions involving technology. That’s why Microsoft and Certiport are pleased to offer you the Microsoft Technology Associate (MTA) certification—Microsoft’s new entry-level credential that validates fundamental technology knowledge among students seeking to build a career in technology.
The Microsoft Technology Associate (MTA) certification is the ideal and preferred path to Microsoft’s world-renowned advanced technology certification programs, such as Microsoft Certified Technology Specialist (MCTS) and Microsoft Certified IT Professional (MCITP). MTA is sure to become the premier credential for individuals seeking to explore and pursue a career in technology, or augment related pursuits such as business or any other field where technology is pervasive.
Why Get Certified?MTA validates students’ understanding of the key IT building blocks essential for intermediate study, while more advanced certifications such as Microsoft Certified Technology Specialist (MCTS) and Microsoft Certified IT Professional (MCITP) validate skills and experience with Microsoft products and IT solutions developed using Microsoft technologies. Microsoft Certifications recognize and reward your abilities and expertise as your career develops.
Whether you are new to technology, changing jobs, or a seasoned IT professional, becoming certified demonstrates to customers, peers, and employers that you are committed to advancing your skills and taking on greater challenges. In addition, certification provides you with access to exclusive Microsoft Certified IT Professional (MCITP) resources and benefits, including opportunities to connect with a vast, global network of MCPs.For E
valu
atio
n Onl
y
Related Documents