8100 SERIES DRAPERY TRACKING

Welcome message from author
This document is posted to help you gain knowledge. Please leave a comment to let me know what you think about it! Share it to your friends and learn new things together.
Transcript

8100 SERIES
DRAPERY TRACKING
REV0816
DRAPERY TRACKING AND PARTS DESCRIPTIONS
8100 SERIES GENERAL DESCRIPTIONS
8100 Drapery Track Drapery track system shall be Fabtex Model Number 8300 complete with 1.5” x 1.0625” extruded aluminum track channel, carriers, end caps, and other required accessories for a complete and operational track system. Draperies are cord drawn. The 8100 track may be wall or ceiling mounted. The 8100 track is extruded of .050” 6063-T5 Aluminum alloy with white baked enamel. Track channel available in straight continuous lengths up to 18 feet. It is shown here with a ball bearing carrier and drapery pin hook.
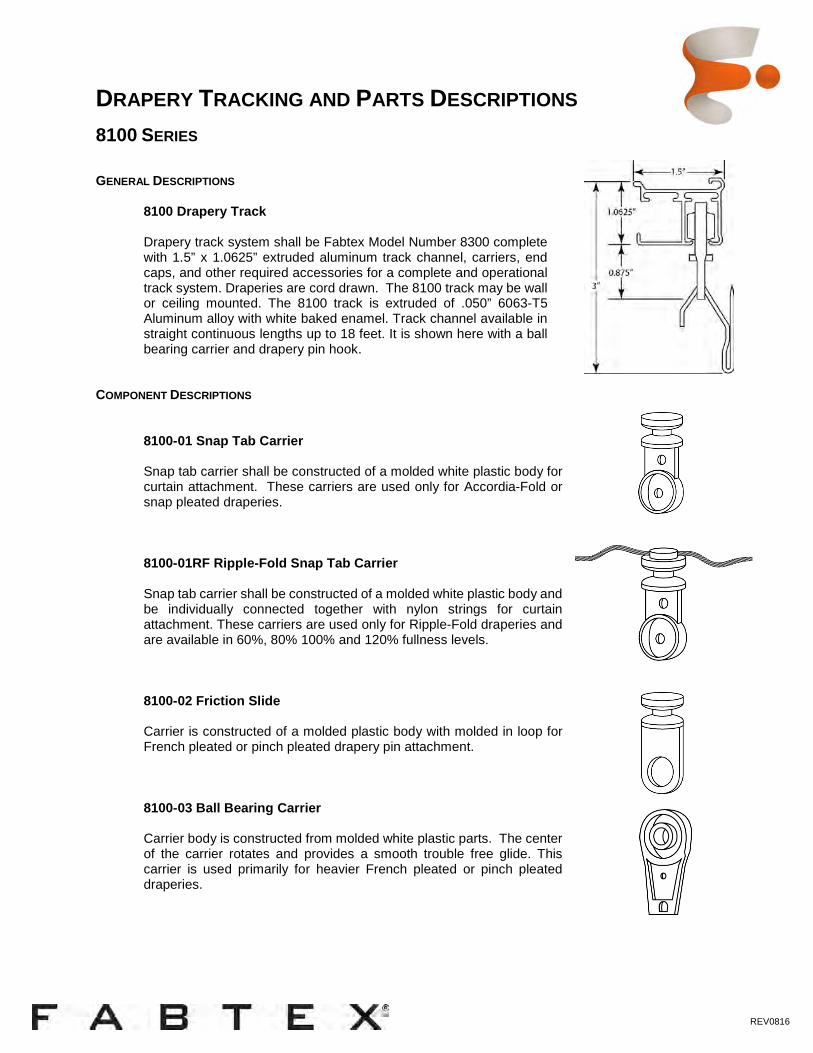
COMPONENT DESCRIPTIONS 8100-01 Snap Tab Carrier Snap tab carrier shall be constructed of a molded white plastic body for curtain attachment. These carriers are used only for Accordia-Fold or snap pleated draperies. 8100-01RF Ripple-Fold Snap Tab Carrier Snap tab carrier shall be constructed of a molded white plastic body and be individually connected together with nylon strings for curtain attachment. These carriers are used only for Ripple-Fold draperies and are available in 60%, 80% 100% and 120% fullness levels. 8100-02 Friction Slide Carrier is constructed of a molded plastic body with molded in loop for French pleated or pinch pleated drapery pin attachment. 8100-03 Ball Bearing Carrier Carrier body is constructed from molded white plastic parts. The center of the carrier rotates and provides a smooth trouble free glide. This carrier is used primarily for heavier French pleated or pinch pleated draperies.
REV0816
DRAPERY TRACKING AND PARTS DESCRIPTIONS
8100 SERIES COMPONENT DESCRIPTIONS (CONTINUED)
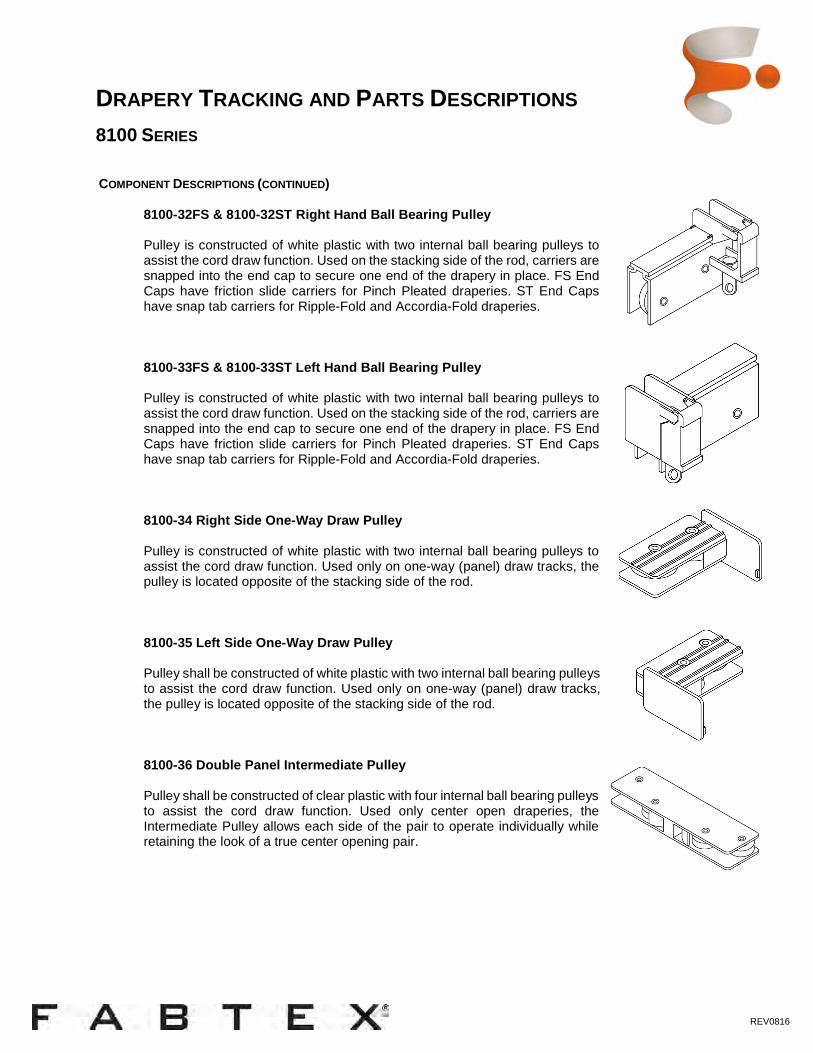
8100-32FS & 8100-32ST Right Hand Ball Bearing Pulley Pulley is constructed of white plastic with two internal ball bearing pulleys to assist the cord draw function. Used on the stacking side of the rod, carriers are snapped into the end cap to secure one end of the drapery in place. FS End Caps have friction slide carriers for Pinch Pleated draperies. ST End Caps have snap tab carriers for Ripple-Fold and Accordia-Fold draperies. 8100-33FS & 8100-33ST Left Hand Ball Bearing Pulley Pulley is constructed of white plastic with two internal ball bearing pulleys to assist the cord draw function. Used on the stacking side of the rod, carriers are snapped into the end cap to secure one end of the drapery in place. FS End Caps have friction slide carriers for Pinch Pleated draperies. ST End Caps have snap tab carriers for Ripple-Fold and Accordia-Fold draperies.
8100-34 Right Side One-Way Draw Pulley Pulley is constructed of white plastic with two internal ball bearing pulleys to assist the cord draw function. Used only on one-way (panel) draw tracks, the pulley is located opposite of the stacking side of the rod.
8100-35 Left Side One-Way Draw Pulley Pulley shall be constructed of white plastic with two internal ball bearing pulleys to assist the cord draw function. Used only on one-way (panel) draw tracks, the pulley is located opposite of the stacking side of the rod.
8100-36 Double Panel Intermediate Pulley Pulley shall be constructed of clear plastic with four internal ball bearing pulleys to assist the cord draw function. Used only center open draperies, the Intermediate Pulley allows each side of the pair to operate individually while retaining the look of a true center opening pair.
REV0816
DRAPERY TRACKING AND PARTS DESCRIPTIONS
8100 SERIES COMPONENT DESCRIPTIONS (CONTINUED)
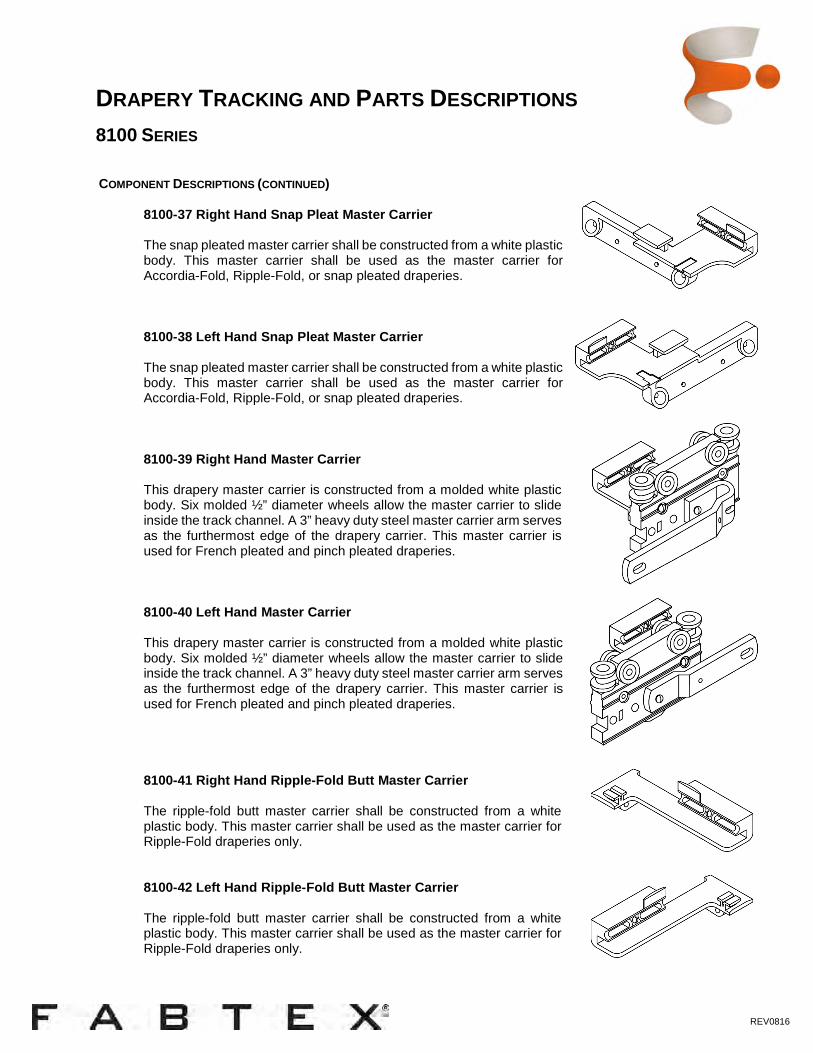
8100-37 Right Hand Snap Pleat Master Carrier The snap pleated master carrier shall be constructed from a white plastic body. This master carrier shall be used as the master carrier for Accordia-Fold, Ripple-Fold, or snap pleated draperies. 8100-38 Left Hand Snap Pleat Master Carrier The snap pleated master carrier shall be constructed from a white plastic body. This master carrier shall be used as the master carrier for Accordia-Fold, Ripple-Fold, or snap pleated draperies. 8100-39 Right Hand Master Carrier This drapery master carrier is constructed from a molded white plastic body. Six molded ½” diameter wheels allow the master carrier to slide inside the track channel. A 3” heavy duty steel master carrier arm serves as the furthermost edge of the drapery carrier. This master carrier is used for French pleated and pinch pleated draperies. 8100-40 Left Hand Master Carrier This drapery master carrier is constructed from a molded white plastic body. Six molded ½” diameter wheels allow the master carrier to slide inside the track channel. A 3” heavy duty steel master carrier arm serves as the furthermost edge of the drapery carrier. This master carrier is used for French pleated and pinch pleated draperies.
8100-41 Right Hand Ripple-Fold Butt Master Carrier The ripple-fold butt master carrier shall be constructed from a white plastic body. This master carrier shall be used as the master carrier for Ripple-Fold draperies only.
8100-42 Left Hand Ripple-Fold Butt Master Carrier The ripple-fold butt master carrier shall be constructed from a white plastic body. This master carrier shall be used as the master carrier for Ripple-Fold draperies only.
REV0816
DRAPERY TRACKING AND PARTS DESCRIPTIONS
8100 SERIES COMPONENT DESCRIPTIONS (CONTINUED)
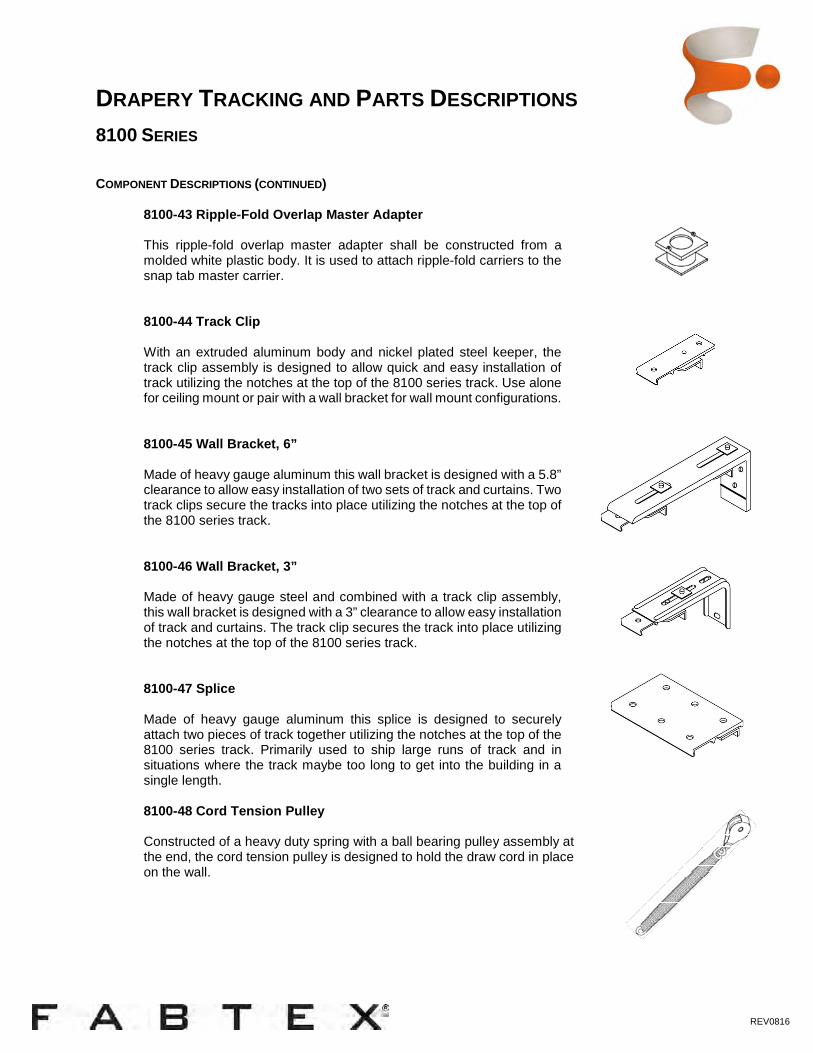
8100-43 Ripple-Fold Overlap Master Adapter This ripple-fold overlap master adapter shall be constructed from a molded white plastic body. It is used to attach ripple-fold carriers to the snap tab master carrier. 8100-44 Track Clip With an extruded aluminum body and nickel plated steel keeper, the track clip assembly is designed to allow quick and easy installation of track utilizing the notches at the top of the 8100 series track. Use alone for ceiling mount or pair with a wall bracket for wall mount configurations.
8100-45 Wall Bracket, 6” Made of heavy gauge aluminum this wall bracket is designed with a 5.8” clearance to allow easy installation of two sets of track and curtains. Two track clips secure the tracks into place utilizing the notches at the top of the 8100 series track.
8100-46 Wall Bracket, 3” Made of heavy gauge steel and combined with a track clip assembly, this wall bracket is designed with a 3” clearance to allow easy installation of track and curtains. The track clip secures the track into place utilizing the notches at the top of the 8100 series track.
8100-47 Splice Made of heavy gauge aluminum this splice is designed to securely attach two pieces of track together utilizing the notches at the top of the 8100 series track. Primarily used to ship large runs of track and in situations where the track maybe too long to get into the building in a single length. 8100-48 Cord Tension Pulley Constructed of a heavy duty spring with a ball bearing pulley assembly at the end, the cord tension pulley is designed to hold the draw cord in place on the wall.
REV0816
ASSEMBLY INSTRUCTIONS
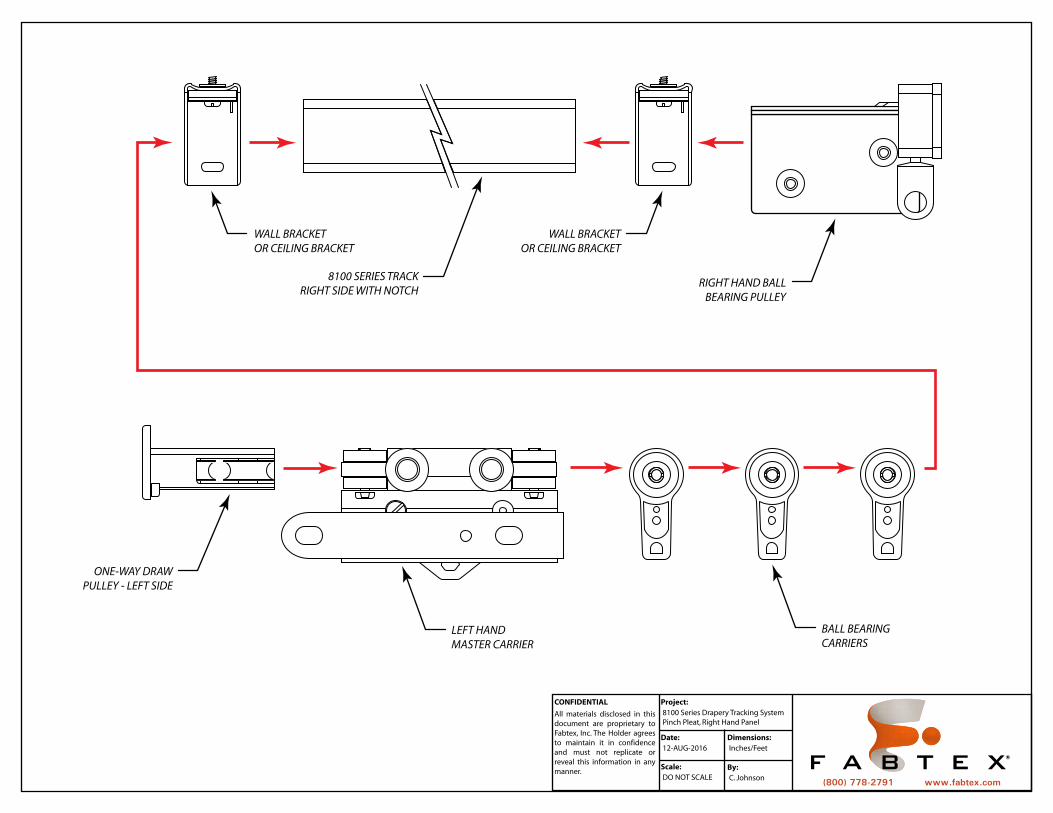
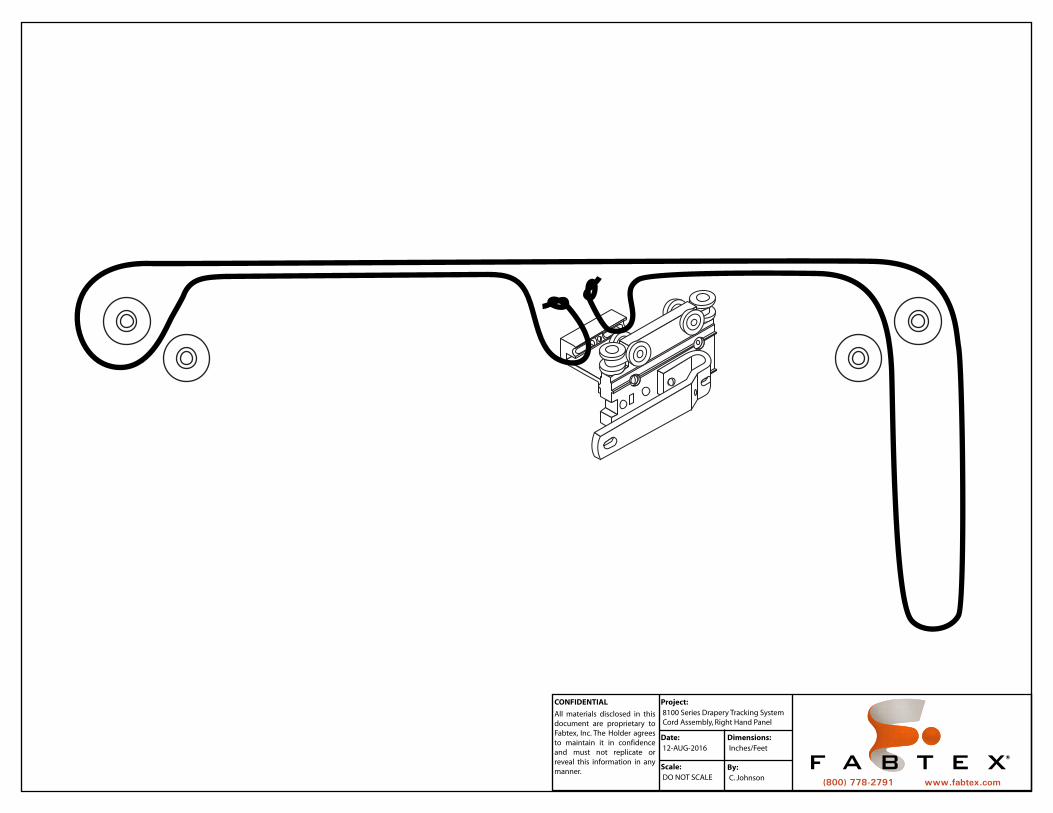
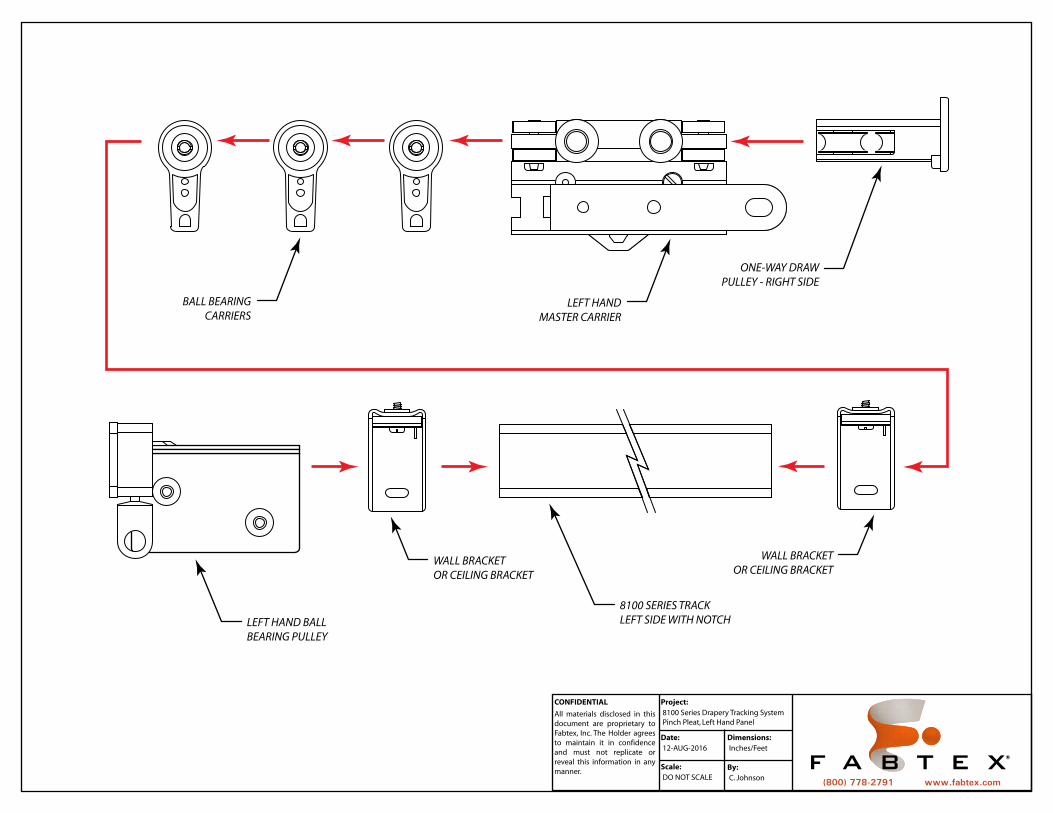
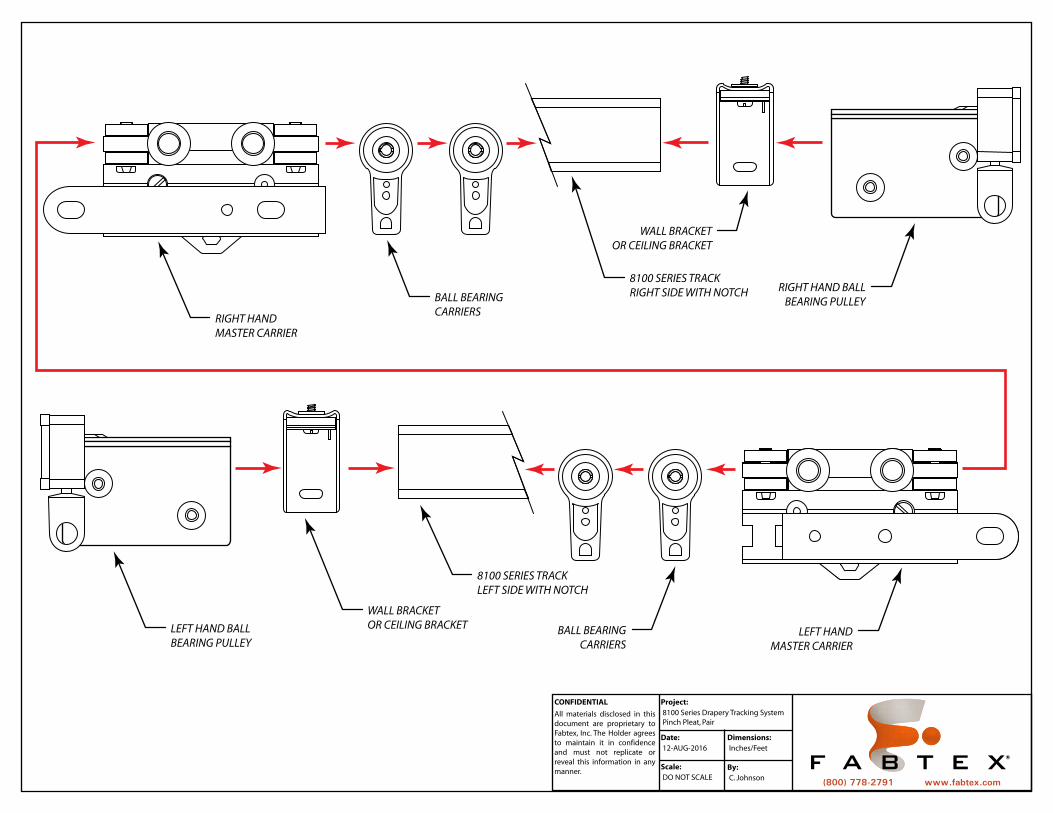
8100 SERIES TRACK Pinch Pleated Draperies Configured as a Panel Cut track to length and notch the desired cord draw side to allow for the ball bearing pulley end. Insert ball bearing pulley in the notched end. On the other end of the track, insert the carriers, the master carrier, and finally the one-way draw pulley to cap the end. Refer to the Cord Assembly diagrams and install the draw cord accordingly. Next, attach the wall mount track bracket or ceiling clip to the top of the track, leaving 24” to 36” between each one. Once all of the wall brackets or ceiling clips are installed hold the entire track system up to the wall/ceiling and mark the holes you need to drill. Remove wall brackets/ceiling clips from the track and attach them to the wall/ceiling. Once the brackets/clips are properly mounted, re-attach the track to the brackets/clips. Hang drapery and check to ensure smooth operation. For smoother operation, lightly spray the inside of the track with an aerosol silicone lubricant. Depending upon environment, clean and re-lubricate as necessary. Pinch Pleated Draperies Configured as a Pair Cut track to length and notch both ends of the track. Insert ball bearing pulley in one end. On the other end of the track, insert half of the carriers, the master carriers, the second half of the carriers, and finally the ball bearing pulley to cap the end. Refer to the Cord Assembly diagrams and install the draw cord accordingly. Next, attach the wall mount track bracket or ceiling clip to the top of the track, leaving 24” to 36” between each one. Once all of the wall brackets or ceiling clips are installed hold the entire track system up to the wall/ceiling and mark the holes you need to drill. Remove wall brackets/ceiling clips from the track and attach them to the wall/ceiling. Once the brackets/clips are properly mounted, re-attach the track to the brackets/clips. Hang drapery and check to ensure smooth operation. For smoother operation, lightly spray the inside of the track with an aerosol silicone lubricant. Depending upon environment, clean and re-lubricate as necessary.
CONFIDENTIAL Project:
All materials disclosed in this
document are proprietary to
Fabtex, Inc. The Holder agrees
to maintain it in confidence
and must not replicate or
reveal this information in any
manner.
8100 Series Drapery Tracking System
Pinch Pleat, Right Hand Panel
Date:
12-AUG-2016
Scale:
DO NOT SCALE
Dimensions:
Inches/Feet
By:
C. Johnson(800) 778-2791 www.fabtex.com
ONE-WAY DRAW
PULLEY - LEFT SIDE
8100 SERIES TRACK
RIGHT SIDE WITH NOTCHRIGHT HAND BALL
BEARING PULLEY
WALL BRACKET
OR CEILING BRACKET
WALL BRACKET
OR CEILING BRACKET
LEFT HAND
MASTER CARRIER
BALL BEARING
CARRIERS
CONFIDENTIAL Project:
All materials disclosed in this
document are proprietary to
Fabtex, Inc. The Holder agrees
to maintain it in confidence
and must not replicate or
reveal this information in any
manner.
8100 Series Drapery Tracking System
Cord Assembly, Right Hand Panel
Date:
12-AUG-2016
Scale:
DO NOT SCALE
Dimensions:
Inches/Feet
By:
C. Johnson(800) 778-2791 www.fabtex.com
CONFIDENTIAL Project:
All materials disclosed in this
document are proprietary to
Fabtex, Inc. The Holder agrees
to maintain it in confidence
and must not replicate or
reveal this information in any
manner.
8100 Series Drapery Tracking System
Pinch Pleat, Left Hand Panel
Date:
12-AUG-2016
Scale:
DO NOT SCALE
Dimensions:
Inches/Feet
By:
C. Johnson(800) 778-2791 www.fabtex.com
ONE-WAY DRAW
PULLEY - RIGHT SIDE
WALL BRACKET
OR CEILING BRACKET
LEFT HAND BALL
BEARING PULLEY
WALL BRACKET
OR CEILING BRACKET
8100 SERIES TRACK
LEFT SIDE WITH NOTCH
LEFT HAND
MASTER CARRIER
BALL BEARING
CARRIERS
CONFIDENTIAL Project:
All materials disclosed in this
document are proprietary to
Fabtex, Inc. The Holder agrees
to maintain it in confidence
and must not replicate or
reveal this information in any
manner.
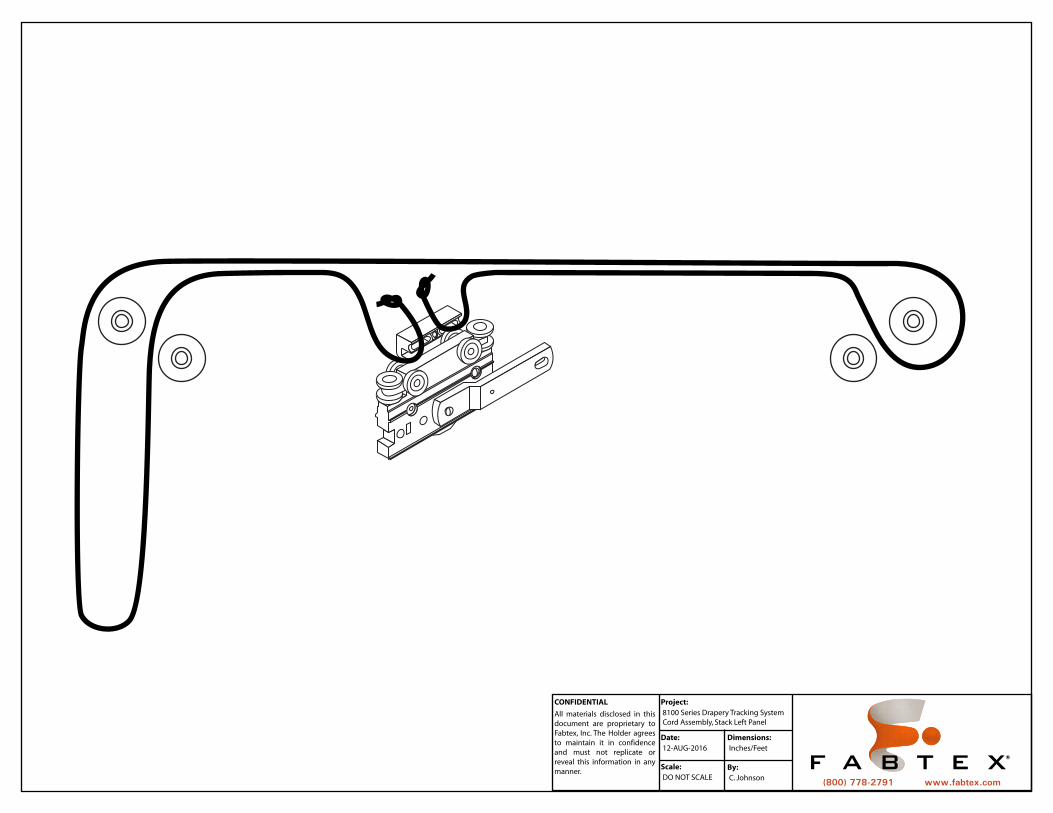
8100 Series Drapery Tracking System
Cord Assembly, Stack Left Panel
Date:
12-AUG-2016
Scale:
DO NOT SCALE
Dimensions:
Inches/Feet
By:
C. Johnson(800) 778-2791 www.fabtex.com
CONFIDENTIAL Project:
All materials disclosed in this
document are proprietary to
Fabtex, Inc. The Holder agrees
to maintain it in confidence
and must not replicate or
reveal this information in any
manner.
8100 Series Drapery Tracking System
Pinch Pleat, Pair
Date:
12-AUG-2016
Scale:
DO NOT SCALE
Dimensions:
Inches/Feet
By:
C. Johnson(800) 778-2791 www.fabtex.com
8100 SERIES TRACK
RIGHT SIDE WITH NOTCH
WALL BRACKET
OR CEILING BRACKET
RIGHT HAND
MASTER CARRIER
BALL BEARING
CARRIERS
LEFT HAND BALL
BEARING PULLEY
WALL BRACKET
OR CEILING BRACKET
8100 SERIES TRACK
LEFT SIDE WITH NOTCH
LEFT HAND
MASTER CARRIER
BALL BEARING
CARRIERS
RIGHT HAND BALL
BEARING PULLEY
CONFIDENTIAL Project:
All materials disclosed in this
document are proprietary to
Fabtex, Inc. The Holder agrees
to maintain it in confidence
and must not replicate or
reveal this information in any
manner.
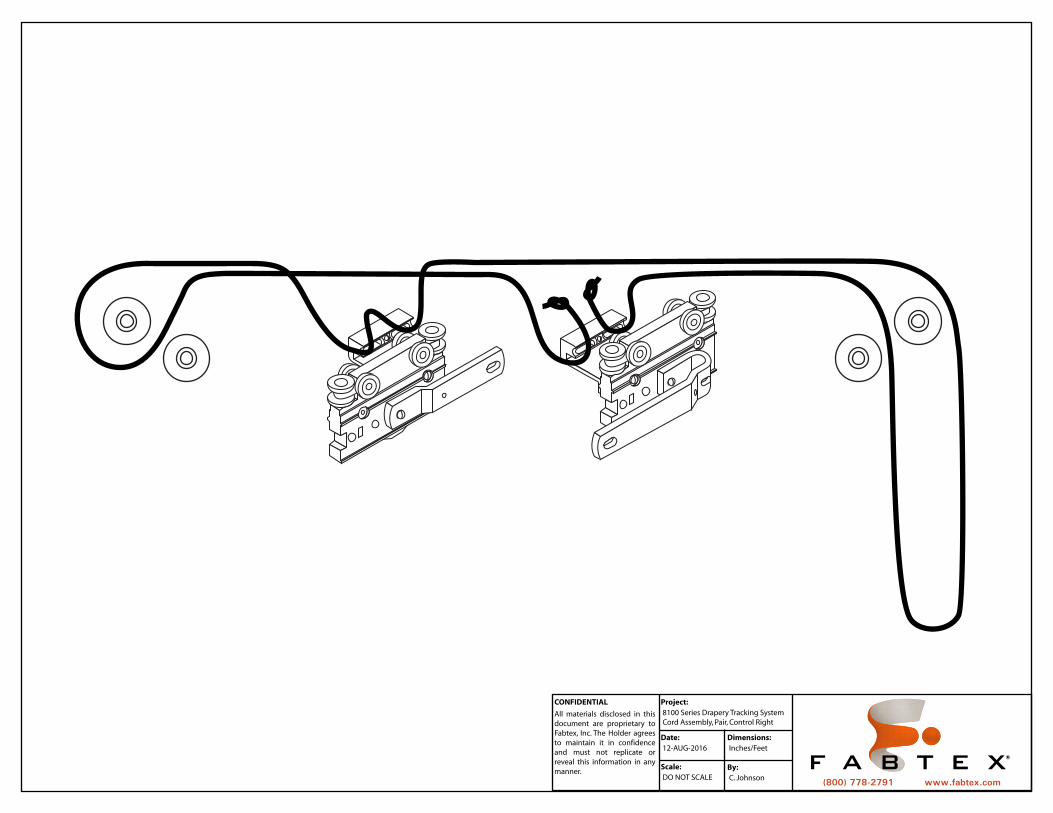
8100 Series Drapery Tracking System
Cord Assembly, Pair, Control Right
Date:
12-AUG-2016
Scale:
DO NOT SCALE
Dimensions:
Inches/Feet
By:
C. Johnson(800) 778-2791 www.fabtex.com
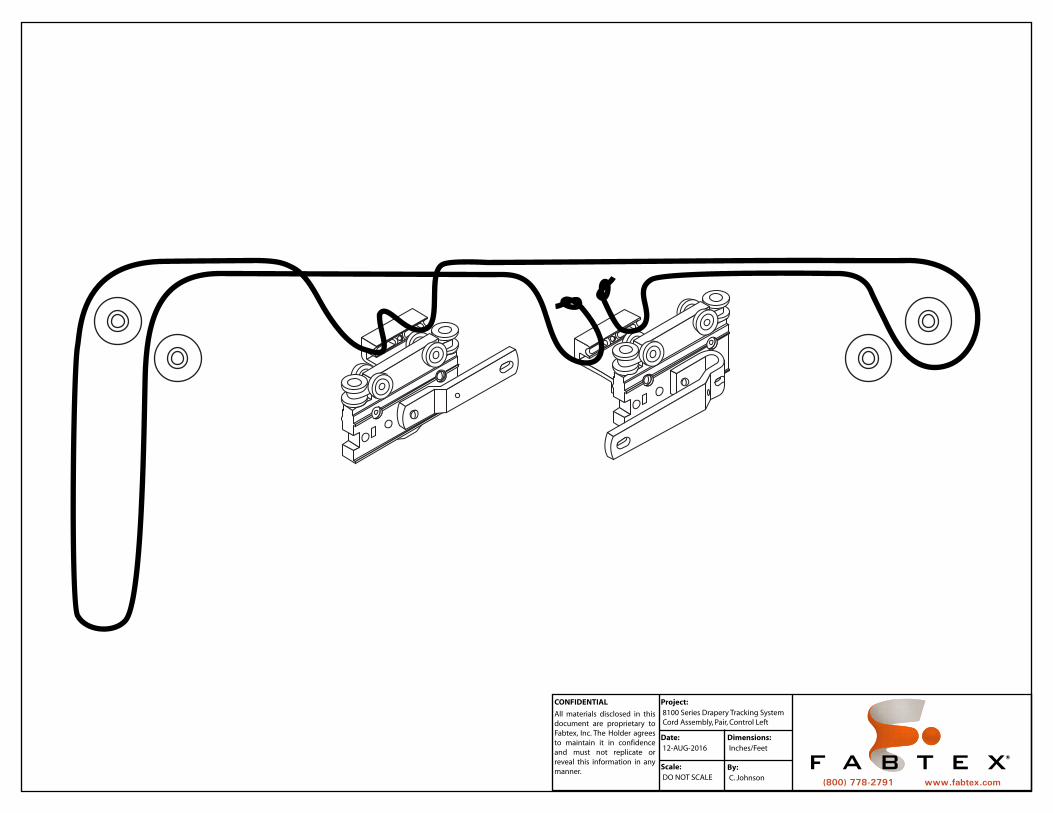
CONFIDENTIAL Project:
All materials disclosed in this
document are proprietary to
Fabtex, Inc. The Holder agrees
to maintain it in confidence
and must not replicate or
reveal this information in any
manner.
8100 Series Drapery Tracking System
Cord Assembly, Pair, Control Left
Date:
12-AUG-2016
Scale:
DO NOT SCALE
Dimensions:
Inches/Feet
By:
C. Johnson(800) 778-2791 www.fabtex.com

REV0816
ASSEMBLY INSTRUCTIONS
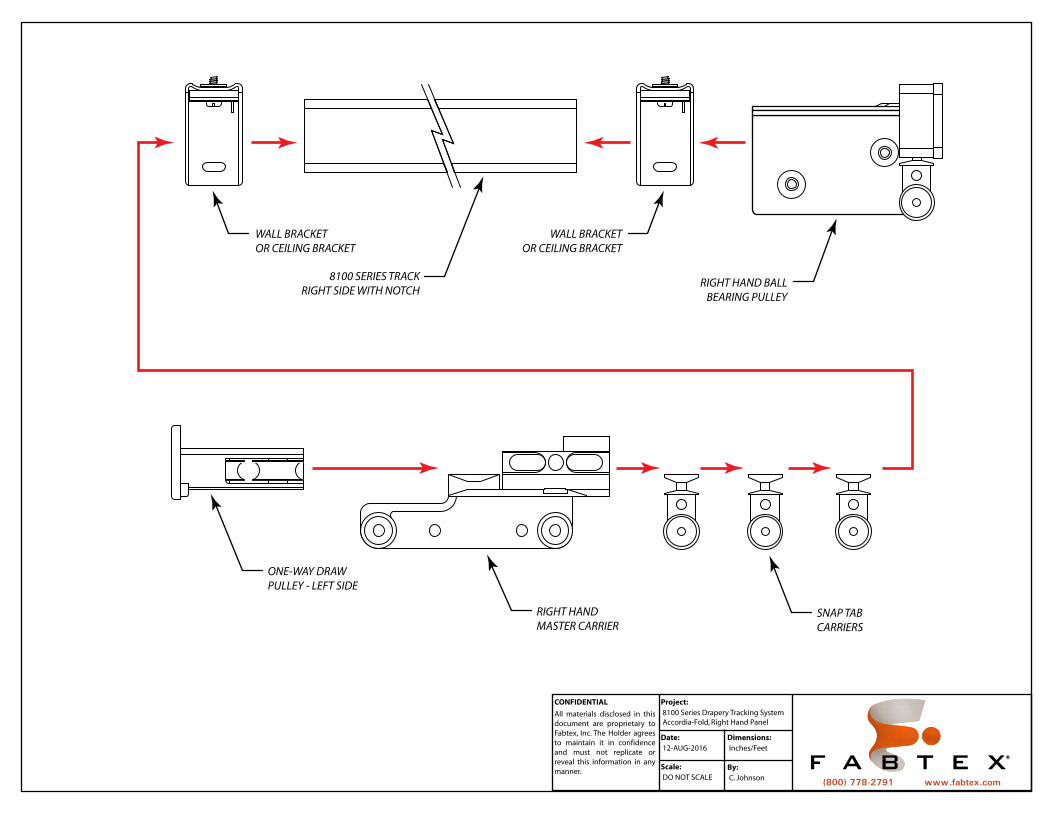
8100 SERIES TRACK Accordia-Fold Draperies Configured as a Panel Cut track to length and notch the desired cord draw side to allow for the ball bearing pulley end. Insert ball bearing pulley in the notched end. On the other end of the track, insert the carriers, the master carrier, and finally the one-way draw pulley to cap the end. Refer to the Cord Assembly diagrams and install the draw cord accordingly. Next, attach the wall mount track bracket or ceiling clip to the top of the track, leaving 24” to 36” between each one. Once all of the wall brackets or ceiling clips are installed hold the entire track system up to the wall/ceiling and mark the holes you need to drill. Remove wall brackets/ceiling clips from the track and attach them to the wall/ceiling. Once the brackets/clips are properly mounted, re-attach the track to the brackets/clips. Hang drapery and check to ensure smooth operation. For smoother operation, lightly spray the inside of the track with an aerosol silicone lubricant. Depending upon environment, clean and re-lubricate as necessary. Accordia-Fold Draperies Configured as a Pair Cut track to length and notch both ends of the track. Insert ball bearing pulley in one end. On the other end of the track, insert half of the carriers, the master carriers, the second half of the carriers, and finally the ball bearing pulley to cap the end. Refer to the Cord Assembly diagrams and install the draw cord accordingly. Next, attach the wall mount track bracket or ceiling clip to the top of the track, leaving 24” to 36” between each one. Once all of the wall brackets or ceiling clips are installed hold the entire track system up to the wall/ceiling and mark the holes you need to drill. Remove wall brackets/ceiling clips from the track and attach them to the wall/ceiling. Once the brackets/clips are properly mounted, re-attach the track to the brackets/clips. Hang drapery and check to ensure smooth operation. For smoother operation, lightly spray the inside of the track with an aerosol silicone lubricant. Depending upon environment, clean and re-lubricate as necessary.
CONFIDENTIAL Project:
All materials disclosed in this
document are proprietary to
Fabtex, Inc. The Holder agrees
to maintain it in confidence
and must not replicate or
reveal this information in any
manner.
8100 Series Drapery Tracking System
Accordia-Fold, Right Hand Panel
Date:
12-AUG-2016
Scale:
DO NOT SCALE
Dimensions:
Inches/Feet
By:
C. Johnson(800) 778-2791 www.fabtex.com
ONE-WAY DRAW
PULLEY - LEFT SIDE
RIGHT HAND
MASTER CARRIER
SNAP TAB
CARRIERS
8100 SERIES TRACK
RIGHT SIDE WITH NOTCHRIGHT HAND BALL
BEARING PULLEY
WALL BRACKET
OR CEILING BRACKET
WALL BRACKET
OR CEILING BRACKET
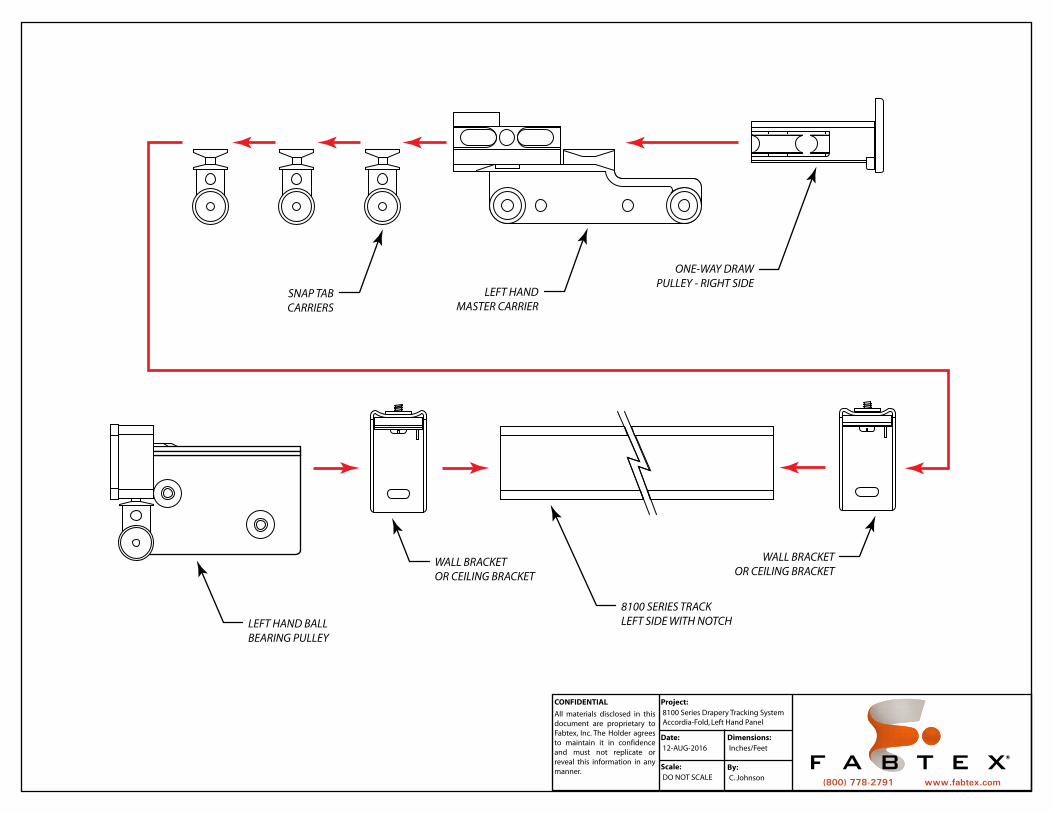
CONFIDENTIAL Project:
All materials disclosed in this
document are proprietary to
Fabtex, Inc. The Holder agrees
to maintain it in confidence
and must not replicate or
reveal this information in any
manner.
8100 Series Drapery Tracking System
Accordia-Fold, Left Hand Panel
Date:
12-AUG-2016
Scale:
DO NOT SCALE
Dimensions:
Inches/Feet
By:
C. Johnson(800) 778-2791 www.fabtex.com
ONE-WAY DRAW
PULLEY - RIGHT SIDE
WALL BRACKET
OR CEILING BRACKET
LEFT HAND BALL
BEARING PULLEY
WALL BRACKET
OR CEILING BRACKET
8100 SERIES TRACK
LEFT SIDE WITH NOTCH
LEFT HAND
MASTER CARRIER
SNAP TAB
CARRIERS
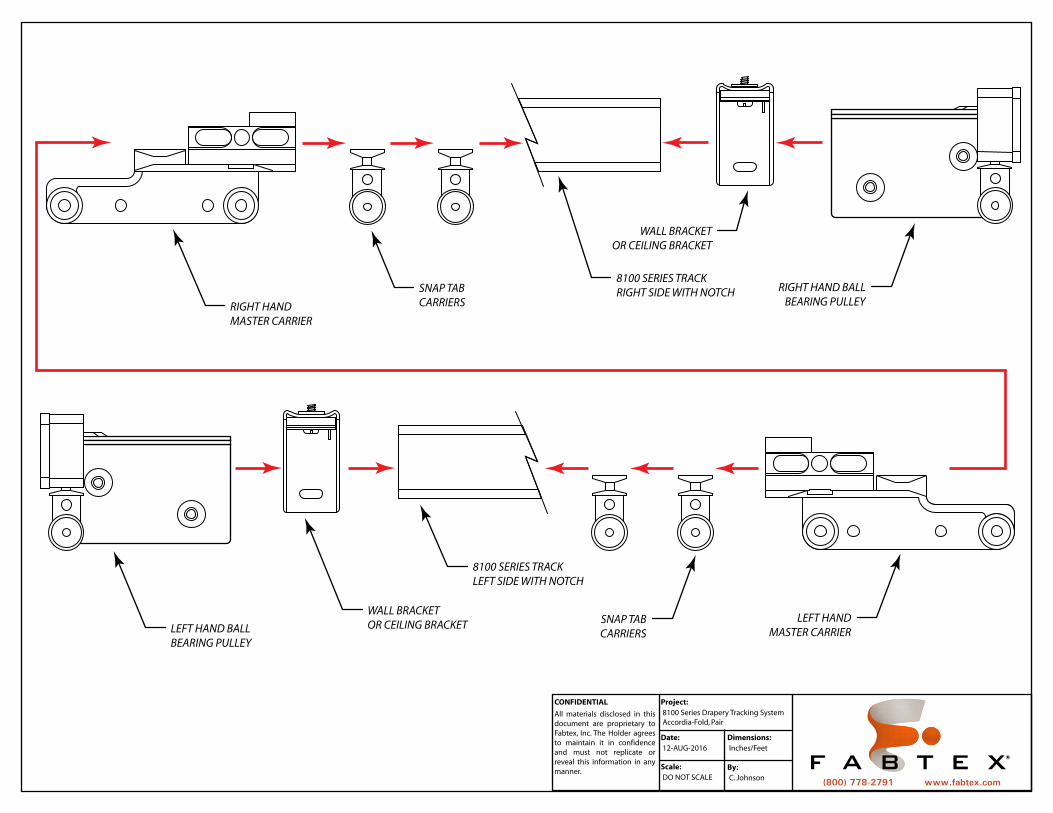
CONFIDENTIAL Project:
All materials disclosed in this
document are proprietary to
Fabtex, Inc. The Holder agrees
to maintain it in confidence
and must not replicate or
reveal this information in any
manner.
8100 Series Drapery Tracking System
Accordia-Fold, Pair
Date:
12-AUG-2016
Scale:
DO NOT SCALE
Dimensions:
Inches/Feet
By:
C. Johnson(800) 778-2791 www.fabtex.com
RIGHT HAND
MASTER CARRIER
SNAP TAB
CARRIERS
8100 SERIES TRACK
RIGHT SIDE WITH NOTCH
WALL BRACKET
OR CEILING BRACKET
LEFT HAND BALL
BEARING PULLEY
WALL BRACKET
OR CEILING BRACKET
8100 SERIES TRACK
LEFT SIDE WITH NOTCH
LEFT HAND
MASTER CARRIER
SNAP TAB
CARRIERS
RIGHT HAND BALL
BEARING PULLEY
REV0816
ASSEMBLY INSTRUCTIONS
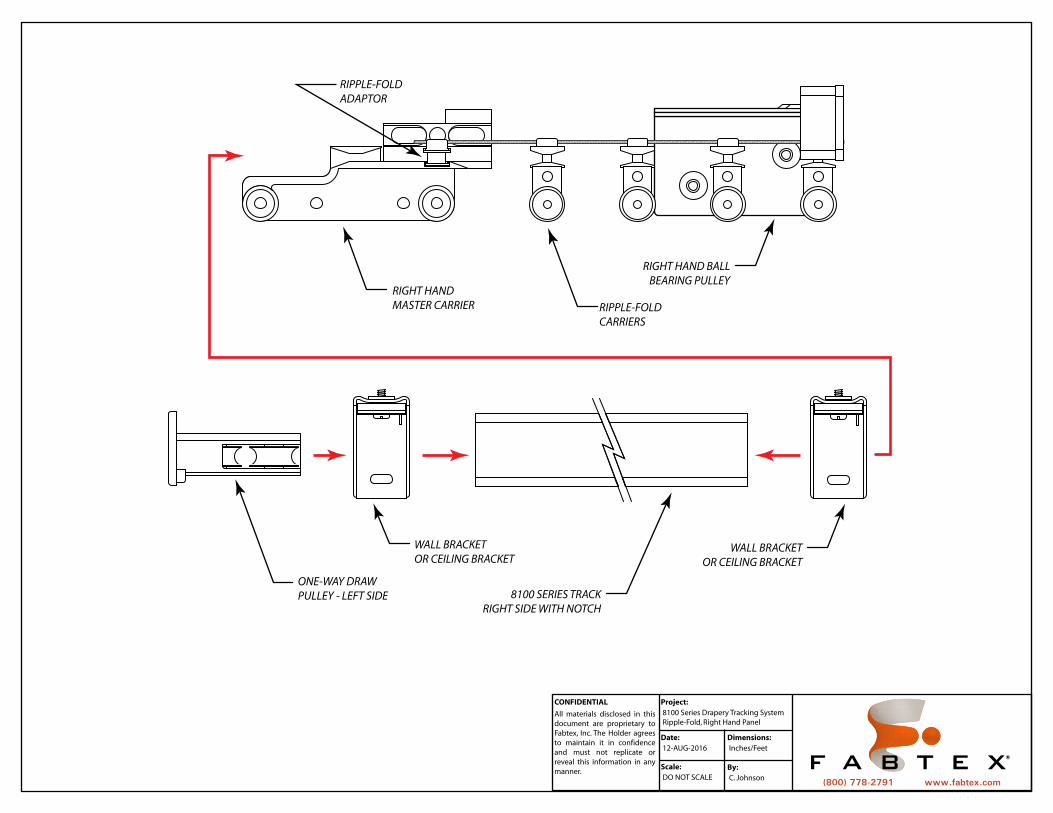
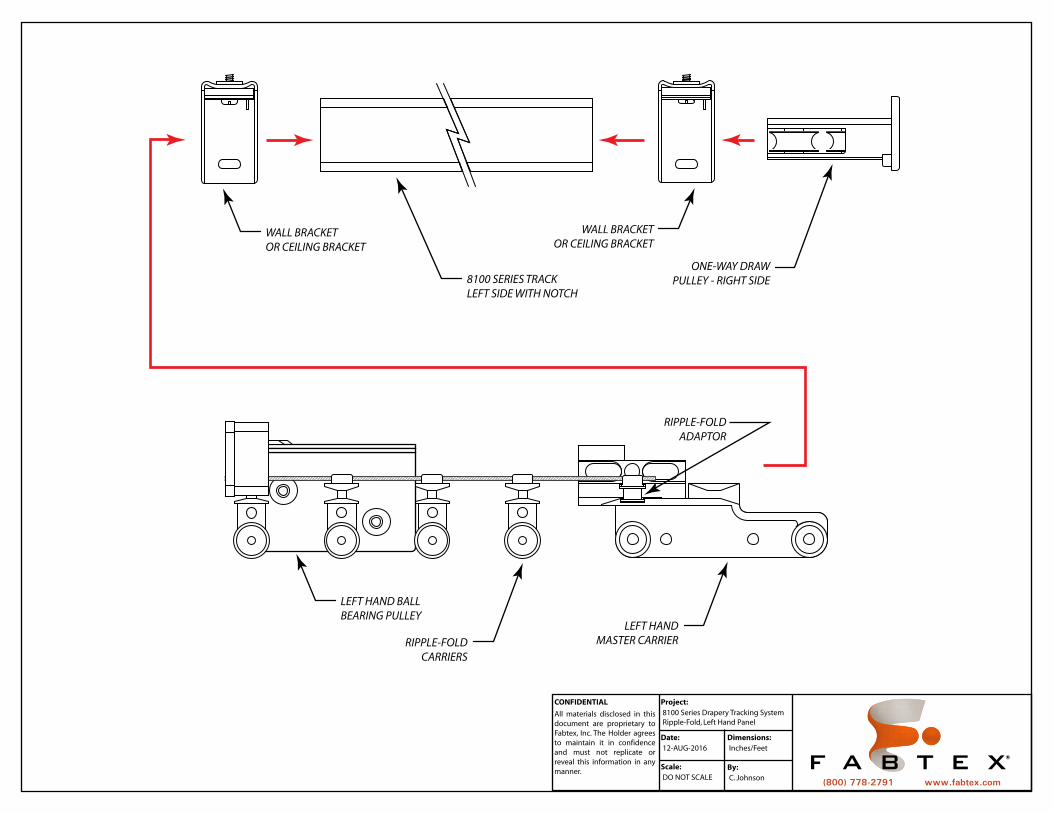
8100 SERIES TRACK Ripple-Fold Draperies Configured as a Panel Cut track to length and notch the desired cord draw side to allow for the ball bearing pulley end. Insert ball bearing pulley in the notched end. On the other end of the track, insert the carriers, the master carrier, and finally the one-way draw pulley to cap the end. Returning to the ball bearing pulley end, open the end of the pulley cap and insert the last carrier on the ripple-fold carrier drapery string. This will hold the stationary side of the drapery in place. Refer to the Cord Assembly diagrams and install the draw cord accordingly. Next, attach the wall mount track bracket or ceiling clip to the top of the track, leaving 24” to 36” between each one. Once all of the wall brackets or ceiling clips are installed hold the entire track system up to the wall/ceiling and mark the holes you need to drill. Remove wall brackets/ceiling clips from the track and attach them to the wall/ceiling. Once the brackets/clips are properly mounted, re-attach the track to the brackets/clips. Hang drapery and check to ensure smooth operation. For smoother operation, lightly spray the inside of the track with an aerosol silicone lubricant. Depending upon environment, clean and re-lubricate as necessary. Ripple-Fold Draperies Configured as a Pair Cut track to length and notch both ends of the track. Insert ball bearing pulley in one end. On the other end of the track, insert half of the carriers, the master carriers, the second half of the carriers, and finally the ball bearing pulley to cap the end. On both ends, open the end of the pulley cap and insert the last carrier on the ripple-fold carrier drapery string. This will hold the stationary side of the drapery in place. Refer to the Cord Assembly diagrams and install the draw cord accordingly. Next, attach the wall mount track bracket or ceiling clip to the top of the track, leaving 24” to 36” between each one. Once all of the wall brackets or ceiling clips are installed hold the entire track system up to the wall/ceiling and mark the holes you need to drill. Remove wall brackets/ceiling clips from the track and attach them to the wall/ceiling. Once the brackets/clips are properly mounted, re-attach the track to the brackets/clips. Hang drapery and check to ensure smooth operation. For smoother operation, lightly spray the inside of the track with an aerosol silicone lubricant. Depending upon environment, clean and re-lubricate as necessary.
CONFIDENTIAL Project:
All materials disclosed in this
document are proprietary to
Fabtex, Inc. The Holder agrees
to maintain it in confidence
and must not replicate or
reveal this information in any
manner.
8100 Series Drapery Tracking System
Ripple-Fold, Right Hand Panel
Date:
12-AUG-2016
Scale:
DO NOT SCALE
Dimensions:
Inches/Feet
By:
C. Johnson(800) 778-2791 www.fabtex.com
ONE-WAY DRAW
PULLEY - LEFT SIDE
WALL BRACKET
OR CEILING BRACKET
WALL BRACKET
OR CEILING BRACKET
8100 SERIES TRACK
RIGHT SIDE WITH NOTCH
RIGHT HAND BALL
BEARING PULLEYRIGHT HAND
MASTER CARRIER RIPPLE-FOLD
CARRIERS
RIPPLE-FOLD
ADAPTOR
CONFIDENTIAL Project:
All materials disclosed in this
document are proprietary to
Fabtex, Inc. The Holder agrees
to maintain it in confidence
and must not replicate or
reveal this information in any
manner.
8100 Series Drapery Tracking System
Ripple-Fold, Left Hand Panel
Date:
12-AUG-2016
Scale:
DO NOT SCALE
Dimensions:
Inches/Feet
By:
C. Johnson(800) 778-2791 www.fabtex.com
ONE-WAY DRAW
PULLEY - RIGHT SIDE
WALL BRACKET
OR CEILING BRACKET
WALL BRACKET
OR CEILING BRACKET
8100 SERIES TRACK
LEFT SIDE WITH NOTCH
LEFT HAND BALL
BEARING PULLEYLEFT HAND
MASTER CARRIERRIPPLE-FOLD
CARRIERS
RIPPLE-FOLD
ADAPTOR

CONFIDENTIAL Project:
All materials disclosed in this
document are proprietary to
Fabtex, Inc. The Holder agrees
to maintain it in confidence
and must not replicate or
reveal this information in any
manner.
8100 Series Drapery Tracking System
Ripple-Fold, Pair
Date:
12-AUG-2016
Scale:
DO NOT SCALE
Dimensions:
Inches/Feet
By:
C. Johnson(800) 778-2791 www.fabtex.com
8100 SERIES TRACK
RIGHT SIDE WITH NOTCH
WALL BRACKET
OR CEILING BRACKET
LEFT HAND BALL
BEARING PULLEY WALL BRACKET
OR CEILING BRACKET
8100 SERIES TRACK
LEFT SIDE WITH NOTCH
LEFT HAND
MASTER CARRIERRIPPLE-FOLD
CARRIERS
RIPPLE-FOLD
ADAPTOR
RIGHT HAND BALL
BEARING PULLEYRIGHT HAND
MASTER CARRIER RIPPLE-FOLD
CARRIERS
RIPPLE-FOLD
ADAPTOR
REV0816
DRAPERY TRACKING INSTALLATION INSTRUCTIONS
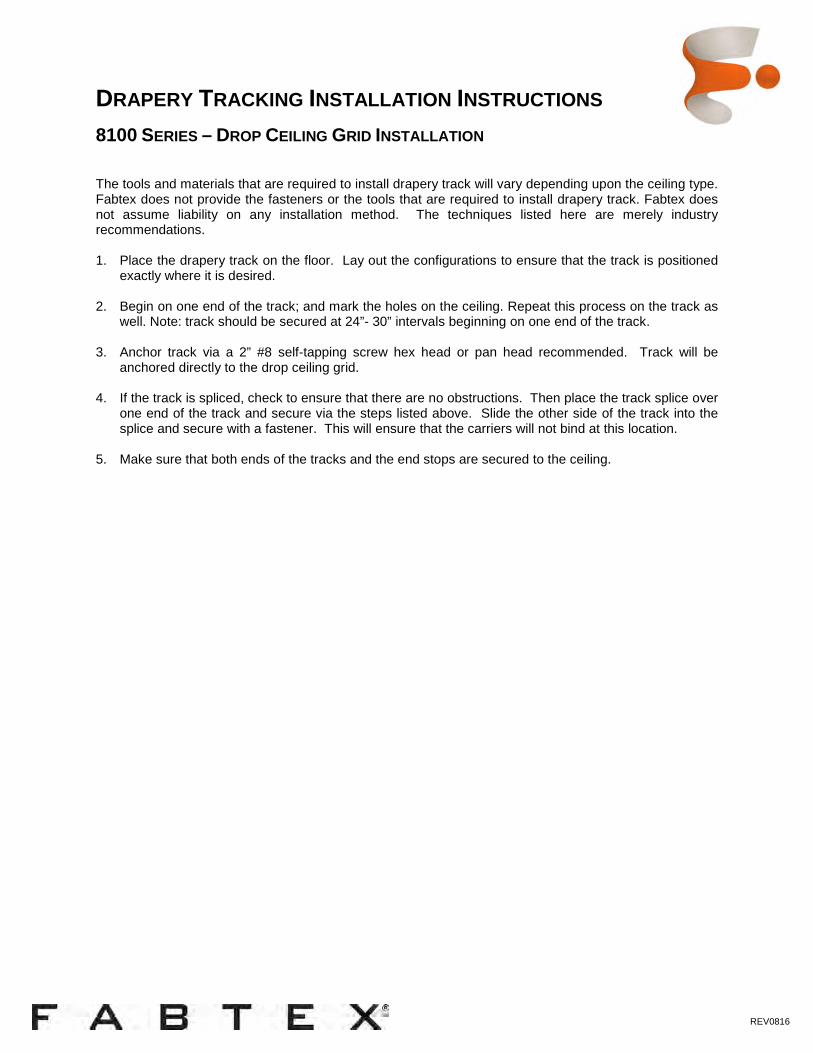
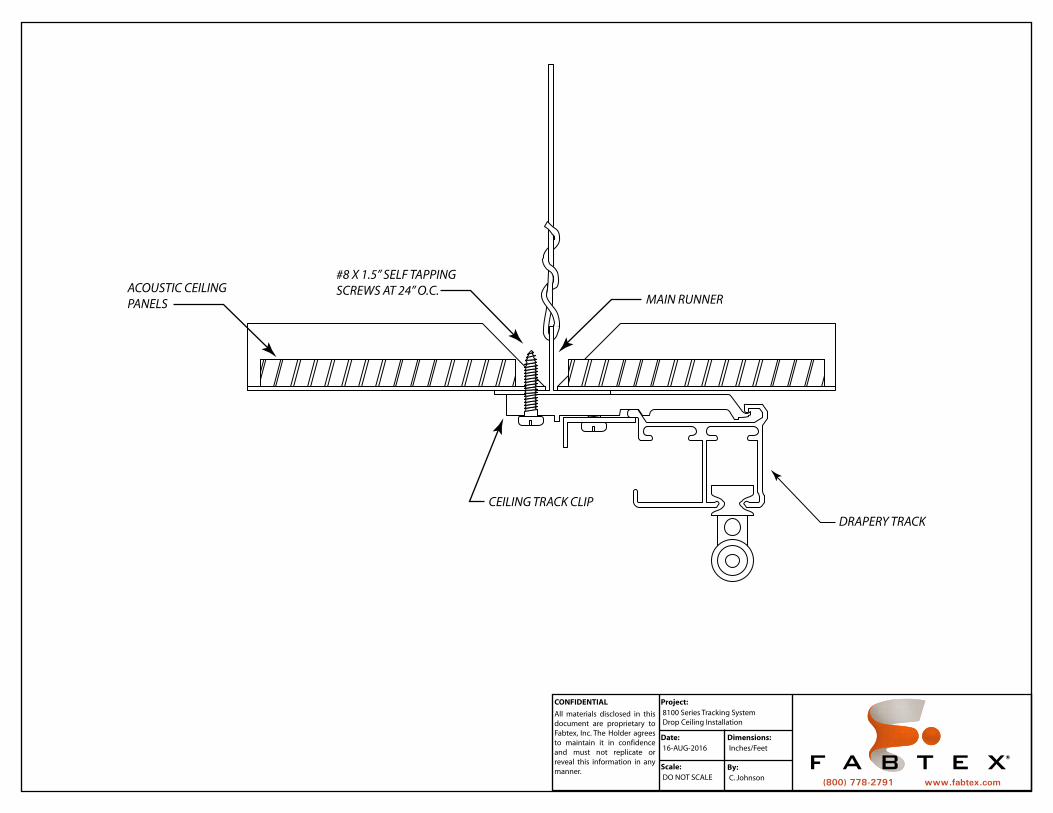
8100 SERIES – DROP CEILING GRID INSTALLATION The tools and materials that are required to install drapery track will vary depending upon the ceiling type. Fabtex does not provide the fasteners or the tools that are required to install drapery track. Fabtex does not assume liability on any installation method. The techniques listed here are merely industry recommendations. 1. Place the drapery track on the floor. Lay out the configurations to ensure that the track is positioned
exactly where it is desired. 2. Begin on one end of the track; and mark the holes on the ceiling. Repeat this process on the track as
well. Note: track should be secured at 24”- 30” intervals beginning on one end of the track. 3. Anchor track via a 2” #8 self-tapping screw hex head or pan head recommended. Track will be
anchored directly to the drop ceiling grid. 4. If the track is spliced, check to ensure that there are no obstructions. Then place the track splice over
one end of the track and secure via the steps listed above. Slide the other side of the track into the splice and secure with a fastener. This will ensure that the carriers will not bind at this location.
5. Make sure that both ends of the tracks and the end stops are secured to the ceiling.
CONFIDENTIAL Project:
All materials disclosed in this
document are proprietary to
Fabtex, Inc. The Holder agrees
to maintain it in confidence
and must not replicate or
reveal this information in any
manner.
8100 Series Tracking System
Drop Ceiling Installation
Date:
16-AUG-2016
Scale:
DO NOT SCALE
Dimensions:
Inches/Feet
By:
C. Johnson(800) 778-2791 www.fabtex.com
#8 X 1.5” SELF TAPPING
SCREWS AT 24” O.C.MAIN RUNNER
ACOUSTIC CEILING
PANELS
DRAPERY TRACK
CEILING TRACK CLIP
REV0816
DRAPERY TRACKING INSTALLATION INSTRUCTIONS
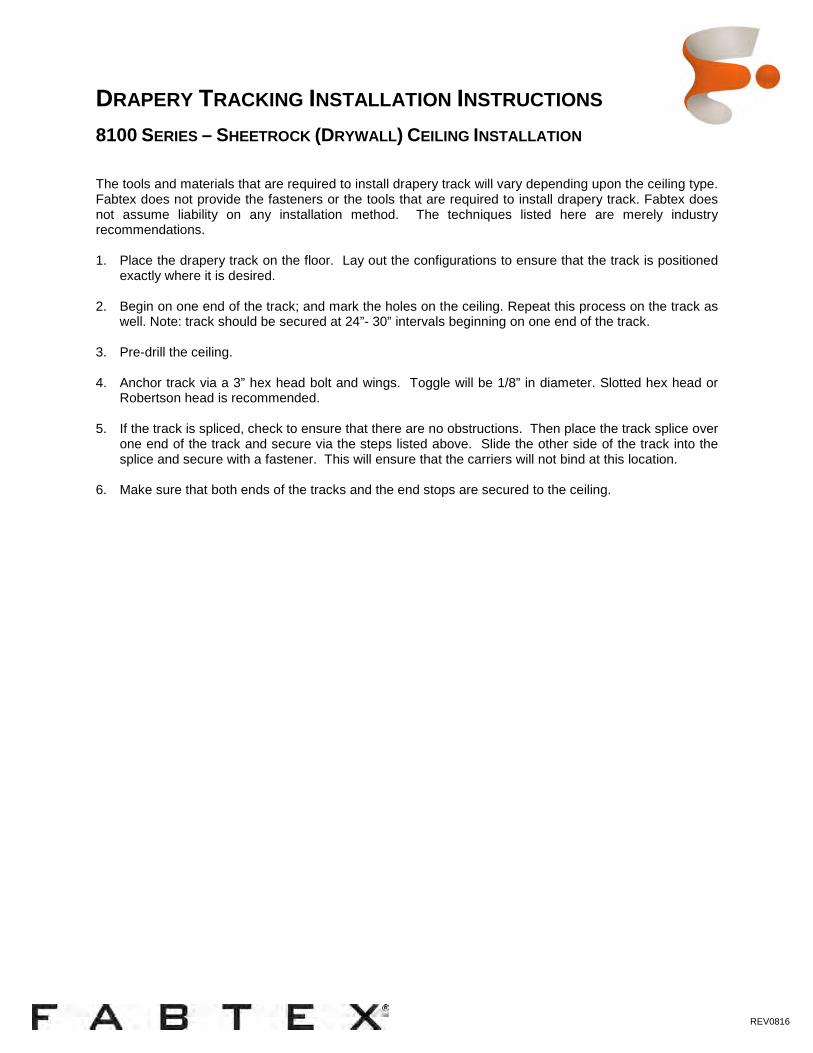
8100 SERIES – SHEETROCK (DRYWALL ) CEILING INSTALLATION The tools and materials that are required to install drapery track will vary depending upon the ceiling type. Fabtex does not provide the fasteners or the tools that are required to install drapery track. Fabtex does not assume liability on any installation method. The techniques listed here are merely industry recommendations. 1. Place the drapery track on the floor. Lay out the configurations to ensure that the track is positioned
exactly where it is desired. 2. Begin on one end of the track; and mark the holes on the ceiling. Repeat this process on the track as
well. Note: track should be secured at 24”- 30” intervals beginning on one end of the track. 3. Pre-drill the ceiling.
4. Anchor track via a 3” hex head bolt and wings. Toggle will be 1/8” in diameter. Slotted hex head or
Robertson head is recommended. 5. If the track is spliced, check to ensure that there are no obstructions. Then place the track splice over
one end of the track and secure via the steps listed above. Slide the other side of the track into the splice and secure with a fastener. This will ensure that the carriers will not bind at this location.
6. Make sure that both ends of the tracks and the end stops are secured to the ceiling.
CONFIDENTIAL Project:
All materials disclosed in this
document are proprietary to
Fabtex, Inc. The Holder agrees
to maintain it in confidence
and must not replicate or
reveal this information in any
manner.
8100 Series Tracking System
Sheetrock Installation
Date:
16-AUG-2016
Scale:
DO NOT SCALE
Dimensions:
Inches/Feet
By:
C. Johnson(800) 778-2791 www.fabtex.com
SHEETROCK
#8 X 2.5” TOGGLE BOLT
DRAPERY TRACK
CEILING TRACK CLIP
REV0816
DRAPERY TRACKING INSTALLATION INSTRUCTIONS
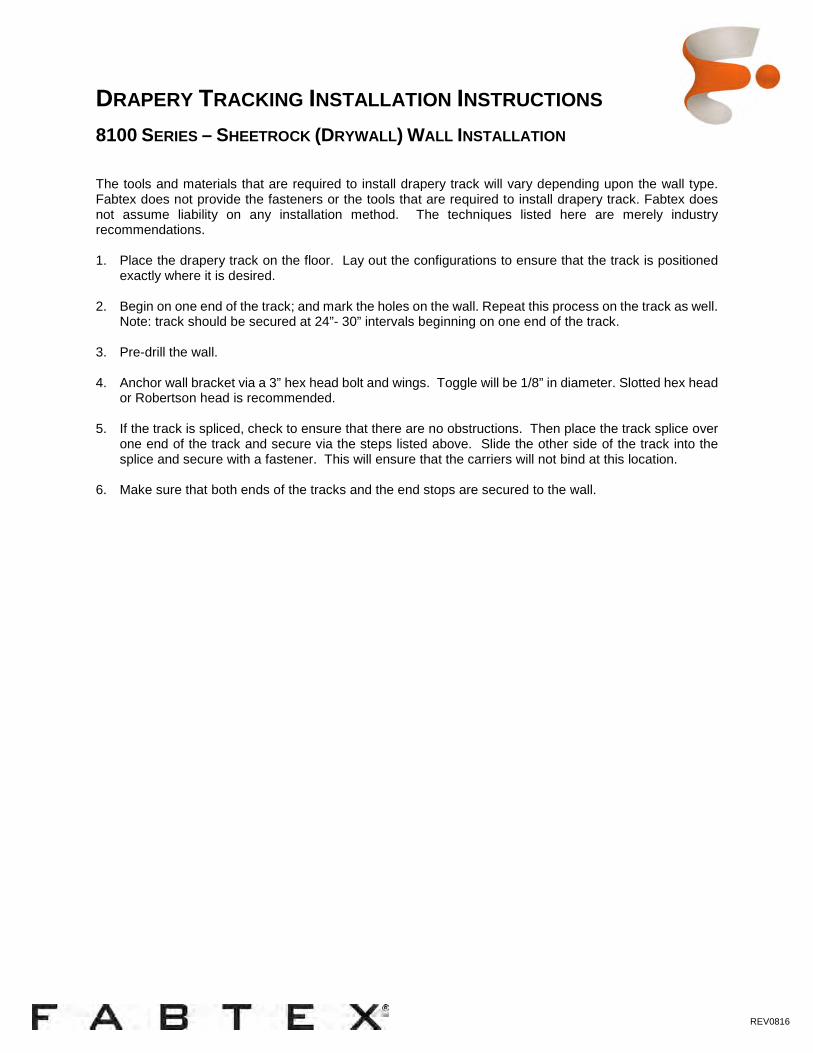
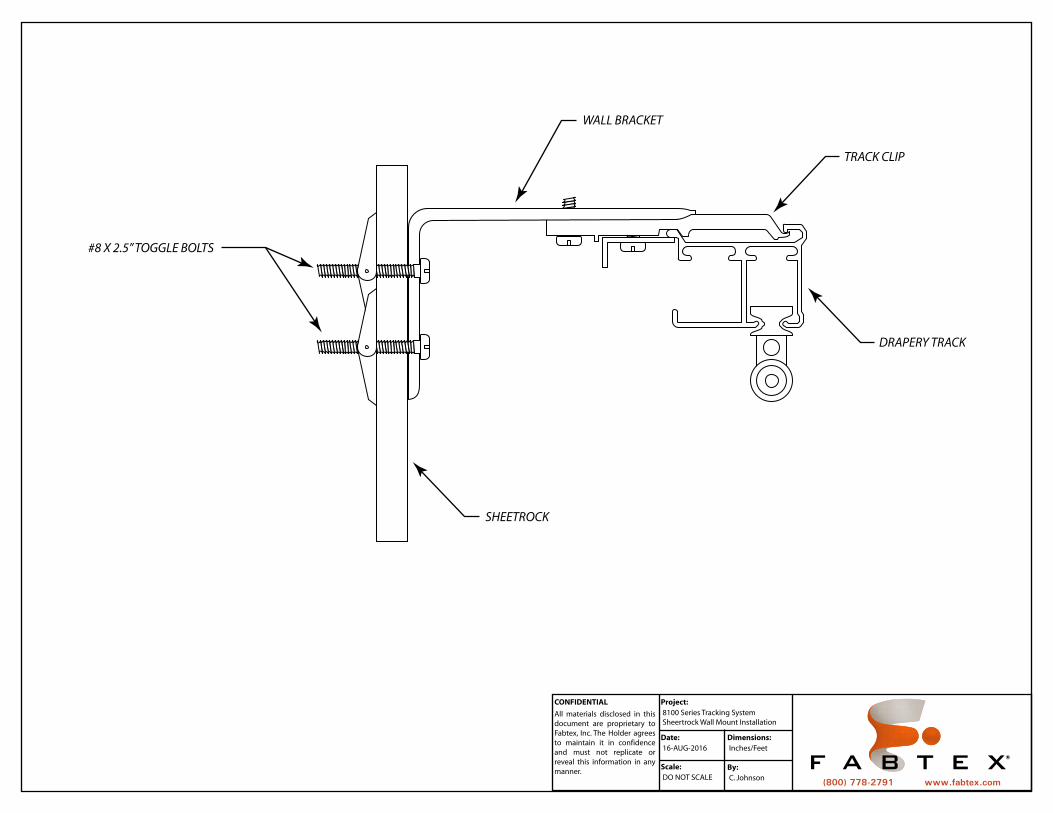
8100 SERIES – SHEETROCK (DRYWALL ) WALL INSTALLATION The tools and materials that are required to install drapery track will vary depending upon the wall type. Fabtex does not provide the fasteners or the tools that are required to install drapery track. Fabtex does not assume liability on any installation method. The techniques listed here are merely industry recommendations. 1. Place the drapery track on the floor. Lay out the configurations to ensure that the track is positioned
exactly where it is desired. 2. Begin on one end of the track; and mark the holes on the wall. Repeat this process on the track as well.
Note: track should be secured at 24”- 30” intervals beginning on one end of the track. 3. Pre-drill the wall. 4. Anchor wall bracket via a 3” hex head bolt and wings. Toggle will be 1/8” in diameter. Slotted hex head
or Robertson head is recommended. 5. If the track is spliced, check to ensure that there are no obstructions. Then place the track splice over
one end of the track and secure via the steps listed above. Slide the other side of the track into the splice and secure with a fastener. This will ensure that the carriers will not bind at this location.
6. Make sure that both ends of the tracks and the end stops are secured to the wall.
CONFIDENTIAL Project:
All materials disclosed in this
document are proprietary to
Fabtex, Inc. The Holder agrees
to maintain it in confidence
and must not replicate or
reveal this information in any
manner.
8100 Series Tracking System
Sheertrock Wall Mount Installation
Date:
16-AUG-2016
Scale:
DO NOT SCALE
Dimensions:
Inches/Feet
By:
C. Johnson(800) 778-2791 www.fabtex.com
SHEETROCK
DRAPERY TRACK
#8 X 2.5” TOGGLE BOLTS
WALL BRACKET
TRACK CLIP
REV0816
DRAPERY TRACKING INSTALLATION INSTRUCTIONS
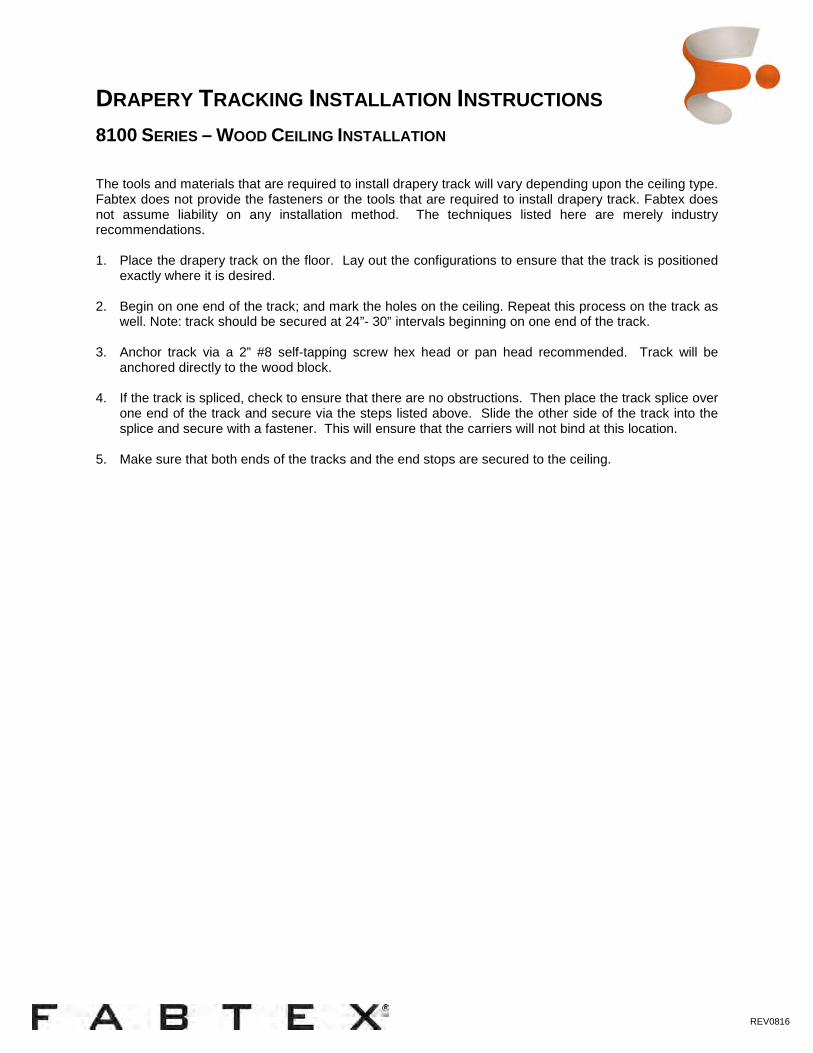
8100 SERIES – WOOD CEILING INSTALLATION The tools and materials that are required to install drapery track will vary depending upon the ceiling type. Fabtex does not provide the fasteners or the tools that are required to install drapery track. Fabtex does not assume liability on any installation method. The techniques listed here are merely industry recommendations. 1. Place the drapery track on the floor. Lay out the configurations to ensure that the track is positioned
exactly where it is desired. 2. Begin on one end of the track; and mark the holes on the ceiling. Repeat this process on the track as
well. Note: track should be secured at 24”- 30” intervals beginning on one end of the track. 3. Anchor track via a 2” #8 self-tapping screw hex head or pan head recommended. Track will be
anchored directly to the wood block. 4. If the track is spliced, check to ensure that there are no obstructions. Then place the track splice over
one end of the track and secure via the steps listed above. Slide the other side of the track into the splice and secure with a fastener. This will ensure that the carriers will not bind at this location.
5. Make sure that both ends of the tracks and the end stops are secured to the ceiling.
CONFIDENTIAL Project:
All materials disclosed in this
document are proprietary to
Fabtex, Inc. The Holder agrees
to maintain it in confidence
and must not replicate or
reveal this information in any
manner.
8100 Series Tracking System
Wood Stud Installation
Date:
16-AUG-2016
Scale:
DO NOT SCALE
Dimensions:
Inches/Feet
By:
C. Johnson(800) 778-2791 www.fabtex.com
SHEETROCK
#8 X 2.5” WOOD SCREW
WOOD STUD
DRAPERY TRACK
CEILING TRACK CLIP

REV0816
DRAPERY TRACKING INSTALLATION INSTRUCTIONS
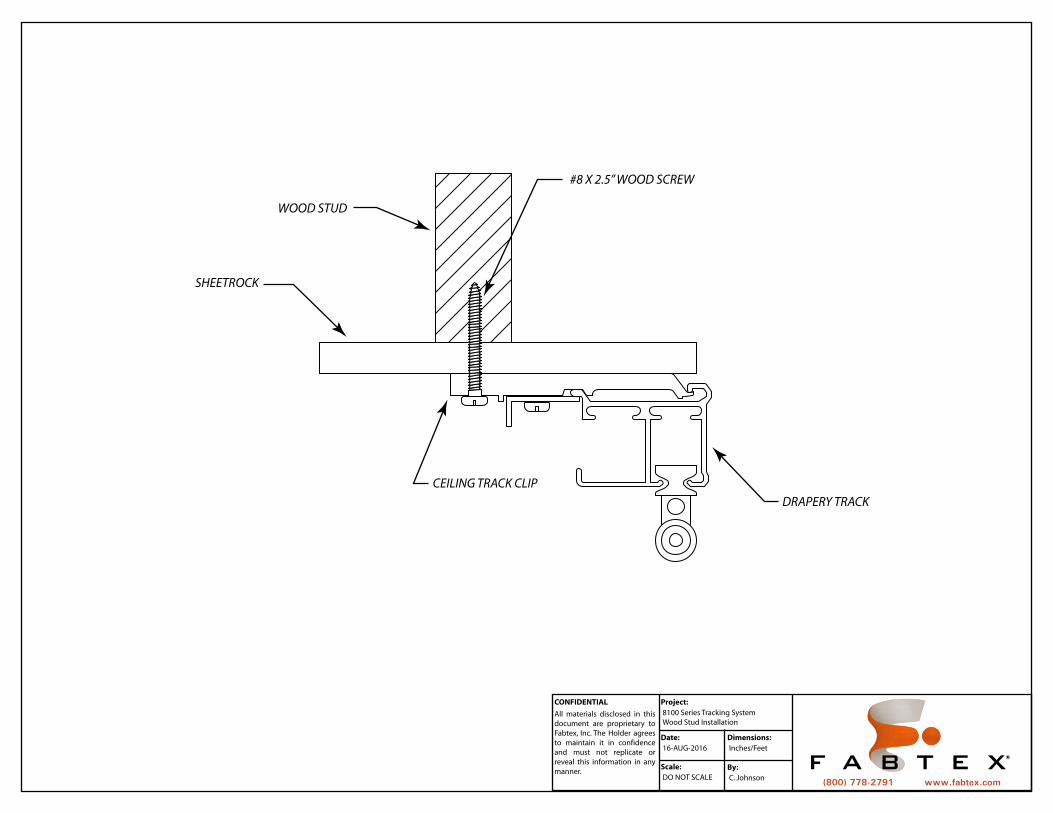
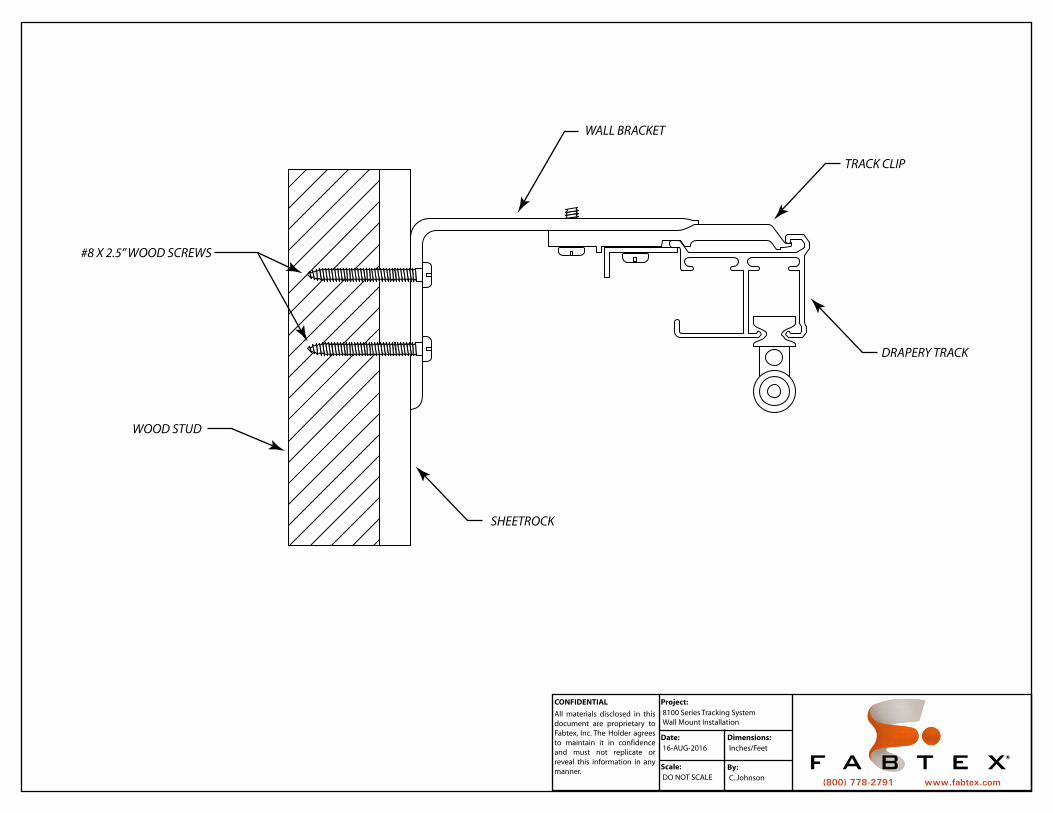
8100 SERIES – WOOD WALL INSTALLATION The tools and materials that are required to install drapery track will vary depending upon the wall type. Fabtex does not provide the fasteners or the tools that are required to install drapery track. Fabtex does not assume liability on any installation method. The techniques listed here are merely industry recommendations. 1. Place the drapery track on the floor. Lay out the configurations to ensure that the track is positioned
exactly where it is desired. 2. Begin on one end of the track; and mark the holes on the wall. Repeat this process on the track as well.
Note: track should be secured at 24”- 30” intervals beginning on one end of the track. 3. Anchor track via a 2” #8 self-tapping screw hex head or pan head recommended. Track will be
anchored directly to the drop ceiling grid. 4. If the track is spliced, check to ensure that there are no obstructions. Then place the track splice over
one end of the track and secure via the steps listed above. Slide the other side of the track into the splice and secure with a fastener. This will ensure that the carriers will not bind at this location.
5. Make sure that both ends of the tracks and the end stops are secured to the wall.
CONFIDENTIAL Project:
All materials disclosed in this
document are proprietary to
Fabtex, Inc. The Holder agrees
to maintain it in confidence
and must not replicate or
reveal this information in any
manner.
8100 Series Tracking System
Wall Mount Installation
Date:
16-AUG-2016
Scale:
DO NOT SCALE
Dimensions:
Inches/Feet
By:
C. Johnson(800) 778-2791 www.fabtex.com
SHEETROCK
#8 X 2.5” WOOD SCREWS
WOOD STUD
DRAPERY TRACK
WALL BRACKET
TRACK CLIP
REV0816
DRAPERY TRACKING INSTALLATION INSTRUCTIONS
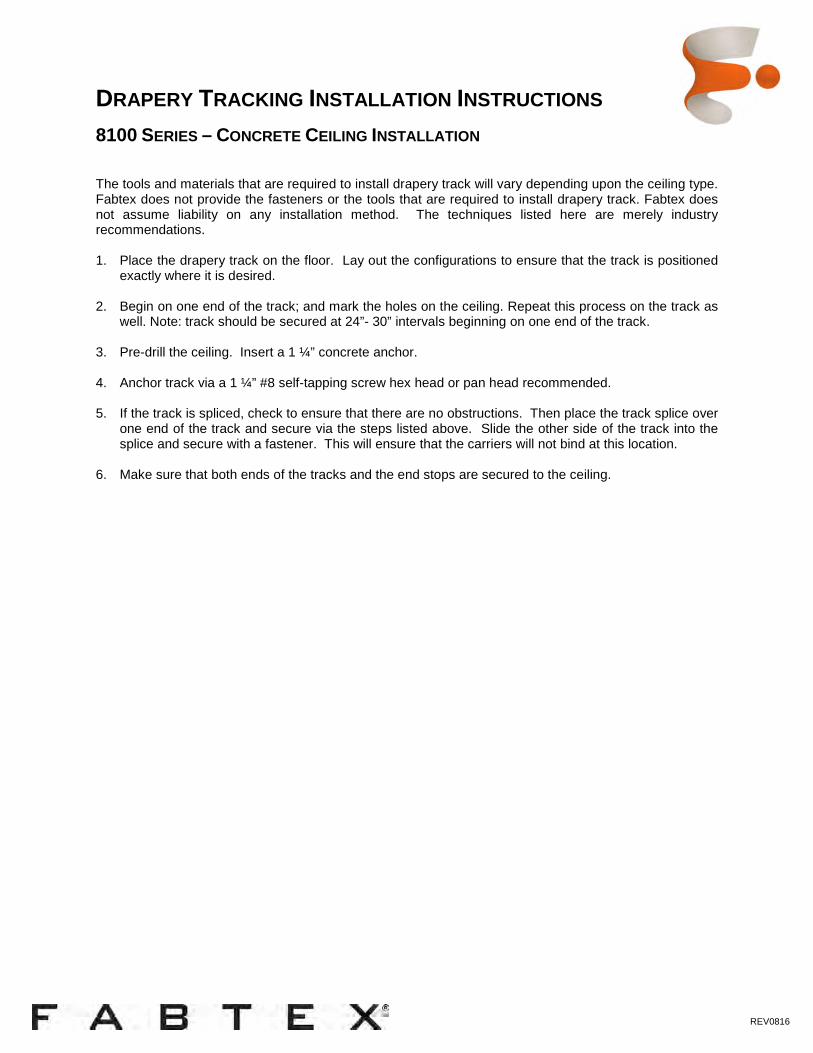
8100 SERIES – CONCRETE CEILING INSTALLATION The tools and materials that are required to install drapery track will vary depending upon the ceiling type. Fabtex does not provide the fasteners or the tools that are required to install drapery track. Fabtex does not assume liability on any installation method. The techniques listed here are merely industry recommendations. 1. Place the drapery track on the floor. Lay out the configurations to ensure that the track is positioned
exactly where it is desired. 2. Begin on one end of the track; and mark the holes on the ceiling. Repeat this process on the track as
well. Note: track should be secured at 24”- 30” intervals beginning on one end of the track. 3. Pre-drill the ceiling. Insert a 1 ¼” concrete anchor. 4. Anchor track via a 1 ¼” #8 self-tapping screw hex head or pan head recommended. 5. If the track is spliced, check to ensure that there are no obstructions. Then place the track splice over
one end of the track and secure via the steps listed above. Slide the other side of the track into the splice and secure with a fastener. This will ensure that the carriers will not bind at this location.
6. Make sure that both ends of the tracks and the end stops are secured to the ceiling.
CONFIDENTIAL Project:
All materials disclosed in this
document are proprietary to
Fabtex, Inc. The Holder agrees
to maintain it in confidence
and must not replicate or
reveal this information in any
manner.
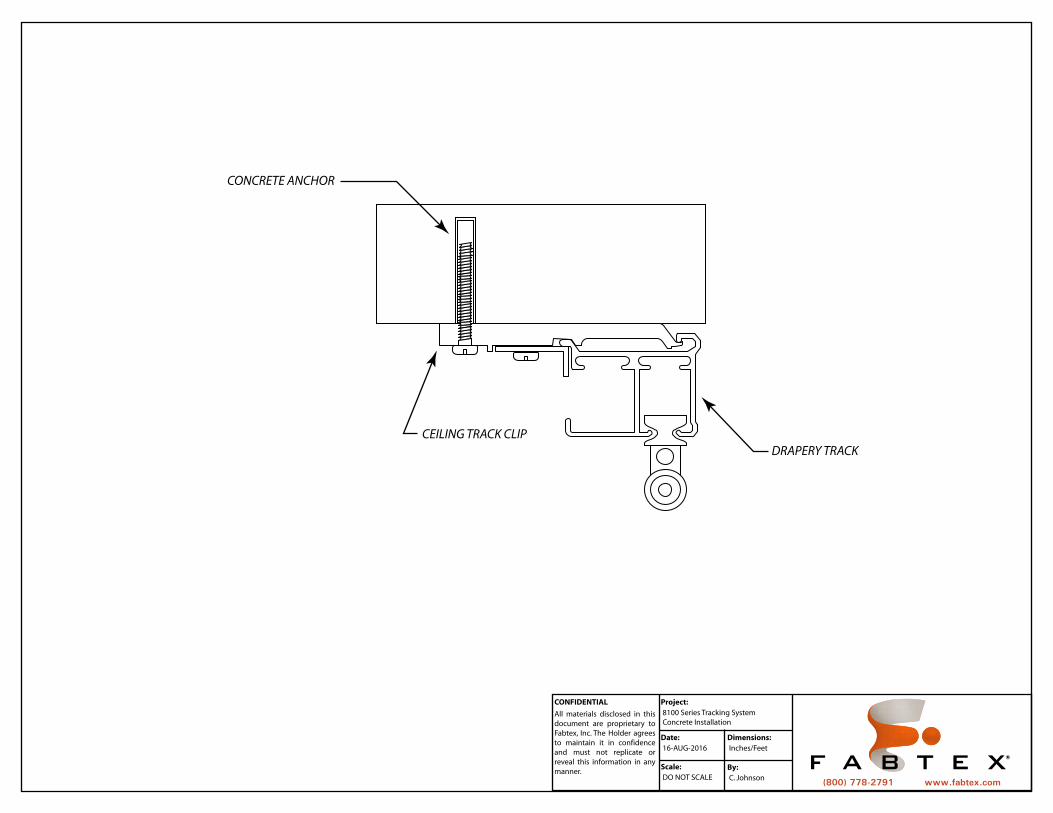
8100 Series Tracking System
Concrete Installation
Date:
16-AUG-2016
Scale:
DO NOT SCALE
Dimensions:
Inches/Feet
By:
C. Johnson(800) 778-2791 www.fabtex.com
CONCRETE ANCHOR
DRAPERY TRACK
CEILING TRACK CLIP
REV0816
DRAPERY TRACKING INSTALLATION INSTRUCTIONS
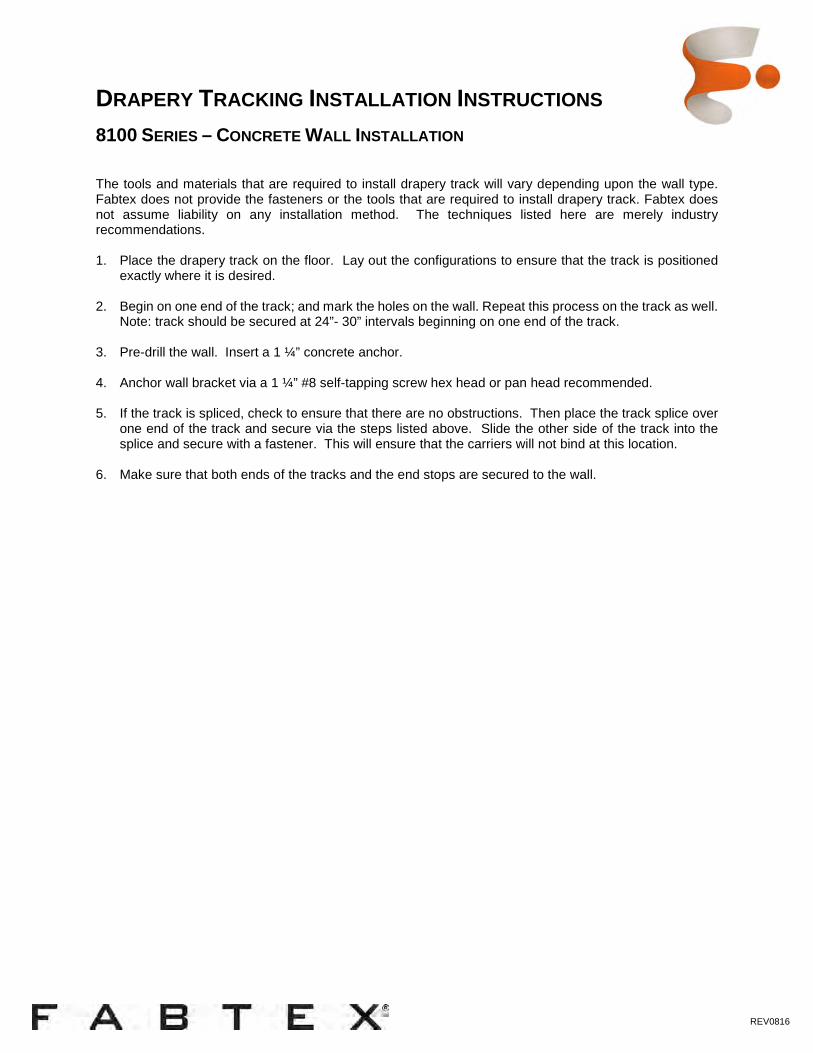
8100 SERIES – CONCRETE WALL INSTALLATION The tools and materials that are required to install drapery track will vary depending upon the wall type. Fabtex does not provide the fasteners or the tools that are required to install drapery track. Fabtex does not assume liability on any installation method. The techniques listed here are merely industry recommendations. 1. Place the drapery track on the floor. Lay out the configurations to ensure that the track is positioned
exactly where it is desired. 2. Begin on one end of the track; and mark the holes on the wall. Repeat this process on the track as well.
Note: track should be secured at 24”- 30” intervals beginning on one end of the track. 3. Pre-drill the wall. Insert a 1 ¼” concrete anchor. 4. Anchor wall bracket via a 1 ¼” #8 self-tapping screw hex head or pan head recommended. 5. If the track is spliced, check to ensure that there are no obstructions. Then place the track splice over
one end of the track and secure via the steps listed above. Slide the other side of the track into the splice and secure with a fastener. This will ensure that the carriers will not bind at this location.
6. Make sure that both ends of the tracks and the end stops are secured to the wall.
CONFIDENTIAL Project:
All materials disclosed in this
document are proprietary to
Fabtex, Inc. The Holder agrees
to maintain it in confidence
and must not replicate or
reveal this information in any
manner.
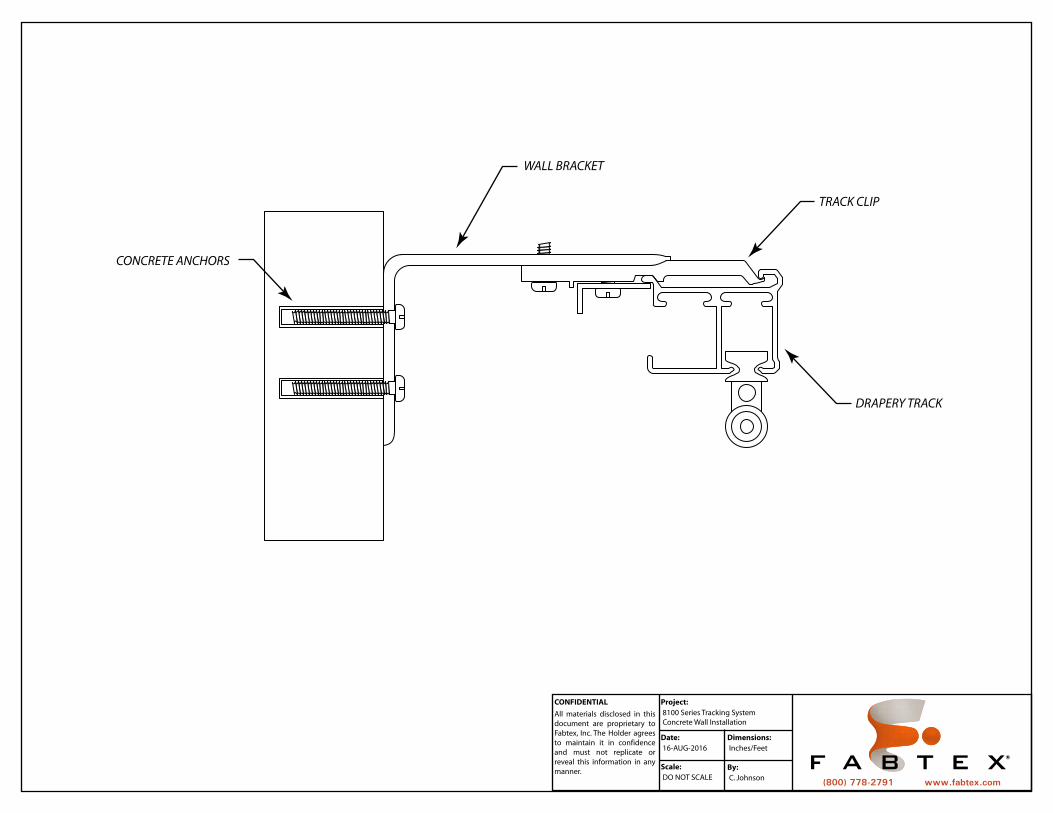
8100 Series Tracking System
Concrete Wall Installation
Date:
16-AUG-2016
Scale:
DO NOT SCALE
Dimensions:
Inches/Feet
By:
C. Johnson(800) 778-2791 www.fabtex.com
CONCRETE ANCHORS
DRAPERY TRACK
WALL BRACKET
TRACK CLIP

REV0816
DRAPERY TRACKING SPECIFICATIONS – 8100 SERIES DIVISION 12490 Part 1 – General 1.1 Summary
A. Work included in this Section: Provision of drapery and track. B. Related Work Not Included in this Section: Backing for drapery tracks.
1.2 System Description A. Performance Requirements
1. Provide draperies that conform to the following requirements of regulatory agencies and the quality control of the Fabtex, Inc.
B. Fire Performance Characteristics 1. Provide curtains that conform to NFPA 701 (Fire Tests for Flame and Resistant Textiles and
Films) and California Title 17 regulations. 1.3 Submittals
A. Product Data 1. Manufacturer’s printed product data for each type of drapery specified.
B. Fabric Samples 1. Swatch cards of fabric (memo) samples illustrating fabric color and weave.
C. Track Samples 1. Verification samples of drapery track, 6 inch (152.4mm) long, in full size with carriers and end
caps. 1.4 Delivery, Storage and Handling
A. Deliver and store packaged products in original containers with seals unbroken and labels intact until time of use.
B. Inspect materials at delivery to assure that specified products have been received. C. Store delivered products inside in a clean, safe and dry environment.
1.5 Warranty A. Standard Fabtex Limited Warranty against material and manufacturing defects for a period of 1
year from the date of the installation. Part 2 – Products 2.1 Fabtex 8100 Series Drapery Track
A. Description: Ceiling or wall mounted aluminum track with matching splices; carriers or slides; corded traverse operations.
B. Acceptable manufacturer 1. Fabtex Inc., (800) 778-2791 in accordance with specifications, drawings, and contract
documents. C. Substitutions: Not Permitted D. Provide all drapery tracks from a single source. E. Construction:
1. Drapery Track System: Fabtex 8100 Series heavy duty extruded aluminum drapery track systems.
2. Track to be delivered in straight lengths up to 18 feet (5.49m). 2.2 Drapery
A. Description: 100% polyester draperies. Fabric is to be dry cleanable and flame retardant. B. Acceptable Manufacturer
1. Fabtex Inc., (800) 778-2791 in accordance with specifications, drawings, and contract documents.
C. Substitutions: Not Permitted D. Provide all draperies from a single source. E. Drapery Styles (select one)
1. Pinch Pleated

REV0816
DRAPERY TRACKING SPECIFICATIONS – 8100 SERIES DIVISION 12490 Part 2 – Products (continued)
2. Accordia-Fold 3. Ripple-Fold
F. Construction: 1. Height of draperies to be from 1 inch (25mm) below ceiling or wall mounted track to a distance
of not more than 1 inch (25mm) from the floor. Unless otherwise noted. 2. Draperies to have minimum of 200 percent (double) fullness, width to be determined by length
of track to ensure proper enclosure. 3. Form top and bottom hems by a double fold securely sewn with edges and panels seams 4
inch (102mm) overlapped lock stitched. 4. Provide pin hooks per every pleat or snap tape as appropriate for the construction of the
drapery. 5. Sew a Fabtex identification label and cleaning instructions on the top hem of each drapery to
identify the size of the drapery. 6. Fabricate curtains with a polyester or blackout lining to be sewn to each drapery. 7. Fabric railroading: Vertical striped patterns are to be railroaded. All other patterns will be
pattern matched and sewn with vertical seams. 8. Plaids: Cut plaid pattern materials utilizing a straight edge; thread pulling to mark cutting line is
not an acceptable method. G. Fabric:
1. Fabric Selection a. Select solid or patterned fabric from manufacturer’s selection.
2. Lining Selection a. Select blackout lining or polyester lining from the standard selection of samples from the
Fabtex, Inc. Part 3 – Execution 3.1 Preparation
A. Coordinate details with other work supporting, adjoining, or otherwise contacting items as required to insure proper installation.
B. Verify that surfaces and above ceiling supports/backing are installed by the general contractor and are ready to receive work. 1. Exposed finishes have been applied, and setting conditions are dry, clean, and otherwise
proper for installation. 3.2 Examination
A. Examine construction to support, adjoin, or otherwise contact and verify that: 1. Dimensions are correct. 2. Backing is available and installed where required.
B. Do not install items until unsatisfactory conditions have been corrected. 3.3 Installation
A. Install track in accordance with approved Fabtex, Inc. recommendations and reviewed Shop Drawings.
B. Typical Fastenings 1. Use machine screws or bolts to metal backing.
C. Drill and tap mounting surfaces for mounting hardware as required. D. Install track in one piece when less than 18 feet (5.49m) long and with no more than one splice for
each additional 18 feet (5.49m). E. Butt Joints
1. Secure with splices. F. Carriers / Slides

REV0816
DRAPERY TRACKING SPECIFICATIONS – 8100 SERIES DIVISION 12490 Part 3 – Execution (continued)
1. Furnish one carrier or slide per every pin hook or snap of drapery. G. End Caps
1. Provide at both ends with return attachment. H. Furnish tag designating proper size drapery at return of each curtain.
3.4 Cleaning A. At completion of installation, remove any debris and clean surfaces in accordance with Fabtex, Inc.
clean-up and maintenance instructions.
Related Documents