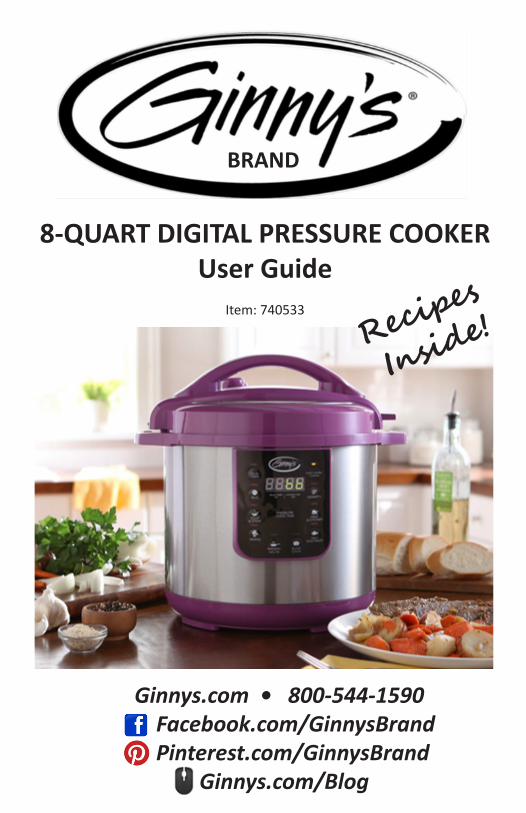
BRAND 8-QUART DIGITAL PRESSURE COOKER User Guide Item: 740533 Ginnys.com • 800-544-1590 Facebook.com/GinnysBrand Pinterest.com/GinnysBrand Ginnys.com/Blog Recipes Inside!

Welcome message from author
This document is posted to help you gain knowledge. Please leave a comment to let me know what you think about it! Share it to your friends and learn new things together.
Transcript
BRAND
8-QUART DIGITAL PRESSURE COOKERUser Guide
Item: 740533
Ginnys.com • 800-544-1590 Facebook.com/GinnysBrand Pinterest.com/GinnysBrand Ginnys.com/Blog
Recipes
Inside!
TABLE OF CONTENTS
Important Safeguards 3 Electrical Safety and Specifications 4 Get to Know Your Cooker 5-8 How to Operate 8-11 Cooking Time Charts 12-15 Canning 15 Trouble Shooting 16-18 Cleaning & Care 19 Recipes 20-23 Warranty 24
____________________________________________________________
____________________________________________________________
Thank you for purchasing a Ginny’s Brand 8-Quart Digital Pressure Cooker. This is not your grandma’s pressure cooker! This one is equipped with several safety features to remove the worry. It’s easy to use — nearly foolproof, with programmed menu buttons. You’ll be cooking faster and healthier...nutrients will be sealed in, rather than boiled away! Plus, this pressure cooker automatically switches to “warm” when the cooking cycle is done — so your food is hot, and ready when you are. Enjoy!
2 Ginnys.com 800-544-1590
____________________________________________________________
____________________________________________________________
IMPORTANT SAFEGUARDS READ CAREFULLY BEFORE USING AND SAVE THESE INSTRUCTIONS!
• FOR HOUSEHOLD USE ONLY. Do not use this appliance for other than its intended use.• REMOVE all packaging materials and labels before first use.• WASH all removable parts before first use. See Cleaning & Care.• A SHORT CORD is provided to reduce the hazards resulting from entan- glement or tripping. If this is a DETACHABLE CORD, always attach it to the appliance first, then to the electrical outlet. Do not drape the cord over the counter or tabletop, where it can be pulled on or tripped over.• We do not recommend using an extension cord with this appliance. However, IF AN EXTENSION CORD IS USED, the marked electrical rating should be at least as great as the electrical rating of this appliance. • CLOSE SUPERVISION is necessary when using this appliance near CHILDREN.• A fire may occur if this appliance is used near FLAMMABLE MATERIALS, including curtains, towels, walls, etc. Do not place any paper, plastic, or other non-food items in the appliance. Do not place the appliance or its cord on or near a heated surface, or in a heated oven.• This appliance should always be used on a STABLE, DRY, HEAT-RESISTANT SURFACE. • Do not use an accessory or attachment not recommended by Ginny’s, as this may cause injury, or damage the appliance.• Always use OVEN MITTS when handling hot food or appliances. Do not attempt to move an appliance when it is hot, or has hot contents.• Do not use outdoors.• Turn OFF AND UNPLUG this appliance when not in use.• NO SERVICEABLE PARTS INSIDE THIS APPLIANCE. • DO NOT USE AN APPLIANCE WITH A DAMAGED CORD OR PLUG, OR AFTER THE APPLIANCE MALFUNCTIONS, OR HAS BEEN DAMAGED IN ANY MANNER.• NEVER OVERFILL YOUR PRESSURE COOKER WHEN COOKING SUCH
FOODS AS BEANS, LEGUMES, OATMEAL, SOUP MIXES CONTAINING DRIED VEGETABLES, OR PASTA - USE HALF-WAY MARK. THESE FOODS TEND TO FOAM AND FROTH AND MAY BLOCK THE VALVES.
• When canning, always use supplies specifically made for canning.
3Facebook.com/GinnysBrand
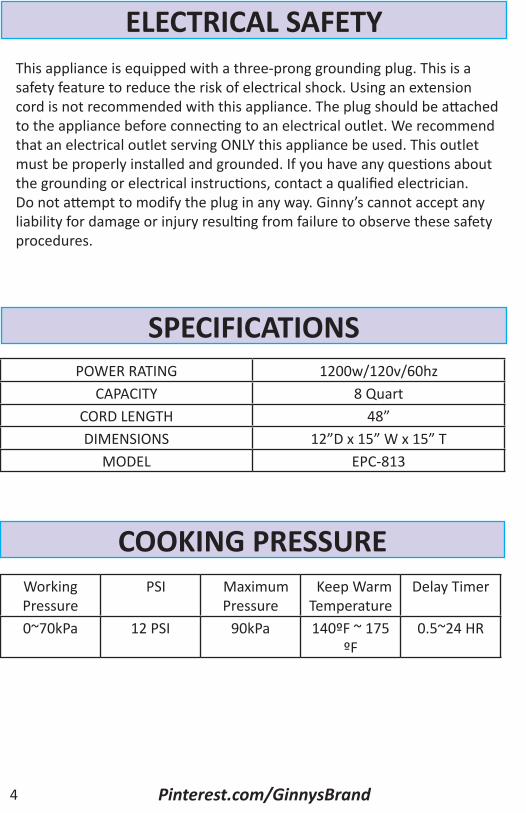
ELECTRICAL SAFETY
SPECIFICATIONS
This appliance is equipped with a three-prong grounding plug. This is a safety feature to reduce the risk of electrical shock. Using an extension cord is not recommended with this appliance. The plug should be attached to the appliance before connecting to an electrical outlet. We recommend that an electrical outlet serving ONLY this appliance be used. This outlet must be properly installed and grounded. If you have any questions about the grounding or electrical instructions, contact a qualified electrician. Do not attempt to modify the plug in any way. Ginny’s cannot accept any liability for damage or injury resulting from failure to observe these safety procedures.
POWER RATING 1200w/120v/60hzCAPACITY 8 Quart
CORD LENGTH 48”DIMENSIONS 12”D x 15” W x 15” T
MODEL EPC-813
4 Pinterest.com/GinnysBrand
COOKING PRESSUREWorking Pressure
PSI Maximum Pressure
Keep Warm Temperature
Delay Timer
0~70kPa 12 PSI 90kPa 140ºF ~ 175 ºF
0.5~24 HR
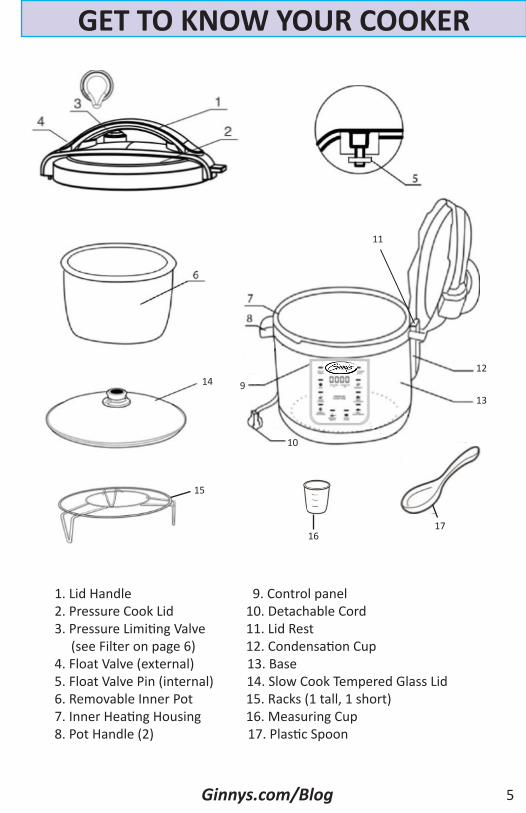
GET TO KNOW YOUR COOKER
5Ginnys.com/Blog
1. Lid Handle 9. Control panel 2. Pressure Cook Lid 10. Detachable Cord 3. Pressure Limiting Valve 11. Lid Rest (see Filter on page 6) 12. Condensation Cup 4. Float Valve (external) 13. Base 5. Float Valve Pin (internal) 14. Slow Cook Tempered Glass Lid 6. Removable Inner Pot 15. Racks (1 tall, 1 short) 7. Inner Heating Housing 16. Measuring Cup 8. Pot Handle (2) 17. Plastic Spoon
15
16
14 9
10
12
13
11
17
GET TO KNOW YOUR APPLIANCE
6 Ginnys.com 800-544-1590
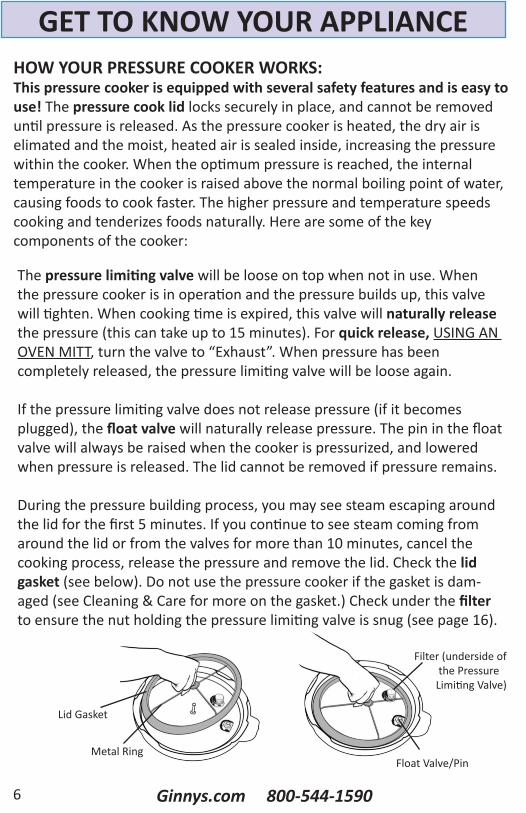
HOW YOUR PRESSURE COOKER WORKS:This pressure cooker is equipped with several safety features and is easy to use! The pressure cook lid locks securely in place, and cannot be removed until pressure is released. As the pressure cooker is heated, the dry air is elimated and the moist, heated air is sealed inside, increasing the pressure within the cooker. When the optimum pressure is reached, the internal temperature in the cooker is raised above the normal boiling point of water, causing foods to cook faster. The higher pressure and temperature speeds cooking and tenderizes foods naturally. Here are some of the key components of the cooker:
The pressure limiting valve will be loose on top when not in use. When the pressure cooker is in operation and the pressure builds up, this valve will tighten. When cooking time is expired, this valve will naturally release the pressure (this can take up to 15 minutes). For quick release, USING AN OVEN MITT, turn the valve to “Exhaust”. When pressure has been completely released, the pressure limiting valve will be loose again.
If the pressure limiting valve does not release pressure (if it becomes plugged), the float valve will naturally release pressure. The pin in the float valve will always be raised when the cooker is pressurized, and lowered when pressure is released. The lid cannot be removed if pressure remains.
During the pressure building process, you may see steam escaping around the lid for the first 5 minutes. If you continue to see steam coming from around the lid or from the valves for more than 10 minutes, cancel the cooking process, release the pressure and remove the lid. Check the lid gasket (see below). Do not use the pressure cooker if the gasket is dam-aged (see Cleaning & Care for more on the gasket.) Check under the filter to ensure the nut holding the pressure limiting valve is snug (see page 16).
Lid Gasket
Filter (underside of the Pressure Limiting Valve)
Float Valve/PinMetal Ring
GET TO KNOW YOUR APPLIANCE
7Facebook.com/GinnysBrand
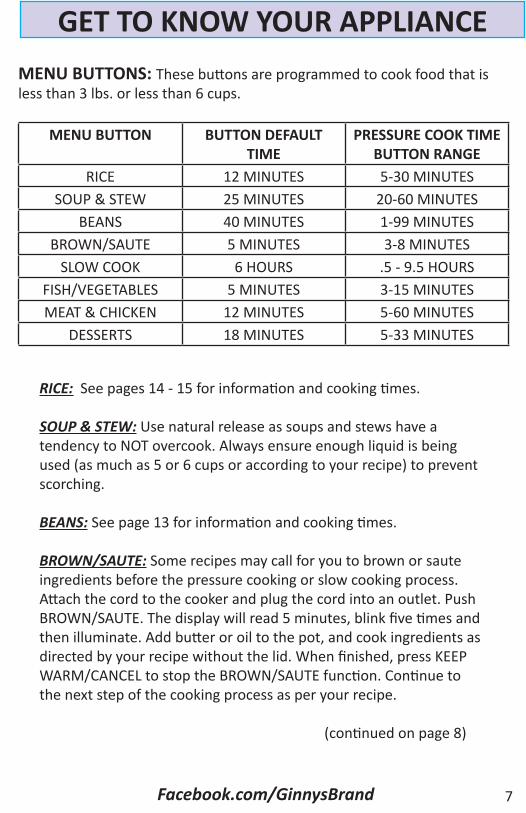
MENU BUTTONS: These buttons are programmed to cook food that is less than 3 lbs. or less than 6 cups.
MENU BUTTON BUTTON DEFAULT TIME
PRESSURE COOK TIME BUTTON RANGE
RICE 12 MINUTES 5-30 MINUTESSOUP & STEW 25 MINUTES 20-60 MINUTES
BEANS 40 MINUTES 1-99 MINUTESBROWN/SAUTE 5 MINUTES 3-8 MINUTES
SLOW COOK 6 HOURS .5 - 9.5 HOURSFISH/VEGETABLES 5 MINUTES 3-15 MINUTESMEAT & CHICKEN 12 MINUTES 5-60 MINUTES
DESSERTS 18 MINUTES 5-33 MINUTES
RICE: See pages 14 - 15 for information and cooking times.
SOUP & STEW: Use natural release as soups and stews have a tendency to NOT overcook. Always ensure enough liquid is being used (as much as 5 or 6 cups or according to your recipe) to prevent scorching.
BEANS: See page 13 for information and cooking times.
BROWN/SAUTE: Some recipes may call for you to brown or saute ingredients before the pressure cooking or slow cooking process. Attach the cord to the cooker and plug the cord into an outlet. Push BROWN/SAUTE. The display will read 5 minutes, blink five times and then illuminate. Add butter or oil to the pot, and cook ingredients as directed by your recipe without the lid. When finished, press KEEP WARM/CANCEL to stop the BROWN/SAUTE function. Continue to the next step of the cooking process as per your recipe. (continued on page 8)
8 Pinterest.com/GinnysBrand
GET TO KNOW YOUR APPLIANCE
FISH/VEGETABLES: See page 13 for fish/seafood information and cooking times. See page 14 for vegetable information and cooking times.
MEAT & CHICKEN: Cooking times for meat or poultry may vary according to the quality and quantity; the denser the cut, the longer the cooking time should be. See page 12 for information and cooking times.
DESSERTS: For cooking down fruits, making cakes, etc. Use recipes specifically written for pressure cookers.
KEEP WARM/CANCEL: To keep cooked food warm or to cancel an operation. Attach the cord to the cooker and plug the cord into an outlet. Select KEEP WARM/CANCEL one time for warming. The indicator light will come on and the display will read “bb”. Either lid may be used. If the pressure cook lid is used, turn the pressure limiting valve to “Exhaust”. To avoid drying out or scorching, we do not recommend keeping food warm for more than four hours. To cancel, press KEEP WARM/CANCEL again and the indicator light will go off. Unplug the cooker.
counting down. When cooking is complete, the cooker will beep three times and switch to KEEP WARM. The indicator light will iluminate and the display will show bb. To turn off, press KEEP WARM/CANCEL, and unplug the cooker.
The amount of food and water should not exceed 2/3 of the inner pot (MAX FILL LINE). For food that will expand in water, the level should not exceed 1/2 of the inner pot. These markings are listed on the inside of the pot for easy reference.
Note:
SLOW COOK: For slow cooker recipes. Use the slow cook tempered glass lid rather than the pressure cook lid. Attach the cord to the cook-er and plug the cord into an outlet. Select SLOW COOK. The display will read 6 hours. If you desire more or less time, press SLOW COOK and time will increase by 30 minute intervals. (When 9:30 is reached, the display will start over at :30.) Stop pressing SLOW COOK when the desired time is reached. The display will blink five times and then illuminate. The cooker may take 5-20 minutes (depending on the amount of food) to reach temperature before the display starts to count down. Temperature is similar to HIGH on your traditional slow cooker.
HOW TO OPERATE
9Ginnys.com/Blog
HOW TO OPERATE
5. Prepare desired food and place into cooking pot. Lock the pressure cook lid securely.
6. Make sure the pressure limiting valve is set to “Airtight”.7. Attach the cord to the cooker. Plug the cord into an outlet. The screen will display 00 00.8. Choose the desired menu button. The cooking time will display (the display will blink five times and then illuminate).9. It may take 5-20 minutes for pressure to build (depending on the amount of food). When pressure is reached, the first digit of the display will be “P”. The display will begin to count down. 10. When cooking time has counted down, the cooker will beep three times and go to KEEP WARM (the indicator light will illuminate and the display will show “bb”).11. The cooker will begin releasing pressure. Natural release may take up to 15 minutes. For quick release see page 6. KEEP CLEAR OF THE RELEASING STEAM! (continued on page 10)
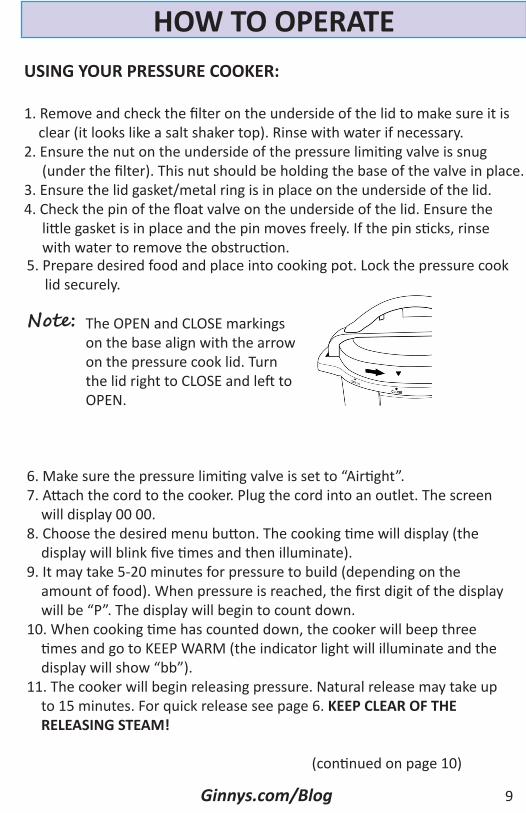
The OPEN and CLOSE markings on the base align with the arrow on the pressure cook lid. Turn the lid right to CLOSE and left to OPEN.
Note:
USING YOUR PRESSURE COOKER:
1. Remove and check the filter on the underside of the lid to make sure it is clear (it looks like a salt shaker top). Rinse with water if necessary. 2. Ensure the nut on the underside of the pressure limiting valve is snug (under the filter). This nut should be holding the base of the valve in place.3. Ensure the lid gasket/metal ring is in place on the underside of the lid.4. Check the pin of the float valve on the underside of the lid. Ensure the little gasket is in place and the pin moves freely. If the pin sticks, rinse with water to remove the obstruction.
HOW TO OPERATE
10
USING THE PRESSURE COOK TIME BUTTON: This button is used with the menu buttons when you need more or less time than the default time. See the table on page 7 for the time ranges.
1. Prepare desired food and place into cooking pot. Lock the pressure cook lid securely.2. Make sure the pressure limiting valve is set to “Airtight”.3. Attach the cord to the cooker. Plug the cord into an outlet. The screen will display 00 00.4. Choose the desired menu button. The cooking time will display. Quickly press PRESSURE COOK TIME to increase or decrease the default time. Hold the button down for rapid increase. Hold the button down until it passes the maximum time and the display will begin at the minimum time indicated on the table on page 7. When desired time is reached, stop pressing the button (the display will blink five times and then illuminate).5. It may take 5-20 minutes for pressure to build (depending on the amount of food). When pressure is reached, the first digit of the display will be “P”. The display will begin to count down. 6. When cooking time has counted down, the cooker will beep three times and go to KEEP WARM (the indicator light will illuminate and the display will show “bb”).7. The cooker will begin releasing pressure. Natural release may take up to 15 minutes. For quick release see page 6. KEEP CLEAR OF THE RELEASING STEAM! 8. Press KEEP WARM/CANCEL to turn off the cooker and unplug the pressure cooker.
Ginnys.com 800-544-1590
WARNING: ALWAYS BE CERTAIN PRESSURE IS FULLY RELEASED AND THE PRESSURE LIMITING VALVE IS TURNED TO “EXHAUST” BEFORE ATTEMPTING TO UNLOCK THE PRESSURE COOK LID. (THE PRESSURE LIMITING VALVE WILL BE LOOSE.) NEVER FORCE THE LID OPEN - IT SHOULD MOVE FREELY WHEN PRESSURE IS RELEASED. 12. Press KEEP WARM/CANCEL to turn off the cooker. Unplug the pressure cooker.
HOW TO OPERATE
11
Do not use DELAY TIMER to cook foods that may spoil. Only use it to cook food that can be left out, such as rice, beans, grains, or other foods that will not spoil quickly.
Note:
USING THE DELAY TIMER BUTTON: This button is used with the menu buttons and PRESSURE COOK TIME to set your cooker to begin cooking at a later time (up to 24 hours later).
1. Prepare desired food and place into cooking pot. Lock the pressure cook lid securely.2. Make sure the pressure limiting valve is set to “Airtight”3. Attach the cord to the cooker. Plug the cord into an outlet. The screen will display 00 00.4. Choose the desired menu button. The cooking time will display. If needed, quickly press PRESSURE COOK TIME to increase or decrease the default time (see page 10). 5. When the desired time is reached, quickly press DELAY TIMER. Each time you press this button, the display will count up in 30 minute intervals. When you have reached the desired delay time, stop pressing DELAY TIMER. The display will blink five times and then illuminate.6. The display will count down the time until it begins cooking. When it reaches 00 00, the cooker will begin building pressure and cook your food as you indicated.7. It may take 5-20 minutes (depending on the amount of food) for pressure to build. When pressure is reached, the first digit of the display will be “P”. The display will begin to count down. 8. When cooking time has counted down, the cooker will beep three times and go to KEEP WARM (the indicator light will illuminate and the display will show “bb”).9. The cooker will begin releasing pressure. Natural release may take up to 15 minutes. For quick release see page 6. KEEP CLEAR OF THE RELEASING STEAM!10. Press KEEP WARM/CANCEL to turn off the cooker and unplug the pressure cooker.
Facebook.com/GinnysBrand
COOKING TIME CHARTS
12
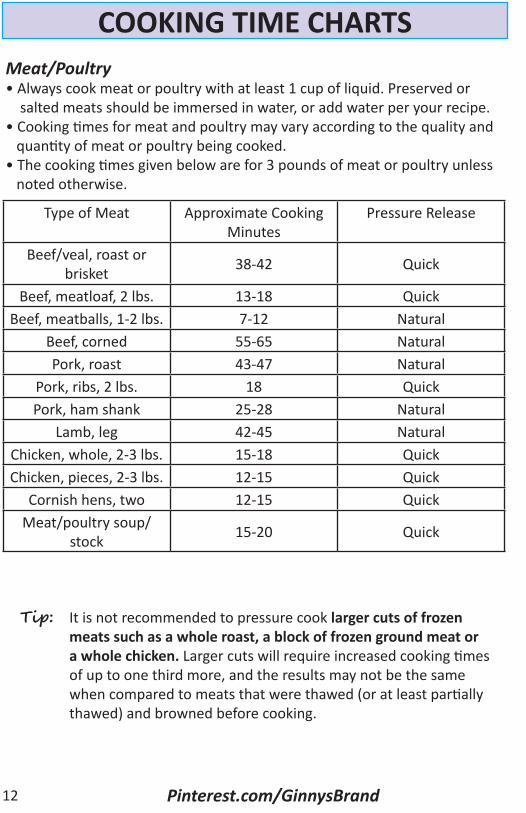
Type of Meat Approximate Cooking Minutes
Pressure Release
Beef/veal, roast or brisket 38-42 Quick
Beef, meatloaf, 2 lbs. 13-18 QuickBeef, meatballs, 1-2 lbs. 7-12 Natural
Beef, corned 55-65 NaturalPork, roast 43-47 Natural
Pork, ribs, 2 lbs. 18 QuickPork, ham shank 25-28 Natural
Lamb, leg 42-45 NaturalChicken, whole, 2-3 lbs. 15-18 QuickChicken, pieces, 2-3 lbs. 12-15 Quick
Cornish hens, two 12-15 QuickMeat/poultry soup/
stock 15-20 Quick
Meat/Poultry• Always cook meat or poultry with at least 1 cup of liquid. Preserved or salted meats should be immersed in water, or add water per your recipe.• Cooking times for meat and poultry may vary according to the quality and quantity of meat or poultry being cooked.• The cooking times given below are for 3 pounds of meat or poultry unless noted otherwise.
12 Pinterest.com/GinnysBrand
Tip: It is not recommended to pressure cook larger cuts of frozen meats such as a whole roast, a block of frozen ground meat or a whole chicken. Larger cuts will require increased cooking times of up to one third more, and the results may not be the same when compared to meats that were thawed (or at least partially thawed) and browned before cooking.
COOKING TIME CHARTS
13
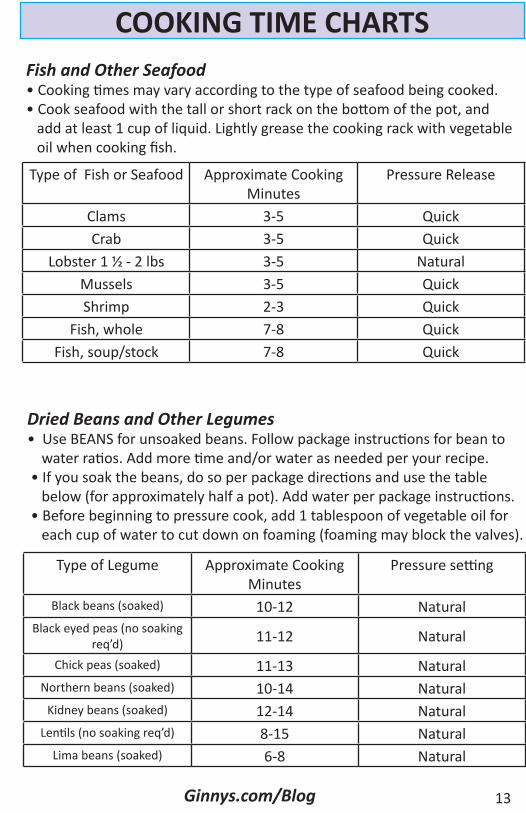
Type of Fish or Seafood Approximate Cooking Minutes
Pressure Release
Clams 3-5 QuickCrab 3-5 Quick
Lobster 1 1/2 - 2 lbs 3-5 NaturalMussels 3-5 QuickShrimp 2-3 Quick
Fish, whole 7-8 QuickFish, soup/stock 7-8 Quick
Type of Legume Approximate Cooking Minutes
Pressure setting
Black beans (soaked) 10-12 NaturalBlack eyed peas (no soaking
req’d) 11-12 Natural
Chick peas (soaked) 11-13 NaturalNorthern beans (soaked) 10-14 Natural
Kidney beans (soaked) 12-14 NaturalLentils (no soaking req’d) 8-15 Natural
Lima beans (soaked) 6-8 Natural
Fish and Other Seafood• Cooking times may vary according to the type of seafood being cooked.• Cook seafood with the tall or short rack on the bottom of the pot, and add at least 1 cup of liquid. Lightly grease the cooking rack with vegetable oil when cooking fish.
Dried Beans and Other Legumes• Use BEANS for unsoaked beans. Follow package instructions for bean to water ratios. Add more time and/or water as needed per your recipe. • If you soak the beans, do so per package directions and use the table below (for approximately half a pot). Add water per package instructions. • Before beginning to pressure cook, add 1 tablespoon of vegetable oil for each cup of water to cut down on foaming (foaming may block the valves).
Ginnys.com/Blog
COOKING TIME CHARTS
14 Ginnys.com 800-544-1590
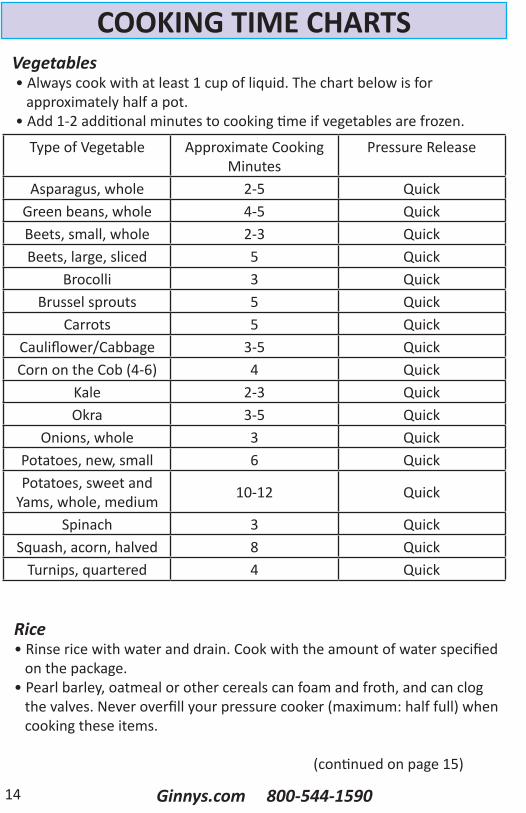
Type of Vegetable Approximate Cooking Minutes
Pressure Release
Asparagus, whole 2-5 QuickGreen beans, whole 4-5 QuickBeets, small, whole 2-3 QuickBeets, large, sliced 5 Quick
Brocolli 3 QuickBrussel sprouts 5 Quick
Carrots 5 QuickCauliflower/Cabbage 3-5 QuickCorn on the Cob (4-6) 4 Quick
Kale 2-3 QuickOkra 3-5 Quick
Onions, whole 3 QuickPotatoes, new, small 6 QuickPotatoes, sweet and
Yams, whole, medium 10-12 Quick
Spinach 3 QuickSquash, acorn, halved 8 Quick
Turnips, quartered 4 Quick
Vegetables • Always cook with at least 1 cup of liquid. The chart below is for approximately half a pot. • Add 1-2 additional minutes to cooking time if vegetables are frozen.
Rice• Rinse rice with water and drain. Cook with the amount of water specified on the package.• Pearl barley, oatmeal or other cereals can foam and froth, and can clog the valves. Never overfill your pressure cooker (maximum: half full) when cooking these items.
(continued on page 15)
COOKING TIME CHARTS
15Facebook.com/GinnysBrand
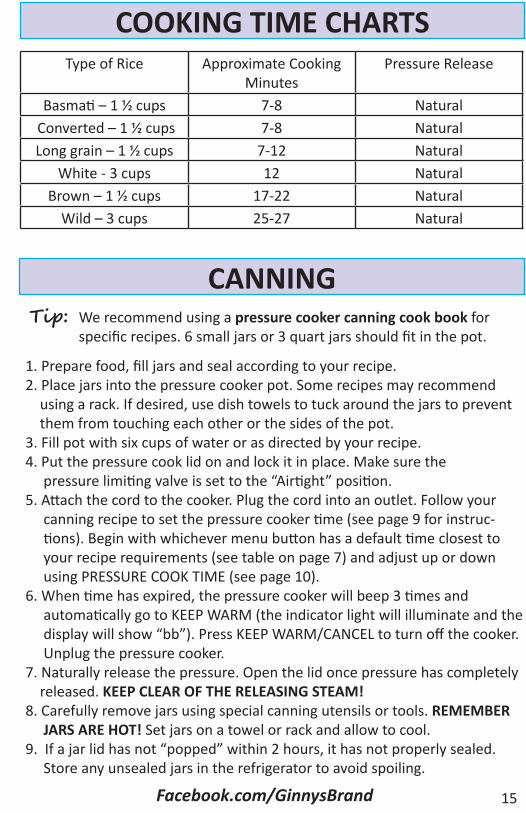
Type of Rice Approximate Cooking Minutes
Pressure Release
Basmati – 1 1/2 cups 7-8 Natural Converted – 1 1/2 cups 7-8 NaturalLong grain – 1 1/2 cups 7-12 Natural
White - 3 cups 12 NaturalBrown – 1 1/2 cups 17-22 Natural
Wild – 3 cups 25-27 Natural
CANNINGTip: We recommend using a pressure cooker canning cook book for
specific recipes. 6 small jars or 3 quart jars should fit in the pot.
1. Prepare food, fill jars and seal according to your recipe.2. Place jars into the pressure cooker pot. Some recipes may recommend using a rack. If desired, use dish towels to tuck around the jars to prevent them from touching each other or the sides of the pot.3. Fill pot with six cups of water or as directed by your recipe.4. Put the pressure cook lid on and lock it in place. Make sure the pressure limiting valve is set to the “Airtight” position.5. Attach the cord to the cooker. Plug the cord into an outlet. Follow your canning recipe to set the pressure cooker time (see page 9 for instruc- tions). Begin with whichever menu button has a default time closest to your recipe requirements (see table on page 7) and adjust up or down using PRESSURE COOK TIME (see page 10).6. When time has expired, the pressure cooker will beep 3 times and automatically go to KEEP WARM (the indicator light will illuminate and the display will show “bb”). Press KEEP WARM/CANCEL to turn off the cooker. Unplug the pressure cooker.7. Naturally release the pressure. Open the lid once pressure has completely released. KEEP CLEAR OF THE RELEASING STEAM!8. Carefully remove jars using special canning utensils or tools. REMEMBER JARS ARE HOT! Set jars on a towel or rack and allow to cool.9. If a jar lid has not “popped” within 2 hours, it has not properly sealed. Store any unsealed jars in the refrigerator to avoid spoiling.
TROUBLESHOOTING
16 Pinterest.com/GinnysBrand
PROBLEM
Is the pressure limiting valve on the top of the lid supposed to be loose?
When I choose a menu button, nothing happens. Pressure is not building up. What’s wrong?
SOLUTION
If pressure is not built up, the valve top will be loose. It will turn 360 degrees and will come off if you pull on it. The valve base should be tight. Once you start using the pressure cooker and the pressure has reached capacity (the valve is set to “Airtight”), the valve should be tight. Sometimes during cooking, steam may escape from the valve. This indicates the valve is not seated properly. Use an oven mitt to carefully adjust it to “Airtight”. Please note, there is a nut under the filter on the underside of the lid (see page 19 diagram). This nut should be snug, and the base of the pressure limiting valve should be tight at all times. Make sure to check this after cleaning. If the nut is loose, pressure will not build-up.
Make sure the pressure limiting valve is set to “Airtight” and the pressure cook lid is locked securely. Once you have selected the menu button, the cooker will start to heat up and build-up pressure. Pressurizing can take anywhere from five minutes up to 30 minutes depending on the quantity and kind of food you are cooking. When the unit has built up enough pressure, the display will change to a countdown timer that displays your desired cooking time. This is the time the unit will start cooking the food.
TROUBLESHOOTING
17
PROBLEM
When I set the menu buttons, the cooker begins to build pressure and heat up. In about five minutes the unit beeps three times and goes to KEEP WARM, and my food did not cook completely. What is happening?
SOLUTION
1. The unit is detecting that not enough liquid has been added to your recipe. The pressure cooker has an automatic over-heat protection sensor that will set itself to KEEP WARM when it detects that not enough liquid is present. Make sure all pressure is released, open the lid, and add liquid by the cup. Lock the pressure cook lid and begin again until the unit will properly build up pressure and cook. -OR-
2. The unit is detecting a leak in the pressure and has not sealed properly. Safely release the pressure first. Remove the pressure cook lid to check the unit thoroughly. Make sure the gasket is in place, the lid is securely locked, and that the valve on top of the lid is set to the “Airtight” position.
For both options, reset the unit by unplugging it from the outlet. Wait 10-seconds and plug it back in. Program the unit again.
Ginnys.com/Blog
18
TROUBLESHOOTINGPROBLEM
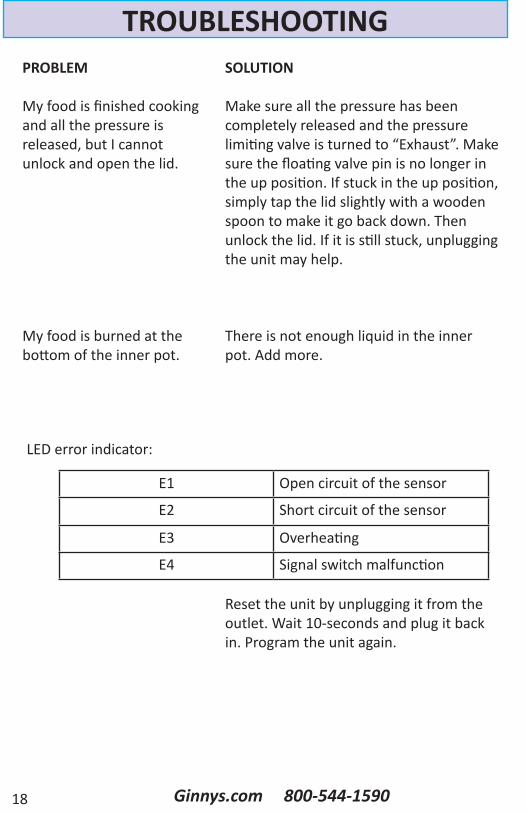
My food is finished cooking and all the pressure is released, but I cannot unlock and open the lid.
My food is burned at the bottom of the inner pot.
SOLUTION
Make sure all the pressure has been completely released and the pressure limiting valve is turned to “Exhaust”. Make sure the floating valve pin is no longer in the up position. If stuck in the up position, simply tap the lid slightly with a wooden spoon to make it go back down. Then unlock the lid. If it is still stuck, unplugging the unit may help.
There is not enough liquid in the inner pot. Add more.
Reset the unit by unplugging it from the outlet. Wait 10-seconds and plug it back in. Program the unit again.
Ginnys.com 800-544-1590
E1 Open circuit of the sensor
E2 Short circuit of the sensor
E3 Overheating
E4 Signal switch malfunction
LED error indicator:
CLEANING & CARE
19
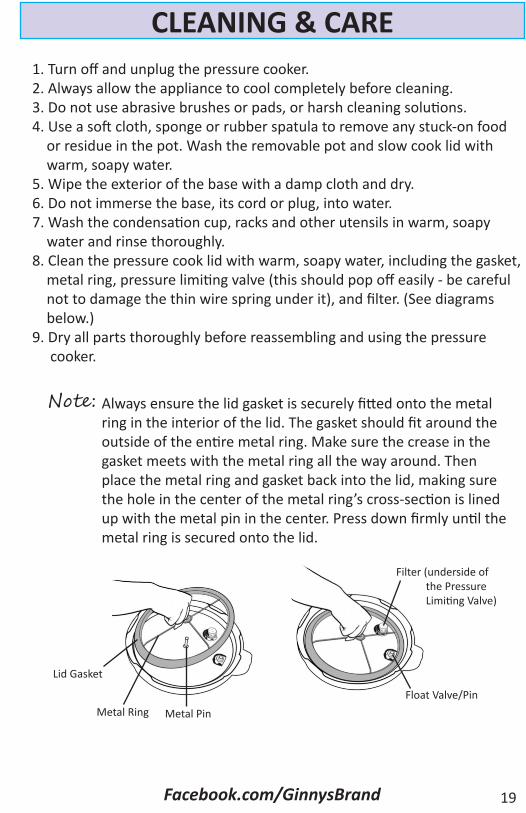
1. Turn off and unplug the pressure cooker.2. Always allow the appliance to cool completely before cleaning.3. Do not use abrasive brushes or pads, or harsh cleaning solutions.4. Use a soft cloth, sponge or rubber spatula to remove any stuck-on food or residue in the pot. Wash the removable pot and slow cook lid with warm, soapy water.5. Wipe the exterior of the base with a damp cloth and dry.6. Do not immerse the base, its cord or plug, into water.7. Wash the condensation cup, racks and other utensils in warm, soapy water and rinse thoroughly. 8. Clean the pressure cook lid with warm, soapy water, including the gasket, metal ring, pressure limiting valve (this should pop off easily - be careful not to damage the thin wire spring under it), and filter. (See diagrams below.)9. Dry all parts thoroughly before reassembling and using the pressure cooker.
Always ensure the lid gasket is securely fitted onto the metal ring in the interior of the lid. The gasket should fit around the outside of the entire metal ring. Make sure the crease in the gasket meets with the metal ring all the way around. Then place the metal ring and gasket back into the lid, making sure the hole in the center of the metal ring’s cross-section is lined up with the metal pin in the center. Press down firmly until the metal ring is secured onto the lid.
Note:
Facebook.com/GinnysBrand
Lid Gasket
Metal Ring
Filter (underside of the Pressure Limiting Valve)
Float Valve/PinMetal Pin
RECIPES
20
Breakfast Bread Pudding
6 slices of bacon, cooked and chopped12 slices of French bread (3/4” thick), cut into quarters3 eggs1½ c. milk¼ t. nutmeg
1. Mix the bacon with the bread in a large bowl.2. In a smaller bowl, beat the eggs with the milk and nutmeg.3. Pour the egg mixture in to the bread mixture. Make sure all pieces are well-coated.4. Pour all into the pressure cooker pot. Make sure all pieces are covered with the egg mixture.5. Lock on the lid and bring to pressure and cook for 18 minutes. 6. Use quick release to release pressure – DON’T FORGET THE OVEN MITT!7. Serve hot with butter and maple syrup.
Serves 4-6
Pulled Pork
1 T. paprika 1 T. salt2 t. garlic powder 2-4 lbs. boneless pork shoulder2 t. dry mustard 2 c. water½ T. brown sugar
1. Mix seasonings together in a large bowl.2. Cut meat into 4“ pieces (large enough to sit easily on your rack). Roll the meat in the seasoning mix. Coat thoroughly. 3. Add water to the bottom of the pressure cooker pot, and place rack in pot. Carefully put the meat pieces into place on the rack (keep the meat from touching the water) - it’s fine if you have to stack the meat.
Pinterest.com/GinnysBrand
RECIPES
21
4. Lock the cover in place. Bring to pressure, and cook for 45 minutes.5. Use quick release to release pressure - DON’T FORGET THE OVEN MITT! 6. When the pressure is released, remove the lid. Place meat on a platter or cutting board and shred with two forks. 7. Serve on buns with your favorite mustard or bar-b-que sauce.
Serves 4-6
Red Beans and Sausage
1 lb. dried red beans ½ t. black pepper1 onion, minced ½ t. cayenne pepper2 cloves garlic, minced 1 t. dried oregano1 stalk celery, minced ½ t. dried thyme1 bell pepper, chopped 2 bay leaves1 ½ t. salt 4 c. water1 t. paprika 1 lb. smoked sausage, sliced
1. Wash and rinse the beans. Soak as per package instructions for 4 hours, or overnight if you have time. If beans are unsoaked, use 5-6 cups of water instead of 4 (do not drain in step 2).2. Drain the beans and add to the pressure cooker pot. Add all ingredients, except the sausage.3. Lock the lid in place and bring to pressure for 30 minutes (or 10 minutes if beans were soaked overnight). If beans are unsoaked, use the BEANS button.4. Use quick release to release the pressure – DON’T FORGET THE OVEN MITT!5. When the pressure is released, remove the lid.6. At this point you may choose to mash some of the beans for a creamier texture. Add the sausage and stir.7. Lock the lid in place and bring to pressure for another 10 minutes.8. Use natural release to release the pressure. When the pressure is released, remove the lid. 9. Serve over rice.
Serves 6Ginnys.com/Blog
RECIPES
22
Kielbasa, Squash & Kale Soup
2 T. olive oil 1 pkg. kielbasa, chopped1 onion, diced 2 sprigs fresh rosemary3 cloves garlic, minced 2 c. fresh kale or collards4 c. chicken broth 1 c. water 2 apples, peeled, cored and cubed Parmesan cheese, grated2 c. butternut squash, cubed
1. Using the BROWN/SAUTE button, heat the oil and brown the onion for 2 minutes. Add the garlic for another minute.2. Add broth, apples and squash. Cook over medium heat until squash soft- ens. CANCEL the BROWN/SAUTE function.3. You may use an immersion blender to puree at this time, if desired. 4. Add kielbasa, rosemary, and kale. 5. Add water as needed to reach desired consistency. Stir.6. Lock the lid into place and bring to pressure for 10 minutes.7. Let the pressure release naturally. When the pressure is released, re- move the lid.8. Serve hot with sprinkled Parmesan on top.
Serves 4-6t
Ginnys.com 800-544-1590
RECIPESRisotto with Mushrooms
1 medium red onion, diced 1 ½ c. Arborio rice 2 cloves garlic, minced 4 c. chicken broth 3 T. butter 1 c. fresh mushrooms, sliced 3 T. olive oil ¼ c. Gorgonzola cheese, crumbled
1. Using the BROWN/SAUTE function, brown the onion and garlic in 1 ½ T. butter and 1 ½ T. olive oil until onions are translucent. CANCEL the BROWN/SAUTE function.2. Add rice and broth, stir. 3. Lock on the lid and bring to pressure for 12 minutes. 4. While the rice is cooking, in a separate pan on the stovetop, saute mush- rooms in the remaining olive oil and butter.5. When the rice is done, use quick release to release the pressure – DON’T FORGET THE OVEN MITT!6. When the pressure is released, remove the lid and add the mushrooms and cheese. 7. Stir and heat 5 minutes on KEEP WARM before serving.
Serves 4-6
Apple Sauce
3 lbs. tart apples juice of 1 lemon1/3 c. water honey 1 tsp. cinnamon
1. Peel, core and quarter apples.2. Add apples, water and cinnamon to pot. Stir well.3. Lock the lid into place and bring to pressure for 5 minutes.4. When the apples are done, use quick release to release the pressure – DON’T FORGET THE OVEN MITT!5. When the pressure is released, remove the lid and add the lemon juice and honey, to taste. Serve warm over vanilla ice cream.
Serves 623Facebook.com/GinnysBrand

WARRANTYGinny’s warrants this product free from defects in material and
workmanship for one year from provable date of purchase.
Within this warranty period, Ginny’s will repair or replace, at its option, defective parts at no charge, provided the product is returned, freight prepaid with proof of purchase to Ginny’s. Allow 2-4 weeks for return
shipping.
This warranty does not cover improper installation, misuse, abuse or neglect on part of the owner. Warranty is also invalid in any case that the product is
taken apart or serviced by an unauthorized service station.
This warranty gives you specific legal rights and they may vary from state to state.
THE FOREGOING WARRANTIES ARE IN LIEU OF ALL OTHER WARRANTIES AND CONDITIONS, EXPRESS OR IMPLIED, INCLUDING BUT NOT LIMITED TO THOSE
OF MERCHANTIBILITY OR FITNESS FOR A PARTICULAR PURPOSE.
Ginny’s, Inc.1112 7th Avenue
Monroe, WI 53566
Customer Service: 800-544-15908:00 a.m. to Midnight CST, Monday through Friday
24 Pinterest.com/GinnysBrand
Related Documents