AS AMERICA, INC. ONE YEAR LIMITED WARRANTY If inspection of this AS America, Inc. (“American Standard”) plumbing product, within one year after its initial purchase, confirms that it is defective in materials or workmanship, American Standard will repair or, at its option, exchange the product for a similar model. This limited warranty applies only to the original purchaser and installation of these products. In the event of a limited warranty claim, proof of purchase will be required—save sales receipt. This limited warranty does not apply to local building code compliance. Since local building codes vary considerably, the purchaser of this product should check with a local building or plumbing contractor to insure local code compliance before installation. This limited warranty is void if the product has been moved from its initial place of installation; if it has been subjected to faulty maintenance, abuse, misuse, accident or other damages; if it was not installed in accordance with American Standard's instructions; or if it has been modified in a manner inconsistent with the product as shipped by American Standard. American Standard's option to repair or exchange the product under this limited warranty does not cover any labor or other costs of removal or installation. IN NO EVENT WILL AMERICAN STANDARD BE LIABLE FOR THE COST OF REPAIR OR REPLACEMENT OF ANY INSTALLATION MATERIALS, INCLUDING BUT NOT LIMITED TO, TILES, MARBLE ETC. American Standard will not be responsible for any other incidental or consequential damages attributable to a product defect or to the repair or exchange of a defective product, all of which are expressly excluded from this limited warranty. This limited warranty does not cover any liability for consequential or incidental damages, all of which are hereby expressly disclaimed, or the extension beyond the duration of this limited warranty of any implied limited warranties, including those of merchantability or fitness for an intended purpose. (Some states or provinces do not allow the exclusion or limitation of implied limited warranties, so this exclusion may not apply to you.) This limited warranty gives you specific legal rights. You may have other statutory rights that vary from state to state or from province to province, in which case this limited warranty does not affect such statutory rights. For service under this warranty, it is suggested that a claim be made through the contractor or dealer from or through whom the product was purchased, or that a service request (including a description of the product model and of the defect) be sent to the following address: In the United States: American Standard Brands 1 Centennial Ave Piscataway, New Jersey 08854 Attention: Director of Consumer Affairs For residents of the United States, warranty information may also be obtained by calling the following toll free number: (800) 442-1902 www.americanstandard-us.com In Canada: LIXIL Canada ULC 5900 Avebury Rd. Mississauga, Ontario Canada L5R 3M3 Toll Free: (800) 387-0369 www.americanstandard.ca In Mexico: Customer Service Manager AS Maquila, S.A. de C.V. Via Morelos #330 Col. Santa Clara Ecatepec 55540 Edo. Mexico www.americanstandard.com.mx Product names listed herein are trademarks of AS America, Inc. © AS America, Inc. 2019 Thank you for selecting American Standard – the benchmark of fine quality for over 100 years. To ensure this product is installed properly, please read these instructions carefully before you begin. (Certain installations may require professional help.) Also be sure your installation conforms to local codes. INSTALLATION INSTRUCTIONS NOTE: Pictures may not exactly depict toilet seat and components. TOILET SEAT S A V E F O R F U T U R E U S E 1 3 4 5 6 2 760406-100EN Rev. 1 12/19 Care and Cleaning When cleaning your toilet seat wash it with a mild, soapy water: rinse the seat thoroughly with clear water and dry with a soft cloth. Avoid detergents, disinfectants, or cleaning products in aerosol cans. Never use abrasive scouring powders on your seat. Some bathroom chemicals and cosmetics may damage the seat’s finish. After installation, check the tightness of the bolts from time to time to ensure a tight fit. Mounting Tray Non-skid rubberized pad Open the hardware pack and remove the mounting tray for the hinge. If the non-skid rubberized pad is not attached to the bottom of the tray, insert the post into the mounting holes. Place the mounting tray into the groove of the hinge. NOTE: Mounting tray can only be inserted one way with rubberized pad facing toilet. NOTE: Do not close the cover of the hinge. Place seat on bowl while carefully aligning seat with bowl. Close cover of mounting hinge. To better clean the toilet, raise the hinge covers and slide toilet seat forward to remove from toilet (Fig. 1). To clean the seat, wipe with warm soapy water with an antimicrobial ingredient like those found in a dishwashing detergent. Common bathroom cleaners that are non-caustic and non-abrasive may be used (Fig. 2). To replace the seat, slide the seat back on to the mounting pad (Fig. 3) and close covers (Fig. 4). NOTE: Do not use abrasive pads, acid based or petroleum based cleaners. 7 8 Fig. 1 Fig. 2 Fig. 3 Fig. 4 Cone Washer Quik-Lok Nut Insert bolts through the mounting holes in the hinges and the two on the back of toilet bowl,make sure the bolt is stopped in the hinge as illustrated in lower left. Put the cone washers on to the bolts. Push the Quick Install Nut up the bolts. Press on the head of the bolt while pushing the Quick Install Nut up the bolt. Screw the nut to tighten it on the bolt. Back bumpers to minimize flex Self-aligning Cone Washer Bolt Adjustable Hinge Non-skid rubberized pad Quick Install Nut REPLACEMENT KIT PART NUMBER 760408-100.0070A DESCRIPTION BOTTOM MOUNTING HARDWARE KIT

Welcome message from author
This document is posted to help you gain knowledge. Please leave a comment to let me know what you think about it! Share it to your friends and learn new things together.
Transcript
AS AMERICA, INC. ONE YEAR LIMITED WARRANTY
If inspection of this AS America, Inc. (“American Standard”) plumbing product, within one year after its initial purchase, confirms that it is defective in materials or workmanship, American Standard will repair or, at its option, exchange the product for a similar model.
This limited warranty applies only to the original purchaser and installation of these products. In the event of a limited warranty claim, proof of purchase will be required—save sales receipt.
This limited warranty does not apply to local building code compliance. Since local building codes vary considerably, the purchaser of this product should check with a local building or plumbing contractor to insure local code compliance before installation.
This limited warranty is void if the product has been moved from its initial place of installation; if it has been subjected to faulty maintenance, abuse, misuse, accident or other damages; if it was not installed in accordance with American Standard's instructions; or if it has been modified in a manner inconsistent with the product as shipped by American Standard.
American Standard's option to repair or exchange the product under this limited warranty does not cover any labor or other costs of removal or installation. IN NO EVENT WILL AMERICAN STANDARD BE LIABLE FOR THE COST OF REPAIR OR REPLACEMENT OF ANY INSTALLATION MATERIALS, INCLUDING BUT NOT LIMITED TO, TILES, MARBLE ETC. American Standard will not be responsible for any other incidental or consequential damages attributable to a product defect or to the repair or exchange of a defective product, all of which are expressly excluded from this limited warranty. This limited warranty does not cover any liability for consequential or incidental damages, all of which are hereby expressly disclaimed, or the extension beyond the duration of this limited warranty of any implied limited warranties, including those of merchantability or fitness for an intended purpose. (Some states or provinces do not allow the exclusion or limitation of implied limited warranties, so this exclusion may not apply to you.)
This limited warranty gives you specific legal rights. You may have other statutory rights that vary from state to state or from province to province, in which case this limited warranty does not affect such statutory rights.
For service under this warranty, it is suggested that a claim be made through the contractor or dealer from or through whom the product was purchased, or that a service request (including a description of the product model and of the defect) be sent to the following address:
In the United States:American Standard Brands
1 Centennial AvePiscataway, New Jersey 08854
Attention: Director of Consumer Affairs
For residents of the United States, warranty information may also be obtained by calling the
following toll free number: (800) 442-1902www.americanstandard-us.com
In Canada:LIXIL Canada ULC5900 Avebury Rd.
Mississauga, Ontario Canada L5R 3M3
Toll Free: (800) 387-0369www.americanstandard.ca
In Mexico:Customer Service Manager
AS Maquila, S.A. de C.V.Via Morelos #330Col. Santa Clara
Ecatepec 55540 Edo. Mexico
www.americanstandard.com.mx
Product names listed herein are trademarks of AS America, Inc. © AS America, Inc. 2019
Thank you for selecting American Standard – the benchmark of fine quality for over 100 years. To ensure this product is installed properly, please read these instructions carefully before you begin. (Certain installations may require professional help.) Also be sure your installation conforms to local codes.
INSTALLATION INSTRUCTIONS
NOTE: Pictures may not exactly depict toilet seat and components.
TOILET SEAT
SA
VE
F
OR
F
UT
UR
E
US
E
1
3 4
5 6
2
760406-100EN Rev. 1 12/19
Care and CleaningWhen cleaning your toilet seat wash it with a mild, soapy water: rinse the seat thoroughly with clear water and dry with a soft cloth.
Avoid detergents, disinfectants, or cleaning products in aerosol cans. Never use abrasive scouring powders on your seat. Some bathroom chemicals and cosmetics may damage the seat’s finish. After installation, check the tightness of the bolts from time to time to ensure a tight fit.
MountingTray
Non-skid rubberized pad
Open the hardware pack and remove the mounting tray for the hinge. If the non-skid rubberized pad is not attached to the bottom of the tray, insert the post into the mounting holes.
Place the mounting tray into the groove of the hinge.
NOTE: Mounting tray can only be inserted one way with rubberized pad facing toilet.
NOTE: Do not close the cover of the hinge.
Place seat on bowl while carefullyaligning seat with bowl.
Close cover of mounting hinge.
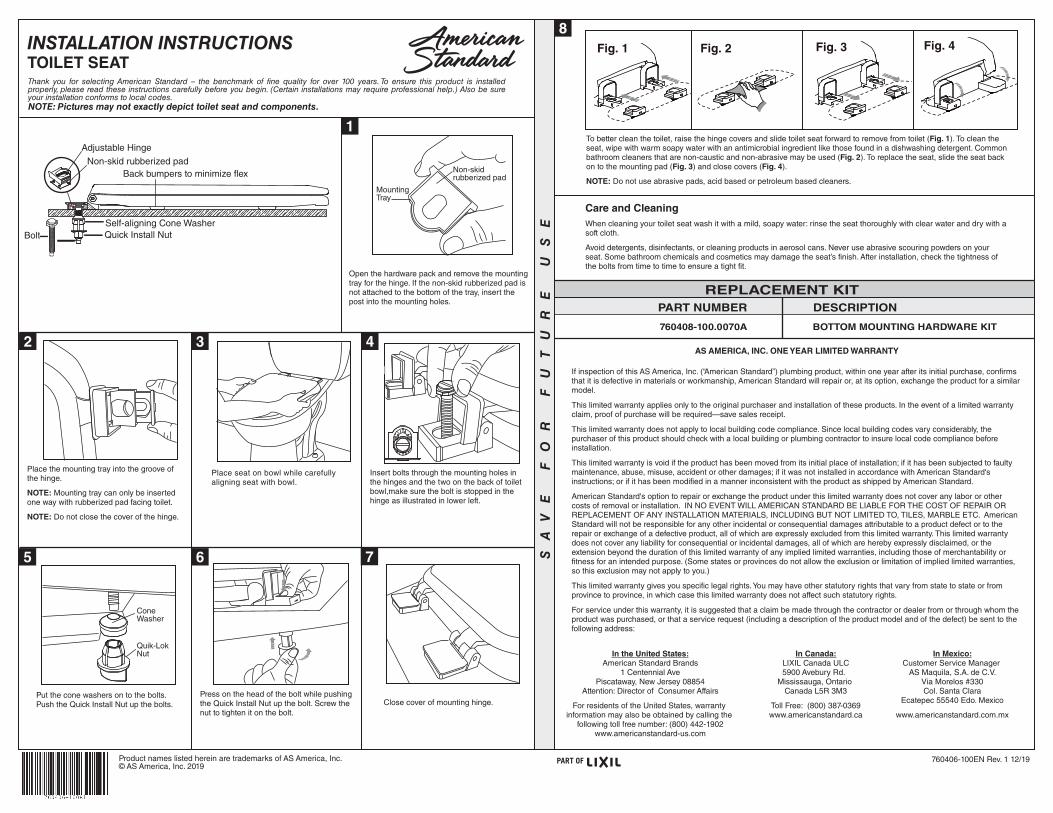
To better clean the toilet, raise the hinge covers and slide toilet seat forward to remove from toilet (Fig. 1). To clean the seat, wipe with warm soapy water with an antimicrobial ingredient like those found in a dishwashing detergent. Common bathroom cleaners that are non-caustic and non-abrasive may be used (Fig. 2). To replace the seat, slide the seat back on to the mounting pad (Fig. 3) and close covers (Fig. 4).
NOTE: Do not use abrasive pads, acid based or petroleum based cleaners.
7
8Fig. 1 Fig. 2 Fig. 3 Fig. 4
Cone Washer
Quik-Lok Nut
Insert bolts through the mounting holes in the hinges and the two on the back of toilet bowl,make sure the bolt is stopped in the hinge as illustrated in lower left.
Put the cone washers on to the bolts. Push the Quick Install Nut up the bolts.
Press on the head of the bolt while pushing the Quick Install Nut up the bolt. Screw the nut to tighten it on the bolt.
Back bumpers to minimize flex
Self-aligning Cone WasherBolt
Adjustable Hinge
Non-skid rubberized pad
Quick Install Nut
REPLACEMENT KITPART NUMBER
760408-100.0070A
DESCRIPTION
BOTTOM MOUNTING HARDWARE KIT

GARANTÍA LIMITADA DE UN AÑO DE AS AMERICA, INC.
Si, dentro del año de haber adquirido este producto sanitario AS America, Inc. (“American Standard”) por primera vez, se confirma mediante inspección que tiene defectos en los materiales o la mano de obra, American Standard reparará o, a su opción, cambiará el producto por un modelo similar.
Esta garantía limitada se aplica solamente al comprador y a la instalación originales de los productos. En el caso de un reclamo, se exigirá la presentación del comprobante de compra; guarde su recibo.
Esta garantía no se aplica al cumplimiento de los códigos locales de construcción. Dado que los códigos locales de construcción varían considerablemente, el comprador del producto debe consultar a un contratista local de servicios de construcción o plomería para asegurar el cumplimiento de las normas locales antes de efectuar la instalación.
Esta garantía limitada quedará sin efecto si el producto se movió de su lugar inicial de instalación; en casos de mantenimiento inadecuado, abuso, uso incorrecto, accidente u otros daños; si no se instaló de acuerdo con las instrucciones de American Standard o si se lo modificó de una manera incongruente con el producto tal como fue enviado por American Standard.
La opción de American Standard de reparar o cambiar el producto conforme a esta garantía limitada no cubre los costos de mano de obra ni de otro tipo incurridos para retirar o instalar el producto. AMERICAN STANDARD NO SERÁ RESPONSABLE EN NINGÚN CASO DEL COSTO DE LA REPARACIÓN O DEL REEMPLAZO DE NINGÚN MATERIAL DE INSTALACIÓN INCLUYENDO, SIN LIMITACIÓN, LOS AZULEJOS, EL MÁRMOL, ETC. American Standard no será responsable de ningunos otros daños y perjuicios incidentales o emergentes atribuibles a un defecto del producto o a la reparación o cambio de un producto defectuoso, los cuales quedan todos excluidos expresamente de esta garantía limitada. Esta garantía limitada no cubre ninguna responsabilidad por daños y perjuicios emergentes o incidentales; quedando expresamente deslindada por el presente, o la prórroga más allá del plazo de esta garantía limitada de cualquier garantía limitada implícita, incluyendo las garantías de comerciabilidad o aptitud para un fin determinado. (Algunos estados o provincias no permiten la exclusión o limitación de garantías implícitas limitadas, por lo cual esta exclusión podría no aplicarse a su caso.)
Esta garantía limitada le otorga derechos legales específicos. Es posible que tenga otros derechos establecidos por ley que varían de un estado a otro o de una provincia a otra, en cuyo caso esta garantía limitada no afecta tales derechos establecidos por ley.
Para obtener servicio técnico bajo esta garantía, se sugiere presentar un reclamo ante el contratista o distribuidor a través del cual adquirió el producto, o enviar una solicitud de servicio (incluyendo una descripción del modelo del producto y del defecto) a la siguiente dirección:
En Estados Unidos:American Standard Brands
1 Centennial AvePiscataway, New Jersey 08854
Attention: Director of Consumer Affairs
Los residentes de Estados Unidos también pueden obtener información sobre la garantía llamando
al siguiente número gratuito: (800) 442-1902www.americanstandard-us.com
En Canadá:LIXIL Canada ULC5900 Avebury Rd.
Mississauga, OntarioCanadá L5R 3M3
Número gratuito: (800) 387-0369www.americanstandard.ca
En México:Gerente de atención al cliente
AS Maquila, S.A. de C.V.Vía Morelos #330Col. Santa Clara
Ecatepec 55540 Estado de México
www.americanstandard.com.mx
Los nombres de producto mencionados en este documento son marcas de comercio de AS America, Inc. © AS America, Inc. 2019
Gracias por elegir American Standard, el parámetro de excelente calidad por más de 100 años. Para asegurar que este producto se instale de manera adecuada, lea las instrucciones con atención antes de comenzar. (Para algunas instalaciones se necesita ayuda profesional). Realice la instalación de conformidad con los códigos locales.
INSTRUCCIONES DE INSTALACIÓN
NOTA: Las imágenes pueden no representar exactamente el asiento del inodoro y sus componentes.
ASIENTO DEL INODORO
GU
AR
DA
R
PA
RA
U
SO
F
UT
UR
O
1
3 4
5 6
2
760406-100SP Rev. 1 12/19
Cuidado y limpieza
Lave el asiento del inodoro con agua y jabón suave; enjuáguelo a fondo con agua limpia y séquelo con un paño suave.
Evite el uso de detergentes, desinfectantes o productos de limpieza en latas de aerosol. Nunca use polvos para restregar abrasivos en el asiento. Algunos cosméticos y sustancias químicas para el baño dañan el acabado del asiento. Después de la instalación, verifique con frecuencia que los pernos estén bien ajustados.
Bandeja de montaje
Almohadilla engomadaantideslizante
Abra el paquete con las piezas de ferretería y retire la bandeja de montaje para la bisagra. Si la almohadilla engomada antideslizante no está fijada a la parte inferior de la bandeja, inserte el poste en los orificios de montaje.
Coloque la bandeja de montaje en la ranura de la bisagra.
NOTA: La bandeja de montaje solo se inserta en una dirección (con la almohadilla engomada hacia el inodoro).
NOTA: No cierre la tapa de la bisagra.
Coloque el asiento en la taza mientras alinea cuidadosamente el asiento con la taza.
Cierre la tapa de la bisagra de montaje.
Para limpiar mejor el inodoro, levante las tapas de la bisagra y deslice el asiento hacia adelante para retirar el inodoro (figura 1). Limpie el asiento con agua tibia con jabón y un ingrediente antimicrobiano como los que contienen los detergentes para vajilla. Puede usar limpiadores para baño comunes no cáusticos y no abrasivos (figura 2). Para regresar el asiento a su lugar, deslícelo sobre la almohadilla de montaje (figura 3) y cierre las tapas (figura 4).
NOTA: No use almohadillas abrasivas ni limpiadores a base de ácido ni petróleo.
7
8Fig. 1 Fig. 2 Fig. 3 Fig. 4
Arandela cónica
Tuerca de instalación rápida
Inserte los pernos en los orificios de montaje en las bisagras. Inserte dos pernos en la parte posterior de la taza del inodoro. El perno debe estar trabado en la bisagra, tal como se ilustra en la imagen inferior izquierda.
Coloque las arandelas cónicas en los pernos. Empuje la tuerca de instalación rápida sobre los pernos.
Presione la cabeza del perno mientras empuja la tuerca de instalación rápida sobre el perno. Atornille la tuerca para fijarla en el perno.
Protectores posteriores para minimizar la flexión
Arandela cónica autoalineantePerno
Bisagra ajustable
Almohadilla engomada antideslizante
Tuerca de instalación rápida
REFACCIONESNÚMERO DE PIEZA
760408-100.0070A
DESCRIPCIÓN
JUEGO DE PIEZAS DE FERRETERÍA PARA EL MONTAJE INFERIOR
Related Documents