323 CHAPTER 8 Nonsurgical Retreatment CHAPTER 9 Periradicular Surgery CHAPTER 10 Regenerative Endodontics CHAPTER 11 Evaluation of Outcomes CHAPTER 12 Structure and Functions of the Dentin-Pulp Complex CHAPTER 13 Pulpal Reactions to Caries and Dental Procedures CHAPTER 14 Microbiology of Endodontic Infections CHAPTER 15 Pathobiology of Apical Periodontitis CHAPTER 16 Root Resorption CHAPTER 17 Diagnosis of Nonodontogenic Toothache CHAPTER 18 Management of Endodontic Emergencies CHAPTER 19 Managing Iatrogenic Endodontic Events The Advanced Science of Endodontics PART II

Welcome message from author
This document is posted to help you gain knowledge. Please leave a comment to let me know what you think about it! Share it to your friends and learn new things together.
Transcript

323
CHAPTER 8Nonsurgical Retreatment
CHAPTER 9Periradicular Surgery
CHAPTER 10Regenerative Endodontics
CHAPTER 11Evaluation of Outcomes
CHAPTER 12Structure and Functions of the Dentin-Pulp Complex
CHAPTER 13Pulpal Reactions to Caries and Dental Procedures
CHAPTER 14Microbiology of Endodontic Infections
CHAPTER 15Pathobiology of Apical Periodontitis
CHAPTER 16Root Resorption
CHAPTER 17Diagnosis of Nonodontogenic Toothache
CHAPTER 18Management of Endodontic Emergencies
CHAPTER 19Managing Iatrogenic Endodontic Events
The Advanced Science of Endodontics
PART II
324
Etiology of Posttreatment DiseaseDiagnosis of Posttreatment DiseaseTreatment PlanningNonsurgical Endodontic Retreatment
Coronal Access Cavity PreparationPost RemovalRegaining Access to the Apical Area
Removal of Separated InstrumentsHeat Generation During Retreatment ProceduresManagement of Canal ImpedimentsFinishing the Retreatment
Repair of PerforationsPrognosis of RetreatmentSummary
Nonsurgical RetreatmentROBERT S. RODA | BRADLEY H. GETTLEMAN
CHAPTER 8
CHAPTER OUTLINE
Nonsurgical root canal therapy has become a routine proce-dure in modern dentistry. Technical and scientific advances in endodontics have resulted in the retention of millions of teeth that would otherwise be lost. Even as advances in surgical and prosthetic restorative care have made tooth replacement less onerous than in the past, it is universally accepted that a natural tooth with a good prognosis is a superior choice to loss and replacement.
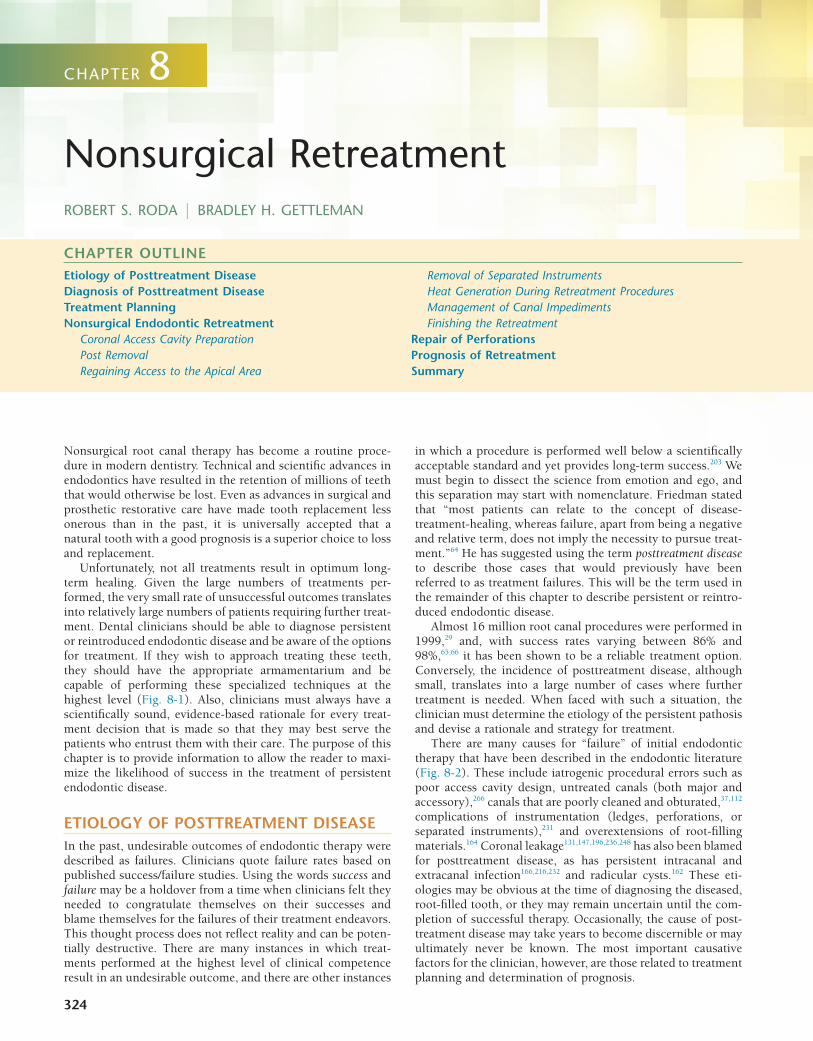
Unfortunately, not all treatments result in optimum long-term healing. Given the large numbers of treatments per-formed, the very small rate of unsuccessful outcomes translates into relatively large numbers of patients requiring further treat-ment. Dental clinicians should be able to diagnose persistent or reintroduced endodontic disease and be aware of the options for treatment. If they wish to approach treating these teeth, they should have the appropriate armamentarium and be capable of performing these specialized techniques at the highest level (Fig. 8-1). Also, clinicians must always have a scientifically sound, evidence-based rationale for every treat-ment decision that is made so that they may best serve the patients who entrust them with their care. The purpose of this chapter is to provide information to allow the reader to maxi-mize the likelihood of success in the treatment of persistent endodontic disease.
ETIOLOGY OF POSTTREATMENT DISEASEIn the past, undesirable outcomes of endodontic therapy were described as failures. Clinicians quote failure rates based on published success/failure studies. Using the words success and failure may be a holdover from a time when clinicians felt they needed to congratulate themselves on their successes and blame themselves for the failures of their treatment endeavors. This thought process does not reflect reality and can be poten-tially destructive. There are many instances in which treat-ments performed at the highest level of clinical competence result in an undesirable outcome, and there are other instances
in which a procedure is performed well below a scientifically acceptable standard and yet provides long-term success.203 We must begin to dissect the science from emotion and ego, and this separation may start with nomenclature. Friedman stated that “most patients can relate to the concept of disease-treatment-healing, whereas failure, apart from being a negative and relative term, does not imply the necessity to pursue treat-ment.”64 He has suggested using the term posttreatment disease to describe those cases that would previously have been referred to as treatment failures. This will be the term used in the remainder of this chapter to describe persistent or reintro-duced endodontic disease.
Almost 16 million root canal procedures were performed in 1999,29 and, with success rates varying between 86% and 98%,65,66 it has been shown to be a reliable treatment option. Conversely, the incidence of posttreatment disease, although small, translates into a large number of cases where further treatment is needed. When faced with such a situation, the clinician must determine the etiology of the persistent pathosis and devise a rationale and strategy for treatment.
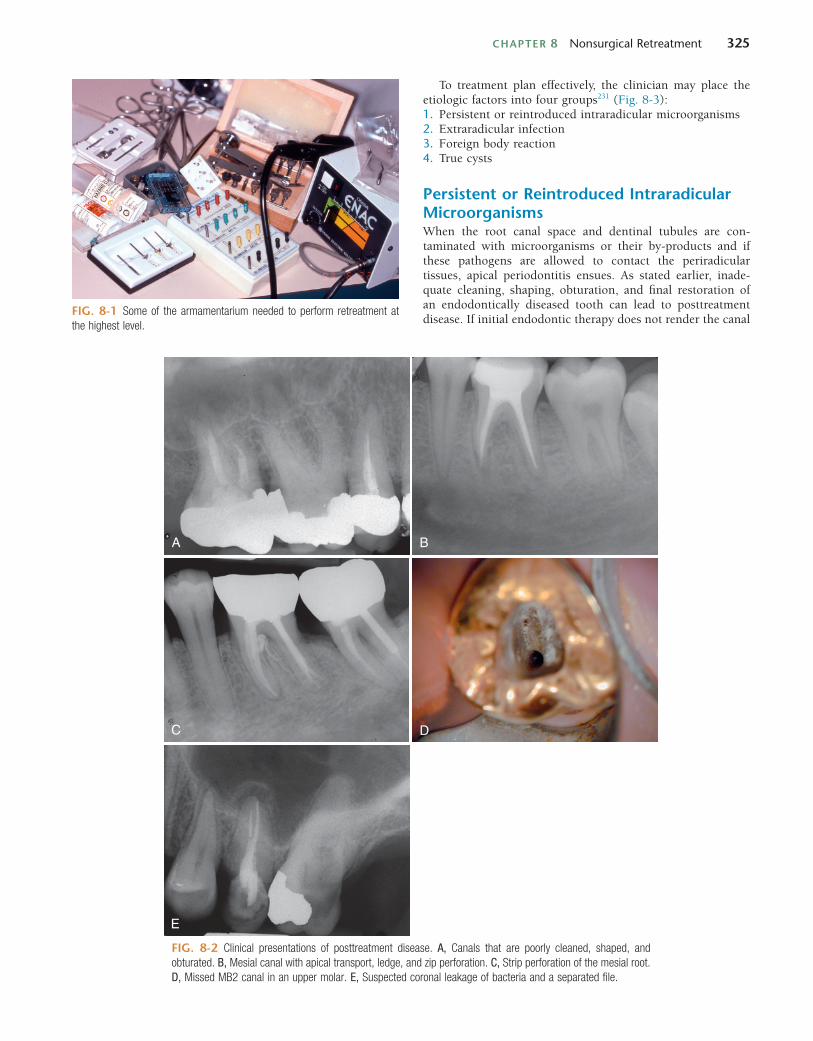
There are many causes for “failure” of initial endodontic therapy that have been described in the endodontic literature (Fig. 8-2). These include iatrogenic procedural errors such as poor access cavity design, untreated canals (both major and accessory),266 canals that are poorly cleaned and obturated,37,112 complications of instrumentation (ledges, perforations, or separated instruments),231 and overextensions of root-filling materials.164 Coronal leakage131,147,196,236,248 has also been blamed for posttreatment disease, as has persistent intracanal and extracanal infection166,216,232 and radicular cysts.162 These eti-ologies may be obvious at the time of diagnosing the diseased, root-filled tooth, or they may remain uncertain until the com-pletion of successful therapy. Occasionally, the cause of post-treatment disease may take years to become discernible or may ultimately never be known. The most important causative factors for the clinician, however, are those related to treatment planning and determination of prognosis.
CHAPTER 8 Nonsurgical Retreatment 325
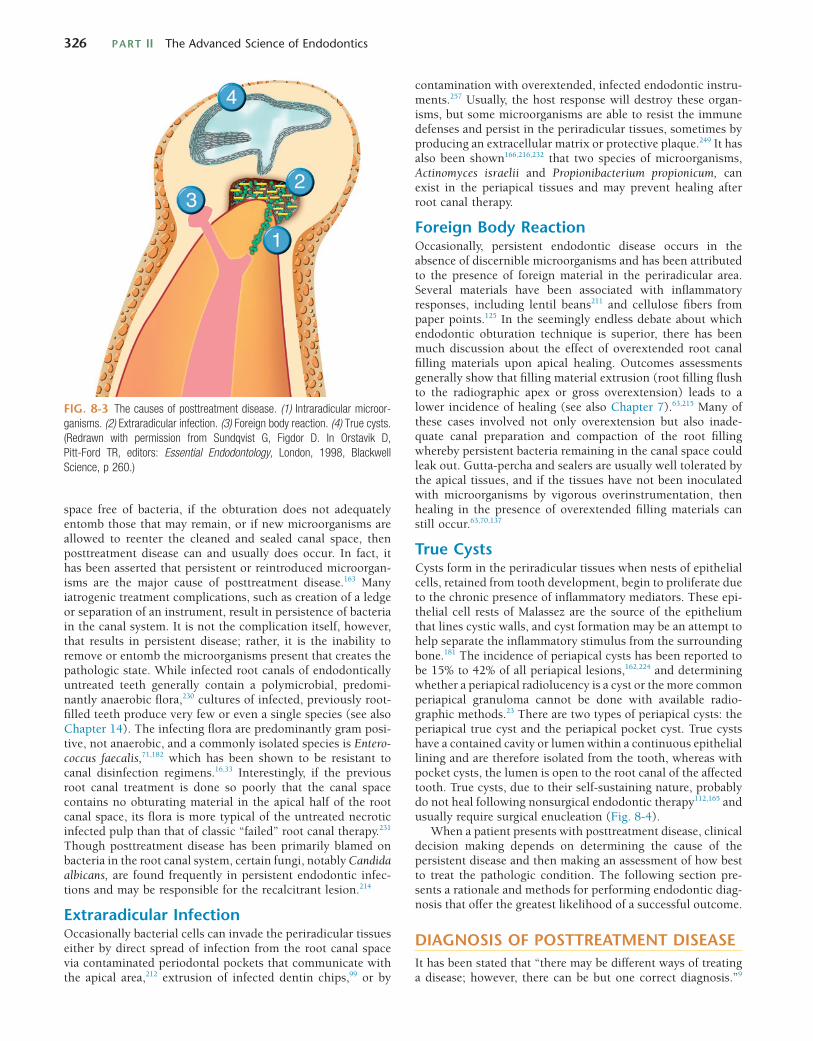
To treatment plan effectively, the clinician may place the etiologic factors into four groups231 (Fig. 8-3):1. Persistent or reintroduced intraradicular microorganisms2. Extraradicular infection3. Foreign body reaction4. True cysts
Persistent or Reintroduced Intraradicular MicroorganismsWhen the root canal space and dentinal tubules are con-taminated with microorganisms or their by-products and if these pathogens are allowed to contact the periradicular tissues, apical periodontitis ensues. As stated earlier, inade-quate cleaning, shaping, obturation, and final restoration of an endodontically diseased tooth can lead to posttreatment disease. If initial endodontic therapy does not render the canal
FIG. 8-1 Some of the armamentarium needed to perform retreatment at the highest level.
FIG. 8-2 Clinical presentations of posttreatment disease. A, Canals that are poorly cleaned, shaped, and obturated. B, Mesial canal with apical transport, ledge, and zip perforation. C, Strip perforation of the mesial root. D, Missed MB2 canal in an upper molar. E, Suspected coronal leakage of bacteria and a separated file.
A B
C D
E
326 PART II The Advanced Science of Endodontics
contamination with overextended, infected endodontic instru-ments.257 Usually, the host response will destroy these organ-isms, but some microorganisms are able to resist the immune defenses and persist in the periradicular tissues, sometimes by producing an extracellular matrix or protective plaque.249 It has also been shown166,216,232 that two species of microorganisms, Actinomyces israelii and Propionibacterium propionicum, can exist in the periapical tissues and may prevent healing after root canal therapy.
Foreign Body ReactionOccasionally, persistent endodontic disease occurs in the absence of discernible microorganisms and has been attributed to the presence of foreign material in the periradicular area. Several materials have been associated with inflammatory responses, including lentil beans211 and cellulose fibers from paper points.125 In the seemingly endless debate about which endodontic obturation technique is superior, there has been much discussion about the effect of overextended root canal filling materials upon apical healing. Outcomes assessments generally show that filling material extrusion (root filling flush to the radiographic apex or gross overextension) leads to a lower incidence of healing (see also Chapter 7).63,215 Many of these cases involved not only overextension but also inade-quate canal preparation and compaction of the root filling whereby persistent bacteria remaining in the canal space could leak out. Gutta-percha and sealers are usually well tolerated by the apical tissues, and if the tissues have not been inoculated with microorganisms by vigorous overinstrumentation, then healing in the presence of overextended filling materials can still occur.63,70,137
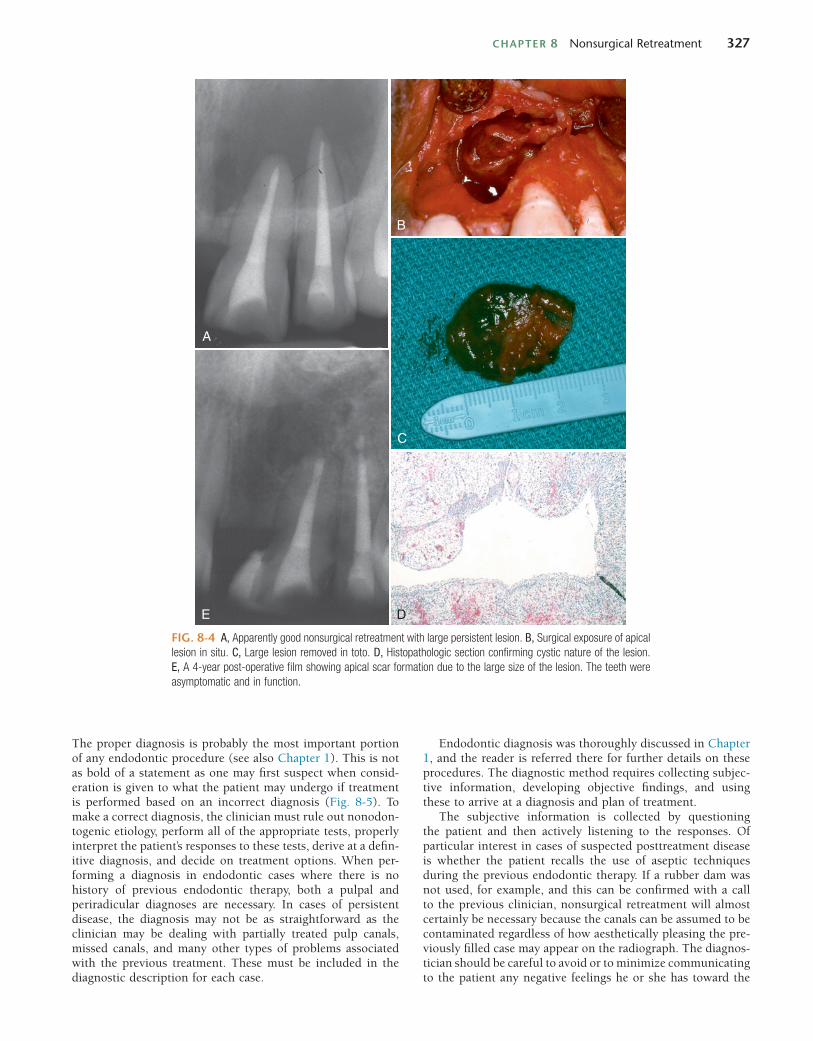
True CystsCysts form in the periradicular tissues when nests of epithelial cells, retained from tooth development, begin to proliferate due to the chronic presence of inflammatory mediators. These epi-thelial cell rests of Malassez are the source of the epithelium that lines cystic walls, and cyst formation may be an attempt to help separate the inflammatory stimulus from the surrounding bone.181 The incidence of periapical cysts has been reported to be 15% to 42% of all periapical lesions,162,224 and determining whether a periapical radiolucency is a cyst or the more common periapical granuloma cannot be done with available radio-graphic methods.23 There are two types of periapical cysts: the periapical true cyst and the periapical pocket cyst. True cysts have a contained cavity or lumen within a continuous epithelial lining and are therefore isolated from the tooth, whereas with pocket cysts, the lumen is open to the root canal of the affected tooth. True cysts, due to their self-sustaining nature, probably do not heal following nonsurgical endodontic therapy112,165 and usually require surgical enucleation (Fig. 8-4).
When a patient presents with posttreatment disease, clinical decision making depends on determining the cause of the persistent disease and then making an assessment of how best to treat the pathologic condition. The following section pre-sents a rationale and methods for performing endodontic diag-nosis that offer the greatest likelihood of a successful outcome.
DIAGNOSIS OF POSTTREATMENT DISEASEIt has been stated that “there may be different ways of treating a disease; however, there can be but one correct diagnosis.”9
space free of bacteria, if the obturation does not adequately entomb those that may remain, or if new microorganisms are allowed to reenter the cleaned and sealed canal space, then posttreatment disease can and usually does occur. In fact, it has been asserted that persistent or reintroduced microorgan-isms are the major cause of posttreatment disease.163 Many iatrogenic treatment complications, such as creation of a ledge or separation of an instrument, result in persistence of bacteria in the canal system. It is not the complication itself, however, that results in persistent disease; rather, it is the inability to remove or entomb the microorganisms present that creates the pathologic state. While infected root canals of endodontically untreated teeth generally contain a polymicrobial, predomi-nantly anaerobic flora,230 cultures of infected, previously root-filled teeth produce very few or even a single species (see also Chapter 14). The infecting flora are predominantly gram posi-tive, not anaerobic, and a commonly isolated species is Entero-coccus faecalis,71,182 which has been shown to be resistant to canal disinfection regimens.16,33 Interestingly, if the previous root canal treatment is done so poorly that the canal space contains no obturating material in the apical half of the root canal space, its flora is more typical of the untreated necrotic infected pulp than that of classic “failed” root canal therapy.231 Though posttreatment disease has been primarily blamed on bacteria in the root canal system, certain fungi, notably Candida albicans, are found frequently in persistent endodontic infec-tions and may be responsible for the recalcitrant lesion.214
Extraradicular InfectionOccasionally bacterial cells can invade the periradicular tissues either by direct spread of infection from the root canal space via contaminated periodontal pockets that communicate with the apical area,212 extrusion of infected dentin chips,99 or by
FIG. 8-3 The causes of posttreatment disease. (1) Intraradicular microor-ganisms. (2) Extraradicular infection. (3) Foreign body reaction. (4) True cysts. (Redrawn with permission from Sundqvist G, Figdor D. In Orstavik D, Pitt-Ford TR, editors: Essential Endodontology, London, 1998, Blackwell Science, p 260.)
CHAPTER 8 Nonsurgical Retreatment 327
Endodontic diagnosis was thoroughly discussed in Chapter 1, and the reader is referred there for further details on these procedures. The diagnostic method requires collecting subjec-tive information, developing objective findings, and using these to arrive at a diagnosis and plan of treatment.
The subjective information is collected by questioning the patient and then actively listening to the responses. Of particular interest in cases of suspected posttreatment disease is whether the patient recalls the use of aseptic techniques during the previous endodontic therapy. If a rubber dam was not used, for example, and this can be confirmed with a call to the previous clinician, nonsurgical retreatment will almost certainly be necessary because the canals can be assumed to be contaminated regardless of how aesthetically pleasing the pre-viously filled case may appear on the radiograph. The diagnos-tician should be careful to avoid or to minimize communicating to the patient any negative feelings he or she has toward the
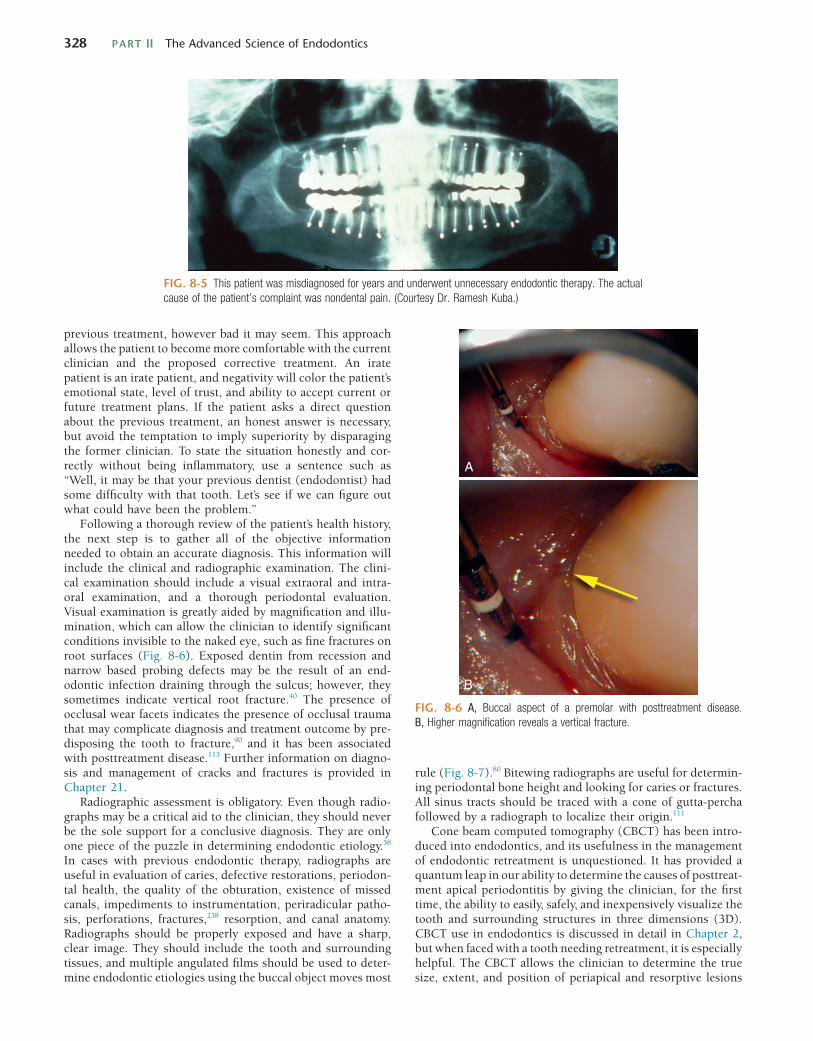
The proper diagnosis is probably the most important portion of any endodontic procedure (see also Chapter 1). This is not as bold of a statement as one may first suspect when consid-eration is given to what the patient may undergo if treatment is performed based on an incorrect diagnosis (Fig. 8-5). To make a correct diagnosis, the clinician must rule out nonodon-togenic etiology, perform all of the appropriate tests, properly interpret the patient’s responses to these tests, derive at a defin-itive diagnosis, and decide on treatment options. When per-forming a diagnosis in endodontic cases where there is no history of previous endodontic therapy, both a pulpal and periradicular diagnoses are necessary. In cases of persistent disease, the diagnosis may not be as straightforward as the clinician may be dealing with partially treated pulp canals, missed canals, and many other types of problems associated with the previous treatment. These must be included in the diagnostic description for each case.
FIG. 8-4 A, Apparently good nonsurgical retreatment with large persistent lesion. B, Surgical exposure of apical lesion in situ. C, Large lesion removed in toto. D, Histopathologic section confirming cystic nature of the lesion. E, A 4-year post-operative film showing apical scar formation due to the large size of the lesion. The teeth were asymptomatic and in function.
A
B
C
DE
328 PART II The Advanced Science of Endodontics
previous treatment, however bad it may seem. This approach allows the patient to become more comfortable with the current clinician and the proposed corrective treatment. An irate patient is an irate patient, and negativity will color the patient’s emotional state, level of trust, and ability to accept current or future treatment plans. If the patient asks a direct question about the previous treatment, an honest answer is necessary, but avoid the temptation to imply superiority by disparaging the former clinician. To state the situation honestly and cor-rectly without being inflammatory, use a sentence such as “Well, it may be that your previous dentist (endodontist) had some difficulty with that tooth. Let’s see if we can figure out what could have been the problem.”
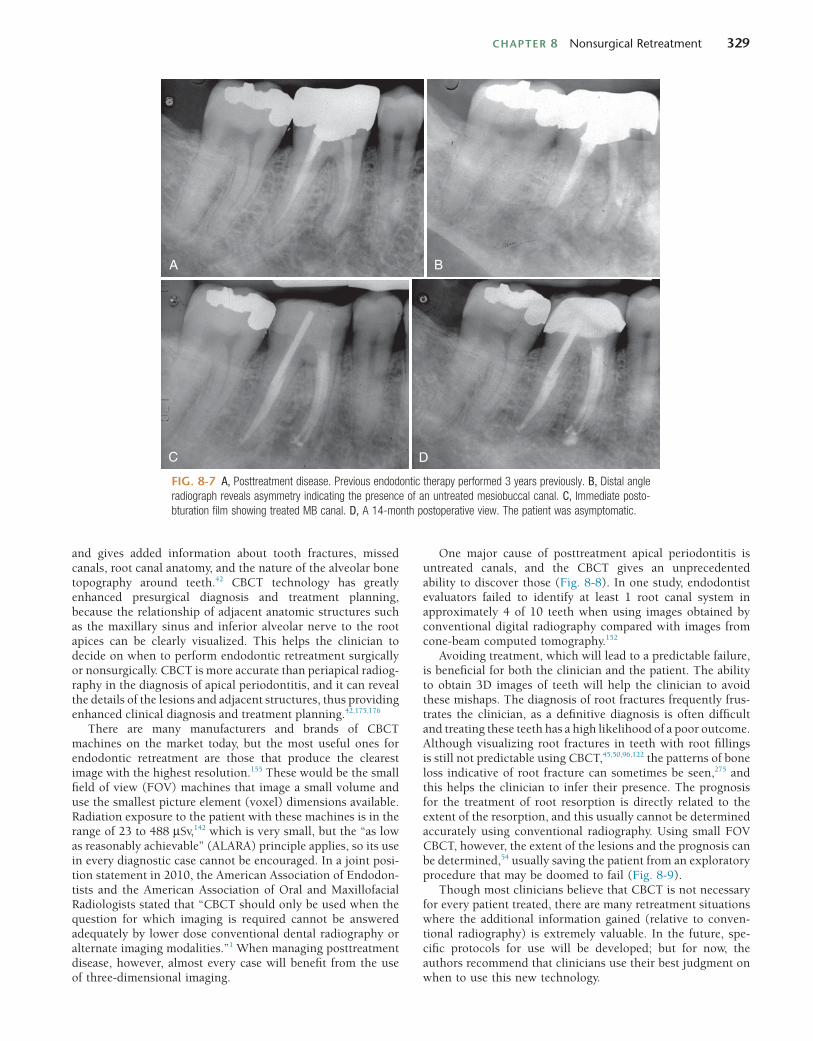
Following a thorough review of the patient’s health history, the next step is to gather all of the objective information needed to obtain an accurate diagnosis. This information will include the clinical and radiographic examination. The clini-cal examination should include a visual extraoral and intra-oral examination, and a thorough periodontal evaluation. Visual examination is greatly aided by magnification and illu-mination, which can allow the clinician to identify significant conditions invisible to the naked eye, such as fine fractures on root surfaces (Fig. 8-6). Exposed dentin from recession and narrow based probing defects may be the result of an end-odontic infection draining through the sulcus; however, they sometimes indicate vertical root fracture.40 The presence of occlusal wear facets indicates the presence of occlusal trauma that may complicate diagnosis and treatment outcome by pre-disposing the tooth to fracture,90 and it has been associated with posttreatment disease.113 Further information on diagno-sis and management of cracks and fractures is provided in Chapter 21.
Radiographic assessment is obligatory. Even though radio-graphs may be a critical aid to the clinician, they should never be the sole support for a conclusive diagnosis. They are only one piece of the puzzle in determining endodontic etiology.58 In cases with previous endodontic therapy, radiographs are useful in evaluation of caries, defective restorations, periodon-tal health, the quality of the obturation, existence of missed canals, impediments to instrumentation, periradicular patho-sis, perforations, fractures,238 resorption, and canal anatomy. Radiographs should be properly exposed and have a sharp, clear image. They should include the tooth and surrounding tissues, and multiple angulated films should be used to deter-mine endodontic etiologies using the buccal object moves most
FIG. 8-5 This patient was misdiagnosed for years and underwent unnecessary endodontic therapy. The actual cause of the patient’s complaint was nondental pain. (Courtesy Dr. Ramesh Kuba.)
FIG. 8-6 A, Buccal aspect of a premolar with posttreatment disease. B, Higher magnification reveals a vertical fracture.
A
B
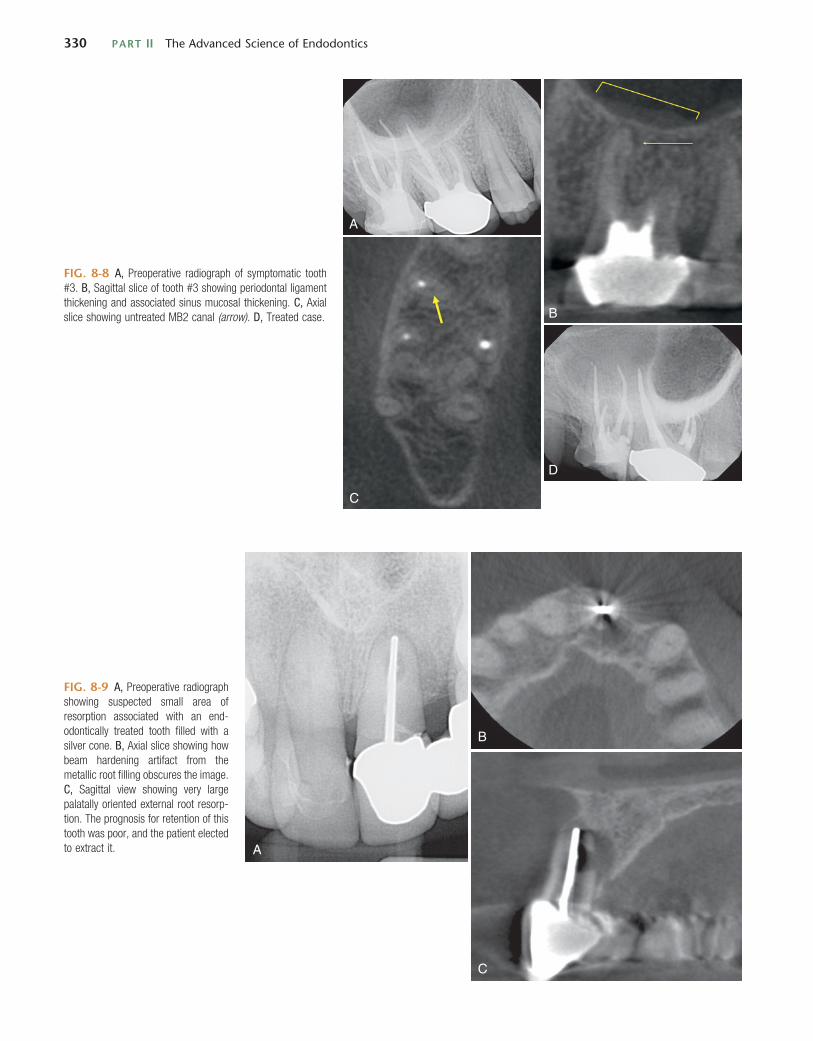
rule (Fig. 8-7).80 Bitewing radiographs are useful for determin-ing periodontal bone height and looking for caries or fractures. All sinus tracts should be traced with a cone of gutta-percha followed by a radiograph to localize their origin.111
Cone beam computed tomography (CBCT) has been intro-duced into endodontics, and its usefulness in the management of endodontic retreatment is unquestioned. It has provided a quantum leap in our ability to determine the causes of posttreat-ment apical periodontitis by giving the clinician, for the first time, the ability to easily, safely, and inexpensively visualize the tooth and surrounding structures in three dimensions (3D). CBCT use in endodontics is discussed in detail in Chapter 2, but when faced with a tooth needing retreatment, it is especially helpful. The CBCT allows the clinician to determine the true size, extent, and position of periapical and resorptive lesions
CHAPTER 8 Nonsurgical Retreatment 329
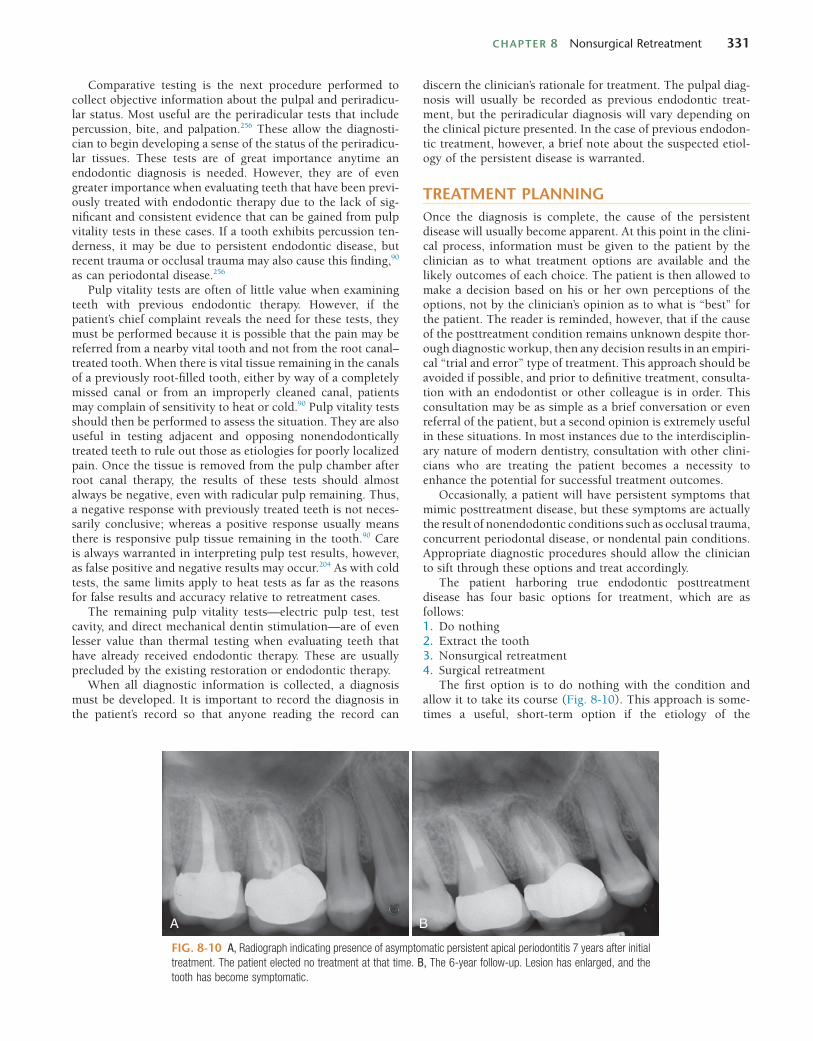
One major cause of posttreatment apical periodontitis is untreated canals, and the CBCT gives an unprecedented ability to discover those (Fig. 8-8). In one study, endodontist evaluators failed to identify at least 1 root canal system in approximately 4 of 10 teeth when using images obtained by conventional digital radiography compared with images from cone-beam computed tomography.152
Avoiding treatment, which will lead to a predictable failure, is beneficial for both the clinician and the patient. The ability to obtain 3D images of teeth will help the clinician to avoid these mishaps. The diagnosis of root fractures frequently frus-trates the clinician, as a definitive diagnosis is often difficult and treating these teeth has a high likelihood of a poor outcome. Although visualizing root fractures in teeth with root fillings is still not predictable using CBCT,45,50,96,122 the patterns of bone loss indicative of root fracture can sometimes be seen,275 and this helps the clinician to infer their presence. The prognosis for the treatment of root resorption is directly related to the extent of the resorption, and this usually cannot be determined accurately using conventional radiography. Using small FOV CBCT, however, the extent of the lesions and the prognosis can be determined,54 usually saving the patient from an exploratory procedure that may be doomed to fail (Fig. 8-9).
Though most clinicians believe that CBCT is not necessary for every patient treated, there are many retreatment situations where the additional information gained (relative to conven-tional radiography) is extremely valuable. In the future, spe-cific protocols for use will be developed; but for now, the authors recommend that clinicians use their best judgment on when to use this new technology.
and gives added information about tooth fractures, missed canals, root canal anatomy, and the nature of the alveolar bone topography around teeth.42 CBCT technology has greatly enhanced presurgical diagnosis and treatment planning, because the relationship of adjacent anatomic structures such as the maxillary sinus and inferior alveolar nerve to the root apices can be clearly visualized. This helps the clinician to decide on when to perform endodontic retreatment surgically or nonsurgically. CBCT is more accurate than periapical radiog-raphy in the diagnosis of apical periodontitis, and it can reveal the details of the lesions and adjacent structures, thus providing enhanced clinical diagnosis and treatment planning.42,175,176
There are many manufacturers and brands of CBCT machines on the market today, but the most useful ones for endodontic retreatment are those that produce the clearest image with the highest resolution.155 These would be the small field of view (FOV) machines that image a small volume and use the smallest picture element (voxel) dimensions available. Radiation exposure to the patient with these machines is in the range of 23 to 488 µSv,142 which is very small, but the “as low as reasonably achievable” (ALARA) principle applies, so its use in every diagnostic case cannot be encouraged. In a joint posi-tion statement in 2010, the American Association of Endodon-tists and the American Association of Oral and Maxillofacial Radiologists stated that “CBCT should only be used when the question for which imaging is required cannot be answered adequately by lower dose conventional dental radiography or alternate imaging modalities.”1 When managing posttreatment disease, however, almost every case will benefit from the use of three-dimensional imaging.
FIG. 8-7 A, Posttreatment disease. Previous endodontic therapy performed 3 years previously. B, Distal angle radiograph reveals asymmetry indicating the presence of an untreated mesiobuccal canal. C, Immediate posto-bturation film showing treated MB canal. D, A 14-month postoperative view. The patient was asymptomatic.
A B
C D
330 PART II The Advanced Science of Endodontics
FIG. 8-8 A, Preoperative radiograph of symptomatic tooth #3. B, Sagittal slice of tooth #3 showing periodontal ligament thickening and associated sinus mucosal thickening. C, Axial slice showing untreated MB2 canal (arrow). D, Treated case.
A
B
C
D
FIG. 8-9 A, Preoperative radiograph showing suspected small area of resorption associated with an end-odontically treated tooth filled with a silver cone. B, Axial slice showing how beam hardening artifact from the metallic root filling obscures the image. C, Sagittal view showing very large palatally oriented external root resorp-tion. The prognosis for retention of this tooth was poor, and the patient elected to extract it. A
B
C
CHAPTER 8 Nonsurgical Retreatment 331
discern the clinician’s rationale for treatment. The pulpal diag-nosis will usually be recorded as previous endodontic treat-ment, but the periradicular diagnosis will vary depending on the clinical picture presented. In the case of previous endodon-tic treatment, however, a brief note about the suspected etiol-ogy of the persistent disease is warranted.
TREATMENT PLANNINGOnce the diagnosis is complete, the cause of the persistent disease will usually become apparent. At this point in the clini-cal process, information must be given to the patient by the clinician as to what treatment options are available and the likely outcomes of each choice. The patient is then allowed to make a decision based on his or her own perceptions of the options, not by the clinician’s opinion as to what is “best” for the patient. The reader is reminded, however, that if the cause of the posttreatment condition remains unknown despite thor-ough diagnostic workup, then any decision results in an empiri-cal “trial and error” type of treatment. This approach should be avoided if possible, and prior to definitive treatment, consulta-tion with an endodontist or other colleague is in order. This consultation may be as simple as a brief conversation or even referral of the patient, but a second opinion is extremely useful in these situations. In most instances due to the interdisciplin-ary nature of modern dentistry, consultation with other clini-cians who are treating the patient becomes a necessity to enhance the potential for successful treatment outcomes.
Occasionally, a patient will have persistent symptoms that mimic posttreatment disease, but these symptoms are actually the result of nonendodontic conditions such as occlusal trauma, concurrent periodontal disease, or nondental pain conditions. Appropriate diagnostic procedures should allow the clinician to sift through these options and treat accordingly.
The patient harboring true endodontic posttreatment disease has four basic options for treatment, which are as follows:1. Do nothing2. Extract the tooth3. Nonsurgical retreatment4. Surgical retreatment
The first option is to do nothing with the condition and allow it to take its course (Fig. 8-10). This approach is some-times a useful, short-term option if the etiology of the
Comparative testing is the next procedure performed to collect objective information about the pulpal and periradicu-lar status. Most useful are the periradicular tests that include percussion, bite, and palpation.256 These allow the diagnosti-cian to begin developing a sense of the status of the periradicu-lar tissues. These tests are of great importance anytime an endodontic diagnosis is needed. However, they are of even greater importance when evaluating teeth that have been previ-ously treated with endodontic therapy due to the lack of sig-nificant and consistent evidence that can be gained from pulp vitality tests in these cases. If a tooth exhibits percussion ten-derness, it may be due to persistent endodontic disease, but recent trauma or occlusal trauma may also cause this finding,90 as can periodontal disease.256
Pulp vitality tests are often of little value when examining teeth with previous endodontic therapy. However, if the patient’s chief complaint reveals the need for these tests, they must be performed because it is possible that the pain may be referred from a nearby vital tooth and not from the root canal–treated tooth. When there is vital tissue remaining in the canals of a previously root-filled tooth, either by way of a completely missed canal or from an improperly cleaned canal, patients may complain of sensitivity to heat or cold.90 Pulp vitality tests should then be performed to assess the situation. They are also useful in testing adjacent and opposing nonendodontically treated teeth to rule out those as etiologies for poorly localized pain. Once the tissue is removed from the pulp chamber after root canal therapy, the results of these tests should almost always be negative, even with radicular pulp remaining. Thus, a negative response with previously treated teeth is not neces-sarily conclusive; whereas a positive response usually means there is responsive pulp tissue remaining in the tooth.90 Care is always warranted in interpreting pulp test results, however, as false positive and negative results may occur.204 As with cold tests, the same limits apply to heat tests as far as the reasons for false results and accuracy relative to retreatment cases.
The remaining pulp vitality tests—electric pulp test, test cavity, and direct mechanical dentin stimulation—are of even lesser value than thermal testing when evaluating teeth that have already received endodontic therapy. These are usually precluded by the existing restoration or endodontic therapy.
When all diagnostic information is collected, a diagnosis must be developed. It is important to record the diagnosis in the patient’s record so that anyone reading the record can
FIG. 8-10 A, Radiograph indicating presence of asymptomatic persistent apical periodontitis 7 years after initial treatment. The patient elected no treatment at that time. B, The 6-year follow-up. Lesion has enlarged, and the tooth has become symptomatic.
A B
332 PART II The Advanced Science of Endodontics
condition remains unknown and the clinician feels that another diagnostic sampling would help with diagnosis. Even though most clinicians would find this approach to be a less than desirable long-term course of action, the decision belongs to the patient. The clinician is bound, however, to ensure that the patient has complete information about what will happen if nothing is done. The events in the progression of the disease and a reasonable timeline are necessary, and the conversation needs to be thoroughly documented in the patient record to avoid possible subsequent accusations of abandonment. The question of whether the clinician is required to follow up with the patient or dismiss the patient from the practice is one that each clinician must make based on the clinician’s experience, judgment, and knowledge of the patient.
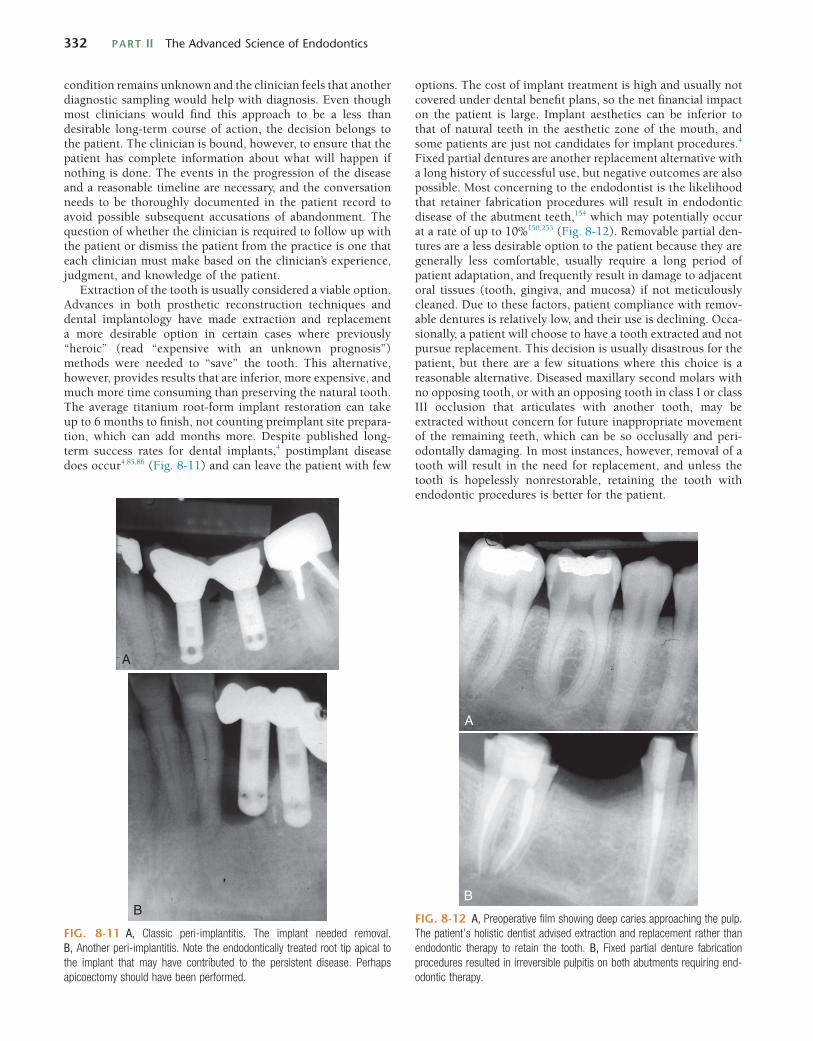
Extraction of the tooth is usually considered a viable option. Advances in both prosthetic reconstruction techniques and dental implantology have made extraction and replacement a more desirable option in certain cases where previously “heroic” (read “expensive with an unknown prognosis”) methods were needed to “save” the tooth. This alternative, however, provides results that are inferior, more expensive, and much more time consuming than preserving the natural tooth. The average titanium root-form implant restoration can take up to 6 months to finish, not counting preimplant site prepara-tion, which can add months more. Despite published long-term success rates for dental implants,4 postimplant disease does occur4,85,86 (Fig. 8-11) and can leave the patient with few
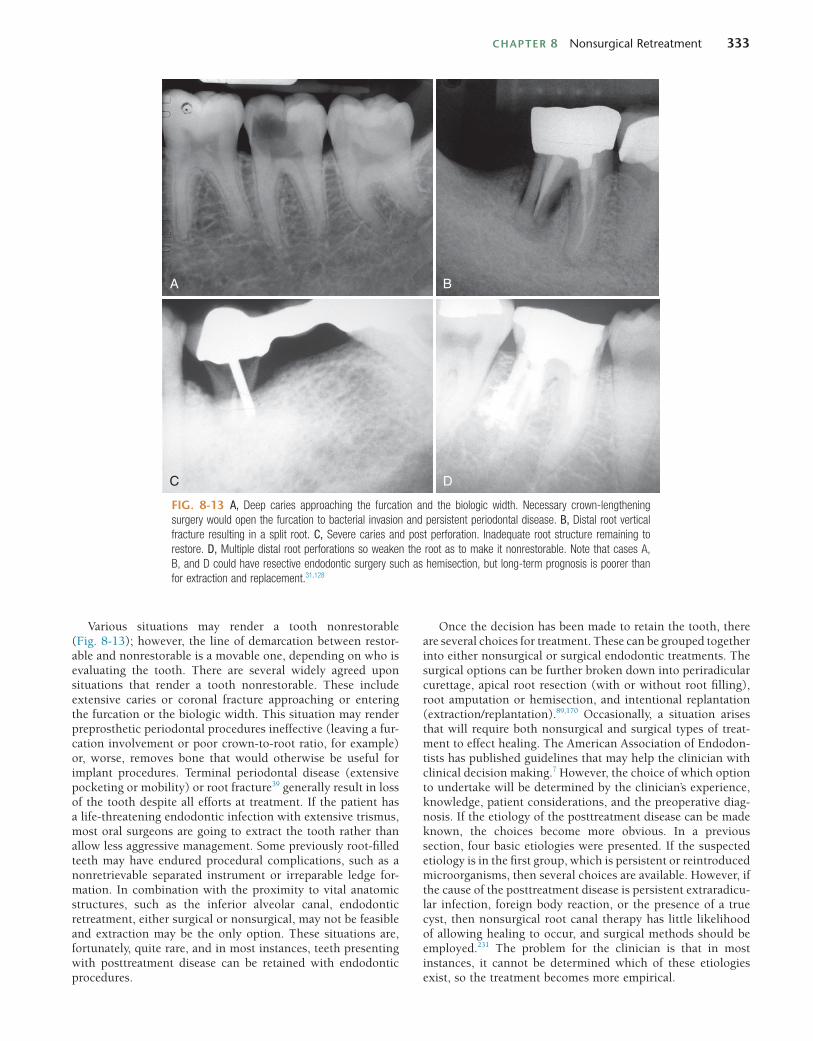
options. The cost of implant treatment is high and usually not covered under dental benefit plans, so the net financial impact on the patient is large. Implant aesthetics can be inferior to that of natural teeth in the aesthetic zone of the mouth, and some patients are just not candidates for implant procedures.4 Fixed partial dentures are another replacement alternative with a long history of successful use, but negative outcomes are also possible. Most concerning to the endodontist is the likelihood that retainer fabrication procedures will result in endodontic disease of the abutment teeth,154 which may potentially occur at a rate of up to 10%150,253 (Fig. 8-12). Removable partial den-tures are a less desirable option to the patient because they are generally less comfortable, usually require a long period of patient adaptation, and frequently result in damage to adjacent oral tissues (tooth, gingiva, and mucosa) if not meticulously cleaned. Due to these factors, patient compliance with remov-able dentures is relatively low, and their use is declining. Occa-sionally, a patient will choose to have a tooth extracted and not pursue replacement. This decision is usually disastrous for the patient, but there are a few situations where this choice is a reasonable alternative. Diseased maxillary second molars with no opposing tooth, or with an opposing tooth in class I or class III occlusion that articulates with another tooth, may be extracted without concern for future inappropriate movement of the remaining teeth, which can be so occlusally and peri-odontally damaging. In most instances, however, removal of a tooth will result in the need for replacement, and unless the tooth is hopelessly nonrestorable, retaining the tooth with endodontic procedures is better for the patient.
FIG. 8-12 A, Preoperative film showing deep caries approaching the pulp. The patient’s holistic dentist advised extraction and replacement rather than endodontic therapy to retain the tooth. B, Fixed partial denture fabrication procedures resulted in irreversible pulpitis on both abutments requiring end-odontic therapy.
A
B
FIG. 8-11 A, Classic peri-implantitis. The implant needed removal. B, Another peri-implantitis. Note the endodontically treated root tip apical to the implant that may have contributed to the persistent disease. Perhaps apicoectomy should have been performed.
A
B
CHAPTER 8 Nonsurgical Retreatment 333
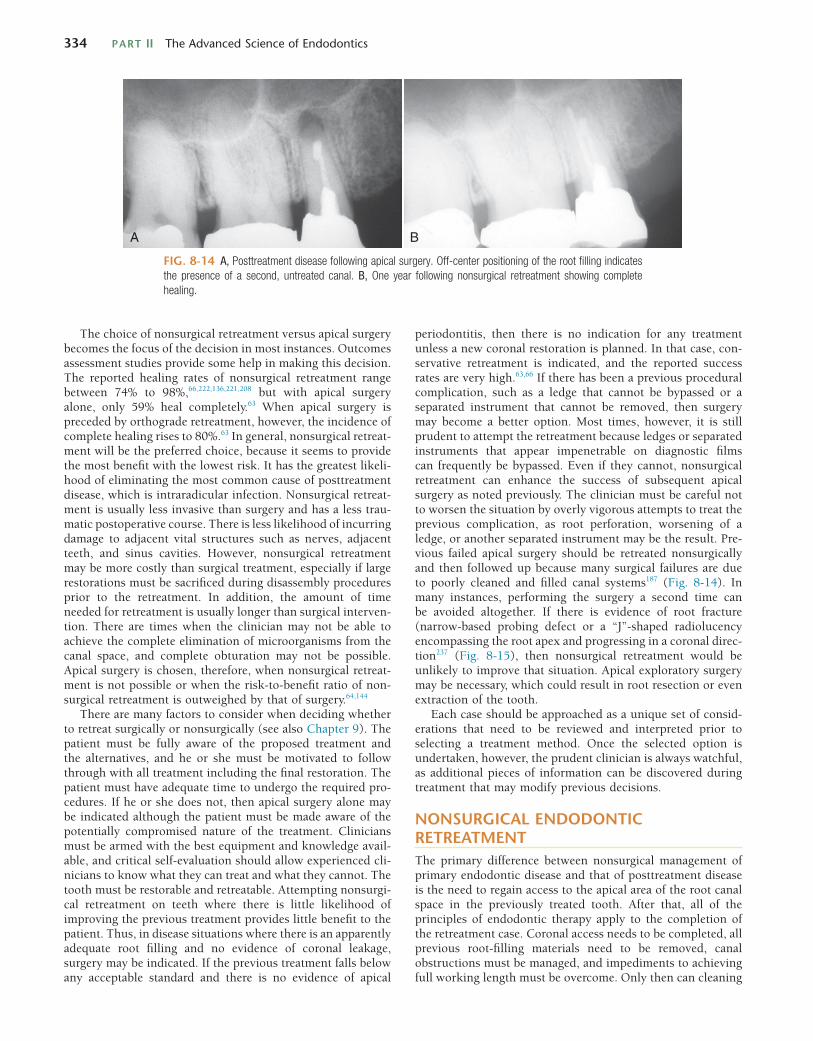
Various situations may render a tooth nonrestorable (Fig. 8-13); however, the line of demarcation between restor-able and nonrestorable is a movable one, depending on who is evaluating the tooth. There are several widely agreed upon situations that render a tooth nonrestorable. These include extensive caries or coronal fracture approaching or entering the furcation or the biologic width. This situation may render preprosthetic periodontal procedures ineffective (leaving a fur-cation involvement or poor crown-to-root ratio, for example) or, worse, removes bone that would otherwise be useful for implant procedures. Terminal periodontal disease (extensive pocketing or mobility) or root fracture39 generally result in loss of the tooth despite all efforts at treatment. If the patient has a life-threatening endodontic infection with extensive trismus, most oral surgeons are going to extract the tooth rather than allow less aggressive management. Some previously root-filled teeth may have endured procedural complications, such as a nonretrievable separated instrument or irreparable ledge for-mation. In combination with the proximity to vital anatomic structures, such as the inferior alveolar canal, endodontic retreatment, either surgical or nonsurgical, may not be feasible and extraction may be the only option. These situations are, fortunately, quite rare, and in most instances, teeth presenting with posttreatment disease can be retained with endodontic procedures.
Once the decision has been made to retain the tooth, there are several choices for treatment. These can be grouped together into either nonsurgical or surgical endodontic treatments. The surgical options can be further broken down into periradicular curettage, apical root resection (with or without root filling), root amputation or hemisection, and intentional replantation (extraction/replantation).89,170 Occasionally, a situation arises that will require both nonsurgical and surgical types of treat-ment to effect healing. The American Association of Endodon-tists has published guidelines that may help the clinician with clinical decision making.7 However, the choice of which option to undertake will be determined by the clinician’s experience, knowledge, patient considerations, and the preoperative diag-nosis. If the etiology of the posttreatment disease can be made known, the choices become more obvious. In a previous section, four basic etiologies were presented. If the suspected etiology is in the first group, which is persistent or reintroduced microorganisms, then several choices are available. However, if the cause of the posttreatment disease is persistent extraradicu-lar infection, foreign body reaction, or the presence of a true cyst, then nonsurgical root canal therapy has little likelihood of allowing healing to occur, and surgical methods should be employed.231 The problem for the clinician is that in most instances, it cannot be determined which of these etiologies exist, so the treatment becomes more empirical.
FIG. 8-13 A, Deep caries approaching the furcation and the biologic width. Necessary crown-lengthening surgery would open the furcation to bacterial invasion and persistent periodontal disease. B, Distal root vertical fracture resulting in a split root. C, Severe caries and post perforation. Inadequate root structure remaining to restore. D, Multiple distal root perforations so weaken the root as to make it nonrestorable. Note that cases A, B, and D could have resective endodontic surgery such as hemisection, but long-term prognosis is poorer than for extraction and replacement.31,128
A B
C D
334 PART II The Advanced Science of Endodontics
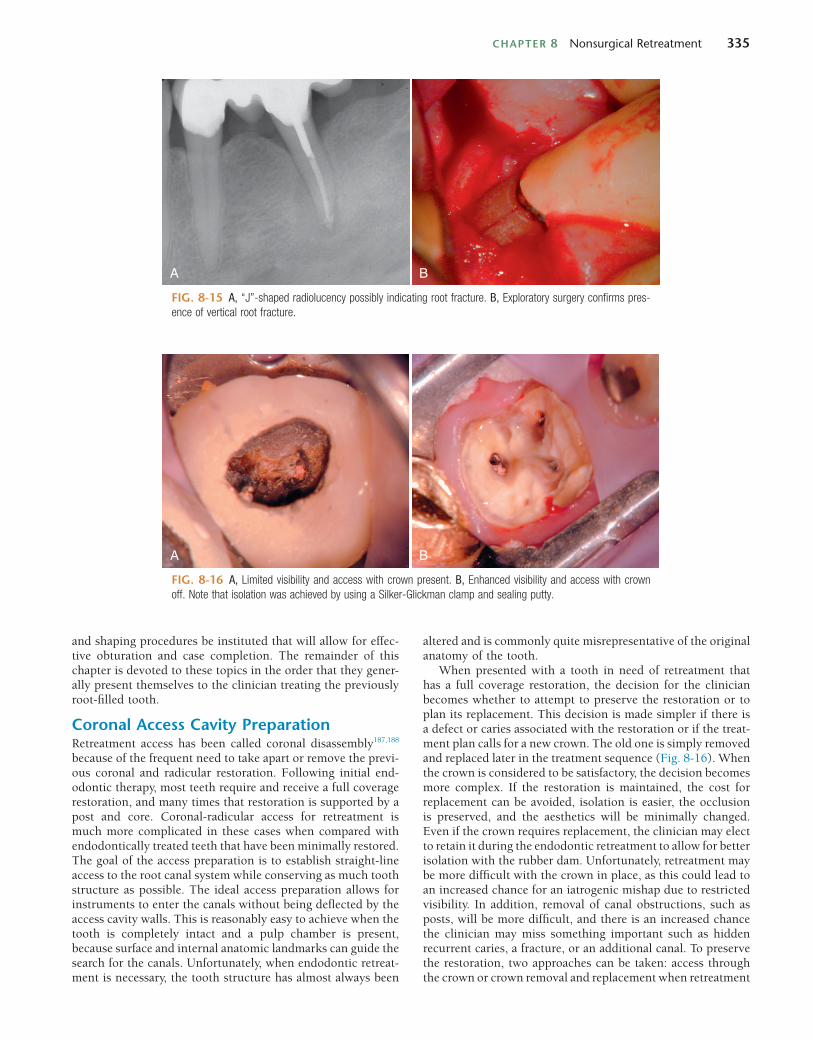
periodontitis, then there is no indication for any treatment unless a new coronal restoration is planned. In that case, con-servative retreatment is indicated, and the reported success rates are very high.63,66 If there has been a previous procedural complication, such as a ledge that cannot be bypassed or a separated instrument that cannot be removed, then surgery may become a better option. Most times, however, it is still prudent to attempt the retreatment because ledges or separated instruments that appear impenetrable on diagnostic films can frequently be bypassed. Even if they cannot, nonsurgical retreatment can enhance the success of subsequent apical surgery as noted previously. The clinician must be careful not to worsen the situation by overly vigorous attempts to treat the previous complication, as root perforation, worsening of a ledge, or another separated instrument may be the result. Pre-vious failed apical surgery should be retreated nonsurgically and then followed up because many surgical failures are due to poorly cleaned and filled canal systems187 (Fig. 8-14). In many instances, performing the surgery a second time can be avoided altogether. If there is evidence of root fracture (narrow-based probing defect or a “J”-shaped radiolucency encompassing the root apex and progressing in a coronal direc-tion237 (Fig. 8-15), then nonsurgical retreatment would be unlikely to improve that situation. Apical exploratory surgery may be necessary, which could result in root resection or even extraction of the tooth.
Each case should be approached as a unique set of consid-erations that need to be reviewed and interpreted prior to selecting a treatment method. Once the selected option is undertaken, however, the prudent clinician is always watchful, as additional pieces of information can be discovered during treatment that may modify previous decisions.
NONSURGICAL ENDODONTIC RETREATMENTThe primary difference between nonsurgical management of primary endodontic disease and that of posttreatment disease is the need to regain access to the apical area of the root canal space in the previously treated tooth. After that, all of the principles of endodontic therapy apply to the completion of the retreatment case. Coronal access needs to be completed, all previous root-filling materials need to be removed, canal obstructions must be managed, and impediments to achieving full working length must be overcome. Only then can cleaning
The choice of nonsurgical retreatment versus apical surgery becomes the focus of the decision in most instances. Outcomes assessment studies provide some help in making this decision. The reported healing rates of nonsurgical retreatment range between 74% to 98%,66,222,136,221,208 but with apical surgery alone, only 59% heal completely.63 When apical surgery is preceded by orthograde retreatment, however, the incidence of complete healing rises to 80%.63 In general, nonsurgical retreat-ment will be the preferred choice, because it seems to provide the most benefit with the lowest risk. It has the greatest likeli-hood of eliminating the most common cause of posttreatment disease, which is intraradicular infection. Nonsurgical retreat-ment is usually less invasive than surgery and has a less trau-matic postoperative course. There is less likelihood of incurring damage to adjacent vital structures such as nerves, adjacent teeth, and sinus cavities. However, nonsurgical retreatment may be more costly than surgical treatment, especially if large restorations must be sacrificed during disassembly procedures prior to the retreatment. In addition, the amount of time needed for retreatment is usually longer than surgical interven-tion. There are times when the clinician may not be able to achieve the complete elimination of microorganisms from the canal space, and complete obturation may not be possible. Apical surgery is chosen, therefore, when nonsurgical retreat-ment is not possible or when the risk-to-benefit ratio of non-surgical retreatment is outweighed by that of surgery.64,144
There are many factors to consider when deciding whether to retreat surgically or nonsurgically (see also Chapter 9). The patient must be fully aware of the proposed treatment and the alternatives, and he or she must be motivated to follow through with all treatment including the final restoration. The patient must have adequate time to undergo the required pro-cedures. If he or she does not, then apical surgery alone may be indicated although the patient must be made aware of the potentially compromised nature of the treatment. Clinicians must be armed with the best equipment and knowledge avail-able, and critical self-evaluation should allow experienced cli-nicians to know what they can treat and what they cannot. The tooth must be restorable and retreatable. Attempting nonsurgi-cal retreatment on teeth where there is little likelihood of improving the previous treatment provides little benefit to the patient. Thus, in disease situations where there is an apparently adequate root filling and no evidence of coronal leakage, surgery may be indicated. If the previous treatment falls below any acceptable standard and there is no evidence of apical
FIG. 8-14 A, Posttreatment disease following apical surgery. Off-center positioning of the root filling indicates the presence of a second, untreated canal. B, One year following nonsurgical retreatment showing complete healing.
A B
CHAPTER 8 Nonsurgical Retreatment 335
FIG. 8-15 A, “J”-shaped radiolucency possibly indicating root fracture. B, Exploratory surgery confirms pres-ence of vertical root fracture.
A B
and shaping procedures be instituted that will allow for effec-tive obturation and case completion. The remainder of this chapter is devoted to these topics in the order that they gener-ally present themselves to the clinician treating the previously root-filled tooth.
Coronal Access Cavity PreparationRetreatment access has been called coronal disassembly187,188 because of the frequent need to take apart or remove the previ-ous coronal and radicular restoration. Following initial end-odontic therapy, most teeth require and receive a full coverage restoration, and many times that restoration is supported by a post and core. Coronal-radicular access for retreatment is much more complicated in these cases when compared with endodontically treated teeth that have been minimally restored. The goal of the access preparation is to establish straight-line access to the root canal system while conserving as much tooth structure as possible. The ideal access preparation allows for instruments to enter the canals without being deflected by the access cavity walls. This is reasonably easy to achieve when the tooth is completely intact and a pulp chamber is present, because surface and internal anatomic landmarks can guide the search for the canals. Unfortunately, when endodontic retreat-ment is necessary, the tooth structure has almost always been
FIG. 8-16 A, Limited visibility and access with crown present. B, Enhanced visibility and access with crown off. Note that isolation was achieved by using a Silker-Glickman clamp and sealing putty.
A B
altered and is commonly quite misrepresentative of the original anatomy of the tooth.
When presented with a tooth in need of retreatment that has a full coverage restoration, the decision for the clinician becomes whether to attempt to preserve the restoration or to plan its replacement. This decision is made simpler if there is a defect or caries associated with the restoration or if the treat-ment plan calls for a new crown. The old one is simply removed and replaced later in the treatment sequence (Fig. 8-16). When the crown is considered to be satisfactory, the decision becomes more complex. If the restoration is maintained, the cost for replacement can be avoided, isolation is easier, the occlusion is preserved, and the aesthetics will be minimally changed. Even if the crown requires replacement, the clinician may elect to retain it during the endodontic retreatment to allow for better isolation with the rubber dam. Unfortunately, retreatment may be more difficult with the crown in place, as this could lead to an increased chance for an iatrogenic mishap due to restricted visibility. In addition, removal of canal obstructions, such as posts, will be more difficult, and there is an increased chance the clinician may miss something important such as hidden recurrent caries, a fracture, or an additional canal. To preserve the restoration, two approaches can be taken: access through the crown or crown removal and replacement when retreatment
336 PART II The Advanced Science of Endodontics
stronger than the previous, making removal increasingly more difficult as cosmetic dentistry advances.
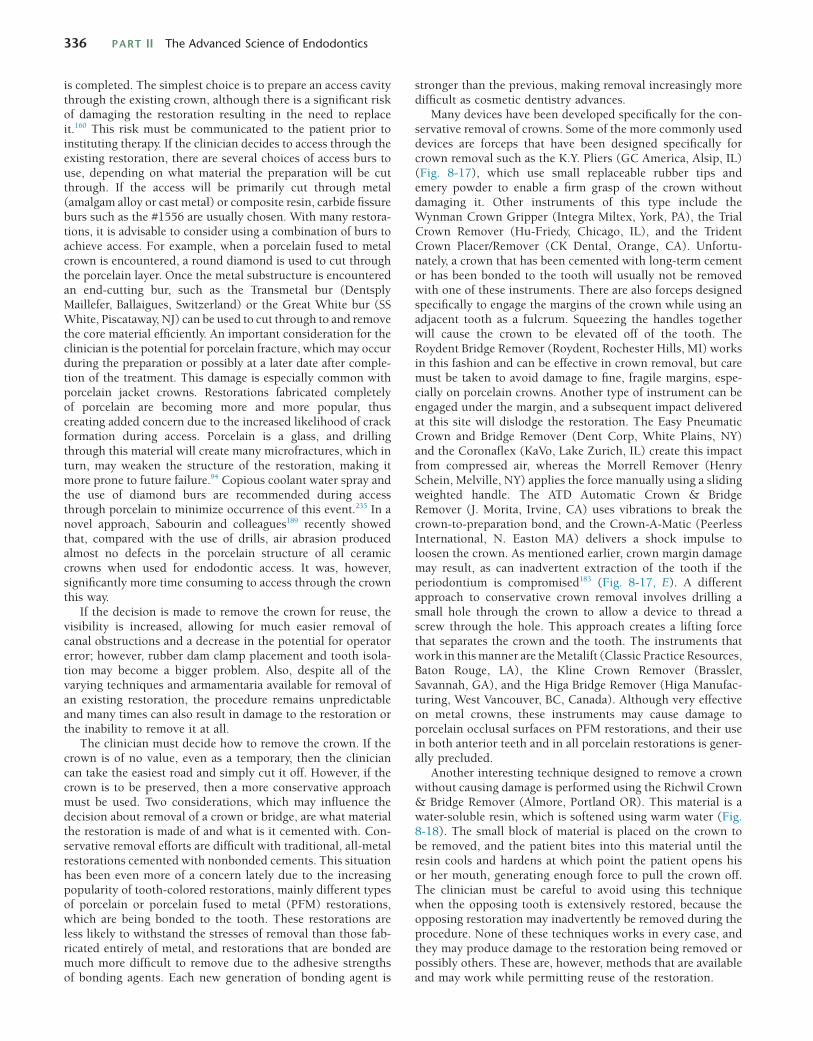
Many devices have been developed specifically for the con-servative removal of crowns. Some of the more commonly used devices are forceps that have been designed specifically for crown removal such as the K.Y. Pliers (GC America, Alsip, IL) (Fig. 8-17), which use small replaceable rubber tips and emery powder to enable a firm grasp of the crown without damaging it. Other instruments of this type include the Wynman Crown Gripper (Integra Miltex, York, PA), the Trial Crown Remover (Hu-Friedy, Chicago, IL), and the Trident Crown Placer/Remover (CK Dental, Orange, CA). Unfortu-nately, a crown that has been cemented with long-term cement or has been bonded to the tooth will usually not be removed with one of these instruments. There are also forceps designed specifically to engage the margins of the crown while using an adjacent tooth as a fulcrum. Squeezing the handles together will cause the crown to be elevated off of the tooth. The Roydent Bridge Remover (Roydent, Rochester Hills, MI) works in this fashion and can be effective in crown removal, but care must be taken to avoid damage to fine, fragile margins, espe-cially on porcelain crowns. Another type of instrument can be engaged under the margin, and a subsequent impact delivered at this site will dislodge the restoration. The Easy Pneumatic Crown and Bridge Remover (Dent Corp, White Plains, NY) and the Coronaflex (KaVo, Lake Zurich, IL) create this impact from compressed air, whereas the Morrell Remover (Henry Schein, Melville, NY) applies the force manually using a sliding weighted handle. The ATD Automatic Crown & Bridge Remover (J. Morita, Irvine, CA) uses vibrations to break the crown-to-preparation bond, and the Crown-A-Matic (Peerless International, N. Easton MA) delivers a shock impulse to loosen the crown. As mentioned earlier, crown margin damage may result, as can inadvertent extraction of the tooth if the periodontium is compromised183 (Fig. 8-17, E). A different approach to conservative crown removal involves drilling a small hole through the crown to allow a device to thread a screw through the hole. This approach creates a lifting force that separates the crown and the tooth. The instruments that work in this manner are the Metalift (Classic Practice Resources, Baton Rouge, LA), the Kline Crown Remover (Brassler, Savannah, GA), and the Higa Bridge Remover (Higa Manufac-turing, West Vancouver, BC, Canada). Although very effective on metal crowns, these instruments may cause damage to porcelain occlusal surfaces on PFM restorations, and their use in both anterior teeth and in all porcelain restorations is gener-ally precluded.
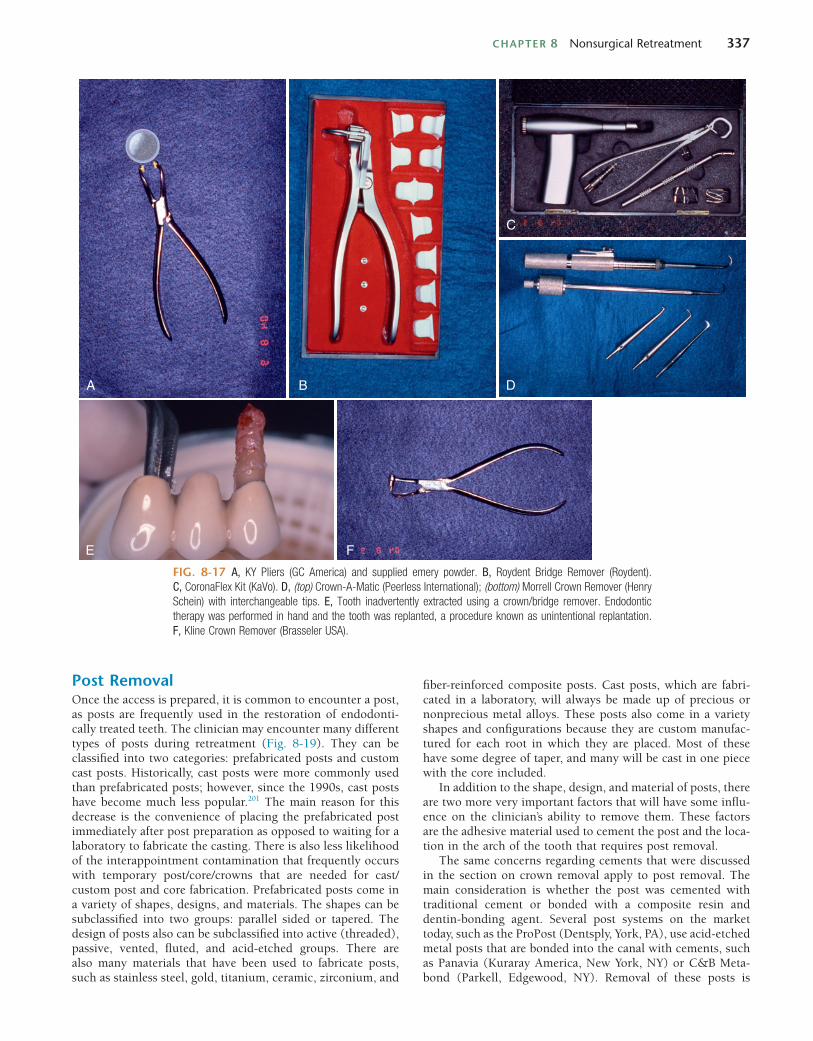
Another interesting technique designed to remove a crown without causing damage is performed using the Richwil Crown & Bridge Remover (Almore, Portland OR). This material is a water-soluble resin, which is softened using warm water (Fig. 8-18). The small block of material is placed on the crown to be removed, and the patient bites into this material until the resin cools and hardens at which point the patient opens his or her mouth, generating enough force to pull the crown off. The clinician must be careful to avoid using this technique when the opposing tooth is extensively restored, because the opposing restoration may inadvertently be removed during the procedure. None of these techniques works in every case, and they may produce damage to the restoration being removed or possibly others. These are, however, methods that are available and may work while permitting reuse of the restoration.
is completed. The simplest choice is to prepare an access cavity through the existing crown, although there is a significant risk of damaging the restoration resulting in the need to replace it.160 This risk must be communicated to the patient prior to instituting therapy. If the clinician decides to access through the existing restoration, there are several choices of access burs to use, depending on what material the preparation will be cut through. If the access will be primarily cut through metal (amalgam alloy or cast metal) or composite resin, carbide fissure burs such as the #1556 are usually chosen. With many restora-tions, it is advisable to consider using a combination of burs to achieve access. For example, when a porcelain fused to metal crown is encountered, a round diamond is used to cut through the porcelain layer. Once the metal substructure is encountered an end-cutting bur, such as the Transmetal bur (Dentsply Maillefer, Ballaigues, Switzerland) or the Great White bur (SS White, Piscataway, NJ) can be used to cut through to and remove the core material efficiently. An important consideration for the clinician is the potential for porcelain fracture, which may occur during the preparation or possibly at a later date after comple-tion of the treatment. This damage is especially common with porcelain jacket crowns. Restorations fabricated completely of porcelain are becoming more and more popular, thus creating added concern due to the increased likelihood of crack formation during access. Porcelain is a glass, and drilling through this material will create many microfractures, which in turn, may weaken the structure of the restoration, making it more prone to future failure.94 Copious coolant water spray and the use of diamond burs are recommended during access through porcelain to minimize occurrence of this event.235 In a novel approach, Sabourin and colleagues189 recently showed that, compared with the use of drills, air abrasion produced almost no defects in the porcelain structure of all ceramic crowns when used for endodontic access. It was, however, significantly more time consuming to access through the crown this way.
If the decision is made to remove the crown for reuse, the visibility is increased, allowing for much easier removal of canal obstructions and a decrease in the potential for operator error; however, rubber dam clamp placement and tooth isola-tion may become a bigger problem. Also, despite all of the varying techniques and armamentaria available for removal of an existing restoration, the procedure remains unpredictable and many times can also result in damage to the restoration or the inability to remove it at all.
The clinician must decide how to remove the crown. If the crown is of no value, even as a temporary, then the clinician can take the easiest road and simply cut it off. However, if the crown is to be preserved, then a more conservative approach must be used. Two considerations, which may influence the decision about removal of a crown or bridge, are what material the restoration is made of and what is it cemented with. Con-servative removal efforts are difficult with traditional, all-metal restorations cemented with nonbonded cements. This situation has been even more of a concern lately due to the increasing popularity of tooth-colored restorations, mainly different types of porcelain or porcelain fused to metal (PFM) restorations, which are being bonded to the tooth. These restorations are less likely to withstand the stresses of removal than those fab-ricated entirely of metal, and restorations that are bonded are much more difficult to remove due to the adhesive strengths of bonding agents. Each new generation of bonding agent is
CHAPTER 8 Nonsurgical Retreatment 337
FIG. 8-17 A, KY Pliers (GC America) and supplied emery powder. B, Roydent Bridge Remover (Roydent). C, CoronaFlex Kit (KaVo). D, (top) Crown-A-Matic (Peerless International); (bottom) Morrell Crown Remover (Henry Schein) with interchangeable tips. E, Tooth inadvertently extracted using a crown/bridge remover. Endodontic therapy was performed in hand and the tooth was replanted, a procedure known as unintentional replantation. F, Kline Crown Remover (Brasseler USA).
A B
C
D
E F
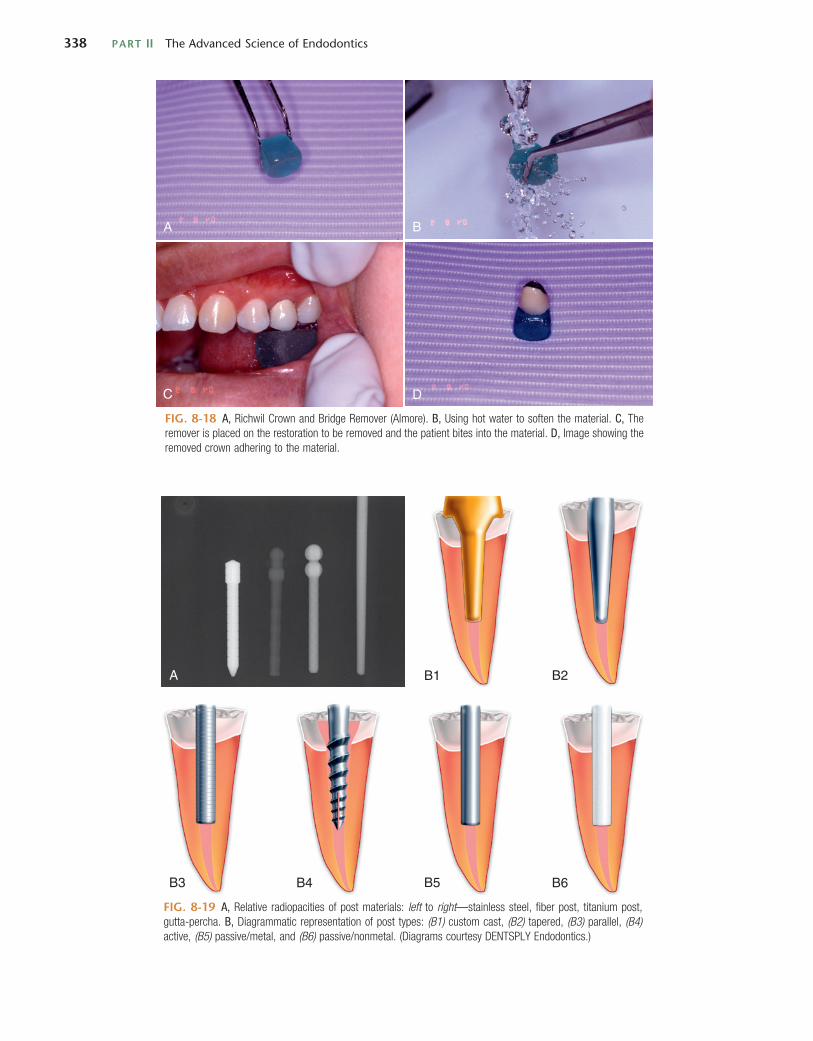
Post RemovalOnce the access is prepared, it is common to encounter a post, as posts are frequently used in the restoration of endodonti-cally treated teeth. The clinician may encounter many different types of posts during retreatment (Fig. 8-19). They can be classified into two categories: prefabricated posts and custom cast posts. Historically, cast posts were more commonly used than prefabricated posts; however, since the 1990s, cast posts have become much less popular.201 The main reason for this decrease is the convenience of placing the prefabricated post immediately after post preparation as opposed to waiting for a laboratory to fabricate the casting. There is also less likelihood of the interappointment contamination that frequently occurs with temporary post/core/crowns that are needed for cast/custom post and core fabrication. Prefabricated posts come in a variety of shapes, designs, and materials. The shapes can be subclassified into two groups: parallel sided or tapered. The design of posts also can be subclassified into active (threaded), passive, vented, fluted, and acid-etched groups. There are also many materials that have been used to fabricate posts, such as stainless steel, gold, titanium, ceramic, zirconium, and
fiber-reinforced composite posts. Cast posts, which are fabri-cated in a laboratory, will always be made up of precious or nonprecious metal alloys. These posts also come in a variety shapes and configurations because they are custom manufac-tured for each root in which they are placed. Most of these have some degree of taper, and many will be cast in one piece with the core included.
In addition to the shape, design, and material of posts, there are two more very important factors that will have some influ-ence on the clinician’s ability to remove them. These factors are the adhesive material used to cement the post and the loca-tion in the arch of the tooth that requires post removal.
The same concerns regarding cements that were discussed in the section on crown removal apply to post removal. The main consideration is whether the post was cemented with traditional cement or bonded with a composite resin and dentin-bonding agent. Several post systems on the market today, such as the ProPost (Dentsply, York, PA), use acid-etched metal posts that are bonded into the canal with cements, such as Panavia (Kuraray America, New York, NY) or C&B Meta-bond (Parkell, Edgewood, NY). Removal of these posts is
338 PART II The Advanced Science of Endodontics
FIG. 8-18 A, Richwil Crown and Bridge Remover (Almore). B, Using hot water to soften the material. C, The remover is placed on the restoration to be removed and the patient bites into the material. D, Image showing the removed crown adhering to the material.
A B
C D
FIG. 8-19 A, Relative radiopacities of post materials: left to right—stainless steel, fiber post, titanium post, gutta-percha. B, Diagrammatic representation of post types: (B1) custom cast, (B2) tapered, (B3) parallel, (B4) active, (B5) passive/metal, and (B6) passive/nonmetal. (Diagrams courtesy DENTSPLY Endodontics.)
A B1 B2
B3 B4 B5 B6
CHAPTER 8 Nonsurgical Retreatment 339
extremely difficult and occasionally impossible, regardless of which technique is used.84 One study has shown that heat generation with ultrasonic vibration may help to decrease retention of resin cemented posts,73 but concern for heat-generated periodontal ligament damage may preclude this technique.201
With regard to location, the more posterior in the arch, the more difficult the post is to remove. This predicament is a result of accessibility. The more accessible the tooth is, the easier the post is to remove because the clinician will have more techniques and instruments available to use.2 Also, the more anterior the tooth is, the less the opposing occlusion will interfere with post removal.
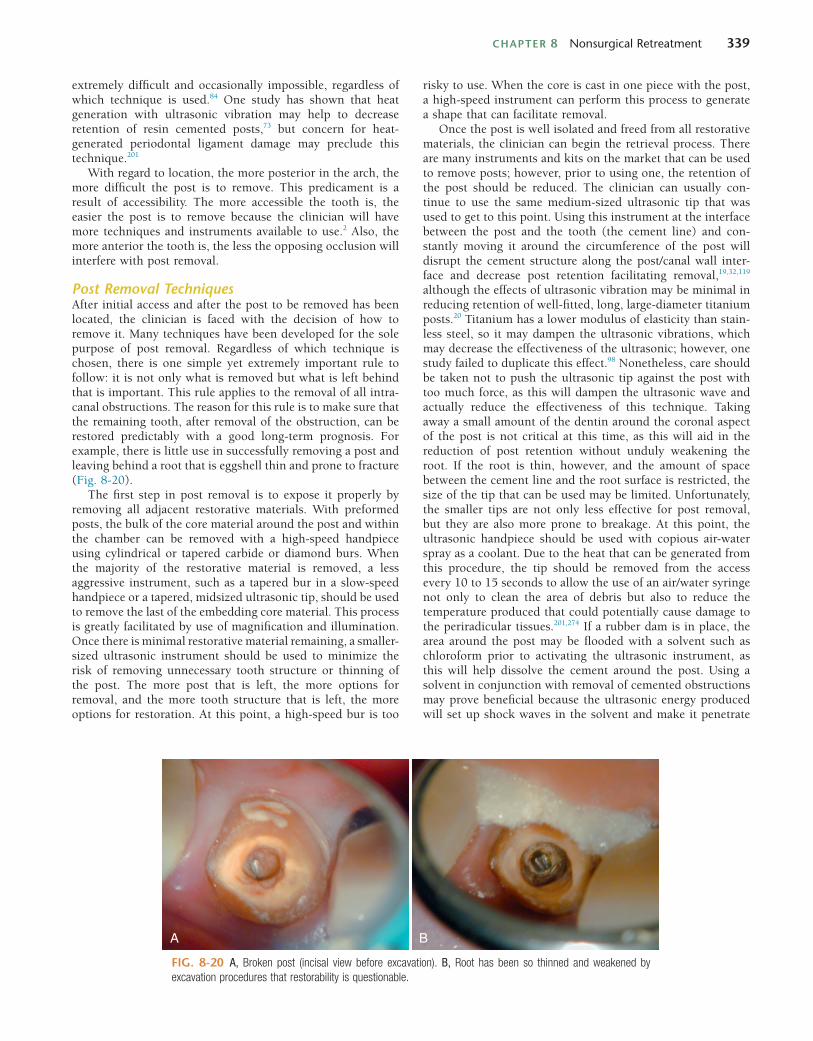
Post Removal TechniquesAfter initial access and after the post to be removed has been located, the clinician is faced with the decision of how to remove it. Many techniques have been developed for the sole purpose of post removal. Regardless of which technique is chosen, there is one simple yet extremely important rule to follow: it is not only what is removed but what is left behind that is important. This rule applies to the removal of all intra-canal obstructions. The reason for this rule is to make sure that the remaining tooth, after removal of the obstruction, can be restored predictably with a good long-term prognosis. For example, there is little use in successfully removing a post and leaving behind a root that is eggshell thin and prone to fracture (Fig. 8-20).
The first step in post removal is to expose it properly by removing all adjacent restorative materials. With preformed posts, the bulk of the core material around the post and within the chamber can be removed with a high-speed handpiece using cylindrical or tapered carbide or diamond burs. When the majority of the restorative material is removed, a less aggressive instrument, such as a tapered bur in a slow-speed handpiece or a tapered, midsized ultrasonic tip, should be used to remove the last of the embedding core material. This process is greatly facilitated by use of magnification and illumination. Once there is minimal restorative material remaining, a smaller-sized ultrasonic instrument should be used to minimize the risk of removing unnecessary tooth structure or thinning of the post. The more post that is left, the more options for removal, and the more tooth structure that is left, the more options for restoration. At this point, a high-speed bur is too
risky to use. When the core is cast in one piece with the post, a high-speed instrument can perform this process to generate a shape that can facilitate removal.
Once the post is well isolated and freed from all restorative materials, the clinician can begin the retrieval process. There are many instruments and kits on the market that can be used to remove posts; however, prior to using one, the retention of the post should be reduced. The clinician can usually con-tinue to use the same medium-sized ultrasonic tip that was used to get to this point. Using this instrument at the interface between the post and the tooth (the cement line) and con-stantly moving it around the circumference of the post will disrupt the cement structure along the post/canal wall inter-face and decrease post retention facilitating removal,19,32,119 although the effects of ultrasonic vibration may be minimal in reducing retention of well-fitted, long, large-diameter titanium posts.20 Titanium has a lower modulus of elasticity than stain-less steel, so it may dampen the ultrasonic vibrations, which may decrease the effectiveness of the ultrasonic; however, one study failed to duplicate this effect.98 Nonetheless, care should be taken not to push the ultrasonic tip against the post with too much force, as this will dampen the ultrasonic wave and actually reduce the effectiveness of this technique. Taking away a small amount of the dentin around the coronal aspect of the post is not critical at this time, as this will aid in the reduction of post retention without unduly weakening the root. If the root is thin, however, and the amount of space between the cement line and the root surface is restricted, the size of the tip that can be used may be limited. Unfortunately, the smaller tips are not only less effective for post removal, but they are also more prone to breakage. At this point, the ultrasonic handpiece should be used with copious air-water spray as a coolant. Due to the heat that can be generated from this procedure, the tip should be removed from the access every 10 to 15 seconds to allow the use of an air/water syringe not only to clean the area of debris but also to reduce the temperature produced that could potentially cause damage to the periradicular tissues.201,274 If a rubber dam is in place, the area around the post may be flooded with a solvent such as chloroform prior to activating the ultrasonic instrument, as this will help dissolve the cement around the post. Using a solvent in conjunction with removal of cemented obstructions may prove beneficial because the ultrasonic energy produced will set up shock waves in the solvent and make it penetrate
FIG. 8-20 A, Broken post (incisal view before excavation). B, Root has been so thinned and weakened by excavation procedures that restorability is questionable.
A B

340 PART II The Advanced Science of Endodontics
FIG. 8-21 A, Radiograph of fractured post. B, Fractured post, labial view. C, Ultrasonic troughing. D, Post removed by ultrasonic alone. E, Check film confirming complete post removal.
A
B
C
DE
deeper into the canal space, exerting a faster solvent action on the cement.78
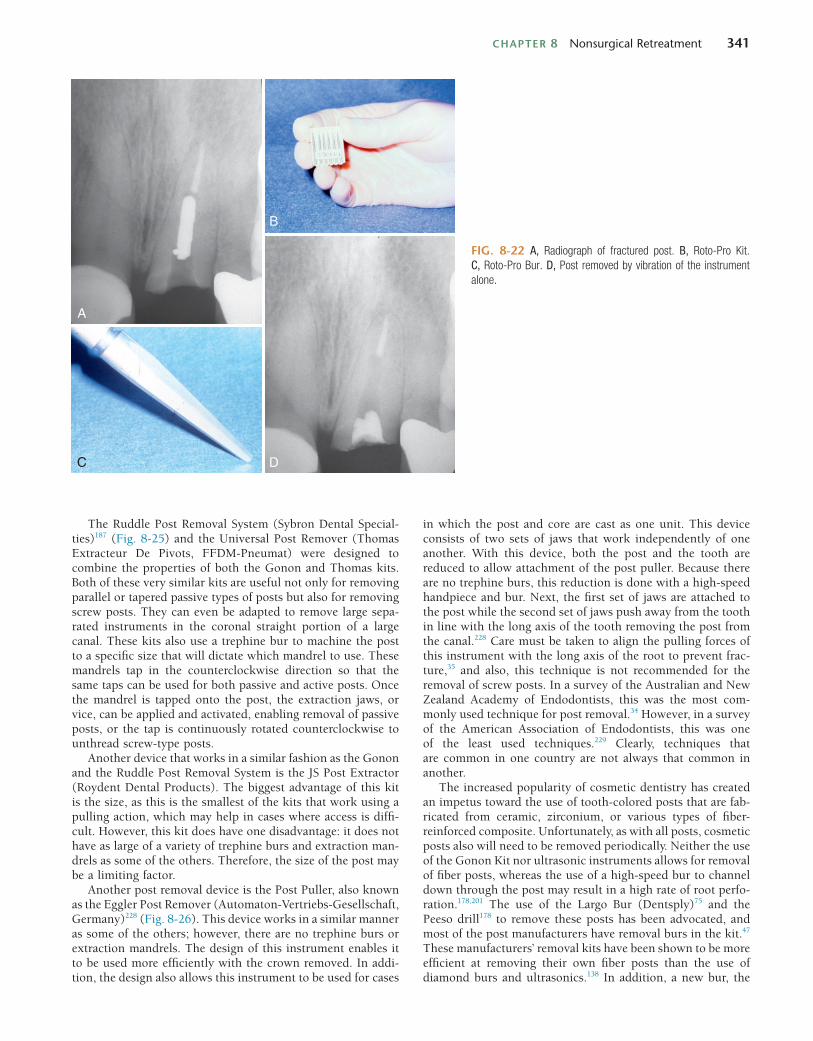
Using an ultrasonic instrument in this fashion is not simply helpful in reducing post retention; this may also prove to be all that is needed to remove the post. Many times, after judicious use of the ultrasonic instrument, the post will loosen and actu-ally spin out of the preparation, completing post removal (Fig. 8-21). In addition, if post removal cannot be accomplished in this manner, the resulting post exposure will be very beneficial in contributing to the predictable use of other techniques, as many of the instruments to be discussed involve using a tre-phine bur to shape the coronal end of the post. Ultrasonic exposure will facilitate this process. Another instrument to consider for exposing and loosening a post is the Roto-Pro bur (Ellman International, Hicksville, NY) (Fig. 8-22). There are three shapes available, all of which are six-sided, noncutting tapered burs that are used in a high-speed handpiece around the circumference of the post. The vibrations created when the noncutting flutes come in contact with the post decrease the retention of the post, facilitating its removal.
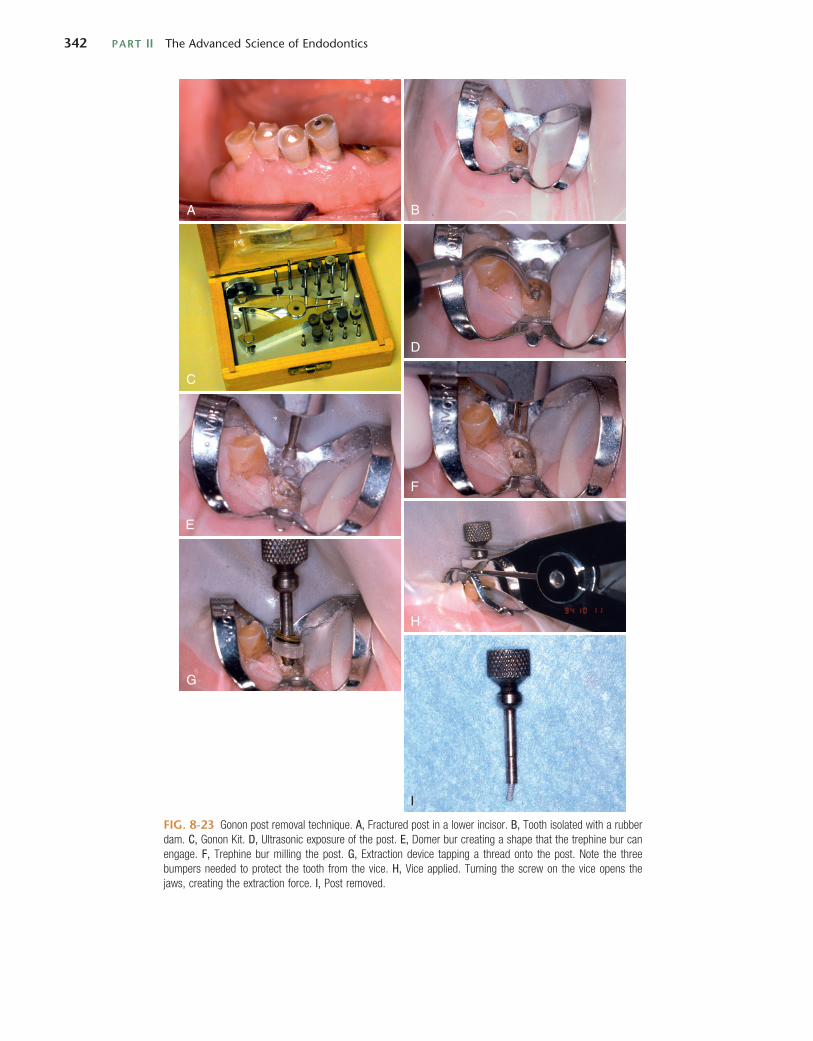
If retention reduction does not remove the post, some form of vice is needed to pull the post from its preparation. Many post removal kits are available on the market today with varying degrees of effectiveness. One such device is the Gonon Post Removing System (Thomas Extracteur De Pivots, FFDM-Pneumat, Bourge, France), which is a very effective instru-ment for removing parallel or tapered, nonactive preformed posts.145,191 This kit utilizes a hollow trephine bur that is
aligned with the long axis of the post and placed over its newly exposed end. The trephine then cuts in an apical direction, shaving off the post’s outer layer not only to remove tooth structure adjacent to the post but also to reduce the circumfer-ence of the post to a specific size and shape. This procedure is necessary to allow a specific, matched-size extraction mandrel to create or tap a thread onto the exposed milled portion of the post. Once the extraction mandrel with its associated washer/bumpers (Fig. 8-23) is attached to the post, the extrac-tion forceps or vice is applied to the tooth and post. Turning the screw on the handle of the vice applies a coronal force in a similar fashion as a corkscrew removes a cork from a bottle of wine. This method is effective because all the force is applied to the bond between the tooth and the post, ideally in the long axis of the root. The main problem with this technique is the size of the vice that can make access in the molar region and between crowded lower incisors difficult. Also, if the extrac-tion force applied is not directed in the long axis of the root, root fracture may occur.35
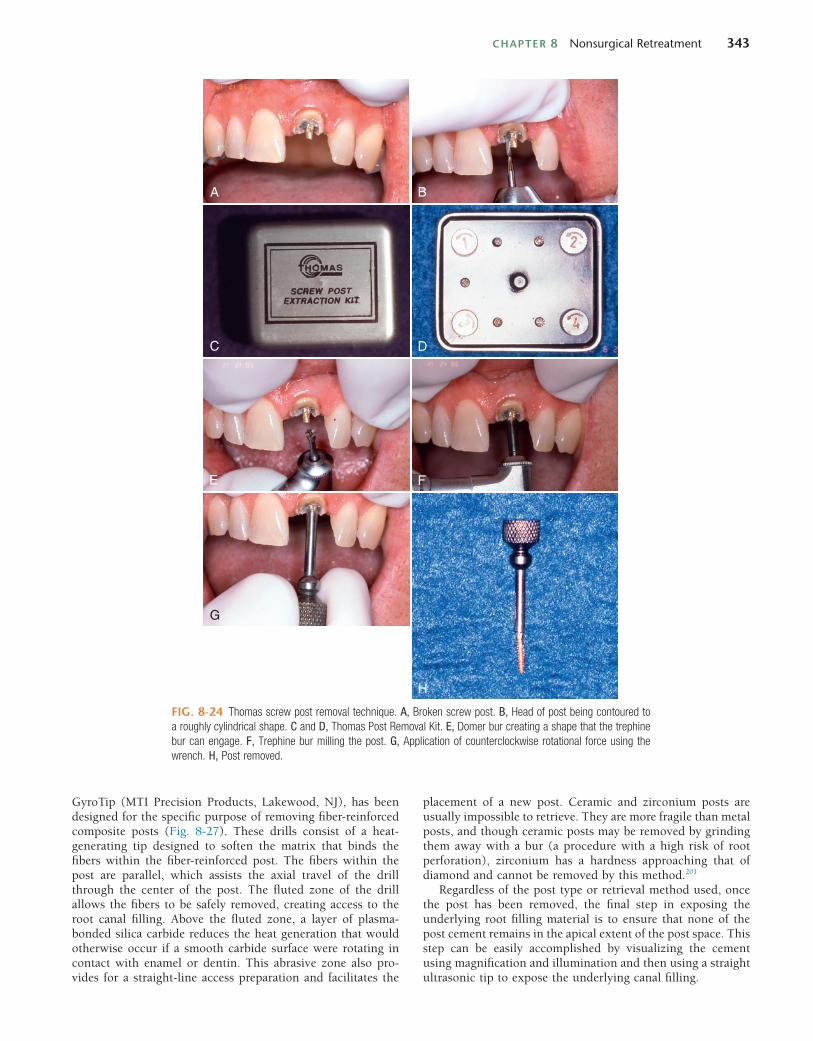
The Thomas Screw Post Removal Kit (Thomas Extracteur De Pivots, FFDM-Pneumat) (Fig. 8-24) is an instrument designed specifically for the removal of active or screw posts. The trephine burs are identical to those used with the Gonon Post Removal System, although the extraction mandrels are threaded in the opposite direction. The mandrels are reverse threaded to enable them to tap onto the screw post in a coun-terclockwise direction so that continued torquing force while creating the thread will unscrew the post.
CHAPTER 8 Nonsurgical Retreatment 341
FIG. 8-22 A, Radiograph of fractured post. B, Roto-Pro Kit. C, Roto-Pro Bur. D, Post removed by vibration of the instrument alone.
A
B
C D
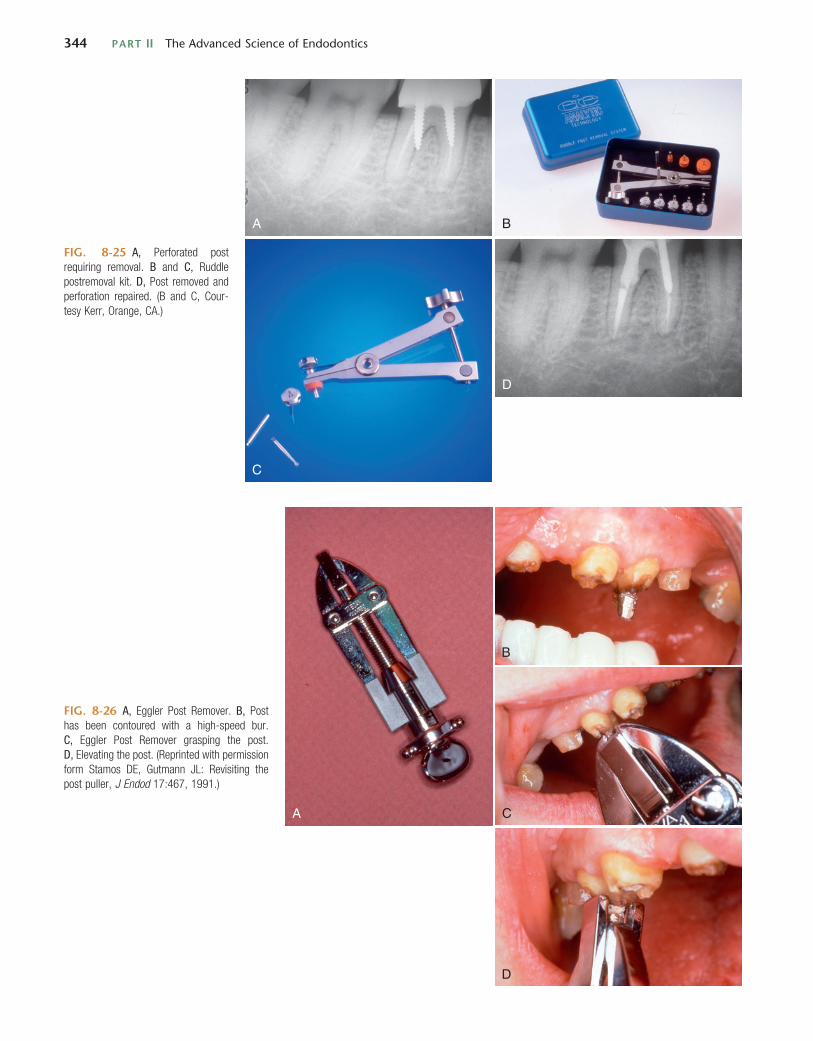
The Ruddle Post Removal System (Sybron Dental Special-ties)187 (Fig. 8-25) and the Universal Post Remover (Thomas Extracteur De Pivots, FFDM-Pneumat) were designed to combine the properties of both the Gonon and Thomas kits. Both of these very similar kits are useful not only for removing parallel or tapered passive types of posts but also for removing screw posts. They can even be adapted to remove large sepa-rated instruments in the coronal straight portion of a large canal. These kits also use a trephine bur to machine the post to a specific size that will dictate which mandrel to use. These mandrels tap in the counterclockwise direction so that the same taps can be used for both passive and active posts. Once the mandrel is tapped onto the post, the extraction jaws, or vice, can be applied and activated, enabling removal of passive posts, or the tap is continuously rotated counterclockwise to unthread screw-type posts.
Another device that works in a similar fashion as the Gonon and the Ruddle Post Removal System is the JS Post Extractor (Roydent Dental Products). The biggest advantage of this kit is the size, as this is the smallest of the kits that work using a pulling action, which may help in cases where access is diffi-cult. However, this kit does have one disadvantage: it does not have as large of a variety of trephine burs and extraction man-drels as some of the others. Therefore, the size of the post may be a limiting factor.
Another post removal device is the Post Puller, also known as the Eggler Post Remover (Automaton-Vertriebs-Gesellschaft, Germany)228 (Fig. 8-26). This device works in a similar manner as some of the others; however, there are no trephine burs or extraction mandrels. The design of this instrument enables it to be used more efficiently with the crown removed. In addi-tion, the design also allows this instrument to be used for cases
in which the post and core are cast as one unit. This device consists of two sets of jaws that work independently of one another. With this device, both the post and the tooth are reduced to allow attachment of the post puller. Because there are no trephine burs, this reduction is done with a high-speed handpiece and bur. Next, the first set of jaws are attached to the post while the second set of jaws push away from the tooth in line with the long axis of the tooth removing the post from the canal.228 Care must be taken to align the pulling forces of this instrument with the long axis of the root to prevent frac-ture,35 and also, this technique is not recommended for the removal of screw posts. In a survey of the Australian and New Zealand Academy of Endodontists, this was the most com-monly used technique for post removal.34 However, in a survey of the American Association of Endodontists, this was one of the least used techniques.229 Clearly, techniques that are common in one country are not always that common in another.
The increased popularity of cosmetic dentistry has created an impetus toward the use of tooth-colored posts that are fab-ricated from ceramic, zirconium, or various types of fiber-reinforced composite. Unfortunately, as with all posts, cosmetic posts also will need to be removed periodically. Neither the use of the Gonon Kit nor ultrasonic instruments allows for removal of fiber posts, whereas the use of a high-speed bur to channel down through the post may result in a high rate of root perfo-ration.178,201 The use of the Largo Bur (Dentsply)75 and the Peeso drill178 to remove these posts has been advocated, and most of the post manufacturers have removal burs in the kit.47 These manufacturers’ removal kits have been shown to be more efficient at removing their own fiber posts than the use of diamond burs and ultrasonics.138 In addition, a new bur, the
342 PART II The Advanced Science of Endodontics
FIG. 8-23 Gonon post removal technique. A, Fractured post in a lower incisor. B, Tooth isolated with a rubber dam. C, Gonon Kit. D, Ultrasonic exposure of the post. E, Domer bur creating a shape that the trephine bur can engage. F, Trephine bur milling the post. G, Extraction device tapping a thread onto the post. Note the three bumpers needed to protect the tooth from the vice. H, Vice applied. Turning the screw on the vice opens the jaws, creating the extraction force. I, Post removed.
A B
C
D
E
F
G
H
I
CHAPTER 8 Nonsurgical Retreatment 343
FIG. 8-24 Thomas screw post removal technique. A, Broken screw post. B, Head of post being contoured to a roughly cylindrical shape. C and D, Thomas Post Removal Kit. E, Domer bur creating a shape that the trephine bur can engage. F, Trephine bur milling the post. G, Application of counterclockwise rotational force using the wrench. H, Post removed.
A B
C D
E F
G
H
GyroTip (MTI Precision Products, Lakewood, NJ), has been designed for the specific purpose of removing fiber-reinforced composite posts (Fig. 8-27). These drills consist of a heat-generating tip designed to soften the matrix that binds the fibers within the fiber-reinforced post. The fibers within the post are parallel, which assists the axial travel of the drill through the center of the post. The fluted zone of the drill allows the fibers to be safely removed, creating access to the root canal filling. Above the fluted zone, a layer of plasma-bonded silica carbide reduces the heat generation that would otherwise occur if a smooth carbide surface were rotating in contact with enamel or dentin. This abrasive zone also pro-vides for a straight-line access preparation and facilitates the
placement of a new post. Ceramic and zirconium posts are usually impossible to retrieve. They are more fragile than metal posts, and though ceramic posts may be removed by grinding them away with a bur (a procedure with a high risk of root perforation), zirconium has a hardness approaching that of diamond and cannot be removed by this method.201
Regardless of the post type or retrieval method used, once the post has been removed, the final step in exposing the underlying root filling material is to ensure that none of the post cement remains in the apical extent of the post space. This step can be easily accomplished by visualizing the cement using magnification and illumination and then using a straight ultrasonic tip to expose the underlying canal filling.
344 PART II The Advanced Science of Endodontics
FIG. 8-25 A, Perforated post requiring removal. B and C, Ruddle postremoval kit. D, Post removed and perforation repaired. (B and C, Cour-tesy Kerr, Orange, CA.)
A B
C
D
FIG. 8-26 A, Eggler Post Remover. B, Post has been contoured with a high-speed bur. C, Eggler Post Remover grasping the post. D, Elevating the post. (Reprinted with permission form Stamos DE, Gutmann JL: Revisiting the post puller, J Endod 17:467, 1991.)
A
B
C
D
CHAPTER 8 Nonsurgical Retreatment 345
teeth.250 Therefore, it seems obvious that any additional work, which may require removal of further tooth structure, will further weaken the tooth, increasing the likelihood of fracture. An in vitro study showed that cracks can form in radicular dentin during post removal using both the Gonon Kit and ultrasonics, but there was no significant difference between these two groups, and teeth with posts that were not removed.6 The authors speculated that the potential for vertical root frac-ture might increase; however, the clinical significance of this
Potential Complications of Post RemovalAs with many dental procedures, post removal has risks. These risks include fracture of the tooth, leaving the tooth nonrestor-able, root perforation, post breakage, and inability to remove the post.229 An additional concern is ultrasonically generated heat damage to the periodontium.201
Even though there may still be some who feel posts strengthen teeth, it is widely accepted that they do not.201 Actu-ally, it has been shown that post preparation alone weakens
A B C
D E F
G H I
J
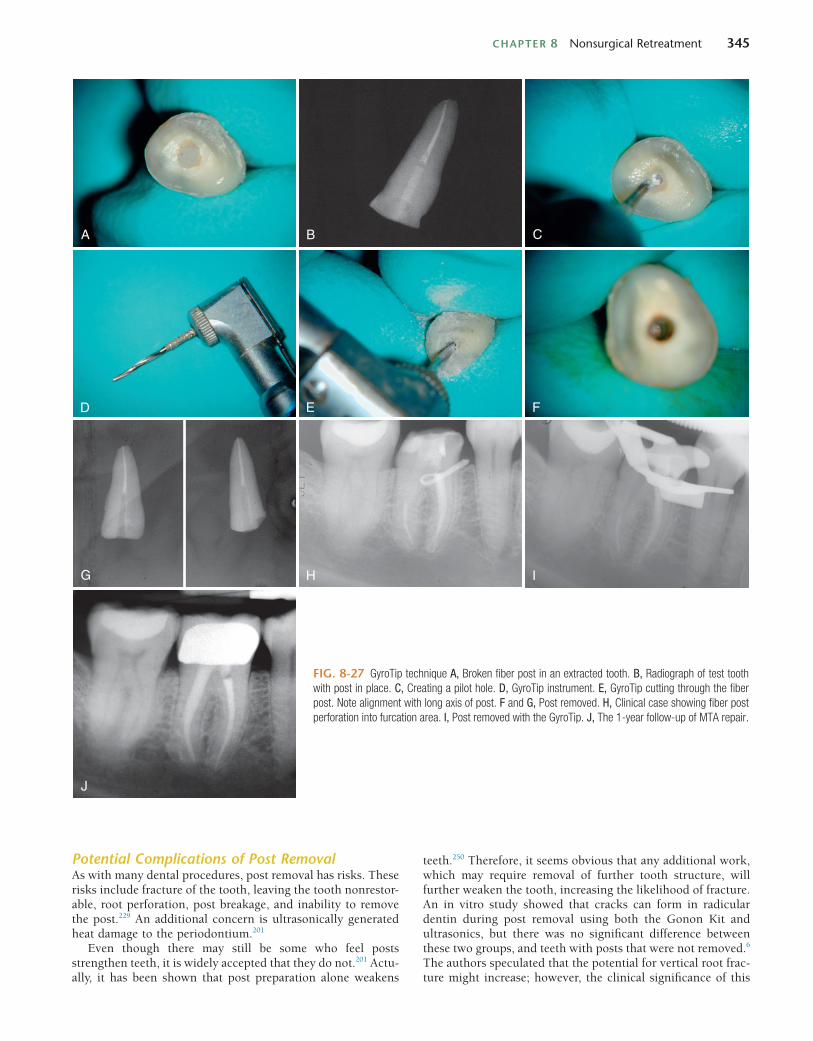
FIG. 8-27 GyroTip technique A, Broken fiber post in an extracted tooth. B, Radiograph of test tooth with post in place. C, Creating a pilot hole. D, GyroTip instrument. E, GyroTip cutting through the fiber post. Note alignment with long axis of post. F and G, Post removed. H, Clinical case showing fiber post perforation into furcation area. I, Post removed with the GyroTip. J, The 1-year follow-up of MTA repair.
346 PART II The Advanced Science of Endodontics
remains unknown. A more recent study, however, concluded that the incidence of root fracture during post removal was extremely low and that with good case selection, post removal is, in fact, a predictable procedure.2 If, however, post removal would also leave the remaining tooth structure in a state that may not be predictably restored with a good prognosis and if this situation can be predicted ahead of time, surgery may be the preferred treatment option.
Perforation is an additional possible complication that can happen during post removal, especially if the post is removed by simply attempting to drill it out with high-speed burs.178 If perforation occurs, the clinician should repair it immediately, as the prognosis will worsen as the time between perforation and repair lengthens.24,206 Once a perforation occurs, the clini-cian must reconsider the prognosis and determine whether the tooth should be salvaged. Terminating the procedure and pur-suing a different treatment option could be considered at this point. Extraction and replacement with an implant or a fixed prosthesis was a treatment option prior to initiating the retreat-ment, and some may consider this treatment the best option once a perforation has occurred. However, with the develop-ment of mineral trioxide aggregate (Pro-Root MTA, Dentsply, York, PA), perforations can be repaired with a favorable prog-nosis.184 The techniques and materials for perforation repair will be discussed in detail in a later section of this chapter.
Another complication is separation of the post, causing removal of the coronal segment leaving a small portion of the post with even less accessibility. This separation will decrease the likelihood of removal and occurs more frequently when attempting to retrieve titanium posts.201
The use of ultrasonic energy for prolonged periods of time can generate excessive amounts of heat. The heat generated can cause damage to the surrounding periodontium.78,201 This damage may be as serious as both tooth and permanent bone loss (Fig. 8-28). For this reason, stopping periodically to cool off the area with a water spray is necessary. This will be dis-cussed in detail in a later section.
If the clinician is unable to remove the post, he or she will be faced with a decision of what to do. This decision is based on whether the post is being removed for restorative purposes or due to the persistence of disease. If the reason is for restor-ative purposes and the clinician can adequately restore the tooth with the existing post or post segment, then he or she should do so. If the tooth cannot be properly restored without removal of the post and placement of a new post, then extrac-tion and replacement with an implant or fixed prosthesis will be needed. If the reason for post removal is the persistence of disease, the tooth should be treated surgically and restored as well as possible.
Regaining Access to the Apical AreaOnce the coronal-radicular access is made and all posts and obstructing restorations have been removed, then the clinician must regain access to the apical area by removing the previous root-filling materials (Fig. 8-29). This part of nonsurgical retreatment is complicated by the large variety of types of root fillings used. Today, the majority of root fillings are performed using gutta-percha in various forms; however, many other materials have been and are still being used. Silver points were popular until the 1970s and various types of pastes are,
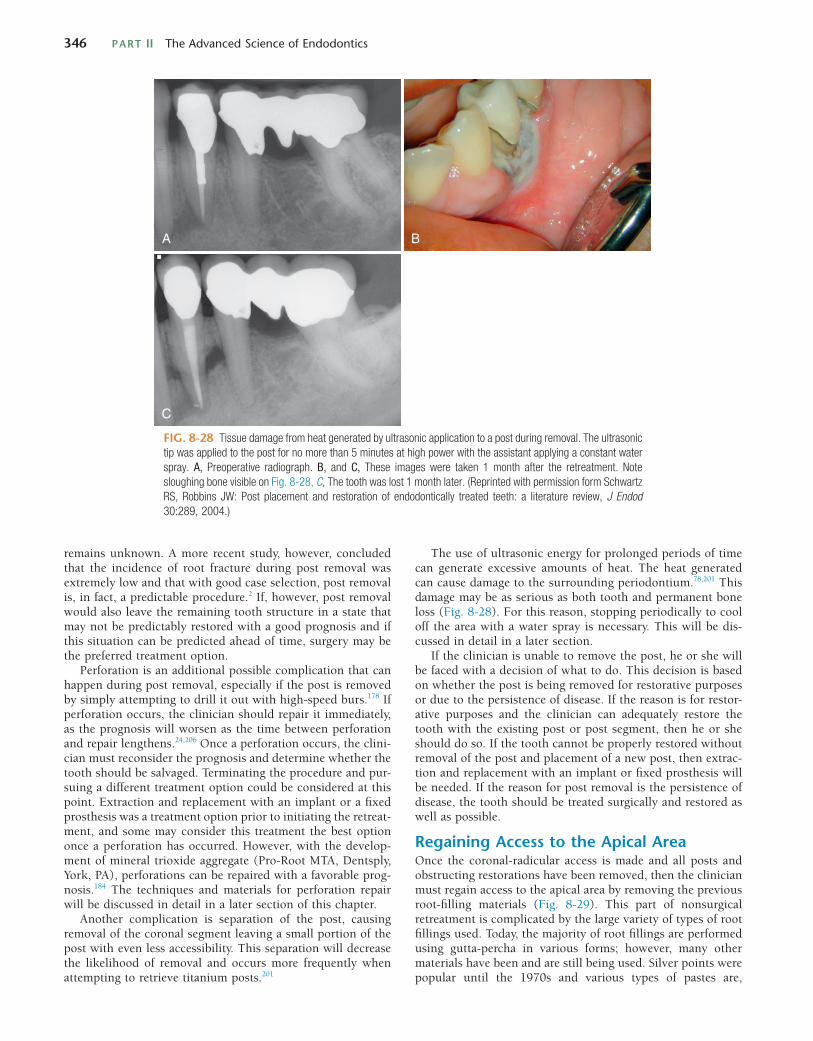
FIG. 8-28 Tissue damage from heat generated by ultrasonic application to a post during removal. The ultrasonic tip was applied to the post for no more than 5 minutes at high power with the assistant applying a constant water spray. A, Preoperative radiograph. B, and C, These images were taken 1 month after the retreatment. Note sloughing bone visible on Fig. 8-28, C, The tooth was lost 1 month later. (Reprinted with permission form Schwartz RS, Robbins JW: Post placement and restoration of endodontically treated teeth: a literature review, J Endod 30:289, 2004.)
A B
C
CHAPTER 8 Nonsurgical Retreatment 347
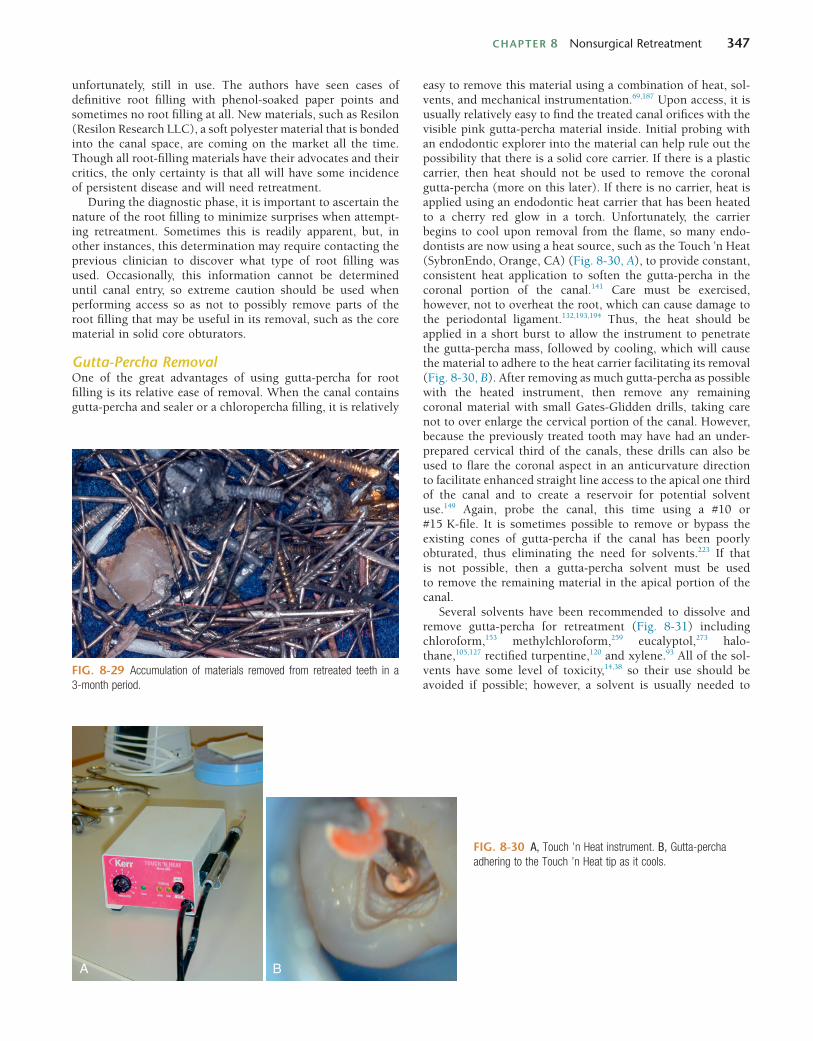
FIG. 8-29 Accumulation of materials removed from retreated teeth in a 3-month period.
unfortunately, still in use. The authors have seen cases of definitive root filling with phenol-soaked paper points and sometimes no root filling at all. New materials, such as Resilon (Resilon Research LLC), a soft polyester material that is bonded into the canal space, are coming on the market all the time. Though all root-filling materials have their advocates and their critics, the only certainty is that all will have some incidence of persistent disease and will need retreatment.
During the diagnostic phase, it is important to ascertain the nature of the root filling to minimize surprises when attempt-ing retreatment. Sometimes this is readily apparent, but, in other instances, this determination may require contacting the previous clinician to discover what type of root filling was used. Occasionally, this information cannot be determined until canal entry, so extreme caution should be used when performing access so as not to possibly remove parts of the root filling that may be useful in its removal, such as the core material in solid core obturators.
Gutta-Percha RemovalOne of the great advantages of using gutta-percha for root filling is its relative ease of removal. When the canal contains gutta-percha and sealer or a chloropercha filling, it is relatively
easy to remove this material using a combination of heat, sol-vents, and mechanical instrumentation.69,187 Upon access, it is usually relatively easy to find the treated canal orifices with the visible pink gutta-percha material inside. Initial probing with an endodontic explorer into the material can help rule out the possibility that there is a solid core carrier. If there is a plastic carrier, then heat should not be used to remove the coronal gutta-percha (more on this later). If there is no carrier, heat is applied using an endodontic heat carrier that has been heated to a cherry red glow in a torch. Unfortunately, the carrier begins to cool upon removal from the flame, so many endo-dontists are now using a heat source, such as the Touch ’n Heat (SybronEndo, Orange, CA) (Fig. 8-30, A), to provide constant, consistent heat application to soften the gutta-percha in the coronal portion of the canal.141 Care must be exercised, however, not to overheat the root, which can cause damage to the periodontal ligament.132,193,194 Thus, the heat should be applied in a short burst to allow the instrument to penetrate the gutta-percha mass, followed by cooling, which will cause the material to adhere to the heat carrier facilitating its removal (Fig. 8-30, B). After removing as much gutta-percha as possible with the heated instrument, then remove any remaining coronal material with small Gates-Glidden drills, taking care not to over enlarge the cervical portion of the canal. However, because the previously treated tooth may have had an under-prepared cervical third of the canals, these drills can also be used to flare the coronal aspect in an anticurvature direction to facilitate enhanced straight line access to the apical one third of the canal and to create a reservoir for potential solvent use.149 Again, probe the canal, this time using a #10 or #15 K-file. It is sometimes possible to remove or bypass the existing cones of gutta-percha if the canal has been poorly obturated, thus eliminating the need for solvents.223 If that is not possible, then a gutta-percha solvent must be used to remove the remaining material in the apical portion of the canal.
Several solvents have been recommended to dissolve and remove gutta-percha for retreatment (Fig. 8-31) including chloroform,153 methylchloroform,259 eucalyptol,273 halo-thane,105,127 rectified turpentine,120 and xylene.93 All of the sol-vents have some level of toxicity,14,38 so their use should be avoided if possible; however, a solvent is usually needed to
FIG. 8-30 A, Touch ’n Heat instrument. B, Gutta-percha adhering to the Touch ’n Heat tip as it cools.
A B
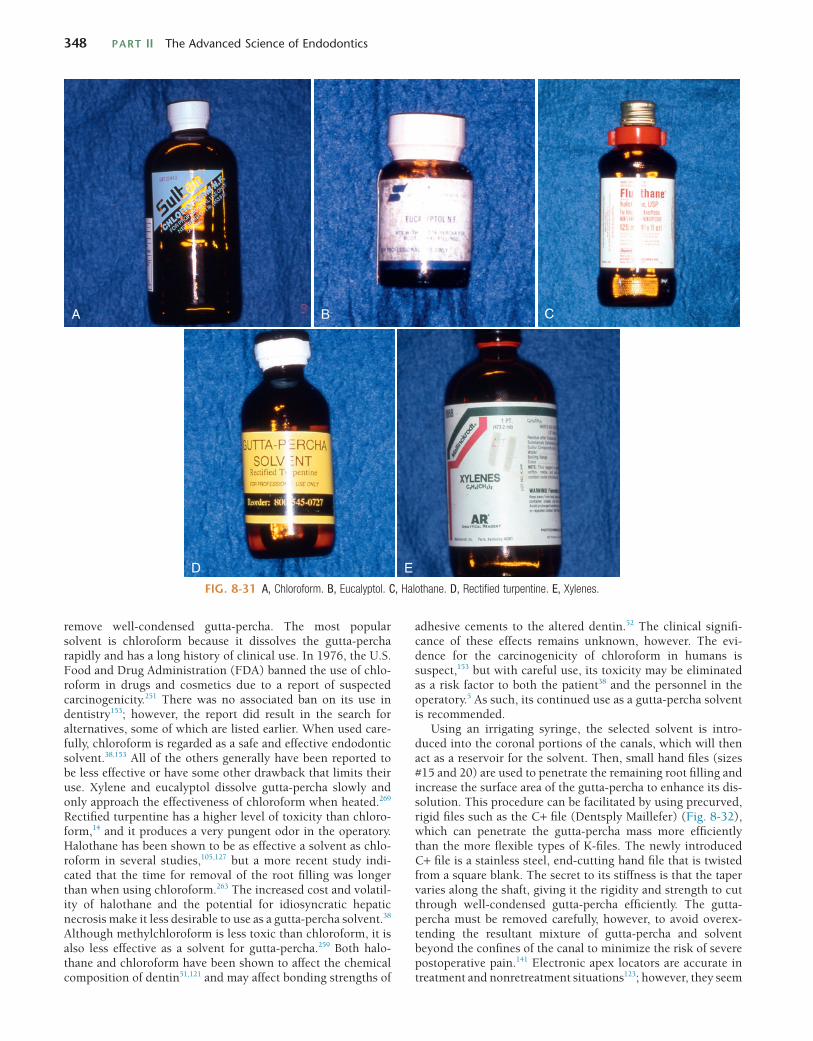
348 PART II The Advanced Science of Endodontics
FIG. 8-31 A, Chloroform. B, Eucalyptol. C, Halothane. D, Rectified turpentine. E, Xylenes.
A B C
D E
remove well-condensed gutta-percha. The most popular solvent is chloroform because it dissolves the gutta-percha rapidly and has a long history of clinical use. In 1976, the U.S. Food and Drug Administration (FDA) banned the use of chlo-roform in drugs and cosmetics due to a report of suspected carcinogenicity.251 There was no associated ban on its use in dentistry153; however, the report did result in the search for alternatives, some of which are listed earlier. When used care-fully, chloroform is regarded as a safe and effective endodontic solvent.38,153 All of the others generally have been reported to be less effective or have some other drawback that limits their use. Xylene and eucalyptol dissolve gutta-percha slowly and only approach the effectiveness of chloroform when heated.269 Rectified turpentine has a higher level of toxicity than chloro-form,14 and it produces a very pungent odor in the operatory. Halothane has been shown to be as effective a solvent as chlo-roform in several studies,105,127 but a more recent study indi-cated that the time for removal of the root filling was longer than when using chloroform.263 The increased cost and volatil-ity of halothane and the potential for idiosyncratic hepatic necrosis make it less desirable to use as a gutta-percha solvent.38 Although methylchloroform is less toxic than chloroform, it is also less effective as a solvent for gutta-percha.259 Both halo-thane and chloroform have been shown to affect the chemical composition of dentin51,121 and may affect bonding strengths of
adhesive cements to the altered dentin.52 The clinical signifi-cance of these effects remains unknown, however. The evi-dence for the carcinogenicity of chloroform in humans is suspect,153 but with careful use, its toxicity may be eliminated as a risk factor to both the patient38 and the personnel in the operatory.5 As such, its continued use as a gutta-percha solvent is recommended.
Using an irrigating syringe, the selected solvent is intro-duced into the coronal portions of the canals, which will then act as a reservoir for the solvent. Then, small hand files (sizes #15 and 20) are used to penetrate the remaining root filling and increase the surface area of the gutta-percha to enhance its dis-solution. This procedure can be facilitated by using precurved, rigid files such as the C+ file (Dentsply Maillefer) (Fig. 8-32), which can penetrate the gutta-percha mass more efficiently than the more flexible types of K-files. The newly introduced C+ file is a stainless steel, end-cutting hand file that is twisted from a square blank. The secret to its stiffness is that the taper varies along the shaft, giving it the rigidity and strength to cut through well-condensed gutta-percha efficiently. The gutta-percha must be removed carefully, however, to avoid overex-tending the resultant mixture of gutta-percha and solvent beyond the confines of the canal to minimize the risk of severe postoperative pain.141 Electronic apex locators are accurate in treatment and nonretreatment situations123; however, they seem
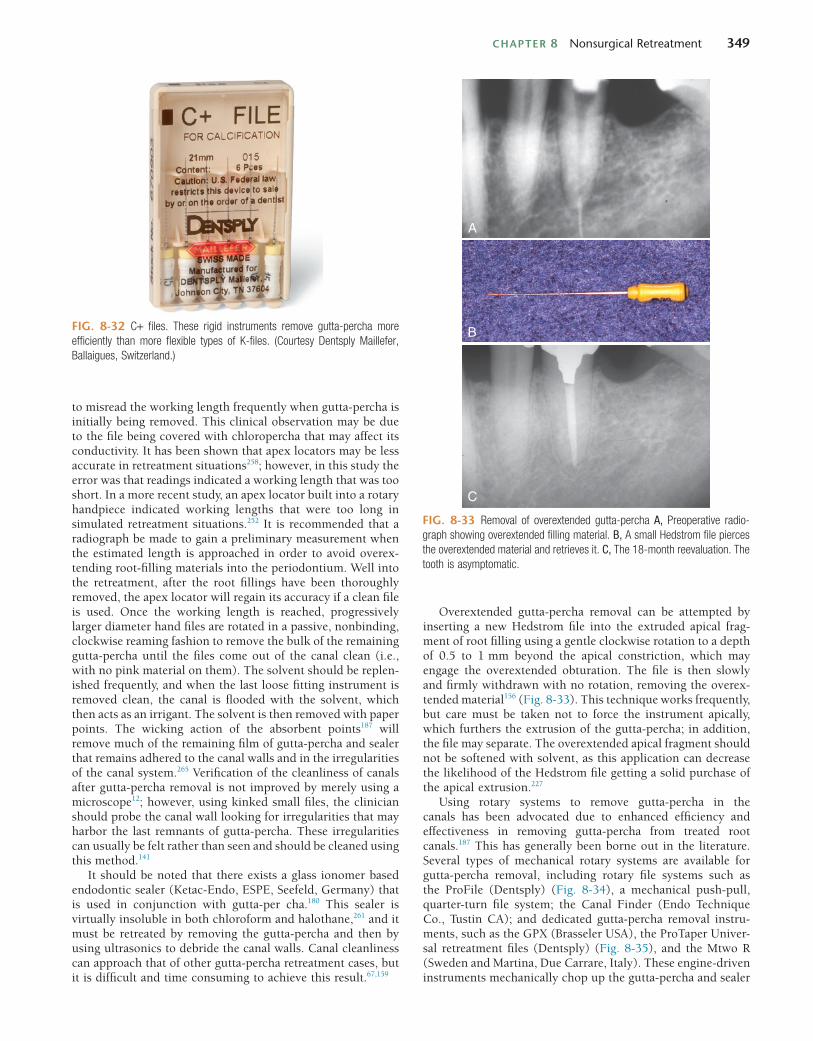
CHAPTER 8 Nonsurgical Retreatment 349
Overextended gutta-percha removal can be attempted by inserting a new Hedstrom file into the extruded apical frag-ment of root filling using a gentle clockwise rotation to a depth of 0.5 to 1 mm beyond the apical constriction, which may engage the overextended obturation. The file is then slowly and firmly withdrawn with no rotation, removing the overex-tended material156 (Fig. 8-33). This technique works frequently, but care must be taken not to force the instrument apically, which furthers the extrusion of the gutta-percha; in addition, the file may separate. The overextended apical fragment should not be softened with solvent, as this application can decrease the likelihood of the Hedstrom file getting a solid purchase of the apical extrusion.227
Using rotary systems to remove gutta-percha in the canals has been advocated due to enhanced efficiency and effectiveness in removing gutta-percha from treated root canals.187 This has generally been borne out in the literature. Several types of mechanical rotary systems are available for gutta-percha removal, including rotary file systems such as the ProFile (Dentsply) (Fig. 8-34), a mechanical push-pull, quarter-turn file system; the Canal Finder (Endo Technique Co., Tustin CA); and dedicated gutta-percha removal instru-ments, such as the GPX (Brasseler USA), the ProTaper Univer-sal retreatment files (Dentsply) (Fig. 8-35), and the Mtwo R (Sweden and Martina, Due Carrare, Italy). These engine-driven instruments mechanically chop up the gutta-percha and sealer
FIG. 8-32 C+ files. These rigid instruments remove gutta-percha more efficiently than more flexible types of K-files. (Courtesy Dentsply Maillefer, Ballaigues, Switzerland.)
to misread the working length frequently when gutta-percha is initially being removed. This clinical observation may be due to the file being covered with chloropercha that may affect its conductivity. It has been shown that apex locators may be less accurate in retreatment situations258; however, in this study the error was that readings indicated a working length that was too short. In a more recent study, an apex locator built into a rotary handpiece indicated working lengths that were too long in simulated retreatment situations.252 It is recommended that a radiograph be made to gain a preliminary measurement when the estimated length is approached in order to avoid overex-tending root-filling materials into the periodontium. Well into the retreatment, after the root fillings have been thoroughly removed, the apex locator will regain its accuracy if a clean file is used. Once the working length is reached, progressively larger diameter hand files are rotated in a passive, nonbinding, clockwise reaming fashion to remove the bulk of the remaining gutta-percha until the files come out of the canal clean (i.e., with no pink material on them). The solvent should be replen-ished frequently, and when the last loose fitting instrument is removed clean, the canal is flooded with the solvent, which then acts as an irrigant. The solvent is then removed with paper points. The wicking action of the absorbent points187 will remove much of the remaining film of gutta-percha and sealer that remains adhered to the canal walls and in the irregularities of the canal system.265 Verification of the cleanliness of canals after gutta-percha removal is not improved by merely using a microscope12; however, using kinked small files, the clinician should probe the canal wall looking for irregularities that may harbor the last remnants of gutta-percha. These irregularities can usually be felt rather than seen and should be cleaned using this method.141
It should be noted that there exists a glass ionomer based endodontic sealer (Ketac-Endo, ESPE, Seefeld, Germany) that is used in conjunction with gutta-per cha.180 This sealer is virtually insoluble in both chloroform and halothane,261 and it must be retreated by removing the gutta-percha and then by using ultrasonics to debride the canal walls. Canal cleanliness can approach that of other gutta-percha retreatment cases, but it is difficult and time consuming to achieve this result.67,159
FIG. 8-33 Removal of overextended gutta-percha A, Preoperative radio-graph showing overextended filling material. B, A small Hedstrom file pierces the overextended material and retrieves it. C, The 18-month reevaluation. The tooth is asymptomatic.
A
B
C
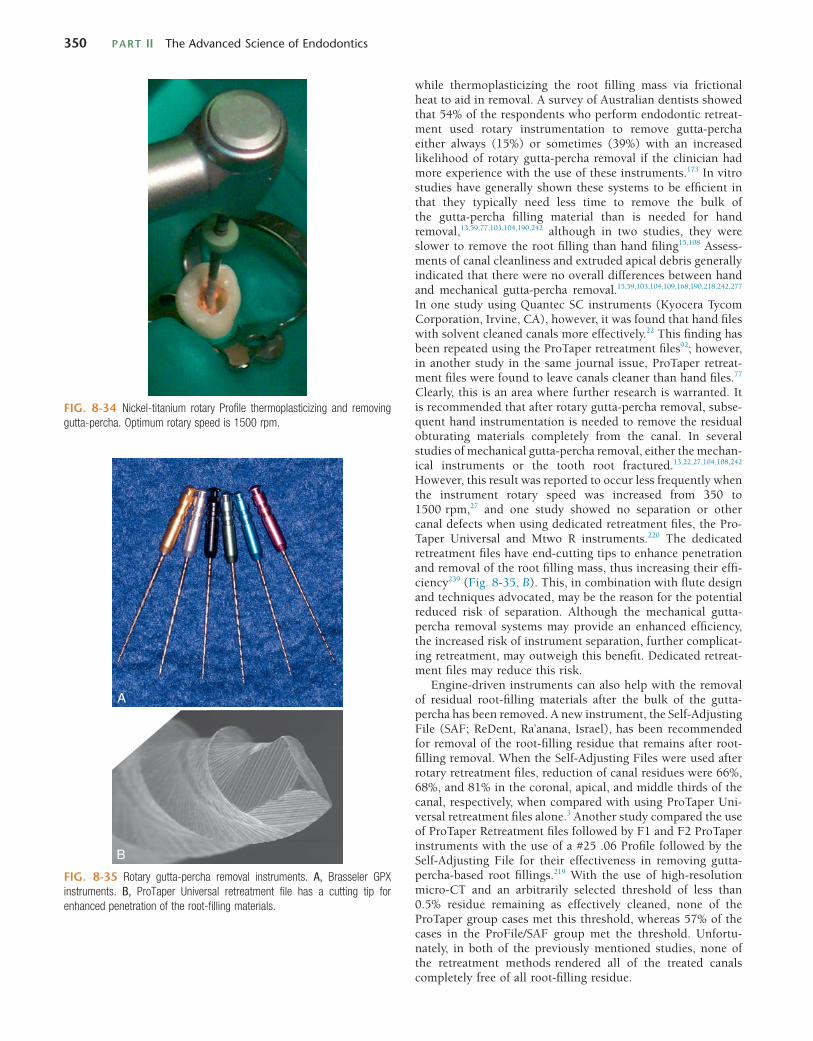
350 PART II The Advanced Science of Endodontics
while thermoplasticizing the root filling mass via frictional heat to aid in removal. A survey of Australian dentists showed that 54% of the respondents who perform endodontic retreat-ment used rotary instrumentation to remove gutta-percha either always (15%) or sometimes (39%) with an increased likelihood of rotary gutta-percha removal if the clinician had more experience with the use of these instruments.173 In vitro studies have generally shown these systems to be efficient in that they typically need less time to remove the bulk of the gutta-percha filling material than is needed for hand removal,13,59,77,103,104,190,242 although in two studies, they were slower to remove the root filling than hand filing15,108 Assess-ments of canal cleanliness and extruded apical debris generally indicated that there were no overall differences between hand and mechanical gutta-percha removal.15,59,103,104,109,168,190,218,242,277 In one study using Quantec SC instruments (Kyocera Tycom Corporation, Irvine, CA), however, it was found that hand files with solvent cleaned canals more effectively.22 This finding has been repeated using the ProTaper retreatment files92; however, in another study in the same journal issue, ProTaper retreat-ment files were found to leave canals cleaner than hand files.77 Clearly, this is an area where further research is warranted. It is recommended that after rotary gutta-percha removal, subse-quent hand instrumentation is needed to remove the residual obturating materials completely from the canal. In several studies of mechanical gutta-percha removal, either the mechan-ical instruments or the tooth root fractured.13,22,27,104,108,242 However, this result was reported to occur less frequently when the instrument rotary speed was increased from 350 to 1500 rpm,27 and one study showed no separation or other canal defects when using dedicated retreatment files, the Pro-Taper Universal and Mtwo R instruments.220 The dedicated retreatment files have end-cutting tips to enhance penetration and removal of the root filling mass, thus increasing their effi-ciency239 (Fig. 8-35, B). This, in combination with flute design and techniques advocated, may be the reason for the potential reduced risk of separation. Although the mechanical gutta-percha removal systems may provide an enhanced efficiency, the increased risk of instrument separation, further complicat-ing retreatment, may outweigh this benefit. Dedicated retreat-ment files may reduce this risk.
Engine-driven instruments can also help with the removal of residual root-filling materials after the bulk of the gutta-percha has been removed. A new instrument, the Self-Adjusting File (SAF; ReDent, Ra’anana, Israel), has been recommended for removal of the root-filling residue that remains after root-filling removal. When the Self-Adjusting Files were used after rotary retreatment files, reduction of canal residues were 66%, 68%, and 81% in the coronal, apical, and middle thirds of the canal, respectively, when compared with using ProTaper Uni-versal retreatment files alone.3 Another study compared the use of ProTaper Retreatment files followed by F1 and F2 ProTaper instruments with the use of a #25 .06 Profile followed by the Self-Adjusting File for their effectiveness in removing gutta-percha-based root fillings.219 With the use of high-resolution micro-CT and an arbitrarily selected threshold of less than 0.5% residue remaining as effectively cleaned, none of the ProTaper group cases met this threshold, whereas 57% of the cases in the ProFile/SAF group met the threshold. Unfortu-nately, in both of the previously mentioned studies, none of the retreatment methods rendered all of the treated canals completely free of all root-filling residue.
FIG. 8-34 Nickel-titanium rotary Profile thermoplasticizing and removing gutta-percha. Optimum rotary speed is 1500 rpm.
FIG. 8-35 Rotary gutta-percha removal instruments. A, Brasseler GPX instruments. B, ProTaper Universal retreatment file has a cutting tip for enhanced penetration of the root-filling materials.
A
B
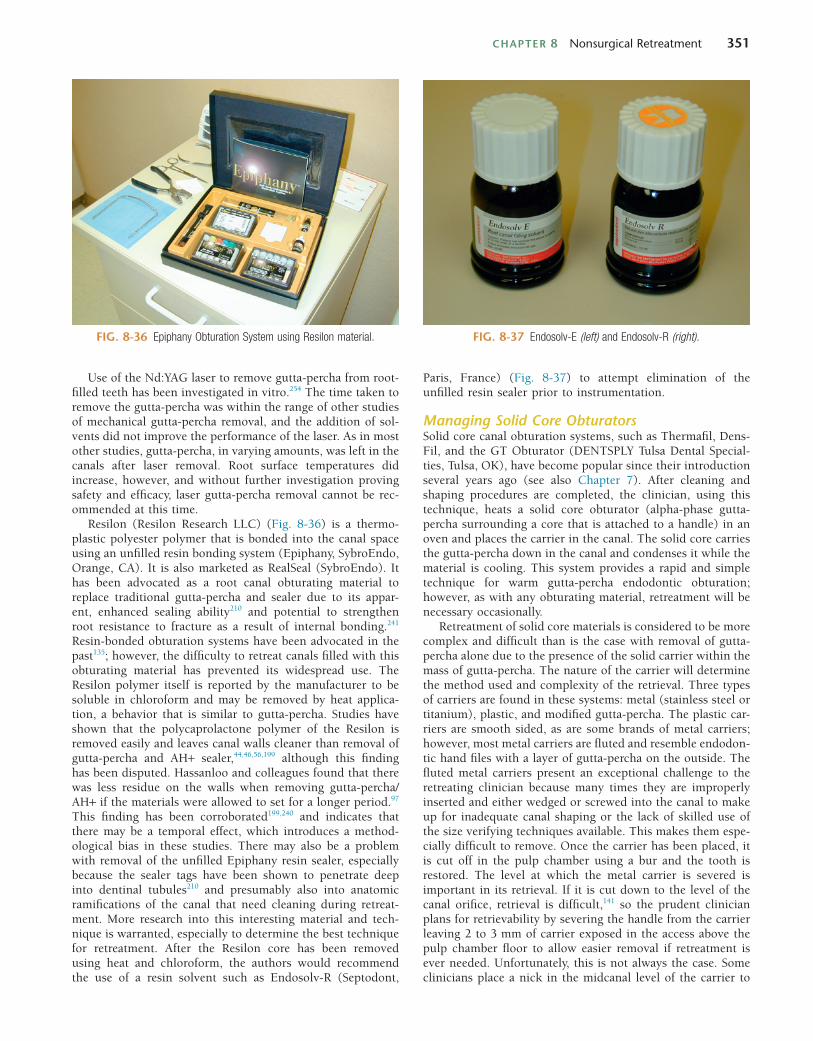
CHAPTER 8 Nonsurgical Retreatment 351
Paris, France) (Fig. 8-37) to attempt elimination of the unfilled resin sealer prior to instrumentation.
Managing Solid Core ObturatorsSolid core canal obturation systems, such as Thermafil, Dens-Fil, and the GT Obturator (DENTSPLY Tulsa Dental Special-ties, Tulsa, OK), have become popular since their introduction several years ago (see also Chapter 7). After cleaning and shaping procedures are completed, the clinician, using this technique, heats a solid core obturator (alpha-phase gutta-percha surrounding a core that is attached to a handle) in an oven and places the carrier in the canal. The solid core carries the gutta-percha down in the canal and condenses it while the material is cooling. This system provides a rapid and simple technique for warm gutta-percha endodontic obturation; however, as with any obturating material, retreatment will be necessary occasionally.
Retreatment of solid core materials is considered to be more complex and difficult than is the case with removal of gutta-percha alone due to the presence of the solid carrier within the mass of gutta-percha. The nature of the carrier will determine the method used and complexity of the retrieval. Three types of carriers are found in these systems: metal (stainless steel or titanium), plastic, and modified gutta-percha. The plastic car-riers are smooth sided, as are some brands of metal carriers; however, most metal carriers are fluted and resemble endodon-tic hand files with a layer of gutta-percha on the outside. The fluted metal carriers present an exceptional challenge to the retreating clinician because many times they are improperly inserted and either wedged or screwed into the canal to make up for inadequate canal shaping or the lack of skilled use of the size verifying techniques available. This makes them espe-cially difficult to remove. Once the carrier has been placed, it is cut off in the pulp chamber using a bur and the tooth is restored. The level at which the metal carrier is severed is important in its retrieval. If it is cut down to the level of the canal orifice, retrieval is difficult,141 so the prudent clinician plans for retrievability by severing the handle from the carrier leaving 2 to 3 mm of carrier exposed in the access above the pulp chamber floor to allow easier removal if retreatment is ever needed. Unfortunately, this is not always the case. Some clinicians place a nick in the midcanal level of the carrier to
FIG. 8-36 Epiphany Obturation System using Resilon material.
Use of the Nd:YAG laser to remove gutta-percha from root-filled teeth has been investigated in vitro.254 The time taken to remove the gutta-percha was within the range of other studies of mechanical gutta-percha removal, and the addition of sol-vents did not improve the performance of the laser. As in most other studies, gutta-percha, in varying amounts, was left in the canals after laser removal. Root surface temperatures did increase, however, and without further investigation proving safety and efficacy, laser gutta-percha removal cannot be rec-ommended at this time.
Resilon (Resilon Research LLC) (Fig. 8-36) is a thermo-plastic polyester polymer that is bonded into the canal space using an unfilled resin bonding system (Epiphany, SybroEndo, Orange, CA). It is also marketed as RealSeal (SybroEndo). It has been advocated as a root canal obturating material to replace traditional gutta-percha and sealer due to its appar-ent, enhanced sealing ability210 and potential to strengthen root resistance to fracture as a result of internal bonding.241 Resin-bonded obturation systems have been advocated in the past135; however, the difficulty to retreat canals filled with this obturating material has prevented its widespread use. The Resilon polymer itself is reported by the manufacturer to be soluble in chloroform and may be removed by heat applica-tion, a behavior that is similar to gutta-percha. Studies have shown that the polycaprolactone polymer of the Resilon is removed easily and leaves canal walls cleaner than removal of gutta-percha and AH+ sealer,44,46,56,199 although this finding has been disputed. Hassanloo and colleagues found that there was less residue on the walls when removing gutta-percha/AH+ if the materials were allowed to set for a longer period.97 This finding has been corroborated199,240 and indicates that there may be a temporal effect, which introduces a method-ological bias in these studies. There may also be a problem with removal of the unfilled Epiphany resin sealer, especially because the sealer tags have been shown to penetrate deep into dentinal tubules210 and presumably also into anatomic ramifications of the canal that need cleaning during retreat-ment. More research into this interesting material and tech-nique is warranted, especially to determine the best technique for retreatment. After the Resilon core has been removed using heat and chloroform, the authors would recommend the use of a resin solvent such as Endosolv-R (Septodont,
FIG. 8-37 Endosolv-E (left) and Endosolv-R (right).
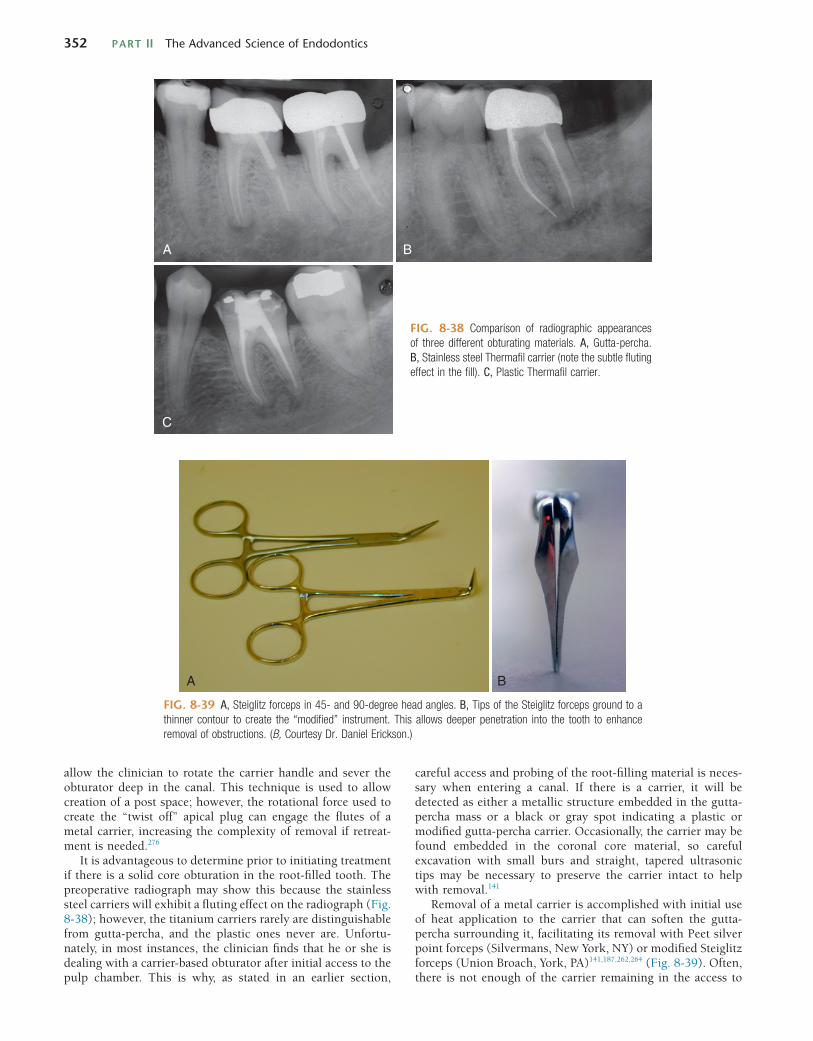
352 PART II The Advanced Science of Endodontics
A B
C
FIG. 8-38 Comparison of radiographic appearances of three different obturating materials. A, Gutta-percha. B, Stainless steel Thermafil carrier (note the subtle fluting effect in the fill). C, Plastic Thermafil carrier.
FIG. 8-39 A, Steiglitz forceps in 45- and 90-degree head angles. B, Tips of the Steiglitz forceps ground to a thinner contour to create the “modified” instrument. This allows deeper penetration into the tooth to enhance removal of obstructions. (B, Courtesy Dr. Daniel Erickson.)
A B
allow the clinician to rotate the carrier handle and sever the obturator deep in the canal. This technique is used to allow creation of a post space; however, the rotational force used to create the “twist off” apical plug can engage the flutes of a metal carrier, increasing the complexity of removal if retreat-ment is needed.276
It is advantageous to determine prior to initiating treatment if there is a solid core obturation in the root-filled tooth. The preoperative radiograph may show this because the stainless steel carriers will exhibit a fluting effect on the radiograph (Fig. 8-38); however, the titanium carriers rarely are distinguishable from gutta-percha, and the plastic ones never are. Unfortu-nately, in most instances, the clinician finds that he or she is dealing with a carrier-based obturator after initial access to the pulp chamber. This is why, as stated in an earlier section,
careful access and probing of the root-filling material is neces-sary when entering a canal. If there is a carrier, it will be detected as either a metallic structure embedded in the gutta-percha mass or a black or gray spot indicating a plastic or modified gutta-percha carrier. Occasionally, the carrier may be found embedded in the coronal core material, so careful excavation with small burs and straight, tapered ultrasonic tips may be necessary to preserve the carrier intact to help with removal.141
Removal of a metal carrier is accomplished with initial use of heat application to the carrier that can soften the gutta-percha surrounding it, facilitating its removal with Peet silver point forceps (Silvermans, New York, NY) or modified Steiglitz forceps (Union Broach, York, PA)141,187,262,264 (Fig. 8-39). Often, there is not enough of the carrier remaining in the access to
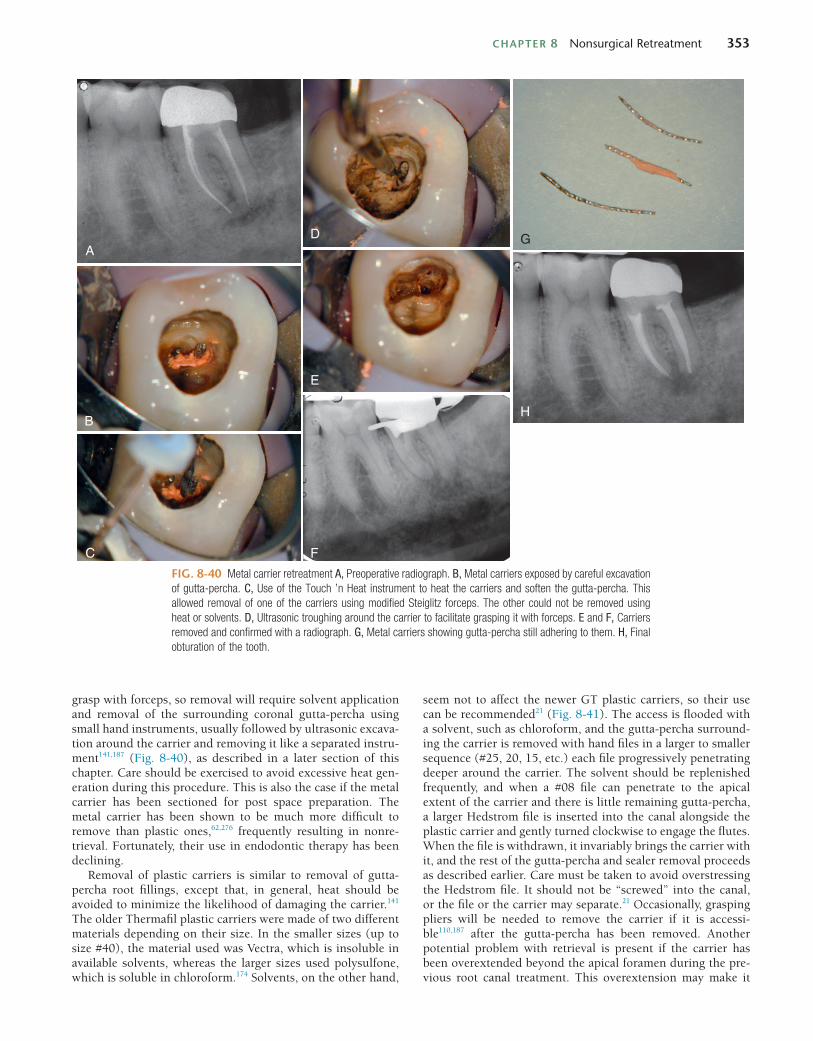
CHAPTER 8 Nonsurgical Retreatment 353
grasp with forceps, so removal will require solvent application and removal of the surrounding coronal gutta-percha using small hand instruments, usually followed by ultrasonic excava-tion around the carrier and removing it like a separated instru-ment141,187 (Fig. 8-40), as described in a later section of this chapter. Care should be exercised to avoid excessive heat gen-eration during this procedure. This is also the case if the metal carrier has been sectioned for post space preparation. The metal carrier has been shown to be much more difficult to remove than plastic ones,62,276 frequently resulting in nonre-trieval. Fortunately, their use in endodontic therapy has been declining.
Removal of plastic carriers is similar to removal of gutta-percha root fillings, except that, in general, heat should be avoided to minimize the likelihood of damaging the carrier.141 The older Thermafil plastic carriers were made of two different materials depending on their size. In the smaller sizes (up to size #40), the material used was Vectra, which is insoluble in available solvents, whereas the larger sizes used polysulfone, which is soluble in chloroform.174 Solvents, on the other hand,
seem not to affect the newer GT plastic carriers, so their use can be recommended21 (Fig. 8-41). The access is flooded with a solvent, such as chloroform, and the gutta-percha surround-ing the carrier is removed with hand files in a larger to smaller sequence (#25, 20, 15, etc.) each file progressively penetrating deeper around the carrier. The solvent should be replenished frequently, and when a #08 file can penetrate to the apical extent of the carrier and there is little remaining gutta-percha, a larger Hedstrom file is inserted into the canal alongside the plastic carrier and gently turned clockwise to engage the flutes. When the file is withdrawn, it invariably brings the carrier with it, and the rest of the gutta-percha and sealer removal proceeds as described earlier. Care must be taken to avoid overstressing the Hedstrom file. It should not be “screwed” into the canal, or the file or the carrier may separate.21 Occasionally, grasping pliers will be needed to remove the carrier if it is accessi-ble110,187 after the gutta-percha has been removed. Another potential problem with retrieval is present if the carrier has been overextended beyond the apical foramen during the pre-vious root canal treatment. This overextension may make it
FIG. 8-40 Metal carrier retreatment A, Preoperative radiograph. B, Metal carriers exposed by careful excavation of gutta-percha. C, Use of the Touch ’n Heat instrument to heat the carriers and soften the gutta-percha. This allowed removal of one of the carriers using modified Steiglitz forceps. The other could not be removed using heat or solvents. D, Ultrasonic troughing around the carrier to facilitate grasping it with forceps. E and F, Carriers removed and confirmed with a radiograph. G, Metal carriers showing gutta-percha still adhering to them. H, Final obturation of the tooth.
A
B
C
D
E
H
F
G
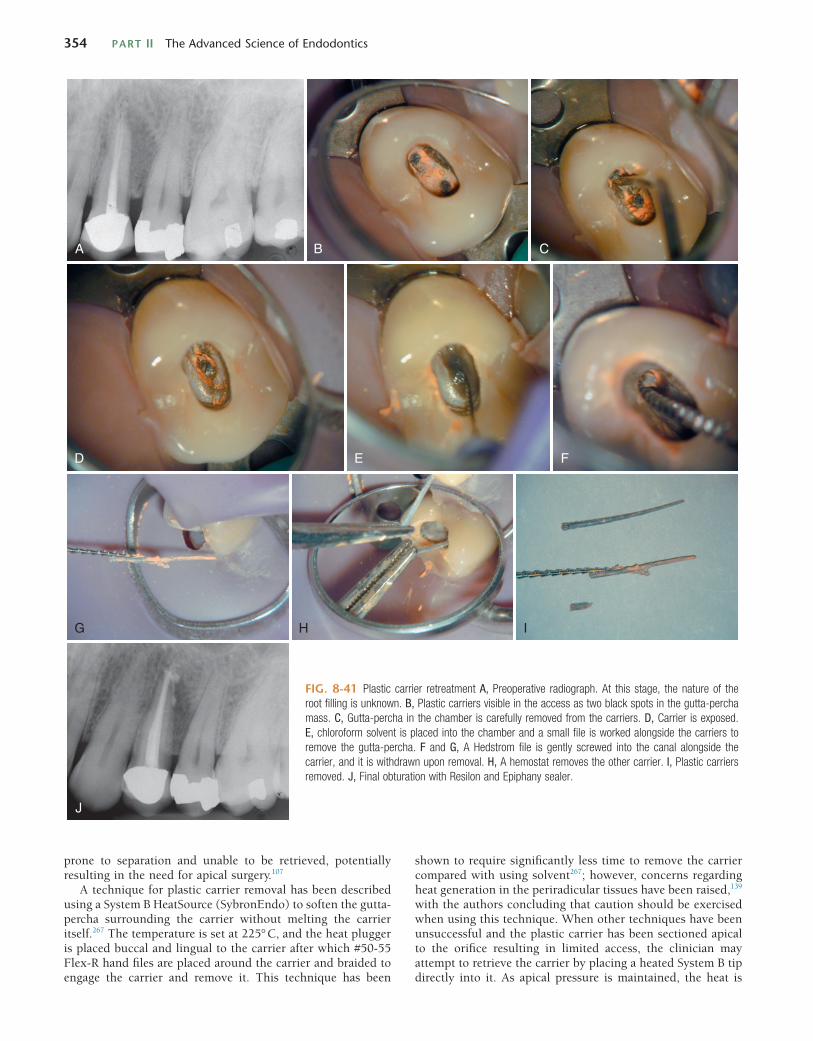
354 PART II The Advanced Science of Endodontics
A B C
D E F
G
J
H I
FIG. 8-41 Plastic carrier retreatment A, Preoperative radiograph. At this stage, the nature of the root filling is unknown. B, Plastic carriers visible in the access as two black spots in the gutta-percha mass. C, Gutta-percha in the chamber is carefully removed from the carriers. D, Carrier is exposed. E, chloroform solvent is placed into the chamber and a small file is worked alongside the carriers to remove the gutta-percha. F and G, A Hedstrom file is gently screwed into the canal alongside the carrier, and it is withdrawn upon removal. H, A hemostat removes the other carrier. I, Plastic carriers removed. J, Final obturation with Resilon and Epiphany sealer.
prone to separation and unable to be retrieved, potentially resulting in the need for apical surgery.107
A technique for plastic carrier removal has been described using a System B HeatSource (SybronEndo) to soften the gutta-percha surrounding the carrier without melting the carrier itself.267 The temperature is set at 225° C, and the heat plugger is placed buccal and lingual to the carrier after which #50-55 Flex-R hand files are placed around the carrier and braided to engage the carrier and remove it. This technique has been
shown to require significantly less time to remove the carrier compared with using solvent267; however, concerns regarding heat generation in the periradicular tissues have been raised,139 with the authors concluding that caution should be exercised when using this technique. When other techniques have been unsuccessful and the plastic carrier has been sectioned apical to the orifice resulting in limited access, the clinician may attempt to retrieve the carrier by placing a heated System B tip directly into it. As apical pressure is maintained, the heat is
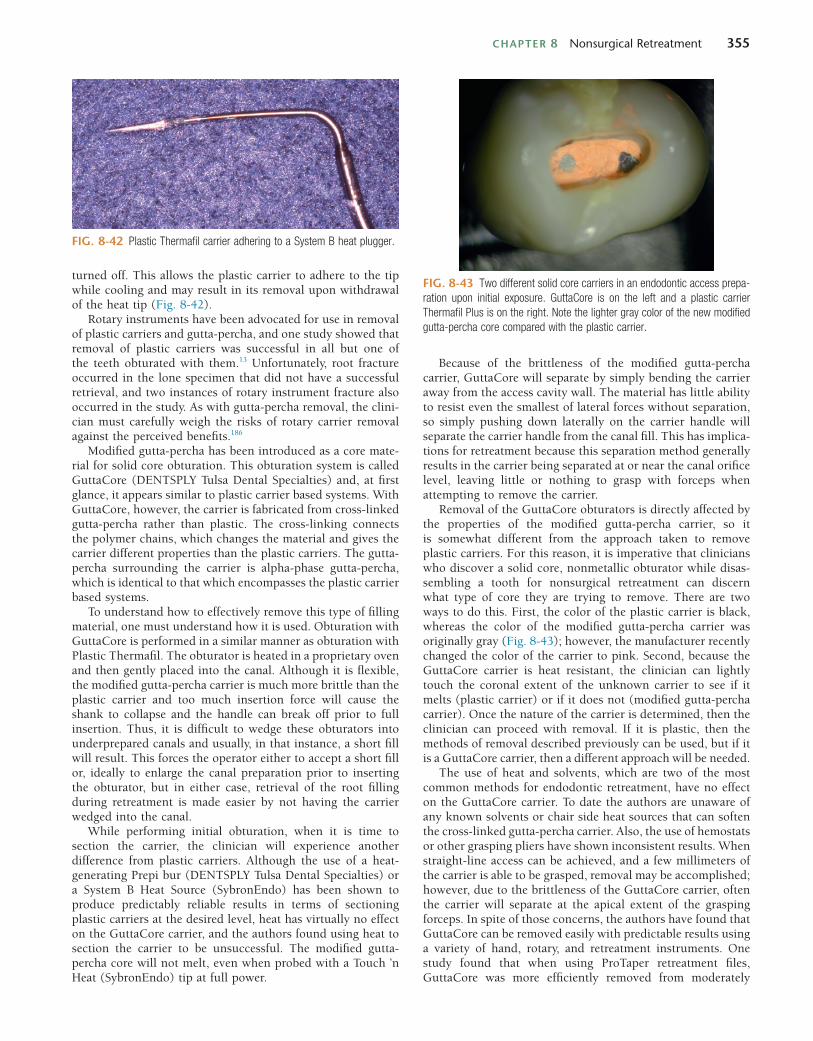
CHAPTER 8 Nonsurgical Retreatment 355
Because of the brittleness of the modified gutta-percha carrier, GuttaCore will separate by simply bending the carrier away from the access cavity wall. The material has little ability to resist even the smallest of lateral forces without separation, so simply pushing down laterally on the carrier handle will separate the carrier handle from the canal fill. This has implica-tions for retreatment because this separation method generally results in the carrier being separated at or near the canal orifice level, leaving little or nothing to grasp with forceps when attempting to remove the carrier.
Removal of the GuttaCore obturators is directly affected by the properties of the modified gutta-percha carrier, so it is somewhat different from the approach taken to remove plastic carriers. For this reason, it is imperative that clinicians who discover a solid core, nonmetallic obturator while disas-sembling a tooth for nonsurgical retreatment can discern what type of core they are trying to remove. There are two ways to do this. First, the color of the plastic carrier is black, whereas the color of the modified gutta-percha carrier was originally gray (Fig. 8-43); however, the manufacturer recently changed the color of the carrier to pink. Second, because the GuttaCore carrier is heat resistant, the clinician can lightly touch the coronal extent of the unknown carrier to see if it melts (plastic carrier) or if it does not (modified gutta-percha carrier). Once the nature of the carrier is determined, then the clinician can proceed with removal. If it is plastic, then the methods of removal described previously can be used, but if it is a GuttaCore carrier, then a different approach will be needed.
The use of heat and solvents, which are two of the most common methods for endodontic retreatment, have no effect on the GuttaCore carrier. To date the authors are unaware of any known solvents or chair side heat sources that can soften the cross-linked gutta-percha carrier. Also, the use of hemostats or other grasping pliers have shown inconsistent results. When straight-line access can be achieved, and a few millimeters of the carrier is able to be grasped, removal may be accomplished; however, due to the brittleness of the GuttaCore carrier, often the carrier will separate at the apical extent of the grasping forceps. In spite of those concerns, the authors have found that GuttaCore can be removed easily with predictable results using a variety of hand, rotary, and retreatment instruments. One study found that when using ProTaper retreatment files, GuttaCore was more efficiently removed from moderately
turned off. This allows the plastic carrier to adhere to the tip while cooling and may result in its removal upon withdrawal of the heat tip (Fig. 8-42).
Rotary instruments have been advocated for use in removal of plastic carriers and gutta-percha, and one study showed that removal of plastic carriers was successful in all but one of the teeth obturated with them.13 Unfortunately, root fracture occurred in the lone specimen that did not have a successful retrieval, and two instances of rotary instrument fracture also occurred in the study. As with gutta-percha removal, the clini-cian must carefully weigh the risks of rotary carrier removal against the perceived benefits.186
Modified gutta-percha has been introduced as a core mate-rial for solid core obturation. This obturation system is called GuttaCore (DENTSPLY Tulsa Dental Specialties) and, at first glance, it appears similar to plastic carrier based systems. With GuttaCore, however, the carrier is fabricated from cross-linked gutta-percha rather than plastic. The cross-linking connects the polymer chains, which changes the material and gives the carrier different properties than the plastic carriers. The gutta-percha surrounding the carrier is alpha-phase gutta-percha, which is identical to that which encompasses the plastic carrier based systems.
To understand how to effectively remove this type of filling material, one must understand how it is used. Obturation with GuttaCore is performed in a similar manner as obturation with Plastic Thermafil. The obturator is heated in a proprietary oven and then gently placed into the canal. Although it is flexible, the modified gutta-percha carrier is much more brittle than the plastic carrier and too much insertion force will cause the shank to collapse and the handle can break off prior to full insertion. Thus, it is difficult to wedge these obturators into underprepared canals and usually, in that instance, a short fill will result. This forces the operator either to accept a short fill or, ideally to enlarge the canal preparation prior to inserting the obturator, but in either case, retrieval of the root filling during retreatment is made easier by not having the carrier wedged into the canal.
While performing initial obturation, when it is time to section the carrier, the clinician will experience another difference from plastic carriers. Although the use of a heat-generating Prepi bur (DENTSPLY Tulsa Dental Specialties) or a System B Heat Source (SybronEndo) has been shown to produce predictably reliable results in terms of sectioning plastic carriers at the desired level, heat has virtually no effect on the GuttaCore carrier, and the authors found using heat to section the carrier to be unsuccessful. The modified gutta-percha core will not melt, even when probed with a Touch ’n Heat (SybronEndo) tip at full power.
FIG. 8-42 Plastic Thermafil carrier adhering to a System B heat plugger.
FIG. 8-43 Two different solid core carriers in an endodontic access prepa-ration upon initial exposure. GuttaCore is on the left and a plastic carrier Thermafil Plus is on the right. Note the lighter gray color of the new modified gutta-percha core compared with the plastic carrier.
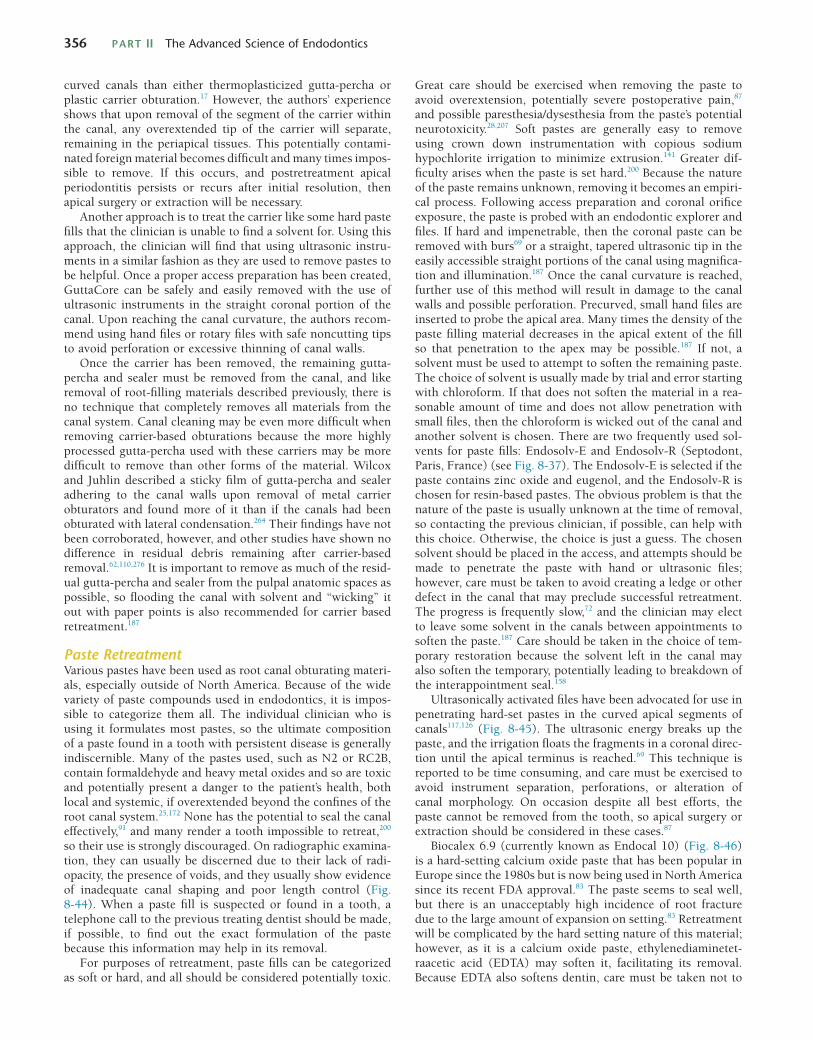
356 PART II The Advanced Science of Endodontics
curved canals than either thermoplasticized gutta-percha or plastic carrier obturation.17 However, the authors’ experience shows that upon removal of the segment of the carrier within the canal, any overextended tip of the carrier will separate, remaining in the periapical tissues. This potentially contami-nated foreign material becomes difficult and many times impos-sible to remove. If this occurs, and postretreatment apical periodontitis persists or recurs after initial resolution, then apical surgery or extraction will be necessary.
Another approach is to treat the carrier like some hard paste fills that the clinician is unable to find a solvent for. Using this approach, the clinician will find that using ultrasonic instru-ments in a similar fashion as they are used to remove pastes to be helpful. Once a proper access preparation has been created, GuttaCore can be safely and easily removed with the use of ultrasonic instruments in the straight coronal portion of the canal. Upon reaching the canal curvature, the authors recom-mend using hand files or rotary files with safe noncutting tips to avoid perforation or excessive thinning of canal walls.
Once the carrier has been removed, the remaining gutta-percha and sealer must be removed from the canal, and like removal of root-filling materials described previously, there is no technique that completely removes all materials from the canal system. Canal cleaning may be even more difficult when removing carrier-based obturations because the more highly processed gutta-percha used with these carriers may be more difficult to remove than other forms of the material. Wilcox and Juhlin described a sticky film of gutta-percha and sealer adhering to the canal walls upon removal of metal carrier obturators and found more of it than if the canals had been obturated with lateral condensation.264 Their findings have not been corroborated, however, and other studies have shown no difference in residual debris remaining after carrier-based removal.62,110,276 It is important to remove as much of the resid-ual gutta-percha and sealer from the pulpal anatomic spaces as possible, so flooding the canal with solvent and “wicking” it out with paper points is also recommended for carrier based retreatment.187
Paste RetreatmentVarious pastes have been used as root canal obturating materi-als, especially outside of North America. Because of the wide variety of paste compounds used in endodontics, it is impos-sible to categorize them all. The individual clinician who is using it formulates most pastes, so the ultimate composition of a paste found in a tooth with persistent disease is generally indiscernible. Many of the pastes used, such as N2 or RC2B, contain formaldehyde and heavy metal oxides and so are toxic and potentially present a danger to the patient’s health, both local and systemic, if overextended beyond the confines of the root canal system.25,172 None has the potential to seal the canal effectively,91 and many render a tooth impossible to retreat,200 so their use is strongly discouraged. On radiographic examina-tion, they can usually be discerned due to their lack of radi-opacity, the presence of voids, and they usually show evidence of inadequate canal shaping and poor length control (Fig. 8-44). When a paste fill is suspected or found in a tooth, a telephone call to the previous treating dentist should be made, if possible, to find out the exact formulation of the paste because this information may help in its removal.
For purposes of retreatment, paste fills can be categorized as soft or hard, and all should be considered potentially toxic.
Great care should be exercised when removing the paste to avoid overextension, potentially severe postoperative pain,87 and possible paresthesia/dysesthesia from the paste’s potential neurotoxicity.28,207 Soft pastes are generally easy to remove using crown down instrumentation with copious sodium hypochlorite irrigation to minimize extrusion.141 Greater dif-ficulty arises when the paste is set hard.200 Because the nature of the paste remains unknown, removing it becomes an empiri-cal process. Following access preparation and coronal orifice exposure, the paste is probed with an endodontic explorer and files. If hard and impenetrable, then the coronal paste can be removed with burs69 or a straight, tapered ultrasonic tip in the easily accessible straight portions of the canal using magnifica-tion and illumination.187 Once the canal curvature is reached, further use of this method will result in damage to the canal walls and possible perforation. Precurved, small hand files are inserted to probe the apical area. Many times the density of the paste filling material decreases in the apical extent of the fill so that penetration to the apex may be possible.187 If not, a solvent must be used to attempt to soften the remaining paste. The choice of solvent is usually made by trial and error starting with chloroform. If that does not soften the material in a rea-sonable amount of time and does not allow penetration with small files, then the chloroform is wicked out of the canal and another solvent is chosen. There are two frequently used sol-vents for paste fills: Endosolv-E and Endosolv-R (Septodont, Paris, France) (see Fig. 8-37). The Endosolv-E is selected if the paste contains zinc oxide and eugenol, and the Endosolv-R is chosen for resin-based pastes. The obvious problem is that the nature of the paste is usually unknown at the time of removal, so contacting the previous clinician, if possible, can help with this choice. Otherwise, the choice is just a guess. The chosen solvent should be placed in the access, and attempts should be made to penetrate the paste with hand or ultrasonic files; however, care must be taken to avoid creating a ledge or other defect in the canal that may preclude successful retreatment. The progress is frequently slow,72 and the clinician may elect to leave some solvent in the canals between appointments to soften the paste.187 Care should be taken in the choice of tem-porary restoration because the solvent left in the canal may also soften the temporary, potentially leading to breakdown of the interappointment seal.158
Ultrasonically activated files have been advocated for use in penetrating hard-set pastes in the curved apical segments of canals117,126 (Fig. 8-45). The ultrasonic energy breaks up the paste, and the irrigation floats the fragments in a coronal direc-tion until the apical terminus is reached.69 This technique is reported to be time consuming, and care must be exercised to avoid instrument separation, perforations, or alteration of canal morphology. On occasion despite all best efforts, the paste cannot be removed from the tooth, so apical surgery or extraction should be considered in these cases.87
Biocalex 6.9 (currently known as Endocal 10) (Fig. 8-46) is a hard-setting calcium oxide paste that has been popular in Europe since the 1980s but is now being used in North America since its recent FDA approval.83 The paste seems to seal well, but there is an unacceptably high incidence of root fracture due to the large amount of expansion on setting.83 Retreatment will be complicated by the hard setting nature of this material; however, as it is a calcium oxide paste, ethylenediaminetet-raacetic acid (EDTA) may soften it, facilitating its removal. Because EDTA also softens dentin, care must be taken not to
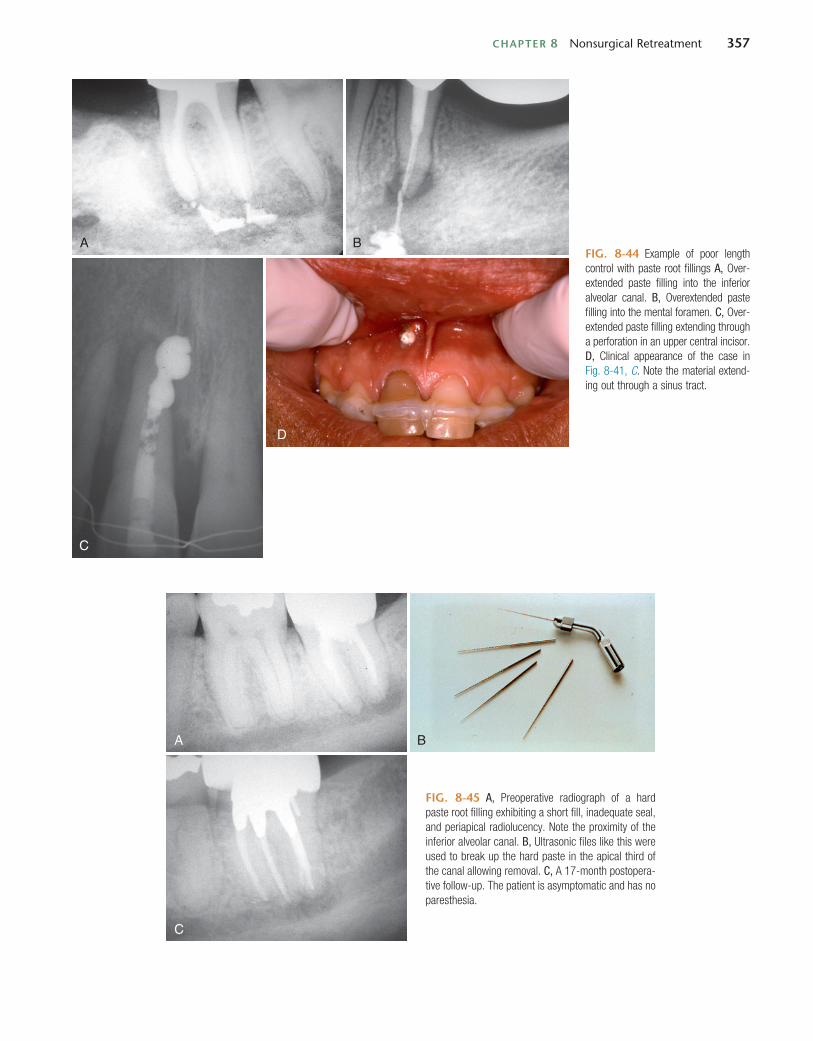
CHAPTER 8 Nonsurgical Retreatment 357
FIG. 8-44 Example of poor length control with paste root fillings A, Over-extended paste filling into the inferior alveolar canal. B, Overextended paste filling into the mental foramen. C, Over-extended paste filling extending through a perforation in an upper central incisor. D, Clinical appearance of the case in Fig. 8-41, C. Note the material extend-ing out through a sinus tract.
A B
C
D
A
C
B
FIG. 8-45 A, Preoperative radiograph of a hard paste root filling exhibiting a short fill, inadequate seal, and periapical radiolucency. Note the proximity of the inferior alveolar canal. B, Ultrasonic files like this were used to break up the hard paste in the apical third of the canal allowing removal. C, A 17-month postopera-tive follow-up. The patient is asymptomatic and has no paresthesia.
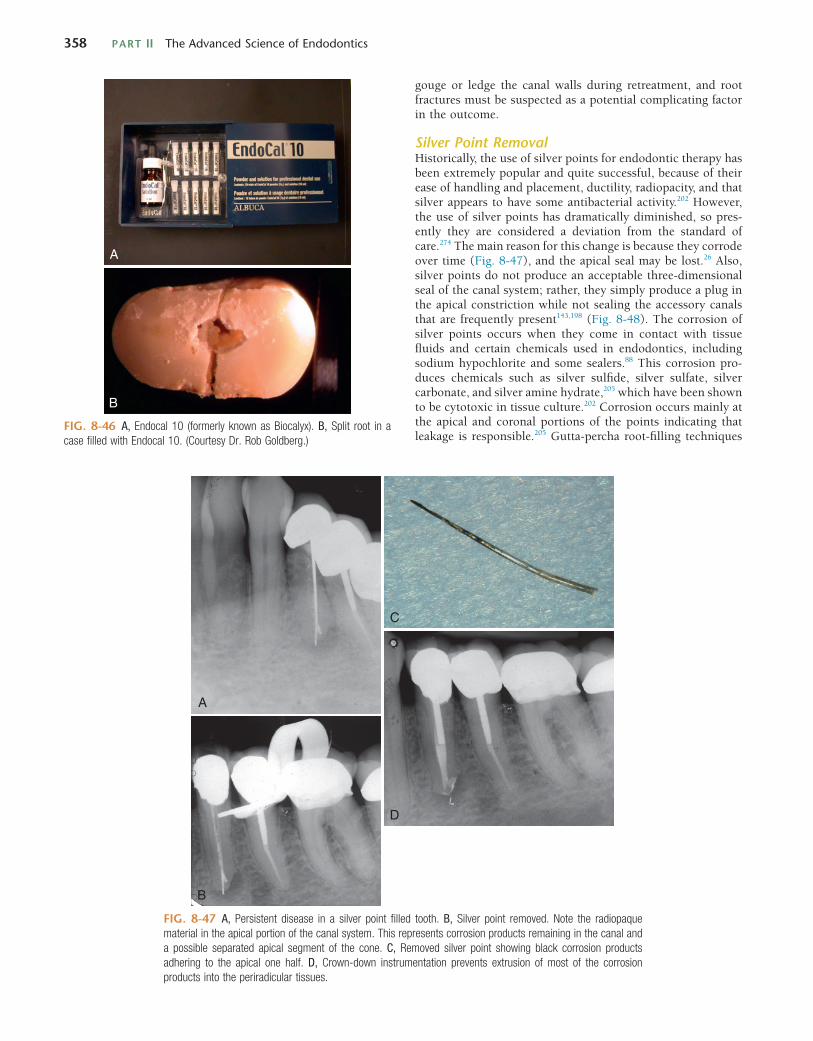
358 PART II The Advanced Science of Endodontics
gouge or ledge the canal walls during retreatment, and root fractures must be suspected as a potential complicating factor in the outcome.
Silver Point RemovalHistorically, the use of silver points for endodontic therapy has been extremely popular and quite successful, because of their ease of handling and placement, ductility, radiopacity, and that silver appears to have some antibacterial activity.202 However, the use of silver points has dramatically diminished, so pres-ently they are considered a deviation from the standard of care.274 The main reason for this change is because they corrode over time (Fig. 8-47), and the apical seal may be lost.26 Also, silver points do not produce an acceptable three-dimensional seal of the canal system; rather, they simply produce a plug in the apical constriction while not sealing the accessory canals that are frequently present143,198 (Fig. 8-48). The corrosion of silver points occurs when they come in contact with tissue fluids and certain chemicals used in endodontics, including sodium hypochlorite and some sealers.88 This corrosion pro-duces chemicals such as silver sulfide, silver sulfate, silver carbonate, and silver amine hydrate,205 which have been shown to be cytotoxic in tissue culture.202 Corrosion occurs mainly at the apical and coronal portions of the points indicating that leakage is responsible.205 Gutta-percha root-filling techniques
FIG. 8-46 A, Endocal 10 (formerly known as Biocalyx). B, Split root in a case filled with Endocal 10. (Courtesy Dr. Rob Goldberg.)
A
B
FIG. 8-47 A, Persistent disease in a silver point filled tooth. B, Silver point removed. Note the radiopaque material in the apical portion of the canal system. This represents corrosion products remaining in the canal and a possible separated apical segment of the cone. C, Removed silver point showing black corrosion products adhering to the apical one half. D, Crown-down instrumentation prevents extrusion of most of the corrosion products into the periradicular tissues.
A
B
C
D
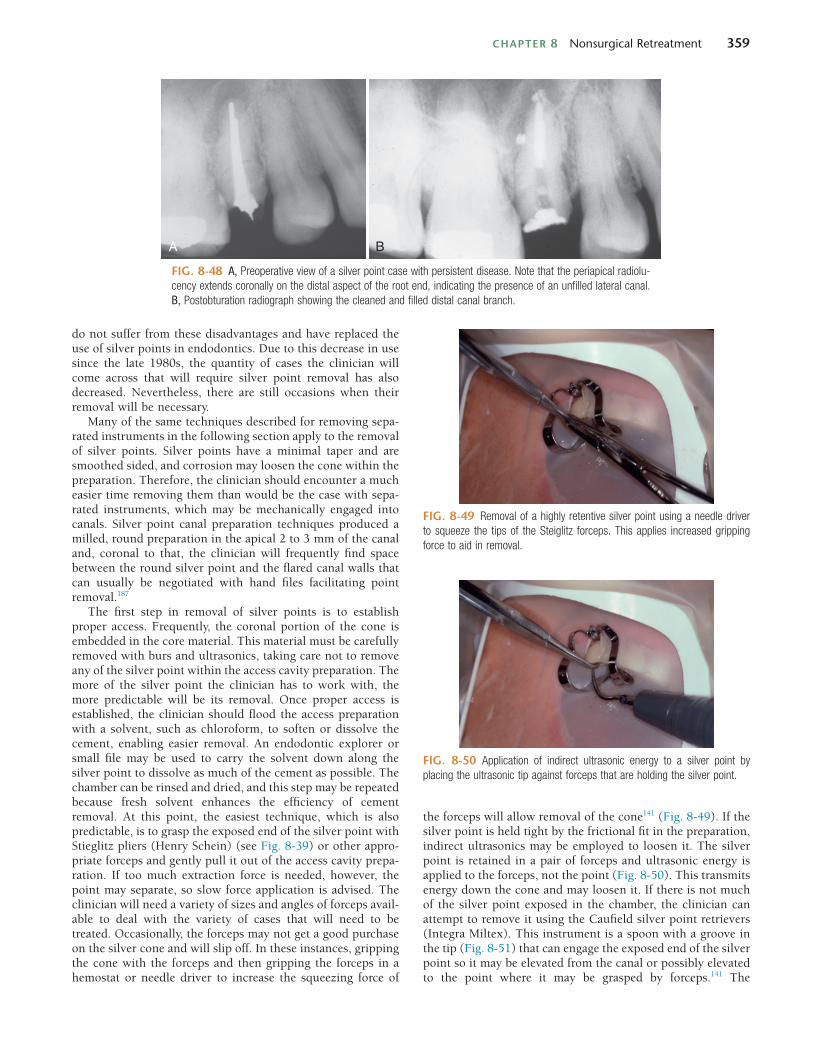
CHAPTER 8 Nonsurgical Retreatment 359
FIG. 8-48 A, Preoperative view of a silver point case with persistent disease. Note that the periapical radiolu-cency extends coronally on the distal aspect of the root end, indicating the presence of an unfilled lateral canal. B, Postobturation radiograph showing the cleaned and filled distal canal branch.
A B
do not suffer from these disadvantages and have replaced the use of silver points in endodontics. Due to this decrease in use since the late 1980s, the quantity of cases the clinician will come across that will require silver point removal has also decreased. Nevertheless, there are still occasions when their removal will be necessary.
Many of the same techniques described for removing sepa-rated instruments in the following section apply to the removal of silver points. Silver points have a minimal taper and are smoothed sided, and corrosion may loosen the cone within the preparation. Therefore, the clinician should encounter a much easier time removing them than would be the case with sepa-rated instruments, which may be mechanically engaged into canals. Silver point canal preparation techniques produced a milled, round preparation in the apical 2 to 3 mm of the canal and, coronal to that, the clinician will frequently find space between the round silver point and the flared canal walls that can usually be negotiated with hand files facilitating point removal.187
The first step in removal of silver points is to establish proper access. Frequently, the coronal portion of the cone is embedded in the core material. This material must be carefully removed with burs and ultrasonics, taking care not to remove any of the silver point within the access cavity preparation. The more of the silver point the clinician has to work with, the more predictable will be its removal. Once proper access is established, the clinician should flood the access preparation with a solvent, such as chloroform, to soften or dissolve the cement, enabling easier removal. An endodontic explorer or small file may be used to carry the solvent down along the silver point to dissolve as much of the cement as possible. The chamber can be rinsed and dried, and this step may be repeated because fresh solvent enhances the efficiency of cement removal. At this point, the easiest technique, which is also predictable, is to grasp the exposed end of the silver point with Stieglitz pliers (Henry Schein) (see Fig. 8-39) or other appro-priate forceps and gently pull it out of the access cavity prepa-ration. If too much extraction force is needed, however, the point may separate, so slow force application is advised. The clinician will need a variety of sizes and angles of forceps avail-able to deal with the variety of cases that will need to be treated. Occasionally, the forceps may not get a good purchase on the silver cone and will slip off. In these instances, gripping the cone with the forceps and then gripping the forceps in a hemostat or needle driver to increase the squeezing force of
the forceps will allow removal of the cone141 (Fig. 8-49). If the silver point is held tight by the frictional fit in the preparation, indirect ultrasonics may be employed to loosen it. The silver point is retained in a pair of forceps and ultrasonic energy is applied to the forceps, not the point (Fig. 8-50). This transmits energy down the cone and may loosen it. If there is not much of the silver point exposed in the chamber, the clinician can attempt to remove it using the Caufield silver point retrievers (Integra Miltex). This instrument is a spoon with a groove in the tip (Fig. 8-51) that can engage the exposed end of the silver point so it may be elevated from the canal or possibly elevated to the point where it may be grasped by forceps.141 The
FIG. 8-49 Removal of a highly retentive silver point using a needle driver to squeeze the tips of the Steiglitz forceps. This applies increased gripping force to aid in removal.
FIG. 8-50 Application of indirect ultrasonic energy to a silver point by placing the ultrasonic tip against forceps that are holding the silver point.
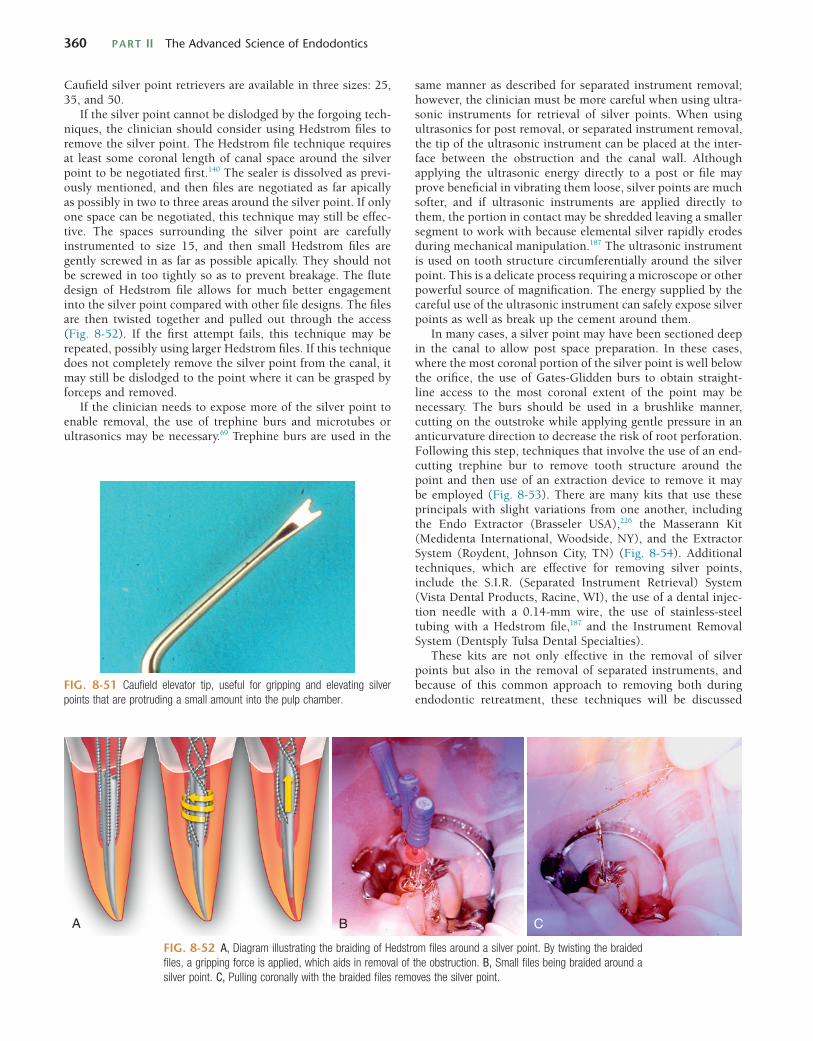
360 PART II The Advanced Science of Endodontics
FIG. 8-51 Caufield elevator tip, useful for gripping and elevating silver points that are protruding a small amount into the pulp chamber.
FIG. 8-52 A, Diagram illustrating the braiding of Hedstrom files around a silver point. By twisting the braided files, a gripping force is applied, which aids in removal of the obstruction. B, Small files being braided around a silver point. C, Pulling coronally with the braided files removes the silver point.
A B C
Caufield silver point retrievers are available in three sizes: 25, 35, and 50.
If the silver point cannot be dislodged by the forgoing tech-niques, the clinician should consider using Hedstrom files to remove the silver point. The Hedstrom file technique requires at least some coronal length of canal space around the silver point to be negotiated first.140 The sealer is dissolved as previ-ously mentioned, and then files are negotiated as far apically as possibly in two to three areas around the silver point. If only one space can be negotiated, this technique may still be effec-tive. The spaces surrounding the silver point are carefully instrumented to size 15, and then small Hedstrom files are gently screwed in as far as possible apically. They should not be screwed in too tightly so as to prevent breakage. The flute design of Hedstrom file allows for much better engagement into the silver point compared with other file designs. The files are then twisted together and pulled out through the access (Fig. 8-52). If the first attempt fails, this technique may be repeated, possibly using larger Hedstrom files. If this technique does not completely remove the silver point from the canal, it may still be dislodged to the point where it can be grasped by forceps and removed.
If the clinician needs to expose more of the silver point to enable removal, the use of trephine burs and microtubes or ultrasonics may be necessary.69 Trephine burs are used in the
same manner as described for separated instrument removal; however, the clinician must be more careful when using ultra-sonic instruments for retrieval of silver points. When using ultrasonics for post removal, or separated instrument removal, the tip of the ultrasonic instrument can be placed at the inter-face between the obstruction and the canal wall. Although applying the ultrasonic energy directly to a post or file may prove beneficial in vibrating them loose, silver points are much softer, and if ultrasonic instruments are applied directly to them, the portion in contact may be shredded leaving a smaller segment to work with because elemental silver rapidly erodes during mechanical manipulation.187 The ultrasonic instrument is used on tooth structure circumferentially around the silver point. This is a delicate process requiring a microscope or other powerful source of magnification. The energy supplied by the careful use of the ultrasonic instrument can safely expose silver points as well as break up the cement around them.
In many cases, a silver point may have been sectioned deep in the canal to allow post space preparation. In these cases, where the most coronal portion of the silver point is well below the orifice, the use of Gates-Glidden burs to obtain straight-line access to the most coronal extent of the point may be necessary. The burs should be used in a brushlike manner, cutting on the outstroke while applying gentle pressure in an anticurvature direction to decrease the risk of root perforation. Following this step, techniques that involve the use of an end-cutting trephine bur to remove tooth structure around the point and then use of an extraction device to remove it may be employed (Fig. 8-53). There are many kits that use these principals with slight variations from one another, including the Endo Extractor (Brasseler USA),226 the Masserann Kit (Medidenta International, Woodside, NY), and the Extractor System (Roydent, Johnson City, TN) (Fig. 8-54). Additional techniques, which are effective for removing silver points, include the S.I.R. (Separated Instrument Retrieval) System (Vista Dental Products, Racine, WI), the use of a dental injec-tion needle with a 0.14-mm wire, the use of stainless-steel tubing with a Hedstrom file,187 and the Instrument Removal System (Dentsply Tulsa Dental Specialties).
These kits are not only effective in the removal of silver points but also in the removal of separated instruments, and because of this common approach to removing both during endodontic retreatment, these techniques will be discussed
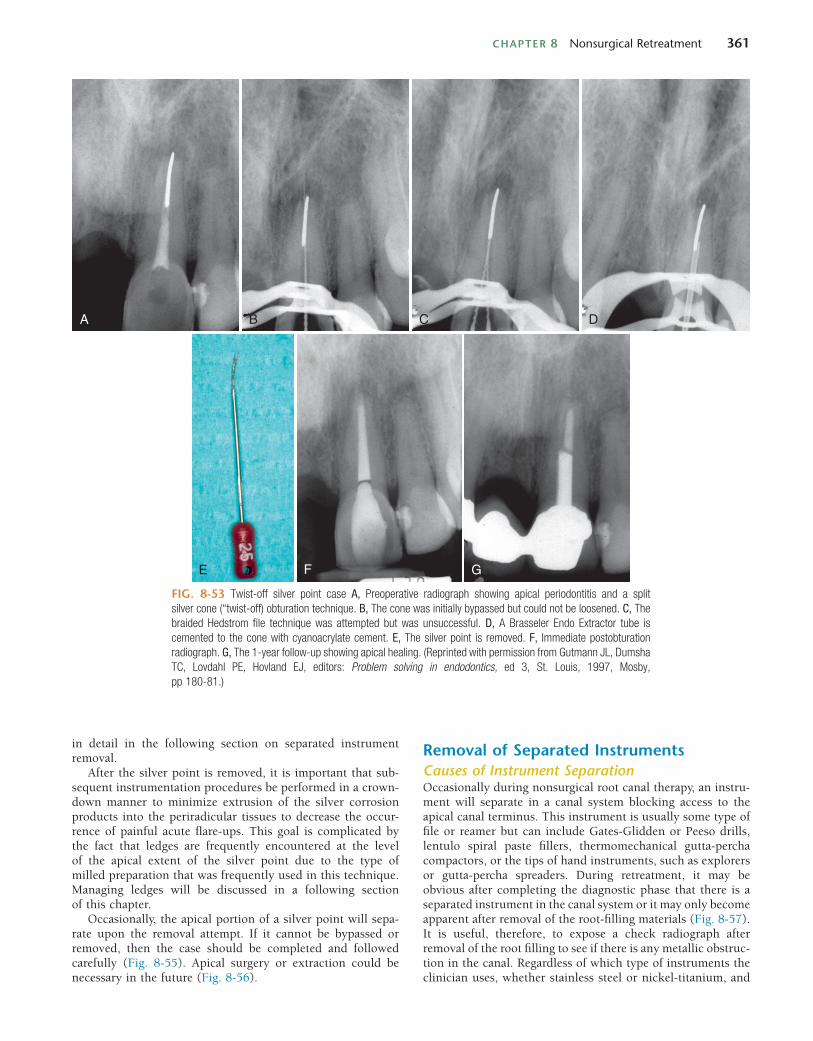
CHAPTER 8 Nonsurgical Retreatment 361
FIG. 8-53 Twist-off silver point case A, Preoperative radiograph showing apical periodontitis and a split silver cone (“twist-off) obturation technique. B, The cone was initially bypassed but could not be loosened. C, The braided Hedstrom file technique was attempted but was unsuccessful. D, A Brasseler Endo Extractor tube is cemented to the cone with cyanoacrylate cement. E, The silver point is removed. F, Immediate postobturation radiograph. G, The 1-year follow-up showing apical healing. (Reprinted with permission from Gutmann JL, Dumsha TC, Lovdahl PE, Hovland EJ, editors: Problem solving in endodontics, ed 3, St. Louis, 1997, Mosby, pp 180-81.)
A B C D
E F G
in detail in the following section on separated instrument removal.
After the silver point is removed, it is important that sub-sequent instrumentation procedures be performed in a crown-down manner to minimize extrusion of the silver corrosion products into the periradicular tissues to decrease the occur-rence of painful acute flare-ups. This goal is complicated by the fact that ledges are frequently encountered at the level of the apical extent of the silver point due to the type of milled preparation that was frequently used in this technique. Managing ledges will be discussed in a following section of this chapter.
Occasionally, the apical portion of a silver point will sepa-rate upon the removal attempt. If it cannot be bypassed or removed, then the case should be completed and followed carefully (Fig. 8-55). Apical surgery or extraction could be necessary in the future (Fig. 8-56).
Removal of Separated InstrumentsCauses of Instrument SeparationOccasionally during nonsurgical root canal therapy, an instru-ment will separate in a canal system blocking access to the apical canal terminus. This instrument is usually some type of file or reamer but can include Gates-Glidden or Peeso drills, lentulo spiral paste fillers, thermomechanical gutta-percha compactors, or the tips of hand instruments, such as explorers or gutta-percha spreaders. During retreatment, it may be obvious after completing the diagnostic phase that there is a separated instrument in the canal system or it may only become apparent after removal of the root-filling materials (Fig. 8-57). It is useful, therefore, to expose a check radiograph after removal of the root filling to see if there is any metallic obstruc-tion in the canal. Regardless of which type of instruments the clinician uses, whether stainless steel or nickel-titanium, and
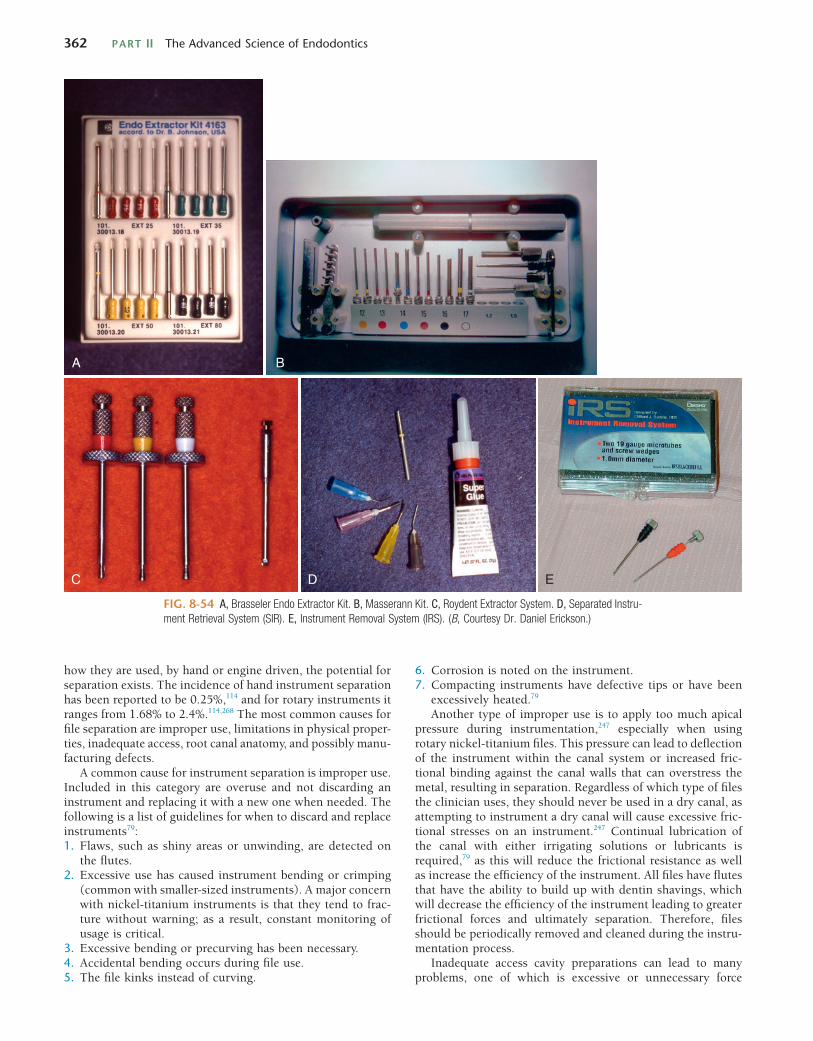
362 PART II The Advanced Science of Endodontics
6. Corrosion is noted on the instrument.7. Compacting instruments have defective tips or have been
excessively heated.79
Another type of improper use is to apply too much apical pressure during instrumentation,247 especially when using rotary nickel-titanium files. This pressure can lead to deflection of the instrument within the canal system or increased fric-tional binding against the canal walls that can overstress the metal, resulting in separation. Regardless of which type of files the clinician uses, they should never be used in a dry canal, as attempting to instrument a dry canal will cause excessive fric-tional stresses on an instrument.247 Continual lubrication of the canal with either irrigating solutions or lubricants is required,79 as this will reduce the frictional resistance as well as increase the efficiency of the instrument. All files have flutes that have the ability to build up with dentin shavings, which will decrease the efficiency of the instrument leading to greater frictional forces and ultimately separation. Therefore, files should be periodically removed and cleaned during the instru-mentation process.
Inadequate access cavity preparations can lead to many problems, one of which is excessive or unnecessary force
how they are used, by hand or engine driven, the potential for separation exists. The incidence of hand instrument separation has been reported to be 0.25%,114 and for rotary instruments it ranges from 1.68% to 2.4%.114,268 The most common causes for file separation are improper use, limitations in physical proper-ties, inadequate access, root canal anatomy, and possibly manu-facturing defects.
A common cause for instrument separation is improper use. Included in this category are overuse and not discarding an instrument and replacing it with a new one when needed. The following is a list of guidelines for when to discard and replace instruments79:1. Flaws, such as shiny areas or unwinding, are detected on
the flutes.2. Excessive use has caused instrument bending or crimping
(common with smaller-sized instruments). A major concern with nickel-titanium instruments is that they tend to frac-ture without warning; as a result, constant monitoring of usage is critical.
3. Excessive bending or precurving has been necessary.4. Accidental bending occurs during file use.5. The file kinks instead of curving.
FIG. 8-54 A, Brasseler Endo Extractor Kit. B, Masserann Kit. C, Roydent Extractor System. D, Separated Instru-ment Retrieval System (SIR). E, Instrument Removal System (IRS). (B, Courtesy Dr. Daniel Erickson.)
A B
C D E
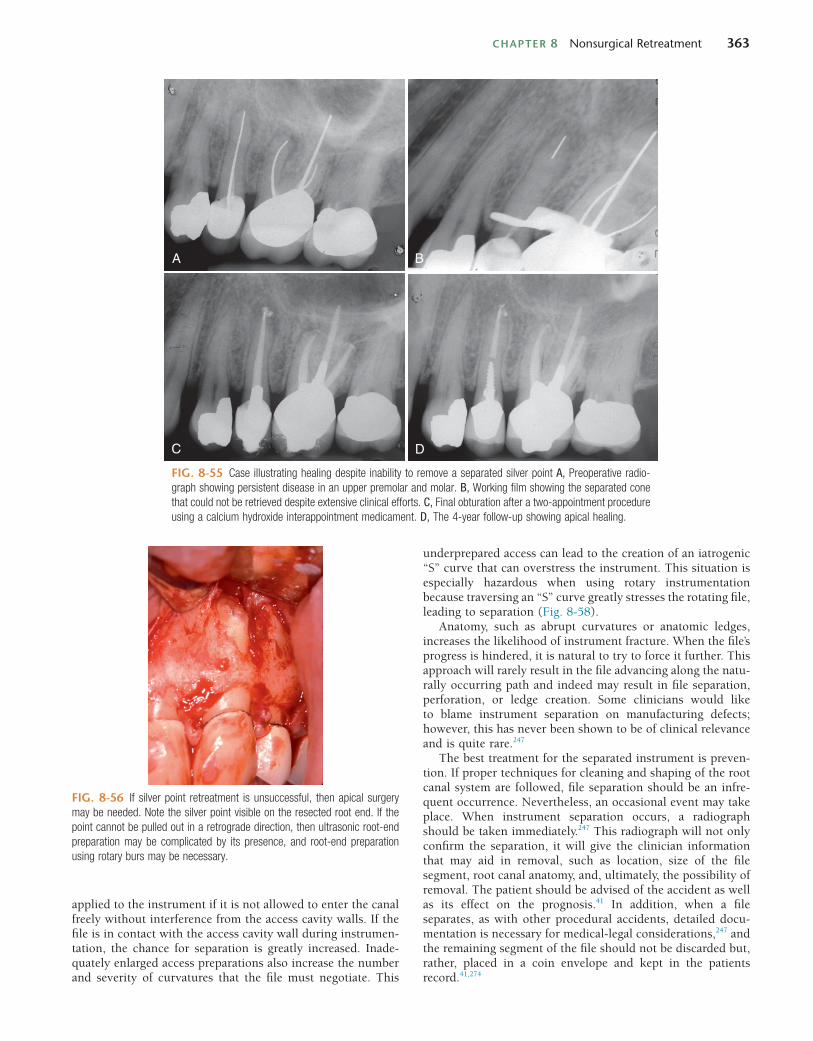
CHAPTER 8 Nonsurgical Retreatment 363
underprepared access can lead to the creation of an iatrogenic “S” curve that can overstress the instrument. This situation is especially hazardous when using rotary instrumentation because traversing an “S” curve greatly stresses the rotating file, leading to separation (Fig. 8-58).
Anatomy, such as abrupt curvatures or anatomic ledges, increases the likelihood of instrument fracture. When the file’s progress is hindered, it is natural to try to force it further. This approach will rarely result in the file advancing along the natu-rally occurring path and indeed may result in file separation, perforation, or ledge creation. Some clinicians would like to blame instrument separation on manufacturing defects; however, this has never been shown to be of clinical relevance and is quite rare.247
The best treatment for the separated instrument is preven-tion. If proper techniques for cleaning and shaping of the root canal system are followed, file separation should be an infre-quent occurrence. Nevertheless, an occasional event may take place. When instrument separation occurs, a radiograph should be taken immediately.247 This radiograph will not only confirm the separation, it will give the clinician information that may aid in removal, such as location, size of the file segment, root canal anatomy, and, ultimately, the possibility of removal. The patient should be advised of the accident as well as its effect on the prognosis.41 In addition, when a file separates, as with other procedural accidents, detailed docu-mentation is necessary for medical-legal considerations,247 and the remaining segment of the file should not be discarded but, rather, placed in a coin envelope and kept in the patients record.41,274
FIG. 8-55 Case illustrating healing despite inability to remove a separated silver point A, Preoperative radio-graph showing persistent disease in an upper premolar and molar. B, Working film showing the separated cone that could not be retrieved despite extensive clinical efforts. C, Final obturation after a two-appointment procedure using a calcium hydroxide interappointment medicament. D, The 4-year follow-up showing apical healing.
A B
C D
FIG. 8-56 If silver point retreatment is unsuccessful, then apical surgery may be needed. Note the silver point visible on the resected root end. If the point cannot be pulled out in a retrograde direction, then ultrasonic root-end preparation may be complicated by its presence, and root-end preparation using rotary burs may be necessary.
applied to the instrument if it is not allowed to enter the canal freely without interference from the access cavity walls. If the file is in contact with the access cavity wall during instrumen-tation, the chance for separation is greatly increased. Inade-quately enlarged access preparations also increase the number and severity of curvatures that the file must negotiate. This
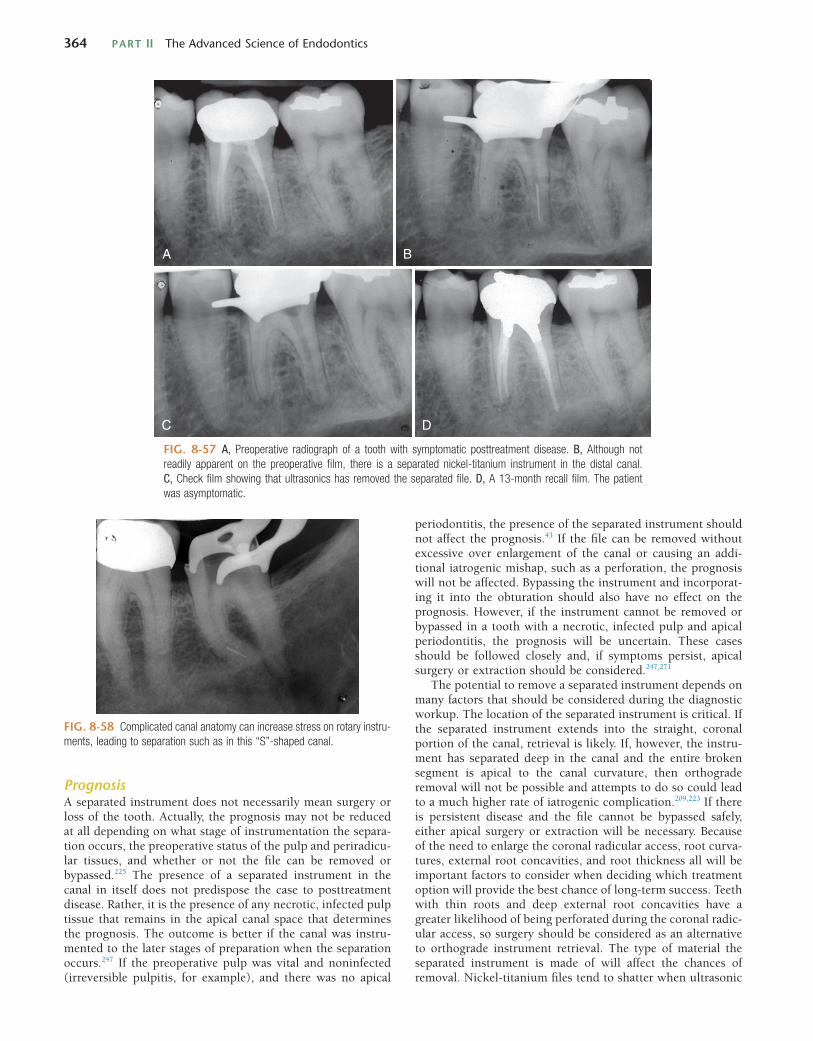
364 PART II The Advanced Science of Endodontics
periodontitis, the presence of the separated instrument should not affect the prognosis.43 If the file can be removed without excessive over enlargement of the canal or causing an addi-tional iatrogenic mishap, such as a perforation, the prognosis will not be affected. Bypassing the instrument and incorporat-ing it into the obturation should also have no effect on the prognosis. However, if the instrument cannot be removed or bypassed in a tooth with a necrotic, infected pulp and apical periodontitis, the prognosis will be uncertain. These cases should be followed closely and, if symptoms persist, apical surgery or extraction should be considered.247,271
The potential to remove a separated instrument depends on many factors that should be considered during the diagnostic workup. The location of the separated instrument is critical. If the separated instrument extends into the straight, coronal portion of the canal, retrieval is likely. If, however, the instru-ment has separated deep in the canal and the entire broken segment is apical to the canal curvature, then orthograde removal will not be possible and attempts to do so could lead to a much higher rate of iatrogenic complication.209,223 If there is persistent disease and the file cannot be bypassed safely, either apical surgery or extraction will be necessary. Because of the need to enlarge the coronal radicular access, root curva-tures, external root concavities, and root thickness all will be important factors to consider when deciding which treatment option will provide the best chance of long-term success. Teeth with thin roots and deep external root concavities have a greater likelihood of being perforated during the coronal radic-ular access, so surgery should be considered as an alternative to orthograde instrument retrieval. The type of material the separated instrument is made of will affect the chances of removal. Nickel-titanium files tend to shatter when ultrasonic
PrognosisA separated instrument does not necessarily mean surgery or loss of the tooth. Actually, the prognosis may not be reduced at all depending on what stage of instrumentation the separa-tion occurs, the preoperative status of the pulp and periradicu-lar tissues, and whether or not the file can be removed or bypassed.225 The presence of a separated instrument in the canal in itself does not predispose the case to posttreatment disease. Rather, it is the presence of any necrotic, infected pulp tissue that remains in the apical canal space that determines the prognosis. The outcome is better if the canal was instru-mented to the later stages of preparation when the separation occurs.247 If the preoperative pulp was vital and noninfected (irreversible pulpitis, for example), and there was no apical
FIG. 8-57 A, Preoperative radiograph of a tooth with symptomatic posttreatment disease. B, Although not readily apparent on the preoperative film, there is a separated nickel-titanium instrument in the distal canal. C, Check film showing that ultrasonics has removed the separated file. D, A 13-month recall film. The patient was asymptomatic.
A B
C D
FIG. 8-58 Complicated canal anatomy can increase stress on rotary instru-ments, leading to separation such as in this “S”-shaped canal.
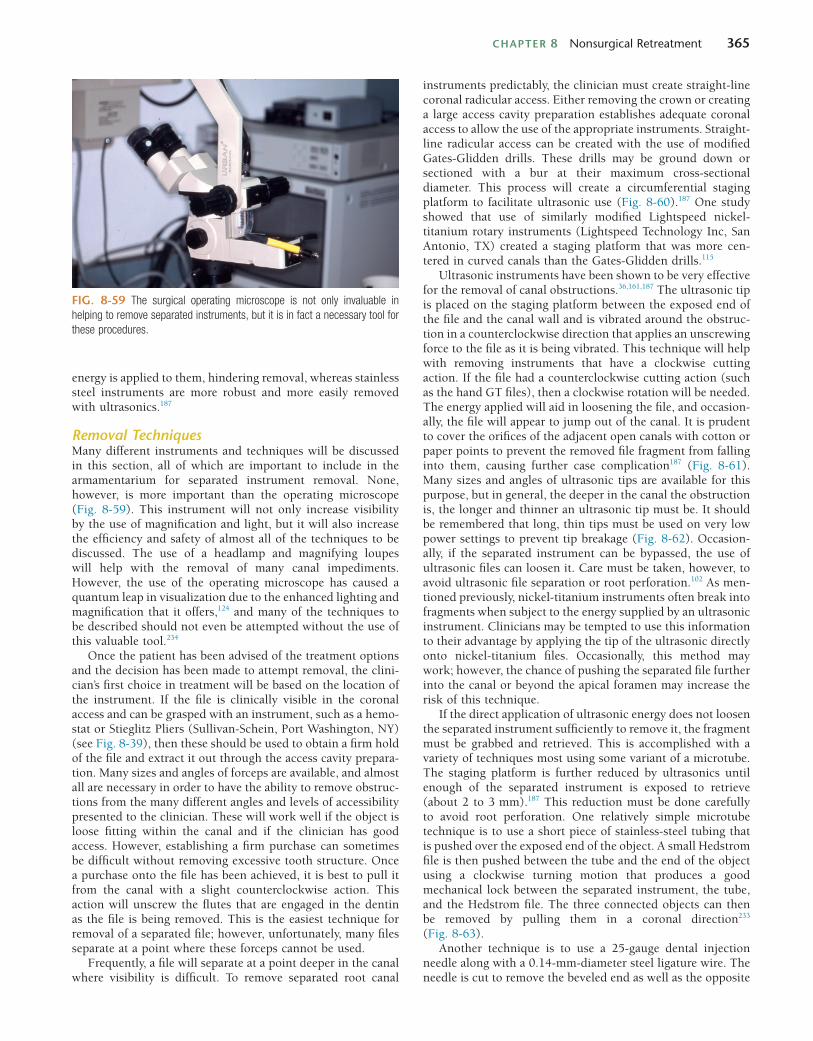
CHAPTER 8 Nonsurgical Retreatment 365
FIG. 8-59 The surgical operating microscope is not only invaluable in helping to remove separated instruments, but it is in fact a necessary tool for these procedures.
energy is applied to them, hindering removal, whereas stainless steel instruments are more robust and more easily removed with ultrasonics.187
Removal TechniquesMany different instruments and techniques will be discussed in this section, all of which are important to include in the armamentarium for separated instrument removal. None, however, is more important than the operating microscope (Fig. 8-59). This instrument will not only increase visibility by the use of magnification and light, but it will also increase the efficiency and safety of almost all of the techniques to be discussed. The use of a headlamp and magnifying loupes will help with the removal of many canal impediments. However, the use of the operating microscope has caused a quantum leap in visualization due to the enhanced lighting and magnification that it offers,124 and many of the techniques to be described should not even be attempted without the use of this valuable tool.234
Once the patient has been advised of the treatment options and the decision has been made to attempt removal, the clini-cian’s first choice in treatment will be based on the location of the instrument. If the file is clinically visible in the coronal access and can be grasped with an instrument, such as a hemo-stat or Stieglitz Pliers (Sullivan-Schein, Port Washington, NY) (see Fig. 8-39), then these should be used to obtain a firm hold of the file and extract it out through the access cavity prepara-tion. Many sizes and angles of forceps are available, and almost all are necessary in order to have the ability to remove obstruc-tions from the many different angles and levels of accessibility presented to the clinician. These will work well if the object is loose fitting within the canal and if the clinician has good access. However, establishing a firm purchase can sometimes be difficult without removing excessive tooth structure. Once a purchase onto the file has been achieved, it is best to pull it from the canal with a slight counterclockwise action. This action will unscrew the flutes that are engaged in the dentin as the file is being removed. This is the easiest technique for removal of a separated file; however, unfortunately, many files separate at a point where these forceps cannot be used.
Frequently, a file will separate at a point deeper in the canal where visibility is difficult. To remove separated root canal
instruments predictably, the clinician must create straight-line coronal radicular access. Either removing the crown or creating a large access cavity preparation establishes adequate coronal access to allow the use of the appropriate instruments. Straight-line radicular access can be created with the use of modified Gates-Glidden drills. These drills may be ground down or sectioned with a bur at their maximum cross-sectional diameter. This process will create a circumferential staging platform to facilitate ultrasonic use (Fig. 8-60).187 One study showed that use of similarly modified Lightspeed nickel-titanium rotary instruments (Lightspeed Technology Inc, San Antonio, TX) created a staging platform that was more cen-tered in curved canals than the Gates-Glidden drills.115
Ultrasonic instruments have been shown to be very effective for the removal of canal obstructions.36,161,187 The ultrasonic tip is placed on the staging platform between the exposed end of the file and the canal wall and is vibrated around the obstruc-tion in a counterclockwise direction that applies an unscrewing force to the file as it is being vibrated. This technique will help with removing instruments that have a clockwise cutting action. If the file had a counterclockwise cutting action (such as the hand GT files), then a clockwise rotation will be needed. The energy applied will aid in loosening the file, and occasion-ally, the file will appear to jump out of the canal. It is prudent to cover the orifices of the adjacent open canals with cotton or paper points to prevent the removed file fragment from falling into them, causing further case complication187 (Fig. 8-61). Many sizes and angles of ultrasonic tips are available for this purpose, but in general, the deeper in the canal the obstruction is, the longer and thinner an ultrasonic tip must be. It should be remembered that long, thin tips must be used on very low power settings to prevent tip breakage (Fig. 8-62). Occasion-ally, if the separated instrument can be bypassed, the use of ultrasonic files can loosen it. Care must be taken, however, to avoid ultrasonic file separation or root perforation.102 As men-tioned previously, nickel-titanium instruments often break into fragments when subject to the energy supplied by an ultrasonic instrument. Clinicians may be tempted to use this information to their advantage by applying the tip of the ultrasonic directly onto nickel-titanium files. Occasionally, this method may work; however, the chance of pushing the separated file further into the canal or beyond the apical foramen may increase the risk of this technique.
If the direct application of ultrasonic energy does not loosen the separated instrument sufficiently to remove it, the fragment must be grabbed and retrieved. This is accomplished with a variety of techniques most using some variant of a microtube. The staging platform is further reduced by ultrasonics until enough of the separated instrument is exposed to retrieve (about 2 to 3 mm).187 This reduction must be done carefully to avoid root perforation. One relatively simple microtube technique is to use a short piece of stainless-steel tubing that is pushed over the exposed end of the object. A small Hedstrom file is then pushed between the tube and the end of the object using a clockwise turning motion that produces a good mechanical lock between the separated instrument, the tube, and the Hedstrom file. The three connected objects can then be removed by pulling them in a coronal direction233 (Fig. 8-63).
Another technique is to use a 25-gauge dental injection needle along with a 0.14-mm-diameter steel ligature wire. The needle is cut to remove the beveled end as well as the opposite
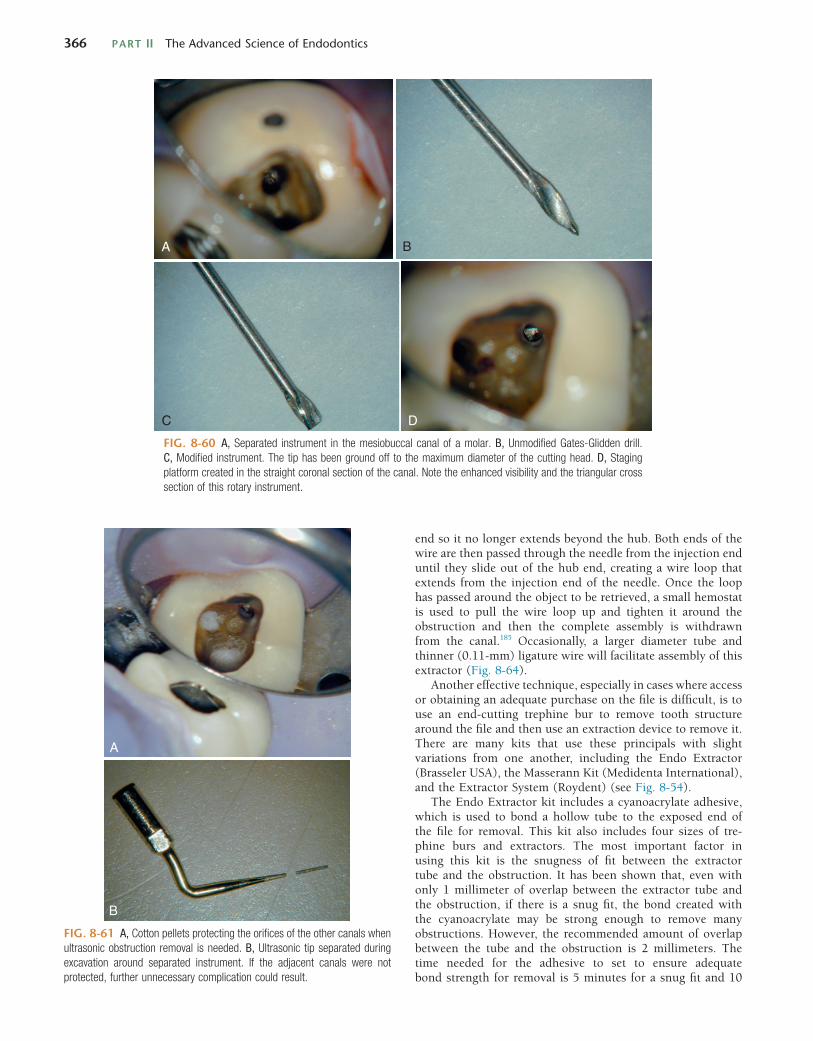
366 PART II The Advanced Science of Endodontics
FIG. 8-60 A, Separated instrument in the mesiobuccal canal of a molar. B, Unmodified Gates-Glidden drill. C, Modified instrument. The tip has been ground off to the maximum diameter of the cutting head. D, Staging platform created in the straight coronal section of the canal. Note the enhanced visibility and the triangular cross section of this rotary instrument.
A B
C D
end so it no longer extends beyond the hub. Both ends of the wire are then passed through the needle from the injection end until they slide out of the hub end, creating a wire loop that extends from the injection end of the needle. Once the loop has passed around the object to be retrieved, a small hemostat is used to pull the wire loop up and tighten it around the obstruction and then the complete assembly is withdrawn from the canal.185 Occasionally, a larger diameter tube and thinner (0.11-mm) ligature wire will facilitate assembly of this extractor (Fig. 8-64).
Another effective technique, especially in cases where access or obtaining an adequate purchase on the file is difficult, is to use an end-cutting trephine bur to remove tooth structure around the file and then use an extraction device to remove it. There are many kits that use these principals with slight variations from one another, including the Endo Extractor (Brasseler USA), the Masserann Kit (Medidenta International), and the Extractor System (Roydent) (see Fig. 8-54).
The Endo Extractor kit includes a cyanoacrylate adhesive, which is used to bond a hollow tube to the exposed end of the file for removal. This kit also includes four sizes of tre-phine burs and extractors. The most important factor in using this kit is the snugness of fit between the extractor tube and the obstruction. It has been shown that, even with only 1 millimeter of overlap between the extractor tube and the obstruction, if there is a snug fit, the bond created with the cyanoacrylate may be strong enough to remove many obstructions. However, the recommended amount of overlap between the tube and the obstruction is 2 millimeters. The time needed for the adhesive to set to ensure adequate bond strength for removal is 5 minutes for a snug fit and 10
FIG. 8-61 A, Cotton pellets protecting the orifices of the other canals when ultrasonic obstruction removal is needed. B, Ultrasonic tip separated during excavation around separated instrument. If the adjacent canals were not protected, further unnecessary complication could result.
A
B
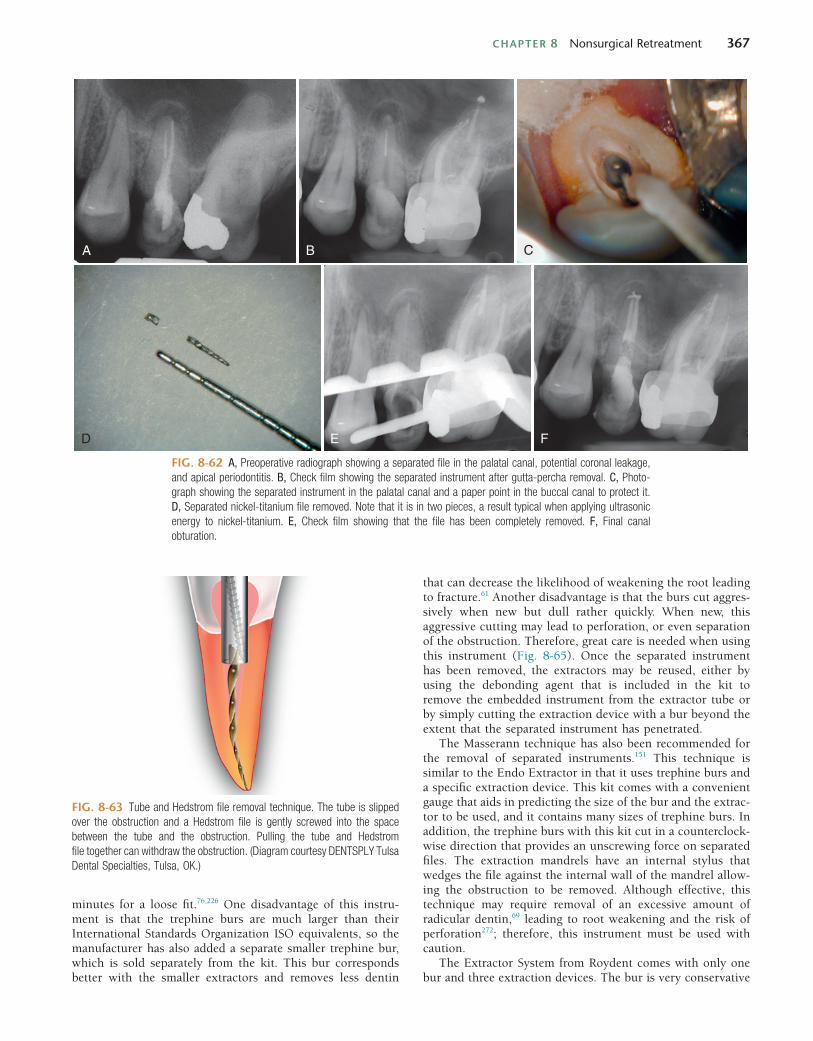
CHAPTER 8 Nonsurgical Retreatment 367
that can decrease the likelihood of weakening the root leading to fracture.61 Another disadvantage is that the burs cut aggres-sively when new but dull rather quickly. When new, this aggressive cutting may lead to perforation, or even separation of the obstruction. Therefore, great care is needed when using this instrument (Fig. 8-65). Once the separated instrument has been removed, the extractors may be reused, either by using the debonding agent that is included in the kit to remove the embedded instrument from the extractor tube or by simply cutting the extraction device with a bur beyond the extent that the separated instrument has penetrated.
The Masserann technique has also been recommended for the removal of separated instruments.151 This technique is similar to the Endo Extractor in that it uses trephine burs and a specific extraction device. This kit comes with a convenient gauge that aids in predicting the size of the bur and the extrac-tor to be used, and it contains many sizes of trephine burs. In addition, the trephine burs with this kit cut in a counterclock-wise direction that provides an unscrewing force on separated files. The extraction mandrels have an internal stylus that wedges the file against the internal wall of the mandrel allow-ing the obstruction to be removed. Although effective, this technique may require removal of an excessive amount of radicular dentin,69 leading to root weakening and the risk of perforation272; therefore, this instrument must be used with caution.
The Extractor System from Roydent comes with only one bur and three extraction devices. The bur is very conservative
FIG. 8-62 A, Preoperative radiograph showing a separated file in the palatal canal, potential coronal leakage, and apical periodontitis. B, Check film showing the separated instrument after gutta-percha removal. C, Photo-graph showing the separated instrument in the palatal canal and a paper point in the buccal canal to protect it. D, Separated nickel-titanium file removed. Note that it is in two pieces, a result typical when applying ultrasonic energy to nickel-titanium. E, Check film showing that the file has been completely removed. F, Final canal obturation.
A B C
D E F
FIG. 8-63 Tube and Hedstrom file removal technique. The tube is slipped over the obstruction and a Hedstrom file is gently screwed into the space between the tube and the obstruction. Pulling the tube and Hedstrom file together can withdraw the obstruction. (Diagram courtesy DENTSPLY Tulsa Dental Specialties, Tulsa, OK.)
minutes for a loose fit.76,226 One disadvantage of this instru-ment is that the trephine burs are much larger than their International Standards Organization ISO equivalents, so the manufacturer has also added a separate smaller trephine bur, which is sold separately from the kit. This bur corresponds better with the smaller extractors and removes less dentin
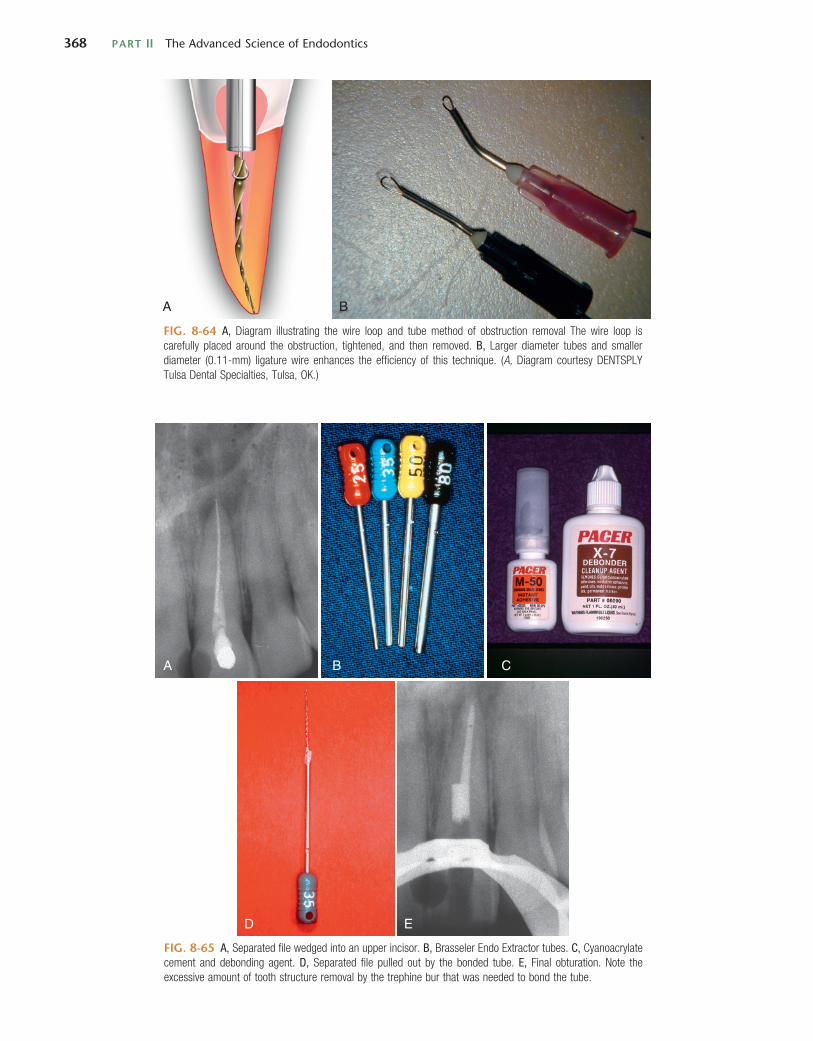
368 PART II The Advanced Science of Endodontics
FIG. 8-64 A, Diagram illustrating the wire loop and tube method of obstruction removal The wire loop is carefully placed around the obstruction, tightened, and then removed. B, Larger diameter tubes and smaller diameter (0.11-mm) ligature wire enhances the efficiency of this technique. (A, Diagram courtesy DENTSPLY Tulsa Dental Specialties, Tulsa, OK.)
A B
FIG. 8-65 A, Separated file wedged into an upper incisor. B, Brasseler Endo Extractor tubes. C, Cyanoacrylate cement and debonding agent. D, Separated file pulled out by the bonded tube. E, Final obturation. Note the excessive amount of tooth structure removal by the trephine bur that was needed to bond the tube.
A B C
D E
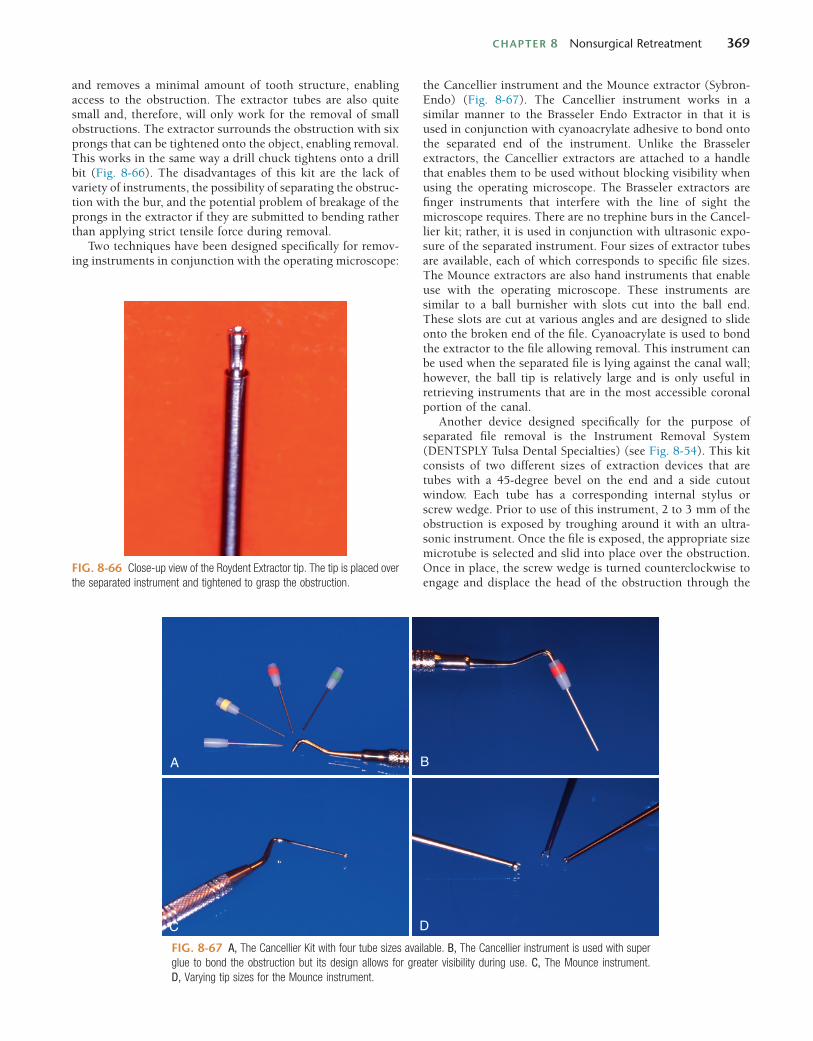
CHAPTER 8 Nonsurgical Retreatment 369
FIG. 8-66 Close-up view of the Roydent Extractor tip. The tip is placed over the separated instrument and tightened to grasp the obstruction.
FIG. 8-67 A, The Cancellier Kit with four tube sizes available. B, The Cancellier instrument is used with super glue to bond the obstruction but its design allows for greater visibility during use. C, The Mounce instrument. D, Varying tip sizes for the Mounce instrument.
A
C
B
D
and removes a minimal amount of tooth structure, enabling access to the obstruction. The extractor tubes are also quite small and, therefore, will only work for the removal of small obstructions. The extractor surrounds the obstruction with six prongs that can be tightened onto the object, enabling removal. This works in the same way a drill chuck tightens onto a drill bit (Fig. 8-66). The disadvantages of this kit are the lack of variety of instruments, the possibility of separating the obstruc-tion with the bur, and the potential problem of breakage of the prongs in the extractor if they are submitted to bending rather than applying strict tensile force during removal.
Two techniques have been designed specifically for remov-ing instruments in conjunction with the operating microscope:
the Cancellier instrument and the Mounce extractor (Sybron-Endo) (Fig. 8-67). The Cancellier instrument works in a similar manner to the Brasseler Endo Extractor in that it is used in conjunction with cyanoacrylate adhesive to bond onto the separated end of the instrument. Unlike the Brasseler extractors, the Cancellier extractors are attached to a handle that enables them to be used without blocking visibility when using the operating microscope. The Brasseler extractors are finger instruments that interfere with the line of sight the microscope requires. There are no trephine burs in the Cancel-lier kit; rather, it is used in conjunction with ultrasonic expo-sure of the separated instrument. Four sizes of extractor tubes are available, each of which corresponds to specific file sizes. The Mounce extractors are also hand instruments that enable use with the operating microscope. These instruments are similar to a ball burnisher with slots cut into the ball end. These slots are cut at various angles and are designed to slide onto the broken end of the file. Cyanoacrylate is used to bond the extractor to the file allowing removal. This instrument can be used when the separated file is lying against the canal wall; however, the ball tip is relatively large and is only useful in retrieving instruments that are in the most accessible coronal portion of the canal.
Another device designed specifically for the purpose of separated file removal is the Instrument Removal System (DENTSPLY Tulsa Dental Specialties) (see Fig. 8-54). This kit consists of two different sizes of extraction devices that are tubes with a 45-degree bevel on the end and a side cutout window. Each tube has a corresponding internal stylus or screw wedge. Prior to use of this instrument, 2 to 3 mm of the obstruction is exposed by troughing around it with an ultra-sonic instrument. Once the file is exposed, the appropriate size microtube is selected and slid into place over the obstruction. Once in place, the screw wedge is turned counterclockwise to engage and displace the head of the obstruction through the
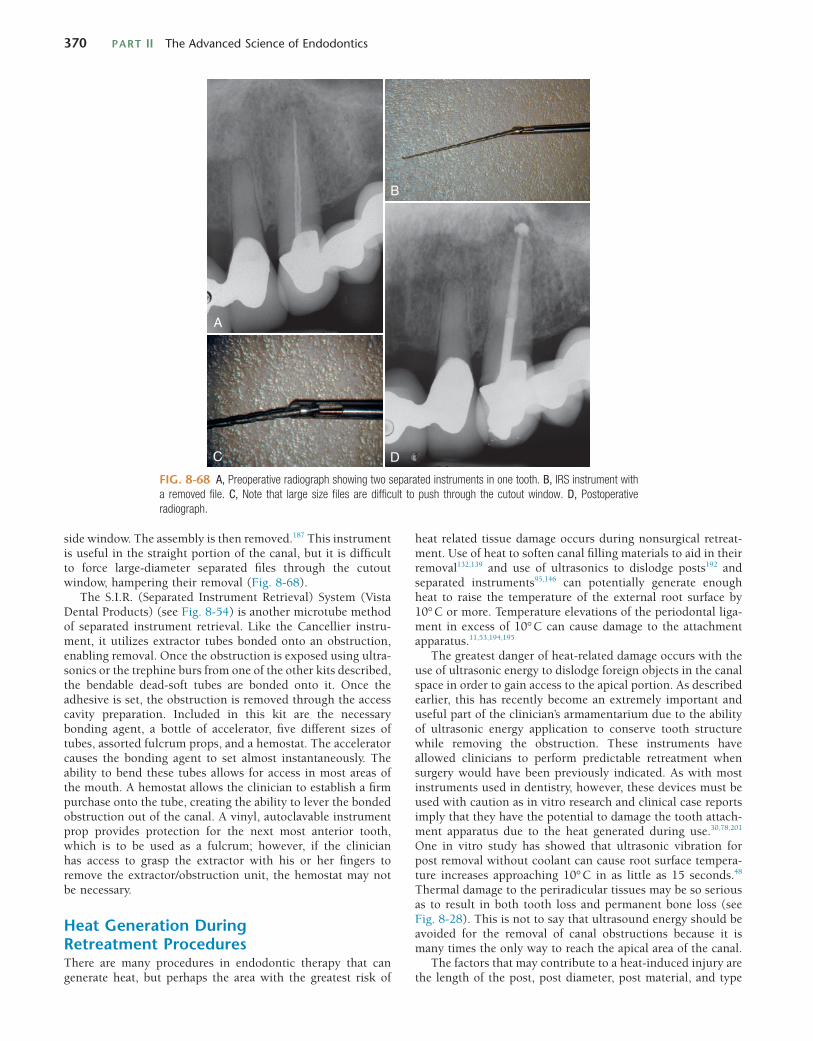
370 PART II The Advanced Science of Endodontics
heat related tissue damage occurs during nonsurgical retreat-ment. Use of heat to soften canal filling materials to aid in their removal132,139 and use of ultrasonics to dislodge posts192 and separated instruments95,146 can potentially generate enough heat to raise the temperature of the external root surface by 10° C or more. Temperature elevations of the periodontal liga-ment in excess of 10° C can cause damage to the attachment apparatus.11,53,194,195
The greatest danger of heat-related damage occurs with the use of ultrasonic energy to dislodge foreign objects in the canal space in order to gain access to the apical portion. As described earlier, this has recently become an extremely important and useful part of the clinician’s armamentarium due to the ability of ultrasonic energy application to conserve tooth structure while removing the obstruction. These instruments have allowed clinicians to perform predictable retreatment when surgery would have been previously indicated. As with most instruments used in dentistry, however, these devices must be used with caution as in vitro research and clinical case reports imply that they have the potential to damage the tooth attach-ment apparatus due to the heat generated during use.30,78,201 One in vitro study has showed that ultrasonic vibration for post removal without coolant can cause root surface tempera-ture increases approaching 10° C in as little as 15 seconds.48 Thermal damage to the periradicular tissues may be so serious as to result in both tooth loss and permanent bone loss (see Fig. 8-28). This is not to say that ultrasound energy should be avoided for the removal of canal obstructions because it is many times the only way to reach the apical area of the canal.
The factors that may contribute to a heat-induced injury are the length of the post, post diameter, post material, and type
side window. The assembly is then removed.187 This instrument is useful in the straight portion of the canal, but it is difficult to force large-diameter separated files through the cutout window, hampering their removal (Fig. 8-68).
The S.I.R. (Separated Instrument Retrieval) System (Vista Dental Products) (see Fig. 8-54) is another microtube method of separated instrument retrieval. Like the Cancellier instru-ment, it utilizes extractor tubes bonded onto an obstruction, enabling removal. Once the obstruction is exposed using ultra-sonics or the trephine burs from one of the other kits described, the bendable dead-soft tubes are bonded onto it. Once the adhesive is set, the obstruction is removed through the access cavity preparation. Included in this kit are the necessary bonding agent, a bottle of accelerator, five different sizes of tubes, assorted fulcrum props, and a hemostat. The accelerator causes the bonding agent to set almost instantaneously. The ability to bend these tubes allows for access in most areas of the mouth. A hemostat allows the clinician to establish a firm purchase onto the tube, creating the ability to lever the bonded obstruction out of the canal. A vinyl, autoclavable instrument prop provides protection for the next most anterior tooth, which is to be used as a fulcrum; however, if the clinician has access to grasp the extractor with his or her fingers to remove the extractor/obstruction unit, the hemostat may not be necessary.
Heat Generation During Retreatment ProceduresThere are many procedures in endodontic therapy that can generate heat, but perhaps the area with the greatest risk of
FIG. 8-68 A, Preoperative radiograph showing two separated instruments in one tooth. B, IRS instrument with a removed file. C, Note that large size files are difficult to push through the cutout window. D, Postoperative radiograph.
A
C
B
D
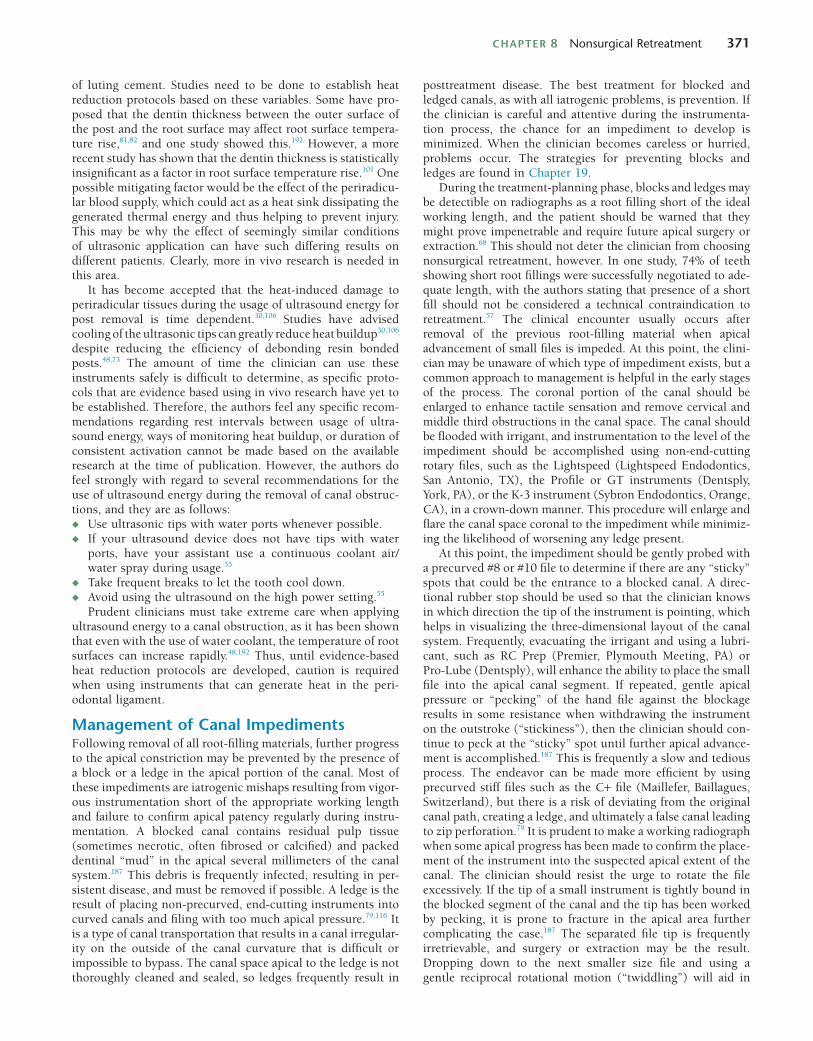
CHAPTER 8 Nonsurgical Retreatment 371
of luting cement. Studies need to be done to establish heat reduction protocols based on these variables. Some have pro-posed that the dentin thickness between the outer surface of the post and the root surface may affect root surface tempera-ture rise,81,82 and one study showed this.192 However, a more recent study has shown that the dentin thickness is statistically insignificant as a factor in root surface temperature rise.101 One possible mitigating factor would be the effect of the periradicu-lar blood supply, which could act as a heat sink dissipating the generated thermal energy and thus helping to prevent injury. This may be why the effect of seemingly similar conditions of ultrasonic application can have such differing results on different patients. Clearly, more in vivo research is needed in this area.
It has become accepted that the heat-induced damage to periradicular tissues during the usage of ultrasound energy for post removal is time dependent.30,106 Studies have advised cooling of the ultrasonic tips can greatly reduce heat buildup30,106 despite reducing the efficiency of debonding resin bonded posts.48,73 The amount of time the clinician can use these instruments safely is difficult to determine, as specific proto-cols that are evidence based using in vivo research have yet to be established. Therefore, the authors feel any specific recom-mendations regarding rest intervals between usage of ultra-sound energy, ways of monitoring heat buildup, or duration of consistent activation cannot be made based on the available research at the time of publication. However, the authors do feel strongly with regard to several recommendations for the use of ultrasound energy during the removal of canal obstruc-tions, and they are as follows:◆ Use ultrasonic tips with water ports whenever possible.◆ If your ultrasound device does not have tips with water
ports, have your assistant use a continuous coolant air/water spray during usage.55
◆ Take frequent breaks to let the tooth cool down.◆ Avoid using the ultrasound on the high power setting.55
Prudent clinicians must take extreme care when applying ultrasound energy to a canal obstruction, as it has been shown that even with the use of water coolant, the temperature of root surfaces can increase rapidly.48,192 Thus, until evidence-based heat reduction protocols are developed, caution is required when using instruments that can generate heat in the peri-odontal ligament.
Management of Canal ImpedimentsFollowing removal of all root-filling materials, further progress to the apical constriction may be prevented by the presence of a block or a ledge in the apical portion of the canal. Most of these impediments are iatrogenic mishaps resulting from vigor-ous instrumentation short of the appropriate working length and failure to confirm apical patency regularly during instru-mentation. A blocked canal contains residual pulp tissue (sometimes necrotic, often fibrosed or calcified) and packed dentinal “mud” in the apical several millimeters of the canal system.187 This debris is frequently infected, resulting in per-sistent disease, and must be removed if possible. A ledge is the result of placing non-precurved, end-cutting instruments into curved canals and filing with too much apical pressure.79,116 It is a type of canal transportation that results in a canal irregular-ity on the outside of the canal curvature that is difficult or impossible to bypass. The canal space apical to the ledge is not thoroughly cleaned and sealed, so ledges frequently result in
posttreatment disease. The best treatment for blocked and ledged canals, as with all iatrogenic problems, is prevention. If the clinician is careful and attentive during the instrumenta-tion process, the chance for an impediment to develop is minimized. When the clinician becomes careless or hurried, problems occur. The strategies for preventing blocks and ledges are found in Chapter 19.
During the treatment-planning phase, blocks and ledges may be detectible on radiographs as a root filling short of the ideal working length, and the patient should be warned that they might prove impenetrable and require future apical surgery or extraction.68 This should not deter the clinician from choosing nonsurgical retreatment, however. In one study, 74% of teeth showing short root fillings were successfully negotiated to ade-quate length, with the authors stating that presence of a short fill should not be considered a technical contraindication to retreatment.57 The clinical encounter usually occurs after removal of the previous root-filling material when apical advancement of small files is impeded. At this point, the clini-cian may be unaware of which type of impediment exists, but a common approach to management is helpful in the early stages of the process. The coronal portion of the canal should be enlarged to enhance tactile sensation and remove cervical and middle third obstructions in the canal space. The canal should be flooded with irrigant, and instrumentation to the level of the impediment should be accomplished using non-end-cutting rotary files, such as the Lightspeed (Lightspeed Endodontics, San Antonio, TX), the Profile or GT instruments (Dentsply, York, PA), or the K-3 instrument (Sybron Endodontics, Orange, CA), in a crown-down manner. This procedure will enlarge and flare the canal space coronal to the impediment while minimiz-ing the likelihood of worsening any ledge present.
At this point, the impediment should be gently probed with a precurved #8 or #10 file to determine if there are any “sticky” spots that could be the entrance to a blocked canal. A direc-tional rubber stop should be used so that the clinician knows in which direction the tip of the instrument is pointing, which helps in visualizing the three-dimensional layout of the canal system. Frequently, evacuating the irrigant and using a lubri-cant, such as RC Prep (Premier, Plymouth Meeting, PA) or Pro-Lube (Dentsply), will enhance the ability to place the small file into the apical canal segment. If repeated, gentle apical pressure or “pecking” of the hand file against the blockage results in some resistance when withdrawing the instrument on the outstroke (“stickiness”), then the clinician should con-tinue to peck at the “sticky” spot until further apical advance-ment is accomplished.187 This is frequently a slow and tedious process. The endeavor can be made more efficient by using precurved stiff files such as the C+ file (Maillefer, Baillagues, Switzerland), but there is a risk of deviating from the original canal path, creating a ledge, and ultimately a false canal leading to zip perforation.79 It is prudent to make a working radiograph when some apical progress has been made to confirm the place-ment of the instrument into the suspected apical extent of the canal. The clinician should resist the urge to rotate the file excessively. If the tip of a small instrument is tightly bound in the blocked segment of the canal and the tip has been worked by pecking, it is prone to fracture in the apical area further complicating the case.187 The separated file tip is frequently irretrievable, and surgery or extraction may be the result. Dropping down to the next smaller size file and using a gentle reciprocal rotational motion (“twiddling”) will aid in
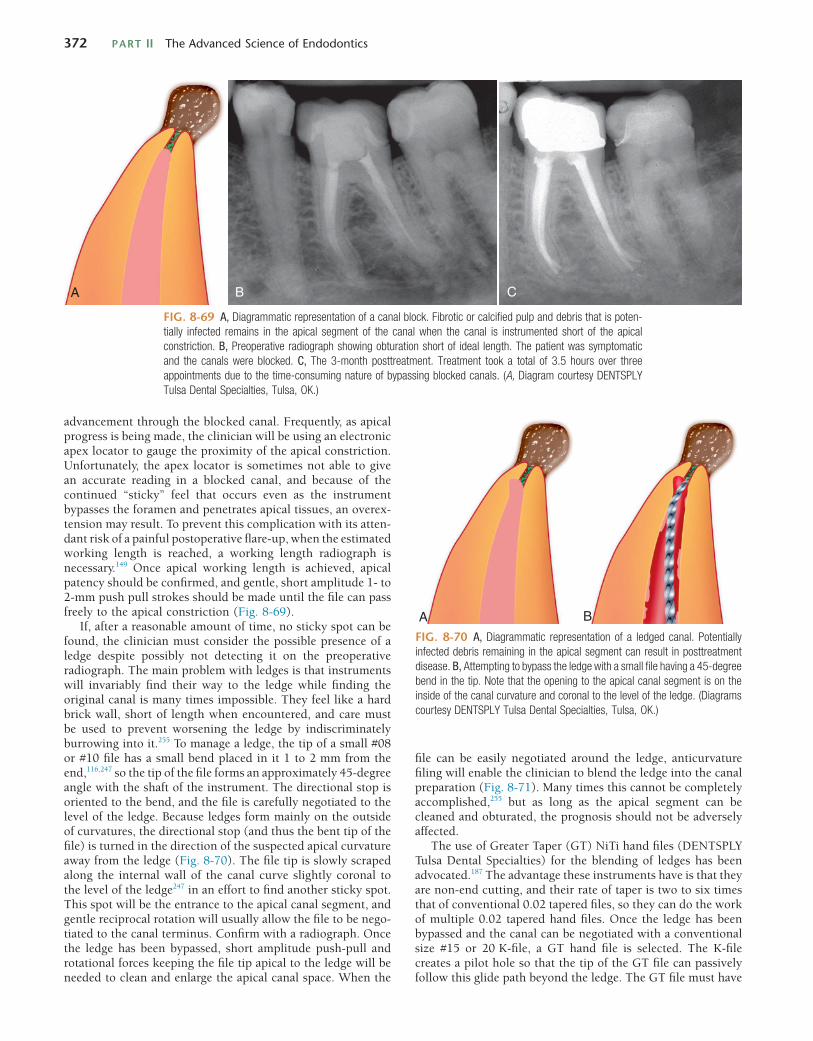
372 PART II The Advanced Science of Endodontics
advancement through the blocked canal. Frequently, as apical progress is being made, the clinician will be using an electronic apex locator to gauge the proximity of the apical constriction. Unfortunately, the apex locator is sometimes not able to give an accurate reading in a blocked canal, and because of the continued “sticky” feel that occurs even as the instrument bypasses the foramen and penetrates apical tissues, an overex-tension may result. To prevent this complication with its atten-dant risk of a painful postoperative flare-up, when the estimated working length is reached, a working length radiograph is necessary.149 Once apical working length is achieved, apical patency should be confirmed, and gentle, short amplitude 1- to 2-mm push pull strokes should be made until the file can pass freely to the apical constriction (Fig. 8-69).
If, after a reasonable amount of time, no sticky spot can be found, the clinician must consider the possible presence of a ledge despite possibly not detecting it on the preoperative radiograph. The main problem with ledges is that instruments will invariably find their way to the ledge while finding the original canal is many times impossible. They feel like a hard brick wall, short of length when encountered, and care must be used to prevent worsening the ledge by indiscriminately burrowing into it.255 To manage a ledge, the tip of a small #08 or #10 file has a small bend placed in it 1 to 2 mm from the end,116,247 so the tip of the file forms an approximately 45-degree angle with the shaft of the instrument. The directional stop is oriented to the bend, and the file is carefully negotiated to the level of the ledge. Because ledges form mainly on the outside of curvatures, the directional stop (and thus the bent tip of the file) is turned in the direction of the suspected apical curvature away from the ledge (Fig. 8-70). The file tip is slowly scraped along the internal wall of the canal curve slightly coronal to the level of the ledge247 in an effort to find another sticky spot. This spot will be the entrance to the apical canal segment, and gentle reciprocal rotation will usually allow the file to be nego-tiated to the canal terminus. Confirm with a radiograph. Once the ledge has been bypassed, short amplitude push-pull and rotational forces keeping the file tip apical to the ledge will be needed to clean and enlarge the apical canal space. When the
FIG. 8-69 A, Diagrammatic representation of a canal block. Fibrotic or calcified pulp and debris that is poten-tially infected remains in the apical segment of the canal when the canal is instrumented short of the apical constriction. B, Preoperative radiograph showing obturation short of ideal length. The patient was symptomatic and the canals were blocked. C, The 3-month posttreatment. Treatment took a total of 3.5 hours over three appointments due to the time-consuming nature of bypassing blocked canals. (A, Diagram courtesy DENTSPLY Tulsa Dental Specialties, Tulsa, OK.)
A B C
FIG. 8-70 A, Diagrammatic representation of a ledged canal. Potentially infected debris remaining in the apical segment can result in posttreatment disease. B, Attempting to bypass the ledge with a small file having a 45-degree bend in the tip. Note that the opening to the apical canal segment is on the inside of the canal curvature and coronal to the level of the ledge. (Diagrams courtesy DENTSPLY Tulsa Dental Specialties, Tulsa, OK.)
A B
file can be easily negotiated around the ledge, anticurvature filing will enable the clinician to blend the ledge into the canal preparation (Fig. 8-71). Many times this cannot be completely accomplished,255 but as long as the apical segment can be cleaned and obturated, the prognosis should not be adversely affected.
The use of Greater Taper (GT) NiTi hand files (DENTSPLY Tulsa Dental Specialties) for the blending of ledges has been advocated.187 The advantage these instruments have is that they are non-end cutting, and their rate of taper is two to six times that of conventional 0.02 tapered files, so they can do the work of multiple 0.02 tapered hand files. Once the ledge has been bypassed and the canal can be negotiated with a conventional size #15 or 20 K-file, a GT hand file is selected. The K-file creates a pilot hole so that the tip of the GT file can passively follow this glide path beyond the ledge. The GT file must have
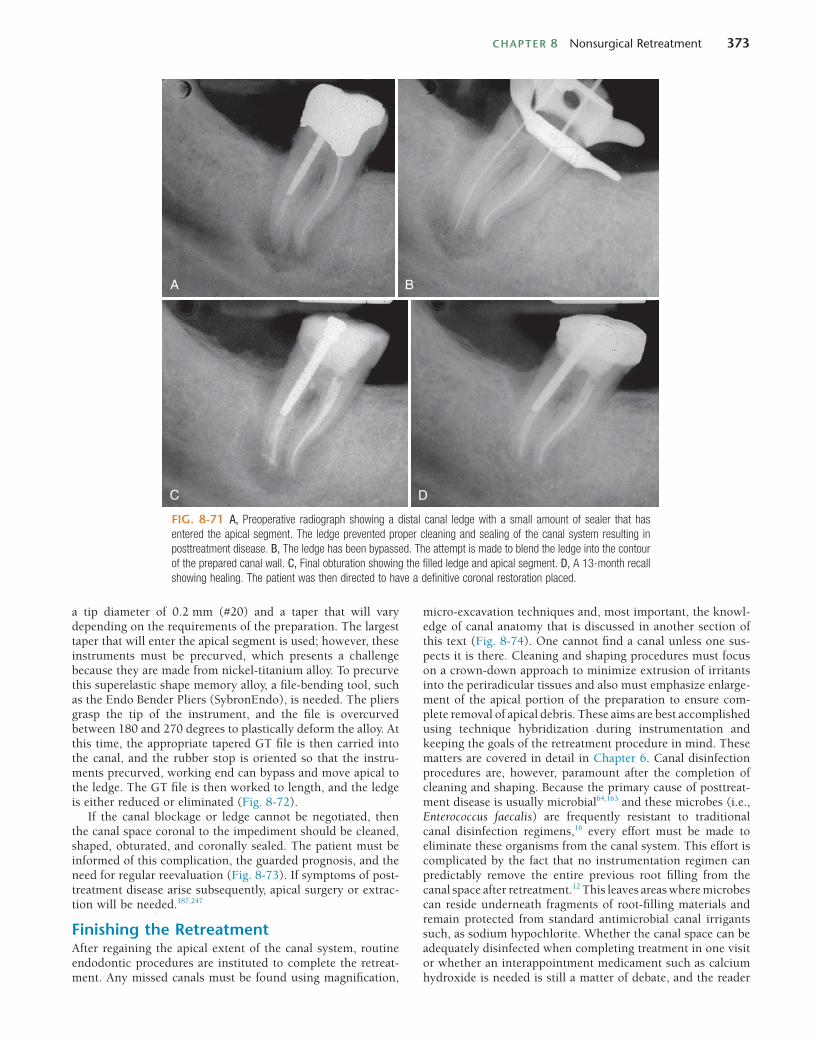
CHAPTER 8 Nonsurgical Retreatment 373
FIG. 8-71 A, Preoperative radiograph showing a distal canal ledge with a small amount of sealer that has entered the apical segment. The ledge prevented proper cleaning and sealing of the canal system resulting in posttreatment disease. B, The ledge has been bypassed. The attempt is made to blend the ledge into the contour of the prepared canal wall. C, Final obturation showing the filled ledge and apical segment. D, A 13-month recall showing healing. The patient was then directed to have a definitive coronal restoration placed.
A B
C D
a tip diameter of 0.2 mm (#20) and a taper that will vary depending on the requirements of the preparation. The largest taper that will enter the apical segment is used; however, these instruments must be precurved, which presents a challenge because they are made from nickel-titanium alloy. To precurve this superelastic shape memory alloy, a file-bending tool, such as the Endo Bender Pliers (SybronEndo), is needed. The pliers grasp the tip of the instrument, and the file is overcurved between 180 and 270 degrees to plastically deform the alloy. At this time, the appropriate tapered GT file is then carried into the canal, and the rubber stop is oriented so that the instru-ments precurved, working end can bypass and move apical to the ledge. The GT file is then worked to length, and the ledge is either reduced or eliminated (Fig. 8-72).
If the canal blockage or ledge cannot be negotiated, then the canal space coronal to the impediment should be cleaned, shaped, obturated, and coronally sealed. The patient must be informed of this complication, the guarded prognosis, and the need for regular reevaluation (Fig. 8-73). If symptoms of post-treatment disease arise subsequently, apical surgery or extrac-tion will be needed.187,247
Finishing the RetreatmentAfter regaining the apical extent of the canal system, routine endodontic procedures are instituted to complete the retreat-ment. Any missed canals must be found using magnification,
micro-excavation techniques and, most important, the knowl-edge of canal anatomy that is discussed in another section of this text (Fig. 8-74). One cannot find a canal unless one sus-pects it is there. Cleaning and shaping procedures must focus on a crown-down approach to minimize extrusion of irritants into the periradicular tissues and also must emphasize enlarge-ment of the apical portion of the preparation to ensure com-plete removal of apical debris. These aims are best accomplished using technique hybridization during instrumentation and keeping the goals of the retreatment procedure in mind. These matters are covered in detail in Chapter 6. Canal disinfection procedures are, however, paramount after the completion of cleaning and shaping. Because the primary cause of posttreat-ment disease is usually microbial64,163 and these microbes (i.e., Enterococcus faecalis) are frequently resistant to traditional canal disinfection regimens,16 every effort must be made to eliminate these organisms from the canal system. This effort is complicated by the fact that no instrumentation regimen can predictably remove the entire previous root filling from the canal space after retreatment.12 This leaves areas where microbes can reside underneath fragments of root-filling materials and remain protected from standard antimicrobial canal irrigants such, as sodium hypochlorite. Whether the canal space can be adequately disinfected when completing treatment in one visit or whether an interappointment medicament such as calcium hydroxide is needed is still a matter of debate, and the reader
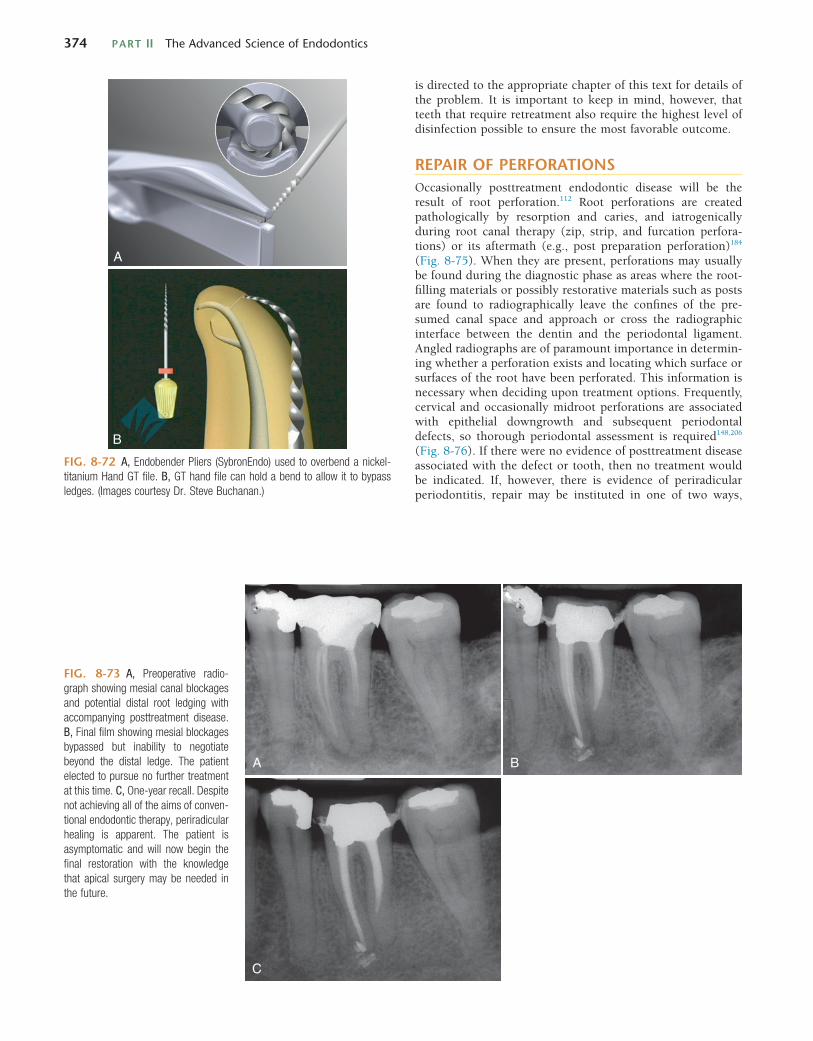
374 PART II The Advanced Science of Endodontics
is directed to the appropriate chapter of this text for details of the problem. It is important to keep in mind, however, that teeth that require retreatment also require the highest level of disinfection possible to ensure the most favorable outcome.
REPAIR OF PERFORATIONSOccasionally posttreatment endodontic disease will be the result of root perforation.112 Root perforations are created pathologically by resorption and caries, and iatrogenically during root canal therapy (zip, strip, and furcation perfora-tions) or its aftermath (e.g., post preparation perforation)184 (Fig. 8-75). When they are present, perforations may usually be found during the diagnostic phase as areas where the root-filling materials or possibly restorative materials such as posts are found to radiographically leave the confines of the pre-sumed canal space and approach or cross the radiographic interface between the dentin and the periodontal ligament. Angled radiographs are of paramount importance in determin-ing whether a perforation exists and locating which surface or surfaces of the root have been perforated. This information is necessary when deciding upon treatment options. Frequently, cervical and occasionally midroot perforations are associated with epithelial downgrowth and subsequent periodontal defects, so thorough periodontal assessment is required148,206 (Fig. 8-76). If there were no evidence of posttreatment disease associated with the defect or tooth, then no treatment would be indicated. If, however, there is evidence of periradicular periodontitis, repair may be instituted in one of two ways,
FIG. 8-72 A, Endobender Pliers (SybronEndo) used to overbend a nickel-titanium Hand GT file. B, GT hand file can hold a bend to allow it to bypass ledges. (Images courtesy Dr. Steve Buchanan.)
A
B
FIG. 8-73 A, Preoperative radio-graph showing mesial canal blockages and potential distal root ledging with accompanying posttreatment disease. B, Final film showing mesial blockages bypassed but inability to negotiate beyond the distal ledge. The patient elected to pursue no further treatment at this time. C, One-year recall. Despite not achieving all of the aims of conven-tional endodontic therapy, periradicular healing is apparent. The patient is asymptomatic and will now begin the final restoration with the knowledge that apical surgery may be needed in the future.
A
C
B
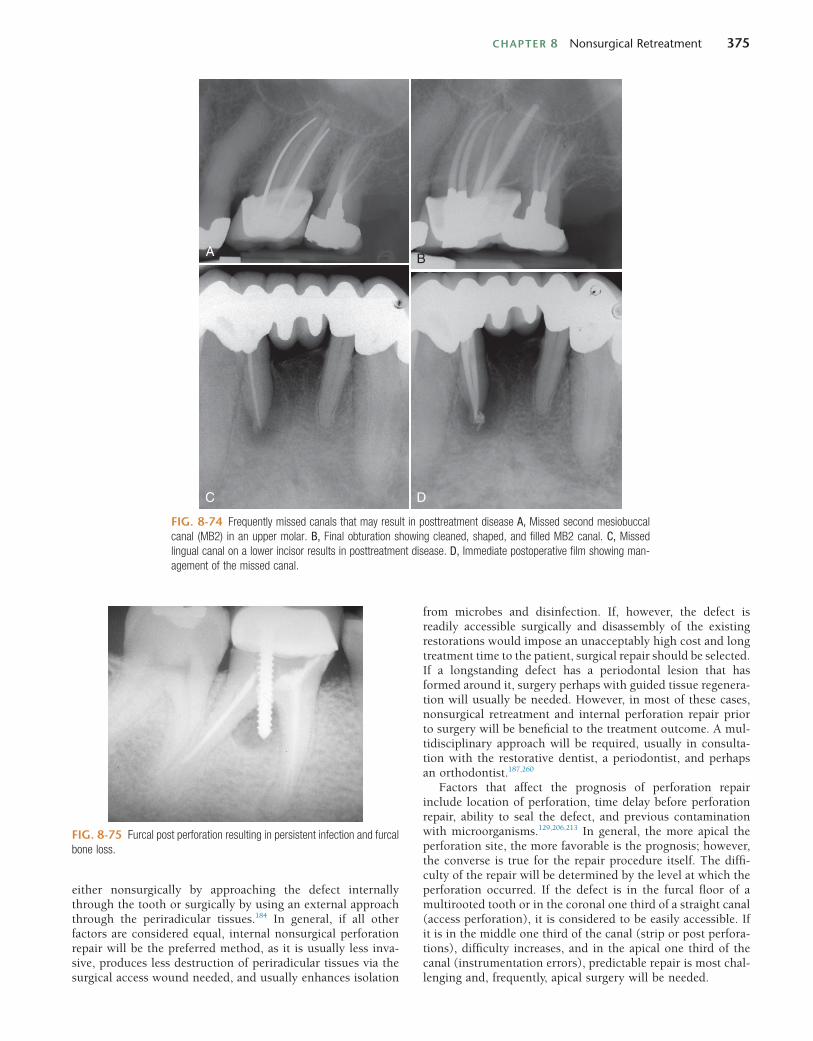
CHAPTER 8 Nonsurgical Retreatment 375
from microbes and disinfection. If, however, the defect is readily accessible surgically and disassembly of the existing restorations would impose an unacceptably high cost and long treatment time to the patient, surgical repair should be selected. If a longstanding defect has a periodontal lesion that has formed around it, surgery perhaps with guided tissue regenera-tion will usually be needed. However, in most of these cases, nonsurgical retreatment and internal perforation repair prior to surgery will be beneficial to the treatment outcome. A mul-tidisciplinary approach will be required, usually in consulta-tion with the restorative dentist, a periodontist, and perhaps an orthodontist.187,260
Factors that affect the prognosis of perforation repair include location of perforation, time delay before perforation repair, ability to seal the defect, and previous contamination with microorganisms.129,206,213 In general, the more apical the perforation site, the more favorable is the prognosis; however, the converse is true for the repair procedure itself. The diffi-culty of the repair will be determined by the level at which the perforation occurred. If the defect is in the furcal floor of a multirooted tooth or in the coronal one third of a straight canal (access perforation), it is considered to be easily accessible. If it is in the middle one third of the canal (strip or post perfora-tions), difficulty increases, and in the apical one third of the canal (instrumentation errors), predictable repair is most chal-lenging and, frequently, apical surgery will be needed.
FIG. 8-74 Frequently missed canals that may result in posttreatment disease A, Missed second mesiobuccal canal (MB2) in an upper molar. B, Final obturation showing cleaned, shaped, and filled MB2 canal. C, Missed lingual canal on a lower incisor results in posttreatment disease. D, Immediate postoperative film showing man-agement of the missed canal.
A B
C D
FIG. 8-75 Furcal post perforation resulting in persistent infection and furcal bone loss.
either nonsurgically by approaching the defect internally through the tooth or surgically by using an external approach through the periradicular tissues.184 In general, if all other factors are considered equal, internal nonsurgical perforation repair will be the preferred method, as it is usually less inva-sive, produces less destruction of periradicular tissues via the surgical access wound needed, and usually enhances isolation
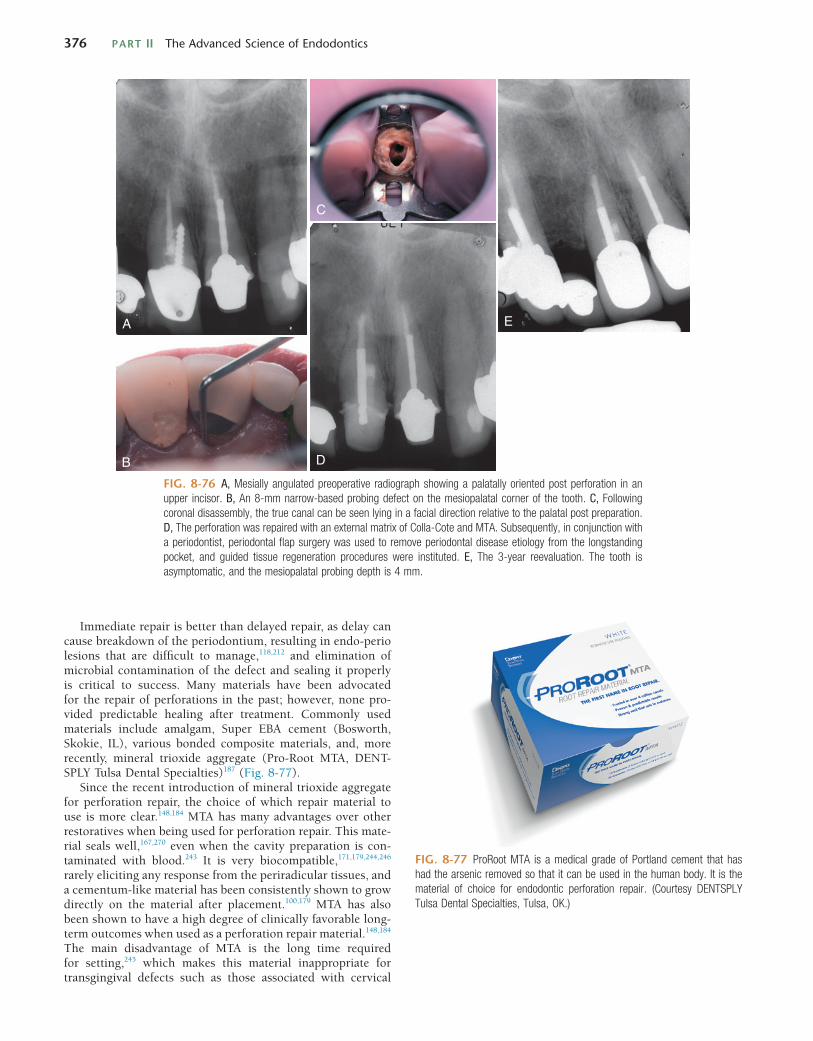
376 PART II The Advanced Science of Endodontics
FIG. 8-76 A, Mesially angulated preoperative radiograph showing a palatally oriented post perforation in an upper incisor. B, An 8-mm narrow-based probing defect on the mesiopalatal corner of the tooth. C, Following coronal disassembly, the true canal can be seen lying in a facial direction relative to the palatal post preparation. D, The perforation was repaired with an external matrix of Colla-Cote and MTA. Subsequently, in conjunction with a periodontist, periodontal flap surgery was used to remove periodontal disease etiology from the longstanding pocket, and guided tissue regeneration procedures were instituted. E, The 3-year reevaluation. The tooth is asymptomatic, and the mesiopalatal probing depth is 4 mm.
A
B
C
D
E
FIG. 8-77 ProRoot MTA is a medical grade of Portland cement that has had the arsenic removed so that it can be used in the human body. It is the material of choice for endodontic perforation repair. (Courtesy DENTSPLY Tulsa Dental Specialties, Tulsa, OK.)
Immediate repair is better than delayed repair, as delay can cause breakdown of the periodontium, resulting in endo-perio lesions that are difficult to manage,118,212 and elimination of microbial contamination of the defect and sealing it properly is critical to success. Many materials have been advocated for the repair of perforations in the past; however, none pro-vided predictable healing after treatment. Commonly used materials include amalgam, Super EBA cement (Bosworth, Skokie, IL), various bonded composite materials, and, more recently, mineral trioxide aggregate (Pro-Root MTA, DENT-SPLY Tulsa Dental Specialties)187 (Fig. 8-77).
Since the recent introduction of mineral trioxide aggregate for perforation repair, the choice of which repair material to use is more clear.148,184 MTA has many advantages over other restoratives when being used for perforation repair. This mate-rial seals well,167,270 even when the cavity preparation is con-taminated with blood.243 It is very biocompatible,171,179,244,246 rarely eliciting any response from the periradicular tissues, and a cementum-like material has been consistently shown to grow directly on the material after placement.100,179 MTA has also been shown to have a high degree of clinically favorable long-term outcomes when used as a perforation repair material.148,184 The main disadvantage of MTA is the long time required for setting,245 which makes this material inappropriate for transgingival defects such as those associated with cervical
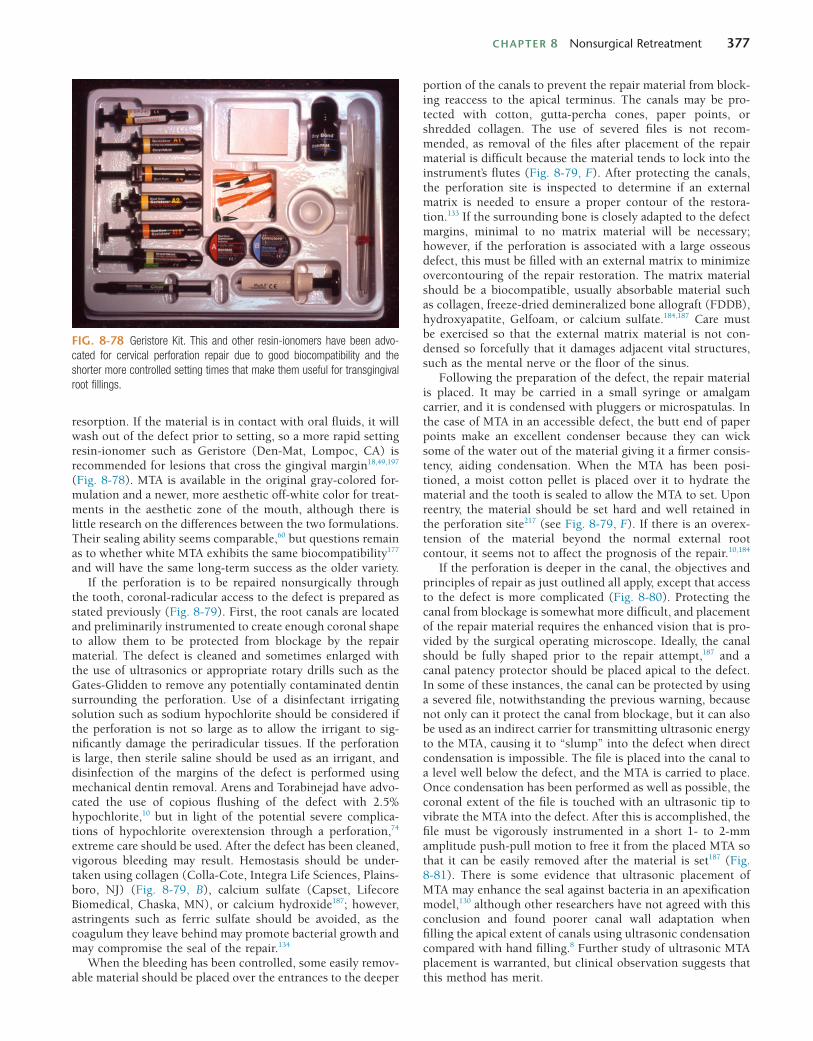
CHAPTER 8 Nonsurgical Retreatment 377
FIG. 8-78 Geristore Kit. This and other resin-ionomers have been advo-cated for cervical perforation repair due to good biocompatibility and the shorter more controlled setting times that make them useful for transgingival root fillings.
resorption. If the material is in contact with oral fluids, it will wash out of the defect prior to setting, so a more rapid setting resin-ionomer such as Geristore (Den-Mat, Lompoc, CA) is recommended for lesions that cross the gingival margin18,49,197 (Fig. 8-78). MTA is available in the original gray-colored for-mulation and a newer, more aesthetic off-white color for treat-ments in the aesthetic zone of the mouth, although there is little research on the differences between the two formulations. Their sealing ability seems comparable,60 but questions remain as to whether white MTA exhibits the same biocompatibility177 and will have the same long-term success as the older variety.
If the perforation is to be repaired nonsurgically through the tooth, coronal-radicular access to the defect is prepared as stated previously (Fig. 8-79). First, the root canals are located and preliminarily instrumented to create enough coronal shape to allow them to be protected from blockage by the repair material. The defect is cleaned and sometimes enlarged with the use of ultrasonics or appropriate rotary drills such as the Gates-Glidden to remove any potentially contaminated dentin surrounding the perforation. Use of a disinfectant irrigating solution such as sodium hypochlorite should be considered if the perforation is not so large as to allow the irrigant to sig-nificantly damage the periradicular tissues. If the perforation is large, then sterile saline should be used as an irrigant, and disinfection of the margins of the defect is performed using mechanical dentin removal. Arens and Torabinejad have advo-cated the use of copious flushing of the defect with 2.5% hypochlorite,10 but in light of the potential severe complica-tions of hypochlorite overextension through a perforation,74 extreme care should be used. After the defect has been cleaned, vigorous bleeding may result. Hemostasis should be under-taken using collagen (Colla-Cote, Integra Life Sciences, Plains-boro, NJ) (Fig. 8-79, B), calcium sulfate (Capset, Lifecore Biomedical, Chaska, MN), or calcium hydroxide187; however, astringents such as ferric sulfate should be avoided, as the coagulum they leave behind may promote bacterial growth and may compromise the seal of the repair.134
When the bleeding has been controlled, some easily remov-able material should be placed over the entrances to the deeper
portion of the canals to prevent the repair material from block-ing reaccess to the apical terminus. The canals may be pro-tected with cotton, gutta-percha cones, paper points, or shredded collagen. The use of severed files is not recom-mended, as removal of the files after placement of the repair material is difficult because the material tends to lock into the instrument’s flutes (Fig. 8-79, F). After protecting the canals, the perforation site is inspected to determine if an external matrix is needed to ensure a proper contour of the restora-tion.133 If the surrounding bone is closely adapted to the defect margins, minimal to no matrix material will be necessary; however, if the perforation is associated with a large osseous defect, this must be filled with an external matrix to minimize overcontouring of the repair restoration. The matrix material should be a biocompatible, usually absorbable material such as collagen, freeze-dried demineralized bone allograft (FDDB), hydroxyapatite, Gelfoam, or calcium sulfate.184,187 Care must be exercised so that the external matrix material is not con-densed so forcefully that it damages adjacent vital structures, such as the mental nerve or the floor of the sinus.
Following the preparation of the defect, the repair material is placed. It may be carried in a small syringe or amalgam carrier, and it is condensed with pluggers or microspatulas. In the case of MTA in an accessible defect, the butt end of paper points make an excellent condenser because they can wick some of the water out of the material giving it a firmer consis-tency, aiding condensation. When the MTA has been posi-tioned, a moist cotton pellet is placed over it to hydrate the material and the tooth is sealed to allow the MTA to set. Upon reentry, the material should be set hard and well retained in the perforation site217 (see Fig. 8-79, F). If there is an overex-tension of the material beyond the normal external root contour, it seems not to affect the prognosis of the repair.10,184
If the perforation is deeper in the canal, the objectives and principles of repair as just outlined all apply, except that access to the defect is more complicated (Fig. 8-80). Protecting the canal from blockage is somewhat more difficult, and placement of the repair material requires the enhanced vision that is pro-vided by the surgical operating microscope. Ideally, the canal should be fully shaped prior to the repair attempt,187 and a canal patency protector should be placed apical to the defect. In some of these instances, the canal can be protected by using a severed file, notwithstanding the previous warning, because not only can it protect the canal from blockage, but it can also be used as an indirect carrier for transmitting ultrasonic energy to the MTA, causing it to “slump” into the defect when direct condensation is impossible. The file is placed into the canal to a level well below the defect, and the MTA is carried to place. Once condensation has been performed as well as possible, the coronal extent of the file is touched with an ultrasonic tip to vibrate the MTA into the defect. After this is accomplished, the file must be vigorously instrumented in a short 1- to 2-mm amplitude push-pull motion to free it from the placed MTA so that it can be easily removed after the material is set187 (Fig. 8-81). There is some evidence that ultrasonic placement of MTA may enhance the seal against bacteria in an apexification model,130 although other researchers have not agreed with this conclusion and found poorer canal wall adaptation when filling the apical extent of canals using ultrasonic condensation compared with hand filling.8 Further study of ultrasonic MTA placement is warranted, but clinical observation suggests that this method has merit.
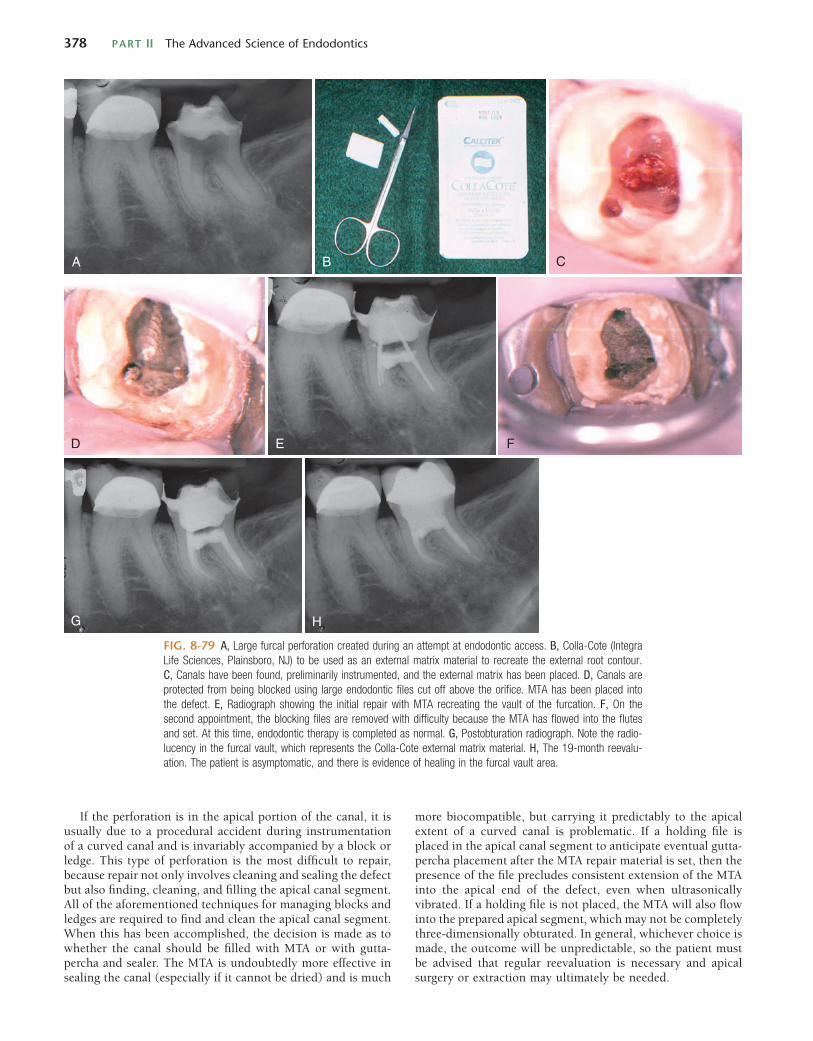
378 PART II The Advanced Science of Endodontics
FIG. 8-79 A, Large furcal perforation created during an attempt at endodontic access. B, Colla-Cote (Integra Life Sciences, Plainsboro, NJ) to be used as an external matrix material to recreate the external root contour. C, Canals have been found, preliminarily instrumented, and the external matrix has been placed. D, Canals are protected from being blocked using large endodontic files cut off above the orifice. MTA has been placed into the defect. E, Radiograph showing the initial repair with MTA recreating the vault of the furcation. F, On the second appointment, the blocking files are removed with difficulty because the MTA has flowed into the flutes and set. At this time, endodontic therapy is completed as normal. G, Postobturation radiograph. Note the radio-lucency in the furcal vault, which represents the Colla-Cote external matrix material. H, The 19-month reevalu-ation. The patient is asymptomatic, and there is evidence of healing in the furcal vault area.
A B C
D E
G H
F
If the perforation is in the apical portion of the canal, it is usually due to a procedural accident during instrumentation of a curved canal and is invariably accompanied by a block or ledge. This type of perforation is the most difficult to repair, because repair not only involves cleaning and sealing the defect but also finding, cleaning, and filling the apical canal segment. All of the aforementioned techniques for managing blocks and ledges are required to find and clean the apical canal segment. When this has been accomplished, the decision is made as to whether the canal should be filled with MTA or with gutta-percha and sealer. The MTA is undoubtedly more effective in sealing the canal (especially if it cannot be dried) and is much
more biocompatible, but carrying it predictably to the apical extent of a curved canal is problematic. If a holding file is placed in the apical canal segment to anticipate eventual gutta-percha placement after the MTA repair material is set, then the presence of the file precludes consistent extension of the MTA into the apical end of the defect, even when ultrasonically vibrated. If a holding file is not placed, the MTA will also flow into the prepared apical segment, which may not be completely three-dimensionally obturated. In general, whichever choice is made, the outcome will be unpredictable, so the patient must be advised that regular reevaluation is necessary and apical surgery or extraction may ultimately be needed.
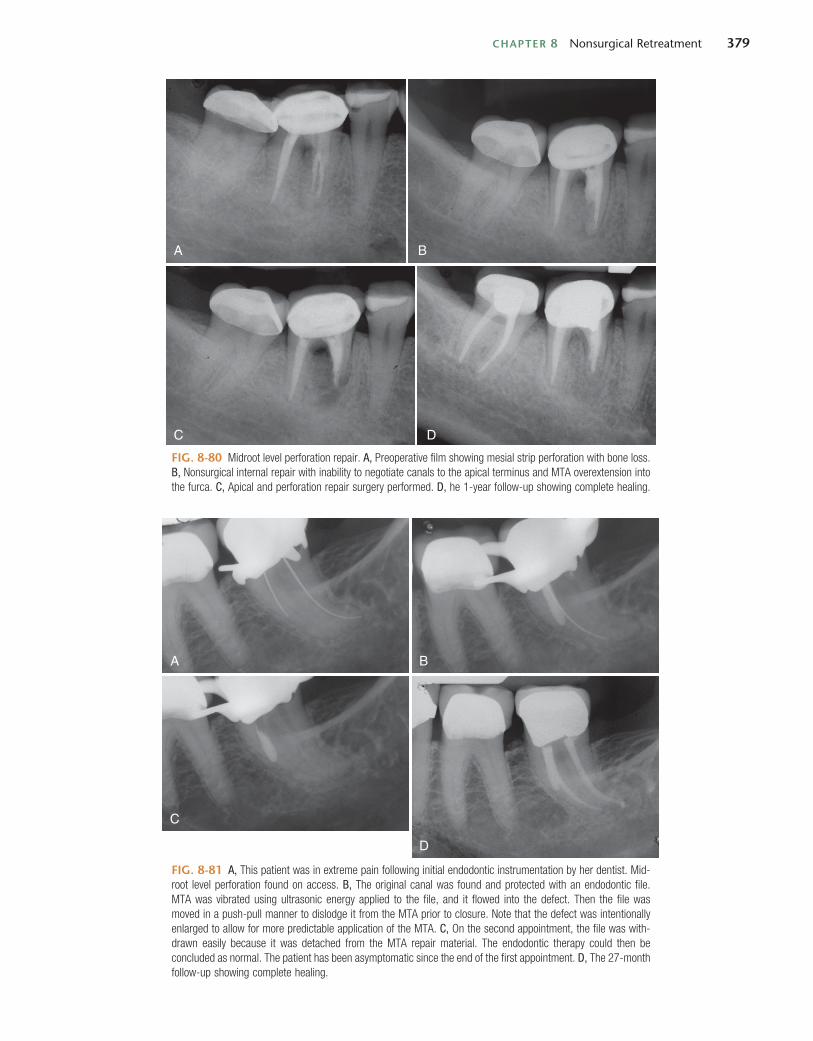
CHAPTER 8 Nonsurgical Retreatment 379
FIG. 8-80 Midroot level perforation repair. A, Preoperative film showing mesial strip perforation with bone loss. B, Nonsurgical internal repair with inability to negotiate canals to the apical terminus and MTA overextension into the furca. C, Apical and perforation repair surgery performed. D, he 1-year follow-up showing complete healing.
A
C
B
D
FIG. 8-81 A, This patient was in extreme pain following initial endodontic instrumentation by her dentist. Mid-root level perforation found on access. B, The original canal was found and protected with an endodontic file. MTA was vibrated using ultrasonic energy applied to the file, and it flowed into the defect. Then the file was moved in a push-pull manner to dislodge it from the MTA prior to closure. Note that the defect was intentionally enlarged to allow for more predictable application of the MTA. C, On the second appointment, the file was with-drawn easily because it was detached from the MTA repair material. The endodontic therapy could then be concluded as normal. The patient has been asymptomatic since the end of the first appointment. D, The 27-month follow-up showing complete healing.
A B
C
D
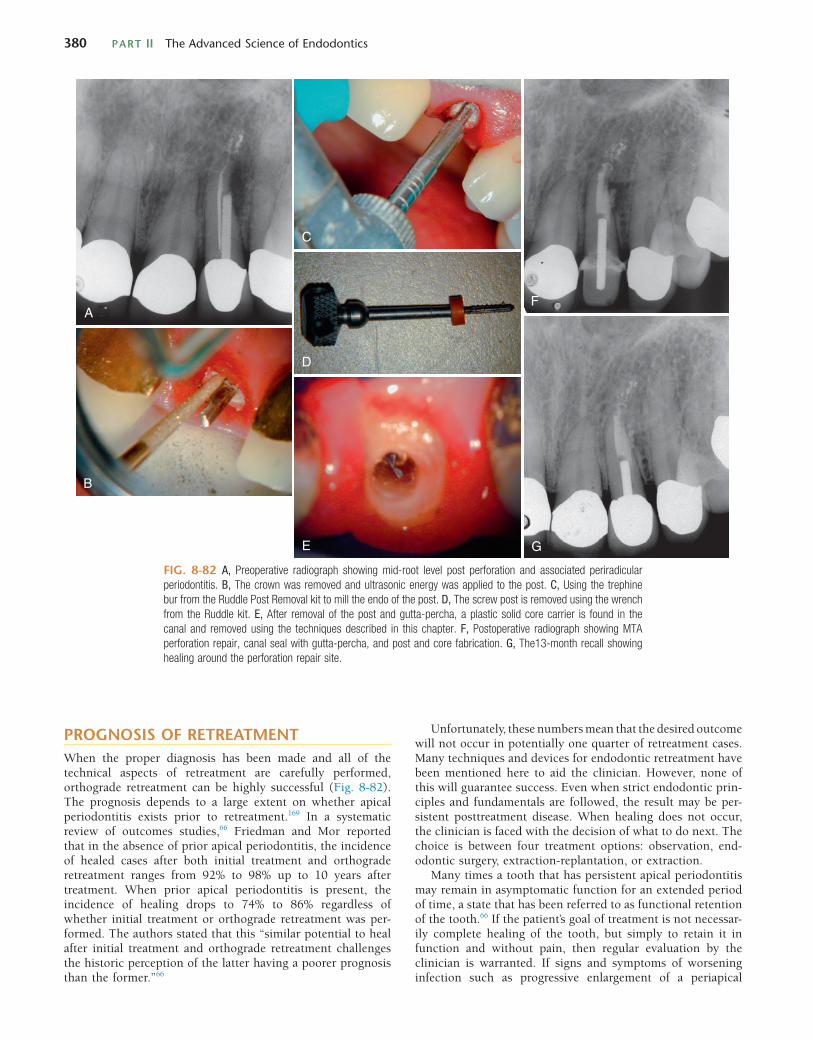
380 PART II The Advanced Science of Endodontics
FIG. 8-82 A, Preoperative radiograph showing mid-root level post perforation and associated periradicular periodontitis. B, The crown was removed and ultrasonic energy was applied to the post. C, Using the trephine bur from the Ruddle Post Removal kit to mill the endo of the post. D, The screw post is removed using the wrench from the Ruddle kit. E, After removal of the post and gutta-percha, a plastic solid core carrier is found in the canal and removed using the techniques described in this chapter. F, Postoperative radiograph showing MTA perforation repair, canal seal with gutta-percha, and post and core fabrication. G, The13-month recall showing healing around the perforation repair site.
A
B
C
D
E
F
G
PROGNOSIS OF RETREATMENTWhen the proper diagnosis has been made and all of the technical aspects of retreatment are carefully performed, orthograde retreatment can be highly successful (Fig. 8-82). The prognosis depends to a large extent on whether apical periodontitis exists prior to retreatment.169 In a systematic review of outcomes studies,66 Friedman and Mor reported that in the absence of prior apical periodontitis, the incidence of healed cases after both initial treatment and orthograde retreatment ranges from 92% to 98% up to 10 years after treatment. When prior apical periodontitis is present, the incidence of healing drops to 74% to 86% regardless of whether initial treatment or orthograde retreatment was per-formed. The authors stated that this “similar potential to heal after initial treatment and orthograde retreatment challenges the historic perception of the latter having a poorer prognosis than the former.”66
Unfortunately, these numbers mean that the desired outcome will not occur in potentially one quarter of retreatment cases. Many techniques and devices for endodontic retreatment have been mentioned here to aid the clinician. However, none of this will guarantee success. Even when strict endodontic prin-ciples and fundamentals are followed, the result may be per-sistent posttreatment disease. When healing does not occur, the clinician is faced with the decision of what to do next. The choice is between four treatment options: observation, end-odontic surgery, extraction-replantation, or extraction.
Many times a tooth that has persistent apical periodontitis may remain in asymptomatic function for an extended period of time, a state that has been referred to as functional retention of the tooth.66 If the patient’s goal of treatment is not necessar-ily complete healing of the tooth, but simply to retain it in function and without pain, then regular evaluation by the clinician is warranted. If signs and symptoms of worsening infection such as progressive enlargement of a periapical
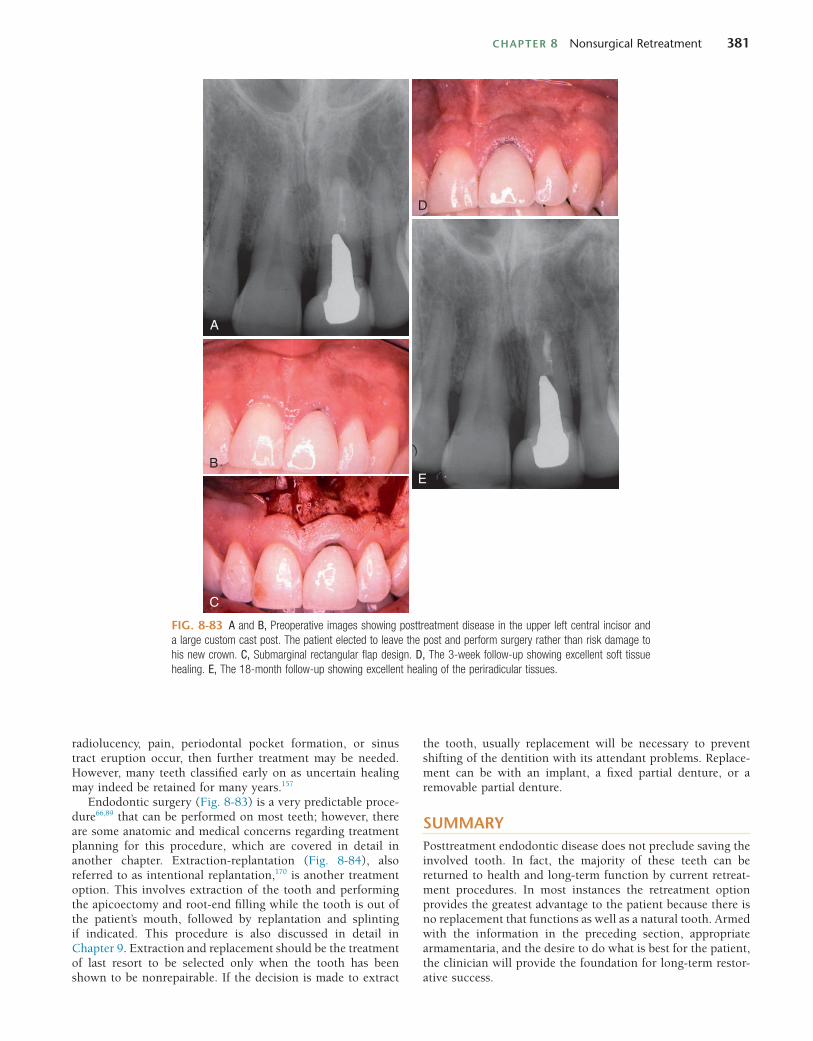
CHAPTER 8 Nonsurgical Retreatment 381
the tooth, usually replacement will be necessary to prevent shifting of the dentition with its attendant problems. Replace-ment can be with an implant, a fixed partial denture, or a removable partial denture.
SUMMARYPosttreatment endodontic disease does not preclude saving the involved tooth. In fact, the majority of these teeth can be returned to health and long-term function by current retreat-ment procedures. In most instances the retreatment option provides the greatest advantage to the patient because there is no replacement that functions as well as a natural tooth. Armed with the information in the preceding section, appropriate armamentaria, and the desire to do what is best for the patient, the clinician will provide the foundation for long-term restor-ative success.
radiolucency, pain, periodontal pocket formation, or sinus tract eruption occur, then further treatment may be needed. However, many teeth classified early on as uncertain healing may indeed be retained for many years.157
Endodontic surgery (Fig. 8-83) is a very predictable proce-dure66,89 that can be performed on most teeth; however, there are some anatomic and medical concerns regarding treatment planning for this procedure, which are covered in detail in another chapter. Extraction-replantation (Fig. 8-84), also referred to as intentional replantation,170 is another treatment option. This involves extraction of the tooth and performing the apicoectomy and root-end filling while the tooth is out of the patient’s mouth, followed by replantation and splinting if indicated. This procedure is also discussed in detail in Chapter 9. Extraction and replacement should be the treatment of last resort to be selected only when the tooth has been shown to be nonrepairable. If the decision is made to extract
FIG. 8-83 A and B, Preoperative images showing posttreatment disease in the upper left central incisor and a large custom cast post. The patient elected to leave the post and perform surgery rather than risk damage to his new crown. C, Submarginal rectangular flap design. D, The 3-week follow-up showing excellent soft tissue healing. E, The 18-month follow-up showing excellent healing of the periradicular tissues.
A
D
EB
C
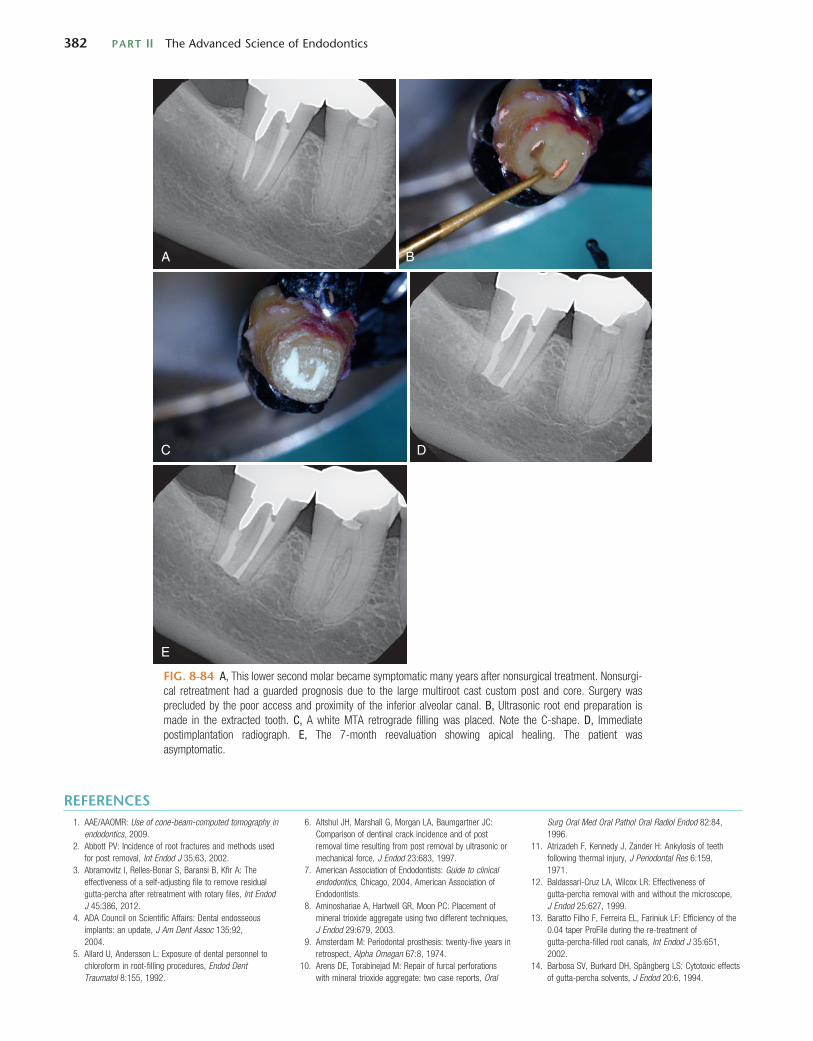
382 PART II The Advanced Science of Endodontics
FIG. 8-84 A, This lower second molar became symptomatic many years after nonsurgical treatment. Nonsurgi-cal retreatment had a guarded prognosis due to the large multiroot cast custom post and core. Surgery was precluded by the poor access and proximity of the inferior alveolar canal. B, Ultrasonic root end preparation is made in the extracted tooth. C, A white MTA retrograde filling was placed. Note the C-shape. D, Immediate postimplantation radiograph. E, The 7-month reevaluation showing apical healing. The patient was asymptomatic.
A B
C
E
D
REFERENCES1. AAE/AAOMR: Use of cone-beam-computed tomography in
endodontics, 2009.2. Abbott PV: Incidence of root fractures and methods used
for post removal, Int Endod J 35:63, 2002.3. Abramovitz I, Relles-Bonar S, Baransi B, Kfir A: The
effectiveness of a self-adjusting file to remove residual gutta-percha after retreatment with rotary files, Int Endod J 45:386, 2012.
4. ADA Council on Scientific Affairs: Dental endosseous implants: an update, J Am Dent Assoc 135:92, 2004.
5. Allard U, Andersson L: Exposure of dental personnel to chloroform in root-filling procedures, Endod Dent Traumatol 8:155, 1992.
6. Altshul JH, Marshall G, Morgan LA, Baumgartner JC: Comparison of dentinal crack incidence and of post removal time resulting from post removal by ultrasonic or mechanical force, J Endod 23:683, 1997.
7. American Association of Endodontists: Guide to clinical endodontics, Chicago, 2004, American Association of Endodontists.
8. Aminoshariae A, Hartwell GR, Moon PC: Placement of mineral trioxide aggregate using two different techniques, J Endod 29:679, 2003.
9. Amsterdam M: Periodontal prosthesis: twenty-five years in retrospect, Alpha Omegan 67:8, 1974.
10. Arens DE, Torabinejad M: Repair of furcal perforations with mineral trioxide aggregate: two case reports, Oral
Surg Oral Med Oral Pathol Oral Radiol Endod 82:84, 1996.
11. Atrizadeh F, Kennedy J, Zander H: Ankylosis of teeth following thermal injury, J Periodontal Res 6:159, 1971.
12. Baldassari-Cruz LA, Wilcox LR: Effectiveness of gutta-percha removal with and without the microscope, J Endod 25:627, 1999.
13. Baratto Filho F, Ferreira EL, Fariniuk LF: Efficiency of the 0.04 taper ProFile during the re-treatment of gutta-percha-filled root canals, Int Endod J 35:651, 2002.
14. Barbosa SV, Burkard DH, Spångberg LS: Cytotoxic effects of gutta-percha solvents, J Endod 20:6, 1994.
CHAPTER 8 Nonsurgical Retreatment 383
15. Barrieshi-Nusair KM: Gutta-percha retreatment: effectiveness of nickel-titanium rotary instruments versus stainless steel hand files, J Endod 28:454, 2002.
16. Basrani B, Tjaderhane L, Santos JM, et al: Efficacy of chlorhexidine- and calcium hydroxide-containing medicaments against Enterocaucus faecalis in vitro, Oral Surg 96:618, 2003.
17. Beasley RT, Williamson AE, Justman BC, Qian F: Time required to remove GuttaCore, Thermafil Plus, and Thermoplasticized gutta-percha from moderately curved root canals with ProTaper files, J Endod 39:125, 2013.
18. Behnia A, Strassler HE, Campbell R: Repairing iatrogenic root perforations, J Am Dent Assoc 131:196, 2000.
19. Berbert A, Filho MT, Ueno AH, et al: The influence of ultrasound in removing intraradicular posts, Int Endod J 28:100, 1995.
20. Bergeron BE, Murchison DF, Schindler WG, Walker WA 3rd: Effect of ultrasonic vibration and various sealer and cement combinations on titanium post removal, J Endod 27:13, 2001.
21. Bertrand MF, Pellegrino JC, Rocca JP, et al: Removal of Thermafil root canal filling material, J Endod 23:54, 1997.
22. Betti LV, Bramante CM: Quantec SC rotary instruments versus hand files for gutta-percha removal in root canal retreatment, Int Endod J 34:514, 2001.
23. Bhaskar SN: Periapical lesion: types, incidence, and clinical features, Oral Surg 21:657, 1966.
24. Bhaskar SN, Rappaport HM: Histologic evaluation of endodontic procedures in dogs, Oral Surg Oral Med Oral Pathol 31:526, 1971.
25. Block RM, Lewis RD, Hirsch J, et al: Systemic distribution of N2 paste containing 14C paraformaldehyde following root canal therapy in dogs, Oral Surg Oral Med Oral Pathol 50:350, 1980.
26. Brady JM, del Rio CE: Corrosion of endodontic silver cones in humans: a scanning electron microscope and X-ray microprobe study, J Endod 1:205, 1975.
27. Bramante CM, Betti LV: Efficacy of Quantec rotary instruments for gutta-percha removal, Int Endod J 33:463, 2000.
28. Brodin P: Neurotoxic and analgesic effects of root canal cements and pulp-protecting dental materials, Endod Dent Traumatol 4:1, 1988.
29. Brown LJ, Nash KD, Johns BA, Warren M: The economics of endodontics, Chicago, 2003, American Association of Endodontists.
30. Budd JC, Gekelman D, White JM: Temperature rise of the post and on the root surface during ultrasonic post removal, Int Endod J 38:705, 2005.
31. Buhler H: Evaluation of root-resected teeth: results after 10 years, J Periodontol 59:805, 1988.
32. Buoncristiani J, Seto BG, Caputo AA: Evaluation of ultrasonic and sonic instruments for intraradicular post removal, J Endod 20:486, 1994.
33. Bystrom A, Claesson R, Sundqvist G: The antibacterial effect of camphorated paramonochlorophenol, camphorated phenol and calcium hydroxide in the treatment of infected root canals, Endod Dent Traumatol 1:170, 1985.
34. Castrisos T, Abbott PV: A survey of methods used for post removal in specialist endodontic practice, Int Endod J 35:172, 2002.
35. Castrisos TV, Palamara JE, Abbott PV: Measurement of strain on tooth roots during post removal with the Eggler post remover, Int Endod J 35:337, 2002.
36. Chenail BL, Teplitsky PE: Orthograde ultrasonic retrieval of root canal obstructions, J Endod 13:186, 1987.
37. Chugal NM, Clive JM, Spangberg LS: Endodontic infection: some biologic and treatment factors associated with outcome, Oral Surg Oral Med Oral Pathol Oral Radiol Endod 96:81, 2003.
38. Chutich MJ, Kaminski EJ, Miller DA, Lautenschlager EP: Risk assessment of the toxicity of solvents of gutta-percha used in endodontic retreatment, J Endod 24:213, 1998.
39. Cohen AS, Brown DC: Orofacial dental pain emergencies: endodontic diagnosis and management. In Cohen S, Burns RC, editors: Pathways of the pulp, ed 8, St. Louis, 2002, Mosby, p 31.
40. Cohen S, Liewehr F: Diagnostic procedures. In Cohen S, Burns RC, editors: Pathways of the pulp, ed 8, St. Louis, 2002, Mosby, p 3.
41. Cohen S, Schwartz S: Endodontic complications and the law, J Endod 13:191, 1987.
42. Cotton TP, Geisler TM, Holden DT, et al: Endodontic applications of cone-beam volumetric tomography, J Endod 33:1121, 2007.
43. Crump MC, Natkin E: Relationship of broken root canal instruments to endodontic case prognosis: a clinical investigation, J Am Dent Assoc 80:1341, 1970.
44. Cunha RS, De Martin AS, Barros PP, et al: In vitro evaluation of the cleansing working time and analysis of the amount of gutta-percha or Resilon remnants in the root canal walls after instrumentation for endodontic retreatment, J Endod 33:1426, 2007.
45. da Silveira PF, Vizzotto MB, Liedke GS, et al: Detection of vertical root fractures by conventional radiographic examination and cone beam computed tomography: an in vitro analysis, Dent Traumatol 29:41, 2013.
46. de Oliveira DP, Barbizam JV, Trope M, Teixeira FB: Comparison between gutta-percha and resilon removal using two different techniques in endodontic retreatment, J Endod 32:362, 2006.
47. de Rijk WG: Removal of fiber posts from endodontically treated teeth, Am J Dent 13:19B, 2000.
48. Dominici JT, Clark S, Scheetz J, Eleazer PD: Analysis of heat generation using ultrasonic vibration for post removal, J Endod 31:301, 2005.
49. Dragoo MR: Resin-ionomer and hybrid-ionomer cements: part II, human clinical and histologic wound healing responses in specific periodontal lesions, Int J Periodontics Restorative Dent 17:75, 1997.
50. Edlund M, Nair MK, Nair UP: Detection of vertical root fractures by using cone-beam computed tomography: a clinical study, J Endod 37:768, 2011.
51. Erdemir A, Eldeniz AU, Belli S: Effect g-percha solvents on mineral contents of human root dentin using ICP-AES technique, J Endod 30:54, 2004.
52. Erdemir A, Eldeniz AU, Belli S, Pashley DH: Effects of solvents on bonding to root canal dentin [abstract], J Dent Res (Spec Iss A) 81:241, 2002.
53. Eriksson AR, Albrektsson T: Temperature threshold levels for heat-induced bone tissue injury: a vital-microscopic study in the rabbit, J Prosthet Dent 50:101, 1983.
54. Estrela C, Bueno MR, De Alencar AH, et al: Method to evaluate inflammatory root resorption by using cone beam computed tomography, J Endod 35:1491, 2009.
55. Ettrich CA, Labossiere PE, Pitts DL, Johnson JD: An investigation of the heat induced during ultrasonic post removal, J Endod 33:1222, 2007.
56. Ezzie E, Fleury A, Solomon E, et al: Efficacy of retreatment techniques for a resin-based root canal obturation material, J Endod 32:341, 2006.
57. Farzaneh M, Abitbol S, Friedman S: Treatment outcome in endodontics: the Toronto study. Phases I and II: orthograde retreatment, J Endod 30:627, 2004.
58. Fava LR, Dummer PM: Periapical radiographic techniques during endodontic diagnosis and treatment, Int Endod J 30:250, 1997.
59. Ferreira JJ, Rhodes JS, Ford TR: The efficacy of gutta-percha removal using ProFiles, Int Endod J 34:267, 2001.
60. Ferris DM, Baumgartner JC: Perforation repair comparing two types of mineral trioxide aggregate, J Endod 30:422, 2004.
61. Fors UG, Berg JO: Endodontic treatment of root canals obstructed by foreign objects, Int Endod J 19:2, 1986.
62. Frajlich SR, Goldberg F, Massone EJ, et al: Comparative study of retreatment of Thermafil and lateral condensation endodontic fillings, Int Endod J 31:354, 1998.
63. Friedman S: Treatment outcome and prognosis of endodontic therapy. In Orstavik D, Pitt-Ford TR, editors: Essential endodontology: prevention and treatment of apical periodontitis, London, 1998, Blackwell Science, p 367.
64. Friedman S: Orthograde retreatment. In Walton RE, Torabinejad M, editors: Principles and practice of endodontics, ed 3, Philadelphia, 2002, Saunders, p 345.
65. Friedman S, Abitbol S, Lawrence HP: Treatment outcome in endodontics: the Toronto study. Phase 1: Initial treatment, J Endod 29:787, 2003.
66. Friedman S, Mor C: The success of endodontic therapy: healing and functionality, Calif Dent Assoc J 32:493, 2004.
67. Friedman S, Moshonov J, Trope M: Efficacy of removing glass ionomer cement, zinc oxide eugenol, and epoxy resin sealers from retreated root canals, Oral Surg Oral Med Oral Pathol 73:609, 1992.
68. Friedman S, Stabholz A: Endodontic retreatment—case selection and technique. Part 1: criteria for case selection, J Endod 12:28, 1986.
69. Friedman S, Stabholz A, Tamse A: Endodontic retreatment—case selection and technique. 3. Retreatment techniques, J Endod 16:543, 1990.
70. Fristad I, Molven O, Halse A: Nonsurgically retreated root-filled teeth: radiographic findings after 20-27 years, Int Endod J 37:12, 2004.
71. Fukushima H, Yamamoto K, Hirohata K, et al: Localization and identification of root canal bacteria in clinically asymptomatic periapical pathosis, J Endod 16:534, 1990.
72. Gambrel MG, Hartwell GR, Moon PC, Cardon JW: The effect of endodontic solutions on resorcinol-formalin paste in teeth, J Endod 31:25, 2005.
73. Garrido ADB, Fonseca TS, Alfredo E, et al: Influence of ultrasound, with and without water spray cooling, on removal of posts cemented with resin or zinc phosphate cements, J Endod 30:173, 2004.
74. Gernhardt CR, Eppendorf K, Kozlowski A, Brandt M: Toxicity of concentrated sodium hypochlorite used as an endodontic irrigant, Int Endod J 37:272, 2004.
75. Gesi A, Magnolfi S, Goracci C, Ferrari M: Comparison of two techniques for removing fiber posts, J Endod 29:580, 2003.
76. Gettleman BH, Spriggs KA, ElDeeb ME, Messer HH: Removal of canal obstructions with the Endo Extractor, J Endod 17:608, 1991.
77. Giuliani V, Cocchetti R, Pagavino G: Efficacy of ProTaper universal retreatment files in removing filling materials during root canal retreatment, J Endod 34:1381, 2008.
78. Glick DH, Frank AL: Removal of silver points and fractured posts by ultrasonics, J Pros Dent 55:212, 1986.
79. Glickman GN, Dumsha TC: Problems in canal cleaning and shaping. In Gutmann JL, Dumsha TC, Lovdahl PE, Hovland EJ, editors: Problem solving in endodontics: prevention, identification, and management, ed 3, St. Louis, 1997, Mosby, p 91.
80. Glickman GN, Pileggi R: Preparation for treatment. In Cohen S, Burns RC, editors: Pathways of the pulp, ed 8, St. Louis, 2002, Mosby, p 103.
81. Gluskin AH, Peters CI, Wong RDM, Ruddle CJ: Retreatment of non-healing endodontic therapy and management of mishaps. In Ingle JI, Bakland LK, Baumgartner JC, editors: Endodontics, ed 6, Hamilton, 2008, BC Decker, p 1088.
82. Gluskin AH, Ruddle CJ, Zinman EJ: Thermal injury through intraradicular heat transfer using ultrasonic devices: precautions and practical preventive strategies, J Am Dent Assoc 136:1286, 2005.
83. Goldberg RA, Kuttler S, Dorn SO: The properties of Endocal 10 and its potential impact on the structural integrity of the root, J Endod 30:159, 2004.
84. Gomes AP, Kubo CH, Santos RA, et al: The influence of ultrasound on the retention of cast posts cemented with different agents, Int Endod J 34:93, 2001.
85. Goodacre CJ, Bernal G, Rungcharassaeng K, Kan JY: Clinical complications with implants and implant prostheses, J Prosthet Dent 90:121, 2003.
384 PART II The Advanced Science of Endodontics
86. Goodacre CJ, Kan JY, Rungcharassaeng K: Clinical complications of osseointegrated implants, J Prosthet Dent 81:537, 1999.
87. Gound TG, Marx D, Schwandt NA: Incidence of flare-ups and evaluation of quality after retreatment of resorcinol-formaldehyde resin (“Russian Red Cement”) endodontic therapy, J Endod 29:624, 2003.
88. Gutierrez JH, Villena F, Gigoux C, Mujica F: Microscope and scanning electron microscope examination of silver points corrosion caused by endodontic materials, J Endod 8:301, 1982.
89. Gutmann JL, Harrison JW: Surgical endodontics, ed 2, St. Louis, 1994, Ishiyaku EuroAmerica, p 468.
90. Gutmann JL, Lovdahl PE: Problems in the assessment of success and failure, quality assurance, and their integration into endodontic treatment planning. In Gutmann JL, Dumsha TC, Lovdahl PE, Hovland EJ, editors: Problem solving in endodontics. Prevention, identification, and management, ed 3, St. Louis, 1997, Mosby, p 1.
91. Gutmann JL, Witherspoon DE: Obturation of the cleaned and shaped root canal system. In Cohen S, Burns RC, editors: Pathways of the pulp, St. Louis, 2002, Mosby, p 293.
92. Hammad M, Qualtrough A, Silikas N: Three-dimensional evaluation of effectiveness of hand and rotary instrumentation for retreatment of canals filled with different materials, J Endod 34:1370, 2008.
93. Hansen MG: Relative efficiency of solvents used in endodontics, J Endod 24:38, 1998.
94. Haselton DR, Lloyd PM, Johnson WT: A comparison of the effects of two burs on endodontic access in all-ceramic high lucite crowns, Oral Surg Oral Med Oral Pathol Oral Radiol Endod 89:486, 2000.
95. Hashem AA: Ultrasonic vibration: temperature rise on external root surface during broken instrument removal, J Endod 33:1070, 2007.
96. Hassan B, Metska ME, Ozok AR, et al: Detection of vertical root fractures in endodontically treated teeth by a cone beam computed tomography scan, J Endod 35:719, 2009.
97. Hassanloo A, Watson P, Finer Y, Friedman S: Retreatment efficacy of the Epiphany soft resin obturation system, Int Endod J 40:633, 2007.
98. Hauman CHJ, Chandler NP, Purton DG: Factors influencing the removal of posts, Int Endod J 36:687, 2003.
99. Holland R, De Souza V, Nery MJ, et al: Tissue reactions following apical plugging of the root canal with infected dentin chips: a histologic study in dogs’ teeth, Oral Surg Oral Med Oral Pathol 49:366, 1980.
100. Holland R, Filho JA, de Souza V, et al: Mineral trioxide aggregate repair of lateral root perforations, J Endod 27:281, 2001.
101. Horan BB, Tordik PA, Imamura G, Goodell GG: Effect of dentin thickness on root surface temperature of teeth undergoing ultrasonic removal of posts, J Endod 34:453, 2008.
102. Hulsmann M: Removal of fractured instruments using a combined automated/ultrasonic technique, J Endod 20:144, 1994.
103. Hulsmann M, Bluhm V: Efficacy, cleaning ability and safety of different rotary NiTi instruments in root canal retreatment, Int Endod J 37:468, 2004.
104. Hulsmann M, Stotz S: Efficacy, cleaning ability and safety of different devices for gutta- percha removal in root canal retreatment, Int Endod J 30:227, 1997.
105. Hunter KR, Doblecki W, Pelleu GB Jr: Halothane and eucalyptol as alternatives to chloroform for softening gutta-percha, J Endod 17:310, 1991.
106. Huttula AS, Tordik PA, Imamura G, et al: The effect of ultrasonic post instrumentation on root surface temperature, J Endod 32:1085, 2006.
107. Ibarrola JL, Knowles KI, Ludlow MO: Retrievability of Thermafil plastic cores using organic solvents, J Endod 19:417, 1993.
108. Imura N, Kato AS, Hata GI, et al: A comparison of the relative efficacies of four hand and rotary instrumentation techniques during endodontic retreatment, Int Endod J 33:361, 2000.
109. Imura N, Zuolo ML, Ferreira MO, Novo NF: Effectiveness of the Canal Finder and hand instrumentation in removal of gutta-percha root fillings during root canal retreatment, Int Endod J 29:382, 1996.
110. Imura N, Zuolo ML, Kherlakian D: Comparison of endodontic retreatment of laterally condensed gutta-percha and Thermafil with plastic carriers, J Endod 19:609, 1993.
111. Ingle JI, Heithersay GS, Hartwell GR, et al: Endodontic diagnostic procedures. In Ingle JI, Bakland LK, editors: Endodontics, ed 5, Hamilton, 2002, BC Decker, p 203.
112. Ingle JI, Simon JH, Machtou P, Bogaerts P: Outcome of endodontic treatment and retreatment. In Ingle JI, Bakland LK, editors: Endodontics, ed 5, Hamilton, 2002, BC Decker, p 747.
113. Iqbal MK, Johansson AA, Akeel RF, et al: A retrospective analysis of factors associated with the periapical status of restored, endodontically treated teeth, Int J Prosthodont 16:31, 2003.
114. Iqbal MK, Kohli MR, Kim JS: A retrospective clinical study of incidence of root canal instrument separation in an endodontics graduate program: a PennEndo database study, J Endod 32:1048, 2006.
115. Iqbal MK, Rafailov H, Kratchman SI, Karabucak B: A comparison of three methods for preparing centered platforms around separated instruments in curved canals, J Endod 32:48, 2006.
116. Jafarzadeh H, Abbott PV: Ledge formation: review of a great challenge in endodontics, J Endod 33:1155, 2007.
117. Jeng HW, ElDeeb ME: Removal of hard paste fillings from the root canal by ultrasonic instrumentation [published erratum appears in J Endod 13:565, 1987], J Endod 13:295, 1987.
118. Jew RC, Weine FS, Keene JJ Jr, Smulson MH: A histologic evaluation of periodontal tissues adjacent to root perforations filled with Cavit, Oral Surg Oral Med Oral Pathol 54:124, 1982.
119. Johnson WT, Leary JM, Boyer DB: Effect of ultrasonic vibration on post removal in extracted human premolar teeth, J Endod 22:487, 1996.
120. Kaplowitz GJ: Using rectified turpentine oil in endodontic retreatment, J Endod 22:621, 1996.
121. Kaufman D, Mor C, Stabholz A, Rotstein I: Effect of gutta-percha solvents on calcium and phosphorus levels of cut human dentin, J Endod 23:614, 1997.
122. Khedmat S, Rouhi N, Drage N, et al: Evaluation of three imaging techniques for the detection of vertical root fractures in the absence and presence of gutta-percha root fillings, Int Endod J 45:1004, 2012.
123. Kim E, Lee SJ: Electronic apex locator, Dent Clin North Am 48:35, 2004.
124. Koch K: The microscope. Its effect on your practice, Dent Clin North Am 41:619, 1997.
125. Koppang HS, Koppang R, Solheim T, et al: Cellulose fibers from endodontic paper points as an etiological factor in postendodontic periapical granulomas and cysts, J Endod 15:369, 1989.
126. Krell KV, Neo J: The use of ultrasonic endodontic instrumentation in the re-treatment of a paste-filled endodontic tooth, Oral Surg Oral Med Oral Pathol 60:100, 1985.
127. Ladley RW, Campbell AD, Hicks ML, Li SH: Effectiveness of halothane used with ultrasonic or hand instrumentation to remove gutta-percha from the root canal, J Endod 17:221, 1991.
128. Langer B, Stein SD, Wagenberg B: An evaluation of root resections: a ten-year study, J Periodontol 52:719, 1981.
129. Lantz B, Persson PA: Periodontal tissue reactions after root perforations in dog’s teeth: a histologic study, Odontologisk Tidskrift 75:209, 1967.
130. Lawley GR, Schindler WG, Walker WA, Kolodrubetz D: Evaluation of ultrasonically placed MTA and fracture
resistance with intracanal composite resin in a model of apexification, J Endod 30:167, 2004.
131. Lazarski MP, Walker WA 3rd, Flores CM, et al: Epidemiological evaluation of the outcomes of nonsurgical root canal treatment in a large cohort of insured dental patients, J Endod 27:791, 2001.
132. Lee FS, Van Cura JE, BeGole E: A comparison of root surface temperatures using different obturation heat sources, J Endod 24:617, 1998.
133. Lemon RR: Nonsurgical repair of perforation defects: internal matrix concept, Dent Clin North Am 36:439, 1992.
134. Lemon RR, Steele PJ, Jeansonne BG: Ferric sulfate hemostasis: effect on osseous wound healing: left in situ for maximum exposure, J Endod 19:170, 1993.
135. Leonard JE, Gutmann JL, Guo IY: Apical and coronal seal of roots obturated with a dentine bonding agent and resin, Int Endod J 29:76, 1996.
136. Li H, Zhai F, Zhang R, Hou B: Evaluation of microsurgery with SuperEBA as root-end filling material for treating post-treatment endodontic disease: a 2-year retrospective study, J Endod 40:345, 2014.
137. Lin LM, Skribner JE, Gaengler P: Factors associated with endodontic treatment failures, J Endod 18:625, 1992.
138. Lindemann M, Yaman P, Dennison JB, Herrero AA: Comparison of the efficiency and effectiveness of various techniques for removal of fiber posts, J Endod 31:520, 2005.
139. Lipski M, Wozniak K: In vitro infrared thermographic assessment of root surface temperature rises during thermafil retreatment using system B, J Endod 29:413, 2003.
140. Lovdahl PE: Endodontic retreatment, Dent Clin North Am 36:473, 1992.
141. Lovdahl PE, Gutmann JL: Problems in nonsurgical root canal retreatment. In Gutmann JL, Dumsha TC, Lovdahl PE, Hovland EJ, editors: Problem solving in endodontics. Prevention, identification, and management, ed 3, St. Louis, 1997, Mosby, p 157.
142. Ludlow JB: Dose and risk in dental diagnostic imaging: with emphasis on dosimetry of CBCT, Kor J Oral and Maxillofac Rad 39:175, 2009.
143. Luks S: Gutta percha vs. silver points in the practice of endodontics, NY State Dent J 31:341, 1965.
144. Maalouf EM, Gutmann JL: Biological perspectives on the non-surgical endodontic management of periradicular pathosis, Int Endod J 27:154, 1994.
145. Machtou P, Sarfati P, Cohen AG: Post removal prior to retreatment, J Endod 15:552, 1989.
146. Madarati AA, Qualtrough AJ, Watts DC: Factors affecting temperature rise on the external root surface during ultrasonic retrieval of intracanal separated files, J Endod 34:1089, 2008.
147. Madison S, Swanson K, Chiles SA: An evaluation of coronal microleakage in endodontically treated teeth. Part II. Sealer types, J Endod 13:109, 1987.
148. Main C, Mirzayan N, Shabahang S, Torabinejad M: Repair of root perforations using mineral trioxide aggregate: a long-term study, J Endod 30:80, 2004.
149. Mandel E, Friedman S: Endodontic retreatment: a rational approach to root canal reinstrumentation, J Endod 18:565, 1992.
150. Martin JA, Bader JD: Five-year treatment outcomes for teeth with large amalgams and crowns, Oper Dent 22:72, 1997.
151. Masserann J: Entfernen metallischer Fragmente aus Wurzelkanalen (Removal of metal fragments from the root canal), J Br Endod Soc 5:55, 1971.
152. Matherne RP, Angelopoulos C, Kulild JC, Tira D: Use of cone-beam computed tomography to identify root canal systems in vitro, J Endod 34:87, 2008.
153. McDonald MN, Vire DE: Chloroform in the endodontic operatory, J Endod 18:301, 1992.
154. Messer HH: Permanent restorations and the dental pulp. In Hargreaves KM, Goodis HE, editors: Seltzer and

CHAPTER 8 Nonsurgical Retreatment 385
Bender’s dental pulp, Chicago, 2002, Quintessence Books, p 345.
155. Metska ME, Aartman IH, Wesselink PR, Ozok AR: Detection of vertical root fractures in vivo in endodontically treated teeth by cone-beam computed tomography scans, J Endod 38:1344, 2012.
156. Metzger Z, Ben-Amar A: Removal of overextended gutta-percha root canal fillings in endodontic failure cases, J Endod 21:287, 1995.
157. Molven O, Halse A, Fristad I, MacDonald-Jankowski D: Periapical changes following root-canal treatment observed 20-27 years postoperatively, Int Endod J 35:784, 2002.
158. Moshonov J, Peretz B, Ben-Zvi K, et al: Effect of gutta-percha solvents on surface microhardness of IRM fillings, J Endod 26:142, 2000.
159. Moshonov J, Trope M, Friedman S: Retreatment efficacy 3 months after obturation using glass ionomer cement, zinc oxide-eugenol, and epoxy resin sealers, J Endod 20:90, 1994.
160. Mulvay PG, Abbott PV: The effect of endodontic access cavity preparation and subsequent restorative procedures on molar crown retention, Aust Dent J 41:134, 1996.
161. Nagai O, Tani N, Kayaba Y, et al: Ultrasonic removal of broken instruments in root canals, Int Endod J 19:298, 1986.
162. Nair PN: New perspectives on radicular cysts: do they heal? Int Endod J 31:155, 1998.
163. Nair PN, Sjogren U, Krey G, et al: Intraradicular bacteria and fungi in root-filled, asymptomatic human teeth with therapy-resistant periapical lesions: a long-term light and electron microscopic follow-up study, J Endod 16:580, 1990.
164. Nair PN, Sjogren U, Krey G, Sundqvist G: Therapy-resistant foreign body giant cell granuloma at the periapex of a root-filled human tooth, J Endod 16:589, 1990.
165. Nair PN, Sjogren U, Schumacher E, Sundqvist G: Radicular cyst affecting a root-filled human tooth: a long-term post-treatment follow-up, Int Endod J 26:225, 1993.
166. Nair PNR, Schroeder HE: Periapical actinomycosis, J Endod 10:567, 1984.
167. Nakata TT, Bae KS, Baumgartner JC: Perforation repair comparing mineral trioxide aggregate and amalgam using an anaerobic bacterial leakage model, J Endod 24:184, 1998.
168. Nearing MV, Glickman GN: Comparative efficacy of various rotary instrumentation systems for gutta-percha removal [Abstract], J Endod 24:295, 1999.
169. Ng YL, Mann V, Gulabivala K: Outcome of secondary root canal treatment: a systematic review of the literature, Int Endod J 41:1026, 2008.
170. Niemczyk SP: Re-inventing intentional replantation: a modification of the technique, Pract Proced Aesthet Dent 13:433, 2001.
171. Osorio RM, Hefti A, Vertucci FJ, Shawley AL: Cytotoxicity of endodontic materials, J Endod 24:91, 1998.
172. Ozgoz M, Yagiz H, Cicek Y, Tezel A: Gingival necrosis following the use of a paraformaldehyde-containing paste: a case report, Int Endod J 37:157, 2004.
173. Parashos P, Messer HH: Questionnaire survey on the use of rotary nickel-titanium endodontic instruments by Australian dentists, Int Endod J 37:249, 2004.
174. Parker H, Glickman GN: Solubility of plastic Thermafil carriers, J Dent Res 72:188, 1993.
175. Patel S: New dimensions in endodontic imaging: part 2. Cone beam computed tomography, Int Endod J 42:463, 2009.
176. Patel S, Dawood A, Ford TP, Whaites E: The potential applications of cone beam computed tomography in the management of endodontic problems, Int Endod J 40:818, 2007.
177. Perez AL, Spears R, Gutmann JL, Opperman LA: Osteoblasts and MG-63 osteosarcoma cells behave differently when in contact with ProRoot MTA and White MTA, Int Endod J 36:564, 2003.
178. Peters SB, Canby FL, Miller DA: Removal of a carbon-fiber post system [abstract PR35], J Endod 22:215, 1996.
179. Pitt-Ford TR, Torabinejad M, McKendry DJ, et al: Use of mineral trioxide aggregate for repair of furcal perforations, Oral Surg Oral Med Oral Pathol 79:756, 1995.
180. Ray H, Seltzer S: A new glass ionomer root canal sealer, J Endod 17:598, 1991.
181. Regezi JA, Sciubba JJ: Cysts of the oral region. In Regezi JA, Sciubba JJ, editors: Oral pathology: clinical pathologic correlations, ed 3, Philadelphia, 1999, Saunders, p 288.
182. Rocas IN, Siqueira JFJ, Santos KR: Association of enterococcus faecalis with different forms of periradicular diseases, J Endod 30:315, 2004.
183. Roda R: Clinical showcase—unintentional replantation: a technique to avoid, J Can Dent Assoc 72:133, 2006.
184. Roda RS: Root perforation repair: surgical and nonsurgical management, Pract Proced Aesthet Dent 13:467, 2001.
185. Roig-Greene JL: The retrieval of foreign objects from root canals: a simple aid, J Endod 9:394, 1983.
186. Royzenblat A, Goodell GG: Comparison of removal times of Thermafil plastic obturators using ProFile rotary instruments at different rotational speeds in moderately curved canals, J Endod 33:256, 2007.
187. Ruddle CJ: Non-surgical endodontic retreatment. In Cohen S, Burns RC, editors: Pathways of the pulp, ed 8, St. Louis, 2002, Mosby, p 875.
188. Ruddle CJ: Nonsurgical retreatment, J Endod 30:827, 2004.
189. Sabourin CR, Flinn BD, Pitts DL, et al: A novel method for creating endodontic access preparations through all-ceramic restorations: air abrasion and its effect relative to diamond and carbide bur use, J Endod 31:616, 2005.
190. Sae-Lim V, Rajamanickam I, Lim BK, Lee HL: Effectiveness of ProFile .04 taper rotary instruments in endodontic retreatment, J Endod 26:100, 2000.
191. Sakkal S, Gauthier G, Milot P, Lemian L: A clinical appraisal of the Gonon post-pulling system, J Can Dent Assoc–Journal de l Association Dentaire Canadienne 60:537, 1994.
192. Satterthwaite JD, Stokes AN, Frankel NT: Potential for temperature change during application of ultrasonic vibration to intra-radicular posts, Eur J Prosthodont Restor Dent 11:51, 2003.
193. Saunders EM: In vivo findings associated with heat generation during thermomechanical compaction of gutta-percha. 1. Temperature levels at the external surface of the root, Int Endod J 23:263, 1990.
194. Saunders EM: In vivo findings associated with heat generation during thermomechanical compaction of gutta-percha. 2. Histological response to temperature elevation on the external surface of the root, Int Endod J 23:268, 1990.
195. Saunders EM, Saunders WP: The heat generated on the external root surface during post space preparation, Int Endod J 22:169, 1989.
196. Saunders WP, Saunders EM: Coronal leakage as a cause of failure in root-canal therapy: a review, Endod Dent Traumatol 10:105, 1994.
197. Scherer W, Dragoo MR: New subgingival restorative procedures with Geristore resin ionomer, Pract Periodontics Aesthet Dent 7:1, 1995.
198. Schilder H: Filling root canals in three dimensions, Dent Clin North Am Nov:723, 1967.
199. Schirrmeister JF, Meyer KM, Hermanns P, et al: Effectiveness of hand and rotary instrumentation for removing a new synthetic polymer-based root canal obturation material (Epiphany) during retreatment, Int Endod J 39:150, 2006.
200. Schwandt NW, Gound TG: Resorcinol-formaldehyde resin “Russian Red” endodontic therapy, J Endod 29:435, 2003.
201. Schwartz RS, Robbins JW: Post placement and restoration of endodontically treated teeth: a literature review, J Endod 30:289, 2004.
202. Seltzer S: Endodontology: biologic considerations in endodontic procedures, ed 2, Philadelphia, 1988, Lea & Febiger, p x.
203. Seltzer S, Bender IB: Cognitive dissonance in endodontics, Oral Surg Oral Med Oral Pathol 20:505, 1965.
204. Seltzer S, Bender IB, Ziontz BA: The dynamics of pulp inflammation: correlations between diagnostic data and actual histologic findings in the pulp, Oral Surg 16:846, 1963.
205. Seltzer S, Green DB, Weiner N, DeRenzis F: A scanning electron microscope examination of silver cones removed from endodontically treated teeth, Oral Surg Oral Med Oral Pathol 33:589, 1972.
206. Seltzer S, Sinai I, August D: Periodontal effects of root perforations before and during endodontic procedures, J Dent Res 49:332, 1970.
207. Serper A, Ucer O, Onur R, Etikan I: Comparative neurotoxic effects of root canal filling materials on rat sciatic nerve, J Endod 24:592, 1998.
208. Setzer FC, Kohli MR, Shah SB, et al: Outcome of endodontic surgery: a meta-analysis of the literature—Part 2: comparison of endodontic microsurgical techniques with and without the use of higher magnification, J Endod 38:1, 2012.
209. Shen Y, Peng B, Cheung GS: Factors associated with the removal of fractured NiTi instruments from root canal systems, Oral Surg Oral Med Oral Pathol Oral Radiol Endod 98:605, 2004.
210. Shipper G, Orstavik D, Teixeira FB, Trope M: An evaluation of microbial leakage in roots filled with a thermoplastic synthetic polymer-based root canal filling material (Resilon), J Endod 30:342, 2004.
211. Simon JH, Chimenti RA, Mintz GA: Clinical significance of the pulse granuloma, J Endod 8:116, 1982.
212. Simon JH, Glick DH, Frank AL: The relationship of endodontic-periodontic lesions, J Periodontol 43:202, 1972.
213. Sinai IH: Endodontic perforations: their prognosis and treatment, J Am Dent Assoc 95:90, 1977.
214. Siqueira JF, Sen BH: Fungi in endodontic infections, Oral Surg Oral Med Oral Pathol Oral Radiol Endod 97:632, 2004.
215. Sjogren U, Hagglund B, Sundqvist G, Wing K: Factors affecting the long-term results of endodontic treatment, J Endod 16:498, 1990.
216. Sjogren U, Happonen RP, Kahnberg KE, Sundqvist G: Survival of Arachnia propionica in periapical tissue, Int Endod J 21:277, 1988.
217. Sluyk SR, Moon PC, Hartwell GR: Evaluation of setting properties and retention characteristics of mineral trioxide aggregate when used as a furcation perforation repair material, J Endod 24:768, 1998.
218. So MV, Saran C, Magro ML, et al: Efficacy of ProTaper retreatment system in root canals filled with gutta-percha and two endodontic sealers, J Endod 34:1223, 2008.
219. Solomonov M, Paque F, Kaya S, et al: Self-adjusting files in retreatment: a high-resolution micro-computed tomography study, J Endod 38:1283, 2012.
220. Somma F, Cammarota G, Plotino G, et al: The effectiveness of manual and mechanical instrumentation for the retreatment of three different root canal filling materials, J Endod 34:466, 2008.
221. Song M, Chung W, Lee SJ, Kim E: Long-term outcome of the cases classified as successes based on short-term follow-up in endodontic microsurgery, J Endod 38:1192, 2012.
222. Song M, Nam T, Shin SJ, Kim E: Comparison of clinical outcomes of endodontic microsurgery: 1 year versus long-term follow-up, J Endod 40:490, 2014.
223. Souter NJ, Messer HH: Complications associated with fractured file removal using an ultrasonic technique, J Endod 31:450, 2005.
224. Spatafore CM, Griffin JA Jr, Keyes GG, et al: Periapical biopsy report: an analysis of over a 10-year period, J Endod 16:239, 1990.
386 PART II The Advanced Science of Endodontics
225. Spili P, Parashos P, Messer HH: The impact of instrument fracture on outcome of endodontic treatment, J Endod 31:845, 2005.
226. Spriggs K, Gettleman B, Messer HH: Evaluation of a new method for silver point removal, J Endod 16:335, 1990.
227. Stabholz A, Friedman S: Endodontic retreatment—case selection and technique. Part 2: treatment planning for retreatment, J Endod 14:607, 1988.
228. Stamos DE, Gutmann JL: Revisiting the post puller, J Endod 17:466, 1991.
229. Stamos DE, Gutmann JL: Survey of endodontic retreatment methods used to remove intraradicular posts, J Endod 19:366, 1993.
230. Sundqvist G: Ecology of the root canal flora, J Endod 18:427, 1992.
231. Sundqvist G, Figdor D: Endodontic treatment of apical periodontitis. In Orstavik D, Pitt-Ford TR, editors: Essential endodontology: prevention and treatment of apical periodontitis, London, 1998, Blackwell Science, p 242.
232. Sundqvist G, Reuterving CO: Isolation of Actinomyces israelii from periapical lesion, J Endod 6:602, 1980.
233. Suter B: A new method for retrieving silver points and separated instruments from root canals, J Endod 24:446, 1998.
234. Suter B, Lussi A, Sequeira P: Probability of removing fractured instruments from root canals, Int Endod J 38:112, 2005.
235. Sutherland JK, Teplitsky PE, Moulding MB: Endodontic access of all-ceramic crowns, J Prosthodont Res 61:146, 1989.
236. Swanson K, Madison S: An evaluation of coronal microleakage in endodontically treated teeth. Part I. Time periods, J Endod 13:56, 1987.
237. Tamse A, Fuss Z, Lustig J, Kaplavi J: An evaluation of endodontically treated vertically fractured teeth, J Endod 25:506, 1999.
238. Tamse A, Kaffe I, Lustig J, et al: Radiographic features of vertically fractured endodontically treated mesial roots of mandibular molars, Oral Surg Oral Med Oral Pathol Oral Radiol Endod 101:797, 2006.
239. Tasdemir T, Er K, Yildirim T, Celik D: Efficacy of three rotary NiTi instruments in removing gutta-percha from root canals, Int Endod J 41:191, 2008.
240. Tasdemir T, Yildirim T, Celik D: Comparative study of removal of current endodontic fillings, J Endod 34:326, 2008.
241. Teixeira FB, Teixeira EC, Thompson JY, Trope M: Fracture resistance of roots endodontically treated with a new resin filling material, J Am Dent Assoc 135:646, 2004.
242. Teplitsky PE, Rayner D, Chin I, Markowsky R: Gutta percha removal utilizing GPX instrumentation, J Can Dent Assoc–Journal de l Association Dentaire Canadienne 58:53, 1992.
243. Torabinejad M, Higa RK, McKendry DJ, Pitt Ford TR: Dye leakage of four root end filling materials: effects of blood contamination, J Endod 20:159, 1994.
244. Torabinejad M, Hong C, Pitt Ford TR: Tissue reaction to implanted super-EBA and Mineral trioxide aggregate in the mandible of guinea pigs: a preliminary report, J Endod 21:569, 1995.
245. Torabinejad M, Hong CU, McDonald F, Pitt Ford TR: Physical and chemical properties of a new root-end filling material, J Endod 21:349, 1995.
246. Torabinejad M, Hong CU, Pitt Ford TR, Kettering JD: Cytotoxicity of four root end filling materials, J Endod 21:489, 1995.
247. Torabinejad M, Lemon RR: Procedural accidents. In Walton RE, Torabinejad M, editors: Principles and practice of endodontics, ed 3, Philadelphia, 2002, Saunders, p 310.
248. Torabinejad M, Ung B, Kettering JD: In vitro bacterial penetration of coronally unsealed endodontically treated teeth, J Endod 16:566, 1990.
249. Tronstad L, Barnett F, Cervone F: Periapical bacterial plaque in teeth refractory to endodontic treatment, Endod Dent Traumatol 6:73, 1990.
250. Trope M, Maltz DO, Tronstad L: Resistance to fracture of restored endodontically treated teeth, Endod Dent Traumatol 1:108, 1985.
251. United States Drug Administration: Chloroform used as an ingredient (active or inactive) in drug products. Federal Register No. 26845. Washington DC, 1976, US Government Printing Office.
252. Uzun O, Topuz O, Tinaz C, et al: Accuracy of two root canal length measurement devices integrated into rotary endodontic motors when removing gutta-percha from root-filled teeth, Int Endod J 41:725, 2008.
253. Valderhaug J, Jokstad A, Ambjornsen E, Norheim PW: Assessment of the periapical and clinical status of crowned teeth over 25 years, J Dent 25:97, 1997.
254. Viducic D, Jukic S, Karlovic Z, et al: Removal of gutta-percha from root canals using an Nd:YAG laser, Int Endod J 36:670, 2003.
255. Walton RE, Rivera EM: Cleaning s. In Walton RE, Torabinjad M, editors: Principles and practice of endodontics, ed 3, Philadelphia, 2002, Saunders, p 206.
256. Walton RE, Torabinejad M: Diagnosis and treatment planning. In Walton RE, Torabinejad M, editors: Principles and practice of endodontics, ed 3, Philadelphia, 2002, Saunders, p 49.
257. Weiger R, Manncke B, Werner H, Lost C: Microbial flora of sinus tracts and root canals of non-vital teeth, Endod Dent Traumatol 11:15, 1995.
258. Welk AR, Baumgartner JC, Marshall JG: An in vivo comparison of two frequency-based electronic apex locators, J Endod 29:497, 2003.
259. Wennberg A, Orstavik D: Evaluation of alternatives to chloroform in endodontic practice, Endod Dent Traumatol 5:234, 1989.
260. White C, Bryant N: Combined therapy of mineral trioxide aggregate and guided tissue regeneration in the treatment of external root resorption and an associated osseous defect, J Periodontol 73:1517, 2002.
261. Whitworth JM, Boursin EM: Dissolution of root canal sealer cements in volatile solvents, Int Endod J 33:19, 2000.
262. Wilcox LR: Thermafil retreatment with and without chloroform solvent, J Endod 19:563, 1993.
263. Wilcox LR: Endodontic retreatment with halothane versus chloroform solvent, J Endod 21:305, 1995.
264. Wilcox LR, Juhlin JJ: Endodontic retreatment of Thermafil versus laterally condensed gutta-percha, J Endod 20:115, 1994.
265. Wilcox LR, Krell KV, Madison S, Rittman B: Endodontic retreatment: evaluation of gutta-percha and sealer removal and canal reinstrumentation, J Endod 13:453, 1987.
266. Wolcott J, Ishley D, Kennedy W, et al: A 5 yr clinical investigation of second mesiobuccal canals in endodontically treated and retreated maxillary molars, J Endod 31:262, 2005.
267. Wolcott JF, Himel VT, Hicks ML: Thermafil retreatment using a new “System B” technique or a solvent, J Endod 25:761, 1999.
268. Wolcott S, Wolcott J, Ishley D, et al: Separation incidence of protaper rotary instruments: a large cohort clinical evaluation, J Endod 32:1139, 2006.
269. Wourms DJ, Campbell AD, Hicks ML, Pelleu GB Jr: Alternative solvents to chloroform for gutta-percha removal, J Endod 16:224, 1990.
270. Yatsushiro JD, Baumgartner JC, Tinkle JS: Longitudinal study of the microleakage of two root-end filling materials using a fluid conductive system, J Endod 24:716, 1998.
271. Yeo JF, Loh FC: Retrograde removal of fractured endodontic instruments, Ann Acad Med Singapore 18:594, 1989.
272. Yoldas O, Oztunc H, Tinaz C, Alparslan N: Perforation risks associated with the use of Masserann endodontic kit drills in mandibular molars, Oral Surg Oral Med Oral Pathol Oral Radiol Endod 97:513, 2004.
273. Zakariasen KL, Brayton SM, Collinson DM: Efficient and effective root canal retreatment without chloroform, J Can Dent Assoc–Journal de l Association Dentaire Canadienne 56:509, 1990.
274. Zinman EJ: Records and legal responsibilities. In Cohen S, Burns RC, editors: Pathways of the pulp, ed 8, St. Louis, 2002, Mosby, p 365.
275. Zou X, Liu D, Yue L, Wu M: The ability of cone-beam computerized tomography to detect vertical root fractures in endodontically treated and nonendodontically treated teeth: a report of 3 cases, Oral Surg Oral Med Oral Pathol Oral Radiol Endod 111:797, 2011.
276. Zuolo ML, Imura N, Ferreira MO: Endodontic retreatment of thermafil or lateral condensation obturations in post space prepared teeth, J Endod 20:9, 1994.
277. Zuolo ML, Kherlakian N, Imura N: Effectiveness of nickel titanium rotary and hand instrumentation in endodontic retreatment [Abstract], J Endod 22:209, 1996.
Related Documents