7910 7910 OBDII For bmw Oil reset BMS reset BAT EPB reset Tool Setup ETCS reset

Welcome message from author
This document is posted to help you gain knowledge. Please leave a comment to let me know what you think about it! Share it to your friends and learn new things together.
Transcript
7910
7910
OBDII For bmw Oil reset
BMS resetBATEPB reset
Tool SetupETCS reset

SAFETY PRECAUTIONS
ABOUT 7910
To prevent personal injury or damage to vehicles and/or the scan tool, Read this instruction manual first and observe the following safety precautions at a minimum whenever working on a vehicle:
Always perform automotive testing in a safe environment Do not attempt to operate or observe the tool while driving a vehicle. Operating or observing the tool will cause driver distraction and could cause a fatal accident.Wear safety eye protection that meets ANSI standards.Operate the vehicle in a well ventilated work area: Exhaust gases are Poisonous.Put the transmission in PARK (for automatic transmission) or NEUTRAL (for manual transmission) and make sure the parking brake is engaged.Keep the scan tool dry, clean, free from oil/water or grease. Use a mild detergent on a clean cloth to clean the outside of the scan tool, when Necessary.
1) 7910 supports for BMW, Mini and Rolls-Royce brand cars. It works on all the systems such as engine, transmission, ABS and airbag etc.2) Supports OBDII/EOBD Modes of operation
1. Coverage
• 2.8’LCD,320 X 240 pixels color screen• Operating Voltage: 8V-18V.• Operating Temperature: 0°C-60°C(32-140°F).• Storage Temperature: -20°C-70°C(4-158°F).
2. Product specification
1
7910
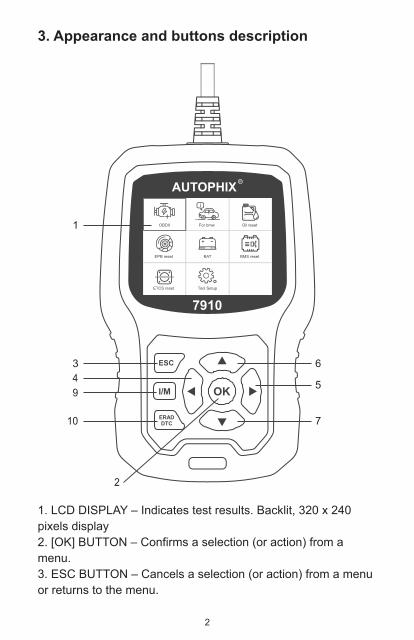
3. Appearance and buttons description
1. LCD DISPLAY – Indicates test results. Backlit, 320 x 240 pixels display2. [OK] BUTTON – Confirms a selection (or action) from a menu.3. ESC BUTTON – Cancels a selection (or action) from a menu or returns to the menu.
OBDII For bmw Oil reset
BMS resetBATEPB reset
Tool SetupETCS reset
2
1
3 6
5
7
2
4
10
9
I/M Readiness
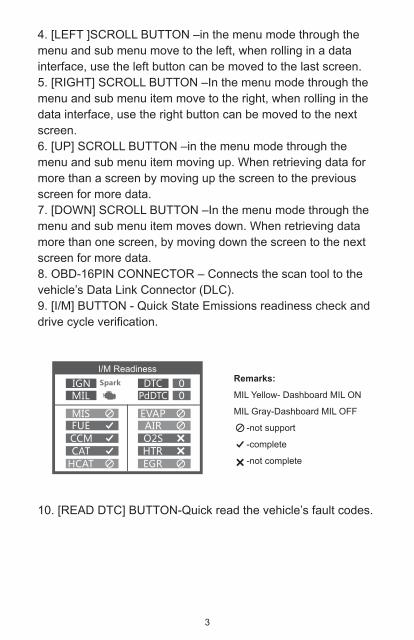
10. [READ DTC] BUTTON-Quick read the vehicle’s fault codes.
4. [LEFT ]SCROLL BUTTON –in the menu mode through the menu and sub menu move to the left, when rolling in a data interface, use the left button can be moved to the last screen.5. [RIGHT] SCROLL BUTTON –In the menu mode through the menu and sub menu item move to the right, when rolling in the data interface, use the right button can be moved to the next screen.6. [UP] SCROLL BUTTON –in the menu mode through the menu and sub menu item moving up. When retrieving data for more than a screen by moving up the screen to the previous screen for more data.7. [DOWN] SCROLL BUTTON –In the menu mode through the menu and sub menu item moves down. When retrieving data more than one screen, by moving down the screen to the next screen for more data.8. OBD-16PIN CONNECTOR – Connects the scan tool to the vehicle’s Data Link Connector (DLC).9. [I/M] BUTTON - Quick State Emissions readiness check and drive cycle verification.
3
Remarks:
MIL Yellow- Dashboard MIL ON
MIL Gray-Dashboard MIL OFF
-not support
-complete
-not complete
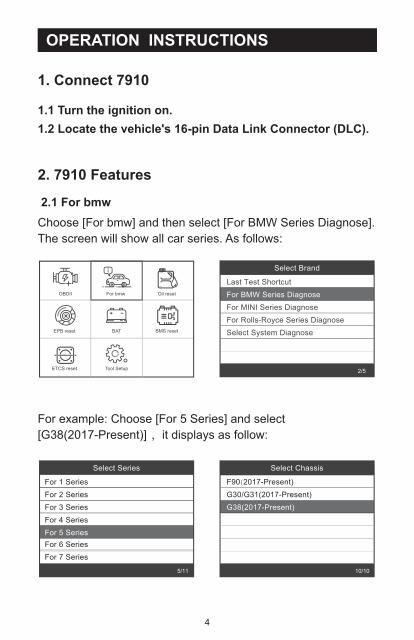
OPERATION INSTRUCTIONS
For example: Choose [For 5 Series] and select [G38(2017-Present)] ,it displays as follow:
1.1 Turn the ignition on.1.2 Locate the vehicle's 16-pin Data Link Connector (DLC).
2.1 For bmw
1. Connect 7910
2. 7910 Features
Choose [For bmw] and then select [For BMW Series Diagnose]. The screen will show all car series. As follows:
Select Brand
Last Test ShortcutFor BMW Series DiagnoseFor MINI Series DiagnoseFor Rolls-Royce Series DiagnoseSelect System Diagnose
2/5
Select Chassis
F90(2017-Present)G30/G31(2017-Present)G38(2017-Present)
10/10
Select Series
For 1 SeriesFor 2 SeriesFor 3 SeriesFor 4 SeriesFor 5 SeriesFor 6 SeriesFor 7 Series
5/11
OBDII For bmw Oil reset
BMS resetBATEPB reset
Tool SetupETCS reset
4

Choose [Basic Functions] and it displays as follow:
2.2 Basic Functions
Select System Diagnose
CAS Car Access SystemECM Engine Control ModuleECM2 Engone Control Module 2EGS Transmission ABS/ACS/DSC Dynamic Stabilit...SRS Air BagFPB Electronic Parking Brake
1/86
Select Menu
System ScanManual Select
2/2
Select Function
Basic FunctionsSpecial FunctionsErase All Systems Fault Codes
1/3
System scan is to scan all vehicle systems.Manual Select is to display all possible systems, select one of the systems to diagnosis.
Choose [Manual Select] and it displays as follows:
For example: Choose [ECM Engine Control Module] and it displays as follows:
Select System Diagnose
CAS Car Access SystemECM Engine Control ModuleECM2 Engone Control Module 2EGS Transmission ABS/ACS/DSC Dynamic Stabilit...SRS Air BagFPB Electronic Parking Brake
1/86
Select Function
Version InformationRead Fault CodesErase Fault CodesRead Datastream
1/4
5
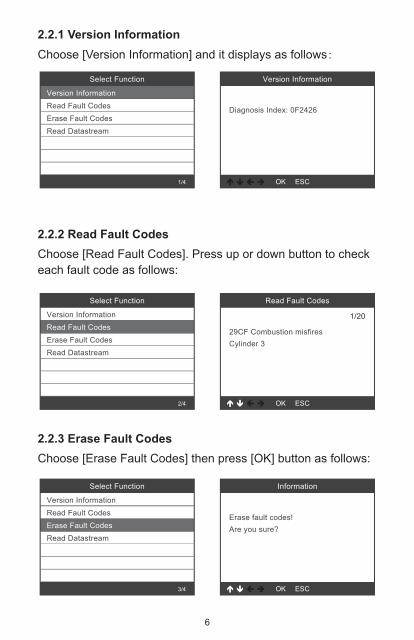
2.2.1 Version Information
Select Function
Version InformationRead Fault CodesErase Fault CodesRead Datastream
1/4
Select Function
Version InformationRead Fault CodesErase Fault CodesRead Datastream
2/4
Select Function
Version InformationRead Fault CodesErase Fault CodesRead Datastream
3/4
Choose [Version Information] and it displays as follows:
Version Information
Diagnosis Index: 0F2426
2.2.2 Read Fault CodesChoose [Read Fault Codes]. Press up or down button to check each fault code as follows:
Read Fault Codes
29CF Combustion misfiresCylinder 3
1/20
2.2.3 Erase Fault CodesChoose [Erase Fault Codes] then press [OK] button as follows:
Information
Erase fault codes!Are you sure?
6

Select Function
Version InformationRead Fault CodesErase Fault CodesRead Datastream
4/4
Select Function
View All ItemsSelect Items
2/2
Select DatastreamAll Datastream Of Page[v]
[v]
[v]
[v]
[v]
Engine speed[rpm]
DISA potentiometer voltage[v]
Throttle opening[%]
Throttle opening[%]
1~4/6
Choose [Read Datastream] then press [OK] button as follow:
Choose [Select Items] and press [OK] button as follows:
Press [LEFT] and [RIGHT] buttons to pagePress [UP] and [DOWN] buttons to select one by onePress [OK] button to select the DatastreamPress [ESC] button to read Datastream
You need to press [OK] again to clear the fault codes. Or you can press [ESC] button to give up clearing fault codes, as follows:
Version Information
Erase fault codes had success.Please wait 10 seconds, Turn ignition off and Switch on again.Read fault codes to verify.
2.2.4 Read Datastream
7

Select Function
Basic FunctionsSpecial FunctionsErase All Systems Fault Codes
2/3
Select Function
CBS Function(Service Function)Reset Control UnitECM Engine Control ModuleElectric fuel pumpBattery ManagementEPB Electronic Parking BrakeSteering-angle Sensor
1/9
CBS Function(Service Function)
Oil resetCBS ResetCBS Correction
1/3
Oil reset
This function will perform’ engine oil reset’ and ‘vehicle check reset’.Note! The vehicle check is related to the engine oil. After the oil is
Choose [Special Functions] and it displays as follows:
2.3 Special Functions
Choose [CBS Function (Service Function)] and it displays as follows:
[CBS reset 1]: Engine oil, Spark plugs, Front brakes, Rear brakes, Coolant, Diesel particle filter, Brake fluid, Micro filter, Vehicle inspection, Exhaust emission inspection, Vehicle check.[CBS reset 2]: Oil service, Inspection, Time interval, Correct follow-on service, Display service interval status.[CBS correction]: Engine oil, Spark plugs, Front brakes, Rear brakes, Coolant, Diesel particle filter, Brake fluid, Micro filter, Vehicle inspection, Exhaust emission inspection, Vehicle check.
2.3.1 CBS Functions
8
Select Function
CBS Function(Service Function)Reset Control UnitECM Engine Control ModuleElectric fuel pumpBattery ManagementEPB Electronic Parking BrakeSteering-angle Sensor
3/9
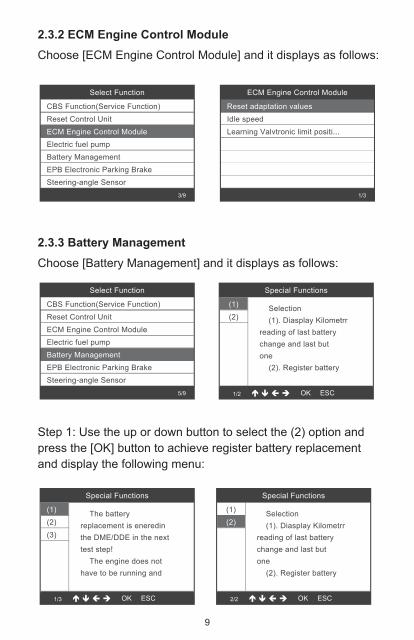
ECM Engine Control Module
Reset adaptation valuesIdle speedLearning Valvtronic limit positi...
1/3
Choose [ECM Engine Control Module] and it displays as follows:
2.3.2 ECM Engine Control Module
Select Function
CBS Function(Service Function)Reset Control UnitECM Engine Control ModuleElectric fuel pumpBattery ManagementEPB Electronic Parking BrakeSteering-angle Sensor
5/9
Choose [Battery Management] and it displays as follows:
Step 1: Use the up or down button to select the (2) option and press the [OK] button to achieve register battery replacement and display the following menu:
2.3.3 Battery Management
Special Functions
(2)(3)
1/3
The batteryreplacement is eneredin the DME/DDE in the next test step! The engine does not have to be running and
(1)
9
Special Functions
1/2
Selection (1). Diasplay Kilometrr reading of last battery change and last butone (2). Register battery
(2)(1)
Special Functions
2/2
Selection (1). Diasplay Kilometrr reading of last battery change and last butone (2). Register battery
(2)(1)

Step 2: Use the up or down button to select the (1) option and press the [OK] button to display the following menu:
Special Functions
The battery replacement isentered in the engineelectronics(DME or DDE) Please wait!
10
Choose [EPB Electronic Parking brake] and it displays as follows:
2.3.4 EPB Electronic Parking Brake
Select Function
CBS Function(Service Function)Reset Control UnitECM Engine Control ModuleElectric fuel pumpBattery ManagementEPB Electronic Parking BrakeSteering-angle Sensor
6/9
EPB Parking brake
Workshop mode,Automatic Hol...Startup-up,Automatic Hold br ake
1/2
Choose [Steering-angle sensor] and it displays as follows:
2.3.5 Steering-angle sensor
Select Function
CBS Function(Service Function)Reset Control UnitECM Engine Control ModuleElectric fuel pumpBattery ManagementEPB Electronic Parking BrakeSteering-angle Sensor
7/9
Information
Exactly set front wheels to staright - ahead position. The steering wheel must be positioned horizontally.(Approximate setting suffient). Preconditon for initialization of
Special Functions
The battery replacement wasregistered successfully in theDME/DDE) The folloeing is now enteredin the DME/DDE: Last battery replacement:

Select Function
Basic FunctionsSpecial FunctionsErase All Systems Fault Codes
3/3
Note: The special features of each model are different, please according to the actual operation.
Note: For BMW car after 2003.
Choose [Erase All Systems Fault Codes] and it displays as follows:
You need to press [OK] again to clear the fault codes. Or you can press [ESC] button to give up clearing fault codes. It shows as the follow after clearing the fault codes.
2.4 Erase All Systems Fault Codes
Information
Erase fault codes! Are you sure?
Information
Erase fault codes hadsuccess.Please wait 10 seconds, Turnignition off and Switch on again.Read fault codes to verify.
11
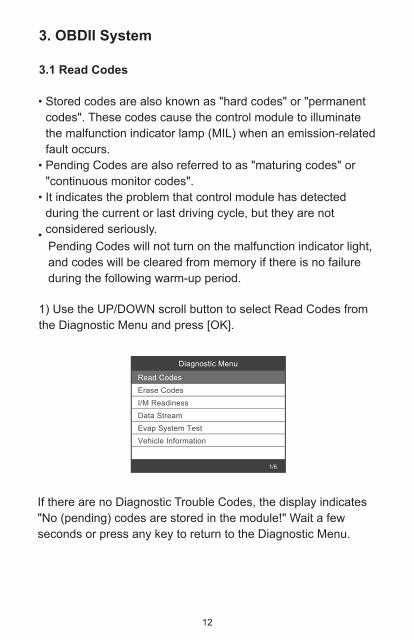
Diagnostic Menu
Read CodesErase CodesI/M ReadinessData StreamEvap System TestVehicle Information
1/6
1) Use the UP/DOWN scroll button to select Read Codes from the Diagnostic Menu and press [OK].
If there are no Diagnostic Trouble Codes, the display indicates "No (pending) codes are stored in the module!" Wait a few seconds or press any key to return to the Diagnostic Menu.
Pending Codes will not turn on the malfunction indicator light, and codes will be cleared from memory if there is no failure during the following warm-up period.
3.1 Read Codes
3. OBDII System
Stored codes are also known as "hard codes" or "permanent codes". These codes cause the control module to illuminate the malfunction indicator lamp (MIL) when an emission-related fault occurs.Pending Codes are also referred to as "maturing codes" or "continuous monitor codes".It indicates the problem that control module has detected during the current or last driving cycle, but they are not considered seriously.
12
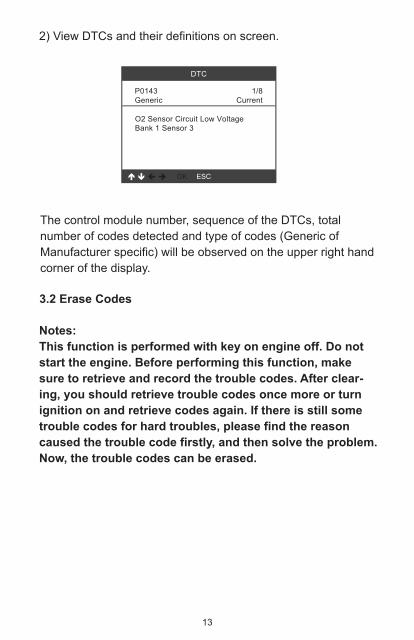
2) View DTCs and their definitions on screen.
The control module number, sequence of the DTCs, total number of codes detected and type of codes (Generic of Manufacturer specific) will be observed on the upper right hand corner of the display.
Notes: This function is performed with key on engine off. Do not start the engine. Before performing this function, make sure to retrieve and record the trouble codes. After clear-ing, you should retrieve trouble codes once more or turn ignition on and retrieve codes again. If there is still some trouble codes for hard troubles, please find the reason caused the trouble code firstly, and then solve the problem. Now, the trouble codes can be erased.
3.2 Erase Codes
DTC
P0143Generic
1/8Current
O2 Sensor Circuit Low VoltageBank 1 Sensor 3
13
Diagnostic Menu
Read CodesErase CodesI/M ReadinessData StreamEvap System TestVehicle Information
2/6
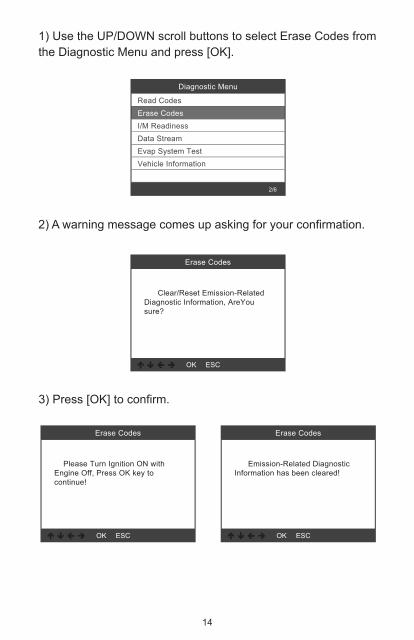
1) Use the UP/DOWN scroll buttons to select Erase Codes from the Diagnostic Menu and press [OK].
2) A warning message comes up asking for your confirmation.
3) Press [OK] to confirm.
Erase Codes
Clear/Reset Emission-RelatedDiagnostic Information, AreYousure?
Erase Codes
Please Turn Ignition ON with Engine Off, Press OK key tocontinue!
Erase Codes
Emission-Related Diagnostic Information has been cleared!
14

Diagnostic Menu
Read CodesErase CodesI/M ReadinessData StreamEvap System TestVehicle Information
3/6
I/M Readiness
Since DTCs Were ClearedThis Drive Cycle
1/2
Diagnostic Menu
Read CodesErase CodesI/M ReadinessData StreamEvap System TestVehicle Information
4/6
Datastream
View All ItemsSelect Items
1/2
I/M refers to Inspection and Maintenance, that is legislated by the Government to meet federal clean-air standards. I/M Readiness indicates whether or not the various emissions-relat-ed systems on the vehicle are operating properly and are ready for Inspection and Maintenance testing.The I/M readiness Monitor Status function also can be used (after repair of a fault has been performed) to confirm that the repair has been performed correctly, and/ or to check for Monitor Run Status.
3.3 I/M Readiness
The OBDII Scan Tool is a special diagnostic tool that communi-cates with the vehicle’s computer. The Scan Tool lets you view “real-time” Live Data. This information includes value(volts, rpm, temperature, speed etc.) and system status information (open loop, closed loop, fuel system status, etc.) generated by the various vehicle sensors, switches and actuators.Press ENTER
3.4 Data Stream
15
Evap System Test
Evaportive system leak test not supported
Diagnostic Menu
Read CodesErase CodesI/M ReadinessData StreamEvap System TestVehicle Information
5/6
Vehice InformationDiagnostic Menu
Read CodesErase CodesI/M ReadinessData StreamEvap System TestVehicle Information
6/6
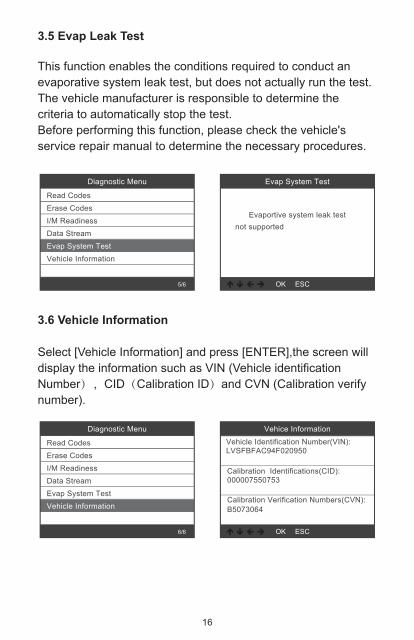
This function enables the conditions required to conduct an evaporative system leak test, but does not actually run the test. The vehicle manufacturer is responsible to determine the criteria to automatically stop the test. Before performing this function, please check the vehicle's service repair manual to determine the necessary procedures.
Select [Vehicle Information] and press [ENTER],the screen will display the information such as VIN (Vehicle identification Number),CID(Calibration ID)and CVN (Calibration verify number).
3.5 Evap Leak Test
3.6 Vehicle Information
Vehicle Identification Number(VIN):LVSFBFAC94F020950
Calibration Identifications(CID):000007550753
Calibration Verification Numbers(CVN):B5073064
16

Tool Setup
LanguageBeeperInstructions(Display at startup)Unit of MeasureSkin StyleFeedbackDevice Information
1/7
Language
EnglishSvenskaSuomalainenNorsk språkDanskDeutschFrançais
1/10
Choose [Language] and it displays as follows:
4. Tool Setup
4.1 Language
Tool Setup
LanguageBeeperInstructions(Display at startup)Unit of MeasureSkin StyleFeedbackDevice Information
2/7
Beeper
OFFON
1/2
Choose [Beeper] and it displays as follows:
4.2 Beeper
Choose [Instructions(Display at startup)] and it displays as follows:
4.3 Instructions(Display at startup)
17
Tool Setup
LanguageBeeperInstructions(Display at startup)Unit of MeasureSkin StyleFeedbackDevice Information
3/7
Instructions(Display at startup)
OFFON
1/2
Tool Setup
LanguageBeeperInstructions(Display at startup)Unit of MeasureSkin StyleFeedbackDevice Information
4/7
Unit of measure
MerticImperial
1/2
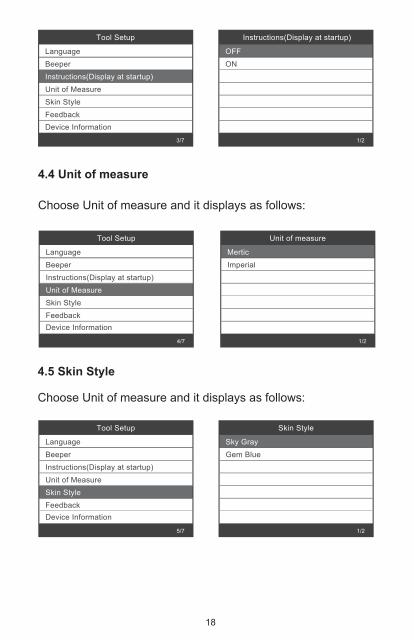
Choose Unit of measure and it displays as follows:
4.4 Unit of measure
18
Tool Setup
LanguageBeeperInstructions(Display at startup)Unit of MeasureSkin StyleFeedbackDevice Information
5/7
Skin Style
Sky GrayGem Blue
1/2
Choose Unit of measure and it displays as follows:
4.5 Skin Style

19
Tool Setup
LanguageBeeperInstructions(Display at startup)Unit of MeasureSkin StyleFeedbackDevice Information
6/7
1. If it shows connected error with vehicle or other problem during using, please using the feedback function. Choose [Feedback] and it displays as follows:
Next : Press EXIT Button several times and return to the main menu.
2. For example: Register battery change fail Enter [Register battery change] option, and do Register battery change again (This step is very important)Note : Keep tool connect with car in above steps.
3. After doing register battery change, disconnect with car.
4.6 Feedback
Feedback
Automatic recording is ready, perform the related functions that require feedback. After the execution, disconnect the car, connect to the computer via USB use the
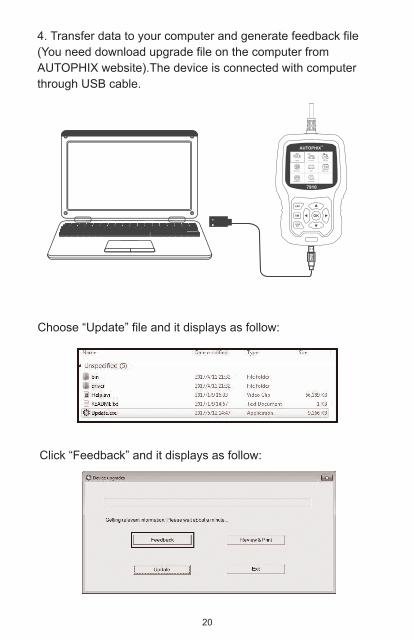
4. Transfer data to your computer and generate feedback file (You need download upgrade file on the computer from AUTOPHIX website).The device is connected with computer through USB cable.
Choose “Update” file and it displays as follow:
Click “Feedback” and it displays as follow:
OBDII For bmw Oil reset
BMS resetBATEPB reset
Tool SetupETCS reset
20
7910

5. UpdateThe device is connected with computer through USB cable.
Please send the feedback.bin file to [email protected].
Choose Device information and it displays as follows:
4.7 Device information
OBDII For bmw Oil reset
BMS resetBATEPB reset
Tool SetupETCS reset
Tool Setup
LanguageBeeperInstrucions(Display at startup)Unit of MeasureSkin StyleFeedbackDevice Information
7/7
Device Information
Software Version:
Hardware Version:
Serial Number:
01.62.000
01.10.000
Autophix20180300000001
21
7910
6. WarrantyOur company provides customers with warranty of 12 months from the date of purchase. Refer to our warranty and conditions policy. http://www.autophix.com/en/support/warranty.html
7. Service ProceduresIf you have any questions, please contact your local store, distributor or visit our website www. autophix.com .If it becomes necessary to return the scan tool for repair, contact your local distributor for more information.
1) When upgrade the device software, it only supports window 7/8/10 system.2) It can be updated directly on Window8 and window10 system.3) When the computer is window7 system, the device’s software driver is installed on the computer.
22
23
PRÉCAUTIONS DE SÉCURITÉ
À PROPOS DE 7910
Pour éviter toute blessure corporelle ou tout dommage aux véhicules et / ou à l’outil de numérisation, lisez tout d’abord ce manuel d’instructions et observez au minimum les précautions de sécurité suivantes lorsque vous travaillez sur un véhicule:
Toujours effectuer des tests automobiles dans un environne-ment sécurisé N'essayez pas d'utiliser ou d'observer l'outil pendant que vous conduisez un véhicule. L'utilisation ou l'observation de l'outil peut distraire le conducteur et causer un accident mortel.Portez des lunettes de sécurité conformes aux normes ANSI.Utilisez le véhicule dans une zone de travail bien ventilée: Les gaz d'échappement sont toxiques.Mettez la transmission en position de stationnement (pour la transmission automatique) ou neutre (pour la transmission manuelle) et assurez-vous que le frein de stationnement est serré.Gardez l’outil d’analyse sec, propre, exempt d’huile / eau ou de graisse. Utilisez un détergent doux sur un chiffon propre pour nettoyer l'extérieur de l'analyseur, si nécessaire.
1) 7910 supports pour marques de voitures BMW, Mini et Rolls-Royce. Il fonctionne sur tous les systèmes tels que moteur, transmission, ABS et airbag, etc.2) Prend en charge les modes de fonctionnement OBDII / EOBD.
1. couverture
• Écran couleur 2.8'LCD, 320 x 240 pixels• Tension de fonctionnement: 8V-18V
2. spécification du produit
7910
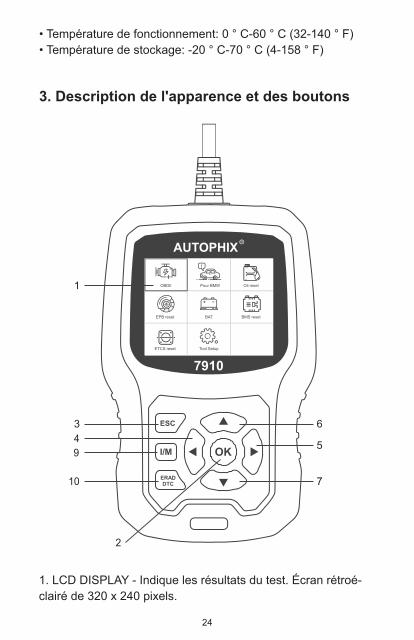
3. Description de l'apparence et des boutons
• Température de fonctionnement: 0 ° C-60 ° C (32-140 ° F)• Température de stockage: -20 ° C-70 ° C (4-158 ° F)
1. LCD DISPLAY - Indique les résultats du test. Écran rétroé-clairé de 320 x 240 pixels.
OBDII Pour BMW Oil reset
BMS resetBATEPB reset
Tool SetupETCS reset
24
1
3 6
5
7
2
4
10
9
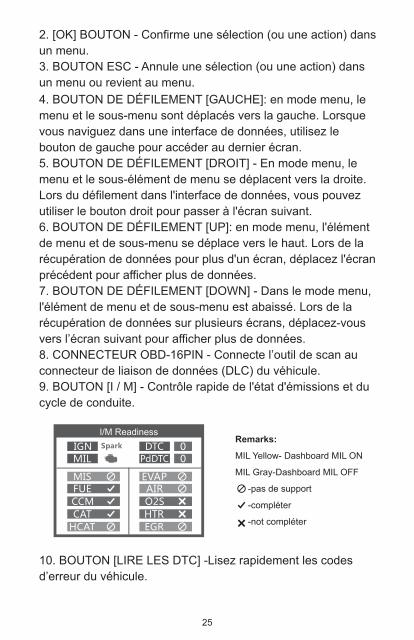
2. [OK] BOUTON - Confirme une sélection (ou une action) dans un menu.3. BOUTON ESC - Annule une sélection (ou une action) dans un menu ou revient au menu.
I/M Readiness
10. BOUTON [LIRE LES DTC] -Lisez rapidement les codes d’erreur du véhicule.
4. BOUTON DE DÉFILEMENT [GAUCHE]: en mode menu, le menu et le sous-menu sont déplacés vers la gauche. Lorsque vous naviguez dans une interface de données, utilisez le bouton de gauche pour accéder au dernier écran.5. BOUTON DE DÉFILEMENT [DROIT] - En mode menu, le menu et le sous-élément de menu se déplacent vers la droite. Lors du défilement dans l'interface de données, vous pouvez utiliser le bouton droit pour passer à l'écran suivant.6. BOUTON DE DÉFILEMENT [UP]: en mode menu, l'élément de menu et de sous-menu se déplace vers le haut. Lors de la récupération de données pour plus d'un écran, déplacez l'écran précédent pour afficher plus de données.7. BOUTON DE DÉFILEMENT [DOWN] - Dans le mode menu, l'élément de menu et de sous-menu est abaissé. Lors de la récupération de données sur plusieurs écrans, déplacez-vous vers l’écran suivant pour afficher plus de données.8. CONNECTEUR OBD-16PIN - Connecte l’outil de scan au connecteur de liaison de données (DLC) du véhicule.9. BOUTON [I / M] - Contrôle rapide de l'état d'émissions et du cycle de conduite.
25
Remarks:
MIL Yellow- Dashboard MIL ON
MIL Gray-Dashboard MIL OFF
-pas de support
-compléter
-not compléter
Instructions d'utilisation
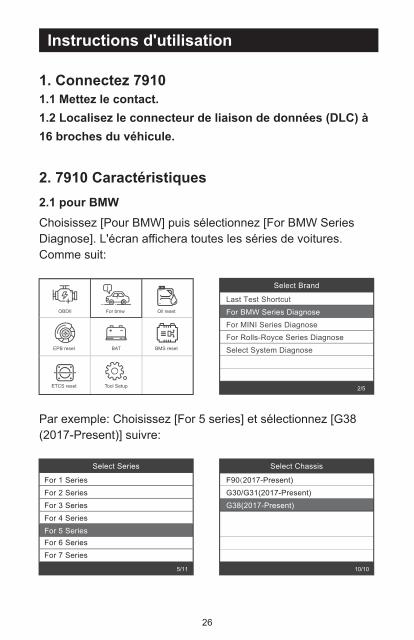
Par exemple: Choisissez [For 5 series] et sélectionnez [G38 (2017-Present)] suivre:
1.1 Mettez le contact.1.2 Localisez le connecteur de liaison de données (DLC) à 16 broches du véhicule.
2.1 pour BMW
1. Connectez 7910
2. 7910 Caractéristiques
Choisissez [Pour BMW] puis sélectionnez [For BMW Series Diagnose]. L'écran affichera toutes les séries de voitures. Comme suit:
26
Select Brand
Last Test ShortcutFor BMW Series DiagnoseFor MINI Series DiagnoseFor Rolls-Royce Series DiagnoseSelect System Diagnose
2/5
Select Chassis
F90(2017-Present)G30/G31(2017-Present)G38(2017-Present)
10/10
Select Series
For 1 SeriesFor 2 SeriesFor 3 SeriesFor 4 SeriesFor 5 SeriesFor 6 SeriesFor 7 Series
5/11
OBDII For bmw Oil reset
BMS resetBATEPB reset
Tool SetupETCS reset

Choisissez [Fonctions de base] et il s’affiche comme suit:
2.2 Fonctions de base
L'analyse du système consiste à analyser tous les systèmes du véhicule.La sélection manuelle consiste à afficher tous les systèmes possibles. Sélectionnez l'un des systèmes à diagnostiquer.
Choisissez [Sélection manuelle] et l’affichage se présente comme suit:
Par exemple: Choisissez [ECM Engine Control Module] et le message suivant s'affiche:
27
Select System Diagnose
CAS Car Access SystemECM Engine Control ModuleECM2 Engone Control Module 2EGS Transmission ABS/ACS/DSC Dynamic Stabilit...SRS Air BagFPB Electronic Parking Brake
1/86
Select Menu
System ScanManual Select
2/2
Select FunctionBasic FunctionsSpecial FunctionsErase All Systems Fault Codes
1/3
Select System Diagnose
CAS Car Access SystemECM Engine Control ModuleECM2 Engone Control Module 2EGS Transmission ABS/ACS/DSC Dynamic Stabilit...SRS Air BagFPB Electronic Parking Brake
1/86
Select Function
Version InformationRead Fault CodesErase Fault CodesRead Datastream
1/4
5
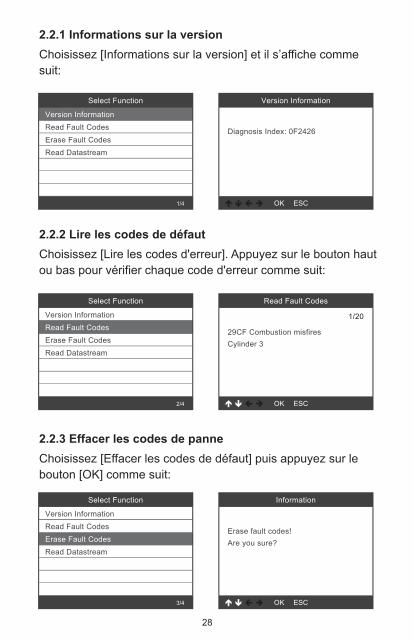
2.2.1 Informations sur la versionChoisissez [Informations sur la version] et il s’affiche comme suit:
2.2.2 Lire les codes de défautChoisissez [Lire les codes d'erreur]. Appuyez sur le bouton haut ou bas pour vérifier chaque code d'erreur comme suit:
2.2.3 Effacer les codes de panneChoisissez [Effacer les codes de défaut] puis appuyez sur le bouton [OK] comme suit:
28
Select Function
Version InformationRead Fault CodesErase Fault CodesRead Datastream
1/4
Select Function
Version InformationRead Fault CodesErase Fault CodesRead Datastream
2/4
Select Function
Version InformationRead Fault CodesErase Fault CodesRead Datastream
3/4
Version Information
Diagnosis Index: 0F2426
Read Fault Codes
29CF Combustion misfiresCylinder 3
1/20
Information
Erase fault codes!Are you sure?

29
Choisissez [Lire le flux de données] puis appuyez sur le bouton [OK] comme suit:
Choisissez [Sélectionner les éléments] et appuyez sur le bouton [OK] comme suit:
Vous devez appuyer à nouveau sur [OK] pour effacer les codes d'erreur. Ou vous pouvez appuyer sur la touche [ESC] pour annuler l’effacement des codes de panne, comme suit:
2.2.4 Lire le flux de données
Select Function
Version InformationRead Fault CodesErase Fault CodesRead Datastream
4/4
Select Function
View All ItemsSelect Items
2/2
Select DatastreamAll Datastream Of Page[v]
[v]
[v]
[v]
[v]
Engine speed[rpm]
DISA potentiometer voltage[v]
Throttle opening[%]
Throttle opening[%]
1~4/6
Version Information
Erase fault codes had success.Please wait 10 seconds, Turn ignition off and Switch on again.Read fault codes to verify.

1~4/7
Appuyez sur les touches [LEFT] et [RIGHT] pour faire défilerAppuyez sur les boutons [UP] et [DOWN] pour sélectionner un par unAppuyez sur le bouton [OK] pour sélectionner le flux de données.Appuyez sur le bouton [ESC] pour lire Datastream
Choisissez [Fonctions spéciales] et l’affichage se présente comme suit:
2.3 Fonctions spéciales
Choisissez [Fonction CBS (fonction de service)] et l’affichage se fait comme suit:
[ Réinitialisation CBS 1]: Huile moteur, Bougies d’allumage, Freins avant, Freins arrière, Liquide de refroidissement, Filtre à particules diesel, Liquide de frein, Microfiltre, Contrôle du véhicule, Contrôle des émissions de gaz d’échappement,
2.3.1 Fonctions CBS
30
德
Select Function
Basic FunctionsSpecial FunctionsErase All Systems Fault Codes
2/3
Select Function
CBS Function(Service Function)Reset Control UnitECM Engine Control ModuleElectric fuel pumpBattery ManagementEPB Electronic Parking BrakeSteering-angle Sensor
1/9
CBS Function(Service Function)
Oil resetCBS ResetCBS Correction
1/3
Oil reset
This function will perform’ engine oil reset’ and ‘vehicle check reset’.Note! The vehicle check is related to the engine oil. After the oil is
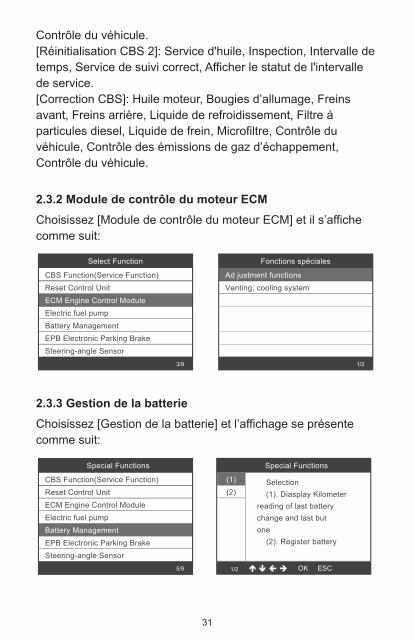
Contrôle du véhicule.[Réinitialisation CBS 2]: Service d'huile, Inspection, Intervalle de temps, Service de suivi correct, Afficher le statut de l'intervalle de service.[Correction CBS]: Huile moteur, Bougies d’allumage, Freins avant, Freins arrière, Liquide de refroidissement, Filtre à particules diesel, Liquide de frein, Microfiltre, Contrôle du véhicule, Contrôle des émissions de gaz d’échappement, Contrôle du véhicule.
Select Function
CBS Function(Service Function)Reset Control UnitECM Engine Control ModuleElectric fuel pumpBattery ManagementEPB Electronic Parking BrakeSteering-angle Sensor
3/9
Fonctions spéciales
Ad justment functionsVenting, cooling system
1/2
Choisissez [Module de contrôle du moteur ECM] et il s’affiche comme suit:
2.3.2 Module de contrôle du moteur ECM
CBS Function(Service Function)Reset Control UnitECM Engine Control ModuleElectric fuel pumpBattery ManagementEPB Electronic Parking BrakeSteering-angle Sensor
5/9
Choisissez [Gestion de la batterie] et l’affichage se présente comme suit:
2.3.3 Gestion de la batterie
31
1/2
Selection (1). Diasplay Kilometerreading of last batterychange and last butone (2). Register battery
(2)(1)
Special FunctionsSpecial Functions

Étape 2: Utilisez les boutons haut ou bas pour sélectionner l'option (1), puis appuyez sur le bouton [OK] pour afficher le menu suivant:
Étape 1: Utilisez les boutons haut ou bas pour sélectionner l'option (2), puis appuyez sur le bouton [OK] pour remplacer la pile et enregistrer le menu suivant:
(1)
2/2
Selection (1). Diasplay distance reading at last battery exchange and on before last. (2). Register battery
Special Functions
(2)(3)
1/3
(2)(1)
32
The battyreplacement is eneredin the DME/DDE in the next test step! The engine does not have to be running and
The battery replacemnt isentered in the engineelectronics (DME OR DDE) Please wait!
Choisissez [EPB Electronic Frein] et l’affichage se présente comme suit:
2.3.4 Frein de stationnement électronique EPB
Special Functions
CBS Function(Service Function)Reset Control UnitECM Engine Control ModuleElectric fuel pumpBattery ManagementEPB Electronic Parking BrakeSteering-angle Sensor
6/9
EPB Parking brake
Workshop modeStartupParking brake: Bedding-in proce...
1/3
Special Functions
Special Functions Special Functions
The battery replacement wasregistered successfully in theDME/DDE) The folloeing is now enteredin the DME/DDE: Last battery replacement:
33
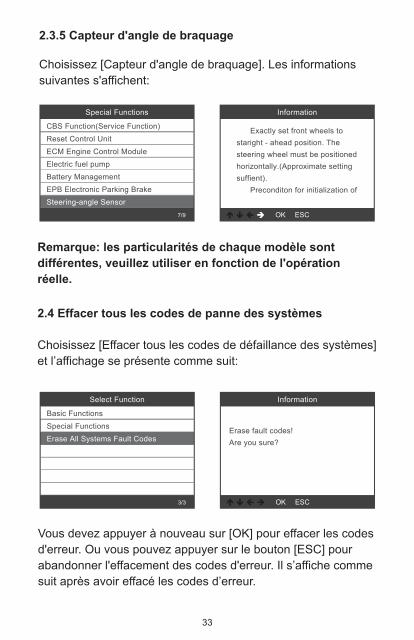
Choisissez [Capteur d'angle de braquage]. Les informations suivantes s'affichent:
Remarque: les particularités de chaque modèle sont différentes, veuillez utiliser en fonction de l'opération réelle.
2.3.5 Capteur d'angle de braquage
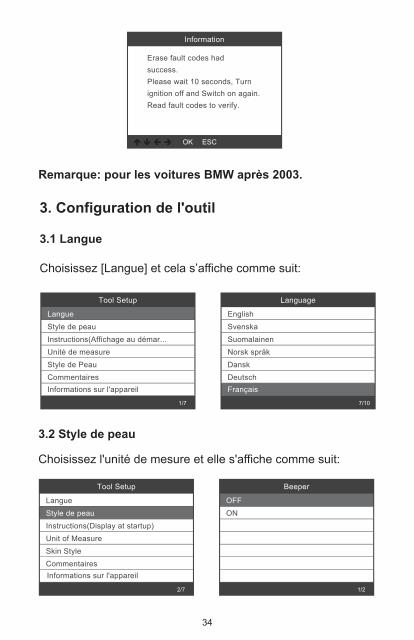
Choisissez [Effacer tous les codes de défaillance des systèmes] et l’affichage se présente comme suit:
Vous devez appuyer à nouveau sur [OK] pour effacer les codes d'erreur. Ou vous pouvez appuyer sur le bouton [ESC] pour abandonner l'effacement des codes d'erreur. Il s’affiche comme suit après avoir effacé les codes d’erreur.
2.4 Effacer tous les codes de panne des systèmes
CBS Function(Service Function)Reset Control UnitECM Engine Control ModuleElectric fuel pumpBattery ManagementEPB Electronic Parking BrakeSteering-angle Sensor
7/9
Information
Exactly set front wheels to staright - ahead position. The steering wheel must be positioned horizontally.(Approximate setting suffient). Preconditon for initialization of
Special Functions
Select Function
Basic FunctionsSpecial FunctionsErase All Systems Fault Codes
3/3
Information
Erase fault codes! Are you sure?
1. LCD DISPLAY - Indique les résultats du test. Écran rétroé-clairé de 320 x 240 pixels.
Remarque: pour les voitures BMW après 2003.
34
Tool Setup
LangueStyle de peauInstructions(Affichage au démar...Unité de measureStyle de PeauCommentairesInformations sur l'appareil
1/7
Language
EnglishSvenskaSuomalainenNorsk språkDanskDeutschFrançais
7/10
Choisissez [Langue] et cela s’affiche comme suit:
3. Configuration de l'outil
3.1 Langue
Tool Setup
LangueStyle de peauInstructions(Display at startup)Unit of MeasureSkin StyleCommentaires
2/7
Beeper
OFFON
1/2
Choisissez l'unité de mesure et elle s'affiche comme suit:
3.2 Style de peau
Informations sur l'appareil
Information
Erase fault codes hadsuccess.Please wait 10 seconds, Turnignition off and Switch on again.Read fault codes to verify.

35
1. S'il indique une erreur de connexion avec le véhicule ou un autre problème lors de l'utilisation, veuillez utiliser la fonction de retour. Choisissez [Commentaires] et il s’affiche comme suit:
Suivant: Appuyez plusieurs fois sur le bouton EXIT pour revenir au menu principal.
3.3 Commentaires
Tool Setup
LangueStyle de peauInstructions(Display at startup)Unit of MeasureSkin StyleCommentaires
6/7
2. Par exemple: Enregistrer le changement de batterie a échoué Entrez dans l’option [Enregistrer le changement de batterie], puis inscrivez à nouveau le changement de batterie (cette étape est très importante).
Remarque: Gardez l'outil connecté à la voiture dans les étapes ci-dessus.
3. Après avoir changé la batterie de registre, déconnectez-vous de la voiture.
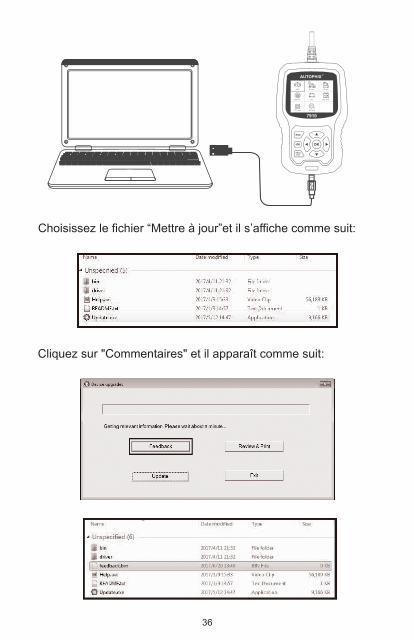
4. Transférez des données sur votre ordinateur et générez un fichier de commentaires (vous devez télécharger le fichier de mise à niveau sur l'ordinateur à partir du site Web AUTOPHIX). Le périphérique est connecté à l'ordinateur via un câble USB.
Feedback
L'enregistrement automatique est prêt. Exécutez les fonctions associées qui nécessitent un retour d’informations. Après l'exécution,déconnectez la voiture,connecter
Informations sur l'appareil
36
Choisissez le fichier “Mettre à jour”et il s’affiche comme suit:
Cliquez sur "Commentaires" et il apparaît comme suit:
OBDII For bmw Oil reset
BMS resetBATEPB reset
Tool SetupETCS reset
7910
37
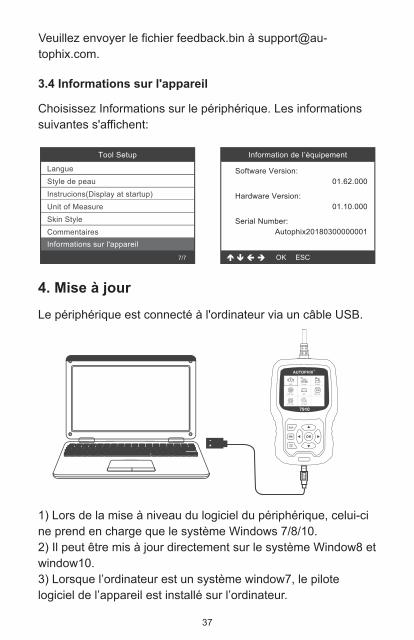
4. Mise à jourLe périphérique est connecté à l'ordinateur via un câble USB.
1) Lors de la mise à niveau du logiciel du périphérique, celui-ci ne prend en charge que le système Windows 7/8/10.2) Il peut être mis à jour directement sur le système Window8 et window10.3) Lorsque l’ordinateur est un système window7, le pilote logiciel de l’appareil est installé sur l’ordinateur.
Veuillez envoyer le fichier feedback.bin à [email protected].
Choisissez Informations sur le périphérique. Les informations suivantes s'affichent:
3.4 Informations sur l'appareil
Tool Setup
LangueStyle de peauInstrucions(Display at startup)Unit of MeasureSkin StyleCommentaires
7/7
Software Version:
Hardware Version:
Serial Number:
01.62.000
01.10.000
Autophix20180300000001Informations sur l'appareil
Information de I’équipement
OBDII For bmw Oil reset
BMS resetBATEPB reset
Tool SetupETCS reset
7910

38
Sicherheitshinweise und Warnungen
ÜBER 7910
Um die Gefahr von Verletzungen oder Schäden am Fahrzeugund/oder dem Abtastwerkzeug zu vermeiden, bitte dieseBedienungsanleitung aufmerksam durchlesen und dienachfolgenden Sicherheitshinweise bei jeglicher Arbeit amFahrzeug befolgen:
Immer Fahrzeugüberprüfungen in sicherer Umgebuingausführen. Die Bedienung oder Beobachtung des Geräts während der Fahrt führt zur Ablenkung des Fahrers und kann zu tödlichen Unfällen führen.Bitte tragen Sie stets Augenschutzausrüstung, die den ANSI-Normen entspricht. Das Fahrzeug in einer gut belüfteten Umgebung laufen lassen; Abgase sind giftig.Das Getrieb auf PARKEN stellen (bei Automatikgetriebe)oder auf NEUTRALschalten (bei Gangschaltung) undsicherstellen, dass die Parkbremse aktiviert wurde.Halten Sie das Abtastwerkzeug trocken, sauber und frei vonÖl/Wasser oder Schmiermittel. Ein sanftes Reinigungsmittelauf einem sauberen Lappen verwenden, um, wann immernotwendig, die Außenseite des Abtastwerkzeugs zu reinigen.
1) 7910-Unterstützung für Fahrzeuge der Marken BMW, Mini und Rolls-Royce. Es funktioniert auf allen Systemen wie Motor, Getriebe, ABS und Airbag usw.2) Unterstützt OBDII / EOBD-Betriebsarten
1. Deckung
• 2,8-Zoll-LCD-Farbdisplay mit 320 x 240 Pixel• Betriebsspannung: 8V-18V• Betriebstemperatur: 0 ° C-60 ° C• Lagertemperatur: -20 ° C-70 ° C
2. Produktspezifikation
39
7910
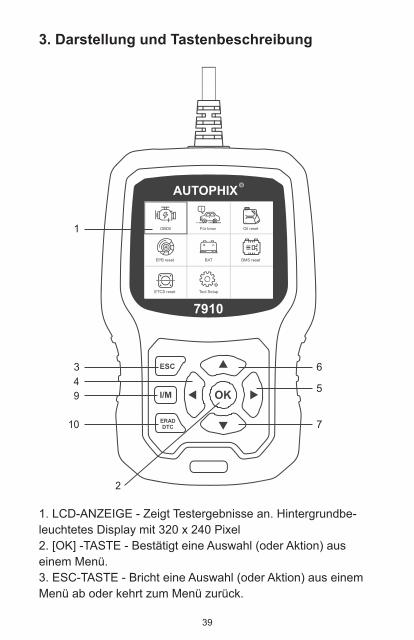
3. Darstellung und Tastenbeschreibung
1. LCD-ANZEIGE - Zeigt Testergebnisse an. Hintergrundbe-leuchtetes Display mit 320 x 240 Pixel2. [OK] -TASTE - Bestätigt eine Auswahl (oder Aktion) aus einem Menü.3. ESC-TASTE - Bricht eine Auswahl (oder Aktion) aus einem Menü ab oder kehrt zum Menü zurück.
OBDII Für bmw Oil reset
BMS resetBATEPB reset
Tool SetupETCS reset
1
3 6
5
7
2
4
10
9

40
10. [READ DTC] -TASTE - Schnell die Fehlercodes des Fahrzeugs lesen.
4. [LEFT] SCROLL-TASTE - Im Menümodus durch das Menü und Untermenü nach links bewegen, beim Rollen in einer Datenschnittstelle mit der linken Taste zum letzten Bildschirm bewegen.5. [RECHTS] -SCROLLTASTE - Bewegen Sie sich im Menümo-dus durch das Menü und den Untermenüpunkt nach rechts. Wenn Sie sich in der Datenschnittstelle bewegen, können Sie die rechte Taste zum nächsten Bildschirm bewegen.6. [UP] -SCROLLTASTE - Im Menümodus durch das Menü und den Untermenüpunkt nach oben bewegen. Wenn Sie Daten für mehr als einen Bildschirm abrufen, bewegen Sie den Bildschirm nach oben, um weitere Daten auf dem vorherigen Bildschirm anzuzeigen.7. [DOWN] -SCROLLTASTE - Bewegt sich im Menümodus durch das Menü und den Untermenüpunkt nach unten. Wenn Sie Daten von mehr als einem Bildschirm abrufen, bewegen Sie sich für weitere Daten nach unten zum nächsten Bildschirm.8. OBD-16PIN-ANSCHLUSS - Verbindet den Diagnose-Tester mit dem Data Link Connector (DLC) des Fahrzeugs.9. [I / M] -TASTE - Schnellprüfung der Emissionsbereitschaft und Überprüfung des Fahrzyklus.
Bemerkungen:
MIL Gelb-Dashboard MIL ON
MIL Gray-Dashboard MIL AUS
-nicht unterstützt
-Komplett
-unvollständig
I/M Readiness
41
Operation instructions
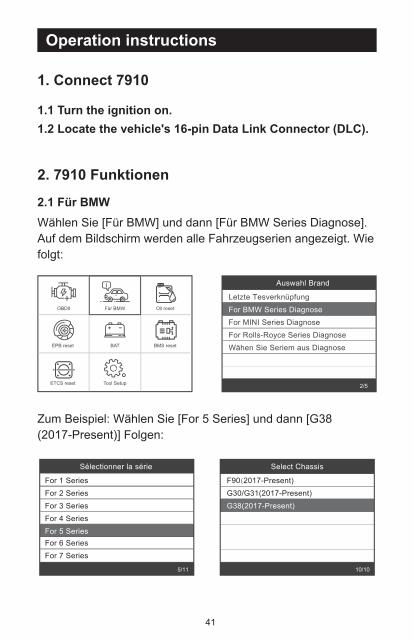
Zum Beispiel: Wählen Sie [For 5 Series] und dann [G38 (2017-Present)] Folgen:
1.1 Turn the ignition on.1.2 Locate the vehicle's 16-pin Data Link Connector (DLC).
2.1 Für BMW
1. Connect 7910
2. 7910 Funktionen
Wählen Sie [Für BMW] und dann [Für BMW Series Diagnose]. Auf dem Bildschirm werden alle Fahrzeugserien angezeigt. Wie folgt:
OBDII Für BMW Oil reset
BMS resetBATEPB reset
Tool SetupETCS reset
Auswahl Brand
Letzte Tesverknüpfung For BMW Series DiagnoseFor MINI Series DiagnoseFor Rolls-Royce Series DiagnoseWähen Sie Seriem aus Diagnose
2/5
Select Chassis
F90(2017-Present)G30/G31(2017-Present)G38(2017-Present)
10/10
Sélectionner la série
For 1 SeriesFor 2 SeriesFor 3 SeriesFor 4 SeriesFor 5 SeriesFor 6 SeriesFor 7 Series
5/11
42
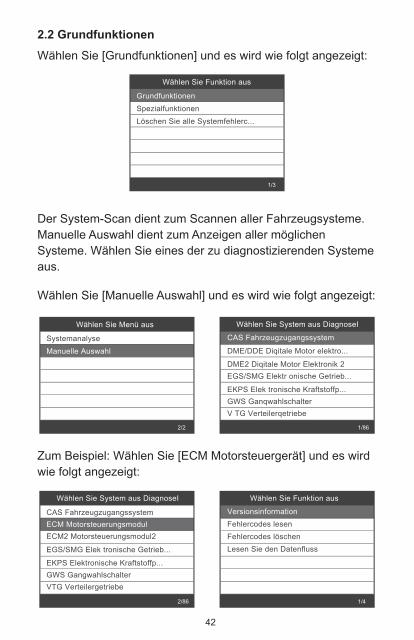
Wählen Sie [Grundfunktionen] und es wird wie folgt angezeigt:
2.2 Grundfunktionen
1/86
2/86 1/4
Wählen Sie Menü aus
SystemanalyseManuelle Auswahl
2/2
Wählen Sie Funktion aus
GrundfunktionenSpezialfunktionenLöschen Sie alle Systemfehlerc...
1/3
Der System-Scan dient zum Scannen aller Fahrzeugsysteme.Manuelle Auswahl dient zum Anzeigen aller möglichen Systeme. Wählen Sie eines der zu diagnostizierenden Systeme aus.
Wählen Sie [Manuelle Auswahl] und es wird wie folgt angezeigt:
Zum Beispiel: Wählen Sie [ECM Motorsteuergerät] und es wird wie folgt angezeigt:
Wählen Sie System aus DiagnoseI
CAS Fahrzeugzugangssystem
DME/DDE Diqitale Motor elektro...
DME2 Diqitale Motor Elektronik 2EGS/SMG Elektr onische Getrieb...
EKPS Elek tronische Kraftstoffp...GWS GanqwahlschalterV TG Verteilerqetriebe
CAS FahrzeugzugangssystemECM MotorsteuerungsmodulECM2 Motorsteuerungsmodul2
EGS/SMG Elek tronische Getrieb...
EKPS Elektronische Kraftstoffp...GWS GangwahlschalterVTG Verteilergetriebe
Wählen Sie System aus DiagnoseI Wählen Sie Funktion aus
VersionsinformationFehlercodes lesenFehlercodes löschenLesen Sie den Datenfluss

43
2.2.1 Versions informationenWählen Sie [Versionsinformationen] und es wird wie folgt angezeigt:
Versionsinformation
Diagnoseindex: 0F17B0
2.2.2 Fehlercodes lesenWählen Sie [Fehlercodes lesen]. Drücken Sie die Hoch- oder Runter-Taste, um jeden Fehlercode wie folgt zu überprüfen:
Fehlercodes lesen
100101 Drosselklappe, ständigblockiert: Fehlfunktion
1/3
2.2.3 Fehlercodes löschenWählen Sie [Fehlercodes löschen] und drücken Sie die Taste [OK] wie folgt:
Informationen
Fehlercodes löschen!Sind Sie sicher?
1/4
Wählen Sie Funktion aus
VersionsinformationFehlercodes lesenFehlercodes löschenLesen Sie den Datenfluss
2/4
Wählen Sie Funktion ausVersionsinformation
Fehlercodes lesenFehlercodes löschenLesen Sie den Datenfluss
3/4
Wählen Sie Funktion ausVersionsinformationFehlercodes lesenFehlercodes löschenLesen Sie den Datenfluss
44
Datenstrom
Alle Items sehenItems wählen
2/2
[v]
[v]
[v]
[v]
[v]
1~4/7
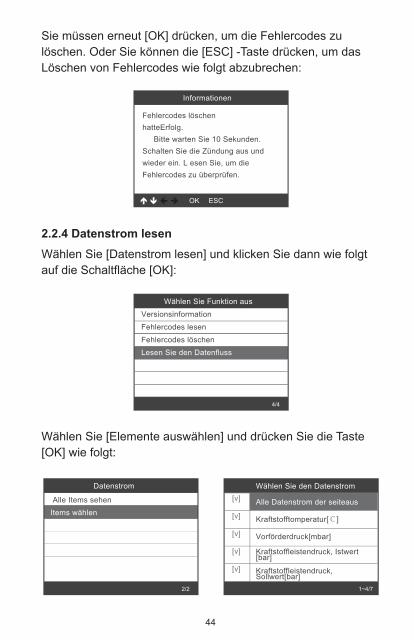
Wählen Sie [Datenstrom lesen] und klicken Sie dann wie folgt auf die Schaltfläche [OK]:
Wählen Sie [Elemente auswählen] und drücken Sie die Taste [OK] wie folgt:
Sie müssen erneut [OK] drücken, um die Fehlercodes zu löschen. Oder Sie können die [ESC] -Taste drücken, um das Löschen von Fehlercodes wie folgt abzubrechen:
2.2.4 Datenstrom lesen
Fehlercodes löschen hatteErfolg. Bitte warten Sie 10 Sekunden.Schalten Sie die Zündung aus undwieder ein. L esen Sie, um dieFehlercodes zu überprüfen.
Informationen
4/4
Wählen Sie Funktion ausVersionsinformationFehlercodes lesenFehlercodes löschenLesen Sie den Datenfluss
Wählen Sie den Datenstrom
Alle Datenstrom der seiteaus
Kraftstofftomperatur[℃]
Vorförderdruck[mbar]
Kraftstoffleistendruck, Istwert[bar]
Kraftstoffleistendruck,Sollwert[bar]

45
Wählen Sie Funktion aus
GrundfunktionenSpezialfunktionenLöschen Sie alle Systemfehlerc...
2/3
CBS Funkunktionen
Oil resetCBS ResetCBS Correction
1/3
Drücken Sie die Tasten [LINKS] und [RECHTS], um zu blätternDrücken Sie die Tasten [UP] und [DOWN], um eine nach der anderen auszuwählenDrücken Sie die Taste [OK], um den Datenstrom auszuwählenDrücken Sie die [ESC] -Taste, um den Datenstrom zu lessen
Oil reset
Diese Funktion führt ein Zurücksetzen des Motoröls und ein Zurücksetzen der Fahrzeugprüfung durch.Hinweis!Die Fahrzeugüberprüfung bezieht sich auf das Motoröl. Nach dem
Wählen Sie [Sonderfunktionen] und es wird wie folgt angezeigt:
2.3 Sonder funktionen
Wählen Sie [CBS Function (Service Function)] und es wird wie folgt angezeigt:
[CBS reset 1]: Motoröl, Zündkerzen, Vorderradbremsen, Hinterradbremsen, Kühlmittel, Dieselpartikelfilter, Bremsflüs-sigkeit, Mikrofilter, Fahrzeugprüfung, Abgasuntersuchung, Fahrzeugprüfung.[CBS reset 2]: Ölservice, Inspektion, Zeitintervall, Korrekter
2.3.1 CBS-Funktionen
CBS Function(Service Function)Reset Control UnitECM MotorsteuerungsmodulElektrische KraftstoffpumpeBatterie ManagementEPB Electronische ParkbremseLenkwinkelsensor
1/9
Sonder Funktionen

46
Folgeservice, Status des Serviceintervalls anzeigen.[CBS-Korrektur]: Motoröl, Zündkerzen, Vorderradbremsen, Hinterradbremsen, Kühlmittel, Dieselpartikelfilter, Bremsflüs-sigkeit, Mikrofilter, Fahrzeugprüfung, Abgasuntersuchung, Fahrzeugprüfung.
Wählen Sie [ECM Engine Control Module] und es wird wie folgt angezeigt:
2.3.2 ECM-Motorsteuergerät
Wählen Sie [Battery Management] und es wird wie folgt angezeigt:
Schritt 1: Wählen Sie die Option (2) und drücken Sie die Taste [OK], um den Batteriewechsel zu aktivieren und das folgende Menü anzuzeigen:
2.3.3 Batteriemanagement
Spezialfunktionen
LuftmassenmesserElektrische KraftstoffpumpeMengen-MittelwertanpassungleerlaufdrehzahlInjektormengenabgleichEntlüftung KraftstoffsystemRegeneration Partikelfilter
3/10
CBS Function(Service Function)Reset Control UnitECM MotorsteuerungsmodulElektrische KraftstoffpumpeBatterie ManagementEPB Electronische ParkbremseLenkwinkelsensor
3/9
Sonder Funktionen
CBS Function(Service Function)Reset Control UnitECM MotorsteuerungsmodulElektrische KraftstoffpumpeBatterie ManagementEPB Electronische ParkbremseLenkwinkelsensor
5/9
Sonder Funktionen
1/2
Auswahl (1). Kilometerstanddes letzten undvorletztenBatterieaustauschesanzeigen.
(2)
Spezialfunktionen
(1)

47
Schritt 2: Wählen Sie mit der Aufwärts- oder Abwärtstaste die Option (1) und drücken Sie die Taste [OK], um das folgende Menü anzuzeigen:
(1)
2/2
(2)(3)
1/3
Im nächstenTestschritt wirdBatteriewechsel in dieDME/DDE eingetragenlMotor muss nichtIaufen und KI.15 ein
(2)(1)
Batteriewechsel wird in derMotorelektronik (DME oder DDE)eingetragenBitte warten!
(1)
Wählen Sie [Elektronische Parkbremse EPB] und es wird wie folgt angezeigt:
2.3.4 Elektronische Parkbremse EPB
EPB Parking brake
WerkstattmodeInbetriebnahmeEMF: Einbremsvorgang
1/3
Spezialfunktionen Spezialfunktionen
Auswahl (1). Kilometerstanddes letzten undvorletztenBatterieaustauschesanzeigen.
Spezialfunktionen Spezialfunktionen
Der Batteriewechsel wurdeerfolgreich in die DME/DDEregistiert.In der DME/DDE ist nunfolgendes eingetragen:Letzter Batteriewechsel:
CBS Function(Service Function)Reset Control UnitECM MotorsteuerungsmodulElektrische KraftstoffpumpeBatterie ManagementEPB Electronische ParkbremseLenkwinkelsensor
6/9
Sonder Funktionen

48
Wählen Sie [Lenkwinkelsensor] und es wird wie folgt angezeigt:
Hinweis: Die Besonderheiten der einzelnen Modelle sind je nach tatsächlichem Betrieb unterschiedlich.
2.3.5 Lenkwinkelsensor
Wählen Sie [Alle Systemfehlercodes löschen] und es wird wie folgt angezeigt:
Sie müssen erneut [OK] drücken, um die Fehlercodes zu löschen. Oder Sie können die Taste [ESC] drücken, um das Löschen der Fehlercodes aufzugeben. Nach dem Löschen der Fehlercodes wird Folgendes angezeigt.
2.4 Alle Systemfehlercodes löschen
Information
Fehlercodes löschen!Sind Sie sicher?
Information
Setzen Sie die Vorderrädergenau in Geradeausstellung. DasLenkrad muss horizontalausgerichtet werden.(Sicht-Schätzung ausreichend). Voraussetzung für die
Wählen Sie Funktion aus
GrundfunktionenSpezialfunktionenLöschen Sie alle Systemfehlerc...
3/3
CBS Function(Service Function)Reset Control UnitECM MotorsteuerungsmodulElektrische KraftstoffpumpeBatterie ManagementEPB Electronische ParkbremseLenkwinkelsensor
7/9
Sonder Funktionen
49
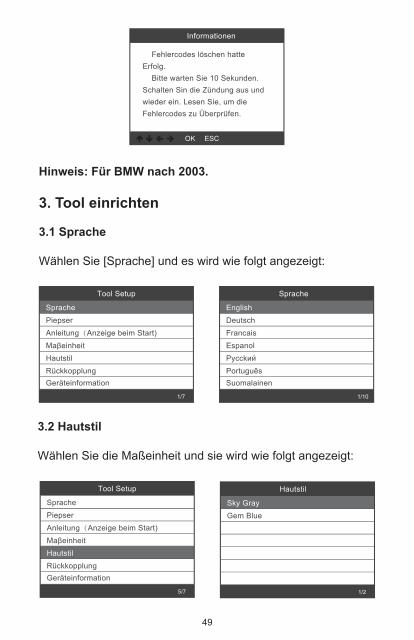
Hinweis: Für BMW nach 2003.
Informationen
Fehlercodes löschen hatteErfolg. Bitte warten Sie 10 Sekunden.Schalten Sin die Zündung aus undwieder ein. Lesen Sie, um dieFehlercodes zu Überprüfen.
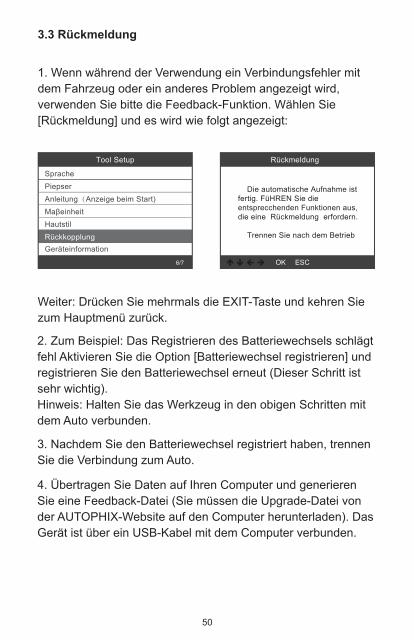
Tool Setup
SprachePiepserAnleitung(Anzeige beim Start)MaβeinheitHautstilRückkopplungGeräteinformation
1/7
Sprache
EnglishDeutschFrancaisEspanolPycckийPortuguēsSuomalainen
1/10
Wählen Sie [Sprache] und es wird wie folgt angezeigt:
3. Tool einrichten
3.1 Sprache
Wählen Sie die Maßeinheit und sie wird wie folgt angezeigt:
3.2 Hautstil
Hautstil
Sky GrayGem Blue
1/2
Tool Setup
SprachePiepserAnleitung(Anzeige beim Start)MaβeinheitHautstilRückkopplungGeräteinformation
5/7
50
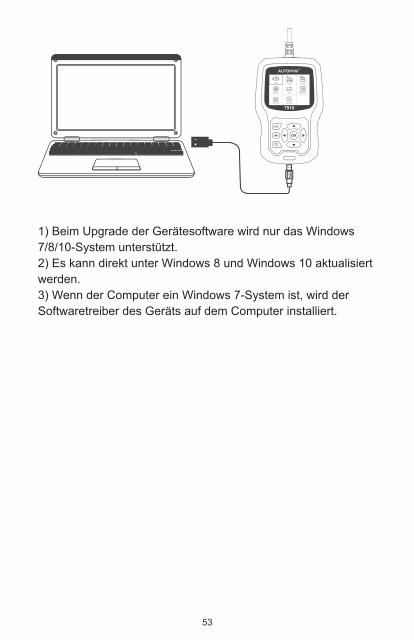
1. Wenn während der Verwendung ein Verbindungsfehler mit dem Fahrzeug oder ein anderes Problem angezeigt wird, verwenden Sie bitte die Feedback-Funktion. Wählen Sie [Rückmeldung] und es wird wie folgt angezeigt:
Weiter: Drücken Sie mehrmals die EXIT-Taste und kehren Sie zum Hauptmenü zurück.
2. Zum Beispiel: Das Registrieren des Batteriewechsels schlägt fehl Aktivieren Sie die Option [Batteriewechsel registrieren] und registrieren Sie den Batteriewechsel erneut (Dieser Schritt ist sehr wichtig).Hinweis: Halten Sie das Werkzeug in den obigen Schritten mit dem Auto verbunden.
4. Übertragen Sie Daten auf Ihren Computer und generieren Sie eine Feedback-Datei (Sie müssen die Upgrade-Datei von der AUTOPHIX-Website auf den Computer herunterladen). Das Gerät ist über ein USB-Kabel mit dem Computer verbunden.
3. Nachdem Sie den Batteriewechsel registriert haben, trennen Sie die Verbindung zum Auto.
3.3 Rückmeldung
西
Rückmeldung
Die automatische Aufnahme istfertig. FüHREN Sie dieentsprecchenden Funktionen aus,die eine Rückmeldung erfordern.
Trennen Sie nach dem Betrieb
Tool Setup
SprachePiepserAnleitung(Anzeige beim Start)MaβeinheitHautstilRückkopplungGeräteinformation
6/7

51
Wählen Sie " Aktualisieren " -Datei und es wird wie folgt angezeigt:
Klicken Sie auf " Rückmeldung" und es wird wie folgt angezeigt:
OBDII Für bmw Oil reset
BMS resetBATEPB reset
Tool SetupETCS reset
7910

52
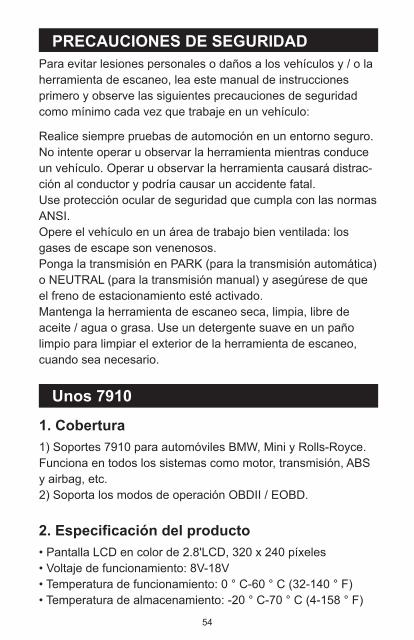
4. Aktualisieren
Das Gerät ist über ein USB-Kabel mit dem Computer verbund-en.
Bitte senden Sie die Datei feedback.bin an [email protected].
Wählen Sie Geräteinformationen und es wird wie folgt ange-zeigt:
3.4 Geräteinformationen
Device Information
Softwareversion:
Hardwareversion:
Serial Number:
01.68.000
01.30.000
Autophix20170500266457
Tool Setup
SprachePiepserAnleitung(Anzeige beim Start)MaβeinheitHautstilRückkopplungGeräteinformation
7/7
53
1) Beim Upgrade der Gerätesoftware wird nur das Windows 7/8/10-System unterstützt.2) Es kann direkt unter Windows 8 und Windows 10 aktualisiert werden.3) Wenn der Computer ein Windows 7-System ist, wird der Softwaretreiber des Geräts auf dem Computer installiert.
OBDII Für bmw Oil reset
BMS resetBATEPB reset
Tool SetupETCS reset
7910
54
PRECAUCIONES DE SEGURIDAD
Unos 7910
Para evitar lesiones personales o daños a los vehículos y / o la herramienta de escaneo, lea este manual de instrucciones primero y observe las siguientes precauciones de seguridad como mínimo cada vez que trabaje en un vehículo:
Realice siempre pruebas de automoción en un entorno seguro.No intente operar u observar la herramienta mientras conduce un vehículo. Operar u observar la herramienta causará distrac-ción al conductor y podría causar un accidente fatal.Use protección ocular de seguridad que cumpla con las normas ANSI.Opere el vehículo en un área de trabajo bien ventilada: los gases de escape son venenosos.Ponga la transmisión en PARK (para la transmisión automática) o NEUTRAL (para la transmisión manual) y asegúrese de que el freno de estacionamiento esté activado.Mantenga la herramienta de escaneo seca, limpia, libre de aceite / agua o grasa. Use un detergente suave en un paño limpio para limpiar el exterior de la herramienta de escaneo, cuando sea necesario.
1) Soportes 7910 para automóviles BMW, Mini y Rolls-Royce. Funciona en todos los sistemas como motor, transmisión, ABS y airbag, etc.2) Soporta los modos de operación OBDII / EOBD.
1. Cobertura
• Pantalla LCD en color de 2.8'LCD, 320 x 240 píxeles• Voltaje de funcionamiento: 8V-18V• Temperatura de funcionamiento: 0 ° C-60 ° C (32-140 ° F)• Temperatura de almacenamiento: -20 ° C-70 ° C (4-158 ° F)
2. Especificación del producto
55
7910
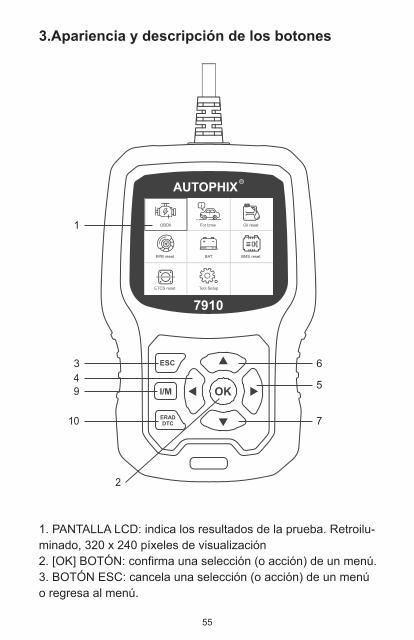
3.Apariencia y descripción de los botones
1. PANTALLA LCD: indica los resultados de la prueba. Retroilu-minado, 320 x 240 píxeles de visualización2. [OK] BOTÓN: confirma una selección (o acción) de un menú.3. BOTÓN ESC: cancela una selección (o acción) de un menú o regresa al menú.
OBDII For bmw Oil reset
BMS resetBATEPB reset
Tool SetupETCS reset
1
3 6
5
7
2
4
10
9
56
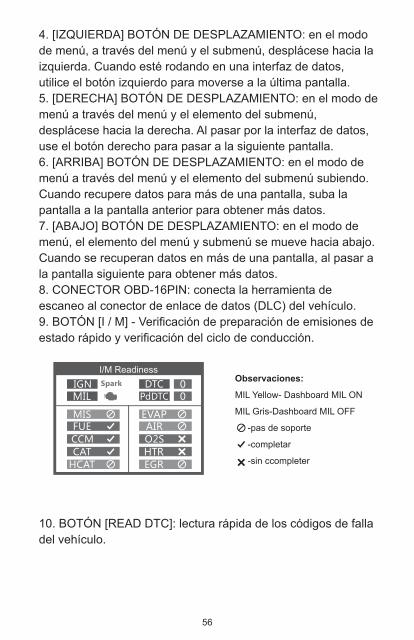
10. BOTÓN [READ DTC]: lectura rápida de los códigos de falla del vehículo.
4. [IZQUIERDA] BOTÓN DE DESPLAZAMIENTO: en el modo de menú, a través del menú y el submenú, desplácese hacia la izquierda. Cuando esté rodando en una interfaz de datos, utilice el botón izquierdo para moverse a la última pantalla.5. [DERECHA] BOTÓN DE DESPLAZAMIENTO: en el modo de menú a través del menú y el elemento del submenú, desplácese hacia la derecha. Al pasar por la interfaz de datos, use el botón derecho para pasar a la siguiente pantalla.6. [ARRIBA] BOTÓN DE DESPLAZAMIENTO: en el modo de menú a través del menú y el elemento del submenú subiendo. Cuando recupere datos para más de una pantalla, suba la pantalla a la pantalla anterior para obtener más datos.7. [ABAJO] BOTÓN DE DESPLAZAMIENTO: en el modo de menú, el elemento del menú y submenú se mueve hacia abajo. Cuando se recuperan datos en más de una pantalla, al pasar a la pantalla siguiente para obtener más datos.8. CONECTOR OBD-16PIN: conecta la herramienta de escaneo al conector de enlace de datos (DLC) del vehículo.9. BOTÓN [I / M] - Verificación de preparación de emisiones de estado rápido y verificación del ciclo de conducción.
Observaciones:
MIL Yellow- Dashboard MIL ON
MIL Gris-Dashboard MIL OFF
-pas de soporte
-completar
-sin ccompleter
I/M Readiness
57
Instrucciones de operación
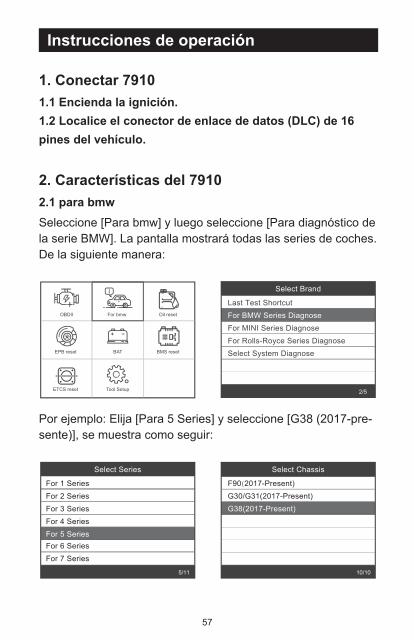
Por ejemplo: Elija [Para 5 Series] y seleccione [G38 (2017-pre-sente)], se muestra como seguir:
1.1 Encienda la ignición.1.2 Localice el conector de enlace de datos (DLC) de 16 pines del vehículo.
2.1 para bmw
1. Conectar 7910
2. Características del 7910
Seleccione [Para bmw] y luego seleccione [Para diagnóstico de la serie BMW]. La pantalla mostrará todas las series de coches. De la siguiente manera:
Select Brand
Last Test ShortcutFor BMW Series DiagnoseFor MINI Series DiagnoseFor Rolls-Royce Series DiagnoseSelect System Diagnose
2/5
Select Chassis
F90(2017-Present)G30/G31(2017-Present)G38(2017-Present)
10/10
Select Series
For 1 SeriesFor 2 SeriesFor 3 SeriesFor 4 SeriesFor 5 SeriesFor 6 SeriesFor 7 Series
5/11
OBDII For bmw Oil reset
BMS resetBATEPB reset
Tool SetupETCS reset
58
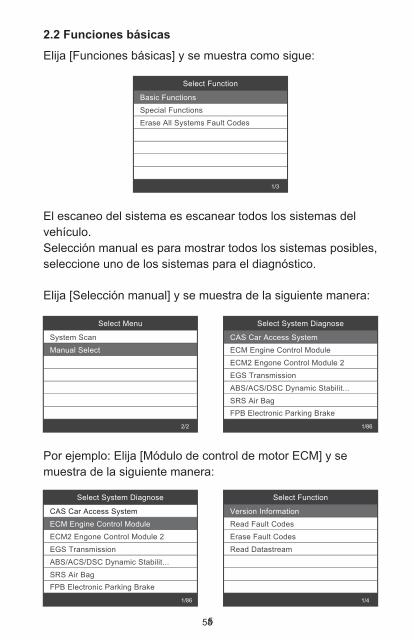
Elija [Funciones básicas] y se muestra como sigue:
2.2 Funciones básicas
El escaneo del sistema es escanear todos los sistemas del vehículo.Selección manual es para mostrar todos los sistemas posibles, seleccione uno de los sistemas para el diagnóstico.
Elija [Selección manual] y se muestra de la siguiente manera:
Por ejemplo: Elija [Módulo de control de motor ECM] y se muestra de la siguiente manera:
Select System Diagnose
CAS Car Access SystemECM Engine Control ModuleECM2 Engone Control Module 2EGS Transmission ABS/ACS/DSC Dynamic Stabilit...SRS Air BagFPB Electronic Parking Brake
1/86
Select Menu
System ScanManual Select
2/2
Select Function
Basic FunctionsSpecial FunctionsErase All Systems Fault Codes
1/3
Select System Diagnose
CAS Car Access SystemECM Engine Control ModuleECM2 Engone Control Module 2EGS Transmission ABS/ACS/DSC Dynamic Stabilit...SRS Air BagFPB Electronic Parking Brake
1/86
Select Function
Version InformationRead Fault CodesErase Fault CodesRead Datastream
1/4
5
59
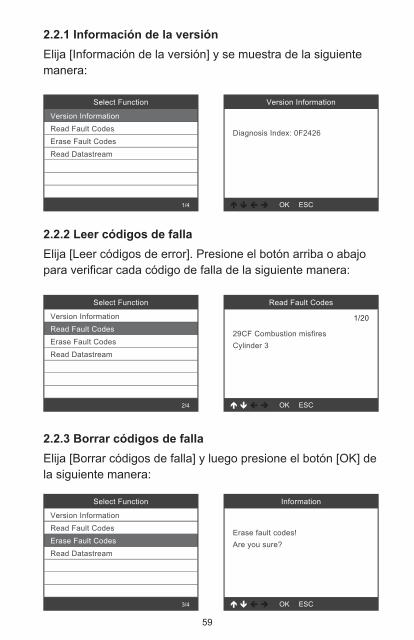
2.2.1 Información de la versiónElija [Información de la versión] y se muestra de la siguiente manera:
2.2.2 Leer códigos de fallaElija [Leer códigos de error]. Presione el botón arriba o abajo para verificar cada código de falla de la siguiente manera:
2.2.3 Borrar códigos de fallaElija [Borrar códigos de falla] y luego presione el botón [OK] de la siguiente manera:
Select Function
Version InformationRead Fault CodesErase Fault CodesRead Datastream
1/4
Select Function
Version InformationRead Fault CodesErase Fault CodesRead Datastream
2/4
Select Function
Version InformationRead Fault CodesErase Fault CodesRead Datastream
3/4
Version Information
Diagnosis Index: 0F2426
Read Fault Codes
29CF Combustion misfiresCylinder 3
1/20
Information
Erase fault codes!Are you sure?

60
Elija [Leer Datastream] y luego presione el botón [OK] como sigue:
Elija [Seleccionar artículos] y presione el botón [OK] de la siguiente manera:
Debe presionar [OK] nuevamente para borrar los códigos de falla. O puede presionar el botón [ESC] para renunciar a borrar los códigos de falla, de la siguiente manera:
2.2.4 Leer Datastream
4/4
Select Function
Version InformationRead Fault CodesErase Fault CodesRead Datastream
4/4
Select Function
View All ItemsSelect Items
2/2
Select DatastreamAll Datastream Of Page[v]
[v]
[v]
[v]
[v]
Engine speed[rpm]
DISA potentiometer voltage[v]
Throttle opening[%]
Throttle opening[%]
1~4/6
Version Information
Erase fault codes had success.Please wait 10 seconds, Turn ignition off and Switch on again.Read fault codes to verify.
61
2/86 1/4
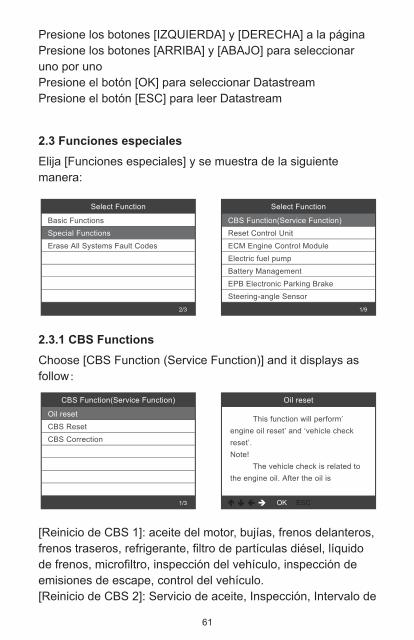
Presione los botones [IZQUIERDA] y [DERECHA] a la páginaPresione los botones [ARRIBA] y [ABAJO] para seleccionar uno por unoPresione el botón [OK] para seleccionar DatastreamPresione el botón [ESC] para leer Datastream
Elija [Funciones especiales] y se muestra de la siguiente manera:
2.3 Funciones especiales
Choose [CBS Function (Service Function)] and it displays as follow:
[Reinicio de CBS 1]: aceite del motor, bujías, frenos delanteros, frenos traseros, refrigerante, filtro de partículas diésel, líquido de frenos, microfiltro, inspección del vehículo, inspección de emisiones de escape, control del vehículo.[Reinicio de CBS 2]: Servicio de aceite, Inspección, Intervalo de
2.3.1 CBS Functions
Select Function
Basic FunctionsSpecial FunctionsErase All Systems Fault Codes
2/3
Select Function
CBS Function(Service Function)Reset Control UnitECM Engine Control ModuleElectric fuel pumpBattery ManagementEPB Electronic Parking BrakeSteering-angle Sensor
1/9
CBS Function(Service Function)
Oil resetCBS ResetCBS Correction
1/3
Oil reset
This function will perform’ engine oil reset’ and ‘vehicle check reset’.Note! The vehicle check is related to the engine oil. After the oil is
62
Select Function
CBS Function(Service Function)Reset Control UnitECM Engine Control ModuleElectric fuel pumpBattery ManagementEPB Electronic Parking BrakeSteering-angle Sensor
3/9
ECM Engine Control Module
Reset adaptation valuesIdle speedLearning Valvtronic limit positi...
1/3
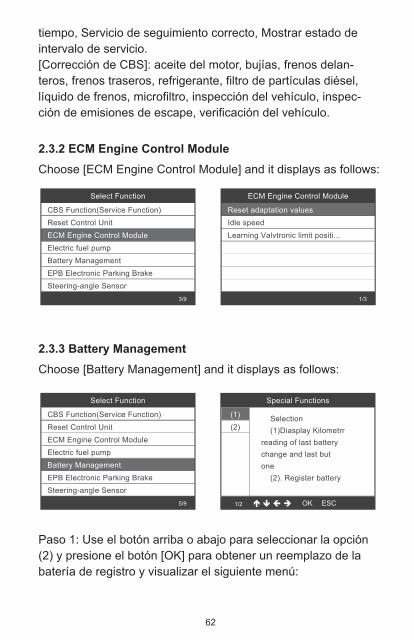
tiempo, Servicio de seguimiento correcto, Mostrar estado de intervalo de servicio.[Corrección de CBS]: aceite del motor, bujías, frenos delan-teros, frenos traseros, refrigerante, filtro de partículas diésel, líquido de frenos, microfiltro, inspección del vehículo, inspec-ción de emisiones de escape, verificación del vehículo.
Choose [ECM Engine Control Module] and it displays as follows:
2.3.2 ECM Engine Control Module
Select Function
CBS Function(Service Function)Reset Control UnitECM Engine Control ModuleElectric fuel pumpBattery ManagementEPB Electronic Parking BrakeSteering-angle Sensor
5/9
Choose [Battery Management] and it displays as follows:
Paso 1: Use el botón arriba o abajo para seleccionar la opción (2) y presione el botón [OK] para obtener un reemplazo de la batería de registro y visualizar el siguiente menú:
2.3.3 Battery Management
3/4
Special Functions
1/2
Selection (1)Diasplay Kilometrr reading of last battery change and last butone (2). Register battery
(2)(1)

63
Paso 2: Use el botón arriba o abajo para seleccionar la opción (1) y presione el botón [OK] para mostrar el siguiente menú:
Special Functions
(2)(3)
1/3
(1)
Special Functions Special Functions
Elija [EPB Electronic Parking brake] y se muestra de la siguiente manera:
2.3.4 Freno de estacionamiento electrónico EPB
Select Function
CBS Function(Service Function)Reset Control UnitECM Engine Control ModuleElectric fuel pumpBattery ManagementEPB Electronic Parking BrakeSteering-angle Sensor
6/9
EPB Parking brake
Workshop modeStartup
1/2
Special Functions
(1)
2/2
Selection (1)Diasplay Kilometrr reading of last battery change and last butone (2). Register battery
(2) The batteryreplacement is eneredin the DME/DDE in the next test step! The engine does not have to be running and
The battery replacement isentered in the engineelectronics(DME or DDE) Please wait!
The battery replacement wasregistered successfully in theDME/DDE) The folloeing is now enteredin the DME/DDE: Last battery replacement:
64
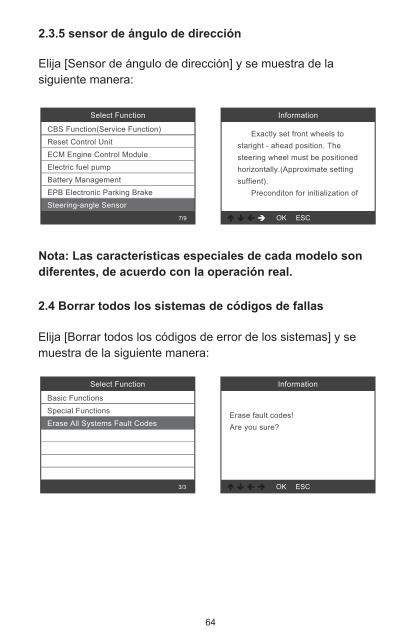
Elija [Sensor de ángulo de dirección] y se muestra de la siguiente manera:
Nota: Las características especiales de cada modelo son diferentes, de acuerdo con la operación real.
2.3.5 sensor de ángulo de dirección
Elija [Borrar todos los códigos de error de los sistemas] y se muestra de la siguiente manera:
2.4 Borrar todos los sistemas de códigos de fallas
Select Function
CBS Function(Service Function)Reset Control UnitECM Engine Control ModuleElectric fuel pumpBattery ManagementEPB Electronic Parking BrakeSteering-angle Sensor
7/9
Information
Exactly set front wheels to staright - ahead position. The steering wheel must be positioned horizontally.(Approximate setting suffient). Preconditon for initialization of
Select Function
Basic FunctionsSpecial FunctionsErase All Systems Fault Codes
3/3
Information
Erase fault codes! Are you sure?
65
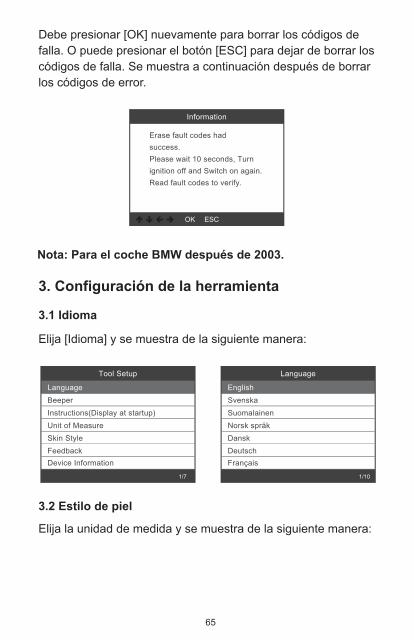
Debe presionar [OK] nuevamente para borrar los códigos de falla. O puede presionar el botón [ESC] para dejar de borrar los códigos de falla. Se muestra a continuación después de borrar los códigos de error.
Nota: Para el coche BMW después de 2003.
Tool Setup
LanguageBeeperInstructions(Display at startup)Unit of MeasureSkin StyleFeedbackDevice Information
1/7
Language
EnglishSvenskaSuomalainenNorsk språkDanskDeutschFrançais
1/10
Elija [Idioma] y se muestra de la siguiente manera:
3. Configuración de la herramienta
3.1 Idioma
Elija la unidad de medida y se muestra de la siguiente manera:
3.2 Estilo de piel
Information
Erase fault codes hadsuccess.Please wait 10 seconds, Turnignition off and Switch on again.Read fault codes to verify.

66
Tool Setup
LanguageBeeperInstructions(Display at startup)Unit of MeasureSkin StyleFeedbackDevice Information
5/7
Skin Style
Sky GrayGem Blue
1/2
Tool Setup
LanguageBeeperInstructions(Display at startup)Unit of MeasureSkin StyleFeedbackDevice Information
6/7
1. Si muestra un error de conexión con el vehículo u otro problema durante el uso, utilice la función de respuesta. Elija [Comentarios] y se muestra de la siguiente manera:
Siguiente: Presione el botón EXIT varias veces y regrese al menú principal.
2. Por ejemplo: Registro de cambio de batería fallidoIngrese a la opción [Registrar cambio de batería] y vuelva a registrar el cambio de batería (este paso es muy importante)Nota: Mantenga la herramienta conectada con el automóvil en los pasos anteriores.
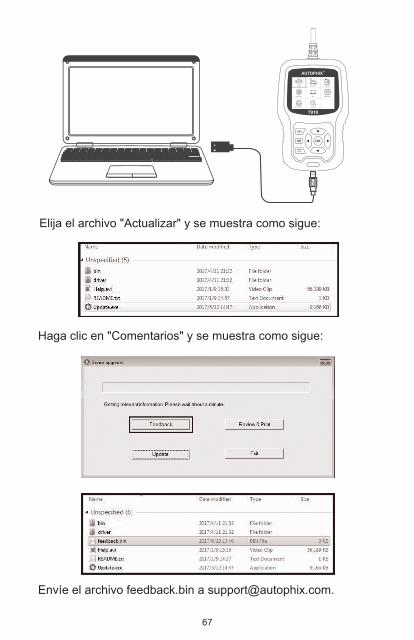
4. Transfiera datos a su computadora y genere un archivo de comentarios (necesita descargar el archivo de actualización en la computadora del sitio web de AUTOPHIX). El dispositivo está conectado a la computadora a través del cable USB.
3. Después de realizar el cambio de registro de la batería, desconectar con el coche.
3.3 Comentarios
Feedback
Automatic recording is ready, perform the related functions that require feedback. After the execution, disconnect the car, connect to the computer via USB use the
67
Elija el archivo "Actualizar" y se muestra como sigue:
Haga clic en "Comentarios" y se muestra como sigue:
Envíe el archivo feedback.bin a [email protected].
OBDII For bmw Oil reset
BMS resetBATEPB reset
Tool SetupETCS reset
7910
68
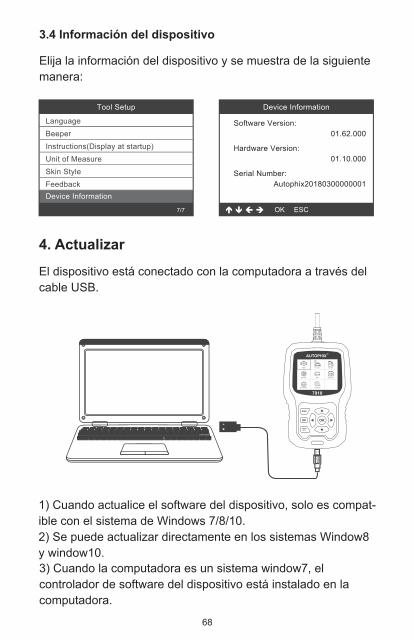
4. ActualizarEl dispositivo está conectado con la computadora a través del cable USB.
1) Cuando actualice el software del dispositivo, solo es compat-ible con el sistema de Windows 7/8/10.2) Se puede actualizar directamente en los sistemas Window8 y window10.3) Cuando la computadora es un sistema window7, el controlador de software del dispositivo está instalado en la computadora.
Elija la información del dispositivo y se muestra de la siguiente manera:
3.4 Información del dispositivo
Tool Setup
LanguageBeeperInstructions(Display at startup)Unit of MeasureSkin StyleFeedbackDevice Information
7/7
Device Information
Software Version:
Hardware Version:
Serial Number:
01.62.000
01.10.000
Autophix20180300000001
OBDII For bmw Oil reset
BMS resetBATEPB reset
Tool SetupETCS reset
7910

69
MISURE DI SICUREZZA
CIRCA 7910
Per prevenire lesioni personali o danni ai veicoli e / o allo strumento di scansione,Leggere prima questo manuale di istruzioni e osservare le seguenti precauzioni di sicurezza come minimo ogni volta che si lavora su un veicolo:
Esegui sempre i test automobilistici in un ambiente sicuro Non tentare di utilizzare o osservare lo strumento mentre si guida un veicolo,L'uso o l'osservazione dello strumento causerà la distrazione del guidatore e potrebbe causare un incidente mortale.Indossare protezioni per gli occhi di sicurezza conformi agli standard ANSI.Azionare il veicolo in un'area di lavoro ben ventilata:I gas di scarico sono velenosi.Mettere la trasmissione in PARK (per la trasmissione automati-ca) o NEUTRAL (per la trasmissione manuale) e assicurarsi che il freno di stazionamento sia inserito.Mantenere lo strumento di scansione asciutto, pulito, privo di olio / acqua o grasso. Utilizzare un detergente delicato su un panno pulito per pulire l'esterno dello strumento di scansione, se necessario.
1) 7910 supporti per auto di marca BMW, Mini e Rolls-Royce. Funziona su tutti i sistemi come motore, trasmissione, ABS e airbag ecc.2) Supporta le modalità di funzionamento OBDII / EOBD.
1. Copertura
• Schermo LCD da 2,8 ", 320 X 240 pixel• Tensione di funzionamento: 8V-18V• Temperatura di funzionamento: 0 ° C-60 ° C (32-140 ° F)• Temperatura di conservazione: -20 ° C-70 ° C (4-158 ° F)
2. Specifiche del prodotto
意70
7910
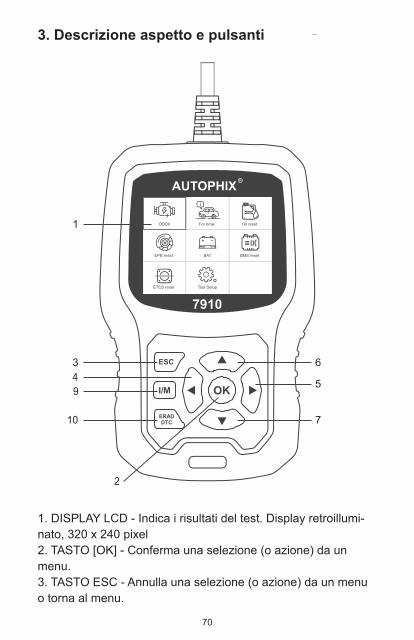
3. Descrizione aspetto e pulsanti
1. DISPLAY LCD - Indica i risultati del test. Display retroillumi-nato, 320 x 240 pixel2. TASTO [OK] - Conferma una selezione (o azione) da un menu.3. TASTO ESC - Annulla una selezione (o azione) da un menu o torna al menu.
OBDII For bmw Oil reset
BMS resetBATEPB reset
Tool SetupETCS reset
1
3 6
5
7
2
4
10
9

71
10. [READ DTC] BUTTON-Quick legge i codici di errore del veicolo.
4. [SINISTRA] PULSANTE DI SCORRIMENTO: nella modalità menu attraverso il menu e il sottomenu spostarsi a sinistra, quando si scorre in un'interfaccia dati, utilizzare il pulsante sinistro può essere spostato sull'ultima schermata.5. [DESTRA] PULSANTE DI SCORRIMENTO - Nella modalità menu attraverso il menu e la voce del sottomenu spostarsi a destra, quando si scorre nell'interfaccia dati, utilizzare il pulsante destro può essere spostato alla schermata succes-siva.6. [SU] PULSANTE SCORR. - nella modalità menu attraverso il menu e la voce del sottomenu che si sposta verso l'alto. Quando si recuperano dati per più di uno schermo spostando lo schermo alla schermata precedente per altri dati.7. [GIÙ] PULSANTE SCORR. -Nella modalità menu attraverso il menu e la voce del sottomenu si sposta verso il basso. Quando si recuperano dati su più di uno schermo, spostandosi verso il basso nella schermata successiva per ulteriori dati.8. CONNETTORE OBD-16PIN - Collega lo strumento di scansione al connettore DLC (Data Link Connector) del veicolo.9. PULSANTE [I / M] - Controllo di prontezza delle emissioni Quick State e verifica del ciclo di guida.
Osservazioni:
MIL Yellow- Cruscotto MIL ON
MIL Gray -Cruscotto MIL OFF
-non supporto
-completare
-non completo
I/M Readiness
72
Istruzioni di funzionamento
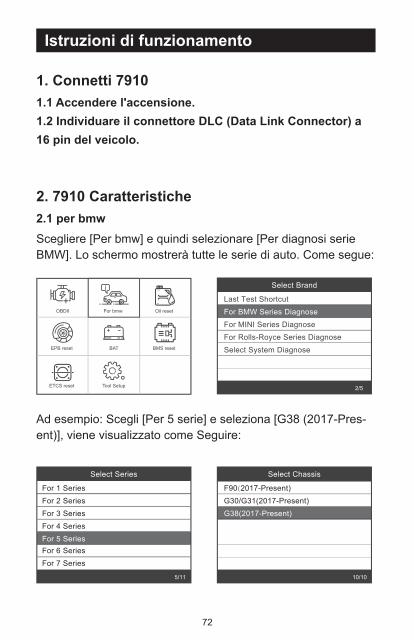
Ad esempio: Scegli [Per 5 serie] e seleziona [G38 (2017-Pres-ent)], viene visualizzato come Seguire:
1.1 Accendere l'accensione.1.2 Individuare il connettore DLC (Data Link Connector) a 16 pin del veicolo.
2.1 per bmw
1. Connetti 7910
2. 7910 Caratteristiche
Scegliere [Per bmw] e quindi selezionare [Per diagnosi serie BMW]. Lo schermo mostrerà tutte le serie di auto. Come segue:
Select Brand
Last Test ShortcutFor BMW Series DiagnoseFor MINI Series DiagnoseFor Rolls-Royce Series DiagnoseSelect System Diagnose
2/5
Select Chassis
F90(2017-Present)G30/G31(2017-Present)G38(2017-Present)
10/10
Select Series
For 1 SeriesFor 2 SeriesFor 3 SeriesFor 4 SeriesFor 5 SeriesFor 6 SeriesFor 7 Series
5/11
OBDII For bmw Oil reset
BMS resetBATEPB reset
Tool SetupETCS reset

73
Scegli [Funzioni di base] e visualizza come segue:
2.2 Funzioni di base
Select System Diagnose
CAS Car Access SystemECM Engine Control ModuleECM2 Engone Control Module 2EGS/SMG Transmission Manag...EKPS Fuel-pump ControlGWS Gear Selector SwitchVTG Transfer Case
1/86
Select System Diagnose
CAS Car Access SystemECM Engine Control ModuleECM2 Engone Control Module 2EGS/SMG Transmission Manag...EKPS Fuel-pump ControlGWS Gear Selector SwitchVTG Transfer Case
2/86
Select Function
Version InformationRead Fault CodesErase Fault CodesRead Datastream
1/4
Select Menu
System ScanManual Select
2/2
Select Function
Basic FunctionsSpecial FunctionsErase All Systems Fault Codes
1/3
La scansione del sistema consiste nello scannerizzare tutti i sistemi del veicolo.Selezione manuale serve per visualizzare tutti i sistemi possibili, selezionare uno dei sistemi da diagnosticare.
Scegli [Selezione manuale] e visualizza come segue:
Ad esempio: Scegli [Modulo controllo motore ECM] e visualizza come segue:
74
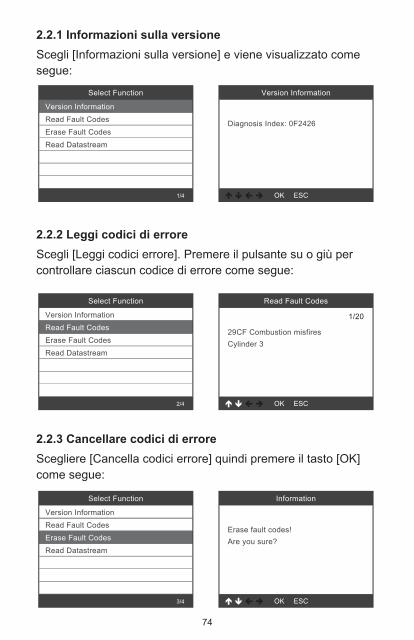
2.2.1 Informazioni sulla versione
Select Function
Version InformationRead Fault CodesErase Fault CodesRead Datastream
1/4
Select Function
Version InformationRead Fault CodesErase Fault CodesRead Datastream
2/4
Select Function
Version InformationRead Fault CodesErase Fault CodesRead Datastream
3/4
Scegli [Informazioni sulla versione] e viene visualizzato come segue:
Version Information
Diagnosis Index: 0F2426
2.2.2 Leggi codici di erroreScegli [Leggi codici errore]. Premere il pulsante su o giù per controllare ciascun codice di errore come segue:
Read Fault Codes
29CF Combustion misfiresCylinder 3
1/20
2.2.3 Cancellare codici di erroreScegliere [Cancella codici errore] quindi premere il tasto [OK] come segue:
Information
Erase fault codes!Are you sure?
75
Select Function
Version InformationRead Fault CodesErase Fault CodesRead Datastream
4/4
Select Function
View All ItemsSelect Items
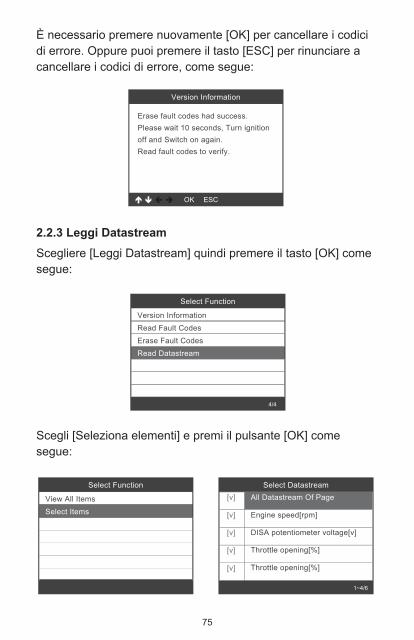
Select DatastreamAll Datastream Of Page[v]
[v]
[v]
[v]
[v]
Engine speed[rpm]
DISA potentiometer voltage[v]
Throttle opening[%]
Throttle opening[%]
1~4/6
Scegliere [Leggi Datastream] quindi premere il tasto [OK] come segue:
Scegli [Seleziona elementi] e premi il pulsante [OK] come segue:
È necessario premere nuovamente [OK] per cancellare i codici di errore. Oppure puoi premere il tasto [ESC] per rinunciare a cancellare i codici di errore, come segue:
Version Information
Erase fault codes had success.Please wait 10 seconds, Turn ignition off and Switch on again.Read fault codes to verify.
2.2.3 Leggi Datastream
76
Select Function
Basic FunctionsSpecial FunctionsErase All Systems Fault Codes
2/3
Select Function
CBS Function(Service Function)Reset Control UnitECM Engine Control ModuleElectric fuel pumpBattery ManagementEPB Electronic Parking BrakeSteering-angle Sensor
1/9
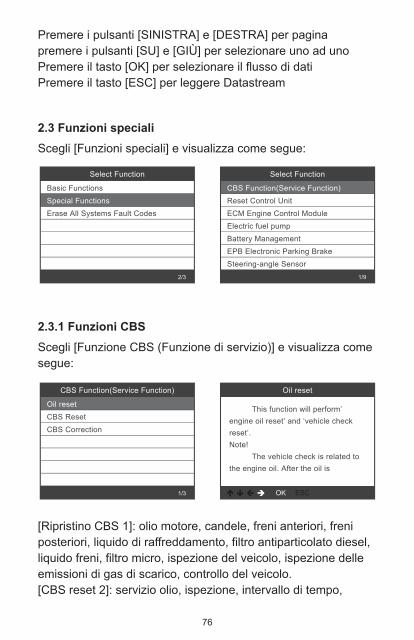
CBS Function(Service Function)
Oil resetCBS ResetCBS Correction
1/3
Premere i pulsanti [SINISTRA] e [DESTRA] per paginapremere i pulsanti [SU] e [GIÙ] per selezionare uno ad unoPremere il tasto [OK] per selezionare il flusso di datiPremere il tasto [ESC] per leggere Datastream
Oil reset
This function will perform’ engine oil reset’ and ‘vehicle check reset’.Note! The vehicle check is related to the engine oil. After the oil is
Scegli [Funzioni speciali] e visualizza come segue:
2.3 Funzioni speciali
Scegli [Funzione CBS (Funzione di servizio)] e visualizza come segue:
[Ripristino CBS 1]: olio motore, candele, freni anteriori, freni posteriori, liquido di raffreddamento, filtro antiparticolato diesel, liquido freni, filtro micro, ispezione del veicolo, ispezione delle emissioni di gas di scarico, controllo del veicolo.[CBS reset 2]: servizio olio, ispezione, intervallo di tempo,
2.3.1 Funzioni CBS
77
Select Function
CBS Function(Service Function)Reset Control UnitECM Engine Control ModuleElectric fuel pumpBattery ManagementEPB Electronic Parking BrakeSteering-angle Sensor
3/9
ECM Engine Control Module
Reset adaptation valuesIdle speedLearning Valvtronic limit positi...
1/3
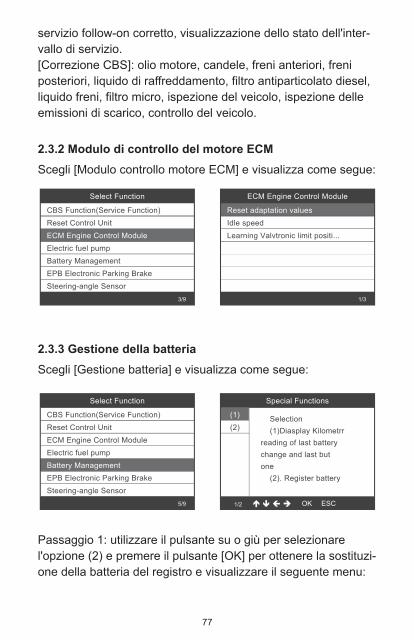
servizio follow-on corretto, visualizzazione dello stato dell'inter-vallo di servizio.[Correzione CBS]: olio motore, candele, freni anteriori, freni posteriori, liquido di raffreddamento, filtro antiparticolato diesel, liquido freni, filtro micro, ispezione del veicolo, ispezione delle emissioni di scarico, controllo del veicolo.
Scegli [Modulo controllo motore ECM] e visualizza come segue:
2.3.2 Modulo di controllo del motore ECM
Select Function
CBS Function(Service Function)Reset Control UnitECM Engine Control ModuleElectric fuel pumpBattery ManagementEPB Electronic Parking BrakeSteering-angle Sensor
5/9
Scegli [Gestione batteria] e visualizza come segue:
Passaggio 1: utilizzare il pulsante su o giù per selezionare l'opzione (2) e premere il pulsante [OK] per ottenere la sostituzi-one della batteria del registro e visualizzare il seguente menu:
2.3.3 Gestione della batteria
Special Functions
1/2
Selection (1)Diasplay Kilometrr reading of last battery change and last butone (2). Register battery
(2)(1)
78
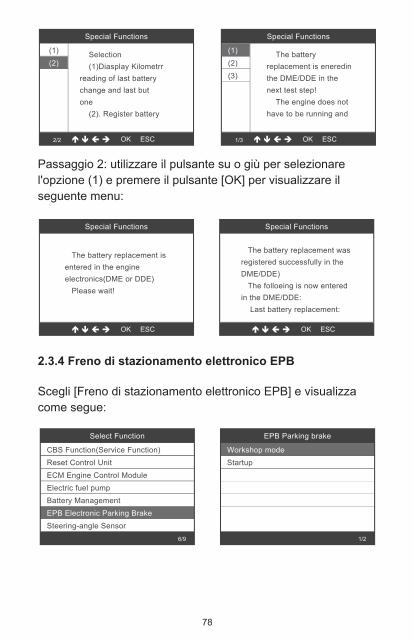
Passaggio 2: utilizzare il pulsante su o giù per selezionare l'opzione (1) e premere il pulsante [OK] per visualizzare il seguente menu:
Scegli [Freno di stazionamento elettronico EPB] e visualizza come segue:
2.3.4 Freno di stazionamento elettronico EPB
Select Function
CBS Function(Service Function)Reset Control UnitECM Engine Control ModuleElectric fuel pumpBattery ManagementEPB Electronic Parking BrakeSteering-angle Sensor
6/9
EPB Parking brake
Workshop modeStartup
1/2
Special Functions
(2)(3)
1/3
(1)
Special Functions
(1)
2/2
Selection (1)Diasplay Kilometrr reading of last battery change and last butone (2). Register battery
(2) The batteryreplacement is eneredin the DME/DDE in the next test step! The engine does not have to be running and
Special Functions Special Functions
The battery replacement isentered in the engineelectronics(DME or DDE) Please wait!
The battery replacement wasregistered successfully in theDME/DDE) The folloeing is now enteredin the DME/DDE: Last battery replacement:
79
2/2
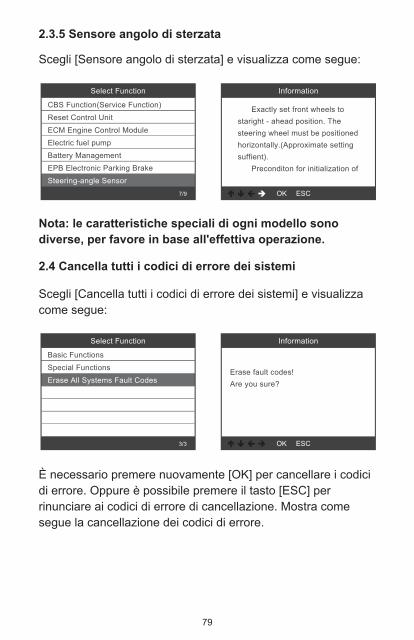
Scegli [Sensore angolo di sterzata] e visualizza come segue:
Nota: le caratteristiche speciali di ogni modello sono diverse, per favore in base all'effettiva operazione.
2.3.5 Sensore angolo di sterzata
Scegli [Cancella tutti i codici di errore dei sistemi] e visualizza come segue:
È necessario premere nuovamente [OK] per cancellare i codici di errore. Oppure è possibile premere il tasto [ESC] per rinunciare ai codici di errore di cancellazione. Mostra come segue la cancellazione dei codici di errore.
2.4 Cancella tutti i codici di errore dei sistemi
Select Function
CBS Function(Service Function)Reset Control UnitECM Engine Control ModuleElectric fuel pumpBattery ManagementEPB Electronic Parking BrakeSteering-angle Sensor
7/9
Select Function
Basic FunctionsSpecial FunctionsErase All Systems Fault Codes
3/3
Information
Erase fault codes! Are you sure?
Information
Exactly set front wheels to staright - ahead position. The steering wheel must be positioned horizontally.(Approximate setting suffient). Preconditon for initialization of

80
Information
Erase fault codes hadsuccess.Please wait 10 seconds, Turnignition off and Switch on again.Read fault codes to verify.
Nota: per auto BMW dopo il 2003.
Tool Setup
LanguageBeeperInstructions(Display at startup)Unit of MeasureSkin StyleFeedbackDevice Information
1/7
Language
EnglishSvenskaSuomalainenNorsk språkDanskDeutschFrançais
1/10
Scegli [Lingua] e visualizza come segue:
3. Impostazione dello strumento
3.1 Lingua
Scegli Unità di misura e visualizza come segue:
3.2 Stile della pelle
Tool Setup
LanguageBeeperInstructions(Display at startup)Unit of MeasureSkin StyleFeedbackDevice Information
5/7
Skin Style
Sky GrayGem Blue
1/2
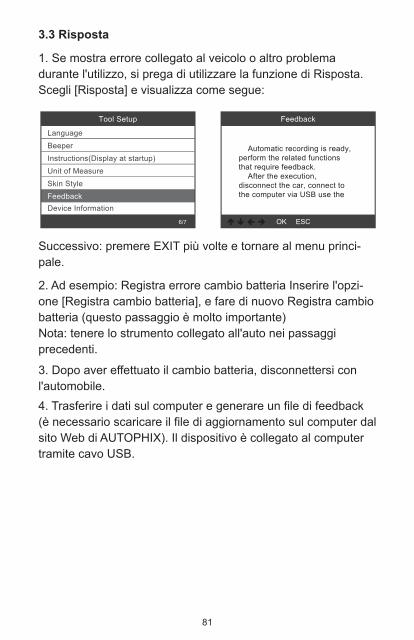
81
Tool Setup
LanguageBeeperInstructions(Display at startup)Unit of MeasureSkin StyleFeedbackDevice Information
6/7
1. Se mostra errore collegato al veicolo o altro problema durante l'utilizzo, si prega di utilizzare la funzione di Risposta. Scegli [Risposta] e visualizza come segue:
Successivo: premere EXIT più volte e tornare al menu princi-pale.
2. Ad esempio: Registra errore cambio batteria Inserire l'opzi-one [Registra cambio batteria], e fare di nuovo Registra cambio batteria (questo passaggio è molto importante)Nota: tenere lo strumento collegato all'auto nei passaggi precedenti.
4. Trasferire i dati sul computer e generare un file di feedback (è necessario scaricare il file di aggiornamento sul computer dal sito Web di AUTOPHIX). Il dispositivo è collegato al computer tramite cavo USB.
3. Dopo aver effettuato il cambio batteria, disconnettersi con l'automobile.
3.3 Risposta
Feedback
Automatic recording is ready, perform the related functions that require feedback. After the execution, disconnect the car, connect to the computer via USB use the

82
Scegli il file "Aggiorna" e viene visualizzato come segue:
Fai clic su " Risposta " e viene visualizzato come segue:
OBDII For bmw Oil reset
BMS resetBATEPB reset
Tool SetupETCS reset
7910
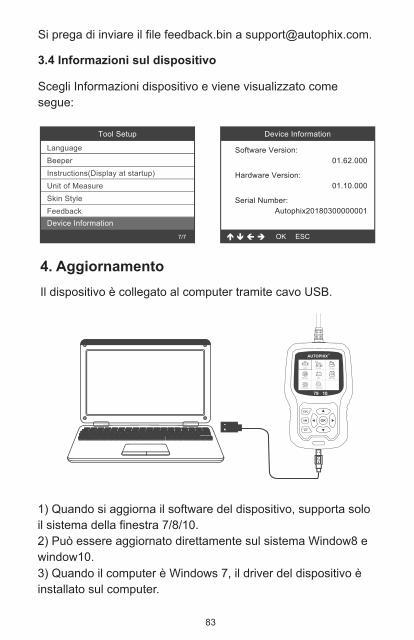
83
4. AggiornamentoIl dispositivo è collegato al computer tramite cavo USB.
1) Quando si aggiorna il software del dispositivo, supporta solo il sistema della finestra 7/8/10.2) Può essere aggiornato direttamente sul sistema Window8 e window10.3) Quando il computer è Windows 7, il driver del dispositivo è installato sul computer.
Si prega di inviare il file feedback.bin a [email protected].
Scegli Informazioni dispositivo e viene visualizzato come segue:
3.4 Informazioni sul dispositivo
OBDII For bmw Oil reset
BMS resetBATEPB reset
Tool SetupETCS reset
Tool Setup
LanguageBeeperInstructions(Display at startup)Unit of MeasureSkin StyleFeedbackDevice Information
7/7
Device Information
Software Version:
Hardware Version:
Serial Number:
01.62.000
01.10.000
Autophix20180300000001
79 10


Floor4, Building2, Jinxicheng Industry park, Longhua District, Shenzhen, China
Étage 4, bâtiment 2, parc industriel de Jinxicheng, district de Longhua,
Shenzhen,Chine
Stock 4, gebäude 2, jinxicheng industriepark, longhua bezirk, shenzhen, china
Piso 4, edificio 2, parque industrial de Jinxicheng, distrito de Longhua,
Shenzhen, China
Piano 4, edificio 2, parco industriale Jinxicheng, distretto di Longhua,
Shenzhen, Cina
Phone: 0755-8528-1258
E-mail: [email protected]
Website: www.autophix.com
Related Documents