SAFETY INFORMATION IMPORTANT: Please read all instructions before servicing this equipment. Pay attention to all safety warnings and any other special notes highlighted in the manual. Safety markings are used frequently throughout this manual to designate a degree or level of seriousness and should not be ignored. WARNING indicates a potentially hazardous situation that if not avoided, could result in personal injury or death. CAUTION indicates a potentially hazardous situation that if not avoided, may result in minor or moderate injury or property damage WARNING: These instructions are primarily intended to assist qualified individuals experienced in the proper installation of Heating, Air Conditioning, or Heat Pump equipment including the iQ Drive ® System. Local codes may require licensed installation / service personnel for this type of equipment. WARNING: Improper installation, service, adjustment, or maintenance may cause explosion, fire, electrical shock or other hazardous conditions which may result in personal injury or property damage. Unless otherwise noted in these instructions, only factory authorized kits or accessories may be used with this product. WARNING: PROPOSITION 65 WARNING: This product contains chemicals known to the state of California to cause cancer, birth defects or other reproductive harm. GENERAL INFORMATION iQ Drive ® cased coils are designed for upflow or horizontal applications.These coils are equipped with ESX step motor expansion valve which provides precise flow control for maximum efficiency and reliability. These coils are also equipped with a coil temperature sensor (to monitor coil temperature during dehumidification mode) and with braze type refrigerant connections for easy installation. Installation Instructions Split System Indoor Coils for iQ Drive ® Systems EXV SAFETY INFORMATION ............. Front Cover GENERAL INFORMATION .......... Front Cover COIL INSTALLATION .................................... 2 Upflow Furnace .......................................... 2 Horizontal Left Installations ........................ 2 Horizontal Right Installations...................... 2 Refrigerant Line Connections..................... 3 Condensate Drain ...................................... 3 Air Filter ...................................................... 3 Panels ........................................................ 3 Refrigerant Charging .................................. 3 Maintenance and Service .......................... 3 Coil Specifications ...................................... 4 EXV INSTALLATION...................................... 5 System Checkout ....................................... 7 Configuration............................................ 7 Startup and Operation ............................. 7 System Shutdown .................................... 7 SERVICE REFERENCE INFORMATION ....... 8 TROUBLESHOOTING ................................... 9

Welcome message from author
This document is posted to help you gain knowledge. Please leave a comment to let me know what you think about it! Share it to your friends and learn new things together.
Transcript
SAFETY INFORMATIONIMPORTANT: Please read all instructions before servicing this equipment. Pay attention to all safety warnings and any other special notes highlighted in the manual. Safety markings are used frequently throughout this manual to designate a degree or level of seriousness and should not be ignored. WARNING indicates a potentially hazardous situation that if not avoided, could result in personal injury or death. CAUTION indicates a potentially hazardous situation that if not avoided, may result in minor or moderate injury or property damage
WARNING:These instructions are primarily intended to assist qualifi ed individuals experienced in the proper installation of Heating, Air Conditioning, or Heat Pump equipment including the iQ Drive® System. Local codes may require licensed installation / service personnel for this type of equipment.
WARNING:Improper installation, service, adjustment, or maintenance may cause explosion, fi re, electrical shock or other hazardous conditions which may result in personal injury or property damage. Unless otherwise noted in these instructions, only factory authorized kits or accessories may be used with this product.
WARNING:PROPOSITION 65 WARNING: This product contains chemicals known to the state of California to cause cancer, birth defects or other reproductive harm.
GENERAL INFORMATIONiQ Drive® cased coils are designed for upfl ow or horizontal applications. These coils are equipped with ESX step motor expansion valve which provides precise fl ow control for maximum effi ciency and reliability.
These coils are also equipped with a coil temperature sensor (to monitor coil temperature during dehumidifi cation mode) and with braze type refrigerant connections for easy installation.
Installation InstructionsSplit System Indoor Coils for iQ Drive® Systems
EXV
SAFETY INFORMATION .............Front CoverGENERAL INFORMATION ..........Front CoverCOIL INSTALLATION .................................... 2 Upfl ow Furnace .......................................... 2 Horizontal Left Installations ........................ 2 Horizontal Right Installations ...................... 2 Refrigerant Line Connections..................... 3 Condensate Drain ...................................... 3 Air Filter ...................................................... 3 Panels ........................................................ 3 Refrigerant Charging .................................. 3 Maintenance and Service .......................... 3 Coil Specifi cations ...................................... 4EXV INSTALLATION ...................................... 5 System Checkout ....................................... 7 Confi guration ............................................ 7 Startup and Operation ............................. 7 System Shutdown .................................... 7SERVICE REFERENCE INFORMATION ....... 8TROUBLESHOOTING ................................... 9

2
• Read the installation manual supplied with the outdoor unit for: refrigerant line connection procedures, required line sizes, and connection of additional components of the iQ Drive® system.
• Verify that the air delivery of the furnace/air handler is adequate to handle the static pressure drop of the coil, fi lter, and duct work.
• If precise forming of refrigerant lines is required, a copper tubing bender designed for the size lines used is recommended. Avoid sharp bends and contact of the refrigerant lines with metal surfaces.
• Refrigerant lines should be wrapped with pressure sensitive neoprene or other suitable material where they pass through roughly edged holes.
COIL INSTALLATION
WARNING:Shut off all electrical power to the furnace and outdoor condensing unit before performing any maintenance or service on the system.
Note: All condensate pans have primary and secondary drain connections to meet FHA requirements. If the application is located in or above a living space where damage may result from condensate overfl ow, a separate 3/4 inch drain must be provided from the secondary drain connection and a secondary drain pan must be installed under the entire unit. Run secondary drain lines to a place where they are noticeable if used.
Upfl ow Furnace1. Disconnect all electrical power to the furnace.2. Remove the lower coil access door.3. Remove the drain pan (horizontal applications) and
install the coil as level as possible.
CAUTION:The coil must be level to ensure proper condensate drainage. An unlevel installation may result in structural damage, premature equipment failure, or possible personal injury.
4. Connect the refrigerant lines as outlined in the Refrigerant Lines Connection section.
5. Seal the enclosure as required to minimize air leakage.6. Proceed with EXV System Installation as shown on
page 5.
Horizontal Left Installations1. Disconnect all electrical power to the furnace.2. Remove the lower coil access door.3. Remove the plug and knockout from one of the
threaded holes in the horizontal drain pan.
CAUTION:The knockout must be removed and discarded to ensure proper condensate drainage. Improper drainage may result in structural damage, premature equipment failure, or possible personal injury.
4. Install plug (from horizontal drain pan) in the open drain hole in the drain pan at the bottom of the unit. This will block bypass air from entering the system.
5. Remove the drain line knockout from the coil access door. This will allow access to the horizontal drain.
6. Connect the refrigerant lines as outlined in the Refrigerant Lines Connection section.
7. Seal the enclosure as required to minimize air leakage.8. Proceed with EXV System Installation as shown on
page 5.
Horizontal Right Installations1. Disconnect all electrical power to the furnace.2. Remove the lower coil access door.3. Remove the plug and knockout from one of the
threaded holes in the horizontal drain pan.
CAUTION:The knockout must be removed and discarded to ensure proper condensate drainage. Failure to do so may result in structural damage, premature equipment failure, or possible personal injury.
4. Place the horizontal drain pan on the opposite side of the coil. (If unit has 2 sets of knockouts, remove the other set of knockouts in the coil spacing plates and insert support rod).
5. Install plug (from horizontal drain pan) in the open drain hole in the drain pan at the bottom of the unit. This will block bypass air from entering the system.
6. Slide the coil and the horizontal drain pan assembly back into the unit.
7. Remove the drain line knockout from the coil access door. This will allow access to the horizontal drain.
8. Connect the refrigerant lines as outlined in the Refrigerant Lines Connection section.
9. Seal the enclosure as required to minimize air leakage.10. Proceed with EXV System Installation as shown on
page 5.
3
1. Remove grommet from the suction line stub.2. Remove the valve cap from the end of the liquid line stub
and depress the valve. This will relieve all pressure from the coil.
3. Remove the valve core and valve core holder on the liquid line. DO NOT reuse the valve, threaded valve holder or O-ring.
4. Unbraze and remove the cap on the suction line.
CAUTION:It is recommended that a wet rag be wrapped around the suction line between the sensing bulb and the line set braze joint before applying heat. Failure to keep components cool during brazing may result in structural damage, premature equipment failure, or possible personal injury.
5. Cut the line set tubing to the proper length in accordance with the outdoor unit specifi cations.
6. Inspect both refrigerant lines, ensuring ends of the lines are round, clean, and free of any burrs.
7. Position grommet on line set while allowing suffi cient distance to braze joint.
8. Install the suction line set tube into the coil suction tube stub until it bottoms out.
9. Slip the nut from the Schrader valve holder onto the liquid line while maintaining correct orientation.
10. Insert liquid line into liquid line stub until it bottoms out. NOTE: Liquid line stub is shipped with the coil but is not attached.
11. Braze the individual connections with dry nitrogen fl owing through the joints. This will prevent internal oxidation and scaling from occurring.
12. Fasten nut to secure the liquid line to the bulkhead fi tting. No O-ring is required.
13. Check the assembly for leaks.
14. Reposition the sensing bulb on the suction line to the 4 o'clock or 8 o'clock position(Horizontal models only).
15. Properly dispose of all removed parts.
Condensate Drain
CAUTION:The coil must be level to ensure proper condensate drainage. An unlevel installation may result in structural damage, premature equipment failure, or possible personal injury.
1. The coil condensate pan is designed with 3/4" NPSC drain connections. Use a PVC or similar material fi tting to attach the drain line to the pan. IMPORTANT NOTE: The fi tting should be hand tightened only. Overtightening may crack the drain pan and cause condensate to leak.
2. Connect the drain line and run to a suitable drain avoiding sharp bends and pinching of the line. Install a condensate trap and prime with water.
3. During system checkout, inspect the drain line and connections to verify proper condensate disposal.
Air FilterAir fi lters are not supplied as an integral part of this coil; however, a fi lter must be installed upstream of the coil and inspected frequently. When the fi lter becomes clogged with dust or lint, it should be replaced (disposable type) or cleaned (washable type). It is recommended that fi lters be inspected and replaced at least twice during the year. Generally it is best to replace or clean the fi lters at the start of each heating and cooling season.
PanelsReinstall all inner and outer panels of the coil case and furnace that were previously removed.
Refrigerant ChargingThese cased indoor coils are not factory charged with refrigerant.
Always evacuate the indoor coil and line set prior to charging. Refer to the outdoor unit installation manual for detailed charges and instructions.
Maintenance and Service
WARNING:Shut off all electrical power to the furnace and outdoor condensing unit before performing any maintenance or service on the system.
To ensure optimum performance and to minimize possible equipment failure, the following maintenance tasks should be performed periodically on this equipment:
WARNING:
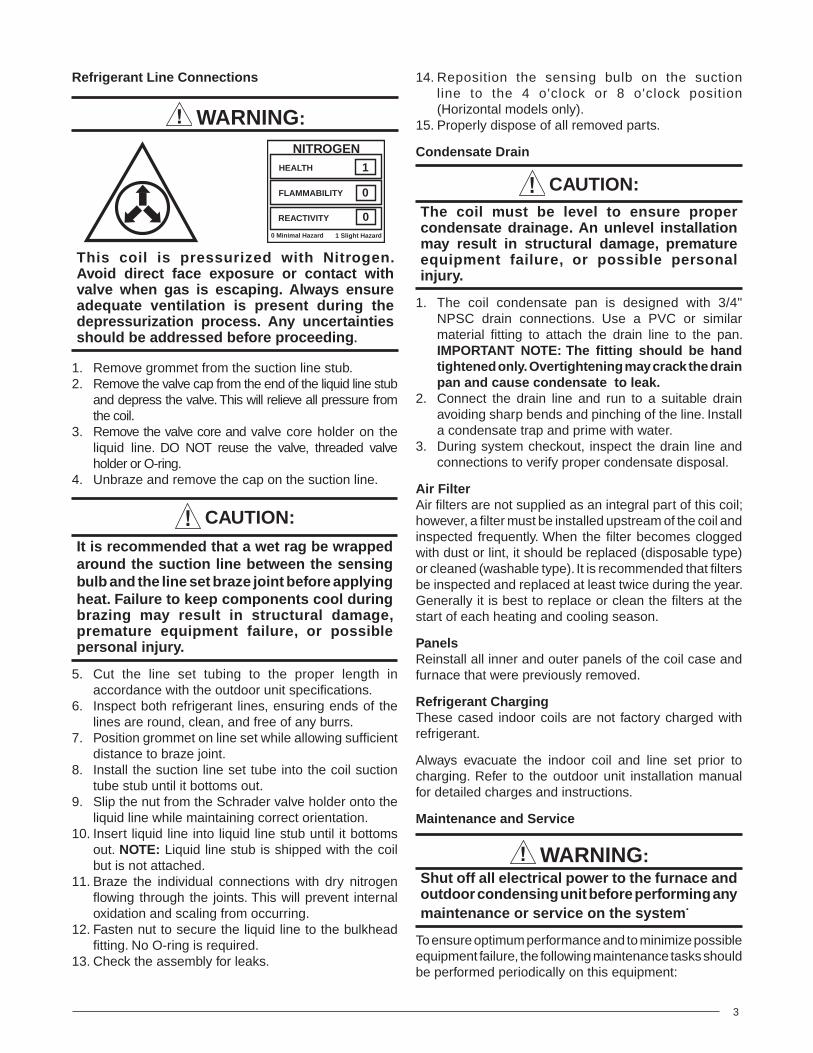
This coil is pressurized with Nitrogen. Avoid direct face exposure or contact with valve when gas is escaping. Always ensure adequate ventilation is present during the depressurization process. Any uncertainties should be addressed before proceeding.
NITROGENHEALTH
FLAMMABILITY
REACTIVITY
0 Minimal Hazard 1 Slight Hazard
1
0
0
Refrigerant Line Connections

4
W
H
OWOW 5/85/8
20 3/420 3/4
HLHL
HSHS
4
17 1/417 1/4
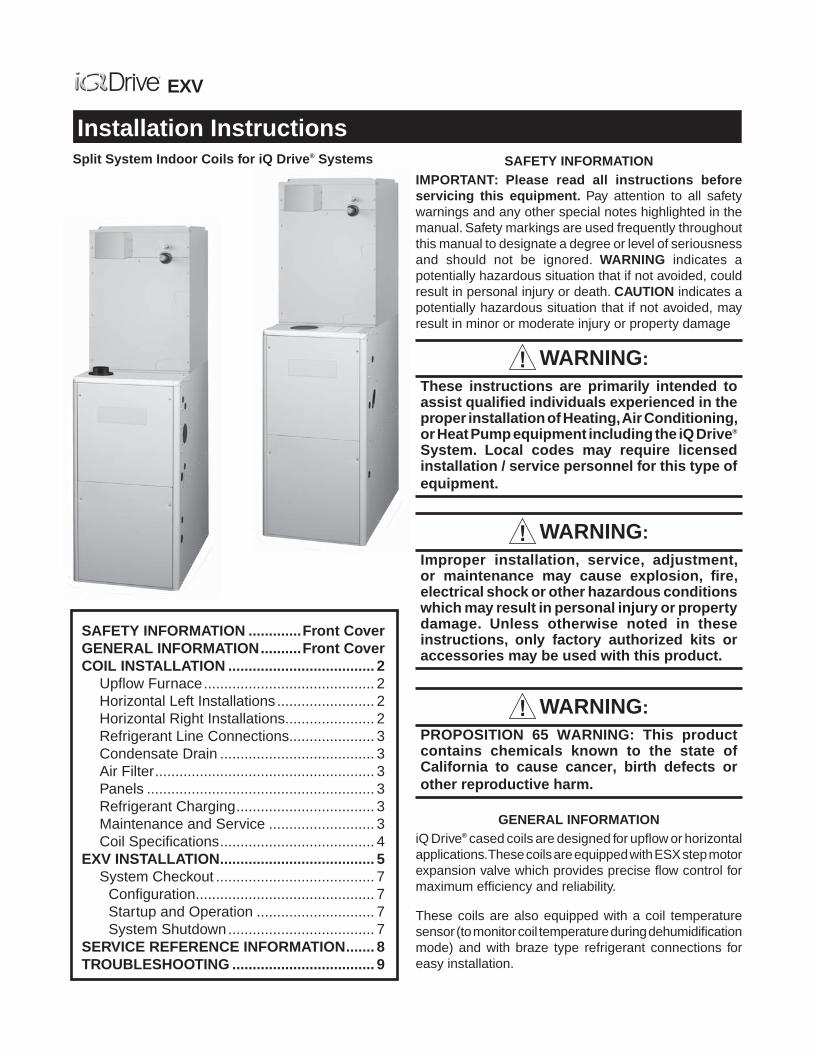
Figure 1 Coil Dimensions
Coil Model C6BH 1, 2 I24-B I36-B I36-C I48-C I48-D
Nominal Capacity BTUH 3 24,000 36,000 36,000 48,000 48,000
Nominal Airfl ow (CFM) 800 1,200 1,200 1,600 1,600
W - Width (in.) 17 1/2 17 1/2 21 21 24 1/2
H - Height (in.) 20 3/4 26 3/4 26 3/4 30 1/4 30 1/4
HL - Height of Liquid Line (in.) 17 1/2 23 1/2 23 1/2 27 27
HS - Height of Suction Line (in.) 15 1/2 21 1/2 21 1/2 25 25
Connection - Liquid Line 3/8 3/8 3/8 3/8 3/8
Connection - Suction Line 3/4 3/4 7/8 7/8 7/8
NOTES:
1. Refer to sales specifi cation sheets for Listed/Certifi ed combinations of equipment and required accessories
2. “I” in the model description designates factory installed electronic TXV for R-410a refrigerant.
3. Refer to the current ARI Directory for certifi ed ratings of split systems.
Table 1. Coil Specifi cations
COIL SPECIFICATIONS

5
1. The air fi lter installed with the system should be checked and cleaned or replaced twice per year.
2. Check the coil, drain pan, and condensate drain line for cleanliness at the start of each heating and cooling season. Clean as needed.
CAUTION:Do not operate the system without a suitable fi lter in the return air duct system. Always replace the fi lter with the same size and type.
EXV INSTALLATIONThese Instructions describe an update to the electronic expansion valve (EXV) system which has been installed on this equipment, as part of an iQ Drive® 23 SEER split air conditioning or heat pump system.
The ESX valve is controlled to maintain constant superheat in a wide range of conditions via a pressure transducer and a temperature sensor installed on the coil suction header.
On iQ Drive® systems whose indoor equipment is made up of a separate coil and blower (furnace or furnace blower kit), the updated EXV system must be interconnected between these parts. Models that this applies to include one of the following coil assemblies plus either the furnace blower kit or a gas furnace listed in Table 2.
Figure 2. Cables with wire ties
WireTies
Hole “C”
Table 2. Coils, Blower Kits, and Furnaces
COIL ASSEMBLIES SKU
C6BH-I24C-B 920781
C6BH-I36C-B 920782
C6BH-I36C-C 920783
C6BH-I48C-C 920784
C6BH-I48C-D 920785
C6BH-I24U-B FRU 920790
C6BH-I36U-B FRU 920791
C6BH-I36U-C FRU 920792
C6BH-I48U-C FRU 920793
C6BH-I48U-D FRU 920794
FURNACE BLOWER KITS SKU
A Cabinet variable speed, high effi ciency, VSHE 904876
B Cabinet variable speed, high effi ciency, VSHE 904877
C Cabinet variable speed, high effi ciency, VSHE 904878
D Cabinet variable speed, high effi ciency, VSHE 904879
GAS FURNACES SKU
Any furnace with an iSEER ™ variable speed blower
WARNING:To avoid electric shock, personal injury, or death, turn off the electric power at the disconnect or the main service panel before making any electrical connections to EXV System.
1. Remove the lower door from the coil assembly and the furnace’s blower compartment.
2. Locate the bundled set of cables in the coil case and cut the wire ties.
3. Route the following cables out through hole “C” (Figure 2):• EXV coil cable (6-wire) with 6-pin connector plug
(1).• Pressure Transducer cable (3-wire) with 4-pin
connector plug (2).• Suction Line Thermistor cable (2 red wires) with
2-pin connector (3).• Indoor Coil Temperature Sensor cable (4).
Figure 3. Control Board and Cables
EXV coilcable
PressureTransducer
Cable
Suction LineThermistor
Cable
Indoor Coil TemperatureSensor Cable
StrainRelief
4. Remove EXV circuit board from packaging and install on upper cabinet as shown in Figure 3.
6
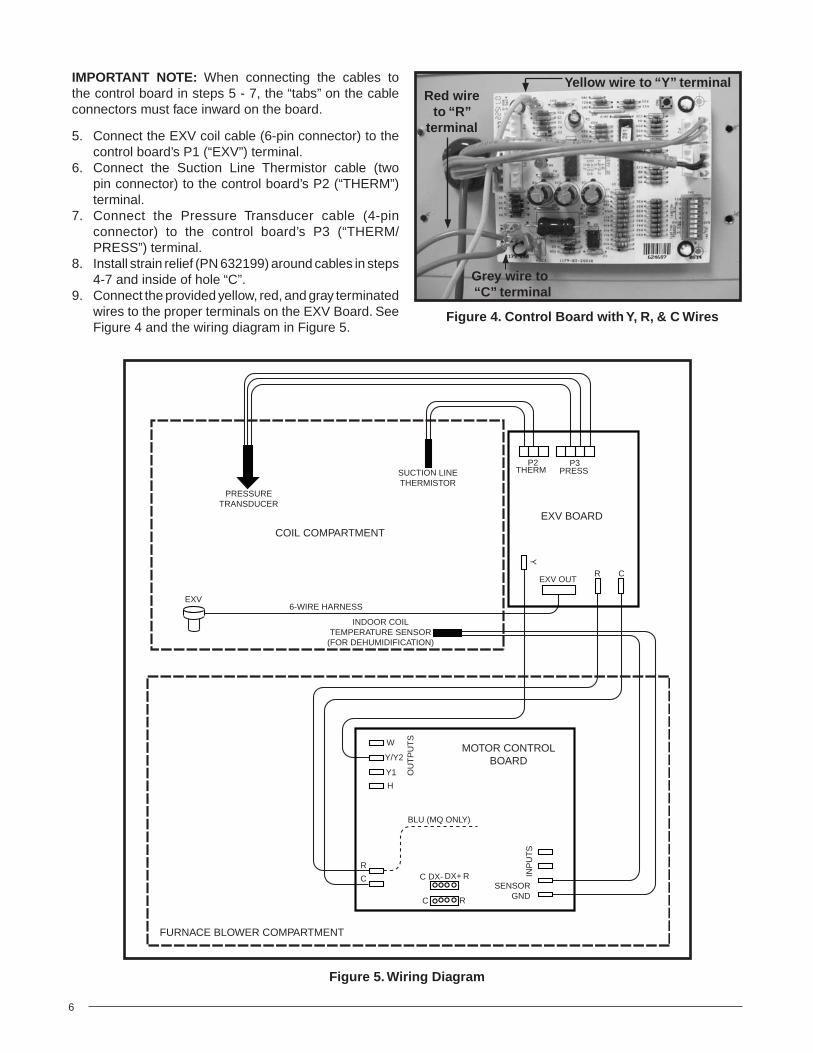
Figure 4. Control Board with Y, R, & C Wires
Grey wire to “C” terminal
Red wireto “R”
terminal
Yellow wire to “Y” terminalIMPORTANT NOTE: When connecting the cables to the control board in steps 5 - 7, the “tabs” on the cable connectors must face inward on the board.
5. Connect the EXV coil cable (6-pin connector) to the control board’s P1 (“EXV”) terminal.
6. Connect the Suction Line Thermistor cable (two pin connector) to the control board’s P2 (“THERM”) terminal.
7. Connect the Pressure Transducer cable (4-pin connector) to the control board’s P3 (“THERM/PRESS”) terminal.
8. Install strain relief (PN 632199) around cables in steps 4-7 and inside of hole “C”.
9. Connect the provided yellow, red, and gray terminated wires to the proper terminals on the EXV Board. See Figure 4 and the wiring diagram in Figure 5.
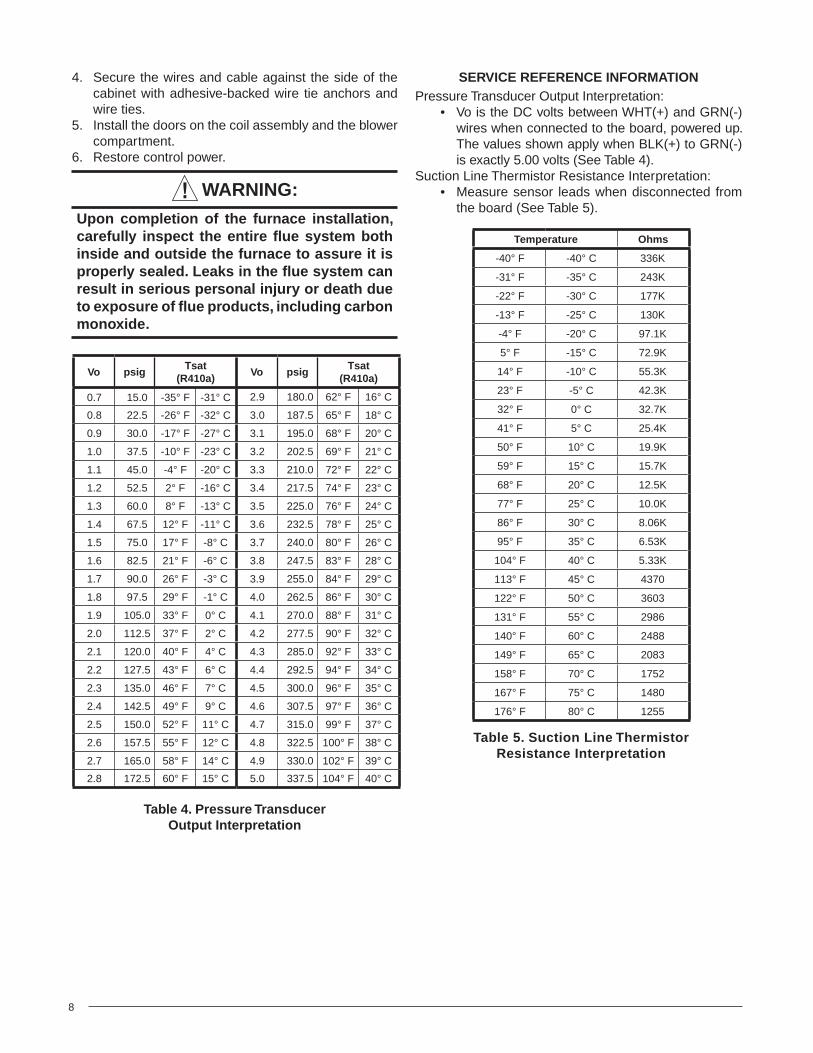
Figure 5. Wiring Diagram
SUCTION LINETHERMISTOR
PRESSURETRANSDUCER
INDOOR COILTEMPERATURE SENSOR
(FOR DEHUMIDIFICATION)
6-WIRE HARNESSEXV
COIL COMPARTMENT
FURNACE BLOWER COMPARTMENT
MOTOR CONTROLBOARD
C
OU
TP
UT
S
INP
UT
S
R
BLU (MQ ONLY)
W
H
Y1
Y/Y2
SENSORGND
C DX- DX+ R
C R
CR
Y
EXV OUT
P2 P3PRESSTHERM
EXV BOARD

7
14. Proceed to the System Checkout section after all wiring is connected. DO NOT install the control box cover or blower compartment door
System CheckoutNormally, adjustments are not required, and system checkout is just a precautionary measure for verifying communication of the EXV system and electrical operation of the valve. The iQ Drive® thermostat does not communicate with, and cannot provide information about the status of the EXV system.
Confi gurationThe EXV circuit board contains DIP switches (white switches on a red plastic block) that are confi gured at the factory (except for replacement boards).
Numbers appear on one side of the red block. If a switch is near the number, this indicates that the switch is ON. Compare/set switch positions to the row in Table 3 based on the nominal size in tons of the unit. Verify switch settings match the required settings for the application.
Switch # 1 2 3 4 5 6 7 8
2 TON ON OFF ON OFF OFF ON ON ON
3 TON ON OFF OFF OFF ON ON ON ON
4 TON ON ON OFF ON ON ON ON ON
Table 3. Recommended DIP Switch Settings
10. Route the following wires thru the hole in the EXV board box (Figure 6):• Terminated red, yellow, and grey wires.• Indoor coil temperature sensor cable.
GROUND
SENSOR
DHUM_IN
Y1_IN
H_OUT
L2-OUT L2-IN
L1-IN
L1-OUT
Y1_OUT
Y/Y2_OUT
W_OUT
C
EXPANSION PORT
R
RE
D
GR
EE
N
NOT FORFIELD USE
CONNECTION TOFURNACE CONTROL
BOARD
CO
NN
EC
TIO
N T
OIQ
TH
ER
MO
STA
T(I
F A
PP
LIC
AB
LE)
MOTOR WIRINGHARNESS
RE
D
INP
UT
TE
RM
INA
LS
COOLHEAT
FAN SPEED
OU
TPU
T TE
RMIN
ALS
STATUS LIGHTS
1 2 3 4 5 6 7 8
OF
F O
N
Figure 7. Motor Control Board
3
4
5
1
2
Figure 6. EXV Board Box
StrainRelief
EXVBoardBox
13. Connect the other end of the terminated wires to the Motor Control Board (Figure 6).• Attach the yellow wire to the “Y/Y2_OUT” Terminal
(3).• Attach the red wire to the “R” Terminal (4).• Attach the GREY wire to the “C” Terminal (5).
Startup and Operation1. Use an alternative (but temporary) means to prop
the door switch on the blower compartment so that when the control power is applied, the closed switch will allow the unit to operate. This will allow observing the EXV board in a powered-up state.
2. Switch on the control power. The following are indications of a normal operating EXV system:• After the fi rst few seconds, the green LED on the
EXV board should remain lit.• During initial power-up and when the valve is
moving to a new position, a soft but audible clicking sound may be heard, indicating that the valve is operating.
System Shutdown1. When the checkout has been successfully completed,
turn off power and remove the prop that was used to temporarily close the door switch.
2. Install strain relief (PN 632199) around the four wires and inside of hole in the EXV board box.
3. Using four screws, install EXV board box (fi gure 12) on front of cabinet
CAUTION:Do not allow the wiring to come into contact with any sharp edges on the wire ties or the metal casing.
11. Route the red, yellow, and grey wires and the Indoor Coil Temperature Sensor cable down the side of the cabinet into any available hole opposite of the gas line. Run wires inside of the furnace until they are routed to the control board.
12. Connect the wires in the Indoor Coil Temperature Sensor Cable to the Motor Control Board (Figure 7) located in the blower compartment:• Attach the red wire to the terminal labeled SENSOR
(1).• Attach the black wire to the terminal labeled
GROUND (2).
8
4. Secure the wires and cable against the side of the cabinet with adhesive-backed wire tie anchors and wire ties.
5. Install the doors on the coil assembly and the blower compartment.
6. Restore control power.
WARNING:Upon completion of the furnace installation, carefully inspect the entire fl ue system both inside and outside the furnace to assure it is properly sealed. Leaks in the fl ue system can result in serious personal injury or death due to exposure of fl ue products, including carbon monoxide.
SERVICE REFERENCE INFORMATIONPressure Transducer Output Interpretation:
• Vo is the DC volts between WHT(+) and GRN(-) wires when connected to the board, powered up. The values shown apply when BLK(+) to GRN(-) is exactly 5.00 volts (See Table 4).
Suction Line Thermistor Resistance Interpretation:• Measure sensor leads when disconnected from
the board (See Table 5).
Vo psigTsat
(R410a)Vo psig
Tsat(R410a)
0.7 15.0 -35° F -31° C 2.9 180.0 62° F 16° C
0.8 22.5 -26° F -32° C 3.0 187.5 65° F 18° C
0.9 30.0 -17° F -27° C 3.1 195.0 68° F 20° C
1.0 37.5 -10° F -23° C 3.2 202.5 69° F 21° C
1.1 45.0 -4° F -20° C 3.3 210.0 72° F 22° C
1.2 52.5 2° F -16° C 3.4 217.5 74° F 23° C
1.3 60.0 8° F -13° C 3.5 225.0 76° F 24° C
1.4 67.5 12° F -11° C 3.6 232.5 78° F 25° C
1.5 75.0 17° F -8° C 3.7 240.0 80° F 26° C
1.6 82.5 21° F -6° C 3.8 247.5 83° F 28° C
1.7 90.0 26° F -3° C 3.9 255.0 84° F 29° C
1.8 97.5 29° F -1° C 4.0 262.5 86° F 30° C
1.9 105.0 33° F 0° C 4.1 270.0 88° F 31° C
2.0 112.5 37° F 2° C 4.2 277.5 90° F 32° C
2.1 120.0 40° F 4° C 4.3 285.0 92° F 33° C
2.2 127.5 43° F 6° C 4.4 292.5 94° F 34° C
2.3 135.0 46° F 7° C 4.5 300.0 96° F 35° C
2.4 142.5 49° F 9° C 4.6 307.5 97° F 36° C
2.5 150.0 52° F 11° C 4.7 315.0 99° F 37° C
2.6 157.5 55° F 12° C 4.8 322.5 100° F 38° C
2.7 165.0 58° F 14° C 4.9 330.0 102° F 39° C
2.8 172.5 60° F 15° C 5.0 337.5 104° F 40° C
Table 4. Pressure Transducer Output Interpretation
Temperature Ohms
-40° F -40° C 336K
-31° F -35° C 243K
-22° F -30° C 177K
-13° F -25° C 130K
-4° F -20° C 97.1K
5° F -15° C 72.9K
14° F -10° C 55.3K
23° F -5° C 42.3K
32° F 0° C 32.7K
41° F 5° C 25.4K
50° F 10° C 19.9K
59° F 15° C 15.7K
68° F 20° C 12.5K
77° F 25° C 10.0K
86° F 30° C 8.06K
95° F 35° C 6.53K
104° F 40° C 5.33K
113° F 45° C 4370
122° F 50° C 3603
131° F 55° C 2986
140° F 60° C 2488
149° F 65° C 2083
158° F 70° C 1752
167° F 75° C 1480
176° F 80° C 1255
Table 5. Suction Line Thermistor Resistance Interpretation
9
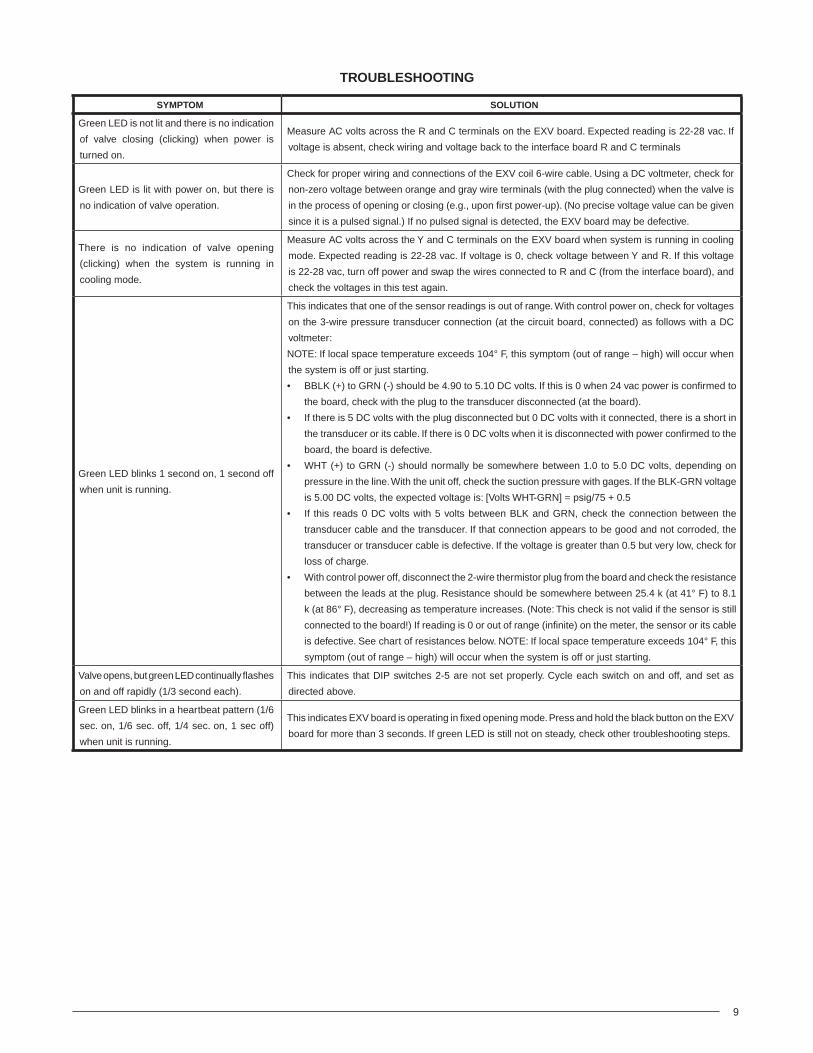
SYMPTOM SOLUTION
Green LED is not lit and there is no indication
of valve closing (clicking) when power is
turned on.
Measure AC volts across the R and C terminals on the EXV board. Expected reading is 22-28 vac. If
voltage is absent, check wiring and voltage back to the interface board R and C terminals
Green LED is lit with power on, but there is
no indication of valve operation.
Check for proper wiring and connections of the EXV coil 6-wire cable. Using a DC voltmeter, check for
non-zero voltage between orange and gray wire terminals (with the plug connected) when the valve is
in the process of opening or closing (e.g., upon fi rst power-up). (No precise voltage value can be given
since it is a pulsed signal.) If no pulsed signal is detected, the EXV board may be defective.
There is no indication of valve opening
(clicking) when the system is running in
cooling mode.
Measure AC volts across the Y and C terminals on the EXV board when system is running in cooling
mode. Expected reading is 22-28 vac. If voltage is 0, check voltage between Y and R. If this voltage
is 22-28 vac, turn off power and swap the wires connected to R and C (from the interface board), and
check the voltages in this test again.
Green LED blinks 1 second on, 1 second off
when unit is running.
This indicates that one of the sensor readings is out of range. With control power on, check for voltages
on the 3-wire pressure transducer connection (at the circuit board, connected) as follows with a DC
voltmeter:
NOTE: If local space temperature exceeds 104° F, this symptom (out of range – high) will occur when
the system is off or just starting.
• BBLK (+) to GRN (-) should be 4.90 to 5.10 DC volts. If this is 0 when 24 vac power is confi rmed to
the board, check with the plug to the transducer disconnected (at the board).
• If there is 5 DC volts with the plug disconnected but 0 DC volts with it connected, there is a short in
the transducer or its cable. If there is 0 DC volts when it is disconnected with power confi rmed to the
board, the board is defective.
• WHT (+) to GRN (-) should normally be somewhere between 1.0 to 5.0 DC volts, depending on
pressure in the line. With the unit off, check the suction pressure with gages. If the BLK-GRN voltage
is 5.00 DC volts, the expected voltage is: [Volts WHT-GRN] = psig/75 + 0.5
• If this reads 0 DC volts with 5 volts between BLK and GRN, check the connection between the
transducer cable and the transducer. If that connection appears to be good and not corroded, the
transducer or transducer cable is defective. If the voltage is greater than 0.5 but very low, check for
loss of charge.
• With control power off, disconnect the 2-wire thermistor plug from the board and check the resistance
between the leads at the plug. Resistance should be somewhere between 25.4 k (at 41° F) to 8.1
k (at 86° F), decreasing as temperature increases. (Note: This check is not valid if the sensor is still
connected to the board!) If reading is 0 or out of range (infi nite) on the meter, the sensor or its cable
is defective. See chart of resistances below. NOTE: If local space temperature exceeds 104° F, this
symptom (out of range – high) will occur when the system is off or just starting.
Valve opens, but green LED continually fl ashes
on and off rapidly (1/3 second each).
This indicates that DIP switches 2-5 are not set properly. Cycle each switch on and off, and set as
directed above.
Green LED blinks in a heartbeat pattern (1/6
sec. on, 1/6 sec. off, 1/4 sec. on, 1 sec off)
when unit is running.
This indicates EXV board is operating in fi xed opening mode. Press and hold the black button on the EXV
board for more than 3 seconds. If green LED is still not on steady, check other troubleshooting steps.
TROUBLESHOOTING

10

11

709006B(Replaces 709006A)Specifi cations and illustrations subject to change
without notice or incurring obligations. Printed in U.S.A. (09/09)O’Fallon MO
The installer performing this work assumes all responsibility for this installation. These instructions are primarily intended to assist qualifi ed individuals experienced in the proper installation of these components. Some local codes require licensed installation/service personnel for this type of equipment. Safety should always be the deciding factor when installing this product and using common sense plays an important role as well. Improper installation of the components or failure to follow safety warnings could result in serious injury, death, or property damage. After completing the installation, return these instructions to the Homeowner’s Package for owner-user’s future reference.
709006B
¢709006©¤
jennera
Stamp
Related Documents