FORM 4897-4 700 Series Disk and Drum Lathe Operators Manual

Welcome message from author
This document is posted to help you gain knowledge. Please leave a comment to let me know what you think about it! Share it to your friends and learn new things together.
Transcript
FORM 4897-4
700 SeriesDisk and Drum LatheOperators Manual

2
CHECK LIST1. Standard equipment is shown on page 3.2. Optional accessories are available from your John Bean Dealer. You may also order by contacting John Bean Company, Exchange Ave., Conway, AR.72032 or by calling 1 - (800) 362-83263. Assemble deluxe bench if ordered. The lathe can be mounted on either when removed from the carton.
SAFETY INSTRUCTIONSWarning!
For Your Own Safety, Read Instruc-tion Manual Before Operating Lathe
1. Lathes are supplied with a three-wire cord to provide grounding if yourelectrical system is properly installedby a qualified electrician and in com-pliance with the national, regional andlocal electrical codes.
2. Improper grounding can causeelectrical shock. In the event of amalfunction or breakdown, groundingprovides a path of least resistance forelectrical current to reduce risk ofelectric shock.
GROUNDING INSTRUCTIONS
All grounded, cord-connected tools:The lathe is equipped with an electriccord having an equipment-groundingconductor and a grounding gap. Theplug must be plugged into a matchingoutlet that is properly installed andgrounded in accordance with all codesand ordinances.Do not modify the plug provided withdomestic lathes - if it will not fit theoutlet, have the proper outlet installedby a qualified electrician.Improper connection of the equipmentgrounding conductor can result in arisk of electric shock. In the U.S.A.,the conductor with insulation havingan outer surface that is green with orwithout yellow stripes is the equip-ment-grounding conductor. If repairor replacement of the electrical cordor plug is necessary, do not connectthe equipment-grounding conductorto a live terminal.Check with a qualified electrician orserviceman if the grounding instruc-tions are not completely understood,or if in doubt as to whether the tool isproperly grounded.
Lathes sold and installed in the U.S.A.should use only 3-wire extension cordsthat have 3-prong grounding plugsand 3-pole receptacles that acceptthe power plug.Repair or replace damaged or worncords immediately.This tool is intended for use on acircuit that has an outlet that looks like
4. DON’T USE IN DANGEROUS EN-VIRONMENT. Use lathe indoors only.Don’t use lathe in damp or wet loca-tions, or expose to rain. Keep workarea well lighted.
5. DON’T FORCE LATHE. It will dothe job better and safer at the rate forwhich it was designed.
6. USE RIGHT TOOL. Don’t forcelathe or attachment for a job for whichit was not designed.
7. WEAR PROPER APPAREL. Donot wear loose clothing, gloves, neck-tie, rings, bracelets, or other jewelrythat might get caught in moving parts.Nonslip footwear is recommended.Wear protective hair covering to con-tain long hair.
8. ALWAYS WEAR SAFETYGLASSES. Everyday eyeglassesonly have impact resistant lenses,they are NOT safety glasses. Alsouse face or dust mask if cutting opera-tion is dusty.
9. DON’T OVERREACH. Keep properfooting and balance.
10. MAINTAIN LATHE WITH CARE.Keep cutters sharp and clean for bestperformance and to reduce the risk ofinjury to persons. Follow instructionsfor lubricating and changing accesso-ries.
11. DISCONNECT LATHE before ser-vicing, or when changing accesso-ries, such as spacers, collets, cuttersand the like.
12. REDUCE THE RISK OF UNIN-TENTIONAL STARTING. Make sureunit power switch is in the off positionbefore plugging in.
the one illustrated in Sketch (A) above.The tool has a grounding plug thatlooks like the plug illustrated in Sketch(A) above. A temporary adaptershould be used only until a properlygrounded outlet can be installed by aqualified electrician. A temporaryadapter which looks like the adapterillustrated in sketch (C), may be usedto connect to a 2-pole receptacle asshown in Sketch (B). The green-col-ored rigid ear, lug, etc. extending fromthe adapter must be connected to apermanent ground, such as a prop-erly grounded outlet box or a coldwater pipe (metal).
SAFETY PRECAUTIONS
1. KEEP GUARDS IN PLACE and inworking order.
2. REMOVE ALL TOOLS FROM THEWORK AREA before turning lathe on.Always place tools in storage area.
3. KEEP WORK AREA CLEAN. Clut-tered areas and benches invite acci-dents.

3
13. USE RECOMMENDED ACCES-SORIES. The use of improper acces-sories could result in risk of injury topersons as well as poor performanceon the disk or drum being Machined.Consult the operator's manual for rec-ommended accessories.
14. CHECK FOR DAMAGEDPARTS. Before use of the lathe, aguard or other part that is damagedshould be checked to determine that itwill operate properly and perform itsintended function. Check for align-ment of moving parts, binding of mov-ing parts, breakage of parts, mount-ing, and any other conditions that mayaffect its operation. A guard or otherpart that is damaged should be prop-erly repaired or replaced.
15. DIRECTION OF FEED. Feedwork into cutter against the directionof rotation of the cutter only.
21. USE PROPER EXTENSIONCORD. Make sure your extensioncord is in good condition. When usingan extension cord, be sure to use oneheavy enough to carry the currentyour lathe will require. An undersizedcord will cause a drop in line voltageresulting in loss of power and over-heating. See chart below for correctsize to use depending on cord lengthand ampere rating. If in doubt use thenext heavier cord. NOTE: the smallerthe gage number the heavier the wire.
16. NEVER STAND ON TOOL. Se-rious injury could result if tool is tippedor if the cutting tool is unintentionallycontacted.
17. NEVER LEAVE LATHE RUN-NING UNATTENDED. TURNPOWER OFF. Don’t leave lathe untilit comes to a complete stop.
18. CLEAN CHIPS FROM LATHE.Chip accumulation can cover tips,preventing proper adjustment. Neveruse your fingers to remove chips fromcutter tips. Use a brush to removechip accumulations.
19. KEEP UNAUTHORIZED PER-SONNEL AWAY from all equipmentin shop. Alternative - disconnect allelectrical cords from wall plug.
20. ADDITIONAL SAFETY PRECAU-TIONS are noted throughout thismanual.
Total length of cord in feet AWG0 - 50ft 1450 - 100ft 12over 100ft *Not Recommended over 100 ft.Size figured for voltage of 115v @ 14amps
Topics of Interest PageCheck List 2Safety Instructions 2Preview 3Specifications 4Standard Equipment 4Feeds and Speeds 5Cutting Tools 6Installation Instructions for 700 Series Lathes 6Mounting Equipment on Base or Bench 7How to Machine a Brake Drum 9How to Machine a Disc Brake Rotor 12Operating Lathe 13Preventive Maintenance 16Warranty 18
1. This lathe was thoroughly tested before shipment to perform all operations for which it was designed.
2. Before operating your lathe, read and thoroughly familiarize yourself with the contents of this manual. Your JBCDealer is available to acquaint you with the features of this lathe. Do not operate the lathe until you understand allof its functions.
3. Become familiar with the standard equipment supplied with your lathe. Review the adapter chart supplied anddetermine if optional adapters will be required for the type of passenger cars and light trucks that frequent yourestablishment.
4. For your convenience, when supplies and parts are required, John Bean has a serviceman caring for your areawho carries parts for emergency requirements. Refer to the Parts Reference and order parts by their 'Part Number'.
This manual contains operating instructions, safety information, preventive maintenance instructions, and otherinformation relating to the proper operation of JBC Lathes.
Table of Contents

4
SPECIFICATIONSCapacity:Drums 6" to 28" diameter, 6" wide faceDiscs 6" to 20" Diameter, 2" thick
Spindle Speed:701 160 RPM702 105 or 160 RPM
Feeds:Power crossfeed: 001 - .010" per spindlerevolutionCarriage: .005 & .0125 per spindlerevolution
Motor:1 HP, 115-230 Volt, 50/60Hz, 1Phase
Shipping Weight:700 - 350 lbs.701/702 - 350 lbs.710 - 350 lbs
Notice:Components of the 700 Series Lathes maychange as requirements vary and thesechanges will be made, to increase the basiccapacity of the equipment, without priornotice.
Description
Floating drum Attachment
Silencer Band - Passenger Car Drums
Silencer - Passenger Car Solid Rotors
Silencer-Passenger Car & Light TrucksVentilated Rotors
Silencer - Large Solid Rotors
Cutter Kit, RH Cutter with 2 - 90847 Tips
Import Hubless Face Plate
Small Disc Collet Adapter
Medium Disc Collet Adapter
Large Disc Collet Adapter
Hubless Rotor Adapter Set
Inertia Dampener
Self-Centering Arbor Nut
Spacer, 1" Long
Spanner Wrench
Spacer, 2" Long
Rotor-Truer with 90495 LH &90494 RHCutters and 90711 Spacer
Chrysler Drum/Disc Collet Kit
Hubless Rotor Adapter Set
Clip-On Disc Silencer
Standard Equipment for the 700 Series
700
1
1
1
1
2
1
1
1
1
1
1
1
1
701/702
1
1
1
1
1
1
1
2
1
1
1
1
1
1
1
1
1
1
1
Supplied with710
1
1
1
1
1
2
1
1
1
1
1
1
1
1
1
1
1
CatalogNumber
90526
90988
90986
90989
90987
90490
90510
90519
90520
90521
90527
90543
90547
90554
90578
90556
90650
90178
90528
90198

5
FEEDS AND SPEEDS
1. Drum Machining - John Bean 700is equipped with two feed speeds.See Figure 1.
A. Rough Cut - .0125" per spindlerevolution.
B. Finish Cut - .005" per spindlerevolution.
The above feed settings have beenestablished after years of researchand experience in conjunction withcar manufacturers’ recommendations.A finish cut produces an excellentsurface for all types of brake linings,hard or soft, woven or molded.
Finish Cut
Rough Cut
Figure 1
Figure 3 Figure 4
Figure 2
The feed rate of the rotor cutter iscontrolled by the scaled dial wheel onthe front of the lathe chassis. Therotor cutter drive shaft is direct drivenby the small DC motor on the back ofthe housing. There are no belts orpulleys to change, See Figures 3and 4.
3. 702 Spindle Speed - The 702spindle speed can be changed bymoving a HI/LO toggle switch on theback of the motor. The LO (105 RPM)is recommended for 12" or largerdrums and rotors and the HI (160RPM) for smaller drums and rotors.
2. Disc Machining - Model 700Lathes are equipped to machine discbrake rotors with feed range of .001 -.010" per spindle revolution.
The feed range allows the operator toset the scaled dial to the feed rate toobtain a desired finish on a rotor.
Normally, the finish of the rotor aftermachining will meet or exceed mostcar manufacturers’ specifications. Ifyou desire an even smoother finish,an approximate 30 second applica-tion for each side of the rotor with the90646 Rotor Finisher (optional acces-sory) will provide a smooth non-direc-tional finish. See Figure 2.

6
CUTTING TOOLS
Tool Holders, Cutter Shanks andCarbide Tips
1. John Bean Lathes are designedto use cutter shanks with No. 90487carbide tips with three cuttingedges.
Figure 5
Cutting Tools
Cutters Supplied 700 701/702 710
90490 Right Hand Cutter Kit with 2 extra90487 Carbide Tips
90494 Right Hand Cutter with 90487 Carbide Tip
90495 Left Hand Cutter With 90487 Carbide Tip
xx
x
x
x
x
Brake LatheModel 701 ECFSerial # J81DC030Volts 115 Amps 14Hz 60/50 Phase 1 John Bean Company,
Conway, AR. 72032
2. IMPORTANT: Sharp cutting tipsmust be used at all times. A dull cutterwill affect the finish of both drums androtors.
3. Coated carbide tips are availablefor heavy duty drum and disc machin-ing. Order part 91281 from your near-est John Bean Service Center.
4. Tip life is affected by speed, gradeof carbide, cutter tip design and size.These are all based on mechanicalconsiderations of the lathe - motor,speed, and gear ratios.
5. Check tightness of carbide tip in thecutting tool. Examine for breaks onthe cutting edge. If the cutting edge isdamaged, replace promptly. Be sureno metal chips are under tip whenremounting with fresh tip.
Be sure to keep an adequate supply ofreplaceable carbide tips on hand at alltimes.
INSTALLATION INSTRUCTIONS
For 700 Brake Lathes
Electrical Requirements:
1. Refer to the name plate located on theback of the lathe. Be sure the powersource is of sufficient voltage and amper-age to operate the lathe. If in doubt,have a qualified electrician check.See Figure 5.
2. Domestic Lathes. An approvedthree-wire cord and a three-prongedplug is supplied with the lathe and theprong for grounding must not be re-moved. Change the receptacle in thewall socket if necessary to insureproper grounding.If the use of an extension cord isnecessary, use a heavy duty 3-wirecord containing a grounding prongand the proper receptacle to acceptthe plug on the lathe cord.
3. Should the electric power supplycord become damaged, repair or re-place it immediately. Use only partnumber specified or equivalent.
4. If wiring the lathe to a permanentconnection is desired, be sure theground wire in the lathe cord is con-nected to a ground in an approvedmetal outlet box. The power sourcemust be fused or have a circuit breakerlarge enough to handle the voltageand amperage as specified on thename plate.
Initial Cleaning/Lubrication
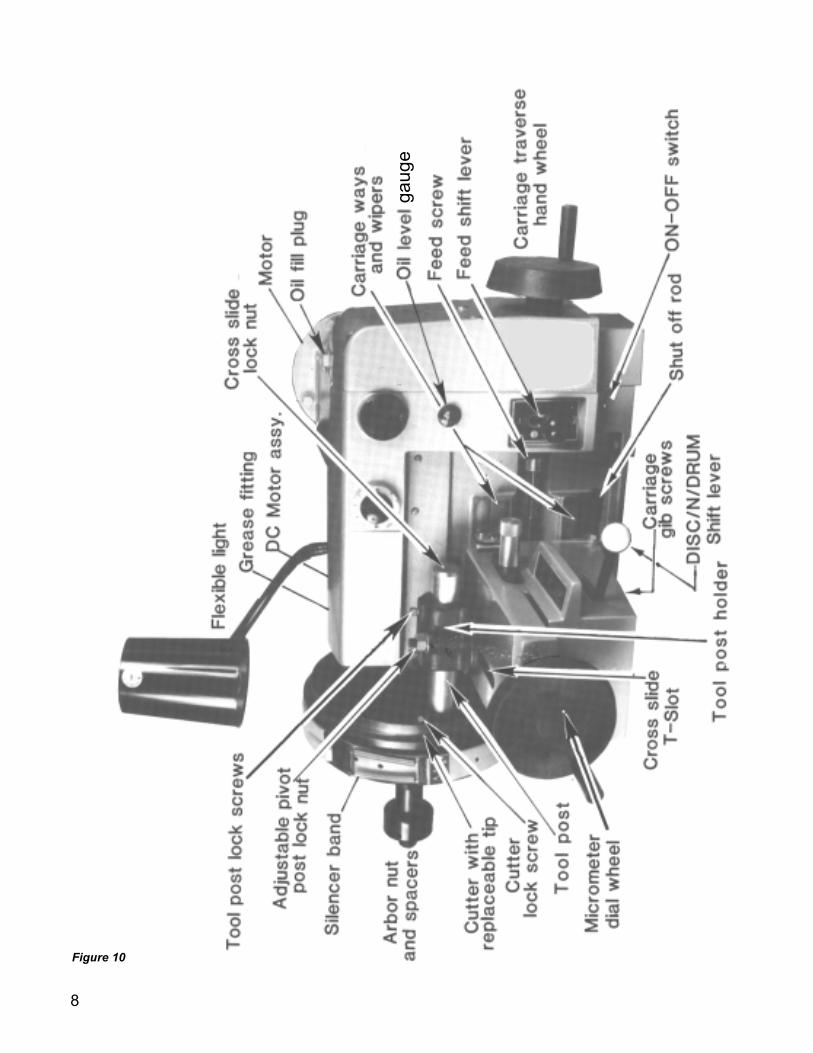
Clean all machined surfaces of fac-tory-applied rust preventive. Apply agood lubricant (e.g. WD40 or CRC) tothe dovetail ways (housing & car-riage), cross slide and rotor truer. SeeFigure 10.
WARNING!!!
Lathe must be grounded wheneverin use. Failure to do so may result inelectrical shock and cause seriouspersonal injury.

7
MOUNTING EQUIPMENT
On Base or Bench
1. The Base is designed for one latheor brake shoe grinder mounting. TheBench is designed for two lathes or alathe and brake shoe grinder mount-ing operation. Follow assembly in-structions supplied with each.
2. Mounting hardware, nuts, bolts,accessory hooks, etc. are suppliedwith the bench. See Figure 6.
3. Two rubber pads are supplied withthe 672 Bench, and one must be usedbetween each lathe and the bench.
4. Be sure the mounting bolts aretightened securely to eliminate anypossibility of vibration. If the lathe isnot mounted securely, it may causethe lathe to operate improperly.
5. Provisions for storing adapters andaccessories are incorporated with theBase . See Figure 7.Accessory hooks are supplied forcones, spacers, and collets. A shelf isprovided for larger items.
6. Adapters and accessories shouldbe stored on the accessory hooksprovided underneath the top of thebase or bench, or on the sign board.
Figure 9Drum Prevents hand wheel fromturning, causing damage to gear train.
WARNING!!!
Keep all loose equipment properlystored and away from the area of therevolving hand wheel. See figure 9.
Figure 7Base with Lathe, Sign and Accessories
Figure 6
8
gaug
e
Figure 10

9
HOW TO MACHINE ABRAKE DRUM
Model 700
See Figure 10.
After the following instructions are readand understood, obtain a scrap brakedrum for practice. Select the properadapters for mounting on a spindle.Mounting is one of the most importantfunctions of the machining operation,since it affects accuracy and finish.
Practice setting cutter for machiningdrums. Learn all the functions thor-oughly to insure proper operation.
Machining Limitations - Drums
Drums produced recently have themaximum drum diameter value castinto the outer surface. The properprocedure for determining whether toresurface drums or discard them islisted below:
A. Check to see if the brake drum hasa maximum size cast into it. If not,refer to the current John Bean Drumand Rotor Specifications Book.
B. Measure the drum with the op-tional John Bean 90240 Drum mi-crometer (90239 - Metric) and, if it issmaller than the maximum allowablesize, it can be machined.
C. After machining, check size againwith the Drum Micrometer and dis-card if it is beyond the maximum lim-its.
Mounting Brake Drums
1. Hub type Drums.
On a 700 Lathe, proceed as follows:( 702 only determine the correctspindle speed, refer to page 5 par. 3)
A. Clean excess grease from bearingraces of drum. Inspect bearing racesfor damage and replace if necessary.
B. Select collets to fit in bearingraces, by referring to the current Drumand Rotor Specification book.
C. Install collet for inner bearing raceon arbor. See Figure 11. Mount thedrum (to be machined), the collet forouter bearing race, and necessaryspacers to fill arbor past mountingsurface. Install arbor nut and tightenby hand. This will center the drum onthe collets. Using 90578 SpannerWrench, tighten arbor nut snugly. Ifdrum touches housing, place a spaceron arbor between inner collet andarbor shoulder.
D. IMPORTANT: Do not overtightenarbor nut when mounting drums orrotors on the spindle. Usually thepressure of one hand with the Span-ner Wrench engaged in the arbor nutis sufficient to tighten. See Figure 14.If spacers and adapters are not cleanand free of nicks, burrs or foreignmatter when the arbor is tightened, itcould introduce spindle runout. Thiscan be detected by observing the endof spindle when the arbor is revolving.If this occurs, check spacers andadapters for nicks, etc., to be surethey are smooth and clean and thatthe arbor nut is properly tightened.
E. Wrap a 90988 silencer around thedrum (snug, but not too tight). SeeFigure 14. The rubber silencer dead-ens vibration of the drum while ma-chining. A brake drum is like a bell andwhen it is machined without the si-lencer band, vibration is created bythe cutter tip removing metal, result-ing in a poor finish.
For wider drums or large finned drums,the wider, optional 90983 DeluxeSilencer band is recommended. SeeFigure 13.
2. Mounting Hubless Brake Drums.
A. When machining rear hublessdrums, use the 90526 Floating DrumAttachment (Optional 90559 or 90560Truck Face Plate Set if truck drumsare to be machined), select the propercone to fit the center hole in the drum.Follow the illustration as shown inFigures 12 & 15.
B. Clean the inner face of the drumwith a wire brush.
Figure 14
Dampen vibrations during themachining operation. Excessivetightness of silencer on drums mayresult in minor chatter.
Figure 13
Use 90526 floating drum attachmentto mount floating hubless reardrums.
Figure 12Use of collets to mount tapered rollerbearings equipped brake drums.
Figure 11
Hand tighten arbor nutwith 90578 spannerwrench.

10
NOTE: When Turning drums, therotor feed rate selector dial should bein the OFF position. This step saveswear on the DC motor.
2. Depending on width of drum, ad-vance carriage assembly toward thedrum by turning carriage traverse handwheel clockwise, until left side of car-riage is approximately one-half inchbeyond the end of lathe housing.
3. Move cross slide to its innermostposition and then back off by turningdial wheel five turns (about 1/2") coun-terclockwise. Loosen nut and adjusttool post holder, tool bar, and cutterassembly to approximate drum diam-eter. Tighten nut and leave feed shiftlever in neutral (N) position. SeeFigure 17.
ter tip should extend from tool bar nomore than 3/4" when turning a typicalbrake drum. Some small drums mayrequire less cutter extension. SeeFigure 18.
5. Turn lathe on and advance car-riage by turning traverse hand wheeluntil cutter is at the extreme back ofdrum. Advance cutter into brakingsurface to be machined by turningmicrometer dial wheel counterclock-wise. Continue turning dial wheel untildesired depth of cut is obtained.NOTE: Micrometer dial wheel readingindicates the amount of metal removedfrom diameter of drum (not radius).
6. Tighten adjusting knob on side ofcarriage. Engage feed lever in eitherrough or finish cut, depending on thecondition of the drum surface to bemachined.
NOTE: When machining a barrelshaped or worn drum, the outer edge(open end) of drum usually has asmaller diameter than the center sec-tion where the brake shoe exerts themost wear. The smaller diameterarea (outer edge) must be machinedfirst before making the finish cut. SeeFigure 19.Some drums may have a deep grooveor grooves (usually .020" or less) that
4. Loosen two square head set screwson tool post holder and move cutterand tool bar into brake drum until ittouches back of drum. While tighten-ing set screws, rock tool bar clock-wise and counterclockwise until setscrews tighten on flat surfaces. Cut-
can be machined in one pass. Whenthis condition exists, move cutter tobottom of deepest groove and notemicrometer dial reading. Turn dialwheel to remove cutter from groove
Figure 17
Figure 18Figure 16
Tighten
Tighten 1/2"
Move controllever to drumpositon
C. Place one face plate over arbor.Install spring and centering cone.
D. Place drum over the centeringcone and follow with the other faceplate and necessary spacers to fillarbor past mounting surface. Installarbor nut and tighten by hand. Thiswill center the drum between the faceplates.
E. Tighten arbor nut snugly with span-ner wrench. If drum touches housing,place a spacer on arbor between in-ner face plate and arbor shoulder.
NOTE: If you experience hard spotswhen machining front and rear drums,turn motor off, slow the speed andfinish the cut. If the finish is objection-able, discard the drum.
Figure 19
Figure 15
Rear drum mountedusing 90526 floatingdrum attachment
Operating Lathe1. The Model 700 Combination Drumand Disc Lathe is equipped with acontrol lever on the carriage. Thiscontrol lever must be in the drumposition to machine a brake drum.See Figure 16.

11
If the switch fails, the feed nut will dropinto the undercut and the carriagemovement stops. To reengage thefeed nut on the threads of the feedscrew, turn off lathe, apply slightpressure on the right side of the car-riage while turning hand wheel clock-wise. Care must be taken not tocrossthread the feed nut. If handwheel turns hard, back off and startover again.
9. Prepare to remove the drum byturning the carriage traverse handwheel counterclockwise to clear cut-ter from the drum and silencer band.Follow same procedure for frontdrums.
10. To remove a front drum from thearbor, loosen the arbor nut one turnand place the handle end of the span-ner between the hub of the drum andthe collet in the outer bearing race.Push the top of the wrench downtoward the drum to free the collet fromthe bearing race. A slight hand tap onthe wrench may be necessary. SeeFigure 23.
next drum. Most rear drums aremounted with the 90526 floating drumattachment, thus require no specialdemount instructions, other than to becareful not to allow drum to drop onthe spindle when demounting.
11. If the next operation is to machinea rotor on a John Bean 700 lathe,proceed to page 12.
CAUTION!!DO NOT REMOVE THE SHUT-OFFRODA safety factor has also been incorpo-rated with an undercut on the carriagefeed screw. This feature preventsany damage to the lathe in case of anelectrical switch malfunction. See Fig-ure 22.
7. When the machining is completed,disengage feed lever from finish cut toneutral (N). See Figure 21.
8. The lathe is equipped with an auto-matic shut-off rod. It is preset at thefactory to turn lathe off when the car-riage reaches its maximum travel tothe right.
and move cutter to back of drum. Turndial wheel to previous measurementplus .002 or .003 inches and proceedto machine drum as described above.See Figure 20.
After the collet has been loosened,hold the drum with one hand andremove the arbor nut, spacers, collet,and the drum. Remove the remainingcollet on the arbor and remove anyforeign matter before mounting the
Figure 20
Figure 22
Loosen nut one turnremove collet.
Shut off rod Switch
Figure 21
Figure 23

12
HOW TO MACHINE A DISCBRAKE ROTOR
Model 700
After the following instructions are readand understood, obtain a scrap rotorfor practice. Select the proper adapt-ers for mounting on spindle. Mount-ing is one of the most important func-tions of the machining operation, as itaffects accuracy and finish.Practice setting cutters for machiningrotors. Learn all the function thor-oughly to insure proper operation.Machining Limitations - RotorsSince 1971, rotors have the minimumthickness values cast into the outersurface.The proper procedure for determiningwhether to resurface rotors or discardthem is listed below:
A. Using a John Bean 90317 (90318- metric) micrometer or some othermicrometer suitable for measuring thethickness of the rotor to be machined,check the rotor thickness at four points(90 degrees apart) about 1" from theouter diameter.B. If the thickness at any of the fourpoints is less than the minimum es-tablished by car manufacturers asshown on the rotor or in the currentJohn Bean Brake Specifications Book,replace the rotor.C. The rotor may be resurfaced ifscored or it has a small amount ofrunout, provided it is within the mini-mum thickness requirement.D. After the rotor is machined, mea-sure the thickness again, and, if it isnot within the allowable minimum lim-its, discard it.
NOTE: This check requires a mea-surement in only one spot if both brak-ing surfaces cleaned up 100%, be-cause the turning operation assuresalmost absolute parallelism.
Mounting Brake Rotors
1. Hub Type Rotors
On a 700 lathe, proceed as follows:A. Clean excess grease from bearingraces of rotor. Inspect bearing racesfor damage and replace if necessary.B. Select collets to fit in bearingraces. Refer to current Drum andRotor Specs. book.C. Install collet for inner bearing raceon arbor. See Figure 25. Then mountthe rotor, collet for outer bearing race,and necessary spacers to fill arborpast mounting surface. Install arbornut and tighten by hand. This willcenter the rotor on the collets. Using90578 Spanner Wrench, tighten ar-bor nut snugly. If rotor touches hous-ing, place a spacer on arbor betweeninner collet and arbor shoulder.
2. Mounting Hubless Rotors.A. Locate 90527 Hubless RotorAdapter Set and proper cone to fitrotor to be machined.B. Install one face plate over arbor,then follow with a spring and center-ing cone.C. Place rotor over arbor and center-ing cone, then install second faceplate over arbor and up against rotor.D. Add necessary spacers to fill arborpast mounting surface. Install arbornut and tighten by hand. This willcenter the rotor to the face plates.Use 90578 Spanner Wrench to tighten
arbor nut snugly. If rotor toucheshousing, place a spacer on arbor be-tween the inner face plate and arborshoulder.
E. IMPORTANT: Do not overtightenarbor nut when mounting rotors on thespindle. Usually the pressure of onehand with the spanner wrench en-gaged in the arbor nut is sufficient totighten. See Figure 14. If spacersand adapters are not clean and free ofnicks and burrs or foreign matter whenthe arbor is tightened, it could intro-duce spindle runout. This can bedetected by observing the end of thespindle when the arbor is revolving. Ifthis occurs, check spacers and adapt-ers for nicks, etc., to be sure they aresmooth and clean and that the arbornut is properly tightened.3. Install Rotor Silencer.Select silencer that is appropriate forrotor being machined, and installaround outer edge of rotor. There arefour (4) sizes of band type silencers,plus a clip-on silencer. One of themwill be appropriate for the rotor beingmachined. See Figure 27.
Figure 25 Use collets in bearing raceas illustrated, add necessary spacers
Figure 26 An accurate way to machinehubless rotors. Follow instructionssupplied with 90527.
Figure 27 90989 Rotor Silencer band.

13
Operating Lathe1. Align the carriage pointer with thepointer on the lathe housing by turningthe carriage traverse hand wheel.Control lever must be in DRUM posi-tion to move carriage. It is very impor-tant to view this alignment when youare directly in front of the lathe. If youare off to the side, the pointers mayappear aligned, when in actuality, theyare not. See Figure 28.
position, alignment is correct. If itdoes not, then examine the pointersfor proper alignment. Push the con-trol lever to the neutral (N) positionand turn off the lathe. See Figure 30.3. If drum machining was the lastoperation performed, remove the tool
5. Mount the rotor on the arbor usingthe required adapters (collets, optional90527 Hubless Rotor Attachment, orother Special Adapters).
6. Advance cross slide to within ap-proximately 1/2" of its extreme inwardposition. See Figure 30.
CAUTION!!!
Before placing the rotor-truer on theadjustable pivot post, it is extremelyimportant that all chips, dirt, and anyforeign matter be removed from thetop of the cross slide and the bottomsurface of the rotor-truer plate. Be-cause of the very large contact areabetween the rotor-truer plate and thecross slide, any small chips or piecesof dirt measuring only a few thou-sandths of an inch can cause the rotorto be machined improperly. If chipsare present, you may notice that extraeffort is required to turn the microme-ter dial wheel. See Fig. 32.
post nut, washer, and the tool barassembly. Always loosen cross slideadjusting knob when preparing tomachine disc brake rotors. See Fig-ure 30.
4. Be sure the arbor and adapters areabsolutely clean. A small chip, nick,or burr on the surfaces where spacersand adapters come together mightcause the rotor to be machined inac-curately and create improper opera-tion when the rotor is reinstalled onthe vehicle.Cleanliness is of the utmost impor-tance. See Figure 31.
Figure 29 -Pull lever to rotor position asshown
2. After pointers are aligned, savesetup time by turning on the lathe andslowly pulling the control lever on theright side of the carriage to the rotorposition.
This is the farthest movement towardoperator. See Figure 29. The physi-cal shape of the drive shaft and itsmating driven shaft is a hexagon, justlike a socket wrench and the head ofa bolt.
Figure 28 Point to point alignment
7. IMPORTANT: In all cases whenmachining rotors, be sure the adjust-ing knob that locks the cross slide isalways loose. If tightened, it will cre-ate unnecessary wear and strain onthe drive train. See Figure 33.IMPORTANT: Whenever machininga rotor always be sure the feed shiftlever that controls the drum feed is inthe neutral (N) position.
Point to Point
Shift toneutralwhenmachin-ing rotors
Loosen whenmachining rotors
1/2"
Loosen whenMachining Rotors
Move toNeutral
Figure 30
Clean betweenspacers
Clean colletsand arbor
Figure 31
Clean Surface
Figure 32
Figure 33
By carefully aligning the pointers (Step1), you insure the proper alignment ofthe two hex parts.
If control lever moves freely to rotor

14
rate (about 8) for rough cuts, and aslow rate (3 is preferred) for fine cuts.
8. Now that the Rotor-Truer and crossslide surfaces have been properlycleaned, place the Rotor-Truer on thecross slide over the adjustable pivotpost. Install a spacer, washer andnut. Hand tighten. See Figure 34.Adjust the cutting tips to approximatelyopposite each other and then tightenthe nut with the spanner wrench, lock-ing the rotor-truer in the operatingposition. See Figure 35.
operation on the other side, if scored.In many instances, the other side maybe perfectly flat and a normal cut canbe taken.
11. With the lathe still running, ad-vance the cross slide until these cut-ters reach the innermost portion of thebraking surface. Turn the knurledknobs in the direction of the arrow withmicrometer dial wheels past zero to.003 or .004" to clean up the rotor.See Figure 36.
12. Tighten the knurled screws on topof the rotor truer casting to hold toolbars in proper position. See Figure36. Engage the feed by pulling thecontrol lever on the carriage slowly tothe rotor position. The cutters willmove across the face of the rotor,machining both sides simultaneously.On severely scored rotors, it may benecessary to make more than onecut. If so, repeat step 11.
13. Normally the finish of the rotorafter machining will meet or exceedmost car manufacturers' specifica-tions. If a smoother finish is desired,an application with the 90646 RotorFinisher on each side of the rotor for a30 second duration will provide asmooth, non-directional finish.
14. Carbide tip cutters last longer pro-viding more cuts per tip when the latheis operated at low speed.
15. When machining is complete,move the control lever on the side ofthe carriage to the neutral position.
16. Prepare to remove the rotor byturning the micrometer dial wheelcounter-clockwise until the cuttersclear the rotor and silencers.
17. To remove the rotor from the ar-bor, loosen the arbor one turn andplace the spanner wrench betweenthe rotor and the collet in the outerbearing race. Push the top of the
T-Slot
Set dialto zero
Be sure setscrews are tight
Knurled knob
Knurled screw
Hand Tighten
Figure 34
Adjust to inner surfaceof rotor
Figure 35
NOTE: Some rotors have a sweptarea on one side than on the other,which necessitates adjustment of thecutters to insure both surfaces aremachined complete at the same time.
NOTE: The T-slot feature, with itsadjustable pivot post, allows you tomachine rotors of all sizes with thecross slide dovetail ways in full con-tact with carriage. This insures maxi-mum rigidity of the lathe, while ma-chining either drums or rotors. SeeFigures 36 and 38.
9. Select feed rate with scaled dial onfront of lathe casting. Select a fast
Figure 36
A slow rate is also suggested for largerotors.10. Turn lathe on. If the rotor to bemachined is rough and scored, withgrooves no deeper than .010", movethe cross slide until the cutter tip isopposite the deepest groove. Turn
Figure 37 Groove simulated here.
the knurled micrometer knob on therotor truer until the cutter tip touchesthe bottom of the groove. Now turnthe micrometer dial (next to the knurledknob) to zero. See Figure 37.
CAUTION!!!Be careful not to move the knurledknob which moves the cutter.Turn the knurled knob in until thecutter is clear of the rotor. Repeat this

15
Figure 39
proceed with steps shown in “How toMachine a Brake Drum" on page 9.
20. In the case where the cross slideis allowed to run until it begins to ‘FreeWheel’. Reverse the direction of thecross slide by placing the shift lever inneutral and turning the dial wheel untilthe cranking handle is at the 6 o’clockposition. Using the heel of the hand,firmly bump the end of the cross slideand, at the same time, start turning thedial wheel. If, for any reason, the feednut and feed screw tends to bind upduring this re-engagement action,back up and start over.
WARNING:
Do not force re-engagementbecause it may result in dam-age to the feed nut.
control lever is moved out of the neu-tral position and into drum position,the carriage is unlocked for move-ment during the drum machining op-eration. See Figure 40.19. If another rotor is to be machined,repeat the operation described above.If the next operation is to machine adrum, move the control lever to thedrum position, remove the Rotor Truerand install the tool bar assembly. Then
wrench toward the rotor, a slight handtap on the wrench may be necessaryto free the collet from the bearingrace. See Figure 39.
After the collet has been loosenedhold the rotor with one hand and re-move the arbor nut, spacers, colletand the rotor.
Remove the remaining collet on thearbor and remove any grease or chipsbefore mounting the next rotor or drum.Many rotors are mounted with the90527 Hubless Rotor Attachment,thus requiring no special demount in-structions, other than to be careful notto allow the rotor to drop on the spindlewhen demounting.
18. An important feature of this latheis the control lever on the carriage.When in the neutral (N) position, thecarriage is automatically locked in thatposition and conversely, when the
Turncounterclockwise
Figure 38
Figure 40
Drumposition
16
PREVENTIVEMAINTENANCE
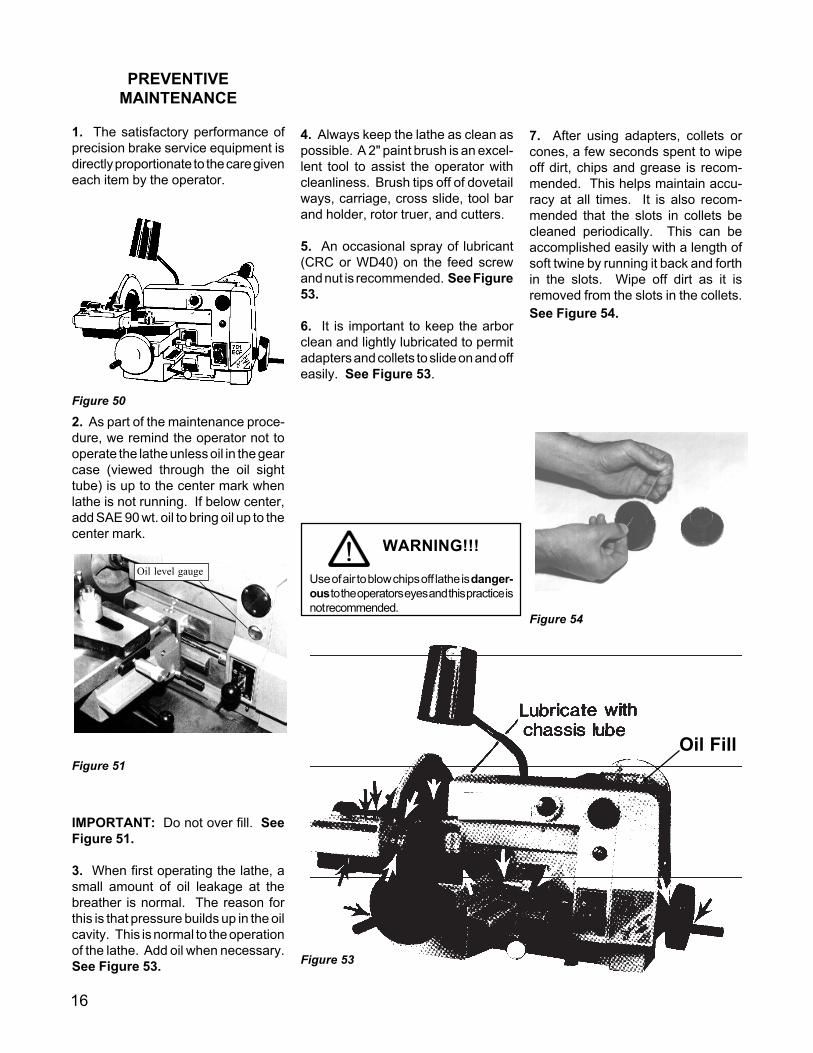
1. The satisfactory performance ofprecision brake service equipment isdirectly proportionate to the care giveneach item by the operator.
IMPORTANT: Do not over fill. SeeFigure 51.
3. When first operating the lathe, asmall amount of oil leakage at thebreather is normal. The reason forthis is that pressure builds up in the oilcavity. This is normal to the operationof the lathe. Add oil when necessary.See Figure 53. Figure 53
Figure 51
Figure 50
Figure 54
Oil level gauge
WARNING!!!
Use of air to blow chips off lathe is danger-ous to the operators eyes and this practice isnot recommended.
2. As part of the maintenance proce-dure, we remind the operator not tooperate the lathe unless oil in the gearcase (viewed through the oil sighttube) is up to the center mark whenlathe is not running. If below center,add SAE 90 wt. oil to bring oil up to thecenter mark.
Oil Fill
4. Always keep the lathe as clean aspossible. A 2" paint brush is an excel-lent tool to assist the operator withcleanliness. Brush tips off of dovetailways, carriage, cross slide, tool barand holder, rotor truer, and cutters.
5. An occasional spray of lubricant(CRC or WD40) on the feed screwand nut is recommended. See Figure53.
6. It is important to keep the arborclean and lightly lubricated to permitadapters and collets to slide on and offeasily. See Figure 53.
7. After using adapters, collets orcones, a few seconds spent to wipeoff dirt, chips and grease is recom-mended. This helps maintain accu-racy at all times. It is also recom-mended that the slots in collets becleaned periodically. This can beaccomplished easily with a length ofsoft twine by running it back and forthin the slots. Wipe off dirt as it isremoved from the slots in the collets.See Figure 54.

17
8. The rotor truer must be kept clean.A periodic spray of lubricant directedunder the cover casting is recom-mended. This will keep the tool barlubricated and operating freely whenturning the micrometer feed dial knobs.See Figure 53.
9. After each three months of opera-tion, lubrication with chassis greasethrough grease fitting at arbor end (onthe back side of the housing) is rec-ommended. See Figure 53.
10. Periodically check the retainingscrew on the carriage traverse handwheel for looseness. If found to beloose, tighten securely. Spray thehandles of hand wheels with lubri-cants so they turn freely and are easyto operate. See Figure 55.
Figure 55
Tighten Set Screw
Replace felt when worn
Figure 56
11. Check gib wiper on carriage tomake sure that chips are being re-moved from ways as carriage movesback to prevent any undue wear onthe surface of the ways. Replace thefelt wipers, if worn. See Figure 56.
12. Check the electric cords for breaksor cuts that may cause short circuit-ing. Replace defective cords promptly.
13. Check the silencers periodicallyfor possible damage. See Figure 57. Lock nut
Adjuster knob
Figure 60
Adjust Gib Screws
Figure 59
Figure 58
Figure 57
14. There is a possibility, after consid-erable use, that a clicking noise maybe heard when machining a rotor.This noise is caused by the loss ofelasticity in the rubber silencer and,as the rotor revolves, the metal tubesmove away from the rotor and thensnap back. It is recommended thatthe silencer band be replaced if thisnoise occurs. See Figure 58.
15. Periodic adjustment of the crossslide and carriage gibs may be neces-sary. Slight tightening of the lock nutwill provide the desired adjustment ofthe cross slide gib. If necessary,make the same adjustment on thecarriage gib screws located under thecarriage. Test tightness by turningthe dial wheel and the hand wheel. Ifcorrect, a slight drag should be felt.See Figures 59 and 60.
16. DC Motor Circuit (Rotor Drive):There is no service requirement forthe DC motor or its associated cir-cuitry. However, if either the DC mo-tor or the Speed Control circuit boardbecome faulty and must be replaced,a technician must calibrate the unitbefore placing the rotor circuit back inservice. Drum cutting operation is notaffected. Simply turn the feed ratecontrol to the “OFF” position, selectDRUM, and continue operating.

18
STANDARD FACTORY WARRANTY
JOHN BEAN 700 SERIES BRAKE LATHES: John Bean Company warrants each new Brake Latheto be free from defects in material and workmanship for a period of 12 months from the date of originalequipment installation to the original equipment owner under normal use and service. The labor andservice call charges to correct such defects is covered by this warranty for 90 days. Brake Latheaccessory items are warranted to be free from defects in material and workmanship for a period of 90days including labor and Service call charges. THE FOREGOING WARRANTY IS IN LIEU OF ALLOTHER WARRANTIES, EXPRESSED OR IMPLIED, INCLUDING THOSE OF MERCHANTABIL-ITY OR FITNESS FOR ANY PURPOSE.
John Bean will not be responsible for claims arising on any unit which (1) has been subject to misusethrough negligence or accident (in installation or operation), (2) shall have been repaired, altered orserviced in any manner by anyone other than John Bean Company or its authorized representative,or (3) shall have been operated in a manner other than as specified by John Bean Company so as, inour judgment, to affect its operation adversely, when the claim is due to one of the above mentionedcauses.
Any cause of action for breach of the foregoing warranty must be brought within one year from thedate the alleged breach was discovered or would have been discovered, whichever occurs first.
John Bean’s liability for our products shall be limited to, and the customer’s remedies are limited torepairing or replacing parts found by us to be defective, or at our option, to refunding the purchaseprice of such products or parts. At our request, Buyer will send, at Buyers expense, any allegedlydefective parts to the plant which manufactured them.
DISCLAIMER OF CONSEQUENTIAL DAMAGES
Seller shall not be liable for consequential damages arising out of or in connection withits products. Consequential damages shall include, without limitation, loss of use,income, or profit, loss sustained as the result of injury (including death) to any person,or loss of or damage to property (including property handled, processed or tested byour products). NOTE: The equipment registration card attached to each serializeditem must be completed and returned to the factory for warranty to be valid.
John Bean CompanyExchange AvenueConway, Arkansas 72032

19
USA309 Exchange AvenueConway, Arkansas 72032Tel.: 1-800-362-8326 or (501) 450-1500Fax: (501) 450-1585
GERMANYWesterwaldstrasse 36D-35722 HerbornTel: 02772-51098Fax: 02772-52144
CANADA2844 Slough StreetMississauga, Ontario L4TL63Tel: (905) 672-2600Fax: (905) 672-2126
IRELANDSitecast Industrial EstateLittle Island, CorkTel: 021 354477Fax: 021 354530
FRANCEZ.I. Du Haut Galy93602 Aulnay S/S BoisTel: 1/4865-3828Fax: 1/4865-7331
SOUTHEAST ASIA149 Gul CircleSingapore 9161Tel: 65/861-3011Fax: 65/862-0527
Notice: The information contained in this document is subject to change without notice. John BeanCompany makes no warranty with regard to this material. John Bean Company shall not be liablefor errors contained herein or for incidental consequential damages in connection with furnishings,performance, or use of this material.
This document contains proprietary information which is protected by copyright and patents. Allrights are reserved. No part of this document may be photocopied, reproduced, or translated withoutprior written consent of John Bean Company.
is a registered trademark of the John Bean Company and Snap-on Company.
Form 4897-4 File:i:\pubs\lathes\form4897.pm6...wdc...9/96 Printed in USA
Related Documents