UV2400U Air Purifier with AirBRIGHT™ Odor Absorption Installation Instructions

Welcome message from author
This document is posted to help you gain knowledge. Please leave a comment to let me know what you think about it! Share it to your friends and learn new things together.
Transcript
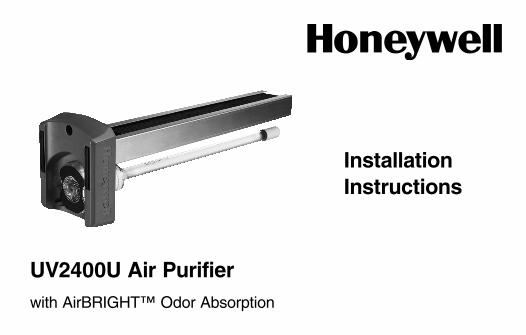
UV2400U Air Purifierwith AirBRIGHT™ Odor Absorption
Installation Instructions

2
Before Installing this ProductRead these instructions carefully; failure to follow them could damage the product and cause a hazardous situation.
Installer must be a trained, experienced service technician.
WARNING: UV Light Hazard. Harmful to bare skin and eyes. Can cause temporary or permanent loss of vision. Never look at lamps while illuminated.
• To prevent exposure to ultraviolet light, disconnect power to the ultraviolet air treatment system before servicing any part of the heating/air conditioning system.
• View illumination only through lamp handle or sight glass.• Do not attempt to bypass duct mount switch.• Do not attempt to open housing; unit is sealed to prevent ultraviolet light
exposure.
3
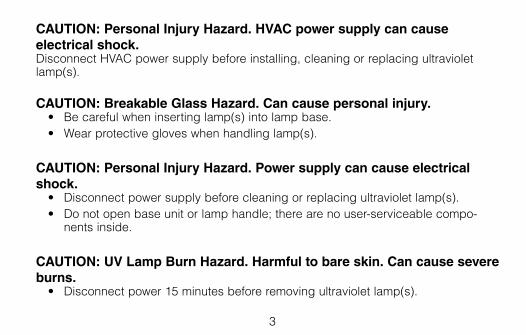
CAUTION: Personal Injury Hazard. HVAC power supply can cause electrical shock.Disconnect HVAC power supply before installing, cleaning or replacing ultraviolet lamp(s).
CAUTION: Breakable Glass Hazard. Can cause personal injury.• Be careful when inserting lamp(s) into lamp base.• Wear protective gloves when handling lamp(s).
CAUTION: Personal Injury Hazard. Power supply can cause electrical shock.• Disconnect power supply before cleaning or replacing ultraviolet lamp(s).• Do not open base unit or lamp handle; there are no user-serviceable compo-
nents inside.
CAUTION: UV Lamp Burn Hazard. Harmful to bare skin. Can cause severe burns.• Disconnect power 15 minutes before removing ultraviolet lamp(s).

4
1. UV lamp handle2. Base3. Foam Gasket4. 16W UV lamp5. AirBRIGHT™ Odor
Absorber (included in UV2400U5000 only)
6. Bushing7. Sight Glass8. Warning sticker9. 24 VAC Ballast10. Self Tapping
Screws (3)11. Power Cord12. wire connectors
(not pictured)
Parts Included
4
5
2
11
9
1
8
M34596
3
7
10
6

5
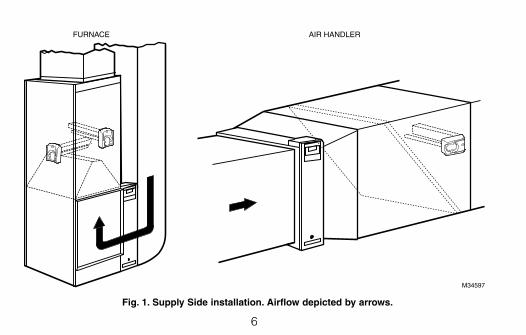
Typical Mounting LocationsWe recommend the UV Air Purifier be installed on the supply side duct 3–5 inches above the A-coil, but it can also be installed on the return side if necessary. See Figures 1 and 2.
The germicidal UV light should be positioned to shine on the surfaces that are prone to mold growth like the A-coil, or be placed in an open area of the return duct where there are long straight runs.
WARNING: Do not mount device in location that allows ultraviolet light to be seen after installation other than by the UV protected lamp handle or sight glass.
Important: Some materials inside the HVAC system (including filter media, flex duct, wiring etc.) may not be UV light resistant. Cover materials affected by UV light with UV shielding or reflective tape.
The AirBRIGHT™ Odor Absorber unit should be oriented so that the air flows past the UV Light first then into the AirBRIGHT Odor Absorber.
6
Fig. 1. Supply Side installation. Airflow depicted by arrows.
M34597
FURNACE AIR HANDLER

7
Fig. 2. Return Side installation. Airflow depicted by arrows.
M34621
FURNACE AIR HANDLER
8
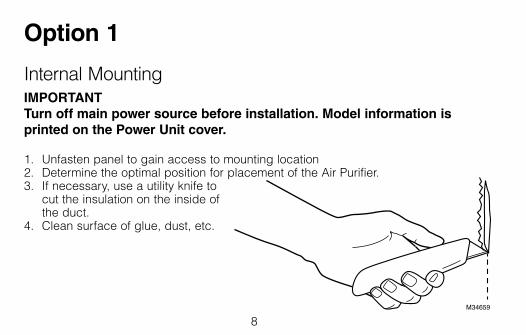
Option 1
Internal MountingIMPORTANT Turn off main power source before installation. Model information is printed on the Power Unit cover.
1. Unfasten panel to gain access to mounting location2. Determine the optimal position for placement of the Air Purifier. 3. If necessary, use a utility knife to
cut the insulation on the inside of the duct.
4. Clean surface of glue, dust, etc.
M34659
9M34689
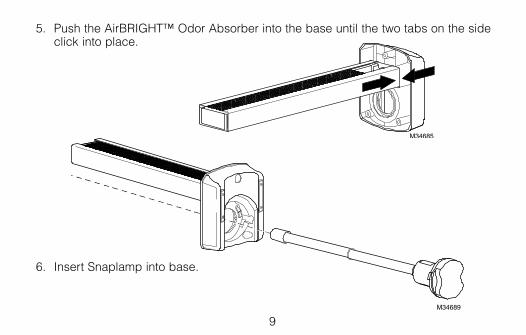
5. Push the AirBRIGHT™ Odor Absorber into the base until the two tabs on the side click into place.
6. Insert Snaplamp into base.
M34685
10
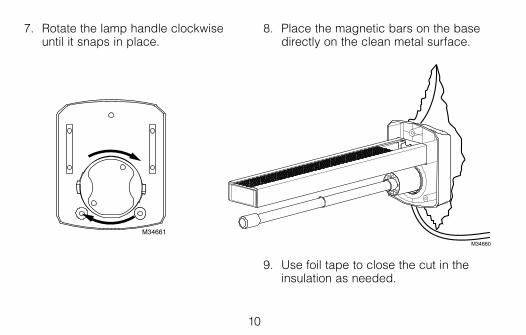
8. Place the magnetic bars on the base directly on the clean metal surface.
M34661
7. Rotate the lamp handle clockwise until it snaps in place.
9. Use foil tape to close the cut in the insulation as needed.
M34660
11
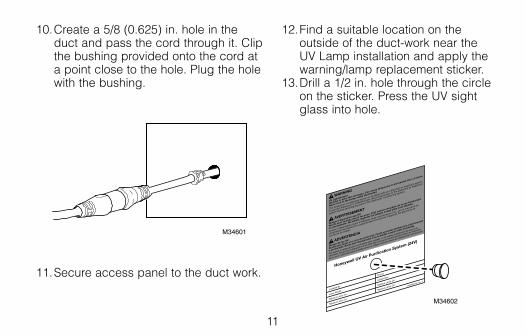
10. Create a 5/8 (0.625) in. hole in the duct and pass the cord through it. Clip the bushing provided onto the cord at a point close to the hole. Plug the hole with the bushing.
M34601
M34602
12. Find a suitable location on the outside of the duct-work near the UV Lamp installation and apply the warning/lamp replacement sticker.
13. Drill a 1/2 in. hole through the circle on the sticker. Press the UV sight glass into hole.
11. Secure access panel to the duct work.
12
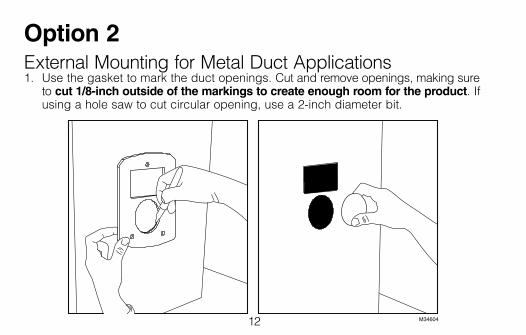
Option 2External Mounting for Metal Duct Applications1. Use the gasket to mark the duct openings. Cut and remove openings, making sure
to cut 1/8-inch outside of the markings to create enough room for the product. If using a hole saw to cut circular opening, use a 2-inch diameter bit.
M34604
13M34687
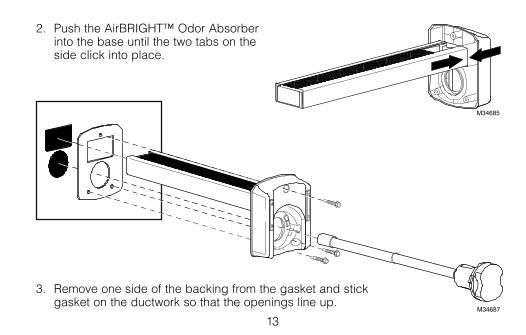
2. Push the AirBRIGHT™ Odor Absorber into the base until the two tabs on the side click into place.
M34685
3. Remove one side of the backing from the gasket and stick gasket on the ductwork so that the openings line up.

14
4. Peel away the other side of the backing on the gasket and insert AirBRIGHT™ into the duct until the base sticks securely to the gasket.
5. Secure the base to the ductwork using self-tapping screws.6. Insert lamp into base and turn handle clockwise to lock in place.
M34661
7. Find a suitable location on the outside of the duct-work near the UV Lamp installation and apply the warning/lamp replacement sticker.
15
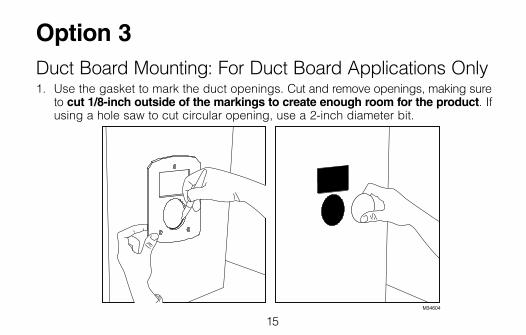
Option 3Duct Board Mounting: For Duct Board Applications Only1. Use the gasket to mark the duct openings. Cut and remove openings, making sure
to cut 1/8-inch outside of the markings to create enough room for the product. If using a hole saw to cut circular opening, use a 2-inch diameter bit.
M34604

16
M34853
M34685
M34685
2. Push the AirBRIGHT™ Odor Absorber into the base until the two tabs on the side click into place.
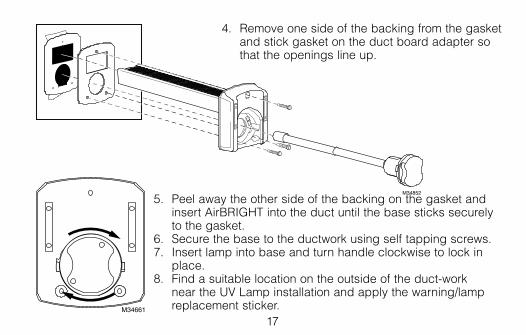
3. Bend metal tabs of duct board adapter over the holes cut in the duct board.
17
M34852
4. Remove one side of the backing from the gasket and stick gasket on the duct board adapter so that the openings line up.
5. Peel away the other side of the backing on the gasket and insert AirBRIGHT into the duct until the base sticks securely to the gasket.
6. Secure the base to the ductwork using self tapping screws.7. Insert lamp into base and turn handle clockwise to lock in
place. 8. Find a suitable location on the outside of the duct-work
near the UV Lamp installation and apply the warning/lamp replacement sticker.M34661
18
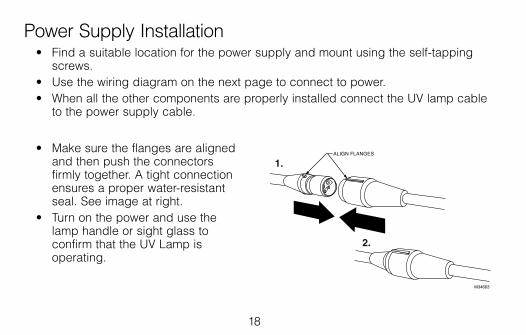
Power Supply Installation• Find a suitable location for the power supply and mount using the self-tapping
screws.• Use the wiring diagram on the next page to connect to power.• When all the other components are properly installed connect the UV lamp cable
to the power supply cable.
M34663
ALIGN FLANGES
2.
1. • Make sure the flanges are aligned
and then push the connectors firmly together. A tight connection ensures a proper water-resistant seal. See image at right.
• Turn on the power and use the lamp handle or sight glass to confirm that the UV Lamp is operating.
19
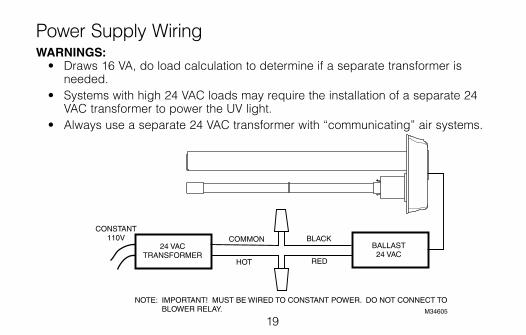
Power Supply WiringWARNINGS: • Draws 16 VA, do load calculation to determine if a separate transformer is
needed. • Systems with high 24 VAC loads may require the installation of a separate 24
VAC transformer to power the UV light.• Always use a separate 24 VAC transformer with “communicating” air systems.
M34605
NOTE: IMPORTANT! MUST BE WIRED TO CONSTANT POWER. DO NOT CONNECT TO BLOWER RELAY.
24 VACTRANSFORMER
BALLAST24 VAC
COMMON
HOT
BLACK
RED
CONSTANT110V

20
MaintenanceNote: Lamps should be replaced every year. UV lamps will continue to emit visible light but lose germicidal effectiveness after approximately one year.
Changing UV Lamp1. Disconnect the power to your heating and cooling system.2. Unplug or turn off power to your UV System and allow the lamp to cool for at least
15 minutes.3. Rotate the lamp handle counterclockwise, as shown below, and gently pull the
lamp handle to remove the lamp.
M34606
M34609
21
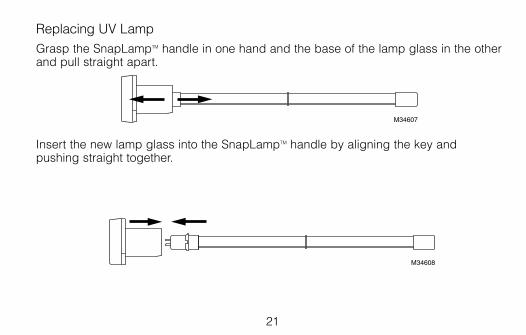
Replacing UV LampGrasp the SnapLampTM handle in one hand and the base of the lamp glass in the other and pull straight apart.
Insert the new lamp glass into the SnapLampTM handle by aligning the key and pushing straight together.
M34607
M34608
22
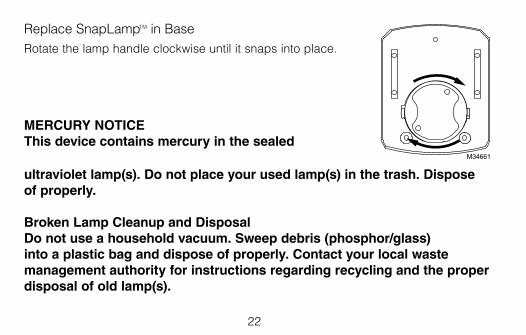
Replace SnapLampTM in BaseRotate the lamp handle clockwise until it snaps into place.
MERCURY NOTICEThis device contains mercury in the sealed
ultraviolet lamp(s). Do not place your used lamp(s) in the trash. Dispose of properly.
Broken Lamp Cleanup and DisposalDo not use a household vacuum. Sweep debris (phosphor/glass) into a plastic bag and dispose of properly. Contact your local waste management authority for instructions regarding recycling and the proper disposal of old lamp(s).
M34661
23
Note: Use of replacement UV lamps other than Honeywell approved lamps voids warranty.
Replacement PartsUV2400U5000 - UV Air Purifier with AirBRIGHT™ Odor Absorption
UV2400U1000 - UV Air Purifier
UV2400XPCO1 - AirBRIGHT Odor Absorber
UV2400XBAL1 - Replacement Ballast
UV2400XLAM1 - Replacement Lamp
UV2400XDBA1 - Duct Board Adapter

24
Five-Year Limited Warranty
Honeywell warrants this product, excluding lamps, to be free from defects in the workmanship or materials, under normal use and service, for a period of five (5) years from the date of purchase by the consumer. If, at any time during the warranty period, the product is defective or malfunctions, Honeywell shall repair or replace it (at Honeywell’s option) within a reasonable period of time. If the product is defective, (i)return it, with a bill of sale or other dated proof of purchase, to the retailer from which you purchased it, or (ii) package it carefully, along with proof of purchase (including date of purchase) and a short description of the malfunction, and mail it, postage prepaid, to the following address: Honeywell Return Goods, Dock 4 MN10-3860, 1885 Douglas Dr. N, Golden Valley, MN 55422.
This warranty does not cover removal or reinstallation costs. This warranty shall not apply if it is shown by Honeywell that the defect or malfunction was caused by damage which occurred while the product was in the possession of a consumer.
Honeywell’s sole responsibility shall be to repair or replace the product within the terms stated above. HONEYWELL SHALL NOT BE LIABLE FOR ANY LOSS OR DAMAGE OF ANY KIND, INCLUDING ANY INCIDENTAL OR CONSEQUENTIAL DAMAGES RESULTING, DIRECTLY OR INDIRECTLY, FROM ANY BREACH OF ANY WARRANTY, EXPRESS OR IMPLIED, OR ANY OTHER FAILURE OF THIS PRODUCT. Some states do not allow the exclusion or limitation of incidental or consequential damages, so this limitation may not apply to you.
THIS WARRANTY IS THE ONLY EXPRESS WARRANTY HONEYWELL MAKES ON THIS
25
PRODUCT. THE DURATION OF ANY IMPLIED WARRANTIES, INCLUDING THE WARRANTIES OF MERCHANTABILITY AND FITNESS FOR A PARTICULAR PURPOSE, IS HEREBY LIMITED TO THE FIVE YEAR DURATION OF THIS WARRANTY. Some states do not allow limitations on how long an implied warranty lasts, so the above limitation may not apply to you. This warranty gives you specific legal rights, and you may have other rights which vary from state to state. If you have any questions concerning this warranty, please write Honeywell Customer Relations, Honeywell, 1985 Douglas Dr. N MN10-1461, Golden Valley, MN 55422 or call 1-800-468-1502. In Canada, write Retail Products ON15-02H, Honeywell Limited/Honeywell Limitée, 35 Dynamic Drive, Toronto, Ontario M1V4Z9.
Automation and Control Solutions
Honeywell International Inc.
1985 Douglas Drive North
Golden Valley, MN 55422
yourhome.honeywell.com
69-2796EFS-02
Honeywell LTD
705 Montrichard Avenue
Saint-Jean-sur-Richelieu, Québec J2X 5K8
® U.S. Registered Trademark© 2013 Honeywell International Inc.69-2796EFS—02 Rev. M.S. 09-13Printed in United States
Purificateur d’air UV2400U avec absorption d’odeur AirBRIGHT™
Notice d’installation

2
Avant d’installer ce produitPrière de lire ces instructions avec soin; le non-respect des instructions peut endommager le produit et provoquer une situation dangereuse.
L’installateur doit être un technicien expérimenté ayant reçu la formation adéquate.
AVERTISSEMENT : Danger de rayonnement UV. Néfaste à la peau nue et aux yeux. Peut causer une perte de la vision temporaire ou permanente. Ne jamais regarder les lampes lorsqu’elles sont allumées.
• Pour éviter l’exposition à la lumière ultraviolette, débrancher l’alimentation du système de traitement de l’air aux ultraviolets avant de procéder à l’entretien de toute pièce du système de chauffage/climatisation.
• N’observer la lumière que par la poignée de la lampe ou le regard.• Ne pas tenter de neutraliser l’interrupteur de montage en gaine.• Ne pas tenter d’ouvrir le boîtier; l’unité est scellée pour éviter l’exposition aux
ultraviolets.
3
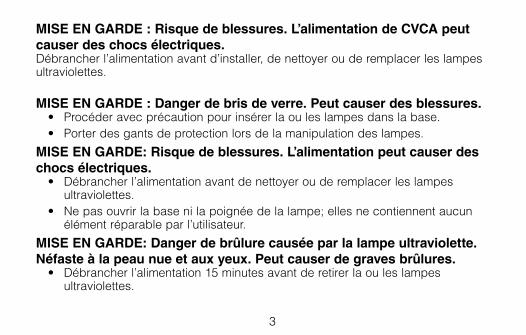
MISE EN GARDE : Risque de blessures. L’alimentation de CVCA peut causer des chocs électriques.Débrancher l’alimentation avant d’installer, de nettoyer ou de remplacer les lampes ultraviolettes.
MISE EN GARDE : Danger de bris de verre. Peut causer des blessures.• Procéder avec précaution pour insérer la ou les lampes dans la base.• Porter des gants de protection lors de la manipulation des lampes.
MISE EN GARDE: Risque de blessures. L’alimentation peut causer des chocs électriques.• Débrancher l’alimentation avant de nettoyer ou de remplacer les lampes
ultraviolettes.• Ne pas ouvrir la base ni la poignée de la lampe; elles ne contiennent aucun
élément réparable par l’utilisateur.
MISE EN GARDE: Danger de brûlure causée par la lampe ultraviolette. Néfaste à la peau nue et aux yeux. Peut causer de graves brûlures.• Débrancher l’alimentation 15 minutes avant de retirer la ou les lampes
ultraviolettes.
4
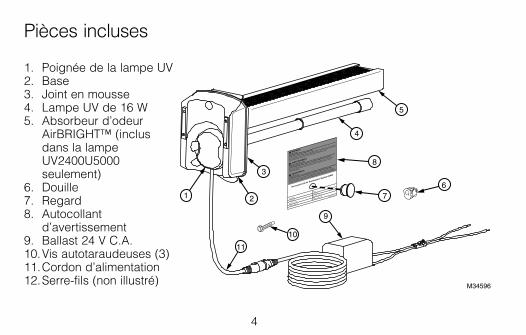
1. Poignée de la lampe UV2. Base3. Joint en mousse4. Lampe UV de 16 W5. Absorbeur d’odeur
AirBRIGHT™ (inclus dans la lampe UV2400U5000 seulement)
6. Douille7. Regard8. Autocollant
d’avertissement9. Ballast 24 V C.A.10. Vis autotaraudeuses (3)11. Cordon d’alimentation12. Serre-fils (non illustré)
Pièces incluses
4
5
2
11
9
1
8
M34596
3
7
10
6

5
Emplacements de montage typiquesIl est recommandé d’installer le purificateur d’air UV sur la gaine d’arrivée à 8-13 cm (3-5 po) au-dessus du serpentin d’évaporateur en A, mais il peut aussi être installé sur le côté retour si nécessaire. Voir les figures 1 et 2.
La lumière UV germicide doit être positionnée pour illuminer les surfaces sujettes à la moisissure telles que le serpentin d’évaporateur en A, ou être placée dans une zone ouverte de la gaine de retour dans une gaine droite et longue.
AVERTISSEMENT : Ne pas monter l’appareil à un emplacement qui permettrait à la lumière UV d’être perçue autrement que par la poignée de lampe ou le regard.
Important : Certains matériels dans le système de CVCA (y compris le filtre, la gaine flexible, le câblage) peuvent ne pas être résistant à la lumière UV. Couvrir les matériels affectés par la lumière UV avec une protection anti-UV ou du ruban réfléchissant.
L’absorbeur d’odeur AirBRIGHT™ doit être orienté de sorte que le flux d’air passe d’abord par la lumière UV puis dans l’absorbeur d’odeur AirBRIGHT.

6
Fig. 1. Installation côté arrivée. Le débit d’air est illustré par les flèches.
MF34597
APPAREIL DE CHAUFFAGE APPAREIL DE TRAITEMENT D’AIR

7
Fig. 2. Installation côté retour. Le débit d’air est illustré par les flèches.MF34621
APPAREIL DE CHAUFFAGE APPAREIL DE TRAITEMENT D’AIR

8
Option 1 :
Montage interneIMPORTANT Couper l’alimentation principale avant l’installation. Les informations sur le modèle sont imprimées sur le couvercle du bloc moteur.
1. Détacher le panneau pour accéder à l’emplacement de montage.2. Déterminer l’emplacement optimal du purificateur d’air. 3. Si nécessaire, utiliser un couteau
pour couper l’isolation à l’intérieur de la gaine.
4. Nettoyer la surface de toute trace de colle, poussière, etc.
M34659

9M34689
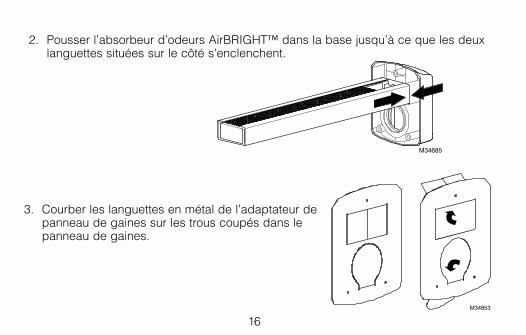
5. Pousser l’absorbeur d’odeurs AirBRIGHT™ dans la base jusqu’à ce que les deux languettes situées sur le côté s’enclenchent.
6. Insérer la Snaplamp dans la base.
M34685

10
8. Placer les barres magnétiques sur la base directement sur la surface métallique propre.
M34661
7. Faire tourner la poignée de la lampe dans le sens horaire jusqu’à ce qu’elle s’enclenche en position.
9. Utiliser du papier aluminium pour fermer l’ouverture dans l’isolation, selon le besoin.
M34660
11
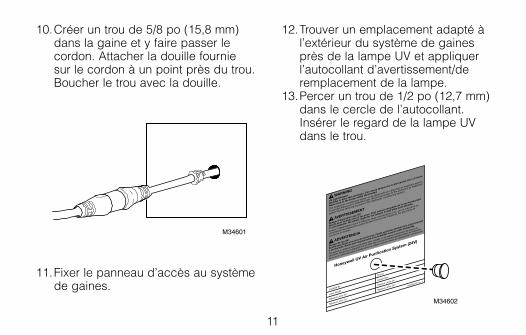
10. Créer un trou de 5/8 po (15,8 mm) dans la gaine et y faire passer le cordon. Attacher la douille fournie sur le cordon à un point près du trou. Boucher le trou avec la douille.
M34601
M34602
12. Trouver un emplacement adapté à l’extérieur du système de gaines près de la lampe UV et appliquer l’autocollant d’avertissement/de remplacement de la lampe.
13. Percer un trou de 1/2 po (12,7 mm) dans le cercle de l’autocollant. Insérer le regard de la lampe UV dans le trou.
11. Fixer le panneau d’accès au système de gaines.
12
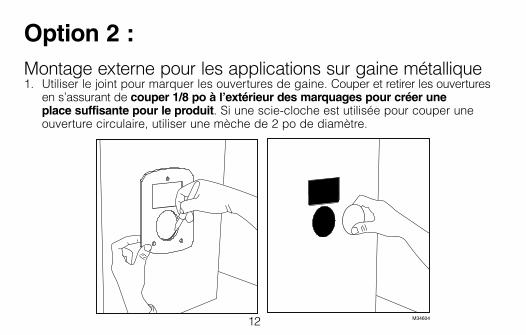
Option 2 :Montage externe pour les applications sur gaine métallique1. Utiliser le joint pour marquer les ouvertures de gaine. Couper et retirer les ouvertures
en s’assurant de couper 1/8 po à l’extérieur des marquages pour créer une place suffisante pour le produit. Si une scie-cloche est utilisée pour couper une ouverture circulaire, utiliser une mèche de 2 po de diamètre.
M34604

13M34687
2. Pousser l’absorbeur d’odeurs AirBRIGHT™ dans la base jusqu’à ce que les deux languettes situées sur le côté s’enclenchent.
M34685
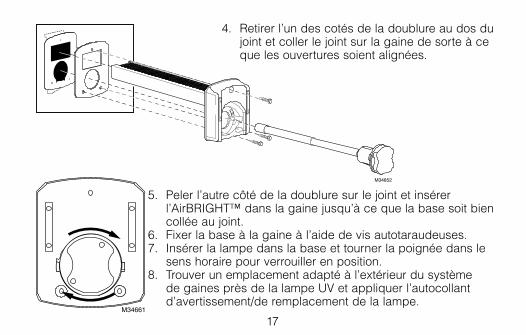
3. Retirer l’un des cotés de la doublure au dos du joint et coller le joint sur la gaine de sorte à ce que les ouvertures soient alignées.

14
4. Peler l’autre côté de la doublure sur le joint et insérer l’AirBRIGHT™ dans la gaine jusqu’à ce que la base soit bien collée au joint.
5. Fixer la base à la gaine à l’aide de vis autotaraudeuses.6. Insérer la lampe dans la base et tourner la poignée dans le sens horaire pour
verrouiller en position.
M34661
7. Trouver un emplacement adapté à l’extérieur du système de gaines près de la lampe UV et appliquer l’autocollant d’avertissement/de remplacement de la lampe.
15
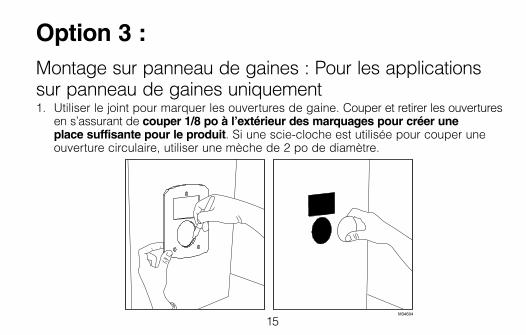
Option 3 :Montage sur panneau de gaines : Pour les applications sur panneau de gaines uniquement1. Utiliser le joint pour marquer les ouvertures de gaine. Couper et retirer les ouvertures
en s’assurant de couper 1/8 po à l’extérieur des marquages pour créer une place suffisante pour le produit. Si une scie-cloche est utilisée pour couper une ouverture circulaire, utiliser une mèche de 2 po de diamètre.
M34604
16M34853
M34685
2. Pousser l’absorbeur d’odeurs AirBRIGHT™ dans la base jusqu’à ce que les deux languettes situées sur le côté s’enclenchent.
3. Courber les languettes en métal de l’adaptateur de panneau de gaines sur les trous coupés dans le panneau de gaines.
17
M34852
4. Retirer l’un des cotés de la doublure au dos du joint et coller le joint sur la gaine de sorte à ce que les ouvertures soient alignées.
5. Peler l’autre côté de la doublure sur le joint et insérer l’AirBRIGHT™ dans la gaine jusqu’à ce que la base soit bien collée au joint.
6. Fixer la base à la gaine à l’aide de vis autotaraudeuses.7. Insérer la lampe dans la base et tourner la poignée dans le
sens horaire pour verrouiller en position. 8. Trouver un emplacement adapté à l’extérieur du système
de gaines près de la lampe UV et appliquer l’autocollant d’avertissement/de remplacement de la lampe.
M34661
18
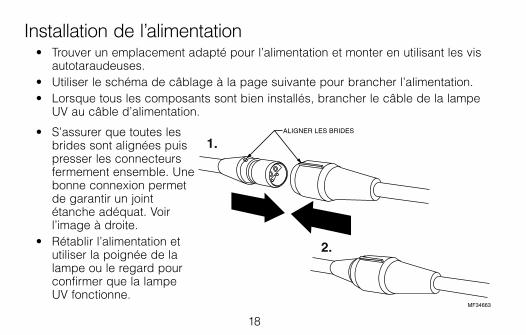
Installation de l’alimentation• Trouver un emplacement adapté pour l’alimentation et monter en utilisant les vis
autotaraudeuses.• Utiliser le schéma de câblage à la page suivante pour brancher l’alimentation.• Lorsque tous les composants sont bien installés, brancher le câble de la lampe
UV au câble d’alimentation.
• S’assurer que toutes les brides sont alignées puis presser les connecteurs fermement ensemble. Une bonne connexion permet de garantir un joint étanche adéquat. Voir l’image à droite.
• Rétablir l’alimentation et utiliser la poignée de la lampe ou le regard pour confirmer que la lampe UV fonctionne.
MF34663
ALIGNER LES BRIDES
2.
1.
19MF34605
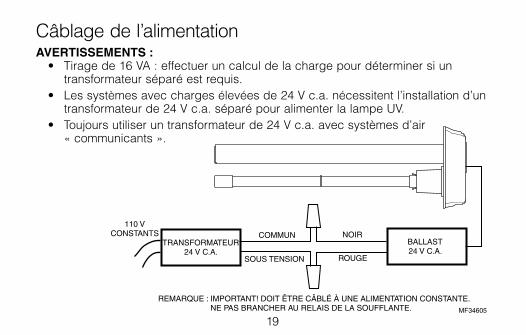
REMARQUE : IMPORTANT! DOIT ÊTRE CÂBLÉ À UNE ALIMENTATION CONSTANTE. NE PAS BRANCHER AU RELAIS DE LA SOUFFLANTE.
TRANSFORMATEUR24 V C.A.
BALLAST24 V C.A.
COMMUN
SOUS TENSION
NOIR
ROUGE
110 VCONSTANTS
Câblage de l’alimentationAVERTISSEMENTS : • Tirage de 16 VA : effectuer un calcul de la charge pour déterminer si un
transformateur séparé est requis.• Les systèmes avec charges élevées de 24 V c.a. nécessitent l’installation d’un
transformateur de 24 V c.a. séparé pour alimenter la lampe UV.• Toujours utiliser un transformateur de 24 V c.a. avec systèmes d’air
« communicants ».
20
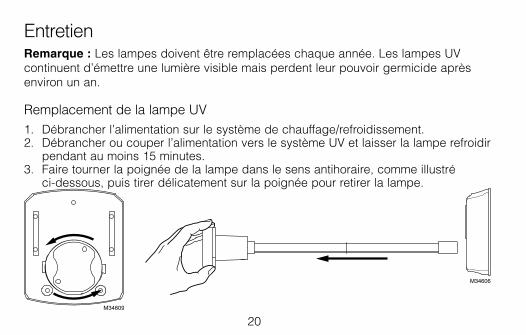
EntretienRemarque : Les lampes doivent être remplacées chaque année. Les lampes UV continuent d’émettre une lumière visible mais perdent leur pouvoir germicide après environ un an.
Remplacement de la lampe UV1. Débrancher l’alimentation sur le système de chauffage/refroidissement.2. Débrancher ou couper l’alimentation vers le système UV et laisser la lampe refroidir
pendant au moins 15 minutes.3. Faire tourner la poignée de la lampe dans le sens antihoraire, comme illustré
ci-dessous, puis tirer délicatement sur la poignée pour retirer la lampe.
M34606
M34609

21
Remplacement de la lampe UVSaisir la poignée de la SnapLamp™ d’une main et la base du verre dans l’autre et tirer pour les séparer.
Insérer le verre neuf dans la poignée de la SnapLamp™ en alignant la clavette et en poussant tout droit pour assembler.
M34607
M34608
22
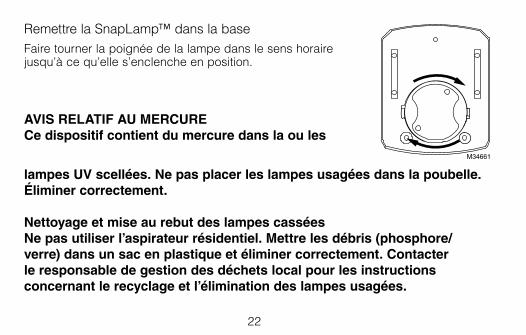
Remettre la SnapLamp™ dans la baseFaire tourner la poignée de la lampe dans le sens horaire jusqu’à ce qu’elle s’enclenche en position.
AVIS RELATIF AU MERCURECe dispositif contient du mercure dans la ou les
lampes UV scellées. Ne pas placer les lampes usagées dans la poubelle. Éliminer correctement.
Nettoyage et mise au rebut des lampes casséesNe pas utiliser l’aspirateur résidentiel. Mettre les débris (phosphore/verre) dans un sac en plastique et éliminer correctement. Contacter le responsable de gestion des déchets local pour les instructions concernant le recyclage et l’élimination des lampes usagées.
M34661
23
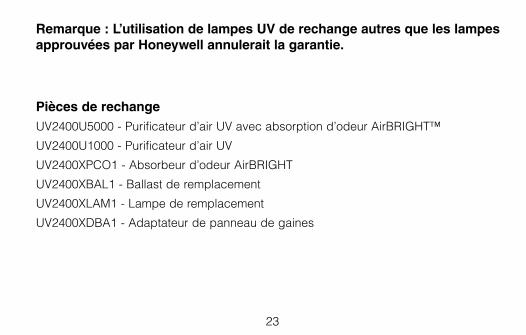
Remarque : L’utilisation de lampes UV de rechange autres que les lampes approuvées par Honeywell annulerait la garantie.
Pièces de rechangeUV2400U5000 - Purificateur d’air UV avec absorption d’odeur AirBRIGHT™
UV2400U1000 - Purificateur d’air UV
UV2400XPCO1 - Absorbeur d’odeur AirBRIGHT
UV2400XBAL1 - Ballast de remplacement
UV2400XLAM1 - Lampe de remplacement
UV2400XDBA1 - Adaptateur de panneau de gaines
24
Garantie limitée de cinq ans
Honeywell garantit ce produit, à l’exception des lampes, contre tout défaut de pièce ou de main d’œuvre, durant une période de cinq (5) ans à partir de la date d’achat si le produit est utilisé et entretenu convenablement. En cas de défectuosité ou de mauvais fonctionnement pendant la période de garantie, Honeywell remplacera ou réparera le produit (au gré de Honeywell) dans un délai raisonnable. Si le produit est défectueux, (i) le retourner, accompagné d’une preuve d’achat indiquant la date d’achat, au détaillant auprès de qui il a été acheté, ou (ii) s’adresser aux Services à la clientèle de Honeywell en composant le 1-800-468-1502. Les Services à la clientèle détermineront alors si le produit doit être retourné à l’adresse suivante : Honeywell Return Goods, Dock 4 MN10-3860, 1885 Douglas Dr. N., Golden Valley, MN 55422.
La présente garantie ne couvre pas les frais de retrait ou de réinstallation. La présente garantie ne s’appliquera pas s’il est démontré que la défectuosité ou le mauvais fonctionnement est dû à un endommagement du produit alors que le consommateur l’avait en sa possession.
La responsabilité de Honeywell se limite à réparer ou à remplacer le produit conformément aux modalités susmentionnées. HONEYWELL N’EST EN AUCUN CAS RESPONSABLE DES PERTES OU DOMMAGES, Y COMPRIS LES DOMMAGES INDIRECTS OU ACCESSOIRES DÉCOULANT DIRECTEMENT OU INDIRECTEMENT D’UNE VIOLATION QUELCONQUE D’UNE GARANTIE, EXPRESSE OU TACITE, APPLICABLE AU PRÉSENT PRODUIT NI DE TOUTE AUTRE DÉFECTUOSITÉ DU PRÉSENT PRODUIT. Certaines provinces ne permettent pas l’exclusion ou la restriction des dommages indirects et, par conséquent, la présente restriction peut ne pas s’appliquer.
LA PRÉSENTE GARANTIE DE HONEYWELL TIENT LIEU DE TOUTES LES AUTRES GARANTIES, EXPRESSES OU TACITES, ET LES GARANTIES DE VALEUR MARCHANDE ET DE CONFORMITÉ À UNE FIN PARTICULIÈRE SONT PAR LES PRÉSENTES EXCLUES APRÈS LA PÉRIODE DE CINQ ANS DE LA PRÉSENTE GARANTIE.

25
Certaines provinces ne permettent pas de limiter la durée des garanties tacites et, par conséquent, la présente limitation peut ne pas s’appliquer. La présente garantie donne au consommateur des droits légaux spécifiques et peut-être certains autres droits qui peuvent varier d’une province à l’autre.
Pour toute question concernant la présente garantie, prière d’écrire aux Services à la clientèle de Honeywell à l’adresse suivante : Honeywell Customer Relations, 1985 Douglas Drive, Golden Valley, MN 55422, ou encore composer le 1-800-468-1502. Au Canada, prière de s’adresser au service des Retail Products ON15-02H, Honeywell Limited/Honeywell Limitée, 35 Dynamic Drive, Toronto, Ontario M1V4Z9.
69-2796EFS-02
Honeywell LTD
705 Montrichard Avenue
Saint-Jean-sur-Richelieu, Québec J2X 5K8
Solutions de régulation et d’automatisation
Honeywell International Inc.
1985 Douglas Drive North
Golden Valley, MN 55422
yourhome.honeywell.com
® Marque de commerce déposée aux États-Unis© 2013 Honeywell International Inc.69-2796EFS—02 Rev. M.S. 09-13Imprimé aux États-Unis
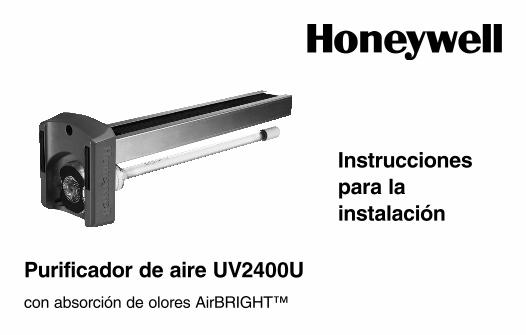
Purificador de aire UV2400Ucon absorción de olores AirBRIGHT™
Instrucciones para la instalación
2
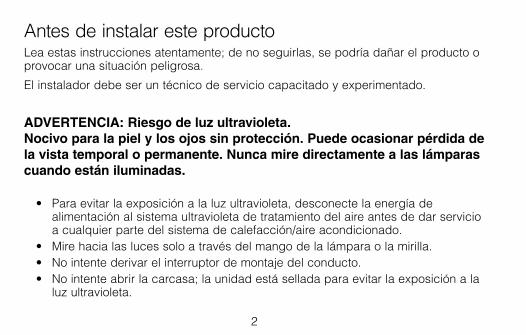
Antes de instalar este productoLea estas instrucciones atentamente; de no seguirlas, se podría dañar el producto o provocar una situación peligrosa.
El instalador debe ser un técnico de servicio capacitado y experimentado.
ADVERTENCIA: Riesgo de luz ultravioleta. Nocivo para la piel y los ojos sin protección. Puede ocasionar pérdida de la vista temporal o permanente. Nunca mire directamente a las lámparas cuando están iluminadas.
• Para evitar la exposición a la luz ultravioleta, desconecte la energía de alimentación al sistema ultravioleta de tratamiento del aire antes de dar servicio a cualquier parte del sistema de calefacción/aire acondicionado.
• Mire hacia las luces solo a través del mango de la lámpara o la mirilla.• No intente derivar el interruptor de montaje del conducto.• No intente abrir la carcasa; la unidad está sellada para evitar la exposición a la
luz ultravioleta.

3
PRECAUCIÓN: Riesgo de lesiones personales. El suministro de energía del sistema de HVAC puede ocasionar descarga eléctrica.• Desconecte el suministro eléctrico del sistema de HVAC antes de instalar, limpiar
o reemplazar la(s) lámpara(s) ultravioleta.
PRECAUCIÓN: Riesgo de rotura del vidrio. Puede ocasionar lesiones personales.• Tenga cuidado cuando inserte la(s) lámpara(s) en la base de la lámpara.• Utilice guantes protectores cuando manipule la(s) lámpara(s).
PRECAUCIÓN: Riesgo de lesiones personales. El suministro eléctrico puede ocasionar descarga eléctrica.• Desconecte la electricidad antes de limpiar o cambiar la(s) lámpara(s)
ultravioleta.• No abra la base de la unidad ni el mango de la lámpara; no contienen
componentes a los cuales el usuario pueda prestarle servicio.
PRECAUCIÓN: Riesgo de quemadura con la lámpara ultravioleta. Dañino para la piel sin protección. Puede ocasionar quemaduras graves.• Desconecte la electricidad 15 minutos antes de retirar la(s) lámpara(s)
ultravioleta.
4
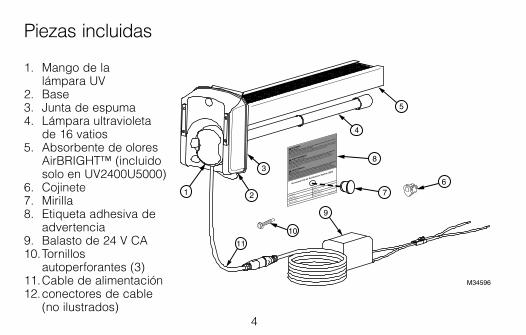
1. Mango de la lámpara UV
2. Base3. Junta de espuma4. Lámpara ultravioleta
de 16 vatios5. Absorbente de olores
AirBRIGHT™ (incluido solo en UV2400U5000)
6. Cojinete7. Mirilla8. Etiqueta adhesiva de
advertencia9. Balasto de 24 V CA10. Tornillos
autoperforantes (3)11. Cable de alimentación12. conectores de cable
(no ilustrados)
Piezas incluidas
4
5
2
11
9
1
8
M34596
3
7
10
6

5
Ubicaciones de montaje típicasRecomendamos que el purificador de aire UV se instale en el costado del conducto de suministro de 3 a 5 pulgadas (8 a 13 cm) por encima del serpentín A, pero también se puede instalar en el lado de retorno si fuese necesario. Consulte las Figuras 1 y 2.
La luz germicida UV se debe colocar de modo que ilumine las superficies que están propensas al crecimiento de moho como el serpentín A, o colocarse en un área abierta del conducto de retorno donde haya tramos rectos largos.
ADVERTENCIA: No monte el dispositivo en un lugar que permita la observación de la luz ultravioleta después de la instalación a menos que sea el mango protegido de la lámpara de rayos ultravioleta o la mirilla.
Importante: Es posible que algunos materiales que se encuentran dentro del sistema de HVAC (incluyendo el medio filtrante, el conducto flexible, el cableado, etc.) no sean resistentes a la luz ultravioleta. Cubra los materiales afectados por la luz ultravioleta con cinta protectora contra rayos ultravioleta o cinta reflectante.
La unidad absorbente de olores AirBRIGHT™ debe estar orientada para que el aire fluya más allá de la luz ultravioleta primero y luego hacia el absorbente de olores AirBRIGHT.
6
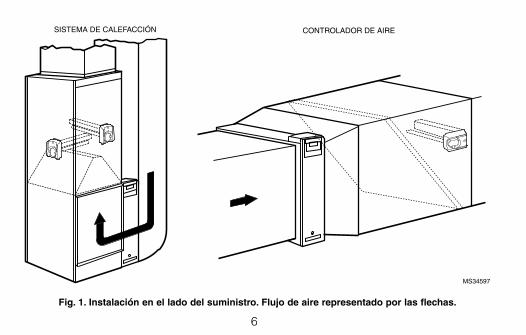
Fig. 1. Instalación en el lado del suministro. Flujo de aire representado por las flechas.
MS34597
SISTEMA DE CALEFACCIÓN CONTROLADOR DE AIRE
7
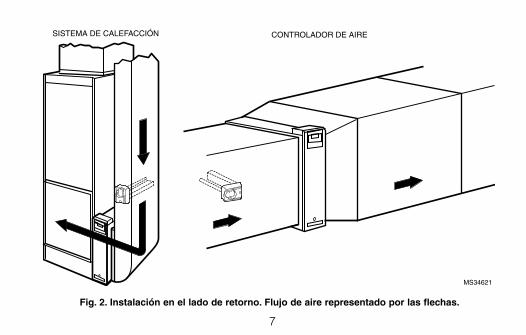
Fig. 2. Instalación en el lado de retorno. Flujo de aire representado por las flechas.
MS34621
SISTEMA DE CALEFACCIÓN CONTROLADOR DE AIRE
8
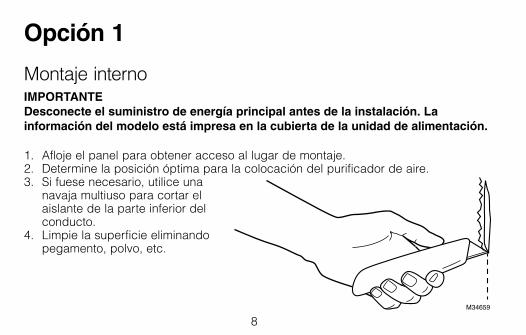
Opción 1
Montaje internoIMPORTANTE Desconecte el suministro de energía principal antes de la instalación. La información del modelo está impresa en la cubierta de la unidad de alimentación.
1. Afloje el panel para obtener acceso al lugar de montaje.2. Determine la posición óptima para la colocación del purificador de aire. 3. Si fuese necesario, utilice una
navaja multiuso para cortar el aislante de la parte inferior del conducto.
4. Limpie la superficie eliminando pegamento, polvo, etc.
M34659

9M34689
5. Presione el absorbente de olores AirBRIGHT™ en la base hasta que las dos lengüetas laterales hagan clic en su lugar.
6. Inserte la Snaplamp en su lugar.
M34685
10
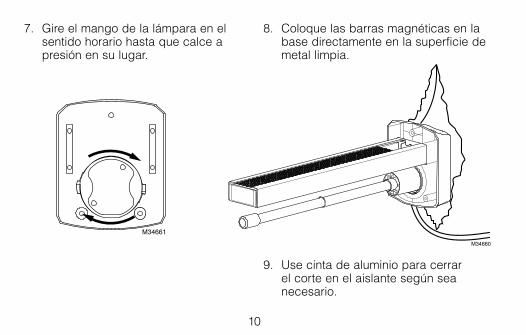
8. Coloque las barras magnéticas en la base directamente en la superficie de metal limpia.
M34661
7. Gire el mango de la lámpara en el sentido horario hasta que calce a presión en su lugar.
9. Use cinta de aluminio para cerrar el corte en el aislante según sea necesario.
M34660

11
10. Haga un agujero de 5/8 de pulgada (15.8 mm) en el conducto y pase el cable a través de él. Recorte el cojinete que se suministra en el cable en un punto cercano al agujero. Tape el agujero con el cojinete.
M34601
M34602
12. Busque un lugar adecuado en la parte exterior del sistema de conductos cerca de la instalación de la lámpara ultravioleta y aplique la etiqueta adhesiva de advertencia/cambio de lámpara.
13. Taladre un agujero de 1/2 de pulgada (12.7 mm) a través del círculo de la etiqueta adhesiva. Presione la mirilla de los rayos ultravioleta en el agujero.
11. Fije el panel de acceso al sistema de conductos.
12
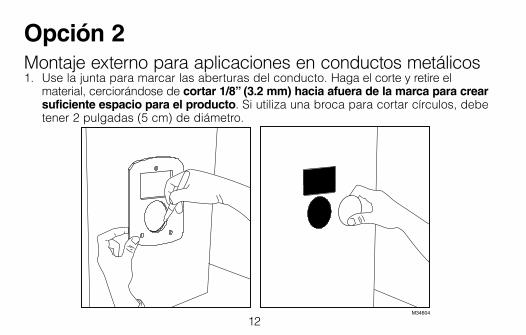
Opción 2Montaje externo para aplicaciones en conductos metálicos1. Use la junta para marcar las aberturas del conducto. Haga el corte y retire el
material, cerciorándose de cortar 1/8” (3.2 mm) hacia afuera de la marca para crear suficiente espacio para el producto. Si utiliza una broca para cortar círculos, debe tener 2 pulgadas (5 cm) de diámetro.
M34604

13M34687
2. Presione el absorbente de olores AirBRIGHT™ en la base hasta que las dos lengüetas laterales hagan clic en su lugar.
M34685
3. Retire un lado del respaldo de la junta y fije esta en el sistema de conductos de modo que las aberturas queden alineadas.
14
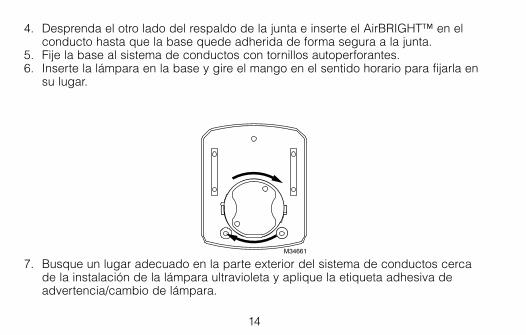
4. Desprenda el otro lado del respaldo de la junta e inserte el AirBRIGHT™ en el conducto hasta que la base quede adherida de forma segura a la junta.
5. Fije la base al sistema de conductos con tornillos autoperforantes.6. Inserte la lámpara en la base y gire el mango en el sentido horario para fijarla en
su lugar.
M34661
7. Busque un lugar adecuado en la parte exterior del sistema de conductos cerca de la instalación de la lámpara ultravioleta y aplique la etiqueta adhesiva de advertencia/cambio de lámpara.
15
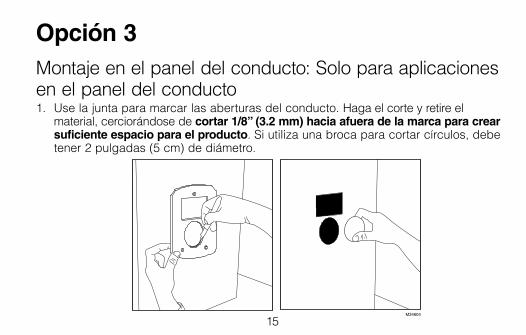
Opción 3Montaje en el panel del conducto: Solo para aplicaciones en el panel del conducto1. Use la junta para marcar las aberturas del conducto. Haga el corte y retire el
material, cerciorándose de cortar 1/8” (3.2 mm) hacia afuera de la marca para crear suficiente espacio para el producto. Si utiliza una broca para cortar círculos, debe tener 2 pulgadas (5 cm) de diámetro.
M34604
16
M34853
M34685
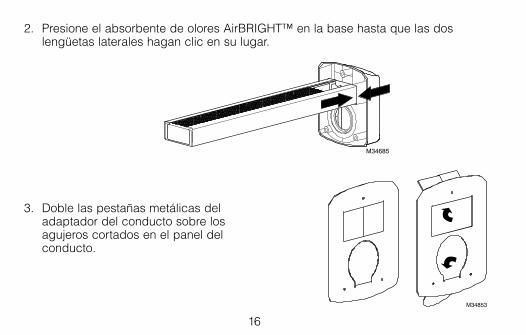
2. Presione el absorbente de olores AirBRIGHT™ en la base hasta que las dos lengüetas laterales hagan clic en su lugar.
3. Doble las pestañas metálicas del adaptador del conducto sobre los agujeros cortados en el panel del conducto.
17
M34852
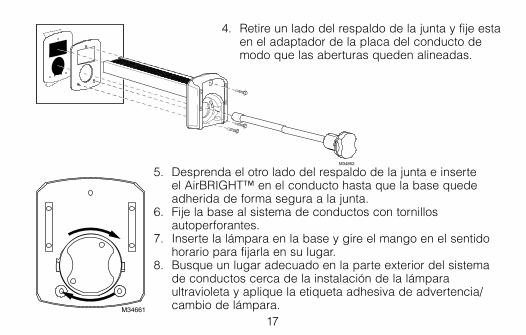
4. Retire un lado del respaldo de la junta y fije esta en el adaptador de la placa del conducto de modo que las aberturas queden alineadas.
5. Desprenda el otro lado del respaldo de la junta e inserte el AirBRIGHT™ en el conducto hasta que la base quede adherida de forma segura a la junta.
6. Fije la base al sistema de conductos con tornillos autoperforantes.
7. Inserte la lámpara en la base y gire el mango en el sentido horario para fijarla en su lugar.
8. Busque un lugar adecuado en la parte exterior del sistema de conductos cerca de la instalación de la lámpara ultravioleta y aplique la etiqueta adhesiva de advertencia/cambio de lámpara.M34661

18
Instalación al suministro de energía• Busque un lugar adecuado para el suministro de eléctrico e instale utilizando los
tornillos autoperforantes.• Utilice el diagrama de cableado de la página siguiente para conectar la
electricidad.• Cuando todos los otros componentes estén adecuadamente instalados, conecte
el cable de la lámpara ultravioleta al cable de suministro eléctrico.• Compruebe que las
pestañas estén alineadas y empuje los conectores juntos firmemente. Una conexión ajustada garantiza un sello adecuado resistente al agua. Consulte la imagen de la derecha.
• Active la energía eléctrica y use el mango de la lámpara o la mirilla para confirmar que la lámpara ultravioleta esté funcionando.
MS34663
ALINEE LAS PESTAÑAS
2.
1.
19MS34605
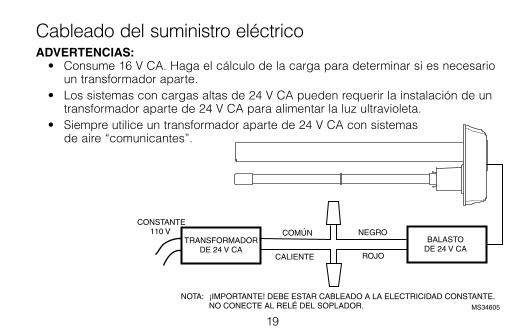
NOTA: ¡IMPORTANTE! DEBE ESTAR CABLEADO A LA ELECTRICIDAD CONSTANTE. NO CONECTE AL RELÉ DEL SOPLADOR.
TRANSFORMADORDE 24 V CA
BALASTODE 24 V CA
COMÚN
CALIENTE
NEGRO
ROJO
CONSTANTE110 V
Cableado del suministro eléctricoADVERTENCIAS: • Consume 16 V CA. Haga el cálculo de la carga para determinar si es necesario
un transformador aparte.• Los sistemas con cargas altas de 24 V CA pueden requerir la instalación de un
transformador aparte de 24 V CA para alimentar la luz ultravioleta.• Siempre utilice un transformador aparte de 24 V CA con sistemas
de aire “comunicantes”.

20
MantenimientoNota: Las lámparas se deben reemplazar todos los años. Las lámparas ultravioleta continuarán emitiendo luz visible pero perderán su poder germicida al cabo de un año aproximadamente.
Cambio de la lámpara ultravioleta 1. Desconecte la energía eléctrica del sistema de calefacción y refrigeración.2. Desenchufe o desactive la electricidad de su sistema ultravioleta y deje que la
lámpara se enfríe por lo menos 15 minutos.3. Gire el mango de la lámpara en el sentido antihorario, como se ilustra, y hale
suavemente el mango de la lámpara para retirarla.
M34606
M34609
21
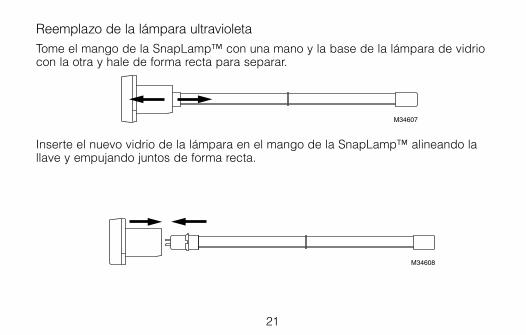
Reemplazo de la lámpara ultravioletaTome el mango de la SnapLamp™ con una mano y la base de la lámpara de vidrio con la otra y hale de forma recta para separar.
Inserte el nuevo vidrio de la lámpara en el mango de la SnapLamp™ alineando la llave y empujando juntos de forma recta.
M34607
M34608
22
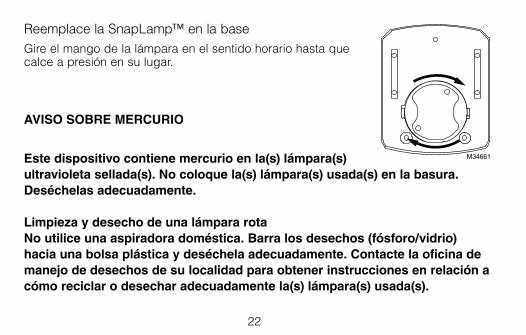
Reemplace la SnapLamp™ en la baseGire el mango de la lámpara en el sentido horario hasta que calce a presión en su lugar.
AVISO SOBRE MERCURIO
Este dispositivo contiene mercurio en la(s) lámpara(s) ultravioleta sellada(s). No coloque la(s) lámpara(s) usada(s) en la basura. Deséchelas adecuadamente.
Limpieza y desecho de una lámpara rotaNo utilice una aspiradora doméstica. Barra los desechos (fósforo/vidrio) hacia una bolsa plástica y deséchela adecuadamente. Contacte la oficina de manejo de desechos de su localidad para obtener instrucciones en relación a cómo reciclar o desechar adecuadamente la(s) lámpara(s) usada(s).
M34661
23
Nota: El uso de lámparas ultravioleta de reemplazo que no estén aprobadas por Honeywell invalida la garantía.
Piezas de repuestoUV2400U5000 - Purificador de aire UV con absorción de olores AirBRIGHT™
UV2400U1000 - Purificador de aire UV
UV2400XPCO1 - Absorbente de olores AirBRIGHT
UV2400XBAL1 - Balasto de reemplazo
UV2400XLAM1 - Lámpara de repuesto
UV2400XDBA1 - Adaptador de panel de conducto
24
Garantía limitada de cinco años
Honeywell garantiza este producto, a excepción de las lámparas, por el término de cinco (5) años, contra cualquier defecto de fabricación o de los materiales, a partir de la fecha de compra por parte del consumidor, en condiciones normales de uso y servicio. Si en cualquier momento durante el período de garantía se verifica que el producto tiene un defecto o mal funcionamiento, Honeywell lo reparará o reemplazará (a elección de Honeywell). Si el producto tiene defectos, (i) devuélvalo, con la factura de venta u otra prueba de compra fechada, al lugar donde lo compró; o (ii) comuníquese con el Centro de atención al cliente de Honeywell al 1-800-468-1502. El servicio de atención al cliente decidirá si se debe devolver el producto a la siguiente dirección: Devolución de mercaderías de Honeywell, Dock 4 MN10-3860, 1885 Douglas Dr. N., Golden Valley, MN 55422, o si se le puede enviar un producto en reemplazo.
Esta garantía no cubre los costos de extracción o reinstalación. Esta garantía no se aplicará si Honeywell demuestra que el defecto o mal funcionamiento estaba causado por daños ocurridos mientras el producto estaba en posesión de un consumidor.
La única responsabilidad de Honeywell será reparar o reemplazar el producto dentro de los plazos establecidos anteriormente. HONEYWELL NO RESPONDERÁ POR LA PÉRDIDA O DAÑO DE NINGÚN TIPO, INCLUIDO EL DAÑO INCIDENTAL O INDIRECTO DERIVADO, DIRECTA O INDIRECTAMENTE, DEL INCUMPLIMIENTO DE LAS GARANTÍAS, EXPRESAS O IMPLÍCITAS, O DE OTRAS FALLAS DE ESTE PRODUCTO. Algunos estados no permiten la exclusión o limitación del daño incidental o indirecto, entonces, esta limitación puede no resultar aplicable a su caso.
LA PRESENTE GARANTÍA ES LA ÚNICA GARANTÍA EXPRESA QUE HONEYWELL PROPORCIONA RESPECTO DE ESTE PRODUCTO. LA DURACIÓN DE LAS GARANTÍAS IMPLÍCITAS, INCLUIDAS LAS GARANTÍAS DE COMERCIABILIDAD Y APTITUD PARA UN OBJETIVO PARTICULAR, ESTA LIMITADA A LA DURACIÓN DE
25
CINCO AÑOS DE LA PRESENTE GARANTÍA.
Algunos estados no permiten las limitaciones sobre la duración del período de una garantía implícita, entonces la limitación anterior puede no resultar aplicable a su caso. Esta garantía le brinda derechos legales específicos, y usted podrá tener otros derechos que varían según el estado.
Si tiene preguntas sobre la presente garantía, sírvase escribir a Honeywell Customer Relations, 1985 Douglas Dr, Golden Valley, MN 55422 o llamar al 1-800-468-1502. En Canadá, escriba a Retail Products ON15-02H, Honeywell Limited/Honeywell Limitée, 35 Dynamic Drive, Toronto, Ontario M1V4Z9.

26

27

69-2796EFS-02
Honeywell LTD
705 Montrichard Avenue
Saint-Jean-sur-Richelieu, Québec J2X 5K8
Automatización y control desenlace
Honeywell International Inc.
1985 Douglas Drive North
Golden Valley, MN 55422
yourhome.honeywell.com
® Marca Registrada en los Estados Unidos© 2013 Honeywell Internacional Inc.69-2796EFS—02 Rev. M.S. 09-13Impreso en Estados Unidos
Related Documents