Projector 6233/6235W/6528/6532 6532W/65406532 User’s Manual 6233_6235W_6528_6532_6532W_6540 User Manual v00

6233 6540 user-manual
Jul 15, 2015
Welcome message from author
This document is posted to help you gain knowledge. Please leave a comment to let me know what you think about it! Share it to your friends and learn new things together.
Transcript

Projector
6233/6235W/6528/65326532W/65406532
User’s Manual
6233_6235W_6528_6532_6532W_6540 User Manual v00

• DLPisatrademarkofTexasInstruments.
• Apple,Mac,MacOS,andMacBookaretrademarksofAppleInc.registeredintheU.S.andothercountries.
• Microsoft,Windows,WindowsVista, InternetExplorer, .NETFrameworkandPowerPointareeitheraregisteredtrademarkortrademarkofMicrosoftCorporationintheUnitedStatesand/orothercountries.
• IntelandIntelCorearetrademarksofIntelCorporationintheU.S.and/orothercountries.
• PowerPCisaregisteredtrademarkoftheInternationalBusinessMachinesCorporation.
• MicroSaverisaregisteredtrademarkofKensingtonComputerProductsGroup,adivisionofACCOBrands.
• VirtualRemoteToolusesWinI2C/DDClibrary,©NicomsoftLtd.
• HDMI,theHDMILogoandHigh-DefinitionMultimediaInterfacearetrademarksorregisteredtrademarksofHDMILicensingLLC.
• TrademarkPJLinkisatrademarkappliedfortrademarkrightsinJapan,theUnitedStatesofAmericaandothercountries and areas.
• Wi-Fi®,Wi-FiAlliance®,andWi-FiProtectedAccess(WPA,WPA2)®are registered trademarksof theWi-FiAlli-ance.
• Blu-rayisatrademarkofBlu-rayDiscAssociation
• CRESTRONandROOMVIEWareregisteredtrademarksofCrestronElectronics,Inc.intheUnitedStatesandothercountries.
• Otherproductandcompanynamesmentionedinthisuser’smanualmaybethetrademarksorregisteredtrademarksoftheirrespectiveholders.
• GPL/LGPLSoftwareLicenses
TheproductincludessoftwarelicensedunderGNUGeneralPublicLicense(GPL),GNULesserGeneralPublicLicense(LGPL),andothers.
Formoreinformationoneachsoftware,see“readme.pdf”insidethe“aboutGPL&LGPL”folderonthesuppliedCD-ROM.
NOTES(1)Thecontentsofthisuser’smanualmaynotbereprintedinpartorwholewithoutpermission.
(2)Thecontentsofthisuser’smanualaresubjecttochangewithoutnotice.
(3)Greatcarehasbeentakeninthepreparationofthisuser’smanual;however,shouldyounoticeanyquestionablepoints,errorsoromissions,pleasecontactus.
(4)Notwithstandingarticle(3),DukanewillnotberesponsibleforanyclaimsonlossofprofitorothermattersdeemedtoresultfromusingtheProjector.
Note: The Dukane models described in this document are manufactured by NEC and use the same firmware, software programs, control code, and accessory parts. The equivalent Dukane to NEC models are 6233 (NP-M332XS), 6235W (NP-M352WS), 6528 (NP-M282X), 6532 (NP-322X), 6532W (NP-M322W), and 6540 (NP-M402X).

i
Important InformationSafety CautionsPrecautionsPleasereadthismanualcarefullybeforeusingyourDukaneprojectorandkeepthemanualhandyforfuturereference.
CAUTIONToturnoffmainpower,besuretoremovetheplugfrompoweroutlet.Thepoweroutletsocketshouldbeinstalledasneartotheequipmentaspossible,andshouldbeeasilyaccessible.
CAUTIONTOPREVENTSHOCK,DONOTOPENTHECABINET.THEREAREHIGH-VOLTAGECOMPONENTSINSIDE.REFERSERVICINGTOQUALIFIEDSERVICEPERSONNEL.
Thissymbolwarnstheuserthatuninsulatedvoltagewithintheunitmaybesufficienttocauseelectricalshock.Therefore,itisdangeroustomakeanykindofcontactwithanypartinsideoftheunit.
Thissymbolalertstheuserthatimportantinformationconcerningtheoperationandmaintenanceofthisunithasbeenprovided.Theinformationshouldbereadcarefullytoavoidproblems.
WARNING:TOPREVENTFIREORSHOCK,DONOTEXPOSETHISUNITTORAINORMOISTURE.DONOTUSETHISUNIT’SPLUGWITHANEXTENSIONCORDORINANOUTLETUNLESSALLTHEPRONGSCANBEFULLYINSERTED.
DOC Compliance Notice (for Canada only)ThisClassBdigitalapparatuscomplieswithCanadianICES-003.
Machine Noise Information Regulation - 3. GPSGV,Thehighestsoundpressurelevelislessthan70dB(A)inaccordancewithENISO7779.
Disposing of your used product
EU-widelegislationasimplementedineachMemberStaterequiresthatusedelectricalandelectronicprod-uctscarryingthemark(left)mustbedisposedofseparatelyfromnormalhouseholdwaste.Thisincludesprojectorsandtheirelectricalaccessoriesorlamps.Whenyoudisposeofsuchproducts,pleasefollowtheguidanceofyourlocalauthorityand/orasktheshopwhereyoupurchasedtheproduct.Aftercollectingtheusedproducts,theyarereusedandrecycledinaproperway.Thiseffortwillhelpusreducethewastesaswellasthenegativeimpactsuchasmercurycontainedinalamptothehumanhealthandtheenvironmentattheminimumlevel.ThemarkontheelectricalandelectronicproductsonlyappliestothecurrentEuropeanUnionMemberStates.

ii
Important Information
WARNING TO CALIFORNIA RESIDENTS:Handlingthecablessuppliedwiththisproductwillexposeyoutolead,achemicalknowntotheStateofCaliforniatocausebirthdefectsorotherreproductiveharm.WASHHANDSAFTERHANDLING.
RF Interference (for USA only)
WARNINGTheFederalCommunicationsCommissiondoesnotallowanymodificationsorchangestotheunitEXCEPTthosespecifiedbyNECDisplaySolutionsofAmerica,Inc.inthismanual.Failuretocomplywiththisgovernmentregu-lationcouldvoidyourrighttooperatethisequipment.ThisequipmenthasbeentestedandfoundtocomplywiththelimitsforaClassBdigitaldevice,pursuanttoPart15oftheFCCRules.Theselimitsaredesignedtoprovidereasonableprotectionagainstharmfulinterferenceinaresidentialinstallation.Thisequipmentgenerates,uses,andcanradiateradiofrequencyenergyand,ifnotinstalledandusedinaccordancewiththeinstructions,maycauseharmfulinterferencetoradiocommunications.However,thereisnoguaranteethatinterferencewillnotoccurinaparticularinstallation.Ifthisequipmentdoescauseharmfulinterferencetoradioortelevisionreception,whichcanbedeterminedbyturningtheequipmentoffandon,theuserisencouragedtotrytocorrecttheinterferencebyoneormoreofthefollowingmeasures:
• Reorientorrelocatethereceivingantenna.• Increasetheseparationbetweentheequipmentandreceiver.• Connecttheequipmentintoanoutletonacircuitdifferentfromthattowhichthereceiverisconnected.• Consultthedealeroranexperiencedradio/TVtechnicianforhelp.
ForUKonly:InUK,aBSapprovedpowercordwithmouldedplughasaBlack(fiveAmps)fuseinstalledforusewiththisequipment.Ifapowercordisnotsuppliedwiththisequipmentpleasecontactyoursupplier.
Important SafeguardsThesesafetyinstructionsaretoensurethelonglifeofyourprojectorandtopreventfireandshock.Pleasereadthemcarefullyandheedallwarnings.
Installation• Donotplacetheprojectorinthefollowingconditions:
- on an unstable cart, stand, or table.- nearwater,baths,ordamprooms.- indirectsunlight,nearheaters,orheatradiatingappliances.- inadusty,smokyorsteamyenvironment.- onasheetofpaperorcloth,rugsorcarpets.
• Ifyouwishtohavetheprojectorinstalledontheceiling:- Donotattempttoinstalltheprojectoryourself.- Theprojectormustbeinstalledbyqualifiedtechniciansinordertoensureproperoperationandreducetherisk
ofbodilyinjury.- Inaddition,theceilingmustbestrongenoughtosupporttheprojectorandtheinstallationmustbeinaccordance
withanylocalbuildingcodes.- Pleaseconsultyourdealerformoreinformation.

iii
Important Information
WARNING• Donotuseanyotherobjectthantheprojector’sslidinglenscovertocoverthelenswhiletheprojectorison.
Doingsocancausetheobjecttogetextremelyhot,andpossiblyresultinginafireordamageduetotheheatemittedfromthelightoutput.
• Donotcoverthelenswiththelenscaporequivalentwhiletheprojectorison.Doingsocanleadtomeltingofthecapduetotheheatemittedfromthelightoutput.
• Donotplaceanyobjects,whichareeasilyaffectedbyheat,infrontoftheprojectorlens.Doingsocouldleadtotheobjectmeltingfromtheheatthatisemittedfromthelightoutput.
• Donotsprayflammablegastogetridofdustanddirtthataccumulateinthelens.Doingsocouldcauseafire.
Place the projector in a horizontal positionThetiltangleoftheprojectorshouldnotexceed10degrees,norshouldtheprojectorbeinstalledinanywayotherthanthedesktopandceilingmount,otherwiselamplifecoulddecreasedramatically.
10˚
Fire and Shock Precautions • Ensurethatthereissufficientventilationandthatventsareunobstructedtopreventthebuild-upofheatinsideyour
projector.Allowatleast4inches(10cm)ofspacebetweenyourprojectorandawall.• Donottrytotouchtheexhaustventontherightfront(whenseenfromthefront)asitcanbecomeheatedwhilethe
projectoristurnedonandimmediatelyaftertheprojectoristurnedoff.PartsoftheprojectormaybecometemporarilyheatediftheprojectoristurnedoffwiththePOWERbuttonoriftheACpowersupplyisdisconnectedduringnormalprojectoroperation.
Usecautionwhenpickinguptheprojector.
• Preventforeignobjectssuchaspaperclipsandbitsofpaperfromfallingintoyourprojector.Donotattempttoretrieveanyobjectsthatmightfallintoyourprojector.Donotinsertanymetalobjectssuchasawireorscrewdriverintoyourprojector.Ifsomethingshouldfallintoyourprojector,disconnectitimmediatelyandhavetheobjectremovedbyaqualifiedservicepersonnel.
• Donotplaceanyobjectsontopoftheprojector.• Donottouchthepowerplugduringathunderstorm.Doingsocancauseelectricalshockorfire.• Theprojectorisdesignedtooperateonapowersupplyof100-240VAC50/60Hz.Ensurethatyourpowersupply
fitsthisrequirementbeforeattemptingtouseyourprojector.• Donotlookintothelenswhiletheprojectorison.Seriousdamagetoyoureyescouldresult.
• Keepanyitemssuchasmagnifyingglassoutofthelightpathoftheprojector.Thelightbeingprojectedfromthelensisextensive,thereforeanykindofabnormalobjectsthatcanredirectlightcomingoutofthelens,cancauseunpredictableoutcomesuchasfireorinjurytotheeyes.

iv
Important Information
• Donotplaceanyobjects,whichareeasilyaffectedbyheat,infrontofaprojectorexhaustvent. Doingsocouldleadtotheobjectmeltingorgettingyourhandsburnedfromtheheatthatisemittedfromtheex-
haust.• Donotsplashwaterovertheprojector.Doingsocancauseelectricalshockorfire.Iftheprojectorgetswet,turnoff
theprojector,unplugthepowercordandhavetheprojectorservicedbyaqualifiedservicepersonnel.• Handlethepowercordcarefully.Adamagedorfrayedpowercordcancauseelectricshockorfire.
- Donotuseanypowercordotherthantheonesuppliedwiththeprojector.- Donotbendortugthepowercordexcessively.- Donotplacethepowercordundertheprojector,oranyheavyobject.- Donotcoverthepowercordwithothersoftmaterialssuchasrugs.- Donotheatthepowercord.- Donothandlethepowerplugwithwethands.
• Turnofftheprojector,unplugthepowercordandhavetheprojectorservicedbyaqualifiedservicepersonnelunderthefollowingconditions:- Whenthepowercordorplugisdamagedorfrayed.- Ifliquidhasbeenspilledintotheprojector,orifithasbeenexposedtorainorwater.- Iftheprojectordoesnotoperatenormallywhenyoufollowtheinstructionsdescribedinthisuser’smanual.- Iftheprojectorhasbeendroppedorthecabinethasbeendamaged.- Iftheprojectorexhibitsadistinctchangeinperformance,indicatinganeedforservice.
• Disconnectthepowercordandanyothercablesbeforecarryingtheprojector.• Turnofftheprojectorandunplugthepowercordbeforecleaningthecabinetorreplacingthelamp.• Turnofftheprojectorandunplugthepowercordiftheprojectorisnottobeusedforanextendedperiodoftime.• WhenusingaLANcable(onlymodelswiththeRJ-45LANport): Forsafety,donotconnecttotheconnectorforperipheraldevicewiringthatmighthaveexcessivevoltage.
CAUTION• Donotusethetilt-footforpurposesotherthanoriginallyintended.Misusessuchasgrippingthetilt-footorhang-
ingonthewallcancausedamagetotheprojector.• Donotsendtheprojectorinthesoftcasebyparceldeliveryserviceorcargoshipment.Theprojectorinsidethe
softcasecouldbedamaged.• Select[HIGH]inFanmodeifyoucontinuetousetheprojectorforconsecutivedays.(Fromthemenu,select
[SETUP]→[OPTIONS(1)]→[FANMODE]→[HIGH].)• DonotturnofftheACpowerfor60secondsafterthelampisturnedonandwhilethePOWERindicatorisblink-
ingblue.Doingsocouldcauseprematurelampfailure.
Remote Control Precautions
• Handletheremotecontrolcarefully.
• Iftheremotecontrolgetswet,wipeitdryimmediately.
• Avoidexcessiveheatandhumidity.
• Donotshort,heat,ortakeapartbatteries.
• Donotthrowbatteriesintofire.
• Ifyouwillnotbeusingtheremotecontrolforalongtime,removethebatteries.
• Ensurethatyouhavethebatteries’polarity(+/−)alignedcorrectly.
• Donotusenewandoldbatteriestogether,orusedifferenttypesofbatteriestogether.
• Disposeofusedbatteriesaccordingtoyourlocalregulations.
v
Important Information
Note for US ResidentsThelampinthisproductcontainsmercury.PleasedisposeaccordingtoLocal,StateorFederalLaws.
Lamp Replacement• Usethespecifiedlampforsafetyandperformance.• Toreplacethelamp,followallinstructionsprovidedonpage132.• Besuretoreplacethelampwhenthemessage[THE LAMP HAS REACHED THE END OF ITS USABLE LIFE.
PLEASE REPLACE THE LAMP.]appears.Ifyoucontinuetousethelampafterthelamphasreachedtheendofitsusablelife,thelampbulbmayshatter,andpiecesofglassmaybescatteredinthelampcase.Donottouchthemasthepiecesofglassmaycauseinjury.
Ifthishappens,contactyourdealerforlampreplacement.
A Lamp CharacteristicTheprojectorhasahigh-pressuremercurylampasalightsource.Alamphasacharacteristicthatitsbrightnessgraduallydecreaseswithage.Alsorepeatedlyturningthelamponandoffwillincreasethepossibilityofitslowerbrightness.Theactuallamplifemayvarydependingupontheindividuallamp,theenvironmentalconditionsandusage.
CAUTION:• DONOTTOUCHTHELAMPimmediatelyafterithasbeenused.Itwillbeextremelyhot.Turntheprojectoroff
andthendisconnectthepowercord.Allowatleastonehourforthelamptocoolbeforehandling.• Whenremovingthelampfromaceiling-mountedprojector,makesurethatnooneisundertheprojector.Glass
fragmentscouldfallifthelamphasbeenburnedout.
About High Altitude mode
• Set[FANMODE]to[HIGHALTITUDE]whenusingtheprojectorataltitudesapproximately5500feet/1700metersorhigher.
Usingtheprojectorataltitudesapproximately5500feet/1700metersorhigherwithoutsettingto[HIGHALTITUDE]cancausetheprojectortooverheatandtheprotectorcouldshutdown.Ifthishappens,waitacoupleminutesandturnontheprojector.
• Usingtheprojectorataltitudeslessthanapproximately5500feet/1700metersandsettingto[HIGHALTITUDE]cancausethelamptoovercool,causingtheimagetoflicker.Switch[FANMODE]to[AUTO].
• Usingtheprojectorataltitudesapproximately5500feet/1700metersorhighercanshortenthelifeofopticalcom-ponentssuchasthelamp.
About Copyright of original projected pictures:Pleasenotethatusingthisprojectorforthepurposeofcommercialgainortheattractionofpublicattentioninavenuesuchasacoffeeshoporhotelandemployingcompressionorexpansionofthescreenimagewiththefollowingfunc-tionsmayraiseconcernabouttheinfringementofcopyrightswhichareprotectedbycopyrightlaw.[ASPECTRATIO],[KEYSTONE],Magnifyingfeatureandothersimilarfeatures.
Turkish RoHS information relevant for Turkish marketEEE Yonetmeliğine Uygundur.
Thisdeviceisnotintendedforuseinthedirectfieldofviewatvisualdisplayworkplaces.Toavoidincommodingreflec-tionsatvisualdisplayworkplacesthisdevicemustnotbeplacedinthedirectfieldofview.

vi
Important Information
Power management functionTheprojectorhaspowermanagementfunctions.Toreducepowerconsumption,thepowermanagementfunctions(1and2)arefactorypresetasshownbelow.TocontroltheprojectorfromanexternaldeviceviaaLANorserialcableconnection,usetheon-screenmenutochangethesettingsfor1and2.
1. STANDBY MODE (Factory preset: NORMAL)
To control the projector from an external device, select [NETWORK STANDBY] for [STANDBY MODE].
NOTE:• When[NORMAL]isselectedfor[STANDBYMODE],thefollowingconnectorsandfunctionswillnotwork: MONITOROUT connector, AUDIOOUT connector,USB-Bport, LAN functions,Mail Alert function,DDC/CI (VirtualRemoteTool)
2. AUTO POWER OFF (Factory preset: 1 hour)
To control the projector from an external device, select [OFF] for [AUTO POWER OFF].
NOTE:• When[1:00]isselectedfor[AUTOPOWEROFF],youcanenabletheprojectortoautomaticallyturnoffin60minutesifthereisnosignalreceivedbyanyinputorifnooperationisperformed.
Health precautions to users viewing 3D images
Beforeviewing,besuretoreadhealthcareprecautionsthatmaybefoundintheuser’smanualincludedwithyourLCDshuttereyeglassesoryour3DcompatiblecontentsuchasDVDs,videogames,computer'svideofilesandthelike.Toavoidanyadversesymptoms,heedthefollowing:• DonotuseLCDshuttereyeglassesforviewinganymaterialotherthan3Dimages.
• Allowadistanceof2m/7feetorgreaterbetweenthescreenandauser.Viewing3Dimagesfromtoocloseadistancecanstrainyoureyes.
• Avoidviewing3Dimagesforaprolongedperiodoftime.Takeabreakof15minutesorlongeraftereveryhourofviewing.
• Ifyouoranymemberofyourfamilyhasahistoryoflight-sensitiveseizures,consultadoctorbeforeviewing3Dimages.
• Whileviewing3Dimages,ifyougetsicksuchasnausea,dizziness,queasiness,headache,eyestrain,blurryvision,convulsions,andnumbness,stopviewingthem.Ifsymptomsstillpersist,consultadoctor.
• View3Dimagesfromthefrontofthescreen.Viewingfromananglemaycausefatigueoreyestrain.
vii
Table of ContentsImportant Information ............................................................................................ i
1. Introduction ...........................................................................................................1❶What’sintheBox? ..........................................................................................................1❷IntroductiontotheProjector ...........................................................................................2
CongratulationsonYourPurchaseoftheProjector ..................................................2Featuresyou’llenjoy: ................................................................................................2Aboutthisuser’smanual ...........................................................................................3ComparativeTableofMainFeatures ........................................................................4
❸PartNamesoftheProjector ...........................................................................................5Front/Top ...................................................................................................................5Rear ..........................................................................................................................6Front/Top ...................................................................................................................7Rear ..........................................................................................................................7TopFeatures .............................................................................................................8TerminalPanelFeatures ...........................................................................................9
❹PartNamesoftheRemoteControl ..............................................................................10BatteryInstallation ..................................................................................................11RemoteControlPrecautions ...................................................................................11OperatingRangeforWirelessRemoteControl .......................................................11
❺OperatingEnvironmentforSoftwareIncludedonCD-ROM .........................................12OperatingEnvironment ...........................................................................................13
2. Projecting an Image (Basic Operation) ...............................................15❶FlowofProjectinganImage .........................................................................................15❷ConnectingYourComputer/ConnectingthePowerCord ..............................................16❸TurningontheProjector ...............................................................................................17
NoteonStartupscreen(MenuLanguageSelectscreen) .......................................18❹SelectingaSource .......................................................................................................19
Selectingthecomputerorvideosource..................................................................19❺AdjustingthePictureSizeandPosition ........................................................................20
AdjusttheTiltFoot ..................................................................................................21Zoom .......................................................................................................................22Focus ......................................................................................................................23
❻CorrectingKeystoneDistortionManually .....................................................................24Adjustingwithbuttonsonthecabinet .....................................................................24Adjustingwiththeremotecontrol ............................................................................25
❼OptimizingComputerSignalAutomatically ..................................................................28AdjustingtheImageUsingAutoAdjust ...................................................................28
❽TurningUporDownVolume .........................................................................................28❾TurningofftheProjector ...............................................................................................29❿AfterUse.......................................................................................................................30
3. Convenient Features ......................................................................................31❶TurningofftheImageandSound .................................................................................31❷FreezingaPicture ........................................................................................................31❸EnlargingaPicture .......................................................................................................31

viii
Table of Contents
❹ChangingEcoMode/CheckingEnergy-SavingEffect .................................................33UsingEcoMode[ECOMODE] ...............................................................................33CheckingEnergy-SavingEffect[CARBONMETER] ..............................................34
❺ PreventingtheUnauthorizedUseoftheProjector[SECURITY] .......................................35❻UsingtheComputerCable(VGA)toOperatetheProjector(VirtualRemoteTool) ......38❼ OperatingYourComputer’sMouseFunctionsfromtheProjector’sRemoteControl
viatheUSBCable(RemoteMouseFunction) .......................................................... 44❽ProjectingYourComputer’sScreenImagefromtheProjectorviatheUSBCable
(USBDisplay) .........................................................................................................45❾ControllingtheProjectorbyUsinganHTTPBrowser ..................................................47❿ ControllingtheProjectoroveraLAN(PCControlUtilityPro4/Pro5) ............................. 54⓫ProjectingYourComputer’sScreenImagefromtheProjectoroveraLAN(Image
ExpressUtilityLite) .................................................................................................58StartingImageExpressUtilityLitefromaUSBMemoryorSDCard .....................61DownloadingImageExpressUtilityLiteviatheHTTPserver .................................62
⓬ProjectinganImagefromanAngle(GeometricCorrectionToolinImageExpressUtilityLite) ...............................................................................................................65WhatyoucandowithGCT .....................................................................................65ProjectinganImagefromanAngle(GCT) ..............................................................65
⓭Viewing3DImages .......................................................................................................67⓮ConnectingYourMicrophone ........................................................................................71
4. Using the Viewer ..............................................................................................72❶WhatyoucandowiththeViewer ..................................................................................72❷ProjectingimagesstoredinaUSBmemorydevice .....................................................74
5. Using On-Screen Menu .................................................................................80❶UsingtheMenus ...........................................................................................................80❷MenuElements .............................................................................................................81❸ListofMenuItems ........................................................................................................82❹MenuDescriptions&Functions[SOURCE] .................................................................85
COMPUTER ...........................................................................................................85HDMI1and2 ...........................................................................................................85VIDEO .....................................................................................................................85USB-A(Viewer) .......................................................................................................85LAN .........................................................................................................................85USB-B(USBDisplay) .............................................................................................85
❺MenuDescriptions&Functions[ADJUST] ...................................................................86[PICTURE] ..............................................................................................................86[IMAGEOPTIONS] .................................................................................................89
❻MenuDescriptions&Functions[SETUP] .....................................................................94[GENERAL] .............................................................................................................94[MENU] ...................................................................................................................97[INSTALLATION] .....................................................................................................99[OPTIONS(1)] .......................................................................................................101[OPTIONS(2)] .......................................................................................................103[3D] .......................................................................................................................106SettinguptheProjectorforaWiredLANConnection[WIREDLAN] ....................108
ix
Table of Contents
SettinguptheProjectorforaWirelessLANConnection(withtheoptionalUSBWirelessLANUnitequipped)[WIRLESSLAN] .....................................................109
❼MenuDescriptions&Functions[INFO.] .....................................................................111[USAGETIME] ......................................................................................................111[SOURCE(1)] ........................................................................................................112[SOURCE(2)] ........................................................................................................112[WIREDLAN] ........................................................................................................112[WIRELESSLAN] .................................................................................................113[VERSION(1)] .......................................................................................................113[VERSION(2)] .......................................................................................................113[OTHERS] .............................................................................................................114
❽MenuDescriptions&Functions[RESET] ...................................................................115ReturningtoFactoryDefault[RESET] ..................................................................115
6. Installation and Connections ..................................................................116❶SettingUptheScreenandtheProjector ....................................................................116
SelectingaLocation..............................................................................................116ThrowDistanceandScreenSize ..........................................................................119
❷MakingConnections ...................................................................................................121ConnectingYourComputer ...................................................................................121ConnectinganExternalMonitor ...........................................................................123ConnectingYourDVDPlayerorOtherAVEquipment ...........................................124ConnectingComponentInput ...............................................................................125ConnectingHDMIInput.........................................................................................126ConnectingtoaWiredLAN ..................................................................................127ConnectingtoaWirelessLAN(Optional:NP02LMseries) ...................................128
7. Maintenance .....................................................................................................131❶CleaningtheLens.......................................................................................................131❷CleaningtheCabinet ..................................................................................................131❸ReplacingtheLamp....................................................................................................132
8. Appendix ..............................................................................................................135❶Troubleshooting ..........................................................................................................135
IndicatorMessages ...............................................................................................135CommonProblems&Solutions ............................................................................136Ifthereisnopicture,orthepictureisnotdisplayedcorrectly. ...............................137
❷Specifications .............................................................................................................138❸CabinetDimensions ...................................................................................................142
AttachingtheOptionalCableCover(NP05CV) ....................................................144❹PinAssignmentsofD-SubCOMPUTERInputConnector .........................................145❺CompatibleInputSignalList .......................................................................................146❻PCControlCodesandCableConnection ..................................................................147❼TroubleshootingCheckList .........................................................................................148❽TCOCertification ........................................................................................................150❾REGISTERYOURPROJECTOR!(forresidentsintheUnitedStates,Canada,and
Mexico) .................................................................................................................151

1
Projector
[6528/6532/6532W/6540] Power Cable(US: 7N080236/7N080242)(EU: 7N080022/7N080028)
Soft case (24BS8391)
The 6235/6233 do not come with a soft case.
[6235W/6233] Power cord(US: 7N080240/7N080243)(EU: 7N080027/7N080029)
Computer cable (VGA)(7N520089)
Remote control(7N901051)
Batteries (AAA × 2)
For North America onlyLimited warrantyFor customers in Europe: You will find our current valid Guarantee Policy on our Web Site: www.dukaneav.com
• ImportantInfomation (For North America: 7N8N4362) (For Other countries than North
America: 7N8N4362 and 7N8N4372)• QuickSetupGuide (7N8N4382)/(7N8N4392)
Projector CD-ROMUser’s manual (PDF) and the utility software(7N952002)
1. Introduction❶ What’s in the Box?Makesureyourboxcontainseverythinglisted.Ifanypiecesaremissing,contactyourdealer.Pleasesavetheoriginalboxandpackingmaterialsifyoueverneedtoshipyourprojector.

2
1. Introduction
❷ Introduction to the ProjectorThissectionintroducesyoutoyournewprojectoranddescribesthefeaturesandcontrols.
Congratulations on Your Purchase of the ProjectorThisprojectorisoneoftheverybestprojectorsavailabletoday.Theprojectorenablesyoutoprojectpreciseimagesupto300inches(150inchesforshortthrowmodels)across(measureddiagonally)fromyourPCorMaccomputer(desktopornotebook),VCR,DVDplayer,ordocumentcamera.Youcanusetheprojectoronatabletoporcart,youcanusetheprojectortoprojectimagesfrombehindthescreen,andtheprojectorcanbepermanentlymountedonaceiling*1.Theremotecontrolcanbeusedwirelessly.
*1 Donotattempttomounttheprojectoronaceilingyourself.
Theprojectormustbeinstalledbyqualifiedtechniciansinordertoensureproperoperationandreducetheriskofbodilyinjury.
Inaddition,theceilingmustbestrongenoughtosupporttheprojectorandtheinstallationmustbeinaccordancewithanylocalbuildingcodes.Pleaseconsultyourdealerformoreinformation.
Features you’ll enjoy:
• 0.2W(100-130VAC)/0.38W(200-240VAC)instandbyconditionwithenergysavingtechnology
Selecting[NORMAL]for[STANDBYMODE]fromthemenucanputtheprojectorinpower-savingmode.
NORMAL:0.20W(100-130VAC)/0.38W(200-240VAC)
NETWORKSTANDBY:2.5W(100-130VAC)/2.9W(200-240VAC)
• CarbonMeter
Thisfeaturewillshowenergy-savingeffectintermsofCO2emissionreduction(kg)whentheprojector’s[ECOMODE]issetto[AUTOECO],[NORMAL],or[ECO].
TheamountofCO2emissionreductionwillbedisplayedintheconfirmationmessageatthetimeofpower-offandintheINFOoftheon-screenmenu.
• Lamplifeupto8000hours
UsinginEcoModeallowsyoutoprolongtheprojector’slamplifeupto8000hours(upto3500hoursinECOMODEOFF).
M282X:upto10000uphours(upto4500hoursinECOMODEOFF).
• Nofilterreplacementrequired
Sincetheprojectorhasnofilters,filterreplacementisnotrequired.
• TwoHDMIinputportsprovidedigitalsignal
ThetwoHDMIinputsprovideHDCPcompatibledigitalsignals.TheHDMIinputalsosupportsaudiosignal.
• 20Wbuilt-inspeakerforanintegratedaudiosolution/micinputsupprted
Powerful20wattmonauralspeakerprovidesvolumeneedforlargeroomsadynamicorcondensermiccanbeused.
• ThesuppliedremotecontrolallowsyoutoassignaCONTROLIDtotheprojector
MultipleprojectorscanbeoperatedseparatelyandindependentlywiththesamesingleremotecontrolbyassigninganIDnumbertoeachprojector.
• Autoverticalkeystonecorrection
AutoKeystonefeatureallowstheprojectortodetectitstiltandcorrectverticaldistortionautomatically.
• USBDisplay
UsingacommerciallyavailableUSBcable(compatiblewithUSB2.0specifications)toconnectthecomputerwiththeprojectorallowsyoutosendyourcomputerscreenimagetotheprojectorwithouttheneedofatraditionalcomputercable(VGA).
3
1. Introduction
• IntegratedRJ-45connectorforwirednetworkingcapabilityalongwithwirelessnetworkingcapabilities
AnRJ-45connectorisstandard.AnoptionalUSBWirelessLANUnitisrequiredforwirelessLANconnection.
• Softwareprograms(UserSupportware)containedinthesuppliedCD-ROM
ThesuppliedProjectorincludesthreeprograms:VirtualRemoteTool,ImageExpressUtilityLite(forWindows/MacOS),PCControlUtilityPro4(forWindows)/5(forMacOS).
ImageExpressUtilityLite(forWindows)canbestartedfromacommerciallyavailableUSBmemoryorSDcardwithouttheneedofinstallingonyourcomputer.
• Audiotransfercapability(forWindowsonly)
ImageExpressUtilityLiteallowsyoutosendthecomputer’sscreenimageandaudiototheprojectoroveranetworkorUSBconnection.
* Audiotransfercapabilityisavailableonlywhenthecomputerconnectswiththeprojectorinpeer-to-peernet-work.
• AUTOPOWERONandAUTOPOWEROFFfeatures
TheDIRECTPOWERON,AUTOPOWERON(COMP.),AUTOPOWEROFF,andOFFTIMERfeatureseliminatetheneedtoalwaysusethePOWERbuttonontheremotecontrolorprojectorcabinet.
• AUTOPOWEROFFFunction
Theprojectorispresetatthefactorysothatitwillautomaticallyturnoffifthereisnosignalpresentafterapresetduration.Ifyoudonotneedthispresetfunction,cancelitfromtheOSDmenu.Seepage104formoreinforma-tion.
• Preventingunauthorizeduseoftheprojector
Enhancedsmartsecuritysettingsforkeywordprotection,cabinetcontrolpanellock,securityslot,andsecuritychainopeningtohelppreventunauthorizedaccess,adjustmentsandtheftdeterrence.
• HighresolutionuptoWUXGA
Highresolutiondisplay-uptoWUXGAcompatible,XGA(6528, 6532, 6540, 6233)/WXGA/6235W, 6532W)nativeresolution.
• 3DImagessupported
Theprojectorprovides3Dimagestoauserwearingcommerciallyavailable3Deyeglasses.
• CRESTRONROOMVIEWcompatibility
TheprojectorsupportsCRESTRONROOMVIEW,allowingmultipledevicesconnectedinthenetworktobeman-agedandcontrolledfromacomputerorcontroller.
About this user’s manualThefastestwaytogetstartedistotakeyourtimeanddoeverythingrightthefirsttime.Takeafewminutesnowtoreviewtheuser’smanual.Thismaysaveyoutimelateron.Atthebeginningofeachsectionofthemanualyou’llfindanoverview.Ifthesectiondoesn’tapply,youcanskipit.
Note: The Dukane models described in this document are manufactured by NEC and use the same firmware, software programs, control code, and accessory parts. The equivalent Dukane to NEC models are 6233 (NP-M332XS), 6235W (NP-M352WS), 6528 (NP-M282X), 6532 (NP-322X), 6532W (NP-M322W), and 6540 (NP-M402X).

4
1. Introduction
Comparative Table of Main FeaturesThemainfeaturesvarydependingonthemodelasfollows.
Standard Models with Wide Panel Standard Models Short-Throw Models with Wide Panel
Short-Throw Model
M M362W 6532W 6540 M362X6532 6528 6235W M302WS 6233Native Aspect Ratio
16:10Wide
4:3Standard
16:10Wide
4:3Standard
Native Resolution (dots × lines*1)
WXGA (1280 × 800) XGA (1024 × 768) WXGA (1280 × 800) XGA (1024 × 768)
Screen Size
30" - 300" 60" - 150"
Projection Distance
29–531 inches/0.75–13.5 m 35–627 inches/0.89–15.9 m 22–58 inches/0.57–1.5 m
27–70 inches/
0.68–1.8 mLight output *2
*3 in OFF for ECO MODE
4000 lumens
3600 lumens
3200 lumens
4000 lumens
3600 lumens
3200 lumens
2800 lumens
3500 lumens
3000 lumens
3300 lumens
Lamp Replace-ment Time (average)
OFF for ECO MODE/ON for ECO MODE (H)3500/8000 4500/10000 3500/8000 3500/8000 3500/8000
Lamp Model
456-6540 NP29LP 456-6532 456-6540 NP29LP 456-6532 456-6528 456-6540 NP28LP 456-6540
Lamp Wattage (AC)
270 W 250 W 225 W 270 W 250 W 225 W 200 W 270 W 225 W 270 W
Zoom Using the manual zoom lever Using the [DIGITAL ZOOM] func-tion from the menu
Focus Using the manual focus ring Using the manual focus lever
Forfurtherdetailsonthespecifications,seepages138 to 140.
*1 Effectivepixelsaremorethan99.99%.*2 Thisisthelightoutputvalue(lumens)whenthe[PRESET]modeissetto[HIGH-BRIGHT].Ifanyothermodeisselectedasthe
[PRESET]mode,thelightoutputvaluemaydropslightly.*3 CompliancewithISO21118-2005
TIP:Themodelnameislocatedonthecabinet.
5
1. Introduction
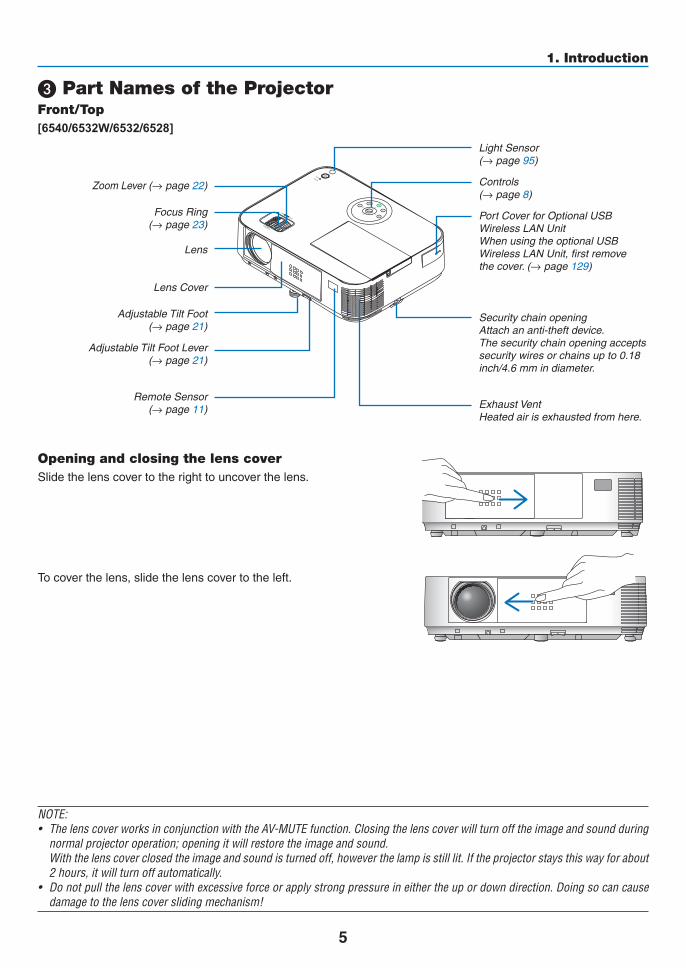
❸ Part Names of the ProjectorFront/Top[6540/6532W/6532/6528]
Controls(→ page 8)
Remote Sensor(→ page 11) Exhaust Vent
Heated air is exhausted from here.
Port Cover for Optional USB Wireless LAN Unit When using the optional USB Wireless LAN Unit, first remove the cover. (→ page 129)
Zoom Lever (→ page 22)
Lens Cover
Focus Ring(→ page 23)
Adjustable Tilt Foot Lever (→ page 21)
Adjustable Tilt Foot (→ page 21)
Lens
Light Sensor(→ page 95)
Security chain opening Attach an anti-theft device.The security chain opening accepts security wires or chains up to 0.18 inch/4.6 mm in diameter.
Opening and closing the lens coverSlidethelenscovertotherighttouncoverthelens.
Tocoverthelens,slidethelenscovertotheleft.
NOTE:• ThelenscoverworksinconjunctionwiththeAV-MUTEfunction.Closingthelenscoverwillturnofftheimageandsoundduringnormalprojectoroperation;openingitwillrestoretheimageandsound.
Withthelenscoverclosedtheimageandsoundisturnedoff,howeverthelampisstilllit.Iftheprojectorstaysthiswayforabout2hours,itwillturnoffautomatically.
• Donotpullthelenscoverwithexcessiveforceorapplystrongpressureineithertheupordowndirection.Doingsocancausedamagetothelenscoverslidingmechanism!

6
1. Introduction
ACInputConnect the supplied power cord’s
three-pin plug here, and plug the other end into an active wall outlet.
(→ page 16)
Built-in Security Slot ( )*
Terminal Panel (→ page 9)
Connection for cable cover (Left) Screw holes
(→ page 144)
Connection for cable cover (Right) Screw holes (→ page 144)
Lamp Cover (→ page 132)
Rear Feet (→ page 21)
IntakeVent(→ page 131)
Rear[6540/6532W/6532/6528]
MonauralSpeaker(20W)
* ThissecurityslotsupportstheMicroSaver®SecuritySystem.

7
1. Introduction
Focus Lever(→ page 23)
Front/Top[6233/6235W]
Remote Sensor(→ page 11) Exhaust Vent
Heated air is exhausted from here.
Lens Cap
Adjustable Tilt Foot Lever (→ page 21)
Adjustable Tilt Foot (→ page 21)
Lens
Security chain opening Attach an anti-theft device.The security chain opening accepts security wires or chains up to 0.18 inch/4.6 mm in diameter.
Controls(→ page 8)
Port Cover for Optional USB Wireless LAN Unit When using the optional USB Wireless LAN Unit, first remove the cover. (→ page 129)
Light Sensor(→ page 95)
ACInputConnect the supplied power cord’s
three-pin plug here, and plug the other end into an active wall outlet.
(→ page 16)
Built-in Security Slot ( )*
Terminal Panel (→ page 9)
Lamp Cover (→ page 132)
Rear Feet (→ page 21)
IntakeVent(→ page 131)
Rear[6233/6235]
MonauralSpeaker(20W)
* ThissecurityslotsupportstheMicroSaver®SecuritySystem.
Connection for cable cover (Left) Screw holes
(→ page 144)
Connection for cable cover (Right) Screw holes (→ page 144)

8
1. Introduction
Top Features
6532W/6528/6532/6540 6235W/6233
1, 28 9 11
12
56 10
3
4
7138 9 11
12
56 10713
1. (POWER)Button (→page17, 29)
2. POWER Indicator (→page16, 17, 29, 135)
3. STATUS Indicator (→page135)
4. LAMPIndicator (→page132, 135)
5. ECOButton (→page33)
6. SOURCEButton (→page19)
7. AUTOADJ.Button (→page28)
8. MENUButton (→page80)
[6235W/6233]
9. ▲▼◀▶/VolumeButtons◀▶/KeystoneButtons▲▼
(→page24, 28, 80)[6532W/6540/6532W/6528]
9. ▲▼◀▶/VolumeButtons◀▶/KeystoneButton▼ ( )
(→page24, 28, 80)
10.ENTERButton (→page80)
11.EXITButton (→page80)
12.WirelessLANIndicator( ) Whentheprojectoristurnedonwiththeoptionalwire-
lessLANunitinserted,theindicatorwilllightupblue. (→page128)
13. ECO Indicator When [ECOMODE] isset to theotheroptions than
[OFF],thisindicatorwilllightupgreen. (→page33)
NOTE:• Allthebuttonsexcept▲▼◀▶willlightwhenpressed.Thelightwillturnoffifnobuttonoperationismadefor90seconds.

9
1. Introduction
Terminal Panel Features
12 46
1413
7
98
1211 10 35
1. COMPUTERIN/ComponentInputConnector(MiniD-Sub15Pin)
(→page121, 123, 125)
2. COMPUTERAUDIOINMiniJack(StereoMini) (→page121, 123, 125)
3. HDMI1INConnector(TypeA) (→page121, 126)
4. HDMI2INConnector(TypeA) (→page121, 126)
5. USB-BPort(TypeB) (→page44, 45)
6. MONITOROUT(COMP.)Connector(MiniD-Sub15Pin)
(→page123)
7. AUDIOOUTMiniJack(StereoMini) (→page123)
8. VIDEOINConnector(RCA) (→page124)
9. VIDEOAUDIOINL/MONO,R(RCA) (→page124)
10.MICInputJack(MonauralMini) (→page71)
11.LANPort(RJ-45) (→page127)
12.USB-APort(TypeA) (→page74)
13.3DSYNC(MiniDIN4Pin) (→page67)
14.PCCONTROL[PCCONTROL]Port(D-Sub9Pin) (→page146) UsethisporttoconnectaPCorcontrolsystem.This
enablesyoutocontroltheprojectorusingserialcommu-nicationprotocol.Ifyouarewritingyourownprogram,typicalPCcontrolcodesareonpage146.

10
1. Introduction
❹ Part Names of the Remote Control
3467
1
2
1016
171514
9
58
13
30
3132
20212628
292524
2322
27
33
1918
1211
1. Infrared Transmitter (→page11)
2. POWER ON Button (→page17, 29)
3. STANDBY Button (→page29)
4. SOURCEButton (→page19)
5,6.COMP1/COMP2Button (→page19) (COMP2buttondoesnotworkin
thisseriesofprojectors.)
7. AUTOADJ.Button (→page28)
8,9.HDMI1/HDMI2Button (→page19)
10.DisplayPortButton (Thisbuttondoesnotworkinthis
seriesofprojectors) (→page19)
11.VIDEOButton (→page19)
12.USB-AButton (→page19, 74)
13.USB-BButton (→page19)
14.LANButton (→page19)
15.IDSETButton (→page100)
16.NumericKeypadButton/CLEAR Button
(→page100)
17. FREEZE Button (→page31)
18.AV-MUTEButton (→page31)
19. MENU Button (→page80)
20.EXITButton (→page80)
21. ▲▼◀▶ Button (→page80)
22. ENTER Button (→page80)
23.D-ZOOM(+)(–)Button (→page31)
24.MOUSEL-CLICKButton* (→page44)
25.MOUSER-CLICKButton* (→page44)
26.PAGE▽/△ Button (→page44)
27. ECO Button (→page33)
28.KEYSTONEButton (→page25)
29. PICTURE Button (→page86, 88)
30.VOL.(+)(–)Button (→page28)
31. ASPECT Button (→page91)
32.FOCUS/ZOOMButton TheZOOMbuttonworksonthe
short-throw models only.TheFOCUSbuttondoesnotworkonthisseriesofprojectors.
33. HELP Button (→page111)
* TheMOUSEL-CLICKandMOUSER-CLICKbuttonsworkonlywhenaUSBcableisconnectedwithyourcomputer.

11
1. Introduction
Remote Control Precautions• Handletheremotecontrolcarefully.• Iftheremotecontrolgetswet,wipeitdryimmediately.• Avoidexcessiveheatandhumidity.• Donotshort,heat,ortakeapartbatteries.• Donotthrowbatteriesintofire.• Ifyouwillnotbeusingtheremotecontrolforalongtime,removethebatteries.• Ensurethatyouhavethebatteries’polarity(+/−)alignedcorrectly.• Donotusenewandoldbatteriestogether,orusedifferenttypesofbatteriestogether.• Disposeofusedbatteriesaccordingtoyourlocalregulations.
Operating Range for Wireless Remote Control
22 feet/7 m
22 feet/7 m
Remote control
Remote sensor on projector cabinet
Remote control
• Theinfraredsignaloperatesbyline-of-sightuptoadistanceofabout22feet/7mandwithina60-degreeangleoftheremotesensorontheprojectorcabinet.
• Theprojectorwillnotrespondifthereareobjectsbetweentheremotecontrolandthesensor,orifstronglightfallsonthesensor.Weakbatterieswillalsopreventtheremotecontrolfromproperlyoperatingtheprojector.
1 Pressfirmlyandslidethebatterycoveroff.
2 Installnewbatteries(AAA).Ensurethatyouhavethebatteries’polarity(+/−)alignedcorrectly.
Battery Installation
3 Slip thecoverbackover thebat-teriesuntilitsnapsintoplace.Donotmixdifferenttypesofbatteriesornewandoldbatteries.
OPEN
OPEN

12
1. Introduction
❺ Operating Environment for Software Included on CD-ROMNamesandFeaturesofBundledSoftwarePrograms
Nameofsoftwareprogram Features
VirtualRemoteTool(Windowsonly)
ThisisasoftwareprogramusedtocontrolthepowerON/OFFandsourceselec-tionoftheprojectorfromyourcomputerbyusingthesuppliedcomputercable(VGA)andothers.(→page38)
Nameofsoftwareprogram Features
ImageExpressUtilityLite • Thisisasoftwareprogramusedtoprojectyourcomputer’sscreenorsoundfromthecomputerover theUSBcableor thewired/wirelessnetwork.Thecomputercable(VGA)isnotrequired.(→page58)
• ThissoftwareprogramcanbeusedtocontrolthepowerON/OFFandsourceselectionoftheprojectorfromyourcomputer.
• TheGeometricCorrectionTool(GCT)functionallowsyoutocorrectdistortionofimagesprojectedonacurvedwall.(→page65)
ImageExpressUtilityLiteforMacOS
• Thisisasoftwareprogramusedtoprojectyourcomputer'sscreenoverthewired/wirelessnetwork.Thecomputercable(VGA)isnotrequired.(→page58, 63)
• ThissoftwareprogramcanbeusedtocontrolthepowerON/OFFandsourceselectionoftheprojectorfromyourcomputer.* “Audiotransmission”,“USBDisplay”,and“GCT”functionsarenotsupported
byMac.
Nameofsoftwareprogram Features
PCControlUtilityPro4PCControlUtilityPro5(forMacOS)
ThisisasoftwareprogramusedtooperatetheprojectorfromthecomputerwhenthecomputerandtheprojectorareconnectedwithLAN(wiredorwireless)oraserialcable.(→page54)
NOTE:• ImageExpressUtilityLitedoesnotsupport"MeetingMode"inImageExpressUtility2.0includedwithourothermodels.
Download serviceFortheupdateinformationaboutthesesoftwareprograms,visitourwebsite:URL:http://www.nec-display.com/dl/en/index.html

13
1. Introduction
Operating EnvironmentThefollowingistheoperatingenvironmentforImageExpressUtilityLite.Fortheoperatingenvironmentofothersoft-wareprogram,refertothehelpfunctionofeachsoftwareprogram.
[Windows]
SupportedOS Windows8(CoreEdition)Windows8ProWindows8EnterpriseWindows7HomeBasicWindows7HomePremiumWindows7ProfessionalWindows7UltimateWindows7EnterpriseWindowsVistaHomeBasicWindowsVistaHomePremiumWindowsVistaBusinessWindowsVistaUltimateWindowsVistaEnterpriseWindowsXPHomeEdition(32-bitversion)ServicePack3orlaterWindowsXPProfessional(32-bitversion)ServicePack3orlater• Windowspower-savingfunctionisnotsupported.• Tousetheaudiotransfercapability,Windows8/Windows7/WindowsVista
ServicePack1orlaterisrequired.
Processor • Windows8/Windows7/WindowsVistaPentiumM1.2GHzequivalentorhigherrequiredDualcore1.5GHzorhigherrecommended
• WindowsXPPentiumM1.0GHzequivalentorhigherrequiredDualcore1.0GHzorhigherrecommended
Memory • Windows8/Windows7/WindowsVista512MBormorerequired1GBormorerecommended
• WindowsXP256MBormorerequired512MBormorerecommended*Morememorymaybe required to runadditionalapplicationssimultane-ously.
Graphicprocessor • Windows8/Windows7/WindowsVistaThe“Graphics” score3.0ormoreof“WindowsExperience Index” recom-mended.
Networkenvironment TCP/IP-compatiblewiredLANorwirelessLAN* UseawirelessLANunitcomplyingwiththeWi-Fistandard.* Audiotransfercapabilityrequires3Mbpsormorethroughput.
Resolution • Windows8/Windows7/WindowsVistaSVGA(800×600)orhigherrequiredXGA(1024×768)recommended
• WindowsXPVGA(640×480)orhigherrequiredXGA(1024×768)recommended
1024dots×768lines-1280dots×800linesrecommended(6532W/6235W)M
ScreenColors HighColor(15bits,16bits)TrueColor(24bits,32bits)(recommended)• 256orfewercolorsarenotsupported.

14
1. Introduction
[Mac]
SupportedOS MacOSXv10.6,v10.7,v10.8
Processor(CPU) Intel®Core™Duoprocessor1.5GHzorhigherrequiredIntel®Core™2Duoprocessor1.6GHzorhigherrecommended* PowerPC®isnotsupported
Memory 512MBorhigherrequired
Networkenvironment WiredorwirelessLANrequiredthatsupportsTCP/IP* ThefollowingLANadaptersareverifiedtoworkwithImageExpressUtility
Lite:• WiredLANadapterbuiltintoMac• WirelessLANadapterbuiltintoMac• AppleUSBEthernetadapter
“EasyConnection”supportsonlywirelessLAN.
SupportedResolution SVGA(800×600)orhigherrequiredXGA(1024×768)recommended(1024×768–1280×800recommendedfor6532W/6235W)
SupportedScreenColors 16.70millioncolorsrequired

15
Thissectiondescribeshowtoturnontheprojectorandtoprojectapictureontothescreen.
❶ Flow of Projecting an Image
Step 1• Connectingyourcomputer/Connectingthepowercord(→page16)
Step 2 • Turningontheprojector(→page17)
Step 3 • Selectingasource(→page19)
Step 4• Adjustingthepicturesizeandposition(→page20)
• Correctingkeystonedistortion[KEYSTONE](→page24)
Step 5• Adjustingapictureandsound
- Optimizing a computer signal automatically (→ page 28)
- Turning up or down volume (→ page 28)
Step 6• Makingapresentation
Step 7• Turningofftheprojector(→page29)
Step 8• Afteruse(→page30)
2. Projecting an Image (Basic Operation)
16
2. Projecting an Image (Basic Operation)
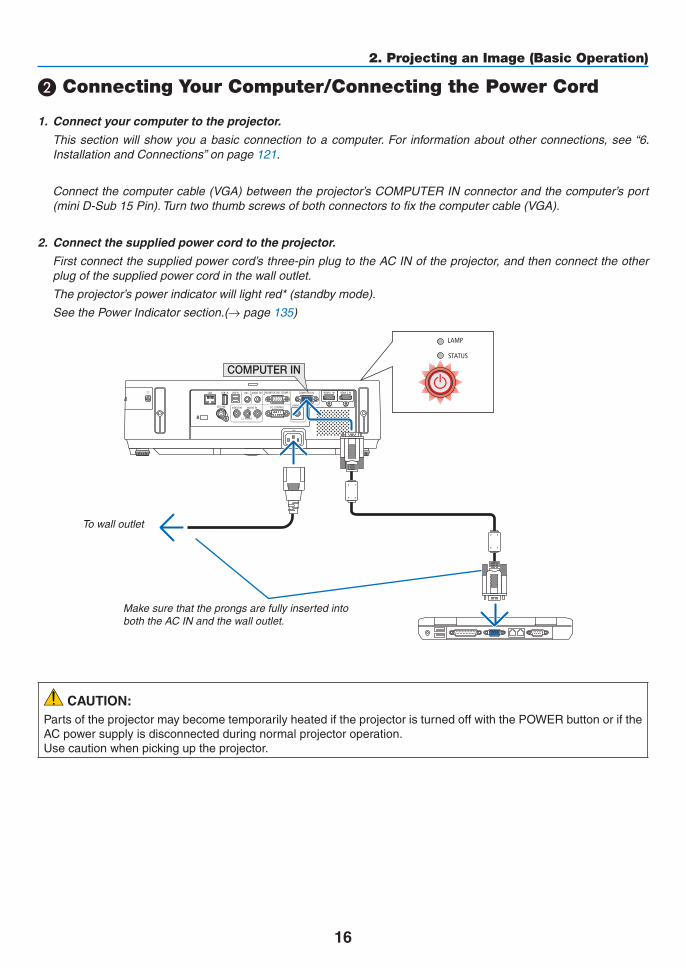
❷ Connecting Your Computer/Connecting the Power Cord
1. Connectyourcomputertotheprojector.
This section will show you a basic connection to a computer. For information about other connections, see “6. InstallationandConnections”onpage121.
Connectthecomputercable(VGA)betweentheprojector’sCOMPUTERINconnectorandthecomputer’sport(mini D-Sub 15 Pin). Turn two thumb screws of both connectors to fix the computer cable (VGA).
2. Connectthesuppliedpowercordtotheprojector.
Firstconnectthesuppliedpowercord’sthree-pinplugtotheACINoftheprojector,andthenconnecttheotherplug of the supplied power cord in the wall outlet.
The projector’s power indicator will light red* (standby mode).
SeethePowerIndicatorsection.(→ page 135)
COMPUTER IN
MakesurethattheprongsarefullyinsertedintoboththeACINandthewalloutlet.
To wall outlet
CAUTION:PartsoftheprojectormaybecometemporarilyheatediftheprojectoristurnedoffwiththePOWERbuttonoriftheACpowersupplyisdisconnectedduringnormalprojectoroperation.Usecautionwhenpickinguptheprojector.

17
2. Projecting an Image (Basic Operation)
Standby Blinking PowerOn
Steady red light Blinking blue light
Steady blue light
❸ Turning on the Projector
1. Slidethelenscovertotherighttouncoverthelens.
[6233/6235W]
1. Removethelenscap.
2. Press the (POWER) button on the projector cabinet or the POWER ON button on the remote control.
The POWER indicator will turn to blue and the projector will become ready to use.
TIP:• Whenthemessage“Projectorislocked!Enteryourpassword.”isdisplayed,itmeansthatthe[SECURITY]featureisturnedon.(→page35)
After you turn on your projector, ensure that the computer or video source is turned on and that the lens cover is open.
NOTE:Whenno inputsignal ispresent, theno-signalguidance isdisplayed(factorymenusetting).
(→page135)
Lens cap
18
2. Projecting an Image (Basic Operation)
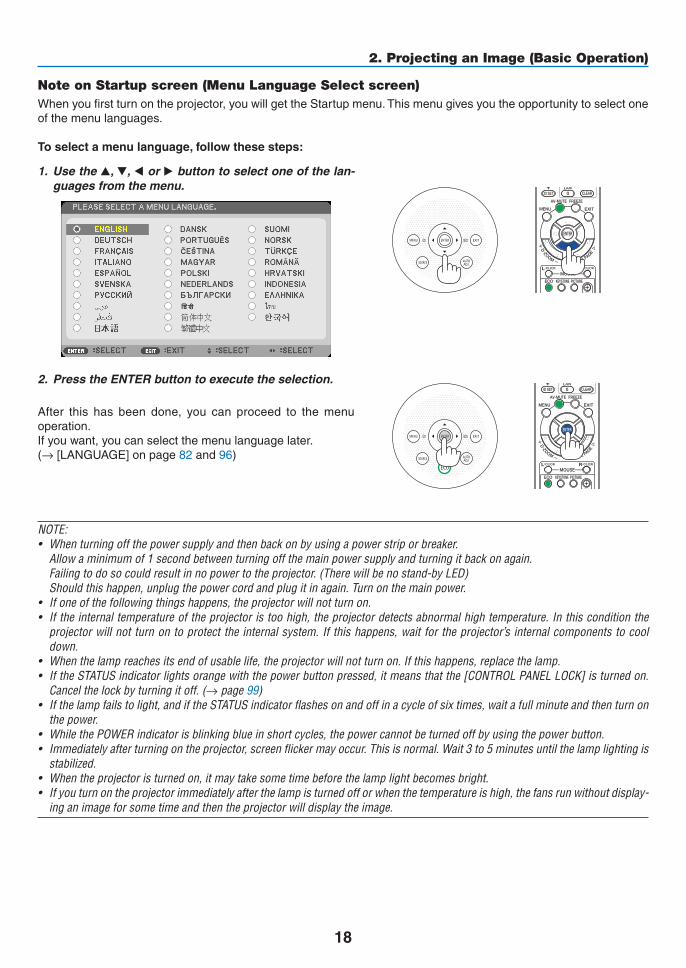
Note on Startup screen (Menu Language Select screen)Whenyoufirstturnontheprojector,youwillgettheStartupmenu.Thismenugivesyoutheopportunitytoselectoneofthemenulanguages.
Toselectamenulanguage,followthesesteps:
1. Use the ▲, ▼, ◀ or ▶buttontoselectoneofthelan-guagesfromthemenu.
2. Press the ENTER button to execute the selection.
After this has been done, you can proceed to the menuoperation.Ifyouwant,youcanselectthemenulanguagelater.(→[LANGUAGE]onpage82 and 96)
NOTE:• Whenturningoffthepowersupplyandthenbackonbyusingapowerstriporbreaker. Allowaminimumof1secondbetweenturningoffthemainpowersupplyandturningitbackonagain. Failingtodosocouldresultinnopowertotheprojector.(Therewillbenostand-byLED) Shouldthishappen,unplugthepowercordandplugitinagain.Turnonthemainpower.• Ifoneofthefollowingthingshappens,theprojectorwillnotturnon.• Iftheinternaltemperatureoftheprojectoristoohigh,theprojectordetectsabnormalhightemperature.Inthisconditiontheprojectorwillnotturnontoprotecttheinternalsystem.Ifthishappens,waitfortheprojector’sinternalcomponentstocooldown.
• Whenthelampreachesitsendofusablelife,theprojectorwillnotturnon.Ifthishappens,replacethelamp.• IftheSTATUSindicatorlightsorangewiththepowerbuttonpressed,itmeansthatthe[CONTROLPANELLOCK]isturnedon.Cancelthelockbyturningitoff.(→page99)
• Ifthelampfailstolight,andiftheSTATUSindicatorflashesonandoffinacycleofsixtimes,waitafullminuteandthenturnonthepower.
• WhilethePOWERindicatorisblinkingblueinshortcycles,thepowercannotbeturnedoffbyusingthepowerbutton.• Immediatelyafterturningontheprojector,screenflickermayoccur.Thisisnormal.Wait3to5minutesuntilthelamplightingisstabilized.
• Whentheprojectoristurnedon,itmaytakesometimebeforethelamplightbecomesbright.• Ifyouturnontheprojectorimmediatelyafterthelampisturnedofforwhenthetemperatureishigh,thefansrunwithoutdisplay-inganimageforsometimeandthentheprojectorwilldisplaytheimage.
19
2. Projecting an Image (Basic Operation)
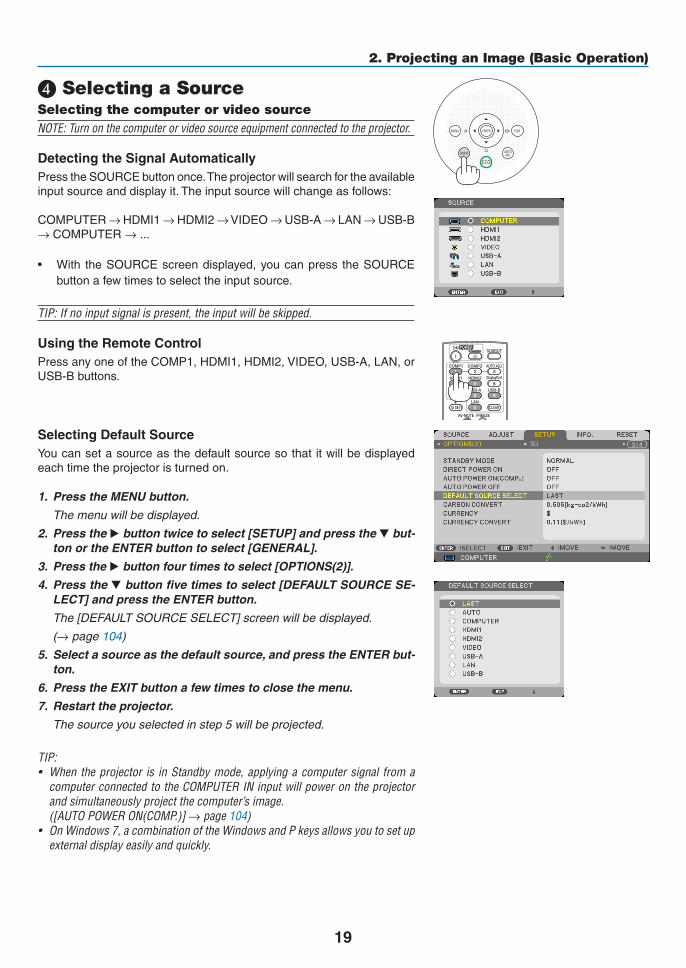
❹ Selecting a SourceSelecting the computer or video sourceNOTE:Turnonthecomputerorvideosourceequipmentconnectedtotheprojector.
DetectingtheSignalAutomaticallyPresstheSOURCEbuttononce.Theprojectorwillsearchfortheavailableinputsourceanddisplayit.Theinputsourcewillchangeasfollows:
COMPUTER→HDMI1→HDMI2→VIDEO→USB-A→LAN→USB-B→COMPUTER→ ...
• With theSOURCEscreendisplayed,youcanpress theSOURCEbuttonafewtimestoselecttheinputsource.
TIP:Ifnoinputsignalispresent,theinputwillbeskipped.
Using the Remote ControlPressanyoneoftheCOMP1,HDMI1,HDMI2,VIDEO,USB-A,LAN,orUSB-Bbuttons.
Selecting Default Source Youcansetasourceasthedefaultsourcesothatitwillbedisplayedeachtimetheprojectoristurnedon.
1. Press the MENU button.
The menu will be displayed.
2. Press the ▶buttontwicetoselect[SETUP]andpressthe▼ but-tonortheENTERbuttontoselect[GENERAL].
3. Press the ▶buttonfourtimestoselect[OPTIONS(2)].
4. Press the ▼buttonfivetimestoselect[DEFAULTSOURCESE-LECT]andpresstheENTERbutton.
The [DEFAULT SOURCE SELECT] screen will be displayed.
(→ page 104)
5. Selectasourceasthedefaultsource,andpresstheENTERbut-ton.
6. PresstheEXITbuttonafewtimestoclosethemenu.
7. Restart the projector.
The source you selected in step 5 will be projected.
TIP:• When theprojector is inStandbymode,applyingacomputersignal fromacomputerconnectedtotheCOMPUTERINinputwillpowerontheprojectorandsimultaneouslyprojectthecomputer’simage.
([AUTOPOWERON(COMP.)]→page104)• OnWindows7,acombinationoftheWindowsandPkeysallowsyoutosetupexternaldisplayeasilyandquickly.

20
2. Projecting an Image (Basic Operation)
❺ Adjusting the Picture Size and PositionUsetheadjustabletiltfoot,thezoomfunctionorthefocusringtoadjustthepicturesizeandposition.Inthischapterdrawingsandcablesareomittedforclarity.
Adjustingthethrowangle(theheightofanimage)[Tiltfoot](→page21)
Adjustingtheleftandrighttiltofanimage[Rearfoot](→page21)
Finelyadjustingthesizeofanimage[Zoomfunction](→page22)
Adjustingthefocus[Focusfunction](→page23)
Adjustingthekeystonecorrection[KEYSTONE]*(→page24)
* AutomaticKeystoneCorrectionfunctionisturnedonatthetimeofshipment.Toperformkeystonecorrectionmanually,see“6.CorrectingKeystoneDistortionManually”onpage24.

21
2. Projecting an Image (Basic Operation)
2
1
3
Adjustable Tilt Foot
Adjustable Tilt Foot Lever
Adjust the Tilt Foot1.Liftthefrontedgeoftheprojector.
CAUTION:DonottrytotouchtheexhaustventduringTiltFootadjustmentasitcanbecomeheatedwhiletheprojectoristurnedonandafteritisturnedoff.
2.PushupandholdtheAdjustableTiltFootLeveronthefrontoftheprojectortoextendtheadjustabletiltfoot.
3.Lowerthefrontoftheprojectortothedesiredheight.
4.ReleasetheAdjustableTiltFootLevertolocktheAdjustabletiltfoot.
The tilt foot can be extended up to 2 inches/52 mm.
There is approximately 10 degrees (up) of adjustment for the front of the projector.
Rotate the rear foot to the desired height in order to square the image on the projection surface.
CAUTION:• Donotusethetilt-footforpurposesotherthanoriginallyintended. Misusessuchasusingthetiltfoottocarryorhang(fromthewallor
ceiling)theprojectorcancausedamagetotheprojector.
Adjustingtheleftandrighttiltofanimage[Rearfoot]• Rotatetherearfoot.
The rear foot can be extended up to 1 inch/26.5 mm. Rotating the rear foot allows the projector to be placed horizontally.
NOTE:• Donotextendtherearfootbeyonditsheightlimit(0.8inch/21.5mm).Doingsomaycausetherearfoottocomeoutoftheprojector.
• Ifextendingtheleftrearfoot(viewedfromtherear)causestheprotrusiontointerferewiththefloor,extendtherightrearfootby0.5inch/12mmorlonger.Ifextendingtherightrearfootcausestheprotrusiontointerferewiththefloor,extendtheleftrearfootby0.3inch/8mm.
Rear feet
Up Down

22
2. Projecting an Image (Basic Operation)
Zoom
[6540/6532/6528/6532W]UsetheZOOMlevertoadjusttheimagesizeonthescreen.
[6233/6235W]Theimagesizecanbeadjustedelectronicallyfromthemenu.Todoso,followthestepsbelow.AdjustingwiththeZOOMbuttonontheremotecontrol1. Press the ZOOM button.
TheDIGITALZOOMbarwillbedisplayed.
2. Press the ◀ or ▶buttontoadjusttheimagesize.
3. PresstheEXITbutton.
TheDIGITALZOOMbarwillbeclosed.
Zoom Lever

23
2. Projecting an Image (Basic Operation)
FocusUsetheFOCUSringtoobtainthebestfocus.
Focus Ring
Focus Lever
[6528/6532/6532W/6540]
[6233/6235W]UsetheFOCUSlevertoobtainthebestfocus.

24
2. Projecting an Image (Basic Operation)
❻ Correcting Keystone Distortion ManuallyIfthescreenistiltedvertically,keystonedistortionbecomeslarge.AutomaticKeystoneCorrectionfunctionisturnedonatthetimeofshipment.Tocorrectkeystonedistortionmanually,proceedwiththefollowingstepstocorrectkeystonedistortion.
NOTE:• TheKeystonecorrectioncancauseanimagetobeslightlyblurredbecausethecorrectionismadeelectronically.• TheKeystonecorrectionrangecanbemadenarrower,dependingonasignaloritsaspectratioselection.
[6233]
Adjusting with buttons on the cabinet1. Press the ▲ or ▼buttonwithnomenusdisplayed.
Thekeystonebarwillbedisplayed.
2. Use the ▲ or ▼tocorrectthekeystonedistortion.
Thekeystonebarwillbeclosedafteraperiodoftime.
3. Press the ENTER button.
Thekeystonebarwillbeclosed.
NOTE:• Whenthemenuisdisplayed,theaboveoperationisnotavailable.Whenthemenuisdisplayed,presstheMENUbuttontoclosethemenuandstarttheKeystonecorrection.
Fromthemenu,select[SETUP]→[GENERAL]→[KEYSTONE].Thechangescanbesavedwith[KEYSTONESAVE].(→page94)
• Keystonecontrolisnotavailablewiththe▲or▼buttonwhenthe[USB-B]inputisused.

25
2. Projecting an Image (Basic Operation)
Adjusting with the remote control1. PresstheKEYSTONEbutton.
The Keystone bar will be displayed.
2. Use the ◀ or ▶buttontocorrectthekeystonedistortion.
Adjust so that the right and left sides are parallel.
3. PresstheEXITbutton.
The Keystone bar will be closed.

26
2. Projecting an Image (Basic Operation)
[6532W/6540/6532/6528]
1. Press the ▼ ( ) button on the projector cabinet withnomenusdisplayed.
The Keystone screen will be displayed on the screen.
• PresstheKEYSTONEbuttonwhenusingtheremotecontrol.
2. Press the ▼buttontoselect[VERTICAL]andthenuse the ◀ or ▶sothattheleftandrightsidesoftheprojectedimageareparallel.
* Adjusttheverticalkeystonedistortion.
Projected areaScreen frame
3. Aligntheleft(orright)sideofthescreenwiththeleft(orright)sideoftheprojectedimage.
• Usetheshortersideoftheprojectedimageasthebase.
• Intherightexample,usetheleftsideasthebase.
Align left side
4. Press the ▲buttontoselect[HORIZONTAL]andthenuse the ◀ or ▶sothatthetopandbottomsidesoftheprojectedimageareparallel.
• Adjustthehorizontalkeystonedistortion.
5. Repeatsteps2and4 tocorrect keystonedistor-tion.

27
2. Projecting an Image (Basic Operation)
6. After completing Keystone correction, press theEXITbutton.
The Keystone screen will disappear.
• ToperformKeystonecorrectionagain,pressthe▼ button to display the Keystone screen and repeat above steps 1 to 6.

28
2. Projecting an Image (Basic Operation)
❼ Optimizing Computer Signal AutomaticallyAdjusting the Image Using Auto AdjustOptimizingacomputerimageautomatically.(COMPUTER)PresstheAUTOADJ.buttontooptimizeacomputerimageautomatically.Thisadjustmentmaybenecessarywhenyouconnectyourcomputerforthefirsttime.
[Poor picture]
[Normal picture]
NOTE:Somesignalsmaytaketimetodisplayormaynotbedisplayedcorrectly.• IftheAutoAdjustoperationcannotoptimizethecomputersignal,trytoadjust[HORIZONTAL],[VERTICAL],[CLOCK],and[PHASE]manually.(→page89,90)
❽ Turning Up or Down VolumeSoundlevelfromthespeakercanbeadjusted.
TIP:Whennomenusappear,the◀and▶buttonsontheprojectorcabinetworkasavolumecontrol.
NOTE:• Volumecontrolisnotavailablewiththe◀or▶buttonwhenanimageisenlargedbyusingtheD-ZOOM(+)buttonorwhenthemenuisdisplayed.
• Volume control is not availablewith the◀ or▶ buttonwhenVIEWER isused.
TIP:The[BEEP]soundvolumecannotbeadjusted.Toturnoffthe[BEEP]sound,fromthemenu,select[SETUP]→[OPTIONS(1)]→[BEEP]→[OFF].
Increasevolume
Decrease volume
29
2. Projecting an Image (Basic Operation)
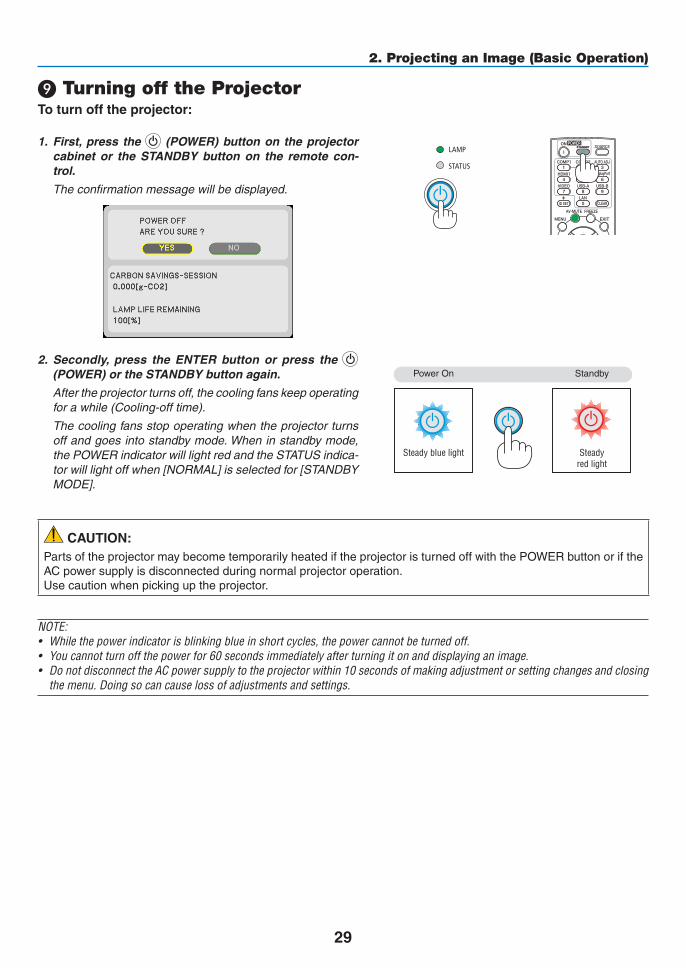
❾ Turning off the ProjectorToturnofftheprojector:
1. First, press the (POWER) button on the projector cabinet or the STANDBY button on the remote con-trol.
The confirmation message will be displayed.
2. Secondly, press the ENTER button or press the (POWER)ortheSTANDBYbuttonagain.
Aftertheprojectorturnsoff,thecoolingfanskeepoperatingfor a while (Cooling-off time).
The cooling fans stop operating when the projector turns off and goes into standby mode. When in standby mode, the POWER indicator will light red and the STATUS indica-tor will light off when [NORMAL] is selected for [STANDBY MODE].
PowerOn
Steady blue light
Standby
Steady red light
CAUTION:PartsoftheprojectormaybecometemporarilyheatediftheprojectoristurnedoffwiththePOWERbuttonoriftheACpowersupplyisdisconnectedduringnormalprojectoroperation.Usecautionwhenpickinguptheprojector.
NOTE:• Whilethepowerindicatorisblinkingblueinshortcycles,thepowercannotbeturnedoff.• Youcannotturnoffthepowerfor60secondsimmediatelyafterturningitonanddisplayinganimage.• DonotdisconnecttheACpowersupplytotheprojectorwithin10secondsofmakingadjustmentorsettingchangesandclosingthemenu.Doingsocancauselossofadjustmentsandsettings.
30
2. Projecting an Image (Basic Operation)
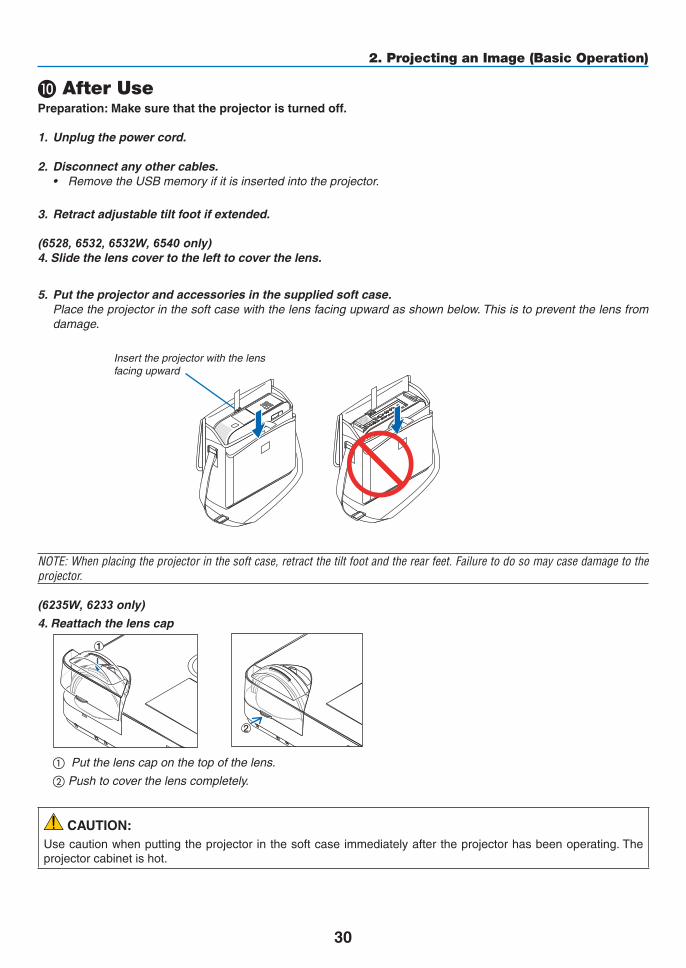
❿ After UsePreparation:Makesurethattheprojectoristurnedoff.
1. Unplugthepowercord.
2. Disconnect any other cables.• RemovetheUSBmemoryifitisinsertedintotheprojector.
3. Retractadjustabletiltfootifextended.
(6528, 6532, 6532W, 6540only)4.Slidethelenscovertothelefttocoverthelens.
5. Puttheprojectorandaccessoriesinthesuppliedsoftcase. Place the projector in the soft case with the lens facing upward as shown below. This is to prevent the lens from
damage.
Inserttheprojectorwiththelensfacing upward
NOTE:Whenplacingtheprojectorinthesoftcase,retractthetiltfootandtherearfeet.Failuretodosomaycasedamagetotheprojector.
(6235W, 6233only)
4. Reattach the lens cap
1
2
① Put the lens cap on the top of the lens.
② Push to cover the lens completely.
CAUTION:Usecautionwhenputtingtheprojectorinthesoftcaseimmediatelyaftertheprojectorhasbeenoperating.Theprojectorcabinetishot.
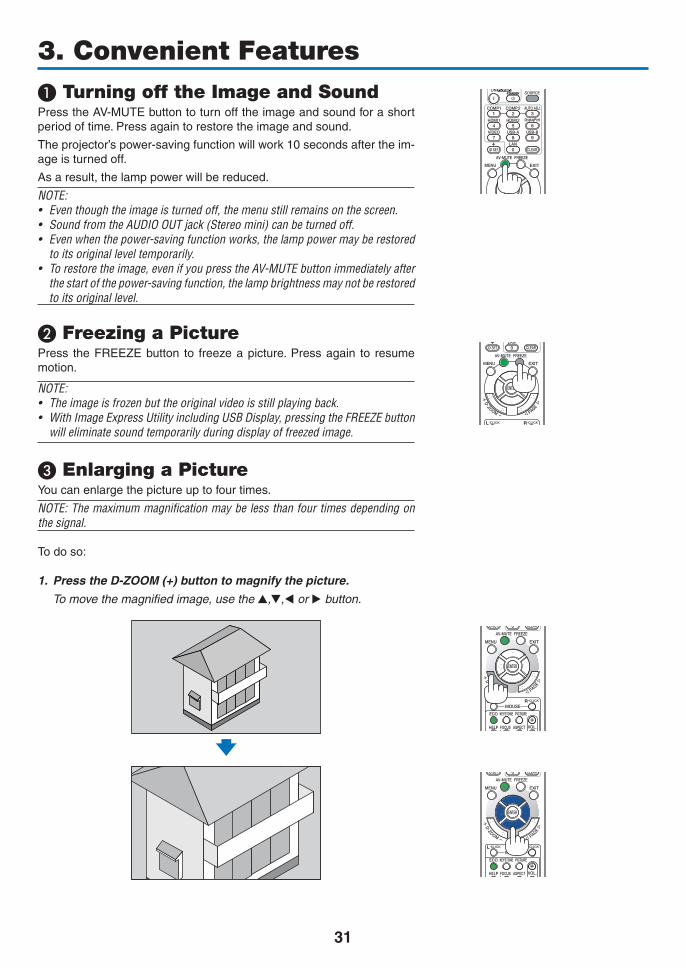
31
❶ Turning off the Image and SoundPresstheAV-MUTEbuttontoturnofftheimageandsoundforashortperiodoftime.Pressagaintorestoretheimageandsound.
Theprojector’spower-savingfunctionwillwork10secondsaftertheim-ageisturnedoff.
Asaresult,thelamppowerwillbereduced.
NOTE:• Eventhoughtheimageisturnedoff,themenustillremainsonthescreen.• SoundfromtheAUDIOOUTjack(Stereomini)canbeturnedoff.• Evenwhenthepower-savingfunctionworks,thelamppowermayberestoredtoitsoriginalleveltemporarily.
• Torestoretheimage,evenifyoupresstheAV-MUTEbuttonimmediatelyafterthestartofthepower-savingfunction,thelampbrightnessmaynotberestoredtoitsoriginallevel.
❷ Freezing a PicturePress theFREEZEbutton to freezeapicture.Pressagain to resumemotion.
NOTE:• Theimageisfrozenbuttheoriginalvideoisstillplayingback.• WithImageExpressUtilityincludingUSBDisplay,pressingtheFREEZEbuttonwilleliminatesoundtemporarilyduringdisplayoffreezedimage.
❸ Enlarging a PictureYoucanenlargethepictureuptofourtimes.
NOTE:Themaximummagnificationmaybelessthanfourtimesdependingonthesignal.
Todoso:
1. PresstheD-ZOOM(+)buttontomagnifythepicture.
To move the magnified image, use the ▲,▼,◀ or ▶ button.
3. Convenient Features

32
3. Convenient Features
2. Press the ▲▼◀▶ button. The area of the magnified image will be moved
3. Press the D-ZOOM (−) button.
Each time the D-ZOOM (−) button is pressed, the image is reduced.
NOTE:• Theimagewillbeenlargedorreducedatthecenterofthescreen.• Displayingthemenuwillcancelthecurrentmagnification.
33
3. Convenient Features
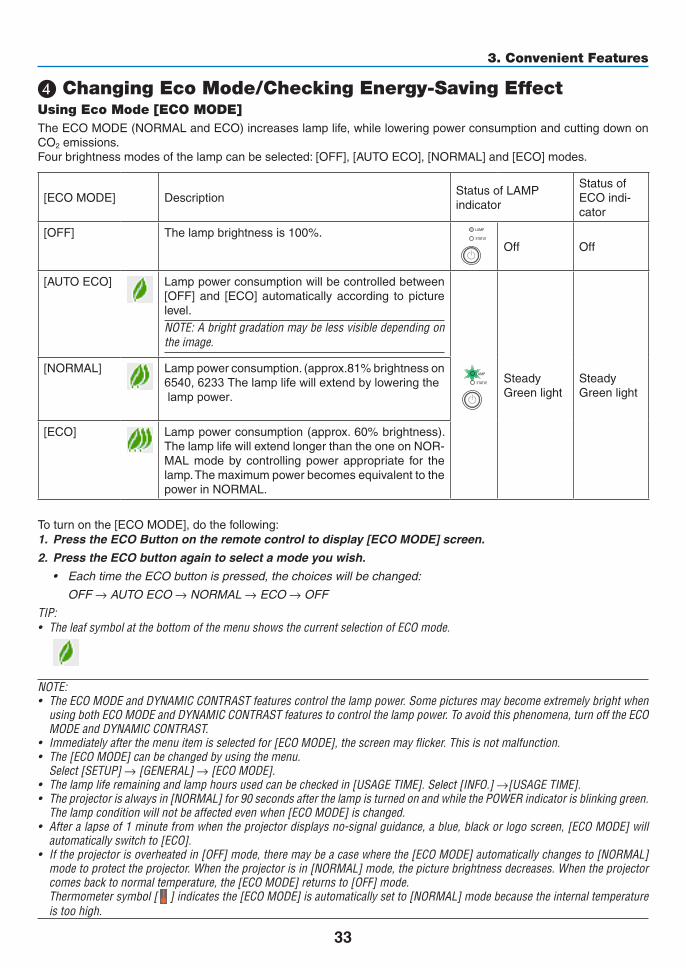
❹ Changing Eco Mode/Checking Energy-Saving Effect Using Eco Mode [ECO MODE]TheECOMODE(NORMALandECO)increaseslamplife,whileloweringpowerconsumptionandcuttingdownonCO2 emissions. Fourbrightnessmodesofthelampcanbeselected:[OFF],[AUTOECO],[NORMAL]and[ECO]modes.
[ECOMODE] DescriptionStatusofLAMPindicator
StatusofECOindi-cator
[OFF] Thelampbrightnessis100%.Off Off
[AUTOECO] Lamppowerconsumptionwillbecontrolledbetween[OFF]and [ECO]automaticallyaccording topicturelevel.NOTE:Abrightgradationmaybelessvisibledependingontheimage.
SteadyGreenlight
SteadyGreenlight
[NORMAL] Lamppowerconsumption.(approx.81%brightnesson6540, 6233The lamp life will extend by lowering thelamp power.
[ECO] Lamppowerconsumption(approx.60%brightness).ThelamplifewillextendlongerthantheoneonNOR-MAL mode by controlling power appropriate for thelamp.ThemaximumpowerbecomesequivalenttothepowerinNORMAL.
Toturnonthe[ECOMODE],dothefollowing:1. PresstheECOButtonontheremotecontroltodisplay[ECOMODE]screen.
2. PresstheECObuttonagaintoselectamodeyouwish.
• EachtimetheECObuttonispressed,thechoiceswillbechanged:
OFF → AUTO ECO → NORMAL → ECO → OFF
TIP:• TheleafsymbolatthebottomofthemenushowsthecurrentselectionofECOmode.
NOTE:• TheECOMODEandDYNAMICCONTRASTfeaturescontrolthelamppower.SomepicturesmaybecomeextremelybrightwhenusingbothECOMODEandDYNAMICCONTRASTfeaturestocontrolthelamppower.Toavoidthisphenomena,turnofftheECOMODEandDYNAMICCONTRAST.
• Immediatelyafterthemenuitemisselectedfor[ECOMODE],thescreenmayflicker.Thisisnotmalfunction.• The[ECOMODE]canbechangedbyusingthemenu. Select[SETUP]→[GENERAL]→[ECOMODE].• Thelampliferemainingandlamphoursusedcanbecheckedin[USAGETIME].Select[INFO.]→[USAGETIME].• Theprojectorisalwaysin[NORMAL]for90secondsafterthelampisturnedonandwhilethePOWERindicatorisblinkinggreen.Thelampconditionwillnotbeaffectedevenwhen[ECOMODE]ischanged.
• Afteralapseof1minutefromwhentheprojectordisplaysno-signalguidance,ablue,blackorlogoscreen,[ECOMODE]willautomaticallyswitchto[ECO].
• Iftheprojectorisoverheatedin[OFF]mode,theremaybeacasewherethe[ECOMODE]automaticallychangesto[NORMAL]modetoprotecttheprojector.Whentheprojectorisin[NORMAL]mode,thepicturebrightnessdecreases.Whentheprojectorcomesbacktonormaltemperature,the[ECOMODE]returnsto[OFF]mode.
Thermometersymbol[ ]indicatesthe[ECOMODE]isautomaticallysetto[NORMAL]modebecausetheinternaltemperatureistoohigh.

34
3. Convenient Features
Checking Energy-Saving Effect [CARBON METER]Thisfeaturewillshowenergy-savingeffectintermsofCO2emissionreduction(kg)whentheprojector’s[ECOMODE]issetto[AUTOECO],[NORMAL],or[ECO].Thisfeatureiscalledas[CARBONMETER].
Therearetwomessages:[TOTALCARBONSAVINGS]and[CARBONSAVINGS-SESSION].The[TOTALCARBONSAVINGS]messageshowsthetotalamountofCO2emissionreductionfromthetimeofshipmentuptonow.Youcanchecktheinformationon[USAGETIME]from[INFO.]ofthemenu.(→page111)
The[CARBONSAVINGS-SESSION]messageshowstheamountofCO2emissionreductionbetweenthetimeofchangingtoECOMODEimmediatelyafterthetimeofpower-onandthetimeofpower-off.The[CARBONSAVINGS-SESSION]messagewillbedisplayedinthe[POWEROFF/AREYOUSURE?]messageatthetimeofpower-off.
TIP:• TheformulaasshownbelowisusedtocalculatetheamountofCO2emissionreduction. AmountofCO2emissionreduction=(PowerconsumptioninOFFforECOMODE−PowerconsumptioninAUTOECO/NORMAL/ECOforECOMODE)×CO2conversionfactor.*WhentheimageisturnedoffwiththeAV-MUTEbuttonorwiththelenscoverclosed,theamountofCO2emmissionreductionwillalsoincrease.
*CalculationforamountofCO2emissionreductionisbasedonanOECDpublication“CO2EmissionsfromFuelCombustion,2008Edition”.
• The[TOTALCARBONSAVINGS]iscalculatedbasedonsavingsrecordedin15minutesintervals.• Thisformulawillnotapplytothepowerconsumptionwhichisnotaffectedbywhether[ECOMODE]isturnedonoroff.

35
3. Convenient Features
❺ Preventing the Unauthorized Use of the Projector [SECURITY]AkeywordcanbesetforyourprojectorusingtheMenutoavoidoperationbyanunauthorizeduser.Whenakeywordisset,turningontheprojectorwilldisplaytheKeywordinputscreen.Unlessthecorrectkeywordisentered,thepro-jectorcannotprojectanimage.•The[SECURITY]settingcannotbecancelledbyusingthe[RESET]ofthemenu.
ToenabletheSecurityfunction:
1. Press the MENU button.
The menu will be displayed.
2. Press the ▶buttontwicetoselect[SETUP]andpressthe▼buttonortheENTERbuttontoselect[GEN-ERAL].
3. Press the ▶buttontoselect[INSTALLATION].
4. Press the ▼buttonthreetimestoselect[SECURITY]andpresstheENTERbutton.
The OFF/ON menu will be displayed.
5. Press the ▼buttontoselect[ON]andpresstheENTERbutton.
The[SECURITYKEYWORD]screenwillbedisplayed.
6. Typeinacombinationofthefour▲▼◀▶buttonsandpresstheENTERbutton.
NOTE:Akeywordmustbe4to10digitsinlength.
The[CONFIRMKEYWORD]screenwillbedisplayed.

36
3. Convenient Features
7. Typeinthesamecombinationof▲▼◀▶buttonsandpresstheENTERbutton.
The confirmation screen will be displayed.
8. Select[YES]andpresstheENTERbutton.
TheSECURITYfunctionhasbeenenabled.
Toturnontheprojectorwhen[SECURITY]isenabled:
1. Press the POWER button.
Theprojectorwillbeturnedonanddisplayamessagetotheeffectthattheprojectorislocked.
2. Press the MENU button.
3. TypeinthecorrectkeywordandpresstheENTERbutton.Theprojectorwilldisplayanimage.
NOTE:Thesecuritydisablemodeismaintaineduntilthemainpoweristurnedofforunpluggingthepowercord.

37
3. Convenient Features
TodisabletheSECURITYfunction:
1. Press the MENU button.
The menu will be displayed.
2.Select[SETUP]→[INSTALLATION]→[SECURITY]andpresstheENTERbutton.
The OFF/ON menu will be displayed.
3. Select[OFF]andpresstheENTERbutton.
TheSECURITYKEYWORDscreenwillbedisplayed.
4. TypeinyourkeywordandpresstheENTERbutton.
Whenthecorrectkeywordisentered,theSECURITYfunctionwillbedisabled.
NOTE:Ifyouforgetyourkeyword,contactyourdealer.Yourdealerwillprovideyouwithyourkeywordinexchangeforyourrequestcode.YourrequestcodeisdisplayedintheKeywordConfirmationscreen.Inthisexample[NB52-YGK8-2VD6-K585-JNE6-EYA8]isarequestcode.
38
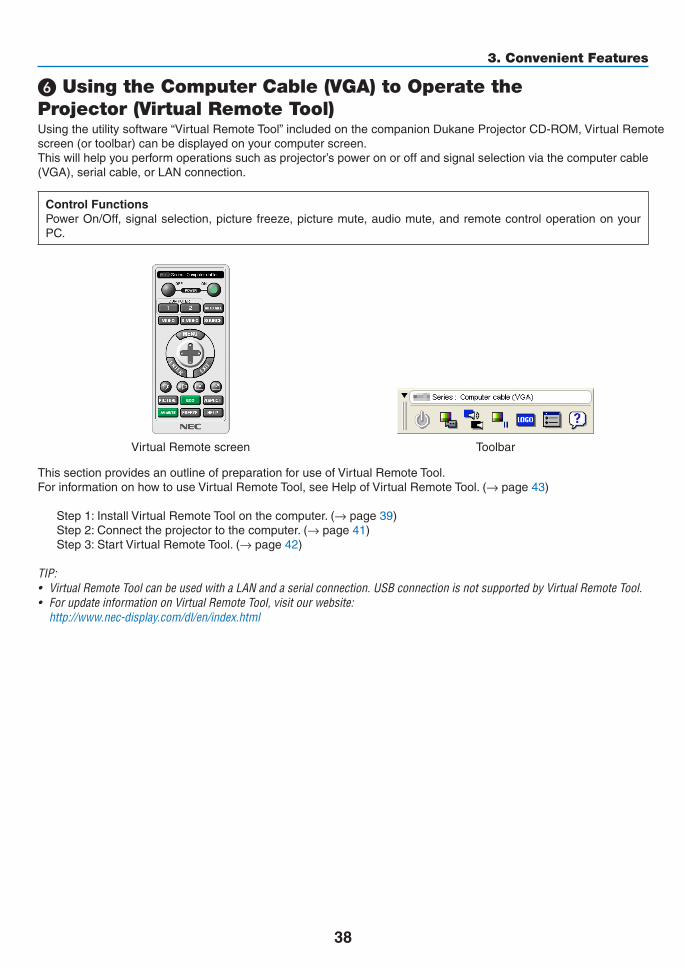
3. Convenient Features
❻ Using the Computer Cable (VGA) to Operate the Projector (Virtual Remote Tool)Usingtheutilitysoftware“VirtualRemoteTool”includedonthecompanionDukaneProjectorCD-ROM,VirtualRemotescreen(ortoolbar)canbedisplayedonyourcomputerscreen.Thiswillhelpyouperformoperationssuchasprojector’spoweronoroffandsignalselectionviathecomputercable(VGA),serialcable,orLANconnection.
Control FunctionsPowerOn/Off,signalselection,picturefreeze,picturemute,audiomute,andremotecontroloperationonyourPC.
VirtualRemotescreen Toolbar
ThissectionprovidesanoutlineofpreparationforuseofVirtualRemoteTool.ForinformationonhowtouseVirtualRemoteTool,seeHelpofVirtualRemoteTool.(→page43)
Step1:InstallVirtualRemoteToolonthecomputer.(→page39)Step2:Connecttheprojectortothecomputer.(→page41)Step3:StartVirtualRemoteTool.(→page42)
TIP:• VirtualRemoteToolcanbeusedwithaLANandaserialconnection.USBconnectionisnotsupportedbyVirtualRemoteTool.• ForupdateinformationonVirtualRemoteTool,visitourwebsite: http://www.nec-display.com/dl/en/index.html

39
3. Convenient Features
NOTE:• When[COMPUTER]isselectedfromyoursourceselection,theVirtualRemotescreenorthetoolbarwillbedisplayedaswellasyourcomputerscreen.
• Usethesuppliedcomputercable(VGA)toconnecttheCOMPUTERINconnectordirectlywiththemonitoroutputconnectorofthecomputertouseVirtualRemoteTool.
Usingaswitcherorothercablesthanthesuppliedcomputercable(VGA)maycausefailureinsignalcommunication. VGAcableconnector: PinNos.12and15arerequiredforDDC/CI.• VirtualRemoteToolmaynotworkdependingonyourcomputer’sspecificationsandversionofgraphicadaptersordrivers.• TorunVirtualRemoteToolonWindows8andWindowsXP,“Microsoft.NETFrameworkVersion2.0”isrequired.TheMicrosoft.NETFrameworkVersion2.0,3.0or3.5isavailablefromMicrosoft’swebpage.Downloadandinstalltheitonyourcomputer.
TIP:• Theprojector’sCOMPUTERINconnectorsupportsDDC/CI(DisplayDataChannelCommandInterface).DDC/CIisastandardinterfaceforbidirectionalcommunicationbetweendisplay/projectorandcomputer.
Step 1: Install Virtual Remote Tool on the computer
NOTE:• ToinstallVirtualRemoteTool,theWindowsuseraccountmusthave“Administrator”privilege(Windows8,Windows7,WindowsVistaandWindowsXP).
• ExitallrunningprogramsbeforeinstallingVirtualRemoteTool.Ifanotherprogramisrunning,theinstallationmaynotbecom-pleted.
1 InserttheaccompanyingDukaneProjectorCD-ROMintoyourCD-ROMdrive.
The menu window will be displayed.

40
3. Convenient Features
TIP:Ifthemenuwindowwillnotbedisplayed,trythefollowingprocedure.ForWindows71. Click“start”onWindows.
2. Click“AllPrograms”→“Accessories”→“Run”.
3. Type your CD-ROM drive name (example:“Q:\”) and“LAUNCHER.EXE” in“Name”. (example: Q:\LAUNCHER.EXE)
4. Click“OK”.
The menu window will be displayed.
2 Click“InstallVirtualRemoteTool”onthemenuwindow.
The installation will start.
When the installation is complete, the Welcome window will be displayed.
3 Click“Next”.
“ENDUSERLICENSEAGREEMENT”screenwillbedisplayed.
Read“ENDUSERLICENSEAGREEMENT”carefully.
4 Ifyouagree,click“Iacceptthetermsinthelicenseagreement”andthenclick“Next”.
• Followtheinstructionsontheinstallerscreenstocompletetheinstallation.
• Whentheinstallationiscomplete,youwillreturntothemenuwindow.

41
3. Convenient Features
TIP:
UninstallingVirtualRemoteToolPreparation:ExitVirtualRemoteToolbeforeuninstalling.TouninstallVirtualRemoteTool,theWindowsuseraccountmusthave“Administrator”privilege(Windows8,Windows7andWindowsVista)or“ComputerAdministrator”privilege(WindowsXP).
•ForWindows7/WindowsVista1 Click“Start”andthen“ControlPanel”.
The Control Panel window will be displayed.
2 Click“Uninstallaprogram”under“Programs”
The“ProgramsandFeatures”windowwillbedisplayed.
3 SelectVirtualRemoteToolandclickit.
4 Click“Uninstall/Change”or“Uninstall”.
•Whenthe“UserAccountControl”windowsisdisplayed,click“Continue”.
Follow the instructions on the screens to complete the uninstallation.
•ForWindowsXP1 Click“Start”andthen“ControlPanel”.
The Control Panel window will be displayed.
2 Double-click“Add/RemovePrograms”.
The Add / Remove Programs window will be displayed.
3 ClickVirtualRemoteToolfromthelistandthenclick“Remove”.
Follow the instructions on the screens to complete the uninstallation.
Step 2: Connect the projector to the computer1 Usethesuppliedcomputercable(VGA)toconnecttheCOMPUTERINconnectoroftheprojectordirectly
withthemonitoroutputconnectorofthecomputer.
2 ConnectthesuppliedpowercordtotheACINoftheprojectorandthewalloutlet.
The projector is in the standby condition.
AC IN
COMPUTER IN
Supplied computer cable (VGA)
To wall outletPower cord (supplied)
TIP:• WhenVirtualRemoteToolstartsforthefirsttime,“EasySetup”windowwillbedisplayedtonavigateyourconnections.

42
3. Convenient Features
Step 3: Start Virtual Remote Tool
Start using the shortcut icon• Double-clicktheshortcuticon ontheWindowsDesktop.
Start from the Start menu• Click[Start]→[AllPrograms]or[Programs]→[NECProjectorUserSupportware]→[VirtualRemoteTool]
→[VirtualRemoteTool].
WhenVirtualRemoteToolstartsforthefirsttime,“EasySetup”windowwillbedisplayed.
Follow the instructions on the screens
When“EasySetup”iscompleted,theVirtualRemoteToolscreenwillbedisplayed.
NOTE:• When[NORMAL]isselectedfor[STANDBYMODE]fromthemenu,theprojectorcannotbeturnedonviathecomputercable(VGA)ornetwork(wiredLAN/wirelessLAN)connection.
TIP:• TheVirtualRemoteToolscreen(orToolbar)canbedisplayedwithoutdisplaying“EasySetup”window. Todoso,clicktoplaceacheckmarkfor“ DonotuseEasySetupnexttime”onthescreenatStep6in“EasySetup”.

43
3. Convenient Features
ExitingVirtualRemoteTool1 ClicktheVirtualRemoteToolicon ontheTaskbar.
The pop-up menu will be displayed.
2 Click“Exit”.
The Virtual Remote Tool will be closed.
ViewingthehelpfileofVirtualRemoteTool•Displayingthehelpfileusingthetaskbar1 ClicktheVirtualRemoteToolicon onthetaskbarwhenVirtualRemoteToolisrunning.
The pop-up menu will be displayed.
2. Click“Help”.
The Help screen will be displayed.
•DisplayingthehelpfileusingtheStartMenu.1. Click“Start”→“Allprograms”or“Programs”→“NECProjectorUserSupportware”→“VirtualRemote
Tool”→andthen“VirtualRemoteToolHelp”inthisorder.
The Help screen will be displayed.

44
3. Convenient Features
❼ Operating Your Computer’s Mouse Functions from the Projector’s Remote Control via the USB Cable (Remote Mouse Function)Thebuilt-inremotemousefunctionenablesyoutooperateyourcomputer’smousefunctionsfromthesuppliedremotecontrolwhentheprojectorisconnectedtoacomputerviaacommerciallyavailableUSBcable(compatiblewithUSB2.0specifications).TheRemoteMousefunctionworksfortheCOMPUTERinputwhilethecomputerscreenisdisplayed.TheRemoteMousefunctionwillnotworkwhileyoufreezeormagnifyanimage.- UsingtheUSBcabletoconnecttheprojectorandthecomputerwillalsostartUSBDisplayfunction.
AC IN
USB-B
USB cable (not supplied)
To wall outlet
NOTE:• AUSBcablemustsupporttheUSB2.0Specifications.• Themousefunctioncanbeusedwiththefollowingoperatingsystems: Windows7,WindowsXP,orWindowsVista• InSP2orolderversionofWindowsXP,ifthemousecursorwillnotmovecorrectly,dothefollowing: CleartheEnhancepointerprecisioncheckboxunderneaththemousespeedsliderintheMousePropertiesdialogbox[PointerOptionstab].
• Waitatleast5secondsafterdisconnectingtheUSBcablebeforereconnectingitandviceversa.ThecomputermaynotidentifytheUSBcableifitisrepeatedlyconnectedanddisconnectedinrapidintervals.
• ConnecttheprojectortothecomputerwithaUSBcableafterstartingthecomputer.Failuretodosomayfailtostartthecom-puter.
Operatingyourcomputer’smousefromtheremotecontrolYoucanoperateyourcomputer’smousefromtheremotecontrol.
PAGE ▽/△ Button ���������������������������scrolls the viewing area of the window or to move to the previous or next slide in PowerPoint on your computer�
▲▼◀▶ Buttons ������������������������������moves the mouse cursor on your computer�MOUSE L-CLICK/ENTER Button ������works as the mouse left button�MOUSE R-CLICK Button ������������������works as the mouse right button�
NOTE:• Whenyouoperatethecomputerusingthe▲▼◀or▶buttonwiththemenudisplayed,boththemenuandthemousepointerwillbeaffected.Closethemenuandperformthemouseoperation.
TIP:YoucanchangethePointerspeedontheMousePropertiesdialogboxontheWindows.Formoreinformation,seetheuserdocumentationoronlinehelpsuppliedwithyourcomputer.

45
3. Convenient Features
❽ Projecting Your Computer’s Screen Image from the Projector via the USB Cable (USB Display)UsingacommerciallyavailableUSBcable(compatiblewithUSB2.0specifications)toconnectthecomputerwiththeprojectorallowsyoutosendyourcomputerscreenimagetotheprojectorfordisplaying.PowerOn/Offandsourceselectionoftheprojectorcanbedonefromyourcomputerwithoutconnectingacomputercable(VGA).
NOTE:• TomakeUSBDISPLAYavailableonWindows8,Windows7,WindowsVistaandWindowsXP,theWindowsuseraccountmusthave“Administrator”privilege.
• USBDisplayusesfunctionsofImageExpressUtilityLitecontainedonNECProjectorCD-ROM(→page58). StartingUSBDisplay,however,willnotinstallImageExpressUtilityLiteonyourcomputer.ThisisbecauseUSBDisplayexecutestheprojector’sprogramonly.
• WhenImageExpressUtilityLiteisinstalledtobothyourcomputerandtheprojector,theoneinstalledtoyourcomputeralwaysstartevenifitisolderversionthantheoneinstalledtotheprojector.
Ifaudiotransfercapabilityandotherfeatureswillnotwork,tryuninstallingImageExpressUtilityLitefromyourcomputer.Thiswillallowyoutouseallthefeatures.
• USBDisplaywillnotworkin[NORMAL]of[STANDBYMODE].TouseUSBDisplay,select[NETWORKSTANDBY]for[STANDBYMODE].(→page103)
• WhenUSBDisplayisused,thesoundisoutputfromtheCOMPUTERAUDIOINMiniJack(StereoMini).Imageandsoundmaynotbesynchronized.
1. Start the computer.
2. Connecttheprojector’spowercordtothewalloutletandputtheprojectorintostandbycondition.
• Opentheprojector’slenscoverorlenscap.
3. UsetheUSBcabletoconnectthecomputerwiththeprojector.
AC IN
USB-B
USB cable (not supplied)
To wall outletPower cord (supplied)
Themessage“Theprojectorisinstandbymode.Connectit?”willbedisplayedonthecomputerscreen.
• ThecontrolwindowofImageExpressUtilityLitewillbedisplayedonthetopofthescreen.
NOTE:Dependingon the computer setting, the “AutoPlay”windowmaybedisplayedwhen thecomputerdetects theconnection to theprojector. If thishappens,click the“StartUSBDisplay”window.
4. Click“Yes”.
Theprojectorwillturnonandthemessage“Theprojectorisgettingready.Pleasewait.”willbedisplayedonthecomputer screen. This message will disappear in a few seconds.
DukaneThe

46
3. Convenient Features
5. Operatethecontrolwindow.
(1) (Source) ����� Selects an input source of the projector� (2) (Picture) ���� Turns on or off AV-MUTE (Picture mute), and turns on or off FREEZE (Freeze a picture), and Geometric
Correction Tool (GCT) functions�(3) (Sound) ����� Turns on or off AV-MUTE (Sound mute), play the sound and turns up or down the volume�(4) (Others) ����� Uses “Update”, “HTTP Server”*, “Settings” and “Information”�
* The HTTP Server cannot be selected when a USB cable is connected�
(5) (Exit) ���������� Exit Image Express Utility Lite� You can also turn off the projector at the same time�(6) (Help) ����������� Displays the help of Image Express Utility Lite�
(1) (2) (3) (4) (5)(6)

47
3. Convenient Features
❾ Controlling the Projector by Using an HTTP BrowserOverviewTheHTTPServerfunctionprovidessettingsandoperationsfor:1. Settingforwired/wirelessnetwork(NETWORKSETTINGS)
To use wireless LAN connection, the optional USB Wireless LAN Unit is required. (→ page 128)
To use wired/wireless LAN connection, connect the projector to the computer with a commercially available LAN cable. (→ page 127)
2. SettingAlertMail(ALERTMAIL)
Whentheprojectorisconnectedtoawired/wirelessnetwork,lampreplacetimeorerrormessageswillbesentviae-mail.
3. Operatingtheprojector
Power on/off, selecting input, volume control and picture adjustments are possible.
4. SettingPJLinkPASSWORDandAMXBEACON
5. AllowingImageExpressUtilityLitetobedownloadedandcopiedtoyourUSBmemory
Thisdeviceuses“JavaScript”and“Cookies”andthebrowsershouldbesettoacceptthesefunctions.Thesettingmethodwillvarydependingontheversionofbrowser.Pleaserefertothehelpfilesandtheotherinformationprovidedinyoursoftware.
TwowaysofaccesstotheHTTPserverfunctionareavailable:• StarttheWebbrowseronthecomputerviathenetworkconnectedtotheprojectorandenterthefollowing
URL :
http://<theprojector’sIPaddress>/index.html
• UseImageExpressUtilityLitecontainedonthesuppliedDukaneProjectorCD-ROM.
TIP:ThefactorysettingIPaddressis[DHCPON].
NOTE:• Tousetheprojectorinanetwork,consultwithyournetworkadministratoraboutnetworksettings.• Thedisplay’sorbutton’sresponsecanbesloweddownoroperationmaynotbeaccepteddependingthesettingsofyournet-work.
Shouldthishappen,consultyournetworkadministrator.Theprojectormaynotrespondifitsbuttonsarerepeatedlypressedinrapidintervals.Shouldthishappen,waitamomentandrepeat.Ifyoustillcan’tgetanyresponse,turnoffandbackontheprojec-tor.
• IfthePROJECTORNETWORKSETTINGSscreendoesnotappearinthewebbrowser,presstheCtrl+F5keystorefreshyourwebbrowser(orclearthecache).
Preparation before UseConnecttheprojectortoacommerciallyavailableLANcablebeforeengaginginbrowseroperations.(→page127)Operationwithabrowserthatusesaproxyservermaynotbepossibledependingonthetypeofproxyserverandthesettingmethod.Althoughthetypeofproxyserverwillbeafactor,itispossiblethatitemsthathaveactuallybeensetwillnotbedisplayeddependingontheeffectivenessofthecache,andthecontentssetfromthebrowsermaynotbereflectedinoperation.Itisrecommendedthataproxyservernotbeusedunlessitisunavoidable.

48
3. Convenient Features
Handling of the Address for Operation via a BrowserRegardingtheactualaddressthatisenteredfortheaddressorenteredtotheURLcolumnwhenoperationofthepro-jectorisviaabrowser,thehostnamecanbeusedasitiswhenthehostnamecorrespondingtotheIPaddressoftheprojectorhasbeenregisteredtothedomainnameserverbyanetworkadministrator,orthehostnamecorrespondingtotheIPaddressoftheprojectorhasbeensetinthe“HOSTS”fileofthecomputerbeingused.
Example1:Whenthehostnameoftheprojectorhasbeensetto“pj.nec.co.jp”,accessisgainedtothenetworksettingbyspecifying http://pj.nec.co.jp/index.html fortheaddressortheentrycolumnoftheURL.
Example2:WhentheIPaddressoftheprojectoris“192.168.73.1”,accessisgainedtothenetworksettingbyspecifying http://192.168.73.1/index.html fortheaddressortheentrycolumnoftheURL.
PROJECTOR ADJUSTMENT
POWER:Thiscontrolsthepoweroftheprojector.ON ������������������������� Power is switched on�OFF ������������������������ Power is switched off�
VOLUME:Thiscontrolsthevolumeoftheprojector.▲ ��������������������������� Increases the volume adjustment value�▼ ��������������������������� Decreases the volume adjustment value�
AV-MUTE:Thiscontrolsthemutefunctionoftheprojector.PICTURE ON ���������� Mutes the video�PICTURE OFF ��������� Cancels the video muting�SOUND ON ������������ Mutes the audio�SOUND OFF ����������� Cancels the audio muting�ALL ON ������������������ Mutes each of the video, and audio functions�ALL OFF ����������������� Cancels the muting of each of the video, and audio functions�

49
3. Convenient Features
PICTURE:Controlsthevideoadjustmentoftheprojector.BRIGHTNESS ▲ ���� Increases the brightness adjustment value�BRIGHTNESS ▼ ���� Decreases the brightness adjustment value�CONTRAST ▲ �������� Increases the contrast adjustment value�CONTRAST ▼ �������� Decreases the contrast adjustment value�COLOR ▲ �������������� Increases the color adjustment value�COLOR ▼ �������������� Decreases the color adjustment value�HUE ▲ ������������������� Increases the hue adjustment value�HUE ▼ ������������������� Decreases the hue adjustment value�SHARPNESS ▲ ����� Increases the sharpness adjustment value�SHARPNESS ▼ ����� Decreases the sharpness adjustment value�
• Thefunctionsthatcanbecontrolledwillvarydependingonthesignalbeinginputtotheprojector.(→page88)
SOURCESELECT:Thisswitchestheinputconnectoroftheprojector.COMPUTER ����������� Switches to the COMPUTER IN connector�HDMI 1 ������������������ Switches to the HDMI 1 IN connector�HDMI 2 ������������������ Switches to the HDMI 2 IN connector�VIDEO �������������������� Switches to the VIDEO IN connector�USB-A �������������������� Switches to the data on the USB memory device�LAN ������������������������ Switches to a LAN signal�USB-B �������������������� Switches to the USB-B Port�
PROJECTORSTATUS:Thisdisplaystheconditionoftheprojector.LAMP LIFE REMAINING �����Displays the remaining life of the lamp as a percentage�LAMP HOURS USED �����������Displays how many hours the lamp has been used�ERROR STATUS ������������������Displays the status of errors occurring within the projector�
LOGOFF:Loggingoffyourprojectorandreturningtotheauthenticationscreen(LOGONscreen).

50
3. Convenient Features
NETWORK SETTINGS
•SETTINGS
WIRED or WIRELESS
SETTING SetforwiredLANorforwirelessLAN.
APPLY ApplyyoursettingstowiredLANorwirelessLAN.
DHCPON AutomaticallyassignIPaddress,subnetmask,andgatewaytotheprojectorfromyourDHCPserver.
DHCPOFF SetIPaddress,subnetmask,andgatewaytotheprojectorassignedbyyournetworkadministrator.
IPADDRESS SetyourIPaddressofthenetworkconnectedtotheprojector.
SUBNETMASK Setyoursubnetmasknumberofthenetworkconnectedtotheprojector.
GATEWAY Setthedefaultgatewayofthenetworkconnectedtotheprojector.
AUTODNSON DHCPserverwillautomaticallyassign IPaddressofDNSserverconnected to theprojector.
AUTODNSOFF SetyourIPaddressofDNSserverconnectedtotheprojector.
Setting for WIRED LAN
ENABLE TurnonwiredLANconnection
DISABLE TurnoffwiredLANconnection
SettingforWIRELESSLAN(withtheoptionalUSBWirelessLANUnitequipped)
EASYCONNECTION ExecuteawirelessLANusingEASYCONNECTION.
SIMPLEACCESSPOINT Settheprojectorforsimpleaccesspoint.
CHANNEL Selectachannel.Availablechannelsvarydependingonthecountryandregion.Whenyouselect[INFRASTRUCTURE],makesurethattheprojectorandyouraccesspointareonthesamechannel;whenyouselect[ADHOC],makesurethattheprojectorandyourcomputerareonthesamechannel.
PROFILE1/PROFILE2 TwosettingscanbesetforwirelessLANconnection.SelectPROFILE1orPROFILE2.
SSID Enteran identifier (SSID) forwirelessLAN.CommunicationcanbedoneonlywithequipmentwhoseSSIDmatchesSSIDforyourwirelessLAN.
SITESURVEY DisplaysalistofavailableSSIDsforwirelessLANonsite.SelectanSSIDwhichyoucan access.

51
3. Convenient Features
NETWORKTYPE SelectcommunicationmethodwhenusingwirelessLAN.INFRASTRUCTURE:Selectthisoptionwhencommunicatingwithoneormoreequip-mentconnectedtothewirelessLANnetworkviaawirelessaccesspoint.ADHOC:SelectthisoptionwhenusingthewirelessLANtodirectlycommunicatewithacomputerinpeer-to-peermode.
SECURITYTYPE Turnonorofftheencryptionmodeforsecuretransmission.Whenturnontheencryp-tionmode,setWEPkeyorencryptedkey.
DISABLE Willnotturnontheencryptionfeature.Yourcommunicationsmaybemonitoredbysomeone.
WEP64bit Uses64-bitdatalengthforsecuretransmission.
WEP128bit Uses128-bitdatalengthforsecuretransmission.Thisoptionwillincreaseprivacyandsecuritywhencomparedtouseof64-bitdatalengthencryption.
WPA-PSKTKIP/WPA-PSKAES/WPA2-PSKTKIP/WPA2-PSKAES/
TheseoptionsprovidestrongersecuritythanWEP.
NOTE:• TheWEPsettingsmustbethesameascommunicationdevicessuchasPCoraccesspointinyourwirelessnetwork.
• WhenyouuseWEP,yourimagetransmissionspeedwillslowdown.• [WPAPSK-TKIP],[WPAPSK-AES],[WPA2PSK-TKIP]and[WPA2PSK-AES]arenotavailablewhen[ADHOC]isselectedfrom[NETWORKTYPE].
INDEX Selectencryptionkeywhenselecting[WEP64bit]or[WEP128bit] in[SECURITYTYPE].When[WEP64bit]or[WEP128bit]isselectedfor[SECURITYTYPE],theWEPkeyisfixedto“1”andcannotbechanged.
KEY Whenselecting[WEP64bit]or[WEP128bit]in[SECURITYTYPE]:EnterWEPkey.
Select Characters(ASCII) Hexadecimaldigit(HEX)
WEP64bit Upto5characters Upto10characters
WEP128bit Upto13characters Upto26characters
When selecting [WPA PSK-TKIP], [WPA PSK-AES], [WPA2 PSK-TKIP] or [WPA2PSK-AES]:Enterencryptionkey.Keylengthmustbe8orgreaterand63orless.

52
3. Convenient Features
•NAME
PROJECTORNAME Enteranameforyourprojectorso thatyourcomputercan identify theprojector.Aprojectornamemustbe16charactersorless.TIP:Projectornamewillnotbeaffectedevenwhen[RESET]isdonefromthemenu.
HOSTNAME Enterthehostnameofthenetworkconnectedtotheprojector.Ahostnamemustbe15 or less.
DOMAINNAME Enter thedomainnameof thenetworkconnectedtotheprojector.Adomainnamemust be 60 characters or less.
•ALERTMAIL
ALERTMAIL(Englishonly)
Thisoptionwillnotifyyourcomputeroflampreplacetimeorerrormessagesviae-mailwhenusingwirelessorwiredLAN.PlacingacheckmarkwillturnontheAlertMailfeature.ClearingacheckmarkwillturnofftheAlertMailfeature.Sampleofamessagetobesentfromtheprojector:
Thelampisattheendofitsusablelife.Pleasereplacethelamp.ProjectorName:NECProjectorLampHoursUsed:100[H]
SENDER’SADDRESS Entersender’saddress.
SMTPSERVERNAME EntertheSMTPservernametobeconnectedtotheprojector.
RECIPIENT’SADDRESS1,2,3
Enteryourrecipient’saddress.Uptothreeaddressescanbeentered.
TESTMAIL SendatestmailtocheckwhetheryoursettingsarecorrectornotNOTE:• Ifyouexecuteatest,youmaynotreceiveanAlertmail.Shouldthishappen,checkifnetworksettingsarecorrect.
• Ifyouenteredanincorrectaddressinatest,youmaynotreceiveanAlertmail.Shouldthishappen,checkiftheRecipient’sAddressiscorrect.
SAVE Clickthisbuttontoreflecttheabovesettings.
•NETWORKSERVICE
PJLinkPASSWORD SetapasswordforPJLink*.Apasswordmustbe32charactersorless.Donotforgetyourpassword.However,ifyouforgetyourpassword,consultwithyourdealer.
HTTPPASSWORD SetapasswordforHTTPserver.Apasswordmustbe10charactersorless.
AMXBEACON TurnonorofffordetectionfromAMXDeviceDiscoverywhenconnectingtothenetworksupportedbyAMX’sNetLinxcontrolsystem.TIP:WhenusingadevicethatsupportsAMXDeviceDiscovery,allAMXNetLinxcontrolsystemwillrec-ognizethedeviceanddownloadtheappropriateDeviceDiscoveryModulefromanAMXserver.PlacingacheckmarkwillenabledetectingtheprojectorfromAMXDeviceDiscovery.ClearingacheckmarkwilldisabledetectingtheprojectorfromAMXDeviceDiscovery.
ImageExpressUtilityLite Click“DOWNLOAD”todisplaythedownloadpagefromwhichtheEXEfileofImageExpressUtilityLitecanbedownloadedtoyourUSBmemoryconnectedtoyourcom-puter.(→page62)
SAVE Clickthisbuttontoreflecttheabovesettings.
* WhatisPJLink? PJLinkisastandardizationofprotocolusedforcontrollingprojectorsofdifferentmanufacturers.Thisstandardprotocolisestab-
lishedbyJapanBusinessMachineandInformationSystemIndustriesAssociation(JBMIA)in2005. TheprojectorsupportsallthecommandsofPJLinkClass1. SettingofPJLinkwillnotbeaffectedevenwhen[RESET]isdonefromthemenu.
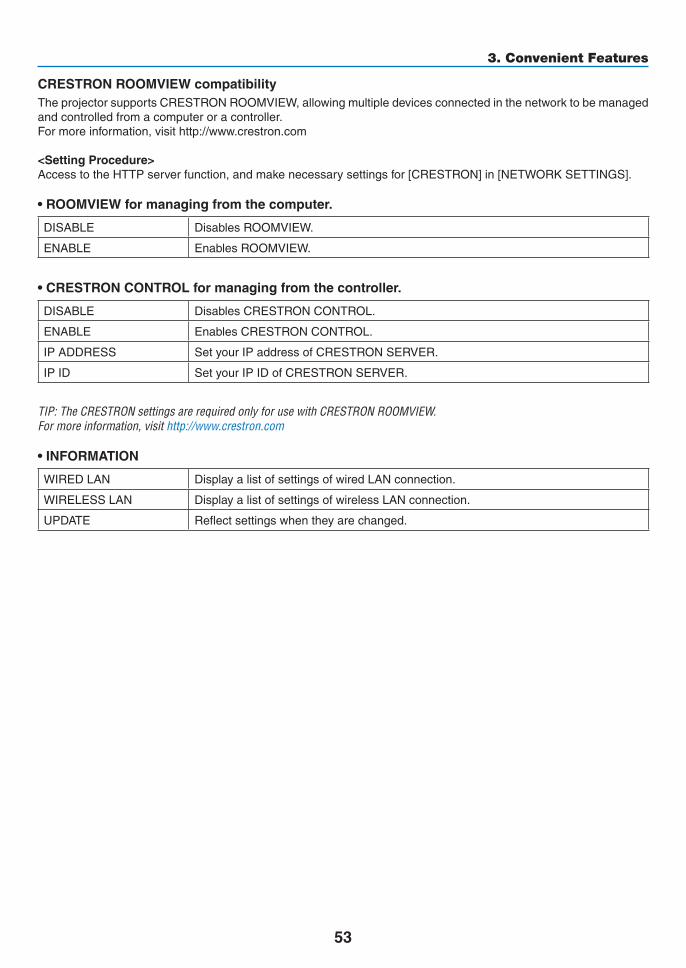
53
3. Convenient Features
CRESTRONROOMVIEWcompatibilityTheprojectorsupportsCRESTRONROOMVIEW,allowingmultipledevicesconnectedinthenetworktobemanagedandcontrolledfromacomputeroracontroller.Formoreinformation,visithttp://www.crestron.com
<Setting Procedure>AccesstotheHTTPserverfunction,andmakenecessarysettingsfor[CRESTRON]in[NETWORKSETTINGS].
•ROOMVIEWformanagingfromthecomputer.
DISABLE DisablesROOMVIEW.
ENABLE EnablesROOMVIEW.
•CRESTRONCONTROLformanagingfromthecontroller.
DISABLE DisablesCRESTRONCONTROL.
ENABLE EnablesCRESTRONCONTROL.
IPADDRESS SetyourIPaddressofCRESTRONSERVER.
IPID SetyourIPIDofCRESTRONSERVER.
TIP:TheCRESTRONsettingsarerequiredonlyforusewithCRESTRONROOMVIEW.Formoreinformation,visithttp://www.crestron.com
•INFORMATION
WIREDLAN DisplayalistofsettingsofwiredLANconnection.
WIRELESSLAN DisplayalistofsettingsofwirelessLANconnection.
UPDATE Reflectsettingswhentheyarechanged.

54
3. Convenient Features
❿ Controlling the Projector over a LAN (PC Control Utility Pro 4/Pro 5)Usingtheutilitysoftware“PCControlUtilityPro4”and“PCControlUtilityPro5”includedonthecompanionProjectorCD-ROM,theprojectorcanbecontrolledfromacomputeroveraLAN.PCControlUtilityPro4isaprogramcompatiblewithWindows.(→thispage)PCControlUtilityPro5isaprogramcompatiblewithMacOS.(→page57)
Control FunctionsPowerOn/Off,signalselection,picturefreeze,picturemute,audiomute,adjusting,errormessagenotification,eventschedule.
ScreenofPCControlUtilityPro4
ThissectionprovidesanoutlineofpreparationforuseofPCControlUtilityPro4/Pro5.ForinformationonhowtousePCControlUtilityPro4/Pro5,seeHelpofPCControlUtilityPro4/Pro5.(→page56, 57)
Step1:InstallPCControlUtilityPro4/Pro5onthecomputer.Step2:ConnecttheprojectortoaLAN.Step3:StartPCControlUtilityPro4/Pro5.
• TorunPCControlUtilityPro4onWindows8andWindowsXP,“Microsoft.NETFrameworkVersion2.0”isrequired.TheMicrosoft.NETFrameworkVersion2.0,3.0or3.5isavailablefromMicrosoft’swebpage.Downloadandinstalltheitonyourcomputer.
TIP:• PCControlUtilityPro4canbeusedwithaserialconnection.
Using on Windows
Step 1: Install PC Control Utility Pro 4 on the computer
NOTE:• Toinstalloruninstall theprogram,theWindowsuseraccountmusthave[Administrator]privilege(Windows8,Windows7,WindowsVistaandWindowsXP)
• Exitallrunningprogramsbeforeinstallation.Ifanotherprogramisrunning,theinstallationmaynotbecompleted.
1 InserttheaccompanyingDukaneProjectorCD-ROMintoyourCD-ROMdrive.
The menu window will be displayed.

55
3. Convenient Features
TIP:Ifthemenuwindowwillnotbedisplayed,trythefollowingprocedure.ForWindows7:1. Click“start”onWindows.
2. Click“AllPrograms”→“Accessories”→“Run”.
3. Type your CD-ROM drive name (example:“Q:\”) and“LAUNCHER.EXE” in“Name”. (example: Q:\LAUNCHER.EXE)
4. Click“OK”.
the menu window will be displayed.
2 Click“PCControlUtilityPro4”onthemenuwindow.
The installation will start.
When the installation is complete, the Welcome window will be displayed.
3 Click“Next”.
“ENDUSERLICENSEAGREEMENT”screenwillbedisplayed.
Read“ENDUSERLICENSEAGREEMENT”carefully.
4 Ifyouagree,click“Iacceptthetermsinthelicenseagreement”andthenclick“Next”.
• Followtheinstructionsontheinstallerscreenstocompletetheinstallation.
• Whentheinstallationiscomplete,youwillreturntothemenuwindow.
TIP:•UninstallingPCControlUtilityPro4TouninstallPCControlUtilityPro4,dothesameproceduresstatedasin“UninstallingVirtualRemoteTool”.Read“VirtualRemoteTool”as“PCControlUtilityPro4”(→page41)
56
3. Convenient Features
Step 2: Connect the projector to a LAN.ConnecttheprojectortotheLANbyfollowingtheinstructionsin“ConnectingtoaWiredLAN”(→page127),“Con-nectingtoaWirelessLAN(Optional:NP02LMseries)”(→page128)and“9.ControllingtheProjectorbyUsinganHTTPBrowser”(→page47)
Step 3: Start PC Control Utility Pro 4Click“Start”→“Allprograms”or“Programs”→“NECProjectorUserSupportware”→“PCControlUtilityPro4”→ “PCControlUtilityPro4”.
NOTE:• FortheSchedulefunctionofthePCControlutilityPro4towork,youmusthaveyourcomputerrunningandnotinstandby/sleepmode.Select“PowerOptions”fromthe“ControlPanel”inWindowsanddisableitsstandby/sleepmodebeforerunningthescheduler.
[Example]ForWindows7:Select“ControlPanel”→“SystemandSecurity”→“PowerOptions”→“Changewhenthecomputersleeps”→“Putthecomputertosleep”→“Never”.NOTE:• When[NORMAL]isselectedfor[STANDBYMODE]fromthemenu,theprojectorcannotbeturnedonviathenetwork(wiredLAN/wirelessLAN)connection.
TIP:
ViewingtheHelpofPCControlUtilityPro4• DisplayingtheHelpfileofPCControlUtilityPro4whileitisrunning.
Click“Help(H)”→“Help(H)…”ofwindowofPCControlUtilityPro4inthisorder.
The pop-up menu will be displayed.
• DisplayingthehelpfileusingtheStartMenu.
Click“Start”→“Allprograms”or“Programs”→“NECProjectorUserSupportware”→“PCControlUtilityPro4”→ “PCControlUtilityPro4Help”.
The Help screen will be displayed.

57
3. Convenient Features
Using on Mac OS
Step 1: Install PC Control Utility Pro 5 on the computer1. InserttheaccompanyingDukaneProjectorCD-ROMinyourMacCD-ROMdrive.
TheCD-ROMiconwillbedisplayedonthedesktop.
2. Double-clicktheCD-ROMicon.
The CD-ROM window will be displayed.
3. Double-clickthe“MacOSX”folder.
4. Double-click“PCControlUtility.mpkg”.
The installer will start.
5. Click“Next”.
“ENDUSERLICENSEAGREEMENT”screenwillbedisplayed.
6. Read“ENDUSERLICENSEAGREEMENT”andclick“Next”.
The confirmation window will be displayed
7. Click“Iacceptthetermsinthelicenseagreement”.
Follow the instructions on the installer screens to complete the installation.
Step 2: Connect the projector to a LANConnecttheprojectortotheLANbyfollowingtheinstructionsin“ConnectingtoaWiredLAN”(→page127),“Con-nectingtoaWirelessLAN(Optional:NP02LMseries)”(→page128)and“❾ControllingtheProjectorbyUsinganHTTPBrowser”(→page47)
Step 3: Start PC Control Utility Pro 51. OpenyourApplicationsfolderinMacOS.
2. Clickthe“PCControlUtilityPro5”folder.
3. Clickthe“PCControlUtilityPro5”icon.
PC Control Utility Pro 5 will start.
NOTE:• FortheSchedulefunctionofthePCControlutilityPro5towork,youmusthaveyourcomputerrunningandnotinsleepmode.Select“EnergySaver”fromthe“SystemPreferences”inMacanddisableitssleepmodebeforerunningthescheduler.
• When[NORMAL]isselectedfor[STANDBYMODE]fromthemenu,theprojectorcannotbeturnedonviathenetwork(wiredLAN/wirelessLAN)connection.
TIP:
ViewingtheHelpofPCControlUtilityPro5•DisplayingtheHelpfileofPCControlUtilityPro5whileitisrunning.• Fromthemenubar,click“Help”→“Help”inthisorder.
The Help screen will be displayed.
•DisplayingtheHelpusingtheDock1. Open“ApplicationFolder”inMacOS.
2. Clickthe“PCControlUtilityPro5”folder.
3. Clickthe“PCControlUtilityPro5Help”icon.
The Help screen will be displayed.

58
3. Convenient Features
⓫ Projecting Your Computer’s Screen Image from the Projector over a LAN (Image Express Utility Lite) UsingImageExpressUtilityLitecontainedonthesuppliedDukaneProjectorCD-ROMallowsyoutosendthecomputer’sscreenimageandsoundtotheprojectoroveraUSBcableorawiredorwirelessLAN.ImageExpressUtilityLiteisaprogramcompatiblewithWindows.ImageExpressUtilityLiteforMacOSisaprogramcompatiblewithMacOS.(→page63)ThissectionwillshowyouanoutlineabouthowtoconnecttheprojectortoaLANandtouseImageExpressUtilityLite.FortheoperationofImageExpressUtilityLite,seethehelpofImageExpressUtilityLite.
Step1:installImageExpressUtilityLiteonthecomputer.Step2:ConnecttheprojectortoaLAN.Step3:StartImageExpressUtilityLite.
TIP:• ImageExpressUtilityLite(forWindows)canbestartedfrommostcommerciallyavailableremovablemediasuchasUSBmemorydevicesorSDcardswithouttheneedtoinstallonyourcomputer.(→page61)
What You can Do with Image Express Utility Lite
•Imagetransmission(forWindowsandMacOS)• Thescreenofyourcomputercanbesenttotheprojectorviaawiredorwirelessnetworkwithoutacomputercable
(VGA).
• Byusing“EASYCONNECTION”function,thecomplicatednetworksettingscanbesimplifiedandthecomputerwillautomaticallyconnecttotheprojector.
• Thescreenofyourcomputercanbesenttouptofourprojectorsatthesametime.
•Audiotransfercapability(forWindowsonly)• ImageExpressUtilityLiteallowsyoutosendthecomputer’sscreenimageandaudiototheprojectoroverwired/
wirelessLANorUSBconnection.
• Audio transfercapability isavailableonlywhen thecomputerconnectswith theprojector inpeer-to-peernet-work.
•USBDisplay(forWindowsonly)• Computer’sscreen imageandaudiocanbeprojectedviaaUSBcable,withoutconnectingacomputercable
(VGA).
• JustconnectingthecomputerandtheprojectoroveraUSBcablewillmaketheUSBDisplayfunctionavailable(Plug&Play)evenwithoutinstallingImageExpressUtilityLiteonthecomputer.(→page45)
•GeometricCorrectionTool[GCT](forWindowsonly)See“⓬ProjectinganImagefromanAngle(GeometricCorrectionToolinImageExpressUtilityLite)”.

59
3. Convenient Features
Using on Windows
Step 1: install Image Express Utility Lite on the computer.
NOTE:• Toinstalloruninstalltheprogram,theWindowsuseraccountmusthave“Administrator”privilege(Windows8,Windows7,WindowsVistaandWindowsXP).
• Exitallrunningprogramsbeforeinstallation.Ifanotherprogramisrunning,theinstallationmaynotbecompleted.• ImageExpressUtilityLitewillbeinstalledtothesystemdriveofyourcomputer. Ifthemessage“Thereisnotenoughfreespaceondestination”isdisplayed,freeupenoughspace(about100MB)toinstalltheprogram.
1. InserttheaccompanyingDukaneProjectorCD-ROMintoyourCD-ROMdrive.
The menu window will be displayed.
TIP:Ifthemenuwindowwillnotbedisplayed,trythefollowingprocedure.ForWindows7:1.Click“start”onWindows.
2.Click“AllPrograms”→“Accessories”→“Run”.
3. Type your CD-ROM drive name (example:“Q:\”) and“LAUNCHER.EXE” in“Name”. (example: Q:\LAUNCHER.EXE)
4. Click“OK”.
The menu window will be displayed.
2. Click“InstallingImageExpressUtilityLite”onthemenuwindow.
The installation will start.
“ENDUSERLICENSEAGREEMENT”screenwillbedisplayed.
Read“ENDUSERLICENSEAGREEMENT”carefully
3. Ifyouagree,click“Iagree.”andthenclick“Next”.
• Followtheinstructionsontheinstallerscreenstocompletetheinstallation.
• Whentheinstallationiscomplete,youwillreturntothemenuwindow.
When the installation is complete, a completion message will be displayed.
4. Click“OK”.
This completes the installation.
TIP:•UninstallingImageExpressUtilityLiteTouninstallImageExpressUtilityLite,dothesameproceduresstatedasin“UninstallingVirtualRemoteTool”.Read“VirtualRemoteTool”as“ImageExpressUtilityLite”(→page41)
Step 2: Connect the projector to a LAN.ConnecttheprojectortotheLANbyfollowingtheinstructionsin“ConnectingtoaWiredLAN”(→page127),“Con-nectingtoaWirelessLAN(Optional:NP02LMseries)”(→page128)and“9.ControllingtheProjectorbyUsinganHTTPBrowser”(→page47)

60
3. Convenient Features
Step 3: Start Image Express Utility Lite.1. OnWindows,click“Start”→“Allprograms”→“NECProjectorUserSupportware”→“ImageExpressUtility
Lite”→“ImageExpressUtilityLite”.
ImageExpressUtilityLitewillstart.
Theselectwindowfornetworkconnectionwillbedisplayed
2. SelectNetworkandclick“OK”.
The select window for destination will show a list of connectable projectors.
• Whenconnectingthecomputerdirectlytotheprojectorbyone-to-one,“EasyConnection”isrecommended.
• Whenoneormorenetworksfor“EASYCONNECTION”arefound,the“EasyConnectionSelectionScreen”windowwillbedisplayed.
• Tocheckforthenetworkavailableforconnectedprojectors,fromthemenu,select[INFO.]→[WIRELESSLAN]→[SSID].
3. Selectthenetworkyouwishtoconnect,andclick“Select”.
The target selection window will be displayed.
4. Placeacheckmarkforprojectorstobeconnected,andthenclick“Connect”.
• Whenoneormoreprojectorsaredisplayed,fromthemenuontheprojector,select[INFO.]→[WIRELESSLAN]→[IPADDRESS].
When connecting with the projector is established, you can operate the control window to control the projector. (→ page 46)
NOTE:• When[NORMAL]isselectedfor[STANDBYMODE]fromthemenu,theprojectorthatisturnedoffwillnotbedisplayedintheselectwindowfordestination
TIP:
Viewingthe“Help”fileofImageExpressUtilityLite• DisplayingtheHelpfileofImageExpressUtilityLitewhileitisrunning.
Clickthe[?](help)icononthecontrolwindow.
The Help screen will be displayed.
• DisplayingtheHelpfileofGCTwhileitisrunning.
Click“Help”→“Help”ontheeditwindow.
The Help screen will be displayed.
• DisplayingthehelpfileusingtheStartMenu.
Click“Start”→“Allprograms”or“Programs”→“NECProjectorUserSupportware”→“ImageExpressUtilityLite”→“ImageExpressUtilityLiteHelp”.
The Help screen will be displayed.

61
3. Convenient Features
Starting Image Express Utility Lite from a USB Memory or SD CardImageExpressUtilityLitecanbestartedfromcommerciallyavailableremovablemediasuchUSBmemoryorSDcardsifitiscopiedbeforehand.ThiswilleliminatethetroubleofinstallingImageExpressUtilityLitetoyourcomputer.1. CopyImageExpressUtilityLitetoremovablemedia.
Copyallthefoldersandfiles(totalsizeapprox.6MB)fromthe“IEU_Lite(removable-media)”folderinthesuppliedNEC Projector CD-ROM to the root directory of your removable media.
2. Insertyourremovablemediaintoyourcomputer.
The“AutoPlay”screenwillbedisplayedonyourcomputer.
TIP:• Ifthe“AutoPlay”screenisnotdisplayed,openthefolderfrom“Computer”(“MyComputer”forWindowsXP).
3. Click“Openfoldertoviewfiles”
TheIEU_Lite.exe,otherfolder,andfileswillbedisplayed.
4. Double-clickthe“IEU_Lite.exe”( ) icon.
ImageExpressUtilityLitewillstart.
NOTE:• The“EASYCONNECTION”functionisnotsupportedwhenImageExpressUtilityLiteisstartedfromremovablemedia.

62
3. Convenient Features
Downloading Image Express Utility Lite via the HTTP serverDownloadingprocedurewhentheprojectorisconnectedtotheInternet.1. AccesstheHTTPserver.(→page47)
2. Selectthe“NETWORKSETTINGS”tabandthenthe“NETWORKSERVICE”tab.
3. Click“DOWNLOAD”for“ImageExpressUtilityLite”.
The download page will be displayed.
4. PlaceacheckmarkforIEU_Lite(removable-media).zipand/orgct.ngm.
5. Click“DOWNLOAD”.
6. Chooseafolderwhereyouwanttodownloadthefileandclick“SAVE”.
(A folder in your computer is recommeded.)
The downloading will start.
Afterthedownloadingiscompleted,makesurethatthefileisplacedinthedestinationfolder.
Supported OS:• Windows8(32-bit/64-bit)• Windows8Pro(32-bit/64-bit)• Windows8Enterprise(32-bit/64-bit)• Windows7HomeBasic(32-bit/64-bit)• Windows7HomePremium(32-bit/64-bit)• Windows7Professional(32-bit/64-bit)• Windows7Ultimate(32-bit/64-bit)• Windows7Enterprise(32-bit/64-bit)• WindowsVistaHomeBasic(32-bit/64-bit)• WindowsVistaHomePremium(32-bit/64-bit)• WindowsVistaBusiness(32-bit/64-bit)• WindowsVistaUltimate(32-bit/64-bit)• WindowsVistaEnterprise(32-bit/64-bit)• WindowsXPHomeEditionServicePack3orlater(32-bit)• WindowsXPProfessionalServicePack3orlater(32-bit)
StartingIEULite(removable-media).zipandgct.ngm1. ExtractthedownloadedIEULite(removable-media)zipfileintoyourremovablemedia.
2. Double-clicktheIEULite.exeiconintheIEULite(removable-media)folder.
• Ifyoudownloadedgct.ngmtoo,movegct.ngmtothesamefolderwhereIEU_Lite_GCT.exeisplaced.
• TousetheGeometricCorrectionToolfunction(GCT)ofImageExpressUtilitylitetogetherwithavideocable,double-clickthe“IEU_Lite_GCT.exe”icon.WhenGCTcorrectiondata(*.ngm)issavedinthesamefolderwhereIEU_Lite_GCT.exeisplaced,thedatawillbeautomaticallyusedwithouttheneedofLANconnection.
NOTE:The“EASYCONNECTION”functionisnotsupportedwhenImageExpressUtilityLiteisstartedfromremovablemedia.
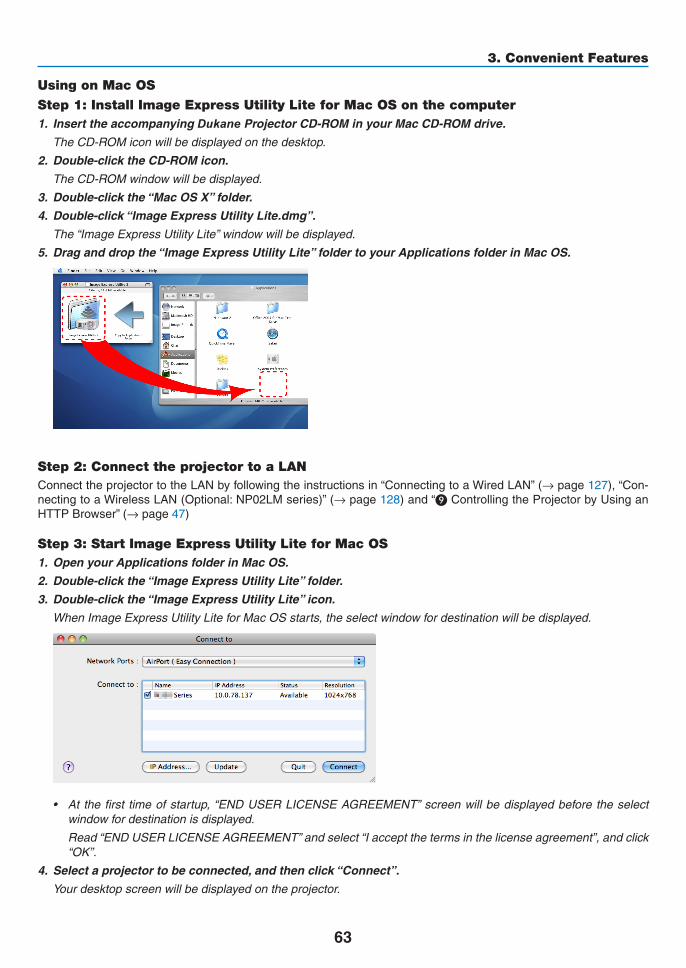
63
3. Convenient Features
Using on Mac OS
Step 1: Install Image Express Utility Lite for Mac OS on the computer1. InserttheaccompanyingDukaneProjectorCD-ROMinyourMacCD-ROMdrive.
TheCD-ROMiconwillbedisplayedonthedesktop.
2. Double-clicktheCD-ROMicon.
The CD-ROM window will be displayed.
3. Double-clickthe“MacOSX”folder.
4. Double-click“ImageExpressUtilityLite.dmg”.
The“ImageExpressUtilityLite”windowwillbedisplayed.
5. Draganddropthe“ImageExpressUtilityLite”foldertoyourApplicationsfolderinMacOS.
Step 2: Connect the projector to a LANConnecttheprojectortotheLANbyfollowingtheinstructionsin“ConnectingtoaWiredLAN”(→page127),“Con-nectingtoaWirelessLAN(Optional:NP02LMseries)”(→page128)and“❾ControllingtheProjectorbyUsinganHTTPBrowser”(→page47)
Step 3: Start Image Express Utility Lite for Mac OS1. OpenyourApplicationsfolderinMacOS.
2. Double-clickthe“ImageExpressUtilityLite”folder.
3. Double-clickthe“ImageExpressUtilityLite”icon.
WhenImageExpressUtilityLiteforMacOSstarts,theselectwindowfordestinationwillbedisplayed.
• At thefirst timeofstartup,“ENDUSERLICENSEAGREEMENT”screenwillbedisplayedbeforetheselectwindow for destination is displayed.
Read“ENDUSERLICENSEAGREEMENT”andselect“Iacceptthetermsinthelicenseagreement”,andclick“OK”.
4. Selectaprojectortobeconnected,andthenclick“Connect”.
Yourdesktopscreenwillbedisplayedontheprojector.

64
3. Convenient Features
TIP:ViewingtheHelpofImageExpressUtilityLiteforMacOS• Fromthemenubar,click“Help”→“ImageExpressUtilityLiteHelp”whileImageExpressUtilityisrun-
ning.
The Help screen will be displayed

65
3. Convenient Features
⓬ Projecting an Image from an Angle (Geometric Correction Tool in Image Express Utility Lite) TheGeometricCorrectionTool (GCT) functionallowsyou tocorrectdistortionof imagesprojectedeven fromanangle.
What you can do with GCT
• TheGCTfeatureincludesthefollowingthreefunctions
• 4-pointCorrection:Youcanfitaprojectedimagewithintheborderofthescreeneasilybyalignthefourcornersofanimagetotheonesofthescreen.
• Multi-pointCorrection:Youcancorrectadistortedimageonthecornerofawallorirregularshapedscreenbyusingmanyseparatedscreenstocorrecttheimageaswellas4-pointCorrection.
• Parameters Correction:Youcancorrectadistortedimagebyusingacombinationoftransformationalrulespreparedinadvance.
Thissectionwillshowanexampleforusewith4-pointCorrection.Forinformationabout“Multi-pointCorrection”and“ParametersCorrection”,seethehelpfileofImageExpressUtilityLite.(→page60)
• Yourcorrectiondatacanbestoredintheprojectororyourcomputerwhichcanberestoredwhennecessary.
• TheGCTfunctionisavailablewithaUSBcable,wiredorwirelessLANconnection,andvideocable.
Projecting an Image from an Angle (GCT)ThissectionwillshowanexampleforusewithUSBDisplay(usingaUSBcabletoconnectacomputerandthepro-jector).• TheUSBDisplayfunctionwillautomaticallydisplaythecontrolwindow
• ForavideocableorLANconnection,installandstartImageExpressUtilityLiteinyourcomputerbeforehand.(→ page58)
Preparation:Adjusttheprojectorpositionorthezoomsothattheprojectedimagecancoverthewholescreenarea.
1. Clickthe“ ”(Picture)iconandthenthe“ ”button.
The“4-pointCorrection”windowwillbedisplayed.
2. Clickthe“StartCorrection”buttonandthen“Start4-pointCorrection”button.
A green frame and a mouse pointer ( ) will be displayed.
• Four[•]markswillbeappearedatfourcornersofthegreenframe

66
3. Convenient Features
3. Usethemousetoclickthe[•]markofwhichcorneryouwishtomove.
The currently selected [ •]markwillturnred.
(Intheaboveexample,Windowsscreensareomittedforclarification.)
4. Dragtheselected[•]marktothepointyouwishtocorrectanddropit.
• Whenyouclicksomewherewithintheprojectimagearea,thenearest[•]markwillgotothepositionwherethe mouse cursor is.
5. RepeatStep3and4tocorrectthedistortionoftheprojectedimage.
6. Aftercompleting,right-clickthemouse.
The green frame and the mouse pointer will disappear from the projected image area. This will complete the cor-rection.
7. Clickthe“X”(close)buttononthe“4-pointCorrection”window.
The“4-pointCorrection”windowwilldisappearandthe4-pointcorrectionwilltakeeffect.
8. Clickthe“ ”buttononthecontrolwindowtoexittheGCT.
TIP:• Afterperformingthe4-pointcorrection,youcansavethe4-pointcorrectiondatatotheprojectorbyclicking“File”→“Exporttotheprojector…”onthe“4-pointCorrection”window.
• SeetheHelpofImageExpressUtilityLiteforoperating“4-pointCorrection”windowandotherfunctionsthanGCT.(→page60)

67
3. Convenient Features
⓭ Viewing 3D Images
Theprojectorprovides3DimagestoauserwearingcommerciallyavailableLCDshuttereyeglasses.
CAUTIONHealth precautionsBeforeviewing,besuretoreadhealthcareprecautionsthatmaybefoundintheuser’smanualincludedwithyourLCDshuttereyeglassesoryour3DcompatiblecontentsuchasDVDs,videogames,computer’svideofilesandthelike.Toavoidanyadversesymptoms,heedthefollowing:• DonotuseLCDshuttereyeglassesforviewinganymaterialotherthan3Dimages.• Allowadistanceof2m/7feetorgreaterbetweenthescreenandauser.Viewing3Dimagesfromtooclosea
distancecanstrainyoureyes.• Avoidviewing3Dimagesforaprolongedperiodoftime.Takeabreakof15minutesorlongeraftereveryhour
ofviewing.• Ifyouoranymemberofyourfamilyhasahistoryoflight-sensitiveseizures,consultadoctorbeforeviewing3D
images.• Whileviewing3Dimages,ifyougetsicksuchasnausea,dizziness,queasiness,headache,eyestrain,blurry
vision,convulsions,andnumbness,stopviewingthem.Ifsymptomsstillpersist,consultadoctor.• View3Dimagesfromthefrontofthescreen.Viewingfromananglemaycausefatigueoreyestrain.
LCDshuttereyeglasses(recommended)• UsecommerciallyavailableDLP®LinkorothermethodcompatibleLCDshuttereyeglasses.
Stepsforviewing3Dimagesontheprojector1. Connecttheprojectortoyourvideoequipment.
2. Turnontheprojector,displaytheon-screenmenu,andthenselect[ON]forthe3Dmode.
Fortheoperatingproceduretoturnonthe3Dmode,referto“On-screenmenufor3Dimages”onthefollowingpage.
3. Playyour3Dcompatiblecontentandusetheprojectortodisplaytheimage.
4. PutonyourLCDshuttereyeglassestoview3Dimages.
Also refer to the user’s manual accompanied with your LCD shutter eyeglasses for more information.
On-screenmenufor3DimagesFollowthestepstodisplaythe3Dmenu.1. Press the MENU button.
The on-screen menu will be displayed.
2. Press the ▷buttontwice.
The [SETUP] menu will be displayed.
[6528, 6532, 6532W, 6540] [6235W, 6233]

68
3. Convenient Features
3. Press the ▽buttononce,andthenpressthe▷buttonfivetimes.
The [3D] menu will be displayed
4. Press the ▽buttontoselectasignalandpresstheENTERbutton.
The3D(DETAILSETTINGS)screenwillbedisplayed.
5. Press the ▽buttontoselect[3D]andpresstheENTERbutton.
6. Press the ▽buttontoselect[ON].
The selected signal will be displayed in 3D.
7. Press the ▽buttonto[GLASSES]andpresstheENTERbutton.
The [GLASSES] setting screen will be displayed.
8. Press the ▽buttontoselectacompatibleeyeglassmethodandpresstheENTERbutton.
Setother3D-relatedmenuoptionssuchas[FORMAT]and[L/RINVERT]asnecessary.
9. Press the MENU button once.
The menu will disappear.
Selectinginputconnectedtoasourceof3Dimages[COMPUTER/HDMI1/HDMI2/VIDEO]Thisfunctionswitchesthe3DmodebetweenONandOFFforeachinput.
NOTE:Toconfirmthatthesupported3Dsignalisaccepted,useeitherwayofthefollowing:• Makesurethat[3D]isdisplayedinthetoprightofthescreenafterthesourceisselected.• Display[INFO.]→[SOURCE]→[3DSIGNAL]andmakesurethat“SUPPORTED”isdisplayed.
69
3. Convenient Features
Toview3Dimages,seepage67.Select[COMPUTER],[HDMI1],[HDMI2],or[VIDEO].
NOTE:• Themaximumdistanceforviewing3Dimagesis10m/394inchesfromthescreensurfaceunderthefollowingrestrictions:
- Brightnessontheprojector:2000lumensorgreater- Screengain:1- Viewingposition:Facingstraighttowardsthescreencenter- Outsidelight:None- LCDshuttereyeglasses:DLP®Linkcompatible3Deyeglasses
• If3DcontentisplayedbackonyourcomputerandtheperformanceispooritmaybecausedbytheCPUorgraphicschip.Inthiscaseyoumayhavedifficultyseeingthe3Dimagesastheywereintended.Checktoseeifyourcomputermeetstherequirementsprovidedinyouruser’smanualincludedwithyour3Dcontent.
• TheDLP®LinkcompatibleLCDshuttereyeglassesallowyoutoview3Dimagesbyreceivingsynchsignals,whichareincludedinlefteyeandrighteyeimages,reflectedfromthescreen.Dependingonenvironmentsorconditionssuchastheambientbright-ness,screensizeorviewingdistance,theLCDshuttereyeglassesmayfailtoreceivesynchsignals,causingpoor3Dimages.
• Whenthe3Dmodeisenabled,theKeystonecorrectionrangewillbenarrower.• Whenthe3Dmodeisenabled,thefollowingsettingsareinvalid. [WALLCOLOR],[PRESET],[REFERENCE],[COLORTEMPERATURE]• Refertothe[SOURCE]screenunderthe[INFO.]menuforinformationonwhethertheinputsignalis3Dcompatible.• Signalsotherthanthoselistedin“CompatibleInputSignalList”onpage143willbeoutofrangeorwillbedisplayedin2D.
Using a 3D emitterThisprojectorcanbeusedtowatchvideosin3Dusingcommercially-availableactiveshutter-type3Deyewear.Inordertosynchronizethe3Dvideoandeyewear,acommercially-available3Demitterneedstobeconnectedtotheprojector(ontheprojectorside).The3Deyewearreceivesinformationfromthe3Demitterandperformsopeningandclosingontheleftandright.
3Deyewearand3DemitterpreparationsPleaseuseanactiveshutter-type3DeyewearthatconformswiththeVESAstandard.Acommercially-availableRFtypemadebyXpandisrecommended.
3D eyewear ������������ Xpand X105-RF-X23D emitter �������������� Xpand AD025-RF-X1
Connectyour3Demittertothe3DSYNCconnectoroftheprojector.
NOTE:• Useanactiveshutter3Deyewear(compliancewithVESA)• ChecktheoperatingconditionsdescribedintheusermanualoftheBlu-rayplayer.• PleaseconnecttheDINterminalofthe3Demittertothe3DSYNCoftheprojector.• The3Deyewearallowsvideostobeviewedin3Dbyreceivingsynchronizedopticalsignalsoutputfromthe3Demitter.Asaresult,the3Dimagequalitymaybeaffectedbyconditionssuchasthebrightnessofthesurroundings,screensize,viewingdistance,etc.
• Whenplayinga3Dvideosoftwareonacomputer,the3DimagequalitymaybeaffectedifthecomputerCPUandgraphicschipperformancearelow.Pleasechecktherequiredoperatingenvironmentofthecomputerthatisstatedintheoperatingmanualattachedtothe3Dvideosoftware.
70
3. Convenient Features
Troubleshootingonviewing3DimagesIfimageswillnotbedisplayedin3Dor3Dimagesappearas2D,checkthefollowingtable.Alsorefertotheuser’smanualaccompaniedwithyour3DcontentorLCDshuttereyeglasses.
Possiblecauses Solutions• Thecontentyouareplayingbackisnotcompatiblewith3D. • Playbackacontentcompatiblewith3D.
• The3Dmodewasturnedofffortheselectedsource.• Usetheprojector’smenutoturnon3Dmodefortheselected
source.(→page106)• YouarenotusingourrecommendedLCDshuttereyeglasses. • UseourrecommendedLCDshuttereyeglasses.(→page67)• IftheshutterofyourLCDshuttereyeglassescannotsynchronize
withthecurrentlyprojectedsource,thefollowingarepossiblecauses:
- YourLCDshuttereyeglassesarenotswitchedon.
• SwitchonyourLCDshuttereyeglasses.Forusinga3Demitter:• Useanactiveshutter-type3Deyewearand3Demitterrecom-
mended.- ThebatteryintheLCDshuttereyeglassesrandown. • Rechargethebatteryorreplaceit.
- Thecorrecteyeglassmethodisnotselected.• Changetheeyeglassmethodfor3Dbyusingthemenu..(→
page106)
- Theviewingdistancebetweentheviewerandthescreenistoofar.
• Moveclosertothescreenuntiltheviewergets3Dimages.• Orusetheprojector’smenutoselect[NON-INVERT]for[L/R
INVERT].
- Therearebright lightsourcesorotherprojectorsneartheviewer.
• Keeplightsourcesorotherprojectorsawayfromtheviewer.• Donotlooktowardabrightlightsource.• Orusetheprojector’smenutoselect[NON-INVERT]for[L/R
INVERT].• If yourcomputer isnot set for3Dviewing, the followingare
possiblecauses:- Yourcomputerdoesnotmeettherequirementsfor3Dview-
ing.• Checktoseeifyourcomputermeetstherequirementsprovided
inyouruser’smanualincludedwithyour3Dcontent.- Yourcomputerisnotsetfor3Doutput. • Setyourcomputerfor3Doutput.
Forusinga3Demitter:- Thereisanobstaclebetweentheopticalreceiverofthe3D
eyewearandthe3Demitter.• Pleaseremovetheobstacle.
- The3Dformatofthe3Dvideocontentsisnotsupported. • Pleasecheckwiththecompanysellingthe3Dvideocontents.
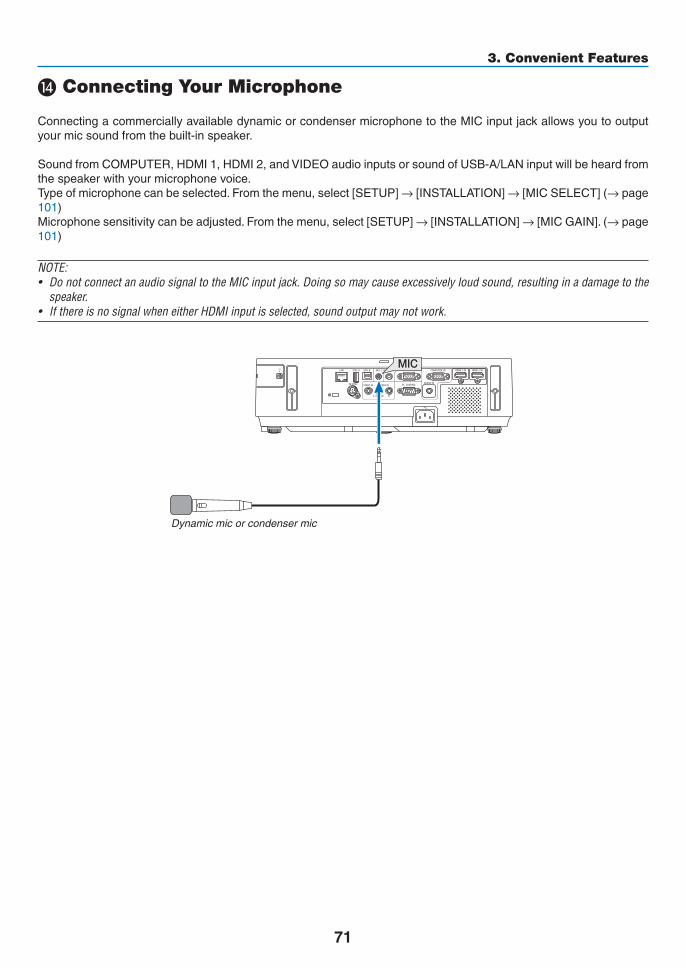
71
3. Convenient Features
⓮ Connecting Your Microphone ConnectingacommerciallyavailabledynamicorcondensermicrophonetotheMICinputjackallowsyoutooutputyourmicsoundfromthebuilt-inspeaker.
SoundfromCOMPUTER,HDMI1,HDMI2,andVIDEOaudioinputsorsoundofUSB-A/LANinputwillbeheardfromthespeakerwithyourmicrophonevoice.Typeofmicrophonecanbeselected.Fromthemenu,select[SETUP]→[INSTALLATION]→[MICSELECT](→page101)Microphonesensitivitycanbeadjusted.Fromthemenu,select[SETUP]→[INSTALLATION]→[MICGAIN].(→page101)
NOTE:• DonotconnectanaudiosignaltotheMICinputjack.Doingsomaycauseexcessivelyloudsound,resultinginadamagetothespeaker.
• IfthereisnosignalwheneitherHDMIinputisselected,soundoutputmaynotwork.
MIC
Dynamic mic or condenser mic

72
4. Using the Viewer❶ What you can do with the ViewerTheViewerhasthefollowingfeatures.
• WhenacommerciallyavailableUSBmemorythatstoresimagefilesisinsertedintotheUSB-Aport(TypeA)oftheprojector,theViewerallowsyoutoviewtheimagefilesontheUSBmemory.
Evenifnocomputerisavailable,presentationscanbeconductedsimplywiththeprojector.
• SupportedgraphicformatisJPEG.
• TheViewerdisplaysthethumbnailscreen(JPEGExifonly)onwhichyoucanjumptoanyspecificimageyouwishtoproject.
• Thereare twowaysofplayback forslideshow:manualplaybackandautoplayback.The interval timecanbechangedinautoplayback.
• Theorderofdisplaying imagescanbesetbyname,dateorsize.Ascendingordescendingordercanbese-lected.
• Imagescanberotatedby90degreesduringplayback.

73
4. Using the Viewer
NOTE• TheUSB-AportoftheprojectordoesnotsupportUSBhub.• ThefollowingoperationsbyusingthebuttonsontheprojectorarenotpossiblewhentheVIEWERscreensuchastheslidescreenandthethumbnailscreenisdisplayed.- Keystonecorrectionbyusingthe▲/▼button- AutoAdjustmentbyusingtheAUTOADJ.button- Volumecontrolwiththe◀or▶button ToperformKeystonecorrectionorSourceselectionduringdisplayoftheViewer,presstheMENUbuttontwicetodisplaythemenuandoperateViewerfromthemenu.
• FreezingpicturebyusingtheFREEZEbuttonontheremotecontrolisnotpossiblewhentheVIEWERscreensuchastheslidescreenandthethumbnailscreenisdisplayed.
• Executing[RESET]→[ALLDATA]fromthemenuwillreturnthesettingsfortheViewertoolbartothefactorydefault.• USBmemory- BesuretouseaUSBmemorydeviceformattedwiththeFAT32orFAT16filesystem. TheprojectordoesnotsupportNTFSformattedUSBmemory. IftheprojectordoesnotrecognizeyourUSBmemory,checkiftheformatissupported. ToformatyourUSBmemoryinyourcomputer,refertothedocumentorhelpfilethatcomeswithyourWindows.- WedonotwarrantthattheUSB-AportoftheprojectorwillsupportallUSBmemoriesinthemarket.
• Supportedimages- SupportedfileformatforViewerareasfollows. WedonotwarrantalltheimagesaresupportedforViewer. Imagesotherthanmentionedinthetablemaynotbesupported.
Imagetype Extension Description
JPEG JPG/JPEG Baseline/Exifaresupported
- Slideshow,effect,andsoundeffectsetwithPowerPointcannotbeplayedback.- Imagecanbedisplayedataresolutionupto10000×10000pixels.- Evenifimagesaremetbytheaboveconditions,theremaybesomeimageswhichcannotbeplayedback.- Morethan200icons(totalnumberofimagefileiconsandfoldericons)cannotbedisplayedinathumbnailscreen.- Longfile/foldernamewillbelimitedtothespecifiedlength.Thiscanbeshownbybracketadded.- Ifonefolderhasmanyfiles,ittakessometimetoplayback.
• Ifasinglefoldercontainstoomanyfiles,switchingimageswilltaketime.Toshortenswitchingtime,reducethenumberofimagescontainedinasinglefolder.
TIP:Exchangeable imagefileformat(Exif) isastandardimagefileformatusedbydigitalcameraswiththeadditionofspecificshootingdata.

74
4. Using the Viewer
❷ Projecting images stored in a USB memory deviceThissectionexplainsthebasicoperationoftheViewer.TheexplanationprovidestheoperationalprocedurewhentheViewertoolbar(→page78)issettothefactoryde-fault.
•StartingtheViewer .......................................................................below•RemovingtheUSBmemoryfromtheprojector ....................... page76•ExitingtheViewer .................................................................... page76
Preparation:BeforestartingtheViewer,storeimagestotheUSBmemoryusingyourcomputer.
Starting the Viewer1. Turn on the projector. (→page17)
2. InserttheUSBmemoryintotheUSB-Aportofthepro-jector.
• DonotremovetheUSBmemoryfromtheprojectorwhileit’s LED flashes. Doing so may corrupt the data.
3. PresstheSOURCEbuttonontheprojectorcabinet.
The Viewer start screen will be displayed.
• PresstheUSB-Abuttonontheremotecontrol.

75
4. Using the Viewer
4. Press the ENTER button.
The thumbnail screen will be displayed. (→ page 77)
5. Use the ▲▼◀ or ▶ button to select an icon.
• The→ (arrow) symbol on the right indicates there are more pages. pressing the PAGE ▽ (page down) button will show the next page: pressing the PAGE △ (page up) will show the previous page.
6. Press the ENTER button.
The selected slide will be displayed.
• Whenafoldericonisselected,iconscontainedinthefolderwill be displayed.
7. Press the ▶buttontoselectthenextslide.
The slide on the right will be displayed.
• The◀ or ▶ button can be used to select the next (right) slide or the previous (left) slide in the thumbnail screen.
• PressingtheMENUbuttonduringdisplayofthethumbnailscreen, the slide screen, or the slideshow screen will display the toolbar. The toolbar is used to select or rotate an slide.(→ page 78)
8. Press the EXIT button when the toolbar is not dis-played.
Thethumbnailscreenwillbedisplayed.
• AnotherwaytodisplaythethumbnailscreenistopresstheENTER button.
• Toclosethetoolbar,presstheMENUbuttontoreturntotheSOURCE list, and press the MENU button again to close the SOURCE list.

76
4. Using the Viewer
Removing the USB memory from the projector1. SelecttheVIEWERstartscreen.
PresstheEXITbuttonwithnomenudisplayed.
2. RemovetheUSBmemoryfromtheprojector.
MakesurethattheLEDontheUSBmemoryisnotflashingbefore removing the USB memory.
NOTE:IfyouremovetheUSBmemoryfromtheprojectorwithaslidedisplayed,theprojectormaynotoperatecorrectly.Ifthishappens,turnofftheprojectorandunplugthepowercord.Wait3minutes,thenconnectthepowercord,andturnontheprojector.
Exiting the Viewer1. Press theMENUbutton with the slide screenor the
thumbnailscreendisplayed.
The control bar or the pop-up menu will be displayed.
2. PresstheMENUbuttonagain.
The on-screen menu will be displayed.
3. Selectasourceotherthan[USB-A]andpresstheEN-TER button.
The Viewer will be exited.
TIP:ToexittheViewerusingtheremotecontrol,selectasourceotherthan[USB-A].

77
4. Using the Viewer
Parts of each screenTheViewerhasfourscreens.
(1) Viewer start screen (3) Thumbnail screen (9) Slide screen/(11) Slideshow screen
Name Description
(1)Viewerstartscreen ThisscreenwillbedisplayedfirstwhenyouselecttheViewer.
(2)USBicon ThisiconindicatesthattheUSBmemoryisinsertedintotheprojector.
(3)Thumbnailscreen ThisscreenwillshowalistoffoldersandimagefilesstoredintheUSBmemory.TheJPEGExiffileswillbedisplayedinthumbnailscreenonly.• Themaximumnumberofimagefilesorfolderswithinonepageisdifferentdepending
on the model. 6540/6532/6528/6233are5by4 6532W/6235Ware6by4
(4)Cursor Thecursorisusedtoselect(highlight)thefolderorimagefilebyusing▲▼◀▶ but-ton.
(5)Backicon Thisiconisusedtoreturntotheupper(parent)folder.
(6)Foldericon ThisiconshowsthattheUSBmemoryhasfolders.
(7)Pageup(Pagedown)icon
Thisiconshowsfurtherfoldersorimagefilesareavailableinthenext(previous)page.Usethe▶buttontogotothenext(previous)row.ThePAGE▽orPAGE△ on the remotecontrolisusedtogotothenextorpreviouspagedirectly.
(8)Thumbnailtoolbar Thistoolbarisusedinthethumbnailscreen.PressingtheMENUbuttonwilldisplaythistoolbar.(→page78)
(9)Slidescreen Thisscreenisusedformanualplayback.Theselectedimagewillbedisplayedinfullscreen.
(10)Slidetoolbar Thistoolbar isusedintheslidescreen.PressingtheMENUbuttonwilldisplaythistoolbar.(→page79)
(11)Slideshowscreen Thisscreenisusedforautoplayback.Theslideswillbechangedautomatically.
(12)Slideshowtoolbar Thistoolbarisusedintheslideshowscreen.PressingtheMENUbuttonwilldisplaythistoolbar.(→page79)
(5) (6) (4) (7)
(8)(2) (10) (12)

78
4. Using the Viewer
Using the toolbar
1. Press the MENU button.
The toolbar will be displayed.
The SOURCE screen will be displayed as Viewer connection screen.
2. Use the ◀ or ▶buttontoselectanitemandusethe▲ or ▼buttontoselectitsavailableoption.
When the cursor is placed, the selected item will be changed to yellow.
The ▲ or ▼ shows more available choices.
3. Press the ENTER button.
The selected item will be displayed.
4. PresstheMENUbuttontwotimes.
The toolbar will be closed and the SOURCE list will be displayed. Press the MENU button again to close the SOURCE list.
Thumbnailtoolbar
Menu Options Description
(1)Back — Goesbacktothepreviousimage.Whenthecursorreachesthetopleftofthescreen,itwillgotothepreviouspage.
(2)Forward — Goestothenextimage.Whenthecursorreachesthebottomrightofthescreen,itwillgotothenextpage.
(3)Display Closesthemenuandreturnstothethumbnailscreen.
Closesthemenuandstartstheslideshowfromthehighlighteditem.
Closesthemenuanddisplaystheslidescreen.
(4)Order Displaystheiconsalphabeticallybyname.(numberbeforealphabet)
Displaystheiconsindescendingorderoffilesize.
Displaystheiconsintheorderofcreationdate
(1) (2) (3) (4)

79
4. Using the Viewer
Slidetoolbar
Menu Options Description
(1)Display Closesthemenuandswitchestotheslidescreen.
Closesthemenuanddisplaysthethumbnailscreen.
Closesthemenuandstartstheslideshowfromthehighlighteditem.
(2)Imagedisplay
Closesthemenuanddisplaystheimageinitsactualsize.
Closesthemenuanddisplaystheimageintheprojector’smaximumreso-lution.
(3)Clockwiserotation
— Closethemenuandrotatetheimage90°clockwise
(4)Counter-clockwiserotation
— Closethemenuandrotatetheimage90°counterclockwise
Slideshowtoolbar
Menu Options Description
(1)Stop — Closesthemenuandchangestotheslidescreen.
(2)Back — Goesbacktothepreviousimage.
(3)Forward — Goestothenextimage.
(4)Interval Specifiesintervaltimewhenplayingbacktheslides.
(5)Repeat Repeatstoplaybacktheimagesinthefolder.
Returnstothethumbnailscreen.
TIP:• Apictureiconatthecenterofthescreenshowsthatthefilecannotbedisplayedintheslidescreenorthumbnailscreen.• Slidetoolbarsettingforrotationwillbecancelledifthefolderismovedfromoneplacetoanother.
(1) (2) (3) (4)
(1) (2) (3) (4) (5)

80
5. Using On-Screen Menu❶ Using the Menus
NOTE:Theon-screenmenumaynotbedisplayedcorrectlywhileinterlacedmotionvideoimageisprojected.
1. PresstheMENUbuttonontheremotecontrolortheprojectorcabinettodisplaythemenu.
NOTE:ThecommandssuchasENTER,EXIT,▲▼,◀▶inthebottomshowavailablebuttonsforyouroperation.
2. Press the ◀▶buttonsontheremotecontrolortheprojectorcabinettodisplaythesubmenu.
3. PresstheENTERbuttonontheremotecontrolortheprojectorcabinettohighlightthetopitemorthefirsttab.
4. Use the ▲▼buttonsontheremotecontrolortheprojectorcabinettoselecttheitemyouwanttoadjustorset.
You can use the ◀▶buttonsontheremotecontrolortheprojectorcabinettoselectthetabyouwant.
5. PresstheENTERbuttonontheremotecontrolortheprojectorcabinettodisplaythesubmenuwindow.
6. Adjustthelevelorturntheselecteditemonoroffbyusingthe▲▼◀▶ buttons on the remote control or the projector cabinet.
Changesarestoreduntiladjustedagain.
7. Repeatsteps2-6toadjustanadditionalitem,orpresstheEXITbuttonontheremotecontrolortheprojec-torcabinettoquitthemenudisplay.
NOTE:Whenamenuormessageisdisplayed,severallinesofinformationmaybelost,dependingonthesignalorsettings.
8. Press the MENU button to close the menu.
Toreturntothepreviousmenu,presstheEXITbutton.
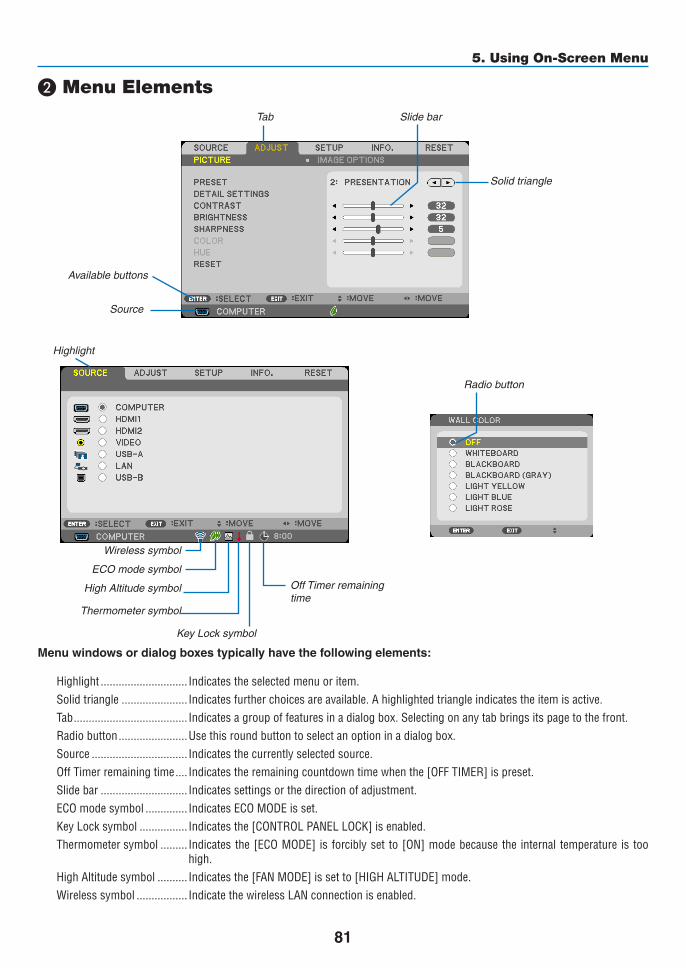
81
5. Using On-Screen Menu
❷ Menu ElementsSlide bar
Solid triangle
Tab
Radio button
High Altitude symbol
ECO mode symbol
Wireless symbol
Menuwindowsordialogboxestypicallyhavethefollowingelements:
Highlight ����������������������������� Indicates the selected menu or item� Solid triangle ���������������������� Indicates further choices are available� A highlighted triangle indicates the item is active� Tab �������������������������������������� Indicates a group of features in a dialog box� Selecting on any tab brings its page to the front�Radio button �����������������������Use this round button to select an option in a dialog box�Source �������������������������������� Indicates the currently selected source�Off Timer remaining time ���� Indicates the remaining countdown time when the [OFF TIMER] is preset�Slide bar ����������������������������� Indicates settings or the direction of adjustment�ECO mode symbol �������������� Indicates ECO MODE is set�Key Lock symbol ���������������� Indicates the [CONTROL PANEL LOCK] is enabled�Thermometer symbol ��������� Indicates the [ECO MODE] is forcibly set to [ON] mode because the internal temperature is too
high�High Altitude symbol ���������� Indicates the [FAN MODE] is set to [HIGH ALTITUDE] mode�Wireless symbol ����������������� Indicate the wireless LAN connection is enabled�
Source
Available buttons
Thermometer symbol
KeyLocksymbol
Off Timer remaining time
Highlight
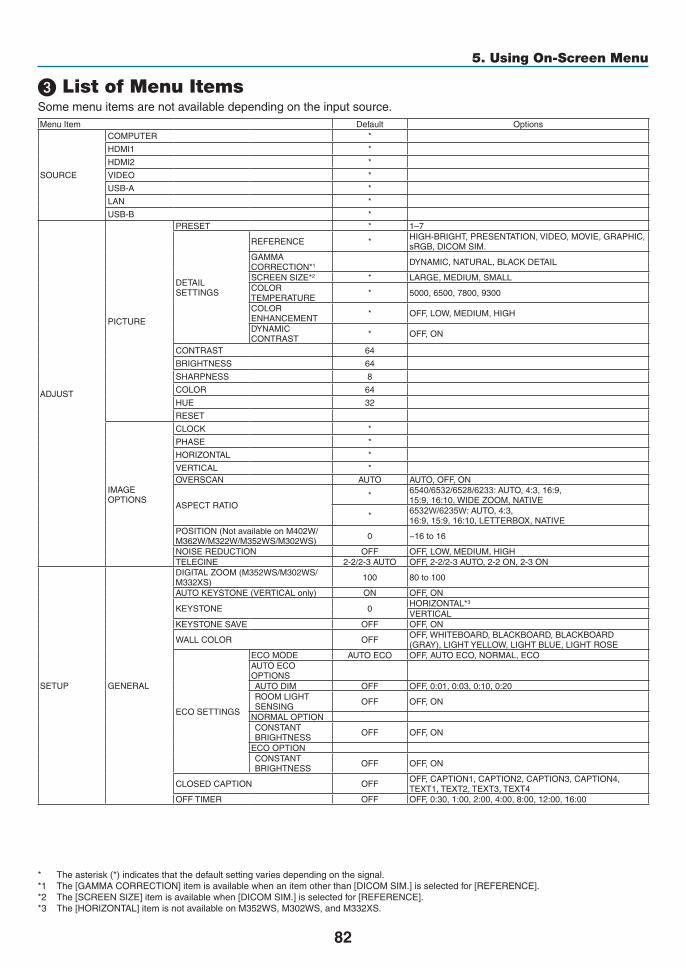
82
5. Using On-Screen Menu
❸ List of Menu ItemsSomemenuitemsarenotavailabledependingontheinputsource.MenuItem Default Options
SOURCE
COMPUTER *
HDMI1 *
HDMI2 *
VIDEO *
USB-A *
LAN *
USB-B *
ADJUST
PICTURE
PRESET * 1–7
DETAILSETTINGS
REFERENCE * HIGH-BRIGHT,PRESENTATION,VIDEO,MOVIE,GRAPHIC,sRGB,DICOMSIM.
GAMMACORRECTION*1 DYNAMIC,NATURAL,BLACKDETAIL
SCREENSIZE*2 * LARGE,MEDIUM,SMALLCOLORTEMPERATURE * 5000,6500,7800,9300
COLORENHANCEMENT * OFF,LOW,MEDIUM,HIGH
DYNAMICCONTRAST * OFF,ON
CONTRAST 64
BRIGHTNESS 64
SHARPNESS 8
COLOR 64
HUE 32
RESET
IMAGEOPTIONS
CLOCK *
PHASE *
HORIZONTAL *
VERTICAL *OVERSCAN AUTO AUTO,OFF,ON
ASPECTRATIO* 6540/6532/6528/6233:AUTO,4:3,16:9,
15:9,16:10,WIDEZOOM,NATIVE
* 6532W/6235W:AUTO,4:3,16:9,15:9,16:10,LETTERBOX,NATIVE
POSITION(NotavailableonM402W/M362W/M322W/M352WS/M302WS) 0 −16to16
NOISEREDUCTION OFF OFF,LOW,MEDIUM,HIGHTELECINE 2-2/2-3AUTO OFF,2-2/2-3AUTO,2-2ON,2-3ON
SETUP GENERAL
DIGITALZOOM(M352WS/M302WS/M332XS) 100 80 to 100
AUTOKEYSTONE(VERTICALonly) ON OFF,ON
KEYSTONE 0HORIZONTAL*3
VERTICALKEYSTONESAVE OFF OFF,ON
WALLCOLOR OFF OFF,WHITEBOARD,BLACKBOARD,BLACKBOARD(GRAY),LIGHTYELLOW,LIGHTBLUE,LIGHTROSE
ECOSETTINGS
ECOMODE AUTOECO OFF,AUTOECO,NORMAL,ECOAUTOECOOPTIONSAUTODIM OFF OFF,0:01,0:03,0:10,0:20ROOMLIGHTSENSING OFF OFF,ON
NORMALOPTIONCONSTANTBRIGHTNESS OFF OFF,ON
ECOOPTIONCONSTANTBRIGHTNESS OFF OFF,ON
CLOSEDCAPTION OFF OFF,CAPTION1,CAPTION2,CAPTION3,CAPTION4,TEXT1,TEXT2,TEXT3,TEXT4
OFFTIMER OFF OFF,0:30,1:00,2:00,4:00,8:00,12:00,16:00
* Theasterisk(*)indicatesthatthedefaultsettingvariesdependingonthesignal.*1 The[GAMMACORRECTION]itemisavailablewhenanitemotherthan[DICOMSIM.]isselectedfor[REFERENCE].*2 The[SCREENSIZE]itemisavailablewhen[DICOMSIM.]isselectedfor[REFERENCE].*3 The[HORIZONTAL]itemisnotavailableonM352WS,M302WS,andM332XS.

83
5. Using On-Screen Menu
MenuItem Default Options
SETUP
GENERAL LANGUAGE ENGLISH
ENGLISH,DEUTSCH,FRANÇAIS,ITALIANO,ESPAÑOL,SVENSKA,日本語DANSK,PORTUGUÊS,ČEŠTINA,MAGYAR,POLSKI,NEDERLANDS,SUOMINORSK,TÜRKÇE,РУССКИЙ, , Ελληνικά, 中文, 한국어ROMÂNĂ, HRVATSKI, БЪЛГАРСКИ, INDONESIA, हिन्दी, ไทย, , 繁體中文
MENU
COLORSELECT COLOR COLOR,MONOCHROMESOURCEDISPLAY ON OFF,ONIDDISPLAY ON OFF,ONECOMESSAGE OFF OFF,ONDISPLAYTIME AUTO45SEC MANUAL,AUTO5SEC,AUTO15SEC,AUTO45SECBACKGROUND BLUE BLUE,BLACK,LOGO
INSTALLATION
ORIENTATION DESKTOPFRONT
DESKTOPFRONT,CEILINGREAR,DESKTOPREAR,CEILINGFRONT
CONTROLPANELLOCK OFF OFF,ONSECURITY OFF OFF,ONCOMMUNICATIONSPEED 38400bps 4800bps,9600bps,19200bps,38400bps
CONTROLIDCONTROLIDNUMBER 1 1 to 254
CONTROLID OFF OFF,ONTESTPATTERN CROSSHATCHMICSELECT DYNAMICMIC DYNAMICMIC,CONDENSERMICMICGAIN 2 0 to 15
OPTIONS(1)
FANMODE AUTO AUTO,HIGH,HIGHALTITUDE
COLORSYSTEM VIDEO AUTO AUTO,NTSC3.58,NTSC4.43,PAL,PAL-M,PAL-N,PAL60,SECAM
WXGAMODE
M402X/M362X/M322X/M282X/M332XS:OFF
M402W/M362W/M322W/M352WS/
M302WS:ON
OFF,ON
HDMISETTINGS
HDMI1VIDEOLEVEL NORMAL AUTO,NORMAL,ENHANCED
HDMI2VIDEOLEVEL NORMAL AUTO,NORMAL,ENHANCED
AUDIOSELECT
HDMI1 HDMI1 HDMI1,COMPUTERHDMI2 HDMI2 HDMI2,COMPUTERLAN LAN LAN,COMPUTERUSBB USBB USBB,COMPUTER
BEEP ON OFF,ON
OPTIONS(2)
STANDBYMODE NORMAL NORMAL,NETWORKSTANDBYDIRECTPOWERON OFF OFF,ONAUTOPOWERON(COMP.) OFF OFF,ONAUTOPOWEROFF* 1:00 OFF,0:05,0:10,0:15,0:20,0:30,1:00
DEFAULTSOURCESELECT LAST LAST,AUTO,COMPUTER,HDMI1,HDMI2,VIDEO,USB-A,LAN,USB-B
CARBONCONVERT 0.505CURRENCY $ $, €,JP¥,RMB¥CURRENCYCONVERT
3D
COMPUTER
3D OFF OFF,ONGLASSES DLP®Link DLP®Link,OTHERSFORMAT SIDEBYSIDE SIDEBYSIDE,TOPANDBOTTOM,FRAMESEQUENTIALL/RINVERT NON-INVERT NON-INVERT,INVERT
HDMI1
3D OFF OFF,ONGLASSES DLP®Link DLP®Link,OTHERS
FORMAT AUTO AUTO,FRAMEPACKING,SIDEBYSIDE,TOPANDBOTTOM
L/RINVERT NON-INVERT NON-INVERT,INVERT
HDMI2
3D OFF OFF,ONGLASSES DLP®Link DLP®Link,OTHERS
FORMAT AUTO AUTO,FRAMEPACKING,SIDEBYSIDE,TOPANDBOTTOM
L/RINVERT NON-INVERT NON-INVERT,INVERT
VIDEO3D OFF OFF,ONGLASSES DLP®Link DLP®Link,OTHERSL/RINVERT NON-INVERT NON-INVERT,INVERT
WIREDLAN
WIREDLAN ENABLE DISABLE,ENABLE
SETTINGS DHCP:ONAUTODNS:OFF
DHCP,IPADDRESS,SUBNETMASK,GATEWAY,AUTODNS,DNS
RECONNECT
WIRELESSLANPROFILE DISABLE DISABLE,EASYCONNECTION,SIMPLEACCESSPOINT,
PROFILE1,PROFILE2RECONNECT
*AUTOPOWEROFF:Thisitemcanbeselectedonlywhen[NORMAL]isselectedfor[STANDBYMODE].

84
5. Using On-Screen Menu
MenuItem Default Options
INFO.
USAGETIME
LAMPLIFEREMAINING
LAMPHOURSUSED
TOTALCARBONSAVINGS
TOTALCOSTSAVINGS
SOURCE(1)
RESOLUTION
HORIZONTALFREQUENCY
VERTICALFREQUENCY
SYNCTYPE
SYNCPOLARITY
SCANTYPE
SOURCE(2)
SIGNALTYPE
VIDEOTYPE
BITDEPTH
VIDEOLEVEL
3DSIGNAL
WIREDLAN
IPADDRESS
SUBNETMASK
GATEWAY
MACADDRESS
WIRELESSLAN
IPADDRESS
SUBNETMASK
GATEWAY
MACADDRESS
SSID
NETWORKTYPE
WEP/WPA
CHANNEL
SIGNALLEVEL
VERSION(1)FIRMWARE
DATA
VERSION(2) FIRMWARE2
OTHERS
PROJECTORNAME
MODELNO.
SERIALNUMBER
LANUNITTYPECONTROLID(when[CONTROLID]isset)
RESET
CURRENTSIGNAL
ALLDATA
CLEARLAMPHOURS

85
5. Using On-Screen Menu
❹ Menu Descriptions & Functions [SOURCE]
COMPUTERSelectsthecomputerconnectedtoyourCOMPUTERinputconnectorsignal.NOTE:WhenthecomponentinputsignalisconnectedtotheCOMPUTERINconnector,select[COMPUTER]respectively.
HDMI1 and 2SelectstheHDMIcompatibleequipmentconnectedtoyourHDMI1orHDMI2INconnector.
VIDEOSelectswhatisconnectedtoyourVIDEOinput-VCR,DVDplayerordocumentcamera.
USB-A (Viewer)ThisfeatureenablesyoutomakepresentationsusingaUSBmemorythatcontainsslides.(→page72“4.UsingtheViewer”)
LANSelectsasignalfromtheLANport(RJ-45)ortheinstalledUSBwirelessLANunit(optional).
USB-B (USB Display)SelectsthecomputerconnectedtotheUSB-Bport(typeB)byusingacommerciallyavailableUSBcable.(→page45)

86
5. Using On-Screen Menu
❺ Menu Descriptions & Functions [ADJUST][PICTURE]
[PRESET]Thisfunctionallowsyoutoselectoptimizedsettingsforyourprojectedimage.Youcanadjustneutraltintforyellow,cyanormagenta.Therearesevenfactorypresetsoptimizedforvarioustypesofimages.Youcanalsouse[DETAILSETTINGS]tosetuseradjustablesettingstocustomizeeachgammaorcolor.Yoursettingscanbestoredin[PRESET1]to[PRESET7].
HIGH-BRIGHT �������� Recommended for use in a brightly lit room�PRESENTATION ����� Recommended for making a presentation using a PowerPoint file�VIDEO �������������������� Recommended for typical TV program viewing�MOVIE ������������������� Recommended for movies�GRAPHIC ��������������� Recommended for graphics�sRGB ��������������������� Standard color valuesDICOM SIM� ���������� Recommended for DICOM simulation format�
NOTE:• The[DICOMSIM.]optionisfortraining/referenceonlyandshouldnotbeusedforactualdiagnosis.• DICOMstandsforDigitalImagingandCommunicationsinMedicine.ItisastandarddevelopedbytheAmericanCollegeofRadiol-ogy(ACR)andtheNationalElectricalManufacturersAssociation(NEMA).
Thestandardspecifieshowdigitalimagedatacanbemovedfromsystemtosystem.
[DETAIL SETTINGS]

87
5. Using On-Screen Menu
StoringYourCustomizedSettings[REFERENCE]Thisfunctionallowsyoutostoreyourcustomizedsettingsin[PRESET1]to[PRESET7].First,selectabasepresetmodefrom[REFERENCE],thenset[GAMMACORRECTION],[SCREENSIZE],[COLORTEMPERATURE],[COLORENHANCEMENT],and[DYNAMICCONTRAST].
HIGH-BRIGHT �������� Recommended for use in a brightly lit room�PRESENTATION ����� Recommended for making a presentation using a PowerPoint file�VIDEO �������������������� Recommended for typical TV program viewing�MOVIE ������������������� Recommended for movies�GRAPHIC ��������������� Recommended for graphics�sRGB ��������������������� Standard color values�DICOM SIM� ���������� Recommended for DICOM simulation format�
Selecting Gamma Correction Mode [GAMMA CORRECTION]Eachmodeisrecommendedfor:
DYNAMIC �������������� Creates a high-contrast picture�NATURAL ��������������� Natural reproduction of the picture�BLACK DETAIL ������� Emphasizes detail in dark areas of the picture�
NOTE:Thisfunctionisnotavailablewhen[DICOMSIM.]isselectedfor[DETAILSETTINGS].
SelectingScreenSizeforDICOMSIM[SCREENSIZE]Thisfunctionwillperformgammacorrectionappropriateforthescreensize.
LARGE ������������������� For screen size of 150"MEDIUM ���������������� For screen size of 100"SMALL ������������������� For screen size of 50"
NOTE:Thisfunctionisavailableonlywhen[DICOMSIM.]isselectedfor[DETAILSETTINGS].
AdjustingColorTemperature[COLORTEMPERATURE]Thisoptionallowsyoutoselectthecolortemperatureofyourchoice.
NOTE:When[PRESENTATION]or[HIGH-BRIGHT]isselectedin[REFERENCE],thisfunctionisnotavailable.
Enhancing the Color [COLOR ENHANCEMENT]Thisfunctionallowsyoutoadjustthecolordensityoftheimage.Thecoloroftheimagewillbecomedeeperintheorderof“LOW”,“MEDIUM”and“HIGH”astheimagewillbecomedarker.With[OFF]selected,theCOLORENHANCEMENTfunctionwillnotwork.
AdjustingBrightnessandContrast[DYNAMICCONTRAST]Thisfunctionallowsyoutoadjustthecontrastratioopticallyusingthebuilt-iniris.Toincreasethecontrastratio,select[ON].
NOTE:• The[DYNMICCONTRAST]itemcannotbeselectedinthefollowingcases:- When[CONSTANTBRIGHTNESS]isenabledwith[ON]selectedfor[ECOMODE]from[ECOSETTINGS].- When[ON]isselectedfor[3D]whileimagesareprojected.
• TheECOMODEandDYNAMICCONTRASTfeaturescontrolthelamppower.SomepicturesmaybecomeextremelybrightwhenusingbothECOMODEandDYNAMICCONTRASTfeaturestocontrolthelamppower.Toavoidthisphenomena,turnofftheECOMODEandDYNAMICCONTRAST.

88
5. Using On-Screen Menu
[CONTRAST]Adjuststheintensityoftheimageaccordingtotheincomingsignal.
[BRIGHTNESS]Adjuststhebrightnesslevelorthebackrasterintensity.
[SHARPNESS]Controlsthedetailoftheimage.
[COLOR]Increasesordecreasesthecolorsaturationlevel.
[HUE]Variesthecolorlevelfrom+/−greento+/−blue.Theredlevelisusedasreference.
Inputsignal CONTRAST BRIGHTNESS SHARPNESS COLOR HUE
COMPUTER/HDMI(RGB) Yes Yes Yes No No
COMPUTER/HDMI(COMPONENT) Yes Yes Yes Yes Yes
VIDEO/COMPONENT Yes Yes Yes Yes Yes
USB-A/LAN/USB-B Yes Yes Yes No No
Yes=Adjustable,No=Notadjustable
[RESET]Thesettingsandadjustmentsfor[PICTURE]willbereturnedtothefactorysettingswiththeexceptionofthefollowing;Presetnumbersand[REFERENCE]withinthe[PRESET]screen.Thesettingsandadjustmentsunder[DETAILSETTINGS]withinthe[PRESET]screenthatarenotcurrentlyselectedwillnotbereset.

89
5. Using On-Screen Menu
[IMAGE OPTIONS]
AdjustingClockandPhase[CLOCK/PHASE]ThisallowsyoutomanuallyadjustCLOCKandPHASE.
CLOCK ������������������� Use this item to fine tune the computer image or to remove any vertical banding that might appear� This function adjusts the clock frequencies that eliminate the horizontal banding in the image�This adjustment may be necessary when you connect your computer for the first time�
PHASE ������������������� Use this item to adjust the clock phase or to reduce video noise, dot interference or cross talk� (This is evident when part of your image appears to be shimmering�)Use [PHASE] only after the [CLOCK] is complete�
NOTE:The[CLOCK]and[PHASE]itemsareavailableforRGBsignalsonly.

90
5. Using On-Screen Menu
AdjustingHorizontal/VerticalPosition[HORIZONTAL/VERTICAL]Adjuststheimagelocationhorizontallyandvertically.
NOTE:The[HORIZONTAL]and[VERTICAL]itemsarenotavailableforVIDEO,HDMI1,HDMI2,USB-A,LAN,andUSB-B.
- Animagecanbedistortedduringtheadjustmentof[CLOCK]and[PHASE].Thisisnotmalfunction.
- Theadjustments for [CLOCK], [PHASE], [HORIZONTAL],and[VERTICAL]willbestored inmemoryfor thecurrentsignal.Thenexttimeyouprojectthesignalwiththesameresolution,horizontalandverticalfrequency,itsadjustmentswillbecalledupandapplied.
Todeleteadjustmentsstoredinmemory,fromthemenu,youselect[RESET]→[CURRENTSIGNAL]or[ALLDATA]andresettheadjustments.
SelectingOverscanPercentage[OVERSCAN]Thisallowsyoutosettheappropriateoverscanforanincomingsignal.
AUTO ��������������������� Display an appropriately overscanned image (factory setting)�OFF ������������������������ Does not overscan the image�ON ������������������������� Overscans the image�
NOTE:• The[OVERSCAN]itemcannotbeselectedwhenVIDEOsignalsareusedorwhen[NATIVE]isselectedfor[ASPECTRATIO].

91
5. Using On-Screen Menu
Selecting Aspect Ratio [ASPECT RATIO]Theterm“aspectratio”referstotheratioofwidthtoheightofaprojectedimage.Theprojectorautomaticallydeterminestheincomingsignalanddisplaysitinitsappropriateaspectratio.•Thistableshowstypicalresolutionsandaspectratiosthatmostcomputerssupport.
Resolution AspectRatioVGA 640×480 4:3SVGA 800×600 4:3XGA 1024×768 4:3WXGA 1280×768 15:9WXGA 1280×800 16:10WXGA+ 1440×900 16:10SXGA 1280×1024 5:4SXGA+ 1400×1050 4:3UXGA 1600×1200 4:3WUXGA 1920×1200 16:10
Options Function
AUTO Theprojectorwillautomaticallydeterminetheincomingsignalanddisplayitinitsaspectratio.(→ nextpage)Theprojectormayerroneouslydeterminetheaspectratiodependingonitssignal.Ifthisoccurs,selecttheappropriateaspectratiofromthefollowing.
4:3 Theimageisdisplayedin4:3aspectratio.
16:9 Theimageisdisplayedin16:9aspectratio.
15:9 Theimageisdisplayedin15:9aspectratio.
16:10 Theimageisdisplayedin16:10aspectratio.
WIDEZOOM(6540/6532/6528/6233)M
Theimageisstretchedleftandright.Partsofthedisplayedimagearecroppedattheleftandrightedgesandthereforenotvisible.
LETTERBOX(6532W/6235W)MM
Theimageofaletterboxsignalisstretchedequallyinthehorizontalandverticaldirec-tionstofitthescreen.Partsofthedisplayedimagearecroppedatthetopandbottomedgesandthereforenotvisible.
NATIVE Theprojectordisplaysthecurrentimageinitstrueresolutionwhentheincomingcomputersignalhasalowerresolutionthantheprojector’snativeresolution.
[Example 1]When the incomingsignal with the resolution of 800×600 isdisplayedon the6233/6528/6532/6540:
[Example 2]Whentheincomingsig-nalwiththeresolutionof800×600isdisplayedonthe6235W/6532W:
NOTE:• Whenanon-computersignalisdisplayed,the[NATIVE]isnotavailable.• Whenasignalwithahigherresolutionthantheprojector’snativeresolutionisdisplayed,[NA-TIVE]isnotavailable.

92
5. Using On-Screen Menu
SampleimagewhentheappropriateaspectratioisautomaticallydeterminedM6233/6528/6532/6540[Computersignal]Aspectratioofincomingsignal 4:3 5:4 16:9 15:9 16:10
Sampleimagewhentheappro-priate aspect ratio is automati-callydetermined
[Videosignal]Aspectratioofincomingsignal 4:3 Letterbox Squeeze
Sample image when the as-pect ratio is automatically de-termined
NOTE:Todisplayasqueezedsignalprop-erly,select[16:9]or[WIDEZOOM].
6235W/6532W[Computersignal]Aspectratioofincomingsignal 4:3 5:4 16:9 15:9 16:10
Sampleimagewhentheappro-priate aspect ratio is automati-callydetermined
[Videosignal]Aspectratioofincomingsignal 4:3 Letterbox Squeeze
Sample image when the as-pect ratio is automatically de-termined
NOTE:Todisplayaletterboxsignalprop-erly,select[LETTERBOX].
NOTE:Todisplayasqueezedsignalprop-erly,select[16:9].
TIP:• Imagepositioncanbeadjustedverticallyusing[POSITION]whenthe[16:9],[15:9],or[16:10]aspectratiosareselected.• Theterm“letterbox”referstoamorelandscape-orientedimagewhencomparedtoa4:3image,whichisthestandardaspectratioforavideosource.
Theletterboxsignalhasaspectratioswiththevistasize“1.85:1”orcinemascopesize“2.35:1”formoviefilm.• Theterm“squeeze”referstothecompressedimageofwhichaspectratioisconvertedfrom16:9to4:3.
AdjustingtheVerticalPositionofImage[POSITION](notavailableon6532W, 6235W)
(onlywhen[16:9],[15:9],or[16:10]isselectedfor[ASPECTRATIO])
When[16:9],[15:9],or[16:10]isselectedin[ASPECTRATIO],theimageisdisplayedwithblackbordersonthetopand bottom.Youcanadjusttheverticalpositionfromthetoptothebottomoftheblackarea.

93
5. Using On-Screen Menu
Turning on Noise Reduction [NOISE REDUCTION]Thisfunctionallowsyoutoselectthelevelofnoisereduction.Theprojectorissettotheoptimizedlevelforeachsignalatthefactory.Selectyourpreferenceitemforyoursignalwhenvideonoiseisnoticeable.Theoptionsare[OFF],[LOW],[MEDIUM],and[HIGH].
NOTE:ThisfeatureisnotavailablefortheRGBsignal.Noisereductionsettooffgivesbestimagequalitybywayofhigherbandwidth.Noisereductionsettoonsoftenstheimage.
Setting Telecine Mode [TELECINE]Thisfunctionallowsyoutoconvertmotionpicturefilmimagesintovideo.Theprocessaddsadditionalframestothepictureinordertoincreasetheframerate.
NOTE:ThisfeatureisavailableonlywhenanSDTVsignalisselected.
OFF ������������������������ Turns off the TELECINE mode�2-2/2-3 AUTO �������� Detects pull-down correction method�2-2 ON ������������������� Uses 2-2 pull-down correction method2-3 ON ������������������� Uses 2-3 pull-down correction method

94
5. Using On-Screen Menu
❻ Menu Descriptions & Functions [SETUP]
[GENERAL]
[6528, 6532, 6532W, 6540] [6233, 6235W]
UsingDigitalZoom[DIGITALZOOM](M352WS/M302WS/M332XS)Thisfeatureallowsyoutoelectronicallyfineadjusttheimagesizeonthescreen.Usethe◀ or ▶buttontolargeorreducetheprojectedimage.
TIP:Toadjusttheprojectedimagesizeroughly,movetheprojectorawayorclosertothescreen.Tofineadjustthezoom,usethe[DIGITALZOOM]function.(→page22)
EnablingAutoKeystone[AUTOKEYSTONE]Thisfeatureallowstheprojectortodetectitstiltandcorrectverticaldistortionautomatically.ToturnontheAUTOKEYSTONEfeature,select[ON].ToadjusttheKEYSTONEfeaturemanually,select[OFF].
CorrectingHorizontalandVerticalKeystoneDistortionManually[KEYSTONE]Youcancorrecthorizontalandverticaldistortionmanually.(→page24)
NOTE:• The[HORIZONTAL]keystoneitemisnotavailableonM352WS/M302WS/M322XS.
TIP:Whenthisoptionishighlighted,pressingtheENTERbuttonwilldisplayitsslidebarforadjustment.
SavingKeystoneCorrection[KEYSTONESAVE]Thisoptionenablesyoutosaveyourcurrentkeystonesettings.
OFF ������������������������ Does not save current keystone correction settings� It will return your keystone correction settings to “zero”�
ON ������������������������� Saves current keystone correction settings
Savingyourchangeonceaffectsallsources.Thechangesaresavedwhentheprojectoristurnedoff.
NOTE:When[AUTOKEYSTONE]issetto[ON],[KEYSTONESAVE]isnotavailable.Nexttimeyouturnonthepower,theAUTOKEYSTONEfunctionwillworkandthedatastoredwith[KEYSTONESAVE]willbeinvalid.
6233, 6235W.

95
5. Using On-Screen Menu
Using the Wall Color Correction [WALL COLOR]
Thisfunctionallowsforquickadaptivecolorcorrectioninapplicationswherethescreenmaterialisnotwhite.
NOTE:• Selecting[WHITEBOARD]reduceslampbrightness.• The[WALLCOLOR]itemcannotbeselectedwhen[ON]isselectedfor[3D]whileimagesareprojected.
Settingvariousitemsrelatedtolampbrightness[ECOSETTINGS]Thisoptionallowsyoutodecreasethepowerconsumptionortoprolongthelamplifebycontrollingthelampbright-ness.
ECO MODETheECOMODEincreaseslamplife,whileloweringpowerconsumptionandcuttingdownonCO2emissions.Fourbrightnessmodesofthelampcanbeselected:[OFF],[AUTOECO],[NORMAL]and[ECO]modes.(→page33)
NOTE:The[OFF]itemisautomaticallyselectedfor[ECOMODE]when[ON]isselected[3D]whileimagesareprojected.
AUTO ECO OPTIONSSetoptionswhen[AUTOECO]isselectedfor[ECOMODE].
AUTODIM OFF TheAUTODIMfeaturewillnotwork.
0:01,0:03,0:10,0:20(min.)
This option will automatically dim the lamp light whennoinputsignalispresentforacertainperiodtime:0:01,0:03,0:10,and0:20(minutes).Whenitreachesthepre-settime,thelampbrightnesswilldecreasetoabout30%immediatelyafterthescreenbecomesdimforamoment.Changingimageswillreturntoitsoriginalbrightness.
ROOMLIGHTSENSING OFF Thesensorwillnotwork.
ON Thesensorwilldetectambientbrightnessandcontrolthelampbrightness.Iftheprojectorisplacedinadarkroom,thelampbrightnesswillautomaticallydecrease.NOTE:Thebrightnesscannotbechangedwhen[CEILINGREAR]or[CEILINGFRONT]isselectedfor[ORIENTATION].
NORMAL OPTIONSettheoptionwhen[NORMAL]isselectedfor[ECOMODE].CONSTANTBRIGHTNESS:
OFF ������������������������ The CONSTANT BRIGHTNESS feature will not work� The lamp brightness will gradually decrease over long periods of time�
ON ������������������������� The lamp brightness will increase according to the lamp use of time and will be kept at the lamp brightness equivalent to the brightness at NORMAL� After the lamp brightness reaches the maximum, the lamp bright-ness will gradually decrease over long periods of time�

96
5. Using On-Screen Menu
ECO OPTIONSettheoptionwhen[ECO]isselectedfor[ECOMODE].CONSTANTBRIGHTNESS:
OFF ������������������������ The CONSTANT BRIGHTNESS feature will not work� The lamp brightness will gradually decrease over long periods of time�
ON ������������������������� The lamp brightness will increase according to the lamp use of time and will be kept at the lamp brightness equivalent to the brightness at ECO� After the lamp brightness reaches the maximum, the lamp brightness will gradually decrease over long periods of time� The lamp brightness will be kept longer than at NORMAL�
Setting Closed Caption [CLOSED CAPTION]ThisoptionsetsseveralclosedcaptionmodesthatallowtexttobesuperimposedontheprojectedimageofVideo.
OFF ������������������������ This exits the closed caption mode�CAPTION 1-4 ��������� Text is superimposed�TEXT 1-4 ���������������� Text is displayed�
NOTE:• Theclosedcaptionisnotavailableunderthefollowingconditions:- whenmessagesormenusaredisplayed.- whenanimageismagnified,frozen,ormuted.
• Portionsofsuperimposedtextorclosedcaptionmaybetruncated.Ifthathappens,trytoplacethesuperimposedtextorclosedcaptionwithinthescreen.
Using Off Timer [OFF TIMER]1. Selectyourdesiredtimebetween30minutesand16hours:OFF,0:30,1:00,2:00,4:00,8:00,12:00,16:00.
2. Press the ENTER button on the remote control.
3. Theremainingtimestartscountingdown.
4. Theprojectorwillturnoffafterthecountdowniscomplete.
NOTE:• Tocancelthepresettime,set[OFF]forthepresettimeorturnoffthepower.• Whentheremainingtimereaches3minutesbeforetheprojectoristurnedoff,the[THEPROJECTORWILLTURNOFFWITHIN3MINUTES]messagewillbedisplayedonthebottomofthescreen.
Selecting Menu Language [LANGUAGE]Youcanchooseoneof29languagesforon-screeninstructions.
NOTE:Yoursettingwillnotbeaffectedevenwhen[RESET]isdonefromthemenu.

97
5. Using On-Screen Menu
[MENU]
Selecting Menu Color [COLOR SELECT]Youcanchoosebetweentwooptionsformenucolor:COLORandMONOCHROME.
TurningOn/OffSourceDisplay[SOURCEDISPLAY]ThisoptionturnsonoroffinputnamedisplaysuchasCOMPUTER,HDMI1,HDMI2,VIDEO,USB-A,LAN,USB-B,tobedisplayedonthetoprightofthescreen.Whennoinputsignalispresent,theno-signalguidancepromptingyoutocheckforanavailableinputwillbedisplayedatthecenterofthescreen.Whenthe[USB-A]or[LAN]itemisselectedfor[SOURCE],theno-signalguidancewillnotbedisplayed.
TurningON/OFFControlID[IDDISPLAY]ID DISPLAY ����������� This option turns on or off the ID number which is displayed when the ID SET button on the remote control
is pressed�
TurningOn/OffEcoMessage[ECOMESSAGE]Thisoptionturnsonoroffthefollowingmessageswhentheprojectoristurnedon.
TheEcoMessagepromptstheusertosaveenergy.When[OFF]isselectedfor[ECOMODE],youwillgetamessagetopromptyoutoselect[AUTOECO],[NORMAL],or[ECO]for[ECOMODE].
When[AUTOECO],[NORMAL],or[ECO]isselectedfor[ECOMODE]
Toclosethemessage,pressanyoneofthebuttons.Themessagewilldisappearifnobuttonoperationisdonefor30 seconds.
When[OFF]isselectedfor[ECOMODE]
PressingtheENTERbuttonwilldisplaythe[ECOMODE]screen.(→page33)Toclosethemessage,presstheEXITbutton.

98
5. Using On-Screen Menu
SelectingMenuDisplayTime[DISPLAYTIME]Thisoptionallowsyoutoselecthowlongtheprojectorwaitsafterthelasttouchofabuttontoturnoffthemenu.Thepresetchoicesare[MANUAL],[AUTO5SEC],[AUTO15SEC],and[AUTO45SEC].The[AUTO45SEC]isthefac-torypreset.
SelectingaColororLogoforBackground[BACKGROUND]Use this feature to display a blue/black screen or logo when no signal is available.The default background is[BLUE].NOTE:• Ifthe[LOGO]itemisselectedfor[BACKGROUND]withthe[LAN]or[USB-B]sourceselected,the[LOGO]itemwillbeselectedregardlessofitsselection.
• When[SOURCEDISPLAY]isturnedon,theno-signalguidancepromptingyoutocheckforanavailableinputwillbedisplayedatthecenterofthescreenregardlessofitsselection.
• Yoursettingwillnotbeaffectedevenwhen[RESET]isdonefromthemenu.

99
5. Using On-Screen Menu
[INSTALLATION]
SelectingProjectorOrientation[ORIENTATION]Thisreorientsyourimageforyourtypeofprojection.Theoptionsare:desktopfrontprojection,ceilingrearprojection,desktoprearprojection,andceilingfrontprojection.
DESKTOPFRONT CEILINGREAR
DESKTOPREAR CEILINGFRONT
DisablingtheCabinetButtons[CONTROLPANELLOCK]ThisoptionturnsonorofftheCONTROLPANELLOCKfunction.
NOTE:• ThisCONTROLPANELLOCKdoesnotaffecttheremotecontrolfunctions.• Whenthecontrolpanelislocked,pressingandholdingtheSOURCEbuttonontheprojectorcabinetforabout10secondswillchangethesettingto[OFF].
TIP:Whenthe[CONTROLPANELLOCK]isturnedon,akeylockicon[ ]willbedisplayedatthebottomrightofthemenu.
EnablingSecurity[SECURITY]ThisfeatureturnsonorofftheSECURITYfunction.Unlessthecorrectkeywordisentered,theprojectorcannotprojectanimage.(→page35)
NOTE:Yoursettingwillnotbeaffectedevenwhen[RESET]isdonefromthemenu.

100
5. Using On-Screen Menu
Selecting Communication Speed [COMMUNICATION SPEED]ThisfeaturesetsthebaudrateofthePCControlport(D-Sub9P).Itsupportsdataratesfrom4800to38400bps.Thedefaultis38400bps.Selecttheappropriatebaudrateforyourequipmenttobeconnected(dependingontheequip-ment,alowerbaudratemayberecommendedforlongcableruns).
NOTE:Yourselectedcommunicationspeedwillnotbeaffectedevenwhen[RESET]isdonefromthemenu.
SettingIDtotheProjector[CONTROLID]YoucanoperatemultipleprojectorsseparatelyandindependentlywiththesingleremotecontrolthathastheCONTROLIDfunction.IfyouassignthesameIDtoalltheprojectors,youcanconvenientlyoperatealltheprojectorstogetherusingthesingleremotecontrol.Todoso,youhavetoassignanIDnumbertoeachprojector.
CONTROL ID NUMBER �������Select a number from 1 to 254 you wish to assign to your projector�CONTROL ID �����������������������Select [OFF] to turn off the CONTROL ID setting and select [ON] to turn on the CONTROL ID set-
ting�
NOTE:• When[ON]isselectedfor[CONTROLID],theprojectorcannotbeoperatedbyusingtheremotecontrolthatdoesnotsupporttheCONTROLIDfunction.(Inthiscasethebuttonsontheprojectorcabinetcanbeused.)
• Yoursettingwillnotbeaffectedevenwhen[RESET]isdonefromthemenu.•PressingandholdingtheENTERbuttonontheprojectorcabinetfor10secondswilldisplaythemenuforcancelingtheControlID.
Assigning or Changing the Control ID1. Turn on the projector.
2. PresstheIDSETbuttonontheremotecontrol.
TheCONTROLIDscreenwillbedisplayed.
IftheprojectorcanbeoperatedwiththecurrentremotecontrolID,the[ACTIVE]willbedisplayed.IftheprojectorcannotbeoperatedwiththecurrentremotecontrolID,the[INACTIVE]willbedisplayed.Tooperatetheinactiveprojector,assignthecontrolIDusedfortheprojectorbyusingthefollowingprocedure(Step3).
3. PressoneofnumerickeypadbuttonswhilepressingandholdingtheIDSETbuttonon the remote control.
Example:
Toassign“3”,pressthe“3”buttonontheremotecontrol.
NoIDmeansthatalltheprojectorscanbeoperatedtogetherwithasingleremotecontrol.Toset“NoID”,enter“000”orpresstheCLEARbutton.
TIP:TherangeofIDsisfrom1to254.
4. ReleasetheIDSETbutton.
TheupdatedCONTROLIDscreenwillbedisplayed.
NOTE:•TheIDscanbeclearedinafewdaysafterthebatteriesarerundownorremoved.•AccidentallypressinganyoneofthebuttonsoftheremotecontrolwillclearcurrentlyspecifiedIDwithbatteriesremoved.
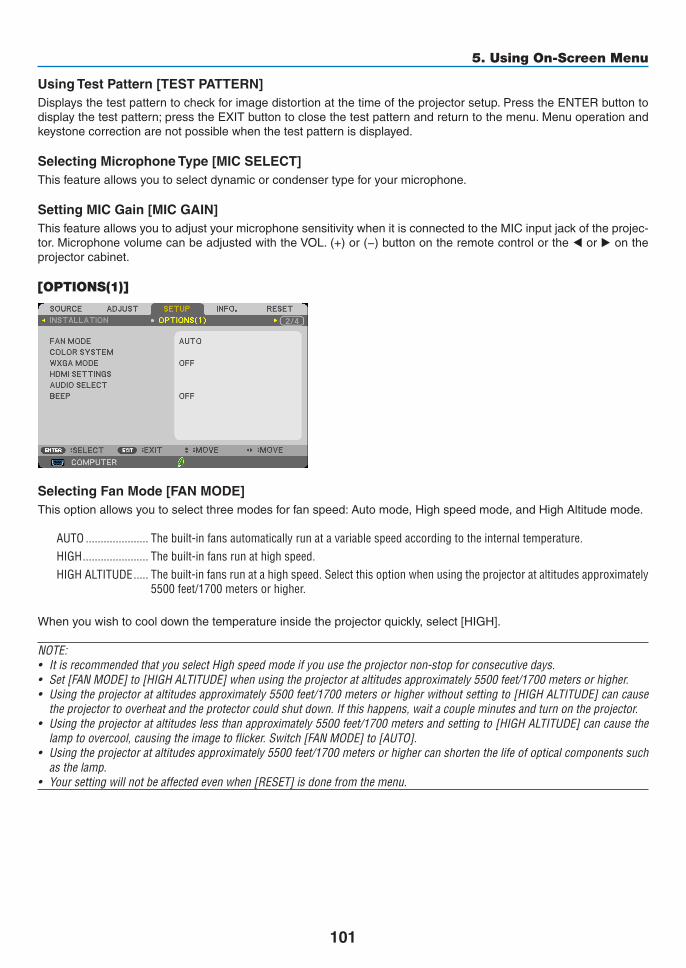
101
5. Using On-Screen Menu
Using Test Pattern [TEST PATTERN]Displaysthetestpatterntocheckforimagedistortionatthetimeoftheprojectorsetup.PresstheENTERbuttontodisplaythetestpattern;presstheEXITbuttontoclosethetestpatternandreturntothemenu.Menuoperationandkeystonecorrectionarenotpossiblewhenthetestpatternisdisplayed.
SelectingMicrophoneType[MICSELECT]Thisfeatureallowsyoutoselectdynamicorcondensertypeforyourmicrophone. Setting MIC Gain [MIC GAIN]ThisfeatureallowsyoutoadjustyourmicrophonesensitivitywhenitisconnectedtotheMICinputjackoftheprojec-tor.MicrophonevolumecanbeadjustedwiththeVOL.(+)or(−)buttonontheremotecontrolorthe◀ or ▶ on the projectorcabinet.
[OPTIONS(1)]
Selecting Fan Mode [FAN MODE]Thisoptionallowsyoutoselectthreemodesforfanspeed:Automode,Highspeedmode,andHighAltitudemode.
AUTO ��������������������� The built-in fans automatically run at a variable speed according to the internal temperature�HIGH ���������������������� The built-in fans run at high speed�HIGH ALTITUDE ����� The built-in fans run at a high speed� Select this option when using the projector at altitudes approximately
5500 feet/1700 meters or higher�
Whenyouwishtocooldownthetemperatureinsidetheprojectorquickly,select[HIGH].
NOTE:• ItisrecommendedthatyouselectHighspeedmodeifyouusetheprojectornon-stopforconsecutivedays.•Set[FANMODE]to[HIGHALTITUDE]whenusingtheprojectorataltitudesapproximately5500feet/1700metersorhigher.• Usingtheprojectorataltitudesapproximately5500feet/1700metersorhigherwithoutsettingto[HIGHALTITUDE]cancausetheprojectortooverheatandtheprotectorcouldshutdown.Ifthishappens,waitacoupleminutesandturnontheprojector.
•Usingtheprojectorataltitudeslessthanapproximately5500feet/1700metersandsettingto[HIGHALTITUDE]cancausethelamptoovercool,causingtheimagetoflicker.Switch[FANMODE]to[AUTO].
•Usingtheprojectorataltitudesapproximately5500feet/1700metersorhighercanshortenthelifeofopticalcomponentssuchasthelamp.
• Yoursettingwillnotbeaffectedevenwhen[RESET]isdonefromthemenu.

102
5. Using On-Screen Menu
Selecting Signal Format [COLOR SYSTEM]Thisfeatureallowsyoutoselectvideostandardsmanually.Normallyselect[AUTO].Selectthevideostandardfromthepulldownmenu.
EnablingorDisablingWXGAMode[WXGAMODE]Selecting[ON]willgiveprioritytoWXGA(1280×768)/WUXGA(1920×1080)signalsinrecognizinganinputsig-nal.When[WXGAMODE] isset to[ON],XGA(1024×768)/UXGA(1600×1200)signalsmaynotberecognizedon6233, 6528, 6532, 6540.Inthiscase,select[OFF].
NOTE:• The[OFF]isselectedatthetimeofshipmentofM402X/M362X/M322X/M282X/M332XS.• The[ON]isselectedatthetimeofshipmentofM402W/M362W/M322W/M352WS/M302WS.
SettingHDMI1/2[HDMISETTINGS]MakethesettingsforeachvideolevelwhenconnectingHDMIequipmentsuchasaDVDplayer.
VIDEO LEVEL ��������� Select [AUTO] to automatically detect video level� If automatic detection may not work well, select [NOR-MAL] to disable the [ENHANCED] feature of your HDMI equipment or select [ENHANCED] to improve image contrast and increase detail in the dark areas�
NOTE:• IftheprojectordoesnotreflectthesettingsforyourHDMIequipmentsuchasaDVDplayerconnectedtotheHDMI1INorHDMI2INconnector,selecttheHDMI1orHDMI2inputsourceagainontheprojector.
Setting Audio [AUDIO SELECT]Makethesettings foreachaudio levelwhenconnectingHDMIequipment,yournetwork,andUSB-Bport.Selectbetweeneachequipmentandcomputer.
HDMI ��������������������� Select [HDMI1] or [HDMI2] to switch the HDMI 1 or HDMI 2 IN digital audio signal or select [COMPUTER] to switch the COMPUTER input audio signal�
LAN ������������������������ Select [LAN] or [COMPUTER] to switch the source connected to the network�USB-B �������������������� Select [USB-B] or [COMPUTER] to switch the source connected over the USB cable (USB-B)�
EnablingKeySoundandErrorSound[BEEP]This feature turnsonoroff thebuttonsoundoralarmwhenanerroroccursor the followingoperationsareper-formed.
-Displayingthemainmenu
-Switchingsources
-Resettingdatabyusing[RESET]
-PressingPOWERONorSTANDBYbutton
6233, 6528, 6532, 6540.6532W, 6235W.

103
5. Using On-Screen Menu
[OPTIONS(2)]
SelectingStandbyconditionin[STANDBYMODE]Theprojectorhastwostandbymodes:[NORMAL]and[NETWORKSTANDBY].The[NORMAL]modeisthemodethatallowsyoutoputtheprojectorinthepower-savingconditionwhichconsumeslesspowerthanthe[NETWORKSTANDBY]mode.Theprojectorispresetforthe[NORMAL]modeatthefactory.
NORMAL �����������������������������POWER indicator: Red light/STATUS indicator: OffWhen [NORMAL] is selected, only the following buttons and feature will work:POWER button on the projector cabinet and the remote control, and powering on from PC Control command�
NETWORK STANDBY ����������POWER indicator: Orange light/STATUS indicator: OffWhen [NETWORK STANDBY] is selected, the projector can be turned on over a wired LAN connec-tion and only the following buttons, port, and features will work:POWER button on the projector cabinet and the remote control, powering on from PC Control command, AUTO POWER ON(COMP�), LAN port, wireless LAN unit (optional), Virtual Remote Tool, LAN feature, and Mail Alert feature�
Important:- When[NETWORKSTANDBY]isselected,[AUTOPOWEROFF]willturngreyincolorandbedisabled,and[0:15]willbeselectedautomatically.
NOTE:• Evenwhen[NORMAL]or[NETWORKSTANDBY]isselectedfor[STANDBYMODE],poweronoroffcanbedonebyusingthePCCONTROLport.
• ThepowerconsumptioninthestandbymodewillnotbeincludedincalculatingCO2emissionreduction.• Yoursettingwillnotbeaffectedevenwhen[RESET]isdonefromthemenu.
EnablingDirectPowerOn[DIRECTPOWERON]Turnstheprojectoronautomaticallywhenthepowercordisinsertedintoanactivepoweroutlet.ThiseliminatestheneedtoalwaysusethePOWERbuttonontheremotecontrolorprojectorcabinet.

104
5. Using On-Screen Menu
TurningOntheProjectorByApplyingComputerSignal[AUTOPOWERON(COMP.)]WhentheprojectorisinStandbymode,applyingacomputersignalfromacomputerconnectedtotheCOMPUTERINinputwillpowerontheprojectorandsimultaneouslyprojectthecomputer’simage.ThisfunctionalityeliminatestheneedtoalwaysusethePOWERbuttonontheremotecontrolortheprojectorcabinettopowerontheprojector.Tousethisfunction,firstconnectacomputertotheprojectorandtheprojectortoanactiveACinput.
NOTE:• Disconnectingacomputersignalfromthecomputerwillnotpowerofftheprojector.Werecommendusingthisfunctionincom-binationoftheAUTOPOWEROFFfunction.
• Thisfunctionwillnotbeavailableunderthefollowingconditions:- whenacomponentsignalisappliedtotheCOMPUTERINconnector- whenaSynconGreenRGBsignalorcompositesyncsignalisapplied- when[NORMAL]isselectedfor[STANDBYMODE].
• ToenabletheAUTOPOWERON(COMP.)afterturningofftheprojector,wait3secondsandinputacomputersignal. Ifacomputersignalisstillpresentwhentheprojectoristurnedoff,theAUTOPOWERON(COMP.)willnotworkandtheprojectorremainsinstandbymode.
EnablingPowerManagement[AUTOPOWEROFF]Whenthisoptionisselectedyoucanenabletheprojectortoautomaticallyturnoff(attheselectedtime:5min.,10min.,15min.,20min.,30min.,60min.)ifthereisnosignalreceivedbyanyinputorifnooperationisperformed.
NOTE:• Thisitemcanbeselectedonlywhen[NORMAL]isselectedfor[STANDBYMODE].• When[NETWORKSTANDBY]isselected,[AUTOPOWEROFF]willturngreyincolorandbedisabledand[0:15]willbeselectedautomatically.
Selecting Default Source [DEFAULT SOURCE SELECT]Youcansettheprojectortodefaulttoanyoneofitsinputseachtimetheprojectoristurnedon.
LAST ���������������������� Sets the projector to default to the previous or last active input each time the projector is turned on�AUTO ��������������������� Searches for an active source in order of COMPUTER → HDMI1 → HDMI2 → VIDEO → USB-A → USB-B
→ COMPUTER and displays the first found source�COMPUTER ����������� Displays the computer signal from the COMPUTER IN connector every time the projector is turned on�HDMI1 ������������������� Displays the digital source from the HDMI 1 IN connector every time the projector is turned on� HDMI2 ������������������� Displays the digital source from the HDMI 2 IN connector every time the projector is turned on� VIDEO �������������������� Displays the Video source from the VIDEO IN connector every time the projector is turned on�USB-A �������������������� Displays slides or plays back movie files from the USB memory device every time the projector is turned
on�LAN ������������������������ Displays a signal from LAN port (RJ-45) or the USB Wireless LAN Unit�USB-B �������������������� Displays the computer signal from the USB-B port every time the projector is turned on�

105
5. Using On-Screen Menu
Settingcarbonfootprintfactor[CARBONCONVERT]Adjuststhecarbonfootprintfactorinthecarbonsavingcalculation.Theinitialsettingis0.505[kg-CO2/kWh]basedontheCO2EmissionsfromFuelCombustion(2008Edition)publishedbyOECD.
Selectingyourcurrency[CURRENCY]Displayselectricitypricing(availablein4currencyunits).
$ ���������������������������� US Dollar€ ��������������������������� EU EuroJP¥ ������������������������ Japanese YenRMB¥ �������������������� Chinese Yuan
Changingcurrencysettingandcurrencyconvertsetting[CURRENCYCONVERT]ChangescurrencysettingandcurrencyconvertsettingforCARBONMETER.Theinitialsettingareasfollows:
US Dollar ��������������� 0�11 [$/kWh]EU Euro ����������������� 0�19 [€/kWh]Japanese Yen ��������� 20 [¥/kWh]Chinese Yuan ��������� 0�48 [¥/kWh]
TheinitialsettingsforUSdollar,EUEuro,andJapaneseYenarebasedon“EnergyPricesandTaxes(secondquarter2010”publishedbyOECD.TheinitialsettingforChineseYuanisbasedon“ChineseDataFile(2010)”publishedbyJETRO.

106
5. Using On-Screen Menu
[3D]
Selectinginputconnectedtoasourceof3Dimages[COMPUTER/HDMI1/HDMI2/VIDEO]
[3D]Thisfunctionswitchesthe3DmodebetweenONandOFFforeachinput.
ON ������������������������� Turns on the 3D mode for the selected input�
NOTE:Toconfirmthatthesupported3Dsignalisaccepted,useeitherwayofthefollowing:• Makesurethat[3D]isdisplayedinthetoprightofthescreenafterthesourceisselected.• Display[INFO.]→[SOURCE]→[3DSIGNAL]andmakesurethat“SUPPORTED”isdisplayed.
OFF ������������������������ Turns off the 3D mode for the selected input�
[GLASSES]Selecta3Dglassmethod.
DLP® Link �������������� For 3D eyeglasses (ones manufactured by XPAND are recommended) or DLP® Link compatible LCD shutter eyeglasses�
Others �������������������� For other LCD shutter eyeglasses such as IR or wired LCD shutter types�
[FORMAT]Sets3Dformat.NOTE:ThisoptionwillnotworkforVIDEOsource.
AUTO ����������������������������������Automatically selects the appropriate format� The supported format is HDMI 3D only�SIDE BY SIDE ���������������������Selects this format for the SIDE BY SIDE 3D image� SIDE BY SIDE is a format that stores the left
and right eye images displayed horizontally� Only the half of the horizontal resolution is supported TOP AND BOTTOM �������������Selects this format for the TOP AND BOTTOM 3D image� TOP AND BOTTOM is a format that stores the
left and right eye images displayed vertically� Only the half of the vertical resolution is supported�FRAME PACKING ����������������Selects this format for the FRAME PACKING 3D image� FRAM PACKING is a format that stores the
left and right eye images without compression�FRAME SEQUENTIAL ����������Selects this format for the FRAME SEQUENTIAL 3D image� FRAME SEQUENTIAL is a format that
displays the left and right eye images alternately� This format is available only for COMPUTER input�
NOTE:ThisfunctionwillnotworkforVIDEOsource.Thisoptionisavailableonlywhen[DLP®Link]isselectedfor[GLASSES].

107
5. Using On-Screen Menu
[L/RINVERT]Changethesettingifyouhavedifficultyseeing3Dimages.
NON-INVERT ��������� Normal setting�INVERT ������������������ Changes the order of displaying the images for left eye and right eye�
NOTE:Thisoptionisavailableonlywhen[DLP®Link]isselectedfor[GLASSES].

108
5. Using On-Screen Menu
Setting up the Projector for a Wired LAN Connection [WIRED LAN]
Important• Consultwithyournetworkadministratoraboutthesesettings.• WhenusingawiredLANconnection,connectaLANcable(Ethernetcable)totheLANport(RJ-45)oftheprojec-
tor.(→page127)
TIP:Thenetworksettingsyoumakewillnotbeaffectedevenwhen[RESET]isdonefromthemenu.
[WIREDLAN] [DISABLE] WiredLANconnectionwillbeturnedoff.
[ENABLE] WiredLANconnectionwillbeturnedon.
[SETTINGS] [DHCP] ON �������������������������� IP address, subnet mask, and gateway will be automatically assigned to the projector from your DHCP server�
OFF ������������������������� Specify IP address, subnet mask, and gate-way assigned by your network administra-tor�
[IPADDRESS] Set your IP address of the network connected to theprojector.
[SUBNETMASK] Setyoursubnetmasknumberofthenetworkconnectedtotheprojector.
[GATEWAY] Setthedefaultgatewayofthenetworkconnectedtotheprojector.
[AUTODNS] ON ��������������������������DHCP server will automatically assign IP address of DNS server connected to the projector�
OFF ������������������������� Set your IP address of DNS server connected to the projector�
[RECONNECT] Retrytoconnecttheprojectortoanetwork.
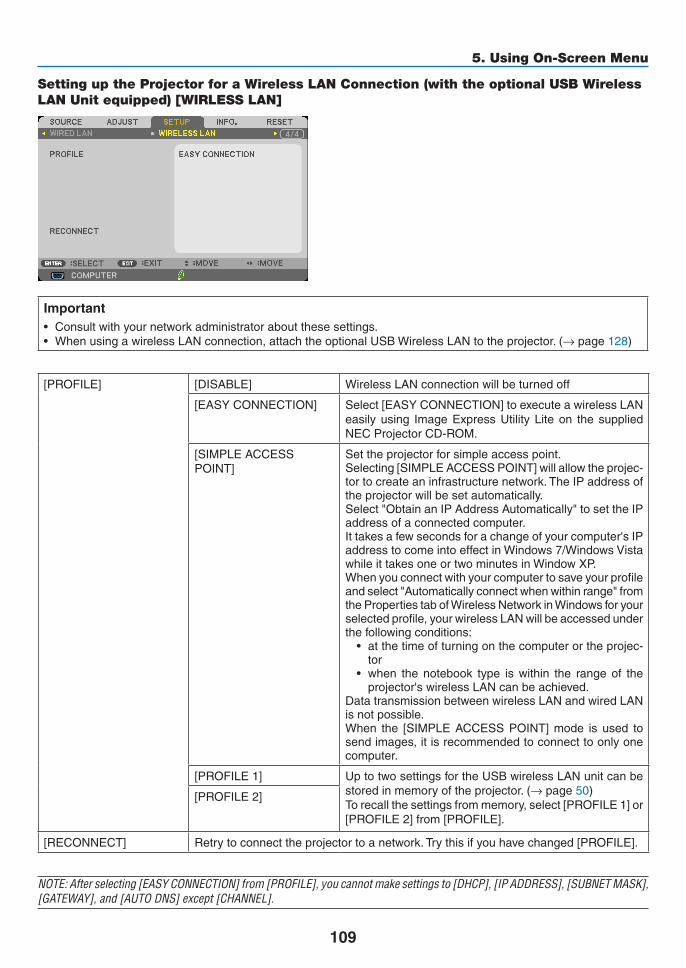
109
5. Using On-Screen Menu
Setting up the Projector for a Wireless LAN Connection (with the optional USB Wireless LAN Unit equipped) [WIRLESS LAN]
Important• Consultwithyournetworkadministratoraboutthesesettings.• WhenusingawirelessLANconnection,attachtheoptionalUSBWirelessLANtotheprojector.(→page128)
[PROFILE] [DISABLE] WirelessLANconnectionwillbeturnedoff
[EASYCONNECTION] Select[EASYCONNECTION]toexecuteawirelessLANeasilyusing ImageExpressUtilityLiteon thesuppliedNECProjectorCD-ROM.
[SIMPLEACCESSPOINT]
Settheprojectorforsimpleaccesspoint.Selecting[SIMPLEACCESSPOINT]willallowtheprojec-tortocreateaninfrastructurenetwork.TheIPaddressoftheprojectorwillbesetautomatically.Select"ObtainanIPAddressAutomatically"tosettheIPaddressofaconnectedcomputer.Ittakesafewsecondsforachangeofyourcomputer'sIPaddresstocomeintoeffectinWindows7/WindowsVistawhileittakesoneortwominutesinWindowXP.Whenyouconnectwithyourcomputertosaveyourprofileandselect"Automaticallyconnectwhenwithinrange"fromthePropertiestabofWirelessNetworkinWindowsforyourselectedprofile,yourwirelessLANwillbeaccessedunderthefollowingconditions:
• atthetimeofturningonthecomputerortheprojec-tor
• when the notebook type is within the range of theprojector'swirelessLANcanbeachieved.
DatatransmissionbetweenwirelessLANandwiredLANisnotpossible.When the [SIMPLEACCESSPOINT]mode isused tosendimages,itisrecommendedtoconnecttoonlyonecomputer.
[PROFILE1] UptotwosettingsfortheUSBwirelessLANunitcanbestoredinmemoryoftheprojector.(→page50)Torecallthesettingsfrommemory,select[PROFILE1]or[PROFILE2]from[PROFILE].
[PROFILE2]
[RECONNECT] Retrytoconnecttheprojectortoanetwork.Trythisifyouhavechanged[PROFILE].
NOTE:Afterselecting[EASYCONNECTION]from[PROFILE],youcannotmakesettingsto[DHCP],[IPADDRESS],[SUBNETMASK],[GATEWAY],and[AUTODNS]except[CHANNEL].

110
5. Using On-Screen Menu
Hints on How to Set Up LAN Connection
TosetuptheprojectorforaLANconnection:AccesstheHTTPserverfunctiontodisplaythewebbrowser(→page47)andselect[NETWORKSETTINGS]→ [SETTINGS]→[WIRELESSLAN]→[PROFILE1]or[PROFILE2].TwosettingscanbesetfortheUSBWirelessLANUnit.Nextselect[SETTINGS]foryourselectedprofile,andset[ENABLE]or[DISABLE]for[DHCP],[IPADDRESS],[SUBNETMASK],and[GATEWAY].Lastclick[SAVE].Toreflectchanges,clickthe[SETTING]tabandthenclick[APPLY].(→page50)
TorecallLANsettingsstoredintheprofilenumber:Touse[PROFILE1]or[PROFILE2]setontheHTTPserver,fromtheprojector’menu,select[SETUP]→[WIRE-LESSLAN]→[PROFILE]→[PROFILE1]or[PROFILE2].Lastselect[YES]andpresstheENTERbutton.(→ page109)
To connect a DHCP server:Fromtheprojectormenu,select[SETUP]→[WIREDLAN]→[SETTINGS]→[DHCP]→[ON]andpresstheENTERbutton.TospecifyIPaddresswithoutusingtheDHCPserver,usetheHTTPserverfunction.(→page47)
TosetonlyforwirelessLAN(NETWORKTYPEandWEP/WPA):AccesstheHTTPserverfunctiontodisplaythewebbrowser(→page47)andselect[NETWORKSETTINGS]→ [SETTINGS]→[WIRELESSLAN]→[PROFILE1]or[PROFILE2].Makenecessarysettingsfor[SETTINGS]andclick[SAVE].Fromtheprojectormenu,select[SETUP]→[WIRELESSLAN]→[PROFILE]→[PROFILE1]or[PROFILE2].
To select an SSID:AccesstheHTTPserverfunctiontodisplaythewebbrowser(→page47)andselect[NETWORKSETTINGS]→ [SETTINGS]→[WIRELESSLAN]→[CONNECTION]→[SITESURVEY]andselecttheID.Ifyoudonotuse[SITESURVEY],typetheSSIDin[CONNECTION]andselect[INFRASTRUCTURE]or[ADHOC].(→page50)
Toreceivelampreplacementtimeorerrormessagesviae-mail:AccesstheHTTPserverfunctiontodisplaythewebbrowser(→page47)andselect[NETWORKSETTINGS]→ [ALERTMAIL],andset[SENDER’SADDRESS],[SMTPSERVERNAME],and[RECIPIENT’SADDRESS].Last,click[SAVE].(→page52)
Toexecute[EASYCONNECTION]usingImageExpressUtilityLite:The[EASYCONNECTION]isamodethatcanabbreviatethetroublesomeLANsettingswhenusingtheImageExpressUtilityLiteandconnectingthePCandprojectorviaawirelessLAN.TheImageExpressUtilityLiteiscontainedonthesuppliedNECProjectorCD-ROM.
Touse[EASYCONNECTION],accesstheHTTPserverfunctiontodisplaythewebbrowser(→page47)andselect[NETWORKSETTINGS]→[SETTINGS]→[WIRELESSLAN]→[EASYCONNECTION].Nextselect[SETTINGS]→[CHANNEL].Lastclick[SAVE].Fromtheprojectormenu,select[SETUP]→[WIRELESSLAN]→[PROFILE]→[EASYCONNECTION].

111
5. Using On-Screen Menu
❼ Menu Descriptions & Functions [INFO.]Displaysthestatusofthecurrentsignalandlampusage.Thisitemhassixpages.Theinformationincludedisasfollows:
TIP:PressingtheHELPbuttonontheremotecontrolwillshowthe[INFO.]menuitems.
[USAGE TIME]
[LAMPLIFEREMAINING](%)*[LAMPHOURSUSED](H)[TOTALCARBONSAVINGS](kg-CO2)[TOTALCOSTSAVINGS]($)
* Theprogressindicatorshowsthepercentageofremainingbulblife.
Thevalueinformsyouoftheamountoflampusage.Whentheremaininglamptimereaches0,theLAMPLIFEREMAININGbarindicatorchangesfrom0%to100Hoursandstartscountingdown.
Iftheremaininglamptimereaches0hours,theprojectorwillnotturnon.
• Themessagetotheeffectthatthelampshouldbereplacedwillbedisplayedforoneminutewhentheprojec-toristurnedonandwhenthePOWERbuttonontheprojectorortheSTANDBYbuttonontheremotecontrolispressed.
Todismissthismessage,pressanybuttonontheprojectorortheremotecontrol.
Lamplife(H) BrightnessbymodeOFF AUTO ECO NORMAL ECO OFF AUTO ECO NORMAL ECO
M402W 3500H 3500Hto6000H
5000H 8000H 100% OFFthruECO
Approx.81% Approx.60%65406235W6233M362W 3500H 3500Hto
6500H5000H 8000H Approx.74%
M362X6532W 3500H 3500Hto
7000H5500H 8000H Approx.76%
6532M302WS6528 4500H 4500Hto
8000H6000H 10000H Approx.78%
• [TOTALCARBONSAVINGS]
Thisdisplaystheestimatedcarbonsavinginformationinkg.Thecarbonfootprintfactorinthecarbonsavingcal-culationisbasedontheOECD(2008Edition).(→page34)

112
5. Using On-Screen Menu
[SOURCE(1)]
[RESOLUTION] [HORIZONTALFREQUENCY][VERTICALFREQUENCY] [SYNCTYPE][SYNCPOLARITY] [SCANTYPE]
[SOURCE(2)]
[SIGNALTYPE] [VIDEOTYPE][BITDEPTH] [VIDEOLEVEL][3DSIGNAL]
[WIRED LAN]
[IPADDRESS] [SUBNETMASK][GATEWAY] [MACADDRESS]

113
5. Using On-Screen Menu
[WIRELESS LAN]
[IPADDRESS] [SUBNETMASK][GATEWAY] [MACADDRESS][SSID] [NETWORKTYPE][WEP/WPA] [CHANNEL][SIGNALLEVEL]
[VERSION(1)]
[FIRMWARE]Version[DATA]Version
[VERSION(2)]
[FIRMWARE2]Version
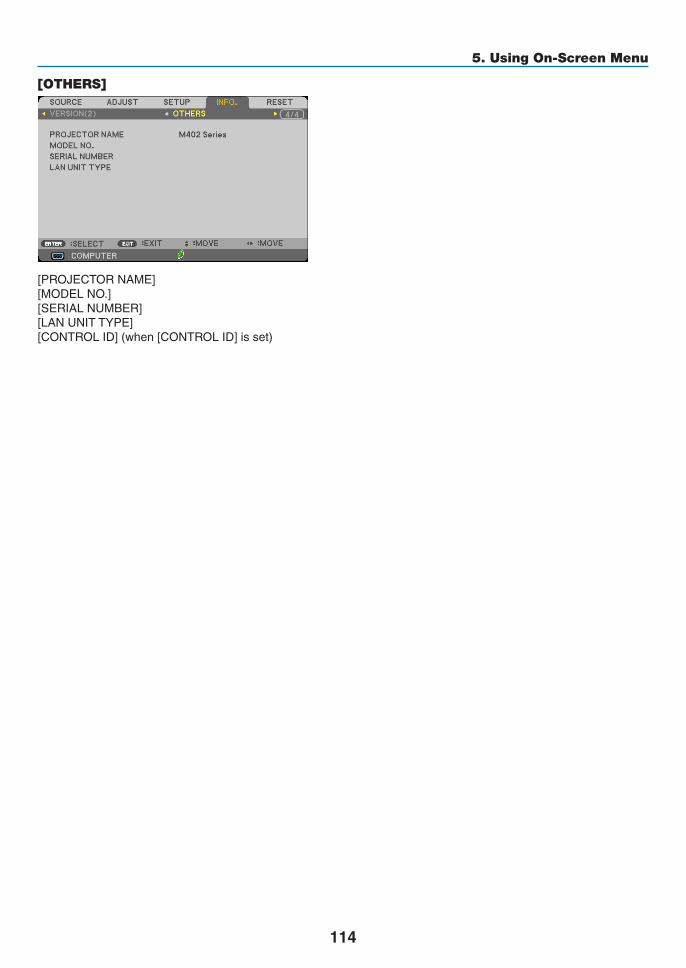
114
5. Using On-Screen Menu
[OTHERS]
[PROJECTORNAME][MODELNO.][SERIALNUMBER][LANUNITTYPE][CONTROLID](when[CONTROLID]isset)

115
5. Using On-Screen Menu
❽ Menu Descriptions & Functions [RESET]
Returning to Factory Default [RESET]TheRESETfeatureallowsyoutochangeadjustmentsandsettingstothefactorypresetfora(all)source(s)exceptthefollowing:
[CURRENTSIGNAL]Resetstheadjustmentsforthecurrentsignaltothefactorypresetlevels.Theitemsthatcanberesetare:[PRESET],[CONTRAST],[BRIGHTNESS],[COLOR],[HUE],[SHARPNESS],[ASPECTRATIO],[HORIZONTAL],[VERTICAL],[CLOCK],[PHASE],[OVERSCAN],[NOISEREDUCTION],and[TELECINE].
[ALLDATA]Resetalltheadjustmentsandsettingsforallthesignalstothefactorypreset.All items can be reset EXCEPT [LANGUAGE], [BACKGROUND], [SECURITY], [COMMUNICATIONSPEED],[CONTROLID],[STANDBYMODE],[FANMODE],[CARBONCONVERT],[CURRENCY],[CURRENCYCON-VERT], [LAMPLIFEREMAINING], [LAMPHOURSUSED], [TOTALCARBONSAVINGS], [WIREDLAN],and[WIRELESSLAN].Toresetthelampusagetime,see“ClearingLampHourMeter[CLEARLAMPHOURS]”below.
Clearing Lamp Hour Meter [CLEAR LAMP HOURS]Resetsthelampclockbacktozero.Selectingthisoptiondisplayssubmenuforaconfirmation.Select[YES]andpresstheENTERbutton.
NOTE:Elapsedtimeofthelampusewillnotbeaffectedevenwhen[RESET]isdonefromthemenu.
NOTE:Theprojectorwillturnoffandgointostandbymodewhenyoucontinuetousetheprojectorforanother100hoursafterthelamphasreachedtheendofitslife.Inthisconditionyoucannotclearthelamphourmeteronthemenu.Ifthishappens,presstheHELPbuttonontheremotecontrolfor10secondstoresetthelampclockbacktozero.Dothisonlyafterreplacingthelamp.

116
6. Installation and Connections
32
1
Thissectiondescribeshowtosetupyourprojectorandhowtoconnectvideoandaudiosources.Yourprojectorissimpletosetupanduse.Butbeforeyougetstarted,youmustfirst:
① Setupascreenandtheprojector.
② Connectyourcomputerorvideoequip-menttotheprojector.
(→ page 121, 123, 124, 125, 126, 127)
③ Connect the supplied power cord. (→page16)
NOTE:Ensurethatthepowercordandanyothercablesaredisconnectedbeforemovingthepro-jector.Whenmovingtheprojectororwhenitisnot inuse,cover the lenswith thesliding lenscover.
❶ Setting Up the Screen and the ProjectorSelecting a Location
[6540/6532/6528Thefurtheryourprojectorisfromthescreenorwall,thelargertheimage.Theminimumsizetheimagecanbeisapproximately30"(0.76m)measureddiagonallywhentheprojectorisroughly48inches(1.2m)fromthewallorscreen.Thelargesttheimagecanbeis300"(7.6m)whentheprojectorisabout499inches(12.7m)fromthewallor screen.
300"
Distance (Unit: m/inch)
Lens center
Screen Size
Screen Size (Unit: cm/inch)
200"
150"
120"100"
80"
12.7/498"
6.3/248"
5.0/198"
4.2/164"
3.3/131"2.5/97"
1.6/64"
40"8.4/331"
60"
30"
1.2/47"
609.6(W)�457.2(H) / 240(W)�180(H)
406.4(W)�304.8(H) / 160(W)�120(H)
304.8(W)�228.6(H) / 120(W)�90(H)
243.8(W)�182.9(H) / 96(W)�72(H)
203.2(W)�152.4(H) / 80(W)�60(H)
162.6(W)�121.9(H) / 64(W)�48(H)
121.9(W)�91.4(H) / 48(W)�36(H)
81.3(W)�61.0(H) / 32(W)�24(H)
61.0(W)�45.7(H) / 24(W)�18(H)
TIP:• Thedistancesareindicatedbyintermediatevaluesbetweenteleandwide.Useasaruleofthumb.• Formoredetailsonthrowdistance,seepage119.
To the wall outlet.

117
6. Installation and Connections
[6532W]Thefurtheryourprojectorisfromthescreenorwall,thelargertheimage.Theminimumsizetheimagecanbeisapproximately30"(0.76m)measureddiagonallywhentheprojectorisroughly41inches(1.0m)fromthewallorscreen.Thelargesttheimagecanbeis300"(7.6m)whentheprojectorisabout423inches(10.7m)fromthewallor screen.
300"
Distance (Unit: m/inch)
Screen Size
Screen Size (Unit: cm/inch)
200"
150"
120"100"
80"
10.7/422"
5.3/210"
4.2/167"
3.5/139"
2.8/111"2.1/82"
1.4/54"
40"7.1/280"
60"
30"
1.0/40"
646.2(W)�403.9(H) / 254(W)�159(H)
430.8(W)�269.2(H) / 170(W)�106(H)
323.1(W)�201.9(H) / 127(W)�79(H)
258.5(W)�161.5(H) / 102(W)�64(H)
215.4(W)�134.6(H) / 85(W)�53(H)
172.3(W)�107.7(H) / 68(W)�42(H)
129.2(W)�80.8(H) / 51(W)�32(H)
86.2(W)�53.8(H) / 34(W)�21(H)
64.6(W)�40.4(H) / 25(W)�16(H)
Lens center
TIP:• Thedistancesareindicatedbyintermediatevaluesbetweenteleandwide.Useasaruleofthumb.• Formoredetailsonthrowdistance,seepage119.
[6233]Thefurtheryourprojectorisfromthescreenorwall,thelargertheimage.Theminimumsizetheimagecanbeisap-proximately60"(1.52m)measureddiagonallywhentheprojectorisroughly27inches(0.68m)fromthewallorscreen.Thelargesttheimagecanbeis150"(3.8m)whentheprojectorisabout69inches(1.8m)fromthewallorscreen.
150"
120"
Distance (Unit: m/inch)
Lens center
Screen Size
1.4/55" 1.8/69.2"
1.2/45.5"0.9/36"
0.7/26.6"
203.2(W)�152.4(H) / 80(W)�60(H)
162.6(W)�121.9(H) / 64(W)�48(H)
121.9(W)�91.4(H) / 48(W)�36(H)
Screen Size (Unit: cm/inch)
304.8(W)�228.6(H) / 120(W)�90(H)
243.8(W)�182.9(H) / 96(W)�72(H)
100"
80"
60"
TIP:• DigitalZoomcanresultinablurryimageduetotheelectroniczoom.• Formoredetailsonthrowdistance,seepage119.

118
6. Installation and Connections
[6235W]Thefurtheryourprojectorisfromthescreenorwall,thelargertheimage.Theminimumsizetheimagecanbeisap-proximately60"(1.52m)measureddiagonallywhentheprojectorisroughly22inches(0.6m)fromthewallorscreen.Thelargesttheimagecanbeis150"(3.8m)whentheprojectorisabout58inches(1.5m)fromthewallorscreen.
150"
120"
Distance (Unit: m/inch)
Lens center
Screen Size
1.2/46.3" 1.5/58.3"
1/38.3"
0.8/30.3"
0.6/22.2"
Screen Size (Unit: cm/inch)
323.1(W)�201.9(H) / 127(W)�79(H)
258.5(W)�161.5(H) / 102(W)�64(H)
100"
80"
60"
215.4(W)�134.6(H) / 85(W)�53(H)
172.3(W)�107.7(H) / 68(W)�42(H)
129.2(W)�80.8(H) / 51(W)�32(H)
TIP:• DigitalZoomcanresultinablurryimageduetotheelectroniczoom.• Formoredetailsonthrowdistance,seepage119.

119
6. Installation and Connections
B
D
C
α
Throw Distance and Screen SizeThefollowingshowstheproperrelativepositionsof theprojectorandscreen.Refer to thetabletodeterminethepositionofinstallation.
Distance Chart
B= Vertical distance between lens center andscreen center
C= ThrowdistanceD= Vertical distance between lens center and
screenbottom(topofscreenforceilingap-plication)
α= Throwangle
NOTE:Thevalues in the tablesaredesignvaluesandmayvary.
[6528, 6532, 6540]Screen Size B C D
αDiagonal Width Height wide tele wide tele
inch mm inch mm inch mm inch mm inch mm - inch mm inch mm degree - degree30 762 24 610 18 457 12 297 35 892 - 60 1523 3 69 17�6 - 10�5 40 1016 32 813 24 610 16 396 47 1206 - 81 2056 4 91 17�5 - 10�5 60 1524 48 1219 36 914 23 594 72 1833 - 123 3123 5 137 17�5 - 10�5 80 2032 64 1626 48 1219 31 792 97 2461 - 165 4192 7 183 17�5 - 10�5 90 2286 72 1829 54 1372 35 892 109 2775 - 186 4725 8 206 17�5 - 10�5
100 2540 80 2032 60 1524 39 990 122 3088 - 207 5258 9 228 17�5 - 10�5 120 3048 96 2438 72 1829 47 1188 146 3716 - 249 6324 11 274 17�5 - 10�5 150 3810 120 3048 90 2286 59 1486 183 4658 - 312 7925 14 343 17�5 - 10�5 200 5080 160 4064 120 3048 78 1981 245 6228 - 417 10594 18 457 17�5 - 10�5 300 7620 240 6096 180 4572 117 2971 369 9367 - 627 15931 27 685 17�5 - 10�5
[6532W]Screen Size B C D
αDiagonal Width Height wide tele wide tele
inch mm inch mm inch mm inch mm inch mm - inch mm inch mm degree - degree30 762 25 646 16 404 10 252 29 749 - 50 1278 2 50 17�6 - 10�5 40 1016 34 862 21 538 13 336 40 1015 - 68 1731 3 67 17�6 - 10�5 60 1524 51 1292 32 808 20 504 61 1547 - 104 2636 4 100 17�5 - 10�5 80 2032 68 1723 42 1077 26 672 82 2080 - 139 3541 5 133 17�5 - 10�5 90 2286 76 1939 48 1212 30 756 92 2346 - 157 3995 6 151 17�5 - 10�5
100 2540 85 2154 53 1346 33 840 103 2611 - 175 4447 7 167 17�5 - 10�5 120 3048 102 2585 64 1615 40 1008 124 3144 - 211 5353 8 200 17�5 - 10�5 150 3810 127 3231 79 2019 50 1260 155 3942 - 264 6708 10 250 17�5 - 10�5 200 5080 170 4308 106 2692 66 1680 208 5273 - 353 8971 13 333 17�5 - 10�5 300 7620 254 6462 159 4039 99 2520 312 7936 - 531 13497 20 500 17�5 - 10�5
[6233]Screen Size B C D
αDiagonal Width Height wide wide
inch mm inch mm inch mm inch mm inch mm inch mm degree60 1524 48 1219 36 914 24 617 27 675 6 160 40�880 2032 64 1626 48 1219 32 823 36 915 8 214 40�8
100 2540 80 2032 60 1524 41 1029 46 1156 11 267 40�7120 3048 96 2438 72 1829 49 1235 55 1396 13 320 40�7150 3810 120 3048 90 2286 61 1543 69 1757 16 400 40�7
[6235W]Screen Size B C D
αDiagonal Width Height wide wide
inch mm inch mm inch mm inch mm inch mm inch mm degree60 1524 51 1292 32 808 21 524 22 565 5 120 40�980 2032 68 1723 42 1077 27 698 30 769 6 160 40�8
100 2540 85 2154 53 1346 34 873 38 973 8 199 40�8120 3048 102 2585 64 1615 41 1047 46 1177 9 239 40�7150 3810 127 3231 79 2019 52 1309 58 1482 12 299 40�7
Screen center
Lens center
Screen bottom

120
6. Installation and Connections
WARNING* Installingyourprojectorontheceilingmustbedonebyaqualifiedtechnician.ContactyourDukanedealerformore
information.* Donotattempttoinstalltheprojectoryourself.• Onlyuseyourprojectoronasolid, levelsurface.Iftheprojectorfallstotheground,youcanbeinjuredandthe
projectorseverelydamaged.• Donotusetheprojectorwheretemperaturesvarygreatly.Theprojectormustbeusedattemperaturesbetween
41°F(5°C)and104°F(40°C)(Ecomodeselectedautomaticallyat95°Fto104°F/35°Cto40°C).• Donotexposetheprojectortomoisture,dust,orsmoke.Thiswillharmthescreenimage.• Ensurethatyouhaveadequateventilationaroundyourprojectorsoheatcandissipate.Donotcovertheventson
thesideorthefrontoftheprojector.
Reflecting the ImageUsingamirrortoreflectyourprojector’simageenablesyoutoenjoyamuchlargerimagewhenasmallerspaceisrequired.ContactyourDukanedealerifyouneedamirrorsystem.Ifyou’reusingamirrorsystemandyourimageisinverted,usetheMENUand▲▼◀▶buttonsonyourprojectorcabinetoryourremotecontroltocorrecttheorienta-tion.(→page99)

121
6. Installation and Connections
HDMI 2 IN
HDMI 1 IN
COMPUTER INUSB-B
AUDIO IN
Computer cable (VGA) (supplied)To mini D-Sub 15-pin connector ontheprojector.Itisrecommend-ed that you use a commercially available distribution amplifier if connecting a signal cable longer than the cable supplied.
NOTE:ForMac,useacommerciallyavailable pin adapter (not sup-plied) to connect to yourMac’svideoport.
A commercially available USB cable (compatible with USB 2.0 specifications)
Stereo mini-plug audio cable (not supplied)
❷ Making ConnectionsNOTE:WhenusingwithanotebookPC,besuretoconnecttheprojectorandnotebookPCwhiletheprojectorisinstandbymodeandbeforeturningonthepowertothenotebookPC.InmostcasestheoutputsignalfromthenotebookPCisnotturnedonunlessconnectedtotheprojectorbeforebeingpoweredup.* Ifthescreengoesblankwhileusingyourremotecontrol,itmaybetheresultofthecomputer’sscreen-saverorpowermanage-mentsoftware.
Enabling the computer’s external displayDisplayinganimageonthenotebookPC’sscreendoesnotnecessarilymeanitoutputsasignaltotheprojector.WhenusingaPCcompatiblelaptop,acombinationoffunctionkeyswillenable/disabletheexternaldisplay.Usually,thecombinationofthe“Fn”keyalongwithoneofthe12functionkeysgetstheexternaldisplaytocomeonoroff.Forexample,NEClaptopsuseFn+F3,whileDelllaptopsuseFn+F8keycombinationstotogglethroughexternaldisplayselections.
Connecting Your Computer
NOTE:SignalssupportedbyPlug&Play(DDC2)
INPUTCOMPUTER IN HDMI 1 IN HDMI 2 IN
analog digital digitalYes Yes Yes
HDMIcable(notsupplied)UseHighSpeedHDMI® Cable.
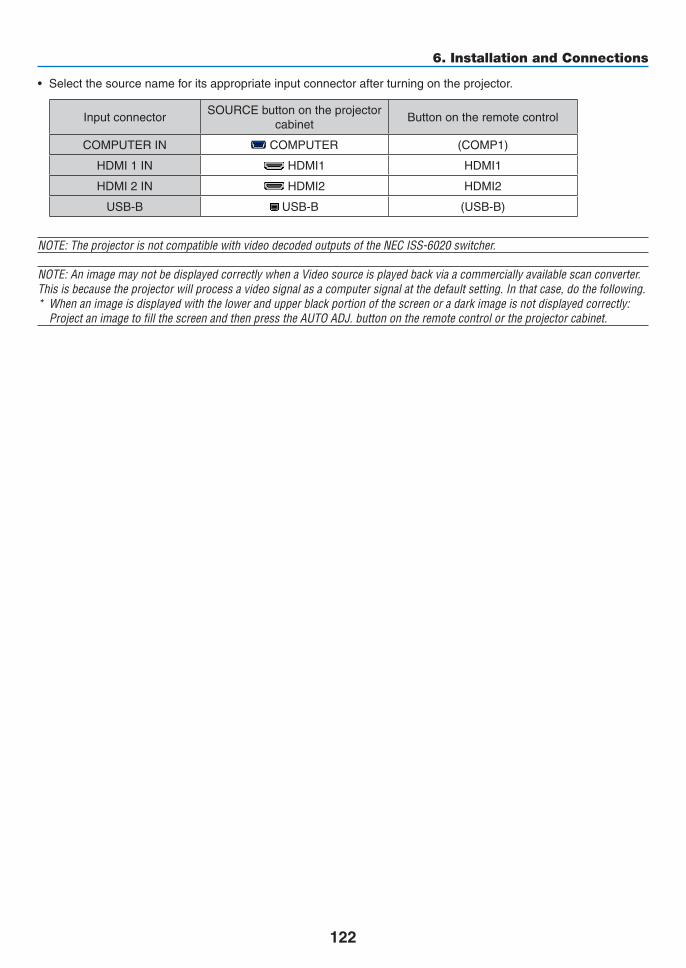
122
6. Installation and Connections
• Selectthesourcenameforitsappropriateinputconnectorafterturningontheprojector.
InputconnectorSOURCEbuttonontheprojector
cabinetButtonontheremotecontrol
COMPUTERIN COMPUTER (COMP1)
HDMI1IN HDMI1 HDMI1
HDMI2IN HDMI2 HDMI2
USB-B USB-B (USB-B)
NOTE:TheprojectorisnotcompatiblewithvideodecodedoutputsoftheNECISS-6020switcher.
NOTE:AnimagemaynotbedisplayedcorrectlywhenaVideosourceisplayedbackviaacommerciallyavailablescanconverter.Thisisbecausetheprojectorwillprocessavideosignalasacomputersignalatthedefaultsetting.Inthatcase,dothefollowing.* Whenanimageisdisplayedwiththelowerandupperblackportionofthescreenoradarkimageisnotdisplayedcorrectly: ProjectanimagetofillthescreenandthenpresstheAUTOADJ.buttonontheremotecontrolortheprojectorcabinet.

123
6. Installation and Connections
Connecting an External Monitor
Youcanconnectaseparate,externalmonitortoyourprojectortosimultaneouslyviewonamonitorthecomputeranalogimageyou’reprojecting.
NOTE:• Daisychainconnectionisnotpossible.• Whenaudioequipmentisconnected,theprojectorspeakerisdisabled.
Monitoroutandsleepmode:• TheMONITOROUT(COMP.)connectorwillnotworkwhen[NORMAL]isselectedfor[STANDBYMODE]. TheMONITOROUT(COMP.)connectorwillworkonlyinthesleepmode. ApplyingasignalfromtheCOMPUTERINconnectorwillputtheprojectorinthesleepmode,whichallowsyouto
usetheMONITOROUT(COMP.)connectorandtheAUDIOOUTminijack.SoundfromtheMICinputjackwillbeoutputtotheAUDIOOUTminijack.
Thesleepmodeisoneofthestandbymodes.Thesleepmodecannotbeselectedfromthemenu.• Inthenetworkstandbymode,soundforthelastviewedcomputerorvideosourcewillbeheard. BNC-to-D-SUBconvertedsignalwillnotbeoutputinthestandbymodeandsleepmode.
MONITOR OUT(COMP.)AUDIO OUT
AUDIO IN
COMPUTER IN
Computer cable (VGA) (supplied)
Stereo mini-plug audio cable (not supplied)
Computer cable (VGA) (not supplied)

124
6. Installation and Connections
Connecting Your DVD Player or Other AV EquipmentConnectingVideoInput
• Selectthesourcenameforitsappropriateinputconnectorafterturningontheprojector.
InputconnectorSOURCEbuttonontheprojector
cabinetButtonontheremotecontrol
VIDEOIN VIDEO (VIDEO)
NOTE:TheAUDIOINLandRjacks(RCA)aresharedbetweentheVideoinputs.
NOTE:RefertoyourVCRowner’smanualformoreinformationaboutyourequipment’svideooutputrequirements.
NOTE:An imagemaynotbedisplayedcorrectlywhenaVideosource isplayedback in fast-forwardor fast-rewindviaascanconverter.
VIDEO IN
AUDIO IN
Audio cable (not supplied)Video cable (not supplied)
Audio equipment
Audio cable (not supplied)

125
6. Installation and Connections
Connecting Component Input
• Selectthesourcenameforitsappropriateinputconnectorafterturningontheprojector.
InputconnectorSOURCEbuttonontheprojector
cabinetButtonontheremotecontrol
COMPUTERIN COMPUTER (COMP1)
NOTE:RefertoyourDVDplayer’sowner’smanualformoreinformationaboutyourDVDplayer’svideooutputrequirements.
COMPUTER INAUDIO IN
Audio cable (not supplied)
15-pin - to - RCA (fe-male) × 3 cable adapter (ADP-CV1E)
Stereo mini plug - to - RCA audio cable (not supplied)
Component video RCA × 3 cable (not supplied)
DVD player
Audio Equipment

126
6. Installation and Connections
HDMI 2 INHDMI 1 IN
Connecting HDMI InputYoucanconnecttheHDMIoutputofyourDVDplayer,harddiskplayer,Blu-rayplayer,ornotebooktypePCtotheHDMIINconnectorofyourprojector.NOTE:TheHDMIINconnectorsupportsPlug&Play(DDC2B).
Audio cable (not supplied)
HDMIcable(notsupplied)UseHighSpeedHDMI® Cable.
InputconnectorSOURCEbuttonontheprojector
cabinetButtonontheremotecontrol
HDMI1IN HDMI1 HDMI1
HDMI2IN HDMI2 HDMI2
TIP:ForusersofaudiovideoequipmentwithanHDMIconnector:Select“Enhanced”ratherthan“Normal”ifHDMIoutputisswitchablebetween“Enhanced”and“Normal”.Thiswillprovideimprovedimagecontrastandmoredetaileddarkareas.Formoreinformationonsettings,refertotheinstructionmanualoftheaudiovideoequipmenttobeconnected.
• WhenconnectingtheHDMIINconnectoroftheprojectortotheDVDplayer,theprojector’svideolevelcanbemadesettingsinaccordancewiththeDVDplayer’svideolevel.Inthemenuselect[HDMISETTINGS]→[VIDEOLEVEL]andmakenecessarysettings.
• IftheHDMIinputsoundcannotbeheard,inthemenuselect[HDMISETTINGS]→[AUDIOSELECT]→[HDMI1]or[HDMI2].
Audio Equipment

127
6. Installation and Connections
Connecting to a Wired LANTheprojectorcomesstandardwithaLANport(RJ-45)whichprovidesaLANconnectionusingaLANcable.TouseaLANconnection,youarerequiredtosettheLANontheprojectormenu.Select[SETUP]→[WIREDLAN].(→page108).
Example of LAN connectionExampleofwiredLANconnection
Server
Hub
LAN cable (not supplied)
NOTE:UseaCategory5orhigherLANcable.

128
6. Installation and Connections
Connecting to a Wireless LAN (Optional: NP02LM series)TheUSBWirelessLANUnitalsoprovidesawirelessLANconnection.TouseawirelessLANconnection,youarerequiredtoassignanIPaddresstotheprojector.
Important:• IfyouusetheprojectorwiththeUSBWirelessLANUnitintheareawheretheuseofwirelessLANequipmentis
prohibited,removetheUSBWirelessLANUnitfromtheprojector.
• BuytheappropriateUSBWirelessLANUnitforyourcountryorarea.
NOTE:• WhentheprojectoristurnedonwiththeoptionalwirelessLANunitinserted,theindicatorwilllightupblueandthegreenLEDontheUSBWirelessLANUnitflashestoshowthattheUSBWirelessLANUnitisworking.
• Yourcomputer’swirelessLANadapter(orunit)mustbecompliedwithWi-Fi(IEEE802.11b/g/n)standard.
Flow of Setting Wireless LANStep 1: Attach the USB Wireless LAN Unit to the projector.
Step 2: ConnectthecomputertotheprojectorviawiredLAN.(→page127)
Usethecomputer’sbrowsertodisplaytheprojector’sHTTPserver.(→page47)
Step 3: UseanHTTPservertosetthewirelessLAN.(→page50)
AccesstheHTTPserverfunctiontoset[NETWORKSETTINGS]→[SETTINGS]→[WIRELESS]→ [EASYCONNECTION],[SIMPLEACCESSPOINT],[PROFILE1]or[PROFILE2].
NOTE:• TousetheHTTPserverfunction,theprojectormustbeconnectedtoanetwork. FirstusethewiredLANtoconnecttheprojectortoanetworkandthenusetheHTTPservertosetthewirelessLAN.• AftersettingthewirelessLANbyusingtheHTTPserver,set[NETWORKSETTINGS]→[SETTINGS]→[WIRED]→[DISABLE]
WhenswitchingtosetontheprojectorafterconnectingtothewirelessLAN:UsethemenutosetthewirelessLANconnectionfortheprojector.(→page109)Select[DISABLE],[EASYCONNECTION],[PROFILE1]or[PROFILE2]yousetfromtheHTTPserver.
Attaching the USB Wireless LAN Unit
NOTE:• TheUSBWirelessLANUnitmustbeinsertedintotheUSBWirelessLANUnitportinthecorrectdirection.Itcannotbeinsertedinthereversedirection.IftheUSBWirelessLANUnitisinsertedinthereversedirectionwithexcessiveforceapplied,theUSBportmaybreak.
• BeforetouchingtheUSBWirelessLANUnit,touchametallicobject(suchasadoorknoboraluminumwindowframe)todischargethestaticelectricityfromyourbody.
• AlwaysinsertorremovetheUSBWirelessLANunitwhenthemainpoweristurnedoff.FailuretodosomaycauseprojectormalfunctionordamagetotheUSBwirelessLANunit.Iftheprojectorwillnotworkcorrectly,turnofftheprojector,disconnectthepowercord,andthenconnectitagain.
• DonotinsertotherUSBdevicesintotheUSBWirelessLANunitport.DonotinserttheUSBWirelessLANunitintotheUSB-Bport(TypeB).

129
6. Installation and Connections
PrepareaPhillipsscrewdriverbeforehand.
1. PressthePOWERbuttontoturnofftheprojectorandsetitintostandbycondition,anddisconnectthepowercord.
2. RemovetheUSB(LAN)portcover.
Loosen the screw securing the port cover.
•Thescrewisnotremovable.
3. SlowlyinserttheUSBWirelessLANUnitintotheUSB(LAN)port.
Remove the cap from the USB Wireless LAN Unit, and then insert it with the surface (side of indicator) facing outward. Keep the cap for later use.
NOTE:DonotforcetoinserttheUSBWirelessLANUnit.
4. PuttheUSB(LAN)portcoverbackintoplace.
InsertthecatchoftheUSB(LAN)portcoverintothegrooveoftheprojector cabinet, and then tighten the screw to secure the port cover.
ToremovetheUSBWirelessLANUnit,disconnectthepowercordandusetheaboveprocedure.
NOTE:• ThegreenLEDontheUSBWirelessLANUnitflashestoshowthatWirelessLANUnitisworking.IftheUSBWirelessLANUnitisincorrectlyattached,theblueLEDwillnotflash.
• DonotpressthebuttonontheUSBWirelessLANUnit.Thebuttonwillnotworkwiththismodel.

130
6. Installation and Connections
ExampleofwirelessLANconnection(NetworkType→Infrastructure)
PC with wireless LAN card inserted
PC with built-in wireless LAN function
Wired LAN
Wireless access point
USB Wireless LAN Unit
Toenabledirect communication (i.e.,peer-to-peer)betweenpersonal computersandprojectors, youneed toselecttheAdHocmode.
UsetheHTTPserverfunctiontomakethesettings.(→page47)
PC with wireless LAN card inserted
PC with built-in wireless LAN function
UsetheHTTPserverfunctiontomakethesettings.(→page47)
ExampleofwirelessLANconnection(NetworkType→AdHoc)
USB Wireless LAN Unit

131
Thissectiondescribes thesimplemaintenanceproceduresyoushould followtocleanthe lens, thecabinet,and toreplacethelamp.
❶ Cleaning the Lens
WARNING• Donotsprayflammablegastogetridofdustanddirtthataccumulateinthelens.Doingsocouldcausea
fire.
• Turnofftheprojectorbeforecleaning.
• Theprojectorhasaplasticlens.Useacommerciallyavailableplasticlenscleaner.
• Donotscratchormarthelenssurfaceasaplasticlensiseasilyscratched.
• Neverusealcoholorglasslenscleanerasdoingsowillcausedamagetotheplasticlenssurface.
❷ Cleaning the CabinetTurnofftheprojector,andunplugtheprojectorbeforecleaning.• Useadrysoftclothtowipedustoffthecabinet.
Ifheavilysoiled,useamilddetergent.
• Neverusestrongdetergentsorsolventssuchasalcoholorthinner.
• Whencleaningtheventsorthespeakerusingavacuumcleaner,donotforcethebrushofthevacuumcleanerintotheslitsofthecabinet.
Vacuum the dust off the vents.
• Cloggedventsmaycauseariseintheinternaltemperatureoftheprojector,resultinginmalfunction.
• Donotscratchorhitthecabinetwithyourfingersoranyhardobjects
• Contactyourdealerforcleaningtheinsideoftheprojector.
NOTE:Donotapplyvolatileagentsuchasinsecticideonthecabinet,thelens,orthescreen.Donotleavearubberorvinylproductinprolongedcontactwithit.Otherwisethesurfacefinishwillbedeterioratedorthecoatingmaybestrippedoff.
7. Maintenance

132
7. Maintenance
❸ Replacing the LampWhenthelampreachestheendofitslife,theLAMPindicatorinthecabinetwillblinkredandthemessage“THELAMPHASREACHEDTHEENDOFITSUSABLELIFE.PLEASEREPLACETHELAMP.”willappear(*).Eventhoughthelampmaystillbeworking,replacethelamptomaintaintheoptimalprojectorperformance.Afterreplacingthelamp,besuretoclearthelamphourmeter.(→page115)
CAUTION• DONOTTOUCHTHELAMPimmediatelyafterithasbeenused.Itwillbeextremelyhot.Turntheprojector
offandthendisconnectthepowercord.Allowatleastonehourforthelamptocoolbeforehandling.
• Usethespecifiedlampforsafetyandperformance.
Toorderthereplacementlamp,specifyyourlamptype.
Replacementlamp:
456-5640: 6540, 6233, 6235W 456-6532: 6532, 6532W 456-6528: 6528
• DONOTREMOVEANYSCREWSexceptonelampcoverscrewandthreelamphousingscrews.Youcouldreceiveanelectricshock.
• Donotbreaktheglassonthelamphousing.
Keepfingerprintsofftheglasssurfaceonthelamphousing.Leavingfingerprintsontheglasssurfacemightcauseanunwantedshadowandpoorpicturequality.
• Theprojectorwillturnoffandgointostandbymodewhenyoucontinuetousetheprojectorforanother100hoursafterthelamphasreachedtheendofitslife.Ifthishappens,besuretoreplacethelamp.Ifyoucontinuetousethelampafterthelampreachestheendofitslife,thelampbulbmayshatter,andpiecesofglassmaybescatteredinthelampcase.Donottouchthemasthepiecesofglassmaycauseinjury.Ifthishappens,contactyourDukanedealerforlampreplacement.
*NOTE:Thismessagewillbedisplayedunderthefollowingconditions:• foroneminuteaftertheprojectorhasbeenpoweredon• whenthe (POWER)buttonontheprojectorcabinetortheSTANDBYbuttonontheremotecontrolispressed
Toturnoffthemessage,pressanybuttonontheprojectorcabinetortheremotecontrol.
Optionallampandtoolsneededforreplacement:
• Phillipsscrewdriver(plus-head)
• Replacementlamp
Flow of Replacing the Lamp
Step 1. Replace the lamp
Step 2. Clearthelampusagehours(→page115)

133
7. Maintenance
2. Removethelamphousing.
(1)Loosenthethreescrewssecuringthelamphousinguntilthephillipsscrewdrivergoesintoafreewheelingcondi-tion.
•Thethreescrewsarenotremovable.
•There isan interlockonthiscasetoprevent theriskofelectricalshock.Donotattempt tocircumvent thisinterlock.
(2)Removethelamphousingbyholdingit.
CAUTION:Makesurethatthelamphousingiscoolenoughtobeforeremovingit.
Interlock
To replace the lamp: 1. Removethelampcover.
(1)Loosenthelampcoverscrew
•Thelampcoverscrewisnotremovable.
(2)Pushandslidethelampcoveroff.

134
7. Maintenance
This completes the lamp replacement.Go on to the clearing lamp hour meters.
NOTE:Whenyoucontinuetousetheprojectorforanother100hoursafterthelamphasreachedtheendofitslife,theprojectorcannotturnonandthemenuisnotdisplayed.Ifthishappens,presstheHELPbuttonontheremotecontrolfor10secondstoresetthelampclockbacktozero.Whenthelamptimeclockisresettozero,theLAMPindicatorgoesout.
To clear the lamp usage hours:1. Placetheprojectorwhereyouuseit.
2. Plugthepowercordintothewalloutlet,andthenturnontheprojector.
3. Clearthelampusagehours.
From the menu, select [RESET] → [CLEAR LAMP HOURS] and reset the lamp usage hours.
4. Reattachthelampcover.
(1)Slidethelampcoverbackuntilitsnapsintoplace.
(2)Tightenthescrewtosecurethelampcover.
•Besuretotightenthescrew.
3. Installanewlamphousing.
(1)Insertanewlamphousinguntilthelamphousingispluggedintothesocket.
(2)Pushthetopcenterofthelamphousingtosecureit.
(3)Secureitinplacewiththethreescrews.
•Besuretotightenthescrews.

135
8. Appendix❶ TroubleshootingThissectionhelpsyouresolveproblemsyoumayencounterwhilesettinguporusingtheprojector.Indicator MessagesPower Indicator
Indicator Condition Projector Condition NoteOff The main power is off –
Blinking light Blue 0.5 sec On,0.5 sec Off
The projector is getting ready to turn on. Wait for a moment.
2.5 sec On,0.5 sec Off
Off Timer is enabled. –
Orange 0.5 sec On,0.5 sec Off
The projector is cooling down. Wait for a moment.
Steady light Blue The projector is turned on. –Orange The projector is [NETWORK STANDBY] mode or
sleep mode*.–
Red [NORMAL] is selected for [STANDBY MODE] –
Status IndicatorIndicator Condition Projector Condition Note
Off Power on or Standby ([NORMAL] or [NETWORK STANDBY] for [STANDBY MODE])
–
Blinking light Red 1 cycle (0.5 sec On, 2.5 sec Off)
Lamp cover error or lamp housing error Replace the lamp cover or lamp housing correctly.
2 cycle (0.5 sec On, 0.5 sec Off)
Temperature error The projector is overheated. Move the projector to a cooler location.
3 cycle (0.5 sec On, 0.5 sec Off)
Power error Power unit is not working properly. Contact your dealer.
4 cycle (0.5 sec On, 0.5 sec Off)
Fan error Fans will not work correctly.
6 cycle (0.5 sec On, 0.5 sec Off)
Lamp error Lamp fails to light. Wait a full minute and then turn on again.
Orange 1 cycle (0.5 sec On, 2.5 sec Off)
Network conflict Both the built-in wired LAN and the wireless LAN cannot be connected to the same network at the same time.To use both built-in wired LAN and wireless LAN at the same time, connect them to different networks. When the projector is in NORMAL STANDBY mode or NETWORK STANDBY mode, even if a network conflict occurs, the STATUS indicator will not blink orange.
Green Re-firing the lamp (The projector is cooling down.) The projector is re-firing.Wait for a moment.
Steady light Green The projector is in [NORMAL] mode or sleep mode. –Orange CONTROL PANEL LOCK is on. You have pressed cabinet button when Control Panel
Lock is on.CONTROL ID error Remote control ID and projector ID are not matched.
Lamp IndicatorIndicator Condition Projector Condition Note
Off Normal –Blinking light Red Lamp has reached its end of life. Lamp replacement
message will be displayed.Replace the lamp.
Steady light Red Lamp has been used beyond its limit. The projector will not turn on until the lamp is replaced.
Replace the lamp.
Green [ECO MODE] is set to [AUTO ECO], [NORMAL] or [ECO]
–
*Formoreinformationon"sleepmode",seepage123.
Over-TemperatureProtectionIfthetemperatureinsidetheprojectorrisestoohigh,theover-temperatureprotectorwillautomaticallyturnoffthelampwiththeSTATUSindicatorblinking(2-cycleOnandOff.)Shouldthishappen,dothefollowing:• Unplugthepowercordafterthecoolingfansstop.• Movetheprojectortoacoolerlocationiftheroomwhereyouarepresentingisparticularlytoowarm.• Cleantheventsiftheyarecloggedwithdust.• Waitabout60minutesuntiltheinsideoftheprojectorbecomescoolenough.

136
8. Appendix
Common Problems & Solutions(→“Power/Status/LampIndicator”onpage135.)
Problem CheckTheseItems
Does not turn onor shut down
• Checkthatthepowercordispluggedinandthatthepowerbuttonontheprojectorcabinetortheremotecontrolis on� (→ pages 16, 17)
• Ensurethatthelampcoverisinstalledcorrectly.(→ page 134)• Checktoseeiftheprojectorhasoverheated.Ifthereisinsufficientventilationaroundtheprojectororiftheroom
where you are presenting is particularly warm, move the projector to a cooler location�• Checktoseeifyoucontinuetousetheprojectorforanother100hoursafterthelamphasreachedtheendofits
life� If so, replace the lamp� After replacing the lamp, reset the lamp hours used� (→ page 115)• Thelampmayfailtolight.Waitafullminuteandthenturnonthepoweragain.• Set[FANMODE]to[HIGHALTITUDE]whenusingtheprojectorataltitudesapproximately5500feet/1700meters
or higher� Using the projector at altitudes approximately 5500 feet/1700 meters or higher without setting to [HIGH ALTITUDE] can cause the projector to overheat and the projector could shut down� If this happens, wait a couple minutes and turn on the projector� (→ page 101)
If you turn on the projector immediately after the lamp is turned off, the fans run without displaying an image for some time and then the projector will display the image� Wait for a moment�
Will turn off • Ensurethatthe[OFFTIMER]or[AUTOPOWEROFF]isoff.(→ page 96, 104)
No picture • Usetheinputselectbuttonontheremotecontroltoselectyoursource(COMPUTER,HDMI1,HDMI2,VIDEO,USB-A, LAN, or USB-B)� (→ page 19) If there is still no picture, press the button again�
• Ensureyourcablesareconnectedproperly.• Usemenustoadjustthebrightnessandcontrast.(→ page 88)• Ensurethatthelenscoverisopen.(orlenscapisremovedonM352WS/M302WS/M332XS)(→ page 5, 17)• Resetthesettingsoradjustmentstofactorypresetlevelsusingthe[RESET]intheMenu.(→ page 115)• EnteryourregisteredkeywordiftheSecurityfunctionisenabled.(→ page 35)• BesuretoconnecttheprojectorandnotebookPCwhiletheprojectorisinstandbymodeandbeforeturningon
the power to the notebook PC� In most cases the output signal from the notebook PC is not turned on unless connected to the projector before
being powered up�* If the screen goes blank while using your remote control, it may be the result of the computer’s screen-saver
or power management software�• Seealsothenext page�
Picture suddenly be-comes dark
• CheckiftheprojectorisintheForcedECOmodebecauseoftoohighambienttemperature.Ifthisisthecase,lower the internal temperature of the projector by selecting [HIGH] for [FAN MODE]� (→ page 101)
Color tone or hue is un-usual
• Checkifanappropriatecolorisselectedin[WALLCOLOR].Ifso,selectanappropriateoption.(→ page 95)• Adjust[HUE]in[PICTURE].(→ page 88)
Image isn’t square to the screen
• Repositiontheprojectortoimproveitsangletothescreen.(→ page 20)• UsetheKeystonecorrectionfunctiontocorrectthetrapezoiddistortion.(→ page 24)
Picture is blurred • Adjustthefocus.(→ page 23)• Repositiontheprojectortoimproveitsangletothescreen.(→ page 20)• Ensure that the distance between the projector and screen is within the adjustment range of the lens.
(→ page 116)• Condensationmayformonthelensiftheprojectoriscold,broughtintoawarmplaceandisthenturnedon.
Should this happen, let the projector stand until there is no condensation on the lens�
F l i cke r appears on screen
• Set [FAN MODE] to other than [HIGH ALTITUDE] mode when using the projector at altitudes approximately 5500 feet/1700 meters or lower� Using the projector at altitudes less than approximately 5500 feet/1700 meters and setting to [HIGH ALTI-TUDE] can cause the lamp to overcool, causing the image to flicker� Switch [FAN MODE] to [AUTO]� (→ page 101)
Image is scrolling ver-tically, horizontally or both
• Checkthecomputer’sresolutionandfrequency.Makesurethattheresolutionyouaretryingtodisplayissupportedby the projector� (→ page 145)
• AdjustthecomputerimagemanuallywiththeHorizontal/Verticalinthe[IMAGEOPTIONS].(→ page 90)
Remote control does not work
• Installnewbatteries.(→ page 11)• Makesuretherearenoobstaclesbetweenyouandtheprojector.• Standwithin22feet(7m)oftheprojector.(→ page 11)
Indicator is lit or blink-ing
• SeethePOWER/STATUS/LAMPIndicator.(→ page 135)
Cross color in RGB mode
• PresstheAUTOADJ.buttonontheprojectorcabinetortheremotecontrol.(→ page 28)• Adjustthecomputerimagemanuallywith[CLOCK]/[PHASE]in[IMAGEOPTIONS]inthemenu.(→ page 89)
Formoreinformationcontactyourdealer.
6233, 6535W

137
8. Appendix
If there is no picture, or the picture is not displayed correctly.
• PoweronprocessfortheprojectorandthePC.
BesuretoconnecttheprojectorandnotebookPCwhiletheprojectorisinstandbymodeandbeforeturningonthepowertothenotebookPC.
InmostcasestheoutputsignalfromthenotebookPCisnotturnedonunlessconnectedtotheprojectorbeforebeingpoweredup.
NOTE:Youcancheckthehorizontalfrequencyofthecurrentsignalintheprojector’smenuunderInformation.Ifitreads“0kHz”,thismeansthereisnosignalbeingoutputfromthecomputer.(→page112orgotonextstep)
• Enablingthecomputer’sexternaldisplay.
DisplayinganimageonthenotebookPC’sscreendoesnotnecessarilymeanitoutputsasignaltotheprojector.WhenusingaPCcompatiblelaptop,acombinationoffunctionkeyswillenable/disabletheexternaldisplay.Usu-ally,thecombinationofthe“Fn”keyalongwithoneofthe12functionkeysgetstheexternaldisplaytocomeonoroff.Forexample,NEClaptopsuseFn+F3,whileDelllaptopsuseFn+F8keycombinationstotogglethroughexternaldisplayselections.
• Non-standardsignaloutputfromthecomputer
IftheoutputsignalfromanotebookPCisnotanindustrystandard,theprojectedimagemaynotbedisplayedcorrectly.Shouldthishappen,deactivatethenotebookPC’sLCDscreenwhentheprojectordisplayisinuse.EachnotebookPChasadifferentwayofdeactivate/reactivatethelocalLCDscreensasdescribedinthepreviousstep.Refertoyourcomputer’sdocumentationfordetailedinformation.
• ImagedisplayedisincorrectwhenusingaMac
WhenusingaMacwiththeprojector,settheDIPswitchoftheMacadapter(notsuppliedwiththeprojector)ac-cordingtoyourresolution.Aftersetting,restartyourMacforthechangestotakeaffect.
ForsettingdisplaymodesotherthanthosesupportedbyyourMacandtheprojector,changingtheDIPswitchonaMacadaptermaybounceanimageslightlyormaydisplaynothing.Shouldthishappen,settheDIPswitchtothe13"fixedmodeandthenrestartyourMac.Afterthat,restoretheDIPswitchestoadisplayablemodeandthenrestarttheMacagain.
NOTE:AVideoAdaptercablemanufacturedbyAppleInc.isneededforaMacBookwhichdoesnothaveaminiD-Sub15-pinconnector.
• MirroringonaMacBook
* WhenusingtheprojectorwithaMacBook,outputmaynotbesetto1024×768unless“mirroring”isoffonyourMacBook.Refertoowner’smanualsuppliedwithyourMaccomputerformirroring.
• FoldersoriconsarehiddenontheMacscreen
Foldersoriconsmaynotbeseenonthescreen.Shouldthishappen,select[View]→[Arrange]fromtheApplemenuandarrangeicons.
138
8. Appendix
❷ SpecificationsThissectionprovidestechnicalinformationaboutprojector’sperformance.
[6528/6532/6532W/6540]
Optical
Model Number NP-M402W NP-M362W 6532W 6540 NP-M362X 6532 6528Projection System
Single DLP® chip (0.65", aspect 16:10) Single DLP® chip (0.55", aspect 4:3)
Resolution*1 1280 × 800 pixels (WXGA) 1024 × 768 pixels (XGA)Lens Manual zoom and focus
Zoom Ratio = 1.7F2.4–3.1/f = 17.09–29.05 mm
Lamp 270 W AC (219 W in NOR-MAL)(162 W in ECO)
250 W AC (189 W in NOR-MAL)(150 W in ECO)
225W AC(171W in NOR-MAL)(135W in ECO)
270 W AC (218 W in NOR-MAL)(162 W in ECO)
250 W AC (190 W in NOR-MAL)(150 W in ECO)
225W AC(171W in NOR-MAL)(135W in ECO)
200W AC(160W in NOR-MAL)(120W in ECO)
Light Output*2*3 4000 lumens 3600 lumens 3200 lumens 4000 lumens 3600 lumens 3200 lumens 2800 lumensNORMAL: 81% NORMAL: 76% NORMAL: 81% NORMAL: 76%ECO: 60%*4
Contrast Ratio*3
(full white: full black)
10000:1 with DYNAMIC CONTRAST ON
Image Size (Diagonal)
30–300 inches/0.76 m–7.6 m (16:10) 30–300 inches/0.76 m–7.6 m (4:3)
Projection Distance(Min.–Max.)
29"–312" (wide) / 50"–531" (tele)0.75–7.94 m (wide) / 1.28–13.5 m (tele)
35"–369" (wide) / 60"–627" (tele)0.89–9.37 m (wide) / 1.52–15.93 m (tele)
Projection Angle 10.5° (wide)/17.5°–17.6° (tele) 10.5° (wide)/17.5°–17.6° (tele)
*1 Effectivepixelsaremorethan99.99%.*2 Thisisthelightoutputvalue(lumens)whenthe[PRESET]modeissetto[HIGH-BRIGHT].Ifanyothermodeisselectedasthe
[PRESET]mode,thelightoutputvaluemaydropslightly.*3 CompliancewithISO21118-2005*4ThemaximumpowerbecomesequivalenttopowerinECO(ECOMODE).
Electrical
Model Number NP-M402W NP-M36 2W6532W 6540 6532 6528Inputs 1 × RGB/Component (D-Sub 15 P), 2 × HDMI Type A (19P, HDMI® Connector) HDCP supported*5,
1 × Video (RCA), 1 × (L/R) RCA Audio, 1 × Stereo Mini AudioOutputs 1 × RGB (D-Sub 15P), 1 × Stereo Mini AudioPC Control 1 × PC Control Port (D-Sub 9P)Wired LAN Port 1 × RJ-45 (10BASE-T/100BASE-TX)Wireless LAN Port (Optional)
IEEE 802.11 b/g/n (optional USB Wireless LAN Unit required)
USB Port 1 × Type A, 1 × Type BMIC Input 1 × Monaural Mini AudioColor Reproduc-tion
10-bit signal processing (1.07 billion colors) (USB-A, LAN: 16.7 million colors)
*5 HDMI®(DeepColor,LipSync)withHDCP WhatisHDCP/HDCPtechnology? HDCPisanacronymforHigh-bandwidthDigitalContentProtection.HighbandwidthDigitalContentProtection(HDCP)isasystem
forpreventingillegalcopyingofvideodatasentoveraHigh-DefinitionMultimediaInterface(HDMI). IfyouareunabletoviewmaterialviatheHDMIinput,thisdoesnotnecessarilymeantheprojectorisnotfunctioningproperly.With
theimplementationofHDCP,theremaybecasesinwhichcertaincontentisprotectedwithHDCPandmightnotbedisplayedduetothedecision/intentionoftheHDCPcommunity(DigitalContentProtection,LLC).
Video:DeepColor;8/10/12-bit,LipSync Audio:LPCM;upto2ch,samplerate32/44.1/48KHz,samplebit;16/20/24-bit*6 An imagewithhigheror lower resolution than theprojector’snative resolution (6233/6528/6532/6540:1024×768 /
6235W/6532W:1280×800)willbedisplayedwithAdvancedAccuBlend.
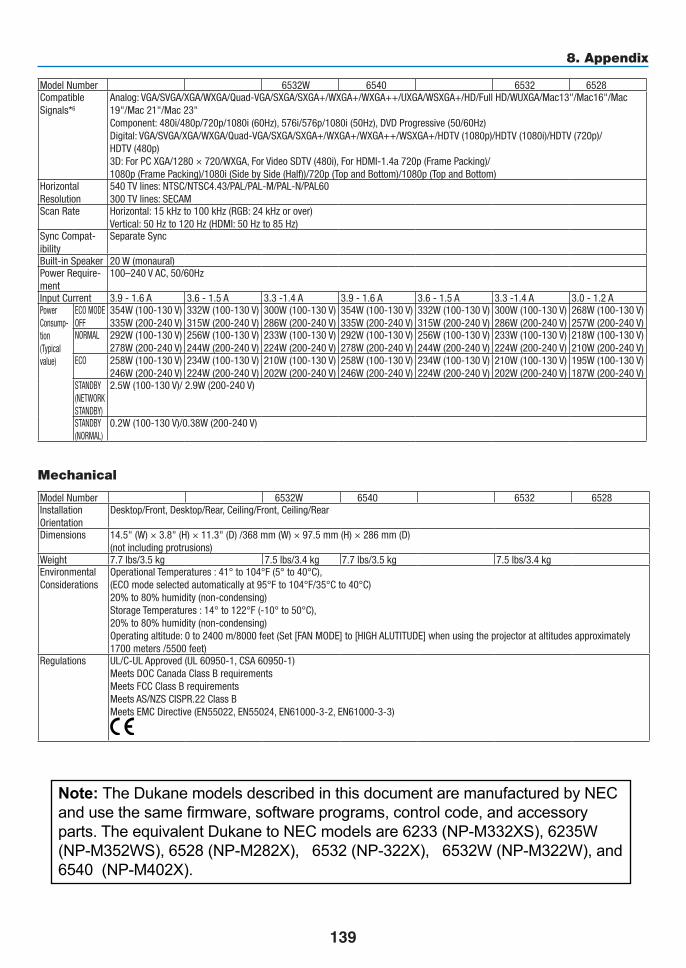
139
8. Appendix
Model Number NP-M402W NP-M362W 6532W 6540 6532 6528Compatible Signals*6
Analog: VGA/SVGA/XGA/WXGA/Quad-VGA/SXGA/SXGA+/WXGA+/WXGA++/UXGA/WSXGA+/HD/Full HD/WUXGA/Mac13"/Mac16"/Mac 19"/Mac 21"/Mac 23"Component: 480i/480p/720p/1080i (60Hz), 576i/576p/1080i (50Hz), DVD Progressive (50/60Hz)Digital: VGA/SVGA/XGA/WXGA/Quad-VGA/SXGA/SXGA+/WXGA+/WXGA++/WSXGA+/HDTV (1080p)/HDTV (1080i)/HDTV (720p)/HDTV (480p)3D: For PC XGA/1280 × 720/WXGA, For Video SDTV (480i), For HDMI-1.4a 720p (Frame Packing)/ 1080p (Frame Packing)/1080i (Side by Side (Half))/720p (Top and Bottom)/1080p (Top and Bottom)
Horizontal Resolution
540 TV lines: NTSC/NTSC4.43/PAL/PAL-M/PAL-N/PAL60300 TV lines: SECAM
Scan Rate Horizontal: 15 kHz to 100 kHz (RGB: 24 kHz or over)Vertical: 50 Hz to 120 Hz (HDMI: 50 Hz to 85 Hz)
Sync Compat-ibility
Separate Sync
Built-in Speaker 20 W (monaural)Power Require-ment
100–240 V AC, 50/60Hz
Input Current 3.9 - 1.6 A 3.6 - 1.5 A 3.3 -1.4 A 3.9 - 1.6 A 3.6 - 1.5 A 3.3 -1.4 A 3.0 - 1.2 APower Consump-tion(Typical value)
ECO MODE OFF
354W (100-130 V)335W (200-240 V)
332W (100-130 V)315W (200-240 V)
300W (100-130 V)286W (200-240 V)
354W (100-130 V)335W (200-240 V)
332W (100-130 V)315W (200-240 V)
300W (100-130 V)286W (200-240 V)
268W (100-130 V)257W (200-240 V)
NORMAL 292W (100-130 V)278W (200-240 V)
256W (100-130 V)244W (200-240 V)
233W (100-130 V)224W (200-240 V)
292W (100-130 V)278W (200-240 V)
256W (100-130 V)244W (200-240 V)
233W (100-130 V)224W (200-240 V)
218W (100-130 V)210W (200-240 V)
ECO 258W (100-130 V)246W (200-240 V)
234W (100-130 V)224W (200-240 V)
210W (100-130 V)202W (200-240 V)
258W (100-130 V)246W (200-240 V)
234W (100-130 V)224W (200-240 V)
210W (100-130 V)202W (200-240 V)
195W (100-130 V)187W (200-240 V)
STANDBY (NETWORK STANDBY)
2.5W (100-130 V)/ 2.9W (200-240 V)
STANDBY (NORMAL)
0.2W (100-130 V)/0.38W (200-240 V)
Mechanical
Model Number NP-M402W NP-M362W 6532W 6540 NP-M362X 6532 6528InstallationOrientation
Desktop/Front, Desktop/Rear, Ceiling/Front, Ceiling/Rear
Dimensions 14.5" (W) × 3.8" (H) × 11.3" (D) /368 mm (W) × 97.5 mm (H) × 286 mm (D) (not including protrusions)
Weight 7.7 lbs/3.5 kg 7.5 lbs/3.4 kg 7.7 lbs/3.5 kg 7.5 lbs/3.4 kgEnvironmental Considerations
Operational Temperatures : 41° to 104°F (5° to 40°C), (ECO mode selected automatically at 95°F to 104°F/35°C to 40°C) 20% to 80% humidity (non-condensing) Storage Temperatures : 14° to 122°F (-10° to 50°C), 20% to 80% humidity (non-condensing)Operating altitude: 0 to 2400 m/8000 feet (Set [FAN MODE] to [HIGH ALUTITUDE] when using the projector at altitudes approximately 1700 meters /5500 feet)
Regulations UL/C-UL Approved (UL 60950-1, CSA 60950-1)Meets DOC Canada Class B requirementsMeets FCC Class B requirementsMeets AS/NZS CISPR.22 Class BMeets EMC Directive (EN55022, EN55024, EN61000-3-2, EN61000-3-3)
Note: The Dukane models described in this document are manufactured by NEC and use the same firmware, software programs, control code, and accessory parts. The equivalent Dukane to NEC models are 6233 (NP-M332XS), 6235W (NP-M352WS), 6528 (NP-M282X), 6532 (NP-322X), 6532W (NP-M322W), and 6540 (NP-M402X).

140
8. Appendix
[6233/6235W]
Optical
ModelNumber 6235W NP-M302WS 6322ProjectionSystem SingleDLP®chip(0.65",aspect16:10) SingleDLP®chip(0.55",aspect
4:3)Resolution*1 1280×800pixels(WXGA) 1024×768pixels(XGA)Lens Digitalzoomandmanualfocus
DigitalZoomRatio=1.2F2.4/f=6.5mm
Lamp 270WAC(219WinNORMAL)(162WinECO)
225WAC(171WinNORMAL)(135WinECO)
270WAC(219WinNORMAL)(162WinECO)
LightOutput*2*3 3500 lumens 3000 lumens 3300 lumens NORMAL:81% NORMAL:76% NORMAL:81%ECO:60%*4
ContrastRatio*3
(fullwhite:fullblack)10000:1withDYNAMICCONTRASTON
ImageSize(Diagonal) 60–150inches/1.52m–3.81m(16:10) 60–150inches/1.52m–3.81m(4:3)
ProjectionDistance(Min.–Max.)
22.2–58.3inches/0.57–1.48m 26.6–69.2inches/0.68–1.76m
ProjectionAngle 40.7°–40.9° 40.7°–40.8°
*1 Effectivepixelsaremorethan99.99%.*2 Thisisthelightoutputvalue(lumens)whenthe[PRESET]modeissetto[HIGH-BRIGHT].Ifanyothermodeisselectedasthe
[PRESET]mode,thelightoutputvaluemaydropslightly.*3 CompliancewithISO21118-2005*4ThemaximumpowerbecomesequivalenttopowerinECO(ECOMODE).
Electrical
ModelNumber 6235W NP-M302WS 6233Inputs 1×RGB/Component(D-Sub15P),2×HDMITypeA(19P,HDMI®Connector)HDCPsupported*5,
1×Video(RCA),1×(L/R)RCAAudio,1×StereoMiniAudioOutputs 1×RGB(D-Sub15P),1×StereoMiniAudioPCControl 1×PCControlPort(D-Sub9P)WiredLANPort 1×RJ-45(10BASE-T/100BASE-TX)WirelessLANPort (Optional)
IEEE802.11b/g/n(optionalUSBWirelessLANUnitrequired)
USBPort 1×TypeA,1×TypeBMICInput 1×MonauralMiniAudioColorReproduction 10-bitsignalprocessing(1.07billioncolors)(USB-A,LAN:16.7millioncolors)CompatibleSignals*6 Analog:VGA/SVGA/XGA/WXGA/Quad-VGA/SXGA/SXGA+/WXGA+/WXGA++/UXGA/WSXGA+/HD/
FullHD/WUXGA/Mac13"/Mac16"/Mac19"/Mac21"/Mac23"Component:480i/480p/720p/1080i(60Hz),576i/576p/1080i(50Hz),DVDProgressive(50/60Hz)Digital:VGA/SVGA/XGA/WXGA/Quad-VGA/SXGA/SXGA+/WXGA+/WXGA++/WSXGA+/HDTV(1080p)/HDTV(1080i)/HDTV(720p)/HDTV(480p)3D:ForPCXGA/1280×720/WXGA,ForVideoSDTV(480i),ForHDMI-1.4a720p(FramePacking)/ 1080p(FramePacking)/1080i(SidebySide(Half))/720p(TopandBottom)/1080p(TopandBottom)
HorizontalResolution 540TVlines:NTSC/NTSC4.43/PAL/PAL-M/PAL-N/PAL60300TVlines:SECAM
ScanRate Horizontal:15kHzto100kHz(RGB:24kHzorover)Vertical:50Hzto120Hz(HDMI:50Hzto85Hz)
*5 HDMI®(DeepColor,LipSync)withHDCP WhatisHDCP/HDCPtechnology? HDCPisanacronymforHigh-bandwidthDigitalContentProtection.HighbandwidthDigitalContentProtection(HDCP)isasystem
forpreventingillegalcopyingofvideodatasentoveraHigh-DefinitionMultimediaInterface(HDMI). IfyouareunabletoviewmaterialviatheHDMIinput,thisdoesnotnecessarilymeantheprojectorisnotfunctioningproperly.With
theimplementationofHDCP,theremaybecasesinwhichcertaincontentisprotectedwithHDCPandmightnotbedisplayedduetothedecision/intentionoftheHDCPcommunity(DigitalContentProtection,LLC).
Video:DeepColor;8/10/12-bit,LipSync Audio:LPCM;upto2ch,samplerate32/44.1/48KHz,samplebit;16/20/24-bit*6 Animagewithhigherorlowerresolutionthantheprojector’snativeresolution(M332XS:1024×768/M352WS/M302WS:1280
×800)willbedisplayedwithAdvancedAccuBlend.

141
8. Appendix
ModelNumber 6235W NP-M302WS 6233SyncCompatibility SeparateSyncBuilt-inSpeaker 20W(monaural)PowerRequirement 100–240VAC,50/60HzInputCurrent 3.9-1.6A 3.3-1.4A 3.9-1.6APowerConsump-tion(Typicalvalue)
ECOMODEOFF
354W(100-130V)335W(200-240V)
300W(100-130V)286W(200-240V)
354W(100-130V)335W(200-240V)
NORMAL 292W(100-130V)278W(200-240V)
233W(100-130V)224W(200-240V)
292W(100-130V)278W(200-240V)
ECO 258W(100-130V)246W(200-240V)
210W(100-130V)202W(200-240V)
258W(100-130V)246W(200-240V)
STANDBY(NETWORKSTANDBY)
2.5W(100-130V)2.9W(200-240V)
STANDBY(NORMAL)
0.2W(100-130V)0.38W(200-240V)
Mechanical
ModelNumber 6235W NP-M302WS 6233InstallationOrientation
Desktop/Front,Desktop/Rear,Ceiling/Front,Ceiling/Rear
Dimensions 14.5"(W)×5.3"(H)×11.5"(D)/368mm(W)×134mm(H)×291mm(D)14.5"(W)×3.9"(H)×11.3"(D)/368mm(W)×98mm(H)×286mm(D)(notincludingprotrusions)
Weight M352W/M332XS:8.2lbs/3.7kgM302WS:8.0lbs/3.6kg
EnvironmentalConsiderations
OperationalTemperatures:41°to104°F(5°to40°C),(ECOmodeselectedautomaticallyat95°Fto104°F/35°Cto40°C)20%to80%humidity(non-condensing)StorageTemperatures:14°to122°F(-10°to50°C),20%to80%humidity(non-condensing)Operatingaltitude:0to2400m/8000feet(Set[FANMODE]to[HIGHALUTITUDE]whenusingthepro-jectorataltitudesapproximately1700meters/5500feet)
Regulations UL/C-ULApproved(UL60950-1,CSA60950-1)MeetsDOCCanadaClassBrequirementsMeetsFCCClassBrequirementsMeetsAS/NZSCISPR.22ClassBMeetsEMCDirective(EN55022,EN55024,EN61000-3-2,EN61000-3-3)MeetsLowVoltageDirective(EN60950-1,TÜVGSApproved)
Foradditionalinformationvisit:www.dukaneav.com
Forinformationonouroptionalaccessories,visitourwebsiteorseeourbrochure.
Thespecificationsaresubjecttochangewithoutnotice.

142
8. Appendix
368 (14.5)
291
(11.
46)
107.
5 (4
.23)
130
(5.1
2)
150
(5.9
1)
200 (7.87)
175 (6.89)
98 (3
.9)
108
(4.3
)
80 (3.15)
❸ Cabinet Dimensions[6528, 6532, 6532W, 6540]
Lens center
Lens center
Holes for ceiling mount
Unit:mm(inch)

143
8. Appendix
368 (14.5)
286(
11.3
)
134
(5.3
)
130
(5.2
)
150
(5.9
)
200 (7.9)
175 (6.9)
98 (3
.9)
80 (3.2)10
8 (4
.3)
291
(11.
5)
[6233, 6235W]
Lens center
Lens center
Holes for ceiling mount
Unit:mm(inch)

144
8. Appendix
Attaching the Optional Cable Cover (NP05CV)Anoptionalcablecover(NP05CV)isavailableforhidingcables.
CAUTION:• Besuretotightenthescrewsafterattachingthecablecover.Failuretodosomaycausethecablecovertocome
offandfall,resultingininjuryordamagetothecablecover.• Donotputbundledcablesinthecablecover.Failuretodosomaydamagethepowercord,resultingafire.• Donotforceexcessivepressuretothecablecover.Doingsomaycausedamagetothecablecover,resulting
ininjury.
AttachingthecablecoverAttachthecablecoverafterinstallingtheprojectorontheceilingandconnectingcables.Toolneededforattaching:• Phillipsscrewdriver(plus-head)
1. Aligntwotabsontheoutsideofthecablecoverwithgroovesoftheprojectorandpushthetopend.
• Atthesametimetwotabsontheinsideofthecablecoverwillbeengagedintherespondinggroovesoftheprojector.
NOTE:• Becarefulnottogetcablescaughtinbetweenthecablecoverandtheprojector.
2. Tightenthecablecoverscrews.
• Besuretotightenthescrews.
1
12
2
Removingthecablecover1. LoosenthecablecoverscrewsuntilthePhillipsscrewdrivergoesintoafreewheelingcondition
1
1
2. Removethecablecover.
Push up the cable cover slightly and rotate it to release.

145
8. Appendix
❹ Pin Assignments of D-Sub COMPUTER Input ConnectorMini D-Sub 15 Pin Connector
SignalLevelVideosignal:0.7Vp-p(Analog)Syncsignal:TTLlevel
51 42 310
11 12 13 14 156 97 8
Pin No. RGBSignal(Analog) YCbCrSignal1 Red Cr2 GreenorSynconGreen Y3 Blue Cb4 Ground5 Ground6 RedGround CrGround7 GreenGround YGround8 BlueGround CbGround9 Hotplug10 SyncSignalGround11 NoConnection12 Bi-directionalDATA(SDA)13 HorizontalSyncorComposite
Sync14 VerticalSync15 DataClock
COMPUTER INNOTE:PinNos.12and15arerequiredforDDC/CI.

146
8. Appendix
❺ Compatible Input Signal List
Analog RGBSignal Resolution(dots) AspectRatio RefreshRate(Hz)
VGA 640 × 480 4:3 60/72/75/85SVGA 800 × 600 4:3 56/60/72/75/85XGA 1024 × 768 *1 4:3 60/70/75/85WXGA 1280 × 768 *2 15:9 60
1280 × 800 *2 16:10 601360 × 768 *3 16:9 601366 × 768 *3 16:9 60
Quad-VGA 1280 × 960 4:3 60/75SXGA 1280 × 1024 5:4 60/75SXGA+ 1400 × 1050 4:3 60WXGA+ 1440 × 900 16:10 60WXGA++ 1600 × 900 *3 16:9 60UXGA 1600 × 1200 *4 4:3 60WSXGA+ 1680 × 1050 16:10 60HD 1280 × 720 16:9 60FullHD 1920 × 1080 16:9 60WUXGA 1920 × 1200 *5 16:10 60MAC13" 640 × 480 4:3 67MAC16" 832 × 624 4:3 75MAC19" 1024 × 768 4:3 75MAC21" 1152 × 870 4:3 75MAC23" 1280 × 1024 5:4 65
ComponentSignal Resolution(dots) AspectRatio RefreshRate(Hz)
HDTV(1080p) 1920 × 1080 16:9 50/60HDTV(1080i) 1920 × 1080 16:9 50/60HDTV(720p) 1280 × 720 16:9 50/60SDTV(480p) 720 × 480 4:3/16:9 60SDTV(576p) 720 × 576 4:3/16:9 50SDTV(480i) 720 × 480 4:3/16:9 60SDTV(576i) 720 × 576 4:3/16:9 50
CompositeVideoSignal AspectRatio RefreshRate(Hz)
NTSC 4:3 60PAL 4:3 50PAL60 4:3 60SECAM 4:3 50
HDMISignal Resolution(dots) AspectRatio RefreshRate(Hz)
VGA 640 × 480 4:3 60SVGA 800 × 600 4:3 60XGA 1024 × 768 *1 4:3 60WXGA 1280 × 768 *2 15:9 60
1280 × 800 *2 16:10 601366 × 768 16:9 60
Quad-VGA 1280 × 960 4:3 60SXGA 1280 × 1024 5:4 60SXGA+ 1400 × 1050 4:3 60WXGA+ 1440 × 900 16:10 60WXGA++ 1600 × 900 16:9 60WSXGA+ 1680 × 1050 16:10 60HDTV(1080p) 1920 × 1080 16:9 50/60HDTV(1080i) 1920 × 1080 16:9 50/60HDTV(720p) 1280 × 720 16:9 50/60SDTV(480p) 720 × 480 4:3/16:9 60SDTV(576p) 720 × 576 4:3/16:9 50SDTV(480i) 720
(1440)× 480 4:3/16:9 60
SDTV(576i) 720(1440)
× 576 4:3/16:9 50
3DSignal Resolution(dots) AspectRatio RefreshRate(Hz)
ForPCSignal*6
XGA 1024 × 768 4:3 60*7/120*8
HD 1280 × 720 16:9 60*7/120*8
WXGA 1280 × 800 16:10 60*7/120*8
HDTV(1080p) 1920 × 1080 16:9 60ForVideoSignal*9
SDTV(480i) 720 × 480 4:3/16:9 60
HDMI 3DSignal Resolution(dots) AspectRatio RefreshRate(Hz)
Structure:FramePacking1080p 1920 × 1080 16:9 23.98/24720p 1280 × 720 16:9 50/59.94/60Structure:SidebySide(Half)1080i 1920 × 1080 16:9 50/59.94/60Structure:TopandBottom1080p 1920 × 1080 16:9 23.98/24720p 1280 × 720 16:9 50/59.94/60
*1Native resolution on XGA model (6233, 6528, 6532, 6540)
*2Native resolution on WXGA model (6235W, 6532W)
*3Theprojectormayfailtodisplaythesesignalscorrectlywhen[AUTO]isselectedfor[ASPECTRATIO]intheon-screenmenu.
Thefactorydefaultis[AUTO]for[ASPECTRATIO].Todisplaythesesignals,select[16:9]for[ASPECTRATIO].
*4WXGAMODE:OFF*5WXGAMODE:ON*6:HDMIsignalsareincluded.*760HzsignalsaresupportedforSidebySide,TopandBottom,andFrame
Sequential.*8120HzsignalsaresupportedforFrameSequentialonly.*9Videosignal(SDTV480i)issupportedforFrameSequentialonly.
NOTE:• Animagewithhigherorlowerresolutionthantheprojector’snativeresolution(M402X/M362X/M322X/M282X/M332XS:1024×
/M402W/M362W/M322W/M352WS/M302WS:1280×800)willbedisplayedwithAdvancedAccuBlend.• SynconGreenandCompositesyncsignalsarenotsupported.• Signalsotherthanthosespecifiedinthetableabovemaynotbedisplayedcorrectly.Ifthisshouldhappen,changetherefreshrateorresolutiononyourPC.RefertoDisplayPropertieshelpsectionofyourPCforprocedures.
6233, 6528, 6532, 6540: 1024 x768 / 6235W, 6532W: 1280 x 800) will be displayed with Advanced AccuBlend.
147
8. Appendix
❻ PC Control Codes and Cable ConnectionPC Control Codes
Function Code Data
POWER ON 02H 00H 00H 00H 00H 02H
POWER OFF 02H 01H 00H 00H 00H 03H
INPUT SELECT COMPUTER 02H 03H 00H 00H 02H 01H 01H 09H
INPUT SELECT HDMI 1 02H 03H 00H 00H 02H 01H A1H A9H
INPUT SELECT HDMI 2 02H 03H 00H 00H 02H 01H A2H AAH
INPUT SELECT VIDEO 02H 03H 00H 00H 02H 01H 06H 0EH
INPUT SELECT USB-A 02H 03H 00H 00H 02H 01H 1FH 27H
INPUT SELECT LAN 02H 03H 00H 00H 02H 01H 20H 28H
INPUT SELECT USB-B 02H 03H 00H 00H 02H 01H 22H 2AH
PICTURE MUTE ON 02H 10H 00H 00H 00H 12H
PICTURE MUTE OFF 02H 11H 00H 00H 00H 13H
SOUND MUTE ON 02H 12H 00H 00H 00H 14H
SOUND MUTE OFF 02H 13H 00H 00H 00H 15H
NOTE:ContactyourlocaldealerforafulllistofthePCControlCodesifneeded.
Cable ConnectionCommunicationProtocol
Baud rate �����������������������������������������38400 bpsData length ��������������������������������������8 bitsParity �����������������������������������������������No parityStop bit ��������������������������������������������One bitX on/off ��������������������������������������������NoneCommunications procedure �������������Full duplex
NOTE:Dependingontheequipment,alowerbaudratemayberecommendedforlongcableruns.
PC Control Connector (D-SUB 9P)
NOTE1:Pins1,4,6and9arenoused.
NOTE2:Jumper“RequesttoSend”and“CleartoSend”togetheronbothendsofthecabletosimplifycableconnection.
NOTE3:Forlongcablerunsitisrecommendedtosetcommunicationspeedwithinprojectormenusto9600bps.
1 52 43
6 7 98
To GND of PC
To RxD of PC
To TxD of PC
To RTS of PC
To CTS of PC

148
8. Appendix
No image is displayed from your PC or video equipment to the projector�
Still no image even though you connect the projector to the PC first, then start the PC�Enabling your notebook PC’s signal output to the projector�• Acombinationoffunctionkeyswillenable/disabletheexter-naldisplay.Usually,thecombinationofthe“Fn”keyalongwithoneofthe12functionkeysturnstheexternaldisplayonoroff.
No image (blue or black background, no display)�Still no image even though you press the AUTO ADJUST button�Still no image even though you carry out [RESET] in the projector’s menu�Signal cable’s plug is fully inserted into the input connectorA message appears on the screen�( _____________________________________________ )The source connected to the projector is active and available�Still no image even though you adjust the brightness and/or the contrast�Input source’s resolution and frequency are supported by the projector�
❼ Troubleshooting Check ListBeforecontactingyourdealerorservicepersonnel,checkthefollowinglisttobesurerepairsareneededalsobyreferringtothe“Troubleshooting”sectioninyouruser’smanual.Thischecklistbelowwillhelpussolveyourproblemmoreefficiently.*Printthispageandthenextpageforyourcheck.
Frequency of occurrence always sometimes (How often?_____________________) other (__________________)
PowerNo power (POWER indicator does not light blue) See also “Status Indicator (STATUS)”�
Power cord’s plug is fully inserted into the wall outlet�Lamp cover is installed correctly�Lamp Hours Used (lamp operation hours) was cleared after lamp replacement�No power even though you press and hold the POWER but-ton�
Shut down during operation�Power cord’s plug is fully inserted into the wall outlet�Lamp cover is installed correctly �[AUTO POWER OFF] is turned off (only models with the [AUTO POWER OFF] function)�[OFF TIMER] is turned off (only models with the [OFF TIMER] function)�
Video and Audio
Image is too dark�Remains unchanged even though you adjust the brightness and/or the contrast�
Image is distorted�Image appears to be trapezoidal (unchanged even though you carry out the [KEYSTONE] adjustment)�
Parts of the image are lost�Still unchanged even though you press the AUTO ADJUST button�Still unchanged even though you carry out [RESET] in the projector’s menu�
Image is shifted in the vertical or horizontal direction�Horizontal and vertical positions are correctly adjusted on a computer signal�Input source’s resolution and frequency are supported by the projector�Some pixels are lost�
Image is flickering�Still unchanged even though you press the AUTO ADJUST button�Still unchanged even though you carry out [RESET] in the projector’s menu�Image shows flickering or color drift on a computer signal�Still unchanged even though you change [FAN MODE] from [HIGH ALTITUDE] to [AUTO]�
Image appears blurry or out of focus�Still unchanged even though you checked the signal’s resolution on PC and changed it to projector’s native resolution�Still unchanged even though you adjusted the focus�
No sound�Audio cable is correctly connected to the audio input of the projector�Still unchanged even though you adjusted the volume level�AUDIO OUT is connected to your audio equipment (only models with the AUDIO OUT connector)�
OtherRemote control does not work�
No obstacles between the sensor of the projector and the remote control�Projector is placed near a fluorescent light that can disturb the infrared remote controls�Batteries are new and are not reversed in installation�
Buttons on the projector cabinet do not work (only models with the [CONTROL PANEL LOCK] function)
[CONTROL PANEL LOCK] is not turned on or is disabled in the menu�Still unchanged even though you press and hold the EXIT button for a minimum of 10 seconds�

149
8. Appendix
In the space below please describe your problem in detail.
Information on application and environment where your projector is used
Projector
Model number:Serial No�:Date of purchase:Lamp operating time (hours):Eco Mode: OFF AUTO ECO NORMAL ECOInformation on input signal:
Horizontal synch frequency [ ] kHzVertical synch frequency [ ] HzSynch polarity H (+) (−) V (+) (−)Synch type Separate Composite
Sync on GreenSTATUS Indicator:
Steady light Orange GreenFlashing light [ ]] cycles
Remote control model number:
Signalcable
NEC standard or other manufacturer’s cable?Model number: Length: inch/m
Distribution amplifierModel number:
SwitcherModel number:
AdapterModel number:
Installation environment
Screen size: inchScreen type: White matte Beads Polarization Wide angle High contrast Throw distance: feet/inch/m Orientation: Ceiling mount DesktopPower outlet connection:
Connected directly to wall outlet Connected to power cord extender or other (the
number of connected equipment______________) Connected to a power cord reel or other (the number
of connected equipment______________)
Computer
Manufacturer:
Model number:
Notebook PC / Desktop
Native resolution:
Refresh rate:
Video adapter:
Other:
Videoequipment
VCR, DVD player, Video camera, Video game or other
Manufacturer:
Model number:
Projector PC
DVD player

150
8. Appendix
❽ TCO CertificationSomemodelsinthisproductfamilyareTCOcertified.AllTCOcertifiedmodelshavetheTCOmarkonthemarkingplate(onthebottomoftheproduct).ToseealistofourTCOcertifiedprojectorsandtheirTCOCertification(inEnglishonly),visitthewebsiteathttp://www.nec-display.com/ap/en_projector/tco/index.htmlTheTCOcertification,designedbyTCODevelopment,isaninternationalenvironmentalandergonomicsstandardforITequipment.InsomecaseswemaypostalistofTCOcertifiedmodelsonourwebsitebeforetheTCOmarkisplacedontheprod-uct.Thisdifferenceintimingisrelatedtothedatecertificationisreceivedcomparedwiththeprojectorsmanufacturingdate.

151
8. Appendix
❾ REGISTER YOUR PROJECTOR! (for residents in the United States, Canada, and Mexico)
Pleasetaketimetoregisteryournewprojector.ThiswillactivateyourlimitedpartsandlaborwarrantyandInstaCareserviceprogram.Visitourwebsiteatwww.dukaneav.com,clickonsupportcenter/registerproductandsubmityourcompletedformonline.Uponreceipt,wewillsendaconfirmationletterwithallthedetailsyouwillneedtotakeadvantageoffast,reliablewarrantyandserviceprogramsfromtheindustryleader,Dukane AV.

DUKANE CORP AV SERVICE DEPT 2900 Dukane DriveSt Charles, IL 60174800-676-2487 / 630-762-4032 Fax [email protected] www.dukaneav.com
6233_6235W_6528_6532_6532W_6540 User Manual v00
Related Documents