Uncontrolled Copy when printed or downloaded. Please refer to the 4D Systems website for the latest Revision of this document Workshop 4 - ViSi-Genie Reference Manual Document Date: 30 th April 2013 Document Revision: 1.3 REFERENCE 4D SYSTEMS TURNING TECHNOLOGY INTO ART

Welcome message from author
This document is posted to help you gain knowledge. Please leave a comment to let me know what you think about it! Share it to your friends and learn new things together.
Transcript

Uncontrolled Copy when printed or downloaded. Please refer to the 4D Systems website for the latest Revision of this document
Workshop 4 - ViSi-Genie Reference Manual
Document Date: 30th April 2013
Document Revision: 1.3 REFERENCE
4D SYSTEMS TURNING TECHNOLOGY INTO ART

© 2012 4D SYSTEMS Page 2 of 44 www.4dsystems.com.au
ViS
i-Gen
ie R
efer
ence
Manu
al
Contents
1. ViSi-Genie Introduction .......................................................................................................... 3
2. ViSi-Genie Communications Protocols ..................................................................................... 4
Genie Standard Protocol ........................................................................................................................ 5 2.1.
2.1.1 Protocol Definitions ............................................................................................................. 5
2.1.2 Command and Parameters Table ........................................................................................ 6
2.1.3 Command Set Messages ...................................................................................................... 7
3. ViSi-Genie Objects Summary and Properties ......................................................................... 15
List of objects ....................................................................................................................................... 15 3.1.
Combining the Objects ........................................................................................................................ 15 3.2.
3.2.1 Button Objects ................................................................................................................... 18
3.2.2 Input Objects ..................................................................................................................... 19
3.2.3 Gauge Objects ................................................................................................................... 26
3.2.4 LEDs and Digits Objects ..................................................................................................... 31
3.2.5 Text And String Objects ..................................................................................................... 35
3.2.6 System and Media Objects ................................................................................................ 37
Object Summary Table ......................................................................................................................... 42 3.3.
4. Revision History ................................................................................................................... 43
5. Legal Notice ......................................................................................................................... 44
6. Contact Information ............................................................................................................. 44

4D SYSTEMS ViSi-Genie Reference Manual
© 2012 4D SYSTEMS Page 3 of 44 www.4dsystems.com.au
ViS
i-Gen
ie R
efer
ence
Manu
al
1. ViSi-Genie Introduction The ViSi-Genie is a breakthrough in the way 4D Systems’ graphic display modules are programmed, it provides an easy method for designing complex Graphics User Interface applications without any coding. It is an environment like no other, a code-less programming environment that provides the user with a rapid visual experience, enabling a simple GUI application to be ‘designed’ from scratch in literally seconds. ViSi-Genie does all the background coding, no 4DGL to learn, it does it all for you. Pick and choose the relevant objects to place on the display, much like the ViSi environment, yet without having to write a single line of code. The full animation of the objects is done under-the-hood, such as pressing a button or moving the thumb of the slider. Each object has parameters which can be set, and configurable events to animate and drive other objects or communicate with an external host. Simply place an object on the screen, position and size it to suit, set the parameters such as colour, range, text, and finally select the event you wish the object to be associated with, it is that simple. In seconds you can transform a blank display into a fully animated GUI with moving meters, animated press and release buttons, and much more. All without writing a single line of code! ViSi-Genie provides the user with a feature rich rapid development environment, second to none. This document covers the ViSi-Genie functions available for the PICASO and the DIAOBLO16 Processors. This document should be used in conjunction with the ViSi-Genie User Guide.

4D SYSTEMS ViSi-Genie Reference Manual
© 2012 4D SYSTEMS Page 4 of 44 www.4dsystems.com.au
ViS
i-Gen
ie R
efer
ence
Manu
al
2. ViSi-Genie Communications Protocols
The ViSi-Genie display platform offers a serial communications protocol called the Genie Standard Protocol. The protocol provides access to a majority of the display’s features and gives the host detailed information on the current state of all the objects used in the display application.
The Genie Standard Protocol provides a simple yet effective interface between the display and the host controller and all communications are reported over this bidirectional link. The protocol utilises only a handful of commands and is simple and easy to implement. Serial data settings are:
8 Bits, No Parity, 1 Stop Bit. The baud rate for the display is selected from the Workshop Genie project. The user should match the same baud rate on the host side.
Note: RS-232 handshaking signals (i.e., RTS, CTS, DTR, and DSR) are not supported by the ViSi-Genie protocols. Instead, only the RxD (received data), TxD (transmitted data), and signal ground are used.
Objects are drawn on the display in the order they are created in the Workshop project. If Image objects are to be used for the background and other objects on top, then the image objects must be created and added first. Also note this only applies to non-active Image objects, other active objects should not be added on top of each other.

4D SYSTEMS ViSi-Genie Reference Manual
© 2012 4D SYSTEMS Page 5 of 44 www.4dsystems.com.au
ViS
i-Gen
ie R
efer
ence
Manu
al
Genie Standard Protocol 2.1. This section describes the Genie Standard Protocol in detail.
2.1.1 Protocol Definitions The commands and parameters are sent and received using a very simple messaging structure. The message consists of a command byte, command parameters, and a checksum byte. The checksum ensures some the integrity of the message. The following figure shows the organisation of the message.
CMD PARAM (1 to N bytes) CHKSUM
CMD: This byte indicates the command code. Some commands will have more parameters than others. The table below outlines the available commands and their relevant parameters.
PARAM: Parameter bytes (variable); a variable number of parameter bytes (between 1 to N) that contains information pertaining to the command. Refer to the command table below.
CHKSUM: Checksum byte; this byte is calculated by taking each byte and XOR’ing all bytes in the message from (and including) the CMD byte to the last parameter byte. Then, the result is appended to the end to yield the checksum byte.
Note: If the message is correct, XOR’ing all the bytes (including the checksum byte) will give a result of zero.

4D SYSTEMS ViSi-Genie Reference Manual
© 2012 4D SYSTEMS Page 6 of 44 www.4dsystems.com.au
ViS
i-Gen
ie R
efer
ence
Manu
al
2.1.2 Command and Parameters Table
Command Code Parameter 1 Parameter 2 Parameter 3 Parameter 4 Parameter N Checksum
READ_OBJ 0x00 Object ID Object Index - - - Checksum
WRITE_OBJ 0x01 Object ID Object Index Value (msb) Value(lsb) - Checksum
WRITE_STR 0x02 String Index String Length String (1 byte chars) Checksum
WRITE_ STRU 0x03 String Index String Length String (2 byte chars) Checksum
WRITE_ CONTRAST 0x04 Value - - - - Checksum
REPORT_OBJ 0x05 Object ID Object Index Value (msb) Value(lsb) - Checksum
REPORT_EVENT 0x07 Object ID Object Index Value (msb) Value(lsb) - Checksum

4D SYSTEMS ViSi-Genie Reference Manual
© 2012 4D SYSTEMS Page 7 of 44 www.4dsystems.com.au
ViS
i-Gen
ie R
efer
ence
Manu
al
2.1.3 Command Set Messages
This section provides detailed information intended for programmers of the Host Controller. It contains the message formats of the commands that comprise the ViSi-Genie protocol. New commands may be added in future to expand the protocol.
Acknowledgement Bytes Table
ACK Acknowledge byte (0x06); this byte is issued by the Display to the Host when the Display
has correctly received the last message frame from the Host.
The transmission message for this is a single byte: 0x06
NAK Not Acknowledge byte (0x15); this byte is issued by the receiver (Display or Host) to the
sender (Host or Display) when the receiver has not correctly received the last message
frame from the sender.
The transmission message for this is a single byte: 0x15

4D SYSTEMS ViSi-Genie Reference Manual
© 2012 4D SYSTEMS Page 8 of 44 www.4dsystems.com.au
ViS
i-Gen
ie R
efer
ence
Manu
al
2.1.3.1 Read Object Status Message
Message CMD, OBJ-ID, OBJ-INDEX, CHKSUM
CMD 0x00 : READ OBJECT Command Code.
OBJ-ID Object ID. Refer to Object ID table for the relevant codes
OBJ-INDEX This byte specifies the index or the item number of the Object
CHKSUM Checksum byte
Direction From Host to Display
Length Message length is 4 bytes
Response From Display to Host: NAK or REPORT OBJECT
NAK
REPORT OBJ
If the Display did not understand the message it will respond with the NAK byte. In this case, the Host should retransmit the message.
If the Display understood the message, it will respond back with the Report Object Status message.
Description The host issues the Read Object message when it wants to determine the current value of a specific object instance. Upon receipt of this message the display will reply with either a NAK (in the case of an error) or the REPORT_OBJ message (0x05, Object-ID, Object Index, Value{msb}, Value{lsb}, checksum). For more details refer to the Report Object Status message in this section.
Example

4D SYSTEMS ViSi-Genie Reference Manual
© 2012 4D SYSTEMS Page 9 of 44 www.4dsystems.com.au
ViS
i-Gen
ie R
efer
ence
Manu
al
2.1.3.2 Write Object Value Message
Message CMD, OBJ-ID, OBJ-INDEX, VALUE(msb), VALUE(lsb), CHKSUM
CMD 0x01 : WRITE OBJECT Command Code
OBJ-ID Object ID. Refer to Object ID table for the relevant codes
OBJ-INDEX This byte specifies the index or the item number of the Object
VALUE(msb) Most significant byte of the 2 byte VALUE
VALUE(lsb) Least significant byte of the 2 byte VALUE
CHKSUM Checksum byte
Direction From Host to Display
Length Message length is 6 bytes
Response From Display to Host, ACK or NAK
ACK
NAK
If the Display understood the message, it will respond back to the host with an ACK after completing the requested action.
If the Display did not understand the message it will respond with a NAK. In this case, the Host should retransmit the message.
Description The host issues the Write Object command message when it wants to change the status of an individual object item. For example, Meter 3 value needs to be set to 50.
Example

4D SYSTEMS ViSi-Genie Reference Manual
© 2012 4D SYSTEMS Page 10 of 44 www.4dsystems.com.au
ViS
i-Gen
ie R
efer
ence
Manu
al
2.1.3.3 Write String (ASCII) Message
Message CMD, STR-INDEX, STRLEN, “STRING”, CHKSUM
CMD 0x02 : WRITE STRING (ASCII) Command Code
STR-INDEX This byte specifies the index or the item number of the ASCII String Object
STRLEN Length of the string characters, including the null terminator
STRING ASCII String characters
CHKSUM Checksum byte
Direction From Host to Display
Length Message length is 4 bytes + the number of string characters (including the null terminator).
Response From Display to Host: ACK or NAK
ACK
NAK
If the Display understood the message, it will respond back to the host with the ACK byte after completing the requested action.
If the Display did not understand the message it will respond with the NAK byte. In this case, the Host should retransmit the message.
Description A place holder for ASCII string objects can be defined and created in the Genie project. In order to display a dynamic string, the host can send this Write String (ASCII) message along with the string object index and then the string to be displayed. The maximum string length is 80 characters.
Note1: The ASCII characters are 1 byte each.
Note2: The String should not be null terminated.
Note3: Refer to the application notes for detailed information on Strings and their usage.
Example

4D SYSTEMS ViSi-Genie Reference Manual
© 2012 4D SYSTEMS Page 11 of 44 www.4dsystems.com.au
ViS
i-Gen
ie R
efer
ence
Manu
al
2.1.3.4 Write String (Unicode) Message
Message CMD, STR-INDEX, STRLEN, “STRING”, CHKSUM
CMD 0x03 : WRITE STRING (Unicode) Command Code
STR-INDEX This byte specifies the index or the item number of the Unicode String Object
STRLEN Length of the string characters, including the null terminator
STRING Unicode String characters (2 bytes per character).
CHKSUM Checksum byte
Direction From Host to Display
Length Message length is 4 bytes + the number of string characters (including the null terminator).
Response From Display to Host: ACK or NAK
ACK
NAK
If the Display understood the message, it will respond back to the host with the ACK byte after completing the requested action.
If the Display did not understand the message it will respond with the NAK byte. In this case, the Host should retransmit the message.
Description A place holder for Unicode string objects can be defined and created in the Genie project. In order to display a dynamic string, the host can send this Write String (Unicode) message along with the string object index and then the string to be displayed. The maximum string length is 80 characters.
Note1: The Unicode characters are 2 bytes each.
Note2: The String should not be null terminated.
Note3: Refer to the application notes for detailed information on Strings and their usage.
Example

4D SYSTEMS ViSi-Genie Reference Manual
© 2012 4D SYSTEMS Page 12 of 44 www.4dsystems.com.au
ViS
i-Gen
ie R
efer
ence
Manu
al
2.1.3.5 Write Contrast Message
Message CMD, VALUE, CHKSUM
CMD 0x04 : WRITE CONTRAST Command Code
VALUE Contrast value: 0 to 15
CHKSUM Checksum byte
Direction From Host to Display
Length Message length is 3 bytes
Response From Display to Host, ACK or NAK
ACK
NAK
If the Display understood the message, it will respond back to the host with an ACK after completing the requested action.
If the Display did not understand the message it will respond with a NAK. In this case, the Host should retransmit the message.
Description The host issues the Write Contrast command message when it wants to change the contrast or brightness of the display. Certain power saving modes and applications may require the host to dim or completely turn off the backlight.
Note: Contrast value of 0 will turn the backlight OFF. Any non 0 value will turn the backlight ON.
Example

4D SYSTEMS ViSi-Genie Reference Manual
© 2012 4D SYSTEMS Page 13 of 44 www.4dsystems.com.au
ViS
i-Gen
ie R
efer
ence
Manu
al
2.1.3.6 Report Object Status Message
Message CMD, OBJ-ID, OBJ-INDEX, VALUE(msb), VALUE(lsb), CHKSUM
CMD 0x05 : REPORT OBJECT Command Code
OBJ-ID Object ID. Refer to Object ID table for the relevant codes
OBJ-INDEX This byte specifies the index or the item number of the Object
VALUE(msb) Most significant byte of the 2 byte VALUE
VALUE(lsb) Least significant byte of the 2 byte VALUE
CHKSUM Checksum byte
Direction From Display to Host
Length Message length is 6 bytes
Response From Host to Display: NAK
NAK
If the Host did not understand the message it may respond with a NAK. In this case, the Display will retransmit the message.
Description This is the response message from the Display after the Host issues the Read Object Status message. The Display will respond back with the 2 byte value for the specific item of that object.
Example

4D SYSTEMS ViSi-Genie Reference Manual
© 2012 4D SYSTEMS Page 14 of 44 www.4dsystems.com.au
ViS
i-Gen
ie R
efer
ence
Manu
al
2.1.3.7 Report Event Message
Message CMD, OBJ-ID, OBJ-INDEX, VALUE(msb), VALUE(lsb), CHKSUM
CMD 0x07 : REPORT EVENT Command Code
OBJ-ID Object ID. Refer to Object ID table for the relevant codes
OBJ-INDEX This byte specifies the index or the item number of the Object that caused the event
VALUE(msb) Most significant byte of the 2 byte VALUE
VALUE(lsb) Least significant byte of the 2 byte VALUE
CHKSUM Checksum byte
Direction From Display to Host
Length Message length is 6 bytes
Response From Host to Display: NAK
NAK
If the Host did not understand the message it may respond with a NAK. In this case, the Display will retransmit the message.
Description When designing the Genie display application in Workshop, each Object can be configured to report its status change without the host having to poll it (see Read Object Status message). If the object’s ‘Event Handler’ is set to ‘Report Event’ in the ‘Event’ tab, the display will transmit the object’s status upon any change. For example, Slider 3 object was set from 0 to 50 by the user.
Example

4D SYSTEMS ViSi-Genie Reference Manual
© 2012 4D SYSTEMS Page 15 of 44 www.4dsystems.com.au
ViS
i-Gen
ie R
efer
ence
Manu
al
3. ViSi-Genie Objects Summary and Properties This section provides a summary of all the objects along with some relevant information. For more detailed information on the Objects and their properties, refer to the individual application notes and the ViSi-Genie User Guide.
List of objects 3.1. Legends used in this section:
On Actions: These are the actions of an object that will influence other objects; OnChanged, OnChanging, OnActivate. These are selectable by the user under the ‘Event’ tab object properties in the Workshop4 Genie project.
OnChanged: Other objects can be influenced when the state of the Object has changed.
OnChanging: Other objects can be influenced whilst touch is maintained and the state of the object is changing.
Combining the Objects 3.2.
Combining the events with the objects allows multiple configurations.
The same track-bar object sends two different messages, each message being triggered by an event:
The event onChanged sends a message to the LED digits;
While the event onChanging sends a message to the meter.

4D SYSTEMS ViSi-Genie Reference Manual
© 2012 4D SYSTEMS Page 16 of 44 www.4dsystems.com.au
ViS
i-Gen
ie R
efer
ence
Manu
al
Another configuration with a comparable result:
Only one event is used, onChanging, and sends a message to a first object, the LED digit;
The LED digit raises another event, onChanged, and sends a message to the second object, the meter.
Now, a message can be sent the host controller, using the ReportMessage.
Below, the same track-bar object sends two different messages, each message being triggered by an event:
The event onChanged sends a ReportMessage to the host controller;
While the event onChanging sends a message to the LED digits;
The LED digit raises another event, onChanged, and sends a message to the second object, the meter.
Another configuration with the same result: the objects are chained and the last one sends a ReportMessage to the host controller:
Note1: The visible properties of the objects are not applicable to the Genie application and can’t be dynamically altered. The visible properties are adjustable and set only during the design phase under the ‘Properties’ tab in the Workshop Genie project.
Note2: To minimize the amount communications traffic during event reporting back to the host, it is advisable to select the ‘OnChanged’ event report option in the Genie project settings.

4D SYSTEMS ViSi-Genie Reference Manual
© 2012 4D SYSTEMS Page 17 of 44 www.4dsystems.com.au
ViS
i-Gen
ie R
efer
ence
Manu
al
Note3: The host is able to alter the state of any Object by issuing the Write Object command message (with the exception of the Image object).
Note4: For the last combination, although the meter is set to report message back to the Host, the event reported would be actually that of the Slider which is the initiator of the event. A report is from the Input (ie a slider), not from any other widget in the chain.

4D SYSTEMS ViSi-Genie Reference Manual
© 2012 4D SYSTEMS Page 18 of 44 www.4dsystems.com.au
ViS
i-Gen
ie R
efer
ence
Manu
al
3.2.1 Button Objects
3.2.1.1 WIN BUTTON
Object Winbutton
ID 6 (0x06)
Description A Windows Style Button Object. The button can be turned in to either a Momentary type or a Toggle type or a Matrix.
Input Yes
Output Yes
On Actions OnChanged When the button is pressed and then released, the selection action occurs. This can cause a message to be sent to the host, or to activate another form or other actions to occur such as sounds, strings, timer or video objects. Note: The initial state for all buttons is OFF. For matrixed buttons it is necessary to set one button ON before displaying the form they are on.
Event Report OnChanged Report Event message will be transmitted to the host after the button is pressed and then released.
Value(msb:lsb) This is the 2 byte value, Value(msb):Value(lsb), that is used in the message transmissions to and from the host. For this object the Value(msb) is always 0x00. The least significant byte, Value(lsb) will contain the button state setting. When reporting an Event or responding to query from Host: For Toggle or Matrix: If Button is OFF: Value(lsb) = 0 If Button is ON: Value(lsb) = 1 For Momentary: If Button was pressed: Value(lsb) = 1 If Button was released: Value(lsb) = 0
Note: It is not recommended for the host to poll momentary type buttons as the Press/Release action can be missed. Instead, configure the display to automatically report the event.

4D SYSTEMS ViSi-Genie Reference Manual
© 2012 4D SYSTEMS Page 19 of 44 www.4dsystems.com.au
ViS
i-Gen
ie R
efer
ence
Manu
al
3.2.2 Input Objects
3.2.2.1 DIP SWITCH
Object Dipswitch
ID 0 (0x00)
Description A Dip Switch Object that can have from 2 to 16 positions.
Input Yes
Output Yes
On Actions OnChanged Other objects can be influenced when the switch position has changed, such as LED turns ON/OFF or 7segment display indicates position.
OnChanging Other objects can be influenced whilst touch is maintained and the switch position is changing. For example, if the Dip Switch has 16 positions, each intermediate change can dynamically display its position on a 7 segment display.
Event Report OnChanged Report Event message will be transmitted to the host once the position has changed and touch is released.
OnChanging Report Event message will be transmitted to the host as the position changes and whilst touch is maintained.
Value(msb:lsb) This is the 2 byte value, Value(msb):Value(lsb), that is used in the message transmissions to and from the host. For this object the Value(msb) is always 0x00. The least significant byte, Value(lsb) will contain the dipswitch position settings. For 2 position Dip Switch: Value(lsb) = 0 or 1 For 3 position Dip Switch: Value(lsb) = 0 to 2 For N position Dip Switch: Value(lsb) = 0 to N-1 Note: N max = 16

4D SYSTEMS ViSi-Genie Reference Manual
© 2012 4D SYSTEMS Page 20 of 44 www.4dsystems.com.au
ViS
i-Gen
ie R
efer
ence
Manu
al
3.2.2.2 KNOB
Object Knob
ID 1 (0x01)
Description A Knob Object. The size, color and appearance of the knob are defined by the ‘Backimage’. The size, color and appearance of the ‘handle’ (the red ‘dot’) are defined by the ‘Handleimage’. These are adjustable under the object ‘Properties’ tab in the Genie project.
Input Yes
Output Yes
On Actions OnChanged Other objects can be influenced when the knob position has changed. For example, the knob can be used as the frequency dial and the 7segment display indicates the new frequency when the change is made.
OnChanging Other objects can be influenced whilst touch is maintained and the knob position is changing. As per the example above, the 7 segment display can dynamically update the frequency values while the knob is rotated.
Event Report OnChanged Report Event message will be transmitted to the host once the position has changed and touch is released.
OnChanging Report Event message will be transmitted to the host as the position changes and whilst touch is maintained.
Value(msb:lsb) This is the 2 byte value, Value(msb):Value(lsb), that is used in the message transmissions to and from the host. The range of values for the knob can range from 0 to 65535 (0x00 to 0xFFFF). For example, if the knob value is 289 (0x0121) the 2 byte value will be: Value(msb) = 0x01 Value(lsb) = 0x21

4D SYSTEMS ViSi-Genie Reference Manual
© 2012 4D SYSTEMS Page 21 of 44 www.4dsystems.com.au
ViS
i-Gen
ie R
efer
ence
Manu
al
3.2.2.3 ROCKER SWITCH
Object Rockerswitch
ID 2 (0x02)
Description A Rocker Switch Object. This object has 2 positions, ON or OFF state.
Input Yes
Output Yes
On Actions OnChanged Other objects can be influenced when the switch state has changed.
Event Report OnChanged Report Event message will be transmitted to the host once the switch position/state has changed and touch is released.
Value(msb:lsb) This is the 2 byte value, Value(msb):Value(lsb), that is used in the message transmissions to and from the host. For this object the Value(msb) is always 0x00. The least significant byte, Value(lsb) will contain the switch position setting. For OFF state: Value(lsb) = 0 For ON state: Value(lsb) = 1

4D SYSTEMS ViSi-Genie Reference Manual
© 2012 4D SYSTEMS Page 22 of 44 www.4dsystems.com.au
ViS
i-Gen
ie R
efer
ence
Manu
al
3.2.2.4 ROTARY SWITCH
Object Rotaryswitch
ID 3 (0x03)
Description A Rotary Switch Object that can have from 2 to N positions.
Input Yes
Output Yes
On Actions OnChanged Other objects can be influenced when the switch position has changed. For example a 7segment display indicates the switch position.
OnChanging Other objects can be influenced whilst touch is maintained and the switch position is changing. For example, if the Rocker Switch has 10 positions, each intermediate change can dynamically display its position on a 7 segment display.
Event Report OnChanged Report Event message will be transmitted to the host once the position has changed and touch is released.
OnChanging Report Event message will be transmitted to the host as the position changes and whilst touch is maintained.
Value(msb:lsb) This is the 2 byte value, Value(msb):Value(lsb), that is used in the message transmissions to and from the host. For this object the Value(msb) is always 0x00. The least significant byte, Value(lsb) will contain the rocker switch position settings. For 2 position Rocker Switch: Value(lsb) = 0 or 1 For 3 position Rocker Switch: Value(lsb) = 0 to 2 For N position Rocker Switch: Value(lsb) = 0 to N-1 Note: Although there’s no limit to the number of positions, for practical purposes limit N to 32.
4D SYSTEMS ViSi-Genie Reference Manual
© 2012 4D SYSTEMS Page 23 of 44 www.4dsystems.com.au
ViS
i-Gen
ie R
efer
ence
Manu
al
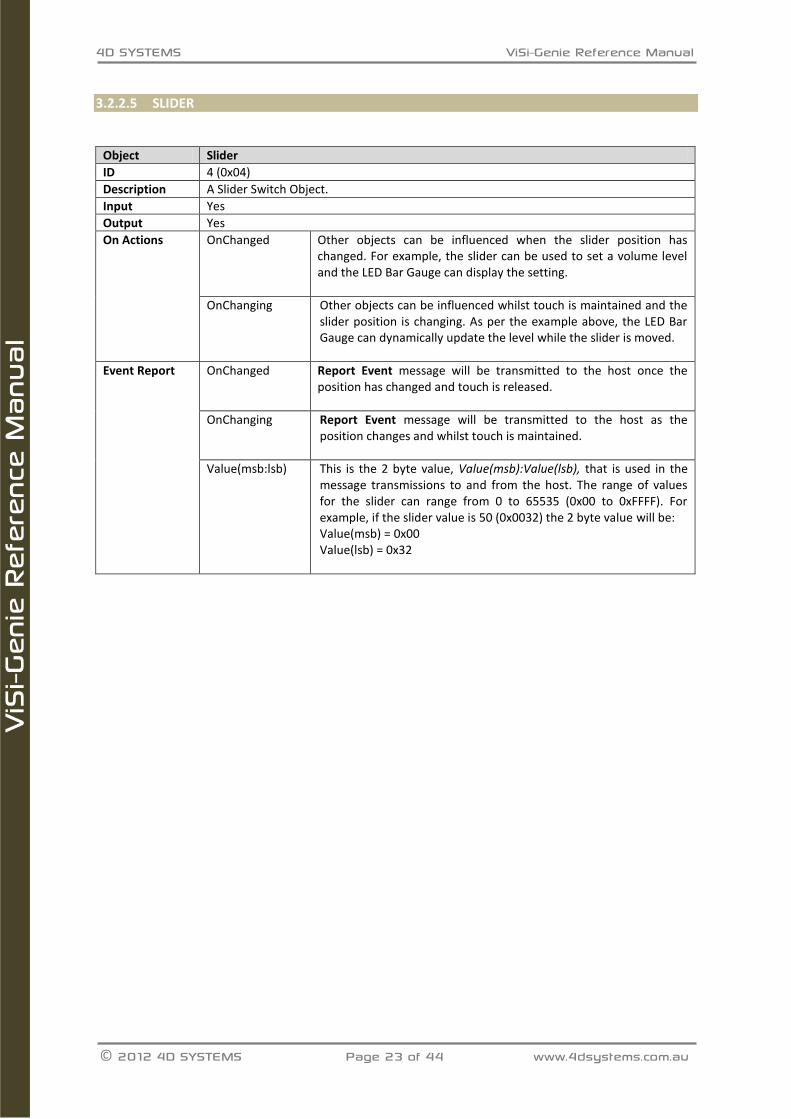
3.2.2.5 SLIDER
Object Slider
ID 4 (0x04)
Description A Slider Switch Object.
Input Yes
Output Yes
On Actions OnChanged Other objects can be influenced when the slider position has changed. For example, the slider can be used to set a volume level and the LED Bar Gauge can display the setting.
OnChanging Other objects can be influenced whilst touch is maintained and the slider position is changing. As per the example above, the LED Bar Gauge can dynamically update the level while the slider is moved.
Event Report OnChanged Report Event message will be transmitted to the host once the position has changed and touch is released.
OnChanging Report Event message will be transmitted to the host as the position changes and whilst touch is maintained.
Value(msb:lsb) This is the 2 byte value, Value(msb):Value(lsb), that is used in the message transmissions to and from the host. The range of values for the slider can range from 0 to 65535 (0x00 to 0xFFFF). For example, if the slider value is 50 (0x0032) the 2 byte value will be: Value(msb) = 0x00 Value(lsb) = 0x32

4D SYSTEMS ViSi-Genie Reference Manual
© 2012 4D SYSTEMS Page 24 of 44 www.4dsystems.com.au
ViS
i-Gen
ie R
efer
ence
Manu
al
3.2.2.6 TRACK BAR
Object Trackbar
ID 5 (0x05)
Description The Trackbar Object.
Input Yes
Output Yes
On Actions OnChanged Other objects can be influenced when the trackbar position has changed. For example, the trackbar can be used to set a volume level and the LED Bar Gauge can display the setting.
OnChanging Other objects can be influenced whilst touch is maintained and the trackbar position is changing. As per the example above, the LED Bar Gauge can dynamically update the level while the trackbar is moved.
Event Report OnChanged Report Event message will be transmitted to the host once the position has changed and touch is released.
OnChanging Report Event message will be transmitted to the host as the position changes and whilst touch is maintained.
Value(msb:lsb) This is the 2 byte value, Value(msb):Value(lsb), that is used in the message transmissions to and from the host. The range of values for the trackbar can range from 0 to 65535 (0x00 to 0xFFFF). For example, if the slider value is 300 (0x012C) the 2 byte value will be: Value(msb) = 0x01 Value(lsb) = 0x2C

4D SYSTEMS ViSi-Genie Reference Manual
© 2012 4D SYSTEMS Page 25 of 44 www.4dsystems.com.au
ViS
i-Gen
ie R
efer
ence
Manu
al
3.2.2.7 KEYBOARD
Object Keyboard
ID 13 (0x0D)
Description A highly configurable Keyboard Object with 4 predefined configurations and an unlimited number of user definable configurations. Predefined configurations are: QWERTY, NUMERIC, CELLPHONE, CUSTOM
Input Yes
Output No
On Actions OnChanged At the time of writing this document the keyboard object has no influence on other objects.
Event Report OnChanged Report Event message will be transmitted to the host along with the key value as soon as the key is pressed.
Value(msb:lsb) This is the 2 byte value, Value(msb):Value(lsb), that is used in the message transmissions to the host. For the keyboard object the Value(msb) is always 0x00. The least significant byte, Value(lsb) will contain the value of the key pressed. Value(lsb) = Key value
Notes For more detailed information on the Keyboard objects and its, refer to the individual application notes and the ViSi-Genie User Guide.

4D SYSTEMS ViSi-Genie Reference Manual
© 2012 4D SYSTEMS Page 26 of 44 www.4dsystems.com.au
ViS
i-Gen
ie R
efer
ence
Manu
al
3.2.3 Gauge Objects
3.2.3.1 ANGULAR METER
Object Angularmeter
ID 7 (0x07)
Description An Angular Meter Object.
Input No
Output Yes
On Actions OnChanged An input type object (such as a Slider, Trackbar, etc) can cause this output type Meter to be changed. This can subsequently cause another output type object (Digital Gauge, LED Digits, etc) to be changed.
Event Report OnChanged Report Event message will be transmitted to the host after the meter state has changed.
Value(msb:lsb) This is the 2 byte value, Value(msb):Value(lsb), that is used in the message transmissions to and from the host. The range of values for the meter (theoretically) can range from 0 to 65535 (0x00 to 0xFFFF). For example, if the meter value is 290 (0x0122) the 2 byte value will be: Value(msb) = 0x01 Value(lsb) = 0x22
See Also Cool Gauge, Meter

4D SYSTEMS ViSi-Genie Reference Manual
© 2012 4D SYSTEMS Page 27 of 44 www.4dsystems.com.au
ViS
i-Gen
ie R
efer
ence
Manu
al
3.2.3.2 COOL GAUGE
Object Coolgauge
ID 8 (0x08)
Description A Cool Gauge Object.
Input No
Output Yes
On Actions OnChanged An input type object (such as a Slider, Trackbar, etc) can cause this output type Gauge to be changed. This can subsequently cause another output type object (Digital Gauge, LED Digits, etc) to be changed.
Event Report OnChanged Report Event message will be transmitted to the host after the gauge state has changed.
Value(msb:lsb) This is the 2 byte value, Value(msb):Value(lsb), that is used in the message transmissions to and from the host. The range of values for the gauge (theoretically) can range from 0 to 65535 (0x00 to 0xFFFF). For example, if the gauge value is 100 (0x0064) the 2 byte value will be: Value(msb) = 0x00 Value(lsb) = 0x64
See Also Meter, Angular Meter

4D SYSTEMS ViSi-Genie Reference Manual
© 2012 4D SYSTEMS Page 28 of 44 www.4dsystems.com.au
ViS
i-Gen
ie R
efer
ence
Manu
al
3.2.3.3 GAUGE (LED Type)
Object Gauge
ID 11 (0x0B)
Description A LED Type Gauge Object.
Input No
Output Yes
On Actions OnChanged An input type object (such as a Slider, Trackbar, etc) can cause this output type Gauge to be changed. This can subsequently cause another output type object (Meter, LED Digits, etc) to be changed.
Event Report OnChanged Report Event message will be transmitted to the host after the meter state has changed.
Value(msb:lsb) This is the 2 byte value, Value(msb):Value(lsb), that is used in the message transmissions to and from the host. For example, if the Gauge value is 120 (0x0078) the 2 byte value will be: Value(msb) = 0x00 Value(lsb) = 0x78

4D SYSTEMS ViSi-Genie Reference Manual
© 2012 4D SYSTEMS Page 29 of 44 www.4dsystems.com.au
ViS
i-Gen
ie R
efer
ence
Manu
al
3.2.3.4 METER
Object Meter
ID 16 (0x10)
Description A Meter Object.
Input No
Output Yes
On Actions OnChanged An input type object (such as a Slider, Trackbar, etc) can cause this output type Meter to be changed. This can subsequently cause another output type object (Digital Gauge, LED Digits, etc) to be changed.
Event Report OnChanged Report Event message will be transmitted to the host after the meter state has changed.
Value(msb:lsb) This is the 2 byte value, Value(msb):Value(lsb), that is used in the message transmissions to and from the host. The range of values for the meter (theoretically) can range from 0 to 65535 (0x00 to 0xFFFF). For example, if the meter value is 290 (0x0122) the 2 byte value will be: Value(msb) = 0x01 Value(lsb) = 0x22
See Also Cool Gauge, Angular Meter

4D SYSTEMS ViSi-Genie Reference Manual
© 2012 4D SYSTEMS Page 30 of 44 www.4dsystems.com.au
ViS
i-Gen
ie R
efer
ence
Manu
al
3.2.3.5 THERMOMETER
Object Thermometer
ID 18 (0x12)
Description The Thermometer Object.
Input No
Output Yes
On Actions OnChanged An input type object (such as a Slider, Trackbar, etc) can cause this output type Thermometer to be changed. This can subsequently cause another output type object (Meter, LED Digits, etc) to be changed.
Event Report OnChanged Report Event message will be transmitted to the host after the meter state has changed.
Value(msb:lsb) This is the 2 byte value, Value(msb):Value(lsb), that is used in the message transmissions to and from the host. For example, if the Thermometer value is 120 (0x0078) the 2 byte value will be: Value(msb) = 0x00 Value(lsb) = 0x78

4D SYSTEMS ViSi-Genie Reference Manual
© 2012 4D SYSTEMS Page 31 of 44 www.4dsystems.com.au
ViS
i-Gen
ie R
efer
ence
Manu
al
3.2.4 LEDs and Digits Objects
3.2.4.1 LED
Object Led
ID 14 (0x0E)
Description The LED Object.
Input No
Output Yes
On Actions OnChanged An input type object can cause this output type LED to be changed. This can subsequently cause another output type object to be changed.
Event Report OnChanged Report Event message will be transmitted to the host after the LED state has changed.
Value(msb:lsb) This is the 2 byte value, Value(msb):Value(lsb), that is used in the message transmissions to and from the host. For the LED object the Value(msb) is always 0x00. The least significant byte, Value(lsb) will contain the state of the LED. If LED is OFF: Value(lsb) = 0 If LED is ON: Value(lsb) = 1
Notes Glyph If LedType is custom this Bitmap defines the Led that is displayed. The Bitmap should be two bitmaps side by side, the first being the ‘OFF’ image, the second being the ‘ON’ image.
LedType Can be set to three internal LED types or custom, in which case the LED is based on the Image contained in ‘Glyph’.
See Also User LED

4D SYSTEMS ViSi-Genie Reference Manual
© 2012 4D SYSTEMS Page 32 of 44 www.4dsystems.com.au
ViS
i-Gen
ie R
efer
ence
Manu
al
3.2.4.2 USER LED
Object Userled
ID 19 (0x13)
Description The LED Object.
Input No
Output Yes
On Actions OnChanged An input type object can cause this output type LED to be changed. This can subsequently cause another output type object to be changed.
Event Report OnChanged Report Event message will be transmitted to the host after the LED state has changed.
Value(msb:lsb) This is the 2 byte value, Value(msb):Value(lsb), that is used in the message transmissions to and from the host. For the LED object the Value(msb) is always 0x00. The least significant byte, Value(lsb) will contain the state of the LED. If LED is OFF: Value(lsb) = 0 If LED is ON: Value(lsb) = 1
See Also LED

4D SYSTEMS ViSi-Genie Reference Manual
© 2012 4D SYSTEMS Page 33 of 44 www.4dsystems.com.au
ViS
i-Gen
ie R
efer
ence
Manu
al
3.2.4.3 LED DIGITS
Object Leddigits
ID 15 (0x0F)
Description 7 Segment LED Digits Object.
Input No
Output Yes
On Actions OnChanged An input type object can cause this output type LED Digits to be changed. This can subsequently cause another output type object to be changed.
Event Report OnChanged Report Event message will be transmitted to the host after the LED Digits state has changed.
Value(msb:lsb) This is the 2 byte value, Value(msb):Value(lsb), that is used in the message transmissions to and from the host. For example, if the LED Digits value is 5645 (0x160D) the 2 byte value will be: Value(msb) = 0x16 Value(lsb) = 0x0D
See Also Custom Digits

4D SYSTEMS ViSi-Genie Reference Manual
© 2012 4D SYSTEMS Page 34 of 44 www.4dsystems.com.au
ViS
i-Gen
ie R
efer
ence
Manu
al
3.2.4.4 CUSTOM DIGITS
Object Customdigits
ID 9 (0x09)
Description The Custom Digits Object. The size, color and shape of the digits are defined by the ‘Bitmap’.
Input No
Output Yes
On Actions OnChanged An input type object (such as a Slider, Trackbar, etc) can cause this output type Digits to be changed. This can subsequently cause another output type object (Digital Gauge, LED Digits, etc) to be changed.
Event Report OnChanged Report Event message will be transmitted to the host after the digits state has changed.
Value(msb:lsb) This is the 2 byte value, Value(msb):Value(lsb), that is used in the message transmissions to and from the host. The range of values for the gauge (theoretically) can range from 0 to 65535 (0x00 to 0xFFFF). For example, if the digits value is 2100 (0x0834) the 2 byte value will be: Value(msb) = 0x08 Value(lsb) = 0x34
Notes To create a custom bitmap, use GIMP, for example, type in the letters 0-9, adjust the fonts and attributes to obtain the desired appearance, then save the resulting image as a bitmap. The bitmap may need modifying, its width should be ten times the size of each digit.
See Also Led Digits

4D SYSTEMS ViSi-Genie Reference Manual
© 2012 4D SYSTEMS Page 35 of 44 www.4dsystems.com.au
ViS
i-Gen
ie R
efer
ence
Manu
al
3.2.5 Text And String Objects
3.2.5.1 STATIC TEXT
Object Statictext
ID 21 (0x15)
Description The Static Text Object.
Input No
Output No
On Actions Not Applicable
Event Report Not Applicable
Notes Static Text is displayed as part of the form, there is no need to alter it.

4D SYSTEMS ViSi-Genie Reference Manual
© 2012 4D SYSTEMS Page 36 of 44 www.4dsystems.com.au
ViS
i-Gen
ie R
efer
ence
Manu
al
3.2.5.2 STRINGS
Object Strings
ID 17 (0x11)
Description The Strings Object.
Input No
Output Yes
On Actions OnChanged An input type object (such as a Button, Slider, Trackbar, etc) can cause this output type String to be changed. A string can be made up of many segments of messages (each separated by 0x0A Carriage Return). A button or other input type object can sequence thru these messages. Very handy when different messages need to be displayed upon certain actions taken. A state change in the string can subsequently cause another output type object to be changed.
Event Report OnChanged Report Event message will be transmitted to the host after the string state has changed.
Value(msb:lsb) Not used.
Notes The first strings are displayed initially. Normally strings are set to predefined values, e.g. a value of 0 might display the string ‘Hello There’. Using predefined values makes the most efficient use of the comms link and also minimizes the code required in your controller. In order to display a dynamically created string the user can send the Write String ASCII command message. The maximum strings length is 80. For Unicode string objects Unicode strings can be sent, using the Write String Unicode command message. CRs and LFs can be included and the user is responsible for the ‘formatting’ of the string. Note: Refer to the application notes for detailed information on Strings and their usage.

4D SYSTEMS ViSi-Genie Reference Manual
© 2012 4D SYSTEMS Page 37 of 44 www.4dsystems.com.au
ViS
i-Gen
ie R
efer
ence
Manu
al
3.2.6 System and Media Objects
3.2.6.1 FORM
Object Form
ID 10 (0x0A)
Description A Form Object (a page on the screen).
Input No
Output Yes
On Actions OnActivate An input type object (such as Button) can cause a form to be activated, along with all the objects on that form.
Event Report OnActivate Report Event message will be transmitted to the host after the form is activated.
Value(msb:lsb) Not used.
Notes Form0 (or the first form) is automatically made active when the Genie application program starts on the display. The host can change the form by setting the value of the Form’s index and sending the Write Object Value message. The selected form will then be displayed along with all of its objects and the ACK will be returned once this is complete.

4D SYSTEMS ViSi-Genie Reference Manual
© 2012 4D SYSTEMS Page 38 of 44 www.4dsystems.com.au
ViS
i-Gen
ie R
efer
ence
Manu
al
3.2.6.2 IMAGE
Object Image
ID 12 (0x0C)
Description The Image Object.
Input No
Output No
On Actions Not Applicable
Event Report Not Applicable
Notes Images are displayed as part of the form, there is no need to alter them.

4D SYSTEMS ViSi-Genie Reference Manual
© 2012 4D SYSTEMS Page 39 of 44 www.4dsystems.com.au
ViS
i-Gen
ie R
efer
ence
Manu
al
3.2.6.3 VIDEO
Object Video
ID 20 (0x14)
Description The Video Object.
Input No
Output Yes
On Actions OnChanged An input type object, such as a button or a slider, can cause each frame of the video to be changed. This can subsequently cause another output type object to be changed, such as Led Digits as a frame counter.
Event Report OnChanged Report Event message will be transmitted to the host after the LED state has changed.
Value(msb:lsb) This is the 2 byte value, Value(msb):Value(lsb), that is used in the message transmissions to and from the host. This 2 byte field is the value of the video frame count.
Notes Note 1: To use the video object as a video player, the Timer object must be used. Each click of the timer will increment to the next frame of the video. Note 2: The video object can also be used as a slideshow. Compile all of the separate images into a GIF file. A slider or a button can then be used to sequence thru the images as frames. Note 3: Refer to the video object application note for detailed information on the Video object and its usage.

4D SYSTEMS ViSi-Genie Reference Manual
© 2012 4D SYSTEMS Page 40 of 44 www.4dsystems.com.au
ViS
i-Gen
ie R
efer
ence
Manu
al
3.2.6.4 SOUNDS
Object Sounds
ID 22 (0x16)
Description The Sounds Object. The sound object can be made up of one or many wav files. Each wav file corresponds to an index within the sound object.
Input No
Output Yes
On Actions OnPlayingChanged OnVolumeChanged
When one of these values is changed by an input you can cause either another output to be changed or a message to be sent to the host.
Event Report OnPlayingChanged OnVolumeChanged
Report Event message will be transmitted to the host after any of these states has changed.
Value(msb:lsb) This is the 2 byte value, Value(msb):Value(lsb), that is used in the message transmissions to and from the host. This 2 byte field hold the value of the specific action (see Notes below).
Notes The Sound object is different to other objects in that there is only one of them (Sounds0) and that the values have predefined meanings, write to them to ‘set’ them. Reading Object # 0 returns the number of blocks left to play Object Index Meaning (Value field)
0 Play wav file n 1 Set Volume n 2 Pause 3 Continue 4 Stop
An input can change the current wav file being played and/or change the volume of the sound object. For buttons this can be a discrete file, for other inputs care must be taken to ensure the value is valid and reasonable.
The Sound object (like the Timer object) will always reside in Form0.

4D SYSTEMS ViSi-Genie Reference Manual
© 2012 4D SYSTEMS Page 41 of 44 www.4dsystems.com.au
ViS
i-Gen
ie R
efer
ence
Manu
al
3.2.6.5 TIMER
Object Timer
ID 22 (0x17)
Description The Timer Object.
Input No
Output Yes
On Actions OnTimer Normally used to move a video to the next frame.
Event Report Not Applicable
Notes Enabled Set to yes to indicate the timer is to start when the Codeless program is loaded. Once enabled the timer continues until the Video displays its last frame.
Interval The number of milliseconds between timer events.
The Timer object (like the Sounds object) will always reside in Form0.

4D SYSTEMS ViSi-Genie Reference Manual
© 2012 4D SYSTEMS Page 42 of 44 www.4dsystems.com.au
ViS
i-Gen
ie R
efer
ence
Manu
al
Object Summary Table 3.3.
Object ID Input Output Notes
Dipswitch 0 (0x00)
Knob 1 (0x01)
Rockerswitch 2 (0x02)
Rotaryswitch 3 (0x03)
Slider 4 (0x04)
Trackbar 5 (0x05)
Winbutton 6 (0x06)
Angularmeter 7 (0x07)
Coolgauge 8 (0x08)
Customdigits 9 (0x09)
Form 10 (0x0A) Used to set the current form
Gauge 11 (0x0B)
Image 12 (0x0C) Displayed as part of form, no method to alter
Keyboard 13 (0x0D) Keyboard inputs are always single bytes and are unsolicited
Led 14 (0x0E)
Leddigits 15 (0x0F)
Meter 16 (0x10)
Strings 17 (0x11)
Thermometer 18 (0x12)
Userled 19 (0x13)
Video 20 (0x14)
Statictext 21 (0x15) Displayed as part of form, no method to alter
Sound 22 (0x16)
Timer 23 (0x17)
Note: Object IDs may change with future releases; it is not advisable to code their values as constants.

4D SYSTEMS ViSi-Genie Reference Manual
© 2012 4D SYSTEMS Page 43 of 44 www.4dsystems.com.au
ViS
i-Gen
ie R
efer
ence
Manu
al
4. Revision History
Revision Revision Content Revision Date
1.0 First Release Nov 19, 2012
1.1 Fixed incorrect information in Section 2 Feb 28, 2013
1.2 Updated description in 2.1.3.1 Mar 7, 2013
1.3 Updated Note 4 in section 3.2 April 30, 2013

4D SYSTEMS ViSi-Genie Reference Manual
© 2012 4D SYSTEMS Page 44 of 44 www.4dsystems.com.au
ViS
i-Gen
ie R
efer
ence
Manu
al
5. Legal Notice Proprietary Information The information contained in this document is the property of 4D Systems Pty. Ltd. and may be the subject of patents pending or granted, and must not be copied or disclosed without prior written permission. 4D Systems endeavours to ensure that the information in this document is correct and fairly stated but does not accept liability for any error or omission. The development of 4D Systems products and services is continuous and published information may not be up to date. It is important to check the current position with 4D Systems. 4D Systems reserves the right to modify, update or makes changes to Specifications or written material without prior notice at any time. All trademarks belong to their respective owners and are recognised and acknowledged. Disclaimer of Warranties & Limitation of Liability 4D Systems makes no warranty, either expressed or implied with respect to any product, and specifically disclaims all other warranties, including, without limitation, warranties for merchantability, non-infringement and fitness for any particular purpose. Information contained in this publication regarding device applications and the like is provided only for your convenience and may be superseded by updates. It is your responsibility to ensure that your application meets with your specifications. Images and graphics used throughout this document are for illustrative purposes only. All images and graphics used are possible to be displayed on the 4D Systems range of products, however the quality may vary. In no event shall 4D Systems be liable to the buyer or to any third party for any indirect, incidental, special, consequential, punitive or exemplary damages (including without limitation lost profits, lost savings, or loss of business opportunity) arising out of or relating to any product or service provided or to be provided by 4D Systems, or the use or inability to use the same, even if 4D Systems has been advised of the possibility of such damages. 4D Systems products are not fault tolerant nor designed, manufactured or intended for use or resale as on line control equipment in hazardous environments requiring fail – safe performance, such as in the operation of nuclear facilities, aircraft navigation or communication systems, air traffic control, direct life support machines or weapons systems in which the failure of the product could lead directly to death, personal injury or severe physical or environmental damage (‘High Risk Activities’). 4D Systems and its suppliers specifically disclaim any expressed or implied warranty of fitness for High Risk Activities. Use of 4D Systems’ products and devices in 'High Risk Activities' and in any other application is entirely at the buyer’s risk, and the buyer agrees to defend, indemnify and hold harmless 4D Systems from any and all damages, claims, suits, or expenses resulting from such use. No licenses are conveyed, implicitly or otherwise, under any 4D Systems intellectual property rights.
6. Contact Information
For Technical Support: [email protected]
For Sales Support: [email protected]
Website: www.4dsystems.com.au
Copyright 4D Systems Pty. Ltd. 2000-2012.
Related Documents