1 About the Web Interface This guide details the commands available on the Web and the Command Line Interfaces. The tables contained in this document reference the CLI commands and the equivalent Web Interface menu items that allow the same configuration to be made via the web interface. About the Command Line Interface To use and navigate the command line interface of your unit, please refer to the following points for assistance: ■ When initially accessing the command line interface, press Enter when prompted. The User View menu for the unit displays. This is indicated by the chevron brackets around the name of the unit at the prompt, for example, <4500>. ■ When in the System View menu, square brackets appear around the name of the unit at the prompt, for example, [4500]. ■ You must be in the System View menu to access the configurable CLI commands. ■ Some commands can be entered directly at any prompt from anywhere in the interface. ■ If you enter part of a command followed by a ? (with no space between), the CLI will show you all the commands that begin in that way. ■ To display command parameters: At the prompt, enter the name of the command followed by a space and ?. For example: <4500>boot ? The following parameters are displayed: boot-loader bootrom <4500> To specify boot loader, enter the command as follows: <4500>boot boot-loader ? You only need to enter ? if parameters exist for the command. ■ To display parent menus: At the prompt, enter quit. ■ To display the User View menu: Press <CTRL-Z>. ■ To obtain help: At the prompt, enter ?. ■ The term ‘view’ may be used interchangeably with the term ‘menu’. 3COM ® SUPERSTACK 3 SWITCH 4500 QUICK REFERENCE GUIDE 3COM OS V ERSION 3.1.X

Welcome message from author
This document is posted to help you gain knowledge. Please leave a comment to let me know what you think about it! Share it to your friends and learn new things together.
Transcript
1
About the Web InterfaceThis guide details the commands available on the Web and the Command Line Interfaces. The tables contained in this document reference the CLI commands and the equivalent Web Interface menu items that allow the same configuration to be made via the web interface.
About the Command Line InterfaceTo use and navigate the command line interface of your unit, please refer to the following points for assistance:
■ When initially accessing the command line interface, press Enter when prompted. The User View menu for the unit displays. This is indicated by the chevron brackets around the name of the unit at the prompt, for example, <4500>.
■ When in the System View menu, square brackets appear around the name of the unit at the prompt, for example, [4500].
■ You must be in the System View menu to access the configurable CLI commands.
■ Some commands can be entered directly at any prompt from anywhere in the interface.
■ If you enter part of a command followed by a ? (with no space between), the CLI will show you all the commands that begin in that way.
■ To display command parameters:At the prompt, enter the name of the command followed by a space and ?. For example:
<4500>boot ?
The following parameters are displayed:
boot-loaderbootrom
<4500>
To specify boot loader, enter the command as follows:
<4500>boot boot-loader ?
You only need to enter ? if parameters exist for the command.
■ To display parent menus:At the prompt, enter quit.
■ To display the User View menu:Press <CTRL-Z>.
■ To obtain help:At the prompt, enter ?.
■ The term ‘view’ may be used interchangeably with the term ‘menu’.
3COM® SUPERSTACK 3 SWITCH 4500QUICK REFERENCE GUIDE 3COM OS VERSION 3.1.X
DQA1756-1AAA01.fm Page 1 Tuesday, September 13, 2005 10:08 PM
2
■ The undo command is placed before the command you wish to undo, for example, undo set authentication password.
■ <CTRL A> places the cursor back to the start of the command line.
■ Enter the first few characters of a command and press TAB to enter the full command without having to input the entire command (where there is only one command that starts with the entered characters).
■ Use the Up Arrow key at the prompt to repeat the previous command string.
■ Use the Delete key to delete the character after the cursor; the Backspace key deletes the charac-ter before the cursor.
■ When entering physical port numbers, Enter the port number as x/0/z, where x is the unit number and z is the physical port number.
Further Information
For further information about how to use the command line interface, refer to the Command Reference Guide and the Configuration Guide, which are both available as PDF documents on the CD that accompanied the unit.
MenusThis section provides a summary of menus and commands supported by the agent for each of the supported hardware platform variants. Any matching web commands available in the web interface are also shown.
Commands marked with ‘*’ are available on the Switch 4500 PWR only.
Table 1 Command Line Editing
Table 2 Commands Available in Any View
<Ctrl+A> Moves the cursor to the start of the command line
<Tab> Command completion
Command Description Web Command
? Help
display Display current system information
display acl View detailed configuration information about the ACL
display am View the status of access management function
display arp View the ARP mapping table
display arp timer aging View the current setting of the dynamic ARP map aging timer
display boot-loader View the APP file used for this boot and the one that will be used at next boot
display channel View details about the information channel
display clock View the date and time
display config-agent View statistics of the configuration agent
DQA1756-1AAA01.fm Page 2 Tuesday, September 13, 2005 10:08 PM

3
display connection View the connection information of all or specified users
display cpu Display the occupancy of the CPU
display current-configuration
Display the current configuration parameters
display debugging View the enabled debugging process
display device Display device information
display dhcp client View detailed information about address allocation to DHCP client
display dhcp-server View information about DHCP server group
display dhcp-server interface vlan-interface
View information about the DHCP server group corresponding to the VLAN interface
display diagnostic-information
View the current configuration information about all running modules
display domain View the configuration of ISP domains
display dot1x View the relevant information of 802.1x
display fan View the working state of the built-in fans
display fib View the summary of the Forwarding Information Base
display fib ip_address View the FIB entries matching a destination IP address (range)
display fib acl View the FIB entries matching a specific ACL
display fib ip-prefix View the FIB entries matching a specific prefix list
display fib statistics View the total number of FIB entries
display ftm Display Fabric topology management
display ftp-server View the parameters of the current FTP server
display ftp-user View the parameters of current FTP user
display history-command View the saved history of commands
display icmp statistics View the statistics information about ICMP packets
display igmp-snooping configuration
View IGMP snooping configuration information
display igmp-snooping group View IP multicast groups and MAC multicast groups
display igmp-snooping statistics
View the statistics information on IGMP snooping
display info-center View the configuration of system log and the information recorded in the memory buffer
display interface View port configuration information Port -> Statistics
display interface vlan-interface
View the information about specified or all VLAN interfaces
display ip host View all the host names and the corresponding IP addresses
display ip interface vlan-interface
View the information of an IP interface
display ip ip-prefix View the IP address prefix list
DQA1756-1AAA01.fm Page 3 Tuesday, September 13, 2005 10:08 PM
4
display ip socket Display the information about the sockets in the current system
display ip statistics View the statistics information about IP packets
display ip routing-table View the routing table summary
display ip routing-table X.X.X.X
View the routing information of the specified destination address
display ip routing-table X.X.X.X X.X.X.X
View the routing information in the specified destination address range
display ip routing-table acl View the route filtered through specified basic access control list (ACL)
display ip routing-table ip-prefix
View the route information that passed the filtering rule according the input ip prefix list name
display ip routing-table protocol
View the route information of specified protocol
display ip routing-table radix
View radix tree of routing table
display ip routing-table statistics
Summary statistics of all routes
display ip routing-table verbose
Detail information of routing table
display isolate port View port isolation information
display lacp system-id View actor system ID
display link-aggregation interface
View detailed link aggregation information at a designated port
display link-aggregation summary
View summary information of all aggregation groups
display link-aggregation verbose
View detailed information of a designated port
display local-user View the relevant information of all (or specified) local users
display local-server statistics
View the configuration information of local RADIUS server group
display loopback-detection View whether port loopback detection has been enabled and any details
display mac-address View MAC address table information
display mac-address aging-time
View the aging time of the dynamic entry in the MAC address table
display mac-authentication Display the global information on centralized MAC address authentication
display mirror View port mirroring configuration
display packet-filter View the information of the activated of ACL
display password-control Display password-control information
display password-control blacklist
Display blacklist information
display password-control super
Display super user's password-control information
DQA1756-1AAA01.fm Page 4 Tuesday, September 13, 2005 10:08 PM
5
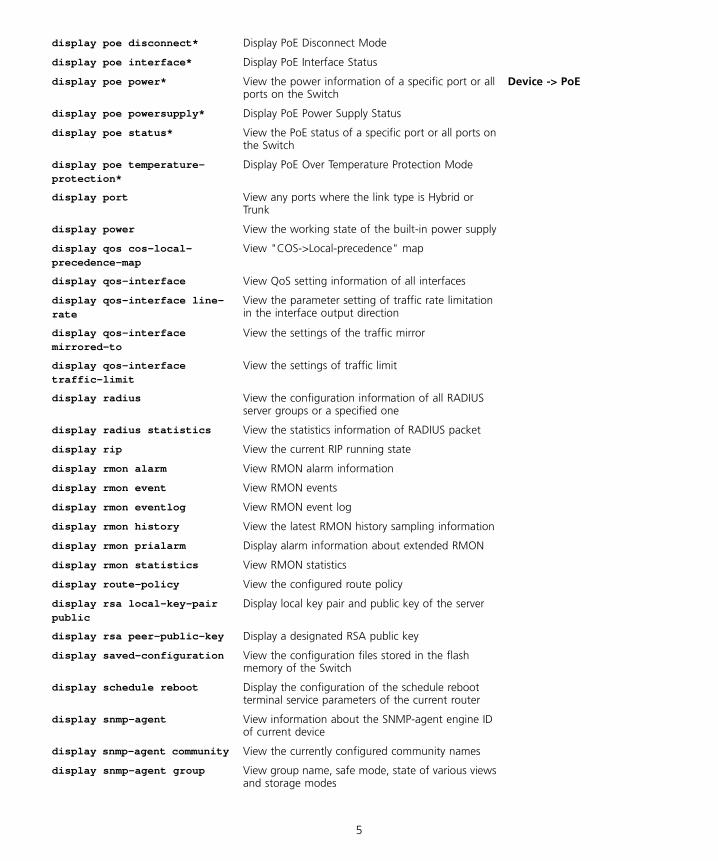
display poe disconnect* Display PoE Disconnect Mode
display poe interface* Display PoE Interface Status
display poe power* View the power information of a specific port or all ports on the Switch
Device -> PoE
display poe powersupply* Display PoE Power Supply Status
display poe status* View the PoE status of a specific port or all ports on the Switch
display poe temperature-protection*
Display PoE Over Temperature Protection Mode
display port View any ports where the link type is Hybrid or Trunk
display power View the working state of the built-in power supply
display qos cos-local-precedence-map
View "COS->Local-precedence" map
display qos-interface View QoS setting information of all interfaces
display qos-interface line-rate
View the parameter setting of traffic rate limitation in the interface output direction
display qos-interface mirrored-to
View the settings of the traffic mirror
display qos-interface traffic-limit
View the settings of traffic limit
display radius View the configuration information of all RADIUS server groups or a specified one
display radius statistics View the statistics information of RADIUS packet
display rip View the current RIP running state
display rmon alarm View RMON alarm information
display rmon event View RMON events
display rmon eventlog View RMON event log
display rmon history View the latest RMON history sampling information
display rmon prialarm Display alarm information about extended RMON
display rmon statistics View RMON statistics
display route-policy View the configured route policy
display rsa local-key-pair public
Display local key pair and public key of the server
display rsa peer-public-key Display a designated RSA public key
display saved-configuration View the configuration files stored in the flash memory of the Switch
display schedule reboot Display the configuration of the schedule reboot terminal service parameters of the current router
display snmp-agent View information about the SNMP-agent engine ID of current device
display snmp-agent community View the currently configured community names
display snmp-agent group View group name, safe mode, state of various views and storage modes
DQA1756-1AAA01.fm Page 5 Tuesday, September 13, 2005 10:08 PM
6
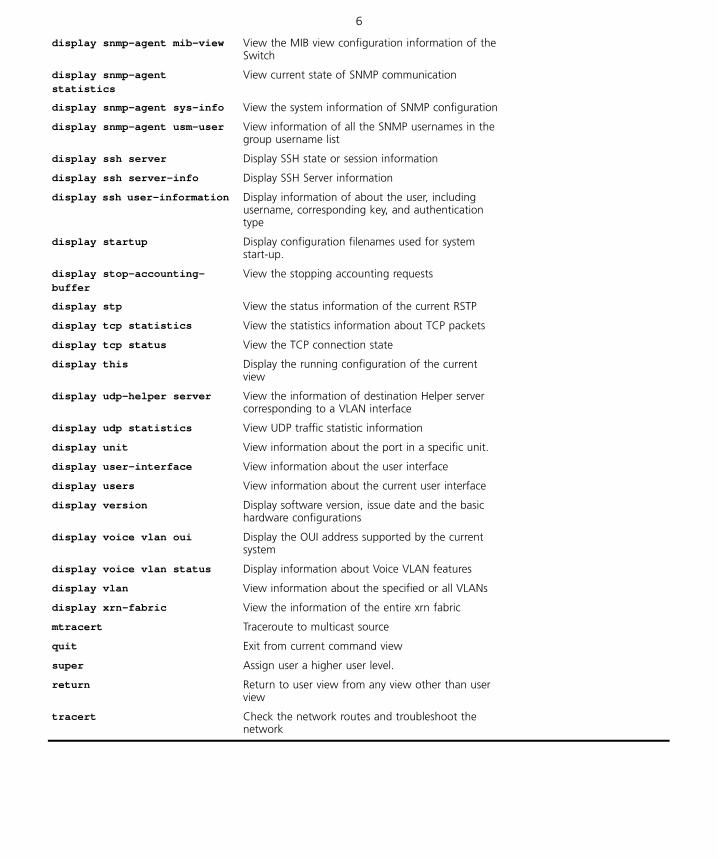
display snmp-agent mib-view View the MIB view configuration information of the Switch
display snmp-agent statistics
View current state of SNMP communication
display snmp-agent sys-info View the system information of SNMP configuration
display snmp-agent usm-user View information of all the SNMP usernames in the group username list
display ssh server Display SSH state or session information
display ssh server-info Display SSH Server information
display ssh user-information Display information of about the user, including username, corresponding key, and authentication type
display startup Display configuration filenames used for system start-up.
display stop-accounting-buffer
View the stopping accounting requests
display stp View the status information of the current RSTP
display tcp statistics View the statistics information about TCP packets
display tcp status View the TCP connection state
display this Display the running configuration of the current view
display udp-helper server View the information of destination Helper server corresponding to a VLAN interface
display udp statistics View UDP traffic statistic information
display unit View information about the port in a specific unit.
display user-interface View information about the user interface
display users View information about the current user interface
display version Display software version, issue date and the basic hardware configurations
display voice vlan oui Display the OUI address supported by the current system
display voice vlan status Display information about Voice VLAN features
display vlan View information about the specified or all VLANs
display xrn-fabric View the information of the entire xrn fabric
mtracert Traceroute to multicast source
quit Exit from current command view
super Assign user a higher user level.
return Return to user view from any view other than user view
tracert Check the network routes and troubleshoot the network
DQA1756-1AAA01.fm Page 6 Tuesday, September 13, 2005 10:08 PM

7
Table 3 User View
<4500>
Command Description Web Command
boot boot-loader Specify the application file (.app) used for booting the Switch
boot bootrom Upgrade bootrom
cd Change the current directory
clock datetime Configure the current date and time
clock summer-time Configure summer time on the Switch
clock timezone Configure local timezone
copy Copy from one file to another
debugging Enable system debugging functions
debugging arp packet Enable ARP debugging
debugging dhcp client Enable DHCP client debugging
debugging dhcp-relay Enable DHCP relay debugging
debugging lacp packet Enable LACP packets debugging at a designated port or ports
debugging lacp state Enable LACP state machines debugging on a designated port or ports
debugging link-aggregation error
Enable link aggregation errors debugging
debugging link-aggregation event
Enable link aggregation events debugging
debugging mac-authentication event
Enable the centralized MAC address authentication debugging switch
debugging ssh server Display debugging information in running SSH
debugging udp-helper Enable UDP Helper debugging
delete Delete a file
dir List files on a file system
fabric save-unit-id Save Unit ID
format Format the storage device on the Switch
free user-interface Reset a specified user interface
ftp Establish control connection with the remote FTP Server and enter FTP Client View (See Table 10, “FTP Client View,” on page 15)
language-mode Specify the language environment
lock Lock current user terminal interface
mkdir Create a new directory
more Display the contents of a file
move Move the file
pwd Display current working directory
reboot Reset switch Administration -> Reboot
DQA1756-1AAA01.fm Page 7 Tuesday, September 13, 2005 10:08 PM
8
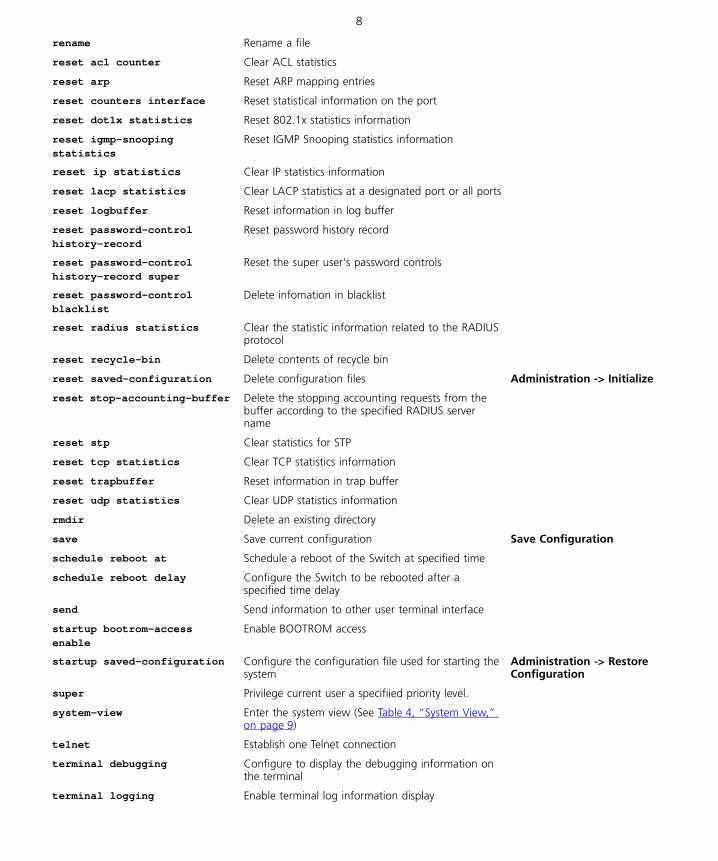
rename Rename a file
reset acl counter Clear ACL statistics
reset arp Reset ARP mapping entries
reset counters interface Reset statistical information on the port
reset dot1x statistics Reset 802.1x statistics information
reset igmp-snooping statistics
Reset IGMP Snooping statistics information
reset ip statistics Clear IP statistics information
reset lacp statistics Clear LACP statistics at a designated port or all ports
reset logbuffer Reset information in log buffer
reset password-control history-record
Reset password history record
reset password-control history-record super
Reset the super user's password controls
reset password-control blacklist
Delete infomation in blacklist
reset radius statistics Clear the statistic information related to the RADIUS protocol
reset recycle-bin Delete contents of recycle bin
reset saved-configuration Delete configuration files Administration -> Initialize
reset stop-accounting-buffer Delete the stopping accounting requests from the buffer according to the specified RADIUS server name
reset stp Clear statistics for STP
reset tcp statistics Clear TCP statistics information
reset trapbuffer Reset information in trap buffer
reset udp statistics Clear UDP statistics information
rmdir Delete an existing directory
save Save current configuration Save Configuration
schedule reboot at Schedule a reboot of the Switch at specified time
schedule reboot delay Configure the Switch to be rebooted after a specified time delay
send Send information to other user terminal interface
startup bootrom-access enable
Enable BOOTROM access
startup saved-configuration Configure the configuration file used for starting the system
Administration -> Restore Configuration
super Privilege current user a specifiied priority level.
system-view Enter the system view (See Table 4, “System View,” on page 9)
telnet Establish one Telnet connection
terminal debugging Configure to display the debugging information on the terminal
terminal logging Enable terminal log information display
DQA1756-1AAA01.fm Page 8 Tuesday, September 13, 2005 10:08 PM
9
Table 4 System View
<4500>sys
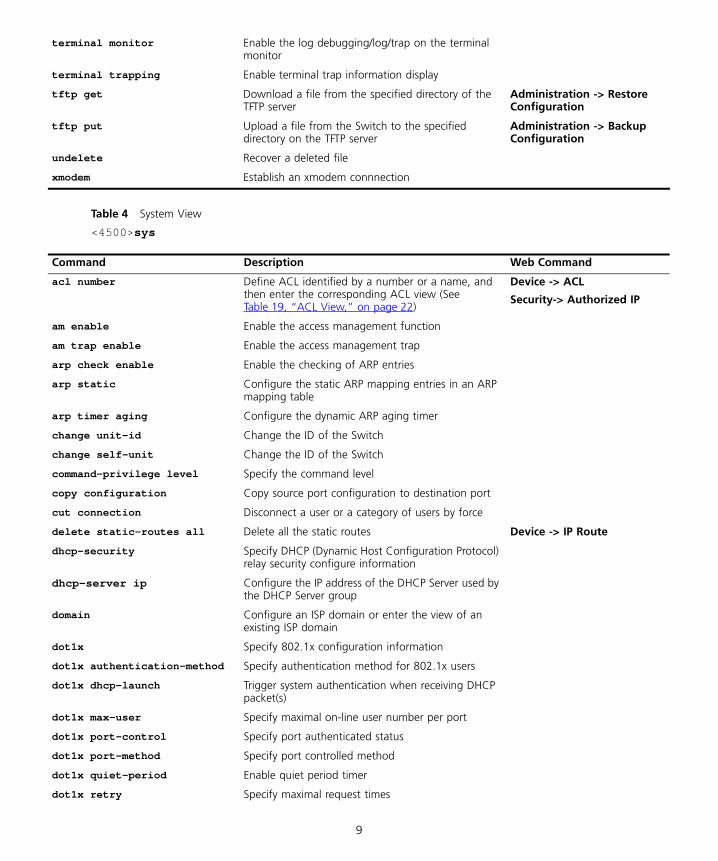
terminal monitor Enable the log debugging/log/trap on the terminal monitor
terminal trapping Enable terminal trap information display
tftp get Download a file from the specified directory of the TFTP server
Administration -> Restore Configuration
tftp put Upload a file from the Switch to the specified directory on the TFTP server
Administration -> Backup Configuration
undelete Recover a deleted file
xmodem Establish an xmodem connnection
Command Description Web Command
acl number Define ACL identified by a number or a name, and then enter the corresponding ACL view (See Table 19, “ACL View,” on page 22)
Device -> ACL
Security-> Authorized IP
am enable Enable the access management function
am trap enable Enable the access management trap
arp check enable Enable the checking of ARP entries
arp static Configure the static ARP mapping entries in an ARP mapping table
arp timer aging Configure the dynamic ARP aging timer
change unit-id Change the ID of the Switch
change self-unit Change the ID of the Switch
command-privilege level Specify the command level
copy configuration Copy source port configuration to destination port
cut connection Disconnect a user or a category of users by force
delete static-routes all Delete all the static routes Device -> IP Route
dhcp-security Specify DHCP (Dynamic Host Configuration Protocol) relay security configure information
dhcp-server ip Configure the IP address of the DHCP Server used by the DHCP Server group
domain Configure an ISP domain or enter the view of an existing ISP domain
dot1x Specify 802.1x configuration information
dot1x authentication-method Specify authentication method for 802.1x users
dot1x dhcp-launch Trigger system authentication when receiving DHCP packet(s)
dot1x max-user Specify maximal on-line user number per port
dot1x port-control Specify port authenticated status
dot1x port-method Specify port controlled method
dot1x quiet-period Enable quiet period timer
dot1x retry Specify maximal request times
DQA1756-1AAA01.fm Page 9 Tuesday, September 13, 2005 10:08 PM

10
dot1x supp-proxy-check Check whether user(s) access the networks by proxy or not
dot1x timer Specify timer parameters
dot1x timer handshake-period Set the handshake period of 802.1x
end-station polling ip-address
Configure the Switch to periodically test specified end-stations by sending PING packets
execute Run the batch file
fabric-port enable Specify the fabric port of the Switch Port -> Administration
file prompt Modify prompt modes of file operations
ftm stacking-vlan Specify the stacking VLAN of the Switch Device -> XRN Fabric
ftp server Start or shutdown the FTP server
ftp timeout Configure the FTP connection timeout interval
header Define the login banner
igmp-snooping IGMP snooping Device -> IGMP Snooping
igmp-snooping host-aging-time
Configure the port aging time of the multicast group members
igmp-snooping max-response-time
Configure the maximum response time for a query
igmp-snooping router-aging-time
Configure the router port aging time of IGMP Snooping
info-center channel name Rename a channel
info-center console channel Configure the channel through which log information is output to the console
info-center enable Enable the system log
info-center logbuffer Configure to output information to the memory buffer
info-center loghost Configure the IP address of the info-center loghost to which to send information
info-center loghost source Configure the source address of the packets sent to loghost
info-center monitor channel Configure the channel to output the log information to the user terminal
info-center snmp channel Specify new channel for transmitting the SNMP information
info-center source Add or delete a record to the information channel
info-center switch-on Turn on the information synchronization on the specified Switch
info-center timestamp Configure the timestamp output format in debugging/trap information
info-center trapbuffer Output information to the trap buffer
interface ethernet Enter Ethernet Port View (See Table 16, “Ethernet Port View,” on page 19)
interface vlan-interface Enable VLAN interface and enter VLAN interface view (See Table 15, “VLAN Inteface View,” on page 18)
Device -> VLAN InterfaceAdministration -> IP Setup
ip host Configure the host name and the host IP address
DQA1756-1AAA01.fm Page 10 Tuesday, September 13, 2005 10:08 PM
11
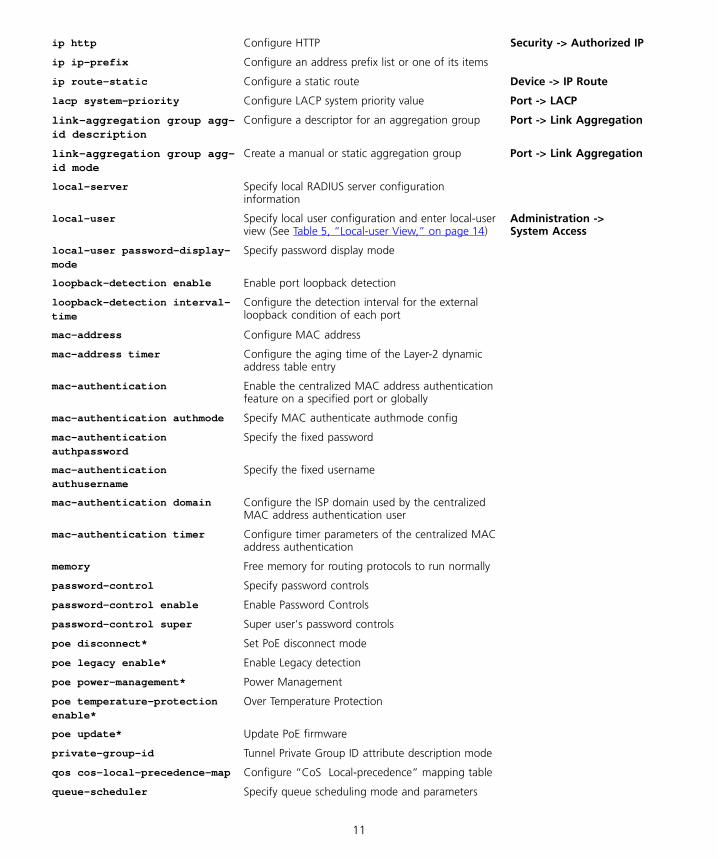
ip http Configure HTTP Security -> Authorized IP
ip ip-prefix Configure an address prefix list or one of its items
ip route-static Configure a static route Device -> IP Route
lacp system-priority Configure LACP system priority value Port -> LACP
link-aggregation group agg-id description
Configure a descriptor for an aggregation group Port -> Link Aggregation
link-aggregation group agg-id mode
Create a manual or static aggregation group Port -> Link Aggregation
local-server Specify local RADIUS server configuration information
local-user Specify local user configuration and enter local-user view (See Table 5, “Local-user View,” on page 14)
Administration -> System Access
local-user password-display-mode
Specify password display mode
loopback-detection enable Enable port loopback detection
loopback-detection interval-time
Configure the detection interval for the external loopback condition of each port
mac-address Configure MAC address
mac-address timer Configure the aging time of the Layer-2 dynamic address table entry
mac-authentication Enable the centralized MAC address authentication feature on a specified port or globally
mac-authentication authmode Specify MAC authenticate authmode config
mac-authentication authpassword
Specify the fixed password
mac-authentication authusername
Specify the fixed username
mac-authentication domain Configure the ISP domain used by the centralized MAC address authentication user
mac-authentication timer Configure timer parameters of the centralized MAC address authentication
memory Free memory for routing protocols to run normally
password-control Specify password controls
password-control enable Enable Password Controls
password-control super Super user's password controls
poe disconnect* Set PoE disconnect mode
poe legacy enable* Enable Legacy detection
poe power-management* Power Management
poe temperature-protection enable*
Over Temperature Protection
poe update* Update PoE firmware
private-group-id Tunnel Private Group ID attribute description mode
qos cos-local-precedence-map Configure “CoS Local-precedence” mapping table
queue-scheduler Specify queue scheduling mode and parameters
DQA1756-1AAA01.fm Page 11 Tuesday, September 13, 2005 10:08 PM
12
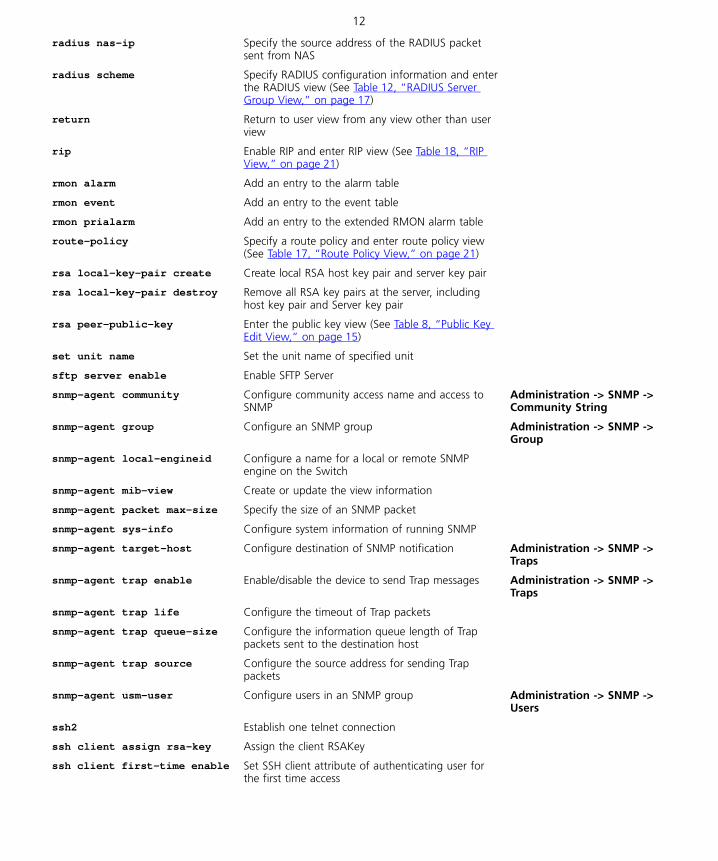
radius nas-ip Specify the source address of the RADIUS packet sent from NAS
radius scheme Specify RADIUS configuration information and enter the RADIUS view (See Table 12, “RADIUS Server Group View,” on page 17)
return Return to user view from any view other than user view
rip Enable RIP and enter RIP view (See Table 18, “RIP View,” on page 21)
rmon alarm Add an entry to the alarm table
rmon event Add an entry to the event table
rmon prialarm Add an entry to the extended RMON alarm table
route-policy Specify a route policy and enter route policy view (See Table 17, “Route Policy View,” on page 21)
rsa local-key-pair create Create local RSA host key pair and server key pair
rsa local-key-pair destroy Remove all RSA key pairs at the server, including host key pair and Server key pair
rsa peer-public-key Enter the public key view (See Table 8, “Public Key Edit View,” on page 15)
set unit name Set the unit name of specified unit
sftp server enable Enable SFTP Server
snmp-agent community Configure community access name and access to SNMP
Administration -> SNMP -> Community String
snmp-agent group Configure an SNMP group Administration -> SNMP -> Group
snmp-agent local-engineid Configure a name for a local or remote SNMP engine on the Switch
snmp-agent mib-view Create or update the view information
snmp-agent packet max-size Specify the size of an SNMP packet
snmp-agent sys-info Configure system information of running SNMP
snmp-agent target-host Configure destination of SNMP notification Administration -> SNMP -> Traps
snmp-agent trap enable Enable/disable the device to send Trap messages Administration -> SNMP -> Traps
snmp-agent trap life Configure the timeout of Trap packets
snmp-agent trap queue-size Configure the information queue length of Trap packets sent to the destination host
snmp-agent trap source Configure the source address for sending Trap packets
snmp-agent usm-user Configure users in an SNMP group Administration -> SNMP -> Users
ssh2 Establish one telnet connection
ssh client assign rsa-key Assign the client RSAKey
ssh client first-time enable Set SSH client attribute of authenticating user for the first time access
DQA1756-1AAA01.fm Page 12 Tuesday, September 13, 2005 10:08 PM
13
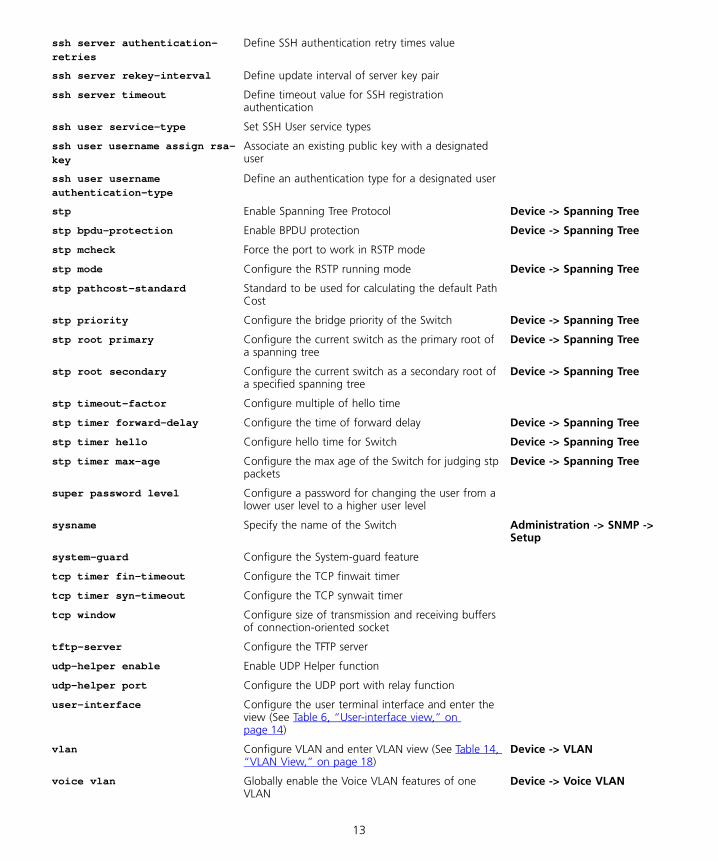
ssh server authentication-retries
Define SSH authentication retry times value
ssh server rekey-interval Define update interval of server key pair
ssh server timeout Define timeout value for SSH registration authentication
ssh user service-type Set SSH User service types
ssh user username assign rsa-key
Associate an existing public key with a designated user
ssh user username authentication-type
Define an authentication type for a designated user
stp Enable Spanning Tree Protocol Device -> Spanning Tree
stp bpdu-protection Enable BPDU protection Device -> Spanning Tree
stp mcheck Force the port to work in RSTP mode
stp mode Configure the RSTP running mode Device -> Spanning Tree
stp pathcost-standard Standard to be used for calculating the default Path Cost
stp priority Configure the bridge priority of the Switch Device -> Spanning Tree
stp root primary Configure the current switch as the primary root of a spanning tree
Device -> Spanning Tree
stp root secondary Configure the current switch as a secondary root of a specified spanning tree
Device -> Spanning Tree
stp timeout-factor Configure multiple of hello time
stp timer forward-delay Configure the time of forward delay Device -> Spanning Tree
stp timer hello Configure hello time for Switch Device -> Spanning Tree
stp timer max-age Configure the max age of the Switch for judging stp packets
Device -> Spanning Tree
super password level Configure a password for changing the user from a lower user level to a higher user level
sysname Specify the name of the Switch Administration -> SNMP -> Setup
system-guard Configure the System-guard feature
tcp timer fin-timeout Configure the TCP finwait timer
tcp timer syn-timeout Configure the TCP synwait timer
tcp window Configure size of transmission and receiving buffers of connection-oriented socket
tftp-server Configure the TFTP server
udp-helper enable Enable UDP Helper function
udp-helper port Configure the UDP port with relay function
user-interface Configure the user terminal interface and enter the view (See Table 6, “User-interface view,” on page 14)
vlan Configure VLAN and enter VLAN view (See Table 14, “VLAN View,” on page 18)
Device -> VLAN
voice vlan Globally enable the Voice VLAN features of one VLAN
Device -> Voice VLAN
DQA1756-1AAA01.fm Page 13 Tuesday, September 13, 2005 10:08 PM

14
Table 5 Local-user View
[4500]local-user admin
Table 6 User-interface view
[4500]user-interface
voice vlan aging Configure the aging time of Voice VLAN Device -> Voice VLAN
voice vlan mac_address Set the MAC address that the Voice VLAN can control
Device -> Voice VLAN
voice vlan mode auto Set the Voice VLAN in auto mode Device -> Voice VLAN
voice vlan security enable Enable the Voice VLAN security mode Device -> Voice VLAN
web set-package Change the default web source file name
xrn-fabric authentication-mode
Configure authentication mode of the fabric Device->XRN Fabric
Command Description Web Command
attribute Configure some attributes for specified local user Administration -> System Access
level Configure user priority level Administration -> System Access
password Specify password of local user Administration -> System Access
service-type Configure a service type for a particular user
state Configure the state of the current user
Command Description Web Command
acl Reference ACL and implement the ACL control to the TELNET users
Security -> Authorized IP
authentication-mode Configure local password authentication method
auto-execute command Configure to automatically run a specified command after a user logs on
databits Configure the data bits for AUX (Console) port
flow-control Configure the flow control mode on AUX (Console) port
history-command max-size Configure the size of the history command buffer
idle-timeout Configure the timeout function
parity Configure the parity mode on AUX (Console) port
protocol Set user interface protocol
screen-length Configure how many lines can be displayed on a screen of the terminal
set authentication password Configure the password for local authentication Administration -> System Access
shell Enable terminal service of a user interface
DQA1756-1AAA01.fm Page 14 Tuesday, September 13, 2005 10:08 PM
15
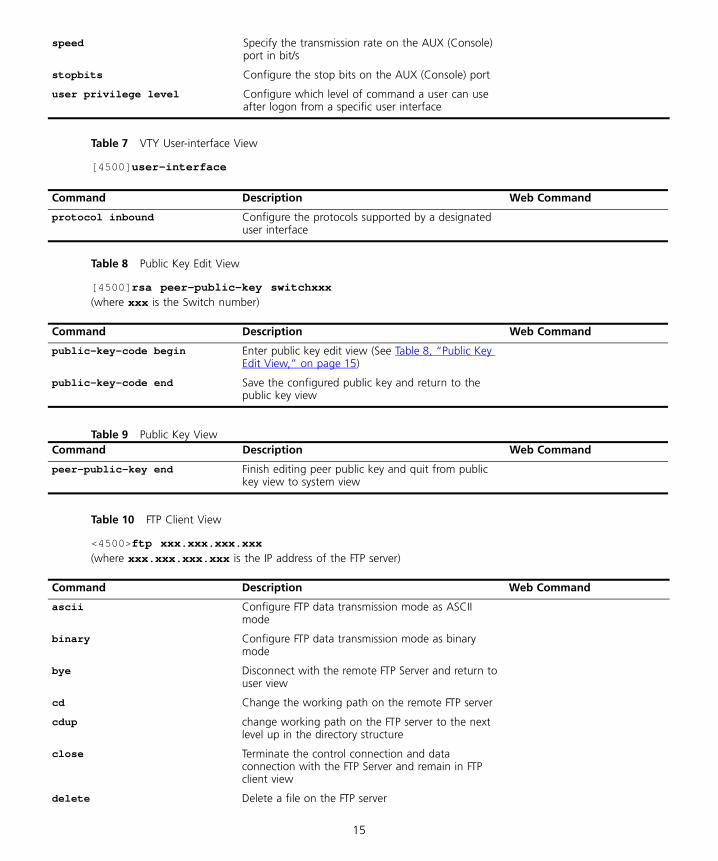
Table 7 VTY User-interface View
[4500]user-interface
Table 8 Public Key Edit View
[4500]rsa peer-public-key switchxxx(where xxx is the Switch number)
Table 9 Public Key View
Table 10 FTP Client View
<4500>ftp xxx.xxx.xxx.xxx(where xxx.xxx.xxx.xxx is the IP address of the FTP server)
speed Specify the transmission rate on the AUX (Console) port in bit/s
stopbits Configure the stop bits on the AUX (Console) port
user privilege level Configure which level of command a user can use after logon from a specific user interface
Command Description Web Command
protocol inbound Configure the protocols supported by a designated user interface
Command Description Web Command
public-key-code begin Enter public key edit view (See Table 8, “Public Key Edit View,” on page 15)
public-key-code end Save the configured public key and return to the public key view
Command Description Web Command
peer-public-key end Finish editing peer public key and quit from public key view to system view
Command Description Web Command
ascii Configure FTP data transmission mode as ASCII mode
binary Configure FTP data transmission mode as binary mode
bye Disconnect with the remote FTP Server and return to user view
cd Change the working path on the remote FTP server
cdup change working path on the FTP server to the next level up in the directory structure
close Terminate the control connection and data connection with the FTP Server and remain in FTP client view
delete Delete a file on the FTP server
DQA1756-1AAA01.fm Page 15 Tuesday, September 13, 2005 10:08 PM
16
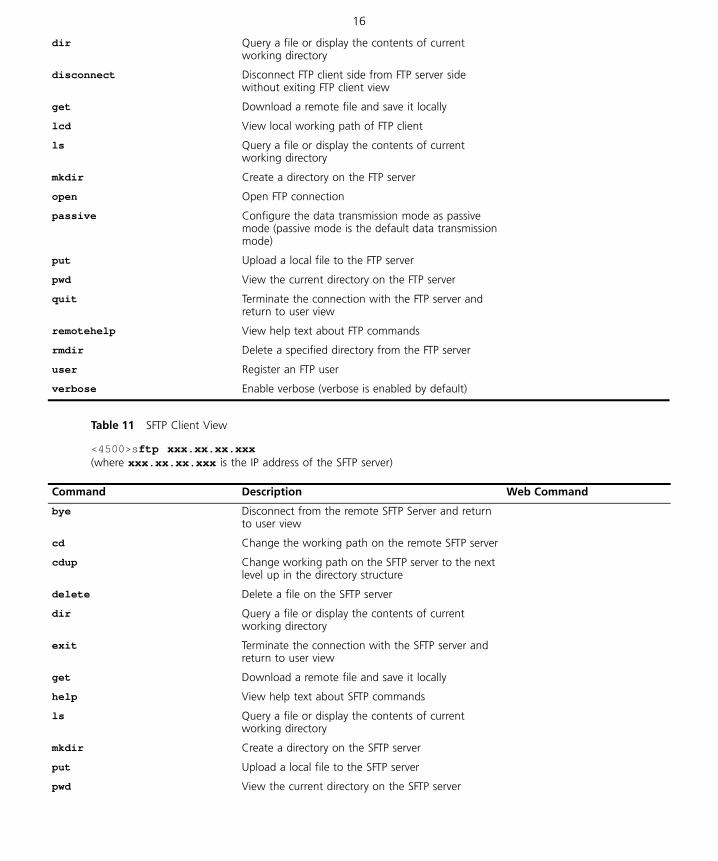
Table 11 SFTP Client View
<4500>sftp xxx.xx.xx.xxx(where xxx.xx.xx.xxx is the IP address of the SFTP server)
dir Query a file or display the contents of current working directory
disconnect Disconnect FTP client side from FTP server side without exiting FTP client view
get Download a remote file and save it locally
lcd View local working path of FTP client
ls Query a file or display the contents of current working directory
mkdir Create a directory on the FTP server
open Open FTP connection
passive Configure the data transmission mode as passive mode (passive mode is the default data transmission mode)
put Upload a local file to the FTP server
pwd View the current directory on the FTP server
quit Terminate the connection with the FTP server and return to user view
remotehelp View help text about FTP commands
rmdir Delete a specified directory from the FTP server
user Register an FTP user
verbose Enable verbose (verbose is enabled by default)
Command Description Web Command
bye Disconnect from the remote SFTP Server and return to user view
cd Change the working path on the remote SFTP server
cdup Change working path on the SFTP server to the next level up in the directory structure
delete Delete a file on the SFTP server
dir Query a file or display the contents of current working directory
exit Terminate the connection with the SFTP server and return to user view
get Download a remote file and save it locally
help View help text about SFTP commands
ls Query a file or display the contents of current working directory
mkdir Create a directory on the SFTP server
put Upload a local file to the SFTP server
pwd View the current directory on the SFTP server
DQA1756-1AAA01.fm Page 16 Tuesday, September 13, 2005 10:08 PM
17
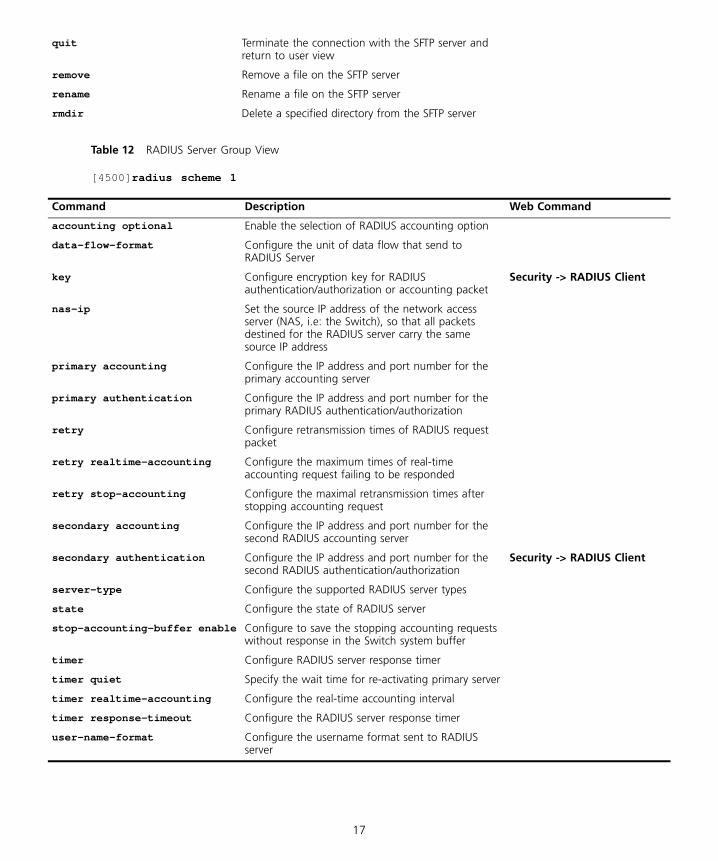
Table 12 RADIUS Server Group View
[4500]radius scheme 1
quit Terminate the connection with the SFTP server and return to user view
remove Remove a file on the SFTP server
rename Rename a file on the SFTP server
rmdir Delete a specified directory from the SFTP server
Command Description Web Command
accounting optional Enable the selection of RADIUS accounting option
data-flow-format Configure the unit of data flow that send to RADIUS Server
key Configure encryption key for RADIUS authentication/authorization or accounting packet
Security -> RADIUS Client
nas-ip Set the source IP address of the network access server (NAS, i.e: the Switch), so that all packets destined for the RADIUS server carry the same source IP address
primary accounting Configure the IP address and port number for the primary accounting server
primary authentication Configure the IP address and port number for the primary RADIUS authentication/authorization
retry Configure retransmission times of RADIUS request packet
retry realtime-accounting Configure the maximum times of real-time accounting request failing to be responded
retry stop-accounting Configure the maximal retransmission times after stopping accounting request
secondary accounting Configure the IP address and port number for the second RADIUS accounting server
secondary authentication Configure the IP address and port number for the second RADIUS authentication/authorization
Security -> RADIUS Client
server-type Configure the supported RADIUS server types
state Configure the state of RADIUS server
stop-accounting-buffer enable Configure to save the stopping accounting requests without response in the Switch system buffer
timer Configure RADIUS server response timer
timer quiet Specify the wait time for re-activating primary server
timer realtime-accounting Configure the real-time accounting interval
timer response-timeout Configure the RADIUS server response timer
user-name-format Configure the username format sent to RADIUS server
DQA1756-1AAA01.fm Page 17 Tuesday, September 13, 2005 10:08 PM
18
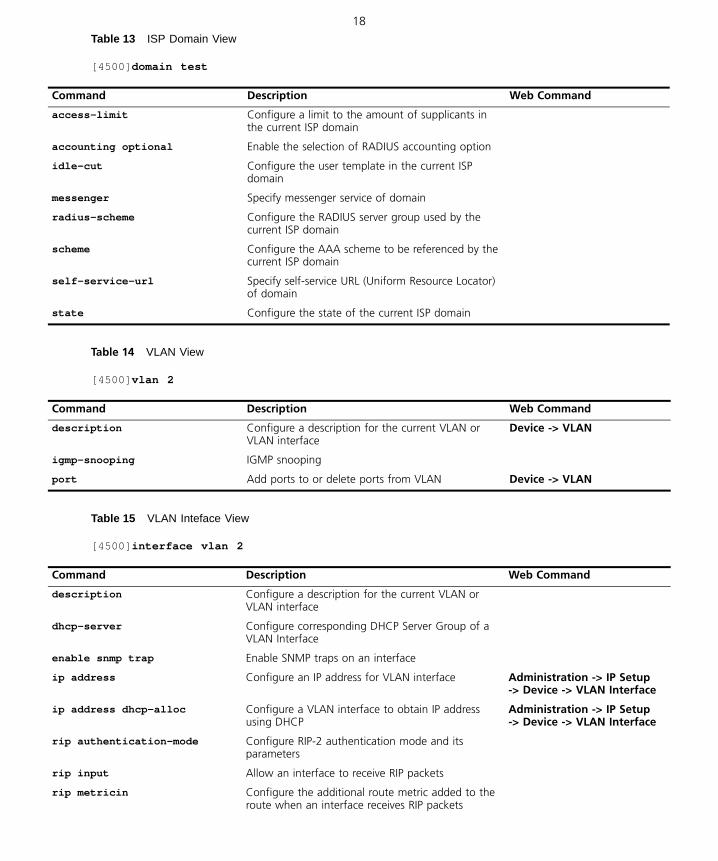
Table 13 ISP Domain View
[4500]domain test
Table 14 VLAN View
[4500]vlan 2
Table 15 VLAN Inteface View
[4500]interface vlan 2
Command Description Web Command
access-limit Configure a limit to the amount of supplicants in the current ISP domain
accounting optional Enable the selection of RADIUS accounting option
idle-cut Configure the user template in the current ISP domain
messenger Specify messenger service of domain
radius-scheme Configure the RADIUS server group used by the current ISP domain
scheme Configure the AAA scheme to be referenced by the current ISP domain
self-service-url Specify self-service URL (Uniform Resource Locator) of domain
state Configure the state of the current ISP domain
Command Description Web Command
description Configure a description for the current VLAN or VLAN interface
Device -> VLAN
igmp-snooping IGMP snooping
port Add ports to or delete ports from VLAN Device -> VLAN
Command Description Web Command
description Configure a description for the current VLAN or VLAN interface
dhcp-server Configure corresponding DHCP Server Group of a VLAN Interface
enable snmp trap Enable SNMP traps on an interface
ip address Configure an IP address for VLAN interface Administration -> IP Setup -> Device -> VLAN Interface
ip address dhcp-alloc Configure a VLAN interface to obtain IP address using DHCP
Administration -> IP Setup -> Device -> VLAN Interface
rip authentication-mode Configure RIP-2 authentication mode and its parameters
rip input Allow an interface to receive RIP packets
rip metricin Configure the additional route metric added to the route when an interface receives RIP packets
DQA1756-1AAA01.fm Page 18 Tuesday, September 13, 2005 10:08 PM
19
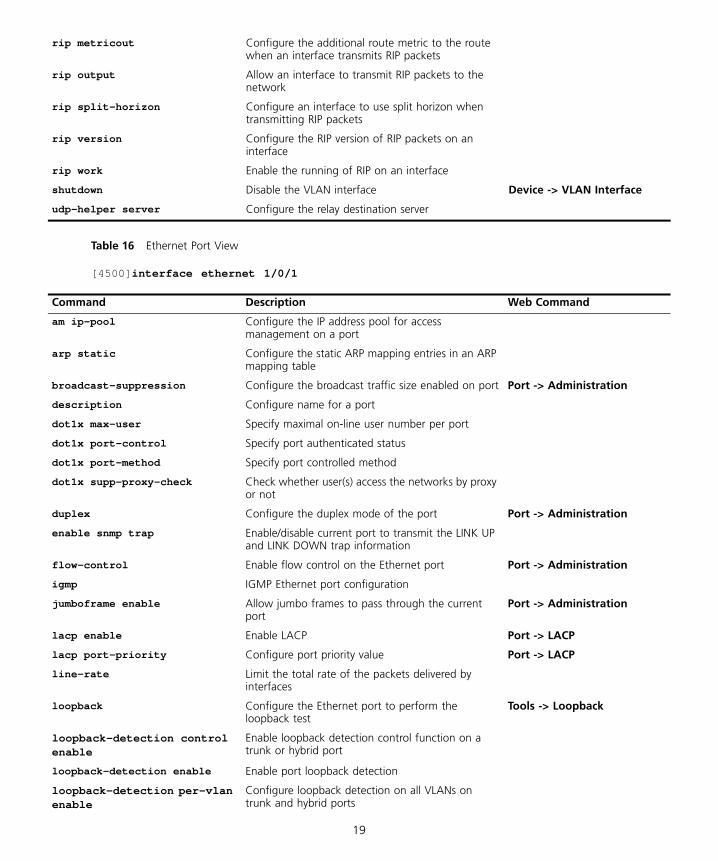
Table 16 Ethernet Port View
[4500]interface ethernet 1/0/1
rip metricout Configure the additional route metric to the route when an interface transmits RIP packets
rip output Allow an interface to transmit RIP packets to the network
rip split-horizon Configure an interface to use split horizon when transmitting RIP packets
rip version Configure the RIP version of RIP packets on an interface
rip work Enable the running of RIP on an interface
shutdown Disable the VLAN interface Device -> VLAN Interface
udp-helper server Configure the relay destination server
Command Description Web Command
am ip-pool Configure the IP address pool for access management on a port
arp static Configure the static ARP mapping entries in an ARP mapping table
broadcast-suppression Configure the broadcast traffic size enabled on port Port -> Administration
description Configure name for a port
dot1x max-user Specify maximal on-line user number per port
dot1x port-control Specify port authenticated status
dot1x port-method Specify port controlled method
dot1x supp-proxy-check Check whether user(s) access the networks by proxy or not
duplex Configure the duplex mode of the port Port -> Administration
enable snmp trap Enable/disable current port to transmit the LINK UP and LINK DOWN trap information
flow-control Enable flow control on the Ethernet port Port -> Administration
igmp IGMP Ethernet port configuration
jumboframe enable Allow jumbo frames to pass through the current port
Port -> Administration
lacp enable Enable LACP Port -> LACP
lacp port-priority Configure port priority value Port -> LACP
line-rate Limit the total rate of the packets delivered by interfaces
loopback Configure the Ethernet port to perform the loopback test
Tools -> Loopback
loopback-detection control enable
Enable loopback detection control function on a trunk or hybrid port
loopback-detection enable Enable port loopback detection
loopback-detection per-vlan enable
Configure loopback detection on all VLANs on trunk and hybrid ports
DQA1756-1AAA01.fm Page 19 Tuesday, September 13, 2005 10:08 PM
20
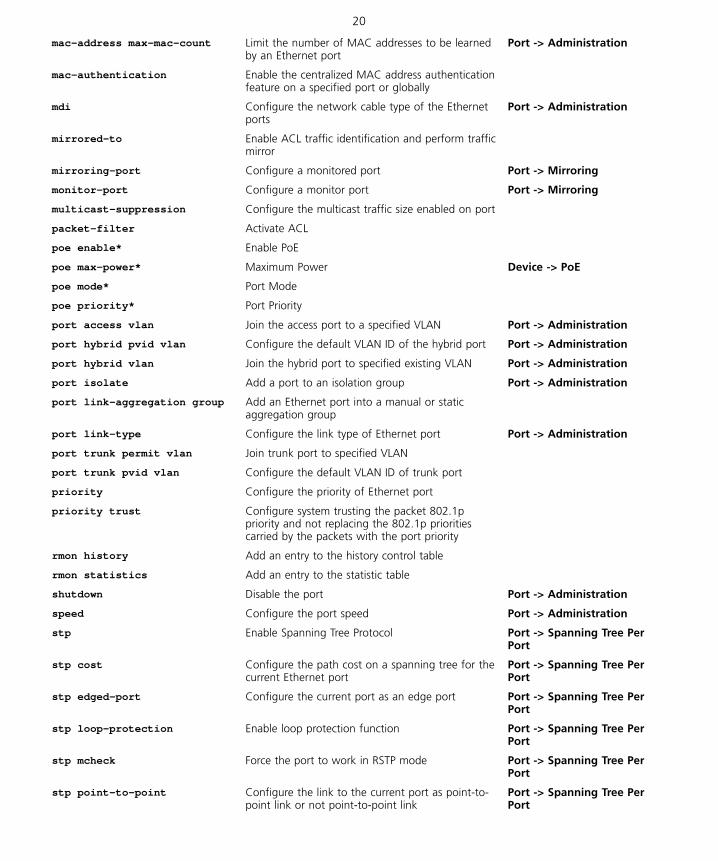
mac-address max-mac-count Limit the number of MAC addresses to be learned by an Ethernet port
Port -> Administration
mac-authentication Enable the centralized MAC address authentication feature on a specified port or globally
mdi Configure the network cable type of the Ethernet ports
Port -> Administration
mirrored-to Enable ACL traffic identification and perform traffic mirror
mirroring-port Configure a monitored port Port -> Mirroring
monitor-port Configure a monitor port Port -> Mirroring
multicast-suppression Configure the multicast traffic size enabled on port
packet-filter Activate ACL
poe enable* Enable PoE
poe max-power* Maximum Power Device -> PoE
poe mode* Port Mode
poe priority* Port Priority
port access vlan Join the access port to a specified VLAN Port -> Administration
port hybrid pvid vlan Configure the default VLAN ID of the hybrid port Port -> Administration
port hybrid vlan Join the hybrid port to specified existing VLAN Port -> Administration
port isolate Add a port to an isolation group Port -> Administration
port link-aggregation group Add an Ethernet port into a manual or static aggregation group
port link-type Configure the link type of Ethernet port Port -> Administration
port trunk permit vlan Join trunk port to specified VLAN
port trunk pvid vlan Configure the default VLAN ID of trunk port
priority Configure the priority of Ethernet port
priority trust Configure system trusting the packet 802.1p priority and not replacing the 802.1p priorities carried by the packets with the port priority
rmon history Add an entry to the history control table
rmon statistics Add an entry to the statistic table
shutdown Disable the port Port -> Administration
speed Configure the port speed Port -> Administration
stp Enable Spanning Tree Protocol Port -> Spanning Tree Per Port
stp cost Configure the path cost on a spanning tree for the current Ethernet port
Port -> Spanning Tree Per Port
stp edged-port Configure the current port as an edge port Port -> Spanning Tree Per Port
stp loop-protection Enable loop protection function Port -> Spanning Tree Per Port
stp mcheck Force the port to work in RSTP mode Port -> Spanning Tree Per Port
stp point-to-point Configure the link to the current port as point-to-point link or not point-to-point link
Port -> Spanning Tree Per Port
DQA1756-1AAA01.fm Page 20 Tuesday, September 13, 2005 10:08 PM
21
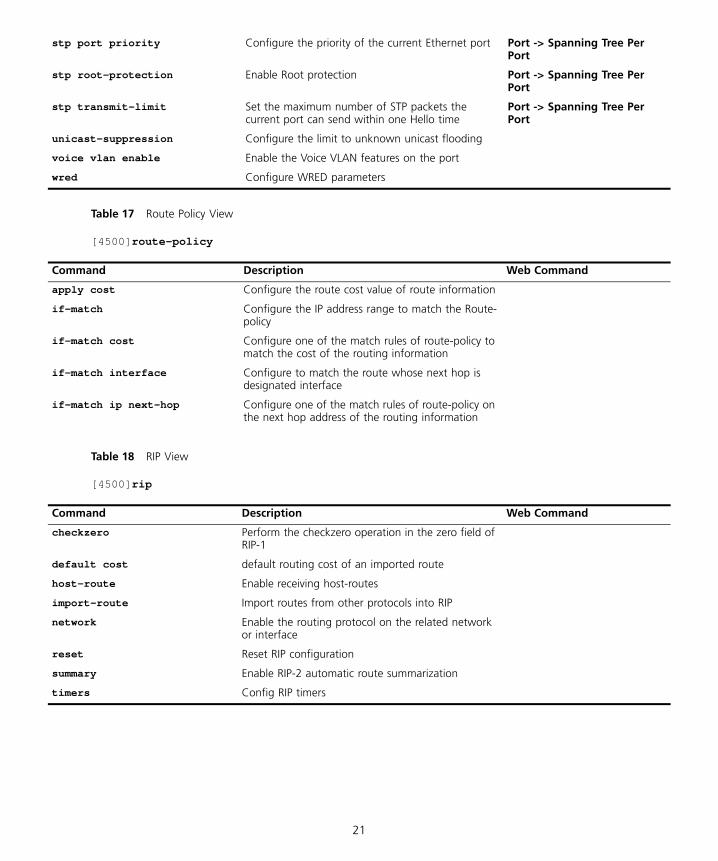
Table 17 Route Policy View
[4500]route-policy
Table 18 RIP View
[4500]rip
stp port priority Configure the priority of the current Ethernet port Port -> Spanning Tree Per Port
stp root-protection Enable Root protection Port -> Spanning Tree Per Port
stp transmit-limit Set the maximum number of STP packets the current port can send within one Hello time
Port -> Spanning Tree Per Port
unicast-suppression Configure the limit to unknown unicast flooding
voice vlan enable Enable the Voice VLAN features on the port
wred Configure WRED parameters
Command Description Web Command
apply cost Configure the route cost value of route information
if-match Configure the IP address range to match the Route-policy
if-match cost Configure one of the match rules of route-policy to match the cost of the routing information
if-match interface Configure to match the route whose next hop is designated interface
if-match ip next-hop Configure one of the match rules of route-policy on the next hop address of the routing information
Command Description Web Command
checkzero Perform the checkzero operation in the zero field of RIP-1
default cost default routing cost of an imported route
host-route Enable receiving host-routes
import-route Import routes from other protocols into RIP
network Enable the routing protocol on the related network or interface
reset Reset RIP configuration
summary Enable RIP-2 automatic route summarization
timers Config RIP timers
DQA1756-1AAA01.fm Page 21 Tuesday, September 13, 2005 10:08 PM

22
Table 19 ACL View
[4500]acl number xxxx(where xxxx is the acl number)
Command Description Web Command
rule Add a subrule to an ACL Device -> ACLSecurity -> Authorized IP
Part Number: DQA1756-1AAA01Published September 2005
DQA1756-1AAA01.fm Page 22 Tuesday, September 13, 2005 10:08 PM
Related Documents