PARTS BREAKDOWN Item Description 1. Flaring Tool 2. Locking Screws (x2) 3. Removable Handle 4. Positioning Bolt 5. OP1 Punch 6. OP2 Punch 7. Die Lubricant TOOL SETUP & TUBING PREPARATION Always prepare tubing prior to flaring. Failure to do so will result in poorly formed flares. - Tubing edge should have a clean straight cut and be free of corrosion. If necessary, use a tubing cutter to cut a straight edge. - Deburr edges using a reamer, file, or a knife blade. - Ensure proper fitting has been placed on tubing prior to flaring the end. - For on car use, leave handle connected. If using in bench vise, remove handle and clamp bottom half of tool into vise. 3/16 Inch Brake Line Flaring Tool 038ERL 1 3 4 7 5 6 2

Welcome message from author
This document is posted to help you gain knowledge. Please leave a comment to let me know what you think about it! Share it to your friends and learn new things together.
Transcript
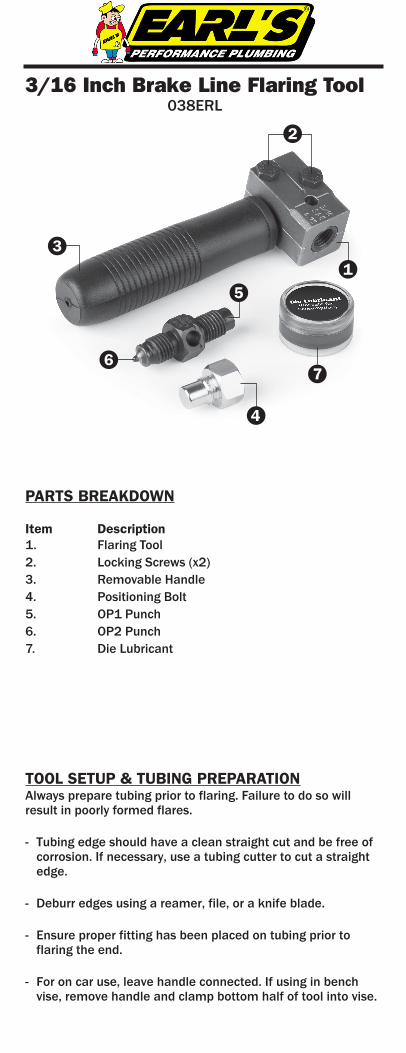
PARTS BREAKDOWN
Item Description1. Flaring Tool2. Locking Screws (x2)3. Removable Handle4. Positioning Bolt5. OP1 Punch6. OP2 Punch7. Die Lubricant
TOOL SETUP & TUBING PREPARATIONAlways prepare tubing prior to flaring. Failure to do so will result in poorly formed flares.
- Tubing edge should have a clean straight cut and be free of corrosion. If necessary, use a tubing cutter to cut a straight edge.
- Deburr edges using a reamer, file, or a knife blade.
- Ensure proper fitting has been placed on tubing prior to flaring the end.
- For on car use, leave handle connected. If using in bench vise, remove handle and clamp bottom half of tool into vise.
3/16 Inch Brake Line Flaring Tool038ERL
13
4
7
5
6
2
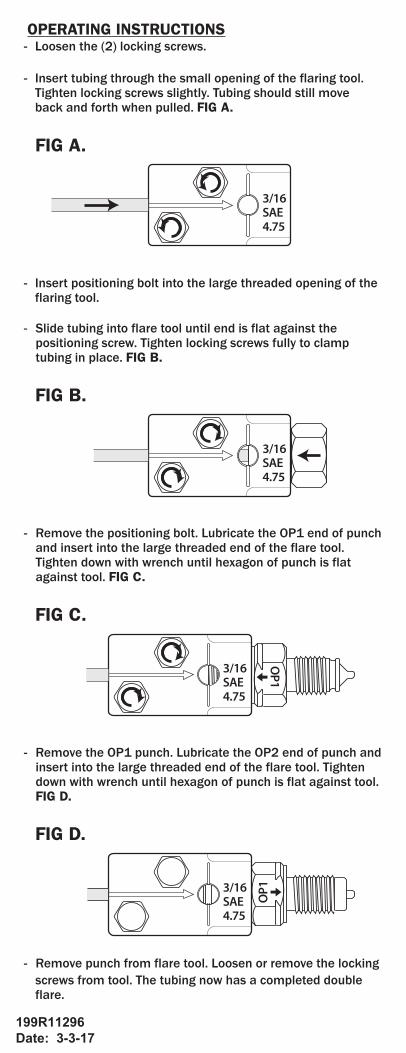
OPERATING INSTRUCTIONS- Loosen the (2) locking screws.
- Insert tubing through the small opening of the flaring tool.Tighten locking screws slightly. Tubing should still moveback and forth when pulled. FIG A.
- Insert positioning bolt into the large threaded opening of theflaring tool.
- Slide tubing into flare tool until end is flat against thepositioning screw. Tighten locking screws fully to clamptubing in place. FIG B.
- Remove the positioning bolt. Lubricate the OP1 end of punchand insert into the large threaded end of the flare tool.Tighten down with wrench until hexagon of punch is flatagainst tool. FIG C.
- Remove the OP1 punch. Lubricate the OP2 end of punch andinsert into the large threaded end of the flare tool. Tightendown with wrench until hexagon of punch is flat against tool.FIG D.
- Remove punch from flare tool. Loosen or remove the lockingscrews from tool. The tubing now has a completed doubleflare.
FIG A.
FIG B.
FIG C.
FIG D.
3/16SAE4.75
3/16SAE4.75
OP13/16
SAE4.75
OP1
OP1
3/16SAE4.75
OP1
199R11296Date: 3-3-17
Related Documents


