ACP ThinManager 6.0 523 Non-ThinManager Components 28 Non-ThinManager Components Microsoft Terminal Servers play an important role in the ThinManager system. It is recommended that you become familiar with the documentation provided by Microsoft about their server. The following information is provided as an aid to understanding terminal services and is not a substitute for Microsoft documentation. Microsoft Terminal Services requires a license, either a TS CAL (Terminal Services Client Access License) on a 2003 Server or a RDS CAL (Remote Desktop Services Client Access License) on a 2008 Server. This section covers: Server 2003 Server 2008 DHCP (Dynamic Host Configuration Protocol) Servers Terminal Services Licensing 28.1 Windows Server 2003 28.1.1 Installing Terminal Services A Windows 2003 Server can be made a terminal server by installing the Terminal Services role. This can be done with either the Manage Your Server or through the Add/Remove Programs > Add/Remove Windows Components.

Welcome message from author
This document is posted to help you gain knowledge. Please leave a comment to let me know what you think about it! Share it to your friends and learn new things together.
Transcript

ACP ThinManager 6.0 523 Non-ThinManager Components
28 Non-ThinManager Components
Microsoft Terminal Servers play an important role in the ThinManager system. It is recommended that you become familiar with the documentation provided by Microsoft about their server. The following information is provided as an aid to understanding terminal services and is not a substitute for Microsoft documentation.
Microsoft Terminal Services requires a license, either a TS CAL (Terminal Services Client Access License) on a 2003 Server or a RDS CAL (Remote Desktop Services Client Access License) on a 2008 Server.
This section covers:
Server 2003
Server 2008
DHCP (Dynamic Host Configuration Protocol) Servers
Terminal Services Licensing
28.1 Windows Server 2003
28.1.1 Installing Terminal Services A Windows 2003 Server can be made a terminal server by installing the Terminal Services role. This can be done with either the Manage Your Server or through the Add/Remove Programs > Add/Remove Windows Components.
524 Non-ThinManager Components ACP ThinManager 6.0
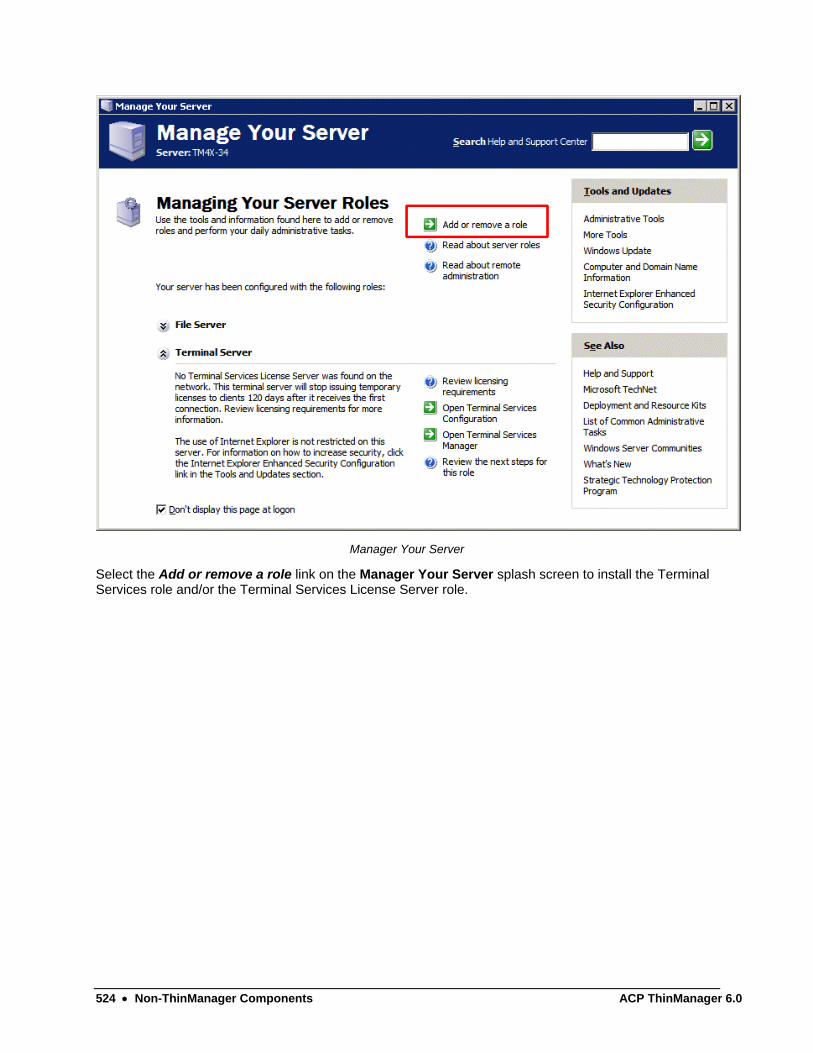
Manager Your Server
Select the Add or remove a role link on the Manager Your Server splash screen to install the Terminal Services role and/or the Terminal Services License Server role.

ACP ThinManager 6.0 Non-ThinManager Components 525
Windows Component Wizard
Terminal Services can be installed by selecting the Terminal Server checkbox in the Windows Component Wizard.
The Windows Component Wizard is launched by selecting the Add/Remove Windows Component button on Control Panel > Add/Remove Programs.
Each Microsoft terminal server system will need a Microsoft Terminal Server Licensing server install. This doesn’t have to be a separate computer but is a program installed on an existing computer. It is installed by selecting the Terminal Server Licensing checkbox on the Windows Component Wizard.
See Microsoft Licenses for details.
526 Non-ThinManager Components ACP ThinManager 6.0
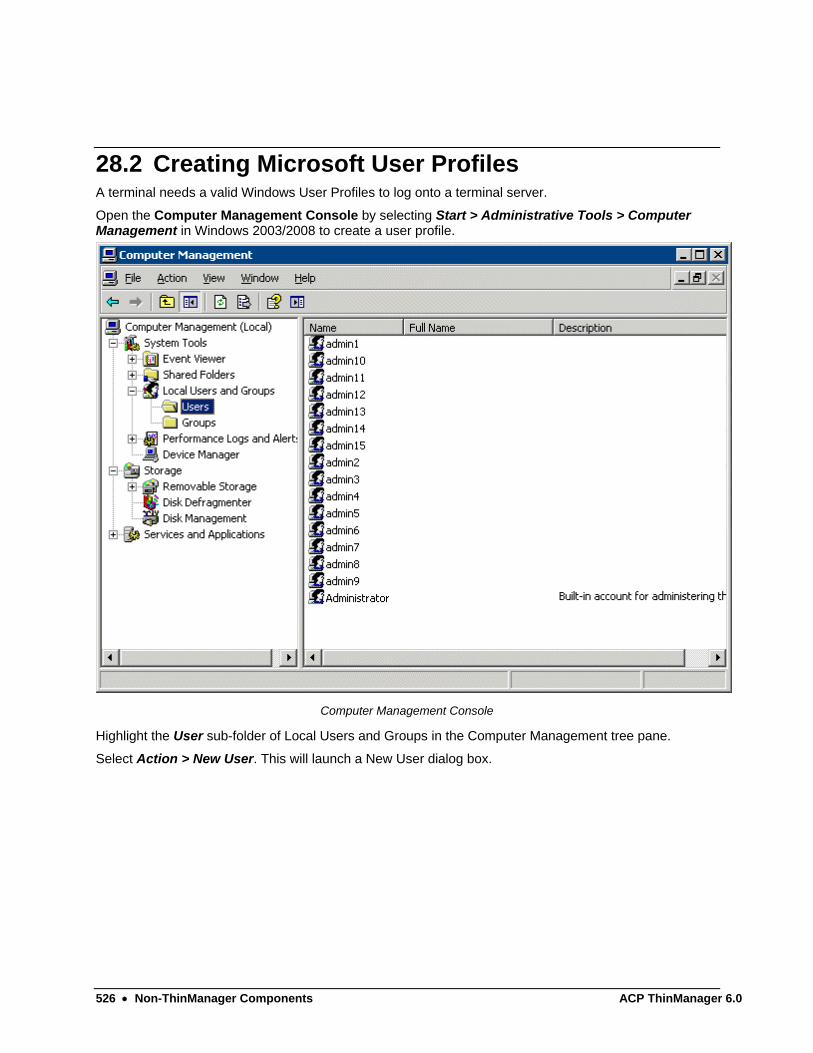
28.2 Creating Microsoft User Profiles A terminal needs a valid Windows User Profiles to log onto a terminal server.
Open the Computer Management Console by selecting Start > Administrative Tools > Computer Management in Windows 2003/2008 to create a user profile.
Computer Management Console
Highlight the User sub-folder of Local Users and Groups in the Computer Management tree pane.
Select Action > New User. This will launch a New User dialog box.
ACP ThinManager 6.0 Non-ThinManager Components 527
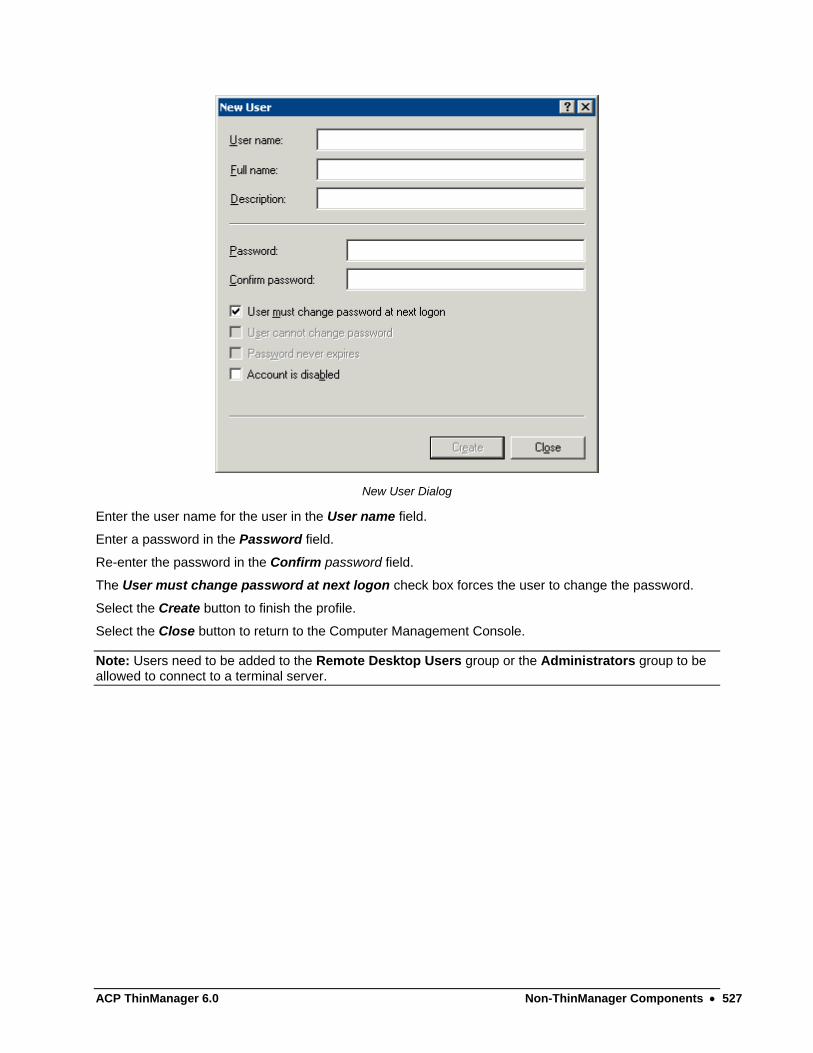
New User Dialog
Enter the user name for the user in the User name field.
Enter a password in the Password field.
Re-enter the password in the Confirm password field.
The User must change password at next logon check box forces the user to change the password.
Select the Create button to finish the profile.
Select the Close button to return to the Computer Management Console.
Note: Users need to be added to the Remote Desktop Users group or the Administrators group to be allowed to connect to a terminal server.

528 Non-ThinManager Components ACP ThinManager 6.0
28.3 Software Installation On Windows 2003 Microsoft Windows 2003/Server requires that software be added in the “Install Mode” through the Control Panel > Add/Remove Programs.
Select Start > Settings > Control Panel > Add/Remove Programs to launch the Add/Remove Programs dialog box.
Note: Some software, especially downloaded software, doesn’t allow the installer to install it through the Add/Remove Programs tools. To manually put the machine into the install mode open a command prompt and type: change user /install This command sets the machine to install mode. When finished, type: change user /execute This command returns the machine to the normal run mode.
Add/Remove Programs
Select the CD or Floppy button on the Add/Remove Programs dialog box to open the Installation wizard.
ACP ThinManager 6.0 Non-ThinManager Components 529
Install Program Window
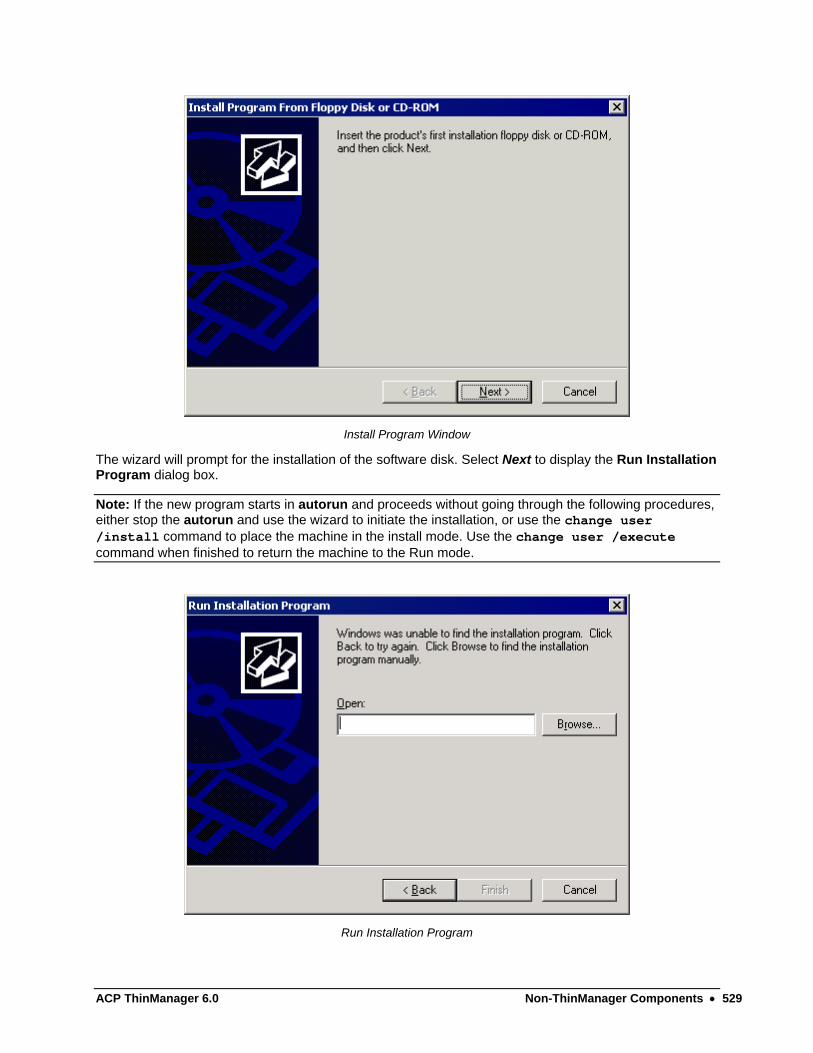
The wizard will prompt for the installation of the software disk. Select Next to display the Run Installation Program dialog box.
Note: If the new program starts in autorun and proceeds without going through the following procedures, either stop the autorun and use the wizard to initiate the installation, or use the change user /install command to place the machine in the install mode. Use the change user /execute command when finished to return the machine to the Run mode.
Run Installation Program

530 Non-ThinManager Components ACP ThinManager 6.0
Enter the command line of the installation program and select Finish, or select the Browse button to select the installation file.
Browse File Window
Selecting the Browse button on the Run Installation dialog box will launch a Browse File window. Highlight the installation file and select Open. This will begin the application setup.
After Installation Window
As the installation begins, an After Installation dialog box is displayed. It requests that the Next button be selected when the installation is finished. When this button is selected a second confirmation window is displayed.

ACP ThinManager 6.0 Non-ThinManager Components 531
Finish Install Window
Select the Finish button when the installation is finished.
Note: If a choice is given to Reboot Now or Reboot Later, choose to reboot later once the entire setup is completed and the dialog boxes are cleared.
28.3.1 Terminal Services Configuration Microsoft provides the Terminal Services Configuration interface to configure how terminal services is handled on each terminal server.
Select Start > Programs > Administrative Tools > Terminal Services Configuration to launch the Terminal Services Configuration Console. There are two folders, Connections and Server Settings.
28.3.2 Terminal Services Connections The Terminal Services Configuration tree has a Connections folder. Highlighting this folder will display the installed client communication protocols.
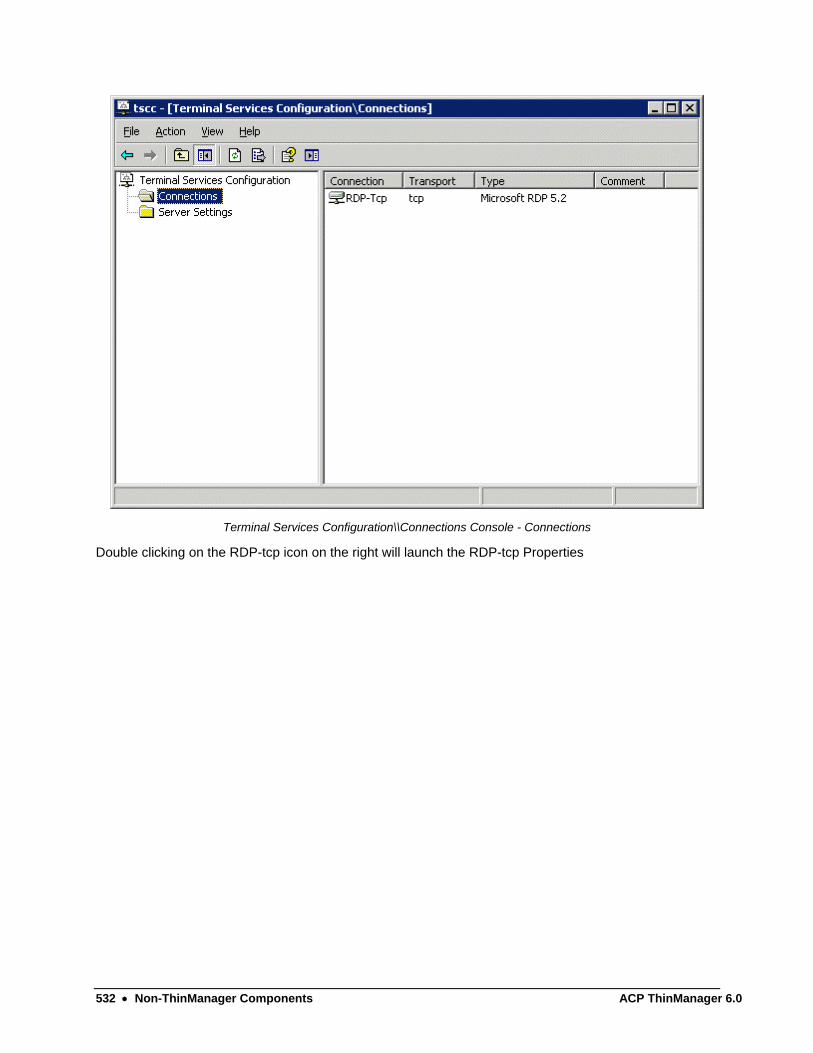
532 Non-ThinManager Components ACP ThinManager 6.0
Terminal Services Configuration\\Connections Console - Connections
Double clicking on the RDP-tcp icon on the right will launch the RDP-tcp Properties

ACP ThinManager 6.0 Non-ThinManager Components 533
28.3.2.1 RDP-tcp Login Settings
RDP-tcp Login Settings
The Login Settings should use the Use client-provided logon information radio button so that each user will login with a unique account.
The Always prompt for password should be unselected to allow auto-logins.
534 Non-ThinManager Components ACP ThinManager 6.0
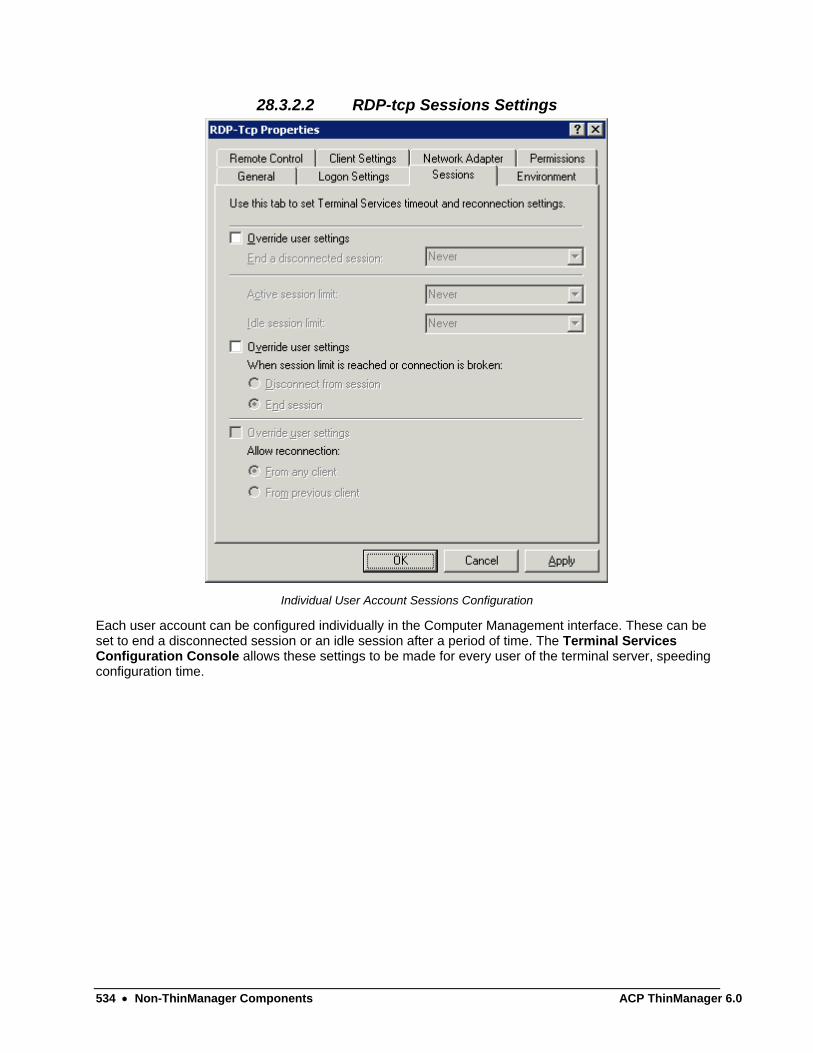
28.3.2.2 RDP-tcp Sessions Settings
Individual User Account Sessions Configuration
Each user account can be configured individually in the Computer Management interface. These can be set to end a disconnected session or an idle session after a period of time. The Terminal Services Configuration Console allows these settings to be made for every user of the terminal server, speeding configuration time.

ACP ThinManager 6.0 Non-ThinManager Components 535
RDP-tcp Sessions Settings
The Sessions tab of the RDP-tcp Properties allows all users to be configured with a consistent disconnect policy by selecting the Override user settings checkbox.
Selecting End Session setting for the When session limit is reached or connection is broken and selecting the Override user settings will cause a new session to be created when a terminal disconnects and reconnects.

536 Non-ThinManager Components ACP ThinManager 6.0
28.3.2.3 RDP-tcp Client Settings
RDP-tcp Client Settings
The Client Settings tab of the RDP-tcp Properties allows the color depth to be set in the Limit Maximum Color Depth drop-down.
Drive mapping, LPT port mapping, COM port mapping, and audio mapping are allowed if the appropriate Disable the following checkboxes are un-selected.
Audio mapping is disabled by default. You need to uncheck the Audio mapping checkbox to allow a thin client to play sound.
ACP ThinManager 6.0 Non-ThinManager Components 537
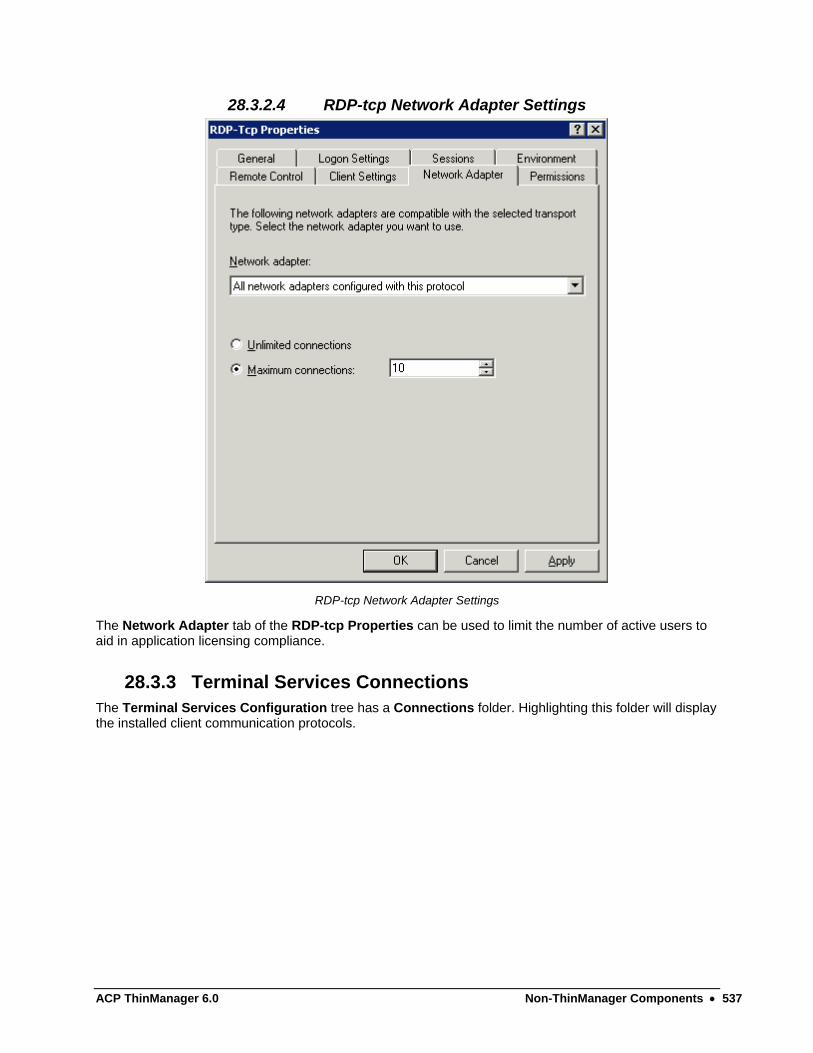
28.3.2.4 RDP-tcp Network Adapter Settings
RDP-tcp Network Adapter Settings
The Network Adapter tab of the RDP-tcp Properties can be used to limit the number of active users to aid in application licensing compliance.
28.3.3 Terminal Services Connections The Terminal Services Configuration tree has a Connections folder. Highlighting this folder will display the installed client communication protocols.

538 Non-ThinManager Components ACP ThinManager 6.0
Terminal Services Configuration\\Connections Console - Connections
The Server Settings have several settings that can control the terminal services experience.
28.3.4 Licensing Mode Microsoft expanded the Terminal Services Client Access License (TS CAL) program in Windows 2003. TS CALs are available in two types, TS Device CALs and TS User CALs.
The TS Device CAL licenses one device to connect to any Microsoft Terminal Servers as any user. This functions like the previous Windows 2000 TS CAL.
The TS User CAL licenses one user for any device to connect to any Microsoft Terminal Servers.
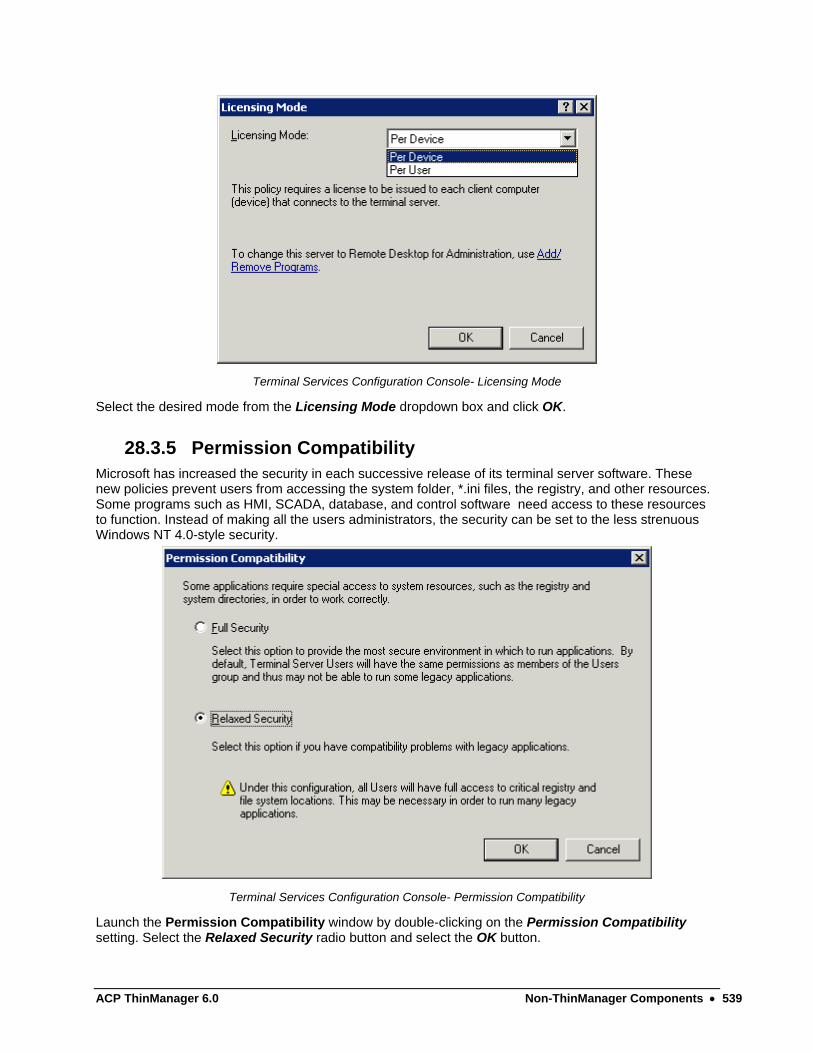
To change between the Per Device licensing and Per User licensing, double-click Licensing to launch the Licensing Mode window.
ACP ThinManager 6.0 Non-ThinManager Components 539
Terminal Services Configuration Console- Licensing Mode
Select the desired mode from the Licensing Mode dropdown box and click OK.
28.3.5 Permission Compatibility Microsoft has increased the security in each successive release of its terminal server software. These new policies prevent users from accessing the system folder, *.ini files, the registry, and other resources. Some programs such as HMI, SCADA, database, and control software need access to these resources to function. Instead of making all the users administrators, the security can be set to the less strenuous Windows NT 4.0-style security.
Terminal Services Configuration Console- Permission Compatibility
Launch the Permission Compatibility window by double-clicking on the Permission Compatibility setting. Select the Relaxed Security radio button and select the OK button.

540 Non-ThinManager Components ACP ThinManager 6.0
28.3.6 Restrict Each User to a Single Session The Restrict Each User to a Single Session setting prevents duplicate and orphaned sessions by limiting each user to a single login.
Double-clicking the setting will launch a settings window.
Terminal Services Configuration Console- Single Session Per User
The Restrict each user to one session checkbox is selected by default in Windows 2003.
Note: Keep this setting selected. MultiSession will still work as long as each session is using a different AppLink program.
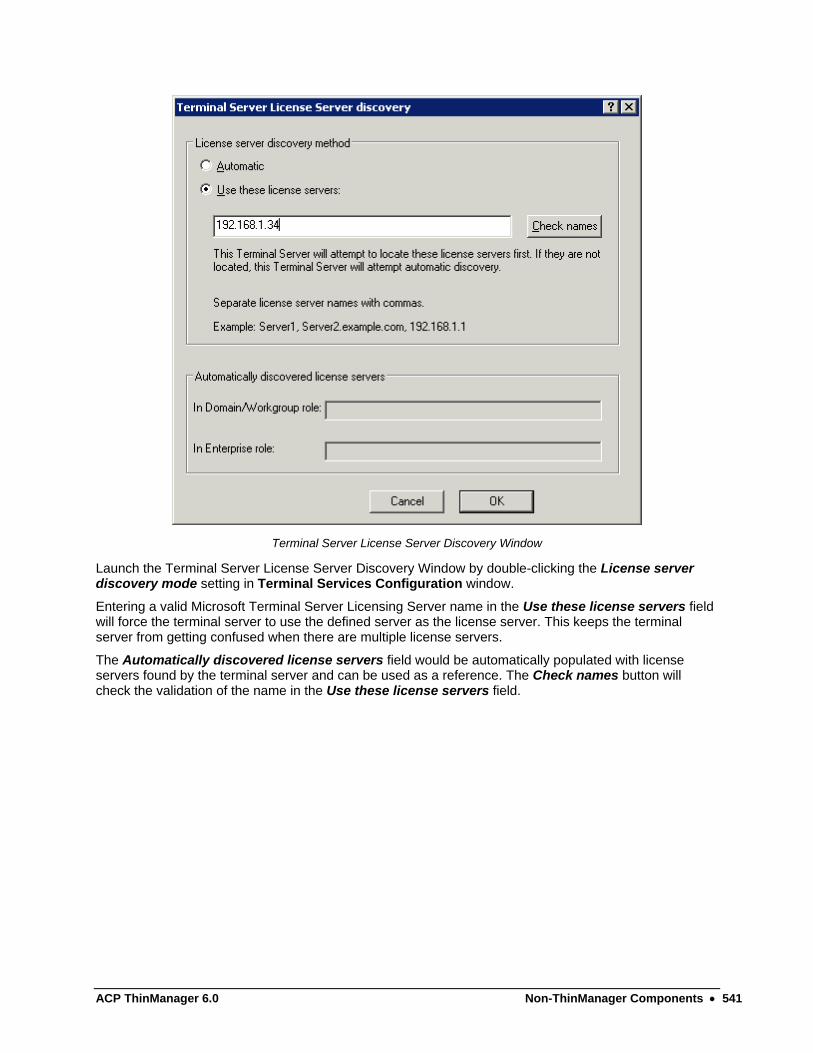
28.3.7 License Server Discovery Mode A new feature in Windows 2003, Service Pack 1 and later, is a setting to point the terminal server to a specific Terminal Server Licensing Server. This is the License server discovery mode setting in Terminal Services Configuration. This is easier than hard coding the license server into the registry.
ACP ThinManager 6.0 Non-ThinManager Components 541
Terminal Server License Server Discovery Window
Launch the Terminal Server License Server Discovery Window by double-clicking the License server discovery mode setting in Terminal Services Configuration window.
Entering a valid Microsoft Terminal Server Licensing Server name in the Use these license servers field will force the terminal server to use the defined server as the license server. This keeps the terminal server from getting confused when there are multiple license servers.
The Automatically discovered license servers field would be automatically populated with license servers found by the terminal server and can be used as a reference. The Check names button will check the validation of the name in the Use these license servers field.
542 Non-ThinManager Components ACP ThinManager 6.0
28.4 Windows 2008 Server
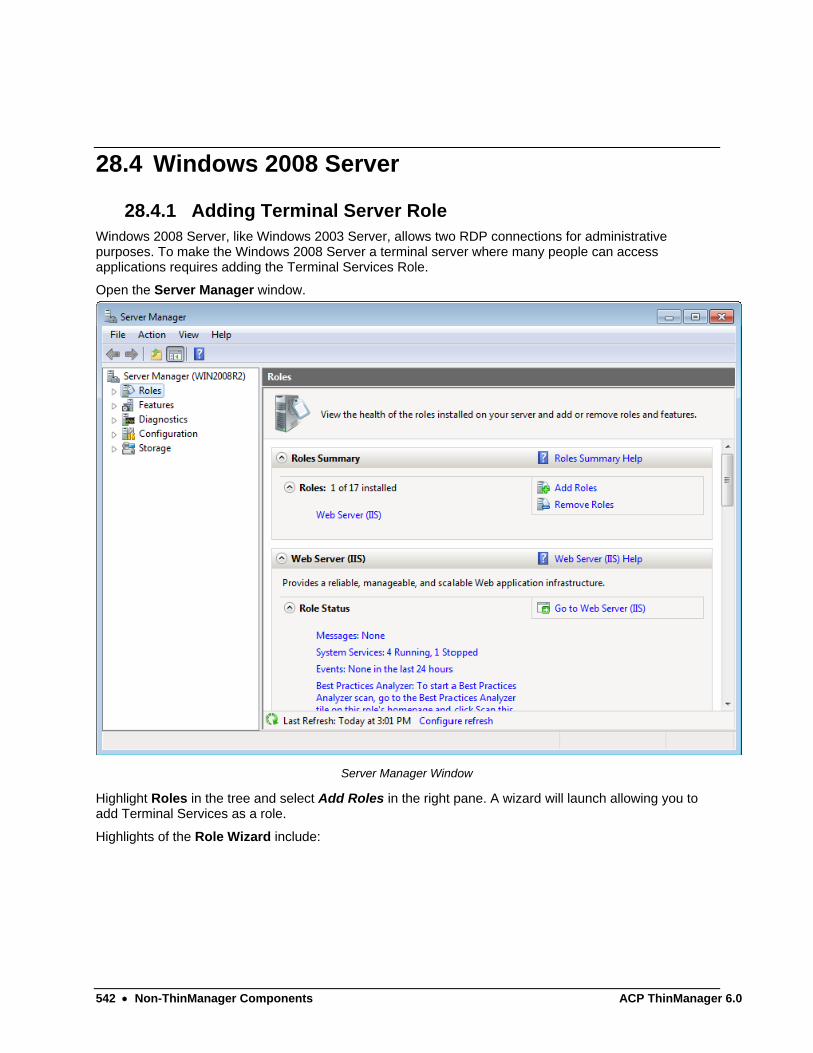
28.4.1 Adding Terminal Server Role Windows 2008 Server, like Windows 2003 Server, allows two RDP connections for administrative purposes. To make the Windows 2008 Server a terminal server where many people can access applications requires adding the Terminal Services Role.
Open the Server Manager window.
Server Manager Window
Highlight Roles in the tree and select Add Roles in the right pane. A wizard will launch allowing you to add Terminal Services as a role.
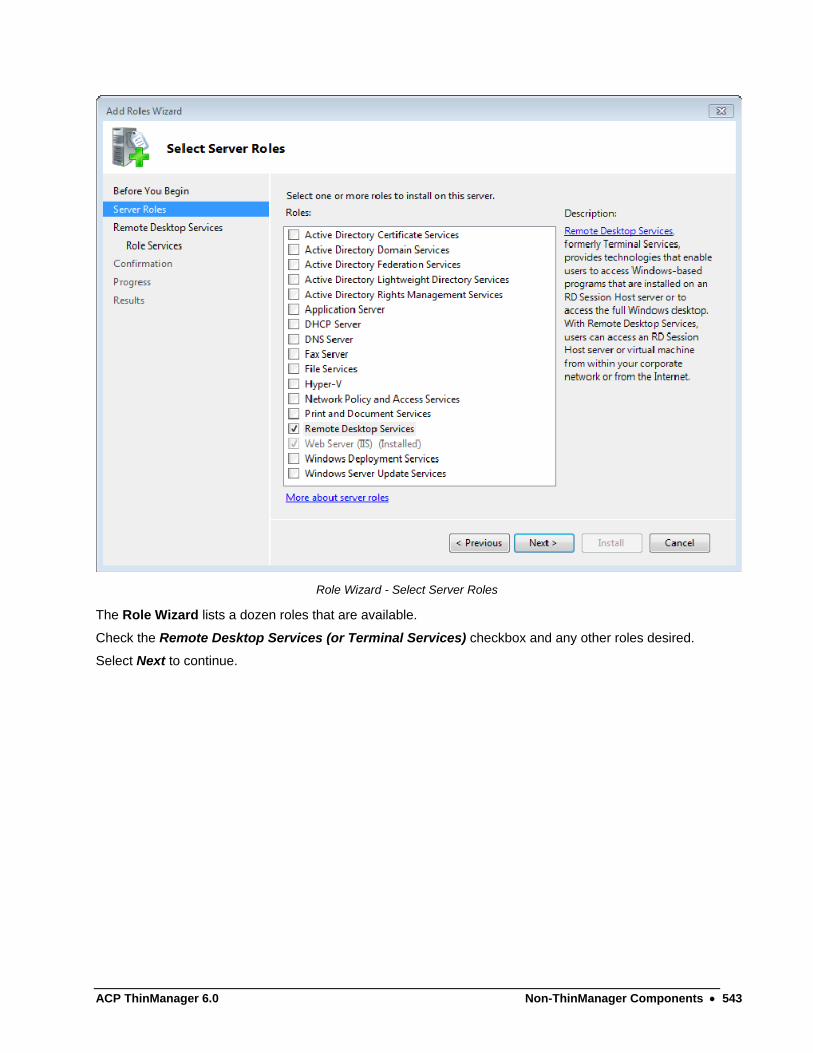
Highlights of the Role Wizard include:
ACP ThinManager 6.0 Non-ThinManager Components 543
Role Wizard - Select Server Roles
The Role Wizard lists a dozen roles that are available.
Check the Remote Desktop Services (or Terminal Services) checkbox and any other roles desired.
Select Next to continue.
544 Non-ThinManager Components ACP ThinManager 6.0
Role Wizard –Select Role Services
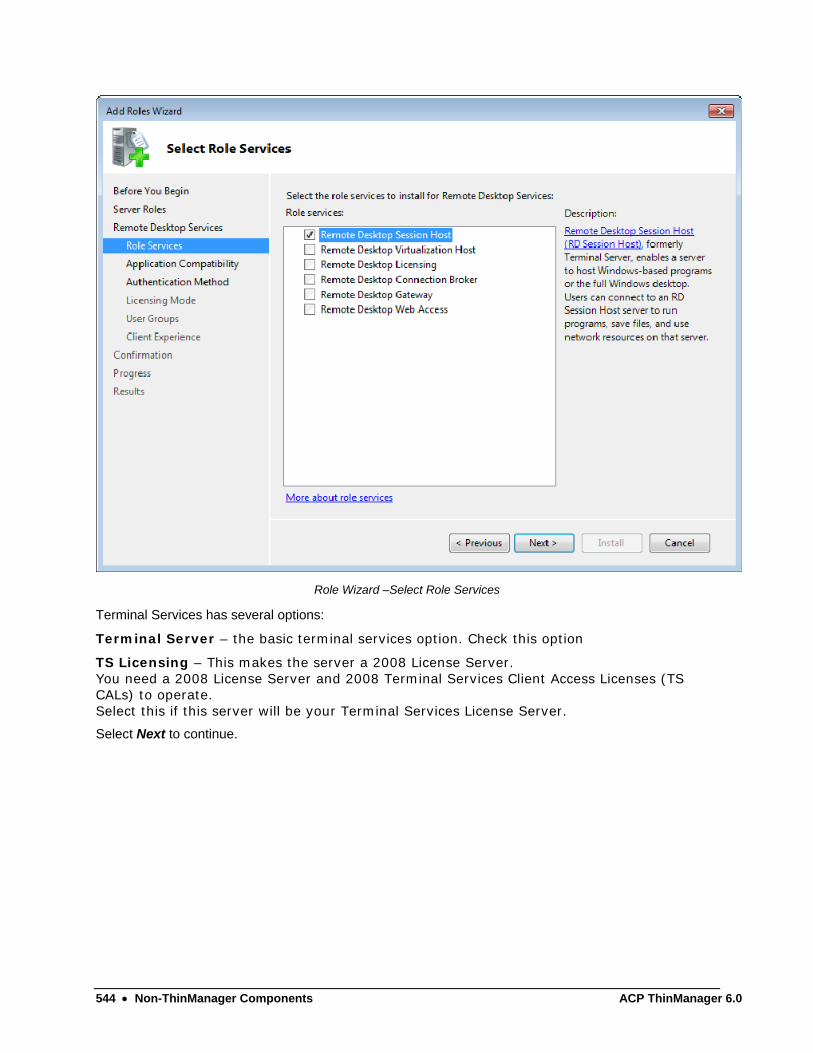
Terminal Services has several options:
Terminal Server – the basic terminal services option. Check this option
TS Licensing – This makes the server a 2008 License Server. You need a 2008 License Server and 2008 Terminal Services Client Access Licenses (TS CALs) to operate. Select this if this server will be your Terminal Services License Server.
Select Next to continue.

ACP ThinManager 6.0 Non-ThinManager Components 545
Role Wizard – Specify Licensing Mode
Windows 2008 TS CALs, like Windows 2003 TS CALs, are available as Per Device or Per User.
The terminal server should match the mode that the license server is using.
Select Next to continue.

546 Non-ThinManager Components ACP ThinManager 6.0
Role Wizard – Confirm Installation Selections
The Add Roles Wizard will end with a list of the configurations that will be installed.
Select Install to add the role(s). Once the wizard is finished it will assume the role of a terminal server.
ACP ThinManager 6.0 Non-ThinManager Components 547
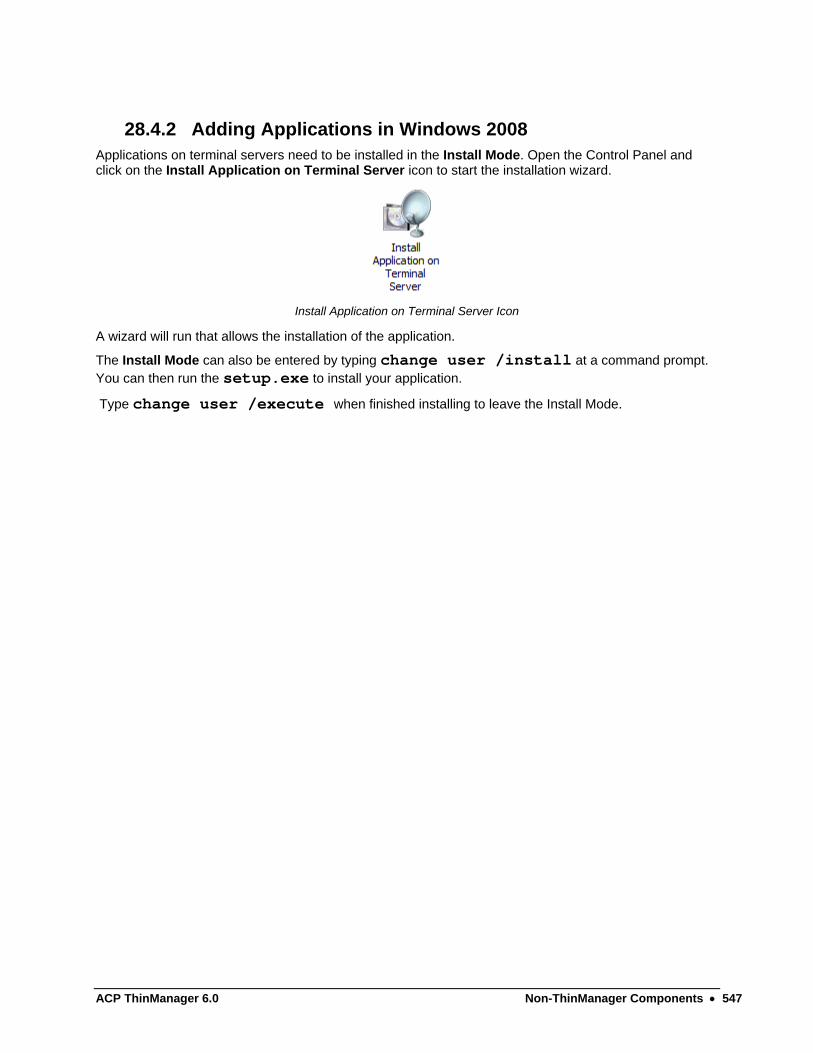
28.4.2 Adding Applications in Windows 2008 Applications on terminal servers need to be installed in the Install Mode. Open the Control Panel and click on the Install Application on Terminal Server icon to start the installation wizard.
Install Application on Terminal Server Icon
A wizard will run that allows the installation of the application.
The Install Mode can also be entered by typing change user /install at a command prompt. You can then run the setup.exe to install your application.
Type change user /execute when finished installing to leave the Install Mode.
548 Non-ThinManager Components ACP ThinManager 6.0
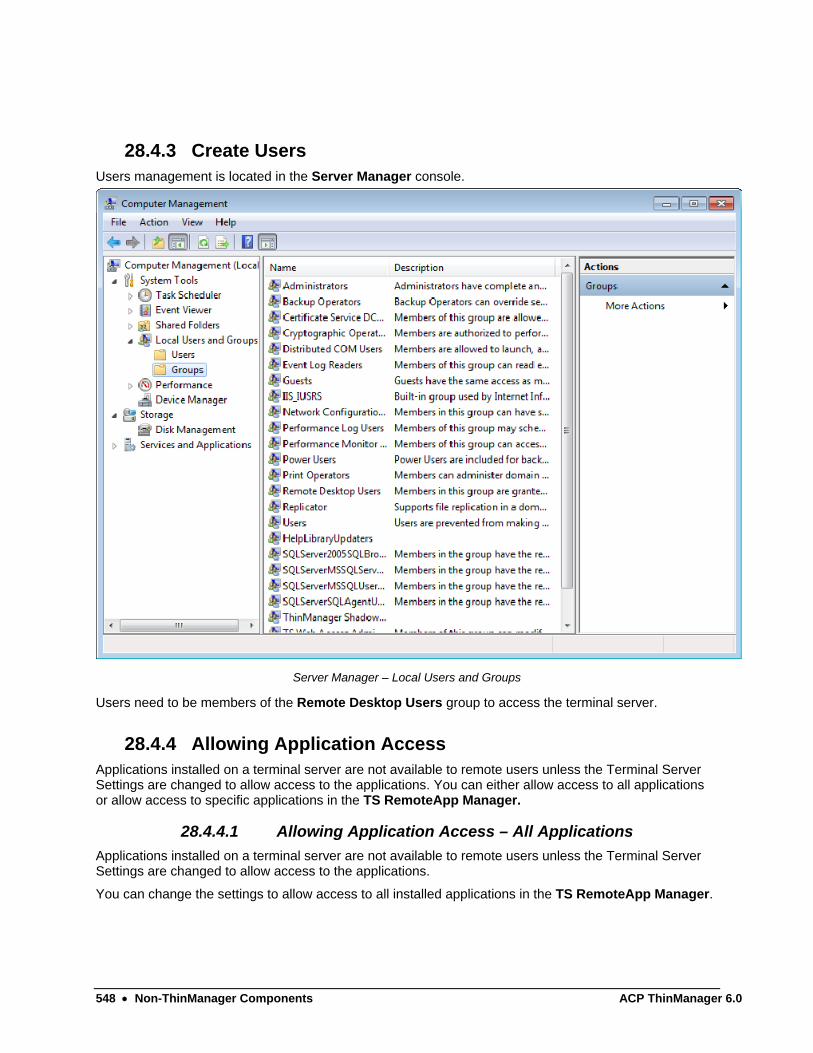
28.4.3 Create Users Users management is located in the Server Manager console.
Server Manager – Local Users and Groups
Users need to be members of the Remote Desktop Users group to access the terminal server.
28.4.4 Allowing Application Access Applications installed on a terminal server are not available to remote users unless the Terminal Server Settings are changed to allow access to the applications. You can either allow access to all applications or allow access to specific applications in the TS RemoteApp Manager.
28.4.4.1 Allowing Application Access – All Applications
Applications installed on a terminal server are not available to remote users unless the Terminal Server Settings are changed to allow access to the applications.
You can change the settings to allow access to all installed applications in the TS RemoteApp Manager.

ACP ThinManager 6.0 Non-ThinManager Components 549
TS RemoteApp Manager
Highlight TS RemoteApp Manager under the Terminal Services branch of the Server Manager tree.
Select the Change link for the Terminal Server Settings to launch the RemoteApp Deployment Settings page.

550 Non-ThinManager Components ACP ThinManager 6.0
RemoteApp Deployment Settings
Select the Terminal Server tab of the RemoteApp Deployment Settings page.
Select the Allow users to start both listed and unlisted programs on initial connection radio button in the Access to unlisted programs section.
This will allow any program to be run by an authorized user.
You can also select and define specific applications that can be run by configuring them in the TS RemoteApp Manager.
ACP ThinManager 6.0 Non-ThinManager Components 551
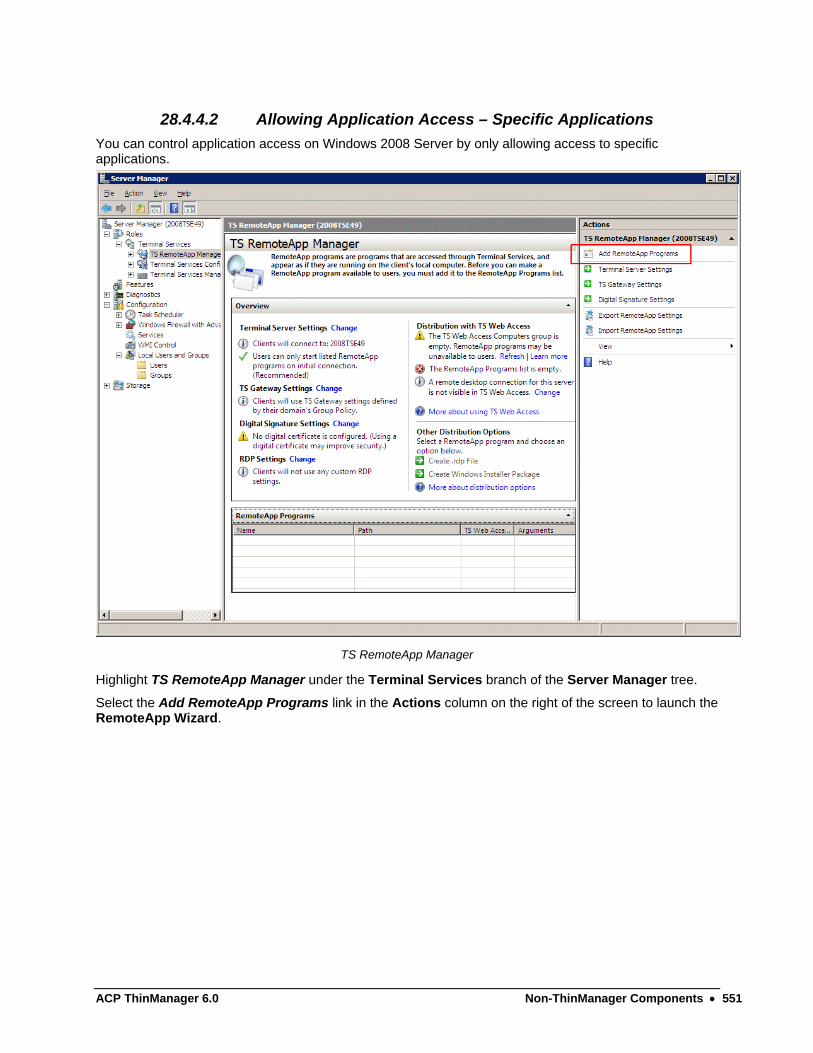
28.4.4.2 Allowing Application Access – Specific Applications
You can control application access on Windows 2008 Server by only allowing access to specific applications.
TS RemoteApp Manager
Highlight TS RemoteApp Manager under the Terminal Services branch of the Server Manager tree.
Select the Add RemoteApp Programs link in the Actions column on the right of the screen to launch the RemoteApp Wizard.

552 Non-ThinManager Components ACP ThinManager 6.0
RemoteApp Wizard
The RemoteApp Wizard shows a list of applications installed on the Windows 2008 Server.
Select the checkbox for each application that you want available for deployment as a ThinManager Display Client.
Select Next to complete the wizard. A remote user can run any checked application.
28.4.5 Installing ThinManager It is a common practice to install ThinManager on a terminal server but ThinManager is independent of terminal services and doesn’t need to be installed on a terminal server.
Applications on terminal servers need to be installed in the Install Mode. Open the Control Panel and click on the Install Application on Terminal Server icon to start the installation wizard.
Install Application on Terminal Server Icon

ACP ThinManager 6.0 Non-ThinManager Components 553
Once the wizard begins navigate to the ThinManager setup.exe program and continue with the wizard. See Installation of ThinManager for details.
The Install Mode can also be entered by typing change user /install at a command prompt. You can then run the setup.exe to install ThinManager.
Type change user /execute when finished installing to leave the Install Mode.
28.4.6 Allow Inbound Traffic to Firewall ThinManager requires communications to the thin clients. This communication is blocked by default in the firewall and needs to be allowed.
You can either open the firewall to all traffic or open the specific ports needed.
28.4.6.1 Allow All Inbound Traffic
You can configure the firewall by selecting Windows Firewall with Advanced Security in the Server Manager tree.
Windows Firewall with Advanced Security
Highlight Windows Firewall with Advanced Security in the Server Manager tree. Right click and select Properties to launch the Properties window.

554 Non-ThinManager Components ACP ThinManager 6.0
Windows Firewall with Advanced Security Properties
Select the profile tab that matches the type of network you are using, Domain, Private, or Public profile.
Change the Inbound connections to Allow and select OK to accept the change.
This will allow the thin clients to connect to ThinManager through the firewall.

ACP ThinManager 6.0 Non-ThinManager Components 555
28.4.6.2 Open Ports in Firewall
You can open specific ports in the Windows 2008 Server firewall instead of allowing all inbound connections if you prefer.
Open the Local Security Policy by selecting the Start > Administrative Tools > Local Security Policy.
Local Security Policy
Expand the Windows Firewall with Advanced Security to show the Inbound Rules.
Right click on the Inbound Rules and select New Rule. A wizard will launch that allows configuration of a new port.
You need to run the wizard twice, once to allow UDP 4900 and once to allow TCP 2031.

556 Non-ThinManager Components ACP ThinManager 6.0
Rule Wizard – Rule Type
Select Port as the rule you are configuring and select Next to continue.

ACP ThinManager 6.0 Non-ThinManager Components 557
Rule Wizard – Protocols and Ports
You will need to select the protocol and port for each rule. You will need to run the wizard once for UDP 4900 and once for TCP 2031.
Select the protocol and enter the port as shown in Rule Wizard – Protocols and Ports.
Select Next to continue.
558 Non-ThinManager Components ACP ThinManager 6.0
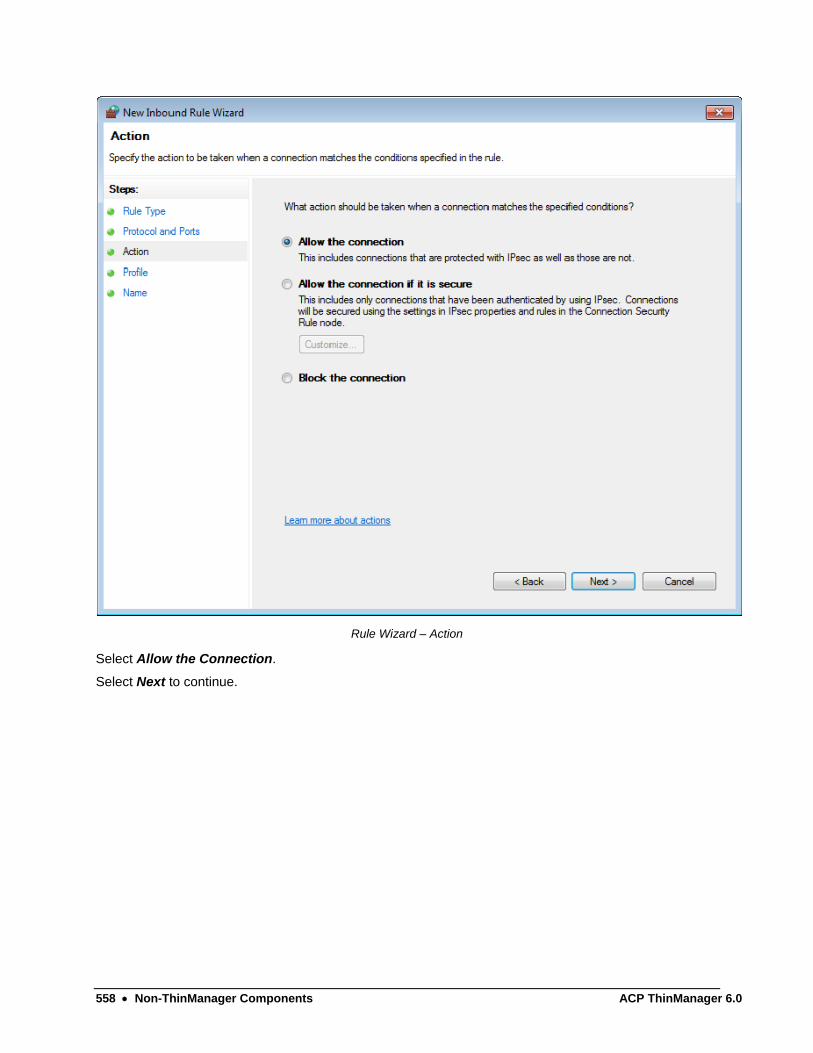
Rule Wizard – Action
Select Allow the Connection.
Select Next to continue.

ACP ThinManager 6.0 Non-ThinManager Components 559
Rule Wizard – Profile
Select the network(s) that the rule will apply to.
Select Next to continue.
A Name page will allow you to name the rule and add a description for management and organizational purposes.
Select Finish to save and apply the rule.
560 Non-ThinManager Components ACP ThinManager 6.0
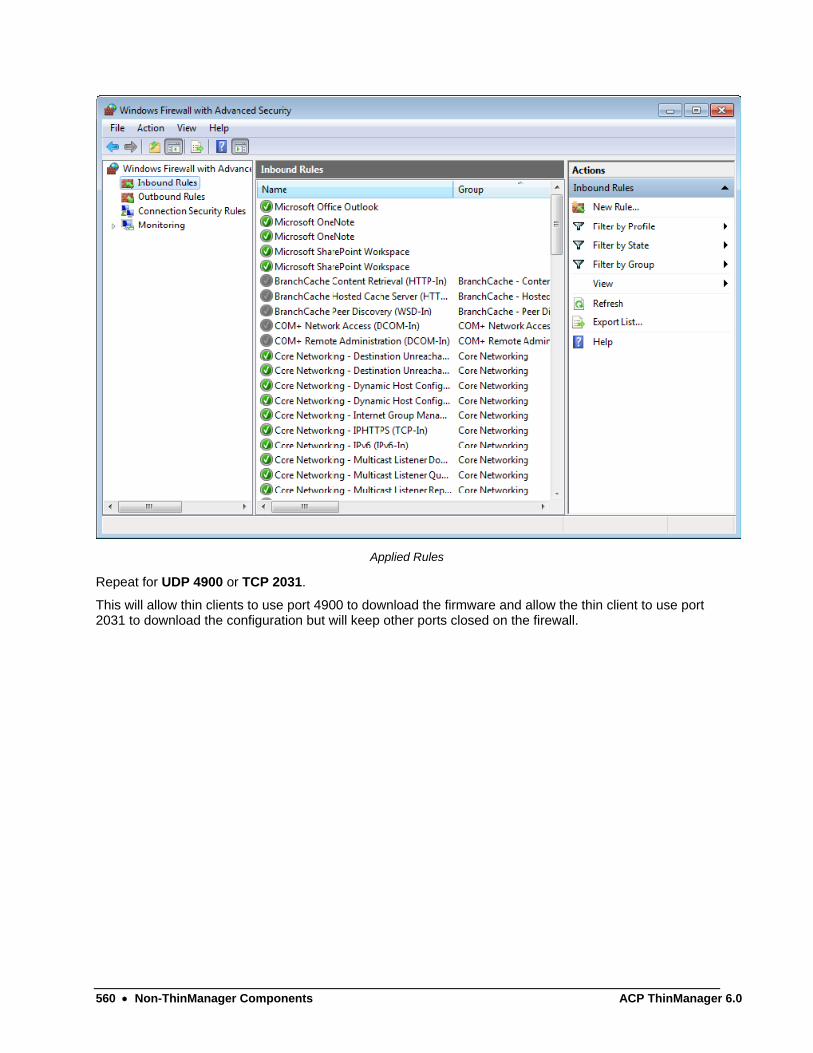
Applied Rules
Repeat for UDP 4900 or TCP 2031.
This will allow thin clients to use port 4900 to download the firmware and allow the thin client to use port 2031 to download the configuration but will keep other ports closed on the firewall.
ACP ThinManager 6.0 Non-ThinManager Components 561
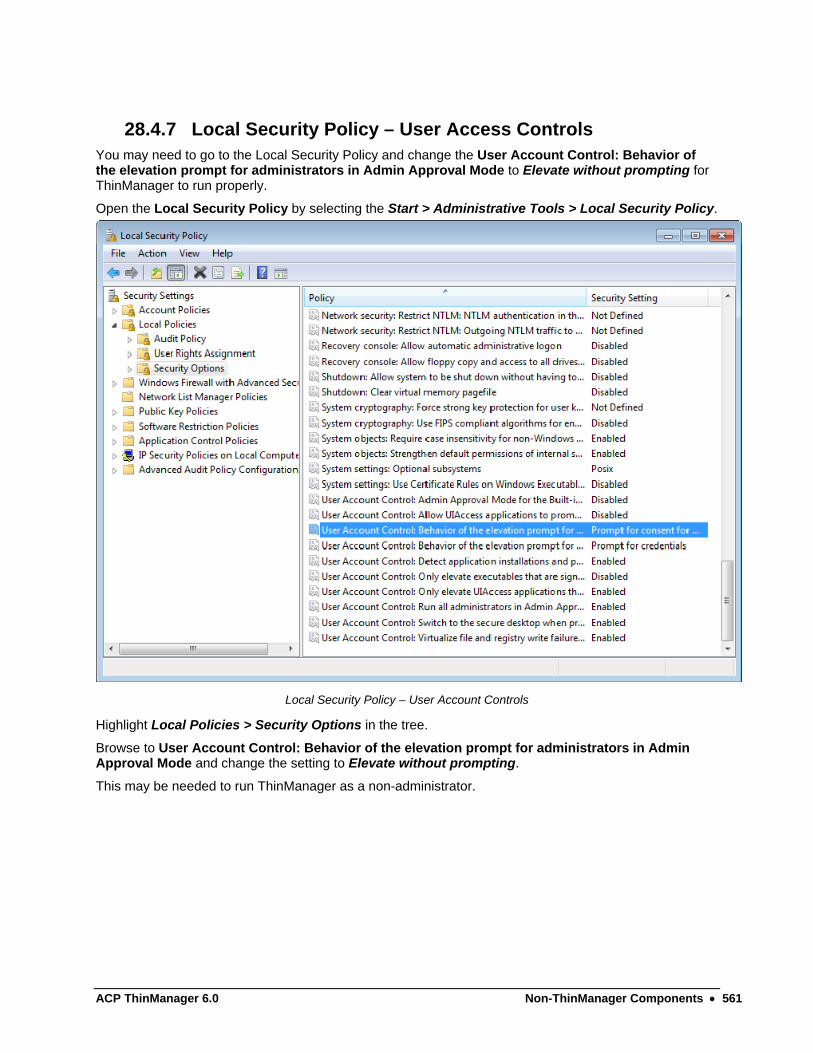
28.4.7 Local Security Policy – User Access Controls You may need to go to the Local Security Policy and change the User Account Control: Behavior of the elevation prompt for administrators in Admin Approval Mode to Elevate without prompting for ThinManager to run properly.
Open the Local Security Policy by selecting the Start > Administrative Tools > Local Security Policy.
Local Security Policy – User Account Controls
Highlight Local Policies > Security Options in the tree.
Browse to User Account Control: Behavior of the elevation prompt for administrators in Admin Approval Mode and change the setting to Elevate without prompting.
This may be needed to run ThinManager as a non-administrator.

562 Non-ThinManager Components ACP ThinManager 6.0
28.5 Command Prompt Terminal Services has several commands that aid in managing the terminal server. Some useful ones are:
Command Action
change logon Temporarily disables logons to a Terminal Server
change port Changes COM port mappings for MS-DOS program compatibility
change user /install Puts the server into “Install Mode”
change user /execute Removes the server from “Install Mode”
Ipconfig Displays the IP addresses of the network card
Logoff Logs off a user from a session and deletes the session from the server
net send username “message” Sends a message to a user. username is the NT/2000 user name that the person or terminal is logged in as. “message” is the text of the message. Quotation marks are needed for any messages containing a space.
query process Displays information about processes running on a Terminal server
query session Displays information about sessions on a Terminal server
query termserver Displays a list of all Terminal servers on the network
query user Displays information about user sessions on a Terminal server
reset session Resets a session to known initial values
Shadow Monitors another user's session
Tsdiscon Disconnects a client from a terminal server session
Tsshutdn Shuts down the terminal server in an orderly manner
See the Windows online help for additional commands and parameters.
Other useful commands include:
Command Action
gpedit.msc Launches the Group Policy Editor
tscc.msc Launches the Terminal Services Configuration Console
tsadmin Launches the Terminal Services Manager

ACP ThinManager 6.0 Non-ThinManager Components 563
28.6 Alternative Terminal Keystrokes Certain keystrokes are not available in a terminal session. Microsoft has provided these alternatives.
Keystroke Function
ALT+PAGE UP Switches between programs from left to right.
ALT+PAGE DOWN Switches between programs from right to left.
ALT+INSERT Cycles through the programs in the order they were started.
ALT+HOME Displays the Start menu.
CTRL+ALT+BREAK Switches the client between a window and full screen.
CTRL+ALT+END Brings up the Windows 2000 Security dialog box.
ALT+DELETE Displays the Windows menu.
CTRL+ALT+Minus (-) symbol on the numeric keypad
Places a snapshot of the active window, within the client, on the Terminal server clipboard (provides the same functionality as pressing PrintScrn on a local computer.)
CTRL+ALT+Plus (+) symbol on the numeric keypad
Places a snapshot of the entire client window area on the Terminal server clipboard (provides the same functionality as pressing ALT+PrintScrn on a local computer.)

564 Non-ThinManager Components ACP ThinManager 6.0
28.7 DHCP Server Setup Dynamic Host Configuration Protocol (DHCP) is a program that assigns IP addresses to devices on a network. DHCP server can be used to provide IP addresses to thin clients. It can also be configured to point the thin clients to the ThinManager Servers with Option 66, Boot Server Host Name.
28.7.1.1 Scope Options
The DHCP Server needs Option 066 configured before it will provide the ThinManager Server IP address that the terminal needs to boot.
Boot Server Host Name
The Boot Server Host Name, Option 066, assigns a ThinManager server to the terminal.
Open the Scope Options dialog box by highlighting the Scope Option folder in the tree pane of the Computer Management Console under the Services and Application > DHCP folder and selecting Action > Configure Options.
Scroll through the list window and check the Option 066 check box.
Enter the IP address of the desired ThinManager server in the String Value field.
The DHCP Server can issue the IP address for a Primary ThinManager Server and a Secondary ThinManager Server by listing the IP addresses of both, separated with a space.
ACP ThinManager 6.0 Non-ThinManager Components 565
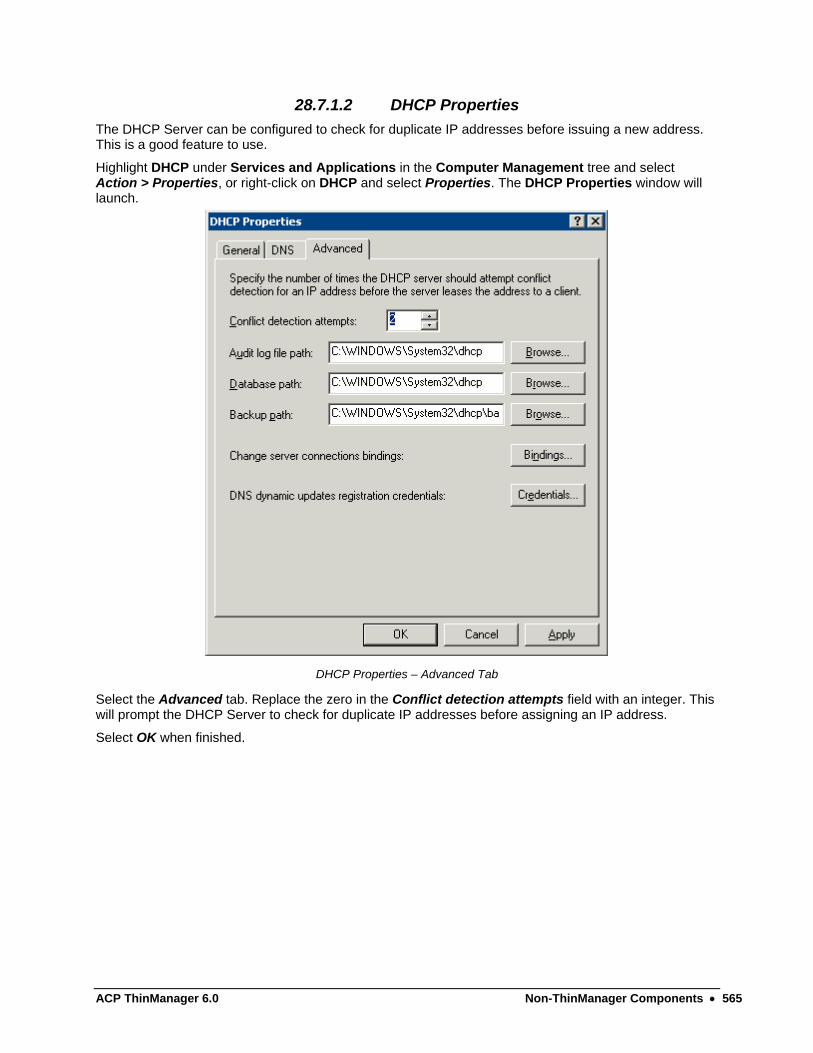
28.7.1.2 DHCP Properties
The DHCP Server can be configured to check for duplicate IP addresses before issuing a new address. This is a good feature to use.
Highlight DHCP under Services and Applications in the Computer Management tree and select Action > Properties, or right-click on DHCP and select Properties. The DHCP Properties window will launch.
DHCP Properties – Advanced Tab
Select the Advanced tab. Replace the zero in the Conflict detection attempts field with an integer. This will prompt the DHCP Server to check for duplicate IP addresses before assigning an IP address.
Select OK when finished.

566 Non-ThinManager Components ACP ThinManager 6.0
28.8 Group Policy Windows has a number of features that can be allowed or prevented with a Group Policy. Group Policy is configured in the Group Policy Object Editor snap-in to the Microsoft Management Console.
Access the Group Policy Editor by typing gpedit.msc at a command prompt to launch the Microsoft Group Policy Editor.
Group Policy Settings
Expanding the tree will show Group Policy settings that can affect the terminal server experience.
Please refer to Microsoft documentation for information on using these features.
ACP ThinManager 6.0 Non-ThinManager Components 567
28.9 Microsoft Licenses
28.9.1 Microsoft Client Access Licenses (CALs) Thin Clients require a terminal server with Windows 2003 or 2008 Server with Terminal Services enabled as an operating system.
Each of these operating systems requires a standard Microsoft Client Access License (CAL) for each connection to the server. These are based on concurrent use; a 5-pack would allow more than five users to access server resources, but only five users at a time.
28.9.2 Microsoft Terminal Server Licenses Terminals, such as thin clients and fat clients, require a license to access terminal services in addition to the standard Microsoft Client Access License (CAL). This is called the Microsoft Terminal Services Client Access License (TS CAL) in Windows 2003 and is called the Remote Desktop Services Client Access License (RDS CAL) in Windows 2008.
Windows 2003 terminal servers require Windows 2003 TS CALs and Windows 2008 terminal servers require Windows 2008 RDS CALs.
Note: This document will refer to all terminal services CALs as a TS/RDS CALs.
. This licensing is per seat; ten terminals would require ten TS/RDS CALs, even if only two were connected at a time.
These can be installed as Per Device or Per User.
The TS/RDS Device CAL licenses one device to connect to any Microsoft Terminal Servers as any user. This functions like the previous Windows 2000 TS CAL.
The TS/RDS User CAL licenses one user for any device to connect to any Microsoft Terminal Servers.
All TS/RDS CALs are installed on a Terminal Services Licensing Server. This acts as a repository for all TS/RDS CALs. The terminal servers request TS/RDS CAL authentication from the Terminal Services Licensing Server as terminals attach to terminal servers.
Note: The Terminal Server Licensing Server does not need to be a separate computer. It is a program that can be installed on any existing server.
The Terminal Services Licensing server is activated through the Internet by connecting to the Microsoft Certificate Authority and License Clearinghouse.
Windows 2003 and 2008 Servers with Terminal Services enabled will issue 90-day or 120-day temporary licenses while the Terminal Services Licensing server is being setup and activated. If this period has elapsed, the terminal will not connect to the terminal server and will display an “Error Number 50” message box.
Windows Server is not normally sold with TS CALs. These need to purchased separately and installed on the Terminal Services License server.

568 Non-ThinManager Components ACP ThinManager 6.0
28.9.3 Microsoft Terminal Server Licensing Activation In Windows 2003 and 2008, all the TS CALs are installed on a single Terminal Server Licensing Server. This allows a single site for management and authentication of terminal server connections. A server becomes a Terminal Server Licensing Server by selection of the option during the installation phase or by selecting Add/Remove Programs > Add/Remove Windows Components from the Control Panel and selecting the Terminal Services Licensing.
The licensing of the Microsoft components of a Windows 2003 or 2008 terminal server is a two-step process; one must first authorize the Terminal Server Licensing Server, then one must activate the licenses. The license activation will be repeated for each license pack.
Related Documents