User Manual MessageBuilder Configuration Software (Catalog No. 2706-MB1) Allen-Bradley

Welcome message from author
This document is posted to help you gain knowledge. Please leave a comment to let me know what you think about it! Share it to your friends and learn new things together.
Transcript
UserManual
MessageBuilderConfigurationSoftware
(Catalog No. 2706-MB1)
Allen-Bradley

Solid state equipment has operational characteristics differing fromthose of electromechanical equipment. “Safety Guidelines for theApplication, Installation and Maintenance of Solid State Controls”(Publication SGI-1.1) describes some important differences betweensolid state equipment and hard–wired electromechanical devices.Because of this difference, and also because of the wide variety ofuses for solid state equipment, all persons responsible for applyingthis equipment must satisfy themselves that each intendedapplication of this equipment is acceptable.
In no event will the Allen-Bradley Company be responsible or liablefor indirect or consequential damages resulting from the use orapplication of this equipment.
The examples and diagrams in this manual are included solely forillustrative purposes. Because of the many variables andrequirements associated with any particular installation, theAllen-Bradley Company cannot assume responsibility or liability foractual use based on the examples and diagrams.
No patent liability is assumed by Allen-Bradley Company withrespect to use of information, circuits, equipment, or softwaredescribed in this manual.
Reproduction of the contents of this manual, in whole or in part,without written permission of the Allen-Bradley Company isprohibited.
Throughout this manual we use notes to make you aware of safetyconsiderations.
!ATTENTION: Identifies information about practicesor circumstances that can lead to personal injury ordeath, property damage, or economic loss.
Attentions help you:
• identify a hazard
• avoid the hazard
• recognize the consequences
Important: Identifies information that is especially important forsuccessful application and understanding of the product.
MessageBuilder and MessageView are trademarks of Alen-Bradley Company, Inc.PLC and PLC–5 are registered trademarks of Allen-Bradley Company, Inc.SLC 5/03, SLC 5/04, Dataliner and AdaptaScan are trademarks of Allen-Bradley Company, Inc.INTERCHANGE is a trademark of Rockwell Software Inc.Intel is a registered trademark of Intel Corporation.MS-DOS and Microsoft Windows are registered trademarks of Microsoft Corporation.
Important User Information

Publication 2706-817
Chapter 1
What is MessageBuilder? 1–1. . . . . . . . . . . . . . . . . . . . . . . . . . . . . . . MessageBuilder Software Features 1–2. . . . . . . . . . . . . . . . . . . . . . . . Typical Messages in an Application 1–5. . . . . . . . . . . . . . . . . . . . . . . . Typical Message Contents 1–6. . . . . . . . . . . . . . . . . . . . . . . . . . . . . .
Chapter 2
System Requirements 2–1. . . . . . . . . . . . . . . . . . . . . . . . . . . . . . . . . Installing MessageBuilder Software 2–2. . . . . . . . . . . . . . . . . . . . . . . . INTERCHANGE Device Configuration Utility 2–7. . . . . . . . . . . . . . . . . Troubleshooting the Installation Procedure 2–12. . . . . . . . . . . . . . . . . . .
Chapter 3
Windows Environment 3–1. . . . . . . . . . . . . . . . . . . . . . . . . . . . . . . . . MessageBuilder Window 3–2. . . . . . . . . . . . . . . . . . . . . . . . . . . . . . . Message Editor Table View 3–4. . . . . . . . . . . . . . . . . . . . . . . . . . . . . . Opening and Closing Menus 3–7. . . . . . . . . . . . . . . . . . . . . . . . . . . . . Status Bar and Toolbars 3–8. . . . . . . . . . . . . . . . . . . . . . . . . . . . . . . . Message Editor Terminal View 3–10. . . . . . . . . . . . . . . . . . . . . . . . . . . Dialogs 3–11. . . . . . . . . . . . . . . . . . . . . . . . . . . . . . . . . . . . . . . . . . . . Getting Help 3–14. . . . . . . . . . . . . . . . . . . . . . . . . . . . . . . . . . . . . . . .
Chapter 4
Design Checklist 4–1. . . . . . . . . . . . . . . . . . . . . . . . . . . . . . . . . . . . . Safety Considerations 4–2. . . . . . . . . . . . . . . . . . . . . . . . . . . . . . . . . Applications and Projects 4–3. . . . . . . . . . . . . . . . . . . . . . . . . . . . . . . Messages 4–4. . . . . . . . . . . . . . . . . . . . . . . . . . . . . . . . . . . . . . . . . . Controlling Devices 4–7. . . . . . . . . . . . . . . . . . . . . . . . . . . . . . . . . . . Triggering a Message 4–9. . . . . . . . . . . . . . . . . . . . . . . . . . . . . . . . . Slaving 4–15. . . . . . . . . . . . . . . . . . . . . . . . . . . . . . . . . . . . . . . . . . . . Slave Device 4–18. . . . . . . . . . . . . . . . . . . . . . . . . . . . . . . . . . . . . . . . Historical Event Stack 4–19. . . . . . . . . . . . . . . . . . . . . . . . . . . . . . . . . Function Keys 4–20. . . . . . . . . . . . . . . . . . . . . . . . . . . . . . . . . . . . . . . Function Key Types 4–23. . . . . . . . . . . . . . . . . . . . . . . . . . . . . . . . . . . LED Indicators 4–25. . . . . . . . . . . . . . . . . . . . . . . . . . . . . . . . . . . . . . . Handshaking 4–26. . . . . . . . . . . . . . . . . . . . . . . . . . . . . . . . . . . . . . . .
Table of Contents
Preface
Introducing MessageBuilderConfiguration Software
Installing MessageBuilderSoftware
MessageBuilder Basics
Planning an Application

Table of Contentstoc–ii
Publication 2706-817
Tags 4–31. . . . . . . . . . . . . . . . . . . . . . . . . . . . . . . . . . . . . . . . . . . . . . Data Types 4–33. . . . . . . . . . . . . . . . . . . . . . . . . . . . . . . . . . . . . . . . . Address Worksheet 4–35. . . . . . . . . . . . . . . . . . . . . . . . . . . . . . . . . . . Defining Tags 4–36. . . . . . . . . . . . . . . . . . . . . . . . . . . . . . . . . . . . . . . Scaling Data Display Variables 4–37. . . . . . . . . . . . . . . . . . . . . . . . . . . Scaling Data Entry Variables 4–38. . . . . . . . . . . . . . . . . . . . . . . . . . . . . Precision and Rounding 4–41. . . . . . . . . . . . . . . . . . . . . . . . . . . . . . . .
Chapter 5
MessageView 421 Terminal Ports 5–1. . . . . . . . . . . . . . . . . . . . . . . . . RS-232 Port Communication 5–3. . . . . . . . . . . . . . . . . . . . . . . . . . . . ASCII Triggering Commands 5–8. . . . . . . . . . . . . . . . . . . . . . . . . . . . Remote I/O Communication 5–12. . . . . . . . . . . . . . . . . . . . . . . . . . . . . Discrete I/O 5–15. . . . . . . . . . . . . . . . . . . . . . . . . . . . . . . . . . . . . . . . . Block Transfer 5–17. . . . . . . . . . . . . . . . . . . . . . . . . . . . . . . . . . . . . . .
Chapter 6
Starting MessageBuilder 6–1. . . . . . . . . . . . . . . . . . . . . . . . . . . . . . . Creating a New Application 6–2. . . . . . . . . . . . . . . . . . . . . . . . . . . . . . Opening an Existing Application 6–4. . . . . . . . . . . . . . . . . . . . . . . . . . Saving an Application 6–6. . . . . . . . . . . . . . . . . . . . . . . . . . . . . . . . . . Renaming and Describing an Application 6–8. . . . . . . . . . . . . . . . . . . . Closing an Application 6–10. . . . . . . . . . . . . . . . . . . . . . . . . . . . . . . . . Exiting MessageBuilder 6–10. . . . . . . . . . . . . . . . . . . . . . . . . . . . . . . .
Chapter 7
The Message Editor Dialog 7–1. . . . . . . . . . . . . . . . . . . . . . . . . . . . . . Working with Messages 7–2. . . . . . . . . . . . . . . . . . . . . . . . . . . . . . . . Selecting Messages 7–3. . . . . . . . . . . . . . . . . . . . . . . . . . . . . . . . . . . Editing Messages 7–5. . . . . . . . . . . . . . . . . . . . . . . . . . . . . . . . . . . . Set Preferences 7–14. . . . . . . . . . . . . . . . . . . . . . . . . . . . . . . . . . . . . . Message Editor Terminal View 7–16. . . . . . . . . . . . . . . . . . . . . . . . . . . Embedded Variables and Graphics 7–18. . . . . . . . . . . . . . . . . . . . . . . . Numeric Variable Display 7–23. . . . . . . . . . . . . . . . . . . . . . . . . . . . . . . ASCII Variable Display 7–26. . . . . . . . . . . . . . . . . . . . . . . . . . . . . . . . . Numeric Variable Entry 7–27. . . . . . . . . . . . . . . . . . . . . . . . . . . . . . . . . ASCII Variable Entry 7–30. . . . . . . . . . . . . . . . . . . . . . . . . . . . . . . . . . Message Attributes 7–33. . . . . . . . . . . . . . . . . . . . . . . . . . . . . . . . . . . Slaving 7–41. . . . . . . . . . . . . . . . . . . . . . . . . . . . . . . . . . . . . . . . . . . . Function Keys 7–48. . . . . . . . . . . . . . . . . . . . . . . . . . . . . . . . . . . . . . . LED Attributes 7–52. . . . . . . . . . . . . . . . . . . . . . . . . . . . . . . . . . . . . . . Special Messages 7–54. . . . . . . . . . . . . . . . . . . . . . . . . . . . . . . . . . . .
Communications Overview
Working with ApplicationFiles
Creating Messages
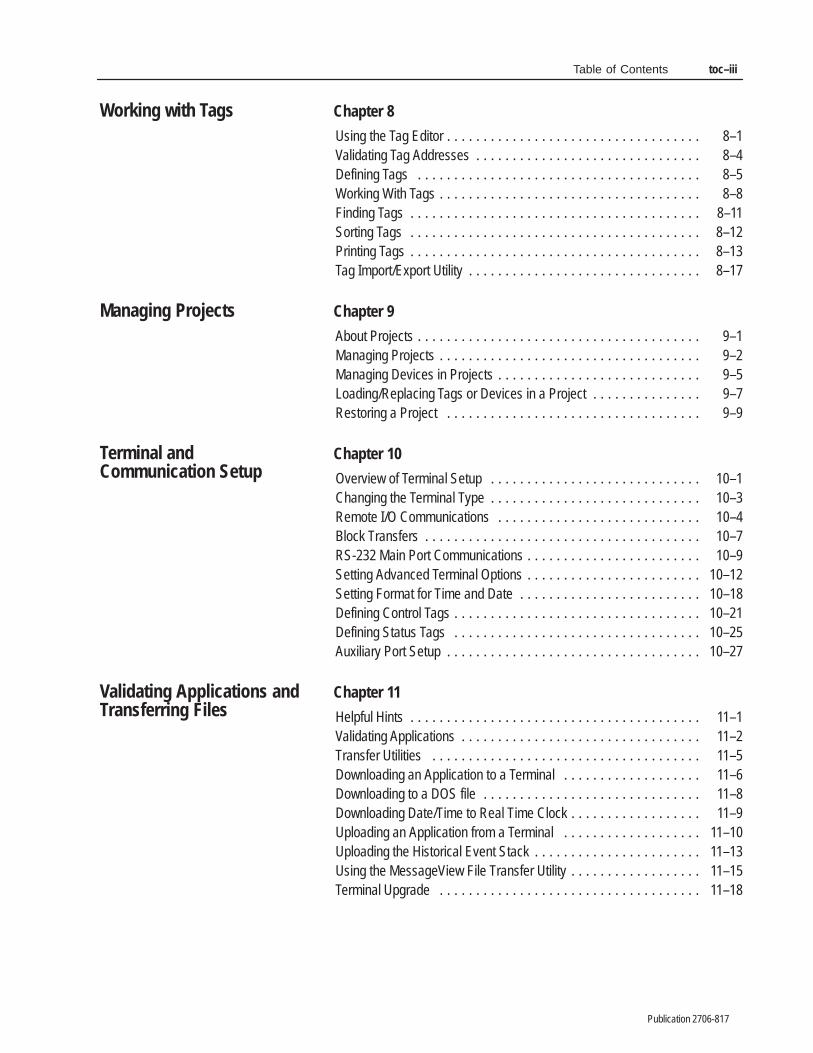
Table of Contents toc–iii
Publication 2706-817
Chapter 8
Using the Tag Editor 8–1. . . . . . . . . . . . . . . . . . . . . . . . . . . . . . . . . . . Validating Tag Addresses 8–4. . . . . . . . . . . . . . . . . . . . . . . . . . . . . . . Defining Tags 8–5. . . . . . . . . . . . . . . . . . . . . . . . . . . . . . . . . . . . . . . Working With Tags 8–8. . . . . . . . . . . . . . . . . . . . . . . . . . . . . . . . . . . . Finding Tags 8–11. . . . . . . . . . . . . . . . . . . . . . . . . . . . . . . . . . . . . . . . Sorting Tags 8–12. . . . . . . . . . . . . . . . . . . . . . . . . . . . . . . . . . . . . . . . Printing Tags 8–13. . . . . . . . . . . . . . . . . . . . . . . . . . . . . . . . . . . . . . . . Tag Import/Export Utility 8–17. . . . . . . . . . . . . . . . . . . . . . . . . . . . . . . .
Chapter 9
About Projects 9–1. . . . . . . . . . . . . . . . . . . . . . . . . . . . . . . . . . . . . . . Managing Projects 9–2. . . . . . . . . . . . . . . . . . . . . . . . . . . . . . . . . . . . Managing Devices in Projects 9–5. . . . . . . . . . . . . . . . . . . . . . . . . . . . Loading/Replacing Tags or Devices in a Project 9–7. . . . . . . . . . . . . . . Restoring a Project 9–9. . . . . . . . . . . . . . . . . . . . . . . . . . . . . . . . . . .
Chapter 10
Overview of Terminal Setup 10–1. . . . . . . . . . . . . . . . . . . . . . . . . . . . . Changing the Terminal Type 10–3. . . . . . . . . . . . . . . . . . . . . . . . . . . . . Remote I/O Communications 10–4. . . . . . . . . . . . . . . . . . . . . . . . . . . . Block Transfers 10–7. . . . . . . . . . . . . . . . . . . . . . . . . . . . . . . . . . . . . . RS-232 Main Port Communications 10–9. . . . . . . . . . . . . . . . . . . . . . . . Setting Advanced Terminal Options 10–12. . . . . . . . . . . . . . . . . . . . . . . . Setting Format for Time and Date 10–18. . . . . . . . . . . . . . . . . . . . . . . . . Defining Control Tags 10–21. . . . . . . . . . . . . . . . . . . . . . . . . . . . . . . . . . Defining Status Tags 10–25. . . . . . . . . . . . . . . . . . . . . . . . . . . . . . . . . . Auxiliary Port Setup 10–27. . . . . . . . . . . . . . . . . . . . . . . . . . . . . . . . . . .
Chapter 11
Helpful Hints 11–1. . . . . . . . . . . . . . . . . . . . . . . . . . . . . . . . . . . . . . . . Validating Applications 11–2. . . . . . . . . . . . . . . . . . . . . . . . . . . . . . . . . Transfer Utilities 11–5. . . . . . . . . . . . . . . . . . . . . . . . . . . . . . . . . . . . . Downloading an Application to a Terminal 11–6. . . . . . . . . . . . . . . . . . . Downloading to a DOS file 11–8. . . . . . . . . . . . . . . . . . . . . . . . . . . . . . Downloading Date/Time to Real Time Clock 11–9. . . . . . . . . . . . . . . . . . Uploading an Application from a Terminal 11–10. . . . . . . . . . . . . . . . . . . Uploading the Historical Event Stack 11–13. . . . . . . . . . . . . . . . . . . . . . . Using the MessageView File Transfer Utility 11–15. . . . . . . . . . . . . . . . . . Terminal Upgrade 11–18. . . . . . . . . . . . . . . . . . . . . . . . . . . . . . . . . . . .
Working with Tags
Managing Projects
Terminal andCommunication Setup
Validating Applications andTransferring Files

Table of Contentstoc–iv
Publication 2706-817
Chapter 12
Types of Reports 12–1. . . . . . . . . . . . . . . . . . . . . . . . . . . . . . . . . . . . . Creating and Printing a Report 12–2. . . . . . . . . . . . . . . . . . . . . . . . . . . Changing the Report Setup 12–3. . . . . . . . . . . . . . . . . . . . . . . . . . . . . Previewing a Report 12–5. . . . . . . . . . . . . . . . . . . . . . . . . . . . . . . . . . . Setting up a Printer 12–6. . . . . . . . . . . . . . . . . . . . . . . . . . . . . . . . . . . Sending a Report to a File 12–7. . . . . . . . . . . . . . . . . . . . . . . . . . . . . .
Appendix A
Appendix B
Appendix C
Appendix D
Appendix E
Appendix F
Appendix G
Appendix H
Appendix I
Creating Reports
Menus and CommandsSummary
Tool Summary
Configuration SoftwareError and WarningMessages
Validation Error Messages
Upload/Download ErrorMessages
Global ConfigurationParameters
Tags and Data Types
Tag Address Worksheet
ASCII and Extended ASCIICharacters
Glossary
Index

�������
Publication 2706-817
�������
Welcome to MessageBuilder Configuration Software. You can usethis software to create control panel applications for MessageView421 Operator Terminals.
MessageBuilder software allows you to create applications designedspecifically to control processes in your plant. When you load aMessageBuilder application in a MessageView terminal, the terminaldisplays messages that:
• give information about the operation
• ask for input to control the operation.
Your software registration card is located in the envelope with thesoftware disks. To register your software, mail the card to thisaddress:
Allen-BradleyGlobal Technical Support6680 Beta DriveMayfield Village, Ohio 44143.
Or fax the card to (216) 646-6770.
This manual is a resource to help you design message displayapplications that will run in a MessageView 421 terminal. Sincethere are many options designed to give a smooth-running operationunder any circumstances, you should become familiar with thechoices to be made.
MessageBuilder Configuration Software runs under MicrosoftWindows. You should know how to use a mouse, choose commands,and work with windows and dialog boxes. To learn basic windowstechniques, read the User’s Guide that came with your MicrosoftWindows package.
PLC and SLC logic controllers and ASCII Triggering devices arean important part of the systems that MessageBuilder applicationscontrol. You should understand how controllers work, especially theprogram and data files. See the user manuals for the controllers usedin your operation.
Registering Your Copy ofMessageBuilder Software
Intended Audience

PrefaceP–2
Publication 2706-817
The MessageBuilder Configuration Software package (Catalog No. 2706-MB1) comes with:
• 4 (3 1/2 inch) installation disks
– 3 MessageBuilder Software disks (includingINTERCHANGE utility)
– 1 A-B Utilities disk.
• This manual: MessageBuilder Configuration Software manual(Publication No. 2706-817).
• MessageView 421 Display Terminal user manual (PublicationNo. 2706-816).
This manual uses the following conventions:
• Software or MessageBuilder software refers to theMessageBuilder Configuration Software.
• Terminal refers to a MessageView 421 terminal.
• Windows (with a capital “W”) refers to Microsoft Windows or tothe Window menu in MessageBuilder. MessageBuilder windowsare written with a small “w”.
• Keys on the keyboard appear in boldface small capital letters:
– the Shift key (on the computer) appears as SHIFT in the text– the Acknowledge key (on the terminal) appears as ACK.
• A hand with italicized text in the left margin gives helpful hints.
MessageBuilder software often gives a choice of methods forselecting a command. Use the most convenient one.
• Select a tool on the toolbar.
A toolbar is displayed along the top of the screen specific to whatyou are doing. Simply click on the appropriate tool and it isactivated. Appendix B illustrates all tools in all the toolbars.
• Use a key combination.
Certain commands in the File and Edit menus have a keycombination. Use it instead of selecting the command.
• Select a menu command.
Click the menu name and then the command name. Or press theALT key and the underlined letter of the menu name to drop themenu, then type the underlined letter of the command. AppendixA describes all commands in all the menus.
For example, to open an application from the initial MessageBuilderscreen, do one of the following:
– click on the Open File tool, or– press CTRL + O, or– type ALT + F then type O, to select Open from the File menu,
and the File Open dialog appears.
Software Package
Conventions
☞ The Release.txt and Readmekt.txtfiles contain the most recent installation information.
Key combinations

Preface P–3
Publication 2706-817
This manual is organized as follows:
Chapter Title Description
PrefaceDescribes the purpose and contents of themanual, and its intended audience.
1Introducing
MessageBuilder SoftwareDescribes MessageBuilder ConfigurationSoftware and some of its features.
2Installing MessageBuilder
Software
Explains how to install MessageBuilder andINTERCHANGE software on a personalcomputer.
3 MessageBuilder BasicsExplains how to use MessageBuildersoftware’s menus, tools and dialogs. Also howto use the Help system.
4 Planning an ApplicationGives guidelines for designing an application,including safety considerations.
5Communications
OverviewGives guidelines for setting up MessageViewterminal communications.
6Working with Application
Files
Explains how to open and closeMessageBuilder software, and how to open,close and save application files.
7 Creating Messages
Shows how to create messages and set theirattributes. Also how to embed variables andgraphics in a message, and how functionkeys work.
8 Working with TagsExplains how to use the Tag Editor feature ofMessageBuilder software. Tags specify theaddresses in which variable data are stored.
9 Managing Projects
Tells how to link a project to an application,and how to copy, rename or delete projects.Also shows how to work with devices inprojects.
10Terminal and
Communication Setup
Tells how to set operating and runtimecommunication parameters for theMessageView 421 terminal and a logiccontroller.
11Validating Applicationsand Transferring Files
Tells how to validate an application. Explainsseveral methods that transfer it between acomputer and a terminal or a disk file.
12 Creating Reports Tells how to design a report and print it.
You should have the MessageView Display Terminal User Manual(Publication No. 2706-816) at hand while creating an application.Also refer as needed to the manual(s) for the controller the systemwill be using.
Information and procedures relating to INTERCHANGE Softwareand Microsoft Windows are given in this manual. For further details,refer to the manuals for these products.
Contents of the Manual
Related Publications

PrefaceP–4
Publication 2706-817
Local Product Support
Contact your local Allen-Bradley representative for:
• sales and order support
• product technical training
• warranty support
• support service agreements.
Technical Product Assistance
If you have questions about MessageBuilder Configuration software:
• check online Help
• review information on the subject in this manual
• review the release notes: these are separate icons in theMessageBuilder Group in the Windows Program Manager
• review any technical notes on the subject that you have receivedfrom Allen-Bradley.
If you still have a question, call your local Allen-Bradleyrepresentative.
If you need more help, call:
Allen-BradleyGlobal Technical Support6680 Beta DriveMayfield Village, Ohio 44143.
Phone numbers:
• In the USA and Canada, call 1-800-289-2279.
• Outside the USA and Canada, call your local Allen-Bradleyoffice, or call USA (216) 646-6800.
• Fax number: (216) 646-6770.
Note: If you need to call Allen-Bradley for technical assistance,please have the serial number of your software available. It may befound in three places:
• on the software registration card
• on the welcome screen that appears when MessageBuilder starts
• in the main Help menu, choose About MessageBuilder to see theAbout MessageBuilder dialog, which has:
– the release date and version number of MessageBuildersoftware
– the release date and version number of the Allen-BradleyUtilities software.
Allen-Bradley Support

Chapter 1
Publication 2706-817
������� �� ������� ��
���� ����� �� �������
This chapter covers the following topics:
• What is MessageBuilder?
• MessageBuilder software features
• Typical messages in an application
• Typical message contents.
MessageBuilder is a Microsoft Windows software package. Anapplication designer can use it to create custom applications forMessageView 421N, 421F and 421D terminals.
MessageBuilder software makes creating an application as easy aspossible, by supplying dialog boxes, toolbars and menus. Theseinclude:
• menus and toolbars keyed to the current situation
• dialogs to set up the computer workstation, the MessageViewterminal and the interface to controllers used in the process.
• dialogs in which applications and projects are created and edited
• the Message Editor Table View, in which messages are createdand edited
• the Message Editor Terminal View, which previews individualmessages
• the Tag Editor, in which tags are created and edited
• validation of the application before it is downloaded to a terminal,and on command while the application is being created
• printer dialogs for making permanent records of specific orgeneral aspects of the application
• on-line and context-sensitive help.
What is MessageBuilder?
1–2 Introducing MessageBuilder Configuration Software
Publication 2706-817
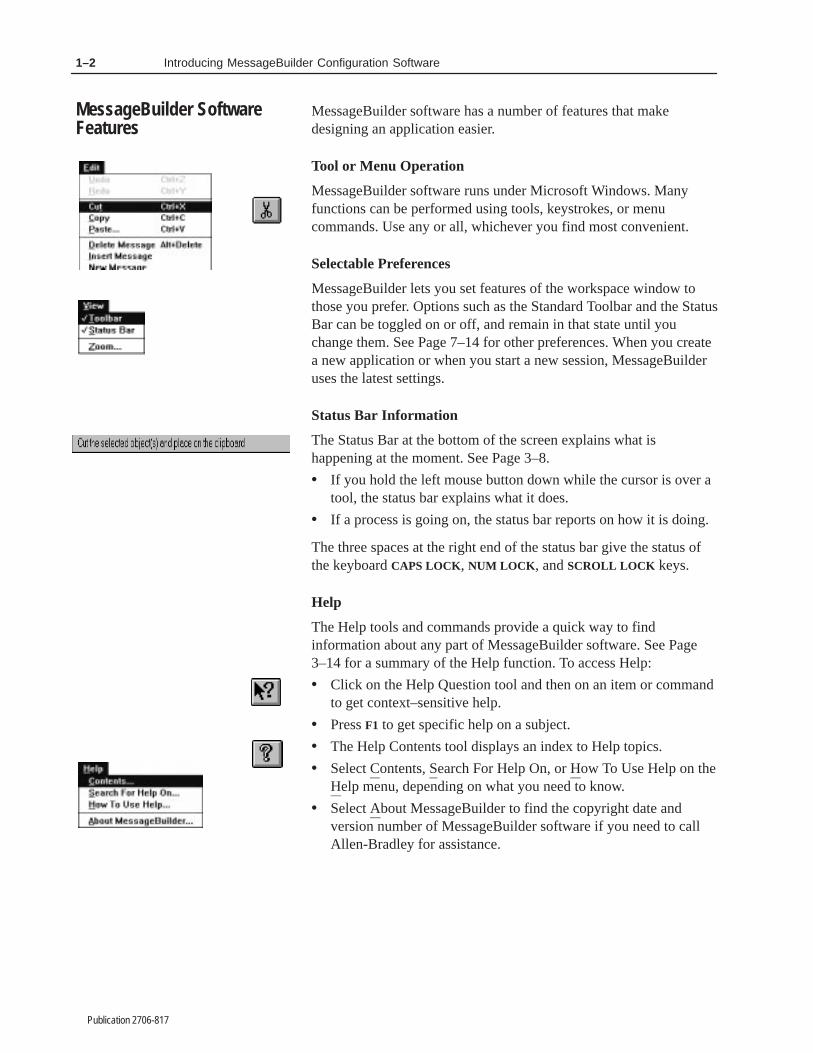
MessageBuilder software has a number of features that makedesigning an application easier.
Tool or Menu Operation
MessageBuilder software runs under Microsoft Windows. Manyfunctions can be performed using tools, keystrokes, or menucommands. Use any or all, whichever you find most convenient.
Selectable Preferences
MessageBuilder lets you set features of the workspace window tothose you prefer. Options such as the Standard Toolbar and the StatusBar can be toggled on or off, and remain in that state until youchange them. See Page 7–14 for other preferences. When you createa new application or when you start a new session, MessageBuilderuses the latest settings.
Status Bar Information
The Status Bar at the bottom of the screen explains what ishappening at the moment. See Page 3–8.
• If you hold the left mouse button down while the cursor is over atool, the status bar explains what it does.
• If a process is going on, the status bar reports on how it is doing.
The three spaces at the right end of the status bar give the status ofthe keyboard CAPS LOCK, NUM LOCK , and SCROLL LOCK keys.
Help
The Help tools and commands provide a quick way to findinformation about any part of MessageBuilder software. See Page3–14 for a summary of the Help function. To access Help:
• Click on the Help Question tool and then on an item or commandto get context–sensitive help.
• Press F1 to get specific help on a subject.
• The Help Contents tool displays an index to Help topics.
• Select Contents, Search For Help On, or How To Use Help on theHelp menu, depending on what you need to know.
• Select About MessageBuilder to find the copyright date andversion number of MessageBuilder software if you need to callAllen-Bradley for assistance.
MessageBuilder SoftwareFeatures
1–3Introducing MessageBuilder Configuration Software
Publication 2706-817
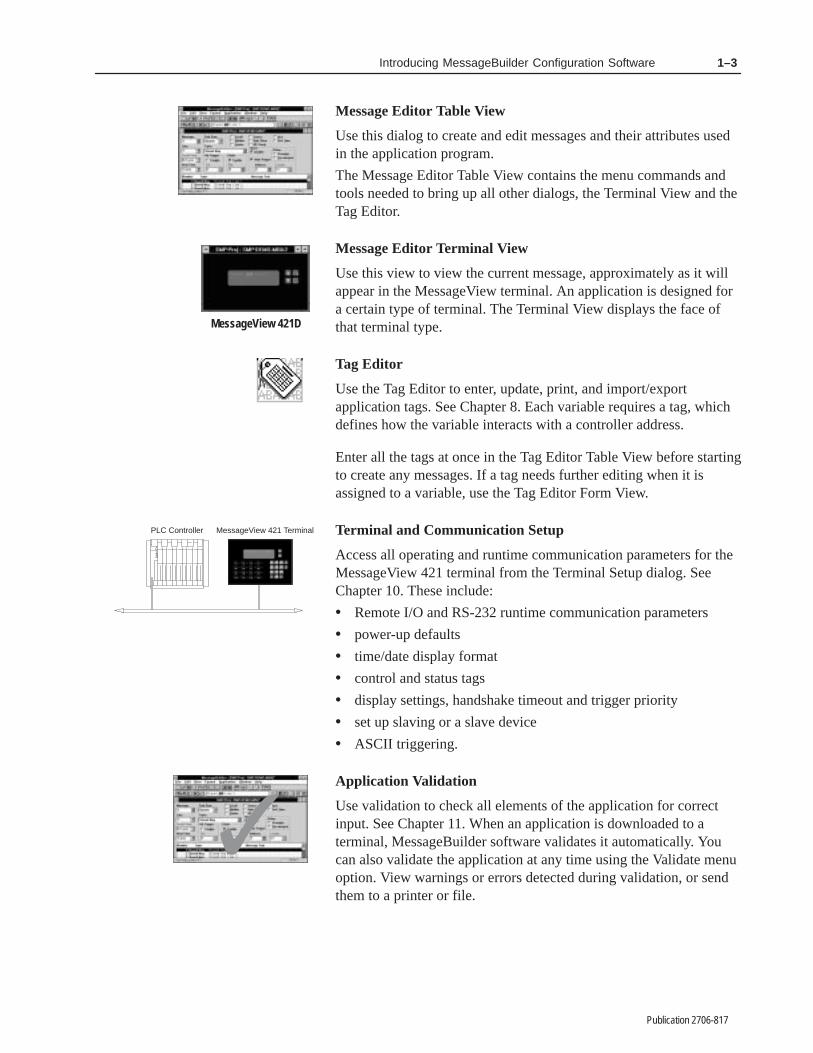
Message Editor Table View
Use this dialog to create and edit messages and their attributes usedin the application program.
The Message Editor Table View contains the menu commands andtools needed to bring up all other dialogs, the Terminal View and theTag Editor.
Message Editor Terminal View
Use this view to view the current message, approximately as it willappear in the MessageView terminal. An application is designed fora certain type of terminal. The Terminal View displays the face ofthat terminal type.
Tag Editor
Use the Tag Editor to enter, update, print, and import/exportapplication tags. See Chapter 8. Each variable requires a tag, whichdefines how the variable interacts with a controller address.
Enter all the tags at once in the Tag Editor Table View before startingto create any messages. If a tag needs further editing when it isassigned to a variable, use the Tag Editor Form View.
Terminal and Communication Setup
Access all operating and runtime communication parameters for theMessageView 421 terminal from the Terminal Setup dialog. SeeChapter 10. These include:
• Remote I/O and RS-232 runtime communication parameters
• power-up defaults
• time/date display format
• control and status tags
• display settings, handshake timeout and trigger priority
• set up slaving or a slave device
• ASCII triggering.
Application Validation
Use validation to check all elements of the application for correctinput. See Chapter 11. When an application is downloaded to aterminal, MessageBuilder software validates it automatically. Youcan also validate the application at any time using the Validate menuoption. View warnings or errors detected during validation, or sendthem to a printer or file.
MessageView 421D
PLC Controller MessageView 421 Terminal
✓

1–4 Introducing MessageBuilder Configuration Software
Publication 2706-817
Application Upload/Download Capabilities
Transfer applications between a MessageView 421 terminal and acomputer running either:
• MessageBuilder Configuration software
• MessageView File Transfer Utility.
See the section starting on Page 11–6.
Upload Historical Event Stack
The MessageView terminal maintains a running log of triggeredmessages in a Historical Event Stack file. Upload this file from theterminal to a computer that has either MessageBuilder software orthe File Transfer Utility installed. See the section starting on Page4–19 for information on the Historical Event Stack, and on Page11–13 for information on how to upload it to the computer foranalysis.
Reports
Use the report function to create customized reports for anapplication. See Chapter 12. Reports may include any or all of thefollowing:
• application description
• messages
• message attributes
• terminal settings
• tags and their attributes
• function keys
• LED indicators.
Send reports to a printer supported by Microsoft Windows.
In addition to the report function, you may print information on tagsand their attributes via the Tag Editor (see Page 8–13).
Terminal Upgrade
Use the Upgrade Terminal command to upgrade the firmware in yourMessageView terminal(s). See Page 11–18.

1–5Introducing MessageBuilder Configuration Software
Publication 2706-817
An application contains messages. Messages may contain embeddeddata variables, graphical symbols, and when designed forMessageView 421F terminals, may have function keys enabled.
This example of a 421N Terminal View has a message that contains:
• a graphic symbol
• an ASCII Variable Display.
This example of a 421F Terminal View has a message that contains:
• a Time Variable
• a Numeric Variable Display
• enabled Function Keys.
Note: One message may occupy more than one line in the TerminalView if the Line attribute is selected as “All”.
Typical Messages in anApplication

1–6 Introducing MessageBuilder Configuration Software
Publication 2706-817
Time or Date Display
Time Displays indicate the current time (hours, minutes andseconds) according to the terminal’s Real Time Clock. Specify theformat of the display using the Terminal Setup dialog.
Date Displays indicate the current date (day, month and year)according to the terminal’s Real Time Clock. Specify the format ofthe display using the Terminal Setup dialog.
Set the Real Time Clock using the RTC Download command in theApplication menu.
Display Variables
Numeric Variable Displays shows the current value at a specificcontroller address: binary, BCD or signed/unsigned integer. Scaling(y = mx + b) may be used.
ASCII Variable Displays present status information to the terminaloperator according to the current character array at a specificcontroller address.
Entry Variables
Numeric Variable Entries may be used in applications designed forMessageView 421N and 421F terminals. These variables allow theterminal operator to enter a numeric value from the terminal keypad.Scaling (y = mx + b) may be used.
ASCII Variable Entries may be used in applications designed forMessageView 421D, 421N and 421F terminals if the terminalfirmware can support these variables. These variables allow theterminal operator to enter ASCII characters from an ASCII Inputdevice via the RS-232 port, or via the numeric keypad on theterminal.
Graphics
Graphics consist of a set of 32 ISA symbols illustratingmanufacturing components such as motors and containers.
Typical Message Contents
Time is 16:23 CST.
Date is 06/24/96.
Pressure is 300 PSI.
Temperature Too High.
Enter Flow Rate:
Bar Code Reading:
Valve is open.

1–7Introducing MessageBuilder Configuration Software
Publication 2706-817
Function Keys
MessageView 421F terminals can use applications that haveFunction keys enabled. An enabled function key is assigned to one ofthese types:
A Momentary Function Key changes state when pressed andchanges back to the original state when its hold time has expiredafter it is released.
A Maintained Function Key changes state when pressed andremains in the changed state when released. It changes back to theoriginal state when the Function Key is pressed and released again.
A Latched Function Key changes state when pressed and remainsin that state until the controller unlatches it.
!ATTENTION: Function Keys are active only whenthey are enabled for a message currently displayed bythe terminal. All other Function Keys are non-active.
Example
Suppose a message has function keys F1, F5, and F9 enabled.Whenever that message is displayed by the MessageView terminal,these three keys are activated, but the 13 other Function keys remaininactive.
When the message is terminated, the three Function keys areinactivated at once.
Note: A Latched Function key remains in its changed state until thecontroller unlatches it, but it is not active after its message isterminated.

Chapter 2
Publication 2706-817
� ������ �������������
�������
This chapter covers the following topics:
• System requirements
• Installing MessageBuilder software
• INTERCHANGE Device Configuration Utility
• Troubleshooting the installation procedure.
The minimum hardware requirements for installing and runningMessageBuilder software are:
• a personal computer using Intel 386 or 486 processor orequivalent
• a minimum 4 MB of memory (8 MB recommended) withminimum of 10 MB permanent swap under virtual memory
• a hard disk with 12 MB of free space
• a 3.5 inch high-density (1.44 MB) disk drive
• a VGA or better monitor that is supported by Windows
• an RS-232 communications port
• a cable for downloading/uploading applications between thecomputer and the RS-232 port of a MessageView 421 terminal.Order Catalog No. 2706-NC13.
Also highly recommended are:
• a mouse compatible with Windows
• a printer that supports graphics, compatible with Windows.
The minimum software requirements for installing and runningMessageBuilder software are:
• MS-DOS operating system version 3.31 or later (MS-DOSversion 5.0 or later recommended)
• Microsoft Windows version 3.1 or later, or Windows forWorkgroups version 3.11 or later.
Note: MessageBuilder software utilizing INTERCHANGE V6.1or later, is compatible with Microsoft Windows 95.
System Requirements

2–2 Installing MessageBuilder Software
Publication 2706-817
To install MessageBuilder Configuration Software:
1. Insert MessageBuilder software disk 1 in the appropriatehigh-density floppy disk drive.
2. Start Windows (if necessary) by typing win at the DOS commandprompt and pressing ENTER.
3. To start installing MessageBuilder:
• with Windows 3.1x, in the Program Manager window choose Runfrom the File menu (ALT + F, R)
• with Windows 95, in the Start menu choose Run (MS key + R)
4. In the command line box, type the drive letter of the drivecontaining the MessageBuilder Software disk 1, followed by acolon and the word setup. For example, type:
a:setup.
Then select OK or press ENTER.
5. You are prompted to begin the MessageBuilder installation.Select:
• Yes to continue
• No to cancel.
6. The installation software checks your system for AB Utilitiessoftware.
If it detects an older version of AB Utilities software, it warnsyou that the previous version will be deleted before the newversion is installed.
If it detects the same or a newer version of AB Utilities software,it notifies you that there is no need to upgrade it.
7. If installation of AB Utilities is required, you are prompted toinstall the AB Utilities Software:
• Insert the AB Utilities disk.• Enter target drive and directory for installing files.
Recommended drive and directory is C:\AB.
The files are copied to the target directory.
8. Re-insert MessageBuilder software disk 1 to continue installingthe MessageBuilder software.
Installing MessageBuilderSoftware

2–3Installing MessageBuilder Software
Publication 2706-817
9. You are prompted to begin the MessageBuilder installation. Theinstallation software checks your system for MessageBuildersoftware.
If it detects a previous version of MessageBuilder software, itwarns you that the previous version will be deleted before thenew version is installed.
If it detects the same version of MessageBuilder software, it givesyou the option of re-installing or deleting the files.
– Re-install writes over existing files– Delete removes the files; you must then run the installation
again to install the new software.
10. Enter registration information: name, company name, andproduct serial number. The serial number is on your registrationcard.
11. Enter target drive and directory for installing files. Recommendeddrive and directory is C:\AB.
The files are copied to the target directory.
12. Insert MessageBuilder disk 2 to install the remaining files.
13. You are prompted to install the INTERCHANGE software. Entertarget drive and directory for installing files.
Recommended drive and directory is C:\RSI\IC.
The files are copied to the target directory.
• If the installation detects a previous version ofINTERCHANGE, the procedure replaces existing componentswith new components. The procedure will not overwriteconfiguration files.
• If the installation detects the same version ofINTERCHANGE, you are allowed to reinstall thecomponents.
14. Insert MessageBuilder Disk 3 to install the remainingINTERCHANGE files.

2–4 Installing MessageBuilder Software
Publication 2706-817
15. The installation prompts you to update the AUTOEXEC.BATfile. It adds:
– C:\AB\BIN to the path.– C:\RSI\IC\BIN to the path.– SHARE.EXE to the file (Windows 3.1x only).– Environment variable ABIC_CONFIG=C:\RSI\IC\BIN.– ABICRUN.BAT (starts INTERCHANGE software).
Important: MessageBuilder Configuration software andINTERCHANGE Software will not run without theselines.
Note: If you do not update your AUTOEXEC.BAT file duringMessageBuilder installation, MessageBuilder software writes thechanges to the file AUTOEXEC.EXM for future reference.
16. The INTERCHANGE Device Configuration Utility opens. Usethis utility to select and configure the “DF1 on COM Port”communication drivers that your computer (workstation) will useto transfer MessageView applications. See Page 2–8.
17. Review the release note that appears at the end of the installationprocedure.
18. When the installation is complete, you must exit Windows andreboot your computer.

2–5Installing MessageBuilder Software
Publication 2706-817
Installation Summary
MessageBuilder installation:
• copies MessageBuilder files to the hard disk under the targetdrive and directory (C:\AB) or the location specified duringinstallation
• copies the AB Utilities files to disk under the target drive anddirectory (C:\AB) or the location specified during installation
• copies INTERCHANGE files to disk under the target drive anddirectory (C:\RSI\IC) or the location specified during installation
• adds SHARE.EXE to AUTOEXEC.BAT file (Windows 3.1xonly)
• adds C:\AB\BIN and C:\RSI\IC\BIN to path
• adds ABIC_CONFIG=C:\RSI\IC\BIN to AUTOEXEC.BAT,which defines the location of the INTERCHANGE fileCFG_KT.INI
• adds MBWIN.INI and ISP.INI to the Windows directory
• creates a MessageBuilder group in the Program Managercontaining icons for MessageBuilder Software, the MessageViewFile Transfer Utility, INTERCHANGE Device Config. Utility,and the release notes.
Online Release Notes
Online release notes are available for the MessageBuilderConfiguration Software. These files contain the most recentinformation on software and new functionality, proper configurationand work arounds, and the organization of MessageBuilder files.

2–6 Installing MessageBuilder Software
Publication 2706-817
Refer to: For:
C:\AB\MBWIN\RELEASE.TXT MessageBuilder Configuration Software
C:\RSI\IC\READMEKT.TXT INTERCHANGE Software
C:\AB\README.TXT AB Utilities Software
The same MessageBuilder and INTERCHANGE software text filesare available through the MessageBuilder Group icon.
The RELEASE.TXT file or icon contains:
• last-minute updates to the manual
• installation notes
• a list of any known problems involving MessageBuilder software
• a list of all files installed in the default directories.
Or if you chose not to use the default directories duringinstallation, a list of all files installed in the directories youselected.
The READMEKT.TXT file or icon contains:
• information on software and hardware compatibility withINTERCHANGE software
• new and changed features in Release 1.00 and later
• a list of all files installed in C:\RSI\IC directory
• a list of problems, and of problems in previous releases that havebeen fixed
• application notes.
Installing with Windows 95
The installation procedure is the same when the operating system isWindows 95.
Note: The version of INTERCHANGE must be 6.1 or later to allowyou to perform application uploads and downloads.
Registering Your Copy of MessageBuilder software
Please take time to complete and send in the registration card youreceived with MessageBuilder Configuration Software packet.Registration entitles you to:
• automatic notification of upgrades and revisions toMessageBuilder Configuration Software
• technical assistance.

2–7Installing MessageBuilder Software
Publication 2706-817
The INTERCHANGE Device Configuration Utility configurescommunication drivers that the computer will use to transferapplications. It allows you to:
• view active communication drivers
• select and configure a communication driver
• edit a communication driver
• remove a communication driver
• access advanced driver parameters.
This utility automatically updates the file CFG_KT.INI when driversare added, configured and removed.
If you intend to transfer applications using an RS-232, DH–485 orPass-Through connection you must first configure the appropriatedrivers. MessageView uses only RS-232. However otherAllen-Bradley products such as PanelView 900 might use othercommunication drivers.
Access the INTERCHANGE Device Configuration Utility in one ofthree ways:
• automatically as the final step in the MessageBuilder installation.
• as a separate icon in the MessageBuilder Group icon
Note: If Interchange was installed via another programmingsoftware, such as AB PanelBuilder, the Interchange icon will befound in that software’s group.
• through the Workstation Setup command in the MessageBuilderFile menu.
INTERCHANGE DeviceConfiguration Utility

2–8 Installing MessageBuilder Software
Publication 2706-817
To select and configure an INTERCHANGE driver on yourcomputer:
1. Double-click the utility icon in the MessageBuilder group icon, orchoose Workstation Setup from the MessageBuilder File menu.
Note: At the end of the MessageBuilder installation procedure,the INTERCHANGE Device Configuration dialog opensautomatically.
Configured Devices
NAME
DEVICE
PORT
STATUS
Refers to driver name
Refers to selected driver
Refers to unique number assigned toINTERCHANGE driver
Shows whether driver is enabled ordisabled
2. Select a driver from the Available Drivers: list. The selectiondepends on the type of MessageView terminal and thecommunication card installed in your computer.
Select: For MessageView Terminal: To:
DF1 on COM Port2706-M1D1, -M1N1, -M1F1;2706-M1D, -M1N, -M1F.
Transfer applications between the RS-232 port of a MessageViewterminal and a computer using DF1 (RS-232) communications.
1784-KL on DH+ ➀Transfer applications between a computer on the DH+ link using a1784-KL communications card and the Remote I/O port of aMessageView Terminal on a Remote I/O network.
1784-KT or 1784-KT2on DH+ ➀
Transfer applications between a computer on the DH+ link using a1784-KT/B or -KT2 communications card and the Remote I/O port of aMessageView Terminal on a Remote I/O network.
1784-KTC onControlNet ➀
1784-KTX on DH485➀
Transfer applications between a computer on the DH-485 networkusing a 1784-KTX communications card and the DH-485 port of aMessageView Terminal.
1784-KTX on DH+ ➀Transfer applications between a computer on the DH+ link using a1784-KTX communications card and the Remote I/O port of aMessageView Terminal on a Remote I/O network.
1784-PCMK on DH+➀
Transfer applications between a computer on the DH+ link using a1784-PCMK communications card and the Remote I/O port of aMessageView Terminal on a Remote I/O network.
PIC on COM Port ➀
Transfer applications between a computer on the DH-485 network andthe DH-485 port of a MessageView terminal using a 1747-PICinterface converter, or between a computer and the RS-232 port of aMessageView terminal.
➀ Not used by MessageBuilder Software.

2–9Installing MessageBuilder Software
Publication 2706-817
3. Select the Add Device button to add and open the configurationdialog for the selected driver.
For example, if you select DF1 on COM Port this dialog opens:
Unique number assigned toINTERCHANGE driver
(This is not the computer’s COM port.)Default Driver Name(can be edited)
Disables driver configurationwithout removing it fromConfigured Drivers list.
COM Port = 1 and Interrupt = 4, orCOM Port = 2 and Interrupt = 3
DF1 parameters must be set to:Baud:
Parity:
Error Detect:
19200
None
CRC
Typical:
Note: Consult your personal computer’s user manual for COMPort Interrupt settings.
4. Edit parameters and select OK when done.
The parameters are specific to the communications card installedin your computer, or to the type of connection you will be usingto transfer files.
The configured driver appears under the Configured Devices: listin the Driver Configuration dialog.
Important: Do not configure more than one driver for the samecommunication port.
5. Reboot your computer to load the driver and its configuration.
Important: You must reboot your computer any time you add orremove a driver or change configuration parameters of adriver.
Exiting Windows and re-entering will not load thedriver.

2–10 Installing MessageBuilder Software
Publication 2706-817
To configure an existing INTERCHANGE driver:
1. Select the driver from the Configured Devices: list.
2. Select the Edit Device button to open the configuration dialog forthe selected driver.
3. Edit parameters and select OK when done.
4. Reboot your computer to load the driver and its configuration.
To remove a current driver:
1. Select a driver from the Configured Devices: list.
2. Select the Remove Device button.
3. A dialog asks for confirmation of the removal. Choose OK .
4. Reboot your computer to unload the driver.
To specify advanced parameters for drivers:
1. Select the Advanced button from the INTERCHANGE DeviceConfiguration dialog.
2. Modify the settings as needed. See below.
3. Select the OK button to save the settings
Or select the Cancel button to return to the Configuration menuwithout changing the parameters.

2–11Installing MessageBuilder Software
Publication 2706-817
Memory Manager Options
Load drivers high when enabled (checked) loads INTERCHANGEdrivers (executables) into high memory. Drivers are not loaded untilyou reboot the computer. If this option is disabled, drivers are loadedinto the base 640K memory.
MessageBuilder recommends: Either enabled or disabled.
Memory Manager Selection allows you to specify the memorymanager in use on your system. Select one of the radio buttons.
MessageBuilder recommends: EMM386.
Driver Self-Test
When enabled this option requires KT devices to run self-diagnosticsbefore loading driver configuration.
MessageBuilder recommends: Perform the tests.
RNA Parameters
Use upper memory for packet buffers when enabled places packetbuffer space in upper MS-DOS memory.
MessageBuilder recommends: Use upper memory.
Number of solicited buffers allocates the number of packet buffers(1 to 200). Each buffer uses 300 bytes of memory. The default is 20.
MessageBuilder recommends: 20 buffers.
Number of unsolicited data items allocates space for unsolicitedmessages (0 to 200).
MessageBuilder recommends: 0 data items, which allocates nospace.
PCMK Enabler Selection
Specifies the Enabler to use for the 1784-PCMK on the DH+ DeviceDriver.
Specific Enabler uses PCMKINIT or RSIPCMK. This Enablerrequires you to enter the socket number containing the card in thedriver dialog. The INTERCHANGE socket numbers are (0 to 7). InWindows 95, the sockets are numbered (0 to 8).
Generic Enabler uses PCENABLE. This Enabler requires that youenter a Memory address and IRQ (Interrupt).
MessageBuilder recommends: (Ignores).

2–12 Installing MessageBuilder Software
Publication 2706-817
Possible difficulties with installation
• If you used the default installation procedure, the Path in yourAUTOEXEC.BAT file now includes the \AB\BIN and\RSI\IC\BIN directories. In Windows 3.1x the AUTOEXEC.BATfile also includes SHARE.EXE. If you edit this file yourself,MessageBuilder software requires these modifications.
• If the computer has Windows for Workgroups installed, it has avirtual device driver (VxD) called VSHARE.386. If Windows forWorkgroups uses this share driver, remove the SHARE.EXE filefrom the AUTOEXEC.BAT file. The Windows for Workgroupsmanual has details on using VSHARE.386.
Note: Windows 95 does not need the SHARE.EXE file. It has itsown virtual device driver installed.
Possible difficulties with INTERCHANGE drivers
The INTERCHANGE drivers may cause conflicts with other driverssharing common interrupts or memory areas in the system. Here aresome problems that may occur and what to do about them.
• If you are using a special Windows video driver, try using thestandard Windows VGA driver; you may also have to edit theEMM386 line in the CONFIG.SYS file to remove specificmemory exclusions added by the special video driver.
Exit Windows and run ABICSTOP (see below). If ABICSTOP isnot successful, comment out the ABICRUN line in theAUTOEXEC.BAT file and reboot, then run ABICSTOP again.
• If you are experiencing lockups when using a serial mouse in aDOS application, try waiting several seconds for the mouse toinitialize. If mouse operation is still a problem, run ABICSTOP.
It may be necessary to create a dual boot environment to manageconflicting drivers. Refer to the DOS user manual for informationon this.
• If you experience error messages during a system reboot, theymay indicate an incomplete or incorrect configuration of theINTERCHANGE drivers. See Page 2–8 for instructions onconfiguring the drivers.
For more details on INTERCHANGE Software, refer to theINTERCHANGE Software user manuals and the MessageBuilderonline release notes.
Troubleshooting theInstallation Procedure

2–13Installing MessageBuilder Software
Publication 2706-817
Possible conflicts in using communication ports
If you plan to run other software on your computer that uses thesame communication ports as MessageBuilder and INTERCHANGESoftware (such as APS software), follow these steps.
1. Exit from Windows if necessary. Make sure thatINTERCHANGE is not running.
2. Type ABICSTOP at the DOS prompt. For example, type: C:\> ABICSTOP.
3. If ABICSTOP is not successful, comment out ABICRUN in theAUTOEXEC.BAT file:
REM CALL ABICRUN.BAT
Reboot the computer and run ABICSTOP again.
4. Run the other software.

������ �
Publication 2706-817
�������� ��� �����
This chapter covers the following topics:
• Windows environment
• MessageBuilder window
• Message Editor Table View
• Opening and closing menus
• Status bar and toolbars
• Message Editor Terminal View
• Dialogs
• Getting help.
MessageBuilder software runs in a Microsoft Windows environment.It uses menus, dialog boxes and tools, and follows the samekeyboard and mouse conventions used by Windows.
You should be familiar with basic Windows conventions. That is,you should know how to use the mouse, select commands frommenus, and work with windows and dialog boxes.
If you use a mouse, here are the basic terms used:
Feature: How to use it:
ClickPosition the mouse pointer on the object, area, orfield, then press and release the left button once.
Double-clickPosition the mouse pointer on the object, area, orfield, and click the left button twice quickly.
Choose an item or commandClick to highlight the item to be affected by the nextcommand, or click on a dialog box option.
Select an item or commandClick on an tool, on a menu command, or on an itemin a dialog box or Help window.
DragPoint to an item, press and hold the left mousebutton, and move the pointer, then release themouse button. Use drag to highlight a text string.
If you prefer to use the keyboard:
Action: How to do it:
Select a command from a menuPress the ALT key and type the letter underlined inthe menu name simultaneously. Then type the letterunderlined in the command name.
Choose an item or commandUse the arrow keys (or in a dialog, both the TAB andarrow keys) to move to the item
Select an item or command Highlight an item, then press the ENTER key.
Windows Environment

3–2 MessageBuilder Basics
Publication 2706-817
When you start MessageBuilder software, the MessageBuilderwindow opens.
Title Bar Minimize ButtonMaximize Button
Control-menu Box
Menu Bar
Num Lock
Menu
Border
Command
Mouse Pointer
Status Baron
Caps Lock
Scroll Lock
off
off
Standard Toolbar
⇐⇒ Arrow toResize Window
Feature: How to use it:
Control-menu BoxClick to open the Control menu. Or double-click to close the current window.
Title Bar Drag to move a window.
Menu Bar
Click a name on the menu bar to open the menu anddisplay its commands. Or press ALT + X, where X is the underlined letter inthe menu name.
Standard ToolbarClick a tool to carry out a command.Can be toggled on/off using the View menu.
CommandClick a command to choose it or to carry out itsaction.Or type the underlined letter in the command name.
Status BarShows what the software is doing at the moment.Can be toggled on/off using the View menu.
Border Drag to enlarge or shrink the window.
Mouse Pointer Use to select an item or object.
Minimize Button Click to reduce the window to an icon.
Maximize ButtonClick to enlarge the window to the full size of thescreen.
MessageBuilder Window

3–3MessageBuilder Basics
Publication 2706-817
Here are the commands available on each menu when no applicationfile is open.
File menu has commands that:
• create and open application files
• configure the computer workstation for file transfer
• download new firmware to a MessageView 421 terminal.
• list the last four applications that were opened, for easy reopening
• exit MessageBuilder software.
View menu has commands that:
• toggle the Standard Toolbar on and off
• toggle the Status Bar on and off.
Application menu has commands that:
• manage projects and their devices
• upload an application file or the Historical Event Stack file from aMessageView 421 terminal
• download the time and date to the terminal’s Real Time Clock
• allow the user to set preferences.
Help menu has commands that:
• identify the versions of MessageBuilder and AB Utilities softwareand the registration serial number
• access topics in the MessageBuilder Help utility.
Four tools are active:
• New File
• Open File
• both Help tools.
3–4 MessageBuilder Basics
Publication 2706-817
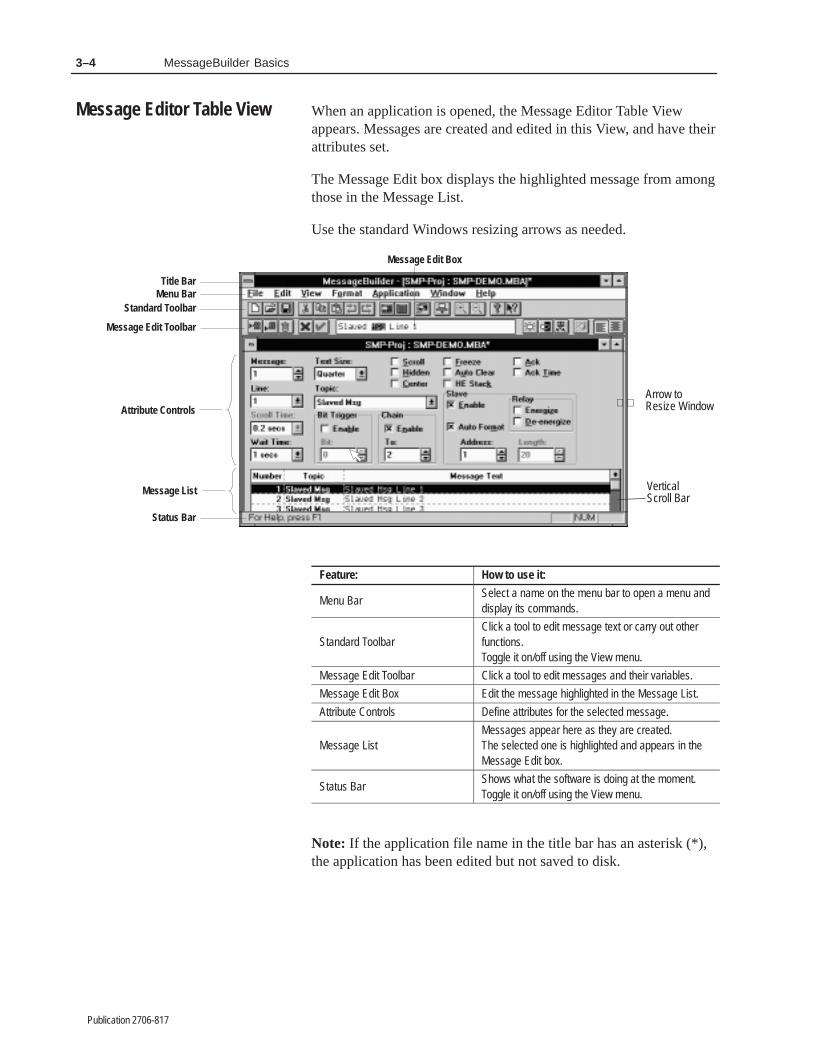
When an application is opened, the Message Editor Table Viewappears. Messages are created and edited in this View, and have theirattributes set.
The Message Edit box displays the highlighted message from amongthose in the Message List.
Use the standard Windows resizing arrows as needed.
Status Bar
Standard ToolbarMenu Bar
Message Edit Toolbar
Message Edit Box
⇐⇒Arrow toResize WindowAttribute Controls
Title Bar
Vertical Scroll Bar
Message List
Feature: How to use it:
Menu BarSelect a name on the menu bar to open a menu anddisplay its commands.
Standard ToolbarClick a tool to edit message text or carry out otherfunctions.Toggle it on/off using the View menu.
Message Edit Toolbar Click a tool to edit messages and their variables.
Message Edit Box Edit the message highlighted in the Message List.
Attribute Controls Define attributes for the selected message.
Message ListMessages appear here as they are created. The selected one is highlighted and appears in theMessage Edit box.
Status BarShows what the software is doing at the moment.Toggle it on/off using the View menu.
Note: If the application file name in the title bar has an asterisk (*),the application has been edited but not saved to disk.
Message Editor Table View

3–5MessageBuilder Basics
Publication 2706-817
Here are the commands available on each menu when an applicationfile is open.
File menu has commands that:
• create, open, close and save application files
• generate reports
• configure the computer workstation for file transfer
• download new firmware to a MessageView 421 terminal
• list the last four applications that were opened, for easy reopening
• exit to the Windows desktop.
Edit menu has commands that:
• copy, cut and paste text strings; undo and restore changes in amessage
• insert, append and delete whole messages
• find, sort and renumber messages in the Message List
• replace text strings in one or many messages
• assign names to topics.
View menu has commands that:
• toggle the Standard Toolbar and the Status Bar on and off
• zoom the Terminal View in or out.
Format menu has commands that:
• specify what size the message text will be in the terminal display
• align text in the display
• display selected text in a message with Flash and Inverse Video
• insert and edit Time and Date Displays, Numeric and ASCIIDisplay Variables in a message
• (for MessageView 421N and 421F terminals) insert and editNumeric Entry variables in a message
• (for terminals whose firmware can support these variables) insertand edit Numeric Entry and ASCII Entry variables in a message
• insert graphic symbols and ASCII characters in a message
• (for MessageView 421F terminals) enable function keys for amessage.

3–6 MessageBuilder Basics
Publication 2706-817
Application menu has commands that:
• create tags and their attributes that will be assigned to variableswhen messages are created
• manage projects and their devices
• enter a description of the application
• validate and download an application to a MessageView 421terminal or to a DOS file
• upload an application file or the Historical Event Stack file from aterminal
• download the time and date to the terminal’s Real Time Clock
• set up the terminal’s communications, control and status tags, andglobal attributes
• assign bit triggers and date/time tags for special messages
• (for MessageView 421F terminals) set global attributes and assigntags for all the function keys and LEDs used in the application
• allow the user to set preferences.
Window menu has commands that:
• open and arrange application windows and arrange their icons
• open the list of problems in the application (“Exceptions”) thatwere identified after a Validate or Download command
• open the Terminal View and toggle it with the Table View
• list the windows currently open for easy access, with the activeone checked.
Help menu has commands that:
• access topics in the MessageBuilder Help utility.
• identify the versions of MessageBuilder and AB Utilities softwareand the registration serial number

3–7MessageBuilder Basics
Publication 2706-817
Each name on the menu bar opens a menu with a set of commands.
To open a menu:
• point to a name on the menu bar and click the left mouse button
• or press ALT and the underlined letter in the menu namesimultaneously. For example, to open the File menu, press ALT + F.
MessageBuilder menus look like this:
Note: Appendix A lists the commands on each menu and brieflyexplains what each one does.
To choose a menu command:
• click the command name
• or type the underlined letter in the command name
• or use the UP and DOWN ARROW keys to choose an item; thenpress ENTER to select it.
Menu conventions are listed in this table:
Menu convention: What it means:
Greyed command name The command is not available at this time.
A check mark (�) before thename
The command is active. Select the command toinactivate the command; the check mark disappears.Select it again to activate it.
A key combination after the nameA shortcut for the command. Use the shortcut keys ifyou prefer instead of the menu command or tool.
An ellipsis (...) after the command
The command opens a dialog box that containsoptions that must be selected beforeMessageBuilder software can carry out thecommand.
A triangle (�) to the right of amenu command
The command opens a submenu.
Opening and ClosingMenus

3–8 MessageBuilder Basics
Publication 2706-817
To close a menu:
• click the menu name or anywhere outside the menu
• or press ALT or F10 to close the menu and move back to theworkspace
• or press ESC to close the menu and remain on the menu bar.
The status bar appears at the bottom of the MessageBuilder window.
• It indicates what the software is doing at the moment.
• It explains a tool’s function when the left mouse button is presseddown while the cursor is over a tool.
• It explains the command when a menu command is highlighted.
• It gives the status of the Caps Lock, Num Lock and Scroll Lockkeys on the keyboard.
To toggle the status bar on or off:
1. Choose View from the menu bar.
2. Choose Status Bar from the View menu.
A check mark (�) appears next to the Status Bar command whenit is active. To turn the status bar off, choose the command again.
Status Bar and Toolbars

3–9MessageBuilder Basics
Publication 2706-817
Standard and Message Edit toolbars
Two toolbars are located at the top of the application window. Toolsprovide easy access to commonly used commands. Instead ofopening a menu and choosing a command, simply click a tool tocarry out an action. Some tools complete the action immediately;others open a dialog or a menu for further input.
Note: Tools on a toolbar can be accessed only with a mouse. Alltoolbar commands are available on one of the menus or in theApplications area.
Standard Toolbar
Message Edit Toolbar
Message Edit Box
To identify a tool, move the cursor arrow to the tool. Press and holdthe left mouse button while watching the status bar.
• If the tool is correct, release the mouse button.
• If the tool is not correct, move the cursor off the icon beforereleasing the mouse button.
Note: Appendix B lists all the available tools and briefly explainswhat each one does.
To toggle the Standard Toolbar on and off:
1. Choose View from the menu bar.
2. Choose Toolbar from the View menu.
A check mark (�) appears next to the Toolbar command when it isactive. To disable the Toolbar command, choose the command again.
Note: The Message Edit toolbar cannot be turned off.

3–10 MessageBuilder Basics
Publication 2706-817
MessageBuilder defaults
MessageBuilder software keeps the most recent Standard Toolbarand Status Bar settings as its default settings. Default settings areused:
• the next time MessageBuilder software is opened
• when a new application is created.
In addition, the Preferences command on the Application menuoffers other selectable options. See Page 7–14.
The Terminal View displays messages approximately as they willappear on a MessageView 421 terminal. This view represents thefront face of the type of terminal the application is designed for.
Display area in the Terminal View.
Message Edit Box in the Table View.
The Message Edit box on the Table View is active while theTerminal View is displayed. If the Terminal View is the activewindow, as a message is edited the changes appear in the TerminalView display.
The Terminal View may be enlarged or reduced using the Zoomtools or the Zoom command on the View menu. See Page 7–17.
Note: The Terminal View, like the MessageView terminal, candisplay only:
21 characters in Quarter text size
10 characters in Half text size
7 characters in Full text size.
If the message is longer than the Terminal View can display, scrollthrough the message in the Message Edit box to see the remainder ofthe message. When the Terminal View is the active window, itsdisplay will follow the insertion point in the Message Edit box. Thatis, it will scroll through the message up to the cursor point.
Message Editor TerminalView

3–11MessageBuilder Basics
Publication 2706-817
MessageBuilder software uses dialogs to request information it needsto carry out a command. After you supply the requested information,select a command button to confirm or cancel the command.
Dialogs also display additional information and warnings, or explainwhy a requested task could not be accomplished.
An ellipsis (...) after a dialog command means another dialog willopen when you choose that command.
Some dialogs provide different sets of options, each on a separatetab. Select the tab to work with a specific set of options.
A sample dialog:
Spin Control
Tab
Command Button
List Box
Radio Button
Check Box
To move around a dialog:
• move the mouse pointer to a field and click the left mouse button
• or press TAB to move forward through fields and SHIFT+TAB tomove backward through fields. Use the arrow keys to select aradio button
• or press the ALT key and the underlined letter of a field namesimultaneously. For example, to move to the Return MessageNumber check box, press ALT +R.
Dialogs

3–12 MessageBuilder Basics
Publication 2706-817
Features of dialogs
Command Buttons
Short rectangles with text explaining their function. Select acommand button to invoke the command.
Text Boxes
Long rectangles with instructions about what should be entered inthem. Sometimes these boxes contain a default value or text,sometimes they are empty. The mouse pointer changes to an I-beamwhen it is on a text box.
• To add text, place the cursor point where the new text goes andstart typing.
• To delete text, highlight it and press the DELETE or BACKSPACE
key.
• To replace some or all text, highlight it and type the new text.
List Boxes
Boxes with a down-arrow at the right. To configure an item within aList Box:
• Click on the down arrow to the right of a list box to display itslist, then click on an item to select that option.
• Or move the highlight to a list box and press ALT + thedown-arrow key to display the list. Then use the up or downarrow key to select an option.
If there are more items than can fit in the list, a scroll bar appears.
Some list boxes let you use the mouse to select multiple items. Clickon the first item, press and hold the SHIFT key, then click the lastitem. Or click the first item and drag the pointer to the last item. Todeselect a range, click the first item on the list.
Drop-Down Text Boxes
Text boxes with a down-arrow at the right, separated from the textbox. To configure an item within a Drop-Down Text Box:
• Click on the down arrow to the right of a list box to display itslist, then click on an item to select that option.
• Or move the highlight to a list box and press ALT + ↓ (thedown-arrow key) to display the list, then use the up or downarrow key to select an option.
• Or highlight existing text in the box and type the appropriatename or number.

3–13MessageBuilder Basics
Publication 2706-817
Check Boxes
Square boxes that may contain an X or ✓ . Check boxes are used toselect or clear an option. An X or ✓ in the box means the option isselected. A blank (cleared) box means the option is not selected.
• Click on a check box to select or deselect the option.
• Or select a check box and press the Spacebar to toggle it.
Radio Buttons
Circles that function as a group. One of the group has a solid dot inthe middle (it is selected), and all the others are blank. Choose abutton in the group to select that option and clear all other options.
• Click on a radio button to select it.
• Or select a group of radio buttons and press the up or down arrowkey to toggle them.
Spin Controls
Small boxes with up/down arrows at the right. To configure an itemwithin a Spin Control box:
• Click the up or the down arrow until the required number appearsin the box.
• Or highlight the text and type the number.
Tabs and Dialog Buttons
Some dialog boxes have tabs which open to give new sets of options.Others have buttons that open a Tag Form or other dialog. Select atab or button to display a new set of options.

3–14 MessageBuilder Basics
Publication 2706-817
MessageBuilder software has both context-sensitive and online help.Help may be invoked by any of the following commands.
• Click the Help Question tool and the mouse arrow changes to aquestion mark. Click the question mark on an item forcontext-sensitive help.
• Click the Help Contents tool to display an index to Help topics.
• Choose a command from the Help menu. The Contents commandbrings up the same index as the Help Contents tool.
• Select a dialog’s Help button to get help about the its topic.
• Press the F1 key at any time to get context-sensitive help.
Using Help
This is a very brief overview of the Help features. For furtherinformation on using Help, select How To Use Help or see theMicrosoft Windows manual.
All of the methods of finding information on a topic produce thesame textual information. Choose the method most convenient foryou among those listed here.
Helpful hints:
• If a term is underlined, you may select it to bring up a new screendefining or describing that subject.
• If scroll bars appear, you may use them to see more items on thelist or more information on the subject.
• To return to a previous screen, use either the Back button (whichsteps through each screen you have called up) or the Historybutton (which lists all the screens you have called up, so you candouble-click on the one you want to return to).
• To see text on a related subject, use the Previous (<<) or Next(>>) button.
Getting Help

3–15MessageBuilder Basics
Publication 2706-817
Contents
The Help Contents screen is illustrated above.
1. Double-click a subject on this index to bring up a new screen,which contains a subindex of subjects on the topic.
2. Then double-click on a subject in the subindex, until you reachtext describing the topic you want information on.
Search
The Search button at the top of the Contents screen brings up adialog with an alphabetical list of all the Help headings.
To locate a topic:
• use the scroll bar
• type one or a few letters to display the part of the alphabet thatcontains the subject you are interested in.
When you see the name of a Help subject that you want:
1. Highlight the name or type it in the Word box.
2. Select the Show Topics button.
3. Select the Go To button.
A screen appears with text describing or explaining the selectedtopic.

3–16 MessageBuilder Basics
Publication 2706-817
Help Topics:Contents
The Help Topics button at the top of the Help Contents screen bringsup a tabbed dialog. The first tab is Contents.
In this screen, if the button next to a subject is:
• a book, double-click on it to display a list of subtopics
• a question mark, double-click on it to bring up text on the subject.
Help Topics: Index
The Index tab displays a dialog with an alphabetical list of all theHelp headings.
3–17MessageBuilder Basics
Publication 2706-817
To locate a topic:
• use the scroll bar
• type one or a few letters in the Type box to display the part of thealphabet that contains the subject you are interested in.
When you see the name of the subject that you want help with:
1. Highlight the name in the Click box, or type it in the Type box.
2. Select the Display button.
A screen appears with text describing or explaining the selectedtopic.
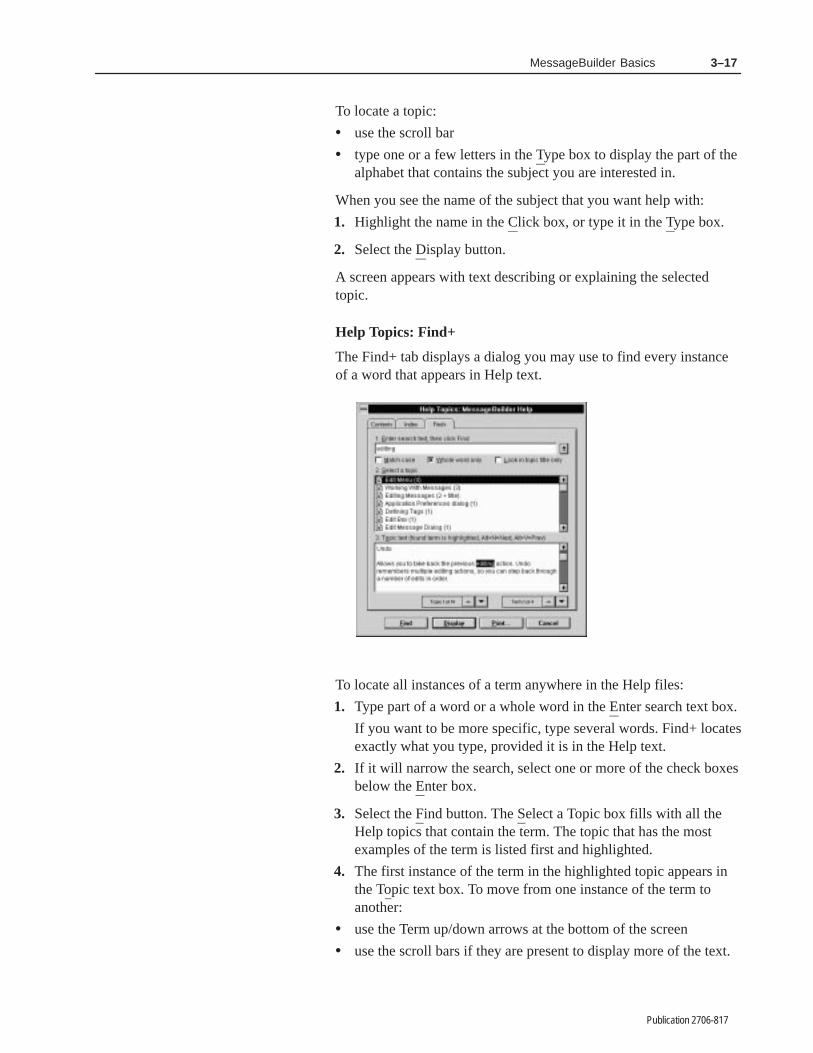
Help Topics: Find+
The Find+ tab displays a dialog you may use to find every instanceof a word that appears in Help text.
To locate all instances of a term anywhere in the Help files:
1. Type part of a word or a whole word in the Enter search text box.
If you want to be more specific, type several words. Find+ locatesexactly what you type, provided it is in the Help text.
2. If it will narrow the search, select one or more of the check boxesbelow the Enter box.
3. Select the Find button. The Select a Topic box fills with all theHelp topics that contain the term. The topic that has the mostexamples of the term is listed first and highlighted.
4. The first instance of the term in the highlighted topic appears inthe Topic text box. To move from one instance of the term toanother:
• use the Term up/down arrows at the bottom of the screen
• use the scroll bars if they are present to display more of the text.

3–18 MessageBuilder Basics
Publication 2706-817
5. To select another topic, do one of the following:
• click on a topic to highlight it
• use the Topic up/down arrows at the bottom of the screen to movethe highlight
• use the scroll bars if they are present to display more of the list.
6. When you find a subject about which you want to read more,click the Display button. A full screen appears with the Help text.
About MessageBuilder
If you must call Allen–Bradley for assistance, you will have toprovide the release date and version number of MessageBuildersoftware. Choose About MessageBuilder from the Help menu to getthis dialog:
User nameCompany name
It gives you:
• the version number and release date of MessageBuilder software
• the version number of the Allen-Bradley Utilities software
• the serial number of this particular software package.

Chapter 4
Publication 2706-817
����� � ���������
This chapter covers the following topics:
• Design checklist
• Safety considerations
• Applications and projects
• Messages
• Triggering a message
• Controlling devices
• Slaving
• Slave Device
• Historical Event Stack
• Function keys
• Function key types
• LED indicators
• Handshaking
• Tags
• Data types
• Address worksheet
• Defining tags
• Scaling data display variables
• Scaling data entry variables
• Precision and rounding.
Before creating an application, check the following:
� Plan the application: what is it supposed to do, and how?
� Outline the documentation the operator will work from.
Finish it after the application is completed.
� Consider safety requirements.
� Review data types and data formats.
� Fill in the Address Worksheet (Appendix H).
� Review communications (Chapter 5).
Design Checklist

4–2 Planning an Application
Publication 2706-817
The application designer must make sure that an application cannotbe used in an unsafe manner. Failsafes must be built into eachapplication.
!ATTENTION: Do not configure Function Keys asemergency stops or other controls critical for safeoperation. Use separate hard-wired operator interfacedevices.
Refer to “Safety Guidelines for the Application, Installation andMaintenance of Solid State Controls” (Publication SGI-1.1).
Communications interruptions
The MessageView 421 terminal relies on communications with thelogic controller or ASCII Triggering device.
• Communications are interrupted within the terminal when it:
– is in the Front Panel Editor mode– is receiving an application download from a personal
computer– has a major fault– loses power– detects that the Remote I/O link has failed.
The logic controller considers the terminal as a faulted I/O rackwhen it does not communicate. The controller must be programmedto cope with this situation. Specifically, it must:
• return any machine or process to a safe state
• monitor the rack fault bit associated with the MessageViewterminal’s assigned rack.
Refer to the controller’s user manual.
Safety Considerations

4–3Planning an Application
Publication 2706-817
Here are the steps needed to create an application:
1. The designer should document the application carefully. Thisdocumentation should include the purpose of the application,what information the operator will need to make good decisions,and what choices the operator will have to make. The designerand operator should discuss this document together before theapplication is run.
!ATTENTION: Documentation is often neglected, butis very important. The operator can make betterdecisions if the designer explains what is going on.
2. The designer creates an application, the basic design unit ofMessageBuilder software. It is designed to be loaded in a specifictype of MessageView terminal, run using a specific type ofcontroller, and direct a specific operation. It includes:
– messages, with their attributes, triggers, embedded graphics,and embedded display and entry variables
– configuration parameters for communications port(s) of aspecific MessageView terminal
– global attributes that apply to all messages in the application– tags, which are named references to data addresses in a
specific logic controller (ASCII Triggering devices use thetags as memory references)
– function keys and LEDs (MessageView 421F terminals only).
3. The designer associates the application with a project, which isassigned or created when an application is created. A project cansupport more than one application, provided that all of them aredesigned for the same type of terminal and the same type of logiccontroller. It links the application(s) to:
– the tag database– the specific devices – the MessageView terminal and the PLC,
SLC or ASCII Triggering device – that the application willinteract with.
4. Values associated with variables are stored in controller memoryaddresses, and are referenced by the application via named tags.The designer usually enters all the tags in the Tag Editor TableView before creating any messages. Tags may also be edited laterwhen they are assigned to their variables.
Applications and Projects

4–4 Planning an Application
Publication 2706-817
5. The application designer can validate an application at any time,using the Validate command on the Application menu.Incompatibilities are caught during validation. See Page 11–2.
Note: An application is automatically validated byMessageBuilder software before it is downloaded to a terminal.
6. The designer or operator can monitor how the application isrunning. Messages that have their HE Stack attribute set arelogged into the Historical Event Stack file each time they aretriggered. These logged messages include the value of theirdisplay variables at the instant of triggering, and the current dateand time. The HE Stack file is uploaded to the computer onrequest.
A MessageView terminal has memory reserved for an applicationwith up to 4096 standard messages. Messages are triggeredindividually by the Logic Controller or ASCII Triggering device asrequired by the interaction between:
• the MessageBuilder application, and
• feedback from the machinery to the Logic Controller or ASCIITriggering Device.
The content of a message is determined by:
• the MessageBuilder application
• information transferred between the MessageView terminal andits controller.
Each message has a unique number, which is used to identify it in theapplication. Numbers in the range:
• 1 to 9900 are used for application messages
• 9901 to 9999 are reserved for Special Messages
• greater than 9999 are not supported by the MessageViewterminal.
A message’s number is its value trigger. A message may also have abit trigger assigned to it. To trigger a specific message in the terminaldisplay, assert its corresponding bit or value trigger at the properlocation in controller memory. See the section on Triggering onPage 4–9.
Messages

4–5Planning an Application
Publication 2706-817
A message may be up to 100 characters long, and can include anycombination of text, graphics, and variables. It can have:
• up to one date variable
• up to one time variable
• up to 10 entry or display data variables in any combination,provided the total message length is 100 characters or fewer
• up to 50 graphics symbols, provided the total message length is100 characters or fewer.
Variable and Graphic display characteristics in the MessageEditor
Message Component Table View Terminal View
Time Sample Time Sample Time
Date Sample Date Sample Date
Numeric Data Entry Placeholder (^^^) Placeholder (^^^)
Numeric Data Display Placeholder (###) Placeholder (###)
ASCII Data Entry Placeholder (EEE) Placeholder (EEE)
ASCII Data Display Placeholder (AAA) Placeholder (AAA)
ASCII Character Placeholder (~) Placeholder (~)
Graphics Placeholder (GR) Actual graphics symbol
Message text Alphanumeric Alphanumeric
Special Messages
The MessageView terminal supports a predefined set of SpecialMessages. Message numbers 9901 to 9999 are reserved for SpecialMessages.
Special Messages are triggered just like any other message while anapplication is running. When triggered, they are typically notdisplayed by the terminal, but acted upon.
Special Messages:
• cannot be edited, although bit triggers may be assigned to them
• are not displayed in the Message Editor Table View
• are not displayed in the Message Editor Terminal View
• cannot be chained to another message
• are not logged into the Historical Event stack.
The Special Messages dialog is found on Page 7–54.

4–6 Planning an Application
Publication 2706-817
This table gives the current Special Messages.
MessageNumber
Message Description ASCII Triggering Device Requirements
9901 Clear DisplayClears all active display messages.The display/slave buffers and Slave Devicesare not cleared.
Use the [Ctrl-T] command:to terminal: [Ctrl-T]9901\ MV Address [CR]
9902Clear ValueTriggered MessageQueue
Clears the Value Triggered Message Queueand any display/slave buffers.
Use the [Ctrl-T] command:to terminal: [Ctrl-T]9902\ MV Address [CR]
9903Reset MessageViewTerminal
Aborts all terminal functions in progress.Resets the terminal, which then goes throughits Power On Self Test (POST).
Use the [Ctrl-T] command:to terminal: [Ctrl-T]9903\ MV Address [CR]
9904 Display Test
Tests every pixel in the terminal display.During the test, the terminal suspends allmessage activity. When the test is completedthe terminal resumes normal Run Modeoperation.
Use the [Ctrl-T] command:to terminal: [Ctrl-T]9904\ MV Address [CR]
9905Set Clock – Time –Date
Sets or updates the Real Time Clock in theterminal from addresses in the logiccontroller. Valid only if the tags are defined inthe Special Messages dialog.
Use six [Ctrl-V] commands: year, month, day, hour,minute, second:to terminal: [Ctrl-T]9905\ MV Addr [CR] to terminal: [Ctrl-V]Year Value\ 1\ MV Addr [CR]
[Ctrl-V]Month Value\ 2\ MV Addr [CR] [Ctrl-V]Day Value\ 3\ MV Addr [CR] [Ctrl-V]Hour Value\ 4\ MV Addr [CR] [Ctrl-V]Minute Value\ 5\ MV Addr [CR] [Ctrl-V]Second Value\ 6\ MV Addr [CR]
9906Get Real Time ClockTime/Date
Sends the terminal Real Time Clock time anddate to addresses in the logic controller.Valid only if the tags are defined in theSpecial Messages dialog.
Use six [Ctrl-I] responses: year, month, day, hour,minute, second:to terminal: [Ctrl-T]9906\MV Addr [CR] from terminal: [Ctrl-I]9906\ Year Value\ 1 [CR]
[Ctrl-I]9906\ Month Value\ 2 [CR] [Ctrl-I]9906\ Day Value\ 3 [CR] [Ctrl-I]9906\ Hour Value\ 4 [CR] [Ctrl-I]9906\ Minute Value\ 5 [CR] [Ctrl-I]9906\ Second Value\ 6 [CR]
9907 Battery Test
Tests the battery for sufficient power. If theBattery Test passes, a 1 is sent to the batterystatus bit. If the Battery Test fails, a 0 is sent.Valid only if the tag is defined in the SpecialMessages dialog.
Use the [Ctrl-I] response:to terminal: [Ctrl-T]9907\ MV Addr [CR] from terminal: [Ctrl-I]9907\ 1 or 0\ 1 [CR]
9908Display BrightnessAdjustment1
Adjusts the brightness of the displayaccording to the value input in the SpecialMessage.If an incorrect value is input for the brightnesslevel, the terminal will ignore the command.Valid only if the tag is defined in the SpecialMessages dialog.
Use the [Ctrl-V] command:to terminal: [Ctrl-T]9905\ MV Addr [CR] to terminal: [Ctrl-V]0 to 7\ 1\ MV Addr [CR]

4–7Planning an Application
Publication 2706-817
1 This table shows the brightness level corresponding to each value inSpecial Message 9908’s Ctrl-V command:
Value 0 1 2 3 4 5 6 7
Levels 12% 25% 38% 50% 60% 75% 87% 100%
A MessageView terminal can accept commands from one of thesetwo types of controlling devices:
• a logic controller such as an Allen-Bradley PLC or SLC
A logic controller communicates with a MessageView terminalthrough the Remote I/O port on the daughterboard card.Terminals with daughterboard cards are Catalog Nos.2706-M1D1, -M1N1 and -M1F1.
• an ASCII Triggering device, such as an Allen-Bradley computerproduct or SLC BASIC Module. See Page 5–7 for a list.
An ASCII Triggering device communicates through the RS-232port on the main board of the terminal. It is used with terminalsthat do not have daughterboard cards: Catalog Nos. 2706-M1D,-M1N and -M1F.
MessageView features supported by a controlling device
A MessageView terminal can support the following features whencontrolled by either type of device:
• displaying triggered messages with or without embeddedvariables
• queuing messages
• chaining messages
• supporting Special Messages
• supporting hidden messages to be sent to the Historic Event Stackwhen triggered
• displaying messages with Numeric Entry variables embedded, in421N and 421F terminals
• implementing Handshaking for latched function keys, in 421Fterminals
• scaling Numeric Display and Numeric Entry variables
• returning Message Numbers to the controlling device
• displaying Startup and Background messages
• supporting Debug Mode
• supporting Simulate Mode
Controlling Devices
4–8 Planning an Application
Publication 2706-817
MessageView features supported by a logic controller
A MessageView terminal can support the following additionalfeatures when controlled by a PLC or other logic controller:
• supporting Handshaking for numeric entry and ACK messages aswell as for latched function keys
• supporting bit triggering
• supporting Startup and Background messages that containembedded display variables
• sending Preset or Last values for variables to the controller
ASCII Triggering Device limitations:
• If the ASCII network has more than one device, the terminaloperator must not send data (such as Entry variables embedded ina message) from the MessageView terminal to the ASCIITriggering device. This could cause data collisions. Consider thiswhen creating an application for such a network.
Data is sent from a terminal when:
– the ACK key is pressed (all terminals)– numeric keys are used (421N and 421F terminals)– an enabled Function key is pressed (421F terminals)
• The MessageView terminal supports an output buffer to processoutgoing data responses. The buffer is designed to handle at leasttwo of the largest responses (such as 20 Ctrl-I responses or 2messages that contain the maximum of 10 Entry Variables).
If the output buffer becomes full (for instance, if someonerepeatedly presses a Momentary Function Key before the data canbe sent), any new outgoing data is lost until the output buffer isavailable again.
• ASCII Trigger applications require a value trigger tag name to bedefined. See Page 10–21. Only the tag name is used; the nodeaddress and node name may be left blank. The tag name is usedinternally by the MessageView terminal as a reference.
Communication setup
In MessageBuilder software, a logic controller is specified by itsPLC/SLC/Scanner type. An ASCII Triggering device is a singledevice that does not require a device type.

4–9Planning an Application
Publication 2706-817
All messages, including Special Messages, must be triggered to bedisplayed on, or used by, the MessageView terminal. A message maybe defined as only value trigger, or both value trigger and bit trigger.
• Value trigger is acquired from either a logic controller or from anASCII Triggering Device.
• Bit trigger is acquired only from a logic controller, using RemoteI/O communication.
Note: In time-critical or priority type applications, bit triggering isrecommended if available.
Important: An ASCII Triggering device cannot use Bit Triggering.
Value triggering
This method uses the message number as a trigger. Each message inan application has its own unique number, so there are as many valuetriggers in the application as there are messages.
When the terminal receives the message number value trigger, it
• displays the message if its assigned lines are free and its Hiddenattribute is disabled
• queues the message if its lines are occupied, the Hidden attributeis disabled and the Message Queue is enabled
• logs the message into the HE Stack whether is is displayed or not,if its HE Stack attribute is enabled
• ignores the message if the line(s) are occupied and the HE Stackattribute and the Message Queue are disabled.
• slaves the message whether displayed by the master device or notif the slave attribute is enabled.
Some messages may be triggered but are not displayed:
• messages with the Hidden attribute set
• Special Messages.
Note: Any message that has its HE Stack or slave attribute set, issent to the Historic Event Stack or the slave device when it istriggered. The message does not have to be displayed.
Triggering a Message

4–10 Planning an Application
Publication 2706-817
From a logic controller using Remote I/O
The MessageView terminal supports a Value Trigger tag in the PLCor other logic controller. When a message is to be triggered, the logiccontroller writes the message number to this tag address.
Only one message may be value-triggered at a time. The terminalscans the Value Trigger tag address at regular intervals. A triggeredmessage number must remain stable in the Value Trigger tag addressfor a minimum of 100 milliseconds, to allow for the terminal scantimes.
The message is not triggered again until the value in the ValueTrigger tag address is changed to a different number and thenchanged back. Thus the ladder logic application designer may use amessage number of 0 (zero) to change the Value Trigger tag addresswithout triggering a message.
From an ASCII Triggering Device using RS-232
The MessageView terminal supports the triggering of messagesusing the Value Trigger method. The format of this method is:
[Ctrl-T]Message Number\MessageView Address[CR]
• [Ctrl-T] is the control code for a command to the terminal
• Message Number is the value trigger for the message
• MessageView Address is the node in the network where theterminal is located
• [CR] is the carriage return that ends a packet.
Note: The delimiter in ASCII triggering packets uses the backslash \.
In order to trigger a message, the ASCII Triggering Device transmitsa [Ctrl-T] packet sequence. When the terminal receives this packet, itdisplays or queues the message.
Note: A MessageView terminal in an ASCII network that has anaddress from 1 to 126 will respond to messages addressed to it, andalso to messages addressed to 127. A terminal with an address of 127will respond to messages addressed to 127 only.
4–11Planning an Application
Publication 2706-817
The Message Queue
Queuing is important in situations where multiple message triggersare likely to occur. Value triggered messages that are triggered butcannot be displayed at once are stored in the terminal’s MessageQueue if the Queue is enabled.
Note: A bit–triggered message is not queued. The bit remains setuntil the controller resets it.
The MessageView terminal supports two fixed Message Queuelengths, set in the Terminal Setup Advanced dialog. See Page 10–13.The length may be:
• 64 messages deep (the Queue is enabled)
• 1 message deep (in effect, the Queue is disabled)
The MessageView terminal processes messages according to thefollowing criteria:
• A triggered message is displayed at once if possible.
• If the specified line for a value–triggered message is not free, it isplaced at the bottom of the Message Queue Stack.
• Messages are processed from the Queue Stack in a top-to-bottomFirst In, First Out (FIFO) priority.
• The topmost message is displayed when its assigned display lineis available. The terminal continues to queue additional triggeredmessages while it waits to display the topmost message.
Note: Messages in the Queue are not displayed until they reachthe top of the Queue, even if their line is available.
• If the Queue reaches Full status, the next message that is queuedwill be entered at the top of the Queue, overwriting a pre–existingqueued message.
Note: The Message Queue is not cleared when the terminal operatorenters the Front Panel Editor (FPE). When the operator closes theFPE, Run mode resumes and the queued messages are displayed as ifthere was no interruption.
The Message Queue is cleared if:
• the terminal has processed all queued messages
• the terminal is reset
• the controller triggers a Clear Queue (9902) Special Message
• the controller triggers a Terminal Reset (9903) Special Message.
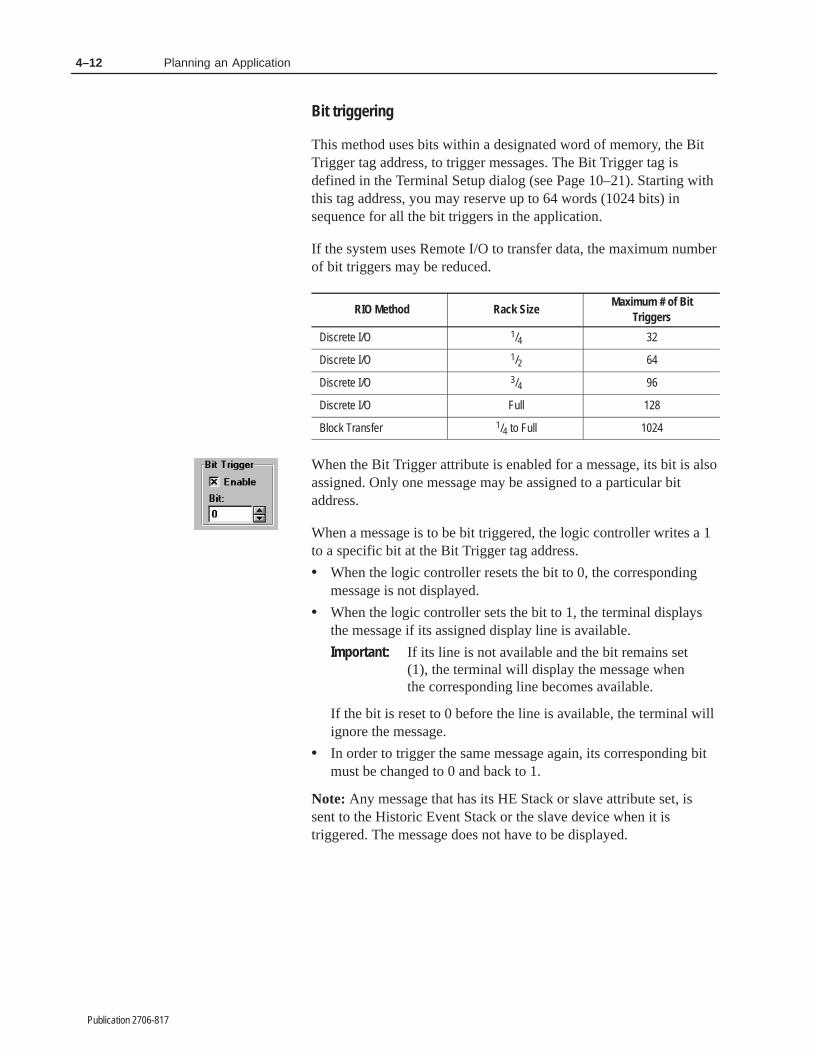
4–12 Planning an Application
Publication 2706-817
Bit triggering
This method uses bits within a designated word of memory, the BitTrigger tag address, to trigger messages. The Bit Trigger tag isdefined in the Terminal Setup dialog (see Page 10–21). Starting withthis tag address, you may reserve up to 64 words (1024 bits) insequence for all the bit triggers in the application.
If the system uses Remote I/O to transfer data, the maximum numberof bit triggers may be reduced.
RIO Method Rack SizeMaximum # of Bit
Triggers
Discrete I/O 1/4 32
Discrete I/O 1/2 64
Discrete I/O 3/4 96
Discrete I/O Full 128
Block Transfer 1/4 to Full 1024
When the Bit Trigger attribute is enabled for a message, its bit is alsoassigned. Only one message may be assigned to a particular bitaddress.
When a message is to be bit triggered, the logic controller writes a 1to a specific bit at the Bit Trigger tag address.
• When the logic controller resets the bit to 0, the correspondingmessage is not displayed.
• When the logic controller sets the bit to 1, the terminal displaysthe message if its assigned display line is available.
Important: If its line is not available and the bit remains set(1), the terminal will display the message whenthe corresponding line becomes available.
If the bit is reset to 0 before the line is available, the terminal willignore the message.
• In order to trigger the same message again, its corresponding bitmust be changed to 0 and back to 1.
Note: Any message that has its HE Stack or slave attribute set, issent to the Historic Event Stack or the slave device when it istriggered. The message does not have to be displayed.
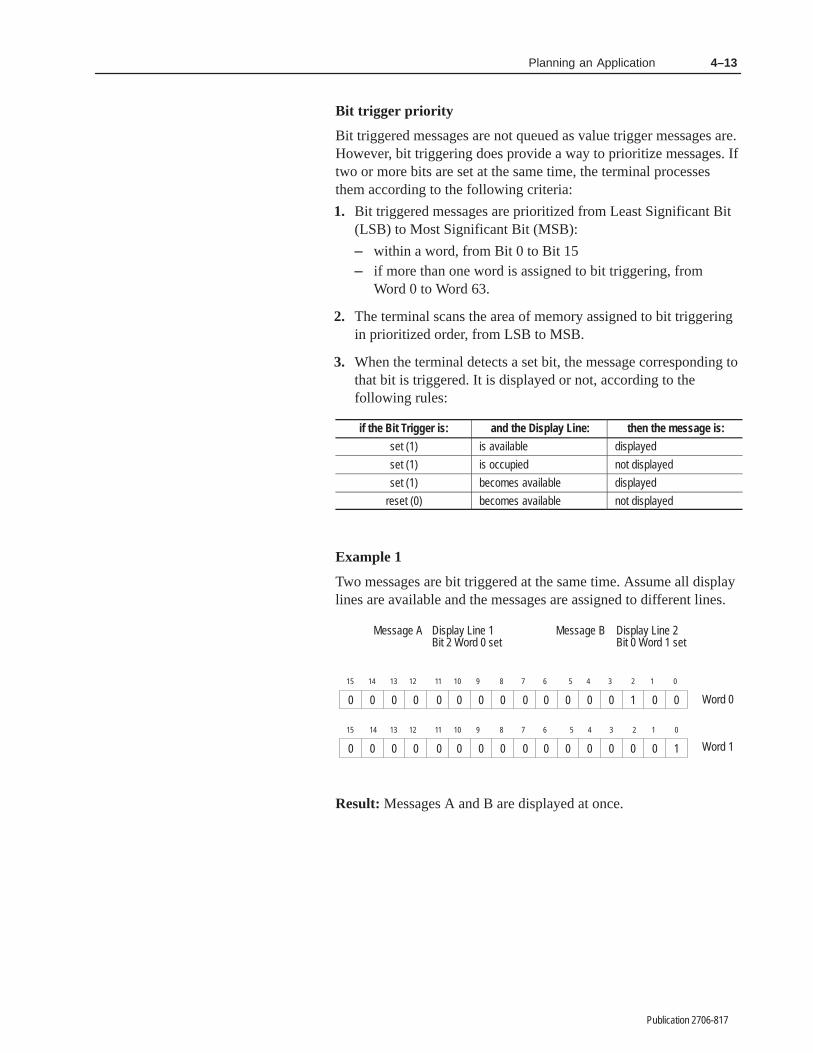
4–13Planning an Application
Publication 2706-817
Bit trigger priority
Bit triggered messages are not queued as value trigger messages are.However, bit triggering does provide a way to prioritize messages. Iftwo or more bits are set at the same time, the terminal processesthem according to the following criteria:
1. Bit triggered messages are prioritized from Least Significant Bit(LSB) to Most Significant Bit (MSB):
– within a word, from Bit 0 to Bit 15– if more than one word is assigned to bit triggering, from
Word 0 to Word 63.
2. The terminal scans the area of memory assigned to bit triggeringin prioritized order, from LSB to MSB.
3. When the terminal detects a set bit, the message corresponding tothat bit is triggered. It is displayed or not, according to thefollowing rules:
if the Bit Trigger is: and the Display Line: then the message is:
set (1) is available displayed
set (1) is occupied not displayed
set (1) becomes available displayed
reset (0) becomes available not displayed
Example 1
Two messages are bit triggered at the same time. Assume all displaylines are available and the messages are assigned to different lines.
0 0 0 0 0 0 0 0 0 0 0 0 0 1 0 0
0123456789101112131415
Message A Display Line 1Bit 2 Word 0 set
Message B Display Line 2Bit 0 Word 1 set
0 0 0 0 0 0 0 0 0 0 0 0 0 0 0 1
0123456789101112131415
Word 0
Word 1
Result: Messages A and B are displayed at once.

4–14 Planning an Application
Publication 2706-817
Example 2
Two messages are bit triggered at the same time. Assume all displaylines are available and the messages are assigned to the same line.
0 0 0 0 0 0 0 0 0 0 0 0 0 1 0 0
0123456789101112131415
Message A Display Line 1Bit 2 Word 0 set
Message B Display Line 1Bit 0 Word 1 set
0 0 0 0 0 0 0 0 0 0 0 0 0 0 0 1
0123456789101112131415
Word 0
Word 1
Result: Message A is displayed at once. After Message A isterminated, Message B will be displayed if its corresponding bit isstill set. If its bit is no longer set, Message B will not be displayedunless it is triggered again.
Example 3
Three messages are bit triggered at the same time. Assume alldisplay lines are available and two of the messages are assigned tothe same line.
0 0 0 0 0 0 0 0 0 0 0 0 0 1 0 0
0123456789101112131415
Message A Display Line 1Bit 2 Word 0 set
Message B Display Line 2Bit 0 Word 1 set
0 1 0 0 0 0 0 0 0 0 0 0 0 0 0 1
0123456789101112131415
Word 0
Word 1
Message C Display Line 1Bit 14 Word 1 set
Result: Messages A and B are displayed at once. After Message A isterminated, Message C will be displayed if its corresponding bit isstill set.
Bit and Value trigger priority
A bit triggered message and a value triggered message may betriggered at the same time.
• If the messages are assigned to different display lines, bothmessages will be displayed.
• If the messages are assigned to the same display line, priority isdetermined by the Trigger Priority attribute in the Terminal SetupAdvanced dialog. See Page 10–17.

4–15Planning an Application
Publication 2706-817
A MessageView terminal with a RIO daughterboard (Catalog Nos.2706-M1D1, -M1N1 or -M1F1) and firmware that supports a SlavePort can act as a master device with up to 126 slave devices.
Note: A MessageView 421D terminal without a daughterboard canbe used as a slave device. A list of slave devices is given on Page5–6.
An example of a master terminal setup with four slaves
MessageView TerminalRS-232
RIO
PLC5
RS-232
RS-485
RS-485
BlackBox
BlackBox
BlackBox
BlackBox
BlackBox
Slave
Slave
Slave
Slave
MessageView Terminal slave buffers
Each slave device is addressed individually. The MessageViewterminal has 14 buffers that store messages that are monitored,updated, and continuously displayed by the slave(s). Each slave onthe network has its own node address. Each message is directed to aspecific slave to be displayed on a specific line.
The MessageView Terminal buffer system works as follows:
1. Message 1, sent to the slave at node 6 slated for line 1, is stored inone of the buffers and displayed immediately by the slave.
2. Message 2, sent to the slave at node 2 slated for line 1, is stored inanother buffer and displayed by the second slave.
3. Message 3, sent to the slave at node 6 slated for line 2, is stored ina third buffer and displayed concurrently with Message 1.
4. Message 4, sent to the slave at node 6 slated for line 1, overwritesthe message in the first buffer and is slaved at once.
5. If all the buffers are full, and if no buffer has a message for theslave at node 6 line 4, a new message for the slave at node 6 line4 overwrites the message in the oldest node 6 buffer. If none ofthe buffers has a message for node 6, then the oldest buffer isoverwritten, no matter which node it was addressed to.
Slaving

4–16 Planning an Application
Publication 2706-817
6. A message slated for Any Line is displayed on the same line thatit was displayed on by the Master Device. If the message was aHidden Any Line message, it is displayed on line 1 of the slave’sdisplay.
7. A message with address 127 is placed in a buffer and is sent to allslaves. All other buffers with the same Line Number attribute(e.g., Line 3) are cleared.
8. A message with address 127 slated as an All Lines message isplaced in a buffer and is sent to all slaves. All other buffers arecleared.
Note: If the terminal operator accesses its Front Panel Editor, orswitches the RS-232 port to MessageBuilder parameters, all slavingactivities are interrupted. Slaving activities are resumed when theoperator sets the RS-232 port to Aux. Port parameters and exits theFront Panel Editor.
Slave Message embedded variables
Numeric and ASCII Entry variables and Function keys are supportedin slaved messages, but they are active only on the Master Device.The terminal removes the embedded entry variables, enabledFunction keys and (unless Ctrl-G is used) embedded Graphicsymbols before transmitting the message to the Slave Device(s).
If the following are embedded in messages, they are supported onboth the Master and the Slave Device(s):
• date and time
• graphics (if Ctrl-G is used; see Page 7–41)
• Numeric and ASCII Display variables
Data variables are continuously updated in the slave display as longas the slave message is active.
Other features include:
• Numeric Display variable data may be scaled.
• Messages with the Hidden and Slave Enable attributes set are notdisplayed by the master, but are displayed by the slave device

4–17Planning an Application
Publication 2706-817
Slave Packet
A message intended for transmission to a slave device has thefollowing format:
[Optional Control Byte][ASCII Text][Optional DisplayMode Byte][Slave Address Byte][Line Number Byte][CR]
MessageBuilder software allows for the automatic or manualinsertion of the Optional Control Byte and Optional Display ModeByte.
If you choose to embed them manually, the individual control codesare found on Page 7–42. The slave packet fields are:
• Control Byte: specifies text size or clears the slave display.
• ASCII Text: the message itself, including embedded variables andgraphics. The maximum length for any message is 100characters; in a slave packet the control codes are not counted.
• Display Mode Byte: specifies scrolling, centering and holdmessage options.
• Slave Address Byte: specifies the Slave Device node address, aninteger from 1 to 127. Addresses 1-126 specify an individualnode where a Slave Device is connected. Address 127 addressesall Slave Devices.
• Line Number Byte: specifies a Display Line number. An integerfrom 1 to 4 specifies a specific line; 50 clears all lines if ControlByte was Ctrl-C.
• CR: a carriage return, to signal the end of the message.
Note: Non–printable codes and characters are not included in thecharacter count for slaved messages.
Slave device alarm relay
The MessageView terminal supports a slave device alarm relay. Amessage with the Relay attribute enabled will energize the slavedevice alarm relay when the slave device receives the relay packet.
The alarm will remain energized until a message with the Relayattribute disabled is slaved to that node and line number, replacingthe alarm message and de-energizing the alarm.
The following slave device supports an alarm relay:
• DL50

4–18 Planning an Application
Publication 2706-817
A MessageView 421D terminal without a daughterboard (CatalogNo. 2607-M1D only) is a Slave Device. MessageView 421D SlaveDevices are shipped with an application downloaded. Theapplication provides the ASCII characters and graphics needed todisplay messages.
The MessageView 421D Slave Device terminal does not support aStartup or Background message. It acts as a “dumb terminal”, whichcan receive data but not transmit it. It can accept commands from avariety of slaving (master) devices. A list of master devices is givenon Page 5–8.
A message is displayed as soon as it is received from the masterdevice. There is no buffering or Message Queue. If a message isreceived that is slated for a line which has another messagedisplayed, the old message is terminated at once and the newmessage is displayed.
Embedded variables are treated as follows:
• Display, time and date variables in slaved messages are displayedby the 421D Slave Device. They are updated by the MasterDevice as long as they are displayed.
• ASCII Characters are displayed.
• Graphics may be displayed if the Ctrl-G control code is inserted.
The slave packet format and control codes are given on Page 7–42.
Slave Device
4–19Planning an Application
Publication 2706-817
The MessageView terminal features a Historical Event (HE) Stack.The HE Stack file supports up to 4000 messages, each 21alphanumeric characters long. Messages with the HE Stack attributeenabled are recorded in the Historical Event Stack each time they aretriggered.
The Historical Event Stack file includes for each message:
• Message number.
• Message text, which includes:
– data display variables at the time of triggering– placeholders for data entry variables– placeholders for graphic symbols.
• Message topic.
• Time and date when the message was triggered.
• Time and date when the message was acknowledged, if the AckTime attribute was enabled. See Page 7–39.
Historical Event Stack messages are stored in the terminal’s memoryin chronological order.
The terminal can alert the operator when the Historical Event Stackfile is 85%, 95% and 100% full, so that overflows can be avoided. Ifthe Stack file is full, new messages overwrite messages in the file,starting with the oldest.
Viewing the Historical Event Stack
The Historical Event Stack may be viewed using either:
• the terminal’s Front Panel Editor
• the personal computer via the HE Stack Upload command.
When using the Front Panel Editor, the terminal operator may viewthe Historical Event Stack in either of two formats:
• frequency of occurrence
• chronological order.
The HE Stack Upload command, on the Application menu, uploadsthe HE Stack file to a computer file in CSV (Comma SeparatedVariable) format. This format allows the user to import the file into aspreadsheet or database software package for analysis. See Page11–13.
Historical Event Stack

4–20 Planning an Application
Publication 2706-817
A MessageView 421F terminal supports 16 Function keys (F1 toF16) and 16 LEDs on the front panel.
A typical message with Function keys enabled informs the operatorthe intended function of each enabled function key. For instance:F1 Start F2 Stop Pump
Pressing a Function key sets or clears a bit value assigned to theFunction key’s write tag address. The controller logic program canuse the write tag address for a variety of control operations such as amachine’s start and stop functions.
!ATTENTION: Do not use a MessageView terminalfor emergency stops or other controls critical for thesafety of personnel or equipment. Use separatehard-wired operator interface devices.
Global attributes
Individual Function key attributes are globally defined. For instance,if F1 is defined as momentary, every time it is enabled for a messageit is a Momentary Function Key. If a Latched Function Key isneeded, you must enable a different key.
The MessageView terminal supports three types of Function keyoperations as global attributes:
• momentary
• maintained
• latched.
See the section on each type starting on Page 4–23. Other globalattributes are discussed in these sections.
Function Keys

4–21Planning an Application
Publication 2706-817
Enabling and disabling function keys:
Function keys are enabled only when a message assigned Functionkey operations is displayed (activated). For example:
PRESSF1 - Start PumpF2 - Stop PumpF3 - Sound Warning
F1, F2 and F3 are enabled.F4 through F16 are disabled.
Note: Unless a Function key is specifically enabled for the activemessage, it is disabled on the terminal.
!ATTENTION: As a safety precaution, enable onlythe function keys that are used in the message. Unusedfunction keys should remain disabled, since adverseeffects could result.
All 16 Function keys may be enabled for a single message ifrequired. However, only one message assigned to Function keyoperation can be displayed at a time.
Jog and non-jog modes
Messages with momentary, maintained or latched function keysenabled may be defined as either jog or non-jog.
• Messages are defined as non-jog if their Auto Clear attribute isenabled. Non-jog messages are terminated at the completion of aFunction key operation, including Hold Time. For example:
PRESSF1 - Start PumpF2 - Stop PumpF3 - Sound Warning
The message is terminated after any of F1,F2 or F3 is pressed and released, and theHold Time, if any, expires.
• Messages are defined as jog if their Auto Clear attribute isdisabled. Jog messages, including their associated Function keys,remain displayed (active) even after a function key is pressed andits Wait Time has expired. For example:
PRESSF1 - Start PumpF2 - Stop PumpF3 - Sound Warning
The message remains active after any ofF1, F2 or F3 is pressed and released, andthe Hold Time, if any, expires.

4–22 Planning an Application
Publication 2706-817
Jog mode is an aspect of the Auto Clear attribute which becomesapparent in messages that have Function keys enabled. It isnon-global. For example, Message 5 with F1 enabled may be jogmode and Message 25 with F1 enabled may be non-jog, in the sameapplication.
Terminating Function Key messages
A Function key message in Jog mode remains displayed until it isspecifically terminated. Another message triggered to be displayedon the same line will not clear it.
Function key enabled messages are terminated by:
• pressing the Function key, if the Auto Clear attribute is set(non–jog)
• pressing the [0] and [+/-] keys on the terminal at the same time
• triggering Special Message 9901, Clear Display
• performing a terminal reset.
When the controller is an ASCII Triggering device
Each time a Function key is pressed, the MessageView terminalsends a [Ctrl-F] command to the ASCII Triggering device.
[Ctrl-F]Message #\F-Key #\F-Key Action[CR]
• Message # is the number of the displayed message
• F-Key # is the function key being pressed
• F-Key Action is the resulting state, 0=OFF and 1=ON.
If the Function key is of Latched type, the ASCII Triggering devicesends a [Ctrl-U] command to the terminal to unlatch it.
[Ctrl-U]Function Key #\MessageView Address[CR],
• Function Key # is the Function key being unlatched, and the
• MessageView Address is the node address of the terminal in theASCII network.

4–23Planning an Application
Publication 2706-817
Momentary Function KeysA Momentary Function Key remains in a changed state as long asthe key is pressed. When it is released, after a preset Hold Time hasexpired the key changes back to its original state. The Hold Timevalue represents a brief delay in which the control function remainsactive after the operator releases the Function key. This Hold time isset in the Function Keys dialog, which is accessed through acommand on the Application menu.
The MessageView terminal supports Hold Times of 0, 50, 250, 500,750 or 1000 milliseconds.
A Momentary Function Key does not have a definitive handshaketag.
!ATTENTION: If communication with the logiccontroller uses Remote I/O protocol with blocktransfer, the Function key write tags must all beassigned to the same block as the Function Key ReturnMessage Number tag.
Maintained Function Keys
A Maintained Function Key changes state (0 to 1, or 1 to 0) whenpressed, and remains in the changed state when released. It returns toits original state when the function key is pressed and released again.
A Maintained Function Key retains its current state after the messageis terminated.
Since a Maintained Function Key toggles between two states, itsInitial state (0 or 1) must be specified independently of its ContactNormally Open/Normally Closed state. The initial state of aMaintained Function Key after a powerup or terminal reset dependson the Values At Startup attribute, which is set in the Terminal SetupAdvanced Dialog.
• Preset: the Function key’s state at startup is the same as its initialstate, set in the application.
• Last: the Function key’s state at startup is its last state before thepower down or reset.
A Maintained Function Key does not have a definitive handshaketag.
!ATTENTION: If communication with the logiccontroller uses Remote I/O protocol with blocktransfer, the function key write tags must all beassigned to the same block as the Function Key ReturnMessage Number tag.
Function Key Types

4–24 Planning an Application
Publication 2706-817
Toggling a Maintained Function Keys
The procedure for toggling a Maintained Function key depends onwhether the initial message is in Jog or non-Jog mode.
To return the Function key’s associated bit to its former state:
• If the message is in jog mode, the operator may press and releasethe Function key a second time. If the operator continues to pressand release the Function key the associated bit will be toggled.
• If the message is in non-jog mode, a second message that has thesame Function key enabled must be triggered. It tells the operatorto press and release the Function key.
Latched Function Keys
A Latched Function Key changes state (0 to 1 or 1 to 0) whenpressed, and remains in the changed state when released. It does notunlatch if it is pressed again. A Latched Function Key returns to itsoriginal state only when the logic controller sets the latch handshakebit.
For the procedure when the controller is an ASCII Triggering device,see Page 4–22.
A Latched Function Key retains its latched state after the message isterminated. After a terminal reset or powerup, the initial state of aLatched Function Key is always its released state.
A Latched Function Key requires a handshake tag. The handshaketag unlatches the Function key when the bit at the handshake tagaddress is set to 1 by the logic controller.
Handshake Bit = 0Write Tag Bit = 0
Function Key Pressed
Function Key Initial State
Controller Program Sets
Handshake Bit = 0 Handshake Bit = 0
Handshake Bit to 1
Handshake Bit = 1
Controller Program SetsHandshake Bit to 0
OFF ON ON OFF
Function Key Released
Write Tag Bit = 0Write Tag Bit = 1 Write Tag Bit = 1
!ATTENTION: If communication with the logiccontroller uses Remote I/O protocol with blocktransfer, the Function key write tags must all beassigned to the same block as the Function Key ReturnMessage Number tag.

4–25Planning an Application
Publication 2706-817
MessageView 421F terminals have a red LED located next to eachfunction key. Each LED may or may not have an Indicator tagassigned to it.
Indicator tags are globally defined in the LED dialog.
• When a LED is assigned a certain tag, that tag remains assignedto it throughout the application.
• When an LED does not have a tag assigned to it, the LED has notag any time it is used in the application.
When the LED does not have an Indicator tag assigned to it, theLED follows the state of the associated Function key (LED1 with F1,LED 16 with F16). For example, LED4 will light when Function keyF4 is pressed. LED4 remains lit as long as the Function key is in theOn state and the message displayed remains active.
When the LED has an Indicator tag assigned to it, the LED operatesindependently of the associated Function key. For example, pressingand releasing Function key F1 will have no effect on the operation ofLED1. The controller program turns the LED On and Off by settingor clearing the bit at the Indicator tag address. Thus the logiccontroller can indicate a process status to the operator withoutdisplaying a message.
➀➀
No Indicator Tag Indicator Tag
➁➂
➃
Step Description
➀
➁
➂
Bit set to 1 in F-key
Function Key pressed
LED changes state
Step Description
➀➁
➂
➃
Bit at Indicator Tag addressset by logic controller
➂
Write Tag address
based on bit read from
INITIALSTATE
ÎÎÎÎÎÎÎÎÎ
NEXTSTATE
INITIALSTATE
ÎÎÎÎÎÎÎÎÎ
NEXTSTATE
➁
Write Tag address
Function Key pressedBit set to 1 in F-keyWrite Tag address
LED changes statebased on bit read fromIndicator Tag address
LED Indicators

4–26 Planning an Application
Publication 2706-817
An ASCII Triggering device sends the [Ctrl-L] command to controla tagged LED:
[Ctrl-L]LED #\LED State\MessageView Address[CR]
• LED # is the LED being toggled
• LED State is 1 (On) or 0 (Off)
• MessageView Address is the node address of the terminal in theASCII network.
Handshaking is a means of acknowledging that a command has beenreceived and performed by either the MessageView terminal or thelogic controller.
The MessageView terminal supports handshaking for:
• latched function keys
• numeric and ASCII data entry variables
• Auxiliary Port devices (hardware handshaking).
The MessageView terminal supports pseudo handshaking for:
• momentary function keys
• maintained function keys
• acknowledge messages
• all other messages.
Latched Function Key handshake
Latched Function Keys require a defined handshake tag. When amessage uses a Latched Function Key, the Function key write tagnotifies the logic controller that the Function key bit assigned islatched in the On state. The controller then uses the handshake tag tonotify the MessageView terminal when the Function key is to beunlatched.
The handshake tag for a Latched Function Key is globally defined inthe Function Key dialog. That is, the tag assigned to a LatchedFunction Key is the same tag every time that Function key is enabledfor a message.
Handshaking

4–27Planning an Application
Publication 2706-817
Numeric and ASCII Data Entry handshake
Numeric and ASCII data entry variables do not require a definedhandshake tag. However if you want to enable the handshake featureof a data entry variable message, both a notification tag and ahandshake tag must be defined.
• When a notification tag is assigned, the MessageView terminalhas a means of signalling that data entered from the terminal hasbeen transferred to the logic controller.
• When a handshake tag is assigned, the logic controller has ameans of signalling the MessageView terminal that it received thedata.
Note: Define both notification and handshake tag or neither. If onlyone is defined, the application will not pass validation.
Note: If a message contains more than one data entry variable, eachvariable is supported by its own write tag address. However thenotification and handshake tags are shared by all data entry variablesin the message. Consider the write tag to be local to the individualdata entry variable, and the notification and handshake tags global tothe message as a whole.
Example:
Message A contains:
Enter Air Temperature: XXX; Enter Water Temperature: YYY.
where XXX and YYY are data entry variables.
If XXX is assigned these tag addresses:
Write Tag Address: TAG_ANotification Tag address: TAG_NOTIFYHandshake Tag Address: TAG_HAND
Then YYY would be assigned these tag addresses:
Write Tag Address (any tag address but TAG_A)Notification Tag Address TAG_NOTIFYHandshake Tag Address TAG_HAND
If the notification or handshake tag is changed in one of the dataentry variables in a message, the change affects all data entryvariables in that message.

4–28 Planning an Application
Publication 2706-817
When data entry handshaking is used, the controller logic is requiredto set the handshake tag bit before the user-defined handshaketimeout occurs. If the terminal does not receive the handshake bitbefore time expires, it will display a handshake timeout message.The terminal operator must acknowledge the timeout message beforethe application can resume. See page 10–16 to adjust the timeouttime.
Example of handshaking with Entry Variables:
Operator entersvalue.
Handshake Tag = 0
Operator pressesEnter key.
Terminal Sets Notification Tag = 1
Handshake Tag = 0Notification Tag = 0
Controller ladder logic program Verifies that notification address is set to 1.Sets handshake address to 1.
––
Controller program then clears handshake tag.
➁
➂ ➃
Controller Sets Handshake Tag = 1Notification Tag = 1
Handshake Tag = 0Notification Tag = 0
Message contains an Entry Variable. ➀
➄
Handshake Tag = 0Notification Tag = 0
Terminal clears notification tag.
Notification Tag Handshake TagB3
1 1
B3
WHEN THE TERMINAL SETS THE NOTIFICATION TAG, IT WAITS FOR THE CONTROLLER TO SET THEHANDSHAKE TAG.IF THE HANDSHAKE TAG IS NOT SET BEFORE THE SPECIFIED TIMEOUT TIME, THE TERMINAL NOTIFIESTHE OPERATOR THAT THERE IS A COMMUNICATIONS PROBLEM.

4–29Planning an Application
Publication 2706-817
Hardware handshake for an auxiliary port
A MessageView terminal may have its RS-232 port connected to anauxiliary device. A number of auxiliary devices are listed on Pages5–6 and 5–7.
The RS-232 cable has an RTS line from the terminal to notify thedevice when it is ready to receive, and a CTS line from the device tonotify the terminal when it is ready to receive. These are used asfollows:
• If the terminal’s input buffer is full, the terminal asserts the RTSline so the auxiliary device will stop sending data.
• If the terminal detects an asserted CTS line, it will not send anymore data.
• If the terminal detects an asserted CTS line after 30 seconds, theterminal displays a CTS error message. This message remainsactive for 2 seconds, then it is cleared from the display. After 30seconds the terminal tests the CTS line again and if necessarydisplays the CTS error message again. This cycle is repeated untilthe communications problem is corrected and the CTS line isnon–asserted.
Momentary or Maintained Function Keys pseudo handshake
The MessageView terminal supports a pseudo handshake forMomentary and Maintained Function Keys. The pseudo handshakeuses the Function Key Return Message Number tag defined in theTerminal Setup Control Tags dialog. See Page 10–24.
If the Function Key Return Message Number tag is defined, theMessageView terminal will return the message number associatedwith the Function key each time the Function key is pressed. Thisprovides a means of signalling to the logic controller that a Functionkey bit has been set or reset.
The Function Key Return Message Number tag is globally defined.That is, the Return Message Number tag address is the same for allmessages using a Function key.

4–30 Planning an Application
Publication 2706-817
Acknowledge messages pseudo handshake
The MessageView terminal supports a pseudo handshake foracknowledgeable messages. The pseudo handshake uses theAcknowledge Return Message Number tag defined in the TerminalSetup Control Tags dialog. See Page 10–23.
If the Acknowledge Return Message Number tag is defined, theMessageView terminal will return the message number associatedwith a message each time an acknowledgeable message isacknowledged. If a message is not acknowledged, no messagenumber is returned. This provides a means of signalling to the logiccontroller that a message has been acknowledged.
The Acknowledge Return Message Number tag is globally defined.That is, the Return Message Number tag address is the same for allacknowledgeable messages.
All messages pseudo handshake
The MessageView terminal supports a pseudo handshake for allmessages not included in the above handshake types. The pseudohandshake uses the Return Message Number tag defined in theTerminal Setup Control Tags dialog. See Page 10–21.
If the Return Message Number tag is defined, the MessageViewterminal will return the message number associated with a messagethat does not have the Ack attribute or function keys, each time themessage is displayed. If a message is not displayed, no messagenumber is returned. This provides a means of signalling to the logiccontroller that a message has been displayed.
Note: Hidden messages do not return a message number when theyare processed, since they are not displayed.
The Return Message Number tag is globally defined. That is, theReturn Message Number tag address is the same for all messages.
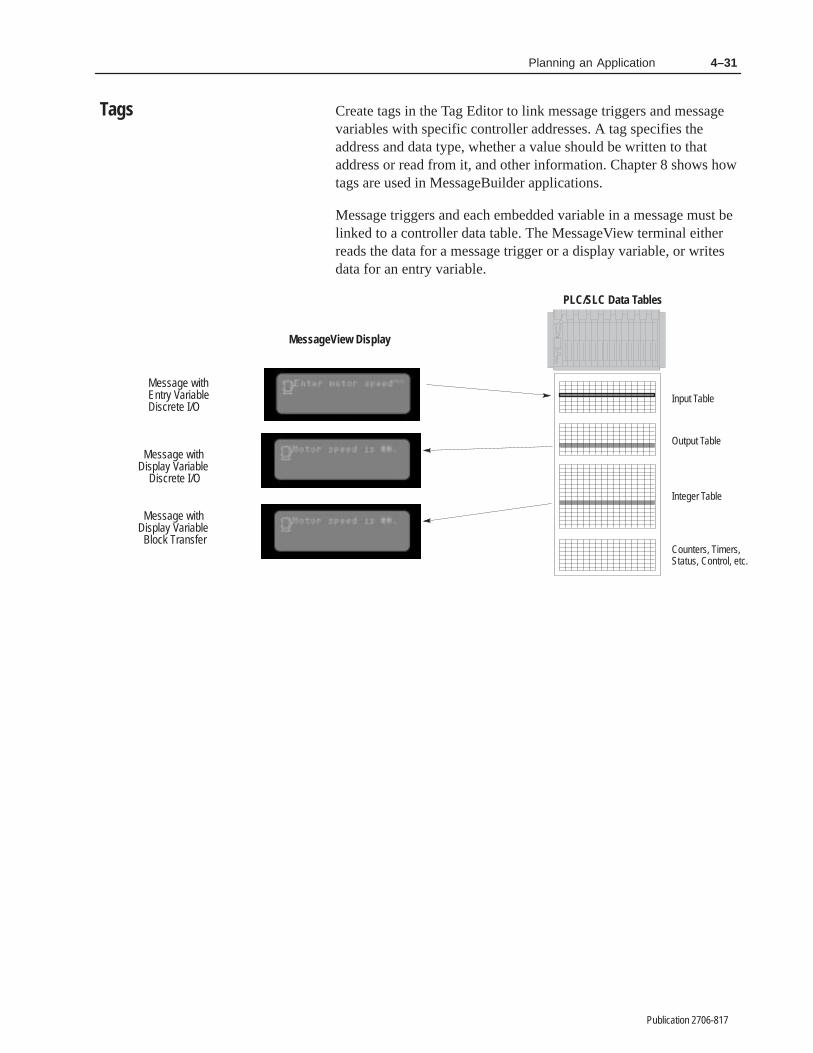
4–31Planning an Application
Publication 2706-817
Create tags in the Tag Editor to link message triggers and messagevariables with specific controller addresses. A tag specifies theaddress and data type, whether a value should be written to thataddress or read from it, and other information. Chapter 8 shows howtags are used in MessageBuilder applications.
Message triggers and each embedded variable in a message must belinked to a controller data table. The MessageView terminal eitherreads the data for a message trigger or a display variable, or writesdata for an entry variable.
MessageView Display
PLC/SLC Data Tables
Input Table
Output Table
Integer Table
Counters, Timers, Status, Control, etc.
Message withEntry VariableDiscrete I/O
Message withDisplay Variable Discrete I/O
Message withDisplay Variable Block Transfer
Tags
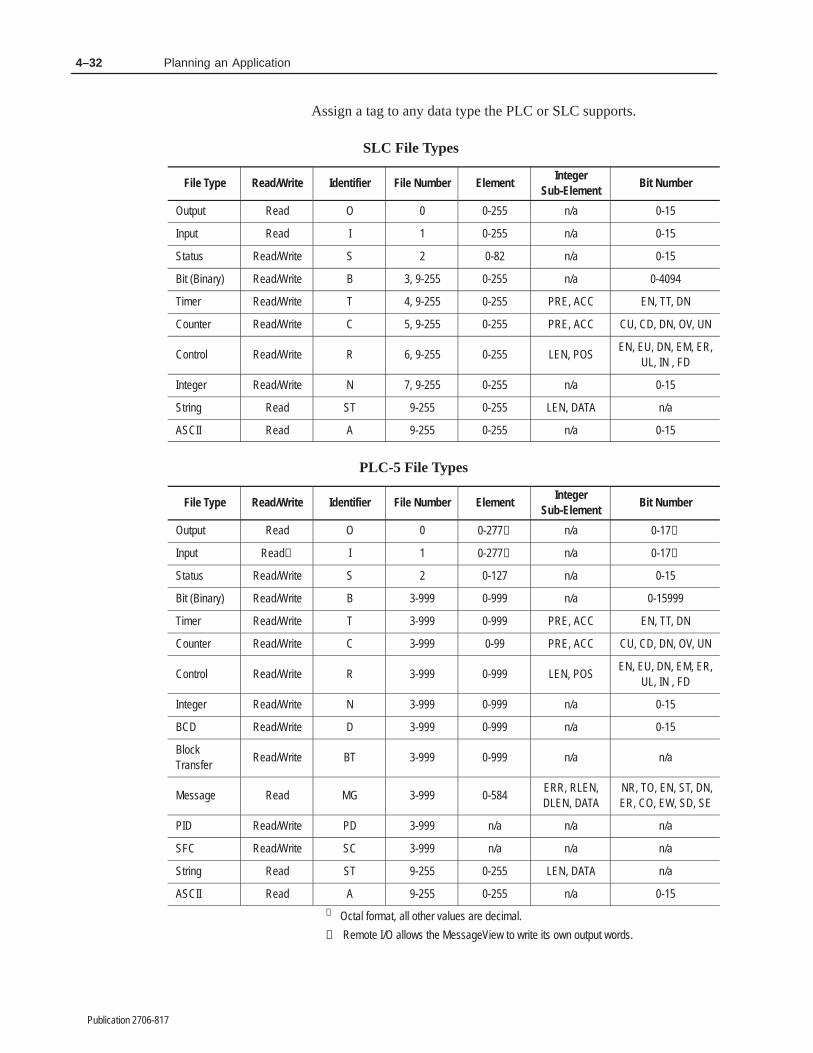
4–32 Planning an Application
Publication 2706-817
Assign a tag to any data type the PLC or SLC supports.
SLC File Types
File Type Read/Write Identifier File Number ElementInteger
Sub-ElementBit Number
Output Read O 0 0-255 n/a 0-15
Input Read I 1 0-255 n/a 0-15
Status Read/Write S 2 0-82 n/a 0-15
Bit (Binary) Read/Write B 3, 9-255 0-255 n/a 0-4094
Timer Read/Write T 4, 9-255 0-255 PRE, ACC EN, TT, DN
Counter Read/Write C 5, 9-255 0-255 PRE, ACC CU, CD, DN, OV, UN
Control Read/Write R 6, 9-255 0-255 LEN, POSEN, EU, DN, EM, ER,
UL, IN , FD
Integer Read/Write N 7, 9-255 0-255 n/a 0-15
String Read ST 9-255 0-255 LEN, DATA n/a
ASCII Read A 9-255 0-255 n/a 0-15
PLC-5 File Types
File Type Read/Write Identifier File Number ElementInteger
Sub-ElementBit Number
Output Read O 0 0-277➀ n/a 0-17➀
Input Read➁ I 1 0-277➀ n/a 0-17➀
Status Read/Write S 2 0-127 n/a 0-15
Bit (Binary) Read/Write B 3-999 0-999 n/a 0-15999
Timer Read/Write T 3-999 0-999 PRE, ACC EN, TT, DN
Counter Read/Write C 3-999 0-99 PRE, ACC CU, CD, DN, OV, UN
Control Read/Write R 3-999 0-999 LEN, POSEN, EU, DN, EM, ER,
UL, IN , FD
Integer Read/Write N 3-999 0-999 n/a 0-15
BCD Read/Write D 3-999 0-999 n/a 0-15
BlockTransfer
Read/Write BT 3-999 0-999 n/a n/a
Message Read MG 3-999 0-584ERR, RLEN,DLEN, DATA
NR, TO, EN, ST, DN,ER, CO, EW, SD, SE
PID Read/Write PD 3-999 n/a n/a n/a
SFC Read/Write SC 3-999 n/a n/a n/a
String Read ST 9-255 0-255 LEN, DATA n/a
ASCII Read A 9-255 0-255 n/a 0-15
➀ Octal format, all other values are decimal.
➁ Remote I/O allows the MessageView to write its own output words.

4–33Planning an Application
Publication 2706-817
The MessageView terminal can read and write both of these datatypes:
• single bit data type
• value data type.
Bit data
Bit data occupies a single bit address and represent an On (closed) orOff (open) condition.
Address B3/10 = On = Off1 0
Use a bit address:
• to read or write a value of 0 or 1 in a variable
• to trigger a message.
Value data
Value data types occupy a word (2 bytes or 16 bits) address thatrepresents a numeric value. No matter how large or small the value, awhole word must be assigned to it.
0 0 0 0 0 0 0 1 0 0 0 1 0 1 0
124816326412825651210242048409681921638432768
1Address N7:2 = 277
Data Formats
The MessageView terminal recognizes and transfers 5 data formats.
Data Format Range
Bit 0 or 1
Unsigned Integer 0 to 65535
Signed Integer -32768 to +32767
BCD 0 to 9999
Character Array alphanumeric characters
Bit
Data in bit format occupies only one bit of memory. Its address isgiven not as a word (N7:2), but as a bit (N7:2/10). A bit is a location,and depends on its position in the word. It can be set or reset.
Data Types

4–34 Planning an Application
Publication 2706-817
Signed and Unsigned Integers
Data in signed and unsigned integer format occupy one word (2 bytes or 16 bits) of memory, no matter how small the value is.
Every bit has a value that depends on its position in the word. Thevalue encoded is the sum of the bits that are set.
0 0 0 0 0 0 0 1 0 0 0 1 0 1 0 1
124816326412825651210242048409681921638432768
256 16 4 1+ + + = 277
Unsigned Integer
1 1 1 1 1 1 1 0 1 1 1 0 1 0 1
Signed Integer
1248163264128256512102420484096819216384
1
256 16 4+ + = –277+ 1
Sign Bit1=Negative0=Positive
2’s Complement
BCD
Data in BCD format (also called 4-BCD) occupy one word ofmemory. Every four bits encodes a single decimal digit 0 � 9.
0 0 0 0 0 0 1 0 0 1 1 1 0 1 1
BCD1248
1
124812481248
2 7 70 = 277
Character Array
Data in Character Array format are assigned to ASCII variables. Thelength of a character array is from 1 to 32 bytes.
The ST file type is a character array. Other file types can also beviewed as characters.

4–35Planning an Application
Publication 2706-817
Before entering tags in the Tag Editor dialog, use a copy of theAddress Worksheet in Appendix H to record them. Each line in theworksheet is 1 word (2 bytes or 16 bits), since this is the unit ofcontroller address memory. Use separate worksheets for display(logic controller write) and for entry (logic controller read) variables,since these are stored in different memory areas.
The figure shows two examples of recording addresses. For properaddress formats, refer to the controller’s user manual. Assign:
• a whole word (16 bits) to signed and unsigned integers and 4BCDdata types
• specific bits to bit data types
• a word (or words adjacent to one another) for bit triggers
• character arrays to ASCII data types.
15 14 13 12 11 10 9 8 7 6 5 4 3 2 1 0
Entry Address Worksheet
Controller Address
Word AddressTag Name
I:020
O:027
O:028
17 16 15 14 13 12 11 10 7 6 5 4 3 2 1 0
15 14 13 12 11 10 9 8 7 6 5 4 3 2 1 0
Word AddressTag Name
17 16 15 14 13 12 11 10 7 6 5 4 3 2 1 0
Octal
Decimal
Octal
Decimal
RTRN_MSG_NO
HANDSH
Read Tag Name = MOTOR_DISPLAY
Write Tag Name = MOTOR_ENTRY
Handshake Tag Name = HANDSH
Notification Tag Name = RTRN_MSG_NO
READ
WRITE
MOTOR_DISPLAY
Display Address Worksheet
MOTOR_ENTRYI:021
Address Worksheet

4–36 Planning an Application
Publication 2706-817
Read or Write tags that define controller addresses for variables areentered in the Tag Editor. See Page 8–2. A tag has the followingattributes:
Tag Attributes Description
Tag Name Unique name identifying tag address
Data Type Bit, BCD, Unsigned/Signed Integer, Character Array
Array SizeNumber of elements in a character array. For other data types, leave blank.
Description General description of the variable
Node NameName of the logic controller that will store theaddress
Tag Address Specifies word or bit location in controller memory
Initial Value Value in tag address at powerup
Update FrequencyHow often the tag address will be updated while theoperation is running
Scaling➀ Scale and scale offset values
Data Entry Limits➀ Upper and lower limits of data stored at tag address
➀ Usage depends on the variable. These attributes can be entered only in the Form View.
The Tag Editor supports two different methods for entering tags:
• Table View for entering multiple tags.
• Form View for entering a single tag.
Table View Form View
Tags are stored in a database that is referenced by a project name.The project name is entered when creating a new application file.
Note: A project can be created only when a new application iscreated. However, once it has been created, existing or newapplications may be assigned to it.
Defining Tags

4–37Planning an Application
Publication 2706-817
Scaled Data Display Variables take raw numeric values andmathematically manipulate them so the values can be shown instandard units such as:
• gallons
• feet per second
• pounds per square inch.
Values from the logic controller address are scaled using the formula:
y = mx + b
y = scaled (displayed) value
m = scale (multiplier)
x = value stored in controller address
b = offset.
The scale and offset values are entered in the Tag Editor.
Example: Scaling a Display Variable
Flow RateTransducerValue
510
Valve #1
Flow RateTransducer 510
Controller
13Scaling(x 0.0059 + 10)
Note: Messages sent to slave devices may contain scaled variables.The variable tag contains the scaling information.
Scaling Data DisplayVariables

4–38 Planning an Application
Publication 2706-817
Data entered by a MessageView terminal operator can be scaledfrom engineering units such as:
• gallons
• pounds per square inch.
to machine control values.
Values entered at the terminal are scaled according to the formula:
x =y - b
m =Entered Value - Offset
Scale
y = mx + b
y = scaled value (entered by operator)
m = scale (multiplier)
x = controller value
b = offset.
To calculate value (x) stored at the controller address, the formula becomes:
The scale and offset values are entered in the Tag Editor. Scaledvalues affect the controller values as follows:
• A scale (m) entered as a value >1 generates an x value smallerthan y - b.
• A scale (m) entered as a value <1 generates an x value larger thany - b.
Note: An ASCII Input device may transmit either numeric oralphanumeric data.
• If it sends numeric data, it may enter the data in a Numeric Entryvariable where it may be scaled if necessary.
• If it sends alphanumeric data, it enters the data in an ASCII Entryvariable, where it cannot be scaled.
Scaling Data EntryVariables

4–39Planning an Application
Publication 2706-817
Example: Scaling a data entry variable
The offset (b) is specified as 2 and the scale (m) is specified as .01.If an operator enters a value of 30 for (y):
x =
y - bm =
30 - 2.01
= 2800
The terminal sends a value of 2,800 to the controller, whichcompares it to the value from the weigh scale transducer:
Value from Weigh Scale= 2,800
Operator InputsWeight of 30 Pounds
MessageView TerminalScales Value to 2,800for Match Code
Weigh Scale Value (2,800)Matches Input Value (2,800)Package is Accepted
➂
➁
➃
➀
4–40 Planning an Application
Publication 2706-817
Data Limits for a scaled variable
If a value exceeds the range for the selected data type, the terminalwill display a “Value Not in Range” warning. When using scaling, itis a good idea to limit the minimum and maximum values anoperator can enter. These values are set in the Tag Editor Form View.
The range for scaled values should be calculated before the TagForm dialog is filled out. Use the following formula to determinescaled minimum and maximum values:
Maximum Input Value =
Minimum Input Value =
Maximum Value for Data Type x Scale + Offset
Minimum Value for Data Type x Scale + Offset
Example:
Scale = 1.8 and Offset = 32 (Fahrenheit to Celsius conversion)
Data type is Signed Integer (-32,768 to +32,767)
The minimum and maximum values an operator can enter withouttruncating:
Maximum Input Value =
Minimum Input Value =
32,767 x 1.8
-32,768 x 1.8
+ 32 = 59012
+ 32 = -58950
Initial value of a scaled variable
The initial value specified in the Tag Form dialog is written to thecontroller upon powerup or reset. This initial value is not scaled, so itmust be entered in the units used by the logic controller.
For instance, assume the terminal uses °C and the controller uses °F.To initialize the terminal to a value of 32 °F, the initial value in theTag Editor needs to be 32, not 0.

4–41Planning an Application
Publication 2706-817
The logic controller stores values only as integers. Digits to the rightof the decimal are rounded off. However the terminal can scaledecimal values to or from integer values.
In this illustration, the entered value of 7.5 is rounded up to 8. Whenthis value is displayed or used in a mathematical formula, the resultmay be incorrect.
Entered Value = 7.5 Displayed Value = 8
Controller Value = 8(rounded)
If decimal precision is needed, select appropriate values for scale andoffset.
Example:
Use scaling to convert a decimal value from degrees Fahrenheit todegrees Celsius.
ScaleRounded4964.44
4964Offset = 32
Scale = .018 4964
121.36Entered Value
121.35Displayed Value
Controller
Scale50.5
51Offset = 32Scale = 1.8 51
122.9Entered Value
123.8Displayed Value
Controller
Fixed DecimalDecimal Position = 2Field Width = 6
Keypad Controlled DecimalDecimal Position = Operator EnteredField Width = 6
123.8
Rounded
The decimal point is positioned to provide a display appropriate to the scaled value.
Controller Value =Entered Value – Offset
Scale
Displayed Value = Controller Value x Scale +Offset
Equations for Scaling Example
121.36 – 32
0.018= 4964.44 = 4964
(4964 x 0.018) + 32 = 121.35
Stored Value =
Displayed Value =
Fixed Decimal
Stored Value =
Displayed Value =
122.9 – 32
1.8= 50.5 = 51
(51 x 1.8) + 32 = 123.8
Stored Value =
Displayed Value =
Keypad Controlled Decimal
The terminal stores the full precision value and the controller storesthe rounded value.
Note: The value stored in the terminal may be different than thevalue sent to the controller because of rounding that occurs duringpre-scaling.
Precision and Rounding

Chapter 5
Publication 2706-817
������� �� ��������
This chapter covers the following topics:
• MessageView 421 terminal ports
• RS-232 Port communication
• ASCII Triggering commands
• Remote I/O communication
• Discrete I/O
• Block transfer.
Each Message View 421 terminal has a standard RS-232 port on theMain Logic Board. It may also include an optional Remote I/O(RIO) Communications daughterboard card.
The MessageView terminal’s two available ports are used as follows:
• The Remote I/O Port (optional) connects to a logic controller on aRemote I/O network.
• The RS-232 Port connects to:
– the RS-232 port of a personal computer– other devices set up in the application to be used when the
terminal is in Run Mode, which are listed on Page 5–3.
Remote I/O Port
Certain MessageView terminals have a Remote I/O Port installed(Catalog Nos. 2706-M1D1, -M1N1 and -M1F1). The RIO port isused for the sole purpose of communicating with:
• a logic controller, which runs the operation
The Remote I/O port of a MessageView terminal, when connected toa logic controller, is used to transmit and receive data utilizingdiscrete I/O and block transfer modes.
Each MessageView terminal is configured to match the device typeand communication parameters of the Logic Controller in its RemoteI/O system. The configuration is set up when the application iscreated, so a terminal may be used in a variety of systems accordingto the application downloaded into it. This will be discussed startingon Page 5–12.
MessageView 421 TerminalPorts

5–2 Communications Overview
Publication 2706-817
RS-232 Port
All MessageView terminals incorporate an RS-232 port for serialcommunications.
Use the RS-232 port to connect the terminal to:
A MessageView terminal uses its RS-232 port:
• to transfer applications and other information between theMessageView terminal and a personal computer
• to communicate with an ASCII Input device (terminals whichsupport ASCII Input)
• to communicate with one or more slave devices (terminals whichsupport the slaving feature)
• to communicate with an ASCII Triggering device (Catalog Nos.2706-M1D, -M1N and -M1F)
• to connect a 421D slave device (Catalog No. 2706-M1D) to amaster device.
RS-232 port: DF1 configuration
The RS-232 port of a MessageView terminal is used to transfer filesto and from a computer using DF1 point-to-point communicationprotocol.
• DF1 parameters in the MessageView terminal used inpoint-to-point communications with a computer containingMessageBuilder software are predefined and non-configurable.
• DF1 parameters in the computer were defined when theINTERCHANGE Configuration Utility was installed. See Page 2–7.
DF1 parameters are given here for reference only.
Parameter: DF1 Settings:
Baud Rate 19.2K
Parity None
Data Bits 8
Stop Bits 1
Hardware Handshaking None
Error Type CRC
RS-232 port: Auxiliary Device configuration
If the terminal is to communicate with an Auxiliary Device (one ofthose listed on Page 5–3), you must configure the RS-232 portcommunication parameters for that device.
Configuration options will be discussed starting on Page 5–3, andconfiguration procedures starting on Page 10–9.

5–3Communications Overview
Publication 2706-817
The RS-232 port of the MessageView terminal may be used tocommunicate with:
• a personal computer running MessageBuilder (see Page 11–6) orthe File Transfer Utility (see Page 11–15).
• an ASCII Triggering Device (see the list on Page 5–7)
• an ASCII Input Device (see the list on Page 5–6)
• one or more slave devices (see the list on Page 5–6)
• a master device (see the list on Page 5–8)
Switching RS-232 settings in the MessageView terminal
The MessageView terminal shares its RS-232 port betweencommunications with a computer that has MessageBuilder softwareinstalled, and communications with an Auxiliary Device. Theterminal’s RS-232 port must be switched (configured) to the propersetting before communications can be established.
Example: The terminal’s RS-232 port’s last communication wasfrom a bar code reader (an ASCII Input device). Next, the HE Stackfile has to be uploaded to a personal computer that hasMessageBuilder software running. The terminal operator mustconfigure the RS-232 port as a MessageBuilder port to establishcommunication with the computer.
To do this, the operator enters the terminal’s Front Panel Editor. Thefirst menu item, “Change Port To: MessageBuilder” allows theoperator to switch to the MessageBuilder port settings in one quickstep without entering half a dozen communication parameters. Afterthe HE Stack file has been uploaded, the terminal operator switchesthe “Change Port To:” menu item to ASCII Input and returns theterminal to Run Mode.
Important: If you find your computer cannot communicate withthe MessageView terminal, verify that the RS-232port is set to the correct communication device.
RS-232 PortCommunication

5–4 Communications Overview
Publication 2706-817
If the Front Panel Editor “Change Port To:” menu item reads:
• “Change Port To: MessageBuilder”, the RS-232 port is currentlyset to communicate with the Auxiliary Device the application isdesigned for.
• “Change Port To: [ASCII Triggering, Slave Device, Slave Port, orASCII Input]”, the RS-232 port is currently set to communicatewith the computer.
The name in the “Change Port To:” menu item is the type ofAuxiliary Device the application is designed for.
Note: The physical connection between the computer and theterminal does not have to be maintained after an application isdownloaded. If it is not maintained, the connection must bere-established when a file is to be uploaded to or downloaded fromthe computer.
RS-232 Port Power-Up attribute
The application sets the MessageView terminal’s RS-232 port topower up to one of the two possible settings when the applicationstarts running:
• MessageBuilder parameters
• auxiliary port parameters.
The Port Power-Up attribute is configured in the Advanced tab in theTerminal Setup dialog. See Page 10–16.
MessageView terminal hardware/firmware
MessageBuilder software has been designed to configure the RS-232port parameters for communication with a device compatible withthe MessageView terminal’s hardware/firmware configuration.
If the terminal’s RS-232 port is used to communicate with:
• the computer only, the port parameters do not have to beconfigured in the application. They are predefined in theINTERCHANGE Configuration Utility (see Page 5–2) and theMessageView terminal’s firmware.
• an Auxiliary Device while the application is running, the portparameters must be configured in the application to match thoseof the auxiliary device.
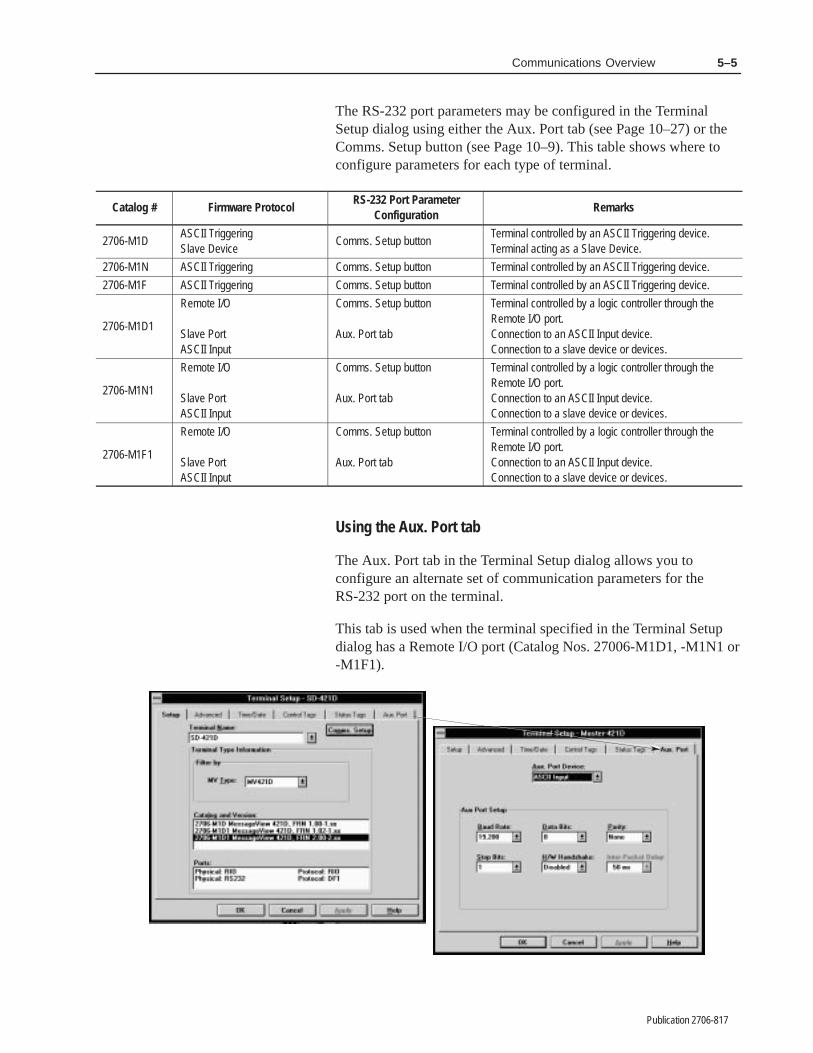
5–5Communications Overview
Publication 2706-817
The RS-232 port parameters may be configured in the TerminalSetup dialog using either the Aux. Port tab (see Page 10–27) or theComms. Setup button (see Page 10–9). This table shows where toconfigure parameters for each type of terminal.
Catalog # Firmware ProtocolRS-232 Port Parameter
ConfigurationRemarks
2706-M1DASCII TriggeringSlave Device
Comms. Setup buttonTerminal controlled by an ASCII Triggering device.Terminal acting as a Slave Device.
2706-M1N ASCII Triggering Comms. Setup button Terminal controlled by an ASCII Triggering device.
2706-M1F ASCII Triggering Comms. Setup button Terminal controlled by an ASCII Triggering device.
2706-M1D1
Remote I/O
Slave PortASCII Input
Comms. Setup button
Aux. Port tab
Terminal controlled by a logic controller through theRemote I/O port.Connection to an ASCII Input device.Connection to a slave device or devices.
2706-M1N1
Remote I/O
Slave PortASCII Input
Comms. Setup button
Aux. Port tab
Terminal controlled by a logic controller through theRemote I/O port.Connection to an ASCII Input device.Connection to a slave device or devices.
2706-M1F1
Remote I/O
Slave PortASCII Input
Comms. Setup button
Aux. Port tab
Terminal controlled by a logic controller through theRemote I/O port.Connection to an ASCII Input device.Connection to a slave device or devices.
Using the Aux. Port tab
The Aux. Port tab in the Terminal Setup dialog allows you toconfigure an alternate set of communication parameters for theRS-232 port on the terminal.
This tab is used when the terminal specified in the Terminal Setupdialog has a Remote I/O port (Catalog Nos. 27006-M1D1, -M1N1 or-M1F1).

5–6 Communications Overview
Publication 2706-817
The Auxiliary Device uses the same RS-232 port that Message-Builder software uses to download the application, but the portparameters may be different.
• See Page 10–27 for the procedure to configure the RS-232 port tocommunicate with one of the auxiliary devices listed below.
• See Page 5–3 for an outline of the procedure the terminaloperator uses to switch from one set of port parameters to theother.
Note: Parameters for communication between the MessageViewterminal and the computer are built into the terminal firmware, andcannot be edited.
ASCII Input device
A MessageView terminal with a RIO daughterboard and firmwarethat supports ASCII Input, can accept data from an ASCII Inputdevice. Data from such a device is entered into ASCII or NumericEntry variables embedded in a message.
ASCII Input devices include the following:
• bar code scanner
• AdaptaScan reader
• PLC port 0.
• other devices with serial communication that can send ASCIIdata.
To set up a terminal to communicate with an ASCII Input device, seePage 10–27.
Slave Port (master device)
A MessageView terminal with a RIO daughterboard and firmwarethat supports slaving can command up to 126 slave devices. Theslave devices display messages as they are commanded. Each slavedevice may be addressed individually, or a command may be sent toall slaves at the same time using node address 127.
Slave devices include:
• Allen-Bradley Dataliner DL10
• Allen-Bradley Dataliner DL20
• Allen-Bradley Dataliner DL50
• MessageView 421D terminal without a daughterboard (CatalogNo. 2706-M1D). See Page 5–8 for the 421D Slave Device.
To set up a terminal as a master device to communicate with slavedevices, see Page 10–27.

5–7Communications Overview
Publication 2706-817
Using the Comms. Setup button
The Comms. Setup button in the Terminal Setup dialog allows you toconfigure communication parameters for the RS-232 port on theterminal.
This dialog may be accessed only when the terminal specified in theTerminal Setup dialog is a slave device or is controlled by an ASCIITriggering device (Catalog Nos. 2706-M1D, -M1N and -M1F).
When the MessageView terminal communicates with an ASCIITriggering device or acts as a slave to a master device, it uses thesame RS-232 port that Message Builder software uses to downloadthe application, but the port parameters may be different.
• See Page 10–9 for the procedure to configure the RS-232 port tocommunicate with one of these devices.
• See Page 5–3 for an outline of the procedure the terminaloperator uses to switch from one set of port parameters to theother.
Note: Parameters for communication between the MessageViewterminal and the computer are built in to the terminal firmware, andcannot be edited.
ASCII Triggering device
An ASCII Triggering device is used to trigger messages on theMessageView terminal using RS-232 ASCII protocol.
ASCII Triggering devices include:
• SLC 5/03 , SLC 5/04 Port 0
• SLC BASIC Module
• PLC-5 Port 0
• other logic controllers with serial ports
• Allen-Bradley Industrial Computers
• any ASCII Transmitting device, including a VT100 DumbTerminal.

5–8 Communications Overview
Publication 2706-817
To set up a terminal to communicate with an ASCII Triggeringdevice, see Page 10–9.
For the format of commands to and from an ASCII Triggeringdevice, see the section starting on Page 5–8.
MessageView 421D Slave Device
A MessageView 421D Slave Device (Catalog No. 2706-M1D) is aMessageView terminal with no daughterboard and no numeric orfunction keys. It is shipped with an application loaded. Theapplication supplies the alphanumeric fonts and graphic charactersneeded to display the messages sent from the master device.
The slave terminal may receive commands from any one of thefollowing slaving devices (masters):
• Allen-Bradley Dataliner DL20
• Allen-Bradley Dataliner DL40
• MessageView 421D terminal whose firmware supports slaving
• MessageView 421N terminal whose firmware supports slaving
• MessageView 421F terminal whose firmware supports slaving
• Allen-Bradley Industrial Computers.
To set up a terminal as a Slave Device, see Page 10–9.
For the format of commands to a slave device, see the sectionstarting on Page 7–42.
Messages to the MessageView terminal
Trigger a message with [Ctrl-T]
Used by the ASCII Triggering device to trigger a specific message inthe terminal.
Format: [Ctrl-T]Message#\ MV Address[CR]
• Message# range: 1 to 9999; limited to the subset used in theapplication
• MV Address range: 1 to 127 for a single node; 127 to address alldevices
Example: [Ctrl-T]24\ 6[CR]
• The terminal at node #6 displays message #24 in the downloadedapplication
ASCII TriggeringCommands

5–9Communications Overview
Publication 2706-817
Send data to a display variable with [Ctrl-V]
Used by the ASCII Triggering device to send data to a specificdisplay variable in the terminal. Each variable must be addressedindividually. Numeric data may be scaled.
Format: [Ctrl-V]Variable Data\ Variable Position\ MV Address[CR]
• Variable Data range: -32768 to +65535 for numeric data
any ASCII character for ASCII data
• Variable Position range: 1 to 10
Note: Variable position is the position of the variable in themessage, counting from left to right. If the message contains onlyone display variable, the position is 1.
• MV Address range: 1 to 127 for a single node; 127 to address alldevices
Data enclosed in quotation marks is interpreted as ASCII data, evenif it consists of numbers.
Example: [Ctrl-V]“Press “ACK””\ 1\ 2[CR]
• The terminal at node #2 displays Press “ACK” in the firstdisplay variable in the currently active message.
Activate/Deactivate an LED with [Ctrl-L]
Used by the ASCII Triggering device to toggle a specific LED in theterminal.
• Format: [Ctrl-L]LED#\ LED State\ MV Address[CR]
• LED# range: 1 to 16
• LED State range 0 or 1; 0 represents the LED Off state, 1represents the LED On state
• MV Address range: 1 to 127 for a single node; 127 to address alldevices
Example: [Ctrl-L]4\ 1\ 22[CR]
• The terminal at node #22 turns LED #4 On.

5–10 Communications Overview
Publication 2706-817
Unlatch a latched function key with [Ctrl-U]
Used by the ASCII Triggering device to unlatch a specific latchedfunction key in the terminal.
Format: [Ctrl-U]F-key#\ MV Address[CR]
• F-key# range: 1 to 16
• MV Address range: 1 to 127 for a single node; 127 to address alldevices
Example: [Ctrl-U]7\ 22[CR]
• The terminal at node #22 unlatches function key #7. The terminalthen sends a Ctrl-F message when the message is received andacted upon.
Messages from the MessageView terminal:
Send data from entry variables [Ctrl-I]
Used by the terminal to send input data to the ASCII device.
Format: [Ctrl-I]Message#\ Variable Data\ Variable Position[CR]
• Message# range: 1 to 9999; limited to the subset used in theapplication
• Variable Data range: -32768 to +65535 for numeric data
any ASCII character for ASCII data
• Variable Position range: 1 to 10
Note: Variable position is the position of the variable in themessage, counting from left to right. If the message contains onlyone entry variable, the position is 1.
• MV Address range: 1 to 127 for a single node; 127 to address alldevices
Example: [Ctrl-I]64\ 44232\ 3[CR]
• The terminal sends the value 44232 which was input in the thirdvariable in message #64.
Note: If users are entering data [Ctrl-I] at the same time at differentterminals in the network, they may cause data collisions. TheMessageView node address was intentionally left off the Data Entry[Ctrl-I] response message to discourage this situation.
!ATTENTION: If the ASCII network has more thanone terminal, data should not be sent from any terminalto the ASCII device. Data collisions may result if theASCII device has data coming from more than onesource.

5–11Communications Overview
Publication 2706-817
Acknowledge an alarm message with [Ctrl-K]
Used by the terminal to inform the ASCII Triggering device that theoperator has pressed the ACK key in response to an alarm message.
Format: [Ctrl-K]Message#[CR]
• Message# range: 1 to 9999; limited to the subset used in theapplication
Example: [Ctrl-K]75[CR]
• The terminal displayed message #75, which was defined as anacknowledgeable message. The operator pressed the ACK key,and this response message was sent to the ASCII Triggeringdevice.
Report a function key press with [Ctrl-F]
Used by the terminal to inform the ASCII Triggering device that theoperator has pressed a function key.
Format: [Ctrl-F]Message#\ F-key#\ F-key action[CR]
• Message# range: 1 to 9999; limited to the subset used in theapplication
• F-key# range: 1 to 16
• F-key action range: 0 or 1; the application defined the functionkey as Normally Open or Normally Closed; this Normal state isdefined as 0.
Example: [Ctrl-F]33\ 5\ 1[CR]
• When the terminal operator pressed function key #5 which wasenabled in Message #33, the terminal informs the ASCIITriggering device that the function key has changed to the alteredstate.
Note: If the operator presses a momentary function key, theterminal will automatically send another [Ctrl-F] message whenits Hold Time is up:
[Ctrl-F]33\ 5\ 0[CR]
Note: If a latched function key is unlatched after the terminalreceives a [Ctrl-U] message, the Message# parameter in the[Ctrl-F] message is 0.

5–12 Communications Overview
Publication 2706-817
Return message number with [Ctrl-N]
Certain types of messages have their message number returned to theASCII Triggering device using [Ctrl-K], [Ctrl-I] or [Ctrl-F]. Theterminal uses the [Ctrl-N] command to report all other types ofmessages when they are triggered.
Format: [Ctrl-N]Message#[CR]
• Message# range: 1 to 9999; limited to the subset used in theapplication
Example: [Ctrl-N]637[CR]
• The terminal reports that message #637 was triggered.
Report the HE Stack status with [Ctrl-H]
Used by the terminal to report to the ASCII Triggering device thatthe Historical Event Stack is 85%, 95% or 100% full.
Format: [Ctrl-H]HE Stack Status[CR]
• HE Stack Status range: 85, 95 or 100
Example: [Ctrl-H]85[CR]
• The Historical Event Stack is 85% full.
On a remote I/O network, the MessageView 421 terminal appearslike any other Remote I/O rack. Configure the terminal to occupy allor part of a single rack, up to 128 I/O.
Two types of addresses can be assigned to application variables on aRemote I/O network:
• discrete - a single input or output bit address
• block transfer - a series of contiguous word addresses transferredas a unit.
Important: Plan the addresses before starting to create theapplication for most efficient use of memory.
The direction of data transfer over a remote I/O link is from the pointof view of the logic controller:
• entry variables are BTR (block transfer read): data from theterminal to the controller
• display variables are BTW (block transfer write): data from thecontroller to the terminal.
Remote I/OCommunication

5–13Communications Overview
Publication 2706-817
Module groups
The MessageView 421 I/O can occupy 1/4, 1/2, 3/4, or a Full rack.Each 1/4 rack contains two module groups (32 input and 32 outputbits). An entire rack contains 8 module groups that are numberedfrom 0 to 7.
Rack # MessageView I/O
Four 1/4 Rack Sizes
Eight Input/OutputModule Groups
0 1 2 3 4 5 6 7
1/41/4 1/41/4
Input
Output 0 1 2 3 4 5 6 7
Each input or output module group has 16 bits
If a MessageView terminal does not occupy a full rack, anotherterminal or device can be configured for the unused modules. Forexample:
Parameter MessageView 421 Other Rack Device
Rack Number 1 1
Starting Module Group 0 6
Rack Size 3/4 1/4
Last Chassis? No Yes
Important: Two I/O systems can not share the same module.
The maximum rack number that can be assigned to the terminaldepends on the type of logic controller.

5–14 Communications Overview
Publication 2706-817
Controller Types
The Remote I/O port can communicate with any of the PLC or SLCcontroller/scanner types listed below.
Controller/Scanner Type Lowest Rack # Highest Rack #Supports
BlockTransfer?
IBM PC 6008-SIVME 6008-SVDEC QBUS 6008-SQ
0 7 Yes
PLC 5/11 3 3 Yes
PLC 5/15PLC 5/20
1 3 Yes
PLC 5/25PLC 5/30
1 7 Yes
PLC 5/40 1 17octal Yes
PLC 5/60PLC 5/80
1 27octal Yes
SLC 1747-SN Series A 0 3 No
SLC 1747-SN Series B 0 3 Yes
Other 1771-SN Subsystem 1 7octal No
Remote I/O Communication parameters
Define RIO communication parameters in the Communication Setupdialog, which is accessed from the Terminal Setup dialog.
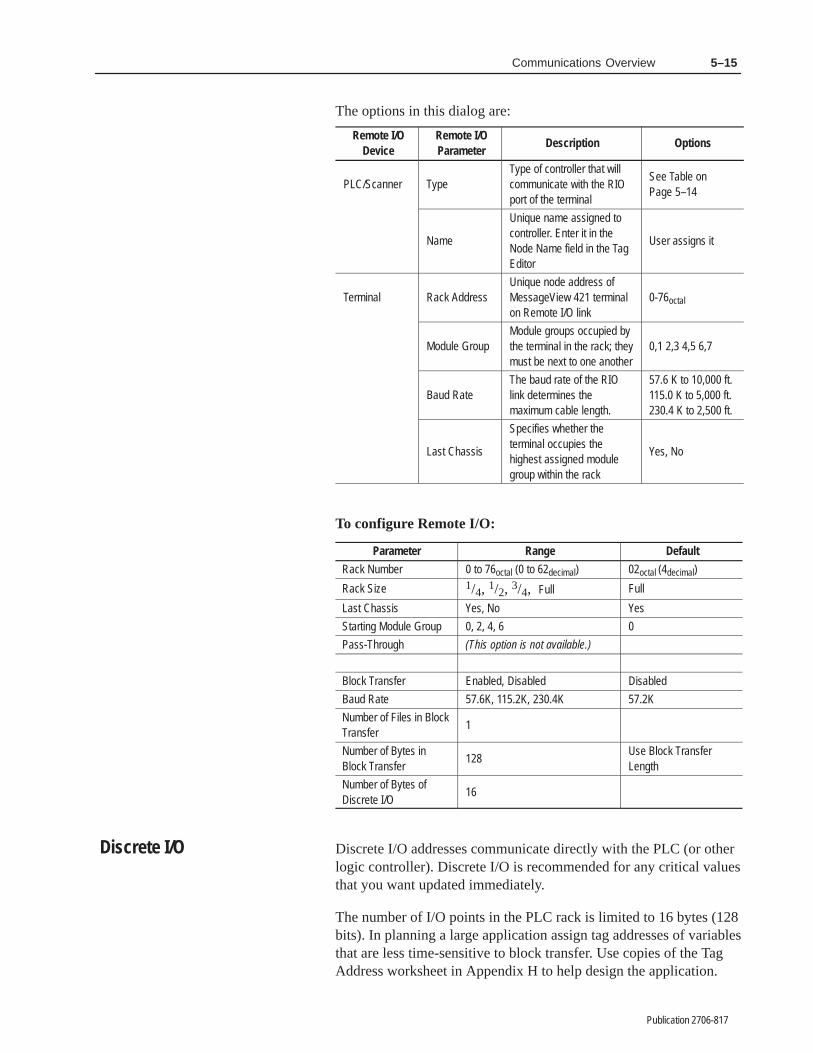
5–15Communications Overview
Publication 2706-817
The options in this dialog are:
Remote I/ODevice
Remote I/OParameter
Description Options
PLC/Scanner TypeType of controller that willcommunicate with the RIOport of the terminal
See Table on Page 5–14
Name
Unique name assigned tocontroller. Enter it in theNode Name field in the TagEditor
User assigns it
Terminal Rack AddressUnique node address ofMessageView 421 terminalon Remote I/O link
0-76octal
Module GroupModule groups occupied bythe terminal in the rack; theymust be next to one another
0,1 2,3 4,5 6,7
Baud RateThe baud rate of the RIOlink determines themaximum cable length.
57.6 K to 10,000 ft.115.0 K to 5,000 ft.230.4 K to 2,500 ft.
Last Chassis
Specifies whether theterminal occupies thehighest assigned modulegroup within the rack
Yes, No
To configure Remote I/O:
Parameter Range Default
Rack Number 0 to 76octal (0 to 62decimal) 02octal (4decimal)
Rack Size 1/4, 1/2, 3/4, Full Full
Last Chassis Yes, No Yes
Starting Module Group 0, 2, 4, 6 0
Pass-Through (This option is not available.)
Block Transfer Enabled, Disabled Disabled
Baud Rate 57.6K, 115.2K, 230.4K 57.2K
Number of Files in BlockTransfer
1
Number of Bytes inBlock Transfer
128Use Block TransferLength
Number of Bytes ofDiscrete I/O
16
Discrete I/O addresses communicate directly with the PLC (or otherlogic controller). Discrete I/O is recommended for any critical valuesthat you want updated immediately.
The number of I/O points in the PLC rack is limited to 16 bytes (128bits). In planning a large application assign tag addresses of variablesthat are less time-sensitive to block transfer. Use copies of the TagAddress worksheet in Appendix H to help design the application.
Discrete I/O

5–16 Communications Overview
Publication 2706-817
Example: Discrete I/O
The MessageView 421 terminal occupies rack #3 in which itsstarting module group is 0. The F1 key is addressed as I:030/03, andthe bit trigger for the next message as O:031/01.
➁ The PLC ladder program monitors address I:030/03.
Rack #3 MessageView I/O
0 1 2 3 4 5 6 70 1 2 3 4 5 6 7
8 Input Words 8 Output Words
030 031
➂ The operator presses F1. The terminal sets a bit in theaddress assigned to that function key and clears the message.
➃ The ladder program reads bit 03 at address I:030/03.
030
031
Input Word
Output Word
➀ The MessageView monitors the status ofthe 8 input words in its rack assignment.
➄ The ladder program sets bit 01 at address O:031/01.
0 0 0 0 0 0 0 0 0 0 0 0 1 0 0 0
01
0 0 0 0 0 0 0 0 0 0 0 0 0 0 1 0
03 01
23456701234567
0123456701234567
➅ The terminal reads the address, which is assigned as a bittrigger for the next message. The next message is displayed.

5–17Communications Overview
Publication 2706-817
The RIO interface on the MessageView RIO daughterboard supportsthe transfer of blocks of data between a PLC and a MessageView421 terminal.
Note: Some logic controllers do not support block transfer. Checkthe user manual for the controller used in the system.
Using Block Transfers
Block transfers are assigned to a single byte of input data (modulecontrol byte) and output data (module status byte) within the rackassigned to the terminal. These two bytes control the operation of theblock transfer and are no longer available for discrete I/O.
These bytes always occupy the low byte of the lowest module groupin the terminal rack assignment. For example, if the starting modulegroup is 0:
Rack 03 MessageView I/O
0 2 4 61 3 5 7
012345610
11121314151617
012345610
11121314151617
Starting ModuleGroup 0
Input Word
Output Word
Status Byte
Module Control Byte
7
7
No matter how many block transfers are assigned (1 to 10), one byteis reserved in the input and and one in the output rack.
Note: Two copies of the worksheet in Appendix H are used forDiscrete I/O (input and output). Be sure to block off the status byteand module control byte in these worksheets if the application usesblock transfer.
Block transfer directions are in reference to the PLC:
• Block Transfer Reads (BTR) are inputs to the PLC. They are usedto transfer data from data entry variables on the MessageViewterminal.
• Block Transfer Writes (BTW) are outputs from the PLC. They areused to transfer data to data display variables on theMessageView terminal.
Block Transfer

5–18 Communications Overview
Publication 2706-817
PLC
Block Transfer Read
Block Transfer Write
MessageView Terminal
Configuring a Block Transfer
Configure MessageView 421 block transfers using the BlockTransfer dialog which is accessed from the Communication Setupdialog.
Note: When a block transfer starting address is assigned in theBlock Transfer dialog, the size of the block (up to 64 words) isalso specified. The terminal uses the block size (length) toidentify the data segment being transferred.

5–19Communications Overview
Publication 2706-817
Each block transfer must have certain information specified:
• Enabled: whether the block transfer enabled or disabled.
• Address: the starting address to read or write the block transfer.
• Mode: select R for a Read operation or W for a Write operation.
• Length: how many words are transferred (1 to 64). TheMessageView terminal uses the length to identify data blocks.
Each block transfer read must be a unique length and each blocktransfer write must be a unique length. However a read block canbe the same length as a write block.
A length of 63 is reserved for Pass-Through.
• Pass-Through: (This option is not available at this time.)
• Block Transfer Timeout: specifies a timeout value fortransferring applications using Pass-Through. A value of 0disables the timeout.
• Each block transfer requires a corresponding Block TransferWrite or Block Transfer Read instruction in the ladder programfor the controller. The Data File and Length settings must matchthe Data File and Length settings in the Block Transfer dialog.
BTR or BTWBLOCK TRANSFER READ/WRITERack 03Group 0Module 0Control Block N36:0Data File N37:1Length 4Continuous N
High or Low Byte (Always 0 for MessageView)
MessageView Rack AssignmentGroup No. 0 � 7
Address of the data file which is written or read.Must match the address entered in the BlockTransfer dialog.
Length of the data being transferred. Must matchthe length entered in the Block Transfer dialog.
File that controls how the instruction works
Operating mode of the transfer

5–20 Communications Overview
Publication 2706-817
Helpful Hints for Block Transfers
Keep these suggestions in mind when using block transfers:
• Read and Write Blocks can use the same address.
• Read and Write Blocks may overlap partially or completely.
• Since Remote I/O scanners usually make only one block transferin one I/O scan:
– improve response times by compacting the data into thefewest possible blocks (no unused bits)
– if the Function Key Return Message Number global attributeis enabled, make sure that the tags for function keys are in thesame block as the Function Key Return Message Number tag.
Example: Block Transfer Read
In this example, the MessageView 421 terminal is assigned to rack#3 and its starting module group is 0. A Numeric Variable Entryvariable has the address N7:2, and its value is read by the logiccontroller in a part of the data block being transferred.
BLOCK TRANSFER READRack 03Group 0Module 0Control Block N36:0Data File N7:2Length 4Continuous N
➀ The operator enters 30 as the motorspeed in the Numeric Variable Entry.
➁ Using information supplied by the CommunicationSetup utility, the MessageView determines theposition of the data and the block size.
Entry variable with Tag Name “Motor_Speed” toAddress N7:2
➂ The MessageView terminal places thedata in the first word of a 4 word block.
➃ The PLC reads the 4 word block of dataand stores it at the Data File address.
BTR(EN)
➄ The value (30) entered on the MessageViewterminal display is now stored at N7:2.
Read FromMessageView
Data To PLC
Word 1 30Word 2Word 3Word 4

5–21Communications Overview
Publication 2706-817
Example: Block Transfer Write
In this example, the MessageView 421 terminal is assigned to rack#3 and its starting module group is 0. A Numeric Variable Displayvariable has the address N7:0, and its value is written by the logiccontroller to a portion of the data block being transferred.
BTW(EN)BLOCK TRANSFER WRITE
Rack 03Group 0Module 0Control Block N16:1Data File N7:0Length 10Continuous N
➀ The PLC receives and stores data froman input device, in this example a flowsensor.
➁ The PLC ladder logic program initiates ablock transfer of a data block (10 words)containing the display data.
Display variable withTag Name “Flow_Rate” from Address N7:5
➂ The MessageView terminal receives the data anddetermines the starting address where the data iswritten by matching the block size with the addressentered in the Communication Setup utility.
➄ The MessageView updates the Numeric VariableDisplay using the data from the controller.
Flow RateTransducer
Data FromPLC
N7:5
10 WORDSN7:0N7:1N7:2N7:3N7:4N7:5N7:6N7:7N7:8N7:9
Flow Rate Data
➃ The MessageView now carries a copy of thatsegment of the logic controllers data table.
Tag Name = Flow_Rate

5–22 Communications Overview
Publication 2706-817
Example: Transferring Multiple Blocks
Multiple block transfers use a single channel (single Module Controland Status Bytes defined). Each block transfer read or block transferwrite must be a unique length since the MessageView terminal usesthe block size to determine the starting location of the read or write.The following is an example of a block transfer write of two blocks.
BTW(EN)BLOCK TRANSFER WRITE
Rack 03Group 0Module 0Control Bloc N16:6Data File N90:10Length 60Continuous N
➀ The PLC ladder logic program initiatesmultiple block transfers of 2 data blocks(7 words and 60 words).
➁ The MessageView terminal receives the first datablock and determines the starting address N7:0where the data is written by matching the block sizewith the address entered in the Communication Setuputility.The MessageView handles the second block in thesame manner.
Data FromPLC
N7:0N7:1N7:2N7:3N7:4N7:5N7:6N7:7N7:8N7:9
➂ The MessageView carries a copy of thelogic controller data tables N7:0 to N7:6.
BTW(EN)BLOCK TRANSFER WRITE
Rack 03Group 0Module 0Control Block N16:1Data File N7:0Length 7Continuous N
Data FromPLC
➄ The MessageView display variables are updated using the new data.
Block 1 Transfer N90:8N90:9N90:10N90:11
➃ The MessageView carries a copy of thelogic controller data tables N90:10 to N90:69.
Block 2 Transfer
. . .N90:12
N90:67N90:68N90:69N90:70N90:71
Note: If interfacing to an Allen-Bradley PLC2, single block transferis recommended.

Chapter 6
Publication 2706-817
���� � �� �������� ����
This chapter covers the following topics:
• Starting MessageBuilder
• Creating a new application
• Opening an existing application
• Saving an application
• Renaming and describing an application
• Closing an application
• Exiting MessageBuilder.
MessageBuilder opens like any other Windows application.
To start MessageBuilder:
1. At the DOS prompt, type win and press ENTER.
2. Double-click the MessageBuilder group icon in the ProgramManager. Then double-click the MessageBuilder icon to open thewelcome screen showing copyright and release information.
Or use the Run command in the File menu of the ProgramManager, and type the path and file name.
User nameCompany name
Starting MessageBuilder
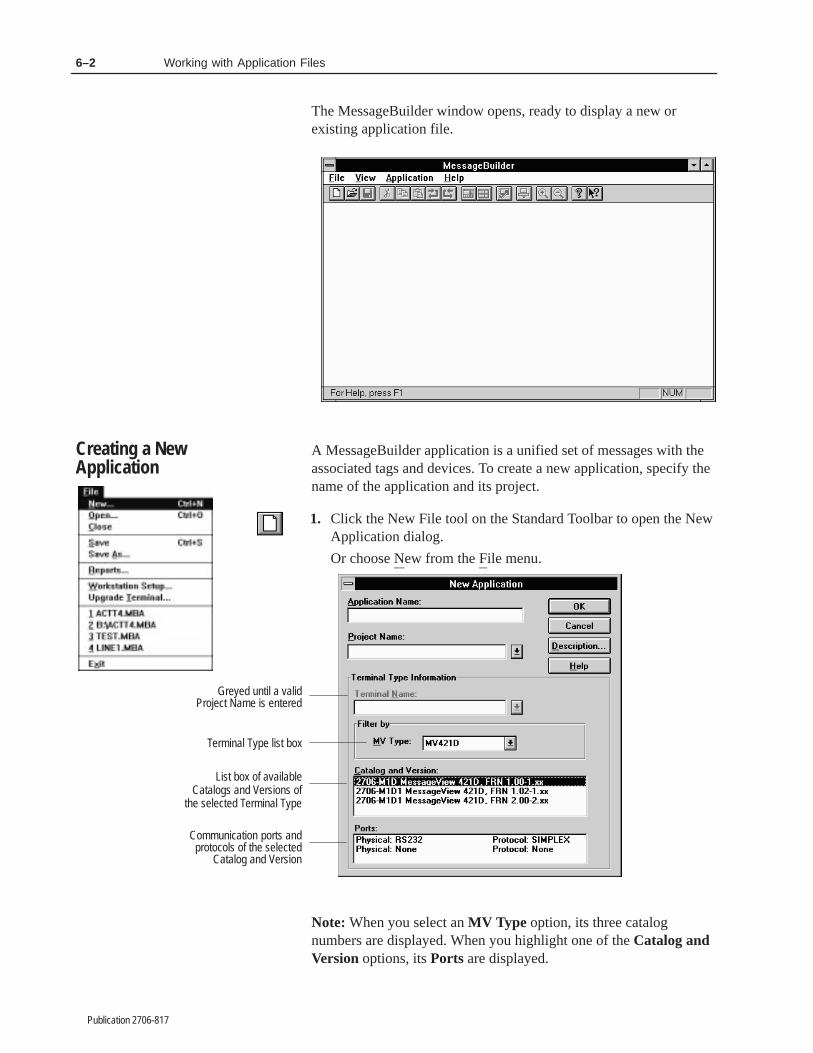
6–2 Working with Application Files
Publication 2706-817
The MessageBuilder window opens, ready to display a new orexisting application file.
A MessageBuilder application is a unified set of messages with theassociated tags and devices. To create a new application, specify thename of the application and its project.
1. Click the New File tool on the Standard Toolbar to open the NewApplication dialog.
Or choose New from the File menu.
Communication ports andprotocols of the selected
Catalog and Version
Greyed until a validProject Name is entered
Terminal Type list box
List box of availableCatalogs and Versions of
the selected Terminal Type
Note: When you select an MV Type option, its three catalognumbers are displayed. When you highlight one of the Catalog andVersion options, its Ports are displayed.
Creating a NewApplication

6–3Working with Application Files
Publication 2706-817
2. In the Application Name box, enter a name up to 32 characterslong. This name cannot start with a number or contain spaces.
When MessageBuilder software saves the application, the defaultfile name is the first 8 characters of the application name, with theextension .MBA. Page 6–6 explains how to save under adifferent file name.
3. In the Project Name box, select or enter a name up to 32characters long. This name cannot start with a number or containspaces.
The Project Name List box gives all existing project names.Select one of these if the new application will use the same tagdefinitions and devices as a previous application.
The Project Name links the application with a database of tagdefinitions and device (terminal and controller) information.
!ATTENTION: If a project name must be changed inMessageBuilder software, or a project deleted from thesoftware, DO NOT use a DOS or Windows command.Use the Project Management command on theApplication menu.
4. Define the specific MessageView 421 terminal that will run theapplication. If the terminal device with its catalog information isnot already associated with the project, add it now.
• In the Terminal Name box, select or enter a name (up to 32characters long) for the terminal.
• In the Filter by MV Type list box, select the correctMessageView terminal type for the application.
• In the Catalog and Version list, highlight the catalog numberand firmware version (FRN x.xx) installed in the terminal.Note: Make sure that the Catalog number and FirmwareVersion selected matches the Catalog number and FirmwareVersion of the terminal in which the application will reside.
• The Ports box displays the physical ports and protocol for theselected terminal type. This box is read only.
5. If a description will be useful, select the Description button toopen another dialog. See Page 6–8.
6. Select the OK button to begin creating the MessageBuilderapplication.
☞ To copy, rename, or delete devicesfrom a project, see Page 9–1.
☞ For an existing terminal, the dialog displays defined terminal information.

6–4 Working with Application Files
Publication 2706-817
To reopen an application:
The bottom of the File menu lists up to four application files, theones that were opened most recently. To reopen one of them, simplyselect it.
Note: The paths for files in the File menu are given if different fromthe current directory. In the File menu illustrated at the left below,one file (ACCT4.MBA) was opened from a floppy disk and saved tothe current directory.
Note: Devices or tags in a reopened application may not matchthose in its assigned project. See Page 9–8 for details on how toreconcile the project with its application.
To open an application file that is not listed on the File menu:
1. Click the File Open tool on the Standard Toolbar to display theFile Open dialog .
Or choose Open from the File menu.
The File Name list box shows all MessageBuilder application(MBA) files in the current drive and directory.
• To locate a file on another drive, select the drive name in theDrives list box.
• To locate a file in another directory, use the scroll bars ifneeded to locate the correct directory in the Directories listbox, or find it through its parent directory. Select the directoryname.
Opening an ExistingApplication

6–5Working with Application Files
Publication 2706-817
2. Double-click the name of a file in the File Name list box to selectand open the file.
• Or highlight the name and select OK.
• Or enter the path name and name of the file in the File Name boxand select OK .
Multiple applications open
MessageBuilder supports multiple open applications. Create newapplication files or open existing files as needed.
When you open a second application, it is cascaded over the first.Use the commands on the Window menu to toggle between Cascadeand Tile. The active application in the Window menu is checked.
To activate a different open application, either:
• select it on the Window menu
• click on its title bar.
The application with its title bar highlighted is the active one. TheEdit Box, menu commands and tool icons apply only to the activeapplication.
This illustration shows tiled applications with the lower one active.

6–6 Working with Application Files
Publication 2706-817
If too many applications are open for available computer memory,this dialog appears. Close some applications before opening anymore new ones.
The File menu provides two commands for saving an application:
• Use the Save command to save the application to the defaultdrive and directory, overwriting the previous version.
• Use the Save As command to save a revised application with anew name so the previous version is not overwritten.
Important: It is good practice to save an application frequently.
The first time an application is saved, the Save As dialog opens sothe file can be named.
To save an existing application file:
• click the Save File tool on the Standard Toolbar
• choose Save from the File menu.
MessageBuilder replaces the previous version of the application ondisk with the new version.
To save a new or existing application with a new name:
1. Choose Save As from the File menu to open the Save As dialog.
Saving an Application
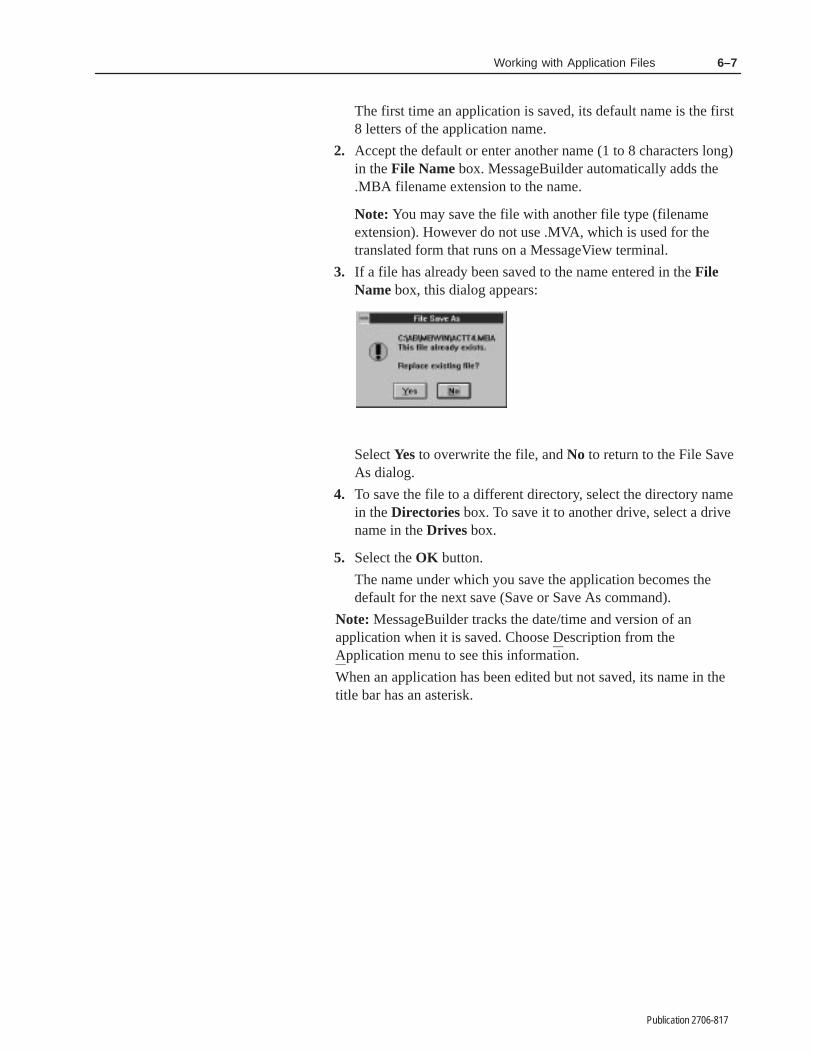
6–7Working with Application Files
Publication 2706-817
The first time an application is saved, its default name is the first8 letters of the application name.
2. Accept the default or enter another name (1 to 8 characters long)in the File Name box. MessageBuilder automatically adds the.MBA filename extension to the name.
Note: You may save the file with another file type (filenameextension). However do not use .MVA, which is used for thetranslated form that runs on a MessageView terminal.
3. If a file has already been saved to the name entered in the FileName box, this dialog appears:
Select Yes to overwrite the file, and No to return to the File SaveAs dialog.
4. To save the file to a different directory, select the directory namein the Directories box. To save it to another drive, select a drivename in the Drives box.
5. Select the OK button.
The name under which you save the application becomes thedefault for the next save (Save or Save As command).
Note: MessageBuilder tracks the date/time and version of anapplication when it is saved. Choose Description from theApplication menu to see this information.
When an application has been edited but not saved, its name in thetitle bar has an asterisk.

6–8 Working with Application Files
Publication 2706-817
Use the Description command on the Application menu to:
• enter an application description which can be included in a report
• view the version number of an application and when it was lastsaved.
To open the Application Description dialog:
• choose Description from the Application menu
• select the Description button in the New Application dialog.
Note: The Application Name and Project Name do not appear whenthe Description dialog is accessed from the New Application dialog.
I-Beam Pointer
Current Project Associated With Application
Version
Application Name
When the Application was Saved
This dialog gives the date and time of the last save, and the currentversion. Each time an application file is edited and saved, the versionnumber is automatically incremented.
Renaming and Describingan Application

6–9Working with Application Files
Publication 2706-817
To enter or edit an application description:
Important: The description is downloaded to the terminal with theapplication, so it uses terminal memory.
1. Select the Description box and type the description. The textautomatically wraps.
To change the location of the insertion point in the Descriptionbox, move the I-beam pointer or use the arrow keys. The insertionpoint moves with the text when the scroll bar is used.
– To start a new line, press CTRL+ENTER.
Note: ENTER alone closes the Description dialog.
– To delete text, drag pointer over the text to highlight it, thenpress BACKSPACE or DELETE.
– To replace text, drag pointer over the text to highlight it, thentype the new text.
– To add text, position the cursor where you want to insert textand then type the new text.
– Use any of the standard Window editing functions to edit text.
2. When done, select OK to close the dialog.
To edit a description in a different application:
Change the application name in this dialog if you want to enter orrevise a description in a different application than the open one. Thischange does not affect the open application.
1. Select the Application Name box. Highlight the text, then type anew name.
2. Create or edit the dialog for this application file.
3. Select OK to close the dialog.

6–10 Working with Application Files
Publication 2706-817
To close an application file:
• double-click the control-menu box on the Application dialog, or
• choose Close from the File menu.
If you made changes to the application since the last save,MessageBuilder gives you the option of saving the file beforeclosing it.
When you exit MessageBuilder to the Windows desktop, all openapplications are closed.
Note: Always exit MessageBuilder software before turning off thecomputer.
To quit MessageBuilder:
• double-click the Control-menu box on the MessageBuilderwindow, or
• choose Exit from the File menu.
If any applications are open and unmodified, they are closedautomatically.
If any or all were modified since the last save, a dialog for eachapplication asks if it should be saved before closing.
Select Yes to save the application and exit, No to exit without saving,and Cancel to return to MessageBuilder.
Closing an Application
Exiting MessageBuilder

Chapter 7
Publication 2706-817
������� �����
This chapter covers the following topics:
• The Message Editor dialog
• Working with messages
• Selecting messages
• Editing messages
• Set Preferences
• Message Editor Terminal View
• Embedded variables and graphics
• Numeric variable display
• ASCII variable display
• Numeric variable entry
• ASCII variable entry
• Message attributes
• Slaving
• Function keys
• LED attributes
• Special Messages.
When a new or existing application is opened, the Message EditorTable View appears. It is the main window for application design.
Project Name Application File Name
Menu Bar
Standard Toolbar
Message List
Status Bar
Message Edit Box
Message Edit Toolbar
Attribute Controls
The Message Editor Dialog

7–2 Creating Messages
Publication 2706-817
In the Message Editor Table View you can:
• create and revise individual messages
• enter and revise attributes for each message
• work with many commands and tools which are available onlywhen an application is open.
The Message List at the bottom of the Message Editor Table Viewlists all messages in the application.
• The Number column displays the Message number, which is usedas the Value Trigger.
• The Topic column displays the message subgroup to which themessage is assigned.
• The Message Text column displays the text and placeholders thatmake up the message text.
Each message in an application is created and edited individually.
To create a new message:
MessageBuilder software has four ways to create a message and addit to the Message List.
To append a message at the end of the Message List:
• click the Append Message tool on the Message Edit Toolbar
• select New Message in the Edit menu.
To insert a message above the currently highlighted message:
• click the Insert Message tool on the Message Edit Toolbar
• select Insert Message in the Edit menu.
Each new message is highlighted in the Message List, and isdisplayed in the Message Edit box. It has default text of “Message#X”, where X is its Message Number.
To delete a message:
Highlight the message in the Message List, then:
• click the Delete Message tool
• press ALT + DEL
• select Delete Message on the Edit menu.
To restore a deleted message:
• click the Undo tool
• press CTRL + Z
• select Undo on the Edit menu.
Working with Messages

7–3Creating Messages
Publication 2706-817
When a message is selected in the Message List, the message textappears in the Message Edit box, and its attributes are displayed inthe Attribute Controls section of the Message Editor Table View.
Selecting a message for editing
Select (highlight) a message in the Message List:
• manually
• by using the Find command in the Edit menu.
Important: The attribute box labelled Message changes themessage number of the selected message. It does notselect a message in the Message List.
To select a message manually:
If the message is visible, highlight it. A highlighted message isselected and its message text appears automatically in the MessageEdit box. To highlight (select) a message:
• click on the message
• select the Message List and use the up or down arrow keys.
Note: Double-click a message to highlight the message’s text in theMessage Edit box.
If the message is not visible, select the Message List and scroll it upor down through the list until the message is visible, using:
• arrow keys
• Page Up or Page Down keys
• the vertical scroll bar.
The Message List vertical scroll bar appears when there are moremessages than the application window can display at once.
Note: Make the Application window wider if necessary to displaythis scroll bar.
Selecting Messages

7–4 Creating Messages
Publication 2706-817
To select a message using the Find command:
1. Press CTRL + F to open the Find Message dialog box.
Or select the Find command in the Edit menu.
2. Under Search select Up or Down for the direction of search.
3. To specify the type of search, select one of the options under theSearch For command. The Find ... box changes its title to suitthe option.
4. Enter text or a value in the Find ... box as follows:
• Text – in the Find Text box, type a text string, which can be anypart of a message’s text. Include spaces and punctuation.Variables and graphics cannot be part of the search.
Note: The Match Case option is active only when Text isselected. Select it if capitalization is important in the searchstring; otherwise Search is not case-sensitive.
• Message Number – in the Find Message Number spin control:
– type the message number– use the spin control to display the desired number.
• Bit Trigger Bit – in the Find Bit Trigger Bit spin control:
– type the number of the bit trigger for the message– use the spin control to display the desired number.
• Topic – in the Find Topic list box, select the list box andhighlight the correct topic.
Note: Search For Topic locates messages scattered through theapplication. If you want to edit all messages assigned to a topic,they can be brought together in the Message List by Sorting.

7–5Creating Messages
Publication 2706-817
5. Select the Find Next button.
When a match is found, the matching message is highlighted inthe Message List and appears in the Message Edit box.
If a match is not found by the bottom (top) of the list, the Findfunction wraps to continue the search through the rest of the list.
If there is no match, a dialog appears:
6. Select the Find Next button again to locate the next message thatmeets the search criteria. The Find Message dialog remains openuntil Close is selected.
7. Select the Close button to return to the Message Editor TableView at the last found message.
To edit a message, select it by highlighting it in the Message List.The selected message’s text appears in the Message Edit box. Avertical bar appears at the insertion point.
Message Edit BoxMessage Edit Bar
Insertion point
To highlight text in the Message Edit box:
• in the Message List, double-click on the message to highlight thewhole message in the Message Edit box
• in the Message Edit box, click and drag to highlight all or part ofa message
• in the Message Edit box, double-click to highlight the word orplaceholder under the cursor
• in the Message Edit box, hold down the SHIFT key and use theleft or right arrow keys to highlight all or part of the message.
Editing Messages

7–6 Creating Messages
Publication 2706-817
Creating a text string
To add or insert text in a message:
1. Click in the Message Edit box where the text is to go.
Or select the Message Edit box and move the insertion pointerusing the left/right arrow keys or the Home/End keys.
2. Start typing.
Important: Highlighted text is overwritten.
Accented characters
Characters that do not appear on the computer keyboard, such asaccented characters used in European languages, may be added toany MessageBuilder message. These characters and their ASCIInumbers are given in the ASCII tables in Appendix I.
When ASCII and Extended ASCII characters are added toMessageBuilder messages, they are treated as text characters. SeePage 7–21 for a discussion of ASCII Control characters.
To use ASCII characters in a message:
1. Set the insertion pointer in the Message Edit box where theASCII character is to go.
2. Look up the ASCII character on Page I–2 or I–3, and notedecimal number.
The range of valid ASCII and Extended ASCII characters is 032to 0255. Characters numbered 0 to 31 are reserved for controlcharacters.
3. Press ALT + #, where # is the decimal representation of thecharacter preceded by a zero. For instance:
• 065 represents the letter A.
• 055 represents the number 7.
• 0160 represents the accented character á.
• 0248 represents the degree sign °.
The character appears in the Message Edit box at the insertion point.

7–7Creating Messages
Publication 2706-817
To cut a text string:
1. Set the insertion pointer in the Message Edit box at the start orend of the text to be cut.
2. Drag the mouse pointer over the text to highlight it.
Or hold down the SHIFT key and use the left or right arrow keys.
3. Click the Cut tool.
• Or press CTRL + X.
• Or select Cut from the Edit menu.
The selected text is removed and is copied to the Windows clipboard.It may be Pasted to the same or another message.
To copy a text string:
1. Set the insertion pointer in the Message Edit box at the start orend of the text to be copied.
2. Drag the mouse pointer over the text to highlight it.
Or hold down the SHIFT key and use the left or right arrow keys.
3. Click the Copy tool.
• Or press CTRL + C.
• Or select Copy from the Edit menu.
The selected text remains highlighted and is copied to the Windowsclipboard. It may be Pasted to the same or another message.
Note: If it is to be pasted in the same message, move the insertionpointer to remove the highlighting.
To paste a text string:
1. Cut or copy the text string to the Windows clipboard.
2. If necessary, use the Find command or scroll bar to bring up thedestination message in the Message Edit box.
3. Set the insertion pointer in the Message Edit box.
4. Click the Paste tool.
• Or press CTRL + V.
• Or select Paste from the Edit menu.
Note: A text string may be pasted repeatedly. Any cut or copied textstring remains on the clipboard until:
• some other text string is cut or copied
• Microsoft Windows is closed.
Note: Text can be copied to or from another Windows applicationusing these techniques.

7–8 Creating Messages
Publication 2706-817
Important: When a text string is Copied, Cut and Pasted, orReplaced, any embedded variables or graphics are lostin transit. They must be recreated using the EmbeddedVariable tool or commands. However, see the nextsection to copy a message and its attributes.
Copying and Pasting a message with its variables and attributes:
1. Select the source message in the Message List.
2. Click the Copy tool to copy the message, including its text,embedded variables and attributes, to the Windows Clipboard.
Or select Copy from the Edit menu.
Important: Make sure that the insertion pointer is not in theMessage Edit box, and that text in the Message Edit boxis not selected.
If text is highlighted in the Message Edit box and thencopied, the Message Paste dialog will have just the TextOnly option active. In other words, if you highlight andcopy part or all of the message in the Message Edit box,the text is pasted into the destination message, but itsvariables and attributes are not.
3. Create a destination message, see Page 7–2.
Or highlight an existing message in the Message List, which willbe replaced by the copied message.
Important: Make sure that the insertion pointer is not in theMessage Edit box, and that text in the Message Edit boxis not selected.
When the insertion pointer is in the Message Edit box,the Paste command simply copies the text string intothe destination message. The Message Paste dialog doesnot appear.
4. Click the Paste tool, and the Message Paste dialog appears.
Or select Paste from the Edit menu.

7–9Creating Messages
Publication 2706-817
The dialog displays the destination message number and the textstring copied in the Windows clipboard.
5. Select one of these options:
Option: Message Text:EmbeddedVariables:
Attributes:
Text Only Copied n/a n/a
Text with EmbeddedVariables
Copied Copied n/a
Attributes Only n/a n/a Copied
All Copied Copied Copied
6. Select OK to implement the choice.
Replacing a text string in a message or messages
1. Press CTRL + H to bring up the Replace dialog.
Or select Replace in the Edit menu.
2. Enter the Find Text string and the Replace Text string.
Find Text and Replace Text can not include graphics orvariables. However they may have spaces and punctuation.
3. Select the Match Case check box if capitalization is important inthe Find Text string.
4. Select one of the Search radio buttons to choose whether thesearch should go up or down through the Message List.
5. Select Find Next and then for each message found, decidewhether to replace the text string.
Or select Replace All and the text string is replaced automaticallyin every message where it occurs.
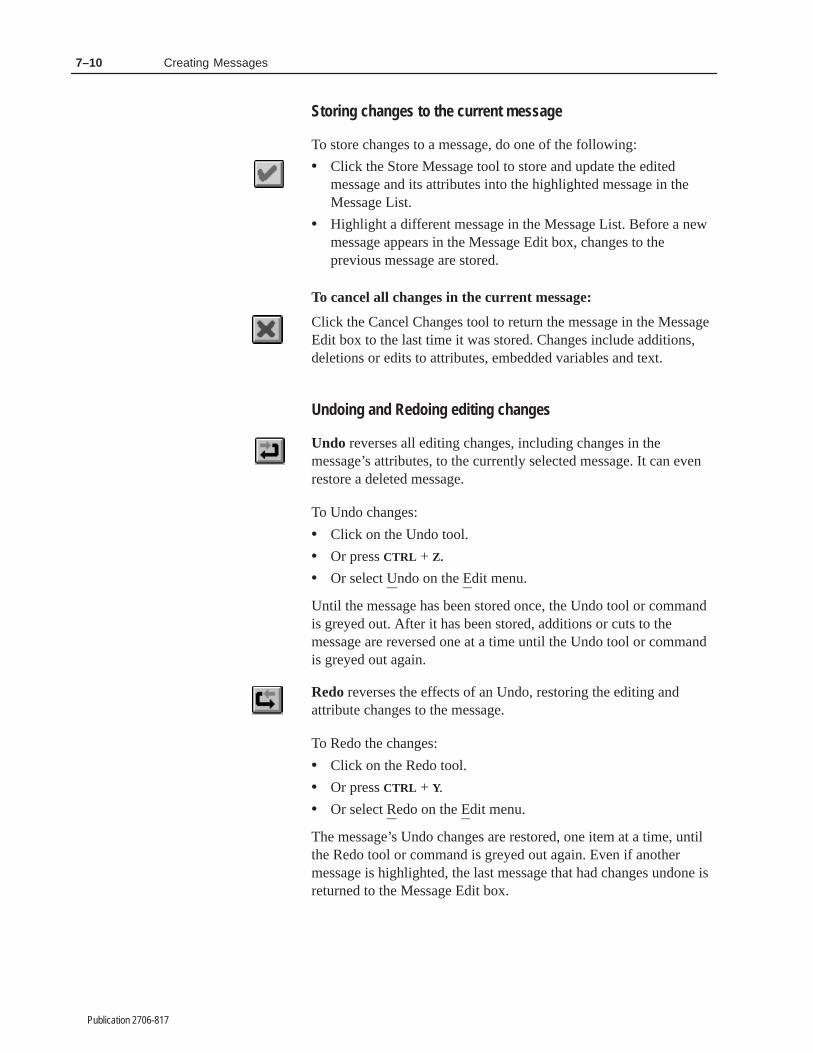
7–10 Creating Messages
Publication 2706-817
Storing changes to the current message
To store changes to a message, do one of the following:
• Click the Store Message tool to store and update the editedmessage and its attributes into the highlighted message in theMessage List.
• Highlight a different message in the Message List. Before a newmessage appears in the Message Edit box, changes to theprevious message are stored.
To cancel all changes in the current message:
Click the Cancel Changes tool to return the message in the MessageEdit box to the last time it was stored. Changes include additions,deletions or edits to attributes, embedded variables and text.
Undoing and Redoing editing changes
Undo reverses all editing changes, including changes in themessage’s attributes, to the currently selected message. It can evenrestore a deleted message.
To Undo changes:
• Click on the Undo tool.
• Or press CTRL + Z.
• Or select Undo on the Edit menu.
Until the message has been stored once, the Undo tool or commandis greyed out. After it has been stored, additions or cuts to themessage are reversed one at a time until the Undo tool or commandis greyed out again.
Redo reverses the effects of an Undo, restoring the editing andattribute changes to the message.
To Redo the changes:
• Click on the Redo tool.
• Or press CTRL + Y.
• Or select Redo on the Edit menu.
The message’s Undo changes are restored, one item at a time, untilthe Redo tool or command is greyed out again. Even if anothermessage is highlighted, the last message that had changes undone isreturned to the Message Edit box.

7–11Creating Messages
Publication 2706-817
Sorting messages
1. Select Sort on the Edit menu to open the Sort Messages dialog.
2. To specify which attribute of the messages in the Message List tosort on, select one of the radio buttons under the Sort Oncommand.
• Message Number arranges messages in numerical order.
Each message keeps its own message number in a Sort, so youcan restore the original list by Sorting on Message Number.
• Trigger arranges messages in order of the address of their bittriggers. Messages without bit triggers appear first in the list intheir original order.
• Text arranges messages in order by the initial item. Priority goesin order to:
– a variable– a space– a number– a letter.
• Topic places messages with the same topic together.
Note: If you want messages to be sorted within the topic, do apreliminary Sort on the other attribute(s) before sorting on Topic.
3. Select Master List to retain this sort as a default when theapplication is closed and reopened.
If Master List is not enabled, the Sort is used temporarily whileediting. In fact, a number of Table Views can be displayed at thesame time with different sort orders for their Message Lists.
4. Select OK to perform the Sort. Messages are rearranged in theMessage List according to the option chosen.

7–12 Creating Messages
Publication 2706-817
Renumbering messages
!ATTENTION: When you renumber a message ormessages, recheck chained messages. They must beedited if they refer to a number that was changed.
Message numbers may be changed in two ways.
• To change the number of a message, select the Message attribute.
Use the up/down arrow to display a new number for thehighlighted message, or enter a value in the spin control, thenclick the Store Message tool.
• To change the numbers of all messages in the Message List, selectRenumber on the Edit menu to bring up a dialog:
In the Renumber Messages dialog:
1. Type the number the Message List should start with.
Or use the spin control to display the correct number.
2. Select OK to return to the Message Editor Table View.
All messages in the Message List are renumbered in order followingthe initial number.
Note: This command simply renumbers messages, it does not changetheir order in the Message List. However it may be used after a Sortcommand to get the numbers back in sequence.
Topic
The Topic attribute allows messages in an application to beorganized or grouped by subject matter or function.
Use the Topic list box to assign a topic to each message; default isTopic 1. Assign all messages concerned with one aspect of theapplication to the same topic.
You can Sort messages by topic. See the Sort option on Page 7–11.

7–13Creating Messages
Publication 2706-817
To rename topics:
Rename any or all topics used in the application. The new text canhave up to 12 ASCII characters, including spaces.
1. Select Topics on the Edit menu to open the Topics to View dialog:
2. Select a text box and type an informative Topic name.
3. Repeat for every topic used in the application if desired.
4. Select OK to confirm the changes.
Every message that is assigned to a named topic will have that nameshown in its Topic column in the Message List. In addition, theTopic dropdown list now has the new topic names.
To view only messages with the same Topic:
Messages assigned to the same topic may be scattered through theMessage List. You can filter messages so the Message List displaysonly certain selected topics, to make editing more convenient.
1. Select Topics on the Edit menu to open the Topics to View dialog.
2. Deselect the check boxes beside topics that you don’t want in theMessage List at the moment.
3. Select OK . The Message List now displays only messagesassigned to the selected topic(s).
4. Select all the check boxes to return to the original Message List.
Validating messages
MessageBuilder software validates applications and messages so thatall attributes, variables, tags and devices are compatible with oneanother. Appendix D contains a list of Validation error messages.
• MessageBuilder software automatically validates all applicationsbefore they are downloaded.
• You may validate an application at any time by selecting Validateon the Application menu.
• You can also set up MessageBuilder to validate each messageindividually when it is stored or updated. See Page 7–15.

7–14 Creating Messages
Publication 2706-817
Note: Whenever you use the Paste command MessageBuildervalidates the message, to make sure the destination terminal cansupport all its attributes. For instance, if you try to paste a messagecontaining the Enable Slave attribute into an application intended torun on a terminal whose firmware cannot support Slave Port, youwill be unable to do so.
Error messages
If an error or warning message appears while you are:
• creating or editing an application, see Appendix C.
• validating an application, see Appendix D.
• uploading or downloading an application, see Appendix E.
These appendices list the error messages and what to do for eachone.
When you set preferences, they remain as you set them even whenthe computer is shut down and restarted. Preferences include:
• validate individual messages
• change the colors that distinguish Flash text and Embeddedcharacters in the Message Edit box.
To set preferences:
1. Select Preferences on the Application menu.
2. Select one of the options on the Preferences submenu.
3. Configure the option.
4. Select OK to return to the Message Editor Table View.
Message Options
This option allows you to decide whether MessageBuilder softwareshould validate each message as it is created and stored. SelectMessage Options to display the Application Preferences dialog:
Enable or disable the Automatic Message Validation option byclicking in the check box.
Default is to disable this option.
Set Preferences

7–15Creating Messages
Publication 2706-817
Colors
Flashing Text defaults to blue in the Message Edit box, andEmbedded Text to red. Embedded text includes variables andgraphics. Inverse Video appears with black and white inverted, so itdoes not need a special color to emphasize it.
When you select this option, the Color Selection box is displayed:
1. Select the type of text whose color you would like to change.
2. Select the Edit Color button. The Color dialog appears with thecurrent color selected.
Selected color
3. If you prefer to create a custom color, select the Define CustomColors button, and a color mixing dialog appears:
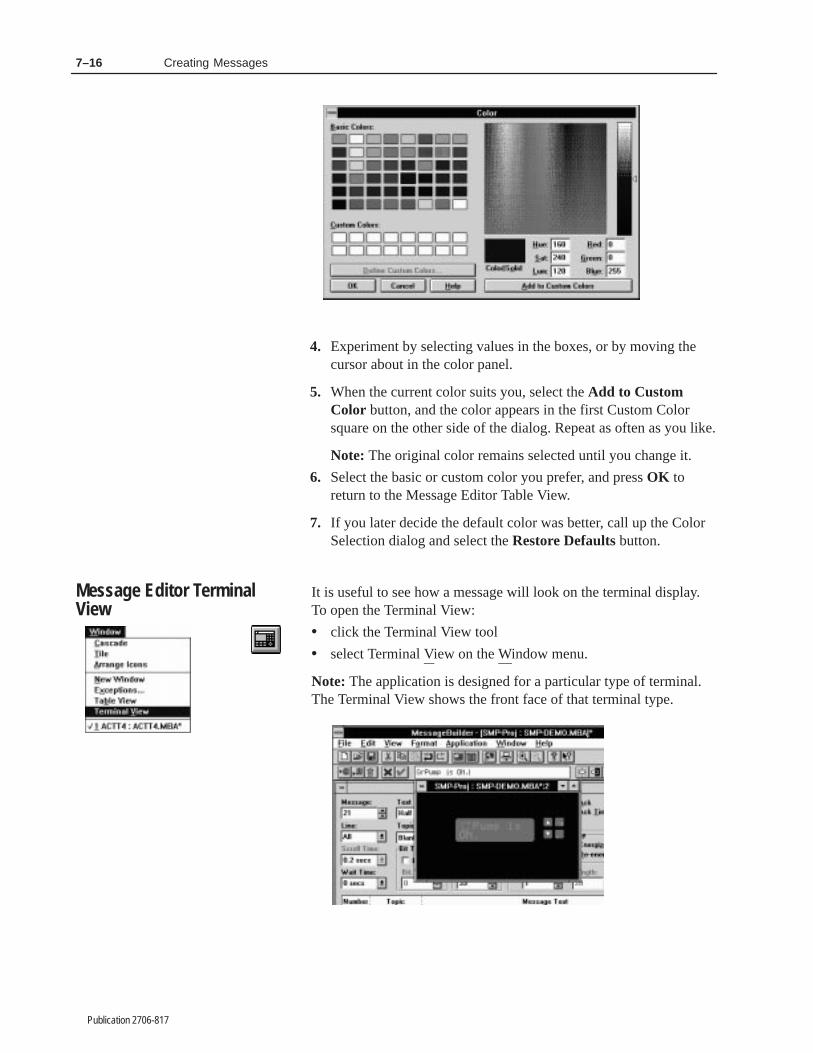
7–16 Creating Messages
Publication 2706-817
4. Experiment by selecting values in the boxes, or by moving thecursor about in the color panel.
5. When the current color suits you, select the Add to CustomColor button, and the color appears in the first Custom Colorsquare on the other side of the dialog. Repeat as often as you like.
Note: The original color remains selected until you change it.
6. Select the basic or custom color you prefer, and press OK toreturn to the Message Editor Table View.
7. If you later decide the default color was better, call up the ColorSelection dialog and select the Restore Defaults button.
It is useful to see how a message will look on the terminal display.To open the Terminal View:
• click the Terminal View tool
• select Terminal View on the Window menu.
Note: The application is designed for a particular type of terminal.The Terminal View shows the front face of that terminal type.
Message Editor TerminalView

7–17Creating Messages
Publication 2706-817
The Terminal View displays the active (highlighted) message. If theTerminal View is the active window, when a message is being editedin the Message Edit box, the changes appear in the Terminal Viewdisplay. (An active window has its Title Bar highlighted.)
• Text appears as entered, in its correct display mode size.
• Variables are represented by placeholders (see the table on Page7–18).
• Graphics appear as they will appear on the terminal display.
• Scrolling is not supported in the Terminal View, but Flash andInverse Video appear as they will on the terminal display.
Note: If the message is longer than the Terminal View can display,scroll through the message in the Message Edit box to see theremainder of the message. When the Terminal View is the activewindow, its display will follow the insertion point in the MessageEdit box. That is, it will scroll through the message up to the cursorpoint.
To return to the Message Editor Table View, select:
• The Table View tool.
• The Table View command in the Window menu.
• At the bottom of the Window menu is a list of open windows.Two of them have the same name. The name that is checkedrepresents the active Terminal View, so the Table View isrepresented by the name that is not checked (inactive). Select it toactivate the Table View.
Zoom
The Terminal View can be resized in one of two ways:
• Click on one of the Zoom tools.
The Zoom In [+] and Zoom Out [-] tools may be clicked up tofour times. When the display reaches the maximum or minimumsize, the tool you have used becomes inactive and is greyed out.
• Or select the Zoom command on the View menu to open a dialog:
Select a Zoom To percentage increase over the basic size. SelectOK , and the Terminal View is resized.
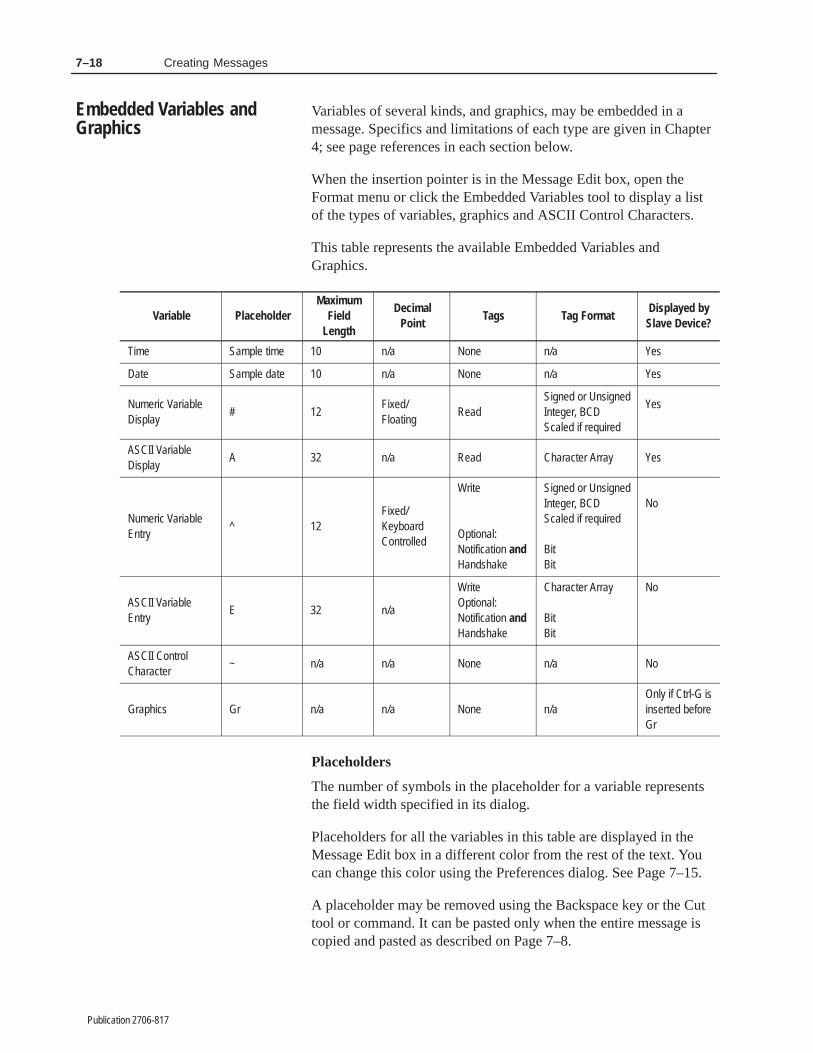
7–18 Creating Messages
Publication 2706-817
Variables of several kinds, and graphics, may be embedded in amessage. Specifics and limitations of each type are given in Chapter4; see page references in each section below.
When the insertion pointer is in the Message Edit box, open theFormat menu or click the Embedded Variables tool to display a listof the types of variables, graphics and ASCII Control Characters.
This table represents the available Embedded Variables andGraphics.
Variable PlaceholderMaximum
FieldLength
DecimalPoint
Tags Tag FormatDisplayed bySlave Device?
Time Sample time 10 n/a None n/a Yes
Date Sample date 10 n/a None n/a Yes
Numeric VariableDisplay
# 12Fixed/Floating
ReadSigned or UnsignedInteger, BCDScaled if required
Yes
ASCII VariableDisplay
A 32 n/a Read Character Array Yes
Numeric VariableEntry
^ 12Fixed/KeyboardControlled
Write
Optional:Notification andHandshake
Signed or UnsignedInteger, BCDScaled if required
BitBit
No
ASCII VariableEntry
E 32 n/a
WriteOptional:Notification andHandshake
Character Array
BitBit
No
ASCII ControlCharacter
~ n/a n/a None n/a No
Graphics Gr n/a n/a None n/aOnly if Ctrl-G isinserted beforeGr
Placeholders
The number of symbols in the placeholder for a variable representsthe field width specified in its dialog.
Placeholders for all the variables in this table are displayed in theMessage Edit box in a different color from the rest of the text. Youcan change this color using the Preferences dialog. See Page 7–15.
A placeholder may be removed using the Backspace key or the Cuttool or command. It can be pasted only when the entire message iscopied and pasted as described on Page 7–8.
Embedded Variables andGraphics

7–19Creating Messages
Publication 2706-817
Adding Time or Date to a message
Time and Date displays may be included in messages, but not morethan one of each per message.
To add either time or date to a message:
1. Set the insertion pointer in the Message Edit box where the timeor date display should be placed.
2. Click on the Embedded Variable tool to display a menu ofchoices.
Or select the Format menu to display a similar menu.
3. Select Time Display or Date Display.
A placeholder for Time or Date is added to the message at theinsertion point. The placeholder value is an arbitrary time or datewhich does not change.
When a message containing a Time or Date variable is displayed bya MessageView terminal, the terminal continually updates the Timeor Date variable according to its Real Time Clock.
You can change the format in which time or date are displayed on theterminal. Use the Time/Date tab on the Terminal Setup dialog, seePage 10–18.
Note: A Time or Date placeholder may be removed using theBackspace key or the Cut tool or command. It can be pasted onlywhen the entire message is copied and pasted as described on Page7–8.
Slave devices
Slave devices support the display of Time and Date variables inmessages. The time and date are updated while the slave message isactively displayed.

7–20 Creating Messages
Publication 2706-817
Adding graphics to a message
A set of 32 ISA bitmap graphics is supplied with MessageBuildersoftware. They illustrate components commonly used inmanufacturing. See Page B–6 for the list of ISA symbols.
Graphics may be embedded in a message. Each graphic occupies anarea 24 x 16 pixels: the area required by two half display modecharacters. Since a message has a maximum of 100 characters, it cantheoretically have up to 50 graphics symbols. Graphics cannot beresized.
Note: Graphics may be embedded only in half text size displaymode messages. If they are used in quarter or full text size displaymode messages, the application will not pass Validation.
To add a graphic to a message:
1. Set the insertion pointer in the Message Edit box where thegraphic should be placed.
2. Click on the Embedded Variable tool to display a menu ofchoices.
Or select the Format menu to display a similar menu.
3. Select Graphic to display the Select Graphic dialog whichillustrates and names all 32 ISA symbols:
4. Use the scroll bar if necessary to display the required graphicsymbol.
5. Double-click on the symbol.
Or highlight the symbol and select OK.
A placeholder, Gr, is added to the message at the insertion point.
Note: A Graphic placeholder may be removed using the Backspacekey or the Cut tool or command. It can be pasted only when theentire message is copied and pasted as described on Page 7–8.

7–21Creating Messages
Publication 2706-817
Slave devices
Slave devices support and display graphics embedded in messagesonly if a Ctrl-G is inserted before each graphic. If this controlcharacter is not inserted, the terminal replaces the graphic with twospaces before sending the message to the slave.
Adding ASCII Control Characters to a message
This option is used to embed ASCII control characters in a message.ASCII control characters are used to embed Control Mode andDisplay Mode Control Bytes in a message to be slaved. Slaving isdiscussed in the section starting on Page 7–41.
Important: This option is not used to embed ASCII and ExtendedASCII characters, which include the accentedcharacters used in European languages. See Page 7–6.
To add an ASCII Control Character to a message:
1. Set the insertion pointer in the Message Edit box where theControl Character should be placed.
2. Click on the Embedded Variable tool to display a menu ofchoices.
Or select the Format menu to display a similar menu.
3. Select ASCII Char to display the ASCII Characters dialog:
4. Select the number corresponding to the ASCII character youwant.
See the ASCII Table on Page I–2. ASCII characters with decimalnumbers 0 to 31 are reserved for control characters.
5. Select OK.
A placeholder, ~, is added to the message at the insertion point.
Note: ASCII characters with numbers 0 to 31 are reserved forcontrol characters. If #32 or higher is selected in this dialog, it willbe represented in the Message Edit box by a placeholder, eventhough that number does not represent a control character.

7–22 Creating Messages
Publication 2706-817
Note: An ASCII Control Character placeholder may be removedusing the Backspace key or the Cut tool or command. It can bepasted only when the entire message is copied and pasted asdescribed on Page 7–8.
Adding numeric and ASCII variables to a message
A message may contain embedded numeric and ASCII variables.They may be:
• display variables that display values in the logic controller
• entry variables that allow the terminal operator to enter values atthe terminal via:
– the front panel keypad– an ASCII Input device.
A message may have up to 10 display/entry variables, provided thetotal message length is not over 100 characters.
To add a variable to a message:
1. Set the insertion pointer in the Message Edit box where thevariable should be placed.
2. Click on the Embedded Variable tool to display a menu ofchoices.
Or select the Format menu to display a similar menu.
3. Select the name of the variable type to display its dialog box.
Each type of variable has its own dialog box. They are discussedin detail in the next few pages.
4. Edit the attributes for the variable.
5. Select OK.
A placeholder is added to the message at the insertion pointer:
• # for Numeric Display variables
• A for ASCII Display variables
• ^ for Numeric Entry variables
• E for ASCII Entry variables.
The number of symbols in the placeholder for each entry and displayvariable represents the field width specified in its dialog.
Note: A Variable placeholder may be removed using the Backspacekey or the Cut tool or command. It can be pasted only when theentire message is copied and pasted as described on Page 7–8.

7–23Creating Messages
Publication 2706-817
To edit a variable:
1. Double-click on the placeholder to select the variable.
Or click and drag the mouse pointer over the placeholder.
Or hold down the SHIFT key and use the left or right arrow keys.
2. Click on the Embedded Variable tool to display the dialog for theselected variable type.
Or select the Edit Variable command on the Format menu.
3. Revise as necessary.
4. Select OK.
A Numeric Variable Display provides a numeric readout of a valuestored at a controller tag address.
To create the variable, set the insertion pointer in the Message Editbox where the variable should be placed.
• Click the Embedded Variable tool on the Message Edit toolbarand select Numeric Variable Display on the dialog.
• Or select the Numeric Variable Display command on the Formatmenu.
To edit the variable, highlight the variable placeholder in themessage.
• Click the Embedded Variable tool.
• Or select the Edit Variable command on the Format menu.
When a variable is created or edited, its dialog appears:
Numeric Variable Display

7–24 Creating Messages
Publication 2706-817
Digits
The Field Width spin control specifies the maximum number ofcharacters (0 to 9, +, -, and .) that can appear in the display. If thevalue from the logic controller exceeds the specified field width, thefield on the terminal display fills with >>> symbols.
Default is 12. To change the field width, select or enter a value in thespin control.
To fill empty data positions with zeros rather than leaving themblank, enable the Fill With Zeros check box. Default is disabled.
00065932
65,932
8 Digit Field WidthZero Fill
8 Digit Field WidthNo Zero Fill
Value to Display
65932
Decimal Point
A logic controller can store only integer values, so the value sent to adisplay variable is always an integer. However if the value is scaled,it may be displayed as a decimal. See the section on scalingbeginning on Page 4–37.
The Decimal Point area specifies whether a scaled value displayswith a fixed or floating point decimal.
Value from Controller
32767 x (.0001) +94 =
SCALEScale = .0001Offset = 94
Displayed Value = 97.2767
= 32767
• Select Fixed Point to position the decimal point 0 to 4 places tothe left of the rightmost character. Select or enter the number ofdecimal places in the Position spin control. The decimal positionmust be less than the field width.
Select:For ThisPosition:
0 97
1 97.2
2 97.27
3 97.276
4 97.2767
• Select Floating Point to have the terminal position the decimal.

7–25Creating Messages
Publication 2706-817
Read Tag
The Read Tag specifies the name of the tag address from which theterminal will read the display data. Select a tag from the Read Taglist box or type in a new Read Tag name. Valid data types for theread tag are unsigned/signed integer or BCD.
Note: It is easier to create an application if all its tags are entered inthe Tag Editor before you start to write messages. If a new Read Tagname is used, its parameters must be edited when it is assigned.
If the variable will be scaled, needs different data limits, or has a newRead Tag assigned:
1. Put the insertion pointer in the Read Tag box.
2. Select the Edit Tag button to bring up the Tag Form dialog.
3. Edit the tag’s attributes (see the section starting on Page 8–2).
4. Select OK .
Slave devices
Slave devices support the display of Numeric Display variables inmessages. They are updated while the slave message is activelydisplayed.
ASCII Triggering devices
Tag Node Name and Address attributes are ignored by an ASCIITriggering device. They may be omitted when creating applicationsfor use with such a device.

7–26 Creating Messages
Publication 2706-817
An ASCII Variable Display provides an alphanumeric readout of aASCII text string stored at a controller tag address.
To create the variable, set the insertion pointer in the Message Editbox where the variable should be placed.
• Click the Embedded Variable tool on the Message Edit toolbarand select ASCII Variable Display on the dialog.
• Or select the ASCII Variable Display command on the Formatmenu.
To edit the variable, highlight the variable placeholder in themessage.
• Click the Embedded Variable tool.
• Or select the Edit Variable command on the Format menu.
When a variable is created or edited, its dialog appears:
Characters
The Field Width spin control specifies the maximum number ofalphanumeric characters that can be entered in the variable.
Note: The message will not pass Validation if the Field Width isgreater than the Read Tag’s Character Array value.
Default is 32. To change the field width, select or enter a value in thespin control.
Read Tag
The Read Tag specifies the name of the tag address from which theterminal will read the display data. Select a tag from the Read Taglist box, or type in a new Read Tag name. The only valid data typefor the read tag is Character Array.
Note: It is easier to create an application if all its tags are entered inthe Tag Editor before you start to write messages. If a new Read Tagname is used, its parameters must be edited when it is assigned.
ASCII Variable Display
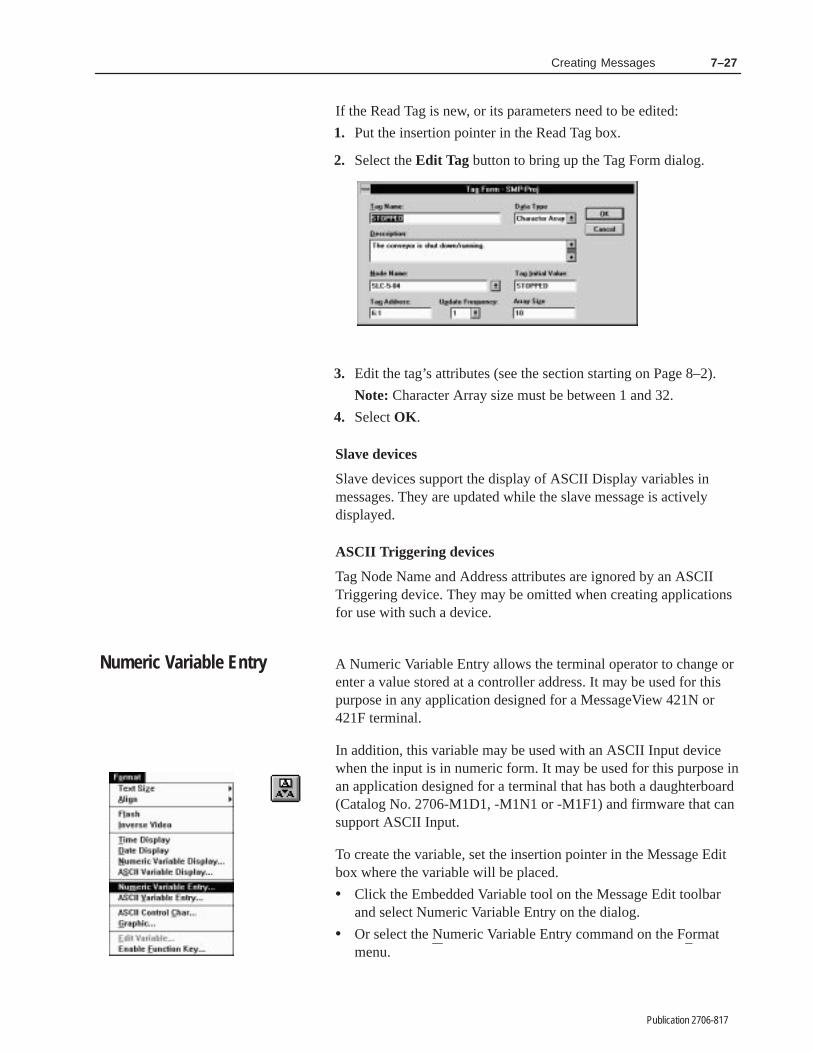
7–27Creating Messages
Publication 2706-817
If the Read Tag is new, or its parameters need to be edited:
1. Put the insertion pointer in the Read Tag box.
2. Select the Edit Tag button to bring up the Tag Form dialog.
3. Edit the tag’s attributes (see the section starting on Page 8–2).
Note: Character Array size must be between 1 and 32.
4. Select OK .
Slave devices
Slave devices support the display of ASCII Display variables inmessages. They are updated while the slave message is activelydisplayed.
ASCII Triggering devices
Tag Node Name and Address attributes are ignored by an ASCIITriggering device. They may be omitted when creating applicationsfor use with such a device.
A Numeric Variable Entry allows the terminal operator to change orenter a value stored at a controller address. It may be used for thispurpose in any application designed for a MessageView 421N or421F terminal.
In addition, this variable may be used with an ASCII Input devicewhen the input is in numeric form. It may be used for this purpose inan application designed for a terminal that has both a daughterboard(Catalog No. 2706-M1D1, -M1N1 or -M1F1) and firmware that cansupport ASCII Input.
To create the variable, set the insertion pointer in the Message Editbox where the variable will be placed.
• Click the Embedded Variable tool on the Message Edit toolbarand select Numeric Variable Entry on the dialog.
• Or select the Numeric Variable Entry command on the Formatmenu.
Numeric Variable Entry

7–28 Creating Messages
Publication 2706-817
To edit the variable, highlight the variable placeholder in themessage.
• Click the Embedded Variable tool.
• Or select the Edit Variable command on the Format menu.
When a variable is created or edited, its dialog appears:
Format
The Field Width spin control specifies the maximum number ofcharacters (0 to 9, +, -, and .) that can be entered in the variable.
Default is 12. To change the field width, select or enter a value in thespin control.
Decimal Point
A logic controller can store only integer values. If the entered valueis a decimal, it will be rounded by the logic controller. However ifthe value is scaled, it may be entered as a decimal, but stored as aninteger. See the section on entry scaling beginning on Page 4–38.
The Decimal Point area specifies whether the decimal point is fixed(formatted), or keypad controlled.
• Select Fixed to position the decimal point 0 to 4 places to the leftof the rightmost character. As the terminal operator enters thevalue the numbers are shifted to the left around the decimal point.
Select or enter a value in the Position spin control. The decimalposition must be less than the field width.
Select:For ThisPosition:
0 6
1 6.5
2 6.55
3 6.553
4 6.5535
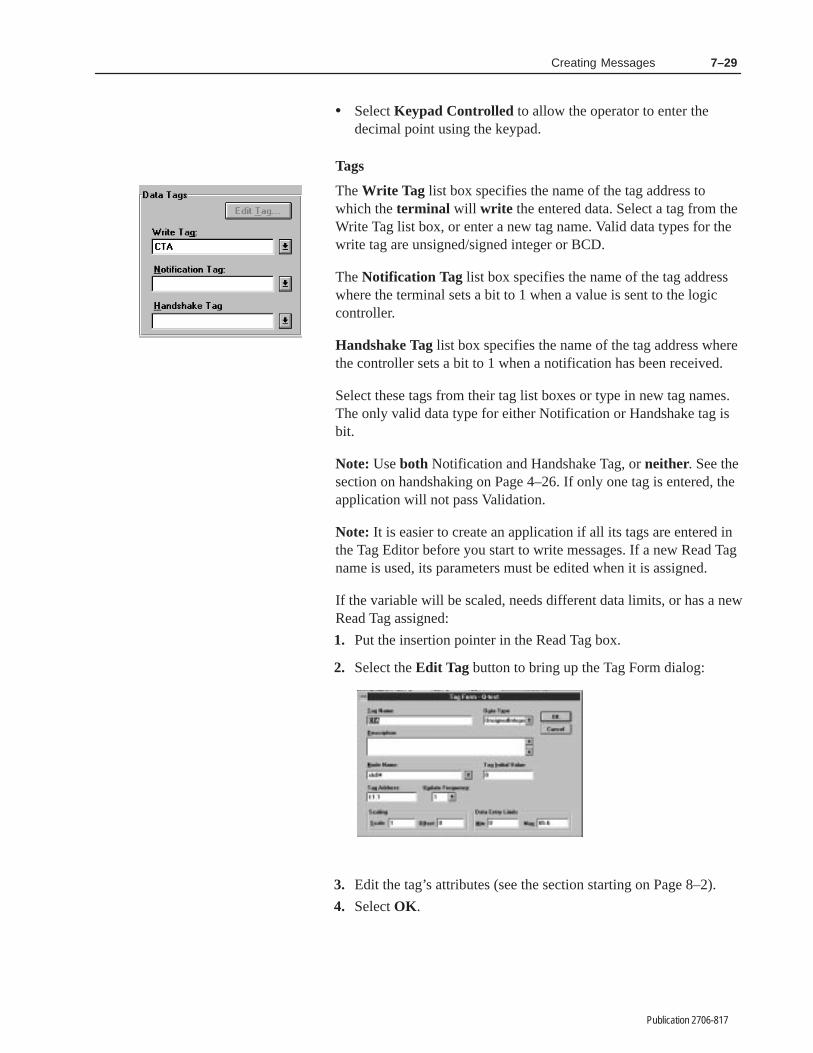
7–29Creating Messages
Publication 2706-817
• Select Keypad Controlled to allow the operator to enter thedecimal point using the keypad.
Tags
The Write Tag list box specifies the name of the tag address towhich the terminal will write the entered data. Select a tag from theWrite Tag list box, or enter a new tag name. Valid data types for thewrite tag are unsigned/signed integer or BCD.
The Notification Tag list box specifies the name of the tag addresswhere the terminal sets a bit to 1 when a value is sent to the logiccontroller.
Handshake Tag list box specifies the name of the tag address wherethe controller sets a bit to 1 when a notification has been received.
Select these tags from their tag list boxes or type in new tag names.The only valid data type for either Notification or Handshake tag isbit.
Note: Use both Notification and Handshake Tag, or neither. See thesection on handshaking on Page 4–26. If only one tag is entered, theapplication will not pass Validation.
Note: It is easier to create an application if all its tags are entered inthe Tag Editor before you start to write messages. If a new Read Tagname is used, its parameters must be edited when it is assigned.
If the variable will be scaled, needs different data limits, or has a newRead Tag assigned:
1. Put the insertion pointer in the Read Tag box.
2. Select the Edit Tag button to bring up the Tag Form dialog:
3. Edit the tag’s attributes (see the section starting on Page 8–2).
4. Select OK .

7–30 Creating Messages
Publication 2706-817
Slave devices
Slave devices do not support the display of Numeric Entry variablesin messages. Numeric Entry variables are removed from a messageby the master MessageView terminal before the message is slaved.
Although slave devices do not display Numeric Entry variables in amessage, the master terminal does display them whenever it displaysthe message.
ASCII Triggering devices
Tag Node Name and Address attributes are ignored by an ASCIITriggering device. They may be omitted when creating applicationsfor use with such a device.
An ASCII Variable Entry allows the terminal operator to change tochange or enter a value stored at a controller address. This variablemay be used in an application designed for a terminal that has both adaughterboard (Catalog No. 2706-M1D1, -M1N1 or -M1F1) andfirmware that can support an ASCII Input device.
An ASCII Variable Entry allows the entry of:
• numeric values from the front keypad
• alphanumeric characters from an ASCII Input device; inputdevices are listed on Page 5–6.
If the ASCII Entry variable is defined as:
• an integer (signed or unsigned) the entered data is displayed innumeric format. It may be scaled like data in a Numeric Entryvariable.
• a character array, the entered data is displayed in alphanumericformat. It cannot be scaled.
To create the variable, set the insertion pointer in the Message Editbox where the variable should be placed.
• Click the Embedded Variable tool on the Message Edit toolbarand select Numeric Variable Entry on the dialog.
• Or select the ASCII Variable Entry command on the Formatmenu.
To edit the variable, highlight the variable placeholder in themessage.
• Click the Embedded Variable tool.
• Or select the Edit Variable command on the Format menu.
ASCII Variable Entry

7–31Creating Messages
Publication 2706-817
When a variable is created or edited, its dialog appears:
Format
The Field Width spin control specifies the maximum number ofalphanumeric characters that can be entered in the variable.
Note: The message will not pass Validation if the Field Width isgreater than the Write Tag’s Character Array value.
Default is 32. To change the field width (range 1 to 32), select orenter a value in the spin control.
Note: If the input device sends more characters than fit in the FieldWidth, the extra characters are ignored.
Tags
The Write Tag list box specifies the name of the tag address towhich the terminal will write the entered data. Select a tag from theWrite Tag list box or enter a new Write Tag name. The only validdata type is Character Array.
The Notification Tag list box specifies the name of the tag addresswhere the terminal sets a bit to 1 when a value is sent to the logiccontroller.
Handshake Tag list box specifies the name of the tag address wherethe controller sets a bit to 1 when a notification has been received.
Select these tags from their tag list boxes or enter new tag names.The only valid data type for either Notification or Handshake tag isbit.
Note: Use both Notification and Handshake Tag, or neither. See thesection on handshaking on Page 4–26. If only one tag is entered, theapplication will not pass Validation.
Note: It is easier to create an application if all its tags are entered inthe Tag Editor before you start to write messages. If a new tag nameis used, its parameters must be edited when it is assigned.
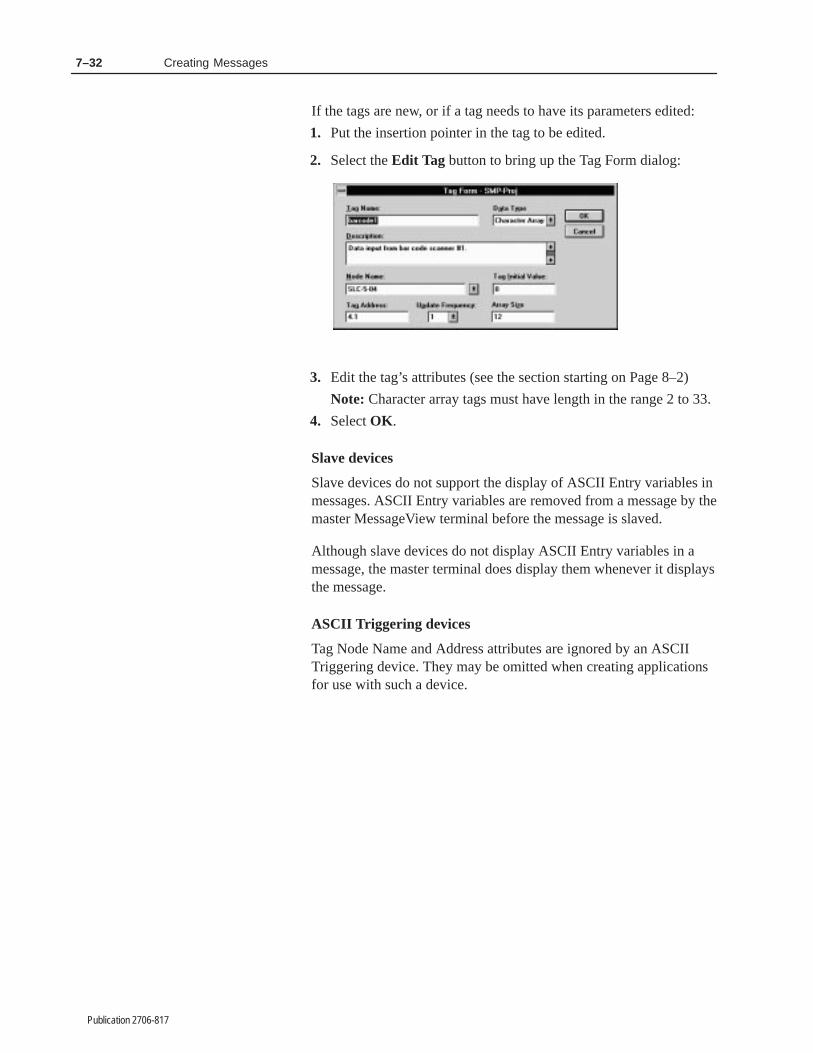
7–32 Creating Messages
Publication 2706-817
If the tags are new, or if a tag needs to have its parameters edited:
1. Put the insertion pointer in the tag to be edited.
2. Select the Edit Tag button to bring up the Tag Form dialog:
3. Edit the tag’s attributes (see the section starting on Page 8–2)
Note: Character array tags must have length in the range 2 to 33.
4. Select OK .
Slave devices
Slave devices do not support the display of ASCII Entry variables inmessages. ASCII Entry variables are removed from a message by themaster MessageView terminal before the message is slaved.
Although slave devices do not display ASCII Entry variables in amessage, the master terminal does display them whenever it displaysthe message.
ASCII Triggering devices
Tag Node Name and Address attributes are ignored by an ASCIITriggering device. They may be omitted when creating applicationsfor use with such a device.

7–33Creating Messages
Publication 2706-817
The message’s attributes appear in the Attributes section of theMessage Editor Table View.
Attributes
Attributes for each message may be set using the Message EditorTable View:
• at the time the message is created
• at any later time when the message is selected (highlighted) in theMessage List and displayed in the Message Edit box.
Click the Store Message tool to store the current text and attributesettings for the selected message.
Note: A message is stored automatically when another message isselected for editing.
Click the Cancel Changes tool to restore the message as it was beforeediting. All changes, whether adding, deleting or editing attributes,revert to their condition when the message was last stored.
To edit related messages together, use the Topics command on theEdit menu. See Page 7–12. In the Topics dialog, deselect all topicsbut the one(s) needed at the moment. The Message List now containsonly messages assigned to the selected topic(s).
To view the original Message List, simply bring up the Topics dialogand select all the topics.
Message Attributes

7–34 Creating Messages
Publication 2706-817
Message
Use the Message spin control to assign a new number to thecurrently selected message. This attribute does not change theposition of the message in the list.
Important: The message number is often used as a trigger. If amessage number is changed, verify that anothermessage does not chain to the old message number.
To change the order of messages in the list but not their numbers, usethe Sort command on the Edit menu. See Page 7–11.
Text Size and Line Number
Select one of the available text sizes from the Text Size list box orfrom the Text Size menu that opens from the Format menu. Optionsare Quarter, Half, and Full.
Select an option from the Line list box. Options are 1, 2, 3, 4, Alland Any. Default is Quarter Display mode and Line 1.
This table gives the available options depending on which text size isselected. If a message is assigned to a line too close to the bottom ofthe display for its size, the error will be caught when the applicationis validated.
Text Size Occupies: Characters: Starting Line
Quarter 1 display line 21 1, 2, 3, 4, All, Any
Half 2 display lines 10 1, 2, 3, All, Any
Full all 4 display lines 7 1
Select All to use the whole display for the message. This may beuseful for complex messages.
After it is triggered, a message with Starting Line All must waituntil:
• all lines on the display are available, or
• Special message 9901, Clear Display, is triggered.
Select Any to display the message on the first available line startingfrom the top of the display.
Note: Graphics may be used only in Half Text Display modemessages. Each graphic is as wide as two characters. If graphics areused in a Quarter or Full Display mode message, the application willnot pass Validation.

7–35Creating Messages
Publication 2706-817
Example of priorities in displaying a message:
The terminal display has a quarter display mode message on Line 2.A half display mode message is value triggered. If it is assigned to:
• Line 3, it is displayed at once.
• Any, it is displayed at once on Line 3.
• Line 1 or 2, it is put in the Message Queue until the first messageis terminated.
• All, it is put in the Message Queue until the first message isterminated.
• Line 4, it cannot be displayed; this discrepancy is caught duringValidation of the application.
To display more than one message:
Assign messages to different lines if they are to be displayed at thesame time. The terminal can display:
• four different messages in Quarter Display mode
• two messages in Quarter Display mode and one in Half Displaymode
• two messages in Half Display mode.
When messages require action by the operator, consider thefollowing:
• Only one message may be displayed at a time that requires theoperator to use either:
– numeric keys, although one message can have up to 10Numeric Entry variables (MessageView 421N or 421Fterminals)
– the ACK key (all terminal types)
• In MessageView 421F terminals, only one message may bedisplayed at a time that requires the operator to press a Functionkey. However another message can be displayed that containseither Numeric Entry variables or the Ack attribute.
Clearing messages from the terminal display
Wait Time
Select the Wait Time list box to specify the minimum time themessage will be displayed. Wait time may be 0 to 31 seconds; defaultis 1 second.
Note: If Scroll is disabled and Auto Clear is enabled, Wait Timecannot be 0. If it is 0, the application will not pass Validation.

7–36 Creating Messages
Publication 2706-817
Auto Clear
Use the Auto Clear check box to clear the message from the displayafter its Wait Time has expired. Disable Auto Clear to display themessage until another message is triggered (or comes to the top ofthe queue) that is assigned to the same line(s).
Note: If Wait Time is 0 and Scroll is disabled, Auto Clear must bedisabled. If it is enabled, the application will not pass Validation.
If a message has a Function key or keys enabled, the Jog Modeaspect of the Auto Clear attribute is used.
• Non–jog mode: if Auto Clear is enabled, the Function keymessage is terminated as soon as a Function key operation iscompleted (including Hold Time if any)
• Jog mode: if Auto Clear is disabled, the Function key messageremains active until:
– the the terminal operator presses the [0] and [+/-] keys on theterminal at the same time
– the controller triggers Special Message 9901, Clear Display– the controller triggers Special Message 9903, Reset Terminal– the terminal operator resets the terminal manually.
Jog mode is discussed in detail on Page 4–21.
Scrolling
Use the Scroll check box to enable scrolling.
• The Scroll attribute is disabled to pop the message onto thedisplay.
A message longer than the display is wide appears in segments,each remaining for the Wait Time specified for the message.
• The Scroll attribute is enabled to scroll the message onto thedisplay from the right side, one character at a time.
A message too long for the display scrolls off the display at theleft. When the last character appears, the message remains for itsWait Time before it is terminated.
If the Auto Clear attribute is not set, the message will continue toscroll until another message is triggered or queued for the sameline(s).
When Scroll is enabled, the Scroll Time list box is activated. Usethe Scroll Time list box to set the time interval between onecharacter appearing and the next. Range is 0.1 to 5 seconds; defaultis 0.2 seconds.

7–37Creating Messages
Publication 2706-817
Note: A long message may be checked in the Terminal View if you:
• set the insertion pointer in the Message Edit box at differentpoints along the message; the message in the Terminal View startswith the insertion point.
• if the All Line attribute is set, use the Return (Enter) key to breakup the message into segments.
Note: If Auto Clear is enabled and Wait Time is 0, Scroll must beenabled. If it is disabled, the application will not pass Validation.
If All is selected in the Line attribute, Scroll must be disabled.
Hidden
A Hidden message is triggered like any other message but notdisplayed. When the Hidden attribute is enabled its message neverappears on the terminal display.
Since a Hidden message is not displayed, it cannot support any typeof operator action.
Note: Set the HE Stack attribute for a Hidden message to log aDisplay Variable into the stack without displaying it.
Note: Set the Slave Enable attribute for a Hidden message to have aslave device display a message that does not appear on the masterdevice’s display.
Text Attributes
Several attributes define the way in which a message is displayed.
Center
A message is left justified by default. To toggle between centeredand left justified for the message in the Message Edit box, do one ofthe following:
• select the Center check box to enable or disable centering
• click the Center or Left Justify icon
• select Align from the Format menu, and choose Left or Center inthe menu that appears.
If you want a message to be right justified, insert spaces at the startof the message in the Message Edit box, and check the result in theTerminal View.
Note: The number of displayable characters in a centered messagemust be less than or equal to the number of characters per displayline available for the selected text size.

7–38 Creating Messages
Publication 2706-817
Inverse
A message or any part of a message may be displayed with black andwhite reversed. In the Message Edit box, highlight:
• text
• a variable
• a graphic
• the entire message.
Then either:
• click the Inverse Video icon
• select Inverse Video from the Format menu.
Any text, variables or graphics entered in the message while theInverse Video icon is selected, will be in Inverse Video setting.
The selected text will be displayed with black and white reversed inthe Message Edit box and in the Terminal View.
Flash
A message or any part of a message may be displayed flashing onand off. In the Message Edit box, highlight:
• text
• a variable
• a graphic
• the entire message.
Then either:
• click the Flash icon
• select Flash from the Format menu.
Any text, variables or graphics entered in the message while theFlash icon is selected, will be in Flash setting.
The selected text will be displayed in a different color in theMessage Edit box. It will flash on and off in the Terminal View andin the MessageView terminal.
Note: To change the color distinguishing Flashing text in theMessage Edit box, see Page 7–15.

7–39Creating Messages
Publication 2706-817
Freeze
Use the Freeze check box to keep display variables at the value theyhad when their message was triggered. If the Freeze attribute isdisabled the terminal continually updates display variables as long asthe message is displayed.
Note: The value sent to the Historical Event Stack (if the HE Stackattribute is enabled) is the value at the moment of triggering.
Historical Event Stack
Use the HE Stack check box to enable this attribute. The messagewill be logged into the Historical Event Stack file each time it istriggered.
The logged message includes the time and date when the message istriggered, and the value in each display variable at the moment it istriggered. See Page 4–19 for a discussion of the Historical EventStack.
Acknowledge Time
The Ack Time attribute may be used to log into the HE stack withthe message, the time and date when the message was acknowledgedif both the following apply:
• the message requires the operator to press the ACK key on theterminal, and
• the HE Stack attribute is enabled.
Acknowledgeable Message
Messages may be defined as acknowledgeable messages whichrequire operator intervention.
Acknowledgeable messages remain displayed (active) until theterminal operator presses the ACK key and the preset acknowledgehold time (50 ms) has expired. The bit at the global Acknowledgetag address is set. The controller program checks this bit to makesure the terminal operator has pressed the key before triggeringanother message.
Use the Ack check box to define a message as acknowledgeable.When Ack is enabled, Wait Time is overridden.
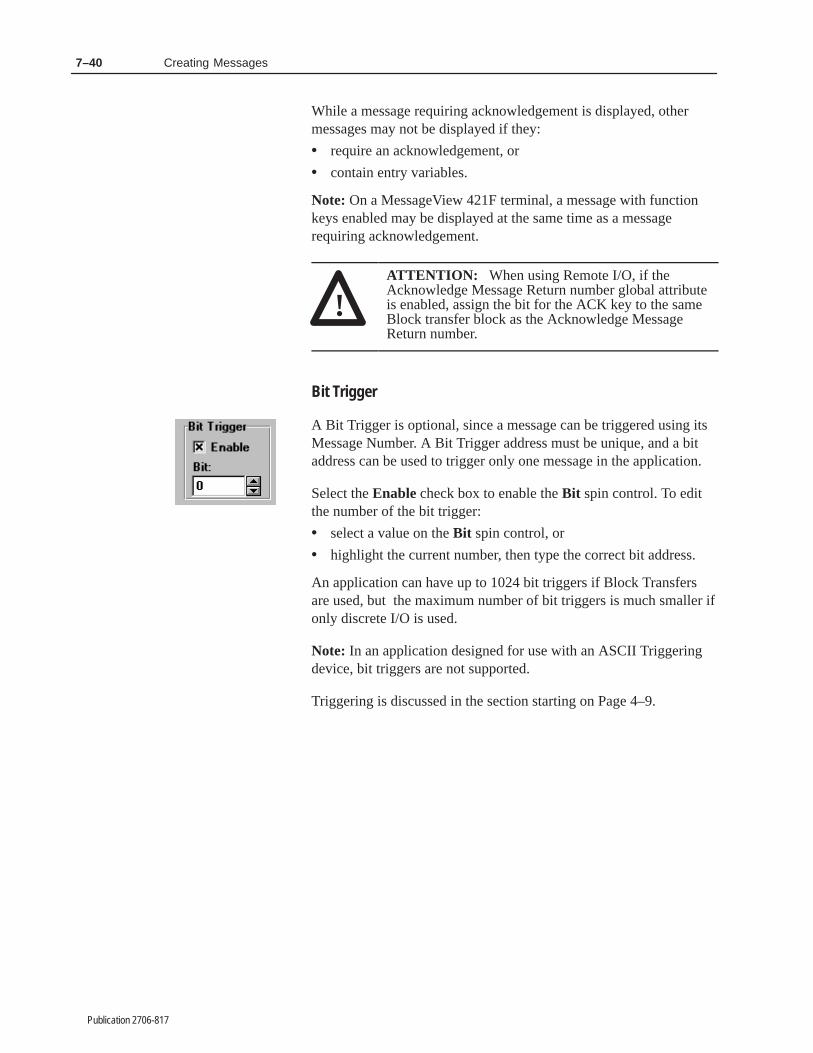
7–40 Creating Messages
Publication 2706-817
While a message requiring acknowledgement is displayed, othermessages may not be displayed if they:
• require an acknowledgement, or
• contain entry variables.
Note: On a MessageView 421F terminal, a message with functionkeys enabled may be displayed at the same time as a messagerequiring acknowledgement.
!ATTENTION: When using Remote I/O, if theAcknowledge Message Return number global attributeis enabled, assign the bit for the ACK key to the sameBlock transfer block as the Acknowledge MessageReturn number.
Bit Trigger
A Bit Trigger is optional, since a message can be triggered using itsMessage Number. A Bit Trigger address must be unique, and a bitaddress can be used to trigger only one message in the application.
Select the Enable check box to enable the Bit spin control. To editthe number of the bit trigger:
• select a value on the Bit spin control, or
• highlight the current number, then type the correct bit address.
An application can have up to 1024 bit triggers if Block Transfersare used, but the maximum number of bit triggers is much smaller ifonly discrete I/O is used.
Note: In an application designed for use with an ASCII Triggeringdevice, bit triggers are not supported.
Triggering is discussed in the section starting on Page 4–9.

7–41Creating Messages
Publication 2706-817
Chain
A message may be chained to another. That is, a message can triggeranother message by invoking its message number. A chainedmessage has exactly the same attributes as if it were not chained.
When the first message in a chain is triggered, it is displayed orqueued. After it is terminated, if the next message in the chain:
– has the same display line as the previous message, it haspriority over messages in the queue and is displayed
– has a different display line assigned, and that line is free, themessage is displayed
– has a different display line assigned, and that line is occupied,the message is appended to the Message Queue.
• Select the Enable check box, then select the chained MessageNumber from the To: spin control.
• Or highlight the current number and type the chained MessageNumber.
Any message in the application may be chained to another. A chainmay even be circular, with the last message triggering the firstmessage. A circular chain can be useful in certain cases. To break thechain:
• tell the terminal operator to do a Powerup Reset, or
• trigger Special message 9901, Clear Display.
ASCII Triggering devices
ASCII Triggering devices do not support embedded display variablesin chained messages.
A MessageView terminal with a Remote I/O daughterboard (CatalogNos. 2706-M1D1, -M1N1 or -M1F1) and firmware that supports aSlave Port can act as a master device with up to 126 slave devices.Each Slave device at a specific Node Address displays the messagessent to its Node Address.
Slaved messages may contain variables, graphics and messageattributes set up by the MessageBuilder software, with the followingcautions:
• A graphic must be preceded by a Ctrl-G, or the terminal willreplace the graphic with two spaces before sending the messageto the slave.
• The terminal removes embedded data entry variables from amessage before sending the message to the slave.
Slaving

7–42 Creating Messages
Publication 2706-817
Slave Packet format
The MessageView terminal supports transmission of messages to aslave device, using Simplex protocol.
The Simplex protocol consists of a data packet with 6 data fields:
Field Field 1 Field 2 Field 3 Field 4 Field 5 Field 6
ContentsOptionalControlByte
ASCII Textand specialControlCharacters
OptionalDisplayMode Byte
SlaveAddress
LineNumber
CarriageReturn(CR]
Numberof Bytes
1 0 to 100 1 1 1 1
Note: Simplex protocol is compatible with Allen-Bradley DL20,DL40, DL50 and MessageView 421D slave devices.
Field 1: Optional Control Byte
This is an optional field which indicates the text size of the slavedmessage as it is transmitted. The following characters are used:
Byte Decimal Value Definition
Default – Quarter height text
Ctrl-S 19 Half height text
Ctrl-W 23 Full height text
Ctrl-C 3Clear Display line, based on Line Number Byte.Used with Line Number Byte to specify line.
The optional Control Byte may be omitted. If omitted, the defaultsize will be Quarter height text.
If the Auto Format attribute is enabled, the Optional Control Byte isautomatically embedded, based on the text size selected in themessage’s Text Size attribute.
The Optional Control Byte may be placed in the message manually,embedding it as the first character in the text portion of the message.It overrides a Control Byte embedded by Auto Format.

7–43Creating Messages
Publication 2706-817
Field 2: ASCII Text
This field contains the ASCII characters and/or special ASCIIcontrol characters that are to be displayed by, or to control, a slavedevice.
The ASCII text can include embedded variables, graphics andcontrol codes for Flash and Inverse Video. It can have up to 100characters.
The following codes may be embedded in the ASCII text:
Byte Decimal Value Definition
Ctrl-F 6toggle between Flashing and non–Flashingcharacters
Ctrl-I 9toggle between Inverse Video and non–InverseVideo characters
Ctrl-G 7Embedded Graphic, where the next byte is agraphic, ISA symbol 1 to 32
If Auto Format is enabled, Flash and Inverse Video controlcharacters will be embedded automatically, based on whether theattribute is enabled in the Message Edit box.
If the first or last byte of the ASCII Text field is a control character,it will be interpreted as the Optional Control Byte or the OptionalDisplay Mode Byte, respectively.
Note: An embedded Carriage Return control character (decimal 13)is not allowed in the ASCII Text portion of the slave packet.
Field 3: Optional Display Mode Byte
This optional field indicates how the message text is to be displayed.The following characters are used:
Byte Decimal Value Definition
Default –
Holding message, non-Auto ClearIf the message is longer than the display width, WaitTime between segments of the message is 1second.
Ctrl-A 1Holding message, non-Auto ClearIf the message is longer than the display width, WaitTime is 3 seconds.
Ctrl-C 3Scrolling message, non-Auto Clear, Scroll Time 0.2seconds, Wait Time is 1 second.
Ctrl-V 22Center message (message length must be less thanor equal to the number of characters in the displayline for that text size).

7–44 Creating Messages
Publication 2706-817
If the Optional Display Mode Byte is omitted, the message willremain displayed on the slave device unless it is cleared. If themessage is longer than the packet length, the first segment of themessage remains displayed for 1 second. After 1 second the secondpacket is sent with the next portion of the message, and so on untilall packets have been sent. The message will repeat this cycle unlessit is cleared.
If Auto Format is enabled,the Optional Display Byte defaults to thedefault status unless the Scroll or Center Message attribute isenabled.
The Optional Display Mode Byte may be manually placed in themessage by embedding it as the last character in the text portion ofthe message. It overrides a character embedded by Auto Format.
Field 4: Slave Address
The Slave Address Byte is a single byte field that specifies the NodeAddress of the receiving slave device. Valid slave node addresses areintegers from 1 to 127, except for 13.
Note: If a Slave Device has a Node Address of 127, it will respondto all messages, regardless of the slave packet address. If a messagepacket has a Node Address of 127 it will be received by all slavedevices on the network.
Field 5: Line Number Byte
The Line Number Byte indicates the display line on which themessage will appear. The Line Number Byte is automaticallyembedded in the slave packet based on the message’s Line attribute.
Line Attribute Selected Line Number Embedded
1 1
2 2
3 3
4 4
Any1 to 4, depending on the line where the Masterdevice displays the message
All 50
The “All” Line attribute (50) is used with the Ctrl-C OptionalControl Byte to clear all lines on the slave device.
The Line Number Byte function depends on the slave device and itsfunctions. Consult the slave device’s user manual for the lineconfigurations it supports.

7–45Creating Messages
Publication 2706-817
Field 6: Carriage Return
The Carriage Return (decimal 13) indicates the end of a messagepacket. It is embedded at the end of the Slave Packet automatically.
Slaving attributes
Enable
Select Enable to send this message out the RS-232 port to the slavedevice specified in the address attribute.
If Enable is not selected, the message is used by the slaving (master)terminal only.
Auto Format
If Auto Format is enabled, the MessageView terminal sends theentire message to a slave at once, up to the maximum message lengthof 100 characters. The terminal also embeds the optional Controlbyte, ASCII Text Code bytes, Optional Display Mode byte and LineNumber byte automatically.
• Optional Control byte is set according to the Text Size attribute.
• Flashing, Inverse Video and embedded Graphics have the propercontrol characters set according to the corresponding attributes.
• Optional Display Mode byte is set according to the Scroll andCenter attributes.
• Line Number is set according to the Line attribute.
Note: If you place an embedded Control Byte:
• at the beginning of the text portion of the message, it willoverride an automatically placed Control Byte.
• at the end of the text portion of the message, it will override anautomatically placed Display Mode Control Byte.
If Auto Format is disabled, the MessageView terminal:
• sends the message to the slave device in package lengthscorresponding to the value set in the Length attribute.
• does not embed the optional Control Byte, ASCII Text CodeBytes, or Display Mode Byte in the message packet.
In this case these optional bytes must be placed manually in the textportion of the message, using the ASCII Control Characters dialog(accessed through the Format menu). See Page 7–21.

7–46 Creating Messages
Publication 2706-817
Example:
~This ~Message~ is half height.~
Placeholders for Ctrl-F(ASCII Text Code Byte for Flash)
Placeholder for Ctrl-S(optional Control Byte for Half Text Size)
Placeholder for Ctrl-C(optional Display Mode Byte for Scroll)
Note: If the slave device is a MessageView 421D Slave Deviceterminal (Catalog No. 2706-M1D), it is recommended that youenable Auto Format.
Address
Use the Address spin control to specify the Node Address to whichthe message is to be slaved. Each slave device has its own nodeaddress. See Page 4–15 for a diagram of a possible network.
The address for an individual slave device is a number from 1 to 126.Address 127 sends the message to all slave devices on the network.
Length
The Length attribute is enabled if Auto Format is disabled, so apacket length may be selected.
Use the up/down arrow keys to select a number from 7 to 100 in theLength spin control.
If the message is larger than the selected Length, the MessageViewterminal will divide it up into packets. The last packet will havespaces inserted after the last character in the message if necessary tomeet the Length requirements.
For instance, a message 28 characters long with a Length of 10 issent in three packets. The last packet contains 8 characters and 2spaces to fill it.
Note: If Auto Format is disabled and the Line attribute is “All”, onlythe number of characters in the Length attribute will be sent, even ifeach line portion of the message is longer. For example, if Text Sizeattribute is Quarter (21 characters per line) and the Length attributeis set at 10, the last eleven characters of each line will never be sentto the slave if each line contains 21 characters.

7–47Creating Messages
Publication 2706-817
Relay
Enable the Relay Energize attribute to trigger (enable) an alarmrelay in a DL50 slave device.
The message with the Relay attribute set is displayed at the sametime as the alarm is triggered, and should explain why the alarm wastriggered.
If the message is divided into packets, the MessageView terminalsends the packets in this order:
Message Packet #1 – Relay Packet – Message Packet #2 –Message Packet #3 ...
Important: The alarm relay will not de-energize until anothermessage is slaved to that Alarm Relay, disabling it.
!ATTENTION: Use the alarm relay as a warning only.Do not use it for control.
Slave Packet transmission rate
Slave Packets are sent to the slave at a user-defined rate called theInter-Packet Delay. This delay is the time allowed betweensuccessive packets sent from the master to the slave device.Inter-Packet Delay is set in the Aux. Port tab of the Terminal Setupdialog, see Page 10–28.

7–48 Creating Messages
Publication 2706-817
MessageView 421F terminals have 16 Function keys on theirkeypad. Function keys may be used in any application designed for aMessageView 421F terminal. See the section starting on Page 4–20for a discussion of Function keys.
Note: Function keys are not “embedded”in the message. Themessage enables one or more Function keys based on the Functionkey enable dialog (Format menu) and typically tells the terminaloperator which keys to press. The text description is developed bythe application designer.
A message with Function keys enabled:
• can not be displayed with another message that has Function keysenabled
• may be displayed with a message that contains entry variables orwith a message which requires acknowledgement.
Function key attributes
When the application is designed, make a list of the Function keysthat will be used. Set them all up before any messages are created,and then enable them for specific messages as needed.
Important: Function key attributes are global. That is, once aFunction key’s attributes are set, they are the sameevery time that Function key is used in any messagewithin the application. If attributes are changed in oneinstance, they are changed for all instances.
Select Function Keys in the Application menu to open the FunctionKeys dialog.
Function Keys

7–49Creating Messages
Publication 2706-817
Function Key: Select a Function key from the Function Key listbox. After all its attributes are set, you may select another Functionkey and set its attributes.
Type: Select the Type list box and highlight the type needed.
• None: the Function key is not used.
• Momentary: changes state (0 to 1 or 1 to 0) when pressed andreleased. Changes back to its initial state after the defined HoldTime has expired.
• Maintained: changes state (0 to 1 or 1 to 0) when pressed andremains in the changed state when released.
– If the message is in Jog mode, the Function key returns to itsoriginal state when pressed and released again.
– If the message is in non-Jog mode, a new message must betriggered and displayed with the same Function key enabled,so the key can be pressed and released again.
• Latched: changes state (0 to 1 or 1 to 0) when pressed andremains in the changed state when released. To return theFunction key to its original state, the logic controller must set ahandshake bit. See Page 4–24 for a discussion of LatchedFunction Keys and handshaking.
Initial State: If a Maintained Function Key was selected underType, select Open or Closed initial state. This option is greyed outwhen another type is selected. A Maintained Function Key togglesbetween two states, so the state on powerup does not need to be thesame as the Contact Open/Closed state.
Contacts: Select either Normally Open or Normally Closed,depending on how the Function key is to be used.
Hold Time: If a Momentary Function Key was selected under Type,select a Hold Time. This option is greyed out when another type isselected. Hold Time can be 0, 50, 250, 500, 750 or 1000milliseconds; default is 500 ms.
The terminal holds the Function Key bit set/cleared for the HoldTime, even if the key is physically released at once. The Hold Timeshould be longer than the scan time of the controller, to ensure thatthe bit is read at least once.

7–50 Creating Messages
Publication 2706-817
Function key tags
Write Tag: Select a write tag from the list box or type in a newWrite Tag name. A write tag is required for each enabled Functionkey. The only valid data type for a Function key Write tag is bit type.
The write tag is the address location used by both the MessageViewterminal and the logic controller to reflect the On or Off state of theFunction key.
Handshake Tag: If a Latched Function Key was selected underType, select a handshake tag from the list box or type in a newHandshake Tag name. This option is greyed out for Momentary andMaintained Function Keys. The only valid data type for a Functionkey Handshake tag is bit type.
The value at this tag address is set/reset by the controller. When thebit is set, the terminal releases the Latched Function Key, and itreturns to its initial state.
Indicator Tag: The indicator tag is a read-only tag in the FunctionKeys dialog. It is discussed in the section on LED attributes on Page7–52.
To edit the Write or Handshake tag attributes:
1. Put the insertion pointer in the tag box.
2. Select the Edit Tag button to bring up the Tag Form dialog:
3. Edit the tag’s attributes (see the section starting on Page 8–2).
4. Select OK .
ASCII Triggering devices
Tag Node Name and Address attributes are ignored by an ASCIITriggering device. They may be omitted when creating applicationsfor use with such a device.

7–51Creating Messages
Publication 2706-817
Enable Function Keys
Any or all of the Function keys may be enabled for any message. Toenable Function keys for the current message:
1. Select the Enable Function Keys tool to bring up the EnableFunction Keys dialog.
Or select Enable Function Key on the Format menu.
The dialog displays the message number.
2. Select the check box in front of each Function key the currentmessage will use.
3. Select OK to return to the Message Editor Table View.
The text of the message typically tells the operator what to do witheach enabled function key. For instance:
F1 Start Conveyor F4 Enable Paint Sprayer.
Using jog mode in messages with Function keys enabled
Jog mode is discussed in detail on Page 4–21.
Example 1: When Auto Clear is enabled the message is terminatedas soon as a Function key is pressed, and if a Momentary Functionkey, its Hold Time is expired. To enable Jog mode, disable the AutoClear attribute for the message. The message then remains active onthe display until:
• the the terminal operator presses the [0] and [+/-] keys on theterminal at the same time
• the controller triggers Special Message 9901, Clear Display
• the terminal is reset.

7–52 Creating Messages
Publication 2706-817
Example 2: A Maintained Function Key that has been pressed onlyonce remains in the changed state after the message is terminated. Itmay be returned to its original state in either of two ways.
• Enable jog mode by disabling the Auto Clear attribute. Themessage tells the operator to press and release the Function keytwice.
• Chain or trigger another message that has the same Function keyenabled. The second message tells the operator to press theFunction key again.
The LED located beside the Function key may or may not have itsIndicator tag defined. LEDs may be used in any application designedfor a MessageView 421F terminal. See Page 4–25 for a discussion ofLEDs.
When the application is designed, make a list of the LEDs to be usedand note which ones need an Indicator tag defined. Set them all upbefore any messages are created.
Important: LED attributes are global.
• When an LED does not have a tag assigned to it, the LED has notag any time it is used in the application.
• When a LED is assigned a certain tag, that tag remains assignedto it throughout the application.
When the LED does not have an Indicator tag assigned to it, then theLED follows the state of the associated Function key (LED1 with F1,LED 16 with F16). For example, LED4 will light when Function keyF4 is pressed, and LED4 remains lit for the duration of the Functionkey’s On state while the message associated with the Function key isactively displayed.
When the LED has an Indicator tag assigned to it, the LED operatesindependently of the associated Function key. For example, pressingand releasing Function key F1 will have no effect on the operation ofLED1. The controller logic program controls the LED by setting orclearing the bit at the Indicator tag address. Thus the controller canindicate a process status without displaying a message.
Note: All assigned LED tags are monitored on a continuous basisexcept when the terminal is in its Front Panel Editor mode.
LED Attributes

7–53Creating Messages
Publication 2706-817
Defining LED tags
1. Select LED Indicators on the Application menu to open the LEDIndicator Tags dialog.
2. For each LED that needs an indicator tag, choose an existing tagname from the list box or create a new tag.
The only valid data type for an LED Indicator tag is bit.
3. Select OK to return to the Message Editor Table View.
To edit the LED tag attributes:
1. Put the insertion pointer in the LED Tag box.
2. Select the Edit Tag button to bring up the Tag Form dialog:
3. Edit the tag’s attributes (see the section starting on Page 8–2).
4. Select OK .
ASCII Triggering devices
Tag Node Name and Address attributes are ignored by an ASCIITriggering device. They may be omitted when creating applicationsfor use with such a device.

7–54 Creating Messages
Publication 2706-817
Special Messages give commands to the terminal. They may becalled up using either a value trigger (the message number) or a bittrigger, just like other messages. See Page 4–5 for a list of SpecialMessages.
The Special Messages dialog is used only when:
• one or more Special Messages need to be defined as a bit trigger.
• the Special Messages Set Time/Date or Set Brightness will beused, and needs to have its read tags assigned.
• the Special Messages Get Time/Date or Test Battery will be used,and needs to have its write tags assigned.
To assign a bit trigger to a Special Message
1. Select Special Messages on the Application menu to bring up theSpecial Messages dialog:
2. Select the Bit Trigger Enable box for the special message.
3. Use the Bit Number spin control to assign an address to the bittrigger.
4. When all special messages are edited, select OK to return to theMessage Editor Table View.
Important: Bit triggers cannot be used when the terminal iscontrolled by an ASCII Triggering Device.
Special Messages

7–55Creating Messages
Publication 2706-817
Write Tags
If the Get Date/Time or Test Battery Special Message is used, its tagsneed to be defined. Select the Write Tags tab. This dialog appears:
1. For each variable, choose an existing tag name from the List Box,or create a new tag. The only valid data type for:
• a Date or Time Write Tag is Unsigned Integer.
• the Test Battery tag is Bit.
2. Select OK to return to the Special Messages dialog.
3. Select OK to return to the Message Editor Table View.
Read Tags
If the Set Time/Date or Set Brightness Special Message is used, itstags need to be defined. Select the Read Tags tab. This dialogappears:

7–56 Creating Messages
Publication 2706-817
1. For each variable, choose an existing tag name from the List Box,or create a new tag. The only valid data type for:
• a Date or Time Read Tag is Unsigned Integer.
• the Brightness Level tag is Bit.
2. Select OK to return to the Special Messages dialog.
3. Select OK to return to the Message Editor Table View.
To edit the Special Message tag attributes:
1. Put the insertion pointer in the tag box.
2. Select the Edit Tag button to bring up the Tag Form dialog:
3. Edit the tag’s attributes (see the section starting on Page 8–2).
4. Select OK .
ASCII Triggering devices
Tag Node Name and Address attributes are ignored by an ASCIITriggering device. They may be omitted when creating applicationsfor use with such a device.

Chapter 8
Publication 2706-817
����� �� � ����
This chapter covers the following topics:
• Using the tag editor
• Validating tag addresses
• Defining tags
• Working with tags
• Finding tags
• Sorting tags
• Printing tags
• Using tools
• Tag import/export utility
– importing tags– exporting tags– examining the results of an import/export.
Tags define the link between each variable and its assigned addressin the logic controller. See the section starting on Page 4–31 for adiscussion of how tags work.
Enter tag information in either of two ways:
Table View
Enter and edit all tags for the application in a table which has its owntoolbar, and columns for tag attributes. This is also called theSummary View.
Form View
Enter or edit a single tag from an Edit Tag dialog, available throughthe variable’s dialog in the Message Editor Table View.
If Numeric Variables are to be scaled, change from the Tag EditorTable View to the Form View as needed.
Using the Tag Editor

8–2 Working with Tags
Publication 2706-817
Opening the Tag Editor
To open the Table View 68
Choose Tag Editor from the Application menu.
You can toggle the Status Bar and Tool Bar on and off just as withthe Message Editor Table View. Simply select the appropriatecommand in the View menu.
Tag Toolbar
Error on row (in this case,duplicate tag name)
Editing this row
Name ofthis window
Type of View
Toolbar
Project Name
Menu Bar
Status Bar

8–3Working with Tags
Publication 2706-817
To open the Form View:
• From a dialog in MessageBuilder, select or enter a tag name andselect the Edit Tag button.
• From the Tag Editor Table View, choose Form from the Viewmenu.
Navigating through the Tag Editor
To move between fields in Form View or Table View:
Move the mouse pointer to the field and click the left button.
• Or press TAB to move forward through fields and SHIFT+TAB tomove backward.
• Or in Form View, press ALT + X, where X is the underlined letterin the field name.
To change from Table View to Form View:
Click the Form tool on the toolbar.
• Or choose Form from the View menu.
• Or choose Form Editor from the Tools menu.
To change from Form View to Table View:
Select the Tag Editor button in the Tag Form View.
• Or select Summary from the View menu.
• Or choose List Editor from the Tools menu.
Note: If you enter data in the Form View, it will not appear in theTable View when you switch views. Choose Refresh from theWindow menu to display the new data.

8–4 Working with Tags
Publication 2706-817
To exit the Tag Editor:
Double-click the Control-menu box at the top left of the window.
• Or in Table View, choose Exit from the Project menu to return tothe Message Editor Table View.
• Or in Form View, select OK or Cancel to return to the TableView, then exit from the Table View.
Before starting to create tags, set up the Tag Editor to validate tagaddresses. Address Validation checks only tags that are entered ormodified while it is active.
Important: Addresses for existing tags are not validated.
To activate address validation
Choose Address Validation from the Options menu. A check marknext to the command indicates that the option is activated.
The Tag Editor checks each address against the type of devicespecified in the Node Name field. If the address is not valid for thatdevice, the Tag Editor displays the following warning:
Select: To:
Return to the invalid address in the Table View
Save the tag in the database with the invalid address
For information on valid addresses for a specific type of controller,refer to the user manual for that controller.
Note: In Form View, address validation is always active.
Validating Tag Addresses
Table View only

8–5Working with Tags
Publication 2706-817
69
Table View Form View
Field Description Valid Characters Notes
Tag Name ①The name of thetag
Maximum characters = 32.
• A to Z, a to z, 0 to 9
• hyphen (–), underscore(_), percent (%).
If an invalid character is entered, the Tag Editor beeps and doesnot display it.
• Do not use blanks, tabs, carriage returns or non-printable characters.
• Tag names cannot begin with 0 – 9, hyphen, or percent.
• Tag names are not case-sensitive: LIST, List, and list are all the same to the Tag Editor.
• Tag names must be unique in a project.
Data Type ①The data formatfor the tag
Select one of the following:
• bit
• 4BCD
• unsigned integer
• signed integer
• character arrayUse either of these methods:
• Type the letter of the data type, for example, b for bit.
• Use TAB to move to the Data Type field, press ALT + ↓ to display the list of data types.
The tag Data Type determines the data format for the variable.
Array Size(Character Arraytype only)
The number ofcharacters in thearray
Range of characters = 2 to 33;
• A to Z, 1 to 9.
• Do not use blanks, tabs, carriage returns or non-printable characters.
• Array size must be an integer.
Defining Tags

8–6 Working with Tags
Publication 2706-817
Field Description Valid Characters Notes
Description ②A description ofthe tag
Maximum characters = 255.
• any printable character.Use either of these methods: Select the box and type, or Use the Description Editor (seebelow).
• Do not use blanks, tabs, carriage returns or non-printable characters.
Node Name ①
The node on thenetwork wherethe device islocated
A node name cannot be the same asa tag name or a terminal name.Maximum characters = 32.
• A to Z, a to z, 0 to 9
• hyphen (–), underscore(_), percent (%).
The node name must match the controller name entered in theCommunication Setup dialog. See Page 10–6.If an invalid character is entered, the Tag Editor beeps and doesnot display it.
• Do not use blanks, tabs, carriage returns or non-printable characters.
• Node names cannot begin with 0 – 9, hyphen, or percent.
• Node names are not case-sensitive: SLC, Slc and slc are all the same to the Tag Editor.
Address ①
The data tableaddress in thelogic controllerfor the tag
Maximum characters = 32For more information on validaddresses, refer to the controller’suser manual.
• Do not use blanks, tabs, carriage returns or non-printable characters.
Initial Value(Numeric Entryvariables only)
The startingvalue for the tagin engineeringunits, which maynot be the sameunits used bythe controller.
If the Data Type is a bit, enter either
• 0 or 1.Maximum characters for other DataTypes = 24; they can be:
• 0 to 9
• e, E, +, –, and period (.).
• Do not use blanks, tabs, carriage returns or non-printable characters.
• Maximum precision is 6 places to the right of the decimal point.
• If present, a sign (+ or –) for the number must be first. Default is +.
• If present, a sign for the exponent must immediately follow the e or E. Default is +.
• Default initial value is 0.
UpdateFrequency
How often theterminal shouldread the data inthe tag address
• 1 to 9, where 1 is the fastest update rate.Use either of these methods:
• Click the down arrow and click on the rate.
• Use TAB to move to the Update Frequency field, press ALT + ↓ to display the list of frequencies.
Does not apply to Remote I/O.

8–7Working with Tags
Publication 2706-817
Field Description Valid Characters Notes
Scaling ③Scale = ‘m’ in y = mx + bOffset: = ‘b’ in y = mx + b
The values thatconvert the tag’scontroller integervalues (“x” ) toengineeringunits (“y”)
Maximum characters = 12
• 0 to 9
• e, E, +, –, and period (.)
• Do not use blanks, tabs or carriage returns.
• Maximum precision for scale is 4 places to the right of the decimal point.
• Maximum precision for offset is 6 places to the right of the decimal point.
• If present, a sign (+ or –) for the number must be first. Default is no sign, which represents +.
• If present, a sign for the exponent must immediately follow the e or E. Default is no sign, which represents +.
Data Entry
Limits ③ 70
The minimumand maximumvalues that theoperator canenter for the tag
Maximum characters = 12
• 0 to 9
• e, E, +, –, and period (.)
• Do not use blanks, tabs or carriage returns.
• Maximum precision is 4 places to the right of the decimal point.
• If present, a sign (+ or –) for the number must be first. Default is +.
• If present, a sign for the exponent must immediately follow the e or E. Default is +.
① Required fields for either Table View or Form View.
② To bring up the Description Editor: 1. Select the Description field. 2. Click the right mouse button. 3. Choose Editor from the menu that appears. 4. When finished entering the description, select OK.
③ Scaling and Data Entry fields In Form View, these fields are present only when the Data Type is signed/unsigned integer or BCD. In Table View, these fields are not present.

8–8 Working with Tags
Publication 2706-817
Saving Tags
To save tag definitions in Form View: 71
Select OK.
• Or press ENTER..
• Or select the Tag Editor button to move to the Table View.
To close the form without saving anything, select the Cancel button.
To save tag definitions in Table View:
Double-click in the Status Column for that tag.
• Or in the last column press ENTER.
• Or use the arrow keys to move the highlight to a different(existing) row.
• Or use the scroll bar or the Page Up or Page Down keys to moveto a different row.
• Or insert a new tag in the table.
• Or change to the form view.
Different Views
To display: Do this:
only data types unsigned or signed integer,BCD, or character array (if you are in theTable View)
choose BCD/Integer from View menu
all tags in the project (if you are in theBCD/Integer View)
choose Summary from View menu.
another copy of the current viewclick or choose New from the
Windows menu.
Inserting and Deleting Tags
To select a row (a tag), click the left mouse button in the StatusColumn for its row.
For this result: Do this:
insert a tagclick or choose Insert from Edit menu.
A blank line appears in the table onwhich to enter a new tag.
delete a tagclick or choose Delete from Edit menu.
The tag is deleted from theapplication and cannot be retrieved.
cut a tag
click or choose Cut from Edit menu.
The tag is cut from the currentproject. It may be added to this oranother application using the Pastecommand.
Working With Tags
Table View only

8–9Working with Tags
Publication 2706-817
Copying tags
Select, Copy and Paste entire tags or individual fields. Then edittheir attributes as needed. See also Duplicating Tags below. 72
In fact, since tags and fields are copied to the Microsoft Windowsclipboard, they can be pasted in another application, even anapplication in another project.
When a tag is copied, the new tag’s name is the same as the originaltag’s name in the Tag Editor Table View. An X appears in the Statuscolumn for the new tag’s row until its name is changed.
For this result: Do this:
select a field click the left mouse button in the field
select a rowclick the left mouse button in the Status column forthe row (the column at the far left)
select several adjoining rows
click the left mouse button in the Status column forthe first row. Then either: drag the mouse down the column, or press and hold the SHIFT key and press the Page Up or Page Down key
select several separated rowsclick the left mouse button in the Status column forthe first row. Then press and hold the CTRL key andclick in the Status column of the other rows.
To copy and paste tag information:
1. Select the row that you want to copy, or the contents of a field.
2. Click the Copy tool.
Or choose Copy from the Edit menu.
3. Use the up/down arrow keys to move the cursor to the newlocation.
4. Click the Paste tool.
Or choose Paste from the Edit menu.
If a tag is pasted, it is inserted above the current row.
If a field is pasted, it replaces the contents of the field that containsthe insertion point. Be careful to paste it in a field in the samecolumn.
Table View only
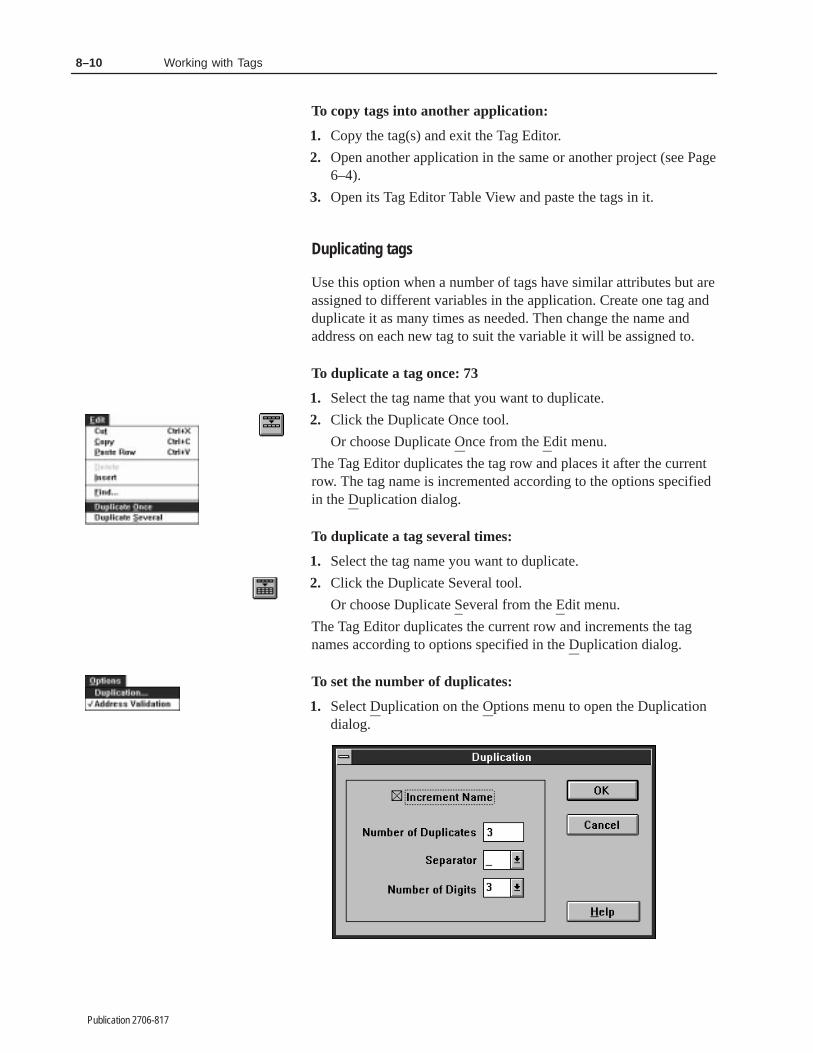
8–10 Working with Tags
Publication 2706-817
To copy tags into another application:
1. Copy the tag(s) and exit the Tag Editor.
2. Open another application in the same or another project (see Page6–4).
3. Open its Tag Editor Table View and paste the tags in it.
Duplicating tags
Use this option when a number of tags have similar attributes but areassigned to different variables in the application. Create one tag andduplicate it as many times as needed. Then change the name andaddress on each new tag to suit the variable it will be assigned to.
To duplicate a tag once: 73
1. Select the tag name that you want to duplicate.
2. Click the Duplicate Once tool.
Or choose Duplicate Once from the Edit menu.
The Tag Editor duplicates the tag row and places it after the currentrow. The tag name is incremented according to the options specifiedin the Duplication dialog.
To duplicate a tag several times:
1. Select the tag name you want to duplicate.
2. Click the Duplicate Several tool.
Or choose Duplicate Several from the Edit menu.
The Tag Editor duplicates the current row and increments the tagnames according to options specified in the Duplication dialog.
To set the number of duplicates:
1. Select Duplication on the Options menu to open the Duplicationdialog.

8–11Working with Tags
Publication 2706-817
2. Select the Increment Name check box to choose whether or notto distinguish names of duplicated tags by adding a number to thename. Default is to add a number.
3. Select a separator from the Separator list box that will gobetween the name and number of duplicated tags.
4. Select a number from 1 to 4 from the Number of Digits list box.This sets the number of characters to the right of the separator.
5. Highlight the value in the Number of Duplicates text box andtype a number.
The number of duplicates is also displayed in a Duplications text boxon the toolbar. The value in the Duplications text box may behighlighted and changed without entering the Duplication dialog.
Use this tool or command to locate any tag or tags in the Tag Editorby name. Other tag attributes cannot be used in the Find dialog.
Important: If the active View is BCD/Integer, the Find commandcannot locate tags with bit addresses.
1. Click the Find tool to open the Find dialog.
Or choose Find on the Edit menu.
2. Type the name of the tag and press ENTER. The Find commandlocates tag names containing the sequence of characters.
The command is not case sensitive. For example, if you enterswitch, the Find command locates: switch, Switch, SWITCH,Switch_5, Limit_switch, LimitSwitch, etc.
3. Select the appropriate button to move among the occurrences ofthe tag name.
Click: To Move To:
the first occurrence in the current view
the previous occurrence
the next occurrence
the last occurrence in the current view
4. When done, select the Exit or Cancel button, or press ESC on thekeyboard.
Finding Tags
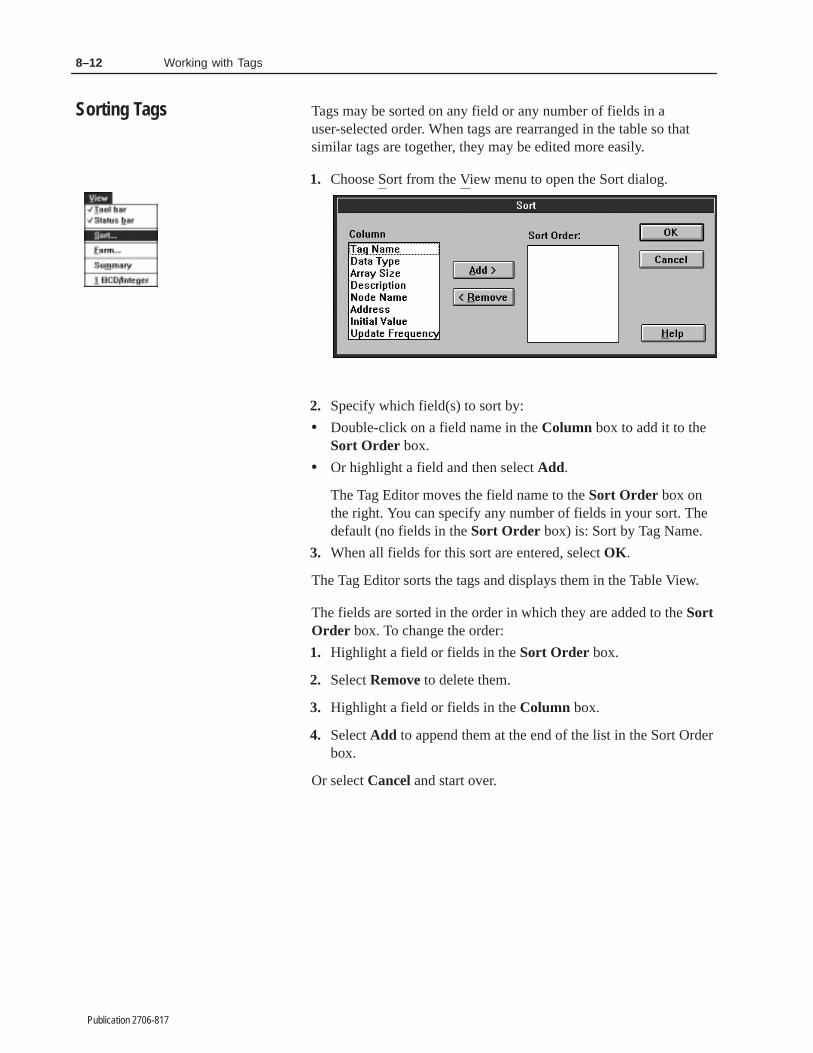
8–12 Working with Tags
Publication 2706-817
Tags may be sorted on any field or any number of fields in auser-selected order. When tags are rearranged in the table so thatsimilar tags are together, they may be edited more easily.
1. Choose Sort from the View menu to open the Sort dialog.
2. Specify which field(s) to sort by:
• Double-click on a field name in the Column box to add it to theSort Order box.
• Or highlight a field and then select Add.
The Tag Editor moves the field name to the Sort Order box onthe right. You can specify any number of fields in your sort. Thedefault (no fields in the Sort Order box) is: Sort by Tag Name.
3. When all fields for this sort are entered, select OK .
The Tag Editor sorts the tags and displays them in the Table View.
The fields are sorted in the order in which they are added to the SortOrder box. To change the order:
1. Highlight a field or fields in the Sort Order box.
2. Select Remove to delete them.
3. Highlight a field or fields in the Column box.
4. Select Add to append them at the end of the list in the Sort Orderbox.
Or select Cancel and start over.
Sorting Tags

8–13Working with Tags
Publication 2706-817
Tags may be printed if the personal computer is connected to aprinter and the correct drivers are installed. See the manual for theprinter and the Windows manual. 74
!ATTENTION: Make sure your printer is connectedand online.
Important: If a row is being edited, signalled by a “pencil” in theStatus Column (the first column on the left), the Printcommand is not active. Select a different row (whichstores the edited row) before calling up the Print dialog.
To print tags:
1. Click the Print tool to open the Print dialog.
Or choose Print from the Project menu.
Opens Print Setup dialog
Opens Page Setup dialog
Name of current printer.
Note: The name of the current printer is displayed. To change to adifferent printer, see the next section. The printer used in thissession will be the default printer next time this dialog is opened.
2. Under Print What , specify whether to print All Rows in thecurrent tag view or only selected rows.
See Page 8–9 for details on how to select contiguous ornoncontiguous rows.
3. Select the Print The Cover Page box to print the cover page.Information for the cover page is entered automatically: itincludes product, project and view name, date and time.
The product is: Allen-Bradley Tag Editor.
4. If the Current Printer default printer should be changed, selectthe Printer Setup button to open the Print Setup dialog.
5. If the setup should be checked or edited, select the Page Setupbutton to open the Page Setup dialog.
6. Select OK .
Printing Tags
Table View only

8–14 Working with Tags
Publication 2706-817
Other information
• The column width of the printed output is based on the columnwidth in the Tag Editor.
• The Tag Editor prints as many columns as fit on the width of thepage (minus the margins). If a column does not fit, it is printed onthe next page.
The Tag Editor does not print a column that is less than onecharacter wide, that is, an empty column.
• If a row does not fit on the page, it is printed on the next page(each row is one text line high).
To set up the printer:
1. Select the Printer Setup button in the Print dialog to open thestandard Windows Print Setup dialog.
The dialog entries are based on the computer’s systemconfiguration and installation options.
2. Select the default or another printer and specify its settings.
!ATTENTION: Check the Microsoft Windows usermanual to make sure the settings are correct for thetype of printer.
3. Select the Options button to open a dialog to fine-tune thespecific printer. This dialog is different for each type of printer.
4. Select OK to return to the Print dialog.
If the printer is not listed:
1. Check for hardware compatibility between the printer and one ofthe printers listed.
2. Check if your printer has an emulation mode that is compatiblewith one of the printers listed.
3. It may be necessary to install a printer driver for your printer.Refer to the Windows User’s Guide.
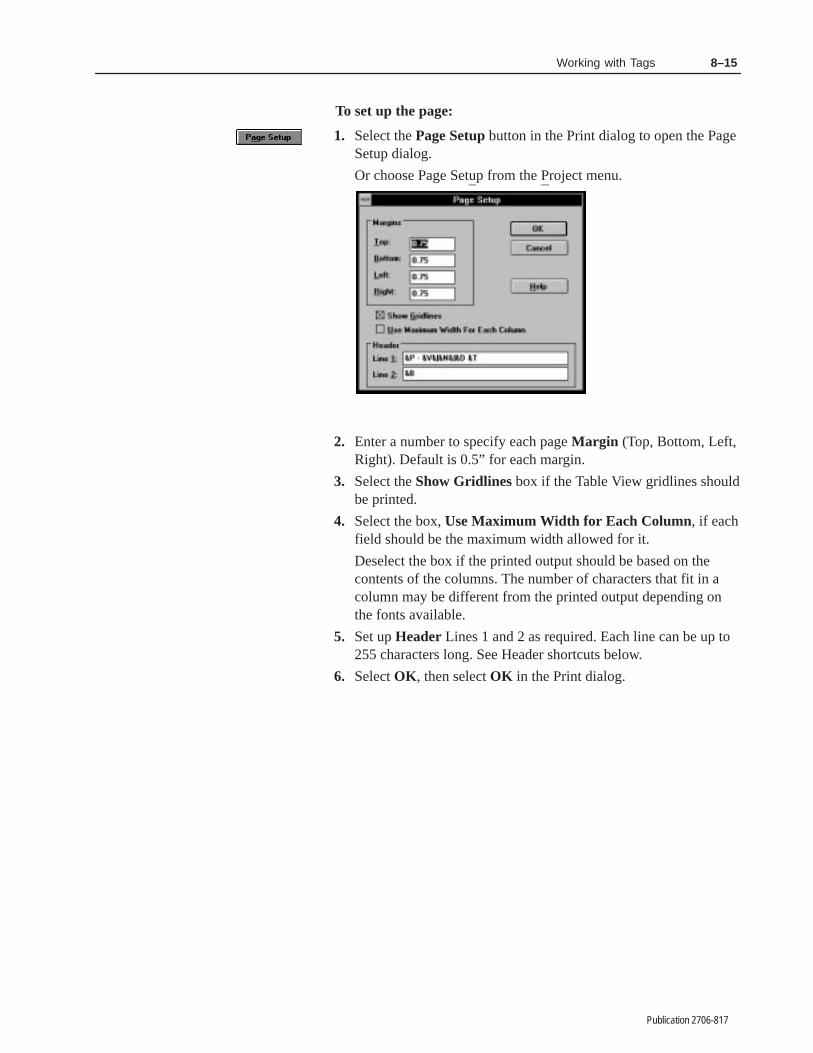
8–15Working with Tags
Publication 2706-817
To set up the page:
1. Select the Page Setup button in the Print dialog to open the PageSetup dialog.
Or choose Page Setup from the Project menu.
2. Enter a number to specify each page Margin (Top, Bottom, Left,Right). Default is 0.5” for each margin.
3. Select the Show Gridlines box if the Table View gridlines shouldbe printed.
4. Select the box, Use Maximum Width for Each Column, if eachfield should be the maximum width allowed for it.
Deselect the box if the printed output should be based on thecontents of the columns. The number of characters that fit in acolumn may be different from the printed output depending onthe fonts available.
5. Set up Header Lines 1 and 2 as required. Each line can be up to255 characters long. See Header shortcuts below.
6. Select OK , then select OK in the Print dialog.

8–16 Working with Tags
Publication 2706-817
Entering Header Information
Do this to enter Header text: For example:
Most text prints as typed.
To print this:
type This is the header.
This is the header.
Type one of the following charactersequences to save time: 1 2
&D = current date 3
&N = page number 3 &T = current time&V = view name&P = project name&B = space (use this to print a blank line)&A = product name:
Allen-Bradley Tag Editor
To print this:
type &D &P
To print a blank line, type &B.To print an &, type &&.A character sequence that is not definedis printed as is. For example, if you enter&Z, then &Z is printed.
2/2/95 Project 1
1 Character sequences are not case sensitive.2 If the expanded text is larger than 255 characters, the printed output may be distorted or cut off.3 These values are based on the computer’s Control Panel settings. See the Microsoft Windows user
manual for information about the Control Panel.
Aligning the Headers
Left justified text is the default alignment.
• For centered text: type &| before the text or character sequence.
• For right justified text: type &|&| before the text or charactersequence.
For example, if you want to print this:
type &P&|&N&|&D
Project 1 2 2/3/95
text after thischaracter sequence
is centered
text after this secondcharacter sequence isright justified
Important: If alignment is specified in part of a header line, makesure the text does not overlap. For instance, if leftjustified text runs to the center of the page, it willoverlap centered text.

8–17Working with Tags
Publication 2706-817
If the Status column or Tag Name column for a specific tag isselected, the Tools menu gives a list of available tools. From the listselect the tool needed.
In some cases, the Tools menu commands may depend on whatsoftware is installed the the computer system.
List Editor is the same as the Summary command on the Viewmenu: it brings up a new Tag Editor Table View.
Form Editor is the same as the Form command on the View menu:it brings up the Tag Form dialog for the selected tag.
Import and Export access the Tag Import/Export Utility.
Supported file formats
The Tag Import/Export utility copies SLC and PLC-5 taginformation from a supported file format to a MessageBuildersoftware project and vice versa. The supported ASCII file formatsare:
File Format Description
Advanced Programming Software(APS)
The ASCII documentation file produced by theAPSIE utility, for the SLC processor only. See the APS Import/Export Utility user manual,publication 1747-NM006.
Comma Separated Value (CSV)format
This format is used by certain software packages,such as Excel. See the user manual for the software.
Advanced Interface (AI) seriessoftware
The WINtelligent series version of the CSV format.
Tag Import/Export Utility

8–18 Working with Tags
Publication 2706-817
Importing tags
Note: The Import function does not import:
• files created without keywords
• files created with annotations.
1. Choose Import from the Tools menu to open the Import Tagsdialog.
2. Select an input format (APS ASCII, AI, or CSV).
When you import from APS ASCII format :
The Import function automatically translates special characters inaddress comments (AC) used by APS software:
• backslash (\) is changed to carriage return (<cr>)• double quotation marks (””) are changed to single (”)• tilde preceding a backslash (∼\) is changed to a backslash (\).
3. Type a source file in the File box.
Or select Browse to search for a source file.
4. Under Destination, select a project and the logic controller usedby the project.
5. Select OK .
The Reading Source File dialog opens, followed by the ImportingTags to Project dialog. Each of these dialogs displays thepercentage complete.

8–19Working with Tags
Publication 2706-817
When the Import function has finished importing the tags, theSummary Report dialog opens.
• Select View Report to check it over.
• Select Save Report to save it to a file. A report must be savedbefore it can be printed.
• Select OK to return to the Tag Editor Table View.
To handle data collisions
If two or more tags have the same name, this dialog opens.
Important: The Import function does not check for duplicateaddresses, only duplicate names.
Click: The Import utility will:
Ignore conflicting tags. The tags in the projectremain, and the conflicting ones in the Import sourcefile are discarded.
Rename conflicting tags. The Import function addsan extension to duplicate tags
_# (where # is 1, 2 or 3)After three tags of the same name are renamed, anymore imported tags of that name are discarded.
Update the tags in the project with the data from theimported tags.
Exit the Import/Export utility and return to the TagEditor.

8–20 Working with Tags
Publication 2706-817
Exporting tags
1. Choose Export from the Tools menu to open the Export Tagsdialog.
2. Select an output format (APS ASCII, AI, or CSV).
!ATTENTION: The Export function automaticallyadjusts tag names and descriptions to fit the newformat. If this will cause problems, edit the tags andtheir names before opening the Export tool.
• When you export to an APS ASCII file:
– If the tag name is longer than 10 characters, the Exportfunction truncates the name.
– If the description is longer than 50 characters, the Exportfunction truncates the description.
– If special characters in the description are equivalent to thoseused by APS, the Export function translates them:carriage return (<cr>) to backslash (\)quotation mark (”) to double quotation marks (””)backslash (\) to tilde-backslash (∼\).
– If the tag name contains other special characters, the Exportfunction deletes them.
• When you export to an AI file:
– If the tag name is longer than 15 characters, the Exportfunction truncates the name.
– If the description is longer than 75 characters, the Exportfunction truncates the description.
• When you export to a CSV file:
– If the comment (description) field contains quotation marks,commas or carriage returns, the Export function puts quotationmarks around the comment field.
– If the comment field contains embedded quotation marks, theExport function changes them to double quotation marks (””).

8–21Working with Tags
Publication 2706-817
3. Under Source, select a project and the logic controller associatedwith it.
4. Under Destination, type a destination file in the File box or selectBrowse to search for a destination file.
5. Select OK .
The Exporting Tags From Project dialog opens, followed by theWriting Destination File dialog. Each of these dialogs display thepercentage complete.
When the Export function has finished exporting the tags, theSummary Report dialog opens.
• Select View Report to check it over.
• Select Save Report to save it to a file. A report must be savedbefore it can be printed.
• Select OK to return to the Tag Editor Table View.
Examining the Results of an Import/Export
To examine detailed results of an import or export, select the ViewReport button from the Summary Report dialog. For example, if afile has been imported, View Report produces this dialog:

8–22 Working with Tags
Publication 2706-817
Interpreting Import/Export error messages 75
This error: Means that: What to do:
device error - nodevice specified
a device has not been specified Select OK, then select or enter a device.
device error -device does notexist
the specified device has not been defined
Select No to select or enter another device.
Select Yes to create a new device. This dialog box opens:
1. Select the type of device.
2. Enter the device address.
3. Select OK.
device error -device not an SLCprocessor1
a file imported from APS format requires anSLC processor, which was not defined
Select OK, then select an SLC device.
parse error1
the selected source file was:
• corrupted
• unsupported type, or a type other than the type selected
• manually edited, with uncorrected mistakes
Select OK to abort the Tag Import/Export utility.Fix the bad file if necessary. Choose Import from the Tools menu again andselect the same or another file to be imported.
file error - the filedoes not exist1
the selected source file does not exist Select OK. Select another source file or cancel.
file error - the filealready exists2
the selected destination file is already inthe project
Select Yes to replace the file with the imported file.Select No to cancel the import.
project error the selected project does not exist Select OK. Select another project or cancel.
1Import only2Export only

Chapter 9
Publication 2706-817
������ ������
This chapter covers the following topics:
• About projects
• Managing projects
• Managing devices in projects
• Loading/replacing tags or devices in projects
• Restoring a project.
Each MessageBuilder application (MBA file) is associated with aproject. The project stores: 76
• tag definitions
• device information (devices are MessageView terminals and logiccontrollers).
Tags and devices are specific to the type of communications, so aproject must be equally specific. Different applications can share aproject as long as they all use the same type of communications.
For example, a remote I/O application requires a MessageViewterminal with a Remote I/O port, and either:
• a valid PLC controller and tags with PLC formatted addresses, or
• a SLC with SN scanner and tags with SLC formatted addresses.
Each project is created as a separate subdirectory in theC:\AB\PROJECTS directory. The project stores tag definitions anddevice information for an application or applications.
Use the Project Management dialog to:
• change the project associated with an application
• copy, rename or delete projects and devices.
About Projects

9–2 Managing Projects
Publication 2706-817
Use the Project tab in the Project Management dialog to work withprojects. You can: 77
• view the current project for an open application
• change the current project for an application
• create a new project
• rename a project
• make a copy of an existing project
• delete a project.
To manipulate projects:
1. Choose Project Management from the Application menu to openthe Project Management dialog.
The New Project box is used whencreating, renaming or copying a project.
2. Select the Projects tab.
The Projects tab shows the project that is currently used by theopened application, and a list of existing projects.
If no application is open, the Current Project field is blank.
3. Perform a task as defined on the next page.
4. Select the Done button to close the dialog and return to theMessage Editor Table View (if an application is open) or theMessageBuilder window (if no application is open).
Managing Projects
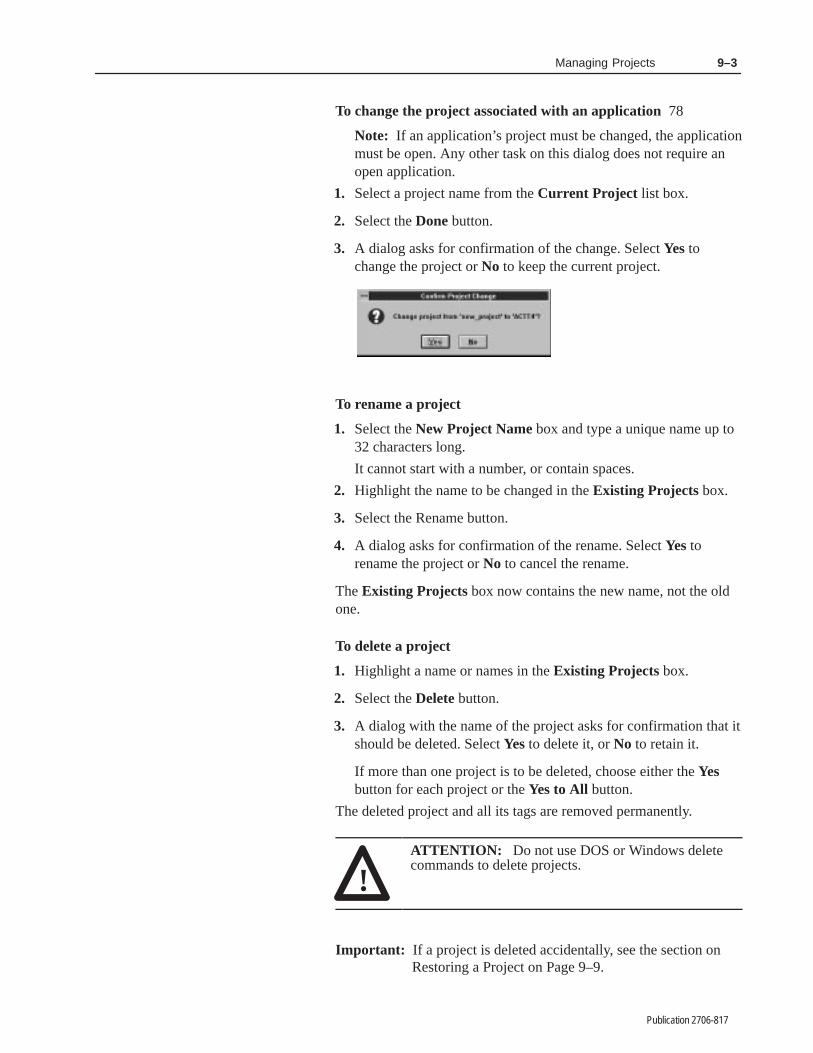
9–3Managing Projects
Publication 2706-817
To change the project associated with an application 78
Note: If an application’s project must be changed, the applicationmust be open. Any other task on this dialog does not require anopen application.
1. Select a project name from the Current Project list box.
2. Select the Done button.
3. A dialog asks for confirmation of the change. Select Yes tochange the project or No to keep the current project.
To rename a project
1. Select the New Project Name box and type a unique name up to32 characters long.
It cannot start with a number, or contain spaces.
2. Highlight the name to be changed in the Existing Projects box.
3. Select the Rename button.
4. A dialog asks for confirmation of the rename. Select Yes torename the project or No to cancel the rename.
The Existing Projects box now contains the new name, not the oldone.
To delete a project
1. Highlight a name or names in the Existing Projects box.
2. Select the Delete button.
3. A dialog with the name of the project asks for confirmation that itshould be deleted. Select Yes to delete it, or No to retain it.
If more than one project is to be deleted, choose either the Yesbutton for each project or the Yes to All button.
The deleted project and all its tags are removed permanently.
!ATTENTION: Do not use DOS or Windows deletecommands to delete projects.
Important: If a project is deleted accidentally, see the section onRestoring a Project on Page 9–9.

9–4 Managing Projects
Publication 2706-817
To create a new project 79
1. Select the New Project Name box and type a unique name up to32 characters long.
It cannot start with a number, or contain spaces.
2. Select the New button.
The Existing Projects box now lists the new name.
To copy a project
1. Select the New Project Name box and type a unique name up to32 characters long.
It cannot start with a number, or contain spaces.
2. Highlight the name of the project to be copied in the ExistingProjects box.
3. Select the Copy button.
If the project has an application open it cannot be copied. Adialog appears:
4. A dialog asks for confirmation of the copy. Select Yes to copythe project or No to cancel the copy.
The Existing Projects box now lists two copies of the same projectunder different names.
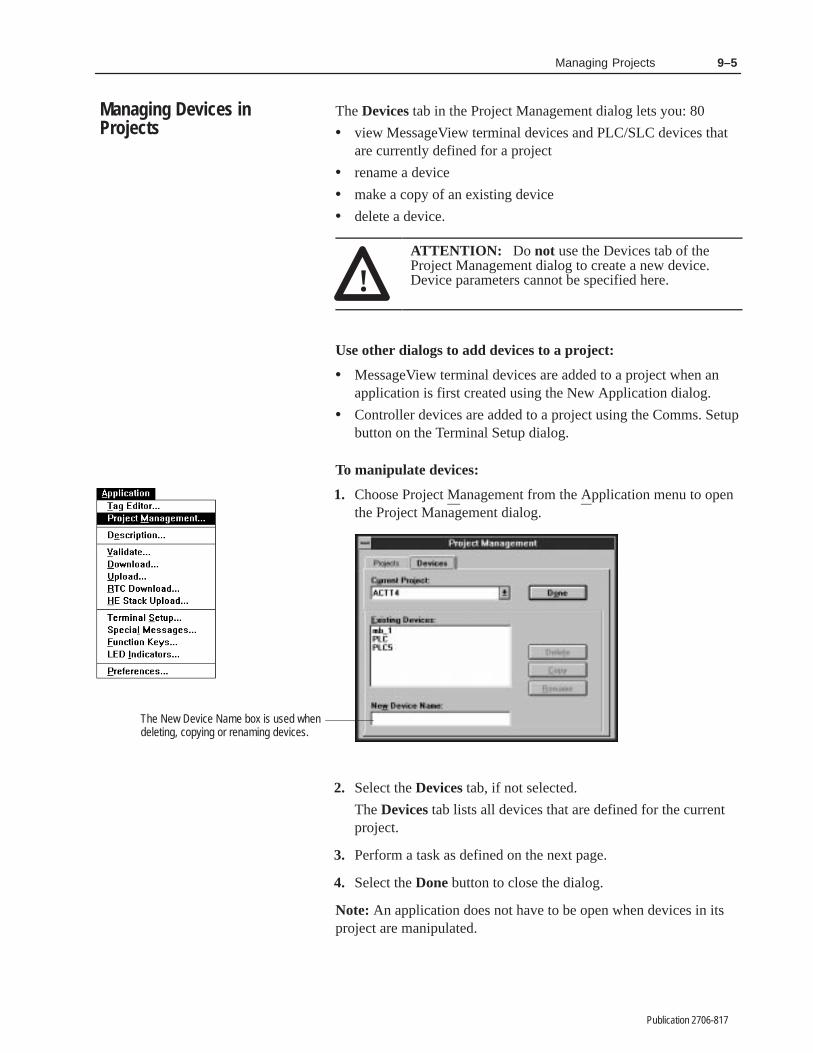
9–5Managing Projects
Publication 2706-817
The Devices tab in the Project Management dialog lets you: 80
• view MessageView terminal devices and PLC/SLC devices thatare currently defined for a project
• rename a device
• make a copy of an existing device
• delete a device.
!ATTENTION: Do not use the Devices tab of theProject Management dialog to create a new device.Device parameters cannot be specified here.
Use other dialogs to add devices to a project:
• MessageView terminal devices are added to a project when anapplication is first created using the New Application dialog.
• Controller devices are added to a project using the Comms. Setupbutton on the Terminal Setup dialog.
To manipulate devices:
1. Choose Project Management from the Application menu to openthe Project Management dialog.
The New Device Name box is used whendeleting, copying or renaming devices.
2. Select the Devices tab, if not selected.
The Devices tab lists all devices that are defined for the currentproject.
3. Perform a task as defined on the next page.
4. Select the Done button to close the dialog.
Note: An application does not have to be open when devices in itsproject are manipulated.
Managing Devices inProjects

9–6 Managing Projects
Publication 2706-817
To delete a device
1. Highlight a name or names in the Existing Devices box.
2. Select the Delete button.
3. A dialog with the name of the device asks for confirmation that itshould be deleted. Select Yes to delete it or No to retain it.
If more than one device is to be deleted, choose either the Yesbutton for each device or the Yes to All button.
The device is permanently removed from the project, and alloccurrences of the device name are removed from the application(s)in the project.
To copy a device
1. Select the New Device Name box and type a unique name up to32 characters long.
It cannot start with a number, or contain spaces.
2. Highlight in the Existing Devices box the name of the device tobe copied.
3. Select the Copy button.
4. A dialog asks for confirmation of the copy. Select Yes to copythe device or No to cancel the copy.
The Existing Devices box now has two copies of the same deviceunder different names.
To rename a device
1. Select the New Device Name box and type a unique name up to32 characters long.
It cannot start with a number, or contain spaces.
2. Highlight the name to be changed in the Existing Devices box.
3. Select the Rename button.
4. A dialog asks for confirmation of the rename. Select Yes torename the device or No to cancel the rename.
The Existing Devices box now has the new name, not the old one.

9–7Managing Projects
Publication 2706-817
To edit devices in a different project than the current one
If an application is open, the project associated with it is listed in theCurrent Project box. However a different project can be selectedand its devices edited.
Select a project name in the Current Project list box. The ExistingDevices box lists all devices in the selected project.
When reopening an application, it is possible that the devices or tagsin the application are not in the project or are different from thedevices or tags in the project. This section shows how to:
• load unknown devices or tags in a project
• replace devices or tags in a project.
If application devices or tags are not in its project:
MessageBuilder displays the following dialog if the application youare opening contains devices (terminal/controller) or tags that are notstored in the project.
MessageBuilder must be told what to do. The options are:
Select: To:
Add the named device or tag to the project database.
Ignore the device or tag, do not add it to the database.
Add all unknown devices or tags to the database.
Ignore all unknown devices or tags, and open the application.
Do not open the application.
If Yes or No was chosen, the dialog reappears with the nextapplication tag or device not found in the project.
Loading/Replacing Tags orDevices in a Project

9–8 Managing Projects
Publication 2706-817
If No or Add None was selected, the following caution appears:
Select OK to accept the warning. The application opens as usual.
If application devices or tags are different than those in itsproject: 81
MessageBuilder displays the following dialog if the application youare opening contains different devices (terminal/controller) or tagsthan those of the same name stored in the application’s project:
Discrepancies that may exist between the application and project:
• The application and project reference the same device name butthe device types are different.
• A tag in the application has the same name as a device in theproject. For example, the application contains a tag namedGRIPPER and the project contains a MessageView terminalnamed GRIPPER.
• A device in the application has the same name as a tag in theproject. For example, the application contains a device namedMOTOR and the project contains a tag named MOTOR.

9–9Managing Projects
Publication 2706-817
For each discrepancy, MessageBuilder must be told what to do. Theoptions are:
Select: To:
Replace the project device or tag with the applicationdevice or tag.
Ignore the device or tag, do not replace it to thedatabase.
Replace all project devices or tags with theapplication devices or tags.
Ignore all unresolved devices or tags, and open theapplication.
Close the application.
If Yes or No was chosen, the dialog reappears with the next differentapplication tag or device.
If No or Replace None is selected, a dialog warns that theapplication may not validate because of the differences.
If a project is deleted accidentally, an application associated with itmay be used to recreate the project. 82
1. Open the application. This dialog appears:
2. Select Yes. The project is recreated with all the device and tagdata required by the application.
Restoring a Project

Chapter 10
Publication 2706-817
������ ��� � ������� �
�����
This chapter covers the following topics:
• Overview of terminal setup
• Changing the terminal type
• Remote I/O communications
• Block transfers
• RS-232 main port communications
• Setting advanced terminal options
• Setting format for time and date
• Defining control tags
• Defining status tags
• Auxiliary port setup.
The Terminal Setup tool or the Terminal Setup command on theApplication menu opens the Terminal Setup dialog. This dialogdefines both operating parameters and runtime communicationparameters.
Terminal Namewas definedwhen theapplication wascreated.
Overview of TerminalSetup

10–2 Terminal and Communication Setup
Publication 2706-817
The Terminal Setup dialog uses tabs to organize its tasks by function.
Tab Function
Setup change terminal type of MessageView device
define runtime communication parameters betweenthe terminal and controlling device (accessed viaComms. Setup button)
Advanced set a variety of terminal options
Time/Datespecify how the time and date will display in theterminal
Control Tags
define tags for:Message Trigger (bit and value)Return Message NumberAcknowledge Acknowledge HandshakeAcknowledge Return NumberFunction Key Return Number
Status Tags define tags for HE Stack Status
Aux. Port define Auxiliary Port (RS-232) device parameters
Note: The control buttons at the bottom of this set of tabbed dialogsapply to all tabs. OK saves parameters on all tabs, Cancel does notsave any parameter.
Terminal Port dialogs
MessageBuilder software has two dialogs where communicationparameters for a terminal port may be set up.
Terminal Ports Where they are configured
Remote I/O and RS-232Catalog Nos. 2706-M1D1, -M1N1, -M1F1.
Remote I/O in the dialog accessed by theComms. Setup button. See Page 10–4.RS-232 in the Aux. Port tab. See Page10–9.
RS-232 onlyCatalog Nos. 2706-M1D, -M1N, -M1F.
RS-232 in the dialog accessed by theComms. Setup button. See Page 10–27.
The Comms. Setup button dialog is used to configure thecommunications between the MessageView terminal and thecontrolling device. This configuration is commonly calledControlling Communications.
The Aux. Port tab dialog is used to configure the communicationsbetween the MessageView terminal and an input or output devicethat is not a controlling device. This configuration is commonlycalled Auxiliary Device Communication.

10–3Terminal and Communication Setup
Publication 2706-817
To change the type of MessageView terminal assigned to an existingapplication:
1. Choose Terminal Setup from the Application menu.
The Setup Tab shows the information that was associated withthe terminal name when the application was first created.
2. Change the Terminal Type to the type of terminal that theapplication will be designed for.
3. Select an existing Terminal Name that matches the new terminaltype from the list box
Or highlight the entry in the box and type in a new name.
4. If you typed a new name, select a Catalog number and firmwareVersion; only the choices that fit the selected terminal type aredisplayed.
5. The Ports list box displays the ports available on the terminal youdefined. Select OK .
Special considerations
Each application is designed for a certain type of MessageViewterminal.
If the selected terminal type and the application type do not match, adialog asks if the application should be changed.
Select Yes to convert the application.
• Select No to keep the application as it is, even though it may notpass validation.
• Select Cancel to keep the original terminal type.
Changing the TerminalType

10–4 Terminal and Communication Setup
Publication 2706-817
If messages in the application before conversion consisted ofembedded Function keys or Entry variables, and the new designatedterminal type does not support these functions, the conversionprocess will display an error dialog box.
The error dialog box reports the message numbers of anyincompatible messages in the application.
If the terminal is changedfrom:
To: Remove:
MessageView 421F MessageView 421NFunction keysLEDs
MessageView 421F MessageView 421DFunction keysLEDsEntry Variables
MessageView 421N MessageView 421D Entry Variables
MessageView 421N MessageView 421F none
MessageView 421DMessageView 421NMessageView 421F
nonenone
Note: The conversion will not take place (aborts) if theseincompatibilities exist. Each of the messages reported in the errordialog must be edited individually before the application can beconverted.
This section shows how to define runtime parameters for aMessageView terminal and a PLC or SLC, that will communicateover a Remote I/O (RIO) link.
The MessageView terminal operates as a single rack on the network.Its RIO communication parameters are set to match those of thelogic controller it will exchange data with, while the application isrunning.
MessageView terminals with RIO daughterboards are Catalog Nos.2706-M1D1, -M1N1, and -M1F1.
Remote I/OCommunications
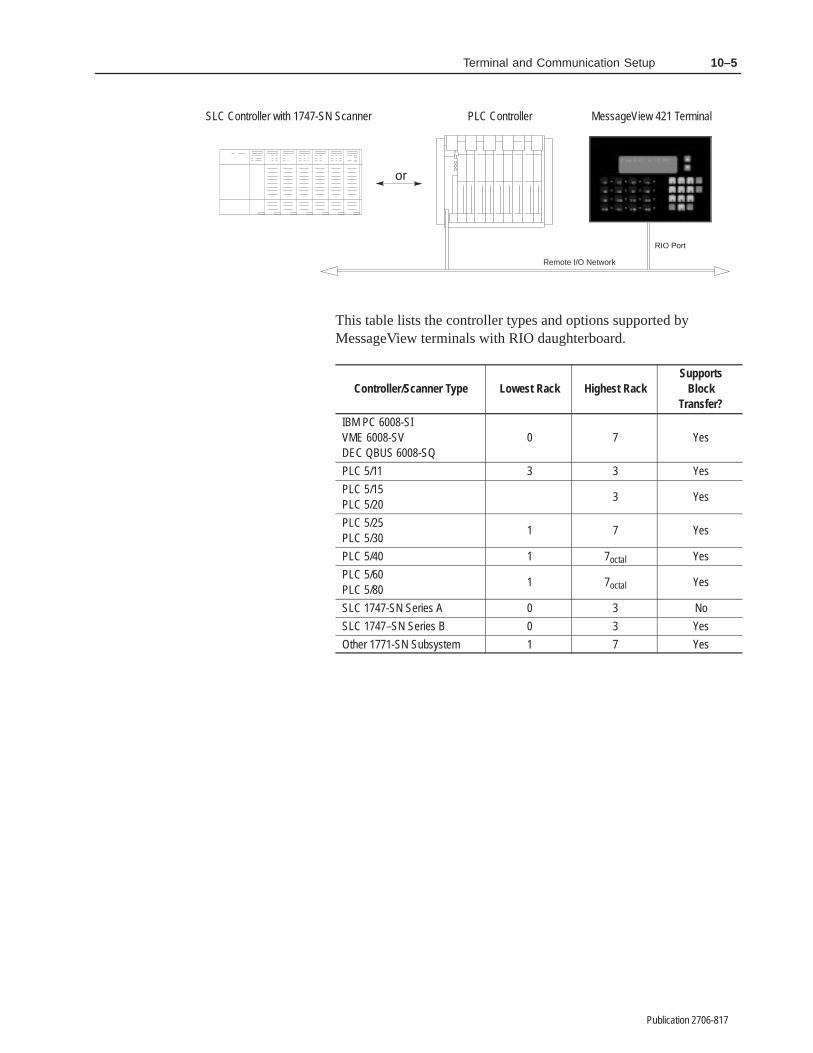
10–5Terminal and Communication Setup
Publication 2706-817
PLC Controller MessageView 421 Terminal
RIO Port
Remote I/O Network
SLC Controller with 1747-SN Scanner
or
This table lists the controller types and options supported byMessageView terminals with RIO daughterboard.
Controller/Scanner Type Lowest Rack Highest RackSupports
BlockTransfer?
IBM PC 6008-SIVME 6008-SVDEC QBUS 6008-SQ
0 7 Yes
PLC 5/11 3 3 Yes
PLC 5/15PLC 5/20
3 Yes
PLC 5/25PLC 5/30
1 7 Yes
PLC 5/40 1 7octal Yes
PLC 5/60PLC 5/80
1 7octal Yes
SLC 1747-SN Series A 0 3 No
SLC 1747–SN Series B 0 3 Yes
Other 1771-SN Subsystem 1 7 Yes
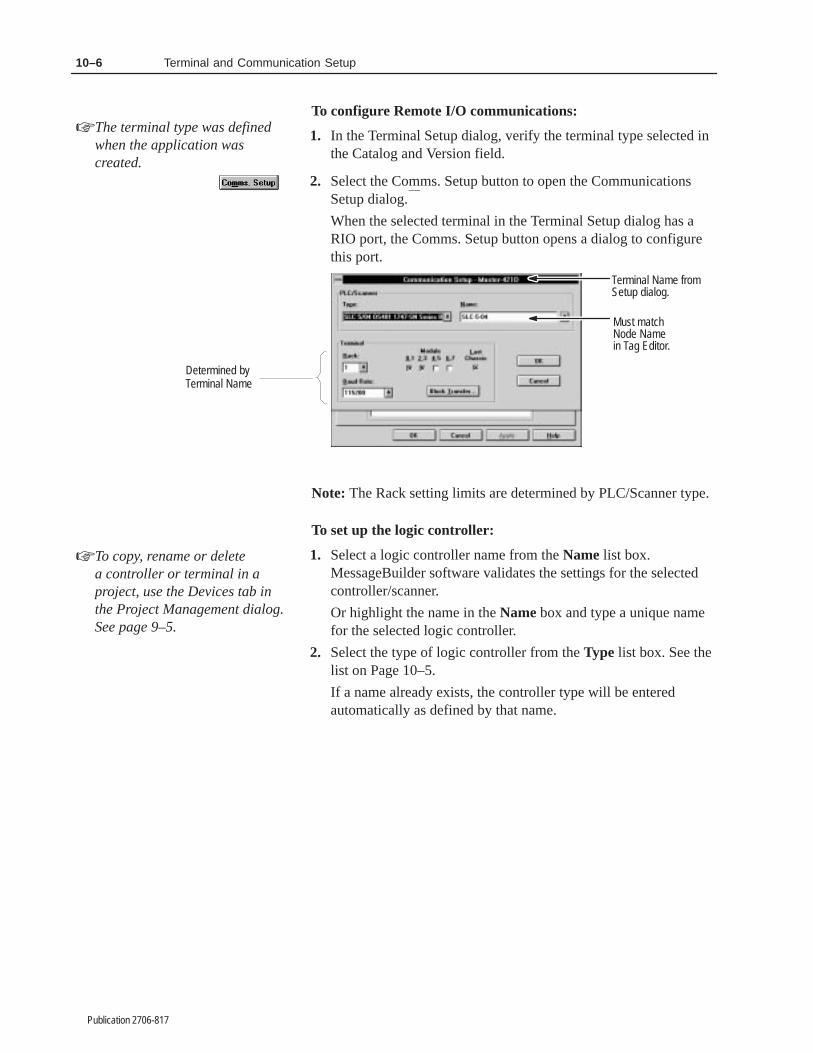
10–6 Terminal and Communication Setup
Publication 2706-817
To configure Remote I/O communications:
1. In the Terminal Setup dialog, verify the terminal type selected inthe Catalog and Version field.
2. Select the Comms. Setup button to open the CommunicationsSetup dialog.
When the selected terminal in the Terminal Setup dialog has aRIO port, the Comms. Setup button opens a dialog to configurethis port.
Terminal Name fromSetup dialog.
Must matchNode Namein Tag Editor.
Determined byTerminal Name
Note: The Rack setting limits are determined by PLC/Scanner type.
To set up the logic controller:
1. Select a logic controller name from the Name list box.MessageBuilder software validates the settings for the selectedcontroller/scanner.
Or highlight the name in the Name box and type a unique namefor the selected logic controller.
2. Select the type of logic controller from the Type list box. See thelist on Page 10–5.
If a name already exists, the controller type will be enteredautomatically as defined by that name.
☞ The terminal type was defined when the application was created.
☞ To copy, rename or deletea controller or terminal in a project, use the Devices tab in the Project Management dialog.See page 9–5.

10–7Terminal and Communication Setup
Publication 2706-817
To set up the terminal port:
Use: To:
RackUse only rack numbers supported by the controlleror scanner.
Module GroupSpecify the module groups used by the terminal inthe rack; they must be contiguous.
Last ChassisCheck this box if these module groups have thehighest numbers assigned in the rack.
Baud Rate
Specify the baud rate used on the RIO link. Theoptions are: 57.6 K 10,000 feet 115.2 K 5,000 feet 230.4 K 2,500 feet
Block Transfer Discussed in detail in the next section.
3. Select OK to save the Remote I/O settings and return to TerminalSetup dialog.
Use block transfers on a Remote I/O link to transfer a large block ofdata between the MessageView 421 terminal and the logic controller.See the section starting on Page 5–17.
Create up to 10 block transfer channels, numbered 1 to 10. Eachchannel is associated with a block transfer read or write instruction(BTR or BTW) in the controller ladder logic.
To define block transfers:
1. Select the Block Transfer button in the Communication Setupdialog.
Note: If the controller/scanner does not support block transfer,the Block Transfer button is dimmed and inactive.
Block Transfers

10–8 Terminal and Communication Setup
Publication 2706-817
2. Enter the parameters for each block transfer to be used.
Use: To:
Enabled Enable or disable the block transfer.
AddressSpecify the starting address of the block transfer in anative SLC or PLC (Remote I/O) link.
Mode Select Read or Write.
LengthSelect the number of words (1 to 64) required by theblock transfer. A length of 63 is reserved for Pass-Through.
3. Select OK to return to the Communication Setup dialog.
Note: Pass-Through Enable and Block Transfer Timeout are futureenhancements. Ignore them in this dialog.
Example
In this example, two block transfer assignments are specified.
N77:2
N7:0
!ATTENTION: When block transfer is used, becertain that if the Return Message Number globalattribute is selected:The Acknowledge bit tag is assigned to the same blockas the Acknowledge Return Message Number tag.Function Key write tags are assigned to the same blockas the Function Key Return Message Number tag.
10–9Terminal and Communication Setup
Publication 2706-817
A MessageView terminal’s RS-232 port may be used as:
• A MessageBuilder communications link port (all terminals)
• an ASCII Trigger controlling port (Catalog Nos. 2706-M1D,-M1N, -M1F)
• a slave device port (Catalog No. 2706-M1D)
• an Auxiliary Device port (Catalog Nos. 2706-M1D1, -M1N1,-M1F1)
MessageBuilder communications link port
The RS-232 port on all MessageView 421 terminals is used in one ofits configurations as the link between the terminal andMessageBuilder Configuration software. The RS-232 portparameters for this link are fixed (not user configurable). See Page5–2 for the DF1 parameters.
The section starting on Page 11–6 explains uploading to anddownloading from the MessageBuilder software. You can configurethe terminal to default to MessageBuilder configuration parameterson power–up, see Page 10–16.
ASCII Trigger controlling port or Slave Device port
This section shows how to define runtime parameters for a terminalcontrolled by an ASCII Triggering device and a terminal as a slavedevice. Both devices communicate via an ASCII serial port, the mainRS-232 port.
To configure the RS-232 communications for ASCII Triggeringand Slave Device:
1. In the Terminal Setup dialog, verify the terminal type selected inthe Catalog and Version field.
RS-232 Main PortCommunications

10–10 Terminal and Communication Setup
Publication 2706-817
2. Select the Comms. Setup button to open the CommunicationsSetup dialog.
When the selected terminal in the Terminal Setup dialog has onlyan RS-232 port, the Comms. Setup button opens a dialog toconfigure this port.
3. Select the radio button for either ASCII Triggered or SlaveDevice.
4. Set the parameter values as needed.
Parameter Names Default Parameters Options
Node Number(The node address ofthe MessageViewterminal.)
11 to 127.
Baud Rate 9600300, 600, 1200, 2400, 9600, 19,200,38,400 bps
H/W Handshake Disabled Enabled, Disabled
Parity None None, Odd, Even
Data Bits 8 7, 8
Stop Bits 1 1, 2
Note: For information on the Hardware Handshake parameter,see Page 4–29.
5. Select OK to save the RS-232 settings and return to TerminalSetup dialog.
Note: The RS-232 communication parameters may be changed bythe terminal operator via the Front Panel Editor.
Note: The application may be Password enabled to prevent theterminal operator from changing the settings and disruptingcommunications. See Page 10–18.
Note: Since the same RS-232 port on the terminal is used forcommunications with an ASCII Triggering device or a masterdevice, and also with MessageBuilder programming software, theterminal must be set to the correct port configuration before propercommunications can be established. See the discussion on Page 5–3.

10–11Terminal and Communication Setup
Publication 2706-817
MessageView terminal as a slave device
When a MessageView terminal is set up as a slave device, it isconsidered to be a slave in a master/slave relationship. The slavedevice terminal receives commands from a slaving (master) device,but does not initiate communications itself. See Page 4–18 for adiscussion of slave devices.
Because of the architecture of the MessageView 421D Slave Deviceterminal (Catalog No. 2706-M1D), an application with thecommunication parameters and a blank message needs to reside inthe terminal’s memory. All MessageView 421D terminals (CatalogNo. 2706-M1D) are shipped with an application residing in memoryfor this purpose.
Consult the Slave Device section of the MessageView terminal usermanual for more details.
Auxiliary Device port
The MessageView terminal configured with a daughterboardcommunications card (Remote I/O) can use the RS-232 port as anauxiliary port for communications to:
• an ASCII Input device
• a slave device (the MessageView terminal is a master device)
The Auxiliary port parameters are configured under the Aux. Porttab in the Terminal Setup dialog. See the section starting on Page10–27 to configure the auxiliary port.
Note: Since the same RS-232 port on the terminal is used forcommunications with an ASCII Triggering device or a slave device,and also with MessageBuilder programming software, the terminalmust be set to the correct port configuration before propercommunications can be established. See the discussion on Page 5–3.

10–12 Terminal and Communication Setup
Publication 2706-817
The Advanced tab in the Terminal Setup dialog allows theapplication designer to define a variety of global configurationparameters for the MessageView terminal.
To set or modify advanced terminal options:
1. Select the Advanced tab from the Terminal Setup dialog.
2. Modify the settings as needed.
3. Select the OK button to save all the settings from the TerminalSetup dialog and return to the main Message Editor Table View.
• Or select another tab and continue setting up the terminal for theapplication.
• Or select the Cancel button to return to the Message Editor TableView without saving any Terminal Setup settings.
Return Message Number to PLC
If this option is enabled, the message number of the displayedmessage is sent to the controller, provided its global Return MessageNumber tag is defined. The controller may be a logic controller or anASCII Triggering device.
The three classes of messages may have Return Number tags:
• messages with the Ack attribute enabled
• messages with Function Keys enabled
• messages of all other kinds.
Note: If the Return Message Number to PLC attribute is enabled,then one or more of the three Return Number tags in the ControlTags tab must be defined. See Page 10–21.
If the controller is an ASCII Triggering device, the Return MessageNumber is sent back as part of the Ctrl-N message. See Page 5–12.
Setting Advanced TerminalOptions

10–13Terminal and Communication Setup
Publication 2706-817
!ATTENTION: When this global attribute is selected,be certain that if block transfer is used:The Acknowledge bit tag is assigned to the same blockas the Return Message Number tag.Function Key write tags are assigned to the same blockas the Return Message Number tag,
The Function key Return Message Number is sent to the controllertwice:
• when the message is displayed
• when the Function key is pressed and released.
If the controlling device is an ASCII Triggering device the Functionkey Return Message Number is sent back as part of the Ctrl-Fcommand. See Page 5–11.
The Acknowledge Return Message Number is sent to the controllertwice:
• when the message is displayed
• when the ACK key is pressed and released.
If the controlling device is an ASCII Triggering device theAcknowledge Return Message Number is sent back as part of theCtrl-K command. See Page 5–11
If the Return Message Number option is disabled, messages thatrequire operator input may need individual notification andhandshake tags.
Note: A message with the Hidden Message attribute set will notreturn its number to the controlling device, since it is not displayed.
Enable Message Queue
The Message Queue in the MessageView 421 terminal storesvalue-triggered messages until the line(s) in which they will bedisplayed is available. Bit-triggered messages are not queued.
• If this option is enabled, up to 64 messages can be queued on aFirst In – First Out basis. They are displayed in turn as terminaldisplay lines become available.
With this option enabled, make sure to define a Value Trigger tagin the Control Tags tab dialog. See Page 10–23.
• If this option is disabled, a message is displayed only if the lineassigned to it is available when it is triggered.
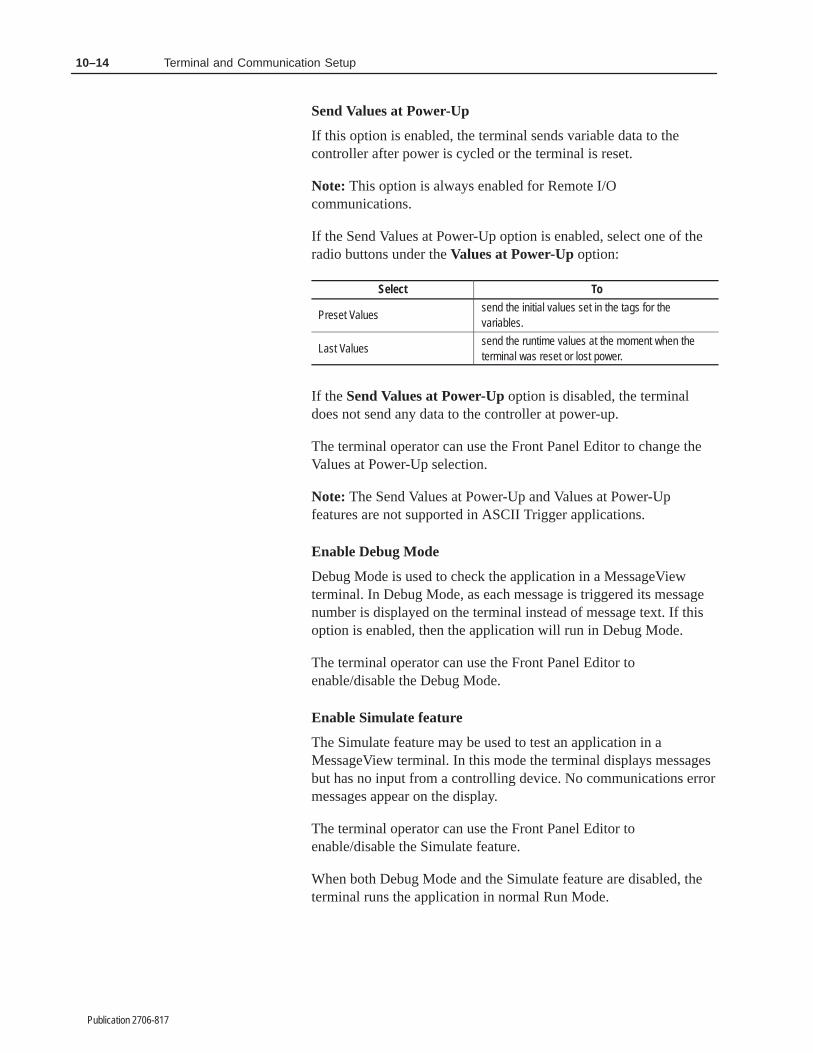
10–14 Terminal and Communication Setup
Publication 2706-817
Send Values at Power-Up
If this option is enabled, the terminal sends variable data to thecontroller after power is cycled or the terminal is reset.
Note: This option is always enabled for Remote I/Ocommunications.
If the Send Values at Power-Up option is enabled, select one of theradio buttons under the Values at Power-Up option:
Select To
Preset Valuessend the initial values set in the tags for thevariables.
Last Valuessend the runtime values at the moment when theterminal was reset or lost power.
If the Send Values at Power-Up option is disabled, the terminaldoes not send any data to the controller at power-up.
The terminal operator can use the Front Panel Editor to change theValues at Power-Up selection.
Note: The Send Values at Power-Up and Values at Power-Upfeatures are not supported in ASCII Trigger applications.
Enable Debug Mode
Debug Mode is used to check the application in a MessageViewterminal. In Debug Mode, as each message is triggered its messagenumber is displayed on the terminal instead of message text. If thisoption is enabled, then the application will run in Debug Mode.
The terminal operator can use the Front Panel Editor toenable/disable the Debug Mode.
Enable Simulate feature
The Simulate feature may be used to test an application in aMessageView terminal. In this mode the terminal displays messagesbut has no input from a controlling device. No communications errormessages appear on the display.
The terminal operator can use the Front Panel Editor toenable/disable the Simulate feature.
When both Debug Mode and the Simulate feature are disabled, theterminal runs the application in normal Run Mode.

10–15Terminal and Communication Setup
Publication 2706-817
Flash Rate
Flash Rate determines the speed at which a character, word ormessage flashes on the terminal display. The rates are:
Rate Selected Speed (Approximate)
NoneEven if the Flash attribute is used, it will nothave any effect.
Low Once a second (1 sec. on/off)
Med Twice a second (0.5 sec. on/off)
High Ten times a second (0.1 sec. on/off)
The terminal operator can use the Front Panel Editor to change theFlash Rate.
Note: A MessageView terminal as a slave device uses this parameterto flash messages transmitted to it from the master device, with anembedded Ctrl-F.
Local Language
Local Language specifies the language in which the MessageViewterminal’s Front Panel Editor menus, and internal warning and errormessages from the firmware, appear in the MessageView terminaldisplay. Select a language from the list box.
The terminal operator can use the Front Panel Editor to change theLanguage selection.
Important: Application messages will always use the language inwhich they were written, even if the Local Language isdifferent.
Brightness
Brightness determines the terminal display light level. Select a levelfrom the list: 12, 25, 38, 50, 60,75, 87 or 100%. Default is 75%.
The terminal operator can use the Front Panel Editor to change theBrightness selection.
See Page 4–6 for the ASCII Triggering device command for aSpecial Message that changes display brightness.

10–16 Terminal and Communication Setup
Publication 2706-817
Port Power-Up
This option determines how the RS-232 port is configured atPower-Up.
• The MessageBuilder option configures the terminal to power-upwith the communication parameters defined to communicate witha computer where MessageBuilder software resides, for instanceto upload the Historic Event Stack
• The Auxiliary option configures the terminal to power-up with anASCII Triggering device or the communication device defined inthe Aux. tab dialog.
The terminal operator can use the Front Panel Editor to toggle thisoption.
Note: This option may affect downloading an application, if theMessageView terminal is configured to the Auxiliary Device whenan attempt is made at communicating with a computer. To correctthis situation, change the port configuration of the receivingMessageView terminal via the Front Panel Editor. See the section onPage 5–3 that discusses switching RS-232 settings.
Handshake Timeout
Handshaking is an option used to confirm that the information hasbeen received by the controller, whether a logic controller or anASCII Triggering device. If the terminal does not receive thehandshake within a certain time, a Timeout message appears on thedisplay. See the discussion on handshaking on Page 4–26.
Set the Timeout time by selecting a value from the HandshakeTimeout spin control. The range is 0 to 60 seconds, default is 4seconds.

10–17Terminal and Communication Setup
Publication 2706-817
Trigger Priority
Two or more messages may be triggered at the same time andcontend for the same display line(s). See the section on triggeringthat starts on Page 4–9.
• If the messages are value-triggered, priority is determined bywhich Message Number is entered into the Value Trigger addressfirst.
• If the messages are bit-triggered, priority is determined by thelowest set bit in the Bit Trigger tag.
• If one message is value-triggered and one is bit-triggered, priorityis determined by this option, the Trigger Priority global attribute:
– if Bit is selected, the message with a bit trigger is displayedand the one with the value trigger is queued (if the MessageQueue is enabled)
– if Value is selected, the message with a value trigger isdisplayed and the one with the bit trigger waits. If the bit isstill set when the value triggered message is terminated, itsmessage is displayed.
Note: Bit triggering cannot be used by an ASCII Triggering device,so this option must be set to value trigger.
Startup Message
Enable this option if a certain message should be displayed wheneverthe terminal powers up.
• Select the message number in the spin control.
• Or highlight the current number and type the selected number.
Background Message
Enable this option if a certain message is to be displayed after 2seconds in which no active message is displayed.
• Select the message number in the spin control.
• Or highlight the current number and type the selected number.
Note: ASCII Triggering applications do not support Startup orBackground Messages with embedded display variables.
The terminal operator can use the Front Panel Editor to change theStartup and Background Messages.

10–18 Terminal and Communication Setup
Publication 2706-817
Password
A password for the MessageView terminal is optional. It protects theMessageView terminal from an unauthorized person making changesto the system configuration using the Front Panel Editor. Theterminal operator does not need a password to run the application.
Note: MessageView 421D terminals do not support the passwordoption.
Select the check box to enable the password option. Then highlightthe text in the box and type a 4-digit number as the password.
A password applies as long as the current application resides in theMessageView terminal. Other applications that run at different timesin the same terminal may have the same or a different password, ornone.
A terminal operator who knows the password can use the FrontPanel Editor to disable and enable the password feature, provided itis enabled and defined in the application. If it is not defined, theoperator cannot enable it.
The Time/Date tab in the Terminal Setup dialog specifies how thetime and date are displayed on the MessageView terminal. Forexample:
Date Formats Time Formats
Month/Day/Year7/3/95 07/03/95
7/3/19953/7/95Day/Month/Year
Year/Month/Day95/7/3
With Leading Zeroes
With 2-Digit Year Prefix
7*3*95
With UserDefined Separator
12-Hour Format2:56
2:56 PM CST
02:5614:5624-Hour Format
With Seconds14:56:29
With Time Zone & Time
With Leading Zeroes
14*56*29
With UserDefined Separator
Standard Designations
Setting Format for Timeand Date

10–19Terminal and Communication Setup
Publication 2706-817
To select the time or date format used by the terminal:
1. Select the Time/Date tab from the Terminal Setup dialog.
2. Set the Date Format and the Time Format as required.
3. Select the OK button to save all the settings from the TerminalSetup dialog and return to the main Message Editor Table View.
Or select another tab and continue setting up the terminal for theapplication.
Or select the Cancel button to return to the Message Editor TableView without saving any Terminal Setup settings.

10–20 Terminal and Communication Setup
Publication 2706-817
Use the Date Format area to set the options for the date format. TheSample area (lower right) displays the format as it is selected.
Option: Used to:
OrderSelect the order of the month (M), day (D) and year (Y). Default is MDY.
SeparatorSpecify the symbol to separate the month, day and year. Anycharacter may be used.Default is the slash (/).
Leading ZeroSpecify that the day and month always have two digits. If this option is enabled, February 2 displays as 02/07.Default is leading zeros not displayed: 2/7.
YearSpecify whether the year is displayed as two or four digits. Forexample the year 1996 can be displayed as 96 or 1996.
Use the Time Format area to set the options for the time format.The Sample area (lower right) displays the format as it is selected.
Option: Used to:
12-Hour/24 Hour
Display the time in numbers representing hours:Select 12-Hour to reset time to 00:00 after 11:59. Select 24-Hour to reset time to 00:00 after 23:59.The text boxes to the right display editable suffixes.
SeparatorSpecify a character to separate hours, minutes and seconds.Default is the colon (:).
Leading ZeroDisplay the hours before ten with a leading zero.If this option is enabled, 3:15 displays as 03:15.Default is leading zero not displayed: 3:15.
Display SecondsSpecify whether seconds are displayed.Default is to display seconds.
Set the time and date in the MessageView terminal using the RTCDownload command. See Page 11–9.
The terminal operator can use the Front Panel Editor to change theTime and Date in the Real Time Clock. The format can be changedonly by using MessageBuilder software.
See Page 4–6 for the ASCII Triggering device command for theSpecial Messages that get or set the Real Time Clock time.

10–21Terminal and Communication Setup
Publication 2706-817
The terminal uses control tags to specify addresses for globalattributes.
1. Select the Control Tags tab from the Terminal Setup dialog.
2. Assign tags as needed.
3. Select the OK button to save all the settings from the TerminalSetup dialog and return to the main Message Editor Table View.
Or select another tab and continue setting up the terminal for theapplication.
Or select the Cancel button to return to the Message Editor TableView without saving any Terminal Setup settings.
Note: If the Return Message Number attribute is enabled in theAdvanced tab, then one or more of the three Return Number tags inthis tab must be defined.
Message Tags
The Value Trigger tag address contains the message number of themost recently triggered message. The terminal scans the integervalue and displays or queues the message that has that messagenumber. This tag is required if the Message Queue was enabled inthe Advanced tab dialog.
The only valid data type for this tag is unsigned integer.
Note: In an ASCII Trigger application, only a tag name is requiredfor the value trigger. Node name and address may be left blank. SeePage 5–8 for the Ctrl-T command used to trigger a message.
Defining Control Tags

10–22 Terminal and Communication Setup
Publication 2706-817
The Bit Trigger tag is the base address for a table that contains up to1024 bits (64 words). Specific messages are assigned one bit as theirbit trigger. The terminal scans the bit table and triggers the messagewhose bit corresponds to the lowest set bit in the table.
This tag is required if at least one message in the application has a bittrigger assigned and enabled.
The only valid data type for this tag is unsigned integer.
Note: An ASCII Triggering device does not support bit triggers.
The Return Number tag is the address where the terminal writes themessage number of the most recent active message on the display,provided:
• the message has no function keys enabled, and
• Acknowledge is not enabled, and
• the Return Message Number attribute is enabled in the Advancedtab dialog.
The only valid data type for this tag is unsigned integer.
Note: If the controller is an ASCII Triggering device, the ReturnMessage Number is sent back as part of the Ctrl-N message. SeePage 5–12.
To enter these global Message Tags:
• select the name of a tag from the list box, or
• type a new tag name and select the Edit Tag button to define thetag.
To edit the Message Tag attributes:
1. Put the insertion pointer in the tag box.
2. Select the Edit Tag button to bring up the Tag Form dialog:

10–23Terminal and Communication Setup
Publication 2706-817
3. Edit the tag’s attributes (see the section starting on Page 8–2).
4. Select OK .
Note: In an ASCII Trigger application, only a tag name is requiredfor message tags. Node name and address may be left blank.
Acknowledge Tags
The Acknowledge tag is the address where the terminal writes a 1when its ACK key is pressed in response to a message with theAcknowledge attribute enabled.
The only valid data type for this tag is bit.
Note: If the controller is an ASCII Triggering device, theAcknowledgement is sent back as part of the Ctrl-K message. SeePage 5–11.
The Handshake tag is the address where the terminal scans for a 1to confirm that the ACK key press was acquired by the logiccontroller. If this tag is not defined, Acknowledge handshaking isdisabled.
The only valid data type for this tag is bit.
Note: An ASCII Triggering device does not support handshaking foran Acknowledgeable message.
The Acknowledge Return Number tag is the address where theterminal writes the message number of the most recent activemessage on the display if:
• the message has the Ack attribute enabled, and
• the Return Message Number attribute is enabled in the Advancedtab dialog.
The only valid data type for this tag is unsigned integer.
Note: If the controller is an ASCII Triggering device, the ReturnMessage Number is sent back as part of the Ctrl-K message. SeePage 5–11.
To enter these global acknowledge tags:
• select the name of a tag from the list box, or
• type a new tag name and select the Edit Tag button to define thetag.

10–24 Terminal and Communication Setup
Publication 2706-817
To edit the Acknowledge Tag attributes:
1. Put the insertion pointer in the tag box.
2. Select the Edit Tag button to bring up the Tag Form dialog:
3. Edit the tag’s attributes (see the section starting on Page 8–2).
4. Select OK .
Note: In an ASCII Trigger application, only a tag name is requiredfor acknowledge tags. Node name and address may be left blank.
Function Key Tag
The Return Number tag is the address where the terminal writes themessage number of the most recent active message on the display if:
• the message has Function key(s) enabled, and
• the Return Message Number attribute is enabled in the Advancedtab dialog.
The only valid data type for this tag is unsigned integer.
Note: If the controller is an ASCII Triggering device, the ReturnFunction Key Message Number is sent back as part of the Ctrl-Fmessage. See Page 5–11.
To enter the global Function key tag:
• select the name of a tag from the list box, or
• type a new tag name and select the Edit Tag button to define thetag.

10–25Terminal and Communication Setup
Publication 2706-817
To edit the Function Key Tag attributes:
1. Put the insertion pointer in the tag box.
2. Select the Edit Tag button to bring up the Tag Form dialog:
3. Edit the tag’s attributes (see the section starting on Page 8–2).
4. Select OK .
Note: In an ASCII Trigger application, only a tag name is requiredfor Function key tags. Node name and address may be left blank.
The HE Stack Status tags provide an indication to the logiccontroller when the stack is nearly or completely full. The HistoricalEvent Stack holds about 4000 alphanumeric text messages. See Page4–19 for a discussion of the Historical Event Stack.
1. Select the Status Tags tab from the Terminal Setup dialog.
Defining Status Tags

10–26 Terminal and Communication Setup
Publication 2706-817
2. Select the name of a tag from the list box for one or all of thesetags.
• 100% is the address where the terminal writes a 1 when the stackis full.
• 95% is the address where the terminal writes a 1 when the stackis 95% full.
• 85% is the address where the terminal writes a 1 when the stackis 85% full.
The only valid data type for these tags is bit.
Once set, these status bits remain On until the condition has beencleared. Warning messages are displayed on the terminal for thecorresponding conditions. The 100% warning message requires theoperator to acknowledge the condition.
Note: An ASCII Trigger application supports the HE Stack Statustags. However the terminal returns the actual status number: 85, 95or 100 to the controlling device, as part of the Ctrl-H command. SeePage 5–12 for the HE Stack report the terminal sends to the ASCIITriggering device.
To enter these global status tags:
• select the name of a tag from the list box, or
• type a new tag name and select the Edit Tag button to define thetag.
To edit a Status Tag attributes:
1. Put the insertion pointer in the tag box.
2. Select the Edit Tag button to bring up the Tag Form dialog:
3. Edit the tag’s attributes (see the section starting on Page 8–2).
4. Select OK .
Note: In an ASCII Trigger application, only a tag name is requiredfor HE Stack tags. Node name and address may be left blank.
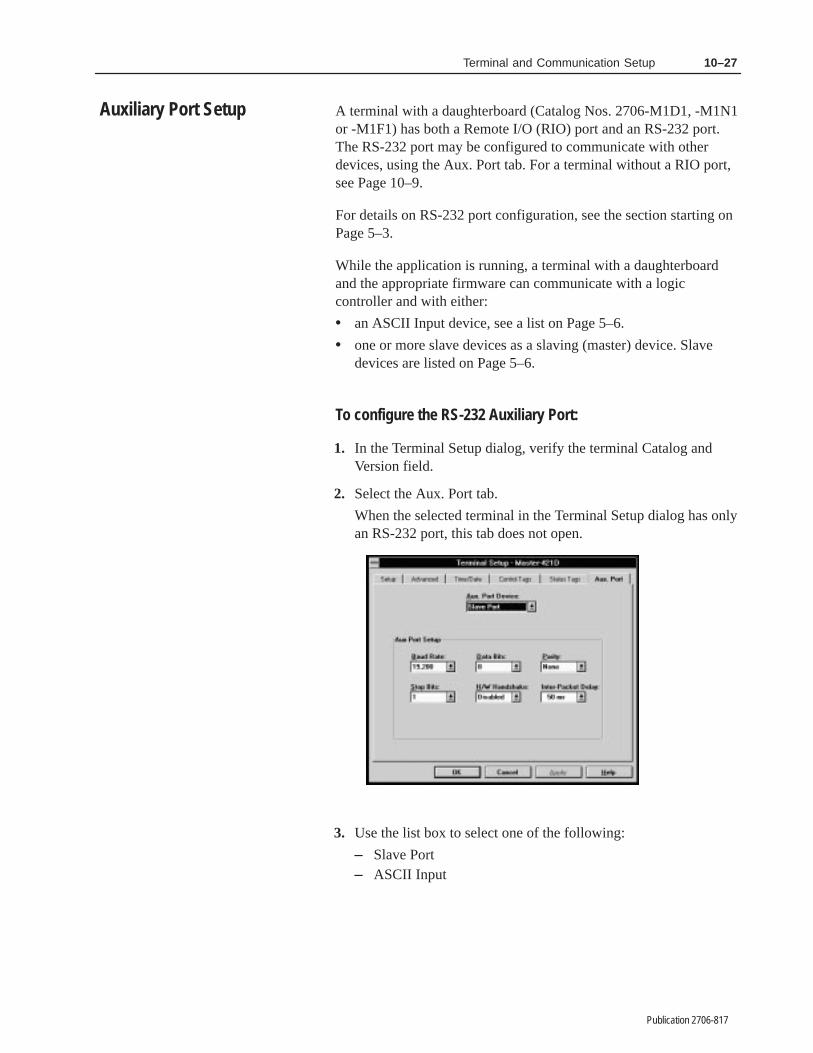
10–27Terminal and Communication Setup
Publication 2706-817
A terminal with a daughterboard (Catalog Nos. 2706-M1D1, -M1N1or -M1F1) has both a Remote I/O (RIO) port and an RS-232 port.The RS-232 port may be configured to communicate with otherdevices, using the Aux. Port tab. For a terminal without a RIO port,see Page 10–9.
For details on RS-232 port configuration, see the section starting onPage 5–3.
While the application is running, a terminal with a daughterboardand the appropriate firmware can communicate with a logiccontroller and with either:
• an ASCII Input device, see a list on Page 5–6.
• one or more slave devices as a slaving (master) device. Slavedevices are listed on Page 5–6.
To configure the RS-232 Auxiliary Port:
1. In the Terminal Setup dialog, verify the terminal Catalog andVersion field.
2. Select the Aux. Port tab.
When the selected terminal in the Terminal Setup dialog has onlyan RS-232 port, this tab does not open.
3. Use the list box to select one of the following:
– Slave Port– ASCII Input
Auxiliary Port Setup

10–28 Terminal and Communication Setup
Publication 2706-817
4. Set the parameter values as needed.
Parameters Default Options
Baud Rate 9600300, 600, 1200, 2400, 9600, 19,200,38,400 bps
Data Bits 8 7, 8
Parity None None, Odd, Even
Stop Bits 1 1, 2
H/W Handshake Disabled Enabled, Disabled
Inter-Packet Delay 200 ms50, 100, 150, 200, 250, 300, 350,400, 450, 500 ms
For information on the Hardware Handshake parameter, see Page4–29.
Note: The Inter-Packet Delay parameter is intended to allow aDataliner DL10, DL20 or DL50 time to process each messagepacket before the next packet is sent from the master. The worstcase for the Dataliner family is 300 ms.
If the port is configured for an ASCII Input device, this optiondoes not apply.
5. Select OK to save the RS-232 settings and return to the TerminalSetup dialog.
Chapter 11
Publication 2706-817
�� ������� ��� �������� ���
���������� �� �
This chapter covers the following topics:
• Helpful hints
• Validating applications
• Transfer utilities
• Downloading an application to a terminal
• Downloading to a DOS file
• Downloading time/date to Real Time Clock
• Uploading an application from a terminal
• Uploading the Historical Event Stack
• Using the MessageView File Transfer Utility
• Terminal upgrade.
• MessageBuilder applications are normally saved to MBA files.The MBA file is translated and saved as an MVA file during thedownload process, whether to a MessageView terminal or to aDOS file.
• Applications are validated (checked for errors) during thedownload process. It is also helpful to validate applications aspart of the creation process, and correct any errors before tryingto download.
• An application can be downloaded only to a terminal it isdesigned for. However MessageBuilder software can reconfigurean application for another type of terminal. See Page 10–3.
• Transferring applications between a computer and MessageViewTerminal using an RS-232 connection requires theINTERCHANGE DF1 driver. This driver was installed as part ofthe MessageBuilder software installation.
• See the MessageView Operator Terminals user manual on how toconnect the computer and with a MessageView 421 terminal’sRS–232 port.
Helpful Hints

11–2 Validating Applications and Transferring Files
Publication 2706-817
MessageBuilder automatically validates an application beforedownloading it. When it has been downloaded, the MessageViewterminal verifies the application before running it. 103
In validating, each message, each tag, and the application as a wholeis checked. See Appendix D for a list of Exceptions messages.
The Preferences dialog may be set up to validate each message as itis created. See Page 7–13. Or the application designer may validatethe entire application at any time.
To validate an application:
Choose Validate from the Application menu.
• If the application passes validation, the following dialog opens.
• If the application does not pass validation, the Exceptions dialogopens with a list of all errors found. Correct the errors and thenvalidate again.
Sends validationmessages to aprinter or file.
Defines printersettings.
While correcting errors, select the Exceptions command in theWindow menu to access the Exceptions dialog.
Press: To:
close the dialog.
send validation messages to a printer or file.
define printer settings.
Validating Applications
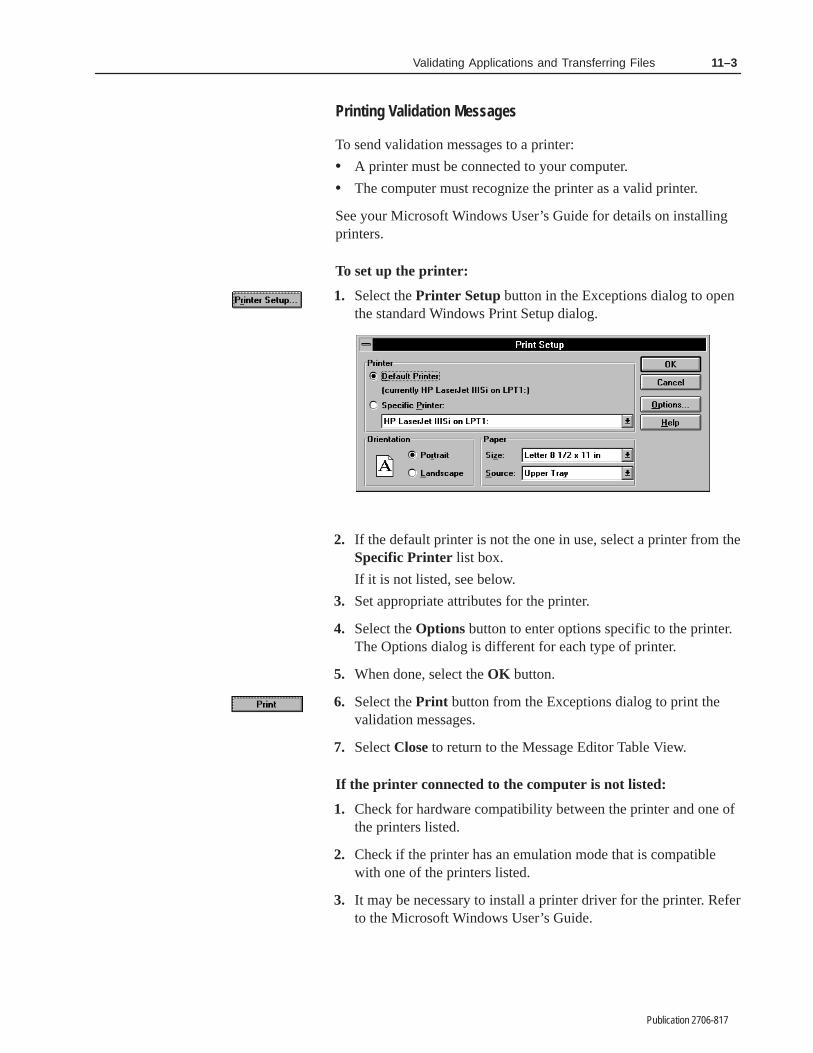
11–3Validating Applications and Transferring Files
Publication 2706-817
Printing Validation Messages
To send validation messages to a printer:
• A printer must be connected to your computer.
• The computer must recognize the printer as a valid printer.
See your Microsoft Windows User’s Guide for details on installingprinters.
To set up the printer:
1. Select the Printer Setup button in the Exceptions dialog to openthe standard Windows Print Setup dialog.
2. If the default printer is not the one in use, select a printer from theSpecific Printer list box.
If it is not listed, see below.
3. Set appropriate attributes for the printer.
4. Select the Options button to enter options specific to the printer.The Options dialog is different for each type of printer.
5. When done, select the OK button.
6. Select the Print button from the Exceptions dialog to print thevalidation messages.
7. Select Close to return to the Message Editor Table View.
If the printer connected to the computer is not listed:
1. Check for hardware compatibility between the printer and one ofthe printers listed.
2. Check if the printer has an emulation mode that is compatiblewith one of the printers listed.
3. It may be necessary to install a printer driver for the printer. Referto the Microsoft Windows User’s Guide.
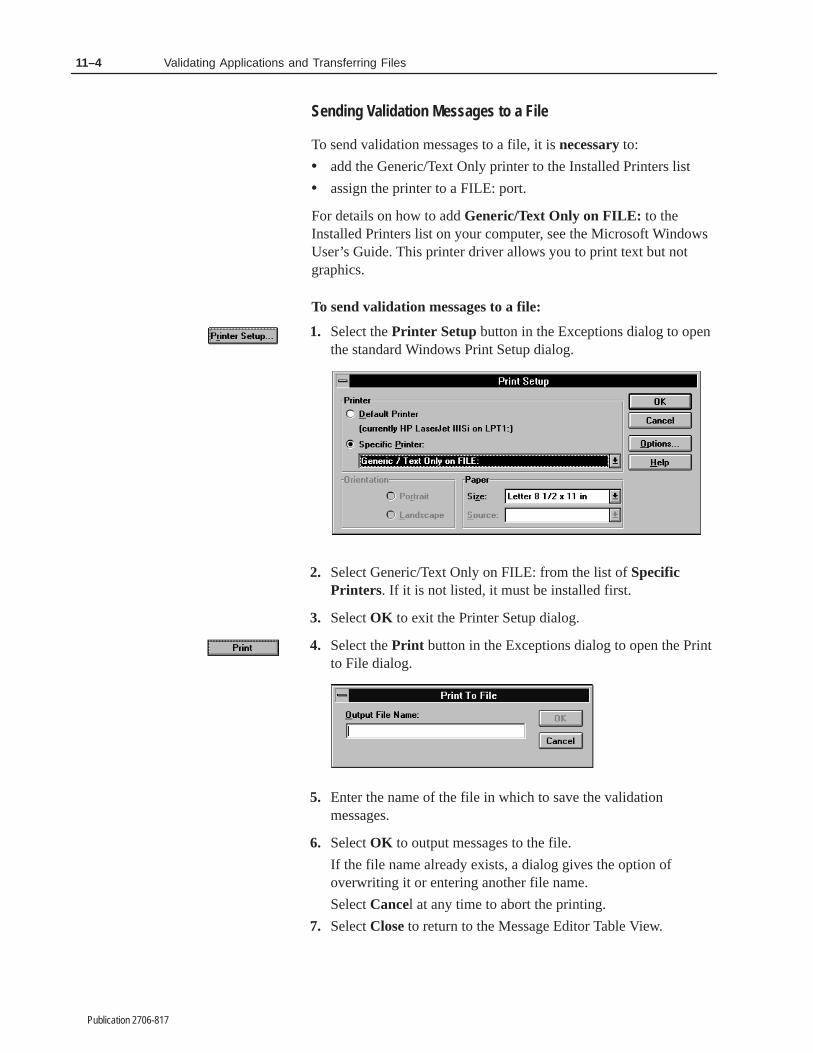
11–4 Validating Applications and Transferring Files
Publication 2706-817
Sending Validation Messages to a File
To send validation messages to a file, it is necessary to:
• add the Generic/Text Only printer to the Installed Printers list
• assign the printer to a FILE: port.
For details on how to add Generic/Text Only on FILE: to theInstalled Printers list on your computer, see the Microsoft WindowsUser’s Guide. This printer driver allows you to print text but notgraphics.
To send validation messages to a file:
1. Select the Printer Setup button in the Exceptions dialog to openthe standard Windows Print Setup dialog.
2. Select Generic/Text Only on FILE: from the list of SpecificPrinters. If it is not listed, it must be installed first.
3. Select OK to exit the Printer Setup dialog.
4. Select the Print button in the Exceptions dialog to open the Printto File dialog.
5. Enter the name of the file in which to save the validationmessages.
6. Select OK to output messages to the file.
If the file name already exists, a dialog gives the option ofoverwriting it or entering another file name.
Select Cancel at any time to abort the printing.
7. Select Close to return to the Message Editor Table View.

11–5Validating Applications and Transferring Files
Publication 2706-817
Use one of these methods to transfer applications to/from aMessageView terminal:
• MessageBuilder Application menu.
• MessageView File Transfer utility.
MessageBuilder Application Menu
Most application transfers are initiated from the Application menu ofthe MessageBuilder software. Choose the Download or Uploadcommand from the Application menu for application transfers.
Use the Download command to download an application to either a:
• MessageView terminal using the INTERCHANGE DF1 driverand an RS-232 serial connection.
• DOS file in MVA format (the terminal uses .MVA file type).
Use the Upload command to upload an application from aMessageView terminal using the INTERCHANGE DF1 driver andan RS-232 connection.
Other file transfer options available from the Application menuinclude:
• RTC Download for downloading the computer’s time and date tothe Real Time Clock (RTC) in the terminal.
• HE Stack Upload for uploading the Historical Event Stack file tothe computer in CSV format.
MessageView File Transfer Utility
Use the MessageView File Transfer Utility (WINMFT.EXE) totransfer applications when MessageBuilder is not running. Thisutility is available as an icon in the MessageBuilder group. SeePage 11–15.
Use tools or File menu commands to:
• download an application to a MessageView terminal from anMVA file
• upload an application from a MessageView terminal to an MVAfile
• verify an application on the computer in the same way it isverified in the MessageView 421 terminal
• download the computer’s time and date to the Real Time Clock(RTC) in the terminal
• upload the terminal’s Historical Event Stack file to a CSV file.
Transfer Utilities

11–6 Validating Applications and Transferring Files
Publication 2706-817
An application may be downloaded to a MessageView terminal usingthe Application menu Download command.
Before downloading an application: 104
• DF1 INTERCHANGE communication driver must be installedand loaded on the computer. See Page 2–3.
• Driver communication parameters must be checked using theWorkstation Setup command on the File menu. See Page 2–7.
• Cable connections must be correct. See the MessageViewTerminal User Manual (Publication 2706-816) for details.
• The MessageView terminal must have its RS-232 port set toMessageBuilder communication parameters. See Page 5–3 foran example of how to switch settings.
To download an application to a MessageView terminal:
1. Open the application to be downloaded.
2. Select the Download tool to open the Download Applicationdialog.
Or choose Download from the Application menu.
Appears only if DF1INTERCHANGEdriver installed
Shows driverscurrently loaded.
3. Under Destination, select Operator Terminal.
Downloading anApplication to a Terminal

11–7Validating Applications and Transferring Files
Publication 2706-817
4. In the File Name box, enter the name of an MVA file in which tosave the translated application. The MVA file is downloaded tothe terminal.
Default is the first 8 characters of the application name and the.MVA extension.
5. Select the Download only if different from current applicationcheck box to download the application only if it does not matchthe application currently loaded in the terminal.
The default is to download the application even if a match exists.
6. Select the Setup button to specify which port to use if more thanone of the computer’s COM ports is configured with a DF1driver. The DF1 Setup dialog lists the available INTERCHANGEports. Select the appropriate port and close the dialog.
7. Select OK from the Download Application dialog.
The application is validated and translated to an MVA file.
8. If errors or warnings are detected, the Exceptions dialog opensand displays them.
• Errors must be corrected before the download can proceed.
• Warnings should be corrected, but the download will proceed ifthey are not corrected.
9. The download begins. The terminal enters Programming modeand erases the current application. MessageBuilder softwaredisplays the progress of the download.
When the download is complete, the terminal resets, runs itsself-tests, verifies and starts the application.

11–8 Validating Applications and Transferring Files
Publication 2706-817
Note: The terminal erases its current application to prepare for a newapplication to be downloaded. If the download is cancelled after thiserasure, the terminal’s powerup diagnostics will report that theterminal has no valid application.
Note: Error messages may appear during this download. SeeAppendix E for a list of error messages and how to correct theproblems.
An application may be downloaded to a file in the DOSenvironment. An application downloaded to a DOS file is translatedfrom the MessageBuilder application file type (*.MBA) to theMessageView 421 terminal file type (*.MVA). 105
The MessageView File Transfer Utility may be used to transfer anyMVA file between a computer and a MessageView terminal. Seepage 11–15.
To download an application to a DOS file:
1. Open the application to be downloaded.
2. Select the Download tool to open the Application Downloaddialog.
Or choose Download from the Application menu.
3. Under Destination, select DOS File.
Downloading to a DOS file

11–9Validating Applications and Transferring Files
Publication 2706-817
4. In the File Name box, enter the path and name of an MVA file inwhich to save the file on disk.
Or select Browse to search for a specific MVA file that will beoverwritten with this new application.
5. Select OK from the Download Application dialog. Theapplication is validated, translated and saved to a DOS file.
Note: If errors or warnings are detected, the Exceptions dialog opensand displays them:
• Errors must be corrected before the download can proceed.
• Warnings should be corrected, but the download will proceedeven if they are not corrected.
6. A dialog appears when the application has been successfullytranslated. Select OK to return to the Message Editor Table View.
Note: Error messages may appear during this download. SeeAppendix E for a list of error messages and how to correct theproblems.
The computer’s date and time may be downloaded to the Real TimeClock (RTC) in the MessageView terminal.
Before downloading the RTC file: 106
• DF1 INTERCHANGE communication driver must be installedand loaded on the computer. See Page 2–3.
• Driver communication parameters must be checked using theWorkstation Setup command on the File menu. See Page 2–7.
• Cable connections must be correct. See the MessageViewTerminal User Manual (Publication 2706-816) for details.
• The MessageView terminal must have its RS-232 port set toMessageBuilder communication parameters. See Page 5–3 foran example of how to switch settings.
To download the computer’s real time clock to a terminal:
Note: An application file does not have to be open when thiscommand is used.
1. Choose RTC Download from the Application menu to open theDownload Date & Time dialog.
Downloading Date/Time to Real Time Clock

11–10 Validating Applications and Transferring Files
Publication 2706-817
Appears only if DF1INTERCHANGEdriver installed
Shows driverscurrently loaded.
2. Under Destination, verify that Operator Terminal is selected.This is the only option available.
3. Select OK . The terminal remains in run mode. Its real time clockis updated in the background.
When the download is complete, you are returned to the MessageEditor Table View.
Note: Error messages may appear during this download. SeeAppendix E for a list of error messages and how to correct theproblems.
The application may be uploaded from the terminal if it needs to berevised. The upload saves the application to both an MVA file and anMBA file. Open the MBA file in MessageBuilder for editing. 107
Before uploading an application: 108
• DF1 INTERCHANGE communication driver must be installedand loaded on the computer. See Page 2–3.
• Driver communication parameters must be checked using theWorkstation Setup command on the File menu. See Page 2–7.
• Cable connections must be correct. See the MessageViewTerminal User Manual (Publication 2706-816) for details.
• The MessageView terminal must have its RS-232 port set toMessageBuilder communication parameters. See Page 5–3 foran example of how to switch settings.
Uploading an Application from a Terminal

11–11Validating Applications and Transferring Files
Publication 2706-817
To upload an application from a MessageView terminal:
1. Choose Upload from the Application menu.
Shows driverscurrently loaded.
Appears only if DF1INTERCHANGEdriver installed
2. Under Source, verify that Operator Terminal is selected. This isthe only option available.
3. In the File Name box, enter an MBA file name in which to savethe uploaded application
Or select Browse to search for an existing file which will beoverwritten by the uploaded application file.
4. Select the Setup button to specify which port to use if more thanone of the computer’s COM ports is configured with a DF1driver. The DF1 Setup dialog lists the available INTERCHANGEports. Select the appropriate port and close the dialog.
5. Select OK .
The upload begins. MessageBuilder software displays theprogress of the upload.

11–12 Validating Applications and Transferring Files
Publication 2706-817
6. A dialog opens asking for the name of the MBA file in which tosave the uploaded application. The default file name is that of theuploaded application. Enter a file name and path, then select OK .
If the MBA file already exists, a dialog asks if the file should beoverwritten.
7. A dialog verifies that the application file was saved to thespecified MBA file. Select OK to return to the MessageBuilderworkspace.
C:\AB\MBWIN\SMP-SD.MBA
Note: Error messages may appear during this upload. See AppendixE for a list of error messages and how to correct the problems.

11–13Validating Applications and Transferring Files
Publication 2706-817
The Historical Event Stack file is a log of messages maintained bythe MessageView terminal. It may be uploaded to the computer usingMessageBuilder menu commands. 109
The file is a text file in CSV (Comma Separated Value) format.Many commercially available software packages, such as texteditors, spreadsheets or databases are able to view, print, analyze orotherwise manipulate the HE stack data.
Before uploading the HE Stack:
• DF1 INTERCHANGE communication driver must be installedand loaded on the computer. See Page 2–3.
• Driver communication parameters must be checked using theWorkstation Setup command on the File menu. See Page 2–7.
• Cable connections must be correct. See the MessageViewTerminal User Manual (Publication 2706-816) for details.
• The MessageView terminal must have its RS-232 port set toMessageBuilder communication parameters. See Page 5–3 foran example of how to switch settings.
To upload the HE Stack from a MessageView terminal:
Note: An application file does not have to be open when thiscommand is used.
1. Choose HE Stack Upload from the Application menu.
Shows driverscurrently loaded.
Appears only if DF1INTERCHANGEdriver installed
2. Under Source, verify that Operator Terminal is selected. This isthe only option available.
3. In the File Name box, enter a file name (8 characters maximum)with the .CSV extension in which to save the HE stackinformation.
Or select Browse to search for an existing file which will beoverwritten by the uploaded file.
Uploading the Historical Event Stack

11–14 Validating Applications and Transferring Files
Publication 2706-817
4. Select Clear Historical Event Stack after successful upload ifyou want the HE Stack file in the terminal to be cleared.
Note: If the HE Stack file becomes full, a warning messageinforms the terminal operator that it is full. After this message isacknowledged, the operator may use the Front Panel Editor toclear the file. If the file is not cleared the oldest messages areoverwritten as new messages are added.
5. If more than one of the computer COM ports is configured with aDF1 driver, specify which port to use. Select the Setup button.The DF1 Setup dialog opens with the available INTERCHANGEports. Select a port and close the dialog.
6. Select OK to start the upload. MessageBuilder displays itsprogress. The terminal remains in run mode during the upload.
Note: If the HE Stack file in the terminal is empty, the message“Terminal has no file available” appears in the Status bar.
When the upload is complete, you are returned to the Message EditorTable View.
Note: Error messages may appear during this upload. See AppendixE for a list of error messages and how to correct the problems.

11–15Validating Applications and Transferring Files
Publication 2706-817
Use the MessageView File Transfer Utility to transfer applicationsbetween a terminal and a computer running Windows. This Utilitywas installed as part of the MessageBuilder software installation. 110
Important: Applications transferred using this utility must be inMVA format; that is, they must have .MVA fileextension.
To create an MVA file for downloading, you must download theMBA application to a DOS file from the Application menu ofMessageBuilder. See Page 11–8. Applications uploaded from aterminal are already in MVA format.
Before using the MessageView File Transfer Utility:
• DF1 INTERCHANGE communication driver must be loaded andconfigured on the computer.
• Cable connections must be correct.
• The MessageView terminal must have its RS-232 port set toMessageBuilder communication parameters. See Page 5–3 foran example of how to switch settings.
To start the MessageView File Transfer Utility:
• Double-click the MessageView File Transfer Utility icon in theMessageBuilder program group to open the utility workspace.
• Or select WINMFT.EXE in the Windows File Manager.
Using the MessageView File Transfer Utility

11–16 Validating Applications and Transferring Files
Publication 2706-817
In the MessageView File Transfer Utility, applications and data maybe downloaded/ uploaded either from the Toolbar or from the Filemenu.
Click: or Choose: To:
Application UploadUpload an application from a MessageViewterminal to an MVA file.
The MVA file can be opened as an MBA file inMessageBuilder for editing.
Application DownloadDownload an MVA file to a MessageViewterminal.
To create an MVA file, download theapplication to a DOS file. See Page 11–8.
Application VerifyCompare the application in the terminal withthe application to be downloaded, todetermine if they are the same or different.
HE Stack UploadUpload the Historical Event Stack from aMessageView terminal.
RTC DownloadDownload the date and time from thecomputer to the MessageView terminal’s RealTime Clock.
Exit Exit the MessageView File Transfer Utility.
Note: All Download and Upload dialogs are identical to the dialogsaccessed from the Application menu in MessageBuilder software.The only dialog that is different is the Application Verify dialog.
Error messages
Error messages may appear while the File Transfer Utility isdownloading or uploading files. See Appendix E for a list of errormessages and how to correct the problems.

11–17Validating Applications and Transferring Files
Publication 2706-817
Verifying an Application when using the File Transfer Utility
Use the Verify command to compare an application with theapplication loaded in a specific terminal. You might want todownload an application only if it is different from the one installed.The verification process checks whether the applications match.
Note: This Verify command is different from the Validate commandwhich is part of the Application Download from MessageBuildersoftware. See the Glossary.
To verify an application:
1. Click the Verify tool.
Or choose Application Verify from the File menu.
Shows driverscurrently loaded.
Appears only if DF1INTERCHANGEdriver installed
2. Under Source, Operator Terminal is the only option available.
3. In the File Name box, enter the name of an MVA file that youwant to verify.
Or select Browse to search for an existing MVA file.
4. Select OK to open the Application Verification dialog.
When done, the dialog shows whether the applications match or not.

11–18 Validating Applications and Transferring Files
Publication 2706-817
Allen-Bradley may send a new version of MessageView terminalfirmware to registered users. For most efficient terminal operation,upgrade the firmware in each of your terminals as soon as possible.
Before upgrading the terminal: 111
• DF1 INTERCHANGE communication driver must be installedand loaded on the computer, see Page 2–3.
• Driver communication parameters must be checked using theWorkstation Setup command on the File menu. See Page 2–7.
• Cable connections must be correct. See the MessageViewTerminal User Manual (Publication 2706-816) for details.
• The MessageView terminal must have its RS-232 port set toMessageBuilder communication parameters. See Page 5–3 foran example of how to switch settings.
To install a firmware upgrade in a MessageView terminal:
1. Choose Upgrade Terminal on the File menu. A dialog warns thatthe current application will be erased from the terminal.
2. Select Yes. Downloading begins. MessageBuilder softwaredisplays the progress of the download.
Note: The application resident in the terminal was erased as soonas the Firmware Download started. Even if the download iscancelled, the application is gone. If the terminal is switched toRun mode, its startup self-tests will report that there is no validapplication.
3. Download an application, see Page 11–6.
Terminal Upgrade

Chapter 12
Publication 2706-817
���� ��� ��� �
This chapter covers the following topics:
• Types of reports
• Creating and printing a report
• Changing the report setup
• Previewing a report
• Setting up a printer
• Sending a report to a file.
MessageBuilder lets you specify the types of information to includein a report.
Report Options Description
DescriptionIncludes the first page of the application descriptionas entered in the Application Description dialog.
Messages Lists all messages in the application.
Message AttributesLists attributes of all messages in the application.Messages are listed in order of their messagenumbers.
Terminal SetupLists runtime communications and setup parametersfor MessageView terminals.
Tag Attributes Lists all tag definitions in the application.
Function KeysLists all function keys used in the application andtheir attributes.
LED IndicatorsLists all function key LEDs used in the applicationand their attributes.
Types of Reports

12–2 Creating Reports
Publication 2706-817
Use the Reports command to create a customized reportdocumenting all or specific aspects of an application. Reports areuseful for tracking application updates and changes. 112
To set up a report:
1. Choose Reports from the File menu to open the Report Setupdialog.
2. Select the application components to include in the report byselecting the appropriate check boxes under Application . Toremove a component, clear the box.
3. Indicate which messages will be included in the report.
• Select All to include all messages.
• Select From to include a range of messages. Enter the range ofmessage numbers in the From and To boxes.
4. Select the Graphic Images check box to include ISA graphicsembedded in messages in the report. To clear this option, selectthe box again.
5. From the Topics list box, specify whether you want to includemessages assigned to a specific topic or all messages. The defaultis All.
Press this button: To:
PrintSend report to a printer or file. Select Cancel atany time to abort printing of the report.
Cancel Exit dialog without printing the report.
Report Setup Change page headers and title page of the report.
Print Setup Define printer settings for the report.
Preview Preview how the report will look.
Save Settings Save current report settings as the default.Otherwise the dialog reverts to the originalsettings when closed.
Creating and Printing a Report

12–3Creating Reports
Publication 2706-817
Specify the page headers and the title page of a report.
To change the page headers and title page:
1. Select the Report Setup button from the Report Setup dialog toopen another Report Setup dialog.
2. By default, all options are selected. If some are not needed, selectthe appropriate check boxes in each area. To enable an option,select the box again.
Select: To Print:
Application Name The name of the application.
TimeTime of printout in 24-hour format:Hour/Minute/Second.
DateDate of printout:Month/Day/Year.
Page Number Consecutive page numbers. Title page is 1.
User Defined Text Up to 80 characters including spaces.
3. When done, select the OK button.
The next page shows where each option appears in the page headerand title page of a report.
Changing the ReportSetup

12–4 Creating Reports
Publication 2706-817
The title page is the first page printed in a report.
MessageBuilder Application Report
ACTT4:ACTT4.MBA
Application Version:9 – Last Saved 11/20/95 08:51:54
11/20/95 12:03:15
[User Defined Title Text]
Project : Application Name
Date and Time when
User Defined text
Report was Generated
Version and Save Information
Header information appears on every page of a report except the titlepage.
10/09/95 12:03:15 ACTT4 Page 2
Application Name
Date and Time when
User Defined text
Page Number
Report was Generated
[User Defined Page Text]
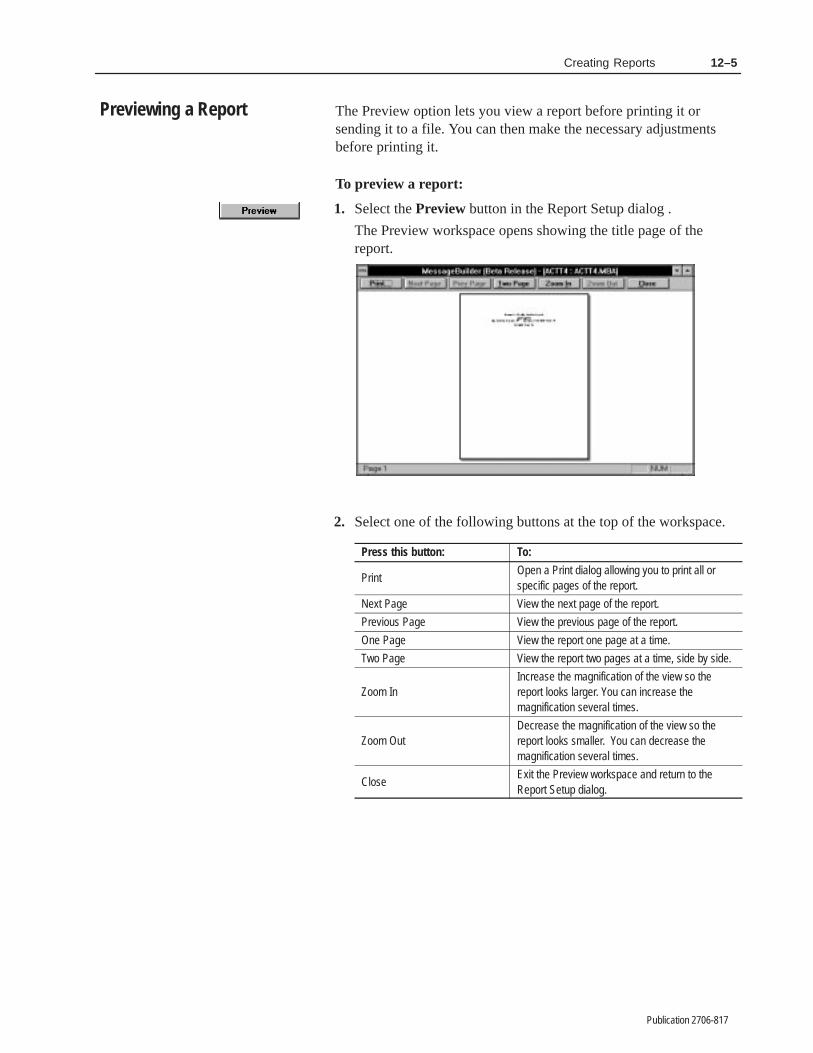
12–5Creating Reports
Publication 2706-817
The Preview option lets you view a report before printing it orsending it to a file. You can then make the necessary adjustmentsbefore printing it.
To preview a report:
1. Select the Preview button in the Report Setup dialog .
The Preview workspace opens showing the title page of thereport.
2. Select one of the following buttons at the top of the workspace.
Press this button: To:
PrintOpen a Print dialog allowing you to print all orspecific pages of the report.
Next Page View the next page of the report.
Previous Page View the previous page of the report.
One Page View the report one page at a time.
Two Page View the report two pages at a time, side by side.
Zoom InIncrease the magnification of the view so thereport looks larger. You can increase themagnification several times.
Zoom OutDecrease the magnification of the view so thereport looks smaller. You can decrease themagnification several times.
CloseExit the Preview workspace and return to theReport Setup dialog.
Previewing a Report

12–6 Creating Reports
Publication 2706-817
To print a report:
• A printer must be connected to your computer.
• The computer must recognize the printer as a valid printer.
See your Microsoft Windows User’s Guide for details on installingprinters.
To set up the printer:
1. Select the Printer Setup button in the Report Setup dialog toopen the standard Windows Print Setup dialog.
2. If the default printer is not the one in use, select a printer from theSpecific Printer list box.
If it is not listed, see below.
3. Set appropriate attributes for the printer.
4. Select the Options button to fine-tune the printer. The Optionsdialog is different for each type of printer.
5. When done, select the OK button.
6. Select the Print button from the Reports Setup dialog to print thereport.
7. Select Close to return to the Message Editor Table View.
If the printer connected to the computer is not listed:
1. Check for hardware compatibility between the printer and one ofthe printers listed.
2. Check if your printer has an emulation mode that is compatiblewith one of the printers listed.
3. It may be necessary to install a printer driver for your printer.Refer to the Windows User’s Guide.
Setting up a Printer

12–7Creating Reports
Publication 2706-817
To send a report to a file, is is necessary to:
• add the Generic/Text Only printer to the Installed Printers list
• connect the printer to a FILE: port.
For details on how to add Generic/Text Only on FILE: to theInstalled Printers list on your computer, see the Microsoft WindowsUser’s Guide. This printer driver allows you to print text but notgraphics.
To send a report to a file:
1. Select the Printer Setup button in the Report Setup dialog toopen the standard Windows Print Setup dialog.
2. Select Generic/Text Only on FILE: from the list of SpecificPrinters. If it is not listed, it must be installed first.
3. Select OK to exit the Printer Setup dialog.
4. Select the Print button in the Report Setup dialog to open thePrint to File dialog.
5. Enter the name of the file in which to save the report.
The default directory is C:\AB\MBWIN\.
6. Select OK to print the report to a file.
If the file name already exists, a dialog gives the option ofoverwriting it or of entering another file name.
Select Cancel at any time to abort the printing.
7. Select Close to return to the Message Editor Table View.
Sending a Report to a File

�������� �
Publication 2706-817
�� � �� ������
� �����
Use commands on the File menu to handle application files.
New...
Opens a dialog for creating a new application file for a specificMessageView terminal.
Open...
����� �� ������� ����������� ���� ��� �������� � ���� �� ���
������ �� �� ������������
Close
Closes the current application file.
Save
Saves the application file and replaces the previous version stored ondisk.
Save As...
Saves a copy of the application file with all its changes under a newname. The original file remains intact.
Reports...
Opens a dialog to generate a customized report for an applicationusing the default or user defined format. Reports can be printed orsaved to a file.
Workstation Setup ...
Accesses the INTERCHANGE Configuration Utility to configureserial communications required for transferring files to and from aMessageView 421 terminal.
Upgrade Terminal...
Opens a dialog to load updated firmware in a MessageView terminal.
1 XXX.MBA
The four applications opened most recently are listed here forconvenient access. 1 is the most recent or current application.
File Menu
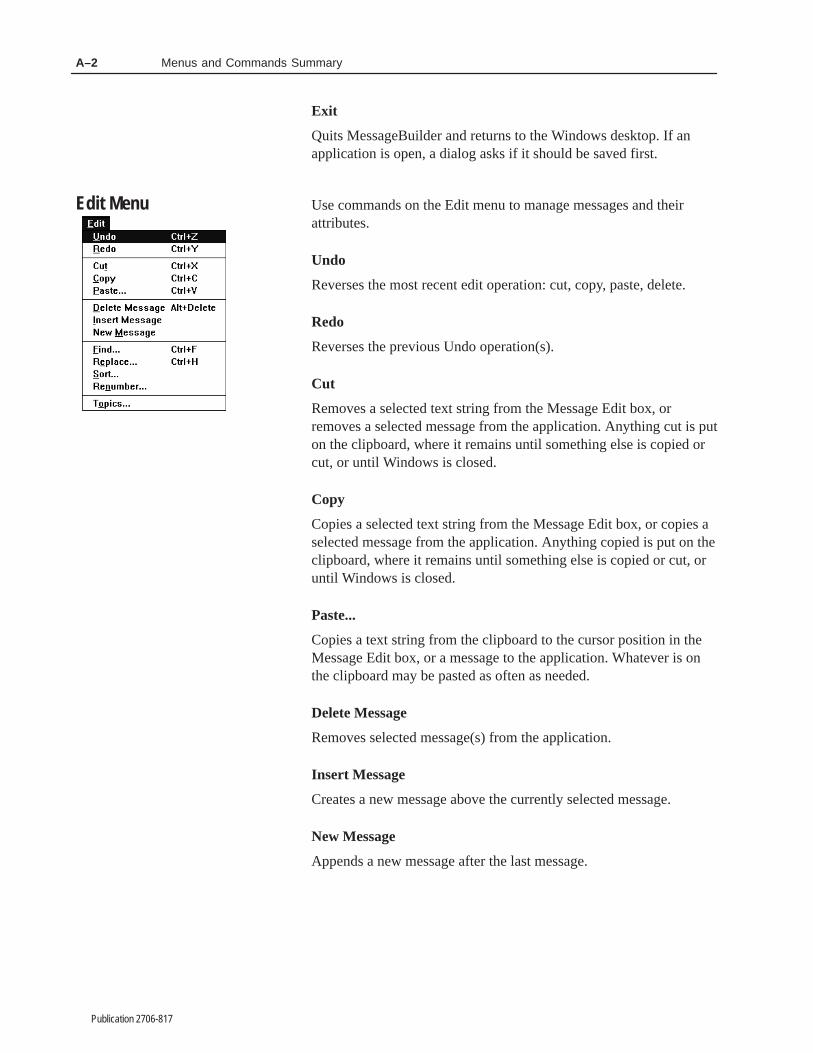
Menus and Commands SummaryA–2
Publication 2706-817
Exit
Quits MessageBuilder and returns to the Windows desktop. If anapplication is open, a dialog asks if it should be saved first.
Use commands on the Edit menu to manage messages and theirattributes.
Undo
Reverses the most recent edit operation: cut, copy, paste, delete.
Redo
Reverses the previous Undo operation(s).
Cut
Removes a selected text string from the Message Edit box, orremoves a selected message from the application. Anything cut is puton the clipboard, where it remains until something else is copied orcut, or until Windows is closed.
Copy
Copies a selected text string from the Message Edit box, or copies aselected message from the application. Anything copied is put on theclipboard, where it remains until something else is copied or cut, oruntil Windows is closed.
Paste...
Copies a text string from the clipboard to the cursor position in theMessage Edit box, or a message to the application. Whatever is onthe clipboard may be pasted as often as needed.
Delete Message
Removes selected message(s) from the application.
Insert Message
Creates a new message above the currently selected message.
New Message
Appends a new message after the last message.
Edit Menu

Menus and Commands Summary A–3
Publication 2706-817
Find...
Opens a dialog to locate any message in the application by messagenumber, topic, text, or trigger.
Replace...
Opens a dialog to replace a text string with another text string, in anyor all of the messages in which the text string is found.
Sort...
Opens a dialog to sort all messages in the application by messagenumber, topic, text, or trigger.
Renumber...
Opens a dialog to set the number of the first message and renumberin sequence all messages that follow.
Topics...
Opens a dialog to define a text string for each topic used in theapplication.
Use commands on the View menu to toggle window bars and thetoolbox on or off. Click the menu name to toggle the command. Acheck mark (�) next to a command means the command is active.
Tool Bar
Toggles the toolbar on or off.
Status Bar
Toggles the status bar on or off.
Zoom
Opens a dialog to enlarge or reduce the size of the Message EditorTerminal View.
View Menu

Menus and Commands SummaryA–4
Publication 2706-817
Use commands on the Format menu to change the appearance ofmessage text, and to enter display and entry variables.
Text Size � Quarter Half Full
Sets the size of the text in the message.
Align � Left Center
Toggles between centered and left justified.
Flash
Toggles between flashing and non-flashing for the highlighted text inthe Edit Box.
Inverse Video
Toggles between inverse video and normal text for the highlightedtext in the Edit Box.
Time Display
Enters a placeholder in the message that will display the current timein the MessageView terminal.
Date Display
Enters a placeholder in the message that will display the current datein the MessageView terminal.
Numeric Variable Display...
Enters a placeholder in the message that will display a numericvariable in the MessageView terminal.
ASCII Variable Display...
Enters a placeholder in the message that will display a variable thatcontains ASCII characters in the MessageView terminal.
Numeric Variable Entry...
Enters a placeholder in the message that allows the terminal operatorto input a numeric value.
Format Menu

Menus and Commands Summary A–5
Publication 2706-817
ASCII Variable Entry...
Enters a placeholder in the message that allows an ASCII Inputdevice to send alphanumeric characters to the terminal. Valid only inapplications designed for terminals with a Remote I/O daughterboardand firmware that supports ASCII Input.
ASCII Control Char...
Enters an ASCII Control Character in the message.
Graphic...
Enters an ISA graphical symbol in the message.
Edit Variable...
When a variable in the message is selected, opens the dialog for thattype of variable.
Enable Function Key...
When the application is designed for a MessageView 421F terminal,allows specific function keys to be enabled in the message.
Use commands on the Application menu to validate, download andupload an application, edit function key and special messageattributes, and set runtime parameters for the MessageView terminal.
Tag Editor...
Opens the Tag Editor to view, add or edit tag information for anapplication. Tag information is specific to the communicationprotocol that the application will use.
Project Management...
Opens the Project Management dialog to manipulate (display, create,copy, rename, delete) projects and to manipulate (create, copy,rename, delete) devices in projects.
Description...
Opens a dialog to enter an application description and change theapplication name. Also shows when the last version of theapplication was saved.
Validate..
Checks the entire application for potential problems. This commandallows the designer to make necessary corrections beforedownloading is attempted.
Application Menu

Menus and Commands SummaryA–6
Publication 2706-817
Download...
Downloads an application to a MessageView terminal or a DOS file.Download to a terminal uses DF1 point to point protocol through aconnection at the RS-232 COM port.
Upload...
Uploads an application from a MessageView terminal.
RTC Download...
Sends the computer’s time and date to the terminal to update its RealTime Clock.
HE Stack Upload...
Uploads the Historical Event Stack file from the terminal to a file inCSV format.
Terminal Setup...
Sets runtime communication and operating parameters for theMessageView terminal.
Special Messages...
Assigns bit triggers or other tags to special messages used in theapplication.
Function Keys...
If the application is designed for a MessageView 421F terminal, setsthe function key attributes.
LED Indicators...
If the application is designed for a MessageView 421F terminal,assigns the LED indicator tags.
Preferences...
Allows the user to specify whether messages should be validatedindividually when they are created or edited, and what colors shouldbe used in the Message Edit box to distinguish Flashing Text andEmbedded Text.

Menus and Commands Summary A–7
Publication 2706-817
Use commands on the Window menu to arrange application messagetables and icons to suit, and to toggle between table and terminalview of messages.
The bottom of the Window menu displays a list of open views of thecurrent application file. A check mark (�) next to a window namemeans the window is active.
Cascade
Arranges open windows in the workspace so that they overlap eachother, with the title bar of each screen remaining visible.
Tile
Arranges open windows in a vertical row in the workspace.
Arrange Icons
When some of the open windows are minimized to icons, spacesthem evenly along the bottom of the workspace so they do notoverlap.
New Window
Opens a new Message Editor Table View dialog.
Exceptions...
Opens the Exceptions dialog which displays errors detected duringapplication validation. Use this dialog as a reference while correctingerrors.
Table View
Brings focus to the Message Editor Table View.
Terminal View
Brings focus to the Message Editor Terminal View with the currentmessage displayed.
1 Project: Application.MBA
A list of all applications and all views currently open in theworkspace. The active window is checked.
Window Menu
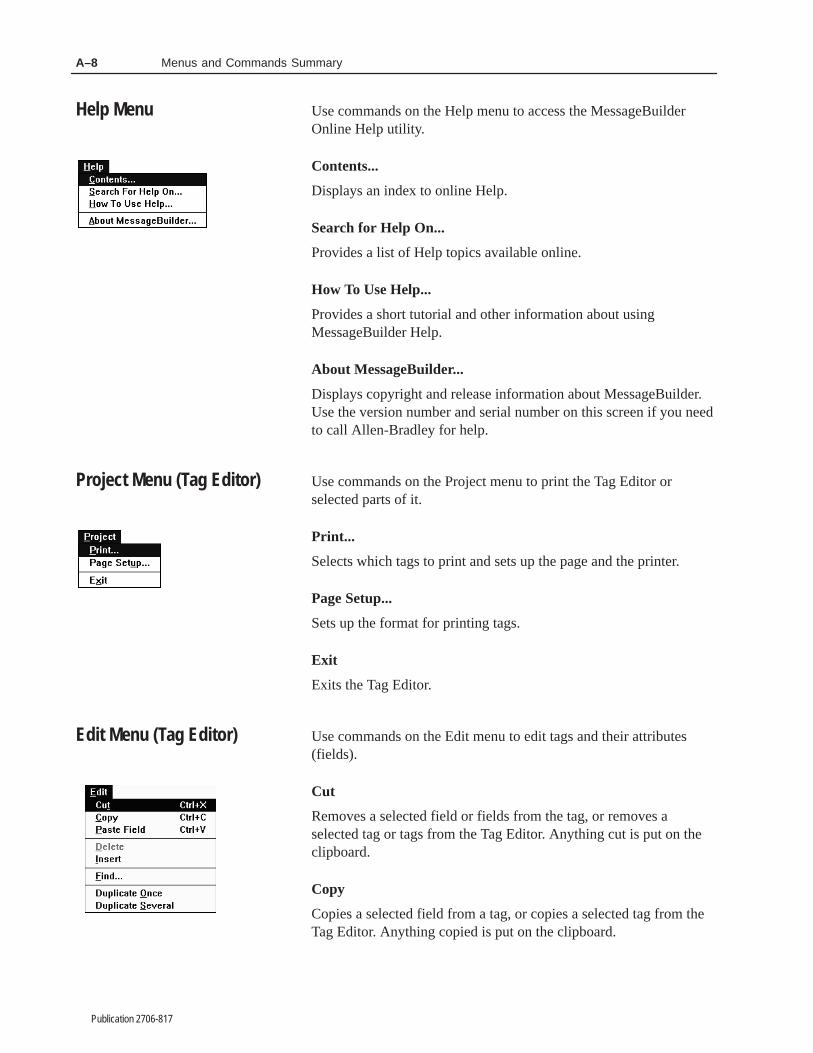
Menus and Commands SummaryA–8
Publication 2706-817
Use commands on the Help menu to access the MessageBuilderOnline Help utility.
Contents...
Displays an index to online Help.
Search for Help On...
Provides a list of Help topics available online.
How To Use Help...
Provides a short tutorial and other information about usingMessageBuilder Help.
About MessageBuilder...
Displays copyright and release information about MessageBuilder.Use the version number and serial number on this screen if you needto call Allen-Bradley for help.
Use commands on the Project menu to print the Tag Editor orselected parts of it.
Print...
Selects which tags to print and sets up the page and the printer.
Page Setup...
Sets up the format for printing tags.
Exit
Exits the Tag Editor.
Use commands on the Edit menu to edit tags and their attributes(fields).
Cut
Removes a selected field or fields from the tag, or removes aselected tag or tags from the Tag Editor. Anything cut is put on theclipboard.
Copy
Copies a selected field from a tag, or copies a selected tag from theTag Editor. Anything copied is put on the clipboard.
Help Menu
Project Menu (Tag Editor)
Edit Menu (Tag Editor)
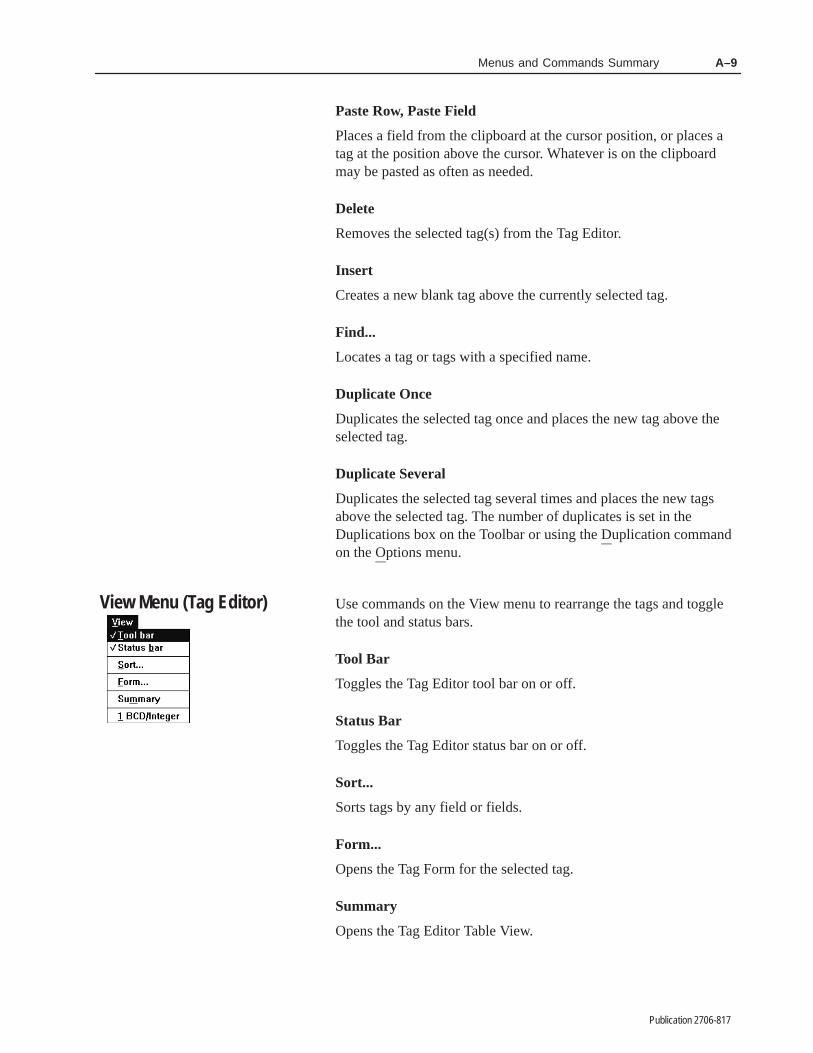
Menus and Commands Summary A–9
Publication 2706-817
Paste Row, Paste Field
Places a field from the clipboard at the cursor position, or places atag at the position above the cursor. Whatever is on the clipboardmay be pasted as often as needed.
Delete
Removes the selected tag(s) from the Tag Editor.
Insert
Creates a new blank tag above the currently selected tag.
Find...
Locates a tag or tags with a specified name.
Duplicate Once
Duplicates the selected tag once and places the new tag above theselected tag.
Duplicate Several
Duplicates the selected tag several times and places the new tagsabove the selected tag. The number of duplicates is set in theDuplications box on the Toolbar or using the Duplication commandon the Options menu.
Use commands on the View menu to rearrange the tags and togglethe tool and status bars.
Tool Bar
Toggles the Tag Editor tool bar on or off.
Status Bar
Toggles the Tag Editor status bar on or off.
Sort...
Sorts tags by any field or fields.
Form...
Opens the Tag Form for the selected tag.
Summary
Opens the Tag Editor Table View.
View Menu (Tag Editor)

Menus and Commands SummaryA–10
Publication 2706-817
1 BCD/Integer
Filters the tags to display all tags with value data type.
Use commands on the Options menu to set Tag Editor options.
Duplication...
Sets the options for number of duplicates to be created with theDuplicate Several command on the Edit menu, and sets the formatfor names of duplicated tags.
Address Validation
Toggles address validation on and off.
Use commands on the Tools menu to import or export tags from afile in a different format.
List Editor
Opens a new Tag Editor Table View.
Form Editor
Opens the Tag Form for the selected tag.
Import
Opens a dialog for importing tags from files in different formats.
Export
Opens a dialog for exporting tags to files in different formats.
Use commands on the Window menu to arrange Tag Editor windowsand icons to suit, or to close all windows.
The bottom of the Window menu displays a list of open Tag Editorwindows. A check mark (�) next to a window name means thewindow is active.
New
Opens a new window with the Tag Editor Table View.
Refresh
Updates the Table View to reflect changes made in a Form View.
Options Menu (Tag Editor)
Tools Menu (Tag Editor)
Window Menu (Tag Editor)

Menus and Commands Summary A–11
Publication 2706-817
Cascade
Arranges open Tag Editor views so that they overlap each other, withthe title bar of each screen remaining visible.
Tile Horizontal
Arranges open windows in a horizontal row in the workspace.
Tile Vertical
Arranges open windows in a vertical row in the workspace.
Arrange Icons
Spaces icons evenly along the bottom of the workspace so they donot overlap.
Close All
Closes all the Tag Editor windows.
1 Project: View
A list of all views currently open in the Tag Editor. The active viewis checked.
Use commands on the Help menu to access the Tag Editor OnlineHelp utility.
Contents
Displays an index to online Help.
About...
Displays copyright and release information about the Tag Editor.
Help Menu (Tag Editor)

������� �
Publication 2706-817
���� �����
This appendix contains a brief description of all MessageBuildertools on the Standard Toolbar, Message Edit Toolbar and Tag EditorToolbar. Certain tools cannot be applied in some fields of the dialog;the icons are greyed out when those fields are selected.
File Tools
New File
Creates a new application file.
Open File
Opens an existing application file.
Save File
Saves an application file to disk.
Edit Text Tools
Cut
Cuts the selected text string or an entire message from the Edit boxand places it on the clipboard.
Copy
Copies the selected text string or an entire message from the Edit boxto the clipboard.
Paste
Pastes the contents of the clipboard at the cursor position in the Editbox. If text is highlighted, the pasted text replaces it.
Undo
Reverses the last edit operation in a message.
Redo
Reverses an Undo.
Standard Toolbar

Tool SummaryB–2
Publication 2706-817
Windows Tools
Terminal View
Displays the front face of the MessageView terminal that theapplication is designed for.
Table View
Displays the main MessageBuilder Table View dialog.
Application Tools
Terminal Setup
Opens the Terminal Setup dialog, to configure the MessageView 421terminal.
Download
Opens the Download Application dialog.
View Tools
Zoom In
Increases the Terminal View to the next higher magnification. Maybe repeated twice.
Zoom Out
Reduces the Terminal View to the next lower magnification. May berepeated twice.
Help Tools
Help Contents
Displays an index to Help topics.
Help Question
Changes the cursor arrow to a question mark. Click the questionmark on an item to get context-sensitive online help.

Tool Summary B–3
Publication 2706-817
Message Edit Tools
Insert Message
Inserts a new message with default text before the currenthighlighted message.
Append Message
Appends a new message with default text after the last message inthe list.
Delete Message
Permanently deletes the highlighted message from the Message List.
Cancel Changes
Removes any changes in the Edit box since the last Store Message.
Store Message
Copies the message in the Edit box to the highlighted row in theMessage List.
Message Edit box
Displays the text of the highlighted message so it can be edited.
Formatting Tools
Flash
Sets highlighted text, graphics or variables to flash on/off when themessage is displayed by the MessageView terminal.
Inverse Video
Sets highlighted text, graphics or variables in reversed video.
Embedded Variable
Opens a menu to insert a variable, ASCII control character orgraphic in a message at the cursor position. If a variable is selected,opens the dialog to edit that type of variable.
Enable Function Key
Opens the Enable Function Key dialog to specify which functionkeys are enabled for the current message.
Left Justify
Aligns a message at the left side of the display. Toggles with Center.
Message Editor Toolbar

Tool SummaryB–4
Publication 2706-817
Center
Centers a message in the display. Toggles with Left Justify.
Many of the Tag Editor tools are the same as in the Message Editordialog. Certain tools cannot be applied in some fields of the dialog;the icons are greyed out when those fields are selected.
Opens the Print dialog, with Printer and Page Setup dialogsavailable.
Cut
Cuts the selected field or row and places it on the clipboard.
Copy
Copies the selected field or row to the clipboard.
Paste
Pastes the contents of the clipboard at the cursor position.
Insert Tag
Inserts a blank tag above the cursor position, no matter what field thecursor is in.
Delete Tag
Removes the highlighted tag. If only a field is selected, the icon isgreyed out.
Find Tag
Opens a dialog from which each tag of a specified name can befound.
Duplicate Tag Once
Duplicates the selected tag once and places the new tag above theselected tag.
Duplicate Tag Several Times
Duplicates the selected tag several times and places the new tagsabove the selected tag. The number of duplicates is set using theDuplications box in the tool bar.
Tag Editor Toolbar

Tool Summary B–5
Publication 2706-817
Form View
Opens the Form View dialog for the selected tag.
Table View
Opens a copy of the Tag Editor Table View.
Duplications
A text box which displays the number of duplicate tags the DuplicateSeveral command or icon will create.

Tool SummaryB–6
Publication 2706-817
ISA symbols are a standard set of graphics that illustrate varioustypes of manufacturing tools. They are illustrated and named in theSelect Graphics dialog box. 113
Use them to help the operator visualize the operation controlled byspecific messages.
1: Horizontal Valve with Actuator
2: Horizontal Valve with Throttling Actuator
3: Horizontal Valve with Manual Actuator
4: Vertical Valve with Actuator
5: Vertical Valve with Throttling Actuator
6: Vertical Valve with Manual Actuator
7: Butterfly Valve
8: Check Valve
9: Relief Valve
10: Liquid Filter
11: Vacuum Filter
12: Motor
13: Transformer
14: Vessel
15: Reactor
16: Storage Bin
17: Distillation Tower
18: Pressure Storage Vessel
19: Weight Hopper
ISA Symbols

Tool Summary B–7
Publication 2706-817
20: Pump
21: Turbine
22: Blower
23: Compressor
24: Agitator
25: Conveyor
26: Screw Conveyor
27: Inline Mixer
28: Rotary Feeder
29: Exchanger
30: Furnace
31: Rotary Kiln
32: Cyclone Separator

������� �
Publication 2706-817
�� �������� ������ �����
� � ��� � � ������
This appendix lists messages that may appear while creating orediting an application. Messages are listed alphabetically.
For messages that may appear during validation, see Appendix D.For messages that may appear during a download, see Appendix E.For messages that may appear during a tag import or export, seePage 8–22.
Message Meaning What to do
AB Utilities error creating projectThe project could not be created. Causecould be a full disk or a write-protectednetwork partition.
Check available disk space.Verify the computer’s write privileges if it is ona network.
AB Utilities failed to initializeMessageBuilder could not initialize Utilitiesduring startup because SHARE.EXE is notrunning.
MessageBuilder installation should addSHARE.EXE to the AUTOEXEC.BAT file. Seethe RELEASE.TXT file in C:\AB for moredetails.
Cannot delete project associated with currentapplication.
The project belonging to the currentapplication cannot be deleted.
Reassign the current application to anotherproject, then delete the project.
Cannot find desired terminal in Terminalcatalog.
The CATALOG.DAT file is missing orcorrupted. This file stores the terminal typethat is selected when creating a newapplication or changing the application to fit adifferent terminal type.
Contact A-B technical support.
Cannot find or cannot load the Application FileTransfer Utility.
The WINMFT.EXE executable failed to load.Verify that WINMFT.EXE is in the samedirectory as MBWIN.EXE. If it is not there,reload the file from the installation disk.
Cannot initialize print device. Printer could not be initialized. Check the Print Setup settings and try again.
Cannot load the data for tag: [tag name]. Internal error.Check tag information. Contact A-B technicalsupport if error continues.
Cannot locate tag: [tag name]. Internal error.Check tag information. Contact A-B technicalsupport if error continues.
Cannot parse address for tag: [tag name]. Internal error.Check tag information. Contact A-B technicalsupport if error continues.
Cannot perform terminal conversion. Thefollowing message(s) have function keysenabled: Message(s): [number], [number] ...
The application is being converted to aTerminal that does not have Function Keys.One or more messages has Function KeysEnabled.
Remove all the messages that have FunctionKeys enabled from the Application.
ÁÁÁÁÁÁÁÁÁÁÁÁÁÁÁÁÁÁÁÁÁÁÁÁÁÁÁÁÁÁÁÁÁÁÁÁÁÁÁÁÁÁÁÁÁÁÁÁ
Cannot perform terminal conversion. Thefollowing message(s) have Numeric VariableEntry fields: Message(s): [number], [number]...
ÁÁÁÁÁÁÁÁÁÁÁÁÁÁÁÁÁÁÁÁÁÁÁÁÁÁÁÁÁÁÁÁÁÁÁÁÁÁÁÁÁÁÁÁ
Attempting to convert an application from a421N or 421F terminal to a 421D terminal.
ÁÁÁÁÁÁÁÁÁÁÁÁÁÁÁÁÁÁÁÁÁÁÁÁÁÁÁÁÁÁÁÁÁÁÁÁÁÁÁÁÁÁÁÁÁÁÁÁ
Remove Numeric Entry variables from allmessages listed.
ÁÁÁÁÁÁÁÁÁÁÁÁÁÁÁÁÁÁÁÁÁÁÁÁÁÁÁÁÁÁÁÁÁÁÁÁÁÁÁÁÁÁÁÁÁÁÁÁ
Cannot perform terminal conversion. Thefollowing message(s) have ASCII VariableEntry fields: Message(s): [number], [number]...
ÁÁÁÁÁÁÁÁÁÁÁÁÁÁÁÁÁÁÁÁÁÁÁÁÁÁÁÁÁÁÁÁÁÁÁÁÁÁÁÁÁÁÁÁ
Attempting to convert an application from aterminal with a daughterboard to one withouta daughterboard.
ÁÁÁÁÁÁÁÁÁÁÁÁÁÁÁÁÁÁÁÁÁÁÁÁÁÁÁÁÁÁÁÁÁÁÁÁÁÁÁÁÁÁÁÁÁÁÁÁ
Remove ASCII Entry variables from allmessages listed.
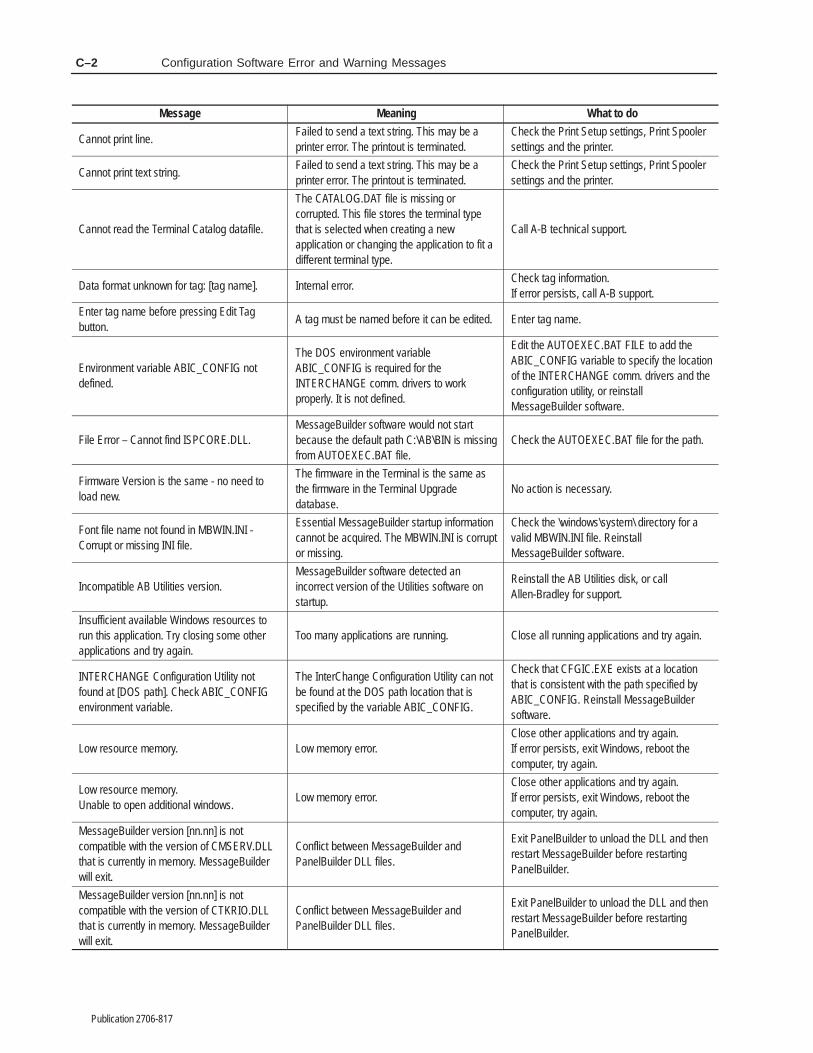
Configuration Software Error and Warning MessagesC–2
Publication 2706-817
Message What to doMeaning
Cannot print line.Failed to send a text string. This may be aprinter error. The printout is terminated.
Check the Print Setup settings, Print Spoolersettings and the printer.
Cannot print text string.Failed to send a text string. This may be aprinter error. The printout is terminated.
Check the Print Setup settings, Print Spoolersettings and the printer.
Cannot read the Terminal Catalog datafile.
The CATALOG.DAT file is missing orcorrupted. This file stores the terminal typethat is selected when creating a newapplication or changing the application to fit adifferent terminal type.
Call A-B technical support.
Data format unknown for tag: [tag name]. Internal error.Check tag information. If error persists, call A-B support.
Enter tag name before pressing Edit Tagbutton.
A tag must be named before it can be edited. Enter tag name.
Environment variable ABIC_CONFIG notdefined.
The DOS environment variableABIC_CONFIG is required for theINTERCHANGE comm. drivers to workproperly. It is not defined.
Edit the AUTOEXEC.BAT FILE to add theABIC_CONFIG variable to specify the locationof the INTERCHANGE comm. drivers and theconfiguration utility, or reinstallMessageBuilder software.
File Error – Cannot find ISPCORE.DLL.MessageBuilder software would not startbecause the default path C:\AB\BIN is missingfrom AUTOEXEC.BAT file.
Check the AUTOEXEC.BAT file for the path.
Firmware Version is the same - no need toload new.
The firmware in the Terminal is the same asthe firmware in the Terminal Upgradedatabase.
No action is necessary.
Font file name not found in MBWIN.INI -Corrupt or missing INI file.
Essential MessageBuilder startup informationcannot be acquired. The MBWIN.INI is corruptor missing.
Check the \windows\system\ directory for avalid MBWIN.INI file. ReinstallMessageBuilder software.
Incompatible AB Utilities version.MessageBuilder software detected anincorrect version of the Utilities software onstartup.
Reinstall the AB Utilities disk, or callAllen-Bradley for support.
Insufficient available Windows resources torun this application. Try closing some otherapplications and try again.
Too many applications are running. Close all running applications and try again.
INTERCHANGE Configuration Utility notfound at [DOS path]. Check ABIC_CONFIGenvironment variable.
The InterChange Configuration Utility can notbe found at the DOS path location that isspecified by the variable ABIC_CONFIG.
Check that CFGIC.EXE exists at a locationthat is consistent with the path specified byABIC_CONFIG. Reinstall MessageBuildersoftware.
Low resource memory. Low memory error.Close other applications and try again. If error persists, exit Windows, reboot thecomputer, try again.
Low resource memory.Unable to open additional windows.
Low memory error.Close other applications and try again.If error persists, exit Windows, reboot thecomputer, try again.
MessageBuilder version [nn.nn] is notcompatible with the version of CMSERV.DLLthat is currently in memory. MessageBuilderwill exit.
Conflict between MessageBuilder andPanelBuilder DLL files.
Exit PanelBuilder to unload the DLL and thenrestart MessageBuilder before restartingPanelBuilder.
MessageBuilder version [nn.nn] is notcompatible with the version of CTKRIO.DLLthat is currently in memory. MessageBuilderwill exit.
Conflict between MessageBuilder andPanelBuilder DLL files.
Exit PanelBuilder to unload the DLL and thenrestart MessageBuilder before restartingPanelBuilder.

Configuration Software Error and Warning Messages C–3
Publication 2706-817
Message What to doMeaning
MessageBuilder version [nn.nn] is notcompatible with the version of WPFTDLL.DLLthat is currently in memory. MessageBuilderwill exit.
Conflict between MessageBuilder andPanelBuilder DLL files.
Exit PanelBuilder to unload the DLL and thenrestart MessageBuilder before restartingPanelBuilder.
No default printer.Use Control Panel to install and select adefault printer.
A default printer has not been configured.See the Windows user manual for details onhow to install and select printers.
Not enough resource memory to open dialog. Low memory error.Close other applications and try again. If errorpersists, exit Windows, reboot, and try again.
Out of memory.Close other applications and try again.Otherwise select Cancel to quit.
Attempt to allocate additional memory hasfailed.
Close other Windows applications and tryagain. If this is unsuccessful, MessageBuilderexits.
Print manager failed. Error received from print manager (spooler). Check print spooler for possible errors.
Printer setup failed. Error occurred during printer setup.Check validity of the print driver. Reload driveris necessary.
Project does not exist. There is no project of that name. Select another project name.
Project exists. Entered a project name that already exists.Enter another project name, or use theexisting project.
The input file is not a MessageBuilderapplication file. Please select a new data file.
The file is not a MessageBuilder Applicationfile and is not compatible withMessageBuilder.
Enter a different file name and retry.MessageBuilder Application files typicallyhave the extension MBA or MVA.

������� �
Publication 2706-817
������� � � ��������
This appendix lists messages that may appear while validating anapplication, whether on command or automatically beforedownloading. Messages are listed alphabetically.
For messages that may appear during creation or editing of anapplication, see Appendix C. For messages that may appear during a download, see Appendix E.For messages that may appear during a tag import or export, seePage 8–22.
Message Meaning What to do
[Terminal Setup] Terminal selected in TerminalSetup does not match Application Type.
The selected catalog number does not matchthat of the application.
Change the catalog number using theTerminal Setup dialog to change the MV Typeand Catalog and Version controls to matchthat of the application, or press OK to theTerminal Setup dialog to convert theapplication to match the selected terminaltype.
Background message [number] doesn’t exist.The assigned Background message is notdefined.
Define the Background message or disablebackground message with the TerminalSetup/Advanced dialog.
Bit Trigger Number [number] duplicated[number] times.
The bit trigger numbers for all messages in anapplication are not unique.
Use the Bit Trigger control on the MessageEditor Table View to change the bit number ordelete the offending message to insure thatbit trigger numbers are unique.
Bit Trigger Priority mismatch with undefinedBit Triggered Messages.
Bit triggering is assigned priority over Valuetriggering yet there are no Bit Trigger enabledmessages in the Application.
Use the Trigger Priority control on theTerminal Setup/Advanced dialog to changethe priority to Value.
Bit Trigger Tag missing or tag not assigned.The application has one or more messagesthat has bit triggers enabled; however the BitTrigger Tag is undefined for the Application.
Change all message to value triggers or usethe Terminal Setup/Control Tags dialog todefine a Bit Trigger for the Application.
Chain-To-Message number greater than themaximum allowed.
The message is chained to a non-existentmessage.
Use Chain control on the Message EditorTable View to disable the chain or alter the“To” message number to select a differentexisting message.ÁÁÁÁÁÁÁÁÁÁÁÁ
ÁÁÁÁÁÁÁÁÁÁÁÁÁÁÁÁÁÁÁÁÁÁÁÁ
Checking Msg [number] for unsupportedfeatures.
ÁÁÁÁÁÁÁÁÁÁÁÁÁÁÁÁÁÁÁÁÁÁÁÁÁÁÁÁÁÁÁÁÁ
ÁÁÁÁÁÁÁÁÁÁÁÁÁÁÁÁÁÁÁÁÁÁÁÁÁÁÁÁÁÁÁÁÁÁÁÁDisplay variable storage size is greater than
100 characters. Reduce the tag sizes ofdisplay variables.
The combined tag array sizes for theembedded ASCII Variable Display variables inthe message exceed 100 characters.
Use the tag editor to reduce the array size ofthe tags assigned to the embedded ASCIIVariable Display variables in the message.
Duplicate Message Number withinApplication.
The message number for all messages in anApplication are not unique.
Renumber or delete the offending message toinsure that message numbers are unique.
Duplicate RTC Date Variables withinmessage.
The message has more than one embeddedDate variable. One is permitted per message.
Remove all but one Date variable.
Duplicate RTC Time Variables withinmessage.
The message has more than one embeddedTime variable. One is permitted per message.
Remove all but one Time variable.

Validation Error MessagesD–2
Publication 2706-817
Message What to doMeaning
Embedded ASCII Character 13 is not allowed.The embedded ASCII Character of value 13is not allowed for slaving messages.
Remove or change the value of theembedded ASCII character 13 by selectingthe embedded ASCII character in themessage and pressing the Delete key, orselecting the Format/Edit Variable Dialog.
Embedded ASCII Entry Tag array size mustbe greater than ASCII Entry variable fieldwidth.
The assigned tag array size is smaller thanthe display field width. Operator input cannotbe completed without a large character arraydefined.
Use the tag editor to change the tag arraysize.
Embedded Carriage-Return not allowed with“Full” size text.
The message with “Full” attribute can notcontain embedded Carriage-Return.
Use the Message Editor Table view to changethe text size or remove the embeddedCarriage-Return from the message.
Embedded Display Variables are not allowedin Chained message [number], chained frommessage [number].
Applications can not support embeddeddisplayable variables in a chained-tomessage.
Resolve the conflict by chaining to a differentmessage or removing the embedded displayvariables in the chained-”To” message.
Embedded Display Variables are not allowedin the Background message.
The Background Message assigned that hasembedded display variables is not allowed.
Change or disable the Background Messagein the Terminal Setup/Advanced dialog orremove the embedded display variables fromthe message.
Embedded Display Variables are not allowedin the Startup message.
The Startup Message assigned that hasembedded display variables is not allowed.
Change or disable the Startup Message in theTerminal Setup/Advanced dialog or removethe embedded display variables from themessage.
Embedded Entry Write Tag used but notdefined.
The tag is undefined in the project database. Use the tag editor to define the tag.
Embedded Graphic 13 is not allowed in slavemessages.
The embedded Graphic symbol number 13 isnot allowed for slaving messages.
Remove or change the value of theembedded Graphic number 13 by selectingthe embedded Graphic in the message andpressing the Delete key or selecting theFormat/Edit Variable Dialog.
Embedded-Carriage-Return not allowedwithout All attribute set.
Embedded Carriage-Return requires “All”attribute enabled.
Use the Message Editor Table view to changethe Line attribute to “ALL” or remove theembedded Carriage-Return from themessage.ÁÁÁÁÁÁÁÁÁÁÁÁ
ÁÁÁÁÁÁÁÁÁÁÁÁÁÁÁÁÁÁÁÁÁÁÁÁÁÁÁÁÁÁÁÁÁÁÁÁ
Error: Msg [number] Numeric Variable Entry isnot supported by terminal type.
ÁÁÁÁÁÁÁÁÁÁÁÁÁÁÁÁÁÁÁÁÁÁÁÁÁÁÁÁÁÁÁÁÁÁÁÁÁÁÁÁÁÁÁÁ
The terminal is a 421D type.ÁÁÁÁÁÁÁÁÁÁÁÁÁÁÁÁÁÁÁÁÁÁÁÁÁÁÁÁÁÁÁÁÁÁÁÁÁÁÁÁÁÁÁÁÁÁÁÁ
Remove Numeric Entry variables from themessages listed. Or if practical change theapplication to a different terminal type.
Error: “Return Message Number to PLC”checked in the Advanced dialog requires MsgTags Return Number, Ack Tags ReturnNumber or FKey Tag Return Number bedefined.
An appropriate return message number tagmust be defined if Return Message Numberto PLC option is selected.
Remove the Return Message Number to PLCoption in the Terminal Setup/Advanced dialogor define a return message number tag in theTerminal Setup/Control Tags dialog.
Field width of Entry is larger than the width ofthe display.
An entry is not allowed to be wider than thedisplayable area.
Reduce the embedded Variable Entry Fieldwidth or increase the display width by makingthe message Text Size Half or Quarter.
ÁÁÁÁÁÁÁÁÁÁÁÁÁÁÁÁÁÁÁÁÁÁÁÁÁÁÁÁÁÁÁÁÁÁÁÁ
Function Key Write Tag missing or tag notassigned.
ÁÁÁÁÁÁÁÁÁÁÁÁÁÁÁÁÁÁÁÁÁÁÁÁÁÁÁÁÁÁÁÁÁ
The Function Key Write Tag is undefined forone or more Function Keys that are enabledin the Application.
ÁÁÁÁÁÁÁÁÁÁÁÁÁÁÁÁÁÁÁÁÁÁÁÁÁÁÁÁÁÁÁÁÁÁÁÁ
Use the Function Key dialog to define a WriteTag for each Function Key that is enabled inthe Application.
Graphic does not display properly on the endof the line.
The defined message cannot be displayedproperly.
Reformat the message by deletingcharacters, or enable the scrolling attribute.

Validation Error Messages D–3
Publication 2706-817
Message What to doMeaning
If “Enable Message Queue” is checked ValueTrigger Tag must be defined.
The Message Queue option was selected butonly Value Triggered messages can utilize theMessage Queue.
Disable the Enable Message Queue option inthe Terminal Setup/Advanced dialog or definea value trigger tag in the Terminal Setup/Control Tags dialog.
Invalid Ack attribute for message withEmbedded Entry Variables.
Not more than one operator action can berequired per message.
Resolve the conflicting attributes. Disable theAck attribute for a message with entryvariables.
Invalid Ack attribute with Hidden Messageattribute assignment.
A hidden message can not support anyoperator actions.
Resolve the conflicting attributes. Disable theAck attribute for a hidden message.
Invalid Ack Time attribute with Ack attributeassignment.
Ack Time is enabled for a message that is notAck enabled.
Resolve the conflicting attributes. Disable theAck Time attribute for a non-Ack message.
Invalid Ack Time attribute with HiddenMessage attribute assignment.
Hidden messages can not be acknowledged.Resolve the conflicting attributes. Disable theAck Time or Hidden Message attribute formessage.
Invalid Any line attribute with hidden andslave attributes.
A message with Line attribute “Any” can notbe hidden and slaved.
Resolve the conflicting attributes. Disable theHidden or Slave message attribute or changethe Line message attribute.
Invalid Auto Clear attribute with Wait Timezero and Scroll attribute not assigned.
The message is invisible.Disable selection of the Auto Clear attribute orincrease the Wait Time.
Invalid Block Transfer Table - Block [number]has an invalid direction.
The enabled block transfer block must have adirection.
Use the Communication Setup Block Transferdialog to define the direction.
Invalid Block Transfer Table - Block [number]has an invalid length.
The block transfer length is illegal.Use the Communication Setup Block Transferdialog to define the proper length.
Invalid center attribute with HE stack andhidden attributes and no slave enabledattribute.
Message that are only Historical EventStacked can not be centered.
Resolve the conflicting attributes. Disable theCenter Message attribute for messages thatare only Historical Event Stacked.
Invalid embedded ASCII char without slaveenable attribute.
Embedded ASCII characters are defined in amessage without the Slave Attribute enabled.
Select Slave Enable attribute or delete theEmbedded ASCII characters.
Invalid embedded ASCII character with noother displayable characters in message.
The message defined is invisible on theterminal.
Define the message with displayablecharacters.
Invalid embedded carriage return characterwith no other displayable characters inmessage.
The message defined is invisible on theterminal.
Define displayable characters for themessage.
Invalid Enable Function keys attribute formessage with Embedded Entry Variables.
Not more than one operator action can berequired per message.
Resolve the conflicting attributes. Disable thefunction keys or delete the Embedded entryvariables.
Invalid Enable Function keys attribute formessage with Acknowledge attribute.
Not more than one operator action can berequired per message.
Resolve the conflicting attributes. Disable theAck attribute for a message with FunctionKeys enabled.
Invalid Enable Function keys attribute formessage with Ack Time attribute.
Not more than one operator action can berequired per message.
Resolve the conflicting attributes. Disable theAck Time attribute for a message withFunction Keys enabled.
Invalid Enable Function keys attribute formessage with Hidden Message attributeassignment.
A hidden message can not support anyoperator actions.
Resolve the conflicting attributes. Disable theHidden Message attribute for a message withFunction Keys enabled.
Invalid hidden attribute without slave, or HEstack.
A hidden message must be slaved and/orHistorical Event Stacked.
Resolve the conflicting attributes. Enable theHE Stack or Slave Enable message attribute.
Invalid Hidden Message attribute withEmbedded Entries.
A hidden message can not support anyoperator actions.
Resolve the conflicting attributes. Disable theHidden Message attribute for a message withEmbedded Entry variables.
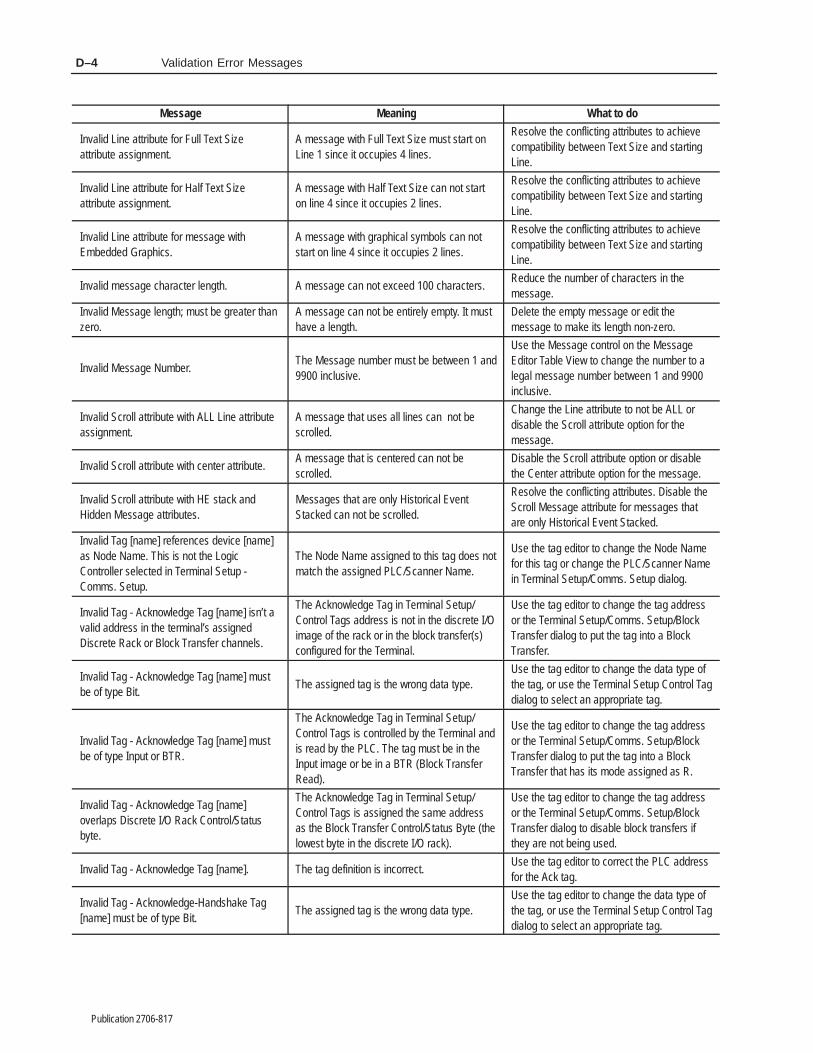
Validation Error MessagesD–4
Publication 2706-817
Message What to doMeaning
Invalid Line attribute for Full Text Sizeattribute assignment.
A message with Full Text Size must start onLine 1 since it occupies 4 lines.
Resolve the conflicting attributes to achievecompatibility between Text Size and startingLine.
Invalid Line attribute for Half Text Sizeattribute assignment.
A message with Half Text Size can not starton line 4 since it occupies 2 lines.
Resolve the conflicting attributes to achievecompatibility between Text Size and startingLine.
Invalid Line attribute for message withEmbedded Graphics.
A message with graphical symbols can notstart on line 4 since it occupies 2 lines.
Resolve the conflicting attributes to achievecompatibility between Text Size and startingLine.
Invalid message character length. A message can not exceed 100 characters.Reduce the number of characters in themessage.
Invalid Message length; must be greater thanzero.
A message can not be entirely empty. It musthave a length.
Delete the empty message or edit themessage to make its length non-zero.
Invalid Message Number.The Message number must be between 1 and9900 inclusive.
Use the Message control on the MessageEditor Table View to change the number to alegal message number between 1 and 9900inclusive.
Invalid Scroll attribute with ALL Line attributeassignment.
A message that uses all lines can not bescrolled.
Change the Line attribute to not be ALL ordisable the Scroll attribute option for themessage.
Invalid Scroll attribute with center attribute.A message that is centered can not bescrolled.
Disable the Scroll attribute option or disablethe Center attribute option for the message.
Invalid Scroll attribute with HE stack andHidden Message attributes.
Messages that are only Historical EventStacked can not be scrolled.
Resolve the conflicting attributes. Disable theScroll Message attribute for messages thatare only Historical Event Stacked.
Invalid Tag [name] references device [name]as Node Name. This is not the LogicController selected in Terminal Setup -Comms. Setup.
The Node Name assigned to this tag does notmatch the assigned PLC/Scanner Name.
Use the tag editor to change the Node Namefor this tag or change the PLC/Scanner Namein Terminal Setup/Comms. Setup dialog.
Invalid Tag - Acknowledge Tag [name] isn’t avalid address in the terminal’s assignedDiscrete Rack or Block Transfer channels.
The Acknowledge Tag in Terminal Setup/Control Tags address is not in the discrete I/Oimage of the rack or in the block transfer(s)configured for the Terminal.
Use the tag editor to change the tag addressor the Terminal Setup/Comms. Setup/BlockTransfer dialog to put the tag into a BlockTransfer.
Invalid Tag - Acknowledge Tag [name] mustbe of type Bit.
The assigned tag is the wrong data type.Use the tag editor to change the data type ofthe tag, or use the Terminal Setup Control Tagdialog to select an appropriate tag.
Invalid Tag - Acknowledge Tag [name] mustbe of type Input or BTR.
The Acknowledge Tag in Terminal Setup/Control Tags is controlled by the Terminal andis read by the PLC. The tag must be in theInput image or be in a BTR (Block TransferRead).
Use the tag editor to change the tag addressor the Terminal Setup/Comms. Setup/BlockTransfer dialog to put the tag into a BlockTransfer that has its mode assigned as R.
Invalid Tag - Acknowledge Tag [name]overlaps Discrete I/O Rack Control/Statusbyte.
The Acknowledge Tag in Terminal Setup/Control Tags is assigned the same addressas the Block Transfer Control/Status Byte (thelowest byte in the discrete I/O rack).
Use the tag editor to change the tag addressor the Terminal Setup/Comms. Setup/BlockTransfer dialog to disable block transfers ifthey are not being used.
Invalid Tag - Acknowledge Tag [name]. The tag definition is incorrect.Use the tag editor to correct the PLC addressfor the Ack tag.
Invalid Tag - Acknowledge-Handshake Tag[name] must be of type Bit.
The assigned tag is the wrong data type.Use the tag editor to change the data type ofthe tag, or use the Terminal Setup Control Tagdialog to select an appropriate tag.

Validation Error Messages D–5
Publication 2706-817
Message What to doMeaning
Invalid Tag - Acknowledge-Handshake Tag[name] isn’t a valid address in the terminal’sassigned Discrete Rack or Block Transferchannels.
The Acknowledge-Handshake Tag in TerminalSetup/Control Tags address is not in thediscrete I/O image of the rack or in the blocktransfer(s) configured for the Terminal.
Use the tag editor to change the tag addressor the Terminal Setup/Comms. Setup/BlockTransfer dialog to put the tag into a BlockTransfer.
Invalid Tag - Acknowledge-Handshake Tag[name] must be of type Output or BTW.
The tag is controlled by the PLC and is readby the Terminal. The tag must be in theOutput image or be in a BTW (Block TransferWrite).
Use the tag editor to change the tag addressor the Terminal Setup/Comms. Setup/BlockTransfer dialog to put the tag into a BlockTransfer that has its mode assigned as W.
Invalid Tag - Acknowledge-Handshake Tag[name] overlaps Discrete I/O RackControl/Status byte.
The Acknowledge-Handshake Tag in TerminalSetup/Control Tags is assigned the sameaddress as the Block Transfer Control/StatusByte (the lowest byte in the discrete I/O rack).
Use the tag editor to change the tag addressor the Terminal Setup/Comms. Setup/BlockTransfer dialog to disable block transfers ifthey are not being used.
Invalid Tag - Acknowledge-Handshake Tag[name].
Tag is undefined in the project database. Use the tag editor to define the tag.
Invalid Tag - Bit Trigger Tag [name]. Tag is undefined in the project database. Use the tag editor to define the tag.
Invalid Tag - Bit Trigger Tag [name] isn’t avalid address in the terminal’s assignedDiscrete Rack or Block Transfer channels.
The tag address is not in the discrete I/Oimage of the rack or in the block transfer(s)configured for the Terminal.
Use the tag editor to change the tag addressor the Terminal Setup/Comms. Setup/BlockTransfer dialog to put the tag into a BlockTransfer.
Invalid Tag - Bit Trigger Tag [name] must be oftype Output or BTW.
The tag is controlled by the PLC and is readby the Terminal. The tag must be in theOutput image or be in a BTW (Block TransferWrite).
Use the tag editor to change the tag addressor the Terminal Setup/Comms. Setup/BlockTransfer dialog to put the tag into a BlockTransfer that has its mode assigned as W.
Invalid Tag - Bit Trigger Tag [name] must be oftype Unsigned Integer.
The assigned tag is the wrong data type.Use the tag editor to change the data type ofthe tag.
Invalid Tag - Bit Trigger Tag [name] overlapsDiscrete I/O Rack Control/Status byte.
The tag is assigned the same address as theBlock Transfer Control/Status Byte (the lowestbyte in the discrete I/O rack).
Use the tag editor to change the tag addressor the Terminal Setup/Comms. Setup/BlockTransfer dialog to disable block transfers ifthey are not being used.
Invalid Tag - Bit Trigger Tag [name] will not fitin the Block Transfer Table (Max Bit Trigger =[number]) or tag is not defined in the Table.
The tag will not fit within the valid range in thediscrete I/O image of the rack or in the blocktransfer(s) configured for the Terminal.
Redefine the block transfer address or reducethe total number of bit triggered messages.
Invalid Tag - Block [number] for Tag [name].Address defined in the block transfer isincorrect.
Use the Communication Setup Block Transferdialog to define the proper address.
Invalid Tag - Brightness Level Tag [name]must be of type Output or BTW.
The tag is controlled by the PLC and is readby the Terminal. The tag must be in theOutput image or be in a BTW (Block TransferWrite).
Use the tag editor to change the tag addressor the Block Transfer dialog to put the tag intoa BTW.
Invalid Tag - Brightness Level Tag [name]must be of type Unsigned Integer.
The assigned tag is the wrong data type.Use the tag editor to change the data type ofthe tag.
Invalid Tag - Brightness Level Tag [name] isn’ta valid address in the terminal’s assignedDiscrete Rack or Block Transfer channels.
The tag address is not in the discrete I/Oimage of the rack or in the block transfer(s)configured for the Terminal.
Use the tag editor to change the tag addressor the Communication Setup Block Transferdialog to put the tag into a Block Transfer.
Invalid Tag - Brightness Level Tag [name]overlaps Discrete I/O Rack Control/Statusbyte.
The tag is assigned the same address as theBlock Transfer Control/Status Byte (the lowestbyte in the discrete I/O rack).
Use the tag editor to change the tag addressor the Terminal Setup/Comms. Setup/BlockTransfer dialog to disable block transfers ifthey are not being used.
Invalid Tag - Day Read Tag [name] must be oftype Unsigned Integer.
The assigned tag is the wrong data type.
Use the tag editor to change the data type ofthe tag, or use the Application/SpecialMessages/Read Tags dialog to select anappropriate tag.

Validation Error MessagesD–6
Publication 2706-817
Message What to doMeaning
Invalid Tag - Day Write Tag [name] must be oftype Unsigned Integer.
The assigned tag is the wrong data type.
Use the tag editor to change the data type ofthe tag, or use the Application/SpecialMessages/Write Tags dialog to select anappropriate tag.
Invalid Tag - Function Key F[number]Handshake Tag [name] must be of type Bit.
The assigned tag is the wrong data type.Use the tag editor to change the data type ofthe tag, or use the Function Keys dialog toselect or add an appropriate tag.
Invalid Tag - Function Key F[number]Handshake Tag [name] not defined.
Tag is undefined in the project database. Use the tag editor to define the tag.
Invalid Tag - Function Key F[number] WriteTag [name] must be of type Bit.
The assigned tag is the wrong data type.Use the tag editor to change the data type ofthe tag, or use the Function Keys dialog toselect or add an appropriate tag.
Invalid Tag - Function Key F[number] WriteTag [name] not defined.
Tag is undefined in the project database.Use the tag editor to define the tag, or use theFunction Keys dialog to select or add anappropriate tag.
Invalid Tag - HE100% Full Tag [name] mustbe of type Bit.
The assigned tag is the wrong data type.Use the tag editor to change the data type ofthe tag, or use the Terminal Setup StatusTags dialog to select an appropriate tag.
Invalid Tag - HE80% Full Tag [name] must beof type Bit.
The assigned tag is the wrong data type.Use the tag editor to change the data type ofthe tag, or use the Terminal Setup StatusTags dialog to select an appropriate tag.
Invalid Tag - HE95% Full Tag [name] must beof type Bit.
The assigned tag is the wrong data type.Use the tag editor to change the data type ofthe tag, or use the Terminal Setup StatusTags dialog to select an appropriate tag.
Invalid Tag - Hour Read Tag [name] must beof type Unsigned Integer.
The assigned tag is the wrong data type.
Use the tag editor to change the data type ofthe tag, or use the Application/SpecialMessages/Read Tags dialog to select anappropriate tag.
Invalid Tag - Hour Write Tag [name] must beof type Unsigned Integer.
The assigned tag is the wrong data type.
Use the tag editor to change the data type ofthe tag, or use the Application/SpecialMessages/Write Tags dialog to select anappropriate tag.
Invalid Tag - LED #[number] Tag [name] mustbe of type Bit.
The assigned tag is the wrong data type.Use the tag editor to change the data type ofthe tag, or use the Application/LED Indicatorsdialog to select an appropriate tag.
Invalid Tag - LED #[number] Tag [name] mustbe of type Output or BTW.
The tag is controlled by the PLC and is readby the Terminal. The tag must be in theOutput image or be in a BTW (Block TransferWrite).
Use the tag editor to change the tag addressor the Terminal Setup/Block Transfer dialog toput the tag into a Block Transfer that has itsmode assigned as W.
Invalid Tag - LED #[number] Tag [name]overlaps Discrete I/O Rack Control/Statusbyte.
The tag is assigned the same address as theBlock Transfer Control/Status Byte (the lowestbyte in the discrete I/O rack).
Use the tag editor to enter a different addressfor the tag or use the Terminal Setup/Comms.Setup/Block Transfer dialog to disable blocktransfers if they are not being used.
Invalid Tag - LED #[number] Tag [name] Tag is undefined in the project database. Use the tag editor to define the tag.
Invalid Tag - LED #[number] Tag [name] isn’ta valid address in the terminal’s assignedDiscrete Rack or Block Transfer channels.
The tag address is not in the discrete I/Oimage of the rack or in the block transfer(s)configured for the Terminal.
Use the tag editor to change the tag addressor the Terminal Setup/Comms. Setup/BlockTransfer dialog to put the tag into a BlockTransfer.
Invalid Tag - Message Return Number Tag[name] must be of type Unsigned Integer.
The Message Return Number tag in TerminalSetup/Control Tags is the wrong data type.
Use the tag editor to change the data type ofthe tag, or use the Terminal Setup StatusTags dialog to select an appropriate tag.

Validation Error Messages D–7
Publication 2706-817
Message What to doMeaning
Invalid Tag - Minute Read Tag [name] must beof type Unsigned Integer.
The assigned tag is the wrong data type.
Use the tag editor to change the data type ofthe tag, or use the Application/SpecialMessages/Read Tags dialog to select anappropriate tag.
Invalid Tag - Minute Write Tag [name] must beof type Unsigned Integer.
The assigned tag is the wrong data type.
Use the tag editor to change the data type ofthe tag, or use the Application/SpecialMessages/Write Tags dialog to select anappropriate tag.
Invalid Tag - Month Read Tag [name] must beof type Unsigned Integer.
The assigned tag is the wrong data type.
Use the tag editor to change the data type ofthe tag, or use the Application/SpecialMessages/Read Tags dialog to select anappropriate tag.
Invalid Tag - Month Write Tag [name] must beof type Unsigned Integer.
The assigned tag is the wrong data type.
Use the tag editor to change the data type ofthe tag, or use the Application/SpecialMessages/Write Tags dialog to select anappropriate tag.
Invalid Tag - Msg #[number] Embedded EntryNotify Tag [name] must be of type Input orBTR.
The tag is controlled by the Terminal and isread by the PLC. The tag must be in the Inputimage or be in a BTR (Block Transfer Read).
Use the tag editor to change the tag addressor the Terminal Setup/Comms. Setup/BlockTransfer dialog to put the tag into a BlockTransfer that has its mode assigned as R.
Invalid Tag - Msg #[number] Bit TriggerNumber [number] greater than 1023.
The bit trigger number is required to be withinthe range of 0 to 1023.
Change the bit trigger number.
Invalid Tag - Msg #[number] Embedded ASCIIDisplay Read Tag [name] must be of typeOutput or BTW.
The tag is controlled by the PLC and is readby the Terminal. The tag must be in theOutput image or be in a BTW (Block TransferWrite).
Use the tag editor to change the tag addressor the Terminal Setup/Comms. Setup/BlockTransfer dialog to put the tag into a BlockTransfer that has its mode assigned as W.
Invalid Tag - Msg #[number] Embedded ASCIIDisplay Tag [name] must be of type CharacterArray.
The assigned tag is the wrong data type.Use the tag editor to change the data type ofthe tag, or use the Terminal Setup Control Tagdialog to select an appropriate tag.
Invalid Tag - Msg #[number] Embedded ASCIIDisplay Tag [name].
The tag definition is incorrect.Use the tag editor to correct the PLC addressfor the tag.
Invalid Tag - Msg #[number] Embedded ASCIIDisplay Tag used but not defined.
The tag is undefined in the project database. Use the tag editor to define the tag.
Invalid Tag - Msg #[number] Embedded ASCIIDisplay Tag [name] array size must bebetween 1 and 32.
The assigned tag must have an array sizebetween the values of 1 and 32.
Use the tag editor to change the tag arraysize.
Invalid Tag - Msg #[number] Embedded ASCIIDisplay Tag [name] isn’t a valid address in theterminal’s assigned Discrete Rack or BlockTransfer channels.
The tag address is not in the discrete I/Oimage of the rack or in the block transfer(s)configured for the Terminal.
Use the tag editor to change the tag addressor the Communication Setup Block Transferdialog to put the tag into a Block Transfer.
Invalid Tag - Msg #[number] Embedded ASCIIDisplay Tag [name] overlaps Discrete I/ORack Control/Status byte.
The tag is assigned the same address as theBlock Transfer Control/Status Byte (the lowestbyte in the discrete I/O rack).
Use the tag editor to change the tag addressor the Terminal Setup/Comms. Setup/BlockTransfer dialog to disable block transfers ifthey are not being used.
Invalid Tag - Msg #[number] Embedded ASCIIEntry Tag [name] array size must be between2 and 33.
The assigned tag array size is outside thevalid range.
Use the tag editor to change the tag arraysize.
Invalid Tag - Msg #[number] Embedded ASCIIEntry Tag array size must be greater thanASCII Entry variable field width.
The assigned tag array size is smaller thanthe display field width. Operator input cannotbe completed without a large character arraydefined.
Use the tag editor to change the tag arraysize.

Validation Error MessagesD–8
Publication 2706-817
Message What to doMeaning
Invalid Tag - Msg #[number] Embedded EntryHandshake Tag [name] Bit address specifiedbut tag isn’t Bit data type.
The assigned tag is the wrong data type.Use the tag editor to change the data type ofthe tag, or use the Numeric Entry dialog toselect or add an appropriate tag.
Invalid Tag - Msg #[number] Embedded EntryHandshake Tag [name] must be of type Bit.
The assigned tag is the wrong data type.Use the tag editor to change the data type ofthe tag.
Invalid Tag - Msg #[number] Embedded EntryHandshake Tag defined without EmbeddedEntry Notification Tag.
Tag is undefined in the project database.Use the tag editor to change the data type ofthe tag, or use the Numeric Entry dialog toselect or add an appropriate tag.
Invalid Tag - Msg #[number] Embedded EntryHandshake Tag [name] must be of typeOutput or BTW.
The tag is controlled by the PLC and is readby the Terminal. The tag must be in theOutput image or be in a BTW (Block TransferWrite).
Use the tag editor to change the tag addressor the Terminal Setup/Comms. Setup/BlockTransfer dialog to put the tag into a BlockTransfer that has its mode assigned as W.
Invalid Tag - Msg #[number] Embedded EntryHandshake Tag [name] isn’t a valid address inthe terminal’s assigned Discrete Rack orBlock Transfer channels.
The tag address is not in the discrete I/Oimage of the rack or in the block transfer(s)configured for the Terminal.
Use the tag editor to change the tag addressor the Communication Setup Block Transferdialog to put the tag into a Block Transfer.
Invalid Tag - Msg #[number] Embedded EntryHandshake Tag [name] overlaps Discrete I/ORack Control/Status byte.
The tag is assigned the same address as theBlock Transfer Control/Status Byte (the lowestbyte in the discrete I/O rack).
Use the tag editor to enter a different addressfor the tag or use the Terminal Setup/Comms.Setup/Block Transfer dialog to disable blocktransfers if they are not being used.
Invalid Tag - Msg #[number] Embedded EntryNotification Tag defined without EmbeddedEntry Handshake Tag.
The tag is undefined in the project database. Use the tag editor to define the tag.
Invalid Tag - Msg #[number] Embedded EntryNotify Tag [name] isn’t a valid address in theterminal’s assigned Discrete Rack or BlockTransfer channels.
The tag address is not in the discrete I/Oimage of the rack or in the block transfer(s)configured for the Terminal.
Use the tag editor to change the tag addressor the Terminal Setup/Comms. Setup/BlockTransfer dialog to put the tag into a BlockTransfer.
Invalid Tag - Msg #[number] Embedded EntryNotify Tag [name] must be of type Bit.
The assigned tag is the wrong data type.Use the tag editor to change the data type ofthe tag, or use the Terminal Setup StatusTags dialog to select an appropriate tag.
Invalid Tag - Msg #[number] Embedded EntryNotify Tag [name] overlaps Discrete I/O RackControl/Status byte.
The tag is assigned the same address as theBlock Transfer Control/Status Byte (the lowestbyte in the discrete I/O rack).
Use the tag editor to enter a different addressfor the tag or use the Terminal Setup/Comms.Setup/Block Transfer dialog to disable blocktransfers if they are not being used.
Invalid Tag - Msg #[number] Embedded EntryWrite Tag [name] Bit address specified but tagisn’t Bit data type.
The assigned tag is the wrong data type.Use the tag editor to change the data type ofthe tag.
Invalid Tag – Msg #[number] Embedded EntryWrite Tag [name] Initial Value exceeds theallowed value for this tag type.
The assigned tag initial value is outside of thevalid range.
Use the tag editor to change the tag initialvalue.
Invalid Tag – Msg #[number] Embedded EntryWrite Tag [name] Max Data Entry Limitexceeds the allowed value for this tag type.
The assigned tag maximum Data Entry Limitis invalid.
Use the tag editor to change the Maximumentry value.
Invalid Tag – Msg #[number] Embedded EntryWrite Tag [name] Max Entry value must begreater than Min Entry value.
The assigned tag minimum Data Entry Limit isgreater than the maximum Data Entry Limit.
Use the tag editor to change the Maximum orMinimum entry values.
Invalid Tag – Msg #[number] Embedded EntryWrite Tag [name] Maximum Data Entryexceeds data limits (-2147483647 to+2147483647).
The assigned tag maximum entry is greaterthan the maximum value allowed.
Use the tag editor to change the MaximumData Entry value.

Validation Error Messages D–9
Publication 2706-817
Message What to doMeaning
Invalid Tag – Msg #[number] Embedded EntryWrite Tag [name] Min Data Entry Limit issmaller than the allowed value for this tagtype.
The assigned tag minimum Data Entry Limit isinvalid.
Use the tag editor to change the Minimumentry value.
Invalid Tag – Msg #[number] Embedded EntryWrite Tag [name] Minimum Data Entryexceeds data limits (-2147483647 to+2147483647).
The assigned tag minimum entry is less thanthe minimum value allowed.
Use the tag editor to change the MinimumData Entry value.
Invalid Tag - Msg #[number] Embedded EntryWrite Tag [name] Scale value of 0 or not inrange (�.0001 to �9999.0).
The tag scaling factors are outside the validrange.
Use the tag editor to change the tag scale.
Invalid Tag - Msg #[number] Embedded EntryWrite Tag [name].
Tag is undefined in the project database. Use the tag editor to define the tag.
Invalid Tag - Msg #[number] Embedded EntryWrite Tag [name] used but not defined.
Tag is undefined in the project database. Use the tag editor to define the tag.
Invalid Tag - Msg #[number] Embedded EntryWrite Tag [name] has wrong type.
The assigned tag is the wrong data type.Use the tag editor to change the data type ofthe tag.
Invalid Tag - Msg #[number] Embedded EntryWrite Tag [name] initial value must be aninteger.
The assigned tag is the wrong data type.Use the tag editor to change the data type ofthe tag.
Invalid Tag - Msg #[number] Embedded EntryWrite Tag [name] isn’t a valid address in theterminal’s assigned Discrete Rack or BlockTransfer channels.
The tag address is not in the discrete I/Oimage of the rack or in the block transfer(s)configured for the Terminal.
Use the tag editor to change the tag addressor the Communication Setup Block Transferdialog to put the tag into a Block Transfer.
Invalid Tag - Msg #[number] Embedded EntryWrite Tag [name] Max value not valid or not inrange.
The assigned tag maximum value is invalid.Use the tag editor to change the Maximumentry value.
Invalid Tag - Msg #[number] Embedded EntryWrite Tag [name] Min value not valid or not inrange.
The assigned tag minimum value is invalid.Use the tag editor to change the Minimumentry value.
Invalid Tag - Msg #[number] Embedded EntryWrite Tag [name] must be of type Input orBTR.
The tag is controlled by the Terminal and isread by the PLC. The tag must be in the Inputimage or be in a BTR (Block Transfer Read).
Use the tag editor to change the tag addressor the Terminal Setup/Comms. Setup/BlockTransfer dialog to put the tag into a BlockTransfer that has its mode assigned as R.
Invalid Tag - Msg #[number] Embedded EntryWrite Tag [name] offset not in range.
The tag offset value is outside the range of–32768 and +32767.
Use the tag editor to change the tag offset.
Invalid Tag - Msg #[number] Embedded EntryWrite Tag [name] overlaps Discrete I/O RackControl/Status byte.
The tag is assigned the same address as theBlock Transfer Control/Status Byte (the lowestbyte in the discrete I/O rack).
Use the tag editor to enter a different addressfor the tag or use the Terminal Setup/Comms.Setup/Block Transfer dialog to disable blocktransfers if they are not being used.
Invalid Tag - Msg #[number] EmbeddedNumeric Display Tag [name].
Tag is undefined in the project database. Use the tag editor to define the tag.
Invalid Tag - Msg #[number] EmbeddedNumeric Display Tag [name] has wrong type.
The Embedded Numeric Display Tag must bea signed integer, unsigned integer, or bit datatype.
Use the tag editor to change the data type ofthe tag, or select the embedded variable inthe message and select the appropriate tagusing the Format/Edit Variable dialog.
Invalid Tag - Msg #[number] EmbeddedNumeric Display Tag [name] isn’t a validaddress in the terminal’s assigned DiscreteRack or Block Transfer channels.
The tag address is not in the discrete I/Oimage of the rack or in the block transfer(s)configured for the Terminal.
Use the tag editor to change the tag addressor the Terminal Setup/Comms. Setup/BlockTransfer dialog to put the tag into a BlockTransfer.

Validation Error MessagesD–10
Publication 2706-817
Message What to doMeaning
Invalid Tag - Msg #[number] EmbeddedNumeric Display Tag [name] Scale value of 0is not valid.
Scale value of zero is not allowed.Use the tag editor to change the tag Scale tobe non-zero.
Invalid Tag - Msg #[number] EmbeddedNumeric Display Tag [name] must be of typeOutput or BTW.
The tag is controlled by the PLC and is readby the Terminal. The tag must be in theOutput image or be in a BTW (Block TransferWrite).
Use the tag editor to change the tag addressor the Terminal Setup/Comms. Setup/BlockTransfer dialog to put the tag into a BlockTransfer that has its mode assigned as W.
Invalid Tag - Msg #[number] EmbeddedNumeric Display Tag [name] isn’t a validaddress in the terminal’s assigned DiscreteRack or Block Transfer channels.
The tag address is not in the discrete I/Oimage of the rack or in the block transfer(s)configured for the Terminal.
Use the tag editor to change the tag addressor the Terminal Setup/Comms. Setup/BlockTransfer dialog to put the tag into a BlockTransfer.
Invalid Tag - Msg #[number] EmbeddedNumeric Display Tag [name] overlapsDiscrete I/O Rack Control/Status byte.
The tag is assigned the same address as theBlock Transfer Control/Status Byte (the lowestbyte in the discrete I/O rack).
Use the tag editor to enter a different addressfor the tag or use the Terminal Setup/Comms.Setup/Block Transfer dialog to disable blocktransfers if they are not being used.
Invalid Tag - Msg #[number] EmbeddedNumeric Entry Write Tag [name] Tag minimumabsolute value is too large for Numeric Entryfield width.
The Minimum Data Entry Limit assigned tothe tag will not fit within the Numeric VariableEntry Field Width.
Use the tag editor to change the MinimumData Entry or select the embedded variable inthe message and change the Field Widthusing the Format/Edit Variable dialog.
Invalid Tag - Msg #[number] EmbeddedNumeric Display Tag [name] Bit addressspecified but tag isn’t Bit data type.
The assigned tag is the wrong data type.Use the tag editor to change the data type ofthe tag.
Invalid Tag - Msg #[number] Tag [name]references device [name] as Node Name.This is not the Logic Controller selected inTerminal Setup - Comms. Setup.
The Node Name assigned to this tag used inthis message does not match the assignedPLC/Scanner Name.
Use the tag editor to change the Node namefor this tag or change the PLC/Scanner Namein the Terminal Setup/Comms. Setup dialog.
Invalid Tag - Msg #[number] Tag [name]references no device. Tag Node Name mustmatch the Logic Controller selected inTerminal Setup - Comms. Setup.
There is no Node Name assigned to the tagused in this message.
Use the tag editor to change the Node Namefor this tag.
Invalid Tag - Msg #[number] UndefinedEmbedded Numeric Display Tag.
Tag is undefined in the project database. Use the tag editor to define the tag.
Invalid Tag - Msg #[number] with EmbeddedEntry Handshake Tag [name].
Tag is undefined in the project database.Use the tag editor to change the data type ofthe tag, or use the Numeric Entry dialog toselect or add an appropriate tag.
Invalid Tag - Msg #[number] with EmbeddedEntry Notify Tag [name].
Tag is undefined in the project database. Use the tag editor to define the tag.
Invalid Tag - Return Number for Ack Tag[name] must be of type Unsigned Integer.
The Acknowledge Return Number tag inTerminal Setup/Control Tags is the wrongdata type.
Use the tag editor to change the data type ofthe tag, or use the Terminal Setup StatusTags dialog to select an appropriate tag.
Invalid Tag - Return Number for FKey Tag[name] must be of type Unsigned Integer.
The Function Key Return Number tag inTerminal Setup/Control Tags is the wrongdata type.
Use the tag editor to change the data type ofthe tag, or use the Terminal Setup StatusTags dialog to select an appropriate tag.
Invalid Tag - Second Read Tag [name] mustbe of type Unsigned Integer.
The assigned tag is the wrong data type.
Use the tag editor to change the data type ofthe tag, or use the Application/SpecialMessages/Read Tags dialog to select anappropriate tag.
Invalid Tag - Second Write Tag [name] mustbe of type Unsigned Integer.
The assigned tag is the wrong data type.
Use the tag editor to change the data type ofthe tag, or use the Application/SpecialMessages/Write Tags dialog to select anappropriate tag.
Invalid Tag - Tag [name] Bit address specifiedbut tag isn’t Bit data type.
The assigned tag is the wrong data type.Use the tag editor to change the data type ofthe tag.

Validation Error Messages D–11
Publication 2706-817
Message What to doMeaning
Invalid Tag - Value Trigger Tag [name] isn’t avalid address in the terminal’s assignedDiscrete Rack or Block Transfer channels.
The tag address is not in the discrete I/Oimage of the rack or in the block transfer(s)configured for the Terminal.
Use the tag editor to change the tag addressor the Terminal Setup/Comms. Setup/BlockTransfer dialog to put the tag into a BlockTransfer.
Invalid Tag - Value Trigger Tag [name] mustbe of type Output or BTW.
The tag is controlled by the PLC and is readby the Terminal. The tag must be in theOutput image or be in a BTW (Block TransferWrite).
Use the tag editor to change the tag addressor the Terminal Setup/Comms. Setup/BlockTransfer dialog to put the tag into a BlockTransfer that has its mode assigned as W.
Invalid Tag - Value Trigger Tag [name] mustbe of type Unsigned Integer.
The assigned tag is the wrong data type.Use the tag editor to change the data type ofthe tag, or use the Terminal Setup/ControlTags dialog to select an appropriate tag.
Invalid Tag - Value Trigger Tag [name]overlaps Discrete I/O Rack Control/Statusbyte.
The tag is assigned the same address as theBlock Transfer Control/Status Byte (the lowestbyte in the discrete I/O rack).
Use the tag editor to enter a different addressfor the tag or use the Terminal Setup/Comms.Setup/Block Transfer dialog to disable blocktransfers if they are not being used.
Invalid Tag - Value Trigger Tag [name]. Tag is undefined in the project database. Use the tag editor to define the tag.
Invalid Tag - Year Read Tag [name] must beof type Unsigned Integer.
The assigned tag is the wrong data type.
Use the tag editor to change the data type ofthe tag, or use the Application/SpecialMessages/Read Tags dialog to select anappropriate tag.
Invalid Tag - Year Write Tag [name] must beof type Unsigned Integer.
The assigned tag is the wrong data type.
Use the tag editor to change the data type ofthe tag, or use the Application/SpecialMessages/Write Tags dialog to select anappropriate tag.
Invalid Tag - Bit Trigger Tag not defined. Tag is undefined in the project database. Use the tag editor to define the tag.
Invalid Tag - Tag [name] references nodevice. Tag Node Name must match theLogic Controller selected in Terminal Setup -Comms. Setup.
The tag node name is not assigned.Use the tag editor to define the tag nodename.
Invalid Tag - [tag description] Tag [name]overlaps Discrete I/O Rack Control/Statusbyte.
The tag is assigned the same address as theBlock Transfer Control/Status Byte (the lowestbyte in the discrete I/O rack).
Use the tag editor to enter a different addressfor the tag or use the Terminal Setup/Comms.Setup/Block Transfer dialog to disable blocktransfers if they are not being used.
Invalid Tag - [tag description] Tag [name] isn’ta valid address in the terminal’s assignedDiscrete Rack or Block Transfer channels.
The tag address is not in the discrete I/Oimage of the rack or in the block transfer(s)configured for the Terminal.
Use the tag editor to change the tag addressor the Terminal Setup/Comms. Setup/BlockTransfer dialog to put the tag into a BlockTransfer.
Invalid Tag - [tag description] Tag [name] mustbe of type Input or BTR.
The tag is controlled by the Terminal and isread by the PLC. The tag must be in the Inputimage or be in a BTR (Block Transfer Read).
Use the tag editor to change the tag addressor the Terminal Setup/Comms. Setup/BlockTransfer dialog to put the tag into a BlockTransfer that has its mode assigned as R.
Invalid Tag - [tag description] Tag [name] mustbe of type Output or BTW.
The tag is controlled by the PLC and is readby the Terminal. The tag must be in theOutput image or be in a BTW (Block TransferWrite).
Use the tag editor to change the tag addressor the Terminal Setup/Comms. Setup/BlockTransfer dialog to put the tag into a BlockTransfer that has its mode assigned as W.
Invalid Tag - [tag description] Tag [name]references no device. Tag Node Name mustmatch the Logic Controller selected inTerminal Setup - Comms. Setup.
There is no Node Name assigned to the tag.Use the tag editor to define the Node Namefor this tag.
Invalid Text Size attribute assignment formessage with Embedded Graphics.
The Text Size of a message with embeddedgraphical symbols must be Half; i.e. the sizeof a graphic is fixed at 2 display lines.
Use Half Text Size to display graphicalsymbols.

Validation Error MessagesD–12
Publication 2706-817
Message What to doMeaning
Maximum allowable Embedded EntryVariables per message exceeded.
The message has more than ten embeddedvariables.
Reduce the total number of embeddedvariables to 10 or less.
Message [number] Chain-to message numbercannot be 0.
The message is chained to a non-existentmessage.
Use Chain control on the Message EditorTable view to disable the chain or alter the“To” message number to select a differentexisting message.
Message number [number] chained to invalidmessage number.
The message is chained to a non-existentmessage.
Use Chain control on the Message EditorTable view to disable the chain or alter the“To” message number to select a differentexisting message.
Message number [number] circular chain. The message is chained to itself.
Use Chain control on the Message EditorTable view to disable the chain or alter the“To” message number to select a differentexisting message.
Message number [number] doesn’t have avalid trigger source or isn’t chained to fromanother message.
The message can not be triggered with thedefined application.
Define a Value Trigger tag in the TerminalSetup/Control Tags dialog, select Bit TriggerEnable for this message, or select ChainEnable in another message to this message.
Message number [number] duplicated[number] times.
The message numbers for all messages in anapplication are not unique.
Renumber or delete the offending message toinsure that message numbers are unique.
Msg #[number] Slave message enabledwithout Slave Device selected in Aux. Portterminal setup.
The message has the Slave Enable attributeset when Slave Device is not selected.
Disable the Slave Enable attribute for themessage or select Slave Device as the Aux.Port Device in the Terminal Setup/Aux. Portdialog.
Msg #[number] ASCII Variable Entry is notsupported by terminal type.
Embedded ASCII Entry variables are notallowed for ASCII trigger application.
Use the Terminal Setup/Comms. Setup dialogto convert the terminal type, or delete theembedded ASCII entry variables in themessage.
Msg #[number] Numeric Variable Entry is notsupported by terminal type.
Applications can not support embeddedNumeric Entry in the message.
Resolve the conflict by removing theembedded Numeric Entry Variable(s).
PLC/Scanner not assigned.The PLC/Scanner with which the terminalcommunicates is not defined.
Use the Terminal Setup CommunicationSetup dialog to configure the PLC/Scannertype and name.
RIO rack information not defined.The Remote I/O rack information is notdefined.
Use the Terminal Setup CommunicationSetup dialog to configure the Remote I/O rackinformation.
Slave message address is greater than themaximum allowed address.
The Slave Address can not be greater than127.
Change the value of the Slave Addressbetween 1 and 127 inclusive.
Slave message address is less than theminimum allowed address.
The Slave Address can not be less than 1.Change the value of the Slave Addressbetween 1 and 127 inclusive.
Slave message address of 13 is not allowed.The Slave Address of 13 assigned to themessage is not allowed.
Change the value of the Slave Address tosome other value than 13.
Startup Message [number] doesn’t exist.The Startup Message is assigned to anundefined message number.
Change or disable the Startup Message in theTerminal Setup/Advanced dialog or create amessage with the assigned message number.
Tag not assigned or data type mismatch. Tag is undefined in the project database. Use the tag editor to define the tag.
Unable to create RIO Block Array.The RIO communication port setup isincomplete.
Use the Terminal Setup/Comms. Setup dialogor the Communication Setup Block Transferdialog to define the RIO port information.
Validation Tags: Device not found in projectdatabase.
The PLC or Terminal device name is not inthe project database.
Use the Terminal Setup/Comms. Setup dialogor the Terminal Setup dialog to define thedevice.

Validation Error Messages D–13
Publication 2706-817
Message What to doMeaning
Validation Tags: PLC/Scannercommunications port not defined.
The PLC/Scanner with which the terminalcommunicates is not defined.
Use the Terminal Setup CommunicationSetup dialog to configure the PLC/Scannertype and name.
Value Trigger Priority mismatch withundefined Value Triggered Messages.
There is no Value Trigger tag defined for theapplication; however the Trigger Priority is setto Value.
Use the Trigger Priority control on theTerminal Setup/Advanced dialog to changethe priority to Bit, or use the TerminalSetup/Control Tags dialog to define a ValueTrigger tag.
With line attribute “All” message won’t fit ondisplay.
The All Line message contains moredisplayable characters than the display canshow.
Reformat the message with fewer charactersor change the text size.

������� �
Publication 2706-817
��� ���� ��� �� ��� �
�����
This appendix lists error messages that may appear during adownload or upload operation. Messages are listed alphabetically.
For messages that may appear during creation or editing of anapplication, see Appendix C. For messages that may appear during validation, see Appendix D.For messages that may appear during a tag import or export, seePage 8–22.
Error Message Meaning What to do
Address overlaps Block Transfer Control Byte.A tag is assigned the same address as theBlock Transfer Control Byte, the lowestaccessible byte in the discrete I/O rack.
Enter a different address for the tag in the TagEditor. Or if BTs are not used, disable blocktransfers in the Block Transfer dialog.
Application (Data) file CRC is incorrect.The computed CRC of the MVA file does notmatch the CRC stored in the program.
The file is corrupted. Specify a valid MVA file.
Application file length does not match fileheader record.
The MVA file has a different file lengthrecorded than the length of the file. This typically occurs when a file is beingdownloaded which was truncated by anaborted upload.
Specify a valid MVA file.
Application matches file in terminal, nodownload is necessary.
The CRC of the MVA file is identical to theCRC or the application in the terminal.
No action is necessary.
Application type does not match terminal type.Re-configure in Terminal Setup.
The application is configured for acommunication protocol that does not matchthe terminal port.
From the Setup tab in Terminal Setup, selecta terminal type that matches the application.Or convert the application to match theterminal type, then update the tagsappropriately.
Block Transfer Channel Number: [Num] –Length is invalid.
The block transfer length is defined as 0 orexceeds the maximum of 64.
In the Block Transfer dialog, correct theinvalid length of a block transfer.
Cannot continue, terminal is BUSY. – – – – – – – – OR – – – – – – – – Cannot continue, terminal is not in RUNmode.
The terminal is in a mode that will not supportfile transfers.
Wait until the terminal is in RUN mode, thenretry the file transfer.
Cannot continue, terminal is in PROGRAMmode.
The terminal is transferring a file to or fromanother computer.
Wait until the terminal completes the othertransfer, then retry the operation.
Cannot perform file transfer operation, noINTERCHANGE communication drivers arecurrently running.
INTERCHANGE drivers are not loaded on thecomputer.
Exit Windows. Configure the appropriateINTERCHANGE drivers and load them asdescribed in Chapter 2.
Data file CRC is incorrect.The CRC of the historical event data file didnot match the CRC sent by the MessageViewterminal.
Retry the historical event stack uploadoperation.
Data file length is incorrect.The historical event data file did not match thelength sent by the MessageView terminal.
Retry the historical event stack uploadoperation.
Error while scanning for application file CRCMessageBuilder software could not read theMVA file to verify the CRC.
Specify a valid MVA file.
Note: CRC is Cyclic Redundancy Check, a check for errors in files.

Upload/Download Error MessagesE–2
Publication 2706-817
Error Message What to doMeaning
Error while scanning for data file CRC.The historical event data file could not beread to verify its data.
Retry the historical event stack uploadoperation.
INTERCHANGE command failure. Remotestation did not acknowledge command.
MessageBuilder software aborted the transferbecause it did not receive a response to acommand.
Verify that the MessageView terminal isconnected to the computer and startup selftests are normal. Retry operation.
RNA: Error $COOA placing device #n onlineINTERCHANGE could not start the driverassociated with port #n of the computer.
Check the driver configuration in CFG-KT.INI.It may be set for a different baud rate than thephysical network.
Terminal Aborted File Transfer: File is NOTcompatible with terminal.
The type of MessageView application file thatis being downloaded is not compatible withthe selected terminal device.
Generate a new application file specifying thecorrect terminal type.
Terminal Aborted File Transfer: File is toolarge for terminal.
The application file that is being downloadedwill not fit in the terminal’s memory.
Reduce the size of the application.
Terminal Aborted File Transfer: Terminal hasno file available.
An upload attempt failed because the terminaldid not have an application loaded in memory.
Download an application to the terminal.
Terminal has no file available.The requested file for upload does not exist.This typically occurs when the HE Stack isempty, that is, it is cleared.
Do not attempt to upload an empty HE Stackfile.
Note: CRC is Cyclic Redundancy Check, a check for errors in files.

������� �
Publication 2706-817
������ �� ������
����������
In this table, a dot in the MessageView 421 Terminals column meansthat the attribute may be changed by the terminal operator using theFront Panel Editor.
A dot in the MessageBuilder Software column means that theattribute may be changed by the application designer in the TerminalSetup dialogs.
Parameter name Description(Default)Range
MessageView421 Terminals
MessageBuilderSoftware
Ack Bit Hold TimeAfter a message is acknowledged, theAcknowledge bit is set high for 50 msec. Thistime cannot be changed
50 msec
BackGround MessageWhen no message is triggered, this messagedisplays
(none)1 to 9900 • •
CenterWhether the message should be centered inthe display •
Debug Mode OperationMessages are displayed in the terminal butnot active
(Disable)Enable • •
Display Brightness How bright the display should be(75%)
12, 25, 38, 50,60, 87,100%
• •
Flash Whether characters should be flashing •Flash Rate What the flash rate should be • •
Handshake Time-Out
How long the terminal should wait for aresponse from the logic controller beforenotifying the operator that the logic controlleris not responding. A timeout of 0 means thatno response is required
(4 sec.)0 to 3, 5 to 60 sec. •
Inverse Whether characters should be in inverse video •
Language Which language the terminal should use(English)
German, French, Italian,Spanish
• •
Message Queue EnabledShould there be a Message Queue to storevalue triggered messages until they can bedisplayed
(1)64 •
Password – Entry Enter a password(none)
any four digits • •
Password – Modify Create or change a password(none)
any four digits •
Port PowerupTo power communication parameters for thecomputer with MessageBuilder software(OLP)
(Aux)OLP • •

Global Configuration ParametersF–2
Publication 2706-817
Parameter nameMessageBuilder
SoftwareMessageView421 Terminals
(Default)Range
Description
Return Msg NumWhen a message is displayed, whether itsmessage number should be sent to thecontroller
(No)Yes •
RIO Baud Rate Setting up Remote I/O communications port(57.6K)
115.2K, 230.4KView Only •
RIO Block TransferWhether block transfer (default) or discrete I/Oshould be used
(Disabled)Enabled
View Only •
RIO Last Chassis Is this the last chassis on the logic controller?(No)Yes
View Only •
RIO ModuleThe starting module for MessageViewaddresses
(0)1 to 3
View Only •
RIO Pass-ThroughWhether the controller should passdata/applications through to the computer onanother network
(Disabled)Enabled
View Only n/a
RIO Rack Number Setting up Remote I/O communications port(4octal)
0 to 3, 5 to 76octalView Only •
RIO Rack Size Setting up Remote I/O communications port 1/4, 1/2, 3/4, Full View Only •
RS-232 Data BitsSetting up the motherboard communicationsport
(8)7 • •
RS-232 HardwareHandshake
Setting up the motherboard communicationsport
(Enable)Disable • •
RS-232 ParitySetting up the motherboard communicationsport
(None)Odd, Even • •
RS-232 Stop BitsSetting up the motherboard communicationsport
(1)2 • •
RS-232 Baud RateSetting up the motherboard communicationsport
(19200)300, 1200, 2400, 9600,
38,400• •
Send Values at Power-UpWhether to send data to PLC following loss ofcommunications and at powerup;RIO has this always enabled
(Disable)Enable • •
Simulate ModeAllow a demonstration using a MessageViewterminal not connected to a logic controller orany devices
(Disable)Enable • •
Startup Msg The message to be displayed at powerup(none)
1 to 9900 • •
Trigger PriorityWhether a bit trigger or a value trigger hashigher priority
(bit)value •
Values at Power-UpSend data type as Preset or as in the Lastactive communications state
(Preset)Last • •

Global Configuration Parameters F–3
Publication 2706-817
The time and date are also set globally.
Parameter name Description(Default)Range
MessageView421 Terminals
MessageBuilderSoftware
Date Day The current day of the month(1)
2 to 31 • •
Date Format Order Setting the order of items in the date(M/D/Y)
D/M/Y, Y/M/D •
Date Format Year Display How to display the year(1995)
95 •
Date Format Lead ZeroWhether February 2 should be 2/2 (default) or02/02
(Disable)Enable •
Date Format Separators The symbol to separate day, month and year(/)
any single character •
Date Month The current month of the year(1)
2 to 12 • •
Date Year The current year(1995)
1996 to 2094 • •
Time Format Format separators for time display(:)
any single character •
Time Format Lead Zero Whether 9:03 (default) is displayed as 09:03(Disable)Enable •
Time Format SecondsIncluded
Whether seconds should be displayed(default)
(Enable)Disable •
Time Hour The current hour(0)
1 to 12/0 to 24 • •
Time Hour Format 12-hour or 24-hour format(12)24 •
Time Hour Notation –Selection
The suffix to be displayed after the time, e.g.PM CST; this is only selection, not entry of 10characters
(AM)PM,
any 10 characters•
Time Minutes The current minutes after the hour(0)
1 to 59 • •
Time Seconds The current seconds after the minute(0)
1 to 59 • •

������� �
Publication 2706-817
��� ��� ���� ���
Read tags are controlled by the PLC. For Remote I/O, read tags areOutput or BTW.
Tag Type Purpose Range
Acknowledge Handshake BitA bit that when set informs the terminal that the Acknowledge bitand Acknowledge Return Number have been acquired by thecontroller. Use of the Acknowledge Handshake is optional.+
0, 1
ASCII Display Character Array
A string of ASCII characters that is scanned whenever a messagewith an embedded ASCII Variable Display is triggered. An ASCIIDisplay tag is required for every embedded ASCII Variable Displayin the application.
An array ofcharacters.
ASCII Entry Handshake BitA bit that when set informs the terminal that the ASCII VariableEntry and Message Return Number have been acquired by thecontroller. Use of the Numeric Entry Handshake is optional.
0, 1
Bit trigger Unsigned Integer
The first word of a bit sequence for triggering messages by theirbit number. The bit sequence is up to 64 words long. The terminalcontinuously scans the bit sequence whenever one or morebit-triggered messages exist in the application.
Bit position0-1023
(Latched) Function Key Handshake BitA bit that when set returns a Latched Function Key to thede-energized state. Every Latched Function Key in the applicationrequires a corresponding Handshake tag.
0, 1
LED Indicator Bit
A bit that controls an LED indicator on the 2706-M1F1 terminal.One bit is optionally assigned to each LED indicator in theapplication. The terminal continuously scans the LED indicatortags whenever they are assigned.
0, 1
Numeric DisplaySigned Integer,
UnsignedInteger, or BCD
A numeric value that is scanned, formatted and displayedwhenever a message with an embedded Numeric Variable Displayis triggered. A Numeric Display tag is required for every embeddedNumeric Variable Display in the application.
Depends onthe type.
Numeric Entry Handshake BitA bit that when set informs the terminal that the Numeric VariableEntry and Message Return Number have been acquired by thecontroller. Use of the Numeric Entry Handshake is optional.
0, 1
Special Message 9905: Year Unsigned IntegerA value for setting the year of the Real-Time Clock in the terminal.The value is acquired when Special Message 9905 (SetTime/Date) is triggered.
0-2035
Special Message 9905: Month Unsigned IntegerA value for setting the month of the Real-Time Clock in theterminal. The value is acquired when Special Message 9905 (SetTime/Date) is triggered.
0-12
Special Message 9905: Day Unsigned IntegerA value for setting the day of the Real-Time Clock in the terminal.The value is acquired when Special Message 9905 (SetTime/Date) is triggered.
0-31
Special Message 9905: Hour Unsigned IntegerA value for setting the hour of the Real-Time Clock in the terminal.The value is acquired when Special Message 9905 (SetTime/Date) is triggered.
0-23
Special Message 9905: Minute Unsigned IntegerA value for setting the minute of the Real-Time Clock in theterminal. The value is acquired when Special Message 9905 (SetTime/Date) is triggered.
0-59

Tags and Data TypesG–2
Publication 2706-817
Tag RangePurposeType
Special Message 9905: Second Unsigned IntegerA value for setting the second of the Real-Time Clock in theterminal. The value is acquired when Special Message 9905 (SetTime/Date) is triggered.
0-59
Special Message 9908: SetBrightness
Unsigned Integer
A value for setting the level of brightness of the terminal display.Bit Brightness Bit Brightness0 12% 4 60%1 25% 5 75%2 38% 6 87%3 50% 7 100%
0–7
Value trigger Unsigned IntegerA value for triggering messages by their message number. Theterminal continuously scans for a new (changed) trigger value.
1-9900
Write tags are controlled by the terminal. For Remote I/O, write tagsare Input or BTR.
Tag Type Purpose Range
Message Return number Unsigned IntegerA value that indicates the message number of the last-triggeredmessage on display when the message does not requireAcknowledge nor have Function Keys enabled.
1-9900
Acknowledge BitA bit that when set informs the logic controller that the Ack key ispressed for a message that requires Acknowledgement by theoperator.
0, 1
Acknowledge Return Number Unsigned IntegerA value that indicates the message number of the last–triggeredmessage on display when the message requiresAcknowledgement by the operator.
1-9900
Function Key BitA bit that when set indicates that a Function Key has beenpressed. The behavior of this bit is determined by the type ofFunction Key and how it is configured.
0, 1
Function Key Return Number Unsigned IntegerA value that indicates the message Number of the last-triggeredmessage on display when the message has one or more FunctionKeys enabled.
1-9900
Numeric EntrySigned Integer,
UnsignedInteger, or BCD
A numeric value that indicates the operator entered valuewhenever a message with an embedded Numeric Variable Entry ison display. A Numeric Entry tag is required for every embeddedNumeric Variable Entry in the application.
Depends onthe type.
Numeric Entry Notification BitA bit that when set informs the controller that the Numeric VariableEntry is changed and ready to be acquired by the controller.
0, 1
ASCII Entry Character ArrayAlphanumeric characters entered by an ASCII Input device. AnASCII Entry tag is required for every embedded ASCII VariableEntry in the application.
Depends onthe ASCII
Input device
ASCII Entry Notification BitA bit that when set informs the controller that the ASCII VariableEntry is changed and ready to be acquired by the controller.
0, 1
HE Stack Status 85% Bit A bit that when set indicates that the HE Stack is 85% full. 0, 1
HE Stack Status 95% Bit A bit that when set indicates that the HE Stack is 95% full. 0, 1
HE Stack Status 100% Bit A bit that when set indicates that the HE Stack is 100% full. 0, 1
Special Message 9906: Year Unsigned IntegerA value that indicates the year of the Real-Time Clock in theterminal. The value is available when Special Message 9906 (GetTime/Date) is triggered.
0-65535

Tags and Data Types G–3
Publication 2706-817
Tag RangePurposeType
Special Message 9906: Month Unsigned IntegerA value that indicates the month of the Real-Time Clock in theterminal. The value is available when Special Message 9906 (GetTime/Date) is triggered.
0-12
Special Message 9906: Day Unsigned IntegerA value that indicates the day of the Real-Time Clock in theterminal. The value is available when Special Message 9906 (GetTime/Date) is triggered.
0-31
Special Message 9906: Hour Unsigned IntegerA value that indicates the hour of the Real-Time Clock in theterminal. The value is available when Special Message 9906 (GetTime/Date) is triggered.
0-23
Special Message 9906: Minute Unsigned IntegerA value that indicates the minute of the Real-Time Clock in theterminal. The value is available when Special Message 9906 (GetTime/Date) is triggered.
0-59
Special Message 9906: Second Unsigned IntegerA value that indicates the second of the Real-Time Clock in theterminal. The value is available when Special Message 9906 (GetTime/Date) is triggered.
0-59
Special Message 9907: Battery Test BitA bit that when set indicates that the battery is functional.0 = Fails, 1 = Pass
0, 1

������� �
Publication 2706-817
��� ����� ��� ���
This appendix contains a worksheet to help in planning anapplication. Variables cannot be assigned to memory addresses thatoverlap, and the only way to make sure they do not overlap is towrite them all down.
Make copies as needed and use them to enter addresses for each tagin the application. Depending on what your application requires, youmay need one or more worksheets for each of the following:
• ������
• Discrete I/O
• ��� �������� ���
• Block Transfer Write
Or you may prefer to have a separate worksheet for each blocktransfer (maximum of 10).
Note: If the application requires block transfer, be sure to mark offthe Status and Control bytes on the Discrete I/O worksheet(s). SeePage5–17.
In the Worksheet:
Each row represents one word of memory.
A signed or unsigned integer or a BCD type variable must beassigned to one word.
Bits may be assigned to any available bit address.

Tag Address WorksheetH–2
Publication 2706-817
WordAddress→Tag Name ↓
DecimalOctal
1517
1416
1315
1214
1113
1012
911
810
77
66
55
44
33
22
11
00
WordAddress→Tag Name ↓
DecimalOctal
1517
1416
1315
1214
1113
1012
911
810
77
66
55
44
33
22
11
00
WordAddress→Tag Name ↓
DecimalOctal
1517
1416
1315
1214
1113
1012
911
810
77
66
55
44
33
22
11
00
WordAddress→Tag Name ↓
DecimalOctal
1517
1416
1315
1214
1113
1012
911
810
77
66
55
44
33
22
11
00
������� �
Publication 2706-817
����� �� ���� �����
��� ��� �
This appendix includes all the ASCII and Extended ASCII charactersyou can enter in a message.
• The first 31 characters are used as ASCII Control Codecharacters. They are used to embed control codes in messagessent to slaves.
• Characters numbered 032 to 0127 are usually typed in from thecomputer keyboard.
• Characters numbered 0128 to 0255 are Extended ASCIIcharacters. The 850 version of the Extended ASCII character listis designed for use with European languages.
To enter an ASCII character in a message:
1. Place the insertion bar in the Edit Box where the ASCII characteris to go.
2. Hold down the ALT key while entering the number in the keypad.
The corresponding character appears at the insertion point.
To enter an ASCII Control Character in a message to be sent toa slave device:
1. Place the insertion bar in the Edit Box where the ASCII ControlCode should be embedded.
2. Click the Embedded Variable icon, or open the Format menu.
3. Select ASCII Control Char to open the ASCII Control Characterdialog.
4. Use the scroll bar to locate the number you want.
5. Highlight it and select OK.
A placeholder ~ for the character appears in the Edit Box at theinsertion point. A Control Code character determines how themessage is displayed by the slave device(s).
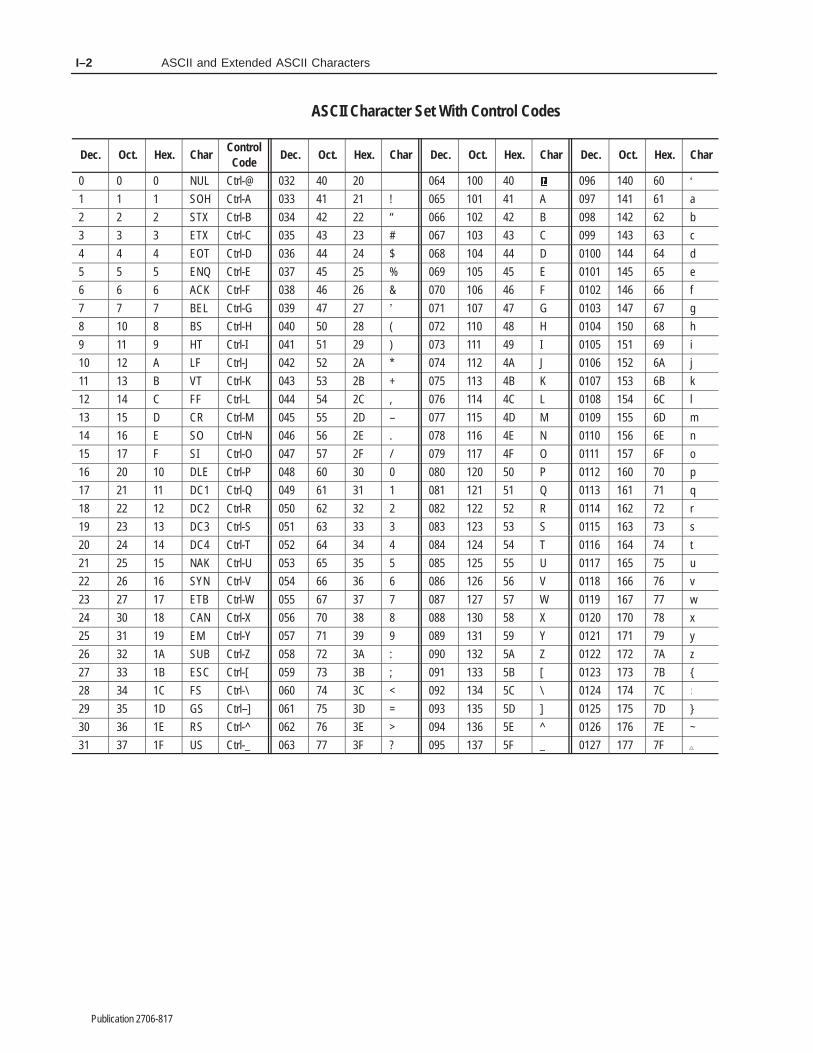
ASCII and Extended ASCII CharactersI–2
Publication 2706-817
ASCII Character Set With Control Codes
Dec. Oct. Hex. CharControlCode
Dec. Oct. Hex. Char Dec. Oct. Hex. Char Dec. Oct. Hex. Char
0 0 0 NUL Ctrl-@ 032 40 20 064 100 40 096 140 60 �
1 1 1 SOH Ctrl-A 033 41 21 ! 065 101 41 A 097 141 61 a
2 2 2 STX Ctrl-B 034 42 22 “ 066 102 42 B 098 142 62 b
3 3 3 ETX Ctrl-C 035 43 23 # 067 103 43 C 099 143 63 c
4 4 4 EOT Ctrl-D 036 44 24 $ 068 104 44 D 0100 144 64 d
5 5 5 ENQ Ctrl-E 037 45 25 % 069 105 45 E 0101 145 65 e
6 6 6 ACK Ctrl-F 038 46 26 & 070 106 46 F 0102 146 66 f
7 7 7 BEL Ctrl-G 039 47 27 � 071 107 47 G 0103 147 67 g
8 10 8 BS Ctrl-H 040 50 28 ( 072 110 48 H 0104 150 68 h
9 11 9 HT Ctrl-I 041 51 29 ) 073 111 49 I 0105 151 69 i
10 12 A LF Ctrl-J 042 52 2A * 074 112 4A J 0106 152 6A j
11 13 B VT Ctrl-K 043 53 2B + 075 113 4B K 0107 153 6B k
12 14 C FF Ctrl-L 044 54 2C , 076 114 4C L 0108 154 6C l
13 15 D CR Ctrl-M 045 55 2D – 077 115 4D M 0109 155 6D m
14 16 E SO Ctrl-N 046 56 2E . 078 116 4E N 0110 156 6E n
15 17 F SI Ctrl-O 047 57 2F / 079 117 4F O 0111 157 6F o
16 20 10 DLE Ctrl-P 048 60 30 0 080 120 50 P 0112 160 70 p
17 21 11 DC1 Ctrl-Q 049 61 31 1 081 121 51 Q 0113 161 71 q
18 22 12 DC2 Ctrl-R 050 62 32 2 082 122 52 R 0114 162 72 r
19 23 13 DC3 Ctrl-S 051 63 33 3 083 123 53 S 0115 163 73 s
20 24 14 DC4 Ctrl-T 052 64 34 4 084 124 54 T 0116 164 74 t
21 25 15 NAK Ctrl-U 053 65 35 5 085 125 55 U 0117 165 75 u
22 26 16 SYN Ctrl-V 054 66 36 6 086 126 56 V 0118 166 76 v
23 27 17 ETB Ctrl-W 055 67 37 7 087 127 57 W 0119 167 77 w
24 30 18 CAN Ctrl-X 056 70 38 8 088 130 58 X 0120 170 78 x
25 31 19 EM Ctrl-Y 057 71 39 9 089 131 59 Y 0121 171 79 y
26 32 1A SUB Ctrl-Z 058 72 3A : 090 132 5A Z 0122 172 7A z
27 33 1B ESC Ctrl-[ 059 73 3B ; 091 133 5B [ 0123 173 7B {
28 34 1C FS Ctrl-\ 060 74 3C < 092 134 5C \ 0124 174 7C
29 35 1D GS Ctrl–] 061 75 3D = 093 135 5D ] 0125 175 7D }
30 36 1E RS Ctrl-^ 062 76 3E > 094 136 5E ^ 0126 176 7E ~
31 37 1F US Ctrl-_ 063 77 3F ? 095 137 5F _ 0127 177 7F

ASCII and Extended ASCII Characters I–3
Publication 2706-817
Extended ASCII Character Set (850, Multilingual Latin I)
Dec. Oct. Hex. Char Dec. Oct. Hex. Char Dec. Oct. Hex. Char Dec. Oct. Hex. Char
0128 200 80 Ç 0160 240 A0 á 0192 300 C0 0224 340 E0 Ó
0129 201 81 ü 0161 241 A1 í 0193 301 C1 0225 341 E1 ß
0130 202 82 é 0162 242 A2 ó 0194 302 C2 0226 342 E2 Ô
0131 203 83 â 0163 243 A3 ú 0195 303 C3 0227 343 E3 Ò
0132 204 84 ä 0164 244 A4 ñ 0196 304 C4 0228 344 E4 õ
0133 205 85 à 0165 245 A5 Ñ 0197 305 C5 0229 345 E5 Õ
0134 206 86 å 0166 246 A6 � 0198 306 C6 ã 0230 346 E6 µ0135 207 87 ç 0167 247 A7 � 0199 307 C7 Ã 0231 347 E7 �
0136 210 88 ê 0168 250 A8 ¿ 0200 310 C8 0232 350 E8
0137 211 89 ë 0169 251 A9 0201 311 C9 0233 351 E9 Ú
0138 212 8A è 0170 252 AA 0202 312 CA 0234 352 EA Û
0139 213 8B ï 0171 253 AB � 0203 313 CB 0235 353 EB Ù
0140 214 8C î 0172 254 AC � 0204 314 CC 0236 354 EC
0141 215 8D ì 0173 255 AD ¡ 0205 315 CD 0237 355 ED �
0142 216 8E Ä 0174 256 AE � 0206 316 CE 0238 356 EE
0143 217 8F Å 0175 257 AF � 0207 317 CF 0239 357 EF �
0144 220 90 É 0176 260 B0 0208 320 D0 δ 0240 360 F0
0145 221 91 æ 0177 261 B1 0209 321 D1 D 0241 361 F1 �
0146 222 92 Æ 0178 262 B2 0210 322 D2 Ê 0242 362 F2 =
0147 223 93 ô 0179 263 B3 0211 323 D3 Ë 0243 363 F3 �
0148 224 94 ö 0180 264 B4 0212 324 D4 È 0244 364 F4 �
0149 225 95 ò 0181 265 B5 Á 0213 325 D5 0245 365 F5 �
0150 226 96 û 0182 266 B6 Â 0214 326 D6 Í 0246 366 F6 �
0151 227 97 ù 0183 267 B7 À 0215 327 D7 Î 0247 367 F7
0152 230 98 ÿ 0184 270 B8 0216 330 D8 Ï 0248 370 F8 �
0153 231 99 Ö 0185 271 B9 0217 331 D9 0249 371 F9
0154 232 9A Ü 0186 272 BA 0218 332 DA 0250 372 FA
0155 233 9B ø 0187 273 BB 0219 333 DB 0251 373 FB �
0156 234 9C £ 0188 274 BC 0220 334 DC 0252 374 FC �
0157 235 9D Ø 0189 275 BD ¢ 0221 335 DD 0253 375 FD �
0158 236 9E � 0190 276 BE ¥ 0222 336 DE Ì 0254 376 FE
0159 237 9F ƒ 0191 277 BF 0223 337 DF 0255 377 FF

Glossary G–1
Publication 2706-817
��������
Note: A word or words in bold face in an entry has its own entry inthis Glossary.
A –
Active Window – The window that is currently selected. Only onewindow can be active at a time, though a number of Table Views ofone or several Applications may be open. The title bar of the activewindow is highlighted to differentiate it from other open windows,and its name is checked in the Window menu. All Tools, Menus,Attributes and the Edit Box apply only to the active window. Anyopen Dialogs must be closed before another window can beactivated.
Address – A label identifying a memory location in the Controller.The link between the address and the Variable or other item thatuses that address is specified by a Tag. See also Node Address.
AI Software – The WINtelligent series version of CSV formatsoftware.
Application – A logical arrangement of Messages, Tags, andconfiguration Parameters for a specific type of MessageViewterminal in a system with a specific type of Controller . Theapplication runs in a MessageView terminal to control a specificprocess.
Application File – The form in which an application is stored in thecomputer or used by a MessageView terminal. Files created andsaved by MessageBuilder are in an MBA format (*.MBA file type).They are changed to MVA format (*.MVA file type) before beingdownloaded to a MessageView terminal.
APS Software – Acronym for Advanced Programming Software.The APS Import/Export Utility uses this software, which works withthe SLC logic controller only.
ASCII – A code defining all the alphanumeric characters, includingpunctuation, so they may be used by a computer. A number ofEnhanced ASCII codes are available, which have accentedcharacters, mathematical and graphical symbols, and so forth.

GlossaryG–2
Publication 2706-817
ASCII Input Device – A bar code scanner or other device thatsends alphanumeric data to a MessageView terminal. A terminalwith two ports and firmware that supports ASCII Input may have itsRS-232 port connected to an ASCII Input device. Data input by sucha device is stored as alphanumeric characters in an ASCII entry ordisplay variable.
ASCII Triggering Device – A device that can trigger messages in aMessageView terminal via a serial communications link. It reads andwrites data through the terminal’s RS-232 port.
Attribute – In MessageBuilder software, information thatdetermines how a Message will appear on the MessageViewterminal (e.g., text size), how it interacts with other messages (e.g.chained), and how it is used by the terminal (e.g. logged in the HEStack).
Auxiliary Device – A device connected to the RS-232 port of aMessageView terminal that is being controlled through its RemoteI/O port by a Logic Controller. An auxiliary device may be anASCII Input device such as an AdaptaScan reader, or a SlaveDevice such as a Dataliner DL50.
B –
Background Message – A message that is displayed by aMessageView terminal when no other message has been active for 2seconds.
Baud – The rate at which data transmission occurs. One baud equalsone Bit per second.
Bit – The smallest unit of information in the binary numberingsystem. A bit contains either 0 or 1.
Bitmap – A Graphic image stored as a pattern of dots (or pixels).
Bit Trigger – A Bit location that may be assigned to a Message.When the Logic Controller sets its bit to 1, the correspondingmessage is triggered. An ASCII Triggering application does notsupport bit triggers. See also Value Trigger.
Block Transfer – One of the two methods of data transfer used by aRemote I/O port on a MessageView terminal. See also Direct I/O .
Byte – A sequence of 8 consecutive Bits that are treated as a singlevalue.

Glossary G–3
Publication 2706-817
C –
Cascade – A way of arranging open windows in the workspace sothat they overlap each other, with the title bar of each visible. Seealso Tile.
Choose – Highlight an item by using the mouse or a keycombination. A command (such as the OK button in a dialog) canthen select or invoke that item. Tools, menu items and certaincommands may be selected and chosen in a single mouse click. Seealso Select.
Click – Press and release the left mouse button quickly.
Command – An item in a Menu that that carries out an action whenit is selected.
Command Button – A labelled rectangle in a dialog that carries outan action when selected. Its label that describes the action to carryout (Close, Cancel). Choosing a command button followed byellipsis (Options...) opens another dialog.
Control Tag – A tag that specifies the Controller’s memory addressfor a specific Global attribute.
Controller – A device that controls a MessageView terminal byTriggering messages and providing data for display variables. SeeLogic Controller, ASCII Triggering Device.
Copy – To put a duplicate of the selected item onto the clipboard sothat you can transfer it to another location.
CSV Format – This format is used by Excel and some othersoftware packages. The HE Stack is uploaded in CSV format.
Cursor Point – The flashing vertical line in the Edit Box wheretext, graphics or variables are added to the message.
Cut – To move the selected item onto the clipboard, from which itcan be placed somewhere else. See also Delete.
D –
Daughterboard – A communications card installed in aMessageView terminal. It provides a Remote I/O port for theterminal.
Delete – To remove the selected item permanently. See also Cut.

GlossaryG–4
Publication 2706-817
Device – Any of a number of mechanical units, such as LogicControllers, ASCII Input devices and computers that may beconnected to a MessageView terminal. A MessageView terminal isitself a device.
DF1 – An Allen-Bradley communications protocol used to transferan application or other data between a computer and a MessageViewterminal’s RS-232 port.
Dialog – A window that opens to request information. Dialogs haveoptions you must choose before MessageBuilder software can carryout a command.
Direct I/O – One of the two methods of data transfer used by aRemote I/O port on a MessageView terminal. See also BlockTransfer.
Double-Click – Press and release the left mouse button twicequickly, without moving the mouse.
Drag – Highlight text by pressing and holding down the left mousebutton while moving the mouse.
Download – The process of transferring data from a computer to aMessageView terminal, or storing an application as a DOS file.Specific download commands load an Application in the terminal,change the date or time in the RTC, or update Firmware .
Driver – A personal computer’s ports are configured by a set ofcommunication parameters collectively called a driver, installed byINTERCHANGE software. A MessageView terminal’s Ports areconfigured as part of its application.
E –
Edit Box – The place where the active Message highlighted in theMessage List is edited. Only one message is edited at a time. Themessage in the Edit Box may have its text entered and edited, itsAttributes assigned, Variables and Graphics embedded, and (inApplications designed for MessageView 421F terminals) FunctionKeys enabled.
Exceptions Dialog – A list of all the warning and error messagesgenerated during a Validate operation.
Export – The process of changing Tags automatically fromMessageBuilder format to a different format.

Glossary G–5
Publication 2706-817
F –
File Transfer Utility – Software that supports transfer of an MVAfile between a computer that does not have MessageBuilderrunning, and a MessageView terminal. It can also download theRTC clock and upload the HE Stack file. In Microsoft Windows itappears as an icon in the MessageBuilder group.
Firmware – Software that allows the MessageView terminal to runan Application . Several versions of firmware are available,depending on how the terminal is to be used. Firmware can beupgraded using software disks from Allen-Bradley and theMessageBuilder Download command.
Flashing – A Message or part of a message that is emphasized bybeing turned on and off regularly on the MessageView terminaldisplay.
Function Keys – A set of keys labeled F1 to F16 (only on theMessageView 421F terminal) that may be enabled for a Message.When a displayed message has a function key or keys enabled, theterminal operator can use the key(s) to initiate a procedure. Functionkeys are disabled unless they are specifically enabled for a messagebeing displayed.
G –
Global – An Attribute or Parameter that is defined once, and maythen be used as often as needed in the application.
Graphic – One of 32 standard ISA Bitmaps representing motors,valves and other objects used in manufacture.
Greyed – A command that is unavailable or disabled at the momentis represented by a greyed icon, menu item or button. For instance,most of the commands on the Format menu can be used only whenthe cursor point is in the Edit Box. When it is elsewhere inMessageBuilder, these commands are greyed out.
H –
Handshake – Acknowledgement that data has been received byanother device, such as a Logic Controller.
HE Stack – Acronym for the Historical Event Stack. A file in theMessageView terminal in which messages are logged as they areTriggered, with a time/date stamp. It may be viewed by the terminaloperator, or uploaded into a computer for analysis.

GlossaryG–6
Publication 2706-817
I –
Import – The process of changing Tags automatically from adifferent format into MessageBuilder format.
Inverse Video – A Message or part of a message that is emphasizedby having its colors reversed in the MessageView terminal display.
ISA – Acronym for Instrumentation Society of America.MessageBuilder software includes a set of standard ISA BitmapGraphic symbols that can be embedded in a message.
J –
Jog Feature – One aspect of the Auto Clear attribute. When AutoClear is disabled for a Message that has embedded Function Keys,jog feature is enabled. If the jog feature is disabled, the message isterminated after one of its function keys is pressed. If the jog featureis enabled, the message remains active until the terminal display iscleared or the terminal is reset.
K –
Keypad – A set of keys on the MessageView terminal that theterminal operator uses to input data, acknowledge messages andaccess the Front Panel Editor. See also Numeric Keypad andFunction Keys.
L –
LED – Acronym for Light Emitting Diode. A MessageView 421Fterminal has a red LED beside each of the 16 Function Keys. TheseLEDs may or may not reflect the condition of the function key,depending on how they are set up in the Application .
Logic Controller – A device used to replace relay logic used forsequencing, timing, and counting. Instead of physical wiring devicessuch as relays, push buttons and limit switches, a logic controllertests the state of inputs and sets outputs according to storedprograms. Also called programmable controller. See also SLC; PLC.
M –
Master Device – A device which controls one or more SlaveDevices. It sends Messages to be displayed by its slaves, andcontrols the appearance of the message in the slave display. AMessageView terminal with a Daughterboard and Firmware thatsupports Slave Port can address up to 127 slave devices through itsRS-232 port.
MBA Format – See Application File.
Glossary G–7
Publication 2706-817
Menu – A list of related commands in MessageBuilder software.Menu names appear in a menu bar under the title bar at the top of theMessage Editor Table View.
Message – The basic unit of a MessageBuilder Application . Itcontains any or all of the following: text, embedded Variables,Graphics and, enabled Function Keys. Each message hasAttributes and a Value Trigger, and it may also have a Bit Trigger .It is edited in the Edit Box.
MessageBuilder Software – A Microsoft Windows based programused to develop an Application that can run in a MessageViewterminal.
Message Editor – The main window for Application design. Seealso Table View; Terminal View.
Message List – Messages are entered in the Message List at thebottom of the Message Editor Table View as they are created. Theymay be returned to the Edit Box for editing. Messages in theMessage List may be rearranged in a number of ways as needed.
MessageView Terminal – An Allen-Bradley Device which runs aMessageBuilder Application and controls a process. The terminalprovides an operator display interface to a Controller and often toother devices when the application is executing. Terminals differ intheir Keypad options and their Firmware . Thus an Application mustbe designed for the capabilities of one type of terminal.
MFT – Acronym for the MessageBuilder File Transfer Utility .
MVA Format – See Application File.
N –
Node – A point on a network to which a device can be connected.The MessageView terminal may be at a node on a Remote I/Onetwork or an ASCII Triggering Device network.
Node Address – A unique integer assigned to each node on anetwork. Data transfer between devices on a network requires adestination address.
Numeric Keypad – On MessageView 421N and 421F terminals,keys the operator can use to input data in Numeric Entry variables.
GlossaryG–8
Publication 2706-817
P –
Parameter – A characteristic of a device or system that is definedas part of its set-up. For instance, a MessageView terminal’s RemoteI/O port must be set up as part of the Application so it cancommunicate with the specific type of Logic Controller the systemwill use.
Paste – To copy the contents of the clipboard to a specified location.To paste attributes or variables of a message, see the procedure in themanual.
Placeholder– Each type of variable has its own placeholder, whichrepresents it in the Edit Box and Terminal View.
PLC – Acronym for Programmable Logic Controller , anAllen-Bradley trademarked device.
Pointer – The arrow-shaped cursor on the computer screen thatfollows the movement of the mouse and indicates which area of thescreen will be affected when you press the mouse button. The pointerchanges shape during certain tasks. Also called mouse pointer.
Port – The part of a device through which it communicates withother devices. Before two devices can communicate, they must havea hardware connector (cable) joining their ports and both ports musthave the correct software communication Parameters set. AMessageView terminal has an RS-232 port and may also have aRemote I/O port.
Preset Value – A value that is loaded into a PLC or SLC controllerdata table when an Application starts up in a MessageViewterminal.
Project – A database of Tag definitions and device informationassociated with an Application . A project may be assigned to morethan one application.
Q –
Queue – A memory location in the MessageView terminal where aValue-triggered message may be stored if it cannot be displayedimmediately when it is triggered.

Glossary G–9
Publication 2706-817
R –
Real Time Clock – The MessageView terminal has its ownbattery-operated clock, also referred to as RTC. It provides values fortime or date variables in displayed messages. The terminal’s clockmay be set using the RTC Download command fromMessageBuilder software, or the terminal operator may set it.
RS-232 – A serial link for transmitting data to and from the RS-232port of a MessageView terminal. Communication with a personalcomputer requires a DF1 connection, whose parameters are set up inthe terminal’s Firmware . Communication with any other devicerequires that the RS-232 port Parameters are set up in theApplication . Communication with a Slave Device requires aRS-232/Simplex connection.
Remote I/O – A serial link for transmitting data to and from a PLCor SLC processor/scanner and the Remote I/O port of aMessageView terminal. Also supports Block Transfer of data that ismoved using block transfer ladder instructions.
S –
Save – The process of transferring data stored in RAM memory to adisk file.
Scaling – Mathematically manipulating data so it may be stored inone form in a Controller and displayed in another form in theMessageView terminal.
Select – Select an action to activate a chosen (highlighted) item. Insome cases a mouse click can Choose and select an item in one step.
Slave Device – A device that receives and displays messages from aMaster Device, but does not initiate communication. Slave Devicesinclude the MessageView 421D Slave Device terminal (Catalog2706-M1D) and several of the Allen-Bradley Dataliner family.
Slaving – A system in which a Master Device controls one or moreSlave Devices remotely. A MessageView terminal with adaughterboard and firmware that supports Slave Port can act as amaster device for up to 127 Slave Devices.
SLC – Allen-Bradley trademarked name for Small LogicController .
Special Messages – Messages that affect the MessageViewterminal. They are not displayed or sent to the HE Stack, but may betriggered as part of the application.

GlossaryG–10
Publication 2706-817
Startup Message – The message displayed when the MessageViewterminal powers up.
Status Bar – The horizontal bar at the bottom of the MessageEditor window that tells you what MessageBuilder software isdoing at the moment.
T –
Table View – A window in which Messages or Tags are created andtheir attributes assigned.
Tag – The collective name for a group of Parameters that define acontroller address and how it interacts with a MessageBuildervariable.
Tag Editor – A section of MessageBuilder software in which Tagsmay be created, edited, and imported.
Terminal View – A window that looks like the face of theMessageView terminal for which the current Application isdesigned. It shows what the Message being edited will look like inthe terminal display.
Tile – A way of arranging open windows in the workspace so thatthey do not overlap. Each window occupies a horizontal segment ofthe workspace. See also Cascade.
Tool – An icon that can be used to Select frequently usedcommands. Some tools complete the action immediately; others opena Dialog for further input.
Trigger – A unique value or bit assigned to a message, used by theController to call up the message. See also Bit Trigger ; ValueTrigger.
U –
Upload – The process of transferring an Application or a HE Stackfile from a MessageView terminal to a computer runningMessageBuilder software or the File Transfer Utility . An uploadedapplication exists in both MBA and MVA formats. An uploaded HEStack file exists in CSV format.

Glossary G–11
Publication 2706-817
V –
Validate – The process of checking an Application for mistakesthat will cause problems when it is run. MessageBuilder softwarenotifies the application designer of any validation errors, since theymust be corrected before the application can be downloaded to aMessageView terminal. Applications are automatically validated aspart of the Download process, and they may also be validated whilethey are being created.
Value Trigger – A message’s number. The Controller may specifya message number to call up the corresponding message.
Variable – A number or an array of characters whose value in amessage displayed by the MessageView terminal is sent from data inthe Controller , or from the value input by the operator or by anASCII Input Device. In MessageBuilder software a variable isrepresented by a Placeholder.
Verify – The process by which a MessageView terminal checks anApplication that has been Downloaded to make sure it is designedfor the correct type of terminal.
W –
Workspace – The area of the computer display in which theMessageBuilder Application is created and edited.
Z –
Zoom – A procedure for enlarging the Terminal View so that it islarger than the default size.

Publication 2706-817
�
�*2 (::80);:,� ����.36)(3 :(.9� ���
�*2 %04, (::80);:,� ����
�++8,9905.� ��� %(.9
�� -684(:� 04768:05.�,>768:05. :(.9����A���
�3(84 8,3(?� ��� $3(<05. �4(9:,8�+,<0*,
�30.505.� ����
�33,5@�8(+3,? (++8,99� "�
�77,5+ ,99(., :663� ���� ���
�7730*(:065 4,5;�,9*807:065� ���� ����6=536(+� ��� ���:6 ( �!$ -03,� ���;5*:065 �,?9� �� �� ����� $:(*2 &736(+� ��� ������ �5+0*(:689� ����� ���"8,-,8,5*,9� �� � ���"861,*: (5(.,4,5:� ���+,<0*,9� ���7861,*:9� ���#%� �6=536(+� ��� ���$7,*0(3 ,99(.,9� ��� � ���%(. �+0:68� ���� ���%,8405(3 $,:;7� �� ���&736(+� �� ���'(30+(:,� ��� ���
�7730*(:0659��� ���� �8868 4,99(.,9� "861,*:9(9:,8092 05 %0:3, �(8� ���*/(5.05. :,8405(3 :?7,� ��*8,(:05.� ���+(:, 9(<,+� ���+,9*807:065� ����,9*807:065+6=536(+�;736(+� ��5,= 5(4,� ���67,505.� �� 73(5505.� �A � 8,768:9� ��9(-,:?� ��9(<05.� ��� $(<05.<(30+(:05.� ��� '(30+(:05.<,89065� ���
�"$ -684(:04768:05.�,>768:05. :(.9����A���
768:9� ���
�$��� (5+ �>:,5+,+ �$���*/(8(*:,89� ���� ���A���
�$��� �65:863 �/(8(*:,89� �������
�$��� �57;: +,<0*,9�$��� '(80()3, +0973(?� ����;>� "68: +0(36.� ���A���9,:;7� ���
�$��� %80..,805. +,<0*,9�6449� $,:;7 +0(36.� ���A���*65:863 � 8,97659, *6+,9����A��
768: 9,:;7� ��
�$��� '(80()3, �0973(?� ����A����
�$��� '(80()3, �5:8?� ���A���
�::80);:,9-;5*:065 2,?9� ��� �;5*:065 2,?9.36)(3� ����36)(39,::05. ;7� ����A����;5+605.� 8,+605. */(5.,9 05� ��
�;:6 �3,(8 (::80);:,� ������� ���� �6. -,(:;8,
�;:6 �684(:� �� �
�;:6,>,*�)(: -03,� ��
�;>030(8? +,<0*,9��� ���� �$��� �57;: +,<0*,9�$3(<05. �4(9:,8� +,<0*,
/(8+=(8, /(5+9/(2,� ���9;44(8?� ��
�;>030(8? 768:� ��� #$@���
�
�(*2.86;5+ ,99(.,� ��
�(;+ 8(:,#,46:, ��!� �� � ��#$@���� ���� �
��� -684(:� ����(:( -684(:9
�0: -684(:� ����(:( -684(:9
�0: %80..,8 (::80);:,� ��
�0: :80..,89� ��)(9, (++8,99� ���-05+05. 4,99(.,9� �� �,(9: $0.50-0*(5: �0:� ��968:05. 4,99(.,9� ��$7,*0(3 ,99(.,9� ���
Index

IndexI–2
Publication 2706-817
�14(0 97&38+*78� ��@ �(43+.,:7.3,� ��@ ��*7747 2*88&,*8 .3� ��*=&251*� 2:19.51*� �*=&251*� 7*&)� ��*=&251*� <7.9*� �8*9:5� ���@���
�7.,-93*88 &997.':9*� ��
�
�&3(*1 �-&3,*8 9441� ���� ��������
�*39*7 9441� ����� ���
�-&.3 &997.':9*� ���
�-&.3.3,� ���7*3:2'*7*) 2*88&,*8� ����
�-&7&(9*7 &77&>� ����&9& +472&98
�-&7&(9*78� &((*39*)� ���� ���
�422:3.(&9.438� ����� ���� !"?�� !*249* ��
�425:9*7��� ���� ��#�!������0*>'4&7) (43;*39.438� ��7*6:.7*2*398� �
�439&(98� +:3(9.43 0*>8� ����
�439741 '>9*8� ��� "1&;.3, �2&89*7�)*;.(*
�439741 (-&7&(9*78� ��� ��
�439741 (4)*8� 81&;* )*;.(*� ���
�439741 9&,8&(034<1*),* 2*88&,*� ����:3(9.43 0*> 2*88&,*� ���2*88&,* 9&,8� ��
�4397411*78� ���!"?� )*;.(*8� ��� �"���
#7.,,*7.3, )*;.(*8!*249* �� )*;.(*8� ��� �4,.(
(4397411*78
�45> 9441� ���� ���� ��
�45> 9441 �#&, �).947�� ���� ���
�45>.3,&997.':9*8� ���2*88&,*� ���9&,8� ���9*=9 897.3,� ���;&7.&'1*8� ���
�"% +472&9�� "9&(0 +.1*� ���.25479.3,�*=5479.3, 9&,8�
���@��
�:9 9441� ���� ��
�:9 9441 �#&, �).947�� ���� ���
�
�&9& +472&98� �������� �����.9� �����-&7&(9*7 &77&>� ����".,3*)�$38.,3*) .39*,*78� ����
�&9& 9>5*8� ����� ��
�&9*+472&99.3,� ���8*99.3, 9*72.3&1 (14(0� ��
�&9* �.851&>� ���
�&9* "5*(.&1 �*88&,*8� 8*9:5� ��
�*':, �4)*� ���
�*(.2&1 548.9.43�:2*7.( %&7.&'1* �.851&>� ����:2*7.( %&7.&'1* �397>� ���
�*1*9* �*88&,* 9441� ��� ���
�*1*9* #&, 9441� ���� ���
�*8(7.59.43&551.(&9.43� ���9&,8� ���
�*;.(*8��� ���� �"��� #7.,,*7.3, )*;.(*8�
�4,.( (4397411*78� #*72.3&18*9:5
(43+1.(9 .3 574/*(9� ���2&3&,.3,� ��
�� (422:3.(&9.438� ���� ���� !"?�(43+.,:7.3,� ��97&38+*77.3, &551.(&9.438� �
�.&14,8(43;*39.438� ���*15� ���
�.8(7*9* �� � � @ ��'14(0 97&38+*7 '>9*8� ��

Index I–3
Publication 2706-817
�5<425(+ 9552� ��� ���
�5<425(+04.+(9, � 903,� ��,7757 3,88(.,8 04� ��9,7304(2 -073<(7,� ��95 ( ��# -02,� ��95 ( 9,7304(2� ��:804. �6620*(9054 3,4:� ��:804. �02, $7(48-,7 %90209>� ��
�70;,78� ��� ��$�"������
�:620*(9, $(. 95528� ��� ��
�:620*(90548 )5= �$(. �+0957�� ������
�
�+09 3,4:�56>� ���� ���� ����:9� ���� ����,2,9, �,88(.,� ���� ����04+� �� � ����48,79 �,88(.,� ���� ����,< �,88(.,� ���� ��� (89,� ���� ���� ���",+5� ��� ���",4:3),7� ���� ���",62(*,� ���� ���#579� ��� ���$560*8� ���� ���%4+5� ��� ���
�+09 3,4: �$(. �+0957��56>� ���� ����:9� ���� ����,2,9,� ���� ����:620*(9,� ��� ����04+� ��� ����48,79� ���� ��� (89,� ���� ���
�3),++,+ &(70()2, 9552� ���� ���
�3),++,+ &(70()2,8� ��� &(70()2,8
�4()2, �,):. �5+, (9970):9,��
�4()2, �:4*9054 �,>8 9552� �������
�4()2, �,88(., !:,:, (9970):9,���
�4()2, #03:2(9, �5+, (9970):9,��
�7757 3,88(.,8��� ���� �=*,690548*7,(904.�,+0904. (6620*(90548� ��9(. 036579�,=6579� ����
:625(+�+5<425(+� ��
�=*,690548� ��,77578 -5:4+ 04 &(20+(9054� ��6704904.� ��8(;04.� �
�
�0,2+ <0+9/�#��� &(70()2, �0862(>� �����#��� &(70()2, �497>� ����:3,70* &(70()2, �0862(>� ��� �:3,70* &(70()2, �497>� ����
�02, 3,4:�258,� ��� ���=09� ��� ����,<� ���� ���6,4� �� � ��",65798� ���� ��#(;,� ���� ��#(;, �8� ���� ��%6.7(+, $,7304(2� ��� ��'57189(9054 #,9:6� ���� ���
��
�02, $7(48-,7 %90209>0*54� ���:804.� ��?��&,70-> 9552�*533(4+� ��
�04+ 3,88(.,� ��
�04+ $(. 9552� ��� ��
�073<(7, +5<425(+� ��
�2(8/� ����*/(4., 7(9,� �� 7,-,7,4*,8� ���
�2(8/ 9552� ����� ���
�573 &0,< 9552 �$(. �+0957�� �������
�573(9 3,4:�20.4� ����� �� �#��� �/(7� ���� ����#��� &(70()2, �0862(>� �����
�� �#��� &(70()2, �497>� ���� ����(9, �0862(>� ���� �� �+09 &(70()2,� ����� ����4()2, �:4*9054 �,>� ���� ����2(8/� ����� �� �7(6/0*� ���� ����4;,78, &0+,5� ����� ��

IndexI–4
Publication 2706-817
�:3,70* '(70()2, �0862(>� �������
�:3,70* '(70()2, �497>� �������
%,=9 $0?,� ����� ���%03, �0862(>� ���� ���
�7,,?, (9970):9,� ����
�:4*9054 1,>8� ���@������ ���� �5. -,(9:7,� ���8(9970):9,8� ����,4()204.� �� #,9:74 �:3),7 9(.� ���8,9:6� ����@�� 9(.8� �� �
�
�25)(2��� ���� �549752 9(.8� $9(9:8 9(.8(+;(4*,+ 9,7304(2 5690548�
��@���-573(9904. +(9,� ���-573(9904. 903,� ���-:4*9054 1,> (9970):9,8� ����
������� 04+0*(957 9(.8� �� � �� 2089 5- 6(7(3,9,78� ��
�7(6/0*8� ����$� $>3)528� ���@���!7,-,7,4*,8� ��
�
�(4+8/(1, %03,5:9 (9970):9,����
�(4+8/(104.(*145<2,+.,� ����$��� '(70()2, �497>� ���+0(.7(3� ���
/(7+<(7,� ���2(9*/,+ -:4*9054 1,>� ���� �� ��:3,70* '(70()2, �497>� ���+0(.7(3� ���
68,:+5� ���@����903,5:9� ��� %03,5:997:,� ���@���
�� $9(*1� ���89(9:8 9(.8� �� :625(+� ��
�� $9(*1 (9970):9,� ����
�,26 �549,498 9552� ���� ��
�,26 3,4:� ����)5:9 �,88(.,�:02+,7� ����
����549,498� ����5< %5 &8, �,26� ���$,(7*/ �57 �,26 4� ���9,*/40*(2 (88089(4*,� !��
�,26 3,4: �%(. �+0957��)5:9� ���549,498� ��
�,26 ":,89054 9552� ���� ��
�0++,4 (9970):9,� ����
�089570*(2 �;,49 $9(*1� ����� $9(*1
�52+ %03, ��53,49(7> -:4*90541,>�� ����
�
�4+0*(957 9(.8� ��� ���8
�4090(2 $9(9, ��(049(04,+ -:4*90541,>�� ����
�48,79 �,88(., 9552� ��� ���
�48,79 %(. 9552� ���� ���
�489(22(9054� ����,88(.,�:02+,785-9<(7,
��%�#������*54-0.:704. +70;,78� ��@��0489(22(9054� ��0489(22(9054 675)2,38� �:625(+�+5<425(+� �
�4;,78, '0+,5 9552� ����� ���
�$� $>3)528� ���@���
�
�5. -,(9:7,� ��� ����,=(362,8� �� 3(049(04,+ -:4*9054 1,>8� ���
�:890->� ��� �,-9 �:890-> 9552
�
�(4.:(., (9970):9,� ��
�(9*/,+ -:4*9054 1,>8� ��� �:4*90541,>8
�,(89 $0.40-0*(49 �09� ��� �09 970..,78

Index I–5
Publication 2706-817
���9� ���9,:;6� ����
�,-: �;9:0-? :552� ����� ���
�04, (::80);:,� ��� A����
�5.0* *54:8522,89(++8,99,9� ���-02, :?6,9� ���A ���#,35:, ��! 9,:;6� ��� #,35:, ��!:?6,9� �� � ��
�
�(04:(04,+ -;4*:054 1,?9� ����;4*:054 1,?9
�(9:,8 +,<0*,� ��� $2(<04. �3(9:,8�+,<0*,
�(9:,8 �09:� ��
��� -02,� �
�,4;9(6620*(:054 45: 56,4� ���(6620*(:054 56,4� ���*54<,4:0549� ���
�,99(., (::80);:,� ���
�,99(., �+0: )5>� ���� ���
�,99(., �+0:58 %()2, '0,=� ���%()2, '0,=
�,99(., �+0:58 %,8304(2 '0,=� ���%,8304(2 '0,=
�,99(., �09:� ���-04+ 3,99(., 4;3),8� �� -04+ :,>: 9:804.� �� 8,4;3),804.� ��� #,4;3),804.9,2,*:04. ( 3,99(.,� ���958:04.� ��
�,99(., 7;,;,� �,4()204.� ��
�,99(.,�;02+,8 95-:=(8,��� ���� � %�#��� ��049:(22(:054� ���A�� 049:(22(:054 685)2,39� ���A���685.8(3 .85;6� ���8,.09:8(:054� ���8,7;08,3,4:9� ��9:(8:;6� ��<,89054� "�
�,99(.,9� � ��� ���� �+0: 3,4;� �,99(., �09:*(4*,2204. */(4.,9� ��*56?04.� ���*8,(:04.� ���
+0962(? 204,9� ��� A����,+0:04.� ���A����3),++,+ <(80()2,9� ��� '(80()2,9,>(362,9� ���(9:,8 �09:� ��8,:;84 4;3),8 :5 "��� ��9,::04. (::80);:,9� ��� �::80);:,9$6,*0(2� ��� $6,*0(2 �,99(.,99:5804.� ��
�,99(.,'0,= :,8304(2��� ���� %,8304(2 9,:;6�/5: 1,?�� ��
��%� ��� �02, %8(49-,8 &:020:?
�53,4:(8? -;4*:054 1,?9� ����;4*:054 1,?9
�5;9,� *54<,4:0549� ��
�'� -02,� �
�
,= �02, :552� ���� ��
5:0-0*(:054 :(.� ����(4+9/(104.
;3,80* '(80()2, �0962(?�����A����
;3,80* '(80()2, �4:8?� ����A����
�
!--9,:� ��� $*(204. +(:(
!6,4 �02, :552� �� � ��
!6:0549 3,4; �%(. �+0:58��++8,99 '(20+(:054� �� � ���;620*(:054� ��� ��
�
"(*1,:9� ��� $2(<04. �3(9:,8� +,<0*,
"(99=58+ (::80);:,� ��
"(9:, :552� ���� ���� ��
"(9:, :552 �%(. �+0:58�� ���� ��
"(9:04.3,99(.,� ���:,>: 9:804.� ���
"2(*,/52+,89� ���
"��� ��� �5.0* *54:8522,89
"58:9� ��� #,35:, ��!� #$@���

IndexI–6
Publication 2706-817
8/4: :552 �$'- �*/:58�� ���� ���
8/4:/4-+8858 3+99'-+9 /4� ���>)+6:/549 ,853 <'2/*':/4-� ��8+658:9� ��:'-9� ���
8/58/:/+9� ��� $8/--+8/4-� 8/58/:?
850+): 3+4; �$'- �*/:58��>/:� ���� ��� '-+ #+:;6� �� � ��� 8/4:� ���� ���
850+):9� ���� ��'662/)':/549� ����662/)':/549)8+':/4-� ���� ���3'4'-/4-� ��8+)54)/2/4- =/:. '4 '662/)':/54�
���:'- *':'('9+� ����</+=/4-� ��
�
!;+;+� ����+99'-+ 7;+;+
�
"+'* $'-�#��� &'8/'(2+ �/962'?� ����;3+8/) &'8/'(2+ �/962'?� ��
"+*5 :552� ���� ��
"+2'?� ��� #2'</4- �3'9:+8� *+</)+
"+35:+ ������ ���� �25)1 :8'49,+89� �/9)8+:+
���*+</)+9� ��� �5-/) )54:8522+89658: 9+:;6� ��� ���8;4:/3+ 6'8'3+:+89� ���A���
"+4;3(+8/4- 3+99'-+9� ���+99'-+ '::8/(;:+� ����
"+62')/4-� :+>: 9:8/4-� ���
"+658:9)8+':/4-� �56:/549� �68/4:/4- � ��
"+:;84 �+99'-+ �;3(+8 '::8/(;:+���
"+:;84 �;3(+8��� 3+99'-+ :'-� ����;4):/54 1+? :'-� ���3+99'-+ :'-� ��
"��� ��� "+35:+ ���
"#@���� ���� �#��� �46;: *+</)+9�
�#��� $8/--+8/4- *+</)+9�#2'<+ *+</)+� #2'</4- �3'9:+8�*+</)+
*+</)+9� ��+99'-+�;/2*+8 )54,/-;8':/54�
�658: 9+:;6� ��� ���� ���8;4:/3+ 6'8'3+:+89� ���
"$� �5=425'*� ���/2+ $8'49,+8 %:/2/:?� ��
�
#'<+ �/2+ :552� ���� ��
#'</4-'662/)':/549� ����>)+6:/549� ��8+658:9� ��:'-9� ���:5 '4 �&� ,/2+� ��
#)'2/4- *':'� ����A����$'- �*/:58� ���
#)8522 '::8/(;:+� ����
#)8522 ('8� �+99'-+ �/9:� ���
#+'8)./4-� ����+99'-+ �/9:
#+2+):/4-� ����+99'-+ �/9:
#/-4+* /4:+-+8 ,583':� ����':',583':9
#/3;2':+ �5*+� ���
#2'<+ *+</)+� ����5339� #+:;6 */'25-� ��A ��658: 9+:;6� ���
#2'</4- �3'9:+8� *+</)+� �� '::8/(;:+9 9+:;6� ����;:5 �583':� ��� �;>� 58: */'25-� � A ��(;,,+89� �� 6')1+: ,583':� ���9+:;6� ���#2'<+ '2'83 8+2'?� ���� ����92'<+ 6')1+:� ���
#��� ��� �5-/) )54:8522+89
#5,:='8+� ����+99'-+�;/2*+895,:='8+
#58:/4-3+99'-+9� ��:'-9� ��

Index I–7
Publication 2706-817
#6+)/'2 �+88'-+88+9:6� �� �2/89� ��
#9'79:6 �+88'-+� ���
#9'9:8 �'7� ���
#9'9:8 9'-8� ��
#957+ �+88'-+ 9552� ���� ���8957/4- '997/(:9+8� ����
�
$'(2+ &/+<� /22:897'9/54� ���� ��
$'(2+ &/+< 9552� ���� ��
$'(2+ &/+< 9552 �$'- �*/957�� ������
$'- �*/957� �����#��� &'7/'(2+ �/862'>� ����#��� &'7/'(2+ �497>� ���).'4-/4- ;/+<8� ����573 &/+<� ����:4)9/54 1+> 9'-� �� �� �� ��
�� �� ��� ���� �� ����
�:3+7/) &'7/'(2+ �/862'>� �� �:3+7/) &'7/'(2+ �497>� ���$'(2+ &/+<� ��
$'-8� ����� ���� �*/9 3+4: �$'- �*/957��
�7757 3+88'-+8'**7+88 <5718.++9� ��� '**7+88+8� */'-7'3� ���'997/(:9+8� ����)54,2/)9 </9. 6750+)9� ���)549752 9'-8� ��� �549752 9'-8*+,/4/4-� �� A���*:62/)'9/4-� ���+=6579/4-� ���/36579/4-� ���67/49/4-� ���A���8';/4-� ���8579/4-� ��89'9:8 9'-8� ��� #9'9:8 9'-8:4145<4 /4 6750+)9� ���<5718.++9� ��
$+).4/)'2 �88/89'4)+� !��
$+73/4'2 8+9:6�:=/2/'7> �+;/)+8� ��).'4-/4- 9>6+� ���-25('2 '997/(:9+8� ����25('24+< '662/)'9/54� ���65<+7@:6 8+99/4-� ���"� 6579 )54,/-:7'9/54� ���
"+359+ ��
"#@� 6579 )54,/-:7'9/54� ���"#@�
$+73/4'2 #+9:6 9552� ��� ��
$+73/4'2 &/+</22:897'9/548� ���� ���?553/4-� ���
$+73/4'2 &/+< 9552� ���� ��
$+=9 #/?+ '997/(:9+� ����A���
$/3+,573'99/4-� ���8+99/4- 9+73/4'2 )25)1� ��
$/3+ �/862'>� ���
$/3+ #6+)/'2 �+88'-+8� 8+9:6� ��
$/3+5:9(25)1 97'48,+7� ��.'4*8.'1+� ���� ���
$552('78'662/)'9/54 459 56+4� ����+88'-+ �*/9� ���#9'4*'7*� ���$'- �*/957� ��
$5528 3+4: �$'- �*/957��=6579� ���� ����573 �*/957� ���� ���� ����36579� ���� ����/89 �*/957� ���� ���� ���
$56/) '997/(:9+� ��
$56/)8,/29+7/4- 956/)8� ���,/4*/4- 3+88'-+8� ���4'3/4-� ���8579/4- 54� ��
$7'48,+7 :9/2/9/+8� ����5<425'*/4-�%625'*/4-
$7/--+7 !7/57/9> '997/(:9+� ���
$7/--+7/4-� ���A����� ���� �/9 97/--+78� &'2:+ 97/--+7867/57/9>� ���A�� � ���
$75:(2+8.559/4-� ��� �7757 3+88'-+8��+26
�
%4*5 9552� ���� ��
%48/-4+* /49+-+7 ,573'9� ����'9',573'98
%6-7'*/4- 9+73/4'2� ��

IndexI–8
Publication 2706-817
2.1$',0*$22.,&$5,10� �(3313 /(44$*(4 ,0� ���� �5$&-� ��64,0* �,.( �3$04)(3 5,.,5:� ��
�
!$.,'$5,0*� ���',$.1*� �(3313 /(44$*(4� ��� �9&(25,104,0',7,'6$. /(44$*(4� ���5$* $''3(44(4� ���
!$.6( 53,**(34� ������ ���� �+$,0,0*5$* $''3(44� ��
!$.6(4 $5 �18(3; 2 $553,%65(� ���
!$3,$%.(4����� !$3,$%.( �,42.$:� �������� !$3,$%.( �053:� ����(/%(''(' 7$3,$%.(4� ����6/(3,& !$3,$%.( �,42.$:� ����6/(3,& !$3,$%.( �053:� ����3()(3(0&(4� �� 5$*4� ��� �$*4
!(3,):,0* ��,.( �3$04)(3 5,.,5:����
!,(8 /(06�5$564 �$3� ���� ����11.%$3� ���� ���#11/� ���� ���
!,(8 /(06 ��$* �',513������05(*(3� ���� ����13/� ���� ����135� ��� ����5$564 �$3� ��� ����6//$3:� ���� ����11. �$3� ��� ���
�
"$,5 �,/( $553,%65(� ���
"$30,0* /(44$*(4� ��� �9&(25,104
",0'18 /(06$&5,7( 7,(8� ���� ����33$0*( �&104� ����$4&$'(� ����9&(25,104� �� ����(8",0'18� ����$%.( !,(8� ���� ����(3/,0$. !,(8� ���� ����,.(� �� � ���
",0'18 /(06 ��$* �',513�$&5,7( 7,(84� ���33$0*( �&104� ���$4&$'(� ���.14( �..� ���(8� ���� ����()3(4+� ���� ����,.(� ��
",0'184',$.1* %19(4� ����,$.1*4/(064� ����(064�(44$*(�6,.'(3 )($563(4� ���511.4� ��� �11.%$348,0'18 ',$*3$/� ��
"13-45$5,10� ��� �1/265(3
"3,5( 5$*����� !$3,$%.( �053:� ���)60&5,10 -(:4� �� ��6/(3,& !$3,$%.( �053:� ���
�
#11/ 511.4� ���� ��

Publication 2706-817 –December 1996
Allen-Bradley, a Rockwell Automation Business, has been helping its customers improveproductivity and quality for more than 90 years. We design, manufacture and support a broadrange of automation products worldwide. They include logic processors, power and motioncontrol devices, operator interfaces, sensors and a variety of software. Rockwell is one of theworld’s leading technology companies.
Worldwide representation.
Argentina • Australia • Austria • Bahrain • Belgium • Brazil • Bulgaria • Canada • Chile • China, PRC • Colombia • Costa Rica • Croatia • Cyprus • Czech Republic •Denmark • Ecuador • Egypt • El Salvador • Finland • France • Germany • Greece • Guatemala • Honduras • Hong Kong • Hungary • Iceland • India • Indonesia • Ireland • Israel • Italy • Jamaica • Japan • Jordan • Korea • Kuwait • Lebanon • Malaysia • Mexico • Netherlands • New Zealand • Norway • Pakistan • Peru •Philippines • Poland • Portugal • Puerto Rico • Qatar • Romania • Russia–CIS • Saudi Arabia • Singapore • Slovakia • Slovenia • South Africa, Republic • Spain •Sweden • Switzerland • Taiwan • Thailand • Turkey • United Arab Emirates • United Kingdom • United States • Uruguay • Venezuela • Yugoslavia
Allen-Bradley Headquarters, 1201 South Second Street, Milwaukee, WI 53204 USA, Tel: (1) 414 382-2000 Fax: (1) 414 382-4444
Publication 2706-817 –December 1996Supersedes Publiication 2706-817 Dated February 1996
40061-287-01(D)Copyright 1996 Allen-Bradley Company, Inc. Printed in USA
Related Documents