Use& CareGuide Manual deUsey Cuidado English/ Espa_ol Models/Modelos: 116.21614 P/N C01ZDUEI_UO_ - KC_IZDUEI_UO Sears Brands Management Corporation Hoffman Estates, JL 60179 U.S.A www.kenmore.com www.sears.com

21614Purple Kenmore 21614 Progressive Canister Vacuum HEPA
Nov 30, 2015
Purple Kenmore 21614 Progressive Canister Vacuum HEPA
Welcome message from author
This document is posted to help you gain knowledge. Please leave a comment to let me know what you think about it! Share it to your friends and learn new things together.
Transcript
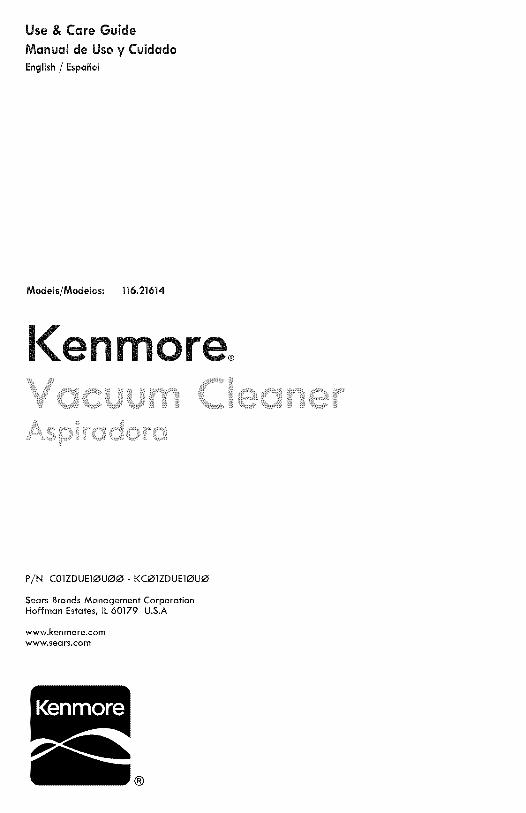
Use& CareGuideManualdeUsey CuidadoEnglish/ Espa_ol
Models/Modelos: 116.21614
P/N C01ZDUEI_UO_ - KC_IZDUEI_UO
Sears Brands Management CorporationHoffman Estates, JL60179 U.S.A
www.kenmore.comwww.sears.com
Before Using Your NewVacuum Cleaner .................... 2
Packing List ..................... 2Vacuum Cleaner Help Line ........... 3Kenmore Vacuum Cleaner Warranty . . . 3Important Safety Instructions .......... 4Parts and Features ................ 5-7
Assembly mnstructlons .............. 8-9Operating Instructions .............. 10
How to Start .................. 10-11
Vacuuming Tips ............... 12-13Suggested Pile Height Settings ...... 13Attachments .................. 14-16Attachment Use Table ............ 16
Attachment Storage .............. 17Performance Features ............. 18
Canister Care ..................... 19
Removing Clogs ................. 19Cleaning Exterior and Attachments .. 19Bag Changing .................. 20Motor Safety Filter Changing ....... 21Exhaust Filter Changing ........... 22
PowerMafe ® Care .................. 23
Belt Changing and AgitatorCleaning .................... 23-24Bulb Changing .................. 25Agitator Servicing ............... 25
Troubleshootlng ................ 26-27Master Protection Agreements ........ 28Requesting AssistanceOr Service ................ Back Cover
Please read this guide. It will help you assemble and operate your new Kenmore vacuumcleaner in the safest and most effective way.
For more information about vacuum cleaner care and operation, call your nearest Searsstore. You will need the complete model and serial numbers when requesting information.Your vacuum cleaner's model and serial numbers are located on the Model and SerialNumber Plate.
Use the space below to record the model number and serial number of your new Kenmorevacuum cleaner.
Model No.
Serial No.
Date of Purchase
Keep this book and your sales check (receipt) in a safe place for future reference.
PACKING LiST
Your KENMORE VACUUM CLEANER is packaged with the following parts and compo-nents assembled separately in the carton:
Canister Vacuum CleanerPowerMate®Hose & Handle AssemblyFloor Brush _Crevice Tool _Combination Brush
1 Pet Tool _1 Pet PowerMate®1 Telescoping Wand1 Use & Care Guide1 Repair Parts List
Each of the above assemblies are shown in detail inside the Repair Parts List._These items are found under the Tool Cover._These items are found on the hose & handle assembly.
=2=
1-877-531-7321
8:00am-5:00pm EST, M-F(U.S.A. and Canada)
One Year Limited WarrantyWhen assembled, operated and maintained according to alt instructions supplied withthe product, if this vacuum cleaner fails due to a defect in material or workmanshipwithin one year from the date of purchase, return it to any Sears store, Sears Parts &Repair Center or other Kenmore outlet for free repair.
If this vacuum cleaner is used for other than private family purposes, this warrantyapplies for only 90 days from the date of purchase.
This warranty covers only defects in material and workmanship. Sears will NOT pay for:1. Expendable items that can wear out from normal use, including but not limited to
filters, belts, light bulbs, and bags.2. A service technician to instruct the user in correct product assembly, operation or
maintenance.3. A service technician to clean or maintain this product.4. Damage to or failure of this product if it is not assembled, operated or maintained
according to all instructions supplied with the product.5. Damage to or failure of this product resulting from accident, abuse, misuse or use for
other than its intended purpose.6. Damage to or failure of this product caused by the use of detergents, cleaners,
chemicals or utensils other than those recommended in all instructions supplied withthe product.
Z Damage to or failure of parts or systems resulting from unauthorized modificationsmade to this product.
Disclaimer of implied warranties; limitation of remediesCustomer's sole and exclusive remedy under this limited warranty shall be productrepair as provided herein. Implied warranties, including warranties of merchantability orfitness for a particular purpose, are limited to one year or the shortest period allowedby law. Sears shall not be liable for incidental or consequential damages. Some statesand provinces do not allow the exclusion or limitation of incidental or consequentialdamages, or limitations on the duration of implied warranties of merchantability orfitness, so these exclusions or limitations may not apply to you.
This warranty applies only while this vacuum cleaner is used in the United States andCanada.
This warranty gives you specific legal rights, and you may also have other rights whichvary from state to state.
Sears Brands Management Corporation, Hoffman Estates, IL 60179 U.S.A
-3-
Read all instructions in this guide before assembling or using your vacuum cleaner.
WARNING:Your safety is important to us. To reduce the risk of fire, electrlcal shock, injury topersons or damage when using your vacuum cleaner, follow basic safetyprecautions including the following:
Use your vacuum cleaner only as describedin this guide. Use only with Searsrecommended attachments.
Disconnect electrical supply beforeservicing or cleaning out the brush area.Failure to do so could result in the electricalshock or brush suddenly starting.
Do not leave vacuum cleaner when pluggedin. Unplug from outlet when not in use andbefore performing servicing.
To reduce the risk of electrical shock - Donot useoutdoors or on wet surfaces.
Do not allow to be used as a toy. Closeattention is necessary when used by or nearchildren.
Do not usewith a damaged cord or plug.If vacuum cleaner is not working as itshould,has been dropped, damaged, leftoutdoors, or dropped in water, return it to aSears Service Center.
Do not pull or carry by cord, use cord as ahandle, close a door on cord, or pull cordaround sharp edges or corners. Do not runvacuum cleaner overcord. Keep cordaway from heated surfaces.
Do not unplug by pulling on cord. Tounplug, grasp the plug, not the cord.
Do not handle plug or vacuum cleaner withwet hands.
Do not put any objects into openings.
Do not usewith any opening blocked; keepfree of dust, lint, hair, and anything thatmay reduce air flow.
Keep hair, loose clothing, fingers, and allparts of body away from openings andmoving parts.
Turn off all controls before unplugging.
Use extra care when cleaning on stairs.Do not put on chairs, tables, etc. Keep onfloor.
Do not use vacuum cleaner to pick upflammable or combustible liquids (gasoline,cleaning fluid, perfumes, etc.), or use inareas where they may be present. Thefumes from these substances can create afire hazard or explosion.
Do not pick up anything that is burning orsmoking, such as cigarettes, matches, or hotashes.
Do not use vacuum cleaner without dustbag and/or filters in place.
Always change the dust bag aftervacuuming carpet cleaners or freshener,powders, and fine dust. These productsclog the filters, reduce airflow and cancause damage to the vacuum cleaner.Failure to chage the bag could causepermanent damage to the vacuum cleaner.
Do not use the vacuum cleaner to pick upsharp hard objects, small toys, pins, paperclips, etc. They may damage the vacuumcleaner.
Do not operature the vacuum cleanerwithout the exhaust filter or filter door inplace.
The hose contains electrical wires. Do notuse when damaged, cut, or punctured.Replace if cut or worn. Do not pick upsharp objects.
Always turn off and unplug beforeconnecting or disconnecting either hose,wand, Pet PowerMate ®,or nozzle.
Hold plug when rewinding onto cord reel.Do not allow plug to whip when rewinding.
You are responsible for making sure thatyour vacuum cleaner is not used by anyoneunable to operate it properly.
SAVE THESE iNSTRUCTiONSProper assembly and safe use ofyour vacuum cleaner are your responsibilities. Your vacuumcleaner is intended for Household use. Read this Use & Care Guide carefully for importantuse and safety information. This guide contains safety statements under warning andcaution symbols.
=4 =
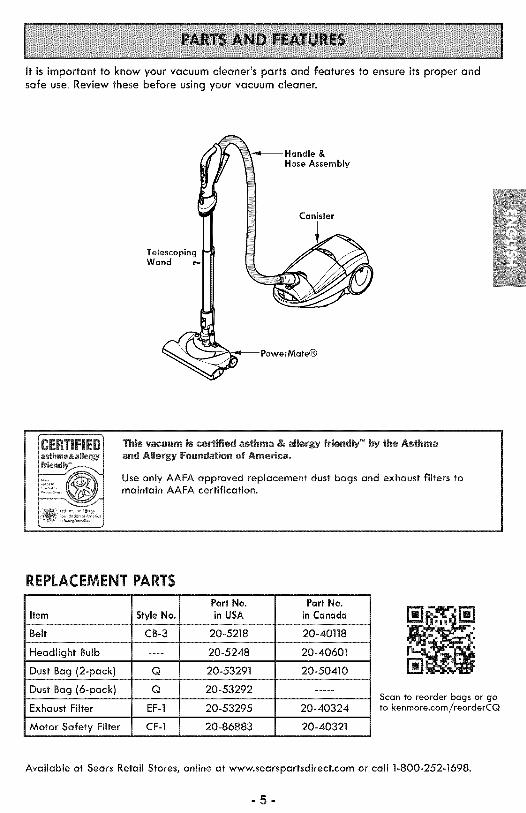
It is important to know your vacuum cleaner's parts and features to ensure its proper andsafe use. Review these before using your vacuum cleaner.
Hose Assembmy
Canister
This vacuum is certified asthma & allergy friendly TM by the Asthma
and A||ergy Foundation of Amer_cao
Use only AAFA approved replacement dust bags and exhaust filters tomaintain AAFA certification.
REPLACEMENT PARTS
Part No.Item Style No. in USA
Belt CB-3 20-5218
Headlight Bulb .... 20-5248
Dust Bag (2-pack) Q 20-53291
Dust Bag (6-pack) Q 20-53292
Exhaust Filter EF-] 20-53295
Motor Safety Filter CF-] 20-86883
Part No.in Canada
20-40]]8
20-40601
20-50410
20-40324
20-40321
Scan to reorder bags or goto kenrnore.com/reorderCQ
Available at Sears Retail Stores, online at www.searspartsdirect.com or call 1-800-252-1698.
-5-
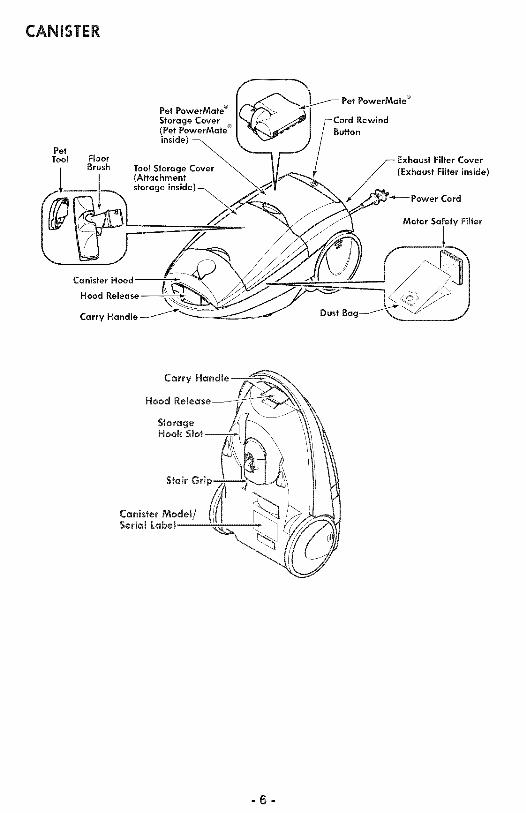
CANISTER
PetTool
Pet PowerMate ®
Storage Cover(Pet PowerMote ®inside)
ToomStorage Cover(Attachment
storage inside) -_
Pet PowerMate ®
:ord Rewind
Button
Filter Cover
(Exhaust Filter inside)
Zord
Motor Safety Filter
Carry Handle
-6-
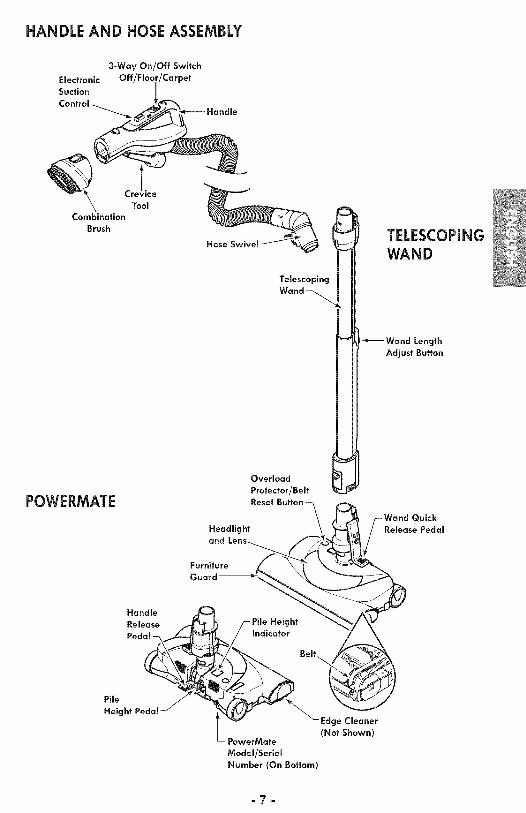
HANDLE AND HOSE ASSEMBLY
Electronic
SuctionControl
3-Way On/Off Switch
Crevice
Tool
CombinationBrush
POWERMATE
Telescoping
Wand
Overload
Protector/Belt
Reset
Headlightand
Furniture
G
TELESCOPINGWAND
_Wand Length
Adjust Button
Quick
Release Pedal
HandleRelease _ _ /--Pile HeightPedal / _ / Indicator
_ilee'ghtPeda'" t _ _Edge Cleaner
L_ PowerMate (Not Shown)
Model/SerialNumber (On Bottom)
-7-

Please pay special attention to these hazard alert boxes, and follow any instruc-tions given. WARNING statements alert you to such dangers as fire, electricshock, burns and personal injury. CAUTION statements alert you to such dan-gers as personal injury and/or property damage.
WARNING
Electrical Shock Hazard
DO NOT plug into electrical supply untilassembly is complete. Failure to do so
Before assembling vacuum cleaner, checkthe PACKING LIST (page 2). Use this listto verify that you have received andidentified all the components of your newKenmore vacuum cleaner.
POWERMATE
Insert wand ontoPowerMate until thewand locks into place.
CANISTER1. Open the canister hood.
2. Check to see that the dust bag isproperly installed. See BAG CHANGING(page 20) for instructions.
3. Check to see that the motor safety filteris properly installed. See MOTOR SAFETYFILTERCHANGING (page 21) forinstructions.
HOOD AND TOOL STORAGECOVER
It is normal for the canister hood and tool
storage cover to come off when openedfurther than needed. Line up the hinge slots,insert the hinges into the slots, and closethe hood and tool storage cover toreinstall.
CAUTIONNever open canister hood with the toolstorage cover open. This will help toprevent damage from occurring to thecanister hood and/or tool storage cover.
HOSE
Line up the hose latch tab and notch incanister hood and insert hose into canister
until it snaps into place.
-!// j
Hose
Latch
To remove: Do not open hood beforeremoving hose. With hood closed, depresshose latch tab. Pull upward on hose.
-8-
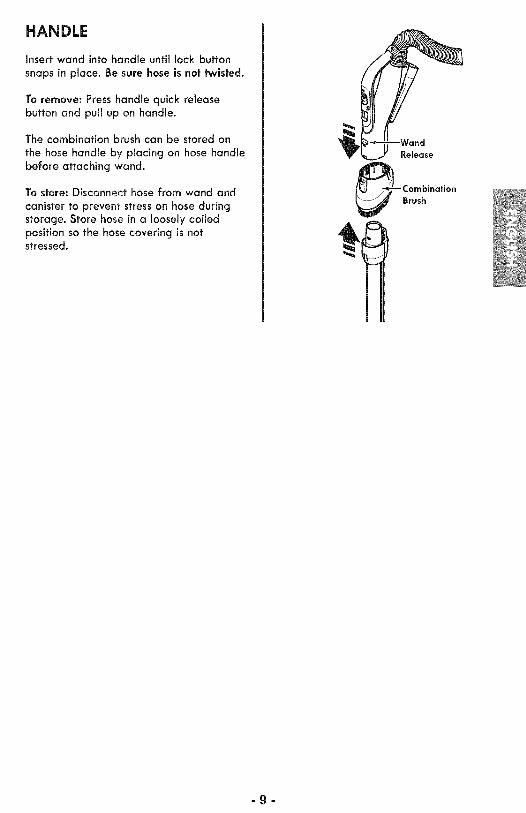
HANDLE
Insert wand into handle until lock button
snaps in place. Be sure hose is not twisted.
To remove: Press handle quick releasebutton and pull up on handle.
The combination brush can be stored on
the hose handle by placing on hose handlebefore attaching wand.
To store: Disconnect hose from wand and
canister to prevent stress on hose duringstorage. Store hose in a loosely coiledpositionso the hose covering is notstressed.
Release
Brush
=g=
CAUTIONMoving parts! To reduce the risk of personal injury, DONOT touch the agitator when vacuum cleaner is on.Contacting the agitator while it is rotating can cut,bruise or cause other injuries. Always turn off andunplug from electrlcal outlet before servicing.
Use caution when operating near children.
HOW TO START
WARNINGPersonal injury and Product DamageHazard
DO NOT plug in if switch is in ONposition. Personal injury or propertydamage could result.
The cord moves rapidly whenrewinding. Keep children awayand provide a clear path whenrewinding the cord to preventpersonal injury.
DO NOT use outlets above counters.
Damage from cord to items insurrounding area could occur.
When any abnormality/failure occurs,stop using the product immediately anddisconnect the power plug.
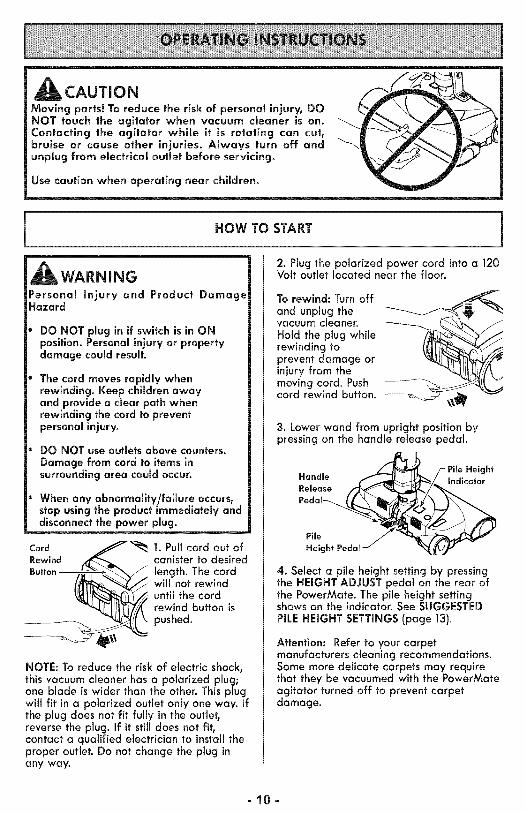
Card f'_Rewind
1. Pull cord out ofcanister to desired
length. The cordwill not rewinduntil the cordrewind button is
pushed.
NOTE: To reduce the risk of electric shock,this vacuum cleaner has a polarized plug;one blade is wider than the other. This plugwill fit in a polarized outlet only one way. Ifthe plug does not fit fully in the outlet,reverse the plug. If it still does not fit,contact a qualified electrician to install theproper outlet. Do not change the plug inany way.
2. Plug the polarized power cord into a 120Volt outlet located near the floor.
To rewind: Turn off
and unplug thevacuum cleaner.
Hold the plug whilerewinding toprevent damage orinjury from themoving cord. Pushcord rewind button. --
3. Lower wand from upright position bypressing on the handle release pedal.
Handle IndicatorRelease
Pile
Height Pedal
4. Select a pile height setting by pressingthe HEIGHT ADJUST pedal on the rear ofthe PowerMate. The pile height settingshows on the indicator. See SUGGESTEDPiLE HEIGHT SETTINGS (page 13).
Attention: Refer to your carpetmanufacturers cleaning recommendations.Some more delicate carpets may requirethat they be vacuumed with the PowerMateagitator turned off to prevent carpetdamage.
-10-
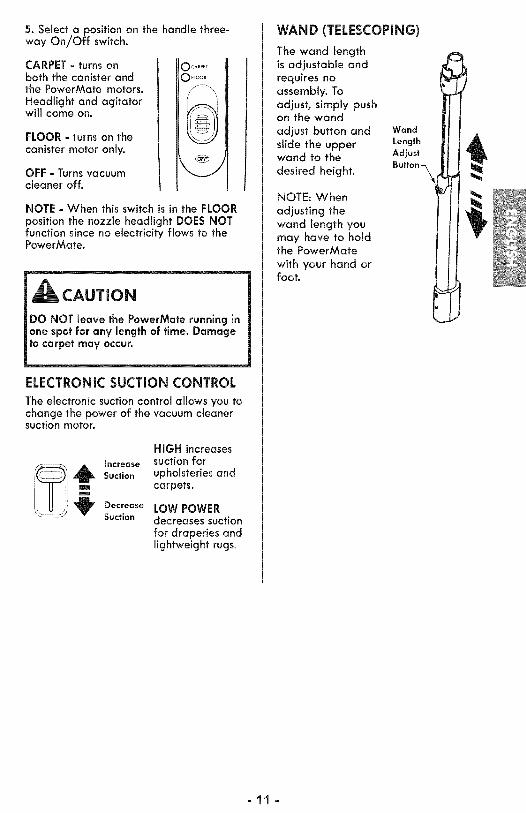
5. Select a position on the handle three-way On/Off switch.
CARPET = turns onboth the canister andthe PowerMate motors.Headlight and agitatorwill come on.
FLOOR = turns on thecanister motor only.
OFF - Turns vacuumcleaner off.
)CARPET
)FLOOR
NOTE = When this switch is in the FLOORposition the nozzle headlight DOES NOTfunction since no electricity flows to thePowerMate.
CAUTION
DO NOT leave the PowerMate running inone spot for any length of time. Damageto carpet may occur.
ELECTRONIC SUCTION CONTROL
The electronic suction control allows you tochange the power of the vacuum cleanersuction motor.
HIGH increasesIncrease suction for
,_ Suction upholsteries andmm carpets.
_V LOW POWERDecrease
Suction decreases suctionfor draperies andlightweight rugs.
WAND (TELESCOPING)
The wand lengthis adjustable andrequires noassembly. To
adjust, simply pushan the wand
adjust button and Wandslide the upper Lengthwand to the Adjust
desired height. Button_
NOTE: When
adjusting the
wand length youmay have to holdthe PowerMate
with your hand orfoot.
=11 =
VACUUMING TiPS
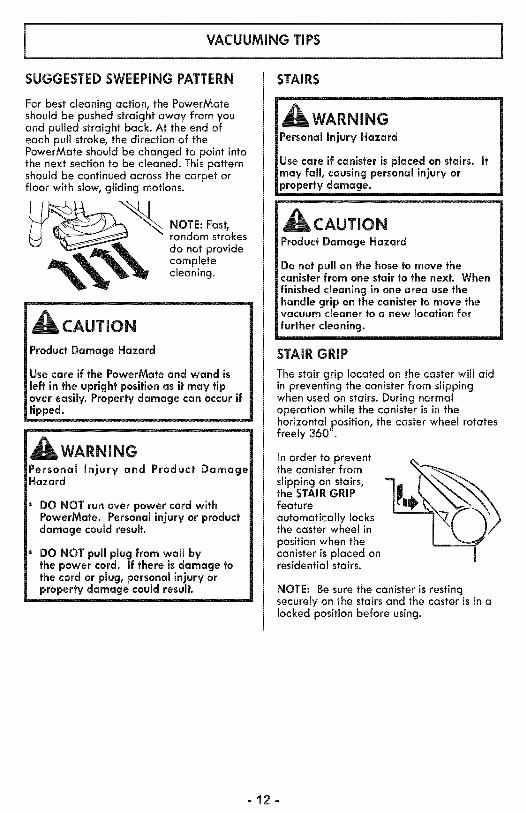
SUGGESTED SWEEPING PATTERN
For best cleaning action, the PowerMateshould be pushed straight away from youand pulled straight back. At the end ofeach pull stroke, the direction of thePowerMate should be changed to point intothe next section to be cleaned. This patternshould be continued across the carpet orfloor with slow, gliding motions.
NOTE: Fast,random strokesdo not providecompletecleaning.
CAUTION
Product Damage Hazard
Use care if the PowerMate and wand isleft in the upright position as it may tipover easily. Property damage can occur iftipped.
WARNINGPersonal Injury and Product DamageHazard
DO NOT run over power cord withPowerMate. Personal injury or productdamage could result.
DO NOT pull plug from wall bythe power cord. If there is damage tothe cord or plug, personal injury orproperty damage could result.
STAIRS
WARNINGPersonal Injury Hazard
Use care if canister is placed on stairs. Itmay fall, causing personal injury orproperty damage.
CAUTIONProduct Damage Hazard
Do not pull on the hose to move thecanister from one stair to the next. When
finished cleaning in one area use thehandle grip on the canister to move thevacuum cleaner to a new location for
further cleaning.
STAIR GRiP
The stair grip located on the caster will aidin preventing the canister from slippingwhen used on stairs. During normaloperation while the canister is in thehorizontal position, the caster wheel rotatesfreely 360 °.
In order to preventthe canister fromslipping on stairs,the STAIR GRiPfeatureautomatically locksthe caster wheel inposition when thecanister is placed onresidential stairs.
NOTE: Be sure the canister is restingsecurely on the stairs and the caster is in alocked position before using.
-12-
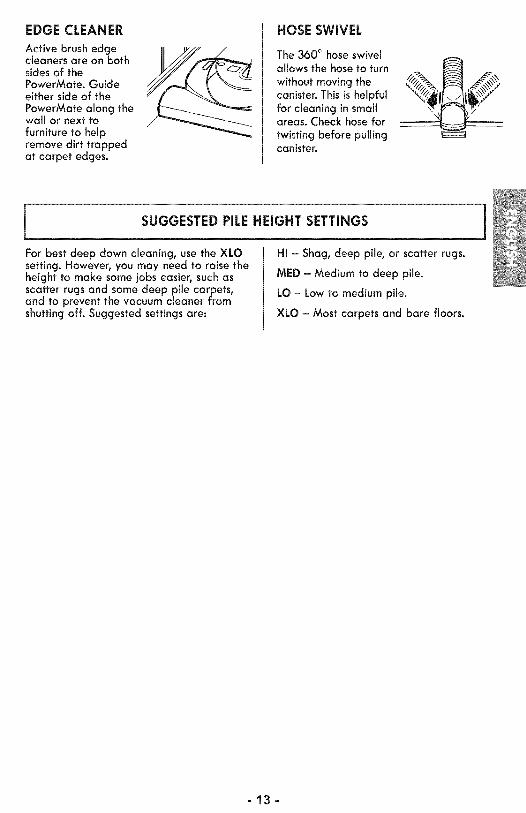
EDGECLEANERActive brush edgecleaners are on bothsides of thePowerMate. Guideeither side of thePowerMate along thewall or next tofurniture to helpremove dirt trappedat carpet edges.
HOSE SWIVEL
The 360 ° hose swivelallows the hose to turn
without moving thecanister. This is helpfulfor cleaning in smallareas. Check hose for
twisting before pullingcanister.
SUGGESTED PiLE HEIGHT SETTINGS
For best deep down cleaning, use the XLOsetting. However, you may need to raise theheight to make some jobs easier, such asscatter rugs and some deep pile carpets,and to prevent the vacuum cleaner fromshutting off. Suggested settings are:
HI - Shag, deep pile, or scatter rugs.
MED - Medium to deep pile.
LO - Low to medium pile.
XLO - Most carpets and bare floors.
-13-

ATTACHMENTS
CAUTION
DO NOT attach or remove handle orwands while vacuum cleaner is ON. This
could cause sparking and damage theelectrical contacts or electronic controls.
ATTACHMENTS ON HANDLE
NOTE: if the {I/l_/___wa
PowerMate is
attached, turnvacuum cleaneroff before
removing handle ndfrom wand. Release
1. Press wand _release button
and pull up onhandle.
2. Slide attachments firmly on handle asneeded. See ATTACHMENT USE TABLE(page ]6).
:ornbinafion
Brush
Per Tool
Crevice
Tool
Floor
Brush
Pet PowerMafe
NOTE:
To remove combination brush, press thebrush release button and slide off.
Brash
NOTE:To remove floor brush and/or PetPowerMate, pressthe wand release buttonand slide off.
Wand
Wand
-14-
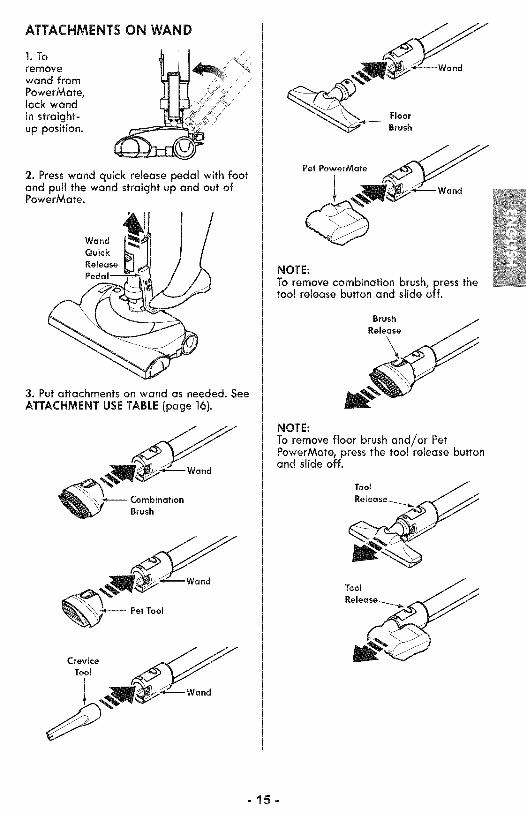
ATTACHMENTS ON WAND
,.Toremovewand from _;_///,"PowerMate,
lock wand ;__/_"in straight- ,_%_
up position.
2. Press wand quick release pedal with footand pull the wand straight up and out ofPowerMate.
p
3. Put attachments on wand as needed. SeeATTACHMENT USETABLE (page 16).
Combination
Brush
Crevice
Tool
Fmoor
Brush
NOTE:To remove combination brush, press thetool release button and slide off.
Brush
Release
NOTE:To remove floor brush and/or PetPowerMate, press the tool release buttonand slide off.
Tool
-15-
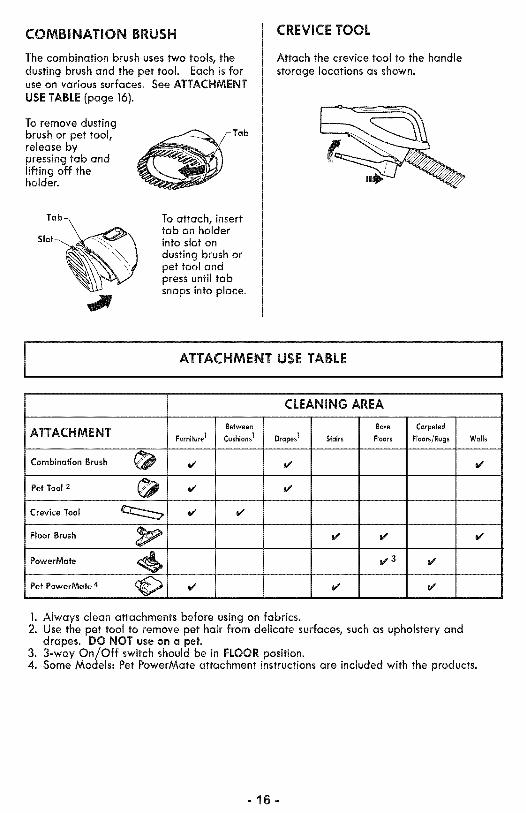
COMBINATION BRUSH
The combination brush usestwo tools, thedusting brush and the pet tool. Each is foruse on various surfaces. See ATTACHMENTUSETABLE (page 16).
To remove dustingbrush or pet tool,release bypressing tab andlifting off theholder.
Tab_ To attach, insert
Slot_ \_-4_ tab on holder
dusting brush orpet tool andpress until tabsnaps into place.
,J
CREVICE TOOL
Attach the crevice tool to the handlestorage locations as shown.
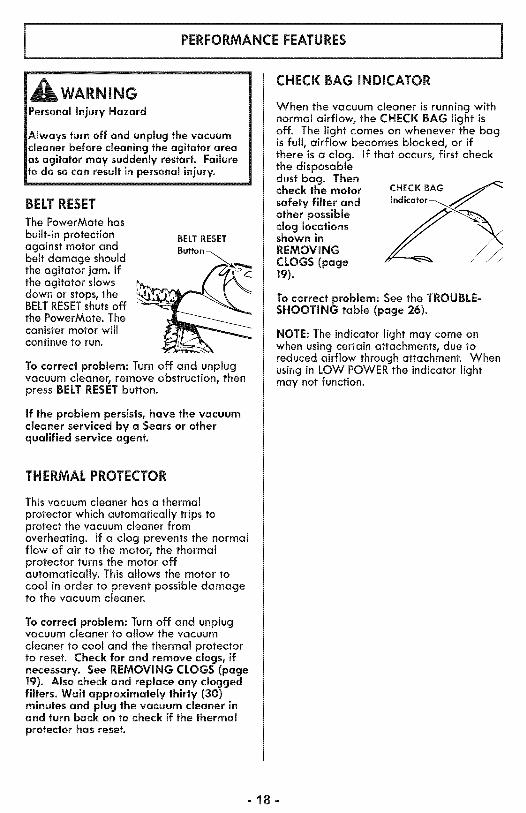
ATTACHMENT USE TABLE
CLEANING AREA
Between Bare Carpeted
ATTACHMENT Fur.lt,.oI Cush_o.sI DroposI Stoi_ El.... Floo_/_og_woll_
Combination Brush _ i/ i/ I/
Pet Tool 2 (_ i/ i/
Crevice Tool _ i/
Floor Brush _ i/ i/ i/
PowerMate _ i/3 i/
Pet PowerMate 4 _ _/ _/ _/
1. Always clean attachments before using on fabrics.2. Use the pet tool to remove pet hair from delicate surfaces, such as upholstery and
drapes. DO NOT use on a pet.3. 3-way On//Off switch should be in FLOOR position.4. Some Models: Pet PowerMate attachment instructions are included with the products.
-16-

ATTACHMENTSTORAGE
PetPowerMate
This canister is equipped with an on-boardstorage area for a Pet PowerMateattachment.
To Store:
1. Open the Pet PowerMate storage cover.
2. Insert the Pet PowerMate and press downuntil it clicks into place.
3. Close the lid securely.
Pet PowerMateCover
To Remove:
1. Open the storage cover.
2. Remove Pet PowerMate from the storagearea.
3. Use as needed. See ATTACHMENTS
(page 14-15) and ATTACHMENT USE TABLE(page 16).
Floor Brush & Pet Tool
This canister is equipped with an on-boardstorage area for attachments.
To Store:
1. Open the tool storage cover.
2. Insert the tool and pressdown until itclicks into place.
3. Close the lid securely.
Pet _ _ Cover
Tool
Floor
Oro,,
To Remove:
1. Open the storage cover.
2. Remove attachment from the storagearea.
3. Use as needed. See ATTACHMENTS
(page 14-15)and ATTACHMENT USETABLE(page 16).
-17-
PERFORMANCE FEATURES
WARNING
Personal injury Hazard
Always turn off and unplug the vacuumcleaner before cleaning the agitator areaas agitator may suddenly restart. Fallure
to do so can result in personal injury.
BELT RESET
The PowerMate hasbuilt-in protectionagainst motor andbelt damage shouldthe agitator jam. ifthe agitator slowsdown or stops, theBELT RESET shuts offthe PowerMate. Thecanister motor willcontinue to run.
BELT RESET
To correct problem: Turn off and unplugvacuum cleaner, remove obstruction, thenpress BELT RESET button.
If the problem persists, have the vacuumcleaner serviced by a Sears or otherqualified service agent.
THERMAL PROTECTOR
This vacuum cleaner has a thermalprotector which automatically trips toprotect the vacuum cleaner fromoverheating. If a clog prevents the normalflow of air to the motor, the thermalprotector turns the motor offautomatically. This allows the motor tocool in order to prevent possible damageto the vacuum cleaner.
To correct problem: Turn off and unplugvacuum cleaner to allow the vacuumcleaner to cool and the thermal protectorto reset. Check for and remove clogs, ifnecessary. See REMOVING CLOGS (page19). Also check and replace any cloggedfilters. Wait approxlmately thirty (30)minutes and plug the vacuum cleaner inand turn back on to check if the thermalprotector has reset.
CHECK BAG iNDiCATOR
When the vacuum cleaner is running withnormal airflow, the CHECK BAG light isoff. The light comes on whenever the bagis full, airflow becomes blocked, or ifthere is a clog. If that occurs, first checkthe disposabledust bag. Thencheck the motor CHECKBAGsafety filter andother possiblectog locationsshown inREMOVINGCLOGS (page19).
To correct problem: See the TROUBLE=SHOOTING table (page '26).
NOTE: The indicator light may come onwhen using certain attachments, due toreduced airflow through attachment. Whenusing in LOW POWER the indicator lightmay not function.
=18=
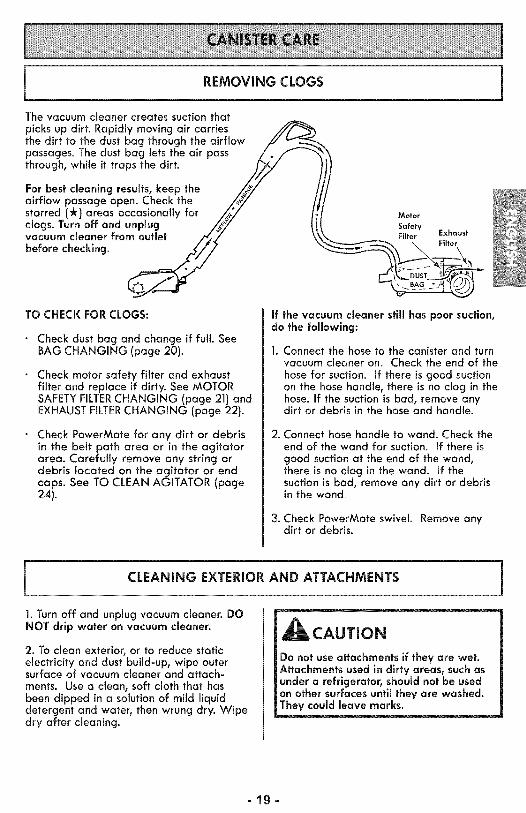
REMOVING CLOGS
The vacuum cleaner creates suction that
picks up dirt. Rapidly moving air carriesthe dirt to the dust bag through the airflow // _'___passages. The dust bag lets the air pass /, f_-_-q
through, while it traps the dirt. /j_//v //-/
For best cleaning results, keep the ,/_o_/ ,airflow passage open. Check the /'_/ /starred (-k) areas occasionally for /__*/ J,clogs.Turnoffandunplugvacuum cleaner from outlet ,,'_I_" \
before checking. S
TO CHECK FOR CLOGS:
Check dust bag and change if full. SeeBAG CHANGING (page 20).
Check motor safety filter and exhaustfilter and replace if dirty. See MOTORSAFETYFILTERCHANGING (page 21) andEXHAUSTFILTERCHANGING (page 22).
Check PowerMate for any dirt or debrisin the belt path area or in the agitatorarea. Carefully remove any string ordebris located on the agitator or endcaps. See TO CLEAN AGITATOR (page24).
Motor
Safety
If the vacuum cleaner still has poor suction,do the following:
Connect the hose to the canister and turnvacuum cleaner on. Check the end of the
hose for suction. If there is good suctionon the hose handle, there is no clog in thehose. If the suction is bad, remove anydirt or debris in the hose and handle.
2. Connect hose handle to wand. Check theend of the wand for suction. If there isgood suction at the end of the wand,there is no clog in the wand. If thesuction is bad, remove any dirt or debrisin the wand.
3. Check PowerMate swivel. Remove anydirt or debris.
CLEANING EXTERIOR AND ATTACHMENTS
1. Turn off and unplug vacuum cleaner. DONOT drip water on vacuum cleaner.
2. To clean exterior, or to reduce staticelectricity and dust build-up, wipe outersurface of vacuum cleaner and attach-ments. Use a clean, soft cloth that hasbeen dipped in a solution of mild liquiddetergent and water, then wrung dry. Wipedry after cleaning.
CAUTION
Do not use attachments if they are wet.Attachments used in dirty areas, such asunder a refrigerator, should not be usedon other surfaces until they are washed.They could leave marks.
-lg-
BAGCHANGING
For best cleaning results, the dust bag should be changed often. The CHECK BAG indicatorwill come on when the bag needs to be changed or the airflow is blocked.
NOTE: Use replacement dust bag STYLEQ, see part number detail in REPLACEMENTPARTS(page 5).
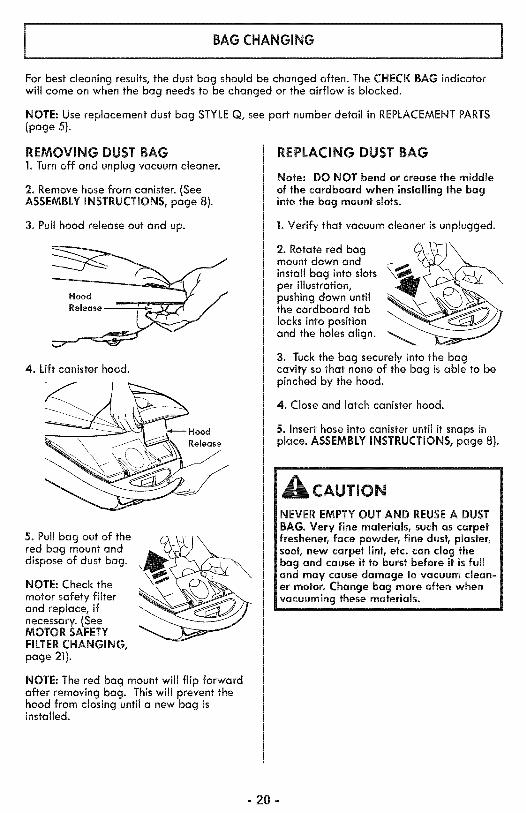
REMOVING DUST BAG1. Turn off and unplug vacuum cleaner.
2. Remove hose from canister. (SeeASSEMBLYINSTRUCTIONS, page 8).
3. Pull hood release out and up.
4. Lift canister hood.
_Hood
5. Pull bag out of thered bag mount anddispose of dust bag.
,!NOTE: Check themotor safety filterand replace, ifnecessary. (SeeMOTOR SAFETYFILTERCHANGING,page 21).
NOTE: The red bag mount will flip forwardafter removing bag. This will prevent thehood from closing until a new bag isinstalled.
REPLACING DUST BAG
Note: DO NOT bend or crease the middleof the cardboard when installing the baginto the bag mount slots.
1. Verify that vacuum cleaner isunplugged.
2. Rotate red bogmount down andinstall bag into slotsper illustration,pushingdown untilthe cardboard tablocks into positionand the holes align.
3. Tuck the bag securely into the bagcavity so that none of the bag is able to bepinched by the hood.
4. Close and latch canister hood.
5. Insert hose into canister until it snaps inplace. ASSEMBLY INSTRUCTIONS, page 8).
CAUTION
NEVER EMPTY OUT AND REUSEA DUSTBAG. Very fine materials, such as carpetfreshener, face powder, fine dust, plaster,soot,new carpet lint, etc. can clog thebag and cause it to burst before it is fulland may cause damage to vacuum clean-er motor. Change bag more often whenvacuuming these materials.
- 20 -
MOTORSAFETYFILTERCHANGING
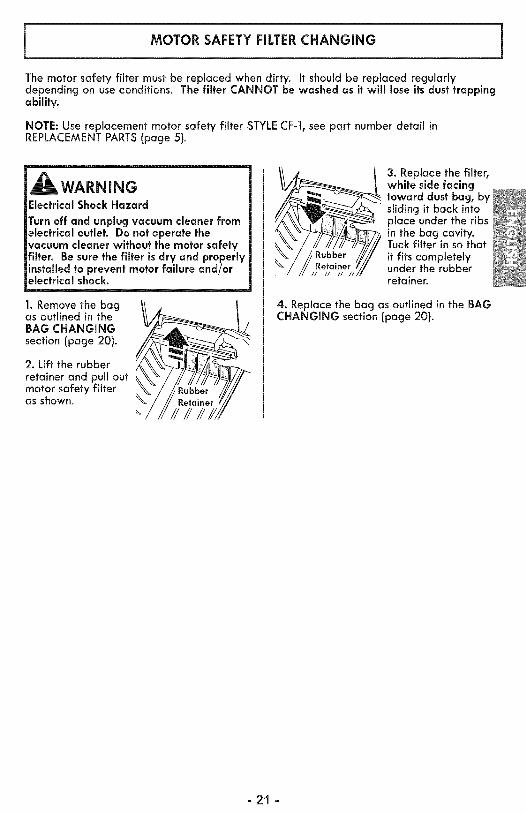
The motor safety filter must be replaced when dirty, It should be replaced regularlydepending on use conditions. The filter CANNOT be washed as it will lose its dust trappingability.
NOTE: Use replacement motor safety filter STYLECF-1,see part number detail inREPLACEMENTPARTS(page 5).
WARNINGElectrical Shock Hazard
Turn off and unplug vacuum cleaner fromelectrical outlet. Do not operate thevacuum cleaner without the motor safetyfilter. Be sure the filter is dry and properlyinstalled to prevent motor failure and/orelectrical shock.
1. Remove the bagas outlined in theBAG CHANGINGsection (page 20).
2. Lift the rubberretainer and pull outmotor safety filteras shown.
3. Replace the filter,white side facingtoward dust bag, bysliding it back intoplace under the ribsin the bag cavity.Tuck filter in so thatit fits completelyunder the rubberretainer.
4. Replace the bag as outlined in the BAGCHANGING section (page 20).
-21 -
EXHAUST FILTER CHANGING
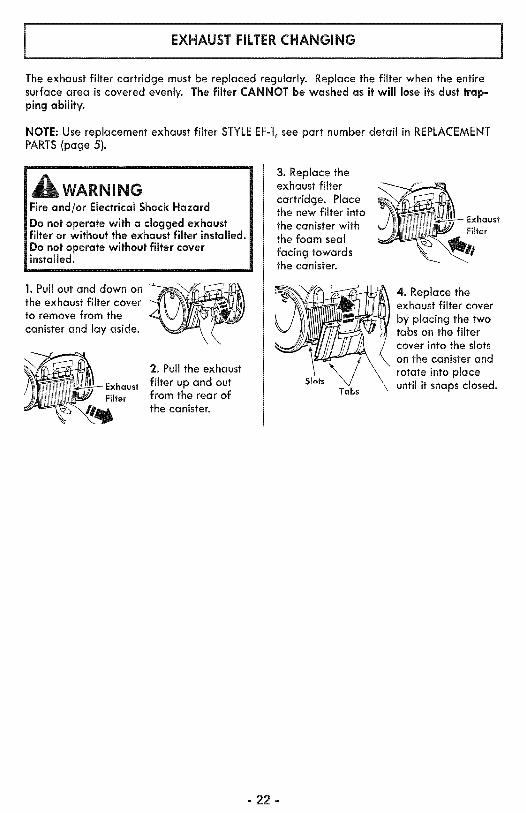
The exhaust filter cartridge must be replaced regularly. Replace the filter when the entiresurface area is covered evenly. The filter CANNOT be washed as it will lose its dust trap-ping ability.
NOTE: Use replacement exhaust filter STYLEEF-1,see part number detail in REPLACEMENTPARTS(page 5).
WARNINGFire and/or Electrical Shock Hazard
Do not operate with a clogged exhaustfilter or without the exhaust filter installed.Do not operate without filter coverinstalled.
1. Pull out and down on __the exhaust filter coverto remove from the
canister and lay aside.
__---_-_ Exhaust
Fiffer
2. Pull the exhaust
filter up and outfrom the rear ofthe canister.
3. Replace theexhaust filter
cartridge. Placethe new filter intothe canister withthe foam seal
facing towardsthe canister.
SlotsTabs
Exhaust
ter
4. Replace theexhaust filter cover
by placing the twotabs on the filtercover into the slotson the canister and
rotate into placeuntil it snaps closed.
=22 =
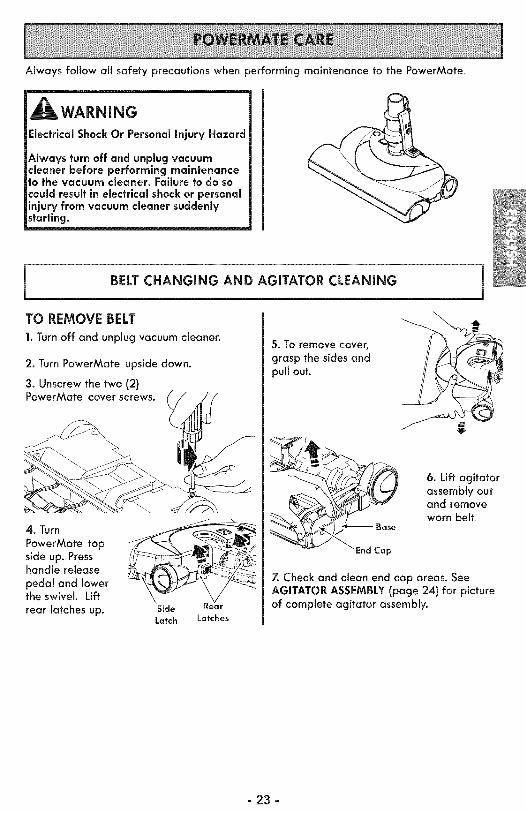
Always follow all safety precautions when performing maintenance to the PowerMate.
WARNING
Electrical Shack Or Persanal injury Hazard
Always turn aft and unplug vacuumcleaner before performing maintenanceto the vacuum cleaner. Failure ta da sa
could result in electrical shock ar personalinjury from vacuum cleaner suddenlystarting.
BELT CHANGING AND AGITATOR CLEANING JTO REMOVE BELT
1. Turn off and unplug vacuum cleaner.
2. Turn PowerMate upside down.
3. Unscrew the two (2)PowerMate cover screws.
4Tur0PowerMate top
side up. Press _jhandle release _ _,_-pedal and lower _- .........._the swivel. Lift \_" _/rear latches up. Side ear" R
Latch Latches
5. To remove cover_grasp the sides andpull out.
6. Lift agitatorassemblyoutand removeworn belt.
7. Check and clean end cap areas. SeeAGITATOR ASSEMBLY (page 24) for pictureof complete agitator assembly.
- 23 -
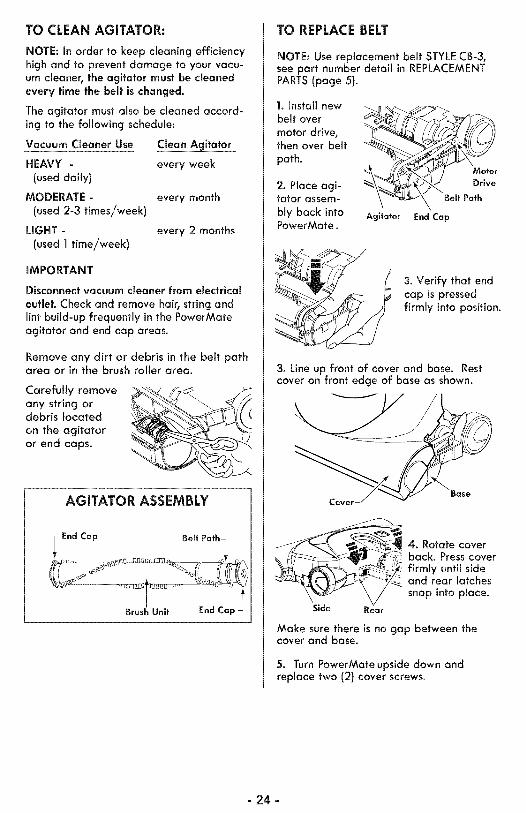
TOCLEAN AGITATOR:
NOTE: In order to keep cleaning efficiencyhigh and to prevent damage to your vacu-um cleaner, the agitator must be cleanedevery time the belt is changed.
The agitator must also be cleaned accord-ing to the following schedule:
Vacuum Cleaner Use
HEAVY -
(used daily)
MODERATE -
(used 2-3 times/week)
LIGHT -
(used 1 time/week)
Clean Agitator
every week
every month
every 2 months
IMPORTANT
Disconnect vacuum cleaner from electrical
outlet. Check and remove hair, string andlint build-up frequently in the PowerMateagitator and end cap areas.
Remove any dirt or debris in the belt patharea or in the brush roller area.
oreemovany string ordebris located
on the agitatoror end caps.
AGITATOR ASSEMBLY
TO REPLACE BELT
NOTE: Use replacement belt STYLE CB-3,see part number detail in REPLACEMENTPARTS (page 5).
1. Install new
belt over
motor drive,then over belt
path.
2. Place agi- _\_/_._ Drive
tarot assem- \ "_'-,_/_ BeffPathbly back into Agitator EndCapPowerMate.
3. Verify that endcap is pressedfirmly into position.
3. Line up front of cover and base. Restcover on front edge of base as shown.
Covel
Side Rear
4. Rotate coverback. Press coverfirmly until sideand rear latches
snap into place.
Make sure there is no gap between thecover and base.
5. Turn PowerMateupside down andreplace two (2) cover screws.
- 24 -
LIGHTBULBCHANGING
_WARNING
Electrical Shock Or Personal injuryHazard
Turn off and unplug vacuum deanerbefore performing maintenance to thevacuum cleaner. Failure to do so could
result in electrical shock or personalinjury From the vacuum cleanersuddenly starting.
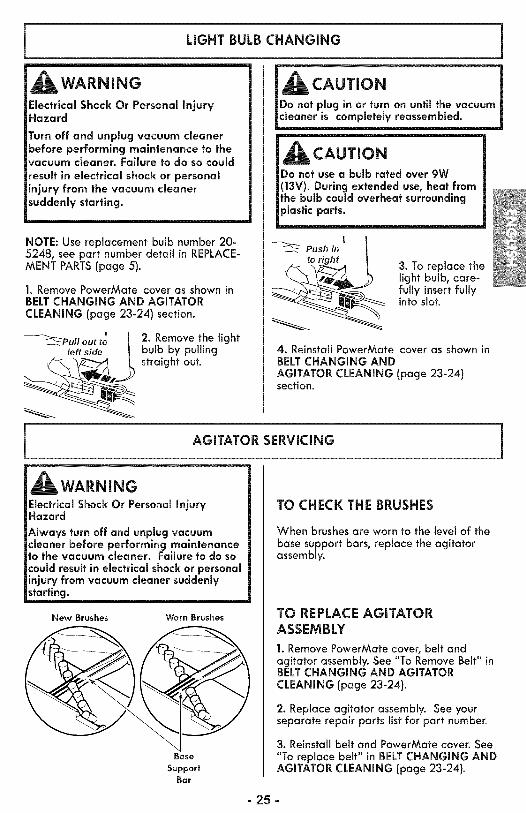
NOTE: Use replacement bulb number 20-5248, see part number detail in REPLACE-MENT PARTS (page 5).
1. Remove PowerMate cover as shown inBELTCHANGING AND AGITATORCLEANING (page 23-24) section.
2. Remove the lightbulb by pullingstraight out.
CAUTIONDo not plug in or turn on until the vacuum
CAUTION
_ Push in
to right3. To replace thelight bulb, care-fully insert fullyinto slot.
4. Reinstall PowerMate cover as shown inBELT CHANGING ANDAGITATOR CLEANING (page 23-24)section.
AGITATOR SERVICING
WARNINGElectrical Shack Or Personal InjuryHazard
Always turn off and unplug vacuumcleaner before performing maintenanceto the vacuum cleaner. Failure to do socould result in electrical shock or personalinjury from vacuum cleaner suddenlystarting.
New Brushes Worn Brushes
Bose
SupportBar
- 25
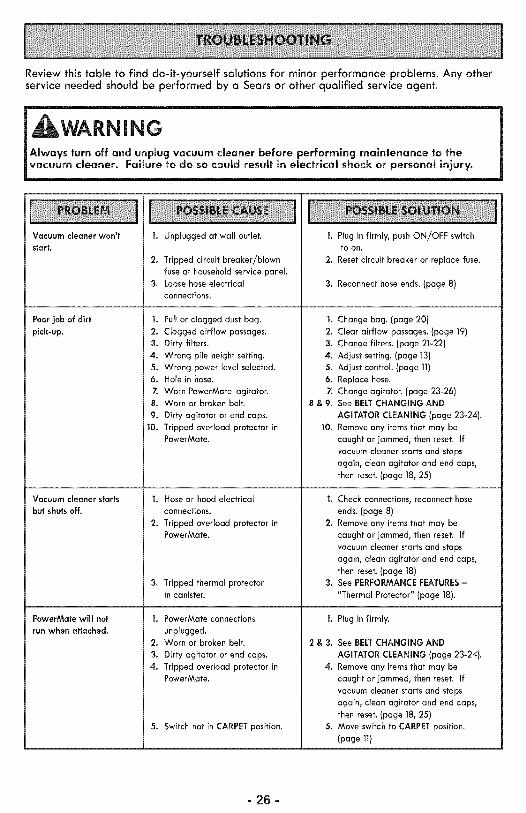
TO CHECK THE BRUSHES
When brushes are worn to the level of the
base support bars, replace the agitatorassembly.
TO REPLACE AGITATORASSEMBLY
1. Remove PowerMate cover, belt andagitator assembly.See "To Remove Belt" inBELTCHANGING AND AGITATORCLEANING (page 23-24).
2. Replace agitator assembly. See yourseparate repair parts list for part number.
3. Reinstall belt and PowerMate cover. See
"To replace belt" in BELT CHANGING ANDAGITATOR CLEANING (page 23-24).
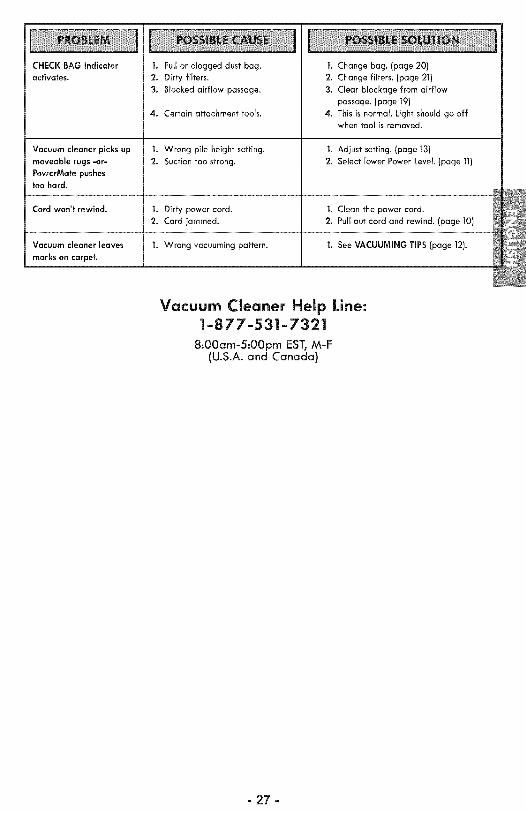
Review this table to find do-it-yourself solutions for minor performance problems. Any otherservice needed should be performed by a Sears or other qualified service agent.
WARNINGAlways turn off and unplug vacuum cleaner before performing maintenance to the
vacuum cleaner. Fallure to do so could result in electrlcal shock or personal injury.
Vacuum cleaner won't
start.
I.
2.
Poor job of dirt I.pick=up. 2.
3.
4.5.
6.7.
8.9.
10.
Vacuum cleaner startsbut shuts off.
PowerMate will notrun when attached.
Unplugged at wall outlet.
Tripped circuit breaker/blown
fuse at household service panel.
Loose hose electricalconnections.
Full or clogged dust bag.
Clogged airflow passages.
Dirty filters.
Wrong pile height setting.
Wrong power level selected.
Hole in hose.
Worn PowerMate agitator.Worn or broken belt.
Dirty agitator or end caps.
Tripped overload protector inPowerMate.
I. Hose or hood electricalconnections.
2. Tripped overload protector inPowerMate.
3. Tripped thermal protector
in canister.
1. PowerMate connections
unplugged.
2. Worn or broken belt.
3. Dirty agitator or end caps.
4. Tripped overload protector inPowerMate.
5. Switch not in CARPET position.
I. Plug in firmly, push ON/OFF switch
to on.
2. Reset circuit breaker or replace fuse.
3. Reconnect hose ends. (page 8)
I. Change bag. (page 20)
2. Clear airflow passages. (page 19)
3. Change filters. (page 21-22)
4. Adjust setting. (page 13)
5. Adjust control. (page 11)6. Replace hose.
Z Change agitator. (page 23-26)8 & 9. See BELTCHANGING AND
AGITATOR CLEANING (page 23-24).10. Remove any items that may be
caught or jammed, then reset, if
vacuum cleaner starts and stops
again, clean agitator and end caps,
then reset. (page 18, 25)
I. Check connections, reconnect hose
ends. (page 8)2. Remove any items that may be
caught or jammed, then reset. If
vacuum cleaner starts and stops
again, clean agitator and end caps,
then reset. (page 18)3. See PERFORMANCE FEATURES-
"Thermal Protector" (page 18).
I.
2&3.
4.
5.
Plug in firmly.
See BELTCHANGING AND
AGITATOR CLEANING (page 23-24).Remove any items that may be
caught or jammed, then reset, if
vacuum cleaner starts and stops
again, clean agitator and end caps,
then reset. (page 18, 25)Move switch to CARPET position.
(page 11)
=26 =
CHECK BAG indicatoractivates.
I. Full or clogged dust bag.2. Dirty filters.
3. Blocked airflow passage.
I. Change bag. (page 20)
2. Change filters. (page 21)
3. Clear blockage from airflow
passage. (page 19)
4. This is normal. Light should go offwhen tool is removed.
4. Certain attachment tools.
Vacuum cleaner picks up 1. Wrong pile height setting. 1. Adjust setting. (page 13)
moveable rugs -or- 2. Suction too strong. 2. Select lower Power Level (page 11)PowerMate pushes
too hard.
Cord won't rewind. I. Dirty power cord. I. Clean the power cord.
2. Cord jammed. 2. Pull out cord and rewind. (page 10)
Vacuum cleaner leaves I. Wrong vacuuming pattern. I. See VACUUMING TIPS (page 12).
marks on carpet.
Vacuum Cleaner Help Line:1-877-531-7321
8:00am-5:OOpm EST, M-F(U.S.A. and Canada)
- 27 -
MasterProtectionAgreements
Congratulations on making a smart purchase. Your new Kenmore® product is designed and
manufactured for years of dependable operation. But like all products, it may require
preventive maintenance or repair from time to time. That's when having a Master Protection
Agreement can save you money and aggravation.
The Master Protection Agreement also helps extend the life of your new product. Here's what
the Agreement _ includes:
[] Parts and tabor needed to help keep products operating properly under normaJ use, notjust defects. Our coverage goes well beyond the product warranty. No deductibles, nofunctional failure excluded from coverage -- reaJ protection.
[] Expert service by a force of more than 10,0OO authorized Sears service technicians,which means someone you can trust will be working on your product.
[] Unlimited service coifs and nationwide service, as often as you want us, whenever youwant US,
[] "No-Jemon" guarantee - replacement of your covered product if four or more productfailures occur within twelve months.
[] Product replacement if your covered product can't be fixed.
[] AnnuaJ Preventive Maintenance Check at your request - no extra charge.
[] Fast hetp by phone - we call it Rapid Resolution - phone support from a Searsrepresentative on aH products. Think of us as a "talking owner's manual."
[] Power surge protection against electrical damage due to power fluctuations.
[] $250 Food LossProtection annually for any food spoilage that is the result ofmechanical failure of any covered refrigerator or freezer.
[] RentaJ reimbursement if repair of your covered product takes longer than promised.
[] 10% discount off the regular price of any non-covered repair service and reJatedinstalled parts.
Once you purchase the Agreement, a simple phone call is all that if takes for you to scheduleservice. You can call anytime day or night, or schedule a service appointment online.
The Master Protection Agreement is a risk free purchase, if you cancel for any reason during
the product warranty period, we will provide a full refund. Or, a prorated refund anytime after
the product warranty period expires. Purchase your Master Protection Agreement today!
Some limitations and exclusions apply. For prices and additional information in the U.S.A. call]-800-827-6655.
Coverage in Canada varies on some items. For full details call Sears Canada at ]-800-361-6665.
Sears Installation Service
For Sears professional installation of home appliances, garage door openers, water heaters,and other major home items, in the U.S.A. or Canada call ]-800-4-MY-HOME®.
=28 =
Antes de usar su aspiradora nueva . .. 1Lista de embalaje ............... 1
L_nea de ayuda de aspiradoras ...... 2Garanfia de la aspiradorade Kenmore ...................... 2Instrucciones importantesde seguridad ..................... 3Piezas V caracter_stlcas ............ 4-6Instrucclones de ensamble ......... 7-8Instrucciones de operati6n .......... 9
Para comenzar ............... 9-10Sugerencias para aspirar ...... 11-12Sugerencias sobre el ajuste denivel de pelo de la alfombra ..... 12Accesorios .................. 13-15Cuadro de uso de los accesorios .. 15Almacenaje del accesorios ........ 1 6Caracterfsticas derendimiento ................... 17
Culdado del recept6culo ........... 18Quitar de los residuos de basuraen los conductos ............... 18Limpieza de! exterior y de losaccesrrios ..................... 18Cambio de la bolsa ............ 19Cambio del fittro de seguridaddel motor .................... 20Cambio del filtro de escape ...... 21
Culdado de la PowerMate ®......... 22Cambio de la correa y limpiezadel agitador ................ 22-23Cambio de la bombilla .......... 24Cuidado del agitador ........... 24
Reconoclmiento de problemas ... 25-26Acuerdos maestros de protecci6n ... 27Informaci6n de aslstenclao servlclo ........... Posterior Cubierta
Por favor lea esta gufa que le ayudara a ensamblary operar su aspiradora nueva de Kenmoreen una manera m6s segura y efectiva.
Para mas informaci6nacerca del cuidado y operaci6n de esta aspiradora, Ilame a su tiendaSears mas cercana. Cuando pregunte por informaci6nusted necesitar6 el n6mero completo deserie y modelo de la aspiradora que est6 Iocalizado en la placa de los n6merosde modelo yserie.
Use el espacio de abajo para registrar el n6mero de modelo y serie para su nueva aspiradoraKenmore.
NOmero de Modelo
NOmero de Serie
Fecha de Compra
Mantenga este libra y su recibo en un lugar seguro para referencias futuras.
I LISTA DE EMBALAJE
Su ASPIRADORA KENMORE se empaca con las siguientes piezas y componentes potseparado:
1 Recept6culo 1 Cepitlo para combinaci6n _1 PowerMate® 1 Pet PowerMate®
1 Manguera 1 Tubo tetescopico1 Cepillo para pisos _ 1 Manual de uso y cuidadol Herramienta para l Lista de partes
hendiduras _
Cada uno de estos ensambles es mostrado detalladamente en la lista de piezas parareparaci6n._Estos arficulos se encuentran bajo la cubierta de atmacenamiento para accesorios.
-1-
1-877-531-7321
8:00am-5:OOpm EST, M-F(U.S.A. and Canada)
Garanfia limitada de un aSoSi esta aspiradora fatla par un defecto en sus materiales o fabricaci6n en el per[odo deun aSo desde la fecha de compra, cuando se instala, maneja y mantiene siguiendotodas las instrucciones incluidas con el producto, devu_lvala a cualquier tienda Sears,Sears Parts & Repair Center (Centro de Reparaciones y Piezas Sears) o a otrodistribuidor I<enmore para que reparen el aparato de forma gratuita.
Esta garantra es v6tida solamente durante 90 dras desde la fecha de compra,si la aspiradora se utitiza para otros fines que no sean el uso familiar privado.
Esta garanfia cubre exclusivamente los defectos de materiales y fabricaci6n. Sears NOpagar6:1. Los elementos desechables que puedan desgastarse con un uso normal, incluyendo
sin car6cter excluyente, filtros, correas, 16mparas y bolsas.2. Un t_cnico del servicio t_cnico para que ense_e al usuario a instalar, manejar o
mantener correctamente el producto.3. Un t_cnico del servicio t_cnico para limpiar o mantener este producto.4. Dafios o averfa de este producto si no se ha instalado, manejado o mantenido
siguiendo todas las instrucciones incluidas con el producto.5. Da_os o averra a este producto originados pot accidente, abuso, uso incorrecto o
uso del producto para otros fines distintos de los indicados.6. Dafios o averfa de este producto causados pot el uso de detergentes, limpiadores,
productos qurmicos o utensilios diferentes a los recomendados en todas lasinstrucciones que se incluyen con el producto.
Z Da_os o averras de las piezas o sistemas causados por modificaciones noautorizadas que se hayan hecho a este producto.
Limltaci6n de responsabilidad de las garanfias impffcitas; limitaci6n de remediosEl 6nico y exclusivo remedio del cliente bajo esta garantra limitada ser6 la reparaci6ndel producto segOn Io indicado en este documento. Las garant[as impffcitas, incluyendolas garantfas de comerciabitidad o idoneidad para un prop6sito especffico, se limitan aun afro o el perfodo m6s corto permitido por la ley. Sears no ser6 responsable pordaffos incidentates ni consecuenciales. Algunos estados o provincias no permiten laexclusi6n o limitaci6n de daffos incidentates o consecuenciales, ni limitaciones en laduraci6n de las garantras implrcitas de comerciabitidad o idoneidad, pot Io que estasexclusiones o limitaciones podrfan no apticar en su caso.
Esta garantfa aplica solamente cuando esta aspiradora se utiliza en Estados Unidos oCanad6.
Esta garantra le otorga derechos tegales especfficos, y usted podrra tenet otrosderechos que varran en funci6n de cada estado.
Sears Brands Management Corporation, Hoffman Estates, IL 60179
-2-
Lea las instrucclones en este manual antes de arrnar o usar su aspiradora.
ADVERTENCIA:Su seguridad es muy impartante para nasotros. Para reducir el riesgo de incendio, choqueel6ctrico, lesi6n corporal a da_os al utiJizar su aspiradara, actOe de acuerda can precaucianesb6sicas de seguridad, entre elias:
Use suaspiradora 6nicamente en {a farinadescrita en este manual. Use 6nicamente conaccesorios recomendados par Sears.
Desconecte el cord6n el6ctrico antes decomponer o limpiar el 6rea del cepillo. De Iocontrario, el cepillo podr{a arrancar de farinaimprevista o podr{a producirse un choqueel6ctrico.
No abandone la aspiradora cuando est6conectada. Descon6ctela cuando no la est6usando y antes de dar{e servicio.
Para reducir e{ riesgo de choque el6ctrico, nouse su aspiradora al aire libre ni sabresuperficies mojadas.
No permita que sea utilizada coma juguete. Serequiere tener mayor cuidado cuando seaufilizada en la proximidad de niSos o par niSos.
No use la aspiradora si el cord6n o el enchufeest6n daSados. Si la aspiradora no est6funcionando adecuadamente o si se ha dejadocaer, est6 daSada, se ha dejado expuesta a laintemperie o se ha dejado caer en agua,devu61vala a un Centro de servicio de Sears.
No jale ni transporte {a aspiradora par elcord6n; no use e) cord6n coma mango; no cierrepuertas sabre el cord6n; no jale el cord6n sabrerebordes agudos ni esquinas. No pase laaspiradora sabre el cord6n. Mantenga el cord6naIejado de superficies calientes.
No desconecte la aspiradora tirando del cord6nel6ctrico. Para desconectarla, jaie el enchufe, noel cord6n.
No toque la aspiradora ni el enchufe con lasmanos mojadas.
No coloque objetos en las aberturas.
No ufilice la aspiradora si alguna abertura est6bloqueada; mant6ngaia libre de polvo, pelusa,cabellos y cualquiera cosa que podr{a disminuirel flujo de aire.
Mantenga el cabello, ropa sue{ta, dedos y todaslas partes del cuerpo alejados de las aberturas
y piezas mec6nicas.
Apague todos los controtes antes dedesenchufar.
Tenga cuidado especial al utilizar la aspiradoraen escalones. No la coloque sabre siI{as, mesas,etc. Mant6ngala en el piso.
No use la aspiradora para aspirar I¿quidosinflamables o combustibles (gasolina, {{quidospara limpieza, perfumes, etc.) ni la use enlugares donde 6stos podr{an estar presentes. Losvapores de estas sustancias pueden crear unpeligro de incendio o explosi6n.
No levante ninguna cosa que se est6 quemandoo emitiendo humo, coma cigarriI{os, ceriI{os ocenizas calientes.
No use la aspiradora sin tener instalada la botsapara poIvo y/o los filtros.
Cambie siempre la balsa para polvo despv6s deaspirar Iimpiadores de alfombras odesodorantes, talcos y polvos finos. Estosproductos atascan la balsa, reducen el flujo deaire y pueden causar que 6sta se rompa. Si nocambia la balsa podHa ocasionar daSopermanente a la aspiradora.
No use la aspiradora para levantar objetosagudos, juguetes pequeSos, aIfileres,sujetapapeies, etc. Podrian daSar la aspiradorao la balsa para polvo.
No opere sin et filtro de escape ni la cubiertadel fi{tro de escape instalados.
La manguera confiene cables el6ctricos. No lause cuando est6 daSada, cortada, operforada. Reemplace si est6 cortada odesgastada. No levante objetos afiIados.
Siempre apagu6 y desconecte la aspiradoraantes de conectar o desconectar la manguera,e los tubas, Pet HandiMate, o la boquilla.
Sujete el enchufe con la mano al enrotlar elcord6n el6ctrico. Para desconectarIa, jaIe elenchufe, no el cord6n.
Usted es responsabIe de asegurar que suaspiradora no sea utilizada par ninguna personaque no pueda manejarta correctamente.
GUARDE ESTASINSTRUCCIONESEl armada y usa seguro de su aspiradora son suresponsabilidad. Esta aspiradora ha sido dise_adaexclusivamente para usa dom6stico. La aspiradora deber6 aImacenarse en un lugar seco y en elinterior. Lea este Manual de Usa y Cuidado detenidamente, puescontiene informaci6n importantesabre seguridad y usa. Esta guia contiene informaci6n sabre seguridad debajo de s¿mbotos deadvertencia cuidado.
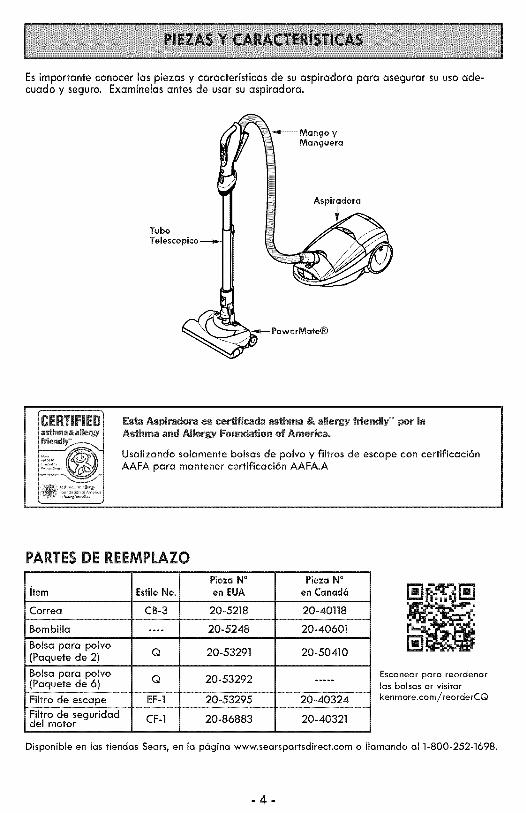
Esimportante conocer las piezas y caractedsficas de su aspkadora para asegurar su usoade-cuado y seguro. Examfnelas antes de usar su aspkadora.
YManguera
TuboTemescopico
Aspiradora
G
Es_ Aspiradora ÷s certificada asthma & aJmergyfriendmyTM pot _aAsthma and Altergy Foundatien of America.
UsaJizando solamente bolsas de polvo y fiffros de escape con cerfificaci6nAAFA para mantener cerfificaci6n AAFA.A
PARTES DE REEMPLAZO
Item EstiloNo.
Correa CB-3
Bombilla ....
Bolsa para polvo(Paquete de 2) Q
Boisa para poiva(Paquete de 6) Q
Filtro de escape EF-1
Filtro de seguridad CF-1del motor
Pieza NOen EUA
20-5218
20-5248
20-53291
20-53292
20-53295
20-86883
Pieza N°en Canad6
20-40118
20-40601
20-50410
20-40324
20-40321
[]
Escanear para reordenarlas bolsas or visitar
kenmore.com/reorderCQ
Disponible en las tiendas Sears, en la p6gina www.searspartsdirect.com o Ilamando al 1-800-252-1698.
-4-
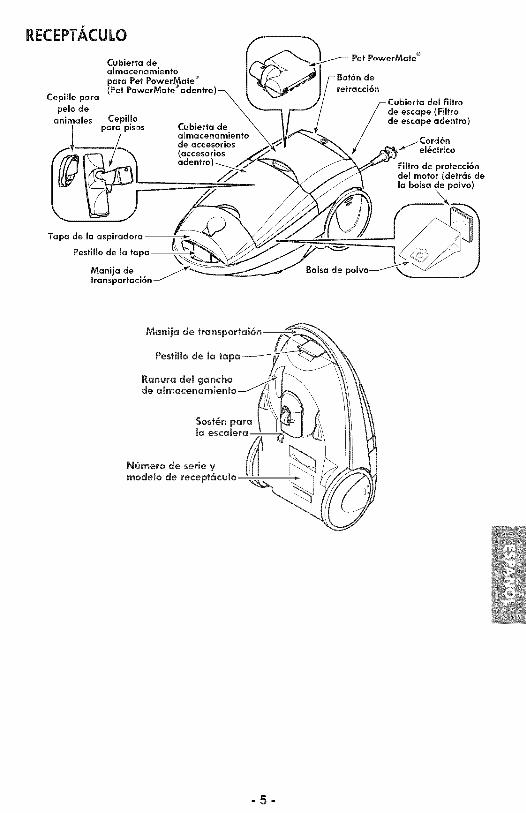
RECEPTACULO
Cepillo para
pelo de
animales
Cubierta dea_macenan_ientopara Pet Power_ ate®
(Pet pawerMate adentro)-_
Cepillopises Cubierta de
de accesorios(accesoriosadentro
t PawerMate ®
Filtra de protecci6ndel motor (detr6s demabalsa de polvo)
Bomsa
-5-
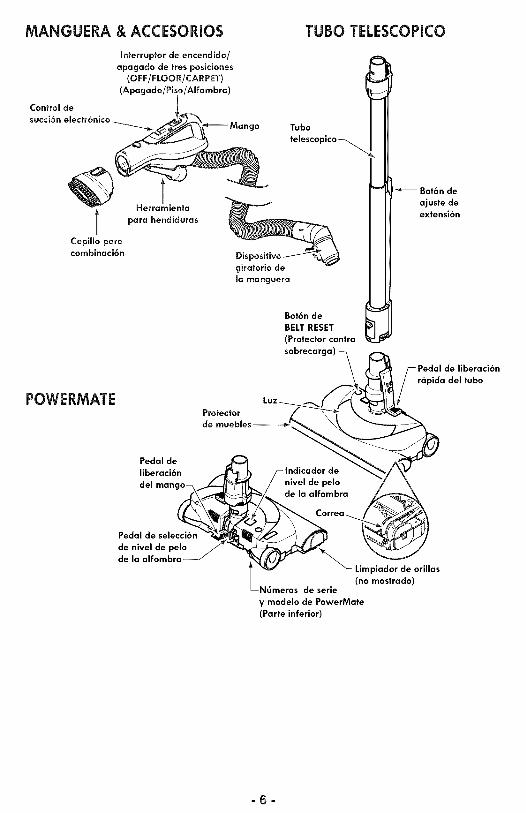
MANGUERA & ACCESORIOS TUBa TELESCOPICO
Control desucci6n
TCepillo paracombinaci6n
Interruptar de encendido/
apagado de tres pasiciones(OFF/FLOOR/CARPET)
(Apagado/Pi_ o/Affambra)
POWERMATE
Herramienta
para hendiduras
Tuba
telescopico
giratorio de
la manguera
Bot6n de
BELT RESET
(Protector contrasobrecarc
Luz _ /
Protector "__ iI
de muebles _._
Pedal de _C_
liberaci6n /f_ji_ /-Indicador dedel mango- x _J_---./_r_ / nivel de pelo
__/_>de la al fo mbra
___ Carr_
Pedal de sele _de nivel de p_ _'___
de la alfombra v_ _ _ (noLimpiad°rmostrado)deorillas
LN6meros de serie
¥ modelo de PowerMate
(Parte inferior)
Bot6n de
ajuste deextensi6n
/--Pedal de liberaci6n
r6pida del tuba
-6-

Par favor ponga especial atenci6n a _stos recuadras con alerta de riesgo.ADVERTENCIA: Esta informaci6n le alertar6 del pellgro de fuego, chaque el_ctrico,quemaduras V lesiones. CUIDADO: Esta informaci6n le alertara de peligros comalesianes V da_os a la prapiedad.
ADVERTENCIA
Pellgro de choque el_ctrlco
No canecte la aspiradara basra que terminede armarla. De la contrario podria causar un
chaque el_ctrico o lesi6n corporal.
Antes de armar la aspiradora, reivise laLISTA DE EMBALAJE(p6g 1).Use esta listapara verificar e identificar que ha recibidotodos los componentes de su nueva aspirado-ra Kenmore.
POWERMATE
Introduzca la vara en laPowerMate hasta que elpedal de liberaci6nquede fijo en posici6n.
RECEPTACULO
1. Abra la tapa del recept6culo.
2. Examineque la bolsa para polvoesteinstalada correctamente. Consulte las instruc-clones de instalaci6nen: CAMBIO DELABALSA (p_g ]9).
3. Examine que el filtro de seguridaddelmotor que este instaladocorrectamente.Consulte las instruccionesde instalaci6nen:CAMBIO DEL RLTRODESEGURIDADDELMOTOR (pbg 20).
LA TAPA Y LA CUBiERTA
Esnormal que la tapa del recept6culo sedesprenda al ser abierta m6s de Io necesario.Para colocar nuevamente la tapa, alinee lasranuras de la bisagra, ins_rtelasy cierre latapa.
_ CUIDADONunca debe abrk la capucha del contenedorestando la tapa abierta. Asi se evitar6 da_os
a la capucha del contenedor y/o a la tapa.
MANGUERA
Alinee la pesta5a de sujeci6n de la mangueray la ranura de la cubierta del recept6culoeintroduzca la manguera en el recept6culohasta que quede fija en posici6n.
Pes_afiade sujeci6nde la
Para retirar:No abra la cubierta antesde desprender lamanguera. Con la cubierta cerrada, tirehacia arriba la lengiJeta de seguridad yjale de la manguera.
-7-
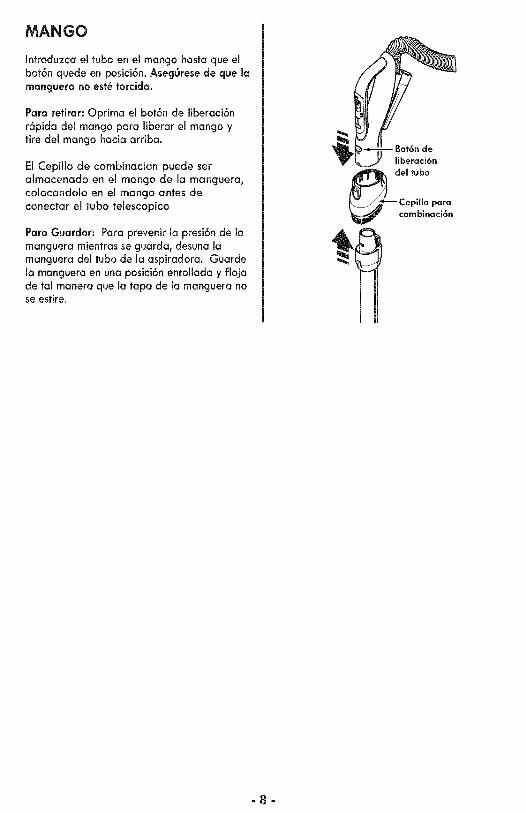
MANGO
Introduzca el tubo en el mango basra que elbot6n quede en posici6n, AsegOrese de que lamanguera no est_ torcida.
Para retirar: Oprima el bot6n de liberaci6nr6pida del mango para liberar el mango ytire del mango hacia arriba.
El Cepiilo de combinacion puede seralmacenado en el mango de la manguera,colocandolo en el mango antes deconectar el tubo telescopico
Para Guardar: Para prevenir la presi6n de lamanguera mientras se guarda, desuna lamanguera del tubo de la aspiradora. Guardela manguera en una posici6n enrollada y flojade tal manera que la tapa de la manguera nose estire.
-8-
,CUIDADO
iPartes en movimlento! Para reducir el riesgo de dafioscorporales, no toque el agitador cuando la asplradoraest6 encendlda. El tocar el agitador rnientras que est6girando puede cortar, contusionar o causar otras "-_\lesiones. Siempre apague y desconecte deltomacorriente antes de dar rnantenlrnlento. Tengaculdado al asplrar cerca de ni_os.
PARA COMENZAR
_ADVERTENCIA
PeIigrade _esi6npersona[ ¥ dafio a[_roducto
SIEMPRE apague ante de desconectar.
El cord6n el_ctrlco se muever6pldamente durante el enrollamiento.Mantenga alejados a los ni_os yasegure espacia llbre suficiente paraevltar leslones persanales al enrollarel cord6n.
NO use los enchufes lacalizadas sabrelos muebles. Los objetas cercanospadrian resultar dafiados.
Cuando alguna anormalidad/desperfec-to ocurra, pare de usar el productoinmediatamente y descon_ctelodeltoma corriente.
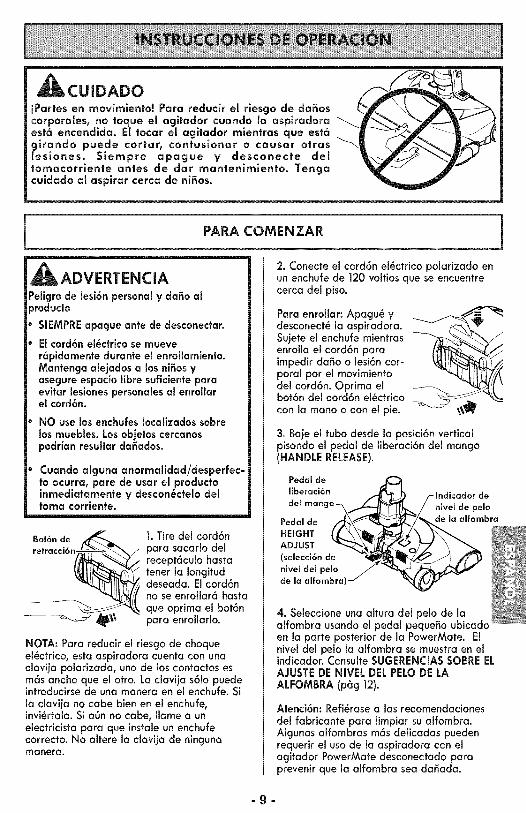
Bot6n de _ 1. Tire del cord6n
retracci6n__ para sacarlo del
__ ecept6culo basra
tener la Iongituddeseada. Elcord6nno se enrollar6 basraque oprima el bot6n
-- para enrollarlo.
NOTA: Para reducir el riesgo de choqueel_ctrico, esta aspiradora cuenta con unaclavija polarizada, uno de los contactos esm6s ancho que el otro. La clavija s61opuedeintroducirsede una manera en el enchufe. Sila claviia no cabe bien en el enchufe,invi_rtala.Si aOnno cabe, Ilame a unelectricista para que instaleun enchufecorrecto. No altere la claviia de ningunamanera.
2. Conecte el cord6n el_ctrico polarizado enun enchufe de ]20 voltios que se encuentrecerca del piso.
Para enrollar: Apagu_ ydesconect_ la aspiradora.Sujete el enchufe mientrasenrolla el cord6n paraimpedirdaSo o lesi6n cor-poral par el movimientodel cord6n. Oprima elbot6n del cord6n el_ctricocon la mano o con el pie.
3. Baje el tuba desde la posici6n verticalpisando el pedal de liberaci6n del mango(HANDLERELEASE).
4. Seleccione una altura del pelo de laalfombra usando el pedal pequeSo ubicadoen la parte posterior de la PowerMate. Elnivel del pelo la alfombra se muestra en elindicador.Consulte SUGERENCIASSABREELAJUSTEDE NIVEL DEL PELODE LAALFOMBRA (p_g 12).
Atenci6n:Refi_rase alas recomendacionesdel fabricante para limpiar sualfombra.Algunas alfombras m6s delicadas puedenrequerir el usade la aspiradora con elagitador PowerMate desconectado paraprevenir que la alfombra sea da_ada.
-9-
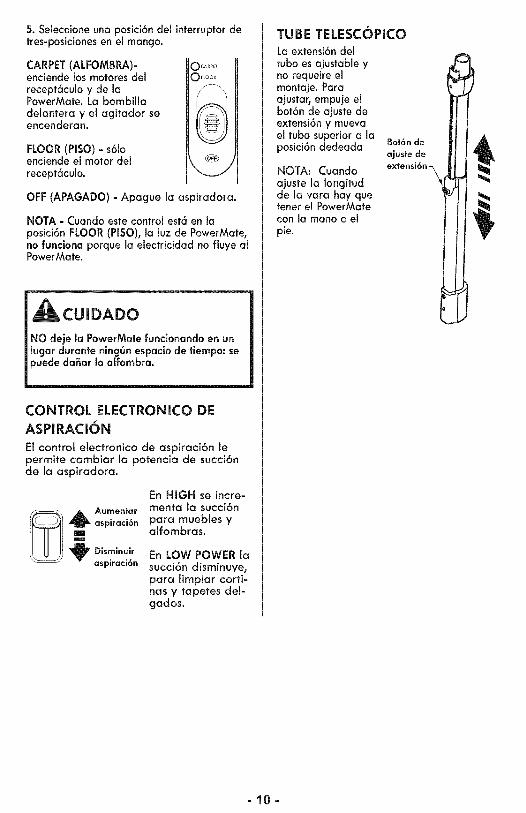
5. Seleccione una posici6n del interruptor detres-posiciones en el mango.
CARPET(ALFOMBRA)-enciende los motores delrecept6culo y de laPowerMate. La bombilladelantera y el agitador seencenderan.
FLOOR (PISO) - s61oenciende el motor delrecept6culo.
CARPET
OFLOOR
OFF(APAGADO) - Apague la aspiradora.
NOTA - Cuando este control est6 en laposici6n FLOOR(PISO), la luz de PowerMate,no funciona porque la electricidad no fluye alPowerMate.
CUIDADO
NO deje la PowerMate funclonando en uniugar durante ningOn espacio de tiempo: sepuede da_ar _a alfombra.
CONTROL ELECTRONICO DEASPmRACI6N
El control electronico de aspiraci6n lepermite cambiar la potencio de succi6nde Io ospirodoro.
En HiGH se incre-Aumentar menta la succi6n
_1 _ aspiraci6n paro muebies yalfombras.
_irDisrninuir En LOW POWER taaspiraci6n succi6n disminuye,
para limpiar corti-nas y tapetes del-godos.
TUBE TELESC6PICOLa extensi6n deltubo es ajustable yno requeire elmontaje. Paraajustar, empuje elbot6n de ajuste deextensi6n y muevael tubo superior a laposici6n dedeada
NOTA: Cuando
ajuste la Iongitudde la vara hay quetener el PowerMatecon la mano o elpie.
Bot6n de
ajuste de
extensi6n
-10-
SUGERENCIASPARAASPIRAR
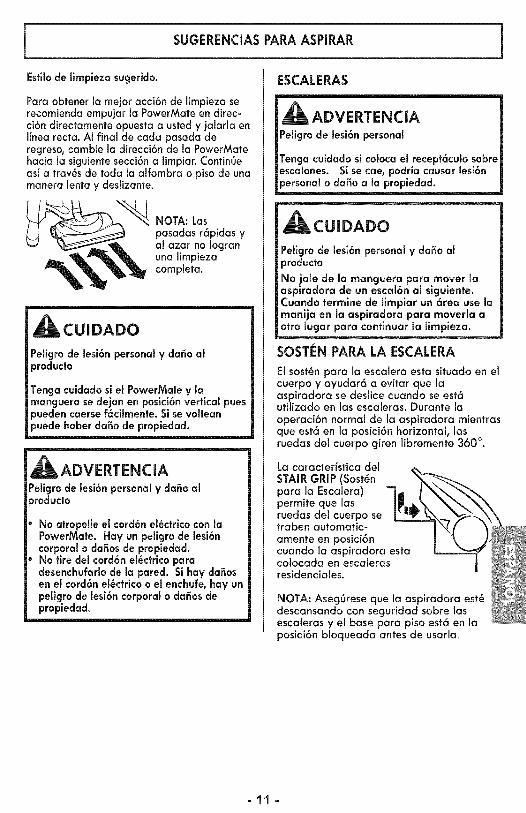
Estilo de limpiezo sugerido.
Para obtener la mejor acci6n de limpieza serecomienda empujar la PowerMate en direc-ci6n directamente opuesta austed y jalarla enIfnea recta. AI final de cada pasada deregreso, cambie la direcci6n de la PowerMatehacia la siguiente secci6n a limpiar. Contin6easf a trav_s de toda la alfombra o piso de unamanera lento y deslizante.
NOTA: Lospasadas r6pidas yal azar no Iogranuna limpiezacompleta.
CUIDADO
Pellgro de lesi6n personal V do_o alproducto
Tenga culdado si el PowerMotey Iomonguero se dejon en posici6nvertical puespuedencoerse f6cilmente. Sisevolteonpuede hober do_o de propiedod.
ADVERTENCIAPellgrode lesi6n personaly do_o ol_roducto
No otropelleel cord6n el@ctrlcocon laPowerMote. Hay un pellgrode lesi6ncorporalo dodosde propledod.No tire del cord6nel@ctricoporadesenchufarlode Io pored. Si hay dodosen el cord6n el_ctricoo el enchufe,hay unpellgro de lesi6n corporal o dodosdepropiedod.
ESCALERAS
ADVERTENCIAPellgrode lesi6n personal
Tengo cuidodo si coloca el recept6culo sobreescalones. Si secae, podriocausor lesi6npersonalo do_oo Io propiedod.
CUIDADO
Pellgro de lesi6n personal y da_o alproducto
No jale de la manguera para mover laaspiradora de un escal6n al sigulente.Cuando termlne de llmpiar un 6tea use lamanija en la aspiradora para moverla aotto lugar para contlnuar la limpieza.
SOSTEN PARA LA ESCALERA
El sost_n para la escalera esta situado en elcuerpo y ayudar6 a evitar que laaspiradora se deslice cuando se est6utilizado en las escaleras. Durante laoperaci6n normal de la aspiradora mientrasque est6 en la posici6n horizontal, lasruedas del cuerpo giren libremente 360 °.
La caracterfstica delSTAIRGRIP (Sost_npara la Escalera)permite que losruedas del cuerpo setraben automatic-amente en posici6ncuando la aspiradora estacolocada en escalerasresidenciales.
NOTA: Aseg0rese que la aspiradora est_descansando con seguridad sobre lasescaleras y el base para piso est6 en laposici6n bloqueada antes de usarla.
-11 -
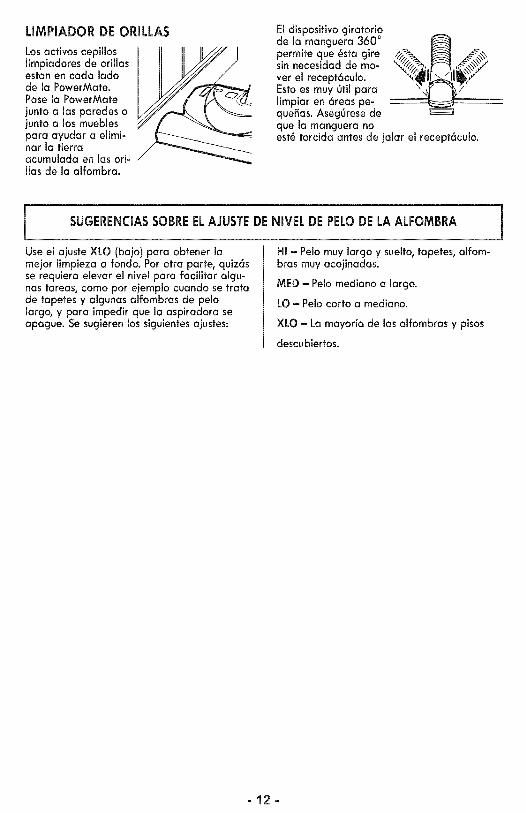
LIMPIADOR DE ORILLAS
Losactivos cepillos |limpiadores de orillasestan en cada ladode la PowerMate.Pasela PowerMatejunto alas paredes ojunto a los mueblespara ayudar a elimi-nar la tierra Yacumulada en las ori-Ilas de la alfombra.
El dispositivo giratoriode la manguera 360 °permite que _sta giresin necesidad de mo-ver el recept6culo.Estoes muy 6til paralimpiar en 6reas pe-que_as. Aseg0resedeque la manguera noest_ torcida antes de jalar el recept6culo.
SUGERENCIASSOBREELAJUSTEDENIVEL DE PELODELAALFOMBRA
Use el ajuste XLO (bajo) para obtener lamejor limpieza a rondo. Por otra parte, quiz6sse requiera elevar el nivel para facilitar algu-has tareas, como por ejemplo cuando se tratade tapetes y algunas alfombras de pelolargo, y para impedirque la aspiradora seapague. Se sugieren los siguientesajustes:
HI - Pelomuy largo y suelto, tapetes, alfom-bras muy acojinadas.
MED - Pelo mediano a largo.
LO - Pelocorto a mediano.
XLO - Lamayorla de las alfombras y pisos
descubiertos.
-12-
ACCESORIOS
Man_
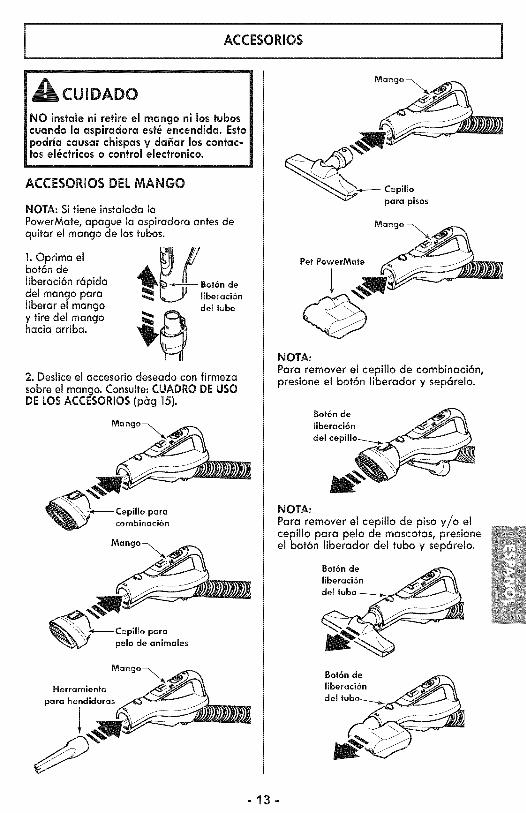
CUIDADO
NO insfale ni retire el mango ni los tuboscuando la asplradora est_ encendlda. Estopodria causar chispas y da_ar los contac-los el_cfricos o control elecfronico.
ACCESORIOS DEL MANGO
NOTA: Si fiene instalada la
PowerMate, apague la aspiradora antes dequitar el mango de los tubos.
liberaci6n r6pidadel mango para nliberar el mango del tuboy tire del mango _hacia arriba.
2. Deslice el accesorio deseado con firmeza
sobre el mango. Consulte: CUADRO DE USODE LOS ACCESORIOS (p6g 15).
paracombinaci6n
para
pelo de anirnales
_on_
Herramienta
para hendiduras
para pisos
Man_
Pet PowerMate
NOTA:
Para remover el cepillo de combinaci6n,presione el bot6n liberador y sep6relo.
Bot6n de
liberaci6ndel
NOTA:Para remover el cepillo de piso y/o elcepillo para pelo de mascotas, presioneel bot6n liberador del tubo y sep6relo.
Bot6n de
liberaci6n
del
Bot6n deliberaci6n
-13-
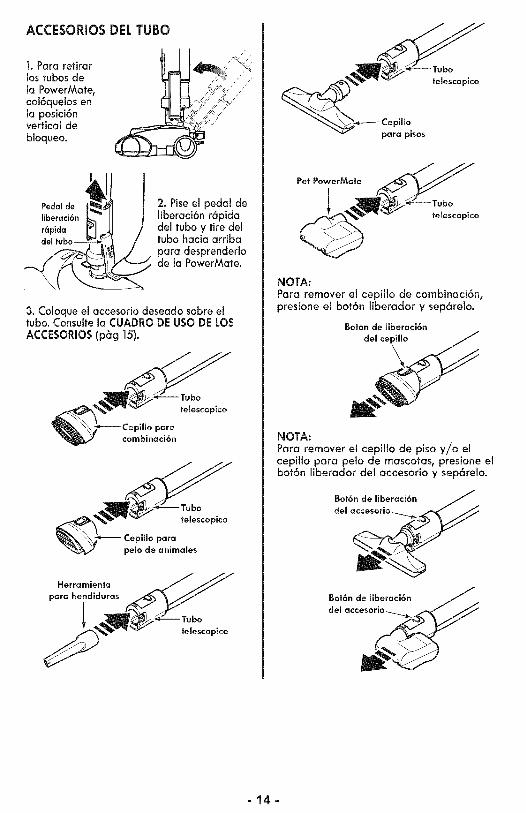
ACCESORIOS DEL TUBO
1. Para retirar TI llos tubas dela PowerMate,col6quelos enla posici6nvertical debloqueo.
Pedal de _
liberaci6n k__'_
r6pida _J
2. Piseel pedal deliberaci6n r6pidadel tuba y tire deltuba hacia arribapara desprenderlode la PowerMate.
3. Coloque el occesorio deseado sabre eltuba. Consulte la CUADRO DE usa DE LOS
ACCESORIOS (p6g 15).
temescopico
combinaci6n
telescopico
telescopico
para pisos
Pet PowerMate
telescopico
NOTA:Pora remover el cepillo de combinaci6n,presione el bot6n liberador y sep6relo.
Bot6n de liberaci6n
del cepillo
NOTA:Pora remover el cepillo de piso y/o elcepillo para pelo de mascotas, presione elbot6n liberador del accesorio y sep6relo.
Bot6n de liberaci6n
del a_es_
gotdn de liberaci6n
del acceso__._b,_
-14-
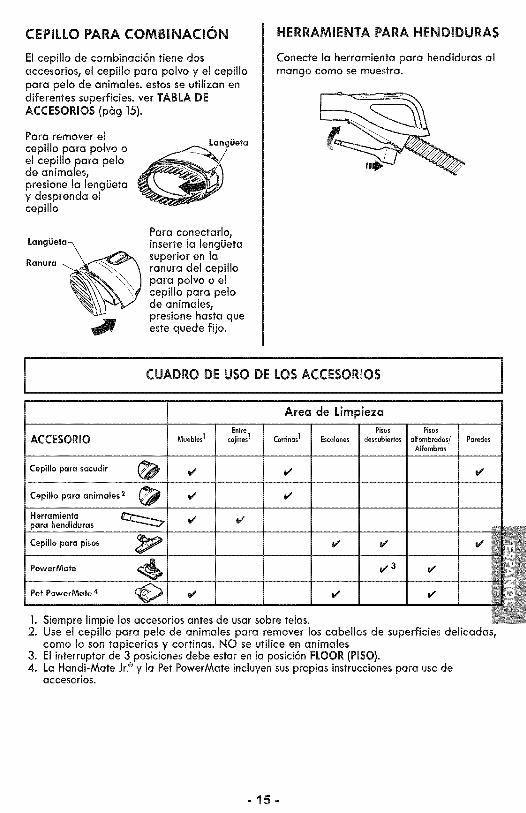
CEPILLOPARACOMB[NACI6N
El cepi[Io de combinaci6n tiene dosaccesorios, el cepiHo para polvo y el cepillopara pe[o de anima[es, estos se uti[izan endiferentes superficies, ver TABLA DEACCESOR[OS (p6g 15).
Paro remover elcepillo para polvo oel cepillo para pelode animales_presione la [eng_Jetay desprenda elcepillo
La ncjiJefa-_
.anura__
Para conectarlo,inserte [a leng[Jetasuperior en [aranura del cepillopara polvo o elcepillo paro pelode animales,presione hasta queeste quede fijo.
HERRAM[ENTA PARA HEND[DURAS
Conecte la herramienta para hendiduras almango como se muestra.
CUADRO DE USO DE LOS ACCESOR[OS
Area de Limpleza [
Entre Pisos PisosACCESORIO MuebleJ cojines] Cortinas| Escalones descubiertos aifombrados/ Paredes
Affombras
Cepilloparasacudir @ _ _
Cepillopara animales 2 _ _
Herramienta _ _parahendiduras
Cepilloparapisos _ _ _
PowerMafe _ V' 3 V'
Pet PowerMafe 4 (_ i#s i#s i#s
1. Siempre limpie los accesorios antesde usar sabre telas.2. Use el cepillo para pelo de animales para remover los cabellos de superficiesdelicadas0
como Io son tapicerias y cortinas. NO se uti[ice en animales3. El interruptorde 3 posiciones debe estar en [a posici6nFLOOR(PISO).4. La Handi-Mate Jr.®y [a PetPowerMate inc[uyensuspropiasinstruccionespara usode
accesorios,
=15=
ALMACENAJE DEL PET POWERMATE Y ACCESORIOS
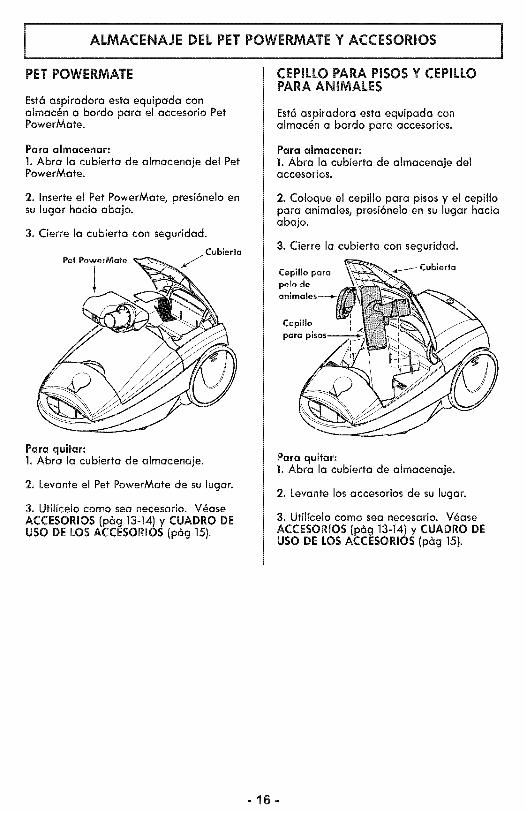
PET POWERMATE
Est6 aspiradora esta equipada conalmac_n a bordo para el accesorio PetPowerMate.
Para aknacenar:1. Abra la cubierta de almacenaje del PetPowerMate.
2. Inserte el Pet PowerMate, presi6nelo ensu lugar hacia abajo.
3. Cierre la cubierta con seguridad.
Pet PowerMafe j Cubierta
Para qultar:1. Abra la cubierta de almacenaje.
2. Levante el Pet PowerMate de su lugar.
3. Ufiffcelo como sea necesario. V_aseACCESORIOS (p6g 13-14) y CUADRO DEUSO DE LOSACCESORIOS (p6g 15).
CEPILLO PARA PISOS Y CEPILLOPARA ANIMALES
Est6 aspiradora esta equipada conalmac_n a bordo para accesorios.
Para almacenar:
1. Abra la cubierta de almacenaje delaccesorios.
2. Coloque el cepillo para pisosy el cepillopara animales, presi6neloen su lugar haciaabajo.
3. Cierre la cubierta con seguridad.
:ubiertaCepiHo para
pemo de
Cepillo
Para qultar:1. Abra la cubierta de almacenaje.
2. Levante los accesorios de su lugar.
3. Util[celo como sea necesario. V_aseACCESORIOS (p6g 13-14) y CUADRO DEUSO DE LOSACCESORIOS (p6g 15).
-16-
CARACTERJSTICASDE RENDIMIENTO
ADVERTENCIA
Pellgrade leslanes personales
Apagu_y desconecteslemprela asplradoraantesde limpiar las_reas de la agltadarpues_stospodrian arrancar de maneraimprevlsta. Ei no hacerla, podria resultar enlesianes personales.
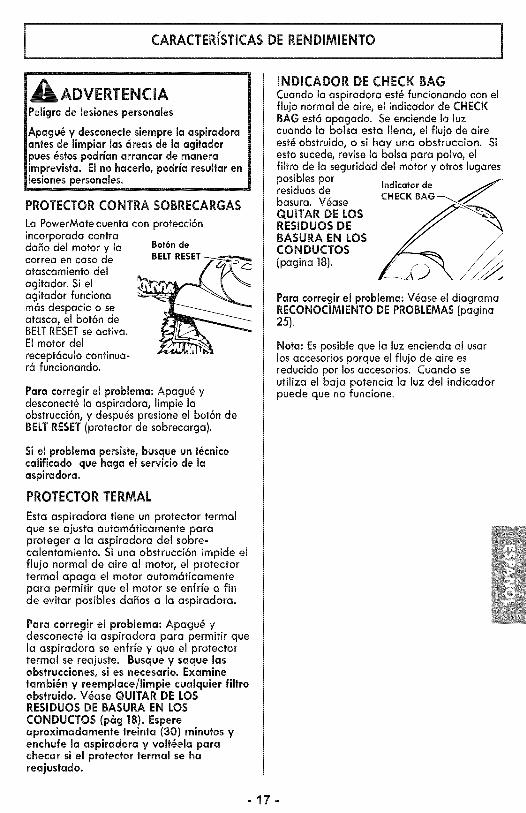
PROTECTORCONTRA SOBRECARGAS
La PowerMate cuenta con protecci6nincorporadacontradaSo del motor y lacorrea en caso deatascamiento delagitador. Si elagitador funcionam6s despacio o seatasca, el bot6n deBELTRESETse active.El motor delrecept6culo continua-r6 funcionando.
Bot6n de
BELT RESET _;_._,._
Pare correglr el problema: Apagu_ ydesconect_ la aspiradora, limpie laobstrucci6n, y despu_spresioneel bot6n deBELTRESET(protectorde sobrecarga).
Si el problema perslste, busque un t_cnicocallficado que haga el servicio de laaspiradora.
PROTECTORTERMAL
Esta aspiradora tiene un protector termalque se ajusta autom6ticamente pareproteger a la aspiradora del sobre-calentamiento. Si una obstrucci6n impide elfiujo normal de aire al motor, el protectortermal apaga el motor autom6ficamentepara permitir que el motor se enfr[e a finde evitar posibles daSos a la aspiradora.
Pare corregk el problema: Apagu_ ydesconect_ la aspiradora pare permifir quela aspiradora se enfr[e y que el protectortermal se reajuste. Busque y saque lasobstrucclones, si es necesario. Examinetambi_n y reemplace/limpie cualquier filtroobstruido. V_ase QUITAR DE LOSRESIDUOS DE BASURA EN LOSCONDUCTOS (p_g 18). Espereaproxlmadamente treinta (30) mlnutos yenchufe la aspiradora y volt_ela parechecar si el protector termal se hareajusfado.
INDICADOR DE CHECK BAGCuando la aspiradora est_ funcionando con elflujo normalde aire, el indicadorde CHECKBAG est6 apagado. Se enciende la luzcuando la balsa esta llena, el flujo de aireest_ obstruido, o si hay una obstruccion. Siesto sucede, revise la balsa pare polvo, elfiltro de la seguridad del motor y arras lugaresposibles parresiduosdebasura. V_aseQUITAR DE LOSRESIDUOS DEBASURA EN LOSCONDUCTOS(pagina ]8).
Pare correglr el problema:V_ase el diagramaRECONOCIMIENTODE PROBLEMAS(pagina25).
Note: Esposible que la luz encienda al usarlos accesorios porque el flujo de aire esreducido par los accesorios. Cuando seutilize el baja potencia la luz del indicadorpuede que no funcione.
=17=
QUITAR DE LOS RESIDUOS DE BASURA EN LOS CONDUCTOS
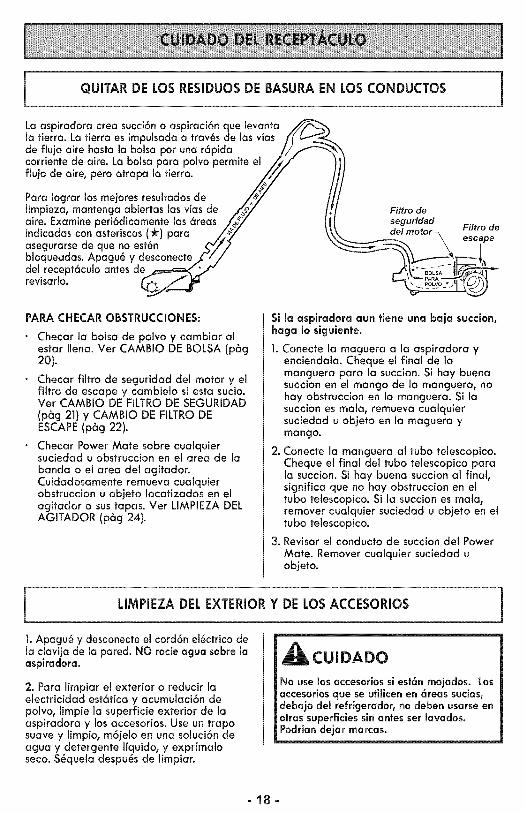
La aspiradora crea succi6n o aspiraci6n que levantala tierra. La fierra es impulsada a trav_s de las vfas /'_ _de flujo aire basra la balsa por una r6pida !//f_'_ \corriente de aire. La balsa para polvo permite el /_/"
Para Iocjrar los mejores resultadosde _/limpieza, mantencja abiertas las vfas de ,_o/ Filtro de
aire. Examine peri6dicamente las 6reas /_/ seguridadindicadascon asteriscos (_r) para ,/_1_J del motor_ Filtro de
asecjurarsede que no est_n _'// _'x__ _\ escape|bloqueadas. Apagu_ y desconecte,X-// _
rev,sar,o.PARA CHECAR OBSTRUCCIONES:
Checar la boisa de polvo y cambiar alestar Ilena. Ver CAMBIO DE BOLSA (p6cj20).
Checar filtro de seguridad del motor y elfiltro de escape y cambielo si esta sucio.Ver CAMBIO DE FILTRO DE SEGURIDAD(p_g 21) y CAMBIO DE FILTRODEESCAPE(P&CJ22).
Checar Power Mate sobre cualquiersuciedad u obstruccion en el area de labanda o el area del acjitador.Cuidadosamente remueva cualquierobstruction u ob]eto Iocatizados en elacjitador o sus tapas. Vet LIMPIEZA DELAGITADOR (p6cj 24).
Si la aspiradora aun fiche una baja succion,haga Io siguienfe.
Conecte la macjuera a la aspiradora yenciendala. Cheque el final de lamancjuera para la succion. Si hay buenasuccion en el mango de la mancjuera, nohay obstruccion en la mancjuera. Si lasuccion es mala, remueva cualquiersuciedad u objeto en la macjuera ymancjo.
2. Conecte la mancjuera al tubo te]escopico.Cheque el final del tubo telescopico parala succion. Si hay buena succion al final,significa que no hay obstruccion en eltubo telescopico. Si la suction es mala,remover cualquier suciedad u objeto en eltubo telescopico.
3. Revisar el conducto de succion del PowerMate. Remover cualquier suciedad uobjeto.
LIMPIEZA DEL EXTERIOR Y DE LOS ACCESORIOS
1. Apagu_ y desconecte el cord6n el_ctrico dela clavija de la pared. NO roc{e agua sabre laaspiradora.
2. Para limpiar el exterior o reducir laelectricidad est6tica y acumulaci6n depolvo, limpie la superficie exterior de laaspiradora y los accesorios. Use un traposuave y limpio, m6jelo en una soluci6n deacjua y detercjente I[quido,y expr[maloseco.S_quela despu_s de limpiar.
CUIDADO
No use los accesorios sl est6n mojados. Losaccesorios que se utillcen en 6reas suclas,debajo del refrlgerador, no deben usarse enarras superficies sin antes ser _avados.Podrian dejar marcas.
-18-
CAMBIODE LA BOLSA
La bolsa debe cambiarse seguido para Iograr los mejores resultados de limpieza. El indicadorCHECKBAG (indicador electr6nico de la bolsa) prenderacuando esta necesite ser cambiada ocuando el fluido de aire este bloqueado.
NOTA: Use el reemplazo de la BOLSA DE POLVO Estilo Q, ver en detalle el nOmero de parteen PARTESDE REEMPLAZO(P6g 4).
REMOVIENDO LA BOLSA DEPOLVO
1. Apagu_ y desconect_ la aspiradora.
2. Quite la rnanguera de la aspiradora. (VetENSAMBLE, p6g 7).
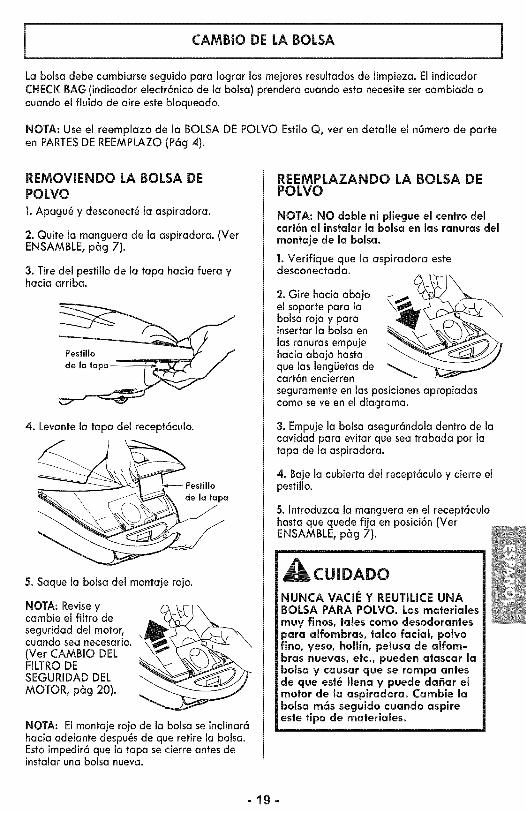
3. Tire del pestillode la tapa hacia fuera yhacia arriba.
PestiHo
de la
4. Levante la tapa de1 recept6culo.
_Pestillo
5. Saque la bolsa del montaje rojo.
NOTA: Reviseycambie el filtro deseguridad del motor,cuando sea necesario.(Ver CAMBIO DELFILTRODESEGURIDAD DELMOTOR, p6g 20).
NOTA: El montaje rojo de la bolsa se inclinar6hacia adelante despu_s de que retire la bolsa.Esto impedir6 que la tapa se cierre antes deinstalar una bolsa nueva.
REEMPLAZANDO LA BOLSA DEPOLVO
NOTA: NO doble ni pliegue el centro delcart6n al instalar la bolsa en las ranuras delmontaje de la bolsa.
1. Verifique que la aspiradora estedesconectada.
2. Gire hacia abajoel soporte para labolsa roja y parainsertar la bolsa enlas ranuras empujehacia abajo basra
que las lengLietas decart6n encierrenseguramente en las posiciones apropiadascomo se ve en el diagrama.
3. Empuje la bolsa asegur6ndola dentro de lacavidad para evitar que sea trabada por latapa de la aspiradora.
4. Baje la cubierta del recept6culo y cierre elpestillo.
5. Introduzca la manguera en el recept6culobasra que quede fija en posici6n (VetENSAMBLE, p6g 7).
CUIDADO
NUNCA VACIE Y REUTILICE UNABOLSA PARA POLVO. Los materlales
muy finos, tales como desodorantespara alfombras, talco Facial, polvoflno, veso, holffn, pelusa de affom-bras nuevas, etc., pueden atascar labolsa y causar que se rompa antesde que est_ ffena V puede da_ar elmotor de la aspiradora. Camble labolsa m6s seguldo cuando aspireeste tlpo de materlales.
-lg-
CAMBIODEL FILTRO DE SEGURIDAD DEL MOTOR
Estefiltro se tiene que cambiar cuando est_ sucio. Debe cambiarse peri6dicamente seg0n lascondiciones de uso. El filtro no se puede lavar pues perderia su capacidad para atrapar polvo.
NOTA: Use el reemplazo del filtro de seguridad del motor ESTILO CF-1,ver en detalle eln0mero de parte en PARTESDE REEMPLAZO (P6g 4).
ADVERTENCIAPeligrode choque el_ctrico
Apagu_ y desconect_la asplradora, Noopere la asplradora sin el filtro de seguridaddel motor. Aseg_uresede que el filtro est_secoe instaladoadecuadamente paraimpedk que el motorfalle y/o que se pro-duzca un choque el_ctrico.
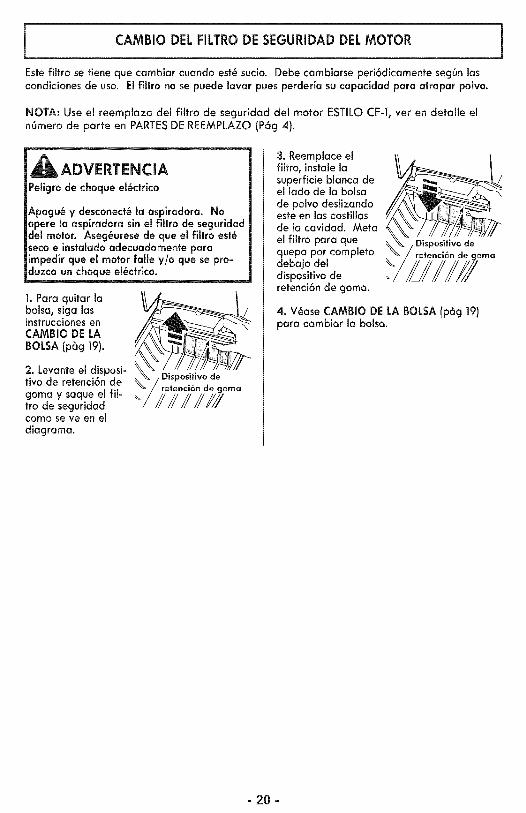
1. Para quitar labolsa, siga lasinstruccionesenCAMBIO DELABOLSA (p_g ]9).
2. Levante el disposi-tivo de retenci6ndegoma y saque el fil-tro de seguridadcomo se ve en eldiagrama.
"///////H//
3. Reemplace elfiltro, instale lasuperficie blanca deel lado de la bolsade polvo deslizandoeste en las costillasde la cavidad. Metael filtro para quequepa por completodebajo deldispositivo deretenci6n de goma.
_ositivo de
retenci6n de\
4. V_ase CAMBIO DE LA BOLSA (pbg ]9)para cambiar la bolsa.
- 20 -
CAMBIO DEL FILTRO DE ESCAPE
Este carfucho del filfro de escape debe ser reemplazado regularmente. Cambie el filfro cuandoel 6rea superficial est_ cubierta por completo. El filtro no se puede lavar pues perderia sucapacidad para atrapar polvo.
NOTA: Use el reemplazo del filtro de escape ESTILO EF-1,ver en detalle el nOmerode parteen PARTESDE REEMPLAZO (P6g 4).
ADVERTENCIA
Peligro de fuego o cheque el_ctrlco
No opere con un filtro de escape bloqueadoo sin el filtro de escape instalados. Noopere sin la cubierta del filtro de escapeinstalada.
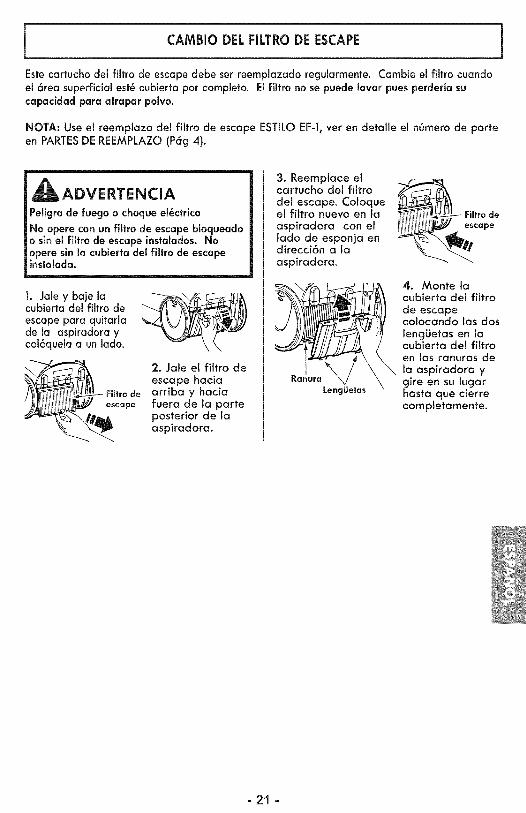
1. Jale y baje lacubierta del filtro deescapepara quitarlade la aspiradora ycol6quela a un lado.
_ iltra de
escape
2. Jate el filtro de
escape haciaarriba y haciafuera de la parteposterior de laaspiradora.
3. Reemplace etcartucho det filtro _del escape. Coloqueel filtro nuevo en la Filtro de
aspiradora con el escape
,o o oe,ooo,oo°direccidn a la
aspiradora.
4. Monte lacubierta del fittrode escapecolocando las doslengLietas en lacubierta del filtroen las ranuras dela aspiradora ygire en su lugarhasta que cierrecompletamente.
-21 -
Siempre deber6n seguirse todas las precauciones de seguridad antes de efectuar elmantenimiento a la PowerMate.
_ADVERTENCIA
Pellgro de cheque el_c|rlco o lesi6n cor-poral
_pagu_ y descenect_ la aspiradoraantes de efectuar el mantenimlento a suaspiradora. De Io contrario podria pro-ducirse un cheque el_ctrlco e causarlesi6n corporal sl la aspiradora arrancade manera imprevlsta.
CAMBIO DE LA CORREA Y LIMPIEZA DEL AGITADOR
PARA RETIRAR LA CORREA
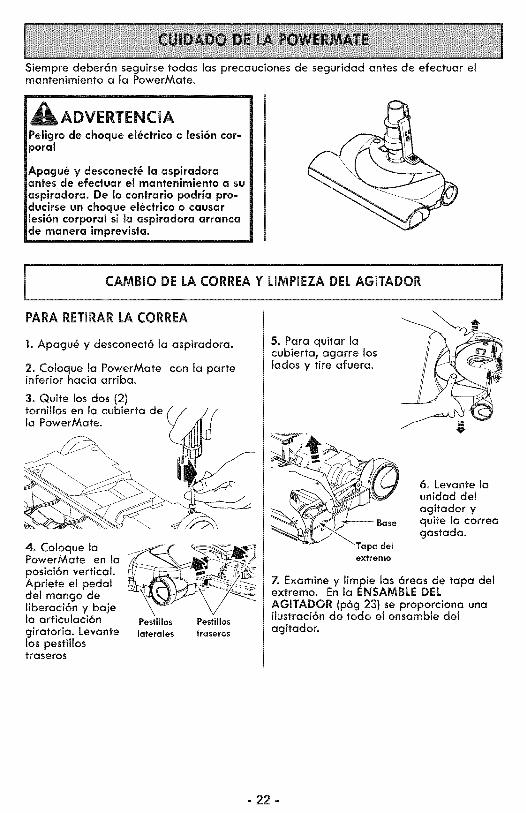
1. Apagu_ y desconect_ la aspiradora.
2. Coloque la PowerMate con la parteinferior hacia arriba.
3. Quite los dos (2)tornil!os en la cubierta dela PowerMate.
PowerMate en la //_ _\j_-_'_j__'/'_posici6n vertical.Apfiete el pedaldel mango de _!
liberaci6n y bajela articulaci6n PestiHos PestiHos
giratoria. Levante laferales fraseros
los pestillostraseros
5. Para quitar lacubierta, agarre loslades y tire afuera.
extreme
6. Levante launidad delagitador yquite ta correagastada.
7. Examine y limpie las 6reas de tapa delextreme. En la ENSAMBLE DELAGITADOR (p6g 23) se proporciona unailustraci6n de todo el ensambte delagitador.
- 22 -
LIMPIEZADELAGITADOR
NOTA: Para mantener una alta eficiencia
de limpieza y evitar dafios a la aspirado-ra, hay que limplar el agitador coda vezque se cambia la correa.
Tambi_n hay que limpiar et agitadorseg0n el sicjuiente catendario:
El uso de la Limpie elaspiradora agitador
Frecuente -(usada diariamente)
cada semana
Moderado -(usada 2 o 3 vecespor semana)
cada rues
Ligero - cada 2 meses(usada I vez por semana)
IMPORTANTE
Apagu_ y desconect_ la aspiradora. Exa-mine frecuentemente et agitador y las6reas de soporte del mismo en laPowerMate y elimine todo cabello, hito ypelusa acumulada.
Retire todo indicio de basura o suciedad
de la ruta de la correa y del rodillo delagitador.
Cocosaque las tapasquite el hilo o
_/osrestos
ubicados en el
agitador. _)_<
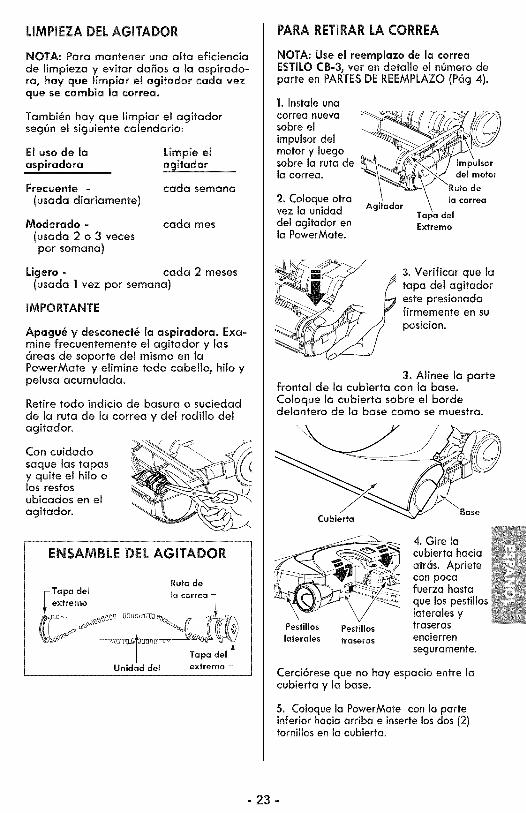
ENSAMBLE DEL AGITADOR
Ruta de
Tapa del ma correa q
extremo _ _1
__de_ _....................Tapa del
Unidad dem extremo .......
PARA RETIRAR LA CORREA
NOTA: Use el reemplazo de la correaESTILO CB-3, vet en detalle el nOmero departe en PARTES DE REEMPLAZO (P6g 4).
I.Instaleuna
correanueva _
sobre elimpulsor delmotory luegosobre la ruta dela correa.
2. Coloque otravez la unidaddel agitador en Extremola PowerMate.
// 3. Verificar laque
tapa del agitador
este presionadafirrnemente en su
posicion.
3. Alinee la partefrontal de la cubierta con la base.Coloque la cubierta sobre el bordedelantero de la base como se muestra.
Cubierta
_ cubiertahacia
atr6s. Apriete
_@ conpoca
___ fuerza basraque los pestilloslaterales y
Pestillos Pestillos traseraslaterales traseros encierren
seguramente.
Cerci6rese que no hay espacio entre lacubierta y la base.
5. Coloque la PowerMate con la parteinferiorhacia arriba e insertelos dos (2)tornillos en la cubierta.
- 23 -
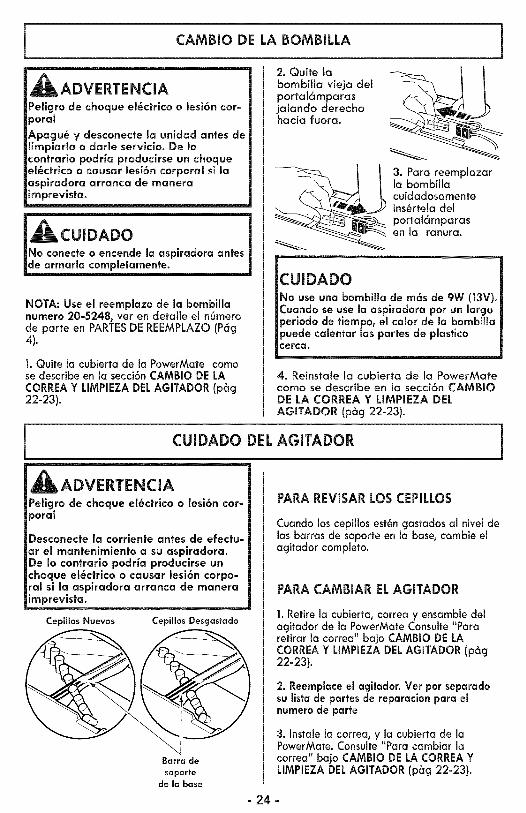
CAMBIODE LA BOMBILLA
_ADVERTENCIAPellgro de choque el_ctrico o lesi6n cot=poral
Apagu_ y desconecte la unidad antes delimpiarla o darle serviclo. De Iocontrario podria produclrse un choqueel@ctrico o causar lesi6n corporal sl laasplradora arranca de rnanerairnprevlsta.
=
|No conecte o encende la aspiradora antes
|de arrnarla completamente.
NOTA: Use el reemplazo de la bombillanumero 20=5248, vet en detalle el n6merode parte en PARTESDE REEMPLAZO (P6g4).
1. Quite la cubierta de la PowerMate comase describe en ia secci6n CAMBIO DE LACORREAY LIMPIEZA DELAGITADOR (p6g22-23).
2. Quite labombiHa vieja delportal6mparasjatando derechohacia fuera.
___ . Para reemplazar
la bombillacuidadosamenteins_rtela del
_ ortal6mparasen la ranura.
CUIDADONo use una bombllla de m6s de 9W (13V).Cuando se use la aspiradora por un largoperiodo de flempo, el calor de la bombillapuede calentar las partes de plastlcocerca.
4. Reinstale la cubierta de la PowerMatecomo se describe en la secci6n CAMBIODE LA CORREA Y LIMPIEZA DELAGITADOR (p6g 22-23).
CUIDADO DEL AGITADOR
_ADVERTENCIAPeligro de choque el_ctrico o lesi6n cor=_oral
:)esconecte la corrlente antes de efectu=ar el mantenimiento a su aspiradora.De Io contrario podria producirse unchoque el_ctrlco o causar lesi6n corpo=ral sl la aspiradora arranca de rnanerairnprevlsta.
CepiHos Nuevos CepiHos Desgastado
Barra de
soporte
de ma base
PARA REVISAR LOS CEPILLOS
Cuando los cepillos est_n gastados al nivel de1as barras de soporte en la base, cambie elagitador completo.
PARA CAMBIAR ELAGITADOR
1. Retire la cubierta, correa y ensamble delagitador de la PowerMate Consulte"Pararefirar la correa" bajo CAMBIO DELACORREAY LIMPaEZADEL AGITADOR (peg22-23).
2. Reemplace el agltador. Ver par separadosu lista de partes de reparacion para e_numero de parte
3. Instale la correa, y la cubierta de laPowerMate. Consulte"Para cambiar lacorrea" bajo CAMBIO DE LA CORREAYLIMPIEZA DELAGITADOR (p6g 22-23).
=24 =
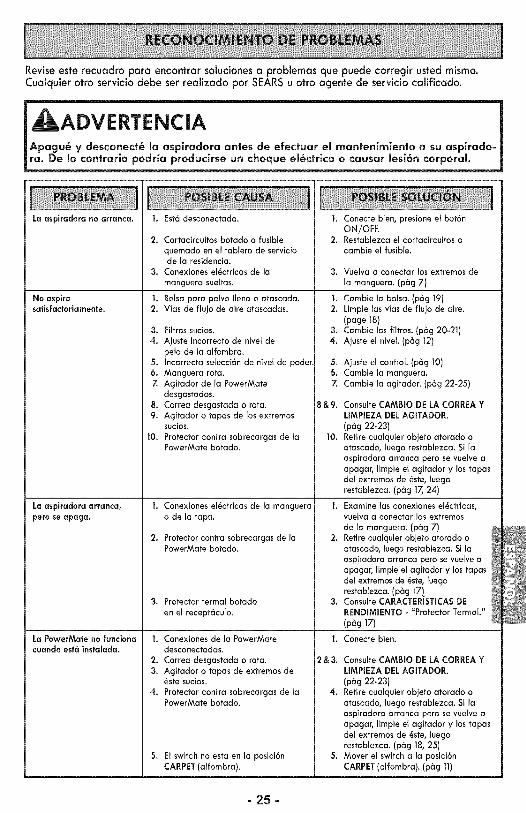
Reviseeste recuadro para encontrar solucionesa problemas que puede corregir usted mismo.Cualquier otro servMo debe ser realizado por SEARSu otro agente de servMo calificado.
l DVERTENCIAApagu_ y desconect_, la asplradora antes de efectuar el mantenimlento a su aspirado=
ra. De Io conirario podHa producirse un choque el_ctrico o causar lesi6n corporal.
La aspiradora no arranca.
No aspirasatisfactoriamente.
La aspiradora arranca,pero se apaga.
La PowerMate no funcionacuando est_ instalada.
I. Est6 desconectada.
2. Cortacircuitos botado o fusible
quemado en eLtablero de serviciode la residencia.
3. Conexiones el_ctricas de la
manguera suertas.
I. Bolsa para polvo Ilena o atascada.2. V_as de flujo de aire atascadas.
3. Filtros sucios.4. Ajuste incorrecto de nivel de
peto de la alfombra.5. Incorrecta serecci6n de nivel de poder6. Manguera rota.7. Agitador de la PowerMate
desgastados.8. Correa desgastada o rota.9. Agitador o tapas de los extremos
sucios.
i 10. Protector contra sobrecargas de laPowerMate botado.
I. Conexiones el_ctricas de la manguerao de la tapa.
2. Protector contra sobrecargas de laPowerMate botado.
3. Protector termal botado
en el recept6culo.
I. Conexiones de la PowerMatedesconectadas.
2. Correa desgastada o rota.
3. Agitador o tapas de extremos de_ste sucios.
4. Protector contra sobrecargas de laPowerMate botado.
5. El switch no esta en la posici6n
CARPET(alfombra).
I. Conecte bien, presione el bot6nON/OFF
2, Restablezca el cortacircuitos ocambie el fusible.
3. Vuelva a conectar los extremos de
la manguera. (p_g 7)
I. Cambie la bolsa. (p6g 19)2. Limpie las v[as de flujo de aire.
(page 18)3. Cambie los filtros. (p_g 20-21)4. Ajuste el niveh (p_g 12)
5. Ajuste el control. (p_g 10)6. Cambie la manguera.
7. Cambie la agitador. (pag 22-25)
8 &9. Consulte CAMBIO DE LA CORREA YLIMPIEZA DEL AGffADOR.
(p6g 22-23)10. Retire cualquier objeto atorado o
atascado, luego restablezca. Si laaspiradora arranca pero se vuelve aapagar, limpie el agitador y los tapasdel extremos de _ste, luegorestaNezca. (pag 17,24)
I. Examine las conexiones el_ctricas,vuelva a conectar los extremos
de la manguera. (p_g 7)2. Retire cualquier objeto atorado o
atascado, luego restablezca. Si laaspiradora arranca pero se vuelve aapagar, limpie el agitador y los tapasdel extremos de _ste, luegorestablezca. (p_g 171
3. Consulte CARACTERISTICASDERENDIMIENTO - "Protector TermaL"
(p_g 17)
I. Conecte bien.
2&3. Consulte CAMBIO DE LA CORREA YLIMPIEZA DEL AGffADOR.
(p6g 22-23)4. Retire cualquier objeto atorado o
atascado, luego restablezca. Si laaspiradora arranca pero se vuelve aapagar, limpie el agitador y los tapas
del extremos de _ste, luegorestaNezca. (p_g 18, 25)
5. Mover el switch a la posici6n
CARPET(alfombra). (p_g 11)
- 25 -
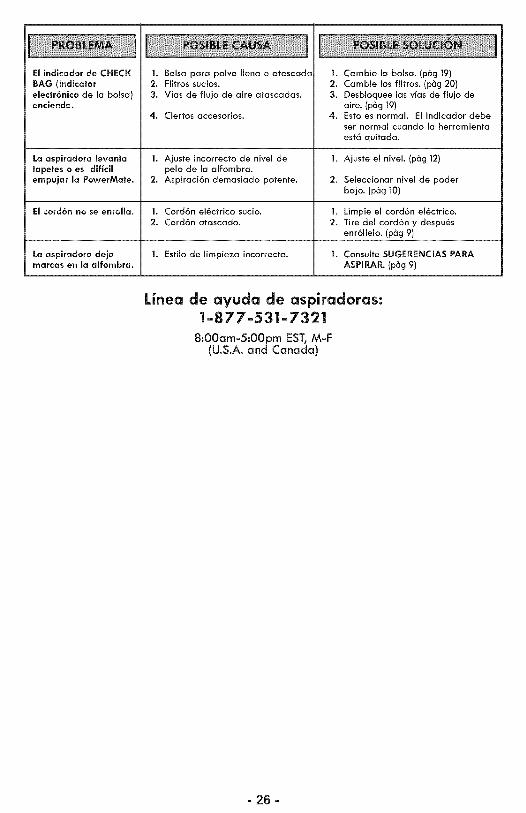
El indicador de CHECKBAG (indicator
elecfr6nico de la boasa)enciende.
1. Bolsa para polvo Hena o atascada2. Fiffros sucios.
3. Vias de flujo de aire atascadas.
4. Ciertos accesorios.
1. Cambie aa bolsa. (p6g 19)2. Cambie aos fiatros. (p6g 20)3. Desbloquee las vlas de flu)o de
aire. (p6g 19)4. Esto es normal Ea indicador debe
ser normaa cuando la herramienta
est6 quitada.
La aspiradora levanta ]. Ajuste incorrecto de nivel de ]. Ajuste el nivel. (p6g 12)tapefes o es diffcim pelo de la alfombra.empujar maPowerMate. 2. Aspiraci6n demasiado potente. 2. Seleccionar nivel de poder
bajo. (pag 10)
El cord6n no se enroHa. 1. Cord6n el_ctrico sucio. 1. Limpie el cord6n el_ctrico.2. Cord6n atascado. 2. Tire del cord6n y despu_s
enr611elo. (p6g 9)
La aspiradora deja 1. Estilo de limpieza incorrecta. 1. Consulte SUGERENCIAS PARAmarcas en la alfombra. ASPIRAR. (p6g 9)
Linea de ayuda de aspiradoras:|-877-53|-732|
8:00am-5:00pm EST, M-F(U.S.A. and Canada)
- 26 -
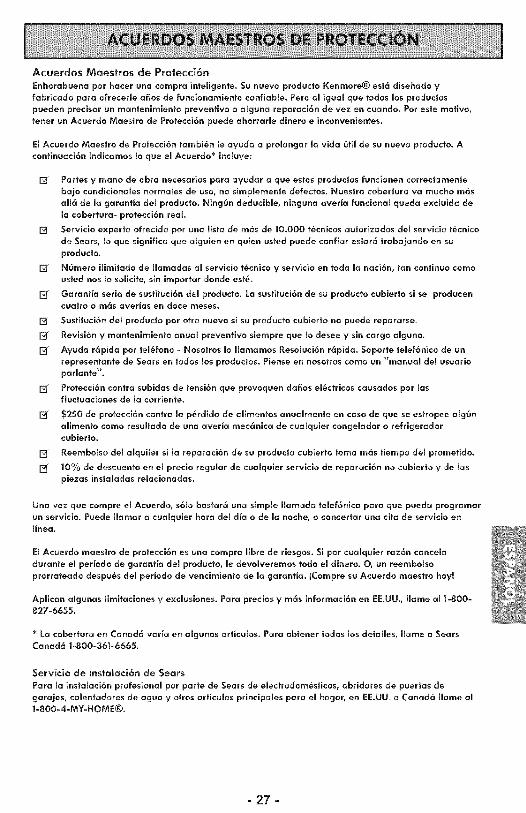
Acuerdos Maestros de Protecci6n
Enhorobuena por hocer una compra inteffgente. Sa nuevo producto Kenmore® est6 dise_ado y
fabricado poro ofrecerme a_os de funcionorniento confiabme. Pero amigaal qae todos mosprodactospaeden precisar un mantenimiento preventivo o amgana reparoci6n de vez en caando. Por este rnotivo,
tener un Acuerdo Maestro de Protecci6n paede ohorrarme dinero e inconvenientes.
EmAcaerdo Maestro de Protecci6n tambi_n meayada a promongar movido 6timde sa nuevo prodacto. Acontinuoci6n indicamos moque emAcuerdo "_induye:
[_ Portes y rnono de obra necesarios pora ayudar a que estos productos fancionen correctarnente
bajo condicionales norrnales de uso, no sirnpmernente defectos. Nuestro cobertura va rnucho rn6s
aft6 de magorontla del prodacto. Ning6n dedacibme, ningana averla funcionol qaedo excmuido de
macoberturo- protecci6n real.
[_ Servicio experto ofrecido por una ffsta de rn6s de 10.000 t_cnicos aatorizados demservicio t_cnico
de Sears, moqae significa qae amgaien en qaien usted puede confior estor6 trobojondo en suprodacto.
[_ N6rnero iffrnitodo de ffarnadas ol servicio t_cnico y servicio en todo monoci6n, ton continuo corno
usted nos mosoffcite, sin irnportar donde est'..
[_ Gorantla seria de sastituci6n demprodacto. La sastituci6n de su prodacto cabierto si se prodacencaatro O rn_s overlas erl doce rneses.
[_ Sastituci6n demprodacto por otro nuevo si sa prodacto cabierto no paede reparorse.
[_ Revisi6n y montenimiento anuol preventivo siempre qae modesee V sin cargo olgano.
[_ Ayada r6pida por tem_fono - Nosotros moffamamos Resomuci6n r6pida. Soporte temef6nico de un
representante de Sears en todos mosprodactos. Piense en nosotros como un "rnanuom del usaorio
parmonte".
[_ Protecci6n contra sabidas de tensi6n qae provoqaen dodos el_ctricos coasodos por masfluctuociones de macorriente.
[_ $250 de protecci6n contra map_rdida de alirnentos anualrnente en caso de qae se estropee alg_n
affmento como resamtodode uno overlo mec6nico de cuomqaier congemador o refrigerodorcabierto.
[_ Reernbomso del olqaimer si mareparoci6n de su prodacto cabierto torna rn6s tiernpo demprometido.
[_ lO°/o de descaento en emprecio regamor de cuolqaier servicio de reporoci6n no cubierto y de mospiezas instomodos relacionados.
Uno vez qae compre e_ Acuerdo, s6_o bostor6 aria simple ffamada te_ef6nico paro qae pueda programar
un servicio. Paede Hamar a caa_qaier hora de_ d_o o de _o noche, o concertor uno cito de servicio enffneo.
E_Acaerdo maestro de protecci6n es una compra fibre de riesgos. Si por cualquier raz6n cance_adarante e_ perlodo de garontla de_ prodacto, _edevo_veremos todo e_ dinero. O, un reembo_so
prorrateodo despots de_ perlodo de vencimiento de _a garanffa, iCompre su Acaerdo maestro boy!
Apffcan olganas ffrnitaciones V exc_usiones. Poro precios y rn6s inforrnoci6n en EE.UU., Home o_ 1-800-827-6655.
"_La cobertura en Canad6 varlo en o_ganos orffcu_os. Poro obtener todos _os detoHes, Home o SearsConod6 1-800-361-6665.
Servicio de instalaci6n de Sears
Para Io insto_oci6n profesiona_ por porte de Sears de e_ectrodorn_sticos, obridores de paertos de
garajes, colentodores de agao y otros artica_os principa_es para e_ hogor, en EE.UU. o Conad6 Home a_-800-4-MY-HOME®.
- 27 -

Your HomeFor troubleshooting, product manuals and expert advice:
managemylifewww.managemylife.com
For repair - in your home - of all major brand appliances,lawn and garden equipment, or heating and cooling systems,
no matter who made it, no matter who sold it!
For the replacement parts, accessories andowner's manuals that you need to do=it=yourself.
For Sears professional installation of home appliancesand items like garage door openers and water heaters.
1-800-4-MY=HOME® Call anytime, day or night
(1-800-469-4663) (U.S.A. and Canada)............................ www,sears,com www=sears=ca
[[: OurHomeForrepairofcarry=initemslikevacuums,lawnequipment,and electronics, call anytime for the location of the nearest
Sears Parts & Repair Service Center
1=800=488=1222 (U.S.A.) 1=800=469=4663 (Canada)[ www.sears.com www.sears.ca
To purchase a protection agreement on a product serviced by Sears:
1"800"827"6655 (U.S.A.) 1"800"361"66{}5 (Canada)
Para pedirservicio de reparaci6n Au Canada pour service en fran(_ais:::{ a domicilio, y para ordenar piezas: 1.800.LE=FOYERMC
1-888-SU=HOGAR® (1-800-533-6937)
(1-888-784--6427) www.sears.ca.... www.sears.com
..... se8 rs
® Registered Trademark / TM Trademark of KCD IP, LLC in the United States, or Sears Brands, LLC in other countries
® Marca Registrada / TM Marca de F_tbrica de KCD IP, LLC en Estados Unidos, o Sears Brands, LLC in otros paises
MCMarque de commerce / MD Marque deposee de Sears Brands, LLC
Related Documents