Installation Instructions Original Instructions 2090-Series Power and Feedback Cables Catalog Numbers 2090-CPBM7DF, 2090-CPWM7DF, 2090-CPBM7E7, 2090-CFBM7E7, 2090-CFBM7DF, 2090-CFBM7DD Summary of Changes This publication contains new and updated information as indicated in the following table. Topic Page Summary of Changes 1 Verify the O-ring Installation for Threaded DIN Cable Plugs 2 Before You Begin 2 Motor/Actuator (M4 and M7) Cable Applications 3 Power/Brake and Feedback Cables 3 Install Continuous-flex Extension Cables 8 Install the Right Angle Cables 10 Additional Resources 12 Topic Page Updated tables and graphics to make better use of space on the page. Throughout Changed the publication title to emphasize cables that are required for motors with separate power and feedback connectors. 1 Updated the introductory text in Verify the O-ring Installation for Threaded DIN Cable Plugs to enhance the O-ring description. 2 Added the 2090-CPWM7DF cable view to Motor Power/Brake Bend Radius Example. 4

Welcome message from author
This document is posted to help you gain knowledge. Please leave a comment to let me know what you think about it! Share it to your friends and learn new things together.
Transcript

Installation Instructions
Original Instructions
2090-Series Power and Feedback CablesCatalog Numbers 2090-CPBM7DF, 2090-CPWM7DF, 2090-CPBM7E7, 2090-CFBM7E7, 2090-CFBM7DF, 2090-CFBM7DD
Summary of ChangesThis publication contains new and updated information as indicated in the following table.
Topic Page
Summary of Changes 1
Verify the O-ring Installation for Threaded DIN Cable Plugs 2
Before You Begin 2
Motor/Actuator (M4 and M7) Cable Applications 3
Power/Brake and Feedback Cables 3
Install Continuous-flex Extension Cables 8
Install the Right Angle Cables 10
Additional Resources 12
Topic Page
Updated tables and graphics to make better use of space on the page. Throughout
Changed the publication title to emphasize cables that are required for motors with separate power and feedback connectors. 1
Updated the introductory text in Verify the O-ring Installation for Threaded DIN Cable Plugs to enhance the O-ring description. 2
Added the 2090-CPWM7DF cable view to Motor Power/Brake Bend Radius Example. 4
2090-Series Power and Feedback Cables
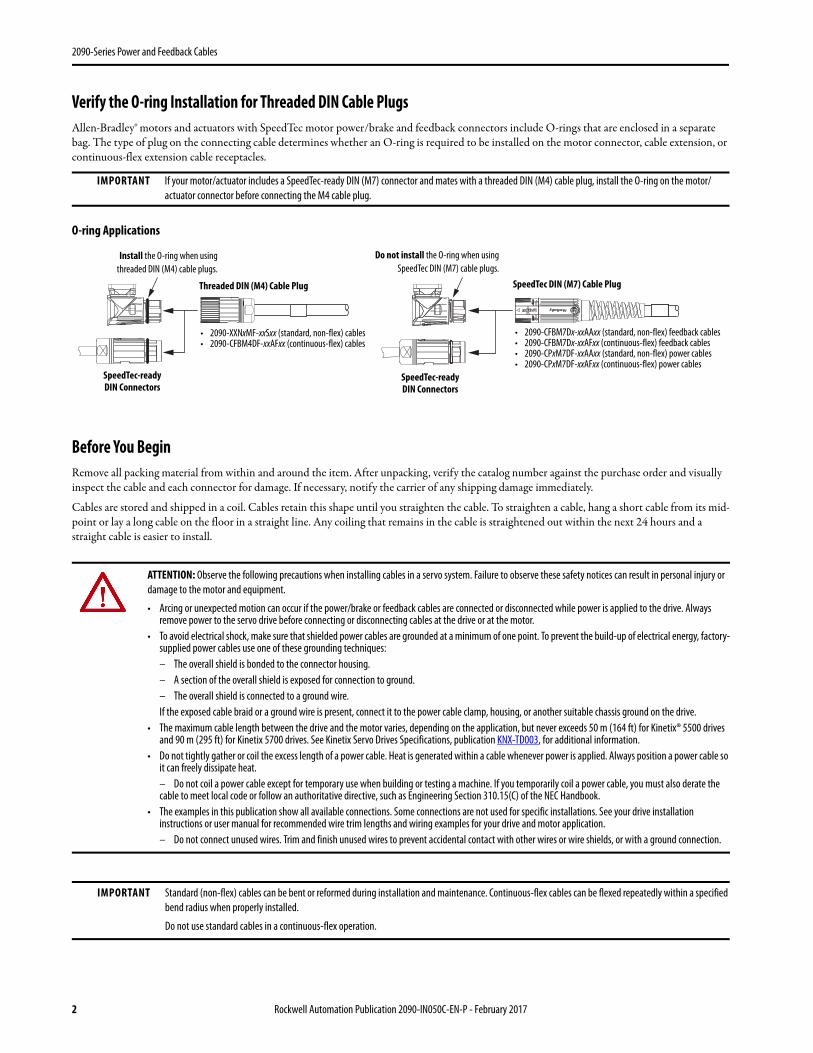
Verify the O-ring Installation for Threaded DIN Cable PlugsAllen-Bradley® motors and actuators with SpeedTec motor power/brake and feedback connectors include O-rings that are enclosed in a separate bag. The type of plug on the connecting cable determines whether an O-ring is required to be installed on the motor connector, cable extension, or continuous-flex extension cable receptacles.
O-ring Applications
Before You BeginRemove all packing material from within and around the item. After unpacking, verify the catalog number against the purchase order and visually inspect the cable and each connector for damage. If necessary, notify the carrier of any shipping damage immediately.
Cables are stored and shipped in a coil. Cables retain this shape until you straighten the cable. To straighten a cable, hang a short cable from its mid-point or lay a long cable on the floor in a straight line. Any coiling that remains in the cable is straightened out within the next 24 hours and a straight cable is easier to install.
IMPORTANT If your motor/actuator includes a SpeedTec-ready DIN (M7) connector and mates with a threaded DIN (M4) cable plug, install the O-ring on the motor/actuator connector before connecting the M4 cable plug.
ATTENTION: Observe the following precautions when installing cables in a servo system. Failure to observe these safety notices can result in personal injury or damage to the motor and equipment.
• Arcing or unexpected motion can occur if the power/brake or feedback cables are connected or disconnected while power is applied to the drive. Always remove power to the servo drive before connecting or disconnecting cables at the drive or at the motor.
• To avoid electrical shock, make sure that shielded power cables are grounded at a minimum of one point. To prevent the build-up of electrical energy, factory-supplied power cables use one of these grounding techniques: – The overall shield is bonded to the connector housing. – A section of the overall shield is exposed for connection to ground. – The overall shield is connected to a ground wire. If the exposed cable braid or a ground wire is present, connect it to the power cable clamp, housing, or another suitable chassis ground on the drive.
• The maximum cable length between the drive and the motor varies, depending on the application, but never exceeds 50 m (164 ft) for Kinetix® 5500 drives and 90 m (295 ft) for Kinetix 5700 drives. See Kinetix Servo Drives Specifications, publication KNX-TD003, for additional information.
• Do not tightly gather or coil the excess length of a power cable. Heat is generated within a cable whenever power is applied. Always position a power cable so it can freely dissipate heat.– Do not coil a power cable except for temporary use when building or testing a machine. If you temporarily coil a power cable, you must also derate the cable to meet local code or follow an authoritative directive, such as Engineering Section 310.15(C) of the NEC Handbook.
• The examples in this publication show all available connections. Some connections are not used for specific installations. See your drive installation instructions or user manual for recommended wire trim lengths and wiring examples for your drive and motor application.– Do not connect unused wires. Trim and finish unused wires to prevent accidental contact with other wires or wire shields, or with a ground connection.
IMPORTANT Standard (non-flex) cables can be bent or reformed during installation and maintenance. Continuous-flex cables can be flexed repeatedly within a specified bend radius when properly installed.
Do not use standard cables in a continuous-flex operation.
Do not install the O-ring when usingSpeedTec DIN (M7) cable plugs.
Install the O-ring when usingthreaded DIN (M4) cable plugs.
SpeedTec-ready DIN Connectors
SpeedTec DIN (M7) Cable PlugThreaded DIN (M4) Cable Plug
• 2090-XXNxMF-xxSxx (standard, non-flex) cables• 2090-CFBM4DF-xxAFxx (continuous-flex) cables
• 2090-CFBM7Dx-xxAAxx (standard, non-flex) feedback cables• 2090-CFBM7Dx-xxAFxx (continuous-flex) feedback cables• 2090-CPxM7DF-xxAAxx (standard, non-flex) power cables• 2090-CPxM7DF-xxAFxx (continuous-flex) power cables
SpeedTec-ready DIN Connectors
2 Rockwell Automation Publication 2090-IN050C-EN-P - February 2017
2090-Series Power and Feedback Cables
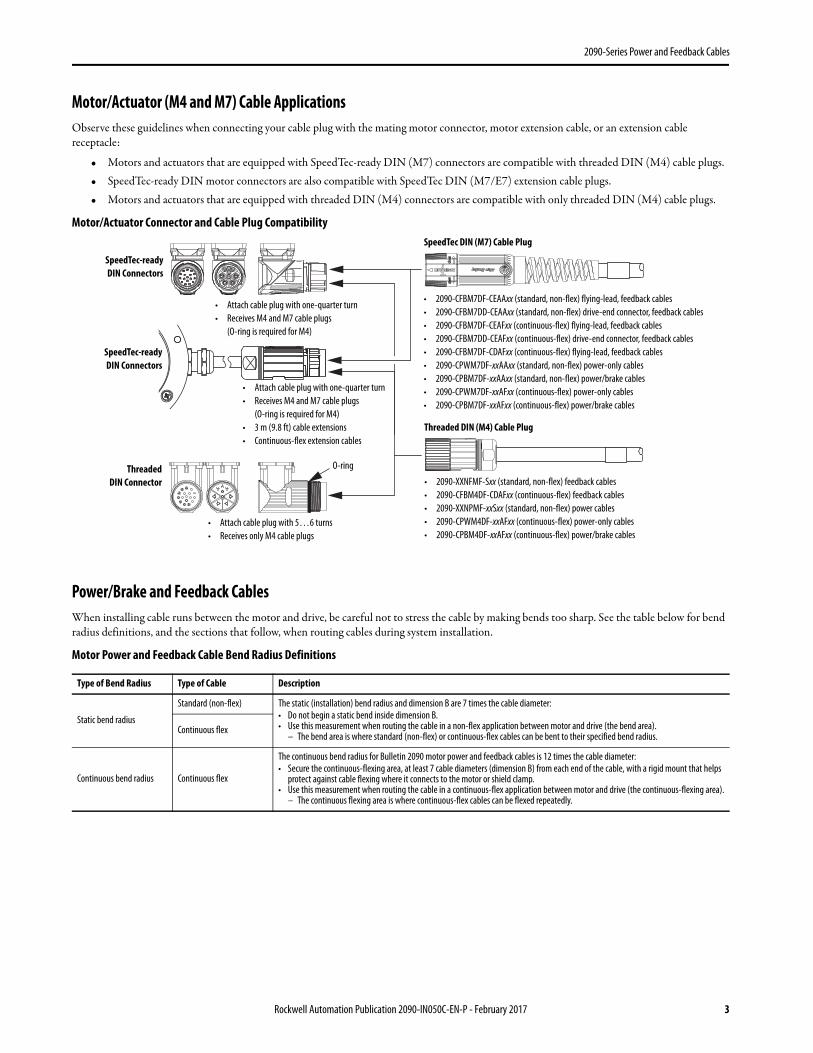
Motor/Actuator (M4 and M7) Cable ApplicationsObserve these guidelines when connecting your cable plug with the mating motor connector, motor extension cable, or an extension cable receptacle:
• Motors and actuators that are equipped with SpeedTec-ready DIN (M7) connectors are compatible with threaded DIN (M4) cable plugs.• SpeedTec-ready DIN motor connectors are also compatible with SpeedTec DIN (M7/E7) extension cable plugs.• Motors and actuators that are equipped with threaded DIN (M4) connectors are compatible with only threaded DIN (M4) cable plugs.
Motor/Actuator Connector and Cable Plug Compatibility
Power/Brake and Feedback CablesWhen installing cable runs between the motor and drive, be careful not to stress the cable by making bends too sharp. See the table below for bend radius definitions, and the sections that follow, when routing cables during system installation.
Motor Power and Feedback Cable Bend Radius Definitions
Type of Bend Radius Type of Cable Description
Static bend radius
Standard (non-flex) The static (installation) bend radius and dimension B are 7 times the cable diameter:• Do not begin a static bend inside dimension B.• Use this measurement when routing the cable in a non-flex application between motor and drive (the bend area).
– The bend area is where standard (non-flex) or continuous-flex cables can be bent to their specified bend radius.Continuous flex
Continuous bend radius Continuous flex
The continuous bend radius for Bulletin 2090 motor power and feedback cables is 12 times the cable diameter:• Secure the continuous-flexing area, at least 7 cable diameters (dimension B) from each end of the cable, with a rigid mount that helps
protect against cable flexing where it connects to the motor or shield clamp.• Use this measurement when routing the cable in a continuous-flex application between motor and drive (the continuous-flexing area).
– The continuous flexing area is where continuous-flex cables can be flexed repeatedly.
• Attach cable plug with one-quarter turn• Receives M4 and M7 cable plugs
(O-ring is required for M4)
SpeedTec-readyDIN Connectors
ThreadedDIN Connector
O-ring
SpeedTec DIN (M7) Cable Plug
Threaded DIN (M4) Cable Plug
• 2090-XXNFMF-Sxx (standard, non-flex) feedback cables• 2090-CFBM4DF-CDAFxx (continuous-flex) feedback cables• 2090-XXNPMF-xxSxx (standard, non-flex) power cables• 2090-CPWM4DF-xxAFxx (continuous-flex) power-only cables• 2090-CPBM4DF-xxAFxx (continuous-flex) power/brake cables
• Attach cable plug with 5…6 turns• Receives only M4 cable plugs
• 2090-CFBM7DF-CEAAxx (standard, non-flex) flying-lead, feedback cables• 2090-CFBM7DD-CEAAxx (standard, non-flex) drive-end connector, feedback cables• 2090-CFBM7DF-CEAFxx (continuous-flex) flying-lead, feedback cables• 2090-CFBM7DD-CEAFxx (continuous-flex) drive-end connector, feedback cables• 2090-CFBM7DF-CDAFxx (continuous-flex) flying-lead, feedback cables• 2090-CPWM7DF-xxAAxx (standard, non-flex) power-only cables• 2090-CPBM7DF-xxAAxx (standard, non-flex) power/brake cables• 2090-CPWM7DF-xxAFxx (continuous-flex) power-only cables• 2090-CPBM7DF-xxAFxx (continuous-flex) power/brake cables
• Attach cable plug with one-quarter turn• Receives M4 and M7 cable plugs
(O-ring is required for M4)• 3 m (9.8 ft) cable extensions• Continuous-flex extension cables
SpeedTec-readyDIN Connectors
Rockwell Automation Publication 2090-IN050C-EN-P - February 2017 3

2090-Series Power and Feedback Cables
Install Motor Power/Brake CablesThis figure illustrates how to measure the bend radius and where cable bends can be made on motor power/brake cables.
Motor Power/Brake Bend Radius Example
Power/Brake Cable Specifications (standard, non-flex)
Power/Brake Cable Specifications (continuous-flex)
Cable Type Cable Cat. No. Wire SizeAWG
Dmm (in.)
B (1)
mm (in.)
(1) Dimension B is based on the cable diameter. See Motor Power and Feedback Cable Bend Radius Definitions on page 3 for more information.
Power/brake cables(standard, non-flex)
2090-CPBM7DF-16AAxx 16 11.6 (0.47) 81.2 (3.2)
2090-CPBM7DF-14AAxx 14 12.7 (0.50) 88.9 (3.5)
2090-CPBM7DF-12AAxx 12 14.3 (0.56) 100 (3.9)
2090-CPBM7DF-10AAxx 10 16.8 (0.66) 118 (4.6)
2090-CPBM7DF-08AAxx 8 20.1 (0.79) 141 (5.5)
2090-CPBM7DF-06AAxx 6 24.3 (0.96) 170 (6.7)
2090-CPBM7DF-04AAxx 4 28.8 (1.13) 202 (7.9)
2090-CPBM7DF-02AAxx 2 32.7 (1.29) 229 (9.0)
Power-only cables(standard, non-flex)
2090-CPWM7DF-16AAxx 16 9.20 (0.36) 64.4 (2.5)
2090-CPWM7DF-14AAxx 14 10.3 (0.40) 72.1 (2.8)
2090-CPWM7DF-12AAxx 12 11.2 (0.44) 78.4 (3.1)
2090-CPWM7DF-10AAxx 10 15.3 (0.6) 107 (4.2)
2090-CPWM7DF-08AAxx 8 18.7 (0.74) 131 (5.2)
Cable Type Cable Cat. No. Wire SizeAWG
Dmm (in.)
B (1)
mm (in.)
(1) Dimension B and continuous bend radius are based on the cable diameter. See Motor Power and Feedback Cable Bend Radius Definitions on page 3 for more information.
Continuous Bend Radius (1)
mm (in.)
Power/brake cables(continuous-flex)
2090-CPBM7DF-16AFxx 16 12.5 (0.49) 87.5 (3.4) 150 (5.9)
2090-CPBM7DF-14AFxx 14 13.7 (0.54) 95.9 (3.8) 164 (6.5)
2090-CPBM7DF-10AFxx 10 17.8 (0.70) 125 (4.9) 214 (8.4)
2090-CPBM7DF-08AFxx 8 20.6 (0.81) 144 (5.7) 247 (9.7)
Power-only cables(continuous-flex)
2090-CPWM7DF-16AFxx 16 9.7 (0.38) 67.9 (2.7) 116 (4.6)
2090-CPWM7DF-14AFxx 14 10.4 (0.41) 72.8 (2.9) 125 (4.9)
2090-CPWM7DF-10AFxx 10 15.7 (0.62) 110 (4.3) 188 (7.4)
2090-CPWM7DF-08AFxx 8 20.2 (0.79) 141 (5.5) 242 (9.5)
B B
D
2090-CPBM7DF-xxAAxx2090-CPBM7DF-xxAFxx
2090-CPWM7DF-xxAAxx2090-CPWM7DF-xxAAxx
U
V
W
PE
D
Bend Area orContinuous Flexing Area
Cable Shields
Bend RadiusBend Radius
CableDiameter
CableDiameter
Cable Shields
4 Rockwell Automation Publication 2090-IN050C-EN-P - February 2017

2090-Series Power and Feedback Cables
Power/Brake Cable Pinouts
Power/Brake Cable Type Cable Cat. No. Description
Power/brake cables (standard, non-flex)
2090-CPBM7DF-16AAxx, 2090-CPBM7DF-14AAxx, 2090-CPBM7DF-12AAxx
Power/brake cables (continuous-flex)
2090-CPBM7DF-16AFxx, 2090-CPBM7DF-14AFxx
Power-only cables(standard, non-flex)
2090-CPWM7DF-16AAxx, 2090-CPWM7DF-14AAxx, 2090-CPWM7DF-12AAxx
Power-only cables(continuous-flex)
2090-CPWM7DF-16AFxx, 2090-CPWM7DF-14AFxx
Power/brake cables(standard, non-flex)
2090-CPBM7DF-10AAxx, 2090-CPBM7DF-08AAxx, 2090-CPBM7DF-06AAxx
Power/brake cables(continuous-flex)
2090-CPBM7DF-10AFxx, 2090-CPBM7DF-08AFxx
Power-only cables(standard, non-flex)
2090-CPWM7DF-10AAxx, 2090-CPWM7DF-08AAxx
Power-only cables(continuous-flex)
2090-CPWM7DF-10AFxx, 2090-CPWM7DF-08AFxx
Power/brake cables(standard, non-flex)
2090-CPBM7DF-04AAxx, 2090-CPBM7DF-02AAxx
ABCD
FG
C B
A
EF
G
HL
D
UVWPE
MBRK+MBRK-
Twisted Wire Pair360° shield-to-ground connections required.
To Motor
ConnectorBackshell
Shielded 360° Shield Wire Connection
To Drive BrownBlackBlue
Green/Yellow
18 AWG White18 AWG Black
Shield
ABCD
C B
A
EF
G
HL
D
UVWPE
360° shield-to-ground connection required.
To Motor
Shield Wire Connection
To Drive
ConnectorBackshell
Shielded 360°
Brown
BlueGreen/Yellow
Shield
Black
UVWPE
MBRK+MBRK–
UVW
+–
W21
+ –
V
U
Twisted Wire Pair
360° shield-to-ground connections required.
To Motor
ConnectorBackshell
Shielded 360°Shield
Wire Connection
To Drive
18 AWG White18 AWG Black
Shield
BrownBlackBlue
Green/Yellow
UVW
UVWPE
W21
+ –V
U
360° shield-to-ground connections required.
To Motor
ConnectorBackshell
Shielded 360°
Shield Wire Connection
To DriveBrownBlackBlue
Green/Yellow
Shield
UVW
+–
UVW
MBRK+MBRK–
V –
12
U
+
W
360° shield-to-ground connections required.
To Motor
ConnectorBackshell
Shielded 360°Shield Wire Connection
To Drive
Twisted Wire Pair
Brown
BlueGreen/Yellow
WhiteBlack
Shield
Black
Rockwell Automation Publication 2090-IN050C-EN-P - February 2017 5

2090-Series Power and Feedback Cables
Install Motor Feedback CablesThis figure illustrates how to measure the bend radius and where cable bends can be made on motor feedback cables.
Motor Feedback Bend Radius Examples
Feedback Cable Specifications
Feedback Cable Pinouts (premolded cable connectors)
Cable Type Cable Cat. No. Dmm (in.)
B (1)
mm (in.)
(1) Dimension B and continuous bend radius are based on the cable diameter. See Motor Power and Feedback Cable Bend Radius Definitions on page 3 for more information.
Continuous Bend Radius (1)
mm (in.)
Feedback cables(standard, non-flex)
2090-CFBM7DD-CEAAxx9.8 (0.39) 68.6 (2.7) N/A
2090-CFBM7DF-CEAAxx
Feedback cables (continuous-flex)
2090-CFBM7DD-CEAFxx10.3 (0.40) 72.1 (2.8) 124 (4.9)
2090-CFBM7DF-CEAFxx
2090-CFBM7DF-CDAFxx 11.7 (0.46) 81.9 (3.2) 140 (5.5)
Feedback Cable Type Cable Cat. No. Description
Feedback cable(standard, non-flex)
2090-CFBM7DD-CEAAxx
Feedback cable(continuous-flex) 2090-CFBM7DD-CEAFxx
2090-CFBM7DD-CEAAxx2090-CFBM7DD-CEAFxx
B B
BD
2090-CFBM7DF-CEAAxx2090-CFBM7DF-CEAFxx2090-CFBM7DF-CDAFxx
Bend Area orContinuous Flexing Area
Bend RadiusBend Radius
CableDiameter Bend Radius
12345
101467
11
1234569
1011131412
SIN+/AM+SIN-/AM-COS+/BM+COS-/BM-DATA+/IM+/R1DATA-/IM-/R2EPWR 5VECOM EPWR 9VTS+TS-ECOM
SIN+/AM+SIN-/AM-
COS+/BM+COS-/BM-
DATA+/IM+/R1DATA-/IM-/R2
EPWR 5VECOM
EPWR 9VTS+
12
3
4
5
16
1514
1312
1110
9
87
6
17 1
510
15
116
22 AWG Black22 AWG White/Black22 AWG Red22 AWG White/Red22 AWG Green22 AWG White/Green22 AWG Gray
22 AWG White/Gray22 AWG Orange22 AWG White/Orange
36 AWG Shield
Motor Plug Drive Plug
Twisted Wire PairConnector Backshell Shielded 360°
Wire ConnectionShield Connector Backshell Shielded 360°
2090-CFBM7DD-CEAAxx feedback cables (-CE designation) have fewer conductors and are designed for motors with high-resolution
absolute-position encoders.
6 Rockwell Automation Publication 2090-IN050C-EN-P - February 2017

2090-Series Power and Feedback Cables
Feedback Cable Pinouts (flying leads)
Feedback Cable Pinouts (flying-leads with Hall signals)
Feedback Cable Type Cable Cat. No. Description
Feedback cable(standard, non-flex)
2090-CFBM7DF-CEAAxx
Feedback cable(continuous-flex) 2090-CFBM7DF-CEAFxx
Feedback Cable Type Cable Cat. No. Description
Feedback cable(continuous-flex) 2090-CFBM7DF-CDAFxx
1234569
1011131412
SIN+/AM+SIN-/AM-COS+/BM+COS-/BM-DATA+/IM+/R1DATA-/IM-/R2EPWR 5VECOM EPWR 9VTS+TS-ECOM
12
3
4
5
16
1514
1312
1110
9
87
6
17
Motor Plug
22 AWG Black22 AWG White/Black22 AWG Red22 AWG White/Red22 AWG Green22 AWG White/Green22 AWG Gray22 AWG White/Gray22 AWG Orange22 AWG White/Orange
36 AWG Shield
To Drive
Twisted Wire Pair
Connector Backshell Shielded 360°
Wire ConnectionShield
Connect Cable Shield to Ground
N/C N/C
1234569
1011131415161778
12
SIN+/AM+SIN-/AM-COS+/BM+COS-/BM-DATA+/IM+DATA-/IM-EPWR 5VECOM EPWR 9VTS+TS-S1 S2 S3 Spare ABSECOM
N/C
12
3
4
5
16
1514
1312
1110
9
87
6
17
Twisted Wire Pair
Motor Plug
Connector Backshell Shielded 360°
Wire Connection
To Drive
Shield
Connect Cable Shield to Ground
26 AWG Black26 AWG White/Black26 AWG Red26 AWG White/Red26 AWG Green26 AWG White/Green16 AWG Gray16 AWG White/Gray22 AWG Orange22 AWG White/Orange26 AWG Blue26 AWG White/Blue26 AWG Yellow26 AWG White/Yellow26 AWG Brown26 AWG White/Brown
36 AWG Shield
2090-CFBM7DF-CDAFxx feedback cables(-CD designation) include Hall signal
conductors and are designed for motors with incremental encoders.
Rockwell Automation Publication 2090-IN050C-EN-P - February 2017 7

2090-Series Power and Feedback Cables
Install Continuous-flex Extension CablesThis figure illustrates how to measure the bend radius and where cable bends can be made on continuous-flex extension cables.
Continuous-flex Extension Cable Bend Radius Example
Extension Power Cable Pinout Diagrams and Specifications
Extension Power/Brake Cable Pinouts
Extension Cable Type Cable Cat. No. Description
Extension power/brake cable(continuous-flex)
2090-CPBM7E7-16AFxx, 2090-CPBM7E7-14AFxx, 2090-CPBM7E7-10AFxx, 2090-CPBM7E7-08AFxx
B
BD
Bend Area or Continuous Flexing Area 2090-CPBM7E7-xxAFxx cable is shown.Continuous
Bend Radius CableDiameter
C B
A
E
F
H L
CB
AF
U
VW
U
V
W
A
BC
A
B
C
F
GEHL
F
GEHL
MBRK+
MBRK-
MBRK+
MBRK-+
–12
+
–12
VV–
–WW
22 11
UU
++
G G
L EH
2090-CPBM7E7-16AFxx 2090-CPBM7E7-14AFxx
2090-CPBM7E7-10AFxx 2090-CPBM7E7-08AFxx
Brown
Black
Blue
Green/Yellow
18 AWG White
18 AWG Black
Shield
Motor Plug Extension Plug
Twisted Wire Pair
Connector Backshell Shielded 360°
Wire ConnectionShield
Connect Cable Shield to Ground
8 Rockwell Automation Publication 2090-IN050C-EN-P - February 2017

2090-Series Power and Feedback Cables
Extension Power/Brake Cable Specifications
Extension Feedback Cable Pinout Diagrams and Specifications2090-CFBM7E7 extension feedback cables are available with and without Hall signal conductors.
• 2090-CFBM7E7-CEAFxx feedback cables (-CE designation) have fewer conductors and are designed for motors with high-resolution absolute-position encoders.
• 2090-CFBM7E7-CDAFxx feedback cables (-CD designation) include Hall signal conductors and are designed for motors with incremental encoders.
Extension Feedback Cable Pinouts
Extension Feedback Cable Specifications
Cable Type Cable Cat. No. Wire SizeAWG
Dmm (in.)
B (1)
mm (in.)
(1) Dimension B and continuous bend radius are based on the cable diameter. See Motor Power and Feedback Cable Bend Radius Definitions on page 3 for more information.
Continuous Bend Radius (1)
mm (in.)
Extension power/brake cables (continuous-flex)
2090-CPBM7E7-16AFxx 16 12.5 (0.49) 87.5 (3.4) 150 (5.9)
2090-CPBM7E7-14AFxx 14 13.7 (0.54) 95.9 (3.8) 164 (6.4)
2090-CPBM7E7-10AFxx 10 17.8 (0.70) 125 (4.9) 214 (8.4)
2090-CPBM7E7-08AFxx 8 20.6 (0.81) 144 (5.7) 247 (9.7)
Cable Type Cable Cat. No. Description
Extension feedback cable (continuous-flex)
2090-CFBM7E7-CEAFxx,2090-CFBM7E7-CDAFxx
Cable Type Cable Cat. No. Dmm (in.)
B (2)
mm (in.)
(2) Dimension B and continuous bend radius are based on the cable diameter. See Motor Power and Feedback Cable Bend Radius Definitions on page 3 for more information.
Continuous Bend Radius (2)
mm (in.)
Extension feedback cables (continuous-flex)
2090-CFBM7E7-CEAFxx 10.3 (0.40) 72.1 (2.8) 124 (4.9)
2090-CFBM7E7-CDAFxx (1)
(1) Pins 15, 16, and 17 (marked with an asterisk) for Hall signals S1, S2, and S3, apply to only the -CD feedback cable. Feedback cables with the -CE designation do not include these conductors.
11.7 (0.46) 81.9 (3.2) 140 (5.5)
1234569
101113
15*16*17*
1234569
10111314
15*16*17*12
SIN+/AM+SIN-/AM-COS+/BM+COS-/BM-DATA+/IM+/R1DATA-/IM-/R2EPWR 5VECOM EPWR 9VTS+TS-S1 S2 S3 ECOM
SIN+/AM+SIN-/AM-
COS+/BM+COS-/BM-
DATA+/IM+DATA-/IM-
EPWR 5VECOM
EPWR 9VTS+
S1 S2 S3
12
3
4
5
16
1514
1312
1110
9
8
76
17
12
3
4
5
16
1514
13
1211
10
9
87 6
17
N/C N/C
N/C
26 AWG Black26 AWG White/Black26 AWG Red26 AWG White/Red26 AWG Green26 AWG White/Green16 AWG Gray16 AWG White/Gray22 AWG Orange22 AWG White/Orange
36 AWG Shield
Motor Plug Extension Plug
Twisted Wire PairConnector Backshell Shielded 360°
Wire ConnectionShield Connector Backshell Shielded 360°
26 AWG Blue26 AWG White/Blue26 AWG Yellow26 AWG White/Yellow
Rockwell Automation Publication 2090-IN050C-EN-P - February 2017 9

2090-Series Power and Feedback Cables
Install the Right Angle CablesFollow these steps to attach a right-angle cable connector to the motor connector.
1. Align all flat surfaces on the cable connector with the flat surface on the motor connector.
2. Push the cable connector onto the motor connector to fully seat the connection.
3. Twist the knurled front end of the cable connector clockwise approximately 60° to secure the connection.
Right-angle Power/Brake CablesThis figure illustrates how to measure the bend radius and where cable bends can be made on right-angle power/brake cables.
Right-angle Power/Brake Cable Bend Radius Example
Right-angle Power/Brake Cable Specifications
You can reposition right-angle power cables in 90° increments. Follow these steps to reposition the power cable connector.
1. Remove the four 2 mm hex screws on the back of the cable connector.
2. Reposition the connector body to a new position by rotating the connector 90°, 180°, or 270°.
3. Secure the two parts together with the four 2 mm hex screws.
Torque screws to 0.25 N•m (2.2 lb•in), maximum.
Right-angle Power/Brake Cable Pinouts
Power/Brake Cable Type Cable Cat. No. Wire SizeAWG
Available Lengthsmm (in.) Connector IP Rating
Right-angle power/brake cable (standard, non-flex) 2090-CPBM7DF-16RAxx 16 (power)
18 (brake)3, 6, 9, 15 m(10, 16, 30, 49 ft)
IP54(dust protected, splashing water)
Power/Brake Cable Type Cable Cat. No. Description
Right-angle power/brake cable (standard, non-flex) 2090-CPBM7DF-16RAxx
71.0(2.8)
82.0(3.2)
150(5.9)
11.6(0.46)
81.2(3.2)
81.2(3.2) Bend Area
CableDiameterHex Screw (4x)
Cable Shields
A
BC
D
EF
G
HL
ABC
FGEHL
UVW
MBRK+MBRK-
Wire Connection Twisted Wire Pair
Hex Screw (4x)BrownBlackBlue
Green/YellowWhiteBlack
Shield
10 Rockwell Automation Publication 2090-IN050C-EN-P - February 2017

2090-Series Power and Feedback Cables
Right-angle Feedback CablesThis figure illustrates how to measure the bend radius and where cable bends can be made on right-angle feedback cables.
Right-angle Power/Brake Cable Bend Radius Example
Right-angle Feedback Cable Specifications
The right-angle feedback cable can be rotated 124° to the left of center or 200° to the right of center. Follow these steps to rotate the feedback cable connector.
1. Mount the cable on the motor connector.
2. Use two hands to rotate the connector into position.a. Grasp the front and rear sections of the connector.b. Use one hand to stabilize the front section of the connector (the area with the knurled locking sleeve) and the connector on the motor.c. Use your other hand to rotate the back section of the connector (the area with the cable) into position.
Right-angle Feedback Cable Pinout
Feedback Cable Type Cable Cat. No. Wire SizeAWG
Available Lengthsmm (in.) Connector IP Rating
Right-angle feedback cable (standard, non-flex) 2090-CFBM7DF-CERAxx 22 3, 6, 9, 15 m
(10, 16, 30, 49 ft)IP67(dust tight, water immersion)
Feedback Cable Type Cable Cat. No. Description
Right-angle feedback cable (standard, non-flex) 2090-CFBM7DF-CERAxx
61.0(2.4)
81.0(3.2)
9.8(0.38)
68.6(2.7)
68.6(2.7)Bend Area
CableDiameterRotation Point
910
1112
13
14 15
16
17
2
34 5 6 7 8
1
12
34
56
910
1113
14
12
Rotation Point
Wire Connection Twisted Wire Pair
BlackWhite/Black
RedWhite/Red
GreenWhite/Green
GrayWhite/Gray
OrangeWhite/Orange
Drain
SIN+/AM+SIN-/AM-
COS+/BM+COS-/BM-
DATA+/IM+/R1DATA-/IM-/R2
EPWR 9V DCCOM
EPWR 5V DCTS+
TS-
COM
Rockwell Automation Publication 2090-IN050C-EN-P - February 2017 11

Additional ResourcesThese documents contain additional information concerning related products from Rockwell Automation.
You can view or download publications at http://www.rockwellautomation.com/global/literature-library/overview.page. To order paper copies of technical documentation, contact your local Allen-Bradley distributor or Rockwell Automation sales representative.
Rockwell Automation SupportFor technical support, visit http://www.rockwellautomation.com/support/overview.page.
Resource Description
Kinetix Rotary Motion Specifications, publication KNX-TD001 Provides product specifications for Kinetix VP (Bulletin VPL, VPF, VPS), MP-Series™ (Bulletin MPL, MPM, MPF, MPS), Kinetix 6000M (Bulletin MDF), TL-Series™, RDD-Series™, and HPK-Series™ rotary motors.
Kinetix Linear Motion Specifications, publication KNX-TD002 Provides product specifications for LDAT-Series linear thrusters, Bulletin MPAS and MPMA linear stages, Bulletin MPAR, MPAI, and TLAR electric cylinders, and LDC-Series™ and LDL-Series™ linear motors.
Kinetix Servo Drives Specifications, publication KNX-TD003 Provides product specifications for Kinetix Integrated Motion over the EtherNet/IP network, Integrated Motion over sercos interface, EtherNet/IP networking, and component servo drive families.
Kinetix Motion Accessories Specifications, publication KNX-TD004 Provides product specifications for Bulletin 2090 motor and interface cables, low-profile connector kits, drive power components, and other servo drive accessory items.
Kinetix Motion Control Selection Guide, publication KNX-SG001 Provides overview of Kinetix servo drives, motors, actuators, and motion accessories designed to help make initial decisions for the motion control products best suited for your system requirements.
Kinetix 5700 Servo Drives User Manual, publication 2198-UM002
Provides information on installing, configuring, startup, troubleshooting, and applications for your Kinetix servo drive system.
Kinetix 5500 Servo Drives User Manual, publication 2198-UM001
Kinetix 6200 and Kinetix 6500 Modular Servo Drives User Manual, publication 2094-UM002
Kinetix 6000 Multi-axis Servo Drive User Manual, publication 2094-UM001
Kinetix 300 EtherNet/IP Indexing Servo Drives User Manual, publication 2097-UM001
Kinetix 350 Single-axis EtherNet/IP Servo Drives User Manual, publication 2097-UM002
Kinetix 3 Component Servo Drives User Manual, publication 2071-UM001
System Design for Control of Electrical Noise Reference Manual, publication GMC-RM001
Provides information, examples, and techniques that are designed to minimize system failures that are caused by electrical noise.
Rockwell Automation® Product Certification, website http://www.rockwellautomation.com/global/certification/overview.page Provides declarations of conformity, certificates, and other certification details.
Allen-Bradley, HPK-Series, Kinetix, LDC-Series, LDL-Series, MP-Series, RDD-Series, Rockwell Automation, Rockwell Software, and TL-Series are trademarks of Rockwell Automation, Inc.
Trademarks not belonging to Rockwell Automation are property of their respective companies.
Rockwell Otomasyon Ticaret A.Ş., Kar Plaza İş Merkezi E Blok Kat:6 34752 İçerenköy, İstanbul, Tel: +90 (216) 5698400
Rockwell Automation maintains current product environmental information on its website athttp://www.rockwellautomation.com/rockwellautomation/about-us/sustainability-ethics/product-environmental-compliance.page.
Publication 2090-IN050C-EN-P - February 2017Supersedes Publication 2090-IN050B-EN-P - July 2014 Copyright © 2017 Rockwell Automation, Inc. All rights reserved. Printed in the U.S.A.
Related Documents