OFFICIAL MICROSOFT LEARNING PRODUCT 20413C Designing and Implementing a Server Infrastructure Companion Content

Welcome message from author
This document is posted to help you gain knowledge. Please leave a comment to let me know what you think about it! Share it to your friends and learn new things together.
Transcript

O F F I C I A L M I C R O S O F T L E A R N I N G P R O D U C T
20413C Designing and Implementing a Server Infrastructure Companion Content
ii Designing and Implementing a Server Infrastructure
Information in this document, including URL and other Internet Web site references, is subject to change without notice. Unless otherwise noted, the example companies, organizations, products, domain names, e-mail addresses, logos, people, places, and events depicted herein are fictitious, and no association with any real company, organization, product, domain name, e-mail address, logo, person, place or event is intended or should be inferred. Complying with all applicable copyright laws is the responsibility of the user. Without limiting the rights under copyright, no part of this document may be reproduced, stored in or introduced into a retrieval system, or transmitted in any form or by any means (electronic, mechanical, photocopying, recording, or otherwise), or for any purpose, without the express written permission of Microsoft Corporation.
Microsoft may have patents, patent applications, trademarks, copyrights, or other intellectual property rights covering subject matter in this document. Except as expressly provided in any written license agreement from Microsoft, the furnishing of this document does not give you any license to these patents, trademarks, copyrights, or other intellectual property.
The names of manufacturers, products, or URLs are provided for informational purposes only and Microsoft makes no representations and warranties, either expressed, implied, or statutory, regarding these manufacturers or the use of the products with any Microsoft technologies. The inclusion of a manufacturer or product does not imply endorsement of Microsoft of the manufacturer or product. Links may be provided to third party sites. Such sites are not under the control of Microsoft and Microsoft is not responsible for the contents of any linked site or any link contained in a linked site, or any changes or updates to such sites. Microsoft is not responsible for webcasting or any other form of transmission received from any linked site. Microsoft is providing these links to you only as a convenience, and the inclusion of any link does not imply endorsement of Microsoft of the site or the products contained therein.
© 2014 Microsoft Corporation. All rights reserved.
Microsoft and the trademarks listed at http://www.microsoft.com/about/legal/en/us/IntellectualProperty/Trademarks/EN-US.aspx are trademarks of the Microsoft group of companies. All other trademarks are property of their respective owners
Product Number: 20413C
Released: 04/2014
MICROSOFT LICENSE TERMS MICROSOFT INSTRUCTOR-LED COURSEWARE These license terms are an agreement between Microsoft Corporation (or based on where you live, one of its affiliates) and you. Please read them. They apply to your use of the content accompanying this agreement which includes the media on which you received it, if any. These license terms also apply to Trainer Content and any updates and supplements for the Licensed Content unless other terms accompany those items. If so, those terms apply. BY ACCESSING, DOWNLOADING OR USING THE LICENSED CONTENT, YOU ACCEPT THESE TERMS. IF YOU DO NOT ACCEPT THEM, DO NOT ACCESS, DOWNLOAD OR USE THE LICENSED CONTENT. If you comply with these license terms, you have the rights below for each license you acquire.
1. DEFINITIONS.
a. “Authorized Learning Center” means a Microsoft IT Academy Program Member, Microsoft Learning
Competency Member, or such other entity as Microsoft may designate from time to time. b. “Authorized Training Session” means the instructor-led training class using Microsoft Instructor-Led
Courseware conducted by a Trainer at or through an Authorized Learning Center. c. “Classroom Device” means one (1) dedicated, secure computer that an Authorized Learning Center owns
or controls that is located at an Authorized Learning Center’s training facilities that meets or exceeds the hardware level specified for the particular Microsoft Instructor-Led Courseware.
d. “End User” means an individual who is (i) duly enrolled in and attending an Authorized Training Session
or Private Training Session, (ii) an employee of a MPN Member, or (iii) a Microsoft full-time employee.
e. “Licensed Content” means the content accompanying this agreement which may include the Microsoft Instructor-Led Courseware or Trainer Content.
f. “Microsoft Certified Trainer” or “MCT” means an individual who is (i) engaged to teach a training session to End Users on behalf of an Authorized Learning Center or MPN Member, and (ii) currently certified as a Microsoft Certified Trainer under the Microsoft Certification Program.
g. “Microsoft Instructor-Led Courseware” means the Microsoft-branded instructor-led training course that educates IT professionals and developers on Microsoft technologies. A Microsoft Instructor-Led Courseware title may be branded as MOC, Microsoft Dynamics or Microsoft Business Group courseware.
h. “Microsoft IT Academy Program Member” means an active member of the Microsoft IT Academy Program.
i. “Microsoft Learning Competency Member” means an active member of the Microsoft Partner Network
program in good standing that currently holds the Learning Competency status. j. “MOC” means the “Official Microsoft Learning Product” instructor-led courseware known as Microsoft
Official Course that educates IT professionals and developers on Microsoft technologies. k. “MPN Member” means an active Microsoft Partner Network program member in good standing.

l. “Personal Device” means one (1) personal computer, device, workstation or other digital electronic device that you personally own or control that meets or exceeds the hardware level specified for the particular Microsoft Instructor-Led Courseware.
m. “Private Training Session” means the instructor-led training classes provided by MPN Members for corporate customers to teach a predefined learning objective using Microsoft Instructor-Led Courseware. These classes are not advertised or promoted to the general public and class attendance is restricted to individuals employed by or contracted by the corporate customer.
n. “Trainer” means (i) an academically accredited educator engaged by a Microsoft IT Academy Program
Member to teach an Authorized Training Session, and/or (ii) a MCT.
o. “Trainer Content” means the trainer version of the Microsoft Instructor-Led Courseware and additional supplemental content designated solely for Trainers’ use to teach a training session using the Microsoft Instructor-Led Courseware. Trainer Content may include Microsoft PowerPoint presentations, trainer preparation guide, train the trainer materials, Microsoft One Note packs, classroom setup guide and Pre-release course feedback form. To clarify, Trainer Content does not include any software, virtual hard disks or virtual machines.
2. USE RIGHTS. The Licensed Content is licensed not sold. The Licensed Content is licensed on a one copy per user basis, such that you must acquire a license for each individual that accesses or uses the Licensed Content.
2.1 Below are five separate sets of use rights. Only one set of rights apply to you.
a. If you are a Microsoft IT Academy Program Member:
i. Each license acquired on behalf of yourself may only be used to review one (1) copy of the Microsoft Instructor-Led Courseware in the form provided to you. If the Microsoft Instructor-Led Courseware is in digital format, you may install one (1) copy on up to three (3) Personal Devices. You may not install the Microsoft Instructor-Led Courseware on a device you do not own or control.
ii. For each license you acquire on behalf of an End User or Trainer, you may either: 1. distribute one (1) hard copy version of the Microsoft Instructor-Led Courseware to one (1) End
User who is enrolled in the Authorized Training Session, and only immediately prior to the commencement of the Authorized Training Session that is the subject matter of the Microsoft Instructor-Led Courseware being provided, or
2. provide one (1) End User with the unique redemption code and instructions on how they can access one (1) digital version of the Microsoft Instructor-Led Courseware, or
3. provide one (1) Trainer with the unique redemption code and instructions on how they can access one (1) Trainer Content,
provided you comply with the following: iii. you will only provide access to the Licensed Content to those individuals who have acquired a valid
license to the Licensed Content, iv. you will ensure each End User attending an Authorized Training Session has their own valid licensed
copy of the Microsoft Instructor-Led Courseware that is the subject of the Authorized Training Session,
v. you will ensure that each End User provided with the hard-copy version of the Microsoft Instructor-Led Courseware will be presented with a copy of this agreement and each End User will agree that their use of the Microsoft Instructor-Led Courseware will be subject to the terms in this agreement prior to providing them with the Microsoft Instructor-Led Courseware. Each individual will be required to denote their acceptance of this agreement in a manner that is enforceable under local law prior to their accessing the Microsoft Instructor-Led Courseware,
vi. you will ensure that each Trainer teaching an Authorized Training Session has their own valid licensed copy of the Trainer Content that is the subject of the Authorized Training Session,
vii. you will only use qualified Trainers who have in-depth knowledge of and experience with the Microsoft technology that is the subject of the Microsoft Instructor-Led Courseware being taught for all your Authorized Training Sessions,
viii. you will only deliver a maximum of 15 hours of training per week for each Authorized Training Session that uses a MOC title, and
ix. you acknowledge that Trainers that are not MCTs will not have access to all of the trainer resources for the Microsoft Instructor-Led Courseware.
b. If you are a Microsoft Learning Competency Member:
i. Each license acquired on behalf of yourself may only be used to review one (1) copy of the Microsoft Instructor-Led Courseware in the form provided to you. If the Microsoft Instructor-Led Courseware is in digital format, you may install one (1) copy on up to three (3) Personal Devices. You may not install the Microsoft Instructor-Led Courseware on a device you do not own or control.
ii. For each license you acquire on behalf of an End User or Trainer, you may either: 1. distribute one (1) hard copy version of the Microsoft Instructor-Led Courseware to one (1) End
User attending the Authorized Training Session and only immediately prior to the commencement of the Authorized Training Session that is the subject matter of the Microsoft Instructor-Led Courseware provided, or
2. provide one (1) End User attending the Authorized Training Session with the unique redemption code and instructions on how they can access one (1) digital version of the Microsoft Instructor-Led Courseware, or
3. you will provide one (1) Trainer with the unique redemption code and instructions on how they can access one (1) Trainer Content,
provided you comply with the following: iii. you will only provide access to the Licensed Content to those individuals who have acquired a valid
license to the Licensed Content, iv. you will ensure that each End User attending an Authorized Training Session has their own valid
licensed copy of the Microsoft Instructor-Led Courseware that is the subject of the Authorized Training Session,
v. you will ensure that each End User provided with a hard-copy version of the Microsoft Instructor-Led Courseware will be presented with a copy of this agreement and each End User will agree that their use of the Microsoft Instructor-Led Courseware will be subject to the terms in this agreement prior to providing them with the Microsoft Instructor-Led Courseware. Each individual will be required to denote their acceptance of this agreement in a manner that is enforceable under local law prior to their accessing the Microsoft Instructor-Led Courseware,
vi. you will ensure that each Trainer teaching an Authorized Training Session has their own valid licensed copy of the Trainer Content that is the subject of the Authorized Training Session,
vii. you will only use qualified Trainers who hold the applicable Microsoft Certification credential that is the subject of the Microsoft Instructor-Led Courseware being taught for your Authorized Training Sessions,
viii. you will only use qualified MCTs who also hold the applicable Microsoft Certification credential that is the subject of the MOC title being taught for all your Authorized Training Sessions using MOC,
ix. you will only provide access to the Microsoft Instructor-Led Courseware to End Users, and x. you will only provide access to the Trainer Content to Trainers.
c. If you are a MPN Member: i. Each license acquired on behalf of yourself may only be used to review one (1) copy of the Microsoft
Instructor-Led Courseware in the form provided to you. If the Microsoft Instructor-Led Courseware is in digital format, you may install one (1) copy on up to three (3) Personal Devices. You may not install the Microsoft Instructor-Led Courseware on a device you do not own or control.
ii. For each license you acquire on behalf of an End User or Trainer, you may either: 1. distribute one (1) hard copy version of the Microsoft Instructor-Led Courseware to one (1) End
User attending the Private Training Session, and only immediately prior to the commencement of the Private Training Session that is the subject matter of the Microsoft Instructor-Led Courseware being provided, or
2. provide one (1) End User who is attending the Private Training Session with the unique redemption code and instructions on how they can access one (1) digital version of the Microsoft Instructor-Led Courseware, or
3. you will provide one (1) Trainer who is teaching the Private Training Session with the unique redemption code and instructions on how they can access one (1) Trainer Content,
provided you comply with the following: iii. you will only provide access to the Licensed Content to those individuals who have acquired a valid
license to the Licensed Content, iv. you will ensure that each End User attending an Private Training Session has their own valid licensed
copy of the Microsoft Instructor-Led Courseware that is the subject of the Private Training Session, v. you will ensure that each End User provided with a hard copy version of the Microsoft Instructor-Led
Courseware will be presented with a copy of this agreement and each End User will agree that their use of the Microsoft Instructor-Led Courseware will be subject to the terms in this agreement prior to providing them with the Microsoft Instructor-Led Courseware. Each individual will be required to denote their acceptance of this agreement in a manner that is enforceable under local law prior to their accessing the Microsoft Instructor-Led Courseware,
vi. you will ensure that each Trainer teaching an Private Training Session has their own valid licensed copy of the Trainer Content that is the subject of the Private Training Session,
vii. you will only use qualified Trainers who hold the applicable Microsoft Certification credential that is the subject of the Microsoft Instructor-Led Courseware being taught for all your Private Training Sessions,
viii. you will only use qualified MCTs who hold the applicable Microsoft Certification credential that is the subject of the MOC title being taught for all your Private Training Sessions using MOC,
ix. you will only provide access to the Microsoft Instructor-Led Courseware to End Users, and x. you will only provide access to the Trainer Content to Trainers.
d. If you are an End User: For each license you acquire, you may use the Microsoft Instructor-Led Courseware solely for your personal training use. If the Microsoft Instructor-Led Courseware is in digital format, you may access the Microsoft Instructor-Led Courseware online using the unique redemption code provided to you by the training provider and install and use one (1) copy of the Microsoft Instructor-Led Courseware on up to three (3) Personal Devices. You may also print one (1) copy of the Microsoft Instructor-Led Courseware. You may not install the Microsoft Instructor-Led Courseware on a device you do not own or control.
e. If you are a Trainer. i. For each license you acquire, you may install and use one (1) copy of the Trainer Content in the
form provided to you on one (1) Personal Device solely to prepare and deliver an Authorized Training Session or Private Training Session, and install one (1) additional copy on another Personal Device as a backup copy, which may be used only to reinstall the Trainer Content. You may not install or use a copy of the Trainer Content on a device you do not own or control. You may also print one (1) copy of the Trainer Content solely to prepare for and deliver an Authorized Training Session or Private Training Session.

ii. You may customize the written portions of the Trainer Content that are logically associated with
instruction of a training session in accordance with the most recent version of the MCT agreement. If you elect to exercise the foregoing rights, you agree to comply with the following: (i) customizations may only be used for teaching Authorized Training Sessions and Private Training Sessions, and (ii) all customizations will comply with this agreement. For clarity, any use of “customize” refers only to changing the order of slides and content, and/or not using all the slides or content, it does not mean changing or modifying any slide or content.
2.2 Separation of Components. The Licensed Content is licensed as a single unit and you may not separate their components and install them on different devices. 2.3 Redistribution of Licensed Content. Except as expressly provided in the use rights above, you may not distribute any Licensed Content or any portion thereof (including any permitted modifications) to any third parties without the express written permission of Microsoft.
2.4 Third Party Notices. The Licensed Content may include third party code tent that Microsoft, not the third party, licenses to you under this agreement. Notices, if any, for the third party code ntent are included for your information only.
2.5 Additional Terms. Some Licensed Content may contain components with additional terms, conditions, and licenses regarding its use. Any non-conflicting terms in those conditions and licenses also apply to your use of that respective component and supplements the terms described in this agreement.
3. LICENSED CONTENT BASED ON PRE-RELEASE TECHNOLOGY. If the Licensed Content’s subject
matter is based on a pre-release version of Microsoft technology (“Pre-release”), then in addition to the other provisions in this agreement, these terms also apply:
a. Pre-Release Licensed Content. This Licensed Content subject matter is on the Pre-release version of
the Microsoft technology. The technology may not work the way a final version of the technology will and we may change the technology for the final version. We also may not release a final version. Licensed Content based on the final version of the technology may not contain the same information as the Licensed Content based on the Pre-release version. Microsoft is under no obligation to provide you with any further content, including any Licensed Content based on the final version of the technology.
b. Feedback. If you agree to give feedback about the Licensed Content to Microsoft, either directly or
through its third party designee, you give to Microsoft without charge, the right to use, share and commercialize your feedback in any way and for any purpose. You also give to third parties, without charge, any patent rights needed for their products, technologies and services to use or interface with any specific parts of a Microsoft technology, Microsoft product, or service that includes the feedback. You will not give feedback that is subject to a license that requires Microsoft to license its technology, technologies, or products to third parties because we include your feedback in them. These rights survive this agreement.
c. Pre-release Term. If you are an Microsoft IT Academy Program Member, Microsoft Learning
Competency Member, MPN Member or Trainer, you will cease using all copies of the Licensed Content on the Pre-release technology upon (i) the date which Microsoft informs you is the end date for using the Licensed Content on the Pre-release technology, or (ii) sixty (60) days after the commercial release of the technology that is the subject of the Licensed Content, whichever is earliest (“Pre-release term”). Upon expiration or termination of the Pre-release term, you will irretrievably delete and destroy all copies of the Licensed Content in your possession or under your control.

4. SCOPE OF LICENSE. The Licensed Content is licensed, not sold. This agreement only gives you some rights to use the Licensed Content. Microsoft reserves all other rights. Unless applicable law gives you more rights despite this limitation, you may use the Licensed Content only as expressly permitted in this agreement. In doing so, you must comply with any technical limitations in the Licensed Content that only allows you to use it in certain ways. Except as expressly permitted in this agreement, you may not: • access or allow any individual to access the Licensed Content if they have not acquired a valid license
for the Licensed Content, • alter, remove or obscure any copyright or other protective notices (including watermarks), branding
or identifications contained in the Licensed Content, • modify or create a derivative work of any Licensed Content, • publicly display, or make the Licensed Content available for others to access or use, • copy, print, install, sell, publish, transmit, lend, adapt, reuse, link to or post, make available or
distribute the Licensed Content to any third party, • work around any technical limitations in the Licensed Content, or • reverse engineer, decompile, remove or otherwise thwart any protections or disassemble the
Licensed Content except and only to the extent that applicable law expressly permits, despite this limitation.
5. RESERVATION OF RIGHTS AND OWNERSHIP. Microsoft reserves all rights not expressly granted to you in this agreement. The Licensed Content is protected by copyright and other intellectual property laws and treaties. Microsoft or its suppliers own the title, copyright, and other intellectual property rights in the Licensed Content.
6. EXPORT RESTRICTIONS. The Licensed Content is subject to United States export laws and regulations. You must comply with all domestic and international export laws and regulations that apply to the Licensed Content. These laws include restrictions on destinations, end users and end use. For additional information, see www.microsoft.com/exporting.
7. SUPPORT SERVICES. Because the Licensed Content is “as is”, we may not provide support services for it.
8. TERMINATION. Without prejudice to any other rights, Microsoft may terminate this agreement if you fail
to comply with the terms and conditions of this agreement. Upon termination of this agreement for any reason, you will immediately stop all use of and delete and destroy all copies of the Licensed Content in your possession or under your control.
9. LINKS TO THIRD PARTY SITES. You may link to third party sites through the use of the Licensed
Content. The third party sites are not under the control of Microsoft, and Microsoft is not responsible for the contents of any third party sites, any links contained in third party sites, or any changes or updates to third party sites. Microsoft is not responsible for webcasting or any other form of transmission received from any third party sites. Microsoft is providing these links to third party sites to you only as a convenience, and the inclusion of any link does not imply an endorsement by Microsoft of the third party site.
10. ENTIRE AGREEMENT. This agreement, and any additional terms for the Trainer Content, updates and
supplements are the entire agreement for the Licensed Content, updates and supplements. 11. APPLICABLE LAW.
a. United States. If you acquired the Licensed Content in the United States, Washington state law governs the interpretation of this agreement and applies to claims for breach of it, regardless of conflict of laws principles. The laws of the state where you live govern all other claims, including claims under state consumer protection laws, unfair competition laws, and in tort.

b. Outside the United States. If you acquired the Licensed Content in any other country, the laws of that country apply.
12. LEGAL EFFECT. This agreement describes certain legal rights. You may have other rights under the laws of your country. You may also have rights with respect to the party from whom you acquired the Licensed Content. This agreement does not change your rights under the laws of your country if the laws of your country do not permit it to do so.
13. DISCLAIMER OF WARRANTY. THE LICENSED CONTENT IS LICENSED "AS-IS" AND "AS
AVAILABLE." YOU BEAR THE RISK OF USING IT. MICROSOFT AND ITS RESPECTIVE AFFILIATES GIVES NO EXPRESS WARRANTIES, GUARANTEES, OR CONDITIONS. YOU MAY HAVE ADDITIONAL CONSUMER RIGHTS UNDER YOUR LOCAL LAWS WHICH THIS AGREEMENT CANNOT CHANGE. TO THE EXTENT PERMITTED UNDER YOUR LOCAL LAWS, MICROSOFT AND ITS RESPECTIVE AFFILIATES EXCLUDES ANY IMPLIED WARRANTIES OF MERCHANTABILITY, FITNESS FOR A PARTICULAR PURPOSE AND NON-INFRINGEMENT.
14. LIMITATION ON AND EXCLUSION OF REMEDIES AND DAMAGES. YOU CAN RECOVER FROM
MICROSOFT, ITS RESPECTIVE AFFILIATES AND ITS SUPPLIERS ONLY DIRECT DAMAGES UP TO US$5.00. YOU CANNOT RECOVER ANY OTHER DAMAGES, INCLUDING CONSEQUENTIAL, LOST PROFITS, SPECIAL, INDIRECT OR INCIDENTAL DAMAGES.
This limitation applies to o anything related to the Licensed Content, services, content (including code) on third party Internet
sites or third-party programs; and o claims for breach of contract, breach of warranty, guarantee or condition, strict liability, negligence,
or other tort to the extent permitted by applicable law.
It also applies even if Microsoft knew or should have known about the possibility of the damages. The above limitation or exclusion may not apply to you because your country may not allow the exclusion or limitation of incidental, consequential or other damages.
Please note: As this Licensed Content is distributed in Quebec, Canada, some of the clauses in this agreement are provided below in French. Remarque : Ce le contenu sous licence étant distribué au Québec, Canada, certaines des clauses dans ce contrat sont fournies ci-dessous en français. EXONÉRATION DE GARANTIE. Le contenu sous licence visé par une licence est offert « tel quel ». Toute utilisation de ce contenu sous licence est à votre seule risque et péril. Microsoft n’accorde aucune autre garantie expresse. Vous pouvez bénéficier de droits additionnels en vertu du droit local sur la protection dues consommateurs, que ce contrat ne peut modifier. La ou elles sont permises par le droit locale, les garanties implicites de qualité marchande, d’adéquation à un usage particulier et d’absence de contrefaçon sont exclues. LIMITATION DES DOMMAGES-INTÉRÊTS ET EXCLUSION DE RESPONSABILITÉ POUR LES DOMMAGES. Vous pouvez obtenir de Microsoft et de ses fournisseurs une indemnisation en cas de dommages directs uniquement à hauteur de 5,00 $ US. Vous ne pouvez prétendre à aucune indemnisation pour les autres dommages, y compris les dommages spéciaux, indirects ou accessoires et pertes de bénéfices. Cette limitation concerne:
• tout ce qui est relié au le contenu sous licence, aux services ou au contenu (y compris le code) figurant sur des sites Internet tiers ou dans des programmes tiers; et.
• les réclamations au titre de violation de contrat ou de garantie, ou au titre de responsabilité stricte, de négligence ou d’une autre faute dans la limite autorisée par la loi en vigueur.

Elle s’applique également, même si Microsoft connaissait ou devrait connaître l’éventualité d’un tel dommage. Si votre pays n’autorise pas l’exclusion ou la limitation de responsabilité pour les dommages indirects, accessoires ou de quelque nature que ce soit, il se peut que la limitation ou l’exclusion ci-dessus ne s’appliquera pas à votre égard. EFFET JURIDIQUE. Le présent contrat décrit certains droits juridiques. Vous pourriez avoir d’autres droits prévus par les lois de votre pays. Le présent contrat ne modifie pas les droits que vous confèrent les lois de votre pays si celles-ci ne le permettent pas. Revised July 2013

Planning Server Upgrade and Migration 1-1
Module 1 Planning Server Upgrade and Migration
Contents: Lesson 1: Considerations for Upgrades and Migrations 2
Lesson 2: Creating a Server Upgrade and Migration Plan 6
Lesson 3: Planning for Virtualization 8
Module Review and Takeaways 10
Lab Review Questions and Answers 11

1-2 Designing and Implementing a Server Infrastructure
Lesson 1 Considerations for Upgrades and Migrations Contents: Resources 3 Demonstration: Using the Microsoft Assessment and Planning Toolkit 3
Planning Server Upgrade and Migration 1-3
Resources
Preinstallation Requirements
Additional Reading: For more information about the Windows Server Virtualization Validation Program, see Welcome to the Windows Server Virtualization Validation Program at http://go.microsoft.com/fwlink/?linkid=279917.
In Place Upgrade vs Server Migration
Additional Reading: For more information on migration, see Install, Use, and Remove Windows Server Migration Tools at http://go.microsoft.com/fwlink/?linkid=280376.
Using MAP Toolkit to Plan for Upgrades and Migrations
Reference Links: For more information about the Microsoft Assessment and Planning (MAP) Toolkit for Windows Server 2012, see http://go.microsoft.com/fwlink/?linkid=279918.
Demonstration: Using the Microsoft Assessment and Planning Toolkit
Demonstration Steps
Review the MAP options 1. On LON-CL1, on the Start screen, click the Microsoft Assessment and Planning Toolkit tile.
2. In the Microsoft Assessment and Planning Toolkit console a dialog box will appear named Microsoft Assessment and Planning Toolkit. To close the dialog box, click Cancel.
3. In the Microsoft Assessment and Planning Toolkit console, review the default window that displays the Overview page.
4. In the Microsoft Assessment and Planning Toolkit console, in the left pane, click Cloud, and then review the readiness information for the different cloud scenarios.
5. In the Microsoft Assessment and Planning Toolkit console, in the left pane, click Desktop, and then review the readiness information for the different desktop scenarios.
6. Repeat step 4 for all remaining items in the left pane: Server, Desktop Virtualization, Server Virtualization, Database, Usage Tracking, and Environment.
Perform inventory 1. On LON-CL1, in the Microsoft Assessment and Planning Toolkit console, in the left pane, click
Overview, and then in the Overview page, click on Select database.
2. In Microsoft Assessment and Planning Toolkit dialog box, ensure that Create an inventory database is selected, then in the Name box type INVENTORY, and then click OK.
3. On the Overview page, click Perform an inventory.
4. In the Inventory and Assessment Wizard, perform the following steps:
a. On the Inventory Scenarios page, select the following check boxes, and then click Next:
Windows computers

1-4 Designing and Implementing a Server Infrastructure
Exchange Server
Lync Server
SQL Server
Windows Azure Platform Migration
b. On the Discovery Methods page, select Use Active Directory Domain Services, Use Windows networking protocols and Scan an IP address range, and then click Next.
c. On the Active Directory Credentials page, in the Domain field, type Adatum.com, and then in the Domain account field, type Adatum\Administrator. In the Password field, type Pa$$w0rd, and then click Next.
d. In the Active Directory Options page, click Next.
e. In the Windows networking protocols page, click Next.
f. On the Scan an IP Address Range page, in the IP address ranges table, click in the cell under Starting Address, and then type 172.16.0.1. Click in the cell under Ending Address, and then type 172.16.0.100. Click Next.
g. On the All Computers Credentials page, click Next, and then on Credentials Order page, click Next.
h. On the Connection Properties page, click Next.
i. On the Summary page, review the inventory options, click Cancel, and then click Yes.
Note: You cancel the inventory procedure because the lab does not contain an environment with older operating systems for MAP to discover. In the next step, you review the test inventory that you import from the sample database in MAP.
Review MAP Toolkit inventory from a sample database 1. In the Microsoft Assessment and Planning Toolkit console, click File, and then click Manage
Databases.
2. In the Microsoft Assessment and Planning Toolkit dialog box, click Import, and then click Browse.
3. In the Microsoft Assessment and Planning Toolkit dialog box, on the left pane expand C:\Program Files\ Microsoft Assessment and Planning Toolkit\Sample, and then on the right pane click on MAP_SampleDB.bak and then click Open.
4. In the Microsoft Assessment and Planning Toolkit dialog box, in the Database Name box, type MAPDEMO, and then click OK.
5. When the dialog box displays a message that the database has been successfully imported, click OK, and then click Close.
6. In Microsoft Assessment and Planning Toolkit window, click File, and then click Select a Database.
7. In Microsoft Assessment and Planning Toolkit dialog box, ensure that Use an existing database is selected, select MAPDEMO, click OK, and then click Close.
8. In the Microsoft Assessment and Planning Toolkit console, review the default window that displays the Overview page that includes inventory information loaded from the sample database. Refresh the Overview page window, if necessary.

Planning Server Upgrade and Migration 1-5
9. In the Microsoft Assessment and Planning Toolkit console, in the left pane, click Cloud, and then review the readiness information for the different cloud scenarios that displays with inventory information from the sample database.
10. In the Microsoft Assessment and Planning Toolkit console, on the left pane, click Desktop, and then review the readiness information for the different desktop scenarios that displays with inventory information from the sample database.
11. Repeat step 4 for all remaining items in the left pane: Server, Desktop Virtualization, Server Virtualization, Database, Usage Tracking, and Environment.

1-6 Designing and Implementing a Server Infrastructure
Lesson 2 Creating a Server Upgrade and Migration Plan Contents: Question and Answers 7 Resources 7

Planning Server Upgrade and Migration 1-7
Question and Answers
Discussion: Planning Volume Activation Question: Your organization’s IT infrastructure consists of personal computers and servers that are running different editions of Windows client operating systems and Windows Server operating systems. Next month, your organization plans to deploy 500 Windows 8 client computers and 20 Windows Server 2012 servers. Because of a legacy application in the finance department, you must deploy 10 client computers that are running Windows 7 and two servers that are running Windows Server 2008 R2. What type of volume activation should you implement?
Answer: You should implement volume licensing based on KMS. This is because your organization deploys different editions of Windows client operating systems and Windows Server operating systems.
Question: Your organization’s IT infrastructure was upgraded from different editions of Windows client operating systems and Windows Server operating systems to Windows 8 and Windows Server 2012, respectively. What type of volume activation should you implement?
Answer: You should implement volume licensing based on Active Directory–based activation. This is because your organization deploys Windows 8 and Windows Server 2012 operating systems, and Active Directory–based activation is supported only on computers that are running Windows Server 2012 and Windows 8.
Resources
Windows Server 2012 Licensing and Activation
Reference Links: For more information on VAMT, see Introduction to VAMT at http://go.microsoft.com/fwlink/?LinkID=391881
Implementing Server Migrations
Additional Reading: For more information about Windows Server Migration Tools, see Install, Use, and Remove Windows Server Migration Tools at http://go.microsoft.com/fwlink/?LinkID=391879.
Additional Reading: For more information about determining which roles and features to migrate, see the migration guides for both Windows Server 2012 and Windows Server 2012 R2 on following web page - Migrate Roles and Features to Windows Server 2012 at http://go.microsoft.com/fwlink/?LinkID=391880.

1-8 Designing and Implementing a Server Infrastructure
Lesson 3 Planning for Virtualization Contents: Question and Answers 9

Planning Server Upgrade and Migration 1-9
Question and Answers
Discussion: Choosing Between Virtual and Physical Deployments Question: When would you choose to deploy your business applications or infrastructure services in a virtual environment?
Answer: Answers will vary. Possible answers include:
• Organizations develop a virtualization strategy to consolidate server infrastructure.
• Better resource utilization and resource allocation.
• Flexible deployment.
• Centralized management.
• Lowering costs for power consumption.
Question: Which server roles, features, or application services do you deploy currently in your physical environment?
Answer: Answers will vary. A possible response concerns applications that are not supported to run in virtual environment.
Question: If your organization has a virtual environment, what do you deploy currently in your virtual environment, and why?
Answer: Answers will vary, including domain controllers, web servers, file servers, Microsoft Exchange servers, Microsoft Lync® servers. These are deployed in virtual environment because of flexible resource allocation and efficient utilization, server consolidation and centralized management.

1-10 Designing and Implementing a Server Infrastructure
Module Review and Takeaways Best Practice When planning to deploy Windows Server 2012 in a physical or virtual environment, always consider high availability and backup/restore strategy for services or applications that run on that operating system. If you are running solutions in the private cloud, always ensure that you use management and monitoring tools, such as System Center 2012, to help the IT environment run efficiently. Additionally, ensure that you have a properly designed storage solution with appropriate size and performance for the virtual machines.
Review Question(s) Question: What are the key considerations that should guide your organization’s strategy regarding different scenarios for Windows Server 2012 operating system deployment?
Answer: Multiple considerations affect an organization’s strategy, such as business requirements, cloud computing, current server infrastructure, and whether current application and infrastructure solutions can be upgraded or migrated to Windows Server 2012.
Real-world Issues and Scenarios Question: Your organization has low usage of virtualization technologies. You have deployed the Windows Server 2012 Standard edition operating system that supports two instances of virtual machines. The management is concerned about future plans that require you to deploy new products in a virtual environment. They would like to have scalable and extensible solution without having to purchase additional licenses when deploying new products.
What strategy should the IT department suggest to the management?
Answer: The IT department should create a server deployment strategy that includes a hardware solution that is running on the Windows Server 2012 Datacenter edition. This enables the organization to deploy applications in a virtual environment and scale flexibly without requiring additional licenses.
Tools
Tool Used for Where to find it
Microsoft Assessment and Planning Toolkit (MAP)
Analyzing the inventory of an organization’s server infrastructure, performs an assessment, and creates reports that you can then use when planning upgrades and migration.
Microsoft website: http://go.microsoft.com/fwlink/?linkid=279918
Planning Server Upgrade and Migration 1-11
Lab Review Questions and Answers Lab: Planning a Server Upgrade and Migration
Question and Answers Question: Why would you want to use MAP when planning your upgrade and migration strategy?
Answer: The MAP analyzes the inventory of an organization’s server infrastructure, performs an assessment, and creates reports that you can use to create upgrade and migration plans. The detailed analysis that this tool performs helps you with your decisions regarding upgrade and migration strategies.
Question: Why would you choose Windows Server 2012 Datacenter edition for virtualization and consolidation of both the A. Datum internal and perimeter networks?
Answer: Windows Server 2012 Datacenter edition supports unlimited instances of virtual machines. Even if the number of the virtual machines per physical server increased to four, A. Datum would not require more licenses for further expansion, which they would if they use the Windows Server 2012 Standard edition.
Planning and Implementing a Server Deployment Strategy 2-1
Module 2 Planning and Implementing a Server Deployment Strategy
Contents: Lesson 1: Selecting an Appropriate Server Deployment Strategy 2
Lesson 2: Implementing an Automated Deployment Strategy 4
Module Review and Takeaways 8
Lab Review Questions and Answers 10

2-2 Designing and Implementing a Server Infrastructure
Lesson 1 Selecting an Appropriate Server Deployment Strategy Contents: Question and Answers 3 Resources 3

Planning and Implementing a Server Deployment Strategy 2-3
Question and Answers
Performing High-Touch with Retail Media Deployments Question: What are the limitations of the High Touch with Retail Media deployment method?
Answer: Answers will vary, but might include:
• IT professionals are required to initiate interactive installations.
• USB flash memory with individual answer files is inefficient.
• Multiple copies of the retail media are required.
• The method does not scale well because it always produces the same configuration settings; however, it is a good solution for smaller deployments.
Discussion: What Is Your Current Deployment Strategy? Question: How do you currently deploy operating systems within your organization?
Answer: Answers will vary, but most organizations implement some sort of deployment strategy and many use infrastructure services to distribute images.
Question: Discuss the different scenarios and deployment strategies used by various organizations.
Answer: Answers will vary, but may include the following:
• Branch offices with no on-site IT staff
• Many servers to deploy throughout the organization
• Similar server configurations throughout the organization
• In-place upgrade or side-by-side migration
• Deployments that require additional customization be performed after the initial server installation
Question: Is your deployment strategy based on files or binary images?
Answer: Some of the participants might still use binary-based images, so discuss and compare the benefits of file-based images in terms of flexibility and offline maintenance.
Resources
What Is the Windows Image File Format?
Additional Reading: For more information on Windows Imaging File Format (WIM), visit the following link: http://go.microsoft.com/fwlink/?LinkID=391886
Performing Lite-Touch High-Volume Deployments
Additional Reading: For more information on advanced deployment usage scenario by using Microsoft Deployment Toolkit 2013, go to http://go.microsoft.com/fwlink/?LinkID=391887.

2-4 Designing and Implementing a Server Infrastructure
Lesson 2 Implementing an Automated Deployment Strategy Contents: Question and Answers 5 Resources 5 Demonstration: Preparing the Windows Server 2012 Image 5

Planning and Implementing a Server Deployment Strategy 2-5
Question and Answers
Choosing a Deployment Scenario Question: When would you typically perform a clean installation of Windows Server 2012?
Answer: There are some cases when a clean installation is the only choice. They are:
• When no operating system is installed on the computer.
• When the installed operating system does not support an upgrade to Windows 8 or Windows Server 2012.
You might prefer a clean installation to an upgrade if the previous version of the Windows operating system was experiencing file corruption or other performance-related issues. If there is no need to retain applications or setting from the previous Windows operating system version, you typically will choose a clean installation over an upgrade or a migration.
Question: What potential issues might you encounter when installing Windows Server 2012?
Answer: Answers may vary. Issues that might occur include:
• Network unavailability in a scenario where the operating system is being deployed over a network.
• The image was not created properly to include all necessary applications.
• Windows DS or Configuration Manager was not configured properly.
• Users were not trained and were not informed that the operating system upgrade occurs according to a selected time schedule.
Resources
Windows ADK for Windows 8.1
Additional Reading: For a complete list of valid search paths, look for the Implicit Answer File Search Order section on the Methods for Running Windows Setup webpage at http://go.microsoft.com/fwlink/?LinkID=277144 .
Additional Reading: For more information about Windows deployment command-line tools, see http://go.microsoft.com/fwlink/?LinkID=391888.
Windows DS
Additional Reading: For more information about Windows Deployment Services Cmdlets in Windows PowerShell, go to http://go.microsoft.com/fwlink/?LinkID=391889.
Demonstration: Preparing the Windows Server 2012 Image
Demonstration Steps 1. Switch to LON-SVR1.
2. On the desktop, on the taskbar, click the File Explorer icon.
3. In File Explorer, in the navigation pane, expand This PC, click Allfiles (E:) drive, right-click the details pane, click New, and then click Folder.

2-6 Designing and Implementing a Server Infrastructure
4. In the New Folder text box, type Images, and then press Enter.
5. In File Explorer, in the navigation pane, double-click Images, right-click the details pane, click New, and then click Folder.
6. In the New Folder text box, type Custom Images, and then press Enter.
7. On your host, in the 20413C-LON-SVR1 window, on the toolbar, click Media, point to DVD Drive, and then click Insert Disk.
8. In the Open dialog box, in the File name text box, type the following address, and then click Open:
D:\Program Files\Microsoft Learning\20413\Drives\Windows2012R2.iso
9. Copy D:\sources\install.wim into the E:\Images\Custom Images folder.
10. In File Explorer, right-click E:\Images, and then click Properties.
11. Click the Sharing tab, and then click Advanced Sharing.
12. In the Advanced Sharing dialog box, select the Share this folder check box.
13. Click Permissions, and then click Add.
14. In the Select Users, Computers, Service Accounts, or Groups dialog box, in the Enter the object names to select (examples): text box, type Administrator, and then click OK.
15. In the Permissions for Images dialog box, click Administrator (ADATUM\Administrator). Under Allow, select the Full Control check box, and then click OK.
16. In the Advanced Sharing dialog box, click OK, and then click Close.
17. In File Explorer, right-click This PC, and then click Map network drive.
18. In the Map network drive dialog box, in the Drive box, ensure that drive Z: displays, in the Folder text box, type \\lon-svr1\Images, and then click Finish.
19. On LON-SVR1, move the mouse pointer to the lower-right corner of the taskbar, click search, and then type cmd.exe.
20. In the Apps list, right-click cmd.exe, and then click Run as administrator.
21. In the Command Prompt window, at the command prompt, type the following command, and then press Enter:
Mkdir c:\mounted
22. At the command prompt, type the following command, and then press Enter:
Dism /get-imageinfo /imagefile:”z:\Custom Images\install.wim”
23. At the command prompt, type the following command, and then press Enter:
Dism /mount-wim /wimfile:”z:\Custom Images\install.wim” /index:4 /mountdir:c:\mounted
Note: This command mounts the install.wim image for offline servicing. After you mount the image, you can add drivers, add packages, or enable features. This step will take approximately five minutes for the mounting of the image finish.
Ensure that The operation completed successfully message displays.

Planning and Implementing a Server Deployment Strategy 2-7
24. At the command prompt, type the following command, and then press Enter:
Dism /image:c:\mounted /get-features
25. At the command prompt, type the following command, and then press Enter:
Dism /image:c:\mounted /get-featureinfo /featurename:IIS-WebServerRole
26. At the command prompt, type the following command, and then press Enter:
Dism /image:c:\mounted /enable-feature /featurename:IIS-WebServerRole –all
Ensure that The operation completed successfully message displays.
27. At the command prompt, type the following command, and then press Enter:
Dism /unmount-wim /mountdir:c:\mounted /commit
Note: This command commits the changes in the install.wim image, which you will use later for deploying to a machine that has no operating system installed. This step to commit the changes in install.wim can take approximately five minutes.
Ensure that The operation completed successfully message displays.

2-8 Designing and Implementing a Server Infrastructure
Module Review and Takeaways Best Practices Best practice Description
Always install the most recent security updates on the reference computer.
Starting with an up-to-date reference computer helps lessen the window of vulnerability for new computers coming online.
Implement access controls to protect bootable media.
When you create bootable media, you should always assign a password and control physical access to the media.
Use PXE service points only on secure network segments.
PXE service point require User Datagram Protocol (UDP) ports to be open on switches and servers
If you must deploy operating systems to an unknown computer, implement access controls to prevent unauthorized computers from connecting to the network.
Although provisioning unknown computers can be a convenient way to bring up multiple computers on demand, it can also allow a malicious user to become a trusted client on your network.
Reduce the size of the boot image to speed up TFTP downloads
Ensure that you prepare the boot image by using the PEIMG.exe /prep command.
Review Question(s) Question: Your organization has different server builds, none of which are identical. You have chosen to use customized images to aid in deployment. Should you think about using thick or thin images?
Answer: Thin images would be most appropriate. Use Group Policy and scripts to automate application deployment after the servers are deployed. Thick images contain too much customization for this scenario.
Question: What tools do you need to automate High Touch with Retail Media deployments?
Answer: The tools that you can use to automate High Touch with Retail Media deployments are retail media, Windows ADK, and removable media.
Question: Your organization wants to implement a lite-touch deployment strategy. Aside from using MDT 2013, what tools would be useful for performing lite-touch deployments?
Answer: The tools that you can use to perform lite-touch deployments are:
Microsoft Assessment and Planning Toolkit (MAP)
Microsoft Application Compatibility Toolkit (ACT)
Volume license media
Windows ADK
Installation media or Windows DS to start the client computers during deployment
Real-world Issues and Scenarios Although Windows DS provides opportunities for deploying Windows operating systems, mid-size and enterprise companies should consider implementing MDT to customize more complex migration

Planning and Implementing a Server Deployment Strategy 2-9
scenarios. For zero-touch implementation, Configuration Manager provides robust, scalable, and a controlled deployment environment. Configuration Manager also enables Windows operating system deployments, and provides ongoing management on already-installed computers.
Tools Tool Use to Where to find it
ACT 6.0 Check application compatibility for Windows 8
http://go.microsoft.com/fwlink/?LinkID=391890 ACT 6.0 is available for download as a component of the Windows Assessment and Deployment Kit (Windows ADK) for Windows 8.1.
Windows Assessment and Deployment Kit (Windows ADK) for Windows 8.1
Assess and deploy Windows 8.1
http://go.microsoft.com/fwlink/?LinkID=391890
Windows SIM Create and edit answer files
Windows ADK
USMT Migrate user settings Windows ADK
DISM Service .wim-based image files
Windows ADK

2-10 Designing and Implementing a Server Infrastructure
Lab Review Questions and Answers Lab: Planning and Implementing a Server Deployment Infrastructure
Question and Answers Question: What was your approach to the design plan?
Answer: Answers will vary.
Question: Did your design plan differ from the suggested solution?
Answer: Answers will vary.
Question: How does the lab design compare with the Windows Server 2012 R2 deployment methods in your organization?
Answer: Answers will vary. However, some students might find the lab design improves on their current deployment strategy.
Question: If budget were not a concern, how would that change your design?
Answer: If budget were not a concern, most companies would consider a zero-touch deployment by using System Center 2012 R2 Configuration Manager, which focuses on complete end-to-end deployment of Windows Server 2012 R2 operating systems. Although there is a greater initial investment in implementing Configuration Manager, A. Datum will soon see a return on their investment. This is because using Configuration Manager will eventually lower the cost of deploying servers with Windows Server 2012 R2 operating system installed, when A. Datum acquires the two new companies.
In addition, when deploying servers for the newly-acquired companies, administrators can use the already-tested image deployment with Configuration Manager. There will be minimal changes (if any at all) in the task sequences for this deployment. Additionally, administrators will have the option to customize overall deployment by using different deployment scenarios such as bare metal deployment, in-place upgrade, computer refresh, or side-by-side migration.
Planning and Deploying Servers Using Virtual Machine Manager 03-1
Module 3 Planning and Deploying Servers Using Virtual Machine Manager
Contents: Lesson 1: VMM Overview 2
Lesson 2: Implementing a Virtual Machine Manager Library and Profiles 6
Lesson 3: Planning and Deploying VMM Services 9
Module Review and Takeaways 14
Lab Review Questions and Answers 15

03-2 Designing and Implementing a Server Infrastructure
Lesson 1 VMM Overview Contents: Resources 3 Demonstration: Adding Hosts to VMM 3 Demonstration: Managing the VMM Fabric 5
Planning and Deploying Servers Using Virtual Machine Manager 03-3
Resources
Virtual Machine Manager
Additional Reading: For more information on the new features in System Center 2012 VMM, refer to the article What’s New in System Center 2012 - Virtual Machine Manager, at http://go.microsoft.com/fwlink/?LinkId=253224.
Demonstration: Adding Hosts to VMM
Demonstration Steps
Set the default domain Group Policy to allow domain members to become hosts 1. On LON-DC1, in Server Manager, click Tools, and then click Group Policy Management.
2. In the Group Policy Management Console, in the console tree, expand Forest: Adatum.com, expand Domains, and then expand Adatum.com. Under Adatum.com, right-click Default Domain Policy, and then click Edit.
3. In the Group Policy Management Editor, maximize the window. In the console tree, under Computer Configuration, expand Policies, and then navigate to the following location: Administrative Templates\Network\Network Connections\Windows Firewall\Domain Profile.
4. In the Domain Profile details pane, double-click Windows Firewall: Allow inbound file and printer sharing exception.
5. In the Windows Firewall: Allow inbound file and printer sharing exception pop-up dialog box, click Enabled, in the Options text box, type an asterisk (*), and then click OK.
6. In the Domain Profile details pane, double-click Windows Firewall: Allow ICMP exceptions.
7. In the Windows Firewall: Allow ICMP exceptions pop-up dialog box, select the Enabled radio button, in the Options area, select the Allow inbound echo request check box, and then click OK.
8. In the Domain Profile details pane, double-click Windows Firewall: Define inbound port exceptions.
9. In the Windows Firewall: Define inbound port exceptions pop-up dialog box, click Enabled. In the Options area, by Define port exceptions, click Show.
10. In the Show Contents pop-up window, in the Value text box, type 5985, and then click OK twice.
11. In the Group Policy Management Editor, in the console tree, under Administrative Templates, expand Windows Components, expand Windows Remote Management (WinRM), and then click WinRM Service.
12. In the WinRM Service details pane, double-click Allow remote server management through WinRM.
13. In the Allow remote server management through WinRM dialog box, click the Enabled radio button. In the Options area, in both the IPv4 and IPv6 text boxes, type an asterisk (*), and then click OK.
14. Close the Group Policy Management Editor, and then close the Group Policy Management Console.
15. On LON-HOST1, on the taskbar, click the Windows PowerShell icon.
16. In the Windows PowerShell window, type the following cmdlet, and then press Enter:

03-4 Designing and Implementing a Server Infrastructure
gpupdate /force
17. When both computer and user policies update successfully, close the Windows PowerShell window.
Add LON-HOST1 to VMM 1. On LON-VMM1, from the desktop, on the taskbar, click the Virtual Machine Manager Console icon.
2. On the Connect to Server page, click Connect.
3. In the Virtual Machine Manager console, click the VMs and Services workspace.
4. In the console tree, right-click All Hosts, and then click Add Hyper-V Hosts and Clusters.
5. In the Add Resource Wizard, on the Resource Location page, click the Windows Server computers in a trusted Active Directory domain option (it should be the default), and then click Next.
Note: On the Credentials page, note the two radio button options. The default is Use an existing Run As account. There is a field to input the Run As account, and a Browse button to browse to the account. Note that the Run As account must have local administrator permissions on the host machine that is being assigned. In this lab, you do not use a Run As account.
6. On the Credentials page, select the Manually enter the credentials option. In the User name text box, type ADATUM\Administrator, in the Password text box, type Pa$$w0rd, and then click Next.
7. On the Discovery Scope page, note the two radio buttons: Specify Windows Server computers by names (which is already selected), and Specify and Active Directory query to search for Windows Server computers. In the Computer names text box, type lon-host1.adatum.com, and then click Next.
8. On the Target resources page, in the Discovered computers section, select the lon-host1.adatum.com check box, and then click Next.
9. When the Virtual Machine Manager pop-up window warns you that if Hyper-V is not enabled on the selected server, then VMM will enable Hyper-V, click OK.
10. On the Host Settings page, note that the Host group drop-down list box has only one option, All Hosts. Note the Reassociate this host with this VMM environment check box. This setting reassigns hosts that are assigned to a different VMM management server, to this one. Click Next.
11. On the Summary page, in the upper left, click the View Script button.
12. In Notepad, review the Windows PowerShell cmdlets that display. These are the cmdlets necessary to run a script in Windows PowerShell to add the LON-HOST1 host to this VMM management server. Saving these scripts can be very useful for documenting your work or for creating another host, perhaps at a later time.
13. Close Notepad without saving the script.
14. On the Summary page, click Finish.
15. A Jobs pop-up window displays, which shows all the individual steps being taken to add the host. The final step, entitled Add virtual machine host, takes the longest. It might take several minutes to complete the job.
16. When the job finishes, in the Jobs pop-up window, a yellow triangle with the text Add virtual machine host Completed w/ info might display. This occurs because Multipath I/O is not enabled for known storage arrays. This is expected.
17. Close the Jobs window.
Planning and Deploying Servers Using Virtual Machine Manager 03-5
In the VMs and Services console tree, under All Hosts, verify that LON-HOST1 now displays.
Demonstration: Managing the VMM Fabric
Demonstration Steps
Create a logical network 1. On LON-VMM1, open the Desktop, and in the Taskbar, double-click l the Virtual Machine Manager
console.
2. In the Virtual Machine Manager console, click the Fabric workspace. In the Navigation pane, click Networking, and then on the on the ribbon, click Create Logical Network.
3. In the Create Logical Network Wizard, on the Name page, in the Name text box, type Adatum UK, and then in the Description text box, type Adatum (London) logical network. Click One connected network, click Allow new VM networks created on this logical network to use network virtualization, and then click Next.
4. On the Network Site page, click Add, and then in the Host groups that can use this network site section, click All Hosts.
5. In the Associated VLANs and IP subnets area, click Insert row. In the VLAN text box, type 0, in the IP subnet text box, type 192.168.1.0/24, click the Network site name text box, select and delete the automatically generated site name, and then type Central.
6. Repeat step 4 and 5, using the following details:
o VLAN: 0
o IP Subnet: 192.168.2.0/24
o Network Site Name: West Side
7. Click Next, and then click Finish.
8. Close the Jobs window.
Create a logical network IP Pool 1. On the ribbon, click Create IP Pool. The Create Static IP Address Pool Wizard launches.
2. In the create Static IP Address Pool Wizard, on the Name page, in the Name text box, type Central IP Pool, ensure that the logical network is Adatum UK, and then click Next.
3. On the Network site page, click Use an existing network site, ensure Central is selected, and then click Next.
4. On the IP address range page, review the options, and then click Next.
5. On the Gateway page, review the options, and then click Next.
6. On the DNS page, review the options, and then click Next.
7. On the WINS page, review the options, and then click Next.
8. On the Summary page, click Finish.
9. Close the Jobs window.
10. Create another IP Pool by repeating steps 1 through 9 for the West Side network site.

03-6 Designing and Implementing a Server Infrastructure
Lesson 2 Implementing a Virtual Machine Manager Library and Profiles Contents: Demonstration: Configuring Profiles 7 Demonstration: Deploying Virtual Machines Using Profiles 8
Planning and Deploying Servers Using Virtual Machine Manager 03-7
Demonstration: Configuring Profiles
Demonstration Steps 1. In the Virtual Machine Manager console, click the Library workspace.
2. In the console tree, expand Profiles.
3. In the console tree, on the Home tab, expand Create, and then click Guest OS Profile.
4. In the New Guest OS Profile Wizard, on the General page, in the Name text box, type DemoGuestOS.
5. In the Description text box, type Demonstration creating a GuestOS profile.
6. In the console tree, click Guest OS Profile.
7. On the General page, in the Operating System drop-down list box, click Windows Server 2012 R2 Standard.
8. Click the Identity Information section, and in the Computer name text box, type WS2012-Core##.
9. Click Admin Password, and in the details pane, select the Specify the password of the local administrator account radio button.
10. In the Password and Confirm text boxes, type Pa$$w0rd.
11. Point out the View Script button. Explain that you use it to create a Windows PowerShell cmdlets script, which you can save for documentation, or which you can use to re-create this hardware profile later.
12. In the New Guest OS Profile Wizard, click OK.
13. Click the Guest OS Profiles node and verify that DemoGuestOS displays in the Profiles detail pane.
14. In the console tree, click Hardware Profiles, and then on the Home tab, click Create.
15. In the context menu, click Hardware Profile.
16. In the New Hardware Profile Wizard, on the General page, in the Name text box, type DemoHWProfile.
17. In the Description text box, type Demonstration creating a hardware profile.
18. Click Hardware Profile, and In the Compatibility section, select the Hyper-V check box.
19. In the central console tree, click Memory.
20. In the Memory details pane, click Dynamic, and in the Maximum memory area, overwrite the current value with 1024.
21. In the center console tree, scroll down and click Network Adapter 1.
22. In the Network Adapter 1 details pane, click Connected to a VM network.
23. In the VM network area, click Browse.
24. Click External Network, and then click OK.
25. Point out the View Script, and explain that you can use it to create a Windows PowerShell cmdlets script, which you can save for documentation, or use to re-create this hardware profile later.
26. In the New Hardware Profile Wizard, click OK.
27. Verify that DemoHWProfile displays in the Hardware Profiles detail pane.
03-8 Designing and Implementing a Server Infrastructure
Demonstration: Deploying Virtual Machines Using Profiles
Demonstration Steps 1. In the Virtual Machine Manager console, click the VMs and Services workspace.
2. In the VMs and Services console tree, under All Hosts, click lon-host1.
3. In the ribbon, on the Home Tab, click Create Virtual Machine, and in the drop-down list box, click Create Virtual Machine.
4. In the Create Virtual Machine Wizard, on the Select Source page, under Use an existing virtual machine, VM template or virtual hard disk, click Browse.
5. In the Select Virtual Machine Source window, scroll down until you reach Type: VHD. Click SmallCore.vhd, and then click OK.
6. On the Select Source page, click Next.
7. On the Identity page, in the Virtual machine name text box, type DemoProfileVM.
8. In the Description text box, type Demonstration using profiles to create a virtual machine, and then click Next.
9. On the Configure Hardware page, in the Hardware profile drop-down list box, click DemoHWProfile, and then click Next.
10. On the Select Destination page, click Next.
11. On the Select Host page, click Next.
12. On the Configure Settings page, click Next.
13. On the Add Properties page, click Next.
14. On the Summary page, click Create.
15. Notice that the Jobs window shows the progress of creating the virtual machine. This process takes approximately 10 minutes, so move on to the next topic while it is being created.
16. After about 10 minutes, on 20413C-LON-HOST1, open the Hyper-V console. You should see the virtual machine in the VMs details pane, with a name of a DemoProfileVM.
Note: You may have to adjust the size of the Name column to see the full name.
17. When the Job completes, close the Jobs window.

Planning and Deploying Servers Using Virtual Machine Manager 03-9
Lesson 3 Planning and Deploying VMM Services Contents: Demonstration: Configuring Virtual Machine and Service Templates 10

03-10 Designing and Implementing a Server Infrastructure
Demonstration: Configuring Virtual Machine and Service Templates
Demonstration Steps
Create a virtual machine template 1. In the Virtual Machine Manager console, click the Library workspace.
2. In the console tree, expand Templates, and then click VM Templates.
3. On the Home tab of the ribbon, click Create VM Template.
4. In the Create VM Template Wizard, on the Select Source page, to the right of the Use an existing VM template or a virtual hard disk stored in the library option, click Browse.
5. In the Select VM Template Source window, click SmallCore.vhd, and then click OK.
6. On the Select Source page, click Next.
7. On the Identity page, in the VM Template name text box, type DemoVMTemplate, in the Description text box, type Demonstration creating a VM template, and then click Next.
8. On the Configure Hardware page, in the Hardware profile drop-down list box, click DemoHWProfile, and then click Next.
9. On the Configure Operating System page, in the Guest OS profile: drop-down list box, click DemoGuestOS, and then click Next.
10. On the Application Configuration page, in the Application profile drop-down list box, click None – do not install any applications, and then click Next.
11. On the SQL Server Configuration page, in the SQL Server profile drop-down list box, click None – no SQL Server configuration settings, and then click Next.
12. On the Summary page, mention the purpose of the View Script button, and then click Create.
13. When the Jobs window displays, once the jobs finish, close the Jobs window.
14. In the details pane, examine the DemoVMTemplate. Note the items in the Template tab of the ribbon. Explain that here you can enable and disable the template in addition to exporting its settings, and even deleting it.
15. On the Template tab, click Properties.
16. In the Properties dialog box, point out that the Hardware and OS Configuration pages no longer point to the profiles created earlier, and instead now contain all the settings that you configured in the profiles.
17. In the DemoVMTemplate, Properties dialog box, click Cancel.
Create a service template 1. In the Virtual Machine Manager console, click the Library workspace.
2. On the Home tab of the ribbon, click Create Service Template.
3. In the New Service Template dialog box, review the various configurable items with the class.
Note: Point out the View Script button, and explain how you can use this to save a script of the various Windows PowerShell cmdlets that would perform the same actions as this user interface.

Planning and Deploying Servers Using Virtual Machine Manager 03-11
4. In the Patterns section, explain the different patterns. Show how when you click each pattern a brief explanation of its functionality displays in the Description line.
5. In the Name text box, type Demo Service Template. In the Release: section, type 1. In the Patterns section, click the Single Machine icon, and then click OK.
6. In the Virtual Machine Manager Service Template Designer console, point out that the name you selected, Demo Service Template, is now part of the overall name, because this is the template you are currently designing. The numeral 1 next to the name is the release version.
7. Point out the Designer canvas area. This area is the central part of the VMM Service Template Designer console, which has the various blocks connected to each other. Point out the grayed-out text with the large down arrow. This text gives advice on how you can drag-and-drop various virtual machine templates into the designer, either in the blank canvas area itself to make a new tier or onto the existing template to replace its tier.
8. Note that the box labeled Single Tier has a red circle with an exclamation mark on it. Point out the text below that explains why it has this warning. There is no virtual hard disk or virtual machine network present in the template. You can make a virtual hard disk or virtual machine network by changing the properties of the Single Tier virtual machine. Right-click the Single Tier virtual machine name, and then click Properties.
9. In the Single Tier Properties dialog box, explain that you might want to make some changes to the Single Tier hardware configuration. Go through the various pages in the properties as follows:
a. General page. Explain that you can use the settings on this page to set the name and description. You can also prevent the virtual machine from being migrated automatically, enable it to be scaled out, and even create an availability set for the tier. In the Name text box, type DemoServiceVM.
b. Hardware Configuration page. Explain that you use this page to set the hardware configurations that you would normally use for any new virtual machine in the VMM console.
i. In the Compatibility section, click Hyper-V. In the console tree, under Bus Configuration, click IDE Devices. Click the green plus icon entitled New, and then click Disk.
ii. In the Virtual Hard Disk details pane, click Browse. In the Select a virtual hard disk pop-up window, click SmallCore.vhd, and then click OK.
iii. In the Network Adapters section, click Network Adapter 1.
iv. In the Network Adapter 1 (Legacy) details pane, click Connected to a VM network, and then click Browse.
v. In the pop-up window, click External Network. Point out the Create VM Network button, with which you can add a new network, and then click OK.
c. OS Configuration page. In the Operating system drop-down list box, click Windows Server 2012 R2 Standard. Point out all the other items that you can select here, including the name of the computer, the local administrator password, the product key, and a time zone. Point out the Roles and Features area, where you can add roles and features that you can run on a Windows Server. Note that you can join a domain, and the Roles and Features area shows that you are currently in a workgroup. Note the Scripts area, where you can provide an Answer File and Run Once commands.
d. Application Configuration page. Use this page to add applications and scripts that run on the virtual machine. Under the Application profile list, point out the three sections: OS Compatibility, Applications, and Scripts. In the OS Compatibility area, in the list in the details pane of the Compatible operating systems available, point out that you can select none, one,
03-12 Designing and Implementing a Server Infrastructure
some, or all of the listed operating systems. Clear 64-bit edition of Windows Server 2008 R2 Standard and then select the Windows Server 2012 R2 Standard check box.
e. On the Application Configuration page, in the console tree, expand Applications. Note that currently there are no applications, but also point out that you can add them by using the green plus icon’s Add drop-down list box. Demonstrate to the class the choices available, but do not select any. In the console tree, note that currently no choices display. On the Application profile list at the top of the page, click None – do not install any applications. Point out that all of the previously viewed items on this page are now disabled.
f. SQL Server Configuration page. By default, the SQL Server profile drop-down list box selection is set to None – no SQL Server configuration settings. Click Default – create new SQL Server configuration settings.
Click Add: SQL Server Deployment, and note the various settings, pointing out the Instance name area that enables you specify a SQL Server Instance. From the SQL Server profile drop-down list box, click None – no SQL Server configuration settings.
g. On the Custom Properties page, click Manage Custom Properties. Explain the configurable items in the pop-up window, and then click Cancel.
h. Settings page. Explain that this page is where you can specify the number of points to apply towards an owner’s virtual machine quota, when a virtual machine is assigned to a self–service user.
i. Dependencies page. Because this is a default template, note that there are no dependencies listed.
j. Validation Errors page. Explain that if there are any validation errors, they will display here.
k. Point out the View Script button in the lower left. Explain the usefulness of saving Windows PowerShell scripts to document settings. At the bottom of the Single Tier Properties window, click OK.
10. The Designer canvas might display the External Network box with a connector spread out across the canvas; in this case, use your mouse to drag the External Network box beside the NIC 1 box. It will adjust the connector to be much shorter.
11. On the Home tab, click Save and Validate, and then click Configure Deployment.
12. In the Select name and destination pop-up dialog box, in the Name text box, type Demo Service, and then click OK.
13. In the Deploy Service – Demo Service console, if a pink shaded area in the middle of the screen displays indicating that it could not find a host, on the ribbon click Refresh Preview.
14. Point out that the host that the console selects to deploy to is based on placement ratings. In this case, the selected host is lon-host1.adatum.com. On the ribbon, click Deploy Service. In the Deploy service pop-up window, point out the View Script button, and then click Deploy.
15. When the Jobs window displays, point out the Create Service Instance job that is running.
Note: The job will take approximately 15-30 minutes to complete, depending on factors such as hardware and software components on the physical host.
16. On LON-HOST1, open the Hyper-V console. You should now see the virtual machine with a name comprised of a long string of letters and numbers.
17. On LON-VMM1, close the Jobs window.

Planning and Deploying Servers Using Virtual Machine Manager 03-13
18. Close all open windows.

03-14 Designing and Implementing a Server Infrastructure
Module Review and Takeaways Review Question(s) Question: How can you deploy a virtual machine template in VMM?
Answer: You can create profiles for the template, such as Application, Guest operating system, Hardware, and SQL Server profiles. If these templates have the desired settings, you can place them into the virtual machine template, thereby making template creation simpler and faster.
Tools Tool Use for Where to find it
VMM console
Creating and deploying virtual machines, hardware profiles, guest profiles, and SQL Server profiles, virtual machine templates, Service Templates, and other library objects.
Installed on the VMM management server
App Controller
Web-based management of virtual machines, Hyper-V hosts, VMM services, private clouds, and other VMM objects.
System Center 2012 VMM installation media
Group Policy Management Editor
Establishing settings for large numbers of computer and users settings. Can also use to set Windows Remote Management settings when deploying the Virtual Machine Manager agent to Hyper-V hosts.
Domain controllers, or add appropriate Remote Server Administrator Tools to the computer
Common Issues and Troubleshooting Tips Common Issue Troubleshooting Tip
You cannot add a library server.
Ensure that you can install the Virtual Machine Manager agent on a host that you want to add as a library server. If you cannot deploy the agent, or if the agent cannot communicate with the VMM server, you will not be able to use the library server.

Planning and Deploying Servers Using Virtual Machine Manager 03-15
Lab Review Questions and Answers Lab: Planning and Deploying Virtual Machines by using Virtual Machine Manager
Question and Answers Question: After you created the virtual machine template, when you reviewed its properties, where did the values in the Hardware and Operating Systems tabs come from?
Answer: The values came from the Hardware and Guest operating system profiles, which used the values from the profiles to update the values in the template.
Question: Why did you decide to use a service template to deploy the virtual machines required by the Developers’ Group?
Answer: Because the Developers’ Group only needs two types of virtual machines with similar, very small performance requirements, and because the virtual machines will be used to test software and then will be be deleted, a service template is usually the quickest way to deploy virtual machines with these requirements.

Designing and Maintaining an IP Configuration and Address Management Solution 4-1
Module 4 Designing and Maintaining an IP Configuration and Address Management Solution
Contents: Lesson 1: Designing DHCP Servers 2
Lesson 3: Designing an IPAM Provisioning Strategy 4
Lesson 4: Managing Servers and Address Spaces by Using IPAM 8
Module Review and Takeaways 10
Lab Review Questions and Answers 11

4-2 Designing and Implementing a Server Infrastructure
Lesson 1 Designing DHCP Servers Contents: Demonstration: Implementing DHCP Failover 3

Designing and Maintaining an IP Configuration and Address Management Solution 4-3
Demonstration: Implementing DHCP Failover
Demonstration Steps 1. Sign in to LON-SVR1 as Adatum\Administrator with a password of Pa$$w0rd.
2. In Server Manager, in the results pane, click Add roles and features.
3. Click Next three times.
4. On the Select server roles page, click the DHCP Server role, and then click Add Features.
5. Click Next three times, and then click Install.
6. Once the role installs, click Complete DHCP configuration.
7. On the Description page, click Next.
8. On the Authorization page, click Commit, and then click Close twice.
9. Switch to LON-DC1.
10. Sign in to LON-DC1 as Adatum\Administrator with a password of Pa$$w0rd.
11. In Server Manager, click Tools, and then in the drop-down list box, click DHCP.
12. In the DHCP console, expand lon-dc1.adatum.com, select and right-click IPv4, and then click Configure Failover.
13. In the Configuration Failover Wizard, click Next.
14. On the Specify the partner server to use for failover page, in the Partner Server text box, type 172.16.0.11, and then click Next.
15. On the Create a new failover relationship page, in the Relationship Name text box, type Adatum Failover.
16. In the Maximum Client Lead Time field, set the hours to 0, and set the minutes to 10.
17. Ensure that the Mode field is set to Load balance.
18. Ensure that both the Load Balance Percentage values are set to 50.
19. Select the State Switchover Interval check box. Leave the default value of 60 minutes.
20. Select the Enable Message Authentication check box, in the Shared Secret text box, type Pa$$w0rd, and then click Next.
21. Click Finish, and then click Close.
22. Switch to LON-SVR1.
23. Open the DHCP console, and note that the IPv4 node is active. If it is not, click lon-svr1.adatum.com, and then on the toolbar, click Refresh.
24. Expand the IPv4 node, and then expand Scope.
25. Click Address Pool, and note that the address pool is configured.
26. Click Scope Options, and note that the scope options are configured.

4-4 Designing and Implementing a Server Infrastructure
Lesson 3 Designing an IPAM Provisioning Strategy Contents: Resources 5 Demonstration: Deploying IPAM 5 Demonstration: Integrating DHCP and DNS Servers with IPAM 5
Designing and Maintaining an IP Configuration and Address Management Solution 4-5
Resources
Capacity Planning for IPAM
Additional Reading: For more information on IPAM deployment and capacity planning, visit http://go.microsoft.com/fwlink/?LinkID=391892.
Demonstration: Deploying IPAM
Demonstration Steps
Install IPAM 1. Sign in to LON-SVR2 as Adatum\Administrator with a password of Pa$$w0rd.
2. In Server Manager, in the results pane, click Add roles and features.
3. In the Add Roles and Features Wizard, click Next.
4. On the Select installation type page, click Next.
5. On the Select destination server page, click Next.
6. On the Select server roles page, click Next.
7. On the Select features page, select the IP Address Management (IPAM) Server check box.
8. In the Add features that are required for IP Address Management (IPAM) Server pop-up dialog box, click Add Features, and then click Next.
9. On the Confirm installation selections page, click Install.
10. When the Add Roles and Features Wizard completes, close the wizard.
Provision IPAM 1. In the Server Manager, in the navigation pane, click IPAM.
2. In the IPAM Overview pane, click Connect to IPAM server. Select LON-SVR2.Adatum.com, and then click OK.
3. Click Provision the IPAM server.
4. In the Provision IPAM Wizard, click Next.
5. On the Configure database page, click Next.
6. On the Select provisioning method page, ensure that Group Policy Based is selected, in the GPO name prefix text box, type IPAM, and then click Next.
7. On the Confirm the Settings page, click Apply. Provisioning will take five or more minutes to complete.
8. When provisioning completes, click Close.
Demonstration: Integrating DHCP and DNS Servers with IPAM
Demonstration Steps 1. On LON-SVR2, in the IPAM Overview pane, click Configure server discovery.
2. In the Configure Server Discovery dialog box, click Add, and then click OK.

4-6 Designing and Implementing a Server Infrastructure
3. In the IPAM Overview pane, click Start server discovery. Discovery may take up to 10 minutes to run. The yellow bar indicates when discovery is complete.
4. In the IPAM Overview pane, click Select or add servers to manage and verify IPAM access. Notice that the IPAM Access Status is blocked for both servers. Scroll down to the Details view, and note the status report. The IPAM server has not yet been granted permission to manage LON-DC1 through Group Policy.
5. On the taskbar, right-click the Windows PowerShell icon, and then click Run as Administrator.
6. At the Windows PowerShell prompt, type the following command on a single line, and then press Enter:
Invoke-IpamGpoProvisioning –Domain Adatum.com –GpoPrefixName IPAM –IpamServerFqdn LON-SVR2.adatum.com –DelegatedGpoUser Administrator
7. When you are prompted to confirm the action, type Y, and then press Enter. The command will take five or more minutes to complete.
8. Close Windows PowerShell.
9. Switch to Server Manager.
10. In the IPv4 details pane, right-click lon-dc1, and then click Edit Server.
11. In the Add or Edit Server dialog box, in the Manageability status box, click Managed, and then click OK.
12. In the IPv4 details pane, right-click lon-svr1, and then click Edit Server.
13. In the Add or Edit Server dialog box, in the Manageability status box, click Managed, and then click OK.
14. Switch to LON-DC1.
15. On the taskbar, click the Windows PowerShell icon.
16. At the Windows PowerShell prompt, type the following command, and then press Enter:
Gpupdate /force
17. Close the Windows PowerShell window.
18. Switch to LON-SVR1.
19. On the taskbar, click the Windows PowerShell icon.
20. At the command prompt, type the following command, and then press Enter:
Gpupdate /force
21. Close the Windows PowerShell window.
22. Switch back to LON-SVR2.
23. In Server Manager, right-click LON-DC1, and then click Refresh Server Access Status.
24. In Server Manager, right-click LON-SVR1, and then click Refresh Server Access Status.
25. When the refresh completes, refresh IPv4 by clicking the Refresh icon. It may take up to five minutes for the status to change.
26. When the Data Retrieval Status displays as Completed, you may proceed.

Designing and Maintaining an IP Configuration and Address Management Solution 4-7
27. In the IPAM Overview pane, click Retrieve data from managed servers. This action will take five or more minutes to complete.

4-8 Designing and Implementing a Server Infrastructure
Lesson 4 Managing Servers and Address Spaces by Using IPAM Contents: Demonstration: Managing Address Spaces 9

Designing and Maintaining an IP Configuration and Address Management Solution 4-9
Demonstration: Managing Address Spaces
Demonstration Steps 1. On LON-SVR2, on the taskbar, click the Windows PowerShell icon.
2. At the Windows PowerShell prompt, run the following command, and then press Enter:
Add-IpamRange –NetworkId 172.16.1.0/24 –StartIPAddress 172.16.1.1 –EndIPAddress 172.16.1.254 -CreateSubnetIfNotFound
3. To add the IP addresses for LON-DC1, LON-SVR1, and LON-SVR2, and to record them as being in use in the range, run the following Windows PowerShell commands, pressing Enter at the end of each line:
Add-IpamAddress –IpAddress 172.16.1.1 Add-IpamAddress –IpAddress 172.16.1.10 Add-IpamAddress –IpAddress 172.16.1.20
4. To view the IP address ranges that are available in the IPAM server, run the following command, and then press Enter:
Get-IpamRange –AddressFamily IPv4
5. To view all IP address ranges with more than 50 percent of their addresses utilized, run the following command, and then press Enter:
Get-IpamRange –AddressFamily IPv4 | Where-Object {$_.PercentUtilized –lt 50}
6. To find a free IP address in the 172.16.1.0 range, run the following commands, and then press Enter:
$range = Get-IpamRange –StartIPAddress 172.16.1.1 –EndIPAddress 172.16.1.254 $freeIP = Find-IpamFreeAddress –InputObject $range -TestReachability
7. To view the contents of the $freeIP variable, run the following command, and then press Enter:
$freeIP
8. To add the free IP address to a printer device with a MAC address of AA-AA-AA-BB-BB-BB, and to add a DHCP reservation for the device, run the following command, and then press Enter:
Add-IpamAddress –IpAddress $freeIP.Address –ManagedByService $range.ManagedByService –ServiceInstance $range.ServiceInstance –DeviceType Printer –AssignmentType Dynamic –MacAddress “AA-AA-AA-BB-BB-BB” –ReservationServer $range.DhcpServerName –ReservationName “Printer”
9. To view the contents of the newly added IP address, run the following commands, and then press Enter:
$IP = Get-IpamAddress –IpAddress $freeIP.Address $IP
10. To unprovision the IP address reserved for the printer, run the following command, and then press Enter:
Remove-IpamAddress –InputObject $IP -Force
4-10 Designing and Implementing a Server Infrastructure
Module Review and Takeaways Review Question(s) Question: You have two subnets in your organization and want to use DHCP to allocate addresses to client computers in both subnets. You do not want to deploy two DHCP servers. What factors must you consider?
Answer: The router that interconnects the two subnets must support DHCP relaying, or else you must place a relay on the subnet that does not host the DHCP server. Additionally, you should consider the impact on service availability if your single DHCP server fails.
Question: Your organization has grown, and your IPv4 scope has few addresses remaining. What could you do?
Answer: You could implement a superscope by combining the existing scope and a new scope.
Question: What information do you require to configure a DHCP reservation?
Answer: You require the media access control (MAC) address of the client that will lease the reservation.
Designing and Maintaining an IP Configuration and Address Management Solution 4-11
Lab Review Questions and Answers Lab: Designing and Maintaining an IP Configuration and IP Address Management Solution
Question and Answers Question: What was your approach to the IP design and planning exercises?
Answer: Answers will vary.
Question: What was your approach to the IPAM deployment planning exercise?
Answer: Answers will vary.
Question: How does the IP addressing scheme design for Contoso compare with the IP addressing scheme in your organization?
Answer: Answers will vary.
Designing and Implementing Name Resolution 5-1
Module 5 Designing and Implementing Name Resolution
Contents: Lesson 1: Designing a DNS Server Implementation Strategy 2
Lesson 3: Designing DNS Zones 4
Lesson 4: Designing DNS Zone Replication and Delegation 8
Lesson 6: Designing DNS for High Availability and Security 10
Module Review and Takeaways 12
Lab Review Questions and Answers 14
5-2 Designing and Implementing a Server Infrastructure
Lesson 1 Designing a DNS Server Implementation Strategy Contents: Demonstration: Installing the DNS Server Role 3

Designing and Implementing Name Resolution 5-3
Demonstration: Installing the DNS Server Role
Demonstration Steps 1. Switch to LON-SVR1.
2. In Server Manager, in the results pane, click Add roles and features.
3. In the Add Roles and Features Wizard, in the Before you begin page, click Next.
4. On the Select installation type page, click Role-based or feature-based installation, and then click Next.
5. On the Select destination server page, click Select a server from the server pool, and then click Next.
6. On the Select server roles page, in the Roles list, select the DNS Server check box, click Add Features, and then click Next.
7. On the Select features page, click Next.
8. On the DNS Server page, click Next.
9. On the Confirmation page, click Install.

5-4 Designing and Implementing a Server Infrastructure
Lesson 3 Designing DNS Zones Contents: Question and Answers 5 Demonstration: Creating DNS Zones 6
Designing and Implementing Name Resolution 5-5
Question and Answers
Discussion: Designing a DNS Zone Strategy Question: How would you modify the DNS design for this scenario?
Answer: Consider deploying additional DNS servers to the branch offices. However, this would affect the DNS zone-transfer configuration.
Question: Where would you place additional name servers, if any?
Answer: To mitigate the effects of a WAN link failure, each location should have another method by which it performs DNS resolution, other than by using the head office DNS servers. Consider deploying at least one DNS server to each location, and more for larger sites. In addition, client computers should have both a preferred and alternate DNS Server address in their TCP/IP Version 4 Properties.
Question: What DNS server roles would you propose deploying?
Answer: The smaller branches might manage with caching-only servers, thereby avoiding zone transfers. Larger branches should have secondary zones of northwindtraders.local. However, if Active Directory–integrated zones are considered, all DNS servers could be promoted as domain controllers. This provides additional network resilience, and ensures zone transfers occur automatically and securely as part of Active Directory replication.
Question: Assuming all Internet connectivity is through the head office, how would you design forwarding?
Answer: You could configure all DNS servers to use a head-office DNS server as a forwarder. This also ensures that you can track where the DNS query traffic is going.
Question: How would you design the DNS zones?
Answer: The existing zone of northwindtraders.local is sufficient. However, if you switched to an Active Directory–integrated zone you could manage zone transfers more easily. This would change to AD DS replication and security, which you can manage by using the AD DS Kerberos protocol.
Question: Are Active Directory–integrated zones indicated?
Answer: Active Directory–integrated zones may be recommended. Active Directory–integrated zones are a best practice for Active Directory domains. When you use Active Directory–integrated zones, you reduce bandwidth consumption significantly, because all zone-transfer updates use attribute level replication rather than sending the entire changed record. Furthermore, because each domain controller that is running DNS is a primary zone server, they can write records directly to each of these domain controllers.
Question: How would you design zone transfers?
Answer: You can design zone transfers by using Active Directory zones. If you use Active Directory–integrated zones, ensure that all DNS servers in the branches also are Active Directory domain controllers. This ensures that zone transfers are part of normal Active Directory replication.
Question: Contoso, Ltd just acquired Northwind Traders. Does this affect your DNS design decisions?
Answer: Yes, it does affect DNS design decisions. Conditional forwarding might be beneficial for the Contoso.com domain. When you use the DNS server address (or addresses) for Northwind Traders as a conditional forwarder for the Northwind Active Directory domain, DNS queries to it go directly to that domain. If you do not use conditional forwarding, the queries would go to the root hint servers and then back through the DNS hierarchy to Northwind Traders.

5-6 Designing and Implementing a Server Infrastructure
Demonstration: Creating DNS Zones
Demonstration Steps
Create a primary reverse lookup zone 1. Switch to LON-DC1
2. From Server Manager, click Tools, and then click DNS.
3. In DNS, expand LON-DC1, and then expand Reverse Lookup Zones.
4. Right-click Reverse Lookup Zones, and then click New Zone.
5. In the New Zone Wizard, click Next.
6. On the Zone Type page, click Primary zone, and then click Next.
7. On the Active Directory Zone Replication Scope page, click Next.
8. On the Reverse Lookup Zone Name page, click IPv4 Reverse Lookup Zone, and then click Next.
9. On the Reverse Lookup Zone Name page, in the Network ID text box, type 172.16., and then click Next.
10. On the Dynamic Update page, click Next.
11. On the Completing the New Zone Wizard page, click Finish.
12. On the taskbar, click the Windows PowerShell icon.
13. In Windows PowerShell, type the following cmdlet,, and then press Enter:
Register-DnsClient
14. Return to DNS Manager and with the Reverse Lookup Zones, 16.172.in-addr.arpa node selected, press F5
Note: In the details pane, a record for the LON-DC1 Server displays as follows: 172.16.0.10 Pointer (PTR) Lon-dc1.adatum.com
Create a secondary forward lookup zone 1. Switch to LON-SVR1.
2. In Server Manager, click Tools, and then click DNS.
3. In DNS, expand LON-SVR1, and then expand Forward Lookup Zones.
4. Right-click Forward Lookup Zones, and then click New Zone.
5. In the New Zone Wizard, click Next.
6. On the Zone Type page, click Secondary zone, and then click Next.
7. On the Zone Name page, in the Zone name text box, type Adatum.com, and then click Next.
8. On the Master DNS Servers page, in the Master Servers list, type 172.16.0.10, press Enter, and then click Next.
9. On the Completing the New Zone Wizard page, click Finish.
Note: Zone transfers are shown in the next demonstration.

Designing and Implementing Name Resolution 5-7

5-8 Designing and Implementing a Server Infrastructure
Lesson 4 Designing DNS Zone Replication and Delegation Contents: Demonstration: Configuring Zone Transfers 9

Designing and Implementing Name Resolution 5-9
Demonstration: Configuring Zone Transfers
Demonstration Steps
Enable zone transfers on a zone 1. Switch to LON-DC1.
2. In the DNS console, expand Forward Lookup Zones, and then click Adatum.com.
3. Right-click Adatum.com, and then click Properties.
4. In the Adatum.com Properties dialog box, click the Zone Transfers tab.
5. Select the Allow zone transfers check box, click Only to servers listed on the Name Servers tab, and then click Notify.
6. In the Notify dialog box, in The following servers list, type 172.16.0.11, and then press Enter.
7. Click OK, and then click the Name Servers tab.
8. Click Add, and in the New Name Server Record dialog box, in the Server fully qualified domain name (FQDN) box, type LON-SVR1.Adatum.com, click Resolve, and then click OK twice.
Perform a zone transfer 1. Switch to LON-SVR1, and then switch to the DNS console.
2. In the navigation pane, click Adatum.com, and then on the toolbar, click Refresh.
Note: The zone transfer may not have occurred yet, so this step may not populate the zone with records. If a Red circle with an X displays in the Details pane, right-click Adatum.com, click Transfer from Master, and then click Refresh again.
3. Switch to LON-DC1.
4. In DNS, right-click Adatum.com, and then click New Alias (CNAME).
5. In the New Resource Record dialog box, in the Alias name text box, type WWW.
6. In the Fully qualified domain name (FQDN) for target host: text box, type LON-SVR1.Adatum.com, and then click OK.
7. Switch to LON-SVR1.
8. In the DNS console, right-click Adatum.com, and then click Transfer from Master.
Note: If the new alias record does not display, in the navigation pane, click Forward Lookup Zones. On the toolbar, click Refresh. Click Adatum.com, and then verify that the new alias record displays.

5-10 Designing and Implementing a Server Infrastructure
Lesson 6 Designing DNS for High Availability and Security Contents: Question and Answers 11
Designing and Implementing Name Resolution 5-11
Question and Answers
Discussion: Guidelines for Designing DNS Security Question: What is the first step you might take to make the internal DNS infrastructure more secure?
Answer: You can make the internal DNS infrastructure more secure by implementing Active Directory–integrated zones.
Question: What configuration changes would be necessary to support your proposals?
Answer: You must promote the deployed name server in Branch office 1 to a domain controller. You also must convert the northwindtraders.localzone to an Active Directory–integrated zone. You also should consider replacing the name servers in the head office with additional domain controllers to avoid using secondary zones and zone transfers. You should rename these servers to reflect their changed roles.
Question: How would you recommend configuring updates on your DNS server?
Answer: If you use Active Directory–integrated zones, you can configure secure-only dynamic updates.
Question: What DNS security policy level have you selected?
Answer: You should select the DNS security policy level as High.
Question: Are there any other security considerations that relate to the DNS design?
Answer: Answers will vary depending on the students’ responses to the preceding questions.
5-12 Designing and Implementing a Server Infrastructure
Module Review and Takeaways Best Practice Whenever possible, use Active Directory–integrated DNS. This provides you with more fault tolerance, because it enables you to have more than one domain controller. This provides better security, because Kerberos version 5 (V5) protocol encrypts all domain replication, and dynamic registrations can occur in secure mode. Furthermore, Active Directory–integrated DNS is more efficient, because all domain replication, including DNS record changes, use attribute-level replication. This is faster and uses fewer bits than typical full-zone transfers (AXFRs), or even incremental zone transfers (IXFRs).
Review Question(s) Question: What is the difference between a subdomain in a DNS zone, and a delegated zone?
Answer: A subdomain in a DNS zone has no name servers of its own, whereas a delegated zone has its own authoritative name servers.
Question: Contoso has created a regional sales department. Some sales staff is located at regional sales centers, where there are approximately 10 computers. These computers should be able to access the same applications and resources as the rest of the Contoso staff. How would you implement DNS at these smaller branches?
Answer: There are a number of possible solutions, but the most logical would be to configure a caching-only server at the branches, if the WAN links are slow or unreliable. If the link speed is adequate, it would be easier and more cost-effective to have the clients talk directly to the DNS servers at the main office.
Question: True or false? You should disable recursion on all internal DNS servers.
Answer: False. Internal DNS servers typically require that you enable recursion. Conversely, you typically disable recursion on a DNS server that is hosting an external DNS namespace. This prevents Internet clients from using that server to resolve DNS names.
Question: Why is it not good practice to disable round-robin rotation on all DNS servers?
Answer: Round-robin rotation is a load-balancing mechanism that DNS servers use to share and distribute network resource loads. If multiple resource records are discovered, you can use it to rotate all resource record types that the query answer contains. Although disabling this feature might reduce the workload on the DNS server’s processor, it will direct all clients to the same resource server for a given query.
Question: When would you configure a caching-only server?
Answer: Caching-only servers do not contain zone data. Therefore, they do not participate in zone transfers. Caching-only servers can be useful if a WAN link that connects to a branch office has minimal spare capacity to support zone transfer traffic.
Question: When considering NetBIOS name resolution, when would you choose WINS over the GlobalNames zone?
Answer: WINS provides greater support of network basic input/output system (NetBIOS) name registration, release, and resolution than the static GlobalNames zone. For enterprise networks that have greater reliance on NetBIOS applications, WINS is the logical choice. However, for organizations in which NetBIOS use is declining, and where clients and servers have static Internet Protocol version 4 (IPv4) configurations, GlobalNames zone might provide all that is required to support NetBIOS name resolution.

Designing and Implementing Name Resolution 5-13
Question: You are concerned about the security of zone data while it travels across the network during a zone transfer. All of your DNS servers also are domain controllers. What two strategies could you implement to mitigate your perceived security threats?
Answer: One strategy would be to implement Active Directory–integrated zones. Zone transfers then occur as part of Active Directory replication by using standard Active Directory encryption on the wire. Alternatively, you can implement a connection security rule, such as IPsec, to encrypt the traffic between the master servers and the configured secondary zone holders.

5-14 Designing and Implementing a Server Infrastructure
Lab Review Questions and Answers Lab: Designing and Implementing Name Resolution
Question and Answers Question: What was your approach to the DNS design exercises?
Answer: Answers will vary. However, the most simplified approach is to use split DNS so that both the internal domain and the DNS domain would have the same name, Contoso.com. Because an external DNS infrastructure exists already, as does a public website, you can house these resources in the perimeter network between the firewalls. You also can house the VPN and secure customer website in this location. However, the VPN would allow connections to pass through to the internal Active Directory–integrated DNS servers.
Question: Did your design differ from the suggested solution?
Answer: Answers will vary.
Question: How does the DNS design for Contoso compare with your organization’s DNS implementation?
Answer: Answers will vary.
Designing and Implementing an Active Directory Domain Services Forest and Domain Infrastructure 6-1
Module 6 Designing and Implementing an Active Directory Domain Services Forest and Domain Infrastructure
Contents: Lesson 1: Designing an Active Directory Forest 2
Lesson 2: Designing and Implementing Active Directory Forest Trusts 4
Lesson 4: Designing and Implementing Active Directory Domains 7
Module Review and Takeaways 9
Lab Review Questions and Answers 10

6-2 Designing and Implementing a Server Infrastructure
Lesson 1 Designing an Active Directory Forest Contents: Question and Answers 3

Designing and Implementing an Active Directory Domain Services Forest and Domain Infrastructure 6-3
Question and Answers
Discussion: Selecting a Suitable Forest Design Question: How many forests are required to integrate the two organizations?
Answer: Two forests—the existing forests—are required. Changing the environment for two large organizations would be a major project, very time-consuming, and prohibitively expensive.
Question: How would you recommend integrating the two organizations?
Answer: You would use forest trusts to integrate the two organizations.
Question: What is the relevance of the schema changes in the Tailspin Toys forest, to any design that you might consider?
Answer: A major reason for implementing multiple forests is that all domain controllers in a forest share a common schema. In other words, two forests have separate and potentially different schemas. Because the scenario suggests that changes are in place in one organization to support a business-critical application, unless these schema updates are relevant to both organizations, they should remain separate.
Question: How do the existing external domain names used affect your design?
Answer: The domain names are not a design factor. The external names need not be related in any way to the internal Active Directory domain and forest names.

6-4 Designing and Implementing a Server Infrastructure
Lesson 2 Designing and Implementing Active Directory Forest Trusts Contents: Demonstration: Creating a Forest Trust 5
Designing and Implementing an Active Directory Domain Services Forest and Domain Infrastructure 6-5
Demonstration: Creating a Forest Trust
Demonstration Steps
Configure the prerequisites for a forest trust 1. On LON-DC1, in Server Manager, click Tools, and then click DNS.
2. In the DNS management console, in the navigation pane, expand LON-DC1, expand Conditional Forwarders, right-click Conditional Forwarders, and then click New Conditional Forwarder.
3. In the New Conditional Forwarder dialog box, in the DNS Domain text box, type treyresearch.net, and then click the IP Address list.
4. Type 172.16.10.10, press Enter, and then click OK.
5. Click the Start button.
6. Type cmd.exe, and then press Enter.
7. At the command prompt, type the following command, and then press Enter:
nslookup trey-dc1.treyresearch.net
8. Verify that the query is successful, returning the IP address of 172.16.10.10.
9. Switch to TREY-DC1.
10. If necessary, sign in as Treyresearch\Administrator with the password Pa$$w0rd.
11. Click the Start button, point to Administrative Tools, and then double-click DNS.
12. In the DNS management console, in the navigation pane, expand TREY-DC1, expand Conditional Forwarders, right-click Conditional Forwarders, and then click New Conditional Forwarder.
13. In the New Conditional Forwarder dialog box, in the DNS Domain text box, type Adatum.com, and then click the IP Address list.
14. Type 172.16.0.10, press Enter, and then click OK.
15. Click the Start button, type cmd.exe, and then press Enter.
16. At the command prompt, type the following command, and then press Enter:
nslookup lon-svr1.adatum.com
17. Verify that the query is successful, returning the IP address of 172.16.0.11.
Create a forest trust 1. Switch to LON-DC1.
2. In Server Manager, click Tools, and then click Active Directory Domains and Trusts.
3. In Active Directory Domains and Trusts, click Adatum.com, right-click Adatum.com, and then click Properties.
4. In the Adatum.com Properties dialog box, click the Trusts tab, and then click New Trust.
5. In the New Trust Wizard dialog box, click Next.
6. On the Trust Name page, in the Name text box, type treyresearch.net, and then click Next.
7. On the Trust Type page, click Forest trust, and then click Next.
8. On the Direction of Trust page, ensure that the Two-way option is selected, and then click Next.
6-6 Designing and Implementing a Server Infrastructure
9. On the Sides of Trust page, click Both this domain and the specified domain, and then click Next.
10. On the User Name and Password page, in the User name text box, type Treyresearch\administrator.
11. In the Password text box, type Pa$$w0rd, and then click Next.
12. On the Outgoing Trust Authentication Level--Local Forest page, click Next.
13. On the Outgoing Trust Authentication Level--Specified Forest page, click Next.
14. On the Trust Selections Complete page, click Next.
15. On the Trust Creation Complete page, click Next.
16. On the Confirm Outgoing Trust page, click Yes, confirm the outgoing trust, and then click Next.
17. On the Confirm Incoming Trust page, click Yes, confirm the incoming trust, and then click Next.
18. On the Completing the New Trust Wizard page, click Finish.

Designing and Implementing an Active Directory Domain Services Forest and Domain Infrastructure 6-7
Lesson 4 Designing and Implementing Active Directory Domains Contents: Demonstration: Implementing an Active Directory Domain 8
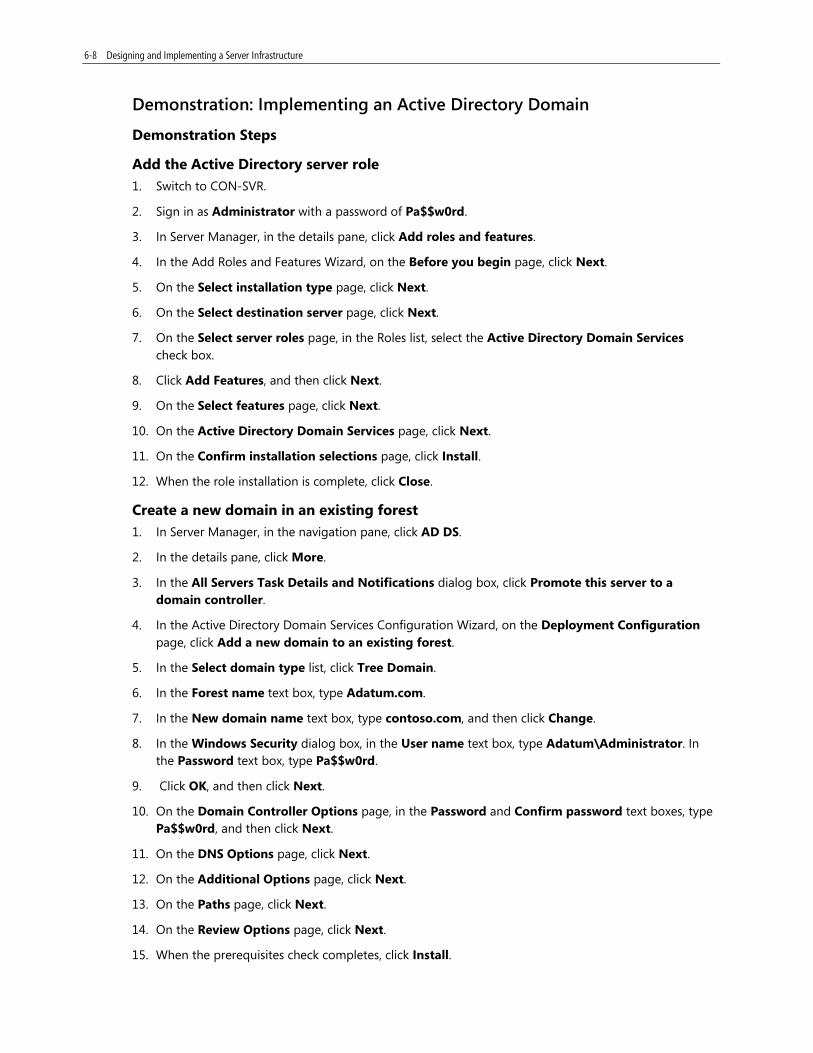
6-8 Designing and Implementing a Server Infrastructure
Demonstration: Implementing an Active Directory Domain
Demonstration Steps
Add the Active Directory server role 1. Switch to CON-SVR.
2. Sign in as Administrator with a password of Pa$$w0rd.
3. In Server Manager, in the details pane, click Add roles and features.
4. In the Add Roles and Features Wizard, on the Before you begin page, click Next.
5. On the Select installation type page, click Next.
6. On the Select destination server page, click Next.
7. On the Select server roles page, in the Roles list, select the Active Directory Domain Services check box.
8. Click Add Features, and then click Next.
9. On the Select features page, click Next.
10. On the Active Directory Domain Services page, click Next.
11. On the Confirm installation selections page, click Install.
12. When the role installation is complete, click Close.
Create a new domain in an existing forest 1. In Server Manager, in the navigation pane, click AD DS.
2. In the details pane, click More.
3. In the All Servers Task Details and Notifications dialog box, click Promote this server to a domain controller.
4. In the Active Directory Domain Services Configuration Wizard, on the Deployment Configuration page, click Add a new domain to an existing forest.
5. In the Select domain type list, click Tree Domain.
6. In the Forest name text box, type Adatum.com.
7. In the New domain name text box, type contoso.com, and then click Change.
8. In the Windows Security dialog box, in the User name text box, type Adatum\Administrator. In the Password text box, type Pa$$w0rd.
9. Click OK, and then click Next.
10. On the Domain Controller Options page, in the Password and Confirm password text boxes, type Pa$$w0rd, and then click Next.
11. On the DNS Options page, click Next.
12. On the Additional Options page, click Next.
13. On the Paths page, click Next.
14. On the Review Options page, click Next.
15. When the prerequisites check completes, click Install.

Designing and Implementing an Active Directory Domain Services Forest and Domain Infrastructure 6-9
Module Review and Takeaways Question: What is the purpose of the resource forest model?
Answer: You can use the resource forest model in an environment with a particularly critical or secure application, shared folder, or other system resource. In such a scenario, administrators create a forest specifically for users who must access that resource.
Question: What forest functional level must you set in AD DS to be able to establish a forest trust?
Answer: You must set the forest functional level to at least Windows Server 2003 so that you can establish a forest trust between two forests. In addition, you must configure DNS in both forests, so that clients can resolve names from another forest.
Question: If you want to integrate multiple internal namespaces, which technologies would you use?
Answer: You would use stub zones and delegation records.
Question: A user from Contoso attempts to access a shared folder in the Tailspin Toys domain and receives an Access Denied error. A trust relationship between these two domains exists. What must you do to provide the user with access?
Answer: First, you should check the direction of the trust, and verify that selective authentication is applied. After that, you should check the access control list (ACL) on the shared folder.
6-10 Designing and Implementing a Server Infrastructure
Lab Review Questions and Answers Lab A: Designing and Implementing an Active Directory Domain Services Forest Infrastructure
Question and Answers Question: What was your approach to the Active Directory forest design exercises?
Answer: Answers will vary with regard to the perimeter network and the total number of forests. Some students may interpret the requirements for simple design or the goal of minimizing costs in different ways.
Question: Did your design differ from the suggested solution?
Answer: Answers will vary. Some students may have thought that the perimeter network should have a forest or that there should be a few different forests for enhanced security.
Question: If cost were not a factor, how might this affect your design?
Answer: Answer will vary, but students may focus on the benefits of merging all the organizations into a single forest. This would be an expensive project, but offers some advantages (as discussed in the Student Handbook).
Lab B: Designing and Implementing an Active Directory Domain Infrastructure
Question and Answers Question: What was your approach to the Active Directory domain design exercises?
Answer: Answers will vary. Some students may opt for working with a single forest and domain for simplicity, while other students may opt for multiple domains (and possibly forests) for administrative segregation. Additionally, students working in high security environments will often have a different approach than students working in a startup environment.
Question: Did your design differ from the suggested solution?
Answer: Answers will vary. There are numerous ways to meet requirements, and so it is likely that some students have solutions that differ from the suggested solution. A multiple forest solution may be the best approach for high-security environments; however, a single forest with a single domain may be the best approach for a startup environment.
Question: How does the domain design compare with your organization’s domain implementation?
Answer: Answers will vary. Students often work in unique environments with different requirements than what is shown in this lab. It is expected that students’ company implementations of Active Directory are different from the Active Directory implementation in this lab.
Designing and Implementing an AD DS Organizational Unit Infrastructure 7-1
Module 7 Designing and Implementing an AD DS Organizational Unit Infrastructure
Contents: Lesson 1: Planning the Active Directory Administrative Tasks Delegation Model 2
Lesson 2: Designing an OU Structure 4
Lesson 3: Designing and Implementing an AD DS Group Strategy 7
Module Review and Takeaways 10
Lab Review Questions and Answers 12

7-2 Designing and Implementing a Server Infrastructure
Lesson 1 Planning the Active Directory Administrative Tasks Delegation Model Contents: Resources 3

Designing and Implementing an AD DS Organizational Unit Infrastructure 7-3
Resources
What Is an Active Directory Administrative Tasks Delegation Model?
Additional Reading: For more information about Best Practices for Delegating Active Directory Administration, see the following:
• Best Practices for Delegating Active Directory Administration http://go.microsoft.com/fwlink/?linkid=279914
• Best Practices for Delegating Active Directory Administration Appendices http://go.microsoft.com/fwlink/?linkid=279915

7-4 Designing and Implementing a Server Infrastructure
Lesson 2 Designing an OU Structure Contents: Question and Answers 5 Demonstration: Implementing OUs 5

Designing and Implementing an AD DS Organizational Unit Infrastructure 7-5
Question and Answers
Strategies for Designing OUs Question: What is the OU structure that you use at your workplace, and why is it designed that way?
Answer: Answers will vary.
Question: What current issues are you facing with your OU model?
Answer: Answers will vary.
Protecting OUs from Accidental Deletion Question: Are there things about the OU structure in your organization that you would like to change?
Answer: Answers will vary.
Demonstration: Implementing OUs
Demonstration Steps
Create an OU 1. On LON-DC1, sign in as Adatum\Administrator with the password Pa$$w0rd.
2. In Server Manager, click Tools, and then click Active Directory Administrative Center.
3. In Active Directory Administrative Center, in the navigation pane, click Adatum (local).
4. In the tasks pane, in the Adatum (local) section, click New, and then click Organizational Unit.
5. In the Create Organizational Unit dialog box, in the Name text box, type Contoso-IT, and then in the Description text box, type OU to contain Accounts / Groups for administrative purposes.
6. Note that the Protect from accidental deletion check box is selected.
7. Click OK to create the OU and close the Create Organizational Unit: Contoso-IT dialog box.
Verify that the OU is protected against accidental deletion 1. In Server Manager, click Tools, and then click Active Directory Users and Computers.
2. In Active Directory Users and Computers, on the menu, click View, and then click Advanced Features.
3. In Active Directory Users and Computers, expand Adatum.com, and then click Adatum.com.
4. In the details pane, right-click Contoso-IT, and then click Properties.
5. In the Contoso-IT Properties dialog box, click the Object tab. Ensure that the Protect object from accidental deletion check box is selected, and then click Cancel.
6. Close Active Directory Users and Computers.
Examine the default security settings of the OU 1. Switch back to the Active Directory Administrative Center.
2. In Active Directory Administrative Center, in the navigation pane, click Adatum (local).
3. In the details pane, click the Contoso-IT OU.
4. In the tasks pane, in the Contoso-IT section, click Properties.
5. Scroll down to the Extensions section, and then on the Security tab, click Advanced.

7-6 Designing and Implementing a Server Infrastructure
6. In the Advanced Security Settings for Contoso-IT dialog box, examine the default security settings, and then click Cancel.
Delete a protected OU 1. In the Contoso-IT dialog box, clear the Protect from accidental deletion check box, and then click
OK.
2. In Active Directory Administrative Center, in the tasks pane, in the Contoso-IT section, click Delete.
3. In the Delete Confirmation dialog box, click Yes.

Designing and Implementing an AD DS Organizational Unit Infrastructure 7-7
Lesson 3 Designing and Implementing an AD DS Group Strategy Contents: Question and Answers 8 Demonstration: Creating and Managing Groups 8

7-8 Designing and Implementing a Server Infrastructure
Question and Answers
Active Directory Groups in Windows Server 2012 Question: What issues are you currently facing in your organization regarding to your group strategy?
Answer: Answers will vary.
Demonstration: Creating and Managing Groups
Demonstration Steps
Create an OU 1. On LON-DC1, open Active Directory Administrative Center, and then in the navigation pane, click
Adatum (local).
2. In the tasks pane, in the Adatum (local) section, click New, and then click Organizational Unit.
3. In the Create Organizational Unit dialog box, in the Name box, type SelfService. In the Description box, type OU for Groups that are managed by themselves, and then click OK.
Create a group, and then configure management of the group 1. In Active Directory Administrative Center, in the details pane, double-click the SelfService OU.
2. In the tasks pane, in the SelfService section, click New, and then click Group.
3. In the Create Group dialog box, in the Group name text box, type SportsInLondon. In the E-Mail text box, type [email protected].
4. In the Description text box, type SelfManaged DL to contain the members of the Sports in London community, and then click OK.
5. In Active Directory Administrative Center, in the SelfService OU, click the SportsInLondon group.
6. In the tasks pane, in the SportsInLondon section, click Properties.
7. In the SportsInLondon Properties dialog box, in the Managed By section, click Edit.
8. In the Select User, Contact or Group dialog box, in the Enter the object name to select (examples) text box, type SportsInLondon, click Check Names, and then click OK.
9. In the SportsInLondon Properties dialog box, in the Managed By section, select the Manager can update membership list check box, and then click OK.
Add a user to the group 1. In Active Directory Administrative Center, in the navigation pane, click Adatum (local).
2. In the details pane, double click the Marketing OU.
3. In the details pane, click Adam Barr.
4. In the tasks pane, in the Adam Barr section, click Add to group.
5. In the Select Groups dialog box, in the Enter the object names to select (examples) text box, type SportsInLondon, click Check Names, and then click OK.
Verify that the community group can manage itself 1. Sign off LON-DC1.
2. Sign in to LON-CL1 as Adatum\Adam with the password Pa$$w0rd.
3. Right-click Start and then click Control Panel.

Designing and Implementing an AD DS Organizational Unit Infrastructure 7-9
4. In Control Panel, click Administrative Tools.
5. In Administrative Tools, double-click Active Directory Administrative Center.
6. In Active Directory Administrative Center, in the navigation pane, click Overview, in the Global Search text box, type Pat, and then click Search.
7. In the details pane, click Pat Coleman.
8. In the tasks pane, in the Pat Coleman section, click Add to group.
9. In the Select Groups dialog box, in the Enter the object names to select text box, type SportsInLondon, click Check Names, and then click OK.
10. In Active Directory Administrative Center, in the navigation pane, click adatum (local).
11. In the details pane, double click the SelfService OU, and then click the SportsInLondon group.
12. In the tasks pane, in the SportsInLondon section, click Properties.
13. In the SportsInLondon Properties dialog box, in the Members section, verify that Pat Coleman is a member of the group, and then click Cancel.
14. Sign off LON-CL1.

7-10 Designing and Implementing a Server Infrastructure
Module Review and Takeaways Best Practice • Use the AG(U)DLP model when designing your group strategy. By doing this, accounts are grouped in
global groups for the business roles. If required, you can consolidate these groups across domains in a universal group. The role groups are then assigned via Domain Local groups that grant access to the specific resource.
• Design your Active Directory administrative tasks model with least privileges in mind. As a best practice, make a list of tasks in your organization, and then grant each task to a specific team. If a team wants the permissions, they become responsible for those tasks.
• Use scripts to implement your design. Review the Windows PowerShell cmdlets and the Dsacls.exe tool for setting permissions.
Review Question(s) Question: Why is it a good idea to implement the least privileges required when delegating administrative tasks?
Answer: When you delegate administrative tasks to other administrative groups, ensure that the administrators cannot elevate their rights. One of the key ways to minimize the likelihood that rights can be elevated is by using the principle of least privilege. This often translates into delegation at the appropriate level and delegation using the appropriate permissions.
Question: Why should you use administrative accounts and store them in a different location than regular user accounts?
Answer: If a user has administrative account privileges, malicious code that they may receive via email or when browsing the Internet can execute or install binaries. Therefore, we recommend using a dedicated, personalized administrative account for administrative purposes only. In addition, restricted administrative accounts are protected against delegation. This protection mechanism can cause issues with certain routine tasks, such as connecting to email when using Exchange ActiveSync®. In addition, you might delegate administrative tasks in your OU structure at a later point. Therefore, place your administrators in a separate OU structure so that you cannot accidentally delegate control over them and permit a delegated administrator to hijack an account and obtain higher permissions.
Question: What must you consider when you want to migrate your OU structure to a new model?
Answer: Consider the following points when migrating your OU structure:
• The new OU structure should not damage the existing OU structure.
• Ensure that delegation works properly before moving objects.
• Ensure that GPOs are linked properly to configured users and computers.
In addition, you might need to reconfigure Lightweight Directory Access Protocol (LDAP)–aware applications, for example to configure the location that they need to search for user accounts. Migrating OUs could also affect hardware that is not a standard Windows computer, such as multifunctional printers and telephone systems. It could also affect perimeter network applications, such as email scanners, which use AD DS to provide telephone numbers or verify that a user has an email account before allowing an email into an organization’s email system. Another consideration is object domain names. Applications sometimes use domain names when they refer to objects. If an object is moved, the domain name changes and any applications that rely on the domain name will have issues.

Designing and Implementing an AD DS Organizational Unit Infrastructure 7-11
Common Issues and Troubleshooting Tips Common Issue Troubleshooting Tip
When using the Security Delegation Wizard to set permissions, once the wizard reopens, the permissions do not display.
Use the Security Delegation Wizard in Active Directory Users and Computers to configure common delegation tasks. The resulting settings are written in the Security properties of the OU, but will not display in the wizard. To verify the permissions, use the Security dialog box and Advanced Security dialog box to review the settings.
How to determine what attributes must be delegated.
See the Best Practices for Delegating Active Directory Administration Whitepaper and its appendix at http://go.microsoft.com/fwlink/?LinkID=391883. You can also, for example, change a value on a user object, and then use the attribute editor to find the value. You can use the LDIFDE.exe tool to create a text-dump of the object’s attributes before and after the change, and then compare the files.
How to change the security settings of an attribute that does not display in the Advanced Security dialog box.
Certain attributes are hidden in the Advanced Security dialog box. As a best practice, use Dsacls.exe to change security settings.
7-12 Designing and Implementing a Server Infrastructure
Lab Review Questions and Answers Lab: Designing and Implementing an Active Directory OU Infrastructure and Delegation Model
Question and Answers Question: What was your suggested OU design? What were the reasons behind your design decisions?
Answer: Answers will vary. Depending on the amount of time that you have, engage students in a discussion about their designs.
Question: While the lab had you use Windows PowerShell to move user objects based on a certain attribute, can you think of other ways to do this?
Answer: In Active Directory Users and Computers, you can use the saved queries feature to create a custom query, select all results, and then move them. Alternatively, in Active Directory Administrative Center, you can perform a global search (via LDAP-Filter), then select all resulting objects, and then move them all at once. However, we recommend using scripting via Windows PowerShell or via a command prompt using dsquery / dsmove, and then validating your scripts in a test environment prior to running them.
Question: Bill suggested self-management for certain groups. How would you implement this? What are the benefits and what are the risks associated with this recommendation?
Answer: Self-management by groups that are not security-relevant is a good idea. An example would be community groups or certain distribution lists where users are free to opt in and opt out as they like. These are groups where the security permissions are set so that the group itself can manage its own members attribute. You can also use the Managed by property in the properties of the group object. After you implement self-management, group members can add other users or remove themselves. If the group is email-enabled, group members can use Microsoft Office Outlook® without having to use client computer administrative tools.

Designing and Implementing a Group Policy Object Strategy 8-1
Module 8 Designing and Implementing a Group Policy Object Strategy
Contents: Lesson 1: Collecting the Information Required for a GPO Design 2
Lesson 2: Designing and Implementing GPOs 4
Lesson 3: Designing GPO Processing 7
Lesson 4: Planning Group Policy Management 10
Module Review and Takeaways 12
Lab Review Questions and Answers 13

8-2 Designing and Implementing a Server Infrastructure
Lesson 1 Collecting the Information Required for a GPO Design Contents: Question and Answers 3

Designing and Implementing a Group Policy Object Strategy 8-3
Question and Answers Question: How is Group Policy used in your organization? What are the issues you face or have faced in your organization regarding Group Policy? What settings or tasks would you would prefer to do with GPOs, but are unable to?
Answer: Answers will vary.

8-4 Designing and Implementing a Server Infrastructure
Lesson 2 Designing and Implementing GPOs Contents: Resources 5 Demonstration: Implementing GPOs 5

Designing and Implementing a Group Policy Object Strategy 8-5
Resources
Alternatives to Using GPOs
Additional Reading: To learn more about the Windows PowerShell Desired State Configuration feature, visit http://go.microsoft.com/fwlink/?LinkID=391884.
Demonstration: Implementing GPOs
Demonstration Steps
Create a Directory Services Restore Mode service user 1. Switch to LON-DC1.
2. In Server Manager, click Tools, and then click Active Directory Administrative Center.
3. In Active Directory Administrative Center, in the navigation pane, click Adatum (local), and then double-click the Users container.
4. In the tasks pane, in the Users section, click New, and then click User.
5. In the Create User dialog box, in the Full name text box, type srv_dsrm.
6. In the User SamAccountName text box, to the right of the backslash, type srv_dsrm.
7. In the Password and Confirm password text boxes, type Pa$$w0rd.
8. In Password options, click Other password options, click Password never expires, and then click OK.
9. In Active Directory Administrative Center, in the Users container details pane, click the new user srv_dsrm.
10. In the tasks pane, in the srv_dsrm section, click Disable.
Create a GPO 1. In Server Manager, click Tools, and then click Group Policy Management.
2. In the Group Policy Management Console, in the navigation pane, expand Forest: Adatum.com, expand Domains, expand Adatum.com, and then click Group Policy Objects.
3. Right-click the Group Policy Objects node, and then click New.
4. In the New GPO dialog box, in the Name text box, type DSRM_Pwd, and then click OK.
Create a scheduled task by using Group Policy Preferences 1. Right-click DSRM_Pwd, and then click Edit.
2. In the Group Policy Management Editor, under Computer Configuration, expand Preferences, expand Control Panel Settings, and then click Scheduled Tasks.
3. Right-click the Scheduled Tasks node, point to New, and then click Scheduled Task (At least Windows 7).
4. In the New Task (At least Windows 7) Properties dialog box, on the General tab, in the Action drop-down list box, click Create.
5. In the Name text box, type Sync DSRM Password.
6. In the Security options section, click Change User or Group.

8-6 Designing and Implementing a Server Infrastructure
7. In the Select User or Group dialog box, in the Enter the object name to select (examples) text box, type System, click Check Names, and then click OK.
8. In the New Task (At least Windows 7) Properties dialog box, click Run whether user is logged on or not.
9. In the Task Scheduler (Windows 7) pop-up window, click Cancel.
10. In the New Task (At least Windows 7) Properties dialog box, select the Do not store password. The task will only have access to local resources and Run with highest privileges check boxes.
11. On the Triggers tab, click New.
12. In the New Trigger dialog box, in the Settings section, select the Daily option, in the Advanced Settings section, select the Repeat task every check box, and then click OK.
13. In the New Task (At least Windows 7) Properties dialog box, on the Actions tab, click New.
14. In the New Action dialog box, in the Settings section, in the Program/script text box, type c:\Windows\System32\ntdsutil.exe.
15. In the Add arguments(optional) text box, type the following arguments, and then click OK twice:
“set dsrm password” “sync from domain account srv_dsrm” quit quit
16. Close the Group Policy Management Editor.
Link the policy to the Domain Controllers organizational unit (OU) 1. In the Group Policy Management Console, in the navigation pane, click Domain Controllers.
2. Right-click Domain Controllers, and then click Link an Existing GPO.
3. In the Select GPO dialog box, under Group Policy objects, click DSRM_Pwd, and then click OK.

Designing and Implementing a Group Policy Object Strategy 8-7
Lesson 3 Designing GPO Processing Contents: Question and Answers 8 Demonstration: Configuring GPO Inheritance and Filtering 8

8-8 Designing and Implementing a Server Infrastructure
Question and Answers Question: How would you want to redesign your Group Policy infrastructure based on the information from the last three lessons? What issues do you expect to encounter when implementing these changes?
Answer: Answers will vary.
Demonstration: Configuring GPO Inheritance and Filtering
Demonstration Steps
Configure GPO inheritance 1. Switch to LON-DC1.
2. In Server Manager, click Tools, and then click Group Policy Management.
3. In the Group Policy Management Console, expand Forest: Adatum.com, expand Domains, expand Adatum.com, right-click Group Policy Objects, and then click New.
4. In the New GPO dialog box, in the Name text box, type Corp Settings, and then click OK.
5. In the left pane of the Group Policy Management Console, right-click the Development OU, and then click New Organizational Unit.
6. In the New Organizational Unit dialog box, in the Name text box, type QA, and then click OK.
7. In the left pane, expand Group Policy Objects.
8. Click the Corp Settings GPO, and drag it to the Development OU to link it there. In the Group Policy Management dialog box, click OK to complete the link.
9. In the left pane, right-click the QA OU, and then click Block Inheritance.
Configure a security filter 1. In the left pane, under Group Policy Objects, click the Corp Settings GPO.
2. In the right pane, on the Scope tab, in the Security Filtering section, click Add.
3. In the Select User, Computer, or Group dialog box, in the Enter the object name to select (examples) text box, type Development, and then click OK.
4. In the right pane, on the Scope tab, in the Security Filtering section, click to highlight Authenticated Users, and then click Remove.
5. In the Group Policy Management dialog box, click OK to complete the removal of the group.
Configure a WMI filter 1. In the left pane, right-click WMI Filters, and then click New.
2. In the New WMI Filter dialog box, in the Name text box, type Windows 7 clients or newer.
3. In the New WMI Filter dialog box, click Add to add a query.
4. In the WMI Query dialog box, in the Query field, type the following query, and then click OK:
SELECT Version, ProductType FROM Win32_OperatingSystem WHERE Version >= '6.1' AND ProductType = '1'
5. In the Warning dialog box, click OK to use the namespace.
6. In the New WMI Filter dialog box, click Save.
7. In the left pane, click the Corp Settings GPO.

Designing and Implementing a Group Policy Object Strategy 8-9
8. In the right pane, on the Scope tab, click the WMI Filtering drop-down list box, and then click the Windows 7 clients or newer WMI filter.
9. In the Group Policy Management dialog box, click Yes to complete the WMI filter change.

8-10 Designing and Implementing a Server Infrastructure
Lesson 4 Planning Group Policy Management Contents: Resources 11 Demonstration: Managing GPOs 11

Designing and Implementing a Group Policy Object Strategy 8-11
Resources
Considerations for Designing Group Policy Administration
Additional Reading: For additional AGPM features, visit http://go.microsoft.com/fwlink/?LinkID=391885.
Demonstration: Managing GPOs
Demonstration Steps
Create a backup of all GPOs 1. On LON-DC1, on the taskbar, click the Windows PowerShell icon.
2. At the Windows PowerShell command prompt, type the following command, and then press Enter:
New-Item c:\GPO-Backups –ItemType Directory
3. Switch to Group Policy Management.
4. In the GPMC, in the navigation pane, right-click Group Policy Objects, and then click Back Up All.
5. In the Back Up Group Policy Object dialog box, in the Location text box, type C:\GPO-Backups\, and then click Back Up.
6. When the backup completes, click OK.
Note: You can also use the following Windows PowerShell cmdlet to back up the GPOs: Backup-GPO –All –Path c:\GPO-Backups
7. In the GPMC, right-click Group Policy Objects, and then click Manage Backups.
8. In the Manage Backups dialog box, review the options, and then click Close.
Document GPO settings 1. In the GPMC, under Group Policy Objects, right-click DSRM_Pwd, and then click Save Report.
2. In the Save GPO Report dialog box, in the navigation pane, click Allfiles (E:), and then click Save.
3. On the taskbar, click File Explorer.
4. In File Explorer, in the navigation pane, click Allfiles (E:).
5. In the details pane, double-click DSRM_Pwd.htm.
6. View the Links and Security Filtering sections, view Delegation, and view the actual settings specified in the GPO.
Note: You can also use the following Windows PowerShell cmdlet to document GPO settings: Get-GPOReport –Name GPO-Name –ReportType HTML –Path c:\GPOReports\GPOReport1.html

8-12 Designing and Implementing a Server Infrastructure
Module Review and Takeaways Best Practices • Enable the Central Store for Group Policy Administrative Templates if you have multiple
administrators who are editing GPOs, and if you are editing GPOs from different computers.
• Avoid using site-linked GPOs.
• Carefully plan your Group Policy backup and recovery strategy.
• Plan for Group Policy testing before you apply GPOs to production users and computers.
• Limit the number of GPOs that apply to users and computers. Use high-level GPOs for common settings, and try to limit individual settings in individual GPOs. A high number of GPOs increases startup and logon times.
• Take time on a regular basis to document or update your GPOs, their settings, and where they are linked in the OU structure.
Review Question(s) Question: What are the options for applying a GPO to specific users or computers?
Answer: You can link the GPO to the domain, to a site, or to any OU in the Active Directory domain. You can use security filtering to set permissions based on groups, or you can use WMI filters to identify certain hardware, operating system configurations, or other computer management aspects. In addition, you can enforce or block inheritance to adjust how GPOs are inherited.
Question: What do you need to consider when applying a GPO to a site?
Answer: GPOs are linked to Active Directory objects, and certain configuration options are stored in AD DS. However, the Group Policy settings are file-based in SYSVOL, which is being replicated automatically. AD DS sites do not necessarily match the domain structure. For example, you can have a domain that spans multiple sites, and a site containing domain controllers of multiple domains. To ensure that the Group Policy settings are not transferred to the wide area network (WAN), you should create the GPO within a domain that has enough domain controllers to service user logon requests in the site where you want to apply the GPO.
Common Issues and Troubleshooting Tips Common Issue Troubleshooting Tip
A recently changed policy does not yet apply.
Run gpupdate /force from a command line, or Invoke-GPUpdate –force in Windows PowerShell.
Security filtering does not work as expected.
In the GPMC, on the Delegations tab, click Advanced. In the Security dialog box, click Advanced again. In the Advanced Security dialog box, on the Effective Permissions tab, troubleshoot the security permissions of specific users.

Designing and Implementing a Group Policy Object Strategy 8-13
Lab Review Questions and Answers Lab: Designing and Implementing a Group Policy Object Strategy
Question and Answers Question: What was your suggested GPO design?
Answer: Answers will vary. Depending on how much time you have, engage the students in a discussion about their GPO designs.
Question: You were using Deny permissions to ensure that certain GPOs do not apply to IT administrators. Are there other methods that you could use to achieve the same requirement?
Answer: You should implement Deny permissions very carefully, because Deny always overrides Allow permissions, and might lead to unexpected results. However, denying certain GPOs for administrators is a common and valid scenario. The only other possible way to achieve this goal would be to apply every other department's group to the policy, and then remove Authenticated Users. This can cause risks for users not yet assigned to their departmental group, or for new department groups that you add later but to which you forget to add to the policy.

Designing and Implementing an AD DS Physical Topology 9-1
Module 9 Designing and Implementing an AD DS Physical Topology
Contents: Lesson 1: Designing and Implementing Active Directory Sites 2
Lesson 2: Designing Active Directory Replication 4
Module Review and Takeaways 6
Lab Review Questions and Answers 7

9-2 Designing and Implementing a Server Infrastructure
Lesson 1 Designing and Implementing Active Directory Sites Contents: Demonstration: Creating Site Objects 3
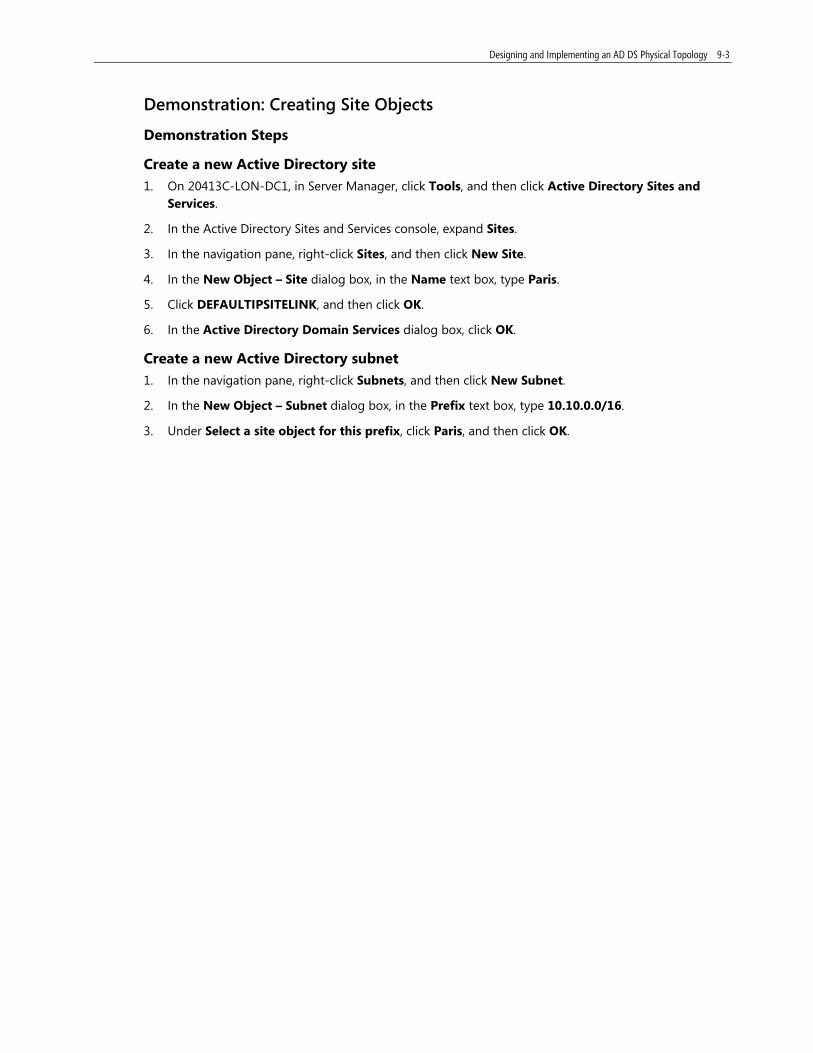
Designing and Implementing an AD DS Physical Topology 9-3
Demonstration: Creating Site Objects
Demonstration Steps
Create a new Active Directory site 1. On 20413C-LON-DC1, in Server Manager, click Tools, and then click Active Directory Sites and
Services.
2. In the Active Directory Sites and Services console, expand Sites.
3. In the navigation pane, right-click Sites, and then click New Site.
4. In the New Object – Site dialog box, in the Name text box, type Paris.
5. Click DEFAULTIPSITELINK, and then click OK.
6. In the Active Directory Domain Services dialog box, click OK.
Create a new Active Directory subnet 1. In the navigation pane, right-click Subnets, and then click New Subnet.
2. In the New Object – Subnet dialog box, in the Prefix text box, type 10.10.0.0/16.
3. Under Select a site object for this prefix, click Paris, and then click OK.

9-4 Designing and Implementing a Server Infrastructure
Lesson 2 Designing Active Directory Replication Contents: Demonstration: Configuring Active Directory Replication 5

Designing and Implementing an AD DS Physical Topology 9-5
Demonstration: Configuring Active Directory Replication
Demonstration Steps
Configure site links 1. On LON-DC1, in the Active Directory Sites and Services console, in the navigation pane, expand Sites,
expand Inter-Site Transports, and then click the IP folder.
2. Right-click the IP folder and then click New Site Link.
3. In the Name text box, type LONDON-PARIS.
4. In the Sites not in this site link box, click AdatumHQ, press the Ctrl key, and then click PARIS. Click Add, and then click OK.
5. Right-click LONDON-PARIS, and then click Properties.
6. In the LONDON-PARIS Properties dialog box, next to Cost, change the value to 80. Next to Replicate Every, change the value to 60, and then click OK.
Move a domain controller to a new site 1. In the Active Directory Sites and Services console, in the navigation pane, expand Sites, expand
AdatumHQ, and then expand the Servers folder.
2. If the PAR-DC1 server does not display, right-click the Servers folder, and then click Refresh.
3. Right-click PAR-DC1, and then click Move.
4. In the Move Server dialog box, click Paris, and then click OK.
5. In the navigation pane, expand the Paris site, expand Servers, right-click PAR-DC1, and then click Properties.
6. In the PAR-DC1 Properties dialog box, in the Transports available for inter-site data transfer box, click IP, and then click Add.
9-6 Designing and Implementing a Server Infrastructure
Module Review and Takeaways Question: In a multisite enterprise, why is it important that you identify and associate all subnets with a site?
Answer: You can make the process of locating domain controllers and other services more efficient if you refer client computers to the correct site, based on the IP address for the client computer and the definition of subnets. If a client computer has an IP address that does not belong to a site, the client computer queries for all domain controllers in the domain, which is not at all efficient. In fact, a single client computer can be performing actions against domain controllers in different sites. If those changes are not yet replicated, this can lead to unwanted results. Therefore, it is important for each client computer to know in which site it resides. You can achieve this by ensuring that domain controllers can identify which client computers are in which sites.
Question: What is the purpose of a bridgehead server?
Answer: The bridgehead server is responsible for all replication in and out of the site for a partition. Instead of replicating all domain controllers in one site with all domain controllers in another site, bridgehead servers manage intersite replication.
Question: Which protocol can you use as an alternative to Active Directory replication? What is the disadvantage of using it?
Answer: You can use Simple Mail Transfer Protocol (SMTP), but it cannot replicate a domain partition.
Designing and Implementing an AD DS Physical Topology 9-7
Lab Review Questions and Answers Lab: Designing and Implementing an Active Directory Domain Services Physical Topology
Question and Answers Question: What was your approach to the Active Directory site and replication design?
Answer: Answers will vary. However, the scenario and suggested answers to the design questions focus the design solution on defining each physical location as a separate site. Domain controllers should be placed at sites where the logon times are slowest (possibly all sites), and site links should be defined that are representative of the underlying network.
Question: How did you address the Active Directory domain controller planning exercise?
Answer: Answers will vary. However, the scenario and suggested answers to the design questions lead the design solution towards moving a domain controller to Paris and deploying domain controllers to the branch offices as necessary to address the user complaints.
Question: How does this physical Active Directory design compare with your organization’s Active Directory implementation?
Answer: Answers will vary. If possible, discuss the comparison of this design with locations where you have worked.

Planning and Implementing Storage and File Services 10-1
Module 10 Planning and Implementing Storage and File Services
Contents: Lesson 1: Planning and Implementing iSCSI SANs 2
Lesson 2: Planning and Implementing Storage Spaces 5
Lesson 3: Optimizing File Services for Branch Offices 8
Module Review and Takeaways 11
Lab Review Questions and Answers 12

10-2 Designing and Implementing a Server Infrastructure
Lesson 1 Planning and Implementing iSCSI SANs Contents: Resources 3 Demonstration: Implementing iSCSI 3

Planning and Implementing Storage and File Services 10-3
Resources
iSCSI Target Server and iSCSI Initiator
Additional Reading: For more information about the introduction of iSCSI targets in Windows Server 2012, see http://go.microsoft.com/fwlink/?linkid=279916.
Demonstration: Implementing iSCSI
Demonstration Steps
Add the iSCSI Target Server role 1. On LON-DC1, in Server Manager, click Add roles and features.
2. In the Add Roles and Features Wizard, on the Before you begin page, click Next.
3. On the Select installation type page, click Next.
4. On the Select destination server page, ensure that Select server from the server pool is selected, and then click Next.
5. On the Select server roles page, expand File And Storage Services (2 of 12 Installed), expand File and iSCSI Services (1 of 11 Installed), select the iSCSI Target Server check box, and then click Next.
6. On the Select features page, click Next.
7. On the Confirm installation selections page, click Install.
8. When installation completes, click Close.
9. If prompted to restart, click Restart Now.
10. Sign in to LON-DC1 with the username Adatum\Administrator and the password Pa$$w0rd.
Create two iSCSI virtual disks and an iSCSI target 1. On LON-DC1, in Server Manager, in the navigation pane, click File and Storage Services.
2. In the File and Storage Services pane, click iSCSI.
3. In the iSCSI VIRTUAL DISKS pane, click TASKS, and then in the TASKS drop-down list box, click New iSCSI Virtual Disk.
4. In the New iSCSI Virtual Disk Wizard, on the Select iSCSI virtual disk location page, under Storage location, click C:, and then click Next.
5. On the Specify iSCSI virtual disk name page, type iSCSIDisk1, and then click Next.
6. On the Specify iSCSI virtual disk size page, in the Size box, type 5, in the drop-down list box, ensure that GB is selected, and then click Next.
7. On the Assign iSCSI target page, click New iSCSI target, and then click Next.
8. On the Specify target name page, in the Name text box, type LON-SVR1, and then click Next.
9. On the Specify access servers page, click Add.
10. In the Select a method to identify the initiator dialog box, click Enter a value for the selected type, in the Type drop-down list box, click IP Address, in the Value text box, type 172.16.0.11, and then click OK.
11. On the Specify access servers page, click Next.

10-4 Designing and Implementing a Server Infrastructure
12. On the Enable Authentication page, click Next.
13. On the Confirm selections page, click Create.
14. On the View results page, wait until creation completes, and then click Close.
15. In the iSCSI VIRTUAL DISKS pane, click TASKS, and then in the TASKS drop-down list box, click New iSCSI Virtual Disk.
16. In the New iSCSI Virtual Disk Wizard, on the Select iSCSI virtual disk location page, under Storage location, click C:, and then click Next.
17. On the Specify iSCSI virtual disk name page, type iSCSIDisk2, and then click Next.
18. On the Specify iSCSI virtual disk size page, in the Size text box, type 5, in the drop-down list box, ensure that GB is selected, and then click Next.
19. On the Assign iSCSI target page, click lon-svr1, and then click Next.
20. On the Confirm selections page, click Create.
21. On the View results page, wait until creation completes, and then click Close.
Connect to the iSCSI target 1. If needed, sign in to LON-SVR1 with the username Adatum\Administrator and the password
Pa$$w0rd.
2. On LON-SVR1, in Server Manager, click the Tools menu, and then click iSCSI Initiator.
3. In the Microsoft iSCSI message box, click Yes.
4. In the iSCSI Initiator Properties dialog box, in the Targets text box, type LON-DC1, and then click Quick Connect.
5. In the Quick Connect window, in the Discovered targets section, click iqn.1991-05.com.microsoft:lon-dc1-lon-dc1-target, and then click Done.
6. In the iSCSI Initiator Properties dialog box, click OK to close the dialog box.
Verify the presence of the iSCSI drive 1. On LON-SVR1, in Server Manager, on the Tools menu, click Computer Management.
2. In the Computer Management console, under Storage node, click Disk Management. Notice that the new disks are added. However, they all are currently offline and not formatted.
3. Close the Computer Management console.

Planning and Implementing Storage and File Services 10-5
Lesson 2 Planning and Implementing Storage Spaces Contents: Resources 6 Demonstration: Configuring Storage Spaces 6
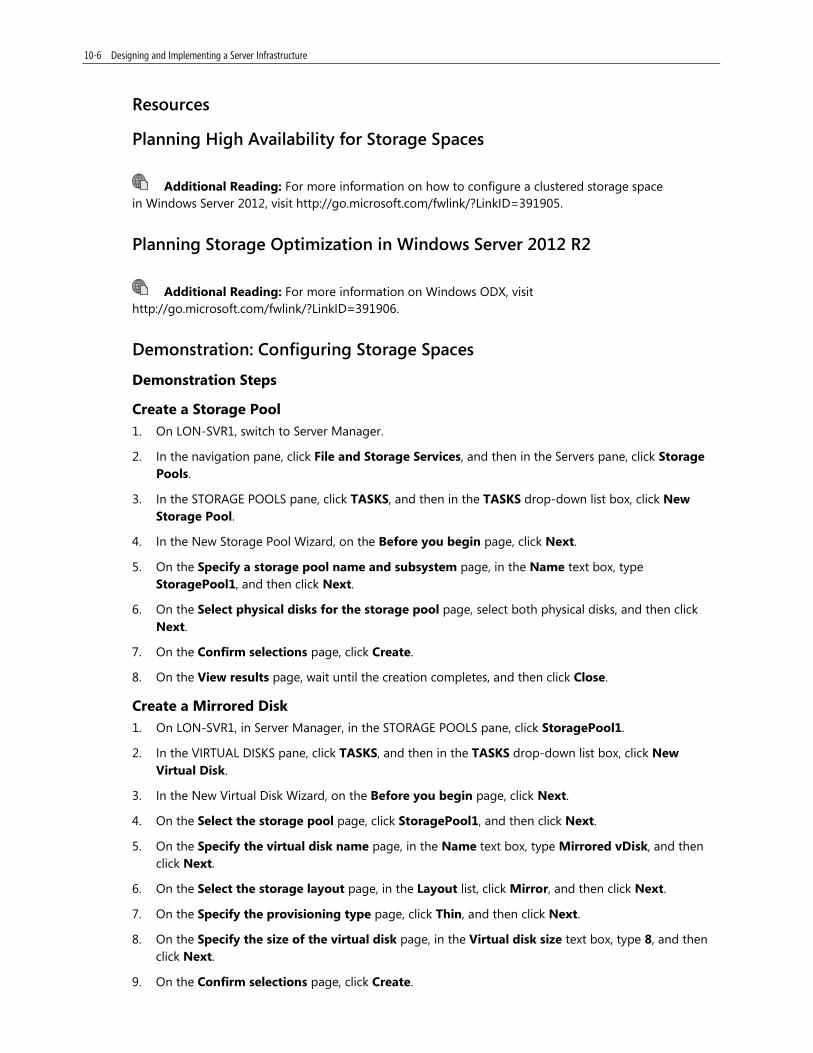
10-6 Designing and Implementing a Server Infrastructure
Resources
Planning High Availability for Storage Spaces
Additional Reading: For more information on how to configure a clustered storage space in Windows Server 2012, visit http://go.microsoft.com/fwlink/?LinkID=391905.
Planning Storage Optimization in Windows Server 2012 R2
Additional Reading: For more information on Windows ODX, visit http://go.microsoft.com/fwlink/?LinkID=391906.
Demonstration: Configuring Storage Spaces
Demonstration Steps
Create a Storage Pool 1. On LON-SVR1, switch to Server Manager.
2. In the navigation pane, click File and Storage Services, and then in the Servers pane, click Storage Pools.
3. In the STORAGE POOLS pane, click TASKS, and then in the TASKS drop-down list box, click New Storage Pool.
4. In the New Storage Pool Wizard, on the Before you begin page, click Next.
5. On the Specify a storage pool name and subsystem page, in the Name text box, type StoragePool1, and then click Next.
6. On the Select physical disks for the storage pool page, select both physical disks, and then click Next.
7. On the Confirm selections page, click Create.
8. On the View results page, wait until the creation completes, and then click Close.
Create a Mirrored Disk 1. On LON-SVR1, in Server Manager, in the STORAGE POOLS pane, click StoragePool1.
2. In the VIRTUAL DISKS pane, click TASKS, and then in the TASKS drop-down list box, click New Virtual Disk.
3. In the New Virtual Disk Wizard, on the Before you begin page, click Next.
4. On the Select the storage pool page, click StoragePool1, and then click Next.
5. On the Specify the virtual disk name page, in the Name text box, type Mirrored vDisk, and then click Next.
6. On the Select the storage layout page, in the Layout list, click Mirror, and then click Next.
7. On the Specify the provisioning type page, click Thin, and then click Next.
8. On the Specify the size of the virtual disk page, in the Virtual disk size text box, type 8, and then click Next.
9. On the Confirm selections page, click Create.

Planning and Implementing Storage and File Services 10-7
10. On the View results page, wait until the creation completes, ensure that Create a volume when this wizard closes is selected, and then click Close.
11. In the New Volume Wizard, on the Before you begin page, click Next.
12. On the Select the server and disk page, in the Disk pane, click the Mirrored vDisk virtual disk, and then click Next.
13. On the Specify the size of the volume page, click Next to confirm the default selection.
14. On the Assign to a drive letter or folder page, verify that drive F is selected in the Drive letter drop-down list box, and then click Next.
15. On the Select file system settings page, in the File system drop-down list box, click ReFS. In the Volume label text box, type Mirrored Volume, and then click Next.
16. On the Confirm selections page, click Create.
17. On the Completion page, wait until the creation completes, and then click Close.

10-8 Designing and Implementing a Server Infrastructure
Lesson 3 Optimizing File Services for Branch Offices Contents: Resources 9 Demonstration: Configuring BranchCache 9

Planning and Implementing Storage and File Services 10-9
Resources
Windows Server 2012 R2 and Windows Server 2012 Enhancements to DFS
Additional Reading: For more information on the enhancements to DFS Replication in Windows Server 2012, visit http://go.microsoft.com/fwlink/?LinkID=391907.
Additional Reading: For more information on the enhancements to DFS Replication in Windows Server 2012 R2, visit http://go.microsoft.com/fwlink/?LinkID=391908.
Demonstration: Configuring BranchCache
Demonstration Steps
Add BranchCache for the Network Files role service 1. On LON-DC1, in Server Manager, click Add roles and features.
2. In the Add Roles and Features Wizard, on the Before you begin page, click Next.
3. On the Select installation type page, click Next.
4. On the Select destination server page, ensure that Select server from the server pool is selected, and then click Next.
5. On the Select server roles page, expand File and Storage Services (2 of 12 Installed), expand File and iSCSI Services (2 of 11 Installed), select the BranchCache for Network Files check box, and then click Next.
6. On the Select features page, click Next.
7. On the Confirm installation selections page, click Install.
8. When installation completes, click Close.
Enable BranchCache for the server 1. On LON-DC1, click the Start screen.
2. On the Start screen, type gpedit.msc, and then press Enter.
3. In the Local Group Policy Editor, expand Computer Configuration, expand Administrative Templates, expand Network, click Lanman Server, and then double-click Hash Publication for BranchCache.
4. In the Hash Publication for BranchCache dialog box, click Enabled.
5. In the Options box, under Hash publication actions, click Allow hash publication only for shared folder on which BranchCache is enabled, and then click OK.
6. Close the Local Group Policy Editor.
Enable BranchCache for a file share 1. On the taskbar, click the File Explorer icon.
2. In File Explorer, click Local Disk (C:).
3. On the quick access bar located on the upper left side of the window, click New Folder, type Share, and then press Enter.
4. Right-click Share, and then click Properties.
5. In the Share Properties dialog box, click the Sharing tab, and then click Advanced Sharing.

10-10 Designing and Implementing a Server Infrastructure
6. In the Advanced Sharing dialog box, click Share this folder, and then click Caching.
7. In the Offline Settings dialog box, select the Enable BranchCache check box, and then click OK.
8. In the Advanced Sharing dialog box, click OK, and then click Close.
9. Close all open windows.

Planning and Implementing Storage and File Services 10-11
Module Review and Takeaways Question: Tailspin Toys needs to decide how to implement various aspects of its storage infrastructure. The company will need to store shared files in a central location, but they do not want to implement a file server at this time. What kind of storage would you recommend?
Answer: Answers will vary, but may include direct-attached storage (DAS) or SAN storage solutions.
Question: Tailspin Toys plans to implement several database servers, and wants to provide disk space for the databases. The company would prefer to create a single, centrally-managed array of disks for all the databases. What kind of storage would you recommend?
Answer: Answers will vary, but may include network-attached storage (NAS) or SAN storage solutions.
Question: What are the primary benefits of a SAN storage solution over a DAS storage solution?
Answer: The primary benefits of a SAN storage solution are that it is highly effective at resource sharing, it provides better storage utilization, and it provides hardware consolidation and availability.

10-12 Designing and Implementing a Server Infrastructure
Lab Review Questions and Answers Lab: Planning and Implementing Storage
Question and Answers Question: How did you approach the storage planning exercise?
Answer: Answers will vary.
Question: How does your organization implement storage?
Answer: Answers will vary.

Designing and Implementing Network Protection 11-1
Module 11 Designing and Implementing Network Protection
Contents: Lesson 1: Overview of Network Security Design 2
Lesson 2: Designing and Implementing a Windows Firewall Strategy 5
Lesson 3: Designing and Implementing a NAP Infrastructure 8
Module Review and Takeaways 13
Lab Review Questions and Answers 14

11-2 Designing and Implementing a Server Infrastructure
Lesson 1 Overview of Network Security Design Contents: Question and Answers 3
Designing and Implementing Network Protection 11-3
Question and Answers
What Network Threats Do Organizations Face? Question: What are the 10 most common network security threats faced by organizations?
Answer: Answers will vary, but may include:
• Insider theft of confidential data
• Malware
• Denial-of-service attacks
• Phishing
• Network traffic interception
• Websites containing malicious code
• Password attacks
• Data compromise through physical loss of USB storage and computers
• Inadvertent data leakage
• Compromised personal devices
Question: What possible mitigations or solutions exist to counter these threats?
Answer: Answers will vary, but may include:
• Insider theft of confidential data. Correctly configure permissions, audit access to sensitive data, and implement Active Directory® Rights Management Services (AD RMS).
• Malware. Educate users about managing email messages and attachments. Implement technologies such as antivirus software that provide for clean messages.
• Denial-of-service attacks. Monitor incoming traffic to detect denial-of-service attacks. Work with your organization’s ISP to mitigate the impact of these attacks.
• Phishing. Implement technologies that provide for a clean message stream. Educate users about best practices for email use.
• Network traffic interception. Restrict physical network access to prevent hackers from connecting network-sniffing devices. Implement secure settings with wireless networks. Educate your users about connecting to unsecured public wireless hotspots. Implement IPsec to secure network traffic.
• Websites containing malicious code. Implement a web browser, such as Windows Internet Explorer® 11, that can identify malicious code, and prevent spyware, adware, and cross-site scripting.
• Password attacks. Many password attacks require trojan code or physical access to your network before they can be implemented. Prevention of trojan code and protection of your physical network will help to reduce password attacks. Use complex passwords help to guard against brute force password attacks.
• Data compromise through physical loss of USB storage and computers. Educate users about the importance of protecting their laptops and USB storage devices. Consider implementing encryption technologies such as BitLocker® Drive Encryption and Windows BitLocker to Go®.
• Inadvertent data leakage. This occurs when people email confidential data to a private email address or store confidential data on public cloud storage services. Implement AD RMS to ensure that confidential data cannot be accessed unless a proper access license is obtained.

11-4 Designing and Implementing a Server Infrastructure
• Compromised personal devices. Organizations that allow people to use their own devices to perform work tasks need to have a way of ensuring that those devices do not contain malware. One solution is to keep devices that are not managed by the organization on a perimeter network and allow access to organizational resources only through technologies such as Remote Desktop.
In summary, the following solutions are useful for countering common network attacks:
• Educate users about online best practices.
• Implement technologies to provide for email message safety.
• Restrict physical access to your network.
• Audit access to sensitive data.
• Implement AD RMS.
• Implement encryption for your storage devices.

Designing and Implementing Network Protection 11-5
Lesson 2 Designing and Implementing a Windows Firewall Strategy Contents: Question and Answers 6 Demonstration: Configuring Connection Security Rules 6
11-6 Designing and Implementing a Server Infrastructure
Question and Answers
Scenarios Addressed by Windows Firewall Question: What scenarios can Windows Firewall can help to address?
Answer: Answers may vary, but will include:
• Protect servers from internal and external threats by restricting incoming communication to specific ranges of IP addresses or specific ports.
• Prevent malicious software (also called malware) from propagating by restricting outbound communication to specific ports or applications.
• Provide for authentication of network traffic with IPsec.
• Provide for encryption of data in transit by using IPsec.
Demonstration: Configuring Connection Security Rules
Demonstration Steps
Enable (Internet Control Message Protocol) ICMP traffic on LON-SVR1 1. Sign in to LON-SVR1 as Adatum\Administrator with the password Pa$$w0rd.
2. In Server Manager, click Tools, and then click Windows Firewall with Advanced Security.
3. In Windows Firewall with Advanced Security, right-click Inbound Rules, and then from the drop-down list box, click New Rule.
4. In the New Inbound Rule Wizard dialog box, click Custom, and then click Next.
5. On the Programs page, click Next.
6. On the Protocols and Ports page, in the Protocol type list, click ICMPv4, and then click Next.
7. On the Scope page, click Next.
8. On the Action page, click Allow the connection if it is secure, and then click Next.
9. On the Users page, click Next.
10. On the Computers page, click Next.
11. On the Profile page, click Next.
12. On the Name page, in the Name text box, type ICMPv4 allowed, and then click Finish.
Create a server–to-server rule on connecting servers 1. On LON-SVR1, in Windows Firewall with Advanced Security, click and then right-click Connection
Security Rules, and then click New Rule.
2. In the New Connection Security Rule Wizard, click Server-to-server, and then click Next.
3. On the Endpoints page, click Next.
4. On the Requirements page, click Require authentication for inbound and outbound connections, and then click Next.
5. On the Authentication Method page, click Advanced, and then click Customize.
6. In the Customize Advanced Authentication Methods dialog box, under First authentication, click Add.
Designing and Implementing Network Protection 11-7
7. In the Add First Authentication Method dialog box, click Preshared Key, type secret, and then click OK.
8. In the Customize Advanced Authentication Methods dialog box, click OK.
9. On the Authentication Method page, click Next.
10. On the Profile page, click Next.
11. On the Name page, in the Name text box, type Adatum-Server-to-Server, and then click Finish.
Create a server-to-server rule on LON-CL1 1. Switch to LON-CL1.
2. Sign in as Adatum\administrator with the password Pa$$w0rd.
3. On the Start screen, type Windows Firewall, and then click Windows Firewall with Advanced Security.
4. Click and then right-click Connection Security Rules, and then click New Rule.
5. In the New Connection Security Rule Wizard, click Server-to-server, and then click Next.
6. On the Endpoints page, click Next.
7. On the Requirements page, click Require authentication for inbound and outbound connections, and then click Next.
8. On the Authentication Method page, click Advanced, and then click Customize.
9. In the Customize Advanced Authentication Methods dialog box, under First authentication, click Add.
10. In the Add First Authentication Method dialog box, click Preshared Key, type secret, and then click OK.
11. In the Customize Advanced Authentication Methods dialog box, click OK.
12. On the Authentication Method page, click Next.
13. On the Profile page, click Next.
14. On the Name page, in the Name text box, type Adatum-Server-to-Server, and then click Finish.
Test the Rule 1. Right click on Start, and then click Windows PowerShell.
2. In Windows PowerShell®, at the command prompt, type ping 172.16.0.11, and then press Enter.
3. Switch to Windows Firewall with Advanced Security.
4. Expand Monitoring, expand Security Associations, and then click Main Mode.
5. In the right pane, double-click the listed item.
6. View the information in Main Mode, and then click OK.
7. Click Quick Mode.
8. In the right pane, double-click the listed item.
9. View the information in Quick Mode, and then click OK.

11-8 Designing and Implementing a Server Infrastructure
Lesson 3 Designing and Implementing a NAP Infrastructure Contents: Demonstration: Implementing NAP 9
Designing and Implementing Network Protection 11-9
Demonstration: Implementing NAP
Demonstration Steps
Install the Network Policy Server (NPS) server role 1. Switch to LON-DC1 and sign in as Adatum\administrator with the password Pa$$w0rd.
2. If necessary, on the taskbar, click Server Manager.
3. In Server Manager, in the details pane, click Add roles and features.
4. In the Add Roles and Features Wizard, click Next.
5. On the Select installation type page, click Role-based or feature based installation, and then click Next.
6. On the Select destination server page, click Next.
7. On the Select server roles page, select the Network Policy and Access Services check box.
8. Click Add Features, and then click Next twice.
9. On the Network Policy and Access Services page, click Next.
10. On the Select role services page, verify that the Network Policy Server check box is selected, and then click Next.
11. On the Confirm installation selections page, click Install.
12. Verify that the installation was successful, and then click Close.
Configure NPS as a NAP health policy server 1. In Server Manager, click Tools, and then click Network Policy Server.
2. In the navigation pane, expand Network Access Protection, expand System Health Validators, expand Windows Security Health Validator, and then click Settings.
3. In the right pane, under Name, double-click Default Configuration.
4. In the navigation pane, click Windows 8/Windows 7/Windows Vista.
5. In the details pane, clear all check boxes, and then select the A firewall is enabled for all network connections check box.
6. Click OK to close the Windows Security Health Validator dialog box.
Configure health policies 1. In the navigation pane, expand Policies.
2. Right-click Health Policies, and then click New.
3. In the Create New Health Policy dialog box, under Policy name, type Compliant.
4. Under Client SHV checks, verify that Client passes all SHV checks is selected.
5. Under SHVs used in this health policy, select the Windows Security Health Validator check box, and then click OK.
6. Right-click Health Policies, and then click New.
7. In the Create New Health Policy dialog box, in the Policy Name text box, type Noncompliant.
8. Under Client SHV checks, click Client fails one or more SHV checks.
9. Under SHVs used in this health policy, select the Windows Security Health Validator check box, and then click OK.
11-10 Designing and Implementing a Server Infrastructure
Configure network policies for compliant computers 1. In the navigation pane, under Policies, click Network Policies.
Note: Important: you also must disable the two default policies found under Policy Name by right-clicking the policies, and then clicking Disable.
2. Right-click Network Policies, and then click New.
3. On the Specify Network Policy Name and Connection Type page, under Policy name, type Compliant-Full-Access, and then click Next.
4. On the Specify Conditions page, click Add.
5. In the Select condition dialog box, double-click Health Policies.
6. In the Health Policies dialog box, under Health policies, click Compliant, and then click OK.
7. On the Specify Conditions page, click Next.
8. On the Specify Access Permission page, click Next.
9. On the Configure Authentication Methods page, clear all check boxes, select the Perform machine health check only check box, and then click Next.
10. Click Next again.
11. On the Configure Settings page, click NAP Enforcement. Verify that Allow full network access is selected, and then click Next.
12. On the Completing New Network Policy page, click Finish.
Configure network policies for noncompliant computers 1. Right-click Network Policies, and then click New.
2. On the Specify Network Policy Name And Connection Type page, in the Policy name text box, type Noncompliant-Restricted, and then click Next.
3. On the Specify Conditions page, click Add.
4. In the Select condition dialog box, double-click Health Policies.
5. In the Health Policies dialog box, under Health policies, click Noncompliant, and then click OK.
6. On the Specify Conditions page, click Next.
7. On the Specify Access Permission page, verify that Access granted is selected, and then click Next.
8. On the Configure Authentication Methods page, clear all check boxes, select the Perform machine health check only check box, and then click Next.
9. Click Next again.
10. On the Configure Settings page, click NAP Enforcement, and then click Allow limited access. Clear the Enable auto-remediation of client computers check box, click Next, and then click Finish.
Configure the Dynamic Host Configuration Protocol (DHCP) server role for NAP 1. In Server Manager, click Tools, and then click DHCP.
2. In DHCP, expand Lon-dc1.Adatum.com, expand IPv4, right-click Scope [172.16.0.0] Adatum, and then click Properties.

Designing and Implementing Network Protection 11-11
3. In the Scope [172.16.0.0] Adatum Properties dialog box, click the Network Access Protection tab, click Enable for this scope, and then click OK.
4. In the navigation pane, under Scope [172.16.0.0) Adatum, right-click Policies, and then click New Policy.
5. In the DHCP Policy Configuration Wizard, in the Policy Name text box, type NAP Policy, and then click Next.
6. On the Configure Conditions for the policy page, click Add.
7. In the Add/Edit Condition dialog box, in the Criteria list, click User Class.
8. In the Operator list, click Equals.
9. In the Value list, click Default Network Access Protection Class, and then click Add.
10. Click OK, and then click Next.
11. On the Configure settings for the policy page, click No, and then click Next.
12. On the Configure settings for the policy page, in the Vendor class list, click DHCP Standard Options.
13. In the Available Options list, select the 006 DNS Servers check box.
14. In the IP address text box, type 172.16.0.10, and then click Add.
15. In the Available Options list, select the 015 DNS Domain Name check box.
16. In the String value text box, type restricted.adatum.com, and then click Next.
17. On the Summary page, click Finish.
18. Close DHCP.
Configure client NAP settings 1. Switch to LON-CL1, and sign in as Adatum\administrator with the password Pa$$w0rd.
2. On the Start screen, type napclcfg.msc, and then press Enter.
3. In NAPCLCFG – [NAP Client Configuration (Local Computer)], in the navigation pane, click Enforcement Clients.
4. In the results pane, right-click DHCP Quarantine Enforcement Client, and then click Enable.
5. Close NAPCLCFG – [NAP Client Configuration (Local Computer)].
6. Pause your mouse pointer over the lower-left of the taskbar, and then click Start.
7. On the Start screen, type Services.msc, and then press Enter.
8. In Services, in the results pane, double-click Network Access Protection Agent.
9. In the Network Access Protection Agent Properties (Local Computer) dialog box, in the Startup type list, click Automatic.
10. Click Start, and then click OK.
11. Pause your mouse pointer over the lower-left of the taskbar, and then click Start.
12. On the Start screen, type gpedit.msc, and then press Enter.
13. In the console tree, expand Local Computer Policy, expand Computer Configuration, expand Administrative Templates, expand Windows Components, and then click Security Center.
14. Double-click Turn on Security Center (Domain PCs only), click Enabled, and then click OK.
11-12 Designing and Implementing a Server Infrastructure
15. Close the console window.
16. Pause your mouse pointer over the lower right of the taskbar, and then click Settings.
17. In the Settings list, click Control Panel.
18. In Control Panel, click Network and Internet.
19. In Network and Internet, click Network and Sharing Center.
20. In Network and Sharing Center, in the left pane, click Change adapter settings.
21. Right-click Ethernet, and then click Properties.
22. In the Ethernet Properties dialog box, double-click Internet Protocol Version 4 (TCP/IPv4).
23. In the Internet Protocol Version 4 (TCP/IPv4) Properties dialog box, click Obtain an IP address automatically.
24. Click Obtain DNS server address automatically, and then click OK.
25. In the Ethernet Properties dialog box, click OK.
Test NAP 1. Pause your mouse pointer over the lower-left of the taskbar, and then click Start.
2. On the Start screen, type cmd.exe, and then press Enter.
3. At the command prompt, type the following command, and then press Enter:
Ipconfig
4. Switch to services.
5. In Services, in the results pane, double-click Windows Firewall.
6. In the Windows Firewall Properties (Local Computer) dialog box, in the Startup type list, click Disabled.
7. Click Stop, and then click OK.
8. In the System Tray area, click the Network Access Protection pop-up warning. Review the information in the Network Access Protection dialog box, and then click Close.
Note: If the pop-up does not display, proceed with the demonstration.
9. At the command prompt, type the following command, and then press Enter:
Ipconfig
10. Notice that the computer has a subnet mask of 255.255.255.255, and a Domain Name System (DNS) Suffix of restricted.Adatum.com.
11. Leave all windows open.

Designing and Implementing Network Protection 11-13
Module Review and Takeaways Question: The Windows SHV can determine both the state of the firewall (enabled or disabled), and whether it is up to date.
( ) True
( ) False
Answer:
(√) True
( ) False
Question: What are some common forms of network attacks?
Answer: Common forms of network attacks include eavesdropping, data modification, identity spoofing, password-based attacks, denial-of-service, man-in-the-middle, compromised key, and application layer attacks.
Question: What server role (or roles) must you deploy to support NAP?
Answer: You must deploy the NPS role and, where required, Active Directory Certificate Services (AD CS). If you are implementing DHCP enforcement, you must deploy a DHCP server. VPN enforcement requires the Routing and Remote Access Service, which is part of the NPS role.
Question: What are the recommended uses for IPsec?
Answer: The recommended uses for IPsec are as follows:
• Packet filtering
• Securing host-to-host traffic
• Securing traffic to servers
• L2TP
• Site-to-site (gateway-to-gateway) tunneling
• Enforcing logical networks
Real-world Issues and Scenarios Scenario: Tailspin Toys is planning to implement NAP as part of its overall security infrastructure. They want an enforcement method that is applicable to all network clients, regardless of how they connect. Currently, a PKI is in place. What enforcement method or methods would you recommend?
Answer: IPsec enforcement would be suitable, as would 802.1X enforcement, depending on whether the switches and access points support 802.1X authentication. DHCP enforcement would be unsuitable, because clients with a manually assigned IP configuration can bypass NAP. VPN enforcement would also be unsuitable, because not all clients are connecting by VPN.
Scenario: Wingtip Toys wants to implement IPsec NAP enforcement. What infrastructure components must be in place to support this method?
Answer: Aside from the general requirements for NAP, IPsec also requires that you deploy a Health Registration Authority (HRA) and a Public Key Infrastructure (PKI) for health certificates.

11-14 Designing and Implementing a Server Infrastructure
Lab Review Questions and Answers Lab: Designing and Implementing Network Protection
Question and Answers Question: What was your approach to the firewall design exercise?
Answer: Answers will vary.
Question: What was your approach to the NAP design exercise?
Answer: Answers will vary.
Question: How does the network access design compare with network access implementation in your organization?
Answer: Answers will vary.

Designing and Implementing Remote Access Services 12-1
Module 12 Designing and Implementing Remote Access Services
Contents: Lesson 1: Planning and Implementing DirectAccess 2
Lesson 2: Planning and Implementing VPN 5
Lesson 3: Planning and Implementing Web Application Proxy 10
Lesson 4: Planning a Complex Remote Access Infrastructure 18
Module Review and Takeaways 20
Lab Review Questions and Answers 21

12-2 Designing and Implementing a Server Infrastructure
Lesson 1 Planning and Implementing DirectAccess Contents: Demonstration: Running the Getting Started Wizard 3

Designing and Implementing Remote Access Services 12-3
Demonstration: Running the Getting Started Wizard
Demonstration Steps
Create security group in Active Directory® Domain Services (AD DS) for DirectAccess client computers 1. On LON-DC1, in the Server Manager console, in the upper-right corner, click Tools, and then click
Active Directory Users and Computers.
2. In the Active Directory Users and Computers console tree, right-click Adatum.com, click New, and then click Organizational Unit.
3. In the New Object – Organizational Unit window, in the Name text box, type DA_Clients OU, and then click OK.
4. In the Active Directory Users and Computers console tree, expand Adatum.com, right-click DA_Clients OU, click New, and then click Group.
5. In the New Object - Group dialog box, in the Group name text box, type DA_Clients.
6. Under Group scope, ensure that Global is selected, under Group type, ensure that Security is selected, and then click OK.
7. In the details pane, right-click DA_Clients, and then click Properties.
8. In the DA_Clients Properties dialog box, click the Members tab, and then click Add.
9. In the Select Users, Contacts, Computers, Service Accounts, or Groups dialog box, click Object Types, select the Computers check box, and then click OK.
10. In the Enter the object names to select (examples) text box, type LON-CL1, and then click OK.
11. Under Members, verify that LON-CL1 displays, and then click OK.
12. Close the Active Directory Users and Computers console.
Configure DirectAccess 1. Switch to LON-RTR.
2. Pause your mouse pointer in the lower left of the display, and then click Start.
3. Click Control Panel.
4. In Control Panel, click Network and Internet.
5. In the Network and Internet window, click Network and Sharing Center.
6. In the Network and Sharing Center window, click Change adapter settings.
7. Right-click Ethernet 2, and then click Properties.
8. In the Ethernet 2 Properties dialog box, double-click Internet Protocol Version 4 (TCP/IPv4).
9. In the IP address text box, type 131.107.0.21.
10. In the Subnet mask text box, type 255.255.0.0, and then click OK.
11. In the Ethernet 2 Properties dialog box, click OK.
12. Pause your mouse pointer in the lower right of the desktop, click Settings, click Power, and then click Restart.
13. If a screen displays asking you to confirm computer restart, click Continue.
14. Once the server restarts, sign in as Adatum\Administrator with the password Pa$$w0rd.

12-4 Designing and Implementing a Server Infrastructure
15. In the Server Manager console, click Tools, and then click Remote Access Management.
16. In the Remote Access Management console, click DirectAccess and VPN, and then click Run the Getting Started Wizard.
17. On the Configure Remote Access page, click Deploy DirectAccess only.
18. Verify that Edge is selected, in the Type the public name or IPv4 address used by clients to connect to the Remote Access server text box, type 131.107.0.21, and then click Next.
19. On the Getting Started Wizard page, click the here link.
20. On the Remote Access Review page, next to Remote Clients, click the Change link.
21. Click Domain Computers (Adatum\Domain Computers), and then click Remove.
22. Click Add, in the text box, type DA_Clients, and then click OK.
23. Clear the Enable DirectAccess for mobile computers only check box, and then click Next.
24. In Network Connectivity Assistant, click Finish.
25. On the Remote Access Review page, click OK.
26. On the Configure Remote Access page, click Finish to finish the DirectAccess Getting Started Wizard.
27. In the Applying Getting Started Wizard Settings dialog box, click Close.
When you finish the demonstration, revert all virtual machines to their initial state. To do this, perform the following steps:
1. On the host computer, start Hyper-V Manager.
2. In the Virtual Machines list, right-click 20413C-LON-DC1, and then click Revert.
3. In the Revert Virtual Machines dialog box, click Revert.
4. Repeat steps 2 and 3 for the following machines: 20413C-LON-RTR.

Designing and Implementing Remote Access Services 12-5
Lesson 2 Planning and Implementing VPN Contents: Question and Answers 6 Resources 6 Demonstration: Implementing a VPN 6

12-6 Designing and Implementing a Server Infrastructure
Question and Answers
Discussion: Designing Remote Access Question: How would you propose to support the sales users’ needs to access their email?
Answer: You can support email access by using any existing VPNs, providing you modify any network policies to facilitate the specific traffic for email access. Exchange Server 2010 and Microsoft Outlook® 2010 support connections that use remote procedure call (RPC) over HTTPS. This method is another way in which the users can communicate with their email servers. This method has some advantages over using VPN, which you could retain for database access. Notably, no configuration changes are required on the firewall, and the way in which users access their email does not change when they are on the internal network. Users do not need to initiate the VPN to connect.
Question: What additional network components do you require to support your design, if any?
Answer: Remote access to email may require firewall modifications, depending on the chosen solution. Additionally, it is not advisable to place mailbox servers on a perimeter network.
Question: To facilitate database access, which VPN tunnel type would you recommend?
Answer: All client types support SSTP, which requires minimal reconfiguration of the firewall, and provides access from nearly any location. You also can use IKEv2 with both Windows 7 and Windows 8. In addition, IKEv2 provides VPN Reconnect for mobile users.
Resources
Planning Client Connectivity to VPNs
Additional Reading: For more information on CMAK, visit http://go.microsoft.com/fwlink/?LinkID=391894.
Demonstration: Implementing a VPN
Demonstration Steps
Configure a VPN server 1. Sign in to LON-RTR as Adatum\Administrator with the password Pa$$w0rd.
2. If necessary, on the taskbar, click the Server Manager icon.
3. In Server Manager, in the details pane, click Add roles and features.
4. In the Add Roles and Features Wizard, click Next.
5. On the Select installation type page, click Role-based or feature based installation, and then click Next.
6. On the Select destination server page, click Next.
7. On the Select server roles page, select the Network Policy and Access Services check box.
8. Click Add Features, and then click Next twice.
9. On the Network Policy and Access Services page, click Next.
10. On the Select role services page, verify that the Network Policy Server check box is selected, and then click Next.

Designing and Implementing Remote Access Services 12-7
11. On the Confirm installation selections page, click Install.
12. Verify that the installation was successful, and then click Close.
13. Close Server Manager.
14. Pause your mouse pointer in the lower left of the taskbar, and then click Start.
15. On the Start screen, click the down arrow on the bottom left of the screen, and then click Network Policy Server.
16. In the Network Policy Server console, in the navigation pane, right-click NPS (Local), and then click Register server in Active Directory.
17. In the Network Policy Server message box, click OK.
18. In the subsequent Network Policy Server dialog box, click OK.
19. Leave the Network Policy Server console window open.
20. Pause your mouse pointer in the lower left of the taskbar, and then click Start.
21. On the Start screen, click Administrative Tools, and then double-click Routing and Remote Access. If the Enable DirectAccess Wizard starts, click Cancel, and then click OK.
22. In the Routing and Remote Access console, right-click LON-RTR (local), and then click Disable Routing and Remote Access. If the option to disable routing and remote access is not available, go to step 24.
23. In the dialog box, click Yes.
24. In the Routing and Remote Access console, right-click LON-RTR (local), click Configure and Enable Routing and Remote Access, and then click Next.
25. Click Remote access (dial-up or VPN), and then click Next.
26. Select the VPN check box, and then click Next.
27. Click the Ethernet 2 network interface, clear the Enable security on the selected interface by setting up static packet filters check box, and then click Next.
28. On the IP Address Assignment page, click From a specified range of addresses, and then click Next.
29. On the Address Range Assignment page, click New. In the Start IP address text box, type 172.16.0.100, in the End IP address text box, type 172.16.0.110, and then click OK.
30. Verify that 11 IP addresses were assigned for remote clients, and then click Next.
31. On the Managing Multiple Remote Access Servers page, click Next.
32. Click Finish.
33. In the Routing and Remote Access dialog box, click OK.
34. If prompted, click OK again.
Configure a VPN client 1. Switch to LON-CL2.
2. Sign in as Adatum\Administrator with the password of Pa$$w0rd.
3. On the Start screen, type Control Panel.
4. In the Apps list, click Control Panel.

12-8 Designing and Implementing a Server Infrastructure
5. In Control Panel, click Network and Internet, click Network and Sharing Center, and then click Set up a new connection or network.
6. On the Choose a connection option page, click Connect to a workplace, and then click Next.
7. On the How do you want to connect page, click Use my Internet connection (VPN).
8. Click I’ll set up an Internet connection later.
9. On the Type the Internet address to connect to page, in the Internet address text box, type 10.10.0.1.
10. In the Destination name text box, type Adatum VPN.
11. Select the Allow other people to use this connection check box, and then click Create.
12. In the Network And Sharing Center window, click Change adapter settings.
13. Right-click the Adatum VPN connection, and then click Properties.
14. In the Adatum VPN Properties dialog box, click the Security tab.
15. On the Security tab, in the Type of VPN list, click Point to Point Tunneling Protocol (PPTP).
16. Under Authentication, click Allow these protocols, and then click OK.
17. In the Network Connections window, right-click the Adatum VPN connection, and then click Connect/Disconnect.
18. In the Networks list on the right, click Adatum VPN, and then click Connect.
19. In Network Authentication, in the User name text box, type Adatum\Administrator.
20. In the Password text box, type Pa$$w0rd, and then click OK.
21. Wait for the VPN connection to connect.
Note: Your connection will be unsuccessful, and you will receive error 812 relating to authentication issues.
22. Click Close.
Create a VPN policy based on the Windows Groups condition 1. Switch to LON-RTR.
2. Switch to Network Policy Server.
3. In Network Policy Server, expand Policies, and then click Network Policies.
4. In the details pane, right-click the policy at the top of the list, and then click Disable.
5. In the details pane, right-click the policy at the bottom of the list, and then click Disable.
6. In the navigation pane, right-click Network Policies, and then click New.
7. In the New Network Policy Wizard, in the Policy name text box, type Adatum VPN Policy.
8. In the Type of network access server list, click Remote Access Server (VPN-Dial up), and then click Next.
9. On the Specify Conditions page, click Add.
10. In the Select condition dialog box, click Windows Groups, and then click Add.
11. In the Windows Groups dialog box, click Add Groups.

Designing and Implementing Remote Access Services 12-9
12. In the Select Group dialog box, in the Enter the object name to select (examples) text box, type Domain Admins, and then click OK.
13. Click OK again, and then click Next.
14. On the Specify Access Permission page, click Access granted, and then click Next.
15. On the Configure Authentication Methods page, click Next.
16. On the Configure Constraints page, click Next.
17. On the Configure Settings page, click Next.
18. On the Completing New Network Policy page, click Finish.
Test the VPN 1. Switch to LON-CL2.
2. In the Networks list on the right, click Adatum VPN, and then click Connect.
3. In Network Authentication, in the User name text box, type Adatum\Administrator.
4. In the Password text box, type Pa$$word, and then click OK.
5. Wait for the VPN connection to connect. This connection is now successful.
When you finish the demonstration, revert all virtual machines to their initial state. To do this, perform the following steps:
1. On the host computer, start Hyper-V Manager.
2. In the Virtual Machines list, right-click 20413C-LON-DC1, and then click Revert.
3. In the Revert Virtual Machines dialog box, click Revert.
4. Repeat steps 2 and 3 for the following machines: 20413C-LON-RTR and 20413C-LON-CL2.

12-10 Designing and Implementing a Server Infrastructure
Lesson 3 Planning and Implementing Web Application Proxy Contents: Resources 11 Demonstration: Publishing a Secure Web Site 11

Designing and Implementing Remote Access Services 12-11
Resources
Planning for Application Publishing
Additional Reading: For more information on how to plan and implement application publishing by using claims-based authentication, visit http://go.microsoft.com/fwlink/?LinkID=391896.
Additional Reading: For more information on how to plan and implement application publishing by using integrated Windows authentication, visit http://go.microsoft.com/fwlink/?LinkID=391897.
Additional Reading: For more information on planning application publishing, visit http://go.microsoft.com/fwlink/?LinkID=391898.
Additional Reading: For information on publishing SharePoint Server and Exchange Server through Web Application Proxy, visit http://go.microsoft.com/fwlink/?LinkID=391899.
Demonstration: Publishing a Secure Web Site
Demonstration Steps
Install the AD FS role 1. On LON-DC1, on the taskbar, click the Windows PowerShell® icon. At the Windows PowerShell
command prompt, type the following command, and then press Enter:
Add-KdsRootKey –EffectiveTime (Get-Date).AddHours(-10)
2. Close the Windows PowerShell window.
3. In Server Manager, click Manage, and then click Add Roles and Features.
4. On the Before you begin page, click Next.
5. On the Select installation type page, click Next.
6. On the Select destination server page, click Next.
7. On the Select server roles page, click Active Directory Federation Services, and then click Next.
8. On the Select features page, click Next.
9. On the AD FS page, click Next.
10. On the Confirm installation selections page, click Install, and then wait for the installation to finish. When the installation completes, click Close.
11. In Server Manager, click the yellow notification icon, and then click the Configure the federation service on this server link.
12. On the Welcome page, ensure that Create the first federation server in a federation server farm is selected, and then click Next.
13. On the Connect to Active Directory Domain Services page, click Next to use the ADATUM\Administrator account.
14. On the Specify Service Properties page, select the SSL certificate that is named LON-DC1.Adatum.com. In the Federation Service Display Name text box, type LON-DC1.Adatum.com, and then click Next.
15. On the Specify Service Account page, click Create a Group Managed Service Account.
12-12 Designing and Implementing a Server Infrastructure
16. In the Account Name text box, type ADFS, and then click Next.
17. On the Specify Configuration Database page, ensure that Create a database on this server using Windows Internal Database is selected, and then click Next.
18. On the Review Options page, verify that the correct configuration settings are listed, and then click Next.
19. On the Prerequisite Checks page, click Configure.
20. Wait for the configuration to finish (note that a service principal name registration error may occur), and then click Close.
21. On LON-DC1, in Server Manager, click Tools, and then click Windows PowerShell.
22. At the Windows PowerShell command prompt, type the following command, and then press Enter:
Set-ADFSProperties –AutoCertificateRollover $False
Note: You must perform this step so that you can modify the certificates that AD FS uses.
23. Close the Windows PowerShell window.
24. In Server Manager, click Tools, and then click AD FS Management.
25. In the AD FS console, in the left pane, expand Service, and then click Certificates.
26. Right-click Certificates, and then click Add Token-Signing Certificate.
27. In the Select a token-signing certificate dialog box, click the certificate with the name LON-DC1.Adatum.com, and then click Click here to view certificate properties.
28. Verify that the certificate purposes include Proves your identity to a remote computer and Ensures the identity of a remote computer, and then click OK.
Note: If the certificate does not show the correct purposes, close the dialog box and repeat step 29 after selecting a different certificate that contains LON-DC1.adatum.com as name.
29. Click OK to close the Windows Security dialog box.
30. When the AD FS Management warning dialog box displays, click OK.
Note: Verify that the certificate has a subject of CN=LON-DC1.Adatum.com. If no name displays under the Subject when you add the certificate, delete the certificate, and then add the next certificate in the list.
31. Under Token-signing, right-click the newly added certificate, and then click Set as Primary. Review the warning message, and then click Yes.
32. Select the certificate that has just been superseded, right-click the certificate, and then click Delete.
33. Click Yes to confirm the deletion.
Install the Web Application Proxy role service 1. Switch to LON-RTR.
2. On the Start screen, click Server Manager.

Designing and Implementing Remote Access Services 12-13
3. In Server Manager, on the Manage menu, click Add roles and features.
4. In the Add Roles and Features Wizard, click Next three times to go to the Select server roles page.
5. On the Select server roles page, expand Remote Access, click Web Application Proxy, and then click Next.
6. On the Select features page, click Next.
7. On the Confirm installation selections page, click Install.
8. On the Installation progress page, verify that the installation is successful, and then click Close.
Obtain a certificate 1. On the Start screen, type cmd, and then press Enter.
2. At the command prompt, type mmc, and then press Enter.
3. In the Microsoft Management Console (MMC), on the File menu, click Add or Remove Snap-In.
4. In Add or Remove Snap-ins, click Certificates, click Add, click Computer account, and then click Next.
5. Verify that Local Computer is selected, click Finish, and then click OK to close the Add or Remove Snap-ins window.
6. In the MMC, expand Certificates (local Computer), right-click Personal, click All Tasks, and then click Request new Certificate.
7. On the Before You Begin page, click Next.
8. On the Select Certificate Enrollment Policy page, click Next.
9. Click Adatum Web Server, and then click More information is required to enroll for this certificate. Click here to configure settings.
10. In the Subject Name in Type drop-down list box, click Common Name, in the Value text box, type lon-dc1.adatum.com, and then click Add.
11. In the Alternative name drop-down list box, click DNS. In the Value text box, type lon-dc1.adatum.com, and then click Add.
12. In the Alternative name drop-down list box, click DNS. In the Value text box, type enterpriseregistration.adatum.com, and then click Add.
13. In the Alternative name drop-down list box, click DNS. In the Value text box, type lon-svr1.adatum.com, and then click Add.
14. To close the Certificate Properties dialog box, click OK.
15. To proceed with certificate enrollment, click Enroll.
16. To close the Certificate Enrollment dialog box, click Finish.
Obtain a certificate for a website 1. Switch to LON-SVR1.
2. On the Start screen, type mmc, and then press Enter.
3. In the MMC, on the File menu, click Add or Remove Snap-In.
4. In Add or Remove Snap-ins, click Certificates, click Add, click Computer account, and then click Next.

12-14 Designing and Implementing a Server Infrastructure
5. Verify that Local Computer is selected, click Finish, and then click OK to close the Add or Remove Snap-ins window.
6. In the left pane, expand Certificates (local Computer), right-click Personal, click All Tasks, and then click Request new Certificate.
7. On the Before You Begin page, click Next.
8. On the Select Certificate Enrollment Policy page, click Next.
9. Click Adatum Web Server, and then click More information is required to enroll for this certificate. Click here to configure settings.
10. In the Subject Name in Type drop-down list box, click Common Name, in the Value text box, type lon-svr1.adatum.com, and then click Add.
11. To close the Certificate Properties dialog box, click OK.
12. Click Enroll to proceed with certificate enrollment.
13. To close the Certificate Enrollment dialog box, click Finish.
14. In Server Manager, on the Tools menu, click Internet Information Services (IIS) Manager.
15. In the Internet Information Services (IIS) Manager, in the console tree, expand LON-SVR1(ADATUM\Administrator), then expand Sites, and then click Default Web site.
16. In the Actions pane, click Bindings, and then click Add.
17. In the Add Site Bindings dialog box, in the Type drop-down list box, click https. In the Host name text box, type lon-svr1.adatum.com, and then in the SSL Certificate drop-down list box, click the lon-svr1.adatum.com certificate.
18. In the Add Site Bindings dialog box, click OK, and then click Close.
19. Close the Internet Information Services (IIS) console.
Configure Web Application Proxy 1. Switch to LON-RTR.
2. In Server Manager, on the Tools menu, open the Remote Access Management console.
3. In the navigation pane, click Web Application Proxy.
4. In the middle pane, click Run the Web Application Proxy Configuration Wizard.
5. In the Web Application Proxy Configuration Wizard, on the Welcome page, click Next.
6. On the Federation Server page, perform the following steps, and then click Next:
a. In the Federation service name text box, type lon-dc1.adatum.com.
b. In the User name text box, type Administrator.
c. In the Password text box, type Pa$$w0rd,
7. On the AD FS Proxy Certificate page, in the list of certificates currently installed on the Web Application Proxy server, select the lon-dc1.adatum.com certificate that will be used by Web Application Proxy for AD FS proxy functionality, and then click Next.
8. On the Confirmation page, review the settings. If needed, you can copy the Windows PowerShell cmdlet to automate additional installations. Click Configure.
9. On the Results page, verify that the configuration is successful, and then click Close.

Designing and Implementing Remote Access Services 12-15
Publish the internal website 1. On the Web Application Proxy server, in the Remote Access Management console, in the navigation
pane, click Web Application Proxy, and then in the tasks pane, click Publish.
2. In the Publish New Application Wizard, on the Welcome page, click Next.
3. On the Preauthentication page, click Pass-through, and then click Next.
4. On the Publishing Settings page, perform following steps:
a. In the Name text box, type a friendly name for the application: LON-SVR1 Web.
b. In the External URL text box, type https://lon-svr1.adatum.com as the external URL for this application.
c. In the External certificate list, click lon-dc1.adatum.com.
d. In the Backend server URL text box, ensure that https://lon-svr1.adatum.com is listed, and then click Next.
Note: Note this value is entered automatically when you enter the external URL.
5. On the Confirmation page, review the settings, and then click Publish. You can copy the Windows PowerShell command to set up additional published applications.
6. On the Results page, ensure that the application published successfully, and then click Close.
Configure internal website authentication 1. Switch to LON-SVR1.
2. In Server Manager, on the Tools menu, click Internet Information Services (IIS) Manager.
3. In the Internet Information Services (IIS) Manager console, expand LON-SVR1 (ADATUM\Administrator), and then click No.
4. In the Internet Information Services (IIS) Manager console tree, navigate to Sites, and then click Default Web site.
5. In the Internet Information Services (IIS) Manager console, in the Default Web Site Home pane, double-click Authentication.
6. In the Internet Information Services (IIS) Manager console, in the Authentication pane, right-click Windows Authentication, and then click Enable.
7. In the Internet Information Services (IIS) Manager console, in the Authentication pane, right-click Anonymous Authentication, and then click Disable.
8. Close the Internet Information Services (IIS) Manager console.
Disable DirectAccess on a client computer 1. Switch to LON-CL1.
2. On the Start screen, type Control Panel, and then press Enter.
3. In Control Panel, click System and Security, click System, and then under Computer name, domain and workgroup settings, click Change Settings.
4. In the System Properties dialog box, click Change.
5. In the Computer Name/Domain Changes dialog box, click Workgroup, type WORKGROUP, and then click OK.
12-16 Designing and Implementing a Server Infrastructure
6. In the Computer Name/Domain Changes dialog box, click OK.
7. If the Windows Security dialog box displays, in the Username text box, type Administrator, in the Password text box, type Pa$$w0rd, and then click OK.
8. In the Welcome to the WORKGROUP workgroup dialog box, click OK.
9. To restart the computer, click OK.
10. To close the System Properties dialog box, click Close.
11. Click Restart Now.
Verify access to the internal website from the client computer 1. On LON-CL1, sign in with user name Admin and password Pa$$w0rd.
2. On the Start screen, type notepad, and then click Notepad.
3. In the Notepad window, type 131.107.0.2 lon-svr1.adatum.com.
4. From the File menu, click Save As.
5. In the Save As dialog box, navigate to Documents.
6. In the Save as type list, click All files (*.*).
7. In the File name text box, type Hosts, and then click Save.
8. Open File Explorer.
9. Copy the Hosts file from the Documents folder to the C:\Windows\System32\drivers\etc folder.
10. In the Replace or Skip Files dialog box, click Replace the file in the destination.
11. In the Destination Folder Access Denied dialog box, click Continue.
12. On the Start screen, click the Internet Explorer tile.
13. In Windows Internet Explorer®, in the Address bar, type t https://lon-svr1.adatum.com, and then press Enter.
14. If Internet Explorer displays a page stating that there is a problem with the certificate used by the page, click Continue to this website (not recommended).
15. In the Internet Explorer dialog box, type Adatum\Bill for the user name and Pa$$w0rd for password, and then click OK.
16. Verify that the default IIS 8.0 web page for LON-SVR1 displays.
17. If you are unable to connect to https://lon-svr1.adatum.com, perform the following steps:
a. On LON-CL1, on the Start screen, type cmd, and then press Enter.
b. At the command prompt, type regedit, and then press Enter.
c. In the User Account Control dialog box, click Yes.
d. In the Registry Editor window, in the navigation pane, expand HKLM, expand Software, expand Policies, expand Microsoft, expand Windows NT, expand DNSClient, and then expand DNSPolicyConfig.
Note: Notice the three entries starting with DA.
e. In the Registry Editor window, in the navigation pane, right-click each of the three entries starting with DA, click Delete, and in the Confirm Key Delete dialog box, click Yes.

Designing and Implementing Remote Access Services 12-17
f. Close the Registry Editor window.
g. Restart LON-CL1 and perform steps 12 through 16 to verify connectivity to default IIS 8.0 web page on LON-SVR1.
When you finish the demonstration, revert all virtual machines to their initial state. To do this, perform the following steps:
1. On the host computer, start Hyper-V Manager.
2. In the Virtual Machines list, right-click 20413C-LON-DC1, and then click Revert.
3. In the Revert Virtual Machines dialog box, click Revert.
Repeat steps 2 and 3 for the following machines: 20413C-LON-RTR. 20413C-LON-SVR1, and 20413C-LON-CL1.

12-18 Designing and Implementing a Server Infrastructure
Lesson 4 Planning a Complex Remote Access Infrastructure Contents: Resources 19
Designing and Implementing Remote Access Services 12-19
Resources
Planning a Highly Available Remote Access Infrastructure
Additional Reading: For more information on planning a load-balanced cluster deployment, visit http://go.microsoft.com/fwlink/?LinkID=391900.
Planning Remote Access Capacity
Additional Reading: For complete details on the DirectAccess capacity planning tests performed, visit http://go.microsoft.com/fwlink/?LinkID=391901.
Planning Remote Access With Multiple Locations
Additional Reading: For more information on planning to deploy multiple Remote Access servers in multiple locations, visit http://go.microsoft.com/fwlink/?LinkID=391902.
Planning Remote Access with Multiple Forests
Additional Reading: For more information on configuring OTP in a multiple forest environment, visit http://go.microsoft.com/fwlink/?LinkID=391903.
Planning a RADIUS Implementation
Additional Reading: To know more about planning NPS as a RADIUS server, visit http://go.microsoft.com/fwlink/?LinkID=391904.

12-20 Designing and Implementing a Server Infrastructure
Module Review and Takeaways Review Question(s) Question: Which type of policy can you use to determine whether a network connection attempt will be successful?
Answer: You can use a network policy, but not a connection request policy.
Question: When configuring home computers to enable access to corporate email, which of the following is generally a better approach for enabling remote access: RPC over HTTPS, or a VPN?
Answer: A VPN in this scenario would be a better approach, because each home computer is unmanaged and will most likely differ in configuration. It also is unlikely that the computer will have Outlook 2010 installed, because many home computers use other email applications.
Question: In a mixed client environment that requires strong levels of security, which of the following VPN tunnel types would you select: PPTP, L2TP/IPsec, SSTP, or IKEv2?
Answer: L2TP/IPsec provides strong authentication and encryption, and is supported by most client types. IKEv2 is only supported on Windows 8 and Windows 7, and SSTP is only supported on Windows 8, Windows 7, and Windows Vista®.
Question: True or False? The NPS server role can function as a RADIUS client.
Answer: False. Windows Server 2012 Routing and Remote Access Services (RRAS) can provide this function, but you can configure NPS only as either a Remote Authentication Dial-In User Service (RADIUS) proxy or a RADIUS server.
Question: Which of the following is a more secure firewall solution: bastion host, multi-homed firewall, or back-to-back firewalls?
Answer: Back-to-back firewalls are the most secure firewall solution.
Question: What function does the network location server have in a DirectAccess solution?
Answer: DirectAccess clients use the network location server to determine their location. If the client can connect with HTTPS, then the client assumes it is on the intranet and disables DirectAccess components. If the network location server is not contactable, then the client assumes it is on the Internet. You install the network location server with the web server role.
Question: In what ways can DirectAccess clients connect to network resources?
Answer: DirectAccess clients can connect to network resources in the following ways:
• Directly, over the IPv6 Internet
• By using IP-HTTPS
• By using 6to4
• By using Teredo

Designing and Implementing Remote Access Services 12-21
Lab Review Questions and Answers Lab: Designing and Implementing Network Access Services
Question and Answers Question: What was your approach to the VPN design?
Answer: Answers will vary. Some students might have taken into account the client requirements for determining the tunneling protocol for use. Other students might have given importance to security and chosen the most secure form of connectivity. Students also may refer to the different requirements to decide how to configure connection policies based on the type of user.
Question: What was your approach to the DirectAccess design?
Answer: Answers will vary. Some students might have decided to implement PKI, which although not a requirement, gives better control over the implementation. Other students might have identified only the minimum requirements for DirectAccess.
Question: How does your organization support remote users?
Answer: Answers will vary. Some students might use RRAS for VPN access with or without certificates, and some others might use non-Microsoft solutions.
Related Documents