2020 FUSION Owner’s Manual 2020 FUSION Owner’s Manual ford.ca owner.ford.com Some illustrations or features that appear in this Owner’s Manual may not be available on your vehicle. November 2019 Second Printing Litho in U.S.A. LE5J 19A321 AB

Welcome message from author
This document is posted to help you gain knowledge. Please leave a comment to let me know what you think about it! Share it to your friends and learn new things together.
Transcript

2020 FUSION Owner’s Manual
2020 FUS
ION
Ow
ner’s Manual
ford.caowner.ford.com
Some illustrations or features that appear in this Owner’s Manual may not be available on your vehicle.
November 2019 Second Printing
Litho in U.S.A.
LE5J 19A321 AB

The information contained in this publication was correct at the time of going to print. In the interest ofcontinuous development, we reserve the right to change specifications, design or equipment at any timewithout notice or obligation. No part of this publication may be reproduced, transmitted, stored in aretrieval system or translated into any language in any form by any means without our written permission.Errors and omissions excepted.© Ford Motor Company 2019
All rights reserved.Part Number: 201905 20191002205825
California Proposition 65
WARNING: Operating, servicing andmaintaining a passenger vehicle or off-highwaymotor vehicle can expose you to chemicalsincluding engine exhaust, carbon monoxide,phthalates, and lead, which are known to theState of California to cause cancer and birthdefects or other reproductive harm. To minimizeexposure, avoid breathing exhaust, do not idle theengine except as necessary, service your vehiclein a well-ventilated area and wear gloves or washyour hands frequently when servicing your vehicle.For more information go towww.P65Warnings.ca.gov/passenger-vehicle.
WARNING: Battery posts, terminals andrelated accessories contain lead and leadcompounds, chemicals known to the State ofCalifornia to cause cancer and reproductive harm.Wash your hands after handling.


IntroductionAbout This Manual ..........................................7Symbols Glossary ............................................7Data Recording .................................................9Perchlorate .......................................................13Ford Credit ........................................................13Replacement Parts Recommendation
...........................................................................14Special Notices ...............................................14Mobile Communications Equipment
............................................................................15Export Unique Options ................................15
EnvironmentProtecting the Environment .......................17
At a GlanceInstrument Panel ...........................................18
Child SafetyGeneral Information .....................................20Installing Child Restraints ..........................22Booster Seats ..................................................27Child Restraint Positioning ........................29Child Safety Locks ..........................................31
SeatbeltsPrinciple of Operation ..................................33Fastening the Seatbelts .............................34Seatbelt Height Adjustment .....................36Seatbelt Warning Lamp and Indicator
Chime ............................................................36Seatbelt Reminder ........................................37Child Restraint and Seatbelt
Maintenance ...............................................38Seatbelt Extensions .....................................39
Personal Safety System™Personal Safety System™ ........................40
Supplementary RestraintsSystem
Principle of Operation ..................................41Driver and Passenger Airbags ...................42Front Passenger Sensing System ...........43Side Airbags ....................................................45Driver and Passenger Knee Airbags .......46Safety Canopy™ ............................................47Crash Sensors and Airbag Indicator ......48Airbag Disposal .............................................49
Keys and Remote ControlsGeneral Information on Radio
Frequencies ................................................50Remote Control .............................................50Replacing a Lost Key or Remote Control
..........................................................................5 5
MyKey™Principle of Operation .................................56Creating a MyKey ...........................................57Clearing All MyKeys ......................................58Checking MyKey System Status ..............58Using MyKey With Remote Start
Systems ........................................................59MyKey – Troubleshooting ..........................59
Doors and LocksLocking and Unlocking .................................61Keyless Entry ..................................................64Interior Luggage Compartment Release
..........................................................................66
SecurityPassive Anti-Theft System .......................68Anti-Theft Alarm ...........................................69
Steering WheelAdjusting the Steering Wheel ...................70Audio Control ..................................................70
1
Fusion (CC7) Canada/United States of America, enUSA, Edition date: 201905, Second-Printing
Table of Contents

Voice Control ....................................................71Cruise Control - Vehicles With: Cruise
Control ............................................................71Cruise Control - Vehicles With: Adaptive
Cruise Control With Stop and Go .........71Information Display Control .......................71Heated Steering Wheel ................................71Horn ....................................................................72
Wipers and WashersWindshield Wipers ........................................73Autowipers .......................................................73Windshield Washers .....................................74
LightingGeneral Information .....................................75Lighting Control ..............................................75Autolamps .......................................................76Instrument Lighting Dimmer .....................76Headlamp Exit Delay ...................................76Daytime Running Lamps - Vehicles With:
Configurable Daytime Running Lamps...........................................................................77
Daytime Running Lamps - Vehicles With:Daytime Running Lamps (DRL) ...........77
Front Fog Lamps ............................................77Direction Indicators .......................................78Interior Lamps ................................................78Ambient Lighting ...........................................79
Automatic High Beam Control
What Is Automatic High Beam Control..........................................................................80
Switching Automatic High Beam ControlOn and Off ..................................................80
Automatic High Beam Control Indicators..........................................................................80
Overriding Automatic High Beam Control..........................................................................80
Windows and MirrorsPower Windows .............................................82Global Opening and Closing .....................83Exterior Mirrors ...............................................83Interior Mirror ..................................................85Sun Visors ........................................................85Moonroof .........................................................85
Instrument ClusterGauges ..............................................................87Warning Lamps and Indicators ...............90Audible Warnings and Indicators ............93
Information DisplaysGeneral Information ....................................94Information Messages ...............................103
Climate ControlManual Climate Control .............................118Automatic Climate Control - Vehicles
With: Touchscreen Display, VehiclesWithout: Sony Audio System ...............119
Automatic Climate Control - VehiclesWith: Sony Audio System/Touchscreen Display ...............................121
Automatic Climate Control - VehiclesWith: SYNC .................................................122
Hints on Controlling the Interior Climate- Vehicles With: AutomaticTemperature Control ..............................124
Hints on Controlling the Interior Climate- Vehicles With: Manual TemperatureControl .........................................................125
Heated Rear Window .................................126Heated Exterior Mirrors ..............................126Cabin Air Filter ...............................................126Remote Start .................................................127
SeatsSitting in the Correct Position .................128Head Restraints ............................................128
2
Fusion (CC7) Canada/United States of America, enUSA, Edition date: 201905, Second-Printing
Table of Contents

Manual Seats ................................................130Power Seats ..................................................130Memory Function .........................................132Rear Seats ......................................................133Heated Seats .................................................135Climate Controlled Seats .........................135
Garage Door OpenerUniversal Garage Door Opener ...............137
Auxiliary Power PointsAuxiliary Power Points ...............................142
Storage CompartmentsCenter Console .............................................144Overhead Console ......................................144Rear Seat Armrest .......................................144
Starting and Stopping theEngine
General Information ...................................145Keyless Starting ...........................................145Starting a Gasoline Engine ......................146Engine Block Heater ...................................148
Unique Driving Characteristics
Auto-Start-Stop ..........................................150
Fuel and RefuelingSafety Precautions ......................................152Fuel Quality ....................................................152Fuel Filler Funnel Location .......................153Running Out of Fuel ...................................154Refueling .........................................................155Fuel Consumption ......................................158
Engine Emission ControlEmission Law ................................................159
Catalytic Converter .....................................160
TransmissionAutomatic Transmission ...........................163
All-Wheel DriveUsing All-Wheel Drive ...............................168
BrakesGeneral Information ....................................173Hints on Driving With Anti-Lock Brakes
.........................................................................173Electric Parking Brake .................................174Hill Start Assist .............................................175
Traction ControlPrinciple of Operation .................................177Using Traction Control ................................177
Stability ControlPrinciple of Operation ................................178Using Stability Control ...............................179
Parking AidsPrinciple of Operation ...............................180Rear Parking Aid ..........................................180Front Parking Aid .........................................182Side Sensing System .................................184Active Park Assist ........................................185Rear View Camera .......................................192
Cruise ControlWhat Is Cruise Control ...............................195Switching Cruise Control On and Off
.........................................................................195Setting the Cruise Control Speed .........195Canceling the Set Speed ..........................196Resuming the Set Speed .........................196Cruise Control Indicators ..........................196Using Adaptive Cruise Control ...............196
3
Fusion (CC7) Canada/United States of America, enUSA, Edition date: 201905, Second-Printing
Table of Contents

Driving AidsDriver Alert ....................................................203Lane Keeping System ...............................204Blind Spot Information System ............208Cross Traffic Alert ........................................210Steering ...........................................................213Pre-Collision Assist .....................................213
Load CarryingLoad Limit .......................................................217
TowingTowing a Trailer ............................................222Recommended Towing Weights ...........223Essential Towing Checks .........................224Towing the Vehicle on Four Wheels .....226
Driving HintsReduced Engine Performance ...............228Economical Driving ....................................228Breaking-In ....................................................229Driving Through Water ..............................229Floor Mats ......................................................229
Roadside EmergenciesRoadside Assistance ..................................231Hazard Flashers ...........................................232Fuel Shutoff ..................................................232Jump Starting the Vehicle .......................233Post-Crash Alert System .........................235Transporting the Vehicle ..........................235
Customer AssistanceGetting the Services You Need ..............237In California (U.S. Only) ...........................238The Better Business Bureau (BBB) Auto
Line Program (U.S. Only) ....................239Utilizing the Mediation/Arbitration
Program (Canada Only) ......................240
Getting Assistance Outside the U.S. andCanada .......................................................240
Ordering Additional Owner's Literature........................................................................242
Reporting Safety Defects (U.S. Only)........................................................................242
Reporting Safety Defects (Canada Only)........................................................................242
FusesFuse Specification Chart .........................244Changing a Fuse ..........................................253
MaintenanceGeneral Information ..................................255Opening and Closing the Hood .............255Under Hood Overview - 1.5L EcoBoost™
........................................................................256Under Hood Overview - 2.0L EcoBoost™
........................................................................257Under Hood Overview - 2.5L ..................258Under Hood Overview - 2.7L EcoBoost™
........................................................................259Engine Oil Dipstick - 1.5L EcoBoost™
.......................................................................260Engine Oil Dipstick - 2.0L EcoBoost™/
2.5L/2.7L EcoBoost™ ...........................260Engine Oil Check ........................................260Oil Change Indicator Reset ......................261Engine Coolant Check ..............................262Automatic Transmission Fluid Check -
1.5L EcoBoost™/2.0L EcoBoost™/2.5L ..............................................................266
Automatic Transmission Fluid Check -2.7L EcoBoost™ .....................................266
Brake Fluid Check .......................................268Washer Fluid Check ...................................269Fuel Filter .......................................................269Changing the 12V Battery ........................270Checking the Wiper Blades ......................271Changing the Wiper Blades ......................271Adjusting the Headlamps ........................272
4
Fusion (CC7) Canada/United States of America, enUSA, Edition date: 201905, Second-Printing
Table of Contents

Removing a Headlamp .............................274Changing a Bulb ..........................................275Changing the Engine Air Filter ................278
Vehicle CareGeneral Information ..................................280Cleaning Products .....................................280Cleaning the Exterior ................................280Waxing ............................................................282Cleaning the Engine ...................................282Cleaning the Windows and Wiper Blades
........................................................................282Cleaning the Interior ..................................283Cleaning the Instrument Panel and
Instrument Cluster Lens ......................283Cleaning Leather Seats ............................284Repairing Minor Paint Damage .............285Cleaning the Wheels .................................285Vehicle Storage ...........................................285Body Styling Kits .........................................287
Wheels and TiresGeneral Information ..................................288Tire Care .........................................................288Using Summer Tires ..................................303Using Snow Chains ....................................303Tire Pressure Monitoring System .........304Changing a Road Wheel ..........................308Technical Specifications - 1.5L
EcoBoost™/2.0L EcoBoost™/2.5L.........................................................................315
Technical Specifications - 2.7LEcoBoost™ ................................................316
Capacities and Specifications
Engine Specifications - 1.5L EcoBoost™.........................................................................317
Engine Specifications - 2.0L EcoBoost™.........................................................................317
Engine Specifications - 2.5L ....................318
Engine Specifications - 2.7L EcoBoost™.........................................................................319
Motorcraft Parts - 1.5L EcoBoost™ ......319Motorcraft Parts - 2.0L EcoBoost™ ......321Motorcraft Parts - 2.5L ..............................322Motorcraft Parts - 2.7L EcoBoost™ ......323Vehicle Identification Number ...............324Vehicle Certification Label ......................325Transmission Code Designation ...........325Capacities and Specifications - 1.5L
EcoBoost™ ...............................................326Capacities and Specifications - 2.0L
EcoBoost™ ................................................331Capacities and Specifications - 2.5L
........................................................................338Capacities and Specifications - 2.7L
EcoBoost™ ..............................................344Bulb Specification Chart ...........................351
Connected VehicleConnected Vehicle Requirements ........353Connected Vehicle Limitations .............353Connecting the Vehicle to a Mobile
Network ......................................................353Connecting the Vehicle to a Wi-Fi
Network ......................................................353Connected Vehicle – Troubleshooting
........................................................................354
Wi-Fi HotspotCreating a Wi-Fi Hotspot .........................356Changing the Wi-Fi Hotspot Name or
Password ...................................................356
Audio SystemGeneral Information ...................................357Audio Unit - Vehicles With: Touchscreen
Display, Vehicles Without: Sony AudioSystem ........................................................357
Audio Unit - Vehicles With: SYNC ........358Audio Unit - Vehicles With: Sony Audio
System/Touchscreen Display .............361
5
Fusion (CC7) Canada/United States of America, enUSA, Edition date: 201905, Second-Printing
Table of Contents

Digital Radio .................................................362Satellite Radio .............................................364USB Port .........................................................367
SYNC™General Information ..................................368Using Voice Recognition ..........................369Using SYNC™ With Your Phone ............371SYNC™ Applications and Services ......372Using SYNC™ With Your Media Player
........................................................................375SYNC™ Troubleshooting .........................376
SYNC™ 3General Information ..................................385Using Voice Recognition ..........................387Entertainment .............................................393Climate ...........................................................403Phone .............................................................405Navigation .....................................................407Apps ..................................................................412Settings ...........................................................415SYNC™ 3 Troubleshooting ......................417
AccessoriesAccessories ...................................................430
Ford ProtectFord Protect ...................................................431
Scheduled MaintenanceGeneral Maintenance Information .......433Normal Scheduled Maintenance .........436Special Operating Conditions Scheduled
Maintenance ............................................439Scheduled Maintenance Record ...........441
AppendicesElectromagnetic Compatibility ..............451End User License Agreement ................453
Declaration of Conformity .......................479Declaration of Conformity - Vehicles
With: SYNC 3 ............................................479
6
Fusion (CC7) Canada/United States of America, enUSA, Edition date: 201905, Second-Printing
Table of Contents

ABOUT THIS MANUALThank you for choosing Ford. Werecommend that you take some time toget to know your vehicle by reading thismanual. The more that you know aboutyour vehicle, the greater the safety andpleasure you will get from driving it.
WARNING: Driving whiledistracted can result in loss of vehiclecontrol, crash and injury. We stronglyrecommend that you use extremecaution when using any device that maytake your focus off the road. Yourprimary responsibility is the safeoperation of your vehicle. Werecommend against the use of anyhand-held device while driving andencourage the use of voice-operatedsystems when possible. Make sure youare aware of all applicable local lawsthat may affect the use of electronicdevices while driving.
Note: This manual describes productfeatures and options available throughoutthe range of available models, sometimeseven before they are generally available. Itmay describe options not fitted to thevehicle you have purchased.Note: Some of the illustrations in thismanual may show features as used indifferent models, so may appear differentto you on your vehicle.Note: Always use and operate your vehiclein line with all applicable laws andregulations.Note: Pass on this manual when sellingyour vehicle. It is an integral part of yourvehicle.This manual may qualify the location of acomponent as left-hand side or right-handside. The side is determined when facingforward in the seat.
E154903
Right-hand side.ALeft-hand side.B
SYMBOLS GLOSSARYThese are some of the symbols you maysee on your vehicle.
E162384
Air conditioning system
E231157
Air conditioning system lubricanttype
Anti-lock braking system
Avoid smoking, flames or sparks
Battery
Battery acid
Brake fluid - non petroleumbased
Brake system
7
Fusion (CC7) Canada/United States of America, enUSA, Edition date: 201905, Second-Printing
Introduction

E270480
Brake system
Cabin air filter
Check fuel cap
Child safety door lock or unlock
Child seat lower anchor
Child seat tether anchor
E71340
Cruise control
Do not open when hot
Engine air filter
Engine coolant
Engine coolant temperature
Engine oil
Explosive gas
Fan warning
E71880
Fasten seatbelt
E231160
Flammable
E67017
Front airbag
Front fog lamps
Fuel pump reset
Fuse compartment
Hazard flashers
Heated rear window
Windshield defrosting system
Interior luggage compartmentrelease
Jack
E161353
Keep out of reach of children
Lighting control
Low tire pressure warning
Maintain correct fluid level
Note operating instructions
8
Fusion (CC7) Canada/United States of America, enUSA, Edition date: 201905, Second-Printing
Introduction

E270945
Horn control
Panic alarm
E139213
Parking aid
Parking brake
Power steering fluid
Power windows front/rear
Power window lockout
E231159
Requires registered technician
Safety alert
See Owner's Manual
E231158
See Service Manual
Service engine soon
E270849
Passenger airbag activated
E270850
Passenger airbag deactivated
Side airbag
E167012
Shield the eyes
E138639
Stability control
E163957
Hill descent control
E272858
Trail control
E270969
Windshield wiping system
Windshield wash and wipe
DATA RECORDING
WARNING: Do not connectwireless plug-in devices to the data linkconnector. Unauthorized third partiescould gain access to vehicle data andimpair the performance of safety relatedsystems. Only allow repair facilities thatfollow our service and repair instructionsto connect their equipment to the datalink connector.
We respect your privacy and arecommitted to protecting it. Theinformation contained in this publicationwas correct at the time of going to print,but as technology rapidly changes, werecommend that you visit the regional Fordwebsite for the latest information.
9
Fusion (CC7) Canada/United States of America, enUSA, Edition date: 201905, Second-Printing
Introduction
Your vehicle has electronic control unitsthat have data recording functionality andthe ability to permanently or temporarilystore data. This data could includeinformation on the condition and status ofyour vehicle, vehicle maintenancerequirements, events and malfunctions.The types of data that can be recorded aredescribed in this section. Some of the datarecorded is stored in event logs or errorlogs.Note: Error logs are reset following a serviceor repair.Note: We may provide information inresponse to requests from law enforcement,other government authorities and thirdparties acting with lawful authority orthrough a legal process. Such informationcould be used by them in legal proceedings.Data recorded includes, for example:• Operating states of system
components, for example, fuel level,tire pressure and battery charge level.
• Vehicle and component status, forexample, wheel speed, deceleration,lateral acceleration and seatbeltstatus.
• Events or errors in essential systems,for example, headlamps and brakes.
• System responses to driving situations,for example, airbag deployment andstability control.
• Environmental conditions, for example,temperature.
Some of this data, when used incombination with other information, forexample, an accident report, damage to avehicle or eyewitness statements, couldbe associated with a specific person.
Service DataService data recorders in your vehicle arecapable of collecting and storingdiagnostic information about your vehicle.This potentially includes information aboutthe performance or status of varioussystems and modules in the vehicle, suchas engine, throttle, steering or brakesystems. In order to properly diagnose andservice your vehicle, Ford Motor Company(Ford of Canada in Canada), and serviceand repair facilities may access or shareamong them vehicle diagnosticinformation received through a directconnection to your vehicle whendiagnosing or servicing your vehicle.Additionally, Ford Motor Company (Fordof Canada, in Canada) may, wherepermitted by law, use vehicle diagnosticinformation for vehicle improvement orwith other information we may have aboutyou, for example, your contact information,to offer you products or services that mayinterest you. Data may be provided to ourservice providers such as part suppliersthat may help diagnose malfunctions, andwho are similarly obligated to protect data.We retain this data only as long asnecessary to perform these functions or tocomply with law. We may provideinformation where required in response toofficial requests to law enforcement orother government authorities or thirdparties acting with lawful authority or courtorder, and such information may be usedin legal proceedings. For U.S. only (ifequipped), if you choose to use connectedapps and services, you consent that certaindiagnostic information may also beaccessed electronically by Ford MotorCompany and Ford authorized servicefacilities, and that the diagnosticinformation may be used to provideservices to you, personalizing yourexperience, troubleshoot, and to improveproducts and services and offer youproducts and services that may interest
10
Fusion (CC7) Canada/United States of America, enUSA, Edition date: 201905, Second-Printing
Introduction

you, where permitted by law. For Canadaonly, for more information, please reviewthe Ford of Canada privacy policy atwww.ford.ca, including our U.S. datastorage and use of service providers inother jurisdictions who may be subject tolegal requirements in Canada, the UnitedStates and other countries applicable tothem, for example, lawful requirements todisclose personal information togovernmental authorities in thosecountries.
Event DataThis vehicle is equipped with an event datarecorder. The main purpose of an eventdata recorder is to record, in certain crashor near crash-like situations, such as anairbag deployment or hitting a roadobstacle; this data assist in understandinghow a vehicle’s systems performed. Theevent data recorder is designed to recorddata related to vehicle dynamics andsafety systems for a short period of time,typically 30 seconds or less.The event data recorder in this vehicle isdesigned to record such data as:• How various systems in your vehicle
were operating;• Whether or not the driver and
passenger seatbelts werebuckled/fastened;
• How far (if at all) the driver wasdepressing the accelerator and/or thebrake pedal; and
• How fast the vehicle was traveling; and• Where the driver was positioning the
steering wheel.This data can help provide a betterunderstanding of the circumstances inwhich crashes and injuries occur.
Note: Event data recorder data is recordedby your vehicle only if a non-trivial crashsituation occurs; no data is recorded by theevent data recorder under normal drivingconditions and no personal data orinformation (e.g., name, gender, age, andcrash location) is recorded. However, otherparties, such as law enforcement, couldcombine the event data recorder data withthe type of personally identifying dataroutinely acquired during a crashinvestigation.To read data recorded by an event datarecorder, special equipment is required,and access to the vehicle or the event datarecorder is needed. In addition to thevehicle manufacturer, other parties, suchas law enforcement, that have such specialequipment, can read the information if theyhave access to the vehicle or the eventdata recorder.
Comfort, Convenience andEntertainment DataYour vehicle has electronic control unitsthat have the ability to store data basedon your personalized settings. The data isstored locally in the vehicle or on devicesthat you connect to it, for example, a USBdrive or digital music player. You can deletesome of this data and also choose whetherto share it through the services to whichyou subscribe. See Settings (page 415).
Comfort and Convenience DataData recorded includes, for example:• Seat and steering wheel position.• Climate control settings.• Radio presets.
11
Fusion (CC7) Canada/United States of America, enUSA, Edition date: 201905, Second-Printing
Introduction

Entertainment DataData recorded includes, for example:• Music, videos or album art.• Contacts and corresponding address
book entries.• Navigation destinations.
Services That We ProvideIf you use our services, we collect and usedata, for example, account information,vehicle location and driving characteristics,that could identify you. We transmit thisdata through a dedicated, protectedconnection. We only collect and use datato enable your use of our services to whichyou have subscribed, with your consent orwhere permitted by law. For additionalinformation, see the terms and conditionsof the services to which you havesubscribed.
Services That Third PartiesProvideWe recommend that you review the termsand conditions and data privacyinformation for any services to which yousubscribe. We take no responsibility forservices that third parties provide.
Vehicles With a Modem (If Equipped)
The modem has a SIM. Themodem was enabled when yourvehicle was built and periodically
sends messages to stay connected to thecell phone network, receive automaticsoftware updates and send vehicle-relatedinformation to us, for example, diagnosticinformation. These messages couldinclude information that identifies yourvehicle, the SIM and the electronic serialnumber of the modem. Cell phone network
service providers could have access toadditional information, for example, cellphone network tower identification. Foradditional information about our privacypolicy, visit www.FordConnected.com orrefer to your local Ford website.Note: The modem continues to send thisinformation unless you disable the modemor stop the modem from sharing vehicledata by changing the modem settings. SeeConnected Vehicle (page 353).Note: The service can be unavailable orinterrupted for a number of reasons, forexample, environmental or topographicalconditions and data plan coverage.Note: To find out if your vehicle has amodem, visit www.FordConnected.com.
Vehicles With SYNCMobile Device DataIf you connect a mobile device to yourvehicle, you can display data from yourdevice on the touchscreen for example,music and album art. You can share yourvehicle data with mobile apps on yourdevice through the system. See Apps(page 412).The mobile apps function operates by yourconnected device sending data to us in theUnited States. The data is encrypted andincludes the vehicle identification numberof your vehicle, the SYNC module serialnumber, odometer, enabled apps, usagestatistics and debugging information. Weretain it only as long as necessary toprovide the service, to troubleshoot, forcontinuous improvement and to offer youproducts and services that may be ofinterest to you according to yourpreferences and where allowed by law.
12
Fusion (CC7) Canada/United States of America, enUSA, Edition date: 201905, Second-Printing
Introduction

If you connect a cell phone to the system,the system creates a profile that links tothat cell phone. The cell phone profileenables more mobile features and efficientoperation. The profile contains, forexample, data from your phonebook, readand unread text messages and call history,including history of calls when your cellphone was not connected to the system.If you connect a media device, the systemcreates and retains a media device indexof supported media content. The systemalso records a short diagnostic log ofapproximately 10 minutes of all recentsystem activity.The cell phone profile, media device indexand diagnostic log remain in your vehicleunless you delete them and are generallyaccessible only in your vehicle when youconnect your cell phone or media device.If you no longer plan to use the system oryour vehicle, we recommend you use themaster reset function to erase the storedinformation. See Settings (page 415).System data cannot be accessed withoutspecial equipment and access to yourvehicle's module.For additional information about ourprivacy policy, refer to your local Fordwebsite.Note: To find out if your vehicle has aconnectivity technology, visitwww.FordConnected.com.
Vehicles With an Emergency CallSystemWhen the emergency call system is active,it may disclose to emergency services thatyour vehicle has been in a crash involvingthe deployment of an airbag or activationof the fuel pump shut-off. Certain versionsor updates to the emergency call systemmay also be capable of electronically orverbally disclosing to emergency servicesoperators your vehicle location or other
details about your vehicle or crash to assistemergency services operators to providethe most appropriate emergency services.If you do not want to disclose thisinformation, do not activate the emergencycall system.Note: You cannot deactivate emergencycall systems that are required by law.
PERCHLORATECertain components in your vehicle suchas airbag modules, seatbelt pretensionersand remote control batteries may containperchlorate material. Special handlingmay apply for service or vehicle end of lifedisposal.
For more information visit:
Web Address
www.dtsc.ca.gov/hazard-ouswaste/perchlorate
FORD CREDITUS OnlyFord Credit offers a full range of financingand lease plans to help you acquire yourvehicle. If you have financed or leased yourvehicle through Ford Credit, thank you foryour business.For assistance call 1-800-727-7000, or formore information about Ford Credit andaccess to the online Account Manager tool,visit www.ford.com/finance.
13
Fusion (CC7) Canada/United States of America, enUSA, Edition date: 201905, Second-Printing
Introduction

REPLACEMENT PARTSRECOMMENDATIONWe have built your vehicle to the higheststandards using quality parts. Werecommend that you demand the use ofgenuine Ford and Motorcraft partswhenever your vehicle requires scheduledmaintenance or repair. You can clearlyidentify genuine Ford and Motorcraft partsby looking for the Ford, FoMoCo orMotorcraft branding on the parts or theirpackaging.
Scheduled Maintenance andMechanical RepairsOne of the best ways for you to make surethat your vehicle provides years of serviceis to have it maintained in line with ourrecommendations using parts thatconform to the specifications detailed inthis Owner’s Manual. Genuine Ford andMotorcraft parts meet or exceed thesespecifications.
Collision RepairsWe hope that you never experience acollision, but accidents do happen.Genuine Ford replacement collision partsmeet our stringent requirements for fit,finish, structural integrity, corrosionprotection and dent resistance. Duringvehicle development we validate thatthese parts deliver the intended level ofprotection as a whole system. A great wayto know for sure you are getting this levelof protection is to use genuine Fordreplacement collision parts.
Warranty on Replacement PartsGenuine Ford and Motorcraft replacementparts are the only replacement parts thatbenefit from a Ford Warranty. The FordWarranty may not cover damage causedto your vehicle as a result of failednon-Ford parts. For additional information,refer to the terms and conditions of theFord Warranty.
SPECIAL NOTICESNew Vehicle Limited WarrantyVehicles sold in the United States andCanadaFor a detailed description of what iscovered by your New Vehicle LimitedWarranty, see your warranty guide that isavailable online. For more information,refer to our website and download yourcopy of the warranty guide.
Vehicles sold outside the United Statesand CanadaFor a detailed description of what iscovered by your New Vehicle LimitedWarranty, see the warranty guide that isprovided to you along with your Owner’sManual.
Special InstructionsFor your added safety, your vehicle is fittedwith sophisticated electronic controls.
WARNING: You risk death orserious injury to yourself and others if youdo not follow the instruction highlightedby the warning symbol. Failure to followthe specific warnings and instructionscould result in personal injury.
14
Fusion (CC7) Canada/United States of America, enUSA, Edition date: 201905, Second-Printing
Introduction

WARNING: NEVER use a rearwardfacing child restraint on a seat protectedby an ACTIVE AIRBAG in front of it,DEATH or SERIOUS INJURY to the CHILDcan occur.
On Board Diagnostics Data LinkConnector
WARNING: Do not connectwireless plug-in devices to the data linkconnector. Unauthorized third partiescould gain access to vehicle data andimpair the performance of safety relatedsystems. Only allow repair facilities thatfollow our service and repair instructionsto connect their equipment to the datalink connector.
Your vehicle has an OBD Data LinkConnector (DLC) that is used inconjunction with a diagnostic scan tool forvehicle diagnostics, repairs andreprogramming services. Installing anaftermarket device that uses the DLCduring normal driving for purposes such asremote insurance company monitoring,transmission of vehicle data to otherdevices or entities, or altering theperformance of the vehicle, may causeinterference with or even damage tovehicle systems. We do not recommendor endorse the use of aftermarket plug-indevices unless approved by Ford. Thevehicle Warranty will not cover damagecaused by an aftermarket plug-in device.
MOBILE COMMUNICATIONSEQUIPMENT
WARNING: Driving whiledistracted can result in loss of vehiclecontrol, crash and injury. We stronglyrecommend that you use extremecaution when using any device that maytake your focus off the road. Yourprimary responsibility is the safeoperation of your vehicle. Werecommend against the use of anyhand-held device while driving andencourage the use of voice-operatedsystems when possible. Make sure youare aware of all applicable local lawsthat may affect the use of electronicdevices while driving.
Using mobile communications equipmentis becoming increasingly important in theconduct of business and personal affairs.However, you must not compromise yourown or others’ safety when using suchequipment. Mobile communications canenhance personal safety and security whenappropriately used, particularly inemergency situations. Safety must beparamount when using mobilecommunications equipment to avoidnegating these benefits. Mobilecommunication equipment includes, butis not limited to, cellular phones, pagers,portable email devices, text messagingdevices and portable two-way radios.
EXPORT UNIQUE OPTIONSFor your particular global region, yourvehicle may be equipped with features andoptions that are different from the featuresand options that are described in thisOwner’s Manual. A market uniquesupplement may be supplied thatcomplements this book. By referring to the
15
Fusion (CC7) Canada/United States of America, enUSA, Edition date: 201905, Second-Printing
Introduction

market unique supplement, if provided,you can properly identify those features,recommendations and specifications thatare unique to your vehicle. This Owner’sManual is written primarily for the U.S. andCanadian Markets. Features or equipmentlisted as standard may be different on unitsbuilt for export. Refer to this Owner’sManual for all other requiredinformation and warnings.
16
Fusion (CC7) Canada/United States of America, enUSA, Edition date: 201905, Second-Printing
Introduction

PROTECTING THEENVIRONMENTYou should play your part in protecting theenvironment. Correct vehicle usage andthe authorized disposal of waste, cleaningand lubrication materials are significantsteps toward this aim.For additional information about oursustainability progress and initiatives, visitwww.sustainability.ford.com.
17
Fusion (CC7) Canada/United States of America, enUSA, Edition date: 201905, Second-Printing
Environment
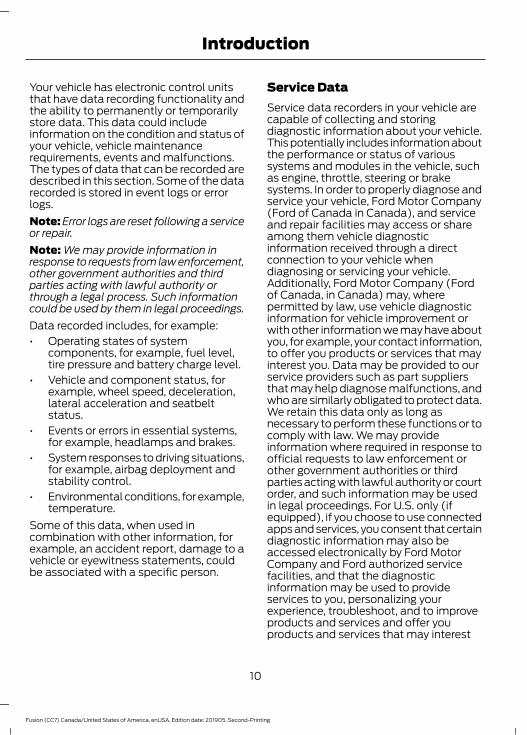
INSTRUMENT PANEL
E271850
Air vents.ADirection indicators. See Direction Indicators (page 78).BInformation display controls. See Information Display Control (page 71).CInstrument cluster. See Instrument Cluster (page 87).DInformation display controls. See Information Display Control (page 71).EWiper lever. See Wipers and Washers (page 73).FKeyless starting. See Keyless Starting (page 145).GHazard flashers. See Hazard Flashers (page 232).HInformation and entertainment display.IAudio system. See Audio System (page 357).JClimate control. See Climate Control (page 118).KHeated windows and mirrors. See Heated Rear Window (page 126).L
18
Fusion (CC7) Canada/United States of America, enUSA, Edition date: 201905, Second-Printing
At a Glance

Audio control. See Audio Control (page 70). Voice control. See Voice Control(page 71).
M
Driver knee airbag. See Driver and Passenger Knee Airbags (page 46).NSteering wheel adjustment. See Adjusting the Steering Wheel (page 70).OHorn.PCruise control. See Cruise Control (page 71).QLighting control. See Lighting Control (page 75).R
19
Fusion (CC7) Canada/United States of America, enUSA, Edition date: 201905, Second-Printing
At a Glance

GENERAL INFORMATIONSee the following sections for directionson how to properly use safety restraintsfor children.
WARNING: Always make sure yourchild is secured properly in a device thatis appropriate for their height, age andweight. Child safety restraints must bebought separately from your vehicle.Failure to follow these instructions andguidelines may result in an increased riskof serious injury or death to your child.
WARNING: All children are shapeddifferently. The National Highway TrafficSafety Administration and other safetyorganizations, base theirrecommendations for child restraints onprobable child height, age and weightthresholds, or on the minimumrequirements of the law. We recommendthat you check with a NHTSA CertifiedChild Passenger Safety Technician
(CPST) to make sure that you properlyinstall the child restraint in your vehicleand that you consult your pediatrician tomake sure you have a child restraintappropriate for your child. To locate achild restraint fitting station and CPST,contact NHTSA toll free at1-888-327-4236 or go towww.nhtsa.dot.gov. In Canada, contactTransport Canada toll free at1-800-333-0371 or go to www.tc.gc.cato find a Child Car Seat Clinic in yourarea. Failure to properly restrain childrenin child restraints made especially fortheir height, age and weight, may resultin an increased risk of serious injury ordeath to your child.
WARNING: On hot days, thetemperature inside the vehicle can risevery quickly. Exposure of people oranimals to these high temperatures foreven a short time can cause death orserious heat related injuries, includingbrain damage. Small children areparticularly at risk.
20
Fusion (CC7) Canada/United States of America, enUSA, Edition date: 201905, Second-Printing
Child Safety

Recommendations for Safety Restraints for Children
Recommended RestraintType
Child Size, Height, Weight, or AgeChild
Use a child restraint(sometimes called an
infant carrier, convertibleseat, or toddler seat).
Children weighing 40 lb (18 kg) or less(generally age four or younger).
Infants ortoddlers
Use a belt-positioningbooster seat.
Children who have outgrown or no longerproperly fit in a child restraint (generallychildren who are less than 57 in (1.45 m)
tall, are greater than age four and lessthan age 12, and between 40 lb (18 kg)and 80 lb (36 kg) and upward to 100 lb
(45 kg) if recommended by your childrestraint manufacturer).
Small children
Use a vehicle seatbelthaving the lap belt snugand low across the hips,shoulder belt centered
across the shoulder andchest, and seat backrest
upright.
Children who have outgrown or no longerproperly fit in a belt-positioning boosterseat (generally children who are at least57 in (1.45 m) tall or greater than 80 lb
(36 kg) or 100 lb (45 kg) if recommendedby child restraint manufacturer).
Larger children
• You are required by law to properly usechild restraints for infants and toddlersin the United States and Canada.
• Many states and provinces require thatsmall children use approved boosterseats until they reach age eight, aheight of 57 in (1.45 m) tall, or 80 lb(36 kg). Check your local and state orprovincial laws for specificrequirements about the safety ofchildren in your vehicle.
• When possible, properly restrainchildren 12 years of age and under in arear seating position of your vehicle.Accident statistics suggest thatchildren are safer when properlyrestrained in the rear seating positionsthan in a front seating position. SeeFront Passenger Sensing System(page 43).
• When installing a rear facing childrestraint, adjust the vehicle seats toavoid interference between the childrestraint and the vehicle seat in frontof the child restraint.
21
Fusion (CC7) Canada/United States of America, enUSA, Edition date: 201905, Second-Printing
Child Safety

INSTALLING CHILDRESTRAINTSChild Seats
E142594
Use a child restraint (sometimes called aninfant carrier, convertible seat, or toddlerseat) for infants, toddlers, or childrenweighing 40 lb (18 kg) or less (generallyage four or younger).
Using Lap and Shoulder Belts
WARNING: Do not place arearward facing child restraint in front ofan active airbag. Failure to follow thisinstruction could result in personal injuryor death.
WARNING: Properly securechildren 12 years old and under in a rearseating position whenever possible. Ifyou are unable to properly secure allchildren in a rear seating position,properly secure the largest child on thefront seat. If you must use a forwardfacing child restraint on the front seat,move the seat as far back as possible.Failure to follow these instructions couldresult in personal injury or death.
WARNING: Depending on whereyou secure a child restraint, anddepending on the child restraint design,you may block access to certain seatbeltbuckle assemblies and LATCH loweranchors, rendering those featurespotentially unusable. To avoid risk ofinjury, make sure occupants only useseating positions where they are able tobe properly restrained.
When installing a child restraint withcombination lap and shoulder belts:• Use the correct seatbelt buckle for that
seating position.• Insert the belt tongue into the proper
buckle until you hear a snap and feel itlatch. Make sure the tongue is securelyfastened in the buckle.
• Keep the buckle release buttonpointing up and away from the childrestraint, with the tongue between thechild restraint and the release button,to prevent accidental unbuckling.
• Place the vehicle seat in the uprightposition before you install the childrestraint.
• Put the seatbelt in the automaticlocking mode. See Step 5. This vehicledoes not require the use of a lockingclip.
Perform the following steps wheninstalling the child restraint withcombination lap and shoulder belts:Note: Although the child restraintillustrated is a forward facing child restraint,the steps are the same for installing a rearfacing child restraint.
22
Fusion (CC7) Canada/United States of America, enUSA, Edition date: 201905, Second-Printing
Child Safety

E142528
1. Position the child restraint in a seatwith a combination lap and shoulderbelt.
E142529
2. Pull down on the shoulder belt andthen grasp the shoulder belt and lapbelt together.
E142530
3. While holding the shoulder and lap beltportions together, route the tonguethrough the child restraint accordingto the child restraint manufacturer'sinstructions. Make sure that you did nottwist the belt webbing.
E142531
4. Insert the belt tongue into the properbuckle (the buckle closest to thedirection the tongue is coming from)for that seating position until you heara snap and feel the latch engage. Makesure that you securely latched thetongue by pulling on it.
E142875
5. To put the retractor in the automaticlocking mode, grasp the shoulderportion of the belt and pull downwarduntil you pull all of the belt out.
23
Fusion (CC7) Canada/United States of America, enUSA, Edition date: 201905, Second-Printing
Child Safety

Note: The automatic locking mode isavailable on the front passenger and rearseats. This vehicle does not require the useof a locking clip.6. Allow the belt to retract to remove
slack. The belt clicks as it retracts toindicate it is in the automatic lockingmode.
7. Try to pull the belt out of the retractorto make sure the retractor is in theautomatic locking mode. You shouldnot be able to pull more belt out. If theretractor did not lock, unbuckle the beltand repeat Steps 5 and 6.
E142533
8. Remove remaining slack from the belt.Force the seat down with extra weight,for example, by pressing down orkneeling on the child restraint whilepulling up on the shoulder belt in orderto force slack from the belt. This isnecessary to remove the remainingslack that exists once you add the extraweight of the child to the child restraint.It also helps to achieve the propersnugness of the child restraint to yourvehicle. Sometimes, a slight leantoward the buckle helps to removeremaining slack from the belt.
9. If the child restraint has a tether strap,attach it.
E142534
10. Before placing the child in the seat,forcibly move the seat forward andback to make sure the seat is securelyheld in place. To check this, grab theseat at the belt path and attempt tomove it side to side and forward andback. There should be no more than1 in (2.5 cm) of movement for properinstallation.
We recommend checking with a NHTSACertified Child Passenger SafetyTechnician to make certain the childrestraint is properly installed. In Canada,check with Transport Canada for referralto a Child Car Seat Clinic.
Using Lower Anchors and Tethersfor CHildren (LATCH)
WARNING: Do not attach two childsafety restraints to the same anchor. Ina crash, one anchor may not be strongenough to hold two child safety restraintattachments and may break, causingserious injury or death.
24
Fusion (CC7) Canada/United States of America, enUSA, Edition date: 201905, Second-Printing
Child Safety

WARNING: Depending on whereyou secure a child restraint, anddepending on the child restraint design,you may block access to certain seatbeltbuckle assemblies and LATCH loweranchors, rendering those featurespotentially unusable. To avoid risk ofinjury, make sure occupants only useseating positions where they are able tobe properly restrained.
The LATCH system has three vehicleanchor points: two lower anchors wherethe seat backrest and seat cushion meet(called the seat bight) and one top tetheranchor behind that seating position.LATCH compatible child restraints havetwo rigid or webbing mountedattachments that connect to the two loweranchors at the LATCH equipped seatingpositions in your vehicle. This type ofattachment method eliminates the needto use seatbelts to attach the childrestraint. However, you can still use theseatbelt to attach the child restraint. Forforward-facing child restraints, you mustattach the top tether strap to the propertop tether anchor, if a top tether strap hasbeen provided with your child restraint.
E142535
Your vehicle has LATCH lower anchors forchild restraint installation at the seatingpositions marked with the child restraintsymbol.
E169083
The LATCH anchors are at the rear sectionof the rear seat between the cushion andseat backrest below the symbols asshown. Follow the child restraintmanufacturer's instructions to properlyinstall a child restraint with LATCHattachments. Follow the instructions onattaching child restraints with tetherstraps.Attach LATCH lower attachments of thechild restraint only to the anchors shown.
Use of Inboard Lower Anchors from theOutermost Seating Positions (CenterSeating Use)
WARNING: The standardizedspacing for LATCH lower anchors is 11 in(280 mm) center to center. Do not useLATCH lower anchors for the centerseating position unless the child restraintmanufacturer's instructions permit andspecify using anchors spaced at least asfar apart as those in this vehicle.
25
Fusion (CC7) Canada/United States of America, enUSA, Edition date: 201905, Second-Printing
Child Safety

The lower anchors at the center of thesecond row rear seat are spaced 18 in(46 cm) apart. You cannot install a childrestraint with rigid LATCH attachments atthe center seating position. You can onlyuse LATCH compatible child restraints withattachments on belt webbing at thisseating position provided that the childrestraint manufacturer's instructionspermit use with the anchor spacing stated.Do not attach a child restraint to any loweranchor if an adjacent child restraint isattached to that anchor.Each time you use the child restraint, checkthat the seat is properly attached to thelower anchors and tether anchor, ifapplicable. Tug the child restraint from sideto side and forward and back where it issecured to your vehicle. The seat shouldmove less than 1 in (2.5 cm) when you dothis for a proper installation.If the child restraint is not anchoredproperly, the risk of a child being injured ina crash greatly increases.
Combining Seatbelt and LATCH LowerAnchors for Attaching Child RestraintsWhen used in combination, you can attacheither the seatbelt or the LATCH loweranchors first, provided a proper installationis achieved. Attach the tether strapafterward, if included with the childrestraint.
Using Tether StrapsMany forward-facing childrestraints include a tether strapwhich extends from the back of
the child restraint and hooks to ananchoring point called the top tetheranchor. Tether straps are available as anaccessory for many older child restraints.
Contact the manufacturer of your childrestraint for information about ordering atether strap, or to obtain a longer tetherstrap if the tether strap on your childrestraint does not reach the appropriatetop tether anchor in your vehicle.Once you install the child restraint usingeither the seatbelt, the lower anchors ofthe LATCH system, or both, you can attachthe top tether strap.The tether strap anchors in your vehicleare in the following positions (shown fromtop view):
E142537
Perform the following steps to install achild restraint with tether anchors:Note: If you install a child restraint with rigidLATCH attachments, do not tighten thetether strap enough to lift the child restraintoff your vehicle seat cushion when the childis seated in it. Keep the tether strap just snugwithout lifting the front of the child restraint.Keeping the child restraint just touching yourvehicle seat gives the best protection in asevere crash.
26
Fusion (CC7) Canada/United States of America, enUSA, Edition date: 201905, Second-Printing
Child Safety

1. Route the child restraint tether strapover the back of the seat. For theoutermost seating positions, route thetether strap under the head restraintand between the head restraint posts.For the center seating position, routethe tether strap over the top of thehead restraint. If needed, you can alsoremove the head restraints.
E144274
2. Locate the correct anchor for theselected seating position, then openthe tether anchor cover.
E144275
3. Clip the tether strap to the anchor asshown.
4. Tighten the child restraint tether strapaccording to the manufacturer'sinstructions. If your child restraintsystem has a tether strap, and the childrestraint manufacturer recommendsits use, we also recommend its use.
BOOSTER SEATS
WARNING: Do not put the shouldersection of the seatbelt or allow the childto put the shoulder section of theseatbelt under their arm or behind theirback. Failure to follow this instructioncould reduce the effectiveness of theseatbelt and increase the risk of injury ordeath in a crash.
Use a belt-positioning booster seat forchildren who have outgrown or no longerproperly fit in a child safety restraint(generally children who are less than 57 in(1.45 m) tall, are greater than age 4 andless than age 12, and between 40 lb (18 kg)and 80 lb (36 kg) and upward to 100 lb(45 kg) if recommended by your childrestraint manufacturer). Many state andprovincial laws require that children useapproved booster seats until they reachage eight, a height of 57 in (1.45 m) tall, or80 lb (36 kg).Booster seats should be used until you cananswer YES to ALL of these questionswhen seated without a booster seat:
E142595
• Can the child sit all the way backagainst their vehicle seat backrest withknees bent comfortably at the edge ofthe seat cushion?
• Can the child sit without slouching?
27
Fusion (CC7) Canada/United States of America, enUSA, Edition date: 201905, Second-Printing
Child Safety

• Does the lap belt rest low across thehips?
• Is the shoulder belt centered on theshoulder and chest?
• Can the child stay seated like this forthe whole trip?
Always use booster seats in conjunctionwith your vehicle lap and shoulder belt.
Types of Booster Seats
E68924
• Backless booster seatsIf your backless booster seat has aremovable shield, remove the shield. If avehicle seating position has a low seatbackrest or no head restraint, a backlessbooster seat may place your child's head(as measured at the tops of the ears)above the top of the seat. In this case,move the backless booster to anotherseating position with a higher seat backrestor head restraint and lap and shoulderbelts, or consider using a high back boosterseat.
E70710
• High back booster seatsIf, with a backless booster seat, you cannotfind a seating position that adequatelysupports your child's head, a high backbooster seat would be a better choice.Children and booster seats vary in size andshape. Choose a booster that keeps thelap belt low and snug across the hips,never up across the stomach, and lets youadjust the shoulder belt to cross the chestand rest snugly near the center of theshoulder. The following drawings comparethe ideal fit (center) to a shoulder beltuncomfortably close to the neck and ashoulder belt that could slip off theshoulder. The drawings also show how thelap belt should be low and snug across thechild's hips.
28
Fusion (CC7) Canada/United States of America, enUSA, Edition date: 201905, Second-Printing
Child Safety

E142596
E142597
If the booster seat slides on the vehicleseat upon which it is being used, placing arubberized mesh sold as shelf or carpetliner under the booster seat may improvethis condition. Do not introduce any itemthicker than this under the booster seat.Check with the booster seatmanufacturer's instructions.
CHILD RESTRAINTPOSITIONING
WARNING: Do not place arearward facing child restraint in front ofan active airbag. Failure to follow thisinstruction could result in personal injuryor death.
WARNING: Properly securechildren 12 years old and under in a rearseating position whenever possible. Ifyou are unable to properly secure allchildren in a rear seating position,properly secure the largest child on thefront seat. If you must use a forwardfacing child restraint on the front seat,move the seat as far back as possible.Failure to follow these instructions couldresult in personal injury or death.
WARNING: Always carefully followthe instructions and warnings providedby the manufacturer of any childrestraint to determine if the restraintdevice is appropriate for your child's size,height, weight, or age. Follow the childrestraint manufacturer's instructions and
29
Fusion (CC7) Canada/United States of America, enUSA, Edition date: 201905, Second-Printing
Child Safety

warnings provided for installation anduse in conjunction with the instructionsand warnings provided by your vehiclemanufacturer. A safety seat that isimproperly installed or utilized, isinappropriate for your child's height, age,or weight or does not properly fit thechild may increase the risk of seriousinjury or death.
WARNING: Do not allow apassenger to hold a child on their lapwhen your vehicle is moving. Failure tofollow this instruction could result inpersonal injury or death in the event of asudden stop or crash.
WARNING: Do not use pillows,books or towels to boost your child'sheight. Failure to follow this instructioncould result in personal injury or death.
WARNING: Properly secure childrestraints or booster seats when they arenot in use. They could become projectilesin a sudden stop or crash. Failure tofollow this instruction could result inpersonal injury or death.
WARNING: Do not put the shouldersection of the seatbelt or allow the childto put the shoulder section of theseatbelt under their arm or behind theirback. Failure to follow this instructioncould reduce the effectiveness of theseatbelt and increase the risk of injury ordeath in a crash.
WARNING: Do not leave childrenor pets unattended in your vehicle.Failure to follow this instruction couldresult in personal injury or death.
30
Fusion (CC7) Canada/United States of America, enUSA, Edition date: 201905, Second-Printing
Child Safety

Recommendations for Attaching Child Safety Restraints for Children
Use Any Attachment Method as Indicated Below by X
CombinedWeight ofChild and
ChildRestraint
RestraintType
SeatbeltOnly
Seatbeltand LATCH
(LowerAnchorsand TopTether
Anchor)
Seatbeltand TopTetherAnchor
LATCH(Lower
AnchorsOnly)
LATCH(Lower
Anchorsand TopTether
Anchor)
XXUp to 65 lb(29.5 kg)
Rear facingchild
restraint
XOver 65 lb(29.5 kg)
Rear facingchild
restraint
XXXUp to 65 lb(29.5 kg)
Forwardfacingchild
restraint
XXOver 65 lb(29.5 kg)
Forwardfacingchild
restraint
Note: The child restraint must rest tightlyagainst the vehicle seat upon which it isinstalled. It may be necessary to lift orremove the head restraint. See Seats (page128).
CHILD SAFETY LOCKSWhen these locks are set, the rear doorscannot be opened from the inside.
31
Fusion (CC7) Canada/United States of America, enUSA, Edition date: 201905, Second-Printing
Child Safety

E112197
The childproof locks are located on therear edge of each rear door and must beset separately for each door.
Left-Hand SideTurn counterclockwise to lock andclockwise to unlock.
Right-Hand SideTurn clockwise to lock andcounterclockwise to unlock.
32
Fusion (CC7) Canada/United States of America, enUSA, Edition date: 201905, Second-Printing
Child Safety

PRINCIPLE OF OPERATION
WARNING: Always drive and ridewith your seatback upright and the lapbelt snug and low across the hips.
WARNING: Children must alwaysbe properly restrained.
WARNING: Do not allow apassenger to hold a child on their lapwhen your vehicle is moving. Failure tofollow this instruction could result inpersonal injury or death in the event of asudden stop or crash.
WARNING: All occupants of yourvehicle, including the driver, shouldalways properly wear their seatbelts,even when an airbag supplementalrestraint system is provided. Failure toproperly wear your seatbelt couldseriously increase the risk of injury ordeath.
WARNING: It is extremelydangerous to ride in a cargo area, insideor outside of a vehicle. In a crash, peopleriding in these areas are more likely to beseriously injured or killed. Do not allowpeople to ride in any area of your vehiclethat is not equipped with seats andseatbelts. Make sure everyone in yourvehicle is in a seat and properly using aseatbelt. Failure to follow this warningcould result in serious personal injury ordeath.
WARNING: In a rollover crash, anunbelted person is significantly morelikely to die than a person wearing aseatbelt.
WARNING: Each seating positionin your vehicle has a specific seatbeltassembly made up of one buckle andone tongue designed to be used as a pair.Use the shoulder belt on the outsideshoulder only. Never wear the shoulderbelt under the arm. Never use a singleseatbelt for more than one person.
WARNING: Even with advancedrestraints systems, properly restrainchildren 12 and under in a rear seatingposition. Failure to follow this couldseriously increase the risk of injury ordeath.
WARNING: Seatbelts and seatsmay be hot in a vehicle that is in thesunshine. The hot seatbelts or seats mayburn a small child. Check seat covers andbuckles before you place a childanywhere near them.
All seating positions in your vehicle havelap and shoulder seatbelts. All occupantsof the vehicle should always properly weartheir seatbelts, even when an airbagsupplemental restraint system is provided.The seatbelt system consists of:• Lap and shoulder seatbelts.• Shoulder seatbelt with automatic
locking mode, (except driver seatbelt).• Height adjuster at the front outermost
seating positions.• Seatbelt pretensioners at the front
outermost and second row outermostseating positions.
• Belt tension sensor at the frontoutermost passenger seating position.
E71880
• Seatbelt warning light and chime.
33
Fusion (CC7) Canada/United States of America, enUSA, Edition date: 201905, Second-Printing
Seatbelts

E67017
• Crash sensors and monitoring systemwith readiness indicator.
The seatbelt pretensioners are designedto tighten the seatbelts when activated. Infrontal and near-frontal crashes, theseatbelt pretensioners may be activatedalone or, if the crash is of sufficient severity,together with the front airbags. Thepretensioners may also activate when aSafety Canopy airbag deploys.
FASTENING THE SEATBELTSThe front outboard and rear safetyrestraints in the vehicle are combinationlap and shoulder belts.
E142587
1. Insert the belt tongue into the properbuckle (the buckle closest to thedirection the tongue is coming from)until you hear a snap and feel it latch.Make sure that you securely fasten thetongue in the buckle.
E142588
2. To unfasten, press the release buttonand remove the tongue from thebuckle.
Using Seatbelts During Pregnancy
WARNING: Always ride and drivewith your seatback upright and properlyfasten your seatbelt. Fit the lap portionof the seatbelt snugly and low acrossthe hips. Position the shoulder portion ofthe seatbelt across your chest. Pregnantwomen must follow this practice. Seethe following figure.
E142590
34
Fusion (CC7) Canada/United States of America, enUSA, Edition date: 201905, Second-Printing
Seatbelts

Pregnant women should always wear theirseatbelt. Position the lap belt portion of acombination lap and shoulder belt lowacross the hips below the belly and wornas tight as comfort allows. Position theshoulder belt to cross the middle of theshoulder and the center of the chest.
Seatbelt Locking Modes
WARNING: If your vehicle isinvolved in a crash, have the seatbeltsand associated components inspectedas soon as possible. Failure to follow thisinstruction could result in personal injuryor death.
All safety restraints in the vehicle arecombination lap and shoulder belts. Thedriver seatbelt has the first type of lockingmode, and the front outboard passengerand rear seat seatbelts have both types oflocking modes described as follows:
Vehicle Sensitive ModeThis is the normal retractor mode, whichallows free shoulder belt lengthadjustment to your movements andlocking in response to vehicle movement.For example, if the driver brakes suddenlyor turns a corner sharply, or the vehiclereceives an impact of about 5 mph(8 km/h) or more, the combinationseatbelts lock to help reduce forwardmovement of the driver and passengers.In addition, the design of the retractor is tolock if you pull the webbing out too quickly.If the seatbelt retractor locks, slowly lowerthe height adjuster to allow the seatbeltto retract. If the retractor does not unlock,pull the seatbelt out slowly then feed a
small length of webbing back toward thestowed position. For rear seatbelts, reclinethe rear seat backrest or push the seatbackrest cushion away from the seatbelt.Feed a small length of webbing backtoward the stowed position.
Automatic Locking ModeIn this mode, the shoulder beltautomatically pre-locks. The belt retractsto remove any slack in the shoulder belt.The automatic locking mode is notavailable on the driver seatbelt.
When to Use the Automatic LockingModeUse this mode any time you install a childsafety seat, except a booster, in passengerfront or rear seating positions. Properlyrestrain children 12 years old and under ina rear seating position whenever possible.See Child Safety (page 20).
How to Use the Automatic LockingMode
E142591
1. Buckle the combination lap andshoulder belt.
2. Grasp the shoulder portion and pulldownward until you pull the entire beltout. Allow the belt to retract. As thebelt retracts, you will hear a clickingsound. This indicates the seatbelt isnow in the automatic locking mode.
35
Fusion (CC7) Canada/United States of America, enUSA, Edition date: 201905, Second-Printing
Seatbelts

How to Disengage the AutomaticLocking ModeUnbuckle the combination lap andshoulder belt and allow it to retractcompletely to disengage the automaticlocking mode and turn on the vehiclesensitive (emergency) locking mode.
SEATBELT HEIGHTADJUSTMENT
WARNING: Position the seatbeltheight adjuster so that the seatbelt restsacross the middle of your shoulder.Failure to adjust the seatbelt correctlycould reduce its effectiveness andincrease the risk of injury in a crash.
E145664
1. Pull the button and slide the heightadjuster up or down.
2. Release the button and pull down onthe height adjuster to make sure it islocked in place.
SEATBELT WARNING LAMPAND INDICATOR CHIME
E71880
This lamp illuminates and anindicator chime will sound if thedriver seatbelt has not been
fastened when the vehicle's ignition isturned on.
Conditions of operation
ThenIf
The seatbelt warning lamp illuminates andthe indicator chime sounds for a few
seconds.
The driver seatbelt is not buckled beforethe ignition switch is turned to the on posi-
tion...
The seatbelt warning lamp and indicatorchime turn off.
The driver seatbelt is buckled while thewarning lamp is illuminated and the indic-
ator chime is sounding...
The seatbelt warning lamp and indicatorchime remain off.
The driver seatbelt is buckled before theignition switch is turned to the on position...
36
Fusion (CC7) Canada/United States of America, enUSA, Edition date: 201905, Second-Printing
Seatbelts

SEATBELT REMINDERBelt-Minder™This feature supplements the seatbeltwarning function by providing additionalreminders that intermittently sound achime and illuminate the seatbelt warninglamp when you are in the driver seat or youhave a front seat passenger and a seatbeltis unbuckled.
The system uses information from thefront passenger sensing system todetermine if a front seat passenger ispresent and therefore potentially in needof a warning. To avoid the system turningon the Belt-Minder feature for objects youplace on the front passenger seat, only thefront seat passengers receive warnings asdetermined by the front passenger sensingsystem.If the Belt-Minder warnings expire(warnings for about five minutes) for onepassenger (driver or front passenger), theother passenger can still cause theBelt-Minder feature to turn on.
Then...If...
The Belt-Minder feature will not activate.You and the front seat passenger buckleyour seatbelts before you switch the igni-tion on or less than 1–2 minutes elapse afteryou switch the ignition on...
The Belt-Minder feature activates, theseatbelt warning lamp illuminates and anindicator chime sounds for 6 seconds every25 seconds, repeating for about 5 minutesor until you and the front seat passengerbuckle your seatbelts.
You or the front seat passenger do notbuckle your seatbelts before your vehiclereaches at least 6 mph (9.7 km/h) and 1–2minutes elapse after you switch the ignitionon...
The Belt-Minder feature activates, theseatbelt warning lamp illuminates and anindicator chime sounds for 6 seconds every25 seconds, repeating for about 5 minutesor until you and the front seat passengerbuckle your seatbelts.
The seatbelt for the driver or frontpassenger is unbuckled for about 1 minutewhile the vehicle is traveling at least 6 mph(9.7 km/h) and more than 1–2 minuteselapse after you switch the ignition on...
37
Fusion (CC7) Canada/United States of America, enUSA, Edition date: 201905, Second-Printing
Seatbelts

Deactivating and Activating theBelt-Minder Feature
WARNING: While the systemallows you to switch it off, this system isdesigned to improve your chances ofbeing safely belted and surviving a crash.We recommend you leave the systemswitched on. To reduce the risk of injury,do not switch the system on or off whiledriving your vehicle.
Note: The driver and front passengerwarnings switch on and off independently.When you perform this procedure for oneseating position, do not buckle the otherposition as this will terminate the process.Read Steps 1–4 thoroughly beforeproceeding with the programmingprocedure.Before following the procedure, make surethat:• The parking brake is set.• The transmission is in park (P) or
neutral (N).• The ignition is off.• The driver and front passenger
seatbelts are unbuckled.1. Switch the ignition on. Do not start the
vehicle.2. Wait until the seatbelt warning lamp
turns off (about 1 minute). After Step2, wait an additional 5 seconds beforeproceeding with Step 3. Once you startStep 3, you must complete theprocedure within 30 seconds.
3. For the seating position you areswitching off, buckle then unbuckle theseatbelt three times at a moderatespeed, ending in the unbuckled state.After Step 3, the seatbelt warning lampturns on.
4. While the seatbelt warning lamp is on,buckle and then unbuckle the seatbelt.After Step 4, the seatbelt warning lampflashes for confirmation.
• This will switch the feature off for thatseating position if it is currently on.
• This will switch the feature on for thatseating position if it is currently off.
CHILD RESTRAINT ANDSEATBELT MAINTENANCEInspect the vehicle seatbelts and childsafety seat systems periodically to makesure they work properly and are notdamaged. Inspect the vehicle and childrestraint seatbelts to make sure there areno nicks, tears or cuts. Replace ifnecessary. All vehicle seatbelt assemblies,including retractors, buckles, front seatbeltbuckle assemblies, buckle supportassemblies (slide bar-if equipped),shoulder belt height adjusters (ifequipped), shoulder belt guide on seatbackrest (if equipped), child safety seatLATCH and tether anchors, and attachinghardware, should be inspected after acrash. Read the child restraintmanufacturer's instructions for additionalinspection and maintenance informationspecific to the child restraint.We recommend that all seatbeltassemblies in use in vehicles involved in acrash be replaced. However, if the crashwas minor and an authorized dealer findsthat the belts do not show damage andcontinue to operate properly, they do notneed to be replaced. Seatbelt assembliesnot in use during a crash should also beinspected and replaced if either damageor improper operation is noted.Properly care for seatbelts. See VehicleCare (page 280).
38
Fusion (CC7) Canada/United States of America, enUSA, Edition date: 201905, Second-Printing
Seatbelts

SEATBELT EXTENSIONS
WARNING: Persons who fit intothe vehicle's seatbelt should not use anextension. Unnecessary use could resultin serious personal injury in the event ofa crash.
WARNING: Only use extensionsprovided free of charge by our dealers.The dealer will provide an extensiondesigned specifically for this vehicle,model year and seating position. The useof an extension intended for anothervehicle, model year or seating positionmay not offer you the full protection ofyour vehicle's seatbelt restraint system.
WARNING: Never use seatbeltextensions to install child restraints.
WARNING: Do not use a seatbeltextension with an inflatable seatbelt.
WARNING: Do not use extensionsto change the way the seatbelt fitsacross the torso, over the lap or to makethe seatbelt buckle easier to reach.
If, because of body size or driving position,it is not possible to properly fasten theseatbelt over your lap and shoulder, anextension that is compatible with theseatbelts is available free of charge fromour dealers. Only use our seatbeltextensions made by the original equipmentseatbelt manufacturer with our seatbelts.Ask your authorized dealer if your extensionis compatible with your vehicle restraintsystem.
39
Fusion (CC7) Canada/United States of America, enUSA, Edition date: 201905, Second-Printing
Seatbelts

The Personal Safety System provides animproved overall level of frontal crashprotection to front seat occupants and isdesigned to help further reduce the risk ofairbag-related injuries. The system is ableto analyze different occupant conditionsand crash severity before activating theappropriate safety devices to help betterprotect a range of occupants in a varietyof frontal crash situations.The Vehicle Personal Safety Systemconsists of:• Driver and passenger dual-stage airbag
supplemental restraints.• Front seat outermost seatbelts with
pretensioners, energy managementretractors and seatbelt usage sensors.
• Driver seat position sensor.• Passenger seat position sensor.• Front passenger sensing system.• Passenger airbag off and on indicators.• Front crash severity sensors.• Restraints control module with impact
and safing sensors.• Restraint system warning lamp and
tone.• The electrical wiring for the airbags,
crash sensors, seatbelt pretensioners,front seatbelt usage sensors, driverseat position sensor, front passengersensing system and indicators.
How Does the Personal SafetySystem Work?The Personal Safety System can adapt thedeployment strategy of the safety devicesaccording to crash severity and occupantconditions. A collection of crash andoccupant sensors provides information tothe restraints control module. During acrash, the restraints control module maydeploy the seatbelt pretensioners, one orboth stages of the dual-stage airbagsbased on crash severity and occupantconditions.
40
Fusion (CC7) Canada/United States of America, enUSA, Edition date: 201905, Second-Printing
Personal Safety System™

PRINCIPLE OF OPERATION
WARNING: Airbags do not inflateslowly or gently, and the risk of injuryfrom a deploying airbag is the greatestclose to the trim covering the airbagmodule.
WARNING: All occupants of yourvehicle, including the driver, shouldalways properly wear their seatbelts,even when an airbag supplementalrestraint system is provided. Failure toproperly wear your seatbelt couldseriously increase the risk of injury ordeath.
WARNING: Even with advancedrestraints systems, properly restrainchildren 12 and under in a rear seatingposition. Failure to follow this couldseriously increase the risk of injury ordeath.
WARNING: Do not place your armson the airbag cover or through thesteering wheel. Failure to follow thisinstruction could result in personal injury.
WARNING: Keep the areas in frontof the airbags free from obstruction. Donot affix anything to or over the airbagcovers. Objects could become projectilesduring airbag deployment or in a suddenstop. Failure to follow this instructioncould result in personal injury or death.
WARNING: Airbags can kill or injurea child in a child restraint. Never place arear-facing child restraint in front of anactive airbag. If you must use aforward-facing child restraint in the frontseat, move the seat upon which the childrestraint is installed all the way back.
WARNING: Do not attempt toservice, repair, or modify thesupplementary restraint system orassociated components. Failure tofollow this instruction could result inpersonal injury or death.
WARNING: Several airbag systemcomponents get hot after inflation. Toreduce the risk of injury, do not touchthem after inflation.
WARNING: If a supplementaryrestraint system component hasdeployed, it will not function again. Havethe system and associated componentsinspected as soon as possible. Failure tofollow this instruction could result inpersonal injury or death.
The airbags are a supplemental restraintsystem and are designed to work with theseatbelts to help protect the driver andright front passenger from certain upperbody injuries. Airbags do not inflate slowly;there is a risk of injury from a deployingairbag.Note: You will hear a loud bang and see acloud of harmless powdery residue if anairbag deploys. This is normal.The airbags inflate and deflate rapidlyupon activation. After airbag deployment,it is normal to notice a smoke-like, powderyresidue or smell the burnt propellant. Thismay consist of cornstarch, talcum powder(to lubricate the bag) or sodiumcompounds (for example, baking soda)that result from the combustion processthat inflates the airbag. Small amounts ofsodium hydroxide may be present whichmay irritate the skin and eyes, but none ofthe residue is toxic.
41
Fusion (CC7) Canada/United States of America, enUSA, Edition date: 201905, Second-Printing
Supplementary Restraints System

While the system is designed to helpreduce serious injuries, contact with adeploying airbag may also cause abrasionsor swelling. Temporary hearing loss is alsoa possibility as a result of the noiseassociated with a deploying airbag.Because airbags must inflate rapidly andwith considerable force, there is the risk ofdeath or serious injuries such as fractures,facial and eye injuries or internal injuries,particularly to occupants who are notproperly restrained or are otherwise out ofposition at the time of airbag deployment.Thus, it is extremely important thatoccupants be properly restrained as faraway from the airbag module as possiblewhile maintaining vehicle control.Routine maintenance of the airbags is notrequired.
DRIVER AND PASSENGERAIRBAGS
WARNING: Do not place your armson the airbag cover or through thesteering wheel. Failure to follow thisinstruction could result in personal injury.
WARNING: Keep the areas in frontof the airbags free from obstruction. Donot affix anything to or over the airbagcovers. Objects could become projectilesduring airbag deployment or in a suddenstop. Failure to follow this instructioncould result in personal injury or death.
WARNING: Airbags can kill or injurea child in a child restraint. Never place arear-facing child restraint in front of anactive airbag. If you must use aforward-facing child restraint in the frontseat, move the seat upon which the childrestraint is installed all the way back.
E151127
The driver and front passenger airbags willdeploy during significant frontal and nearfrontal crashes.The driver and passenger front airbagsystem consists of:• Driver and passenger airbag modules.• Front passenger sensing system.
E67017
· Crash sensors and monitoringsystem with readiness indicator.See Crash Sensors and Airbag
Indicator (page 48).
Proper Driver and Front PassengerSeating Adjustment
WARNING: National HighwayTraffic Safety Administration (NHTSA)recommends a minimum distance of atleast 10 in (25 cm) between anoccupant's chest and the driver airbagmodule.
To properly position yourself away fromthe airbag:• Move your seat to the rear as far as you
can while still reaching the pedalscomfortably.
• Recline the seat slightly (one or twodegrees) from the upright position.
42
Fusion (CC7) Canada/United States of America, enUSA, Edition date: 201905, Second-Printing
Supplementary Restraints System

After all occupants have adjusted theirseats and put on seatbelts, it is veryimportant that they continue to sitproperly. A properly seated occupant sitsupright, leaning against the seatback, andcentered on the seat cushion, with theirfeet comfortably extended on the floor.Sitting improperly can increase the chanceof injury in a crash event. For example, ifan occupant slouches, lies down, turnssideways, sits forward, leans forward orsideways, or puts one or both feet up, thechance of injury during a crash is greatlyincreased.
Children and Airbags
WARNING: Airbags can kill or injurea child in a child restraint. Never place arear-facing child restraint in front of anactive airbag. If you must use aforward-facing child restraint in the frontseat, move the seat upon which the childrestraint is installed all the way back.
E142846
Children must always be properlyrestrained. Accident statistics suggest thatchildren are safer when properly restrainedin the rear seating positions than in thefront seating position. Failure to followthese instructions may increase the risk ofinjury in a crash.
FRONT PASSENGER SENSINGSYSTEM
WARNING: Even with advancedrestraints systems, properly restrainchildren 12 and under in a rear seatingposition. Failure to follow this couldseriously increase the risk of injury ordeath.
WARNING: Sitting improperly, outof position or with the seatback reclinedtoo far can take weight off the seatcushion and affect the decision of thepassenger sensing system, resulting inserious injury or death in the event of acrash. Always sit upright against yourseat back, with your feet on the floor.
WARNING: Do not stow objects inthe seatback map pocket or hangobjects off a seatback if a child is in thefront passenger seat. Do not placeobjects under the front passenger seator between the seat and the centerconsole. Check the passenger airbagindicator lamp for proper airbag status.Failure to follow these instructions mayinterfere with the front passenger seatsensing system and increase the risk ofserious injury.
WARNING: Any alteration ormodification to the front passenger seatmay affect the performance of the frontpassenger sensing system. This couldseriously increase the risk of injury ordeath.
This system works with sensors that arepart of the front passenger seat andseatbelt to detect the presence of aproperly-seated occupant and determineif the front passenger frontal airbag shouldbe enabled (may inflate) or not.
43
Fusion (CC7) Canada/United States of America, enUSA, Edition date: 201905, Second-Printing
Supplementary Restraints System

E227975
The front passenger sensing system usesa passenger airbag status indicator thatilluminates indicating that the frontpassenger frontal airbag is either ON(enabled) or OFF (disabled).The indicator lamp is at the top center ofthe instrument panel.Note: The passenger airbag status indicatorOFF and ON indicator lamps illuminate fora short period of time when you first switchthe ignition on to confirm it is functional.The front passenger sensing system isdesigned to disable (will not inflate) thefront passenger frontal airbag when thefront passenger seat is unoccupied, or arear facing infant seat, a forward-facingchild restraint, or a booster seat isdetected. Even with this technology,parents are strongly encouraged toalways properly restrain children in the rearseat. The sensor also turns off thepassenger front airbag when the passengerseat is empty.
• When the front passenger sensingsystem disables (will not inflate) thefront passenger frontal airbag, thepassenger airbag status indicatorilluminates the OFF lamp and stays litto remind you that the front passengerfrontal airbag is disabled.
• If you install the child restraint and thepassenger airbag status indicatorilluminates the ON lamp, then switchthe vehicle off, remove the childrestraint from the vehicle and reinstallthe restraint following the childrestraint manufacturer's instructions.
The front passenger sensing system isdesigned to enable (may inflate) the frontpassenger frontal airbag anytime thesystem senses that a person of adult sizeis sitting properly in the front passengerseat.• When the front passenger sensing
system enables the front passengerfrontal airbag (may inflate), thepassenger airbag status indicatorilluminates the ON lamp and remainsilluminated.
If a person of adult size is sitting in the frontpassenger seat, but the airbag off indicatorlamp is lit, it is possible that the person isnot sitting properly in the seat. If thishappens:• Switch the vehicle off and ask the
person to place the seat backrest in anupright position.
• Have the person sit upright in the seat,centered on the seat cushion, with theperson’s legs comfortably extended.
• Restart the vehicle and have the personremain in this position for about twominutes. This will allow the system todetect that person and enable thepassenger frontal airbag.
• If the indicator OFF lamp remains liteven after this, advise the person toride in the rear seat.
44
Fusion (CC7) Canada/United States of America, enUSA, Edition date: 201905, Second-Printing
Supplementary Restraints System

Passenger AirbagPassenger Airbag StatusIndicator
Occupant
DisabledOFF: LitEmpty
ON: Unlit
DisabledOFF: LitChild
ON: Unlit
EnabledOFF: UnlitAdult
ON: Lit
After all occupants have adjusted theirseats and put on seatbelts, it is veryimportant that they continue to sitproperly. A properly seated occupant sitsupright, leaning against the seat backrest,and centered on the seat cushion, withtheir feet comfortably extended on thefloor. Sitting improperly can increase thechance of injury in a crash event. Forexample, if an occupant slouches, liesdown, turns sideways, sits forward, leansforward or sideways, or puts one or bothfeet up, the chance of injury during a crashis greatly increased.The conditions listed above may cause theweight of a properly seated occupant tobe incorrectly interpreted by the frontpassenger sensing system. The person inthe front passenger seat may appearheavier or lighter due to the conditionsdescribed in the list above.
E67017
Make sure the front passengersensing system is operatingproperly. See Crash Sensors
and Airbag Indicator (page 48).
Do not attempt to repair or service thesystem. Take your vehicle immediately toan authorized dealer.
If it is necessary to modify an advancedfront airbag system to accommodate aperson with disabilities, contact the FordCustomer Relationship Center. SeeGetting the Services You Need (page237).
SIDE AIRBAGS
WARNING: Do not place objectsor mount equipment on or near theairbag cover, on the side of the front orrear seatbacks, or in areas that maycome into contact with a deployingairbag. Failure to follow theseinstructions may increase the risk ofpersonal injury in the event of a crash.
WARNING: Do not use accessoryseat covers. The use of accessory seatcovers may prevent the deployment ofthe side airbags and increase the risk ofinjury in an accident.
WARNING: Do not lean your headon the door. The side airbag could injureyou as it deploys from the side of theseatback.
45
Fusion (CC7) Canada/United States of America, enUSA, Edition date: 201905, Second-Printing
Supplementary Restraints System

WARNING: Do not attempt toservice, repair, or modify thesupplementary restraint system orassociated components. Failure tofollow this instruction could result inpersonal injury or death.
WARNING: If a supplementaryrestraint system component hasdeployed, it will not function again. Havethe system and associated componentsinspected as soon as possible. Failure tofollow this instruction could result inpersonal injury or death.
The side airbags are on the outboard sideof the seat backrests of the front seats. Incertain sideways crashes, the side airbagswill be inflated. The airbag was designedto inflate between the door panel andoccupant to further enhance the protectionprovided occupants in side impact crashes.
E152533
The system consists of the following:• A label or embossed side panel
indicating that side airbags are fittedto your vehicle.
• Side airbags inside the driver and frontpassenger seat backrests.
• Front passenger sensing system.
E67017
• Crash sensors and monitoring systemwith readiness indicator. See CrashSensors and Airbag Indicator (page48).
The design and development of the sideairbag system included recommendedtesting procedures that were developedby a group of automotive safety expertsknown as the Side Airbag TechnicalWorking Group. These recommendedtesting procedures help reduce the risk ofinjuries related to the deployment of sideairbags.
DRIVER AND PASSENGERKNEE AIRBAGSDriver and passenger knee airbags arelocated under or within the instrumentpanel. During a crash, the restraints controlmodule may activate the driver andpassenger knee airbags (individually orboth) based on crash severity andrespective occupant conditions. Undercertain crash and occupant conditions, thedriver and passenger knee airbags maydeploy (individually or both) but thecorresponding front airbag may notactivate. As with front and side airbags, itis important to be properly seated andrestrained to reduce the risk of death orserious injury.
E67017
Make sure the knee airbags areoperating properly. See CrashSensors and Airbag Indicator
(page 48).
46
Fusion (CC7) Canada/United States of America, enUSA, Edition date: 201905, Second-Printing
Supplementary Restraints System

SAFETY CANOPY™
WARNING: Do not place objectsor mount equipment on or near theheadliner at the siderail that may comeinto contact with a deploying curtainairbag. Failure to follow theseinstructions may increase the risk ofpersonal injury in the event of a crash.
WARNING: Do not lean your headon the door. The curtain airbag couldinjure you as it deploys from theheadliner.
WARNING: Do not attempt toservice, repair, or modify thesupplementary restraint system orassociated components. Failure tofollow this instruction could result inpersonal injury or death.
WARNING: All occupants of yourvehicle, including the driver, shouldalways properly wear their seatbelts,even when an airbag supplementalrestraint system is provided. Failure toproperly wear your seatbelt couldseriously increase the risk of injury ordeath.
WARNING: To reduce risk of injury,do not obstruct or place objects in thedeployment path of the airbag.
WARNING: If a supplementaryrestraint system component hasdeployed, it will not function again. Havethe system and associated componentsinspected as soon as possible. Failure tofollow this instruction could result inpersonal injury or death.
The Safety Canopy deploys duringsignificant side crashes or when a certainlikelihood of a rollover event is detectedby the rollover sensor. The Safety Canopyis mounted to the roof side rail sheet metal,behind the headliner, above each row ofseats. In certain sideways crashes orrollover events, the Safety Canopy will beactivated, regardless of which seats areoccupied. The Safety Canopy is designedto inflate between the side window areaand occupants to further enhanceprotection provided in side impact crashesand rollover events.
E75004
The system consists of the following:• Safety Canopy curtain airbags above
the trim panels over the front and rearside windows identified by a label orwording on the headliner or roof-pillartrim.
• A flexible headliner which opens abovethe side doors to allow air curtaindeployment
E67017
· Crash sensors and monitoringsystem with a readinessindicator. See Crash Sensors
and Airbag Indicator (page 48).
47
Fusion (CC7) Canada/United States of America, enUSA, Edition date: 201905, Second-Printing
Supplementary Restraints System

Properly restrain children 12 years old andunder in the rear seats. The Safety Canopywill not interfere with children restrainedusing a properly installed child or boosterseat because it is designed to inflatedownward from the headliner above thedoors along the side window opening.The design and development of the SafetyCanopy included recommended testingprocedures that were developed by agroup of automotive safety experts knownas the Side Airbag Technical WorkingGroup. These recommended testingprocedures help reduce the risk of injuriesrelated to the deployment of side airbags(including the Safety Canopy).
CRASH SENSORS ANDAIRBAG INDICATOR
WARNING: Modifying or addingequipment to the front end of yourvehicle (including hood, bumper system,frame, front end body structure, towhooks and hood pins) may affect theperformance of the airbag system,increasing the risk of injury. Do notmodify or add equipment to the frontend of your vehicle.
Your vehicle has a collection of crash andoccupant sensors which provideinformation to the restraints controlmodule. The restraints control moduledeploys (activates) the seatbeltpretensioners, driver airbag, passengerairbag, knee airbag(s), seat mounted sideairbags and the Safety Canopy. Based onthe type of crash, the restraints controlmodule deploys the appropriate safetydevices.
The restraints control module alsomonitors the readiness of the above safetydevices plus the crash and occupantsensors. The readiness of the safetysystem is indicated by a warning indicatorlight in the instrument cluster or by abackup tone if the warning light is notworking. Routine maintenance of theairbag is not required.A difficulty with the system is indicated byone or more of the following:
E67017
• The readiness light will not illuminateimmediately after you switch theignition on.
• The readiness light either flashes orstays lit.
• A series of five beeps is heard. The tonepattern repeats periodically until theproblem, the light or both are repaired.
If any of these things happen, evenintermittently, have the supplementalrestraint system serviced at an authorizeddealer immediately. Unless serviced, thesystem may not function properly in theevent of a crash.The restraint system is designed toactivate when the vehicle sustainsconditions sufficient to cause the restraintcontrol module to deploy a safety device.
48
Fusion (CC7) Canada/United States of America, enUSA, Edition date: 201905, Second-Printing
Supplementary Restraints System

The fact that not all the safety devicesactivate for all occupants in a crash doesnot mean something is wrong with thesystem. Rather, it means the restraintscontrol module determined the accidentconditions (crash severity, type of crash,belt usage) were not appropriate toactivate these safety devices.• The front airbags are designed to
activate only in frontal and near-frontalcrashes (not rollovers, side impacts orrear impacts) unless the crash causessufficient frontal deceleration.
• The seatbelt pretensioners aredesigned to activate in frontal,near-frontal and side crashes, and inrollovers.
• The knee airbag(s) may deploy basedon crash severity and occupantconditions.
• The side airbags are designed to inflatein certain side impact crashes orrollover events. Side airbags mayactivate in other types of crashes if yourvehicle experiences sufficient sidewaysmotion or deformation, or a certainlikelihood of rollover.
• The Safety Canopy is designed toinflate in certain side impact crashesor rollover events. The Safety Canopymay activate in other types of crashesif your vehicle experiences sufficientsideways motion or deformation, or acertain likelihood of rollover.
AIRBAG DISPOSALContact your authorized dealer as soon aspossible. Airbags must be disposed of byqualified personnel.
49
Fusion (CC7) Canada/United States of America, enUSA, Edition date: 201905, Second-Printing
Supplementary Restraints System

GENERAL INFORMATION ONRADIO FREQUENCIESThis device complies with Part 15 of theFCC Rules and with Industry Canadalicense-exempt RSS standard(s).Operation is subject to the following twoconditions: (1) This device may not causeharmful interference, and (2) This devicemust accept any interference received,including interference that may causeundesired operation.
WARNING: Changes ormodifications not expressively approvedby the party responsible for compliancecould void the user's authority to operatethe equipment. The term "IC:" before theradio certification number only signifiesthat Industry Canada technicalspecifications were met.
The typical operating range for yourtransmitter is approximately 33 ft (10 m).Vehicles with the remote start feature willhave a greater range.One of the following could cause adecrease in operating range:• Weather conditions.• Nearby radio towers.• Structures around the vehicle.• Other vehicles parked next to your
vehicle.The radio frequency used by your remotecontrol can also be used by other radiotransmitters, for example amateur radios,medical equipment, wireless headphones,wireless remote controls, cell phones,battery chargers and alarm systems. If thefrequencies are jammed, you will not beable to use your remote control. You canlock and unlock the doors with the key.Note: Make sure to lock your vehicle beforeleaving it unattended.
Note: If you are in range, the remote controlwill operate if you press any buttonunintentionally.Note: The remote control contains sensitiveelectrical components. Exposure to moistureor impact may cause permanent damage.
Intelligent Access (If Equipped)
The system uses a radio frequency signalto communicate with your vehicle andauthorize your vehicle to unlock when oneof the following conditions are met:• You activate the front exterior door
handle switch.• You press the luggage compartment
button.• You press a button on the transmitter.If excessive radio frequency interferenceis present in the area or if the transmitterbattery is low, you may need tomechanically unlock your door. You canuse the mechanical key blade in yourintelligent access key to open the driverdoor in this situation. See RemoteControl (page 50).
REMOTE CONTROLIntelligent Access KeyNote: You may not be able to shift out ofpark (P) unless the intelligent access key isinside your vehicle.
50
Fusion (CC7) Canada/United States of America, enUSA, Edition date: 201905, Second-Printing
Keys and Remote Controls

E307003
Your remote control operates the powerlocks and the remote start system. Thekey must be in your vehicle to use the pushbutton start.
Removable Key BladeThe remote control also contains aremovable key blade that you can use tounlock your vehicle.
E307694
Push the release button and pull the keyblade out.
E151795
Note: Your vehicle keys came with asecurity label that provides important keycut information. Keep the label in a safeplace for future reference.
Using the Key BladeThe key cylinder is under a cap on the driverdoor handle.To remove the cap:
51
Fusion (CC7) Canada/United States of America, enUSA, Edition date: 201905, Second-Printing
Keys and Remote Controls

E151956
1. Insert the key blade into the slot on thebottom of the handle and applyupward pressure.
2. While maintaining upward pressure,move the cap rearward to release it.Gently remove the key while doing so.
To install the cap:
E151957
1. Place the cap just forward of the keycylinder.
2. Applying pressure to the cap, move itforward until it is in place. You mayhear a snap as it engages.
Make sure you have properly installed thecap by trying to move it rearward.
Replacing the BatteryNote: Refer to local regulations whendisposing of your remote control batteries.Note: Do not wipe off any grease on thebattery terminals or on the back surface ofthe circuit board.Note: Replacing the battery does not erasethe programmed key from your vehicle. Yourremote control should operate normally.A message appears in the informationdisplay when the remote control batteryis low. See Information Messages (page103).
The remote control uses one coin-typethree-volt lithium battery.
E307694
1. Push the release button and pull thekey blade out.
52
Fusion (CC7) Canada/United States of America, enUSA, Edition date: 201905, Second-Printing
Keys and Remote Controls

E303824
2. Twist a thin coin under the tab hiddenbehind the key blade head to removethe battery cover.
E218402
3. Insert a suitable tool, for example ascrewdriver, in the position shown andcarefully remove the battery.
4. Install a new battery with the + facingupward.
5. Reinstall the battery cover and the keyblade.
Car Finder
E138623
Press the button twice withinthree seconds. The horn soundsand the direction indicators
flash. We recommend you use this methodto locate your vehicle, rather than usingthe panic alarm.
Sounding the Panic AlarmNote: The panic alarm only operates whenthe ignition is off.
E138624
Press the button to sound thepanic alarm. Press the buttonagain or switch the ignition on to
turn it off.
53
Fusion (CC7) Canada/United States of America, enUSA, Edition date: 201905, Second-Printing
Keys and Remote Controls

Remote Start (If Equipped)
WARNING: To avoid exhaustfumes, do not use remote start if yourvehicle is parked indoors or in areas thatare not well ventilated.
Note: Do not use remote start if your fuellevel is low.
E138625
The remote start button is on theremote control.
This feature allows you to start yourvehicle from the outside. Your remotecontrol has an extended operating range.If your vehicle has automatic climatecontrol, you can configure it to operatewhen you remote start your vehicle. SeeClimate Control (page 118). A manualclimate control system will run at thesetting it was set to when you switchedyour vehicle off.Many states and provinces haverestrictions for the use of remote start.Check your local and state or provinciallaws for specific requirements regardingremote start systems.The remote start system does not workwhen any of the following conditions occur:• The ignition is on.• The anti-theft alarm triggers.• You switch the feature off in the
information display.• The hood is open.• The transmission is not in park (P).• The battery voltage is below the
minimum operating voltage.
Remote Control Feedback (IfEquipped)An LED on the remote control providesstatus feedback of remote start or stopcommands.
StatusLED
Remote startsuccessful
Solid green
Remote stopsuccessful
Solid red
Request failed orstatus not received
Blinking red
Status incompleteBlinking green
Remote Starting Your VehicleNote: You must press each button withinthree seconds of each other. Your vehiclewill not remote start if you do not follow thissequence.
E138626
To remote start your vehicle:1. Press the lock button to lock all the
doors.2. Press the remote start button twice.
The exterior lamps flash twice.The horn sounds if the system fails to start.Note: You must press the push buttonignition switch on the instrument panel oncewhile applying the brake pedal beforedriving your vehicle.
54
Fusion (CC7) Canada/United States of America, enUSA, Edition date: 201905, Second-Printing
Keys and Remote Controls

The power windows do not work duringremote start and the radio does not turnon automatically.The parking lamps remain on and yourvehicle will run for 5, 10 or 15 minutes,depending on the setting.
Extending the Engine Running TimeTo extend the engine running time durationof your vehicle during remote start, repeatsteps 1 and 2 while the engine is running.If the duration is set to 15 minutes, theduration extends by another 15 minutes.For example, if your vehicle had beenrunning from the first remote start for 10minutes, your vehicle continues to run nowfor a total of 30 minutes. You can extendthe engine running time duration to amaximum of 30 minutes.Wait at least five seconds before remotestarting after the engine stops running.
Turning Your Vehicle Off After RemoteStarting
E138625
Press the button once. Yourvehicle and the parking lampsturn off.
You may have to be closer to your vehiclethan when starting due to ground reflectionand the added noise of your runningvehicle.You can switch this feature on or off in theinformation display.
Memory FeatureYou can program your remote control torecall memory positions. See MemoryFunction (page 132).
REPLACING A LOST KEY ORREMOTE CONTROLYou can purchase replacement keys orremote controls from an authorized dealer.Authorized dealers can program remotecontrols for your vehicle.
55
Fusion (CC7) Canada/United States of America, enUSA, Edition date: 201905, Second-Printing
Keys and Remote Controls

PRINCIPLE OF OPERATIONMyKey allows you to program keys withrestricted driving modes to promote gooddriving habits. You can program therestrictions to all keys except one. Any keysthat you did not program are administratorkeys or admin keys.You can use admin keys to:• Create a MyKey with certain vehicle
restrictions.• Program certain MyKey settings.• Clear all MyKey restrictions.After you program a MyKey, you can viewthe following information through theinformation display:• The total number of admin keys and
MyKeys for your vehicle.• The total distance a MyKey driver
traveled with your vehicle.Note: Every MyKey receives the samerestrictions and settings. You cannotprogram them individually.Note: For vehicles equipped with apush-button start switch: When both aMyKey and an admin key are present whenyou start your vehicle, the system recognizesthe admin key only.
Standard SettingsNot every vehicle includes the featureslisted below. If your vehicle has thisequipment, then you cannot change thefollowing settings when using a MyKey:• Seatbelt reminder or Belt-Minder™.
MyKey mutes the audio system untildrivers, and in some instances,passengers, fasten their seatbelts.Note: If your vehicle includes anAM/FM radio or a very basic audiosystem, then the radio may not mute.
• Earlier low-fuel warning. The low-fuelwarning activates earlier for MyKeydrivers, giving them more time to refuel.
• Certain driver alerts, stability systemsor parking aids turn on automaticallywhen you use the MyKey system. Forexample, Blind Spot InformationSystem (BLIS), cross traffic alert, lanedeparture warning or forward collisionwarning. Note: MyKey drivers may beable to turn the lane departure warningfeature off, but this feature turns backon automatically with every new keycycle.
• Restricted touchscreen operation insome markets. For example, MyKeymay prevent manual navigationdestination input while the vehicle is inany gear other than park (P) or whenthe vehicle reaches a certain rate ofspeed.
• Satellite radio adult contentrestrictions, if this feature is availablein your market.
Optional SettingsYou can configure certain vehicle featuresettings when you first create a MyKey. Youcan also change the settings afterwardwith an admin key.
56
Fusion (CC7) Canada/United States of America, enUSA, Edition date: 201905, Second-Printing
MyKey™

Note: Not every feature applies to everyvehicle in every market. When they areavailable for your vehicle, then they appearin your information display, providingchoices to switch them on or off, or to selecta more specific setting.• Various vehicle speed limits so the
MyKey driver cannot exceed certainspeeds. The information display showswarnings followed by an audible tonewhen the MyKey driver reaches the setspeed. You cannot override the setspeed by fully depressing theaccelerator pedal.
WARNING: Do not set MyKeymaximum speed limit to a limit that willprevent the driver from maintaining asafe speed considering posted speedlimits and prevailing road conditions. Thedriver is always responsible to drive inaccordance with local laws andprevailing conditions. Failure to do socould result in accident or injury.
• Various vehicle speed reminders soMyKey drivers know when their vehiclespeed approaches the limits. Warningsappear in your information display anda tone sounds when the MyKey driversexceed the set vehicle speed.
• The audio system's maximum volumelimits to 45% so MyKey drivers canconcentrate on the road. A messageappears in the information displaywhen MyKey drivers attempt to exceedthe limited volume. MyKey alsodisables the automatic volume control.Note: If your vehicle includes anAM/FM radio or a very basic audiosystem, then the radio may not limit.
• Always on setting. This setting forcescertain features to remain on andactive for MyKey drivers. For example,E911 or emergency assistance and thedo not disturb features stay on even ifa MyKey driver uses the feature'scontrol to switch it off. When selected,you will not be able to turn off AdvanceTrac or traction control (if your vehiclehas this feature).
CREATING A MYKEYUse the information display to create aMyKey.1. Switch the ignition on using the key or
the transmitter you want to program.If your vehicle has a push-button start,place the transmitter into the backupslot. See Passive Anti-Theft System(page 68).
2. Access the main menu in theinformation display and then scrollthrough the menus to beginprogramming your MyKey. SeeInformation Displays (page 94).
3. Follow the instructions in the display.
57
Fusion (CC7) Canada/United States of America, enUSA, Edition date: 201905, Second-Printing
MyKey™

4. A confirmation message appears in thedisplay after you finish programmingyour MyKey. The programmedrestrictions apply when you key off,open and close driver door and restartyour vehicle with the programmed keyor transmitter.
Note: Make sure you label the programmedMyKey so you can distinguish it from theadmin keys.You can also program the optional MyKeysettings.
Programming or ChangingConfigurable SettingsUse the information display to program orchange your optional MyKey settings.1. Switch the ignition on using the key or
the transmitter you want to program.2. Access the main menu in the
information display and then scrollthrough the menus to change thesettings of your MyKey. SeeInformation Displays (page 94).
3. Follow the instructions in the display.4. A confirmation message appears in the
display after you finish programmingyour MyKey. The programmedrestrictions apply when you key off,open and close the driver door andrestart your vehicle with theprogrammed key or transmitter.
Note: You can clear or change your MyKeysettings at any time during the same keycycle as you created the MyKey. If youswitch the engine off, you must use anadmin key to change or clear your optionalMyKey settings.
CLEARING ALL MYKEYSWhen you clear your MyKeys, you removeall restrictions and return all MyKeys totheir original admin key status at once. Toclear all MyKeys of all MyKey settings, usethe information display.1. Switch the ignition on using an admin
key.2. Access the main menu in the
information display and then scrollthrough the menus to begin clearingyour MyKey programming. SeeInformation Displays (page 94).
3. Follow the instructions in the display.4. A confirmation message appears in the
display after you finish clearing yourMyKeys.
Note: When you clear your MyKeys, youremove all restrictions and return all MyKeysto their original admin key status. Youcannot remove the MyKey restrictionsindividually.
CHECKING MYKEY SYSTEMSTATUSYou can find information about yourprogrammed MyKeys by using theinformation display. See InformationDisplays (page 94).
MyKey DistanceTracks the distance when drivers use aMyKey. The only way to delete theaccumulated distance is by using an adminkey to clear all MyKeys. If the distance doesnot accumulate as expected, then theintended user is not using the MyKey, or anadmin key user recently cleared and thenrecreated a MyKey.
58
Fusion (CC7) Canada/United States of America, enUSA, Edition date: 201905, Second-Printing
MyKey™

Number of MyKeysIndicates the number of MyKeysprogrammed to your vehicle. Use thisfeature to detect how many MyKeys youhave for your vehicle and determine whenall MyKeys have been deleted.
Number of Admin KeysIndicates how many admin keys areprogrammed to your vehicle. Use thisfeature to determine how many adminkeys you have for your vehicle, and detectif an additional MyKey has beenprogrammed.
USING MYKEY WITH REMOTESTART SYSTEMSMyKey is not compatible with nonFord-approved, aftermarket remote startsystems. If you choose to install a remotestart system, see an authorized dealer fora Ford-approved remote start system.
MYKEY – TROUBLESHOOTING
Potential causesCondition
· The key or transmitter used to start thevehicle does not have admin privileges.
I cannot create a MyKey.
· Vehicles with keyless start: Make sure youplace the transmitter into the backup slot.· The key or transmitter used to start thevehicle is the only admin key. There alwayshas to be at least one admin key.· SecuriLock passive anti-theft system isdisabled or in unlimited mode.
· The key or transmitter used to start thevehicle does not have admin privileges.
I cannot program the configurable settings.
· There are no MyKeys programmed to thevehicle. See Creating a MyKey (page 57).
· The key or transmitter used to start thevehicle does not have admin privileges.
I cannot clear the MyKeys.
· No MyKeys are created. See Creating aMyKey (page 57).
· Purchase a new key or transmitter fromyour authorized dealer.
I lost the only admin key.
· Program a spare key or transmitter. Youmay need to see your authorized dealer.
I lost a key.
· The MyKey user is not using the MyKey.MyKey distances do not accumulate.
59
Fusion (CC7) Canada/United States of America, enUSA, Edition date: 201905, Second-Printing
MyKey™

Potential causesCondition
· An admin key holder cleared the MyKeysand created new MyKeys.· The key system has been reset.
60
Fusion (CC7) Canada/United States of America, enUSA, Edition date: 201905, Second-Printing
MyKey™

LOCKING AND UNLOCKINGYou can use the power door lock controlor the remote control to lock and unlockyour vehicle.
Power Door LocksThe power door lock control is on the driverand front passenger door panels.
E138628
Unlock.ALock.B
Door Lock IndicatorAn LED on the door window trimilluminates when you lock the door. Itremains illuminated for up to five minutesafter you switch the ignition off.
Door Lock Switch InhibitorWhen you electronically lock your vehicle,the power door lock switch no longeroperates after 20 seconds. You mustunlock your vehicle with the remote controlor keyless keypad, or switch the ignitionon, to restore function to these switches.You can switch this feature off in theinformation display.See General Information (page 94).Note: Switch the ignition on and off afterchanging the setting in the informationdisplay.
Rear Door Unlocking and OpeningPull the interior door handle twice tounlock and open a rear door. The first pullunlocks the door and the second pullopens the door.
Remote ControlYou can use the remote control at anytime. The luggage compartment releasebutton only works when your vehicle speedis less than 3 mph (5 km/h).
Unlocking the Doors (Two-StageUnlock)
E138629
Press the button to unlock thedriver door. Press the buttonagain within three seconds to
unlock all doors. The direction indicatorsflash.
Press and hold both the lock and unlockbuttons on the remote control for threeseconds to change between driver door orall doors unlock mode. The directionindicators flash twice to indicate a changeto the unlocking mode. Driver door modeonly unlocks the driver door when youpress the unlock button once. All doormode unlocks all doors when you pressthe unlock button once. The unlockingmode applies to the remote control,keyless entry keypad and intelligentaccess. You can also change between theunlocking modes using the informationdisplay. See General Information (page94).
Locking the Doors
E138623
Press the button to lock alldoors. The direction indicatorswill flash.
61
Fusion (CC7) Canada/United States of America, enUSA, Edition date: 201905, Second-Printing
Doors and Locks

Press the button again within threeseconds to confirm that all the doors areclosed. The doors will lock again, the hornwill sound and the direction indicators willflash if all the doors and the luggagecompartment are closed.
E112203
If the central locking function does notoperate, lock the doors individually usingthe key in the position shown. On theleft-hand side, turn the key clockwise tolock. On the right-hand side, turn the keycounterclockwise to lock.
MislockIf any door or the luggage compartment isopen, or if the hood is open on vehicleswith an anti-theft alarm or remote start,the horn sounds twice and the lamps donot flash. You can enable or disable thisfeature in the information display.
Opening the Luggage Compartment
E138630
Press twice within three secondsto open the luggagecompartment.
Activating Intelligent AccessGeneral InformationYou can unlock and lock the vehiclewithout taking the keys out of your pocketor purse when your intelligent access keyis within 3 ft (1 m) of your vehicle.Intelligent access uses a sensor on theback of the door handle for unlocking anda separate sensor on the face of each doorhandle for locking.The system will not function if:• Your vehicle battery has no charge.• The key battery has no charge.• The passive key frequencies are
jammed.Note: The system may not function if thepassive key is close to metal objects orelectronic devices, for example keys or a cellphone.Note: If the system does not function, usethe key blade to lock and unlock yourvehicle. See Remote Control (page 50).
Unlocking Using Intelligent Access
E248553
With your intelligent access key within 3 ft(1 m) of your vehicle, touch the unlocksensor on the back of the door handle fora brief period and then pull on the doorhandle to unlock, being careful to nottouch the lock sensor at the same time orpulling the door handle too quickly. Theintelligent access system requires a briefdelay to authenticate your intelligentaccess key fob.
62
Fusion (CC7) Canada/United States of America, enUSA, Edition date: 201905, Second-Printing
Doors and Locks

Locking Using Intelligent Access
E248554
With your intelligent access key within 3 ft(1 m) of your vehicle, touch the outer doorhandle lock sensor for approximately onesecond to lock, being careful to not touchthe unlock sensor on the back of the doorhandle at the same time. After locking, youcan immediately pull on the door handleto confirm locking occurred withoutinadvertently unlocking.
Opening the Luggage Compartment
E207425
Press the exterior release button hiddenabove the license plate.
Smart Unlocks for IntelligentAccess KeysThis feature helps to prevent you fromlocking your intelligent access key insideyour vehicle’s passenger compartment orrear cargo area.When you electronically lock your vehiclewith any door open, the transmission is inpark (P) and the ignition is off, the systemsearches for an intelligent access keyinside your vehicle after you close the lastdoor. If the system finds a key, all of thedoors will immediately unlock and the hornwill sound twice, indicating that a key isinside.You can override the smart unlock featureand intentionally lock the intelligent accesskey inside your vehicle.To do this, lock your vehicle after you haveclosed all the doors by:• Using the keyless entry keypad.• Pressing the lock button on another
intelligent access key.• Touching the locking area on the front
of the door handle with anotherintelligent access key in your hand.
When you open one of the front doors andlock your vehicle using the power door lockcontrol, all doors will lock then unlock if:• The ignition is on.• The ignition is off and the transmission
is not in park (P).
Autolock (If Equipped)
Autolock locks all the doors when all of thefollowing occur:• All doors are closed.• The ignition is on.• You shift into any gear putting your
vehicle in motion.• Your vehicle reaches a speed greater
than 12 mph (20 km/h).
63
Fusion (CC7) Canada/United States of America, enUSA, Edition date: 201905, Second-Printing
Doors and Locks

Autolock repeats when:• You open then close any door when
the ignition is on and your vehicle speedis 9 mph (15 km/h) or lower.
• Your vehicle reaches a speed greaterthan 12 mph (20 km/h).
AutounlockAutounlock unlocks all the doors when allof the following occur:• The ignition is on, all the doors are
closed, and your vehicle has beenmoving at a speed greater than 12 mph(20 km/h).
• Your vehicle comes to a stop and youswitch the ignition off or to theaccessory position.
• You open the driver door within 10minutes of switching the ignition off orto accessory.
Note: If you electronically lock your vehicleafter you switch the ignition off with thedriver door closed, the doors will notautounlock.
Enabling or Disabling AutounlockNote: You can switch autounlock andautolock on or off independently of eachother.Autolock is not configurable in all markets.If the autolock settings are not availablein your information display, then thesystem is not configurable. See GeneralInformation (page 94).
Illuminated EntryThe interior lamps and some exteriorlamps illuminate when you unlock thedoors with the remote control.
The illuminated entry system turns off thelights if:• The ignition is on.• You press the remote control lock
button.• After 25 seconds of illumination.The lights will not turn off if:• You turn them on with the lamp
control.• Any door is open.
Illuminated ExitThe interior lamps and some exteriorlamps illuminate when all doors are closedand you switch the ignition off.The lamps turn off if all the doors remainclosed and:• 25 seconds have elapsed.• You press the push button ignition
switch.
Battery SaverIf you leave the courtesy lamps, interiorlamps or headlamps on, the battery savershuts them off 10 minutes after you switchthe ignition off.
Battery Saver for Intelligent AccessKeysIf you leave the ignition switched on, itshuts off when it detects a certain amountof battery drain, or after 45 minutes.
KEYLESS ENTRYSECURICODE™ Keyless EntryKeypadThe keypad is near the driver window. Itilluminates when touched.
64
Fusion (CC7) Canada/United States of America, enUSA, Edition date: 201905, Second-Printing
Doors and Locks

Note: If you enter your entry code too faston the keypad, the unlock function may notwork. Enter your entry code again moreslowly.
E138637
You can use the keypad to do thefollowing:• Lock or unlock the doors.• Release the luggage compartment.• Program and erase user codes.• Arm and disarm the anti-theft alarm.You can operate the keypad with thefactory-set five-digit entry code. The codeis on the owner’s wallet card in the glovebox and is available from an authorizeddealer. You can also program up to five ofyour own five-digit personal entry codes.
Programming a Personal Entry Code1. Enter the factory-set five-digit code.2. Press 1·2 on the keypad within five
seconds.3. Enter your personal five-digit code.
You must press each number withinfive seconds of each other.
4. Press 1·2 on the keypad to savepersonal code 1.
The doors lock then unlock to confirm thatprogramming was successful.To program additional personal entrycodes, repeat steps 1 through 3, then forstep 4:• Press 3·4 to save personal code 2.• Press 5·6 to save personal code 3.• Press 7·8 to save personal code 4.• Press 9·0 to save personal code 5.You can also program a personal entrycode using the touchscreen.Hints:• Do not set a code that uses five of the
same number.• Do not use five numbers in sequential
order.• The factory-set code works even if you
have set your own personal code.
Erasing a Personal Code1. Enter the factory-set five-digit code.2. Press and release 1·2 on the keypad
within five seconds.3. Press 1·2 and hold for two seconds.
You must do this within five secondsof completing step 2.
All personal codes erase and only thefactory-set five-digit code works.
Anti-Scan FeatureThe keypad goes into an anti-scan modeif you enter the wrong code seven times.This mode turns off the keypad for oneminute and the keypad lamp flashes.Anti-scan turns off after any of thefollowing occur:• One minute of keypad inactivity.• You press the unlock button on the
remote control.
65
Fusion (CC7) Canada/United States of America, enUSA, Edition date: 201905, Second-Printing
Doors and Locks

• You switch the ignition on.• You unlock the vehicle using intelligent
access.
Locking and Unlocking the Doors
Locking All DoorsPress and hold 7·8 and 9·0 on the keypadsimultaneously with the driver door closed.You do not need to enter a code first.
Unlocking Only the Driver DoorEnter the factory-set or your personalfive-digit code. You must press eachnumber within five seconds of each other.The interior lamps illuminate.Note: All doors unlock if you switch on theall door unlocking mode. See Locking andUnlocking (page 61).
Unlocking All DoorsEnter the factory-set code or your personalcode, then press 3·4 on the keypad withinfive seconds.
Opening the Luggage CompartmentEnter the factory-set code or your personalcode, then press 5·6 on the keypad withinfive seconds.
Displaying the Factory-Set Code
Note: You need to have two programmedkeys for this procedure.1. Remove the key blade from the
transmitter.
E155835
2. Remove the rubber covering (A) fromthe cup holder. With the buttons facingupward and the unlock button facingthe front of your vehicle, place the firstintelligent access key into the backupslot (B).
3. Press the push button ignition switchonce and wait a few seconds.
4. Press the push button ignition switchagain and remove the key.
5. Insert the second programmed key intothe backup slot, and then press thepush button ignition switch.
The factory-set code appears in theinformation display for a few seconds.Note: The code may not display until afterany other warning messages first display.
INTERIOR LUGGAGECOMPARTMENT RELEASE
WARNING: Keep vehicle doors andluggage compartment locked and keepkeys and remote transmitters out of achild’s reach. Unsupervised childrencould lock themselves in the trunk andrisk injury. Children should be taught notto play in vehicles.
66
Fusion (CC7) Canada/United States of America, enUSA, Edition date: 201905, Second-Printing
Doors and Locks

WARNING: Do not leave childrenor animals unattended in the vehicle. Onhot days, the temperature in the trunk orvehicle interior can rise very quickly.Exposure of people or animals to thesehigh temperatures for even a short timecan cause death or serious heat-relatedinjuries, including brain damage. Smallchildren are particularly at risk.
Your vehicle is equipped with a releasehandle that provides a means of escapefor children and adults if they becomelocked inside the luggage compartment.Adults should familiarize themselves withthe operation and location of the releasehandle.
E144403
The handle is located inside the luggagecompartment either on the luggagecompartment door (lid) or near the taillamps. It is composed of a material thatwill glow for hours in darkness followingbrief exposure to ambient light.Pull the handle and push up on the luggagecompartment door (lid) to open fromwithin the luggage compartment.
67
Fusion (CC7) Canada/United States of America, enUSA, Edition date: 201905, Second-Printing
Doors and Locks

PASSIVE ANTI-THEFTSYSTEMNote: The system is not compatible withnon-Ford aftermarket remote start systems.Use of these systems may result in enginestarting problems and a loss of securityprotection.Note: Metallic objects, electronic devicesor a second coded key on the same keychain may result in vehicle startingproblems, especially if they are too close tothe key when starting your vehicle. Preventthese objects from touching the coded keywhen starting your vehicle. Switch theignition off, move all objects on the keychain away from the coded key and restartyour vehicle if a problem occurs.Note: Do not leave a duplicate coded keyin your vehicle. Always take your keys andlock all doors when leaving your vehicle.
SecuriLock®The system helps prevent the engine fromstarting unless you use a coded keyprogrammed to your vehicle. Using thewrong key may prevent your vehicle fromstarting. A message may appear in theinformation display.If you are unable to start your vehicle witha coded key, it is not operating correctly.A message may appear in the informationdisplay.
Automatic ArmingThe system arms when you switch theignition off.
Automatic DisarmingThe system disarms when you switch theignition on with a coded key.
Replacement KeysNote: Your vehicle comes with two keys.
The intelligent access key functions as aprogrammed key that operates the driverdoor lock and turns on the intelligentaccess with push button start system, aswell as a remote control.If your programmed transmitters are lostor stolen and you do not have an extracoded key, you will need to have yourvehicle towed to an authorized dealer. Youneed to erase the key codes from yourvehicle and program new coded keys.Store a spare intelligent access key awayfrom your vehicle in a safe place. You canpurchase replacement keys or remotecontrols from an authorized dealer.
Programming a Spare IntelligentAccess KeyNote: You can program a maximum of fourkeys to your vehicle.You must have two previouslyprogrammed intelligent access keys insideyour vehicle and the new unprogrammedintelligent access key readily accessible.You can purchase replacement keys orremote controls from an authorized dealer.Make sure that the ignition is switched offbefore beginning this procedure. Make surethat you close all the doors beforebeginning and that they remain closedthroughout the procedure. Carry out allsteps within 30 seconds of starting thesequence. Stop and wait for at least oneminute before starting again if you carryout any steps out of sequence.Read and understand the entire procedurebefore you begin.1. Remove the key blade from the
transmitter.
68
Fusion (CC7) Canada/United States of America, enUSA, Edition date: 201905, Second-Printing
Security

E155835
2. Remove the rubber covering (A) fromthe cup holder. With the buttons facingupward and the unlock button facingthe front of your vehicle, place the firstintelligent access key into the backupslot (B).
3. Press the push button ignition switch.4. Wait five seconds and then press the
push button ignition switch again.5. Remove the intelligent access key.6. Within 10 seconds, place a second
programmed intelligent access key inthe backup slot and press the pushbutton ignition switch.
7. Wait five seconds and then press thepush button ignition switch again.
8. Remove the intelligent access key.9. Wait five seconds, then place the
unprogrammed intelligent access keyin the backup slot and press the pushbutton ignition switch.
Programming is now complete. Check thatthe remote control functions operate andyour vehicle starts with the new intelligentaccess key.If programming was unsuccessful, wait 10seconds and repeat steps 1 through 7. If itstill does not work, take your vehicle to anauthorized dealer.
ANTI-THEFT ALARMThe system will warn you of anunauthorized entry to your vehicle. It willbe triggered if any door, the luggagecompartment or the hood is openedwithout using the key, remote control orkeyless entry keypad.The direction indicators will flash and thehorn will sound if unauthorized entry isattempted while the alarm is armed.Take all remote controls to an authorizeddealer if there is any potential alarmproblem with your vehicle.
Arming the AlarmThe alarm is ready to arm when there isnot a key in your vehicle. Electronically lockyour vehicle to arm the alarm.
Disarming the AlarmDisarm the alarm by any of the followingactions:• Unlock the doors or luggage
compartment with the remote controlor keyless entry keypad.
• Switch your vehicle on or start yourvehicle.
• Use a key in the driver door to unlockyour vehicle, then switch your vehicleon within 12 seconds.
Note: Pressing the panic button on theremote control will stop the horn and signalindicators, but will not disarm the system.
69
Fusion (CC7) Canada/United States of America, enUSA, Edition date: 201905, Second-Printing
Security
ADJUSTING THE STEERINGWHEEL
WARNING: Do not adjust thesteering wheel when your vehicle ismoving.
Note: Make sure that you are sitting in thecorrect position. See Sitting in the CorrectPosition (page 128).
E259854
1. Unlock the steering column.2. Adjust the steering wheel to the desired
position.
E259855
3. Lock the steering column.
AUDIO CONTROL
E287246
You can operate the followingfunctions with the control:
E265304
Press - to decrease volume level.Press + to increase volume level.
E268549
Press to silence the currentmedia
Press to access phone mode orto answer a phone call.
70
Fusion (CC7) Canada/United States of America, enUSA, Edition date: 201905, Second-Printing
Steering Wheel

E265040
Press to end a phone call.
Press to access the previousmedia selection.
Press to access the next mediaselection.
VOICE CONTROLThe controls are on the steering wheel.
E142599
Press and release to activatevoice recognition.
CRUISE CONTROL - VEHICLESWITH: CRUISE CONTROL
E191246
See What Is Cruise Control (page 195).
CRUISE CONTROL - VEHICLESWITH: ADAPTIVE CRUISECONTROL WITH STOP AND GO
E222797
See Using Adaptive Cruise Control(page 196).
INFORMATION DISPLAYCONTROL
E144636
See Information Displays (page 94).
HEATED STEERING WHEEL (IF
EQUIPPED)
Switch the heated steering wheel on andoff using the touchscreen.
71
Fusion (CC7) Canada/United States of America, enUSA, Edition date: 201905, Second-Printing
Steering Wheel

Touch the button to switch theheated steering wheel on andoff.
Note: You can use the heated steeringwheel only when the engine is running.Note: The system uses a sensor and isdesigned to control the temperature of thesteering wheel and to prevent it fromoverheating.Note: In warm temperatures, the steeringwheel quickly reaches its maximumtemperature and the system reduces thecurrent to the heating element. This couldcause you to think that the system hasstopped working but it has not. This isnormal.
HORN
E270945
72
Fusion (CC7) Canada/United States of America, enUSA, Edition date: 201905, Second-Printing
Steering Wheel

WINDSHIELD WIPERS
E270969
Push the lever up or down tooperate the windshield wiper.
E197525
Single wipe.AIntermittent wipe.BNormal wipe.CHigh speed wipe.D
Note: Fully defrost the windshield beforeyou switch the windshield wipers on.Note: Make sure that you switch thewindshield wipers off before entering a carwash.Note: If streaks or smears appear on thewindshield, clean the windshield and thewiper blades. If that does not resolve theissue, install new wiper blades.Note: Do not operate the wipers on a drywindshield. This may scratch the glass,damage the wiper blades or cause the wipermotor to burn out. Always use thewindshield washers before wiping a drywindshield.
Intermittent Wipe
E197526
Shortest wipe interval.AIntermittent wipe.BLongest wipe interval.C
Use the rotary control to adjust theintermittent wipe interval.
Speed Dependent WipersWhen your vehicle speed increases, theinterval between wipes decreases.
AUTOWIPERS (IF EQUIPPED)
Note: Fully defrost the windshield beforeyou switch the windshield wipers on.Note: Make sure that you switch thewindshield wipers off before entering a carwash.Note: If streaks or smears appear on thewindshield, clean the windshield and thewiper blades. If that does not resolve theissue, install new wiper blades.Note: If you switch autolamps andautowipers on, the headlamps turn on whenthe windshield wipers continuously operate.
73
Fusion (CC7) Canada/United States of America, enUSA, Edition date: 201905, Second-Printing
Wipers and Washers

Wet or winter driving conditions with ice,snow or salty road mist can causeinconsistent and unexpected wiping orsmearing.
E197526
High sensitivity.AAutowipers on.BLow sensitivity.C
Move the wiper lever upward to the firstposition to switch the autowipers on.Use the rotary control to adjust thesensitivity of the autowipers. When youselect low sensitivity, the wipers operatewhen the sensor detects a large amountof water on the windshield. When youselect high sensitivity, the wipers operatewhen the sensor detects a small amountof water on the windshield.Keep the outside of the windshield clean.The rain sensor is very sensitive and thewipers may operate if dirt, mist or insectshit the windshield.In these conditions, you can do thefollowing:• Lower the sensitivity of the autowipers
to reduce the amount of smearing onthe windshield.
• Switch to normal or high-speed wipe.• Switch autowipers off.
Autowipers SettingsAutowipers defaults to on and remains onuntil you switch it off in the informationdisplay. When you switch off autowipers,the wipers operate in intermittent mode.
WINDSHIELD WASHERS
E197528
E270967
Pull the lever toward you tooperate the windshield washers.
When you release the lever, the wipersoperate for a short time. When activated,a courtesy wipe occurs a short time afterthe wipers stop to clear any remainingwasher fluid.Note: You can switch courtesy wipe on oroff in the information display SeeInformation Messages (page 103).Note: Do not operate the washers whenthe washer reservoir is empty. This couldcause the washer pump to overheat.
Front Camera Washer (If Equipped)
Operating the windshield washer also turnson the front camera washer.
74
Fusion (CC7) Canada/United States of America, enUSA, Edition date: 201905, Second-Printing
Wipers and Washers

GENERAL INFORMATIONCondensation in the Exterior FrontLamps and Rear LampsExterior front lamps and rear lamps havevents to accommodate normal changesin air pressure.Condensation can be a natural by-productof this design. When moist air enters thelamp assembly through the vents, there isa possibility that condensation can occurwhen the temperature is cold. Whennormal condensation occurs, a fine mistcan form on the interior of the lens. Thefine mist eventually clears and exitsthrough the vents during normal operation.Clearing time may take as long as 48 hoursunder dry weather conditions.Examples of acceptable condensation are:• The presence of a fine mist (no streaks,
drip marks or large droplets).• A fine mist covers less than 50% of the
lens.Examples of unacceptable condensationare:• A water puddle inside the lamp.• Streaks, drip marks or large droplets
present on the interior of the lens.If you see any unacceptable condensation,have your vehicle checked by an authorizeddealer.
LIGHTING CONTROL
E142449
Lamps off.AParking lamps, instrument panellamps, license plate lamps andtail lamps.
B
Headlamps.C
Headlamp High Beam
E162679
Push the lever away from you toswitch the high beam on.
Push the lever forward again or pull thelever toward you to switch the high beamsoff.
75
Fusion (CC7) Canada/United States of America, enUSA, Edition date: 201905, Second-Printing
Lighting

Flashing the Headlamp High Beam
E162680
Slightly pull the lever toward you andrelease it to flash the headlamps.
AUTOLAMPS
WARNING: The system does notrelieve you of your responsibility to drivewith due care and attention. You mayneed to override the system if it does notturn the headlamps on in low visibilityconditions, for example daytime fog.
Autolamps turn the headlamps on in lowlight situations or when the wipers operate.
Switch the lighting control to theautolamps position.
The headlamps remain on for a period oftime after you switch the ignition off. Usethe information display controls to adjustthe period of time that the headlampsremain on.Note: If you switch the autolamps on, youcannot switch the high beams on until thesystem turns the low beams on.
Windshield Wiper ActivatedHeadlampsWhen you switch the autolamps on, theheadlamps turn on within 10 seconds ofswitching the wipers on. They turn offapproximately 60 seconds after you switchthe windshield wipers off.The headlamps do not turn on with thewipers:• During a single wipe.• When using the windshield washers.• If the wipers are in intermittent mode.Note: If you switch the autolamps and theautowipers on, the headlamps turn on whenthe windshield wipers continuously operate.
INSTRUMENT LIGHTINGDIMMERThe instrument lighting dimmer buttonsare on the lighting control.
E291299
E291298
Repeatedly press one of thebuttons to adjust the brightness.
HEADLAMP EXIT DELAYAfter you switch the ignition off, you canswitch the headlamps on by pulling thedirection indicator lever toward you. Youwill hear a short tone. The headlamps willswitch off automatically after threeminutes with any door open or 30 secondsafter the last door has been closed. Youcan cancel this feature by pulling thedirection indicator toward you again orswitching the ignition on.
76
Fusion (CC7) Canada/United States of America, enUSA, Edition date: 201905, Second-Printing
Lighting

DAYTIME RUNNING LAMPS -VEHICLES WITH:CONFIGURABLE DAYTIMERUNNING LAMPS
WARNING: The daytime runninglamps system does not activate the rearlamps and may not provide adequatelighting during low visibility drivingconditions. Make sure you switch theheadlamps on, as appropriate, during alllow visibility conditions. Failure to do somay result in a crash.
Switch the daytime running lamps on oroff using the information display. SeeGeneral Information (page 94).The daytime running lamps turn on when:1. The lamps are on in the information
display.2. You switch the ignition on.3. The transmission is not in park (P) for
vehicles with automatic transmissionsor you release the parking brake forvehicles with manual transmissions.
4. The lighting control is in the autolampsposition.
5. The headlamps are off.The other lighting control switch positionsdo not turn on the daytime running lamps.If the daytime running lamps are off in theinformation display, the lamps stay off inall switch positions.
DAYTIME RUNNING LAMPS -VEHICLES WITH: DAYTIMERUNNING LAMPS (DRL)
WARNING: The daytime runninglamps system does not activate the rearlamps and may not provide adequatelighting during low visibility drivingconditions. Make sure you switch theheadlamps on, as appropriate, during alllow visibility conditions. Failure to do somay result in a crash.
The system turns the lamps on in daylightconditions.To switch the system on, switch thelighting control to any position exceptheadlamps.
FRONT FOG LAMPS (IF EQUIPPED)
Switching the Front Fog Lamps Onor OffOnly switch the front fog lamps on duringreduced visibility.You can switch the front fog lamps on ifany of the following occur:• You set the lighting control to the
parking lamps position.• You set the lighting control to the
headlamps position.• You set the lighting control to the
autolamps position and the headlampsare on.
The front fog lamp button is on the lightingcontrol.
Press the button to switch thefront fog lamps on or off.
77
Fusion (CC7) Canada/United States of America, enUSA, Edition date: 201905, Second-Printing
Lighting

Note: The brightness of the daytime runninglamps may decrease when the front foglamps are switched on.
Front Fog Lamp IndicatorIt illuminates when you switchthe front fog lamps on.
DIRECTION INDICATORS
E162681
Push the lever up or down to use thedirection indicators.Note: Tap the lever up or down to make thedirection indicators flash three times toindicate a lane change.
INTERIOR LAMPSThe lamps turn on under the followingconditions:• You open any door.• You press a remote control button.• You press the all lamps on button on
the overhead console.
Front Interior Lamp
E262162
The front interior lamp switches are on theoverhead console.Note: The position of each button on theoverhead console depends on your vehicle.
All Lamps OnPress to switch all interior lampson.
All Lamps Off
E262185
Press to switch all interior lampsoff.
Individual Dome Lamps
E262193
Press to switch the left-handindividual dome lamp on and off.
Press to switch the right-handindividual dome lamp on and off.
Interior Lamp FunctionPress to switch the interior lampfunction on and off.
When the interior lamp function is off andyou open a door, the courtesy and doorlamps stay off.
78
Fusion (CC7) Canada/United States of America, enUSA, Edition date: 201905, Second-Printing
Lighting

When the interior lamp function is on andyou open a door, the courtesy and doorlamps turn on.Note: The indicator lamp lights amberwhen the door function is off.
Individual Map LampsPress a map lens to switch individual maplamps on and off independently.
Rear Interior LampsThe rear interior lamps may be above therear seat or above the rear windows.
Press to switch the lamps on oroff.
AMBIENT LIGHTING (IF EQUIPPED)
Use the touchscreen to select thefollowing:
Select the settings option on thefeature bar.
E279027
Select ambient lighting.
E273192
Switching Ambient Lighting OnTouch a color once.
Changing the ColorTouch any color once.
Adjusting the BrightnessDrag the selected color up or down.
Switching Ambient Lighting OffTouch the selected color once or drag theselected color down to zero brightness.
79
Fusion (CC7) Canada/United States of America, enUSA, Edition date: 201905, Second-Printing
Lighting

WHAT IS AUTOMATIC HIGHBEAM CONTROLThe system turns on high beams if it is darkenough and no other traffic is present. If itdetects an approaching vehicle’sheadlamps or tail lamps, or street lightingahead, the system turns the high beamsoff. Low beams remain on.A camera sensor, centrally mountedbehind the windshield of your vehicle,continuously monitors conditions to turnthe high beams on and off.
SWITCHING AUTOMATIC HIGHBEAM CONTROL ON AND OFFSwitch the system on or off using theinformation display. See GeneralInformation (page 94).
Activating the Automatic HighBeam Control
Switch the lighting control to theautolamps position to activate.See Autolamps (page 76).
Note: Automatic high beams are notavailable when autolamps are not turnedon.When active, the high beams turn on if:• The ambient light level is low enough.• There is no traffic in front of your
vehicle.• The vehicle speed is greater than
approximately 32 mph (52 km/h).When active, the high beams turn off if:• The ambient light level is high enough
that high beams are not required.• The system detects an approaching
vehicle's headlamps or tail lamps.• The system detects severe rain, snow
or fog.
• The camera is blocked.• The vehicle speed falls below
approximately 27 mph (44 km/h).Note: The deactivation speed is lower oncurves.Note: High beam reactivation may bedelayed in certain curvy road situations.Note: The system may not operate properlyif the sensor is blocked. Keep the windshieldfree from obstruction or damage.Note: The system may not operate properlyin cold or inclement conditions. You canswitch on the high beams by overriding thesystem.Note: If the system detects a blockage, forexample bird droppings, bug splatter, snowor ice, the system goes into low beam modeuntil you clear the blockage. A message mayappear in the information display if thecamera is blocked.Note: Using much larger tires or equippingvehicle accessories such as snowplows canmodify your vehicle's ride height anddegrade automatic high beam controlperformance.
AUTOMATIC HIGH BEAMCONTROL INDICATORS
The indicator illuminates toconfirm when the system isready to assist.
OVERRIDING AUTOMATICHIGH BEAM CONTROL
WARNING: The system does notrelieve you of your responsibility to drivewith due care and attention. You mayneed to override the system if it does notturn the high beams on or off.
80
Fusion (CC7) Canada/United States of America, enUSA, Edition date: 201905, Second-Printing
Automatic High Beam Control (If Equipped)
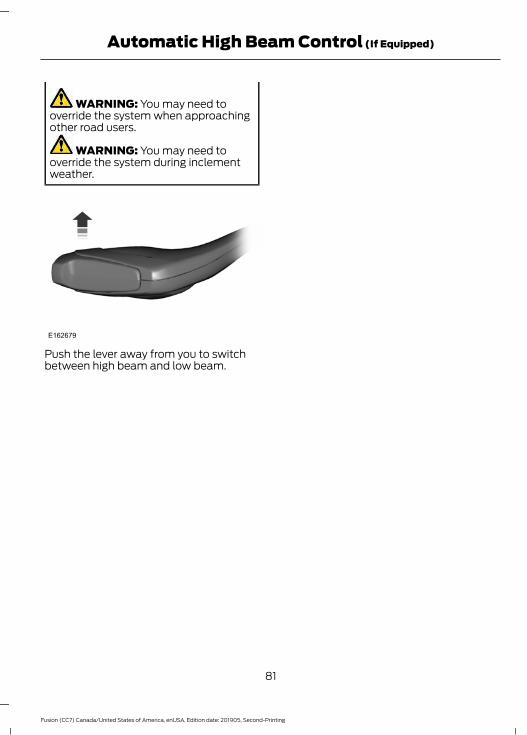
WARNING: You may need tooverride the system when approachingother road users.
WARNING: You may need tooverride the system during inclementweather.
E162679
Push the lever away from you to switchbetween high beam and low beam.
81
Fusion (CC7) Canada/United States of America, enUSA, Edition date: 201905, Second-Printing
Automatic High Beam Control (If Equipped)

POWER WINDOWS
WARNING: Do not leave childrenunattended in your vehicle and do notlet them play with the power windows.Failure to follow this instruction couldresult in personal injury.
WARNING: When closing thepower windows, verify they are free ofobstruction and make sure that childrenand pets are not in the proximity of thewindow openings.
E146043
Note: You may hear a pulsing noise whenonly one of the windows is open. Lower theopposite window slightly to reduce thisnoise.Press the switch to open the window.Lift the switch to close the window.
One-Touch DownPress the switch fully and release it. Pressagain or lift it to stop the window.
One-Touch UpLift the switch fully and release it. Pressagain or lift it to stop the window.
Resetting One-Touch UpStart the engine.1. Lift and hold the window switch until
you fully close the door window.Continue to hold the switch for a fewseconds after you close the window.
2. Release the window switch.3. Press and hold the window switch until
you fully open the door window.4. Release the window switch.5. Lift and hold the window switch until
you fully close the window.6. Test for correct window operation by
carrying out the one-touch down andone-touch up features.
Bounce-BackThe window stops automatically whileclosing. It reverses some distance if thereis an obstacle in the way.
Overriding the Bounce-Back Feature
WARNING: If you overridebounce-back, the window does notreverse if it detects an obstacle. Takecare when closing the windows to avoidpersonal injury or damage to yourvehicle.
Pull up the window switch and hold withina few seconds of the window reaching thebounce-back position. The window travelsup with no bounce-back protection. Thewindow stops if you release the switchbefore the window fully closes.
82
Fusion (CC7) Canada/United States of America, enUSA, Edition date: 201905, Second-Printing
Windows and Mirrors

Window Lock
E259237
Press the control to lock or unlock the rearwindow controls. It illuminates when youlock the rear window controls.
Accessory DelayYou can use the window switches forseveral minutes after you switch theignition off or until you open either frontdoor.
GLOBAL OPENING ANDCLOSINGYou can use the remote control to operatethe windows with the ignition off.Note: You can enable or disable this featurein the information display or see anauthorized dealer. See GeneralInformation (page 94).Note: To operate this feature, accessorydelay must not be active.
Opening the WindowsYou can only open the windows for a shorttime after you unlock your vehicle with theremote control. After you unlock yourvehicle, press and hold the remote controlunlock button to open the windows andvent the moonroof. Release the buttononce movement starts. Press the lock orunlock button to stop movement.
Closing the Windows
WARNING: When closing thewindows and moonroof, you shouldverify they are free of obstructions andmake sure that children and pets are notin the proximity of the window openings.
To close the windows and moonroof, pressand hold the remote control lock button.Release the button once movement starts.Press the lock or unlock button to stopmovement.
EXTERIOR MIRRORSPower Exterior Mirrors
WARNING: Do not adjust themirrors when your vehicle is moving. Thiscould result in the loss of control of yourvehicle, serious personal injury or death.
83
Fusion (CC7) Canada/United States of America, enUSA, Edition date: 201905, Second-Printing
Windows and Mirrors

E316600
Left-hand mirror.AAdjustment control.BRight-hand mirror.C
To adjust a mirror:1. Select the mirror you want to adjust.
The control will illuminate.2. Adjust the position of the mirror.3. Press the mirror switch again.
Fold-Away Exterior MirrorsPush the mirror toward the door windowglass. Make sure that you fully engage themirror in its support when returning it to itsoriginal position.
Power-Folding Mirrors (If Equipped)
E195334
To fold both mirrors, make sure you switchyour vehicle on (with the ignition inaccessory mode or the engine running) andthen:1. Press the control to fold the mirrors.2. Press the control again to unfold.Note: Once you press the control, youcannot stop the mirrors midway throughtheir movement. Wait until the mirrors stopmoving and press the control again.
Heated Exterior Mirrors (If Equipped)
See Heated Exterior Mirrors (page 126).
Memory Mirrors (If Equipped)
You can save and recall the mirrorpositions through the memory function.See Memory Function (page 132).
Auto-Dimming Feature (If Equipped)
The driver exterior mirror automaticallydims when the interior auto-dimmingmirror turns on.
Signal Indicator Mirrors (If Equipped)
The outer portion of the appropriate mirrorhousing will blink when you switch on theturn signal.
Puddle Lamps (If Equipped)
The lamps on the bottom part of the mirrorhousing light when you use yourtransmitter to unlock the doors or whenyou open a door.
Blind Spot Monitor (If Equipped)
See Blind Spot Information System(page 208).
84
Fusion (CC7) Canada/United States of America, enUSA, Edition date: 201905, Second-Printing
Windows and Mirrors

INTERIOR MIRROR
WARNING: Do not adjust themirrors when your vehicle is moving. Thiscould result in the loss of control of yourvehicle, serious personal injury or death.
Note: Do not clean the mirror housing orglass with harsh abrasives, fuel or otherpetroleum-based cleaning products.You can adjust the interior mirror to yourpreference. Some mirrors also have asecond pivot point. This lets you move themirror hear up or down and from side toside.
Manual Dimming MirrorPull the tab below the mirror toward youto reduce the effect of bright light frombehind.
Auto-Dimming Mirror (If Equipped)
Note: Do not block the sensors on the frontand back of the mirror. A rear centerpassenger or raised rear center headrestraint may also block light from reachingthe sensor.The mirror dims to reduce glare whenbright lights are detected from behind yourvehicle. It automatically returns to normalreflection when you shift the transmissioninto reverse (R) to make sure you have aclear view when backing up.
SUN VISORS
E138666
Rotate the sun visor toward the sidewindow and extend it rearward for extrashade.
Illuminated Vanity Mirror
E162197
Lift the cover to switch the lamp on.
MOONROOF (IF EQUIPPED)
WARNING: Do not let children playwith the moonroof or leave themunattended in the vehicle. They mayseriously hurt themselves.
85
Fusion (CC7) Canada/United States of America, enUSA, Edition date: 201905, Second-Printing
Windows and Mirrors

WARNING: When closing themoonroof, you should verify that it is freeof obstructions and make sure thatchildren and pets are not in the proximityof the roof opening.
The sliding shade can be manually openedor closed when the moonroof is closed.Pull the shade toward the front of thevehicle to close it.The moonroof controls are located on theoverhead console and have a one-touchopen and close feature. To stop it duringone-touch operation, touch the control asecond time.
E144499
OpenAVentBCloseC
Opening and Closing the MoonroofTouch (A) to open the moonroof. It willstop short of the fully opened position.Note: This position helps to reduce windnoise or rumbling which may happen withthe moonroof fully open. Touch (A) againto fully open the moonroof.Touch (C) to close the moonroof.
Bounce-BackThe moonroof will stop automatically andreverse some distance if an obstacle isdetected while closing.Touch and hold (C) within two seconds ofa bounce-back event to override thisfunction.
Venting the MoonroofTouch (B) to vent the moonroof. Touch(C) to close it.
86
Fusion (CC7) Canada/United States of America, enUSA, Edition date: 201905, Second-Printing
Windows and Mirrors

GAUGESType 1 and 2
E271817
TachometerAInformation Display (Type 2 shown Type 1 similar)BSpeedometerCFuel GaugeDEngine Coolant Temperature GaugeE
Information DisplayOdometerLocated in the bottom of the informationdisplay. Registers the accumulateddistance your vehicle has traveled.
CompassDisplays the vehicle’s heading direction.
Trip ComputerSee General Information (page 94).
87
Fusion (CC7) Canada/United States of America, enUSA, Edition date: 201905, Second-Printing
Instrument Cluster

Vehicle Settings and PersonalizationSee General Information (page 94).
Engine Coolant TemperatureGauge
WARNING: Do not remove thecoolant reservoir cap when the engine ison or the cooling system is hot. Wait 10minutes for the cooling system to cooldown. Cover the coolant reservoir capwith a thick cloth to prevent thepossibility of scalding and slowly removethe cap. Failure to follow this instructioncould result in personal injury.
Indicates engine coolant temperature. Atnormal operating temperature, the levelindicator will be in the normal range. If theengine coolant temperature exceeds thenormal range, stop your vehicle as soon assafely possible, switch off the engine andlet the engine cool.
Note: Do not restart the engine until thecause of overheating has been resolved.
Fuel GaugeThe fuel gauge indicates about how muchfuel is in the fuel tank.The arrow adjacent to the fuel pumpsymbol indicates on which side of yourvehicle the fuel filler door is located.Note: The fuel gauge may vary slightlywhen your vehicle is moving or on a slope.
Low Fuel ReminderA low fuel level reminder displays andsounds when the distance to emptyreaches 75 mi (120 km) to empty forMyKey, and at 50 mi (80 km), 25 mi(40 km), 10 mi (20 km) and 0 mi (0 km)for all vehicle keys.Note: The low fuel reminder can appear atdifferent fuel gauge positions depending onfuel economy conditions. This variation isnormal.
88
Fusion (CC7) Canada/United States of America, enUSA, Edition date: 201905, Second-Printing
Instrument Cluster

Type 3
E272460
Left Information DisplayASpeedometerBRight Information Display. See General Information (page 94).C
Left Information DisplayOdometerLocated in the bottom of the informationdisplay. Registers the accumulateddistance your vehicle has traveled.
Trip ComputerSee General Information (page 94).
Vehicle Settings and PersonalizationSee General Information (page 94).
89
Fusion (CC7) Canada/United States of America, enUSA, Edition date: 201905, Second-Printing
Instrument Cluster

WARNING LAMPS ANDINDICATORSThe following warning lamps andindicators alert you to a vehicle conditionthat may become serious. Some lampsilluminate when you start your vehicle tomake sure they work. If any lamps remainon after starting your vehicle, refer to therespective system warning lamp for furtherinformation.Note: Some warning indicators appear inthe information display and operate thesame as a warning lamp but do notilluminate when you start your vehicle.
Adaptive Cruise Control (If Equipped)
E144524
The speed control systemindicator light changes color toindicate what mode the system
is in: See What Is Cruise Control (page195).On (white light): Illuminates when theadaptive cruise control system is turnedon. Turns off when the speed controlsystem is turned off.Engaged (green light): Illuminates whenthe adaptive cruise control system isengaged. Turns off when the speed controlsystem is disengaged.
Anti-Lock Braking SystemIf it illuminates when you aredriving, this indicates amalfunction. You will continue
to have the normal braking system(without ABS) unless the brake systemwarning lamp is also illuminated. Have thesystem checked by your authorized dealer.
Auto Start-stop (If Equipped)
It will illuminate to inform youwhen the engine shuts down orin conjunction with a message.
BatteryIf it illuminates while driving, itindicates a malfunction. Switchoff all unnecessary electrical
equipment and have the system checkedby your authorized dealer immediately.
Blind Spot Monitor (If Equipped)
E151262
It will illuminate when you switchthis feature off or in conjunctionwith a message. See Blind Spot
Information System (page 208). SeeInformation Messages (page 103).
Brake System Warning Lamp
WARNING: Driving your vehiclewith the warning lamp on is dangerous.A significant decrease in brakingperformance may occur. It may take youlonger to stop your vehicle. Have yourvehicle checked as soon as possible.Driving extended distances with theparking brake engaged can cause brakefailure and the risk of personal injury.
Note: Indicators vary depending on region.This lamp is a dual function lamp and willilluminate when:• You apply the parking brake with the
ignition on.• Your vehicle has a brake fault or low
brake fluid level, regardless of parkingbrake position.
90
Fusion (CC7) Canada/United States of America, enUSA, Edition date: 201905, Second-Printing
Instrument Cluster

E270480
If the lamp illuminates while youare moving, you may have theparking brake applied. Be surethat the parking brake is off.Have your vehicle checked assoon as possible if the lamp
continues to illuminate.
Cruise Control
E71340
It will illuminate when you switchthis feature on.
Direction IndicatorIlluminates when the left or rightturn signal or the hazard warningflasher is turned on. If the
indicators stay on or flash faster, check fora burned out bulb. See Changing a Bulb(page 275).
Door AjarDisplays when the ignition is onand any door is not completelyclosed.
Electric Park Brake
E146190
It will illuminate when theelectric parking brake has amalfunction.
Engine Coolant TemperatureIlluminates when the enginecoolant temperature is high.Stop the vehicle as soon as
possible, switch off the engine and let cool.
Engine OilIf it illuminates with the enginerunning or when you are driving,this indicates a malfunction.
Stop your vehicle as soon as it is safe todo so and switch the engine off. Check theengine oil level. See Engine Oil Check(page 260).Note: Do not resume your journey if itilluminates despite the level being correct.Have the system checked by your authorizeddealer immediately.
Fasten Seatbelt
E71880
It will illuminate and a chime willsound to remind you to fastenyour seatbelt. See Seatbelt
Reminder (page 37).
Front Airbag
E67017
If it fails to illuminate when youstart your vehicle, continues toflash or remains on, it indicates
a malfunction. Have the system checkedby your authorized dealer.
Front Fog Lamps (If Equipped)
It will illuminate when you switchthe front fog lamps on.
Grade Assist (If Equipped)
E144523
Lights when you switch on thegrade assist function.
91
Fusion (CC7) Canada/United States of America, enUSA, Edition date: 201905, Second-Printing
Instrument Cluster

Heads Up Display (If Equipped)
E156133
A red beam of lights willilluminate on the windshield incertain instances when using
adaptive cruise control and/or the collisionwarning system. It will also illuminatemomentarily when you start your vehicleto make sure the display works.
High BeamIt will illuminate when you switchthe high beam headlamps on. Itwill flash when you use the
headlamp flasher.
Hood Ajar
E159324
Displays when the ignition is onand the hood is not completelyclosed.
Lane Keeping System Lamp (If
Equipped)
E144813
Illuminates when the lanekeeping system is activated.
Low Fuel LevelIt will illuminate when the fuellevel is low or the fuel tank isnearly empty. Refuel as soon as
possible.
Low Tire Pressure WarningIt will illuminate when your tirepressure is low. If the lampremains on with the engine
running or when driving, check your tirepressure as soon as possible.
It will also illuminate momentarily whenyou switch the ignition on to confirm thelamp is functional. If it does not illuminatewhen you switch the ignition on, or beginsto flash at any time, have the systemchecked by your authorized dealer.
Parking LampsIt will illuminate when you switchthe parking lamps on.
Powertrain FaultIlluminates when a powertrainor an AWD fault has beendetected. Contact your
authorized dealer as soon as possible.
Service Engine SoonIf it illuminates when the engineis running this indicates amalfunction. The On Board
Diagnostics system has detected amalfunction of the vehicle emission controlsystem.If it flashes, engine misfire may beoccurring. Increased exhaust gastemperatures could damage the catalyticconverter or other vehicle components.Drive in a moderate fashion (avoid heavyacceleration and deceleration) and haveyour vehicle immediately serviced.It illuminates when you switch the ignitionon prior to engine start to check the bulband to indicate whether your vehicle isready for Inspection and Maintenance(I/M) testing.Normally, it illuminates until the engine iscranked and automatically turns off if nomalfunctions are present. However, if after15 seconds it flashes eight times, thisindicates that your vehicle is not ready forInspection and Maintenance (I/M) testing.See Emission Law (page 159).
92
Fusion (CC7) Canada/United States of America, enUSA, Edition date: 201905, Second-Printing
Instrument Cluster

Sport Mode
E176099
Illuminates when you switch thesport mode on.
Stability Control
E138639
It will flash when the system isactive. If it remains illuminatedor does not illuminate when you
switch the ignition on, this indicates amalfunction. During a malfunction thesystem will switch off. Have the systemchecked by your authorized dealerimmediately. See Using StabilityControl (page 179).
Stability Control Off
E130458
It will illuminate when you switchthe system off. It will go outwhen you switch the system
back on or when you switch the ignitionoff. See Using Stability Control (page179).
Trunk Ajar
E159323
Displays when the ignition is onand the trunk is not completelyclosed.
AUDIBLE WARNINGS ANDINDICATORSKeyless Warning AlertThe horn will sound twice when you exityour vehicle with the intelligent access keyand your vehicle is in RUN, indicating yourvehicle is still on.
Headlamps On Warning ChimeSounds when you have left the headlampsor parking lamps on and open the driverdoor with the vehicle off.
Parking Brake On Warning ChimeSounds when you have left the parkingbrake on and drive your vehicle. If thewarning chime remains on after you havereleased the parking brake, have thesystem checked by your authorized dealerimmediately.
93
Fusion (CC7) Canada/United States of America, enUSA, Edition date: 201905, Second-Printing
Instrument Cluster

GENERAL INFORMATION
WARNING: Driving while distractedcan result in loss of vehicle control, crashand injury. We strongly recommend thatyou use extreme caution when using anydevice that may take your focus off theroad. Your primary responsibility is thesafe operation of your vehicle. Werecommend against the use of anyhand-held device while driving andencourage the use of voice-operatedsystems when possible. Make sure youare aware of all applicable local lawsthat may affect the use of electronicdevices while driving.
Note: Your vehicle may or may not beequipped with all the messages listed in thischapter. Your vehicle will not displaymessages of systems it is not equipped with.Various systems on your vehicle can becontrolled using the information displaycontrols on the steering wheel.Corresponding information is displayed inthe information display.
Information Display Controls(Type 1 and Type 2)
E144637
• Press the up or down arrow buttons toscroll through the list.
• Press the right arrow button to enter asub-menu.
• Press the left arrow button to exit amenu.
• Press and hold the left arrow button atany time to return to the main menudisplay (escape button).
• Press the OK button to choose andconfirm settings or messages.
MenuYou can access the menu using theinformation display control.Note: Some options may appear slightlydifferent or not at all if the items areoptional.
Trip 1 and 2
Digital Speedometer
Distance to E
Trip Odometer
Trip Timer
Fuel Used
94
Fusion (CC7) Canada/United States of America, enUSA, Edition date: 201905, Second-Printing
Information Displays

Trip 1 and 2
Average Fuel
Outside Temperature
All Values1
1 Type 2• Digital Speedometer - Shows the speed your vehicle is traveling.• Distance to E - Shows the approximate distance your vehicle can travel before running
out of fuel.• Trip Odometer — Registers the distance of individual journeys.• Trip Timer — The timer stops when you turn your vehicle off and restarts when you
restart your vehicle.• Fuel Used — Shows the amount of fuel used for a given trip.• Average Fuel — Shows the average fuel economy for a given trip.• Outside Temperature — Shows the outside air temperature.• All Values — Shows the Distance to E, Trip Odometer, Trip Timer and Average Fuel.Note: Press and hold OK on the current screen to reset the respective trip, distance, timeand fuel information.
Fuel Economy
Distance to Empty
Inst Fuel EconAvg MPG 1
Long Term Fuel Economy
Fuel History 1
Average Fuel
95
Fusion (CC7) Canada/United States of America, enUSA, Edition date: 201905, Second-Printing
Information Displays

Fuel Economy
All Values 1
Auto StartStop1 Type 2• Distance to Empty - Shows the approximate distance your vehicle can travel before
running out of fuel.• Inst Fuel Economy - Shows a visual graph of your instantaneous fuel economy along
with your Avg MPG since the function was last reset.• Long Term Fuel Economy - Shows your long term fuel economy.• Fuel History - Shows a bar chart of your fuel history.• Average Fuel — Shows the average fuel economy for a given trip.• All Values — Shows all fuel economy values (DTE, Inst Fuel Econ, Avg Fuel).• Auto StartStop - Available Auto Start-Stop messaging will provide details about what
is happening with your system. See Information Messages (page 103).Note: You can reset your average fuel economy by pressing and holding the OK button onthe left hand steering wheel controls.
Driver Assist
Traction Ctrl - check enabled or uncheck disabled
Blind Spot - check enabled or uncheck disabled1
Cross Traffic - check enabled or uncheck disabled1
Adaptive or NormalCruise Control1
Driver Alert1
Hill Start Assist - check enabled or uncheck disabled
Intelligent AWD1
Alert, Aid or BothModeLane Keeping System1
High, Normal or LowIntensity
High, Normal or LowAlert SensitivityPre-Collision
Active Braking - check enabled or uncheckdisabled
96
Fusion (CC7) Canada/United States of America, enUSA, Edition date: 201905, Second-Printing
Information Displays

Driver Assist
Rear Park Aid - check enabled or uncheck disabled
Tire PressureTire Monitor1 Type 2
Settings
Auto Engine Off - check enabled or uncheck disabledVehicle
Easy Entry/Exit - check enabled or uncheck disabled
Auto Highbeam - check enabled or uncheck disabledLighting
Off or XXSeconds
Autolamp delay
Daytime Lights - check enabled or uncheck disabled
Autolock - check enabled or uncheck disabledLocks
Autounlock - check enabled or uncheck disabled
Mislock - check enabled or uncheck disabled
All Doors or Driver's DoorRemote Unlock
Switches inhibit - check enabled or uncheck disabled
oil Life XXX% - Hold OK to ResetOil LifeRest
Auto or Last SettingsClimate ControlRemoteStart
Automatic or OffDriver Seat or Seats and Wheel
5, 10 or 15 minutesDuration
System - check enabled or uncheck disabled
Remote Open or Remote CloseWindows
Courtesy Wipe or Rain SensingWipers
Hold OK to Create MyKeyCreateMyKey
MyKey
Always On or User Selectable911Assist
97
Fusion (CC7) Canada/United States of America, enUSA, Edition date: 201905, Second-Printing
Information Displays

Settings
On or OffDo NotDisturb
Always On or User SelectableTractionControl
Choose desired speed or OffMaxSpeed
Choose desired speed or OffSpeedMinder
Volume Limiter - check enabled or uncheck disabled
Hold OK to Clear All MyKeysClearMyKeys
Miles & Gallons, L/100km or km/LDistanceDisplaySetup
Fahrenheit (°F) or Celsius (°C)Temper-ature
psi, kPa or barTirePressure
Choose your applicable settingLanguage1 Type 2
Information Display Controls(Type 3)
E144638
• Press the up or down arrow buttons toscroll through the list.
• Press the right arrow button to enter asub-menu.
• Press the left arrow button to exit amenu.
• Press and hold the left arrow button atany time to return to the main menudisplay (escape button).
• Press the OK button to choose andconfirm settings or messages.
Main menuFrom the main menu bar on the left sideof the information display, you can choosefrom the following categories:
98
Fusion (CC7) Canada/United States of America, enUSA, Edition date: 201905, Second-Printing
Information Displays

• Display Mode• Trip 1 & 2• Fuel Economy• Driver Assist• Settings
Scroll up or down to highlight one of thecategories, then press the right arrow keyor OK to enter into that category. Press theleft arrow key as needed to exit back to themain menu.
Display ModeUse the up/down arrow buttons to choosebetween the following display options.
Option 6Option 5Option 4Option 3Option 2Option 1Display mode
----XXXXX mi (km) toempty
XXXXXXFuel gauge
--XX--Round tachometer
XX--X-Vertical tachometer
--X---Engine coolanttemp gauge
-X----Tire Pressure
X-----Speedometer
Intelligent AWD - AWD Gauge
• XXX mi (km) to empty - Shows the approximate distance the vehicle will travel.• Fuel gauge - Indicates approximately how much fuel is left in the fuel tank. The fuel
gauge may vary slightly when the vehicle is in motion or on a grade. When the fuellevel becomes low, the level indicator will change to amber. When the fuel levelbecomes critically low, the level indicator will change to red. Note: When a MyKey®is in use, low fuel warnings will display earlier. The fuel icon and arrow indicates whichside of the vehicle the fuel filler door is located.
• Round tachometer - Indicates the engine speed in revolutions per minute. Driving withyour tachometer pointer continuously at the top of the scale may damage the engine.During SelectShift Automatic™ transmission (SST) use, the currently selected gearwill appear in the display.
• Engine coolant temperature gauge - Indicates engine coolant temperature. At normaloperating temperature, the level indicator will be in the normal range. If the enginecoolant temperature exceeds the normal range, stop the vehicle as soon as safelypossible, switch off the engine and let the engine cool.
• Tire Pressure - Shows the tire pressure of each wheel on your vehicle.• Speedometer - Shows the speed your vehicle is traveling.
99
Fusion (CC7) Canada/United States of America, enUSA, Edition date: 201905, Second-Printing
Information Displays

Trip 1 & 2You can access the menu using theinformation display control.
Note: Some options may appear slightlydifferent or not at all if the items areoptional.
Trip 1 and 2
All Values
All Values — shows all trip values (Trip Timer, Odometer and Average Fuel).• Trip Odometer — Shows your accumulated trip distance.• Trip Timer— The timer stops when you turn your vehicle off and restarts when you
restart your vehicle.• Average Fuel — Shows your average fuel economy for a given trip.Note: You can reset your trip information by pressing and holding the OK button on the lefthand steering wheel controls.
Fuel EconomyUse the left and right arrow buttons tochoose the desired fuel economy display.
Fuel Economy
Instant Fuel Economy - Hold OK to Reset
Fuel History
Average Speed - Hold OK to Reset
Auto StartStop
• Inst Fuel Economy - Shows a visual graph of your instantaneous fuel economy, averagefuel economy and distance to empty.
• Fuel History - Shows a bar chart of your fuel history from the past 30 min, averagefuel economy and distance to empty.
• Average Speed - Shows your vehicles average speed since the function was last reset.• Auto StartStop - Available Auto Start-Stop messaging will provide details about what
is happening with your system. See Information Messages (page 103).Note: You can reset your average fuel economy by pressing and holding the OK button onthe left hand steering wheel controls.
Driver AssistIn this mode, you can configure differentdriver setting choices.
Note: Some items are optional and maynot appear.
100
Fusion (CC7) Canada/United States of America, enUSA, Edition date: 201905, Second-Printing
Information Displays

Driver Assist
Traction Control - check enabled or uncheck disabled
Blind Spot - check enabled or uncheck disabled
Cross Traffic Alert - check enabled or uncheck disabled
Adaptive or NormalCruise Control
Driver Alert
Hill Start Assist - check enabled or uncheck disabled
Alert, Aid or BothModeLane Keeping System
High, Normal or LowIntensity
High, Normal or LowAlert SensitivityPre-Collision
Active Braking - check enabled or uncheckdisabled
Rear Park Aid - check enabled or uncheck disabled
Tire Monitor - Hold OK to ResetTire Monitor
SettingsIn this mode, you can configure differentdriver setting choices.
Note: Some items are optional and maynot appear.
Settings
Auto Engine Off - check enabled or uncheck disabledVehicle
Easy Entry/Exit - check enabled or uncheck disabled
Auto Highbeam - check enabled or uncheck disabledLighting
Off or XX SecondsAutolamp Delay
Daytime Lights - check enabled or uncheck disabled
Autolock - check enabled or uncheck disabledLocks
Autounlock - check enabled or uncheck disabled
Mislock - check enabled or uncheck disabled
All Doors or Driver FirstRemote Unlock
101
Fusion (CC7) Canada/United States of America, enUSA, Edition date: 201905, Second-Printing
Information Displays

Settings
Switch Inhibit - check enabled or uncheck disabled
Autofold - check enabled or uncheck disabledMirrors
XXX% - Hold OK to ResetOil LifeRest
Auto or Last settingClimate ControlRemoteStart
Auto or OffSeats or Seats andWheel
5, 10 or 15 minutesDuration
System - check enabled or uncheck disabled
Seatbelts
Remote Open or Remote CloseWindows
Courtesy Wipe or Rain SensingWipers
Hold OK to Create MyKeyCreateMyKey
MyKey
Always On or User Selectable911Assist
On or OffDo NotDisturb
Always On or User SelectableTractionControl
Choose desired speed or OffMaxSpeed
Choose desired speed or OffSpeedMinder
Volume Limiter - check enabled or uncheck disabled
Hold OK to Clear All MyKeysClearMyKeys
Miles & Gallons, l/100km or km/lDistanceDisplaySetup
Fuel Gauge or Fuel + TachGaugeDisplay
102
Fusion (CC7) Canada/United States of America, enUSA, Edition date: 201905, Second-Printing
Information Displays

Settings
°Fahrenheit or °CelsiusTemper-ature
psi, kPa or barTire Pres-sure
Choose your applicable settingLanguage
INFORMATION MESSAGESNote: Depending on your vehicle optionsand instrument cluster type, not allmessages display or are available. Certainmessages may be abbreviated or shorteneddepending upon which cluster type youhave.
E144636
Press the OK button to acknowledge andremove some messages from theinformation display. The display removesother messages after a short time.Certain messages need to be confirmedbefore you can access the menus.
Active Park
ActionMessage
The system has detected a fault that requires service. Havethe system checked by an authorized dealer.
Active Park Fault
103
Fusion (CC7) Canada/United States of America, enUSA, Edition date: 201905, Second-Printing
Information Displays

Adaptive Cruise Control
ActionMessage
A radar malfunction is preventing the adaptive cruise controlfrom engaging. See Using Adaptive Cruise Control (page
196).
Adaptive CruiseMalfunction
A condition exists such that the adaptive cruise cannot func-tion properly. See Using Adaptive Cruise Control (page
196).
Adaptive Cruise NotAvailable
You have a blocked sensor due to inclement weather, ice,mud or water in front of the radar sensor. You can typicallyclean the sensor to resolve. See Using Adaptive Cruise
Control (page 196).
Adaptive Cruise NotAvailable Sensor
Blocked See Manual
The system has disabled the automatic braking.Normal Cruise ActiveAutomatic Braking
Turned Off
A radar malfunction is preventing the adaptive cruise controlfrom engaging.
Front Sensor Not Aligned
The adaptive cruise has reinstated controls to the driver.Adaptive Cruise - DriverResume Control
Your vehicle speed is too slow to activate the adaptive cruise.Adaptive Cruise SpeedToo Low to Activate
The adaptive cruise is automatically adjusting the gapdistance and you need to shift the transmission into a lower
gear.
Adaptive Cruise ShiftDown
AdvanceTrac®
ActionMessage
The system detects a malfunction due to a blocked sensor.Service AdvanceTrac
The traction control has been switch on or off.AdvanceTrac Off On
104
Fusion (CC7) Canada/United States of America, enUSA, Edition date: 201905, Second-Printing
Information Displays

Airbag
ActionMessage
The system detects a malfunction due to a blocked sensor.Remove blockage.
Occupant SensorBLOCKED Remove
Objects Near PassengerSeat
Alarm
ActionMessage
Alarm triggered due to unauthorized entry. See Anti-TheftAlarm (page 69).
Vehicle Alarm To StopAlarm, Start Vehicle.
Auto Start-Stop
ActionMessage
You need to restart the engine, press the brake pedal to start.Auto StartStop PressBrake to Start Engine
You need to restart the engine, press the brake pedal harderto start.
Auto StartStop PressBrake Harder to Activate
You need to restart the engine, press any pedal to start.Auto StartStop Press aPedal to Start Engine
Select park for the system to restart the engine.Auto StartStop Shift toP, then Restart Engine
The system is not functioning. You need to restart the engine.Auto StartStop ManualRestart Required
Displays when conditions are not met for the Auto StartStopsystem to function properly. See Auto-Start-Stop (page
150).
Auto StartStop NotAvailable
StartStop has shut off the engine automatically.Engine Stopped
StartStop is starting the engine automatically.Engine Starting
The wheels are at a sharp angle or the steering wheel is beingturned.
Engine On due to VehicleManeuvering
105
Fusion (CC7) Canada/United States of America, enUSA, Edition date: 201905, Second-Printing
Information Displays

ActionMessage
The wheels are at a sharp angle or the steering wheel is beingturned.
Engine On due toSteering Wheel Maneuv-
ering
Engine may be on to support high demand for electricalaccessories, such as operating power windows, rear defroster,
or when using the power point.
Engine On due toAccessory Usage
Engine is on to support normal vehicle operation. Includesexternal vehicle conditions, such as altitude, traffic, low
ambient temperature. Also includes battery outside optimaloperating conditions (state of charge and temperature), and
inadequate brake vacuum (can occur if the brake pedal isdepressed a number of times in succession).
Engine On Normal Oper-ation
Engine is on in order to increase the engine temperature to anacceptable level.
Engine On due to LowTemperature
Engine is on to support normal vehicle operation due to lowoutside ambient temperature.
Engine On due toOutside Air Temp
Engine is on in order to increase the engine temperature to anacceptable level.
Engine On due to EngineWarming
Engine is on due to a low gear selection by the transmission.Engine On due toSelected Gear
Engine is on due to a steep road grade.Engine On due to SteepGrade
Engine is on due to no key being detected by the vehicle.Engine On due to Key notDetected
Engine is on due to the driver door being opened.Engine On due to DriverDoor Opened
Engine is on due to the driver seat belt being unbuckled.Engine On due to DriverBelt Unbuckled
Engine is on to achieve or maintain interior compartment atan acceptable level.
Engine On due toHeating /Cooling
Engine is on, which is required to support the use of the poweroutlet (110V).
Engine On due to PowerOutlet in Use
Engine is on due to the vehicle battery needing to be charged.Engine On due to VehicleCharging
You have disabled the Start Stop feature.Deactivated by Driver
106
Fusion (CC7) Canada/United States of America, enUSA, Edition date: 201905, Second-Printing
Information Displays

Automatic Engine Shutdown
ActionMessage
The engine is getting ready to shut off.Engine Shuts Off In{seconds to shut off:#0}
Seconds
The engine has shut off to help increase fuel economy.Engine Shut Off For FuelEconomy
The engine is getting ready to shut off. You can press OK onthe left steering wheel button to override the shut down.
Engine Shuts Off in{seconds to shut off:#0}
Seconds Press Ok toOverride
All-Wheel Drive
ActionMessage
The all-wheel drive system temporarily turns off to protectitself from overheating.
AWD TemporarilyDisabled
The all-wheel drive system temporarily turns off to protectitself from overheating or if you are using the temporary spare
tire.
AWD OFF
The all-wheel drive system will resume normal function andclear this message after driving a short distance with the road
tire re-installed or after the system cools.
AWD Restored
The all-wheel drive system is not operating properly. If thewarning stays on or continues to come on, contact an
authorized dealer as soon as possible.
AWD MalfunctionService Required
107
Fusion (CC7) Canada/United States of America, enUSA, Edition date: 201905, Second-Printing
Information Displays
Battery and Charging System
ActionMessage
The charging system needs servicing. If the warning stays onor continues to come on, contact an authorized dealer as soon
as possible.
Check Charging System
The battery management system detects an extended low-voltage condition. Your vehicle will disable various features
to help preserve the battery. Turn off as many of the electricalloads as soon as possible to improve system voltage. If the
system voltage has recovered, the disabled features willoperate again as normal.
Low Battery FeaturesTemporarily Turned Off
The battery management system determines that the 12Vbattery is at a low state of charge. Start the engine to chargethe battery or charge the battery using an aftermarket battery
charger. This message clears once you restart your vehicleand the battery state of charge has recovered.
Battery State of ChargeLow
The battery management system determines that the batteryis at a low state of charge. Turn the ignition off as soon as
possible to protect the battery. This message will clear oncethe vehicle has been started and the battery state of chargehas recovered. Turning off unnecessary electrical loads will
allow faster battery state-of-charge recovery.
Turn Power Off To SaveBattery
Blind Spot Information and Cross Traffic Alert System
ActionMessage
A fault with the system has occurred. Contact an authorizeddealer as soon as possible.
Blindspot System Fault
The system sensors are blocked. See Blind Spot Informa-tion System (page 208).
Blindspot Not AvailableSensor Blocked See
Manual
The system detects a vehicle. See Blind Spot InformationSystem (page 208).
Cross Traffic VehicleComing From X
The blind spot information system and cross traffic alertsystem sensors are blocked. See Blind Spot Information
System (page 208).
Cross Traffic Not Avail-able Sensor Blocked See
Manual
A fault with the system has occurred. Contact an authorizeddealer as soon as possible.
Cross Traffic SystemFault
108
Fusion (CC7) Canada/United States of America, enUSA, Edition date: 201905, Second-Printing
Information Displays

Doors and Locks
ActionMessage
The door(s) listed is not completely closed.X Door Ajar
The luggage compartment is not completely closed.Trunk Ajar
The hood is not completely closed.Hood Ajar
The system has disabled the door switches.Switches InhibitedSecurity Mode
The factory keypad code displays in the information displayafter system resets the keypad.
Factory Keypad Code {XX X X X}
Driver Alert
ActionMessage
Stop and rest as soon as it is safe to do so.Driver Alert Warning RestNow
Take a rest soon.Driver Alert Warning RestSuggested
Fuel
ActionMessage
An early reminder of a low fuel condition.Fuel Level Low
The fuel fill inlet may not be properly closed.Check Fuel Fill Inlet
Hill Start Assist
ActionMessage
Hill start assist is not available. Contact an authorized dealer.See Hill Start Assist (page 175).
Hill Start Assist NotAvailable
109
Fusion (CC7) Canada/United States of America, enUSA, Edition date: 201905, Second-Printing
Information Displays

Keys and Intelligent Access
ActionMessage
A reminder to press the brake while starting your vehicle.To START Press Brake
The system does not detect a key in your vehicle. See KeylessStarting (page 145).
No Key Detected
You pressed the start/stop button to switch off the engineand your vehicle does not detect your intelligent access key
inside your vehicle.
Restart Now or Key isNeeded
Your vehicle is in the run ignition state.Accessory Power isActive
There is a problem with your vehicle’s starting system. Contactan authorized dealer for service.
Starting System Fault
You have successfully programmed an intelligent access keyto the system.
Key Program Successful
You have failed to program an intelligent access key to thesystem.
Key Program Failure
You have programmed the maximum number of keys to thesystem.
Max Number of KeysLearned
You have not programmed enough keys to the system.Not Enough KeysLearned
The key battery is low. Change the battery as soon as possible.Key Battery Low ReplaceSoon
An attempt is made to program a spare key using two existingkeys.
Could Not ProgramIntegrated Key
A reminder that you are exiting your vehicle and the engine ison.
Vehicle is ON
110
Fusion (CC7) Canada/United States of America, enUSA, Edition date: 201905, Second-Printing
Information Displays

Lane Keeping System
ActionMessage
The system has malfunctioned. Contact your authorizeddealer as soon as possible.
Lane Keeping Sys.Malfunction Service
Required
The system has detected a condition that has caused thesystem to be temporarily unavailable.
Front Camera Tempor-arily Not Available
The system has detected a condition that requires the wind-shield to be cleaned to operate properly.
Front Camera Low Visib-ility Clean Screen
The system has malfunctioned. Contact your authorizeddealer as soon as possible.
Front Camera Malfunc-tion Service Required
The system requests you to keep your hands on the steeringwheel.
Keep Hands on SteeringWheel
Maintenance
ActionMessage
Stop your vehicle as soon as safely possible and turn off theengine. Check the oil level. If the warning stays on or continuesto come on with your engine running, contact an authorized
dealer as soon as possible.
Low Engine Oil Pressure
The engine oil life remaining is 10% or less.Change Engine Oil Soon
The oil life left is at 0%.Oil Change Required
The brake fluid level is low, inspect the brake system immedi-ately. See Brake Fluid Check (page 268).
Brake Fluid Level Low
The brake system needs servicing. Stop your vehicle in a safeplace. Contact an authorized dealer.
Check Brake System
The engine coolant temperature is excessively high. Stopyour vehicle in a safe place and allow the engine to cool. If
the problem persists, contact an authorized dealer. SeeEngine Coolant Check (page 262).
Engine Coolant OverTemperature
111
Fusion (CC7) Canada/United States of America, enUSA, Edition date: 201905, Second-Printing
Information Displays

ActionMessage
The engine has reduced power to help reduce high enginetemperature.
Power Reduced toLower Engine Temp
Your vehicle is still in Transport or Factory mode. This maynot allow some features to operate properly. See an author-
ized dealer.
Transport / FactoryMode
The powertrain needs service due to a powertrain malfunction.See Manual
MyKey
ActionMessage
You cannot program a MyKey.MyKey not Created
MyKey is active.MyKey Active DriveSafely
When switching on your vehicle and MyKey is in use, displaysthat the MyKey speed limit is on.
Speed Limited to XXMPH/km/h
MyKey is in use, the MyKey speed limit is on and your vehiclespeed is approaching 80 mph (130 km/h).
Near Vehicle Top Speed
You have reached the speed limit set for your MyKey.Vehicle at Top Speed ofMyKey Setting
You have an active MyKey with a programmed set speed limit.Check Speed DriveSafely
The belt-minder turns on with a MyKey in use.Buckle Up to UnmuteAudio
With a MyKey in use, AdvanceTrac turns on.AdvanceTrac On -MyKey Setting
With a MyKey in use, traction control turns on.Traction Control On -MyKey Setting
With a MyKey in use, park aid is always on.MyKey Park Aid Cannotbe Deactivated
With a MyKey in use, lane keeping alert turns on.Lane Keeping Alert OnMyKey Setting
112
Fusion (CC7) Canada/United States of America, enUSA, Edition date: 201905, Second-Printing
Information Displays

Park Aid
ActionMessage
The system has detected a fault that requires service. Contactan authorized dealer. See Principle of Operation (page 180).
Check Front Park Aid
The system has detected a fault that requires service. Contactan authorized dealer. See Principle of Operation (page 180).
Check Rear Park Aid
Front park aid status.Front Park Aid On Off
Rear park aid status.Rear Park Aid On Off
Park Brake
ActionMessage
The electric parking brake is set and a manual release isattempted without the brake pedal being pressed.
To Release: Press Brakeand Switch
The electric parking brake is set and an automatic release isattempted but cannot be performed. Perform a manual
release.
Park Brake Use Switchto Release
The electric parking brake is set and your vehicle speedexceeds 3 mph (5 km/h). Release park brake before continued
driving.
Release Park Brake
The electric parking brake is not fully applied.Park Brake Not Applied
The electric parking brake is not fully released.Park Brake Not Released
The electric parking brake system has been put into a specialmode that is used to allow service of the rear brakes. Contact
an authorized dealer.
Park Brake MaintenanceMode
The electric park brake system has detected a condition thatrequires service. Some functionality may still be available.
See an authorized dealer.
Park Brake LimitedFunction Service
Required
The electric parking brake system has detected a conditionthat requires service. See an authorized dealer.
Park Brake MalfunctionService Now
Numerous park brake applies have overheated the system.Wait 2 minutes before attempting to apply again.
Park Brake SystemOverheated
113
Fusion (CC7) Canada/United States of America, enUSA, Edition date: 201905, Second-Printing
Information Displays

Power Steering
ActionMessage
The power steering system detects a condition that requiresservice. Contact an authorized dealer.
Steering Fault ServiceNow
The power steering system is not working. Stop your vehiclein a safe place. Contact an authorized dealer.
Steering Loss StopSafely
The power steering system detects a condition that requiresservice. Contact an authorized dealer.
Steering Assist FaultService Required
Pre-Collision Assist
ActionMessage
There is a system malfunction with the pre-collision assistsystem. The system will be disabled. Contact an authorized
dealer as soon as possible.
Pre-Collision AssistMalfunction
The pre-collision assist system radar is blocked because ofpoor radar visibility due to bad weather or ice, mud, water in
front of the radar. Driver can typically clean the sensor toresolve. Contact an authorized dealer as soon as possible.
Pre-Collision Assist NotAvailable Sensor
Blocked
There is a system malfunction with the pre-collision assistsystem. The system will be disabled. Contact an authorized
dealer as soon as possible.
Pre-Collision Assist NotAvailable
Remote Start
ActionMessage
A reminder to turn the key on to drive your vehicle after aremote start.
To Drive: Turn Key to On
A reminder to apply the brake and push the gearshift buttonto drive your vehicle after a remote start.
To Drive: Press Brakeand Start Button
114
Fusion (CC7) Canada/United States of America, enUSA, Edition date: 201905, Second-Printing
Information Displays

Seats
ActionMessage
A reminder that memory seats are not available while driving.Memory Recall NotPermitted While Driving
Shows where you have saved your memory setting.Memory {0} Saved
Starting System
ActionMessage
A reminder to apply the brake when starting your vehicle.To START Press Brake
The starter is attempting to start your vehicle.Engine Start PendingPlease Wait
The system has cancelled the pending start.Pending Start Cancelled
The starter has exceeded its cranking time in attempting tostart your vehicle.
Cranking Time Exceeded
Tire Pressure Monitoring System
ActionMessage
One or more tires on your vehicle has low tire pressure. SeeTire Pressure Monitoring System (page 304).
Tire Pressure Low
The tire pressure monitoring system is malfunctioning. If thewarning stays on or continues to come on, contact an
authorized dealer. See Tire Pressure Monitoring System(page 304).
Tire Pressure MonitorFault
A tire pressure sensor is malfunctioning or your spare tire is inuse. See Tire Pressure Monitoring System (page 304). If
the warning stays on or continues to come on, contact anauthorized dealer as soon as possible.
Tire Pressure SensorFault
115
Fusion (CC7) Canada/United States of America, enUSA, Edition date: 201905, Second-Printing
Information Displays

Traction Control
ActionMessage
The status of the traction control system after you switchedit off or on. See Using Traction Control (page 177).
Traction Control Off /Traction Control On
A spinout has occurred and the hazards are on.Spinout DetectedHazards Activated
Transmission
ActionMessage
Contact an authorized dealer.Transmission Malfunc-tion Service Now
The transmission is overheating and needs to cool. Stop in asafe place as soon as it is possible.
Transmission Over-heating Stop Safely
The transmission has overheated and needs to cool. Stop ina safe place as soon as it is possible.
Transmission OverTemperature Stop
Safely
Contact an authorized dealer.Transmission ServiceRequired
Transmission is getting hot. Stop to let it cool.Transmission Too HotPress Brake
The transmission has limited functionality. See an authorizeddealer.
Transmission LimitedFunction See Manual
Transmission is too cold. Wait for it to warm up before youdrive.
Transmission WarmingUp Please Wait
A reminder to shift into park.Transmission Not in Park
You need to depress the brake pedal.Press Brake Pedal
Displays when a button needs to be pressed again to enterneutral hold. See Automatic Transmission (page 163).
Select S to confirm Stayin Neutral Mode
Select L to Confirm Stayin Neutral Mode
The transmission has adjusted the shift strategy.Transmission Adjusted
116
Fusion (CC7) Canada/United States of America, enUSA, Edition date: 201905, Second-Printing
Information Displays

ActionMessage
The transmission is adjusting the shift strategy.Transmission Adapt-Mode
The transmission is locked and unable to select gears.Transmission Indicat-Mode Lockup On
The transmission is unlocked and free to select gears.Transmission Indicat-Mode Lockup Off
117
Fusion (CC7) Canada/United States of America, enUSA, Edition date: 201905, Second-Printing
Information Displays

MANUAL CLIMATE CONTROL
E287747
Note: Depending on your vehicle optionpackage, the controls may look differentfrom what you see here.
Directing Air to the InstrumentPanel Air Vents
Press and release the button todirect airflow to instrumentpanel air vents.
Directing Air to the Footwell AirVents
Press and release the button todirect airflow to footwell airvents.
Setting the Blower Motor Speed
E265389
Turn the control to adjust the volume ofair circulated in the vehicle.Note: Lights on the control illuminate toindicate the fan speed.
Setting the Temperature
E244106
Turn the control to set the temperature.
Switching Defrost On and OffPress and release the button todistribute air through thewindshield air vents and
de-mister.
Air directed to the instrument panel andfootwell air vents turns off. You can alsouse this setting to defog and clear thewindshield of a thin covering of ice.
Switching the Air Conditioning Onand Off
Press and release the button toswitch the air conditioning on oroff.
Use air conditioning with recirculated airto improve cooling performance andefficiency.
118
Fusion (CC7) Canada/United States of America, enUSA, Edition date: 201905, Second-Printing
Climate Control

Note: In certain conditions, for example,maximum defrost, the air conditioningcompressor may continue to operate eventhough you switch off the air conditioning.
Switching the Climate Control Onand Off
Press and release the button.
Switching Maximum AirConditioning On and Off
Turn the temperature controlcounterclockwise to the lowestsetting for maximum cooling.
The left-hand and right-hand settings setto LO, recirculated air flows through theinstrument panel air vents, air conditioningturns on and the blower motor adjusts tothe highest speed.
Switching Maximum Defrost Onand Off
Turn the temperature controlclockwise to the highest settingfor maximum defrosting.
The left-hand and right-hand settings setto HI, air flows through the windshield airvents, and the blower motor adjusts to thehighest speed. You can also use this settingto defog and clear the windshield of a thincovering of ice. The heated rear windowalso turns on when you select maximumdefrost.Note: To prevent window fogging, youcannot select recirculated air whenmaximum defrost is on.
Switching Recirculated Air On andOff
Press and release the button toswitch between outside air andrecirculated air.
The air currently in the passengercompartment recirculates. This mayreduce the time needed to cool the interior,when used with A/C, and reduce unwantedodors from entering your vehicle.Note: Recirculated air may turn off, orprevent you from switching on, in all air flowmodes except MAX A/C to reduce the riskof fogging. Recirculation may also turn onand off in various air distribution controlcombinations during hot weather to improvecooling efficiency.
AUTOMATIC CLIMATECONTROL - VEHICLES WITH:TOUCHSCREEN DISPLAY,VEHICLES WITHOUT: SONYAUDIO SYSTEM
E287613
Note: Depending on your vehicle optionpackage, the controls may look differentfrom what you see here.
Accessing the Air DistributionControls
E265283
Press and release the button toactivate the selection screen.
From the screen, switch directed air fromthe windshield, instrument panel orfootwell vents on or off. You can direct airthrough any combination of these vents.See Climate (page 403).
119
Fusion (CC7) Canada/United States of America, enUSA, Edition date: 201905, Second-Printing
Climate Control

Setting the Blower Motor SpeedPress and release + or - to adjustthe volume of air circulated inthe vehicle.
Setting the TemperaturePress and release + or - on the left-handside of the climate control to set theleft-hand temperature.Note: This control also adjusts theright-hand side temperature when youswitch off dual zone mode.Press and release + or - on the right-handside of the climate control to set theright-hand temperature.
Switching Auto Mode On and OffPress and release the button toswitch on automatic operation,then set the temperature.
The system adjusts the blower motorspeed, air distribution, air conditioningoperation, and outside or recirculated airto reach and maintain the temperature youhave set.Note: You can also switch off dual zonemode by pressing and holding the buttonfor more than two seconds.
Switching the Air Conditioning Onand Off
Press and release the button toswitch the air conditioning on oroff.
Use air conditioning with recirculated airto improve cooling performance andefficiency.Note: In certain conditions, for example,maximum defrost, the air conditioningcompressor may continue to operate eventhough you switch off the air conditioning.
Switching the Climate Control Onand Off
Press and release the button.
Switching Maximum AirConditioning On and Off
Press and release the button formaximum cooling.
The left-hand and right-hand settings setto LO, recirculated air flows through theinstrument panel air vents, air conditioningturns on and the blower motor adjusts tothe highest speed.
Switching Maximum Defrost Onand Off
Press and release the button toswitch on maximum defrost.
The left-hand and right-hand settings setto HI, air flows through the windshield airvents, and the blower motor adjusts to thehighest speed. You can also use this settingto defog and clear the windshield of a thincovering of ice.Note: To prevent window fogging, youcannot select recirculated air whenmaximum defrost is on.
Switching Recirculated Air On andOff
Press and release the button toswitch between outside air andrecirculated air.
The air currently in the passengercompartment recirculates. This mayreduce the time needed to cool the interior,when used with A/C, and reduce unwantedodors from entering your vehicle.
120
Fusion (CC7) Canada/United States of America, enUSA, Edition date: 201905, Second-Printing
Climate Control

Note: Recirculated air may turn off, orprevent you from switching on, in all air flowmodes except MAX A/C to reduce the riskof fogging. Recirculation may also turn onand off in various air distribution controlcombinations during hot weather to improvecooling efficiency.
AUTOMATIC CLIMATECONTROL - VEHICLES WITH:SONY AUDIO SYSTEM/TOUCHSCREEN DISPLAY
A
B
A
1 2
203A
A
E287572
Note: Depending on your vehicle optionpackage, the controls may look differentfrom what you see here.Note: You can switch temperature unitsbetween Fahrenheit and Celsius.
Setting the Blower Motor SpeedPress and release + or - to adjustthe volume of air circulated inthe vehicle.
Setting the Temperature
E265400
Press and release + or - on the left-handside of the climate control to set theleft-hand temperature.
Note: This control also adjusts theright-hand side temperature when youswitch off dual zone mode.Press and release + or - on the right-handside of the climate control to set theright-hand temperature.
Switching Auto Mode On and OffPress and release the button toswitch on automatic operation,then set the temperature.
The system adjusts the blower motorspeed, air distribution, air conditioningoperation, and outside or recirculated airto reach and maintain the temperature youhave set.Note: You can also switch off dual zonemode by pressing and holding the buttonfor more than two seconds.
Switching the Air Conditioning Onand Off
Press and release the button toswitch the air conditioning on oroff.
Use air conditioning with recirculated airto improve cooling performance andefficiency.Note: In certain conditions, for example,maximum defrost, the air conditioningcompressor may continue to operate eventhough you switch off the air conditioning.
Switching the Climate Control Onand Off
Press and release the button.
121
Fusion (CC7) Canada/United States of America, enUSA, Edition date: 201905, Second-Printing
Climate Control

Switching Defrost On and OffPress and release the button todistribute air through thewindshield air vents and
de-mister.
Air directed to the instrument panel andfootwell air vents turns off. You can alsouse this setting to defog and clear thewindshield of a thin covering of ice.
Switching Maximum AirConditioning On and Off
Press and release the button formaximum cooling.
The left-hand and right-hand settings setto LO, recirculated air flows through theinstrument panel air vents, air conditioningturns on and the blower motor adjusts tothe highest speed.
Switching Maximum Defrost Onand Off
Press and release the button toswitch on maximum defrost.
The left-hand and right-hand settings setto HI, air flows through the windshield airvents, and the blower motor adjusts to thehighest speed. You can also use this settingto defog and clear the windshield of a thincovering of ice. The heated rear windowalso turns on when you select maximumdefrost.Note: To prevent window fogging, youcannot select recirculated air whenmaximum defrost is on.
Switching Recirculated Air On andOff
Press and release the button toswitch between outside air andrecirculated air.
The air currently in the passengercompartment recirculates. This mayreduce the time needed to cool the interior,when used with A/C, and reduce unwantedodors from entering your vehicle.Note: Recirculated air may turn off, orprevent you from switching on, in all air flowmodes except MAX A/C to reduce the riskof fogging. Recirculation may also turn onand off in various air distribution controlcombinations during hot weather to improvecooling efficiency.
AUTOMATIC CLIMATECONTROL - VEHICLES WITH:SYNC
E287608
Note: Depending on your vehicle optionpackage, the controls may look differentfrom what you see here.
Directing Air to the InstrumentPanel Air Vents
Press and release the button todirect airflow to instrumentpanel air vents.
Directing Air to the Footwell AirVents
Press and release the button todirect airflow to footwell airvents.
122
Fusion (CC7) Canada/United States of America, enUSA, Edition date: 201905, Second-Printing
Climate Control

Setting the Blower Motor SpeedPress and release + or - to adjustthe volume of air circulated inthe vehicle.
Setting the Temperature
E265862
Turn the control on the left-hand side ofthe climate control to set the left-handtemperature.Note: This control also sets the right-handside temperature when you switch off dualzone mode.Turn the control on the right-hand side ofthe climate control to set the right-handtemperature.
Switching Auto Mode On and OffPress and release the button toswitch on automatic operation,then set the temperature.
The system adjusts the blower motorspeed, air distribution, air conditioningoperation, and outside or recirculated airto reach and maintain the temperature youhave set.
Note: You can also switch off dual zonemode by pressing and holding the buttonfor more than two seconds.
Switching the Air Conditioning Onand Off
Press and release the button toswitch the air conditioning on oroff.
Use air conditioning with recirculated airto improve cooling performance andefficiency.Note: In certain conditions, for example,maximum defrost, the air conditioningcompressor may continue to operate eventhough you switch off the air conditioning.
Switching the Climate Control Onand Off
Press and release the button.
Switching Defrost On and OffPress and release the button todistribute air through thewindshield air vents and
de-mister.
Air directed to the instrument panel andfootwell air vents turns off. You can alsouse this setting to defog and clear thewindshield of a thin covering of ice.
Switching Maximum AirConditioning On and Off
Press and release the button formaximum cooling.
The left-hand and right-hand settings setto LO, recirculated air flows through theinstrument panel air vents, air conditioningturns on and the blower motor adjusts tothe highest speed.
123
Fusion (CC7) Canada/United States of America, enUSA, Edition date: 201905, Second-Printing
Climate Control

Switching Maximum Defrost Onand Off
Press and release the button toswitch on maximum defrost.
The left-hand and right-hand settings setto HI, air flows through the windshield airvents, and the blower motor adjusts to thehighest speed. You can also use this settingto defog and clear the windshield of a thincovering of ice. The heated rear windowalso turns on when you select maximumdefrost.Note: To prevent window fogging, youcannot select recirculated air whenmaximum defrost is on.
Switching Recirculated Air On andOff
Press and release the button toswitch between outside air andrecirculated air.
The air currently in the passengercompartment recirculates. This mayreduce the time needed to cool the interior,when used with A/C, and reduce unwantedodors from entering your vehicle.Note: Recirculated air may turn off, orprevent you from switching on, in all air flowmodes except MAX A/C to reduce the riskof fogging. Recirculation may also turn onand off in various air distribution controlcombinations during hot weather to improvecooling efficiency.
HINTS ON CONTROLLING THEINTERIOR CLIMATE -VEHICLES WITH: AUTOMATICTEMPERATURE CONTROLGeneral HintsNote: Prolonged use of recirculated air maycause the windows to fog up.Note: You may feel a small amount of airfrom the footwell air vents regardless of theair distribution setting.Note: To reduce humidity build-up insideyour vehicle, do not drive with the systemswitched off or with recirculated air alwaysswitched on.Note: Do not place objects under the frontseats as this may interfere with the airflowto the rear seats.Note: Remove any snow, ice or leaves fromthe air intake area at the base of thewindshield.Note: To improve the time to reach acomfortable temperature in hot weather,drive with the windows open until you feelcold air through the air vents.
Automatic Climate ControlNote: Adjusting the settings when yourvehicle interior is extremely hot or cold isnot necessary. Automatic mode is bestrecommended to maintain set temperature.Note: The system adjusts to heat or coolthe interior to the temperature you selectas quickly as possible.Note: For the system to function efficiently,the instrument panel and side air ventsshould be fully open.
124
Fusion (CC7) Canada/United States of America, enUSA, Edition date: 201905, Second-Printing
Climate Control

Note: If you select AUTO during coldoutside temperatures, the system directsair flow to the windshield and side windowair vents. In addition, the blower motor mayrun at a slower speed until the engine warmsup.Note: If you select AUTO during hottemperatures and the inside of the vehicleis hot, the system uses recirculated air tomaximize interior cooling. Blower motorspeed may also reduce until the air cools.
Quickly Heating the Interior1. Press and release AUTO.2. Adjust the temperature function to the
setting you prefer.
Recommended Settings forHeating1. Press and release AUTO.2. Adjust the temperature function to the
setting you prefer. Use 72°F (22°C) asa starting point, then adjust the settingas necessary.
Quickly Cooling the Interior1. Press and release MAX A/C.
Recommended Settings forCooling1. Press and release AUTO.2. Adjust the temperature function to the
setting you prefer. Use 72°F (22°C) asa starting point, then adjust the settingas necessary.
Defogging the Side Windows inCold Weather1. Press and release defrost or maximum
defrost.
2. Adjust the temperature control to thesetting you prefer. Use 72°F (22°C) asa starting point, then adjust the settingas necessary.
HINTS ON CONTROLLING THEINTERIOR CLIMATE -VEHICLES WITH: MANUALTEMPERATURE CONTROLGeneral HintsNote: Prolonged use of recirculated air maycause the windows to fog up.Note: You may feel a small amount of airfrom the footwell air vents regardless of theair distribution setting.Note: To reduce humidity build-up insideyour vehicle, do not drive with the systemswitched off or with recirculated air alwaysswitched on.Note: Do not place objects under the frontseats as this may interfere with the airflowto the rear seats.Note: Remove any snow, ice or leaves fromthe air intake area at the base of thewindshield.Note: To improve the time to reach acomfortable temperature in hot weather,drive with the windows open until you feelcold air through the air vents.
Quickly Heating the Interior1. Adjust the blower motor speed to the
highest speed setting.2. Adjust the temperature control to the
highest setting.3. Direct air to the footwell air vents.
125
Fusion (CC7) Canada/United States of America, enUSA, Edition date: 201905, Second-Printing
Climate Control

Recommended Settings forHeating1. Adjust the blower motor speed to the
center setting.2. Adjust the temperature control to the
midway point of the hot settings.3. Direct air to the footwell air vents.
Quickly Cooling the Interior1. Select MAX A/C.2. Drive with the windows open for a short
period of time.
Recommended Settings forCooling1. Adjust the blower motor speed to the
center setting.2. Adjust the temperature control to the
midway point of the cold settings.3. Direct air to the instrument panel air
vents.
Vehicle Stationary for ExtendedPeriods During Extreme HighAmbient Temperatures1. Apply the parking brake.2. Place your vehicle in park (P) or
neutral.3. Select MAX A/C.4. Adjust the blower motor speed to the
lowest speed setting.
Defogging the Side Windows inCold Weather1. Direct air to the instrument panel and
windshield air vents.2. Press and release A/C.3. Adjust the temperature control to the
setting you prefer.4. Adjust the blower motor speed to the
highest setting.
5. Direct air toward the side windows.6. Close the instrument panel air vents.
HEATED REAR WINDOW
E184884
Press the button to clear the rearwindow of thin ice and fog. Theheated rear window turns off
after a short period of time.Note: Do not use harsh chemicals, razorblades or other sharp objects to clean orremove decals from the inside of the heatedrear window. The vehicle warranty may notcover damage to the heated rear windowgrid lines.
HEATED EXTERIOR MIRRORS(IF EQUIPPED)
When you switch the heated rear windowon, the heated exterior mirrors turn on.Note: Do not remove ice from the mirrorswith a scraper or adjust the mirror glasswhen it is frozen in place.Note: Do not clean the mirror housing orglass with harsh abrasives, fuel or otherpetroleum-based cleaning products. Thevehicle warranty may not cover damagecaused to the mirror housing or glass.
CABIN AIR FILTERYour vehicle is equipped with a cabin airfilter, which gives you and your passengersthe following benefits:• It improves your driving comfort by
reducing particle concentration.• It improves the interior compartment
cleanliness.• It protects the climate control
components from particle deposits.
126
Fusion (CC7) Canada/United States of America, enUSA, Edition date: 201905, Second-Printing
Climate Control

You can locate the cabin air filter behindthe glove box.Note: Make sure you have a cabin air filterinstalled at all times. This prevents foreignobjects from entering the system. Runningthe system without a filter in place couldresult in degradation or damage to thesystem.Replace the filter at regular intervals. SeeScheduled Maintenance (page 433).For additional cabin air filter information,or to replace the filter, see an authorizeddealer.
REMOTE START (IF EQUIPPED)
You can switch this feature on or off andadjust the settings using the informationdisplay controls. See InformationDisplays (page 94).The climate control system adjusts theinterior temperature during remote start.You cannot adjust the climate controlsetting during remote start operation.Switch the ignition on to makeadjustments.Based on your remote start settings, thefollowing vehicle-dependent features mayor may not remain on after remote startingyour vehicle:• Climate controlled seats.• Heated steering wheel.• Heated mirrors.• Heated rear window.• Windshield wiper de-icer.Note: For dual zone climate controlledseats, the passenger seat setting defaultsto match the driver seat during remote start.
Automatic SettingsIf Auto is on, the system sets the interiortemperature to 72°F (22°C) and heats orcools the vehicle interior as required toachieve comfort.Note: In cold weather, the heated rearwindow and heated mirrors turn on.
Last SettingsIf Last Settings is on, the system uses thesettings last selected before you turnedoff the vehicle.
Heated and Cooled FeaturesIn Auto mode, certain heated features mayswitch on during cold weather, and cooledfeatures during hot weather.
127
Fusion (CC7) Canada/United States of America, enUSA, Edition date: 201905, Second-Printing
Climate Control

SITTING IN THE CORRECTPOSITION
WARNING: Sitting improperly, outof position or with the seatback reclinedtoo far can take weight off the seatcushion and affect the decision of thepassenger sensing system, resulting inserious injury or death in the event of acrash. Always sit upright against yourseat back, with your feet on the floor.
WARNING: Do not recline theseatback too far as this can cause theoccupant to slide under the seatbelt,resulting in serious injury in the event ofa collision.
WARNING: Do not place objectshigher than the top of the seat backrest.Failure to follow this instruction couldresult in personal injury or death in theevent of a sudden stop or crash.
E68595
When you use them properly, the seat,head restraint, seatbelt and airbags willprovide optimum protection in the eventof a crash.
We recommend that you follow theseguidelines:• Sit in an upright position with the base
of your spine as far back as possible.• Do not recline the seat backrest so that
your torso is more than 30° from theupright position.
• Adjust the head restraint so that thetop of it is level with the top of yourhead and as far forward as possible.Make sure that you remaincomfortable.
• Keep sufficient distance betweenyourself and the steering wheel. Werecommend a minimum of 10 in(25 cm) between your breastbone andthe airbag cover.
• Hold the steering wheel with your armsslightly bent.
• Bend your legs slightly so that you canpress the pedals fully.
• Position the shoulder strap of theseatbelt over the center of yourshoulder and position the lap straptightly across your hips.
Make sure that your driving position iscomfortable and that you can maintain fullcontrol of your vehicle.
HEAD RESTRAINTS
WARNING: Fully adjust the headrestraint before you sit in or operate yourvehicle. This will help minimize the riskof neck injury in the event of a crash. Donot adjust the head restraint when yourvehicle is moving.
128
Fusion (CC7) Canada/United States of America, enUSA, Edition date: 201905, Second-Printing
Seats

WARNING: The head restraint is asafety device. Whenever possible itshould be installed and properlyadjusted when the seat is occupied.Failure to adjust the head restraintproperly could reduce its effectivenessduring certain impacts.
Note: Adjust the seat backrest to an uprightdriving position before adjusting the headrestraint. Adjust the head restraint so thatthe top of it is level with the top of your headand as far forward as possible. Make surethat you remain comfortable. If you areextremely tall, adjust the head restraint toits highest position.Front Seat and Rear Seat OutboardHead Restraints
E138642
Rear Center Head Restraint
E138645
The head restraints consist of:
An energy absorbing headrestraint.
A
Two steel stems.BGuide sleeve adjust and unlockbutton.
C
Guide sleeve unlock and removebutton (If Equipped).
D
Adjusting the Head RestraintRaising the Head RestraintPull the head restraint up.
Lowering the Head Restraint1. Press and hold button C.2. Push the head restraint down.
Removing the Head Restraint (IfEquipped)1. Pull the head restraint up until it
reaches its highest position.2. Press and hold buttons C and D.3. Pull the head restraint up.
Installing the Head RestraintAlign the steel stems into the guide sleevesand push the head restraint down until itlocks.
129
Fusion (CC7) Canada/United States of America, enUSA, Edition date: 201905, Second-Printing
Seats

Tilting Head Restraints (If Equipped)
E144727
The front head restraints tilt for extracomfort.1. Adjust the seat backrest to an upright
driving or riding position.2. Pivot the head restraint forward toward
your head to the desired position.After the head restraint reaches theforward-most tilt position, pivot it forwardagain to release it to the rearward, un-tiltedposition.
MANUAL SEATS
WARNING: Do not adjust the driverseat or seatback when your vehicle ismoving.
WARNING: Rock the seatbackward and forward after releasingthe lever to make sure that it is fullyengaged.
WARNING: Reclining the seatbackcan cause an occupant to slide under theseat's safety belt, resulting in severepersonal injuries in the event of a crash.
The driver and passenger manual seatsmay consist of:
A B C DE144631
A bar to move the seat backwardand forward.
A
A control to adjust the lumbar ofthe seatback (driver seat only).
B
A lever to adjust the height of theseat (driver seat only).
C
A lever to adjust the angle of theseatback.
D
POWER SEATS (IF EQUIPPED)
WARNING: Do not adjust the driverseat or seatback when your vehicle ismoving.
WARNING: Do not place cargo orany objects behind the seatback beforereturning it to the original position.
Note: Driver seat shown, passenger seatsimilar.
130
Fusion (CC7) Canada/United States of America, enUSA, Edition date: 201905, Second-Printing
Seats

6-way power seat
E176793
131
Fusion (CC7) Canada/United States of America, enUSA, Edition date: 201905, Second-Printing
Seats

10-way power seat
E144632
Power Lumbar (If Equipped)
E165608
MEMORY FUNCTION
WARNING: Before activating thememory seat, make sure that the areaimmediately surrounding the seat is clearof obstructions and that all occupantsare clear of moving parts.
WARNING: Do not use the memoryfunction when your vehicle is moving.
This feature recalls the position of thefollowing features:• Driver seat.• Power mirrors.
132
Fusion (CC7) Canada/United States of America, enUSA, Edition date: 201905, Second-Printing
Seats

The memory control is on the driver door.
E223340
Saving a PreSet Position1. Adjust the memory features to the
position you prefer.2. Press the SET button until you hear a
single tone.3. Press the preset button you prefer until
you hear a single tone.You can save up to two preset memorypositions. You can save a memory presetat any time.
Recalling a PreSet PositionPress and release the preset buttonassociated with the driving position youprefer. The memory features move to theposition stored for that preset.Note: You can only recall a preset memoryposition when you switch the ignition off, orwhen the transmission is in park (P) orneutral (N) if the ignition is on and thevehicle is not moving.You can also recall a preset memoryposition by:• Pressing the unlock button on your
intelligent access key fob if it is linkedto a preset position.
• Unlocking the intelligent driver doorhandle if a linked key fob is present.
Note: Using a linked key fob to recall yourmemory position when the ignition is offmoves the seat to the Easy Entry position.
Note: Pressing any active memory featurecontrol or any memory button during amemory recall cancels the operation.
Linking a PreSet Position to yourRemote Control or IntelligentAccess Key FobYour vehicle can save the preset memorypositions for up to two remote controls orintelligent access keys.After you save the memory presetpositions you prefer:1. Press and hold the preset button you
prefer for about three seconds until youhear a single tone.
2. Within three seconds, press the lockbutton on the remote control you arelinking.
To unlink a remote control, follow thesame procedure – except in step 2, pressthe unlock button on the remote control.Note: If more than one linked remotecontrol or intelligent access key is in range,the memory function moves to the settingsof the first key to initiate a memory recall.
Easy Entry and Exit FeatureIf you enable the easy entry and exitfeature, it moves the driver seat positionrearward up to 2 in (5 cm) when you switchthe ignition off.The driver seat returns to the previousposition when you switch the ignition on.You can enable or disable this featurethrough the information display. SeeGeneral Information (page 94).
REAR SEATSNote: Your vehicle may have splitseatbacks that you must fold individually.Note: Make sure the center safety belt isunbuckled before folding the seatback.
133
Fusion (CC7) Canada/United States of America, enUSA, Edition date: 201905, Second-Printing
Seats

To lower the seat back(s) from inside thevehicle, do the following:
E144634
1. Pull the handle to release the seatback.2. Push the seatback forward.
E164098
3. Stow the safety belt in the stowageclip. This will prevent the safety beltfrom getting caught in the seat latch.
When raising the seat back(s), make sureyou hear the seat latch into place.
134
Fusion (CC7) Canada/United States of America, enUSA, Edition date: 201905, Second-Printing
Seats

HEATED SEATS (IF EQUIPPED)
WARNING: Use caution when usingthe heated seat if you are unable to feelpain to your skin because of advancedage, chronic illness, diabetes, spinal cordinjury, medication, alcohol use,exhaustion or other physical conditions.The heated seat could cause burns evenat low temperatures, especially if usedfor long periods of time. Failure to followthis instruction could result in personalinjury.
WARNING: Do not place anythingon the seat that blocks the heat, forexample a seat cover or a cushion. Thiscould cause the seat to overheat. Failureto follow this instruction could result inpersonal injury.
WARNING: Do not poke sharpobjects into the seat cushion or seatbackrest. This could damage the heatedseat element and cause it to overheat.Failure to follow this instruction couldresult in personal injury.
Do not do the following:• Place heavy objects on the seat.• Operate the heated seat if water or any
other liquid is spilled on the seat. Allowthe seat to dry thoroughly.
• Operate the heated seats unless theengine is running. Doing so can causethe battery to lose charge.
E146941
Press the heated seat symbol to cyclethrough the various heat settings and off.Warmer settings are indicated by moreindicator lights.
CLIMATE CONTROLLED SEATS(IF EQUIPPED)
Heated Seats
WARNING: Persons who areunable to feel pain to the skin becauseof advanced age, chronic illness,diabetes, spinal cord injury, medication,alcohol use, exhaustion, or other physicalconditions, must exercise care whenusing the seat heater. The seat heatermay cause burns even at lowtemperatures, especially if used for longperiods of time. Do not place anythingon the seat that insulates against heat,such as a blanket or cushion, becausethis may cause the seat heater tooverheat. Do not puncture the seat withpins, needles, or other pointed objectsbecause this may damage the heatingelement which may cause the seatheater to overheat. An overheated seatmay cause serious personal injury.
135
Fusion (CC7) Canada/United States of America, enUSA, Edition date: 201905, Second-Printing
Seats

Do not do the following:• Place heavy objects on the seat.• Operate the seat heater if water or any
other liquid spills on the seat. Allow theseat to dry thoroughly.
• Operate the heated seats unless theengine is running. Doing so can causethe battery to lose charge.
E146322
Press the heated seat symbol to cyclethrough the various heat settings and off.More indicator lights indicate warmersettings.
Cooled SeatsThe cooled seats will only function whenthe engine is running.
E146309
To operate the cooled seats:Press the cooled seat symbol to cyclethrough the various cooling settings andoff. More indicator lights indicate coolersettings.If the engine falls below 350 RPM whilethe cooled seats are on, the feature willturn itself off. You will need to reactivateit.
Climate controlled seat air filterreplacementYour vehicle is equipped with lifetime airfilters that are integrated with the seats.Regular maintenance or replacement isnot needed.
136
Fusion (CC7) Canada/United States of America, enUSA, Edition date: 201905, Second-Printing
Seats

UNIVERSAL GARAGE DOOROPENERHomeLink Wireless ControlSystem
WARNING: Do not use the systemwith any garage door opener that doesnot have the safety stop and reversefeature as required by U.S. FederalSafety Standards (this includes anygarage door opener manufacturedbefore April 1, 1982). A garage dooropener which cannot detect an object,signaling the door to stop and reverse,does not meet current federal safetystandards. Using a garage door openerwithout these features increases the riskof serious injury or death.
Note: Make sure that the garage door andsecurity device are free from obstructionwhen you are programming. Do not programthe system with the vehicle in the garage.Note: Make sure you keep the originalremote control transmitter for use in othervehicles as well as for future systemprogramming.Note: We recommend that upon the saleor lease termination of your vehicle, youerase the programmed function buttons forsecurity reasons. See Erasing the FunctionButton Codes.Note: You can program a maximum ofthree devices. To change or replace any ofthe three devices after it has been initiallyprogrammed, you must first erase thecurrent settings. See Erasing the FunctionButton Codes.
E142657
The universal garage door opener replacesthe common hand-held garage dooropener with a three-button transmitterthat is integrated into the driver’s sun visor.The system includes two primary features,a garage door opener and a platform forremote activation of devices within thehome. As well as being programmed forgarage doors, the system transmitter canbe programmed to operate entry gateoperators, security systems, entry doorlocks and home or office lighting.Additional system information can befound online at www.homelink.com,www.youtube.com/HomeLinkGentex orby calling the toll-free help line on1-800-355-3515.
In-Vehicle ProgrammingThis process is to program your hand-heldtransmitter and your in-vehicle HomeLinkbutton.Note: The programming steps belowassume you will be programming HomeLinkthat was not previously programmed.Note: Put a new battery in the hand-heldtransmitter. This will ensure quicker trainingand accurate transmission of theradio-frequency signal.
137
Fusion (CC7) Canada/United States of America, enUSA, Edition date: 201905, Second-Printing
Garage Door Opener (If Equipped)

E142658
1. With your vehicle parked outside of thegarage, turn your ignition to the onposition, but do not start your vehicle.
2. Hold your hand-held garage doortransmitter 2–6 in (5–14 cm) awayfrom the HomeLink button you wantto program.
3. Using both hands, simultaneously,press and hold the desired HomeLinkbutton and the hand-held transmitterbutton. DO NOT release either one untilthe HomeLink indicator light flashesslowly and then rapidly. When theindicator light flashes rapidly, bothbuttons may be released. The rapidflashing indicates successful training.
Note: You may need to use a differentmethod if you live in Canada or havedifficulties programming your gate operatoror garage door opener. See Gate Operator/ Canadian Programming.4. Press and hold the HomeLink button
you programmed for two seconds, thenrelease. You may need to do this twiceto activate the door. If your garage doordoes not operate, watch the HomeLinkindicator light.
If the indicator light stays on, theprogramming is complete. No furtheraction is needed.If the indicator light flashes rapidly for 2seconds and then turns to a constant light,the HomeLink button is not programmedyet. See Programming Your Garage DoorOpener Motor.
To program additional buttons, repeatSteps 1 – 4.For questions or comments, please contactHomeLink at www.homelink.com,www.youtube.com/HomeLinkGentex or1-800-355-3515.
Programming Your Garage DoorOpener MotorNote: You may need a ladder to reach theunit and you may need to remove the coveror lamp lens on your garage door opener.
E142659
1. Press the learn button on the garagedoor opener motor and then you have30 seconds to complete the next twosteps.
2. Return to your vehicle.
E142658
3. Press and hold the function button youwant to program for 2 seconds, thenrelease. Repeat this step. Dependingon your brand of garage door opener,you may need to repeat this sequencea third time.
138
Fusion (CC7) Canada/United States of America, enUSA, Edition date: 201905, Second-Printing
Garage Door Opener (If Equipped)

Gate Operator / CanadianProgrammingCanadian radio-frequency laws requiretransmitter signals to “time-out” (or quit)after several seconds of transmission –which may not be long enough forHomeLink to pick up the signal duringprogramming. Similar to this Canadian law,some U.S. gate operators are designed to“time-out” in the same manner.Note: If programming a garage door openeror gate operator, it is advised to unplug thedevice during the “cycling” process toprevent possible overheating.1. Press and hold the HomeLink button
while you press and release, every twoseconds, your hand-held transmitteruntil the HomeLink indicator lightchanges from a slow to a rapidlyblinking light.
2. Release both the HomeLink andhand-held transmitter buttons.
3. Continue programing HomeLink. SeeIn-Vehicle Programming.
Erasing the Function Button CodesNote: You cannot erase individual buttons.
E142660
1. Press and hold the outer two functionbuttons simultaneously forapproximately 20 seconds until theindicator lights above the buttons flashrapidly.
2. When the indicator lights flash, releasethe buttons. The codes for all buttonsare erased.
Reprogramming a Single ButtonTo program a device to a previously trainedbutton, follow these steps:1. Press and hold the desired button. Do
NOT release the button.2. The indicator light will begin to flash
after 20 seconds. Without releasing thebutton, follow Step 1 in theProgramming section.
For questions or comments, contactHomeLink at www.homelink.com,www.youtube.com/HomeLinkGentex or1-800-355-3515.
Programming to a Genie Intellicode 2Garage Door OpenerNote: The Genie Intellicode 2 transmittermust already be programmed to operatewith the garage door opener.Note: To program HomeLink to thetransmitter you must first put thetransmitter into programming mode.
139
Fusion (CC7) Canada/United States of America, enUSA, Edition date: 201905, Second-Printing
Garage Door Opener (If Equipped)

BAE142661
Red indicator lightA.Green indicator lightB.
1. Press and hold one of the buttons onthe hand-held transmitter for 10seconds. The indicator light will changefrom green to red and green.
2. Press the same button twice to confirmthe change to programming mode. Ifdone properly the indicator light willappear red.
3. Hold the transmitter within 1–3 in(2–8 cm) of the button on the visor youwant to program.
4. Press and hold both the programmedGenie button on the hand-heldtransmitter and the button you wantto program. The indicator light on thevisor will flash rapidly when theprogramming is successful.
Note: The Genie transmitter will transmitfor up to 30 seconds. If HomeLink does notprogram within 30 seconds the Genietransmitter will need to be pressed again. Ifthe Genie transmitter indicator light displaysgreen and red, release the button until theindicator light turns off before pressing thebutton again.Once HomeLink has been programmedsuccessfully, the Genie transmitter mustbe changed out of program mode. To dothis:
1. Press and hold the previouslyprogrammed Genie button on thehand-held transmitter for 10 seconds.The indicator light will change from redto red and green.
2. Press the same button twice to confirmthe change. If done correctly theindicator light will turn green.
Programming HomeLink to the GenieIntellicode Garage Door Opener MotorNote: You may need a ladder to access thegarage door opener motor.
E142662
1. Press and hold the program button onthe garage door opener motor untilboth blue indicator lights turn on.
2. Release the program button. Only thesmaller round indicator light should beon.
3. Press and release the program button.The larger purple indicator light willflash.
Note: The next two steps must becompleted in 30 seconds.4. Press and release the Genie Intellicode
2 hand-held transmitter’s previouslyprogrammed button. Both indicatorlights on the garage door opener motorunit should now flash purple.
140
Fusion (CC7) Canada/United States of America, enUSA, Edition date: 201905, Second-Printing
Garage Door Opener (If Equipped)

5. Press and hold the previouslyprogrammed button on the visor for 2seconds. Repeat this step up to 3 timesuntil the garage door moves.
Programming is now complete.
Clearing a HomeLink DeviceTo erase programming from the threeHomeLink buttons press and hold the twoouter HomeLink buttons until the indicatorlight begins to flash. The indicator light willbegin flashing in 10 to 20 seconds, at whichtime both buttons should be released.Programming has now been erased, andthe indicator light should blink slowly toindicate the device is in train mode whenany of the three HomeLink buttons arepressed.
FCC and RSS-210 Industry CanadaComplianceThis device complies with Part 15 of theFCC Rules and with RSS-210 of IndustryCanada. Operation is subject to thefollowing two conditions: (1) this devicemay not cause harmful interference, and(2) this device must accept anyinterference received, includinginterference that may cause undesiredoperation.
WARNING: Changes ormodifications not expressively approvedby the party responsible for compliancecould void the user's authority to operatethe equipment. The term "IC:" before theradio certification number only signifiesthat Industry Canada technicalspecifications were met.
This equipment complies with FCCradiation exposure limits set forth for anuncontrolled environment. End Users mustfollow the specific operating instructionsfor satisfying RF exposure compliance. Thistransmitter must be at least 8 in (20 cm)from the user and must not be co-locatedor operating in conjunction with any otherantenna or transmitter.The term “IC:” before thecertification/registration number onlysignifies that Industry Canada technicalspecifications were met.
141
Fusion (CC7) Canada/United States of America, enUSA, Edition date: 201905, Second-Printing
Garage Door Opener (If Equipped)

12 Volt DC Power Point
WARNING: Do not plug optionalelectrical accessories into the cigarlighter socket. Incorrect use of the cigarlighter can cause damage not coveredby the vehicle warranty, and can resultin fire or serious injury.
Note: When you switch the ignition on, youcan use the socket to power 12 voltappliances with a maximum current ratingof 15 amps.If the power supply does not work after youswitch the ignition off, switch the ignitionon.Note: Do not hang any accessory from theaccessory plug.Note: Do not use the power point over thevehicle capacity of 12 volt DC 180 watts ora fuse may blow.Note: Always keep the power point capsclosed when not in use.Do not insert objects other than anaccessory plug into the power point. Thisdamages the power point and may blowthe fuse.Run the vehicle for full capacity use of thepower point.To prevent the battery from running out ofcharge:• Do not use the power point longer than
necessary when the vehicle is notrunning.
• Do not leave devices plugged inovernight or when you park your vehiclefor extended periods.
LocationsPower points may be in the followinglocations:• On the instrument panel.• Inside the center console.• On the rear of the center console.
110 Volt AC Power Point (If Equipped)
WARNING: Do not keep electricaldevices plugged in the power pointwhenever the device is not in use. Do notuse any extension cord with the 110 voltAC power point, since it will defeat thesafety protection design. Doing so maycause the power point to overload dueto powering multiple devices that canreach beyond the 150 watt load limit andcould result in fire or serious injury.
Note: The power point turns off when youswitch the ignition off, or when the batteryvoltage drops below 11 volts.You can use the power point for electricdevices that require up to 150 watts. It ison the rear of the center console.
E193395
Note: Depending on your vehicle, the powerpoint may open to the right or upward.
142
Fusion (CC7) Canada/United States of America, enUSA, Edition date: 201905, Second-Printing
Auxiliary Power Points

When the indicator light on the power pointis:• On: The power point is working, the
ignition is on and a device is pluggedin.
• Off: The power point is off, the ignitionis off or no device is plugged in.
• Flashing: The power point is in faultmode.
The power outlet temporarily turns offpower when in fault mode if the deviceexceeds the 150 watt limit. Unplug yourdevice and switch the ignition off. Switchthe ignition back on, but do not plug yourdevice back in. Let the system cool off andswitch the ignition off to reset the faultmode. Switch the ignition back on andmake sure the indicator light remains on.Do not use the power point for certainelectric devices, including:• Cathode-ray, tube-type televisions.• Motor loads, such as vacuum cleaners,
electric saws and other electric powertools or compressor-drivenrefrigerators.
• Measuring devices, which processprecise data, such as medicalequipment or measuring equipment.
• Other appliances requiring anextremely stable power supply such asmicrocomputer-controlled electricblankets or touch-sensor lamps.
143
Fusion (CC7) Canada/United States of America, enUSA, Edition date: 201905, Second-Printing
Auxiliary Power Points

CENTER CONSOLEStow items in the cup holder carefully asitems may become loose during hardbraking, acceleration or crashes, includinghot drinks which may spill.Available console features include:
E222012
Front storage compartment withUSB ports and auxiliary powerpoint.
A
Cup holder.BStorage compartment.CAC power point.DAuxiliary power point.ESwitch pack.F
OVERHEAD CONSOLE
E266392
Press near the rear edge of the door toopen it.
REAR SEAT ARMREST (IF
EQUIPPED)
E144635
Fold the armrest down to use the armrestand cupholder.
144
Fusion (CC7) Canada/United States of America, enUSA, Edition date: 201905, Second-Printing
Storage Compartments

GENERAL INFORMATION
WARNING: Extended idling at highengine speeds can produce very hightemperatures in the engine and exhaustsystem, creating the risk of fire or otherdamage.
WARNING: Do not park, idle ordrive your vehicle on dry grass or otherdry ground cover. The emission systemheats up the engine compartment andexhaust system, creating the risk of fire.
WARNING: Do not start the enginein a closed garage or in other enclosedareas. Exhaust fumes can be toxic.Always open the garage door before youstart the engine.
WARNING: Exhaust leaks mayresult in entry of harmful and potentiallylethal fumes into the passengercompartment. If you smell exhaustfumes inside your vehicle, have yourvehicle inspected immediately. Do notdrive if you smell exhaust fumes.
If you disconnect the battery, your vehiclemay exhibit some unusual drivingcharacteristics for approximately 5 mi(8 km) after you reconnect it. This isbecause the engine management systemmust realign itself with the engine. Youcan disregard any unusual drivingcharacteristics during this period.The powertrain control system meets allCanadian interference-causing equipmentstandard requirements regulating theimpulse electrical field or radio noise.When you start the engine, avoid pressingthe accelerator pedal before and duringoperation. Only use the accelerator pedalwhen you have difficulty starting theengine.
KEYLESS STARTINGNote: The system may not function if theintelligent access key is close to metalobjects or electronic devices, for examplekeys or a cell phone.Note: A valid intelligent access key mustbe located inside your vehicle to switch theignition on and start your vehicle.
Ignition Modes
E144447
The keyless starting system has threemodes:Off: Turns the ignition off.• Without applying the brake pedal,
press and release the button oncewhen the ignition is in the on mode, orwhen your vehicle is running but is notmoving.
On: All electrical circuits are operationaland the warning lamps and indicatorsilluminate.• Without applying the brake pedal,
press and release the button once.Start: Starts your vehicle. The engine maynot start when your vehicle starts.• Press the brake pedal, and then press
the button for any length of time. Anindicator light on the button illuminateswhen the ignition is on and when yourvehicle starts.
145
Fusion (CC7) Canada/United States of America, enUSA, Edition date: 201905, Second-Printing
Starting and Stopping the Engine

STARTING A GASOLINEENGINEWhen you start the engine, the idle speedincreases. This helps to warm up theengine. If the engine idle speed does notslow down automatically, have yourvehicle checked by an authorized dealer.Note: You can crank the engine for a totalof 60 seconds without the engine startingbefore the starting system temporarilydisables. The 60 seconds does not have tobe all at once. For example, if you crank theengine three times for 20 seconds eachtime, without the engine starting, youreached the 60-second time limit. Amessage appears in the information displayalerting you that you exceeded the crankingtime. You cannot attempt to start theengine for at least 15 minutes. After 15minutes, you are limited to a 15-secondengine cranking time. You need to wait 60minutes before you can crank the engine for60 seconds again.Before starting your vehicle, check thefollowing:• Make sure all occupants have fastened
their seatbelts.• Make sure the headlamps and
electrical accessories are off.• Make sure the parking brake is on.• Make sure the transmission is in park
(P).
Starting Your VehicleNote: Do not touch the accelerator pedal.Note: You must have your intelligent accesskey in your vehicle to shift the transmissionout of park (P).1. Fully depress the brake pedal.2. Press the push button ignition switch.
Failure to StartThe system does not function if:• The key frequencies are jammed.• The key battery has no charge.If you are unable to start your vehicle, dothe following:1. Remove the key blade from the
transmitter.
E155835
2. Remove the rubber covering (A) fromthe cup holder. With the buttons facingupward and the unlock button facingthe front of your vehicle, place the firstintelligent access key into the backupslot (B).
3. Press the push button ignition switch.If you cannot start the engine after threeattempts, wait 10 seconds and follow thisprocedure:1. Apply the parking brake.2. Fully depress the brake pedal.3. Shift into park (P).4. Fully press the accelerator pedal.5. Briefly press the push button ignition
switch.
146
Fusion (CC7) Canada/United States of America, enUSA, Edition date: 201905, Second-Printing
Starting and Stopping the Engine

Fast RestartThe fast restart feature allows you torestart your vehicle within 20 seconds ofswitching it off, even if it does not detecta valid passive key.Within 20 seconds of switching the engineoff, press the brake pedal and press thepush button ignition switch. After 20seconds, you can no longer start yourvehicle if it does not detect a valid passivekey.Once your vehicle starts, it remains runninguntil you press the push button ignitionswitch, even if your vehicle does not detecta valid passive key. If you open and closea door while your vehicle is running, thesystem searches for a valid passive key.After 20 seconds, you can no longer startyour vehicle if it does not detect a validpassive key.
Automatic Engine ShutdownThis feature automatically shuts downyour vehicle if it has been idling for anextended period. The ignition also turns offto save battery power. Before your vehicleshuts down, a message appears in theinformation display showing a timercounting down. If you do not intervenewithin 30 seconds, your vehicle shutsdown. Another message appears in theinformation display to inform you that yourvehicle has shut down to save fuel. Startyour vehicle as normal.
Automatic Engine Shutdown OverrideNote: You cannot permanently switch offthe automatic shutdown. When you switchit off temporarily, it turns on at the nextignition cycle.
You can stop the shutdown, or reset thetimer, at any point before the 30-secondcountdown has expired by doing any of thefollowing:• Interacting with your vehicle, for
example pressing the brake oraccelerator pedal.
• You can temporarily switch off theshutdown any time the ignition is onusing the information display. SeeInformation Displays (page 94).
• During the countdown beforeshutdown, you are prompted to pressOK or RESET (depending on your typeof information display) to temporarilyswitch the feature off (for the currentignition cycle only).
Stopping the Engine When YourVehicle is StationaryNote: The ignition, all electrical circuits andall warning lamps and indicators will beturned off.Note: If your vehicle is left running for 30minutes without any interaction, itautomatically shuts down.1. Apply the parking brake.2. Shift into park (P).3. Briefly press the push button ignition
switch.
147
Fusion (CC7) Canada/United States of America, enUSA, Edition date: 201905, Second-Printing
Starting and Stopping the Engine

Stopping the Engine When YourVehicle is Moving
WARNING: Switching off theengine when the vehicle is still movingwill result in a loss of brake and steeringassistance. The steering will not lock, buthigher effort will be required. When theignition is switched off, some electricalcircuits, including air bags, warning lampsand indicators may also be off. If theignition was turned off accidentally, youcan shift into neutral (N) and re-start theengine.
1. Shift into neutral and use the brakes tobring your vehicle to a safe stop.
2. When your vehicle has stopped, shiftinto park (P).
3. Apply the parking brake.4. Press and hold the push button ignition
switch, or press it three times withintwo seconds.
Guarding Against Exhaust Fumes
WARNING: If you smell exhaustfumes inside your vehicle, have yourvehicle checked by your authorizeddealer immediately. Do not drive yourvehicle if you smell exhaust fumes.Carbon monoxide is present in exhaustfumes. Take precautions to avoid itsdangerous effects.
Important Ventilating InformationIf you stop your vehicle and then leave theengine idling for long periods, werecommend that you do one of thefollowing:• Open the windows at least 1 in (3 cm).• Set your climate control to outside air.
ENGINE BLOCK HEATER (IF
EQUIPPED)
WARNING: Failure to follow engineblock heater instructions could result inproperty damage or serious personalinjury.
WARNING: Do not use your heaterwith ungrounded electrical systems ortwo-pronged adapters. There is a risk ofelectrical shock.
Note: The heater is most effective whenoutdoor temperatures are below 0°F(-18°C).The heater acts as a starting aid bywarming the engine coolant. This allowsthe climate control system to respondquickly. The equipment includes a heaterelement (installed in the engine block) anda wire harness. You can connect thesystem to a grounded 120-volt ACelectrical source.We recommend that you do the followingfor a safe and correct operation:• Use a 16-gauge outdoor extension cord
that is product certified byUnderwriter’s Laboratory (UL) orCanadian Standards Association(CSA). This extension cord must besuitable for use outdoors, in coldtemperatures, and be clearly markedSuitable for Use with OutdoorAppliances. Do not use an indoorextension cord outdoors. This couldresult in an electric shock or become afire hazard.
• Use as short an extension cord aspossible.
• Do not use multiple extension cords.
148
Fusion (CC7) Canada/United States of America, enUSA, Edition date: 201905, Second-Printing
Starting and Stopping the Engine

• Make sure that when in operation, theextension cord plug and heater cordplug connections are free and clear ofwater. This could cause an electricshock or fire.
• Make sure your vehicle is parked in aclean area, clear of combustibles.
• Make sure the heater, heater cord andextension cord are firmly connected.
• Check for heat anywhere in theelectrical hookup once the system hasbeen operating for approximately 30minutes.
• Make sure the heater system ischecked for proper operation beforewinter.
Using the Engine Block HeaterThe engine block heater plug is located ina housing in the left lower grille. Open thehinged, circular door and make sure thereceptacle terminals are clean and dry priorto use. Clean them with a dry cloth ifnecessary.The heater uses 0.4 to 1.0 kilowatt-hoursof energy per hour of use. The system doesnot have a thermostat. It will achievemaximum temperature afterapproximately three hours of operation. Ifyou use the heater longer than three hours,this will not improve system performanceand will use unnecessary electricity.
149
Fusion (CC7) Canada/United States of America, enUSA, Edition date: 201905, Second-Printing
Starting and Stopping the Engine

AUTO-START-STOPThe system helps reduce fuel consumptionby automatically shutting off and restartingthe engine while your vehicle is stopped.The engine will restart automatically whenyou release the brake pedal. In somesituations, your vehicle may restartautomatically, for example:• To maintain interior comfort• To recharge the batteryNote: Power assist steering is turned offwhen the engine is off.
WARNING: Apply the parkingbrake, shift into park (P), switch theignition off and remove the key beforeyou leave your vehicle. Failure to followthis instruction could result in personalinjury or death.
WARNING: Apply the parkingbrake, shift into park (P), switch theignition off and remove the key beforeyou open the hood or have any serviceor repair work completed. If you do notswitch the ignition off, the engine couldrestart at any time. Failure to follow thisinstruction could result in personal injuryor death.
WARNING: The system mayrequire the engine to automaticallyrestart when the auto-start-stopindicator illuminates green or flashesamber. Failure to follow this instructioncould result in personal injury.
The Auto-Start-Stop system status isavailable at a glance within the informationdisplay. See Information Displays (page94).
Enabling Auto-Start-StopThe system is automatically enabled everytime you start your vehicle if the followingconditions are met:• The Auto-Start-Stop button is not
pressed (not illuminated).• Your vehicle exceeds an initial speed
of 3 mph (5 km/h) after you haveinitially started the vehicle.
• Your vehicle is stopped.• Your foot is on the brake pedal.• The transmission is in drive (D).• The driver's door is closed.• There is adequate brake vacuum.• The interior compartment has been
cooled or warmed to an acceptablelevel.
• The front windshield defroster is off.• The steering wheel is not turned rapidly
or is not at a sharp angle.• The vehicle is not on a steep road
grade.• The battery is within optimal operating
conditions (battery state of charge andtemperature in range).
• The engine coolant is at operatingtemperature.
• Elevation is below approximately12,000 ft (3,650 m).
• Ambient temperature is moderate.The green Auto-Start-Stopindicator light on the instrumentcluster will illuminate to indicate
when the automatic engine stop occurs.
E146361
If the instrument cluster isequipped with a greyAuto-Start-Stop indicator light,
it is illuminated when automatic enginestop is not available due to one of theabove noted conditions not being met.
150
Fusion (CC7) Canada/United States of America, enUSA, Edition date: 201905, Second-Printing
Unique Driving Characteristics (If Equipped)

Automatic Engine RestartAny of the following conditions will resultin an automatic restart of the engine:• Your foot is removed from the brake
pedal.• You press the accelerator pedal.• You press the accelerator and the
brake pedal at the same time.• The driver safety belt becomes
unfastened or the driver door is ajar.• The transmission is moved into reverse
(R).• Your vehicle is moving.• The battery is not within optimal
operating conditions.• The maximum engine off time is
exceeded.• When you press the Auto-Start-Stop
button while the engine is stoppedautomatically.
• The heated windshield is turned on.Any of the following conditions may resultin an automatic restart of the engine:• The blower fan speed is increased or
the climate control temperature ischanged.
• An electrical accessory is turned on orplugged in.
Disabling Auto-Start-StopPress the Auto-Start-Stopbutton located on the centerconsole to switch the system off.
The button will illuminate. The system willonly be deactivated for the current ignitioncycle. Press the button again to restoreAuto-Start-Stop function.
If your vehicle is in an Auto-Start-Stopstate and you shift the transmission toreverse without pressing the brake, amessage telling you to press the brakeappears. You must press the brake pedalwithin 60 seconds, or you will need to shiftto park and manually restart your vehicle.Note: If the Shift to P, Restart Enginemessage appears and the amberAuto-Start-Stop indicator light is flashing,automatic restart is not available. Thevehicle must be restarted manually. SeeInformation Displays (page 94).
151
Fusion (CC7) Canada/United States of America, enUSA, Edition date: 201905, Second-Printing
Unique Driving Characteristics (If Equipped)

SAFETY PRECAUTIONS
WARNING: Do not overfill the fueltank. The pressure in an overfilled tankmay cause leakage and lead to fuel sprayand fire.
WARNING: The fuel system maybe under pressure. If you hear a hissingsound near the fuel filler inlet, do notrefuel until the sound stops. Otherwise,fuel may spray out, which could causeserious personal injury.
WARNING: Fuels can cause seriousinjury or death if misused or mishandled.
WARNING: Fuel may containbenzene, which is a cancer-causingagent.
WARNING: When refueling alwaysshut the engine off and never allowsparks or open flames near the fuel tankfiller valve. Never smoke or use a cellphone while refueling. Fuel vapor isextremely hazardous under certainconditions. Avoid inhaling excess fumes.
Follow these guidelines when refueling:• Extinguish all smoking materials and
any open flames before refueling yourvehicle.
• Always switch the engine off beforerefueling.
• Automotive fuels can be harmful orfatal if swallowed. Fuel is highly toxicand if swallowed can cause death orpermanent injury. If fuel is swallowedimmediately call a physician, even if nosymptoms are immediately apparent.The toxic effects of fuel may not beapparent for hours.
• Avoid inhaling fuel vapors. Inhaling fuelvapor can lead to eye and respiratorytract irritation. In severe cases,excessive or prolonged breathing offuel vapor can cause serious illness andpermanent injury.
• Avoid getting fuel in your eyes. If yousplash fuel in your eyes, immediatelyremove contact lenses (if worn), flushwith water for 15 minutes and seekmedical attention. Failure to seekproper medical attention could lead topermanent injury.
• Fuels can be harmful if absorbedthrough the skin. If you splash fuel onyour skin, clothing or both, promptlyremove contaminated clothing andthoroughly wash your skin with soapand water. Repeated or prolonged skincontact causes skin irritation.
• Be particularly careful if you are takingAntabuse or other forms of Disulfiramfor the treatment of alcoholism.Breathing fuel vapors could cause anadverse reaction, serious personalinjury or sickness. Immediately call aphysician if you experience any adversereactions.
FUEL QUALITYChoosing the Right Fuel
E161513
Your vehicle is designed to operate onregular unleaded gasoline with a minimumpump (R+M)/2 octane rating of 87.
152
Fusion (CC7) Canada/United States of America, enUSA, Edition date: 201905, Second-Printing
Fuel and Refueling

Some fuel stations, particularly those inhigh altitude areas, offer fuels posted asregular unleaded gasoline with an octanerating below 87. The use of these fuelscould result in engine damage that will notbe covered by the vehicle warranty.For best overall vehicle and engineperformance, premium fuel with an octanerating of 91 or higher is recommended. Theperformance gained by using premium fuelis most noticeable in hot weather as wellas other conditions, for example whentowing a trailer. See Towing (page 222).Do not be concerned if the enginesometimes knocks lightly. However, if theengine knocks heavily while using fuel withthe recommended octane rating, contactan authorized dealer to prevent any enginedamage.We recommend Top Tier detergentgasolines, where available to help minimizeengine deposits and maintain optimalvehicle and engine performance. Foradditional information, refer towww.toptiergas.com.Note: Use of any fuel for which the vehiclewas not designed can impair the emissioncontrol system, cause loss of vehicleperformance, and cause damage to theengine which may not be covered by thevehicle Warranty.Do not use:• Diesel fuel.• Fuels containing kerosene or paraffin.• Fuel containing more than 15% ethanol
or E85 fuel.• Fuels containing methanol.• Fuels containing metallic-based
additives, including manganese-basedcompounds.
• Fuels containing the octane boosteradditive, methylcyclopentadienylmanganese tricarbonyl (MMT).
• Leaded fuel, using leaded fuel isprohibited by law.
The use of fuels with metallic compoundssuch as methylcyclopentadienylmanganese tricarbonyl (commonly knownas MMT), which is a manganese-basedfuel additive, will impair engineperformance and affect the emissioncontrol system.
FUEL FILLER FUNNELLOCATIONThe fuel filler funnel is under the luggagecompartment floor covering.
E162864
153
Fusion (CC7) Canada/United States of America, enUSA, Edition date: 201905, Second-Printing
Fuel and Refueling

RUNNING OUT OF FUELRunning out of fuel can cause damage notcovered by the vehicle Warranty.If your vehicle runs out of fuel:• Add a minimum of 1.3 gal (5 L) of fuel
to restart the engine.• You may need to switch the ignition
from off to on several times afterrefueling to allow the fuel system topump the fuel from the tank to theengine. When restarting, cranking timetakes a few seconds longer thannormal.
Note: If your vehicle is on a steep slope,more fuel may be required.
Filling a Portable Fuel Container
WARNING: Flow of fuel through afuel pump nozzle can produce staticelectricity. This can cause a fire if you arefilling an ungrounded fuel container.
Use the following guidelines to avoidelectrostatic charge build-up, which canproduce a spark, when filling anungrounded fuel container:• Only use an approved fuel container to
transfer fuel to your vehicle. Place thecontainer on the ground when filling it.
• Do not fill a fuel container when it isinside your vehicle (including the cargoarea).
• Keep the fuel pump nozzle in contactwith the fuel container when filling it.
• Do not use a device that holds the fuelpump nozzle lever in the fill position.
Adding Fuel From a Portable FuelContainer
WARNING: Do not insert the nozzleof a fuel container or an aftermarketfunnel into the fuel filler neck. This maydamage the fuel system filler neck or itsseal and cause fuel to run onto theground.
WARNING: Do not try to pry openor push open the capless fuel systemwith foreign objects. This could damagethe fuel system and its seal and causeinjury to you or others.
WARNING: Do not dispose of fuelin the household refuse or the publicsewage system. Use an authorized wastedisposal facility.
When refueling the vehicle fuel tank froma fuel container, use the fuel filler funnelincluded with your vehicle. See Fuel FillerFunnel Location (page 153).Note: Do not use aftermarket funnels asthey may not work with the capless fuelsystem and can damage it.When refueling the vehicle fuel tank froma fuel container, do the following:1. Fully open the fuel filler door.2. Fully insert the fuel filler funnel into the
fuel filler inlet.
154
Fusion (CC7) Canada/United States of America, enUSA, Edition date: 201905, Second-Printing
Fuel and Refueling

E157452
3. Add fuel to your vehicle from the fuelcontainer.
4. Remove the fuel filler funnel.5. Fully close the fuel filler door.6. Clean the fuel filler funnel and place it
back in your vehicle or correctly disposeof it.
Note: Extra funnels can be purchased froman authorized dealer if you choose todispose of the funnel.
REFUELINGRefueling System Overview
E267248
B
C
A
Fuel filler door.AFuel tank filler valve.BFuel tank filler pipe.C
Your vehicle does not have a fuel tank fillercap.
155
Fusion (CC7) Canada/United States of America, enUSA, Edition date: 201905, Second-Printing
Fuel and Refueling

E206911
A B
C D
Left-hand side. To open the fuelfiller door, press the center rearedge of the fuel filler door andthen release.
A
Right-hand side. To open thefuel filler door, press the centerrear edge of the fuel filler doorand then release.
B
Left-hand side. Pull the rear ofthe fuel filler door to open it.
C
Right-hand side. Pull the rear ofthe fuel filler door to open it.
D
Refueling Your Vehicle
WARNING: When refueling alwaysshut the engine off and never allowsparks or open flames near the fuel tankfiller valve. Never smoke or use a cellphone while refueling. Fuel vapor isextremely hazardous under certainconditions. Avoid inhaling excess fumes.
WARNING: The fuel system maybe under pressure. If you hear a hissingsound near the fuel filler inlet, do notrefuel until the sound stops. Otherwise,fuel may spray out, which could causeserious personal injury.
WARNING: Do not pry open thefuel tank filler valve. This could damagethe fuel system. Failure to follow thisinstruction could result in fire, personalinjury or death.
WARNING: Do not remove the fuelpump nozzle from its fully insertedposition when refueling.
WARNING: Stop refueling whenthe fuel pump nozzle automaticallyshuts off for the first time. Failure tofollow this will fill the expansion spacein the fuel tank and could lead to fueloverflowing.
WARNING: Do not overfill the fueltank. The pressure in an overfilled tankmay cause leakage and lead to fuel sprayand fire.
WARNING: Wait at least fiveseconds before removing the fuel pumpnozzle to allow any residual fuel to draininto the fuel tank.
1. Fully open the fuel filler door.2. Select the correct fuel pump nozzle for
your vehicle.
156
Fusion (CC7) Canada/United States of America, enUSA, Edition date: 201905, Second-Printing
Fuel and Refueling

E139202
A
3. Insert the fuel pump nozzle up to thefirst notch on the nozzle A. Keep thefuel pump nozzle resting on the fueltank filler pipe.
E139203
A
B
4. Hold the fuel pump nozzle in positionB when refueling. Holding the fuelpump nozzle in position A can affectthe flow of fuel and shut off the fuelpump nozzle before the fuel tank is full.
E206912
A B
5. Operate the fuel pump nozzle withinthe area shown.
E119081
6. When you finish refueling slightly raisethe fuel pump nozzle and slowlyremove it.
7. Fully close the fuel filler door.Do not attempt to start the engine if youhave filled the fuel tank with incorrect fuel.Incorrect fuel use could cause damage notcovered by the vehicle Warranty. Have yourvehicle immediately checked.
Refueling System Warning (If Equipped)
If the fuel tank filler valve does not fullyclose, a message could appear in theinformation display.
Message
Check Fuel Fill Inlet
If the message appears, do the following:1. Stop your vehicle as soon as it is safe
to do so and switch the engine off.2. Shift into park (P) or neutral (N).
157
Fusion (CC7) Canada/United States of America, enUSA, Edition date: 201905, Second-Printing
Fuel and Refueling

3. Apply the parking brake.4. Fully open the fuel filler door.5. Check the fuel tank filler valve for any
debris that may be restricting itsmovement.
6. Remove any debris from the fuel tankfiller valve.
7. Fully insert a fuel pump nozzle or thefuel filler funnel provided with yourvehicle into the fuel filler pipe. SeeFuel Filler Funnel Location (page153). This action should dislodge anydebris that may be preventing the fueltank filler valve from fully closing.
8. Remove the fuel pump nozzle or fuelfiller funnel from the fuel filler pipe.
9. Fully close the fuel filler door.Note: The message may not immediatelyreset. If the message continues to appearand a warning lamp illuminates, have yourvehicle checked as soon as possible.
FUEL CONSUMPTIONAdvertised CapacityThe advertised capacity is the maximumamount of fuel that you can add to the fueltank after running out of fuel. Included inthe advertised capacity is an emptyreserve. The empty reserve is anunspecified amount of fuel that remainsin the fuel tank when the fuel gaugeindicates empty.Note: The amount of fuel in the emptyreserve varies and should not be relied uponto increase driving range.
Calculating Fuel EconomyYour vehicle calculates fuel economyfigures through the trip computer averagefuel function. See Information Displays(page 94).
The first 1,000 mi (1,600 km) of driving isthe break-in period of the engine. A moreaccurate measurement is obtained after2,000–3,000 mi (3,200–4,800 km).Keep a record for at least one month andrecord the type of driving, for example cityor highway. This provides an accurateestimate of your vehicle’s fuel economyunder current driving conditions. Keepingrecords during summer and winter showshow temperature impacts fuel economy.
Conditions Affecting Fuel Efficiency• Carrying unnecessary weight in your
vehicle may reduce fuel economy.• Avoid adding accessories that increase
aerodynamic drag to your vehicle suchas bug deflectors, car top carriers andski or bike racks.
• Remove empty roof racks and keepwindows shut at high speeds to reducewind resistance and fuel use.
• Check and adjust tire pressureregularly. Underinflated tires increasesfuel consumption.
• Sudden acceleration and brakingdegrade fuel efficiency. Drive smoothlylooking as far ahead as possible andavoid short trips when possible.
• Fuel efficiency degrades with lowertemperatures.
• Comfort features use additional energyand consume more fuel. Use AC andother comfort features only whennecessary.
• Using fuel blended with alcohol mayincrease fuel consumption.
158
Fusion (CC7) Canada/United States of America, enUSA, Edition date: 201905, Second-Printing
Fuel and Refueling

EMISSION LAW
WARNING: Do not remove or alterthe original equipment floor covering orinsulation between it and the metal floorof the vehicle. The floor covering andinsulation protect occupants of thevehicle from the engine and exhaustsystem heat and noise. On vehicles withno original equipment floor coveringinsulation, do not carry passengers in amanner that permits prolonged skincontact with the metal floor. Failure tofollow these instructions may result infire or personal injury.
U.S. federal laws and certain state lawsprohibit removing or rendering inoperativeemission control system components.Similar federal or provincial laws mayapply in Canada. We do not approve of anyvehicle modification without firstdetermining applicable laws.
Tampering with emissionscontrol systems includingrelated sensors or the Diesel
Exhaust Fluid system can result in reducedengine power and the illumination of theservice engine soon light.
Tampering With a Noise ControlSystemFederal laws prohibit the following acts:• Removal or rendering inoperative by
any person other than for purposes ofmaintenance.
• Repair or replacement of any device orelement of the design incorporated intoa new vehicle for the purpose of noisecontrol prior to its sale or delivery tothe ultimate purchaser or while it is inuse.
• The use of the vehicle after any personremoves or renders inoperative anydevice or element of the design.
The U.S. Environmental Protection Agencymay presume to constitute tampering asfollows:• Removal of hood blanket, fender apron
absorbers, fender apron barriers,underbody noise shields or acousticallyabsorptive material.
• Tampering or rendering inoperative theengine speed governor, to allow enginespeed to exceed manufacturerspecifications.
If the engine does not start, runs rough,experiences a decrease in engineperformance, experiences excess fuelconsumption or produces excessiveexhaust smoke, check for the following:• A plugged or disconnected air inlet
system hose.• A plugged engine air filter element.• Water in the fuel filter and water
separator.• A clogged fuel filter.• Contaminated fuel.• Air in the fuel system, due to loose
connections.• An open or pinched sensor hose.• Incorrect engine oil level.
159
Fusion (CC7) Canada/United States of America, enUSA, Edition date: 201905, Second-Printing
Engine Emission Control

• Incorrect fuel for climatic conditions.• Incorrect engine oil viscosity for
climactic conditions.Note: Some vehicles have a lifetime fuelfilter that is integrated with the fuel tank.Regular maintenance or replacement is notneeded.Note: If these checks do not help youcorrect the concern, have your vehiclechecked as soon as possible.
Noise Emissions Warranty,Prohibited Tampering Acts andMaintenanceOn January 1, 1978, Federal regulationbecame effective governing the noiseemission on trucks over 10,000 lb(4,536 kg) Gross Vehicle Weight Rating(GVWR). The preceding statementsconcerning prohibited tampering acts andmaintenance, and the noise warrantyfound in the Warranty Guide, areapplicable to complete chassis cabs over10,000 lb (4,536 kg) GVWR.
CATALYTIC CONVERTER
WARNING: Do not park, idle ordrive your vehicle on dry grass or otherdry ground cover. The emission systemheats up the engine compartment andexhaust system, creating the risk of fire.
WARNING: The normal operatingtemperature of the exhaust system isvery high. Never work around or attemptto repair any part of the exhaust systemuntil it has cooled. Use special care whenworking around the catalytic converter.The catalytic converter heats up to a veryhigh temperature after only a shortperiod of engine operation and stays hotafter the engine is switched off.
WARNING: Exhaust leaks mayresult in entry of harmful and potentiallylethal fumes into the passengercompartment. If you smell exhaustfumes inside your vehicle, have yourvehicle inspected immediately. Do notdrive if you smell exhaust fumes.
Your vehicle has various emission controlcomponents and a catalytic converter thatenables it to comply with applicableexhaust emission standards.To make sure that the catalytic converterand other emission control componentscontinue to work properly:• Do not crank the engine for more than
10 seconds at a time.• Do not run the engine with a spark plug
lead disconnected.• Do not push-start or tow-start your
vehicle. Use booster cables. See JumpStarting the Vehicle (page 233).
• Use only the specified fuel listed.• Do not switch the ignition off when your
vehicle is moving.• Avoid running out of fuel.• Have the items listed in scheduled
maintenance information performedaccording to the specified schedule.
Note: Resulting component damage maynot be covered by the vehicle Warranty.The scheduled maintenance items listedin scheduled maintenance information areessential to the life and performance ofyour vehicle and to its emissions system.If you use anything other than Ford,Motorcraft or Ford-authorized parts formaintenance replacements or for serviceof components affecting emission control,such non-Ford parts should be equivalentto genuine Ford Motor Company parts inperformance and durability.
160
Fusion (CC7) Canada/United States of America, enUSA, Edition date: 201905, Second-Printing
Engine Emission Control

Illumination of the service engine soonindicator, charging system warning light orthe temperature warning light, fluid leaks,strange odors, smoke or loss of enginepower could indicate that the emissioncontrol system is not working properly.An improperly operating or damagedexhaust system may allow exhaust toenter the vehicle. Have a damaged orimproperly operating exhaust systeminspected and repaired immediately.Do not make any unauthorized changes toyour vehicle or engine. By law, vehicleowners and anyone who manufactures,repairs, services, sells, leases, tradesvehicles, or supervises a fleet of vehiclesare not permitted to intentionally removean emission control device or prevent itfrom working. Information about yourvehicle’s emission system is on the VehicleEmission Control Information Decallocated on or near the engine. This decalalso lists engine displacement.Please consult your warranty informationfor complete details.
On-Board Diagnostics (OBD-II)Your vehicle has a computer known as theon-board diagnostics system (OBD-II) thatmonitors the engine’s emission controlsystem. The system protects theenvironment by making sure that yourvehicle continues to meet governmentemission standards. The OBD-II systemalso assists a service technician in properlyservicing your vehicle.
When the service engine soonindicator illuminates, the OBD-IIsystem has detected a
malfunction. Temporary malfunctions maycause the service engine soon indicator toilluminate. Examples are:
1. Your vehicle has run out of fuel—theengine may misfire or run poorly.
2. Poor fuel quality or water in thefuel—the engine may misfire or runpoorly.
3. The fuel fill inlet may not have closedproperly. See Refueling (page 155).
4. Driving through deep water—theelectrical system may be wet.
You can correct these temporarymalfunctions by filling the fuel tank withgood quality fuel, properly closing the fuelfill inlet or letting the electrical system dryout. After three driving cycles without theseor any other temporary malfunctionspresent, the service engine soon indicatorshould stay off the next time you start theengine. A driving cycle consists of a coldengine startup followed by mixed city andhighway driving. No additional vehicleservice is required.If the service engine soon indicator remainson, have your vehicle serviced at the firstavailable opportunity. Although somemalfunctions detected by the OBD-II maynot have symptoms that are apparent,continued driving with the service enginesoon indicator on can result in increasedemissions, lower fuel economy, reducedengine and transmission smoothness andlead to more costly repairs.
Readiness for Inspection andMaintenance (I/M) TestingSome state and provincial and localgovernments may haveInspection/Maintenance (I/M) programsto inspect the emission control equipmenton your vehicle. Failure to pass thisinspection could prevent you from gettinga vehicle registration.
If the service engine soonindicator is on or the bulb doesnot work, your vehicle may need
service. See On-Board Diagnostics.
161
Fusion (CC7) Canada/United States of America, enUSA, Edition date: 201905, Second-Printing
Engine Emission Control

Your vehicle may not pass the I/M test ifthe service engine soon indicator is on ornot working properly (bulb is burned out),or if the OBD-II system has determinedthat some of the emission control systemshave not been properly checked. In thiscase, the vehicle is not ready for I/Mtesting.If the vehicle’s engine or transmission hasjust been serviced, or the battery hasrecently run down or been replaced, theOBD-II system may indicate that thevehicle is not ready for I/M testing. Todetermine if the vehicle is ready for I/Mtesting, turn the ignition key to the onposition for 15 seconds without crankingthe engine. If the service engine soonindicator blinks eight times, it means thatthe vehicle is not ready for I/M testing; ifthe service engine soon indicator stays onsolid, it means that your vehicle is readyfor I/M testing.The OBD-II system checks the emissioncontrol system during normal driving. Acomplete check may take several days.If the vehicle is not ready for I/M testing,you can perform the following driving cycleconsisting of mixed city and highwaydriving:1. 15 minutes of steady driving on an
expressway or highway followed by 20minutes of stop-and-go driving with atleast four 30-second idle periods.
2. Allow your vehicle to sit for at leasteight hours with the ignition off. Then,start the vehicle and complete theabove driving cycle. The vehicle mustwarm up to its normal operatingtemperature. Once started, do not turnoff the vehicle until the above drivingcycle is complete.
If the vehicle is still not ready for I/Mtesting, you need to repeat the abovedriving cycle.
162
Fusion (CC7) Canada/United States of America, enUSA, Edition date: 201905, Second-Printing
Engine Emission Control

AUTOMATIC TRANSMISSION
WARNING: Always fully apply theparking brake and make sure you shiftinto park (P). Failure to follow thisinstruction could result in personal injuryor death.
WARNING: Do not apply the brakepedal and accelerator pedalsimultaneously. Applying both pedalssimultaneously for more than a fewseconds will limit engine performance,which may result in difficulty maintainingspeed in traffic and could lead to seriousinjury.
WARNING: When your vehicle isstationary, keep the brake pedal fullypressed when shifting gears. Failure tofollow this instruction could result inpersonal injury, death or propertydamage.
Note: You may not be able to shift out ofpark (P) unless the intelligent access key isinside your vehicle.
Understanding the Positions ofYour Rotary Shift TransmissionSport (S)
E222981
Low (L)
E224178
Your vehicle has an electronic transmissionshifter. The transmission selector is on thecenter console, below the climate controlsystem.To place your vehicle in gear from park (P):1. Fully press down and hold on the brake
pedal through shifts out of park (P).2. Rotate the outer ring of the
transmission selector clockwise frompark (P), until the desired gearilluminates on the transmissionselector. The instrument cluster alsodisplays the current gear selected.
3. Release the brake pedal and thetransmission remains in the selectedgear.
Park (P)With the transmission in park (P), yourvehicle locks the transmission andprevents the wheels from turning. Alwayscome to a complete stop before puttingyour vehicle into and out of park (P). Anaudible chime sounds once you select park(P).When the ignition is turned off, your vehicleautomatically shifts into park (P). If theignition is turned off when the vehicle ismoving, it first shifts into neutral (N) untila slow enough speed is reached and thenshifts into park (P) automatically.
163
Fusion (CC7) Canada/United States of America, enUSA, Edition date: 201905, Second-Printing
Transmission

Automatic Return to ParkNote: This feature does not operate whenyour vehicle is in Stay in Neutral mode orneutral tow.Your vehicle has a feature thatautomatically shifts your vehicle into park(P) when any of the following conditionsoccur:• You turn the vehicle off.• You open the driver's door with your
seatbelt unlatched.• Your seatbelt is unlatched when the
driver's door is open.If you turn your vehicle off when moving,your vehicle first shifts into neutral (N) untilit slows down enough to shift into park (P)automatically.Note: If you have waited an extendedperiod of time (2-15 minutes) before startingyour vehicle, unlatching your seatbelt causesthis feature to activate, even with thedriver's door closed.Note: This feature may not work properlyif the door ajar switch is malfunctioning. Ifyour door ajar indicator does not illuminatewhen you open the driver’s door or theindicator illuminates with the driver’s doorclosed, see your authorized dealer.
Reverse (R)With the selector in reverse (R), yourvehicle moves backward. Always come toa complete stop before shifting into andout of reverse (R).
Neutral (N)With the selector in neutral (N), yourvehicle can be started and is free to roll.Hold the brake pedal down when in thisposition.
Stay in Neutral ModeNote: Always put your vehicle in Stay inNeutral mode when entering an automaticcar wash. Failure to do this could result invehicle damage not covered by warranty.Note: When entering an automatic carwash, always shift to Neutral (N). If you areexiting the vehicle before the car wash, Stayin Neutral Mode is available.Stay in Neutral mode allows your vehicleto stay in neutral when you exit yourvehicle. Your vehicle must be stationary toenter this mode.
To enter Stay in Neutral mode:1. Switch your vehicle on but do not start
the engine. See Keyless Starting(page 145).
2. Place your foot on the brake pedal androtate the transmission selector toneutral (N).
Note: When in neutral (N), a messageappears in the display screen informing youhow to access Stay in Neutral mode.3. Press either the low (L) or sport (S)
button in the middle of thetransmission selector to enter Stay inNeutral mode.
A message appears in the display screenconfirming your vehicle is in Stay in Neutralmode. The neutral (N) indicator light onthe transmission selector also flashes.To exit Stay in Neutral mode, place yourfoot on the brake pedal and rotate thetransmission selector to park (P).
Drive (D)Drive (D) is the normal driving position forthe best fuel economy. The overdrivefunction allows automatic upshifts anddownshifts through gears one through six.
164
Fusion (CC7) Canada/United States of America, enUSA, Edition date: 201905, Second-Printing
Transmission

Grade Assist - If Equipped
E224429
Press the grade assist button to activategrade assist. The grade assist lampappears in the instrument cluster when thesystem is active. Press the button againto switch it off.Grade assist:• Provides additional grade braking with
a combination of engine motoring andhigh-voltage battery charging to helpmaintain vehicle speed whendescending a grade.
• As your vehicle determines the amountof engine motoring and high-voltagebattery charging, you may notice theengine speed increasing anddecreasing to help maintain yourvehicle speed when descending agrade.
• The grade assist lamp in the instrumentcluster is illuminated.
Sport (S) (If Equipped)Putting the vehicle in sport (S):• Provides additional engine braking and
extends lower gear operation toenhance performance for uphill climbs,hilly terrain or mountainous areas. Thisincreases engine RPM during enginebraking.
• Provides additional lower gearoperation through the automatictransmission shift strategy.
• Provides gear selection more quicklyand at higher engine speeds.
Low (L) (If Equipped)• Provides maximum engine braking.• The transmission may be shifted into
low (L) at any vehicle speed.• Is not intended for use under extended
or normal driving conditions and resultsin lower fuel economy.
SelectShift™ AutomaticTransmission (If Equipped)
Your vehicle is equipped with a SelectShiftAutomatic transmission. The SelectShiftAutomatic transmission gives you theability to change gears up or down, withouta clutch as desired.In order to prevent the engine from runningat too low an RPM, which may cause it tostall, SelectShift still automatically makessome downshifts if it has determined thatyou have not downshifted in time.Although SelectShift makes somedownshifts for you, it still allows you todownshift at any time as long as theSelectShift determines that damage tothe engine does not occur fromover-revving.Note: Engine damage may occur if youmaintain excessive engine revving withoutshifting.
165
Fusion (CC7) Canada/United States of America, enUSA, Edition date: 201905, Second-Printing
Transmission

SelectShift does not automatically upshift,even if the engine is approaching the RPMlimit. It must be shifted manually bypressing the + button.Pull the + paddle on the steering wheelto activate SelectShift.• Pull the right paddle (+) to upshift.• Pull the left paddle (–) to downshift.
E144821
SelectShift in drive (D):• Provides a temporary manual mode
for performing more demandingmaneuvers where extra control of gearselection is required (for example,when towing or overtaking). This modeholds a selected gear for a temporaryperiod of time dependent on driverinputs (for example, steering oraccelerator pedal input).
SelectShift in sport (S):• Provides a permanent manual gear
selection where full control of gearselection is required.
To exit SelectShift mode shift thetransmission into another gear (forexample, drive [D]).Upshift to the recommended shift speedsaccording to the following chart:
Upshifts when accelerating (recom-mended for best fuel economy)
Shift from:
15 mph (24 km/h)1 - 2
25 mph (40 km/h)2 - 3
40 mph (64 km/h)3 - 4
45 mph (72 km/h)4 - 5
50 mph (80 km/h)5 - 6
The instrument cluster displays yourcurrently selected gear. If a gear isrequested but not available due to vehicleconditions (low speed, too high enginespeed for requested gear selection), thecurrent gear flashes three times.Note: At full accelerator pedal travel, thetransmission automatically downshifts formaximum performance.
Brake-Shift Interlock Override
WARNING: When doing thisprocedure, you need to take thetransmission out of park (P) whichmeans your vehicle can roll freely. Toavoid unwanted vehicle movement,always fully apply the parking brake priorto doing this procedure. Use wheelschocks if appropriate.
WARNING: If the parking brake isfully released, but the brake warninglamp remains illuminated, the brakesmay not be working properly. Have yourvehicle checked as soon as possible.
WARNING: Do not drive yourvehicle until you verify that thestoplamps are working.
166
Fusion (CC7) Canada/United States of America, enUSA, Edition date: 201905, Second-Printing
Transmission

Note: See your authorized dealer as soonas possible if this procedure is used.Note: For some markets this feature isdisabled.Note: This feature only functions if your12-volt battery has power. If vehicle batteryvoltage is not sufficient, an external 12-voltpower source (for example, jumper cables,battery charger or jump pack) may berequired to function the interlock overrideswitch.Use the brake-shift interlock override tomove your transmission from the parkposition in the event of an electricalmalfunction. If your vehicle has a deadbattery, you need an external powersource.1. Apply the parking brake and turn your
ignition off before performing thisprocedure.
E258561
2. Locate your brake-shift interlockaccess slot. The slot is located in yourcenter console storage bin. The accessslot does not have a label.
Note: Make sure that you correctly identifythe access hole as not to damage the mediahub.3. Using a tool, press and hold the brake
shift interlock switch. The indication inthe rotary dial flashes when yourvehicle is in override mode.
4. With the override switch still held,rotate the selector to neutral (N) toshift from park (P).
5. Release the override button.6. Your vehicle remains in Stay in Neutral
mode for wrecker towing purposes orcan be shifted to the desired gear anddriven (if possible).
7. Release the parking brake.
Automatic Transmission AdaptiveLearningThis feature may increase durability andprovide consistent shift feel over the lifeof your vehicle. A new vehicle ortransmission may have firm shifts, softshifts or both. This operation is considerednormal and does not affect function ordurability of the transmission. Over time,the adaptive learning process fully updatestransmission operation.
If Your Vehicle Gets Stuck In Mudor SnowNote: Do not rock the vehicle if the engineis not at normal operating temperature ordamage to the transmission may occur.Note: Do not rock the vehicle for more thana minute or damage to the transmission andtires may occur, or the engine may overheat.If your vehicle gets stuck in mud or snow,you may rock it out by shifting betweenforward and reverse gears, stoppingbetween shifts in a steady pattern. Presslightly on the accelerator in each gear.
167
Fusion (CC7) Canada/United States of America, enUSA, Edition date: 201905, Second-Printing
Transmission

USING ALL-WHEEL DRIVEAll-wheel drive uses all four wheels topower the vehicle. This increases traction,enabling you to drive over terrain and roadconditions that a conventional two-wheeldrive vehicle cannot. The AWD systemturns on when needed and does not requireinput from you.Note: The AWD feature gives your vehiclesome limited off-road capabilities in whichdriving surfaces are relatively level,obstruction-free and otherwise similar tonormal on-road driving conditions.Operating your vehicle under other thanthose conditions could subject the vehicleto excessive stress which might result indamage which is not covered under yourwarranty.Note: A warning message will be displayedin the information display when an AWDsystem fault is present See GeneralInformation (page 94). An AWD systemfault will cause the AWD system to defaultto front-wheel drive only mode. When thiswarning message is displayed, have yourvehicle serviced at an authorized dealerNote: A warning message will be displayedin the information display if the AWD systemhas overheated See General Information(page 94). This condition may occur if thevehicle was operated in extreme conditionswith excessive wheel slip, such as deepsand. To resume normal AWD function assoon as possible, stop the vehicle in a safelocation and stop the engine for at least 10minutes. After the engine has been restartedand the AWD system has adequatelycooled, the warning message will turn offand normal AWD function will return.Do not use a spare tire of a different sizeother than the tire provided. If themini-spare tire is installed, the AWDsystem may disable automatically andenter front-wheel drive only mode toprotect driveline components. This
condition will be indicated by a warning inthe information display See GeneralInformation (page 94). If there is awarning message in the informationdisplay from using the spare tire, thisindicator should turn off after reinstallingthe repaired or replaced normal road tireand cycling the ignition off and on. It isrecommended to reinstall the repaired orreplaced road tire as soon as possible.Major dissimilar tire sizes between the frontand rear axles could cause the AWDsystem to stop functioning and default tofront-wheel drive or damage the AWDsystem.
Driving In Special Conditions WithAll-Wheel Drive (AWD)AWD vehicles are equipped for driving onsand, snow, mud and rough roads and haveoperating characteristics that aresomewhat different from conventionalvehicles, both on and off the highway.Under severe operating conditions, the A/Cmay cycle on and off to protectoverheating of the engine.
Basic operating principles in specialconditions• Drive slower in strong crosswinds which
can affect the normal steeringcharacteristics of your vehicle.
• Be extremely careful when driving onpavement made slippery by loose sand,water, gravel, snow or ice.
168
Fusion (CC7) Canada/United States of America, enUSA, Edition date: 201905, Second-Printing
All-Wheel Drive (If Equipped)

If Your Vehicle Goes Off the Edge of thePavement• If your vehicle goes off the edge of the
pavement, slow down, but avoid severebrake application, ease the vehicleback onto the pavement only afterreducing your speed. Do not turn thesteering wheel too sharply whilereturning to the road surface.
• It may be safer to stay on the apron orshoulder of the road and slow downgradually before returning to thepavement. You may lose control if youdo not slow down or if you turn thesteering wheel too sharply or abruptly.
• It often may be less risky to strike smallobjects, such as highway reflectors,with minor damage to your vehiclerather than attempt a sudden return tothe pavement which could cause thevehicle to slide sideways out of controlor rollover. Remember, your safety andthe safety of others should be yourprimary concern.
If Your Vehicle Gets Stuck
WARNING: Apply the parkingbrake, shift into park (P), switch theignition off and remove the key beforeyou leave your vehicle. Failure to followthis instruction could result in personalinjury or death.
WARNING: If the parking brake isfully released, but the brake warninglamp remains illuminated, the brakesmay not be working properly. Have yourvehicle checked as soon as possible.
WARNING: Do not spin the wheelsat over 34 mph (55 km/h). The tires mayfail and injure a passenger or bystander.
Note: Do not rock the vehicle if the engineis not at normal operating temperature ordamage to the transmission may occur.Note: Do not rock the vehicle for more thana few minutes or damage to thetransmission and tires may occur or theengine may overheat.If your vehicle gets stuck in mud or snow itmay be rocked out by shifting betweenforward and reverse gears, stoppingbetween shifts, in a steady pattern. Presslightly on the accelerator in each gear.If your vehicle is equipped withAdvanceTrac® with Roll StabilityControl™, it may be beneficial todisengage the AdvanceTrac® with RollStability Control™ system whileattempting to rock the vehicle.
Emergency Maneuvers• In an unavoidable emergency situation
where a sudden sharp turn must bemade, remember to avoid"over-driving" your vehicle (i.e., turn thesteering wheel only as rapidly and asfar as required to avoid theemergency). Excessive steering willresult in less vehicle control, not more.Additionally, smooth variations of theaccelerator and/or brake pedalpressure should be utilized if changesin vehicle speed are called for. Avoid
169
Fusion (CC7) Canada/United States of America, enUSA, Edition date: 201905, Second-Printing
All-Wheel Drive (If Equipped)

abrupt steering, acceleration or brakingwhich could result in an increased riskof loss of vehicle control, vehiclerollover and/or personal injury. Use allavailable road surface to return thevehicle to a safe direction of travel.
• In the event of an emergency stop,avoid skidding the tires and do notattempt any sharp steering wheelmovements.
• If the vehicle goes from one type ofsurface to another (i.e., from concreteto gravel) there will be a change in theway the vehicle responds to amaneuver (steering, acceleration orbraking). Again, avoid these abruptinputs.
SandWhen driving over sand, try to keep all fourwheels on the most solid area of the trail.Avoid reducing the tire pressures but shiftto a lower gear and drive steadily throughthe terrain. Apply the accelerator slowlyand avoid spinning the wheels.Do not drive your AWD vehicle in deepsand. This will cause the AWD system tooverheat. After the system has cooleddown, normal AWD function will return.Under severe operating conditions, the A/Cmay cycle on and off to protectoverheating of the engine.Avoid excessive speed because vehiclemomentum can work against you andcause the vehicle to become stuck to thepoint that assistance may be required fromanother vehicle. Remember, you may beable to back out the way you came if youproceed with caution.
Mud and WaterIf you must drive through high water, driveslowly. Traction or brake capability maybe limited.
When driving through water, determine thedepth; avoid water higher than the bottomof the wheel rims (for cars) or the bottomof the hubs (for trucks) (if possible) andproceed slowly. If the ignition system getswet, the vehicle may stall.
E142667
Once through water, always try the brakes.Wet brakes do not stop the vehicle aseffectively as dry brakes. Drying can beimproved by moving your vehicle slowlywhile applying light pressure on the brakepedal.Be cautious of sudden changes in vehiclespeed or direction when you are driving inmud. Even AWD vehicles can lose tractionin slick mud. As when you are driving oversand, apply the accelerator slowly andavoid spinning your wheels. If the vehicledoes slide, steer in the direction of the slideuntil you regain control of the vehicle.After driving through mud, clean off residuestuck to rotating driveshafts and tires.Excess mud stuck on tires and rotatingdriveshafts causes an imbalance thatcould damage drive components.Note: Driving through deep water maydamage the transmission.If the front or rear axle is submerged inwater, have the power transfer unit (PTU)or rear axle serviced by an authorizeddealer.
170
Fusion (CC7) Canada/United States of America, enUSA, Edition date: 201905, Second-Printing
All-Wheel Drive (If Equipped)

E143950
“Tread Lightly” is an educational programdesigned to increase public awareness ofland-use regulations and responsibilitiesin our nations wilderness areas. Ford MotorCompany joins the U.S. Forest Service andthe Bureau of Land Management inencouraging you to help preserve ournational forest and other public and privatelands by “treading lightly.”
Driving on Hilly or Sloping TerrainNote: Avoid driving crosswise or turning onsteep slopes or hills. A danger lies in losingtraction, slipping sideways and possiblyrolling over. Whenever driving on a hill,determine beforehand the route you willuse. Do not drive over the crest of a hillwithout seeing what conditions are on theother side. Do not drive in reverse over a hillwithout the aid of an observer.Although natural obstacles may make itnecessary to travel diagonally up or downa hill or steep incline, you should alwaystry to drive straight up or straight down.When climbing a steep slope or hill, startin a lower gear rather than downshifting toa lower gear from a higher gear once theascent has started. This reduces strain onthe engine and the possibility of stalling.If you do stall out, do not try to turnaroundbecause you might roll over. It is better toback down to a safe location.Apply just enough power to the wheels toclimb the hill. Too much power will causethe tires to slip, spin or lose traction,resulting in loss of vehicle control.
E143949
Descend a hill in the same gear you woulduse to climb up the hill to avoid excessivebrake application and brake overheating.Do not descend in neutral; instead,disengage overdrive or manually shift to alower gear. When descending a steep hill,avoid sudden hard braking as you couldlose control. The front wheels have to beturning in order to steer the vehicle.Your vehicle has anti-lock brakes, thereforeapply the brakes steadily. Do not “pump”the brakes.
Driving on Snow and Ice
WARNING: If you are driving inslippery conditions that require tirechains or cables, then it is critical thatyou drive cautiously. Keep speeds down,allow for longer stopping distances andavoid aggressive steering to reduce thechances of a loss of vehicle controlwhich can lead to serious injury or death.If the rear end of your vehicle slides whilecornering, steer in the direction of theslide until you regain control of yourvehicle.
Note: Excessive tire slippage can causedriveline damage.AWD vehicles have advantages over 2WDvehicles in snow and ice but can skid likeany other vehicle.
171
Fusion (CC7) Canada/United States of America, enUSA, Edition date: 201905, Second-Printing
All-Wheel Drive (If Equipped)

Should you start to slide while driving onsnowy or icy roads, turn the steering wheelin the direction of the slide until you regaincontrol.Avoid sudden applications of power andquick changes of direction on snow andice. Apply the accelerator slowly andsteadily when starting from a full stop.Avoid sudden braking as well. Although anAWD vehicle may accelerate better thana two-wheel drive vehicle in snow and ice,it won’t stop any faster, because as in othervehicles, braking occurs at all four wheels.Do not become overconfident as to roadconditions.Make sure you allow sufficient distancebetween you and other vehicles forstopping. Drive slower than usual andconsider using one of the lower gears. Inemergency stopping situations, apply thebrake steadily. Since your vehicle isequipped with a four wheel (ABS), do not“pump” the brakes. See Hints on DrivingWith Anti-Lock Brakes (page 173).
Maintenance and ModificationsThe suspension and steering systems onyour vehicle have been designed andtested to provide predictable performancewhether loaded or empty and durable loadcarrying capability. For this reason, FordMotor Company strongly recommends thatyou do not make modifications such asadding or removing parts (such as loweringkits or stabilizer bars) or by usingreplacement parts not equivalent to theoriginal factory equipment.Any modifications to a vehicle that raisethe center of gravity can make it more likelythe vehicle will rollover as a result of a lossof control. Ford Motor Companyrecommends that caution be used withany vehicle equipped with a high load ordevice (such as ladder or luggage racks).
Failure to maintain your vehicle properlymay void the warranty, increase your repaircost, reduce vehicle performance andoperational capabilities and adverselyaffect driver and passenger safety.Frequent inspection of vehicle chassiscomponents is recommended if the vehicleis subjected to off-highway usage.
172
Fusion (CC7) Canada/United States of America, enUSA, Edition date: 201905, Second-Printing
All-Wheel Drive (If Equipped)

GENERAL INFORMATIONNote: Occasional brake noise is normal. Ifa metal-to-metal, continuous grinding orcontinuous squeal sound is present, thebrake linings may be worn-out and anauthorized dealer should check them. If thevehicle has continuous vibration or shudderin the steering wheel while braking, anauthorized dealer should check your vehicle.Note: Brake dust may accumulate on thewheels, even under normal drivingconditions. Some dust is inevitable as thebrakes wear and does not contribute tobrake noise. See Cleaning the Wheels(page 285).
E138644
See Warning Lamps andIndicators (page 90).
Wet brakes result in reduced brakingefficiency. Gently press the brake pedal afew times when driving from a car wash orstanding water to dry the brakes.
Brake Over AcceleratorIn the event the accelerator pedalbecomes stuck or entrapped, apply steadyand firm pressure to the brake pedal toslow the vehicle and reduce engine power.If you experience this condition, apply thebrakes and bring your vehicle to a safestop. Switch the engine off, move thetransmission to park (P) and apply theparking brake. Inspect the acceleratorpedal and the area around it for any itemsor debris that may be obstructing itsmovement.If none are found and thecondition persists, have your vehicle towedto the nearest authorized dealer.
Emergency Brake AssistEmergency brake assist detects when youbrake heavily by measuring the rate atwhich you press the brake pedal. Itprovides maximum braking efficiency aslong as you press the pedal. Emergencybrake assist can reduce stopping distancesin critical situations.
Anti-lock Brake SystemThis system helps you maintain steeringcontrol during emergency stops by keepingthe brakes from locking.
This lamp momentarilyilluminates when you switch theignition on. If the light does not
illuminate during start up, remains on orflashes, the anti-lock braking system maybe disabled. Have the system checked byan authorized dealer. If the anti-lock brakesystem is disabled, normal braking is stilleffective.
E138644
If the brake warning lampilluminates with the parkingbrake released, have your brake
system serviced immediately.It also illuminates momentarily when youswitch the ignition on to confirm the lampis functional. If it does not illuminate whenyou switch the ignition on, or begins toflash at any time, have the system checkedby an authorized dealer.
HINTS ON DRIVING WITHANTI-LOCK BRAKESThe anti-lock braking system does noteliminate the risks when:• You drive too closely to the vehicle in
front of you.• Your vehicle is hydroplaning.
173
Fusion (CC7) Canada/United States of America, enUSA, Edition date: 201905, Second-Printing
Brakes

• You take corners too fast.• The road surface is poor.Note: If the system activates, the brakepedal may pulse and may travel further.Maintain pressure on the brake pedal. Youmay also hear a noise from the system. Thisis normal.
ELECTRIC PARKING BRAKE
WARNING: Always fully apply theparking brake and make sure you shiftinto park (P). Failure to follow thisinstruction could result in personal injuryor death.
WARNING: If you drive extendeddistances with the parking brake applied,you could cause damage to the brakesystem.
WARNING: The electric parkingbrake does not operate if the vehiclebattery is running out of charge.
Your vehicle has an electric parking brake.You operate it with a switch instead of alever. The switch is on the center consoleor to the left-hand side of the steeringwheel, on the lower part of the instrumentpanel.Note: The electric parking brake makesnoises during operation. This is normal.
Applying the Electric ParkingBrake
E267156 Pull the switch upward.
E270480
The red warning lamp flashesduring operation and illuminateswhen the parking brake is
applied.
Note: It remains illuminated for a shortperiod of time after you switch the ignitionoff.If it continues to flash or does notilluminate, the system has malfunctioned.Have your vehicle checked as soon aspossible.Note: You can apply the electric parkingbrake when the ignition is off.Note: The electric parking brake couldautomatically apply when you shift into park(P). See Transmission (page 163).
Applying the Electric Parking Brake inan EmergencyNote: Do not apply the electric parkingbrake when your vehicle is moving, exceptin an emergency. If you repeatedly use theelectric parking brake to slow or stop yourvehicle, you could cause damage to thebrake system.You can use the electric parking brake toslow or stop your vehicle in an emergency.
E267156 Pull the switch upward and holdit.
E270480
The red warning lampilluminates, a tone sounds andthe stoplamps turn on.
The electric parking brake continues toslow your vehicle down unless you releasethe switch.
Manually Releasing the ElectricParking BrakeSwitch the ignition on.Press and hold the brake pedal.
174
Fusion (CC7) Canada/United States of America, enUSA, Edition date: 201905, Second-Printing
Brakes

E267156 Push the switch downward.
E270480
The red warning lamp turns off.
If it remains illuminated or flashes, thesystem has malfunctioned. Have yourvehicle checked as soon as possible.
Pulling Away on a Hill When Towing aTrailerPress and hold the brake pedal.
E267156 Pull the switch upward and holdit.
Shift into gear.Press the accelerator pedal until enginehas developed sufficient torque to preventyour vehicle from rolling down the hill.
E267156 Release the switch and pullaway in a normal manner.
Automatically Releasing theElectric Parking BrakeClose the driver door.Shift into gear.Press the accelerator pedal and pull awayin a normal manner.
E270480
The red warning lamp turns off.
If it remains illuminated or flashes, theelectric parking brake has not released.Manually release the parking brake.
Releasing the Electric ParkingBrake if the Vehicle Battery isRunning Out of ChargeConnect a booster battery to the vehiclebattery to release the electric parking brakeif the vehicle battery is running out ofcharge. See Jump Starting the Vehicle(page 233).
HILL START ASSIST
WARNING: The system does notreplace the parking brake. When youleave your vehicle, always apply theparking brake.
WARNING: You must remain inyour vehicle when the system turns on.At all times, you are responsible forcontrolling your vehicle, supervising thesystem and intervening, if required.Failure to take care may result in the lossof control of your vehicle, seriouspersonal injury or death.
WARNING: The system turns off ifthere is a malfunction or if youexcessively rev the engine.
The system makes it easier to pull awaywhen your vehicle is on a slope without theneed to use the parking brake.When the system is active, your vehicleremains stationary on the slope for two tothree seconds after you release the brakepedal. This allows time to move your footfrom the brake to the accelerator pedal.The system releases the brakesautomatically once the engine hasdeveloped sufficient drive to prevent yourvehicle from rolling down the slope. Thisis an advantage when pulling away on aslope, for example from a car park ramp,traffic lights or when reversing uphill intoa parking space.
175
Fusion (CC7) Canada/United States of America, enUSA, Edition date: 201905, Second-Printing
Brakes
Note: The system only functions when youbring your vehicle to a complete standstill.Shift the gearshift lever to reverse (R) whenfacing downhill and first gear (1) whenfacing uphill.Note: There is no warning light to indicatethe system is either on or off.
Using Hill Start Assist1. Press the brake pedal to bring your
vehicle to a complete standstill. Keepthe brake pedal pressed.
2. If the sensors detect that your vehicleis on a slope, the system activatesautomatically.
3. When you remove your foot from thebrake pedal, your vehicle remains onthe slope without rolling away forabout two to three seconds. This holdtime automatically extends if you arein the process of driving off.
4. Drive off in the normal manner. Thesystem releases the brakesautomatically.
Note: When you remove your foot from thebrake pedal and press the pedal again whenthe system is active, you will experiencesignificantly reduced brake pedal travel. Thisis normal.
Switching the System On and OffVehicles with Manual TransmissionYou can switch this feature on or off in theinformation display.The system remembers the last settingwhen you start your vehicle.
Vehicles with Automatic TransmissionThe system turns on when you switch theignition on and you cannot switch thesystem off.
176
Fusion (CC7) Canada/United States of America, enUSA, Edition date: 201905, Second-Printing
Brakes

PRINCIPLE OF OPERATIONThe traction control system helps avoiddrive wheel spin and loss of traction.If your vehicle begins to slide, the systemapplies the brakes to individual wheelsand, when needed, reduces engine powerat the same time. If the wheels spin whenaccelerating on slippery or loose surfaces,the system reduces engine power in orderto increase traction.
USING TRACTION CONTROL
WARNING: The stability andtraction control light illuminates steadilyif the system detects a failure. Make sureyou did not manually disable the tractioncontrol system using the informationdisplay controls or the switch. If thestability control and traction control lightis still illuminating steadily, have thesystem serviced by an authorized dealerimmediately. Operating your vehicle withthe traction control disabled could leadto an increased risk of loss of vehiclecontrol, vehicle rollover, personal injuryand death.
The system automatically turns on eachtime you switch the ignition on.If your vehicle is stuck in mud or snow,switching traction control off may bebeneficial as this allows the wheels to spin.Note: When you switch traction control off,stability control remains fully active.
Switching the System OffWhen you switch the system off or on, amessage appears in the informationdisplay showing system status.
You can switch the system off by eitherusing the information display controls orthe switch.
Using the Information DisplayControlsYou can switch this feature off or on in theinformation display. See GeneralInformation (page 94).
Using a Switch (If Equipped)
Use the traction control switch on theinstrument panel to switch the system offor on.
System Indicator Lights andMessages
E138639
The stability and traction controllight:
• Temporarily illuminates on enginestart-up.
• Flashes when a driving conditionactivates either of the systems.
• Illuminates if a problem occurs in eitherof the systems.
E130458
The stability and traction controloff light temporarily illuminateson engine start-up and stays on
when you switch the traction controlsystem off.
177
Fusion (CC7) Canada/United States of America, enUSA, Edition date: 201905, Second-Printing
Traction Control

PRINCIPLE OF OPERATION
WARNING: Vehicle modificationsinvolving braking system, aftermarketroof racks, suspension, steering system,tire construction and wheel and tire sizemay change the handling characteristicsof your vehicle and may adversely affectthe performance of the electronicstability control system. In addition,installing any stereo loudspeakers mayinterfere with and adversely affect theelectronic stability control system. Installany aftermarket stereo loudspeaker asfar as possible from the front centerconsole, the tunnel, and the front seatsin order to minimize the risk of interferingwith the electronic stability controlsensors. Reducing the effectiveness ofthe electronic stability control systemcould lead to an increased risk of loss ofvehicle control, vehicle rollover, personalinjury and death.
WARNING: Remember that evenadvanced technology cannot defy thelaws of physics. It’s always possible tolose control of a vehicle due toinappropriate driver input for theconditions. Aggressive driving on anyroad condition can cause you to losecontrol of your vehicle increasing the riskof personal injury or property damage.Activation of the electronic stabilitycontrol system is an indication that atleast some of the tires have exceededtheir ability to grip the road; this couldreduce the operator’s ability to controlthe vehicle potentially resulting in a lossof vehicle control, vehicle rollover,personal injury and death. If yourelectronic stability control systemactivates, SLOW DOWN.
The system automatically turns on eachtime you switch the ignition on.
If a fault occurs in either the stabilitycontrol or the traction control system, youmay experience the following conditions:• The stability and traction control light
illuminates steadily.• The stability control and traction
control systems do not enhance yourvehicle's ability to maintain traction ofthe wheels.
If a driving condition activates either thestability control or the traction controlsystem you may experience the followingconditions:• The stability and traction control light
flashes.• Your vehicle slows down.• Reduced engine power.• A vibration in the brake pedal.• The brake pedal is stiffer than usual.• If the driving condition is severe and
your foot is not on the brake, the brakepedal may move as the system applieshigher brake force.
The stability control system has severalfeatures built into it to help you maintaincontrol of your vehicle:
Electronic Stability ControlThe system enhances your vehicle’s abilityto prevent skids or lateral slides byapplying brakes to one or more of thewheels individually and, if necessary,reducing engine power.
Traction ControlThe system enhances your vehicle’s abilityto maintain traction of the wheels bydetecting and controlling wheel spin. SeeUsing Traction Control (page 177).
178
Fusion (CC7) Canada/United States of America, enUSA, Edition date: 201905, Second-Printing
Stability Control

E72903
A A
AB
B
B
B
Vehicle without stability controlskidding off its intended route.
A
Vehicle with stability controlmaintaining control on a slipperysurface.
B
USING STABILITY CONTROLThe system automatically turns on eachtime you switch the ignition on.You cannot switch the stability controlsystem off, but when you shift into reverse(R), the system deactivates.You can switch the traction control systemoff or on. See Using Traction Control(page 177).
179
Fusion (CC7) Canada/United States of America, enUSA, Edition date: 201905, Second-Printing
Stability Control

PRINCIPLE OF OPERATION
WARNING: To help avoid personalinjury, always use caution when inreverse (R) and when using the sensingsystem.
WARNING: The system may notdetect objects with surfaces that absorbreflection. Always drive with due careand attention. Failure to take care mayresult in a crash.
WARNING: Traffic control systems,inclement weather, air brakes, externalmotors and fans may affect the correctoperation of the sensing system.Thismay cause reduced performance or falsealerts.
WARNING: The system may notdetect small or moving objects,particularly those close to the ground.
Note: If your vehicle has MyKey™, thesensing system cannot be switched offwhen a MyKey™ is present. See Principleof Operation (page 56).Note: Keep the sensors on the bumper orfascia free from snow, ice and largeaccumulations of dirt. If the sensors arecovered, the system’s accuracy can beaffected. Do not clean the sensors withsharp objects.Note: If your vehicle sustains damage tothe bumper or fascia, leaving it misalignedor bent, the sensing zone may be alteredcausing inaccurate measurement ofobstacles or false alerts.
Note: Certain add-on devices installedaround the bumper or fascia may createfalse alerts. For example, large trailerhitches, bike or surfboard racks, license platebrackets, bumper covers or any other devicethat may block the normal detection zoneof the system. Remove the add-on deviceto prevent false alerts.Note: When you connect a trailer to yourvehicle, the rear parking aid may detect thetrailer and therefore provide an alert. Disablethe rear parking aid when you connect atrailer to prevent the alert.The sensing system warns the driver ofobstacles within a certain range of yourvehicle. The system turns on automaticallywhenever you switch the ignition on.You can switch the system off through theinformation display menu or from thepop-up message that appears once youshift the transmission into reverse (R). SeeGeneral Information (page 94). If yourvehicle has a parking aid button, you canswitch the system off by pressing thebutton.If a fault is present in the system, a warningmessage appears in the informationdisplay. See Information Messages(page 103).
REAR PARKING AID (IF EQUIPPED)
WARNING: The system may notdetect objects with surfaces that absorbreflection. Always drive with due careand attention. Failure to take care mayresult in a crash.
WARNING: The system may notdetect small or moving objects,particularly those close to the ground.
180
Fusion (CC7) Canada/United States of America, enUSA, Edition date: 201905, Second-Printing
Parking Aids

WARNING: To help avoid personalinjury, always use caution when inreverse (R) and when using the sensingsystem.
WARNING: The parking aid systemcan only assist you to detect objectswhen your vehicle is moving at parkingspeeds. To help avoid personal injury youmust take care when using the parkingaid system.
Note: Keep the sensors free from snow, iceand large accumulations of dirt.Note: Do not cover up the sensors.Note: Do not clean the sensors with sharpobjects.Note: If your vehicle sustains damageleaving the sensors misaligned, this maycause inaccurate measurements or falsealerts.Note: Some accessories, for example largetrailer hitches or bike or surfboard racks cancause reduced performance or false alerts.The sensors are on the rear bumper.The sensors are active when thetransmission is in reverse (R) and thevehicle speed is less than 3 mph (5 km/h).When the parking aid system sounds atone, the audio system may reduce the setvolume.A warning tone sounds when your vehicleapproaches an object. As your vehiclemoves closer to an object, the rate of thetone increases. The warning tonecontinuously sounds when an object is 12 in(30 cm) or less from the center of the rearbumper.Note: There is a decreased coverage areaat the outer corners.
E130178
The sensor coverage area is up to 70 in(180 cm) from the rear bumper.If the system detects a fault, a warningmessage appears in the informationdisplay.The system detects large objects whenyou shift into reverse (R) and any of thefollowing occur:• Your vehicle is moving backward at low
speed.• Your vehicle is stationary but an object
is approaching the rear of your vehicleat low speed.
• Your vehicle is moving backward at lowspeed and an object is moving towardyour vehicle, for example anothervehicle at low speed.
If your vehicle remains stationary for twoseconds the audible warning turns off. Ifyour vehicle moves backward the tonesounds again.Note: If the detected object is 12 in (30 cm)or less from the rear bumper, the audiblewarning does not turn off.
181
Fusion (CC7) Canada/United States of America, enUSA, Edition date: 201905, Second-Printing
Parking Aids

Object Distance Indicator (If Equipped)
E190459
The system provides object distanceindication through the information display.• As the distance to the object
decreases, the indicator blocksilluminate and move toward the vehicleicon.
• If the system does not detect an object,the distance indicator blocks are gray.
When you shift into reverse (R), the systemprovides audible warnings and visualindication when your vehicle is moving andthe detected object is moving toward yourvehicle. When you stop your vehicle, theaudible warnings stop after two seconds.Visual indication remains on when thetransmission is in reverse (R).
FRONT PARKING AID (IF EQUIPPED)
WARNING: The system may notdetect objects with surfaces that absorbreflection. Always drive with due careand attention. Failure to take care mayresult in a crash.
WARNING: The system may notdetect small or moving objects,particularly those close to the ground.
WARNING: To help avoid personalinjury, always use caution when inreverse (R) and when using the sensingsystem.
WARNING: The parking aid systemcan only assist you to detect objectswhen your vehicle is moving at parkingspeeds. To help avoid personal injury youmust take care when using the parkingaid system.
Note: Keep the sensors free from snow, iceand large accumulations of dirt.Note: Do not cover up the sensors.Note: Do not clean the sensors with sharpobjects.Note: If your vehicle sustains damageleaving the sensors misaligned, this maycause inaccurate measurements or falsealerts.Note: Some accessories, for example largetrailer hitches or bike or surfboard racks cancause reduced performance or false alerts.The sensors are on the front bumper.The sensors are active when thetransmission is in any position other thanpark (P). When the parking aid systemsounds a tone, the audio system mayreduce the set volume.
182
Fusion (CC7) Canada/United States of America, enUSA, Edition date: 201905, Second-Printing
Parking Aids

A warning tone sounds when your vehicleapproaches an object. As your vehiclemoves closer to an object, the rate of thetone increases. The warning tonecontinuously sounds when an object is 12 in(30 cm) or less from the front bumper.Note: There is a decreased coverage areaat the outer corners.The system turns off when the vehiclespeed reaches 5 mph (8 km/h).
E187330
The sensor coverage area is up to 28 in(70 cm) from the center of the bumper.If the transmission is in reverse (R), thesystem detects objects when your vehicleis moving at low speed or an object ismoving toward your vehicle, for exampleanother vehicle at low speed. When youstop your vehicle, the audible warning turnsoff after two seconds.If the transmission is in any forward gear,the system provides audible warningswhen your vehicle is moving and an objectis within the detection area. When you stopyour vehicle, the audible warning turns offafter two seconds and the visual warningturns off after four seconds.If the system detects a fault, a warningmessage appears in the informationdisplay.
Object Distance Indicator (If Equipped)
E190459
The system provides object distanceindication through the information display.• As the distance to the object
decreases, the indicator blocksilluminate and move toward the vehicleicon.
• If there is no object detected, thedistance indicator blocks are gray.
When you shift into any forward gear, thesystem provides audible warnings andvisual indication when your vehicle ismoving at a speed of approximately 5 mph(8 km/h) or below and the system detectsan object within the detection zone. Whenyou stop your vehicle, the audible warningsstop after two seconds and visualindication stops after four seconds.Note: If the detected object is 12 in (30 cm)or less from your vehicle, visual indicationremains on.
183
Fusion (CC7) Canada/United States of America, enUSA, Edition date: 201905, Second-Printing
Parking Aids

When you shift into neutral (N), the systemonly provides visual indication if yourvehicle is moving at a speed ofapproximately 5 mph (8 km/h) or below,for example, your vehicle is moving on aslope, and the system detects an objectmoving toward your vehicle. When youstop your vehicle, visual indication stopsafter four seconds.
SIDE SENSING SYSTEM (IF
EQUIPPED)
WARNING: The system may notdetect objects with surfaces that absorbreflection. Always drive with due careand attention. Failure to take care mayresult in a crash.
WARNING: The system may notdetect small or moving objects,particularly those close to the ground.
WARNING: To help avoid personalinjury, always use caution when inreverse (R) and when using the sensingsystem.
WARNING: The parking aid systemcan only assist you to detect objectswhen your vehicle is moving at parkingspeeds. To help avoid personal injury youmust take care when using the parkingaid system.
Note: Keep the sensors free from snow, iceand large accumulations of dirt.Note: Do not cover up the sensors.Note: Do not clean the sensors with sharpobjects.Note: If your vehicle sustains damageleaving the sensors misaligned, this maycause inaccurate measurements or falsealerts.
Note: If you switch traction control off, theside sensing system also turns off.Note: Some accessories, for example largetrailer hitches or bike or surfboard racks cancause reduced performance or false alerts.Note: The system does not detect an objectthat is moving toward the side of yourvehicle, for example another vehicle movingat low speed, if it does not pass a front orrear sensor.The system uses the front and rearoutermost parking aid sensors to detectobjects that are near to the sides of yourvehicle. The system displays them on avirtual map in the information display asyour vehicle moves past them.The sensors are on the front and rearbumpers.The system may not function if:• You switch the ignition on, off and back
on within a few seconds.• Your vehicle remains stationary for over
two minutes.• The anti-lock brake system activates.• The traction control system activates.To reinitialize the system, you may have todrive your vehicle approximately 10 ft(3 m).
E190458
184
Fusion (CC7) Canada/United States of America, enUSA, Edition date: 201905, Second-Printing
Parking Aids

The sensor coverage area is up to 24 in(60 cm) from the side of your vehicle.When the system detects an object withinthe coverage area and the driving path ofyour vehicle, an audible warning sounds.As the object moves closer to your vehicle,the rate of the tone increases.
Object Distance Indicator (If Equipped)
E190459
The system provides object distanceindication through the information display.• As the distance to the object
decreases, the indicator blocksilluminate and move toward the vehicleicon.
• If there is no object detected, thedistance indicator blocks are gray.
When you shift into reverse (R), the systemprovides audible warnings and visualindication when detected objects arewithin 24 in (60 cm) and are inside thedriving path of your vehicle. When you stopyour vehicle, the audible warnings turn offafter two seconds.
When you shift into any forward gear, thesystem provides audible warnings andvisual indication when your vehicle ismoving at a speed of approximately 5 mph(8 km/h) or below and the system detectsan object within the detection zone. Whenyou stop your vehicle, the audible warningsturn off after two seconds and visualindication turns off after four seconds.When you shift into neutral (N), the systemonly provides visual indication if yourvehicle is moving at a speed ofapproximately 5 mph (8 km/h) or below.For example, your vehicle is moving on aslope, and the system detects an objectmoving toward your vehicle. When youstop your vehicle, visual indication turnsoff after four seconds.If the system is not available, the sidedistance indicator blocks do not display.
ACTIVE PARK ASSIST (IF
EQUIPPED)
WARNING: You must remain inyour vehicle when the system turns on.At all times, you are responsible forcontrolling your vehicle, supervising thesystem and intervening, if required.Failure to take care may result in the lossof control of your vehicle, seriouspersonal injury or death.
WARNING: The sensors may notdetect objects in heavy rain or otherconditions that cause interference.
WARNING: Active park assist doesnot apply the brakes under anycircumstances.
185
Fusion (CC7) Canada/United States of America, enUSA, Edition date: 201905, Second-Printing
Parking Aids

WARNING: You are responsible forcontrolling your vehicle at all times. Thesystem is designed to be an aid and doesnot relieve you of your responsibility todrive with due care and attention. Failureto follow this instruction could result inthe loss of control of your vehicle,personal injury or death.
Note: Keep the sensors free from snow, iceand large accumulations of dirt.Note: Do not cover up the sensors.Note: Do not clean the sensors with sharpobjects.Note: The sensors may not detect objectswith surfaces that absorb ultrasonic waves.The sensors may falsely detect objects dueto ultrasonic interference caused bymotorcycle exhausts, truck air brakes orhorns, for example.Note: If you change any tires, the systemmust recalibrate and may not correctlyoperate for a short time.Active park assist is a multi-step processand may require you to shift thetransmission multiple times. Follow theonscreen instructions until the parkingmaneuver is complete.If you are uncomfortable with the proximityto any vehicle or object, you may chooseto override the system by grabbing thesteering wheel, or by taking full control ofyour vehicle after pressing the active parkassist button.Keep your hands, hair, clothing and anyloose items clear of the steering wheelwhen using active park assist.The sensors are on the front and rearbumpers.
The system may not correctly operate inany of the following conditions:• You use a spare tire or a tire that is
significantly worn more than the othertires.
• One or more tires are incorrectlyinflated.
• You try to park on a tight curve.• Something passes between the front
bumper and the parking space. Forexample, a pedestrian or cyclist.
• The edge of the neighboring parkedvehicle is high off the ground. Forexample, a bus, tow truck or flatbedtruck.
• The weather conditions are poor. Forexample, during heavy rain, snow, fog,high humidity and high temperatures.
Do not use the system if:• You have attached an add-on
accessory close to the sensors on thefront or rear of your vehicle. Forexample, a bike rack or trailer.
• You have attached an overhangingobject to the roof. For example, asurfboard.
• The front bumper, rear bumper or theside sensors are damaged.
• The correct tire size is not in use on yourvehicle. For example, a mini-spare tire.
Using Active Park AssistSelecting an Active Park Assist Mode
E146186
Press the button once toactivate parallel parking. Pressthe button a second time to
activate perpendicular parking. If you pressthe button again the system switches off.
186
Fusion (CC7) Canada/United States of America, enUSA, Edition date: 201905, Second-Printing
Parking Aids

If your vehicle is parked and after youswitch the ignition on, you can use theinformation display to toggle through themodes. Press the button to switch thesystem on and open the system menu inthe information display.Note: If your vehicle is parked, the defaultmode is parallel park out assist. However,if you did not use active park assist toparallel park your vehicle, use theinformation display to select park out assist.Note: You can repeatedly press the activepark assist button to toggle through themodes only after moving your vehicleapproximately 33 ft (10 m).To toggle through the modes, use thebuttons on the information display toselect the following:• Parallel parking.• Perpendicular parking.• Parallel park out assist.• Switch the system off.Note: There is no time limit for togglingthrough the modes.
Parallel ParkingThe system detects available parallelparking spaces and steers your vehicle intothe space. You control the accelerator,gearshift and brakes. The system visuallyand audibly guides you into a parallelparking space.
E146186
Press the button once to searchfor a parking space.
Note: You can also switch the system onafter you have already driven partially orcompletely past a parking space. Press theactive park assist button and the systeminforms you if you have recently passed asuitable parking space.
When the vehicle speed is less than22 mph (35 km/h), the system scans bothsides of your vehicle for an availableparking space. A message and a graphicappear in the information display toindicate the system is searching for aparking space. Use the direction indicatorlever to search for a parking space on thedriver or passenger side of your vehicle.Note: The system scans both sides of yourvehicle and offers parking spaces one sideat a time if you do not use the directionindicator.Note: The system defaults to the passengerside if you do not use the direction indicator.
E130107
Drive your vehicle approximately 3 ft (1 m)and parallel to the other parked vehicleswhen searching for a parking space.Note: If you drive your vehicle less than 2 ft(0.5 m) or greater than 5 ft (1.5 m) awayfrom other parked vehicles, the system maynot be able to detect an available parkingspace.When the system detects a suitable space,a message displays and a tone sounds.Stop your vehicle and follow the onscreeninstructions. If your vehicle is moving veryslowly, you may have to move forward ashort distance before the system is readyto park.Note: You must observe that the space thesystem selects remains clear of obstructionsat all times during the maneuver.Note: The system always offers the lastparking space it detects. For example, if yourvehicle detects multiple spaces when youare driving, it offers the last one.
187
Fusion (CC7) Canada/United States of America, enUSA, Edition date: 201905, Second-Printing
Parking Aids

Note: If the vehicle speed is greater thanapproximately 22 mph (35 km/h), thesystem shows a message to instruct you toreduce the vehicle speed.
Automatically Steering into a ParallelParking SpaceWhen you shift into reverse (R), with yourhands off the steering wheel and nothingobstructing its movement, your vehiclesteers itself into the space. The systemdisplays instructions to move your vehiclebackward and forward in the space.Note: If the vehicle speed exceedsapproximately 6 mph (9 km/h), youinterrupt the maneuver, or the systemswitches off, you must take full control ofyour vehicle.Note: If the system detects an object is veryclose to your vehicle and it may be unsafeto continue the maneuver, it may instructyou to stop your vehicle. The system maynot provide any further instruction. Steeringassistance continues to operate but youmust decide if it is safe to continue themaneuver.
E130108
When you believe your vehicle is correctlyparked, or a solid tone sounds and aninformation message appears, bring yourvehicle to a complete stop.When the Active Park Assist maneuver iscomplete, a tone sounds and aninformation message appears.Note: You are responsible for checking howyour vehicle is parked and making anynecessary corrections before leaving yourvehicle.
Deactivating Active Park AssistYou can manually deactivate the systemby:• Pressing the Active Park Assist button
during an active maneuver.• Grabbing the steering wheel during an
active maneuver.• Driving above 22 mph (35 km/h) for 30
seconds when searching for a parkingspace.
• Driving above 6 mph (9 km/h) duringan active maneuver.
• Switching the traction control systemoff.
Certain vehicle conditions may alsodeactivate the system, for example:• The traction control system activates
or fails.• The anti-lock brake system activates
or fails.If the system malfunctions, a messageappears and a tone sounds. Have yourvehicle checked as soon as possible.
Perpendicular ParkingThe system detects availableperpendicular parking spaces and steersyour vehicle into the space. You control theaccelerator, gearshift and brakes. Thesystem visually and audibly guides you intoa perpendicular parking space.
E146186
Press the button twice to searchfor a parking space.
When the vehicle speed is less than 19 mph(30 km/h), the system scans both sides ofyour vehicle for an available parking space.A message and a graphic appear in theinformation display to indicate the systemis searching for a parking space. Use thedirection indicator lever to search for aparking space on the driver or passengerside of your vehicle.
188
Fusion (CC7) Canada/United States of America, enUSA, Edition date: 201905, Second-Printing
Parking Aids

Note: The system scans both sides of yourvehicle and offers parking spaces one sideat a time if you do not use the directionindicator.Note: The system defaults to the passengerside if you do not use the direction indicator.
E186193
Drive your vehicle approximately 3 ft (1 m)and perpendicular to the other parkedvehicles when searching for a parkingspace.Note: If you drive your vehicle less than 2 ft(0.5 m) or greater than 5 ft (1.5 m) awayfrom other parked vehicles, the system maynot be able to detect an available parkingspace.When the system detects a suitable space,a message displays and a tone sounds.Stop your vehicle and follow the onscreeninstructions. If your vehicle is moving veryslowly, you may have to move forward ashort distance before the system is readyto park.Note: You must observe that the space thesystem selects remains clear of obstructionsat all times during the maneuver.Note: The system always offers the lastdetected parking space. For example, if yourvehicle detects multiple spaces when youare driving, it offers the last one.Note: If the vehicle speed is greater thanapproximately 19 mph (30 km/h), thesystem shows a message to instruct you toreduce the vehicle speed.
Automatically Steering into aPerpendicular Parking SpaceWhen you shift into reverse (R), with yourhands off the steering wheel and nothingobstructing its movement, your vehiclesteers itself into the space. The systemdisplays instructions to move your vehiclebackward and forward in the space.Note: If the vehicle speed exceedsapproximately 6 mph (9 km/h), youinterrupt the maneuver, or the systemswitches off, you must take full control ofyour vehicle.Note: If the system detects an object is veryclose to your vehicle and it may be unsafeto continue the maneuver, it may instructyou to stop your vehicle. The system maynot provide any further instruction. Steeringassistance continues to operate but youmust decide if it is safe to continue themaneuver.
E186191
When you believe your vehicle is correctlyparked, or a solid tone sounds and aninformation message appears, bring yourvehicle to a complete stop.When the active park assist maneuver iscomplete, a tone sounds and a messageappears.Note: You are responsible for checking howyour vehicle is parked and making anynecessary corrections before leaving yourvehicle.
189
Fusion (CC7) Canada/United States of America, enUSA, Edition date: 201905, Second-Printing
Parking Aids

Deactivating Active Park AssistYou can manually deactivate the systemby:• Pressing the Active Park Assist button
during an active maneuver.• Grabbing the steering wheel during an
active maneuver.• Driving above 19 mph (30 km/h) for 30
seconds when searching for a parkingspace.
• Driving above 6 mph (9 km/h) duringan active maneuver.
• Switching the traction control systemoff.
Certain vehicle conditions may alsodeactivate the system, for example:• The traction control system activates
or fails.• The anti-lock brake system activates
or fails.If the system malfunctions, a messageappears and a tone sounds. Have yourvehicle checked as soon as possible.
Parallel Park Out AssistThe system steers your vehicle out of aparallel parking space. You control theaccelerator, gearshift and brakes. Thesystem visually and audibly guides you outof a parallel parking space.Note: This system is not intended to assistwhen exiting a perpendicular parking space.
E146186
Press the button once when yourvehicle is stationary in a parallelparking space.
Note: If you did not use active park assistto parallel park your vehicle, pressing thebutton once selects parallel park. You mustuse the information display to select parkout assist.
The system displays a message instructingyou to switch a direction indicator on. Usethe direction indicator to select which sideof your vehicle you want to exit the parkingspace. The system displays instructions tomove your vehicle backward and forwardin the space.Note: If the system detects an object is veryclose to your vehicle and it may be unsafeto continue the maneuver, it may instructyou to stop your vehicle. The system maynot provide any further instruction. Steeringassistance continues to operate but youmust decide if it is safe to continue themaneuver.
E188012
After the system directs your vehicle to aposition where you can exit the parkingspace in a forward movement, a messageappears instructing you to take full controlof your vehicle. Generally, hand-over iswhen your vehicle is still inside the parkingspace.Note: Parallel Park Out Assist may not beavailable when the clearance to the frontor the rear of your vehicle is too small.Note: If the vehicle speed exceedsapproximately 6 mph (9 km/h), youinterrupt the maneuver, or the systemswitches off, you must take full control ofyour vehicle.Note: You are responsible for controllingyour vehicle and making sure the path isclear prior to pulling into traffic.
190
Fusion (CC7) Canada/United States of America, enUSA, Edition date: 201905, Second-Printing
Parking Aids

Troubleshooting
Possible CauseSymptom
You may have switched the traction control off.The system does not search fora parking space.
The transmission is in reverse (R). Your vehicle mustbe moving forward to be able to detect a parking space.
The sensors may be blocked. For example, snow, iceor dirt buildup. Blocked sensors can affect how thesystem functions.
The system does not offer aparking space.
There is not enough room in the parking space for yourvehicle to safely park.
There is not enough space for the parking maneuver onthe opposite side of the parking space.
The parking space is more than 5 ft (1.5 m) or less than2 ft (0.5 m) away.
The vehicle speed is greater than 22 mph (35 km/h)for parallel parking or greater than 19 mph (30 km/h)for perpendicular parking.
You recently disconnected or replaced the battery. Afteryou reconnect the battery you must drive your vehicleon a straight road for a short period of time.
Your vehicle is rolling in the opposite direction of thecurrent transmission position. For example, rollingforward when in reverse (R).
The system does not correctlyposition your vehicle in aparking space.
An irregular curb along the parking space prevents thesystem from correctly aligning your vehicle.
Vehicles or objects bordering the space may not becorrectly parked.
Your vehicle stopped too far past the parking space.
The tires may not be correctly installed or maintained.For example, not inflated correctly, improper size, or ofdifferent sizes.
A repair or alteration changes the detection capabilities.
191
Fusion (CC7) Canada/United States of America, enUSA, Edition date: 201905, Second-Printing
Parking Aids

Possible CauseSymptom
A parked vehicle has a high attachment. For example,a salt sprayer, snowplow or moving truck bed.
The parking space length or position of parked objectschanges after your vehicle passes the space.
The temperature around your vehicle quickly changes.For example, driving from a heated garage into the cold,or after leaving a car wash.
REAR VIEW CAMERA
WARNING: The rear view camerasystem is a reverse aid supplementdevice that still requires the driver to useit in conjunction with the interior andexterior mirrors for maximum coverage.
WARNING: Objects that are closeto either corner of the bumper or underthe bumper, might not be seen on thescreen due to the limited coverage of thecamera system.
WARNING: Reverse your vehicleslowly. Failure to follow this instructioncould result in the loss of control of yourvehicle, personal injury or death.
WARNING: Use caution when therear cargo door is ajar. If the rear cargodoor is ajar, the camera will be out ofposition and the video image may beincorrect. All guidelines disappear whenthe rear cargo door is ajar. Failure tofollow this instruction could result inpersonal injury.
WARNING: Use caution whenturning camera features on or off whenthe transmission is not in park (P). Makesure your vehicle is not moving.
The rear view camera system provides avideo image of the area behind yourvehicle.During operation, lines appear in thedisplay which represent your vehicle’s pathand proximity to objects behind yourvehicle.
E142435
The camera is located on the luggagecompartment door.
Using the Rear View CameraSystemThe rear view camera system displayswhat is behind your vehicle when you placethe transmission in reverse (R).Note: The reverse sensing system is noteffective at speeds above 7 mph (12 km/h)and may not detect certain angular ormoving objects.
192
Fusion (CC7) Canada/United States of America, enUSA, Edition date: 201905, Second-Printing
Parking Aids
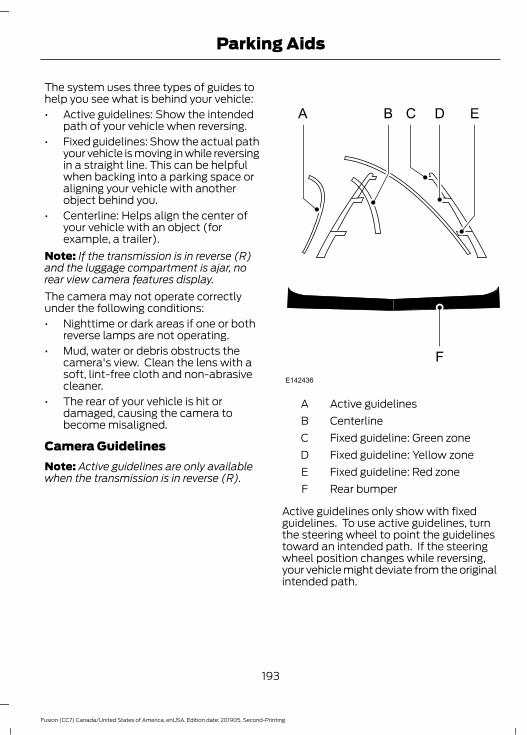
The system uses three types of guides tohelp you see what is behind your vehicle:• Active guidelines: Show the intended
path of your vehicle when reversing.• Fixed guidelines: Show the actual path
your vehicle is moving in while reversingin a straight line. This can be helpfulwhen backing into a parking space oraligning your vehicle with anotherobject behind you.
• Centerline: Helps align the center ofyour vehicle with an object (forexample, a trailer).
Note: If the transmission is in reverse (R)and the luggage compartment is ajar, norear view camera features display.The camera may not operate correctlyunder the following conditions:• Nighttime or dark areas if one or both
reverse lamps are not operating.• Mud, water or debris obstructs the
camera's view. Clean the lens with asoft, lint-free cloth and non-abrasivecleaner.
• The rear of your vehicle is hit ordamaged, causing the camera tobecome misaligned.
Camera GuidelinesNote: Active guidelines are only availablewhen the transmission is in reverse (R).
A B C D
F
E
E142436
Active guidelinesACenterlineBFixed guideline: Green zoneCFixed guideline: Yellow zoneDFixed guideline: Red zoneERear bumperF
Active guidelines only show with fixedguidelines. To use active guidelines, turnthe steering wheel to point the guidelinestoward an intended path. If the steeringwheel position changes while reversing,your vehicle might deviate from the originalintended path.
193
Fusion (CC7) Canada/United States of America, enUSA, Edition date: 201905, Second-Printing
Parking Aids

The fixed and active guidelines fade in andout depending on the steering wheelposition. The active guidelines do notdisplay when the steering wheel positionis straight.Always use caution while reversing.Objects in the red zone are closest to yourvehicle and objects in the green zone arefarther away. Objects are getting closer toyour vehicle as they move from the greenzone to the yellow or red zones. Use theside view mirrors and rear view mirror toget better coverage on both sides and rearof your vehicle.
Camera System SettingsYou can access the rear view camerasystem settings through the display screen.See General Information (page 94).
Enhanced Park Aids or Park Pilot(If Equipped)
E190459
The system uses red, yellow and greenhighlights that appear on top of the videoimage when any of the sensing systemsdetect an object.
Selectable settings for this feature are ONand OFF.
Manual Zoom
WARNING: When manual zoom ison, the full area behind your vehicle maynot show. Be aware of your surroundingswhen using the manual zoom feature.
Note: Manual zoom is only available whenthe transmission is in reverse (R).Note: When you enable manual zoom, onlythe centerline is shown.Selectable settings for this feature arezoom in (+) and zoom out (-). Press thesymbol in the camera screen to change theview. The default setting is Zoom OFF.This allows you to get a closer view of anobject behind your vehicle. The zoomedimage keeps the bumper in the image toprovide a reference. The zoom is onlyactive while the transmission is in reverse(R).
Rear Camera DelaySelectable settings for this feature are ONand OFF.The default setting for the rear cameradelay is OFF.When shifting the transmission out ofreverse (R) and into any gear other thanpark (P), the camera image remains in thedisplay until:• Your vehicle speed sufficiently
increases.• You shift your vehicle into park (P).
194
Fusion (CC7) Canada/United States of America, enUSA, Edition date: 201905, Second-Printing
Parking Aids

WHAT IS CRUISE CONTROLCruise control lets you maintain a setspeed without keeping your foot on theaccelerator pedal. You can use cruisecontrol when your vehicle speed is greaterthan 20 mph (30 km/h).
SWITCHING CRUISE CONTROLON AND OFF
WARNING: Do not use cruisecontrol on winding roads, in heavy trafficor when the road surface is slippery. Thiscould result in loss of vehicle control,serious injury or death.
The cruise controls are on the steeringwheel. See What Is Cruise Control (page195).
Switching Cruise Control On
E265296
Press the button.
Switching Cruise Control Off
E265297
Press the button when thesystem is in standby mode.
The system also turns off when you switchthe ignition off.Note: The set speed erases when youswitch the system off.
SETTING THE CRUISECONTROL SPEED
WARNING: When you are goingdownhill, your vehicle speed couldincrease above the set speed. Thesystem does not apply the brakes.
Drive to the speed you prefer.Press either button to set thecurrent speed.
Take your foot off the accelerator pedal.Note: The indicator changes color in theinformation display.
Changing the Set SpeedPress and release the button toincrease the set speed in smallincrements.
Press and hold the button to accelerate.Release the button when you reach yourpreferred speed.
Press and release the button todecrease the set speed in smallincrements.
Press and hold the button to decelerate.Release the button when you reach yourpreferred speed.Note: If you accelerate by pressing theaccelerator pedal, the set speed does notchange. When you release the acceleratorpedal, your vehicle returns to the speed thatyou previously set.
195
Fusion (CC7) Canada/United States of America, enUSA, Edition date: 201905, Second-Printing
Cruise Control

CANCELING THE SET SPEED
E265298
Press the button, or tap thebrake pedal to cancel the setspeed.
Note: The system remembers the setspeed.Note: The system cancels if the vehiclespeed drops below 10 mph (16 km/h) underthe set speed when driving uphill.
RESUMING THE SET SPEEDPress the button.
CRUISE CONTROLINDICATORS
E71340
Illuminates when you switch thesystem on.
USING ADAPTIVE CRUISECONTROL (IF EQUIPPED)
WARNING: Pay close attention tochanging road conditions such asentering or leaving a highway, on roadswith intersections or roundabouts, roadswithout visible lanes of travel, roads thatare winding, slippery, unpaved, or steepslopes.
WARNING: Do not use the systemin poor visibility, for example fog, heavyrain, spray or snow.
WARNING: Do not use the systemwhen towing a trailer that hasaftermarket electronic trailer brakecontrols. Failure to follow this instructioncould result in the loss of control of yourvehicle, personal injury or death.
WARNING: Do not use tire sizesother than those recommended becausethis can affect the normal operation ofthe system. Failure to do so may resultin a loss of vehicle control, which couldresult in serious injury.
WARNING: The system may notdetect stationary or slow movingvehicles below 6 mph (10 km/h).
WARNING: The system does notdetect pedestrians or objects in the road.
WARNING: The system does notdetect oncoming vehicles in the samelane.
WARNING: The system is not acrash warning or avoidance system.
The system adjusts your vehicle speed tomaintain the set gap between you and thevehicle in front of you in the same lane.You can select four gap settings.The system uses a radar sensor whichprojects a beam directly in front of yourvehicle.
196
Fusion (CC7) Canada/United States of America, enUSA, Edition date: 201905, Second-Printing
Cruise Control

E262918
The cruise controls are on the steeringwheel. See Cruise Control (page 71).
Switching Adaptive Cruise ControlOn
E265296
For vehicles without SpeedLimiter, press and release thebutton.
E144529
For vehicles with Speed Limiter,press and release the button.
The indicator, current gap setting and setspeed appear in the information display.
E164805
Setting the Adaptive Cruise SpeedDrive to your preferred speed.
Press and release the button.
Take your foot off the accelerator pedal.
The indicator, current gap setting and setspeed appear in the information display.
E164805
A vehicle graphic illuminates if there is avehicle detected in front of you.Note: When adaptive cruise control isactive, the speedometer may vary slightlyfrom the set speed displayed in theinformation display.
Setting the Adaptive Cruise SpeedWhen Your Vehicle is StationaryFollow a vehicle to a complete stop.
E265299
Press while keeping the brakepedal fully pressed.
The set speed adjusts to 20 mph(30 km/h).The indicator, current gap setting and setspeed appear in the information display.
Following a Vehicle
WARNING: When following avehicle that is braking, your vehicle doesnot always decelerate quickly enough toavoid a crash without driver intervention.Apply the brakes when necessary. Failureto follow this instruction could result inpersonal injury or death.
197
Fusion (CC7) Canada/United States of America, enUSA, Edition date: 201905, Second-Printing
Cruise Control

WARNING: The system only warnsof vehicles detected by the radar sensor.In some cases there may be no warningor a delayed warning. Apply the brakeswhen necessary. Failure to follow thisinstruction could result in personal injuryor death.
When a vehicle ahead of you enters thesame lane or a slower vehicle is ahead inthe same lane, the vehicle speed adjuststo maintain a preset gap distance. Avehicle graphic illuminates in theinstrument cluster.Note: The brakes may emit noise whenapplied by the system.Note: When you are following a vehicle andyou switch on a direction indicator, adaptivecruise control may provide a smalltemporary acceleration to help you pass.Your vehicle maintains a consistent gapfrom the vehicle ahead until:• The vehicle in front of you accelerates
to a speed above the set speed.• The vehicle in front of you moves out
of the lane you are in.• You set a new gap distance.The system applies the brakes to slow yourvehicle to maintain a safe gap distancefrom the vehicle in front. The system onlyapplies limited braking. You can overridethe system by applying the brakes.If the system determines that its maximumbraking level is not sufficient, an audiblewarning sounds, a message appears in theinformation display and an indicatorflashes when the system continues tobrake. Take immediate action.
Following a Vehicle to a CompleteStopIf your vehicle follows a vehicle to acomplete stop and remains stationary forless than three seconds, your vehicleaccelerates from a stationary position tofollow the vehicle ahead.
E265299
If your vehicle follows a vehicleto a complete stop and remainsstationary for more than three
seconds, press to follow the vehicle ahead.Or press the accelerator pedal.
Setting the Gap DistanceYou can decrease or increase the distancebetween your vehicle and the vehicle infront by pressing the gap control.
E263697
Press and release to decreasethe gap distance.
E263696
Press and release to increase thegap distance.
E164805
The selected gap appears in theinformation display as shown by the barsin the image.Note: The gap setting is time dependentand therefore the distance adjusts with yourvehicle speed.Note: It is your responsibility to select a gapappropriate to the driving conditions.
198
Fusion (CC7) Canada/United States of America, enUSA, Edition date: 201905, Second-Printing
Cruise Control

Adaptive Cruise Control Gap Settings
DynamicBehavior
Distance GapGraphicDisplay,
Bars Indic-ated
BetweenVehicles
Sport.Closest.1
Normal.Close.2
Normal.Medium.3
Comfort.Far.4
Each time you switch the system on, itselects the last chosen gap setting.
Overriding the Set Speed
WARNING: If you override thesystem by pressing the acceleratorpedal, it does not automatically applythe brakes to maintain a gap from anyvehicle ahead.
When you press the accelerator pedal, youoverride the set speed and gap distance.Use the accelerator pedal normally tointentionally exceed the set speed limit.When you override the system, the greenindicator light illuminates and the vehicleimage does not appear in the informationdisplay.The system resumes operation when yourelease the accelerator pedal. The vehiclespeed decreases to the set speed, or alower speed if following a slower vehicle.
Changing the Set Speed
E265299
Press and release to increase theset speed in small increments.
Press and release to decreasethe set speed in smallincrements.
Press and hold either button to change theset speed in large increments. Release thebutton when you reach your preferredspeed.The system may apply the brakes to slowthe vehicle to the new set speed. The setspeed displays continuously in theinformation display when the system isactive.
Canceling the Set Speed
E265298
Press and release the button ortap the brake pedal.
Note: The system remembers the setspeed.
Resuming the Set Speed
E265299
Press and release the button.
Your vehicle speed returns to thepreviously set speed and gap setting. Theset speed displays continuously in theinformation display when the system isactive.Note: Only use resume if you are aware ofthe set speed and intend to return to it.
Automatic CancellationAutomatic cancellation can also occurwhen:• The tires lose traction.• You apply the parking brake.
199
Fusion (CC7) Canada/United States of America, enUSA, Edition date: 201905, Second-Printing
Cruise Control

Park Brake ApplicationAutomatic parking brake application andcancellation occurs if:• You unbuckle the seatbelt and open
the door after you stop the vehicle.• You hold the vehicle at a stop
continuously for more than threeminutes.
Hilly Condition UsageSelect a lower gear when the system isactive in situations such as prolongeddownhill driving on steep grades, forexample in mountainous areas. Thesystem needs additional engine braking inthese situations to reduce the load on thevehicle’s regular brake system to preventit from overheating.Note: An audible alarm sounds and thesystem shuts down if it applies brakes foran extended period of time. This allows thebrakes to cool. The system functionsnormally again after the brakes cool.
Switching Adaptive Cruise ControlOff
E265297
For vehicles without SpeedLimiter, press and release thebutton when the system is in
standby mode or switch the ignition off.
E144529
For vehicles with Speed Limiter,press and release the buttonwhen the system is in standby
mode or switch the ignition off.Note: You erase the set speed when youswitch the system off.
Detection Issues
WARNING: On rare occasions,detection issues can occur due to theroad infrastructures, for example bridges,tunnels and safety barriers. In thesecases, the system may brake late orunexpectedly. At all times, you areresponsible for controlling your vehicle,supervising the system and intervening,if required.
WARNING: If the systemmalfunctions, have your vehicle checkedas soon as possible.
The radar sensor has a limited field of view.It may not detect vehicles at all or detecta vehicle later than expected in somesituations. The lead vehicle graphic doesnot illuminate if the system does notdetect a vehicle in front of you.
200
Fusion (CC7) Canada/United States of America, enUSA, Edition date: 201905, Second-Printing
Cruise Control

E71621
Detection issues can occur:
When driving on a different linethan the vehicle in front.
A
With vehicles that edge into yourlane. The system can only detectthese vehicles once they movefully into your lane.
B
There may be issues with thedetection of vehicles in frontwhen driving into and coming outof a bend or curve in the road.
C
In these cases, the system may brake lateor unexpectedly. You should stay alert andtake action when necessary.If something hits the front end of yourvehicle or damage occurs, theradar-sensing zone may change. This couldcause missed or false vehicle detection.
Optimal system performance requires aclear view of the road by thewindshield-mounted camera.Optimal performance may not occur if:• The camera is blocked.• There is poor visibility or lighting
conditions.• There are bad weather conditions.
System Not AvailableConditions that can cause the system todeactivate or prevent the system fromactivating when requested include:• A blocked sensor.• High brake temperature.• A failure in the system or a related
system.
Blocked Sensor
E249424
201
Fusion (CC7) Canada/United States of America, enUSA, Edition date: 201905, Second-Printing
Cruise Control

A message displays if something obstructsthe radar signals from the sensor. Thesensor is in the lower grille. The systemcannot detect a vehicle ahead and doesnot function when something blocks thesensor.
Note: You cannot see the sensor. It isbehind a fascia panel.Note: Keep the front of your vehicle free ofdirt, metal badges or objects. Vehicle frontprotectors, aftermarket lights, additionalpaint or plastic coatings could also degradesensor performance.
Possible Causes and Actions for This Message Displaying:
ActionCause
Clean the grille surface in front of the radaror remove the object causing the obstruc-tion.
The surface of the radar is dirty orobstructed.
Wait a short time. It may take severalminutes for the radar to detect that it is freefrom obstruction.
The surface of the radar is clean but themessage remains in the display.
Do not use the system in these conditionsbecause it may not detect any vehiclesahead.
Heavy rain or snow is interfering with theradar signals.
Do not use the system in these conditionsbecause it may not detect any vehiclesahead.
Water, snow or ice on the surface of theroad may interfere with the radar signals.
Wait for a short time or switch to normalcruise control.
You are in a desert or remote area with noother vehicles and no roadside objects.
Due to the nature of radar technology, it is possible to get a blockage warning with noactual block. This happens, for example, when driving in sparse rural or desertenvironments. A false blocked condition either self clears, or clears after you restart yourvehicle.
Switching to Normal CruiseControl
WARNING: Normal cruise controlwill not brake when your vehicle isapproaching slower vehicles. Always beaware of which mode you have selectedand apply the brakes when necessary.
E71340
The cruise control indicator lightreplaces the adaptive cruisecontrol indicator light if you
select normal cruise control. The gapsetting does not display, and the systemdoes not respond to lead vehicles.Automatic braking remains active tomaintain set speed.
You can change from adaptive cruisecontrol to normal cruise control throughthe information display.
202
Fusion (CC7) Canada/United States of America, enUSA, Edition date: 201905, Second-Printing
Cruise Control

DRIVER ALERT (IF EQUIPPED)
Principle of Operation
WARNING: You are responsible forcontrolling your vehicle at all times. Thesystem is designed to be an aid and doesnot relieve you of your responsibility todrive with due care and attention. Failureto follow this instruction could result inthe loss of control of your vehicle,personal injury or death.
WARNING: The system may notfunction if the sensor is blocked.
WARNING: Take regular restbreaks if you feel tired. Do not wait forthe system to warn you.
WARNING: Certain driving stylesmay result in the system warning youeven if you are not feeling tired.
WARNING: In cold and severeweather conditions the system may notfunction. Rain, snow and spray can alllimit sensor performance.
WARNING: The system will notoperate if the sensor cannot track theroad lane markings.
WARNING: The system may notoperate properly if the sensor is blocked.Keep the windshield free fromobstruction.
WARNING: If damage occurs in theimmediate area surrounding the sensor,have your vehicle checked as soon aspossible.
WARNING: The system may notcorrectly operate if your vehicle is fittedwith a suspension kit not approved byus.
Note: The system assists you when drivingon fast main roads and freeways.Note: The system calculates an alertnesslevel at vehicle speeds above approximately40 mph (65 km/h).The system monitors your driving behavior.The system is designed to alert you if itcalculates that you are becoming drowsyor if your driving deteriorates.
Using Driver AlertSwitching the System On and OffSwitch the system on using the informationdisplay. See Information Displays (page94).Note: The system remains on or offdepending on how it was last set.The system calculates your alertness levelbased upon your driving behavior in relationto the lane markings and other factors.
System WarningsNote: The system does not warn you if thevehicle speed falls below approximately40 mph (65 km/h).The warning system has two stages:1. A temporary warning is issued to advise
you to take a rest. This message onlyappears for a short time.
2. If you do not rest and the systemcontinues to detect that your drivingdeteriorates, it issues a further warning.This remains in the information displayuntil you cancel it. See InformationMessages (page 103).
203
Fusion (CC7) Canada/United States of America, enUSA, Edition date: 201905, Second-Printing
Driving Aids

Press OK on the steering wheel control toremove the warning.
Resetting the SystemYou can reset the system by:• Switching the ignition off and on.• Stopping your vehicle and then opening
and closing the driver door.
LANE KEEPING SYSTEM (IF
EQUIPPED)
WARNING: You are responsible forcontrolling your vehicle at all times. Thesystem is designed to be an aid and doesnot relieve you of your responsibility todrive with due care and attention. Failureto follow this instruction could result inthe loss of control of your vehicle,personal injury or death.
WARNING: Always drive with duecare and attention when using andoperating the controls and features onyour vehicle.
WARNING: In cold and severeweather conditions the system may notfunction. Rain, snow and spray can alllimit sensor performance.
WARNING: The system will notoperate if the sensor cannot track theroad lane markings.
WARNING: The sensor mayincorrectly track lane markings as otherstructures or objects. This can result ina false or missed warning.
WARNING: Large contrasts inoutside lighting can limit sensorperformance.
WARNING: The system may notoperate properly if the sensor is blocked.Keep the windshield free fromobstruction.
WARNING: If damage occurs in theimmediate area surrounding the sensor,have your vehicle checked as soon aspossible.
WARNING: The system may notcorrectly operate if your vehicle is fittedwith a suspension kit not approved byus.
Note: The system works above 40 mph(64 km/h).Note: The system works as long as thecamera can detect one lane marking.Note: When aid mode is on and the systemdetects no steering activity for a shortperiod, the system alerts you to put yourhands on the steering wheel. The systemmay detect a light grip or touch on thesteering wheel as hands off driving.Note: The system may not function if thecamera is blocked, or if the windshield isdamaged or dirty.
E249505
204
Fusion (CC7) Canada/United States of America, enUSA, Edition date: 201905, Second-Printing
Driving Aids

When you switch the system on and itdetects an unintentional drift out of yourlane is likely to occur, the system notifiesor assists you to stay in your lane throughthe steering system and informationdisplay. In Alert mode, the system providesa warning by vibrating the steering wheel.In Aid mode, the system provides steeringassistance by gently counter steering yourvehicle back into the lane.When the system is functioning in thecombined Alert and Aid mode, the systemfirst provides steering assistance by gentlycounter steering your vehicle back into thelane, followed by a warning that vibratesthe steering wheel if the vehicle is still outof the lane markings.
Switching the System On and OffNote: The system on or off setting is storeduntil it is manually changed, unless aMyKey™ is detected. If the system detectsa MyKey™, it defaults to on and the modeis set to alert.
E132099
Press the button on the direction indicatorstalk to switch the system on or off.
System SettingsThe system has optional setting menusavailable. The system stores thelast-known selection for each of thesesettings. You do not need to readjust yoursettings each time you switch on thesystem.
Mode: This setting allows you to selectwhich of the system features you canenable.
E165515
Alert only – Provides a steering wheelvibration when the system detects anunintended lane departure.
E165516
Aid only – Provides steering assistancetoward the lane center when the systemdetects an unintended lane departure.
205
Fusion (CC7) Canada/United States of America, enUSA, Edition date: 201905, Second-Printing
Driving Aids

E165517
AlertAAidB
Alert + Aid – Provides steering assistancetoward the lane center.If your vehicle continues drifting out of thelane after the lane keeping aid corrects thevehicle, the system provides a steeringwheel vibration.Note: The alert and aid diagrams illustrategeneral zone coverage. They do not provideexact zone parameters.Intensity: This setting affects the intensityof the steering wheel vibration used for thealert and alert + aid modes. This settingdoes not affect the aid mode.• Low• Normal• High
System Display
E151660
If you switch the system on in alert mode,an overhead graphic of a vehicle with lanemarkings appears in the informationdisplay.If you switch the system on in aid or alertand aid mode, a separate white icon alsoappears, or in some vehicles, arrowsdisplay with the lane markings.When you switch the system off, the lanemarking graphics do not display.While the system is on, the color of thelane markings change to indicate thesystem status.Gray: Indicates that the system istemporarily unable to provide a warningor intervention on the indicated side. Thismay be because:• Your vehicle is under the activation
speed.• The direction indicator is active.• Your vehicle is in a dynamic maneuver.
206
Fusion (CC7) Canada/United States of America, enUSA, Edition date: 201905, Second-Printing
Driving Aids

• The road has no or poor lane markingsin the camera field of view.
• The camera is obscured or unable todetect the lane markings due toenvironmental, traffic or vehicleconditions. For example, significant sunangles, shadows, snow, heavy rain orfog, following a large vehicle that isblocking or shadowing the lane, poorheadlamp illumination.
See Troubleshooting for additionalinformation.Green: Indicates that the system isavailable or ready to provide a warning orintervention, on the indicated side.
Yellow: Indicates that the system isproviding or has just provided a lanekeeping aid intervention.Red: Indicates that the system is providingor has just provided a lane keeping alertwarning.The system can be temporarily suppressedat any time by the following:• Quick braking.• Fast acceleration.• Using the direction indicator.• Evasive steering maneuver.• Driving too close to the lane markings.
Troubleshooting
Why is the feature not available (line markings are gray) when I can see the lane markingson the road?
Your vehicle speed is outside the operational range of the feature.
The sun is shining directly into the camera lens.
A quick intentional lane change has occurred.
Your vehicle stays too close to the lane markings.
Driving at high speeds in curves.
The last alert warning or aid intervention occurred a short time ago.
Ambiguous lane markings, for example in construction zones.
Rapid transition from light to dark, or from dark to light.
Sudden offset in lane markings.
ABS or AdvanceTrac™ is active.
There is a camera blockage due to dirt, grime, fog, frost or water on the windshield.
You are driving too close to the vehicle in front of you.
Transitioning between no lane markings to lane markings or vice versa.
There is standing water on the road.
Faint lane markings, for example partial yellow lane markings on concrete roads.
207
Fusion (CC7) Canada/United States of America, enUSA, Edition date: 201905, Second-Printing
Driving Aids

Why is the feature not available (line markings are gray) when I can see the lane markingson the road?
Lane width is too narrow or too wide.
The camera has not been calibrated after a windshield replacement.
Driving on tight roads or on uneven roads.
Why does the vehicle not come back toward the middle of the lane, as expected, in theAid or Aid + Alert mode?
High cross winds are present.
There is a large road crown.
Rough roads, grooves or shoulder drop-offs.
Heavy uneven loading of the vehicle or improper tire inflation pressure.
The tires have been changed, or the suspension has been modified.
BLIND SPOT INFORMATIONSYSTEM (IF EQUIPPED)
WARNING: Do not use the blindspot information system as areplacement for using the interior andexterior mirrors or looking over yourshoulder before changing lanes. Theblind spot information system is not areplacement for careful driving.
WARNING: The system may notoperate properly during severe weatherconditions, for example snow, ice, heavyrain and spray. Always drive with duecare and attention. Failure to take caremay result in a crash.
A
A
E124788
The system is designed to detect vehiclesthat may have entered the blind spot zone(A). The detection area is on both sides ofyour vehicle, extending rearward from theexterior mirrors to approximately 13 ft(4 m) beyond the rear bumper.Note: The system does not prevent contactwith other vehicles. It is not designed todetect parked vehicles, pedestrians, animalsor other infrastructures.
208
Fusion (CC7) Canada/United States of America, enUSA, Edition date: 201905, Second-Printing
Driving Aids

Using the Blind Spot InformationSystemVehicles with Automatic TransmissionThe system turns on when all of thefollowing occur:• You start your vehicle.• You shift into drive (D).• The vehicle speed is greater than
6 mph (10 km/h).Note: The system does not operate in park(P) or reverse (R).
Vehicles with Manual TransmissionThe system turns on when all of thefollowing occur:• You start your vehicle.• The vehicle speed is greater than
6 mph (10 km/h).Note: The system does not operate inreverse (R).
System Lights and Messages
E142442
When the system detects a vehicle, analert indicator illuminates in the exteriormirror on the side the approaching vehicleis coming from. If you turn the directionindicator on for that side of your vehicle,the alert indicator flashes.
Note: The system may not alert you if avehicle quickly passes through the detectionzone.
Blocked Sensors
E205199
The sensors are behind the rear bumperon both sides of your vehicle.Note: Keep the sensors free from snow, iceand large accumulations of dirt.Note: Do not cover the sensors with bumperstickers, repair compound or other objects.Note: Blocked sensors could affect systemperformance.If the sensors are blocked, a message mayappear in the information display. SeeInformation Messages (page 103). Thealert indicators remain illuminated but thesystem does not alert you.
System ErrorsIf the system detects a fault, a warninglamp illuminates and a message displays.See Information Messages (page 103).
Switching the System Off and OnYou can switch the system off using theinformation display. See GeneralInformation (page 94). When you switchthe system off, a warning lamp illuminatesand a message displays. When you switchthe system on or off, the alert indicatorsflash twice.Note: The system remembers the lastsetting when you start your vehicle.
209
Fusion (CC7) Canada/United States of America, enUSA, Edition date: 201905, Second-Printing
Driving Aids

Note: The system may not correctly operatewhen towing a trailer. For vehicles with atrailer tow module and tow bar approvedby us, the system turns off when you attacha trailer. For vehicles with an aftermarkettrailer tow module or tow bar, werecommend that you switch the system offwhen you attach a trailer.To permanently switch the system off,contact an authorized dealer.
CROSS TRAFFIC ALERT (IF
EQUIPPED)
WARNING: Do not use the crosstraffic alert system as a replacement forusing the interior and exterior mirrors orlooking over your shoulder beforereversing out of a parking space. Thecross traffic alert system is not areplacement for careful driving.
WARNING: The system may notoperate properly during severe weatherconditions, for example snow, ice, heavyrain and spray. Always drive with duecare and attention. Failure to take caremay result in a crash.
The system alerts you of vehiclesapproaching from the sides behind yourvehicle when you shift into reverse (R).
Using Cross Traffic AlertThe system detects vehicles that approachat a speed between 4 mph (6 km/h) and37 mph (60 km/h). Coverage decreaseswhen the sensors are partially, mostly orfully obstructed. Slowly reversing helpsincrease the coverage area andeffectiveness.The system turns on when you start theengine and you shift into reverse (R). Thesystem turns off when you shift out ofreverse (R).
E142440
210
Fusion (CC7) Canada/United States of America, enUSA, Edition date: 201905, Second-Printing
Driving Aids

The sensor on the left-hand side is onlypartially obstructed and zone coverage on
the right-hand side is maximized.
E142441
Zone coverage also decreases whenparking at narrow angles. The sensor onthe left-hand side is mostly obstructed andzone coverage on that side is severelyreduced.
Cross Traffic Alert System Sensors
E205199
The sensors are behind the rear bumperon both sides of your vehicle.Note: Keep the sensors free from snow, iceand large accumulations of dirt.Note: Do not cover the sensors with bumperstickers, repair compound or other objects.
Note: Blocked sensors could affect systemperformance.If the sensors are blocked, a message mayappear in the information display whenyou shift into reverse (R).
Cross Traffic Alert SystemLimitationsThe system may not correctly operatewhen any of the following occur:• The sensors are blocked.• Adjacently parked vehicles or objects
are obstructing the sensors.• Vehicles approach at speeds less than
4 mph (6 km/h) or greater than 37 mph(60 km/h).
• The vehicle speed is greater than 7 mph(12 km/h).
• You reverse out of an angled parkingspace.
211
Fusion (CC7) Canada/United States of America, enUSA, Edition date: 201905, Second-Printing
Driving Aids
Cross Traffic Alert Behavior WhenTrailer is AttachedNote: The system may not correctly operatewhen towing a trailer. For vehicles with anapproved trailer tow module and tow bar,the system turns off when you attach atrailer. For vehicles with an aftermarkettrailer tow module or tow bar, werecommend that you switch the system offwhen you attach a trailer.Cross traffic alert remains on when youattach a trailer in vehicles that come withblind spot information system with trailertow under the following conditions:• You connect a trailer.• The trailer is a bike rack or cargo rack
with a maximum length of 3 ft (1 m).• You set the trailer length to 3 ft (1 m)
in the information display.See Blind Spot Information System(page 208).
Switching the System On and OffTo switch the system on or off, adjust thesetting. Depending on your vehicle options,the setting could be in the following:
• Information display. See GeneralInformation (page 94).
• Touchscreen. See Settings (page 415).Note: The system turns on every time youswitch the ignition on. To permanentlyswitch the system off, contact an authorizeddealer.
Cross Traffic Alert Indicator
E268294When the system detects anapproaching vehicle, a tonesounds, a warning lamp
illuminates in the relevant exterior mirrorand arrows appear in the informationdisplay to show which side theapproaching vehicle is coming from.Note: If arrows do not display, a messageappears in the information display.If the system malfunctions, a warning lampilluminates in the instrument cluster anda message appears in the informationdisplay. Have your vehicle checked as soonas possible.Note: In exceptional conditions, the systemcould alert you, even when there is nothingin the detection zone, for example a vehiclepassing further away from your vehicle.
Cross Traffic Alert Information Messages
ActionMessage
Displays instead of indication arrows when the systemdetects a vehicle. Check for approaching traffic.
Cross Traffic Alert
Indicates blocked cross traffic alert system sensors. Cleanthe sensors. If the message continues to appear, have yourvehicle checked as soon as possible.
Cross Traffic Not Avail-able Sensor Blocked SeeManual
The system has malfunctioned. Have your vehicle checkedas soon as possible.
Cross Traffic SystemFault
Displays if you attach a trailer to your vehicle.Cross Traffic Alert Deac-tivated Trailer Attached
212
Fusion (CC7) Canada/United States of America, enUSA, Edition date: 201905, Second-Printing
Driving Aids
STEERINGElectric Power Steering
WARNING: The electric powersteering system has diagnostic checksthat continuously monitor the system. Ifa fault is detected, a message displaysin the information display. Stop yourvehicle as soon as it is safe to do so.Switch the ignition off. After at least 10seconds, switch the ignition on andwatch the information display for asteering system warning message. If asteering system warning messagereturns, have the system checked assoon as possible.
WARNING: If the system detectsan error, you may not feel a difference inthe steering, however a serious conditionmay exist. Have your vehicle checked assoon as possible. Failure to do so mayresult in loss of steering control.
Your vehicle has an electric power steeringsystem, there is no fluid reservoir, nomaintenance is required.If your vehicle loses electrical power whileyou are driving, electric power steeringassistance is lost. The steering system stilloperates and you can steer your vehiclemanually. Manually steering your vehiclerequires more effort.Extreme continuous steering may increasethe effort required for you to steer yourvehicle, this increased effort preventsoverheating and permanent damage tothe steering system. You do not lose theability to steer your vehicle manually.Typical steering and driving maneuversallow the system to cool and return tonormal operation.
Steering TipsIf the steering wanders or pulls, check for:• Correct tire pressures.• Uneven tire wear.• Loose or worn suspension
components.• Loose or worn steering components.• Improper vehicle alignment.Note: A high crown in the road or highcrosswinds may also make the steeringseem to wander or pull.
Adaptive Learning (If Equipped)
The electronic power steering systemadaptive learning helps correct roadirregularities and improves overall handlingand steering feel. It communicates withthe brake system to help operateadvanced stability control and accidentavoidance systems. Additionally, wheneverthe battery is disconnected or a newbattery installed, you must drive yourvehicle a short distance before the systemrelearns the strategy and reactivates allsystems.
PRE-COLLISION ASSIST (IF
EQUIPPED)
WARNING: You are responsible forcontrolling your vehicle at all times. Thesystem is designed to be an aid and doesnot relieve you of your responsibility todrive with due care and attention. Failureto follow this instruction could result inthe loss of control of your vehicle,personal injury or death.
213
Fusion (CC7) Canada/United States of America, enUSA, Edition date: 201905, Second-Printing
Driving Aids

WARNING: The system does notdetect vehicles that are driving in adifferent direction, pedestrians at night,cyclists or animals. Failure to take caremay result in the loss of control of yourvehicle, serious personal injury or death.
WARNING: The system does notoperate during hard acceleration orsteering. Failure to take care may leadto a crash or personal injury.
WARNING: The system may fail oroperate with reduced function duringcold and severe weather conditions.Snow, ice, rain, spray and fog canadversely affect the system. Keep thefront camera and radar free of snow andice. Failure to take care may result in theloss of control of your vehicle, seriouspersonal injury or death.
WARNING: In situations where thevehicle camera has limited detectioncapability, this may reduce systemperformance. These situations includebut are not limited to direct or lowsunlight, vehicles at night without taillights, unconventional vehicle types,pedestrians with complex backgrounds,running pedestrians, partly obscuredpedestrians, or pedestrians that thesystem cannot distinguish from a group.Failure to take care may result in the lossof control of your vehicle, seriouspersonal injury or death.
WARNING: The system cannothelp prevent all crashes. Do not rely onthis system to replace driver judgmentand the need to maintain a safe distanceand speed.
Using the Pre-Collision AssistSystemThe Pre-Collision Assist system is activeat speeds above approximately 3 mph(5 km/h) and pedestrian detection is activeat speeds up to 50 mph (80 km/h).
E156130
If your vehicle is rapidly approachinganother stationary vehicle, a vehicletraveling in the same direction as yours, ora pedestrian within your driving path, thesystem design is to provide three levels offunctionality:1. Alert2. Brake Support3. Active Braking
E156131
Alert: When active, the system provides aflashing visual warning and an audiblewarning sound.Brake Support: The system design is tohelp reduce the impact speed by preparingthe brakes for rapid braking. The systemdoes not automatically apply the brakes.If you press the brake pedal, the systemcould apply additional braking up tomaximum braking force, even if you lightlypress the brake pedal.
214
Fusion (CC7) Canada/United States of America, enUSA, Edition date: 201905, Second-Printing
Driving Aids

Active Braking: Active braking mayactivate if the system determines that acollision is imminent. The system may helpthe driver reduce impact damage or avoidthe crash completely.Note: If you perceive Pre-Collision Assistalerts as being too frequent or disturbing,then you can reduce the alert sensitivity,though the manufacturer recommendsusing the highest sensitivity setting wherepossible. Setting lower sensitivity wouldlead to fewer and later system warnings.
Adjusting Pre-Collision AssistSettingsYou can adjust the Alert sensitivity to oneof three possible settings by using theinformation display control. See GeneralInformation (page 94).If required, you can switch active brakingoff using the information display controls.See General Information (page 94).Note: Active braking automatically turnson every time you switch your vehicle on.
Blocked Sensors
E236695
If a message regarding a blocked sensoror camera appears in the informationdisplay, the radar signals or camera imagesare obstructed. The radar sensor is locatedbehind a fascia cover near the driver sideof the lower grille. With an obstructedradar, the Pre-Collision Assist system doesnot function and cannot detect a vehicleahead. With the front camera obstructed,the Pre-Collision Assist system does notrespond to pedestrians or stationaryvehicles and the system performance onmoving vehicles reduces. The followingtable lists possible causes and actions forwhen this message displays.
215
Fusion (CC7) Canada/United States of America, enUSA, Edition date: 201905, Second-Printing
Driving Aids

ActionCause
Clean the grille surface in front of the radaror remove the object causing the obstruc-
tion.The surface of the radar in the grille is dirty
or obstructed in some way.
Wait a short time. It may take severalminutes for the radar to detect that there
is no obstruction.The surface of the radar in the grille is clean
but the message remains in the display.
The Pre-Collision Assist system is tempor-arily disabled. Pre-Collision Assist should
automatically reactivate a short time afterthe weather conditions improve.
Heavy rain, spray, snow, or fog is interferingwith the radar signals.
The Pre-Collision Assist system is tempor-arily disabled. Pre-Collision Assist should
automatically reactivate a short time afterthe weather conditions improve.
Swirling water, or snow or ice on the surfaceof the road may interfere with the radar
signals.
Contact an authorized dealer to have theradar checked for proper coverage and
operation.Radar is out of alignment due to a front end
impact.
Clean the outside of the windshield in frontof the camera.
The windshield in front of the camera isdirty or obstructed in some way.
Wait a short time. It may take severalminutes for the camera to detect that there
is no obstruction.
The windshield in front of the camera isclean but the message remains in the
display.
Note: Proper system operation requires aclear view of the road by the camera. Haveany windshield damage in the area of thecamera's field of view repaired.Note: If something hits the front end of yourvehicle or damage occurs, the radar sensingzone may change. This could cause missedor false vehicle detections. Contact anauthorized dealer to have the radar checkedfor proper coverage and operation.
Note: If your vehicle detects excessive heatat the camera or a potential misalignmentcondition, a message may display in theinformation display indicating temporarysensor unavailability. This messagedeactivates automatically when operationalconditions are correct. For example, whenthe ambient temperature around the sensordecreases or the sensor automaticallyrecalibrates successfully.
216
Fusion (CC7) Canada/United States of America, enUSA, Edition date: 201905, Second-Printing
Driving Aids

LOAD LIMIT
Vehicle Loading - with andwithout a TrailerThis section guides you in theproper loading of your vehicle,trailer, or both. Keep your loadedvehicle weight within its designrating capability, with or withouta trailer. Properly loading yourvehicle provides maximum returnof vehicle design performance.Before you load your vehicle,become familiar with thefollowing terms for determiningyour vehicle’s weight rating, withor without a trailer, from thevehicle’s Tire and LoadingInformation label or SafetyCompliance Certification label.
Tire and Loading Label InformationExample:
E198719
PayloadPayload is the combined weightof cargo and passengers that yourvehicle is carrying. The maximumpayload for your vehicle appearson the Tire and Loading label. Thelabel is either on the B-pillar or theedge of the driver door. Vehiclesexported outside the US andCanada may not have a tire andloading label. Look for “Thecombined weight of occupantsand cargo should never exceedXXX kg OR XXX lb” for maximumpayload. The payload listed on theTire and Loading Information label
217
Fusion (CC7) Canada/United States of America, enUSA, Edition date: 201905, Second-Printing
Load Carrying

is the maximum payload for yourvehicle as built by the assemblyplant. If you install any additionalequipment on your vehicle, youmust determine the new payload.Subtract the weight of theequipment from the payload listedon the Tire and Loading label.When towing, trailer tongueweight or king pin weight is alsopart of payload.
WARNING: Theappropriate loading capacity ofyour vehicle can be limited eitherby volume capacity (how muchspace is available) or by payloadcapacity (how much weight thevehicle should carry). Once youhave reached the maximumpayload of your vehicle, do notadd more cargo, even if there isspace available. Overloading orimproperly loading your vehiclecan contribute to loss of vehiclecontrol and vehicle rollover.
GAWR - Gross Axle WeightRatingGAWR is the maximum allowableweight that a single axle (front orrear) can carry. These numbersare on the Safety ComplianceCertification label. The label islocated on the door hinge pillar,door-latch post, or the door edgethat meets the door-latch post,next to the driver seating position.
The total load on each axle mustnever exceed its Gross AxleWeight Rating.GVWR - Gross Vehicle WeightRatingGVWR is the maximum allowableweight of the fully loaded vehicle.This includes all options,equipment, passengers and cargo.It appears on the SafetyCompliance Certification label.The label is located on the doorhinge pillar, door-latch post, or thedoor edge that meets thedoor-latch post, next to the driverseating position.The gross vehicle weight mustnever exceed the Gross VehicleWeight Rating.Safety Compliance Certification LabelExample:
E198828
218
Fusion (CC7) Canada/United States of America, enUSA, Edition date: 201905, Second-Printing
Load Carrying

WARNING: Exceeding theSafety Compliance Certificationlabel vehicle weight limits canadversely affect theperformance and handling ofyour vehicle, cause vehicledamage and can result in theloss of control of your vehicle,serious personal injury or death.
Maximum Loaded TrailerWeightMaximum loaded trailer weight isthe highest possible weight of afully loaded trailer the vehicle cantow. Consult an authorized dealer(or the RV and Trailer TowingGuide available at an authorizeddealer) for more detailedinformation.GCWR - Gross CombinedWeight RatingGCWR is the maximum allowableweight of the vehicle and theloaded trailer, including all cargoand passengers, that the vehiclecan handle without riskingdamage. (Important: The towingvehicle’s braking system is ratedfor operation at Gross VehicleWeight Rating, not at GrossCombined Weight Rating.)Separate functional brakes should
be used for safe control of towedvehicles and for trailers where theGross Combined Weight of thetowing vehicle plus the trailerexceed the Gross Vehicle WeightRating of the towing vehicle.The gross combined weight mustnever exceed the Gross CombinedWeight Rating.Note: For trailer towinginformation refer to the RV andTrailer Towing Guide available atan authorized dealer.
WARNING: Do not exceedthe GVWR or the GAWRspecified on the certificationlabel.
WARNING: Do not usereplacement tires with lowerload carrying capacities than theoriginal tires because they maylower your vehicle's GVWR andGAWR limitations. Replacementtires with a higher limit than theoriginal tires do not increase theGVWR and GAWR limitations.
WARNING: Exceeding anyvehicle weight rating canadversely affect theperformance and handling ofyour vehicle, cause vehicledamage and can result in theloss of control of your vehicle,serious personal injury or death.
219
Fusion (CC7) Canada/United States of America, enUSA, Edition date: 201905, Second-Printing
Load Carrying

Steps for determining thecorrect load limit:1. Locate the statement "The
combined weight of occupantsand cargo should never exceedXXX kg or XXX lb." on yourvehicle’s placard.
2. Determine the combinedweight of the driver andpassengers that can be ridingin your vehicle.
3. Subtract the combined weightof the driver and passengersfrom XXX kg or XXX lb.
4. The resulting figure equals theavailable amount of cargo andluggage load capacity. Forexample, if the “XXX” amountequals 1,400 lb. and there canbe five 150 lb. passengers inyour vehicle, the amount ofavailable cargo and luggageload capacity is 650 lb.(1400-750 (5 x 150) = 650 lb.)
5. Determine the combinedweight of luggage and cargobeing loaded on the vehicle.That weight may not safelyexceed the available cargo andluggage load capacitycalculated in Step 4.
6. If you are towing a trailer, loadfrom your trailer is transferredto your vehicle. Consult thismanual to determine how thisreduces the available cargoand luggage load capacity ofyour vehicle.
Helpful examples for calculatingthe available amount of cargoand luggage load capacitySuppose your vehicle has a1400-pound (635-kilogram) cargoand luggage capacity. You decideto go golfing. Is there enough loadcapacity to carry you, four of yourfriends and all the golf bags? Youand four friends average 220pounds (99 kilograms) each andthe golf bags weigh approximately30 pounds (13.5 kilograms) each.The calculation would be: 1400 -(5 x 220) - (5 x 30) = 1400 - 1100- 150 = 150 pounds. Yes, you haveenough load capacity in yourvehicle to transport four friendsand your golf bags. In metric units,the calculation would be: 635kilograms - (5 x 99 kilograms) -(5 x 13.5 kilograms) = 635 - 495 -67.5 = 72.5 kilograms.Suppose your vehicle has a1400-pound (635-kilogram) cargoand luggage capacity. You andone of your friends decide to pickup cement from the local homeimprovement store to finish thatpatio you have been planning forthe past two years. Measuring theinside of the vehicle with the rearseat folded down, you have roomfor twelve 100-pound(45-kilogram) bags of cement. Doyou have enough load capacity totransport the cement to yourhome? If you and your friend eachweigh 220 pounds (99 kilograms),the calculation would be: 1400 -(2 x 220) - (12 x 100) = 1400 - 440
220
Fusion (CC7) Canada/United States of America, enUSA, Edition date: 201905, Second-Printing
Load Carrying

- 1200 = - 240 pounds. No, you donot have enough cargo capacityto carry that much weight. Inmetric units, the calculation wouldbe: 635 kilograms - (2 x 99kilograms) - (12 x 45 kilograms) =635 - 198 - 540 = -103 kilograms.You need to reduce the loadweight by at least 240 pounds(104 kilograms). If you removethree 100-pound (45-kilogram)cement bags, then the loadcalculation would be:1400 - (2 x220) - (9 x 100) = 1400 - 440 -900 = 60 pounds. Now you havethe load capacity to transport thecement and your friend home. Inmetric units, the calculation wouldbe: 635 kilograms - (2 x 99kilograms) - (9 x 45 kilograms) =635 - 198 - 405 = 32 kilograms.The above calculations alsoassume that the loads arepositioned in your vehicle in amanner that does not overloadthe front or the rear gross axleweight rating specified for yourvehicle on the Safety ComplianceCertification label.Special Loading Instructions -for all vehicles
WARNING: When loadingthe roof racks, we recommendyou evenly distribute the load,as well as maintain a low centerof gravity. Loaded vehicles, withhigher centers of gravity, may
handle differently than unloadedvehicles. Take extra precautions,such as slower speeds andincreased stopping distance,when driving a heavily loadedvehicle.
221
Fusion (CC7) Canada/United States of America, enUSA, Edition date: 201905, Second-Printing
Load Carrying

TOWING A TRAILER
WARNING: Do not exceedthe GVWR or the GAWRspecified on the certificationlabel.
WARNING: Towing trailersbeyond the maximumrecommended gross trailerweight exceeds the limit of yourvehicle and could result in enginedamage, transmission damage,structural damage, loss ofvehicle control, vehicle rolloverand personal injury.
Note: Your vehicle may haveelectrical items, such as fuses orrelays, related to towing. SeeFuses (page 244).Your vehicle's load capacitydesignation is by weight, not byvolume, so you cannot necessarilyuse all available space whenloading a vehicle or trailer.Towing a trailer places an extraload on your vehicle's engine,transmission, axle, brakes, tiresand suspension. Inspect thesecomponents periodically during,and after, any towing operation.
Load PlacementTo help minimize how trailermovement affects your vehiclewhen driving:• Load the heaviest items closest
to the trailer floor.• Load the heaviest items
centered between the left andright side trailer tires.
• Load the heaviest items abovethe trailer axles or just slightlyforward toward the trailertongue. Do not allow the finaltrailer tongue weight to goabove or below 10-15% of theloaded trailer weight.
• Select a ball mount with thecorrect rise or drop. When boththe loaded vehicle and trailerare connected, the trailer frameshould be level, or slightlyangled down toward yourvehicle, when viewed from theside.
When driving with a trailer orpayload, a slight takeoff vibrationor shudder may be present due tothe increased payload weight.Additional information regardingproper trailer loading and settingyour vehicle up for towing islocated in the Load Carryingchapter. See Load Limit (page217).You can also find information inthe RV & Trailer Towing Guideavailable at your authorizeddealer, or online.
222
Fusion (CC7) Canada/United States of America, enUSA, Edition date: 201905, Second-Printing
Towing

RV & Trailer Towing Guide Onlinehttp://www.fleet.ford.com/towing-guides/Website
RECOMMENDED TOWINGWEIGHTS
Note: Do not exceed the trailerweight for your vehicleconfiguration listed in the chartbelow.Note: Make sure to take intoconsideration trailer frontal area.Do not exceed 12 feet2 (1.11 meters2)for 1.5L GTDI and 2.5L TiVCT or 20feet2 (1.86 meters2) for 2.0L GTDI.Note: For high altitude operation,reduce the gross combined weightby 2% per 1,000 ft (300 m)starting at the 1,000 ft (300 m)elevation point.
Note: Certain states requireelectric trailer brakes for trailersover a specified weight. Be sure tocheck state regulations for thisspecified weight. The maximumtrailer weights listed may be limitedto this specified weight, as thevehicle’s electrical system may notinclude the wiring connectorneeded to activate electric trailerbrakes.Your vehicle may tow a trailerprovided the maximum trailerweight is less than or equal to themaximum trailer weight listed foryour vehicle configuration on thefollowing chart.
Maximum trailer weight*Powertrain1000 lb (454 kg)1.5L GTDI2000 lb (907 kg)2.0L GTDI1000 lb (454 kg)2.5L TiVCT1000 lb (454 kg)2.7L GTDI
*Calculated with SAE J2807 method.
223
Fusion (CC7) Canada/United States of America, enUSA, Edition date: 201905, Second-Printing
Towing

ESSENTIAL TOWING CHECKSFollow these guidelines for safe towing:• Do not tow a trailer until you drive your
vehicle at least 1,000 mi (1,600 km).• Consult your local motor vehicle laws
for towing a trailer.• See the instructions included with
towing accessories for the properinstallation and adjustmentspecifications.
• Service your vehicle more frequently ifyou tow a trailer. See your scheduledmaintenance information.
• If you use a rental trailer, follow theinstructions the rental agency givesyou.
You can find information on loadspecification terms found on the tire labeland Safety Compliance label as well asinstructions on calculating your vehicle'sload in the Load Carrying chapter. SeeLoad Limit (page 217).Remember to account for the trailertongue weight as part of your vehicle loadwhen calculating the total vehicle weight.
HitchesDo not use a hitch that either clamps ontothe bumper or attaches to the axle.Distribute the trailer load so 10-15% of thetotal trailer weight is on the tongue.
Safety ChainsNote: Never attach safety chains to thebumper.Always connect the safety chains to thehook retainers of your vehicle hitch.To connect the safety chains, cross themunder the trailer tongue and allow enoughslack for turning tight corners. Do not allowthe chains to drag on the ground.
Trailer Brakes
WARNING: Do not connect atrailer's hydraulic brake system directlyto your vehicle's brake system. Yourvehicle may not have enough brakingpower and your chances of having acollision greatly increase.
Electric brakes and manual, automatic orsurge-type trailer brakes are safe if youinstall them properly and adjust them tothe manufacturer's specifications. Thetrailer brakes must meet local and federalregulations.The rating for the tow vehicle's brakingsystem operation is at the gross vehicleweight rating, not the gross combinedweight rating.Separate functioning brake systemsare required for safe control of towedvehicles and trailers weighing morethan 1500 lb (680 kg) when load.
Trailer Lamps
WARNING: Never connect anytrailer lamp wiring to the vehicle's taillamp wiring; this may damage theelectrical system resulting in fire. Contactyour authorized dealer as soon aspossible for assistance in proper trailertow wiring installation. Additionalelectrical equipment may be required.
Trailer lamps are required on most towedvehicles. Make sure all running lights, brakelights, turn signals and hazard lights areworking.
224
Fusion (CC7) Canada/United States of America, enUSA, Edition date: 201905, Second-Printing
Towing

Before Towing a TrailerPractice turning, stopping and backing upto get the feel of your vehicle-trailercombination before starting on a trip.When turning, make wider turns so thetrailer wheels clear curbs and otherobstacles.
When Towing a Trailer• Do not drive faster than 70 mph
(113 km/h) during the first 500 mi(800 km).
• Do not make full-throttle starts.• Check your hitch, electrical connections
and trailer wheel lug nuts thoroughlyafter you have traveled 50 mi (80 km).
• When stopped in congested or heavytraffic during hot weather, place thetransmission in park (P) to aid engineand transmission cooling and to helpA/C performance.
• Turn off the speed control with heavyloads or in hilly terrain. The speedcontrol may turn off automaticallywhen you are towing on long, steepgrades.
• Shift to a lower gear when driving downa long or steep hill. Do not apply thebrakes continuously, as they mayoverheat and become less effective.
• If your transmission is equipped with aGrade Assist or Tow/Haul feature, usethis feature when towing. This providesengine braking and helps eliminateexcessive transmission shifting foroptimum fuel economy andtransmission cooling.
• Allow more distance for stopping witha trailer attached. Anticipate stops andbrake gradually.
• Avoid parking on a grade. However, ifyou must park on a grade:
1. Turn the steering wheel to point yourvehicle tires away from traffic flow.
2. Set your vehicle parking brake.3. Place the transmission in park (P).4. Place wheel chocks in front and back
of the trailer wheels. Chocks are notincluded with your vehicle.
Launching or Retrieving a Boat orPersonal Watercraft (PWC)Note: Disconnect the wiring to the trailerbefore backing the trailer into the water.Note: Reconnect the wiring to the trailerafter removing the trailer from the water.When backing down a ramp during boatlaunching or retrieval:• Do not allow the static water level to
rise above the bottom edge of the rearbumper.
• Do not allow waves to break higherthan 6 in (15 cm) above the bottomedge of the rear bumper.
Exceeding these limits may allow water toenter vehicle components:• Causing internal damage to the
components.• Affecting driveability, emissions, and
reliability.Replace the rear axle lubricant anytimeyou submerge the rear axle in water. Watermay contaminate the rear axle lubricant,which is not a normal maintenanceinspection item unless there is a possibilityof a leak or other axle repair is required.
225
Fusion (CC7) Canada/United States of America, enUSA, Edition date: 201905, Second-Printing
Towing

TOWING THE VEHICLE ONFOUR WHEELSEmergency Towing
WARNING: If your vehicle has asteering wheel lock make sure theignition is in the accessory or on positionwhen being towed.
If your vehicle becomes inoperable(without access to wheel dollies,car-hauling trailer, or flatbed transportvehicle), it can be flat-towed (all wheelson the ground, regardless of the powertrainand transmission configuration) under thefollowing conditions:• Your vehicle is facing forward for
towing in a forward direction.• Shift the transmission into neutral (N).
If you cannot shift the transmission intoneutral (N), you may need to overridethe shifter and enable Stay in Neutralmode. Failing to do so may result indamage to the transmission. SeeTransmission (page 163).
• Maximum distance is 50 mi (80 km).• Maximum speed is 35 mph (56 km/h).
Recreational TowingNote: Put your climate control system inrecirculated air mode to prevent exhaustfumes from entering the vehicle. SeeClimate Control (page 118).Follow these guidelines if you have a needfor recreational (RV) towing. An exampleof recreational towing would be towingyour vehicle behind a motorhome. Wedesigned these guidelines to preventdamage to your transmission.
Vehicles Equipped with 1.5L, 2.0L,and 2.5L EnginesFront-wheel Drive VehiclesFront-wheel drive vehicles CANNOT beflat-towed (all wheels on the ground) asvehicle or transmission damage may occur.It is recommended to tow your vehicle withthe front wheels off the ground by using atow dolly. If you are using a tow dolly,follow the instructions specified by theequipment provider.
All-wheel Drive VehiclesAll-wheel drive vehicles CANNOT beflat-towed (all wheels on the ground) asvehicle or transmission damage may occur.It is recommended to tow your vehicle withall four (4) wheels off the ground such aswhen using a car-hauling trailer. Otherwise,you cannot recreational tow your vehicle.
Vehicles Equipped with a 2.7LEngineYour vehicle can be towed with all fourwheels on the ground using the Stay inNeutral mode feature, or with all fourwheels off the ground using a vehicletransport trailer. If you are using a vehicletransport trailer, follow the instructionspecified by the equipment provider.If you tow your vehicle with all four wheelson the ground:• Tow only in the forward direction.• Release the parking brake.• Place the vehicle in Stay in Neutral
mode. See Automatic Transmission(page 163).
• Do not exceed 65 mph (105 km/h).Note: If the parking brake is applied, amessage appears in the information display.
226
Fusion (CC7) Canada/United States of America, enUSA, Edition date: 201905, Second-Printing
Towing

Note: Start the engine and allow it to runfor a few minutes at the beginning of eachday, and every six hours or fewer. With theengine running and your foot on the brake,shift into drive (D) and then into reverse (R)before shifting back into neutral (N).BEFORE CONTINUING TO TOW, YOUMUST RE-ENABLE STAY IN NEUTRALMODE.
227
Fusion (CC7) Canada/United States of America, enUSA, Edition date: 201905, Second-Printing
Towing

REDUCED ENGINEPERFORMANCE
WARNING: If you continue to driveyour vehicle when the engine isoverheating, the engine could stopwithout warning. Failure to follow thisinstruction could result in the loss ofcontrol of your vehicle.
If the engine coolant temperature gaugeneedle moves to the upper limit position,the engine is overheating. See Gauges(page 87).You must only drive your vehicle for a shortdistance if the engine overheats. Thedistance you can travel depends onambient temperature, vehicle load andterrain. The engine continues to operatewith limited power for a short period oftime.If the engine temperature continues to rise,the fuel supply to the engine reduces. Theair conditioning switches off and the enginecooling fan operates continually.1. Gradually reduce your speed and stop
your vehicle as soon as it is safe to doso.
2. Immediately switch the engine off toprevent severe engine damage.
3. Wait for the engine to cool down.4. Check the coolant level. See Engine
Coolant Check (page 262).5. Have your vehicle checked as soon as
possible.
ECONOMICAL DRIVINGFuel economy is affected by several thingssuch as how you drive, the conditions youdrive under and how you maintain yourvehicle.
There are some things to keep in mind thatmay improve your fuel economy:• Accelerate and slow down in a smooth,
moderate fashion.• Drive at steady speeds.• Anticipate stops; slowing down may
eliminate the need to stop.• Combine errands and minimize
stop-and-go driving (When runningerrands, go to the furthest destinationfirst and then work your way backhome).
• Close the windows for high-speeddriving.
• Drive at reasonable speeds.• Keep the tires properly inflated and use
only the recommended size.• Use the recommended engine oil.• Perform all regularly scheduled
maintenance.There are also some things you may wantto avoid doing because they reduce yourfuel economy:• Avoid sudden or hard accelerations.• Avoid revving the engine before turning
off the car.• Avoid long idle periods.• Do not warm up your vehicle on cold
mornings.• Reduce the use of air conditioning and
heat.• Avoid using speed control in hilly
terrain.• Do not rest your foot on the brake
pedal while driving.• Avoid carrying unnecessary weight.
228
Fusion (CC7) Canada/United States of America, enUSA, Edition date: 201905, Second-Printing
Driving Hints
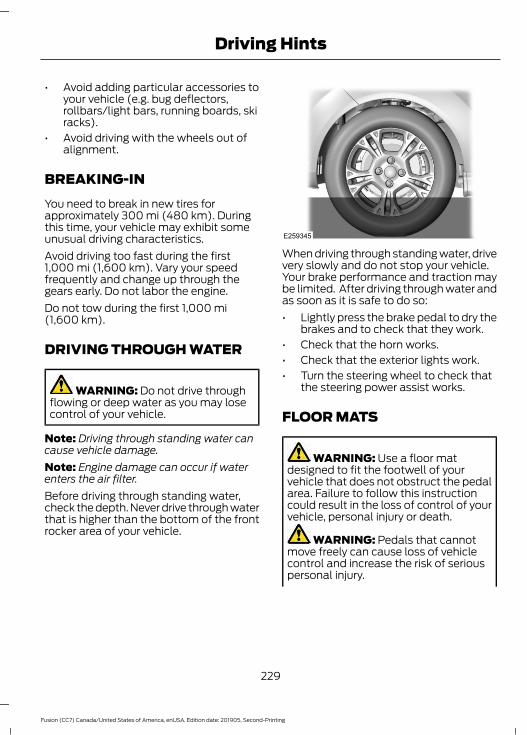
• Avoid adding particular accessories toyour vehicle (e.g. bug deflectors,rollbars/light bars, running boards, skiracks).
• Avoid driving with the wheels out ofalignment.
BREAKING-INYou need to break in new tires forapproximately 300 mi (480 km). Duringthis time, your vehicle may exhibit someunusual driving characteristics.Avoid driving too fast during the first1,000 mi (1,600 km). Vary your speedfrequently and change up through thegears early. Do not labor the engine.Do not tow during the first 1,000 mi(1,600 km).
DRIVING THROUGH WATER
WARNING: Do not drive throughflowing or deep water as you may losecontrol of your vehicle.
Note: Driving through standing water cancause vehicle damage.Note: Engine damage can occur if waterenters the air filter.Before driving through standing water,check the depth. Never drive through waterthat is higher than the bottom of the frontrocker area of your vehicle.
E259345
When driving through standing water, drivevery slowly and do not stop your vehicle.Your brake performance and traction maybe limited. After driving through water andas soon as it is safe to do so:• Lightly press the brake pedal to dry the
brakes and to check that they work.• Check that the horn works.• Check that the exterior lights work.• Turn the steering wheel to check that
the steering power assist works.
FLOOR MATS
WARNING: Use a floor matdesigned to fit the footwell of yourvehicle that does not obstruct the pedalarea. Failure to follow this instructioncould result in the loss of control of yourvehicle, personal injury or death.
WARNING: Pedals that cannotmove freely can cause loss of vehiclecontrol and increase the risk of seriouspersonal injury.
229
Fusion (CC7) Canada/United States of America, enUSA, Edition date: 201905, Second-Printing
Driving Hints

WARNING: Secure the floor matto both retention devices so that itcannot slip out of position and interferewith the pedals. Failure to follow thisinstruction could result in the loss ofcontrol of your vehicle, personal injury ordeath.
WARNING: Do not place additionalfloor mats or any other covering on topof the original floor mats. This couldresult in the floor mat interfering with theoperation of the pedals. Failure to followthis instruction could result in the loss ofcontrol of your vehicle, personal injury ordeath.
WARNING: Always make sure thatobjects cannot fall into the driver footwell while your vehicle is moving. Objectsthat are loose can become trappedunder the pedals causing a loss ofvehicle control.
E142666
To install the floor mats, position the floormat eyelet over the retention post andpress down to lock in position.To remove the floor mat, reverse theinstallation procedure.Note: Regularly check the floor mats tomake sure they are secure.
230
Fusion (CC7) Canada/United States of America, enUSA, Edition date: 201905, Second-Printing
Driving Hints

ROADSIDE ASSISTANCEVehicles Sold in the United States:Getting Roadside AssistanceTo fully assist you should you have avehicle concern, Ford Motor Companyoffers a complimentary roadsideassistance program. This program isseparate from the New Vehicle LimitedWarranty.The service is available:• 24 hours a day, seven days a week.• For the coverage period supplied with
your vehicle.Roadside Assistance covers:• A flat tire change with a good spare
(except vehicles supplied with a tireinflation kit).
• Battery jump start.• Lock-out assistance (key replacement
cost is the customer's responsibility).• Fuel delivery — independent service
contractors, if not prohibited by state,local or municipal law, shall deliver upto 2 gal (8 L) of gasoline or 5 gal (20 L)of diesel fuel to a disabled vehicle.Roadside Assistance limits fuel deliveryservice to two no-charge occurrenceswithin a 12-month period.
• Winch out — available within 100 ft(30 m) of a paved or countymaintained road, no recoveries.
• Towing — independent servicecontractors, if not prohibited by state,local or municipal law, shall tow Fordeligible vehicles to an authorized dealerwithin 35 mi (56 km) of thedisablement location or to the nearestauthorized dealer. If a memberrequests a tow to an authorized dealerthat is more than 35 mi (56 km) fromthe disablement location, the membershall be responsible for any mileagecosts in excess of 35 mi (56 km).
• Roadside Assistance includes up to$200 for a towed trailer if the disabledeligible vehicle requires service at thenearest authorized dealer. If the towingvehicle is operational but the trailer isnot, then the trailer does not qualify forany roadside services.
Vehicles Sold in the United States:Using Roadside AssistanceComplete the roadside assistanceidentification card and place it in yourwallet for quick reference. This card is inthe Owner's Manual kit.United States vehicle customers whorequire Roadside Assistance, call1-800-241-3673.If you need to arrange roadside assistancefor yourself, Ford Motor Companyreimburses a reasonable amount fortowing to the nearest dealership within35 mi (56 km). To obtain reimbursementinformation, United States vehiclecustomers call 1-800-241-3673.Customers need to submit their originalreceipts.
231
Fusion (CC7) Canada/United States of America, enUSA, Edition date: 201905, Second-Printing
Roadside Emergencies

Vehicles Sold in Canada: GettingRoadside AssistanceTo fully assist you should you have avehicle concern, Ford Motor Company ofCanada, Limited offers a complimentaryroadside assistance program. This programis eligible within Canada or the continentalUnited States.The service is available 24 hours a day,seven days a week.This program is separate from the NewVehicle Limited Warranty, but the coverageis concurrent with the powertrain coverageperiod of your vehicle. Canadian roadsidecoverage and benefits may differ from theU.S. coverage.If you require more information, please callus in Canada at 1-800-665-2006, or visitour website at www.ford.ca.
HAZARD FLASHERSNote: The hazard flashers operate whenthe ignition is in any position, or if the key isnot in the ignition. If used when the vehicleis not running, the battery loses charge. Asa result, there may be insufficient power torestart your vehicle.
The flasher control is on theinstrument panel. Use yourhazard flashers when your
vehicle is creating a safety hazard for othermotorists.
• Press the flasher control and all frontand rear direction indicators flash.
• Press the button again to switch themoff.
FUEL SHUTOFF
WARNING: If your vehicle has beeninvolved in a crash, have the fuel systemchecked. Failure to follow this instructioncould result in fire, personal injury ordeath.
Note: When you try to restart your vehicleafter a fuel shutoff, the vehicle makes surethat various systems are safe to restart.Once the vehicle determines the systemsare safe, then the vehicle allows you torestart.Note: In the event that your vehicle doesnot restart after your third attempt, contacta qualified technician.The fuel pump shutoff stops the flow offuel to the engine in the event of amoderate to severe crash. Not everyimpact causes a shutoff.Should your vehicle shut off after a crash,you may restart your vehicle.If your vehicle has a key system:1. Switch off the ignition.2. Switch to start position.3. Switch off the ignition.4. Switch on the ignition to re-enable the
fuel pump.5. If the vehicle does not start, repeat
steps 1 through 4.If your vehicle has a push button startsystem:1. Press START/STOP to switch off your
vehicle.2. Press the brake pedal and
START/STOP to switch on yourvehicle.
3. Remove your foot from the brake pedaland press START/STOP to switch offyour vehicle.
232
Fusion (CC7) Canada/United States of America, enUSA, Edition date: 201905, Second-Printing
Roadside Emergencies

4. You can attempt to start the vehicleby pressing the brake pedal andSTART/STOP, or press START/STOPwithout pressing the brake pedal.
5. If the vehicle does not start, repeatsteps 1 through 4.
JUMP STARTING THE VEHICLE
WARNING: Batteries normallyproduce explosive gases which cancause personal injury. Therefore, do notallow flames, sparks or lightedsubstances to come near the battery.When working near the battery, alwaysshield your face and protect your eyes.Always provide correct ventilation.
WARNING: Keep batteries out ofreach of children. Batteries containsulfuric acid. Avoid contact with skin,eyes or clothing. Shield your eyes whenworking near the battery to protectagainst possible splashing of acidsolution. In case of acid contact with skinor eyes, flush immediately with water fora minimum of 15 minutes and get promptmedical attention. If acid is swallowed,call a physician immediately.
WARNING: Use only adequatelysized cables with insulated clamps.
Preparing Your VehicleDo not attempt to push-start yourautomatic transmission vehicle.Note: Attempting to push-start a vehiclewith an automatic transmission may causetransmission damage.Note: Use only a 12-volt supply to start yourvehicle.
Note: Do not disconnect the battery of thedisabled vehicle as this could damage thevehicle electrical system.Park the booster vehicle close to the hoodof the disabled vehicle, making sure thetwo vehicles do not touch.
Connecting the Jumper Cables
WARNING: Do not connect the endof the second cable to the negative (-)terminal of the battery to be jumped. Aspark may cause an explosion of thegases that surround the battery.
WARNING: Do not use fuel lines,engine valve covers, windshield wiperarms, the intake manifold, or hood latchas ground points.
Note: Do not attach the end of the positivecable to the studs or L-shaped eyeletlocated above the positive (+) terminal ofyour vehicle’s battery. High current may flowthrough and cause damage to the fuses.Note: To avoid reverse polarity connections,make sure that you correctly identify thepositive (+) and negative (-) terminals onboth the disabled and booster vehiclesbefore connecting the cables.Note: Remove the red cap from the positiveprong (B) on your vehicle before connectingthe cables.
E226509
233
Fusion (CC7) Canada/United States of America, enUSA, Edition date: 201905, Second-Printing
Roadside Emergencies

A. Negative prong (–).B. Positive prong (+).
4
2
1
3
E142664
Note: In the illustration, the bottom vehiclerepresents the booster vehicle.1. Connect the positive (+) jumper cable
to the positive (+) terminal of thedischarged battery.
2. Connect the other end of the positive(+) cable to the positive (+) terminalof the booster vehicle battery.
3. Connect the negative (-) cable to thenegative (-) terminal of the boostervehicle battery.
4. Make the final connection of thenegative (-) cable to an exposed metalpart of the stalled vehicle's engine,away from the battery and the fuelinjection system, or connect thenegative (-) cable to a groundconnection point if available.
Jump Starting1. Start the engine of the booster vehicle
and rev the engine moderately, or pressthe accelerator gently to keep yourengine speed between 2000 and 3000RPM, as shown in your tachometer.
2. Start the engine of the disabled vehicle.3. Once the disabled vehicle has been
started, run both vehicle engines for anadditional three minutes beforedisconnecting the jumper cables.
Removing the Jumper CablesRemove the jumper cables in the reverseorder that they were connected.
234
Fusion (CC7) Canada/United States of America, enUSA, Edition date: 201905, Second-Printing
Roadside Emergencies

4
1
3
2
E142665
1. Remove the negative (-) jumper cablefrom the disabled vehicle.
2. Remove the jumper cable on thenegative (-) terminal of the boostervehicle battery.
3. Remove the jumper cable from thepositive (+) terminal of the boostervehicle battery.
4. Remove the jumper cable from thepositive (+) terminal of the disabledvehicle battery.
5. Allow the engine to idle for at least oneminute.
POST-CRASH ALERT SYSTEMThe system flashes the direction indicatorsand sounds the horn (intermittently) in theevent of a serious impact that deploys anairbag (front, side, side curtain or SafetyCanopy) or the seatbelt pretensioners.The horn and indicators turn off when:• You press the hazard control button.• You press the panic button on the
remote entry transmitter (if equipped).• Your vehicle runs out of power.• Sounding of the horn is only enabled
in specific markets.
TRANSPORTING THE VEHICLE
E143886
235
Fusion (CC7) Canada/United States of America, enUSA, Edition date: 201905, Second-Printing
Roadside Emergencies

If you need to have your vehicle towed,contact a professional towing service or,if you are a member of a roadsideassistance program, your roadsideassistance service provider.We recommend the use of a wheel lift anddollies or flatbed equipment to tow yourvehicle. Do not tow with a slingbelt. FordMotor Company has not approved aslingbelt towing procedure. Vehicledamage may occur if towed incorrectly, orby any other means.Ford Motor Company produces a towingmanual for all authorized tow truckoperators. Have your tow truck operatorrefer to this manual for proper hook-upand towing procedures for your vehicle.It is acceptable to have your front-wheeldrive vehicle towed from the front if usingproper wheel lift equipment to raise thefront wheels off the ground. When towingin this manner, the rear wheels can remainon the ground.Front-wheel drive vehicles must have thefront wheels placed on a tow dolly whentowing your vehicle from the rear usingwheel lift equipment. This preventsdamage to the transmission.Towing an all-wheel or four-wheel drivevehicle requires that all wheels be off theground, such as using a wheel lift anddollies or flatbed equipment. This preventsdamage to the transmission, all-wheel orfour-wheel drive system and vehicle.
236
Fusion (CC7) Canada/United States of America, enUSA, Edition date: 201905, Second-Printing
Roadside Emergencies

GETTING THE SERVICES YOUNEEDWarranty repairs to your vehicle must beperformed by an authorized dealer. Whileany authorized dealer handling your vehicleline will provide warranty service, werecommend you return to your sellingauthorized dealer who wants to ensureyour continued satisfaction.Please note that certain warranty repairsrequire special training and equipment, sonot all authorized dealers are authorizedto perform all warranty repairs. This meansthat, depending on the warranty repairneeded, you may have to take your vehicleto another authorized dealer.A reasonable time must be allowed toperform a repair after taking your vehicleto the authorized dealer. Repairs will bemade using Ford or Motorcraft® parts, orremanufactured or other parts that areauthorized by Ford.
Away From HomeIf you are away from home when yourvehicle needs service, contact the FordCustomer Relationship Center or use theonline resources listed below to find thenearest authorized dealer.In the United States:Mailing addressFord Motor CompanyCustomer Relationship CenterP.O. Box 6248Dearborn, MI 48126Telephone1-800-392-3673 (FORD)(TDD for the hearing impaired:1-800-232-5952)If your vehicle is configured as amotorhome please call 1-800-444-3311for support.
Additional information and resources areavailable online:
Website
www.owner.ford.com
These are some of the items that can befound online:• U.S. dealer locator by Dealer Name,
City/State or Zip Code.• Owner Manuals.• Maintenance Schedules.• Recalls.• Ford Extended Service Plans.• Ford Genuine Accessories.• Service specials and promotions.In Canada:Mailing addressCustomer Relationship CentreFord Motor Company of Canada, LimitedP.O. Box 2000Oakville, Ontario L6K 0C8Telephone1-800-565-3673 (FORD)
Website
www.ford.ca
Twitter@FordServiceCA (English Canada)@FordServiceQC (Quebec)
Additional AssistanceIf you have questions or concerns, or areunsatisfied with the service you arereceiving, follow these steps:1. Contact your Sales Representative or
Service Advisor at your selling orservicing authorized dealer.
237
Fusion (CC7) Canada/United States of America, enUSA, Edition date: 201905, Second-Printing
Customer Assistance

2. If your inquiry or concern remainsunresolved, contact the Sales Manager,Service Manager or Customer RelationsManager.
3. If you require assistance or clarificationon Ford Motor Company policies,please contact the Ford CustomerRelationship Center.
In order to help us serve you better, pleasehave the following information availablewhen contacting a Customer RelationshipCenter:• Vehicle Identification Number.• Your telephone number (home and
business).• The name of the authorized dealer and
city where located.• The vehicle’s current odometer reading.In some states within the United States,you must directly notify Ford in writingbefore pursuing remedies under yourstate's warranty laws, and Ford is alsoallowed a final repair attempt.Additionally, in some states within theUnited States, a consumer has the optionof submitting a warranty dispute to theBBB Auto Line before taking action underthe Magnuson-Moss Warranty Act, or tothe extent allowed by state law, beforepursuing replacement or repurchaseremedies provided by certain state laws.This dispute handling procedure is notrequired prior to enforcing state createdrights or other rights which are independentof the Magnuson-Moss Warranty Act orstate replacement or repurchase laws.
IN CALIFORNIA (U.S. ONLY)California Civil Code Section 1793.2(d)requires that, if a manufacturer or itsrepresentative is unable to repair a motorvehicle to conform to the vehicle’sapplicable express warranty after areasonable number of attempts, themanufacturer shall be required to eitherreplace the vehicle with one substantiallyidentical or repurchase the vehicle andreimburse the buyer in an amount equal tothe actual price paid or payable by theconsumer (less a reasonable allowancefor consumer use). The consumer has theright to choose whether to receive a refundor replacement vehicle.California Civil Code Section 1793.22(b)presumes that the manufacturer has hada reasonable number of attempts toconform the vehicle to its applicableexpress warranties if, within the first 18months of ownership of a new vehicle orthe first 18,000 mi (29,000 km), whicheveroccurs first:1. Two or more repair attempts are made
on the same non-conformity likely tocause death or serious bodily injury OR
2. Four or more repair attempts are madeon the same nonconformity (a defector condition that substantially impairsthe use, value or safety of the vehicle)OR
3. The vehicle is out of service for repairof nonconformities for a total of morethan 30 calendar days (not necessarilyall at one time).
In the case of 1 or 2 above, the consumermust also notify the manufacturer of theneed for the repair of the nonconformityat the following address:Ford Motor Company16800 Executive Plaza DriveMail Drop 3NE-BDearborn, MI 48126
238
Fusion (CC7) Canada/United States of America, enUSA, Edition date: 201905, Second-Printing
Customer Assistance

You are required to submit your warrantydispute to BBB AUTO LINE before assertingin court any rights or remedies conferredby California Civil Code Section 1793.22(b).You are also required to use BBB AUTOLINE before exercising rights or seekingremedies created by the FederalMagnuson-Moss Warranty Act, 15 U.S.C.sec. 2301 et seq. If you choose to seekredress by pursuing rights and remediesnot created by California Civil Code Section1793.22(b) or the Magnuson-MossWarranty Act, resort to BBB AUTO LINE isnot required by those statutes.
THE BETTER BUSINESSBUREAU (BBB) AUTO LINEPROGRAM (U.S. ONLY)Your satisfaction is important to FordMotor Company and to your dealer. If awarranty concern has not been resolvedusing the three-step procedure outlinedearlier in this chapter in the Getting theServices you need section, you may beeligible to participate in the BBB AUTOLINE program.The BBB AUTO LINE program consists oftwo parts – mediation and arbitration.During mediation, a representative of theBBB will contact both you and Ford MotorCompany to explore options for settlementof the claim. If an agreement is not reachedduring mediation or you do not want toparticipate in mediation, and if your claimis eligible, you may participate in thearbitration process. An arbitration hearingwill be scheduled so that you can presentyour case in an informal setting before animpartial person. The arbitrator willconsider the testimony provided and makea decision after the hearing.
Disputes submitted to the BBB AUTO LINEprogram are usually decided within fortydays after you file your claim with the BBB.You are not bound by the decision, andmay reject the decision and proceed tocourt where all findings of the BBB AutoLine dispute, and decision, are admissiblein the court action. Should you choose toaccept the BBB AUTO LINE decision, Fordis then bound by the decision, and mustcomply with the decision within 30 daysof receipt of your acceptance letter.BBB AUTO LINE Application: Using theinformation provided below, please call orwrite to request a program application.You will be asked for your name andaddress, general information about yournew vehicle, information about yourwarranty concerns, and any steps you havealready taken to try to resolve them. ACustomer Claim Form will be mailed thatwill need to be completed, signed andreturned to the BBB along with proof ofownership. Upon receipt, the BBB willreview the claim for eligibility under theProgram Summary Guidelines.You can get more information bycalling BBB AUTO LINE at1-800-955-5100, or writing to:BBB AUTO LINE3033 Wilson Boulevard, Suite 600Arlington, Virginia 22201BBB AUTO LINE applications can also berequested by calling the Ford MotorCompany Customer Relationship Centerat 1-800-392-3673.For additional information refer to theBetter Business Bureau website.Note: Ford Motor Company reserves theright to change eligibility limitations, modifyprocedures, or to discontinue this processat any time without notice and withoutobligation.
239
Fusion (CC7) Canada/United States of America, enUSA, Edition date: 201905, Second-Printing
Customer Assistance

UTILIZING THEMEDIATION/ARBITRATIONPROGRAM (CANADA ONLY)For vehicles delivered to authorizedCanadian dealers. In those cases whereyou continue to feel that the efforts by Fordof Canada and the authorized dealer toresolve a factory-related vehicle serviceconcern have been unsatisfactory, Ford ofCanada participates in an impartial thirdparty mediation/arbitration programadministered by the Canadian MotorVehicle Arbitration Plan (CAMVAP).The CAMVAP program is a straight forwardand relatively speedy alternative to resolvea disagreement when all other efforts toproduce a settlement have failed. Thisprocedure is without cost to you and isdesigned to eliminate the need for lengthyand expensive legal proceedings.In the CAMVAP program, impartialthird-party arbitrators conduct hearings atmutually convenient times and places inan informal environment. These impartialarbitrators review the positions of theparties, make decisions and, whenappropriate, render awards to resolvedisputes. CAMVAP decisions are fast, fair,and final as the arbitrator’s award isbinding on both you and Ford of Canada.CAMVAP services are available in allCanadian territories and provinces. Formore information, without charge orobligation, call your CAMVAP ProvincialAdministrator directly at 1-800-207-0685or visit www.camvap.ca.
GETTING ASSISTANCEOUTSIDE THE U.S. ANDCANADABefore exporting your vehicle to a foreigncountry, contact the appropriate foreignembassy or consulate. These officials caninform you of local vehicle registrationregulations and where to find unleadedfuel or petrol/gas engines or the propersulfur fuel for diesel engines.If you cannot find the proper fuelrecommended for your vehicle, contactour Customer Relationship Center.The use of improper fuels in your vehiclewithout proper conversion may damagethe effectiveness of your emission controlsystem and may cause engine knocking orserious engine damage. Ford MotorCompany or Ford of Canada is notresponsible for any damage caused by useof improper fuel. Using improper fuels mayalso result in difficulty importing yourvehicle back into the United States.If your vehicle must be serviced while youare traveling or living in Asia-Pacific Region,Sub-Saharan Africa, U.S. Virgin Islandsand/or Puerto Rico, Central America, theCaribbean, and Israel and the Middle East,contact the nearest authorized dealer. Ifthe authorized dealer cannot help you,contact the corresponding Ford CustomerAssistance Center:FORD MOTOR COMPANYCustomer Relationship Centers in:
240
Fusion (CC7) Canada/United States of America, enUSA, Edition date: 201905, Second-Printing
Customer Assistance

E-mailFaxPhoneCustomer Relation-ship Center
[email protected]/AN/AAsia Pacific
[email protected]+1 313 594 4857Caribbean andCentral America
[email protected] 4 3327 266
Ford
Middle East
80004443673
Lincoln80004441067
UAE80004441066
Saudi Arabia8008443673
Mobily and Zain cellphone users in Saudi
800850078
Kuwait22280384
[email protected]/AN/ANorth Africa
[email protected]/A+1-800-841-3673Puerto Rico and U.S.Virgin Islands
[email protected]/AN/ASub-Saharan Africa
[email protected] [email protected]/A+82-02-1600-6003South Korea
If you buy your vehicle in North Americaand then relocate to any of the abovelocations, register your vehicleidentification number (VIN) and newaddress with Ford Global Trade Servicesby emailing, [email protected].
If you are in another foreign country,contact the nearest authorized dealer. Inthe event your inquiry is unresolved,communicate your concern with thedealership’s Sales Manager, ServiceManager or Customer Relations Manager.If you require additional assistance orclarification, please contact the respectiveCustomer Relationship Center aspreviously listed.Customers in the U.S. should call1-800-392-3673.
241
Fusion (CC7) Canada/United States of America, enUSA, Edition date: 201905, Second-Printing
Customer Assistance

ORDERING ADDITIONALOWNER'S LITERATURETo order the publications in this portfolio,contact Helm, Incorporated at:HELM, INCORPORATED47911 Halyard DrivePlymouth, Michigan 48170Attention: Customer ServiceOr to order a free publication catalog, calltoll free: 1-800-782-4356Monday-Friday 8:00 a.m. - 6:00 p.m. ESTHelm, Incorporated can also be reachedby their website:www.helminc.com(Items in this catalog may be purchasedby credit card, check or money order.)
Obtaining a French Owner’sManualFrench Owner’s Manual can be obtainedfrom your authorized dealer or bycontacting Helm, Incorporated using thecontact information listed previously in thissection.
REPORTING SAFETY DEFECTS(U.S. ONLY)
If you believe that your vehicle hasa defect which could cause acrash or could cause injury ordeath, you should immediatelyinform the National HighwayTraffic Safety Administration(NHTSA) in addition to notifyingFord Motor Company.
If NHTSA receives similarcomplaints, it may open aninvestigation, and if it finds that asafety defect exists in a group ofvehicles, it may order a recall andremedy campaign. However,NHTSA cannot become involvedin individual problems betweenyou, your dealer, or Ford MotorCompany.To contact NHTSA, you may callthe Vehicle Safety Hotlinetoll-free at 1-888-327-4236 (TTY:1-800-424-9153); go to http://www.safercar.gov; or write to:Administrator1200 New Jersey Avenue,SoutheastWashington, D.C. 20590You can also obtain otherinformation about motor vehiclesafety from http://www.safercar.gov .
REPORTING SAFETY DEFECTS(CANADA ONLY)If you believe that your vehicle has a defectwhich could cause a crash or could causeinjury or death, you should immediatelyinform Transport Canada and Ford ofCanada.
242
Fusion (CC7) Canada/United States of America, enUSA, Edition date: 201905, Second-Printing
Customer Assistance
Transport Canada Contact Information
http://www.tc.gc.ca/eng/motorvehiclesafety/reporting-defects-motor-vehicles.html (English)
Website
http://www.tc.gc.ca/fra/securiteautomobile/signaler-defauts-vehicules-automobiles.html (French)
Website
1-800-333-0510Phone
Ford of Canada Contact Information
www.ford.caWebsite
1-800-565-3673Phone
243
Fusion (CC7) Canada/United States of America, enUSA, Edition date: 201905, Second-Printing
Customer Assistance

FUSE SPECIFICATION CHARTPower Distribution Box
WARNING: Always disconnect thebattery before servicing high currentfuses.
WARNING: To reduce risk ofelectrical shock, always replace thecover to the power distribution boxbefore reconnecting the battery orrefilling fluid reservoirs.
The power distribution box is in the enginecompartment. It has high-current fusesthat protect your vehicle's main electricalsystems from overloads.If the battery has been disconnected andreconnected, some features will need tobe reset. See Changing the 12V Battery(page 270).
E190797
244
Fusion (CC7) Canada/United States of America, enUSA, Edition date: 201905, Second-Printing
Fuses

Protected ComponentFuse RatingFuse or RelayNumber
Panoramic moonroof.30A11
Starter relay.—2
Rain sensor.15A33
Blower motor relay.—4
Power point 3 - Back of console.20A 15
Not used.—6
Powertrain control module - vehicle power1.20A 37
Powertrain control module power.
Powertrain control module - vehicle power2.20A 38
Emission components.
Powertrain control module relay.—9
Power point 1 - driver front.20A 110
Powertrain control module - vehicle power4.15A 211
Ignition coils.
Powertrain control module - vehicle power3.15A 212
Non-emission components.
Not used (spare).10A 213
Not used (spare).10A 214
Run-start relay.—15
Power point 2 - console.20A 116
Not used (spare).20A 117
Not used (spare).20A 318
245
Fusion (CC7) Canada/United States of America, enUSA, Edition date: 201905, Second-Printing
Fuses

Protected ComponentFuse RatingFuse or RelayNumber
Run-start electronic power assist steering.10A 319
Adaptive cruise control.10A 320
Run/start transmission control.15A 321Transmission oil pump start/stop.
Air conditioner clutch solenoid.10A 322
Run-start.15A 323Blind spot information system.Rear view camera.Heads-up display.Voltage stability module.Gear shift actuator.
Not used.—24
Run-start anti-lock brake system.10A 225
Run-start powertrain control module.10A 226
Not used (spare).10A127
Not used.—28
Mass air flow monitor.5A 329
Not used.—30
Not used.—31
Electric fan 1 relay.—32
A/C clutch relay.—33
Not used.—34
Not used.—35
Not used.—36
Not used.—37
Electric fan 2 relay.—38
Electric fan coil 2 and 3 relay.—39
246
Fusion (CC7) Canada/United States of America, enUSA, Edition date: 201905, Second-Printing
Fuses

Protected ComponentFuse RatingFuse or RelayNumber
Horn relay.—40
Not used.—41
Fuel pump coil relay.—42
Not used.—43
Left hand side headlamp ballast.20A 344
Not used (spare).5A 345
Not used.—46
Not used.—47
Not used.—48
Not used (spare).10A 349
Horn.20A 350
Not used.—51
Not used.—52
Not used (spare).10A 353
Brake on off switch.10A 254
ALT sensor.10A 255
Not used (spare).30A861 Micro 2 fuse.2 Micro 3 fuse.3 M case fuse.
Power Distribution Box - BottomThere are fuses on the bottom of the fusebox. To access the bottom of the fuse box,do the following:
247
Fusion (CC7) Canada/United States of America, enUSA, Edition date: 201905, Second-Printing
Fuses

E145983
1. Release the two latches, on both sidesof the fuse box.
2. Raise the inboard side of the fuse boxfrom the cradle.
3. Move the fuse box toward the centerof the engine compartment.
4. Pivot the outboard side of the fuse boxto access the bottom side.
E190798
248
Fusion (CC7) Canada/United States of America, enUSA, Edition date: 201905, Second-Printing
Fuses

Protected ComponentFuse RatingFuse or RelayNumber
Not used.—56
Not used.—57
Fuel pump feed.30A 158
Electric fan 330A 259
Electric fan 1 (1.5L, 2.0L, and 2.5L engines).30A 260
Not used.—61
Body control module 1.50A 262
Electric fan 2 (1.5L, 2.0L, and 2.5L engines).25A 163
Not used (spare).30A 164
Front heated seat.20A 165
Not used (spare).15A 166
Body control module 2.50A 267
Heated rear window.40A 168
Anti-lock brake system valves.30A 169
Passenger seat.30A 170
Not used.—71
Trans oil pump.20A 172
Rear heated seats.20A 173
Driver seat module.30A 174
Wiper motor 1.25A 175
Not used (spare).30A 176
249
Fusion (CC7) Canada/United States of America, enUSA, Edition date: 201905, Second-Printing
Fuses

Protected ComponentFuse RatingFuse or RelayNumber
Climate control seat module.30A 177
Not used.—78
Blower motor.40A 279
Wiper motor 2.25A 180
Not used.—81
Not used.—82
TRCM shifter.20A 183
Starter solenoid.30A 184
Not used (spare).30A 185
Anti-lock brake system pump.60A 287
1 M case fuse.2 J case fuse.
Passenger Compartment FusePanelThe fuse panel is under the instrumentpanel to the left of the steering column.
Note: It may be easier to access the fusepanel if you remove the finish trim piece.
250
Fusion (CC7) Canada/United States of America, enUSA, Edition date: 201905, Second-Printing
Fuses

E145984
Protected ComponentFuse RatingFuse or RelayNumber
Not Used—1
Lumbar.7.5A 12
Driver door unlock.20A 13
Not used (spare).5A 14
Subwoofer amplifier.20A 15
Not Used (spare).10A 26
Not used (spare).10A 27
Not used (spare).10A 28
Not used (spare).10A 29
Keypad.5A 210Cellphone passport module.
Not used (spare).5A 211
251
Fusion (CC7) Canada/United States of America, enUSA, Edition date: 201905, Second-Printing
Fuses

Protected ComponentFuse RatingFuse or RelayNumber
Climate control.7.5A 212Gear shift
Steering wheel column lock.7.5A 213Cluster.Datalink logic.
Extended power module.10A 214
Datalink gateway module.10A 215
Child lock.15A 116
Not used (spare).5A 217
Push button stop start switch.5A 218
Extended power module.7.5A 219
Adaptive headlamp.7.5A 220
Humidity and in–car temperature sensor.5A 221
Not used (spare).5A 222
Delayed accessory (moonroof logic, drivermaster switch).10A 123
Central lock/unlock.20A 124
Driver door (window, mirror).30A 125
Front passenger door (window, mirror).30A 126
Moonroof.30A 127
Amplifier.20A 128
Rear driver side door (window).30A 129
Rear passenger side door (window).30A 130
252
Fusion (CC7) Canada/United States of America, enUSA, Edition date: 201905, Second-Printing
Fuses

Protected ComponentFuse RatingFuse or RelayNumber
Not used (spare).15A 131
Global positioning system.10A 132Display.Voice control.Radio frequency receiver.
Radio.20A 133Active noise control.
Run-start bus (fuse 19, 20, 21, 22, 35, 36,37, circuit breaker).30A 134
Not used (spare).5A 135
Auto-dimming rear view mirror.15A 136Continuous control damping suspension.Rear heated seats.
Heated steering wheel.20A 137
Not used.30A381 Micro 2 fuse.2 Micro 3 fuse.
CHANGING A FUSEFuses
WARNING: Always replace a fusewith one that has the specifiedamperage rating. Using a fuse with ahigher amperage rating can cause severewire damage and could start a fire.
E217331
If electrical components in the vehicle arenot working, a fuse may have blown. Blownfuses are identified by a broken wire withinthe fuse. Check the appropriate fusesbefore replacing any electricalcomponents.
253
Fusion (CC7) Canada/United States of America, enUSA, Edition date: 201905, Second-Printing
Fuses

Fuse Types
E207206
Fuse TypeCallout
Micro 2A
Micro 3B
MaxiC
MiniD
M CaseE
J CaseF
J Case Low ProfileG
254
Fusion (CC7) Canada/United States of America, enUSA, Edition date: 201905, Second-Printing
Fuses

GENERAL INFORMATIONHave your vehicle serviced regularly to helpmaintain its roadworthiness and resalevalue. There is a large network ofauthorized dealers that are there to helpyou with their professional servicingexpertise. We believe that their speciallytrained technicians are best qualified toservice your vehicle properly and expertly.They are supported by a wide range ofhighly specialized tools developedspecifically for servicing your vehicle.If your vehicle requires professional service,an authorized dealer can provide thenecessary parts and service. Check yourwarranty information to find out whichparts and services are covered.Use only recommended fuels, lubricants,fluids and service parts conforming tospecifications. Motorcraft® parts aredesigned and built to provide the bestperformance in your vehicle.
Precautions• Do not work on a hot engine.• Make sure that nothing gets caught in
moving parts.• Do not work on a vehicle with the
engine running in an enclosed space,unless you are sure you have enoughventilation.
• Keep all open flames and other burningmaterial (such as cigarettes) awayfrom the battery and all fuel relatedparts.
Working with the Engine Off1. Set the parking brake and shift the
transmission to park (P).2. Switch off the engine.3. Block the wheels.
Working with the Engine On
WARNING: To reduce the risk ofvehicle damage and personal burninjuries, do not start your engine with theair cleaner removed and do not removeit while the engine is running.
1. Set the parking brake and shift thetransmission to park (P).
2. Block the wheels.
OPENING AND CLOSING THEHOODOpening the Hood
E142457
1. Inside the vehicle, pull the hood releasehandle located under the left-handside of the instrument panel.
2. Slightly lift the hood.3. Release the hood latch by pushing the
secondary release lever to yourleft-hand side.
255
Fusion (CC7) Canada/United States of America, enUSA, Edition date: 201905, Second-Printing
Maintenance

E87786
4. Open the hood. Support the hood withthe strut.
Closing the Hood1. Remove the hood strut from the catch
and secure it correctly after use.2. Lower the hood and allow it to drop
under its own weight for the last 8-12in (20-30 cm).
Note: Make sure that the hood is correctlyclosed.
UNDER HOOD OVERVIEW - 1.5L ECOBOOST™
E277788
256
Fusion (CC7) Canada/United States of America, enUSA, Edition date: 201905, Second-Printing
Maintenance

Engine coolant reservoir. See Engine Coolant Check (page 262).AEngine oil filler cap. See Engine Oil Check (page 260).BEngine oil dipstick. See Engine Oil Dipstick (page 260).CBrake fluid reservoir. See Brake Fluid Check (page 268).DBattery. See Changing the 12V Battery (page 270).EEngine compartment fuse box. See Fuses (page 244).FAir filter. See Changing the Engine Air Filter (page 278).GWindshield washer reservoir. See Washer Fluid Check (page 269).H
UNDER HOOD OVERVIEW - 2.0L ECOBOOST™
E159754
Engine coolant reservoir. See Engine Coolant Check (page 262).AEngine oil dipstick. See Engine Oil Dipstick (page 260).BEngine oil filler cap. See Engine Oil Check (page 260).C
257
Fusion (CC7) Canada/United States of America, enUSA, Edition date: 201905, Second-Printing
Maintenance

Brake fluid reservoir. See Brake Fluid Check (page 268).DBattery. See Changing the 12V Battery (page 270).EEngine compartment fuse box. See Fuses (page 244).FAir filter. See Changing the Engine Air Filter (page 278).GWasher system fluid reservoir. See Washer Fluid Check (page 269).H
UNDER HOOD OVERVIEW - 2.5L
E169801
Engine coolant reservoir. See Engine Coolant Check (page 262).AEngine oil filler cap. See Engine Oil Check (page 260).BEngine oil dipstick. See Engine Oil Dipstick (page 260).CBrake fluid reservoir. See Brake Fluid Check (page 268).DBattery. See Changing the 12V Battery (page 270).EEngine compartment fuse box. See Fuses (page 244).F
258
Fusion (CC7) Canada/United States of America, enUSA, Edition date: 201905, Second-Printing
Maintenance

Air filter. See Changing the Engine Air Filter (page 278).GWasher system fluid reservoir. See Washer Fluid Check (page 269).H
UNDER HOOD OVERVIEW - 2.7L ECOBOOST™
A
I EFGH
B C D
E188730
Engine coolant reservoir. See Engine Coolant Check (page 262).ABrake fluid reservoir. See Brake Fluid Check (page 268).BBattery. See Changing the 12V Battery (page 270).CPower distribution box. See Fuses (page 244).DAir filter assembly. See Changing the Engine Air Filter (page 278).EAutomatic transmission fluid dipstick. See Automatic Transmission FluidCheck (page 266).
F
Engine oil dipstick. See Engine Oil Dipstick (page 260).GEngine oil filler cap. See Engine Oil Check (page 260).HWindshield washer fluid reservoir. See Washer Fluid Check (page 269).I
259
Fusion (CC7) Canada/United States of America, enUSA, Edition date: 201905, Second-Printing
Maintenance

ENGINE OIL DIPSTICK - 1.5LECOBOOST™
E199415
A B
Minimum.AMaximum.B
ENGINE OIL DIPSTICK - 2.0LECOBOOST™/2.5L/2.7LECOBOOST™
E250320
Minimum.ANominal.BMaximum.C
ENGINE OIL CHECKTo check the engine oil level consistentlyand accurately, do the following:
1. Make sure the parking brake is on. Makesure the transmission is in park (P) orneutral (N).
2. Run the engine until it reaches normaloperating temperature.
3. Make sure that your vehicle is on levelground.
4. Switch the engine off and wait 15minutes for the oil to drain into the oilpan. Checking the engine oil level toosoon after you switch the engine offmay result in an inaccurate reading.
5. Open the hood. See Opening andClosing the Hood (page 255).
6. Remove the dipstick and wipe it witha clean, lint-free cloth. See UnderHood Overview (page 259).
7. Reinstall the dipstick and remove itagain to check the oil level. See UnderHood Overview (page 259).
8. Make sure that the oil level is betweenthe maximum and minimum marks. Ifthe oil level is at the minimum mark,add oil immediately. See Capacitiesand Specifications (page 326).
9. If the oil level is correct, replace thedipstick and make sure it is fully seated.
Note: Do not remove the dipstick when theengine is running.Note: If the oil level is between themaximum and minimum marks, the oil levelis acceptable. Do not add oil.Note: The oil consumption of new enginesreaches its normal level after approximately3,000 mi (5,000 km).
Adding Engine Oil
WARNING: Do not remove the fillercap when the engine is running.
260
Fusion (CC7) Canada/United States of America, enUSA, Edition date: 201905, Second-Printing
Maintenance

Do not use supplemental engine oiladditives because they are unnecessaryand could lead to engine damage that maynot be covered by the vehicle Warranty.
E142732
Only use oils certified for gasoline enginesby the American Petroleum Institute (API).An oil with this trademark symbolconforms to the current engine andemission system protection standards andfuel economy requirements of theInternational Lubricants SpecificationAdvisory Committee (ILSAC).To top up the engine oil level do thefollowing:1. Clean the area surrounding the engine
oil filler cap before you remove it.2. Remove the engine oil filler cap. See
Under Hood Overview (page 259).Turn it counterclockwise and removeit.
3. Add engine oil that meets ourspecifications. See Capacities andSpecifications (page 326). You mayhave to use a funnel to pour the engineoil into the opening.
4. Recheck the oil level.5. If the oil level is correct, replace the
dipstick and make sure it is fully seated.6. Replace the engine oil filler cap. Turn
it clockwise until you feel a strongresistance.
Note: Do not add oil further than themaximum mark. Oil levels above themaximum mark may cause engine damage.Note: Make sure you install the oil filler capcorrectly.Note: Soak up any spillage with anabsorbent cloth immediately.
OIL CHANGE INDICATORRESETUse the information display controls onthe steering wheel to reset the oil changeindicator.
From the main menu scroll to:
Action and descriptionMessage
Press the right arrow button,then from this menu scrollto the following message.
Settings
Press the right arrow button,then from this menu scrollto the following message.
Vehicle
Press the right arrow button,then from this menu scrollto the following message.
Oil Life
Press and hold the OKbutton until the instrumentcluster displays thefollowing message.
Hold OK toReset
Reset Successful
When the oil change indic-ator resets the instrumentcluster displays 100%.
Remaining Life
{00}%
261
Fusion (CC7) Canada/United States of America, enUSA, Edition date: 201905, Second-Printing
Maintenance

Action and descriptionMessage
If the instrument clusterdisplays one of the followingmessages, repeat theprocess.
Not Reset
Reset Cancelled
ENGINE COOLANT CHECK
WARNING: Do not remove thecoolant reservoir cap when the engine ison or the cooling system is hot. Wait 10minutes for the cooling system to cooldown. Cover the coolant reservoir capwith a thick cloth to prevent thepossibility of scalding and slowly removethe cap. Failure to follow this instructioncould result in personal injury.
WARNING: Do not put coolant inthe windshield washer reservoir. Ifsprayed on the windshield, coolant couldmake it difficult to see through thewindshield.
WARNING: To reduce the risk ofpersonal injury, make sure the engine iscool before unscrewing the coolantpressure relief cap. The cooling systemis under pressure. Steam and hot liquidcan come out forcefully when you loosenthe cap slightly.
WARNING: Do not add coolantfurther than the MAX mark.
When the engine is cold, check theconcentration and level of the coolant atthe intervals listed in the scheduledmaintenance information. See ScheduledMaintenance (page 433).
Note: Make sure that the coolant level isbetween the MIN and the MAX marks onthe coolant reservoir.Note: Coolant expands when it is hot. Thelevel may extend beyond the MAX mark.Note: Automotive fluids are notinterchangeable. Do not use coolant orwindshield washer fluid outside of itsspecified function and vehicle location.Note: Do not use stop leak pellets, coolingsystem sealants, or non-specified additivesas they can cause damage to the enginecooling or heating systems. Resultingcomponent damage may not be covered bythe vehicle Warranty.Maintain coolant concentration within48% to 50%, which equates to a freezepoint between -30°F (-34°C) and -34°F(-37°C). Coolant concentration should bechecked using a refractometer. We do notrecommend the use of hydrometers orcoolant test strips for measuring coolantconcentration.
Adding Coolant
WARNING: Do not add enginecoolant when the engine is on or thecooling system is hot. Failure to followthis instruction could result in personalinjury.
WARNING: Do not remove thecoolant reservoir cap when the engine ison or the cooling system is hot. Wait 10minutes for the cooling system to cooldown. Cover the coolant reservoir capwith a thick cloth to prevent thepossibility of scalding and slowly removethe cap. Failure to follow this instructioncould result in personal injury.
262
Fusion (CC7) Canada/United States of America, enUSA, Edition date: 201905, Second-Printing
Maintenance

It is very important to use predilutedcoolant meeting the correct specificationin order to avoid plugging the smallpassageways in the engine cooling system.See Capacities and Specifications(page 326). Incorrect prediluted coolantuse can cause damage not covered by thevehicle Warranty.Note: If prediluted coolant is not available,use the approved concentrated coolantdiluting it to 50/50 with distilled water. SeeCapacities and Specifications (page 317).Using water that has not been deionizedmay contribute to deposit formation,corrosion and plugging of the small coolingsystem passageways.Note: Coolants marketed for all makes andmodels may not be approved to Fordspecifications and may cause damage tothe cooling system. Resulting componentdamage may not be covered by the vehicleWarranty.If the coolant level is at or below theminimum mark, add prediluted coolantimmediately.To top up the coolant level do thefollowing:1. Unscrew the cap slowly. Any pressure
escapes as you unscrew the cap.2. Add prediluted coolant meeting the
correct specification. See Capacitiesand Specifications (page 317).
3. Add enough prediluted coolant toreach the correct level.
4. Replace the coolant reservoir cap. Turnthe cap clockwise until it contacts thehard stop.
5. Check the coolant level in the coolantreservoir the next few times you driveyour vehicle.
If you have to add more than 1.1 qt (1 L) ofengine coolant per month, have yourvehicle checked as soon as possible.Operating an engine with a low level ofcoolant can result in engine overheatingand possible engine damage.Do not mix different colors or types ofprediluted coolant in your vehicle. Mixingof prediluted coolant or using an incorrectprediluted coolant may harm the engineor cooling system components, and maynot be covered by the vehicle Warranty.In case of emergency, you can add a largeamount of water without engine coolantin order to reach a vehicle service location.In this instance, qualified personnel:1. Must drain the cooling system.2. Chemically clean the cooling system.3. Refill with prediluted coolant as soon
as possible.Water alone, without prediluted coolant,can cause engine damage from corrosion,overheating or freezing.Do not use the following as a coolantsubstitute:• Alcohol.• Methanol.• Brine.• Any coolant mixed with alcohol or
methanol antifreeze.Alcohol and other liquids can cause enginedamage from overheating or freezing.Do not add extra inhibitors or additives tothe coolant. These can be harmful andcompromise the corrosion protection ofthe coolant.
Recycled CoolantWe do not recommend the use of recycledcoolant as an approved recycling processis not yet available.
263
Fusion (CC7) Canada/United States of America, enUSA, Edition date: 201905, Second-Printing
Maintenance

Dispose of used engine coolant in anappropriate manner. Follow yourcommunity's regulations and standardsfor recycling and disposing of automotivefluids.
Severe ClimatesIf you drive in extremely cold climates:• It may be necessary to increase the
coolant concentration above 50%.• A coolant concentration of 60%
provides improved freeze pointprotection. Coolant concentrationsabove 60% decrease the overheatprotection characteristics of thecoolant and may cause enginedamage.
If you drive in extremely hot climates:• It may be necessary to decrease the
coolant concentration to 40%.• A coolant concentration of 40%
provides improved overheatprotection. Coolant concentrationsbelow 40% decrease the freeze andcorrosion protection characteristics ofthe coolant and may cause enginedamage.
Vehicles driven year-round in non-extremeclimates should use prediluted coolant foroptimum cooling system and engineprotection.
Coolant ChangeAt specific mileage intervals, as listed inthe scheduled maintenance information,the coolant should be changed. Addprediluted coolant approved to the correctspecification. See Capacities andSpecifications (page 317).
Fail-Safe CoolingFail-safe cooling allows you to temporarilydrive your vehicle before any incrementalcomponent damage occurs. The fail-safedistance depends on ambienttemperature, vehicle load and terrain.
How Fail-Safe Cooling WorksIf the engine begins to overheat, thecoolant temperature gauge moves towardthe red zone:
A warning lamp illuminates anda message may appear in theinformation display.
If the engine reaches a presetover-temperature condition, the engineautomatically switches to alternatingcylinder operation. Each disabled cylinderacts as an air pump and cools the engine.When this occurs, your vehicle stilloperates, however:• Engine power is limited.• The air conditioning system turns off.Continued operation increases the enginetemperature, causing the engine tocompletely shut down. Your steering andbraking effort increases in this situation.When the engine temperature cools, youcan re-start the engine. Have your vehiclechecked as soon as possible to minimizeengine damage.
When Fail-Safe Mode Is Activated
WARNING: Fail-safe mode is foruse during emergencies only. Operateyour vehicle in fail-safe mode only aslong as necessary to bring your vehicleto rest in a safe location and seekimmediate repairs. When in fail-safe
264
Fusion (CC7) Canada/United States of America, enUSA, Edition date: 201905, Second-Printing
Maintenance

mode, your vehicle will have limitedpower, will not be able to maintainhigh-speed operation, and maycompletely shut down without warning,potentially losing engine power, powersteering assist, and power brake assist,which may increase the possibility of acrash resulting in serious injury.
WARNING: Do not remove thecoolant reservoir cap when the engine ison or the cooling system is hot. Wait 10minutes for the cooling system to cooldown. Cover the coolant reservoir capwith a thick cloth to prevent thepossibility of scalding and slowly removethe cap. Failure to follow this instructioncould result in personal injury.
Your vehicle has limited engine powerwhen in the fail-safe mode, drive yourvehicle with caution. Your vehicle does notmaintain high-speed operation and theengine may operate poorly.Remember that the engine is capable ofautomatically shutting down to preventengine damage. In this situation:1. Pull off the road as soon as safely
possible and switch the engine off.2. If you are a member of a roadside
assistance program, we recommendthat you contact your roadsideassistance service provider.
3. If this is not possible, wait a shortperiod for the engine to cool.
4. Check the coolant level. If the coolantlevel is at or below the minimum mark,add prediluted coolant immediately.
5. When the engine temperature cools,you can re-start the engine. Have yourvehicle checked as soon as possible tominimize engine damage.
Engine Coolant TemperatureManagement (If Equipped)
WARNING: To reduce the risk ofcrash and injury, be prepared that thevehicle speed may reduce and thevehicle may not be able to acceleratewith full power until the coolanttemperature reduces.
If you tow a trailer with your vehicle, theengine may temporarily reach a highertemperature during severe operatingconditions, for example ascending a longor steep grade in high ambienttemperatures.At this time, you may notice the coolanttemperature gauge moves toward the redzone and a message may appear in theinformation display.You may notice a reduction in vehiclespeed caused by reduced engine power inorder to manage the engine coolanttemperature. Your vehicle may enter thismode if certain high-temperature andhigh-load conditions take place. Theamount of speed reduction depends onvehicle loading, grade and ambienttemperature. If this occurs, there is no needto pull off the road. You can continue todrive your vehicle.The air conditioning may automaticallyturn on and off during severe operatingconditions to protect the engine fromoverheating. When the coolanttemperature decreases to the normaloperating temperature, the air conditioningturns on.If the coolant temperature gauge movesfully into the red zone, or if the coolanttemperature warning or service enginesoon messages appear in your informationdisplay, do the following:
265
Fusion (CC7) Canada/United States of America, enUSA, Edition date: 201905, Second-Printing
Maintenance

1. Pull off the road as soon as safelypossible and shift the transmission intopark (P).
2. Leave the engine running until thecoolant temperature gauge needlereturns to the normal position. If thetemperature does not drop afterseveral minutes, follow the remainingsteps.
3. Switch the engine off and wait for it tocool. Check the coolant level.
4. If the coolant level is at or below theminimum mark, add prediluted coolantimmediately.
5. If the coolant level is normal, restartthe engine and continue.
AUTOMATIC TRANSMISSIONFLUID CHECK - 1.5LECOBOOST™/2.0LECOBOOST™/2.5LThe automatic transmission does not havea transmission fluid dipstick.Have an authorized dealer check andchange the transmission fluid at thecorrect service interval. See ScheduledMaintenance (page 433). Yourtransmission does not consume fluid.However, if the transmission slips, shiftsslowly or if you notice a sign of leakingfluid, contact an authorized dealer.Do not use supplemental transmissionfluid additives, treatments or cleaningagents. The use of these materials mayaffect transmission operation and resultin damage to internal transmissioncomponents.
AUTOMATIC TRANSMISSIONFLUID CHECK - 2.7LECOBOOST™Do not use supplemental transmissionfluid additives because they areunnecessary and could lead totransmission damage that may not becovered by the vehicle Warranty.The transmission does not consume fluid.However, if the transmission slips or shiftsslowly you should check the fluid level. Ifyou notice a sign of leaking fluid, contactan authorized dealer.
Checking the Transmission FluidLevel*
Only check the transmission fluid levelwhen the engine is at normal operatingtemprature 179–199°F (82–93°C). Normaloperating temprature is reached afterdriving approximately 20 mi (30 km).
E190273
A B
Minimum.AMaximum.B
Note: Check the fluid level with the enginerunning and the transmission in park (P).1. Make sure that your vehicle is on level
ground.2. Rotate the automatic transmission
fluid cap in a counterclockwisedirection. See Under Hood Overview(page 259).
266
Fusion (CC7) Canada/United States of America, enUSA, Edition date: 201905, Second-Printing
Maintenance

3. Remove the cap and dipstick and wipeit with a clean, lint-free cloth. Replacethe cap and dipstick and remove itagain to check the fluid level.
4. Make sure that the fluid level isbetween the MIN and the MAX marks.If the fluid level is at the MIN mark, addfluid immediately. See AddingTransmission Fluid.
5. Replace the automatic transmissionfluid cap and dipstick. Turn it clockwiseuntil you feel a strong resistance.
Low Fluid LevelIf the fluid level is within the minimumrange (below point A) add the correctspecification fluid to be within the hashmark area. See Capacities andSpecifications (page 317).Note: If the fluid level is below theminimum range do not drive your vehicle.An underfill conition can damage thetransmission.
Correct Fluid LevelIf the fluid level is within the hash markarea (between points A and B) do not addany fluid.
High Fluid LevelIf the fluid level is above the maximumrange (above point B) fluid may need tobe removed. High fluid levels may becaused by a overheating condition. If youhave operated your vehicle at high speeds,towing a trailer or in city traffic during hotweather, allow your vehicle to cool for aminimum of 30 minutes before recheckingthe level.Note: An overfill condition can damage thetransmission.
Adding Transmission Fluid*1. Rotate the automatic transmission
fluid cap in a counterclockwisedirection.*
2. Remove the cap and dipstick and wipeit with a clean, lint-free cloth.
3. Add fluid that meets the Fordspecifications. See Capacities andSpecifications (page 344). Pour thefluid directly into the automatictransmission fluid cap and dipstickhole.
4. Replace the cap and dipstick andremove it again to check the fluid level.
5. Make sure that the fluid level isbetween the MIN and the MAX marks.
6. Replace the automatic transmissionfluid cap and dipstick. Turn it clockwiseuntil you feel a strong resistance.
*Vehicles With 2.7L Turbocharger
WARNING: Do not start the enginewith the air filter removed. This cancause damage not covered by thevehicle Warranty and can result inserious injury.
267
Fusion (CC7) Canada/United States of America, enUSA, Edition date: 201905, Second-Printing
Maintenance

E190367
x2
1. Remove the two air filter assemblysecuring bolts.
2. Lift the air filter assembly to disengagethe locating pins.
3. Rotate the air filter assembly slightlyin a counterclockwise direction.
4. Check the fluid level. See Capacitiesand Specifications (page 344).
5. Install in reverse order. Tighten the twoair filter assembly securing bolts untilyou feel a strong resistance.
BRAKE FLUID CHECK
WARNING: Do not use any fluidother than the recommended brake fluidas this will reduce brake efficiency. Useof incorrect fluid could result in the lossof vehicle control, serious personal injuryor death.
WARNING: Only use brake fluidfrom a sealed container. Contaminationwith dirt, water, petroleum products orother materials may result in brakesystem damage or failure. Failure toadhere to this warning could result in theloss of vehicle control, serious personalinjury or death.
WARNING: Do not allow the fluidto touch your skin or eyes. If thishappens, rinse the affected areasimmediately with plenty of water andcontact your physician.
WARNING: The brake systemcould be affected if the brake fluid levelis below the MIN mark or above the MAXmark on the brake fluid reservoir.
268
Fusion (CC7) Canada/United States of America, enUSA, Edition date: 201905, Second-Printing
Maintenance

E170684
1. Park your vehicle on a level surface.2. Look at the brake fluid reservoir to see
where the brake fluid level is relativeto the MIN and the MAX marks on thereservoir.
Note: If the brake fluid level is between theMIN and the MAX marks on the reservoir, itis acceptable.Note: If the brake fluid level is below theMIN mark or above the MAX mark, haveyour vehicle checked as soon as possible.Note: To avoid fluid contamination, thereservoir cap must remain in place and fullytight, unless you are adding fluid.Only use fluid that meets ourspecifications. See Capacities andSpecifications (page 317).
Brake Fluid Service IntervalBrake fluid absorbs water over time whichdegrades the effectiveness of the brakefluid. Change the brake fluid at thespecified intervals to prevent degradedbraking performance.
For detailed interval information, seeScheduled Maintenance in your Owner'sManual or your local maintenance guide.
WASHER FLUID CHECK
WARNING: If you operate yourvehicle in temperatures below 40°F(5°C), use washer fluid with antifreezeprotection. Failure to use washer fluidwith antifreeze protection in coldweather could result in impairedwindshield vision and increase the riskof injury or accident.
Add fluid to fill the reservoir if the level islow. Only use a washer fluid that meetsFord specifications. See Capacities andSpecifications (page 317).State or local regulations on volatileorganic compounds may restrict the useof methanol, a common windshield washerantifreeze additive. Washer fluidscontaining non-methanol antifreezeagents should be used only if they providecold weather protection without damagingthe vehicle’s paint finish, wiper blades orwasher system.
FUEL FILTERYour vehicle is equipped with a lifetimefuel filter that is integrated with the fueltank. Regular maintenance or replacementis not needed.
269
Fusion (CC7) Canada/United States of America, enUSA, Edition date: 201905, Second-Printing
Maintenance

CHANGING THE 12V BATTERY
WARNING: Batteries normallyproduce explosive gases which cancause personal injury. Therefore, do notallow flames, sparks or lightedsubstances to come near the battery.When working near the battery, alwaysshield your face and protect your eyes.Always provide correct ventilation.
WARNING: When lifting aplastic-cased battery, excessive pressureon the end walls could cause acid to flowthrough the vent caps, resulting inpersonal injury and damage to thevehicle or battery. Lift the battery with abattery carrier or with your hands onopposite corners.
WARNING: Keep batteries out ofreach of children. Batteries containsulfuric acid. Avoid contact with skin,eyes or clothing. Shield your eyes whenworking near the battery to protectagainst possible splashing of acidsolution. In case of acid contact with skinor eyes, flush immediately with water fora minimum of 15 minutes and get promptmedical attention. If acid is swallowed,call a physician immediately.
WARNING: Battery posts,terminals and related accessoriescontain lead and lead compounds,chemicals known to the State ofCalifornia to cause cancer andreproductive harm. Wash your handsafter handling.
Your vehicle has a Motorcraft®maintenance-free battery which normallydoes not require additional water duringits life of service.
Note: If your vehicle's battery has a coveror shield, make sure it is reinstalled after thebattery has been cleaned or replaced.Note: See an authorized dealer for lowvoltage battery access, testing, orreplacement.When a low voltage battery replacementis necessary, see an authorized dealer toreplace the low voltage battery with a Fordrecommended replacement low voltagebattery that matches the electricalrequirements of the vehicle.To ensure proper operation of the batterymanagement system (BMS), do not allowa technician to connect any electricaldevice ground connection directly to thelow voltage battery negative post. Aconnection at the low voltage batterynegative post can cause inaccuratemeasurements of the battery conditionand potential incorrect system operation.Note: If a person adds electrical orelectronic accessories or components to thevehicle, the accessories or components mayadversely affect the low voltage batteryperformance and durability and may alsoaffect the performance of other electricalsystems in the vehicle.For longer, trouble-free operation, keep thetop of the battery clean and dry. Also,make certain the battery cables are alwaystightly fastened to the battery terminals.If you see any corrosion on the battery orterminals, remove the cables from theterminals and clean with a wire brush. Youcan neutralize the acid with a solution ofbaking soda and water.When a battery replacement is required,the battery should only be replaced witha Ford recommended replacement batterythat matches the electrical requirementsof the vehicle.
270
Fusion (CC7) Canada/United States of America, enUSA, Edition date: 201905, Second-Printing
Maintenance

Because your vehicle’s engine iselectronically-controlled by a computer,some engine control settings aremaintained by power from the low voltagebattery. Some engine computer settings,like the idle trim and fuel trim strategy,optimize the driveability and performanceof the engine. Some other computersettings, like the clock and radio stationpresets, are also maintained in memory bypower from the low voltage battery. Whena technician disconnects and connects thelow voltage battery, these settings areerased. Complete the following procedurein order to restore the settings:1. With the vehicle at a complete stop,
set the parking brake.2. Shift the transmission into park (P).3. Switch off all accessories.4. Fully press the brake pedal and start
the vehicle.5. Run the engine until it reaches normal
operating temperature. While theengine is warming up, complete thefollowing: Reset the clock. See AudioSystem (page 357). Reset the powerwindows bounce-back feature. SeeWindows and Mirrors (page 82).Reset the radio station presets. SeeAudio System (page 357).
6. Allow the engine to idle for at least oneminute. If the engine turns off, pressthe accelerator pedal to start theengine.
7. While the engine is running, press thebrake pedal and shift into neutral (N).
8. Allow the engine to run for at least oneminute by pressing on the acceleratorpedal.
9. Drive the vehicle at least 12 mi (20 km)to completely relearn the idle and fueltrim strategy.
Note: If you do not allow the engine torelearn the idle and fuel trim strategy, theidle quality of your vehicle may be adverselyaffected until the engine computereventually relearns the idle trim and fueltrim strategy.Make sure that you dispose of old batteriesin an environmentally friendly way. Seekadvice from your local authority aboutrecycling old batteries.
CHECKING THE WIPERBLADES
E142463
Run the tip of your fingers over the edge ofthe blade to check for roughness.Clean the wiper blades with washer fluidor water applied with a soft sponge orcloth.
CHANGING THE WIPERBLADESThe wiper arms can be manually movedwhen the ignition is off. This allows for easeof blade replacement and cleaning underthe blades.
271
Fusion (CC7) Canada/United States of America, enUSA, Edition date: 201905, Second-Printing
Maintenance

E129990
1
1
21. Pull the wiper blade and arm away
from the glass. Press the lockingbuttons together.
2. Rotate and remove the wiper blade.3. Install in the reverse order.Note: Make sure that the wiper blade locksinto place. Lower the wiper arm and bladeback to the windshield. The wiper arms willautomatically return to their normal positionwhen the ignition is turned on.Replace wiper blades at least once peryear for optimum performance.Poor wiper quality can be improved bycleaning the wiper blades and thewindshield.
ADJUSTING THE HEADLAMPSVertical Aim AdjustmentThe headlamps on your vehicle areproperly aimed at the assembly plant. Ifyour vehicle has been in an accident, thealignment of your headlamps should bechecked by your authorized dealer.
Headlamp Aiming Target
E142592
8 feet (2.4 meters)ACenter height of lamp to groundB25 feet (7.6 meters)CHorizontal reference lineD
Vertical Aim Adjustment Procedure1. Park the vehicle directly in front of a
wall or screen on a level surface,approximately 25 ft (7.6 m) away.
2. Measure the height of the headlampbulb center from the ground and markan 8 ft (2.4 m) horizontal reference lineon the vertical wall or screen at thisheight.
Note: To see a clearer light pattern foradjusting, you may want to block the lightfrom one headlamp while adjusting theother.3. Turn on the low beam headlamps to
illuminate the wall or screen and openthe hood.
272
Fusion (CC7) Canada/United States of America, enUSA, Edition date: 201905, Second-Printing
Maintenance

E142465
4. On the wall or screen you will observea flat zone of high intensity lightlocated at the top of the right handportion of the beam pattern. If the topedge of the high intensity light zone isnot at the horizontal reference line, theheadlamp will need to be adjusted.
E145594
5. Locate the vertical adjuster on eachheadlamp. Using a Phillips #2screwdriver, turn the adjuster eitherclockwise or counterclockwise in orderto adjust the vertical aim of theheadlamp. The horizontal edge of thebrighter light should touch thehorizontal reference line.
6. Close the hood and turn off the lamps.
Horizontal Aim AdjustmentHorizontal aim is not required for thisvehicle and is not adjustable.
273
Fusion (CC7) Canada/United States of America, enUSA, Edition date: 201905, Second-Printing
Maintenance

REMOVING A HEADLAMP
E159693
Note: To remove push pins, use aflat-bladed screwdriver to pull up the centerrelease pin.1. Make sure the headlamp control is in
the off position and open the hood.2. Remove the six push pins securing the
front fascia to the front trim cover.3. Remove the three bumper cover upper
screws using a flat-bladed screwdriver.4. Remove the push pin at the inboard
side of the headlamp you are servicing.
E159694
5. Remove the two screws securing theheadlamp using a flat-bladedscrewdriver.
E159695
6. Remove the lower three wheel housingfasteners by turning themcounterclockwise.
274
Fusion (CC7) Canada/United States of America, enUSA, Edition date: 201905, Second-Printing
Maintenance

E159696
7. Remove the two outmost front bumpercover lower fasteners, only on the sideof the headlamp you are servicing, byturning them counterclockwise.
E159697
8. Separate the front bumper cover fromthe fender by gently pulling the frontbumper cover to the outside of thevehicle 1.2 in (3 cm).
E159698
9. From the front of the vehicle, gentlypull the front bumper cover forward4 in (10 cm) by grasping it next to theheadlamp to be serviced and in thelower front of the wheel opening.
E159699
10. Gently pull the headlamp assemblyoutward to disengage it from thelower fixing point.
11. Carefully lift the headlamp andremove it from the vehicle.
12. Disconnect the electrical connectorfrom the headlamp assembly bypushing the release tab on theconnector.
CHANGING A BULB
WARNING: Switch the lamps andthe ignition off. Failure to follow thiswarning could result in serious personalinjury.
WARNING: Bulbs can become hot.Let the bulb cool down before removingit. Failure to do so could result inpersonal injury.
Use the correct specification bulb. SeeBulb Specification Chart (page 351).Install in the reverse order unless otherwisestated.
275
Fusion (CC7) Canada/United States of America, enUSA, Edition date: 201905, Second-Printing
Maintenance

Headlamp
E222975
A B
Headlamp high beam.AHeadlamp low beam.B
Note: LED headlamps are not serviceable.Have your vehicle checked as soon aspossible.
Headlamp Low Beam1. Carefully remove the cover.2. Disconnect the electrical connector.3. Turn the bulb holder counterclockwise
and remove it.Note: Do not touch the bulb glass.Note: You cannot separate the bulb fromthe bulb holder.
Headlamp High Beam1. Carefully remove the cover.2. Disconnect the electrical connector.3. Turn the bulb holder counterclockwise
and remove it.Note: Do not touch the bulb glass.Note: You cannot separate the bulb fromthe bulb holder.
Front Halogen Fog Lamp
E268887
Note: You cannot separate the fog lampbulb from the bulb holder.Note: Use caution when removing fog lampfacia cover from breaking or scratching.1. Remove the fog lamp cover, using a
flat screwdriver.2. Remove the three fasteners using a
screwdriver.3. Remove the lamp.
276
Fusion (CC7) Canada/United States of America, enUSA, Edition date: 201905, Second-Printing
Maintenance

E268888
4. Disconnect the electrical connector.5. Turn the bulb holder counterclockwise
and remove it.6. Install the new bulb in reverse order.
LED LampsLED lamps are not serviceable. Have yourvehicle checked as soon as possible.The following lamps can be LED:• Front side marker lamps.• Front direction indicators.• Daytime running lamps.• Side direction indicators.• Central high mounted brake lamp.• Rear direction indicators.• Brake and rear lamps.• Front fog lamp.
Reversing Lamp1. Carefully remove the plastic trim clips
holding the interior cover.
E258906
2. Turn the bulb holder counterclockwiseand remove it.
E258907
277
Fusion (CC7) Canada/United States of America, enUSA, Edition date: 201905, Second-Printing
Maintenance

3. Press the bulb in and turn the bulbcounterclockwise to remove it.
License Plate Lamp
3
2
1
E72789
1. Use a suitable tool, for example ascrewdriver, to carefully remove thelamp.
2. Remove the lamp.3. Turn the bulb holder counterclockwise
and remove it.4. Remove the bulb by pulling it straight
out.
CHANGING THE ENGINE AIRFILTER
WARNING: To reduce the risk ofvehicle damage and personal burninjuries, do not start your engine with theair cleaner removed and do not removeit while the engine is running.
When changing the air filter element, useonly the air filter element listed. SeeCapacities and Specifications (page317).
For EcoBoost equipped vehicles: Whenservicing the air cleaner, it is important thatno foreign material enter the air inductionsystem. The engine and turbocharger aresusceptible to damage from even smallparticles.Change the air filter element at the properinterval. See Scheduled Maintenance(page 433).Note: Failure to use the correct air filterelement may result in severe enginedamage. The customer warranty may bevoid for any damage to the engine if thecorrect air filter element is not used.
EcoBoost Engines
E144365
278
Fusion (CC7) Canada/United States of America, enUSA, Edition date: 201905, Second-Printing
Maintenance

2.5L Engine (If Equipped)
E146047
1. Release the clamps that secure the airfilter housing cover.
2. Carefully lift the air filter housing cover.3. Remove the air filter element from the
air filter housing.4. Wipe any dirt or debris from the air filter
housing and cover to make sure no dirtgets in the engine and to make sure youhave a good seal.
5. Install a new air filter element. Becareful not to crimp the filter elementedges between the air filter housingand cover. This could cause filterdamage and allow unfiltered air toenter the engine if not properly seated.
6. Install the air filter housing cover.7. Engage the clamps to secure the air
filter housing cover to the air filterhousing.
279
Fusion (CC7) Canada/United States of America, enUSA, Edition date: 201905, Second-Printing
Maintenance

GENERAL INFORMATIONYour dealer has many quality productsavailable to clean your vehicle and protectits finishes.
CLEANING PRODUCTSMaterialsFor best results, use the following productsor products of equivalent quality:
SpecificationName
Motorcraft® Bug and Tar Remover, ZC-42 (U.S. & Canada)
ESR-M5B194-BMotorcraft® Custom Bright Metal Cleaner, ZC-15 (U.S. & Canada)
ESR-M14P4-AMotorcraft® Detail Wash, ZC-3-A (U.S. & Canada)
ESR-M14P3-AMotorcraft® Engine Shampoo and Degreaser, ZC-20 (U.S.)
Motorcraft® Engine Shampoo, CXC-66-A (Canada)
Motorcraft® Premium Leather and Vinyl Cleaner, ZC-56 (U.S. &Canada)
Motorcraft® Multi-Purpose Cleaner, CXC-101 (Canada)
WSS-M14P19-AMotorcraft® Premium Windshield Wash Concentrate withBitterant, ZC-32-B2 (U.S.)
WSS-M14P19-AMotorcraft® Premium Quality Windshield Washer Fluid, CXC-37-A/B/D/F (Canada)
Motorcraft® Professional Strength Carpet & Upholstery Cleaner,ZC-54 (U.S. & Canada)
ESR-M14P5-AMotorcraft® Premium Glass Cleaner, CXC-100 (Canada)
Motorcraft® Spot and Stain Remover, ZC-14 (U.S.)
ESR-M14P5-AMotorcraft® Ultra-Clear Spray Glass Cleaner, ZC-23 (U.S.)
Motorcraft® Wheel and Tire Cleaner, ZC-37-A (U.S. & Canada)
CLEANING THE EXTERIORWash your vehicle regularly with cool orlukewarm water and a neutral pHshampoo, we recommend MotorcraftDetail Wash.
• Never use strong household detergentsor soap, for example dish washing orlaundry liquid. These products candiscolor and spot painted surfaces.
• Never wash your vehicle when it is hotto the touch, or during strong or directsunlight.
280
Fusion (CC7) Canada/United States of America, enUSA, Edition date: 201905, Second-Printing
Vehicle Care

• Dry your vehicle with a chamois or softterry cloth towel to eliminate waterspotting.
• Immediately remove fuel spillages, birddroppings, insect deposits and road tar.These may cause damage to yourvehicle’s paintwork or trim over time.We recommend Motorcraft Bug andTar Remover.
• Remove any exterior accessories, forexample antennas, before entering acar wash.
• When filling with AdBlue®, remove anyresidue on painted surfacesimmediately.
Note: Suntan lotions and insect repellentscan damage painted surfaces. If thesesubstances come in contact with yourvehicle, wash the affected area as soon aspossible.
Cleaning the HeadlampsNote: Do not scrape the headlamp lensesor use abrasives, alcoholic solvents orchemical solvents to clean them.Note: Do not wipe the headlamps whenthey are dry.
Exterior Chrome Parts• Apply a high quality-cleaning product
to bumpers and other chrome parts.Follow the manufacturer’s instructions.We recommend Motorcraft CustomBright Metal Cleaner.
• Do not apply the cleaning product tohot surfaces. Do not leave the cleaningproduct on chrome surfaces longerthan the time recommended.
• Using non-recommended cleaners canresult in severe and permanentcosmetic damage.
Note: Never use abrasive materials, forexample steel wool or plastic pads as theycan scratch the chrome surface.
Note: Do not use chrome cleaner, metalcleaner or polish on wheels or wheel covers.
Exterior Plastic PartsFor routine cleaning we recommendMotorcraft Detail Wash. If tar or greasespots are present, we recommendMotorcraft Bug and Tar Remover.
Stripes or Graphics (If Equipped)
Hand washing your vehicle is preferredhowever, pressure washing may be usedunder the following conditions:• Do not use water pressure higher than
2,000 psi (14,000 kPa).• Do not use water hotter than 179°F
(82°C).• Use a spray with a 40° wide spray
angle pattern.• Keep the nozzle at a 12 in (305 mm)
distance and 90° angle to yourvehicle's surface.
Note: Holding the pressure washer nozzleat an angle to the vehicle's surface maydamage graphics and cause the edges topeel away from the vehicle's surface.
UnderbodyRegularly clean the underside of yourvehicle using water. Keep body and doordrain holes free of debris or foreignmaterial.
Under HoodFor removing black rubber marks fromunder the hood we recommend MotorcraftWheel and Tire Cleaner or Motorcraft Bugand Tar Remover.
281
Fusion (CC7) Canada/United States of America, enUSA, Edition date: 201905, Second-Printing
Vehicle Care

WAXINGRegular waxing is necessary to protect yourcar's paint from the elements. Werecommend that you wash and wax thepainted surface once or twice a year.When washing and waxing, park yourvehicle in a shaded area out of directsunlight. Always wash your vehicle beforeapplying wax.• Use a quality wax that does not contain
abrasives.• Follow the manufacturer’s instructions
to apply and remove the wax.• Apply a small amount of wax in a
back-and-forth motion, not in circles.• Do not allow wax to come in contact
with any non-body (low-gloss black)colored trim. The wax will discolor orstain the parts over time.• Roof racks.• Bumpers.• Grained door handles.• Side moldings.• Mirror housings.• Windshield cowl area.
• Do not apply wax to glass areas.• After waxing, your car's paint should
feel smooth, and be free of streaks andsmudges.
CLEANING THE ENGINEEngines are more efficient when they areclean because grease and dirt buildup keepthe engine warmer than normal.
When washing:• Take care when using a power washer
to clean the engine. The high-pressurefluid could penetrate the sealed partsand cause damage.
• Do not spray a hot engine with coldwater to avoid cracking the engineblock or other engine components.
• Spray Motorcraft Engine Shampoo andDegreaser on all parts that requirecleaning and pressure rinse clean. InCanada, use Motorcraft EngineShampoo.
Note: If your vehicle has an engine coverremove the cover before application ofMotorcraft Engine Shampoo and Degreaser.Immediately rinse away any over spray.• Never wash or rinse the engine while it
is hot or running; water in the runningengine may cause internal damage.
• Never wash or rinse any ignition coil,spark plug wire or spark plug well, orthe area in and around these locations.
• Cover the battery, power distributionbox, and air filter assembly to preventwater damage when cleaning theengine.
CLEANING THE WINDOWS ANDWIPER BLADESCar wash chemicals and environmentalfallout can result in windshield and wiperblade contamination. Dirty windshield andwipers will result in poor windshield wiperoperation. Keep the windshield and wiperblades clean to maintain windshield wiperperformance.
282
Fusion (CC7) Canada/United States of America, enUSA, Edition date: 201905, Second-Printing
Vehicle Care

To clean the windshield and wiper blades:• Clean the windshield with a
non-abrasive glass cleaner. Whencleaning the interior of the windshield,avoid getting any glass cleaner on theinstrument panel or door panels. Wipeany glass cleaner off these surfacesimmediately.
• For windshields contaminated withtree sap, chemicals, wax or bugs, cleanthe entire windshield using steel wool(no greater than 0000 grade) in acircular motion and rinse with water.
• Clean the wiper blades with isopropylrubbing alcohol or windshield washerconcentrate.
Note: Do not use razor blades or othersharp objects to clean or remove decalsfrom the inside of the heated rear window.The vehicle warranty does not coverdamage caused to the heated rear windowgrid lines.
CLEANING THE INTERIOR
WARNING: Do not use cleaningsolvents, bleach or dye on the vehicle'sseatbelts, as these actions may weakenthe belt webbing.
WARNING: On vehicles equippedwith seat-mounted airbags, do not usechemical solvents or strong detergents.Such products could contaminate theside airbag system and affectperformance of the side airbag in a crash.
For fabric, carpets, cloth seats and seatsequipped with side airbags:• Remove dust and loose dirt with a
vacuum cleaner.• Remove light stains and soil with
Motorcraft Professional StrengthCarpet & Upholstery Cleaner.
• If grease or tar is present on thematerial, spot-clean the area first withMotorcraft Spot and Stain Remover. InCanada, use Motorcraft Multi-PurposeCleaner.
• If a ring forms on the fabric after spotcleaning, clean the entire areaimmediately (but do not oversaturate)or the ring will set.
• Do not use household cleaningproducts or glass cleaners, which canstain and discolor the fabric and affectthe flame retardant abilities of the seatmaterials.
MirrorsDo not clean the housing or glass of anymirror with harsh abrasives, fuel or otherpetroleum or ammonia-based cleaningproducts.
CLEANING THE INSTRUMENTPANEL AND INSTRUMENTCLUSTER LENS
WARNING: Do not use chemicalsolvents or strong detergents whencleaning the steering wheel orinstrument panel to avoid contaminationof the airbag system.
Note: Follow the same procedure ascleaning leather seats for cleaning leatherinstrument panels and leather interior trimsurfaces. See Cleaning Leather Seats(page 284).Clean the instrument panel and clusterlens with a clean, damp and soft cloth,then use a clean, dry and soft cloth to drythese areas.
283
Fusion (CC7) Canada/United States of America, enUSA, Edition date: 201905, Second-Printing
Vehicle Care

• Avoid cleaners or polishes that increasethe gloss of the upper portion of theinstrument panel. The dull finish in thisarea helps protect you fromundesirable windshield reflection.
• Do not use any household cleaningproducts or glass cleaners as thesemay damage the finish of theinstrument panel, interior trim andcluster lens.
• Wash or wipe your hands clean if youhave been in contact with certainproducts such as insect repellent andsuntan lotion to avoid possible damageto the interior painted surfaces.
• Do not allow air fresheners and handsanitizers to spill onto interior surfaces.If a spill occurs, wipe off immediately.Your warranty may not cover thesedamages.
If a staining liquid like coffee or juice hasbeen spilled on the instrument panel or oninterior trim surfaces:1. Wipe up spilled liquid using a clean,
soft cloth as quickly as possible.2. Use Motorcraft Premium Leather and
Vinyl Cleaner or a commerciallyavailable leather cleaning product forautomotive interiors. Test any cleaneror stain remover on an inconspicuousarea.
3. Alternatively, wipe the surface with aclean, soft cloth and a mild soap andwater solution. Dry the area with aclean, soft cloth.
4. If necessary, apply more soap andwater solution or cleaning product toa clean, soft cloth and press it onto thesoiled area. Allow this to set at roomtemperature for 30 minutes.
5. Remove the soaked cloth, then with aclean, damp cloth, use a rubbingmotion for 60 seconds on the soiledarea.
6. Dry the area with a clean, soft cloth.
CLEANING LEATHER SEATS (IF
EQUIPPED)
Note: Follow the same procedure ascleaning leather seats for cleaning leatherinstrument panels and leather interior trimsurfaces.For routine cleaning, wipe the surface witha soft, damp cloth and a mild soap andwater solution. Dry the area with a clean,soft cloth.For cleaning and removing stains such asdye transfer, use Motorcraft PremiumLeather and Vinyl Cleaner or acommercially available leather cleaningproduct for automotive interiors.Note: Test any cleaner or stain remover onan inconspicuous area.You should:• Remove dust and loose dirt with a
vacuum cleaner.• Clean and treat spills and stains as
soon as possible.Do not use the following products as thesemay damage the leather:• Oil and petroleum or silicone-based
leather conditioners.• Household cleaners.• Alcohol solutions.• Solvents or cleaners intended
specifically for rubber, vinyl andplastics.
284
Fusion (CC7) Canada/United States of America, enUSA, Edition date: 201905, Second-Printing
Vehicle Care

REPAIRING MINOR PAINTDAMAGEAuthorized dealers have touch-up paint tomatch your vehicle’s color. Your vehiclecolor code is printed on a sticker on thefront, left-hand side door jamb. Take yourcolor code to your authorized dealer tomake sure you get the correct color.Before repairing minor paint damage, usea cleaner such as Motorcraft Bug and TarRemover to remove particles such as birddroppings, tree sap, insect deposits, tarspots, road salt and industrial fallout.Always read the instructions before usingcleaning products.
CLEANING THE WHEELS1. Regularly clean them with a wheel
cleaner. We recommend that you useFord approved wheel cleaner ifavailable.
2. Remove dirt and brake dust with asponge.
3. Remove tar and grease with a bug andtar remover. We recommend that youuse Ford approved bug and tar removerif available.
4. Thoroughly rinse the wheels with waterafter cleaning.
If you intend on parking your vehicle for anextended period after cleaning the wheelswith a wheel cleaner, drive your vehicle fora few minutes before doing so. Thisreduces the risk of corrosion of the brakediscs, brake pads and linings.Do not clean the wheels when they are hot.Note: Some car washes could damagewheel rims and covers.
Note: Using non-recommended cleaners,harsh cleaning products, chrome wheelcleaners or abrasive materials coulddamage wheel rims and covers.
VEHICLE STORAGEIf you plan on storing your vehicle for 30days or more, read the followingmaintenance recommendations to makesure your vehicle stays in good operatingcondition.We engineer and test all motor vehiclesand their components for reliable, regulardriving. Under various conditions,long-term storage may lead to degradedengine performance or failure unless youuse specific precautions to preserve enginecomponents.
General• Store all vehicles in a dry, ventilated
place.• Protect from sunlight, if possible.• If vehicles are stored outside, they
require regular maintenance to protectagainst rust and damage.
Body• Wash your vehicle thoroughly to
remove dirt, grease, oil, tar or mud fromexterior surfaces, rear-wheel housingand the underside of front fenders.
• Periodically wash your vehicle if it isstored in exposed locations.
• Touch-up exposed or primed metal toprevent rust.
• Cover chrome and stainless steel partswith a thick coat of auto wax to preventdiscoloration. Re-wax as necessarywhen you wash your vehicle.
• Lubricate all hood, door and luggagecompartment hinges and latches witha light grade oil.
285
Fusion (CC7) Canada/United States of America, enUSA, Edition date: 201905, Second-Printing
Vehicle Care

• Cover interior trim to prevent fading.• Keep all rubber parts free from oil and
solvents.
Engine• Change the engine oil and filter prior to
storage because used engine oilcontains contaminates which maycause engine damage.
• Start the engine every 15 days for aminimum of 15 minutes. Run at fastidle with the climate controls set todefrost until the engine reaches normaloperating temperature.
• With your foot on the brake, shiftthrough all the gears while the engineis running.
• We recommend that you change theengine oil before you use your vehicleagain.
Fuel system• Fill the fuel tank with high-quality fuel
until the first automatic shutoff of thefuel pump nozzle.
Cooling system• Protect against freezing temperatures.• When removing your vehicle from
storage, check coolant fluid level.Confirm that there are no coolingsystem leaks and that fluid is at therecommended level.
Disconnecting Your 12 Volt Battery• Check and recharge as necessary. Keep
connections clean.• If storing your vehicle for more than 30
days without recharging the battery,we recommend that you disconnectthe battery cables to maintain batterycharge for quick starting.
Note: It is necessary to reset memoryfeatures if you disconnect the batterycables.
Brakes• Make sure the brakes and parking brake
release fully.
Tires• Maintain recommended air pressure.
Miscellaneous• Make sure all linkages, cables, levers
and pins under your vehicle are coveredwith grease to prevent rust.
• Move vehicles at least 25 ft (7.5 m)every 15 days to lubricate working partsand prevent corrosion.
Removing Vehicle From StorageWhen your vehicle is ready to come out ofstorage, do the following:• Wash your vehicle to remove any dirt
or grease film build-up on windowsurfaces.
• Check windshield wipers for anydeterioration.
• Check under the hood for any foreignmaterial that may have collectedduring storage such as mice or squirrelnests.
• Check the exhaust for any foreignmaterial that may have collectedduring storage.
• Check tire pressures and set tireinflation per the Tire Label.
• Check brake pedal operation. Driveyour vehicle 15 ft (4.5 m) back andforth to remove rust build-up.
286
Fusion (CC7) Canada/United States of America, enUSA, Edition date: 201905, Second-Printing
Vehicle Care

• Check fluid levels (including coolant,oil and gas) to make sure there are noleaks, and fluids are at recommendedlevels.
• If you remove the battery, clean thebattery cable ends and check fordamage.
Contact an authorized dealer if you haveany concerns or issues.
BODY STYLING KITSThe distance between the underside ofyour vehicle and the ground is less thanthat of other models. Drive with extremecare to avoid damage to your vehicle.
287
Fusion (CC7) Canada/United States of America, enUSA, Edition date: 201905, Second-Printing
Vehicle Care

GENERAL INFORMATIONThe recommended tire inflation pressuresare on the tire information label on thedriver side B-pillar.Check and set the tire pressure at theambient temperature in which you areintending to drive your vehicle and whenthe tires are cold. See Tire PressureMonitoring System (page 304).Note: Check your tire pressures regularly tooptimize fuel economy.Installation of any tires that are not theoriginal equipment tire size can cause thespeedometer to display incorrect vehiclespeed.
TIRE CARE
Important information for235/40R19 low-profile tiresand wheels If your vehicle isequipped with 235/40R19 tires,they are low-profile tires. Thesetires and wheels are designed togive your vehicle a sportappearance. With low-profile tires,you may notice an increase in roadnoise and faster tire wear,depending on road conditions anddriving styles. Due to their design,low-profile tires and wheels aremore prone to road damage frompotholes, rough or unpaved roads,car wash rails and curb contactthan standard tires and wheels.
Note: Your vehicle’s warranty doesnot cover these types of damage.Tires should always be kept at thecorrect inflation pressures andextra caution should be taken whenoperating on rough roads to avoidimpacts that could cause wheeland tire damage.Information About UniformTire Quality Grading
E142542
Tire Quality Grades apply to newpneumatic passenger car tires.The Quality grades can be foundwhere applicable on the tiresidewall between tread shoulderand maximum section width. Forexample: Treadwear 200Traction AA Temperature A.These Tire Quality Grades aredetermined by standards that theUnited States Department ofTransportation has set.
288
Fusion (CC7) Canada/United States of America, enUSA, Edition date: 201905, Second-Printing
Wheels and Tires

Tire Quality Grades apply to newpneumatic passenger car tires.They do not apply to deep tread,winter-type snow tires,space-saver or temporary usespare tires, light truck or LT typetires, tires with nominal rimdiameters of 10 to 12 inches orlimited production tires as definedin Title 49 Code of FederalRegulations Part 575.104 ©)(2).U.S. Department ofTransportation Tire qualitygrades: The U.S. Department ofTransportation requires FordMotor Company to give you thefollowing information about tiregrades exactly as the governmenthas written it.TreadwearThe treadwear grade is acomparative rating based on thewear rate of the tire when testedunder controlled conditions on aspecified government test course.For example, a tire graded 150would wear 1 ½ times as well onthe government course as a tiregraded 100. The relativeperformance of tires dependsupon the actual conditions of theiruse, however, and may departsignificantly from the norm due tovariations in driving habits, servicepractices, and differences in roadcharacteristics and climate.
Traction AA A B C
WARNING: The tractiongrade assigned to this tire isbased on straight-ahead brakingtraction tests, and does notinclude acceleration, cornering,hydroplaning or peak tractioncharacteristics.
The traction grades, from highestto lowest are AA, A, B, and C. Thegrades represent the tire’s abilityto stop on wet pavement asmeasured under controlledconditions on specifiedgovernment test surfaces ofasphalt and concrete. A tiremarked C may have poor tractionperformance.Temperature A B C
WARNING: Thetemperature grade for this tire isestablished for a tire that isproperly inflated and notoverloaded. Excessive speed,underinflation, or excessiveloading, either separately or incombination, can cause heatbuildup and possible tire failure.
The temperature grades are A(the highest), B and C,representing the tire’s resistanceto the generation of heat and itsability to dissipate heat whentested under controlled conditionson a specified indoor laboratory
289
Fusion (CC7) Canada/United States of America, enUSA, Edition date: 201905, Second-Printing
Wheels and Tires

test wheel. Sustained hightemperature can cause thematerial of the tire to degenerateand reduce tire life, and excessivetemperature can lead to suddentire failure. The grade Ccorresponds to a level ofperformance which all passengercar tires must meet under theFederal Motor Vehicle SafetyStandard No. 139. Grades B and Arepresent higher levels ofperformance on the laboratorytest wheel than the minimumrequired by law.Glossary of Tire Terminology* Tire label: A label showing theoriginal equipment tire sizes,recommended inflation pressureand the maximum weight thevehicle can carry.*Tire Identification Number(TIN): A number on the sidewallof each tire providing informationabout the tire brand andmanufacturing plant, tire size anddate of manufacture. Also referredto as DOT code.*Inflation pressure: A measureof the amount of air in a tire.
*Standard load: A class ofP-metric or Metric tires designedto carry a maximum load at setpressure. For example: ForP-metric tires 35 psi (2.4 bar) andfor Metric tires 36 psi (2.5 bar).Increasing the inflation pressurebeyond this pressure will notincrease the tire’s load carryingcapability.*Extra load: A class of P-metricor Metric tires designed to carry aheavier maximum load at 42 psi(2.9 bar). Increasing the inflationpressure beyond this pressure willnot increase the tire’s loadcarrying capability.*kPa: Kilopascal, a metric unit ofair pressure.*PSI: Pounds per square inch, astandard unit of air pressure.*Cold tire pressure: The tirepressure when the vehicle hasbeen stationary and out of directsunlight for an hour or more andprior to the vehicle being driven for1.0 mi (1.6 km).*Recommended inflationpressure: The cold inflationpressure found on the SafetyCompliance Certification Label(affixed to either the door hingepillar, door-latch post, or the dooredge that meets the door-latchpost, next to the driver's seatingposition), or Tire Label located onthe B-Pillar or the edge of thedriver’s door.
290
Fusion (CC7) Canada/United States of America, enUSA, Edition date: 201905, Second-Printing
Wheels and Tires

*B-pillar: The structural memberat the side of the vehicle behindthe front door.* Bead area of the tire: Area ofthe tire next to the rim.* Sidewall of the tire: Areabetween the bead area and thetread.* Tread area of the tire: Area ofthe perimeter of the tire thatcontacts the road when mountedon the vehicle.*Rim: The metal support (wheel)for a tire or a tire and tubeassembly upon which the tirebeads are seated.Information Contained on theTire SidewallBoth United States and CanadaFederal regulations require tiremanufacturers to placestandardized information on thesidewall of all tires. Thisinformation identifies anddescribes the fundamentalcharacteristics of the tire and alsoprovides a U.S. DOT TireIdentification Number for safetystandard certification and in caseof a recall.
Information on P Type Tires
H
I
J
KL
M
A
BC D E
FG
E142543
P215/65R15 95H is an example ofa tire size, load index and speedrating. The definitions of theseitems are listed below. (Note thatthe tire size, load index and speedrating for your vehicle may bedifferent from this example.)A. P: Indicates a tire, designatedby the Tire and Rim Association,that may be used for service oncars, sport utility vehicles,minivans and light trucks. Note: Ifyour tire size does not begin witha letter this may mean it isdesignated by either the EuropeanTire and Rim TechnicalOrganization or the Japan TireManufacturing Association.
291
Fusion (CC7) Canada/United States of America, enUSA, Edition date: 201905, Second-Printing
Wheels and Tires

B. 215: Indicates the nominalwidth of the tire in millimetersfrom sidewall edge to sidewalledge. In general, the larger thenumber, the wider the tire.C. 65: Indicates the aspect ratiowhich gives the tire's ratio ofheight to width.D. R: Indicates a radial type tire.E. 15: Indicates the wheel or rimdiameter in inches. If you changeyour wheel size, you will have topurchase new tires to match thenew wheel diameter.F. 95: Indicates the tire's loadindex. It is an index that relates tohow much weight a tire can carry.You may find this information inyour owner’s manual. If not,contact a local tire dealer.Note: You may not find thisinformation on all tires because itis not required by federal law.G. H: Indicates the tire's speedrating. The speed rating denotesthe speed at which a tire isdesigned to be driven for extendedperiods of time under a standardcondition of load and inflationpressure. The tires on your vehiclemay operate at differentconditions for load and inflationpressure. These speed ratings mayneed to be adjusted for thedifference in conditions. Theratings range from 81–186 mph(130–299 km/h). These ratingsare listed in the following chart.
Note: You may not find thisinformation on all tires because itis not required by federal law.
mph ( km/h)Letterrating
81 mph (130 km/h)M87 mph (140 km/h)N99 mph (159 km/h)Q106 mph (171 km/h)R112 mph (180 km/h)S118 mph (190 km/h)T124 mph (200 km/h)U130 mph (210 km/h)H149 mph (240 km/h)V168 mph (270 km/h)W186 mph (299 km/h)Y
Note: For tires with a maximumspeed capability over 149 mph(240 km/h), tire manufacturerssometimes use the letters ZR. Forthose with a maximum speedcapability over 186 mph (299km/h), tire manufacturers alwaysuse the letters ZR.
H. U.S. DOT Tire IdentificationNumber (TIN): This begins withthe letters DOT and indicates thatthe tire meets all federalstandards. The next two numbersor letters are the plant codedesignating where it wasmanufactured, the next two are
292
Fusion (CC7) Canada/United States of America, enUSA, Edition date: 201905, Second-Printing
Wheels and Tires

the tire size code and the last fournumbers represent the week andyear the tire was built. Forexample, the numbers 317 meanthe 31st week of 1997. After 2000the numbers go to four digits. Forexample, 2501 means the 25thweek of 2001. The numbers inbetween are identification codesused for traceability. Thisinformation is used to contactcustomers if a tire defect requiresa recall.I. M+S or M/S: Mud and Snow, orAT: All Terrain, orAS: All Season.J. Tire Ply Composition andMaterial Used: Indicates thenumber of plies or the number oflayers of rubber-coated fabric inthe tire tread and sidewall. Tiremanufacturers also must indicatethe ply materials in the tire and thesidewall, which include steel,nylon, polyester, and others.K. Maximum Load: Indicates themaximum load in kilograms andpounds that can be carried by thetire. Refer to the SafetyCompliance Certification Label(affixed to either the door hingepillar, door-latch post, or the dooredge that meets the door-latchpost, next to the driver's seatingposition), for the correct tirepressure for your vehicle.L. Treadwear, Traction andTemperature Grades:
*Treadwear: The treadweargrade is a comparative ratingbased on the wear rate of the tirewhen tested under controlledconditions on a specifiedgovernment test course. Forexample, a tire graded 150 wouldwear one and one-half times aswell on the government course asa tire graded 100.*Traction: The traction grades,from highest to lowest are AA, A,B, and C. The grades represent thetire's ability to stop on wetpavement as measured undercontrolled conditions on specifiedgovernment test surfaces ofasphalt and concrete. A tiremarked C may have poor tractionperformance.*Temperature: The temperaturegrades are A (the highest), B andC, representing the tire'sresistance to the generation ofheat and its ability to dissipateheat when tested under controlledconditions on a specified indoorlaboratory test wheel.M. Maximum InflationPressure: Indicates the tiremanufacturers' maximumpermissible pressure or thepressure at which the maximumload can be carried by the tire. Thispressure is normally higher thanthe vehicle manufacturer'srecommended cold inflationpressure which can be found onthe Safety ComplianceCertification Label (affixed toeither the door hinge pillar,
293
Fusion (CC7) Canada/United States of America, enUSA, Edition date: 201905, Second-Printing
Wheels and Tires

door-latch post, or the door edgethat meets the door-latch post,next to the driver's seatingposition), or Tire Label which islocated on the B-Pillar or the edgeof the driver’s door. The coldinflation pressure should never beset lower than the recommendedpressure on the vehicle label.The tire suppliers may haveadditional markings, notes orwarnings such as standard load,radial tubeless, etc.Additional InformationContained on the Tire Sidewallfor LT Type TiresNote: Tire Quality Grades do notapply to this type of tire.
A
BC
BDE142544
LT type tires have some additionalinformation beyond those of Ptype tires; these differences aredescribed below.A. LT: Indicates a tire, designatedby the Tire and Rim Association,that is intended for service on lighttrucks.B. Load Range and LoadInflation Limits: Indicates thetire's load-carrying capabilitiesand its inflation limits.C. Maximum Load Dual lb (kg)at psi (kPa) cold: Indicates themaximum load and tire pressurewhen the tire is used as a dual;defined as four tires on the rearaxle (a total of six or more tires onthe vehicle).D. Maximum Load Single lb(kg) at psi (kPa) cold: Indicatesthe maximum load and tirepressure when the tire is used asa single; defined as two tires(total) on the rear axle.Information on T Type TiresT145/80D16 is an example of atire size.Note: The temporary tire size foryour vehicle may be different fromthis example. Tire Quality Gradesdo not apply to this type of tire.
294
Fusion (CC7) Canada/United States of America, enUSA, Edition date: 201905, Second-Printing
Wheels and Tires

AB C D
E
E142545
T type tires have some additionalinformation beyond those of Ptype tires; these differences aredescribed below:A. T: Indicates a type of tire,designated by the Tire and RimAssociation, that is intended fortemporary service on cars, sportutility vehicles, minivans and lighttrucks.B. 145: Indicates the nominalwidth of the tire in millimetersfrom sidewall edge to sidewalledge. In general, the larger thenumber, the wider the tire.
C. 80: Indicates the aspect ratiowhich gives the tire's ratio ofheight to width. Numbers of 70 orlower indicate a short sidewall.D. D: Indicates a diagonal type tire.R: Indicates a radial type tire.E. 16: Indicates the wheel or rimdiameter in inches. If you changeyour wheel size, you will have topurchase new tires to match thenew wheel diameter.Location of the Tire LabelYou will find a Tire Labelcontaining tire inflation pressureby tire size and other importantinformation located on the B-Pillaror the edge of the driver’s door.Inflating Your TiresSafe operation of your vehiclerequires that your tires areproperly inflated. Remember thata tire can lose up to half of its airpressure without appearing flat.Every day before you drive, checkyour tires. If one looks lower thanthe others, use a tire gauge tocheck pressure of all tires andadjust if required.At least once a month and beforelong trips, inspect each tire andcheck the tire pressure with a tiregauge (including spare, ifequipped). Inflate all tires to theinflation pressure recommendedby Ford Motor Company.
295
Fusion (CC7) Canada/United States of America, enUSA, Edition date: 201905, Second-Printing
Wheels and Tires

You are strongly urged to buy areliable tire pressure gauge, asautomatic service station gaugesmay be inaccurate. Fordrecommends the use of a digitalor dial-type tire pressure gaugerather than a stick-type tirepressure gauge.Use the recommended coldinflation pressure for optimum tireperformance and wear.Under-inflation or over-inflationmay cause uneven treadwearpatterns.
WARNING: Under-inflationis the most common cause oftire failures and may result insevere tire cracking, treadseparation or blowout, withunexpected loss of vehiclecontrol and increased risk ofinjury. Under-inflation increasessidewall flexing and rollingresistance, resulting in heatbuildup and internal damage tothe tire. It also may result inunnecessary tire stress, irregularwear, loss of vehicle control andaccidents. A tire can lose up tohalf of its air pressure and notappear to be flat!
Always inflate your tires to theFord recommended inflationpressure even if it is less than themaximum inflation pressureinformation found on the tire. TheFord recommended tire inflationpressure is found on the SafetyCompliance Certification Label
(affixed to either the door hingepillar, door-latch post, or the dooredge that meets the door-latchpost, next to the driver's seatingposition), or Tire Label which islocated on the B-Pillar or the edgeof the driver’s door. Failure tofollow the tire pressurerecommendations can causeuneven treadwear patterns andadversely affect the way yourvehicle handles.Maximum Inflation Pressure isthe tire manufacturer's maximumpermissible pressure and thepressure at which the maximumload can be carried by the tire. Thispressure is normally higher thanthe manufacturer’s recommendedcold inflation pressure which canbe found on the SafetyCompliance Certification Label(affixed to either the door hingepillar, door-latch post, or the dooredge that meets the door-latchpost, next to the driver's seatingposition), or Tire Label which islocated on the B-Pillar or the edgeof the driver’s door. The coldinflation pressure should never beset lower than the recommendedpressure on the SafetyCompliance Certification Label orTire Label.
296
Fusion (CC7) Canada/United States of America, enUSA, Edition date: 201905, Second-Printing
Wheels and Tires

When weather temperaturechanges occur, tire inflationpressures also change. A 10°F(6°C) temperature drop cancause a corresponding drop of1 psi (7 kPa) in inflation pressure.Check your tire pressuresfrequently and adjust them to theproper pressure which can befound on the Safety ComplianceCertification Label or Tire Label.To check the pressure in yourtire(s):1. Make sure the tires are cool,meaning they are not hot fromdriving even a mile.Note: If you are checking tirepressure when the tire is hot, (forexample, driven more than 1 mi(1.6 km)), never bleed or reduce airpressure. The tires are hot fromdriving and it is normal forpressures to increase aboverecommended cold pressures. Ahot tire at or below recommendedcold inflation pressure could besignificantly under-inflated.Note: If you have to drive adistance to get air for your tire(s),check and record the tire pressurefirst and add the appropriate airpressure when you get to thepump. It is normal for tires to heatup and the air pressure inside to goup as you drive.2. Remove the cap from the valveon one tire, then firmly press thetire gauge onto the valve andmeasure the pressure.
3. Add enough air to reach therecommended air pressure.Note: If you overfill the tire, releaseair by pressing on the metal stemin the center of the valve. Thenrecheck the pressure with your tiregauge.4. Replace the valve cap.5. Repeat this procedure for eachtire, including the spare.Note: Some spare tires operate ata higher inflation pressure than theother tires. For T type mini-sparetires, (see the Dissimilar sparewheel and tire assemblyinformation for a description. Storeand maintain at 60 psi (4.15 bar).For full-size and dissimilar sparetires, see the Dissimilar spare wheeland tire assembly information fora description. Store and maintainat the higher of the front and rearinflation pressure as shown on theTire Label.6. Visually inspect the tires tomake sure there are no nails orother objects embedded thatcould poke a hole in the tire andcause an air leak.7. Check the sidewalls to makesure there are no gouges, cuts orbulges.
297
Fusion (CC7) Canada/United States of America, enUSA, Edition date: 201905, Second-Printing
Wheels and Tires

Inspecting Your Tires andWheel Valve StemsPeriodically inspect the tire treadsfor uneven or excessive wear andremove objects such as stones,nails or glass that may be wedgedin the tread grooves. Check the tireand valve stems for holes, cracks,or cuts that may permit airleakage and repair or replace thetire and replace the valve stem.Inspect the tire sidewalls forcracking, cuts, bruises and othersigns of damage or excessivewear. If internal damage to the tireis suspected, have the tiredemounted and inspected in caseit needs to be repaired or replaced.For your safety, tires that aredamaged or show signs ofexcessive wear should not be usedbecause they are more likely toblow out or fail.Improper or inadequate vehiclemaintenance can cause tires towear abnormally. Inspect all yourtires, including the spare,frequently, and replace them ifone or more of the followingconditions exist:
Tire Wear
E142546
When the tread is worn down toone sixteenth of an inch (2 mm),tires must be replaced to helpprevent your vehicle from skiddingand hydroplaning. Built-intreadwear indicators, or wear bars,which look like narrow strips ofsmooth rubber across the treadwill appear on the tire when thetread is worn down to onesixteenth of an inch (2millimeters)When the tire tread wears downto the same height as these wearbars, the tire is worn out and mustbe replaced.DamagePeriodically inspect the tire treadsand sidewalls for damage (suchas bulges in the tread or sidewalls,cracks in the tread groove andseparation in the tread orsidewall). If damage is observed
298
Fusion (CC7) Canada/United States of America, enUSA, Edition date: 201905, Second-Printing
Wheels and Tires

or suspected have the tireinspected by a tire professional.Tires can be damaged duringoff-road use, so inspection afteroff-road use is alsorecommended.Age
WARNING: Tires degradeover time depending on manyfactors such as weather, storageconditions, and conditions of use(load, speed, inflation pressure)the tires experience throughouttheir lives.
WARNING: In general, tiresshould be replaced after sixyears regardless of tread wear.However, heat caused by hotclimates or frequent high loadingconditions can accelerate theaging process and may requiretires to be replaced morefrequently.
WARNING: You shouldreplace your spare tire when youreplace the road tires or after sixyears due to aging even if it hasnot been used.
U.S. DOT Tire IdentificationNumber (TIN)Both U.S. and Canada Federalregulations require tiremanufacturers to placestandardized information on thesidewall of all tires. Thisinformation identifies anddescribes the fundamentalcharacteristics of the tire and alsoprovides a U.S. DOT TireIdentification Number for safetystandard certification and in caseof a recall.This begins with the letters DOTand indicates that the tire meetsall federal standards. The nexttwo numbers or letters are theplant code designating where itwas manufactured, the next twoare the tire size code and the lastfour numbers represent the weekand year the tire was built. Forexample, the numbers 317 meanthe 31st week of 1997. After 2000the numbers go to four digits. Forexample, 2501 means the 25thweek of 2001. The numbers inbetween are identification codesused for traceability. Thisinformation is used to contactcustomers if a tire defect requiresa recall.Tire ReplacementRequirementsYour vehicle is equipped with tiresdesigned to provide a safe rideand handling capability.
299
Fusion (CC7) Canada/United States of America, enUSA, Edition date: 201905, Second-Printing
Wheels and Tires

WARNING: Only usereplacement tires and wheelsthat are the same size, loadindex, speed rating and type(such as P-metric versusLT-metric or all-season versusall-terrain) as those originallyprovided by Ford. Therecommended tire and wheelsize may be found on either theSafety Compliance CertificationLabel (affixed to either the doorhinge pillar, door-latch post, orthe door edge that meets thedoor-latch post, next to thedriver's seating position), or theTire Label which is located onthe B-Pillar or edge of thedriver's door. If this informationis not found on these labels, thenyou should contact yourauthorized dealer as soon aspossible. Use of any tire or wheelnot recommended by Ford canaffect the safety andperformance of your vehicle,which could result in anincreased risk of loss of vehiclecontrol, vehicle rollover, personalinjury and death.
WARNING: To reduce therisk of serious injury, whenmounting replacement tires andwheels, you should not exceedthe maximum pressure indicatedon the sidewall of the tire to setthe beads without additionalprecautions listed below. If thebeads do not seat at themaximum pressure indicated,re-lubricate and try again.
WARNING: When inflatingthe tire for mounting pressuresup to 20 psi (1.38 bar) greaterthan the maximum pressure onthe tire sidewall, the followingprecautions must be taken toprotect the person mounting thetire:
• Make sure that you have thecorrect tire and wheel size.
• Lubricate the tire bead andwheel bead seat area again.
• Stand at a minimum of 12 feet(3.66 meters) away from thewheel and tire assembly.
• Use both eye and earprotection.
WARNING: For a mountingpressure more than 20 psi(1.38 bar) greater than themaximum pressure, a Forddealer or other tire serviceprofessional should do themounting.
300
Fusion (CC7) Canada/United States of America, enUSA, Edition date: 201905, Second-Printing
Wheels and Tires

WARNING: Always inflatesteel carcass tires with a remoteair fill with the person inflatingstanding at a minimum of 12 ft(3.66 m) away from the wheeland tire assembly.
Important: Remember to replacethe wheel valve stems when theroad tires are replaced on yourvehicleIt is recommended that the twofront tires or two rear tiresgenerally be replaced as a pair.The tire pressure sensors mountedin the wheels (originally installedon your vehicle) are not designedto be used in aftermarket wheels.The use of wheels or tires notrecommended by Ford MotorCompany may affect theoperation of your tire pressuremonitoring system.If the TPMS indicator is flashing,your TPMS is malfunctioning. Yourreplacement tire might beincompatible with your TPMS, orsome component of the TPMSmay be damaged.
Safety Practices
WARNING: If your vehicleis stuck in snow, mud or sand, donot rapidly spin the tires;spinning the tires can tear thetire and cause an explosion. Atire can explode in as little asthree to five seconds.
WARNING: Do not spin thewheels at over 34 mph(55 km/h). The tires may fail andinjure a passenger or bystander.
Driving habits have a great dealto do with your tire mileage andsafety.*Observe posted speed limits*Avoid fast starts, stops and turns*Avoid potholes and objects onthe road*Do not run over curbs or hit thetire against a curb when parkingHighway HazardsNo matter how carefully you drivethere’s always the possibility thatyou may eventually have a flat tireon the highway. Drive slowly to theclosest safe area out of traffic.This may further damage the flattire, but your safety is moreimportant.
301
Fusion (CC7) Canada/United States of America, enUSA, Edition date: 201905, Second-Printing
Wheels and Tires

If you feel a sudden vibration orride disturbance while driving, oryou suspect your tire or vehiclehas been damaged, immediatelyreduce your speed. Drive withcaution until you can safely pulloff the road. Stop and inspect thetires for damage. If a tire isunder-inflated or damaged,deflate it, remove wheel andreplace it with your spare tire andwheel. If you cannot detect acause, have the vehicle towed tothe nearest repair facility or tiredealer to have the vehicleinspected.Tire and Wheel AlignmentA bad jolt from hitting a curb orpothole can cause the front endof your vehicle to becomemisaligned or cause damage toyour tires. If your vehicle seems topull to one side when you’redriving, the wheels may be out ofalignment. Have an authorizeddealer check the wheel alignmentperiodically.Wheel misalignment in the frontor the rear can cause uneven andrapid treadwear of your tires andshould be corrected by anauthorized dealer. Front-wheeldrive vehicles and those with anindependent rear suspension (ifequipped) may require alignmentof all four wheels.The tires should also be balancedperiodically. An unbalanced tireand wheel assembly may result inirregular tire wear.
Tire RotationNote: If your tires show unevenwear, ask an authorized dealer tocheck for and correct any wheelmisalignment, tire imbalance ormechanical problem involvedbefore tire rotation.Note: Your vehicle may beequipped with a dissimilar sparewheel and tire assembly. Adissimilar spare wheel and tireassembly is defined as a sparewheel and tire assembly that isdifferent in brand, size orappearance from the road tires andwheels. If you have a dissimilarspare wheel and tire assembly it isintended for temporary use onlyand should not be used in a tirerotation.Note: After having your tiresrotated, inflation pressure must bechecked and adjusted to thevehicle requirements.Rotating your tires at therecommended interval (asindicated in the ScheduledMaintenance chapter) will helpyour tires wear more evenly,providing better tire performanceand longer tire life.Front-wheel drive and all-wheeldrive vehicles (front tires on theleft side of the diagram)
302
Fusion (CC7) Canada/United States of America, enUSA, Edition date: 201905, Second-Printing
Wheels and Tires

E142547
All vehicles with directional tires(front tires on the left side of thediagram)
E147237
Sometimes irregular tire wear canbe corrected by rotating the tires.
USING SUMMER TIRESSummer tires provide superiorperformance on wet and dry roads.Summer tires do not have the Mud andSnow (M+S or M/S) tire traction rating onthe tire side wall. Since summer tires donot have the same traction performanceas All-season or Snow tires, we do notrecommend using summer tires whentemperatures drop to approximately 45°F(7°C) or below (depending on tire wearand environmental conditions) or in snow
and ice conditions. Like any tire, summertire performance is affected by tire wearand environmental conditions. If you mustdrive in those conditions, we recommendusing Mud and Snow (M+S, M/S),All-season or Snow tires.Always store your summer tires indoors attemperatures above 19°F (-7°C). Therubber compounds used in these tires loseflexibility and may develop surface cracksin the tread area at temperatures below19°F (-7°C). If the tires have beensubjected to 19°F (-7°C) or less, warmthem in a heated space to at least 41°F(5°C) for at least 24 hours before installingthem on a vehicle, or moving the vehiclewith the tires installed, or checking tireinflation. Do not place tires near heatersor heating devices used to warm the roomwhere the tires are stored. Do not applyheat or blow heated air directly on the tires.Always inspect the tires after storageperiods and before use.
USING SNOW CHAINS
WARNING: Snow tires must be thesame size, load index and speed ratingas those originally provided by Ford. Useof any tire or wheel not recommendedby Ford can affect the safety andperformance of your vehicle, which couldresult in an increased risk of loss ofcontrol, vehicle rollover, personal injuryand death. Additionally, the use ofnon-recommended tires and wheels cancause steering, suspension, axle, transfercase or power transfer unit failure.Follow the Ford recommended tireinflation pressure found on the SafetyCompliance Certification Label (on thedoor hinge pillar, door latch post or thedoor edge that meets the door latchpost, next to the driver seat), or Tire
303
Fusion (CC7) Canada/United States of America, enUSA, Edition date: 201905, Second-Printing
Wheels and Tires

Label on the B-Pillar or the edge of thedriver door. Failure to follow the tirepressure recommendations can causeuneven treadwear patterns andadversely affect the way your vehiclehandles.
The tires on your vehicle may haveall-weather treads to provide traction inrain and snow. However, in some climates,you may need to use snow tires and cables.If you need to use cables, it isrecommended that steel wheels (of thesame size and specifications) be used, ascables may chip aluminum wheels.Follow these guidelines when using snowtires and traction devices• If possible, avoid fully loading your
vehicle• Purchase chains or cables from a
manufacturer that clearly labels bodyto tire dimension restrictions.
• Use no larger than 0.59 in (15 mm)cables or chains ONLY on front axlewith 215/60R16 tires. Do not use chainsor cables on any other size tires.
• The snow chains or cables must bemounted in pairs on the front axle.
• When driving with tire cables do notexceed 30 mph (48 km/h) or themaximum speed recommended by thechain manufacturer, whichever is less.
• Drive cautiously. If you hear the cablesrub or bang against the vehicle, stopand retighten them. If this does notwork, remove the cables to preventvehicle damage.
• Remove the cables when they are nolonger needed. Do not use cables ondry roads.
If you have any questions regarding snowchains or cables, please contact yourauthorized dealer.
TIRE PRESSURE MONITORINGSYSTEM
WARNING: The tire pressuremonitoring system is not a substitute formanually checking tire pressures. Youshould periodically check tire pressuresusing a pressure gauge. Failure tocorrectly maintain tire pressures couldincrease the risk of tire failure, loss ofcontrol, vehicle rollover and personalinjury.
Note: You should only use tire sealants inroadside emergencies as they could causedamage to the tire pressure monitoringsystem sensor.Note: If the tire pressure monitoring systemsensor becomes damaged, it will notfunction.
Each tire, including the spare (ifprovided), should be checkedmonthly when cold and inflated
to the inflation pressure recommended bythe vehicle manufacturer on the vehicleplacard or tire inflation pressure label. (Ifyour vehicle has tires of a different sizethan the size indicated on the vehicleplacard or tire inflation pressure label, youshould determine the proper tire inflationpressure for those tires).
As an added safety feature, your vehiclehas been equipped with a Tire PressureMonitoring System (TPMS) thatilluminates a low tire pressure telltalewhen one or more of your tires issignificantly under-inflated. Accordingly,when the low tire pressure telltaleilluminates, you should stop and checkyour tires as soon as possible, and inflate
304
Fusion (CC7) Canada/United States of America, enUSA, Edition date: 201905, Second-Printing
Wheels and Tires

them to the proper pressure. Driving on asignificantly under-inflated tire causes thetire to overheat and can lead to tire failure.Under-inflation also reduces fuel efficiencyand tire tread life, and could affect thevehicle’s handling and stopping ability.Please note that the TPMS is not asubstitute for proper tire maintenance, andit is the driver’s responsibility to maintaincorrect tire pressure, even if under-inflationhas not reached the level to triggerillumination of the TPMS low tire pressuretelltale.Your vehicle has also been equipped witha TPMS malfunction indicator to indicatewhen the system is not operating properly.The TPMS malfunction indicator iscombined with the low tire pressuretelltale. When the system detects amalfunction, the telltale will flash forapproximately one minute and then remaincontinuously illuminated. This sequencewill continue upon subsequent vehiclestart-ups as long as the malfunction exists.When the malfunction indicator isilluminated, the system will not be able todetect or signal low tire pressure asintended. TPMS malfunctions could occurfor a variety of reasons, including theinstallation of replacement or alternatetires or wheels on the vehicle that preventthe TPMS from functioning properly.Always check the TPMS malfunctiontelltale after replacing one or more tires orwheels on your vehicle to ensure that thereplacement or alternate tires and wheelsallow the TPMS to continue to functionproperly.This device complies with Part 15 of theFCC Rules and with License exempt RSSStandards of Industry Canada. Operationis subject to the following two conditions:1. This device will not cause harmful
interference, and
2. This device must accept anyinterference received, includinginterference that could causeundesired operation.
Note: Changes or modifications notexpressively approved by the partyresponsible for compliance could void theuser's authority to operate the equipment.The term "IC:" before the radio certificationnumber only signifies that Industry Canadatechnical specifications were met.
Changing Tires With a TirePressure Monitoring System
E142549
Note: Each road tire is equipped with a tirepressure sensor located inside the wheeland tire assembly cavity. The pressuresensor is attached to the valve stem. Thepressure sensor is covered by the tire and isnot visible unless the tire is removed. Takecare when changing the tire to avoiddamaging the sensor.You should always have your tires servicedby an authorized dealer.Check the tire pressure periodically (atleast monthly) using an accurate tiregauge. See When Inflating Your Tires inthis chapter.
305
Fusion (CC7) Canada/United States of America, enUSA, Edition date: 201905, Second-Printing
Wheels and Tires

Understanding Your Tire PressureMonitoring System
E250820
The tire pressure monitoring systemmeasures pressure in your road tires andsends the tire pressure readings to yourvehicle. You can view the tire pressurereadings through the information display.See General Information (page 94). Thelow tire pressure warning light will turn onif the tire pressure is significantly low. Oncethe light is illuminated, your tires areunder-inflated and need to be inflated tothe manufacturer’s recommended tirepressure. Even if the light turns on and ashort time later turns off, your tire pressurestill needs to be checked.
When Your Temporary Spare Tire isInstalledWhen one of your road tires needs to bereplaced with the temporary spare, thesystem will continue to identify an issue toremind you that the damaged road wheeland tire assembly needs to be repaired andput back on your vehicle.To restore the full function of the tirepressure monitoring system, have thedamaged road wheel and tire assemblyrepaired and remounted on your vehicle.
When You Believe Your System is NotOperating ProperlyThe main function of the tire pressuremonitoring system is to warn you whenyour tires need air. It can also warn you inthe event the system is no longer capableof functioning as intended. See thefollowing chart for information concerningyour tire pressure monitoring system:
306
Fusion (CC7) Canada/United States of America, enUSA, Edition date: 201905, Second-Printing
Wheels and Tires

Customer action requiredPossible causeLow tire pressurewarning light
Make sure tires are at the proper pres-sure. See Inflating your tires in thischapter. After inflating your tires to themanufacturer’s recommended pressureas shown on the Tire Label (located onthe edge of driver’s door or the B-Pillar),the vehicle must be driven for at leasttwo minutes over 20 mph (32 km/h)before the light turns off.
Tire(s) under-inflated
Solid warning light Repair the damaged road wheel and tireassembly and reinstall it on the vehicleto restore system function. For adescription on how the system functions,see When Your Temporary Spare Tireis Installed in this section.
Spare tire in use
If the tires are properly inflated and thespare tire is not in use but the lightremains on, contact your authorizeddealer as soon as possible.
TPMS malfunction
Repair the damaged road wheel and tireassembly and reinstall it on the vehicleto restore system function. For adescription on how the system functions,see When Your Temporary Spare Tireis Installed in this section.
Spare tire in use
Flashing warninglight
If the tires are properly inflated and thespare tire is not in use but the lightremains on, contact your authorizeddealer as soon as possible.
TPMS malfunction
When Inflating Your Tires
WARNING: Do not use the tirepressure displayed in the informationdisplay as a tire pressure gauge. Failureto follow this instruction could result inpersonal injury or death.
When putting air into your tires (such as ata gas station or in your garage), the tirepressure monitoring system will notrespond immediately to the air added toyour tires.It could take up to two minutes of drivingover 20 mph (32 km/h) for the light to turnoff after you have filled your tires to therecommended inflation pressure.
307
Fusion (CC7) Canada/United States of America, enUSA, Edition date: 201905, Second-Printing
Wheels and Tires

How Temperature Affects Your TirePressureThe tire pressure monitoring systemmonitors tire pressure in each pneumatictire. While driving in a normal manner, atypical passenger tire inflation pressurecould increase about 2–4 psi (14–28 kPa)from a cold start situation. If the vehicle isstationary overnight with the outsidetemperature significantly lower than thedaytime temperature, the tire pressurecould decrease about 3 psi (21 kPa) for adrop of 30°F (17°C) in ambienttemperature. This lower pressure valuecould be detected by the tire pressuremonitoring system as being significantlylower than the recommended inflationpressure and activate the system warninglight for low tire pressure. If the low tirepressure warning light is on, visually checkeach tire to verify that no tire is flat. If oneor more tires are flat, repair as necessary.Check the air pressure in the road tires. Ifany tire is under-inflated, carefully drivethe vehicle to the nearest location whereair can be added to the tires. Inflate all thetires to the recommended inflationpressure.
CHANGING A ROAD WHEEL
WARNING: If the tire pressuremonitor sensor becomes damaged itmay not function.
Note: The tire pressure monitoring systemindicator light illuminates when the sparetire is in use. To restore the full function ofthe monitoring system, mount all roadwheels equipped with tire pressuremonitoring sensors on the vehicle.
Note: You should only use tire sealants inroadside emergencies as they may causedamage to the tire pressure monitoringsystem sensor.If you get a flat tire when driving, do notapply the brake heavily. Instead, graduallydecrease your speed. Hold the steeringwheel firmly and slowly move to a safeplace on the side of the road.Have a flat serviced by an authorizeddealer to prevent damage to the tirepressure monitoring system sensors. SeeTire Pressure Monitoring System (page304). Replace the spare tire with a road tireas soon as possible. During repairing orreplacing of the flat tire, have an authorizeddealer inspect the tire pressure monitoringsystem sensor for damage.
Dissimilar Spare Wheel and TireAssembly Information
WARNING: Failure to follow theseguidelines could result in an increasedrisk of loss of vehicle control, injury ordeath.
If you have a dissimilar spare wheel andtire, use it for temporary use only. Thismeans that if you need to use it, you shouldreplace it as soon as possible with a roadwheel and tire assembly that is the samesize and type as the road tires and wheelsthat originally came with your vehicle. Ifthe dissimilar spare tire or wheel isdamaged, replace it instead of repairing it.
308
Fusion (CC7) Canada/United States of America, enUSA, Edition date: 201905, Second-Printing
Wheels and Tires
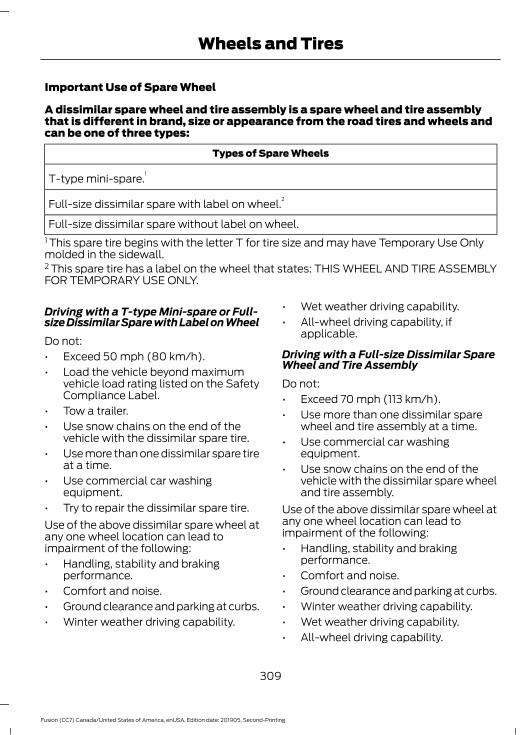
Important Use of Spare Wheel
A dissimilar spare wheel and tire assembly is a spare wheel and tire assemblythat is different in brand, size or appearance from the road tires and wheels andcan be one of three types:
Types of Spare Wheels
T-type mini-spare.1
Full-size dissimilar spare with label on wheel.2
Full-size dissimilar spare without label on wheel.1 This spare tire begins with the letter T for tire size and may have Temporary Use Onlymolded in the sidewall.2 This spare tire has a label on the wheel that states: THIS WHEEL AND TIRE ASSEMBLYFOR TEMPORARY USE ONLY.
Driving with a T-type Mini-spare or Full-size Dissimilar Spare with Label on WheelDo not:• Exceed 50 mph (80 km/h).• Load the vehicle beyond maximum
vehicle load rating listed on the SafetyCompliance Label.
• Tow a trailer.• Use snow chains on the end of the
vehicle with the dissimilar spare tire.• Use more than one dissimilar spare tire
at a time.• Use commercial car washing
equipment.• Try to repair the dissimilar spare tire.Use of the above dissimilar spare wheel atany one wheel location can lead toimpairment of the following:• Handling, stability and braking
performance.• Comfort and noise.• Ground clearance and parking at curbs.• Winter weather driving capability.
• Wet weather driving capability.• All-wheel driving capability, if
applicable.
Driving with a Full-size Dissimilar SpareWheel and Tire AssemblyDo not:• Exceed 70 mph (113 km/h).• Use more than one dissimilar spare
wheel and tire assembly at a time.• Use commercial car washing
equipment.• Use snow chains on the end of the
vehicle with the dissimilar spare wheeland tire assembly.
Use of the above dissimilar spare wheel atany one wheel location can lead toimpairment of the following:• Handling, stability and braking
performance.• Comfort and noise.• Ground clearance and parking at curbs.• Winter weather driving capability.• Wet weather driving capability.• All-wheel driving capability.
309
Fusion (CC7) Canada/United States of America, enUSA, Edition date: 201905, Second-Printing
Wheels and Tires
Give additional caution to the followingwhen driving with the full-size dissimilarspare wheel and tire assembly:• Towing a trailer.• Driving vehicles equipped with a
camper body.• Driving vehicles with a load on the
cargo rack.Drive cautiously when using a full-sizedissimilar spare wheel and tire assemblyand seek service as soon as possible.
Changing a Road Wheel Procedure
WARNING: When one of the frontwheels is off the ground, thetransmission alone will not prevent thevehicle from moving or slipping off thejack, even if the transmission is in park(P).
WARNING: To help prevent yourvehicle from moving when changing awheel, shift the transmission into park(P), set the parking brake and use anappropriate block or wheel chock tosecure the wheel diagonally opposite tothe wheel being changed. For example,when changing the front left wheel,place an appropriate block or wheelchock on the right rear wheel.
WARNING: Do not work on yourvehicle when the jack is the only support.If the vehicle slips off the jack, you orsomeone else could be seriously injured.
WARNING: Check that the vehiclejack is not damaged or deformed andthe thread is lubricated and clean.
WARNING: Never place anythingbetween the vehicle jack and yourvehicle.
WARNING: Never place anythingbetween the vehicle jack and the ground.
WARNING: Do not attempt tochange a tire on the side of the vehicleclose to moving traffic. Pull far enoughoff the road to avoid the danger of beinghit when operating the jack or changingthe wheel.
WARNING: Park your vehicle sothat you do not obstruct the flow oftraffic or place yourself in any danger andset up a warning triangle.
WARNING: The jack supplied withthis vehicle is only intended for changingwheels. Do not use the vehicle jack otherthan when you are changing a wheel inan emergency.
WARNING: Always use the jackprovided as original equipment with yourvehicle. If using a jack other than the oneprovided, make sure the jack capacity isadequate for the vehicle weight,including any vehicle cargo ormodifications. If you are unsure if the jackcapacity is adequate, contact theauthorized dealer.
WARNING: Use only the specifiedjacking points. If you use other positions,you may damage the body, steering,suspension, engine, braking system orthe fuel lines.
WARNING: Failure to follow theseguidelines could result in an increasedrisk of loss of vehicle control, injury ordeath.
310
Fusion (CC7) Canada/United States of America, enUSA, Edition date: 201905, Second-Printing
Wheels and Tires

E166722
Note: Do not allow passengers to remainin your vehicle when using the jack on thevehicle.1. Park on a level surface, set the parking
brake and activate the hazard flashers.2. Place the transmission in park (P) and
turn the engine off. For vehicles with amanual transmission, place thetransmission in reverse (R) after youturn the engine off.
E175447
3. Block both the front and rear of thewheel diagonally opposite the flat tire.For example, if the left front tire is flat,block the right rear wheel.
4. The spare tire, jack, and wrench are inthe spare tire compartment under thetrunk load floor.
5. Remove the spare tire bolt securing thespare tire by turning itcounterclockwise.
6. Remove the spare tire, jack, andwrench from the spare tirecompartment.
E178186
7. Turn the hex nut on the jackcounterclockwise to remove the lugwrench from the jack. This lowers thejack and loosens the mechanical lock.
E175694
8. Unfold the wrench for use.
E181744
311
Fusion (CC7) Canada/United States of America, enUSA, Edition date: 201905, Second-Printing
Wheels and Tires

9. If your vehicle has wheel trim coveringthe lug nuts, use the tool attached tothe spare wheel retainer to remove thewheel trim.
E302004
10. If jacking on the roadside shoulder,set the warning triangle upright onthe shoulder in the direction ofoncoming traffic if the vehicle has awarning triangle.
11. Loosen each wheel lug nut one-halfturn counterclockwise, but do notremove them until you raise thewheel off the ground.
E145908
12. You can identify the vehicle jackingpoints by the triangle markings on themolding as shown. The trianglemarking may be on the side or theunderside of the molding. On vehicleswithout moldings, a pair of arrows onthe metal flange pointing to thejacking point between them identifiesthe jacking points. The warning labelon the jack depicts the details.
E174939
13. Place the jack at the jacking pointnext to the tire you are changing. Turnthe jack handle clockwise until thewheel is completely off the ground.
14. Remove the lug nuts with the lugwrench.
15. Replace the flat tire with the sparetire, making sure the valve stem isfacing outward. Reinstall the lug nutsuntil the wheel is snug against thehub. Do not fully tighten the lug nutsuntil you lower the wheel. If you areusing the temporary tire, the lug nutwashers do not appear to be flushwith the rim. This is normal only whenusing the temporary spare tire.
16. Lower the wheel by turning the jackhandle counterclockwise.
17. Remove the jack and fully tighten thelug nuts in the order shown. SeeTechnical Specifications (page316).
312
Fusion (CC7) Canada/United States of America, enUSA, Edition date: 201905, Second-Printing
Wheels and Tires

1
2
3 4
5
E75442
18. To store the folded wrench on thejack, engage the bracket of the jackbase on the wrench feature as shown.Swing the wrench upward and adjustthe height of the jack until the pinengages the hole. Tighten the hex nutclockwise by hand until secure.
E176165
19. Put the flat tire, jack and lug wrenchaway. Make sure the jack is fastenedsecurely before you drive.
20. Unblock the wheel and retrieve thewarning triangle.
Stowing the Flat Tire Without theRetainer Strap
E227869
You can temporarily stow the full-size roadwheel in the spare tire compartment.1. Lift the carpeted wheel cover at an
angle to access the spare tirecompartment.
2. Place the wheel in the spare tire wellwith the valve stem facing down.
3. Install the shorter jack retainer bolt tothe jack bolt-down bracket through thecenter of the wheel. Finally, wind thewheel retainer down to secure thewheel in place.
4. Place the jack and tools back into thespare tire compartment.
5. Replace the carpeted wheel cover.
313
Fusion (CC7) Canada/United States of America, enUSA, Edition date: 201905, Second-Printing
Wheels and Tires

Stowing the Flat Tire Using theRetainer Strap (If Equipped)
You can temporarily stow the full-size roadwheel in the spare tire compartment.1. Find the flat tire retainer strap tucked
inside the jack channel.
E224480
2. Locate the jack bolt-down bracket.Push the retainer strap through the jackbolt-down bracket.
3. Put the jack and lug wrench away.Make sure you fasten the jack so it doesnot rattle when you drive.
4. Stow the flat tire on the floor in thecargo area.
5. Weave the retainer strap through thewheel openings.
E224479
6. Secure the flat tire by tying a flat knot.
314
Fusion (CC7) Canada/United States of America, enUSA, Edition date: 201905, Second-Printing
Wheels and Tires

TECHNICAL SPECIFICATIONS - 1.5L ECOBOOST™/2.0LECOBOOST™/2.5LWheel Lug Nut Torque Specifications
WARNING: When you install a wheel, always remove any corrosion, dirt or foreignmaterials present on the mounting surfaces of the wheel or the surface of the wheelhub, brake drum or brake disc that contacts the wheel. Make sure to secure any fastenersthat attach the rotor to the hub so they do not interfere with the mounting surfaces ofthe wheel. Installing wheels without correct metal-to-metal contact at the wheelmounting surfaces can cause the wheel nuts to loosen and the wheel to come off whileyour vehicle is in motion, resulting in loss of vehicle control, personal injury or death.
Ib-ft (Nm)*Bolt size
100 (135)M12 x 1.5*Torque specifications are for nut and bolt threads free of oil, dirt and rust. Use only Fordrecommended replacement fasteners.Retighten the lug nuts to the specified torque within 100 miles (160 kilometers) after anywheel disturbance (such as tire rotation, changing a flat tire, wheel removal).
E145950
Wheel pilot bore.AInspect the wheel pilot bore andmounting surface prior to installation.Remove any visible corrosion or looseparticles.
315
Fusion (CC7) Canada/United States of America, enUSA, Edition date: 201905, Second-Printing
Wheels and Tires

TECHNICAL SPECIFICATIONS - 2.7L ECOBOOST™Wheel Lug Nut Torque Specifications
WARNING: When a wheel is installed, always remove any corrosion, dirt or foreignmaterials present on the mounting surfaces of the wheel or the surface of the wheelhub, brake drum or brake disc that contacts the wheel. Make sure that any fastenersthat attach the rotor to the hub are secured so they do not interfere with the mountingsurfaces of the wheel. Installing wheels without correct metal-to-metal contact at thewheel mounting surfaces can cause the wheel nuts to loosen and the wheel to comeoff while your vehicle is in motion, resulting in loss of control.
Ib-ft (Nm)*Bolt size
150 (204)M14 x 1.5*Torque specifications are for nut and bolt threads free of dirt and rust. Use only Fordrecommended replacement fasteners.Retighten the lug nuts to the specified torque within 100 miles (160 kilometers) after anywheel disturbance (such as tire rotation, changing a flat tire, wheel removal).
E145950
Wheel pilot bore.AInspect the wheel pilot bore andmounting surface prior to installation.Remove any visible corrosion or looseparticles.
316
Fusion (CC7) Canada/United States of America, enUSA, Edition date: 201905, Second-Printing
Wheels and Tires

ENGINE SPECIFICATIONS - 1.5L ECOBOOST™
SpecificationMeasurement
92Cubic inches
1-2-4-3Firing order
10.0:1Compression ratio
0.026–0.030 in (0.65–0.75 mm)Spark plug gap
Coil on plugIgnition system
Drivebelt Routing
E270108
ENGINE SPECIFICATIONS - 2.0L ECOBOOST™
SpecificationMeasurement
122Cubic inches
1-3-4-2Firing order
9.7:1Compression ratio
0.028–0.031 in (0.7–0.8 mm)Spark plug gap
Coil on plugIgnition system
317
Fusion (CC7) Canada/United States of America, enUSA, Edition date: 201905, Second-Printing
Capacities and Specifications

Drivebelt Routing
E161383
A
B
A. Long drivebelt is on first pulley grooveclosest to engine
B. Short drivebelt is on second pulleygroove farthest from engine
ENGINE SPECIFICATIONS - 2.5L
SpecificationMeasurement
152Cubic inches
1-3-4-2Firing order
9.7:1Compression ratio
0.049-0.053 in. (1.25-1.35 mm)Spark plug gap
Coil on plugIgnition system
Drivebelt Routing
E161383
A
B
A. Long drivebelt is on first pulley grooveclosest to engine
B. Short drivebelt is on second pulleygroove farthest from engine
318
Fusion (CC7) Canada/United States of America, enUSA, Edition date: 201905, Second-Printing
Capacities and Specifications
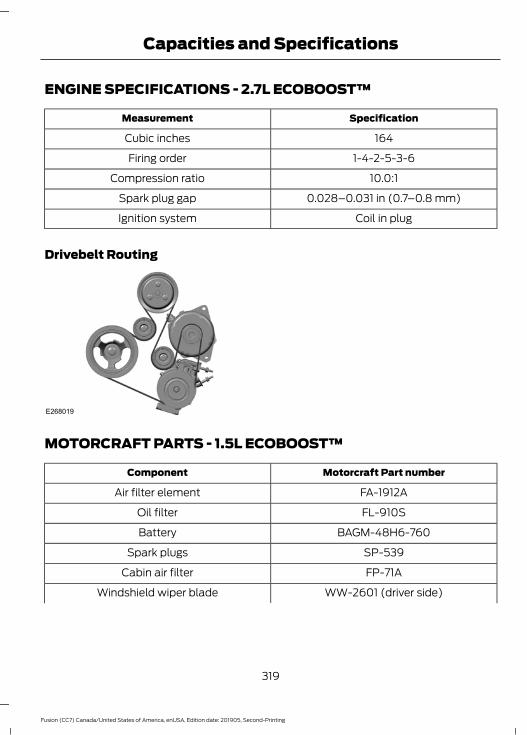
ENGINE SPECIFICATIONS - 2.7L ECOBOOST™
SpecificationMeasurement
164Cubic inches
1-4-2-5-3-6Firing order
10.0:1Compression ratio
0.028–0.031 in (0.7–0.8 mm)Spark plug gap
Coil in plugIgnition system
Drivebelt Routing
E268019
MOTORCRAFT PARTS - 1.5L ECOBOOST™
Motorcraft Part numberComponent
FA-1912AAir filter element
FL-910SOil filter
BAGM-48H6-760Battery
SP-539Spark plugs
FP-71ACabin air filter
WW-2601 (driver side)Windshield wiper blade
319
Fusion (CC7) Canada/United States of America, enUSA, Edition date: 201905, Second-Printing
Capacities and Specifications

Motorcraft Part numberComponent
WW-2700 (passenger side)
We recommend Motorcraft replacement parts available at your Ford dealer or atfordparts.com for scheduled maintenance. These parts meet or exceed Ford MotorCompany’s specifications and are engineered for your vehicle. Use of other parts mayimpact vehicle performance, emissions and durability. Your warranty may be void for anydamage related to use of other parts.If a Motorcraft oil filter is not available, use an oil filter that meets industry performancespecification SAE/USCAR-36.For spark plug replacement, contact an authorized dealer. Replace the spark plugs atthe appropriate intervals. See Scheduled Maintenance (page 433).
320
Fusion (CC7) Canada/United States of America, enUSA, Edition date: 201905, Second-Printing
Capacities and Specifications
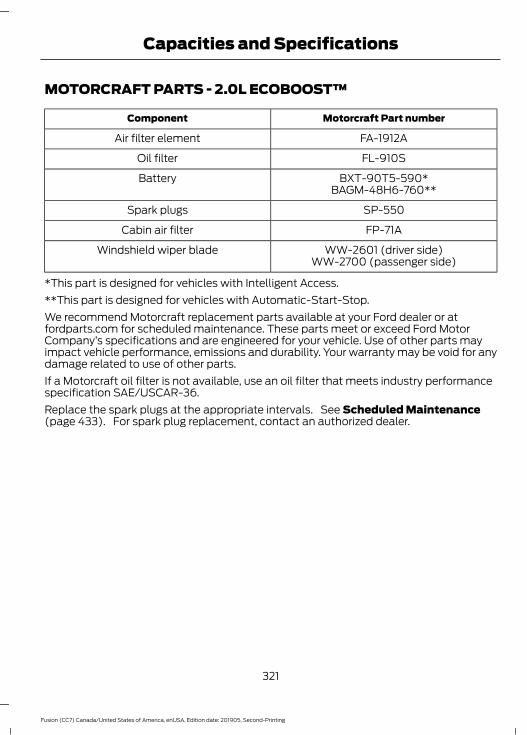
MOTORCRAFT PARTS - 2.0L ECOBOOST™
Motorcraft Part numberComponent
FA-1912AAir filter element
FL-910SOil filter
BXT-90T5-590*BatteryBAGM-48H6-760**
SP-550Spark plugs
FP-71ACabin air filter
WW-2601 (driver side)Windshield wiper bladeWW-2700 (passenger side)
*This part is designed for vehicles with Intelligent Access.**This part is designed for vehicles with Automatic-Start-Stop.We recommend Motorcraft replacement parts available at your Ford dealer or atfordparts.com for scheduled maintenance. These parts meet or exceed Ford MotorCompany’s specifications and are engineered for your vehicle. Use of other parts mayimpact vehicle performance, emissions and durability. Your warranty may be void for anydamage related to use of other parts.If a Motorcraft oil filter is not available, use an oil filter that meets industry performancespecification SAE/USCAR-36.Replace the spark plugs at the appropriate intervals. See Scheduled Maintenance(page 433). For spark plug replacement, contact an authorized dealer.
321
Fusion (CC7) Canada/United States of America, enUSA, Edition date: 201905, Second-Printing
Capacities and Specifications

MOTORCRAFT PARTS - 2.5L
Motorcraft Part NumberComponent
FA-1912AAir filter element
FL-910SOil filter
BXT-90T5-590Battery
SP-530Spark plugs
FP-71ACabin air filter
WW-2601 (driver side)Windshield wiper bladeWW-2700 (passenger side)
We recommend Motorcraft replacement parts available at your Ford dealer or atfordparts.com for scheduled maintenance. These parts meet or exceed Ford MotorCompany’s specifications and are engineered for your vehicle. Use of other parts mayimpact vehicle performance, emissions and durability. Your warranty may be void for anydamage related to use of other parts.If a Motorcraft oil filter is not available, use an oil filter that meets industry performancespecification SAE/USCAR-36.For spark plug replacement, contact an authorized dealer. Replace the spark plugs atthe appropriate intervals. See Scheduled Maintenance (page 433). See ScheduledMaintenance (page 433).
322
Fusion (CC7) Canada/United States of America, enUSA, Edition date: 201905, Second-Printing
Capacities and Specifications

MOTORCRAFT PARTS - 2.7L ECOBOOST™
Motorcraft Part NumberComponent
FA-1912AAir filter element.
FL-2062Oil filter.
BXT-90T5-590Battery.
SP-545Spark plugs.
FP-71ACabin air filter.
WW-2601 (driver side)Windshield wiper blade.WW-2700 (passenger side)
We recommend Motorcraft® replacement parts available at your Ford dealer or atfordparts.com for scheduled maintenance. These parts meet or exceed Ford MotorCompany’s specifications and are engineered for your vehicle. Use of other parts mayimpact vehicle performance, emissions and durability. Your warranty may be void for anydamage related to use of other parts.If a Motorcraft® oil filter is not available, use an oil filter that meets industry performancespecification SAE/USCAR-36.For spark plug replacement, contact an authorized dealer. Replace the spark plugs atthe appropriate intervals. See Scheduled Maintenance (page 433).
323
Fusion (CC7) Canada/United States of America, enUSA, Edition date: 201905, Second-Printing
Capacities and Specifications

VEHICLE IDENTIFICATIONNUMBERThe vehicle identification number islocated on the left-hand side of theinstrument panel.
E142476
Please note that in the graphic, XXXX isrepresentative of your vehicle identificationnumber.The Vehicle Identification Number containsthe following information:
E142477
World manufacturer identifierABrake system, Gross VehicleWeight Rating, Restraint Devicesand their locations
B
Make, vehicle line, series, bodytype
C
Engine typeDCheck digitEModel yearFAssembly plantGProduction sequence numberH
324
Fusion (CC7) Canada/United States of America, enUSA, Edition date: 201905, Second-Printing
Capacities and Specifications

VEHICLE CERTIFICATIONLABEL
E167469
The National Highway Traffic SafetyAdministration Regulations require that aSafety Compliance Certification Label beaffixed to a vehicle and prescribe wherethe Safety Compliance Certification Labelmay be located. The Safety ComplianceCertification Label shall be affixed to eitherthe door hinge pillar, the door latch post,or the edge of the door near the door latch,next to the driver's seating position.
TRANSMISSION CODEDESIGNATION
E167814
The transmission code is on the SafetyCompliance Certification Label. Thefollowing table shows the transmissioncode along with the transmissiondescription.
CodeDescription
WSix-speed automatic transmission (6F35).
CSix-speed automatic transmission (6F55).
325
Fusion (CC7) Canada/United States of America, enUSA, Edition date: 201905, Second-Printing
Capacities and Specifications

CAPACITIES ANDSPECIFICATIONS - 1.5LECOBOOST™Use oil and fluid that meets the definedspecification and viscosity grade.If you do not use oil and fluid that meetsthe defined specification and viscositygrade, it could result in:• Component damage that your vehicle
warranty does not cover.• Longer engine cranking periods.• Increased emission levels.
• Reduced engine performance.• Reduced fuel economy.• Reduced brake performance.
Air Conditioning System
WARNING: The air conditioningrefrigerant system contains refrigerantunder high pressure. Only qualifiedpersonnel should service the airconditioning refrigerant system. Openingthe air conditioning refrigerant systemcan cause personal injury.
Capacities
Refrigerant OilRefrigerantVariant
5.24 fl oz (155 ml)18 oz (0.51 kg)All.
Materials
SpecificationName
WSS-M17B21-AR-1234yf Refrigerant (U.S.)R-1234yf Refrigerant / Frigorigène R-1234yf(Canada)YN-33-A (U.S.)HS7Z-19B519-BA (Canada)
WSS-M2C300-A2Motorcraft® R-1234yf Refrigerant PAG Oil (U.S.)Motorcraft® R-1234yf Refrigerant PAG Oil / HuilePAG pour frigorigène R-1234yf Motorcraft®(Canada)YN-35 (U.S. & Canada)
Automatic TransmissionNote: Automatic transmissions that requireMERCON® LV transmission fluid shouldonly use MERCON® LV transmission fluid.The use of any other fluid could causetransmission damage.
326
Fusion (CC7) Canada/United States of America, enUSA, Edition date: 201905, Second-Printing
Capacities and Specifications

Capacities
QuantityVariant
9.0 qt (8.5 L) 1All.
1 Approximate dry fill capacity. Actual amount could vary during fluid changes.
Materials
SpecificationName
MERCON® LV WSS-M2C938-AMotorcraft® MERCON® LV Automatic TransmissionFluid (U.S.)Motorcraft® MERCON® LV Automatic TransmissionFluid / Huile pour boîte automatique MERCON® LVMotorcraft® (Canada)XT-10-QLVC (U.S.)CXT-10-LV6 (Canada)
Engine CoolantCapacities
QuantityVariant
10.9 qt (10.3 L)All.
Materials
SpecificationName
WSS-M97B57-A2Motorcraft® Yellow Prediluted Antifreeze/Coolant(U.S.)Motorcraft® Yellow Prediluted Antifreeze/Coolant/ Antigel/liquide de refroidissement prédilué jauneMotorcraft® (Canada)VC-13DL-G (U.S.)CVC-13DL-G (Canada)
327
Fusion (CC7) Canada/United States of America, enUSA, Edition date: 201905, Second-Printing
Capacities and Specifications

Engine Oil
E142732
E275759
An oil that displays this symbol conformsto current engine, emission system andfuel economy performance standards ofILSAC.We recommend Motorcraft® motor oil foryour vehicle. If Motorcraft® oil is notavailable, use motor oils of therecommended viscosity grade that meetAPI SN PLUS requirements and display theAPI Certification Mark for gasoline engines.
Capacities
Including the Oil FilterVariant
4.3 qt (4.05 L)All.
Materials
SpecificationName
WSS-M2C945-B1Engine Oil - SAE 5W-20 - Synthetic Blend Motor Oil(U.S.)Engine Oil - SAE 5W-20 - Super Premium Motor Oil/ Huile moteur de très haute qualité SAE 5W-20Motorcraft® (Canada)XO-5W20-Q1SP (U.S.)CXO-5W20-LSP6 (Canada)
328
Fusion (CC7) Canada/United States of America, enUSA, Edition date: 201905, Second-Printing
Capacities and Specifications
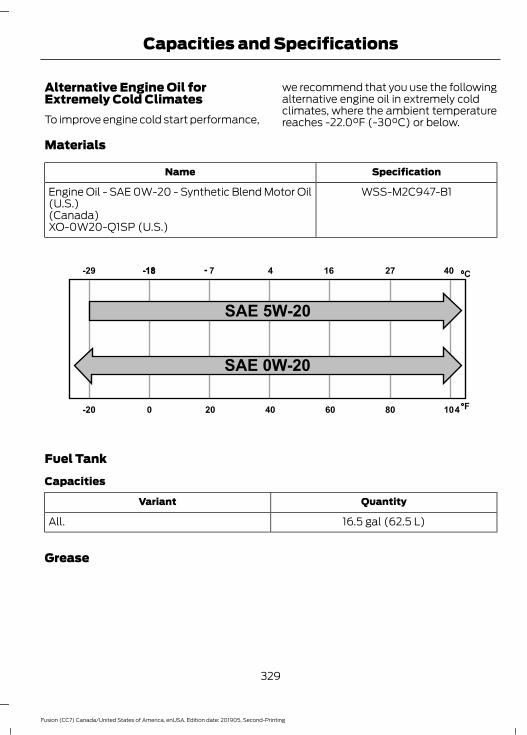
Alternative Engine Oil forExtremely Cold ClimatesTo improve engine cold start performance,
we recommend that you use the followingalternative engine oil in extremely coldclimates, where the ambient temperaturereaches -22.0°F (-30°C) or below.
Materials
SpecificationName
WSS-M2C947-B1Engine Oil - SAE 0W-20 - Synthetic Blend Motor Oil(U.S.)(Canada)XO-0W20-Q1SP (U.S.)
E240522
Fuel TankCapacities
QuantityVariant
16.5 gal (62.5 L)All.
Grease
329
Fusion (CC7) Canada/United States of America, enUSA, Edition date: 201905, Second-Printing
Capacities and Specifications

Materials
SpecificationName
ESB-M1C93-BMotorcraft® Multi-Purpose Grease Spray (U.S.)Motorcraft® Multi-Purpose Grease Spray / Graissetout usage en aérosol Motorcraft® (Canada)XL-5-A (U.S. & Canada)
Hydraulic Brake SystemNote: We recommend using DOT 4 LowViscosity (LV) High Performance Brake Fluidor equivalent meeting WSS-M6C65-A2. Useof any fluid other than the recommendedfluid could cause reduced brakeperformance and not meet our performancestandards. Keep brake fluid clean and dry.Contamination with dirt, water, petroleumproducts or other materials could result inbrake system damage and possible failure.
Materials
SpecificationName
WSS-M6C65-A2Motorcraft® DOT 4 LV High Performance MotorVehicle Brake Fluid (U.S.)Motorcraft® DOT 4 LV High Performance MotorVehicle Brake Fluid / Liquide de frein automobilehaute performance DOT 4 LV Motorcraft® (Canada)PM-20 (U.S. & Canada)
LocksMaterials
SpecificationName
-Motorcraft® Penetrating and Lock Lubricant (U.S.)Motorcraft® Penetrating Fluid / Liquide dégrippantMotorcraft® (Canada)XL-1 (U.S.)CXC-51-A (Canada)
330
Fusion (CC7) Canada/United States of America, enUSA, Edition date: 201905, Second-Printing
Capacities and Specifications
Washer ReservoirCapacities
QuantityVariant
Fill as required.All.
Materials
SpecificationName
WSS-M14P19-AMotorcraft® Premium Windshield Wash Concen-trate with Bitterant (U.S.)Motorcraft® Premium Quality Windshield WasherFluid / Liquide lave-glace de haute qualité Motor-craft® (Canada)ZC-32-B2 (U.S.)CXC-37-A/B/D/F (Canada)
CAPACITIES ANDSPECIFICATIONS - 2.0LECOBOOST™Use oil and fluid that meets the definedspecification and viscosity grade.If you do not use oil and fluid that meetsthe defined specification and viscositygrade, it could result in:• Component damage that your vehicle
warranty does not cover.• Longer engine cranking periods.
• Increased emission levels.• Reduced engine performance.• Reduced fuel economy.• Reduced brake performance.
Air Conditioning System
WARNING: The air conditioningrefrigerant system contains refrigerantunder high pressure. Only qualifiedpersonnel should service the airconditioning refrigerant system. Openingthe air conditioning refrigerant systemcan cause personal injury.
Capacities
Refrigerant OilRefrigerantVariant
5.24 fl oz (155 ml)20 oz (0.56 kg)All.
331
Fusion (CC7) Canada/United States of America, enUSA, Edition date: 201905, Second-Printing
Capacities and Specifications

Materials
SpecificationName
WSS-M17B21-AR-1234yf Refrigerant (U.S.)R-1234yf Refrigerant / Frigorigène R-1234yf(Canada)YN-33-A (U.S.)HS7Z-19B519-BA (Canada)
WSS-M2C300-A2Motorcraft® R-1234yf Refrigerant PAG Oil (U.S.)Motorcraft® R-1234yf Refrigerant PAG Oil / HuilePAG pour frigorigène R-1234yf Motorcraft®(Canada)YN-35 (U.S. & Canada)
Automatic TransmissionNote: Automatic transmissions that requireMERCON® LV transmission fluid shouldonly use MERCON® LV transmission fluid.The use of any other fluid could causetransmission damage.
Capacities
QuantityVariant
9.0 qt (8.5 L) 1All.
1 Approximate dry fill capacity. Actual amount may vary during fluid changes.
Materials
SpecificationName
MERCON® LV WSS-M2C938-AMotorcraft® MERCON® LV Automatic TransmissionFluid (U.S.)Motorcraft® MERCON® LV Automatic TransmissionFluid / Huile pour boîte automatique MERCON® LVMotorcraft® (Canada)XT-10-QLVC (U.S.)CXT-10-LV6 (Canada)
332
Fusion (CC7) Canada/United States of America, enUSA, Edition date: 201905, Second-Printing
Capacities and Specifications

Engine CoolantCapacities
QuantityVariant
8.5 qt (8 L)All.
Materials
SpecificationName
WSS-M97B57-A2Motorcraft® Yellow Prediluted Antifreeze/Coolant(U.S.)Motorcraft® Yellow Prediluted Antifreeze/Coolant/ Antigel/liquide de refroidissement prédilué jauneMotorcraft® (Canada)VC-13DL-G (U.S.)CVC-13DL-G (Canada)
Engine Oil
E142732
E276075
An oil that displays this symbol conformsto current engine, emission system andfuel economy performance standards ofILSAC.We recommend Motorcraft® motor oil foryour vehicle. If Motorcraft® oil is notavailable, use motor oils of therecommended viscosity grade that meetAPI SN PLUS requirements and display theAPI Certification Mark for gasoline engines.
333
Fusion (CC7) Canada/United States of America, enUSA, Edition date: 201905, Second-Printing
Capacities and Specifications

Capacities
Including the Oil FilterVariant
5.7 qt (5.4 L)All.
Materials
SpecificationName
WSS-M2C946-B1Engine Oil - SAE 5W-30 - Synthetic Blend Motor Oil(U.S.)Engine Oil - SAE 5W-30 - Super Premium Motor Oil/ Huile moteur de très haute qualité SAE 5W-30Motorcraft® (Canada)XO-5W30-Q1SP (U.S.)CXO-5W30-LSP6 (Canada)
Alternative Engine Oil forExtremely Cold ClimatesTo improve engine cold start performance,we recommend that you use the followingalternative engine oil in extremely coldclimates, where the ambient temperaturereaches -22.0°F (-30°C) or below.
Materials
SpecificationName
WSS-M2C953-B1Engine Oil - SAE 0W-30
334
Fusion (CC7) Canada/United States of America, enUSA, Edition date: 201905, Second-Printing
Capacities and Specifications

E240523
Fuel TankCapacities
QuantityVariant
18.0 gal (68.1 L)All wheel drive.
16.5 gal (62.5 L)Front wheel drive.
GreaseMaterials
SpecificationName
ESB-M1C93-BMotorcraft® Multi-Purpose Grease Spray (U.S.)Motorcraft® Multi-Purpose Grease Spray / Graissetout usage en aérosol Motorcraft® (Canada)XL-5-A (U.S. & Canada)
335
Fusion (CC7) Canada/United States of America, enUSA, Edition date: 201905, Second-Printing
Capacities and Specifications

Hydraulic Brake System Note: We recommend using DOT 4 LowViscosity (LV) High Performance Brake Fluidor equivalent meeting WSS-M6C65-A2. Useof any fluid other than the recommendedfluid could cause reduced brakeperformance and not meet our performancestandards. Keep brake fluid clean and dry.Contamination with dirt, water, petroleumproducts or other materials could result inbrake system damage and possible failure.
Materials
SpecificationName
WSS-M6C65-A2Motorcraft® DOT 4 LV High Performance MotorVehicle Brake Fluid (U.S.)Motorcraft® DOT 4 LV High Performance MotorVehicle Brake Fluid / Liquide de frein automobilehaute performance DOT 4 LV Motorcraft® (Canada)PM-20 (U.S. & Canada)
LocksMaterials
SpecificationName
-Motorcraft® Penetrating and Lock Lubricant (U.S.)Motorcraft® Penetrating Fluid / Liquide dégrippantMotorcraft® (Canada)XL-1 (U.S.)CXC-51-A (Canada)
Power Transfer UnitCapacities
QuantityVariant
11.8 fl oz (0.35 L)All.
336
Fusion (CC7) Canada/United States of America, enUSA, Edition date: 201905, Second-Printing
Capacities and Specifications

Materials
SpecificationName
WSL-M2C192-AMotorcraft® SAE 75W-140 Synthetic Rear AxleLubricant (U.S.)Motorcraft® SAE 75W-140 Synthetic Rear AxleLubricant / Lubrifiant synthétique pour pont arrièreSAE 75W-140 Motorcraft® (Canada)XY-75W140-QL (U.S.)CXY-75W140-1L (Canada)
Rear AxleCapacities
QuantityVariant
38.9 fl oz (1.15 L)All.
Materials
SpecificationName
WSP-M2C197-AMotorcraft® SAE 80W-90 Premium Rear AxleLubricant (U.S.)Motorcraft® SAE 80W-90 Premium Axle Lubricant/ Lubrifiant pour essieux de très haute qualité SAE80W-90 Motorcraft® (Canada)XY-80W90-QL (U.S.)CXY-80W90-1L (Canada)
Washer ReservoirCapacities
QuantityVariant
Fill as required.All.
337
Fusion (CC7) Canada/United States of America, enUSA, Edition date: 201905, Second-Printing
Capacities and Specifications

Materials
SpecificationName
WSS-M14P19-AMotorcraft® Premium Windshield Wash Concen-trate with Bitterant (U.S.)Motorcraft® Premium Quality Windshield WasherFluid / Liquide lave-glace de haute qualité Motor-craft® (Canada)ZC-32-B2 (U.S.)CXC-37-A/B/D/F (Canada)
CAPACITIES ANDSPECIFICATIONS - 2.5LUse oil and fluid that meets the definedspecification and viscosity grade.If you do not use oil and fluid that meetsthe defined specification and viscositygrade, it could result in:• Component damage that your vehicle
warranty does not cover.• Longer engine cranking periods.• Increased emission levels.
• Reduced engine performance.• Reduced fuel economy.• Reduced brake performance.
Air Conditioning System
WARNING: The air conditioningrefrigerant system contains refrigerantunder high pressure. Only qualifiedpersonnel should service the airconditioning refrigerant system. Openingthe air conditioning refrigerant systemcan cause personal injury.
Capacities
Refrigerant OilRefrigerantVariant
3.21 fl oz (95 ml)22 oz (0.62 kg)All.
338
Fusion (CC7) Canada/United States of America, enUSA, Edition date: 201905, Second-Printing
Capacities and Specifications

Materials
SpecificationName
WSS-M17B21-AR-1234yf Refrigerant (U.S.)R-1234yf Refrigerant / Frigorigène R-1234yf(Canada)YN-33-A (U.S.)HS7Z-19B519-BA (Canada)
WSS-M2C300-A2Motorcraft® R-1234yf Refrigerant PAG Oil (U.S.)Motorcraft® R-1234yf Refrigerant PAG Oil / HuilePAG pour frigorigène R-1234yf Motorcraft®(Canada)YN-35 (U.S. & Canada)
Automatic TransmissionNote: Automatic transmissions that requireMERCON® LV transmission fluid shouldonly use MERCON® LV transmission fluid.The use of any other fluid could causetransmission damage.
Capacities
QuantityVariant
9.0 qt (8.5 L) 1All.
1 Approximate dry fill capacity. Actual amount may vary during fluid changes.
Materials
SpecificationName
MERCON® LV WSS-M2C938-AMotorcraft® MERCON® LV Automatic TransmissionFluid (U.S.)Motorcraft® MERCON® LV Automatic TransmissionFluid / Huile pour boîte automatique MERCON® LVMotorcraft® (Canada)XT-10-QLVC (U.S.)CXT-10-LV6 (Canada)
339
Fusion (CC7) Canada/United States of America, enUSA, Edition date: 201905, Second-Printing
Capacities and Specifications

Engine CoolantCapacities
QuantityVariant
7.8 qt (7.4 L)All.
Materials
SpecificationName
WSS-M97B57-A2Motorcraft® Yellow Prediluted Antifreeze/Coolant(U.S.)Motorcraft® Yellow Prediluted Antifreeze/Coolant/ Antigel/liquide de refroidissement prédilué jauneMotorcraft® (Canada)VC-13DL-G (U.S.)CVC-13DL-G (Canada)
Engine Oil
E142732
E275759
An oil that displays this symbol conformsto current engine, emission system andfuel economy performance standards ofILSAC.We recommend Motorcraft® motor oil foryour vehicle. If Motorcraft® oil is notavailable, use motor oils of therecommended viscosity grade that meetAPI SN PLUS requirements and display theAPI Certification Mark for gasoline engines.
340
Fusion (CC7) Canada/United States of America, enUSA, Edition date: 201905, Second-Printing
Capacities and Specifications

Capacities
Including the Oil FilterVariant
5.7 qt (5.4 L)All.
Materials
SpecificationName
WSS-M2C945-B1Engine Oil - SAE 5W-20 - Synthetic Blend Motor Oil(U.S.)Engine Oil - SAE 5W-20 - Super Premium Motor Oil/ Huile moteur de très haute qualité SAE 5W-20Motorcraft® (Canada)XO-5W20-Q1SP (U.S.)CXO-5W20-LSP6 (Canada)
Alternative Engine Oil forExtremely Cold ClimatesTo improve engine cold start performance,we recommend that you use the followingalternative engine oil in extremely coldclimates, where the ambient temperaturereaches -22.0°F (-30°C) or below.
Materials
SpecificationName
WSS-M2C947-B1Engine Oil - SAE 0W-20 - Synthetic Blend Motor Oil(U.S.)(Canada)XO-0W20-Q1SP (U.S.)
341
Fusion (CC7) Canada/United States of America, enUSA, Edition date: 201905, Second-Printing
Capacities and Specifications

E240522
Fuel TankCapacities
QuantityVariant
16.5 gal (62.5 L)All.
GreaseMaterials
SpecificationName
ESB-M1C93-BMotorcraft® Multi-Purpose Grease Spray (U.S.)Motorcraft® Multi-Purpose Grease Spray / Graissetout usage en aérosol Motorcraft® (Canada)XL-5-A (U.S. & Canada)
342
Fusion (CC7) Canada/United States of America, enUSA, Edition date: 201905, Second-Printing
Capacities and Specifications

Hydraulic Brake System Note: We recommend using DOT 4 LowViscosity (LV) High Performance Brake Fluidor equivalent meeting WSS-M6C65-A2. Useof any fluid other than the recommendedfluid could cause reduced brakeperformance and not meet our performancestandards. Keep brake fluid clean and dry.Contamination with dirt, water, petroleumproducts or other materials could result inbrake system damage and possible failure.
Materials
SpecificationName
WSS-M6C65-A2Motorcraft® DOT 4 LV High Performance MotorVehicle Brake Fluid (U.S.)Motorcraft® DOT 4 LV High Performance MotorVehicle Brake Fluid / Liquide de frein automobilehaute performance DOT 4 LV Motorcraft® (Canada)PM-20 (U.S. & Canada)
LocksMaterials
SpecificationName
-Motorcraft® Penetrating and Lock Lubricant (U.S.)Motorcraft® Penetrating Fluid / Liquide dégrippantMotorcraft® (Canada)XL-1 (U.S.)CXC-51-A (Canada)
Washer ReservoirCapacities
QuantityVariant
Fill as required.All.
343
Fusion (CC7) Canada/United States of America, enUSA, Edition date: 201905, Second-Printing
Capacities and Specifications

Materials
SpecificationName
WSS-M14P19-AMotorcraft® Premium Windshield Wash Concen-trate with Bitterant (U.S.)Motorcraft® Premium Quality Windshield WasherFluid / Liquide lave-glace de haute qualité Motor-craft® (Canada)ZC-32-B2 (U.S.)CXC-37-A/B/D/F (Canada)
CAPACITIES ANDSPECIFICATIONS - 2.7LECOBOOST™Use oil and fluid that meets the definedspecification and viscosity grade.If you do not use oil and fluid that meetsthe defined specification and viscositygrade, it could result in:• Component damage that your vehicle
warranty does not cover.• Longer engine cranking periods.
• Increased emission levels.• Reduced engine performance.• Reduced fuel economy.• Reduced brake performance.
Air Conditioning System
WARNING: The air conditioningrefrigerant system contains refrigerantunder high pressure. Only qualifiedpersonnel should service the airconditioning refrigerant system. Openingthe air conditioning refrigerant systemcan cause personal injury.
Capacities
Refrigerant OilRefrigerantVariant
5.24 fl oz (155 ml)18 oz (0.51 kg)All.
344
Fusion (CC7) Canada/United States of America, enUSA, Edition date: 201905, Second-Printing
Capacities and Specifications

Materials
SpecificationName
WSS-M17B21-AR-1234yf Refrigerant (U.S.)R-1234yf Refrigerant / Frigorigène R-1234yf(Canada)YN-33-A (U.S.)HS7Z-19B519-BA (Canada)
WSS-M2C300-A2Motorcraft® R-1234yf Refrigerant PAG Oil (U.S.)Motorcraft® R-1234yf Refrigerant PAG Oil / HuilePAG pour frigorigène R-1234yf Motorcraft®(Canada)YN-35 (U.S. & Canada)
Automatic TransmissionNote: Automatic transmissions that requireMERCON® LV transmission fluid shouldonly use MERCON® LV transmission fluid.The use of any other fluid could causetransmission damage.
Capacities
QuantityVariant
11.6 qt (11 L) 1All.
1 Approximate dry fill capacity. Actual amount may vary during fluid changes.
Materials
SpecificationName
MERCON® LV WSS-M2C938-AMotorcraft® MERCON® LV Automatic TransmissionFluid (U.S.)Motorcraft® MERCON® LV Automatic TransmissionFluid / Huile pour boîte automatique MERCON® LVMotorcraft® (Canada)XT-10-QLVC (U.S.)CXT-10-LV6 (Canada)
345
Fusion (CC7) Canada/United States of America, enUSA, Edition date: 201905, Second-Printing
Capacities and Specifications

Engine CoolantCapacities
QuantityVariant
11.8 qt (11.2 L)All.
Materials
SpecificationName
WSS-M97B57-A2Motorcraft® Yellow Prediluted Antifreeze/Coolant(U.S.)Motorcraft® Yellow Prediluted Antifreeze/Coolant/ Antigel/liquide de refroidissement prédilué jauneMotorcraft® (Canada)VC-13DL-G (U.S.)CVC-13DL-G (Canada)
Engine Oil
E142732
E276075
An oil that displays this symbol conformsto current engine, emission system andfuel economy performance standards ofILSAC.We recommend Motorcraft® motor oil foryour vehicle. If Motorcraft® oil is notavailable, use motor oils of therecommended viscosity grade that meetAPI SN PLUS requirements and display theAPI Certification Mark for gasoline engines.
346
Fusion (CC7) Canada/United States of America, enUSA, Edition date: 201905, Second-Printing
Capacities and Specifications

Capacities
Including the Oil FilterVariant
6.0 qt (5.7 L)All.
Materials
SpecificationName
WSS-M2C946-B1Engine Oil - SAE 5W-30 - Synthetic Blend Motor Oil(U.S.)Engine Oil - SAE 5W-30 - Super Premium Motor Oil/ Huile moteur de très haute qualité SAE 5W-30Motorcraft® (Canada)XO-5W30-Q1SP (U.S.)CXO-5W30-LSP6 (Canada)
Alternative Engine Oil forExtremely Cold ClimatesTo improve engine cold start performance,we recommend that you use the followingalternative engine oil in extremely coldclimates, where the ambient temperaturereaches -22.0°F (-30°C) or below.
Materials
SpecificationName
WSS-M2C953-B1Engine Oil - SAE 0W-30
347
Fusion (CC7) Canada/United States of America, enUSA, Edition date: 201905, Second-Printing
Capacities and Specifications

E240523
Fuel TankCapacities
QuantityVariant
18.0 gal (68.1 L)All.
GreaseMaterials
SpecificationName
ESB-M1C93-BMotorcraft® Multi-Purpose Grease Spray (U.S.)Motorcraft® Multi-Purpose Grease Spray / Graissetout usage en aérosol Motorcraft® (Canada)XL-5-A (U.S. & Canada)
348
Fusion (CC7) Canada/United States of America, enUSA, Edition date: 201905, Second-Printing
Capacities and Specifications

Hydraulic Brake System Note: We recommend using DOT 4 LowViscosity (LV) High Performance Brake Fluidor equivalent meeting WSS-M6C65-A2. Useof any fluid other than the recommendedfluid could cause reduced brakeperformance and not meet our performancestandards. Keep brake fluid clean and dry.Contamination with dirt, water, petroleumproducts or other materials could result inbrake system damage and possible failure.
Materials
SpecificationName
WSS-M6C65-A2Motorcraft® DOT 4 LV High Performance MotorVehicle Brake Fluid (U.S.)Motorcraft® DOT 4 LV High Performance MotorVehicle Brake Fluid / Liquide de frein automobilehaute performance DOT 4 LV Motorcraft® (Canada)PM-20 (U.S. & Canada)
LocksMaterials
SpecificationName
-Motorcraft® Penetrating and Lock Lubricant (U.S.)Motorcraft® Penetrating Fluid / Liquide dégrippantMotorcraft® (Canada)XL-1 (U.S.)CXC-51-A (Canada)
Power Transfer UnitCapacities
QuantityVariant
15.2 fl oz (0.45 L)All.
349
Fusion (CC7) Canada/United States of America, enUSA, Edition date: 201905, Second-Printing
Capacities and Specifications

Materials
SpecificationName
WSL-M2C192-AMotorcraft® SAE 75W-140 Synthetic Rear AxleLubricant (U.S.)Motorcraft® SAE 75W-140 Synthetic Rear AxleLubricant / Lubrifiant synthétique pour pont arrièreSAE 75W-140 Motorcraft® (Canada)XY-75W140-QL (U.S.)CXY-75W140-1L (Canada)
Rear AxleCapacities
QuantityVariant
21.0 fl oz (0.62 L)All.
Materials
SpecificationName
WSP-M2C197-AMotorcraft® SAE 80W-90 Premium Rear AxleLubricant (U.S.)Motorcraft® SAE 80W-90 Premium Axle Lubricant/ Lubrifiant pour essieux de très haute qualité SAE80W-90 Motorcraft® (Canada)XY-80W90-QL (U.S.)CXY-80W90-1L (Canada)
Washer ReservoirCapacities
QuantityVariant
Fill as required.All.
350
Fusion (CC7) Canada/United States of America, enUSA, Edition date: 201905, Second-Printing
Capacities and Specifications

Materials
SpecificationName
WSS-M14P19-AMotorcraft® Premium Windshield Wash Concen-trate with Bitterant (U.S.)Motorcraft® Premium Quality Windshield WasherFluid / Liquide lave-glace de haute qualité Motor-craft® (Canada)ZC-32-B2 (U.S.)CXC-37-A/B/D/F (Canada)
BULB SPECIFICATION CHARTReplacement bulbs are specified in thechart below. Headlamp bulbs must bemarked with an authorized “D.O.T.” forNorth America to make sure they have theproper lamp performance, light brightness,light pattern, and safe visibility. The correctbulbs will not damage the lamp assemblyor void the lamp assembly warranty andwill provide quality bulb illumination time.
Trade nameFunction
H9.Headlamp high beam (If Equipped)
LED.Headlamp high beam (If Equipped)1
H11LL.Headlamp low beam (If Equipped)
LED.Headlamp low beam (If Equipped)1
LED.Front Side marker lamp1
PWY24W.Front Direction indicator
H8.Front Fog lamp
LED.Tail and brake lamp - high series1
LED.Tail and brake lamp - low series1
921.Reverse lamp
351
Fusion (CC7) Canada/United States of America, enUSA, Edition date: 201905, Second-Printing
Capacities and Specifications

Trade nameFunction
LED.Rear Direction indicator - high series1
LED.Rear Direction indicator - low series1
LED.Rear Side marker lamp1
W5W.License plate lamp
W5W.Trunk lamp (If Equipped)
LED.Trunk lamp (If Equipped)1
LED.High-mount brake lamp1
LED.Side repeater lamp1
LED.Interior lamp1
1 To replace these bulbs, see your authorized dealer.To replace all instrument panel bulbs, see your authorized dealer.
352
Fusion (CC7) Canada/United States of America, enUSA, Edition date: 201905, Second-Printing
Capacities and Specifications

CONNECTED VEHICLEREQUIREMENTSConnected service and related featurefunctionality requires a compatible vehiclenetwork.Some remote features require asubscription. For additional information,see the FordPass app. Some restrictions,third party terms and message or datarates may apply.
CONNECTED VEHICLELIMITATIONSEvolving technology or evolving cellularnetworks could affect functionality andavailability, or continued provision of somefeatures. These changes could even stopsome features from functioning.
CONNECTING THE VEHICLE TOA MOBILE NETWORK
What Is the ModemThe modem enables access toa range of features built into yourvehicle.
Enabling and Disabling the Modem1. Select Settings.
2. Select FordPass Connect.3. Select Connectivity Settings.4. Switch connectivity features on or off.
Connecting FordPass to theModem1. Make sure that the modem is enabled
using the vehicle settings menu.2. Open the FordPass app on your device
and log in.3. Add your vehicle or select your vehicle
if already added.4. Select the option for vehicle details.5. Select the option to activate your
vehicle.6. Make sure that the name on the screen
matches the name shown in yourFordPass account.
7. Confirm that FordPass account isconnected to the modem .
CONNECTING THE VEHICLE TOA WI-FI NETWORK1. Select Settings.2. Select Wi-Fi.3. Switch System Wi-Fi on.4. Select View Available Networks.5. Select an available Wi-Fi network.Note: Enter the network password toconnect to a secure network.
353
Fusion (CC7) Canada/United States of America, enUSA, Edition date: 201905, Second-Printing
Connected Vehicle (If Equipped)

CONNECTED VEHICLE – TROUBLESHOOTING
Possible Cause and ResolutionSymptom
I cannot connect to a Wi-Finetwork.
– Password error.• Enter the correct network password.
– Weak network signal.• Move your vehicle closer to the Wi-Fi hotspot or to
a place where the network signal is not obstructed.– Multiple access points in range with the same SSID.
• Use a unique name for your SSID. Do not use thedefault name unless it contains a unique identifier,for example as part of the MAC address.
The Wi-Fi connectiondisconnects after successfulconnection.
– Weak network signal.• Move your vehicle closer to the Wi-Fi hotspot or to
a place where the network signal is not obstructed.
I am close to a Wi-Fi hotspotbut the network signalstrength is weak.
– Obstructed network signal.• If your vehicle has a heated windshield, position
your vehicle so that the windshield is not facing theWi-Fi hotspot.
• If your vehicle has metallic tinting on the windowsbut not on the windshield, position your vehicle sothat the windshield is facing the Wi-Fi hotspot oropen the windows that are facing the hotspot.
• If your vehicle has metallic tinting on the windowsand the windshield, open the windows that arefacing the hotspot.
• If your vehicle is in a garage and you have thegarage door closed, open the garage door.
I cannot see a network in thelist of available networksthat I expect to see.
– Hidden network.• Make the network visible and try again.
354
Fusion (CC7) Canada/United States of America, enUSA, Edition date: 201905, Second-Printing
Connected Vehicle (If Equipped)

Possible Cause and ResolutionSymptom
I cannot see the Wi-Fihotspot name when I searchfor Wi-Fi networks on mycell phone or other device.
– System limitation.• Make sure Wi-Fi hotspot visibility is on.• The system does not provide a Wi-Fi hotspot at
this time.
– Weak network signal• Move your vehicle closer to the Wi-Fi hotspot or to
a place where the network signal is not obstructed.– Wi-Fi hotspot in high demand or has a slow Internet
connection.• Use a more reliable Wi-Fi hotspot.
Software downloads taketoo long.
– No software update available.– Wi-Fi network requires a subscription or acceptance
of terms and conditions.• Test the connection using another device. If the
network requires a subscription or acceptance ofterms and conditions, contact the network serviceprovider.
The system seems toconnect to a Wi-Fi networkand the signal strength isexcellent but the softwaredoes not update.
355
Fusion (CC7) Canada/United States of America, enUSA, Edition date: 201905, Second-Printing
Connected Vehicle (If Equipped)

CREATING A WI-FI HOTSPOTYou can create a Wi-Fi hotspot in yourvehicle and allow devices to connect to itfor access to the Internet.
Press the button to enter thesettings menu.
1. Select Connectivity Features.2. Select Vehicle Hotspot.Note: The vehicle hotspot default settingis on.3. Select Settings.4. Make sure that you have Wi-Fi visibility
switched on.Note: The Wi-Fi Visibility default setting ison.
Finding the Wi-Fi Hotspot Nameand Password
Press the button to enter thesettings menu.
1. Select Connectivity Features.2. Select Vehicle Hotspot.3. Select Settings.Note: The SSID is the hotspot name.4. Scroll to Hide password.5. Uncheck the box.
Connecting a Device to the Wi-FiHotspot1. On your device, turn on Wi-Fi and select
the hotspot from the list of availableWi-Fi networks.
2. When prompted, enter the password.
Purchasing a Data Plan1. Connect a device to the hotspot.Note: The vehicle network carrier’s portalopens on your device.
2. If the portal does not open on yourdevice, open a website and it redirectsto the vehicle network carrier’s portal.
Note: Secure websites do not redirect.Note: If you have an active plan, the systemdoes not redirect to the vehicle networkcarrier’s portal when you connect a device.Visit the vehicle network carrier’s websiteto purchase more data.Note: If data usage information is availablein the vehicle hotspot menu, it isapproximate.Note: If you carry out a master reset, thesystem does not remove your vehicle fromyour vehicle network carrier’s account. Toremove your vehicle from the account,contact your vehicle network carrier.Note: The vehicle network carrier providesVehicle Hotspot services, subject to yourvehicle network carrier agreement, coverageand availability.
CHANGING THE WI-FIHOTSPOT NAME ORPASSWORD
Press the button to enter thesettings menu.
1. Select Connectivity Features.2. Select Vehicle Hotspot.3. Select Settings.4. Select SSID: ___.5. Enter your required SSID.6. Select Done.7. Select Password: ___.8. Enter your required password.9. Select Done.
356
Fusion (CC7) Canada/United States of America, enUSA, Edition date: 201905, Second-Printing
Wi-Fi Hotspot (If Equipped)

GENERAL INFORMATION
WARNING: Driving while distractedcan result in loss of vehicle control, crashand injury. We strongly recommend thatyou use extreme caution when using anydevice that may take your focus off theroad. Your primary responsibility is thesafe operation of your vehicle. Werecommend against the use of any
hand-held device while driving andencourage the use of voice-operatedsystems when possible. Make sure youare aware of all applicable local lawsthat may affect the use of electronicdevices while driving.
Radio Frequencies and ReceptionFactorsNote: Listening to loud audio for longperiods of time could damage your hearing.
Radio Reception Factors
The further you travel from an AM or FM station, theweaker the signal and the weaker the reception.
Distance and strength
Hills, mountains, tall buildings, bridges, tunnels, freewayoverpasses, parking garages, dense tree foliage andthunderstorms can interfere with the reception.
Terrain
When you pass a ground-based broadcast repeatingtower, a stronger signal may overtake a weaker one andresult in the audio system muting.
Station overload
AUDIO UNIT - VEHICLES WITH:TOUCHSCREEN DISPLAY,VEHICLES WITHOUT: SONYAUDIO SYSTEM
WARNING: Driving while distractedcan result in loss of vehicle control, crashand injury. We strongly recommend thatyou use extreme caution when using anydevice that may take your focus off theroad. Your primary responsibility is thesafe operation of your vehicle. Werecommend against the use of any
hand-held device while driving andencourage the use of voice-operatedsystems when possible. Make sure youare aware of all applicable local lawsthat may affect the use of electronicdevices while driving.
E287571
Note: Depending on your vehicle optionpackage, the controls may look differentfrom what you see here.Note: Some features, such as satelliteradio, may not be available in your location.Check with an authorized dealer.
357
Fusion (CC7) Canada/United States of America, enUSA, Edition date: 201905, Second-Printing
Audio System

Note: The touchscreen system controlsmost of the audio features.
Adjusting the Volume
E265373
Turn to adjust the volume.
Changing Radio Stations
E265696
In radio mode, turn to search through theradio frequency band.In satellite radio mode, turn to find theprevious or next available satellite radiostation.
Playing or Pausing MediaPress and release the button toeither play or pause the audio.
Switching the Audio Unit On andOff
Press and release the button.
Using Seek, Fast Forward andReverse
In radio mode, select a frequency band andpress and release either button. Thesystem stops at the first station it finds inthat direction.In satellite radio mode, press and releaseto select the next or previous satellite radiostation. If you select a specific category,such as jazz, rock or news, press to find thenext or previous station in that category.
AUDIO UNIT - VEHICLES WITH:SYNC
WARNING: Driving while distractedcan result in loss of vehicle control, crashand injury. We strongly recommend thatyou use extreme caution when using anydevice that may take your focus off theroad. Your primary responsibility is thesafe operation of your vehicle. Werecommend against the use of any
358
Fusion (CC7) Canada/United States of America, enUSA, Edition date: 201905, Second-Printing
Audio System

hand-held device while driving andencourage the use of voice-operatedsystems when possible. Make sure youare aware of all applicable local lawsthat may affect the use of electronicdevices while driving.
E289576
Note: Depending on your vehicle optionpackage, the controls may look differentfrom what you see here.Note: Some features, such as satelliteradio, may not be available in your location.Check with an authorized dealer.
Accessing the Apps MenuPress and release the button toaccess the apps menu. Followthe on-screen prompts to make
your selection.
Accessing the Clock Settings
E265036
Press and release the button toaccess the clock setting.Use the center arrow controls to
change the hours and minutes.
Accessing the Media Source Menu
E265035
Press and release the button toopen the media source menu.
You can press this multiple times tochange to a SYNC-Media device or scrollthrough the media sources using the arrowbuttons. Press OK to select a source.
Accessing the Phone FeaturesPress and release the button toaccess the phone features of theSYNC system.
Accessing the Sound Settings
E280315
Press and release the button toaccess settings for Treble,Midrange, Bass, Fade and
Balance.
Accessing the Settings Menu
E142607
Press and release the button toaccess the settings menu.Follow the on-screen prompts
to make your selection.
Adjusting the Volume
E265373
Turn to adjust the volume.
359
Fusion (CC7) Canada/United States of America, enUSA, Edition date: 201905, Second-Printing
Audio System

Changing Radio Stations
E265696
In radio mode, turn to search through theradio frequency band.In satellite radio mode, turn to find theprevious or next available satellite radiostation.
Listening to the Radio
E265033
Press and release the button tolisten to the radio or changeradio stations.
Playing or Pausing MediaPress and release the button toeither play or pause currentmedia source.
Switching the Audio Unit On andOff
Press and release the button.
Switching the Display On and Off
E272035
Press and release the button.
Switching Radio Text On and Off
E268570
Press and release the button todisplay extra information, forexample, artist name.
Note: Extra information may not always beavailable.
Switching Repeat Mode On and Off
E268569
Press and release the button torepeat the current media source.
Switching Shuffle Mode On andOff
Press and release the button toshuffle the current media source.
Using the Display ControlUse the up and down arrow buttons toselect the various settings. When you makeyour selection, press the left and rightarrow buttons to change the settings.
E265041
Press and release to confirm aselection.
Press and release the function buttonsbelow the display to select differentfunctions of the audio system dependingon which mode you are in.
Using the Number BlockIn radio mode, store and recall your favoriteradio stations. To store a favorite station,press and hold until the sound returns. Inphone mode, enter a phone number.
360
Fusion (CC7) Canada/United States of America, enUSA, Edition date: 201905, Second-Printing
Audio System

Using Seek, Fast Forward andReverse
In radio mode, select a frequency band andpress and release either button. Thesystem stops at the first station it finds inthat direction.In satellite radio mode, press and releaseto select the next or previous satellite radiostation. If you select a specific category,such as jazz, rock or news, press to find thenext or previous station in that category.
AUDIO UNIT - VEHICLES WITH:SONY AUDIO SYSTEM/TOUCHSCREEN DISPLAY
WARNING: Driving while distractedcan result in loss of vehicle control, crashand injury. We strongly recommend thatyou use extreme caution when using anydevice that may take your focus off theroad. Your primary responsibility is thesafe operation of your vehicle. Werecommend against the use of anyhand-held device while driving andencourage the use of voice-operatedsystems when possible. Make sure youare aware of all applicable local lawsthat may affect the use of electronicdevices while driving.
A
B
A
1 2
203A
A
E287572
Note: Depending on your vehicle optionpackage, the controls may look differentfrom what you see here.Note: Some features, such as satelliteradio, may not be available in your location.Check with an authorized dealer.Note: The touchscreen system controlsmost of the audio features.
Accessing the Sound Settings
E265271
Press and release the button toaccess settings for Treble,Midrange, Bass, Fade and
Balance.
Adjusting the Volume
E265373
361
Fusion (CC7) Canada/United States of America, enUSA, Edition date: 201905, Second-Printing
Audio System
Turn to adjust the volume.
Changing Radio Stations
E265272
In radio mode, press and release + or - tosearch through the radio frequency band.In satellite radio mode, press and release+ or - to find the previous or next availablesatellite radio station.
Ejecting the CD
E265032
Press and release the button toeject a CD.
Inserting a CDInsert a CD into the CD slot.
Switching the Audio Unit On andOff
Press and release the button.
Using Seek, Fast Forward andReverse
In radio mode, select a frequency band andpress and release either button. Thesystem stops at the first station it finds inthat direction.In CD mode, press and release to selectthe next or previous track. Press and holdto move quickly forward or backwardthrough the current track.
In satellite radio mode, press and releaseto select the next or previous satellite radiostation. If you select a specific category,such as jazz, rock or news, press to find thenext or previous station in that category.
DIGITAL RADIO (IF EQUIPPED)
Note: HD Radio broadcasts are notavailable in all markets.HD Radio technology is the digitalevolution of analog AM/FM radio. Yoursystem has a special receiver that allowsit to receive digital broadcasts, whereavailable, in addition to the analogbroadcasts, it already receives. Digitalbroadcasts provide a better sound qualitythan analog broadcasts with free,crystal-clear audio and no static ordistortion. For more information, and aguide to available stations andprogramming, please visitwww.hdradio.com.When HD Radio is on and you tune to astation broadcasting HD Radio technology,you may notice the HD Radio logo on yourscreen. When this logo is available, youmay also see Title and Artist fieldson-screen.The multicast indicator appears in FMmode, only, if the current station isbroadcasting multiple digital broadcasts.The highlighted numbers signify availabledigital channels where new or differentcontent is available. HD1 signifies the mainprogramming status and is available inanalog and digital broadcasts. Othermulticast stations, HD2 through HD7, areonly available digitally.
362
Fusion (CC7) Canada/United States of America, enUSA, Edition date: 201905, Second-Printing
Audio System

When HD Radio broadcasts are active, youcan access the following functions:• Memory presets allow you to save an
active channel as a memory preset.Touch and hold a memory preset slotuntil the sound returns. There is a briefmute while the radio saves the station.Sound returns when finished. When
switching to an HD2 or HD3 memorypreset, the sound mutes before thedigital audio plays, because the systemhas to reacquire the digital signal.
Note: As with any saved radio station, youcannot access the saved station if yourvehicle is outside the station’s receptionarea.
HD Radio Reception and Station Troubleshooting
Potential reception issues
If you are listening to a multicast station and you are onthe fringe of the reception area, the station may mute dueto weak signal strength.
Reception area
If you are listening to HD1, the system switches back tothe analog broadcast until the digital broadcast is availableagain. However, if you are listening to any of the possibleHD2-HD7 multicast channels, the station mutes and staysmuted unless it is able to connect to the digital signalagain.
When the system first receives a station, aside from HD2-HD7 multicast stations, it first plays the station in theanalog version. Once the receiver verifies the station is anHD Radio station, it shifts to the digital version. Dependingon the station quality, you may hear a slight sound changewhen the station changes from analog to digital. Blendingis the shift from analog to digital sound or digital back toanalog sound.
Station blending
In order to provide the best possibleexperience, use the contact form to reportany station issues found while listening toa station broadcasting with HD Radiotechnology. Independent entities own andoperate each station. These stations areresponsible for the accuracy of all audiostreams and data fields.
363
Fusion (CC7) Canada/United States of America, enUSA, Edition date: 201905, Second-Printing
Audio System

Potential station issues
ActionCauseIssues
No action required. This is abroadcast issue.
This is poor time alignmentby the radio broadcaster.
Echo, stutter, skip or repeatin audio.Increase or decrease inaudio volume.
No action required. Thereception issue may clear upas you continue to drive.
The radio is shifting betweenanalog and digital audio.
Sound fading or blending inand out.
No action required. This isnormal behavior. Wait untilthe audio is available.
The digital multicast is notavailable until the HD Radiobroadcast is decoded. Oncedecoded, the audio is avail-able.
There is an audio mutedelay when selecting HD2 orHD3, multicast preset orDirect Tune.
No action required. Thestation is not available inyour current location.
The previously storedmulticast preset or directtune is not available in yourcurrent reception area.
Cannot access HD2 or HD3multicast channel whenrecalling a preset or from adirect tune.
Fill out the station issueform at website listedbelow. 1
Data service issue by theradio broadcaster.
Text information does notmatch currently playingaudio.
Fill out the station issueform at website listedbelow.1
Data service issue by theradio broadcaster.
There is no text informationshown for currently selectedfrequency.
1 http://hdradio.com/stations/feedback
HD Radio Technology manufactured underlicense from iBiquity Digital Corporationand foreign patents. HD Radio and the HDand HD Radio logos are proprietarytrademarks of DTS Ford Motor Companyand DTS are not responsible for thecontent sent using HD Radio technology.Content may be changed, added or deletedat any time at the station owner'sdiscretion.
SATELLITE RADIO (IF EQUIPPED)
SiriusXM® Satellite Radio broadcasts avariety of music, news, sports, weather,traffic and entertainment satellite radiochannels. For more information and acomplete list of SiriusXM satellite radiochannels, visit www.siriusxm.com in theUnited States, www.siriusxm.ca in Canada,or call SiriusXM at 1-888-539-7474.
364
Fusion (CC7) Canada/United States of America, enUSA, Edition date: 201905, Second-Printing
Audio System

Note: This receiver includes the eCosreal-time operating system. eCos ispublished under the eCos License.
Satellite Radio Reception Factors
Potential satellite radio reception issues
For optimal reception performance, keep the antennaclear of snow and ice build-up and keep luggage and othermaterial as far away from the antenna as possible.
Antenna obstructions
Hills, mountains, tall buildings, bridges, tunnels, freewayoverpasses, parking garages, dense tree foliage andthunderstorms can interfere with your reception.
Terrain
When you pass a ground-based broadcast-repeatingtower, a stronger signal may overtake a weaker one andthe audio system may mute.
Station overload
Your display may show ACQUIRING . . . to indicate theinterference and the audio system may mute.
Satellite radio signal interfer-ence
SiriusXM Satellite Radio ServiceNote: SiriusXM reserves the unrestrictedright to change, rearrange, add or deleteprogramming including canceling, movingor adding particular channels, and its prices,at any time, with or without notice to you.Ford Motor Company shall not beresponsible for any such programmingchanges.
E208625
SiriusXM satellite radio is asubscription-based satellite radio servicethat broadcasts a variety of music, sports,news, weather, traffic and entertainmentprogramming. Your factory-installedSiriusXM satellite radio system includeshardware and a limited subscription term,which begins on the date of sale or leaseof your vehicle. See an authorized dealerfor availability.For more information on extendedsubscription terms (a service fee isrequired), the online media player and acomplete list of SiriusXM satellite radiochannels, and other features, please visitwww.siriusxm.com in the United States,www.siriusxm.ca in Canada, or callSiriusXM at 1-888-539-7474.
Satellite Radio Electronic SerialNumber (ESN)You need your ESN to activate, modify ortrack your satellite radio account.
365
Fusion (CC7) Canada/United States of America, enUSA, Edition date: 201905, Second-Printing
Audio System

Locating Your ESNWith satellite radio as the source, use thetouchscreen to select the following:
1. Select Settings. See Settings (page415).
2. Select SiriusXM.3. Select SiriusXM information.
Troubleshooting
ActionConditionMessage
No action required. Thismessage should disappearshortly.
Radio requires more thantwo seconds to produceaudio for the selectedchannel.
Acquiring…
If this message does notclear shortly, or with an igni-tion key cycle, your receivermay have a fault. See anauthorized dealer for service.
There is an internal moduleor system failure present.
Satellite antenna fault
SIRIUS system failure
Tune to another channel orchoose another preset.
The channel is no longeravailable.
Invalid Channel
Contact SiriusXM at 1-888-539-7474 to subscribe tothe channel, or tune toanother channel.
Your subscription does notinclude this channel.
Unsubscribed Channel
The signal is blocked. Whenyou move into an open area,the signal should return.
The signal is lost from theSiriusXM satellite or Siri-usXM tower to your vehicleantenna.
No Signal
No action required. Theprocess may take up tothree minutes.
Update of channelprogramming in progress.
Updating…
Contact SiriusXM at 1-888-539-7474 to resolvesubscription issues.
Your satellite service is nolonger available.
Questions? Call
1-888-539-7474
Use the channel guide toturn off the Lock or Skipfunction on that station.
All the channels in theselected category are eitherskipped or locked.
None found
Check Channel Guide
No action required.SiriusXM has updated thechannels available for yourvehicle.
Subscription Updated
366
Fusion (CC7) Canada/United States of America, enUSA, Edition date: 201905, Second-Printing
Audio System

USB PORT
WARNING: Driving while distractedcan result in loss of vehicle control, crashand injury. We strongly recommend thatyou use extreme caution when using anydevice that may take your focus off theroad. Your primary responsibility is thesafe operation of your vehicle. Werecommend against the use of anyhand-held device while driving andencourage the use of voice-operatedsystems when possible. Make sure youare aware of all applicable local lawsthat may affect the use of electronicdevices while driving.
E201595
The USB Port is below the climate controland in the center console.You can use the USB port to play mediaand charge a device.
367
Fusion (CC7) Canada/United States of America, enUSA, Edition date: 201905, Second-Printing
Audio System

GENERAL INFORMATIONSYNC is an in-vehicle communicationssystem that works with your Bluetoothenabled cellular phone and portable mediaplayer. This allows you to:• Make and receive calls.• Access and play music from your
portable music player.• Use 911 Assist or Emergency Assistance
and applications via SYNC AppLink.*
• Access phonebook contacts and musicusing voice commands.
• Stream music from your connectedphone.
• Text message.• Use the advanced voice recognition
system.• Charge your USB device (if your device
supports this).*These features are not available in allmarkets and may require activation.Available AppLink enabled apps vary bymarket.Make sure that you review your device'smanual before using it with SYNC.
SupportSYNC support is available at your regionalFord website. See SYNC™Troubleshooting (page 376).
SYNC Owner AccountWhy do I need a SYNC owner account?• Essential for keeping up with the latest
software downloads available forSYNC.
• Access to customer support for anyquestions you may have.
Driving RestrictionsFor your safety, certain features arespeed-dependent and restricted when yourvehicle is traveling over 3 mph (5 km/h).
Safety Information
WARNING: Driving while distractedcan result in loss of vehicle control, crashand injury. We strongly recommend thatyou use extreme caution when using anydevice that may take your focus off theroad. Your primary responsibility is thesafe operation of your vehicle. Werecommend against the use of anyhand-held device while driving andencourage the use of voice-operatedsystems when possible. Make sure youare aware of all applicable local lawsthat may affect the use of electronicdevices while driving.
When using SYNC:• Do not operate playing devices if the
power cords or cables are broken, splitor damaged. Place cords and cablesout of the way, so they do not interferewith the operation of pedals, seats,compartments or safe driving abilities.
• Do not leave playing devices in yourvehicle during extreme conditions as itcould cause them damage. See yourdevice's manual for further information.
• Do not attempt to service or repair thesystem. See an authorized dealer.
Privacy InformationWhen a cellular phone is connected toSYNC, the system creates a profile withinyour vehicle that is linked to that cellularphone. This profile is created in order tooffer you more cellular features and tooperate more efficiently. Among otherthings, this profile may contain data aboutyour cellular phone book, text messages
368
Fusion (CC7) Canada/United States of America, enUSA, Edition date: 201905, Second-Printing
SYNC™

(read and unread), and call history,including history of calls when your cellularphone was not connected to the system.In addition, if you connect a media device,the system creates and retains an index ofsupported media content. The system alsorecords a short development log ofapproximately 10 minutes of all recentsystem activity. The log profile and othersystem data may be used to improve thesystem and help diagnose any problemsthat may occur.The cellular profile, media device index,and development log will remain in thevehicle unless you delete them and aregenerally accessible only in the vehiclewhen you connect the cellular phone ormedia player. If you no longer plan to usethe system or the vehicle, we recommendyou perform a Master Reset to erase allstored information.No one can access system data withoutspecial equipment and access to thevehicle's SYNC module. Ford MotorCompany and Ford of Canada will notaccess the system data for any purposeother than as described absent consent, a
court order, or where required by lawenforcement, other governmentauthorities, or other third parties actingwith lawful authority. Other parties mayseek to access the informationindependently of Ford Motor Company andFord of Canada. For further privacyinformation, see the section on 911 Assist.See SYNC™ Applications and Services(page 372).
USING VOICE RECOGNITIONThis system helps you control manyfeatures using voice commands. Thisallows you to keep your hands on thewheel and focus on what is around you.
Initiating a Voice Session
E142599
Press the voice button. A list ofavailable voice commandsappears in the display.
Global Voice CommandsThese voice commands are alwaysavailable. You can say them at any time.
Global voice commands
Gives you available commands you can useon the current screen.
Help
Gives you a list of possible voicecommands.
List of Commands
This command ends the voice session. Youcan also cancel a session by pressing seekup, seek down, or holding the voice buttonfor two or more seconds.
Cancel
369
Fusion (CC7) Canada/United States of America, enUSA, Edition date: 201905, Second-Printing
SYNC™

Helpful Hints• Make sure the interior of your vehicle is
as quiet as possible. Wind noise fromopen windows and road vibrations mayprevent the system from correctlyrecognizing spoken commands.
• Before giving a voice command, waitfor the system announcement to finish,followed by a single tone. Anycommand spoken before this does notregister with the system.
• Speak naturally, without long pausesbetween words.
• You can interrupt the system at anytime while it is speaking by pressing thevoice button. You can cancel a voicesession by pressing and holding thevoice button.
System Interaction and FeedbackThe system provides feedback throughaudible tones, prompts, questions andspoken confirmations depending on thesituation and the chosen level ofinteraction. You can customize the voicerecognition system to provide more or lessinstruction and feedback.The default setting is to a higher level ofinteraction in order to help you learn to usethe system. You can change these settingsat any time.
Adjusting the Interaction Level
E142599
Press the voice button. Whenprompted, say:
Action and DescriptionVoice Command
Provides more detailed interaction andguidance. (Recommended for first timeusers.)
Interaction Mode Standard
Provides less audible interaction and guid-ance.
Interaction Mode Advanced
Phone ConfirmationUsing phone confirmations the systemasks you to verify before placing any calls.
To adjust this setting press the voice button, when prompted say:
Action and DescriptionVoice Command
When enabled, this feature will prompt youto confirm any voice initiated call commandprior to the call being placed.
Phone Confirmation Off
The system will make a best guess; youmay still occasionally be asked to confirmsettings.
Phone Confirmation On
370
Fusion (CC7) Canada/United States of America, enUSA, Edition date: 201905, Second-Printing
SYNC™

USING SYNC™ WITH YOURPHONEHands-free calling is one of the mainfeatures of SYNC. While the systemsupports a variety of features, many aredependent on your cellular phone'sfunctionality. At a minimum, most cellularphones with Bluetooth wireless technologysupport the following functions:• Answering an incoming call.• Ending a call.• Dialing a number.• Redialing.• Call waiting notification.• Caller ID.Other features, such as text messagingusing Bluetooth and automatic phonebookdownload, are phone-dependent features.
Pairing a PhoneWirelessly pairing your phone with SYNCallows you to make and receive hands-freecalls.Note: Make sure to switch on the ignitionand the radio. Shift the transmission intopark (P) for automatic transmission or firstgear for manual transmission.
Using the Audio SystemNote: To scroll through the menus, pressthe up and down arrows on your audiosystem.1. Make sure to switch on your phone's
Bluetooth feature before starting thesearch. See your device's manual ifnecessary.
2. Press the Settings button.3. Select Bluetooth from the menu.4. Press the OK button.5. Select the option to add. This starts
the pairing process.
6. When a message to begin pairingappears in the audio display, search forSYNC on your device.
Depending on your phone's capability andyour market, the system may prompt youwith questions, such as setting the currentphone as the primary phone anddownloading your phonebook.
Using Voice Commands
E142599
Make sure to switch on yourphone's Bluetooth featurebefore starting the search. See
your device's manual if necessary.
Press the voice button and whenprompted say:
Action and Descrip-tion
Voice Command
Follow the instruc-tions on the audiodisplay.
Pair Phone
Phone Voice Commands
E142599
Press the voice button. You cando things like place a phone calland access text messages.
When prompted, say a command. See thefollowing table for examples ofcommands.
Voice Command
___ List of Commands
Help
Call ___
Dial ___
Text Messages
371
Fusion (CC7) Canada/United States of America, enUSA, Edition date: 201905, Second-Printing
SYNC™

__ is a dynamic listing, meaning that itcould be the name of anything, such as acontact or phone number.
Phone ControlsUse the phone buttons on your steeringwheel to answer, reject, or hang up a call.
Accessing Features through thePhone MenuYou can access your call history,phonebook, sent text messages, as wellas access phone and system settings.1. Press the PHONE button to enter the
phone menu.2. Scroll through the menu to view
contacts, text messages, and thephone dialer.
SYNC™ APPLICATIONS ANDSERVICES• 911 Assist: Can alert 911 in the event of
an emergency.• SYNC AppLink: Allows you to connect
to and use certain applications (if yourphone is compatible).
These features may require activation.Available AppLink enabled apps vary bymarket.
911 Assist
WARNING: Unless the 911 Assistsetting is set on before a crash, thesystem will not dial for help which coulddelay response time, potentiallyincreasing the risk of serious injury ordeath after a crash.
WARNING: Do not wait for 911Assist to make an emergency call if youcan do it yourself. Dial emergencyservices immediately to avoid delayedresponse time which could increase therisk of serious injury or death after acrash. If you do not hear 911 Assist withinfive seconds of the crash, the system orphone may be damaged ornon-functional.
WARNING: Always place yourphone in a secure location in your vehicleso it does not become a projectile or getdamaged in a crash. Failure to do so maycause serious injury to someone ordamage the phone which could prevent911 Assist from working properly.
Note: The SYNC 911 Assist feature must beset on before the incident.Note: The SYNC 911 Assist feature onlyoperates in the U.S., Canada or in a territoryin which 911 is the emergency number.Note: Before setting this feature on, makesure that you read the 911 Assist PrivacyNotice later in this section for importantinformation.Note: If any user switches 911 Assist to onor off, that setting applies for all pairedphones. If 911 Assist is switched off, eithera voice message plays or a display messageor an icon comes on when your vehicle isstarted and after a previously paired phoneconnects.Note: Every phone operates differently.While SYNC 911 Assist works with mostcellular phones, some may have troubleusing this feature.
372
Fusion (CC7) Canada/United States of America, enUSA, Edition date: 201905, Second-Printing
SYNC™

If a crash deploys an airbag (excludingknee airbags and rear inflatable safetybelts [if equipped]) or activates the fuelpump shut-off, your SYNC-equippedvehicle may be able to contact emergencyservices by dialing 911 through a paired andconnected Bluetooth-enabled phone.See Supplementary Restraints System(page 41). Important information aboutairbag deployment is in this chapter.See Roadside Emergencies (page 231).Important information about the fuel pumpshut-off is in this chapter.
Setting 911 Assist On or Off
Press the Settings button then select:
Action and DescriptionMenuItem
Select the desired option, onor off.
911 Assist
To make sure that 911 Assist worksproperly:• SYNC must be powered and working
properly at the time of the incident andthroughout feature activation and use.
• The 911 Assist feature must be set onbefore the incident.
• You must pair and connect a Bluetoothenabled and compatible cell phone toSYNC.
• A connected Bluetooth enabled phonemust have the ability to make andmaintain an outgoing call at the timeof the incident.
• A connected Bluetooth enabled phonemust have adequate network coverage,battery power and signal strength.
• The vehicle must have battery powerand be located in the U.S., Canada orin a territory in which 911 is theemergency number.
In the Event of a CrashNot all crashes deploy an airbag or activatethe fuel pump shut-off (the triggers for 911Assist). If a connected cell phone sustainsdamage or loses its connection to SYNCduring a crash, SYNC searches for and triesto connect to a previously paired cellphone; SYNC then attempts to call theemergency services.Before making the call:• SYNC provides a short window of time
(about 10 seconds) to cancel the call.If you fail to cancel the call, SYNCattempts to dial 911.
• SYNC says the following, or a similarmessage: "SYNC will attempt to call911, to cancel the call, press Cancel onyour screen or press and hold thephone button on your steering wheel".
If you do not cancel the call, and SYNCmakes a successful call, a pre-recordedmessage plays for the 911 operator, andthen the occupant(s) in your vehicle areable to talk with the operator. Be preparedto provide your name, phone number andlocation immediately, because not all 911systems are capable of receiving thisinformation electronically.
911 Assist May Not Work If• Your cellular phone or 911 Assist
hardware sustains damage in a crash.• The vehicle's battery or the SYNC
system has no power.• The phone(s) thrown from your vehicle
are the ones paired and connected tothe system.
373
Fusion (CC7) Canada/United States of America, enUSA, Edition date: 201905, Second-Printing
SYNC™

911 Assist Privacy NoticeWhen you switch on 911 Assist, it maydisclose to emergency services that yourvehicle has been in a crash involving thedeployment of an airbag or activation ofthe fuel pump shut-off. Certain versions orupdates to 911 Assist may also be capableof electronically or verbally disclosing to911 operators your vehicle location or otherdetails about your vehicle or crash to assist911 operators to provide the mostappropriate emergency services. If you donot want to disclose this information, donot switch the feature on.
SYNC Mobile AppsThe system enables voice and steeringwheel control of SYNC AppLink enabledsmartphone apps. When an app is runningthrough AppLink, you can control mainfeatures of the app through voicecommands and steering wheel controls.Note: You must pair and connect yoursmartphone to SYNC to access AppLink.Note: Android users need to connect thephone to SYNC using Bluetooth.
Note: For information on available apps,supported smartphone devices andtroubleshooting tips please visit the FordwebsiteNote: Availability of SYNC AppLink enabledApps will vary by region.Note: Make sure you have an active accountfor the app that you have downloaded.Some apps work automatically with nosetup. Other apps want you to configureyour personal settings and personalize yourexperience by creating stations or favorites.We recommend you do this at home oroutside of your vehicle.
To Access Using the SYNC Menu
Press the Mobile Apps button to accessthe menu on-screen. Then select:
Action and DescriptionMenuItem
Scroll through the list ofavailable applications andselect a particular app.
FindMobileApps
Note: If you cannot find a compatible SYNCAppLink app, make sure the required app isrunning on the mobile device.
To Access Using Voice Commands
Press the voice button, then when prompted say:
Action and DescriptionVoice Command
Say the name of the application after the tone.The app should start. When an app is running through SYNC, youcan press the voice button and speak commands specific to the
app, for example "Play Playlist Road Trip".
Mobile Applications
SYNC lists all of the currently available mobile apps.List Applications
Searches your connected mobile device for SYNC-compatiblemobile apps.
Find Applications
Use this command to discover the available voice commands.Help
374
Fusion (CC7) Canada/United States of America, enUSA, Edition date: 201905, Second-Printing
SYNC™

App PermissionsApp permissions are organized by groups.You can grant these group permissionsindividually. You can change a permissiongroup status any time when not driving, byusing the settings menu.When you launch an app using SYNC, thesystem may ask you to grant certainpermissions, for example:• To allow your vehicle to provide vehicle
information to the app such as, but notlimited to: Fuel level, fuel economy, fuelconsumption, engine speed, rainsensor, odometer, VIN, externaltemperature, gear position, tirepressure, and head lamp status.
• To allow your vehicle to provide drivingcharacteristic information such as, butnot limited to: MyKey, seat belt status,engine revolutions per minute, gearposition, braking events, steering wheelangle, and accelerator pedal position.
• To allow your vehicle to providelocation information, including: GPSand speed.
• To allow the app to send pushnotifications using the vehicle displayand voice capabilities while running ina background state. Push notificationsmay be particularly useful for news orlocation based apps.
Note: You only need to grant permissionsthe first time you use an app with SYNC.Note: Ford is not responsible or liable forany damages or loss of privacy relating tousage of an app, or dissemination of anyvehicle data that you approve Ford toprovide to an app.
Enabling SYNC Mobile AppsIn order to enable mobile apps, SYNCrequires user consent to send and receiveapp authorization information and updatesusing the data plan associated with theconnected device.Data is sent to Ford in the United Statesthrough the connected device. Theinformation is encrypted and includes yourVIN, SYNC module number, anonymoususage statistics and debugginginformation. Updates may take place.Note: You must enable mobile apps foreach connected device the first time youselect a mobile app using the system.Note: Standard data rates apply. Ford isnot responsible for any additional chargesyou may receive from your service provider,when your vehicle sends or receives datathrough the connected device. This includesany additional charges incurred due todriving in areas when roaming out of a homenetwork.
USING SYNC™ WITH YOURMEDIA PLAYERSYNC supports digital media sourcesincluding: iPod, Bluetooth devices, andmost USB drives. SYNC also supportsaudio formats, such as MP3, WMA, WAVand ACC.
Media SourcesThe AUX or MEDIA button allows you toview and select available media sources.Press the AUX or MEDIA button to viewyour sources. Use the directional arrowsand OK button to select your source. Youcan also use the steering wheel audiocontrols.
375
Fusion (CC7) Canada/United States of America, enUSA, Edition date: 201905, Second-Printing
SYNC™

Audio Voice Commands
E142599
Press the voice button. You cando things like play a specific songor album, or tune to a radio
station. When prompted, say a command.See the following table for examplecommands. Not all commands may beavailable on your vehicle.
Command
___ List of Commands
Help
Pause
Play
AM ___
FM ___
CD Player
Sirius Channel ___
USB
Bluetooth Audio
__ is a dynamic listing, meaning that itcould be the name of anything, such as anartist, station, or media source.
SYNC™ TROUBLESHOOTINGYour SYNC system is easy to use. However,should questions arise, see the tablesbelow.Use your regional Ford website at any timeto check your phone's compatibility,register your account and set preferencesas well as access a customerrepresentative via an online chat (duringcertain hours).
Website(s)Market
www.SYNCMyRide.comNorth Americawww.SYNCMyRide.ca
www.sync-maroute.ca
Phone issues
Possible solution(s)Possible cause(s)Issue
Review your phone's manualabout audio adjustments.
The audio control settingson your phone may be
affecting SYNC perform-ance.
There is excessive back-ground noise during a phone
call.
Try turning off the device,resetting the device,
removing the device'sbattery, then trying again.
This may be a possiblephone malfunction.
During a call, I can hear theother person but they
cannot hear me.
Go to the website to reviewyour phone's compatibility.
This is a phone-dependentfeature.
SYNC is not able to down-load my phonebook.
376
Fusion (CC7) Canada/United States of America, enUSA, Edition date: 201905, Second-Printing
SYNC™

Phone issues
Possible solution(s)Possible cause(s)Issue
Try turning off the device,resetting the device orremoving the device's
battery, then trying again.
Try pushing your phonebookcontacts to SYNC by usingthe Add Contacts feature.This may be a possible
phone malfunction. Use the SYNCmyphonefeature available on the
website.
Try pushing your phonebookcontacts to SYNC by usingthe Add Contacts feature.
This may be a limitation onyour phone's capability.
The system says PhonebookDownloaded but the
phonebook in SYNC isempty or missing contacts.
If the missing contacts arestored on your SIM card, trymoving them to the device
memory.
Remove any pictures orspecial ring tones associ-
ated with the missingcontact.
Depending upon your phone,you may have to grant SYNCpermission to access your
phonebook contacts. Makesure to confirm when
prompted by your phoneduring the phonebook
download.
Go to the website to reviewyour phone's compatibility.
This is a phone-dependentfeature.
I am having troubleconnecting my phone to
SYNC.Try turning off the device,
resetting the device orremoving the device's
battery, then trying again.
377
Fusion (CC7) Canada/United States of America, enUSA, Edition date: 201905, Second-Printing
SYNC™

Phone issues
Possible solution(s)Possible cause(s)Issue
Try deleting your devicefrom SYNC, deleting SYNCfrom your device and trying
again.
Check the security and autoaccept and prompt alwayssettings relative to the SYNC
Bluetooth connection onyour phone.This may be a possible
phone malfunction. Update your device's firm-ware.
Turn off the Auto phone-book download setting.
Go to the website to reviewyour phone's compatibility.
This is a phone-dependentfeature.
Text messaging is notworking on SYNC. Try turning off the device,
resetting the device orremoving the device's
battery, then trying again.
This may be a possiblephone malfunction.
Press the Phone button toreturn to the Phone menu.
You are on the Select aCharacter screen.
I cannot return to the Phonemenu when selecting a
contact.
USB and media issues
Possible solution(s)Possible cause(s)Issue
Try turning off the device,resetting the device,
removing the device'sbattery, then trying again.
This may be a possibledevice malfunction.
I am having troubleconnecting my device. Make sure you are using the
manufacturer's cable.
Make sure you insert theUSB cable correctly into the
device and the USB port.
378
Fusion (CC7) Canada/United States of America, enUSA, Edition date: 201905, Second-Printing
SYNC™

USB and media issues
Possible solution(s)Possible cause(s)Issue
Make sure that the devicedoes not have an auto-
install program or activesecurity settings.
Make sure you are notleaving the device in yourvehicle during very hot or
cold temperatures.This is a device limitation.
SYNC does not recognizemy device when I turn on the
car.
Review the device compatib-ility chart on the SYNC
website to confirm yourphone supports the
Bluetooth audio streamingfunction.
This is a phone-dependentfeature.
Bluetooth audio does notstream.
Make sure you correctlyconnect the device to SYNC,and that you have pressed
play on your device.The device is not connected.
Make sure that all songdetails are populated.
Your music files may notcontain the correct artist,song title, album or genre
information.SYNC does not recognize
music that is on my device. The file may be corrupted.
Some devices require you tochange the USB settings
from mass storage to MTPclass.
The song may have copy-right protection, which does
not allow it to play.
Switch radio bands andreturn to Sirius or switch the
feature off. You can thenchange the Sirius station
using the directionalbuttons.
Sirius Replay is active.I cannot change the Siriusstation.
379
Fusion (CC7) Canada/United States of America, enUSA, Edition date: 201905, Second-Printing
SYNC™

Voice command issues
Possible solution(s)Possible cause(s)Issue
Review the phone voicecommands and the media
voice commands at thebeginning of their respective
sections.
You may be using the wrongvoice commands.
SYNC does not understandwhat I am saying. After pressing the voice icon,
wait until after the tonesounds and Listening
appears before saying acommand. Any command
spoken before this does notregister with the system.
You may be speaking toosoon or at the wrong time.
Review the media voicecommands at the beginning
of the media section.You may be using the wrong
voice commands.
SYNC does not understandthe name of a song or artist.
Say the song or artistexactly as listed. If you say
"Play Artist Prince", thesystem does not play musicby Prince and the Revolution
or Prince and the NewPower Generation.
You may be saying thename differently than the
way you saved it.Make sure you are saying the
complete title, such as"California remix featuring
Jennifer Nettles".
If the song titles are in allCAPS, you have to spell
them. LOLA requires you tosay "L-O-L-A".The system may not be
reading the name the sameway you are saying it. Do not use special charac-
ters in the title. The systemdoes not recognize them.
Review the Phone voicecommands at the beginning
of the phone section.You may be using the wrong
voice commands.SYNC does not understand
or is calling the wrongcontact when I want to
make a call.
380
Fusion (CC7) Canada/United States of America, enUSA, Edition date: 201905, Second-Printing
SYNC™

Voice command issues
Possible solution(s)Possible cause(s)Issue
Make sure you are saying thecontacts exactly as they are
listed. For example, if yousave a contact as JoeWilson, say "Call Joe
Wilson".
Using the SYNC phonemenu, open the phonebook
and scroll to the nameSYNC is having trouble
understanding. SYNC willread the name to you, giving
you some idea of thepronunciation SYNC is
expecting.
You may be saying thename differently than the
way you saved it.
The system works better ifyou list full names, such as
"Joe Wilson" rather than"Joe".
The system may not bereading the name the same
way you are saying it.
Do not use special charac-ters, such as 123 or ICE, as
the system does not recog-nize them.
Contacts in your phonebookmay be very short and
similar, or they may containspecial characters.
If a contact is in CAPS, youhave to spell it. JAKE
requires you to say "Call J-A-K-E".
Your phonebook contactsmay be in CAPS.
AppLink issues
Possible solution(s)Possible cause(s)Issue
Ensure you have a compat-ible smartphone; an Androidwith OS 2.3 or higher or aniPhone 3GS or newer with
iOS 5.0 or higher. Addition-ally, ensure your phone is
An AppLink capable phoneis not connected to SYNC.
AppLink Mobile Applica-tions: When I select "Find
New Apps," SYNC does notfind any applications.
paired and connected to
381
Fusion (CC7) Canada/United States of America, enUSA, Edition date: 201905, Second-Printing
SYNC™

AppLink issues
Possible solution(s)Possible cause(s)Issue
SYNC in order to findAppLink-capable apps onyour device. iPhone users
must also connect toSYNC's USB port with an
Apple USB cable.
Ensure you have down-loaded and installed thelatest version of the app
from your phone's app store.Ensure the app is running on
your phone. Some appsAppLink-enabled apps arenot installed and running on
your mobile device.My phone is connected, butI still cannot find any apps. require you to register or
login on the app on thephone before using themwith AppLink. Also, somemay have a "Ford SYNC"
setting, so check the app'ssettings menu on the phone.
Closing and restarting appsmay help SYNC find theapplication if you cannot
discover it inside the vehicle.On an Android device, if
apps have an "Exit' or 'Quit'Sometime apps do not
properly close and re-opentheir connection to SYNC,
over ignition cycles, forexample.
My phone is connected, myapp(s) are running, but I still
cannot find any apps.
option, select that thenrestart the app. If the appdoes not have that option,
you can also manually"Force Close" the app by
going to the phone's settingsmenu, selecting 'Apps.' then
finding the particular appand choosing 'Force stop.'Don't forget to restart the
app afterwards, then select"Find New Apps" on SYNC.
382
Fusion (CC7) Canada/United States of America, enUSA, Edition date: 201905, Second-Printing
SYNC™

AppLink issues
Possible solution(s)Possible cause(s)Issue
On an iPhone with iOS7+, toforce close an app, doubletab the home button then
swipe up on the app to closeit. Tab the home button
again, then select the appagain to restart it. After a
few seconds, the app shouldthen appear in SYNC's
Mobile App's Menu.
Reset the Bluetooth on yourphone by turning it off and
then turning Bluetooth backon. If you are in your vehicle,
SYNC should be able toautomatically re-connect toyour phone if you press the
"Phone" button.
There is a Bluetooth bug onsome older versions of theAndroid operating systemthat may cause apps that
were found on your previousvehicle drive to not be foundagain if you have not turned
off Bluetooth.
My Android phone isconnected, my app(s) arerunning, I restarted them,but I still cannot find any
apps.
383
Fusion (CC7) Canada/United States of America, enUSA, Edition date: 201905, Second-Printing
SYNC™

AppLink issues
Possible solution(s)Possible cause(s)Issue
Unplug the USB cable fromthe phone, wait a moment,
and plug the USB cableback in to the phone. After afew seconds, the app should
appear in SYNC's MobileApps Menu. If not, "Force
Close" the application andrestart it.
The USB connection toSYNC may need to be reset.
My iPhone phone isconnected, my app is
running, I restarted the appbut I still cannot find it on
SYNC.
Try increasing the Bluetoothvolume of the device by
using the device's volumecontrol buttons which aremost often found on the
side of the device.
The bluetooth volume onthe phone may be low.
I have an Android phone. Ifound and started my mediaapp on SYNC, but there is nosound or the sound is very
low.
Force close or uninstall theapps you do not want SYNCto find. If the app has a "FordSYNC" setting, disable thatsetting in the app's settings
menu on the phone.
Some Android devices havea limited number of
bluetooth ports apps canuse to connect. If you havemore AppLink apps on yourphone than the number ofavailable Bluetooth ports,you will not see all of your
apps listed in SYNC's mobileapps menu.
I can only see some of theAppLink apps running on my
phone listed in SYNC'sMobile Apps Menu.
SYNC System Reset
The SYNC system in your vehicle has System Reset feature that can be performed ifthe function of a SYNC feature is lost. This reset is intended to restore functionality andwill not erase any information previously stored in the system (Such as paired devices,phonebook, call history, text messages, or user settings). To perform a System Reset,press and hold the Seek Up (>>) button while pressing and holding the Radio Powerbutton. Release both buttons after 2-3 seconds. Please allow a few minutes for thereset to complete. After a few minutes has passed you can resume using the SYNC
system.
384
Fusion (CC7) Canada/United States of America, enUSA, Edition date: 201905, Second-Printing
SYNC™

GENERAL INFORMATION
WARNING: Driving while distractedcan result in loss of vehicle control, crashand injury. We strongly recommend thatyou use extreme caution when using anydevice that may take your focus off theroad. Your primary responsibility is thesafe operation of your vehicle. Werecommend against the use of anyhand-held device while driving andencourage the use of voice-operatedsystems when possible. Make sure youare aware of all applicable local lawsthat may affect the use of electronicdevices while driving.
About SYNCThe system allows you to interact with theentertainment, information andcommunication systems on your vehicleusing voice commands and a touchscreen.The system provides easy interaction withaudio, phone, navigation, mobile apps andsettings.Note: You can switch the system on anduse it for up to an hour without switchingthe ignition on.Note: You can use the system after youswitch the ignition off for up to 10 minutesor until you open a door.Note: For your safety, some features arespeed-dependent. Their use is limited towhen your vehicle speed is less than 3 mph(5 km/h).
Using the Touchscreen
E293823
Status bar.AHome screen.BClock. See Settings (page 415).COutside air temperature.DFeature bar.E
Status BarCell phone microphone muted.
Audio system muted.
Software update installed.
Wi-Fi connected.
Cell phone roaming.
Text message received.
385
Fusion (CC7) Canada/United States of America, enUSA, Edition date: 201905, Second-Printing
SYNC™ 3

Automatic crash notificationsystem off.
Cell phone network signalstrength.
Feature Bar
E100027
Select to use the radio, a USB, amedia player or a Bluetoothdevice. See Entertainment
(page 393).
E283811
Select to adjust climate settingsSee Climate (page 403).
Select to make calls and accessthe phonebook on your cellphone. See Phone (page 405).
Select to use the navigationsystem. See Navigation (page407).
Select to search for and usecompatible apps on your iOS orAndroid device. See Apps (page
412).
E280315
Select to adjust system settings.See Settings (page 415).
Cleaning the TouchscreenSee Cleaning the Interior (page 283).
Updating the SystemUpdating the System Using a USB Drive
Downloading an Update1. Go to the SYNC update page on the
local Ford website.2. Download the update.Note: The website notifies you if an updateis available.3. Insert a USB drive into your computer.
Note: The USB drive needs to be empty andmeet the minimum requirements detailedon the website.4. Follow the instructions provided to
download the update to the USB drive.
Installing an UpdateNote: You can use the system when aninstallation is in progress.1. Disconnect all other USB devices from
the USB ports.2. Connect the USB drive with the update
to a USB port.Note: Installation starts automaticallywithin 10 minutes.
Updating the System Using a Wi-FiNetwork Connection
Connecting to a Wi-Fi Network
E280315
Select the settings option on thefeature bar.
1. Select Automatic Updates.2. Select System Wi-Fi.3. Switch System Wi-Fi on.4. Select Available Wi-Fi Networks.5. Select an available Wi-Fi network.Note: Enter the network password toconnect to a secure network.
Switching Automatic System UpdatesOn
E280315
Select the settings option on thefeature bar.
1. Select Automatic Updates.2. Switch Automatic System Updates
on.The system is now set to check for andreceive system updates when it isconnected to a Wi-Fi network.
386
Fusion (CC7) Canada/United States of America, enUSA, Edition date: 201905, Second-Printing
SYNC™ 3

Note: You can use the system when adownload is in progress.Note: If the system is disconnected fromthe Wi-Fi network when a download is inprogress, the download continues the nexttime the system is connected to a Wi-Finetwork.
Additional Information andAssistanceFor additional information and assistance,we recommend that you contact anauthorized dealer or refer to the local Fordwebsite.
USING VOICE RECOGNITIONThe system allows you to interact with theentertainment, information andcommunication systems on your vehicleusing voice commands. This allows youto keep your hands on the steering wheeland focus on what is in front of you.
E142599
Press the voice control buttonon the steering wheel and waitfor the voice prompt.
Note: Press the voice control button againto interrupt a voice prompt and beginspeaking.Note: Turn the volume control when a voiceprompt plays to adjust the volume.Note: Press and hold the voice controlbutton on the steering wheel to use Siri onyour iOS device.The following voice commands aredesigned to help you from any screen:• List of Commands• HelpThe following tables list some of the morefrequently used voice commands. For acomplete list of voice commands, refer toour website.
General
DescriptionVoice Command
Get a list of voice commands for a specific feature.1___ List of Commands
Cancel an active voice session.Cancel
Get a list of voice commands for a specific feature.1___ Help
Return to the previous screen.Go back
Go to the main menu.Main Menu
Go to the next page.Next Page
Go to the previous page.Previous Page1 Add the name of the feature to the command.
387
Fusion (CC7) Canada/United States of America, enUSA, Edition date: 201905, Second-Printing
SYNC™ 3

EntertainmentAudio Source
DescriptionVoice Command
Use the radio.Radio
Use the CD player.CD Player
Use a Bluetooth device.Bluetooth Stereo
Use a USB or media player.USB
Radio
DescriptionVoice Command
Listen to AM radio.AM
Tune to a specific AM frequency.1AM ___
Listen to SiriusXM radio.2Sirius Channel ___
Listen to FM radio.FM
Tune to a specific FM frequency.1FM ___
1 Add the radio frequency to two decimal places to the command.2 You can say the Sirius channel name or number such as "Sirius Channel 16" or "SiriusThe Pulse".
388
Fusion (CC7) Canada/United States of America, enUSA, Edition date: 201905, Second-Printing
SYNC™ 3

USB and Media Player
DescriptionVoice Command
Play your music by category.1
Play Album ___
Play Artist ___
Play Genre ___
Play Playlist ___
Play Song ___
Play Audiobook ___
Play Podcast ___
Browse music on a USB device.
Browse All Albums
Browse All Artists
Browse All Audiobooks
Browse All Genres
Browse All Playlists
Browse All Podcasts
Browse All Songs
Browse your music by category on a USB device.1
Browse Album ___
Browse Artist ___
Browse Audiobook ___
Browse Genre ___
Browse Playlist ___
Browse Podcast ___1 Add an album name, artist name, audiobook name, genre name, playlist name, podcastname or track name to the command. Say the name exactly as it appears on your device.
Climate (If Equipped)
You can control the temperature of thevehicle using voice commands.
___ is a dynamic listing, meaning that forclimate voice commands it can be thedesired degrees for the temperaturesetting.
389
Fusion (CC7) Canada/United States of America, enUSA, Edition date: 201905, Second-Printing
SYNC™ 3

To adjust the temperature, say:
DescriptionVoice command
Adjust the temperature between 60–85°F(15.5–29.5°C).
Set Temperature ___
Phone
DescriptionVoice Command
Pair a cell phone or Bluetooth enabled device.Pair Phone
Redial the last number that you dialed.Redial
Dial a number.1Dial ___
Call a specific contact from your phonebook.2Call ___
Call a specific contact from your phonebook at aspecific location.3
Call ___ ___
Listen to a text message.Listen to Message
Listen to a specific text message from a list of textmessages.
Listen to Message ___
Reply to the last text message.Reply to Message1 Add the number you want to dial to the command.2 Add a contact name from your phonebook to the command. Say the first and last nameof your contact exactly as it appears on your device.3 Add a contact name and location from your phonebook to the command. Say the firstand last name of your contact exactly as it appears on your device.
390
Fusion (CC7) Canada/United States of America, enUSA, Edition date: 201905, Second-Printing
SYNC™ 3

Navigation (If Equipped)
Setting a Destination
DescriptionVoice Command
Enter a destination address. When prompted,provide the house number, the street and city.
Find an Address
Search for a point of interest by name or by category.Find a Place
Search for a nearby point of interest by category.1Find the Next ___
Search for a point of interest category.1Find a POI Category
Set your saved home address as your destination.Drive Home
Set your saved place of work as your destination.Drive to Work
Display and select from a list of previous destina-tions.
Show Previous Destinations
Display and select from a list of favorite destinations.Show Favorites1 Add a point of interest category or the name of a major brand or chain to the command.
Route Guidance
DescriptionVoice Command
Cancel the current route.Cancel Route
Select an alternate route.Detour
Repeat the last guidance prompt.Repeat Instruction
Display an overview of the route.Show Route
Display a list of traffic events on your route.Show Traffic
Display the map on the touchscreen.Show Map
Display a two-dimensional map with north towardthe top of the touchscreen.
North Up
Display a two-dimensional map with the directionyou are traveling toward the top of the touchscreen.
Heading Up
Display a three-dimensional map with the directionyou are traveling toward the front.
Show 3D
391
Fusion (CC7) Canada/United States of America, enUSA, Edition date: 201905, Second-Printing
SYNC™ 3

AppsGeneral
DescriptionVoice Command
Start an app. The system prompts you for the appname.
Mobile Applications
Get a list of apps running on your device.List Applications
Search and connect to apps running on your device.Find Applications
Active App
DescriptionVoice Command
Get a list of voice commands for a specific app.1___ Help
Close an app.1Exit ___
1 Add an app name to the command.
SiriusXM Traffic and Travel Link (If Equipped)
DescriptionVoicecommand
Displays a list of traffic incidents.ShowTraffic
Displays the current weather map.ShowWeatherMap
Displays a list of fuel prices.Show FuelPrices
Displays the 5 day weather forecast.Show 5Day Fore-cast
392
Fusion (CC7) Canada/United States of America, enUSA, Edition date: 201905, Second-Printing
SYNC™ 3

Voice Settings
DescriptionVoice Command
Go to the voice settings menu.Voice Settings
Switch long voice prompts on.Interaction Mode Novice
Switch short voice prompts on.Interaction Mode Advanced
Switch call confirmation on. The system promptsyou to confirm before making a call.
Phone Confirmation On
Switch call confirmation off. The system does notprompt you to confirm before making a call.
Phone Confirmation Off
Switch the display of voice commands on.Voice Command Lists On
Switch the display of voice commands off.Voice Command Lists Off
Automatic Blower Motor SpeedReductionIf necessary, the system decreases theblower motor speed when you are usingvoice commands to reduce the amount ofbackground noise in your vehicle. It returnsto normal when you are done.
Switching Automatic Blower MotorSpeed Reduction OffSimultaneously press the A/C andrecirculated air buttons.
ENTERTAINMENT
A
BE293491
Audio source. Select to choosea different audio source.
A
Presets. Swipe left to view morepresets.
B
You can access these options using thetouchscreen or voice commands.
393
Fusion (CC7) Canada/United States of America, enUSA, Edition date: 201905, Second-Printing
SYNC™ 3

Sources Press this button to select the source ofmedia you want to listen to.
Menu Item
AM
FM1SIRIUS
1CD
The name of the USB that is plugged in displays here.USB
Bluetooth Stereo
If you have SYNC 3 compatible apps on your connected smart phone, theydisplay here as individual source selections.
Apps
1 This feature may not be available in all markets and requires an active subscription.
AM/FM RadioTuning a StationYou can use the tune or seek controls onthe radio bezel to select a station.
To tune a station using thetouchscreen, select:
Menu Item
Direct Tune
A pop up appears, allowing you to type inthe frequency of a station. You can onlyenter a valid station for the source you arecurrently listening to.You can press the backspace button todelete the previously entered number.
Once you have entered the station'scall numbers, you can select:
Action and Descrip-tion
Menu Item
Press to beginplaying the stationyou have entered.
Enter
Press to exitwithout changingthe station.
Cancel
PresetsTo set a new preset, tune to the stationand then press and hold one of thememory preset buttons. The audio mutesbriefly while the system saves the stationand then returns.You may be able to add additional presetpages using the settings option on thefeature bar.
394
Fusion (CC7) Canada/United States of America, enUSA, Edition date: 201905, Second-Printing
SYNC™ 3

SiriusXM® Satellite Radio (IfActivated)Note: This feature may not be available inall markets and requires an activesubscription.
E234451
SiriusXM satellite radio is asubscription-based satellite radio servicethat broadcasts a variety of music, sports,news, weather, traffic and entertainmentprogramming. Your factory-installedSiriusXM satellite radio system includeshardware and a limited subscription termthat begins on the date of sale or lease ofyour vehicle. See an authorized dealer foravailability.
For more information on extendedsubscription terms (a service fee isrequired), the online media player and alist of SiriusXM satellite radio channels,and other features, please visitwww.siriusxm.com in the United States,www.siriusxm.ca in Canada, or callSiriusXM at 1-888-539-7474.Note: SiriusXM reserves the unrestrictedright to change, rearrange, add or deleteprogramming. This includes canceling,moving or adding particular channels, andits prices, at any time, with or without noticeto you. We are not responsible for any suchprogramming changes.Note: This receiver includes the eCosreal-time operating system. eCos ispublished under the eCos License.
The following buttons are available for SiriusXM:
Action and DescriptionMenu Item
Touch this button to see a list of available stations.Browse
A pop-up appears, allowing you to type in the call numbers ofa station.
Direct Tune
Once you enter the stations call numbers, you can select:
The system tunes to the station you select.Enter
You exit the pop-up and the current stationcontinues to play.
Cancel
You can press the backspace button to delete the previousnumber.
395
Fusion (CC7) Canada/United States of America, enUSA, Edition date: 201905, Second-Printing
SYNC™ 3

Action and DescriptionMenu Item
Replay audio on the current channel. You can replay approx-imately 45 minutes of audio as long as you remain tuned tothe current station. Changing stations erases the previousaudio.
Replay
When you are in replay mode, you are notable to select a different preset until youreturn to live audio. Pressing this buttonreturns you to the live broadcast.
Live
Save the current song, artist, or team as a favorite. The systemalerts you when it plays again on any channel.
ALERT
Selecting this button allows you to enable and edit alerts. SeeSettings (page 415).
Memory PresetsTo set a preset, tune to the station thenpress and hold one of the memory presetbuttons. The audio mutes briefly while thesystem saves the station and returns oncethe station is stored.
You may be able to add additional presetpages using the settings option on thefeature bar.
Satellite Radio Electronic SerialNumber (ESN)You need your ESN to activate, modify ortrack your satellite radio account. SeeSettings (page 415).
SiriusXM Satellite Radio Reception Factors and Troubleshooting
Potential Reception Issues
For optimal reception performance, keep the antenna clearof snow and ice build-up and keep luggage and othermaterials as far away from the antenna as possible.
Antenna obstructions
Hills, mountains, tall buildings, bridges, tunnels, freewayoverpasses, parking garages, dense tree foliage and thunder-storms can interfere with your reception.
Terrain
When you pass a ground-based broadcast-repeating tower,a stronger signal may overtake a weaker one and the audiosystem may mute.
Station overload
Your display may show ACQUIRING... to indicate the interfer-ence and the audio system may mute.
Satellite radio signalinterference
396
Fusion (CC7) Canada/United States of America, enUSA, Edition date: 201905, Second-Printing
SYNC™ 3

Troubleshooting Tips
ActionCauseMessage
No action required. Thismessage should disappearshortly.
Radio requires more than twoseconds to produce audio forthe selected channel.
Acquiring Signal
If this message does not clearshortly, or with an ignition keycycle, your receiver may havea fault. See an authorizeddealer for service.
There is an internal module orsystem failure present.
Satellite antenna fault
SIRIUS system failure
Tune to another channel orchoose another preset.
The channel is no longer avail-able.
Invalid Channel
Contact SiriusXM at 1-888-539-7474 to subscribe to thechannel, or tune to anotherchannel.
Your subscription does notinclude this channel.
Unsubscribed Channel
The signal is blocked. Whenyou move into an open area,the signal should return.
The signal is lost from the Siri-usXM satellite or SiriusXMtower to your vehicle antenna.
Satellite acquiringsignal…
No action required. Theprocess may take up to threeminutes.
Update of channel program-ming in progress.
Updating…
Contact SiriusXM at 1-888-539-7474 to resolve subscrip-tion issues.
Your satellite service is nolonger available.
Questions? Call 1-888-539-7474
Use the channel guide or theSirius XM Settings tile to turnoff the Lock or Skip function onthat station.
All the channels in the selectedcategory are either skipped orlocked.
None found. Checkchannel guide.
No action required.SiriusXM has updated thechannels available for yourvehicle.
SIRIUS Subscriptionupdated
HD Radio™ Information (IfAvailable)To activate HD radio, please see the RadioSettings in the Settings Chapter. SeeSettings (page 415).
Note: HD Radio broadcasts are notavailable in all markets.
397
Fusion (CC7) Canada/United States of America, enUSA, Edition date: 201905, Second-Printing
SYNC™ 3

HD Radio technology is the digitalevolution of analog AM/FM radio. Yoursystem has a special receiver that allowsit to receive digital broadcasts (whereavailable) in addition to the analogbroadcasts, it already receives. Digitalbroadcasts provide a better sound qualitythan analog broadcasts with free,crystal-clear audio and no static ordistortion. For more information, and aguide to available stations andprogramming, please visit:
Website
www.hdradio.com
When HD Radio is on and you tune to astation broadcasting HD Radio technology,you may notice the following indicators onyour screen:
E142616
The HD logo is grey when acquiring a digitalstation, and then changes to orange whendigital audio is playing. When this logo isavailable, you may also see Title and Artistfields on-screen.The multicast indicator appears in FMmode (only) if the current station isbroadcasting multiple digital broadcasts.The highlighted numbers signify availabledigital channels where new or differentcontent is available. HD1 signifies the mainprogramming status and is available inanalog and digital broadcasts. Othermulticast stations (HD2 through HD7) areonly available digitally.Note: There is also an additional featurefor stations that have more than 1 HDmulticast (For example, HD1 or HD2). TheHD logo and Radio text appears as a button.Pressing this button allows you to cyclethrough all of the HD stations on thatspecific frequency. For example, if you areon 101.1 and it has HD1, HD2, HD3, pressingthe button repeatedly causes the radio tocycle through the HD stations in a cyclicincreasing order.
When HD Radio broadcasts are active, you can access the following functions:
Action and DescriptionMessage
Allows you to save an active channel as a memory preset.Touch and hold a memory preset slot until the sound returns.There is a brief mute while the radio saves the station. Soundreturns when the channel saves. When switching to an HD2or HD3 memory preset, the sound mutes before the digitalaudio plays, because the system has to reacquire the digitalsignal.
Presets
Note: As with any station you save, you cannot access the saved station if your vehicle isoutside the station’s reception area.
398
Fusion (CC7) Canada/United States of America, enUSA, Edition date: 201905, Second-Printing
SYNC™ 3

HD Radio Reception and Station Troubleshooting
Potential Reception Issues
If you are listening to a multicast station and you are on thefringe of the reception area, the station may mute due toweak signal strength.
Reception area
If you are listening to HD1, the system changes back to theanalog broadcast until the digital broadcast is available again.However, if you are listening to any of the possible HD2-HD7multicast channels, the station mutes and stays muted unlessit is able to connect to the digital signal again.
When the system first receives a station (aside from HD2-HD7 multicast stations), it first plays the station in the analogversion. Once the receiver verifies the station is an HD Radiostation, it shifts to the digital version. Depending on the stationquality, you may hear a slight sound change when the stationchanges from analog to digital. Blending is the shift fromanalog to digital sound or digital back to analog sound.
Station blending
In order to provide the best possibleexperience, use the contact form to reportany station issues found while listening toa station broadcasting with HD Radiotechnology. Independent entities own andoperate each station. These stations areresponsible for ensuring all audio streamsand data fields are accurate.
Potential Station Issues
ActionCauseIssues
No action required. This is abroadcast issue.
This is poor time alignment bythe radio broadcaster.
Echo, stutter, skip orrepeat in audio.Increase or decrease inaudio volume.
No action required. The recep-tion issue may clear up as youcontinue to drive.
The radio is shifting betweenanalog and digital audio.
Sound fading orblending in and out.
No action required. This isnormal behavior. Wait until theaudio is available.
The digital multicast is notavailable until the HD Radiobroadcast is decoded. Oncedecoded, the audio is available.
There is an audio mutedelay when selectingHD2 or HD3, multicastpreset or Direct Tune.
399
Fusion (CC7) Canada/United States of America, enUSA, Edition date: 201905, Second-Printing
SYNC™ 3

Potential Station Issues
ActionCauseIssues
No action required. The stationis not available in your currentlocation.
The previously stored multicastpreset or direct tune is notavailable in your current recep-tion area.
Cannot access HD2 orHD3 multicast channelwhen recalling a presetor from a direct tune.
Fill out the station issue form.1Data service issue by the radiobroadcaster.
Text information doesnot match currentlyplaying audio.
Fill out the station issue form.1
Data service issue by the radiobroadcaster.
There is no textinformation shown forcurrently selectedfrequency.
1 You can find the form here:
Website
http://hdradio.com/stations/feedback
HD Radio Technology manufactured underlicense from iBiquity Digital Corporationand foreign patents. HD Radio and the HDand HD Radio logos are proprietarytrademarks of DTS. The vehiclemanufacturer and DTS are not responsiblefor the content sent using HD Radiotechnology. Content may be changed,added or deleted at any time at the stationowner's discretion.
CD (If equipped)Once you select this option, the systemreturns you to the main audio screen.The current audio information appears onthe screen.
The following buttons are also available:
FunctionButton
You can use the browse button to select a track.Browse
Select this button and a small number one displays to indicatethe track is set to repeat.
Repeat
400
Fusion (CC7) Canada/United States of America, enUSA, Edition date: 201905, Second-Printing
SYNC™ 3

FunctionButton
For MP3 CDs, this button allows you to toggle through repeatoff, repeat one track (a small number one displays), and repeatcurrent folder (a small folder displays).
Select the shuffle symbol to have the audio on the disk playin random order.
Shuffle
You can use the forward, reverse, pause orplay buttons to control the audio playback.
Bluetooth Stereo or USBBluetooth Stereo and USB allow you toaccess media that you store on yourBluetooth device or USB device such asmusic, audio books or podcasts.
The following buttons are available for Bluetooth and USB:
FunctionButton
Pressing the repeat button toggles the repeat setting throughthree modes: repeat off (button not highlighted), repeat all(button highlighted) and repeat track (button highlighted witha small number one).
Repeat
Play the tracks in random order.Shuffle
You can use the forward, reverse, pause orplay buttons to control the audio playback.To get more information about thecurrently playing track, press the cover artor Info button.
For some devices, SYNC 3 is able toprovide 30-second skip buttons when youlisten to audio books or podcasts. Thesebuttons allow you to skip forward orbackward within a track.While playing audio from a USB device youcan look for certain music by selecting thefollowing:
FunctionButton
If available, displays the list of tracks in theNow Playing playlist.
Browse
This option, which is available underbrowse, allows you to play all tracks or tofilter the available media into one of thebelow categories.
New Search
Play All
401
Fusion (CC7) Canada/United States of America, enUSA, Edition date: 201905, Second-Printing
SYNC™ 3

FunctionButton
Playlists
Artist
Albums
Songs
Genres
Podcasts
Audio books
Composers
This button allows you to choose a specificletter to view within the category you arebrowsing.
A-Z Jump
If available, this allows you to browse thefolders and files on your USB device.
Explore Device
USB Ports
E211463
The USB ports are in the center console orbehind a small access door in theinstrument panel.This feature allows you to plug in USBmedia devices, memory sticks, flash drivesor thumb drives, and charge devices if theysupport this feature.
Select this option to play audio from yourUSB device.
AppsThe system supports the use of certainaudio apps such as iHeartRadio through aUSB or Bluetooth enabled device.Each app gives you different on-screenoptions depending on the app's content.See Apps (page 412).
Supported Media Players, Formatsand Metadata InformationThe system is capable of hosting nearlyany digital media player, including iPod,iPhone, and most USB drives.Supported audio formats include MP3,WMA, WAV, AAC, and FLAC.Supported audio file extensions includeMP3, WMA, WAV, M4A, M4B, AAC, andFLAC.
402
Fusion (CC7) Canada/United States of America, enUSA, Edition date: 201905, Second-Printing
SYNC™ 3

Supported USB file systems include: FAT,exFAT, and NTFS.SYNC 3 is also able to organize the mediafrom your USB device by metadata tags.Metadata tags, which are descriptivesoftware identifiers embedded in themedia files, provide information about thefile.If your indexed media files contain noinformation embedded in these metadatatags, SYNC 3 may classify the emptymetadata tags as unknown.SYNC 3 is capable of indexing up to50,000 songs per USB device, for up to 10devices.
CLIMATETouch the climate button on thetouchscreen to access your climate controlfeatures.Note: You can switch temperature unitsbetween Fahrenheit and Celsius. SeeSettings (page 415).
Accessing the Climate ControlMenu
E265038
Touch the button to accessadditional controls for the frontclimate system.
Directing the AirflowTouch the button to directairflow to the windshield airvents and de-mister.
Touch the button to directairflow to the instrument panelair vents.
Touch the button to directairflow to the footwell air vents.
You can direct air through any combinationof these air vents.
Setting the Blower Motor SpeedTouch up or down to increase ordecrease the volume of air thatcirculates in your vehicle.
Setting the TemperatureTouch up or down on the left-handtemperature control to set the left-handtemperature.Note: This control also adjusts theright-hand side temperature when youswitch off dual zone mode.Touch up or down on the right-handtemperature control to set the right-handtemperature.
Switching Auto Mode On and OffTouch the button to switch onautomatic operation, then setthe temperature.
The system adjusts the blower motorspeed, air distribution, air conditioningoperation, and outside or recirculated airto reach and maintain the temperature youhave set.
Switching the Air Conditioning Onand Off
A pop-up appears on the screento display the air conditioningoptions.
MAX A/C: Touch the button to activateand maximize cooling. The driver andpassenger temperatures are set to LO,recirculated air flows through theinstrument panel vents, air conditioningautomatically turns on and the fanautomatically adjusts to the highest speed.
403
Fusion (CC7) Canada/United States of America, enUSA, Edition date: 201905, Second-Printing
SYNC™ 3

A/C: Touch to switch the air conditioningon or off. Use A/C with recirculated air toimprove cooling performance andefficiency.Note: In certain conditions, such asmaximum defrost, the air conditioningcompressor may continue to operate eventhough you switch off the air conditioning.
Switching the Climate Control Onand Off
Touch the button.
Switching the Climate ControlledSeats On and Off
E265282
Touch the button to cyclethrough the various climatecontrolled seat settings.
Switching Dual Zone Mode On andOff
E265280
Touch the button to switch ontemperature control for theright-hand side of the vehicle.
Switching the Heated ExteriorMirrors On and Off
E266189
Touch the button.
Switching the Heated WindshieldOn and Off
Touch the button to clear thewindshield of thin ice and fog.The heated windshield turns off
after a short period of time.
Switching the Heated RearWindow On and Off
E184884
Touch the button to clear therear window of thin ice and fog.
Switching the Heated Seats Onand Off
Touch the button to cyclethrough the various heatsettings.
Switching the Heated SteeringWheel On and Off
Touch the button.
Switching Maximum AirConditioning On and Off
Touch the button for maximumcooling.
Recirculated air flows through theinstrument panel air vents, air conditioningturns on and the blower motor adjusts tothe highest speed.
Switching Maximum Defrost Onand Off
Touch the button for maximumdefrosting.
Air flows through the windshield air vents,and the blower motor adjusts to thehighest speed.You can also use this setting to defog andclear the windshield of a thin covering ofice.Note: To prevent window fogging, youcannot select recirculated air whenmaximum defrost is on.
404
Fusion (CC7) Canada/United States of America, enUSA, Edition date: 201905, Second-Printing
SYNC™ 3

Note: The heated rear window also turnson when you select maximum defrost.
Switching Recirculated Air On andOff
Touch the button to switchbetween outside air andrecirculated air.
The air currently in the passengercompartment recirculates. This mayreduce the time needed to cool the interior,when used with A/C, and reduce unwantedodors from entering your vehicle.Note: Recirculated air may turn off, orprevent you from switching on, in all air flowmodes except MAX A/C to reduce the riskof fogging. Recirculation may also turn onand off in various air distribution controlcombinations during hot weather to improvecooling efficiency.
Switching the Ventilated Seats Onand Off
E268558
Touch the button to cyclethrough the various ventilatedseat settings.
Accessing Rear Climate Controls
E270447
Touch the button to accessadditional controls for the rearclimate system.
Rear Climate Control LockIndicator
E265289
Touch the button.When on, you can only operatethe rear passenger settings
through the front controls.
Switching Rear Auto Mode On andOff
Touch the button to switch onrear automatic operation, thenset the temperature.
Switching the Rear ClimateControlled Seats On and Off
E265282
Touch the button to cyclethrough the various climatecontrolled seat settings.
Switching the Rear Heated SeatsOn and Off
Touch the button to cyclethrough the various heatsettings.
Switching the Rear VentilatedSeats On and Off
E268558
Touch the button to cyclethrough the various ventilatedseat settings.
PHONE
WARNING: Driving while distractedcan result in loss of vehicle control, crashand injury. We strongly recommend thatyou use extreme caution when using anydevice that may take your focus off theroad. Your primary responsibility is thesafe operation of your vehicle. Werecommend against the use of anyhand-held device while driving andencourage the use of voice-operatedsystems when possible. Make sure youare aware of all applicable local lawsthat may affect the use of electronicdevices while driving.
405
Fusion (CC7) Canada/United States of America, enUSA, Edition date: 201905, Second-Printing
SYNC™ 3

Check the compatibility of your device onthe regional website.
Pairing Your Cell Phone for theFirst TimeGo to the settings menu on your cell phoneand switch Bluetooth on.
Select the phone option on thefeature bar.
1. Select Add Phone.Note: A prompt alerts you to search for yourvehicle on your cell phone.2. Select your vehicle on your cell phone.Note: A number appears on your cell phoneand on the touchscreen.3. Confirm that the number on your cell
phone matches the number on thetouchscreen.
Note: The touchscreen indicates that youhave successfully paired your cell phone.4. Download the phonebook from your
cell phone when you are prompted.Note: If you pair more than one cell phone,use the phone settings to specify theprimary phone. You can change this settingat any time.
Using Your Cell PhoneRecent Call ListDisplay and select an entry from a list ofprevious calls.
ContactsDisplay a smart search form to look up yourcontacts. Use the List button toalphabetically sort your contacts.
Change DeviceDisplay the list of paired or connecteddevices that you can select.
Phone SettingsChange ring tones, alerts or pair anotherphone.
Do Not DisturbReject incoming calls and switch ring tonesand alerts off.
Phone KeypadDirectly dial a number.
MuteMute the microphone.
Text MessagingSetting Text Message Notification
iOS1. Go to the settings menu on your cell
phone.2. Select Bluetooth.3. Select the information icon to the right
of your vehicle.4. Switch text message notification on.
Android1. Go to the settings menu on your cell
phone.2. Select Bluetooth.3. Select the profiles option.4. Select the phone profile.5. Switch text message notification on.
406
Fusion (CC7) Canada/United States of America, enUSA, Edition date: 201905, Second-Printing
SYNC™ 3

Using Text Messaging
DescriptionMenu Item
Hear the text message.Hear It
View the text message.View
Call the sender.Call
Reply to the text message with a standard text message.Reply
Apple CarPlay (If Equipped)
1. Connect your device to a USB port.2. Follow the instructions on the
touchscreen.Note: Certain features of the system arenot available when you are using AppleCarPlay.
Switching Apple CarPlay OffSelect the settings option on thefeature bar.
1. Select Apple CarPlay Preferences.2. Switch Apple CarPlay off.
Android Auto (If Equipped)
1. Connect your device to a USB port.2. Follow the instructions on the
touchscreen.Note: You might need to enable AndroidAuto from the settings menu.Note: Certain features of the system arenot available when you are using AndroidAuto.
Switching Android Auto OffSelect the settings option on thefeature bar.
1. Select Android Auto.
2. Switch Android Auto off.
NAVIGATION (IF EQUIPPED)
Note: For more information, refer to ourwebsite.
Select the navigation option onthe feature bar.
E297557
Map view menu.AZoom out.BZoom in.CRoute guidance menu.DDestination entry menu.E
407
Fusion (CC7) Canada/United States of America, enUSA, Edition date: 201905, Second-Printing
SYNC™ 3

Setting a DestinationDestination Entry Menu
DescriptionItem
Enter a destination address.Search
Display and select from a list of previous destinations.Previous Destinations
Set your saved home address as your destinationHome
Set your saved place of work as your destination.Work
Display and select from a list of favorite destinations.Favorites
Setting a Destination Using the TextEntry Screen
E297558
Text entry field.AAutomatic suggestions based onthe text you enter.
B
Information icon.CSearch.DKeyboard settings.E
Note: Select one of the suggestions tocopy the detail to the text entry field.
You can search by entering all or part ofthe destination, such as the Address, POICategory or Name, Intersection, City,Latitude/Longitude, etc. Tips: If you donot specify a location, the system willuse the current vehicle location. You canspecify a location by address, city, stateor zip code. For additional search support,please visit: support.ford.com.Note: Press the button in the top right-handcorner of the main map to display estimatedtime of arrival, remaining travel time ordistance to destination.
408
Fusion (CC7) Canada/United States of America, enUSA, Edition date: 201905, Second-Printing
SYNC™ 3

Setting a Destination Using the MapScreen
E297559
Re-center the map.ASelected location.B3D map rotation. Swipe left orright.
C
Start route guidance.DDestination name.E
Select the location on the map.Select Start to begin route guidance.
Changing the Format of the MapDisplay the map in one of the followingformats:• A two-dimensional map with the
direction you are traveling toward thetop of the screen.
• A two-dimensional map with northtoward the top of the screen.
• A three-dimensional map with thedirection you are traveling toward thefront.
ZoomDisplay more or less detail on the map.Note: You can use pinch gestures to zoomin and out. Place two fingers on the screenand move them apart to zoom in. Place twofingers on the screen and bring themtogether to zoom out.
Route Guidance
E297560F
A
Turn indicator. Select to hear thelast voice prompt.
A
Point of interest.BEstimated time of arrival,distance to destination or timeto destination.
C
Current road.DMute guidance prompts.ECancel route guidance.F
Note: To change guidance prompt volume,turn the volume control when a guidanceprompt plays.
409
Fusion (CC7) Canada/United States of America, enUSA, Edition date: 201905, Second-Printing
SYNC™ 3

Route Guidance Menu
DescriptionMenu Item
Adjust your map preferences for when route guidance is active.Screen View
View a full screen map when route guidance is active.Full Map
View highway exit information for your current route.Highway Exit Info
View the turn list for your current route. Select a road to avoidit.
Turn List
You can find the SiriusXM Traffic and Travel Link informationby pressing this button. This information requires an activesubscription to SiriusXM Traffic and Travel Link. When a routeis not active, a list of nearby traffic incidents displays. When aroute is active, you can choose to display a list of traffic nearbyor on the route.
Traffic List
Adjust navigation settings. See Settings (page 415).Navigation Settings
View information about your current location.Where Am I?
Cancel route guidance.Cancel Route
View the entire current route on the map.View Route
View an alternative route compared to your current one.Detour
Change the order or remove waypoints.Edit Waypoints
The system determines the order of waypoints for you.Optimize Order
Go to the next screen and start the new route.Go
Adjusting the Guidance PromptVolumeTurn the volume control when a guidanceprompt plays to adjust the volume.Note: If you have inadvertently adjustedthe volume to zero, press the turn indicatorbutton to play the last voice prompt andthen adjust the volume to the desired level.
Muting Guidance PromptsSelect the mute option on thescreen to mute guidanceprompts.
Note: The system mutes the next and allfuture guidance prompts.
Adding WaypointsYou can add a waypoint to a navigationroute as a destination along your route.You can add up to five waypoints.1. Select the search option on the map.2. Set a destination.3. Select Add Waypoint.4. Select Go.
410
Fusion (CC7) Canada/United States of America, enUSA, Edition date: 201905, Second-Printing
SYNC™ 3

Canceling Route GuidanceSelect the route guidance menuoption on the active guidancescreen.
Select Cancel Route.
E294817
Note: The route guidance menu option isalways in the bottom right-hand corner ofthe main map.
cityseeker (If Equipped)
Note: cityseeker point of interest (POI)information is limited to approximately 1,110cities (1,049 in the United States, 36 inCanada and 15 in Mexico).
E225487
cityseeker, when available, is a service thatprovides more information about certainpoints of interest such as restaurants,hotels and attractions.
When you have selected a point of interest,the location and information appear, suchas address, phone number and a starrating.Press More Information to see a photo,a review, a list of services and facilities, theaverage room or meal price and the webaddress. This screen displays the point ofinterest icons.For restaurants, cityseeker can provideinformation such as star rating, averagecost, review, handicap access, hours ofoperation, and website address.For hotels, cityseeker can provideinformation such as star rating, pricecategory, review, check-in and checkouttimes, hotel service icons and websiteaddress. Hotel service icons include:• Restaurant• Business center• Handicap facilities• Laundry• Refrigerator• 24 hour room service• Fitness center• Internet access• Pool• Wi-FiAttractions include nearby landmarks,amusement parks, historic buildings andmore. cityseeker can provide informationsuch as star rating, reviews, hour ofoperation and admission price.
411
Fusion (CC7) Canada/United States of America, enUSA, Edition date: 201905, Second-Printing
SYNC™ 3

SiriusXM Traffic and Travel Link (If
Equipped)
SiriusXM Traffic and Travel Link is availableon vehicles equipped with navigation andonly in select markets. You must activateand subscribe to receive SiriusXM Trafficand Travel Link information. It helps youlocate the best gas prices, find movielistings, get current traffic alerts, view theweather map, get accurate ski conditionsand see current sports scores.The system calculates a reasonableefficient route based on available speedlimits, traffic, and road conditions. You mayknow a local short cut that is more efficientat a given time than the route provided bySYNC 3, but you should expect a slightdifference in minutes or miles with theSYNC 3 route.
Michelin Travel Guide (If Equipped)
The Michelin travel guide is a service whichprovides additional information aboutcertain places of interest, for examplerestaurants, hotels and tourist sites. Pointsof interest that have Michelin travel guideinformation display a button to show youmore information. Push the button to seethe additional information. If you havepaired your phone with the system, youcan press the phone button to directlyestablish a call with the selected point ofinterest.
Navigation Map Accuracy andUpdatesHERE is the digital map provider for thenavigation application. If you find map dataerrors, you may report them directly toHERE by going to www.here.com. HEREevaluates all reported map errors andresponds with the result of theirinvestigation by e-mail.
The navigation system map data maycontain inaccurate or incompleteinformation due to the passage of time,changing circumstances, sources used andthe nature of collecting comprehensivegeographic data, any of which may lead toincorrect results. Inaccurate speed limitinformation, turn restrictions and otherroad attributes may affect the determinedroute and associated guidanceAnnual navigation map updates areavailable for purchase through yourdealership. Depending on your purchaseagreement, you might be eligible for freeMap update. You can choose to downloadthe Map data update onto a USB, order aUSB, or use Wi-Fi to deliver automaticupdates. To update your Map data overWi-Fi, your vehicle must be connected toa Wi-Fi access point. Map Data files arelarge, so it is highly recommended toperform the update when free Wi-Fi isavailable otherwise high data rates mayapply. For USB updates, free map updateeligibility, and other details, contactdealers at 1-866-462-8837 in the UnitedStates and Canada or 01-800-557-5539in Mexico or visit our local website for moreinformation.
APPSThe system allows you interact with selectmobile apps while keeping your eyes onthe road. Voice commands, your steeringwheel buttons, or a quick tap on yourtouchscreen give you advanced control ofcompatible mobile apps. You can alsostream your favorite music or podcasts,share your time of arrival with friends, andkeep connected safely.
412
Fusion (CC7) Canada/United States of America, enUSA, Edition date: 201905, Second-Printing
SYNC™ 3

When you start an app through the systemfor the first time, you could be asked togrant certain permissions. You can reviewand change the permissions that you havegranted at any time when your vehicle isnot moving. We recommend that youcheck your data plan before using yourapps through the system. Using themcould result in additional charges. We alsorecommend that you check the appprovider's terms and conditions andprivacy policy before using their app. Makesure that you have an active account forapps that you want to use through thesystem. Some apps will work with nosetup. Others require you to configuresome personal settings before you can usethem.Note: For more information about availableapps, visit catalog.ford.com.
Using Apps on an iOS DeviceSelect the apps option on thefeature bar.
1. If your device is connected via USB,switch Apple CarPlay off. See Phone(page 405).
2. Connect your device to a USB port orpair and connect using Bluetooth.
3. If prompted to enable CarPlay, selectDisable.
4. Start the apps on your device that youwant to use through SYNC.
Note: If you close the apps on your device,you will not be able to use them through thesystem.5. Select the app that you want to use on
the touchscreen.Note: Connect your device to a USB port ifyou want to use a navigation app. Whenusing a navigation app, keep your deviceunlocked and the app open.
Using Apps on an Android DeviceSelect the apps option on thefeature bar.
1. If your device is connected via USB,switch Android Auto off. See Phone(page 405).
2. Pair your device. See Phone (page 405).3. Start the apps on your device that you
want to use through SYNC.Note: If you close the apps on your device,you will not be able to use them through thesystem.4. Select Find Mobile Apps.Note: The system searches and connectsto compatible apps that are running on yourdevice.5. Select the app that you want to use on
the touchscreen.Note: Mobile Apps on your device use theUSB port to establish a connection withSYNC. Some devices may lose the ability toplay music over USB when Mobile Apps areenabled.
Using Mobile Navigation on anAndroid Device1. Connect your device to a USB port.2. Switch Android Auto off. See Phone
(page 405).3. Switch on Enable Mobile Apps via
USB in the Mobile Apps Settings tile.4. Select the apps option on the feature
bar.5. Select the navigation app that you
want to use on the touchscreen.Note: When using a navigation app, keepyour device unlocked and the app open.
413
Fusion (CC7) Canada/United States of America, enUSA, Edition date: 201905, Second-Printing
SYNC™ 3

SiriusXM Traffic and Travel Link (If
Equipped)
WARNING: Driving while distractedcan result in loss of vehicle control, crashand injury. We strongly recommend thatyou use extreme caution when using anydevice that may take your focus off theroad. Your primary responsibility is thesafe operation of your vehicle. Werecommend against the use of anyhand-held device while driving andencourage the use of voice-operatedsystems when possible. Make sure youare aware of all applicable local lawsthat may affect the use of electronicdevices while driving.
Note: SiriusXM Traffic and Travel Link maynot be available in all markets.
Note: In order to use SiriusXM Traffic andTravel Link, your vehicle must havenavigation.Note: A paid subscription is required toaccess and use these features. Go towww.siriusxm.com/travellink for moreinformation.Note: Visit www.siriusxm.com/traffic andclick on Coverage map and details for acomplete listing of all traffic areas coveredby SiriusXM Traffic and Travel Link.Note: Neither Sirius nor Ford is responsiblefor any errors or inaccuracies in the SiriusXMTraffic and Travel Link services or its use invehicles.When you subscribe to SiriusXM Trafficand Travel Link, it can help you locate thebest gas prices, find movie listings, getcurrent traffic alerts, view the currentweather map, get accurate ski conditionsand see scores to current sports games.
Action and DescriptionMenu Item
Touch these buttons to identify traffic incidents on your route,near your vehicle’s current location or near any of your favoriteplaces, if programmed.
Traffic on Route
Traffic Nearby
Touch this button to view fuel prices at stations close to yourvehicle’s location or on an active navigation route.
Fuel Prices
Touch this button to view nearby movie theaters and theirshow times, if available.
Movie Listings
Touch this button to view the nearby weather, current weather,or the five-day forecast for the chosen area.
Weather
Select to see the weather map,which can show storms, radarinformation, charts and winds.
Map
414
Fusion (CC7) Canada/United States of America, enUSA, Edition date: 201905, Second-Printing
SYNC™ 3

Action and DescriptionMenu Item
Select to choose from a listing ofweather locations.
Area
Touch this button to view scores and schedules from a varietyof sports. You can also save up to 10 favorite teams for easieraccess. The score automatically refreshes when a game is inprogress.
Sports Info
Touch this button to view ski conditions for a specific area.Ski Conditions
SETTINGS
E280315
Press the button to enter thesettings menu.
E268570
Once you select a tile, press thebutton next to a menu item toview an explanation of the
feature or setting.
SoundSelect this tile to adjust sound the settings.
ClockSelect this tile to adjust the clock settings.
BluetoothSelect this tile to switch Bluetooth on andoff and adjust the settings.
PhoneSelect this tile to connect, disconnect, andmanage the connected device settings.
AudioSelect this tile to adjust the audio settings.
Driver Assist (If Equipped)
Select this tile to adjust Driver Assistfeatures like Parking Aids, Lane KeepingSystem, Pedestrian Detection, andAuto-Start-Stop.
VehicleSelect this tile to adjust vehicle settingslike windows, alarm, lighting, and MyKeysettings.
FordPassSelect this tile to adjust the FordPasssettings
GeneralSelect this tile to adjust settings likelanguage, measurement units, or to resetthe system.
911 Assist (If Equipped)
Select this tile to switch 911 Assist on andoff.
Automatic UpdatesSelect this tile to adjust the automaticupdate settings.
Mobile AppsSelect this tile to adjust permissions,enable, disable, and update mobile apps.
415
Fusion (CC7) Canada/United States of America, enUSA, Edition date: 201905, Second-Printing
SYNC™ 3

DisplaySelect this tile to adjust display settingslike brightness and auto dim.
Charge Settings (If Equipped)
Select this tile to adjust the electric vehiclecharge settings.
Voice ControlSelect this tile to adjust voice controlsettings like command confirmations anddisplayed lists.
Navigation (If Equipped)
Select this tile to adjust navigation settingslike map preferences and route guidance.
Multi Contour Seats (If Equipped)
Select this tile to adjust the position andmassage function of your multi contourseats.
Seats (If Equipped)
Select this tile to adjust the lumbarfunction of your seats.
Message Center (If Equipped)
Select this tile to view vehicle messages.
Personal Profiles (If Equipped)
Select this tile to adjust recalled memoryfeatures when using personal profiles.
Valet Mode (If Equipped)
Select this tile to enable and disable valetmode.
Ambient Lighting (If Equipped)
Select this tile to change the color orintensity of the interior lighting.
416
Fusion (CC7) Canada/United States of America, enUSA, Edition date: 201905, Second-Printing
SYNC™ 3

SYNC™ 3 TROUBLESHOOTINGVoice Recognition
Possible Cause and ResolutionSymptom
The system does not under-stand what I am saying.
– You are using the wrong voice commands.• See Using Voice Recognition (page 387).• For a complete list of voice commands, refer to our
website.– You are speaking too soon.
• Wait for the voice prompt before you speak.
The system does not under-stand the name of a track orartist.
– Device limitation. Bluetooth does not support voicecommands.• Connect your device to a USB port.• If you have an iOS device, press and hold the voice
control button on the steering wheel to use Siri toplay specific tracks.
– You are using the wrong voice commands.• See Using Voice Recognition (page 387).• For a complete list of voice commands, refer to our
website.– You are not saying the name exactly as it appears on
your device.• Say the name of the track or artist exactly as it
appears on your device. Spell out any abbreviationsin the name.
The song or artist name may have some special char-acters that are not being recognized by the system.
– The name contains special characters, for example *,- or +.• Rename the files on your device or use the touch-
screen to select and play the track.
417
Fusion (CC7) Canada/United States of America, enUSA, Edition date: 201905, Second-Printing
SYNC™ 3

Possible Cause and ResolutionSymptom
– You are not saying the name exactly as it appears onyour device.• Say the first and last name of the contact exactly
as it appears on your device. Spell out any abbrevi-ations in the name.
– The name contains special characters, for example *,- or +.• Rename the contact on your device or use the
touchscreen to select and call the contact.
The system does not under-stand the name of a contactin the phonebook on mydevice and calls the wrongcontact.
– You are not saying the name exactly as it appears onyour device.• Say the first and last name of the contact exactly
as it appears on your device. The system appliesphonetic pronunciation rules of the selectedlanguage to the names of contacts in the phone-book on your device. Select the name of thecontact on the touchscreen and use the Hear itoption to get an idea of how the system expectsyou to pronounce it.
The system does not under-stand foreign names ofcontacts in the phonebookon my device.
– Device limitation.• The system uses text-to-speech technology and
uses a synthetically generated voice rather thanpre-recorded human voice.
The system voice promptsand the pronunciation ofsome words does not seemto be very accurate.
USB and Bluetooth Audio
Possible Cause and ResolutionSymptom
I cannot connect my device. – Device malfunction.• Disconnect your device. Switch your device off,
reset it and try again.– Cable connection issue.
• Correctly connect the cable to your device and thevehicle USB port.
– Incompatible cable.• Use the cable recommended by the manufacturer
of your device.
418
Fusion (CC7) Canada/United States of America, enUSA, Edition date: 201905, Second-Printing
SYNC™ 3

Possible Cause and ResolutionSymptom
– Incorrect device settings.• Make sure that your device does not have an auto-
install program or active security settings.• Check that your device is not set only to charge.
– Device lock screen enabled.• Unlock your device before connecting it.
The system does not recog-nize my device.
– Device limitation.• Do not leave your device in your vehicle during very
hot or very cold weather conditions.– Cable connection issue.
• Correctly connect the cable to your device and thevehicle USB port.
– Incompatible cable.• Use the cable recommended by the manufacturer
of your device.
The system does not under-stand the name of a track orartist.
– Device limitation. Bluetooth does not support voicecommands.• Connect your device to a USB port.• If you have an iOS device, press and hold the voice
control button on the steering wheel to use Siri toplay specific tracks.
I cannot stream audio frommy Bluetooth device.
– Incompatible device.• Check the compatibility of your device on our
website.– Device not connected.
• Pair your device. See Phone (page 405).– Media player not running.
• Start the media player on your device.
The system does not recog-nize the music on my device.
– Missing or incorrect audio file metadata, for exampleartist, song title, album or genre.• Repair the files on your device.
– Corrupt files.• Repair the files on your device.
419
Fusion (CC7) Canada/United States of America, enUSA, Edition date: 201905, Second-Printing
SYNC™ 3

Possible Cause and ResolutionSymptom
– Copyright protected files.• Use a device that contains files that are not copy-
right protected.– Unsupported file format.
• Repair or convert the files to a supported format.See Entertainment (page 393).
– Device indexing required.• Re-index your device. See Settings (page 415).
– Device lock screen enabled.• Unlock your device before connecting it.
Sometimes I cannot hear atrack playing on my device.
– Device malfunction.• Disconnect your device. Switch your device off,
reset it and try again.
When I disconnect my iOSdevice the audio volume isset to maximum.
– Device limitation.• Turn the volume down on your device
If the system does not play the tracks on your USB devicein the correct order, the following information could help:
The system does not playthe tracks on my USB drivein the correct order. – If you are selecting USB as the audio source when the
system is still indexing, SYNC plays tracks sortedalphabetically by file name in the root directory.
– If you are selecting USB as the audio source after thesystem has finished indexing, SYNC plays all trackssorted alphabetically by the title in the ID3 tagregardless of where they are located. SYNC uses thefile name if the title in the ID3 Tag does not exist.
– If you are selecting the option to play all tracks fromthe browsing menu, SYNC plays all tracks sortedalphabetically by the title in the ID3 tag regardless ofwhere they are located. SYNC uses the file name if thetitle in the ID3 Tag does not exist.
– If you are selecting a track when using the exploredevice option, SYNC plays tracks sorted alphabeticallyby file name in the folder you have selected. SYNCthen plays all tracks in any subfolders in the folder youhave selected.
420
Fusion (CC7) Canada/United States of America, enUSA, Edition date: 201905, Second-Printing
SYNC™ 3

Phone
Possible Cause and ResolutionSymptom
During a call, I can hearexcessive background noise.
– Incorrect cell phone settings.• Check and adjust the audio settings on your cell
phone. Refer to your cell phone's user manual.
– Cell phone malfunction.• Switch your cell phone off, reset it and try again.
– Cell phone microphone muted.• Unmute your cell phone microphone.
During a call, I can hear theother person but theycannot hear me.
During a call, I cannot hearthe other person and theycannot hear me.
– System restart required.• Restart the system. Switch the ignition off and
open the door. Close the door and lock the vehicle.Wait until the touchscreen is off and any illumin-ated USB ports are not illuminated. Unlock thevehicle, switch the ignition on and try again.
I cannot download phone-book.
– Incompatible cell phone.• Check the compatibility of your cell phone on our
website.– Incorrect cell phone settings.
• Allow the system to retrieve contacts from yourcell phone. Refer to your cell phone's user manual.
– Incorrect system settings.• Switch automatic phonebook download on. See
Settings (page 415).– Cell phone malfunction.
• Switch your cell phone off, reset it and try again.
– Incorrect cell phone settings.• Allow the system to retrieve contacts from your
cell phone. Refer to your cell phone's user manual.• Check the location of the missing contacts on your
cell phone. If they are stored on the SIM card, movethem to the cell phone memory.
– Incorrect system settings.• Switch automatic phonebook download on. See
Settings (page 415).
A message displayssuggesting that my phone-book has downloaded but itis empty or it has missingcontacts.
421
Fusion (CC7) Canada/United States of America, enUSA, Edition date: 201905, Second-Printing
SYNC™ 3

Possible Cause and ResolutionSymptom
– Incompatible cell phone.• Check the compatibility of your cell phone on our
website.– Cell phone malfunction.
• Switch your cell phone off, reset it and try again.• Install the latest cell phone firmware.• Delete your device from system and delete SYNC
from your device and try again.• Switch automatic phonebook download off. See
Settings (page 415).
I cannot connect my cellphone.
Text messaging does notwork.
– You did not switch on text message notifications.• Switch text message notifications on. See Phone
(page 405).– Incompatible cell phone.
• Check the compatibility of your cell phone on ourwebsite.
– Cell phone malfunction.• Switch your cell phone off, reset it and try again.
– Device message sharing is not enabled.• Check the permissions on your device to ensure
text message sharing is enabled.– Incompatible cell phone.
• Check the compatibility of your cell phone on ourwebsite.
I cannot hear text messages.
422
Fusion (CC7) Canada/United States of America, enUSA, Edition date: 201905, Second-Printing
SYNC™ 3

Navigation (If Equipped)
Possible Cause and ResolutionSymptom
I cannot enter a street namewhen I am abroad.
– Incorrect entry method.• Enter the street name with the country.
The system does not recog-nize coordinates.
– You are using the wrong coordinates format.• Use the format ##. #####, ##. ##### (for N/S ,
E/W). Add a minus before coordinates if thedirection is West and keep a positive value if thedirection is East, for example 12.5412 means Eastand -12.5412 means West.
423
Fusion (CC7) Canada/United States of America, enUSA, Edition date: 201905, Second-Printing
SYNC™ 3

Apps
Possible Cause and ResolutionSymptom
The system cannot find anyapps.
– Incompatible device.• You will need an Android device with OS 4.3 or
higher or an iOS device with iOS 8.0 or higher. Pairand connect your Android device to find AppLinkcompatible apps. Connect your iOS device to aUSB port or pair and connect using Bluetooth.
I have a compatible deviceand it is correctly connectedbut the system still cannotfind any apps.
– AppLink compatible apps not installed on your device.• Download and install the latest version of the app.
– AppLink compatible apps not running on your device.• Start the apps to allow the system to find them
and make sure you sign in to any apps if required.– Incorrect app settings.
• Check and adjust the app settings on your deviceand allow SYNC to access the app if required.
I have a compatible device,it is correctly connected andmy apps are running but thesystem still cannot find anyapps.
– Apps failed to fully close.• Restart the apps and try again.• If you have an Android device with apps that have
an exit or quit option, use this and then restart theapps. Alternatively, use the force stop option in thesettings menu on your device.
• If you have an iOS device with iOS 7.0 or higher, tapthe home button on your device twice and thenswipe the app upward to close it.
I have an Android devicethat is correctly connected,I have restarted my appsand they are running but thesystem still cannot findthem.
– An issue on some older versions of the Android oper-ating system could result in apps not being found.• Switch Bluetooth off and on again to force the
system to reconnect to your device.
424
Fusion (CC7) Canada/United States of America, enUSA, Edition date: 201905, Second-Printing
SYNC™ 3

Possible Cause and ResolutionSymptom
I have an iOS device that iscorrectly connected, I haverestarted my apps and theyare running but the systemstill cannot find them.
– Cable connection issue.• Disconnect the cable from your device, wait for a
moment and then connect it again to force thesystem to reconnect to your device.
I have an Android devicerunning a media app whichthe system has found but Icannot hear the sound orthe sound is very quiet.
– Device volume is low.• Turn the volume up on your device.
I have an Android devicerunning a number ofcompatible apps but thesystem cannot find all ofthem.
– Device limitation. Some Android devices have a limitednumber of Bluetooth ports that apps can use toconnect. If you have more apps running on your devicethan the number of available Bluetooth ports, thesystem cannot find all of them.• Close some of the apps to allow the system to find
those that you want to use.
425
Fusion (CC7) Canada/United States of America, enUSA, Edition date: 201905, Second-Printing
SYNC™ 3

Wi-Fi Connectivity
Possible Cause and ResolutionSymptom
I cannot connect to a Wi-Finetwork.
– Password error.• Enter the correct network password.
– Weak network signal.• Move your vehicle closer to the Wi-Fi hotspot or to
a place where the network signal is not obstructed.– Multiple access points in range with the same SSID.
• Use a unique name for your SSID,. Do not use thedefault name unless it contains a unique identifier,for example as part of the MAC address.
The Wi-Fi connectiondisconnects after successfulconnection.
– Weak network signal.• Move your vehicle closer to the Wi-Fi hotspot or to
a place where the network signal is not obstructed.
I am close to a Wi-Fi hotspotbut the network signalstrength is weak.
– Obstructed network signal.• If your vehicle has a heated windshield, position
your vehicle so that the windshield is not facing theWi-Fi hotspot.
• If your vehicle has metallic tinting on the windowsbut not on the windshield, position your vehicle sothat the windshield is facing the Wi-Fi hotspot oropen the windows that are facing the hotspot.
• If your vehicle has metallic tinting on the windowsand the windshield, open the windows that arefacing the hotspot.
• If your vehicle is in a garage and you have thegarage door closed, open the garage door.
I cannot see a network in thelist of available networksthat I expect to see.
– Hidden network.• Make the network visible and try again.
426
Fusion (CC7) Canada/United States of America, enUSA, Edition date: 201905, Second-Printing
SYNC™ 3

Possible Cause and ResolutionSymptom
I cannot see SYNC when Isearch for Wi-Fi networks onmy cell phone or otherdevice.
– System limitation.• SYNC does not provide a Wi-Fi hotspot at this time.
– Weak network signal• Move your vehicle closer to the Wi-Fi hotspot or to
a place where the network signal is not obstructed.– Wi-Fi hotspot in high demand or has a slow Internet
connection.• Use a more reliable Wi-Fi hotspot.
Software downloads taketoo long.
– No software update available.– Wi-Fi network requires a subscription or acceptance
of terms and conditions.• Test the connection using another device. If the
network requires a subscription or acceptance ofterms and conditions, contact the network serviceprovider.
The system seems toconnect to a Wi-Fi networkand the signal strength isexcellent but the softwaredoes not update.
Personal Profiles (If Equipped)
Possible Cause and SolutionSymptom
You have not set up Personal Profiles.
I cannot create a profile.
You entered an invalid profile.
You did not select a memory button when prompted.
You did not have the ignition on or in park (P), or youshifted out park (P) when creating a profile.
Personal Profiles has been switched off.
You did not select the lock button on the remote control.
I cannot link a remotecontrol.
The remote control selected was already associated withanother profile and the system declined to overwrite.
The system performed a profile recall when linking aremote control.
You did not have the ignition on or in park (P), or youshifted out park (P) when creating a profile.
427
Fusion (CC7) Canada/United States of America, enUSA, Edition date: 201905, Second-Printing
SYNC™ 3

Possible Cause and SolutionSymptom
You are using the old linking method.
Personal Profiles does not support your unsaved settings.
My personalized settings donot save.
A different personal profile is active.
Another user changed the settings for the wrong personalprofile.
You did not create a personal profile.
My profile will not recall.
Personal Profiles is turned off.
The profile you requested is already active.
You did not link the memory button you are using to aprofile.
You did not link the remote control you are using to aprofile.
You are using the wrong remote control.
You are pressing a button other than the unlock or remotestart on a linked remote control.
You deleted the personal profile.
You switched the personal profiles off.My preset positions recall,but my profile does not.
The vehicle is in motion.My profile recalls but mypreset positions do not. The preset positions are the same as the guest or previ-
ously active profile.
Unlink and relink your remote control in the PersonalProfiles menu. You may need to see your authorized dealer.I lost a remote control.
You erased and reprogrammed the remote controls. Thiscould happen if you let a dealership add a new remotecontrol to replace a lost one.I lost all profiles.Someone performed a master reset without your know-ledge.
428
Fusion (CC7) Canada/United States of America, enUSA, Edition date: 201905, Second-Printing
SYNC™ 3

Resetting the System1. Simultaneously press and hold the
seek up and the audio unit powerbuttons until the screen goes black.
2. Wait three minutes to allow the systemto complete the reset.
3. Press the audio unit power button toswitch the system on.
Note: You can reset the system to restorefunctionality that has stopped working. Thesystem reset is designed to restorefunctionality and not delete any data thatyou have stored.
Additional Information andAssistanceFor additional information and assistance,we recommend that you contact anauthorized dealer or refer to our website.
429
Fusion (CC7) Canada/United States of America, enUSA, Edition date: 201905, Second-Printing
SYNC™ 3

For a complete listing of the accessoriesthat are available for your vehicle, pleasecontact your authorized dealer or visit theonline store web site:
Web Address (United States)
www.Accessories.Ford.com
Web Address (Canada)
www.Accessories.Ford.ca
We will repair or replace any properlyauthorized dealer-installed Ford OriginalAccessory found to be defective infactory-supplied materials or workmanshipduring the warranty period, as well as anycomponent damaged by the defectiveaccessories.We will warrant your Ford OriginalAccessory through the warranty thatprovides the greatest benefit:• 24 months, unlimited mileage.• The remainder of your new vehicle
limited warranty.Contact an authorized dealer for detailsand a copy of the warranty.*Ford Licensed Accessories. The accessorymanufacturer designs, develops andtherefore warrants Ford LicensedAccessories, and does not design or testthese accessories to Ford Motor Companyengineering requirements. Contact anauthorized Ford dealer for themanufacturer’s limited warranty details,and request a copy of the Ford LicensedAccessories product limited warranty fromthe accessory manufacturer.
For maximum vehicle performance, keepthe following information in mind whenadding accessories or equipment to yourvehicle:• When adding accessories, equipment,
passengers and luggage to yourvehicle, do not exceed the total weightcapacity of the vehicle or of the frontor rear axle (GVWR or GAWR asindicated on the Safety ComplianceCertification label). Ask an authorizeddealer for specific weight information.
• The Federal CommunicationsCommission (FCC) and CanadianRadio TelecommunicationsCommission (CRTC) regulate the useof mobile communications systemsthat are equipped with radiotransmitters, for example two-wayradios, telephones and theft alarms.Any such equipment installed in yourvehicle should comply with FederalCommunications Commission (FCC)and Canadian RadioTelecommunications Commission(CRTC) regulations and should beinstalled only by an authorized dealer.
• An authorized dealer needs to installmobile communications systems.Improper installation may harm theoperation of your vehicle, particularlyif the manufacturer did not design themobile communication systemspecifically for automotive use.
• If you or an authorized Ford dealer addany non-Ford electrical or electronicaccessories or components to yourvehicle, you may adversely affectbattery performance and durability. Inaddition, you may also adversely affectthe performance of other electricalsystems in the vehicle.
430
Fusion (CC7) Canada/United States of America, enUSA, Edition date: 201905, Second-Printing
Accessories

PROTECT YOURSELF FROM THE RISINGCOST OF VEHICLE REPAIRS WITH A FORDPROTECT EXTENDED SERVICE PLAN.
Ford Protect Extended ServicePlans (U.S. Only)Ford Protect extended service plan meanspeace of mind. It’s the extended serviceplan backed by Ford Motor Company, andprovides more protection beyond the NewVehicle Limited Warranty coverage. Whenyou visit your Ford Dealer, Insist on FordProtect extended service plans!
Ford Protect Can Quickly Pay for ItselfOne trip to the Service Center could easilyexceed the price of your Ford Protectextended service plan. With Ford Protectextended service plan you minimize yourrisk for unexpected repair bills and risingrepair costs.
Up to 1,000+ Covered VehicleComponentsThere are four mechanical Ford Protectextended service plans with different levelsof coverage. Ask your authorized dealer fordetails.1. PremiumCARE - Our most
comprehensive coverage. With over1,000 covered components, this planis so complete it’s probably easier tolist what’s not covered.
2. ExtraCARE - Covers 113 components,and includes many high-tech items.
3. BaseCARE - Covers 84 components.4. PowertrainCARE - Covers 29 critical
components.Ford Protect extended service plans arehonored by all authorized Ford dealers inthe U.S., Canada and Mexico.
That means you get:• Reliable, quality service at any Ford or
Lincoln dealership.• Repairs performed by factory trained
technicians, using genuine parts.
Rental Car Reimbursement
1st day Rental BenefitIf you bring your car into your dealer forservice, we’ll give you a loaner to use forthe day.
Extended Rental BenefitsIf your vehicle is kept overnight for coveredrepairs, you are eligible for rental carcoverage, including warranty repairs, andField Service Actions.
Roadside AssistanceExclusive 24/7 roadside assistance,including:• Towing, flat-tire change and battery
jump starts.• Out of fuel and lock-out assistance.• Travel expense reimbursement for
lodging, meals and rental car.• Assistance for taxi, shuttle, rental car
coverage or other transportation.
Transferable CoverageIf you sell your vehicle before your FordProtect extended service plan coverageexpires, you can transfer any remainingcoverage to the new owner. Which shouldgive you and your potential buyer a littlemore peace of mind.
431
Fusion (CC7) Canada/United States of America, enUSA, Edition date: 201905, Second-Printing
Ford Protect

Less Cost to Properly Maintain YourVehicleFord Protect extended service plan alsooffers a Premium Maintenance Plan thatcovers all scheduled maintenance, andselected wear items. The coverage isprepaid, so you never have to worry aboutthe cost of your vehicle’s maintenance.Covered maintenance includes:• Windshield wiper blades.• Spark plugs.• The clutch disc (if equipped).• Brake pads and linings.• Shock absorbers.• Struts.• Engine Belts.• Engine coolant hoses, clamps and
o-rings.• Diesel exhaust fluid replenishment (if
equipped).• Cabin air filter replacement every
20,000 mi (32,000 km) (electricvehicles only).
Interest Free Finance OptionsJust a 10% down payment will provide youwith an affordable, no interest, no feepayment program allowing you all thesecurity and benefits Ford Protectextended service plan has to offer whilepaying over time. You are pre-approvedwith no credit check or hassles. To learnmore, call our Ford Protect extendedservice plan specialists at 800-367-3377.Ford Protect Extended Service PlanP.O. Box 321067Detroit, MI 48232
Ford Protect Extended ServicePlan (CANADA ONLY)You can get more protection for yourvehicle by purchasing a Ford Protectextended service plan. Ford Protectextended service plan is the only servicecontract backed by Ford Motor Companyof Canada, Limited. Depending on the planyou purchase, Ford Protect extendedservice plan provides benefits such as:• Rental reimbursement.• Coverage for certain maintenance and
wear items.• Protection against repair costs after
your New Vehicle Limited WarrantyCoverage expires.
• Roadside Assistance benefits.There are several Ford Protect extendedservice plans available in various time,distance and deductible combinations.Each plan is tailored to fit your own drivingneeds, including reimbursement for towingand rental. When you purchase FordProtect extended service plan, you receiveadded peace-of-mind protectionthroughout Canada, the United States andMexico, provided by a network ofparticipating authorized Ford MotorCompany dealers.Note: Repairs performed outside of Canadaand the United States are not eligible forFord Protect extended service plancoverage.This information is subject to change. Formore information; visit your local Ford ofCanada dealer or www.ford.ca to find theFord Protect extended service plan that isright for you.
432
Fusion (CC7) Canada/United States of America, enUSA, Edition date: 201905, Second-Printing
Ford Protect

GENERAL MAINTENANCEINFORMATIONWhy Maintain Your Vehicle?Carefully following the maintenanceschedule helps protect against major repairexpenses resulting from neglect orinadequate maintenance and may help toincrease the value of your vehicle whenyou sell or trade it. Keep all receipts forcompleted maintenance with your vehicle.We have established regular maintenanceintervals for your vehicle based uponrigorous testing. It is important that youhave your vehicle serviced at the propertimes. These intervals serve two purposes;one is to maintain the reliability of yourvehicle and the second is to keep your costof owning your vehicle down.It is your responsibility to have allscheduled maintenance performed and tomake sure that the materials used meetthe specifications identified in this owner'smanual. See Capacities andSpecifications (page 317).Failure to perform scheduled maintenanceinvalidates warranty coverage on partsaffected by the lack of maintenance.
Why Maintain Your Vehicle at YourDealership?Factory-Trained TechniciansService technicians participate in extensivefactory-sponsored certification training tohelp them become experts on theoperation of your vehicle. Ask yourdealership about the training andcertification their technicians havereceived.
Genuine Ford and Motorcraft®Replacement PartsDealerships stock Ford, Motorcraft andFord-authorized branded re-manufacturedreplacement parts. These parts meet orexceed our specifications. Parts installedat your dealership carry a nationwide24-month or unlimited mile (kilometer)parts and labor limited warranty.If you do not use our authorized parts theymay not meet our specifications anddepending on the part, it could affectemissions compliance.
ConvenienceMany dealerships have extended eveningand Saturday hours to make your servicevisit more convenient and they offer onestop shopping. They can perform anyservices that are required on your vehicle,from general maintenance to collisionrepairs.Note: Not all dealers have extended hoursor body shops. Please contact your dealerfor details.
Protecting Your InvestmentMaintenance is an investment that paysdividends in the form of improvedreliability, durability and resale value. Tomaintain the proper performance of yourvehicle and its emission control systems,make sure you have scheduledmaintenance performed at the designatedintervals.Your vehicle has an Intelligent Oil-LifeMonitor system, a message appears in theinformation display at the proper oilchange interval. This interval may be up toone year or 10,000 mi (16,000 km), hybridvehicles may exceed 10,000 mi(16,000 km).
433
Fusion (CC7) Canada/United States of America, enUSA, Edition date: 201905, Second-Printing
Scheduled Maintenance

When the oil change message appears inthe information display, it is time for an oilchange. Make sure you perform the oilchange within two weeks or 500 mi(800 km) of the message appearing. Makesure you reset the Intelligent Oil-LifeMonitor after each oil change. See OilChange Indicator Reset (page 261).If your information display resetsprematurely or becomes inoperative, youshould perform the oil change interval atsix months or 5,000 mi (8,000 km) fromyour last oil change. Never exceed one yearor 10,000 mi (16,000 km) between oilchange intervals,Your vehicle is very sophisticated and builtwith multiple, complex, performancesystems. Every manufacturer developsthese systems using differentspecifications and performance features.That is why it is important to rely upon yourdealership to properly diagnose and repairyour vehicle.We have recommended maintenanceintervals for various parts and componentsystems based upon engineering testing.We rely upon this testing to determine themost appropriate mileage for replacementof oils and fluids to protect your vehicle atthe lowest overall cost to you andrecommends against maintenanceschedules that deviate from the scheduledmaintenance information.We strongly recommend the use of onlygenuine Ford, Motorcraft orFord-authorized re-manufacturedreplacement parts engineered for yourvehicle.
Additives and ChemicalsThis owner's manual and the ourWorkshop Manual list the recommendedadditives and chemicals for your vehicle.We do not recommend using chemicals oradditives not approved by us as part ofyour vehicle’s normal maintenance. Pleaseconsult your warranty information.
Oils, Fluids and FlushingIn many cases, fluid discoloration is anormal operating characteristic and, byitself, does not necessarily indicate aconcern or that the fluid needs to bechanged. However, a qualified expert, suchas the factory-trained technicians at yourdealership, should inspect discolored fluidsthat also show signs of overheating orforeign material contaminationimmediately.Make sure to change your vehicle’s oils andfluids at the specified intervals or inconjunction with a repair. Flushing is aviable way to change fluid for many vehiclesub-systems during scheduledmaintenance. It is critical that systems areflushed only with new fluid that is the sameas that required to fill and operate thesystem or using a Ford-approved flushingchemical.
Owner Checks and ServicesMake sure you perform the following basicmaintenance checks and inspections everymonth or at six-month intervals.
Check Every Month
Engine oil level.
Function of all interior and exterior lights.
Tires (including spare) for wear and proper pressure.
434
Fusion (CC7) Canada/United States of America, enUSA, Edition date: 201905, Second-Printing
Scheduled Maintenance

Check Every Month
Windshield washer fluid level.
Fuel and water separator. Drain if necessary (or if indicated by the information display).
Holes and slots in the tail pipe to make sure they are functional and clear of debris.
Check Every Six Months
Battery connections. Clean if necessary.
Body and door drain holes for obstructions. Clean if necessary.
Cooling system fluid level and coolant strength.
Door weatherstrips for wear. Lubricate if necessary.
Hinges, latches and outside locks for proper operation. Lubricate if necessary.
Parking brake for proper operation.
Seatbelts and seat latches for wear and function.
Safety warning lamps (brake, ABS, airbag and seatbelt) for operation.
Washer spray and wiper operation. Clean or replace blades as necessary.
Multi-Point InspectionIn order to keep your vehicle running right,it is important to have the systems on yourvehicle checked regularly. This can helpidentify potential issues and prevent majorproblems. We recommend having thefollowing multi-point inspection performedat every scheduled maintenance intervalto help make sure your vehicle keepsrunning great.
Multi-Point Inspection
Hazard warning system operationAccessory drive belt(s)
Horn operationBattery performance
Radiator, cooler, heater and air conditioninghoses
Engine air filter
435
Fusion (CC7) Canada/United States of America, enUSA, Edition date: 201905, Second-Printing
Scheduled Maintenance

Multi-Point Inspection
Suspension components for leaks ordamage
Exhaust system
Steering and linkageExterior lamps operation
Tires (including spare) for wear and properpressure2
Fluid levels1; fill if necessary
Windshield for cracks, chips or pitsFor oil and fluid leaks
Washer spray and wiper operationHalf-shaft dust boots1 Brake, coolant recovery reservoir, automatic transmission and window washer2If your vehicle is equipped with a temporary mobility kit, check the tire sealant expirationUse By date on the canister. Replace as needed.
Be sure to ask your dealership serviceadvisor or technician about the multi-pointvehicle inspection. It is a comprehensiveway to perform a thorough inspection ofyour vehicle. Your checklist gives youimmediate feedback on the overallcondition of your vehicle.
NORMAL SCHEDULEDMAINTENANCEIntelligent Oil-Life MonitorYour vehicle has an Intelligent Oil-LifeMonitor that determines when you shouldchange the engine oil based on how youuse your vehicle. By using severalimportant factors in its calculations, themonitor helps reduce the cost of owningyour vehicle and reduces environmentalwaste at the same time.
This means you do not have to rememberto change the oil on a mileage-basedschedule. Your vehicle lets you know whenan oil change is due by displaying amessage in the information display.The following table provides examples ofvehicle use and its impact on oil changeintervals. It is a guideline only. Actual oilchange intervals depend on several factorsand generally decrease with severity ofuse.
When to Expect the OIL CHANGE REQUIRED Message
Vehicle Use and ExampleInterval
Normal7,500–10,000 mi(12,000–16,000 km) Normal commuting with highway driving
436
Fusion (CC7) Canada/United States of America, enUSA, Edition date: 201905, Second-Printing
Scheduled Maintenance

When to Expect the OIL CHANGE REQUIRED Message
Vehicle Use and ExampleInterval
No, or moderate, load or towingFlat to moderately hilly roadsNo extended idling
Severe
5,000–7,500 mi(8,000–12,000 km)
Moderate to heavy load or towingMountainous or off-road conditionsExtended idlingExtended hot or cold operation
Extreme3,000–5,000 mi
(5,000–8,000 km) Maximum load or towingExtreme hot or cold operation
Normal Maintenance Intervals
At Every Oil Change Interval as Indicated by the Information Display1
Change the engine oil and the filter.2
Rotate the tires.
Perform a multi-point inspection.
Inspect the automatic transmission fluid level. Consult your dealer for requirements.
Inspect the brake pads, rotors, hoses and the parking brake.
Inspect the engine coolant level/strength and the hoses.
Inspect the exhaust system and heat shields.
Inspect the rear axle and U-joints - all-wheel drive only.
Inspect the half-shaft boots.
Inspect the steering linkage, ball joints, suspension, tie-rod ends, driveshaft and the U-joints.
437
Fusion (CC7) Canada/United States of America, enUSA, Edition date: 201905, Second-Printing
Scheduled Maintenance

At Every Oil Change Interval as Indicated by the Information Display1
Inspect the tires, tire wear and measure the tread depth.
Inspect the wheels and related components for abnormal noise, wear, looseness ordrag.
1 Do not exceed one year or 10,000 mi (16,000 km) between service intervals.2 Reset the Intelligent Oil-Life Monitor after engine oil and filter changes. See Oil ChangeIndicator Reset (page 261).
Brake Fluid Maintenance1
Change the brake fluid.2Every 3 Years
1 Perform this maintenance item every 3 years. Do not exceed the designated time forthe interval.2 Brake fluid servicing requires special equipment available at your authorized dealer.
Other Maintenance Items1
Replace cabin air filter.Every 20,000 mi(32,000 km)
Replace engine air filter.Every 30,000 mi(48,000 km)
Replace the spark plugs.Every 100,000 mi(160,000 km) Inspect the accessory drive belt(s).2
Change the automatic transmission fluid.Every 150,000 mi(240,000 km) Replace the accessory drive belt(s).3
Replace the timing belt (1.5L engine).
Change the engine coolant.4At 200,000 mi(322,000 km)
1 Perform these maintenance items within 3,000 mi (4,800 km) of the last engine oil andfilter change. Do not exceed the designated distance for the interval.2 After initial inspection, inspect every other oil change until replaced.3 If not replaced within the last 100,000 mi (160,000 km).4 Initial replacement at 10 years or 200,000 mi (322,000 km), then every five years or100,000 mi (160,000 km).
438
Fusion (CC7) Canada/United States of America, enUSA, Edition date: 201905, Second-Printing
Scheduled Maintenance
SPECIAL OPERATINGCONDITIONS SCHEDULEDMAINTENANCEIf you operate your vehicle primarily in anyof the following conditions, you need toperform extra maintenance as indicated.If you operate your vehicle occasionallyunder any of these conditions, it is notnecessary to perform the extramaintenance. For specificrecommendations, see your dealershipservice advisor or technician.
Perform the services shown in thefollowing tables when specified or within3,000 mi (4,800 km) of the messageappearing in the information displayprompting you to change your oil.• Example 1: The message comes on at
28,751 mi (46,270 km). Perform the30,000 mi (48,000 km) automatictransmission fluid replacement.
• Example 2: The message has notcome on, but the odometer reads30,000 mi (48,000 km) (for example,the Intelligent Oil-Life Monitor wasreset at 25,000 mi (40,000 km)).Perform the engine air filterreplacement.
Towing a Trailer or Using a Car-top Carrier
Change engine oil and filter as indicated by the informationdisplay and perform services listed in the Normal Sched-uled Maintenance chart.
As required
Inspect rear axle and U-joints (All-Wheel Drive only).Inspect frequently, serviceas required
Change automatic transmission fluid.Every 30,000 mi(48,000 km)
Replace spark plugs.Every 60,000 mi(96,000 km)
Extensive Idling or Low-speed Driving for Long Distances, as in Heavy Commercial Use(Such as Delivery, Taxi, Patrol Car or Livery)
Change engine oil and filter as indicated by the informationdisplay and perform services listed in the Normal Sched-uled Maintenance chart.
As required
Replace cabin air filter.Inspect frequently, serviceas required
Replace engine air filter.
Change automatic transmission fluid.Every 30,000 mi(48,000 km)
Replace spark plugs.Every 60,000 mi(96,000 km)
439
Fusion (CC7) Canada/United States of America, enUSA, Edition date: 201905, Second-Printing
Scheduled Maintenance

Operating in Dusty or Sandy Conditions (Such as Unpaved or Dusty Roads)
Replace cabin air filter.Inspect frequently, serviceas required
Replace engine air filter.
Inspect the wheels and related components for abnormalnoise, wear, looseness or drag.
Every 5,000 mi (8,000 km)
Rotate tires, inspect tires for wear and measure treaddepth.
Change engine oil and filter.*Every 5,000 mi (8,000 km)or six months
Perform multi-point inspection.
Change automatic transmission fluid.Every 30,000 mi(48,000 km)
*Reset your Intelligent Oil-Life Monitor after engine oil and filter changes. See Oil ChangeIndicator Reset (page 261).
ExceptionsThere are several exceptions to the NormalSchedule:
Rear Axle and PTU MaintenanceThe Power Transfer Unit (PTU) and rearaxle (All-Wheel Drive only) in your vehicledoes not require any normal scheduledmaintenance, unless the vehicle hasexperienced extended periods of extremeor severe duty cycle driving or both PTUand the axle has been submerged in water.Checking the PTU and rear axle fluid is notnecessary unless the unit shows signs ofleakage. Contact an authorized dealer forservice.
California Fuel Filter ReplacementIf you register your vehicle in California, theCalifornia Air Resources Board hasdetermined that the failure to perform thismaintenance item does not nullify theemission warranty or limit recall liabilitybefore the completion of your vehicle'suseful life. Ford Motor Company, however,urges you to have all recommendedmaintenance services performed at thespecified intervals and to record all vehicleservice.
Hot Climate Oil Change IntervalsVehicles operating in the Middle East,North Africa, Sub-Saharan Africa orlocations with similar climates using anAmerican Petroleum Institute (API)Certified for Gasoline Engines (Certificationmark) oil of SM or SN quality, the normaloil change interval is 3,000 mi (4,800 km).If the available API SM or SN oils are notavailable, then the oil change interval is1,800 mi (2,900 km).
440
Fusion (CC7) Canada/United States of America, enUSA, Edition date: 201905, Second-Printing
Scheduled Maintenance

Engine Air Filter and Cabin Air FilterReplacementThe life of the engine air filter and cabin airfilter is dependent on exposure to dustyand dirty conditions. Vehicles operated inthese conditions require frequentinspection and replacement of the engineair filter and cabin air filter.
SCHEDULED MAINTENANCERECORDAfter the scheduled maintenance servicesare performed, record the Repair Order #,Distance and Engine Hours in the boxesprovided.
E146852
Repair Order #:
Distance:
Engine hours (optional):
Multi-point inspection (recommended):Signature:
Dealer stamp
E146852
Repair Order #:
Distance:
Engine hours (optional):
Multi-point inspection (recommended):Signature:
Dealer stamp
441
Fusion (CC7) Canada/United States of America, enUSA, Edition date: 201905, Second-Printing
Scheduled Maintenance

E146852
Repair Order #:
Distance:
Engine hours (optional):
Multi-point inspection (recommended):Signature:
Dealer stamp
E146852
Repair Order #:
Distance:
Engine hours (optional):
Multi-point inspection (recommended):Signature:
Dealer stamp
442
Fusion (CC7) Canada/United States of America, enUSA, Edition date: 201905, Second-Printing
Scheduled Maintenance

E146852
Repair Order #:
Distance:
Engine hours (optional):
Multi-point inspection (recommended):Signature:
Dealer stamp
E146852
Repair Order #:
Distance:
Engine hours (optional):
Multi-point inspection (recommended):Signature:
Dealer stamp
443
Fusion (CC7) Canada/United States of America, enUSA, Edition date: 201905, Second-Printing
Scheduled Maintenance

E146852
Repair Order #:
Distance:
Engine hours (optional):
Multi-point inspection (recommended):Signature:
Dealer stamp
E146852
Repair Order #:
Distance:
Engine hours (optional):
Multi-point inspection (recommended):Signature:
Dealer stamp
444
Fusion (CC7) Canada/United States of America, enUSA, Edition date: 201905, Second-Printing
Scheduled Maintenance

E146852
Repair Order #:
Distance:
Engine hours (optional):
Multi-point inspection (recommended):Signature:
Dealer stamp
E146852
Repair Order #:
Distance:
Engine hours (optional):
Multi-point inspection (recommended):Signature:
Dealer stamp
445
Fusion (CC7) Canada/United States of America, enUSA, Edition date: 201905, Second-Printing
Scheduled Maintenance

E146852
Repair Order #:
Distance:
Engine hours (optional):
Multi-point inspection (recommended):Signature:
Dealer stamp
E146852
Repair Order #:
Distance:
Engine hours (optional):
Multi-point inspection (recommended):Signature:
Dealer stamp
446
Fusion (CC7) Canada/United States of America, enUSA, Edition date: 201905, Second-Printing
Scheduled Maintenance

E146852
Repair Order #:
Distance:
Engine hours (optional):
Multi-point inspection (recommended):Signature:
Dealer stamp
E146852
Repair Order #:
Distance:
Engine hours (optional):
Multi-point inspection (recommended):Signature:
Dealer stamp
447
Fusion (CC7) Canada/United States of America, enUSA, Edition date: 201905, Second-Printing
Scheduled Maintenance

E146852
Repair Order #:
Distance:
Engine hours (optional):
Multi-point inspection (recommended):Signature:
Dealer stamp
E146852
Repair Order #:
Distance:
Engine hours (optional):
Multi-point inspection (recommended):Signature:
Dealer stamp
448
Fusion (CC7) Canada/United States of America, enUSA, Edition date: 201905, Second-Printing
Scheduled Maintenance

E146852
Repair Order #:
Distance:
Engine hours (optional):
Multi-point inspection (recommended):Signature:
Dealer stamp
E146852
Repair Order #:
Distance:
Engine hours (optional):
Multi-point inspection (recommended):Signature:
Dealer stamp
449
Fusion (CC7) Canada/United States of America, enUSA, Edition date: 201905, Second-Printing
Scheduled Maintenance

E146852
Repair Order #:
Distance:
Engine hours (optional):
Multi-point inspection (recommended):Signature:
Dealer stamp
E146852
Repair Order #:
Distance:
Engine hours (optional):
Multi-point inspection (recommended):Signature:
Dealer stamp
450
Fusion (CC7) Canada/United States of America, enUSA, Edition date: 201905, Second-Printing
Scheduled Maintenance
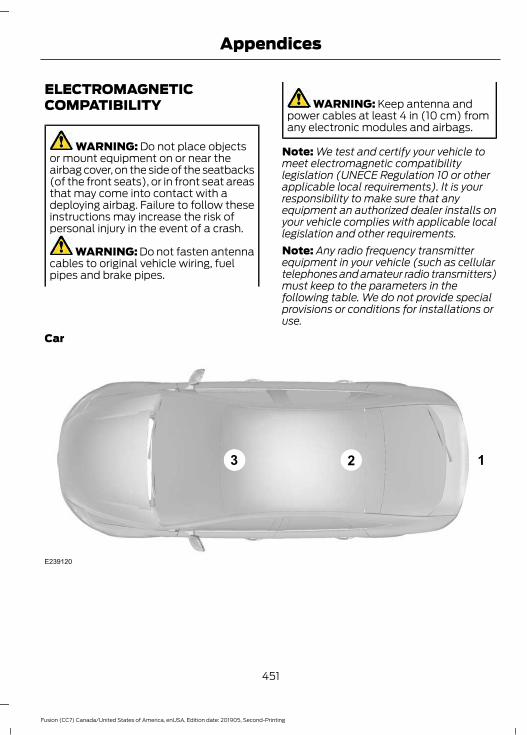
ELECTROMAGNETICCOMPATIBILITY
WARNING: Do not place objectsor mount equipment on or near theairbag cover, on the side of the seatbacks(of the front seats), or in front seat areasthat may come into contact with adeploying airbag. Failure to follow theseinstructions may increase the risk ofpersonal injury in the event of a crash.
WARNING: Do not fasten antennacables to original vehicle wiring, fuelpipes and brake pipes.
WARNING: Keep antenna andpower cables at least 4 in (10 cm) fromany electronic modules and airbags.
Note: We test and certify your vehicle tomeet electromagnetic compatibilitylegislation (UNECE Regulation 10 or otherapplicable local requirements). It is yourresponsibility to make sure that anyequipment an authorized dealer installs onyour vehicle complies with applicable locallegislation and other requirements.Note: Any radio frequency transmitterequipment in your vehicle (such as cellulartelephones and amateur radio transmitters)must keep to the parameters in thefollowing table. We do not provide specialprovisions or conditions for installations oruse.
Car
E239120
451
Fusion (CC7) Canada/United States of America, enUSA, Edition date: 201905, Second-Printing
Appendices

Van
E239122
Truck
E239121
452
Fusion (CC7) Canada/United States of America, enUSA, Edition date: 201905, Second-Printing
Appendices

Antenna PositionsMaximum output power Watt (PeakRMS)
Frequency BandMHz
1501-30
2, 35050-54
2, 35068-88
2, 350142-176
2, 350380-512
2, 310806-870
Note: After the installation of radiofrequency transmitters, check fordisturbances from and to all electricalequipment in your vehicle, both in thestandby and transmit modes.Check all electrical equipment:• With the ignition ON.• With the engine running.• During a road test at various speeds.Check that electromagnetic fieldsgenerated inside your vehicle cabin by thetransmitter installed do not exceedapplicable human exposure requirements.
END USER LICENSEAGREEMENTVEHICLE SOFTWARE END USERLICENSE AGREEMENT (EULA)• You (“You” or “Your” as applicable)
have acquired a vehicle having severaldevices, including SYNC ® and variouscontrol modules, ("DEVICES") thatinclude software licensed or owned byFord Motor Company and its affiliates("FORD MOTOR COMPANY"). Thosesoftware products of FORD MOTORCOMPANY origin, as well as associatedmedia, printed materials, and "online"or electronic documentation("SOFTWARE") are protected byinternational intellectual property lawsand treaties. The SOFTWARE islicensed, not sold. All rights reserved.
• The SOFTWARE may interface withand/or communicate with, or may belater upgraded to interface with and/orcommunicate with additional softwareand/or systems provided by FORDMOTOR COMPANY.
453
Fusion (CC7) Canada/United States of America, enUSA, Edition date: 201905, Second-Printing
Appendices

IF YOU DO NOT AGREE TO THIS ENDUSER LICENSE AGREEMENT ("EULA")DO NOT USE THE DEVICES OR COPYTHE SOFTWARE. ANY USE OF THESOFTWARE, INCLUDING BUT NOTLIMITED TO USE ON THE DEVICES,WILL CONSTITUTE YOUR AGREEMENTTO THIS EULA (OR RATIFICATION OFANY PREVIOUS CONSENT).GRANT OF SOFTWARE LICENSE: ThisEULA grants you the following license:• You may use the SOFTWARE as
installed on the DEVICES and asotherwise interfacing with systemsand/or services provide by or throughFORD MOTOR COMPANY or its thirdparty software and service providers.
Description of Other Rights andLimitations• Speech Recognition: If the
SOFTWARE includes speechrecognition component(s), you shouldunderstand that speech recognition isan inherently statistical process andthat recognition errors are inherent inthe process. Neither FORD MOTOR
COMPANY nor its suppliers shall beliable for any damages arising out oferrors in the speech recognitionprocess. It is your responsibility tomonitor any speech recognitionfunctions included in the system.
• Limitations on Reverse Engineering,Decompilation and Disassembly:You may not reverse engineer,decompile, translate, disassemble orattempt to discover any source codeor underlying ideas or algorithms of theSOFTWARE nor permit others toreverse engineer, decompile ordisassemble the SOFTWARE, exceptand only to the extent that such activityis expressly permitted by applicablelaw notwithstanding this limitation orto the extent as may be permitted bythe licensing terms governing use ofany open source components includedwith the SOFTWARE.
• Limitations on Distributing,Copying, Modifying and CreatingDerivative Works: You may notdistribute, copy, make modificationsto or create derivative works based onthe SOFTWARE, except and only to theextent that such activity is expresslypermitted by applicable lawnotwithstanding this limitation or tothe extent as may be permitted by thelicensing terms governing use of anyopen source components included withthe SOFTWARE.
• Single EULA: The end userdocumentation for the DEVICES andrelated systems and services maycontain multiple EULAs, such asmultiple translations and/or multiplemedia versions (e.g., in the userdocumentation and in the software).Even if you receive multiple EULAs, youare licensed to use only one (1) copy ofthe SOFTWARE.
454
Fusion (CC7) Canada/United States of America, enUSA, Edition date: 201905, Second-Printing
Appendices
• SOFTWARE Transfer: You maypermanently transfer your rights underthis EULA only as part of a sale ortransfer of the DEVICES, provided youretain no copies, you transfer all of theSOFTWARE (including all componentparts, the media and printed materials,any upgrades, and, if applicable, theCertificate(s) of Authenticity), and therecipient agrees to the terms of thisEULA. If the SOFTWARE is an upgrade,any transfer must include all priorversions of the SOFTWARE.
• Termination: Without prejudice to anyother rights, FORD MOTOR COMPANYmay terminate this EULA if you fail tocomply with the terms and conditionsof this EULA.
• Internet-Based ServicesComponents: The SOFTWARE maycontain components that enable andfacilitate the use of certainInternet-based services. Youacknowledge and agree that FORDMOTOR COMPANY, third partysoftware and service suppliers, itsaffiliates and/or its designated agentmay automatically check the versionof the SOFTWARE and/or itscomponents that you are utilizing andmay provide upgrades or supplementsto the SOFTWARE that may beautomatically downloaded to yourDEVICES.
• Additional Software/Services: TheSOFTWARE may permit FORD MOTORCOMPANY, third party software andservice suppliers, its affiliates and/orits designated agent to provide or makeavailable to you SOFTWARE updates,supplements, add-on components, orInternet-based services componentsof the SOFTWARE after the date youobtain your initial copy of theSOFTWARE ("SupplementalComponents".) SOFTWARE updatesmay cause you to incur additional
charges from your wireless serviceprovider. If FORD MOTOR COMPANYor third party software and servicessuppliers provide or make available toyou Supplemental Components andno other EULA terms are providedalong with the SupplementalComponents, then the terms of thisEULA shall apply. FORD MOTORCOMPANY, its affiliates and/or itsdesignated agent reserve the right todiscontinue without liability anyInternet-based services provided toyou or made available to you throughthe use of the SOFTWARE.
• Links to Third Party Sites: TheSOFTWARE may provide you with theability to link to third party sites. Thethird party sites are not under thecontrol of FORD MOTOR COMPANY,its affiliates and/or its designatedagent. Neither FORD MOTORCOMPANY nor its affiliates nor itsdesignated agent are responsible for(I) the contents of any third party sites,any links contained in third party sites,or any changes or updates to thirdparty sites, or (ii) webcasting or anyother form of transmission receivedfrom any third party sites. If theSOFTWARE provides links to thirdparty sites, those links are provided toyou only as a convenience, and theinclusion of any link does not imply anendorsement of the third party site byFORD MOTOR COMPANY, its affiliatesand/or its designated agent.
• Obligation to Drive Responsibly:You recognize your obligation to driveresponsibly and keep attention on theroad. You will read and abide with theDEVICES operating instructionsparticularly as they pertain to safetyand you agree to assume any riskassociated with the use of theDEVICES.
455
Fusion (CC7) Canada/United States of America, enUSA, Edition date: 201905, Second-Printing
Appendices

UPGRADES AND RECOVERY MEDIA:If the SOFTWARE is provided by FORDMOTOR COMPANY separate from theDEVICES on media such as a ROM chip,CD ROM disk(s) or via web download orother means, and is labeled "For UpgradePurposes Only" or "For Recovery PurposesOnly" you may install one (1) copy of suchSOFTWARE onto the DEVICES as areplacement copy for the existingSOFTWARE, and use it in accordance withthis EULA, including any additional EULAterms accompanying the upgradeSOFTWARE.INTELLECTUAL PROPERTY RIGHTS:All title and intellectual property rights inand to the SOFTWARE (including but notlimited to any images, photographs,animations, video, audio, music, text and"applets" incorporated into theSOFTWARE), the accompanying printedmaterials, and any copies of theSOFTWARE, are owned by FORD MOTORCOMPANY, or its affiliates or suppliers. TheSOFTWARE is licensed, not sold. You maynot copy the printed materialsaccompanying the SOFTWARE. All titleand intellectual property rights in and tothe content which may be accessedthrough use of the SOFTWARE is theproperty of the respective content ownerand may be protected by applicablecopyright or other intellectual propertylaws and treaties. This EULA grants you norights to use such content outside itsintended use. All rights not specificallygranted under this EULA are reserved byFORD MOTOR COMPANY, its affiliates,and third party software and serviceproviders and suppliers. Use of any on-lineservices which may be accessed throughthe SOFTWARE may be governed by therespective terms of use relating to suchservices. If this SOFTWARE containsdocumentation that is provided only inelectronic form, you may print one copy ofsuch electronic documentation.
EXPORT RESTRICTIONS: Youacknowledge that the SOFTWARE issubject to U.S. and European Union exportjurisdiction. You agree to comply with allapplicable international and national lawsthat apply to the SOFTWARE, includingthe U.S. Export Administration Regulations,as well as end-user, end-use anddestination restrictions issued by U.S. andother governments.TRADEMARKS: This EULA does not grantyou any rights in connection with anytrademarks or service marks of FORDMOTOR COMPANY, its affiliates, and thirdparty software and service providers.PRODUCT SUPPORT: Please refer toFORD MOTOR COMPANY instructionsprovided in the documentation for theDEVICES product support, such as thevehicle owner guide.Should you have any questions concerningthis EULA, or if you desire to contact FORDMOTOR COMPANY for any other reason,please refer to the address provided in thedocumentation for the DEVICES.No Liability for Certain Damages:EXCEPT AS PROHIBITED BY LAW, FORDMOTOR COMPANY, ANY THIRD PARTYSOFTWARE OR SERVICES SUPPLIERS,AND THEIR AFFILIATES SHALL HAVE NOLIABILITY FOR ANY INDIRECT, SPECIAL,CONSEQUENTIAL OR INCIDENTALDAMAGES ARISING FROM OR INCONNECTION WITH THE USE ORPERFORMANCE OF THE SOFTWARE. THISLIMITATION SHALL APPLY EVEN IF ANYREMEDY FAILS OF ITS ESSENTIALPURPOSE. THERE ARE NO WARRANTIESOTHER THAN THOSE THAT MAY BEEXPRESSLY PROVIDED FOR YOUR NEWVEHICLE.
456
Fusion (CC7) Canada/United States of America, enUSA, Edition date: 201905, Second-Printing
Appendices

SYNC® Automotive Important SafetyInformation Read and followinstructions:• Before using your SYNC® system, read
and follow all instructions and safetyinformation provided in this end usermanual ("Owner Guide".) Notfollowing precautions found in theOwner Guide can lead to an accidentor other serious injuries.
General Operation• Voice Command Control: Certain
functions within the SYNC® systemmay be accomplished using voicecommands. Using voice commandswhile driving helps you to operate thesystem without removing your handsfrom the wheel or eyes from the road.
• Prolonged Views of Screen: Do notaccess any function requiring aprolonged view of the screen while youare driving. Pull over in a safe and legalmanner before attempting to access afunction of the system requiringprolonged attention.
• Volume Setting: Do not raise thevolume excessively. Keep the volumeat a level where you can still hearoutside traffic and emergency signalswhile driving. Driving while unable tohear these sounds could cause anaccident.
• Navigation Features: Any navigationfeatures included in the system areintended to provide turn by turninstructions to get you to a desireddestination. Please make certain allpersons using this system carefullyread and follow instructions and safetyinformation fully.
• Distraction Hazard: Any navigationfeatures may require manual(non-verbal) setup. Attempting toperform such set-up or insert datawhile driving can distract your attentionand could cause an accident or otherserious injury. Stop the vehicle in a safeand legal manner before attemptingthese operations.
• Let Your Judgment Prevail: Anynavigation features are provided onlyas an aid. Make your driving decisionsbased on your observations of localconditions and existing trafficregulations. Any such feature is not asubstitute for your personal judgment.Any route suggestions made by thissystem should never replace any localtraffic regulations or your personaljudgment or knowledge of safe drivingpractices.
• Route Safety: Do not follow the routesuggestions if doing so would result inan unsafe or illegal maneuver, if youwould be placed in an unsafe situation,or if you would be directed into an areathat you consider unsafe. The driver isultimately responsible for the safeoperation of the vehicle and therefore,must evaluate whether it is safe tofollow the suggested directions.
• Potential Map Inaccuracy: Mapsused by this system may be inaccuratebecause of changes in roads, trafficcontrols or driving conditions. Alwaysuse good judgment and common sensewhen following the suggested routes.
• Emergency Services: Do not rely onany navigation features included in thesystem to route you to emergencyservices. Ask local authorities or anemergency services operator for theselocations. Not all emergency servicessuch as police, fire stations, hospitalsand clinics are likely to be contained inthe map database for such navigationfeatures.
457
Fusion (CC7) Canada/United States of America, enUSA, Edition date: 201905, Second-Printing
Appendices

Your Responsibilities and Assumptions ofRisk• You agree to each of the following:(a)
Any use of the SOFTWARE whiledriving an automobile or other vehiclein violation of applicable law orotherwise driving in an unsafe mannerpresents a significant risk of distracteddriving and should not be attemptedunder any circumstances;(b) Use ofthe SOFTWARE at excessive volumeposes a significant risk of hearingdamage and should not be attemptedunder any circumstances;(c) TheSOFTWARE may not be compatiblewith new or different versions of anoperating system, third party software,or third party services, and theSOFTWARE may potentially cause acritical failure of an operating system,third party software, or third partyservice.(d) Any third party serviceaccessed by or third party softwareused with the SOFTWARE (I) maycharge an additional fee for access, (ii)may not work correctly, on anuninterrupted basis, or error free, (iii)may change streaming formats ordiscontinue operation, (iv) may containadult, profane or offensive content; and(v) may contain inaccurate, false ormisleading traffic, weather, financialor safety information or other content;and (e) Use of the SOFTWARE maycause you to incur additional chargesfrom your wireless service provider(WSP) and any data or minutecalculators that may be included in thesoftware program are for referenceonly, are not warranted in any way andshould not be relied upon in anyway.
• When using the SOFTWARE, you agreeto be responsible for and assume theentire risk to the items set forth inSection (a) – (e) above.
Disclaimer of WarrantyYOU EXPRESSLY ACKNOWLEDGE ANDAGREE THAT USE OF THE DEVICES ANDSOFTWARE IS AT YOUR SOLE RISK ANDTHAT THE ENTIRE RISK AS TOSATISFACTORY QUALITY,PERFORMANCE, COMPATIBILITY,ACCURACY AND EFFORT IS WITH YOU.TO THE MAXIMUM EXTENT PERMITTEDBY APPLICABLE LAW, THE SOFTWAREAND ANY THIRD PARTY SOFTWARE ORTHIRD-PARTY SERVICES ARE PROVIDED"AS IS" AND “AS AVAILABLE”, WITH ALLFAULTS AND WITHOUT WARRANTY OFANY KIND, AND FORD MOTOR COMPANYHEREBY DISCLAIMS ALL WARRANTIESAND CONDITIONS WITH RESPECT TOTHE SOFTWARE, THIRD PARTYSOFTWARE, AND THIRD-PARTYSERVICES, EITHER EXPRESS, IMPLIED ORSTATUTORY, INCLUDING, BUT NOTLIMITED TO, THE IMPLIED WARRANTIESAND/OR CONDITIONS OFMERCHANTABILITY, OF SATISFACTORYQUALITY, OF FITNESS FOR ANARTICULAR PURPOSE, OF ACCURACY,OF QUIET ENJOYMENT, ANDNON-INFRINGEMENT OF THIRD-PARTYRIGHTS. FORD MOTOR COMPANY DOESNOT WARRANT (a) AGAINSTINTERFERENCE WITH YOUR ENJOYMENTOF THE SOFTWARE, THIRD PARTYSOFTWARE, OR THIRD-PARTY SERVICES,(b) THAT THE SOFTWARE, THIRD PARTYSOFTWARE, OR THIRD-PARTY SERVICESWILL MEET YOUR REQUIREMENTS, (c)THAT THE OPERATION OF THESOFTWARE, THIRD PARTY SOFTWARE,OR THIRD-PARTY SERVICES WILL BEUNINTERRUPTED OR ERROR-FREE, (d)OR THAT DEFECTS IN THE SOFTWARE,THIRD PARTY SOFTWARE, ORTHIRD-PARTY SERVICES WILL BECORRECTED. NO ORAL OR WRITTENINFORMATION OR ADVICE GIVEN BYFORD MOTOR COMPANY OR ITSAUTHORIZED REPRESENTATIVE SHALL
458
Fusion (CC7) Canada/United States of America, enUSA, Edition date: 201905, Second-Printing
Appendices

CREATE A WARRANTY. SHOULD THESOFTWARE, THIRD PARTY SOFTWARE,OR THIRD-PARTY SERVICES PROVEDEFECTIVE, YOU ASSUME THE ENTIRECOST OF ALL NECESSARY SERVICING,REPAIR OR CORRECTION. SOMEJURISDICTIONS DO NOT ALLOW THEDISCLAIMER OF IMPLIED WARRANTIESOR LIMITATIONS ON APPLICABLESTATUTORY RIGHTS OF A CONSUMER,SO THE ABOVE DISCLAIMER MAY NOTFULLY APPLY TO YOU. THE SOLEWARRANTY PROVIDED BY FORD MOTORCOMPANY SHALL BE FOUND IN THEWARRANTY INFORMATION INCLUDINGWITH YOUR OWNER GUIDE. TO THEEXTENT THAT THERE IS ANY CONFLICTBETWEEN THE TERMS OF THIS SECTIONAND THE WARRANTY BOOKLET, THEWARRANTY BOOKLET SHALL CONTROL.
Applicable Law, Venue, Jurisdiction• The laws of the State of Michigan
govern this EULA and Your use of theSOFTWARE. Your use of theSOFTWARE may also be subject toother local, state, national, orinternational laws. Any litigation arisingout of or related to this EULA shall bebrought and maintained exclusively ina court of the State of Michiganlocated in Wayne County or in theUnited States District Court for theEastern District of Michigan. You herebyconsent to submit to the personaljurisdiction of a court in the State ofMichigan located in Wayne County andthe United States District Court for theEastern District of Michigan for anydispute arising out of or relating to thisEULA.
Binding Arbitration and Class ActionWaiver(a) Application. This Section applies toany dispute EXCEPT IT DOES NOTINCLUDE A DISPUTE RELATING TOCOPYRIGHT INFRINGEMENT, OR TO THEENFORCEMENT OR VALIDITY OF YOUR,FORD MOTOR COMPANY, OR ANY OFFORD MOTOR COMPANY’S LICENSORS’INTELLECTUAL PROPERTY RIGHTS.Dispute means any dispute, action, or othercontroversy between You and FORDMOTOR COMPANY, other than theexceptions listed above, concerning theSOFTWARE (including its price) or thisEULA, whether in contract, warranty, tort,statute, regulation, ordinance, or any otherlegal or equitable basis.(b) Notice of Dispute. In the event of aDispute, You or FORD MOTOR COMPANYmust give the other a “Notice of Dispute”,which is a written statement of the name,address, and contact information of theparty giving it, the facts giving rise to thedispute, and the relief requested. You andFORD MOTOR COMPANY will attempt toresolve any dispute through informalnegotiation within 60 days from the datethe Notice of Dispute is sent. After 60 days,You or FORD MOTOR COMPANY maycommence arbitration.(c) Small claims court. You may alsolitigate any dispute in small claims courtin your county of residence or FORDMOTOR COMPANY’S principal place ofbusiness, if the dispute meets allrequirements to be heard in the smallclaims court. You may litigate in smallclaims court whether or not Younegotiated informally first.(d) Binding arbitration. If You and FORDMOTOR COMPANY, do not resolve anydispute by informal negotiation or in smallclaims court, any other effort to resolvethe dispute will be conducted exclusivelyby binding arbitration. You are giving up
459
Fusion (CC7) Canada/United States of America, enUSA, Edition date: 201905, Second-Printing
Appendices

the right to litigate (or participate in as aparty or class member) all disputes in courtbefore a judge or jury. Instead, all disputeswill be resolved before a neutral arbitrator,whose decision will be final except for alimited right of appeal under the FederalArbitration Act. Any court with jurisdictionover the parties may enforce thearbitrator’s award.(e) Class action waiver. Any proceedingsto resolve or litigate any dispute in anyforum will be conducted solely on anindividual basis. Neither you nor FORDMOTOR COMPANY, will seek to have anydispute heard as a class action, as a privateattorney general action, or in any otherproceeding in which any party acts orproposes to act in a representativecapacity. No arbitration or proceeding willbe combined with another without theprior written consent of all parties to allaffected arbitrations or proceedings.(f) Arbitration procedure. Anyarbitration will be conducted by theAmerican Arbitration Association (the“AAA”), under its Commercial ArbitrationRules. If You are an individual and use theSOFTWARE for personal or vehicle use, orif the value of the dispute is $75,000 orless whether or not You are an individualor how You use the SOFTWARE, the AAASupplementary Procedures forConsumer-Related Disputes will alsoapply. To commence arbitration, submit aCommercial Arbitration Rules Demand forArbitration form to the AAA. You mayrequest a telephonic or in-person hearingby following the AAA rules. In a disputeinvolving $10,000 or less, any hearing willbe telephonic unless the arbitrator findsgood cause to hold an in-person hearinginstead. For more information, see adr.orgor call 1-800-778-7879. You agree tocommence arbitration only in your countyof residence or FORD MOTOR COMPANY’Sprincipal place of business. The arbitrator
may award the same damages to Youindividually as a court could. The arbitratormay award declaratory or injunctive reliefonly to You individually, and only to theextent required to satisfy Your individualclaim.(g) Arbitration fees and incentives.• I. Disputes involving $75,000 or less.
FORD MOTOR COMPANY willpromptly reimburse your filing fees andpay the AAA’s and arbitrator’s fees andexpenses. If you reject FORD MOTORCOMPANY’S last written settlementoffer made before the arbitrator wasappointed (“last written offer”), yourdispute goes all the way to anarbitrator’s decision (called an“award”), and the arbitrator awardsyou more than the last written offer,FORD MOTOR COMPANY will give youthree incentives: (1) pay the greater ofthe award or $1,000; (2) pay twice yourreasonable attorney’s fees, if any; and(3) reimburse any expenses (includingexpert witness fees and costs) thatyour attorney reasonably accrues forinvestigating, preparing, and pursuingyour claim in arbitration. The arbitratorwill determine the amounts.
• ii. Disputes involving more than$75,000. The AAA rules will governpayment of filing fees and the AAA’sand arbitrator’s fees and expenses.
• iii. Disputes involving any amount. Inany arbitration you commence, FORDMOTOR COMPANY will seek its AAAor arbitrator’s fees and expenses, orYour filing fees it reimbursed, only if thearbitrator finds the arbitration frivolousor brought for an improper purpose. Inany arbitration FORD MOTORCOMPANY commences, it will pay all
460
Fusion (CC7) Canada/United States of America, enUSA, Edition date: 201905, Second-Printing
Appendices

filing, AAA, and arbitrator’s fees andexpenses. It will not seek its attorney’sfees or expenses from you in anyarbitration. Fees and expenses are notcounted in determining how much adispute involves.
(h) Claims or disputes must be filedwithin one year. To the extent permittedby law, any claim or dispute under thisEULA to which this Section applies mustbe filed within one year in small claimscourt (Section c) or in arbitration (Sectiond). The one-year period begins when theclaim or dispute first could be filed. If sucha claim or dispute is not filed within oneyear, it is permanently barred.(I) Severability. If the class action waiver(Section e) is found to be illegal orunenforceable as to all or some parts of adispute, then that portion of Section e willnot apply to those parts. Instead, thoseparts will be severed and proceed in a courtof law, with the remaining parts proceedingin arbitration. If any other provision of thatportion Section e is found to be illegal orunenforceable, that provision will besevered with the remainder of Section eremaining in full force and effect.
Telenav Software End User LicenseAgreementPlease read these terms and conditionscarefully before you use the TeleNavSoftware. Your use of the TeleNavSoftware indicates that you accept theseterms and conditions. If you do not acceptthese terms and conditions, do not breakthe seal of the package, launch, orotherwise use the TeleNav Software.TeleNav may revise this Agreement andthe privacy policy at any time, with orwithout notice to you. You agree to visithttp://www.telenav.com from time to timeto review the then current version of thisAgreement and of the privacy policy.
1. Safe and Lawful UseYou acknowledge that devoting attentionto the TeleNav Software may pose a riskof injury or death to you and others insituations that otherwise require yourundivided attention, and you thereforeagree to comply with the following whenusing the TeleNav Software:(a) observe all traffic laws and otherwisedrive safely;(b) use your own personal judgment whiledriving. If you feel that a route suggestedby the TeleNav Software instructs you toperform an unsafe or illegal maneuver,places you in an unsafe situation, or directsyou into an area that you consider to beunsafe, do not follow such instructions;(c) do not input destinations, or otherwisemanipulate the TeleNav Software, unlessyour vehicle is stationary and parked;(d) do not use the TeleNav Software forany illegal, unauthorized, unintended,unsafe, hazardous, or unlawful purposes,or in any manner inconsistent with thisAgreement;(e) arrange all GPS and wireless devicesand cables necessary for use of theTeleNav Software in a secure manner inyour vehicle so that they will not interferewith your driving and will not prevent theoperation of any safety device (such as anairbag).You agree to indemnify and hold TeleNavharmless against all claims resulting fromany dangerous or otherwise inappropriateuse of the TeleNav Software in any movingvehicle, including as a result of your failureto comply with the directions above.
461
Fusion (CC7) Canada/United States of America, enUSA, Edition date: 201905, Second-Printing
Appendices

2. Account InformationYou agree: (a) when registering theTeleNav Software, to provide TeleNav withtrue, accurate, current, and completeinformation about yourself, and (b) toinform TeleNav promptly of any changesto such information, and to keep it true,accurate, current and complete.
3. Software License• Subject to your compliance with the
terms of this Agreement, TeleNavhereby grants to you a personal,non-exclusive, non-transferable license(except as expressly permitted belowin connection with your permanenttransfer of the TeleNav Softwarelicense), without the right tosublicense, to use the TeleNavSoftware (in object code form only) inorder to access and use the TeleNavSoftware. This license shall terminateupon any termination or expiration ofthis Agreement. You agree that you willuse the TeleNav Software only for yourpersonal business or leisure purposes,and not to provide commercialnavigation services to other parties.
3.1 License Limitations• (a) reverse engineer, decompile,
disassemble, translate, modify, alteror otherwise change the TeleNavSoftware or any part thereof; (b)attempt to derive the source code,audio library or structure of theTeleNav Software without the priorexpress written consent of TeleNav;(c) remove from the TeleNavSoftware, or alter, any of TeleNav's orits suppliers' trademarks, trade names,logos, patent or copyright notices, orother notices or markings; (d)
distribute, sublicense or otherwisetransfer the TeleNav Software toothers, except as part of yourpermanent transfer of the TeleNavSoftware; or (e) use the TeleNavSoftware in any manner that
I. infringes the intellectual property orproprietary rights, rights of publicity orprivacy or other rights of any party,ii. violates any law, statute, ordinance orregulation, including but not limited to lawsand regulations related to spamming,privacy, consumer and child protection,obscenity or defamation, oriii. is harmful, threatening, abusive,harassing, tortuous, defamatory, vulgar,obscene, libelous, or otherwiseobjectionable; and (f) lease, rent out, orotherwise permit unauthorized access bythird parties to the TeleNav Softwarewithout advanced written permission ofTeleNav.
4. Disclaimers• To the fullest extent permissible
pursuant to applicable law, in no eventwill TeleNav, its licensors and suppliers,or agents or employees of any of theforegoing, be liable for any decisionmade or action taken by you or anyoneelse in reliance on the informationprovided by the TeleNav Software.TeleNav also does not warrant theaccuracy of the map or other data usedfor the TeleNav Software. Such datamay not always reflect reality due to,among other things, road closures,construction, weather, new roads andother changing conditions. You areresponsible for the entire risk arisingout of your use of the TeleNavSoftware. For example but withoutlimitation, you agree not to rely on theTeleNav Software for criticalnavigation in areas where thewell-being or survival of you or others
462
Fusion (CC7) Canada/United States of America, enUSA, Edition date: 201905, Second-Printing
Appendices

is dependent on the accuracy ofnavigation, as the maps or functionalityof the TeleNav Software are notintended to support such high riskapplications, especially in more remotegeographical areas.
• TELENAV EXPRESSLY DISCLAIMSAND EXCLUDES ALL WARRANTIES INCONNECTION WITH THE TELENAVSOFTWARE, WHETHER STATUTORY,EXPRESS OR IMPLIED, INCLUDING ALLWARRANTIES WHICH MAY ARISEFROM COURSE OF DEALING, CUSTOMOR TRADE AND INCLUDING, BUT NOTLIMITED TO, THE IMPLIEDWARRANTIES OF MERCHANTABILITY,FITNESS FOR A PARTICULARPURPOSE AND NON-INFRINGEMENTOF THIRD PARTY RIGHTS WITHRESPECT TO THE TELENAVSOFTWARE.
• Certain jurisdictions do not permit thedisclaimer of certain warranties, so thislimitation may not apply to you.
5. Limitation of Liability• TO THE EXTENT PERMITTED UNDER
APPLICABLE LAW, UNDER NOCIRCUMSTANCES SHALL TELENAVOR ITS LICENSORS AND SUPPLIERSBE LIABLE TO YOU OR TO ANY THIRDPARTY FOR ANY INDIRECT,INCIDENTAL, CONSEQUENTIAL,SPECIAL OR EXEMPLARY DAMAGES(INCLUDING IN EACH CASE, BUT NOTLIMITED TO, DAMAGES FOR THEINABILITY TO USE THE EQUIPMENTOR ACCESS DATA, LOSS OF DATA,LOSS OF BUSINESS, LOSS OFPROFITS, BUSINESS INTERRUPTIONOR THE LIKE) ARISING OUT OF THEUSE OF OR INABILITY TO USE THETELENAV SOFTWARE, EVEN IFTELENAV HAS BEEN ADVISED OF THEPOSSIBILITY OF SUCH DAMAGES.NOTWITHSTANDING ANY DAMAGESTHAT YOU MIGHT INCUR FOR ANY
REASON WHATSOEVER (INCLUDING,WITHOUT LIMITATION, ALL DAMAGESREFERENCED HEREIN AND ALLDIRECT OR GENERAL DAMAGES INCONTRACT, TORT (INCLUDINGNEGLIGENCE) OR OTHERWISE), THEENTIRE LIABILITY OF TELENAV ANDOF ALL OF TELENAV'S SUPPLIERSSHALL BE LIMITED TO THE AMOUNTACTUALLY PAID BY YOU FOR THETELENAV SOFTWARE. SOME STATESAND/OR JURISDICTIONS DO NOTALLOW THE EXCLUSION ORLIMITATION OF INCIDENTAL ORCONSEQUENTIAL DAMAGES, SO THEABOVE LIMITATIONS OR EXCLUSIONSMAY NOT APPLY TO YOU.
6. Arbitration and Governing Law• You agree that any dispute, claim or
controversy arising out of or relating tothis Agreement or the TeleNavSoftware shall be settled byindependent arbitration involving aneutral arbitrator and administered bythe American Arbitration Associationin the County of Santa Clara, California.The arbitrator shall apply theCommercial Arbitration Rules of theAmerican Arbitration Association, andthe judgment upon the award renderedby the arbitrator may be entered by anycourt having jurisdiction. Note thatthere is no judge or jury in an arbitrationproceeding and the decision of thearbitrator shall be binding upon bothparties. You expressly agree to waiveyour right to a jury trial. This Agreementand performance hereunder will begoverned by and construed inaccordance with the laws of the Stateof California, without giving effect toits conflict of law provisions. To theextent judicial action is necessary inconnection with the binding arbitration,both TeleNav and you agree to submit
463
Fusion (CC7) Canada/United States of America, enUSA, Edition date: 201905, Second-Printing
Appendices

to the exclusive jurisdiction of thecourts of the County of Santa Clara,California. The United NationsConvention on Contracts for theInternational Sale of Goods shall notapply.
7. Assignment• You may not resell, assign, or transfer
this Agreement or any of your rights orobligations, except in totality, inconnection with your permanenttransfer of the TeleNav Software, andexpressly conditioned upon the newuser of the TeleNav Software agreeingto be bound by the terms andconditions of this Agreement. Any suchsale, assignment or transfer that is notexpressly permitted under thisparagraph will result in immediatetermination of this Agreement, withoutliability to TeleNav, in which case youand all other parties shall immediatelycease all use of the TeleNav Software.Notwithstanding the foregoing,TeleNav may assign this Agreement toany other party at any time withoutnotice, provided the assignee remainsbound by this Agreement.
8. Miscellaneous
8.1This Agreement constitutes the entireagreement between TeleNav and you withrespect to the subject matter hereof.
8.2Except for the limited licenses expresslygranted in this Agreement, TeleNav retainsall right, title and interest in and to theTeleNav Software, including withoutlimitation all related intellectual propertyrights. No licenses or other rights which arenot expressly granted in this Agreementare intended to, or shall be, granted or
conferred by implication, statute,inducement, estoppel or otherwise, andTeleNav and its suppliers and licensorshereby reserve all of their respective rightsother than the licenses explicitly grantedin this Agreement.
8.3By using the TeleNav Software, youconsent to receive from TeleNav allcommunications, including notices,agreements, legally required disclosuresor other information in connection with theTeleNav Software (collectively, "Notices")electronically. TeleNav may provide suchNotices by posting them on TeleNav'sWebsite or by downloading such Noticesto your wireless device. If you desire towithdraw your consent to receive Noticeselectronically, you must discontinue youruse of the TeleNav Software.
8.4TeleNav's or your failure to requireperformance of any provision shall notaffect that party's right to requireperformance at any time thereafter, norshall a waiver of any breach or default ofthis Agreement constitute a waiver of anysubsequent breach or default or a waiverof the provision itself.
8.5If any provision herein is heldunenforceable, then such provision will bemodified to reflect the intention of theparties, and the remaining provisions ofthis Agreement will remain in full force andeffect.
464
Fusion (CC7) Canada/United States of America, enUSA, Edition date: 201905, Second-Printing
Appendices

8.6The headings in this Agreement are forconvenience of reference only, will not bedeemed to be a part of this Agreement,and will not be referred to in connectionwith the construction or interpretation ofthis Agreement. As used in this Agreement,the words "include" and "including" andvariations thereof, will not be deemed tobe terms of limitation, but rather will bedeemed to be followed by the words"without limitation".
9. Other Vendors Terms and Conditions• The Telenav Software utilizes map and
other data licensed to Telenav by thirdparty vendors for the benefit of you andother end users. This Agreementincludes end-user terms applicable tothese companies (included at the endof this Agreement), and thus your useof the Telenav Software is also subjectto such terms. You agree to complywith the following additional terms andconditions, which are applicable toTelenav’s third party vendor licensors::
9.1 End User Terms Required by HERENorth America, LLCThe data (“Data”) is provided for yourpersonal, internal use only and not forresale. It is protected by copyright, and issubject to the following terms andconditions which are agreed to by you, onthe one hand, and Telenav (“Telenav”) andits licensors (including their licensors andsuppliers) on the other hand.© 2013 HERE. All rights reserved.The Data for areas of Canada includesinformation taken with permission fromCanadian authorities, including: © HerMajesty the Queen in Right of Canada, ©Queen's Printer for Ontario, © Canada PostCorporation, GeoBase®, © Department ofNatural Resources Canada.
HERE holds a non-exclusive license fromthe United States Postal Service® topublish and sell ZIP+4® information.©United States Postal Service® 2014.Prices are not established, controlled orapproved by the United States PostalService®. The following trademarks andregistrations are owned by the USPS:United States Postal Service, USPS, andZIP+4The Data for Mexico includes certain datafrom Instituto Nacional de Estadística yGeografía.
9.2 End User Terms Required by NAV2(Shanghai) Co., LtdThe data (“Data”) is provided for yourpersonal, internal use only and not forresale. It is protected by copyright, and issubject to the following terms andconditions which are agreed to by you, onthe one hand, and NAV2 (Shanghai) Co.,Ltd (“NAV2”) and its licensors (includingtheir licensors and suppliers) on the otherhand. 20xx. All rights reserved
Terms and ConditionsPermitted Use. You agree to use this Datatogether with the Telenav Software solelyfor the internal business and personalpurposes for which you were licensed, andnot for service bureau, time-sharing orother similar purposes. Accordingly, butsubject to the restrictions set forth in thefollowing paragraphs, you agree not tootherwise reproduce, copy, modify,decompile, disassemble, create anyderivative works of, or reverse engineer anyportion of this Data, and may not transferor distribute it in any form, for any purpose,except to the extent permitted bymandatory laws.
465
Fusion (CC7) Canada/United States of America, enUSA, Edition date: 201905, Second-Printing
Appendices

Restrictions. Except where you have beenspecifically licensed to do so by Telenav,and without limiting the precedingparagraph, you may not use this Data (a)with any products, systems, or applicationsinstalled or otherwise connected to or incommunication with vehicles, capable ofvehicle navigation, positioning, dispatch,real time route guidance, fleetmanagement or similar applications; or (b)with or in communication with anypositioning devices or any mobile orwireless-connected electronic or computerdevices, including without limitationcellular phones, palmtop and handheldcomputers, pagers, and personal digitalassistants or PDAs.Warning. The Data may containinaccurate or incomplete information dueto the passage of time, changingcircumstances, sources used and thenature of collecting comprehensivegeographic data, any of which may lead toincorrect results.No Warranty. This Data is provided to you“as is,” and you agree to use it at your ownrisk. Telenav and its licensors (and theirlicensors and suppliers) make noguarantees, representations or warrantiesof any kind, express or implied, arising bylaw or otherwise, including but not limitedto, content, quality, accuracy,completeness, effectiveness, reliability,fitness for a particular purpose, usefulness,use or results to be obtained from thisData, or that the Data or server will beuninterrupted or error-free.Disclaimer of Warranty: TELENAV ANDITS LICENSORS (INCLUDING THEIRLICENSORS AND SUPPLIERS) DISCLAIMANY WARRANTIES, EXPRESS OR IMPLIED,OF QUALITY, PERFORMANCE,MERCHANTABILITY, FITNESS FOR A
PARTICULAR PURPOSE ORNON-INFRINGEMENT. Some States,Territories and Countries do not allowcertain warranty exclusions, so to thatextent the above exclusion may not applyto you.Disclaimer of Liability: TELENAV ANDITS LICENSORS (INCLUDING THEIRLICENSORS AND SUPPLIERS) SHALL NOTBE LIABLE TO YOU: IN RESPECT OF ANYCLAIM, DEMAND OR ACTION,IRRESPECTIVE OF THE NATURE OF THECAUSE OF THE CLAIM, DEMAND ORACTION ALLEGING ANY LOSS, INJURY ORDAMAGES, DIRECT OR INDIRECT, WHICHMAY RESULT FROM THE USE ORPOSSESSION OF THE INFORMATION; ORFOR ANY LOSS OF PROFIT, REVENUE,CONTRACTS OR SAVINGS, OR ANYOTHER DIRECT, INDIRECT, INCIDENTAL,SPECIAL OR CONSEQUENTIAL DAMAGESARISING OUT OF YOUR USE OF ORINABILITY TO USE THIS INFORMATION,ANY DEFECT IN THE INFORMATION, ORTHE BREACH OF THESE TERMS ORCONDITIONS, WHETHER IN AN ACTIONIN CONTRACT OR TORT OR BASED ON AWARRANTY, EVEN IF TELENAV OR ITSLICENSORS HAVE BEEN ADVISED OF THEPOSSIBILITY OF SUCH DAMAGES. SomeStates, Territories and Countries do notallow certain liability exclusions ordamages limitations, so to that extent theabove may not apply to you.Export Control. You shall not export fromanywhere any part of the Data or any directproduct thereof except in compliance with,and with all licenses and approvalsrequired under, applicable export laws,rules and regulations, including but notlimited to the laws, rules and regulationsadministered by the Office of ForeignAssets Control of the U.S. Department ofCommerce and the Bureau of Industry andSecurity of the U.S. Department ofCommerce. To the extent that any such
466
Fusion (CC7) Canada/United States of America, enUSA, Edition date: 201905, Second-Printing
Appendices

export laws, rules or regulations prohibitHERE from complying with any of itsobligations hereunder to deliver ordistribute Data, such failure shall beexcused and shall not constitute a breachof this Agreement.Entire Agreement. These terms andconditions constitute the entire agreementbetween Telenav (and its licensors,including their licensors and suppliers) andyou pertaining to the subject matter hereof,and supersedes in their entirety any andall written or oral agreements previouslyexisting between us with respect to suchsubject matter.Governing Law. The above terms andconditions shall be governed by the lawsof the State of Illinois [insert “Netherlands”where European HERE Data is used],without giving effect to (i) its conflict oflaws provisions, or (ii) the United NationsConvention for Contracts for theInternational Sale of Goods, which isexplicitly excluded. You agree to submit tothe jurisdiction of the State of Illinois[insert “The Netherlands” where EuropeanHERE Data is used] for any and alldisputes, claims and actions arising fromor in connection with the Data provided toyou hereunder.Government End Users. If the Data isbeing acquired by or on behalf of theUnited States government or any otherentity seeking or applying rights similar tothose customarily claimed by the UnitedStates government, this Data is a“commercial item” as that term is definedat 48 C.F.R. (“FAR”) 2.101, is licensed inaccordance with these End-User Terms,and each copy of Data delivered orotherwise furnished shall be marked andembedded as appropriate with thefollowing “Notice of Use,” and shall betreated in accordance with such Notice:
NOTICE OF USE
CONTRACTOR (MANUFACTURER/SUPPLIER) NAME: HERE
CONTRACTOR (MANUFACTURER/SUPPLIER) ADDRESS: c/o Nokia, 425
West Randolph Street, Chicago, Illinois60606
This Data is a commercial item asdefined in FAR 2.101 and is subject to
these End-User Terms under which thisData was provided.
© 1987 – 2014 HERE – All rights reserved.
If the Contracting Officer, federalgovernment agency, or any federal officialrefuses to use the legend provided herein,the Contracting Officer, federalgovernment agency, or any federal officialmust notify HERE prior to seekingadditional or alternative rights in the Data.
I. US/Canada Territory
A. United States Data. The End-UserTerms for any Application containingData for the United States shall containthe following notices:
“HERE holds a non-exclusive licensefrom the United States PostalService® to publish and sell ZIP+4®information.”
“©United States Postal Service®20XX. Prices are not established,controlled or approved by the UnitedStates Postal Service®. The followingtrademarks and registrations areowned by the USPS: United StatesPostal Service, USPS, and ZIP+4.”
467
Fusion (CC7) Canada/United States of America, enUSA, Edition date: 201905, Second-Printing
Appendices

B. Canada Data. The following provi-sions apply to the Data for Canada,which may include or reflect data fromthird party licensors (“Third PartyData”), including Her Majesty the Queenin Right of Canada (“Her Majesty”),Canada Post Corporation (“CanadaPost”) and the Department of NaturalResources of Canada (“NRCan”):
1. Disclaimer and Limitation: Clientagrees that its use of the Third PartyData is subject to the following provi-sions:
a. Disclaimer: The Third Party Datais licensed on an “as is” basis. Thelicensors of such data, including HerMajesty, Canada Post and NRCan,make no guarantees, representa-tions or warranties respecting suchdata, either express or implied,arising by law or otherwise, includingbut not limited to, effectiveness,completeness, accuracy or fitnessfor a particular purpose.
b. Limitation on Liability: The ThirdParty Data licensors, including HerMajesty, Canada Post and NRCan,shall not be liable: (i) in respect ofany claim, demand or action, irre-spective of the nature of the causeof the claim, demand or actionalleging any loss, injury or damages,direct or indirect, which may resultfrom the use or possession of suchData; or (ii) in any way for loss ofrevenues or contracts, or any otherconsequential loss of any kindresulting from any defect in theData.
2. Copyright Notice: In connection witheach copy of all or any portion of theData for the Territory of Canada, Clientshall affix in a conspicuous manner thefollowing copyright notice on at leastone of: (i) the label for the storagemedia of the copy; (ii) the packagingfor the copy; or (iii) other materialspackaged with the copy, such as usermanuals or end user license agree-ments: “This data includes informationtaken with permission from Canadianauthorities, including © Her Majestythe Queen in Right of Canada, ©Queen's Printer for Ontario, © CanadaPost Corporation, GeoBase®, © TheDepartment of Natural ResourcesCanada. All rights reserved.”
3. End-User Terms: Except as other-wise agreed by the parties, in connec-tion with the provision of any portionof the Data for the Territory of Canadato End-Users as may be authorizedunder the Agreement, Client shallprovide such End-Users, in a reason-ably conspicuous manner, with terms(set forth with other end user termsrequired to be provided under theAgreement, or as otherwise may beprovided, by Client) which shall includethe following provisions on behalf ofthe Third Party Data licensors,including Her Majesty, Canada Postand NRCan:
The Data may include or reflectdata of licensors, including HerMajesty the Queen in the Right ofCanada (“Her Majesty”), CanadaPost Corporation (“Canada Post”)and the Department of NaturalResources Canada (“NRCan”). Suchdata is licensed on an “as is” basis.The licensors, including Her Majesty,Canada Post and NRCan, make noguarantees, representations orwarranties respecting such data,
468
Fusion (CC7) Canada/United States of America, enUSA, Edition date: 201905, Second-Printing
Appendices

either express or implied, arising bylaw or otherwise, including but notlimited to, effectiveness, complete-ness, accuracy or fitness for aparticular purpose. The licensors,including Her Majesty, Canada Postand NRCan, shall not be liable inrespect of any claim, demand oraction, irrespective of the nature ofthe cause of the claim, demand oraction alleging any loss, injury ordamages, direct or indirect, whichmay result from the use or posses-sion of the data or the Data. Thelicensors, including Her Majesty,Canada Post and NRCan, shall notbe liable in any way for loss ofrevenues or contracts, or any otherconsequential loss of any kindresulting from any defect in the dataor the Data.End User shall indemnify and saveharmless the licensors, including HerMajesty, Canada Post and NRCan,and their officers, employees andagents from and against any claim,demand or action, irrespective ofthe nature of the cause of the claim,demand or action, alleging loss,costs, expenses, damages or injuries(including injuries resulting in death)arising out of the use or possessionof the data or the Data.
4. Additional Provisions: The termscontained in this Section are in addi-tion to all of the rights and obligationsof the parties under the Agreement.To the extent that any of the provi-sions of this Section are inconsistentwith, or conflict with, any other provi-sions of the Agreement, the provisionsof this Section shall prevail.
II. Mexico. The following provision appliesto the Data for Mexico, which includescertain data from the Instituto Nacionalde Estadística y Geografía (“INEGI”):
A. Any and all copies of the Data and/orpackaging containing Data for Mexicoshall contain the following notice:“Fuente: INEGI (Instituto Nacional deEstadística y Geografía)”
III. Latin America Territory
A. Third Party Notices. Any and all copiesof the Data and/or packaging relatingthereto shall include the respective ThirdParty Notices set forth below and usedas described below corresponding tothe Territory (or portion thereof)included in such copy:
NoticeTerritory
IGN “INSTITUTOGEOGRAFICO NACIONALARGENTINO”
Argen-tina
“INSTITUTO GEOGRAFICOMILITAR DEL ECUADORAUTORIZACION N° IGM-2011-01- PCO-01 DEL 25 DEENERO DE 2011”
Ecuador
“source: © IGN 2009 - BDTOPO ®”
“Fuente: INEGI (InstitutoNacional de Estadística yGeografía)”
Guade-loupe,FrenchGuianaandMarti-niqueMexico
IV. Middle East Territory
469
Fusion (CC7) Canada/United States of America, enUSA, Edition date: 201905, Second-Printing
Appendices

A. Third Party Notices. Any and all copiesof the Data and/or packaging relatingthereto shall include the respective ThirdParty Notices set forth below and usedas described below corresponding tothe Territory (or portion thereof)included in such copy:
NoticeCountry
“© Royal JordanianGeographic Centre”. Theforegoing notice requirementfor Jordan Data is a materialterm of the Agreement. IfClient or any of its permitted
Jordan
sublicensees (if any) fail tomeet such requirement,HERE shall have the right toterminate Client’s licensewith respect to the JordanData.
B. Jordan Data. Client and its permittedsublicensees (if any) are restricted fromlicensing and/or otherwise distributingHERE’s database for the country ofJordan (“Jordan Data”) for use in Enter-prise Applications to (i) non-Jordanianentities for use of the Jordan Data solelyin Jordan or (ii) Jordan-based customers.In addition, Client, its permitted subli-censees (if any) and End-Users arerestricted from using the Jordan Data inEnterprise Applications if such party is(i) a non-Jordanian entity using theJordan Data solely in Jordan or (ii) aJordan-based customer. For purposesof the foregoing, “Enterprise Applica-tions” shall mean Geomarketing applic-ations, GIS applications, mobile businessasset management applications, callcenter applications, telematics applica-tions, public organization Internetapplications or for providing geocodingservices.
V. Europe Territory
A. Use of Certain Traffic Codes in Europe
1. General Restrictions Applicable toTraffic Codes. Client acknowledgesand agrees that in certain countries ofthe Europe Territory, Client will needto obtain rights directly from thirdparty RDS-TMC code providers toreceive and use the Traffic Codes inthe Data and to deliver to End-UsersTransactions in any way derived fromor based on such Traffic Codes. Forsuch countries, HERE shall deliver theData incorporating Traffic Codes toClient only after receiving certificationfrom Client of its having obtained suchrights.
2. Display of Third Party RightsLegends for Belgium. Client shall, foreach Transaction that uses TrafficCodes for Belgium, provide thefollowing notice to the End-User:“Traffic Codes for Belgium areprovided by the Ministerie van deVlaamse Gemeenschap and theMinistèrie de l’Equipement et desTransports.”
B. Paper Maps. With respect to anylicense granted to Client relating tomaking, selling or distributing papermaps (i.e., a map fixed on a paper orpaper-like medium): (a) such licensewith respect to Data for the Territory ofGreat Britain is conditioned on Client’sentering into and complying with aseparate written agreement with theOrdnance Survey (“OS”) to create andsell paper maps, Client’s paying to theOS any and all applicable paper maproyalties, and Client’s complying withthe OS copyright notice requirements;(b) such license for selling or otherwisedistributing for charge with respect toData for the Territory of Czech Republic
470
Fusion (CC7) Canada/United States of America, enUSA, Edition date: 201905, Second-Printing
Appendices

is conditioned on Client’s obtaining priorwritten consent from Kartografie a.s.;(c) such license for selling or distributingwith respect to Data for the Territory ofSwitzerland is conditioned on Client’sobtaining a permit from Bundesamt fürLandestopografie of Switzerland; (d)Client is restricted from using Data forthe Territory of France to create papermaps with a scale between 1:5,000 and1:250,000; and (e) Client is restrictedfrom using any Data to create, sell ordistribute paper maps that are the sameor substantially similar, in terms of datacontent and specific use of color,symbols and scale, to paper mapspublished by the European nationalmapping agencies, including withoutlimitation, Landervermessungämter ofGermany, Topografische Dienst of theNetherlands, Nationaal GeografischInstituut of Belgium, Bundesamt fürLandestopografie of Switzerland,Bundesamt für Eich-und Vermessung-swesen of Austria, and the NationalLand Survey of Sweden.
C. OS Enforcement. Without limitingSection IV(B) above, with respect toData for the Territory of Great Britain,Client acknowledges and agrees thatthe Ordnance Survey (“OS”) may bringa direct action against Client to enforcecompliance with the OS copyright notice(see Section IV(D) below) and papermap requirements (see Section IV(B)above) contained in this Agreement.
D. Third Party Notices. Any and all copiesof the Data and/or packaging relatingthereto shall include the respective ThirdParty Notices set forth below and usedas described below corresponding tothe Territory (or portion thereof)included in such copy:
NoticeCountry(ies)
“© Bundesamt für Eich-und Vermessungswesen”
Austria
“© EuroGeographics”
CroatiaCyprus,Estonia,Latvia,Lithuania,Moldova,Poland,Sloveniaand/orUkraine
“source: © IGN 2009 – BDTOPO ®”
France
“Die Grundlagendatenwurden mit Genehmigungder zuständigen Behördenentnommen”
Germany
“Contains OrdnanceSurvey data © Crowncopyright and databaseright 2010 Contains RoyalMail data © Royal Mailcopyright and databaseright 2010”
Great Britain
“Copyright GeomaticsLtd.”
Greece
“Copyright © 2003; Top-Map Ltd.”
Hungary
“La Banca Dati Italiana èstata prodotta usandoquale riferimento anchecartografia numerica edal tratto prodotta e fornitadalla Regione Toscana.”
Italy
“Copyright © 2000;Norwegian MappingAuthority”
Norway
“Source: IgeoE – Portugal”Portugal
471
Fusion (CC7) Canada/United States of America, enUSA, Edition date: 201905, Second-Printing
Appendices

“Información geográficapropiedad del CNIG”
Spain
“Based upon electronicdata © National LandSurvey Sweden.”
Sweden
“TopografischeGrundlage: © Bundesamtfür Landestopographie.
Switzerland
E. Respective Country Distribution. Clientacknowledges that HERE has notreceived approvals to distribute mapdata for the following countries in suchrespective countries: Albania, Belarus,Kyrgyzstan, Moldova and Uzbekistan.HERE may update such list from time totime. The license rights granted to Clientunder this TL with respect to the Datafor such countries are contingent uponClient’s compliance with all applicablelaws and regulations, including, withoutlimitation, any required licenses orapprovals to distribute the Applicationincorporating such Data in suchrespective countries.
VI. Australia Territory
A. Third Party Notices. Any and all copiesof the Data and/or packaging relatingthereto shall include the respective ThirdParty Notices set forth below and usedas described below corresponding tothe Territory (or portion thereof)included in such copy:
Copyright. Based on data providedunder license from PSMA AustraliaLimited (www.psma.com.au).
Product incorporates data which is ©20XX Telstra Corporation Limited, GMHolden Limited, Intelematics AustraliaPty Ltd and Continental Pty Ltd.
B. Third Party Notices for Australia. Inaddition to the foregoing, the End-UserTerms for any Application containingRDS-TMC Traffic Codes for Australiashall contain the following notice:“Product incorporates traffic locationcodes which is © 20XX Telstra Corpora-tion Limited and its licensors.”
AT&T Vehicle Network CarrierTelematics DisclosureEND USER FOR PURPOSES OF THISSECTION MEANS YOU AND YOUR HEIRS,EXECUTORS, LEGAL PERSONALREPRESENTATITVES AND PERMITEDASSIGNS. FOR PURPOSES OF THISSECTION “UNDERLYING WIRELESSSERVICE CARRIER” INCLUDES ITSAFFILIATES AND CONTRACTORS ANDTHEIR RESPECTIVE OFFICERS,DIRECTORS, EMPLOYEES, SUCCESSORSAND ASSIGNS. END USER HAS NOCONTRACTUAL RELATIONSHIP WITHTHE UNDERLYING WIRELESS SERVICECARRIER AND END USER IS NOT A THIRDPARTY BENEFICIARY OF ANYAGREEMENT BETWEEN FORD ANDUNDERLYING CARRIER. END USERUNDERSTANDS AND AGREES THAT THEUNDERLYING CARRIER HAS NO LEGAL,EQUITABLE, OR OTHER LIABILITY OF ANYKIND TO END USER. IN ANY EVENT,REGARDLESS OF THE FORM OF THEACTION, WHETHER FOR BREACH OFCONTRACT, WARRANTY, NEGLIGENCE,STRICT LIABILITY IN TORT OROTHERWISE, END USER'S EXCLUSIVEREMEDY FOR CLAIMS ARISING IN ANYWAY IN CONNECTION WITH THISAGREEMENT, FOR ANY CAUSEWHATSOEVER, INCLUDING BUT NOTLIMITED TO ANY FAILURE OR
472
Fusion (CC7) Canada/United States of America, enUSA, Edition date: 201905, Second-Printing
Appendices

DISRUPTION OF SERVICE PROVIDEDHEREUNDER, IS LIMITED TO PAYMENTOF DAMAGES IN AN AMOUNT NOT TOEXCEED THE AMOUNT PAID BY END USERFOR THE SERVICES DURING THETWO-MONTH PERIOD PRECEDING THEDATE THE CLAIM AROSE.(ii) END USER AGREES TO INDEMNIFYAND HOLD HARMLESS THE UNDERLYINGWIRELESS SERVICE CARRIER AND ITSOFFICERS, EMPLOYEES, AND AGENTSAGAINST ANY AND ALL CLAIMS,INCLUDING WITHOUT LIMITATIONCLAIMS FOR LIBEL, SLANDER, OR ANYPROPERTY DAMAGE, PERSONAL INJURYOR DEATH, ARISING IN ANY WAY,DIRECTLY OR INDIRECTLY, INCONNECTION WITH THIS AGREEMENTOR THE USE, FAILURE TO USE, ORINABILITY TO USE THE DEVICE EXCEPTWHERE THE CLAIMS RESULT FROM THEUNDERLYING CARRIER’S GROSSNEGLIGENCE OR WILLFUL MISCONDUCT.THIS INDEMNITY WILL SURVIVE THETERMINATION OF THE AGREEMENT.(iii) END USER HAS NO PROPERTY RIGHTIN ANY NUMBER ASSIGNED TO THEDEVICE.(iv) END USER UNDERSTANDS THATFORD AND THE UNDERLYING CARRIERCANNOT GUARANTY THE SECURITY OFWIRELESS TRANSMISSIONS, AND WILLNOT BE LIABLE FOR ANY LACK OFSECURITY RELATING TO THE USE OF THESERVICESTHE SERVICE IS FOR [END USER’S] USEONLY AND END USER MAY NOT RESELLTHE SERVICE TO ANY OTHER PARTY ENDUSER UNDERSTANDS THAT THEUNDERLYING CARRIER DOES NOTGUARANTEE ANY END USERUNINTERRUPTED SERVICE ORCOVERAGE. THE UNDERLYING CARRIERDOES NOT WARRANT THAT END USERSCAN OR WILL BE LOCATED USING THESERVICE. THE UNDERLYING CARRIER
MAKES NO WARRANTY, EXPRESS ORIMPLIED, OF MERCHANTABILITY ORFITNESS FOR A PARTICULAR PURPOSE,SUITABILITY, OR PERFORMANCEREGARDING ANY SERVICES OR GOODS,AND IN NO EVENT SHALL AT&T BELIABLE, WHETHER OR NOT DUE TO ITSOWN NEGLIGENCE, FOR ANY: (A) ACT OROMISSION OF A THIRD PARTY; (B)MISTAKES, OMISSIONS, INTERRUPTIONS,ERRORS, FAILURES TO TRANSMIT,DELAYS, OR DEFECTS IN THE SERVICEPROVIDED BY OR THROUGH THEUNDERLYING CARRIER; (C) DAMAGE ORINJURY CAUSED BY SUSPENSION ORTERMINATION BY THE UNDERLYINGCARRIER; OR (D) DAMAGE OR INJURYCAUSED BY A FAILURE OR DELAY INCONNECTING A CALL TO ANY ENTITY,INCLUDING 911 OR ANY OTHEREMERGENCY SERVICE. TO THE FULLEXTENT ALLOWED BY LAW, THE ENDUSER RELEASES, INDEMNIFIES ANDHOLDS THE UNDERLYING CARRIERHARMLESS FROM AND AGAINST ANYAND ALL CLAIMS OF ANY PERSON ORENTITY FOR DAMAGES OF ANY NATUREARISING IN ANY WAY FROM OR RELATINGTO, DIRECTLY OR INDIRECTLY, SERVICESPROVIDED BY THE UNDERLYING CARRIEROR ANY PERSON’S USE THEREOF,INCLUDING CLAIMS ARISING IN WHOLEOR IN PART FROM THE ALLEGEDNEGLIGENCE OF THE UNDERLYINGCARRIER.
VII. China Territory
Personal Use OnlyYou agree to use this Data together with[insert name of Client Application] for thesolely personal, non-commercial purposesfor which you were licensed, and not forservice bureau, time-sharing or othersimilar purposes. Accordingly, but subjectto the restrictions set forth in the followingparagraphs, you may copy this Data onlyas necessary for your personal use to (i)
473
Fusion (CC7) Canada/United States of America, enUSA, Edition date: 201905, Second-Printing
Appendices

view it, and (ii) save it, provided that youdo not remove any copyright notices thatappear and do not modify the Data in anyway. You agree not to otherwise reproduce,copy, modify, decompile, disassemble orreverse engineer any portion of this Data,and may not transfer or distribute it in anyform, for any purpose, except to the extentpermitted by mandatory laws.
RestrictionsExcept where you have been specificallylicensed to do so by NAV2 , and withoutlimiting the preceding paragraph, you maynot (a) use this Data with any products,systems, or applications installed orotherwise connected to or incommunication with vehicles, capable ofvehicle navigation, positioning, dispatch,real time route guidance, fleetmanagement or similar applications; or (b)with or in communication with anypositioning devices or any mobile orwireless-connected electronic or computerdevices, including without limitationcellular phones, palmtop and handheldcomputers, pagers, and personal digitalassistants or PDAs. You agree to ceaseusing this Data if you fail to comply withthese terms and conditions.
Limited WarrantyNAV2 warrants that (a) the Data willperform substantially in accordance withthe accompanying written materials for aperiod of ninety (90) days from the dateof receipt, and (b) any support servicesprovided by NAV2 shall be substantially asdescribed in applicable written materialsprovided to you by NAV2, and NAV2’ssupport engineers will make commerciallyreasonable efforts to solve any problemissues.
rigCustomer RemediesNAV2 and its suppliers’ entire liability andyour exclusive remedy shall be, at NAV2’ssole discretion, either (a) return of the pricepaid, if any, or (b) repair or replacement ofthe Data that do not meet NAV2’s LimitedWarranty and that are returned to NAV2with a copy of your receipt. This LimitedWarranty is void if failure of the Data hasresulted from accident, abuse, ormisapplication. Any replacement Data willbe warranted for the remainder of theoriginal warranty period or thirty (30) days,whichever is longer. Neither these remediesnor any product support services offeredby NAV2 are available without proof ofpurchase from an authorized internationalsource.
No Other Warranty:EXCEPT FOR THE LMITED WARRANTYSET FORTH ABOVE AND TO THE EXTENTPERMITTED BY APPLICABLE LAW, NAV2AND ITS LICENSORS (INCLUDING THEIRLICENSORS AND SUPPLIERS) DISCLAIMANY WARRANTIES, EXPRESS OR IMPLIED,OF QUALITY, PERFORMANCE,MERCHANTABILITY, FITNESS FOR APARTICULAR PURPOSE, OWNERSHIP ORNON-INFRINGEMENT. Certain warrantyexclusions may not be permitted underapplicable law, so to that extent the aboveexclusion may not apply to you.
Limited Liability:TO THE EXTENT PERMITTED BYAPPLICABLE LAW, NAV2 AND ITSLICENSORS (INCLUDING THEIRLICENSORS AND SUPPLIERS) SHALL NOTBE LIABLE TO YOU: IN RESPECT OF ANYCLAIM, DEMAND OR ACTION,IRRESPECTIVE OF THE NATURE OF THECAUSE OF THE CLAIM, DEMAND ORACTION ALLEGING ANY LOSS, INJURY ORDAMAGES, DIRECT OR INDIRECT, WHICHMAY RESULT FROM THE USE ORPOSSESSION OF THE INFORMATION; OR
474
Fusion (CC7) Canada/United States of America, enUSA, Edition date: 201905, Second-Printing
Appendices

FOR ANY LOSS OF PROFIT, REVENUE,CONTRACTS OR SAVINGS, OR ANYOTHER DIRECT, INDIRECT, INCIDENTAL,SPECIAL OR CONSEQUENTIAL DAMAGESARISING OUT OF YOUR USE OF ORINABILITY TO USE THIS INFORMATION,ANY DEFECT IN THE INFROMATION, ORTHE BREACH OF THESE TERMS ORCONDITIONS, WHETHER IN AN ACTIONIN CONTRACT OR TORT OR BASED ON AWARRANTY, EVEN IF NAV2 OR ITSLICENSORS HAVE BEEN ADVISED OF THEPOSSIBILITY OF SUCH DAMAGES. UNDERNO CIRCUMSTANCES SHALL NAV2’s ORITS SUPPLIERS’ LIABILITY HEREUNDEREXCEED THE PRICE PAID. Certain liabilityexclusions may not be permitted underapplicable law, so to that extent the aboveexclusion may not apply to you.
Export ControlYou agree not to export to anywhere anypart of the Data provided to you or anydirect product thereof except incompliance with, and with all licenses andapprovals required under, applicableexport laws, rules and regulations.
IP ProtectionThe Data are owned by NAV2 or itssuppliers and are protected by applicablecopyright and other intellectual propertylaw and treaties. The Data are providedsolely on the basis of a license to use, notsale.
Entire AgreementThese terms and conditions constitute theentire agreement between NAV2(and itslicensors, including their licensors andsuppliers) and you pertaining to the subjectmatter hereof, and supersedes in theirentirety any and all written or oralagreements previously existing betweenus with respect to such subject matter.
Governing Law.The above terms and conditions shall begoverned by the laws of the People’sRepublic of China, without giving effect to(i) its conflict of laws provisions, or (ii) theUnited Nations Convention for Contractsfor the International Sale of Goods, whichis explicitly excluded. Any dispute arisingfrom or in connection with the Dataprovided to you hereunder shall besubmitted to the Shanghai InternationalEconomic and Trade ArbitrationCommission for arbitration.
Gracenote® CopyrightCD and music-related data fromGracenote, Inc., copyright©2000-2007 Gracenote. GracenoteSoftware, copyright © 2000-2007Gracenote. This product and service maypractice one or more of the following U.S.Patents 5,987,525; 6,061,680; 6,154,773;6,161,132; 6,230,192; 6,230,207; 6.240,459;6,330,593 and other patents issued orpending. Some services supplied underlicense from Open Globe, Inc. for U.S.Patent 6,304,523.Gracenote and CDDB are registeredtrademarks of Gracenote. The Gracenotelogo and logotype, and the "Powered byGracenote™" logo are trademarks ofGracenote.
Gracenote® End User License Agreement(EULA)This device contains software fromGracenote, Inc. of 2000 Powell StreetEmeryville, California 94608("Gracenote").The software from Gracenote (the"Gracenote Software") enables this deviceto do disc and music file identification andobtain music-related information, includingname, artist, track, and title information("Gracenote Data") from online servers
475
Fusion (CC7) Canada/United States of America, enUSA, Edition date: 201905, Second-Printing
Appendices

("Gracenote Servers"), and to performother functions. You may use GracenoteData only by means of the intended EndUser functions of this device. This devicemay contain content belonging toGracenote's providers. If so, all of therestrictions set forth herein with respect toGracenote Data shall also apply to suchcontent and such content providers shallbe entitled to all of the benefits andprotections set forth herein that areavailable to Gracenote. You agree that youwill use the content from Gracenote("Gracenote Content") , Gracenote Data,the Gracenote Software, and GracenoteServers for your own personal,non-commercial use only. You agree notto assign, copy, transfer or transmit theGracenote Content, Gracenote Softwareor any Gracenote Data (except in a Tagassociated with a music file) to any thirdparty. YOU AGREE NOT TO USE OREXPLOIT GRACENOTE CONTENT,GRACENOTE DATA, THE GRACENOTESOFTWARE, OR GRACENOTE SERVERS,EXCEPT AS EXPRESSLY PERMITTEDHEREIN.You agree that your non-exclusive licensesto use the Gracenote Content, GracenoteData, the Gracenote Software, andGracenote Servers will terminate if youviolate these restrictions. If your licensesterminate, you agree to cease any and alluse of the Gracenote Content, GracenoteData, the Gracenote Software, andGracenote Servers.Gracenote, respectively, reserve all rightsin Gracenote Data, the GracenoteSoftware, and the Gracenote Servers andGracenote Content, including all ownershiprights. Under no circumstances will eitherGracenote become liable for any paymentto you for any information that you provide,
including any copyrighted material ormusic file information. You agree thatGracenote may enforce its respectiverights, collectively or separately, under thisagreement against you, directly in eachcompany's own name.Gracenote uses a unique identifier to trackqueries for statistical purposes. Thepurpose of a randomly assigned numericidentifier is to allow Gracenote to countqueries without knowing anything aboutwho you are. For more information, see theweb page at www.gracenote.com for theGracenote Privacy Policy.THE GRACENOTE SOFTWARE, EACH ITEMOF GRACENOTE DATA AND THEGRACENOTE CONTENT ARE LICENSEDTO YOU "AS IS". NEITHER GRACENOTEMAKES ANY REPRESENTATIONS ORWARRANTIES, EXPRESS OR IMPLIED,REGARDING THE ACCURACY OF ANYGRACENOTE DATA FROM THEGRACENOTE SERVERS OR GRACENOTECONTENT. GRACENOTE COLLECTIVELYAND SEPARATELY RESERVE THE RIGHTTO DELETE DATA AND/OR CONTENTFROM THE COMPANIES' RESPECTIVESERVERS OR, IN THE CASE OFGRACENOTE, CHANGE DATACATEGORIES FOR ANY CAUSE THATGRACENOTE DEEMS SUFFICIENT. NOWARRANTY IS MADE THAT EITHERGRACENOTE CONTENT OR THEGRACENOTE SOFTWARE ORGRACENOTE SERVERS ARE ERROR-FREEOR THAT THE FUNCTIONING OF THEGRACENOTE SOFTWARE ORGRACENOTE SERVERS WILL BEUNINTERRUPTED. GRACENOTE IS NOTOBLIGATED TO PROVIDE YOU WITH ANYENHANCED OR ADDITIONAL DATA TYPESTHAT GRACENOTE MAY CHOOSE TOPROVIDE IN THE FUTURE AND IS FREETO DISCONTINUE ITS ONLINE SERVICESAT ANY TIME. GRACENOTE DISCLAIM ALLWARRANTIES EXPRESS OR IMPLIED,INCLUDING, BUT NOT LIMITED TO,
476
Fusion (CC7) Canada/United States of America, enUSA, Edition date: 201905, Second-Printing
Appendices

IMPLIED WARRANTIES OFMERCHANTABILITY, FITNESS FOR APARTICULAR PURPOSE, TITLE, ANDNON-INFRINGEMENT. NEITHERGRACENOTE WARRANTS THE RESULTSTHAT WILL BE OBTAINED BY YOUR USEOF THE GRACENOTE SOFTWARE OR ANYGRACENOTE SERVER. IN NO CASE WILLGRACENOTE BE LIABLE FOR ANYCONSEQUENTIAL OR INCIDENTALDAMAGES OR FOR ANY LOST PROFITSOR LOST REVENUES FOR ANY REASONWHATSOEVER. © Gracenote 2007.
Radio Frequency StatementFCC ID: ACJ-SYNCG3-LIC: 216B-SYNCG3-LThis device complies with Part 15 of theFCC Rules and with RSS-210 of IndustryCanada. Operation is subject to thefollowing two conditions:(1) This device may not cause harmfulinterference, and(2) this device must accept anyinterference received, includinginterference that may cause undesiredoperation.
WARNING: Changes ormodifications not expressively approvedby the party responsible for compliancecould void the user's authority to operatethe equipment. The term "IC:" before theradio certification number only signifiesthat Industry Canada technicalspecifications were met.
The antenna used for this transmitter mustnot be co-located or operating inconjunction with any other antenna ortransmitter.
Taiwan TerritoryNote: In accordance with the managementapproach of low-power radio waveradiation motors:Article 12: For approved and certifiedlow-power radiation motor models,companies, firms or users must not alterthe frequency, increase the power orchange the characteristics and functionsof the original design without authorization.Article 14: The usage of low-powerradio-frequency motors must not affectaviation safety and interfere with legaltelecommunications. Should interferencebe detected, immediately stop using thedevice and only resume usage afterensuring that there is no longer anyinterference. For the legaltelecommunication and wirelesstelecommunication of the telco, thelow-power radio frequency motor must beable to tolerate legal limits of interferencefrom telecommunication, industrial,scientific and radio wave equipment.
SUNA TRAFFIC CHANNEL – TERMSAND CONDITIONSBy activating, using and/or accessing theSUNA Traffic Channel, SUNA Predictive orother content or material provided byIntelematics (together, SUNA Productsand/or Services), you must acceptcertain terms and conditions. The followingis a brief summary of the terms andconditions that apply to you. To view thefull terms and conditions relevant to youruse of the SUNA Products and/or Services,please consult:
Website
www.sunatraffic.com.au/termsandcon-ditions/
1. Acceptance
477
Fusion (CC7) Canada/United States of America, enUSA, Edition date: 201905, Second-Printing
Appendices

By using SUNA Products and/or Services,you will be deemed to have accepted andagreed to be bound by the terms andconditions fully detailed at:
Website
www.sunatraffic.com.au/termsandcon-ditions/
2. Intellectual PropertySUNA Products and/or Services are foryour personal use. You may not record, orretransmit the content, nor use the contentin association with any other trafficinformation or route guidance service ordevice not approved by Intelematics. Youobtain no right of ownership in anyIntellectual Property Rights (includingcopyright) in the data that is used toprovide SUNA Products and/or Services.3. Appropriate UseSUNA Products and/or Services areintended as an aid to personal motoringand travel planning, and do not providecomprehensive or accurate information onall occasions. On occasions, you mayexperience additional delay as a result ofusing SUNA Products and/or Services. Youacknowledge that it is not intended, orsuitable, for use in applications where timeof arrival or driving directions may impactthe safety of the public or yourself.4. Use of SUNA Products and Serviceswhile drivingYou, and other authorised drivers of thevehicle in which SUNA Products and/orServices are available or installed andactive, remain at all times responsible forobserving all relevant laws and codes ofsafe driving. In particular, you agree to onlyactively operate SUNA Products and/orServices when the Vehicle is at a completestop and it is safe to do so.
5. Service Continuity and Reception ofthe SUNA Traffic ChannelWe will use reasonable endeavours toprovide the SUNA Traffic Channel 24 hoursa day, 365 days a year. The SUNA TrafficChannel may occasionally be unavailablefor technical reasons or for plannedmaintenance. We will try to performmaintenance at times when congestion islight. We reserve the right to withdrawSUNA Products and/or Services at anytime.Also, we cannot assure the uninterruptedreception of the SUNA Traffic ChannelRDS-TMC signal at any particular location.6. Limitation of LiabilityNeither Intelematics (nor its suppliers orthe manufacturer of your device (the“Suppliers”)) shall be liable to you or toany third party for any damages eitherdirect, indirect, incidental, consequentialor otherwise arising out of the use of orinability to use SUNA Products and/orServices even if Intelematics or a Supplierhas been advised of the possibility of suchdamages. You also acknowledge that theneither Intelematics nor any Supplierguarantees nor make any warranties thatrelate to the availability, accuracy orcompleteness of SUNA Products and/orServices, and to the extent which it islawful to do so, both Intelematics and eachSupplier excludes any warranties whichmight otherwise be implied by any Stateor Federal legislation in relation to SUNAProducts and/or Services.7. Please NoteGreat care has been taken in preparing thismanual. Constant product developmentmay mean that some information is notentirely up-to-date. The information in thisdocument is subject to change withoutnotice.
478
Fusion (CC7) Canada/United States of America, enUSA, Edition date: 201905, Second-Printing
Appendices

DECLARATION OFCONFORMITYYour vehicle could have components thattransmit and receive radio waves and aretherefore subject to government
regulation.These components must accept anyinterference received, includinginterference that could cause undesiredoperation. For certification labels anddeclarations of conformity, visitwww.wirelessconformity.ford.com.
DECLARATION OF CONFORMITY - VEHICLES WITH: SYNC 3Radio Frequency Statement
IC Identification NumberFCC Identification NumberSYNC Version
216B-SYNCG3-LACJ-SYNCG3-L3.0
216B-FA170BCARHSACJ-FA-170-BCARHS3.1
216B-FG185SG32MHACJ-FG-185-SG32MH3.2
WARNING: Changes ormodifications not expressively approvedby the party responsible for compliancecould void the user's authority to operatethe equipment. The term "IC:" before theradio certification number only signifiesthat Industry Canada technicalspecifications were met.
These devices comply with Part 15 of theFCC Rules and with RSS-210 of IndustryCanada. Operation is subject to thefollowing two conditions:1. The device does not cause harmful
interference.2. The device accepts any interference
received, including interference thatcould cause undesired operation.
479
Fusion (CC7) Canada/United States of America, enUSA, Edition date: 201905, Second-Printing
Appendices

480
Fusion (CC7) Canada/United States of America, enUSA, Edition date: 201905, Second-Printing

AA/C
See: Climate Control..........................................118About This Manual...........................................7ABS
See: Brakes............................................................173ABS driving hints
See: Hints on Driving With Anti-LockBrakes.................................................................173
Accessories....................................................430Accessories
See: Replacement PartsRecommendation............................................14
ACCSee: Using Adaptive Cruise Control............196
Active Park Assist.........................................185Using Active Park Assist..................................186
Adjusting the Headlamps.........................272Horizontal Aim Adjustment............................273Vertical Aim Adjustment.................................272
Adjusting the Steering Wheel....................70Airbag Disposal...............................................49Air Conditioning
See: Climate Control..........................................118Air Filter
See: Changing the Engine Air Filter.............278Alarm
See: Anti-Theft Alarm........................................69All-Wheel Drive.............................................168Ambient Lighting............................................79
Adjusting the Brightness...................................79Changing the Color..............................................79Switching Ambient Lighting Off.....................79Switching Ambient Lighting On......................79
Anti-Theft Alarm............................................69Arming the Alarm................................................69Disarming the Alarm...........................................69
Appendices.....................................................451Apps...................................................................412
SiriusXM Traffic and Travel Link....................414Using Apps on an Android Device................413Using Apps on an iOS Device.........................413Using Mobile Navigation on an Android
Device.................................................................413At a Glance........................................................18Audible Warnings and Indicators.............93
Headlamps On Warning Chime......................93
Keyless Warning Alert.........................................93Parking Brake On Warning Chime..................93
Audio Control...................................................70You can operate the following functions
with the control:...............................................70Audio System................................................357
General Information..........................................357Audio Unit - Vehicles With: Sony Audio
System/Touchscreen Display...............361Accessing the Sound Settings.......................361Adjusting the Volume.......................................361Changing Radio Stations................................362Ejecting the CD...................................................362Inserting a CD......................................................362Switching the Audio Unit On and Off........362Using Seek, Fast Forward and
Reverse.............................................................362Audio Unit - Vehicles With: SYNC.........358
Accessing the Apps Menu..............................359Accessing the Clock Settings........................359Accessing the Media Source Menu.............359Accessing the Phone Features.....................359Accessing the Settings Menu........................359Accessing the Sound Settings......................359Adjusting the Volume......................................359Changing Radio Stations...............................360Listening to the Radio.....................................360Playing or Pausing Media...............................360Switching Radio Text On and Off...............360Switching Repeat Mode On and Off..........360Switching Shuffle Mode On and Off.........360Switching the Audio Unit On and Off........360Switching the Display On and Off..............360Using Seek, Fast Forward and
Reverse..............................................................361Using the Display Control..............................360Using the Number Block................................360
Audio Unit - Vehicles With: TouchscreenDisplay, Vehicles Without: Sony AudioSystem..........................................................357Adjusting the Volume......................................358Changing Radio Stations................................358Playing or Pausing Media...............................358Switching the Audio Unit On and Off........358Using Seek, Fast Forward and
Reverse.............................................................358
481
Fusion (CC7) Canada/United States of America, enUSA, Edition date: 201905, Second-Printing
Index

Autolamps........................................................76Windshield Wiper Activated
Headlamps........................................................76Automatic Climate Control - Vehicles
With: Sony Audio System/TouchscreenDisplay.............................................................121Setting the Blower Motor Speed...................121Setting the Temperature...................................121Switching Auto Mode On and Off.................121Switching Defrost On and Off........................122Switching Maximum Air Conditioning On
and Off...............................................................122Switching Maximum Defrost On and
Off........................................................................122Switching Recirculated Air On and
Off........................................................................122Switching the Air Conditioning On and
Off.........................................................................121Switching the Climate Control On and
Off.........................................................................121Automatic Climate Control - Vehicles
With: SYNC...................................................122Directing Air to the Footwell Air Vents........122Directing Air to the Instrument Panel Air
Vents...................................................................122Setting the Blower Motor Speed..................123Setting the Temperature..................................123Switching Auto Mode On and Off................123Switching Defrost On and Off........................123Switching Maximum Air Conditioning On
and Off...............................................................123Switching Maximum Defrost On and
Off........................................................................124Switching Recirculated Air On and
Off........................................................................124Switching the Air Conditioning On and
Off........................................................................123Switching the Climate Control On and
Off........................................................................123Automatic Climate Control - Vehicles
With: Touchscreen Display, VehiclesWithout: Sony Audio System.................119Accessing the Air Distribution
Controls..............................................................119Setting the Blower Motor Speed..................120Setting the Temperature.................................120Switching Auto Mode On and Off................120
Switching Maximum Air Conditioning Onand Off..............................................................120
Switching Maximum Defrost On andOff.......................................................................120
Switching Recirculated Air On andOff.......................................................................120
Switching the Air Conditioning On andOff.......................................................................120
Switching the Climate Control On andOff.......................................................................120
Automatic High Beam Control.................80Automatic High Beam Control
Indicators.......................................................80Automatic Transmission............................163
Automatic Transmission AdaptiveLearning.............................................................167
Brake-Shift Interlock Override......................166If Your Vehicle Gets Stuck In Mud or
Snow...................................................................167SelectShift™ Automatic
Transmission...................................................165Understanding the Positions of Your Rotary
Shift Transmission........................................163Automatic Transmission Fluid Check -
1.5L EcoBoost™/2.0L EcoBoost™/2.5L................................................................266
Automatic Transmission Fluid Check -2.7L EcoBoost™........................................266Adding Transmission Fluid* ..........................267Checking the Transmission Fluid Level
.............................................................................266Auto-Start-Stop...........................................150
Disabling Auto-Start-Stop...............................151Enabling Auto-Start-Stop..............................150
Autowipers........................................................73Autowipers Settings............................................74
Auxiliary Power Points................................142110 Volt AC Power Point...................................14212 Volt DC Power Point.....................................142Locations...............................................................142
AWDSee: All-Wheel Drive.........................................168
BBattery
See: Changing the 12V Battery.....................270
482
Fusion (CC7) Canada/United States of America, enUSA, Edition date: 201905, Second-Printing
Index

Blind Spot Information System.............208Switching the System Off and On..............209System Errors.....................................................209Using the Blind Spot Information
System.............................................................209BLIS
See: Blind Spot Information System.........208Body Styling Kits..........................................287Bonnet Lock
See: Opening and Closing the Hood..........255Booster Seats...................................................27
Types of Booster Seats......................................28Brake Fluid Check........................................268
Brake Fluid Service Interval...........................269Brakes................................................................173
General Information...........................................173Breaking-In.....................................................229Bulb Specification Chart............................351
CCabin Air Filter................................................126Canceling the Set Speed...........................196Capacities and Specifications - 1.5L
EcoBoost™.................................................326Air Conditioning System.................................326Alternative Engine Oil for Extremely Cold
Climates...........................................................329Automatic Transmission.................................326Engine Coolant....................................................327Engine Oil..............................................................328Fuel Tank...............................................................329Grease....................................................................329Hydraulic Brake System..................................330Locks......................................................................330Washer Reservoir................................................331
Capacities and Specifications - 2.0LEcoBoost™..................................................331Air Conditioning System...................................331Alternative Engine Oil for Extremely Cold
Climates...........................................................334Automatic Transmission.................................332Engine Coolant...................................................333Engine Oil..............................................................333Fuel Tank...............................................................335Grease....................................................................335Hydraulic Brake System..................................336Locks......................................................................336
Power Transfer Unit..........................................336Rear Axle................................................................337Washer Reservoir................................................337
Capacities and Specifications -2.5L................................................................338Air Conditioning System.................................338Alternative Engine Oil for Extremely Cold
Climates............................................................341Automatic Transmission.................................339Engine Coolant...................................................340Engine Oil.............................................................340Fuel Tank...............................................................342Grease....................................................................342Hydraulic Brake System..................................343Locks.......................................................................343Washer Reservoir...............................................343
Capacities and Specifications - 2.7LEcoBoost™.................................................344Air Conditioning System.................................344Alternative Engine Oil for Extremely Cold
Climates............................................................347Automatic Transmission.................................345Engine Coolant...................................................346Engine Oil.............................................................346Fuel Tank..............................................................348Grease....................................................................348Hydraulic Brake System..................................349Locks......................................................................349Power Transfer Unit..........................................349Rear Axle...............................................................350Washer Reservoir...............................................350
Capacities and Specifications.................317Car Wash
See: Cleaning the Exterior..............................280Catalytic Converter......................................160
On-Board Diagnostics (OBD-II)....................161Readiness for Inspection and Maintenance
(I/M) Testing....................................................161Center Console..............................................144Changing a Bulb...........................................275
Front Halogen Fog Lamp................................276Headlamp.............................................................276LED Lamps............................................................277License Plate Lamp...........................................278Reversing Lamp...................................................277
Changing a Fuse...........................................253Fuses.......................................................................253
483
Fusion (CC7) Canada/United States of America, enUSA, Edition date: 201905, Second-Printing
Index

Changing a Road Wheel...........................308Changing a Road Wheel Procedure............310Dissimilar Spare Wheel and Tire Assembly
Information.....................................................308Stowing the Flat Tire Using the Retainer
Strap...................................................................314Stowing the Flat Tire Without the Retainer
Strap...................................................................313Changing the 12V Battery.........................270Changing the Engine Air Filter.................278
2.5L Engine...........................................................279EcoBoost Engines..............................................278
Changing the Wi-Fi Hotspot Name orPassword.....................................................356
Changing the Wiper Blades.......................271Checking MyKey System Status..............58
MyKey Distance....................................................58Number of Admin Keys......................................59Number of MyKeys..............................................59
Checking the Wiper Blades.......................271Child Restraint and Seatbelt
Maintenance.................................................38Child Restraint Positioning.........................29Child Safety......................................................20
General Information............................................20Child Safety Locks...........................................31
Left-Hand Side......................................................32Right-Hand Side...................................................32
Cleaning Leather Seats.............................284Cleaning Products......................................280
Materials...............................................................280Cleaning the Engine....................................282Cleaning the Exterior.................................280
Cleaning the Headlamps.................................281Exterior Chrome Parts.......................................281Exterior Plastic Parts.........................................281Stripes or Graphics.............................................281Underbody............................................................281Under Hood..........................................................281
Cleaning the Instrument Panel andInstrument Cluster Lens........................283
Cleaning the Interior...................................283Mirrors....................................................................283
Cleaning the Wheels..................................285Cleaning the Windows and Wiper
Blades...........................................................282Clearing All MyKeys.......................................58
Climate............................................................403Accessing Rear Climate Controls................405Accessing the Climate Control Menu........403Directing the Airflow........................................403Rear Climate Control Lock Indicator..........405Setting the Blower Motor Speed.................403Setting the Temperature................................403Switching Auto Mode On and Off...............403Switching Dual Zone Mode On and
Off......................................................................404Switching Maximum Air Conditioning On
and Off.............................................................404Switching Maximum Defrost On and
Off......................................................................404Switching Rear Auto Mode On and
Off......................................................................405Switching Recirculated Air On and
Off......................................................................405Switching the Air Conditioning On and
Off......................................................................403Switching the Climate Controlled Seats On
and Off.............................................................404Switching the Climate Control On and
Off......................................................................404Switching the Heated Exterior Mirrors On
and Off.............................................................404Switching the Heated Rear Window On and
Off......................................................................404Switching the Heated Seats On and
Off......................................................................404Switching the Heated Steering Wheel On
and Off.............................................................404Switching the Heated Windshield On and
Off......................................................................404Switching the Rear Climate Controlled
Seats On and Off.........................................405Switching the Rear Heated Seats On and
Off......................................................................405Switching the Rear Ventilated Seats On
and Off.............................................................405Switching the Ventilated Seats On and
Off......................................................................405Climate Control..............................................118Climate Controlled Seats..........................135
Cooled Seats........................................................136Connected Vehicle......................................353
Connecting the Vehicle to a MobileNetwork............................................................353
484
Fusion (CC7) Canada/United States of America, enUSA, Edition date: 201905, Second-Printing
Index

Connected Vehicle Limitations..............353Connected Vehicle Requirements.........353Connected Vehicle –
Troubleshooting........................................354Connecting the Vehicle to a Mobile
Network........................................................353Connecting FordPass to the Modem.........353Enabling and Disabling the Modem...........353What Is the Modem..........................................353
Connecting the Vehicle to a Wi-FiNetwork........................................................353
Coolant CheckSee: Engine Coolant Check............................262
Crash Sensors and Airbag Indicator.......48Creating a MyKey............................................57
Programming or Changing ConfigurableSettings...............................................................58
Creating a Wi-Fi Hotspot..........................356Connecting a Device to the Wi-Fi
Hotspot............................................................356Finding the Wi-Fi Hotspot Name and
Password.........................................................356Cross Traffic Alert.........................................210
Cross Traffic Alert Behavior When Traileris Attached........................................................212
Cross Traffic Alert Indicator.............................212Cross Traffic Alert Information
Messages..........................................................212Cross Traffic Alert System
Limitations.........................................................211Cross Traffic Alert System Sensors...............211Switching the System On and Off................212Using Cross Traffic Alert..................................210
Cruise Control................................................195Cruise Control Indicators...........................196Cruise Control - Vehicles With: Adaptive
Cruise Control With Stop and Go...........71Cruise Control - Vehicles With: Cruise
Control..............................................................71Customer Assistance..................................237
DData Recording..................................................9
Comfort, Convenience and EntertainmentData........................................................................11
Event Data.................................................................11Service Data............................................................10
Services That Third Parties Provide...............12Services That We Provide..................................12Vehicles With a Modem......................................12Vehicles With an Emergency Call
System..................................................................13Vehicles With SYNC.............................................12
Daytime Running Lamps - Vehicles With:Configurable Daytime RunningLamps...............................................................77
Daytime Running Lamps - Vehicles With:Daytime Running Lamps (DRL).............77
Declaration of Conformity........................479Declaration of Conformity - Vehicles
With: SYNC 3..............................................479Radio Frequency Statement.........................479
Digital Radio..................................................362HD Radio Reception and Station
Troubleshooting............................................363Direction Indicators........................................78Doors and Locks..............................................61Driver Alert.....................................................203
Principle of Operation......................................203Using Driver Alert...............................................203
Driver and Passenger Airbags....................42Children and Airbags...........................................43Proper Driver and Front Passenger Seating
Adjustment........................................................42Driver and Passenger Knee Airbags........46Driving Aids....................................................203Driving Hints..................................................228Driving Through Water...............................229DRL
See: Daytime Running Lamps - Vehicles With:Configurable Daytime Running Lamps.....77
See: Daytime Running Lamps - Vehicles With:Daytime Running Lamps (DRL).................77
EEconomical Driving.....................................228Electric Parking Brake..................................174
Applying the Electric Parking Brake.............174Automatically Releasing the Electric
Parking Brake...................................................175Manually Releasing the Electric Parking
Brake...................................................................174
485
Fusion (CC7) Canada/United States of America, enUSA, Edition date: 201905, Second-Printing
Index

Releasing the Electric Parking Brake if theVehicle Battery is Running Out ofCharge................................................................175
Electromagnetic Compatibility...............451Emission Law.................................................159
Noise Emissions Warranty, ProhibitedTampering Acts and Maintenance.........160
Tampering With a Noise ControlSystem...............................................................159
End User License Agreement.................453VEHICLE SOFTWARE END USER LICENSE
AGREEMENT (EULA) .................................453Engine Block Heater....................................148
Using the Engine Block Heater......................149Engine Coolant Check...............................262
Adding Coolant...................................................262Coolant Change.................................................264Engine Coolant Temperature
Management..................................................265Fail-Safe Cooling...............................................264Recycled Coolant...............................................263Severe Climates.................................................264
Engine Emission Control............................159Engine Immobilizer
See: Passive Anti-Theft System....................68Engine Oil Check.........................................260
Adding Engine Oil..............................................260Engine Oil Dipstick - 1.5L
EcoBoost™................................................260Engine Oil Dipstick - 2.0L EcoBoost™/
2.5L/2.7L EcoBoost™.............................260Engine Specifications - 1.5L
EcoBoost™...................................................317Drivebelt Routing.................................................317
Engine Specifications - 2.0LEcoBoost™...................................................317Drivebelt Routing................................................318
Engine Specifications - 2.5L.....................318Drivebelt Routing................................................318
Engine Specifications - 2.7LEcoBoost™..................................................319Drivebelt Routing................................................319
Entertainment..............................................393AM/FM Radio......................................................394Apps.......................................................................402Bluetooth Stereo or USB.................................401CD (If equipped)...............................................400
HD Radio™ Information (IfAvailable).........................................................397
SiriusXM® Satellite Radio (IfActivated)........................................................395
Sources.................................................................394Supported Media Players, Formats and
Metadata Information................................402USB Ports.............................................................402
Environment......................................................17EPB
See: Electric Parking Brake..............................174Essential Towing Checks..........................224
Before Towing a Trailer....................................225Hitches...................................................................224Launching or Retrieving a Boat or Personal
Watercraft (PWC)........................................225Safety Chains......................................................224Trailer Brakes.......................................................224Trailer Lamps.......................................................224When Towing a Trailer......................................225
Event Data RecordingSee: Data Recording..............................................9
Export Unique Options.................................15Exterior Mirrors................................................83
Auto-Dimming Feature......................................84Blind Spot Monitor..............................................84Fold-Away Exterior Mirrors...............................84Heated Exterior Mirrors......................................84Memory Mirrors.....................................................84Power Exterior Mirrors........................................83Power-Folding Mirrors........................................84Puddle Lamps ......................................................84Signal Indicator Mirrors......................................84
FFastening the Seatbelts..............................34
Seatbelt Locking Modes....................................35Using Seatbelts During Pregnancy................34
Flat TireSee: Changing a Road Wheel.......................308
Floor Mats.......................................................229Fog Lamps - Front
See: Front Fog Lamps.........................................77Ford Credit.........................................................13
US Only.....................................................................13
486
Fusion (CC7) Canada/United States of America, enUSA, Edition date: 201905, Second-Printing
Index

Ford Protect....................................................431Ford Protect Extended Service Plan
(CANADA ONLY)..........................................432Ford Protect Extended Service Plans (U.S.
Only)...................................................................431Front Fog Lamps.............................................77
Front Fog Lamp Indicator..................................78Switching the Front Fog Lamps On or
Off..........................................................................77Front Parking Aid..........................................182
Object Distance Indicator................................183Front Passenger Sensing System............43Fuel and Refueling.......................................152Fuel Consumption.......................................158
Advertised Capacity..........................................158Calculating Fuel Economy..............................158
Fuel Filler Funnel Location........................153Fuel Filter........................................................269Fuel Quality.....................................................152
Choosing the Right Fuel...................................152Fuel Shutoff...................................................232Fuses................................................................244Fuse Specification Chart..........................244
Passenger Compartment FusePanel.................................................................250
Power Distribution Box....................................244
GGarage Door Opener....................................137Garage Door Opener
See: Universal Garage Door Opener............137Gauges................................................................87
Engine Coolant Temperature Gauge............88Fuel Gauge.............................................................88Information Display.............................................87Left Information Display...................................89Type 1 and 2............................................................87Type 3.......................................................................89
GearboxSee: Transmission..............................................163
General Information on RadioFrequencies...................................................50Intelligent Access.................................................50
General Maintenance Information........433Multi-Point Inspection.....................................435Owner Checks and Services..........................434Protecting Your Investment...........................433
Why Maintain Your Vehicle?..........................433Why Maintain Your Vehicle at Your
Dealership?.....................................................433Getting Assistance Outside the U.S. and
Canada.........................................................240Getting the Services You Need...............237
Away From Home..............................................237Global Opening and Closing......................83
Closing the Windows..........................................83Opening the Windows.......................................83
HHazard Flashers............................................232Headlamp Adjusting
See: Adjusting the Headlamps......................272Headlamp Exit Delay....................................76Headlamp Removal
See: Removing a Headlamp..........................274Headrest
See: Head Restraints.........................................128Head Restraints.............................................128
Adjusting the Head Restraint.........................129Tilting Head Restraints ....................................130
Heated Exterior Mirrors...............................126Heated Rear Window..................................126Heated Seats..................................................135Heated Steering Wheel.................................71Heating
See: Climate Control..........................................118Hill Start Assist..............................................175
Switching the System On and Off................176Using Hill Start Assist........................................176
Hints on Controlling the Interior Climate- Vehicles With: AutomaticTemperature Control................................124Defogging the Side Windows in Cold
Weather.............................................................125General Hints........................................................124Quickly Cooling the Interior.............................125Quickly Heating the Interior............................125Recommended Settings for Cooling...........125Recommended Settings for Heating...........125
Hints on Controlling the Interior Climate- Vehicles With: Manual TemperatureControl...........................................................125Defogging the Side Windows in Cold
Weather.............................................................126
487
Fusion (CC7) Canada/United States of America, enUSA, Edition date: 201905, Second-Printing
Index

General Hints........................................................125Quickly Cooling the Interior.............................126Quickly Heating the Interior............................125Recommended Settings for Cooling...........126Recommended Settings for Heating..........126Vehicle Stationary for Extended Periods
During Extreme High AmbientTemperatures..................................................126
Hints on Driving With Anti-LockBrakes.............................................................173
Hood LockSee: Opening and Closing the Hood..........255
Horn.....................................................................72
IIn California (U.S. Only)............................238Information Display Control........................71Information Displays....................................94
General Information............................................94Information Messages................................103
Active Park............................................................103Adaptive Cruise Control...................................104AdvanceTrac®.....................................................104Airbag......................................................................105Alarm......................................................................105All-Wheel Drive...................................................107Automatic Engine Shutdown.........................107Auto Start-Stop..................................................105Battery and Charging System.......................108Blind Spot Information and Cross Traffic
Alert System...................................................108Doors and Locks.................................................109Driver Alert............................................................109Fuel..........................................................................109Hill Start Assist...................................................109Keys and Intelligent Access.............................110Lane Keeping System..........................................111Maintenance...........................................................111MyKey.......................................................................112Park Aid....................................................................113Park Brake...............................................................113Power Steering.....................................................114Pre-Collision Assist.............................................114Remote Start.........................................................114Seats.........................................................................115Starting System ...................................................115Tire Pressure Monitoring System...................115
Traction Control...................................................116Transmission.........................................................116
Installing Child Restraints...........................22Child Seats..............................................................22Using Lap and Shoulder Belts.........................22Using Lower Anchors and Tethers for
CHildren (LATCH)...........................................24Using Tether Straps.............................................26
Instrument Cluster.........................................87Instrument Lighting Dimmer......................76Instrument Panel............................................18Interior Lamps.................................................78
Front Interior Lamp..............................................78Rear Interior Lamps.............................................79
Interior Luggage CompartmentRelease...........................................................66
Interior Mirror...................................................85Auto-Dimming Mirror.........................................85Manual Dimming Mirror.....................................85
Introduction.........................................................7
JJump Starting the Vehicle........................233
Connecting the Jumper Cables....................233Jump Starting......................................................234Preparing Your Vehicle.....................................233Removing the Jumper Cables.......................234
KKeyless Entry...................................................64
SECURICODE™ Keyless EntryKeypad................................................................64
Keyless Starting............................................145Ignition Modes.....................................................145
Keys and Remote Controls........................50
LLane Keeping System................................204
Switching the System On and Off..............205Lighting Control...............................................75
Flashing the Headlamp High Beam..............76Headlamp High Beam........................................75
Lighting...............................................................75General Information............................................75
Load Carrying..................................................217
488
Fusion (CC7) Canada/United States of America, enUSA, Edition date: 201905, Second-Printing
Index

Load Limit........................................................217Special Loading Instructions - for all
vehicles..............................................................221Vehicle Loading - with and without a
Trailer..................................................................217Locking and Unlocking..................................61
Activating Intelligent Access............................62Autolock...................................................................63Autounlock.............................................................64Battery Saver.........................................................64Illuminated Entry..................................................64Illuminated Exit.....................................................64Power Door Locks.................................................61Remote Control.....................................................61Smart Unlocks for Intelligent Access
Keys......................................................................63Lug Nuts
See: Changing a Road Wheel.......................308
MMaintenance..................................................255
General Information.........................................255Manual Climate Control.............................118
Directing Air to the Footwell Air Vents........118Directing Air to the Instrument Panel Air
Vents...................................................................118Setting the Blower Motor Speed...................118Setting the Temperature..................................118Switching Defrost On and Off........................118Switching Maximum Air Conditioning On
and Off................................................................119Switching Maximum Defrost On and
Off........................................................................119Switching Recirculated Air On and
Off........................................................................119Switching the Air Conditioning On and
Off........................................................................118Switching the Climate Control On and
Off........................................................................119Manual Seats.................................................130Memory Function..........................................132
Easy Entry and Exit Feature............................133Linking a PreSet Position to your Remote
Control or Intelligent Access KeyFob.......................................................................133
Saving a PreSet Position..................................133
Message CenterSee: Information Displays.................................94
MirrorsSee: Windows and Mirrors................................82
Mobile Communications Equipment.......15Moonroof..........................................................85
Bounce-Back.........................................................86Opening and Closing the Moonroof.............86Venting the Moonroof........................................86
Motorcraft Parts - 1.5L EcoBoost™.......319Motorcraft Parts - 2.0L
EcoBoost™..................................................321Motorcraft Parts - 2.5L...............................322Motorcraft Parts - 2.7L
EcoBoost™.................................................323MyKey – Troubleshooting...........................59MyKey™.............................................................56
Principle of Operation........................................56
NNavigation......................................................407
Changing the Format of the Map...............409cityseeker................................................................411Michelin Travel Guide........................................412Navigation Map Accuracy and
Updates.............................................................412Route Guidance.................................................409Setting a Destination.......................................408SiriusXM Traffic and Travel Link....................412Zoom.....................................................................409
Normal Scheduled Maintenance..........436Intelligent Oil-Life Monitor.............................436Normal Maintenance Intervals.....................437
OOil Change Indicator Reset.......................261Oil Check
See: Engine Oil Check......................................260Opening and Closing the Hood..............255
Closing the Hood...............................................256Opening the Hood.............................................255
Ordering Additional Owner'sLiterature......................................................242Obtaining a French Owner’s Manual..........242
Overhead Console.......................................144
489
Fusion (CC7) Canada/United States of America, enUSA, Edition date: 201905, Second-Printing
Index

Overriding Automatic High BeamControl............................................................80
PParking Aids...................................................180
Principle of Operation......................................180Passive Anti-Theft System........................68
SecuriLock®..........................................................68PATS
See: Passive Anti-Theft System....................68Perchlorate........................................................13Personal Safety System™.........................40
How Does the Personal Safety SystemWork?..................................................................40
Phone..............................................................405Android Auto.......................................................407Apple CarPlay.....................................................407Pairing Your Cell Phone for the First
Time..................................................................406Text Messaging..................................................406Using Your Cell Phone.....................................406
Post-Crash Alert System..........................235Power Door Locks
See: Locking and Unlocking..............................61Power Seats...................................................130
10-way power seat.............................................1326-way power seat................................................131Power Lumbar......................................................132
Power Windows..............................................82Accessory Delay....................................................83Bounce-Back.........................................................82One-Touch Down.................................................82One-Touch Up.......................................................82Window Lock.........................................................83
Pre-Collision Assist......................................213Adjusting Pre-Collision Assist
Settings..............................................................215Blocked Sensors..................................................215Using the Pre-Collision Assist
System...............................................................214Protecting the Environment........................17Puncture
See: Changing a Road Wheel.......................308
RRear Parking Aid...........................................180
Object Distance Indicator................................182Rear Seat Armrest........................................144Rear Seats.......................................................133Rear View Camera........................................192
Camera Guidelines............................................193Camera System Settings................................194Enhanced Park Aids or Park Pilot.................194Manual Zoom......................................................194Rear Camera Delay............................................194Using the Rear View Camera System.........192
Rear View CameraSee: Rear View Camera....................................192
Recommended Towing Weights............223Reduced Engine Performance................228Refueling..........................................................155
Refueling System Overview............................155Refueling System Warning..............................157Refueling Your Vehicle......................................156
Remote Control..............................................50Car Finder................................................................53Intelligent Access Key........................................50Remote Start.........................................................54Replacing the Battery.........................................52Sounding the Panic Alarm................................53Using the Key Blade.............................................51
Remote Start..................................................127Automatic Settings............................................127Heated and Cooled Features..........................127Last Settings.........................................................127
Removing a Headlamp..............................274Repairing Minor Paint Damage..............285Replacement Parts
Recommendation........................................14Collision Repairs....................................................14Scheduled Maintenance and Mechanical
Repairs..................................................................14Warranty on Replacement Parts.....................14
Replacing a Lost Key or RemoteControl.............................................................55
Reporting Safety Defects (CanadaOnly)..............................................................242
Reporting Safety Defects (U.S.Only)..............................................................242
Resuming the Set Speed..........................196
490
Fusion (CC7) Canada/United States of America, enUSA, Edition date: 201905, Second-Printing
Index

Roadside Assistance...................................231Vehicles Sold in Canada: Getting Roadside
Assistance........................................................232Vehicles Sold in the United States: Getting
Roadside Assistance....................................231Vehicles Sold in the United States: Using
Roadside Assistance....................................231Roadside Emergencies...............................231Running-In
See: Breaking-In.................................................229Running Out of Fuel....................................154
Adding Fuel From a Portable FuelContainer..........................................................154
Filling a Portable Fuel Container..................154
SSafety Canopy™.............................................47Safety Precautions.......................................152Satellite Radio..............................................364
Satellite Radio Electronic Serial Number(ESN)................................................................365
Satellite Radio Reception Factors..............365SiriusXM Satellite Radio Service.................365Troubleshooting.................................................366
Scheduled Maintenance Record............441Scheduled Maintenance...........................433Seatbelt Extensions......................................39Seatbelt Height Adjustment......................36Seatbelt Reminder.........................................37
Belt-Minder™.........................................................37Seatbelts...........................................................33
Principle of Operation.........................................33Seatbelt Warning Lamp and Indicator
Chime..............................................................36Conditions of operation.....................................36
Seats.................................................................128Security..............................................................68Settings............................................................415
911 Assist................................................................415Ambient Lighting................................................416Audio.......................................................................415Automatic Updates...........................................415Bluetooth...............................................................415Charge Settings..................................................416Clock........................................................................415Display....................................................................416Driver Assist..........................................................415
FordPass................................................................415General...................................................................415Message Center..................................................416Mobile Apps..........................................................415Multi Contour Seats...........................................416Navigation.............................................................416Personal Profiles.................................................416Phone......................................................................415Seats.......................................................................416Sound......................................................................415Valet Mode............................................................416Vehicle....................................................................415Voice Control........................................................416
Setting the Cruise Control Speed..........195Changing the Set Speed..................................195
Side Airbags.....................................................45Side Sensing System..................................184
Object Distance Indicator...............................185Sitting in the Correct Position..................128Snow Chains
See: Using Snow Chains.................................303Spare Wheel
See: Changing a Road Wheel.......................308Special Notices................................................14
New Vehicle Limited Warranty.........................14On Board Diagnostics Data Link
Connector............................................................15Special Instructions..............................................14
Special Operating Conditions ScheduledMaintenance..............................................439Exceptions...........................................................440
Speed ControlSee: Cruise Control............................................195
Stability Control............................................178Principle of Operation.......................................178
Starting a Gasoline Engine.......................146Automatic Engine Shutdown.........................147Failure to Start.....................................................146Guarding Against Exhaust Fumes...............148Important Ventilating Information..............148Starting Your Vehicle.........................................146Stopping the Engine When Your Vehicle is
Moving...............................................................148Stopping the Engine When Your Vehicle is
Stationary.........................................................147Starting and Stopping the Engine..........145
General Information..........................................145
491
Fusion (CC7) Canada/United States of America, enUSA, Edition date: 201905, Second-Printing
Index

Steering............................................................213Adaptive Learning...............................................213Electric Power Steering.....................................213
Steering Wheel................................................70Storage Compartments.............................144Sunroof
See: Moonroof.......................................................85Sun Visors.........................................................85
Illuminated Vanity Mirror...................................85Supplementary Restraints System..........41
Principle of Operation.........................................41Switching Automatic High Beam Control
On and Off....................................................80Activating the Automatic High Beam
Control................................................................80Switching Cruise Control On and
Off...................................................................195Switching Cruise Control Off.........................195Switching Cruise Control On..........................195
Symbols Glossary.............................................7SYNC™ 3........................................................385
General Information.........................................385SYNC™ 3 Troubleshooting.......................417
Additional Information andAssistance.......................................................429
Apps........................................................................424Navigation............................................................423Personal Profiles................................................427Phone......................................................................421Resetting the System.......................................429USB and Bluetooth Audio...............................418Voice Recognition...............................................417Wi-Fi Connectivity.............................................426
SYNC™ Applications and Services.......372911 Assist................................................................372SYNC Mobile Apps............................................374
SYNC™...........................................................368General Information.........................................368
SYNC™ Troubleshooting..........................376
TTechnical Specifications
See: Capacities and Specifications..............317The Better Business Bureau (BBB) Auto
Line Program (U.S. Only).......................239Tire Care..........................................................288
Glossary of Tire Terminology........................290
Information About Uniform Tire QualityGrading.............................................................288
Information Contained on the TireSidewall.............................................................291
Temperature A B C............................................289Traction AA A B C..............................................289Treadwear............................................................289
Tire Pressure Monitoring System..........304Changing Tires With a Tire Pressure
Monitoring System.......................................305Understanding Your Tire Pressure
Monitoring System .....................................306Tires
See: Wheels and Tires.....................................288Towing a Trailer.............................................222
Load Placement.................................................222Towing the Vehicle on Four
Wheels..........................................................226Emergency Towing............................................226Recreational Towing.........................................226Vehicles Equipped with 1.5L, 2.0L, and 2.5L
Engines.............................................................226Vehicles Equipped with a 2.7L
Engine................................................................226Towing..............................................................222Traction Control.............................................177
Principle of Operation........................................177Transmission Code Designation............325Transmission..................................................163Transporting the Vehicle...........................235
UUnder Hood Overview - 1.5L
EcoBoost™.................................................256Under Hood Overview - 2.0L
EcoBoost™..................................................257Under Hood Overview - 2.5L...................258Under Hood Overview - 2.7L
EcoBoost™.................................................259Unique Driving Characteristics................150Universal Garage Door Opener................137
HomeLink Wireless Control System............137USB Port..........................................................367Using Adaptive Cruise Control................196
Automatic Cancellation...................................199Blocked Sensor...................................................201Canceling the Set Speed.................................199
492
Fusion (CC7) Canada/United States of America, enUSA, Edition date: 201905, Second-Printing
Index

Changing the Set Speed.................................199Detection Issues................................................200Following a Vehicle............................................197Following a Vehicle to a Complete
Stop....................................................................198Hilly Condition Usage......................................200Overriding the Set Speed................................199Park Brake Application...................................200Resuming the Set Speed.................................199Setting the Adaptive Cruise Speed..............197Setting the Adaptive Cruise Speed When
Your Vehicle is Stationary...........................197Setting the Gap Distance................................198Switching Adaptive Cruise Control
Off......................................................................200Switching Adaptive Cruise Control
On........................................................................197Switching to Normal Cruise Control...........202System Not Available.......................................201
Using All-Wheel Drive................................168Driving In Special Conditions With
All-Wheel Drive (AWD)...............................168Using MyKey With Remote Start
Systems..........................................................59Using Snow Chains.....................................303Using Stability Control................................179Using Summer Tires...................................303Using SYNC™ With Your Media
Player.............................................................375Audio Voice Commands..................................376Media Sources.....................................................375
Using SYNC™ With Your Phone.............371Accessing Features through the Phone
Menu..................................................................372Pairing a Phone....................................................371Phone Controls...................................................372Phone Voice Commands.................................371
Using Traction Control.................................177Switching the System Off................................177System Indicator Lights and
Messages...........................................................177Using a Switch......................................................177Using the Information Display
Controls..............................................................177Using Voice Recognition...........................369
Apps........................................................................392Automatic Blower Motor Speed
Reduction........................................................393
Climate..................................................................389Entertainment....................................................388General..................................................................387Initiating a Voice Session................................369Navigation.............................................................391Phone....................................................................390SiriusXM Traffic and Travel Link...................392System Interaction and Feedback..............370Voice Settings.....................................................393
Utilizing the Mediation/ArbitrationProgram (Canada Only)........................240
VVehicle Care..................................................280
General Information.........................................280Vehicle Certification Label.......................325Vehicle Identification Number................324Vehicle Storage............................................285
Body........................................................................285Brakes....................................................................286Cooling system...................................................286Disconnecting Your 12 Volt Battery.............286Engine....................................................................286Fuel system.........................................................286General..................................................................285Miscellaneous.....................................................286Removing Vehicle From Storage.................286Tires........................................................................286
VentilationSee: Climate Control..........................................118
VINSee: Vehicle Identification Number............324
Voice Control.....................................................71
WWarning Lamps and Indicators................90
Adaptive Cruise Control....................................90Anti-Lock Braking System................................90Auto Start-stop....................................................90Battery.....................................................................90Blind Spot Monitor..............................................90Brake System Warning Lamp.........................90Cruise Control.........................................................91Direction Indicator................................................91Door Ajar...................................................................91Electric Park Brake................................................91
493
Fusion (CC7) Canada/United States of America, enUSA, Edition date: 201905, Second-Printing
Index

Engine Coolant Temperature...........................91Engine Oil.................................................................91Fasten Seatbelt.....................................................91Front Airbag.............................................................91Front Fog Lamps...................................................91Grade Assist............................................................91Heads Up Display.................................................92High Beam..............................................................92Hood Ajar................................................................92Lane Keeping System Lamp............................92Low Fuel Level.......................................................92Low Tire Pressure Warning...............................92Parking Lamps......................................................92Powertrain Fault...................................................92Service Engine Soon...........................................92Sport Mode.............................................................93Stability Control....................................................93Stability Control Off............................................93Trunk Ajar................................................................93
Washer Fluid Check....................................269Washers
See: Cleaning the Exterior..............................280See: Wipers and Washers..................................73
Waxing.............................................................282What Is Automatic High Beam
Control............................................................80What Is Cruise Control................................195Wheel Nuts
See: Changing a Road Wheel.......................308Wheels and Tires.........................................288
General Information.........................................288Technical Specifications - 1.5L EcoBoost™/
2.0L EcoBoost™/2.5L..................................315Technical Specifications - 2.7L
EcoBoost™......................................................316Wi-Fi Hotspot...............................................356Windows and Mirrors....................................82Windshield Washers......................................74
Front Camera Washer.........................................74Windshield Wipers.........................................73
Intermittent Wipe.................................................73Speed Dependent Wipers.................................73
Wiper BladesSee: Checking the Wiper Blades...................271
Wipers and Washers.....................................73
494
Fusion (CC7) Canada/United States of America, enUSA, Edition date: 201905, Second-Printing
Index
Related Documents