TECH REPORT 202: Viewing Cells on Flexcell ® ’s Culture Plates Light and electron microscope techniques and immunofluorescent imaging Document: Viewing Cells on Flexcell Culture Plates Tech Report, Rev 6.0 05-12-17 Culturing Cells in a Mechanically Active Environment ™ Flexcell International Corporation 2730 Tucker Street, Suite 200 Burlington, NC 27215 800-728-3714 (919) 732-1591 FAX: (919) 732-5196 www.flexcellint.com COPYRIGHT © 2009 FLEXCELL INTERNATIONAL CORPORATION

Welcome message from author
This document is posted to help you gain knowledge. Please leave a comment to let me know what you think about it! Share it to your friends and learn new things together.
Transcript

TECH REPORT
202:
Viewing Cells on Flexcell®’s Culture
Plates
Light and electron microscope techniques and immunofluorescent
imaging
Document: Viewing Cells on Flexcell Culture Plates Tech Report, Rev 6.0
05-12-17
Culturing Cells in a Mechanically Active Environment™ Flexcell International Corporation 2730 Tucker Street, Suite 200 Burlington, NC 27215
800-728-3714 (919) 732-1591 FAX: (919) 732-5196 www.flexcellint.com
COPYRIGHT © 2009 FLEXCELL INTERNATIONAL CORPORATION

FLEXCELL® INTERNATIONAL CORPORATION
1
VIEWING CELLS ON FLEXCELL
CULTURE PLATES An inverted or upright (standard) microscope can be used to view cells on the 6-well BioFlex, UniFlex, Tissue Train series plates, or 24-well HT BioFlex culture plates (Fig. 1). Instructions for using each microscope follows below. Before viewing cells, remove the silicone lubricant from the bottom of the rubber membrane. See instructions below for removing lubricant.
INVERTED MICROSCOPE An inverted microscope allows viewing of the cells from the underside of the membrane. Flexcell culture plates are slightly higher and thus farther away from the microscope objective. To view cells on the growth surface of the membrane, the mechanism that stops the travel of the objective may have to be removed or adjusted so that the objective can be raised to a position close enough to the membrane to view cells. A spacer ring can also be placed between the microscope objective turret and the objective. This spacer ring is usually a screw-in device. Contact your microscope manufacturer to determine the best method and to inquire about a spacer
ring. Flexcell® International Corporation is not responsible for any damaged caused to your microscope. 1. Adjust the vertical travel stop mechanism from the focus adjustment on your microscope. Most microscopes have a screw mechanism to stop the vertical travel point relative to the stage (a, Fig. 2). A stop point prevents the objective from contacting the culture plate on the stage. If this stop mechanism is adjusted, the objective lens can travel further allowing the objective to focus on cells on the BioFlex® membrane. Different microscopes have different mechanisms for adjusting the distance for objective lens travel. If you are not sure of the location of your travel adjustment mechanism, contact your local microscope representative or the manufacturer for assistance.
Figure 2. Side view of an Olympus CK2
microscope; screw stop mechanism (a) will normally stop movement of the horizontal brass
piece at its far right side. 2. Use a spacer or expansion ring to extend the focal length of the objective lens. A spacer or expansion ring is a screw-in ring located between the microscope nosepiece and objective lens. Addition of a spacer ring will increase the focal length of the objective lens. Contact your microscope manufacturer if you wish to use one of these. Using a spacer may decrease parfocality and centration in viewing cells.
Figure 1. Flexcell®’s multi-well rubber-bottomed culture plates.
StageTrinocular Objective
a

FLEXCELL® INTERNATIONAL CORPORATION
2
UPRIGHT (STANDARD) MICROSCOPE A standard microscope allows viewing of the cells directly from above. For BioFlex, UniFlex, and Tissue Train series plates, the objective can be inserted into the well from the top, if needed. (NOTE: the walls of the well will somewhat limit the viewable area of the membrane.) However, for the HT BioFlex plates, an objective cannot be inserted into the well because the wells are too small in diameter. Thus, cells will need to be viewed with an objective lens whose focal length is greater than the height of the wells. Before viewing cells, remove the silicone lubricant from the bottom of the rubber membrane. See instructions below for removing lubricant. LIGHT MICROSCOPY HISTOCHEMICAL
STAINING BRIGHT FIELD, PHASE CONTRAST, AND
POLARIZED LIGHT 1. Giemsa Stain for general staining of cells
cultured on BioFlex® membranes: a. Fix cells with acetic methanol (1 part
glacial acetic acid, 3 parts neat methanol) for 5 minutes at 25 °C.
b. Aspirate the fluid and add 1% Giemsa stain in acetic methanol (filter through 0.22 micron filter immediately prior to use). Stain for 2 minutes at 25 °C.
c. Aspirate, stain and save (you can re-use the stain if no radioactive material was used with the cells). Refilter before use.
d. Wash cells gently with 60% methanol in water for 1-2 minutes. Aspirate and repeat. Cells will stain bright red.
e. Cut silicone membrane from the BioFlex plate. Cut into wedges, mount to a slide with water-based
mounting medium and view with a light microscope.
NOTE: For general cell staining, this method works well and does not compromise cell attachment to the rubber. 2. Other stains, such as crystal violet, Von
Kossa for calcium phosphate or alizarin red for calcium may be used (Fig. 3). a. In the latter cases, a non-acidic
fixative is best and 60% methanol-water can be used. Cells sheets may become more brittle, but cells can be stored indefinitely in this state.
b. Other fixatives recommended are 2% neutral buffered formalin or 4% paraformaldehyde.
Figure 3. Rabbit endothelial cells cultured in BioFlex® plates and stained with crystal
violet. TRANSMISSION ELECTRON
MICROSCOPY SAMPLE PREPARATION FIXATION 1. Medium should be aspirated from the
cells, and the cell sheets washed gentle with pre-warmed (37 C) phosphate buffered saline (PBS).
2. PBS is aspirated and the cell sheet fixed with 4% paraformaldehyde in 0.1 cacodylate buffer pH 7.4 for 5 minutes.
3. Cells may be post-fixed with 2% osmium tetroxide buffered with cacodylate to pH

FLEXCELL® INTERNATIONAL CORPORATION
3
7.4. Cells are then washed twice with cacodylate buffer.
DEHYDRATION Cells are dehydrated through a graded series of alcohols (50-100%). EMBEDDING 1. Cells are embedded with EPON or other
embedding medium while still on the rubber membrane in the well of the BioFlex® plate.
2. When embedding medium has cured, remove the EPON block from the culture plate well as a disc.
3. Cells are oriented on the bottom side of the EPON disc and may be cut directly from the disc or smaller pieces of the disc made, maintaining orientation from the perimeter to the center and sections then made.
SCANNING ELECTRON MICROSCOPY FIXATION Cells may be washed and fixed as above down to and including the graded ethanol series steps. DEHYDRATION Further desiccation is carried out by treatment of the cell sheets with hexamethyldisilazane (HMDS) for 5-30 seconds. Specimens can be air dried in a fume hood at room temperature. SECTIONING Sections of the rubber membrane may be cut with cells attached, mounted on aluminum studs, sputter coated with gold-palladium and then analyzed by scanning electron microscopy.
IMMUNOFLUORESCENCE Immunofluorescence techniques are useful for visualizing proteins and other cellular structures in cells grown on flexible substrates such as in BioFlex®, UniFlex®, and HT BioFlex® culture plates. Cells are best used at near confluence, but not at super confluence, to give the best visualization. If you are using scanning confocal microscopy, the confluency level is less important. If you are using conventional fluorescence microscopy, then super confluent cells will give overlapping images which may make observation of a specific protein (i.e., cytoskeletal filament system) particularly difficult. The method described below is a standard method for immunohistochemistry and can be used for cells cultured in monolayer and grown on Flexcell®’s culture plates. The silicone membrane has little or no background fluorescence at wavelengths used for fluorescein, DAPI or rhodamine fluorophores (see Fig. 3-4). NOTE: If using Tissue Train® culture plates, please see Tech Report 207: Methods for Immunochemical Staining of Cells in Three Dimensional Bioartificial Tissues (BATS). METHODS 1. Aspirate medium from the cells. Wash
the cells carefully with warm phosphate buffered saline (PBS), pH 7.2. Apply the wash medium down the sidewall of a well to avoid a direct fluid stream on the cells.
2. Fix the cells for 20 minutes at room temperature in 3.7% formaldehyde or paraformaldehyde in PBS, pH 7.2, or a fixative of your choice. After fixation and removal of grease (see below), the silicone rubber can be cut from the plate
FLEXCELL® INTERNATIONAL CORPORATION
4
and into multiple pieces for multiple staining, if needed.
3. If you are studying an intracellular protein, permeabilize the cells with 0.1% Nonidet-P40 or 0.1% Triton X-100 in PBS for 5 minutes at room temperature.
4. Rinse gently three times with PBS for 5 minutes per wash.
5. Dilute the primary antibody in PBS with 5% BSA. The primary antibody dilution should be optimized according to the instructions from the antibody supplier. Incubated with primary antibody at room temperature for 1 hour or overnight at 4 ̊C.
6. Wash three times with PBS, 5 minutes per wash.
7. Incubate with fluor-dye-labeled secondary antibody for one hour at room temperature.
8. Wash 3X with PBS, 5 min per wash. After immunostaining, mount the membrane on a glass slide and observe under a microscope. A water-based mounting medium is recommended.
9. Observe samples with the excitation and emission filters set for the given fluorescence (Fig. 4-5).
REMOVING LOCTITE SILICONE
LUBRICANT FROM BIOFLEX
MEMBRANES NOTE: Perform this procedure after cells are fixed. 1. Using a dry cotton swab, wipe off as
much of the excess lubricant as possible. This may require a couple of swabs. Only a thin film of lubricant should remain on the membrane surface.
2. Wet the tip of a new cotton swab with a mild cleaning solution such as Formula 409, window cleaner, or hand soap. Rub the wet swab gently over the entire surface of the well. Repeat with a new
cotton swab and fresh cleaning solution as necessary to remove all residual lubricant from the membrane surface.
3. Rinse the cleaned surface with deionized water using a spray, wash, or dispensing bottle.
4. Blot the surface dry with a Kimwipe or other lint-free wipe
Figure 4. Human tenocytes cultured in BioFlex® plates. DAPI-labeled nuclei and
antibody-labeled primary cilia.
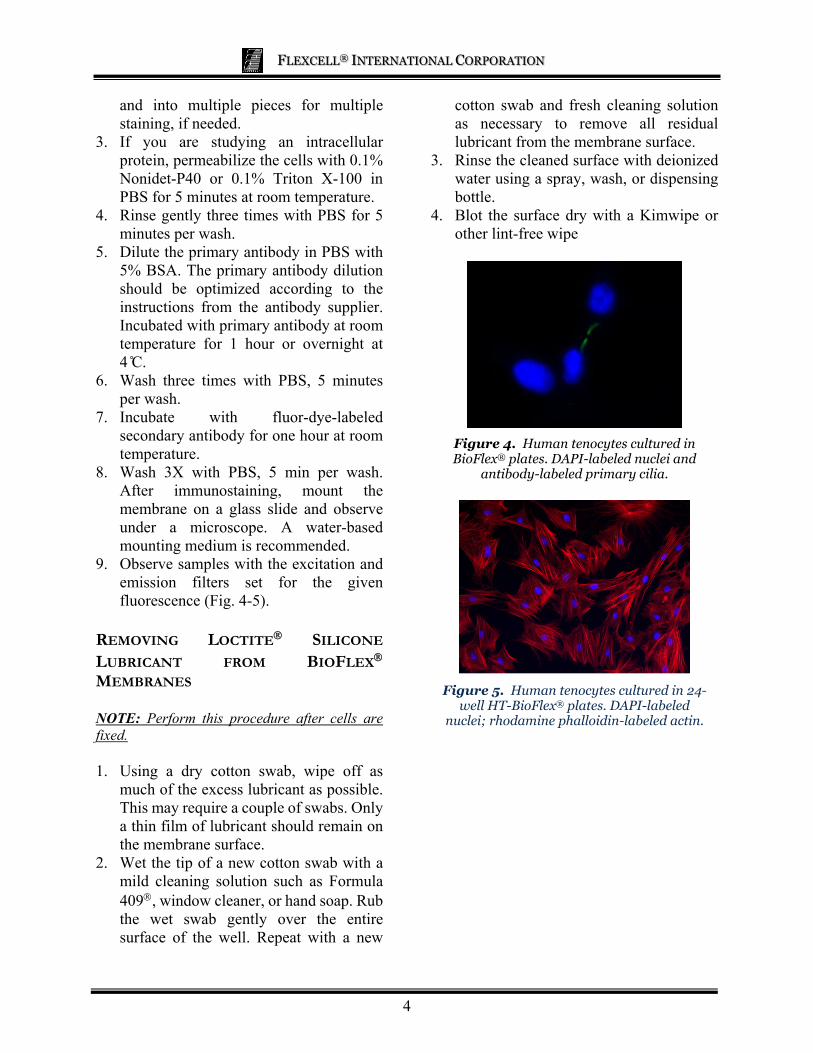
Figure 5. Human tenocytes cultured in 24-
well HT-BioFlex® plates. DAPI-labeled nuclei; rhodamine phalloidin-labeled actin.
Related Documents