HOW TO READ AND UNDERSTAND A GEOTECHNICAL REPORT Presented by: William C. Kwasny, P.E., Principal Engineer American Engineering Testing, Inc. Presented to: SE University

2012.11.14 - How to Read and Understand a Geotechnical Report (Part 2)
Dec 02, 2015
diseño acero parte 2
Welcome message from author
This document is posted to help you gain knowledge. Please leave a comment to let me know what you think about it! Share it to your friends and learn new things together.
Transcript

HOW TO READ AND UNDERSTAND A GEOTECHNICAL REPORT
Presented by: William C. Kwasny, P.E., Principal Engineer
American Engineering Testing, Inc.
Presented to: SE University
~ 1 ~
I. QUESTIONS FOR USERS OF GEOTECHNICAL REPORTS
A. How many soil reports do you read per year?
B. How many soil reports do you use on your jobs per year?
C. Have you ever had a course or instruction on how to read and use a soil report?
Yes No
D. Please list the two most important things you want to get from a soil report.
1.
2.
E. Please list two things a soil report cannot give you.
1.
2.
F. How do you decide if a soil report meets your needs?
_______________________________________________________________________________
_______________________________________________________________________________
G. Have you ever read a soil report and wondered what the writer meant?
Yes No
H. Have you ever had problems following the recommendations in a soil report?
Yes No
I. Have you ever had a job where the soil report and the project specifications/drawings did not
coincide, or contradicted each other?
Yes No
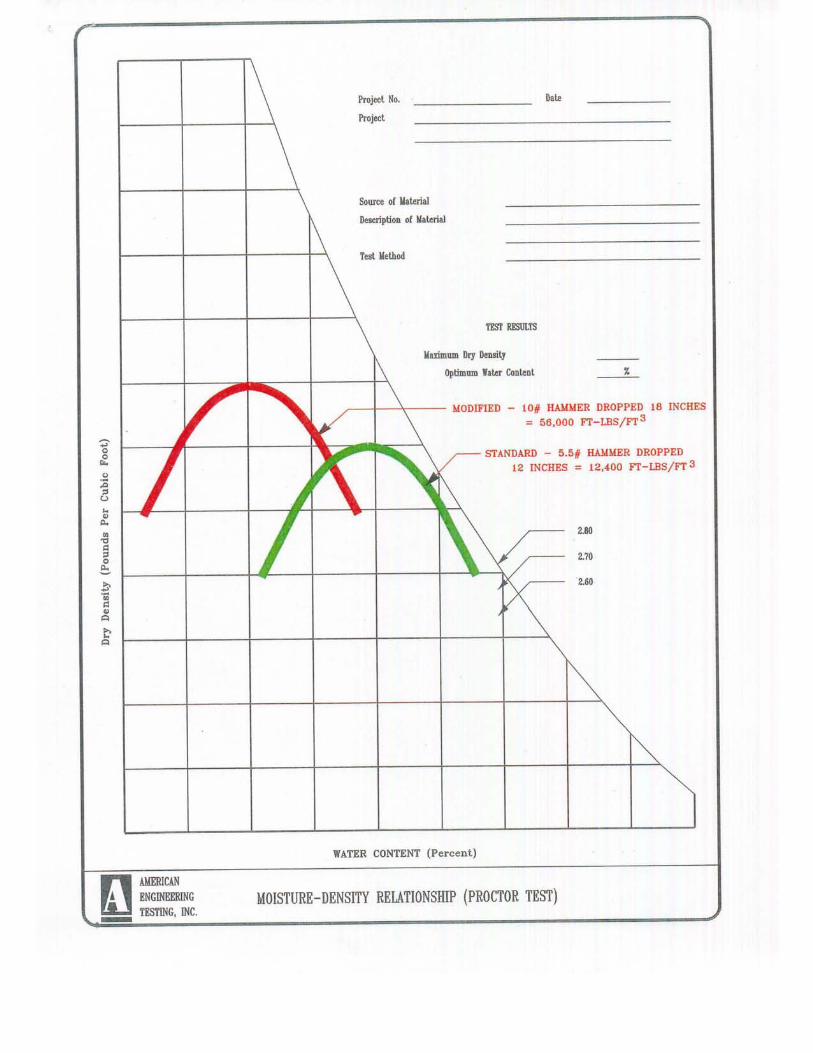
J. Do you know the difference between a Standard Proctor (ASTM: D 698) and a Modified Proctor
(ASTM: D 1557)?
Yes No

~ 2 ~
II. THE FIRST ELEMENT: THE REQUEST FOR PROPOSAL (RFP)
A. The RFP is a very important element in the delivery of a geotechnical report, but it is often
relegated to an unimportant position, conveying little or no information to the Geotechnical
Engineer to use in preparing his proposal.
1. The intended use of the building (office, warehouse, manufacturing, commercial/retail,
hospital, school, and so on), heated or unheated?
2. The number of stories and possible future vertical expansion
3. Building footprint and possible future expansion
4. Type of construction (steel frame, composite floor slabs, post-tensioned concrete, wood frame,
and so on)
5. Column spacing (uniform, irregular, clear span)
6. Structural loads, walls and columns (estimated maximum and minimum, live and dead)
7. Horizontal shear and uplift forces
8. Floor loads in basement on the ground level – live, dynamic (vibratory, impact, rotary),
forklift, high storage racks
9. Basement – under all or part of the footprint? Depth of basement or finished floor elevation
10. Elevation of first floor, and anticipated range of cuts and fills – any loading docks?
11. Any loading docks?
12. Moisture sensitive coatings on basement slab or first floor slab-on-grade?
13. Allowable maximum total and differential settlement (or allow the geotechnical engineer to
default to 1 inch total, and half of this in differential?)
14. Condition of any existing buildings on the site – age, type of foundation, depth/elevation of
basement, method of site preparation, type of structure, groundwater problems, performed
satisfactorily?
15. For pavements: Daily traffic count, allowable maximum axle loads, seasonal load limits,
desired pavement life.
16. Are there any retaining walls planned? Where? How tall? Type of construction?
17. Is a stormwater handling system planned? Retention/detention ponds? Infiltration basins?
B. Present a description of current site conditions.
1. Have Owner or Developer arrange for site access permission (Geotechnical Engineers have no
legal authority to obtain permission).

~ 3 ~
2. Coordinate drilling access with (give name) .
3. Existing buildings – to stay, or be razed?
4. Special site access constraints (no work before 8:00 a.m., no work during recess, drill only in
traffic aisles, and so on)
5. Where to dispose of excess soil cuttings?
6. Site restoration (drill rigs leave ruts!)
7. Patch existing pavement after drilling
C. Present available information regarding soil and groundwater conditions on the site
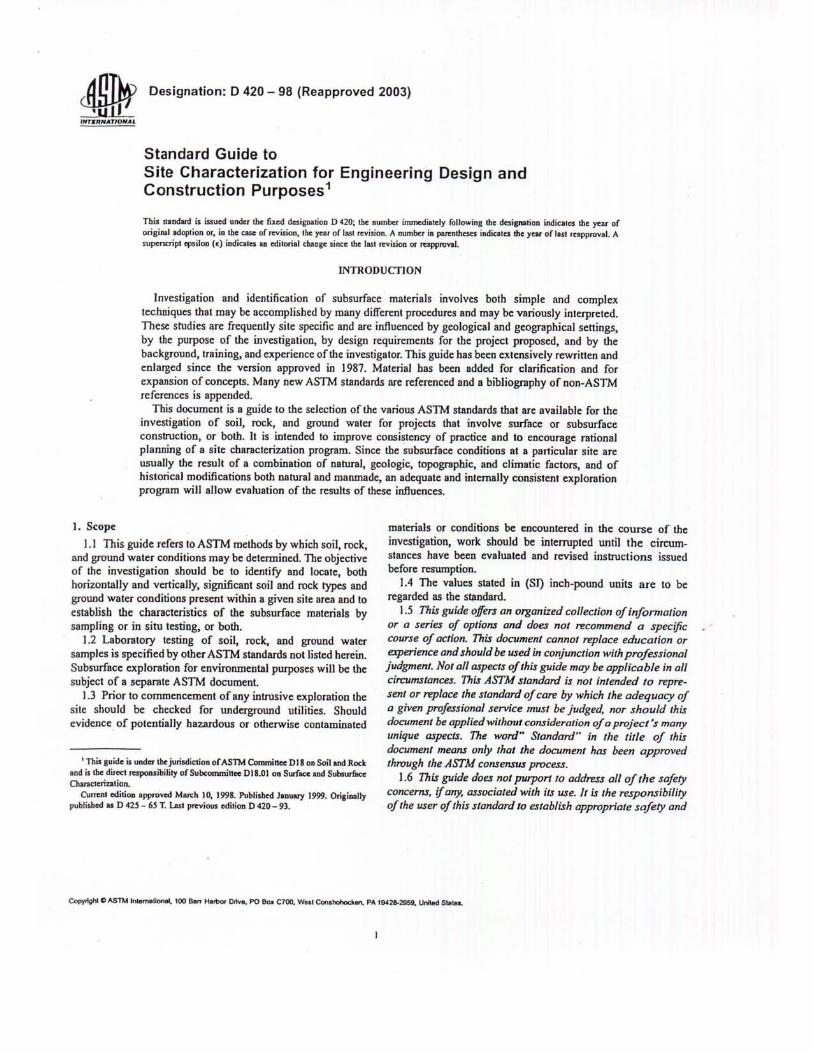
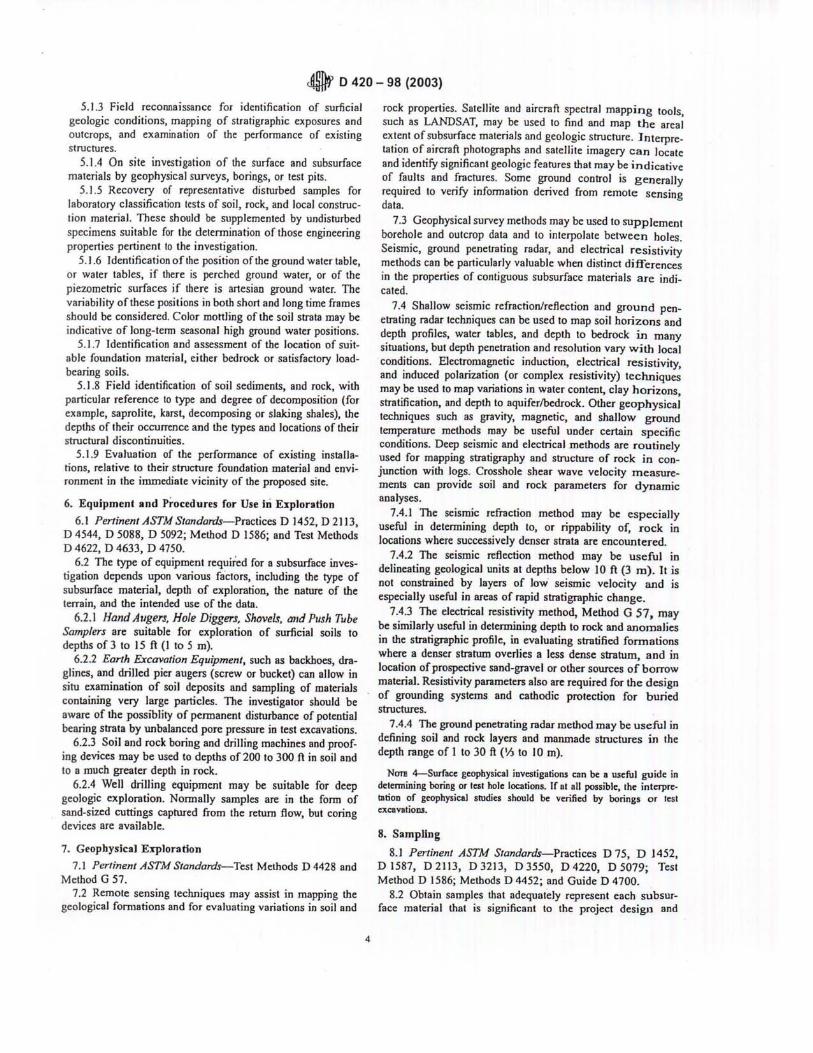
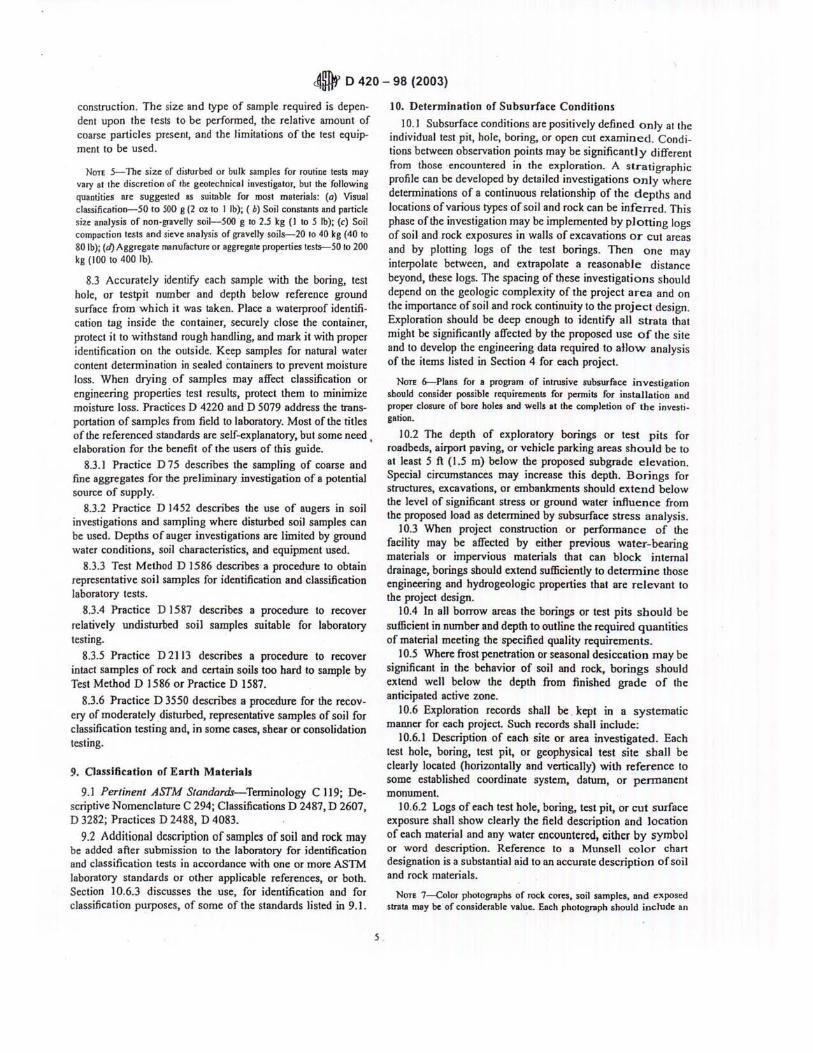
1. This is required in ASTM: D 420! (copy enclosed)
2. Send previous boring logs or available geotechnical reports as part of the RFP
3. Special information known about the site or adjacent site(s) with regards to subsurface
conditions, and existing foundation design and performance
D. Defining the exploration program: Who will do this? The RFP author, or the responding
Geotechnical Engineer (“name you own ball game”)?
1. Number and locations of the borings, and/or test pits in fill or bedrock.
2. Benchmark to be used for boring elevations
3. Whether and where to install piezometers, and when to read the piezometers - should pump
down tests or rate of recovery tests be performed?
4. Routine testing and sampling: split spoons and thin wall tubes
5. Special field testing – pressuremeter, electronic cone (a.k.a., piezocone or seismic cone), vane
shear, Iowa borehole shear test, cross-borehole/down borehole seismic testing (for dynamic
shear modulus in situ) – when are they applicable? When are they necessary? Who will
decide on using these tests?
6. Types and number of laboratory tests – water content, dry density, unconfined compressive
strength (hand penetrometer or load frame?), organic content, Atterberg limits (liquid and
plastic), grain size analysis (washed sieve or sieve-hydrometer?), consolidation test, direct
shear test for segmental retaining walls (SRWs)
7. How long to keep the soil samples? (Samples are typically no longer suitable for most
laboratory tests after about 30 days.)


~ 4 ~
III. READING THE GEOTECHNICAL REPORT
A. It is important that you read the entire geotechnical report, from start to finish. I strongly recommend
that you do this with a number of highlighters and a red pencil so you can mark the important points.
Another suggestion is to keep a separate note pad and write down sections such as Site Preparation,
Building Foundations, Floor Slab Subgrade, Pavement Subgrade Preparation, Pavement Design, and
Construction Considerations, and rephrase the recommendations for each section in your own words
on these pages, so that you understand the report.
B. Now let’s consider the typical separate sections of a report. First of all, let me mention that there is no
standard method of preparing a geotechnical report in the United States. There is no ASTM standard,
no Department of Transportation standard, and no standard from the American Society of Civil
Engineers, or from the Association of Soil and Foundation Engineers. Thus, you will not find a
standard order of sections; I will continue here with the type of information that you need, but you
may find the sections of a report in a different order than I list. Whatever order the report is in, all of
the sections are important..
1. Read the Introduction of the report. Did the Geotechnical Engineer describe the project properly
with respect to the type of building, the size and location? Have you changed the building since
you gave the Geotechnical Engineer the approval to go ahead? Move it? Changed the footprint?
Different structural system? Added or subtracted a basement? If the design information that the
Geotechnical Engineer used is not correct, or is missing, you should call the Geotechnical
Engineer immediately to make sure he is on the right track for the type of project under
consideration.
2. I recommend that you read the sections about the Scope of Services that the Geotechnical
Engineer presents, as well as any special conditions he may explain relative to his services. This
is important so that you understand what the engineer is giving you.
3. The Geotechnical Engineer would then describe the exploration program: number and depths of
borings, who specified the program, how the borings were drilled and sampled, and how the
borings were sealed.
4. Read the section about Laboratory Testing. Many Geotechnical Engineers do little or no
laboratory testing, but I will submit to you that laboratory testing can be very important in your
project. For example, if you are working on a site with cut and fill, and you plan to use clay
excavated from a higher elevation, one important parameter that your excavator will want, beside
the definition of the soil types, is the moisture content of the soil. This lets the excavator know
whether the cut soil must be wetted or dried, or if it is at the optimum moisture content. If the
excavator must wet or dry the soil, this can add to the cost of the earthwork and/or delay the
project.
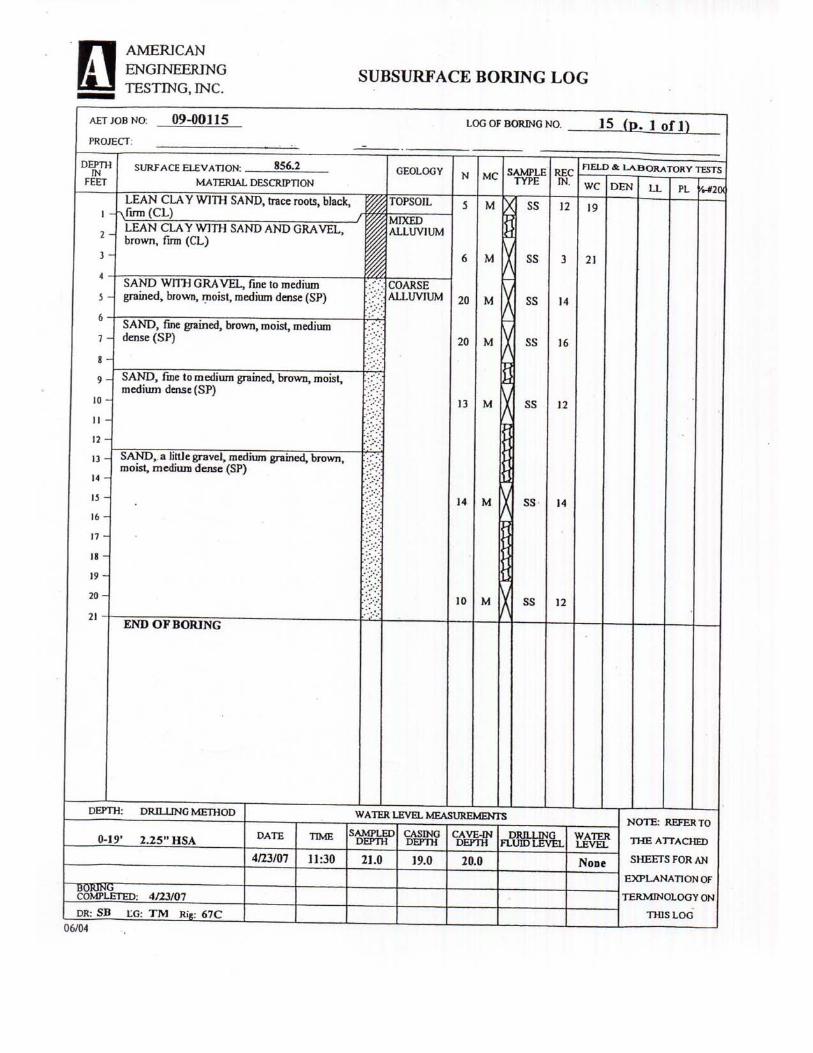
5. The Geotechnical Engineer gives generalized designation of the site and its surface features, the
soil conditions, and the groundwater conditions. The details of the subsurface conditions are
shown on the boring logs.
6. Let us consider a typical site where poor soils, i.e., fill, organics, soft/loose soils, must be
excavated and replaced in order to use footings.
Review the depths of the undercut on a soil correction site; some Geotechnical Engineers will put
this in the form of a table, with the Engineer’s estimate of undercut depths at each boring. Note
that almost all Geotechnical Engineers will tell you that these are only estimates, and that you will


~ 5 ~
not know the actual depth of subcutting until the excavator begins to open the site. This is a well-
established precept in geotechnical engineering known as the “Observational Method.” It is
described in one of the most important text books on soil mechanics, “Soil Mechanics in
Engineering Practice,” written by Karl Terzaghi and Ralph Peck. It describes the fact that with
borings, you have an idea of what is present on your site, but you confirm it by observation and
testing during construction, and adjust as needed. For this reason, I recommend that you always
carry contingency fees for the earthwork. Variations in the earthwork quantities do not necessarily
mean that the Geotechnical Engineer made a mistake.
7. Although we discuss soil correction on a site, commonly considered to be excavation and
replacement of poor soils and replacement with compacted fill, I suggest that it would be
reasonable for your Geotechnical Engineer to discuss alternative methods of site preparation. For
example, other methods of correcting a site that are viable today include compacted aggregate
piers (either Geopiers™ or stone columns), dynamic compaction, or surcharging. I would suggest
that the Geotechnical Engineer discuss these alternatives, and if he believes they are not viable, he
should present the reasons why, so that you can then address this to your client.
8. Read very carefully the section on preparation of the Pavement Subgrade, which is usually
discussed under “Site Preparation.” Does the Geotechnical Engineer recommend a subcut to be
backfilled with select sand as a subbase? If so, you must know this up front when you are doing
your cost estimating for the project.
9. Next, read the section on the Foundation Design Recommendations. I will tell you that the
bearing pressure that the Geotechnical Engineer recommends may well not be the most important
thing in the report; whether you use 2,000 pounds per square foot, 3,000 pounds per square foot, or
4,000 pounds per square foot, it usually won’t have very much affect on the cost of the footings for
low to mid-rise buildings. However, the depths of undercut for soil correction, the type of backfill
to be used, and the recommended depth of bearing for the footings may be more important, as will
the possibility of encountering groundwater in the excavations.
10. Read the section about the preparation of the Floor Slab Subgrade. Does the Geotechnical
Engineer say to use sand backfill in the underslab utility trenches and footing trenches? This is
important because typically, some of the worst fill placed on a project is the backfill around the
footings on the inside of the building, and in underslab utility trenches. Settlement of this fill can
cause post-construction damage to the slab. The “15 minute backfill job” that an excavator may
do around the perimeter footings (especially with clay backfill) is not adequate for a floor slab
subgrade.
Review the section about placing a vapor retarder. You will find most Geotechnical Engineers
today recommend placement of a vapor retarder because of the sensitivity of floor coverings to
migrating moisture, and to address the issue of microbial growth due to moisture migration into a
building.
11. Check to see if there is a section on preparation of the subgrade under Exterior Slabs. I trust that
at one time or another, you have all seen slabs ground down at entry doors – this is not done to
have exposed aggregate slabs! It happened because the slabs heaved and they had to grind the
slabs in order to keep the doors opening. If the site has frost-susceptible soils, such as sandy lean
clay, silt, clayey silt, or sandy silt, the engineer should recommend subcutting these soils and
placing non-frost susceptible (NFS) select granular fill for sites in the northern part of the USA.
NFS fill is sand or a sand and gravel mix having less than 5% passing the No. 200 sieve. It
usually has to be imported, and there is a cost associated with this.

~ 6 ~
12. Regarding underground utility lines, it is important that you read this section, particularly to see if
the engineer gives a recommendation for granular bedding. As a general rule, you do not want to
permit the use if a gap-graded coarse rock bedding material below the water table, because after
everything is backfilled, the subgrade soils can migrate into the voids in this rock, causing
settlement, lateral movement, and possible breakage of the pipe. The selection of bedding
material for underground pipes must be based on the location of the groundwater table and the
type of soil on which the bedding is placed.
13. An important consideration on sites today that didn’t raise much concern in years past, is the use
of geogrid-reinforced, modular block retaining walls, also known as segmental retaining walls
(SRWs), or mechanically stabilized earth (MSE) retaining walls. These walls can be major
structures, and in many areas local codes now require that such walls be designed by a Registered
Professional Engineer if the wall height is more than 4 feet. If the project has walls planned to be
over 4 feet high, there should be borings drilled at the walls, and the Geotechnical Engineer
should present a brief discussion of how the walls would be affected by the soil conditions under
the wall. The actual design of the wall is not part of the geotechnical report. Do not simply
dismiss these walls as something you hand to a landscape contractor to provide as a design-build
operation.
14. The matter of handling stormwater runoff on a site has risen in importance significantly in the last
few years due to USEPA regulations. If this feature is required on your site, you should mention
it in the RFP and you should discuss it with your Civil Engineer. We strongly recommend that
borings be drilled where these ponds are to be excavated for at least two reasons. First, it is not
uncommon to use the soil excavated from these ponds as fill, and you do want to know the type
of soil that will be generated – do not assume that it will be suitable for use as compacted fill!
Next, your Civil Engineer should want to know the soil types and their estimated infiltration rates
at the infiltration basin locations. Wisconsin was the first state in this area to establish a formal
program for investigating infiltration basins, with a preliminary report done first, and then a final
study done with double-ring infiltrometer tests in the field. Minnesota now has a methodology
for doing this, which is based heavily on the Wisconsin method.
I can tell you from personal experience that many Civil Engineers will design infiltration basins on
soils which are unsuitable for infiltration. I submit that the infiltration basin should not be
designed until the borings are completed. Often, a Civil Engineer will ask the Geotechnical
Engineer for an “estimated permeability” – you must recognize that the permeability is not the
infiltration rate. Therefore, an estimated permeability based on a grain size test (using the D’Arcy
method or Kozeny-Carmen method) must be used with extreme caution. Next, I suggest that the
design of infiltration basins should be discussed with the Civil Engineer before he prepares a
design. I have seen numerous cases where Civil Engineers design infiltration systems which were
extremely costly, for example, a system where the engineer was going to place an infiltration
system 19 feet below the level of the parking lot, 5 feet below the groundwater table, bearing in
clay where virtually no infiltration would take place. The developer of this project did not catch
this little quirk in the civil engineering design until he had me review the plans two weeks before
construction was to start. We met with the Civil Engineer and recommended an alternative system
of using precast concrete culverts as a storage tank rather than attempting infiltration – at a cost of
about one-fourth of the original system proposed by the Civil Engineer.
15. Next, read the Construction Considerations section. This may be the most important section of the
report, because the Geotechnical Engineer should present a discussion on the need for dewatering,
and you will have to incorporate this into your project cost. In my opinion, the Geotechnical
Engineer should discuss appropriate methods of dewatering, considering the soil types and depth
of excavation below the water table. The choice of using sump pits versus wellpoints or wells

~ 7 ~
should not be left solely to the excavator, although it is his responsibility to design the dewatering
system. Improper dewatering can lead to problems during construction, and excessive post-
construction settlement if fill and footings are constructed on soft/loose/wet bearing soils.
Read the sections on Winter Construction and the susceptibility of the soils to disturbance by
construction equipment. Failure to consider winter construction can lead to a damaged structure
(such as bearing soils freezing and heaving, or bearing soils freezing and softening upon thawing
to cause building settlement), or lost time and higher costs (such as a slab subgrade that freezes,
then softens when you finally heat the building, requiring expensive corrective work).
C. When you’ve finished reading over the report, if you have any questions, call the Geotechnical
Engineer. These would be questions relating to whether the engineer covered all the points that
you wanted covered and/or whether you understood what the engineer meant. If anything is not
clear or if it is not presented in the report, it is imperative that you call the engineer and ask
questions. Assume nothing in reading a geotechnical engineering report.
D. Conclusion: Remember that those parties who use the geotechnical report, the Architect, the
Structural Engineer, the Civil Engineer, the design-build contractor, are not passive participants.
You don’t just sit and wait until the geotechnical report is given to you and then read only a few
items (such as the bearing pressure!). In order to get the most out of a geotechnical report, it is
important that you participate and understand what the Geotechnical Engineer has done.
Related Documents