user guide 2011

Welcome message from author
This document is posted to help you gain knowledge. Please leave a comment to let me know what you think about it! Share it to your friends and learn new things together.
Transcript

user guide2011

The driver’s primary responsibility is the safe operation of the vehicle. Driving while distracted can result in loss of vehicle control, resulting in a collision and personal injury. Chrysler Group LLC strongly recommends that the driver use extreme caution when using any device or feature that may take their attention off the road. Use of any electrical devices such as cell phones, computers, portable radios, vehicle navigation or other devices by the driver while the vehicle is moving is dangerous and could lead to a serious collision. Texting while driving is also dangerous and should never be done while the vehicle is moving. If you find yourself unable to devote your full attention to vehicle operation, pull off the road to a safe location and stop your vehicle. Some States or Provinces prohibit the use of cellular telephones or texting while driving. It is always the driver’s responsibility to comply with all local laws.
IMPORTANT: This User Guide is intended to familiarize you with the important features of your vehicle. The DVD enclosed contains your Owner’s Manual, Navigation/Media Center Manuals, Warranty Booklets, Tire Warranty and 24-Hour Towing Assistance (new vehicles purchased in the U.S.) or Roadside Assistance (new vehicles purchased in Canada) in electronic format. We hope you find it useful. If you are the first registered owner of your vehicle, you may obtain a printed copy of the Owner’s Manual, Navigation/Media Center Manuals or Warranty Booklet by calling 1-800-423-6343 (U.S.) or 1-800-387-1143 (Canada) or by contacting your dealer. Replacement DVD kits may be purchased by visiting www.techauthority.com. Copyright 2010 Chrysler Group LLC.

INTRODUCTION/WELCOMEWelcome From Chrysler Group LLC . . . . 2
CONTROLS AT A GLANCEDriver Cockpit . . . . . . . . . . . . . . . 4Instrument Cluster . . . . . . . . . . . . . 6
GETTING STARTEDKey FOB . . . . . . . . . . . . . . . . . . 8Remote Start . . . . . . . . . . . . . . . . 9Theft Alarm . . . . . . . . . . . . . . . . . 9Seat Belt . . . . . . . . . . . . . . . . . . 9Supplemental Restraint System (SRS) —Airbags . . . . . . . . . . . . . . . . . . 10Child Restraints . . . . . . . . . . . . . 11Front Seats . . . . . . . . . . . . . . . . 13Heated Seats . . . . . . . . . . . . . . . 15Tilt/Telescoping Steering Column . . . . 16Adjustable Pedals . . . . . . . . . . . . 17
OPERATING YOUR VEHICLETurn Signal/Wiper/Washer/High BeamLever . . . . . . . . . . . . . . . . . . . 18Headlight Switch And Halo LightSwitch . . . . . . . . . . . . . . . . . . 19Speed Control . . . . . . . . . . . . . . 20Electronic Range Selection (ERS) . . . . 21Fuel Economy (Econ) Mode . . . . . . . 21Manual Climate Controls . . . . . . . . . 22Front Three Zone Manual ClimateControls . . . . . . . . . . . . . . . . . . 22Front Three Zone Automatic TemperatureControls (ATC) . . . . . . . . . . . . . . 23Parksense® Rear Park Assist . . . . . . . 25Parkview® Rear Back-Up Camera . . . . 25Rear Cross Path With Blind SpotMonitoring . . . . . . . . . . . . . . . . 25Power Sliding Side Doors . . . . . . . . 26Stow 'N Go® Seating . . . . . . . . . . . 27Third Row Power Recliner . . . . . . . . 28Power Liftgate . . . . . . . . . . . . . . 28Power Sunroof . . . . . . . . . . . . . . 29Wind Buffeting . . . . . . . . . . . . . . 31
ELECTRONICSYour Vehicle's Sound System . . . . . . 32Non-Touch-Screen Radios . . . . . . . . 34Touch-Screen Radio . . . . . . . . . . . 36Steering Wheel Audio Controls . . . . . . 40Uconnect™ Phone . . . . . . . . . . . . 40Uconnect™ Voice Command . . . . . . . 42iPod®/USB/MP3 Control . . . . . . . . . 43Video Entertainment System (VES)™ . . 44
Electronic Vehicle Information Center(EVIC) . . . . . . . . . . . . . . . . . . . 46Programmable Features . . . . . . . . . 47Universal Garage Door Opener(HomeLink®) . . . . . . . . . . . . . . . 48Power Inverter . . . . . . . . . . . . . . 50Power Outlets . . . . . . . . . . . . . . . 51
UTILITYIn-Floor Storage – Stow N’ Go® . . . . . 52Roof Luggage Rack . . . . . . . . . . . . 52Trailer Towing Weights (Maximum TrailerWeight Ratings) . . . . . . . . . . . . . . 53Recreational Towing (Behind Motorhome,Etc.) . . . . . . . . . . . . . . . . . . . . 54
WHAT TO DO IN EMERGENCIES24-Hour Towing Assistance -U.S. Only . . . . . . . . . . . . . . . . . 55Instrument Cluster Warning Lights . . . 55If Your Engine Overheats . . . . . . . . . 58Jacking And Tire Changing . . . . . . . . 59Jump-Starting . . . . . . . . . . . . . . 64Shift Lever Override . . . . . . . . . . . 66Towing A Disabled Vehicle . . . . . . . . 67Freeing A Stuck Vehicle . . . . . . . . . 68Event Data Recorder (EDR) . . . . . . . 69
MAINTAINING YOUR VEHICLEOpening The Hood . . . . . . . . . . . . 70Adding Fuel . . . . . . . . . . . . . . . . 70Engine Compartment . . . . . . . . . . . 72Fluids And Capacities . . . . . . . . . . 73Maintenance Chart . . . . . . . . . . . . 74Fuses . . . . . . . . . . . . . . . . . . . 76Tire Pressures . . . . . . . . . . . . . . . 80Wheel And Wheel Trim Care . . . . . . . 80Exterior Bulbs . . . . . . . . . . . . . . 81
CONSUMER ASSISTANCEChrysler Group LLC Customer Center . . 82Chrysler Canada Inc. CustomerCenter . . . . . . . . . . . . . . . . . . . 82Assistance For The Hearing Impaired . . 82Publications Ordering . . . . . . . . . . 82Reporting Safety Defects In The 50United States And Washington, D.C. . . 83
MOPAR ACCESSORIESAuthentic Accessories By MOPAR® . . . 84
INDEX . . . . . . . . . . . . . . . . . . 85
TABLE OF CONTENTS

WELCOME FROM CHRYSLER GROUP LLC
Congratulations on selecting your new Chrysler Group LLC vehicle. Be assured that itrepresents precision workmanship, distinctive styling, and high quality - all essentialsthat are traditional to our vehicles.
Your new Chrysler Group LLC vehicle has characteristics to enhance the driver's controlunder some driving conditions. These are to assist the driver and are never a substitutefor attentive driving. They can never take the driver's place. Always drive carefully.
Your new vehicle has many features for the comfort and convenience of you and yourpassengers. Some of these should not be used when driving because they take youreyes from the road or your attention from driving. Never text while driving or take youreyes more than momentarily off the road.
This guide illustrates and describes the operation of features and equipment that areeither standard or optional on this vehicle. This guide may also include a description offeatures and equipment that are no longer available or were not ordered on this vehicle.Please disregard any features and equipment described in this guide that are notavailable on this vehicle. Chrysler Group LLC reserves the right to make changes indesign and specifications and/or make additions to or improvements to its productswithout imposing any obligation upon itself to install them on products previouslymanufactured.
The User Guide has been prepared to help you quickly become acquainted with theimportant features of your vehicle. It contains most everything you will need to operateand maintain the vehicle, including emergency information.
The DVD includes a computer application containing detailed owner's informationwhich can be viewed on a personal computer or MAC computer. The multimedia DVDalso includes videos which can be played on any standard DVD player (including theMedia Center Touch-Screen Radios). Additional DVD operational information is locatedon the back of the DVD sleeve.
For complete owner information, refer to your Owner's Manual on the DVD in theowner’s kit provided at the time of new vehicle purchase. For your convenience, theinformation contained on the DVD may also be printed and saved for future reference.
Chrysler Group LLC is committed to protecting our environment and natural resources.By converting from paper to electronic delivery for the majority of the user informationfor your vehicle, together we greatly reduce the demand for tree-based products andlessen the stress on our environment.
Vehicles Sold In Canada
With respect to any vehicles sold in Canada, the name Chrysler Group LLC shall bedeemed to be deleted and the name Chrysler Canada Inc. used in substitutiontherefore.
WARNING!
• Pedals that cannot move freely can cause loss of vehicle control and increasethe risk of serious personal injury.
(Continued)
INTRODUCTION/WELCOME
2

WARNING! (Continued)
• Always make sure that objects cannot fall into the driver foot well while thevehicle is moving. Objects can become trapped under the brake pedal andaccelerator pedal causing a loss of vehicle control.
• Failure to properly follow floor mat installation or mounting can causeinterference with the brake pedal and accelerator pedal operation causingloss of control of the vehicle.
• Never use the ‘PARK’ position as a substitute for the parking brake. Alwaysapply the parking brake fully when parked to guard against vehicle movementand possible injury or damage.
• Refer to your Owner's Manual on the DVD for further details.
USE OF AFTERMARKET PRODUCTS (ELECTRONICS)
The use of aftermarket devices including cell phones, MP3 players, GPS systems, orchargers may affect the performance of on-board wireless features including PassiveEntry, Keyless Go, and Remote Start range. If you are experiencing difficulties with anyof your wireless features, try disconnecting your aftermarket devices to see if thesituation improves. If your symptoms persist, please see an authorized dealer.
CHRYSLER, DODGE, JEEP, ATF+4, MOPAR and Uconnect are registered trademarks ofChrysler Group LLC.COPYRIGHT ©2010 CHRYSLER GROUP LLC
INTRODUCTION/WELCOME
3

DRIVER COCKPIT
CONTROLS AT A GLANCE
4

CONTROLS AT A GLANCE
5
INSTRUMENT CLUSTER
Warning Lights- Low Fuel Warning Light
- Charging System Light**
- Oil Pressure Warning Light**
- Anti-Lock Brake (ABS) Light**
- Airbag Warning Light**
- Electronic Throttle Control (ETC) Light
- Tire Pressure Monitoring System (TPMS) Light
- Engine Temperature Warning Light
- Seat Belt Reminder Light
BRAKE - Brake Warning Light**
- Malfunction Indicator Light (MIL)**
- Electronic Stability Control (ESC) Activation/Malfunction IndicatorLight*
(See page 55 for more information.)
CONTROLS AT A GLANCE
6

Indicators- Turn Signal Indicators
- High Beam Indicator
- Front Fog Light Indicator
- Vehicle Security Indicator*
- Electronic Stability Control (ESC) Off Indicator*
Odometer Messagesdoor - Door Ajar noFUSE* - Fuse FaultgATE* - Liftgate Ajar LoW tirE* - Low Tire Pressurehood - Hood Ajar LoCOOL - Low CoolantgASCAP - Fuel Cap Fault CHAngE OIL* - Change Engine OilLoWASH - Low Washer Fluid CRUISE - Cruise Control On
* If equipped** Bulb Check with Key On
CONTROLS AT A GLANCE
7

KEY FOB
Locking And Unlocking The Doors/Liftgate
• Press the LOCK button once to lock allthe doors and the liftgate. Press theUNLOCK button once to unlock thedriver’s door only and twice within fiveseconds to unlock all the doors andliftgate.
• All doors can be programmed to unlockon the first press of the UNLOCKbutton. Refer to ProgrammableFeatures in this guide.
Panic Alarm
• Press the PANIC button once to turn the panic alarm on.
• Wait approximately three seconds and press the button a second time to turn thepanic alarm off.
Power Liftgate
• Press the LIFTGATE button twice within five seconds to power open/close thePower Liftgate. If the button is pressed while the liftgate is being power closed, theliftgate will reverse to the full open position.
Power Sliding Doors
• Press the LEFT or RIGHT Power Sliding Door button twice within five seconds topower open/close the Power Sliding Door. If the button is pressed while the door isbeing power closed, the door will reverse to the full open position.
Express Window Feature
• To remotely lower both front door windows at the same time, press and release theUNLOCK button and then immediately press and hold the UNLOCK button untilthe windows lower to the level desired or until they lower completely.
Emergency Key
• Should the battery in the vehicle or the Key Fob transmitter go dead, there is anemergency key located in the Key Fob. To remove the emergency key, slide thebutton at the top of the Key Fob sideways with your thumb and then pull the keyout with your other hand.
• The emergency key is also for locking the lower glove compartment.
GETTING STARTED
8

WARNING!
Leaving unattended children in a vehicle is dangerous for a number of reasons.A child or others could be severely injured or killed. Children should be warnednot to touch the parking brake, brake pedal, or the shift lever. Do not leave theKey Fob in the ignition. A child could operate power windows, other controls, ormove the vehicle.
REMOTE START
• Press the REMOTE START button x2 twice within five seconds. Pressing theREMOTE START button a third time shuts the engine off.
• To drive the vehicle, press the UNLOCK button, insert the Key Fob in the ignitionand turn to the ON/RUN position.
• With remote start, the engine will only run for 15 minutes (timeout) unless theignition Key Fob is placed in the ON/RUN position.
• The vehicle must be started with the Key Fob after two consecutive timeouts.
WARNING!
• Do not start or run an engine in a closed garage or confined area. Exhaust gascontains Carbon Monoxide (CO) which is odorless and colorless. CarbonMonoxide is poisonous and can cause you or others to be severely injured orkilled when inhaled.
• Keep Key Fob transmitters away from children. Operation of the Remote StartSystem, windows, door locks or other controls could cause you and others tobe severely injured or killed.
THEFT ALARM
To Arm
• Press the Key Fob LOCK button or the power door lock switch while the door isopen.
To Disarm
• Press the Key Fob UNLOCK button and turn the ignition to the ON/RUN position.
SEAT BELT
• Be sure everyone in your vehicle is in a seat and using a seat belt properly.
• Position the lap belt across your thighs, below your abdomen. To remove slack inthe lap portion, pull up a bit on the shoulder belt. To loosen the lap belt if it is tootight, tilt the latch plate and pull on the lap belt. A snug belt reduces the risk ofsliding under the belt in a collision.
GETTING STARTED
9

• Position the shoulder belt on your chest so that it is comfortable and not resting onyour neck. The retractor will withdraw any slack in the belt.
• A shoulder belt placed behind you will not protect you from injury during acollision. You are more likely to hit your head in a collision if you do not wear yourshoulder belt. The lap and shoulder belt are meant to be used together.
• A belt that is too loose will not protect you properly. In a sudden stop you couldmove too far forward, increasing the possibility of injury. Wear your seat beltsnugly.
• A frayed or torn belt could rip apart in a collision and leave you with no protection.Inspect the belt system periodically, checking for cuts, frays, or loose parts.Damaged parts must be replaced immediately. Do not disassemble or modify thesystem. Seat belt assemblies must be replaced after a collision if they have beendamaged (bent retractor, torn webbing, etc.).
• The seat belts for both front seating positions are equipped with pretensioningdevices that are designed to remove slack from the seat belt in the event of acollision.
• A deployed pretensioner or a deployed airbag must be replaced immediately.
WARNING!
In a collision, you and your passengers can suffer much greater injuries if youare not buckled up properly. You can strike the interior of your vehicle or otherpassengers, or you can be thrown out of the vehicle. Always be sure you andothers in your vehicle are buckled up properly.
SUPPLEMENTAL RESTRAINT SYSTEM (SRS) —
AIRBAGS
• This vehicle has Advanced Front Airbags for both the driver and right frontpassenger as a supplement to the seat belt restraint system. The Advanced FrontAirbags will not deploy in every type of collision.
• Advanced Front Airbags are designed to provide additional protection bysupplementing the seat belts in certain frontal collisions depending on the severityand type of collision. Advanced Front Airbags are not expected to reduce the riskof injury in rear, side, or rollover collisions.
• This vehicle is equipped with Supplemental Side Airbag Inflatable Curtains toprotect the driver, front and rear passengers sitting next to a window.
• This vehicle is equipped with Supplemental Seat-Mounted Side Airbags to provideenhanced protection to help protect an occupant during a side impact.
• If the Airbag Warning Light is not on during starting, stays on, or turns onwhile driving, have the vehicle serviced by an authorized service centerimmediately.
• Refer to the Owner's Manual on the DVD for further details regarding theSupplemental Restraint System (SRS).
GETTING STARTED
10

WARNING!
• Relying on the airbags alone could lead to more severe injuries in a collision.The airbags work with your seat belt to restrain you properly. In somecollisions, the airbags won't deploy at all. Always wear your seat belts eventhough you have airbags.
• Being too close to the steering wheel or instrument panel during AdvancedFront Airbag deployment could cause serious injury, including death. Airbagsneed room to inflate. Sit back, comfortably extending your arms to reach thesteering wheel or instrument panel.
• Supplemental Side Airbag Inflatable Curtains and SupplementalSeat-Mounted Side Airbags need room to inflate. Do not lean against thedoor or window. Sit upright in the center of the seat.
• Being too close to the Supplemental Side Airbag Inflatable Curtain and/orSeat-Mounted Side Airbag during deployment could cause you to be severelyinjured or killed.
• Do not drive your vehicle after the airbags have deployed. If you are involvedin another collision, the airbags will not be in place to protect you.
• After any collision, the vehicle should be taken to an authorized dealerimmediately.
CHILD RESTRAINTS
• Children 12 years and under should ride properly buckled up in a rear seat, ifavailable. According to crash statistics, children are safer when properly restrainedin the rear seats rather than in the front.
• Every state in the United States and all Canadian provinces require that smallchildren ride in proper restraint systems. This is the law, and you can beprosecuted for ignoring it.
Installing The LATCH - Compatible Child Restraint System
• Each vehicle, except commercial cargo vehicles, is equipped with the childrestraint anchorage system called LATCH, which stands for Lower Anchors andTether for CHildren.
• Two LATCH child restraint anchorage systems are installed on all second-row seatsand in the center position on all third row fold-in-floor seats.
• Second-row seats also feature tether strap anchorages, located in the rear surfaceof the seatback.
• In addition, all third row fold-in-floor seats are equipped with a child restrainttether anchor at the center seating position.
GETTING STARTED
11
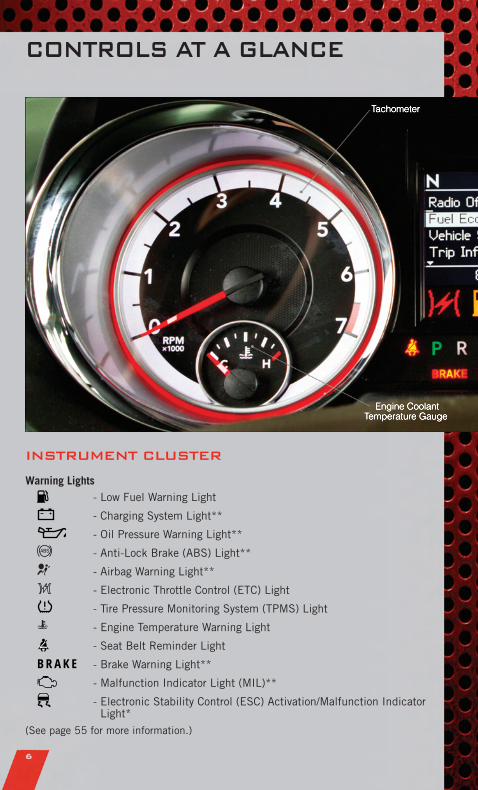
Installing The Lower Attachments:
• The vehicle lower anchorages are round bars located at the rear of the seat cushionwhere it meets the seatback.
• Loosen the child seat adjusters on thelower child restraint attachment strapsto ease the installation.
NOTE: It is recommended to loosen the toptether strap and route it loosely prior tosecuring the lower anchors so the top tetherstrap is not trapped between the vehicleseat and child restraint.
• Attach the lower child restraint attachment straps to the vehicle’s lower anchorbars. Ensure that the lower attachment strap is firmly engaged and that the hook issecure.
• Tighten the lower attachment strap while firmly pushing the child restraintrearward and downward into the vehicle seat. Remove all slack in the lowerattachment straps.
Installing The Top Tether Strap (With Either Lower Anchors Or Vehicle Seat Belt):
• Route the top tether strap under the adjustable head restraint between the steelposts.
• Provide enough slack for the tetherstrap to reach the tether anchorlocated near the bottom of the seatback.
• Clip tether hook to tether anchor.Ensure that the hook is firmly engagedand secure.
• Remove all slack and tighten tetherstrap according to child restraintmanufacturer’s instructions.
NOTE: The top tether strap is always to be secured, regardless of if the child restraintis installed with the lower anchors or the vehicle seat belt.
GETTING STARTED
12
Installing The Child Restraint Using The Vehicle Seat Belts
• To install a child restraint, first, pull enough of the seat belt webbing from theretractor to route it through the belt path of the child restraint and slide the latchplate into the buckle.
• Next, extract all the seat belt webbing out of the retractor and then allow the beltto retract into the retractor. Finally, pull on any excess webbing to tighten the lapportion around the child restraint. Any seat belt system will loosen with time, socheck the belt occasionally, and pull it tight if necessary.
• Once you have completed securing the child restraint with the seat belt, secure thetop tether strap.
WARNING!
• In a collision, an unrestrained child, even a tiny baby, can become aprojectile inside the vehicle. The force required to hold even an infant onyour lap could become so great that you could not hold the child, no matterhow strong you are. The child and others could be severely injured or killed.Any child riding in your vehicle should be in a proper restraint for the child'ssize.
• Failure to comply with the following conditions could result in you and othersbeing severely injured or killed:
• An incorrectly anchored tether strap could lead to increased head motion andpossible injury to the child. Use only the anchor positions directly behind thechild seat to secure a child restraint top tether strap.
• Rearward-facing child seats must never be used in the front seat of a vehiclewith a front passenger airbag. An airbag deployment could cause infants inthis position to be severely injured or killed.
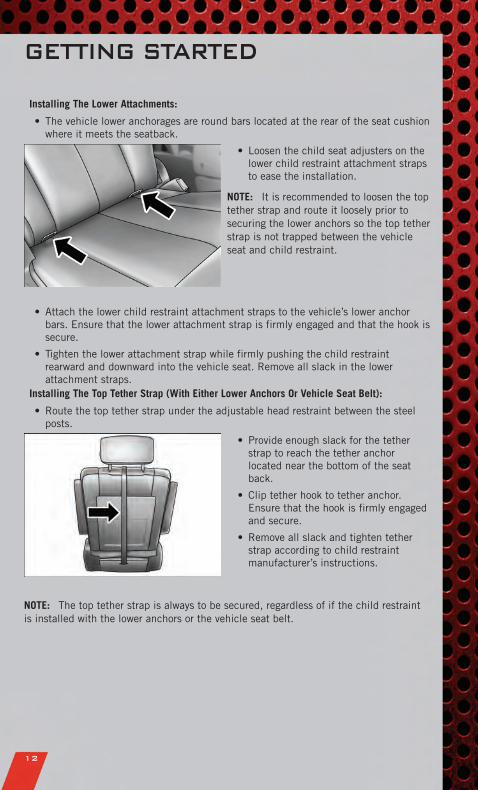
FRONT SEATS
Power Seat
• The recline switch, located on theoutboard side of the seat, controlsseatback adjustment.
• The power seat switch controlsforward/back, up/down, and tiltadjustment.
GETTING STARTED
13

Power Lumbar
• Push the switch forward to increase thelumbar support. Push the switchrearward to decrease the lumbarsupport.
• Pushing upward or downward on theswitch will raise and lower the positionof the support.
Manual Seat Adjustment
Forward/Rearward
• Lift up on the adjusting bar located atthe front of the seat near the floor andrelease at the desired position.
Recliner
• Lift the recliner lever located on theoutboard side of the seat, lean backand release at the desired position.
Memory Seats
• The memory seat feature allows you to save two different driver seating positions,driver's outside mirror, adjustable brake and accelerator pedals, and radio stationpreset settings. The memory seat buttons are located on the driver's door panel.
GETTING STARTED
14
• Adjust all memory profile settings, press the SET button then press 1 or 2 withinfive seconds.
• To program a Key Fob to the memory position, press and release the LOCK buttonwithin 10 seconds on the Key Fob to be programmed.
• Place the ignition switch in the ON position, select Remote Linked to Memory inthe Electronic Vehicle Information Center (EVIC) and enter Yes.
• Press 1 or 2 to recall the saved positions, or press UNLOCK on the programmedKey Fob.
CAUTION!
DO NOT place any article under a power seat or impede its ability to move as itmay cause damage to the seat controls. Seat travel may become limited ifmovement is stopped by an obstruction in the seat's path.
WARNING!
• Adjusting a seat while the vehicle is moving is dangerous. The suddenmovement of the seat could cause you to lose control. The seat belt mightnot be properly adjusted, and you could be severely injured or killed. Onlyadjust a seat while the vehicle is parked.
• Do not ride with the seatback reclined so that the seat belt is no longerresting against your chest. In a collision, you could slide under the seat beltand be severely injured or killed. Use the recliner only when the vehicle isparked.
HEATED SEATS
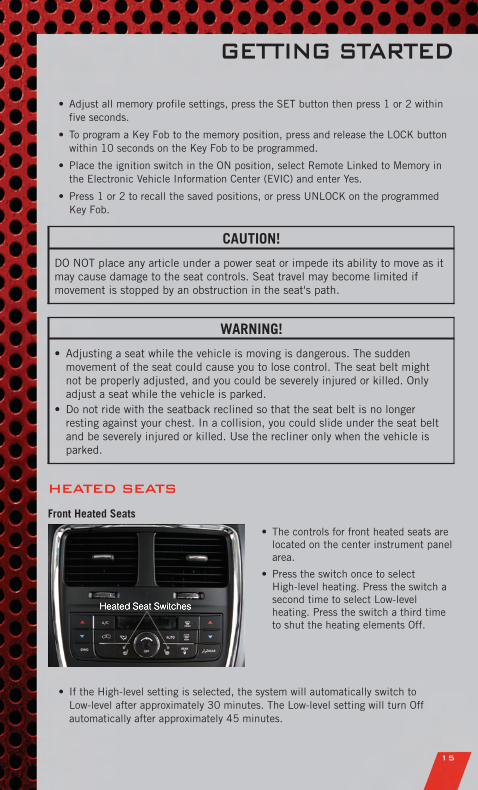
Front Heated Seats
• The controls for front heated seats arelocated on the center instrument panelarea.
• Press the switch once to selectHigh-level heating. Press the switch asecond time to select Low-levelheating. Press the switch a third timeto shut the heating elements Off.
• If the High-level setting is selected, the system will automatically switch toLow-level after approximately 30 minutes. The Low-level setting will turn Offautomatically after approximately 45 minutes.
GETTING STARTED
15

Second Row Heated Seats
• Second row heated seat switches arelocated in the sliding door handle trimpanels.
• Press the switch once to selectHigh-level heating. Press the switch asecond time to select Low-levelheating. Press the switch a third timeto shut the heating elements Off.
• If the High-level setting is selected,the system will automatically switch toLow-level after approximately30 minutes. The Low-level setting willturn Off automatically afterapproximately 45 minutes.
CAUTION!
Repeated overheating of the seat could damage the heating element and/ordegrade the material of the seat.
WARNING!
• Persons who are unable to feel pain to the skin because of advanced age,chronic illness, diabetes, spinal cord injury, medication, alcohol use,exhaustion or other physical conditions must exercise care when using theseat heater. It may cause burns even at low temperatures, especially if usedfor long periods of time.
• Do not place anything on the seat that insulates against heat, such as ablanket or cushion. This may cause the seat heater to overheat. Sitting in aseat that has been overheated could cause serious burns due to the increasedsurface temperature of the seat.
TILT/TELESCOPING STEERING COLUMN
• The tilt steering column tilt lever islocated below the steering wheel.
• Push down on the tilt lever to unlockthe steering column.
• With one hand firmly on the steeringwheel, move the steering columnupward or downward as desired. Tolengthen or shorten the steeringcolumn, pull the steering wheeloutward or push it inward as desired.
GETTING STARTED
16

• Pull upward on the tilt lever to lock the column firmly in place.
WARNING!
Do not adjust the steering wheel while driving. The tilt adjustment must belocked while driving. Adjusting the steering wheel while driving or drivingwithout the tilt adjustment locked could cause the driver to lose control of thevehicle. Failure to follow this warning may result in you and others beingseverely injured or killed.
ADJUSTABLE PEDALS
• Press the switch located on the leftside of the steering column forward tomove the brake and accelerator pedalsaway from the driver and press theswitch rearward to move the pedalscloser to the driver.
NOTE: The pedals cannot be adjusted whenthe vehicle is in REVERSE or when theElectronic Speed Control is set.
CAUTION!
Do not place any article under the adjustable pedals or impede its ability tomove, as it may cause damage to the pedal controls. Pedal travel may becomelimited if movement is stopped by an obstruction in the adjustable pedal'spath.
WARNING!
Do not adjust the pedals while the vehicle is moving. You could lose control andhave a collision. Always adjust the pedals while the vehicle is parked.
GETTING STARTED
17

TURN SIGNAL/WIPER/WASHER/HIGH BEAM
LEVER
Turn Signal/Lane Change Assist
• Tap the lever up or down once and the turn signal (right or left) will flash threetimes and automatically turn off.
• Vehicles equipped with Blind Spot Monitoring may be programmed to add a visualalert when signaling a lane change; refer to your Owner’s Manual on the DVD foroperation.
Front WipersIntermittent, Low And High Operation
• Rotate the end of the lever to the first detent position for one of five intermittentsettings, the second detent for low wiper operation and the third detent for highwiper operation.
Rain Sensing Wipers
• This feature senses moisture on the vehicle’s windshield and automaticallyactivates the wipers for the driver when the switch is in the intermittent positions.Refer to Programmable Features in Getting Started for further details.
Mist
• Push the end of the lever inward to the first detent when a single wipe is desired.Washer Operation
• Push the end of the lever inward to the second detent and hold for as long as sprayis desired.
Rear Wiper
• Rotate the center portion of the lever forward to the first detent for rear wiperoperation.
Rear Washer
• Rotate the center portion of the lever past the first detent to activate the rearwasher.
OPERATING YOUR VEHICLE
18

High Beams
• Push the lever away from you to activate the high beams.
• A high beam symbol will illuminate in the cluster to indicate the high beams areon.
NOTE: For safe driving, turn off the high beams when oncoming traffic is present toprevent headlight glare and as a courtesy to other motorists.
HEADLIGHT SWITCH AND HALO LIGHT SWITCH
Automatic Headlights/ParkingLights/Headlights
• Rotate the headlight switch, located onthe instrument panel to the left of thesteering wheel, to the first detent forparking lights and to thesecond detent for headlights .
• With the parking lights or low beamheadlights on, push the headlightswitch once for fog lights.
• Rotate the headlight switch to “AUTO”for AUTO headlights.
• When set to AUTO, the system automatically turns the headlights on or off basedon ambient light levels.
SmartBeams™
• This system automatically controls the use of the headlight high beams. Refer toProgrammable Features in Electronics for further details.
Instrument Panel Dimmer
• Rotate the dimmer control to the extreme bottom position to fully dim theinstrument panel lights and prevent the interior lights from illuminating when adoor is opened.
• Rotate the dimmer control up to increase the brightness of the instrument panelwhen the parking lights or headlights are on.
• Rotate the dimmer control up to the next detent position to fully brighten theodometer and radio when the parking lights or headlights are on. Refer to yourMedia Center/Radio User Manual on the DVD for display dimming.
• Rotate the dimmer control up to the last detent position to turn on the interiorlighting.
Overhead (Halo) Light
• To activate the Halo lights, rotate the Halo switch control upward or downward toincrease or decrease the lighting.
OPERATING YOUR VEHICLE
19

SPEED CONTROL
• The speed control switches are locatedon the steering wheel.
Cruise ON/OFF
• Push the ON/OFF button to activatethe Speed Control.
• CRUISE READY will appear on theinstrument cluster to indicate theSpeed Control is on.
• Push the ON/OFF button a second timeto turn the system off.
Set
• With the Speed Control on, push and release the SET – button to set a desiredspeed.
Accel/Decel
• Once a speed is set, pushing the RES + button once or the SET – button once willincrease or decrease the set speed approximately 1 mph (2 km/h).
• Push and hold the RES + button to accelerate in 5mph (8 km/h) increments orpush and hold the SET – button to decelerate in 5mph (8 km/h) increments;release the button to save the new set speed.
Resume
• To resume a previously selected set speed in memory, push the RES + button andrelease.
Cancel
• Push the CANCEL button, or apply the brakes to cancel the set speed andmaintain the set speed memory.
• Push the ON/OFF button to turn the system off and erase the set speed memory.
WARNING!
• Leaving the Electronic Speed Control system on when not in use isdangerous. You could accidentally set the system or cause it to go faster thanyou want. You could lose control and have a collision. Always leave theElectronic Speed Control system off when you are not using it.
(Continued)
OPERATING YOUR VEHICLE
20

WARNING! (Continued)
• Electronic Speed Control can be dangerous where the system cannotmaintain a constant speed. Your vehicle could go too fast for the conditions,and you could lose control. A collision could be the result. Do not useElectronic Speed Control in heavy traffic or on roads that are winding, icy,snow-covered or slippery.
ELECTRONIC RANGE SELECTION (ERS)
• Electronic Range Select (ERS) allowsyou to limit the highest availabletransmission gear, and can beactivated during any driving condition.When towing a trailer or operating thevehicle in off-road conditions, usingERS shift control will help youmaximize both performance andengine braking.
• To shift from DRIVE mode to ERSmode, move the shift lever to the left(-) once. The current gear will bemaintained as the top gear. To disableERS, simply press and hold the shiftlever to the right (+) until “D” isdisplayed in the instrument clusterodometer.
• Switching between ERS and DRIVEmode can be done at any vehiclespeed.
• Refer to your Owner's Manual on the DVD for further details.
FUEL ECONOMY (ECON) MODE
• The Fuel Economy (ECON) mode can improve the vehicle’s overall fuel economyduring normal driving conditions.
• Press the “econ” switch in the center stack of the instrument panel and a greenlight will indicate the ECON mode is engaged.
• When the Fuel Economy (ECON) Mode is engaged, the vehicle control systems willbe able to change the following:• The transmission will upshift sooner and downshift later.• The transmission will skip select gears during shifts to allow the engine to
operate at lower speeds.• The torque converter clutch will engage sooner (lower engine rpm’s) and remain
on longer.
OPERATING YOUR VEHICLE
21

• The engine idle speed will be lower.
• The overall driving performance will be more conservative.
MANUAL CLIMATE CONTROLS
Air Recirculation
• Use recirculation for maximum A/C operation.
• For window defogging, turn the recirculation button off.
• Recirculation is not allowed in defrost, floor, defrost/floor (mix) modes.
FRONT THREE ZONE MANUAL CLIMATE
CONTROLS
Air Recirculation
• Use recirculation for maximum A/C operation.
• For window defogging, turn the recirculation button off.
• Recirculation is not allowed in defrost, floor, defrost/floor (mix) modes.
OPERATING YOUR VEHICLE
22

Rear Window Defroster• Pressing the rear window defroster button will turn on the defroster for
approximately 10 minutes. An indicator in the button will illuminate when the rearwindow defroster is on. For an additional five minutes of operation, press thebutton a second time.
Activating Rear Passenger Climate Controls
• Rotate the rear blower control, located on the main climate control in theinstrument panel, to the “REAR” position. This enables the rear passenger climatecontrols located in the headliner above the second row seats.
FRONT THREE ZONE AUTOMATIC TEMPERATURE
CONTROLS (ATC)
Automatic Operation• Push the AUTO mode button to activate the ATC system.• Select the desired temperature by rotating the temperature controls for the driver
or passenger.• The system will maintain the set temperature automatically.
OPERATING YOUR VEHICLE
23

Air Conditioning (A/C)
• If the A/C button is pushed while in AUTO mode, the indicator light may flashthree times to indicate the air conditioning is being controlled automatically.
SYNC Temperature Button
• Push the SYNC button once to control driver and passenger temperaturessimultaneously. Push the SYNC button a second time to control the temperaturesindividually.
Air Recirculation
• Use recirculation for maximum A/C operation.
• For window defogging, turn the recirculation button off.
• If the recirculation button is pushed while in the AUTO mode, the indicator lightmay flash three times to indicate the cabin air is being controlled automatically.
Rear Window Defroster
• Pressing the rear window defroster button will turn on the defroster forapproximately 10 minutes. An indicator in the button will illuminate when the rearwindow defroster is on. For an additional five minutes of operation, press thebutton a second time.
Activating Rear Automatic Temperature Control
• Pressing the REAR LOCK button for the Rear ATC System from the front lower ATCpanel, illuminates a LOCK symbol in the rear display. The rear temperature and airsource are controlled from the front lower ATC panel.
• Rear second row occupants can only adjust the rear ATC control when the REARLOCK button is turned off.
• The Rear ATC System is located in the headliner, near the center of the vehicle.
OPERATING YOUR VEHICLE
24

PARKSENSE®
REAR PARK ASSIST
• If an object is detected behind the rear bumper while the vehicle is in REVERSE, awarning will display in the instrument cluster and a tone, that changes speeddepending on the distance of the object from the bumper, will sound.
PARKVIEW®
REAR BACK-UP CAMERA
• You can see an on-screen image of the rear of your vehicle whenever the shift leveris put into REVERSE. The ParkView® Rear Back-Up Camera image will bedisplayed on the radio display screen, located on the center stack of theinstrument panel.
WARNING!
Drivers must be careful when backing up even when using the ParkView® RearBack-Up Camera. Always check carefully behind your vehicle, and be sure tocheck for pedestrians, animals, other vehicles, obstructions, or blind spotsbefore backing up. You must continue to pay attention while backing up.Failure to do so can result in serious injury or death.
REAR CROSS PATH WITH BLIND SPOT
MONITORING
• The Blind Spot Monitoring (BSM) system uses two radarbased sensors, locatedinside the rear bumper fascia, to detect Highway licensable vehicles (automobiles,trucks, motorcycles etc.) that enter the blind spot zones from the rear/front/side ofthe vehicle.
• The Blind Spot Monitoring (BSM) system warning light, located in the outsidemirrors, will illuminate if a vehicle moves into a blind spot zone.
• The BSM system can also be configured to sound an audible (chime) alert andmute the radio to notify you of objects that have entered the detection zones.
• Refer to your owner's manual on the DVD for further details.
OPERATING YOUR VEHICLE
25

POWER SLIDING SIDE DOORS
Automatic/Manual Operation
• The power sliding door may be opened or closed manually or by using the buttonson the Key Fob, overhead console switch, or rear door switch.
• Pulling the inside or outside powersliding door handle will also poweropen the power sliding doors.
Sliding Side Door Child Protection Lock
• When this system is engaged, the inside manual door handle will not open thesliding door even though the inside door lock is in the unlocked position.
• To engage the Child Protection Door Lock, open the sliding side door. Slide thechild protection door lock control, located on the rear of the sliding door, inward(toward the vehicle) to engage.
• Repeat these steps on the opposite sliding door.
OPERATING YOUR VEHICLE
26

STOW 'N GO®
SEATING
• Move the front seat fully forward. Lower the head restraints and raise the armrestson the second row seat.
• Slide the storage bin locking mechanism to the "LOCK" position and then pull upon the storage bin latch to open the cover.
• Pull up on the seatback recliner lever, located on the outboard side of the seat,and fold the seatback down. To assure the seatback is latched in the foldedposition, additional downward pressure on the seatback may be required whenfolding.
• Pull rearward on the release strap, located at the rear of the seat, and tumble theseat forward into the storage bin.
• Close the storage bin cover.
OPERATING YOUR VEHICLE
27

THIRD ROW POWER RECLINER
• The power recline feature, located on the side of the seat cushion, adjusts theseatback angle forward/rearward for occupant comfort.
Third Row Power Seat Switch
• A one-touch power folding seat switchis located in the left rear trim panel aspart of a switch bank.
• Left and right third row seats can befolded individually or together. Thethird row power folding seats adjust tomultiple positions.
• The switch is only functional when theliftgate is open and the vehicle is inPARK.
NOTE:• Disconnect the center shoulder belt from the small buckle and lower the head
restraints before attempting to fold/stow the power third row seats.• To abort seat operation while the seat is in motion, press a different seat position
selector switch to stop the seat. Once the seat stops moving, then the desiredposition can be selected.
• The third row power seat system includes obstacle detection for safe operation. Whenthe system detects an obstacle, the motors will stop and reverse the motion a shortdistance to move the seat away from the obstacle. Should this occur, remove theobstacle and press the button again for the desired position.
• Refer to your Owner's Manual on the DVD for manual third row seat foldinginstructions.
POWER LIFTGATE
• The power liftgate may be opened and closed by pressing the button on the KeyFob or the button located on the overhead console. Press the button once to open,and a second time to close the power liftgate.
• The power liftgate may be closed by the button, located in the upper left trim inthe liftgate opening. Pressing once will only close the liftgate. This button cannotbe used to open the liftgate.
OPERATING YOUR VEHICLE
28

POWER SUNROOF
Manual Open/Close
• Press and hold the switch rearward to open or forward to close the sunroof. Anyrelease of the switch will stop the movement, and the sunroof will remain in apartially open or closed position until the switch is pressed again.
Pinch Protection Feature
• This feature will detect an obstruction in the opening of the sunroof or the shadeduring Express Close operation. If an obstruction in the path of the sunroof orshade is detected, the sunroof or shade will automatically return to the openposition.
NOTE: Pinch protection is disabled while the switch is pressed and held during manualopening and closing of the sunroof or shade.
OPERATING YOUR VEHICLE
29

WARNING!
• Never leave children in a vehicle with the key in the ignition switch.Occupants, particularly unattended children, can become entrapped by thepower sunroof while operating the power sunroof switch. Such entrapmentmay result in serious injury or death.
• In a collision, there is a greater risk of being thrown from a vehicle with anopen sunroof. You could also be severely injured or killed. Always fasten yourseat belt properly and make sure all passengers are properly secured too.
• Do not allow small children to operate the sunroof. Never allow your fingers,other body parts, or any object to project through the sunroof opening. Injurymay result.
OPERATING YOUR VEHICLE
30

WIND BUFFETING
• Wind buffeting can be described as a helicopter-type percussion sound. Ifbuffeting occurs with the rear windows open, adjust the front and rear windowstogether.
• If buffeting occurs with the sunroof open, adjust the sunroof opening, or adjust anywindow. This will minimize buffeting.
OPERATING YOUR VEHICLE
31

YOUR VEHICLE'S SOUND SYSTEM
ELECTRONICS
32

ELECTRONICS
33

NON-TOUCH-SCREEN RADIOS
Media Center 130 (Sales Code RES)
Media Center 130 with Satellite Radio (Sales Code RES + RSC)
ELECTRONICS
34

NOTE: Your radio may not be equipped with the Uconnect™ Voice Command andUconnect™ Phone features. To determine if your radio has these features, press theVoice Command button on the radio. You will hear a voice prompt if you have thefeature, or see a message on the radio stating “Uconnect Phone not available” if you donot.
• Your radio has many features that add to the comfort and convenience of you andyour passengers. Some of these radio features should not be used when drivingbecause they take your eyes from the road or your attention from driving.
• The radio sales code is located on the lower right side of the radio faceplate.
Seek Up/Down Buttons
• Press to seek through radio stations in AM, FM, or SAT bands. Seek through tracksin CD mode.
• Hold either button to bypass stations without stopping.
Audio Settings
• Press the TUNE/SCROLL control knob and BASS, MID, TREBLE, BALANCE andFADE will display. Rotate the TUNE/SCROLL control knob to select the desiredsetting.
Audio Jack
• The Audio Jack allows a portable device, such as an MP3 player or a cassetteplayer, to be plugged into the radio and utilize the vehicle’s audio system, using a3.5 mm audio cable to amplify the source and play through the vehicle speakers.
• Pressing the AUX button will change the mode to auxiliary device if the Audio Jackis connected, allowing the music from your portable device to play through thevehicle's speakers.
• The functions of the portable device are controlled using the device buttons. Thevolume may be controlled using the radio or portable device.
Clock Setting
• Press and hold the TIME button until the hours blink; turn the TUNE/SCROLLcontrol knob to set the hours.
• Press the TUNE/SCROLL control knob until the minutes begin to blink; turn theTUNE/SCROLL control knob to set the minutes.
• Press the TUNE/SCROLL control knob to save the time change.
• To exit, press any button/knob or wait five seconds.
Store Radio Presets
• Press the SET/RND button once and SET 1 will show in the display. Then selectbutton (1–6).
• A second station may be added to each push button. Press the SET/RND buttontwice and SET 2 will show in the display, then select button (1–6).
ELECTRONICS
35
TOUCH-SCREEN RADIO
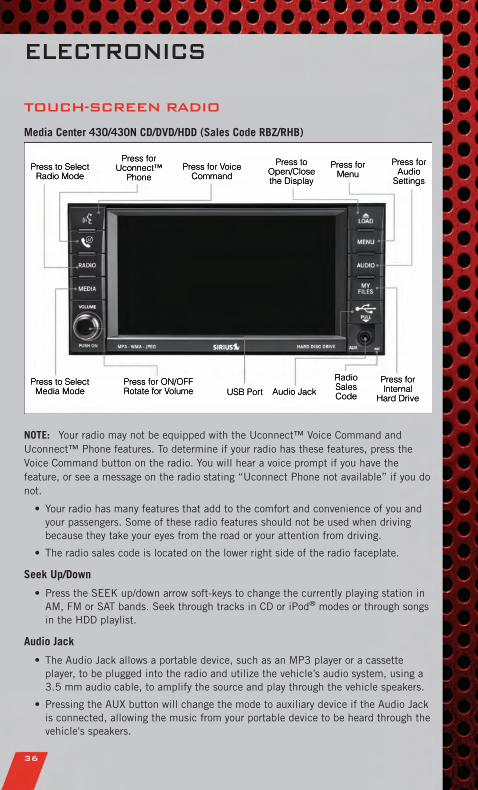
Media Center 430/430N CD/DVD/HDD (Sales Code RBZ/RHB)
NOTE: Your radio may not be equipped with the Uconnect™ Voice Command andUconnect™ Phone features. To determine if your radio has these features, press theVoice Command button on the radio. You will hear a voice prompt if you have thefeature, or see a message on the radio stating “Uconnect Phone not available” if you donot.
• Your radio has many features that add to the comfort and convenience of you andyour passengers. Some of these radio features should not be used when drivingbecause they take your eyes from the road or your attention from driving.
• The radio sales code is located on the lower right side of the radio faceplate.
Seek Up/Down
• Press the SEEK up/down arrow soft-keys to change the currently playing station inAM, FM or SAT bands. Seek through tracks in CD or iPod® modes or through songsin the HDD playlist.
Audio Jack
• The Audio Jack allows a portable device, such as an MP3 player or a cassetteplayer, to be plugged into the radio and utilize the vehicle’s audio system, using a3.5 mm audio cable, to amplify the source and play through the vehicle speakers.
• Pressing the AUX button will change the mode to auxiliary device if the Audio Jackis connected, allowing the music from your portable device to be heard through thevehicle's speakers.
ELECTRONICS
36

• The functions of the portable device are controlled using the device buttons. Thevolume may be controlled using the radio or portable device.
Clock Setting
• Turn the radio on, then touch the screen where the time is displayed.
• Touch the USER CLOCK soft-key (Navigation radio only).
• To adjust the hours, touch either the HOUR FORWARD or HOUR BACKWARDsoft-key.
• To adjust the minutes, touch either the MINUTE FORWARD or MINUTEBACKWARD soft-key.
• To save the new time setting, touch the screen where the word “Save” is displayed.
Store Radio Presets
• Press the RADIO hard-key to display AM FM SAT in the upper left corner of thescreen.
• Select the radio band by touching either the AM, FM, or SAT soft-key.
• Find the station to store by touching the right and left arrow soft-keys, touchingthe SCAN soft-key, or by using the DIRECT TUNE soft-key.
• Once the station is found, touch and hold one of the PRESET soft-keys in the listto the right, until you hear a confirmation beep.
Hard Disk Drive Operation
Copy Complete Audio Disc To Hard-Drive
• Press the LOAD hard-key.
• Insert a disc, then press the MENU hard-key.
• Touch the MY FILES soft-key, then select MY MUSIC.
• Touch the Add Music Files to HDD soft-key, then touch the From Disc soft-key inthe next screen to start the process.
Copying From USB
• The USB port on the radio face plate is for copying files to your hard drive. Toaccess, lift up on the cover.
• Insert a USB device (e.g. thumb drive or memory stick), then select MY MUSIC.
• Touch the Add Music Files to HDD soft-key, then touch the From USB soft-key inthe next screen.
• Select the folders or titles you would like to copy, then touch the DONE soft-key tostart the copy process.
Copy Pictures To The Hard-Drive
• Insert either a CD or a USB device containing your pictures in JPEG format intothe USB port on the radio face.
• Touch the MY FILES soft-key, then go to the MANAGE MY FILES screen.
• Touch the MY PICTURES soft-key to get an overview of the currently storedimages.
ELECTRONICS
37

• Touch one of the ADD PICTURES soft-keys, then select the type of media inserted.
• Use the PAGE soft-keys to page through a list of pictures and press the picture youwould like to import.
• Confirm your selection by touching the YES soft-key. The imported picture is nowavailable in the MANAGE MY PICTURES screen.
• In order to display the imported picture in the radio screen, touch the desiredpicture soft-key.
• Select this picture by pressing the PICTURE VIEW soft-key. A check markindicates the currently used picture.
Cleaning Your Touch-Screen Radio
• Do not spray any liquid or caustic chemicals directly on the screen. Use a cleanand dry micro fiber lens cleaning cloth in order to clean the touch-screen.
• If necessary, use a lint-free cloth dampened with a cleaning solution such asisopropyl alcohol or an isopropyl alcohol and water solution ratio of 50:50. Be sureto follow the solvent manufacturer's precautions and directions.
USB Port
• The USB Port on the radio allows you to copy songs from a connected USB drive orsupported media device onto your Media Center hard drive.
• The USB port located in the glove box also offers the ability to play songs fromconnected USB drives, or supported media devices. Supported devices may becontrolled through the vehicles steering wheel or radio controls, or even with voicecommands, and may be charged through the USB port.
Navigation – Media Center 430N (Sales Code RHB) Only
• For software updates, visit http://www.garmin.com/chrysler website, or contact yourauthorized dealer for the latest available software.
• The Navigation system receives GPS signals from satellites to display the positionof your vehicle. You may experience interruptions or delays in receiving navigationinformation in garages, tunnels, large cities, or other situations where the vehicledoes not have a direct line of sight to the sky.
• Voice Command is not available for navigation commands on this radio (althoughVoice Command functions for all other radio functions).
Map
• Touch the NAV soft-key in the upper-right corner of your radio screen, to access theNavigation system.
• Touch the View Map soft-key to display a map of your current position.
ELECTRONICS
38

Finding a Point of Interest
• Touch the NAV soft-key in the upper-right corner of your radio screen to access theNavigation system.
• Touch the Where To? soft-key to program a destination.
• Next touch one of the subcategories to search for your destination. Address, Pointsof Interest, Recently Found, Favorites and Intersection are a few of the options.
• After touching one of the subcategories, follow the on-screen steps to complete theprocess and be routed to your destination.
Setting a Home Location
• Touch the NAV soft-key in the upper-right corner of your radio screen, to access theNavigation system.
• Touch the Where To? soft-key, then touch Go Home.
• Next, select from:
• Enter My Address – enter an address for the location using the on-screenkeyboard.
• Use my current location – sets your current location as your Home Location.
• Choose from Recently Found – select a location from your recently foundlocations.
• After you set your Home Location, touch Where To? , then touch Go Home.
Editing Home Location
• Touch the NAV soft-key in the upper-right corner of your radio screen, to access theNavigation system.
• Touch the Where To? soft-key, then touch Favorites.
• Touch the location you want to edit.
• Next, touch Press for More.
• Touch Edit.
• Follow the on-screen steps for editing the Home Location.
Go Home
• Touch the NAV soft-key in the upper-right corner of your radio screen, to access theNavigation system.
• Touch Where To? , then touch Go Home.
ELECTRONICS
39

STEERING WHEEL AUDIO CONTROLS
• The steering wheel audio controls arelocated on the rear surface of thesteering wheel.
Right Switch
• Press the switch up or down toincrease or decrease the volume.
• Press the button in the center tochange modes AM/FM/CD/SAT.
Left Switch
• Press the switch up or down to search for the next listenable station or select thenext or previous CD track.
• Press the button in the center to select the next preset station (radio) or to changeCDs if equipped with a CD Changer.
Uconnect™ Phone
• To determine if your vehicle is equipped with Uconnect™ Phone, press theUconnect™ Phone button . If your vehicle has this feature, after a coupleseconds you will hear a voice prompt. If not, you will see a message on the radio“Uconnect phone not available”.
• The Uconnect™ Phone is a voice-activated, hands-free, in-vehicle communicationssystem with Voice Command Capability (see Voice Command section).
• The Uconnect™ Phone allows you to dial a phone number with your mobile phoneusing simple voice commands.
• For vehicles equipped with Video Entertainment System (VES)™, refer to theUconnect™ Phone section of the Uconnect™ User's Manual on the DVD forfurther details.
• For vehicles not equipped with VES™, refer to your vehicle Owner's Manual on theDVD for further details.
NOTE: The Uconnect™ Phone requires a mobile phone equipped with the Bluetooth®
Hands-Free Profile, Version 0.96 or higher. For Uconnect™ customer support, call1–877–855–8400 or visit dodge.com/uconnect.
Phone Pairing
NOTE: Pairing is a one-time initial setup before using the phone. You will also need tofollow the Bluetooth® instructions in your cell phone user guide to complete the phonepairing setup.
• Press the Phone button to begin.
• Wait for the “ready” prompt and BEEP.
ELECTRONICS
40
• (After the BEEP), say “Uconnect setup”.
• (After the BEEP), say “phone pairing”.
• (After the BEEP), say “pair a phone”.
• Follow the audible prompts.
• You will be asked to enter a four-digit Personal Identification Number (PIN), whichyou will later need to enter into your mobile phone. You can enter any four-digitPIN. You will not need to remember this PIN after the initial pairing process.
• You will then be prompted to give the phone pairing a name (each phone pairedshould have a unique name).
• Next you will be asked to give this new pairing a priority of 1 thru 7 (up to sevenphones may be paired); 1 is the highest and 7 is the lowest priority. The systemwill only connect to the highest priority phone that exists within the proximity ofthe vehicle.
Making A Phone Call
• Press the Phone button .
• (After the BEEP), say “dial” (or “call” a name).
• (After the BEEP), say number (or name).
Phonebook Edit
• Press the Phone button .
• (After the BEEP), say “phonebook”.
• (After the BEEP), say “new entry” or “list names” or “delete”.
• Follow the prompts.
Receiving A Call – Accept (And End)
• When an incoming call rings/is announced on Uconnect™, press the Phonebutton .
• To end a call, press the Phone button .
Mute (Or Unmute) Microphone During Call
• During a call, press the Voice Command button .
• (After the BEEP), say “mute on” (or “mute off”).
Transfer Ongoing Call Between Handset And Vehicle
• During a call, press the Voice Command button .
• (After the BEEP), say “transfer call”.
Changing The Volume
• Start a dialogue by pressing the Phone button , then adjust the volume duringa normal call.
• Use the radio ON/OFF VOLUME rotary knob to adjust the volume to a comfortablelevel while the Uconnect™ system is speaking. Please note the volume setting forUconnect™ is different than the audio system.
ELECTRONICS
41

NOTE: To access the tutorial, press the Uconnect™ hard-key. After the BEEP, say“tutorial”. Press any hard-key/button or touch the display (Touch-Screen radio) tocancel the tutorial.
WARNING!
• Any voice commanded system should be used only in safe driving conditionsfollowing local laws and phone use. All attention should be kept on theroadway ahead. Failure to do so may result in a collision causing you andothers to be severely injured or killed.
• In an emergency, to use Uconnect™ Phone, your mobile phone must be:• turned on,• paired to Uconnect™ Phone,• and have network coverage.
Uconnect™ VOICE COMMAND
• The Uconnect™ Voice Command system allows you to control your AM, FM radio,satellite radio, disc player, Uconnect™ Phone, a memo recorder, and supportedportable media devices. The Voice Command system also provides limitedcapability to select and play music by artist, song, album, music, genre, or playlistfrom your compatible iPod® device (this capability is available for Media Center430/430N when connected to the USB port).
• When you press the Voice Command button located on the radio faceplateor steering wheel, you will hear a beep. The beep is your signal to give a command.If you do not say a command within a few seconds, the system will present you witha list of options. If you ever wish to interrupt the system while it lists options, pressthe Voice Command button , listen for the BEEP, and say your command.
Voice Command for Text Messaging
• If equipped with Uconnect™ Voice Command, your Media Center 430N radio maybe able to play incoming SMS messages through the vehicle sound system.
• It also allows you to respond by selecting from various pre-defined phrases.
• Not all phones are compatible with this feature. Refer to the phone compatibilitylist at dodge.com/uconnect. Connected mobile phones must be bluetooth-compatible, and paired with your radio.
Changing The Volume
• Start a dialogue by pressing the Voice Command button , then say acommand (for example, “tutorial”).
• Use the radio ON/OFF VOLUME rotary knob to adjust the volume to a comfortablelevel while the Voice Command system is speaking. The volume setting for VoiceCommand is different than the audio system.
• For vehicles equipped with Video Entertainment System (VES)™, refer to theUconnect™ Voice Command section of the Uconnect™ User's Manual on the DVDfor further details.
ELECTRONICS
42

• For vehicles not equipped with VES™, refer to your vehicle Owner's Manual on theDVD for Uconnect™ Voice Command information.
NOTE: To access the tutorial, press the Voice Command button . After theBEEP, say “tutorial”. Press any hard-key/button or touch the display (Touch-Screenradio) to cancel the tutorial.
WARNING!
Any voice commanded system should be used only in safe driving conditionsfollowing local laws and phone use. All attention should be kept on the roadwayahead. Failure to do so may result in a collision causing you and others to beseverely injured or killed.
iPod®
/USB/MP3 CONTROL
• There are many ways to play music from iPod® players or other portable devicesthrough your vehicle's speakers. Your choices depend on what radio your vehicle isequipped with.
• The radio sales code is located on the lower right side of the radio faceplate.
If Equipped With Media Center 130 with Satellite Radio (Sales Code RES + RSC) OrMedia Center 430/430N (Sales Code RBZ/RHB)
• The USB port, located within the upper glove box, allows you to plug an iPod® intothe vehicle's sound system.
• To hear audio from devices connected to this port from a non-touch-screen radio,press the AUX button on the radio faceplate. From a touch-screen radio, press theMEDIA hard-key, then touch the AUX or iPod® soft-key.
• When connected to this feature:
• The iPod® can be controlled using the radio buttons to Play, Browse, and Listthe iPod® or external devices contents. Refer to the Owner's Manual on the DVDfor details.
• The iPod® battery charges when plugged into the USB port (if supported by thespecific audio device).
• Compatible iPod® devices may also be controllable using voice commands.Refer to the Owner's Manual on the DVD for details.
NOTE:• The USB port supports certain Mini, Classic, Nano, Touch, and iPhone® devices. The
USB port also supports playing music from compatible external USB Mass StorageClass memory devices. For supported audio file formats, refer to the USB Portsection in the Owner's Manual on the DVD. Refer to www.chrysler.com/uconnectwebsite for a list of tested iPod®s. Some iPod® software versions may not fullysupport the USB port features. Please visit Apple’s website for iPod® softwareupdates.
ELECTRONICS
43

Bluetooth® Streaming Audio
If equipped with Uconnect™ Voice Command, your Bluetooth-equipped iPod® devices,cell phones or other media players, may also be able to stream music to your vehicle'sspeakers. Your connected device must be Bluetooth-compatible, and paired with yourMedia Center radio (see Uconnect™ Phone for pairing instructions). Press the AUXbutton on the radio faceplate until "BT" is displayed on the radio screen.
WARNING!
Do not plug in or remove the iPod® or external device while driving. Failure tofollow this warning could result in a collision.
VIDEO ENTERTAINMENT SYSTEM (VES)™
System Operation
• The screen(s) are located in theoverhead compartment console. Tolower a screen, press the releasebutton located in the center of theconsole rear of the screen.
• The third row swivel screen (ifequipped) can be rotated to face thefront of the vehicle. The screen willonly operate if it is fully facingrearward or fully facing forward. Forthe Third Row Swivel Screen to work,the second row screen must be fullyopened.
• The system may be controlled by the front seat occupants using either the radio orDVD player controls, or by the rear seat occupants using the remote control.
• The video screen displays information in a split screen format. The left side of thescreen is referred to as Channel 1 and the right side of the screen is referred to asChannel 2. All modes except video modes are displayed in a split screen format.
• To use the headphones, press the power button located on the right ear cup. Selectthe channel on the headphones (1 or 2) which corresponds to the channel selectedon the desired video screen.
• To receive VES™ audio through the vehicle's sound system, press the VES™soft-key on the radio's touch-screen.
ELECTRONICS
44

Operation Of The Touch-Screen Radio/DVD Player
• To view a DVD press the OPEN/CLOSE hard-key on the touch-screen radio andinsert the disc or insert the disc into the optional DVD player. Playback will beginautomatically after the DVD is recognized by the disc drive. If playback does notbegin automatically when the disc is inserted into the DVD player press the PLAYbutton. If playback does not begin automatically after the disc is inserted into thetouch-screen radio follow these steps:
• Press the MENU hard-key, then touch the Rear VES™ soft-key. If a chapter listappears on the right side of the screen, touch the HIDE LIST soft-key to displaythe Rear VES™ control screen.
• Touch the 1 soft key to select an audio channel, then touch the DISC soft-key inthe MEDIA column.
SIRIUS Backseat TV™
• Press the MENU hard-key, then touch the Rear VES™ soft-key. If a chapter listappears on the right side of the screen, touch the HIDE LIST soft key to displaythe Rear VES™ Control screen.
• Touch the 1 soft-key to select an audio channel, then touch the TV soft-key in theRADIO column to select SIRIUS Backseat TV™.
• To view SIRIUS Backseat TV™ using the remote, set the remote control channelselector switch to channel 1. Press the MODE button, then using the arrow buttonsselect TV and press ENTER.
Operation Of The Remote Control
• The remote control operates similarly to any DVD remote you may have used beforeand allows the rear seat passengers to change stations, tracks, discs andaudio/video modes.
• The remote control is designed to control either channel by using the selectorswitch located on the right side of the remote.
• Connect the video game or other external media devises to the AUX jacks followingthe color coding for the VES™ jacks.
• Pressing the power button will turn the VES™ system ON/OFF.
• Pressing the mode button causes the MODE SELECTION menu to appear on theVES™ screen. Use the remote control arrow buttons to scroll through the availablemodes, and then press ENTER to select the desired mode.
Auxiliary Audio/Video Input Jacks
• The AUX jacks are located on the drivers side rear trim panel behind the slidingdoor.
• Connect the video game or other external media devises to the AUX jacks followingthe color coding for the VES™ jacks.
• Using either the touch-screen radio or remote control, select AUX from the REARVES™ CONTROL or the MODE SELECTION screen.
• Refer to the Uconnect™ Multimedia – Video Entertainment System (VES)™section in the Uconnect™ User's Manual on the DVD for further details.
ELECTRONICS
45

ELECTRONIC VEHICLE INFORMATION CENTER
(EVIC)
• The EVIC features a driver interactivedisplay that is located in theinstrument cluster. Pressing thecontrols on the left side of the steeringwheel allows the driver to selectvehicle information and PersonalSettings. For additional information,refer to Programmable Features in thisguide.
• Press and release the UP button to scroll upward through the main menus(Fuel Economy, Vehicle Info, Tire PSI, Cruise, Messages, Units, System Setup) andsub menus.
• Press and release the DOWN button to scroll downward through the mainmenus and sub menus.
• Press and release the SELECT button for access to main menus, sub menusor to select a personal setting in the setup menu.
• Press the BACK button to scroll back to a previous menu or sub menu.
Compass Calibration
• This compass is self-calibrating, which eliminates the need to set the compassmanually. When the vehicle is new, the compass may appear erratic and the EVICwill display “CAL” until the compass is calibrated.
• You may also calibrate the compass by completing one or more 360 degree turns(in an area free from large metal or metallic objects) until the “CAL” messagedisplayed in the EVIC turns off. The compass will now function normally.
ELECTRONICS
46

PROGRAMMABLE FEATURES
Electronic Vehicle Information Center (EVIC) – If Equipped
• The EVIC can be used to program the following Personal Settings. Press andrelease the MENU button until Personal Settings displays, then press the DOWNbutton to scroll through the settings. Press the SELECT button tochange the setting.
• Language • Turn Headlamps On With Remote KeyUnlock
• Lock Door Automatically at 15 mph(24 km/h)
• Confirmation of Voice Commands
• Auto Unlock On Exit • Illuminated Approach
• Remote Unlock Driver's Door 1st • Hill Start Assist (HSA)
• Sound Horn With Remote Key Lock • Display Units In
• Flash Lights With Remote Key Lock • Automatic Compass Calibration
• Delay Turning Headlights Off • Compass Variance
• Delay Power Off to Accessories untilExit
• To Set the Variance
Key Fob Programmable Features
• The following features may also be programmed by using the Key Fob transmitteror the ignition switch and driver's door lock switch.
NOTE: Pressing the LOCK button while you are inside the vehicle will activate theVehicle Security Alarm. Opening a door with the Vehicle Security Alarm activated willcause the alarm to sound. Press the UNLOCK button to deactivate the Vehicle SecurityAlarm.
Unlock On First Press
• To unlock either the driver's side, or all doors, on the first press of the UNLOCKbutton:
• Press and hold the LOCK button for at least 4 seconds, but no longer than10 seconds. Then, press and hold the UNLOCK button while still holding theLOCK button.
• Release both buttons at the same time.
Auto Unlock Doors On Exit
• To have all of the vehicle doors unlock when any door is opened:
• Enter your vehicle and close all the doors.
• Cycle the ignition switch between LOCK and ON and then back to LOCK fourtimes, ending up in the LOCK position (do not start the engine).
• Press the power door UNLOCK switch to unlock the doors. A single chime willindicate that programming is complete.
ELECTRONICS
47
Auto Door Lock
• To have the doors lock automatically when the vehicle’s speed exceeds 15 mph(24 km/h):
• Enter your vehicle and close all the doors.
• Cycle the ignition switch between LOCK and ON and then back to LOCK fourtimes, ending up in the LOCK position (do not start the engine).
• Press the power door LOCK switch to lock the doors. A single chime will indicatethat programming is complete.
Sound Horn With Lock
• To turn the horn chirp on or off when the doors are locked:
• Press the LOCK button for at least 4 seconds, but no longer than 10 seconds.Then, press the PANIC button while still holding the LOCK button.
• Release both buttons at the same time.
Flashing Lights With Lock
• The turn signal lights flashing, when the doors are locked or unlocked, feature canbe turned on or off. To turn this feature on or off:
• Press and hold the UNLOCK button for at least 4 seconds, but no longer than10 seconds. Then, press and hold the LOCK button while still holding theUNLOCK button.
• Release both buttons at the same time.
UNIVERSAL GARAGE DOOR OPENER
(HomeLink®
)
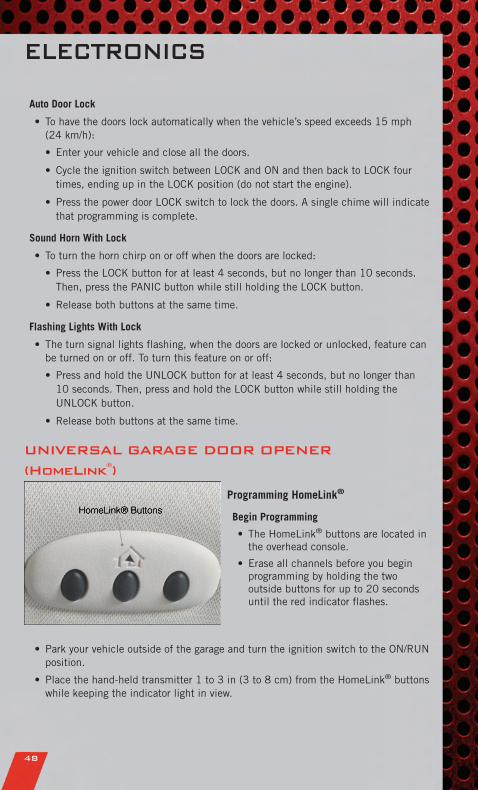
Programming HomeLink®
Begin Programming
• The HomeLink® buttons are located inthe overhead console.
• Erase all channels before you beginprogramming by holding the twooutside buttons for up to 20 secondsuntil the red indicator flashes.
• Park your vehicle outside of the garage and turn the ignition switch to the ON/RUNposition.
• Place the hand-held transmitter 1 to 3 in (3 to 8 cm) from the HomeLink® buttonswhile keeping the indicator light in view.
ELECTRONICS
48

• Simultaneously, press and hold both the chosen HomeLink® button and thehand-held transmitter button until the HomeLink® indicator flash rate changesfrom a slow to a rapidly blinking light, then release both the HomeLink® and thehand-held transmitter buttons. This may take up to 30 seconds, or longer in rarecases.
• Press and hold the just-programmed HomeLink® button; if the indicator light stayson constantly, programming is complete and the garage door should open.
NOTE:• Only use this transceiver with a garage door opener that has a “stop and reverse”
feature as required by Federal safety standards. This includes most garage dooropener models manufactured after 1982. Do not use a garage door opener withoutthese safety features. Call toll-free 1–800–355–3515 or, on the Internet, atwww.HomeLink.com for safety information or assistance.
• If you are having difficulty programming your HomeLink® and your garage dooropener was manufactured after 1995, you may have a rolling code. Follow the stepsbelow for Programming A Rolling Code System.
Programming A Rolling Code System
• At the garage door opener motor (in the garage), locate the “learn” or“programming” button. This can usually be found where the hanging antenna wireis attached to the garage door opener motor (it is NOT the button normally used toopen and close the door).
• Firmly press and release the “learn” or “programming” button. The name and colorof the button may vary by manufacturer. Within 30 seconds, return to the vehicleand press the programmed HomeLink® button twice (holding the button for twoseconds each time). If the device is plugged in and activates, programming iscomplete.
• If the device does not activate, press the button a third time (for two seconds) tocomplete the programming.
Using HomeLink®
• To operate, simply press and release the programmed HomeLink® button and theprogrammed device will operate.
• Refer to your Owner’s Manual on the DVD for further details. If you have anyproblems programming HomeLink®, or require assistance, please call toll-free1–800–355–3515 or, on the Internet, at www.HomeLink.com.
WARNING!
• Your motorized door or gate will open and close while you are programmingthe universal transceiver. Do not program the transceiver if people or pets arein the path of the door or gate.
ELECTRONICS
49

WARNING! (Continued)
• Do not run your vehicle in a closed garage or confined area whileprogramming the transceiver. Exhaust gas from your vehicle contains CarbonMonoxide (CO) which is odorless and colorless. Carbon Monoxide ispoisonous when inhaled and can cause you and others to be severely injuredor killed.
POWER INVERTER
• There is a 115 Volt, 150 Watt powerinverter outlet located on the left reartrim panel immediately behind thesecond row left passenger seat. Thisoutlet can power cellular phones,electronics and other low powerdevices requiring power up to 150Watts.
• Press the switch located in the centerof the instrument panel to turn thepower to the outlet on.
• Press the switch again to turn the power off.
• The status indicator of the AC power inverter indicates whether the inverter isproducing AC power.
NOTE: The power inverter is designed with built-in overload protection. If the powerrating of 150 Watts is exceeded, the power inverter will automatically shut down. Oncethe electrical device has been removed from the outlet, the inverter shouldautomatically reset. If the power rating exceeds approximately 170 Watts, the powerinverter may have to be reset manually. To reset the inverter manually, unplug thedevice and plug it in again. To avoid overloading the circuit, check the power ratings onelectrical devices prior to using the inverter.
WARNING!
To Avoid Serious Injury or Death: Do not use a three-prong adaptor. Do notinsert any objects into the receptacles. Do not touch with wet hands. Close thelid when not in use. If this outlet is mishandled, it may cause an electric shockand failure.
ELECTRONICS
50

POWER OUTLETS
• There are four 12 Volt power outlets inyour vehicle.
• Two are located on the lowerinstrument panel, next to the openstorage bin. The upper power outlet iscontrolled by the ignition switch andthe lower power outlet is connecteddirectly to the battery.
• One is located in the removable floorconsole and is also connected directlyto the battery.
• One is located in the rear quarter panel near the liftgate. This outlet is alsocontrolled by the ignition switch.
NOTE:• Do not exceed the maximum power of 160 Watts (13 Amps) at 12 Volts. If the 160
Watt (13 Amp) power rating is exceeded, the fuse protecting the system will need tobe replaced.
• All accessories connected to the “battery” powered outlets should be removed orturned off when the vehicle is not in use to protect the battery against discharge.
ELECTRONICS
51

IN-FLOOR STORAGE –
STOW N’ GO®
Second Row Seat Storage Bins
• Storage bins are located in the floorin front of the second row seats thatcan be used when the second rowseat is in the upright position. Pullup on the storage bin latch to openthe cover. Slide the storage binlocking mechanism to the "Lock"position to allow greater access tothe storage bin.
Cargo Area Storage
• The liftgate sill plate has a raisedline with the statement “Load ToThis Line”. This line indicates howfar rearward cargo can be placedwithout interfering with liftgateclosing.
WARNING!
In a collision, serious injury couldresult if the seat storage bin coversare not properly latched. Do notdrive the vehicle with the storage bincovers open. Keep the storage bincovers closed and latched while thevehicle is in motion. Do not use astorage bin latch as a tie down.
ROOF LUGGAGE RACK
• The crossbars on your vehicle aredelivered stowed within the roof rackside rails. When installed, the roofrack can hold a maximum of 150 lbs(68 kg) of evenly distributed weight.
Installing The Crossbars
• To install the crossbars, completelyloosen the thumb screws at bothends and lift the crossbar from itsstowed position.
• Bend the pivot points at each end ofthe crossbar and slide the thumbscrew down.
• Set the crossbars into position andtighten the thumb screws.
NOTE: Make sure the directional arrow onthe crossbar aligns with the directionalarrow on the side rail.
• Refer to the Owner's Manual on theDVD for further details.
UTILITY
52
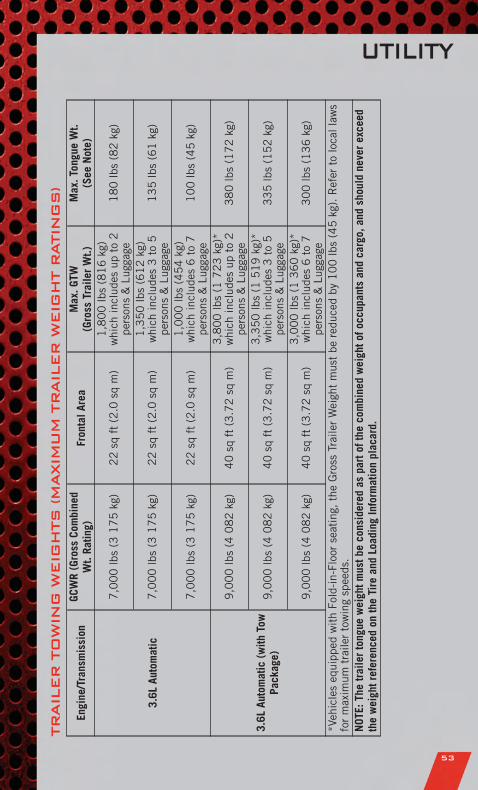
TRAILER
TO
WIN
GW
EIG
HTS
(M
AXIM
UM
TRAILER
WEIG
HT
RATIN
GS)
Engi
ne/T
rans
mis
sion
GCW
R(G
ross
Com
bine
dW
t.Ra
ting)
Fron
talA
rea
Max
.GTW
(Gro
ssTr
aile
rW
t.)M
ax.T
ongu
eW
t.(S
eeN
ote)
3.6L
Auto
mat
ic
7,0
00
lbs
(31
75
kg)
22
sqft
(2.0
sqm
)1
,80
0lb
s(8
16
kg)
whi
chin
clud
esup
to2
pers
ons
&Lu
ggag
e1
80
lbs
(82
kg)
7,0
00
lbs
(31
75
kg)
22
sqft
(2.0
sqm
)1
,35
0lb
s(6
12
kg)
whi
chin
clud
es3
to5
pers
ons
&Lu
ggag
e1
35
lbs
(61
kg)
7,0
00
lbs
(31
75
kg)
22
sqft
(2.0
sqm
)1
,00
0lb
s(4
54
kg)
whi
chin
clud
es6
to7
pers
ons
&Lu
ggag
e1
00
lbs
(45
kg)
3.6L
Auto
mat
ic(w
ithTo
wPa
ckag
e)
9,0
00
lbs
(40
82
kg)
40
sqft
(3.7
2sq
m)
3,8
00
lbs
(17
23
kg)*
whi
chin
clud
esup
to2
pers
ons
&Lu
ggag
e3
80
lbs
(17
2kg
)
9,0
00
lbs
(40
82
kg)
40
sqft
(3.7
2sq
m)
3,3
50
lbs
(15
19
kg)*
whi
chin
clud
es3
to5
pers
ons
&Lu
ggag
e3
35
lbs
(15
2kg
)
9,0
00
lbs
(40
82
kg)
40
sqft
(3.7
2sq
m)
3,0
00
lbs
(13
60
kg)*
whi
chin
clud
es6
to7
pers
ons
&Lu
ggag
e3
00
lbs
(13
6kg
)
*Veh
icle
seq
uipp
edw
ith
Fold
-in-
Floo
rse
atin
g,th
eG
ross
Trai
ler
Wei
ght
mus
tbe
redu
ced
by1
00
lbs
(45
kg).
Ref
erto
loca
llaw
sfo
rm
axim
umtr
aile
rto
win
gsp
eeds
.N
OTE:
The
trai
ler
tong
uew
eigh
tmus
tbe
cons
ider
edas
part
ofth
eco
mbi
ned
wei
ghto
focc
upan
tsan
dca
rgo,
and
shou
ldne
ver
exce
edth
ew
eigh
tref
eren
ced
onth
eTi
rean
dLo
adin
gIn
form
atio
npl
acar
d.
UTILITY
53

RECREATIONAL
TOWING (BEHIND
MOTORHOME, ETC.)
NOTE: If the vehicle requires towing,make sure all four wheels are off theground.
CAUTION!
Towing this vehicle behind anothervehicle (flat-towing with all fourwheels on the ground) is notrecommended.
UTILITY
54

24-HOUR TOWING ASSISTANCE - U.S. ONLY
• Dial toll-free 1-800-521-2779 or 1-800-363-4869 for Canadian residents.
• Provide your name, vehicle identification number and license plate number.
• Provide your location, including telephone number, from which you are calling.
• Briefly describe the nature of the problem and answer a few simple questions.
• You will be given the name of the service provider and an estimated time of arrival.If you feel you are in an “unsafe situation”, please let us know. With your consent,we will contact local police or safety authorities.
INSTRUMENT CLUSTER WARNING LIGHTS
- Electronic Stability Control (ESC) Indicator Light
• If this indicator light flashes during acceleration, apply as little throttle aspossible. While driving, ease up on the accelerator. Adapt your speed and drivingto the prevailing road conditions. To improve the vehicle's traction when startingoff in deep snow, sand or gravel, it may be desirable to switch the ESC system off.
- Tire Pressure Monitoring System (TPMS) Light
• Each tire, including the spare (if provided), should be checked monthly, when coldand inflated to the inflation pressure recommended by the vehicle manufacturer onthe vehicle placard or tire inflation pressure label. (If your vehicle has tires of adifferent size than the size indicated on the vehicle placard or tire inflationpressure label, you should determine the proper tire inflation pressure for thosetires.)
• As an added safety feature, your vehicle has been equipped with a Tire PressureMonitoring System (TPMS) that illuminates a low tire pressure telltale when one ormore of your tires is significantly under-inflated. Accordingly, when the low tirepressure telltale illuminates, you should stop and check your tires as soon aspossible, and inflate them to the proper pressure. Driving on a significantlyunder-inflated tire causes the tire to overheat and can lead to tire failure.Under-inflation also reduces fuel efficiency and tire tread life, and may affect thevehicle’s handling and stopping ability.
• Please note that the TPMS is not a substitute for proper tire maintenance, and it isthe driver’s responsibility to maintain correct tire pressure, even if under-inflationhas not reached the level to trigger illumination of the TPMS low tire pressuretelltale.
• Your vehicle has also been equipped with a TPMS malfunction indicator to indicatewhen the system is not operating properly. The TPMS malfunction indicator iscombined with the low tire pressure telltale. When the system detects amalfunction, the telltale will flash for approximately one minute and then remaincontinuously illuminated. This sequence will continue upon subsequent vehiclestart-ups as long as the malfunction exists.
WHAT TO DO IN EMERGENCIES
55

• When the malfunction indicator is illuminated, the system may not be able todetect or signal low tire pressure as intended. TPMS malfunctions may occur for avariety of reasons, including the installation of replacement or alternate tires orwheels on the vehicle that prevent the TPMS from functioning properly. Alwayscheck the TPMS malfunction telltale after replacing one or more tires or wheels onyour vehicle, to ensure that the replacement or alternate tires and wheels allow theTPMS to continue to function properly.
CAUTION!
The TPMS has been optimized for the original equipment tires and wheels.TPMS pressures and warning have been established for the tire size equippedon your vehicle. Undesirable system operation or sensor damage may resultwhen using replacement equipment that is not of the same size, type, and/orstyle. Aftermarket wheels can cause sensor damage. Do not use tire sealantfrom a can, or balance beads if your vehicle is equipped with a TPMS, asdamage to the sensors may result.
- Engine Temperature Warning Light
• This light warns of an overheated engine condition.
• If the light turns on or flashes continuously while driving, safely pull over and stopthe vehicle. If the A/C system is on, turn it off. Also, shift the transmission intoNEUTRAL and idle the vehicle. If the temperature reading does not return tonormal, turn the engine off immediately and call for service.
• We recommend that you do not operate the vehicle or engine damage will occur.Have the vehicle serviced immediately.
WARNING!
A hot engine cooling system is dangerous. You or others could be badly burnedby steam or boiling coolant. You may want to call an authorized service centerfor service if your vehicle overheats.
BRAKE - Brake Warning Light
• The Brake Warning light illuminates when there is either a system malfunction orthe parking brake is applied. If the light is on and the parking brake is not applied,it indicates a possible brake hydraulic malfunction, brake booster problem or anAnti-Lock Brake System problem.
• We recommend you drive to the nearest service center and have the vehicleserviced immediately.
WHAT TO DO IN EMERGENCIES
56

WARNING!
Driving a vehicle with the red brake light on is dangerous. Part of the brakesystem may have failed. It will take longer to stop the vehicle. You could have acollision. Have the vehicle checked immediately.
- Malfunction Indicator Light (MIL)
• Certain conditions, such as a loose or missing gas cap, poor fuel quality, etc., mayilluminate the MIL after engine start. The vehicle should be serviced if the lightstays on through several typical driving cycles. In most situations, the vehicle willdrive normally and not require towing.
• If the MIL flashes when the engine is running, serious conditions may exist thatcould lead to immediate loss of power or severe catalytic converter damage. Werecommend you do not operate the vehicle. Have the vehicle serviced immediately.
- Electronic Stability Control (ESC) Indicator Light/Brake Assist System (BAS)Warning Light
• If the ESC/BAS warning light comes on continuously with the engine running, amalfunction has been detected.
• If this light remains on after several ignition cycles, and the vehicle has beendriven several miles (kilometers) at speeds greater than 30 mph (48 km/h), werecommend you drive to the nearest service center and have the vehicle servicedimmediately.
- Charging System Light
• This light shows the status of the electrical charging system. If the chargingsystem light remains on, it means that the vehicle is experiencing a problem withthe charging system.
• We recommend you do not continue driving if the charging system light is on. Havethe vehicle serviced immediately.
- Oil Pressure Warning Light
• This light indicates low engine oil pressure. If the light turns on while driving, stopthe vehicle and shut off the engine as soon as possible. A chime will sound for fourminutes when this light turns on.
• We recommend you do not operate the vehicle or engine damage will occur. Havethe vehicle serviced immediately.
- Anti-Lock Brake (ABS) Light
• This light monitors the Anti-Lock Brake System (ABS).
• If the light is not on during starting, stays on, or turns on while driving, werecommend you drive to the nearest service center and have the vehicle servicedimmediately.
WHAT TO DO IN EMERGENCIES
57

- Electronic Throttle Control (ETC) Light
• This light informs you of a problem with the Electronic Throttle Control (ETC)system.
• If a problem is detected, the light will come on while the engine is running. Cyclethe ignition when the vehicle has completely stopped and the shift lever is placedin the PARK position; the light should turn off.
• If the light remains lit with the engine running, your vehicle will usually bedrivable; however, see an authorized service center immediately. If the light isflashing when the engine is running, immediate service is required and you mayexperience reduced performance, an elevated/rough idle or engine stall and yourvehicle may require towing.
- Airbag Warning Light
• If the light is not on during starting, stays on, or turns on while driving, have thevehicle serviced by an authorized service center immediately.
Fuel Cap/Loose Gas Cap Message
• If a “gas cap” message (shown as gASCAP) appears, tighten the gas cap until a“clicking” sound is heard.
• Press the odometer reset button to turn the message off.
• If the message continues to appear for more than three days after tightening thegas cap, see your authorized service center.
Oil Change IndicatorMessage
• If an “oil change” message (shown as CHAngE OIL) appears and a single chimesounds, it is time for your next required oil change.
Resetting The Light After Servicing
• Turn the ignition switch to the ON/RUN position (do not start engine).
• Fully depress the accelerator pedal three times within 10 seconds.
• Turn the ignition switch to the OFF/LOCK position.
IF YOUR ENGINE OVERHEATS
• In any of the following situations, you can reduce the potential for overheating bytaking the appropriate action.
• On the highways — slow down.
• In city traffic — while stopped, shift transmission into NEUTRAL, but do notincrease engine idle speed.
WHAT TO DO IN EMERGENCIES
58

NOTE: There are steps that you can take to slow down an impending overheatcondition:• If your air conditioner (A/C) is on, turn it off. The A/C system adds heat to the engine
cooling system and turning the A/C off can help remove this heat.• You can also turn the Temperature Control to maximum heat, the Mode Control to
floor and the Fan Control to high. This allows the heater core to act as a supplementto the radiator and aids in removing heat from the engine cooling system.
• If the temperature reading does not return to normal, turn the engine offimmediately.
• We recommend that you do not operate the vehicle or engine damage will occur.Have the vehicle serviced immediately.
CAUTION!
Driving with a hot cooling system could damage your vehicle. If the temperaturegauge reads HOT (H), pull over and stop the vehicle. Idle the vehicle with theair conditioner turned off until the pointer drops back into the normal range. Ifthe pointer remains on HOT (H), and you hear continuous chimes, turn theengine off immediately and call for service.
WARNING!
You or others can be badly burned by hot engine coolant (antifreeze) or steamfrom your radiator. If you see or hear steam coming from under the hood, do notopen the hood until the radiator has had time to cool. Never try to open acooling system pressure cap when the radiator or coolant bottle is hot.
JACKING AND TIRE CHANGING
Jack Location
• The jack, jack handle and winchhandle tools are stowed behind therear left side trim panel in the rearcargo area. Turn the two cover latchesto release the cover.
• Remove the pouch containing thescissors jack, jack handle, and tools.
WHAT TO DO IN EMERGENCIES
59

Spare Tire Stowage
• The spare tire is stored inside a protective cover located under the center of thevehicle by means of a cable winch mechanism.
• Using the provided tools, lower thespare tire by turning the “spare tiredrive” nut, located on the floor in frontof the floor console, counter-clockwise.
• Retrieve the spare tire from under thevehicle with the provided spare tirehook.
WHAT TO DO IN EMERGENCIES
60

Preparations For Jacking
• Park on a firm, level surface. Avoid ice or slippery areas.
• Set the parking brake and shift the transmission into PARK.
• Turn the ignition to LOCK and turn on the Hazard Warning flasher.
• Block both the front and rear of thewheel diagonally opposite of thejacking position. For example, ifchanging the right front tire, block theleft rear wheel.
NOTE: Passengers should not remain in thevehicle when the vehicle is being jacked.
Jacking And Tire Changing Instructions
• Remove the spare tire, jack and tools from their stored location.
• Loosen (but do not remove) the wheel lug nuts by turning them counterclockwiseone turn while the wheel is still on the ground.
• Assemble the jack and jacking tools. Connect the jack handle driver to theextension, then to the lug wrench.
NOTE: There are two jack engagement locations on each side of the vehicle body.These locations are on the sill flange of the vehicle body.
• Place the jack:
WHAT TO DO IN EMERGENCIES
61

• Rear jack locations are between apair of down-facing tabs on the sillflange of the vehicle side body.
• Front jack locations are on the sillflange of the vehicle side body andalign with front door edges.
• Turn the jack screw clockwise tofirmly engage the jack saddle withthe lift area of the sill flange.
• Raise the vehicle by turning the jackscrew clockwise. Raise the vehicle onlyuntil the tire just clears the surfaceand enough clearance is obtained toinstall the spare tire.
• Remove the lug nuts and wheel.
• Position the spare wheel/tire on the vehicle and install the lug nuts with thecone-shaped end toward the wheel. Lightly tighten the lug nuts clockwise. To avoidthe risk of forcing the vehicle off the jack, do not tighten the nuts fully until thevehicle has been lowered.
• Lower the vehicle by turning the jack screw counterclockwise, and remove the jackand wheel blocks.
• Finish tightening the lug nuts. Push down on the wrench while tightening forincreased leverage. Alternate nuts until each one has been tightened twice. Thecorrect wheel nut tightness is 95 ft lbs (130 N•m). If in doubt about the correcttightness, have them checked with a torque wrench by your authorized dealer or ata service station.
• Place the deflated (flat) tire and compact spare tire cover assembly in the rearcargo area. DO NOT stow the deflated tire in the spare tire location. Have thefull-sized tire repaired or replaced as soon as possible.
• To stow the winch cable and wheel spacer, fit the assembled jack-handle over thewinch drive nut. Rotate the jack-handle assembly clockwise until you hear thewinch mechanism click three times.
• Secure the jack and tools in their proper locations.
WHAT TO DO IN EMERGENCIES
62

WARNING!
• Do not attempt to change a tire on the side of the vehicle close to movingtraffic. Pull far enough off the road to avoid being hit when operating the jackor changing the wheel.
• Getting under a jacked-up vehicle is dangerous. The vehicle could slip off thejack and fall on you. You could be crushed. Never get any part of your bodyunder a vehicle that is on a jack. If you need to get under a raised vehicle,take it to a service center where it can be raised on a lift.
• The jack is designed to use as a tool for changing tires only. The jack shouldnot be used to lift the vehicle for service purposes. The vehicle should bejacked on a firm, level surface only. Avoid ice or slippery areas.
• If it is necessary to retrieve the spare tire from under the vehicle on the sideof the vehicle close to moving traffic, pull far enough off the road to avoid thedanger of being hit.
• The compact spare tire is for emergency use only. Installation of this compactspare tire affects vehicle handling.
• Do not drive more than 50 mph (80 km/h) with a compact spare tire.• Keep the compact spare tire inflated to the cold tire inflation pressure, listed
on either your tire placard or limited use spare tire and wheel assembly.• Replace (or repair) the original tire at the first opportunity and reinstall it on
your vehicle. Failure to do so could result in loss of vehicle control.• Carefully follow these tire changing procedures to help prevent personal
injury or damage to your vehicle: Always park on a firm, level surface as farfrom the edge of the roadway as possible before raising the vehicle.
• Raising the vehicle higher than necessary can make the vehicle less stableand could cause it to slip off the jack and hurt someone near it. Raise thevehicle only enough to remove the tire.
• A loose tire or jack, thrown forward in a collision or hard stop, could endangerthe occupants of the vehicle. Always stow the jack parts and the spare tire inthe places provided.
WHAT TO DO IN EMERGENCIES
63

JUMP-STARTING
• If your vehicle has a discharged batteryit can be jump-started using a set ofjumper cables and a battery in anothervehicle or by using a portable batterybooster pack.
• Jump-starting can be dangerous ifdone improperly so please follow theprocedures in this section carefully.
NOTE: When using a portable batterybooster pack follow the manufacturer’soperating instructions and precautions.
Preparations for Jump-Start
• The battery in your vehicle is located on the left side of the engine compartment.
• Set the parking brake, shift the automatic transmission into PARK and turn theignition to LOCK.
• Turn off the heater, radio, and all unnecessary electrical accessories.
• If using another vehicle to jump-start the battery, park the vehicle within thejumper cables reach, set the parking brake and make sure the ignition is OFF.
Jump-Starting Procedure
• Connect the positive (+) end of the jumper cable to the positive (+) post of thedischarged vehicle.
• Connect the opposite end of the positive (+) jumper cable to the positive (+) postof the booster battery.
• Connect the negative end (-) of the jumper cable to the negative (-) post of thebooster battery.
• Connect the opposite end of the negative (-) jumper cable to a good engine ground(exposed metal part of the discharged vehicle's engine) away from the battery andfuel injection system.
• Start the engine in the vehicle that has the booster battery, let the engine idle afew minutes, and then start the engine in the vehicle with the discharged battery.
Once the engine is started, remove the jumper cables in the reverse sequence:
• Disconnect the negative (-) jumper cable from the negative (-) post of the vehiclewith the discharged battery.
• Disconnect the negative end (-) of the jumper cable from the negative (-) post ofthe booster battery.
• Disconnect the opposite end of the positive (+) jumper cable from the positive (+)post of the booster battery.
WHAT TO DO IN EMERGENCIES
64
• Disconnect the positive (+) end of the jumper cable from the positive (+) post ofthe discharged vehicle.
• If frequent jump-starting is required to start your vehicle you should have thebattery and charging system inspected at your authorized dealer.
CAUTION!
• Do not use a portable battery booster pack or any other booster source with asystem voltage greater than 12 Volts or damage to the battery, starter motor,alternator or electrical system may occur.
• Failure to follow these procedures could result in damage to the chargingsystem of the booster vehicle or the discharged vehicle.
• Accessories that can be plugged into the vehicle power outlets draw powerfrom the vehicle’s battery, even when not in use (i.e., cellular phones, etc.).Eventually, if plugged in long enough, the vehicle’s battery will dischargesufficiently to degrade battery life and/or prevent the engine from starting.
WARNING!
• When temperatures are below the freezing point, electrolyte in a dischargedbattery may freeze. Do not attempt jump-starting because the battery couldrupture or explode and cause personal injury. Battery temperature must bebrought above freezing point before attempting a jump-start.
• Take care to avoid the radiator cooling fan whenever the hood is raised. It canstart anytime the ignition switch is on. You can be injured by moving fanblades.
• Remove any metal jewelry, such as watch bands or bracelets, that mightmake an inadvertent electrical contact. You could be severely injured.
• Batteries contain sulfuric acid that can burn your skin or eyes and generatehydrogen gas which is flammable and explosive. Keep open flames or sparksaway from the battery.
• Do not allow vehicles to touch each other as this could establish a groundconnection and personal injury could result.
• Failure to follow this procedure could result in personal injury or propertydamage due to battery explosion.
• Do not connect the cable to the negative post (-) of the discharged battery.The resulting electrical spark could cause the battery to explode and couldresult in personal injury.
WHAT TO DO IN EMERGENCIES
65

SHIFT LEVER OVERRIDE
• If a malfunction occurs and the shiftlever cannot be moved out of the PARKposition, you can use the followingprocedure to temporarily move the shiftlever:
• To access the shift lever override,remove the cover located to the topright of the shift lever in theinstrument panel.
• Firmly set the parking brake.
• Turn the ignition switch to the ACCor ON position without starting theengine.
• Press and maintain firm pressure onthe brake pedal.
• The override can be activated bypressing the white-colored tab,which can be accessed through thehole in the instrument panel.
• Move the shift lever into the NEUTRAL position.
• The vehicle may then be started in NEUTRAL.
• Reinstall the override cover.
WHAT TO DO IN EMERGENCIES
66

TO
WIN
GA
DISABLED
VEH
ICLE
Mod
elFl
atTo
win
g(a
llfo
urw
heel
son
the
grou
nd)
Flat
bed
Tow
ing
(all
four
whe
els
susp
ende
dOF
Fth
egr
ound
)
Fron
tWhe
els
Rais
ed,
Rear
Whe
els
onth
eGr
ound
Rear
Whe
els
Rais
ed,
Fron
tWhe
els
onth
eGr
ound
FWD
With
outa
Key
NO
TP
erm
itte
dR
ecom
men
ded
Met
hod
NO
TP
erm
itte
dN
OT
Per
mit
ted
FWD
With
aKe
yS
hift
leve
rm
ust
bein
NE
UTR
AL.
The
dist
ance
tobe
trav
eled
mus
tno
tex
ceed
10
0m
i(1
60
km),
and
the
tow
ing
spee
dm
ust
not
exce
ed4
4m
ph(7
2km
/h).
Rec
omm
ende
dM
etho
dN
OT
Per
mit
ted
NO
TP
erm
itte
d
WHAT TO DO IN EMERGENCIES
67

FREEING A STUCK VEHICLE
• If your vehicle becomes stuck in mud, sand or snow, it can often be moved by arocking motion. Turn your steering wheel right and left to clear the area around thefront wheels. Then, move the shift lever back and forth between REVERSE and 1stgear. Using minimal accelerator pedal pressure to maintain the rocking motion,without spinning the wheels, is most effective.
NOTE: If your vehicle is equipped with Electronic Stability Program (ESP) or TractionControl , turn the system off before attempting to “rock” the vehicle.
CAUTION!
• When “rocking” a stuck vehicle by moving between 1st and REVERSE, donot spin the wheels faster than 15 mph (24 km/h), or drivetrain damage mayresult.
• Revving the engine or spinning the wheels too fast may lead to transmissionoverheating and failure. It can also damage the tires. Do not spin the wheelsabove 30 mph (48 km/h) while in gear (no transmission shifting occurring).
WARNING!
Fast spinning tires can be dangerous. Forces generated by excessive wheelspeeds may cause tire damage or failure. A tire could explode and injuresomeone. Do not spin your vehicle's wheels faster than 30 mph (48 km/h) whenyou are stuck. Do not let anyone near a spinning wheel, no matter what thespeed.
WHAT TO DO IN EMERGENCIES
68

EVENT DATA RECORDER (EDR)
• This vehicle is equipped with an event data recorder (EDR). The main purpose ofan EDR is to record, in certain crash or near crash-like situations, such as an airbag deployment or hitting a road obstacle, data that will assist in understandinghow a vehicle’s systems performed. The EDR is designed to record data related tovehicle dynamics and safety systems for a short period of time, typically30 seconds or less. The EDR in this vehicle is designed to record such data as:
• How various systems in your vehicle were operating;
• Whether or not the driver and passenger safety belts were buckled/fastened;
• How far (if at all) the driver was depressing the accelerator and/or brake pedal;and,
• How fast the vehicle was traveling.
• These data can help provide a better understanding of the circumstances in whichcrashes and injuries occur.
NOTE: EDR data are recorded by your vehicle only if a non-trivial crash situationoccurs; no data are recorded by the EDR under normal driving conditions and nopersonal data (e.g. name, gender, age, and crash location) are recorded. However, otherparties, such as law enforcement, could combine the EDR data with the type ofpersonally identifying data routinely acquired during a crash investigation.
• To read data recorded by an EDR, special equipment is required, and access to thevehicle or the EDR is needed. In addition to the vehicle manufacturer, otherparties such as law enforcement, that have the special equipment, can read theinformation if they have access to the vehicle or the EDR.
WHAT TO DO IN EMERGENCIES
69
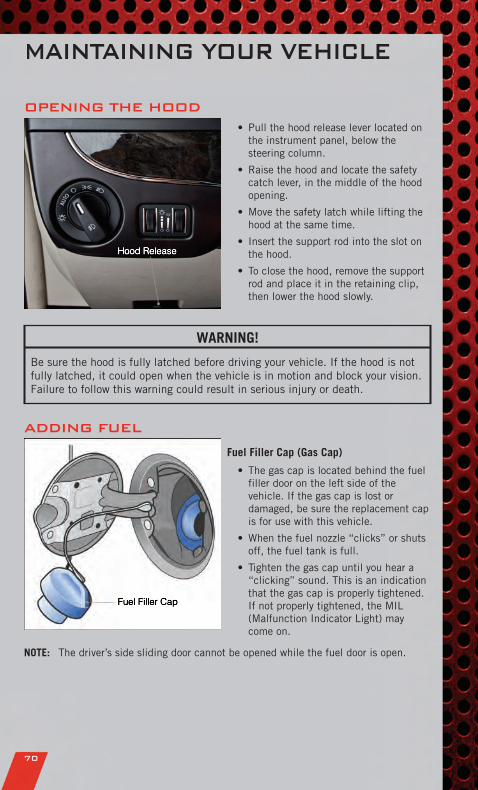
OPENING THE HOOD
• Pull the hood release lever located onthe instrument panel, below thesteering column.
• Raise the hood and locate the safetycatch lever, in the middle of the hoodopening.
• Move the safety latch while lifting thehood at the same time.
• Insert the support rod into the slot onthe hood.
• To close the hood, remove the supportrod and place it in the retaining clip,then lower the hood slowly.
WARNING!
Be sure the hood is fully latched before driving your vehicle. If the hood is notfully latched, it could open when the vehicle is in motion and block your vision.Failure to follow this warning could result in serious injury or death.
ADDING FUEL
Fuel Filler Cap (Gas Cap)
• The gas cap is located behind the fuelfiller door on the left side of thevehicle. If the gas cap is lost ordamaged, be sure the replacement capis for use with this vehicle.
• When the fuel nozzle “clicks” or shutsoff, the fuel tank is full.
• Tighten the gas cap until you hear a“clicking” sound. This is an indicationthat the gas cap is properly tightened.If not properly tightened, the MIL(Malfunction Indicator Light) maycome on.
NOTE: The driver’s side sliding door cannot be opened while the fuel door is open.
MAINTAINING YOUR VEHICLE
70

CAUTION!
• Damage to the fuel system or emissions control system could result fromusing an improper gas cap. A poorly fitting cap could let impurities into the fuelsystem and may cause the MIL to turn on, due to fuel vapors escaping from thesystem.• To avoid fuel spillage and overfilling, do not “top off” the fuel tank afterfilling.
WARNING!
• Never have any smoking materials lit in or near the vehicle when the gas capis removed or the tank filled.• Never add fuel when the engine is running. This is in violation of most stateand federal fire regulations and will cause the MIL to turn on.• A fire may result if gasoline is pumped into a portable container that is insideof a vehicle. You could be burned. Always place gas containers on the groundwhile filling.
MAINTAINING YOUR VEHICLE
71

EN
GIN
ECO
MPARTM
EN
T
3.6L
MAINTAINING YOUR VEHICLE
72

FLU
ID
SAN
DCAPACITIES
Com
pone
ntFl
uid,
Lubr
ican
t,or
Genu
ine
Part
Capa
citie
s
Eng
ine
Coo
lant
3.6
LM
OPA
R®
Ant
ifre
eze/
Coo
lant
Five
Year
/10
0,0
00
Mile
Form
ula
HO
AT(H
ybri
dO
rgan
icA
ddit
ive
Tech
nolo
gy)
oreq
uiva
lent
.
13
.4Q
uart
s(1
2.6
Lite
rs)
Incl
udes
heat
eran
dco
olan
tre
cove
rybo
ttle
fille
dto
MA
Xle
vel.
Add
2.9
Qua
rts
(2.8
Lite
rs)
ifeq
uipp
edw
ith
rear
heat
er.
Eng
ine
Oil
wit
hFi
lter
3.6
LA
PI
cert
ifie
d5
W-3
0en
gine
oil,
mee
ting
the
requ
irem
ents
ofC
hrys
ler
Mat
eria
lS
tand
ard
MS
-63
95
.R
efer
toyo
uroi
lfi
ller
cap
for
corr
ect
SA
Egr
ade.
6Q
uart
s(5
.6Li
ters
)
Fuel
Sel
ecti
on3
.6L
87
Oct
ane
20
Gal
lons
(76
Lite
rs)
Eng
ine
Oil
Filt
er3
.6L
MO
PAR
®E
ngin
eO
ilFi
lter
oreq
uiva
lent
.—
Spa
rkP
lug
3.6
LR
ER
8ZW
YCB
4(G
ap0
.03
1in
[0.7
9m
m])
—
Aut
omat
icTr
ansm
issi
onM
OPA
R®
ATF+
4®
Aut
omat
icTr
ansm
issi
onFl
uid
oreq
uiva
lent
licen
sed
ATF+
4®
prod
uct.
—
Bra
keM
aste
rC
ylin
der
MO
PAR
®D
OT
3an
dS
AE
J17
03
shou
ldbe
used
oreq
uiva
lent
.If
DO
T3
isno
tav
aila
ble,
then
DO
T4
isac
cept
able
.U
seon
lyre
com
men
ded
brak
efl
uids
.
—
Pow
erS
teer
ing
Res
ervo
irM
OPA
R®
Pow
erS
teer
ing
Flui
d+4
orM
OPA
R®
ATF+
4®
Aut
omat
icTr
ansm
issi
onFl
uid
oreq
uiva
lent
licen
sed
ATF+
4®
prod
uct.
—
MAINTAINING YOUR VEHICLE
73

MAIN
TEN
AN
CE
CH
ART
Mile
s:8,
000
16,0
0024
,000
32,0
0040
,000
48,0
0056
,000
64,0
0072
,000
80,0
0088
,000
96,0
0010
4,00
0
Or
Mon
ths:
61
21
82
43
03
64
24
85
46
06
67
27
8
Or
Kilo
met
ers:
13,0
0026
,000
39,0
0052
,000
65,0
0078
,000
91,0
0010
4,00
011
7,00
013
0,00
014
3,00
015
6,00
016
9,00
0
Cha
nge
the
engi
neoi
land
filt
er.
XX
XX
XX
XX
XX
XX
X
Rot
ate
the
tire
s,ro
tate
atth
efi
rst
sign
ofir
regu
lar
wea
r,ev
enif
itoc
curs
befo
resc
hedu
led
mai
nten
ance
.X
XX
XX
XX
XX
XX
XX
Ifus
ing
your
vehi
cle
for
any
ofth
efo
llow
ing:
dust
yor
off-
road
cond
itio
ns.
Insp
ect
the
engi
neai
rcl
eane
rfi
lter
;re
plac
eif
nece
ssar
y.X
XX
Rep
lace
the
air
cond
itio
ning
filt
er.
XX
XX
XX
Insp
ect
the
brak
elin
ings
;re
plac
eif
nece
ssar
y.X
XX
XX
X
Insp
ect
the
CV
join
ts.
XX
XX
Insp
ect
the
fron
tsu
spen
sion
,ti
ero
den
dsan
dbo
otse
als
for
crac
ksor
leak
san
dal
lpar
tsfo
rda
mag
e,w
ear,
impr
oper
loos
enes
sor
end
play
;re
plac
eif
nece
ssar
y.
XX
XX
XX
Insp
ect
the
exha
ust
syst
em.
XX
XX
X
Rep
lace
the
engi
neai
rcl
eane
rfi
lter
.X
XX
Cha
nge
the
auto
mat
ictr
ansm
issi
onfl
uid
and
filt
erif
usin
gyo
urve
hicl
efo
ran
yof
the
follo
win
g:po
lice,
taxi
,fl
eet
orfr
eque
nttr
aile
rto
win
g.X
Flus
han
dre
plac
eth
een
gine
cool
ant
ifno
tdo
neat
10
4,0
00
mile
s(1
73
,00
0km
).X
Flus
han
dre
plac
een
gine
cool
ant
ifno
tdo
neat
60
mon
ths.
X
Rep
lace
the
spar
kpl
ugs
(3.6
Len
gine
).X
Insp
ect
and
repl
ace
the
PC
Vva
lve
idne
cess
ary.
X
•R
efer
toth
eO
wne
r'sM
anua
lon
the
DVD
for
the
com
plet
em
aint
enan
cesc
hedu
le.
MAINTAINING YOUR VEHICLE
74

Maintenance Record
Odometer Date Signature, Authorized Service Center
8,000 Miles(13,000 km)or 6 Months
16,000 Miles(26,000 km)or 12 Months
24,000 Miles(39,000 km)or 18 Months
32,000 Miles(52,000 km)or 24 Months
40,000 Miles(65,000 km)or 30 Months
48,000 Miles(78,000 km)or 36 Months
56,000 Miles(91,000 km)or 42 Months
64,000 Miles(104,000 km)or 48 Months
72,000 Miles(117,000 km)or 54 Months
80,000 Miles(130,000 km)or 60 Months
88,000 Miles(143,000 km)or 66 Months
96,000 Miles(156,000 km)or 72 Months
104,000 Miles(169,000 km)or 78 Months
MAINTAINING YOUR VEHICLE
75

FUSES
MAINTAINING YOUR VEHICLE
76

Integrated Power Module (fuses)
• The Integrated Power Module (fuses) is located in the engine compartment nearthe battery. This center contains cartridge fuses, mini-fuses and relays.
Cavity Cartridge Fuse Mini-Fuse DescriptionJ1 40 Amp Green Power Folding SeatJ2 30 Amp Pink Power Liftgate ModuleJ3 30 Amp Pink Rear Door Module (RR Door
Node)J4 25 Amp Natural Driver Door NodeJ5 25 Amp Natural Passenger Door NodeJ6 40 Amp Green Anti-Lock Brake System (ABS)
Pump/ESPJ7 30 Amp Pink Anti-Lock Brake System (ABS)
Valve/ESPJ8 40 Amp Green Power Memory Seat (If Equipped)J9 40 Amp Green PZEV Motor/Flex Fuel
J10 30 Amp Pink Headlamp Wash Relay/ManifoldTuning Valve
J11 30 Amp Pink Power Sliding DoorModule/Thatchum Relay LockFeed
J13 60 Amp Yellow Ignition Off Draw (IOD) — MainJ14 40 Amp Green Rear Window DefoggerJ15 30 Amp Pink Rear BlowerJ17 40 Amp Green Starter SolenoidJ18 20 Amp Blue Powertrain Control Module (PCM)
Trans RangeJ19 60 Amp Yellow Radiator FanJ20 30 Amp Pink Front Wiper LO/HIJ21 20 Amp Blue Front/Rear WasherJ22 25 Amp Natural Sunroof ModuleM1 15 Amp Blue Center High Mounted Stop Light
(CHMSL)/Brake SwitchM2 — — —M3 20 Amp Yellow Spare FuseM4 10 Amp Red Trailer TowM5 25 Amp Natural InverterM6 20 Amp Yellow Power Outlet #1 (ACC), Rain
SensorM7 20 Amp Yellow Power Outlet #2 (BATT/ACC
SELECT)M8 20 Amp Yellow Front Heated Seat (If Equipped)
MAINTAINING YOUR VEHICLE
77

Cavity Cartridge Fuse Mini-Fuse DescriptionM9 20 Amp Yellow Rear Heated Seat (If Equipped)M10 15 Amp Blue Ignition Off Draw — Vehicle
Entertainment System (IOD-VES),Satellite Digital Audio Receiver(SDARS), DVD, Hands-FreeModule (HFM), Universal GarageDoor Opener (UGDO), VanityLamp (VANITY LP), StreamingVideo Module
M11 10 Amp Red (Ignition Off Draw)IOD-HVAC/ATC
M12 30 Amp Green Amplifier (AMP)/RadioM13 20 Amp Yellow Ignition Off Draw— Cabin
Compartment Node (IOD-CCN),SIREN, Clock Module (CLKMOD), Multi-Function ControlSwitch (MULTIFCTN SW)/ITM
M14 20 Amp Yellow Spare FuseM15 20 Amp Yellow Rear View Mirror (RR VW MIR),
Cabin Compartment Node (CCN),Multi-Function Control Switch(MULTIFTCN SW), Tire PressureMonitor (TPM), Glow Plug Module(GLW PLG MOD) — Export DieselOnly, Assy-Shifter (Hall Effect),Acoustic Noise Cancellation(ANC)
M16 10 Amp Red Occupant RestraintController/Occupant ClassificationModule (ORC/OCM)
M17 15 Amp Blue Left Tail/License/Park Lamp(LT-TAIL/LIC/PRK LMP), RunningLamps
M18 15 Amp Blue Right Tail/Park/Run Lamp(RT-TAIL/PRK/RUN LMP)
M19 25 Amp Natural Auto Shut Down (ASD #1 and#2)
M20 15 Amp Blue Cabin Compartment Node InteriorLight (CCN INT LIGHT), SwitchBank (SW BANK), SteeringControl Module (SCM), SwitchSteering Wheel
M21 20 Amp Yellow Auto Shut Down (ASD #3)M22 10 Amp Red Right Horn (RT HORN (HI/LOW)M23 10 Amp Red Left Horn (LT HORN (HI/LOW)M24 25 Amp Natural Rear Wiper (REAR WIPER)
MAINTAINING YOUR VEHICLE
78
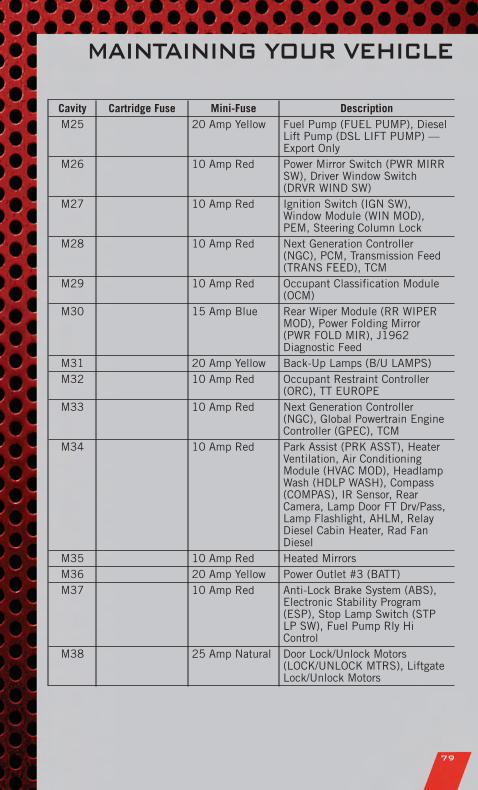
Cavity Cartridge Fuse Mini-Fuse DescriptionM25 20 Amp Yellow Fuel Pump (FUEL PUMP), Diesel
Lift Pump (DSL LIFT PUMP) —Export Only
M26 10 Amp Red Power Mirror Switch (PWR MIRRSW), Driver Window Switch(DRVR WIND SW)
M27 10 Amp Red Ignition Switch (IGN SW),Window Module (WIN MOD),PEM, Steering Column Lock
M28 10 Amp Red Next Generation Controller(NGC), PCM, Transmission Feed(TRANS FEED), TCM
M29 10 Amp Red Occupant Classification Module(OCM)
M30 15 Amp Blue Rear Wiper Module (RR WIPERMOD), Power Folding Mirror(PWR FOLD MIR), J1962Diagnostic Feed
M31 20 Amp Yellow Back-Up Lamps (B/U LAMPS)M32 10 Amp Red Occupant Restraint Controller
(ORC), TT EUROPEM33 10 Amp Red Next Generation Controller
(NGC), Global Powertrain EngineController (GPEC), TCM
M34 10 Amp Red Park Assist (PRK ASST), HeaterVentilation, Air ConditioningModule (HVAC MOD), HeadlampWash (HDLP WASH), Compass(COMPAS), IR Sensor, RearCamera, Lamp Door FT Drv/Pass,Lamp Flashlight, AHLM, RelayDiesel Cabin Heater, Rad FanDiesel
M35 10 Amp Red Heated MirrorsM36 20 Amp Yellow Power Outlet #3 (BATT)M37 10 Amp Red Anti-Lock Brake System (ABS),
Electronic Stability Program(ESP), Stop Lamp Switch (STPLP SW), Fuel Pump Rly HiControl
M38 25 Amp Natural Door Lock/Unlock Motors(LOCK/UNLOCK MTRS), LiftgateLock/Unlock Motors
MAINTAINING YOUR VEHICLE
79

TIRE PRESSURES
• Check the inflation pressure of each tire, including the spare tire, at least monthlyand inflate to the recommended pressure for your vehicle.
• The tire pressures recommended for your vehicle are found on the “Tire andLoading Information” label located on the driver’s side door opening.
NOTE: Refer to the Owner's Manual on the DVD for more information regarding tirewarnings and instructions.
WARNING!
• Overloading of your tires is dangerous. Overloading can cause tire failure,affect vehicle handling, and increase your stopping distance. Use tires of therecommended load capacity for your vehicle. Never overload them.
• Improperly inflated tires are dangerous and can cause collisions.Under-inflation is the leading cause of tire failure and may result in severecracking, component separation, or “blow out”. Over-inflation reduces a tire’sability to cushion shock. Objects on the road and chuck holes can causedamage that results in tire failure. Unequal tire pressures can cause steeringproblems. You could lose control of your vehicle. Over-inflated orunder-inflated tires can affect vehicle handling and can fail suddenly,resulting in loss of vehicle control.
WHEEL AND WHEEL TRIM CARE
• All wheels and wheel trim, especially aluminum and chrome plated wheels, shouldbe cleaned regularly with a mild soap and water to prevent corrosion.
• To remove heavy soil and/or excessive brake dust, use MOPAR® Wheel Cleaner orequivalent or select a non-abrasive, non-acidic cleaner.
CAUTION!
Do not use scouring pads, steel wool, a bristle brush, or metal polishes. Do notuse oven cleaner. These products may damage the wheel's protective finish.Avoid automatic car washes that use acidic solutions or harsh brushes that maydamage the wheel's protective finish. Only MOPAR® Wheel Cleaner orequivalent is recommended.
MAINTAINING YOUR VEHICLE
80

EXTERIOR BULBS
LIGHT BULBS – Exterior Bulb NumberBackup Lamp 3157Tail and Stop Lamp LED (Serviced at Authorized Dealer)Center High-Mounted Stop Lamp LED (*)Fog Lamp – If Equipped PSX24WPark/Turn Signal PY27/7W or 3757AHeadlamp – (Low and High BeamHalogen)
H11
Headlamp (HID) Low Beam D1SLicense Lamp 168
* CHMSL is not serviceable. It is a LED lamp. To replace the LED, the entire CHMSLassembly must be replaced.
MAINTAINING YOUR VEHICLE
81

CHRYSLER GROUP
LLC CUSTOMER
CENTER
P.O. Box 21–8004
Auburn Hills, MI 48321–8004
Phone: 1–800–423–6343
CHRYSLER CANADA
INC. CUSTOMER
CENTER
P.O. Box 1621
Windsor, Ontario N9A 4H6
Phone: 1–800–465–2001
ASSISTANCE FOR THE
HEARING IMPAIRED
• To assist customers who have hearingdifficulties, the manufacturer hasinstalled special TDD(Telecommunication Devices for theDeaf) equipment at its customercenter. Any hearing or speechimpaired customer, who has accessto a TDD or a conventionalteletypewriter (TTY) in the UnitedStates, can communicate with themanufacturer by dialing1–800–380–CHRY. Canadianresidents with hearing difficultiesthat require assistance can use thespecial needs relay service offered byBell Canada. For TTY teletypewriterusers, dial 711 and for Voice callers,dial 1–800–855–0511 to connectwith a Bell Relay Service operator.
WARNING!
Engine exhaust, some of itsconstituents, and certain vehiclecomponents contain, or emit,chemicals known to the State ofCalifornia to cause cancer and birthdefects, or other reproductive harm.In addition, certain fluids containedin vehicles and certain products ofcomponent wear contain, or emit,chemicals known to the State ofCalifornia to cause cancer and birthdefects, or other reproductive harm.
PUBLICATIONS
ORDERING
• If you are the first registered retailowner of your vehicle, you may obtainone free printed copy of the Owner'sManual, Warranty Booklet or RadioManuals on your DVD by calling1–800–423–6343 (U.S.) or1–800–387–1143 (Canada) or bycontacting your dealer.
• Replacement User Guide kits orDVDs or, if you prefer, additionalprinted copies of the Owner'sManual, Warranty Booklet or RadioManuals may be purchased byvisiting www.techauthority.com or bycalling 1–800–890–4038 (U.S.) or1–800–387–1143 (Canada). Visa,Master Card, American Express andDiscover orders are accepted. If youprefer mailing your order, please callthe above numbers for an order form.
NOTE: A street address is required whenordering manuals (no P.O. Boxes).
CONSUMER ASSISTANCE
82

NOTE:• The Owner's Manual and User Guide
electronic files are also available on theChrysler, Jeep and Dodge websites.
• Click on the "For Owners" tab, select"Owner/Service Manuals", then selectyour desired model year and vehiclefrom the drop down lists.
REPORTING SAFETY
DEFECTS IN THE 50
UNITED STATES AND
WASHINGTON, D.C.
• If you believe that your vehicle has adefect that could cause a collision orcause injury or death, you shouldimmediately inform the NationalHighway Traffic SafetyAdministration (NHTSA) in additionto notifying the manufacturer.
• If NHTSA receives similarcomplaints, it may open aninvestigation, and if it finds that asafety defect exists in a group ofvehicles, it may order a recall andremedy campaign. However, NHTSAcannot become involved in individualproblems between you, yourauthorized dealer, and themanufacturer.
• To contact NHTSA, you may eithercall the Auto Safety Hotline toll freeat 1–888–327–4236 (TTY:1–800–424– 9153), or go tohttp://www.safercar.gov; or write to:Administrator, NHTSA, 1200 NewJersey Avenue, SE., West Building,Washington, D.C. 20590. You canalso obtain other information aboutmotor vehicle safety fromhttp://www.safercar.gov.
In Canada
• If you believe that your vehicle has asafety defect, you should contact theCustomer Service Departmentimmediately. Canadian customerswho wish to report a safety defect tothe Canadian government shouldcontact Transport Canada, MotorVehicle Defect Investigations andRecalls at 1-800-333-0510 or go tohttp://www.tc.gc.ca/roadsafety/
• French Canadian customers whowish to report a safety defect to theCanadian government should contactTransport Canada, Motor VehicleDefect Investigations and Recalls at1-800-333-0510 or go tohttp://www.tc.gc.ca/securiteroutiere/
CONSUMER ASSISTANCE
83

AUTHENTIC ACCESSORIES BY MOPAR®
• The following highlights just some of the many Authentic Dodge Accessories byMopar featuring a fit, finish, and functionality specifically for your Dodge GrandCaravan.
• In choosing Authentic Accessories you gain far more than expressive style,premium protection, or extreme entertainment, you also benefit from enhancingyour vehicle with accessories that have been thoroughly tested and factory-approved.
• For the full line of Authentic Dodge Accessories by Mopar, visit your local Dodgedealership or online at mopar.com.
EXTERIOR:• Side Window Air
Deflectors• Sunroof Air Deflector • Molded Splash Guards
• Hitch Receiver • Fog Lights• Molded Running
Boards• Full Vehicle Cover
INTERIOR:• Premium Carpet Floor
Mats• Door Sill Guards • Rear Seat Floor Liner
• Slush Mats • Ambient Light Kit • Katzkin Leather Seats• Cargo Management
ELECTRONICS:• Portable Navigation
Systems• Uconnect™ Web (WiFi) • Rearview Camera
• iPod® Adapter • Ecometer • DVD Rear Seat Video™• Electronic Vehicle
Tracking System• Radio Upgrades • Remote Start
CARRIERS:• Hitch-mount Bike
Carrier• Roof Mount Bike
Carrier• Roof Box Cargo Carrier
• Roof Mount Ski andSnowboard Carrier
• Tent Kit • Roof Mount CanoeCarrier
iPod® is a registered trademark of Apple, Inc.
MOPAR ACCESSORIES
84

Adjustable Pedals . . . . . . . . . . . 17Airbag . . . . . . . . . . . . . . . . . . 10Alarm, Panic . . . . . . . . . . . . . . . 8Arming Theft System(Security Alarm) . . . . . . . . . . . . . 9Automatic Headlights . . . . . . . . . 19Automatic Temperature Control(ATC) . . . . . . . . . . . . . . . . . . 23Automatic Transmission
Fluid Type . . . . . . . . . . . . . . 73Axle Fluid . . . . . . . . . . . . . . . . 73
Belts, Seat . . . . . . . . . . . . . . . . 9Brake Fluid . . . . . . . . . . . . . . . 73Bulb Replacement . . . . . . . . . . . 81
Calibration, Compass . . . . . . . . . 46Cargo Compartment
Luggage Carrier . . . . . . . . . . . 52Change Oil Indicator . . . . . . . . . . 58Child Restraint . . . . . . . . . . . . . 11Child Restraint Tether Anchors . . . . 11Clock Setting . . . . . . . . . . . . 35,37Compass Calibration . . . . . . . . . . 46Cooling System
Coolant Capacity . . . . . . . . . . . 73Cruise Control (Speed Control) . . . . 20Cruise Light . . . . . . . . . . . . . . . 20Customer Assistance . . . . . . . . . . 82
Defects, Reporting . . . . . . . . . . . 83Dimmer Control . . . . . . . . . . . . 19Dimmer Switch, Headlight . . . . . . 19Disarming, Theft System . . . . . . . . 9Driver Cockpit . . . . . . . . . . . . . . 4
Economy (Fuel) Mode . . . . . . . . . 21Electronic Speed Control(Cruise Control) . . . . . . . . . . . . . 20Electronic Vehicle Information Center(EVIC) . . . . . . . . . . . . . . . . 46,47Engine
Compartment . . . . . . . . . . . . 72Oil Selection . . . . . . . . . . . . . 73Overheating . . . . . . . . . . . . . 58
Event Data Recorder . . . . . . . . . . 69Express Down Windows . . . . . . . . . 8
Exterior Lights . . . . . . . . . . . . . 81
Fluid Capacities . . . . . . . . . . . . 73Fluids . . . . . . . . . . . . . . . . . . 73Fog Lights . . . . . . . . . . . . . . . . 19Freeing A Stuck Vehicle . . . . . . . . 68Front Heated Seats . . . . . . . . . . 15
FuelEconomy Mode . . . . . . . . . . . 21Specifications . . . . . . . . . . . . 73
Garage Door Opener (HomeLink®) . . 48
Hard Disk Drive . . . . . . . . . . . . . 37
HeadlightsAutomatic . . . . . . . . . . . . . . 19Dimmer Switch . . . . . . . . . . . 19High Beam . . . . . . . . . . . . . . 19
Heated Seats . . . . . . . . . . . . . . 15
High Beam/Low Beam Select(Dimmer) Switch . . . . . . . . . . . . 19
HomeLink® (Garage Door Opener)Transmitter . . . . . . . . . . . . . . . 48Hood Release . . . . . . . . . . . . . . 70
Instrument Cluster . . . . . . . . . . . . 6
Instrument Cluster WarningLights . . . . . . . . . . . . . . . . . 6,55Intermittent Wipers (Delay Wipers) . . 18Introduction . . . . . . . . . . . . . . . 2Inverter Outlet (115V) . . . . . . . . . 50Inverter, Power . . . . . . . . . . . . . 50
iPod® Control . . . . . . . . . . . . . 43
Jack Location . . . . . . . . . . . . . . 59Jump Starting . . . . . . . . . . . . . 64
Key Fob . . . . . . . . . . . . . . . . . . 8Key Fob Programmable Features . . . 47
Lane Change Assist . . . . . . . . . . 18
LATCH (Lower Anchors and Tether forCHildren) . . . . . . . . . . . . . . . . 11Liftgate, Power . . . . . . . . . . . . . . 8
INDEX
85

LightsTurn Signal . . . . . . . . . . . . . . 18Warning (Instrument ClusterDescription) . . . . . . . . . . . . . . 6
Luggage Rack (Roof Rack) . . . . . . 52
Maintenance Record . . . . . . . . . . 75Maintenance Schedule . . . . . . . . 74Memory Seat . . . . . . . . . . . . . . 14MOPAR® Accessories . . . . . . . . . 84
Navigation . . . . . . . . . . . . . . . 38
Oil Change Indicator . . . . . . . . . . 58Oil, Engine
Capacity . . . . . . . . . . . . . . . 73Overheating, Engine . . . . . . . . . . 58
Panic Alarm . . . . . . . . . . . . . . . 8Pedals, Adjustable . . . . . . . . . . . 17Phone (Pairing) . . . . . . . . . . . . . 40Phone (Uconnect) . . . . . . . . . . . 40Power
Glass Sunroof . . . . . . . . . . . . 29Inverter . . . . . . . . . . . . . . . . 50Lift Gate . . . . . . . . . . . . . . . . 8Outlet (Auxiliary ElectricalOutlet) . . . . . . . . . . . . . . . . 51Seats . . . . . . . . . . . . . . . . . 13Sliding Door . . . . . . . . . . . . . . 8Steering . . . . . . . . . . . . . . . 73
Preparation for Jacking . . . . . . . . 61Programmable Electronic Features . . 47
Radio Operation . . . . . . . . . . 34,36Rain Sensitive Wiper System . . . . . 18Rear Heated Seats . . . . . . . . . . . 16Recreational Towing . . . . . . . . . . 54Remote Starting System . . . . . . . . 9Replacement Bulbs . . . . . . . . . . 81Restraints, Child . . . . . . . . . . . . 11Roof Rack (Luggage Rack) . . . . . . 52
Seat Belts . . . . . . . . . . . . . . . . 9Seats . . . . . . . . . . . . . . . . . . 13
Adjustment . . . . . . . . . . . . . . 14Heated . . . . . . . . . . . . . . . . 15
Lumbar Support . . . . . . . . . . . 14Memory . . . . . . . . . . . . . . . . 14Power . . . . . . . . . . . . . . . . . 13
Setting the Clock . . . . . . . . . . 35,37Shift Lever Override . . . . . . . . . . 66Signals, Turn . . . . . . . . . . . . . . 18SmartBeams . . . . . . . . . . . . . . 19Spare Tire . . . . . . . . . . . . . . . . 60Spark Plugs . . . . . . . . . . . . . . . 73Speed Control (Cruise Control) . . . . 20
StartingRemote . . . . . . . . . . . . . . . . . 9
SteeringTilt Column . . . . . . . . . . . . . . 16
Steering Wheel Audio Controls . . . . 40Store Radio Presets . . . . . . . . 35,37Sun Roof . . . . . . . . . . . . . . . . 29
Supplemental Restraint System -Airbag . . . . . . . . . . . . . . . . . . 10
Theft Alarm (Security Alarm) . . . . . . 9Theft System Arming . . . . . . . . . . 9Theft System Disarming . . . . . . . . . 9Tilt Steering Column . . . . . . . . . . 16
TiresAir Pressure . . . . . . . . . . . . . 80Changing . . . . . . . . . . . . . . . 61Flat Changing . . . . . . . . . . . . 61Jacking . . . . . . . . . . . . . . . . 61
Towing . . . . . . . . . . . . . . . . . . 5324-Hour Towing Assistance . . . . . 55Disabled Vehicle . . . . . . . . . . . 67Recreational . . . . . . . . . . . . . 54
Trailer TowingTrailer and Tongue Weight . . . . . 53
Trailer Weight . . . . . . . . . . . . . . 53
TransmissionFluid . . . . . . . . . . . . . . . . . 73
Turn Signals . . . . . . . . . . . . . . 18
Uconnect™ Phone . . . . . . . . . . . 40USB Port . . . . . . . . . . . . . . 38,43
Video Entertainment System™(Rear Seat Video System) . . . . . . . 44Voice Command . . . . . . . . . . . . 42
INDEX
86
Washer, Rear . . . . . . . . . . . . . . 18Washers, Windshield . . . . . . . . . . 18Wheel and Wheel Trim Care . . . . . . 80Wind Buffeting . . . . . . . . . . . . . 31
Windows, Express Down . . . . . . . . . 8Windshield Washers . . . . . . . . . . 18Windshield Wipers . . . . . . . . . . . 18Wiper, Rear . . . . . . . . . . . . . . . 18
INDEX
87

NOTES
88

Driving and Alcohol: Drunken driving is one of the most frequent causes of collisions. Your driving ability can be seriously impaired with blood alcohol levels far below the legal minimum. If you are drinking, don’t drive. Ride with a designated non-drinking driver, call a cab, a friend, or use public transportation.
Driving after drinking can lead to a collision. Your perceptions are less sharp, your reflexes are slower, and your judgment is impaired when you have been drinking. Never drink and then drive.
WARNING!
11Y532-926-AAGrand CaravanFirst EditionUser Guide
This guide has been prepared to help you get quickly acquainted with your
new Dodge and to provide a convenient reference source for common
questions. However, it is not a substitute for your Owner’s Manual.
For complete operational instructions, maintenance procedures and
important safety messages, please consult your Owner’s Manual,
Navigation/Media Center Manuals, Multimedia User Manual and other
Warning Labels in your vehicle.
Not all features shown in this guide may apply to your vehicle. For
additional information on accessories to help personalize your vehicle,
visit www.mopar.com or your local Dodge dealer.
Related Documents