Tele-View TV-200 ®

Welcome message from author
This document is posted to help you gain knowledge. Please leave a comment to let me know what you think about it! Share it to your friends and learn new things together.
Transcript

Tele-View TV-200®
2
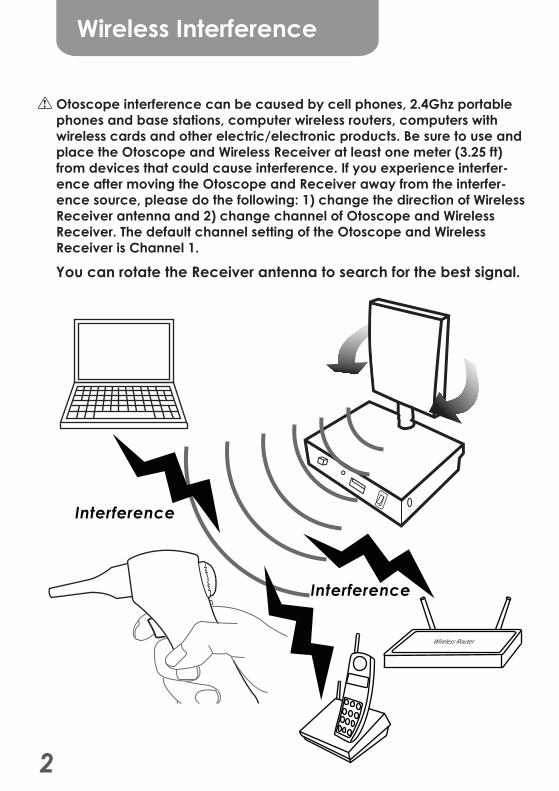
Wireless Interference
You can rotate the Receiver antenna to search for the best signal.
Wireless Router
Otoscope interference can be caused by cell phones, 2.4Ghz portable phones and base stations, computer wireless routers, computers with wireless cards and other electric/electronic products. Be sure to use and place the Otoscope and Wireless Receiver at least one meter (3.25 ft) from devices that could cause interference. If you experience interfer-ence after moving the Otoscope and Receiver away from the interfer-ence source, please do the following: 1) change the direction of Wireless Receiver antenna and 2) change channel of Otoscope and Wireless Receiver. The default channel setting of the Otoscope and Wireless Receiver is Channel 1.
Interference
Interference

8
10
10
3
Table of Contents
Package Contents . . . . . . . . . . . . . . . . . . . . . . . . . . . . . . . . . . . . . . . . . . . . . . . . . . . . . . . . . . . . . . . . . . . . 4
Table of Contents . . . . . . . . . . . . . . . . . . . . . . . . . . . . . . . . . . . . . . . . . . . . . . . . . . . . . . . . . . . . . . . . . . . . . . 3
Physical Descriptions. . . . . . . . . . . . . . . . . . . . . . . . . . . . . . . . . . . . . . . . . . . . . . . . . . . . . . . . . . . . . . . . . . 5
Quick Start/TV. . . . . . . . . . . . . . . . . . . . . . . . . . . . . . . . . . . . . . . . . . . . . . . . . . . . . . . . . . . . . . . . . . . . . . . . . . . 6
Quick Start/Computer . . . . . . . . . . . . . . . . . . . . . . . . . . . . . . . . . . . . . . . . . . . . . . . . . . . . . . . . . . . . . . . .
. . . . . . . . . . . . . . . . . . . . . . . . . . . . . . . . . . . . . . . . . . . . . . . . . . . . . . . . . . . . . . . .
Charging & Power On/Off . . . . . . . . . . . . . . . . . . . . . . . . . . . . . . . . . . . . . . . . . . . . . . . . . . . . . . . . . . .10
Charging
Power ‘On’/Power ‘Off’ . . . . . . . . . . . . . . . . . . . . . . . . . . . . . . . . . . . . . . . . . . . . . . . . . . . . . . . . . . .
RF Channel Setting . . . . . . . . . . . . . . . . . . . . . . . . . . . . . . . . . . . . . . . . . . . . . . . . . . . . . . . . . . . . . . . . . . . .13
Computer Driver & Video Software Installation . . . . . . . . . . . . . . . . . . . . . . . . . . . . . . .14
Troubleshooting . . . . . . . . . . . . . . . . . . . . . . . . . . . . . . . . . . . . . . . . . . . . . . . . . . . . . . . . . . . . . . . . . . . . . . . . 24
Important Notices. . . . . . . . . . . . . . . . . . . . . . . . . . . . . . . . . . . . . . . . . . . . . . . . . . . . . . . . . . . . . . . . . . . . . .26
Storage & Caution . . . . . . . . . . . . . . . . . . . . . . . . . . . . . . . . . . . . . . . . . . . . . . . . . . . . . . . . . . . . . . . . .26
Specifications. . . . . . . . . . . . . . . . . . . . . . . . . . . . . . . . . . . . . . . . . . . . . . . . . . . . . . . . . . . . . . . . . . . . . . . . . . . .27
Function Modes . . . . . . . . . . . . . . . . . . . . . . . . . . . . . . . . . . . . . . . . . . . . . . . . . . . . . . . . . . . . . . . . . . . . . . . .11
‘Real-Time’ Imaging Mode. . . . . . . . . . . . . . . . . . . . . . . . . . . . . . . . . . . . . . . . . . . . . . . . . . . . . . .11
Image Capture Mode . . . . . . . . . . . . . . . . . . . . . . . . . . . . . . . . . . . . . . . . . . . . . . . . . . . . . . . . . . . . .11
Image Review Mode. . . . . . . . . . . . . . . . . . . . . . . . . . . . . . . . . . . . . . . . . . . . . . . . . . . . . . . . . . . . . . .12
Digital Zoom Mode. . . . . . . . . . . . . . . . . . . . . . . . . . . . . . . . . . . . . . . . . . . . . . . . . . . . . . . . . . . . . . . . .13
Brightness Mode. . . . . . . . . . . . . . . . . . . . . . . . . . . . . . . . . . . . . . . . . . . . . . . . . . . . . . . . . . . . . . . . . . .12
Warrany Information . . . . . . . . . . . . . . . . . . . . . . . . . . . . . . . . . . . . . . . . . . . . . . . . . . . . . . . . . . . . . . . . . . 29

4
TV-200
User Manual/CD-ROM
USB Cable (x2)USB Wall Adaptor Video Cable
Wireless Receiver AC Adaptor
Wrist Strap5 Specula
7mm 4mm 3mm 7mm 4mm
TV-200V Package Contents
The contents of this manual are subject to change without notice. For the latest infor-mation, or if you find any errors, omissions, or points which are unclear, please contact Advanced Monitors Corp.Advanced Monitors Corp. accepts no responsibility for losses suffered by the customer ora third party as a result of improper use of this product.
Thank you for purchasing the TV-200V Wireless Handheld Otoscope.To ensure correct and safe use of the product, please read this manual before using.
The Micro SD card and battery are installed in the Otoscope.
The specula for the TV-200 have been shown to be able to be reused at least 5 times before the plastic material begins to deteriorate. The specula should always be thoroughly sterilized between uses and cold sterilization is the recommended procedure. Please follow the directions included with the cold sterilization product used by your office for effective sterilization.

5
Physical Descriptions
Key B ( )
Key A ( ): ON/OFF switch and Image Review Mode Switch
: Image Capture Button
: Focus Adjustment
RF Channel Switch
TV-200
Wireless Receiver
: Brightness/Zoom Mode Switch
5. Video Line Out (for TV’s)6. USB Connector (for PCs)7. DC Power IN
1. TV/PC Switch2. USB Charging Port for Otoscope3. ON/OFF Switch4. RF Channel Switch (1~4)
Knob C ( )
view opening
Key B
Key A
Key DKey F
Key E
Knob C
USB TerminalWrist Strap Eyelet
Battery Cover
Reset key
Key F ( )
: Increase Zoom & Brightness, Backward Review Switch
Key D ( )
: Decrease Zoom & Brightness, Forward Review Switch
Key E ( )
(For NTSC switch goes down, For PAL switch goes up)

6
Wireless Receiver
AC Adaptor
USBCharger
1 install a
speculum
Adjust Receiver and antennafor optimal wireless reception.
Press and hold Key A ( )for 4 seconds to power ‘ON’the Otoscope. (see p.10)
2
3
4
Quick Start / TV
There are 2 ways to charge the Otoscope : (see p.10)
Connect the USB Wall Adaptor to one of the USB cables. Connect this USB Charger to the Otoscope and plug in to a wall outlet and charge for 8 hours.
Take out the Otoscope and install a speculum by placing it on the Otoscope and twisting it to secure.
Plug in the AC Adaptor to a wall outlet and attach to the Wireless Receiver. Connect the Otoscope to the Wireless Receiver with the USB cable and charge for 6 hours.
Connect the Wireless Receiver to the TV with the video cable. Turn the Receiver ‘ON’. (see Drawing A on p. 10) Turn the TV ‘ON’ and switch input to video source.
After it is completely charged, unplug the Otoscope and begin to use.
4 seconds
monitor
RF receiver
7
USB cable
desktop/ notebook PC
8
7
5
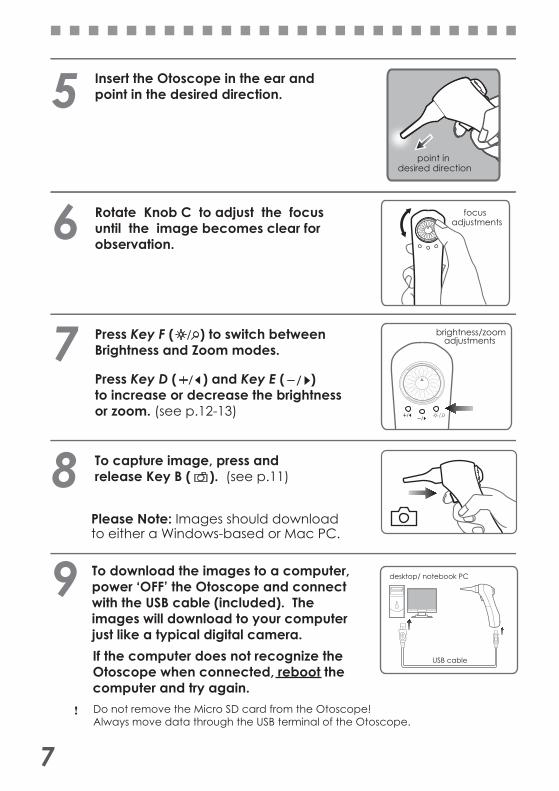
Rotate Knob C to adjust the focus until the image becomes clear for observation.
Press Key F ( ) to switch betweenBrightness and Zoom modes.
Press Key D ( ) and Key E ( )to increase or decrease the brightnessor zoom. (see p.12-13)
Insert the Otoscope in the ear andpoint in the desired direction.
To capture image, press andrelease Key B ( ). (see p.11)
9
focus adjustments
brightness/zoomadjustments
6
To download the images to a computer, power ‘OFF’ the Otoscope and connect with the USB cable (included). The images will download to your computer just like a typical digital camera.
Please Note: Images should download to either a Windows-based or Mac PC.
point in desired direction
Do not remove the Micro SD card from the Otoscope! Always move data through the USB terminal of the Otoscope.
If the computer does not recognize the Otoscope when connected, reboot the computer and try again.
8
1 Install driver and software before connecting the WirelessReceiver. Note: Install the AMC WR-15 Driver first, then the Debut Software. (see p.14)
Minimum Requirements: Windows XP, Windows Vista, Windows 7
Pentium 4, 1.6GHz CPU
512 MB RAM
4GB minimum Hard Disk space
1024 x 768 16-bit graphics card minimum, DirectX 9.0 or up
2 Install CD by following directions on page 14.
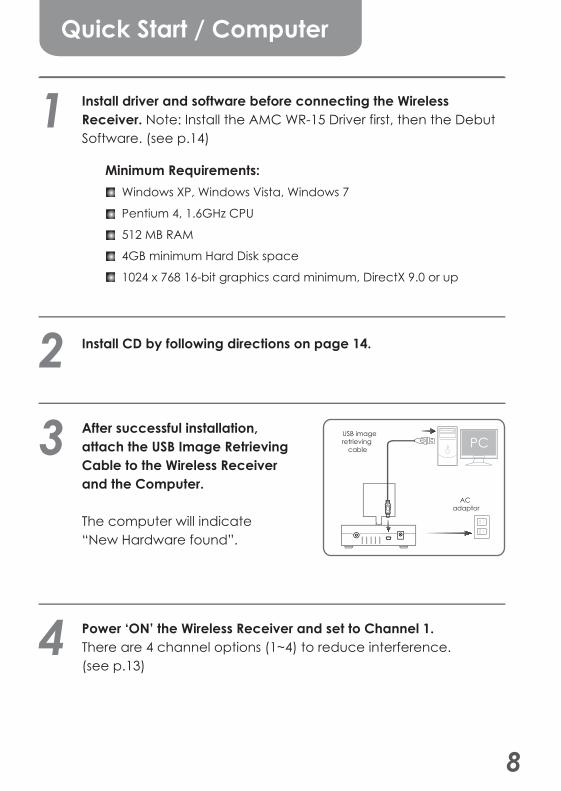
3 After successful installation,attach the USB Image RetrievingCable to the Wireless Receiver and the Computer.
The computer will indicate“New Hardware found”.
4 Power ‘ON’ the Wireless Receiver and set to Channel 1.There are 4 channel options (1~4) to reduce interference.(see p.13)
Quick Start / Computer
AC adaptor
PC USB imageretrieving
cable
9
5
6
7
8
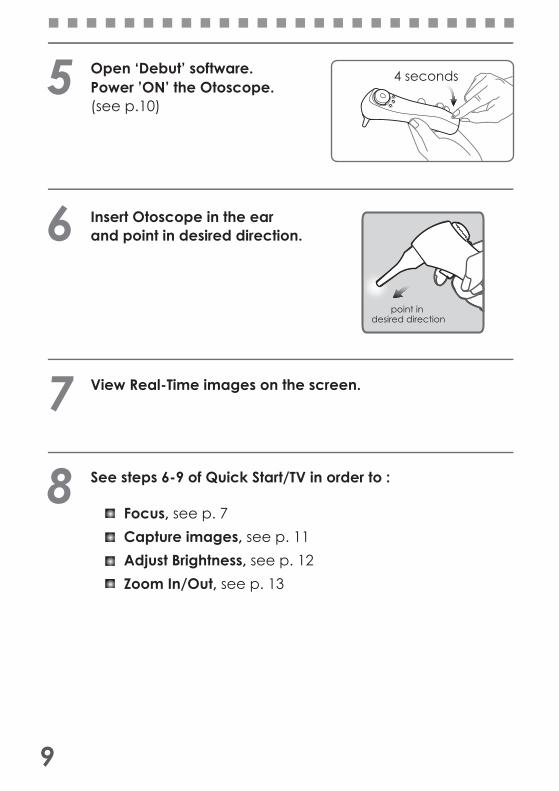
4 secondsOpen ‘Debut’ software.Power ’ON’ the Otoscope.(see p.10)
Insert Otoscope in the ear and point in desired direction.
View Real-Time images on the screen.
See steps 6-9 of Quick Start/TV in order to :
Focus, see p. 7
Adjust Brightness, see p. 12Zoom In/Out, see p. 13
Capture images, see p. 11
point in desired direction
10
AC adaptor
AC adaptor
USB imageretrieving
cable
Wireless Receiver
AC Adaptor
USBCharger
Charging & Power On/Off
Power ‘On’
Power ‘Off’
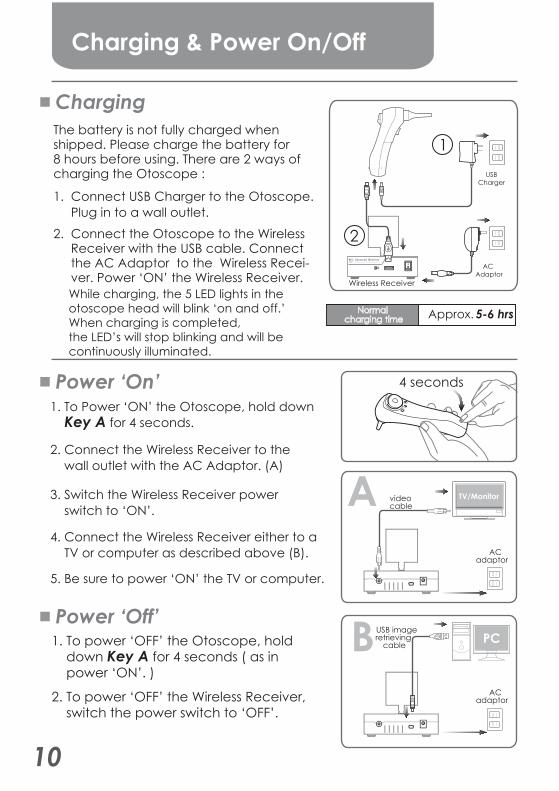
The battery is not fully charged when shipped. Please charge the battery for8 hours before using. There are 2 ways of charging the Otoscope :
2. Connect the Otoscope to the Wireless Receiver with the USB cable. Connect the AC Adaptor to the Wireless Recei- ver. Power ‘ON’ the Wireless Receiver.
1. Connect USB Charger to the Otoscope. Plug in to a wall outlet.
While charging, the 5 LED lights in the otoscope head will blink ‘on and off.’When charging is completed, the LED’s will stop blinking and will be continuously illuminated.
1. To Power ‘ON’ the Otoscope, hold down Key A for 4 seconds.
2. Connect the Wireless Receiver to the wall outlet with the AC Adaptor. (A)
1. To power ‘OFF’ the Otoscope, hold down Key A for 4 seconds ( as in power ‘ON’. )
2. To power ‘OFF’ the Wireless Receiver, switch the power switch to ‘OFF’.
Charging
video cable
4 seconds
Normal charging time Approx. 5-6 hrs
PC
TV/Monitor3. Switch the Wireless Receiver power switch to ‘ON’.
4. Connect the Wireless Receiver either to a TV or computer as described above (B).
5. Be sure to power ‘ON’ the TV or computer.
11
0005picture number
‘real-time’imaging modeicon
battery check
videotarget mark
Function Modes
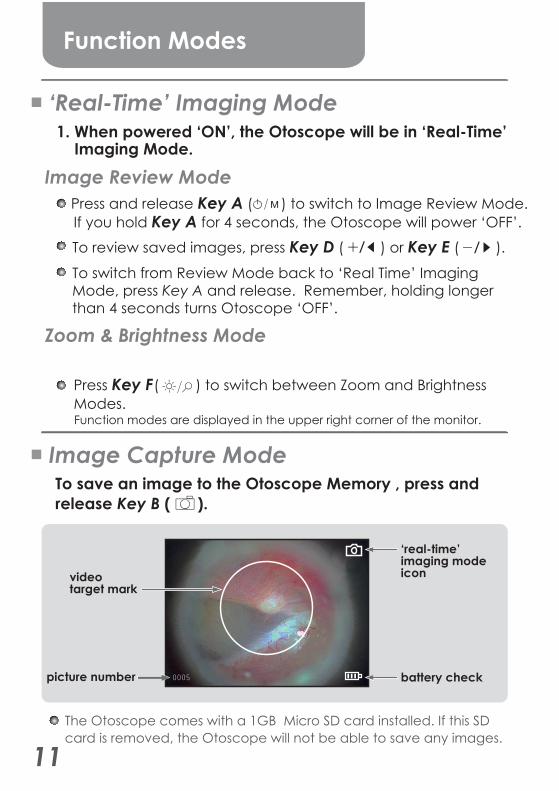
‘Real-Time’ Imaging Mode 1. When powered ‘ON’, the Otoscope will be in ‘Real-Time’ Imaging Mode.
Function modes are displayed in the upper right corner of the monitor.
Image Review Mode
Zoom & Brightness Mode
To save an image to the Otoscope Memory , press andrelease Key B ( ).
Press and release Key A ( ) to switch to Image Review Mode.If you hold Key A for 4 seconds, the Otoscope will power ‘OFF’.
To review saved images, press Key D ( ) or Key E ( ).
Press Key F ( ) to switch between Zoom and Brightness Modes.
The Otoscope comes with a 1GB Micro SD card installed. If this SD card is removed, the Otoscope will not be able to save any images.
Image Capture Mode
To switch from Review Mode back to ‘Real Time’ Imaging Mode, press Key A and release. Remember, holding longer than 4 seconds turns Otoscope ‘OFF’.

12
0005
brightness mode icon
0005
review modeicon
There are 7 brightness settings (-2, -1.5, -1, 0, +1, +1.5, +2).
To get to brightness mode, press Key F ( ). To increasebrightness, press Key D ( ). To decrease brightness,press Key E ( ).
Image Review Mode
Brightness Mode
To erase a saved picture, hold down Key B ( ) for 3 seconds. Youwill then see the ‘Erase’ menu. To erase, press Key A ( ).
To get to Image Review mode, press and release Key A( ). To review saved pictures, press Key D( ) or Key E ( ).Key D will review backwards. Key E will review forwards. The Review Mode will loop the pictures in the order that they were saved.

13
DigitalZoom
Press Key D ( ) to zoom in on the observed image. Press Key E ( ) to zoom out and obtain a broader view.
Digital Zoom ModeTo get to Zoom Mode, press Key F ( ). To increase ordecrease zoom, press Keys D or E. Zoom can be setfrom 1.0 to 2.0. The 2.0 setting is double the picture size.
digital zoom mode icon
0005
RF Channel Settings
Channel 1 : switch 1 on (others off)
Channel 2 : switch 2 on (others off)
Channel 3 : switch 3 on (others off)
Channel 4 : switch 1-3 off
To change the channel on the Wireless Receiver, move RF Channel Switch to desired channel number(1~4).
The Otoscope has 4 transmitting channels (1-4). If you are using multiple Otoscopes, each one can be set to transmit on a different channel to prevent interference between them. To change the transmitting channel, unscrew and remove the battery cover. (see p.4)
When refering to the diagram above, please take notice that the RF switch inside the battery compartment is located upside-down.

14
Computer Driver & Video Software Installation
1. Installing Hardware Driver
c. Click ‘Yes’ and ‘Continue Anyway’.
AMC WR-15
Choose ‘Install Driver’.a.
Click ‘install’.b.
d. Click ‘OK’ Restart computer.

15
2. Installing Debut Video Capture Softwarea. Be sure included CD with Otoscope driver and DebutSoftware is in the CD-ROM Drive.b. Click on ‘My Computer’.c. Click on ‘CD-ROM Drive’ .d. Click on ‘Debutsetup’.e. Click on ‘I agree with these terms’. Click ‘Next’.
f. You do not need to select any related programs. Click on ‘Finish’.

16
g. The Debut Video Capture Program will automatically start up once you click ‘Finish’.h. Once Debute starts up, the program will ask you to set your microphone connections. You do not need to set it up, so just click ‘Cancel’.

17
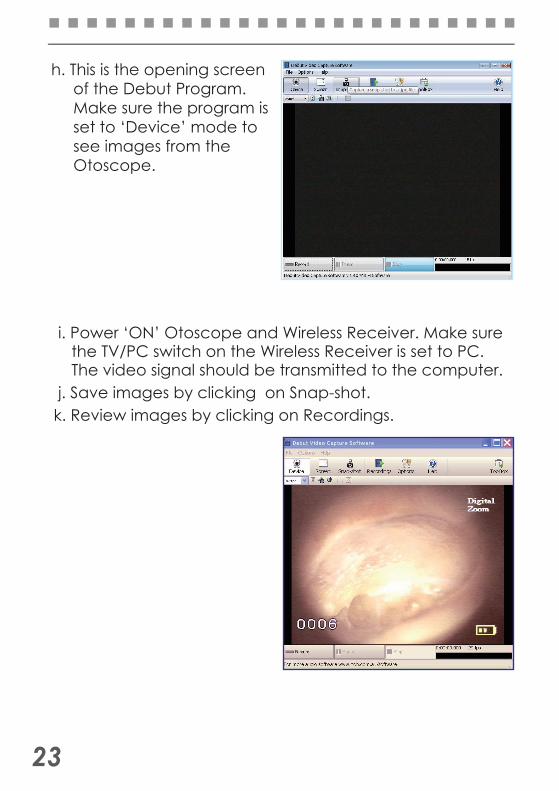
h. This is the opening screen of the Debut Program. Make sure the program is set to ‘Device’ mode to see images from the Otoscope.
i. Power ‘ON’ Otoscope and Wireless Receiver. Make sure the TV/PC switch on the Wireless Receiver is set to PC. The video signal should be transmitted to the computer. j. Save images by clicking on Snap-shot.k. Review images by clicking on Recordings.

18
3. Windows 2000 Installing Hardware Driver
Connect the Wireless Receiver to a USB 2.0 port on the computer.
b.
Choose ‘Don’t search, I will choose the driver to install’.
Putting in‘Windows 2000 Install driver CD’.Choose ‘Install from a list or specific location’.
c.
a. Make sure your computer meets system requirements. Please refer to page 8.
d.
Choose ‘Imagingdevices’.
e.
19
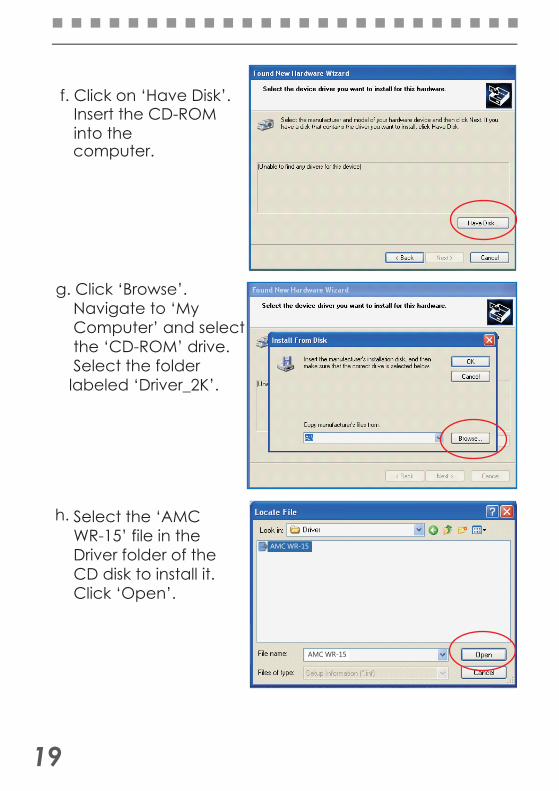
g. Click ‘Browse’. Navigate to ‘My Computer’ and select the ‘CD-ROM’ drive. Select the folder labeled ‘Driver_2K’.
f. Click on ‘Have Disk’. Insert the CD-ROM into the computer.
Select the ‘AMC WR-15’ file in the Driver folder of the CD disk to install it. Click ‘Open’.
h.
AMC WR-15
AMC WR-15
20
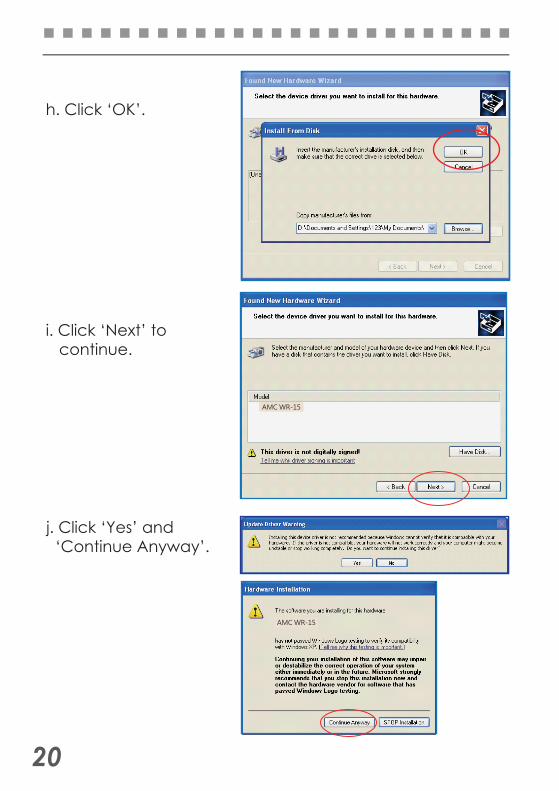
j. Click ‘Yes’ and ‘Continue Anyway’.
i. Click ‘Next’ to continue.
h. Click ‘OK’.
AMC WR-15
AMC WR-15
21
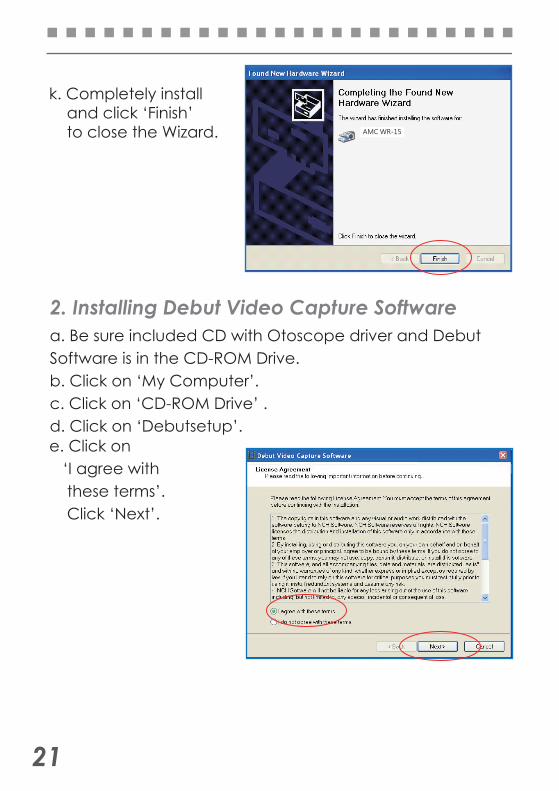
k. Completely install and click ‘Finish’ to close the Wizard.
2. Installing Debut Video Capture Softwarea. Be sure included CD with Otoscope driver and DebutSoftware is in the CD-ROM Drive.b. Click on ‘My Computer’.c. Click on ‘CD-ROM Drive’ .d. Click on ‘Debutsetup’.e. Click on ‘I agree with these terms’. Click ‘Next’.
AMC WR-15
22
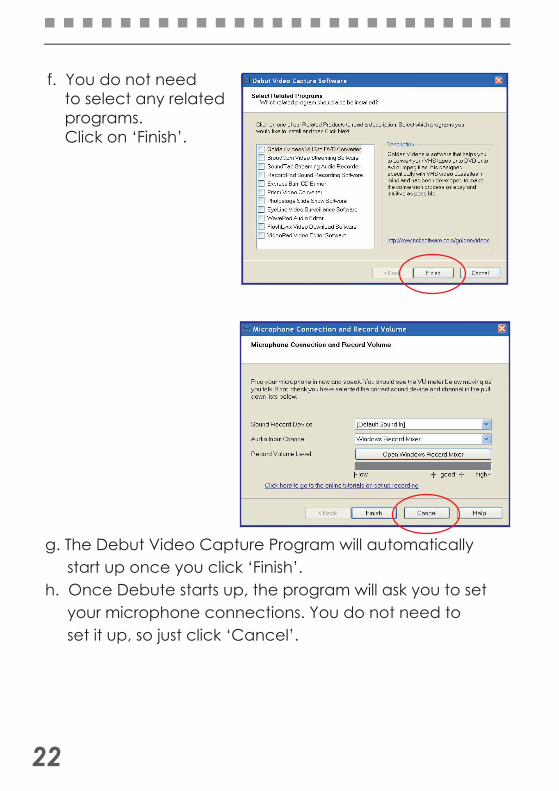
f. You do not need to select any related programs. Click on ‘Finish’.
g. The Debut Video Capture Program will automatically start up once you click ‘Finish’.h. Once Debute starts up, the program will ask you to set your microphone connections. You do not need to set it up, so just click ‘Cancel’.
23
h. This is the opening screen of the Debut Program. Make sure the program is set to ‘Device’ mode to see images from the Otoscope.
i. Power ‘ON’ Otoscope and Wireless Receiver. Make sure the TV/PC switch on the Wireless Receiver is set to PC. The video signal should be transmitted to the computer. j. Save images by clicking on Snap-shot.k. Review images by clicking on Recordings.

24
If the following does not solve your problem, contact AMC’sTechnical Service at 858-536-8237 x102 . If Technical Servicecannot solve the problem, the unit may need to be returnedto Advanced Monitors Corporation for service.
Troubleshooting
Otoscope will not turn on.
- Plug in the AC Adaptor to the wall outlet.- Switch the power switch to ‘ON’ position.
Wireless Receiver will not turn on.
I am not getting a picture on the Computer.
- Check if Computer and Monitor are ‘ON’.- Check if Wireless Receiver is ‘ON’ and if the antenna is ‘UP’.
- Be sure to install the Receiver Driver on the included CD.
- After installing the driver and program, make sure the Debut Video Capture program is open. Once open, be sure to power ‘ON’ the Otoscope to transmit images.
Make sure you are using Windows XP. The Receiver is not configured to work with Windows Vista,Windows 7 or a Mac. To use with Vista or a Mac, you will need to add a video capture card. To purchase a video capture card, contact Advanced Monitors at 1-877-838-8367 x102 or 1-858-536-8237 x102.
-
- Make sure both Otoscope and Wireless Receiver are set to the same channel. The factory default is Channel 1.
- Be sure to install the Debut Setup Software on the included CD. You may need to reboot the computer after installation.
( ) down for 4 seconds.- Hold Key A- Charge the battery and power ‘ON’ again.- Install a new battery.
Otoscope will not turn off or picture ‘freezes’.- Use a paper clip to push the reset key. The Reset Key is on the side of the Otoscope (see page 5). The Otoscope can also be Reset by disconnecting and reconnecting the battery if needed.
25
The Zoom and/or Brightness functions are not working.
( ).- Be sure to toggle between Zoom and Brightness by pushing
Key F - Push either Key D ( ) or Key E ( ) to increase/decrease Zoom and Brightness.
The Otoscope is working fine,but not capturing images.
- Be sure the micro SD card was not removed from the Otoscope battery compartment.
- Be sure to hold down Key B ( ) to capture image.
There is excessive interference on the TV or computer.- Move the Wireless Receiver to another area of the room.- Adjust the location of the Wireless Receiver and the antenna.- Turn off any equipment near the Otoscope or Wireless Receiver. Laptop computers, wireless routers and portable phones all transmit on a 2.4 Ghz frequency. Move these items away from the wireless receiver and Otoscope.
- Change channel of Otoscope and Wireless Receiver.
I am not getting a picture on the TV.
- Check if the Otoscope is ‘ON’.- Check if the Wireless Receiver is ‘ON’.- Check if the antenna is in the ‘UP’ position.
- Make sure both Otoscope and Wireless Receiver are set to the same channel. The factory default is Channel 1.- Make sure the TV is set to the correct input (usually Video 1 or Video 2 depending on the TV plug you are using).
- Check if the video cable is attached to Wireless Receiver and TV.
- Check if the TV is ‘ON’.

26
Important Notices
StorageThe Otoscope contains precision electronic parts. Do not use or storethe Otoscope in any of the following situations as this could result in failure or malfunction. - High temperature - High humidity - Extreme fluctuations of temperature or humidity - Direct sunlight - In a hot car - Near an air conditioner or humidifier - In a location that has a lot of sand, dust or dirt - Near fire - Near water
Also, do not subject the Otoscope to impact or high vibration as thiscould cause malfunction or damage to the device.
Caution1. Keep the Otoscope out of the reach of children.
2. Do not attempt to disassemble or modify the appliances. Such actions void the warranty and could lead to electric shock or injury.
3. All appliances should not be used where it may come in contact with water. They should not be used with wet hands.
4. Avoid dropping or hitting the Otoscope or subjecting it to severe vibration or impact. Damage due to improper usage is not covered under the warranty.
5. Do not remove the Micro SD card from the Otoscope. The Otoscope will not function properly with the Micro SD card removed.
6. Use the charger at the specified voltage.The use at any other charger at different voltages could result in fire, explosion, emission of smoke, overheating, electric shock or burns.7.Do not use the otoscope while charging the battery.
8.When turning on/off the otoscope, avoid holding the power button for more than 10 seconds to prevent malfunction.
27
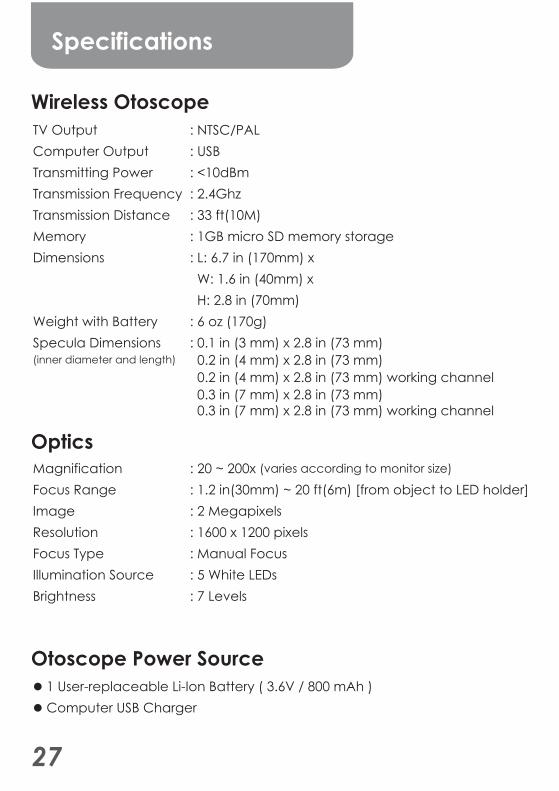
Specifications
Wireless OtoscopeTV Output Computer OutputTransmitting Power Transmission FrequencyTransmission DistanceMemoryDimensions
Weight with BatterySpecula Dimensions(inner diameter and length)
: NTSC/PAL : USB : <10dBm: 2.4Ghz: 33 ft(10M): 1GB micro SD memory storage: L: 6.7 in (170mm) x W: 1.6 in (40mm) x H: 2.8 in (70mm): 6 oz (170g): 0.1 in (3 mm) x 2.8 in (73 mm)
0.2 in (4 mm) x 2.8 in (73 mm) working channel 0.3 in (7 mm) x 2.8 in (73 mm) 0.3 in (7 mm) x 2.8 in (73 mm) working channel
Optics
Otoscope Power Source
MagnificationFocus RangeImageResolutionFocus TypeIllumination SourceBrightness
1 User-replaceable Li-Ion Battery ( 3.6V / 800 mAh ) Computer USB Charger
: 20 ~ 200x (varies according to monitor size)
: 1.2 in(30mm) ~ 20 ft(6m) [from object to LED holder]: 2 Megapixels: 1600 x 1200 pixels: Manual Focus: 5 White LEDs: 7 Levels
0.2 in (4 mm) x 2.8 in (73 mm)

Wireless Receiver SpecificationsReceiving SensitivityTV Output Signal FormatSignal/Noise Ratio Antenna ResistanceCommunication ChannelsPower SupplyDimensions
WeightSystem Requirements
: 85 dBm : NTSC/PAL: 45 dBm: 50 Ohm: 4: DC 5V / 1000mA: L : 4.6 in (118 mm) x W: 4 in (122mm) x H: 1.3 in (33mm)
: 9 oz (255g): TV- composite video input Computer- Windows XP
Receiver Power Source 1 sub-compact charger 110/220V, 50 Hz
For Windows Vista,Windows 7 or Mac, an external video capture card must be added for each computer.
28

29
Limited Warranty
The Tele-View TV-200 Wireless Otoscope is warranted by Advanced Monitors Corporation to be free from manufacturing defects for one (1) year from the date of purchase by the original purchaser. This warranty does not cover malfunction or damage that are the results of dropping, misuse, abuse, or inten- tional damage to the product. The warranty does not
product housing or the portion thereof voids this warranty. Except for the expressed limited warranty set forth above, Advanced Monitors Corporation grants no other warranties, expressed or implied, regarding theTV-200 Wireless Otoscope, accessories or other relatedmaterials, their fitness for a particular purpose, their quality or their merchantablility. No oral or written infor-mation or advice given by Advanced Monitors Corp-oration, its reseller, agents or employees shall create awarranty. In no event shall Advanced Monitors Corporationbe liable for any special, incidental, indirect or con-sequential damages that result from the purchase oruse of the Teleview Wireless Otoscope. The maximumliability shall not exceed the price paid for the instrument.
cover the battery. Opening or disassembly of the

Model: TV-200
7098 Miratech Dr. Suite 130San Diego, CA 92121www.tele-view.com
For Customer or Technical Service,please call Advanced Monitors Customer Service:
1-877-838-8367 x102
1-858-536-8237 x102
Made in Taiwan
0197
Related Documents


![[6] 금연 챔픽스 20091215](https://static.cupdf.com/doc/110x72/54c082264a7959dd538b4597/6-20091215.jpg)