Welcome message from author
This document is posted to help you gain knowledge. Please leave a comment to let me know what you think about it! Share it to your friends and learn new things together.
Transcript


S5312 © 06/09 PAGE 2 OF 4
2009-10 TOYOTA TUNDRA
Removal of Stock System:
1. Apply a penetrating lubricant liberally to all exhaust fasteners, hangers
and rubber insulators.
2. Remove hardware from stock extension pipes. Retain for reinstallation.
Refer to Figure 1.
3. Remove exhaust from rubber insulators. Refer to Figure 2.
4. Remove the exhaust from the rearmost hanger. Leave the rubber
insulators on the truck for installation.
Refer to Figure 3.
Installation of MBRP Inc. Performance Exhaust:
1. Install the Driver Side Front Pipe reusing the existing hardware
and attaching the hanger to the existing rubber insulator. Leave the
hardware loose enough for some adjustment. Refer to Figure 4.
Figure 1
Figure 2
Figure 3
Figure 4
S5312 © 06/09 PAGE 3 OF 4
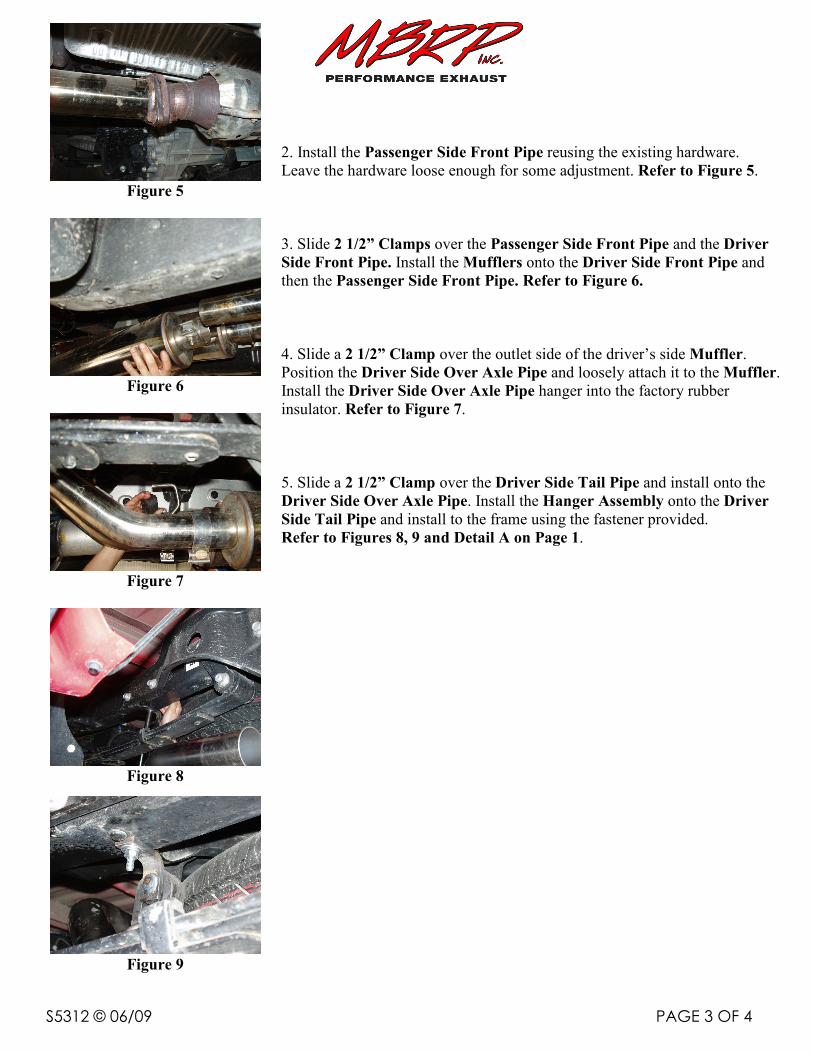
2. Install the Passenger Side Front Pipe reusing the existing hardware.
Leave the hardware loose enough for some adjustment. Refer to Figure 5.
3. Slide 2 1/2” Clamps over the Passenger Side Front Pipe and the Driver
Side Front Pipe. Install the Mufflers onto the Driver Side Front Pipe and
then the Passenger Side Front Pipe. Refer to Figure 6.
4. Slide a 2 1/2” Clamp over the outlet side of the driver’s side Muffler.
Position the Driver Side Over Axle Pipe and loosely attach it to the Muffler.
Install the Driver Side Over Axle Pipe hanger into the factory rubber
insulator. Refer to Figure 7.
5. Slide a 2 1/2” Clamp over the Driver Side Tail Pipe and install onto the
Driver Side Over Axle Pipe. Install the Hanger Assembly onto the Driver
Side Tail Pipe and install to the frame using the fastener provided.
Refer to Figures 8, 9 and Detail A on Page 1.
Figure 5
Figure 6
Figure 7
Figure 8
Figure 9

S5312 © 06/09 PAGE 4 OF 4
7. Slide a 2 1/2” Clamp over the outlet of the passenger side Muffler.
Position the Passenger Side Over Axle Pipe over the axle and loosely attach
it to the Muffler. Loosely attach to the Driver Side Over Axle Pipe using the
hardware provided. Refer to Figure 10.
Note: Additional 5/16” Flat Washers are provided in case spacing is required
for adjustments.
8. Slide the Passenger Side Tail Pipe onto the Passenger Side Over Axle
Pipe installing the hanger to the existing rubber insulator. Refer to Figure 11.
9. Install and adjust the Exhaust Tips to suit. Using a 17mm wrench tighten
the lock bolt located on each Exhaust Tip.
10. Align the exhaust as required. Starting at the front of the vehicle exhaust,
tighten all clamps and connections. Check along the whole length of the
exhaust system to ensure that there is adequate clearance around the spare tire,
fuel and brake lines.
Congratulations! You are ready to begin experiencing the improved power, sound and driving excitement of your
MBRP Inc. performance exhaust system. We know you will enjoy your purchase.
Figure 10
Figure 11
Related Documents