1HW:DUH8SJUDGHDQG0LJUDWLRQ Content provided in partnership with Que , from the book CNE Update for Netware 6 STudy Guide by David Clarke About Us | Advertise On InformIT | Contact US |Site Map | Book Registration © 2003 Pearson Education, Inc. InformIT Division. All rights reserved. Legal Notice Privacy Policy %X\7KLV%RRN)URPLQIRUP,7 T his chapter covers the following testing objectives for Novell Course 3000: Upgrading to NetWare 6. . Use Deployment Manager to Update Your Directory Schema. . Upgrade or Migrate to NetWare 6. . Troubleshoot Your NetWare 6 Migration. In the first leg of our exciting NetWare 6 CNE Update journey, we explored the top 20 features of Novell’s most Internet-savvy network operating system to date. We also strolled through the five phases of NetWare 6 Installation. If you learned anything in Chapter 1, you should have learned If you build it, they will come! But what if you are already running NetWare 4 or 5? I’m sure a lot of you are. Then what? Fortunately, NetWare 6 includes two cool options for you: . NetWare 6 Upgrade—You can install NetWare 6 on the same machine without losing any existing files. This type of upgrade is called an in- place upgrade. You can upgrade to NetWare 6 from either NetWare 5.x or NetWare 4.x. . NetWare 6 Migration—NetWare 6 includes an elaborate migration utility, not surprisingly called the NetWare Migration Wizard. This GUI migration tool enables you to upgrade NetWare 4, 5, or 6 servers “across-the-wire” to NetWare 6. However, the destination server must be running NetWare 5.0, 5.1, or 6. Furthermore, you can even migrate Windows NT 3.51 or 4 servers to NetWare 6—very cool! In

Welcome message from author
This document is posted to help you gain knowledge. Please leave a comment to let me know what you think about it! Share it to your friends and learn new things together.
Transcript
Content provided in partnership with Que, from the book CNE Update for Netware 6 STudy Guide by David Clarke
About Us | Advertise On InformIT | Contact US |Site Map | Book Registration © 2003 Pearson Education, Inc. InformIT Division. All rights reserved. Legal NoticePrivacy Policy
This chapter covers the following testing objectives for Novell Course 3000:Upgrading to NetWare 6.
. Use Deployment Manager to Update Your Directory Schema.
. Upgrade or Migrate to NetWare 6.
. Troubleshoot Your NetWare 6 Migration.
In the first leg of our exciting NetWare 6 CNE Update journey, we exploredthe top 20 features of Novell’s most Internet-savvy network operating systemto date. We also strolled through the five phases of NetWare 6 Installation. Ifyou learned anything in Chapter 1, you should have learned
If you build it, they will come!
But what if you are already running NetWare 4 or 5? I’m sure a lot of youare. Then what? Fortunately, NetWare 6 includes two cool options for you:
. NetWare 6 Upgrade—You can install NetWare 6 on the same machinewithout losing any existing files. This type of upgrade is called an in-place upgrade. You can upgrade to NetWare 6 from either NetWare 5.xor NetWare 4.x.
. NetWare 6 Migration—NetWare 6 includes an elaborate migrationutility, not surprisingly called the NetWare Migration Wizard. ThisGUI migration tool enables you to upgrade NetWare 4, 5, or 6 servers“across-the-wire” to NetWare 6. However, the destination server mustbe running NetWare 5.0, 5.1, or 6. Furthermore, you can evenmigrate Windows NT 3.51 or 4 servers to NetWare 6—very cool! In
Netware 6 Upgrade and MigrationC H A P T E R 2
66
this case, Windows NT Users and Groups are added to eDirectory, andshared folders are placed in the NetWare 6 file system (with rightsintact). Cool, huh?!
So, which NetWare 6 upgrade option is best for you? Your choice dependson a number of factors such as the operating system you’re currently run-ning, the hardware you have, and which NetWare 6 features you plan to use(such as iPrint, iManager, and Novell Cluster Services). Of course, you couldalways choose to install NetWare 6 using the from-scratch installationprocess covered in the previous chapter. That was fun!
In this chapter, we will explore the detailed steps of NetWare 6 Upgrade andMigration. Before we do, however, we must take a quick look at someimportant upgrade setup tasks—namely, minimum system requirements andnetwork preparation with Deployment Manager.
It’s time to begin…
REALWORLD
..................................................
.....
In addition to In-Place Upgrade and Across-the-Wire Migration, NetWare 6includes a third, more advanced, upgrade tool called NetWare AcceleratedUpgrade (NAU). This utility is for network administrators who are skilled attroubleshooting and installing NetWare networks.
Because NetWare Accelerated Upgrade runs from a Windows workstation, youdon’t have to have physical access to the server console, and it doesn’t requirethe server to have a CD-ROM drive installed. This is ideal for new high-performance “rack-mounted” and/or “blade” servers. Of course, you can stillrun NAU from the server using NWCONFIG if you prefer.
NetWare Accelerated Upgrade relies on a staging server (where the installationfiles are stored) and network access to the source and target servers. To runthe Accelerated Upgrade, launch ACCUPG.EXE from the root directory of theNetWare 6 Operating System CD-ROM. Then, log into both the source and targetservers. Next, the utility compares the target server’s properties with an “ideal”NetWare 6 setup. Based on the results, the Accelerated Upgrade configures thetarget machine accordingly.
Think of NetWare Accelerated Upgrade as a turbocharged installation. Vroom!!
Before You BeginTest Objective Covered:
1. Use Deployment Manager to update your directory schema.
Variety is the spice of life!
02 9792 ch02 3/17/03 4:08 PM Page 66

Netware 6 Upgrade and Migration C H A P T E R 2
67
NetWare 6 can be installed, upgraded, and migrated in a variety of differentways by using a plethora of different tools. In Chapter 1, we discovered theNetWare 6 installation method. Now, we will explore NetWare 6 upgradeand migration.
Before you begin upgrading and migrating to NetWare 6, you’ll need to per-form a variety of preliminary tasks including identifying (and satisfying) anyminimum system requirements, backing up your existing servers, preparingthe network for eDirectory 8.6, and updating the Certificate Authority (CA)object.
In this section, we will cover the following pre-upgrade tasks:
. Minimum System Requirements
. Data Backup
. Network Preparation
. Certificate Authority (CA) Update
It always pays to be prepared!
When performing the lab exercises in this guide, it is imperative that you use anonproduction server (that is, a practice server) in an isolated eDirectory tree. Youshould use nonproduction workstations as well. Remember that we are here tohelp improve your life, not to make it more difficult!
TIP.........................................
.........
.....
Minimum SystemRequirementsBefore you upgrade or migrate to NetWare 6, you should ensure that mini-mum hardware, software, and configuration requirements have been met (orexceeded). Following is a detailed review of each of these NetWare 6 systemrequirements. (We also discussed these in depth in Chapter 1.)
Hardware RequirementsThe minimum hardware requirements for a NetWare 6 server are listed here.Remember that these are just minimum requirements—the recommendedvalues are considerably higher (as shown in parentheses).
02 9792 ch02 3/17/03 4:08 PM Page 67

Netware 6 Upgrade and MigrationC H A P T E R 2
68
. A server-class PC with a Pentium II or later processor (Two-wayPentium III 700 MHz or later processor is recommended for multipleprocessor machines. In fact, NetWare 6 supports up to 32 processors.Wow!)
. A Super VGA (or higher) resolution display adapter
. 256MB of RAM (512MB recommended)
. A DOS partition of at least 200MB and 200MB of available space (1GBrecommended)
A quick method for calculating the appropriate size of the DOS partition is to addthe total amount of server RAM to the minimum amount of disk space required.Because 200MB is the minimum amount of available disk space required, a serverwith 2048MB of RAM would theoretically have an optimum DOS partition size of2248MB (2048MB + 200MB = 2248MB). Using this strategy allows you to do acore dump to the disk drive if required for troubleshooting purposes.
TIP.........................................
.........
.....
. 2GB available space outside the DOS partition for the SYS: volume(4GB recommended)
. One (or more) network boards
. A bootable CD drive
. (Optional) A USB, PS/2, or serial mouse (a mouse is recommended)
REALWORLD
..................................................
.....
Although NetWare 6 will run if the minimum requirements are met, you shouldensure that your system meets or exceeds the recommended requirements foroptimum performance. For example, when determining your system require-ments, you will want to ensure that your server has sufficient RAM and harddisk space for any additional Novell products and services you want to install,as well as for any third-party applications, documentation, and the file system.You will also want to ensure that your server has sufficient processor speed toprovide the level of server performance required by your organization. Finally,don’t forget other hardware that may be required such as routers, hubs,cabling, uninterruptible power supplies, and so on.
Software RequirementsThe minimum software requirements for NetWare 6 include some or all ofthe following, depending on your network configuration:
. A NetWare 6 Operating System CD
. A NetWare 6 License/Cryptography disk
02 9792 ch02 3/17/03 4:08 PM Page 68
Netware 6 Upgrade and Migration C H A P T E R 2
69
. (Conditional) DOS 3.3 or later (if the server does not boot from CD)
. (Conditional) DOS CD drivers (if the server does not boot from CD)
. (Conditional) Client connection utilities (optional; for installing from anetwork):
. (Conditional) Novell Client for DOS and Windows 3.1x (option-al; for installing from a NetWare server running InternetworkPacket eXchange (IPX))
. (Conditional) IP Server Connection utility (optional; forinstalling from a NetWare server running IP only)
Configuration RequirementsThe minimum configuration requirements for NetWare 6 include one or allof the following, depending on your network configuration:
. The Supervisor right at the [Root] of the eDirectory tree
. The Supervisor right to the container where the server will be installed
. The Read right to the Security container object for the eDirectory tree
. Network communication parameters required for connecting to theInternet:
. IP address
. IP address of a domain name server
. Name of your domain
. Default Gateway/Router IP Address
. Network board and storage device properties (such as interrupt andport address, if not included with NetWare)
For IP addresses and domain names, contact your system administrator and/orInternet Service Provider (ISP). For network board and storage device information,contact the hardware manufacturer. Finally, there are nifty tools available for gath-ering this network configuration data yourself. Check them out in Novell’s CNEStudy Guide for NetWare 5.1.
TIP.........................................
.........
.....
After all hardware, software, and configuration requirements have been met,you’re just about ready to roll. But first, you must backup your source serverand prepare the network for NetWare 6. In the next two sections, you willlearn how to backup your server and how to prepare the network foreDirectory 8.6.
02 9792 ch02 3/17/03 4:08 PM Page 69
Netware 6 Upgrade and MigrationC H A P T E R 2
70
Data BackupBefore upgrading to a new version of NetWare, you should always make twoor more complete, verified backups of both eDirectory data and file systemdata on your server. You can either use a NetWare solution or a third-partysolution to back up the data.
Before using a third-party backup program, verify that it is fully SMS-compliant. (Ifyou use an SMS-compliant backup program such as ARCserve, trustee informationwill be backed up.)
TIP.........................................
.........
.....
NetWare 6 contains a server backup feature called Storage ManagementServices (SMS). SMS consists of a set of programs that are both operatingsystem independent and hardware independent. These programs allow youto back up and restore data across the network by using SBACKUP. SBACKUPcan back up servers, workstations, or other services to media (such as tape,optical disk, or jukebox) for offsite storage. Examples of targets that can bebacked up by using SBACKUP include eDirectory, binderies, the file system,cluster-enabled pools, or hard disks on individual workstations.
SBACKUP takes a snapshot copy of the data you select, stores a copy on tape(or other media), and then allows you to retrieve the data at a later time incase of a natural disaster, hardware failure, corrupted data, accidentallydeleted data, and/or incorrectly changed data.
Even if you plan to use a third-party program to back up your data, youshould be familiar with the procedures for using SBACKUP to back up (andrestore) data on NetWare 4 and NetWare 5 servers.
Backing Up and Restoring a NetWare 5ServerBefore you backup your NetWare 5 server by using SMS, you should ensurethat your system meets (or exceeds) all the SBACKUP system requirements,including NetWare 5 server with SMS installed, 3MB of available RAM (min-imum), a host server with enough memory to run NetWare and connectedclients, a target server, and, ultimately, a backup device.
To use SMS to back up data on a NetWare 5 server, perform these steps:
02 9792 ch02 3/17/03 4:08 PM Page 70
Netware 6 Upgrade and Migration C H A P T E R 2
71
1. Start at the server console. Load the device drivers for your controllerand storage devices. If you load HAM drivers or add an externaldevice, enter the following at the server console prompt: LISTDEVICES. Then, load the appropriate Target Service Agents (TSAs).
For more detailed information, refer to the section titled “Before Running theBackup Software” in the SMS manual atwww.novell.com/documentation/lg/nw5/docui/index.html.
TIP.........................................
.........
.....
2. Load the Storage Management Engine and backup software on theserver. Begin by entering LOAD SMDR at the console. Accept the defaultor add an SMDR context by pressing Enter. Then, enter the full con-text of your username and provide your administrative password.
3. Type the following commands at the console to activate SBACKUP:
LOAD TSA500
LOAD SMSDI
LOAD QMAN
LOAD SBSC
LOAD SBCON
4. After the NLMs are loaded, select Main Menu, Job Administration,Backup at the main menu. Next, choose the NetWare server runningyour backup or restore TSA by selecting Target Service. Enter the tar-get username and password (if prompted) for the target.
5. You will need to select what you want to back up. To do so, pressInsert. On the NetWare server screen, select the volumes and files youwant to back up, and then press Esc. In the Description field, enter adescriptive name for the backup session, and select Device/MediaName. Then, choose Advanced Options, Append Session. Finally,save your options and continue with the backup by pressing Enter.You can return to the main Menu by pressing Esc repeatedly.
To restore backed up data to a NetWare 5 server, perform these steps:
1. Start at the server console. Load the device drivers for your controllerand storage devices. Next, load the appropriate TSAs. Finally, loadEnhanced SBACKUP.
2. At the Main Menu, select Job Administration, Restore. Then, chooseTarget Service, NetWare Server Running Your Backup and Restore
02 9792 ch02 3/17/03 4:08 PM Page 71

Netware 6 Upgrade and MigrationC H A P T E R 2
72
Target Service Agent. When you are prompted for the target user-name, enter your network administrator username and context (ifrequired) for the target. If prompted, enter the password for the target.
3. In the Description field, enter a descriptive name for the session.Select the device and media to restore. In the Device/Media Namefield, press Enter and decide where you want to restore from. Then,select the session to restore.
4. Finally, to make the selected restore, select Advanced Options, andcomplete the Advanced Restore Options form. Press Esc and answerthe prompt at the Submit Job screen to begin the restore session. Toview the activity log screen, press Alt+Esc. To return to the MainMenu, press Esc repeatedly.
Backing Up and Restoring a NetWare 4ServerBefore you use SMS to backup your NetWare 4 server, you should ensurethat your system meets (or exceeds) all the SBACKUP system requirements,including NetWare 4 server with SMS installed, 3MB of available RAM (min-imum), a host server with enough memory to run NetWare and connectedclients, a target server, and, ultimately, a backup device.
To use SMS to back up data on a NetWare 4 server, perform these steps:
1. Start at the server console. Load the device drivers for controller andstorage devices. Then, load SBACKUP.NLM and the appropriate TSAfiles. On the host server, load the SBACKUP.NLM.
2. From the Main Menu, choose Backup. Select a target for the data youwant to back up. Next, choose the Backup/Restore Target ServicesRunning on <Target Name> listing. Select the TSA you want to use.Then, provide the username and password for the target you want toback up.
3. Select the device that you want to back up. Choose Type of Backupand highlight the type of backup you want to perform. Enter adescription of the backup session. Save the description and continuewith the backup by pressing F10.
4. Finally, specify when you want the backup to start by setting the dateand time for the backup to begin. Press F10, and save your changesby pressing Enter.
02 9792 ch02 3/17/03 4:08 PM Page 72

Netware 6 Upgrade and Migration C H A P T E R 2
73
Before you attempt to restore data to a NetWare 4 server by using SBACKUP,you should ensure that you’ve met all the prerequisite system requirements:You must have Supervisor (or equivalent) rights, you need to know theusername and password for the target server (or workstation) that you wantto restore the data to, and you must be intimately familiar with the filestructure of the data you are restoring.
To restore backed up data to a NetWare 4 server, perform these steps:
1. At the server console, load SBACKUP. From the Main menu, selectRestore. Select the target that you want to restore the data to, andenter the appropriate username and password.
2. Specify how you want the date to restore. Then, start the restore bypressing F10. When you are done, you can view the error log todetermine whether any files were not restored.
For more information, refer to the NetWare 4 documentation atwww.novell.com/documentation/lg/nw42/docui/index.html.
TIP.........................................
.........
.....
Network PreparationBefore you can install, upgrade, or migrate NetWare 6 and eDirectory 8.6 toany servers in an existing network, you must update the eDirectory schema.A convenient way to do so is to use NetWare Deployment Manager, which islocated in the root of the NetWare 6 Operating System CD. This utility helpsyou to ensure that the latest version of eDirectory is running on all yourservers.
The following is a summary of the steps required to prepare your networkto use NetWare Deployment Manager to install, upgrade, or migrateNetWare 6. This process only needs to be performed once per network:
1. Install the Novell Client for Windows 95/98.
2. Install the NICI Client.
3. Update eDirectory with Deployment Manager.
4. Prepare the Network for eDirectory 8.6.
Ready, set, deploy!
02 9792 ch02 3/17/03 4:08 PM Page 73
Netware 6 Upgrade and MigrationC H A P T E R 2
74
Step 1: Install the Novell Client forWindows 95/98To use NetWare Deployment Manager, you must have the latest NovellClient and NICI client on both your primary and secondary administrativeworkstations. Following are the steps for installing the Novell Client forWindows 95/98:
1. Exit any applications that you are running to clear off your worksta-tion. Then, download the appropriate Novell Client from the Novellweb site at
http://download.novell.com
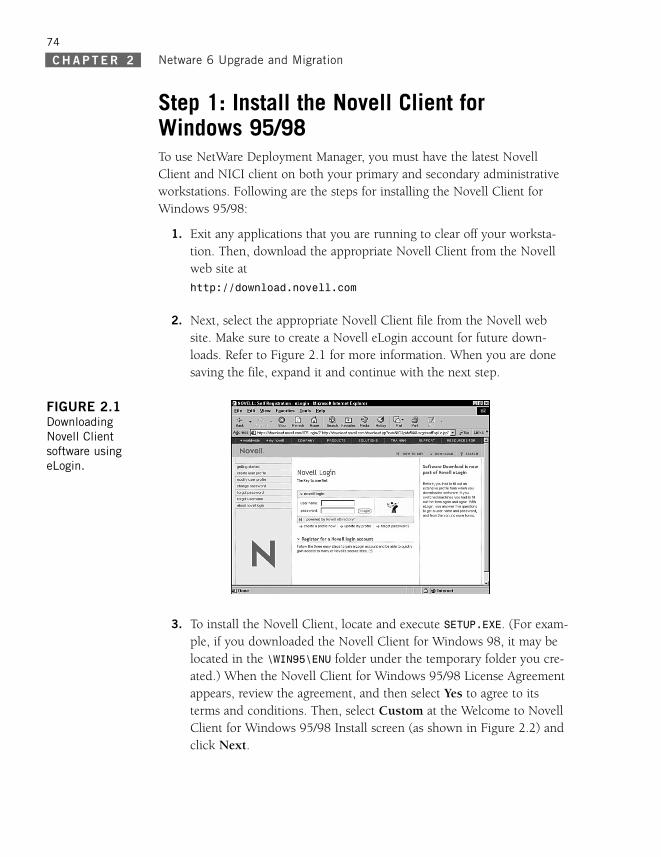
2. Next, select the appropriate Novell Client file from the Novell website. Make sure to create a Novell eLogin account for future down-loads. Refer to Figure 2.1 for more information. When you are donesaving the file, expand it and continue with the next step.
FIGURE 2.1DownloadingNovell Clientsoftware usingeLogin.
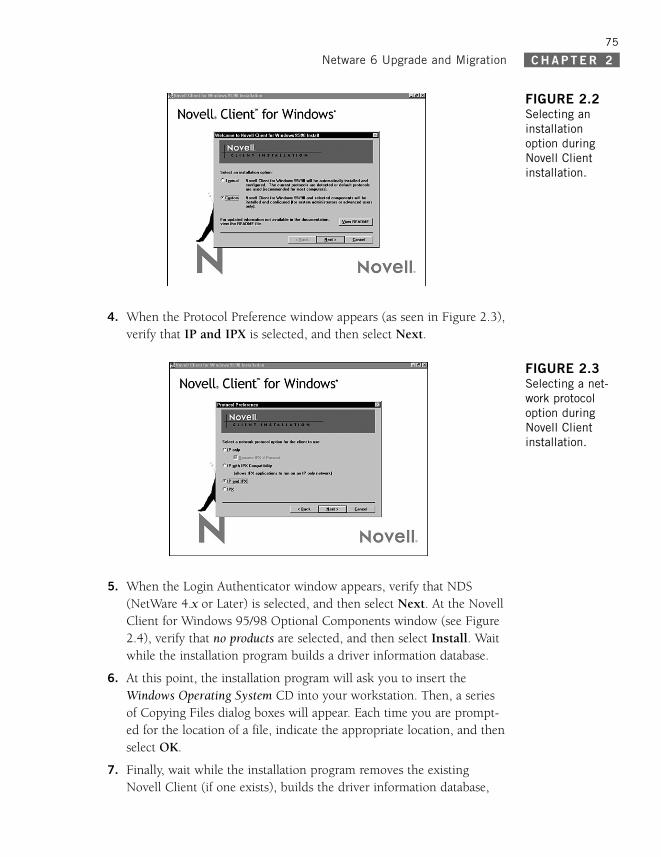
3. To install the Novell Client, locate and execute SETUP.EXE. (For exam-ple, if you downloaded the Novell Client for Windows 98, it may belocated in the \WIN95\ENU folder under the temporary folder you cre-ated.) When the Novell Client for Windows 95/98 License Agreementappears, review the agreement, and then select Yes to agree to itsterms and conditions. Then, select Custom at the Welcome to NovellClient for Windows 95/98 Install screen (as shown in Figure 2.2) andclick Next.
02 9792 ch02 3/17/03 4:08 PM Page 74
Netware 6 Upgrade and Migration C H A P T E R 2
75
4. When the Protocol Preference window appears (as seen in Figure 2.3),verify that IP and IPX is selected, and then select Next.
FIGURE 2.2Selecting aninstallationoption duringNovell Clientinstallation.
FIGURE 2.3Selecting a net-work protocoloption duringNovell Clientinstallation.
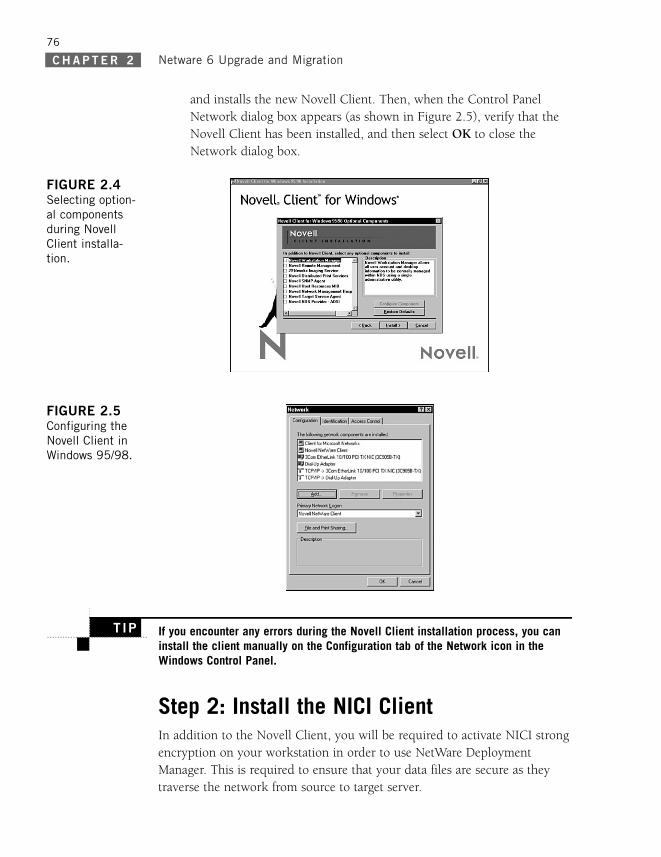
5. When the Login Authenticator window appears, verify that NDS(NetWare 4.x or Later) is selected, and then select Next. At the NovellClient for Windows 95/98 Optional Components window (see Figure2.4), verify that no products are selected, and then select Install. Waitwhile the installation program builds a driver information database.
6. At this point, the installation program will ask you to insert theWindows Operating System CD into your workstation. Then, a seriesof Copying Files dialog boxes will appear. Each time you are prompt-ed for the location of a file, indicate the appropriate location, and thenselect OK.
7. Finally, wait while the installation program removes the existingNovell Client (if one exists), builds the driver information database,
02 9792 ch02 3/17/03 4:08 PM Page 75
Netware 6 Upgrade and MigrationC H A P T E R 2
76
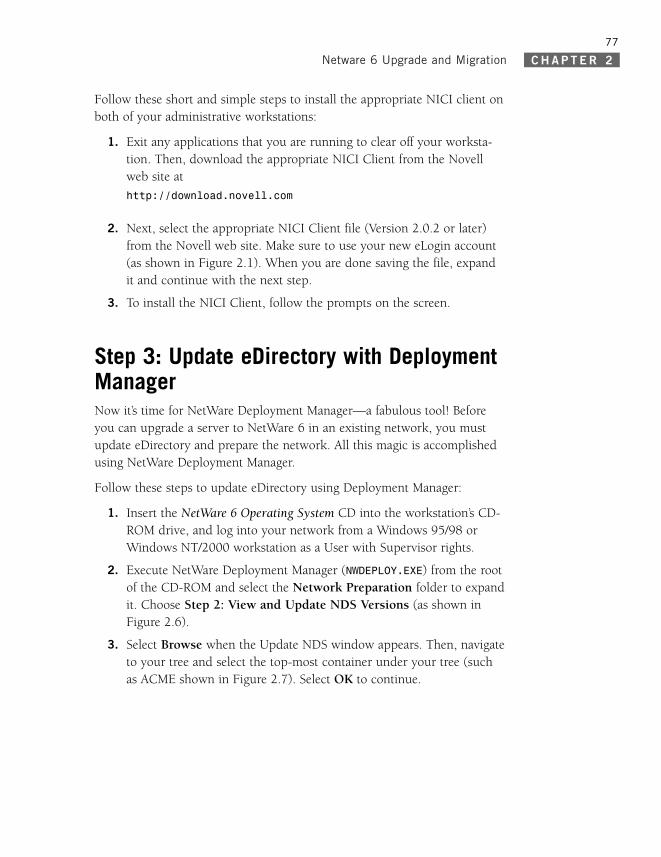
and installs the new Novell Client. Then, when the Control PanelNetwork dialog box appears (as shown in Figure 2.5), verify that theNovell Client has been installed, and then select OK to close theNetwork dialog box.
FIGURE 2.4Selecting option-al componentsduring NovellClient installa-tion.
FIGURE 2.5Configuring theNovell Client inWindows 95/98.
If you encounter any errors during the Novell Client installation process, you caninstall the client manually on the Configuration tab of the Network icon in theWindows Control Panel.
TIP.........................................
.........
.....
Step 2: Install the NICI ClientIn addition to the Novell Client, you will be required to activate NICI strongencryption on your workstation in order to use NetWare DeploymentManager. This is required to ensure that your data files are secure as theytraverse the network from source to target server.
02 9792 ch02 3/17/03 4:08 PM Page 76
Netware 6 Upgrade and Migration C H A P T E R 2
77
Follow these short and simple steps to install the appropriate NICI client onboth of your administrative workstations:
1. Exit any applications that you are running to clear off your worksta-tion. Then, download the appropriate NICI Client from the Novellweb site at
http://download.novell.com
2. Next, select the appropriate NICI Client file (Version 2.0.2 or later)from the Novell web site. Make sure to use your new eLogin account(as shown in Figure 2.1). When you are done saving the file, expandit and continue with the next step.
3. To install the NICI Client, follow the prompts on the screen.
Step 3: Update eDirectory with DeploymentManagerNow it’s time for NetWare Deployment Manager—a fabulous tool! Beforeyou can upgrade a server to NetWare 6 in an existing network, you mustupdate eDirectory and prepare the network. All this magic is accomplishedusing NetWare Deployment Manager.
Follow these steps to update eDirectory using Deployment Manager:
1. Insert the NetWare 6 Operating System CD into the workstation’s CD-ROM drive, and log into your network from a Windows 95/98 orWindows NT/2000 workstation as a User with Supervisor rights.
2. Execute NetWare Deployment Manager (NWDEPLOY.EXE) from the rootof the CD-ROM and select the Network Preparation folder to expandit. Choose Step 2: View and Update NDS Versions (as shown inFigure 2.6).
3. Select Browse when the Update NDS window appears. Then, navigateto your tree and select the top-most container under your tree (suchas ACME shown in Figure 2.7). Select OK to continue.
02 9792 ch02 3/17/03 4:08 PM Page 77

Netware 6 Upgrade and MigrationC H A P T E R 2
78
4. If a Login Dialog window appears, authenticate as a user withSupervisor rights. Then, when the Update NDS window appears,select Include Subordinate Containers (as shown in Figure 2.8). Atthis point, you’ll notice that eDirectory detects which servers need tobe updated and lists them in the Server column. Select the servers youwant to update, and then select Next. Wait while the files are copied.Then, when you are prompted to reload eDirectory for the changes totake effect, select Next. Finally, click Exit to complete the updateprocess.
Step 4: Prepare the Network for eDirectory 8.6During the NetWare 6 upgrade process, you’ll need to install a new versionof eDirectory. However, before you can do that, you’ll need to modify theexisting network Schema. This way, when a new NetWare 6 server isinstalled, the same version of eDirectory will be used throughout the net-work.
FIGURE 2.6Updating NDSversions inDeploymentManager.
FIGURE 2.7Selecting thetop-most contain-er in DeploymentManager.
02 9792 ch02 3/17/03 4:08 PM Page 78
Netware 6 Upgrade and Migration C H A P T E R 2
79
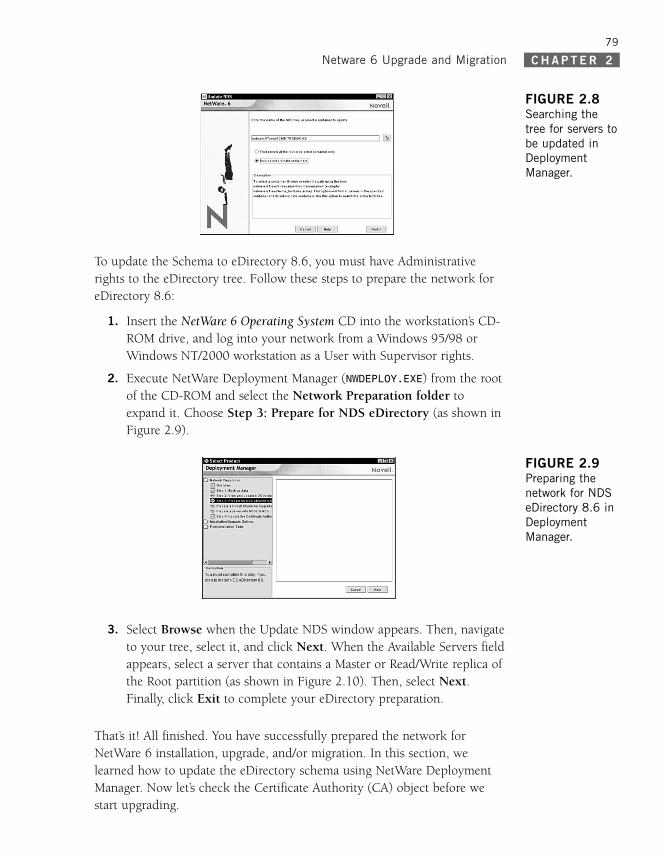
To update the Schema to eDirectory 8.6, you must have Administrativerights to the eDirectory tree. Follow these steps to prepare the network foreDirectory 8.6:
1. Insert the NetWare 6 Operating System CD into the workstation’s CD-ROM drive, and log into your network from a Windows 95/98 orWindows NT/2000 workstation as a User with Supervisor rights.
2. Execute NetWare Deployment Manager (NWDEPLOY.EXE) from the rootof the CD-ROM and select the Network Preparation folder toexpand it. Choose Step 3: Prepare for NDS eDirectory (as shown inFigure 2.9).
FIGURE 2.8Searching thetree for servers tobe updated inDeploymentManager.
FIGURE 2.9Preparing thenetwork for NDSeDirectory 8.6 inDeploymentManager.
3. Select Browse when the Update NDS window appears. Then, navigateto your tree, select it, and click Next. When the Available Servers fieldappears, select a server that contains a Master or Read/Write replica ofthe Root partition (as shown in Figure 2.10). Then, select Next.Finally, click Exit to complete your eDirectory preparation.
That’s it! All finished. You have successfully prepared the network forNetWare 6 installation, upgrade, and/or migration. In this section, welearned how to update the eDirectory schema using NetWare DeploymentManager. Now let’s check the Certificate Authority (CA) object before westart upgrading.
02 9792 ch02 3/17/03 4:08 PM Page 79

Netware 6 Upgrade and MigrationC H A P T E R 2
80
Certificate Authority UpdateThe Novell Certificate Server ensures secure data transmissions betweenservers and workstations over your network. This NetWare 6 service isrequired for web-related products such as Novell LDAP (LightweightDirectory Access Protocol), NetWare Web Server, and the NetWareManagement Portal. It also allows you to mint, issue, and manage digitalcertificates by creating a Security container object and an OrganizationalCertificate Authority (CA) object.
If the network does not already have an Organizational CA object, the firstNetWare 6 server automatically creates and physically stores the Securitycontainer object and Organizational CA object for the entire eDirectory tree.Both objects are created at, and must remain at, the [Root] of the eDirectorytree.
Novell delivered a base-level PKI (public key cryptography) with NetWare5.0. As such, you must update your NetWare 5.0 PKI Services to a NovellCertificate Server CA object. Fortunately, this only applies to NetWare 5.0servers. The NetWare 5.1 CA is updated during the NetWare 6 Upgradeprocess.
To update your network to use the new Novell Certificate Server, you mustsatisfy these minimum requirements:
. You must install the most recent version of Novell Certificate Server.
. To create the organizational CA and complete the NetWare Upgrade,you must have the Supervisor right at the [Root] of the eDirectorytree. You must also have the Supervisor right in the Security container,or at the [Root] of the tree if the Security container does not exist.
FIGURE 2.10Selecting a repli-ca server inDeploymentManager.
02 9792 ch02 3/17/03 4:08 PM Page 80
Netware 6 Upgrade and Migration C H A P T E R 2
81
. If you plan to use the Novell Certificate Server 2.20 ConsoleOne snap-in (available with NetWare 6) you need client NICI 1.5.4 (or later)installed on the workstation where you run ConsoleOne. Refer to the“Network preparation” section earlier in this chapter for more details.
Follow these steps to update your network for the new Novell CertificateServer:
1. First, determine which server in your network is acting as theOrganizational CA. By default, the Organizational CA’s object is storedin the Security container. Using ConsoleOne, double-click theOrganizational CA object, and choose the General tab.
2. On the server acting as the CA, verify that it is running NovellCertificate Server 2.0 or later. From the server console, enterNWCONFIG, and select Product Options. Next, chooseVIEW/Configure/Remove Installed Products. Look for the PKISentry; if there is no entry, or if you do not see 2.0.0 or later, installNovell Certificate Server 2.0 (or later) before continuing. You can findit on Novell’s website.
3. Check for the existence of security-related objects and establish theproper eDirectory rights for creating and operating the CA. If the KAPcontainer or the W0 object do not exist (the KAP container is in theSecurity container, and the W0 object is in the KAP container), theinstallation of the first NetWare 6 (or NetWare 5.1) server will createthem for you. Furthermore, the first NetWare 6 installation or upgradewill create the Organizational CA as well.
The server acting as the CA must remain operational during the installation orupgrade other NetWare 5.1 or NetWare 6 servers into this tree. Furthermore, ifthe CA object, KAP container, and the W0 object exist, you will need the fol-lowing eDirectory rights to upgrade NetWare:
. Read entry rights to the NDSPKI:Private Key attribute of theOrganizational CA’s object.
. Supervisor right to the W0 object
. Supervisor right to the server’s container
REALWORLD
..................................................
.....
Well, there you have it! We’ve satisfied the minimum system requirements,backed up our source and destination servers, prepared the network, andupdated the Certification Authority (CA). Now can we get started?! Yes!
02 9792 ch02 3/17/03 4:08 PM Page 81

Netware 6 Upgrade and MigrationC H A P T E R 2
82
Now that you’ve satisfied all the NetWare 6 Upgrade and Migration require-ments, it’s time to begin building the NetWare 6 server. In the rest of thischapter, we explore the detailed steps of both of these advanced NetWare 6installation options—Upgrade and Migration.
Upgrading to NetWare 6Test Objective Covered:
2. Upgrade or migrate to NetWare 6.
I have good news and I have bad news:
. Good News—The NetWare 6 Upgrade process closely resembles theNetWare 6 Installation steps we covered in the previous chapter.
. Bad News—The NetWare 6 Upgrade process occurs on an existingNovell server with all of its eDirectory information, shared data, andinternal problems.
Fortunately, you are a CNE (Certified Novell Engineer), and therefore youare trained to handle the ups and downs of NetWare 6 Upgrade. The in-place nature of NetWare 6’s Upgrade process is both a benefit and a curse.It’s a benefit in that it allows you to upgrade existing eDirectory and userfiles to NetWare 6 on the same machine. It’s a curse in that it provides limit-ed recovery if (or when) something goes wrong.
In this section, we’re going to explore all 18 steps of the NetWare 6 Upgradeprocess in great depth. Please follow this discussion carefully, because itcould mean the difference between a speedy NetWare 6 server and a uselesshunk of silicon. And, if this journey isn’t enough for you, you can alwayscheck out the detailed step-by-step ACME walk-through at the end of thissection—it’s called “Exercise 2.1: Upgrade NetWare 5.1 to NetWare 6.”
Here is a brief roadmap of the major steps that occur during each of the fiveupgrade phases:
. Phase I: Choosing the Correct NetWare 6 Settings—You will preparethe server, execute the INSTALL.BAT file, accept the license agree-ments, and load the core NetWare operating system. Then, you willselect a plethora of general NetWare 6 settings, including upgradetype, server settings, and regional settings.
02 9792 ch02 3/17/03 4:08 PM Page 82
Netware 6 Upgrade and Migration C H A P T E R 2
83
. Phase II: Upgrading Storage to NetWare 6—You will install and config-ure NetWare 6 storage devices by selecting an appropriate platformsupport module and/or HotPlug support module (if applicable), andconfiguring storage adapter(s), storage device(s), and networkboard(s).
. Phase III: Upgrading the Server and Network—You will configure thefile system and review existing network protocols.
. Phase IV: Setting Up DNS and eDirectory—You will expand beyondthe server to establish Domain Name settings and to configure yourDirectory tree. This phase encompasses the following three steps: con-figure Domain Name Service (DNS), configure eDirectory, and licensethe NetWare 6 server.
. Phase V: Completing the Upgrade—You will complete the NetWare 6upgrade process by (optionally) installing additional network prod-ucts, installing the Novell Certificate Server, and customizing finalupgrade parameters.
Every great adventure begins with a single step—yours starts with Phase I.
Phase I: Choosing the CorrectNetWare 6 SettingsIn Phase I, you will prepare the server, execute the INSTALL.BAT file, acceptthe license agreements, and load the core NetWare operating system. Then,you will select a plethora of general NetWare 6 settings, including upgradetype, server settings, and regional settings.
Let’s get started.
Step 1: Prepare the ServerBefore you do anything, you must back up all the data from your sourceupgrade computer to an offline storage media. Also, make sure that youinstall the latest NetWare service pack. Refer to the “Before You Begin” sec-tion earlier for more information.
NetWare 6 can be upgraded from the server’s local CD drive or fromupgrade files located elsewhere on the network. To access the NetWare 6upgrade files, perform these steps:
02 9792 ch02 3/17/03 4:08 PM Page 83

Netware 6 Upgrade and MigrationC H A P T E R 2
84
1. Install the DOS CD driver for the computer’s CD drive onto the DOSpartition. (The DOS CD driver should be obtained from the CD drivemanufacturer.) After you install the driver, verify that the logical file-name of the CD drive specified in the computer’s CONFIG.SYS andAUTOEXEC.BAT files is not CDROM or CDINST.
2. Verify that the CONFIG.SYS file contains the following parameters:FILES=50 and BUFFERS=30.
3. (Conditional) If you plan to upgrade NetWare 6 from upgrade fileslocated on a network, install the Novell Client for DOS and Windows3.1x or IP Server Connection utility located on the NetWare 6 NovellClient CD, as appropriate.
4. (Conditional) If you plan to upgrade NetWare 6 from upgrade fileslocated on a network, don’t forget to copy the files to the desired serv-er. Also, verify that you have the appropriate security rights to accessthem.
Step 2: Begin the UpgradeTo begin the NetWare 6 upgrade process, insert the NetWare 6 OperatingSystem CD into the CD drive (or log into the network if you have stored theNetWare 6 upgrade files on an existing server), and enter the following com-mand at the prompt:
INSTALL
REALWORLD
..................................................
.....
The INSTALL.BAT file is located in the root directory of the NetWare 6Operating System CD. If you have a bootable CD drive that meets the El Toritospecification, you can boot off the CD to load the upgrade program automati-cally rather than manually executing the INSTALL.BAT program as indicatedabove.
Notice that the upgrade program displays the initial screens in text mode.Autodetected and/or default settings appear on each screen. You can eitheraccept the autodetected and default settings or modify them to meet yourrequirements. To navigate a text screen, use the arrow keys on your key-board. To select a menu choice, highlight the desired option and pressEnter. To toggle between predetermined values in a field, highlight the field,and then press Enter to toggle to the next value. See the bottom of eachscreen for further information.
02 9792 ch02 3/17/03 4:08 PM Page 84
Netware 6 Upgrade and Migration C H A P T E R 2
85
At the beginning of the upgrade process, you are asked to agree to the termsand conditions contained in the NetWare 6 Novell Software LicenseAgreement. Press F10 or select Accept License Agreement, as appropriate,to indicate that you have read the agreement and accept its terms and condi-tions. (The appropriate choice will depend on the method you used to startthe upgrade program.)
The upgrade program then checks the server’s first hard disk to verify that ithas a valid boot partition and adequate disk space. When a screen appearsindicating that a valid boot partition has been found, select Continue withExisting Partition.
When the JReport Runtime License Agreement screen appears, press F10 toindicate that you have read the agreement and accept its terms and condi-tions.
Step 3: Select the Upgrade TypeWhen the “Welcome to the NetWare Server Installation” screen appears, youare given the opportunity to select the installation type (Express or Custom)and the installation method (New Server, Upgrade, or Pre-Migration). Thedefault installation type is Express and the default installation method isUpgrade. Let’s take a closer look at each of these options.
The NetWare 6 installation methods available on the screen include
. New Server—Installs a new server from scratch. Creates a newNetWare partition for the SYS: volume but does not delete system par-titions or other partitions (such as DOS, Unix, or Windows). SeeChapter 1 for more details.
. Upgrade—Upgrades a NetWare 4 or NetWare 5 server to NetWare 6.This option retains all original server data such as partitions, volumes,directory structures, and files.
. Pre-Migration—Uses the Migration Wizard to migrate data from anexisting (source) server to a new (destination) NetWare 6 server.
Review the values listed on this screen and modify them as necessary. In LabExercise 2.1, you will perform a NetWare 6 custom upgrade.
02 9792 ch02 3/17/03 4:08 PM Page 85
Netware 6 Upgrade and MigrationC H A P T E R 2
86
Step 4: Specify the Server SettingsThe Server Settings screen appears next, listing the following default values:
. Load Server at Reboot: Yes
. Server Set Parameters: Edit
. Backup Startup Directory (Optional): C:\NWSERVER.OLD
Some information you might want to keep in mind regarding these optionsincludes
. Load Server at Reboot—If you select Yes (default), the AUTOEXEC.BATand CONFIG.SYS files are copied and renamed with a .00x extension.The original AUTOEXEC.BAT and CONFIG.SYS files are then updated sothat the NetWare operating system automatically loads when the serv-er boots. If you select No, the AUTOEXEC.BAT and CONFIG.SYS files arenot updated.
. Server SET Parameters—SET parameters might need to be modifiedfor device drivers such as network boards or storage devices in orderto complete the installation. SET parameters are saved in the server’sSTARTUP.NCF file.
. Backup Startup Directory (Optional): C:\NWSERVER.OLD—Locationto save old C:\NWSERVER startup files.
REALWORLD
..................................................
.....
If you attempt to access the NetWare 6 upgrade files from a server on a differ-ent network segment, you may discover that you are unable to reconnect to theserver to complete the upgrade until you specify an unfiltered server ID num-ber.
Step 5: Select the Regional SettingsThe Regional Settings screen appears next, as shown in Figure 2.11.Regional settings are used to customize server language and keyboard set-tings. If you are located in the United States, the default values are as fol-lows:
. Country: 001 (USA)
. Code Page: 437 (United States English)
. Keyboard: United States
02 9792 ch02 3/17/03 4:08 PM Page 86

Netware 6 Upgrade and Migration C H A P T E R 2
87
The upgrade program then copies a number of server boot files from the CDto the C:\NWSERVER startup directory. These include files such asSERVER.EXE, disk drivers, NWCONFIG.NLM, NWSNUT.NLM, VREPAIR.NLM, andother NetWare Loadable Modules (NLMs).
This completes the first five steps of NetWare 6 upgrade, and Phase I. Now,we will continue with platform support and NetWare storage.
Phase II: Upgrading Storage toNetWare 6In Phase II, you will install and configure NetWare 6 storage devices byselecting an appropriate platform support module and/or HotPlug supportmodule (if applicable), and configuring storage adapter(s), storage device(s),and network board(s).
Step 6: Select Platform SupportFigure 2.12 shows the first of three driver screens. This one lists the plat-form and support modules (which have been auto-detected, wherever possi-ble):
. Platform Support Module—A platform support module (PSM) drivercan be loaded to optimize the performance of servers with multipleprocessors and other configurations. If a PSM is not detected, yourcomputer probably does not need one. If a platform support moduledriver is detected on a computer that does not contain multipleprocessors, the driver can be allowed to load without adversely affect-ing performance. Platform support modules typically have a .PSM file-name extension.
FIGURE 2.11Selecting region-al settings duringNetWare 6upgrade.
02 9792 ch02 3/17/03 4:08 PM Page 87

Netware 6 Upgrade and MigrationC H A P T E R 2
88
. HotPlug Support Module—PCI HotPlug technology allows storageadapters and network boards to be inserted and removed while thecomputer is powered on. If a PCI HotPlug module is not detected,your computer probably does support the technology (and thus, doesnot need one). PCI HotPlug modules typically have an .NLM extension.
. Storage Adapters—Storage adapters require a software driver called ahost adapter module (HAM) to communicate with the computer(host). Because a single storage adapter can control more than onetype of storage device, only one HAM may be required. Various typesof storage adapters, such as Integrated Drive Electronics (IDE) andSmall Computer System Interface (SCSI), maybe autodetected. If aparticular storage adapter is not detected, choose the appropriate driv-er from the list, or load it from a manufacturer-provided disk. Verifythat properties such as interrupt, port value, and slot do not conflictwith any other device in the computer. Host adapter modules typicallyhave a .HAM extension.
FIGURE 2.12Selecting plat-form support dur-ing NetWare 6upgrade.
REALWORLD
..................................................
.....
To add, change, or delete a device driver in any of the three driver screensdiscussed here, follow these simple steps:
1. In the Options box, select Modify.
2. Select the device type that you want to work with and press Enter.
3. To add a driver, press Insert, specify the location of the driver, and pressEnter. To delete a driver, select it from the list and press Enter. To modifya driver, select it from the list, choose the property to modify, and pressEnter.
Step 7: Select Storage DevicesThe second driver screen lists Storage devices. Storage devices require a soft-ware driver, called a custom device module (CDM) to communicate with thestorage adapter that controls it. Each type of storage device requires a
02 9792 ch02 3/17/03 4:08 PM Page 88
Netware 6 Upgrade and Migration C H A P T E R 2
89
separate CDM. The Upgrade Wizard autodetects many types of storagedevices, such as SCSI/IDE drives, CD-ROM drives, and tape drives. If a storage device is not detected, choose the appropriate driver from the listprovided, or load it from a manufacturer-provided disk. Custom devicemodules typically have a .CDM extension.
Because a single adapter can control more than one type of storage device, yourcomputer may require only one HAM, but have multiple types of storage devices,and thus, multiple CDMs.
TIP.........................................
.........
.....
Step 8: Select Network Boards and NLMsThe third driver screen lists these storage drivers:
. Network Boards—Network boards require a software driver called aLAN driver to communicate with the network. The upgrade programautodetects many types of network boards. If a particular networkboard is not detected, choose the appropriate driver from the list provided, or load it from a manufacturer-provided disk. To edit theproperties of the network board, it must be installed and configuredproperly. Verify that properties such as interrupt, port value, and slotdo not conflict with any other device in your server. LAN drivers typi-cally have a .LAN extension.
. NetWare Loadable Modules—Some servers and network configurationsrequire that you load an NLM before completing the server upgrade.(For example, if you are installing the server in a Token Ring environ-ment, you may need to load ROUTE.NLM.) If required, add the appro-priate NLM to the NetWare Loadable Modules field.
When you select Continue the Upgrade Wizard copies system files to theSYS: volume.
If you are installing NetWare 6 from the network, you will be prompted to recon-nect to the network. To continue the upgrade, you must authenticate with the sameUser object and password that you used at the beginning of the upgrade process.
TIP.........................................
.........
.....
This completes the next three steps of NetWare 6 upgrade, and Phase II.Now, we will venture into a whole new world—GUI installation screens.
02 9792 ch02 3/17/03 4:08 PM Page 89
Netware 6 Upgrade and MigrationC H A P T E R 2
90
Phase III: Upgrading theServer and NetworkWelcome to the Java portion of NetWare 6 upgrade!
In Phase III, you will review existing network protocols. In this stage, youwill leave the boring text-mode world and switch to a Java interface.Although a mouse is recommended, you can use keystrokes to navigatethrough the upgrade program screens. Remember that the NumLock (num-ber lock) key must be activated in order for cursor movements to beenabled on the keypad.
At this point, the Upgrade Wizard copies a number of files to the serverhard drive (called the preparatory file copy process). A Java Virtual Machine(JVM) is created on the server and the GUI portion of the Upgrade Wizard isloaded. This step may take a while, so feel free to go have a cup of javawhile you wait.
Step 9: Enable Cryptography (Conditional)Some technologies (such as SSL and certificate generation) require the use ofcryptography. If the Encryption screen appears, insert the NetWare 6License/Cryptography disk into the computer’s disk drive. On the disk,browse to the License directory, select the .NFK file, then select OK.
If the Encryption screen appears and you don’t select an .NFK file, you won’tbe able to install NetWare 6!
Step 10: Configure the NetWare Server FileSystemThe NetWare 6 file system consists of partitions, volumes, and free space. Inthis step, you are given the option of creating additional NetWare partitionsand volumes using available free space. For example, you can divide a largedisk into two or more volumes, or distribute a single volume over morethan one disk.
You can create two different types of NetWare 6 volumes:
. NSS Volumes—NSS is an advanced file system technology that isdesigned for the management of large volumes, large files, namespaces, and complex storage devices. It significantly reduces the
02 9792 ch02 3/17/03 4:08 PM Page 90

Netware 6 Upgrade and Migration C H A P T E R 2
91
amount of time required to mount large volumes. This is the defaultvolume type.
. Traditional Volumes—Traditional volumes are not recommended andshould only be used if you require the use of technologies such asblock suballocation, NFS (Network File System), FTP, VREPAIR, or filelocks.
If a Configure File System dialog box appears, review the information listed.To create an additional volume, choose one of the displayed Free Spaceicons and select Create.
Although an NSS SYS: volume is recommended for most server installations, youcan create a traditional SYS: volume by pressing F5 during step 10. If all avail-able space has been allocated to the SYS: volume, you will not be prompted foradditional NetWare server file system information. If this is the case, skip to “Step11: View Network Protocols.”
TIP.........................................
.........
.....
If the New Volume dialog box appears, type the name of the new volume inthe Volume Name field, provide a size in the Space to Use field, and selectApply to Volume. When you are done, select OK. The Configure FileSystem screen then reappears, listing the new volume. Repeat the process, asnecessary, to create additional volumes.
In addition, the size of an existing volume can be increased, but notdecreased, by using the Free Space option within the Configure File Systemscreen. In the Space to Use field, enter the new size of the volume, selectApply to Volume, and select OK. To decrease the size of an existing vol-ume, you must delete and re-create it. To delete a volume, highlight it in theConfigure File System screen and then choose Delete.
Volume names can consist of 2 to 15 characters. Valid characters include Athrough Z, 0 through 9, and !, -, @, #, $, %, &, (, and ). A volume name cannotbegin with an underscore (_) or contain two or more consecutive underscores.
TIP.........................................
.........
.....
If the Mount Volumes dialog box appears, indicate whether to mount allvolumes when the server reboots at the end of the upgrade process orwhether to mount all volumes now. The default choice (Yes) establishes thatall volumes will be mounted when the server reboots. You would typicallyonly need to mount all volumes now if you plan to install additional prod-ucts and services (such as documentation) on volumes other than SYS:.
02 9792 ch02 3/17/03 4:08 PM Page 91

Netware 6 Upgrade and MigrationC H A P T E R 2
92
Step 11: View Network ProtocolsAt this point, the Protocols dialog box appears. This screen displays the net-work protocols that are currently configured.
NetWare 6 can be configured to process IP network packets and/or tradi-tional IPX packets. If desired, both protocols can be assigned to a single net-work board. This allows the server to communicate using both IP and IPX.
In fact, your NetWare 6 server can be configured in any of the followingways:
. IP Only—The IP Only protocol configuration forces your NetWare 6server and all its workstations to communicate using IP only. The IPprotocol choice also causes the server to automatically bind the ETHERNET_II frame type to the corresponding internal NIC.
. IP with IPX Compatibility Mode—When the IP protocol is selected,passive support for IPX is also provided. If an IPX request arrives atthe server, NetWare 6 processes the request. This passive support forIPX is called Compatibility Mode and it must be enabled manuallyusing the Advanced tab.
. IPX Only—You can also configure your NetWare 6 server for IPX(Novell’s traditional communications protocol) to facilitate legacyNetWare IPX applications. If IPX, but not IP, is installed on your serv-er, it will actively process IPX packets and ignore packets using otherprotocols, such as IP. This is not a good idea because many newNetWare 6 network features require the more advanced IP protocol.
. IP and IPX—If you have network clients or applications that requireboth IP and IPX, you can install multiple protocols simultaneously.Fortunately, both IP and IPX protocols can be bound to a single serverNIC. In this configuration, the server processes IP requests using IP,and IPX requests using IPX. This solution is elegant in its simplicity!
To configure the IP protocol, you must be familiar with and know the IP address,the subnet address, and the router (gateway) address. The Upgrade utility usesdefault frame types of ETHERNET_802.2 (if no frame types are detected whileinstalling IPX) and ETHERNET_II (for IP).
TIP.........................................
.........
.....
This completes the middle three steps of NetWare 6 upgrade, and Phase III.Now, it’s time to venture “outside” the cozy confines of our server and intothe exciting world of Domain Name Services and eDirectory.
02 9792 ch02 3/17/03 4:08 PM Page 92
Netware 6 Upgrade and Migration C H A P T E R 2
93
Phase IV: Setting Up DNS andeDirectoryIn Phase IV, you will expand beyond the server to establish Domain Namesettings and configure the eDirectory tree. This stage encompassed the fol-lowing three steps: configure Domain Name Service (DNS), configureeDirectory, and license the NetWare 6 server.
Let’s start with enhanced IP address management via the Domain NameService.
Step 12: Configure DNSEarlier, we mentioned that the IP protocol identifies servers and worksta-tions by their unique four-part IP addresses. These addresses are complexand difficult for humans to track. Fortunately, your NetWare 6 server canmaintain a list of simple, readable names that match all the IP addresseddevices on your network. This capability is known as Domain NameServices, and the corresponding NetWare 6 application is called DNS Server.
To provide DNS services from your NetWare 6 server, you must configurethe following information in Figure 2.13:
. Host Computer—The simple, readable name on the DNS server thatmatches your NetWare server’s name (or the name you have bound tothe internal server NIC). You can set up the host computer name onthe DNS server to use the NetWare server name.
. Domain Name—The hierarchical name that represents the organiza-tion of your network, such as acme.com. Typically, you should use theinformation provided by your network administrator. In many cases itis the name of the server’s host Organization object in the NDS tree.
. Domain Name Server—The IP address of the DNS server that main-tains the list containing this NetWare server’s simple, readable nameand IP address. For more information, contact your network adminis-trator or ISP. If your NetWare 6 server is providing DNS services, thiswould be its own IP address.
If you see an error message at this point, it means that you don’t have an A-recordon your DNS server for the hostname you supplied. Be sure to go back later andadd the appropriate record.
TIP.........................................
.........
.....
02 9792 ch02 3/17/03 4:08 PM Page 93

Netware 6 Upgrade and MigrationC H A P T E R 2
94
Step 13: Configure eDirectoryWhen the Login to NDS screen appears, log into the tree as admin, usingthe full distinguished name and password.
At this point, the Upgrade Wizard checks for duplicate tree names andinstalls NDS. When the NDS Summary screen appears (see Figure 2.14),write the values you supplied for the following parameters and store it in asafe place for future reference:
. NDS Tree Name
. Server Context
. Administrator name
. Administrator password you entered on previous screen
FIGURE 2.13ConfiguringDomain NameServices duringNetWare 6upgrade.
FIGURE 2.14Viewing the NDSSummary screenduring NetWare 6upgrade.
02 9792 ch02 3/17/03 4:08 PM Page 94

Netware 6 Upgrade and Migration C H A P T E R 2
95
Step 14: License the NetWare 6 ServerNovell Licensing Services has been enhanced in NetWare 6 to support twodifferent models for distributing valid license certificates to network usersand services:
. Server Connection License (SCL) Model—In the SCL model, users aregranted access to network resources and services based on the serverthey are logged into. This means that each user must obtain an avail-able license for every server that hosts a resource that they need.
. User Access License (UAL) Model—In NetWare 6, Novell Licensinghas evolved beyond the server to focus on the network as a whole.This new model is known as User Access Licensing (UAL). In the UALmodel, User objects receive a permanent license unit that allows themto access network services at any time and from any workstationattached to the network. This greatly simplifies Novell license manage-ment.
When you install or upgrade to NetWare 6, the Wizard installs the SCLmodel by default. To add license certificates and/or upgrade to UAL, youmust use iManager after the installation or upgrade. Fortunately, UAL andSCL can coexist on the same network. In this scenario, NetWare delivers theappropriate license certificate type based on the location of the resource—NetWare 6 servers share a single UAL certificate, while NetWare 5 serversdeliver an SCL certificate for each server.
We will use the NetWare 6 Upgrade Wizard to license the NetWare 6 server(as shown in Figure 2.15). When the Licenses dialog box appears, insert theNetWare license disk in the floppy drive and select the appropriate licensefile. Be sure to use a unique license disk, and make sure that you actuallybrowse to and select the license file, instead of just listing the drive letter (acommon mistake).
When you select the license file, you’ll notice that the type of licenseappears in the Description section, such as “NetWare 6 Server, Plus FiftyUser Connections.” Select OK to return to the Licenses screen, and Next tocontinue to step 15.
02 9792 ch02 3/17/03 4:08 PM Page 95

Netware 6 Upgrade and MigrationC H A P T E R 2
96
NetWare 6 must have a valid software license in order to function as a serv-er. You can install the license from the NetWare 6 License/Cryptography diskor browse to a directory that contains a valid NetWare 6 license. In addition,you can choose to install NetWare 6 without a license by marking the Installwithout Licenses check box in Figure 2.15. In this scenario, the unlicensedserver will allow only two user connections.
If an MLA License Certificate context screen appears, select the NDS contextwhere you would like the MLA server-based license certificate and connec-tion license certificate installed. These MLA certificates are valid for allservers and users located at the selected eDirectory context and below. Youmay wish to install these MLA license certificates high in the tree so thatthey will be available to more servers and users.
FIGURE 2.15Licensing theserver duringNetWare 6upgrade.
If you are using a demo version of the NetWare 6 Operating System CD (that is,one that does not have an associated license disk), use the license file in the pre-selected directory on the CD. If you can’t locate the license file, mark the Installwithout Licenses check box, although you may experience problems with featuressuch as Novell Distributed Print Services (NDPS), which use multiple connections.
TIP.........................................
.........
.....
This completes the three trickiest steps of NetWare 6 upgrade and Phase IV.Now, it’s time for the home stretch: completing the upgrade in Phase V.
Phase V: Completing theUpgradeFinally, in Phase V, you will complete the NetWare 6 upgrade adventure byinstalling additional network products, installing the Novell CertificateServer, and customizing final upgrade parameters.
02 9792 ch02 3/17/03 4:08 PM Page 96

Netware 6 Upgrade and Migration C H A P T E R 2
97
Let’s continue by installing some additional network products. Some of mypersonal favorites are Novell Native File Access Pack (NFAP), NetWare WebAccess, and iPrint.
Step 15: Install Additional NetworkProductsNear the end of the upgrade process, you will be given the opportunity toinstall a variety of additional network products. These products provideenhanced server and network functionality, including Internet printing, webaccess services, Domain Names Services, and advanced Novell auditing.
Some products can only be installed using the NetWare Deployment Manager afterthe server upgrade is complete.
TIP.........................................
.........
.....
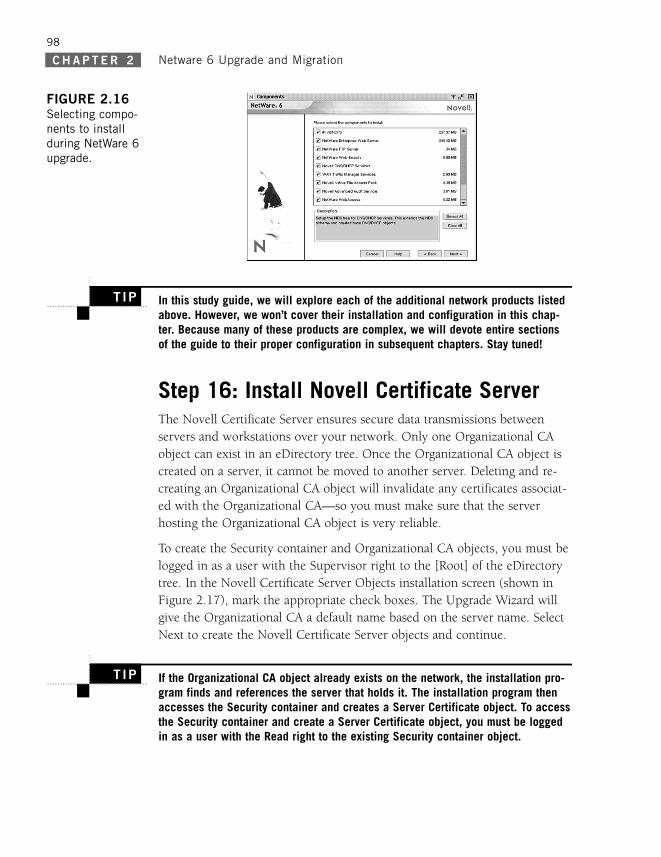
Toward the end of the NetWare 6 upgrade process, the Components dialogbox appears, enabling you to select from the following list of additional net-work products (see Figure 2.16):
. iPrint/NDPS
. NetWare Enterprise Web Server
. NetWare FTP Server
. NetWare Web Search
. Novell DNS/DHCP Services
. WAN Traffic Manager Services
. Novell Native File Access Pack (selected by default)
. Novell Advanced Audit Service (selected by default)
. NetWare Web Access
If you rest your cursor on an installation option, a description of the accom-panying product is displayed at the bottom of the screen. Mark the checkbox of each product you want to install. If a product requires a supportingcomponent, the check box of the supporting product will automatically beselected. Also, always be sure your server has enough disk space and systemmemory to accommodate the products you want to install.
02 9792 ch02 3/17/03 4:08 PM Page 97
Netware 6 Upgrade and MigrationC H A P T E R 2
98
Step 16: Install Novell Certificate ServerThe Novell Certificate Server ensures secure data transmissions betweenservers and workstations over your network. Only one Organizational CAobject can exist in an eDirectory tree. Once the Organizational CA object iscreated on a server, it cannot be moved to another server. Deleting and re-creating an Organizational CA object will invalidate any certificates associat-ed with the Organizational CA—so you must make sure that the serverhosting the Organizational CA object is very reliable.
To create the Security container and Organizational CA objects, you must belogged in as a user with the Supervisor right to the [Root] of the eDirectorytree. In the Novell Certificate Server Objects installation screen (shown inFigure 2.17), mark the appropriate check boxes. The Upgrade Wizard willgive the Organizational CA a default name based on the server name. SelectNext to create the Novell Certificate Server objects and continue.
FIGURE 2.16Selecting compo-nents to installduring NetWare 6upgrade.
In this study guide, we will explore each of the additional network products listedabove. However, we won’t cover their installation and configuration in this chap-ter. Because many of these products are complex, we will devote entire sectionsof the guide to their proper configuration in subsequent chapters. Stay tuned!
TIP.........................................
.........
.....
If the Organizational CA object already exists on the network, the installation pro-gram finds and references the server that holds it. The installation program thenaccesses the Security container and creates a Server Certificate object. To accessthe Security container and create a Server Certificate object, you must be loggedin as a user with the Read right to the existing Security container object.
TIP.........................................
.........
.....
02 9792 ch02 3/17/03 4:08 PM Page 98
Netware 6 Upgrade and Migration C H A P T E R 2
99
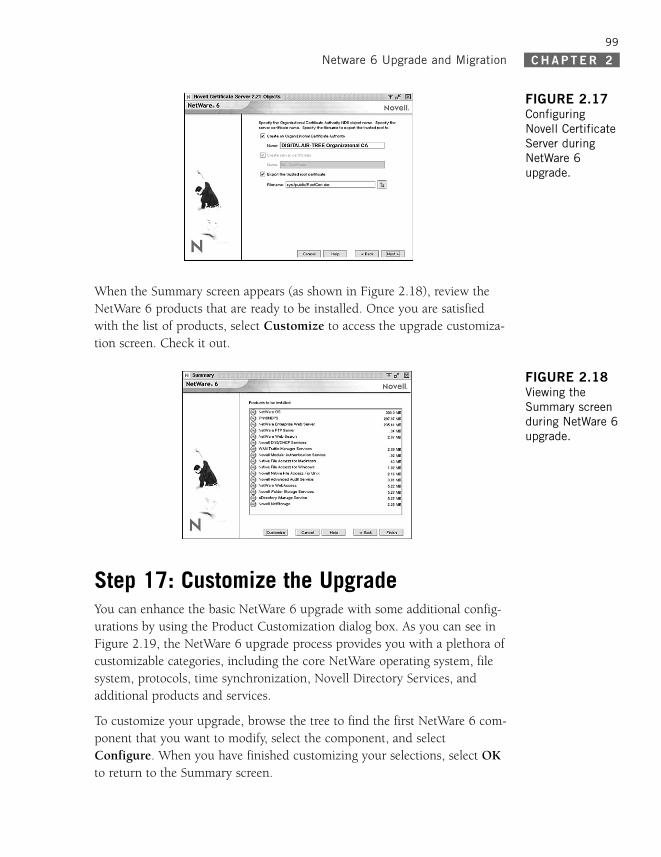
When the Summary screen appears (as shown in Figure 2.18), review theNetWare 6 products that are ready to be installed. Once you are satisfiedwith the list of products, select Customize to access the upgrade customiza-tion screen. Check it out.
FIGURE 2.17ConfiguringNovell CertificateServer duringNetWare 6upgrade.
FIGURE 2.18Viewing theSummary screenduring NetWare 6upgrade.
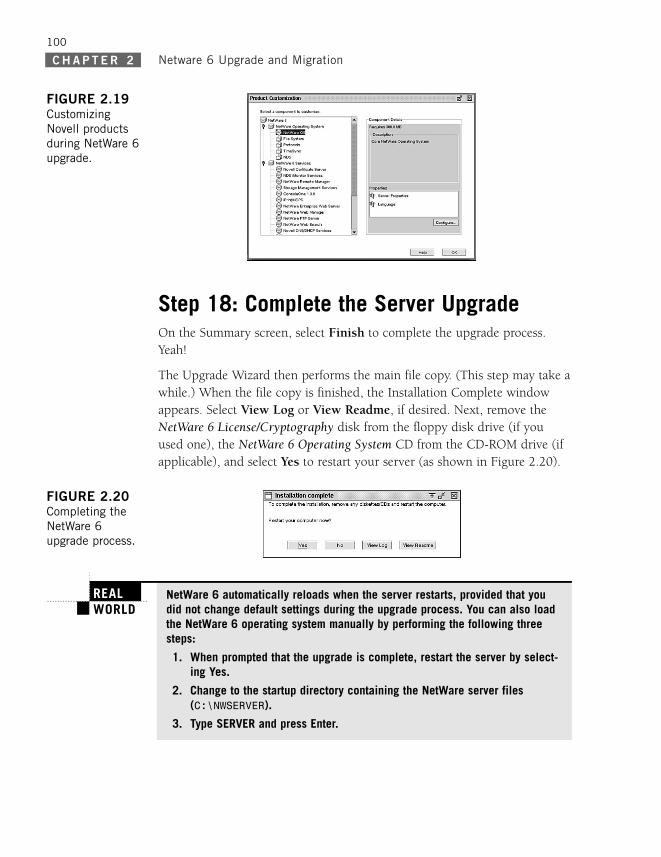
Step 17: Customize the UpgradeYou can enhance the basic NetWare 6 upgrade with some additional config-urations by using the Product Customization dialog box. As you can see inFigure 2.19, the NetWare 6 upgrade process provides you with a plethora ofcustomizable categories, including the core NetWare operating system, filesystem, protocols, time synchronization, Novell Directory Services, andadditional products and services.
To customize your upgrade, browse the tree to find the first NetWare 6 com-ponent that you want to modify, select the component, and selectConfigure. When you have finished customizing your selections, select OKto return to the Summary screen.
02 9792 ch02 3/17/03 4:08 PM Page 99
Netware 6 Upgrade and MigrationC H A P T E R 2
100
Step 18: Complete the Server UpgradeOn the Summary screen, select Finish to complete the upgrade process.Yeah!
The Upgrade Wizard then performs the main file copy. (This step may take awhile.) When the file copy is finished, the Installation Complete windowappears. Select View Log or View Readme, if desired. Next, remove theNetWare 6 License/Cryptography disk from the floppy disk drive (if youused one), the NetWare 6 Operating System CD from the CD-ROM drive (ifapplicable), and select Yes to restart your server (as shown in Figure 2.20).
FIGURE 2.19CustomizingNovell productsduring NetWare 6upgrade.
FIGURE 2.20Completing theNetWare 6upgrade process.
REALWORLD
..................................................
.....
NetWare 6 automatically reloads when the server restarts, provided that youdid not change default settings during the upgrade process. You can also loadthe NetWare 6 operating system manually by performing the following threesteps:
1. When prompted that the upgrade is complete, restart the server by select-ing Yes.
2. Change to the startup directory containing the NetWare server files(C:\NWSERVER).
3. Type SERVER and press Enter.
02 9792 ch02 3/17/03 4:08 PM Page 100

Netware 6 Upgrade and Migration C H A P T E R 2
101
Congratulations—you’ve done it! You have successfully traversed the 5phases and 18 steps of NetWare 6 Upgrade! Now it’s time to use your newserver to help Save the ‘Net! Check out the step-by-step challenges awaitingyou in Lab Exercise 2.1.
02 9792 ch02 3/17/03 4:08 PM Page 101

Netware 6 Upgrade and MigrationC H A P T E R 2
102
Lab Exercise 2.1: Upgrade NetWare 5.1 toNetWare 6In this lab exercise, you will perform these tasks:
. Part I: Install NetWare 5.1 on WHITE-SRV1
. Part II: Install the Latest NetWare 5.1 Support Pack
. Part III: Prepare the Source Server
. Part IV: Perform an In-Place Upgrade to NetWare 6
In this lab exercise, you will need the following components:
. The server hardware used in Lab Exercise 1.1. (In this exercise, youwill overwrite the NetWare 6 operating system with NetWare 5.1.)
. Two workstations running Windows 95/98 or Windows NT/2000 that(meet or exceed) the minimum hardware requirements for a NetWare6 administrative workstation. (These should be the workstations thatyou plan to use as your “primary” administrative workstations for thelab exercises in this book.)
. A Microsoft Windows Operating System CD-ROM (that matches theWindows operating system that is running on the primary administra-tive workstation).
. A Microsoft Windows Operating System CD-ROM (that matches theWindows operating system that is running on the secondary adminis-trative workstation).
. Internet access for the workstations.
. A NetWare 6 Operating System CD.
. (Optional) A NetWare 5.1 License/Cryptography disk containing aserver license.
. A NetWare 6 License/Cryptography disk containing both server anduser licenses. (This is the one you used in Lab Exercise 1.1.)
02 9792 ch02 3/17/03 4:08 PM Page 102
Netware 6 Upgrade and Migration C H A P T E R 2
103
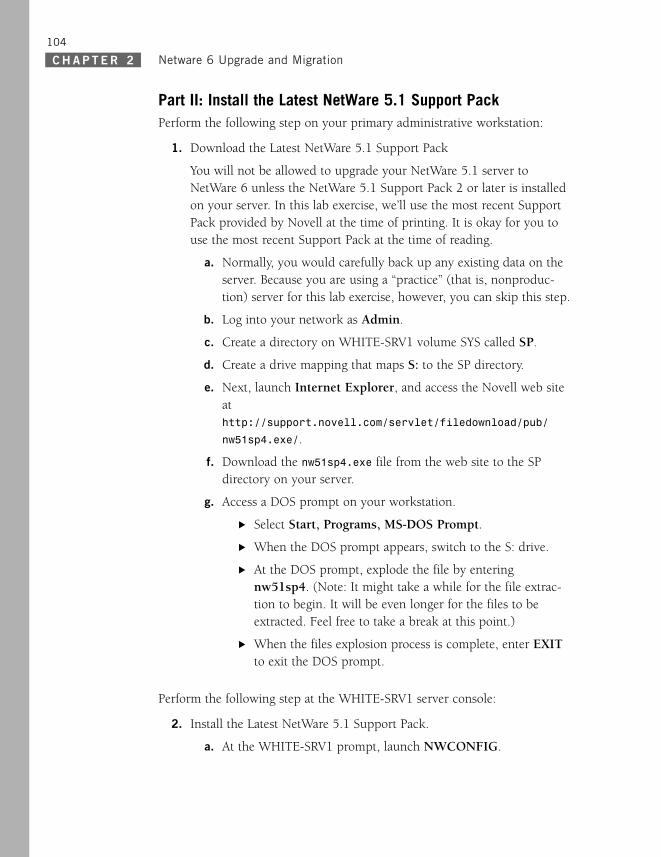
Part I: Install NetWare 5.1 on WHITE-SRV1Perform the following tasks at the WHITE-SRV1 server console:
1. Using the parameters in Table 2.1, install NetWare 5.1 on the WHITE-SRV1 server. During the installation process:
. Install the server as a new server, not as an upgrade! (In otherwords, you are going to overwrite the NetWare 6 operating sys-tem with NetWare 5.1.)
. Do remove and re-create the DOS partition.
. Do remove and re-create the NetWare partition and SYS: vol-ume.
. Overwrite any newer files (even though you would not normallydo so in “real life”).
Novell’s CNE Study Guide for NetWare 5.1 contains a demo version of NetWare5.1 that can be used to install NetWare 5.1. If you don’t have access to aNetWare 5.1 Operating System CD, you’ll have to just “pretend” that your NetWare6 server is a NetWare 5.1 server—and upgrade it anyway.
TIP.........................................
.........
.....
Installation Parameters
PARAMETER VALUE
Installation Type New Server (not upgrade!)
Server Name WHITE-SRV1
NetWare Partition Not to exceed 4 GB
Default Volume SYS: (Not to exceed 4 GB)
IP Address 192.168.1.81
Subnet Mask 255.255.255.0
Hostname WHITE-SRV1
Domain acme.com
eDirectory Tree New tree (not existing tree!)
eDirectory Tree Name ACME-TREE
Server Context OU=WHITE.OU=CRIME.OU=TOKYO.O=ACME
Admin Context OU=WHITE.OU=CRIME.OU=TOKYO.O=ACME
Admin Password ACME
TABLE 2.1
02 9792 ch02 3/17/03 4:08 PM Page 103
Netware 6 Upgrade and MigrationC H A P T E R 2
104
Part II: Install the Latest NetWare 5.1 Support PackPerform the following step on your primary administrative workstation:
1. Download the Latest NetWare 5.1 Support Pack
You will not be allowed to upgrade your NetWare 5.1 server toNetWare 6 unless the NetWare 5.1 Support Pack 2 or later is installedon your server. In this lab exercise, we’ll use the most recent SupportPack provided by Novell at the time of printing. It is okay for you touse the most recent Support Pack at the time of reading.
a. Normally, you would carefully back up any existing data on theserver. Because you are using a “practice” (that is, nonproduc-tion) server for this lab exercise, however, you can skip this step.
b. Log into your network as Admin.
c. Create a directory on WHITE-SRV1 volume SYS called SP.
d. Create a drive mapping that maps S: to the SP directory.
e. Next, launch Internet Explorer, and access the Novell web siteat http://support.novell.com/servlet/filedownload/pub/
nw51sp4.exe/.
f. Download the nw51sp4.exe file from the web site to the SPdirectory on your server.
g. Access a DOS prompt on your workstation.
. Select Start, Programs, MS-DOS Prompt.
. When the DOS prompt appears, switch to the S: drive.
. At the DOS prompt, explode the file by enteringnw51sp4. (Note: It might take a while for the file extrac-tion to begin. It will be even longer for the files to beextracted. Feel free to take a break at this point.)
. When the files explosion process is complete, enter EXITto exit the DOS prompt.
Perform the following step at the WHITE-SRV1 server console:
2. Install the Latest NetWare 5.1 Support Pack.
a. At the WHITE-SRV1 prompt, launch NWCONFIG.
02 9792 ch02 3/17/03 4:08 PM Page 104
Netware 6 Upgrade and Migration C H A P T E R 2
105
b. When the Configuration Options window appears, selectProduct Options, Install a Product Not Listed.
c. To specify the source path, press F3.
d. When the Specify a Directory Path field appears, specify the fol-lowing path:SYS:\SP\NW51SP4
e. Wait while the support pack files are installed.
f. When the Novell Terms and Conditions screen appears, read theinformation on the screen, and then press Esc.
g. When the “Do You Accept the License Agreement” windowappears, select Yes.
h. When the License Agreement for JReport Runtime screenappears, read the information on the screen, then press Esc.
i. When the “Do You Accept the ConsoleOne Reporting ToolLicense Agreement” window appears, select Yes.
j. When a message appears indicating that the NetWare SupportPack Version 5.1.4 is about to be installed, press Enter to con-tinue. (Note: It may take a while for the support pack files to beinstalled. Feel free to take a break at this point.)
k. When the “Backup Files Replaced by NetWare Support Pack”window appears, select Yes.
l. When the “Do you Want to Update the Storage/LAN/PSM/WANDrivers Currently in Use” window appears, select Yes.
m. When the “Reboot the Server After Copying Files” windowappears, select Yes.
n. When a warning screen appears, indicating that the InstalledProducts and Services will now be shut down, press Enter.Then, wait for the files to copy.
o. When the “Enter Destination Path for Backup Files” windowappears, leave the default of SYS:\SYSTEM\BACKSP4 and pressEnter. Then, wait for the files to copy.
p. A message will appear indicating that the system is backing upfiles and that it can take approximately 5 to 15 minutes. Waitwhile this occurs.
02 9792 ch02 3/17/03 4:08 PM Page 105

Netware 6 Upgrade and MigrationC H A P T E R 2
106
q. After the support pack installation is complete, allow the serverto reboot.
r. If the Auto Purge feature is not set on your server, you mightwant to manually purge the volume to free disk space.
Part III: Prepare the Source ServerPerform the following step at the WHITE-SRV1 server console:
1. Run DSREPAIR.
a. At the server prompt, enter DSREPAIR.
. In the Available Options menu, select Unattended FullRepair. Wait until the repair process is complete. Note thenumber of errors, and then press Enter to acknowledgethe message. If any errors occurred, review the log file thatappears on the screen, press Esc to exit the log file, andthen repeat the process until it runs without errors.
. In Available Options menu, select Time Synchronization.When the log file appears, review the log file to determineif any errors occurred, then press Esc. If any errors occur,attempt to troubleshoot the problems.
. In the Available Options menu, select ReportSynchronization Status. When the log file appears,review the log file to determine if any errors occurred,then press Esc. If any errors occur, attempt to trou-bleshoot the problems.
b. Exit DSREPAIR.
Perform the following step on your primary administrative workstation:
2. Run Deployment Manager:
a. Insert the NetWare 6 Operating System CD into the workstation’sCD drive.
b. Log into the network as admin.
c. Launch NetWare Deployment Manager (NWDEPLOY.EXE), whichis located in the root of the NetWare 6 Operating System CD.
. Select Start, Run.
. When the Run dialog box appears, select Browse.
02 9792 ch02 3/17/03 4:08 PM Page 106
Netware 6 Upgrade and Migration C H A P T E R 2
107
. When the Browse dialog box appears, browse to theNetWare 6 Operating System CD.
. Select NWDEPLOY (which is located in the root of theCD), and then select Open.
. When the Run dialog box reappears, select OK.
d. When the Select Product window appears, double-click theNetwork Preparation folder to expand it.
e. Under Network Preparation, select Step 3: Prepare for NDSeDirectory 8.6.
f. When the Update NDS window appears, select the Browse but-ton to the right of the text field.
g. When the NDS Tree Browser window appears
. Expand Novell Network.
. Expand Novell Directory Services.
. Select ACME-TREE.
. Select OK.
h. If a Login Dialog window appears, authenticate as admin.
. In the Username field, enter admin.
. In the User Password field, enter acme.
. In the Tree field, verify that ACME-TREE is listed.
. In the User Context field, enterWHITE.CRIME.TOKYO.ACME.
. Select OK.
i. When the Update NDS window appears, verify that netware://Trees/ACME-TREE is listed, and then select Next.
j. When the next Update NDS window appears, both of yourservers should be listed. Verify that the WHITE-SRV1 serverappears in both the Available Servers and Selected Server fields,then select Next.
k. When the next Update NDS window appears, verify that it indi-cates that the eDirectory tree is prepared for eDirectory 8.6. Ifso, select Exit.
02 9792 ch02 3/17/03 4:08 PM Page 107
Netware 6 Upgrade and MigrationC H A P T E R 2
108
l. On WHITE-SRV1, wait until the following message appears atthe console prompt: “NDSEM-5.0-009: Process Completed.” (Bepatient. It may take a while for this message to appear!) Thisalso verifies that eDirectory on WHITE-SRV1 was prepared foreDirectory 8.6.
m. On your workstation, close Deployment Manager by selectingCancel.
n. When the Exit window appears, select Yes.
Part IV: Perform an In-Place Upgrade to NetWare 6Perform the following steps at the WHITE-SRV1 server console:
1. Prepare the Server. Ensure that the source Upgrade server is preparedfor NetWare 6.
2. Begin the upgrade.
a. Insert the NetWare 6 Operating System CD into the server’s CDdrive.
b. At the server console prompt, enter RESET SERVER. Watch theserver console screen while the server reboots.
c. When prompted, select one of the following:
. To install IDE CD drivers, press I.
. To install SCSI CD drivers, press S.
. To install both IDE and SCSI drivers, press B.
d. When the “Welcome to NetWare Server Installation” screenappears, select Accept License Agreement. This indicates thatyou have read the agreement and accept its terms and condi-tions. Num Lock (number lock) must be on in order for cursormovements to be enabled on the keypad.
e. When a screen appears indicating that a valid boot partition wasdetected on the computer’s hard disk, select Continue withExisting Partition.
f. When the JReport Runtime License Agreement screen appears,press F10 to indicate that you have read the agreement andaccept its terms and conditions.
02 9792 ch02 3/17/03 4:08 PM Page 108
Netware 6 Upgrade and Migration C H A P T E R 2
109
3. Select the Upgrade Type. When the “Welcome to the NetWare ServerInstallation” screen appears, perform these tasks:
. In the “Is This an Express Install or a Custom Install?”field, press Enter to switch the value from Express toCustom.
. In the “Is This a New Server, Upgrade, or Pre-Migration?”field, verify that Upgrade is selected.
. Select Continue.
4. Specify the Server Settings. When the Server Settings screen appears,you’ll notice that the following default values are listed:
. Load Server at Reboot: Yes
. Server Set Parameters: Edit
. Backup Startup Directory (Optional): C:\NWSERVER.OLD
Select Continue.
5. Select the Regional Settings. When the Regional Settings screenappears, you’ll notice that default values are listed for the countrycode, code page, and keyboard type. If you are located in the UnitedStates, the default values are
. Country: 001 (USA)
. Code Page: 437 (United States English)
. Keyboard: United States
Review the values listed on this screen and modify them if necessary.Then, select Continue.
Allow the files to copy. If advised that a target file is newer than theone on the CD, select Never Overwrite Newer Files.
6. Select Platform Support. A device driver screen appears, listingautodetected drivers for the following parameters:
. Platform Support Module
. HotPlug Support Module
. Storage Adapters
Review the values listed on this screen and modify them if necessary.Then, select Continue.
Allow the files to copy.
02 9792 ch02 3/17/03 4:08 PM Page 109

Netware 6 Upgrade and MigrationC H A P T E R 2
110
7. Select Storage Devices. A device driver screen appears, listing autode-tected drivers for storage devices.
Review the values listed on this screen and modify them if necessary.Then, select Continue. Allow the files to copy.
8. Select Network Boards and NLMs. A device driver screen appears,listing autodetected drivers for network board(s) and allowing you to(optionally) specify NLMs.
Review the values listed on this screen and modify them if necessary.Then, select Continue.
Next, the installation program copies a number of files to the server(called the preparatory file copy process). The installation programthen loads the GUI-based Installation Wizard, at which point theinstallation interface switches from being text based to graphic based.
9. Enable Cryptography (Conditional).
10. Configure the NetWare Server File System. When the Configure FileSystem screen appears, review the information on the screen, and thenclick Next.
11. View Network Protocols. When the Protocols screen appears, you’llnotice that the existing IP Address and Subnet Mask values are dis-played.
Review the values listed on this screen and modify them if necessary.Then, select Next.
12. Configure DNS.
a. When the Domain Name Service screen appears, perform thesetasks:
. In the Host Name field, verify that WHITE-SRV1 is listed.
. In the Domain field, enter acme.com.
. Leave the Name Server fields empty.
. Select Next.
b. When the Warning screen appears, perform these tasks:
02 9792 ch02 3/17/03 4:08 PM Page 110
Netware 6 Upgrade and Migration C H A P T E R 2
111
. Read the warning indicating that because you have notconfigured Domain Name Service, you will obtain limitedfunctionality from products that require this service.
. Select OK to acknowledge the warning.
c. When the Login to NDS screen appears, perform these tasks:
. Select Browse.
. When the Browse Users dialog box appears, navigate toand select the admin User object, and then select OK.
d. When the Login to NDS screen reappears
. In the Name (Full NDS Context) field, verify that the fulldistinguished name of the admin User object is listed.
. In the Password field, enter acme.
. Select OK.
e. When the Summary screen appears, review the information onthe screen, and then select Next.
13. Configure eDirectory (Conditional). Note: This screen will probablynot appear, because eDirectory already exists on the source server.
14. License the NetWare 6 Server.
a. When the Licenses screen appears, perform one of the followingtasks:
. Insert the NetWare 6 Cryptography/License disk into thefloppy drive. (Be sure to use a unique license disk.) Selectthe appropriate server license file. Make sure you actuallybrowse to and select the server license file, instead of justlisting the drive letter (a common mistake). If you clickthe filename, you’ll notice that the type of license appearsin the Description section.
. If you are using a demo version of the NetWare 6Operating System CD (that is, a version that does not havean associated license disk), use the license file in the NETWARE6/LICENSE/DEMO directory on the CD. If you can’tlocate a license file, mark the “Install without Licenses”check box. Unfortunately, you may experience problemswith features like NDPS, which use multiple connections.
b. Click Next.
02 9792 ch02 3/17/03 4:08 PM Page 111

Netware 6 Upgrade and MigrationC H A P T E R 2
112
15. Install Additional Network Products. When the Components screenappears, select Clear All, and then select Next.
16. Install Novell Certificate Server.
a. When the “Novell Certificate Server 2.21 Objects” screenappears, review the information on the screen, then select Next.
b. When the LDAP Configuration screen appears, select AllowClear Text Passwords, and then select Next.
c. When the eDirectory iManage Install Options screen appears,select Next.
17. Customize the upgrade and finish.
a. When the Summary screen appears, review the list of NetWare 6products to be installed, and then select Finish to complete theupgrade process.
b. The Installation program then performs the main file copy anddisplays the server console screen. (This step may take a while.)
c. When the copying is complete, the Installation Complete win-dow appears. Follow these steps:
. Remove any CDs or floppy disks from your computerdrives.
. Select Yes to reboot the computer.
Phase IV: Postupgrade TasksPerform the following steps at the WHITE-SRV1 server console:
1. To ensure that all your trustees are restored, manually run the back-link process at WHITE-SRV1 server prompt:
SET DSTRACE=ON
SET DSTRACE=+BLINK
SET DSTRACE=*B
2. Switch to Directory Services screen and verify that backlink has com-pleted.
3. Enter RESET SERVER. Wait while the WHITE-SRV1 server restarts.
02 9792 ch02 3/17/03 4:08 PM Page 112
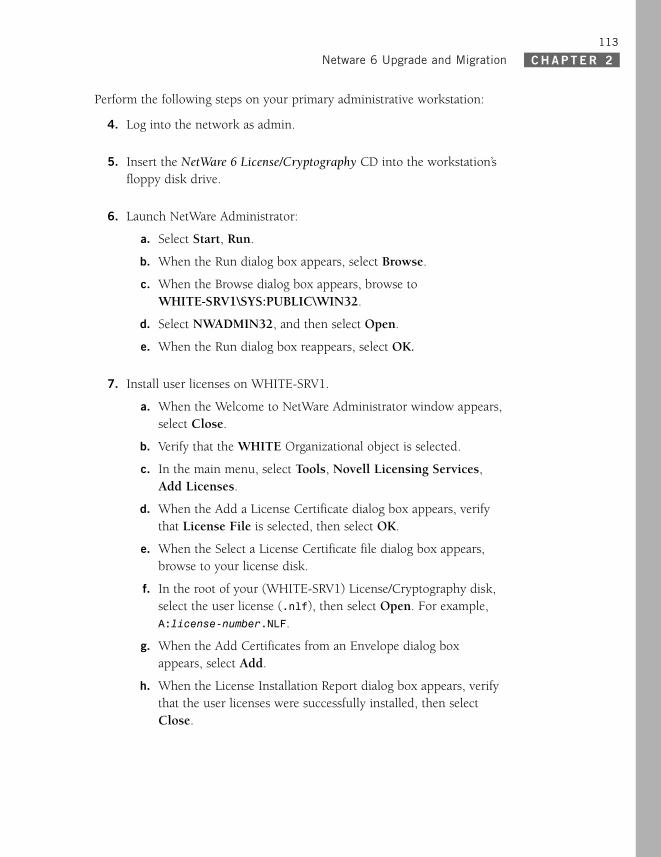
Netware 6 Upgrade and Migration C H A P T E R 2
113
Perform the following steps on your primary administrative workstation:
4. Log into the network as admin.
5. Insert the NetWare 6 License/Cryptography CD into the workstation’sfloppy disk drive.
6. Launch NetWare Administrator:
a. Select Start, Run.
b. When the Run dialog box appears, select Browse.
c. When the Browse dialog box appears, browse to WHITE-SRV1\SYS:PUBLIC\WIN32.
d. Select NWADMIN32, and then select Open.
e. When the Run dialog box reappears, select OK.
7. Install user licenses on WHITE-SRV1.
a. When the Welcome to NetWare Administrator window appears,select Close.
b. Verify that the WHITE Organizational object is selected.
c. In the main menu, select Tools, Novell Licensing Services,Add Licenses.
d. When the Add a License Certificate dialog box appears, verifythat License File is selected, then select OK.
e. When the Select a License Certificate file dialog box appears,browse to your license disk.
f. In the root of your (WHITE-SRV1) License/Cryptography disk,select the user license (.nlf), then select Open. For example,A:license-number.NLF.
g. When the Add Certificates from an Envelope dialog boxappears, select Add.
h. When the License Installation Report dialog box appears, verifythat the user licenses were successfully installed, then selectClose.
02 9792 ch02 3/17/03 4:08 PM Page 113

Netware 6 Upgrade and MigrationC H A P T E R 2
114
Migrating to NetWare 6Test Objectives Covered:
2. Upgrade or migrate to NetWare 6.
3. Troubleshoot your NetWare 6 migration.
NetWare 6 Migration is the ultimate achievement in “nerdiness.” It’s proba-bly the most popular installation method for NetWare 6. After all, there arealready millions of NetWare servers out there—no one wants to start fromscratch. With migration, existing CNEs can simply transfer NDS informationand data files to the new NetWare 6 eDirectory village. The beauty of thissystem is that you don’t have to repopulate it.
The NetWare 6 Migration uses an across-the-wire method for transferringeDirectory information and data from one server to another across the LAN.It requires three machines, each with specific hardware/software require-ments:
. A source server running NetWare 4.11, 4.2, 5.0, 5.1, and/or 6.
. A destination server running NetWare 5.0, 5.1, and/or 6.
. A Windows 98 or Windows NT/2000 workstation running the appro-priate Novell Client.
The NetWare 6 Migration method is the safest upgrade/migration optionbecause the source server—also known as an “escape pod”—remains intact.You can also use it to migrate all or selected information (which is particu-larly useful when dealing with sensitive data files). Furthermore, this multi-faceted migration option allows you to consolidate multiple source serversto a single NetWare 6 machine.
So, how does it work? Good question. All of this fancy across-the-wire foot-work is made possible by the NetWare Migration Wizard. Here’s a quickpreview of the NetWare 6 migration steps we’ll explore in this section:
1. Getting Started
2. Create a Migration Project
3. Volume and Configuration File Migration
4. eDirectory Migration
5. Migration Cleanup
02 9792 ch02 3/17/03 4:08 PM Page 114

Netware 6 Upgrade and Migration C H A P T E R 2
115
In step 1, you jump-start the migration process by preparing the source/tar-get servers and installing the NetWare Migration Wizard. Then, in step 2,you can create your Migration Project. The Migration Project is a databasewizard that stores your migration configuration settings. In steps 3 and 4,you will actually perform the across-the-wire migration using the data youconfigured in the Migration Project database. Finally, the migration endswith some simple housekeeping cleanup chores in step 5.
Now, that wasn’t so bad, was it? So, let’s migrate our old, cranky NetWare5.1 server into a NetWare 6 supermachine.
Step 1: Getting StartedNetWare 6 migration is serious business. As such, it requires some carefulpreparation and you’ll need to accomplish some important premigrationpreparation tasks before you can get started (floppy diskette required).Here’s a quick preview:
. Source Server Preparation—The NetWare 6 Migration process requiresthat you prepare both the source and destination servers in uniqueways. In this first step, we will learn how to prepare the source serverwith ConsoleOne, name space, and DSREPAIR.
. Destination Server Preparation—Then, we will shift our focus to thedestination server. This server must be installed into a temporaryeDirectory tree and prepared for all the exciting new information it isabout to receive.
. Verify the Migration Client—Finally, you’ll need to verify the NovellClient version running on your migration client. This can be accom-plished in a number of ways.
Let’s explore step 1 in more detail. Ready, set, prepare!
Source Server PreparationNetWare 6 Migration requires two types of preparation: Source andDestination. In the Source server preparation phase, you will perform a vari-ety of server housekeeping tasks on the NetWare 4 or 5 server that hosts allyour valuable files, volumes, and eDirectory information.
02 9792 ch02 3/17/03 4:08 PM Page 115
Netware 6 Upgrade and MigrationC H A P T E R 2
116
Let’s start with a closer look at the source-server preparation checklist:
. Use ConsoleOne to verify that you have the Supervisor right to thesource server’s file system and to the source server itself.
. Update the source server with the latest NetWare support pack.Updates are available at http://support.novell.com.
. (Conditional) If you are migrating data from NetWare 4, make surethe source server’s volumes are running long-name space support onall volumes to be copied. To add long-name space support to aNetWare 4.11 or NetWare 4.2 volume, enter the following at the serv-er console:
LOAD LONG
ADD NAME SPACE LONG TO volume name.
. Load DSREPAIR and run the following options:
. Unattended Full Repair
. Time Synchronization
. Report Synchronization Status
. Back up eDirectory and all data.
Destination Server PreparationNext, you must prepare the destination server. This machine is the newcomputer that will receive the data from the source server. As such, it mustbe installed into a temporary, separate eDirectory tree. After that data ismigrated from the source server to the destination server, the destinationserver reboots and the migration wizard modifies the destination server’sAUTOEXEC.NCF file to include the source server’s name and internal IPXnumber or server ID. You don’t have to modify these manually.
Let’s continue with a closer look at the destination server preparation check-list:
. Use ConsoleOne to verify that you have the Supervisor right to thedestination server’s file system and to the server itself.
. Be sure you have created a temporary eDirectory tree with a tempo-rary eDirectory tree name. The temporary name and temporaryeDirectory tree name must not be the same as the source server’s nameor eDirectory tree name; otherwise, the destination server cannotassume the identity of the source server after the migration.
02 9792 ch02 3/17/03 4:08 PM Page 116

Netware 6 Upgrade and Migration C H A P T E R 2
117
. During installation, create volumes on the destination server that arethe same size as, or larger than, volumes on the source server. Volumenames on the destination server must be the same as the volumenames on the source server.
. If migrating from NetWare 4, install and configure IPX. IPX must bebound to the destination server for the migration to work. (You canremove IPX after completing the migration.) IP addresses for thesource server are not migrated. Instead, you manually change themduring migration.
. Install the destination server with the NetWare operating system thatyou are migrating to, and make sure you’ve installed the Pre-Migrationinstallation type. In this case, you are probably migrating to NetWare 6.
. Make sure the destination server’s time is equal to or later than thesource server’s time. This prevents critical time synchronization errorsduring migration.
Migration Wizard migrates compressed volumes. If you are migrating compressedvolumes to uncompressed volumes, Migration Wizard decompresses the volumesduring migration. The decompression process is CPU and time intensive, so allowenough time to complete the operation. Make sure you have room on the uncom-pressed volume to accommodate the source volumes after they are decompressed.
TIP.........................................
.........
.....
Verify the Migration ClientFinally, you’ll need to verify the Novell Client version that is running onyour migration client. The NetWare Migration Wizard can run from either aWindows 98 or Windows NT/2000 workstation. If you are using aWindows 98 workstation, be sure it is running the Novell Client forWindows 98 version 3.3 or higher.
You can determine which version of the client software is running on yourWindows 98 workstation by using any of these three methods:
. Hold down the Alt key while double-clicking the Windows 98Network Neighborhood icon. Select the Novell Client, and then clickProperties.
. Double-click the Network icon in the Windows 98 Control Panel.Select the Novell Client, and then click Properties.
02 9792 ch02 3/17/03 4:08 PM Page 117

Netware 6 Upgrade and MigrationC H A P T E R 2
118
. If you’re running the Novell NetWare 6 Client, right-click the “N” iconnear the right end of the Windows 98 toolbar, which is located at thebottom of your screen, by default. Select the Novell Client Propertiesoption from the popup window that appears.
A Windows NT/2000 client must be running the Novell Client for WindowsNT version 4.8 or higher. The client version should be listed on the title barof the Login dialog box. If these methods don’t work, you’ll probably needto upgrade your client software. Refer to the first lesson of this chapter fordetailed steps.
That’s all there is to it. Consider your three migration machines prepared.Now it’s time to move on to the actual migration process—also known ascreating and implementing the Migration Project.
Step 2: Create a MigrationProjectDuring the first few steps of the NetWare 6 Migration process, you’ll need tocreate and implement a Migration Project. The Migration Project is a data-base wizard that stores your migration configuration settings. First, we willcreate a Migration Project using the NetWare Migration Wizard. Downloadand install Migration Wizard from the NetWare 6 operating system CD orfrom the NetWare section of the Novell Software Downloads web site. Youcan also gain valuable migration knowledge at the NetWare 6 MigrationWizard documentation site (as shown in Figure 2.21). Then, run MigrationWizard on your migration workstation from the following default locationStart, Programs, Novell, NetWare Migration Wizard, NetWare MigrationWizard.
Next, read the Welcome screen, click OK, and select Create a New Projectfrom the Novell NetWare Migration Wizard Startup window (as shown inFigure 2.22).
02 9792 ch02 3/17/03 4:08 PM Page 118
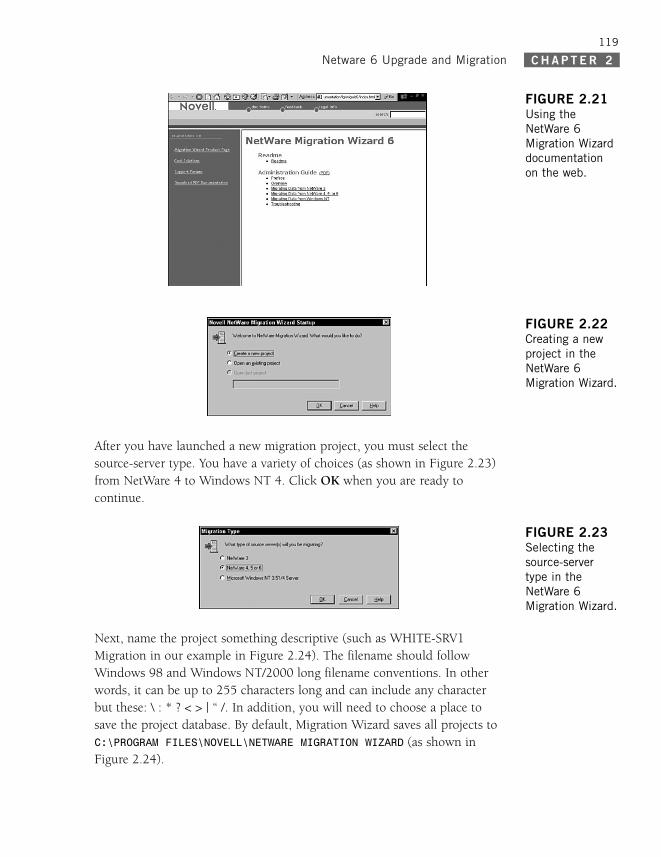
Netware 6 Upgrade and Migration C H A P T E R 2
119
After you have launched a new migration project, you must select thesource-server type. You have a variety of choices (as shown in Figure 2.23)from NetWare 4 to Windows NT 4. Click OK when you are ready to continue.
FIGURE 2.21Using theNetWare 6Migration Wizarddocumentationon the web.
FIGURE 2.22Creating a newproject in theNetWare 6Migration Wizard.
FIGURE 2.23Selecting thesource-servertype in theNetWare 6Migration Wizard.
Next, name the project something descriptive (such as WHITE-SRV1Migration in our example in Figure 2.24). The filename should followWindows 98 and Windows NT/2000 long filename conventions. In otherwords, it can be up to 255 characters long and can include any characterbut these: \ : * ? < > | “ /. In addition, you will need to choose a place tosave the project database. By default, Migration Wizard saves all projects toC:\PROGRAM FILES\NOVELL\NETWARE MIGRATION WIZARD (as shown inFigure 2.24).
02 9792 ch02 3/17/03 4:08 PM Page 119

Netware 6 Upgrade and MigrationC H A P T E R 2
120
Now it’s time to select your source and destination migration servers. First,navigate to the correct tree, and select your source server from the graphicalwindow in Figure 2.25. Then, select your destination server in the same way(as shown in Figure 2.26). In our example, the source server is WHITE-SRV1 and the destination server is WHITE-SRV2.
FIGURE 2.24Naming yourproject file in theNetWare 6Migration Wizard.
FIGURE 2.25Selecting asource server inthe NetWare 6Migration Wizard.
FIGURE 2.26Selecting a desti-nation server inthe NetWare 6Migration Wizard.
Finally, save your project and access the Project Window by selectingCreate. All finished. That was easy. Now let’s jump into action by imple-menting our new project—starting with volumes and configuration files.
02 9792 ch02 3/17/03 4:08 PM Page 120

Netware 6 Upgrade and Migration C H A P T E R 2
121
Step 3: Volume andConfiguration File MigrationAfter you have created your NetWare 6 Migration Project, the ProjectWindow magically appears. Check it out in Figure 2.27. The ProjectWindow is a checklist (with associated buttons) for the four main tasks ofNetWare 6 Migration:
. Copy Volumes—Copy volumes from the source server to the destina-tion server. You can copy a volume as many times as needed.
. Edit Configuration Files—Compare the configuration files between thesource and destination servers. You can edit the destination configura-tion files.
. Begin NDS Migration—After you complete the tasks above, migrateNDS file from the source server to the destination server. The sourceserver will be brought down and the destination server restarted.
. Finish NDS Migration—Upgrade the Schema, fix volume objects, andrestore trustees to the destination server after it has restarted.
FIGURE 2.27Viewing themigration tasklist in theNetWare 6Migration Wizard.
Let’s continue our migration journey with the first two tasks: copying vol-umes and editing configuration files.
Copying Volumes During NetWare 6MigrationFirst, in the Migration Project Window, you will click the Copy Volumesbutton. When you do, the Migration Wizard backs up your directory andfile trustees and saves them in files located on the source and the destination
02 9792 ch02 3/17/03 4:08 PM Page 121

Netware 6 Upgrade and MigrationC H A P T E R 2
122
server. Once the migration is complete, the Wizard restores the trusteerights.
When you are copying volumes during migration, you don’t need to copy all vol-umes at the same time. The Migration Wizard allows you to select volumes tocopy now and then you can copy other volumes later by reopening the project file.Remember that open files are not migrated.
TIP.........................................
.........
.....
To start the volume copying process, simply choose each volume name fromthe list provided and then select Yes or No (Figure 2.28). If you have bigvolumes or slow LAN connections, or if you want to reconfigure your databy putting existing directories into different folders on the destination serv-er, consider using a backup tape to copy your volumes. However, don’trestore the source server’s SYS directories, because these were already creat-ed during the destination server’s NetWare 6 installation process.
FIGURE 2.28Selecting asource volume inthe NetWare 6Migration Wizard.
Next, you will need to decide whether you want to copy the source server’sSYS directories to the destination server’s SYS:SYS.MIG directory. For safetyreasons, Migration Wizard never overwrites the SYS directories on the desti-nation server. If there are files in the source server’s SYS directories that youwant to use on the destination server, copy them from SYS:SYS.MIG into theappropriate SYS directory on the destination server at the end of the migra-tion.
At this point, the Migration Wizard will ask you how you want to resolveduplicate filenames between the source and destination servers. You canchoose one of the following options (also shown in Figure 2.29):
02 9792 ch02 3/17/03 4:08 PM Page 122
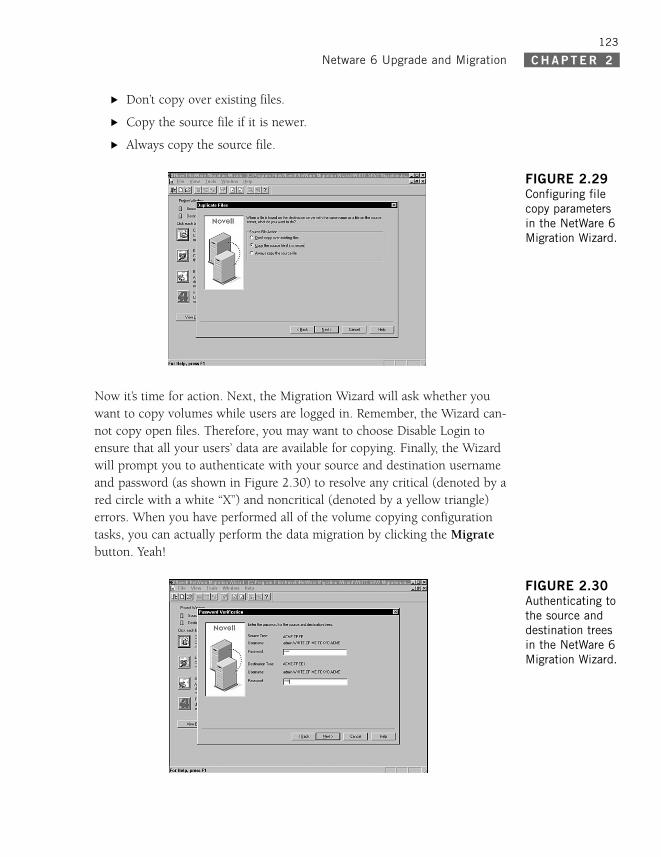
Netware 6 Upgrade and Migration C H A P T E R 2
123
. Don’t copy over existing files.
. Copy the source file if it is newer.
. Always copy the source file.
FIGURE 2.29Configuring filecopy parametersin the NetWare 6Migration Wizard.
Now it’s time for action. Next, the Migration Wizard will ask whether youwant to copy volumes while users are logged in. Remember, the Wizard can-not copy open files. Therefore, you may want to choose Disable Login toensure that all your users’ data are available for copying. Finally, the Wizardwill prompt you to authenticate with your source and destination usernameand password (as shown in Figure 2.30) to resolve any critical (denoted by ared circle with a white “X”) and noncritical (denoted by a yellow triangle)errors. When you have performed all of the volume copying configurationtasks, you can actually perform the data migration by clicking the Migratebutton. Yeah!
FIGURE 2.30Authenticating tothe source anddestination treesin the NetWare 6Migration Wizard.
02 9792 ch02 3/17/03 4:08 PM Page 123

Netware 6 Upgrade and MigrationC H A P T E R 2
124
Editing Configuration Files During NetWare6 MigrationIn the second task to be done from the Migration Project Window, you willclick the Edit Configuration Files button. When you do, the MigrationWizard displays the source server and destination server configuration files(with .NCF and .CFG extensions). These files contain default LOAD statementsand parameters. If you are editing the AUTOEXEC.NCF file, make sure the fileis closed before you migrate your eDirectory database.
To edit a specific configuration file, simply choose it and select Edit File.Then, copy and paste the commands from the configuration file on thesource server to the corresponding configuration file on the destination serv-er. When you finish modifying your configuration file, select Save & Close.
If you intend to change the IP address on your destination server to be the sameas the IP address of your source server, edit your configuration files and changethe IP address in two places: AUTOEXEC.NCF and SYS:ETC/HOSTNAME.Furthermore, if you use INETCFG to assign IP addresses, change the IP addressesafter the migration is complete.
TIP.........................................
.........
.....
Now you have completed the first half of the Project Migration journey.And, your life is about to get a lot more interesting. Next, we will migratethe most critical NetWare 6 component of all: eDirectory. Go team!
Step 4: eDirectory MigrationAfter you have finished migrating the data volumes and configuration files,it’s time to tackle eDirectory. During this step, the source server is broughtdown and the destination server is restarted. Furthermore, the destinationserver takes on the source server’s name and place in your network. Prettycool, huh? Following is a preview of the changes that Migration Wizardmakes to the destination server’s AUTOEXEC.NCF file:
. The server name changes to the name of the source server.
. The time zone is changed to the time zone in the source server’sAUTOEXEC.NCF file.
02 9792 ch02 3/17/03 4:08 PM Page 124

Netware 6 Upgrade and Migration C H A P T E R 2
125
. The server ID changes to the IPX internal network number or serverID in the source server’s AUTOEXEC.NCF file.
. The default time server type is changed to the value stored in thesource server’s AUTOEXEC.NCF file.
. The bindery context is changed to the bindery context stored insource server’s AUTOEXEC.NCF file.
Let’s continue on the Project Migration journey.
Beginning NDS MigrationYour third task using the Migration Project Window is to click the BeginNDS Migration button. When you do, the Migration Wizard requestslicensing information and then updates the source server’s Schema toinclude the eDirectory classes of the default applications that are installed onthe destination server. If you select No to update the Schema, MigrationWizard will compare the source and destination Schemas instead. This com-parison helps you to determine how to extend your Schema manually. ClickYes to continue.
Next, the Wizard will ask you if your eDirectory tree is healthy. This screenis a simple reminder to run DSREPAIR prior to migration. The MigrationWizard does not prevent you from continuing if you have not runDSREPAIR; however, the migration might not complete successfully if youreDirectory tree is unhealthy. Click Yes to continue.
If you are migrating from NetWare 4 running Border Manager, or NetWare5, or NetWare 6, you will be prompted to copy and transfer the NICI con-figuration files from the source server to the destination server. Begin thisprocess by selecting Copy NLM. When you see the confirmation message,click OK to continue. Then, NICI will be automatically configured.
Now it’s time for action. Next, the Migration Wizard will delete all user con-nections (except yours) to the source and destination servers. Click Next tocontinue. Finally, the Wizard will prompt you to authenticate with yoursource and destination username and password and resolve any critical(denoted by a red circle with a white “X”) and noncritical (denoted by a yel-low triangle) errors. When you have performed all of the eDirectory migra-tion tasks, you can actually perform the migration by clicking the Migratebutton.
02 9792 ch02 3/17/03 4:08 PM Page 125

Netware 6 Upgrade and MigrationC H A P T E R 2
126
Finishing NDS MigrationNext, you will click the Finish NDS Migration button in the MigrationProject Window. When you do, the Migration Wizard displays the ContinueNDS Migration window. Make sure to validate that the former destinationserver has restarted, that it has the identity of the source server, and thatlicensing is installed before you continue.
Next, you must ensure that eDirectory is synchronized on all servers in thetree. To check eDirectory synchronization status, enter DSREPAIR at the serv-er console and run the Report Synchronization Status and TimeSynchronization options. If the destination server does not contain aRead/Write or Master replica, you must check eDirectory synchronization byrunning DSREPAIR on another server in the eDirectory tree that has one ofthese replicas.
Then, at the end of the NetWare 6 Migration, verify that you have complet-ed these tasks by selecting Yes. Finally, authenticate to the source tree,resolve any critical and/or noncritical errors, and, complete the migration byclicking Continue.
At this point, the Migration Complete dialog box appears. Click ViewSuccess Log and review the information listed. Click the close button (X) toclose the window. Again, the Migration Complete dialog box reappears.Click Done.
That’s all there is to it!
REALWORLD
..................................................
.....
During the NetWare 6 migration, your trustee assignments might not be fullyrestored to User and Group objects the first time you run Finish NDS Migration.This is because NSS volumes depend on the NDS backlink process to create IDinformation on objects before trustees can be associated with those objects.Therefore, you must verify that the backlink process is complete before runningFinish NDS Migration.
If you have run Finish NDS Migration and are missing trustees, you can manu-ally complete the backlink process and rerun Finish NDS Migration. Reboot theserver after this step completes. To manually run the backlink process, enterthe following commands at the server console:
SET DSTRACE=ON
SET DSTRACE=+BLINK
SET DSTRACE=*B
02 9792 ch02 3/17/03 4:08 PM Page 126
Netware 6 Upgrade and Migration C H A P T E R 2
127
Step 5: Migration CleanupYou’re all finished. The NetWare 6 Migration process was a success.However, you can’t run outside and play just yet. First, you must performsome postmigration cleanup chores, namely
. Modify login scripts and printing configurations.
. Check migrated user and file information.
. Check third-party applications.
. Upgrade Novell clients.
. Run DSREPAIR on the destination server and select Unattended FullRepair.
. Reinstall applications that have files or NLMs associated with theseSYS directories: SYSTEM, PUBLIC, MAIL, ETC, and NETBASIC.
. If your destination server is running NetWare 5.1 instead of NetWare6, you might see warnings referring to SMS, LDAP, Novell CertificateServer, or NetWare Management Portal. Ignore the warnings and rein-stall the products after eDirectory is migrated.
. Install the latest NetWare support pack. This ensures the latest code.The latest support packs are available at the Novell Support web site.
Now you’re finished—you somehow pulled it off. The NetWare 6 Migrationwas a little trickier than the Installation and/or Upgrade methods, but cer-tainly more entertaining.
Migration is the most popular NetWare 6 installation method because itsupports the millions of NetWare servers already in existence. Could youimagine the hassle of rebuilding these operating systems from scratch? Nothanks, it’s not for us.
NetWare 6 MigrationTroubleshootingSo, how did the migration go? Did everything work perfectly? Be honest.Just in case you ran into a few problems, let’s take a moment to exploresome time-proven NetWare 6 migration troubleshooting solutions. You’llthank us later.
02 9792 ch02 3/17/03 4:08 PM Page 127

Netware 6 Upgrade and MigrationC H A P T E R 2
128
The three main areas where you may run into trouble during NetWare 6migration are
. General Migration Problems
. Volume Copy Problems
. eDirectory Migration Problems
Let’s take a closer look.
Solving General Migration ProblemsIn general, you may run into migration problems related to connectionissues, NUWAGENT.NLM, NICI, and SMDR. To eliminate general connectionproblems, make sure your source and destination servers have enough avail-able server and workstation licenses to complete the migration. Also, makesure that the eDirectory User you are using has no concurrent connectionlimitations and has Supervisor rights to the source server’s eDirectory object.
If you have problems establishing or maintaining connections between yourservers and workstations, reboot the workstation to clear the cache in theNovell client. Also, you may want to map a drive to the server instead oflogging in. This is especially useful when connecting with IPX. Finally, tryconnecting to the server and not the eDirectory tree by entering only thename of the server and leaving the tree name and context blank.
NUWAGENT.NLM is the NLM that the Migration Wizard uses to do much of itswork. If you get errors that NUWAGENT.NLM isn’t loading, try manually load-ing NUWAGENT.NLM from the server console. Next, enter SMDR -NEW at thedestination server console. This re-creates the SMDR configuration andallows NUWAGENT.NLM to load.
If you get NICI errors when eDirectory loads or when you copy the NICIfiles, it might mean that your NICI files are corrupt. To correct the problem,copy the .NFK file from server’s license disk to the server’s SYS:SYSTEM direc-tory, rename it NICIFK, and run NREPAIR.NLM. This useful NICI trou-bleshooting tool is available on Novell’s web site:
http://download.novell.com
Sometimes the destination SMDR.NLM program cannot make a connection tothe source server. To correct this problem, try the following:
02 9792 ch02 3/17/03 4:08 PM Page 128

Netware 6 Upgrade and Migration C H A P T E R 2
129
. Reboot the source server.
. Unbind the protocol you are not using from the destination server. Forexample, if you are using IPX for the migration but IP is bound on thedestination server, unbind the IP protocol on the destination serverduring migration.
. If the Migration Wizard cannot load the correct TSA.NLM file on yourdestination server, load it from the destination server console and fol-low the onscreen instructions.
. At the destination server console, load SMDR.NLM and enter SMDR -NEWto solve SMS problems.
Solving Volume Copy ProblemsIf you are having problems copying source volumes to your new destinationserver, try these solutions:
. Enable login on both the destination and source servers. If you disablelogin before you start the file copy, the servers cannot login to eachother to migrate the files. If you select to disable login in the MigrationWizard, the Migration Wizard disables login for you during the migra-tion.
. If files are copying very slowly, make sure the servers and workstationare configured at the lowest common LAN speed. Verify that the net-work boards and anything in between are all hard-coded to eithercommunicate half-duplex or full-duplex.
. If compressed files are migrated to uncompressed volumes, file copymight be slower.
Solving eDirectory Migration ProblemseDirectory migration is the cornerstone of NetWare 6 Migration. It is a com-plex and sophisticated process involving thousands (sometimes millions) ofnetwork objects, resources, and configurations. Therefore, you must takegreat care in ensuring the success of your eDirectory Migration.
If an unfortunate catastrophe occurs and your eDirectory migration fails,you will need to restore the source and destination servers to their originalstate and try again. The five steps necessary to solve an eDirectory failure atthe end of NetWare 6 Migration are
02 9792 ch02 3/17/03 4:08 PM Page 129
Netware 6 Upgrade and MigrationC H A P T E R 2
130
1. Restore the Source Server to Its Original Configuration
2. Remove eDirectory from the Destination Server
3. Remove eDirectory from the Source Server
4. Restore eDirectory to the Source Server
5. Reinstall the Destination Server
Ready, set, restore!
If your eDirectory Migration fails before “Begin NDS Migration” is completed andthe destination server does not reboot and take on the name and identity of thesource server, complete the tasks in “Restore the Source Server to Its OriginalConfiguration.”
On the other hand, if your eDirectory Migration fails after “Begin NDS Migration”and the destination server reboots with the name and identity of the source server,complete all five troubleshooting solution steps in this section.
TIP.........................................
.........
.....
Restore the Source Server to Its Original ConfigurationTo restore the source server to its original state, do the following:
1. If your source server is running NetWare 4, enter LOAD INSTALL atthe console. If your source server is running NetWare 5 (or later),enter NWCONFIG at the server console.
2. Select Directory Options, Directory Backup and Restore, RestoreLocal DS Information after Hardware Upgrade.
3. Press F3 and enter SYS:SYSTEM\NUW30\NDSBU when promptedfor the location of the backup files. eDirectory is now restored to thesource server.
Remove eDirectory from the Destination ServerTo remove eDirectory from the destination server, do the following:
1. At the destination server console, enter NWCONFIG. SelectDirectory Options, Remove Directory Services from This Server.Press Enter when you see a warning instructing you to not removeeDirectory. Ignore all other errors during the removal of eDirectory.Finally, select Yes to remove eDirectory.
02 9792 ch02 3/17/03 4:08 PM Page 130
Netware 6 Upgrade and Migration C H A P T E R 2
131
2. Enter the admin username and password. To reference a differentobject, press Enter. This object is used when eDirectory is restored tothe source server. Do not press Esc. If you do, the server referencesyou entered are not saved or restored to the server.
3. As the placeholder object distinguished name, enter the full adminusername. As the distinguished name to change from, enter [Root]. Ifthe information about a single reference time source appears, reviewthe information and press Enter. If your server holds the Master copyof a replica, you will receive a warning. Press Enter to continue.Designate another server to hold the Master replica, and complete theprocess.
4. Return to NWCONFIG and verify that eDirectory was removed by select-ing Remove Directory Services from This Server. If a messageappears saying that eDirectory has been removed, bring the destina-tion server down and continue with “Remove eDirectory from theSource Server.”
Remove eDirectory from the Source ServerTo remove eDirectory from the source server, do the following:
1. Restart the source server by entering SERVER at the DOS commandprompt.
2. If your source server is running NetWare 4, enter LOAD INSTALL -DSREMOVE. If your source server is running NetWare 5 (or later),enter NWCONFIG -DSREMOVE.
3. Select Directory Options, Remove Directory Services from ThisServer. To skip past warning screens, press Enter. Then, select Yes toremove eDirectory.
4. When the INSTALL or NWCONFIG menu appears again, selectRemove Directory Services again. If a message indicates thateDirectory is removed, continue with the next step, “RestoreeDirectory to the Source Server.”
Restore eDirectory to the Source ServerWhen you removed eDirectory from the source server, you removed theserver from any replica rings that held a partition of the source server. Nowyou must complete the following procedure to restore eDirectory to thesource server and, ultimately, you must retry the NetWare 6 Migration:
02 9792 ch02 3/17/03 4:08 PM Page 131

Netware 6 Upgrade and MigrationC H A P T E R 2
132
1. If your source server is running NetWare 4, enter LOAD INSTALL atthe console. If your source server is running NetWare 5 (or later),enter NWCONFIG at the server console.
2. Select Directory Services, Install Directory Services onto ThisServer. Then, select the eDirectory tree where the source server exist-ed prior to migration. Next, select a time zone and time configurationparameters. Ignore any warnings or errors that appear during therestoration of eDirectory, but record the errors before pressing Esc.
3. Enter the admin username and password. Enter the context where thesource server existed prior to migration and press F10.
4. Wait while the server synchronizes with the eDirectory tree (whichmight take a little while). Return to the INSTALL or NWCONFIG utilityand select Directory Options, Select Directory Back Up andRestore, Restore Local DS Information after Hardware Upgrade,Restore Reference from another Object to This Server. Thisrestores all references to the Server object you assigned when youremoved eDirectory from the destination server. Press Enter to contin-ue.
5. For the placeholder object distinguished name, enter the full adminusername. For the distinguished name to change from, enter [Root].Exit NWCONFIG or INSTALL.
6. At the server console of the source server, enter LOAD DSREPAIR.Select Unattended Full Repair, Advanced Options, Check VolumeObjects and Trustees. Enter the admin username and password, andexit DSREPAIR.
7. At the workstation where you performed the migration, open yourproject. Then, select Restore Trustees to restore the trustee assign-ments. If the source server held the master replica of any partitionsand you want to restore these partitions prior to migrating eDirectoryagain, use DSREPAIR to re-create them. The source server is nowrestored to its original configuration. Yeah!
Reinstall the Destination ServerTo perform the migration again, reinstall the NetWare 6 operating system onthe destination server. If your server is imaged, you can restore the imagerather than reinstalling the software. Then, try the migration again.
Congratulations! You did it! You passed Advanced Nerdiness 101 with flyingcolors.
02 9792 ch02 3/17/03 4:08 PM Page 132
Netware 6 Upgrade and Migration C H A P T E R 2
133
Now you’re a certified member of “NLM” (Nerd Liberation Movement)—what an honor. We’ve been through a lot together today. In this chapter, webuilt on the foundation of NetWare 6 installation with two more excitingoptions:
. NetWare 6 Upgrade—We learned how to transform boring NetWare 4and 5 servers into magnificent, sparkling Internet-savvy NetWare 6roadsters. We evolved existing NetWare servers to NetWare 6 withoutpurchasing additional equipment. With the NetWare 6 Upgrade, alleDirectory information and data stayed right where it was—on theNetWare partition. This was all accomplished with 5 magical phasesand 18 time-proven steps.
. NetWare 6 Migration—We built a NetWare 6 “escape pod” by migrat-ing existing servers to NetWare 6 across-the-wire. The graphicalNetWare Migration Wizard allowed us to customize migration infor-mation and consolidate multiple servers to a single NetWare 6machine. It doesn’t get any more exciting than this. And just think—itwas all accomplished with five simple steps.
So, there you have it. As an official member of “NLM” you can install,upgrade, and migrate servers anywhere in the world. This is a good thing,because NetWare 6 spans the globe. Now we’re ready to take our newNetWare 6 supercomputer to the next level: eDirectory 8.6. After all, youcan’t cruise the worldwide Infobahn without a supercharged roadster.
Ready, set, burn rubber!
02 9792 ch02 3/17/03 4:08 PM Page 133
Netware 6 Upgrade and MigrationC H A P T E R 2
134
Lab Exercise 2.2: Migrate from NetWare5.1 to NetWare 6In this lab exercise, you will perform these tasks in the following five phases:
1. Getting Started
2. Create a Migration Project
3. Volume and Configuration File Migration
4. eDirectory Migration
5. Migration Cleanup
In this lab exercise, you will need these components:
. The WHITE-SRV1 server from Lab Exercise 2.1. (This will be themigration “source” server.)
. A (second) server-class computer that meets (or exceeds) the mini-mum requirements for running the NetWare 6 operating system. Referto the “Hardware Requirements” section in Chapter 1 for additionaldetails. (This will become the migration “destination” server, with atemporary server name of WHITE-SRV2, in a temporary tree calledACME-TREE1.)
. An administrative workstation running Windows 98 or Windows NT4/2000 that meets (or exceeds) the minimum hardware requirementsfor a NetWare 6 administrative workstation.
. A NetWare 6 Operating System CD.
. A unique NetWare 6 License/Cryptography disk (that is different fromthe one you used to install the WHITE-SRV1 server).
Getting StartedLet’s start by preparing the source server.
02 9792 ch02 3/17/03 4:08 PM Page 134
Netware 6 Upgrade and Migration C H A P T E R 2
135
Preparing the Source ServerPerform these tasks on your primary administrative workstation:
1. Use ConsoleOne to verify that the admin User object has Supervisorrights to the source Server object (that is, WHITE-SRV1) and its filesystem.
2. Install the latest NetWare 6 service pack on WHITE-SRV1 (because itis a NetWare 6 server). See Lab Exercise 2.1 for detailed instructionson how to download and install a NetWare service pack.
3. Because the source server is not a NetWare 4 server, you don’t have toworry about adding long name space support to the volumes.
4. Load DSREPAIR with the following options:
. Unattended Full Repair
. Time Synchronization
. Report Synchronization Status
Verify that each test finishes with no errors. See Lab Exercise 2.1 formore detailed instructions on running these tests.
5. Back up eDirectory and all server data. Because you’re using a nonpro-duction (that is, “practice”) server, you can skip this step.
Preparing the Destination ServerPerform these tasks at the WHITE-SRV2 (destination) server console:
1. Use ConsoleOne to verify that the admin User object will haveSupervisor rights to the source Server object (that is, WHITE-SRV2)and its file system.
2. Use the parameters in Table 2.2 to install NetWare 6 on the WHITE-SRV2 server. During the installation process
. Do remove and re-create the DOS partition.
. Do remove and re-create the NetWare partition and SYS: vol-ume.
. During the installation process, make sure that you create vol-umes on the destination server that are the same as, or largerthan, the volumes on the source server.
02 9792 ch02 3/17/03 4:08 PM Page 135
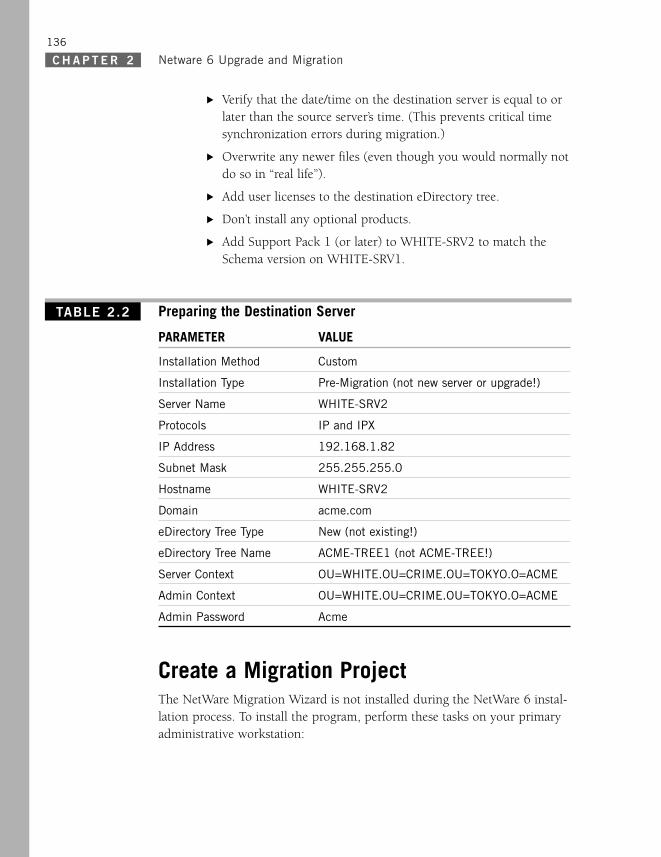
Netware 6 Upgrade and MigrationC H A P T E R 2
136
. Verify that the date/time on the destination server is equal to orlater than the source server’s time. (This prevents critical timesynchronization errors during migration.)
. Overwrite any newer files (even though you would normally notdo so in “real life”).
. Add user licenses to the destination eDirectory tree.
. Don’t install any optional products.
. Add Support Pack 1 (or later) to WHITE-SRV2 to match theSchema version on WHITE-SRV1.2.2
Preparing the Destination Server
PARAMETER VALUE
Installation Method Custom
Installation Type Pre-Migration (not new server or upgrade!)
Server Name WHITE-SRV2
Protocols IP and IPX
IP Address 192.168.1.82
Subnet Mask 255.255.255.0
Hostname WHITE-SRV2
Domain acme.com
eDirectory Tree Type New (not existing!)
eDirectory Tree Name ACME-TREE1 (not ACME-TREE!)
Server Context OU=WHITE.OU=CRIME.OU=TOKYO.O=ACME
Admin Context OU=WHITE.OU=CRIME.OU=TOKYO.O=ACME
Admin Password Acme
Create a Migration ProjectThe NetWare Migration Wizard is not installed during the NetWare 6 instal-lation process. To install the program, perform these tasks on your primaryadministrative workstation:
TABLE 2.2
02 9792 ch02 3/17/03 4:08 PM Page 136

Netware 6 Upgrade and Migration C H A P T E R 2
137
1. Insert the NetWare 6 Operating System CD-ROM into the worksta-tion’s CD-ROM drive.
2. Exit any Windows applications that are running on your workstation.
3. Launch the Upgrade Wizard installation program
a. Select Start, Run.
b. When the Run dialog box appears, select Browse.
c. When the Browse dialog box appears, navigate to the CD drive,and then select the\PRODUCTS\MGRTWZD\MGRTWZD.EXE self-extractingexecutable and select Open. (In some cases, your file may be\PRODUCTS\UPGRDWZD\UPGRDWZD.EXE).
d. When the Run dialog box reappears, select OK to execute thefile.
e. Wait while the files are extracted.
f. Wait while the InstallShield Wizard is prepared.
4. When the Choose Setup Language dialog box appears, leave Englishas the language, and then select OK.
5. When the Welcome dialog box appears, select Next.
6. When the Software License Agreement appears, review the agreement,then select Yes to accept its terms and conditions.
7. When the Choose Destination Location dialog box appears, leave thedefault location and select Next.
8. When the Setup Complete dialog box appears, select Finish.
9. Select Start, Programs, Novell NetWare Migration Wizard,NetWare Migration Wizard. When the About Novell NetWareMigration Wizard window appears, review the information on thescreen, and then select OK.
10. When the Novell NetWare Migration Wizard Startup window appears,verify that Create a New Project is selected, then select OK.
11. When the Migration Type window appears, verify that NetWare 4, 5,or 6 is selected, and then select OK.
02 9792 ch02 3/17/03 4:08 PM Page 137

Netware 6 Upgrade and MigrationC H A P T E R 2
138
12. When the Create Project: Setup Tasks dialog box appears, select ViewSetup Tasks.
13. When your default web browser launches and takes you to theMigration Wizard 6 online documentation web site:
a. Select Migration Data from NetWare 4, 5, or 6 and make sureyou have completed the system and software requirements in“Meet System and Software Requirements.”
b. Close your browser.
14. When the Create Projects: Setup Tasks window reappears, select Next.
15. When the Novell NetWare Migration Wizard Startup window appears
a. In the Project filename field, enter WHITE-SRV1 Migration.
b. Leave the default location in the Location field. (By default, theMigration Wizard saves all projects to the C:\PROGRAMFILES\NOVELL\NETWARE MIGRATION WIZARD directory.)
c. Select Next.
16. When the Select the Source NDS Tree window appears, verify thatACME-TREE is selected, then select Next.
17. When the Select the Source Server window appears, select theWHITE-SRV1 server, and then select Next.
18. When the Select the Destination NDS Tree window appears, verifythat ACME-TREE1 is selected.
19. When a Novell Login window appears
. In the Username field, enter admin.
. In the Password field, enter acme.
. Select the browse button to the right of the Server field. Whenthe Server window appears, select WHITE-SRV2, and thenselect OK, and finally, Next.
20. When the Select the Destination Server window appears, selectWHITE-SRV2, and then choose Next.
02 9792 ch02 3/17/03 4:08 PM Page 138

Netware 6 Upgrade and Migration C H A P T E R 2
139
Volume and Configuration File UpgradeWhen the Create Project dialog box appears, select Create. Now we willbegin upgrading volumes and configuration files.
Copying Volumes1. When the Project window appears, select Copy Volumes.
2. When the Select Volumes to Copy dialog box appears:
. Verify that volume SYS is selected.
. In the Copy This Volume section, verify that Yes is selected.
. Select Next.
3. When the Copy SYS Directories dialog box appears, leave the defaultsand select Next.
4. When the Duplicate Files dialog box appears, leave the default ofCopy the Source File if it is Newer, and then select Next.
5. When the Disable Login Dialog box appears, select Disable Login,and then select Next.
6. When the Password Verification window appears, in both Passwordfields, enter acme, then select Next.
7. When the Error Resolution window appears, resolve any critical errorsor warnings. (Red circles with a white “X” denote critical errors; yel-low triangles denote noncritical ones.) When you’re done resolvingerrors, select Next.
8. When the Ready to Copy Files dialog box appears, select Migrate.
9. When the Backing Up the Trustees dialog box appears, allow theprocess to continue.
10. When the Copy Volumes Status dialog box appears
a. Select View Error Log.
b. Select View Success Log.
c. Select Done.
02 9792 ch02 3/17/03 4:08 PM Page 139
Netware 6 Upgrade and MigrationC H A P T E R 2
140
Edit Configuration FilesIf you wanted to edit any configuration files, you could select EditConfiguration files in the Project window. Because you don’t want to editany configuration files, just skip this step.
eDirectory MigrationNow, you are ready for eDirectory migration. This is the fun part. Let’s startby executing our new Migration Project.
Beginning NDS Migration1. In the Project Window, select Begin NDS Migration.
2. When the Migrate NDS dialog box appears, back up all volumes thatyou are not planning to migrate and complete the following tasksbefore continuing:
. Verify that all volume data migrated successfully.
. Verify that all critical errors from the file copy are resolved.
. Verify that the servers in your source tree are in time sync andthat eDirectory is synchronized, then select Next.
3. Insert the NetWare 6 License/Cryptography disk into the floppy drive.Browse to the path containing the license. Select the license, and thenselect Next.
4. When the Update Schema dialog box appears, verify that Yes is select-ed, and then select Next.
5. When the Verify Novell Directory Services Tree dialog box appears,select Yes to verify that your source server is functioning correctly, andthen select Next.
6. If the Copy NICI Configuration Files dialog box appears, select CopyNLM, and then select Next.
7. When the NUWNICI.NLM Copied dialog box appears, indicating thatthe NUWNICI.NLM file was copied from the source server to the destina-tion server, select OK, then select Next.
02 9792 ch02 3/17/03 4:08 PM Page 140
Netware 6 Upgrade and Migration C H A P T E R 2
141
8. When the Copy NICI Configuration Files (Continued) dialog boxappears, follow the onscreen directions to copy the NICI files from thesource server to the destination server. (If NICI errors appear wheneDirectory is attempting to load or when you copy the NICI files, con-firm that PKI.NLM loads on the destination server.)
9. When the Delete Connections dialog box appears, delete all user con-nections to the source and destination server (except, of course, yourown), and then select Next.
10. When the Password Verification dialog box appears, enter the pass-words for the source and destination trees, then select Next.
11. When the Migrate NDS Verification Results window appears, resolveany critical errors or warnings on the Migrate NDS Verification Resultswindow, then select Next.
12. When the Ready to Migrate NDS dialog box appears, select Migrate.When the migration is done, the source server is brought down andthe destination server reboots and assumes the name and identify ofthe source server.
13. The Migration Wizard modifies the following lines in the destinationserver’s AUTOEXEC.BAT:
. The server name is changed to the name of the source server.
. The time zone is changed to the time zone found in the sourceserver’s AUTOEXEC.NCF file.
. The server ID changes to the IPX internal net value or server IDstored in the source server’s AUTOEXEC.NCF file.
. The default time server type is changed to the value found in thesource server’s AUTOEXEC.NCF file.
. The bindery context is changed to the bindery context locatedin the source server’s AUTOEXEC.NCF file.
14. When the Migrate NDS Verification Results dialog box appears, viewthe Error Log and Success Log, and then select Done.
15. Check the destination server and verify that it has restarted and takenon the name of the source server.
16. Reboot your workstation and log into the former destination server.
02 9792 ch02 3/17/03 4:08 PM Page 141
Netware 6 Upgrade and MigrationC H A P T E R 2
142
17. To ensure that all your trustees are restored
a. Manually run the backlink process at WHITE-SRV1 serverprompt:SET DISGRACE=ON
SET DSTRACE=+BLINK
SET DSTRACE=*B
b. Switch to Directory Services screen and verify that backlink hascompleted.
c. Repeat this process until no more user or group objects appearin the backlinked list on the Directory Services screen.
d. Enter RESET SERVER. Wait while the WHITE-SRV1 serverrestarts.
Finishing NDS Migration1. To complete the NDS migration process, start the Migration Wizard
and select Open Last Project. Click OK. In the Project Window,select Finish NDS Migration.
2. When the Continue NDS Migration window appears:
a. Verify that the following occurred:
. The former destination server restarted and assumed thename and identity of the source server.
. Licensing is installed.
. The DSREPAIR verifies that eDirectory is synchronized onall servers in the tree.
b. To confirm that you have completed the tasks listed above,select Yes, and then select Next.
c. When the Password Verification dialog box appears, enter acme,and then select Next.
d. Resolve any errors or warnings, and then select Next.
e. When the Ready to Continue Migrate NDS dialog box appears,select Continue to finish the eDirectory migration process. TheMigration Wizard restores the file trustees and updates theVolume objects in the tree.
f. When the Migrate NDS Results dialog box appears, view its con-tents, and select Done to continue.
02 9792 ch02 3/17/03 4:08 PM Page 142
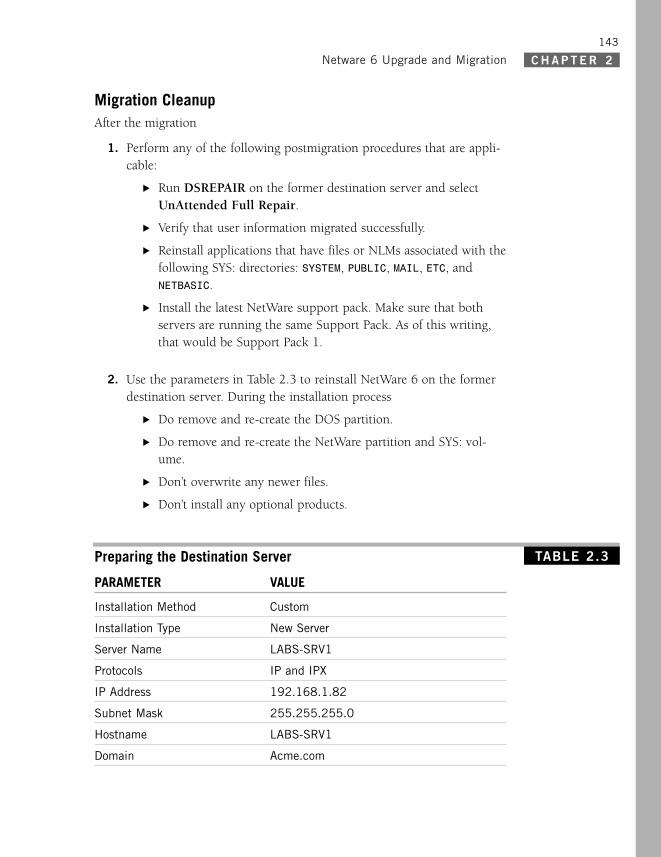
Netware 6 Upgrade and Migration C H A P T E R 2
143
Migration CleanupAfter the migration
1. Perform any of the following postmigration procedures that are appli-cable:
. Run DSREPAIR on the former destination server and selectUnAttended Full Repair.
. Verify that user information migrated successfully.
. Reinstall applications that have files or NLMs associated with thefollowing SYS: directories: SYSTEM, PUBLIC, MAIL, ETC, and NETBASIC.
. Install the latest NetWare support pack. Make sure that bothservers are running the same Support Pack. As of this writing,that would be Support Pack 1.
2. Use the parameters in Table 2.3 to reinstall NetWare 6 on the formerdestination server. During the installation process
. Do remove and re-create the DOS partition.
. Do remove and re-create the NetWare partition and SYS: vol-ume.
. Don’t overwrite any newer files.
. Don’t install any optional products.
Preparing the Destination Server
PARAMETER VALUE
Installation Method Custom
Installation Type New Server
Server Name LABS-SRV1
Protocols IP and IPX
IP Address 192.168.1.82
Subnet Mask 255.255.255.0
Hostname LABS-SRV1
Domain Acme.com
TABLE 2.3
02 9792 ch02 3/17/03 4:08 PM Page 143
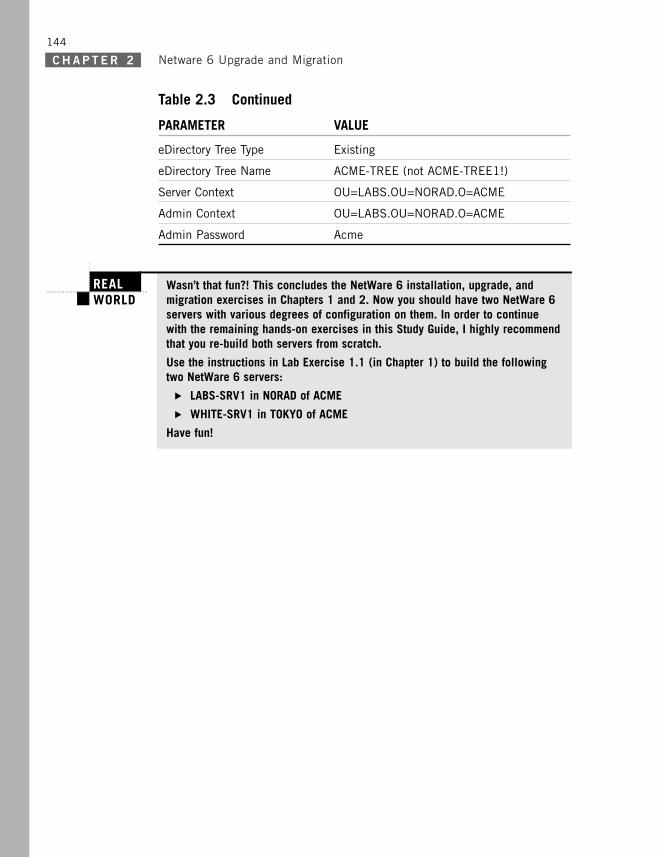
Netware 6 Upgrade and MigrationC H A P T E R 2
144
eDirectory Tree Type Existing
eDirectory Tree Name ACME-TREE (not ACME-TREE1!)
Server Context OU=LABS.OU=NORAD.O=ACME
Admin Context OU=LABS.OU=NORAD.O=ACME
Admin Password Acme
Table 2.3 Continued
PARAMETER VALUE
REALWORLD
..................................................
.....
Wasn’t that fun?! This concludes the NetWare 6 installation, upgrade, andmigration exercises in Chapters 1 and 2. Now you should have two NetWare 6servers with various degrees of configuration on them. In order to continuewith the remaining hands-on exercises in this Study Guide, I highly recommendthat you re-build both servers from scratch.
Use the instructions in Lab Exercise 1.1 (in Chapter 1) to build the followingtwo NetWare 6 servers:
. LABS-SRV1 in NORAD of ACME
. WHITE-SRV1 in TOKYO of ACME
Have fun!
02 9792 ch02 3/17/03 4:08 PM Page 144
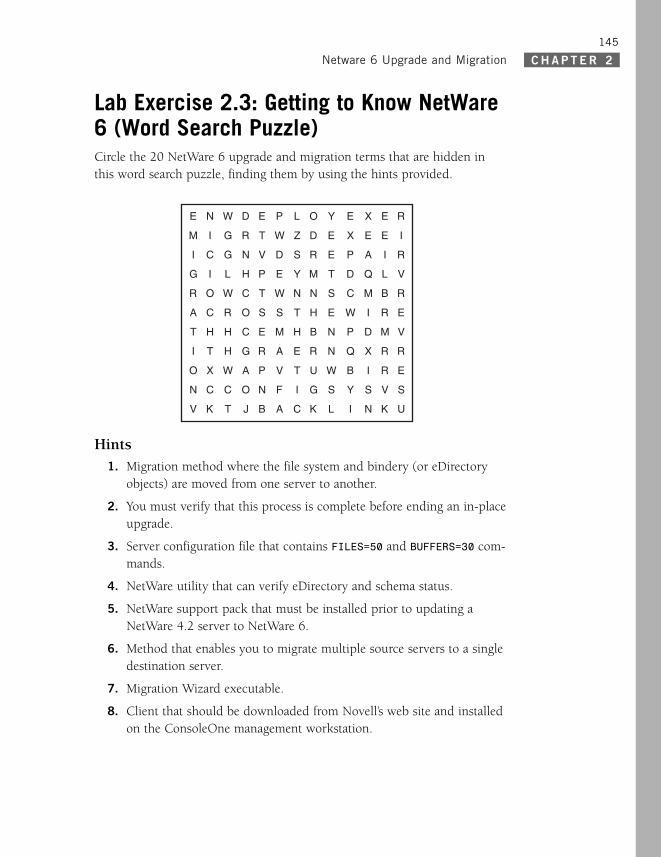
Netware 6 Upgrade and Migration C H A P T E R 2
145
Lab Exercise 2.3: Getting to Know NetWare6 (Word Search Puzzle)Circle the 20 NetWare 6 upgrade and migration terms that are hidden inthis word search puzzle, finding them by using the hints provided.
Hints1. Migration method where the file system and bindery (or eDirectory
objects) are moved from one server to another.
2. You must verify that this process is complete before ending an in-placeupgrade.
3. Server configuration file that contains FILES=50 and BUFFERS=30 com-mands.
4. NetWare utility that can verify eDirectory and schema status.
5. NetWare support pack that must be installed prior to updating aNetWare 4.2 server to NetWare 6.
6. Method that enables you to migrate multiple source servers to a singledestination server.
7. Migration Wizard executable.
8. Client that should be downloaded from Novell’s web site and installedon the ConsoleOne management workstation.
02 9792 ch02 3/17/03 4:08 PM Page 145

Netware 6 Upgrade and MigrationC H A P T E R 2
146
9. NetWare Deployment Manager executable.
10. To upgrade a server to NetWare 6, you must have this right to thesecurity container object for the eDirectory tree.
11. To upgrade a server to NetWare 6, you must have the Supervisor rightto the container where this object resides.
12. Support pack required to upgrade a NetWare 5 server to NetWare 6.
13. NetWare backup/restore architecture.
14. Type of time that is generated when the time stamp on a replica of apartition is ahead of the actual server time.
15. Support pack required to upgrade a NetWare 5.1 server to NetWare 6.
See Appendix C for answers.
02 9792 ch02 3/17/03 4:08 PM Page 146
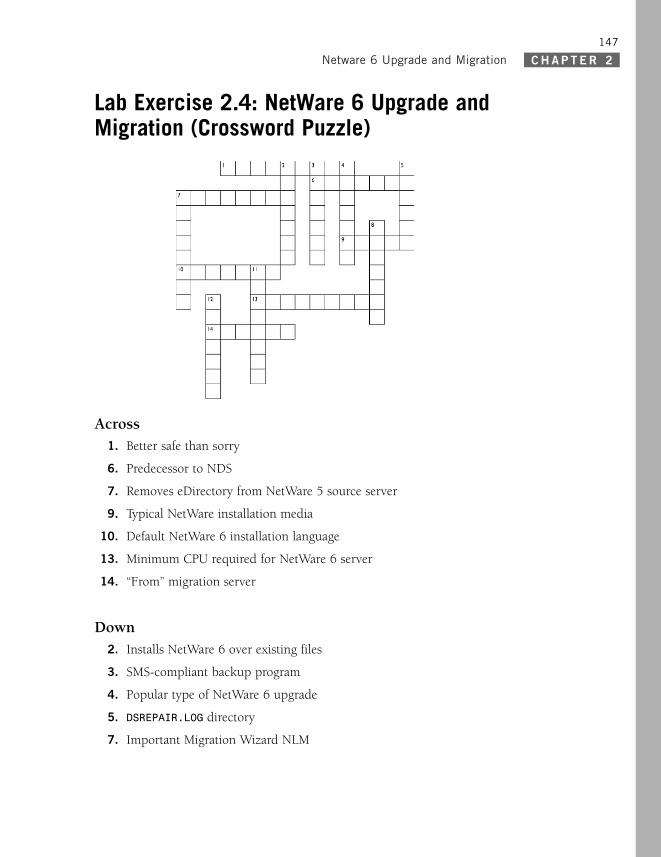
Netware 6 Upgrade and Migration C H A P T E R 2
147
Lab Exercise 2.4: NetWare 6 Upgrade andMigration (Crossword Puzzle)
Across1. Better safe than sorry
6. Predecessor to NDS
7. Removes eDirectory from NetWare 5 source server
9. Typical NetWare installation media
10. Default NetWare 6 installation language
13. Minimum CPU required for NetWare 6 server
14. “From” migration server
Down2. Installs NetWare 6 over existing files
3. SMS-compliant backup program
4. Popular type of NetWare 6 upgrade
5. DSREPAIR.LOG directory
7. Important Migration Wizard NLM
02 9792 ch02 3/17/03 4:08 PM Page 147

About Us | Advertise On InformIT | Contact US |Site Map | Book Registration © 2003 Pearson Education, Inc. InformIT Division. All rights reserved. Legal NoticePrivacy Policy
Netware 6 Upgrade and MigrationC H A P T E R 2
148
8. Utility for troubleshooting NICI errors
11. Recommended server display adapter type
12. Removes eDirectory from NetWare 4 source server
See Appendix C for answers.
Related Documents


![NetWare 6.5 オペレーティングシステムのインストールIslandcenter.jp [ ] Customized NetWare Server [※]Basic NetWare File Server [ ]Pre-Migration Server [ ]DNS/DHCP](https://static.cupdf.com/doc/110x72/60d32e68047fd6547244d3a6/netware-65-fffffffffff-islandcenterjp.jpg)