Certified Lab Instructor Course Curriculum 2004 New York State Department of Health Bureau of Emergency Medical Services 433 River Street, Suite 303 Troy, New York 12180-2299

Welcome message from author
This document is posted to help you gain knowledge. Please leave a comment to let me know what you think about it! Share it to your friends and learn new things together.
Transcript

Certified Lab Instructor Course Curriculum 2004 New York State Department of Health Bureau of Emergency Medical Services 433 River Street, Suite 303 Troy, New York 12180-2299

_____________________________________________________________________________________________2004 Certified Lab Instructor Course Curriculum i
Acknowledgments In 1987, the New York State Department of Health (NYS DOH) Emergency Medical Services (EMS) Program appointed an ad-hoc committee to study issues related to EMS instructor education and address the lack of statewide standardization of instruction. From this review, several key points were realized:
• There is a need for consistency in EMS education. • The lab instructor has more personal impact on students than the lead instructor due to
the personal attention spent in small group activity in the lab setting, and students feel more comfortable asking questions in this less formal setting.
• Lab instructors need different skills for teaching than the lead instructor. • No State was specifically addressing EMS instructor training as it related to certification.
As a result of this committee’s investigation, NYS EMS developed two specific EMS instructor training programs and implemented certification of instructors. It was the original goal of the program to have a minimum of 80% of the lab sessions in an Emergency Medical Technician (EMT) course taught by certified instructors by 1993. Although this goal may be implemented at some future time, current requirements call for a minimum of 50% of the lab sessions to be taught by certified instructors. This curriculum represents the first major revision of the CLI course since its inception. EMS training and education has continued to change, and has become more challenging as new techniques and practices have come into being. We expect the evolution of EMS to continue, with more challenges yet to face. With the continuation of Certified Lab Instructor (CLI) and Certified Instructor Coordinator (CIC) courses, the NYS DOH plans on keeping EMS training and education in New York at the pinnacle of EMS programs across the nation.

_____________________________________________________________________________________________2004 Certified Lab Instructor Course Curriculum ii
In recognition of the hard work, and extensive contributions to this curriculum, we would like to formally recognize those individuals who worked on the development of the original program, and those who undertook the review and creation of this revised curriculum. Original Program Committee (as listed in 1989):
• Robert Strauss, MD St. Francis Hospital • Nicholas Nehrbauer, MD Albany Memorial Hospital • Thomas Luka Erie Community College • Robert Conn Niagara Community College • James Wallace Western NY Regional EMS Training Institute • Arthur DeMello New York City EMS Academy • Robert Elling NYS-EMS • Jonathan Politis NYS-EMS
2001 Committee:
• Ken Beers Monroe Community College • Dave Brenner Suffolk County Community College • John Clappin FDNY - EMS • Robert Elling Hudson Valley Community College • Mickey Forness, RN Emergency Nurses Association, SWREMS • Andy LaMarca Mobile Life Support Services, Inc. • Joyce Mulleedy Adirondack-Appalachian EMS • Richard Parrish Kingston Hospital • Karen Meggenhofen NYS-EMS
_____________________________________________________________________________________________2004 Certified Lab Instructor Course Curriculum iii
Suggested EMS Instructor Training Text: “Teaching EMS: An Educator’s Guide to Improved EMS Instruction”
By Catherine A. Parvensky Copyright © 1995 by JemsCommunication A Mosby imprint of Mosby-Year Book, Inc.

_____________________________________________________________________________________________2004 Certified Lab Instructor Course Curriculum iv
TABLE OF CONTENTS Acnowledgements .......................................................................................................................................... i Suggested EMS Instructor Training Text ................................................................................................. iii TABLE OF CONTENTS ............................................................................................................................ iv Required prescreening practical exam to include.......................................................................................v Module 1 .........................................................................................................................................................7 Course Introduction and Overview............................................................................................................7 Teachers and Learners .............................................................................................................................11 Principles of Learning..............................................................................................................................14 Principles of Instruction...........................................................................................................................17 Principles of EMS Skill Instruction ........................................................................................................19 Module 2 .......................................................................................................................................................23 Psychomotor Instructional Strategies ......................................................................................................23 Communications......................................................................................................................................25 Feedback and Evaluations .......................................................................................................................30 Candidate Rote Skill Demonstration .......................................................................................................32 Module 3 .......................................................................................................................................................33 Overview of EMT-B Course Modules and Psychomotor Objectives ......................................................33 Psychomotor Skill Teaching Tips............................................................................................................42 Using Scenarios in EMS Instruction........................................................................................................46 Group Scenario Building Exercise ..........................................................................................................50 Module 4 .......................................................................................................................................................51 Moulage Techniques................................................................................................................................51 Evaluating Student Performance .............................................................................................................53 Candidate Skills Presentations.................................................................................................................57 End of Course Wrap-up ...........................................................................................................................58 Appendix A – Prescreening CLI Practical Exam Sheets..........................................................................59 Appendix B – Channel / Modality List Suggestions..................................................................................69 Appendix C – Optional Instructional Theory Module .............................................................................70 Appendix D – Suggested Rote Skills for Presentation by CLI Students .................................................73 Appendix E – Instructions and Supplies for Basic Moulage....................................................................75 Appendix F – Module 2 Skill Test Feedback Form ..................................................................................79 Appendix G – Sample Student Skill Tracking Sheet ................................................................................80 Appendix H – Module 1 Class Tracking Form .........................................................................................83

_____________________________________________________________________________________________2004 Certified Lab Instructor Course Curriculum v
CERTIFIED LAB INSTRUCTORS PRESCREENING SKILLS EXAMINATION
ADMINISTRATIVE PROCEDURES FOR CONDUCTING THE PRESCREENING SKILLS EXAMINATION Purpose: The Prescreening of Lab Instructor candidates has been required to ensure that there is a
consistent quality of instruction available throughout the state. This mechanism is to be used in the selection of appropriate candidates for attendance at a Certified Lab Instructor course.
Materials: The equipment needed to conduct the testing stations for the pre-screening examination is
identified in Appendix A of this curriculum. Planning: A single prescreening examination may not provide a sufficient number of CLI
candidates to meet the minimum number needed to conduct a CLI course. Consider scheduling two or more prescreening examinations over a period of several months. Once you have a list of eligible candidates, you will be able to determine the number of courses needed.
Publicity: Advertising for the prescreening examination, you should ensure that Course Sponsors
and prospective candidates receive sufficient notice. This will allow for the registration of a sufficient number of qualified candidates for the prescreening.
Candidate Preparation: Candidates for the prescreening should be advised of the skill stations to be evaluated,
eligibility requirements and procedures for registering for examination. Candidate Pre-requisites: Candidates must meet the CLI course entry requirements prior to being admitted to the
prescreening examination.
Required prescreening practical exam to include: Station 1 -
• Patient Assessment (either trauma or medical) as outlined in NYS Basic Practical Skills Administrative Manual
Station 2 - • Bag-valve-mask usage on both a simulated trauma patient and on a simulated non-
traumatic patient

_____________________________________________________________________________________________2004 Certified Lab Instructor Course Curriculum vi
Station 3 - • Demonstration of 2 random skills from the following list:
Demonstrate measurement and application of a correct size c-collar Demonstrate the correct insertion technique for an oropharyngeal airway in an
infant. Demonstrate obtaining a pedal pulse and performing neurological checks on a
foot Demonstrate one technique for immobilizing a painful deformed upper arm Demonstrate assisting with the administration of nitroglycerine and the ongoing
assessment for the patient Demonstrate the Initial Assessment of a conscious patient with respiratory
difficulty Demonstrate an abdominal assessment in the Detailed Physical Exam Demonstrate obtaining a carotid pulse
(Skill Sheets in Appendix A)

_____________________________________________________________________________________________2004 Certified Lab Instructor Course Curriculum 7
Module 1
MODULE 1
I. Course Introduction and Overview Course Objectives: Provide an overview of the CLI course. Describe the steps necessary to complete the requirements for certification as a CLI.
Understand the modular setup of the EMT-B curriculum. Understand the role of the CLI in EMS instruction. Be able to discuss the different ways in which students learn, and be able to apply multiple techniques in instructing EMS lab skills to meet different student learning needs. Describe the principles of learning as they relate to EMS lab skills, and be able to apply these principles in teaching EMS lab skills. Discuss the importance of communication in learning, be able to communicate effectively with students, and be able to facilitate productive feedback sessions following EMS lab skill practice. Be able to design and run effective EMS lab skill scenarios. Be able to effectively apply basic moulage techniques in EMS lab skill scenarios. Be able to effectively evaluate student performance in EMS lab skills in the classroom, and on the NYS EMS Practical Skills Exam, and be able to differentiate the differences in these evaluations. Be able to successfully participate in EMS instruction as a Certified Lab Instructor.
Materials & Equipment Needed: Name tags Magic Markers CLI Course Curriculum (1 per student) Instructor Application (1 per student) Presentation: A. Student welcome and faculty introductions
1. Introduce yourself 2. Introduce assisting Faculty 3. If time permits, encouraging students to briefly introduce themselves to the class
a) Name, Course Sponsor, teaching experience

_____________________________________________________________________________________________2004 Certified Lab Instructor Course Curriculum 8
Module 1
B. Review administrative matters and site specific information
1. Restroom locations 2. Phones –
a) Cell phones and Pagers should be in vibrate mode only 3. Emergency contact number at facility 4. Smoking policy 5. Emergency exits 6. Break areas and services 7. Other
C. Review Schedule and Handout Materials 1. Course sessions –
a) Attendance to entire course required 2. Homework assignments and instructions on required presentations 3. Student Materials
a) Student Manual b) Applications c) Other handouts d) Course agenda
D. Course Expectations:
1. Why are you here? a) Your motivations for participation
i. Intrinsic (a) Develop better EMS providers (b) Enjoy working with students (c) Enjoy teaching
ii. Extrinisic (a) Job requirement
2. What you should do and expect from this course? a) What will this course provide:
i. Develop and prepare you to teach skills to students ii. Provide understanding of the philosophy behind the skills
3. What students should expect from the instructor? a) Respect b) Guidance c) Knowledge and skills d) Assistance to succeed e) Credibility
4. What instructors should expect from students a) Participation b) Cooperation c) Questions d) Opportunity to share your experiences from field experience
_____________________________________________________________________________________________2004 Certified Lab Instructor Course Curriculum 9
Module 1
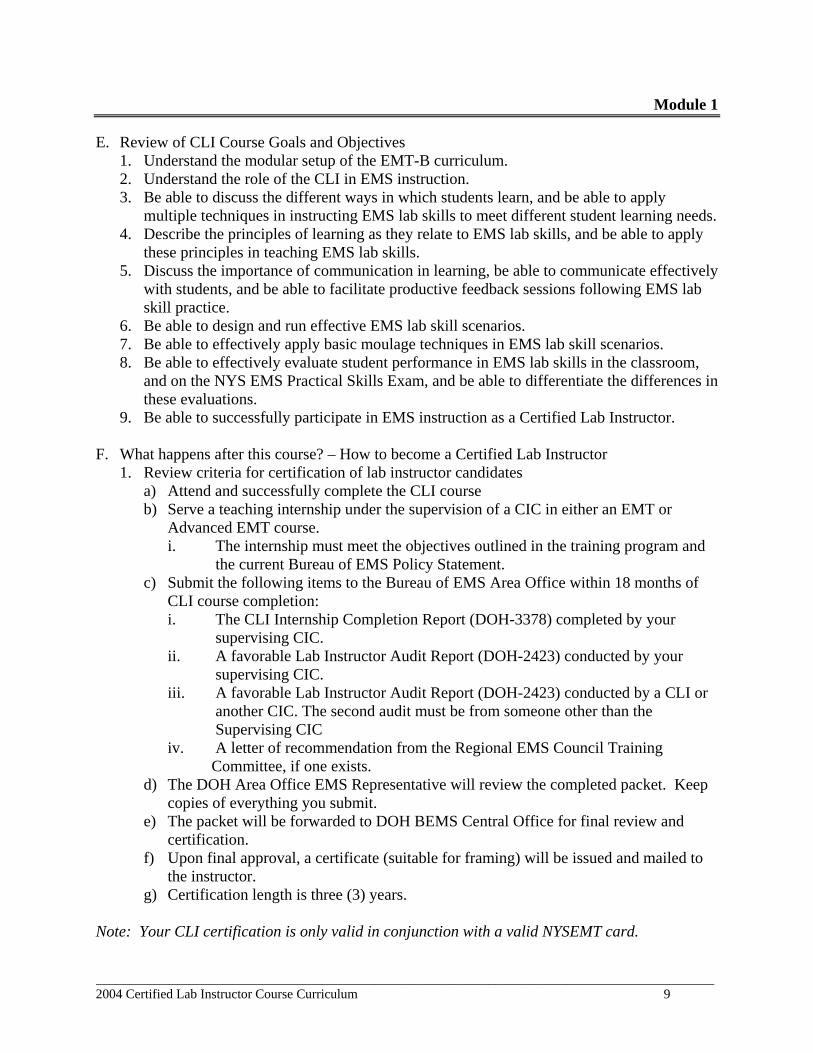
E. Review of CLI Course Goals and Objectives
1. Understand the modular setup of the EMT-B curriculum. 2. Understand the role of the CLI in EMS instruction. 3. Be able to discuss the different ways in which students learn, and be able to apply
multiple techniques in instructing EMS lab skills to meet different student learning needs. 4. Describe the principles of learning as they relate to EMS lab skills, and be able to apply
these principles in teaching EMS lab skills. 5. Discuss the importance of communication in learning, be able to communicate effectively
with students, and be able to facilitate productive feedback sessions following EMS lab skill practice.
6. Be able to design and run effective EMS lab skill scenarios. 7. Be able to effectively apply basic moulage techniques in EMS lab skill scenarios. 8. Be able to effectively evaluate student performance in EMS lab skills in the classroom,
and on the NYS EMS Practical Skills Exam, and be able to differentiate the differences in these evaluations.
9. Be able to successfully participate in EMS instruction as a Certified Lab Instructor. F. What happens after this course? – How to become a Certified Lab Instructor
1. Review criteria for certification of lab instructor candidates a) Attend and successfully complete the CLI course b) Serve a teaching internship under the supervision of a CIC in either an EMT or
Advanced EMT course. i. The internship must meet the objectives outlined in the training program and
the current Bureau of EMS Policy Statement. c) Submit the following items to the Bureau of EMS Area Office within 18 months of
CLI course completion: i. The CLI Internship Completion Report (DOH-3378) completed by your supervising CIC. ii. A favorable Lab Instructor Audit Report (DOH-2423) conducted by your supervising CIC. iii. A favorable Lab Instructor Audit Report (DOH-2423) conducted by a CLI or another CIC. The second audit must be from someone other than the Supervising CIC iv. A letter of recommendation from the Regional EMS Council Training Committee, if one exists.
d) The DOH Area Office EMS Representative will review the completed packet. Keep copies of everything you submit.
e) The packet will be forwarded to DOH BEMS Central Office for final review and certification.
f) Upon final approval, a certificate (suitable for framing) will be issued and mailed to the instructor.
g) Certification length is three (3) years. Note: Your CLI certification is only valid in conjunction with a valid NYSEMT card.

_____________________________________________________________________________________________2004 Certified Lab Instructor Course Curriculum 10
Module 1
2. Maintaining CLI requirements
Review CLI recertification requirements a) Hold current certification as a NYS EMT or AEMT. b) Must have achieved an 85% or greater on the NYS EMT or AEMT written
certification examination within the past three years. Candidates who wish to teach advanced skills must also score at least an 85% on the advanced portion of the exam. You must be certified at or above the level your wish to teach. Those who have recertified their EMT/AEMT through the Pilot EMS Recertification Program must take a NYS EMS written examination for a “instructor score” if they have not done so in the past three years.
c) Must be currently active and providing pre-hospital care with an EMS agency within New York State for at least two of the last three years.
d) Must have served as lab faculty for at least one course within the past three years. e) Attend at least one 6 hour NYS Instructor Update Course within the past three years. f) Complete and return the “Application for Instructor Recertification” (DOH-3508) to
DOH BEMS Central Office. The forms will be mailed to you four to six months prior to your CLI expiration date.

_____________________________________________________________________________________________2004 Certified Lab Instructor Course Curriculum 11
Module 1
II. Teachers and Learners OBJECTIVES: At the completion of this module, the student will be able to: Explain the role of the instructor. Describe the learning channels/modalities that an instructor can use. PRESENTATION: A. What is the role of the Instructor:
(Elicit a definition of the many general tasks the instructor has.) B. (Summarize with at least the following:)
1. To facilitate the STUDENTS’s acquisition of knowledge, skills, and decision making processes inherent in the curriculum. a) What is missing from this definition?
i. The INSTRUCTOR must be responsive to the needs of the students. ii. Understand their motivation for being there. iii. The recognition that it is the instructor’s role to ensure that the learning is
achieved and not to simply “cover” the topic. iv. The instructor hasn’t taught it if the students haven’t learned it.
2. STUDENTS AREN’T THERE FOR THE INSTRUCTOR – a) They are there because of what the instructor will provide them. b) The instructor must do what can reasonably be done to ensure that students learn. c) Students have the same responsibility as the instructor. d) Knowledge and skills cannot be poured into student’s brain and hands.
3. It can’t be “It’s my way or the highway!” or “I talk, you listen and learn.”
C. What learning channels/modalities are open to the instructor? 1. By what methods will you as an instructor provide the skills and knowledge. 2. Elicit how we gather information. 3. This is really just a sensitization to our sensory organs.
D. Learning Channels (Input devices)
1. Visual – What we see 2. Auditory – What we hear 3. Tactile – What we touch 4. Kinesthetic – What we learn from moving and doing 5. Smell – What we remember from specific odors 6. Taste – What we remember from specific tastes
a) Hopefully not often used in EMS training! 7. Proprioception – (Pro – Pry – O – ception)

_____________________________________________________________________________________________2004 Certified Lab Instructor Course Curriculum 12
Module 1
a) Proprioception is the sense of knowing where body parts are in space without other senses. You can close your eyes and touch your nose or clap your hand, scratch your ear, and touch your right foot to your left knee.
E. Which channel/modality is best used?
ACTIVITY – Memory Game -Activity Instructions: Students are provided five lists of ten items each, that they must remember and write down after each list is presented. This will indicate how much they can recall. (Suggested lists in Appendix B). Each list is presented in a different manner using a different sense or combination of senses. Have students self-grade their responses.
Determine how many students got all 10, 7-9, 4-6, or 3 or fewer correct from each list. How many students got the number correct on all five lists? Did all students find success the same way?
F. Activity Wrap-up 1. What did this Activity do? Conclusions from the exercise should include:
a) The group should be able to tell the instructor that students learn in a variety of ways and that within any group of students there is likely to be students who learn differently from each other.
b) Students should be able to conclude that it becomes the instructor’s RESPONSIBILTY to provide instruction in a manner that will be useful to all students.
c) Because STUDENTS learn in a variety of different ways, the INSTRUCTOR must provide instruction in a format that can be assimilated by all students.
G. ACTIVITY – Instructional Devices Instructions: Pair students and ask them to develop a written list of 4 items that answer the question “What instructional DEVICES (not techniques) are available to help us teach in a lab setting?” Provide 2 – 5 minutes of quiet work to accomplish this. Combine the pairs to create groups of 4 that will combine the lists of unique items and further contribute until a list of 10 is created. Provide another 2 – 5 minutes of quiet work to accomplish this. Finally, if time and student numbers permit, combine the groups to form working groups of 8 that will combine their lists and supplement the lists to make a final list of 15 unique items.
(See Appendix C – Optional module on Instructional Theory for more information on factors impacting learners).

_____________________________________________________________________________________________2004 Certified Lab Instructor Course Curriculum 13
Module 1 H. Module Summary
We have reviewed the following: The role of the instructor and their importance in ensuring that learning is achieved and not to simply “covering” the topic.
The “learning channels” / Input devices that help us gather information and learn. Discussed various ways of getting the message across. Discovered that people learn differently.

_____________________________________________________________________________________________2004 Certified Lab Instructor Course Curriculum 14
Module 1
III. Principles of Learning OBJECTIVES: Describe the motivations students have to learn. Describe factors that affect retention and forgetting. Describe the affect modeling has on learning. Describe the methods of evaluation and feedback to adjust the learning process. Describe the various instructional formats available for teaching. Describe the qualities of a good lab instructor. PRESENTATION: A. Anticipatory Set The opportunity for the learner’s mind to ask itself, ”What do I already know about this objective?” – Setting the stage for learning
1. Helps the student focus on what is to be learned 2. Relates to the objective 3. Relates to past experiences 4. Involves the learner 5. Prepare proper frame of mind
B. Motivation 1. Motivated students are better learners 2. Intrinsic vs. Extrinsic Motivation
a) Why are they taking the class? i. Job requirement ii. Desire to serve their community iii. Like helping people iv. Will get a raise if they pass course
3. Influenced by personal: a) Level of Concern
i. Concern for learning ii. “Someone needs to do this”. -Desire to be helpful
b) Feeling-Tone – is the quality of pleasantness or unpleasantness that we experience whenever we see, hear, touch, smell, taste, or think. Feeling-tone can also be somewhere in between “neutral”. i. Plus
(a) Mannequin chest raises ii. Minus
(a) BVM squeaks when you squeeze iii. Neutral
(a) Instructor hands out a student an application c) Knowledge of Results (feedback)
i. Specific – (a) Details – What did I do right or wrong?
ii. Immediate – (a) It’s fresh in my mind what should I do?

_____________________________________________________________________________________________2004 Certified Lab Instructor Course Curriculum 15
Module 1 d) Success
iii. Sense of achievement iv. Self worth v. Reward
C. Retention vs. Forgetting
1. Preservation of learning that makes recall and recognition possible and re-learning easier 2. Meaning
a) The more meaningful, the better the learning - reduces rote memorization. b) How does it relate to past experiences c) Usefulness – “can I use it?” - solves immediate problem. d) Relevant
3. Practice a) Distributed vs. Mass Practice - not too much at once. b) Three 3-hour sessions is better than one 9-hour session. c) Forces retrieval.
4. Over learning a) going over material even after the student thinks s/he has learned it adequately. b) 20% helps retention.
5. Degree of Original Learning a) How well did s/he learn the material the first time.
6. Feeling Tone a) Better feeling tone = better retention
7. Vividness a) Interesting & vivid b) Use of mnemonics
8. Mnemonics a) Examples -
D. Transfer – What you already know (blackboard effect)
1. Old learning can assist or interfere with new learning. 2. Remember going from the pre-1986 curriculum to the Expanded primary and/or then to
the new Trauma and Medical patient assessment. 3. Similarity
a) The more similar the old learning is to the new, the greater the transfer. 4. Association
a) The more closely associated the better the transfer. i. ie. Same type skills
5. Degree of Original Learning a) How well did they know the material?

_____________________________________________________________________________________________2004 Certified Lab Instructor Course Curriculum 16
Module 1
E. Active Participation
b) Consistent engagement of all minds, of all learners, in all of the lesson, all of the time.
c) How can we do this?
E. Modeling 1. Students need to see a correct performance. 2. Actions speak louder than words. 3. Criteria that makes the performance correct must be known to the learner before or
during the learning.
F. Monitor and Adjust – Evaluation and Feedback 1. Proactive –
a) Instructors must observe what is occurring 2. Elicit and observe behavior from all students – get them all involved 3. Interpret observations and act on them 4. Re-teach if necessary
G. Bloom’s Taxonomy – Levels of Knowledge, application and problem solving.
1. Knowledge - Recalling common bits of information about a subject. 2. Comprehension - Understanding the facts you’ve uncovered & showing that you know
the meaning of those facts. 3. Application - Ability to use your knowledge to solve problems or make use of
information in a new or unusual manner. 4. Analysis - Select information, examine it, break it apart and try to learn what makes it
work, why it is so, why something happens, what makes something so special. 5. Synthesis - Use the things you already know to think creatively and respond in new ways,
or come up with different ideas or methods. 6. Evaluation - Ability to assess the value of your information and make judgments. Be
able to make a decision to accept or reject your facts.
H. Closure – Putting it all together 1. By the learner 2. Active Participation 3. Relevant to the objective 4. Opportunity to Monitor and Adjust

_____________________________________________________________________________________________2004 Certified Lab Instructor Course Curriculum 17
Module 1 IV. Principles of Instruction OBJECTIVES: Identify Instructor qualities. Identify student expectations of an Instructor. Identify instructional formats available. Review introduction to skills instructions. A. Introduction
1. The lab instructor is one of the most important people in the instructional team. 2. They work with the student in the smaller work group (6:1 ratio) and get to know the
student and their abilities. 3. Lab Instructor represents the instructional values of the Course Sponsor and Certified
Instructor Coordinator. B. ACTIVITY – Give each student 2 minutes to write down 4 instructor qualities that they feel
are essential to being a good instructor. Have each student present their list, and record so that all students can view these (flip chart or similar). Review any of the following that students have not identified, and ask the students to discuss the importance of each. 1. Knows the subject well 2. Has material organized 3. Evaluates learning 4. Ensures class participation 5. Reinforces behavior 6. Believes in the subject 7. Has positive regard for students 8. Properly attired 9. Appropriate language and voice 10. Maintains eye contact 11. Avoids sarcasm and arguments 12. Is punctual and reliable 13. Learns the names of the students 14. Avoids killer expressions, fills, & mannerisms 15. Is concerned for student safety 16. Is patient 17. Displays a professional attitude 18. Does not read to the class 19. Initiates discussion 20. Avoids ethical conflict
C. Activity Summary – Basic Instructor Qualities should include: 1. Superior knowledge regarding the skill 2. Experience to draw from 3. Is prepared to conduct the lab session

_____________________________________________________________________________________________2004 Certified Lab Instructor Course Curriculum 18
Module 1
4. Role model for student, performing skills expertly 5. Understands the principles behind the skills, not just the techniques 6. Can adapt to new challenges and situations presented by students 7. Continuously analyzing student performance 8. Can communicate effectively:
a) Can talk at their level b) Is not on an “ego trip” c) Knows when to talk and when to listen d) Can recognize student fatigue and when to “call it quits”. e) Can “read” the students by being aware of their body language and expressions
D. Instructional formats available to the Instructor 1. Lecture (Should stress not to use this style in Lab setting) 2. Demonstration 3. Contrived Experiences (simulations/role plays) 4. Clinical Experiences (hospital/clinics/field/ride along) 5. Cooperative Learning (Students teaching students) 6. Questioning (rhetorical, and information gathering) 7. Combinations
E. Concentrating on the Skills of the course 1. Introduction
a) Was the skill introduced or demonstrated as part of the appropriate lecture presentation?
b) Do students understand the when to use and why use this skill? 2. What additional teaching aids I need?
a) Mannequins b) Manufacturer’s Instructions c) Skills practice sheets from Student Manual
3. When should I create learning situations? a) Is it the appropriate time for simulations and scenarios?
4. Evaluation and Feedback a) Verbal correction and praise b) Documented performance
F. Summary
We have reviewed: Qualities of an instructor Student expectations of an instructor Instructional formats available Skills instruction

_____________________________________________________________________________________________2004 Certified Lab Instructor Course Curriculum 19
Module 1
V. Principles of EMS Skill Instruction OBJECTIVES: Describe the typical considerations when conducting a lab session. PRESENTATION: A. Students must understand the purpose of any skill they are taught.
1. Indications for use 2. Contraindications for use 3. Safety considerations for use
B. Principles vs. Techniques
1. Principles a) Are the basis of conduct or operation. b) Basic laws, axioms or doctrines that guide us. c) How and why things work.
2. Techniques a) Are the procedures and methods used to achieve a desired result
3. Principles behind needing a fire don’t change – Warmth, cooking, signaling, etc. Techniques to start one vary greatly, from flint and steel to a BIC lighter.
4. Techniques may come and go, but the principles seldom change Once mastered, principles allow us to improvise and adapt to changing situations.
C. Skills must be introduced in a logical order
1. Introduction of cervical collars before KED 2. All sub-skills must be introduced before larger combined skill is introduced
D. Discuss the importance of knowing all the sub-skills for each skill.
1. Each skill is made up of separate pieces that make up the entire skill. 2. A student will not be successful in the skill if they cannot perform the sub-skills
necessary.
E. ACTIVITY – Break the class into groups of 4 to 6. Allow 2-5 minutes for each group to list all the sub-skills that are needed to teach splinting of a radial bone painful swollen deformity (fracture). Have each group report their list, and record the master list for all to see (flip chart, etc.)
Summary of Activity On a whiteboard or flip chart, create a master list of all the various steps and sub-skills that are offered by the students.

_____________________________________________________________________________________________2004 Certified Lab Instructor Course Curriculum 20
Module 1 F. Other things to consider as a skills instructor
1. Where is this session in the Course and in the Student’s learning experience? a) Demonstration only
i. No student hands-on ii. First exposure to a skill or device after the class lecture
b) Equipment introduction i. Limited hands-on – Just getting the feel of the equipment
(a) Defibrillator, Assembling Oxygen cylinder and regulator/flowmeter, etc. c) Rote skills development
i. Non-scenario based, directed and observed practice ii. “Practice-practice-practice” iii. Continue to assemble and use equipment or practice skill without other
distractions. d) Skills integration (Scenario based)
i. Provides the most realistic use of the equipment and skills in a simulated setting.
2. Physical aspects of the classroom
a) Can practice here? i. Lighting ii. Floor space iii. Obstructions
b) Distractions i. Noise ii. Movement iii. Other activities
G. Where do we start? - Introducing the Equipment
1. Safety first! a) Observe students closely as they work with the equipment b) Immediately stop any error and correct
2. Appropriate to level being taught 3. Does the equipment appropriately represent that commonly used by EMS agencies? 4. Is there enough equipment for group practice. 5. Follow the manufacturers instructions for use 6. Working properly
a) Batteries charged? b) Straps included? c) Tubing available? d) Oxygen available when needed?
H. Instructor Demonstrations
1. Can everyone see all aspects of the skill? a) Make sure the students can see what you are doing.
2. When demonstrating a skill, it must be performed flawlessly a) Follow the steps
_____________________________________________________________________________________________2004 Certified Lab Instructor Course Curriculum 21
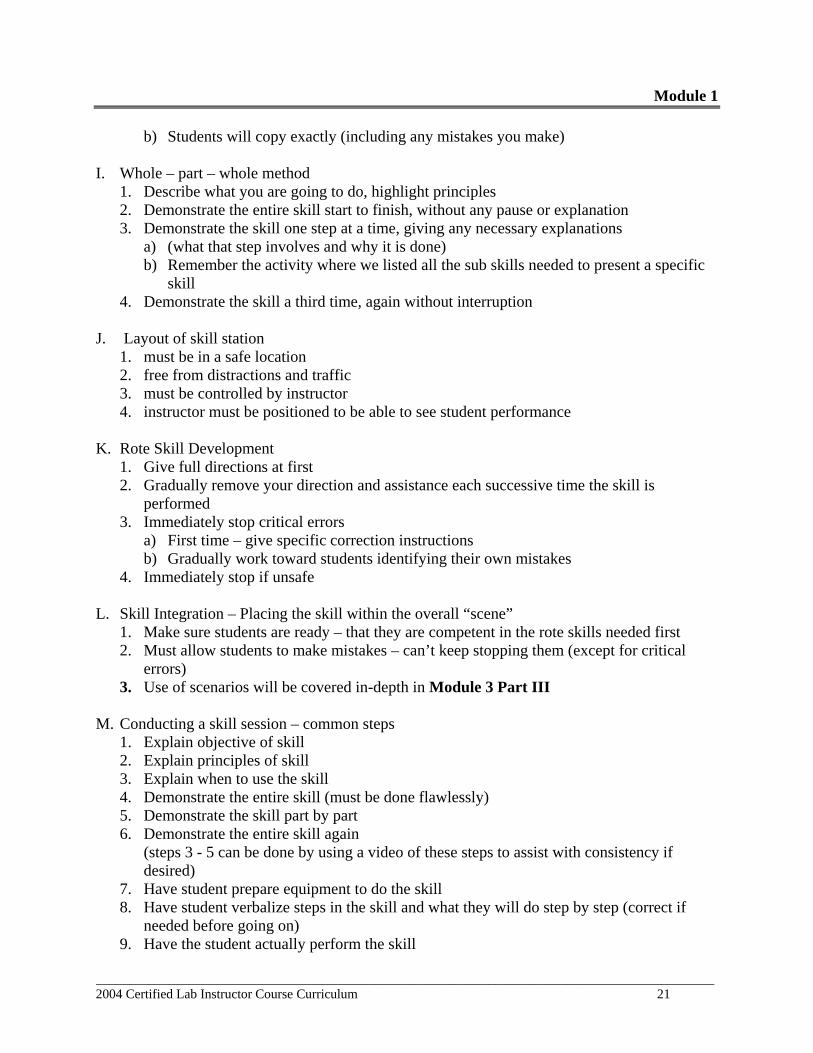
Module 1 b) Students will copy exactly (including any mistakes you make)
I. Whole – part – whole method
1. Describe what you are going to do, highlight principles 2. Demonstrate the entire skill start to finish, without any pause or explanation 3. Demonstrate the skill one step at a time, giving any necessary explanations
a) (what that step involves and why it is done) b) Remember the activity where we listed all the sub skills needed to present a specific
skill 4. Demonstrate the skill a third time, again without interruption
J. Layout of skill station
1. must be in a safe location 2. free from distractions and traffic 3. must be controlled by instructor 4. instructor must be positioned to be able to see student performance
K. Rote Skill Development 1. Give full directions at first 2. Gradually remove your direction and assistance each successive time the skill is
performed 3. Immediately stop critical errors
a) First time – give specific correction instructions b) Gradually work toward students identifying their own mistakes
4. Immediately stop if unsafe L. Skill Integration – Placing the skill within the overall “scene”
1. Make sure students are ready – that they are competent in the rote skills needed first 2. Must allow students to make mistakes – can’t keep stopping them (except for critical
errors) 3. Use of scenarios will be covered in-depth in Module 3 Part III
M. Conducting a skill session – common steps
1. Explain objective of skill 2. Explain principles of skill 3. Explain when to use the skill 4. Demonstrate the entire skill (must be done flawlessly) 5. Demonstrate the skill part by part 6. Demonstrate the entire skill again
(steps 3 - 5 can be done by using a video of these steps to assist with consistency if desired)
7. Have student prepare equipment to do the skill 8. Have student verbalize steps in the skill and what they will do step by step (correct if
needed before going on) 9. Have the student actually perform the skill
_____________________________________________________________________________________________2004 Certified Lab Instructor Course Curriculum 22
Module 1 10. Have the student verbally review the steps they did 11. Give student corrective feedback on their performance 12. Repeat steps 6- 10 until the student can demonstrate minimum competency of the skill on
more then one non-sequential occasion N. Competency Level of Student
1. Student must perform skills at a minimum competency level, before moving to next skill. 2. Opportunities to improve the competency level of the student need to be provided
throughout the course. O. Using Scenarios as a tool
1. Only use after Partial skills and Total skills are accomplished by student 2. Explain the purpose of the scenario as being a combination of skill practice, with the
cognitive practice of developing the ability to judge if a particular skill needs to be performed.
3. More involved scenarios are also used to integrate multiple skills and to allow students to judge the applicability of any skill on a simulated patient.
P. Summary 1. Practice the individual parts of a skill 2. Assemble the parts into the whole skill 3. Ensure they understand when to do the skill
a) Indications b) Contraindications
4. Use the skill in context of the scene 5. Practice, Practice, Practice 6. End with using the skill in a realistic scenario 7. What about the other instructional formats we spoke of?
a) Clinical b) Cooperative – Using selected Refresher students (skilled) to teach new student c) Questioning – should always be part of the instructors tools d) Combinations

_____________________________________________________________________________________________2004 Certified Lab Instructor Course Curriculum 23
Module 2
MODULE 2
I. Psychomotor Instructional Strategies OBJECTIVES: Define Psychomotor Skills. Identify the dimensions for psychomotor skills. Identify methods of practice and demonstration. Describe phases of learning curve. Describe the role of mental practice. PRESENTATION: A. Psychomotor definition
1. Psycho –Refers to the student’s base of cognitive knowledge and analytical ability. a) Has the background knowledge to understand the principles b) Understands the principles. c) Understands the rationales. d) Can perceive when the patient is in trouble and needs the skill(s). e) Understands the sequences of various techniques.
2. Motor –Are physical skills that can be coordinated and make the body move in an effective manner. a) Has a “kinesthetic” sense – Can sense body position and make corrective changes b) Has balance, flexibility to move and a good sense of timing c) Has the strength and endurance to carry out the skill.
B. Psychomotor skills need can be associated into two dimensions
1. Fine vs. Gross a) Gross motor skills – involve the large muscles and often involve the entire body (example
– lifting and moving a patient) b) Fine motor skills – involve limited and precise movements usually of small muscles or
muscle groups (example – placing the mask on a BVM) 2. Continuous vs. Discrete
a) Continuous motor skill – requires the operator to continuously make adjustment or corrections during the application of the skill in response to stimulus encountered during the performance of the skill (example – using a BVM, having to re-adjust the airway, seal, depth of bag squeeze, etc.)
b) Discrete motor skill – a specific motor skill performed in response to a particular stimulus. Quick reaction time is often needed in discrete motor skill (example: applying the break pedal on the ambulance when a car pulls out in front of you).
C. Total skill vs. Partial skill (Whole –Part - Whole ) Faculty Note: If course is conducted as full days, use this as a review of the skills teaching process.
1. Total skill – is the entire procedure from beginning to end (Example – spinal immobilization of a supine patient)
2. Partial skill – is a sub-skill that becomes a component in the total skill (Example – application of a cervical collar, log rolling a patient, adjusting a patient on a long board,

_____________________________________________________________________________________________2004 Certified Lab Instructor Course Curriculum 24
Module 2
3. strapping a patient to a long board, and using head blocks on a patient are all partial skills of the total skill of immobilizing a supine patient)
4. For any skill to be performed skillfully and accurately, practice of the total skill is essential to allow the learner to see how “everything fits together” a) partial skills practiced first b) total skill practiced next c) total skill integrated with other skills to identify priority of skills
D. Learning curve
1. The initial phase is the “discovery” phase – Initial growth is rapid and the student progress is quite obvious.
2. Next level is a plateau and there seems to be little progress. Sometimes boredom, fatigue and frustration set in and it’s important to take a break. This usually precedes a new growth phase.
3. Additional practice at a later time or after a break usually results in new growth. 4. Next period is “latency” and students may make small errors and lose overall motivation.
The instructor needs to persevere and “coach” the students. a) It’s often necessary to let students make mistakes at this point. b) People tend to develop “good judgement” from having had poor judgement. To know
it was poor, the instructor must be there to point it out and guide them. 5. Mastery – is being able to perform a skill as though it is a reflex! They can do it with
poise and confidence 100% of the time. It requires practice-practice-practice!
E. Student performance 1. Actual performance of the skill by students is essential. 2. Due to forgetting and mixing of new information with old information already stored in
the student’s brain, over-learning is also required. 3. Students must be able to repeat minimum competency performance of skills multiple
times, not just once. F. EMT-B program goal is to prepare providers to deal with the situations they will encounter.
1. Unfortunately, we are usually only able to develop minimum competency in skills in the time frame of most courses.
G. Role of mental practice
1. Many studies have demonstrated the role of mental practice of skills just prior to having the student actually perform the skill during practice of partial skills, and total skills. a) A mental “walk through” of the steps and performance of the skill.
2. Have the student assemble and prepare the equipment needed to perform the skill. 3. Have the student verbalize the steps in the performance of the skill, explaining what they
are going to do. 4. If necessary, correct the student before they perform the skill. 5. Have the student actually perform the skill. 6. Have the student verbally review what they did in performing the skill. 7. Give corrective feedback on the performance of the skill.
_____________________________________________________________________________________________2004 Certified Lab Instructor Course Curriculum 25
Module 2
II. Communications (see Notes View in PowerPoint Presentation for more information) A. Communication
1. It’s the process of transmitting ones thoughts, wishes or desires to another. Communication is the essence of teaching! a) It implies the acknowledgement of the receiver. Not all communication is received. b) Speaking AT someone is not necessarily communicating. c) Psychologists say that only about 10% of our feelings are conveyed by words.
Our voice tone and fluctuation convey about 30% of our feelings. Our body language conveys about 50% of our feelings.
d) Teaching requires a maximum of 2-way communication between the instructors and students. e) Many questions which are frequently asked, are posed to instructors while working in
small group settings. f) The instructor must have effective communication skills.
B. Communication Activities 1. ACTIVITY – Select a “volunteer” from the class. Privately show this student the design
that s/he must have the students in the class construct. The volunteer is directed to have the other students draw on their blank papers so that their papers look exactly like the original. The original may not be shown to the students. This volunteer must sit at the front of the class, facing away from the class. No eye contact can be made. The volunteer may not answer questions, the class may not ask questions or react in any way. The class is directed to follow the directions of the volunteer and NOT to copy what others around them may be doing. Remind the volunteer to speak loud and clear and to allow time for the students to complete his/her directions. Allow this activity to run 5-10 minutes, and then stop and discuss.
The design for this exercise is on the next page.
2. Activity Summary a) Thank and applaud the volunteer’s efforts. b) Remind all participants that they all had exactly the same directions. c) If appropriate remark “There was almost no direction that the volunteer gave that was not
correctly interpreted by someone else in the class yet many did not interpret the directions identically.”
d) Ask the students to identify strengths in the directions. e) Perhaps one or two weakness or areas that were vague or easily misinterpreted. f) Ask the volunteer,
i) “What would have made your task easier?”

_____________________________________________________________________________________________2004 Certified Lab Instructor Course Curriculum 26
Module 2 (1) Usually it will be identified that showing the picture would have helped (refer
back to input channels and multiple intelligences. (2) Also, the ability to interact, answer questions, and clarify is identified as a
potentially helpful tool.

_____________________________________________________________________________________________2004 Certified Lab Instructor Course Curriculum 27
_____________________________________________________________________________________________2004 Certified Lab Instructor Course Curriculum 28
Module 2
C. Non-Verbal Communication 1. The teacher communicates his/her feeling and attitudes even without speaking by:
a) Eye contact b) Movement c) Body Posture d) Gestures e) Attire
2. Regardless of the words used, the non-verbal clues that a person displays, may cause a “mixing of the signals”. (Effective instructors are good “models” of the desired behavior)
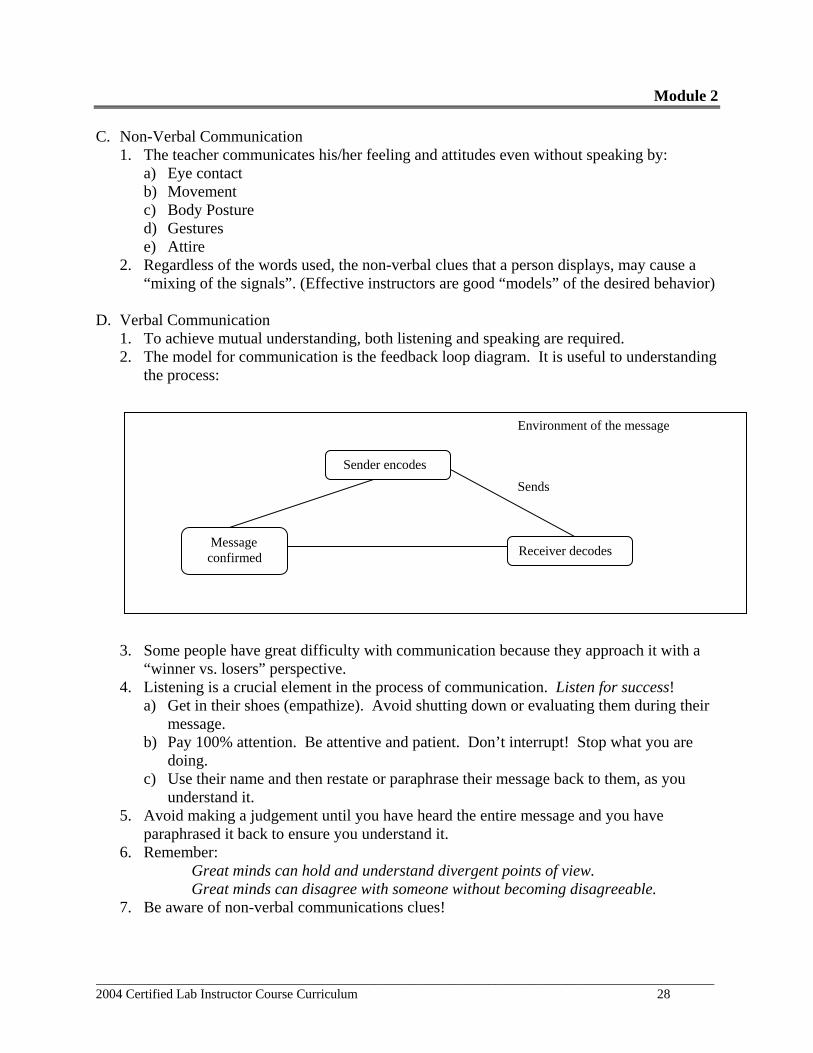
D. Verbal Communication
1. To achieve mutual understanding, both listening and speaking are required. 2. The model for communication is the feedback loop diagram. It is useful to understanding
the process: 3. Some people have great difficulty with communication because they approach it with a
“winner vs. losers” perspective. 4. Listening is a crucial element in the process of communication. Listen for success!
a) Get in their shoes (empathize). Avoid shutting down or evaluating them during their message.
b) Pay 100% attention. Be attentive and patient. Don’t interrupt! Stop what you are doing.
c) Use their name and then restate or paraphrase their message back to them, as you understand it.
5. Avoid making a judgement until you have heard the entire message and you have paraphrased it back to ensure you understand it.
6. Remember: Great minds can hold and understand divergent points of view. Great minds can disagree with someone without becoming disagreeable.
7. Be aware of non-verbal communications clues!
Environment of the message
Sends
Sender encodes
Message confirmed Receiver decodes

_____________________________________________________________________________________________2004 Certified Lab Instructor Course Curriculum 29
Module 2 E. Why communications fail.
1. One or both people are not listening to the message. 2. Someone has a winner vs. loser approach to communication. 3. One person perceives his/her psychological size or importance to be larger.
a) Person “B” perceives self as being smaller or less important than person “A”. b) Sometimes “B” is afraid to ask “A” to explain or clarify.
Instructor Student
c) Sometimes “B” is the instructor and “A” has a very large ego and feels that “B’s” message is unimportant.
d) Sometimes “A’s” are real bullies and throw their weight around. e) Beware of this concept of “psychological” size and attempt to reduce it by
communicating with students on an equal basis. F. View the Video – “Who’s On First” (Time: 5 Min) G. Video Summary
1. What led to the misunderstanding? 2. Why did the lack of communications occur? 3. What skills could have been used to overcome the misunderstanding?
A B

_____________________________________________________________________________________________2004 Certified Lab Instructor Course Curriculum 30
Module 2
III. Feedback and Evaluations OBJECTIVES: List feedback techniques. Describe feedback techniques for skill sessions. Describe other considerations when giving feedback. PRESENTATION: A. ASSESSMENT & FEEDBACK TECHNIQUES
1. Tests & Quizzes (Cognitive and Affective) 2. Questioning (All domains) 3. Student Demonstrations (All domains) 4. Active Participation (All domains)
B. Feedback Technique for Skill Session
Describe the points of the feedback model: 1. Ask the participant how they feel.
a) This is to allow for a venting of emotions so the participant will be more receptive to positive suggestions.
2. Have the participant review the objective(s) of the scenario.
3. Ask the participant to describe what they did step by step in a factual accounting. a) This may bring to light that the participant’s perception of what they actually did
differs from those watching the performance.
4. Ask the participant what they learned and what they might do differently next time. a) This allows the participant to review the learning that took place and allows them to
self correct any behavior or performance prior to anyone else making any suggestions.
b) This helps the participant to develop both problem solving skills, and also helps create a positive learning environment.
5. If the participant performed something wrong, ask the participant why they performed the way they did, without saying it was wrong.
6. Give the participant positive behavioral suggestions for their next performance without passing judgment statements on them. a) This can be handled well by phrasing statements as questions. b) Example – “Would you consider applying a cervical collar before extricating the
patient the next time you are faced with a situation similar to this?”
7. Keep feedback limited to the performance of the student as measured against the objective(s), not against any specific technique you may favor.

_____________________________________________________________________________________________2004 Certified Lab Instructor Course Curriculum 31
Module 2
C. Other considerations
1. Be careful and be prepared to control overly critical participants. 2. Protect student self-esteem.
a) Do your best to protect their self esteem and keep their ego’s intact. i. Sometimes they are overly critical of themselves and at times their actions
don’t warrant it. b) remember there are often many right ways to do things (principles vs. techniques).
3. Focus on the process
a) They need to have specifics about where they went wrong and what phase was well done.
b) Some skills are process some are product oriented. c) Vague feedback only creates more confusion.
i. Pinpoint any perceived error and work the logic of any change with them.
4. Try to end on a positive note a) Try to have them walk away without a bruised ego. b) Bruised egos and damaged pride results in defensiveness and poor learning later. c) If the simulation did not go well, point out what was learned by doing it.
5. Control the feedback.
a) Ask the group to recap what they did and what could have been done differently. b) Let them point out their errors and discuss them. Be careful and be prepared to
control overly critical team members.

_____________________________________________________________________________________________2004 Certified Lab Instructor Course Curriculum 32
Module 2
IV. Candidate Rote Skill Demonstration
(Suggested list in Appendix D) Prior to the course the candidate should be given a pre-assignment of a rote skill demonstration from the following list. Candidates should be broken into groups of 4 to 6 and allowed to present their 5-minute skill presentation. One Regional Faculty member should be present with each group to review the presentation and facilitate the feedback session. Using the guidelines discussed in Module 2, Candidates should receive controlled feedback on their presentations from their partner candidates as well as the Regional Faculty Member. The Feedback should be controlled using the feedback system taught in Module 2: A. Ask the candidate how they feel about their presentation. B. Ask the candidate to list the learning objective(s) they were covering. C. Ask the candidate to describe using only facts what they did to prepare and deliver the
presentation. D. Ask the candidate what they might do differently the next time. E. Ask partner candidates what they might suggest to improve the presentation next time. Stress
that only positive statements can be used. F. Add any positive suggestions you might have. The candidate presentations should be chosen from the following list of topics: (Note: Since the candidates will be broken up into smaller groups, multiple candidates may be given the same topic)
• Measuring and applying a cervical collar • Log rolling a patient with spinal injuries • Assess blood pressure by auscultation • Assess blood pressure by palpation • Assess pulses (Carotid, Radial, Pedal, Popliteal) • Assess pupils • Assess lung sounds • Measure and insert nasopharyngeal airway • Measure and insert oropharyngeal airway • Assemble an oxygen regulator • Application of a sling and swath • Application of an ankle hitch • Assemble and test a suction unit • Application of a non-rebreather mask • Application of a nasal cannula • Assess motor and sensory function of an extremity • Dress and bandage a wound

_____________________________________________________________________________________________2004 Certified Lab Instructor Course Curriculum 33
Module 3 MODULE 3
I. Overview of EMT-B Course Modules and Psychomotor Objectives OBJECTIVE: To be able to list the eight modules of the NYS EMT-B curriculum, and describe the general content of each module. PRESENTATION: A. The skills contained and presented in the EMT – Basic curriculum are at the core of the skills
contained in both the Certified First Responder and are used as the foundation for the Advanced EMT courses. A CLI must be capable of providing proper instruction and evaluation of students since they are setting the stage for patient care. The EMT – Basic course is minimally divided into the following: Lecture Hours: Practical Skills Hours: Clinical Hours: Testing & Evaluation Hours:
The following is a listing of the eight module areas contained in the NYS EMT-B curriculum. A brief description of each module will be covered:
1. Module 1 Preparatory
Lesson 1-1 Introduction to Emergency Medical Care Lesson 1-2 Well-being of the EMT-Basic Lesson 1-3 Medical/Legal and Ethical Issues Lesson 1-4 The Human Body Lesson 1-5 Baseline Vital Signs and SAMPLE History Lesson 1-6 Lifting and Moving Patients Lesson 1-7 Evaluation: Module 1
2. Module 2 Airway
Lesson 2-1 Airway Lesson 2-2 Airway Practical Skills Lesson 2-3 Evaluation: Module 2 3. CPR Module
CPR - 1 CPR (using AHA/ARC/NSC standards) CPR – 2 Practical Lab CPR – 3 Evaluation: CPR 4. Module 3 Patient Assessment
Lesson 3-1 Scene Size-Up Lesson 3-2 Initial Assessment Lesson 3-3 Focused History and Physical Exam - Trauma

_____________________________________________________________________________________________2004 Certified Lab Instructor Course Curriculum 34
Module 3
Lesson 3-4 Focused History and Physical Exam - Medical Lesson 3-5 Detailed Physical Exam Lesson 3-6 On-Going Assessment Lesson 3-7 Communications Lesson 3-8 Documentation
Lesson 3-9 Practical Skill Lab Lesson 3-10 Evaluation: Module 3 5. Module 4 Medical/Behavioral and Obstetrics/Gynecology
Lesson 4-1 General Pharmacology Lesson 4-2 Respiratory Emergencies Lesson 4-3 Cardiac Emergencies Lesson 4-4 Diabetic Emergencies/Altered Mental Status Lesson 4-5 Allergies Lesson 4-6 Poisoning and Overdose Lesson 4-7 Environmental Emergencies Lesson 4-8 Behavioral Emergencies Lesson 4-9 Obstetrics and Gynecology
Lesson 4-10 Practical Skills Lab Lesson 4-11 Evaluation: Module 4 6. Module 5 Trauma
Lesson 5-1 Bleeding and Shock Lesson 5-2 Soft Tissue Injury Lesson 5-3 Musculoskeletal Care Lesson 5-4 Injuries to the Head. Neck and Spine
Lesson 5-5 Practical Skills Lab Lesson 5-6 Evaluation: Module 5 7. Module 6 Infants and Children
Lesson 6-1 Infants and Children Lesson 6-2 Practical Skills Lab Lesson 6-3 Evaluation: Module 6
8. Module 7 Ambulance Operations
Lesson 7-1 Ambulance Operations Lesson 7-2 Gaining Access Lesson 7-3 Brief Overview
Lesson 7-4 Evaluation: Module 7

_____________________________________________________________________________________________2004 Certified Lab Instructor Course Curriculum 35
Module 3 B. Changes to the EMT – Basic Curriculum
1. Previous EMT courses were structured and scheduled to provide an ever-increasing base of knowledge and skills that helped the student develop as they progressed through the course. a) Early in the course you taught CPR, which may have been the first time a student had
to learn and perform skills. b) This helped develop basic assessment skills and allowed the student to become
comfortable with skills and working with other students. c) This also provided an opportunity to evaluate and identify students who may have
difficulty later in the course with doing skills. 2. The current EMT-Basic course uses individual modules of instruction, which could be
considered independent from each other. a) This puts a student immediately into skill development from the start of the course. b) For example: The second session of Module 1 immediately puts the student into a
situation requiring the use of Personal Protective Equipment, Decontamination of equipment and reporting documentation.
c) This puts the responsibility on the CLI to ensure that skills are properly taught and practiced from the onset of the course.
d) There may not be another opportunity to practice or review the skills until much later in the course schedule.
1. MODULE 1 - PREPARATORY Lesson 1-1 No psychomotor objectives Lesson 1-2 (PPE, Vehicle and Equipment Decontamination, Standard Precautions, PCR
Documentation) 1-2.18 Given a scenario with potential infectious exposure, the EMT-B will use appropriate
personal protective equipment. At the end of the scenario, the EMT-B will properly remove and discard the garments.
1-2.19 Given the above scenario, the EMT-B will complete disinfection/cleaning and all reporting documentation.
Lesson 1-3 No psychomotor objectives Lesson 1-4 No psychomotor objectives Lesson 1-5 (Vital Signs) 1-5.32 Demonstrate the skills involved in the assessment of breathing. 1-5.33 Demonstrate the skills associated with obtaining a pulse

_____________________________________________________________________________________________2004 Certified Lab Instructor Course Curriculum 36
Module 3 1-5.34 Demonstrate the skills associated with assessing the skin color, temperature, condition
and capillary refill in infants and children 1-5.35 Demonstrate the skills associated with assessing the pupils. 1-5.36 Demonstrate the skills associated with obtaining a blood pressure. 1-5.37 Demonstrate the skills that should be used to obtain information from the patient, family,
or bystanders at the scene. Lesson 1-6 (Patient Lifting & Moving) 1-6.14 Working in small groups, prepare each of the following devices for use, transfer a patient
to the device, properly position the patient on the device, move the device to the ambulance and load the patient into the ambulance: • Wheeled ambulance stretcher • Portable ambulance stretcher • Stair chair • Scoop stretcher • Long spine board • Basket stretcher • Flexible stretcher
1-6.15 Working with a partner, the EMT-B will demonstrate techniques for the transfer of a
patient from an ambulance stretcher to a hospital stretcher. 1-6.16 Working in small groups, demonstrate the techniques for:
• Emergency moves • Urgent moves • Non urgent moves
2. MODULE 2 - AIRWAY Lesson 2-1 (Airway Management, Ventilation, Suction, Oxygen Equipment) 2-1.25 Demonstrate the steps in performing the head –tilt chin-lift. 2-1.26 Demonstrate the steps in performing the jaw thrust. 2-1.27 Demonstrate the techniques of suctioning. 2-1.28 Demonstrate the steps in providing mouth-to-mouth artificial ventilation with body
substance isolation (barrier shield). 2-1.29 Demonstrate how to use a pocket mask to artificially ventilate a patient. 2-1.30 Demonstrate the assembly of a bag-valve-mask unit. 2-1.31 Demonstrate the steps in performing the skill of ventilating a patient with a bag-valve-
mask for one and two rescuers. 2-1.32 Demonstrate the steps in performing the skill of artificially ventilating a Patient with a
bag-valve-mask while using the jaw thrust. 2-1.33 Demonstrate artificial ventilation of a patient with a flow restricted, oxygen-powered
ventilation device. 2-1.34 Demonstrate how to artificially ventilate a patient with a stoma. 2-1.35 Demonstrate how to insert an oropharyngeal airway.

_____________________________________________________________________________________________2004 Certified Lab Instructor Course Curriculum 37
Module 3 2-1.36 Demonstrate how to insert a nasopharyngeal airway. 2-1.37 Demonstrate the correct operation of oxygen tanks and regulators/flowmeters. 2-1.38 Demonstrate the use of a non-rebreather face mask and state the flow requirements for its
use. 2-1.39 Demonstrate the use of a nasal cannula and state the flow requirements needed for its use. 2-1.40 Demonstrate how to artificially ventilate the infant and child patient. 2-1.41 Demonstrate oxygen administration for the infant and child patient. 3. CPR MODULE Lesson 1 (CPR Skills) CPR-1.27 Demonstrate the proper technique of chest compressions on an adult. CPR-1.28 Demonstrate the proper technique of chest compressions on a child. CPR-1.29 Demonstrate the proper technique of chest compressions on an infant. CPR-1.30 Demonstrate the steps of adult one rescuer CPR. CPR-1.31 Demonstrate the steps of adult two rescuer CPR. CPR-1.32 Demonstrate child CPR. CPR-1.33 Demonstrate infant CPR. 4. MODULE 3 - PATIENT ASSESSMENT Lesson 3-1 (Scene Size up) 3-1.10 Observe various scenarios and identify potential hazards. Lesson 3-2 (Assessment Skills) 3-2.26 Demonstrate the techniques for assessing mental status. 3-2.27 Demonstrate the techniques for assessing the airway. 3-2.28 Demonstrate the techniques for assessing if the patient is breathing. 3-2.29 Demonstrate the techniques for assessing if the patient has a pulse. 3-2.30 Demonstrate the techniques for assessing the patient for external bleeding. 3-2.31 Demonstrate the technique for assessing the patient’s skin color, temperature, condition,
and capillary refill (infants and children only). 3-2.32 Demonstrate the ability to prioritize patients. Lesson 3-3 3-3.11 Demonstrate the rapid trauma assessment that should be used to assess a patient based on
mechanism of injury. Lesson 3-4 3-4.6 Demonstrate the patient assessment skills that should be used to assess a patient who is
responsive with no known history. 3-4.7 Demonstrate the patient assessment skills that should be used to assess a patient who is
unresponsive or has an altered level of consciousness. Lesson 3-5 3-5.6 Demonstrate the skills involved in performing a detailed physical exam

_____________________________________________________________________________________________2004 Certified Lab Instructor Course Curriculum 38
Module 3 Lesson 3-6 3-5.6 Demonstrate the skills involved in performing an ongoing assessment. Lesson 3-7 3-7.11 Perform a simulated, organized, concise radio transmission. 3-7.12 Perform an organized, concise patient report that would be given to the staff at a
receiving facility. 3-4.13 Perform a brief, organized report that would be given to an ALS provider arriving at an
incident scene at which the EMT-B was already providing care. Lesson 3-8 3-4.13 Complete a Prehospital care report. 5. MODULE 4 - MEDICAL/BEHAVIORAL/OBSTETRICS & GYNECOLOGY Lesson 4-1 4-1.7 Demonstrate general steps for assisting patient with self-administration of medications 4-1.8 Read the labels and inspect each type of medication. Lesson 4-2 4-2.11 Demonstrate the emergency medical care for breathing difficulty. 4-2.12 Perform the steps in facilitating the use of an inhaler. Lesson 4-3 4-3.37 Demonstrate the assessment and emergency medical care for a patient experiencing chest
pain/discomfort. 4-3.38 Demonstrate the application and operation of an AED. 4-3.39 Demonstrate the operator maintenance of an AED. 4-3.40 Demonstrate completing a Prehospital care report (PCR) for patients in cardiac arrest
when an AED is connected to the patient. 4-3.41 Perform the steps in facilitating the use of nitrogylcerin for chest pain or discomfort. 4-3.42 Demonstrate the assessment and documentation of patient response to nitroglycerin. 4-3.43 Practice completing a PCR for patients with cardiac emergencies. 4-3.44 Demonstrate the assessment and emergency medical care of a patient with signs and
symptoms of a Cerebrovascular Accident (Stroke). Lesson 4-4 4-4.13 Demonstrate the steps in the emergency medical care for the patient taking diabetic
medication and with an altered mental status and a history of diabetes. 4-4.14 Demonstrate the steps in the administration of oral glucose. 4-4.15 Demonstrate the assessment and documentation of patient response to oral glucose. 4-4.16 Demonstrate how to complete a PCR for patients with diabetic emergencies. Lesson 4-5 4-5.9 Demonstrate the emergency medical care of the patient experiencing an allergic reaction. 4-5.10 Demonstrate the use of an epinephrine auto-injector.
_____________________________________________________________________________________________2004 Certified Lab Instructor Course Curriculum 39
Module 3 4-5.11 Demonstrate the assessment and documentation of patient response to an epinephrine
injection. 4-5.12 Demonstrate proper disposal of equipment. 4-5.13 Demonstrate completing a PCR for patients with allergic emergencies. Lesson 4-6 4-6.12 Demonstrate the steps in the emergency medical care for the patient with possible
overdose. 4-6.13 Demonstrate the steps in the emergency medical care for the patient with suspected
poisoning. 4-6.14 Perform the necessary steps required to provide a patient with activated charcoal. 4-6.15 Perform the necessary steps required to provide a patient with Syrup of Ipecac. 4-6.16 Demonstrate the assessment and documentation of patient response. 4-6.17 Demonstrate proper disposal of the equipment for the administration of Activated
charcoal. 4-6.18 Demonstrate completing a PCR for patients with poisoning/overdose emergency. Lesson 4-7 4-7.10 Demonstrate the assessment and emergency medical care of a patient with exposure to
cold. 4-7.11 Demonstrate the assessment and emergency medical care of a patient with exposure to
heat. 4-7.12 Demonstrate the assessment and emergency medical care of a near drowning patient. 4-7.13 Demonstrate completing a PCR for patients with environmental emergencies. Lesson 4-8 4-8.10 Demonstrate the assessment and emergency medical care of the patient experiencing a
behavioral emergency. 4-8.11 Demonstrate various techniques to safely restrain a patient with a behavioral emergency. Lesson 4-9 4-9.20 Demonstrate the steps to assist in the normal cephalic delivery. 4-9.21 Demonstrate necessary care procedures of the fetus as the head appears. 4-9.22 Demonstrate infant neonatal procedures. 4-9.23 Demonstrate post delivery care of the infant. 4-9.24 Demonstrate how and when to cut the umbilical cord. 4-9.25 Attend to the steps in the delivery of the placenta. 4-9.26 Demonstrate the post delivery care of the mother. 4-9.27 Demonstrate the procedures for the following abnormal deliveries: vaginal bleeding,
breech birth, prolapsed cord, limb presentation. 4-9.28 Demonstrate the emergency medical care of the mother with excessive vaginal bleeding. 4-9.29 Demonstrate completing a PCR for patients with obstetrical/gynecological emergencies.

_____________________________________________________________________________________________2004 Certified Lab Instructor Course Curriculum 40
Module 3 6. MODULE 5 - TRAUMA Lesson 5-1 5-1.15 Demonstrate direct pressure as a method of emergency medical care of external bleeding. 5-1.16 Demonstrate the use of diffuse pressure as a method of emergency medical care of
external bleeding. 5-1.17 Demonstrate the use of pressure points and tourniquets as a method of emergency
medical care of external bleeding. 5-1.18 Demonstrate the care of the patient exhibiting signs and symptoms of internal bleeding. 5-1.19 Demonstrate the care of the patient exhibiting signs and symptoms of shock
(hypoperfusion). 5-1.20 Demonstrate completing a PCR for a patient with bleeding and or shock (hypoperfusion). Lesson 5-2 5.2.34 Demonstrate the steps in the emergency medical care of closed soft tissue injuries. 5.2.35 Demonstrate the steps in the emergency medical care of open soft tissue injuries. 5-2.36 Demonstrate the steps in the emergency medical care of a patient with an open chest
wound. 5-2.37 Demonstrate the steps in the emergency medical care of a patient with an open abdominal
wound. 5-2.38 Demonstrate the steps in the emergency medical care of a patient with an impaled object. 5-2.39 Demonstrate the steps in the emergency medical care of a patient with an amputation. 5-2.40 Demonstrate the steps in the emergency medical care of an amputated part 5-2.41 Demonstrate the steps in the emergency medical care of a patient with superficial burns. 5-2.42 Demonstrate the steps in the emergency medical care of a patient with partial thickness
burns. 5-2.43 Demonstrate the steps in the emergency medical care of a patient with full thickness
burns. 5-2.44 Demonstrate the steps in the emergency medical care of a patient with a chemical burn. 5-2.45 Demonstrate completing a PCR for patients with soft tissue injuries. Lesson 5-3 5-3.12 Demonstrate the emergency medical care of a patient with a painful, swollen, deformed
extremity. 5-3.13 Demonstrate completing a PCR for patients with musculoskeletal injuries. Lesson 5-4 5-4.39 Demonstrate the opening the airway of a patient with a suspected spinal cord injury. 5-4.40 Demonstrate the evaluation of a responsive patient with a suspected spinal cord injury. 5-4.41 Demonstrate the stabilization of the cervical spine. 5-4.42 Demonstrate the four person log roll for a patient with a suspected spinal cord injury. 5-4.43 Demonstrate how to log roll a patient with a suspected spinal cord injury using two
people. 5-4.44 Demonstrate the securing a patient to a long spine board. 5-4.45 Demonstrate using the short board immobilization technique. 5-4.46 Demonstrate the procedure for rapid extrication.

_____________________________________________________________________________________________2004 Certified Lab Instructor Course Curriculum 41
Module 3 5-4.47 Demonstrate the preferred methods for stabilization of a helmet. 5-4.48 Demonstrate the helmet removal techniques. 5-4.49 Demonstrate an alternate method for stabilization of a helmet. 5-4.50 Demonstrate completing a PCR for patients with head and spinal injuries. 7. MODULE 6 - INFANTS AND CHILDREN Lesson 6-1 Demonstrate how open the airway of the pediatric patient. 6-1.32 Demonstrate the techniques of foreign body airway obstruction removal in the infant. 6-1.33 Demonstrate the techniques of foreign body airway obstruction removal in the child. 6-1.34 Demonstrate the assessment of the infant and child. 6-1.35 Demonstrate how to assess a newborn. 6-1.36 Demonstrate how to warm, dry, suction and stimulate the newborn. 6-1.37 Demonstrate how to provide blow by oxygen to the newborn. 6-1.38 Demonstrate how to provide assisted ventilations to the newborn. 6-1.39 Demonstrate how to perform chest compressions on the newborn. 6-1.40 Demonstrate the sizing technique for the selection of infant and child bag-valve-masks
and oxygen delivery devices. 6-1.41 Demonstrate bag-valve-mask artificial ventilations for the infant. 6-1.42 Demonstrate bag-valve-mask artificial ventilations for the child. 6-1.43 Demonstrate oxygen delivery for the infant and child. 6-1.44 Demonstrate suctioning techniques for the infant and child. 6-1.45 Demonstrate how to provide manual stabilization of the head and cervical spine. 6-1.46 Demonstrate how to open the airway of the pediatric patient with a suspected spinal
injury. 6-1.47 Demonstrate how to properly size and apply a cervical collar to the pediatric patient. 6-1.48 Demonstrate the modifications for spinal immobilization for the infant and child. 8. MODULE 7 - AMBULANCE OPERATIONS Lesson 7-1 No psychomotor skills identified. Lesson 7-2 7-2.9 Demonstrate the steps used to remove a patient with a suspected spinal injury from a
vehicle. Lesson 7-3
7-3.9 Given a scenario of a mass casualty incident, perform triage. 9. Certified Lab Instructors must understand each of these psychomotor objectives in order to
teach them. 1. Skills are objective based 2. Must have measurable criteria to evaluate student performance 3. Students must understand what is expected of them

_____________________________________________________________________________________________2004 Certified Lab Instructor Course Curriculum 42
Module 3
II. Psychomotor Skill Teaching Tips OBJECTIVES: This section has been prepared to assist the CLI in teaching specific psychomotor skills. PRESENTATION: When teaching a psychomotor skill, the first task is to identify the level at which the skill is expected to be preformed. The following Objectives Legend is used for the EMT-B psychomotor skills: 1 = Cognitive (Knowledge) Level 2 = Psychomotor (Application) Level 3 = Affective (Problem Solving) Level ACTIVITY - The first skill tip exercise is based on “SKILL: PULSE LOCATION” For each of the following, demonstrate how the teaching tip can be used in teaching the specific psychomotor skill. Read the objective Discuss how the level at which the skill is to be performed can be identified Discuss how the tip can be applied in a skill setting Demonstrate the tip being used (NOTE: It is not necessary to demonstrate each skill in the course, only those listed here.) Alternate Suggested Activity Give students 5 minutes to list individually the skills steps and knowledge needed to accomplish an objective that is read to them. The instructor will list on a flip chart or board all the steps offered by the students. The instructor should not attempt to arrange the steps in a logical order of application. Instructor will review each step and identify whether it is a C, P, or A. The student will then suggest the appropriate order for performing the skill. A. Read Objective 1-5.33: “Demonstrate the skills associated with obtaining a pulse.”
B. Discuss how to determine what level this skill is to be performed at:
1. Cognitive (Knowledge) a) Although students are expected to be able to recall bits of information in performing
this skill, there is a higher expectation. b) Some of the bits of information they need to know including:
i. Pulse locations ii. Principles of taking a pulse
(a) Baring the area to take a pulse (b) Using fingertips to put pressure on artery (c) Not completely compress the artery (d) Counting for 15 seconds and multiplying by 4, unless irregular or unusually
slow iii. Normal pulse ranges

_____________________________________________________________________________________________2004 Certified Lab Instructor Course Curriculum 43
Module 3 iv. Descriptions for pulse qualities and their meanings
(a) Weak – not able to be felt well, may be difficult to feel (b) Strong – able to be felt with ease, very little pressure applied to feel
2. Affective (Application)
a) Students are expected to not only know the bits of information but also understand the information or facts they uncover i. Pulse = 40
b) They must demonstrate that they know the meaning of those facts i. Pulse = 40 is too slow
3. For this objective, students are not expected to perform at a higher level. They should not
need to get into problem solving, analyzing how placing their fingers against the artery causes pulse waves to be felt, or any other higher level synthesis or evaluation.
C. Using the example listed, go through the teaching tips for pulse locations, and discuss how the listed information can be used in the skill setting. (The comments in the parenthesis are for discussion and are not listed in the skill teaching tips.) 1. COMMON STEPS:
a) have patient remove clothing from area where pulse is to be taken (May seem like common sense, but brand new students may not know).
b) note strength and regularity of pulse (Strength and regularity assist in overall quality assessment, and can give clues to cardiac output).
c) if pulse is regular, take for 15 seconds and multiply by 4. (Sufficient for rate determination, and saves a little time. If not sure, take for 1 minute).
d) if pulse irregular, take for one full minute (If only take for 15 seconds, may be grossly inaccurate).
2. DETERMINE CAROTID PULSE:
a) locate the larynx (Adams apple is more commonly known by new students) at the front of the neck.
b) slide two fingers back toward the ear on the same side you are on (Why not reach across? Because of tendency to completely compress artery).
c) locate groove between larynx and the neck muscle (landmark). d) use light pressure, check only one side at a time (Too much pressure can not only
cut off pulse, but risk dislodging plaque. Only check one side at a time so as not to cut off flow to brain).
e) count for 15 seconds and multiply times 4, if irregular count for one minute (Review).
3. DETERMINE BRACHIAL PULSE: a) locate artery on inside of arm in groove between the muscles, at mid point of arm
(landmark). b) count for 15 sec. multiply times 4, if irregular count for one minute (Review).
D. The same examples can be used for the remainder of the pulse points as well.

_____________________________________________________________________________________________2004 Certified Lab Instructor Course Curriculum 44
Module 3 E. ACTIVITY - The second skill tip exercise is based on “SKILL: PATIENT ASSESSMENT
MANAGEMENT – INITIAL ASSESSMENT”
Read the following objectives, Identify them as being included in the process of Initial Assessment: a) Observe various scenarios and identify potential hazards. b) Demonstrate the techniques for assessing mental status. c) Demonstrate the techniques for assessing the airway. d) Demonstrate the techniques for assessing if the patient is breathing. e) Demonstrate the techniques for assessing if the patient has a pulse. f) Demonstrate the techniques for assessing the patient for external bleeding. g) Demonstrate the technique for assessing the patient’s skin color, temperature, condition, and
capillary refill (infants and children only). h) Demonstrate the ability to prioritize patients.
1. Discuss the expected level of performance for the first of these objectives.
a) Observe various scenarios and identify potential hazards. (This would initially seem to be an Application level objective, but looking further into it, it is actually an Evaluation level objective. What we are looking for in our students is the ability to look at each situation as a new situation, identify items which may or may not have been previously identified as a hazard, decide if the hazard outweighs the risks, and to continually reevaluate the hazards and impacts on the scene).
2. Discuss how the teaching tips for “Scene Size- Up” can be applied in a lab setting:
a) BSI Precautions (Do you make your students wear them every time in lab) b) Use gloves, mask, gown, eye protection as needed (Have a number of scenarios in class
that require students to determine the level of protection they need) c) Scene Safety (Reinforce this is a concept, not a checklist) d) Insure scene is safe before you enter, is it safe for your patients, is it safe for bystanders?
(Have scenarios with hazards that might impact each of these and make sure to discuss them with your students)
e) Observe for unsafe environment such as fire, gas, Hazardous Materials, crime scene. Unstable surfaces (Present photos, videos, or other images of various scenes and have students identify hazards. Make sure to have a listing of the hazards you have identified for discussion)
f) Mechanism of Injury or Nature of Illness (Using scene images, discuss the potential MOI/NOI for each)
g) Determine from patient, family, bystanders or observing the scene (Practice having the students roll-play bystanders or family in scenarios. Make sure they are programmed)
h) Determine Number of Patients if Trauma (Have photos of different types of situations of multiple patient scenes from a simple accident with 2 or 3 patients, to major incidents with multiple patients. Discuss the role of triage on every call)
i) Request Additional Resources if Needed (Have students identify additional resources they might need in various scenarios you run in the lab)

_____________________________________________________________________________________________2004 Certified Lab Instructor Course Curriculum 45
Module 3
j) Stabilize Spine if MOI / NOI indicate (Discuss with students during scenarios if a
simulated patient has this need, and have the student explain why or why not)
3. Have the CLI candidates identify the level of expected performance for each of the other objectives from the initial assessment example: a) Demonstrate the techniques for assessing mental status. (Comprehension) b) Demonstrate the techniques for assessing the airway. (Evaluation) c) Demonstrate the techniques for assessing if the patient is breathing. (Analysis) d) Demonstrate the techniques for assessing if the patient has a pulse. (Comprehension) e) Demonstrate the techniques for assessing the patient for external bleeding.
(Comprehension) f) Demonstrate the technique for assessing the patient’s skin color, temperature, condition,
and capillary refill, infants and children only. (Comprehension) 4. Demonstrate the ability to prioritize patients. (Evaluation)

_____________________________________________________________________________________________2004 Certified Lab Instructor Course Curriculum 46
Module 3
III. Using Scenarios in EMS Instruction OBJECTIVES: Discuss the use of role-playing and simulations. Describe scenario planning. List the steps for running a scenario. Describe methods for evaluating a scenario. A. Role Playing and Simulations 1. Introduction
a) Role playing and patient simulations should begin after the students have mastered the skills of the course. Before this point, they don’t have the knowledge and skill base to have a worthwhile experience.
2. Why Use Scenarios?
a) One of the best ways for the instructor to integrate cognitive knowledge with practical skills.
b) As close to the “real-life” experience as possible in a classroom environment.
3. Scenarios - a) Add a sense of realism to the course b) Give students an idea of the pressures faced in “real world” EMS c) Promote interaction and bonding between students d) Provide instructors with the opportunity to evaluate how well the students have grasped
and integrated both didactic and skill objectives
4. Scenarios must be: a) Do-able - Not complicated or tricky b) Realistic - Use some real calls as your basis c) “Win”-able - The intent is not to create a stressful event, it’s to create experiences where
the student can make mistakes, learn, and develop better judgment d) Simple - Usually good programming and simple make-up will do e) At the appropriate level for the students - Know where the students are “at” and what
needs to be practiced f) Used consistently and frequently g) Planned in advance
5. Scenario Planning
a) What type of scenario is appropriate at this point? i. Determine the skill to be evaluated ii. The illness or injury that would require the use of this skill iii. The mechanism of injury or circumstances of the illness
b) Use a planning sheet to plot out your scenario c) State specific objectives

_____________________________________________________________________________________________2004 Certified Lab Instructor Course Curriculum 47
Module 3
6. Detailing your scenario on a Planning Sheet (Appendix D) a) List the objective for the specific scenario (is this a partial or full skill; part of a scene or
complete scene start to finish?) b) List the equipment needed, including clothing - tear away scrubs or old clothes that can
be cut allow the student to expose the patient appropriately.
c) List the role-player setup i. Give moulage instructions ii. State patient instructions iii. State “Bystander” and “Family” instructions iv. List patient & bystander/family cues, and actions to be taken on those cues (such
as a particular response to a particular treatment, or patient response if appropriate treatment is not given)
d) List the scene description i. Describe the call, including any environmental factors affecting the call ii. List any pertinent findings
(1) Scene size-up (2) Focused history (3) Physical exam (4) Baseline and follow-up vitals (If specific vitals are needed, otherwise use the
patients own) (5) Give follow-up vitals (if needed) and patient response if care is
appropriate/inappropriate iii. State crew instructions including start & end point (e.g. “you have already
completed an initial assessment finding …., you will provide treatment up to the point you call for transport.”)
e) State the expected results including treatments & protocols which should be followed f) List potential variables you can think of, with the reasoning behind the variable (such as
on a trouble breathing scenario, a student using a BVM instead of NRBM) g) Leave space for unexpected results – learn from them
7. Programming your Patient
a) Programmed patient situations should contain three elements i. Believable acting and appropriate medical responses ii. Accurately designed injuries iii. Realistic environmental setting
b) Your programmed patient must be able to: c) Portray the injured/ill patient’s reactions and responses realistically d) Convince him or herself that s/he is, in fact, injured or ill - Play the role as they would in
real life e) React with the type of distress the injury or illness causes f) Use appropriate general responses, such as agitation, confusion, unconsciousness, etc. g) Your programmed patient must be able to:
i. Play his/her role with an air of professionalism (avoid giggling, etc.) ii. Mentally set the scene
_____________________________________________________________________________________________2004 Certified Lab Instructor Course Curriculum 48
Module 3 iii. Respond appropriately to many varied questions such as:
(1) Where were you and what were you doing when this occurred? (2) Have you seen a doctor recently & for what? (3) Does anything make you feel worse, better? (4) What is your past medical history, medications, allergies?
h) Your programmed patient must be able to:
i. Act and respond appropriately if the care is appropriate or inappropriate (e.g. React with relief if traction is applied to a fractured femur) ii. Have increased shortness of breath if high concentration oxygen is not given for his respiratory distress iii. Give answers and be consistent iv. Respond appropriately to rescuers rough handling, rudeness, etc.
8. Running Your Scenario
a) Weigh the team evenly b) Balance out more timid students with more aggressive ones, but allow opportunities for
slower students to get some practice being team leader c) Give clear directions about your expectations and what their expectations should be
i. What is covered in the scenario ii. When it starts and ends iii. What each team members role is, and what role the CLI will take iv. etc.
d) What should be simulated and shouldn’t be e) What your role will be and what information they can expect from you f) Allow students to play the game with as few “time outs” as possible
i. Stopping them frequently to correct them cheats them of the experience they would gain by letting the situation run its course ii. Remember the coach cannot play the game for them
g) It’s ok to shout directions from the bench at times to prevent them from faking aspects of patient care such as ventilation techniques, lung sounds, taking vital signs, etc.
9. Evaluating Your Scenario
a) General Considerations i. During the scenario, pay attention and take notes ii. What is the team leader doing and how is the team functioning iii. Thorough notes in chronological order (Use an evaluation tool)
(a) Should be simple to use (b) Can be separate or incorporated into scenario planning sheet
iv. Keep the discussion positive v. Do your best to protect student’s self-esteem and keep egos intact vi. Remember that there are often many right ways to do things (Principles vs.
Techniques)

_____________________________________________________________________________________________2004 Certified Lab Instructor Course Curriculum 49
Module 3
b) Step by Step i. Review the scenario’s objective(s). ii. Ask the group to recap what they did and what could be done differently. iii. Ask the students (crew) to explain how they used the information you gave them
to make their management decisions. iv. Let them point out their errors and discuss them. Be careful and be prepared to
control overly critical team members. v. Elicit information from all participants, including patients. vi. Discuss the case.
(1) Point out the critical steps of care. (2) Provide them with a chronological perspective of what happened and positive
feedback. Point out what should have been done differently. (3) Focus on the process – They need to have specifics about where they went wrong
and where they went right! (4) Answer questions. (5) Expand on any parts left incomplete. (6) Be attentive and respond to participants questions, ideas, concerns, feelings of
inadequacy, etc.
vii. End on a positive note (1) Bruised egos and damaged pride results in defensiveness and poor learning later. (2) If the simulation did not go well, point out what was learned by doing it. (3) Allow them to do it again, if time permits. (4) Allows students to experience and appreciate improved efficiency in case
management. (5) Gives a sense that “I really learned something today.”
10. Some Don’t Discussions
a) Don’t allow negative emotions, frustrations, and expressions of failure. b) Don’t monopolize group discussion – allow for flow of information from all participants. c) Don’t lose track of time. d) Don’t neglect POSITIVE feedback. e) Don’t get side-tracked on issues that are not important.
11. Summary
a) Repeat key aspects of issues raised by participants. b) Summarize by reviewing:
i. Key discussion points ii. What went well iii. What could be improved
c) Bring into focus unresolved issues d) End on a positive note

_____________________________________________________________________________________________2004 Certified Lab Instructor Course Curriculum 50
Module 3
III. Group Scenario Building Exercise A. ACTIVITY – Break the students into groups of 5 or 6. Assign each group to develop a
scenario designed to allow students to integrate a minimum of three Total skills. Each group should prepare a scenario planning sheet for the scenario. Allow 15 minutes for planning.
Pick two groups to present their scenario plan. Have the students from the other group(s) give suggestions on how the scenario
could be improved.

_____________________________________________________________________________________________2004 Certified Lab Instructor Course Curriculum 51
Module 4 MODULE 4
I. Moulage Techniques OBJECTIVES: Define Moulage. State the Purpose. Describe moulage techniques. List item for moulage kit. Demonstrate moulage techniques. 1. Moulage definitions
a) Moulage is a French word that means “to make a mold” b) Your injuries and scenarios should look like they are from a “mold” of the real thing c) The goal of moulage is to create realism in an artificial situation through
i. Make-up ii. Props and Stage settings iii. Patient and bystander programming iv. Provides visual clues
2. Moulage kits
a) Many resources are available - From very expensive kits with professional makeup and plastic injuries to simple homemade versions
b) It is quite simple and inexpensive to make up your own moulage kit c) Look in costume stores, and in general department stores at Halloween time d) Review basic moulage kit (see Appendix E)
4. Simulated Injuries and Moulage Techniques
a) Whatever type of moulage kit you use, you must practice your moulage techniques before attempting to use them in an educational setting
b) Portray the medical situation in as realistic a manner as possible c) Make the patient and injuries look real at close quarters instead of the clown-like
appearance necessary for theatrical (stage) performance d) Make the injuries accurate in
i. Placement ii. Consistency with mechanism of injury
iii. Associated injuries (Contusions, abrasions, etc.) 5. Demonstrate the following moulage:
a) contusion b) abrasion c) laceration d) cyanosis

_____________________________________________________________________________________________2004 Certified Lab Instructor Course Curriculum 52
Module 4
e) shock
6. Demonstrate the following moulage: a) open fracture b) burn
7. Review the moulage hints (Appendix E)

_____________________________________________________________________________________________2004 Certified Lab Instructor Course Curriculum 53
Module 4
II. Evaluating Student Performance (see Notes View in PowerPoint Presentation for more information) OBJECTIVES: Describe evaluating student performance in a lab session. Describe evaluating student performance in a practical exam. Describe common errors in the evaluation process. A. Evaluating Student Performance in the Classroom Lab 1. Evaluate against the objective(s)
2. Try to be objective
a) Using a scale such as: i. Not able to perform skill ii. Not able to complete skill iii. Able to complete skill only with direct instruction
iv. Able to complete skill only with assistance v. Able to complete skill without assistance, but at a level less than minimum
competency (such as too much time, or rough handling, etc.) vi. Able to complete skill without assistance at a minimum competency level
vii. Able to complete skill without assistance above minimum competency level b) Center on performance
3. Use a form for tracking progress
a) Skill Test Feedback Form (Appendix F) b) Student Skill Tracking Sheet (Appendix G) c) Class Tracking Form (Appendix H)
4. Corrective feedback is appropriate and necessary for student progression
5. Written skill feedback on specific principles or errors may be helpful for specific types of
students B. Evaluating Student Performance in the NYS EMS Practical Skills Exam (PSE) 1. Objectives
a) Define the purpose of the NYS EMS PSE b) List the role of each member of the exam team c) Define Evaluation in Terms Applicable to NYS EMS PSE d) Define the role and responsibilities of the PSE evaluator e) Describe the steps involved in conducting the evaluation

_____________________________________________________________________________________________2004 Certified Lab Instructor Course Curriculum 54
f) Document candidates performance in measurable terms g) Describe six common errors made by PSE evaluators
Module 4 h) List the critical tasks / performance for each of the PSE stations
2. Purpose of the PSE
a) Test a candidates rote skill b) Observation of Performance c) Minimum Level of Competency d) Testing - NOT Teaching
3. PSE Administration
a) Course Sponsor - overall responsibility for coordination b) PSE Coordinator - logistics (with Sponsor), and “...ensuring the examination is conducted
according to NYS EMS standards...” c) PSE Evaluator - observes performance and records candidates actions (also referred to as
a PSE Examiner) d) Victims and Helpers - required as part of several stations to allow candidate to
demonstrate skill. Helpers must be EMTs. PSE Evaluators should not expect victims to be CFRs or EMTs
4. Definitions a) Evaluation - Accurate Appraisal of Value b) Examine - To Inspect or Scrutinize With Care; Investigate Critically
i. To Be A “Camcorder” – astute observer ii. To Observe Candidates Performance & Record Against Minimum Critical Tasks
or Performance Criteria
5. PSE Evaluator Role & Responsibilities a) Observe & Record Candidate Performance b) Professional at All Times c) Be On Time d) Professional Image e) Conversations / Jokes f) Actions g) Ethical
6. Conducting the Evaluation
a) Greeting Candidate b) Instructions to the Candidate c) Chance to Check Equipment, Clarify Expectations d) Scenarios e) Attention to Performance
i. Position ii. Proximity

_____________________________________________________________________________________________2004 Certified Lab Instructor Course Curriculum 55
iii. Attention to student
Module 4
f) Ending the Evaluation
7. Scoring & Documentation a) Exam Sheets are ONLY A TOOL!!! b) Principles / Protocols / Instructions / Local Practice c) Document Reasons for NOT Awarding Points! d) Equipment Failure is NOT an Acceptable Reason for Candidate Failure e) Unacceptable Documentation
i. Could Have Used a Better Device / System / Technique ii. Rude to Patient iii. Poor Skills iv. Barely Passed
f) Poor Documentation i. Didn’t Do ii. Not Secure iii. Took Too Long - or - Went Over Time
g) Better Documentation i. After Checking Airway, Went Directly to Circulation. Breathing Was Not
Accessed Until Detailed Physical Exam. ii. KED Slipped Appx. 8” Up Torso After Candidate Finished. Chest Straps Had
Appx. 2” of Play. iii. Candidate Completed to Here (Marked on Sheet) In Allotted Time. Candidate
Took an Additional 6 Minutes to Complete Tasks.
8. Common Errors a) Preconceptions
i. One instructor’s students are better than another's ii. Students from a particular agency do better (or worse) than others iii. Student’s not using techniques you like or are familiar with
b) Keeping It In the Middle (rating everyone the same) c) Rating One Candidate Against Another d) Specificity (requiring one technique to pass) e) Guessing (not being sure yourself of a technique that a student used) f) Bias
9. Critical Tasks / Performance
a) Minimum Criteria to Rate Performance b) Principle Based c) Multiple Techniques d) Hard to “Evaluate” Without Bias
10. Conclusions
_____________________________________________________________________________________________2004 Certified Lab Instructor Course Curriculum 56
a) There Is No Such Thing As An “Objective” Evaluation b) Performance is Recordable, Regardless of Techniques Used
Module 4 c) Great Performers All Use Different Techniques
11. ACTIVITY – Practical Skills Evaluation Practice One Regional Faculty member will perform a NYS EMS PSE “Short Spinal Immobilization Device” as if they were an EMT-B candidate being tested. (A video of an exam can also be used if available). CLI students will each play the part of evaluator (make sure each can see the performance, it may be necessary to break into groups if class size dictates). After the completion of the station, compare the evaluations done by each CLI candidate and discuss the outcome.
_____________________________________________________________________________________________2004 Certified Lab Instructor Course Curriculum 57
Module 4
III. Candidate Skills Presentations Prior to the course the candidate should be pre-assigned the topic for their final skill presentation. Candidates should be broken into groups of 5 or 6, to present the skill as assigned. One Regional Faculty member is needed for each group to observe the presentation, and record performance on the CLI Candidate Presentation Sheet. Each student should receive a copy of their individual presentation sheet. The candidate presentation should be chosen from the following list of topics: (Note: Since the candidates will be broken up into smaller groups, multiple candidates may be assigned the same topic)
• Application of a short spine board • Application of a long spine board • Standing Take Down • Helmet removal • Bleeding control/shock management • Oxygen tank assembly • Suction • Application of a traction splint • Oral/nasal airways • AED • Immobilization of a long bone injury • Immobilization of a joint injury
_____________________________________________________________________________________________2004 Certified Lab Instructor Course Curriculum 58
Module 4
IV. End of Course Wrap-up A. Next Steps to Certification B. Review criteria for certification of lab instructor candidates
1. Attend and successfully complete the CLI course. 2. Serve a teaching internship under the supervision of a CIC in either an EMT or Advanced
EMT course. The internship must meet the objectives outlined in the training program and the current Bureau of EMS Policy Statement.
3. Submit the following items to the Bureau of EMS Area Office within 18 months of CLI course completion:
4. The CLI Internship Completion Report (DOH-3378) from the supervising CIC. 5. A favorable Lab Instructor Audit Report (DOH-2423) conducted by the supervising CIC. 6. A favorable Lab Instructor Audit Report (DOH-2423) conducted by a CLI or another
CIC. The second audit must be from someone other than the supervising CIC. 7. A letter of recommendation from the Regional EMS Council Training Committee, if one
exists.
C. Review Certified Instructor Coordinator entrance requirements:
1. Must have achieved at least an 85% on the most recent NYS EMS written certification exam (if an AEMT, must have received at least 85% on EMT-B portion and at least 85% on AEMT portion)
2. Must be a current NYS EMS CLI 3. Must have participated as a CLI in at least one EMT or AEMT course within the three
years immediately preceding entrance into CIC course 4. Must have sponsorship from a Course Sponsor Administrator attesting:
a) that they have reviewed the job functions of a CIC with the candidate b) that they feel the candidate is capable of completing the CIC course and certification
requirements c) that the Sponsor will provide the opportunity for the candidate to complete the
internship within 18 months of completion of the CIC course
D. Congratulate students on completing the course.
E. Have students fill out end of course evaluations.

_____________________________________________________________________________________________2004 Certified Lab Instructor Course Curriculum 59
Appendix A – Prescreening CLI Practical Exam Sheets For the Patient Assessment (trauma or medical) and BVM usage on a non-traumatic patient – use the sheets provided in the BLS PSE Administrative Manual. For the demonstration of the BVM on a traumatic patient and for the random skills listed, use the sheets on the following pages.

_____________________________________________________________________________________________2004 Certified Lab Instructor Course Curriculum 60
Points: Possible Awarded Comments Takes or verbalizes BSI C Takes spinal stabilization C Opens the airway 1 Directs assistant to inserts an airway adjunct 1 Directs assistant to selects appropriately sized mask 1 With assistant, creates a proper mask-to-face seal 1 Maintains mask seal and spinal stabilization C Directs assistant to ventilate the patient while the candidate controls the mask, airway, and spinal stabilization
1
Assures ventilation of the patient at no less than 800 ml volume (The examiner must witness for at least 30 seconds)
C
Candidate directs ventilation of the patient prior to connecting supplemental oxygen
C
Directs assistant to connects reservoir and oxygen 1 Directs assistant to adjust liter flow to 15 liters/minute or greater
C
Reopens the airway maintaining spinal stabilization C Creates a proper mask-to-face seal 1 Maintains mask seal and spinal stabilization C Directs assistants to resume ventilation at proper volume per breath (The examiner must witness for at least 60 seconds)
1
Did not allow interruption of ventilation for more than 20 seconds
C
Allows for adequate exhalation C Patient ventilated without spinal compromise C Candidate must complete the station within the 5 minute time limit
C
Note: Candidate must complete all critical criteria and receive at least 6 points to pass this station. Total to pass 6 Total 8
COMMENTS:
NEW YORK STATE DEPARTMENT OF HEALTH Emergency Medical Services
CLI Candidate Screening Skill Examination
BAG-VALVE-MASK APNEIC TRAUMA PATIENT
Pass ______ Fail _______
Please Print Candidate ______________________________________
Examiner _________________________ Initials ______
Date ___________ Start Time _____ Stop Time _____

_____________________________________________________________________________________________2004 Certified Lab Instructor Course Curriculum 61
Points: Possible Awarded Comments Takes, or verbalizes, body substance isolation precautions C Directs assistant to place and maintain head in the neutral in-line position
C
Reassesses motor, sensory and circulatory function in each extremity
1
Measures patient for extrication collar 1 Matches measurement to appropriate extrication collar 1 Tightens collar & secures in place 1 Appropriate size collar applied to the patient C Reassesses motor, sensory and circulatory function in each extremity
1
Patient was not manipulated or moved excessively, to cause potential spinal compromise
C
Upon completion of application, head is in the neutral position
C
Candidate must complete the station within the 5 minute time limit
C
Note: Candidate must complete all critical criteria and receive at least 3 points to pass this station.
Total to pass 3 Total 5 COMMENTS:
NEW YORK STATE DEPARTMENT OF HEALTH Emergency Medical Services
CLI Candidate Screening Skill Examination
MEASUREMENT & APPLICATION of EXTRICATION COLLAR
Pass ______ Fail _______
Please Print Candidate ______________________________________
Examiner _________________________ Initials ______
Date ___________ Start Time _____ Stop Time _____

_____________________________________________________________________________________________2004 Certified Lab Instructor Course Curriculum 62
Points: Possible Awarded Comments Takes, or verbalizes, body substance isolation precautions C Selects appropriately sized airway 1 Measures airway 1 Uses tongue-blade to lift tongue C Inserts airway without pushing the tongue posteriorly 1 Note: The examiner must advise the candidate that the patient is gagging and becoming conscious
Removes the oropharyngeal airway 1 Candidate must complete the station within the 5 minute time limit
C
Note: Candidate must complete all critical criteria and receive at least 3 points to pass this station.
Total to pass 3 Total 4 COMMENTS:
NEW YORK STATE DEPARTMENT OF HEALTH Emergency Medical Services
CLI Candidate Screening Skill Examination
OPA INSERTION IN AN INFANT
Pass ______ Fail _______
Please Print Candidate ______________________________________
Examiner _________________________ Initials ______
Date ___________ Start Time _____ Stop Time _____

_____________________________________________________________________________________________2004 Certified Lab Instructor Course Curriculum 63
Points: Possible Awarded Comments Takes or verbalizes BSI C Places tips of two or more fingers on pulse point 1 Compresses pulse without completely occluding blood flow 1 Counts pulse for 15 seconds and multiples x 4 1 Reports pulse rate within 10 BPM C Reports pulse quality 1 Determines movement in foot C Determines sensation in foot C Candidate must complete the station within the 5 minute time limit
C
Note: Candidate must complete all critical criteria and receive at least 3 points to pass this station. Total to pass 3 Total 4
COMMENTS:
NEW YORK STATE DEPARTMENT OF HEALTH Emergency Medical Services
CLI Candidate Screening Skill Examination
PEDAL PULSE & NEURO CHECKS ON A FOOT
Pass ______ Fail _______
Please Print Candidate ______________________________________
Examiner _________________________ Initials ______
Date ___________ Start Time _____ Stop Time _____

_____________________________________________________________________________________________2004 Certified Lab Instructor Course Curriculum 64
Points: Possible Awarded Comments Takes, or verbalizes, body substance isolation precautions C Directs application of manual stabilization of the injury 1 Assesses motor, sensory and circulatory function in the injured extremity
C
Note: The examiner acknowledges “motor, sensory and circulatory function are present and normal”
Measures the splint 1 Applies the splint 1 Immobilizes the joint above the injury site C Immobilizes the joint below the injury site C Secures the entire injured extremity 1 Immobilizes the hand/foot in the position of function 1 Reassesses motor, sensory and circulatory function in the injured extremity
C
Note: The examiner acknowledges “motor, sensory and circulatory function are present and normal”
Candidate did not grossly move the injured extremity C Candidate must complete station within 10 minute time limit
C
Note: Candidate must complete all critical criteria and receive at least 4 points to pass this station.
Total to pass 4 Total 5 COMMENTS:
NEW YORK STATE DEPARTMENT OF HEALTH Emergency Medical Services
CLI Candidate Screening Skill Examination
UPPER ARM IMMOBILIZATION
Pass ______ Fail _______
Please Print Candidate ______________________________________
Examiner _________________________ Initials ______
Date ___________ Start Time _____ Stop Time _____
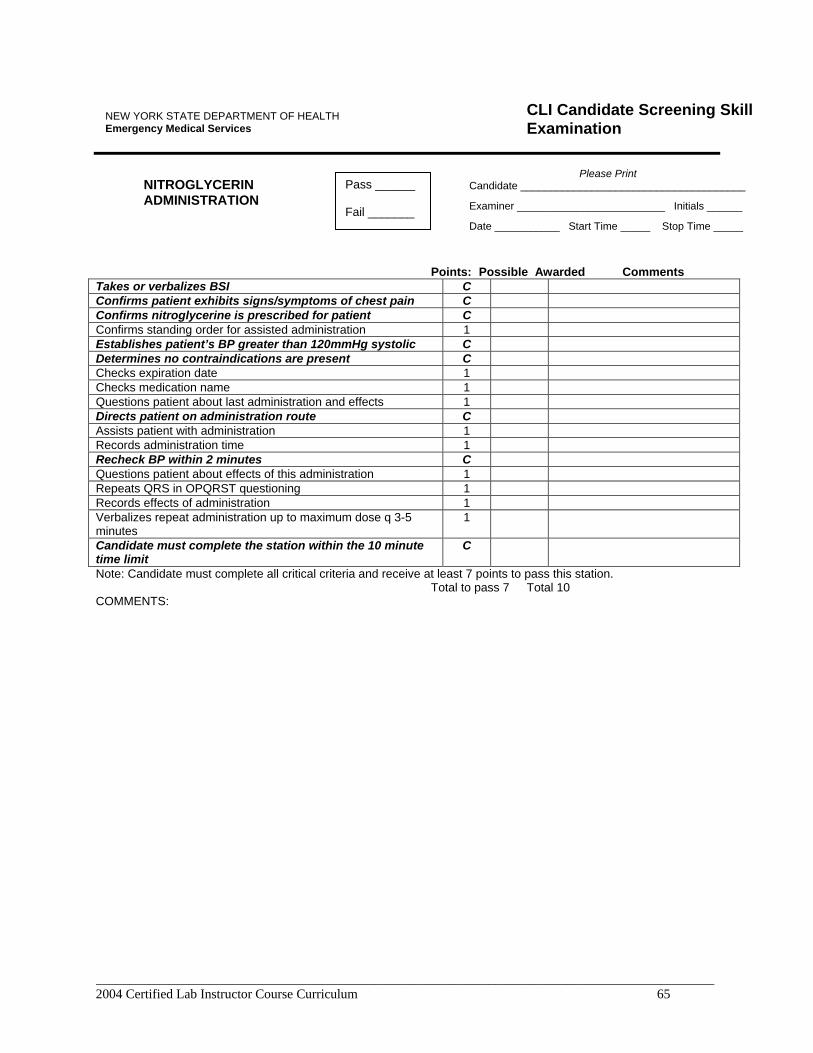
_____________________________________________________________________________________________2004 Certified Lab Instructor Course Curriculum 65
Points: Possible Awarded Comments Takes or verbalizes BSI C Confirms patient exhibits signs/symptoms of chest pain C Confirms nitroglycerine is prescribed for patient C Confirms standing order for assisted administration 1 Establishes patient’s BP greater than 120mmHg systolic C Determines no contraindications are present C Checks expiration date 1 Checks medication name 1 Questions patient about last administration and effects 1 Directs patient on administration route C Assists patient with administration 1 Records administration time 1 Recheck BP within 2 minutes C Questions patient about effects of this administration 1 Repeats QRS in OPQRST questioning 1 Records effects of administration 1 Verbalizes repeat administration up to maximum dose q 3-5 minutes
1
Candidate must complete the station within the 10 minute time limit
C
Note: Candidate must complete all critical criteria and receive at least 7 points to pass this station. Total to pass 7 Total 10
COMMENTS:
NEW YORK STATE DEPARTMENT OF HEALTH Emergency Medical Services
CLI Candidate Screening Skill Examination
NITROGLYCERIN ADMINISTRATION
Pass ______ Fail _______
Please Print Candidate ______________________________________
Examiner _________________________ Initials ______
Date ___________ Start Time _____ Stop Time _____

_____________________________________________________________________________________________2004 Certified Lab Instructor Course Curriculum 66
Points: Possible Awarded Comments Takes or verbalizes BSI C Verbalizes general impression of the patient 1 Determines responsiveness/level of consciousness (AVPU) 1 Determines chief complaint/apparent life threats 1 Airway and breathing
Assesses and maintains airway C Initiates appropriate oxygen therapy C
Assures adequate ventilation C Circulation
Assesses/controls major bleeding C Assesses pulse C
Assesses skin (color, temperature and condition) C Assesses airway breathing & circulation prior to focused history/physical exam
C
Identifies priority patients/makes transport decision C Candidate must complete the station within the 2 minute time limit
C
Note: Candidate must complete all critical criteria and receive at least 3 points to pass this station. Total to pass 3 Total 3
COMMENTS:
NEW YORK STATE DEPARTMENT OF HEALTH Emergency Medical Services
CLI Candidate Screening Skill Examination
INITIAL ASSESSMENT ACUTE RESPIRATORY DIFFICULTY
Pass ______ Fail _______
Please Print Candidate ______________________________________
Examiner _________________________ Initials ______
Date ___________ Start Time _____ Stop Time _____

_____________________________________________________________________________________________2004 Certified Lab Instructor Course Curriculum 67
Points: Possible Awarded Comments Takes or verbalizes BSI C Exposes abdomen 1 Visually inspects abdomen for signs of injury C Palpates entire abdomen C Reports abdomen quality 1 Calls for treatment of all injuries identified according to NYS Protocol
C
Candidate must complete the station within the 5 minute time limit
C
Note: Candidate must complete all critical criteria and receive at least 2 points to pass this station. Total to pass 2 Total 2
COMMENTS:
NEW YORK STATE DEPARTMENT OF HEALTH Emergency Medical Services
CLI Candidate Screening Skill Examination
DETAILED PHYSICAL EXAM - ABDOMEN
Pass ______ Fail _______
Please Print Candidate ______________________________________
Examiner _________________________ Initials ______
Date ___________ Start Time _____ Stop Time _____

_____________________________________________________________________________________________2004 Certified Lab Instructor Course Curriculum 68
Points: Possible Awarded Comments Takes or verbalizes BSI C Places tips of two or more fingers on pulse point 1 Compresses pulse without completely occluding blood flow
C
Counts pulse for 15 seconds and multiples x 4 1 Reports pulse rate within 10 BPM C Reports pulse quality 1 Checks pulse on same side as candidate is positioned 1 Does NOT check both sides at the same time C Candidate must complete the station within the 5 minute time limit
C
Note: Candidate must complete all critical criteria and receive at least 3 points to pass this station.
Total to pass 3 Total 4 COMMENTS:
NEW YORK STATE DEPARTMENT OF HEALTH Emergency Medical Services
CLI Candidate Screening Skill Examination
CAROTID PULSE CHECK
Pass ______ Fail _______
Please Print Candidate ______________________________________
Examiner _________________________ Initials ______
Date ___________ Start Time _____ Stop Time _____

_____________________________________________________________________________________________2004 Certified Lab Instructor Course Curriculum 69
Appendix B – Channel / Modality List Suggestions
ACTIVITY – Memory Game -Activity Instructions: Students are provided five lists of ten items each, that they must remember and write down after each list is presented. This will indicate how much they can recall. (Suggested lists in Appendix B). Each list is presented in a different manner using a different sense or combination of senses. Have students self-grade their responses.
Determine how many students got all 10, 7-9, 4-6, or 3 or fewer correct from each list. How many students got the number correct on all five lists? Did all students find success the same way? These lists are taken from the supporting Powerpoint presentations: A. (Read only) Animals: Rabbit, Dog, Cat, Kangaroo, Zebra, Donkey, Ant, Frog, Penguin, Fox
B. (Plain Text displayed for 30 sec – no note taking allowed) Resistor Colors: Black, Brown,
Red, Orange, Yellow, Green, Blue, Violet, Gray, White
C. (Read and display plain text)
D. (Powerpoint show) Kitchen Ware: Apple divider, Baking pan, Bundt cake pan, Flour sifter, Fry pan, Meat cleaver, Mixing bowl, Pasta machine, Steamer, Tomato knife
E. (Using string – have students tie) Types of knots: Overhand, Overhand Bow, Figure Eight, Granny, Sheet Bend, Square, Double Overhand, Surgeons, Half Hitch, Clove Hitch

_____________________________________________________________________________________________2004 Certified Lab Instructor Course Curriculum 70
Appendix C – Optional Instructional Theory Module 1. What makes students learn differently?
a) Hemisphericity Different activities and processes seem to be located or centered in the left or right
i. hemisphere of the brain.
ii. Activities centered in the left hemisphere: (1) auditory association (2) language (3) listening (4) reading (5) handwriting (6) talking (7) following directions (8) locating details and facts (9) analyzing (10) sequencing (11) temporal
iii. Activities centered in the right hemisphere:
(1) spatial relations (2) shapes/patterns (3) music (4) color sensitivity (5) artistic expression (6) feelings/emotions (7) vision (8) singing (9) intuitive (10) holistic (11) fantasy

_____________________________________________________________________________________________2004 Certified Lab Instructor Course Curriculum 71
Appendix C – Optional Instructional Theory Module b) Multiple Intelligences
i. Spatial Intelligence (1) is the capacity to perceive the visual-spatial world accurately (e.g., guide, hunter,
scout) and to perform transformations upon those perceptions. (2) Students with spatial intelligence have the ability to keenly perceive:
(a) colors; (b) lines; (c) shapes and forms; (d) space;
(3) the relationships that exist among these elements. (4) Students with spatial intelligence also have the ability to:
(a) visualize (b) graphically represent visual or spatial ideas (c) understand one's position in a spatial matrix.
ii. Linguistic Intelligence
(1) Linguistic Intelligence is the capacity to effectively employ words, either orally (e.g., politician, public speaker, storyteller, talk show host) or in writing (e.g., journalist, playwright, poet, editor).
(2) Students with linguistic intelligence have the ability to manipulate: (a) the structure or rules of language (e.g., punctuation for dramatic effect); (b) the sounds of language (e.g., alliteration); (c) the meanings of language (e.g., double entendre); (d) the pragmatic dimensions of language (e) using language to convince (rhetoric- using language to remember
information) (f) using language to explain (expatiation) - using language to talk about itself
(metalanguage).
iii. Logical-Mathematical Intelligence (1) Logical-Mathematical Intelligence is the capacity to effectively employ numbers
(e.g., mathematician, statistician, accountant) and to reason soundly (e.g. computer programmer, logician, scientist).
(2) Students with logical-mathematical intelligence have the ability to perceive: (a) logical patterns and relationships; (b) statements and propositions (if-then, cause-effect); (c) functions and complex processes; and related abstractions.

_____________________________________________________________________________________________2004 Certified Lab Instructor Course Curriculum 72
Appendix C – Optional Instructional Theory Module
iv. Bodily-Kinesthetic Intelligence (1) Bodily-Kinesthetic Intelligence is the capacity to use your complete body in
expressing ideas and feelings (e.g., actor, athlete, dancer, mime), including the facility to use your hand's to create or transform things (e.g., artistic painter, mechanic, sculptor, surgeon).
(2) Students with bodily-kinesthetic intelligence have these physical-based skills: (a) coordination - harmonious functioning of muscles; (b) balance; (c) dexterity - grace in physical movement; (d) muscle strength; (e) flexibility; (f) speed; (g) sensitive touching.
v. Musical Intelligence
(1) Musical Intelligence is the capacity with musical forms to perceive (e.g., music lover), discriminate and judge (e.g., music critic), transform (e.g., composer), and express (instrument player/performer).
(2) Students with musical intelligence have sensitivity to: (a) rhythm, (b) pitch, (c) melody; (d) the timbre or distinctive tone of a musical piece.
vi. Interpersonal Intelligence
(1) Interpersonal Intelligence is the capacity to quickly grasp and evaluate the moods, intentions, motivations, and feelings of other people.
(2) Students with interpersonal intelligence have: (a) sensitivity to facial expressions, gestures, and voice qualities; (b) ability to discriminate among many personal cues and prioritize the degree of
intensity of feelings behind these cues; (c) expertise in responding effectively to these cues so as to assuage negative
emotions or to inspire people to positive actions.
vii. Intrapersonal Intelligence (1) Intrapersonal Intelligence is the capacity to understand yourself and to
subsequently act adaptively. Students with intrapersonal intelligence have: (a) an honest, accurate, and comprehensive picture of themselves (e.g., their
strengths & weaknesses); (b) an awareness of their inner moods, motivations, and desires; self-discipline
tendencies; and healthy self-esteem.

_____________________________________________________________________________________________2004 Certified Lab Instructor Course Curriculum 73
Appendix D – Suggested Rote Skills for Presentation by CLI Students A. Initial assessment of a trauma patient B. Technique for obtaining a blood pressure C. Focused physical exam and history for a cardiac patient D. On going assessment and proper documentation for a patient assisted with a bronchodilator
inhaler E. Variations needed for securing an infant on a long board F. Log rolling a patient on to a long board and properly securing the patient G. Detailed physical exam on a trauma patient H. Demonstrating the features, testing and use of a BVM I. Technique for opening the airway of a trauma patient and inserting an airway adjunct J. Assessing a patients breathing and applying a non-rebreather mask K. Technique for assessing patient skin color, condition, temperature, and capillary refill in an
infant or child L. Proper positioning for a non-trauma patient exhibiting signs and symptoms of hypoperfusion M. Administration of activated charcoal N. Techniques for donning and shedding BSI O. Management of a wrist injury P. Securing a patient with a helmet and shoulder pads to a backboard Q. Rapid assessment of a newborn R. Techniques for administering oxygen to an infant or small child

_____________________________________________________________________________________________2004 Certified Lab Instructor Course Curriculum 74
Appendix D – Scenario Planning Sheet EMS Role Play Simulation on: Objective of the Role Play: List the objective here Equipment Needed: List equipment needed for scenario here Role-player set-up: Moulage - List the moulage for the patient Prompting (Patient) -
List the instructions for the patient to begin, and follow through the simulation.
Prompting (Bystander/ Family) -
List the instructions for the patient to begin, and follow through the simulation.
Cues - List actions the patient should take based on particular events occurring, or not occurring.
Scene Description and Student Instructions: Instructions to the Student, including starting and ending point. Scene Description Expected Results: Type the expected results, including any protocol that should be followed. Possible Variables: List possible variable actions student could take.
List reasoning for possible variation.
List suggestion for corrective feedback.
Unexpected Results: Use this space to record Unexpected results

_____________________________________________________________________________________________2004 Certified Lab Instructor Course Curriculum 75
Appendix E – Instructions for Basic Moulage
INSTRUCTIONS AND SUPPLIES FOR BASIC MOULAGE Supplies for a Basic Moulage Kit MAKE-UP INCLUDING: MAKE-UP APPLICATORS Red Lip stick or red rouge COTTON BALLS OR COTTON Liquid base make-up in various neutral shades FACIAL TISSUE IN PEACH, BEIGE, OR WHITE Eyeshadow in various shades including blue, PETROLEUM JELLY purple, black (Grease pencils can be substituted PLASTIC DRINKING GLASSES (Or other clear for these but are generally more expensive) plastic which can be broken apart and used to Clown or Halloween make-up in white simulate broken glass) VARIOUS THINGS WHICH CAN SIMULATE COLD CREAM OR NOXEMA (For make-up removal) IMPALED OBJECTS: CLEAR COLORED “PEEL-OFF” FACIAL MASK Knife handle MORTICIAN’S RECONSTRUCTION WAX Pieces of wood CHARCOAL POWDER OR CIGARETTES (Ashes) Pencil broken in half ARTIFICIAL BLOOD (or RED FOOD COLORING) Plastic fork with tines removed GLYCERIN Use your imagination! SPRAY BOTTLE CLEAR ADHESIVE TAPE TONGUE BLADES OR CRAFT STICKS ALKA SELTZER TABLETS PIECE OF TIRE TREAD EMPTY IV BAGS AND ADMINISTRATION SETS DOG “BONE” BISCUITS (Or real beef bones - broken) DENTURE POWDER (Fasteeth) (And red food SPIRIT GUM ADHESIVE coloring for making blood clots) OLD CLOTHING KARO SYRUP (And food coloring for venous ALCOHOL SWABS blood) APPLICATOR STICKS Some Basic Moulage Hints: WOUNDS - (Hint - Before applying make-up to the skin, put down a foundation of cold cream or Noxema - For much easier make-up removal) Lacerations - Prep the “patient’s” skin with spirit gum adhesive - Allow to get “tacky”. Remove
embalming wax with tongue blade (ball about 1” round) and roll it in your hand for a short time 30 seconds to one minute. to make it more pliable. Then roll it into a cigar shape. Put a foundation of red color (not too dark ) on the “patient’s” skin in the area where you want the laceration. Place the wax over the reddened area. Make a “cut” in the wax with an applicator stick. Mold the areas around the cut down to the “patient’s” skin so that it looks like a swollen area and not like a ball of wax! With lipstick or rouge, color the inside of the laceration red and use “clotted” and “venous” blood inside and outside the wound. You can also place dirt (charcoal powder or brown powdered eye make-up) in the wound.
Contusions - Place a base of darker flesh-colored foundation make-up on the area of the “wound”. Then blend in purple, red, and blue make-up to simulate the appearance of a bruise. Abrasions - Rub a foundation of red over the “patient’s” skin surface. Over areas of the red
place some darker flesh color and some white. The whole wound should have an irregular appearance. If you want, small crush stone, “dirt” (charcoal powder) brown powdered eye liner, etc. can be dusted into the wound to make it look like “road rash”.
_____________________________________________________________________________________________2004 Certified Lab Instructor Course Curriculum 76
Burns - Color the area of the “burn” with red rouge or lip stick and blend into the “victim’s”
skin. Cover part of this area with petroleum or K-Y jelly in small, irregular piles to simulate blisters. Then place one layer of a tissue over the gel and gently push it down until the tissue is just moistened with the gel. If you want to, some charcoal powder can be used to dust the burned area.
For more realism, burn (safely!) an old shirt in several places on the chest, back, and arms, have the “patient” wear the shirt, and place the burned areas under the holes in the shirt.
Sloughed Skin - You can simulate sloughed skin in burns, abrasions by first applying a
foundation of red under the area where the wound will be. Cover the red with brown or black eye make-up and blend in somewhat. Then place some clear facial mask on the area and when it is dry, peel one side of it back. Under the peeled area, place a small amount of petroleum or K-Y jelly, some “venous” blood and some drops of blood around the wound so that it looks like a small amount of blood ran from the wound.
AMPUTATIONS Fingers - The “patient’s” finger should be taped in a flexed position out of the way with
clear adhesive tape. You can make an amputated finger (or part of a finger) by molding out of embalming wax. Use an artificial fingernail (“Lee Press-On Nails, etc.). Another method is to make a finger out of modeling clay, let it dry and paint it flesh color. (Or if you are restoring some old CPR manikins, why not save the arms off of them for use as amputated fingers and extremities.) The amputated ends should be colored red with rouge or lipstick and thickened blood.
Hand - Keep hands from your CPR manikins, which are being restored. If you look hard
enough you will probably find an arm that is already torn off one of the old manikins! Tape the patient’s hand into a fist and color the end with rouge and thick blood. Active bleeding can be simulated by using an IV bag, filled with artificial blood (or water and red food coloring). Bury the end of the administration set into some reconstruction wax placed at the “stump”.
Arm - Tape the “patient’s” arm to his/her body under his/her shirt. At the shoulder place
a wound to simulate the stump of an amputation. Allow the shirt sleeve to hang free. Bleeding can be simulated, as above, with an IV bag filled with artificial blood and attached administration set.
FRACTURES Open - An open fracture can be simulated by placing small mound of reconstruction wax
on the “patient’s” skin and embedding the broken end of a beef bone. Use blood and clots around the wound.

_____________________________________________________________________________________________2004 Certified Lab Instructor Course Curriculum 77
Open Comminuted - Open, comminuted fractures can be simulated by making a large laceration
with clotted blood and embedding pieces of real bones or “dog bone” biscuits in the wound.
IMPALED OBJECTS - Place a rather large ball of reconstruction wax onto the “patient’s” skin after
covering the underlying skin with red rouge or lip stick. Before placing the wax, prep the skin with adhesive. Contour the sides of the wax ball down to the “patient’s” skin. Place the “impaled” object into the wax and place thickened “venous” blood around the wound to simulate a small amount of bleeding. Spread out the blood - do not apply it thickly.
Impaled objects cannot be long or heavy. They will not stand up in the wax. Use
just the ends of whatever the object is that you are simulating. You can break an object in half and use half on one side and half on the other side of the body (such as through the hand).
Some suggestions for impaled objects are pencil broken in half through the hand,
arrow broken in half through the thigh or side of the chest, pieces of wood, pieces of “glass” (broken clear plastic) the wooden or plastic end of a knife, etc. MAKE SURE THAT THE FLAT END AND NOT A POINT OF THE OBJECT IS AGAINST THE PATIENT, OTHERWISE THEY MAY REALLY BE IMPALED!
SUCKING CHEST WOUND - Form a 1 1/2 inch round ball of wax and place on the “patient’s” chest after
reddening the area and prepping with spirit gum adhesive. Contour the ends of the ball to the “patient’s” skin. Indent the middle of the wax mound with a pencil eraser. Allow some wax to remain between the skin and the bottom of the “hole”. Break an Alka Seltzer tablet in pieces and place some small pieces into the wound. Moisten with watery “blood” The tablet will fizz, simulating air mixing with blood from an open chest wound. The only thing you won’t be able to do is make it vary with respirations!!
SHOCK - Give the “patient” a pale appearance by coloring his/her skin with a light
foundation of white. Blend it in thoroughly, so that the patient doesn’t look like he just graduated from clown school! A gray skin color can be achieved by blending white with a little black eye makeup.
The “patient” can be made diaphoretic by spraying him/her with a mixture of
glycerin and water (mostly glycerin, little water) The glycerin will stay beaded up. Don’t use just water, it will evaporate too quickly.

_____________________________________________________________________________________________2004 Certified Lab Instructor Course Curriculum 78
INTERNAL (ABDOMINAL OR CHEST) TRAUMA - Can be simulated by placing contusions on the abdomen or chest and making
the “patient” shocky. To simulate the patient who was run over by a car, roll a piece of tire tread in
activated charcoal and roll it over the “patient’s” clothes covering the chest or abdomen. Place contusions on the skin in the same direction as the tire tread, make the patient “shocky” and coach him/her to have respiratory distress or abdominal “guarding” depending on the placement of the injury.
SOME ADDITIONAL HINTS REGARDING MOULAGE: Active Bleeding - Can be simulated by filling an empty IV bag with artificial blood, embedding
the end of the IV tubing into the wound with wax, and running the blood from the wound. Adjust the rate of bleeding by using the roller clamp of the administration blood.
A regular or macro administration set will allow greater amounts than a mini or
micro drip set. Arterial bleeding can be simulated by having the “patient” squeeze the bag in a
pumping motion. To prepare the If the “patient’s” skin is oily, clean off the area under which you ‘patient’s” skin - wish to construct a wound by swabbing it with alcohol. Then apply Spirit
gum adhesive. If it is a warm day or area in which you are working, applying antiperspirant to the area will help control sweating. Reconstruction wax will not stick to oily or sweaty surfaces.
Do your moulage in a cool area, if at all possible, and hold the “patients”
after you have moulaged them in a cool area until you are ready to begin the drill. Wax will soften and wounds will come off (especially with no adhesive) if the “patient’s” skin is too warm or they perspire under the wound.
Cyanosis - Can be simulated by applying a bluish tinge to the lips, nail beds, and ear lobes.
Make the face pale. Do not apply heavy blue color to the face; cyanosis does not mean “smurf”!!!
Make sure that victims are instructed how they should act during the drill. Tape vital signs to the victims with adhesive tape. Keep a supply of old clothing on hand which can be torn, cut, etc. by the rescuers to make it a more realistic exercise. Be sure to instruct the rescuers that they may cut or tear clothing as needed. Hospital scrubs modified by cutting up the sides with velcro to hold them closed can also be used, but student’s should become “comfortable” with actually cutting clothing as needed, so old clothes are the ideal.
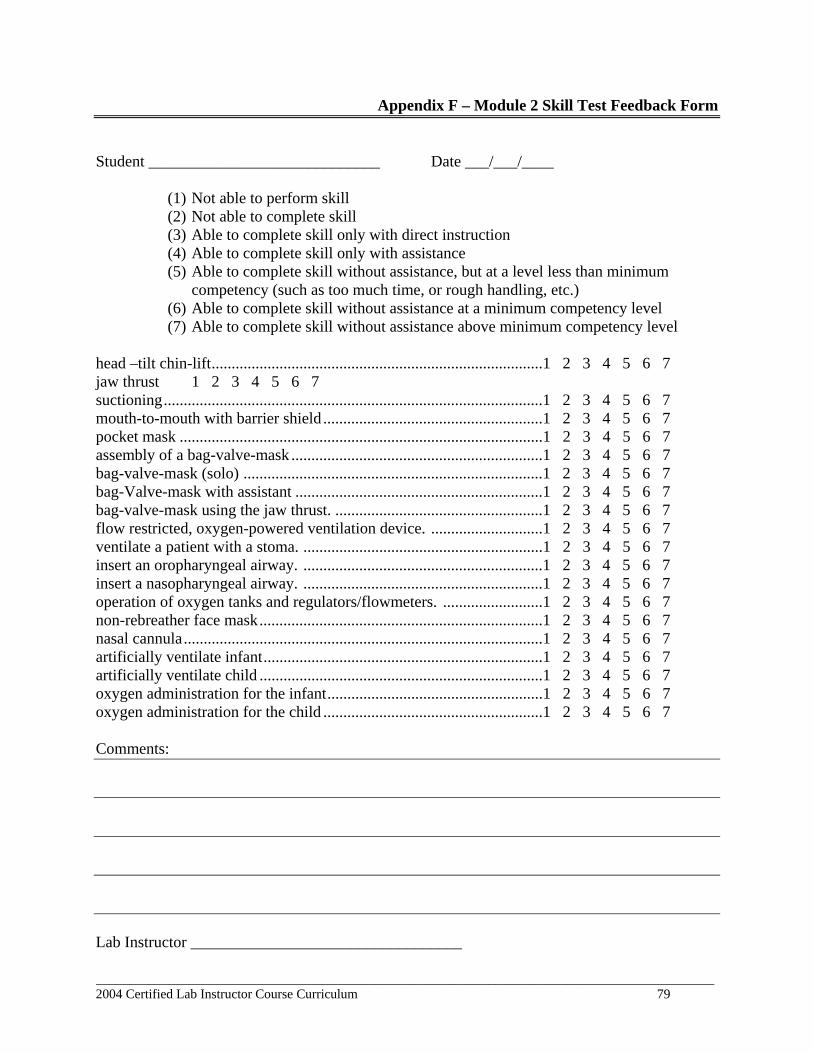
_____________________________________________________________________________________________2004 Certified Lab Instructor Course Curriculum 79
Appendix F – Module 2 Skill Test Feedback Form Student _____________________________ Date ___/___/____
(1) Not able to perform skill (2) Not able to complete skill (3) Able to complete skill only with direct instruction (4) Able to complete skill only with assistance (5) Able to complete skill without assistance, but at a level less than minimum
competency (such as too much time, or rough handling, etc.) (6) Able to complete skill without assistance at a minimum competency level (7) Able to complete skill without assistance above minimum competency level
head –tilt chin-lift...................................................................................1 2 3 4 5 6 7 jaw thrust 1 2 3 4 5 6 7 suctioning...............................................................................................1 2 3 4 5 6 7 mouth-to-mouth with barrier shield .......................................................1 2 3 4 5 6 7 pocket mask ...........................................................................................1 2 3 4 5 6 7 assembly of a bag-valve-mask ...............................................................1 2 3 4 5 6 7 bag-valve-mask (solo) ...........................................................................1 2 3 4 5 6 7 bag-Valve-mask with assistant ..............................................................1 2 3 4 5 6 7 bag-valve-mask using the jaw thrust. ....................................................1 2 3 4 5 6 7 flow restricted, oxygen-powered ventilation device. ............................1 2 3 4 5 6 7 ventilate a patient with a stoma. ............................................................1 2 3 4 5 6 7 insert an oropharyngeal airway. ............................................................1 2 3 4 5 6 7 insert a nasopharyngeal airway. ............................................................1 2 3 4 5 6 7 operation of oxygen tanks and regulators/flowmeters. .........................1 2 3 4 5 6 7 non-rebreather face mask.......................................................................1 2 3 4 5 6 7 nasal cannula..........................................................................................1 2 3 4 5 6 7 artificially ventilate infant......................................................................1 2 3 4 5 6 7 artificially ventilate child .......................................................................1 2 3 4 5 6 7 oxygen administration for the infant......................................................1 2 3 4 5 6 7 oxygen administration for the child .......................................................1 2 3 4 5 6 7 Comments: Lab Instructor __________________________________

_____________________________________________________________________________________________2004 Certified Lab Instructor Course Curriculum 80
Appendix G – Sample Student Skill Tracking Sheet Student _______________________________ Course #__________________
EMT Skills Check-sheet
Skill Date Demonstrated Instructor OK Don & Remove PPE ____/____/____ __________________ Disinfecting Equipment ____/____/____ __________________ Assess Breathing (Unconscious) ____/____/____ __________________ Assess Breathing (Conscious) ____/____/____ __________________ Obtain Radial Pulse ____/____/____ __________________ Obtain Brachial Pulse ____/____/____ __________________ Obtain Lower Extremity Distal Pulse (any) ____/____/____ __________________ Obtain Carotid Pulse (Adult) ____/____/____ __________________ Assess Skin (Adult) ____/____/____ __________________ Assess Skin (Child/Infant) ____/____/____ __________________ Obtain BP (Adult) ____/____/____ __________________ Obtain SAMPLE History ____/____/____ __________________ Load/Unload wheeled stretcher patient ____/____/____ __________________ Lift & move flat stretcher w/patient ____/____/____ __________________ Lift & move chair stretcher w/patient ____/____/____ __________________ Load, lift & move scoop stretcher ____/____/____ __________________ Load, lift & move long spine board ____/____/____ __________________ Load, lift & move stokes basket ____/____/____ __________________ Transfer patient to hospital bed (Clinical) ____/____/____ __________________ Demonstrate one emergency move ____/____/____ __________________ Demonstrate ground lift move ____/____/____ __________________ Demonstrate extremity lift move ____/____/____ __________________ Demonstrate draw sheet move ____/____/____ __________________ Demonstrate head-tilt chin-lift ____/____/____ __________________ Demonstrate jaw thrust ____/____/____ __________________ Demonstrate suctioning ____/____/____ __________________ Demonstrate mouth-to-mouth w/barrier ____/____/____ __________________ Demonstrate pocket mask ____/____/____ __________________ Demonstrate BVM (solo) ____/____/____ __________________ Demonstrate BVM (w/assistant) ____/____/____ __________________ Demonstrate O2 powered PPD ____/____/____ __________________ Demonstrate stoma ventilation ____/____/____ __________________ Demonstrate insertion of OPA ____/____/____ __________________ Demonstrate insertion of NPA ____/____/____ __________________ Demonstrate O2 tank & regulator setup ____/____/____ __________________ Demonstrate NRBM ____/____/____ __________________ Demonstrate nasal cannula ____/____/____ __________________ Demonstrate Adult CPR (solo) ____/____/____ __________________ Demonstrate Adult CPR (w/assistant) ____/____/____ __________________ Demonstrate Child CPR (solo) ____/____/____ __________________ Demonstrate Child CPR (w/assistant) ____/____/____ __________________ Demonstrate Infant CPR (solo) ____/____/____ __________________ Demonstrate Infant CPR (w/assistant) ____/____/____ __________________

_____________________________________________________________________________________________2004 Certified Lab Instructor Course Curriculum 81
Demonstrate Adult FBAO (conscious) ____/____/____ __________________ Demonstrate Adult FBAO (unconscious) ____/____/____ __________________ Demonstrate Child FBAO (unconscious) ____/____/____ __________________ Demonstrate Infant FBAO (conscious) ____/____/____ __________________ Demonstrate Infant FBAO (unconscious) ____/____/____ __________________ Demonstrate Adult CPR w/BVM & OPA ____/____/____ __________________ Demonstrate Child CPR w/BVM & OPA ____/____/____ __________________ Demonstrate Infant CPR w/BVM & OPA ____/____/____ __________________ Demonstrate Scene Size-up ____/____/____ __________________ Demonstrate Initial Assessment (uncons.) ____/____/____ __________________ Demonstrate Initial Assessment (cons.) ____/____/____ __________________ Demonstrate Rapid Trauma Assessment ____/____/____ __________________ Demonstrate Focused History & Physical ____/____/____ __________________ Demonstrate Detailed Physical Exam ____/____/____ __________________ Demonstrate On-going Assessment ____/____/____ __________________ Demonstrate Radio Report ____/____/____ __________________ Demonstrate ALS Arrival Report ____/____/____ __________________ Complete a PCR ____/____/____ __________________ Demonstrate Assisted Inhaler ____/____/____ __________________ Demonstrate Nebulized Albuterol ____/____/____ __________________ Demonstrate Assisted Nitroglycerine ____/____/____ __________________ Demonstrate Oral Glucose Administration ____/____/____ __________________ Demonstrate Epi Auto-injector Admin. ____/____/____ __________________ Demonstrate Activated Charcoal Admin. ____/____/____ __________________ Demonstrate Ipecac Administration ____/____/____ __________________ Demonstrate AED Application & Use ____/____/____ __________________ Demonstrate Stroke Scale Usage ____/____/____ __________________ Demonstrate Heat/Cold Pack Placement ____/____/____ __________________ Demonstrate Patient Restraint ____/____/____ __________________ Demonstrate Emergency OB Delivery ____/____/____ __________________ Demonstrate Bleeding Control (Extremity) ____/____/____ __________________ Demonstrate Bleeding Control (Torso) ____/____/____ __________________ Demonstrate Occlusive Dressing ____/____/____ __________________ Demonstrate Amputation Management ____/____/____ __________________ Demonstrate Burn Management ____/____/____ __________________ Demonstrate Shock Management ____/____/____ __________________ Demonstrate Impaled Object Control ____/____/____ __________________ Demonstrate Simple Splinting (upper ext.) ____/____/____ __________________ Demonstrate Simple Splinting (lower ext.) ____/____/____ __________________ Demonstrate Traction Splinting ____/____/____ __________________ Demonstrate Cervical Collar Application ____/____/____ __________________ Demonstrate Long Board Immobilization ____/____/____ __________________ Demonstrate Short Board Immobilization ____/____/____ __________________ Demonstrate KED (classroom) ____/____/____ __________________ Demonstrate KED (auto) ____/____/____ __________________ Demonstrate Helmet & Pads Immobilization ____/____/____ __________________

_____________________________________________________________________________________________2004 Certified Lab Instructor Course Curriculum 82
Demonstrate Helmet Removal ____/____/____ __________________ Demonstrate Rapid Extrication (classroom) ____/____/____ __________________ Demonstrate Rapid Extrication (auto) ____/____/____ __________________ Demonstrate Rapid Takedown of the Standing Patient ____/____/____ __________________ Demonstrate Triage ____/____/____ __________________ Demonstrate Child OPA ____/____/____ __________________ Demonstrate Child BVM ____/____/____ __________________ Demonstrate Infant OPA ____/____/____ __________________ Demonstrate Infant BVM ____/____/____ __________________ Demonstrate Child Immobilization (board) ____/____/____ __________________ Demonstrate Child Immobilization (KED) ____/____/____ __________________ Demonstrate Rapid Extrication (car-seat) ____/____/____ __________________ Demonstrate Car-seat Immobilization ____/____/____ __________________ Final Lead-Position Scenarios (list): ______________________________ ____/____/____ __________________ Comments: ___________________________________________________________________________________ ______________________________ ____/____/____ __________________ Comments: ___________________________________________________________________________________ ______________________________ ____/____/____ __________________ Comments: ___________________________________________________________________________________ CIC Verification of Completion: Signed: ____________________________________ Date ____/____/_____

_____________________________________________________________________________________________2004 Certified Lab Instructor Course Curriculum 83
Appendix H – Module 1 Class Tracking Form Instructor to initial when student has successfully demonstrated skill: Student # 1
2
3
4
5
6
7
8
9
10
11
12
13
14
15
16
17
18
19
20
Don & Remove PPE
Disinfecting Equipment
Assess Breathing (Unconscious)
Assess Breathing (Conscious)
Obtain Radial Pulse
Obtain Brachial Pulse
Obtain Lower Extremity
Distal Pulse (any)
Obtain Carotid Pulse (Adult)
Assess Skin (Adult)
Assess Skin (Child/Infant)
Obtain BP (Adult)
Obtain SAMPLE History
Load/Unload wheeled stretcher patient
Lift & move flat stretcher w/patient
Lift & move chair stretcher w/patient
Load, lift & move scoop stretcher
Load, lift & move long spine board
Load, lift & move stokes basket
Transfer patient to hospital bed (Clinical)
Demonstrate one emergency move
Demonstrate ground lift move
Demonstrate extremity lift move
Demonstrate draw sheet move

_____________________________________________________________________________________________2004 Certified Lab Instructor Course Curriculum 84
Related Documents