CHAPTER 1 Setting Up Your Android Development Environment Setting Up Your Development Environment Android applications, like most mobile phone applications, are developed in a host- target development environment. In other words, you develop your application on a host computer (where resources are abundant), and download it to a target mobile phone for testing and ultimate use. Applications can be tested and debugged either on a real Android device or on an emulator. For most developers using an emulator is easier for initial development and debug, followed by final testing on real devices. To write your own Android mobile phone applications, you'll first need to collect the required tools and set up an appropriate development environment on your PC or Mac. In this chapter we'll collect the tools you need, download them and install them on your computer, and write a sample application that will let you get the feel of writing and running Android applications on an emulator. Linux, Windows, and OS X are all supported development environments, and we'll show you how to install the latest set of tools on each. Then we'll show you any configuration you need to do after the tools are installed (setting PATH environment variables and the like), again for each of the three operating systems. And finally we'll write a short little "Hello, Android" applica- tion that demonstrates what needs to be done to get a generic application running. This chapter refers to specific versions of the tools you will use for Android program- ming. Google has released three versions of the SDK since it was first released, and will probably continue a rapid pace of development and new releases. The developers of Java and Eclipse can also issue updates independently of the Android SDK. Therefore, if you find yourself using versions of Java, Eclipse, and the Android SDK newer than those described here, check the installation instructions for Java, Eclipse, and the An- droid SDK for updated information. Configuration dialogs have changed since Android was first released and may change again. 1

Welcome message from author
This document is posted to help you gain knowledge. Please leave a comment to let me know what you think about it! Share it to your friends and learn new things together.
Transcript

CHAPTER 1
Setting Up Your Android DevelopmentEnvironment
Setting Up Your Development EnvironmentAndroid applications, like most mobile phone applications, are developed in a host-target development environment. In other words, you develop your application on ahost computer (where resources are abundant), and download it to a target mobilephone for testing and ultimate use. Applications can be tested and debugged either ona real Android device or on an emulator. For most developers using an emulator iseasier for initial development and debug, followed by final testing on real devices.
To write your own Android mobile phone applications, you'll first need to collect therequired tools and set up an appropriate development environment on your PC or Mac.In this chapter we'll collect the tools you need, download them and install them onyour computer, and write a sample application that will let you get the feel of writingand running Android applications on an emulator. Linux, Windows, and OS X are allsupported development environments, and we'll show you how to install the latest setof tools on each. Then we'll show you any configuration you need to do after the toolsare installed (setting PATH environment variables and the like), again for each of thethree operating systems. And finally we'll write a short little "Hello, Android" applica-tion that demonstrates what needs to be done to get a generic application running.
This chapter refers to specific versions of the tools you will use for Android program-ming. Google has released three versions of the SDK since it was first released, and willprobably continue a rapid pace of development and new releases. The developers ofJava and Eclipse can also issue updates independently of the Android SDK. Therefore,if you find yourself using versions of Java, Eclipse, and the Android SDK newer thanthose described here, check the installation instructions for Java, Eclipse, and the An-droid SDK for updated information. Configuration dialogs have changed since Androidwas first released and may change again.
1

The Android Software Development Kit (SDK) supports several different integrateddevelopment environments (IDEs). For this book we will focus on using Eclipse as theIDE, because it is the best integrated with the SDK, and, hey, it's free. No matter whichoperating system you are using, you will need essentially the same set of tools:
• The Eclipse Integrated Development Environment
• Sun's Java Development Kit (JDK)
• The Android Software Developer's Kit (SDK)
• A special Eclipse plug in: the Android Developer Tool (ADT)
Since you're probably going to develop on only one of the host operating systems, skipto the appropriate section that pertains to your selected operating system.
Creating an Android Development EnvironmentThe Android Software Development Kit supports Windows (XP and Vista), Linux(tested on Ubuntu Dapper Drake, but any recent Linux distro should work), and MacOS X (10.4.8 or later) as host development environments. Installation of the SDK issubstantially the same for any of the operating systems, and most of this descriptionapplies equally to all of them. Where the procedure differs, we will clearly tell you whatto do for each environment.
1. Install the Java Development Kit (JDK): The Android SDK requires JDK version5 or version 6. If you already have one of those installed, skip to the next step,where you will install Eclipse. Mac OS X comes with the JDK version 5 alreadyinstalled, and many Linux distributions include an up to date JDK. If the JDK isnot installed, go to http://java.sun.com/javase/downloads and you'll see a list of Javaproducts to download. The one you want is JDK 6 Update n for your operatingsystem, where n is 6 at the time this is written.
Windows (XP and Vista)
• Select the distribution for "Windows Offline Installation, Multi-language."
• Read, review, and accept Sun's license for the JDK. (The license has becomevery permissive, but if you have a problem with it, alternative free JDKsexist.)
• Once the download is complete, a dialog box will ask you whether you wantto run the downloaded executable. When you select "Run," the WindowsInstaller will start up and lead you through a dialog to install the JDK onyour PC.
Linux
• Select the distribution for "Linux self-extracting file."
2 | Chapter 1: Setting Up Your Android Development Environment

• Read, review, and accept Sun's license for the JDK. (The license has becomevery permissive, but if you have a problem with it, alternative free JDKsexist.)
• You will need to download the self-extracting binary to the place you wantto install the JDK on your filesystem. If that place is a system wide directory(such as /usr/local), you will need root access. After the file is downloaded,make it executable (chmod +x jdk-6version-linux-i586.bin) , and executeit. It will self-extract to create a tree of directories.
Mac OS XMac OS X comes with JDK Version 5 already loaded.
2. Install Eclipse: The Android SDK requires Eclipse, and the SDK version 1.6 iscompatible with Eclipse version 3.5, also known as "Galileo." To get Eclipse, youwill need to go to http://www.eclipse.org/downloads to get it.
Eclipse comes in several different, pre-packaged configurations. You want the ver-sion of the Eclipse IDE labeled "Eclipse IDE for Java Developers," and, obviously,you want the version for your operating system.
Windows (XP or Vista)The Eclipse download comes as a big ZIP file that you install by extracting thefiles to your favorite directory. For this book, we'll assume that you extractedto C:/eclipse. Eclipse is now installed, but it will not show up in your Start menuof applications. You may want to create a Windows shortcut for C:/eclipse/eclipse.exe and place it on your desktop, in your Start menu, or someplace elsewhere you can easily find it.
LinuxThe Eclipse download comes as a large archive file (.tar.gz file, also known asa "tarball") that you install by extracting the files to your any directory youchoose. On most Linux systems, opening the archive file starts the archivemanager application. You can then drag the Eclipse folder from the archive towhere you want to extract it. For this book, we'll assume that you extractedto your home folder. The executable itself is located in that directory and isnamed eclipse. You may want to create a shortcut to this executable file.
Mac OS XThe Eclipse download comes as a large "zip" file that you install by extractingthe files to your any directory you choose. Opening the archive file starts thedownload folder shows the contents of the archive. You can then copy Eclipsefolder from the archive and paste it where you want to extract it. The Eclipseexecutable itself is located in the directory where you extracted the archive,and is named eclipse. You may want to create a shortcut to this executable file.
3. Check for Required Plugins: You can skip this step if you just downloaded acurrent version of Eclipse as we recommended. If you are using a pre-installedversion of Eclipse that was already on your PC, you need to make sure you have
Setting Up Your Development Environment | 3

the Java Development Tool (JDT) and Web Standard Tools (WST) plug-ins in-stalled. You can easily check to see whether they are installed by starting Eclipse,which if this is the first time you have started Eclipse, will ask you to specify thelocation of your workspace. Once Eclipse is started, selecting menu options "Win-dow → Preferences..." will bring up the preferences dialog. The list of preferencesshould include one for "Java" and one for either "XML" or "Web and XML." If theyaren't on the list, the easiest thing to do is reinstall Eclipse, as described in theprevious step. Installing "Eclipse IDE for Java Developers" will automatically getthe needed plugins.
4. Install Android SDK: This is where you would start if you already have the rightversions of Eclipse and the JDK loaded. The Android SDK is distributed throughGoogle's Android site, http://developer.android.com. The SDK consists of two parts:An archive you will download and extract, much in the way you installed Eclipse,and an Eclipse plug-in that adds Android-specific support to the Eclipse IDE. Inthe list of downloads, you will see a table of distributions. Select the one for youroperating system (XP and Vista use the same distribution). The Android downloadsite provides directions about how to install the plugin through Eclipse's softwareupdates utility for the versions of Eclipse supported by the SDK, and this chaptercovers installing the plug in, too, after the description, below, of how to install theSDK files in the archive you are downloading.
The file you download is another archive file, as with Eclipse: a ZIP file on Win-dows, or a tarball (.tar.gz) file for Linux and MacOS X. Extract the archive file toa directory where you want to install the Android SDK, such as your home folder,and make a note of the directory name (you'll need it in Step 7). The extractionwill create a directory tree containing a bunch of subdirectories, including onecalled tools. The tools directory contains executable files used by the Eclipse plugand that you will also use directly.
5. Update Environment Variables: To make it easier to launch the Android tools,add the tools directory to the directories listed in your shell's PATH variable, orcreate a shortcut to the tools folder.
• Under Windows XP, click on Start, then right-click on My Computer. In thepop-up menu, click on Properties. In the resulting System Properties dialog box,select the Advanced tab. Near the bottom of the Advanced tab is a button, "En-vironment Variables," that takes you to an Environment Variables dialog. Userenvironment variables are listed in the top half of the box, System environmentvariables in the bottom half. Scroll down the list of System environment varia-bles until you find "Path," select it, and click the "Edit" button. Now you willbe in an Edit System Variable dialog that allows you to change the environmentvariable "Path." Add the full path of the tools directory to the end of the existingPath variable and click "OK." You should now see the new version of the variablein the displayed list. Click "OK" and then "OK" again to exit the dialog boxes.
4 | Chapter 1: Setting Up Your Android Development Environment

• On Windows Vista, click on the Microsoft "flag" in the lower left of the desktop,then right-click on Computer. At the top of the resulting display, just below themenu bar, click on "System Properties." In the column on the left of the resultingbox, click on "Advanced system settings." Vista will warn you with a dialog boxthat says "Windows needs your permission to continue";- click "Continue."Near the bottom of the "System Properties" is a button labeled "EnvironmentVariables" that takes you to an Environment Variables dialog. User environmentvariables are listed in the top half of the box, System environment variables inthe bottom half. Scroll down the list of System environment variables until youfind "Path," select it, and click the "Edit" button. Now you will be in an EditSystem Variable dialog that allows you to change the environment variable"Path". Add the full path of the tools directory to the end of the existing Pathvariable, and click "OK." You should now see the new version of the variable inthe displayed list. Click "OK" and then "OK" again to exit the dialog boxes.
• On Linux, the PATH environment variable can be defined in your ~/.bashrc~/.bash_profile file. If you have either of those files, use a text editor such asgedit, vi,or Emacs to open the file and look for a line that exports the PATHvariable. If you find such a line, edit it to add the full path of the tools directoryto the path. If there is no such line, you can add a line like this:
export PATH=${PATH}:your_sdk_dir/tools
where you put the full path in place of your_sdk_dir.
• On MacOS X, look for a file named .bash_profile in your home directory (notethe initial dot in the filename). If there is one, use an editor to open the file andlook for a line that exports the PATH variable. If you find such a line, edit it toadd the full path of the tools directory to the path. If there is no such line, youcan add a line like this:
export PATH=${PATH}:your_sdk_dir/tools
where you put the full path in place of your_sdk_dir.
6. Install the Android Plugin (ADT): Throughout this book, we will make use ofthe Android Development Tool plugin that Google supplies for use in buildingAndroid applications. The Android plugin is key to making the Android SDK workwith Eclipse.
The plugin is installed in much the same way as any other in Eclipse plugin. Theinstructions here are for Eclipse version 3.5 (Galileo). If you are using a differentversion of Eclipse, you should check the Eclipse site for documentation on instal-ling plugins and the Android SDK site for any changes in installation instructions:
• Start Eclipse, if it's not already running.
• select Help > Install New Software. In the Available Software dialog that nowappears, click "Add"....
Setting Up Your Development Environment | 5

• In the Add Site dialog that now appears, enter a name for the Android plug insite, such as "Android Plugin" in the "Name" field. In the "Location" field, enterthis URL:https://dl-ssl.google.com/android/eclipse/. Click "OK."
• in the Available Software view of the Install New Software dialog, you shouldnow see "Developer Tools" added to the list. Select the checkbox next to De-veloper Tools, which will also automatically select Android DDMS and AndroidDevelopment Tools. Click "Next."
• In the Install Details dialog that now appears, the Android DDMS and AndroidDevelopment Tools features are listed. Click "Next" to read and accept the li-cense agreement and install any dependencies, then click "Finish."
• Restart Eclipse.
• After Eclipse restarts, you need to tell it where the SDK is located. From themenu bar, select "Window → Preferences." (On Mac OS X, the Preferences menuis on the "Eclipse" menu.) In the Preferences dialog, select "Android" in the lefthand column.
• Use the "Browse" button to navigate to the place you installed the Android SDK,and click on "Apply," then on "OK."
Congratulations—you have installed a complete Android development environmentwithout spending a penny. As you'll see in this and subsequent chapters, the environ-ment includes a very sophisticated set of tools to make Android programming easier,including:
• An Integrated Development Environment based on Eclipse, the most widely usedIDE for Java development. Eclipse itself contributes many valuable features appli-cable to Android software development. Google and OHA have taken advantageof Eclipse's extensibility to provide features customized for Android, includingdebugging capabilities that are tuned to the needs of mobile application developerslike you.
• A complete mobile phone emulator that allows you to test your applications with-out having to download them to a target mobile phone. The emulator includesfeatures for testing your application under different mobile phone communicationconditions (fading, dropped connections, etc.).
• A complete Android operation system running on the emulator, and Dalvik virtualmachine that build on Sun's JDK foundation to provide a very sophisticated pro-gramming environment for your applications.
• Test and debugging tools, such as TraceView, which allow you to tune your ap-plication to take best advantage of the limited resources available on a mobilephone.
6 | Chapter 1: Setting Up Your Android Development Environment

Hello, AndroidEnough downloading; let's write a program. A "Hello, World!" program is traditional,and we will start with something similar to demonstrate what you need to do to create,build, and test an Android application. We won't explore much of the Android API forthis program—that's left for the following chapters—but here we'll get a taste for thedevelopment environment and the steps you go through to create an application forAndroid, and you can see that your installation of the Android SDK works correctly.
Where We're GoingThere isn't much to the functionality of this program. We just want to display sometext on the Android emulator window that says "Hello, Android!" (see Figure 1-1).
Starting a New Android Application: HelloWorldSeveral components are needed to build an Android application. Fortunately, theEclipse IDE with the Android plug-in automates a lot of the work needed to create andmaintain these components. We will start by using the IDE to create a project for our
Figure 1-1. "Hello Android" Screenshot
Hello, Android | 7

application. Start up Eclipse and select "File → New → Project..." from the menu bar(be sure to select "Project...," not "Java Project"). You'll see a list of project types some-thing like Figure 1-2.
Select "Android Project" and click "Next" to get the "New Android Project" dialog box(Figure 1-3).
We'll use "HelloWorld" as the name for both the Project and the Application. You don'tneed to change the button or checkbox selections, and we'll use the package namecom.oreilly.helloworld as shown. You may need to specify a target version of theAndroid API, if the current version of the SDK supports more than one. Select the mostrecent version.
Every Android application has to have at least one Activity (an executable that usuallyhas a user interface), so let's say we're going to include an Activity called HelloWorldAc
Figure 1-2. Eclipse New Project menu
8 | Chapter 1: Setting Up Your Android Development Environment

tivity, as shown in the dialog box. Click "Finish," and the Android Development Kitdoes a number of things for you, to make your life easier as a developer. In Fig-ure 1-4, Expand the tree in the Package Explorer window to show some of the files anddirectories that the Android SDK created.
Figure 1-3. Eclipse New Android Project dialog
Hello, Android | 9

The Android SDK created a HelloWorld directory in the default Eclipse workspace foryour project. It also created subdirectories for your source files (.src), references to theAndroid Library, assets, resources (.res), and a manifest file (AndoidManifest.xml). Ineach of the subdirectories it created another level of subdirectories as appropriate. Let'stake a quick look at them:
Sources (under src)
• Contains a directory structure that corresponds to the package name you gavefor your application: in this case, com.oreilly.helloworld.
Figure 1-4. Eclipse project listing after creation of HelloWorld project
10 | Chapter 1: Setting Up Your Android Development Environment

• Contains a Java template for the Activity you indicated was in the application(HelloWorldActivity). A folder named "gen" contains an automatically javasource file containing resource references (R.java). R.java is actually generatedby the Android SDK the first time you compile your application - it contains theJava version of all the resources you define in the res directory (covered below).We'll come back to R.java later.
Android LibraryThis is just what it says. If you like, you can expand the android.jar tree and seethe names of the modules included in the library. This is where your applicationwill go for Android library references.
assetsFiles you want to bundle with your application. We won't have any for HelloWorld.
Resources (under res)
• Drawable resources are any images, bitmaps, etc. that you need for your appli-cation. For HelloWorld, the Android SDK has supplied us with the default An-droid icon, and that's all we'll need.
• Layout resources tell Android how to arrange items on the screen when theapplication runs. These resources are XML files that give you quite a bit offreedom in laying out the screen for different purposes. For HelloWorld, we'lljust use the defaults generated by the Android SDK
• Values are constants, strings, etc. available for use by your application. Keepingthem outside the sources makes it easier to customize the application, such asadapting it for different languages.
Manifest (AndroidManifest.xml)This is another XML file that tells the Android build system what it needs to knowto build and package your application so it can be installed on an Android phoneor the emulator. This file has its own specialized editor, which we'll describe as weget to more complicated applications.
Writing HelloWorldIn the Eclipse Package Explorer window, double-click on HelloWorldActivity.java.This opens the source file of that name in the center window, ready for editing.
package com.oreilly.helloworld;
import android.app.Activity;import android.os.Bundle;
public class HelloWorldActivity extends Activity { /** Called when the activity is first created. */ @Override public void onCreate(Bundle savedInstanceState) { super.onCreate(savedInstanceState); setContentView(R.layout.main);
Hello, Android | 11

}}
Looking quickly at the template code that the Android SDK has provided for us, wecan note several things:
• The Android SDK has included the package reference we asked for, which is con-sistent with the directory structure it created.
• It has also created a (collapsed) set of imports for the library references it knowswe need.
• It created a class definition for the Activity we said we wanted (HelloWorldActivity) including a method called OnCreate.
For the moment, don't worry about the parameter passed into OnCreate. ThesavedInstanceState Bundle is a way of passing data between activities and storingdata between times when the Activity is running. We won't need to use this forHelloWorld.
• One special line of code has been included in OnCreate:
setContentView (R.layout.main);
Android uses "layouts" to define how buttons, images, text, and other UI elementson the screen are arranged, and that main.xml was the name of the default layoutfile that the Android SDK created for us under .res/layout. The R.java file is gen-erated automatically and contains java references for each of the resources un-der .res. You will never need to edit the R.java file by hand— the Android SDKtakes care of it as you add, change or delete resources.
Again in the Eclipse Package Explorer window, double-click on main.xml and you willsee the default layout screen in the center window. There are two tabs at the bottomof the panel that say "Layout" and "main.xml". Click on the one that says "main.xml"to bring up the code:
<?xml version="1.0" encoding="utf-8"?><LinearLayout xmlns:android="http://schemas.android.com/apk/res/android" android:orientation="vertical" android:layout_width="fill_parent" android:layout_height="fill_parent" ><TextView android:layout_width="fill_parent" android:layout_height="wrap_content" android:text="@string/hello" /></LinearLayout>
Again, let's look at the key features of this template code:
• Like any other XML file, this one starts with a reference to the XML version andencoding used.
12 | Chapter 1: Setting Up Your Android Development Environment

• LinearLayout is one of the screen layout formats provided by the Android SDK.There are several others, which can be combined hierarchically to create very com-plex screen layouts. For our purposes, a simple linear layout is fine. More Layouttypes are covered later in the book in Chapter 10, A Widget Bestiary.
Within the LinearLayout definition:
— The code:
xmlns:android="http://schemas.android.com/apk/res/android"
identifies the XML schema being used.
— The code:
android:orientation="vertical"android:layout_width="fill_parent"android:layout_height="fill_parent"
defines an orientation, width and height for the entire scope of the layout.
• TextView describes an area where text can be displayed and edited. It resemblesthe text boxes you may have encountered when programming in other graphicalenvironments.
Within the TextView definition:
— The code:
android:layout_width="fill_parent"android:layout_height="wrap_content"
define a width and height for the TextView box.
— The code:
android:text="@string/hello"
provides some text to display in the TextView. The actual string is defined in aseparate file, res/values/strings.xml. If we open that file (again by clicking onit in the Package Explorer), we see a specialized string editor added by ADT. Ifyou select "hello (String)" by clicking on it, you'll see the current value for thatstring. By a stroke of luck, the Android SDK has already included text that isalmost what we wanted to display anyway. Just to show them who's boss,change the value of the String hello to say "Hello, Android!", or something elseequally clever:
Hello, Android | 13

Save the Project either from the Eclipse File menu (File → Save) or by clicking on thediskette icon in the menu bar.
Believe it or not, we're done. We don't have to write a single line of Java to create thisapplication.
Running HelloWorldFrom the Eclipse menu bar, select Run → Run. A "Run As" dialog box will pop up.Select "Android Application" from the list, which displays the dialog shown in Fig-ure 1-5.
Figure 1-5. Eclipse Application Type selection
14 | Chapter 1: Setting Up Your Android Development Environment

If this is the first time you have have started an Android application, the SDK will askyou to configure an emulator, or "android virtual device" (AVD). First, a dialog appearsinforming you that no compatible targets were found. That is, no AVDs are configuredfor the Android API version and capabilities your application needs to run.
Click "Yes." now the configuration dialog for Android virtual devices appears.
Click "New." Yet another dialog appears, enabling you to name the new AVD, pick theAPI revision number, specify an SD card (which we won't need to for this application),and specify a "skin" from a choice of skins with a different screen sizes.
Figure 1-6. AVD Error project
Figure 1-7. Managing AVDs project
Hello, Android | 15
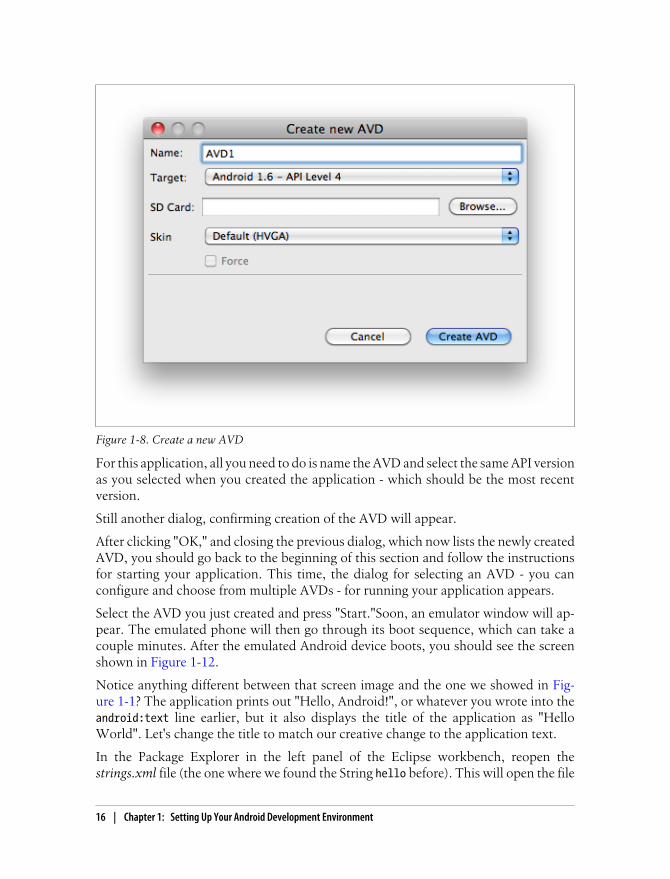
For this application, all you need to do is name the AVD and select the same API versionas you selected when you created the application - which should be the most recentversion.
Still another dialog, confirming creation of the AVD will appear.
After clicking "OK," and closing the previous dialog, which now lists the newly createdAVD, you should go back to the beginning of this section and follow the instructionsfor starting your application. This time, the dialog for selecting an AVD - you canconfigure and choose from multiple AVDs - for running your application appears.
Select the AVD you just created and press "Start."Soon, an emulator window will ap-pear. The emulated phone will then go through its boot sequence, which can take acouple minutes. After the emulated Android device boots, you should see the screenshown in Figure 1-12.
Notice anything different between that screen image and the one we showed in Fig-ure 1-1? The application prints out "Hello, Android!", or whatever you wrote into theandroid:text line earlier, but it also displays the title of the application as "HelloWorld". Let's change the title to match our creative change to the application text.
In the Package Explorer in the left panel of the Eclipse workbench, reopen thestrings.xml file (the one where we found the String hello before). This will open the file
Figure 1-8. Create a new AVD
16 | Chapter 1: Setting Up Your Android Development Environment

in the editing window. The intent of this file is to give you a place to define strings thatwill be used by your application, without actually embedding them in the Java sourcecode. The other string that's defined here is app_name. To make things consistent, changethe definition of app_name to HelloAndroid as shown in Figure 1-13.
Now when we run the application, we get a screen that looks just like what we set outto do, as shown in Figure 1-1.
Figure 1-9. Confirmed creation of an AVD
Figure 1-10. AVD Manager
Hello, Android | 17

Congratulations! You've just created your first Android program by doing nothing morethan changing the text in one line of code. There are much greater challenges ahead.
Figure 1-11. AVD Picker
18 | Chapter 1: Setting Up Your Android Development Environment

Figure 1-12. First try at HelloAndroid
Hello, Android | 19

Figure 1-13. HelloWorld String Editing
20 | Chapter 1: Setting Up Your Android Development Environment
Related Documents


