13mm wrench 14mm wrench 17mm wrench 2 x 10mm wrenches Installation Information: This product requires use of basic hand tools and does not require any modifications to the existing structure of your vehicle. 4mm Allen wrench 5mm Allen wrench Wire crimper Tools needed for installation: Hardware Index: Use this to choose the correct hardware called for in each step. M10x25 M8x25 M8x64 M6x35 M6x25 M6x20 M8x20 M6 Washer M6 Lock Washer M6 Nut M8 Lock Washer M8 Star Washer M10 Washer M10 Lock Washer M10 Nut M8 Nut 1.75” Roll Cage Clamp - 1.875” & 2” Roll Cage Clamp - Polaris Pro-fit Clamp - LED LIGHT BAR INSTALLATION & OPERATIONS MANUAL Thank you for purchasing the SEIZMIK Universal LED Light Bar. Please familiarize yourself with all the steps before beginning assembly. 1 Be sure to read through the entire manual carefully before beginning installation Read all warnings and precautions carefully and follow safety procedures Safety Information: Please follow all warnings and precautions for safe operation. • ALWAYS disconnect the battery before performing any electrical wiring. • AWAYS wear the proper safety equipment when modifying the body of the vehicle • NEVER attempt to connect or disconnect electrical components when the vehicle is wet • ALWAYS make sure bolts and electrical connections are securely tightened. • ALWAYS follow all precautions and warnings from the manufacturer of your vehicle. PART # 12040 PART # 12041 PART # 12042

Welcome message from author
This document is posted to help you gain knowledge. Please leave a comment to let me know what you think about it! Share it to your friends and learn new things together.
Transcript

13mm wrench
14mm wrench
17mm wrench
2 x 10mm wrenches
Installation Information:
This product requires use of basic hand tools and
does not require any modifications to the existing
structure of your vehicle.
4mm Allen wrench
5mm Allen wrench
Wire crimper
Tools needed for installation:
Hardware Index: Use this to choose the correct hardware called for in each step.
M10x25 M8x25
M8x64 M6x35 M6x25 M6x20 M8x20
M6
Washer
M6
Lock
Washer
M6
Nut
M8
Lock
Washer
M8
Star
Washer
M10
Washer
M10
Lock
Washer
M10
Nut
M8
Nut
1.75” Roll Cage Clamp -
1.875” & 2” Roll Cage Clamp -
Polaris Pro-fit Clamp -
LED LIGHT BAR INSTALLATION & OPERATIONS MANUAL
Thank you for purchasing the SEIZMIK Universal LED Light Bar.
Please familiarize yourself with all the steps before beginning assembly.
1
Be sure to read through the entire manual carefully before beginning installation
Read all warnings and precautions carefully and follow safety procedures
Safety Information: Please follow all warnings and precautions for safe operation.
• ALWAYS disconnect the battery before performing any electrical wiring.
• AWAYS wear the proper safety equipment when modifying the body of the vehicle
• NEVER attempt to connect or disconnect electrical components when the vehicle is wet
• ALWAYS make sure bolts and electrical connections are securely tightened.
• ALWAYS follow all precautions and warnings from the manufacturer of your vehicle.
PART # 12040
PART # 12041
PART # 12042

2
Mounting the Light on the Bar:
1. Attach the Mounting Brackets to the Light: Using the M8
bolts and the lower mounting position, attach the mounting
bracket with the feet positioned outward.
2. Mount the Light on the Steel Bar: Placing the rubber isolator
shims under the feet of the mounting brackets, place the light
on the steel bar flange, aligning the bolt holes with the slots on
the flange.
3. Bolt the Light to the Steel Bar: Using the M6 bolts, fender
washers, and M6 hex nuts, secure the light to the mounting
flange on the steel bar. The fender washer should be between
the mounting flange and the hex nut, as shown in the picture.
Light Mount Components:
1. M8 Bolt (2)
2. 8mm Allen Wrench
3. Custom Mounting Brackets (2)
4. Rubber Isolator Shims (2)
5. M6 Bolt (2)
6. 6mm Allen Wrench
7. 7/8” Fender Washer (2)
8. M6 Hex Nut (2)
1.
3.
2.
4.
5. 6.
7.
8.

3
1.75” Roll Cage Clamps (2)
Part #12040
Bar Ends (2) Telescoping Bars (2)
2” Roll Cage Clamps (2)
Part #12041
Kit Contents:
1. Install Sliders: Insert telescoping bars into each end of light bar. Insert an M6x35 bolt through the holes in clamping
lugs with M6 flat washer on each side. Thread nut onto bolt but do not tighten.
2. Install Bar Ends on Telescoping Bars: Insert an M6x25 bolt, M6 split washer, & M6 flat washer into the
hole. Snug, but do not tighten bolt with 4mm Allen wrench.
Automotive Sized
Ring Terminals Terminals
Switch
Wiring Kit Plug
+ -
Clamp Arms (2)
Assembly
Fuse Holder
Light Bar with Light
You will have either:
Polaris Pro-Fit Clamp (2)
Part #12042
OR OR
Fits vehicles with 1.75” Roll
Cage Diameters
Fits 2014 Polaris Ranger XP900
and 2015 & newer Rangers Fits vehicles with 1.875” and
2” Roll Cage Diameters
Rubber shim
(Cut in Half)

4
PART 2: Light Bar Mounting
3. Mount the Light Bar Brackets: Clamp the brackets
onto the vehicle with the flanges to the outsides. Mount
the clamps level to each other.
Reference hardware above. Stamped indicator marks
face toward the outside of the vehicle. Serrated
washer MUST be placed between clamp arm & roll
bar clamp. Snug hardware - do not tighten yet.
IMPORTANT!!
3. Mount the Light Bar Brackets: Install self adhesive rubber shim (cut in half) on the inside of the curved
clamp section. Assemble as shown after placing CLAMP PLATE against roll bar. Assembled clamp will not fit
over roll bar without disassembling first. If you have a windshield, place clamp plate between roll bar and
windshield. Just snug all mounting bolts for now, tighten after you are happy with the final position of the light bar
assembly.
Rubber
Shim
1.75” and 2” Roll Cage Clamp Mounting
Polaris Pro-Fit Roll Cage Clamp Mounting
IMPORTANT!! DO NOT MOUNT LIGHT BAR ON ROPS EQUIPPED
WITH GLASS WINDSHIELD
IMPORTANT!!

Red Wire w/ Fuse:
Connect to the
Positive (+) battery
terminal. You may
need to use an
automotive sized
ring terminal.
5
PART 2: Light Bar Mounting
4. Mount the light bar to the brackets:
• Position the light bar to the brackets & adjust the telescoping arms to the
correct vehicle width.
• Insert hardware through the bracket arms into the bar ends
• Be sure to use the serrated washer between the arm brackets and
bar ends.
BAR ENDS SLIDE IN-OUT TO ADJUST TO VEHICLE WIDTH
2 PEOPLE FOR THIS PROCEDURE IS HELPFUL
5. Adjust the bar position:
• Note the multiple adjustment points
• Adjust the angles and height according
to your specific vehicle setup &
preferences
• Individual lights can adjust as well
This light bar will fit a number of different vehicles. The biggest differences between vehicles is usually where
the battery is located. Some vehicle batteries are located under the hood, under the seat, or under the cargo
bed. The best way to approach installation is to:
1. Install the bar onto the vehicle
2. Locate the battery
3. Decide where the switch will be mounted
4. Connect harness to the lights on the light bar
5. Run the wire from the light bar to the switch
6. Install the switch
7. Run wire to battery
8. Secure the excess wiring to the vehicle with zip ties
PART 3: Wiring the Light Bar
Light Bar Harness:
This is the length of wire
used to run from the
battery to the light bar.
Route the wire & secure
it neatly to the roll cage
with zip ties to prevent it
from getting snagged.
+ - Black Wire:
Connect to the
Negative (-) battery
terminal. You may
need to use an
automotive sized
ring terminal.
Switch Harness: This is
the length of wire used
to run from the battery to
the switch. Route the
wire & secure it neatly to
the roll cage with zip ties
to prevent it from getting
snagged.
Switch: Connect the
white and blue wires
to the switch. Ignore
black wire.
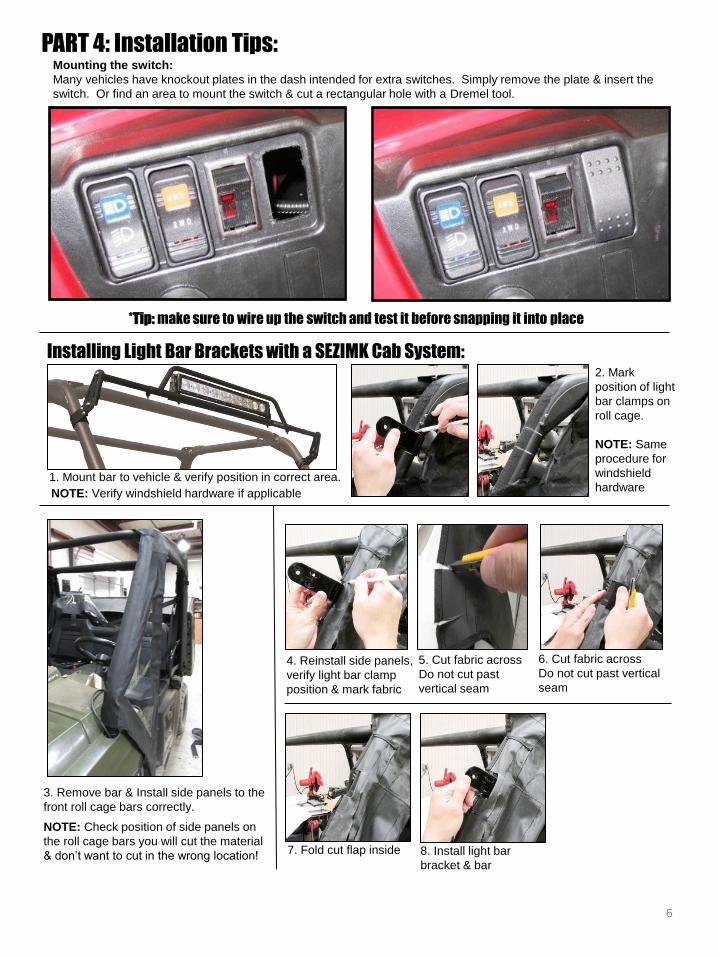
Mounting the switch:
Many vehicles have knockout plates in the dash intended for extra switches. Simply remove the plate & insert the
switch. Or find an area to mount the switch & cut a rectangular hole with a Dremel tool.
*Tip: make sure to wire up the switch and test it before snapping it into place
PART 4: Installation Tips:
Installing Light Bar Brackets with a SEZIMK Cab System:
3. Remove bar & Install side panels to the
front roll cage bars correctly.
1. Mount bar to vehicle & verify position in correct area.
7. Fold cut flap inside
2. Mark
position of light
bar clamps on
roll cage.
NOTE: Same
procedure for
windshield
hardware NOTE: Verify windshield hardware if applicable
NOTE: Check position of side panels on
the roll cage bars you will cut the material
& don’t want to cut in the wrong location!
4. Reinstall side panels,
verify light bar clamp
position & mark fabric
5. Cut fabric across
Do not cut past
vertical seam
6. Cut fabric across
Do not cut past vertical
seam
8. Install light bar
bracket & bar
6
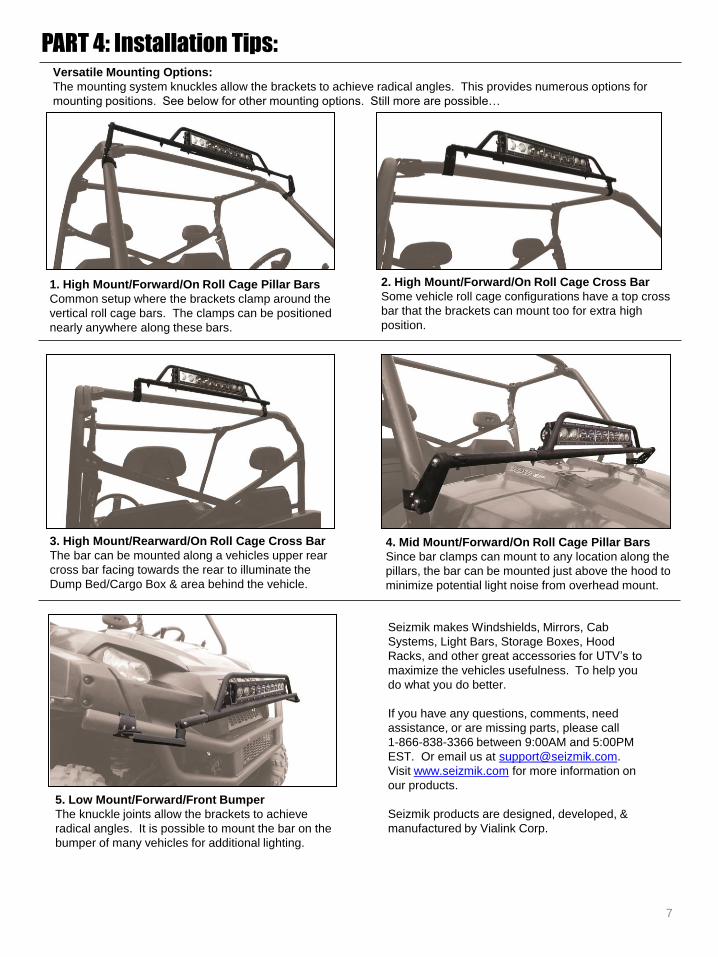
Versatile Mounting Options:
The mounting system knuckles allow the brackets to achieve radical angles. This provides numerous options for
mounting positions. See below for other mounting options. Still more are possible…
Seizmik makes Windshields, Mirrors, Cab
Systems, Light Bars, Storage Boxes, Hood
Racks, and other great accessories for UTV’s to
maximize the vehicles usefulness. To help you
do what you do better.
If you have any questions, comments, need
assistance, or are missing parts, please call
1-866-838-3366 between 9:00AM and 5:00PM
EST. Or email us at [email protected].
Visit www.seizmik.com for more information on
our products.
Seizmik products are designed, developed, &
manufactured by Vialink Corp.
PART 4: Installation Tips:
7
1. High Mount/Forward/On Roll Cage Pillar Bars
Common setup where the brackets clamp around the
vertical roll cage bars. The clamps can be positioned
nearly anywhere along these bars.
2. High Mount/Forward/On Roll Cage Cross Bar
Some vehicle roll cage configurations have a top cross
bar that the brackets can mount too for extra high
position.
3. High Mount/Rearward/On Roll Cage Cross Bar
The bar can be mounted along a vehicles upper rear
cross bar facing towards the rear to illuminate the
Dump Bed/Cargo Box & area behind the vehicle.
4. Mid Mount/Forward/On Roll Cage Pillar Bars
Since bar clamps can mount to any location along the
pillars, the bar can be mounted just above the hood to
minimize potential light noise from overhead mount.
5. Low Mount/Forward/Front Bumper
The knuckle joints allow the brackets to achieve
radical angles. It is possible to mount the bar on the
bumper of many vehicles for additional lighting.
Related Documents