17/10/11 Lecture 4

17/10/11. 2 The form element ( ) is used to include a number of form elements together so that they can be referenced by some other code in order to.
Dec 19, 2015
Welcome message from author
This document is posted to help you gain knowledge. Please leave a comment to let me know what you think about it! Share it to your friends and learn new things together.
Transcript

17/10/11
Lecture 4
2
Forms
The form element (<form></form>) is used to include a number of form elements together so that they can be referenced by some other code in order to read information from the user
The individual form elements are implemented using the <input /> tag and its type attribute

3
The main form
elements that we will
use are:
Textboxes (<input type= “text” />) Checkboxes (<input type= “checkbox” />) Radio Buttons (<input type= “radio” />) Buttons: (<input type= “button” />)

4
We can also use: Password Textboxes (<input type=
“password” />) Submit Buttons (<input type= “submit”
/>) Reset Buttons (<input type= “reset” />)

Example<!DOCTYPE html PUBLIC "-//W3C//DTD XHTML 1.0
Transitional//EN""http://www.w3.org/TR/xhtml1/DTD/xhtml1-
transitional.dtd"><html><body><form name="input" action="newpage.html"
method="get or post">Type your first name: <input type="text" name="FirstName" size="20"><br>Type your last name: <input type="text" name="LastName" size="20"><br><input type="submit" value="Submit"></form> <p>If you click the "Submit" button, you will send your
input to a new page called newpage.html.</p></body></html>
5

6
<!-- Forms--><?xml version="1.0" encoding="UTF-8"?><!DOCTYPE html PUBLIC "-//W3C//DTD XHTML 1.0 Transitional//EN" "http://www.w3.org/TR/xhtml1/DTD/xhtml1-transitional.dtd"><html xmlns="http://www.w3.org/1999/xhtml" xml:lang="en" lang="en"><head>
<title>Using the form Tag with the </title><!-- For readability of this example we will exclude the meta
tags --></head><body> <h1>Forms</h1> <h2>Using the <form> tag and the <input /> tag</h2>
<form name="feedbackfrm">Your Name: <input type="text" /><br />Your Password: <input type="password" /><br />Indicate your favorite color:<br /><input type="radio" checked="true" value="blue"/>Blue<br /><input type="radio" value="red"/>Red<br />Choose one or more of the following:<br /><input type="checkbox" checked = "true" /><br /><input type="checkbox" /><br /><input type="checkbox" /><br /><input type="submit" value="submit your form" /><br /><input type="reset" value="clear your form" /><br />
</form></body></html>

7

8
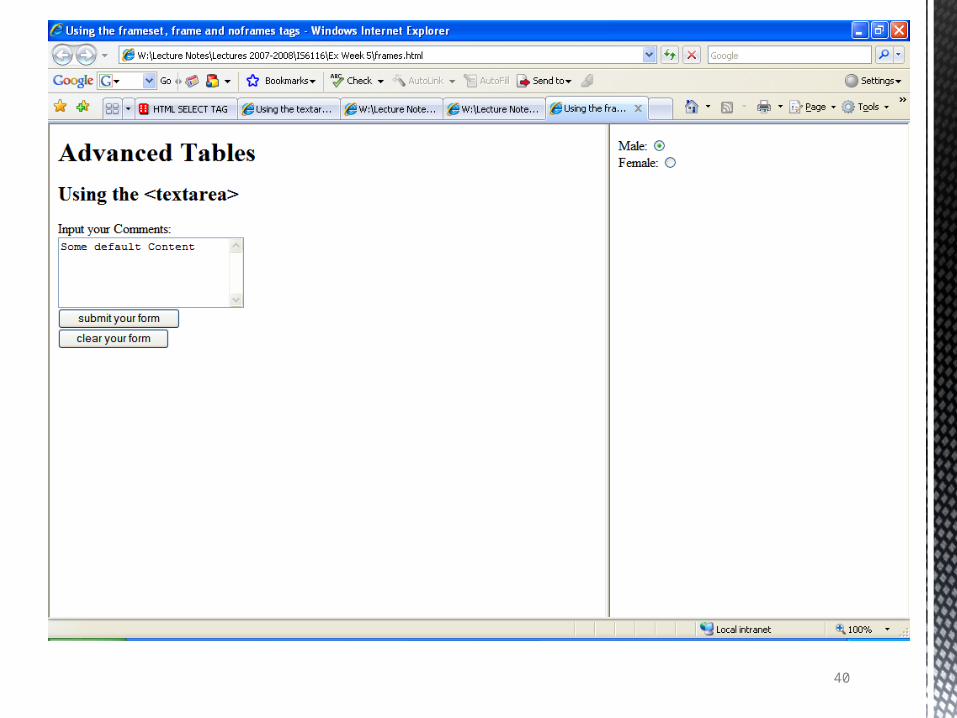
Using the <textarea> tag
textarea element allows larger blocks of text to be submitted
The textarea element uses the <textarea></textarea> tags
use the rows and cols attributes to set the size of the textarea

9
<!-- Forms --><?xml version="1.0" encoding="UTF-8"?><!DOCTYPE html PUBLIC "-//W3C//DTD XHTML 1.0 Transitional//EN""http://www.w3.org/TR/xhtml1/DTD/xhtml1-transitional.dtd"><html xmlns="http://www.w3.org/1999/xhtml" xml:lang="en" lang="en"><head>
<title>Using the textarea tag</title>
</head><body> <h1>Forms</h1> <h2>Using the <textarea></h2> <form name="feedbackfrm">
Input your Comments:<br /><textarea rows="5" cols="25">Some default Content</textarea><br /> <input type="submit" value="submit your form" /><br /><input type="reset" value="clear your form" /><br />
</form> </body</html>

10
11
Note:
set the height of the text area by setting the rows attribute and set the width by setting the cols attribute
default content to appear in your text area, you place it between the open (<textarea>) and close (</textarea>) tags

12
Note:
If you are thinking of using a form on your page, make sure that it is absolutely necessary
Never nest forms within forms

Sometimes a textbox is not suitable Use a list box List box has two tags
<select><option>
The select tag indicates that a list box will be created. The option tag represents a unique choice for the list box. <select> has two main properties: name and size.
ListBox
13

<select name=“box1” size=“20”><option>Ireland</option><option>United Kingdom</option></select>
Example
14
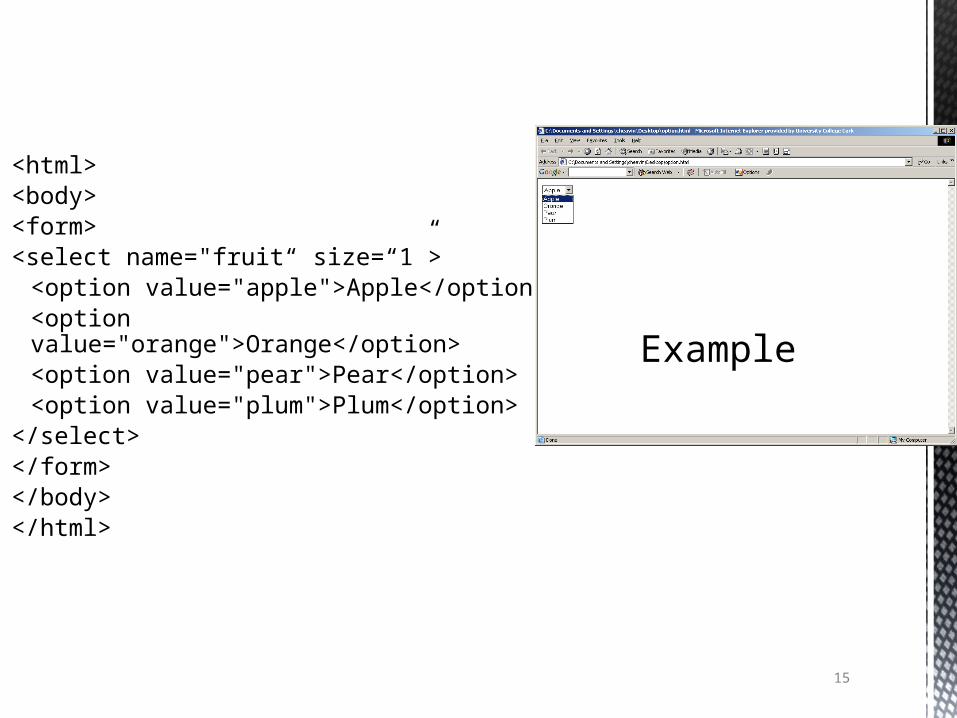
<html><body><form><select name="fruit“ size=“1”>
<option value="apple">Apple</option><option value="orange">Orange</option><option value="pear">Pear</option><option value="plum">Plum</option>
</select></form></body></html>
Example
15

Name as per textfield
Size indicates how many items are shown at one time
<option> </option>The value which uniquely identifies each of the option The text after the <option> is what the user will see
Form Objects
16

Useful for recording user opinions/preferences
Not mutually exclusive Created with an Input Tag Type=checkbox Can group checkboxes by
giving them all the same name
Value property must be unique
The value property is what the processing script will receive
Label for the Checkbox is denoted by the text that follows the input tag
checked=“checked”
Checkboxes
17

<html><body>
<form>My interests: <br />Reading<input type="checkbox" name="Reading" checked="checked“ /><br />Singing<input type="checkbox" name="Singing“ /></form>
</body></html>
Example
18

Allow one or no options to be selected from a group of options.
The name of the button group are kept the same but keep the value for each button different.
Type=Radio
Radio Buttons
19
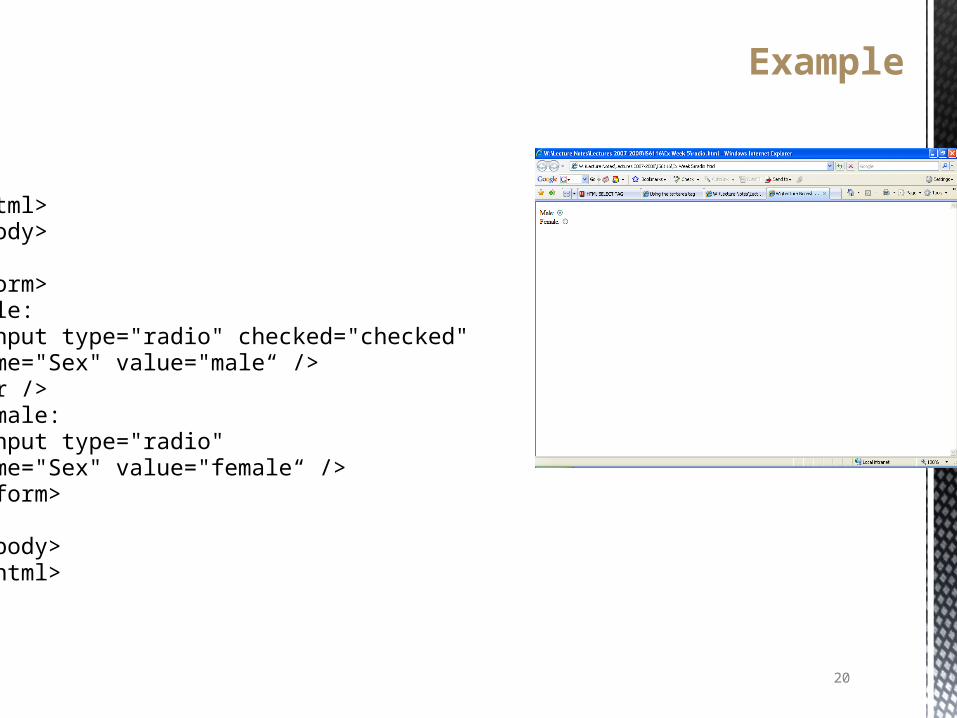
<html><body>
<form>Male: <input type="radio" checked="checked"name="Sex" value="male“ /><br />Female: <input type="radio"name="Sex" value="female“ /></form>
</body></html>
Example
20

To include a table use the <table></table> tags
For each row we need a set of <tr></tr> tags where the tr stands for table row
Each cell within our table can be implemented using either <th></th> (table header) tags or <td></td> (table data) tags
The <th></th> tags will, by default, render their content in bold writing and will align their content to the center
Use these to give a column in your table a heading
Tables
21

<td></td> tags will render their content normally, without any emphasis on the text or change to the alignment unless specified
Tables can also have a caption to describe what they are supposed to be holding information - <caption></caption> tags
These align the text to the center, but do not place any emphasis on the text
Tables
22
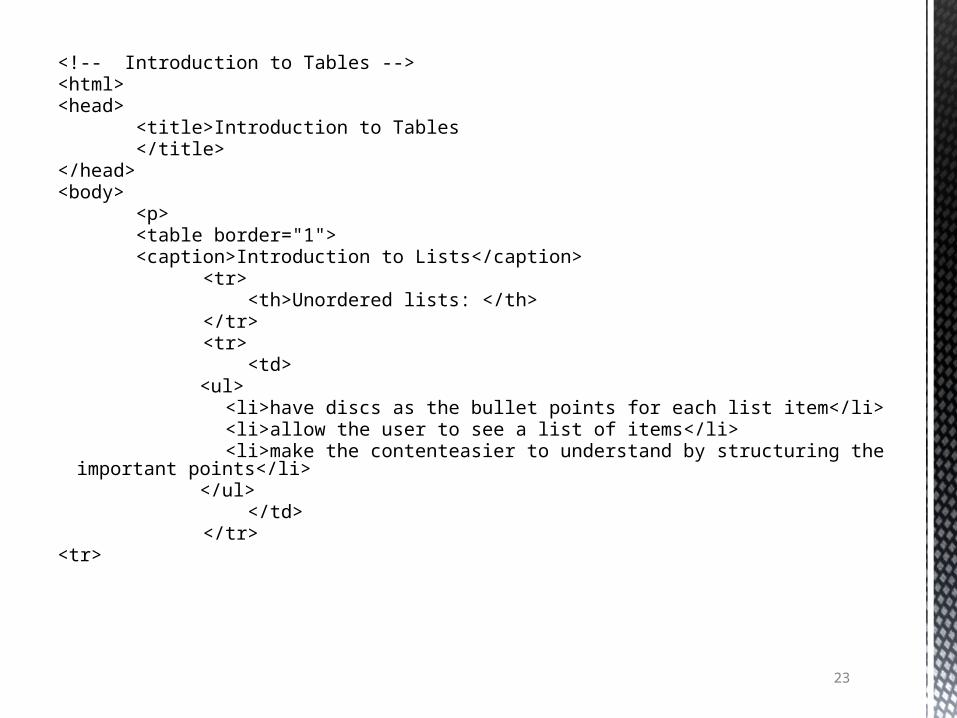
<!-- Introduction to Tables --><html><head> <title>Introduction to Tables </title></head><body> <p> <table border="1"> <caption>Introduction to Lists</caption> <tr> <th>Unordered lists: </th> </tr> <tr> <td>
<ul> <li>have discs as the bullet points for each list item</li> <li>allow the user to see a list of items</li> <li>make the contenteasier to understand by structuring the important points</li>
</ul>
</td> </tr><tr>
23

<th>Ordered Lists - three reasons for using them</th> </tr> <tr> <td>
<ol> <li>They give order to your list items</li> <li>You can use them for "Top Ten"lists</li> <li>They can be used to create "Tables of
Content"</li> </ol>
</td> </tr> </table>
</p></body>
</html>
24

25

Use the align attribute of the <table> tag to change the position of the table on the page
Use the align attribute of the <td> (or <th>) tag to change the alignment of the content of your table cells
Changing the alignment of the
table and table data
26

<!--Advanced Tables--><?xml version="1.0" encoding="UTF-8"?><!DOCTYPE html PUBLIC "-//W3C//DTD XHTML 1.0 Transitional//EN" "http://www.w3.org/TR/xhtml1/DTD/xhtml1-transitional.dtd"><html xmlns="http://www.w3.org/1999/xhtml" xml:lang="en" lang="en"><head>
<title> Changing table alignment</title>
</head><body> <h1>Advanced Tables</h1> <h2>Changing the Alignment of the Table and Table Data</h2> <table border="1" align ="center" width="75%">
<tr><th>Default <th> Alignment</th><th align="left">Left <th> Alignment</th><th align="right">Right <th> Alignment</th>
</tr><tr>
<td align="center">Center <td> Alignment</td><td>Default <td> Alignment</td><td align="right">Right <td> Alignment</td>
</tr> </table>
</body></html>
27

28

When we want to have a cell in one row spanning a number of columns in another row we use the colspan attribute
The colspan attribute takes a numeric value equal to the number of columns you want your cell to span
Using COLSPAN:
29

<!--Advanced Lists--><?xml version="1.0" encoding="UTF-8"?><!DOCTYPE html PUBLIC "-//W3C//DTD XHTML 1.0 Transitional//EN" "http://www.w3.org/TR/xhtml1/DTD/xhtml1-transitional.dtd"><html xmlns="http://www.w3.org/1999/xhtml" xml:lang="en" lang="en"><head>
<title>Using COLSPAN</title>
</head><body> <h1>Advanced Tables</h1> <h2>Using Colspan</h2> <table border="1" align ="center" width="75%">
<tr><td colspan="2" align="center">Row1, Cell1</td><td>Row1, Cell2</td>
</tr><tr>
<td>Row2, Cell1</td><td>Row2, Cell1</td><td>Row2, Cell1</td>
</tr></table>
</body></html>
30

31

The rowspan attribute is used when you want a cell to span a number of rows
Its use is very similar to the use of the colspan attribute
Using ROWSPAN
32

<!--Advanced Tables --><?xml version="1.0" encoding="UTF-8"?><!DOCTYPE html PUBLIC "-//W3C//DTD XHTML 1.0 Transitional//EN" "http://www.w3.org/TR/xhtml1/DTD/xhtml1-transitional.dtd"><html xmlns="http://www.w3.org/1999/xhtml" xml:lang="en" lang="en"><head>
<title>Using Rowspan</title><!-- For readability of this example we will exclude the meta
tags --></head><body> <h1>Advanced Tables</h1> <h2>Using ROWSPAN</h2> <table border="1" align ="center" width="75%">
<tr><td rowspan="2" align="center">Spanning two rows</td><td>Row1 Cell2</td>
</tr><tr>
<td>Row2, Cell2</td></tr>
</table> </body</html>
33

34

35
Using ROWSPAN
The rowspan attribute is used when you want a cell to span a number of rows
Its use is very similar to the use of the colspan attribute

Frames
36
Frames are a device used in XHTML that allow you display more than one web page at a time
Their use is widespread, although they are deprecated from XHTML, which is why they have their own DTD that they must conform to (Frameset)
If you try to validate an XHTML document that uses frames as either Transitional or Strict XHTML, your document will not be valid

Using the <frameset>,<fr
ame /> and <noframes>
tags
37
use the <frameset></frameset> tags instead of the <body></body> tags
Within the <frameset> tags include a <frame /> tag for each page that we want to include
use a set of <noframes></noframes> tags to include content that can be viewed by users whose user agent does not support frames (such as older browsers, mobile devices etc.)
Frames
38
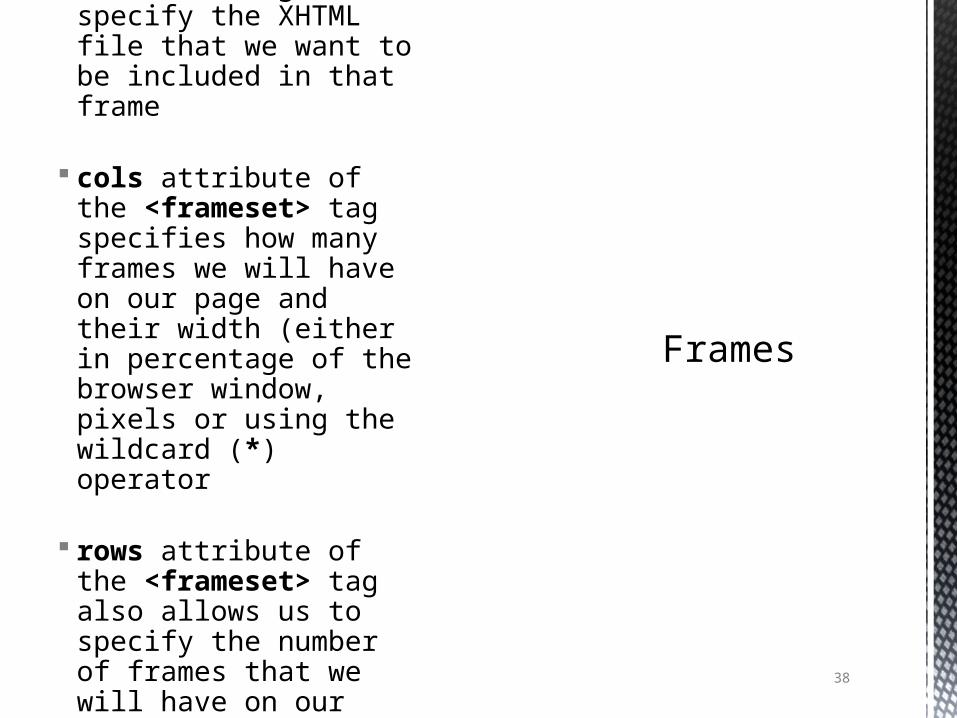
use the src attribute of the <frame /> tag to specify the XHTML file that we want to be included in that frame
cols attribute of the <frameset> tag specifies how many frames we will have on our page and their width (either in percentage of the browser window, pixels or using the wildcard (*) operator
rows attribute of the <frameset> tag also allows us to specify the number of frames that we will have on our page length ways

39
<!--=Frames --><?xml version="1.0" encoding="UTF-8"?><!DOCTYPE html PUBLIC "-//W3C//DTD XHTML 1.0 Frameset//EN" "http://www.w3.org/TR/xhtml1/DTD/xhtml1-frameset.dtd"><html xmlns="http://www.w3.org/1999/xhtml" xml:lang="en" lang="en"><head>
<title>Using the frameset, frame and noframes tags</title>
</head><frameset cols = "*,35%">
<frame src = "form1.html" /><frame src = "radio.html" />
<noframes><body>
This content will only appearif the user agent you are usingdoes not support frames
</body> </noframes></frameset></html>
40

Nesting Frames
41
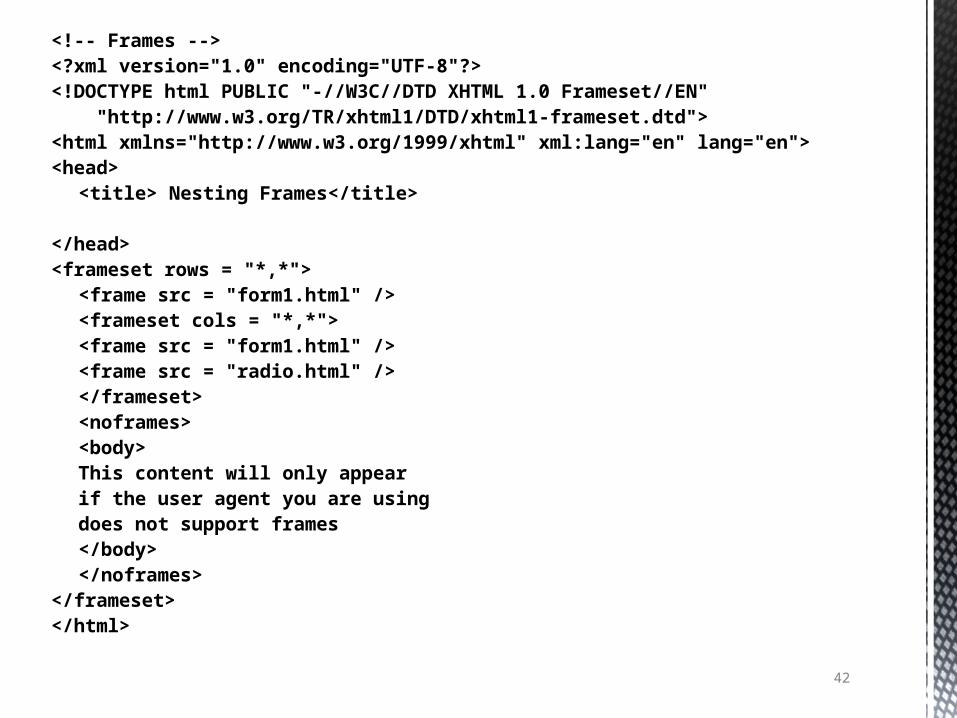
to display a number of frames at a time but want to change the orientation (i.e. we want to specify the cols attribute but also the rows attribute) - nest frameset elements within other frameset elements
42
<!-- Frames --><?xml version="1.0" encoding="UTF-8"?><!DOCTYPE html PUBLIC "-//W3C//DTD XHTML 1.0 Frameset//EN" "http://www.w3.org/TR/xhtml1/DTD/xhtml1-frameset.dtd"><html xmlns="http://www.w3.org/1999/xhtml" xml:lang="en" lang="en"><head>
<title> Nesting Frames</title>
</head><frameset rows = "*,*">
<frame src = "form1.html" /><frameset cols = "*,*">
<frame src = "form1.html" /><frame src = "radio.html" />
</frameset><noframes>
<body>This content will only appearif the user agent you are usingdoes not support frames</body>
</noframes></frameset></html>

43

CSS
44
What style will be used when there is more than one style specified for an HTML element?
Generally speaking we can say that all the styles will "cascade" into a new "virtual" Style Sheet by the following rules, where number four has the highest priority: Browser default External Style Sheet Internal Style Sheet (inside the <head>
tag) Inline Style (inside HTML element)

Inline Style
45
An individual element style is declared using the style attribute.
E.g.<p style =“font-size: 20pt”> Hello</p>
The style attribute allows you to specify a style for an element.

Inline Style
46
An inline style should be used when a unique style is to be applied to a single occurrence of an element.
To use inline styles you use the style attribute in the relevant tag.

Inline Styles
47
E.G <p style=“font-size:20pt;color: blue”>Hello</p>
In this case the style specifies two properties font size and font colour. The attributes are separated by a semi colon. Note that inline styles override any other styles applied in the document.

Note
48
Without style sheets the browser completely controls the look and feel of the web pages.
If the designer implements a particular style to the page, they take control of how it should look in the browser.

49
1. What does xHTML mean?2. Why is it important to do
analysis before developing a website?
3. How is a HTML page processed?
4. What tags are essential when writing a HTML file?
Revision Quiz

http://www.useit.com/alertbox/9710a.html
Customer-friendly : design guidelines for e-commerce (Feller, 2000)
http://www.useit.com/ Nielson
http://www.w3schools.com/
50
Recommended Reading
http://www.w3.org/WAI/mobile/ Accessibility
Related Documents