15-1 611-EED-001, Rev. 01 15. Distribution Concepts 15.1 System Overview Data distribution is accomplished at the Distributed Active Archive Centers (DAACs). The Order Manager Subsystem (OMS) manages all orders arriving via the EWOC [EOSDIS ClearingHOuse (ECHO) Web Service Distribution Language (WSDL) Ordering Component (OC)]. All data requests received into the OMS subsystem are validated by the server. The OMS manages distribution of data electronically using FtpPush, SCP (Secure Copy) and FtpPull. Ftp (file transfer protocol) Pull request links are created in an FtpPull directory indexed by the request id. The links point to the requested files in the Data Pool storage. FtpPush/SCP requests are delivered using the ECS ftp API based on libcurl and GSOAP. This library also used by Ingest and BMGT. Upon successful shipment, OMS sends a Distribution Notice (DN) to the end user. An order is considered complete when it becomes “Shipped”: • FtpPull orders - The request status is updated to “Shipped” after the order is staged (order expires as configured by DAAC’s FtpPull retention time) and file links are made in the Data Pool storage. The DN includes an ftp link to the files. • FtpPush and SCP (Secure Copy Protocol) orders – The request status is “Shipped” after Order Manager Server finishes pushing all the order’s associated data to its destination. Special orders, such as DPL Web Access requested HEG (HDF-EOS to GeoTIFF) Conversion Tool and EWOC requested External Subsetter (EP) and ESI DataAccess (DA) orders require further processing by processing services: • WebAccess requested HEG orders - The Order Manager creates HEG requests, per granule, based on the original HEG order processing instructions. It then submits order to the HEG Server through the HEG API (Application Program Interface). The HEG requests are processed and returns the final output to the Order Manager Server, which then distributes the final output to the end user. • External Subsetter Orders - The External Subsetter creates output granules which are associated with the EPD Server order. The Order Manager Server will later distribute the output granules. • DataAccess requested processing – Reverb forms can be created to allow users to specify ESI processing options when selecting granules from a collection. These are forwarded to OMS which will determine the Processing endpoint which can be used to process the granules as requested. The context diagram (Figure 15.1-1) shows a generalized (high-level) view of the system. The Order Manager Subsystem (OMS) architecture diagram (Figure 15.1-2) illustrates the relationship of the Order Manager with the various subsystems on both the input (order- receiving) and output (order-dispatching) sides of order management.

Welcome message from author
This document is posted to help you gain knowledge. Please leave a comment to let me know what you think about it! Share it to your friends and learn new things together.
Transcript
15-1 611-EED-001, Rev. 01
15. Distribution Concepts
15.1 System Overview Data distribution is accomplished at the Distributed Active Archive Centers (DAACs). The Order Manager Subsystem (OMS) manages all orders arriving via the EWOC [EOSDIS ClearingHOuse (ECHO) Web Service Distribution Language (WSDL) Ordering Component (OC)]. All data requests received into the OMS subsystem are validated by the server. The OMS manages distribution of data electronically using FtpPush, SCP (Secure Copy) and FtpPull. Ftp (file transfer protocol) Pull request links are created in an FtpPull directory indexed by the request id. The links point to the requested files in the Data Pool storage. FtpPush/SCP requests are delivered using the ECS ftp API based on libcurl and GSOAP. This library also used by Ingest and BMGT. Upon successful shipment, OMS sends a Distribution Notice (DN) to the end user. An order is considered complete when it becomes “Shipped”:
• FtpPull orders - The request status is updated to “Shipped” after the order is staged (order expires as configured by DAAC’s FtpPull retention time) and file links are made in the Data Pool storage. The DN includes an ftp link to the files.
• FtpPush and SCP (Secure Copy Protocol) orders – The request status is “Shipped” after Order Manager Server finishes pushing all the order’s associated data to its destination.
Special orders, such as DPL Web Access requested HEG (HDF-EOS to GeoTIFF) Conversion Tool and EWOC requested External Subsetter (EP) and ESI DataAccess (DA) orders require further processing by processing services:
• WebAccess requested HEG orders - The Order Manager creates HEG requests, per granule, based on the original HEG order processing instructions. It then submits order to the HEG Server through the HEG API (Application Program Interface). The HEG requests are processed and returns the final output to the Order Manager Server, which then distributes the final output to the end user.
• External Subsetter Orders - The External Subsetter creates output granules which are associated with the EPD Server order. The Order Manager Server will later distribute the output granules.
• DataAccess requested processing – Reverb forms can be created to allow users to specify ESI processing options when selecting granules from a collection. These are forwarded to OMS which will determine the Processing endpoint which can be used to process the granules as requested.
The context diagram (Figure 15.1-1) shows a generalized (high-level) view of the system. The Order Manager Subsystem (OMS) architecture diagram (Figure 15.1-2) illustrates the relationship of the Order Manager with the various subsystems on both the input (order-receiving) and output (order-dispatching) sides of order management.
15-2 611-EED-001, Rev. 01
Figure 15.1-1. System Context Diagram

15-3 611-EED-001, Rev. 01
Figure 15.1-2. Order Manager Subsystem (OMS) Context Diagram for EP requests
15-4 611-EED-001, Rev. 01
15.2 Order Manager Subsystem (OMS) The Order Manager Subsystem (OMS) performs the following functions:
• Manages all the orders arriving from Reverb, ECHO and the External Processor via the EWOC.
• Performs validation of the orders it receives before submitting the applicable requests to the order-fulfilling services.
• Queues processing requests and dispatches individual line items to processing services.
• OMS creates links for each ordered public granule in the hidden Data Pool (DPL) , creates links from the FtpPull directory in the Data Pool storage to the hidden DPL if the distribution type is FtpPull, and distributes the order to the appropriate host for FtpPush/SCP, then sends a Distribution Notice to the end user when the order is considered shipped.
• The OMS handles requests for Browse granules by extracting the browse cross-reference from the Inventory database and copying the Browse HDF files into the Data Pool.
– The EP and DataAccess orders that arrive via the EWOC are those that have been submitted by Reverb, ECHO, or ASTER Ground Data System (GDS) users.
• EWOC registers external processing orders with OMS. • EPD registers external processing outputs with OMS. • OMS distributes external processing and DataAccess outputs like any other
data. • OMS displays external processing and DataAccess orders.
Order Manager Server has four major components: 1 - Sybase ASE Server:
• COTS software application that handles order management-related interactions (including insertion and retrieval of data) with the Order Management database.
2 - Order Manager (OM) GUI: • GUI that allows operators to view and modify requests that the Order Manager
Server has suspended that requires operator intervention. • In addition, the GUI allows operators to suspend, resume, cancel, resubmit, or
change the priority of requests.
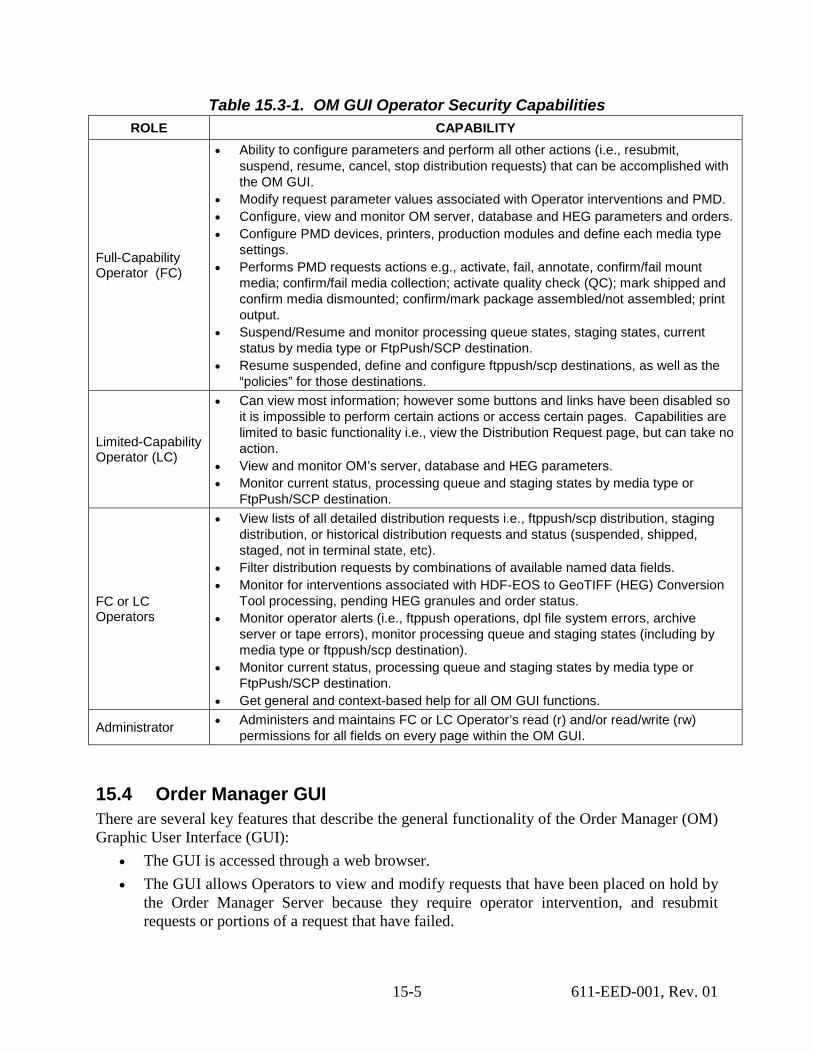
15.3 OM GUI Operator Security The OM GUI allows DAAC Operators to completely manage order distribution requests from a web browser. Operator GUI security offers two levels of permissions, Full and Limited Capability, for OM GUI operations. Table 15.3-1 Operator GUI Security Capabilities defines the allowable security level capabilities of the Operators within the OM GUI.
15-5 611-EED-001, Rev. 01
Table 15.3-1. OM GUI Operator Security Capabilities ROLE CAPABILITY
Full-Capability Operator (FC)
• Ability to configure parameters and perform all other actions (i.e., resubmit, suspend, resume, cancel, stop distribution requests) that can be accomplished with the OM GUI.
• Modify request parameter values associated with Operator interventions and PMD. • Configure, view and monitor OM server, database and HEG parameters and orders. • Configure PMD devices, printers, production modules and define each media type
settings. • Performs PMD requests actions e.g., activate, fail, annotate, confirm/fail mount
media; confirm/fail media collection; activate quality check (QC); mark shipped and confirm media dismounted; confirm/mark package assembled/not assembled; print output.
• Suspend/Resume and monitor processing queue states, staging states, current status by media type or FtpPush/SCP destination.
• Resume suspended, define and configure ftppush/scp destinations, as well as the “policies” for those destinations.
Limited-Capability Operator (LC)
• Can view most information; however some buttons and links have been disabled so it is impossible to perform certain actions or access certain pages. Capabilities are limited to basic functionality i.e., view the Distribution Request page, but can take no action.
• View and monitor OM’s server, database and HEG parameters. • Monitor current status, processing queue and staging states by media type or
FtpPush/SCP destination.
FC or LC Operators
• View lists of all detailed distribution requests i.e., ftppush/scp distribution, staging distribution, or historical distribution requests and status (suspended, shipped, staged, not in terminal state, etc).
• Filter distribution requests by combinations of available named data fields. • Monitor for interventions associated with HDF-EOS to GeoTIFF (HEG) Conversion
Tool processing, pending HEG granules and order status. • Monitor operator alerts (i.e., ftppush operations, dpl file system errors, archive
server or tape errors), monitor processing queue and staging states (including by media type or ftppush/scp destination).
• Monitor current status, processing queue and staging states by media type or FtpPush/SCP destination.
• Get general and context-based help for all OM GUI functions.
Administrator • Administers and maintains FC or LC Operator’s read (r) and/or read/write (rw) permissions for all fields on every page within the OM GUI.
15.4 Order Manager GUI There are several key features that describe the general functionality of the Order Manager (OM) Graphic User Interface (GUI):
• The GUI is accessed through a web browser. • The GUI allows Operators to view and modify requests that have been placed on hold by
the Order Manager Server because they require operator intervention, and resubmit requests or portions of a request that have failed.
15-6 611-EED-001, Rev. 01
• The GUI incorporates management of HEG orders. • The OM GUI allows operators to configure ODL metadata users, external subsetter and
SCP policy. OM GUI is certified for use with any Mozilla 5.0 based browser, e.g., Netscape 7+, Firefox 3.5+, generic “Mozilla” browsers for Linux or UNIX. The OMS GUI was not designed to work with MS Internet Explorer or older versions of Netscape. JavaScript is an integral part of the OM GUI, and as such it must be enabled in the client browser. The ability to create popup windows must be enabled. Table 15.4-1 shows the activity checklist for the Launch Order Manager GUI.
Table 15.4-1. Launch Order Manager GUI - Activity Checklist Order Role Task Section Complete? 1 Distribution
Technician Launching the Order Manager GUI (P) 15.4.1 15.4.1
15.4.1 Launching the Order Manager GUI 1 To activate the OM GUI, access a terminal and logon to a host that has access to a
recommended web browser: Type <URL> and press < Enter> • Example URL: http://x4iil01.<DAAC_extension>:<port>.
NOTE: There is no need to specify a cgi-bin directory or a specific HTML page. The GUI will open in a new window and will close the parent window. If run on a Windows or Linux platform, the parent window may not close. 2 Type the appropriate security information in the Security Login Prompt dialog box:
Type <User Name>, then tab Type <Password>
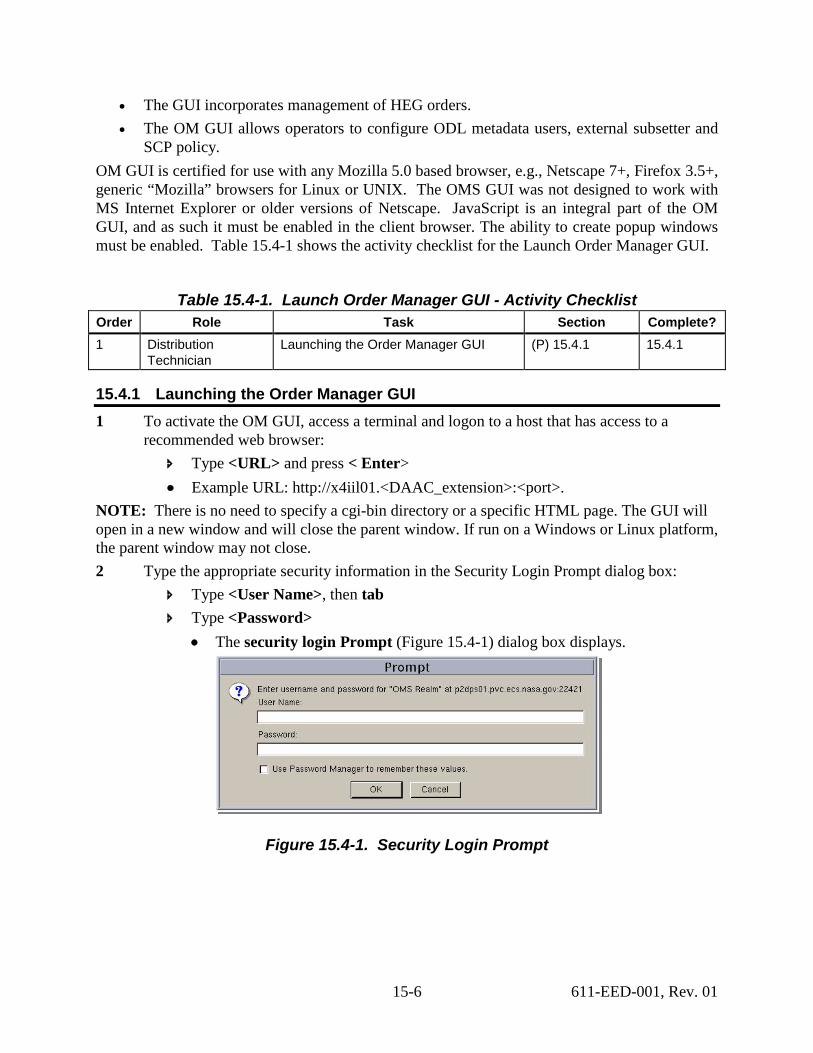
• The security login Prompt (Figure 15.4-1) dialog box displays.
Figure 15.4-1. Security Login Prompt
15-7 611-EED-001, Rev. 01
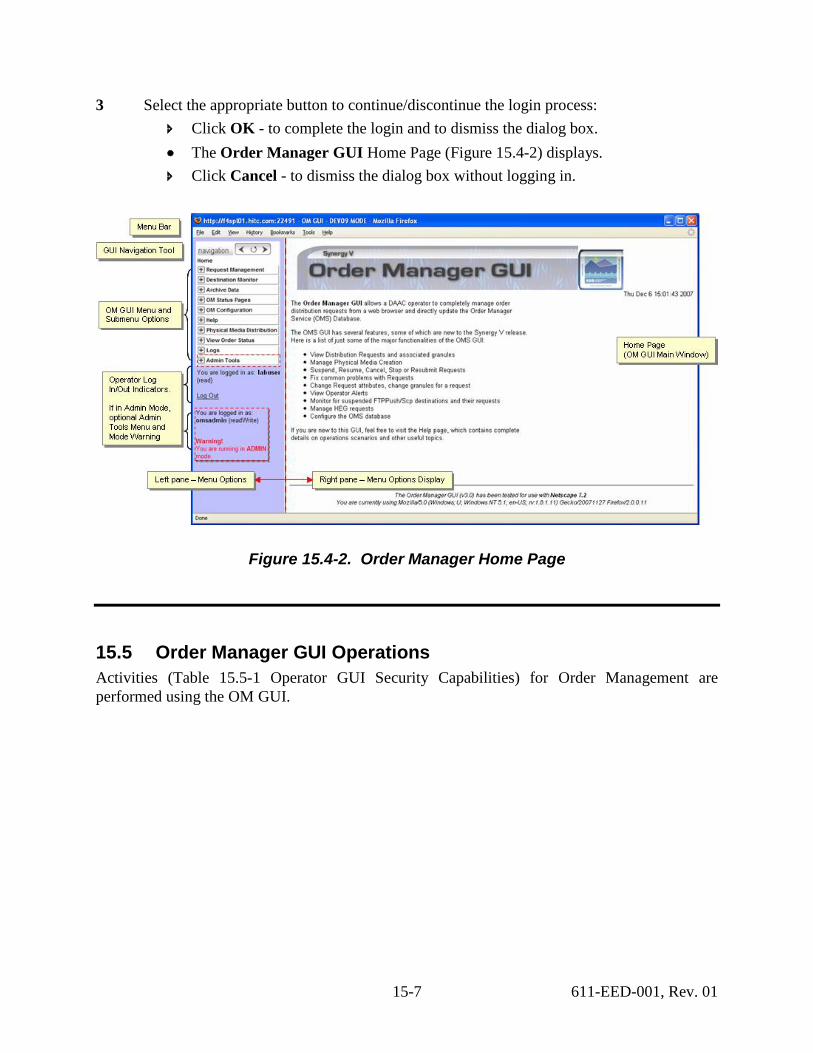
3 Select the appropriate button to continue/discontinue the login process: Click OK - to complete the login and to dismiss the dialog box. • The Order Manager GUI Home Page (Figure 15.4-2) displays. Click Cancel - to dismiss the dialog box without logging in.
Figure 15.4-2. Order Manager Home Page
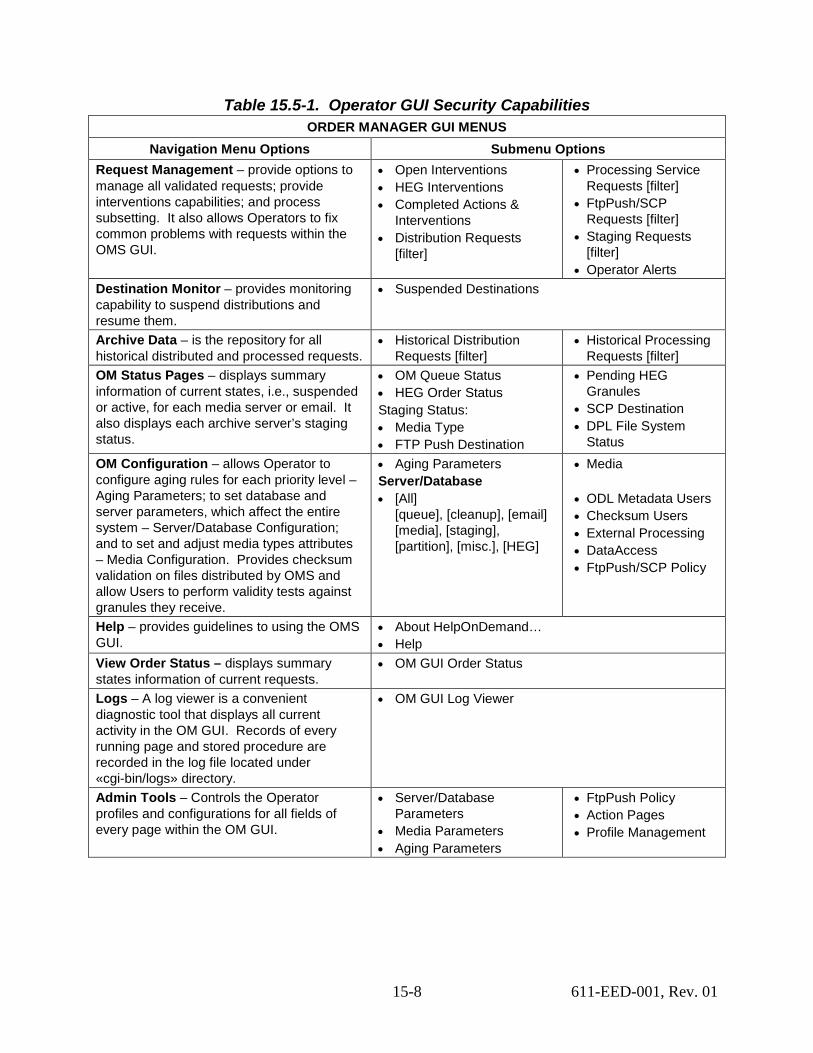
15.5 Order Manager GUI Operations Activities (Table 15.5-1 Operator GUI Security Capabilities) for Order Management are performed using the OM GUI.
15-8 611-EED-001, Rev. 01
Table 15.5-1. Operator GUI Security Capabilities ORDER MANAGER GUI MENUS
Navigation Menu Options Submenu Options Request Management – provide options to manage all validated requests; provide interventions capabilities; and process subsetting. It also allows Operators to fix common problems with requests within the OMS GUI.
• Open Interventions • HEG Interventions • Completed Actions &
Interventions • Distribution Requests
[filter]
• Processing Service Requests [filter]
• FtpPush/SCP Requests [filter]
• Staging Requests [filter]
• Operator Alerts Destination Monitor – provides monitoring capability to suspend distributions and resume them.
• Suspended Destinations
Archive Data – is the repository for all historical distributed and processed requests.
• Historical Distribution Requests [filter]
• Historical Processing Requests [filter]
OM Status Pages – displays summary information of current states, i.e., suspended or active, for each media server or email. It also displays each archive server’s staging status.
• OM Queue Status • HEG Order Status Staging Status: • Media Type • FTP Push Destination
• Pending HEG Granules
• SCP Destination • DPL File System
Status OM Configuration – allows Operator to configure aging rules for each priority level – Aging Parameters; to set database and server parameters, which affect the entire system – Server/Database Configuration; and to set and adjust media types attributes – Media Configuration. Provides checksum validation on files distributed by OMS and allow Users to perform validity tests against granules they receive.
• Aging Parameters Server/Database • [All]
[queue], [cleanup], [email] [media], [staging], [partition], [misc.], [HEG]
• Media
• ODL Metadata Users • Checksum Users • External Processing • DataAccess • FtpPush/SCP Policy
Help – provides guidelines to using the OMS GUI.
• About HelpOnDemand… • Help
View Order Status – displays summary states information of current requests.
• OM GUI Order Status
Logs – A log viewer is a convenient diagnostic tool that displays all current activity in the OM GUI. Records of every running page and stored procedure are recorded in the log file located under «cgi-bin/logs» directory.
• OM GUI Log Viewer
Admin Tools – Controls the Operator profiles and configurations for all fields of every page within the OM GUI.
• Server/Database Parameters
• Media Parameters • Aging Parameters
• FtpPush Policy • Action Pages • Profile Management

15-9 611-EED-001, Rev. 01
15.6 OM GUI – Request Management The Operator is provided with the options to manage, monitor and control open/completed interventions. Allowing the means to provide intervention capabilities help to ensure eligible requests from varying order sources are distributed or handled appropriately. The action to process subsetting is also available. Non-fatal errors and warnings related to data space/storage, ftppush/scp destination, and server warnings are functions handled within the OM GUI. The Request Management submenu options will be examined using the following checklist shown in Table 15.6-1:
Table 15.6-1. Request Management - Activity Checklist Order Role Task Section Complete
? 1 Distribution
Technician Setting Refresh Option (P)15.6.1.1.1
2 Distribution Technician
Viewing and Responding to Open Interventions: • Assignment of Worker • Manual Fail of Granule • Specifying a Replacement Granule • Changing Granule Attributes • Changing Granule Media Type, Priority
and Formats • Changing Request Disposition • Close Interventions
(P) 15.6.1.2
3 Distribution Technician
Viewing and Responding to Open HEG Interventions: • Assign/Change Worker • Fail Action on Request • Fail Request
(P) 15.6.2.1
4 Distribution Technician
Filtering Data on Completed Actions and Interventions Page
(P) 15.6.3.1
5 Distribution Technician
Filtering Data on Distribution Requests Page
(P) 15.6.4.1
6 Distribution Technician
Filtering FtpPush/SCP Requests or Staging Distribution Requests Page
(P) 15.6.5.1
7 Distribution Technician
Filtering Processing Service Requests Page
(P) 15.6.6.1
8 Distribution Technician
Handling Operator Alerts (P) 15.6.7.1
9 Distribution Technician
Logging Out of OM GUI (P) 15.6.8.1
15-10 611-EED-001, Rev. 01
15.6.1 Request Management Submenu Page – Open Interventions The Open Interventions Page (Figure 15.6-3) provides the full-capability Operator with a means of performing the following kinds of interventions (limited-capability operator can view, but cannot work on (respond to) open interventions.):
• Select a different granule to replace an unavailable granule. • Fail selected granule(s). • Disable limit checking. • Change the distribution media for a request. • Resubmit, Fail, or Partition (divide) a request.
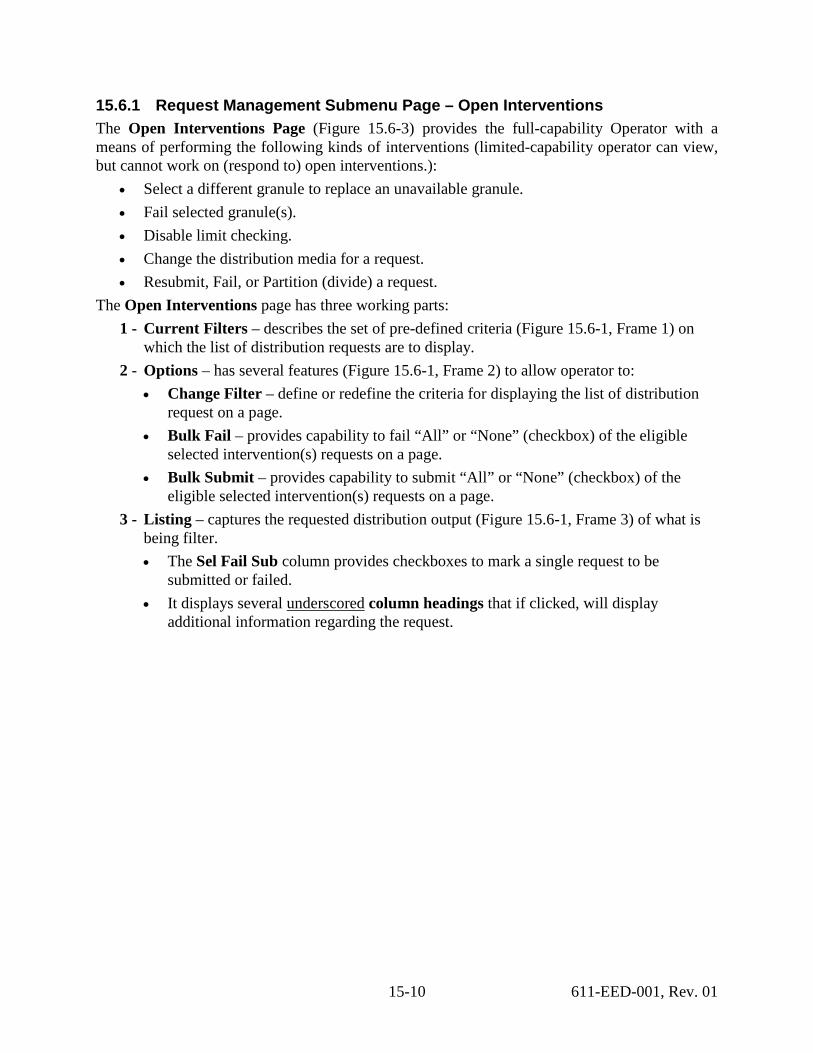
The Open Interventions page has three working parts: 1 - Current Filters – describes the set of pre-defined criteria (Figure 15.6-1, Frame 1) on
which the list of distribution requests are to display. 2 - Options – has several features (Figure 15.6-1, Frame 2) to allow operator to:
• Change Filter – define or redefine the criteria for displaying the list of distribution request on a page.
• Bulk Fail – provides capability to fail “All” or “None” (checkbox) of the eligible selected intervention(s) requests on a page.
• Bulk Submit – provides capability to submit “All” or “None” (checkbox) of the eligible selected intervention(s) requests on a page.
3 - Listing – captures the requested distribution output (Figure 15.6-1, Frame 3) of what is being filter. • The Sel Fail Sub column provides checkboxes to mark a single request to be
submitted or failed. • It displays several underscored
column headings that if clicked, will display additional information regarding the request.
15-11 611-EED-001, Rev. 01
Figure 15.6-1. Open Interventions Page – Fields and Options
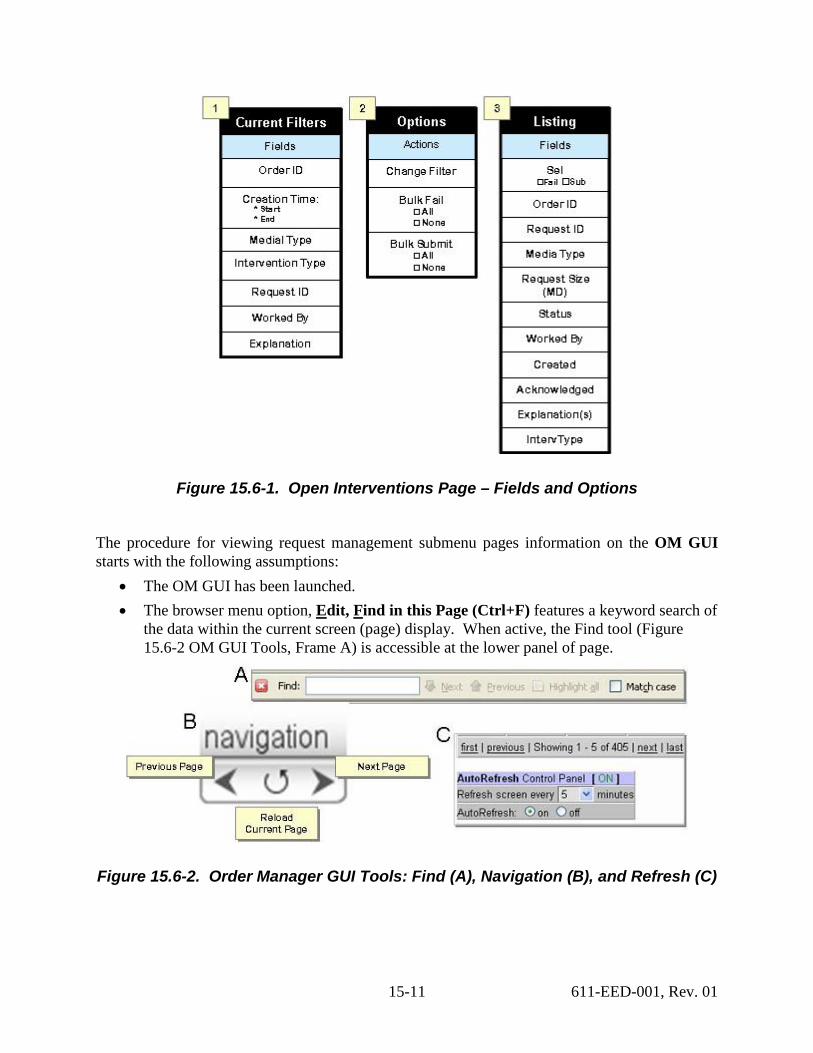
The procedure for viewing request management submenu pages information on the OM GUI starts with the following assumptions:
• The OM GUI has been launched. • The browser menu option, Edit, Find in this Page (Ctrl+F) features a keyword search of
the data within the current screen (page) display. When active, the Find tool (Figure 15.6-2 OM GUI Tools, Frame A) is accessible at the lower panel of page.
Figure 15.6-2. Order Manager GUI Tools: Find (A), Navigation (B), and Refresh (C)
15-12 611-EED-001, Rev. 01
15.6.1.1 Refresh Options on OM GUI Pages The OM GUI pages data can be manually refreshed (updated) using the “refresh ()” icon on the OM GUI Navigation tool. Several OM GUI pages refreshes automatically, if “AutoRefresh” is set to the “ON” position, as often as specified by the “Refresh screen every <number> minutes” tool. NOTE: This tool is found at the lower-left bottom of most OM GUI pages.
15.6.1.1.1 Setting Refresh Option 1 Click Request Management menu option to expand its submenu. 2 Click Open Interventions submenu option to display its page (Figure 15.6-3). Locate
the AutoRefresh Control Panel at bottom of Open Interventions page. 3 If applicable, click on appropriate option button of the AutoRefresh Control Panel to
toggle control “on” or “off”. • on – useful when working with current orders/requests with frequent changes in
status and most current updates are desirable. • off – useful to suspend the refresh option when processing large volume of
orders/requests and it is desirable to preserve the current screen’s display. 4 Change the refresh rate (assuming AutoRefresh is on):
Click Refresh screen every <number> minutes option on list arrow to display minute option.
Click on the desired refresh minutes (range 1 – 45) from list.
15-13 611-EED-001, Rev. 01
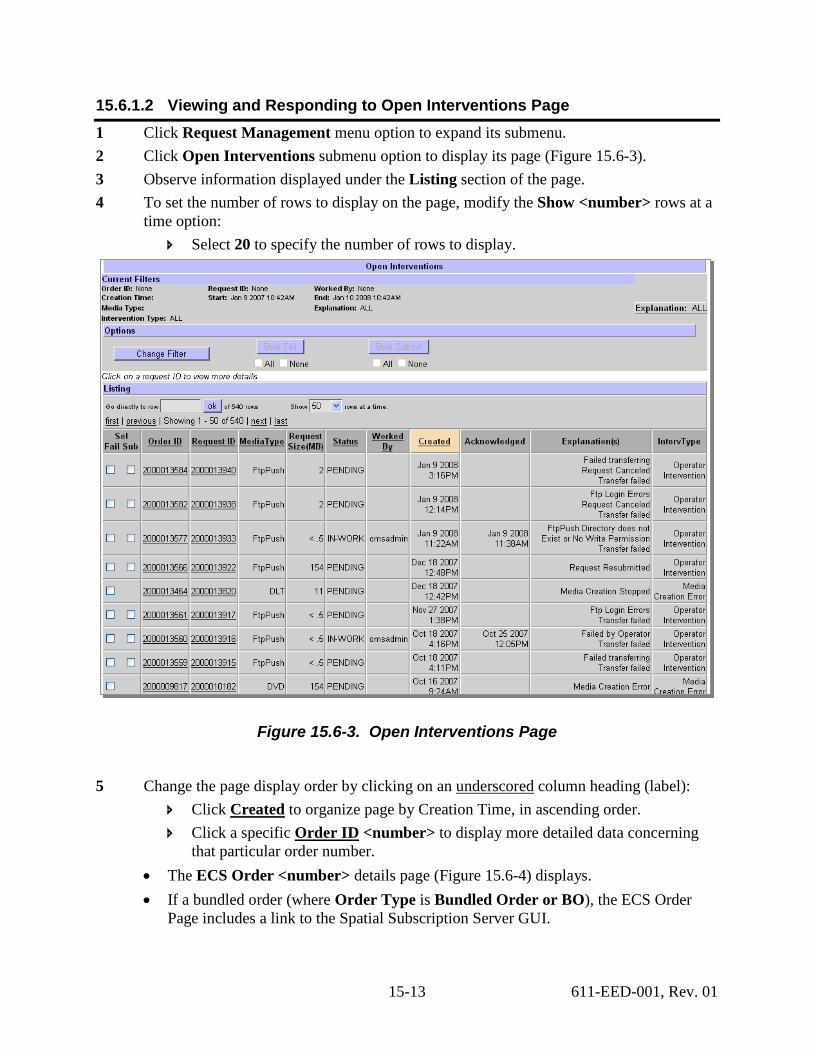
15.6.1.2 Viewing and Responding to Open Interventions Page 1 Click Request Management menu option to expand its submenu. 2 Click Open Interventions submenu option to display its page (Figure 15.6-3). 3 Observe information displayed under the Listing section of the page. 4 To set the number of rows to display on the page, modify the Show <number> rows at a
time option: Select 20 to specify the number of rows to display.
Figure 15.6-3. Open Interventions Page
5 Change the page display order by clicking on an underscored Click
column heading (label): Created
Click a specific to organize page by Creation Time, in ascending order.
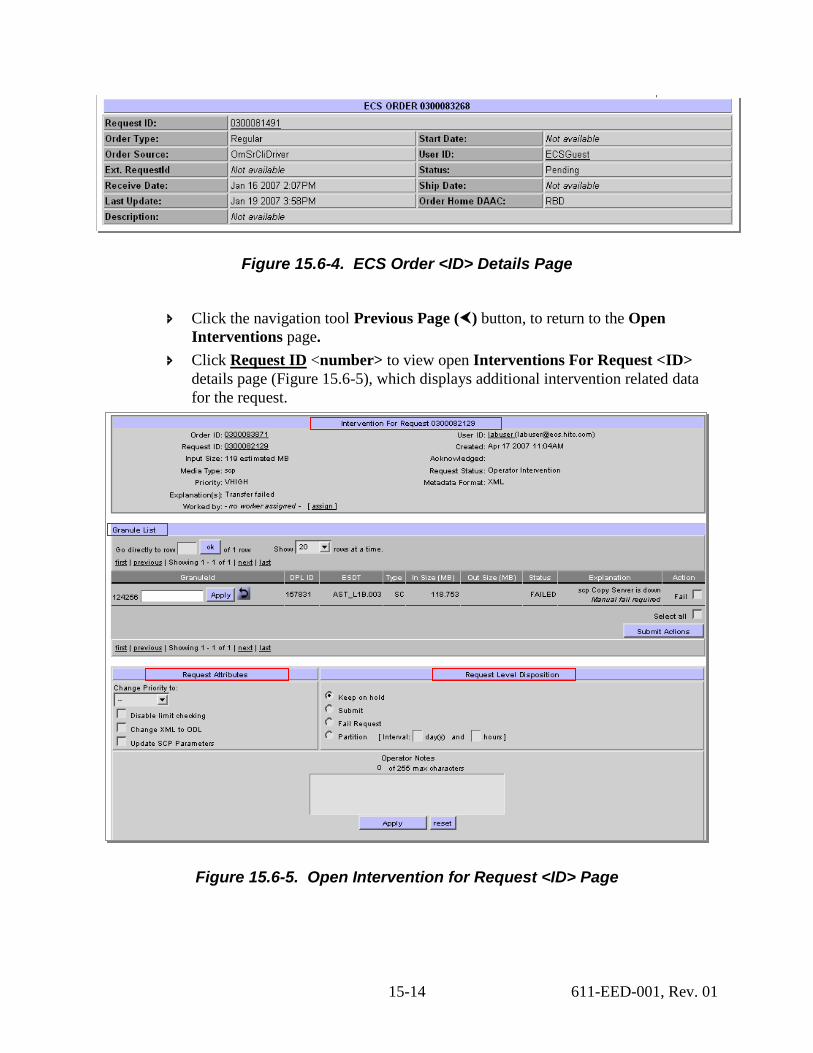
Order ID
• The ECS Order <number> details page (Figure 15.6-4) displays.
<number> to display more detailed data concerning that particular order number.
• If a bundled order (where Order Type is Bundled Order or BO), the ECS Order Page includes a link to the Spatial Subscription Server GUI.
15-14 611-EED-001, Rev. 01
Figure 15.6-4. ECS Order <ID> Details Page
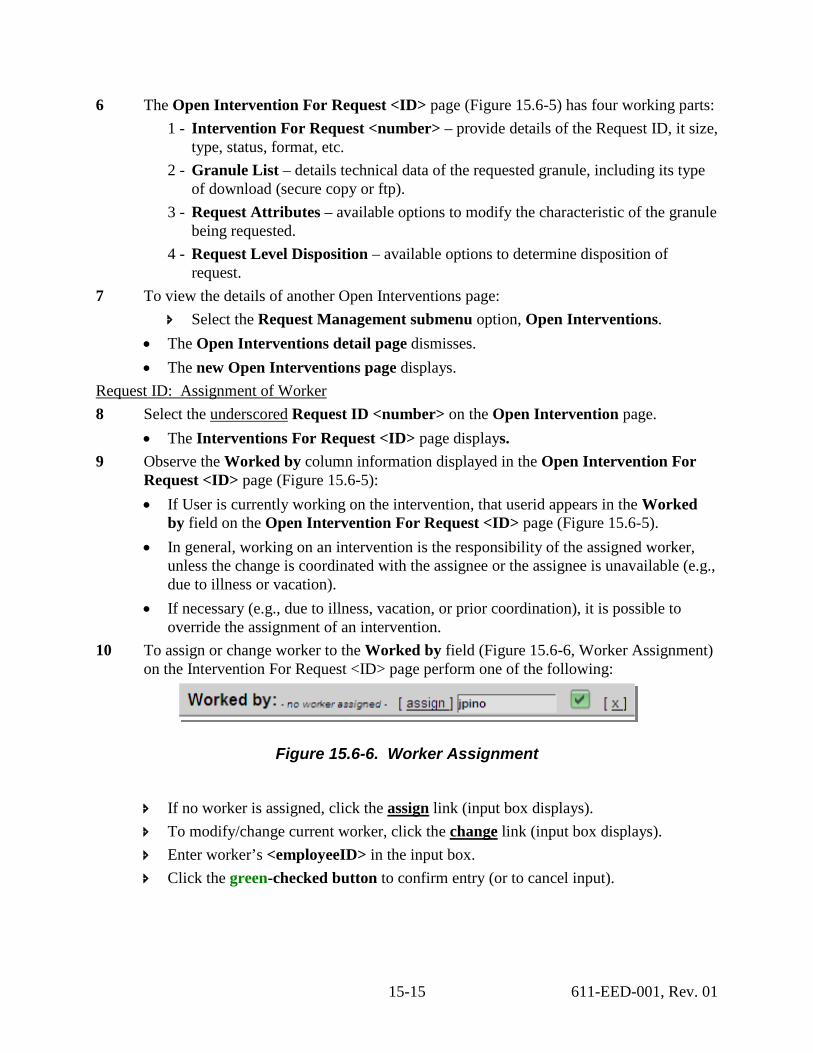
Click the navigation tool Previous Page () button, to return to the Open Interventions page.
Click Request ID
<number> to view open Interventions For Request <ID> details page (Figure 15.6-5), which displays additional intervention related data for the request.
Figure 15.6-5. Open Intervention for Request <ID> Page
15-15 611-EED-001, Rev. 01
6 The Open Intervention For Request <ID> page (Figure 15.6-5) has four working parts: 1 - Intervention For Request <number> – provide details of the Request ID, it size,
type, status, format, etc. 2 - Granule List – details technical data of the requested granule, including its type
of download (secure copy or ftp). 3 - Request Attributes – available options to modify the characteristic of the granule
being requested. 4 - Request Level Disposition – available options to determine disposition of
request. 7 To view the details of another Open Interventions page:
Select the Request Management submenu option, Open Interventions. • The Open Interventions detail page dismisses. • The new Open Interventions page displays.
8 Select the Request ID: Assignment of Worker
underscored• The Interventions For Request <ID> page displays.
Request ID <number> on the Open Intervention page.
9 Observe the Worked by column information displayed in the Open Intervention For Request <ID> page (Figure 15.6-5): • If User is currently working on the intervention, that userid appears in the Worked
by field on the Open Intervention For Request <ID> page (Figure 15.6-5). • In general, working on an intervention is the responsibility of the assigned worker,
unless the change is coordinated with the assignee or the assignee is unavailable (e.g., due to illness or vacation).
• If necessary (e.g., due to illness, vacation, or prior coordination), it is possible to override the assignment of an intervention.
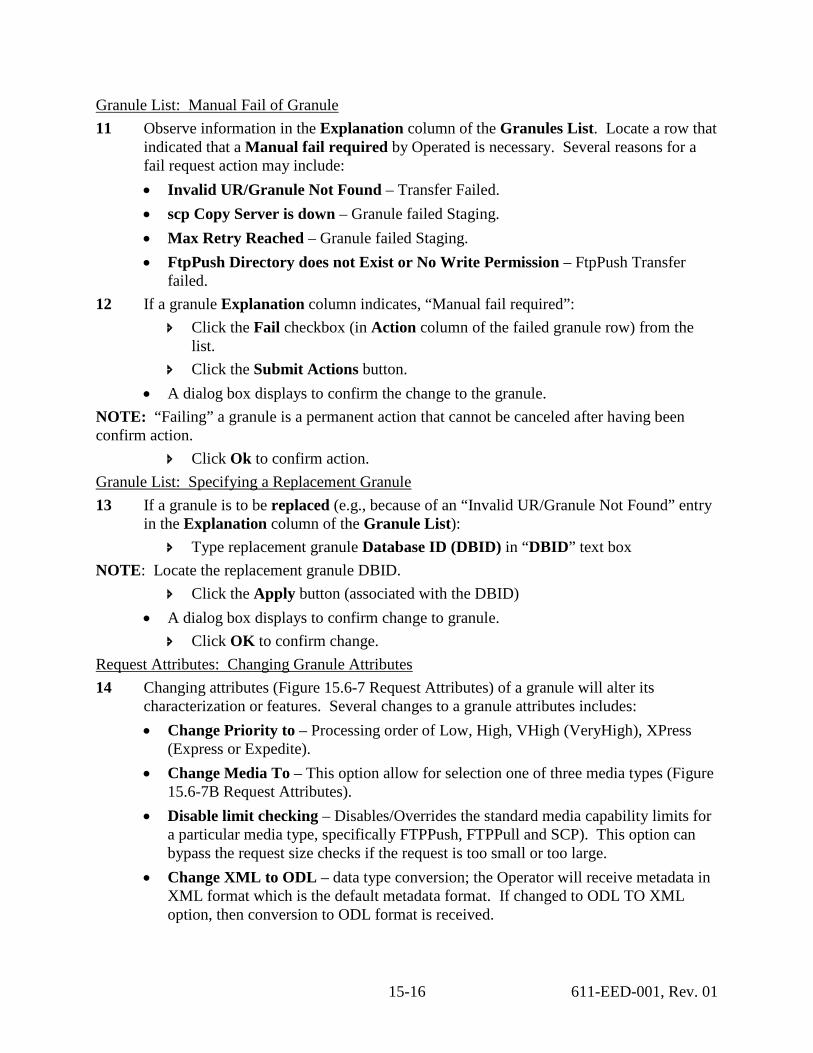
10 To assign or change worker to the Worked by field (Figure 15.6-6, Worker Assignment) on the Intervention For Request <ID> page perform one of the following:
Figure 15.6-6. Worker Assignment
If no worker is assigned, click the assign To modify/change current worker, click the
link (input box displays). change
Enter worker’s <employeeID> in the input box. link (input box displays).
Click the green-checked button to confirm entry (or to cancel input).
15-16 611-EED-001, Rev. 01
11 Observe information in the Explanation column of the Granules List. Locate a row that indicated that a Manual fail required by Operated is necessary. Several reasons for a fail request action may include:
Granule List: Manual Fail of Granule
• Invalid UR/Granule Not Found – Transfer Failed. • scp Copy Server is down – Granule failed Staging. • Max Retry Reached – Granule failed Staging. • FtpPush Directory does not Exist or No Write Permission – FtpPush Transfer
failed. 12 If a granule Explanation column indicates, “Manual fail required”:
Click the Fail checkbox (in Action column of the failed granule row) from the list.
Click the Submit Actions button. • A dialog box displays to confirm the change to the granule.
NOTE: “Failing” a granule is a permanent action that cannot be canceled after having been confirm action.
Click Ok to confirm action.
13 If a granule is to be replaced (e.g., because of an “Invalid UR/Granule Not Found” entry in the Explanation column of the Granule List):
Granule List: Specifying a Replacement Granule
Type replacement granule Database ID (DBID) in “DBID” text box NOTE: Locate the replacement granule DBID.
Click the Apply button (associated with the DBID) • A dialog box displays to confirm change to granule.
Click OK to confirm change.
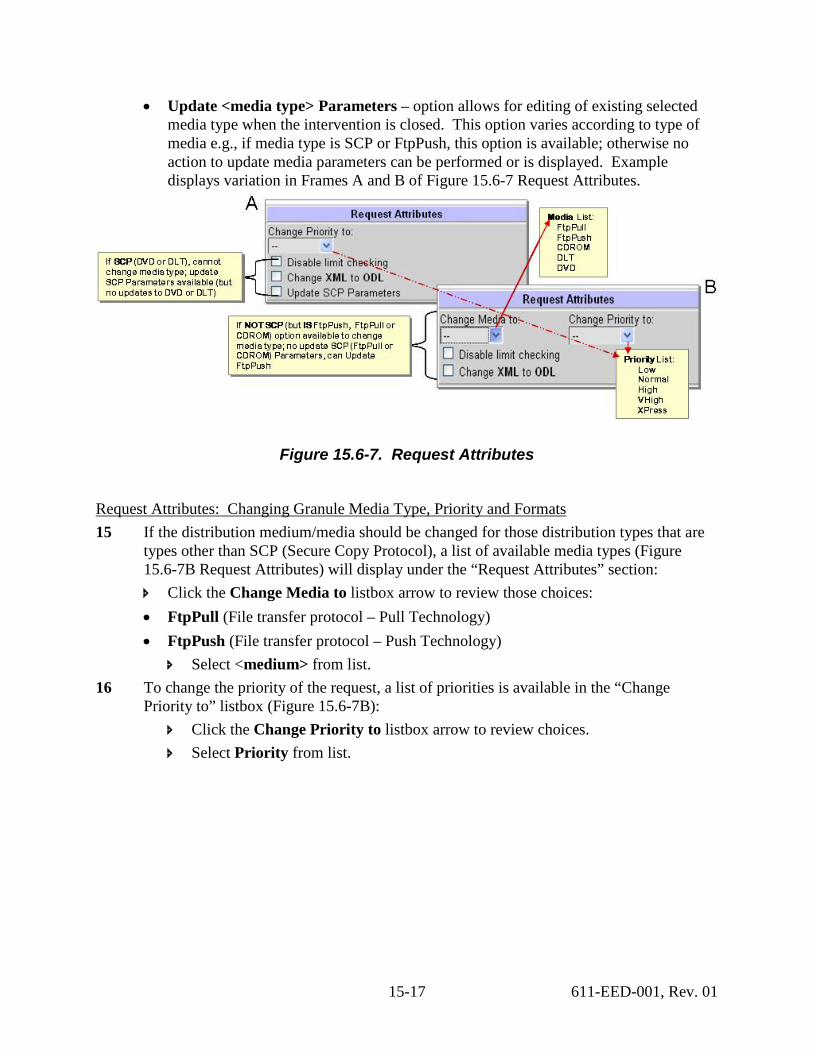
14 Changing attributes (Figure 15.6-7 Request Attributes) of a granule will alter its characterization or features. Several changes to a granule attributes includes:
Request Attributes: Changing Granule Attributes
• Change Priority to – Processing order of Low, High, VHigh (VeryHigh), XPress (Express or Expedite).
• Change Media To – This option allow for selection one of three media types (Figure 15.6-7B Request Attributes).
• Disable limit checking – Disables/Overrides the standard media capability limits for a particular media type, specifically FTPPush, FTPPull and SCP). This option can bypass the request size checks if the request is too small or too large.
• Change XML to ODL – data type conversion; the Operator will receive metadata in XML format which is the default metadata format. If changed to ODL TO XML option, then conversion to ODL format is received.
15-17 611-EED-001, Rev. 01
• Update <media type> Parameters – option allows for editing of existing selected media type when the intervention is closed. This option varies according to type of media e.g., if media type is SCP or FtpPush, this option is available; otherwise no action to update media parameters can be performed or is displayed. Example displays variation in Frames A and B of Figure 15.6-7 Request Attributes.
Figure 15.6-7. Request Attributes
15 If the distribution medium/media should be changed for those distribution types that are types other than SCP (Secure Copy Protocol), a list of available media types (Figure 15.6-7B Request Attributes) will display under the “Request Attributes” section:
Request Attributes: Changing Granule Media Type, Priority and Formats
Click the Change Media to listbox arrow to review those choices: • FtpPull (File transfer protocol – Pull Technology) • FtpPush (File transfer protocol – Push Technology)
Select <medium> from list. 16 To change the priority of the request, a list of priorities is available in the “Change
Priority to” listbox (Figure 15.6-7B): Click the Change Priority to listbox arrow to review choices. Select Priority from list.

15-18 611-EED-001, Rev. 01
17 To Disable size limit checking attribute: Click the Disable limit checking checkbox.
18 To change the values assigned to FtpPush parameters: Click the Update FtpPush Parameters checkbox.
NOTE: This option will only appear if SCP was the originally media type. When this option is checked, the operator will be prompted to change the existing SCP parameters on the next page.
19 Changing a request disposition (Figure 15.6-8) will alter the queuing of its distribution or how it is handled. There are several options to change the level disposition:
Request Level Disposition: Changing Request Disposition
• Keep on hold – Delays applying any intervention action (keeps open the intervention) and dismiss the “Open Intervention Detail” page. This action does not allow changes to the request’s attributes, but saves Operator notes and allows intervention to open at a later time (essentially, the intervention is being “saved”).
• Submit – Applies any actions or changes to the intervention specified in the “Granule List” and “Request Attributes” sections of the “Open Intervention Detail” page and then dismisses the page.
• Fail Request – Fails the entire request (including all associated granules) and dismiss the “Open Intervention Detail” page.
• Partition – This option will start the process of partitioning a request that exceeds maximum request size. The process will perform the distribution of granules in Intervals (days and hours) over a period of time (Figure 15.6-8 Request Level Disposition).
Figure 15.6-8. Request Level Disposition
20 To select a disposition, click the option button () from the list of dispositions. To Fail Request, click the Fail Request option button. Click the Apply button to commit change.
NOTE: The Apply and Reset buttons at bottom of the Open Intervention Detail page will commit change. The “Reset” button does not cancel any changes made to the request or changes made to the DBIDs (changed or failed). It simply resets the form’s option buttons for the Request Level Disposition section to its original state.
15-19 611-EED-001, Rev. 01
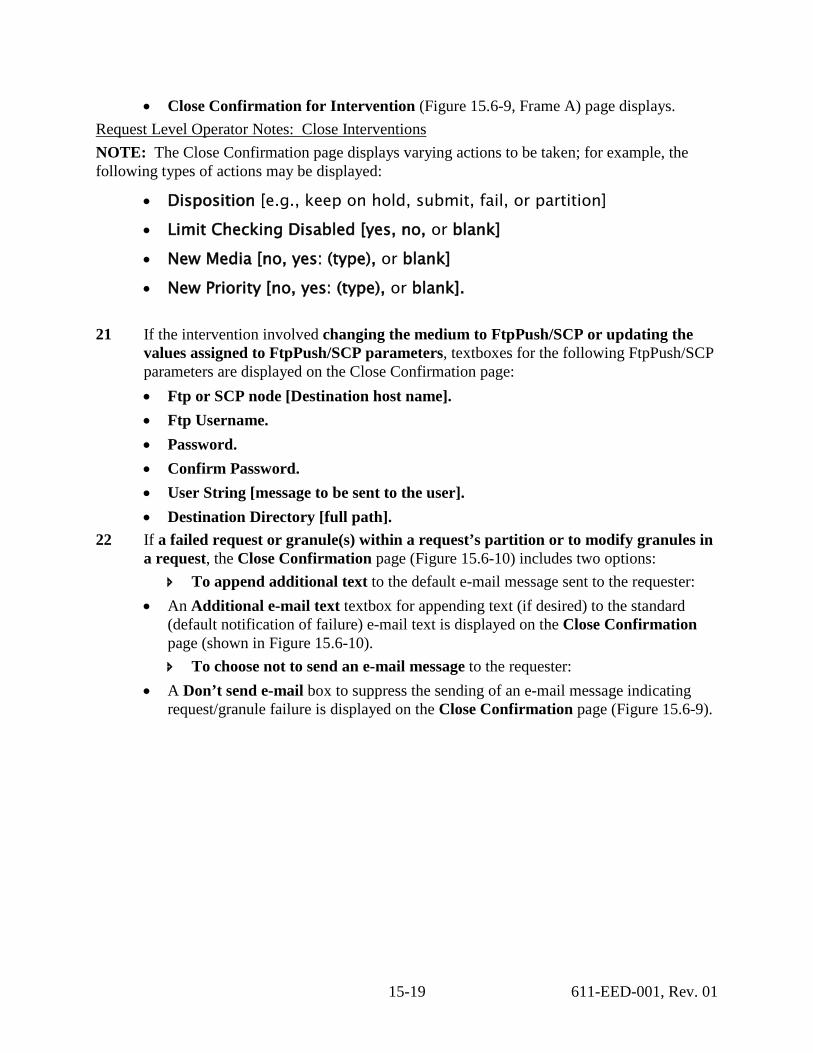
• Close Confirmation for Intervention (Figure 15.6-9, Frame A) page displays.
NOTE: The Close Confirmation page displays varying actions to be taken; for example, the following types of actions may be displayed:
Request Level Operator Notes: Close Interventions
• Disposition [e.g., keep on hold, submit, fail, or partition]
• Limit Checking Disabled [yes, no, or blank]
• New Media [no, yes: (type), or blank]
• New Priority [no, yes: (type), or blank]. 21 If the intervention involved changing the medium to FtpPush/SCP or updating the
values assigned to FtpPush/SCP parameters, textboxes for the following FtpPush/SCP parameters are displayed on the Close Confirmation page: • Ftp or SCP node [Destination host name]. • Ftp Username. • Password. • Confirm Password. • User String [message to be sent to the user]. • Destination Directory [full path].
22 If a failed request or granule(s) within a request’s partition or to modify granules in a request, the Close Confirmation page (Figure 15.6-10) includes two options:
To append additional text to the default e-mail message sent to the requester: • An Additional e-mail text textbox for appending text (if desired) to the standard
(default notification of failure) e-mail text is displayed on the Close Confirmation page (shown in Figure 15.6-10). To choose not to send an e-mail message to the requester:
• A Don’t send e-mail box to suppress the sending of an e-mail message indicating request/granule failure is displayed on the Close Confirmation page (Figure 15.6-9).
15-20 611-EED-001, Rev. 01
Type <appropriate values> in the required text boxes for input/update to mailing/delivery label (Figure 15.6-10, Frame A close).
Figure 15.6-9. Close Confirmation for Intervention <ID> with E-Mail
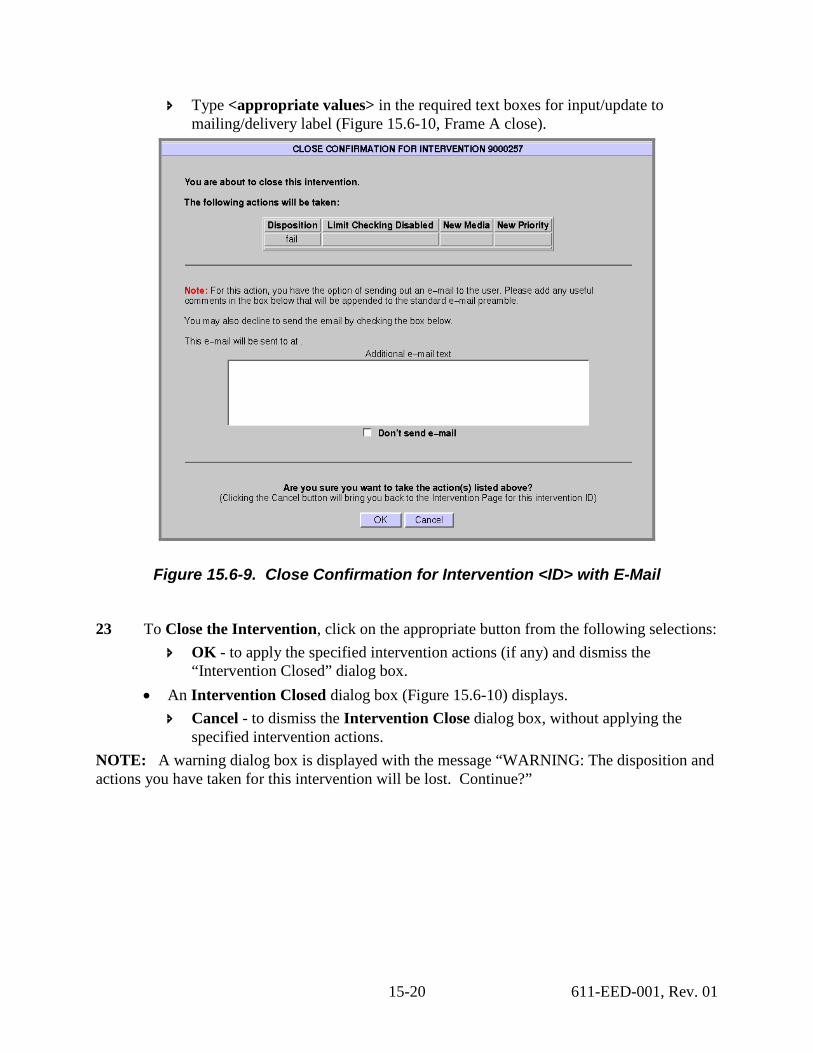
23 To Close the Intervention, click on the appropriate button from the following selections: OK - to apply the specified intervention actions (if any) and dismiss the
“Intervention Closed” dialog box. • An Intervention Closed dialog box (Figure 15.6-10) displays.
Cancel - to dismiss the Intervention Close dialog box, without applying the specified intervention actions.
NOTE: A warning dialog box is displayed with the message “WARNING: The disposition and actions you have taken for this intervention will be lost. Continue?”
15-21 611-EED-001, Rev. 01
Figure 15.6-10. Intervention Closed
24 If a warning dialog box is displayed with the message “WARNING: The disposition and actions you have taken for this intervention will be lost. Continue?”
OK - to dismiss the warning dialog box and the close confirmation. • The Open Interventions detail page returns.
25 To exit the Intervention Closed prompt and display the Open Interventions detail page: Click the OK button.
26 On the OM GUI left pane menu options, click the Home link to return to the Order Manager Home page. • The Order Manager Home page (Figure 15.4-2) displays.
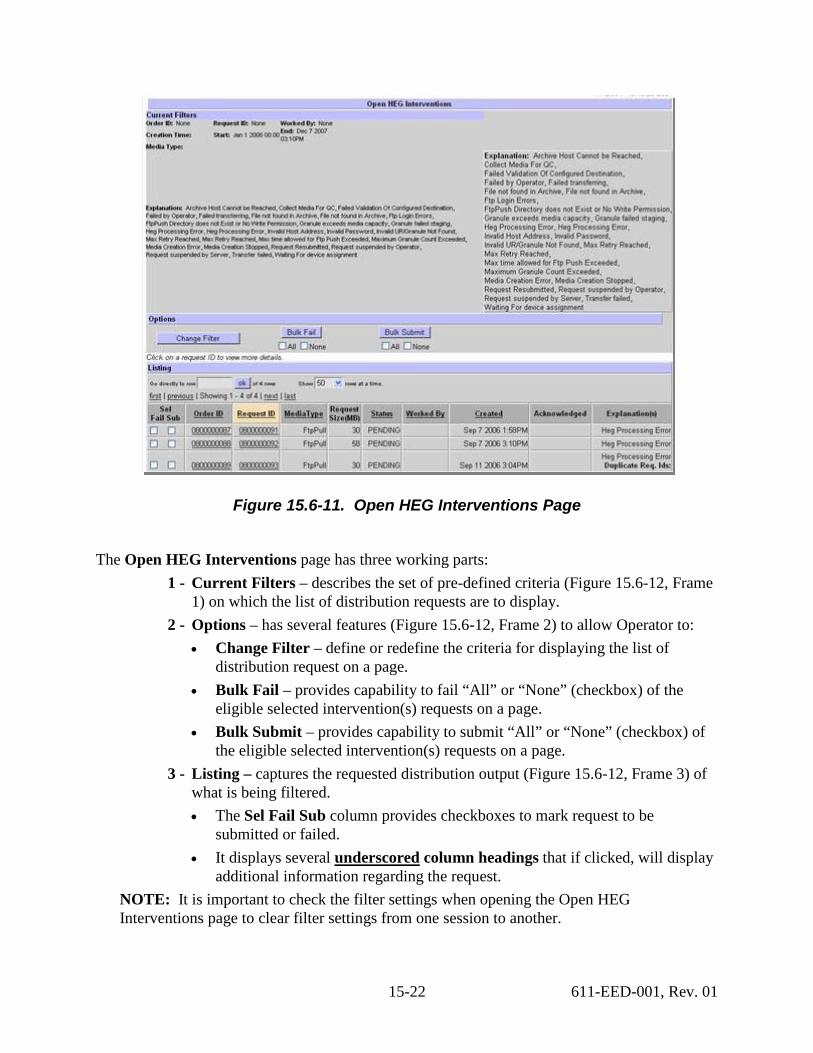
15.6.2 Request Management Submenu Page – HEG Interventions HEG Interventions processing involve “line items” and associated detail links. Although a HEG order may contain a mix of granule types (i.e., those with and without line items), an additional column will show in the granule list containing the number of line items and its details link. The Open HEG Interventions page (Figure 15.6-11) is a hard-coded display that provides the Operators (either full-capability or limited-capability) the option to only view HEG interventions. The HEG Intervention For Request <ID> page (Figure 15.6-14) provides the full-capability operator with a means of performing the following kinds of interventions:
• Assign/Change Worker. • Fail selected granule(s). • Fail a request.
15.6.2.1 Viewing and Responding to Open HEG Interventions 1 Click Request Management menu option to expand its submenu. 2 Click HEG Interventions submenu option to display the Open HEG Interventions
page (Figure 15.6-11). • The Open HEG Interventions page (Figure 15.6-11) displays.
15-22 611-EED-001, Rev. 01
Figure 15.6-11. Open HEG Interventions Page
The Open HEG Interventions page has three working parts: 1 - Current Filters – describes the set of pre-defined criteria (Figure 15.6-12, Frame
1) on which the list of distribution requests are to display. 2 - Options – has several features (Figure 15.6-12, Frame 2) to allow Operator to:
• Change Filter – define or redefine the criteria for displaying the list of distribution request on a page.
• Bulk Fail – provides capability to fail “All” or “None” (checkbox) of the eligible selected intervention(s) requests on a page.
• Bulk Submit – provides capability to submit “All” or “None” (checkbox) of the eligible selected intervention(s) requests on a page.
3 - Listing – captures the requested distribution output (Figure 15.6-12, Frame 3) of what is being filtered. • The Sel Fail Sub column provides checkboxes to mark request to be
submitted or failed. • It displays several underscored
NOTE: It is important to check the filter settings when opening the Open HEG Interventions page to clear filter settings from one session to another.
column headings that if clicked, will display additional information regarding the request.
15-23 611-EED-001, Rev. 01
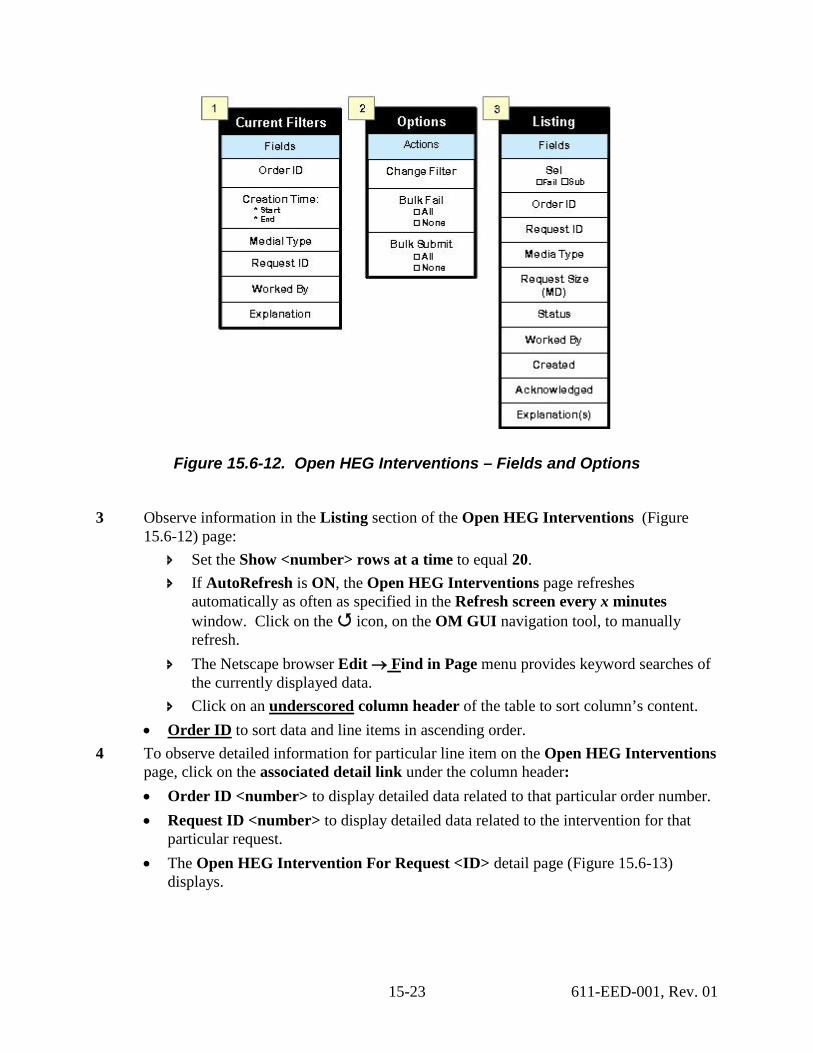
Figure 15.6-12. Open HEG Interventions – Fields and Options
3 Observe information in the Listing section of the Open HEG Interventions (Figure 15.6-12) page:
Set the Show <number> rows at a time to equal 20. If AutoRefresh is ON, the Open HEG Interventions page refreshes
automatically as often as specified in the Refresh screen every x minutes window. Click on the icon, on the OM GUI navigation tool, to manually refresh.
The Netscape browser Edit → F
Click on an
ind in Page menu provides keyword searches of the currently displayed data.
underscored•
column header of the table to sort column’s content. Order ID
4 To observe detailed information for particular line item on the Open HEG Interventions page, click on the associated detail link under the column header:
to sort data and line items in ascending order.
• Order ID <number> to display detailed data related to that particular order number. • Request ID <number> to display detailed data related to the intervention for that
particular request. • The Open HEG Intervention For Request <ID> detail page (Figure 15.6-13)
displays.
15-24 611-EED-001, Rev. 01
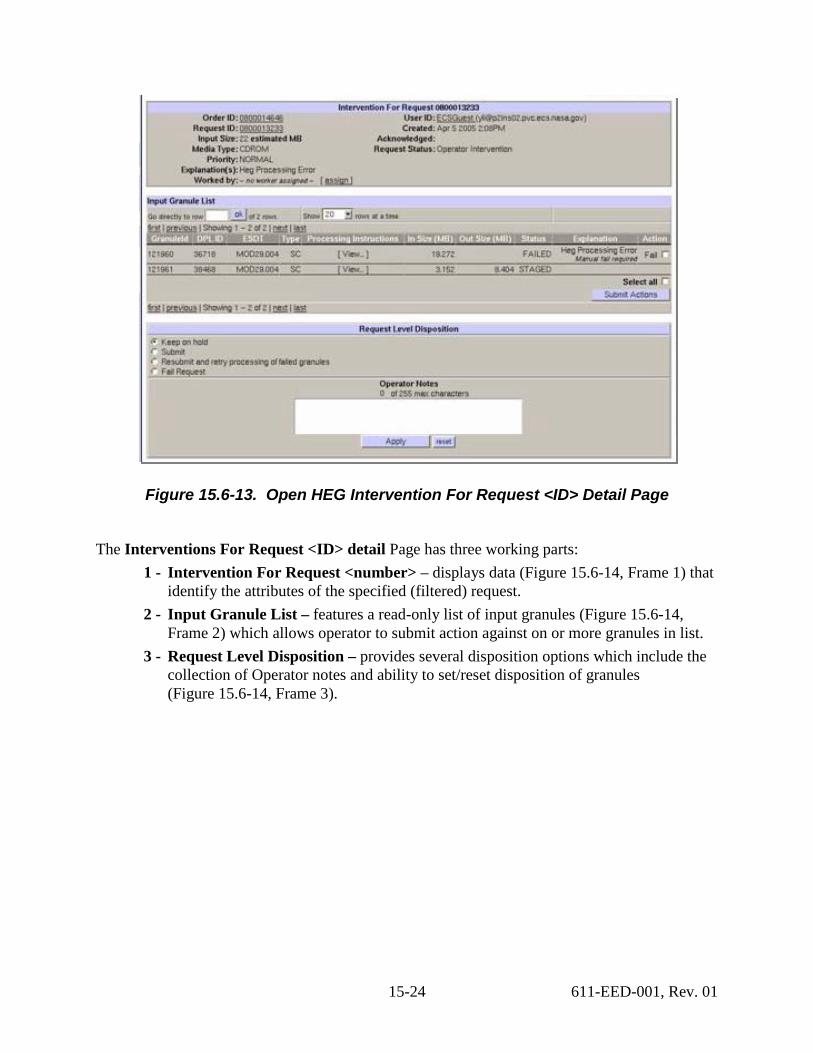
Figure 15.6-13. Open HEG Intervention For Request <ID> Detail Page
The Interventions For Request <ID> detail Page has three working parts: 1 - Intervention For Request <number> – displays data (Figure 15.6-14, Frame 1) that
identify the attributes of the specified (filtered) request. 2 - Input Granule List – features a read-only list of input granules (Figure 15.6-14,
Frame 2) which allows operator to submit action against on or more granules in list. 3 - Request Level Disposition – provides several disposition options which include the
collection of Operator notes and ability to set/reset disposition of granules (Figure 15.6-14, Frame 3).
15-25 611-EED-001, Rev. 01
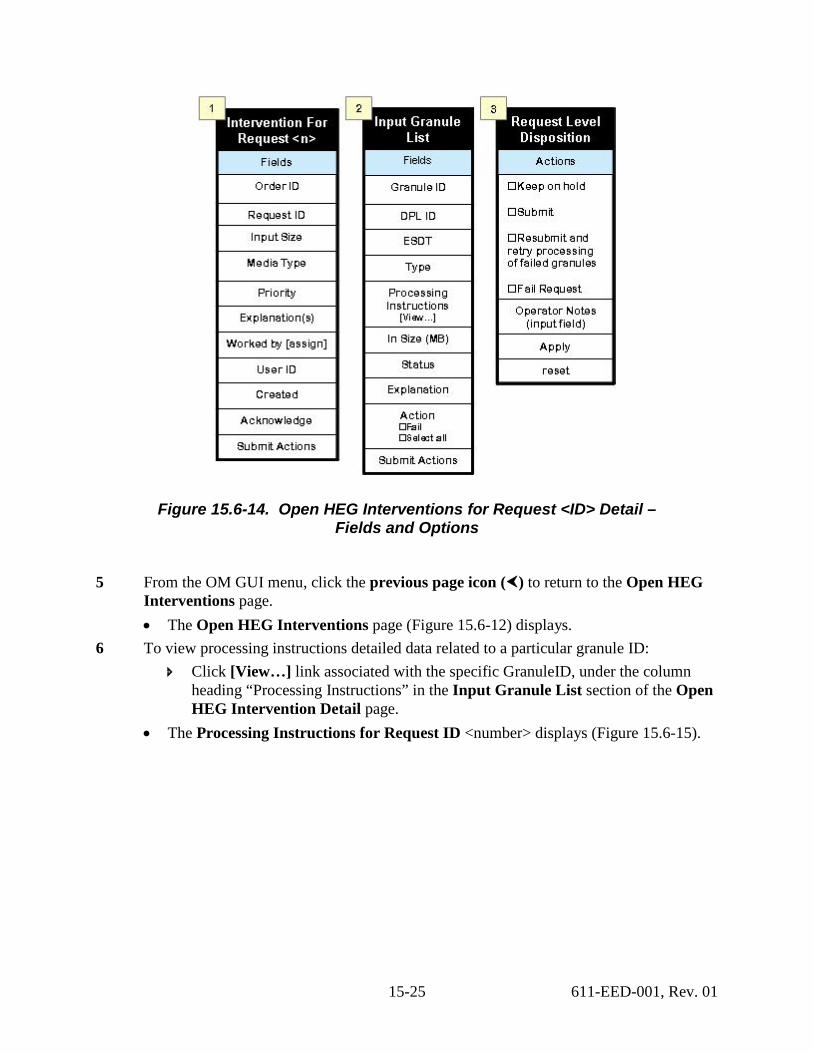
Figure 15.6-14. Open HEG Interventions for Request <ID> Detail – Fields and Options
5 From the OM GUI menu, click the previous page icon () to return to the Open HEG Interventions page. • The Open HEG Interventions page (Figure 15.6-12) displays.
6 To view processing instructions detailed data related to a particular granule ID: Click [View…] link associated with the specific GranuleID, under the column
heading “Processing Instructions” in the Input Granule List section of the Open HEG Intervention Detail page.
• The Processing Instructions for Request ID <number> displays (Figure 15.6-15).
15-26 611-EED-001, Rev. 01
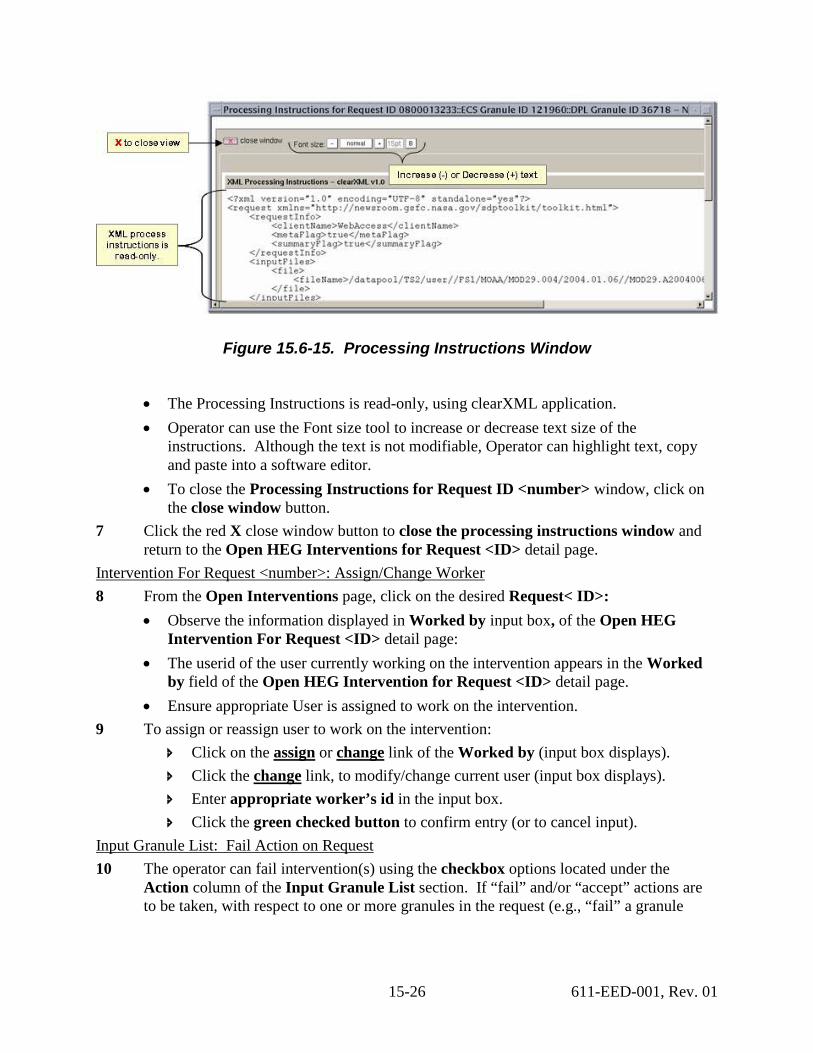
Figure 15.6-15. Processing Instructions Window
• The Processing Instructions is read-only, using clearXML application. • Operator can use the Font size tool to increase or decrease text size of the
instructions. Although the text is not modifiable, Operator can highlight text, copy and paste into a software editor.
• To close the Processing Instructions for Request ID <number> window, click on the close window button.
7 Click the red X close window button to close the processing instructions window and return to the Open HEG Interventions for Request <ID> detail page.
8 From the Open Interventions page, click on the desired Request< ID>: Intervention For Request <number>: Assign/Change Worker
• Observe the information displayed in Worked by input box, of the Open HEG Intervention For Request <ID> detail page:
• The userid of the user currently working on the intervention appears in the Worked by field of the Open HEG Intervention for Request <ID> detail page.
• Ensure appropriate User is assigned to work on the intervention. 9 To assign or reassign user to work on the intervention:
Click on the assign or change Click the
link of the Worked by (input box displays). change
Enter appropriate worker’s id in the input box. link, to modify/change current user (input box displays).
Click the green checked button to confirm entry (or to cancel input).
10 The operator can fail intervention(s) using the checkbox options located under the Action column of the Input Granule List section. If “fail” and/or “accept” actions are to be taken, with respect to one or more granules in the request (e.g., “fail” a granule
Input Granule List: Fail Action on Request

15-27 611-EED-001, Rev. 01
because of an “Invalid UR” entry in the Explanation column of the Granule List). There are two possible checkbox options that can be implemented from this section: • Fail – fails an individual granule in the specified row. • Select All – fails all actions for granules with Accept/Fail options.
11 To implement one or all action(s) to fail intervention(s) on the Open HEG Interventions For Request <ID> page:
Select the Fail checkbox, on the row of a specific granule, to fail “individual” granules.
Select the Select all (bulk fail) checkbox to fail “all” interventions displayed on the page.
NOTE: Set options in the Request Level Disposition section before submitting action.
12 Select one or more of the following requests in the Request Level Disposition section: Request Level Disposition: Fail Request
• Submit - to apply any changes of failing granule(s), which are not reprocessed. • Keep on hold – to delay applying any intervention action (retain as open).
NOTE: Placing an intervention on hold does not allow changing the request's attributes, but saves the operator notes and allows opening the intervention at a later time (essentially, the intervention is being “saved”).
• Resubmit and retry processing of failed granules – to submit the request with any changes and retry HEG processing of failed granules.
• Fail Request – to fail the entire request (including all granules) and dismiss the Open HEG Intervention Detail page.
13 Enter Operator Notes, if more details should be communicated concerning the request (e.g., the reason for making a particular type of intervention).
14 Click Apply to commit/submit action. NOTE: The reset button does not cancel any changes made to the request (changed or failed). It simply resets the form buttons for the Request Level Disposition section to their original states.
• The Close Confirmation for Intervention <ID> displays (Figure 15.6-16)
15-28 611-EED-001, Rev. 01
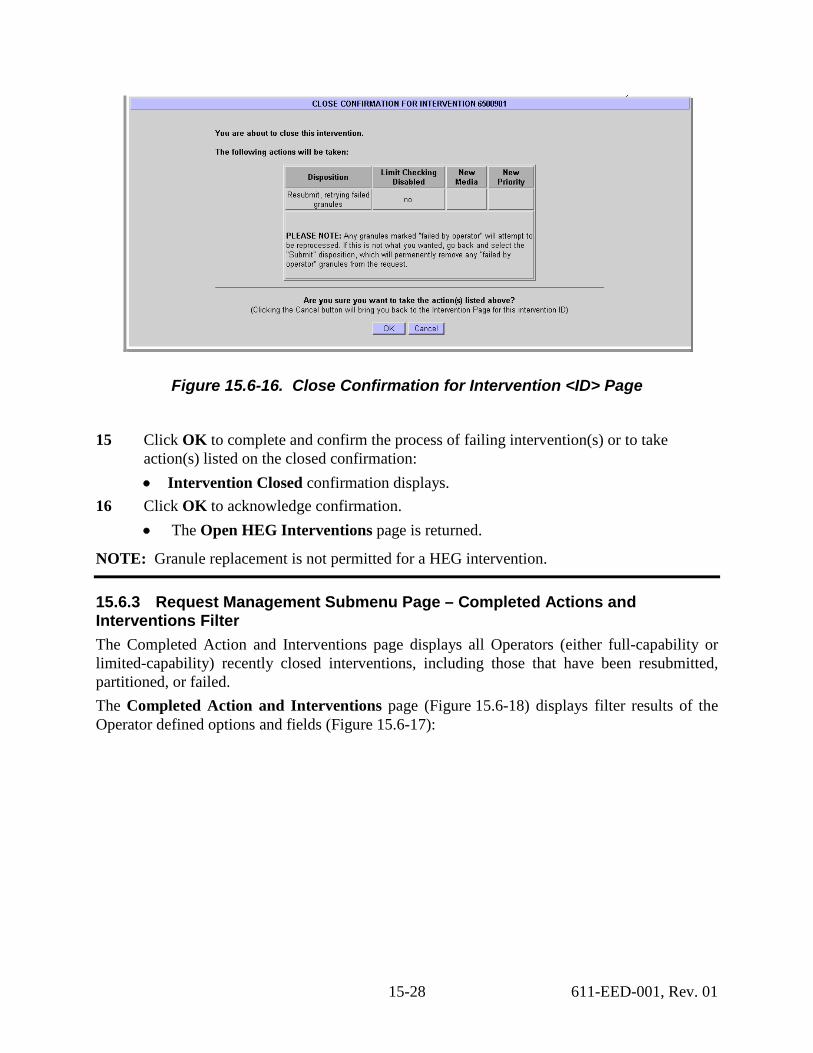
Figure 15.6-16. Close Confirmation for Intervention <ID> Page
15 Click OK to complete and confirm the process of failing intervention(s) or to take action(s) listed on the closed confirmation: • Intervention Closed confirmation displays.
16 Click OK to acknowledge confirmation. • The Open HEG Interventions page is returned.
NOTE: Granule replacement is not permitted for a HEG intervention.
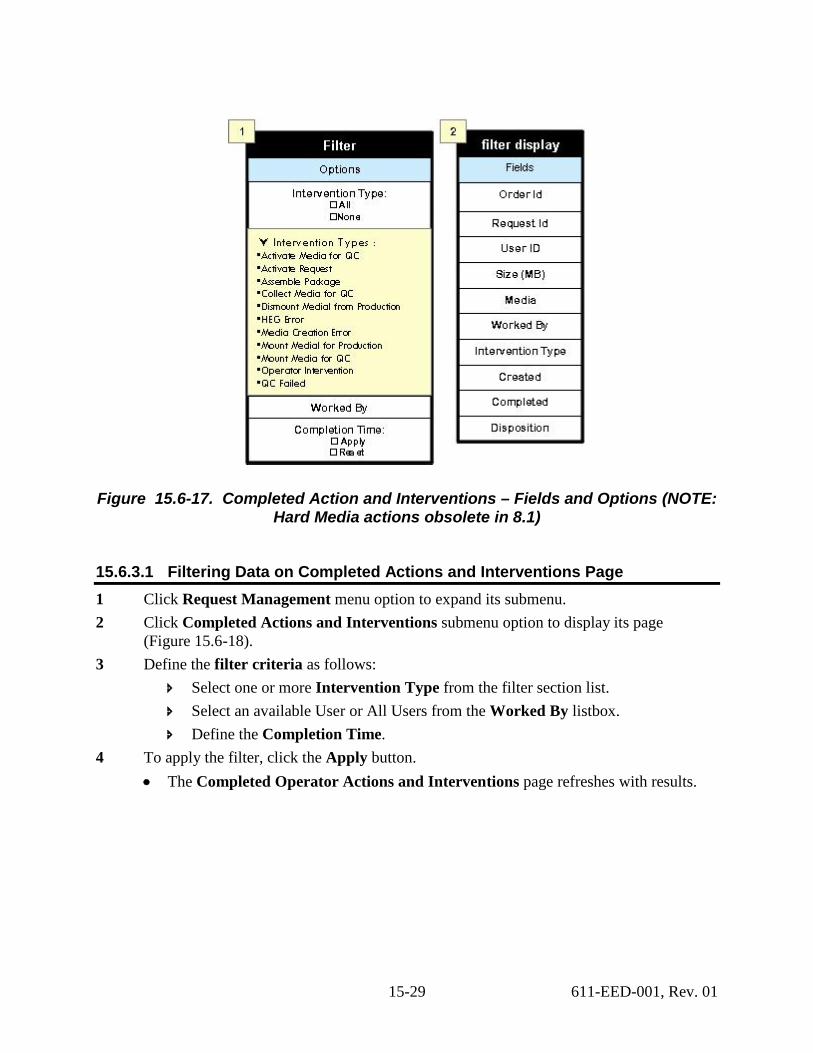
15.6.3 Request Management Submenu Page – Completed Actions and Interventions Filter The Completed Action and Interventions page displays all Operators (either full-capability or limited-capability) recently closed interventions, including those that have been resubmitted, partitioned, or failed. The Completed Action and Interventions page (Figure 15.6-18) displays filter results of the Operator defined options and fields (Figure 15.6-17):
15-29 611-EED-001, Rev. 01
Figure 15.6-17. Completed Action and Interventions – Fields and Options (NOTE: Hard Media actions obsolete in 8.1)
15.6.3.1 Filtering Data on Completed Actions and Interventions Page 1 Click Request Management menu option to expand its submenu. 2 Click Completed Actions and Interventions submenu option to display its page
(Figure 15.6-18). 3 Define the filter criteria as follows:
Select one or more Intervention Type from the filter section list. Select an available User or All Users from the Worked By listbox. Define the Completion Time.
4 To apply the filter, click the Apply button. • The Completed Operator Actions and Interventions page refreshes with results.
15-30 611-EED-001, Rev. 01
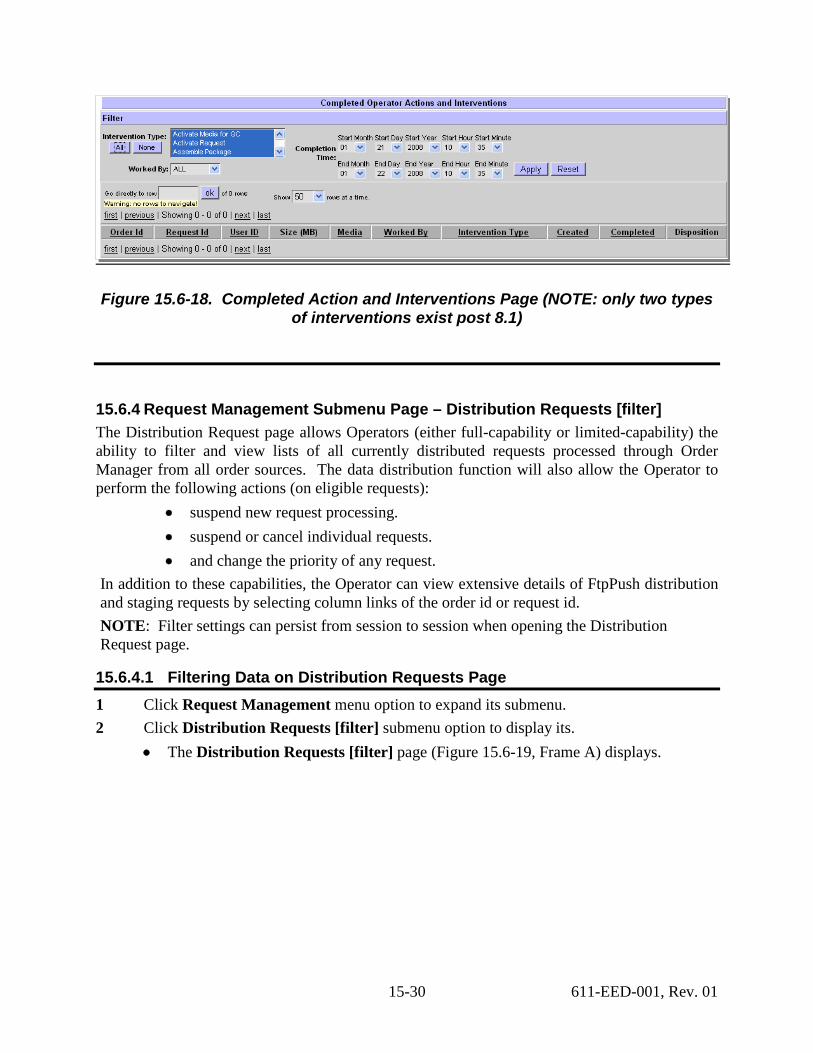
Figure 15.6-18. Completed Action and Interventions Page (NOTE: only two types of interventions exist post 8.1)
15.6.4 Request Management Submenu Page – Distribution Requests [filter] The Distribution Request page allows Operators (either full-capability or limited-capability) the ability to filter and view lists of all currently distributed requests processed through Order Manager from all order sources. The data distribution function will also allow the Operator to perform the following actions (on eligible requests):
• suspend new request processing. • suspend or cancel individual requests. • and change the priority of any request.
In addition to these capabilities, the Operator can view extensive details of FtpPush distribution and staging requests by selecting column links of the order id or request id. NOTE: Filter settings can persist from session to session when opening the Distribution Request page.
15.6.4.1 Filtering Data on Distribution Requests Page 1 Click Request Management menu option to expand its submenu. 2 Click Distribution Requests [filter] submenu option to display its.
• The Distribution Requests [filter] page (Figure 15.6-19, Frame A) displays.
15-31 611-EED-001, Rev. 01
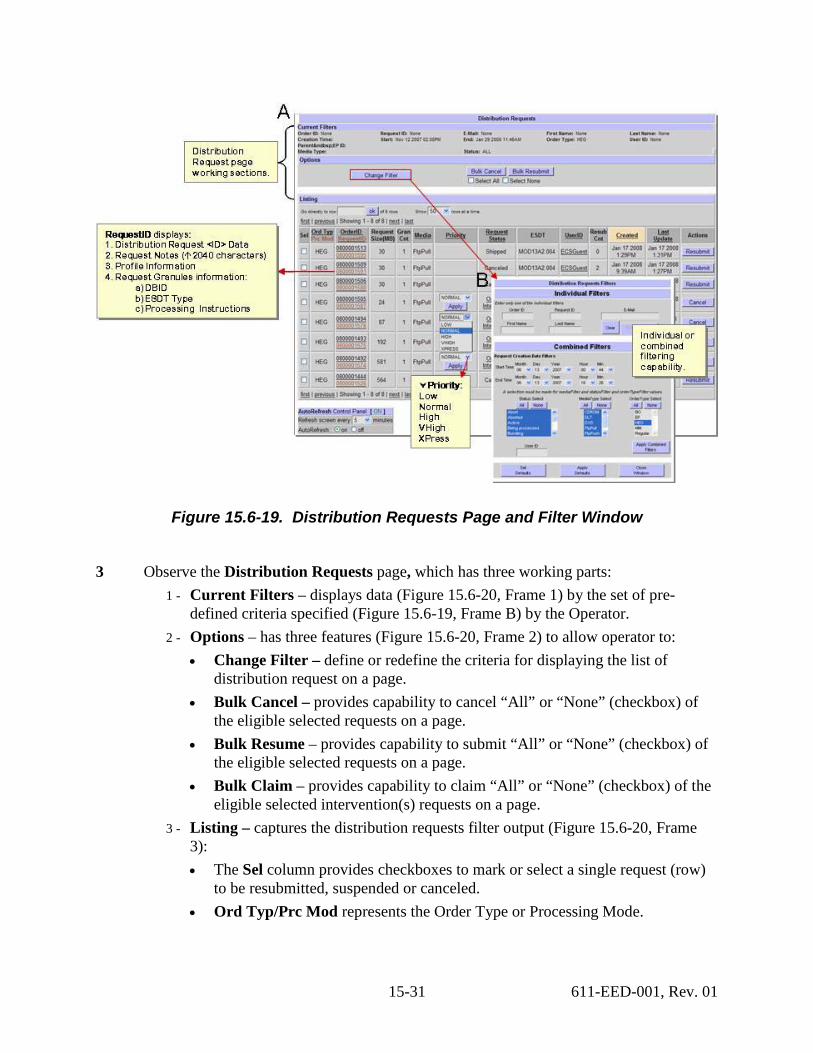
Figure 15.6-19. Distribution Requests Page and Filter Window
3 Observe the Distribution Requests page, which has three working parts: 1 - Current Filters – displays data (Figure 15.6-20, Frame 1) by the set of pre-
defined criteria specified (Figure 15.6-19, Frame B) by the Operator. 2 - Options – has three features (Figure 15.6-20, Frame 2) to allow operator to:
• Change Filter – define or redefine the criteria for displaying the list of distribution request on a page.
• Bulk Cancel – provides capability to cancel “All” or “None” (checkbox) of the eligible selected requests on a page.
• Bulk Resume – provides capability to submit “All” or “None” (checkbox) of the eligible selected requests on a page.
• Bulk Claim – provides capability to claim “All” or “None” (checkbox) of the eligible selected intervention(s) requests on a page.
3 - Listing – captures the distribution requests filter output (Figure 15.6-20, Frame 3): • The Sel column provides checkboxes to mark or select a single request (row)
to be resubmitted, suspended or canceled. • Ord Typ/Prc Mod represents the Order Type or Processing Mode.

15-32 611-EED-001, Rev. 01
• Several underscored
• The Priority column allows Operator to change a request priority using the options listed in the drop-down listbox on a row.
column headings, when clicked, displays additional information regarding the details of a request.
• The Actions checkbox permits Operator to resubmit, cancel, suspend or resume eligible request(s).
Figure 15.6-20. Distribution Requests Page – Fields and Options
4 To define the filter criteria: Click the Change Filter button, in the Options area (Figure 15.6-20, Frame A). • The Distribution Requests Filters window appears.
15-33 611-EED-001, Rev. 01
5 Observe the Distribution Request Filter window, which has two working parts: 1 - Individual Filters – displays limited options (Figure 15.6-19, Frame B) to set a
defined criterion specific to a request (Figure 15.6-19, Frame B). Those options are: • Order ID • Request ID • E-Mail • First Name • Last Name
2 - Combined Filters – has several options (Figure 15.6-19, Frame B) to allow operator to combine multiple criteria to define the filter.
6 Create a combined filter by performing the following: Select a Start Time (Month, Day, Year). Select an End Time (Month, Day, Year) ensuring different that start time. Depressing the <Ctrl> keep, make multiple Status Select selections: Cancelled,
Completed processing, Pending, Shipped. Select All for Media Type Select (can include FtpPull, FtpPush, SCP (Secure
Copy Protocol). Select HEG for Order Type Select (can include Order types “Regular,” “BO”
(Bundled Order), DA (ESI DataAccess Processing) and “HEG” (HDF-EOS to GeoTIFF Conversion requested through DPL Web Access).
Select All for the Order Source Select (can include Order Sources “DataPool,” “Echo,” “SCLI,” “SSS”).
Click Apply Combined Filters button to generate filter. • The Distribution Requests Filters window closes and the Distribution Requests
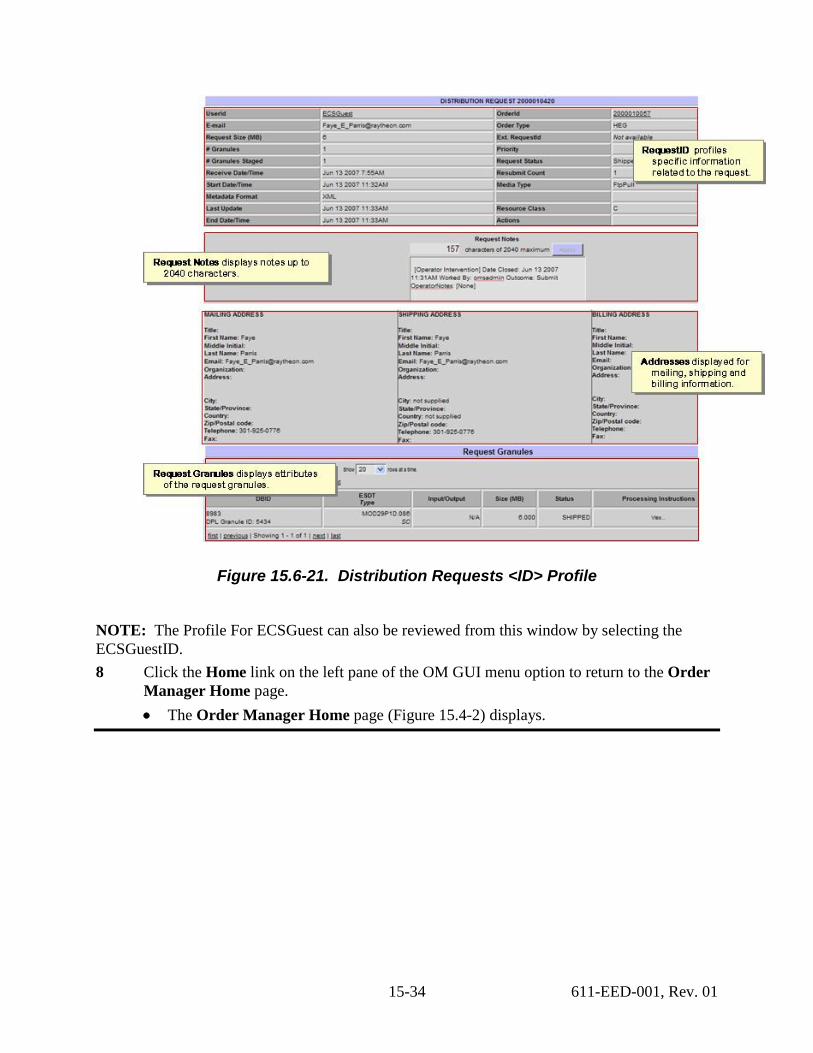
window displays with the applied combined filter results. 7 Click the request <ID> under the Request ID column to view the distribution request
profile information, request notes, addresses (mailing, shipping, billing) and granule information for the request. • The Distribution Request <ID> Profile appears displaying its multiple parts of
information (Figure 15.6-22).
NOTE: Operator can apply only f h d d l
15-34 611-EED-001, Rev. 01
Figure 15.6-21. Distribution Requests <ID> Profile
NOTE: The Profile For ECSGuest can also be reviewed from this window by selecting the ECSGuestID. 8 Click the Home link on the left pane of the OM GUI menu option to return to the Order
Manager Home page. • The Order Manager Home page (Figure 15.4-2) displays.
15-35 611-EED-001, Rev. 01
15.6.5 Request Management Submenu Page – FtpPush/SCP Requests Filters and Staging Requests Filters The distribution requests filtering allow Operators (either full-capability or limited-capability) the ability to view extensive details of FtpPush/SCP and Staging distribution requests currently processed through Order Manager from all order sources. The limited-capability Operator is not allowed to edit FtpPush parameter values for distribution requests using the OM GUI. The FtpPush/SCP and Staging distribution requests pages allows the Operator to:
• Change the priority of or suspend a distribution request while the requested granules are in a staged or pushed waiting state.
• Resume a request that was suspended by the OM GUI operator or while the processing of new requests by the OMS is suspended.
• Resubmit a request in a terminal state (e.g., aborted, cancelled, terminated, or shipped). • Cancel a request that is not in a terminal state and while the requested granules are in a
staged or pushed waiting state.
15.6.5.1 Filtering FtpPush/SCP Requests or Staging Requests Page 1 Click Request Management menu option to expand its submenu. 2 Click FtpPush/SCP Requests [filter] submenu option to display its page.
• The FtpPush/SCP Distribution Requests page (Figure 15.6-22) displays. (Or to view Staging Distribution Requests page:
Click Staging Requests [filter] submenu option to display its page. • The Staging Distribution Requests page displays.)
3 To define the filter criteria: Click on the Change Filter button, from the Options section of the FtpPush/SCP
(or Staging) Distribution Requests page. • The FtpPush/SCP (or Staging) Distribution Requests Filters window (Figure 15.6-
22, Frame A (or Frame B) appears. 4 Observe the FtpPush/SCP (or Staging) Distribution Requests Filters window, which
has two working parts: 1 - Individual Filters – displays limited options (Figure 15.6-22, Frame A (or B) to
set a defined criteria specific to a distribution request. Those options are: • Order ID • Request ID • E-Mail • First Name • Last Name
2 - Combined Filters – has several options (Figure 15.6-22, Frame A (or B) to allow operator to combine multiple criteria to define the filter.
NOTE: Operator can apply only ti f th i di id l
15-36 611-EED-001, Rev. 01
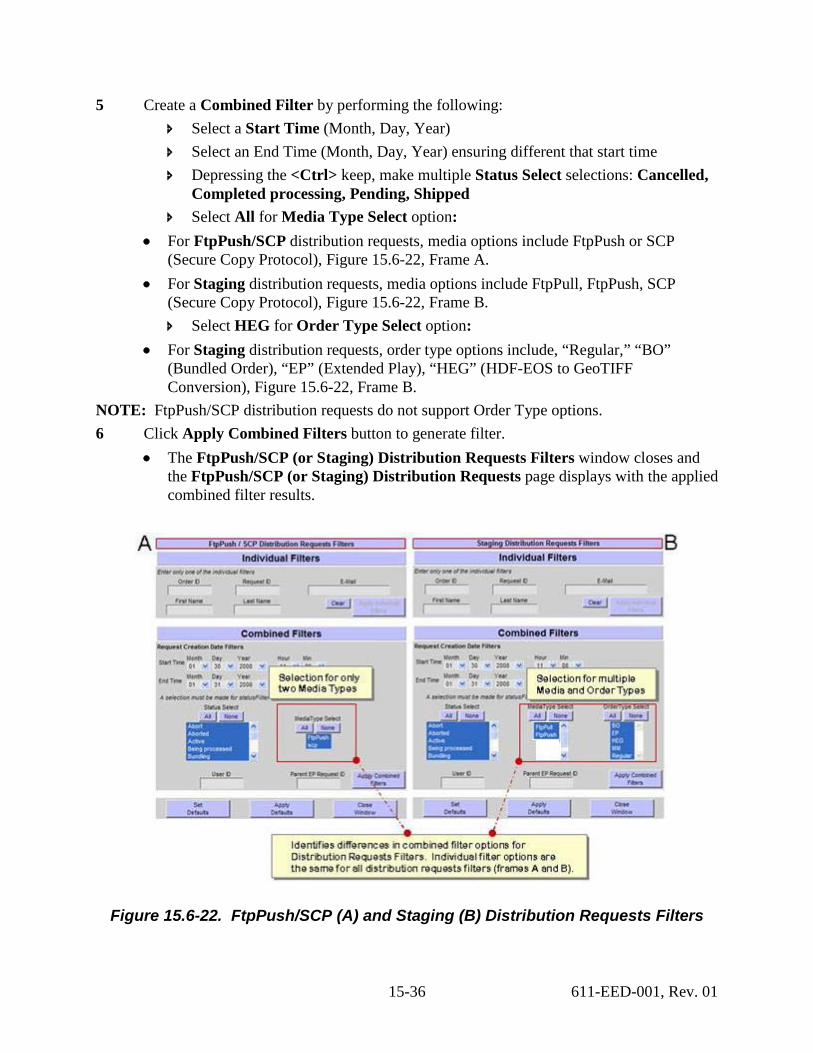
5 Create a Combined Filter by performing the following: Select a Start Time (Month, Day, Year) Select an End Time (Month, Day, Year) ensuring different that start time Depressing the <Ctrl> keep, make multiple Status Select selections: Cancelled,
Completed processing, Pending, Shipped Select All for Media Type Select option:
• For FtpPush/SCP distribution requests, media options include FtpPush or SCP (Secure Copy Protocol), Figure 15.6-22, Frame A.
• For Staging distribution requests, media options include FtpPull, FtpPush, SCP (Secure Copy Protocol), Figure 15.6-22, Frame B. Select HEG for Order Type Select option:
• For Staging distribution requests, order type options include, “Regular,” “BO” (Bundled Order), “EP” (Extended Play), “HEG” (HDF-EOS to GeoTIFF Conversion), Figure 15.6-22, Frame B.
NOTE: FtpPush/SCP distribution requests do not support Order Type options. 6 Click Apply Combined Filters button to generate filter.
• The FtpPush/SCP (or Staging) Distribution Requests Filters window closes and the FtpPush/SCP (or Staging) Distribution Requests page displays with the applied combined filter results.
Figure 15.6-22. FtpPush/SCP (A) and Staging (B) Distribution Requests Filters
15-37 611-EED-001, Rev. 01
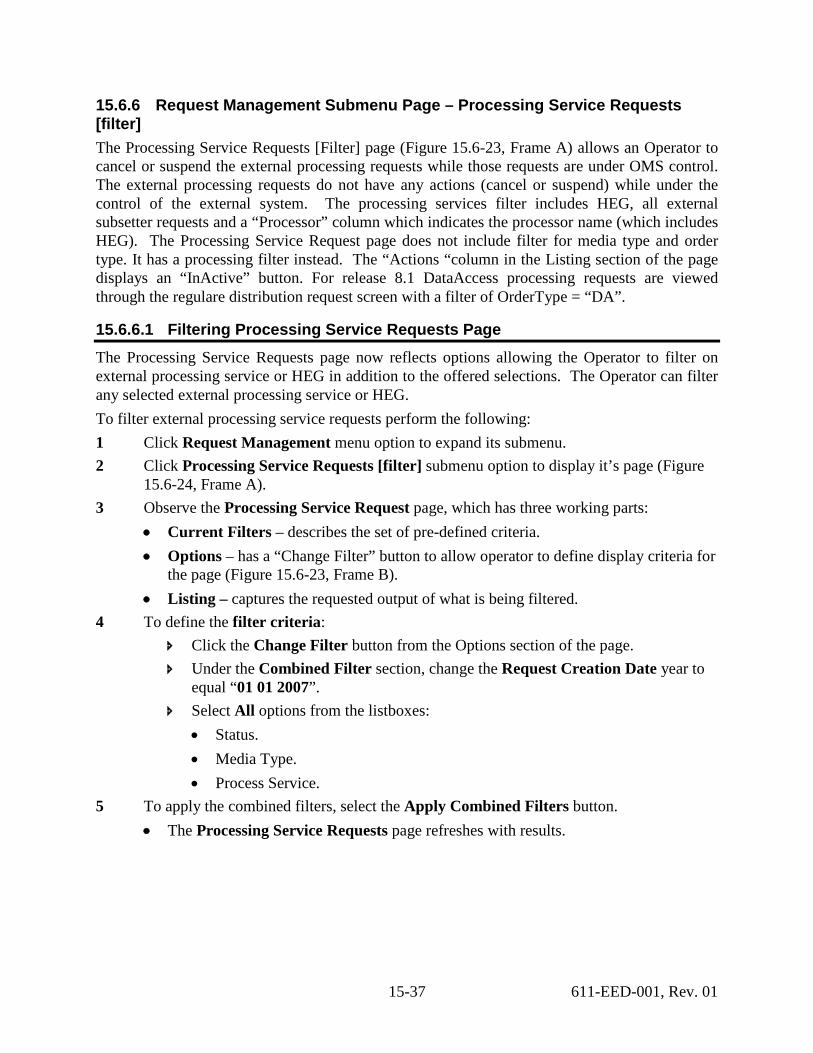
15.6.6 Request Management Submenu Page – Processing Service Requests [filter] The Processing Service Requests [Filter] page (Figure 15.6-23, Frame A) allows an Operator to cancel or suspend the external processing requests while those requests are under OMS control. The external processing requests do not have any actions (cancel or suspend) while under the control of the external system. The processing services filter includes HEG, all external subsetter requests and a “Processor” column which indicates the processor name (which includes HEG). The Processing Service Request page does not include filter for media type and order type. It has a processing filter instead. The “Actions “column in the Listing section of the page displays an “InActive” button. For release 8.1 DataAccess processing requests are viewed through the regulare distribution request screen with a filter of OrderType = “DA”.
15.6.6.1 Filtering Processing Service Requests Page The Processing Service Requests page now reflects options allowing the Operator to filter on external processing service or HEG in addition to the offered selections. The Operator can filter any selected external processing service or HEG. To filter external processing service requests perform the following: 1 Click Request Management menu option to expand its submenu. 2 Click Processing Service Requests [filter] submenu option to display it’s page (Figure
15.6-24, Frame A). 3 Observe the Processing Service Request page, which has three working parts:
• Current Filters – describes the set of pre-defined criteria. • Options – has a “Change Filter” button to allow operator to define display criteria for
the page (Figure 15.6-23, Frame B). • Listing – captures the requested output of what is being filtered.
4 To define the filter criteria: Click the Change Filter button from the Options section of the page. Under the Combined Filter section, change the Request Creation Date year to
equal “01 01 2007”. Select All options from the listboxes:
• Status. • Media Type. • Process Service.
5 To apply the combined filters, select the Apply Combined Filters button. • The Processing Service Requests page refreshes with results.
15-38 611-EED-001, Rev. 01
Figure 15.6-23. Processing Services Requests Page and Filter
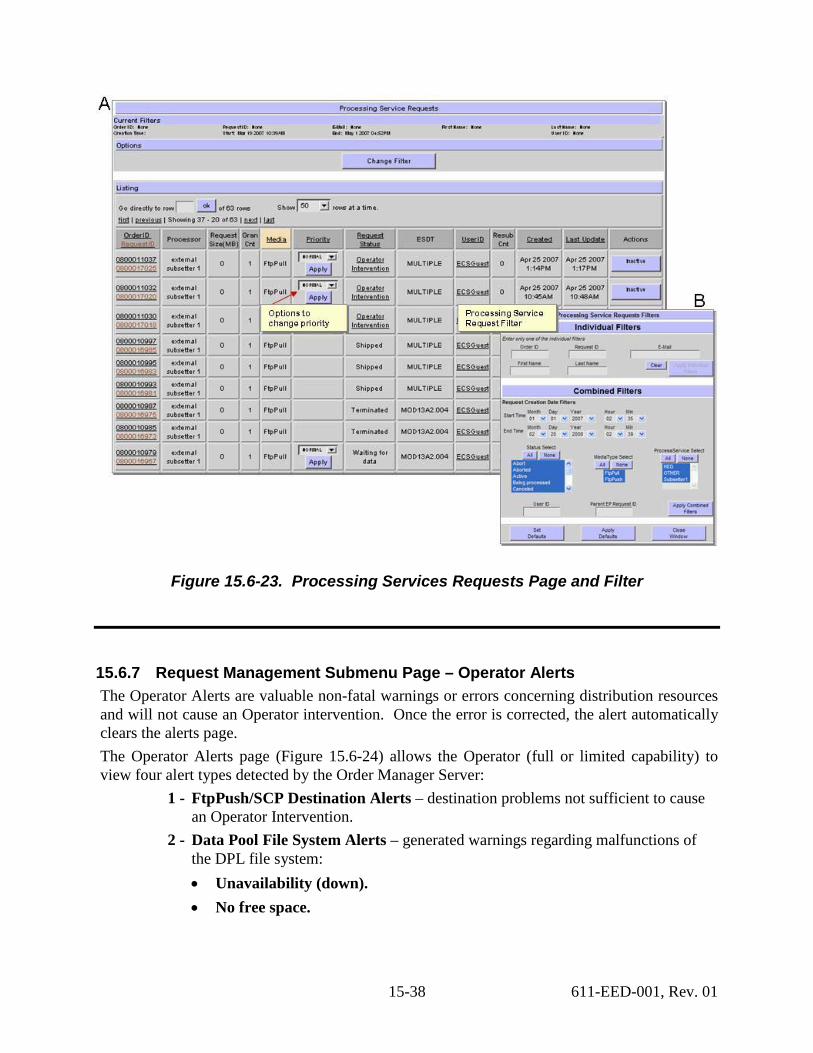
15.6.7 Request Management Submenu Page – Operator Alerts The Operator Alerts are valuable non-fatal warnings or errors concerning distribution resources and will not cause an Operator intervention. Once the error is corrected, the alert automatically clears the alerts page. The Operator Alerts page (Figure 15.6-24) allows the Operator (full or limited capability) to view four alert types detected by the Order Manager Server:
1 - FtpPush/SCP Destination Alerts – destination problems not sufficient to cause an Operator Intervention.
2 - Data Pool File System Alerts – generated warnings regarding malfunctions of the DPL file system: • Unavailability (down). • No free space.
15-39 611-EED-001, Rev. 01
NOTE: The alerts clears automatically after system functions are up or space is freed. NOTE: The alerts clears automatically after the quick server resumes functionally, but the achieve server must be manually resumed on the OM Queue Status page to clears alerts.
3 - ECS Server Alerts (AIM database errors warnings) – detected warnings regarding the AIM malfunctions or OMS resources: • Unavailability (down).
15.6.7.1 Handling Operator Alerts 1 Click Request Management menu option to expand its submenu. 2 Click Operator Alerts submenu option to display its page.
• The Operator Alerts page displays.
Figure 15.6-24. Operator Alerts Page (A) and Alert Details Page (B-C)
3 Observe the alerts listed on the Operator Alerts page (Figure 15.6-24, Frame A). It displays the Order Manager Server’s detected system malfunctions in the following fields (Figure 15.6-24, Frame 1 Operator Alerts Page – Fields and Options) of the Listing section. This section has two display options:
1 - Show <number> rows at a time – displays limited records (values 5 to 100) on the Operator Alerts Page.
2 - Display <list> alerts – displays selection of several alerts types by groups.

15-40 611-EED-001, Rev. 01
4 At the bottom of the Operator Alerts Page, a note indicates, “All operator alerts are also sent as email to :<email address> [Change]” when an alert or intervention is generated. This email address is configured using the “OMS Server and Database Configuration: Email parameters” page, under the OMS Configuration submenu.
Click [Change] to view the configured Operator Alert Email address. • The OMS Server and database Configuration: Email parameters page displays.
Click the navigation Previous Page () button, to return to the Operator Alerts Page.
Figure 15.6-25. Operator Alerts Page – Fields and Options
5 Select FtpPush using from the display <list> alerts option to display all FtpPush Requests.
NOTE: Operator Alerts are displayed in ascending order by Creation Time. Operator can use the browser (Edit, Find in Page) menu option to perform keyword searches on displayed data on current page. 6 Select details… under the Alert Info column to display extended details affecting the
request (Figure 15.6-24 Alert Details Page, Frame B-C).
15-41 611-EED-001, Rev. 01
NOTE: Unlike an Operator Intervention, no specific action can be taken to close an alert. The Order Manager Server automatically clears each alert when the condition(s) causing the infarction is satisfied or is in a satisfactory state.
15.6.8 Exiting the OM GUI The procedure for closing Request Management submenu pages on the OM GUI will log-out the Operator. This is necessary for meeting security requirements. The Operator can still view the pages of the submenus, but will not be able to perform any actions. The Operator will use the log out option found in the left-panel of the menu to invoke the following:
• Operator is logged out from the OM GUI.
15.6.8.1 Logging Out of OM GUI 1 To logout of the OM GUI, locate the Log Out link on the left-pane navigation frame:
Click the Log Out A log-out dialog box message, “Are you sure you want to
log out? This will close your browser displays.
link.
Click OK - to dismiss the dialog box and to complete the log-out. Click Cancel – to dismiss the dialog box without logging out.
15.7 OM GUI – Destination Monitor The OM GUI menu, Destination Monitor page provides the full-capability Operator with monitoring capability to suspend distributions. The Destination Monitor submenu options will be examined using the following checklist in Table 15.7-1:
Table 15.7-1. Destination Monitor - Activity Checklist
15.7.1 Destination Monitor Submenu Page – Suspended Destinations The “Suspended Destinations” (Monitor) page provides the full-capability operator with a means of viewing suspended FtpPush/SCP Destinations and performing several kinds of actions, with respect to suspended FtpPush/SCP Destinations:
• Resume suspended destinations.
Order Role Task Section Complete? 1 Distribution
Technician Viewing and Responding to Suspended FtpPush Distribution Destinations
(P) 15.7.1.1
2 Distribution Technician
Viewing and Responding to Destination Details
(P) 15.7.1.2
15-42 611-EED-001, Rev. 01
• Suspend active destinations. • View details of active or suspended destinations.
15.7.1.1 Viewing and Responding to Suspended FtpPush Distribution Destinations
1 Click Destination Monitor menu option to expand its submenu. 2 Click Suspended Destinations submenu option to display its page. 3 Observe information displayed on the Suspended Destination Monitor page (Figure
15.7-1, Frame A). • The Suspended Destinations page has the following columns:
− Media Type. − Destination Name. − Host Name. − Time of Suspension (if applicable, date and time when the destination was
suspended). − Granules Queued Count (number of granules that are queued). − Granules Queued Size MB (total size in MB of all granules that are queued). − Suspend Reason (why the destination was suspended). − Resume (buttons for resuming the destination).

15-43 611-EED-001, Rev. 01
Figure 15.7-1. Suspended Destinations Monitor (A) and Ftp Push Monitor-Suspended Configured Destination (B) Pages
4 To resume a suspended destination: Click the Resume button in the destination’s Resume column (if applicable).
• The destination is resumed. • The Suspended Destinations page refreshes and the resumed destination is no longer
on the list of suspended destinations.
15-44 611-EED-001, Rev. 01
5 To suspend an active destination or view destination details of an active or suspended destination:
In the Active Destination section of the screen, enter the Destination Name or the destination Host Name (FTP Node) in appropriate text field.
Click applicable button: • Suspend – to suspend an active destination and refresh the page. The
suspended destination is included in the list of suspended destinations. • View Requests - to view ftp push requests associated with an active
destination or a suspended destination. – The FtpPush Requests List For this Destination page (Figure 15.7-1,
Frame B) displays. NOTE: The data displayed in the Ftp Push Requests List For this Destination section are not in a terminal state.
The Host Name Details (Destination Details) page (Figure 15.7-1, Frame B) provides the full-capability Operator the ability to view detailed data of a particular destination and can perform the following actions:
• Suspend an active destination. • Resume a suspended destination. • Change the priority of a distribution request associated with the FtpPush destination
while granules for the request still need to be staged or while granules for the request still need to be pushed.
• Suspend a request that still needs to be staged or while granules for the request still need to be pushed.
• Resume a request that was suspended by the OM GUI operator or while the processing of new requests by the OMS is suspended.
• Cancel a request that is not in a terminal state and while granules for the request still need to be staged or while granules for the request still need to be pushed.
15.7.1.2 Viewing and Responding to Destination Details 1 Click the Host Name link on the Suspended Destinations Monitor page to display the
Destination Details page (if not already being displayed). • The Ftp Push Monitor-Suspended Configured Destination page displays (Figure
15.7-1, Frame B).
15-45 611-EED-001, Rev. 01
2 Observe information displayed on the Ftp Push Monitor-Suspended Configured Destination page. • The page displays the associated destination and host names in its title. • The Destination Failed Request List section has the following columns:
– Request Id. – ECS Granule Id. – DPL Granule Id. – Last Update. – Size (MB). – Explanation.
• Click the underscored
– For example, clicking on the Last Update link causes the table to be organized in numerical order by last date updated.
column header causes table contents to be sorted on that column.
• The FtpPush Requests List For This Destination Listing has the following: • The Show <number> rows at a time window to minimize or maximize number of
data rows to be displayed at a time. − For example, if a Show <number> row at a time is being displayed, selecting 50
from the option button would result in the display of a page of data containing up to 50 rows of data.
• The Go directly to row… window provides a means of displaying a page of data starting with a particular row of the table. − For example, if Go directly to row <number> of 415 rows is being displayed,
typing 315 in the window and clicking on the ok button would result in the display of a page of data containing rows 315 through 364.
3 To suspend an active destination (if applicable), click on the Suspend button: • The destination is suspended. • The Suspend Destination button becomes a Resume Destination button.
4 To resume a suspended destination, click on the Resume Destination button: • The destination is resumed. • The Resume Destination button becomes a Suspend Destination button.
5 Click Home link on the OM GUI menu, to return to the home page.

15-46 611-EED-001, Rev. 01
15.8 OM GUI – Archive Data The Operator (whether full-capability or limited capability) is provided with the option of viewing the repository for all historical distributed and processed requests on the OM GUI using filters. The Archive Data submenu options will be examined using to the following checklist in Table 15.8-1:
Table 15.8-1. Archive Data - Activity Checklist
15.8.1 Archive Data Submenu Page – Historical Distribution Requests Filter The Historical Distribution Requests page (Figure 15.8-1, Frame A) provides the full-capability or limited capability operator the tool to view, by filtering (Figure 15.8-1, Frame B), archived distributed requests information on the OM GUI.
Figure 15.8-1. Historical Distribution Requests Page (A) and Filter (B)
15.8.1.1 Filtering Historical Distribution Requests
1 Click Archive Data menu option to expand its submenu. 2 Click Historical Distribution Requests [filter] submenu option to display the Historical
Distribution Requests page (Figure 15.8-1, Frame A).
Order Role Task Section Complete? 1 Distribution
Technician Filtering Historical Distribution Requests (P) 15.8.1.1
2 Distribution Technician
Filtering Historical Processing Requests (P) 15.8.2.1
15-47 611-EED-001, Rev. 01
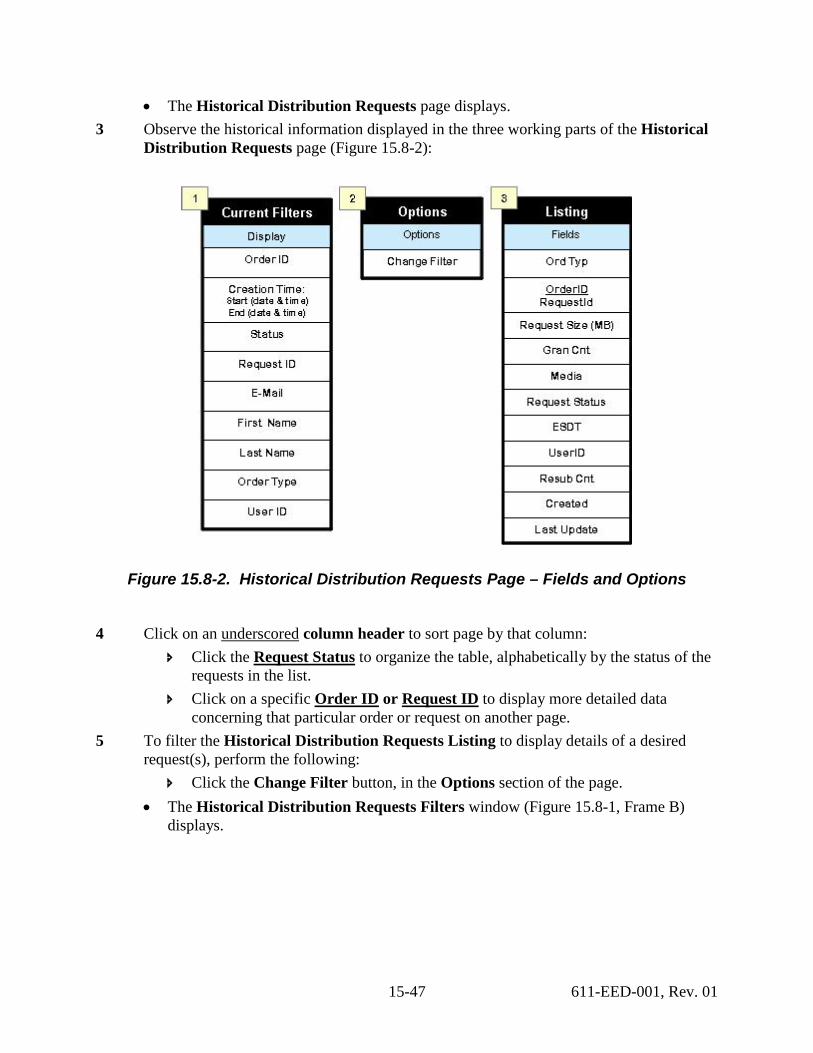
• The Historical Distribution Requests page displays. 3 Observe the historical information displayed in the three working parts of the Historical
Distribution Requests page (Figure 15.8-2):
Figure 15.8-2. Historical Distribution Requests Page – Fields and Options
4 Click on an underscored Click the
column header to sort page by that column: Request Status
Click on a specific
to organize the table, alphabetically by the status of the requests in the list.
Order ID or Request ID
5 To filter the Historical Distribution Requests Listing to display details of a desired request(s), perform the following:
to display more detailed data concerning that particular order or request on another page.
Click the Change Filter button, in the Options section of the page. • The Historical Distribution Requests Filters window (Figure 15.8-1, Frame B)
displays.
15-48 611-EED-001, Rev. 01
Define filter criteria: • Enter search data for any one field of the Individual Filter. • Select multiple options for one or more fields of the Combined Filter.
Click Apply Combined Filter (or Apply Individual Filter) button to apply the filter criteria. • The Historical Distribution Requests page displays.
6 Observe results of the filter change on the Historical Distribution Requests page.
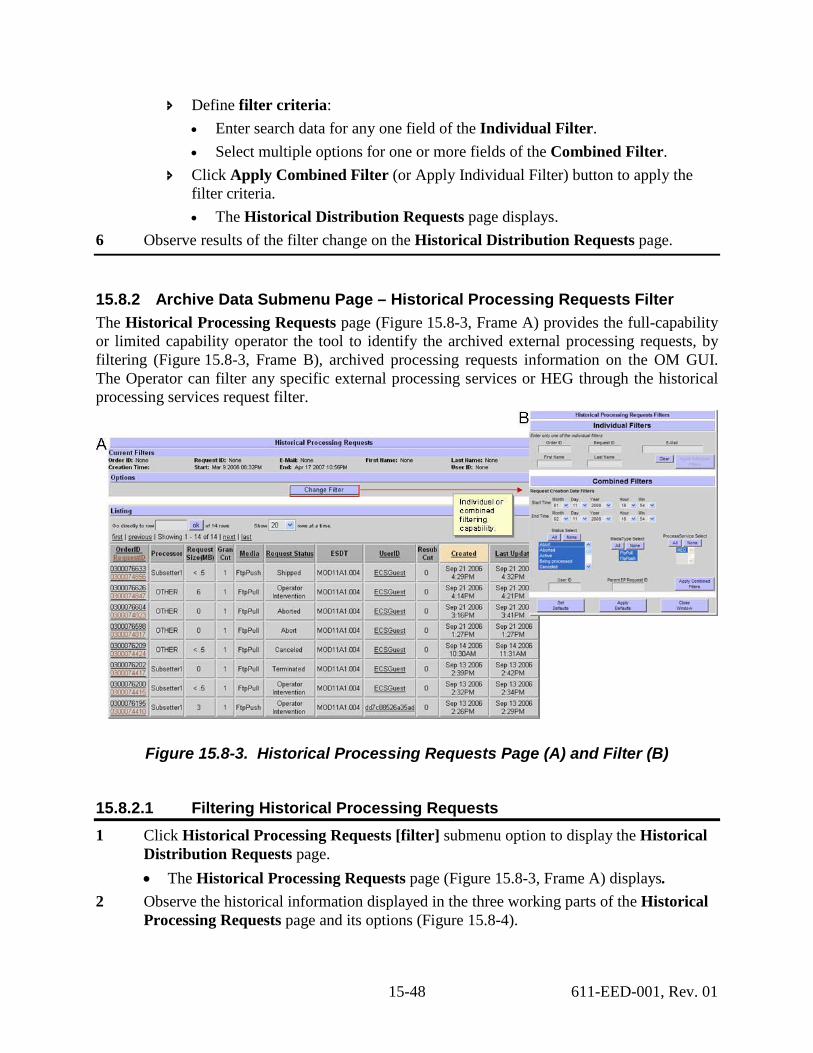
15.8.2 Archive Data Submenu Page – Historical Processing Requests Filter The Historical Processing Requests page (Figure 15.8-3, Frame A) provides the full-capability or limited capability operator the tool to identify the archived external processing requests, by filtering (Figure 15.8-3, Frame B), archived processing requests information on the OM GUI. The Operator can filter any specific external processing services or HEG through the historical processing services request filter.
Figure 15.8-3. Historical Processing Requests Page (A) and Filter (B)
15.8.2.1 Filtering Historical Processing Requests 1 Click Historical Processing Requests [filter] submenu option to display the Historical
Distribution Requests page. • The Historical Processing Requests page (Figure 15.8-3, Frame A) displays.
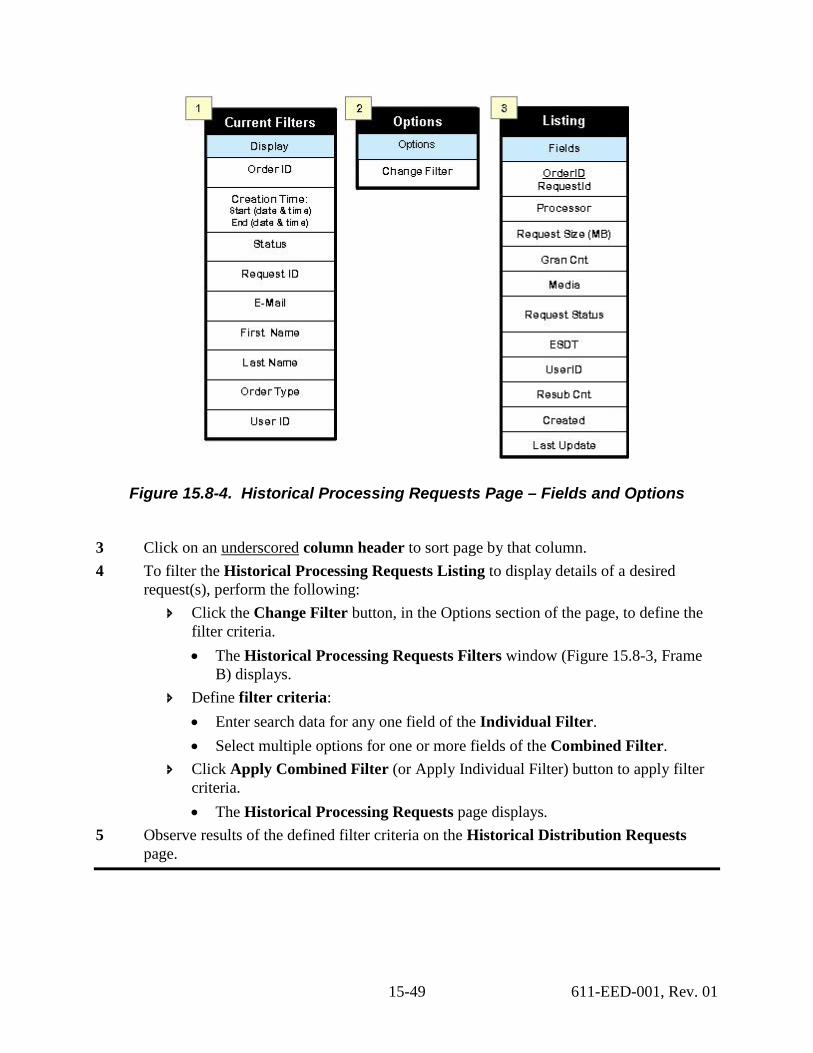
2 Observe the historical information displayed in the three working parts of the Historical Processing Requests page and its options (Figure 15.8-4).
15-49 611-EED-001, Rev. 01
Figure 15.8-4. Historical Processing Requests Page – Fields and Options
3 Click on an underscored4 To filter the Historical Processing Requests Listing to display details of a desired
request(s), perform the following:
column header to sort page by that column.
Click the Change Filter button, in the Options section of the page, to define the filter criteria. • The Historical Processing Requests Filters window (Figure 15.8-3, Frame
B) displays. Define filter criteria:
• Enter search data for any one field of the Individual Filter. • Select multiple options for one or more fields of the Combined Filter.
Click Apply Combined Filter (or Apply Individual Filter) button to apply filter criteria. • The Historical Processing Requests page displays.
5 Observe results of the defined filter criteria on the Historical Distribution Requests page.
15-50 611-EED-001, Rev. 01
15.9 OM GUI – OM Status Pages The Operator (full or limited capability) is provided summary information on current requests processing states, with the option of invoking queries to view the statuses on the on the OM Status pages. The parameters for these status pages are modifiable using the OM Configuration Server/Database submenu options. NOTE: Use the Server/Database Configuration menu to set database and server parameters to "fine tune" the Order Manager Server and the database. These are general parameters that affect the entire system, but no particular media types. The OM Status Pages submenu options will be examined using to the following checklist in Table 15.9-1:
Table 15.9-1. OM Status Pages - Activity Checklist
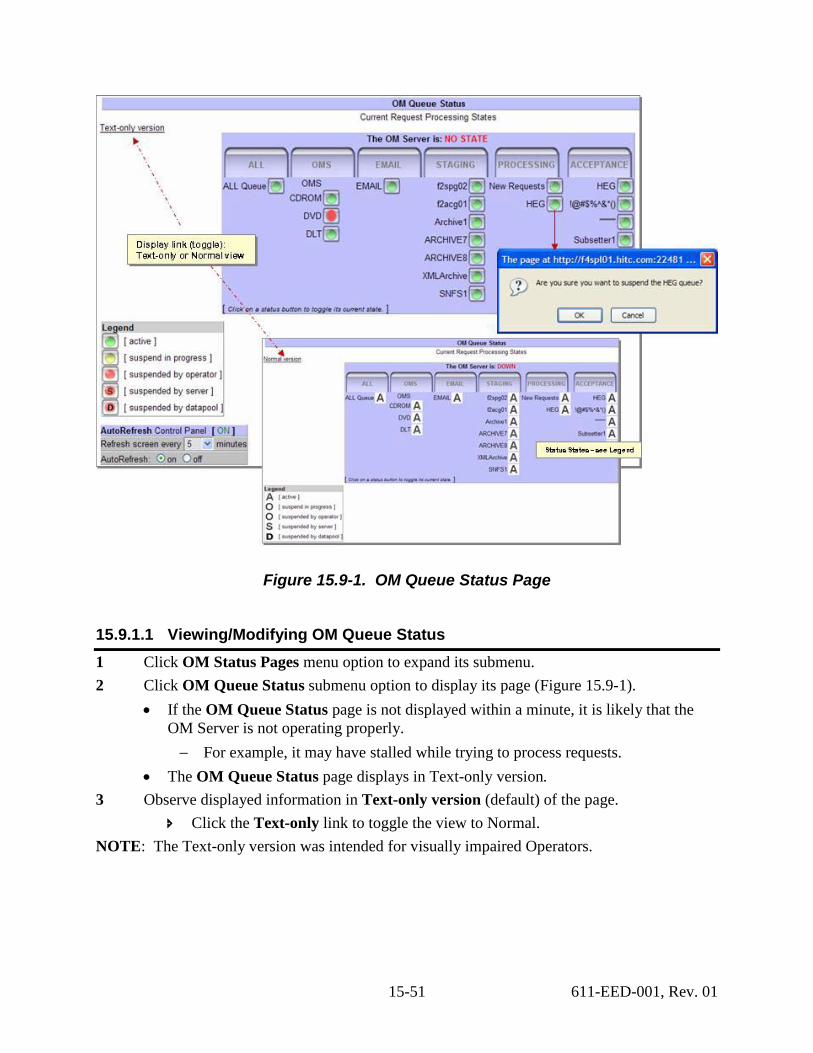
15.9.1 OM Status Pages Submenu Page – OM Queue Status The OM Queue Status page (Figure 15.9-1) provides the full-capability operator with a means to monitor and modify the current status of request queues for all media as well as the request queues for OMS, e-mail, staging, and HEG. (The limited-capability operator can monitor but cannot change the status of queues.) In addition, the OM Queue Status page allows both full-capability and limited-capability Operators to determine the status (“up” or “down”) of the Order Manager Server.
Order Role Task Section Complete? 1 Distribution
Technician Viewing/Modifying OM Queue Status (P) 15.9.1.1
2 Distribution Technician
Viewing HEG Order Status (P) 15.9.2.1
4 Distribution Technician
Viewing Pending HEG Granules (P) 15.9.4.1
5 Distributed Technician
Viewing Data Pool File System Status (P) 15.9.5.1
15-51 611-EED-001, Rev. 01
Figure 15.9-1. OM Queue Status Page
15.9.1.1 Viewing/Modifying OM Queue Status 1 Click OM Status Pages menu option to expand its submenu. 2 Click OM Queue Status submenu option to display its page (Figure 15.9-1).
• If the OM Queue Status page is not displayed within a minute, it is likely that the OM Server is not operating properly. − For example, it may have stalled while trying to process requests.
• The OM Queue Status page displays in Text-only version. 3 Observe displayed information in Text-only version (default) of the page.
Click the Text-only link to toggle the view to Normal. NOTE: The Text-only version was intended for visually impaired Operators.

15-52 611-EED-001, Rev. 01
4 Observe information displayed in the Current Request Processing States table. • The OM Server status is indicated by one of two states:
1 - The OM Server is: (green) UP [OM Server is currently operating]. 2 - The OM Server is: (red) DOWN [OM Server is not currently operating].
The status indicators (legend colors or letters) on the Current Request Processing States page are labeled (by color circles or a letter, based on display version) to indicate the status of the request queues. If clicked, the Operator can toggle states from “activate” to “suspend” or vice versa. The Text-only versions indicators represents:
− Green (no letter or A) – the queue is active (or resumed). The queue is currently active or was resumed by either Operator or Server (automatic) intervention.
− Red (no letter or O) – indicates that the queue was manually suspended by Operator or if yellow, that the queue is suspend in progress.
− Red (S) – indicates that the queue was automatically suspended by OM Server. This is a non-Operator controlled event.
− Red (D) – indicates that the queue has been suspended by Datapool. 5 To toggle the queue state, click on the queue status indicator/button:
• A confirmation dialog box displays asking, Are you sure you want to <state> the <queue type> queue? (Figure 15.9-1) Click OK to change the state of the queue and dismiss the dialog box.
15.9.2 OM Status Pages Submenu Page – HEG Order Status The HEG Order Status page (Figure 15.9-2) allows the full-capability Operator to monitor the number of HEG requests and data volume currently in HEG processing. The information is displayed on the HEG Order Status page is as follows:
• Total HEG Requests Queued. • Total HEG Granules Queued. • Total Input Data (MB).
Figure 15.9-2. HEG Order Status Page
15-53 611-EED-001, Rev. 01
15.9.2.1 Viewing HEG Order Status 1 Click OM Status Pages menu option to expand its submenu. 2 Click HEG Order Status submenu option to display its page (Figure 15.9-2).
• The HEG Order Status page displays. 3 Observe information displayed on the HEG Order Status page.
• The HEG Order Status page has the following columns: − Total HEG Requests Queued. − Total HEG Granules Queued. − Total Input Data (MB).
• If AutoRefresh is ON, the HEG Order Status page refreshes automatically as often as specified in the “Refresh screen every <number> minutes” window.
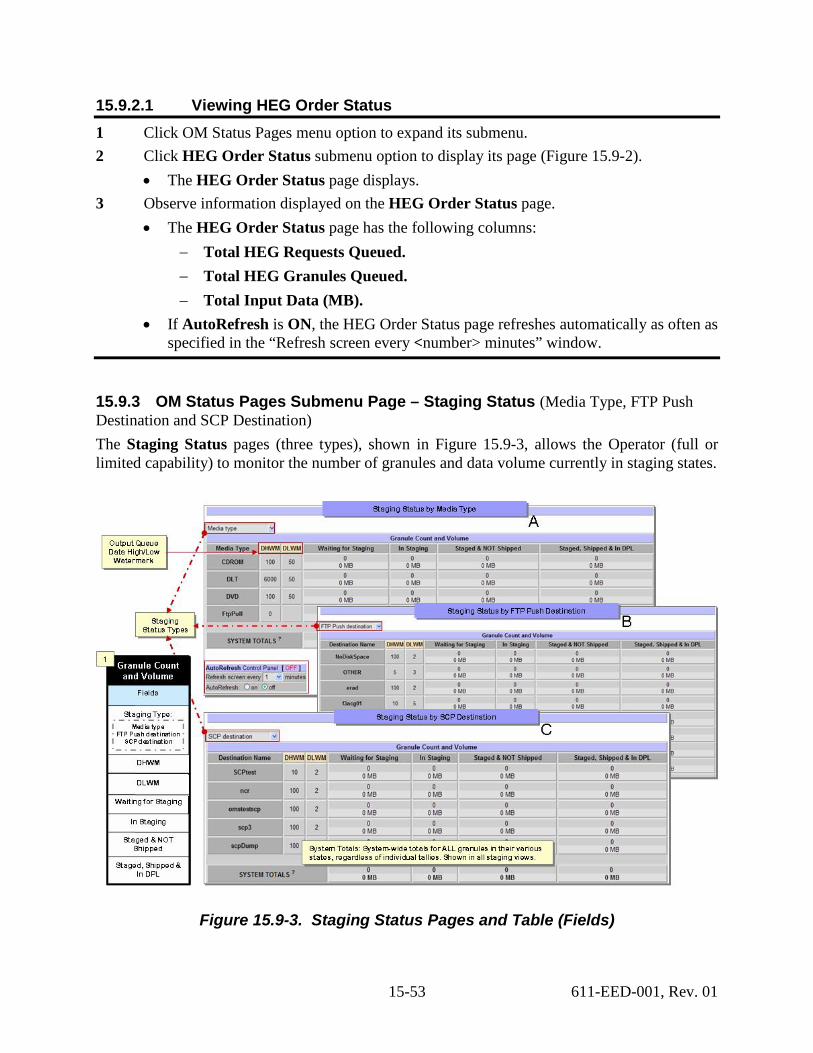
15.9.3 OM Status Pages Submenu Page – Staging Status (Media Type, FTP Push Destination and SCP Destination) The Staging Status pages (three types), shown in Figure 15.9-3, allows the Operator (full or limited capability) to monitor the number of granules and data volume currently in staging states.
Figure 15.9-3. Staging Status Pages and Table (Fields)
15-54 611-EED-001, Rev. 01
Staging Status pages (Figures 15.9-3, Frames A, B, C) displays status in ALL or three ways: 1 - Media Type (Figures 15.9-3, Frames A). 2 - FTP Push Destination (Figures 15.9-3, Frames B). 3 - SCP Destination (Figures 15.9-3, Frames C).
The granules staging information (Figure 15.9-3 Staging Status Pages and Table (Fields) is arranged in four categories:
1 - Granules Waiting for Staging. 2 - Granules In Staging. 3 - Granules that have been Staged and NOT Shipped. 4 - Granules that have been Staged, Shipped and In DPL.
15.9.3.1 Viewing Staging Status 1 Click OM Status Pages menu option to expand its submenu. 2 Click one of three Staging Status submenu options (Media Type, FTP Push Destination
or SCP Destination) to display its page (Figure 15.9-3: Frame A-Media Type; Frame B-FTP Push Destination; Frame C-SCP Destination). • The Staging Status by <staging type> status page displays.
3 To view another staging status page, select staging type from the list box on the currently displayed page.
4 Observe displayed information (Figure 15.9-3) of the Granule Count and Volume section on the Staging Status page as follows: • The Staging Status pages, each displays same information columns, except that data
is either media or destination generated. • The System Totals are system-wide totals for ALL granules in their various states,
regardless of individual tallies. • If AutoRefresh is ON, the Staging Status by <staging type> page refreshes
automatically as often as specified in the Refresh screen every <n> minutes.
15-55 611-EED-001, Rev. 01
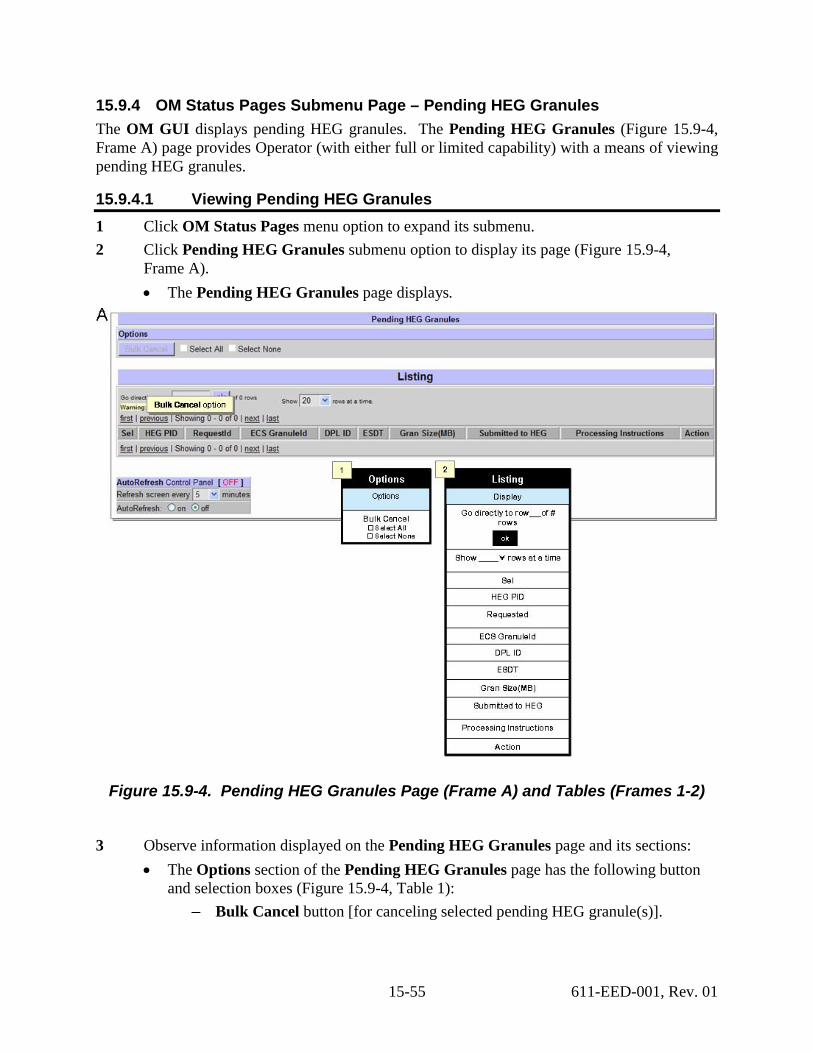
15.9.4 OM Status Pages Submenu Page – Pending HEG Granules The OM GUI displays pending HEG granules. The Pending HEG Granules (Figure 15.9-4, Frame A) page provides Operator (with either full or limited capability) with a means of viewing pending HEG granules.
15.9.4.1 Viewing Pending HEG Granules 1 Click OM Status Pages menu option to expand its submenu. 2 Click Pending HEG Granules submenu option to display its page (Figure 15.9-4,
Frame A). • The Pending HEG Granules page displays.
Figure 15.9-4. Pending HEG Granules Page (Frame A) and Tables (Frames 1-2)
3 Observe information displayed on the Pending HEG Granules page and its sections: • The Options section of the Pending HEG Granules page has the following button
and selection boxes (Figure 15.9-4, Table 1): – Bulk Cancel button [for canceling selected pending HEG granule(s)].
15-56 611-EED-001, Rev. 01
– Select All box [for selecting all eligible items for Bulk Cancel]. – Select None box [for selecting none of the eligible items for Bulk Cancel].
4 Observe the information displayed in the Listing section (Figure 15.9-4, Table 2) of the Pending HEG Granules page:
Click on a specific Request ID in the Listing table of the Pending HEG Granules page to bring up a screen containing detailed data concerning that particular request.
To view the processing instructions for a particular granule, click on the View… link in the Processing Instructions column in the Pending HEG Granules page to bring up a Processing Instructions window to view the processing instructions for the line item.
Click the Close Window button to close the Processing Instructions window. 5 To cancel pending HEG granule(s):
In the Options section, select either the Select All check box (if all pending HEG granules are to be failed) or the individual check boxes in the Sel column associated with the specific pending HEG granules.
Click the Bulk Cancel button in the Options section of the Pending HEG Granules page, to complete the cancel pending HEG granule(s) process. • The specified pending HEG granules are failed.
15.9.5 OM Status Pages Submenu Page – DPL File System Status The OM Status menu option provides Operator (full or limited capability) the ability to view-only the ongoing activities of the Data Pool (DPL) File System (Figure 15.9-5). This status page displays the Data Pool File System Status in two categories:
1 - Data Pool File Systems 2 - Archive File Systems
The sections display activity for data pool files’ data space (free or used) usage/availability; cache threshold (alerts and suspended); granules file size and processing status. NOTE: This status page is Read-Only.
15.9.5.1 Viewing Data Pool File System Status 1 Click OM Status Pages menu option to expand its submenu. 2 Click DPL file System Status submenu option to display the Data Pool File System
Status page (Figure 15.9-5). • The DPL File System Status page displays.

15-57 611-EED-001, Rev. 01
Figure 15.9-5. Data Pool File System Status Page
3 Observe both sections of the Data Pool file System Status page, noting that the Archive File Systems section provides and additional “Suspend Threshold” display.
4 Set the AutoRefresh to ON, the Data Pool file System Status page refreshes automatically as often as specified in the Refresh screen every x minutes window.
15.10 OM GUI – OM Configuration The OM Configuration menu option provides Operator (full or limited capability) the ability to configure the OM GUI parameters values. The OM Configuration submenu pages provide the full-capability Operator with features to check and modify (if necessary) the values assigned to the following types of OM configuration parameters:
• Aging Parameters. • [All] OM Server/Database Parameters:
– Queue. – Cleanup. – Email. – Media. – Staging. – Partition.
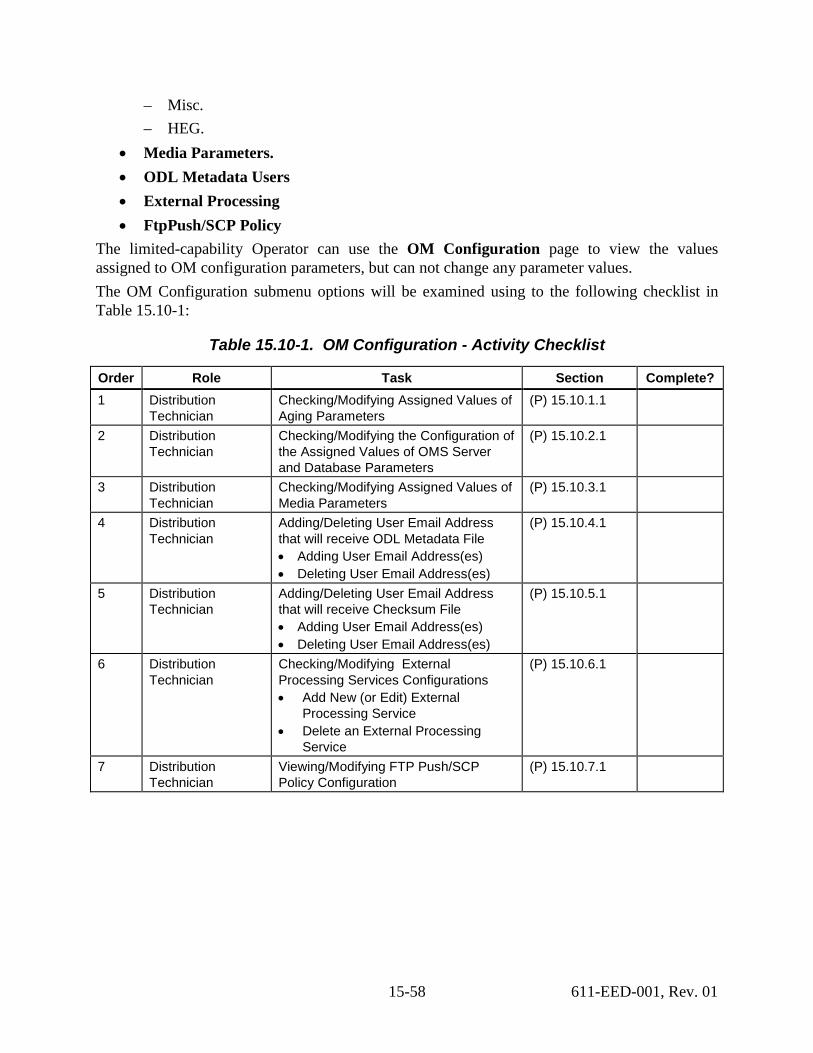
15-58 611-EED-001, Rev. 01
– Misc. – HEG.
• Media Parameters. • ODL Metadata Users • External Processing • FtpPush/SCP Policy
The limited-capability Operator can use the OM Configuration page to view the values assigned to OM configuration parameters, but can not change any parameter values. The OM Configuration submenu options will be examined using to the following checklist in Table 15.10-1:
Table 15.10-1. OM Configuration - Activity Checklist
Order Role Task Section Complete? 1 Distribution
Technician Checking/Modifying Assigned Values of Aging Parameters
(P) 15.10.1.1
2 Distribution Technician
Checking/Modifying the Configuration of the Assigned Values of OMS Server and Database Parameters
(P) 15.10.2.1
3 Distribution Technician
Checking/Modifying Assigned Values of Media Parameters
(P) 15.10.3.1
4 Distribution Technician
Adding/Deleting User Email Address that will receive ODL Metadata File • Adding User Email Address(es) • Deleting User Email Address(es)
(P) 15.10.4.1
5 Distribution Technician
Adding/Deleting User Email Address that will receive Checksum File • Adding User Email Address(es) • Deleting User Email Address(es)
(P) 15.10.5.1
6 Distribution Technician
Checking/Modifying External Processing Services Configurations • Add New (or Edit) External
Processing Service • Delete an External Processing
Service
(P) 15.10.6.1
7 Distribution Technician
Viewing/Modifying FTP Push/SCP Policy Configuration
(P) 15.10.7.1
15-59 611-EED-001, Rev. 01
15.10.1 OM Configuration Submenu Page – Aging Parameters The Aging Parameters submenu option allows the full-capability Operator to configure the aging parameter (rules) for each priority level using the Aging Parameters Configuration page (Figure 15.10-1). Aging parameters affect how Distribution Requests are aged over time. There are three aging parameters, however only two are configurable for each ECS Priority Level (i.e., XPRESS, VHIGH, HIGH, NORMAL, or LOW):
1 - Age Step – is the aging rate (range is 0-255, including decimal fractions) by which the effective priority of a request increases for every hour it has been waiting. If the parameter is set to zero (0), waiting requests never increase in priority. However, the priority will not exceed the “Maximum Priority”. For example, if the Age Step is set to 5.5 and a request with an initial priority of 100 waits 10 hours to be pushed, the request increases in priority by a factor of 5.5 every hour until it has been delivered: Hour 0: priority = 100 Hour 1: priority = 105.5 Hour 2: priority = 111 . . . Hour 10: priority = 155
2 - Maximum Priority – is the maximum priority a request can attain through the aging process. For example, if Maximum Priority were set to 130, once the request had reached a priority of 130, it would not go any higher [e.g., if a Maximum Priority of 130 were applied to the previous example, at Hour 6 the priority would become 130 and at every hour thereafter (if not delivered) it would still be 130].
3 - Starting Priority – is a non-configurable arbitrary value that represents the priority.
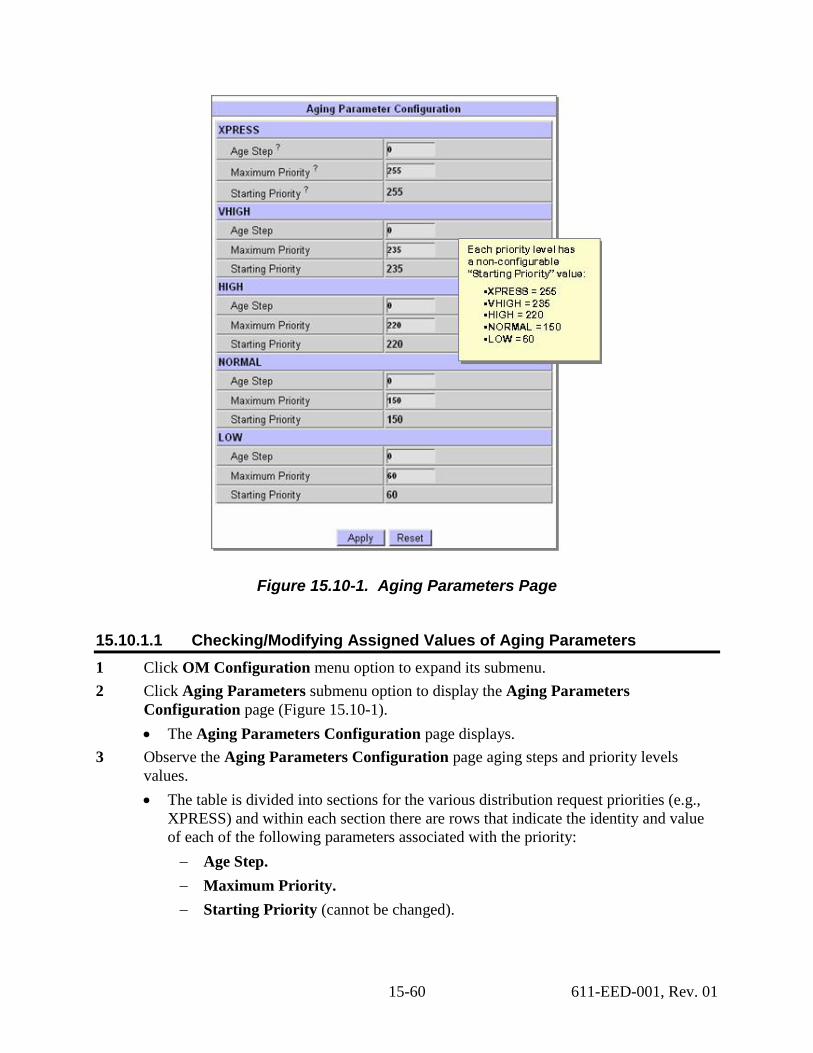
15-60 611-EED-001, Rev. 01
Figure 15.10-1. Aging Parameters Page
15.10.1.1 Checking/Modifying Assigned Values of Aging Parameters 1 Click OM Configuration menu option to expand its submenu. 2 Click Aging Parameters submenu option to display the Aging Parameters
Configuration page (Figure 15.10-1). • The Aging Parameters Configuration page displays.
3 Observe the Aging Parameters Configuration page aging steps and priority levels values. • The table is divided into sections for the various distribution request priorities (e.g.,
XPRESS) and within each section there are rows that indicate the identity and value of each of the following parameters associated with the priority: − Age Step. − Maximum Priority. − Starting Priority (cannot be changed).
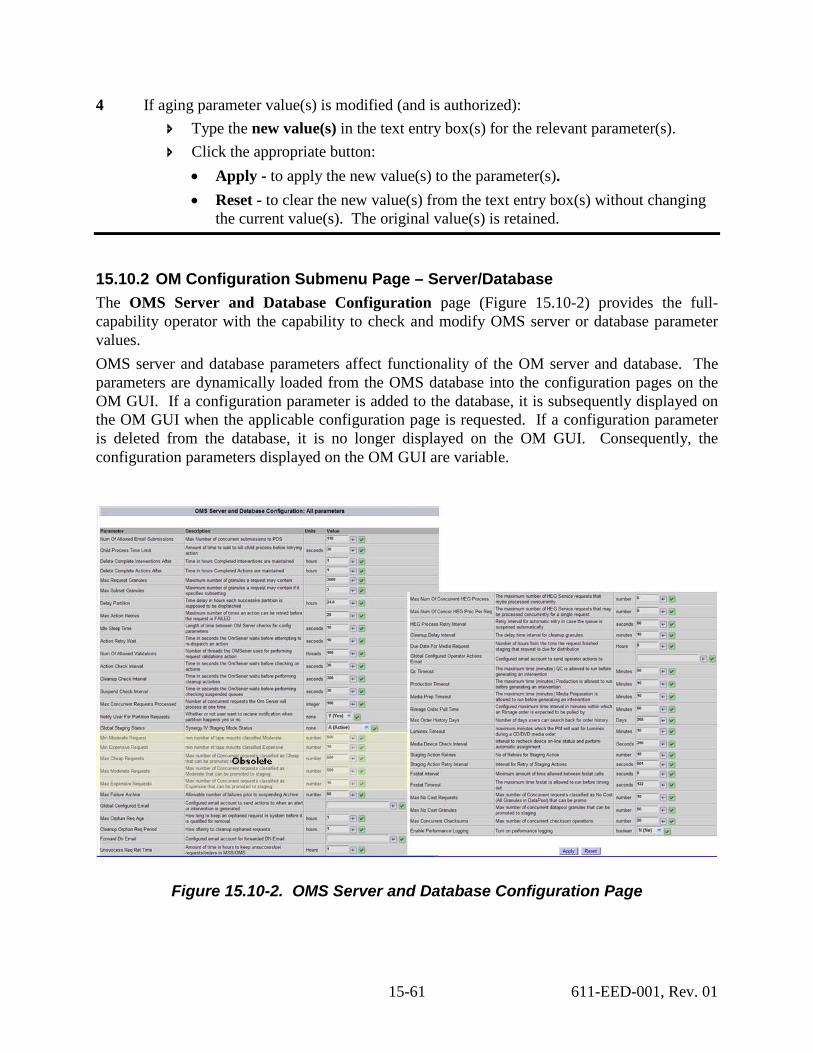
15-61 611-EED-001, Rev. 01
4 If aging parameter value(s) is modified (and is authorized): Type the new value(s) in the text entry box(s) for the relevant parameter(s). Click the appropriate button:
• Apply - to apply the new value(s) to the parameter(s). • Reset - to clear the new value(s) from the text entry box(s) without changing
the current value(s). The original value(s) is retained.
15.10.2 OM Configuration Submenu Page – Server/Database The OMS Server and Database Configuration page (Figure 15.10-2) provides the full-capability operator with the capability to check and modify OMS server or database parameter values. OMS server and database parameters affect functionality of the OM server and database. The parameters are dynamically loaded from the OMS database into the configuration pages on the OM GUI. If a configuration parameter is added to the database, it is subsequently displayed on the OM GUI when the applicable configuration page is requested. If a configuration parameter is deleted from the database, it is no longer displayed on the OM GUI. Consequently, the configuration parameters displayed on the OM GUI are variable.
Figure 15.10-2. OMS Server and Database Configuration Page
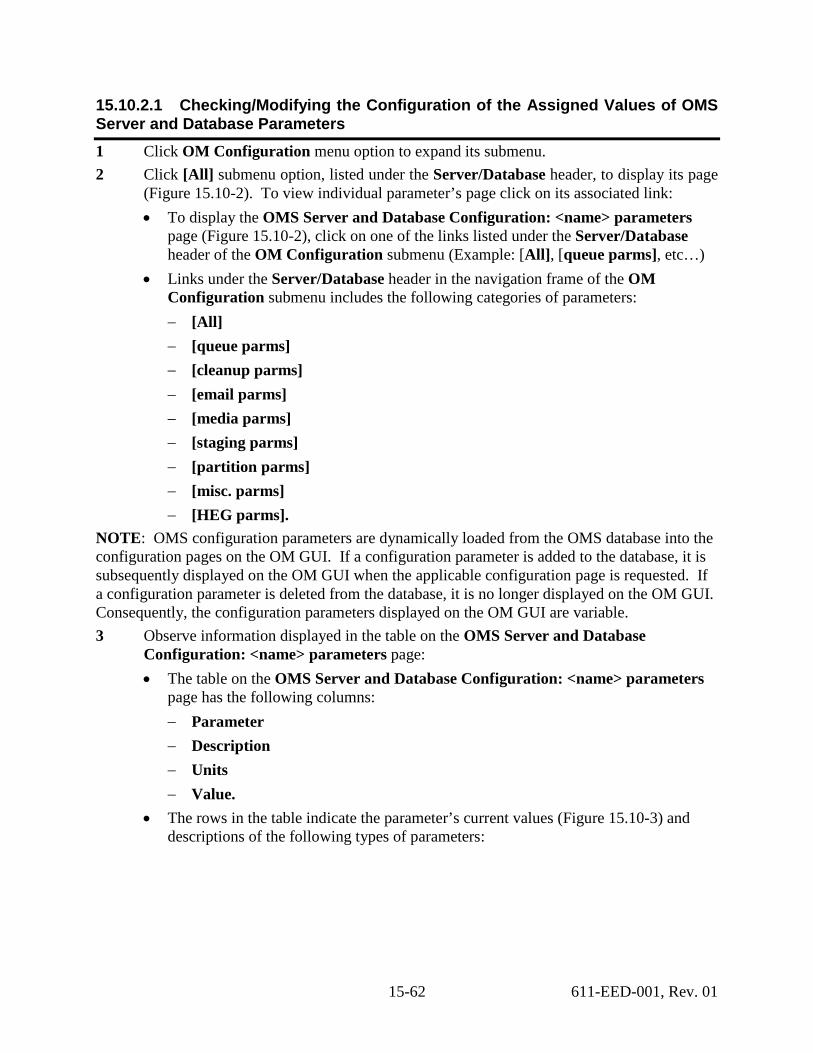
15-62 611-EED-001, Rev. 01
15.10.2.1 Checking/Modifying the Configuration of the Assigned Values of OMS Server and Database Parameters 1 Click OM Configuration menu option to expand its submenu. 2 Click [All] submenu option, listed under the Server/Database header, to display its page
(Figure 15.10-2). To view individual parameter’s page click on its associated link: • To display the OMS Server and Database Configuration: <name> parameters
page (Figure 15.10-2), click on one of the links listed under the Server/Database header of the OM Configuration submenu (Example: [All], [queue parms], etc…)
• Links under the Server/Database header in the navigation frame of the OM Configuration submenu includes the following categories of parameters: − [All] − [queue parms] − [cleanup parms] − [email parms] − [media parms] − [staging parms] − [partition parms] − [misc. parms] − [HEG parms].
NOTE: OMS configuration parameters are dynamically loaded from the OMS database into the configuration pages on the OM GUI. If a configuration parameter is added to the database, it is subsequently displayed on the OM GUI when the applicable configuration page is requested. If a configuration parameter is deleted from the database, it is no longer displayed on the OM GUI. Consequently, the configuration parameters displayed on the OM GUI are variable. 3 Observe information displayed in the table on the OMS Server and Database
Configuration: <name> parameters page: • The table on the OMS Server and Database Configuration: <name> parameters
page has the following columns: − Parameter − Description − Units − Value.
• The rows in the table indicate the parameter’s current values (Figure 15.10-3) and descriptions of the following types of parameters:
15-63 611-EED-001, Rev. 01
Figure 15.10-3. OM Server/Database Configuration - Parameters
• To manually update (refresh) the data on the screen, click on the reload icon in the OM GUI navigation frame.
• The Netscape browser Edit → F
4 If server or database parameter value(s) is (are) to be modified (and there is authorization to do so), type the new value(s) in the text entry box(es) for the relevant parameter(s).
ind in Page menu provides a means of performing a keyword search of the data currently being displayed on the screen.
NOTE: Server parameters cannot be set to 0 (zero). 5 Once all desired parameters are updated, click on the Apply button to apply new value(s)
to the modified parameter(s): • The OMS Server and Database Configuration page refreshes and displays the
modified value(s). • To retain the original value, click the Reset button. The new value(s) from the text
entry box(es) will be reset to the current value(s).
15-64 611-EED-001, Rev. 01
15.10.3 OM Configuration Submenu Page – Media The Media submenu Media Configuration page option (Figure 15.10-4) provides the full-capability Operator the ability to check and modify media parameters. Media parameters are specific to each kind of distribution medium and affect such things as limit checking against standard media capacity (e.g., minimum request size and maximum request size) and the partitioning of requests (e.g., partition size). The parameters are dynamically loaded from the OMS database into the configuration pages on the OM GUI. If a configuration parameter is added to the database, it is subsequently displayed on the OM GUI when the applicable configuration page is requested. If a configuration parameter is deleted from the database, it is no longer displayed on the OM GUI. Consequently, the configuration parameters displayed on the OM GUI are variables.
Figure 15.10-4. Media Configuration Page
15-65 611-EED-001, Rev. 01
15.10.3.1 Checking/Modifying Assigned Values of Media Parameters 1 Click OM Configuration menu option to expand its submenu. 2 Click Media submenu option to display its page (Figure 15.10-4). NOTE: OMS configuration parameters are dynamically loaded from the OMS database into the configuration pages on the OM GUI. If a configuration parameter is added to the database, it is subsequently displayed on the OM GUI when the applicable configuration page is requested. If a configuration parameter is deleted from the database, it is no longer displayed on the OM GUI. Consequently, the configuration parameters displayed on the OM GUI are variable. 3 Observe information displayed on the Media Configuration page.
• The Media Configuration page has the following columns: − Parameter Name. − Value.
• Each of the parameters applies to the following distribution media: − FtpPull. − FtpPush. − scp.
• The rows in the table indicate the current assigned values to the following types of parameters for each type of distribution medium: − PartitionGranuleLimit – is the maximum number of granules that may be
partitioned for the type of medium. − PartitionSizeLimit (GB) – should be the size (in GB) at which point partitioning
of a request can occur. − MinDaysBetweenChecksum – the number of days, post-verification of
checksum, as defined by Operator, in which the checksum process is again verified.
− MinBundleSize (GB) – is the minimum number of gigabytes in a bundle for the type of medium.
− FtpPull (exclusive): • Request High Water Mark – The Request High Watermark [RHWM] is the
desired maximum number of requests that may be in the Staging state, or that have completed Staging but are not yet in a terminal state (e.g., Shipped).
• Data High Water Mark (MB) – The Data High Watermark [DHWM] is the maximum volume (in MB) of data in staging or already staged but not yet shipped. If the data volume and number of requests is above the DHWM, it is assumed the media devices have plenty of work to keep them busy.
• Pull Gran Dpl Time (days) […] – The pull granule Data Pool time is the number of days a granule for an FtpPull request would normally remain in the Data Pool.
15-66 611-EED-001, Rev. 01
• Pull Gran Dpl Ret Pri (number) […] – The pull granule Data Pool retention priority is the normal retention priority for a granule for an FtpPull request.
• Min Pri To Preempt (number) […] – The minimum priority to preempt applies to granules put in the Data Pool for an FtpPull request.
• To manually update (refresh) the data on the screen, click on the reload icon on the OM GUI navigation frame.
• The Netscape browser Edit → F
4 If media parameter value(s) is (are) to be modified, type the new value(s) in the text entry box(es) for the relevant parameter(s).
ind in Page menu provides a means of performing a keyword search of the data currently being displayed on the screen.
5 After all desired parameters have been updated; select the Apply button to submit the media configuration changes. • Select the Reset button to clear the new value(s) from the text entry box(es) and reset
the parameter(s) back to its original value(s). − The value(s) displayed in the text entry boxes return to the original value(s).
15.10.4 OM Configuration Submenu Page – ODL Metadata Users Limited-capability Operator is limited to viewing Metadata File Users configuration only. The Operator cannot add, or delete email addresses. The ODL Metadata File Users Configuration page (Figure 15.10-5) allows the full-capability Operator to configure a list of Email addresses that signifies users that need to receive metadata in ODL .met file format. NOTE: If the list is changed, currently active requests’ metadata format will not change. For example, if a user’s email address is deleted from the list; active requests issued for that user subsequent to the deletion will still distribute the metadata files in ODL format.
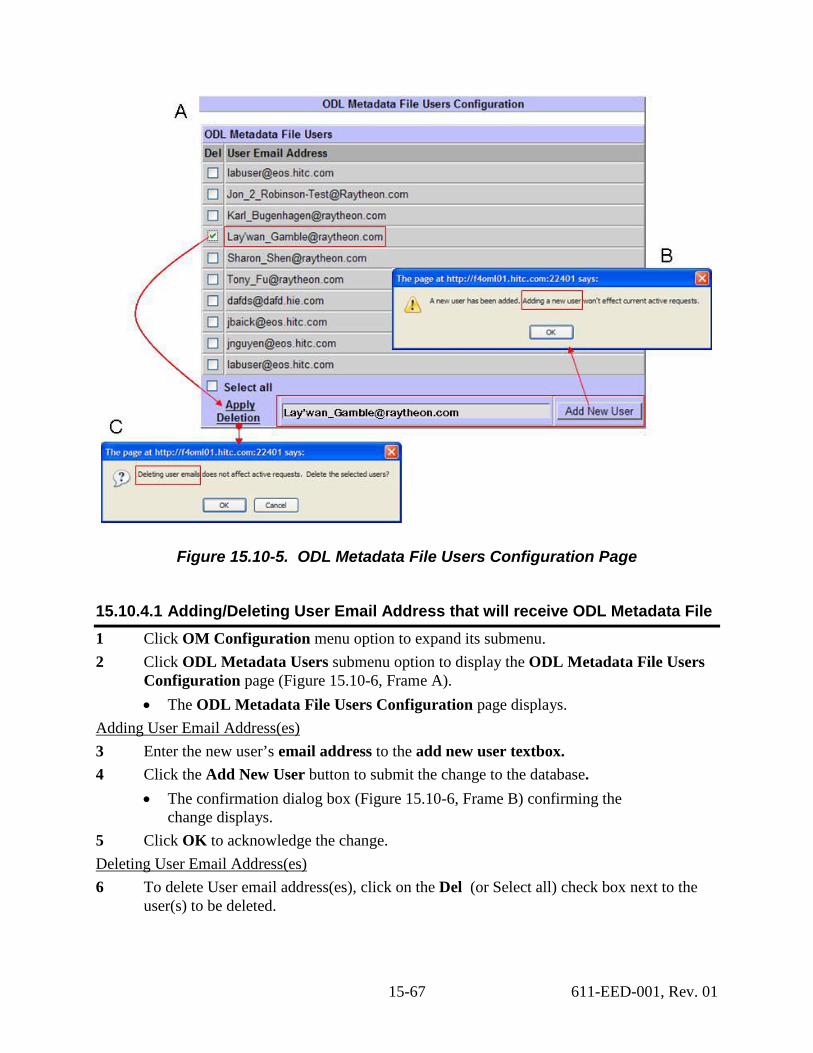
15-67 611-EED-001, Rev. 01
Figure 15.10-5. ODL Metadata File Users Configuration Page
15.10.4.1 Adding/Deleting User Email Address that will receive ODL Metadata File 1 Click OM Configuration menu option to expand its submenu. 2 Click ODL Metadata Users submenu option to display the ODL Metadata File Users
Configuration page (Figure 15.10-6, Frame A). • The ODL Metadata File Users Configuration page displays.
3 Enter the new user’s email address to the add new user textbox. Adding User Email Address(es)
4 Click the Add New User button to submit the change to the database. • The confirmation dialog box (Figure 15.10-6, Frame B) confirming the
change displays. 5 Click OK to acknowledge the change.
6 To delete User email address(es), click on the Del (or Select all) check box next to the user(s) to be deleted.
Deleting User Email Address(es)
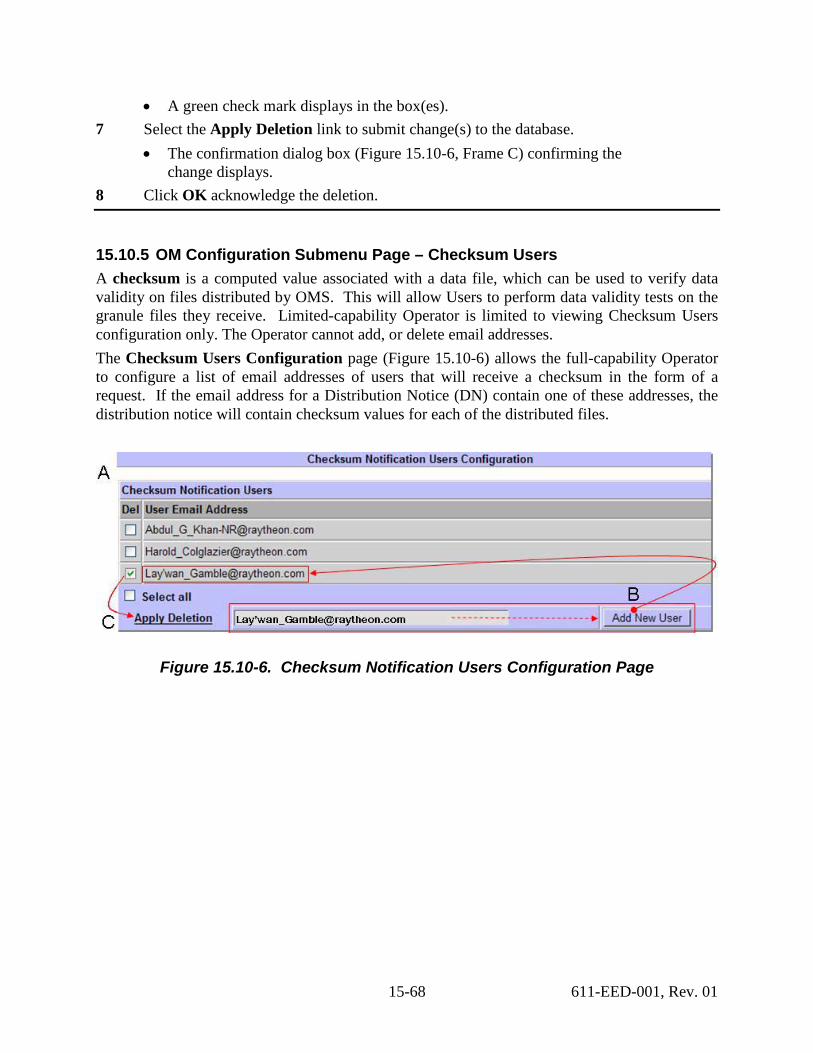
15-68 611-EED-001, Rev. 01
• A green check mark displays in the box(es). 7 Select the Apply Deletion link to submit change(s) to the database.
• The confirmation dialog box (Figure 15.10-6, Frame C) confirming the change displays.
8 Click OK acknowledge the deletion.
15.10.5 OM Configuration Submenu Page – Checksum Users A checksum is a computed value associated with a data file, which can be used to verify data validity on files distributed by OMS. This will allow Users to perform data validity tests on the granule files they receive. Limited-capability Operator is limited to viewing Checksum Users configuration only. The Operator cannot add, or delete email addresses. The Checksum Users Configuration page (Figure 15.10-6) allows the full-capability Operator to configure a list of email addresses of users that will receive a checksum in the form of a request. If the email address for a Distribution Notice (DN) contain one of these addresses, the distribution notice will contain checksum values for each of the distributed files.
Figure 15.10-6. Checksum Notification Users Configuration Page
15-69 611-EED-001, Rev. 01
15.10.5.1 Adding/Deleting User Email Address that will receive Checksum File 1 Click OM Configuration menu option to expand its submenu. 2 Click Checksum Users submenu option to display the Checksum Notification Users
Configuration page (Figure 15.10-6, Frame A). • The Checksum Notification Users Configuration page displays.
3 Enter the new user’s email address to the add new user textbox. Adding User Email Address(es)
4 Click the Add New User button to submit the change to the database. • The new user email address (Figure 15.10-6, Frame B) displays on the page.
5 To delete User Email Address(es), click on the Del (or Select all) check box next to the User(s) Email Address(es) to be deleted.
Deleting User Email Address(es)
• A green check mark displays in the selected box(es). 6 Select the Apply Deletion link (Figure 15.10-6, Frame C) to make change(s) and remove
the User Email Address(es).
15.10.6 OM Configuration Submenu Page – External Processing Limited-capability Operator is limited to only viewing External Processing Configuration. The Operator cannot edit, add, or delete destinations. This page allows the full-capability Operator to define and configure the parameters of an external processing service as follows:
• View the external processing services parameters. • Delete a selected external processing service that has no pending requests for an external
processing service. • Add a new external processing service. • Edit existing processing service configuration.
Special configuration parameters that control external processing requests are displayed on the External Processing Services Policy Configuration page (Figure 15.10-7, Frame A).
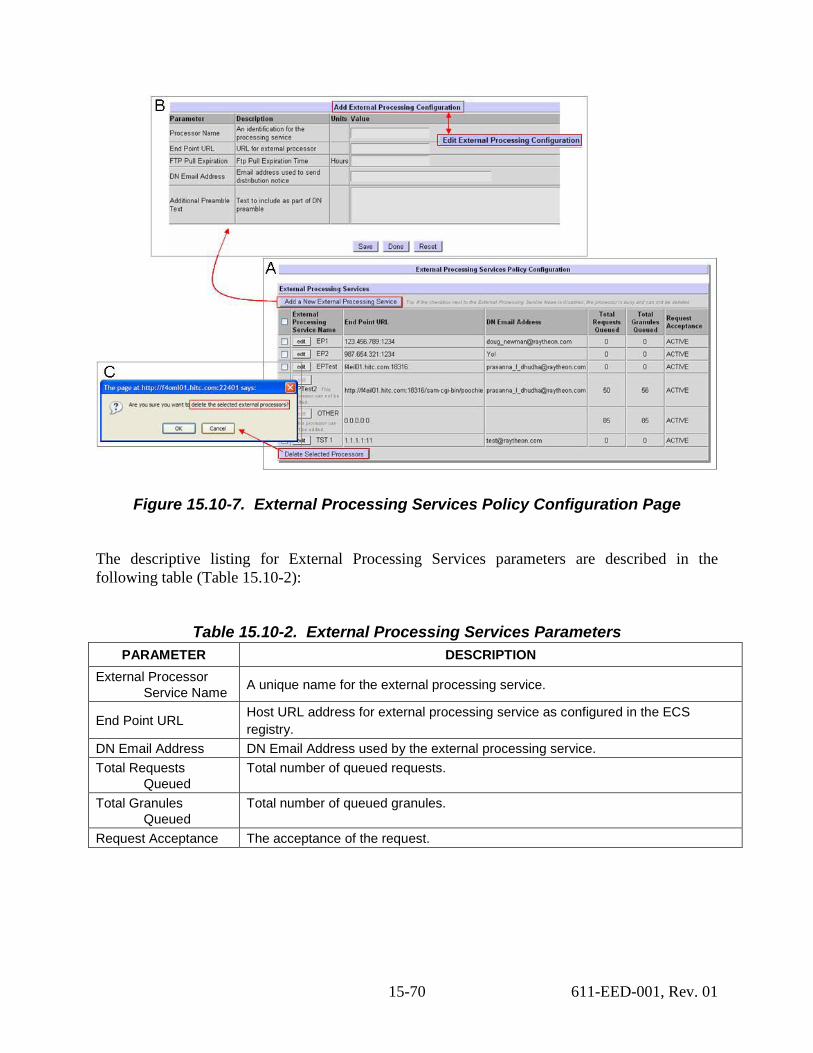
15-70 611-EED-001, Rev. 01
Figure 15.10-7. External Processing Services Policy Configuration Page
The descriptive listing for External Processing Services parameters are described in the following table (Table 15.10-2):
Table 15.10-2. External Processing Services Parameters PARAMETER DESCRIPTION
External Processor Service Name A unique name for the external processing service.
End Point URL Host URL address for external processing service as configured in the ECS registry.
DN Email Address DN Email Address used by the external processing service. Total Requests
Queued Total number of queued requests.
Total Granules Queued
Total number of queued granules.
Request Acceptance The acceptance of the request.
15-71 611-EED-001, Rev. 01
15.10.6.1 Checking/Modifying External Processing Services Configurations 1 Click OM Configuration menu option to expand its submenu. 2 Click External Processing submenu option to display its External Processing Services
Policy Configuration page (Figure 15.10-8, Frame A). 3 Observe the External Processing Services Policy Configuration page:
4 Select the Add a New External Processing Service button, (or if editing, select the edit button next to the processing service to be edited).
Add New (or Edit) External Processing Service
• The Add External Processing Configuration page (Figure 15.10-8, Frame B) displays (if editing, the Edit External Processing Configuration page displays).
5 Add/Edit required data of the External Processing Configuration parameters, as needed.
6 Click Save to submit the input. 7 Click Done to return to the External Processing Services Policy Configuration page
8 To delete and external processing service, select the checkbox of the External Processing Service to be deleted.
Delete an External Processing Service
9 Click the Delete Selected Processors button at bottom of the page. 10 Click OK to confirm deletion, at the deletion prompt (Figure 15.10-8, Frame C) dialog
box and to delete selected external processors.
15.10.7 OM Configuration Submenu Page – FtpPush/SCP Policy The FtpPush/SCP Policy Configuration page (Figure 15.10-8, Frame A) provides the full-capability Operator the ability to define, configure and fine-tune parameter values of FtpPush/SCP destinations.
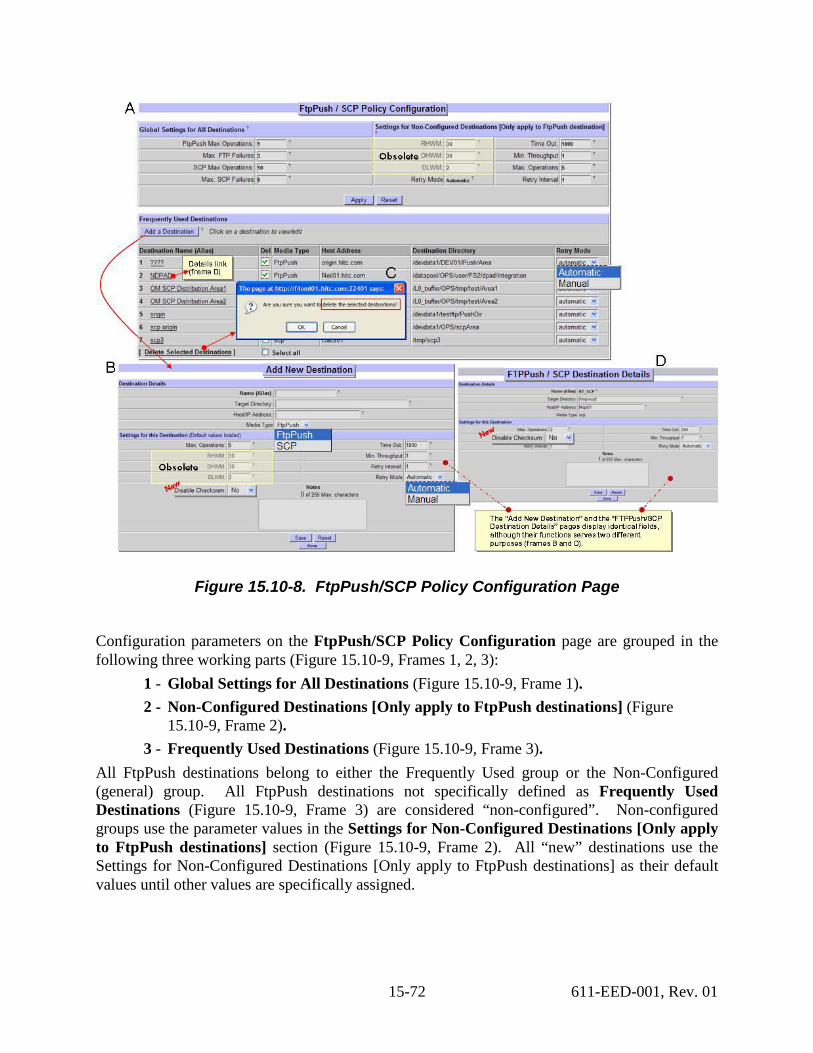
15-72 611-EED-001, Rev. 01
Figure 15.10-8. FtpPush/SCP Policy Configuration Page
Configuration parameters on the FtpPush/SCP Policy Configuration page are grouped in the following three working parts (Figure 15.10-9, Frames 1, 2, 3):
1 - Global Settings for All Destinations (Figure 15.10-9, Frame 1). 2 - Non-Configured Destinations [Only apply to FtpPush destinations] (Figure
15.10-9, Frame 2). 3 - Frequently Used Destinations (Figure 15.10-9, Frame 3).
All FtpPush destinations belong to either the Frequently Used group or the Non-Configured (general) group. All FtpPush destinations not specifically defined as Frequently Used Destinations (Figure 15.10-9, Frame 3) are considered “non-configured”. Non-configured groups use the parameter values in the Settings for Non-Configured Destinations [Only apply to FtpPush destinations] section (Figure 15.10-9, Frame 2). All “new” destinations use the Settings for Non-Configured Destinations [Only apply to FtpPush destinations] as their default values until other values are specifically assigned.

15-73 611-EED-001, Rev. 01
Global Settings for All Destinations (Figure 15.10-9, Frame 1) are parameters that apply to all destinations (both frequently used and non-configured), regardless of their individual settings.
Figure 15.10-9. FtpPush/SCP Policy Configuration Page – Fields and Options
15.10.7.1 Viewing/Modifying FtpPush/SCP Policy Configuration 1 Click OM Configuration menu option to expand its submenu. 2 Click FtpPush/SCP Policy submenu option to display the FtpPush/SCP Policy
Configuration page (Figure 15.10-9).
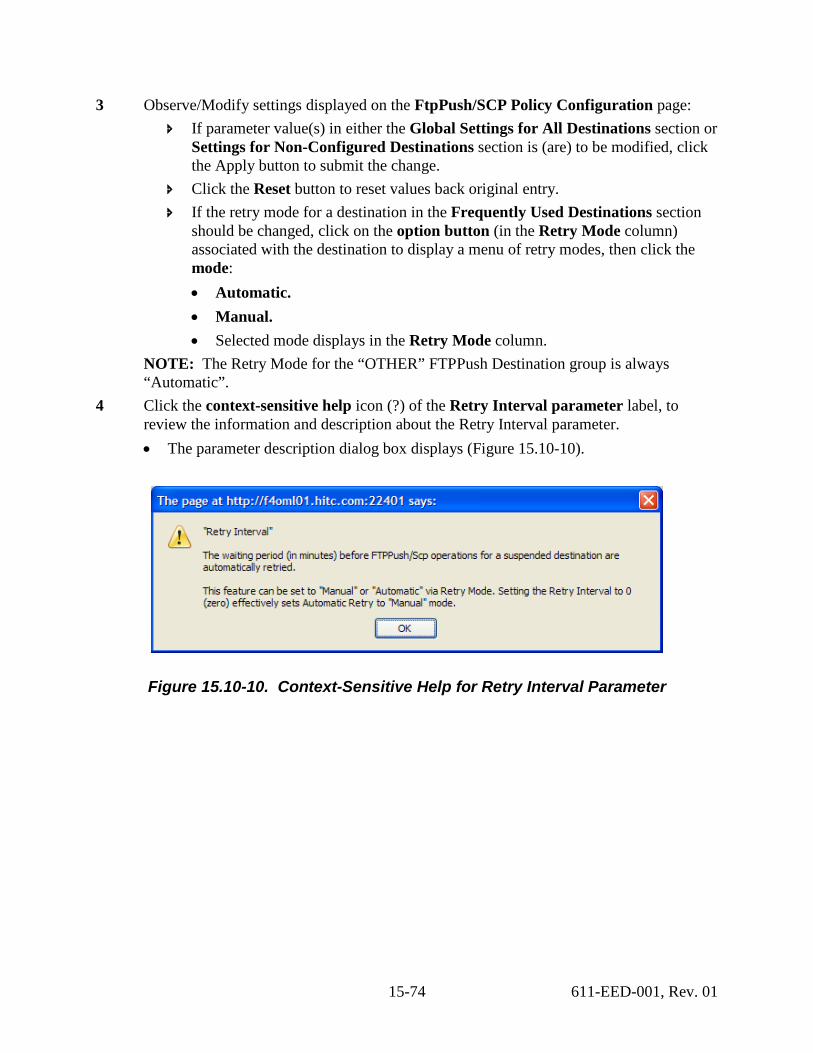
15-74 611-EED-001, Rev. 01
3 Observe/Modify settings displayed on the FtpPush/SCP Policy Configuration page: If parameter value(s) in either the Global Settings for All Destinations section or
Settings for Non-Configured Destinations section is (are) to be modified, click the Apply button to submit the change.
Click the Reset button to reset values back original entry. If the retry mode for a destination in the Frequently Used Destinations section
should be changed, click on the option button (in the Retry Mode column) associated with the destination to display a menu of retry modes, then click the mode: • Automatic. • Manual. • Selected mode displays in the Retry Mode column.
NOTE: The Retry Mode for the “OTHER” FTPPush Destination group is always “Automatic”.
4 Click the context-sensitive help icon (?) of the Retry Interval parameter label, to review the information and description about the Retry Interval parameter. • The parameter description dialog box displays (Figure 15.10-10).
Figure 15.10-10. Context-Sensitive Help for Retry Interval Parameter
15-75 611-EED-001, Rev. 01
5 To review details of a destination, click the underscored Destination Name (Alias)• The FTPPush/SCP Destination Details page displays (Figure 15.10-8, Frame D).
.
Observe the Destination Details section information of the selected alias. Observe the Settings for this Destination section information of the selected
alias. To Disable Checksum, input Yes in the identified textbox. Click the Done button to return to the FTPPush/SCP Policy Configuration page
without saving any possible changes. 6 To Delete (remove) destination(s) from the Frequently Used Destinations section:
Click the Del checkbox next the destination(s) (or select the Select all destinations checkbox to select all listed destinations).
Click the Delete Selected Destinations link near the bottom of the Frequently Used Destinations section.
• The “Are you sure you want to delete the selected destinations?” dialog box displays (Figure 15.10-8, Frame C). Click OK to confirm deletion(s).
NOTE: Removing a destination from the Frequently Used Destinations section does not actually delete the destination; it moves the destination(s) to the non-configured group and erases its individual configuration parameter values.
7 To Add a new destination to the Frequently Used Destinations section: Click the Add a Destination button.
• The Add New Destination page displays (Figure 15.10-8, Frame B). Enter appropriate values/data to the fields/parameters (Figure 15.10-9, Frame 1,
2, 3) as follows: • The Destination Name (Alias) is a unique descriptive name which easily identified
the destination. For example: Norford University • The Target Directory is the directory path of the remote host to which data is to be
pushed by ftp. For example: /sci/data/push • The Host/IP Address text box is the remote host machine name or IP address where
data are to be pushed by ftp. For example: [email protected]. • The Max. Operations value is the maximum number of concurrent FtpPush
operations for a particular destination (exclusive of but subject to the global Max Operations). For example: 2.
• The Time Out (extra time allotment (in minutes) is applied to the expected throughput; such expected throughput equals minimum throughput plus timeout. For example: 60.
• The Min. Throughput value (megabytes per second) represents the minimum data throughput (in MB/sec) for a particular destination. For example: 100.
15-76 611-EED-001, Rev. 01
• The Retry Interval value (in minutes) represents the waiting period before FtpPush operations for a suspended destination are automatically retried. For example: 60.
• The Notes is general information about the destination (e.g., the justification for adding the new destination, etc.)
• Use the listboxes to select the available options for Media Type and Retry Mode. Click the Save button to submit the new destination and to refresh the FTP
Push/SCP Policy Configuration page. • The new destination displays on the FTP Push/SCP Policy Configuration page.
15.10.8 OM Configuration Submenu Page – DataAccess Processing The DataAccess Processing Configuration page (Figure 15.10-11) provides the full-capability Operator the ability to define, configure and fine-tune parameter values of DataAccess services.
Figure 15.10-11. Data Access Services Configuration
15-77 611-EED-001, Rev. 01
Configuration parameters on the Data Access Services Configuration page are grouped by service (Figure 15.10-10).
To add a new service: Enter in the service name into the Service box. Examples include HEG, GDAL, etc. Enter the endpoint URL of the service that is being added into the box under the
column labeled Endpoint. To set the maximum jobs allowed, enter in a value to the box under the column
labeled Max Jobs. To set the timeout for communications between the configured service and OMS
enter in a value (seconds) under the column labeled Timeout. To set the number of times to retry requests sent to the service, enter in a value under
the column labeled Retry Interval. To finish, select the Add button on the far right side of the row.
In order to edit the values for service that is already configured, first delete the service then add a new service using the steps above using the desired configuration values.
15.11 OM GUI – Help There are several ways to get access to help in using the OM GUI:
• HelpOnDemand – features context-sensitive help for each page, particularly for controls or parameters that may not be entirely self-descriptive. Depicted by a question mark (?) located next to a button or text field on an OM GUI page, whenever clicked, a dialog box (Figure 15.11-1, Frame B) opens that describes the item in question.
• Help – features help on various topics covering usage of the Order Manager GUI. The Help submenu option is access from the OM GUI menu home page. (Figure 15.11-1, Frame A) to be displayed.
15-78 611-EED-001, Rev. 01
Figure 15.11-1. Help Page (A) and HelpOnDemand Example (B)
15.11.1 Help Submenu Page – About HelpOnDemand… The About HelpOnDemand… allow Operator to get context-sensitive help on every OM GUI page. Signified by a question mark (?), the Operator simply clicks the question mark to get descriptive context of the control or parameter in a pop-up window (Figure 15.11-1, Frame B).
15.11.2 Help Submenu Page – Help The Order Manager GUI Help (Figure 15.11-1, Frame A) submenu feature provides Operator with several guidelines on how to use the OMS GUI. Complete documentation can be found in the DID 609 document which was included with the installation package for the OMS utility. The submenu features active search function using the current browser (i.e., using Netscape, select Edit "Find in Page..." from the menu or press Ctrl + F (or Alt + F in some UNIX OSs from within the OM GUI page). The Help submenu (Figure 15.11-1, Figure A) hypertext-index features the following topics:
• What is the Order Manager Page? • Request Management
– Operator Intervention Page • OM Queue Status • OM Configuration • OM Server Statistics • OM Log Viewer
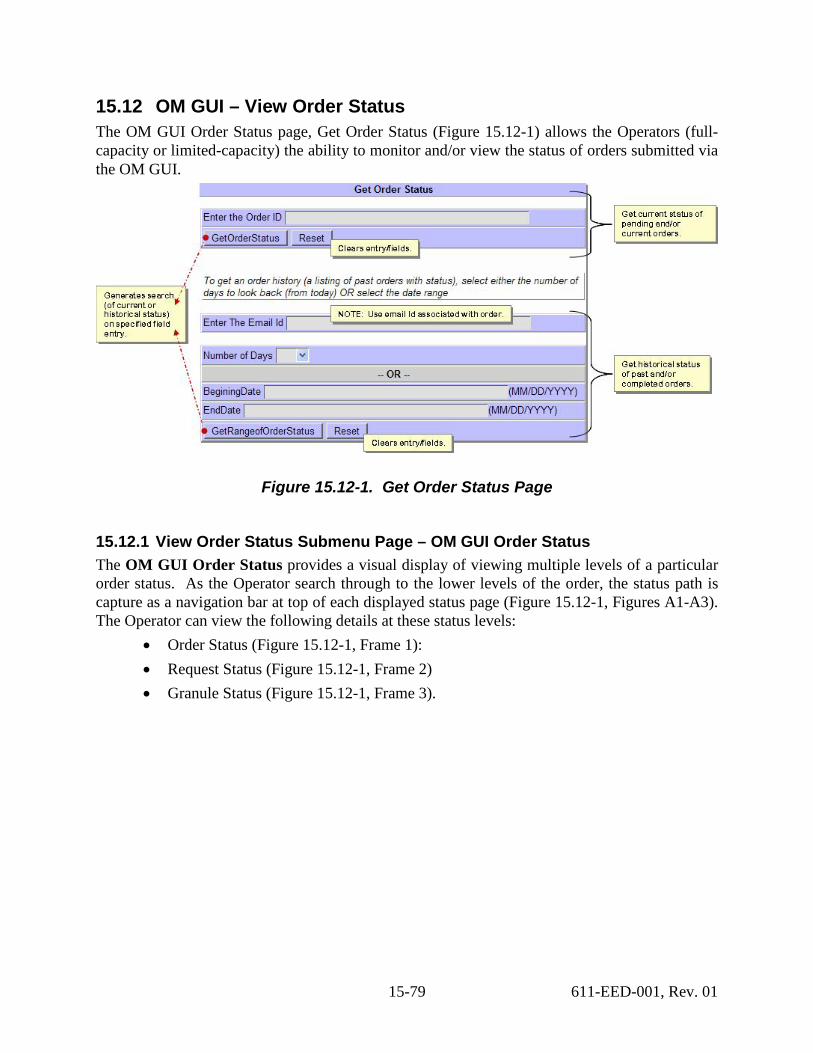
15-79 611-EED-001, Rev. 01
15.12 OM GUI – View Order Status The OM GUI Order Status page, Get Order Status (Figure 15.12-1) allows the Operators (full-capacity or limited-capacity) the ability to monitor and/or view the status of orders submitted via the OM GUI.
Figure 15.12-1. Get Order Status Page
15.12.1 View Order Status Submenu Page – OM GUI Order Status The OM GUI Order Status provides a visual display of viewing multiple levels of a particular order status. As the Operator search through to the lower levels of the order, the status path is capture as a navigation bar at top of each displayed status page (Figure 15.12-1, Figures A1-A3). The Operator can view the following details at these status levels:
• Order Status (Figure 15.12-1, Frame 1): • Request Status (Figure 15.12-1, Frame 2) • Granule Status (Figure 15.12-1, Frame 3).

15-80 611-EED-001, Rev. 01
Figure 15.12-2. Get Order Status Pages Navigation Bars and Fields
The OM GUI Order Status submenu options will be examined using to the following checklist in Table 15.12-1:
Table 15.12-1. OM GUI Order Status - Activity Checklist Order Role Task Section Complete? 1 Distribution
Technician Viewing Distribution Requests Order Status Pages.
(P) 15.12.1.1
15.12.1.1 Viewing Distribution Requests Order Status Pages 1 Click View Order Status menu option to expand its submenu. 2 Click OM GUI Order Status submenu option to display its page.
• The Get Order Status (Figure 15.12-1) page displays. 3 To retrieve the status of a current order:
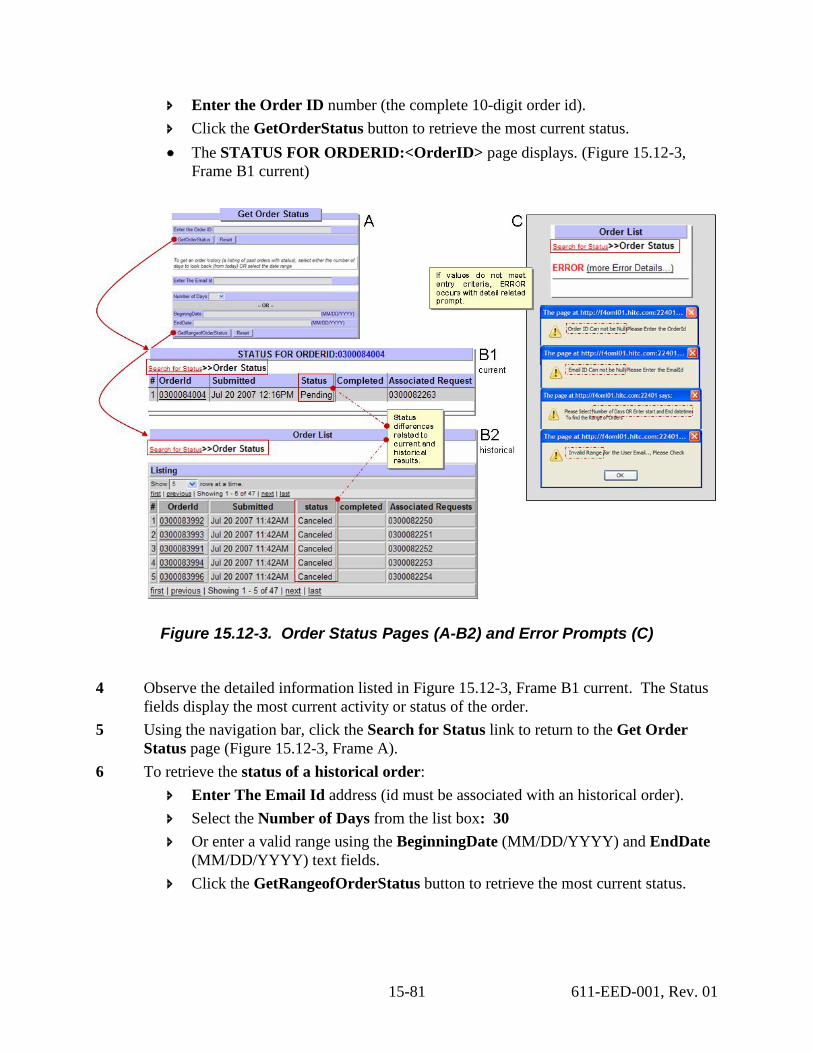
15-81 611-EED-001, Rev. 01
Enter the Order ID number (the complete 10-digit order id). Click the GetOrderStatus button to retrieve the most current status. • The STATUS FOR ORDERID:<OrderID> page displays. (Figure 15.12-3,
Frame B1 current)
Figure 15.12-3. Order Status Pages (A-B2) and Error Prompts (C)
4 Observe the detailed information listed in Figure 15.12-3, Frame B1 current. The Status fields display the most current activity or status of the order.
5 Using the navigation bar, click the Search for Status link to return to the Get Order Status page (Figure 15.12-3, Frame A).
6 To retrieve the status of a historical order: Enter The Email Id address (id must be associated with an historical order). Select the Number of Days from the list box: 30 Or enter a valid range using the BeginningDate (MM/DD/YYYY) and EndDate
(MM/DD/YYYY) text fields. Click the GetRangeofOrderStatus button to retrieve the most current status.
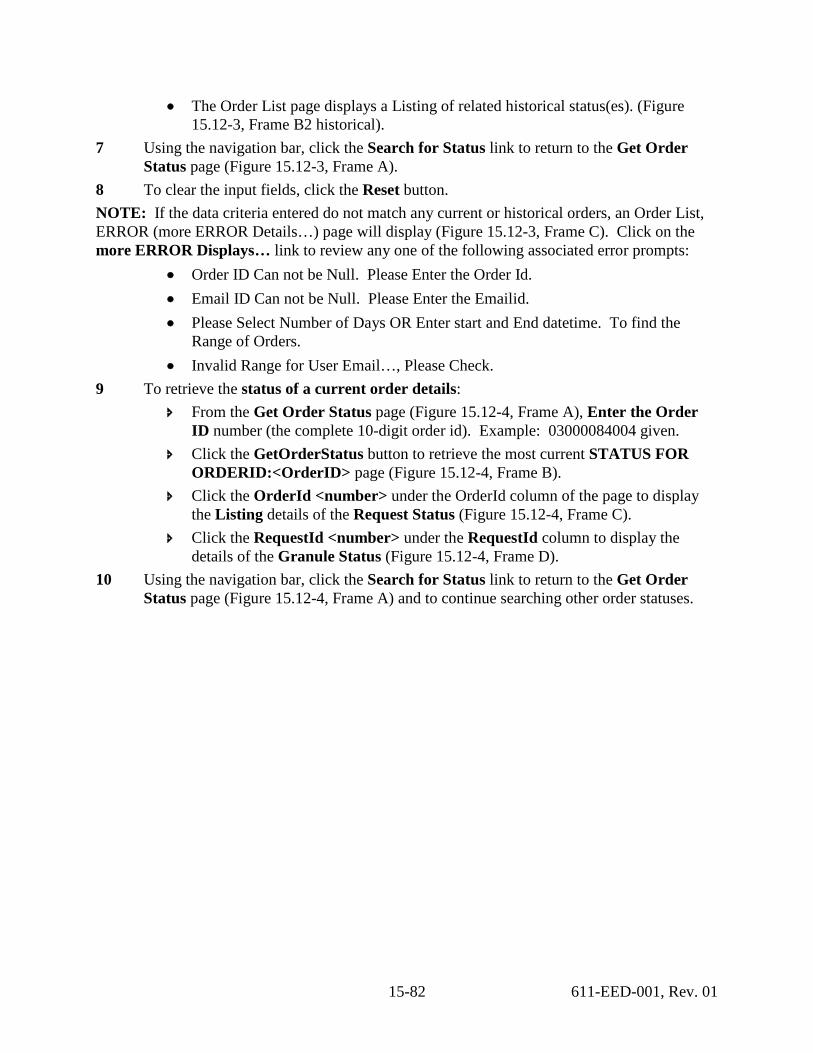
15-82 611-EED-001, Rev. 01
• The Order List page displays a Listing of related historical status(es). (Figure 15.12-3, Frame B2 historical).
7 Using the navigation bar, click the Search for Status link to return to the Get Order Status page (Figure 15.12-3, Frame A).
8 To clear the input fields, click the Reset button. NOTE: If the data criteria entered do not match any current or historical orders, an Order List, ERROR (more ERROR Details…) page will display (Figure 15.12-3, Frame C). Click on the more ERROR Displays… link to review any one of the following associated error prompts:
• Order ID Can not be Null. Please Enter the Order Id. • Email ID Can not be Null. Please Enter the Emailid. • Please Select Number of Days OR Enter start and End datetime. To find the
Range of Orders. • Invalid Range for User Email…, Please Check.
9 To retrieve the status of a current order details: From the Get Order Status page (Figure 15.12-4, Frame A), Enter the Order
ID number (the complete 10-digit order id). Example: 03000084004 given. Click the GetOrderStatus button to retrieve the most current STATUS FOR
ORDERID:<OrderID> page (Figure 15.12-4, Frame B). Click the OrderId <number> under the OrderId column of the page to display
the Listing details of the Request Status (Figure 15.12-4, Frame C). Click the RequestId <number> under the RequestId column to display the
details of the Granule Status (Figure 15.12-4, Frame D). 10 Using the navigation bar, click the Search for Status link to return to the Get Order
Status page (Figure 15.12-4, Frame A) and to continue searching other order statuses.
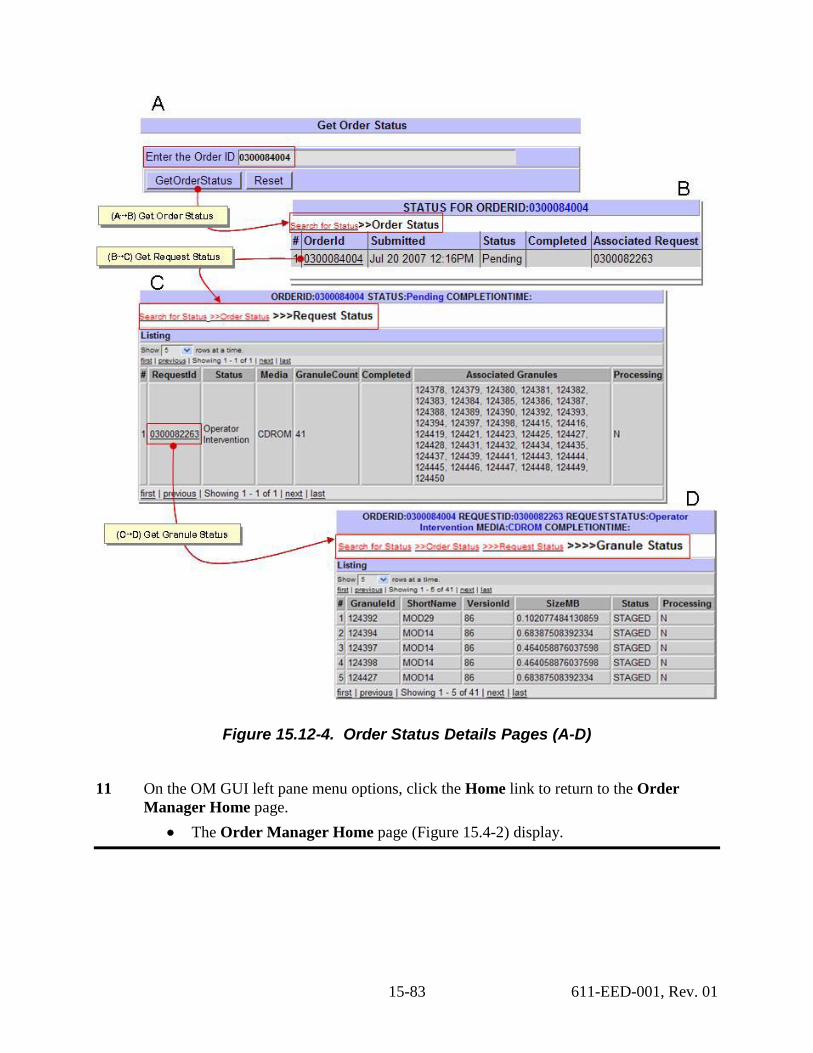
15-83 611-EED-001, Rev. 01
Figure 15.12-4. Order Status Details Pages (A-D)
11 On the OM GUI left pane menu options, click the Home link to return to the Order Manager Home page.
• The Order Manager Home page (Figure 15.4-2) display.
15-84 611-EED-001, Rev. 01
15.13 OM GUI – Logs The OM GUI Log keeps a record of every page that runs and every stored procedure that is called within those pages. It is proven helpful when encountering an error and can aid the System Administrator in fixing the problem.
• The actual log file (EcOmGui.log) is typically located in the /usr/ecs/MODE/CUSTOM/WWW/OMS/cgi-bin/logs directory on the Data Pool Server host (x0dps01) where the OM GUI is installed.
The OM GUI Log Viewer page (Figure 15.13-1, Frame A) provides the Operator the capability to view entries captured in the OM GUI log file.
15.13.1 Logs Submenu Page – OM GUI Log Viewer The OM GUI Log Viewer log file is located under the “cgi-bin/logs” install directory of the OM GUI. It is neither the web server log nor SYSLOG, but a log specifically generated by/for the OM GUI. It works similar to the UNIX <tail> command. If preferred, the log file can be viewed with any UNIX editor or visualizing command (e.g., pg, vi, view, more). The OM GUI Log Viewer submenu options will be examined using to the following checklist in Table 15.13-1):
Table 15.13-1. OM GUI Log Viewer - Activity Checklist
15.13.1.1 Viewing the OM GUI Log 1 Click Logs menu option to expand its submenu. 2 Click OM GUI Log Viewer submenu option to display its page.
• The OM GUI Log Viewer (Figure 15.13-1, Frame A) page displays.
Order Role Task Section Complete? 1 Distribution
Technician Viewing the OM GUI Log (P) 15.13.1.1
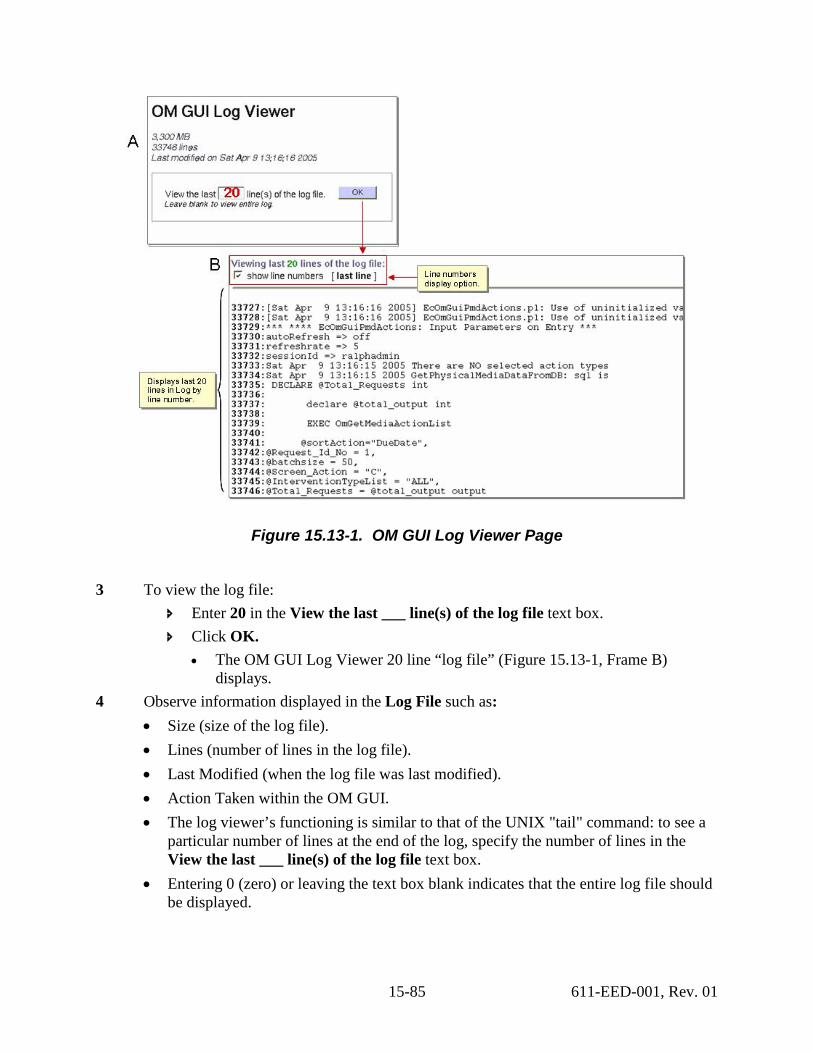
15-85 611-EED-001, Rev. 01
Figure 15.13-1. OM GUI Log Viewer Page
3 To view the log file: Enter 20 in the View the last ___ line(s) of the log file text box. Click OK.
• The OM GUI Log Viewer 20 line “log file” (Figure 15.13-1, Frame B) displays.
4 Observe information displayed in the Log File such as: • Size (size of the log file). • Lines (number of lines in the log file). • Last Modified (when the log file was last modified). • Action Taken within the OM GUI. • The log viewer’s functioning is similar to that of the UNIX "tail" command: to see a
particular number of lines at the end of the log, specify the number of lines in the View the last ___ line(s) of the log file text box.
• Entering 0 (zero) or leaving the text box blank indicates that the entire log file should be displayed.
15-86 611-EED-001, Rev. 01
• It is possible to specify a number that is equal to or greater than the total number of lines in the log file.
• After long periods of usage, the log file may grow to considerable size and it may take some time to load the entire log into the OM GUI Log Viewer page. − In most cases, viewing the last 100 - 500 lines would be adequate to assess
recent activity and would greatly decrease the amount of time to load the file. 5 On the OM GUI left pane menu options, click the Home link to return to the Order
Manager Home page. • The Order Manager Home page (Figure 15.4-2) display.
15.14 OM GUI – Admin Tools The Admin (Administrator) Tools page controls Operators’ profiles and configurations for every field, on every page that is generated within the OMS GUI. This tool is restricted for use by the site Administrator only, as it can substantially change the functionality of data generated within the OMS GUI. The OM GUI Admin Tools submenu options will be examined using the following checklist in Table 15.14-1:
Table 15.14-1. Admin Tools – Activity Checklist Order Role Task Section Complete? 1 Distribution
Technician Setting Permissions for OM GUI Action Pages
(P) 15.14.5.1
2 Distribution Technician
Setting Operator Profile (P) 15.14.6.1
3 Distribution Technician
Preparing Input Files for Use with the OM Configuration CI
(P) 15.14.7.1
4 Distribution Technician
Starting the OMS Configuration CI (P) 15.14.7.2
5 Distribution Technician
Configuring How Long Order-Tracking Infromation is Kept in the OMS Database
(P) 15.14.8.1
6 Distribution Technician
Getting OMS Configuration CI Help (P) 15.14.9.1
7 Distribution Technician
Preparing Input Files for Use with the SCLI
(P) 15.14.10.1
8 Distribution Technician
Run the OMS SCLI (P) 15.14.10.2
15-87 611-EED-001, Rev. 01
15.14.1 Admin Tools Submenu Page – Server/Database Parameters Reference Section 15.10.2 OM Configuration Submenu Page – Server/Database to check and modify server/database parameters values.
15.14.2 Admin Tools Submenu Page – Media Parameters Reference Section 15.10.3 OM Configuration Submenu Page – Media to check and modify media parameters values.
15.14.3 Admin Tools Submenu Page – Aging Parameters Reference Section 15.10.1 OM Configuration Submenu Page – Aging Parameters to configure aging parameters (rules) values.
15.14.4 Admin Tools Submenu Page – FtpPush Policy Reference Section 15.10.8 OM Configuration Submenu Page – FtpPush/SCP Policy to set permissions for FTP Push Policy Configuration Pages. These Global Settings (for all destinations) includes Non-Configured Destinations and Actions for Frequently Used destinations.
15.14.5 Admin Tools Submenu Page – Action Pages Provides the Administrator with a set of predefined permissions to set, remove, suspend or resume any/all related actions and/or related configurations on any/all related OM GUI pages. These predefined set of permissions for the OM GUI action pages are identified in Figure 15.14-1, OM GUI Admin Tools Action (Permissions) Pages.
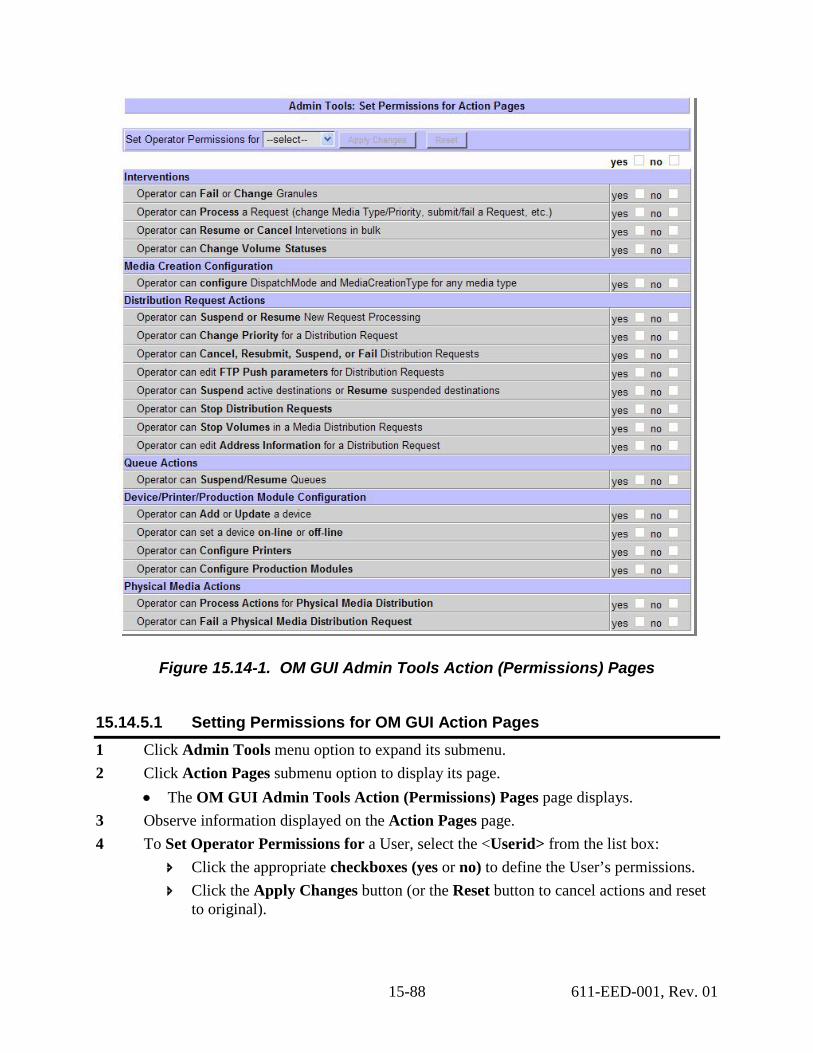
15-88 611-EED-001, Rev. 01
Figure 15.14-1. OM GUI Admin Tools Action (Permissions) Pages
15.14.5.1 Setting Permissions for OM GUI Action Pages 1 Click Admin Tools menu option to expand its submenu. 2 Click Action Pages submenu option to display its page.
• The OM GUI Admin Tools Action (Permissions) Pages page displays. 3 Observe information displayed on the Action Pages page. 4 To Set Operator Permissions for a User, select the <Userid> from the list box:
Click the appropriate checkboxes (yes or no) to define the User’s permissions. Click the Apply Changes button (or the Reset button to cancel actions and reset
to original).
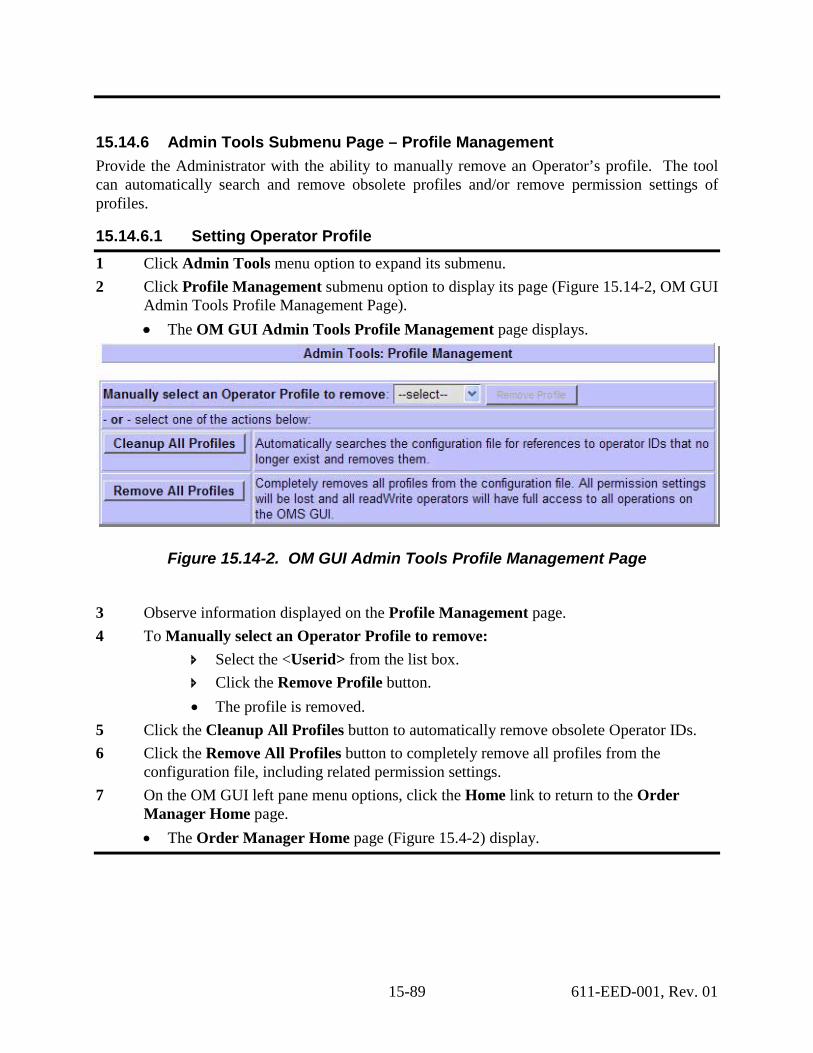
15-89 611-EED-001, Rev. 01
15.14.6 Admin Tools Submenu Page – Profile Management Provide the Administrator with the ability to manually remove an Operator’s profile. The tool can automatically search and remove obsolete profiles and/or remove permission settings of profiles.
15.14.6.1 Setting Operator Profile 1 Click Admin Tools menu option to expand its submenu. 2 Click Profile Management submenu option to display its page (Figure 15.14-2, OM GUI
Admin Tools Profile Management Page). • The OM GUI Admin Tools Profile Management page displays.
Figure 15.14-2. OM GUI Admin Tools Profile Management Page
3 Observe information displayed on the Profile Management page. 4 To Manually select an Operator Profile to remove:
Select the <Userid> from the list box. Click the Remove Profile button. • The profile is removed.
5 Click the Cleanup All Profiles button to automatically remove obsolete Operator IDs. 6 Click the Remove All Profiles button to completely remove all profiles from the
configuration file, including related permission settings. 7 On the OM GUI left pane menu options, click the Home link to return to the Order
Manager Home page. • The Order Manager Home page (Figure 15.4-2) display.
15-90 611-EED-001, Rev. 01
15.14.7 Science Command Line Interface (SCLI) in OMS The Science Command Line Interface (OmSCLI) allows the operator to acquire products by sending orders to the Order Manager Server given a operator’s file of granule identifiers and a file of media options. The operator can request products by FtpPush, FtpPull, and secure copies specified in the media parameter file. The OmSCLI will not generate Metadata Control Files (MCFs) since that functionality is performed by the ESDT Maintenance GUI. The OmSCLI is installed on the same host as the Order Manager Server. It includes a wrapper script acquire, a perl module containing database connection functionality, and a C++ -based executable which interfaces with the OrderManager client. It has its own configuration file containing database environment parameters. It is invoked with arguments that are described in the following section. There are four/five command line parameters and they are used in combination with each other. Table 15.14-2 describes these parameters.
Table 15.14-2. Command Line Parameters of the SCLI Tool Parameter Name Description
mode The mode in which the tool runs (i.e. OPS, TS1) parameterfile A file containing all of the information required to acquire and distribute the
request submitted. file A file that can contain up to 100 granules to be acquired. tag Unique request identification, used to track request in system. decrypt An optional flag to indicate that the password passed in is encrypted and
needs to be decrypted in SCLI.
15.14.7.1 Preparing Input Files for Use with the SCLI 1 Access a terminal window logged into the host where Order Manager is installed
x4oml01. 2 Create the Parameter File using vi editor commands.
• There are brackets ([]), and braces ({}) around some of the lines and groups • Brackets indicate optional entries containing content that is subject to change. • Braces indicate entries that are required but the content is subject to change.
Sample Parameter File: Example 1: PullMediaParameterFile: ECSUSERPROFILE = ECSGuest PRIORITY = NORMAL DDISTMEDIATYPE = FtpPull DDISTMEDIAFMT = FILEFORMAT USERSTRING = JoeUser_PULL DDISTNOTIFYTYPE = MAIL
15-91 611-EED-001, Rev. 01
NOTIFY = [email protected] Example 2: PushMediaParameterFile.input is: ECSUSERPROFILE = labuser FTPUSER = labuser FTPPASSWORD = Feb7A02 FTPHOST = f4eil01 FTPPUSHDEST = /usr/ecs/formal/<MODE>/CUSTOM/scli/PushArea PRIORITY = HIGH DDISTMEDIATYPE = FtpPush DDISTMEDIAFMT = FILEFORMAT USERSTRING = TomRoegner_Push DDISTNOTIFYTYPE = MAIL NOTIFY = [email protected] Example 3: SCPMediaParameterFile.input is: PRIORITY=VHIGH DDISTMEDIATYPE=scp DDISTNOTIFYTYPE=MAIL DDISTMEDIAFMT=FILEFORMAT ECSUSERPROFILE=labuser FTPUSER=labuser FTPHOST=f4spl01 USERSTRING=scp_Request_by_User_XXXX FTPPUSHDEST=/home/labuser/tomr/scp FTPPASSWORD=<password> [email protected] 3 Type ZZ
• vi exits and the edited file is saved. − To exit vi without saving the new entries in the file type :q! − Press Return/Enter.
• The UNIX command line prompt is displayed. 4 Create the Granule File using vi editor commands. This file can contain up to 100
granules and should adhere to the following format: • The ListOfGranules can be include one granule per line in the file. There are
two types: 1) geoid - a specific granule <data type>:<ShortName>.<VersionId>:<dbID> 2) LocalGranuleId - looks like the file name of the data before it was ingested in ECS
15-92 611-EED-001, Rev. 01
Sample Granule File: SC:MOD02HKM.002:2020633145 (a geoID) MYD29P1N.A2007266.h10v08.005.2007267221028.hdf (a Local Granule Id) Etc….
5 Type ZZ • vi exits and the edited file is saved.
− To exit vi without saving the new entries in the file type :q! − Press Return/Enter.
15.14.7.2 Run the OMS SCLI 1 Access a terminal window logged in a host. 2 Type cd /usr/ecs/MODE/CUSTOM/utilities then press Return/Enter.
• The MODE will most likely be one of the following operating modes: − OPS − TS1 − TS2
3 Enter the following command: acquire <mode> -p <parameterfile> -f <file>-t <tag> [-decrypt] • The –p parameter file is the file containingmedia options. • The –f <file> is the file containing the granule identifiers. • The –t <tag> is the unique request identification to the Order Manager.
Note: For each LocalGranuleId listed in the file, the OmSCLI will invoke a search for that LocalGranuleId in the AIM inventory database (via a EcOmDb stored procedure) and return all rows in a format that is a geoID.
15.15 OMS Database Cleanup Guidelines From the perspective of system performance it is very important to clean up the OMS database on a regular basis. Not cleaning up the database tables would have the following effects:
• Overall order-processing throughput would slow down due to the deterioration of OMS response times.
• Response time of the OMS GUI would increase. If order information must be kept for extended periods of time (e.g., for reporting purposes), it is recommended that on a regular basis information be copied (via scripts or Sybase replication) from the operational tables to a separate set of historical tables. The OMS database itself is an operational database and is not suited for long-term retention of order information.
15-93 611-EED-001, Rev. 01
To assist with database cleanup, the OMS provides the following two levels of cleanup: • Removal of completed OMS actions, interventions and notifications. • Removal of order-tracking information for completed orders.
− Order-tracking information for completed orders includes order, request, and granule information.
15.15.1 Removal of Completed OMS Actions, Interventions and Notifications The removal of completed OMS actions, interventions and notifications is configured by setting the values of the following parameters on the OM GUI:
• Delete Complete Interventions After. • Delete Complete Actions After.
Except for special circumstances when the DAAC needs to retain information for subsequent analysis by system support staff or DAAC performance engineers, the parameter settings should be as short as possible (e.g., two hours). For detailed instructions on how to modify OMS parameter values using the OM GUI refer to the procedure for Checking/Modifying Values Assigned to OMS Server or Database Parameters (previous section of this lesson).
15.15.2 Removal of Order-Tracking Information for Completed Orders The removal of order-tracking information for completed orders is configured using the OMS GUI. There are two parameters that will cause the OMS archive scripts to move data from the OMS tables to the OMS Archive tables. Archive Reqeust Age is the maximum number of days that a completed requests will stay in the regular OMS table before being moved to the archive tables. Archive Incomplete Request Age is the maximum number of days a request will be left in the regular OMS table even if it was not appropriately completed.
15.15.3 Fault Handling Failure events are classified according to the following three severity levels:
• Fatal error. − Returned when a request cannot be serviced, even with operator intervention. − For example, if a request is made to distribute data via ftp to a non-existent host,
the request is failed with a fatal error. • Retry error.
− Potentially recoverable error. − Normally, a retry error would be returned to the client only when the server
cannot recover from the error automatically. − A retry error may require operator assistance during recovery.
• Warning. − Provided when operations can proceed without interruption, but an unexpected
circumstance was detected.
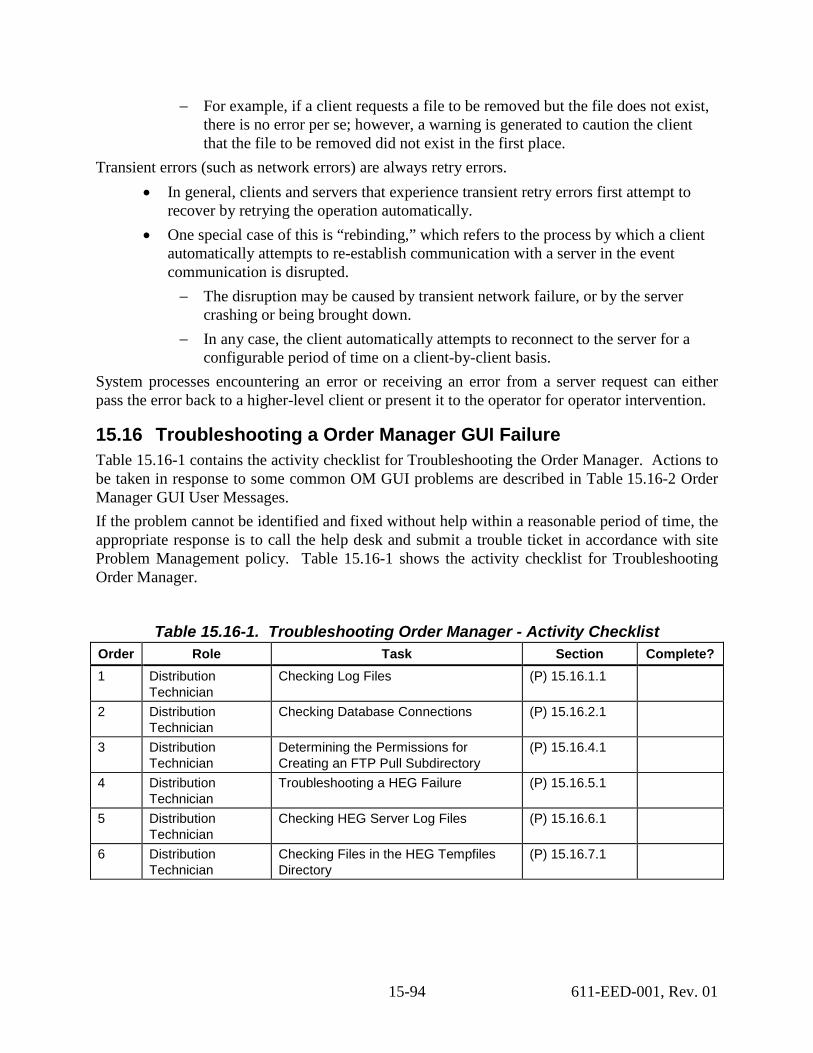
15-94 611-EED-001, Rev. 01
− For example, if a client requests a file to be removed but the file does not exist, there is no error per se; however, a warning is generated to caution the client that the file to be removed did not exist in the first place.
Transient errors (such as network errors) are always retry errors. • In general, clients and servers that experience transient retry errors first attempt to
recover by retrying the operation automatically. • One special case of this is “rebinding,” which refers to the process by which a client
automatically attempts to re-establish communication with a server in the event communication is disrupted. − The disruption may be caused by transient network failure, or by the server
crashing or being brought down. − In any case, the client automatically attempts to reconnect to the server for a
configurable period of time on a client-by-client basis. System processes encountering an error or receiving an error from a server request can either pass the error back to a higher-level client or present it to the operator for operator intervention.
15.16 Troubleshooting a Order Manager GUI Failure Table 15.16-1 contains the activity checklist for Troubleshooting the Order Manager. Actions to be taken in response to some common OM GUI problems are described in Table 15.16-2 Order Manager GUI User Messages. If the problem cannot be identified and fixed without help within a reasonable period of time, the appropriate response is to call the help desk and submit a trouble ticket in accordance with site Problem Management policy. Table 15.16-1 shows the activity checklist for Troubleshooting Order Manager.
Table 15.16-1. Troubleshooting Order Manager - Activity Checklist Order Role Task Section Complete? 1 Distribution
Technician Checking Log Files (P) 15.16.1.1
2 Distribution Technician
Checking Database Connections (P) 15.16.2.1
3 Distribution Technician
Determining the Permissions for Creating an FTP Pull Subdirectory
(P) 15.16.4.1
4 Distribution Technician
Troubleshooting a HEG Failure (P) 15.16.5.1
5 Distribution Technician
Checking HEG Server Log Files (P) 15.16.6.1
6 Distribution Technician
Checking Files in the HEG Tempfiles Directory
(P) 15.16.7.1
15-95 611-EED-001, Rev. 01
Table 15.16-2. Order Manager GUI User Messages (1 of 13) Message Text Impact Cause and Corrective Action
!!! ERROR: It appears that all granules have been failed. You can not submit or partition a request with all FAILED granules. This request should be failed. To do this, Select "Fail Request" from the Request Disposition section and try again. [Displayed in a dialog box]
Intervention cannot be resolved.
The message appears on the Open Intervention Detail page. If all the granules in a request have been failed, the request can no longer be submitted or partitioned. The only corrective action is to fail the entire request or place it on hold. 1. Click on the OK button to dismiss the dialog box. 2. Either fail the entire request or place it on hold. [For detailed instructions refer to the procedure for Responding to an Open Intervention (previous section of this lesson).]
All of the granules for this request have been failed. You can not submit or partition the request because the submission will fail and another operator intervention will be created for it. This request should be failed. Return to the previous page and select "Fail Request" under the Request Disposition section.
Intervention cannot be resolved.
The operator failed all the granules for a particular request and tried to submit or partition it. Since there are no granules, there is nothing to submit or partition. The entire request should be failed. 1. Click on the icon in the OM GUI navigation frame to redisplay the Open Intervention Detail (Intervention for Request x) page. 2. Fail the entire request. [For detailed instructions refer to the procedure for Responding to an Open Intervention (previous section of this lesson).]
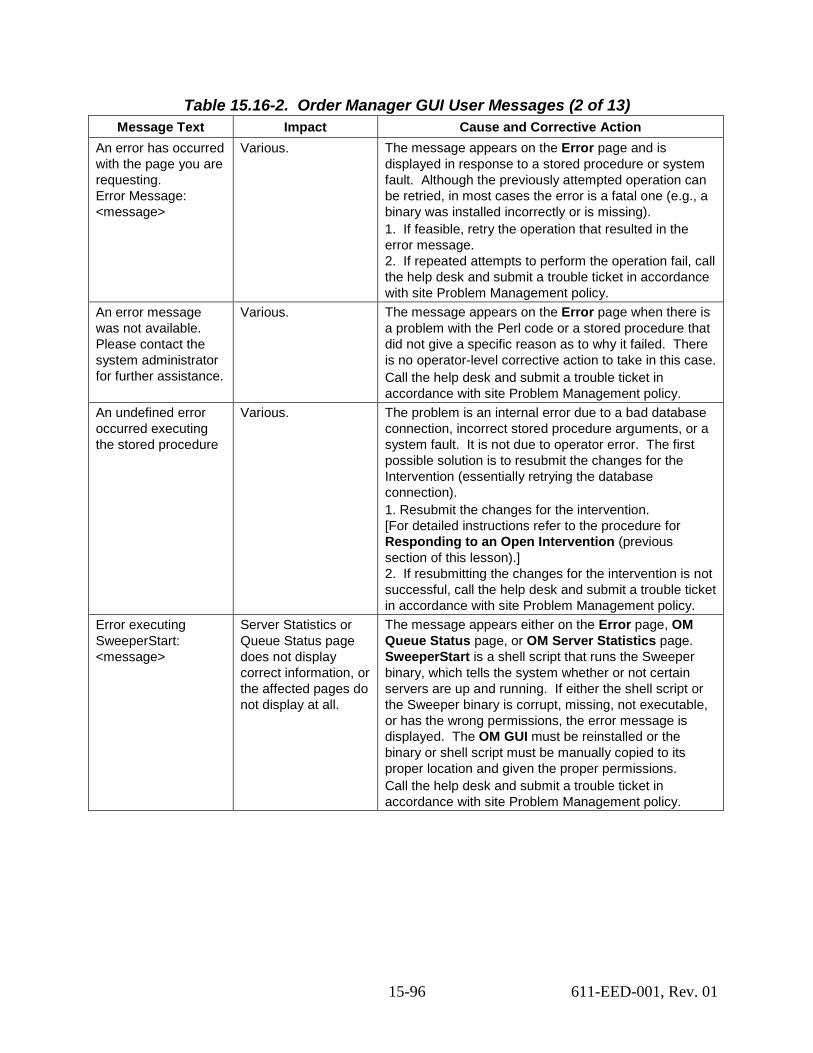
15-96 611-EED-001, Rev. 01
Table 15.16-2. Order Manager GUI User Messages (2 of 13) Message Text Impact Cause and Corrective Action
An error has occurred with the page you are requesting. Error Message: <message>
Various. The message appears on the Error page and is displayed in response to a stored procedure or system fault. Although the previously attempted operation can be retried, in most cases the error is a fatal one (e.g., a binary was installed incorrectly or is missing). 1. If feasible, retry the operation that resulted in the error message. 2. If repeated attempts to perform the operation fail, call the help desk and submit a trouble ticket in accordance with site Problem Management policy.
An error message was not available. Please contact the system administrator for further assistance.
Various. The message appears on the Error page when there is a problem with the Perl code or a stored procedure that did not give a specific reason as to why it failed. There is no operator-level corrective action to take in this case. Call the help desk and submit a trouble ticket in accordance with site Problem Management policy.
An undefined error occurred executing the stored procedure
Various. The problem is an internal error due to a bad database connection, incorrect stored procedure arguments, or a system fault. It is not due to operator error. The first possible solution is to resubmit the changes for the Intervention (essentially retrying the database connection). 1. Resubmit the changes for the intervention. [For detailed instructions refer to the procedure for Responding to an Open Intervention (previous section of this lesson).] 2. If resubmitting the changes for the intervention is not successful, call the help desk and submit a trouble ticket in accordance with site Problem Management policy.
Error executing SweeperStart: <message>
Server Statistics or Queue Status page does not display correct information, or the affected pages do not display at all.
The message appears either on the Error page, OM Queue Status page, or OM Server Statistics page. SweeperStart is a shell script that runs the Sweeper binary, which tells the system whether or not certain servers are up and running. If either the shell script or the Sweeper binary is corrupt, missing, not executable, or has the wrong permissions, the error message is displayed. The OM GUI must be reinstalled or the binary or shell script must be manually copied to its proper location and given the proper permissions. Call the help desk and submit a trouble ticket in accordance with site Problem Management policy.
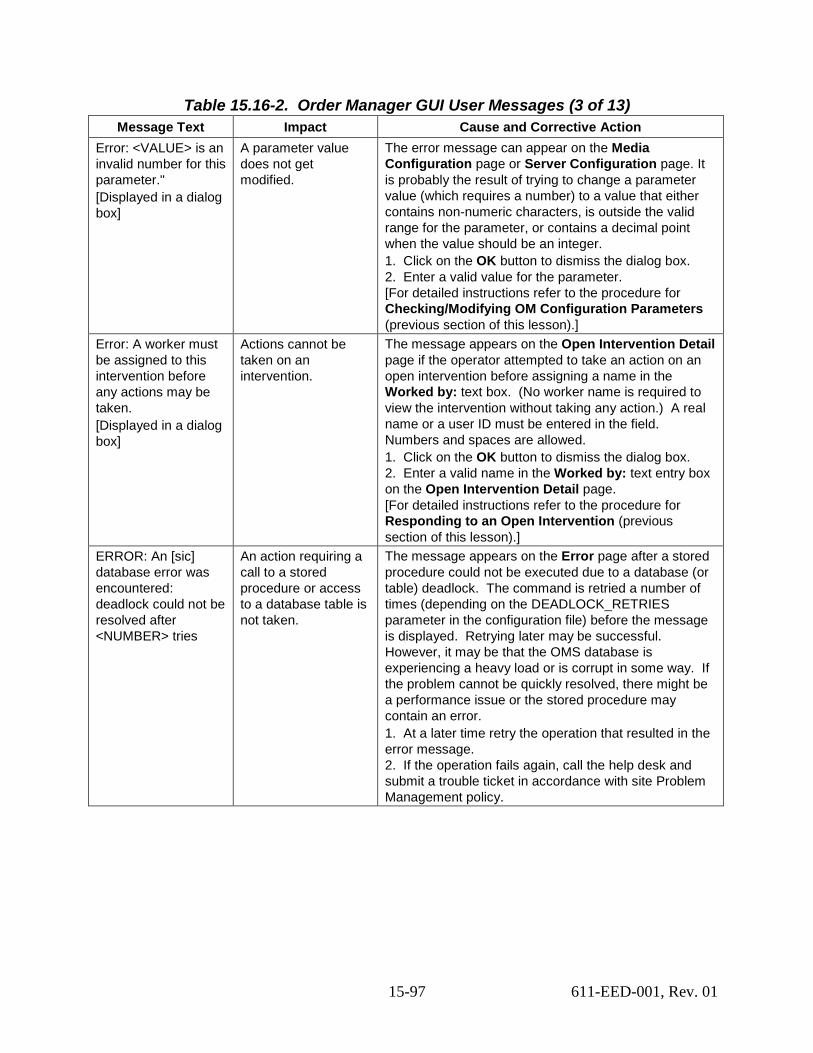
15-97 611-EED-001, Rev. 01
Table 15.16-2. Order Manager GUI User Messages (3 of 13) Message Text Impact Cause and Corrective Action
Error: <VALUE> is an invalid number for this parameter." [Displayed in a dialog box]
A parameter value does not get modified.
The error message can appear on the Media Configuration page or Server Configuration page. It is probably the result of trying to change a parameter value (which requires a number) to a value that either contains non-numeric characters, is outside the valid range for the parameter, or contains a decimal point when the value should be an integer. 1. Click on the OK button to dismiss the dialog box. 2. Enter a valid value for the parameter. [For detailed instructions refer to the procedure for Checking/Modifying OM Configuration Parameters (previous section of this lesson).]
Error: A worker must be assigned to this intervention before any actions may be taken. [Displayed in a dialog box]
Actions cannot be taken on an intervention.
The message appears on the Open Intervention Detail page if the operator attempted to take an action on an open intervention before assigning a name in the Worked by: text box. (No worker name is required to view the intervention without taking any action.) A real name or a user ID must be entered in the field. Numbers and spaces are allowed. 1. Click on the OK button to dismiss the dialog box. 2. Enter a valid name in the Worked by: text entry box on the Open Intervention Detail page. [For detailed instructions refer to the procedure for Responding to an Open Intervention (previous section of this lesson).]
ERROR: An [sic] database error was encountered: deadlock could not be resolved after <NUMBER> tries
An action requiring a call to a stored procedure or access to a database table is not taken.
The message appears on the Error page after a stored procedure could not be executed due to a database (or table) deadlock. The command is retried a number of times (depending on the DEADLOCK_RETRIES parameter in the configuration file) before the message is displayed. Retrying later may be successful. However, it may be that the OMS database is experiencing a heavy load or is corrupt in some way. If the problem cannot be quickly resolved, there might be a performance issue or the stored procedure may contain an error. 1. At a later time retry the operation that resulted in the error message. 2. If the operation fails again, call the help desk and submit a trouble ticket in accordance with site Problem Management policy.
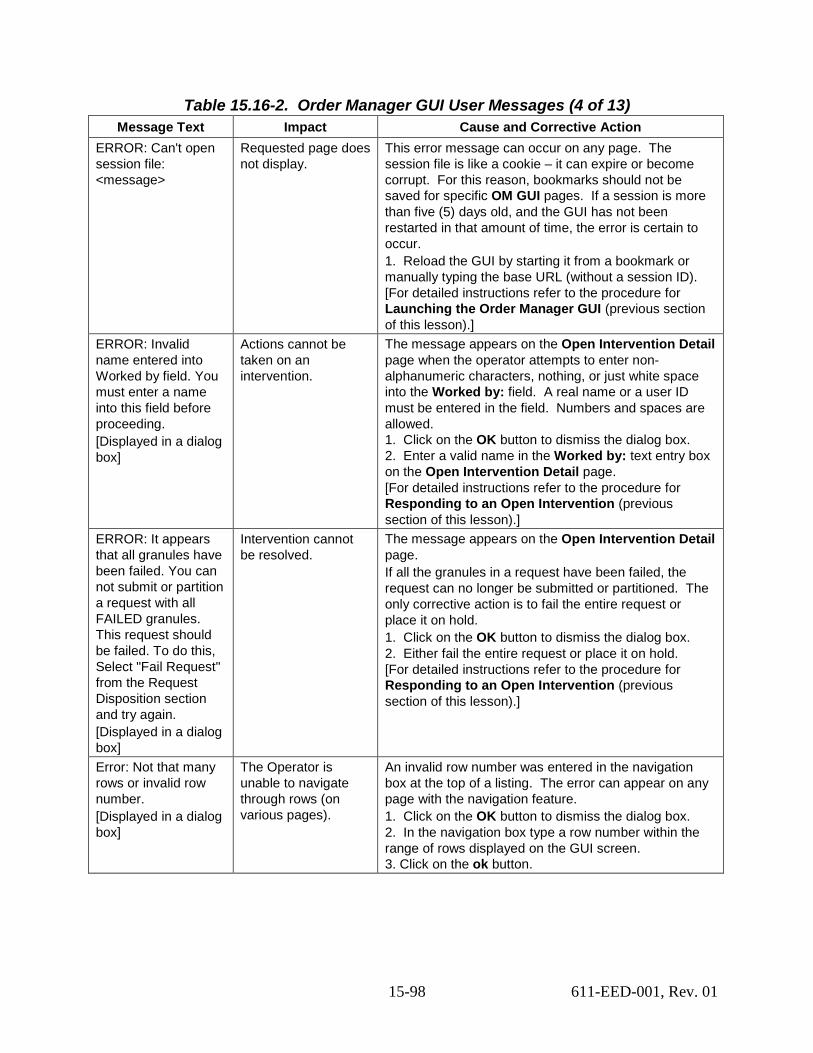
15-98 611-EED-001, Rev. 01
Table 15.16-2. Order Manager GUI User Messages (4 of 13) Message Text Impact Cause and Corrective Action
ERROR: Can't open session file: <message>
Requested page does not display.
This error message can occur on any page. The session file is like a cookie – it can expire or become corrupt. For this reason, bookmarks should not be saved for specific OM GUI pages. If a session is more than five (5) days old, and the GUI has not been restarted in that amount of time, the error is certain to occur. 1. Reload the GUI by starting it from a bookmark or manually typing the base URL (without a session ID). [For detailed instructions refer to the procedure for Launching the Order Manager GUI (previous section of this lesson).]
ERROR: Invalid name entered into Worked by field. You must enter a name into this field before proceeding. [Displayed in a dialog box]
Actions cannot be taken on an intervention.
The message appears on the Open Intervention Detail page when the operator attempts to enter non-alphanumeric characters, nothing, or just white space into the Worked by: field. A real name or a user ID must be entered in the field. Numbers and spaces are allowed. 1. Click on the OK button to dismiss the dialog box. 2. Enter a valid name in the Worked by: text entry box on the Open Intervention Detail page. [For detailed instructions refer to the procedure for Responding to an Open Intervention (previous section of this lesson).]
ERROR: It appears that all granules have been failed. You can not submit or partition a request with all FAILED granules. This request should be failed. To do this, Select "Fail Request" from the Request Disposition section and try again. [Displayed in a dialog box]
Intervention cannot be resolved.
The message appears on the Open Intervention Detail page. If all the granules in a request have been failed, the request can no longer be submitted or partitioned. The only corrective action is to fail the entire request or place it on hold. 1. Click on the OK button to dismiss the dialog box. 2. Either fail the entire request or place it on hold. [For detailed instructions refer to the procedure for Responding to an Open Intervention (previous section of this lesson).]
Error: Not that many rows or invalid row number. [Displayed in a dialog box]
The Operator is unable to navigate through rows (on various pages).
An invalid row number was entered in the navigation box at the top of a listing. The error can appear on any page with the navigation feature. 1. Click on the OK button to dismiss the dialog box. 2. In the navigation box type a row number within the range of rows displayed on the GUI screen. 3. Click on the ok button.
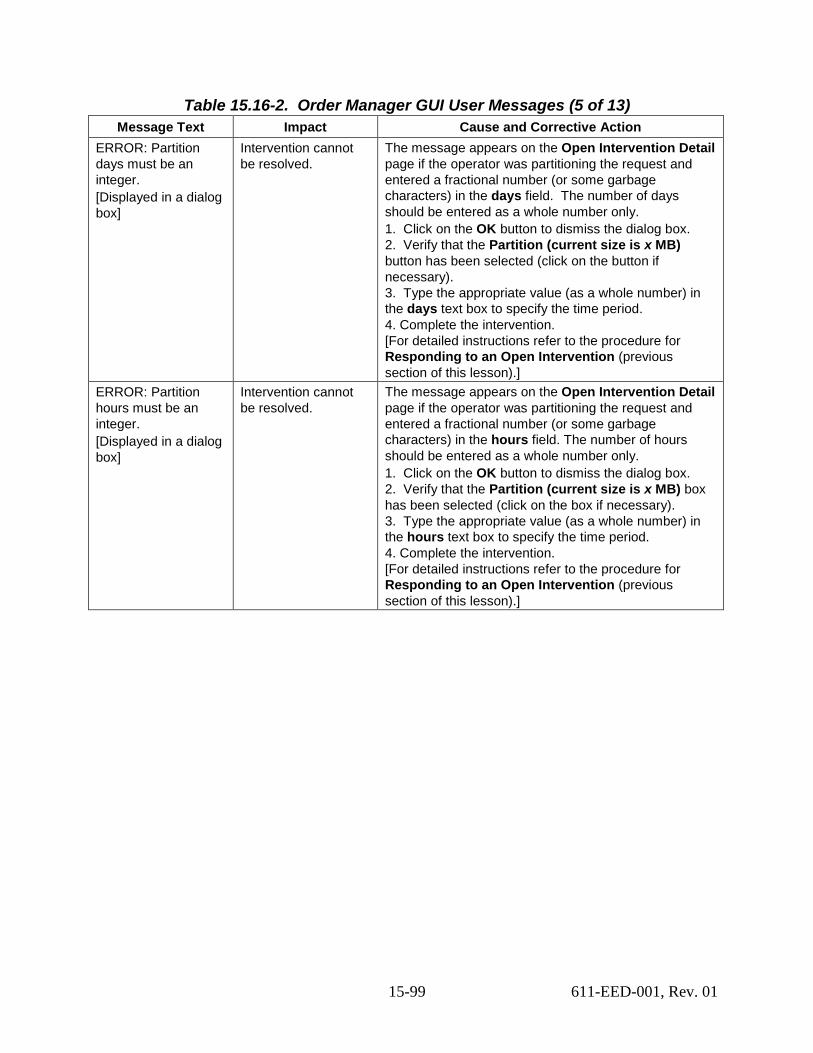
15-99 611-EED-001, Rev. 01
Table 15.16-2. Order Manager GUI User Messages (5 of 13) Message Text Impact Cause and Corrective Action
ERROR: Partition days must be an integer. [Displayed in a dialog box]
Intervention cannot be resolved.
The message appears on the Open Intervention Detail page if the operator was partitioning the request and entered a fractional number (or some garbage characters) in the days field. The number of days should be entered as a whole number only. 1. Click on the OK button to dismiss the dialog box. 2. Verify that the Partition (current size is x MB) button has been selected (click on the button if necessary). 3. Type the appropriate value (as a whole number) in the days text box to specify the time period. 4. Complete the intervention. [For detailed instructions refer to the procedure for Responding to an Open Intervention (previous section of this lesson).]
ERROR: Partition hours must be an integer. [Displayed in a dialog box]
Intervention cannot be resolved.
The message appears on the Open Intervention Detail page if the operator was partitioning the request and entered a fractional number (or some garbage characters) in the hours field. The number of hours should be entered as a whole number only. 1. Click on the OK button to dismiss the dialog box. 2. Verify that the Partition (current size is x MB) box has been selected (click on the box if necessary). 3. Type the appropriate value (as a whole number) in the hours text box to specify the time period. 4. Complete the intervention. [For detailed instructions refer to the procedure for Responding to an Open Intervention (previous section of this lesson).]
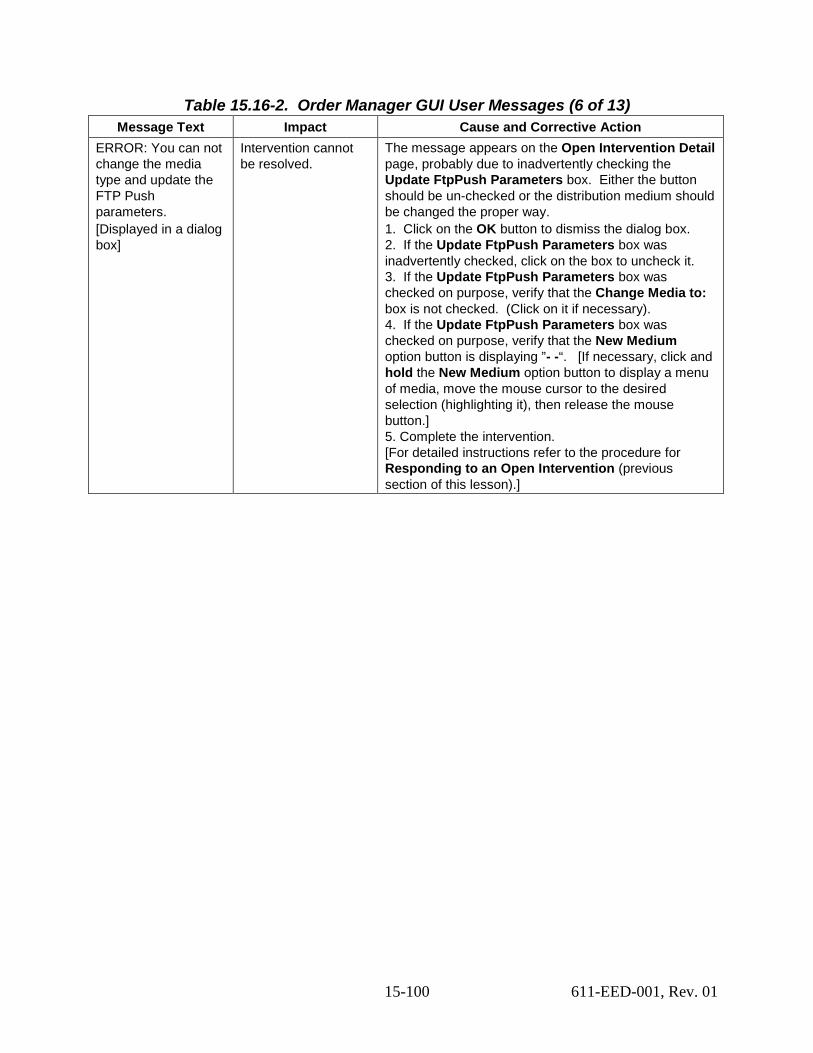
15-100 611-EED-001, Rev. 01
Table 15.16-2. Order Manager GUI User Messages (6 of 13) Message Text Impact Cause and Corrective Action
ERROR: You can not change the media type and update the FTP Push parameters. [Displayed in a dialog box]
Intervention cannot be resolved.
The message appears on the Open Intervention Detail page, probably due to inadvertently checking the Update FtpPush Parameters box. Either the button should be un-checked or the distribution medium should be changed the proper way. 1. Click on the OK button to dismiss the dialog box. 2. If the Update FtpPush Parameters box was inadvertently checked, click on the box to uncheck it. 3. If the Update FtpPush Parameters box was checked on purpose, verify that the Change Media to: box is not checked. (Click on it if necessary). 4. If the Update FtpPush Parameters box was checked on purpose, verify that the New Medium option button is displaying ”- -“. [If necessary, click and hold the New Medium option button to display a menu of media, move the mouse cursor to the desired selection (highlighting it), then release the mouse button.] 5. Complete the intervention. [For detailed instructions refer to the procedure for Responding to an Open Intervention (previous section of this lesson).]
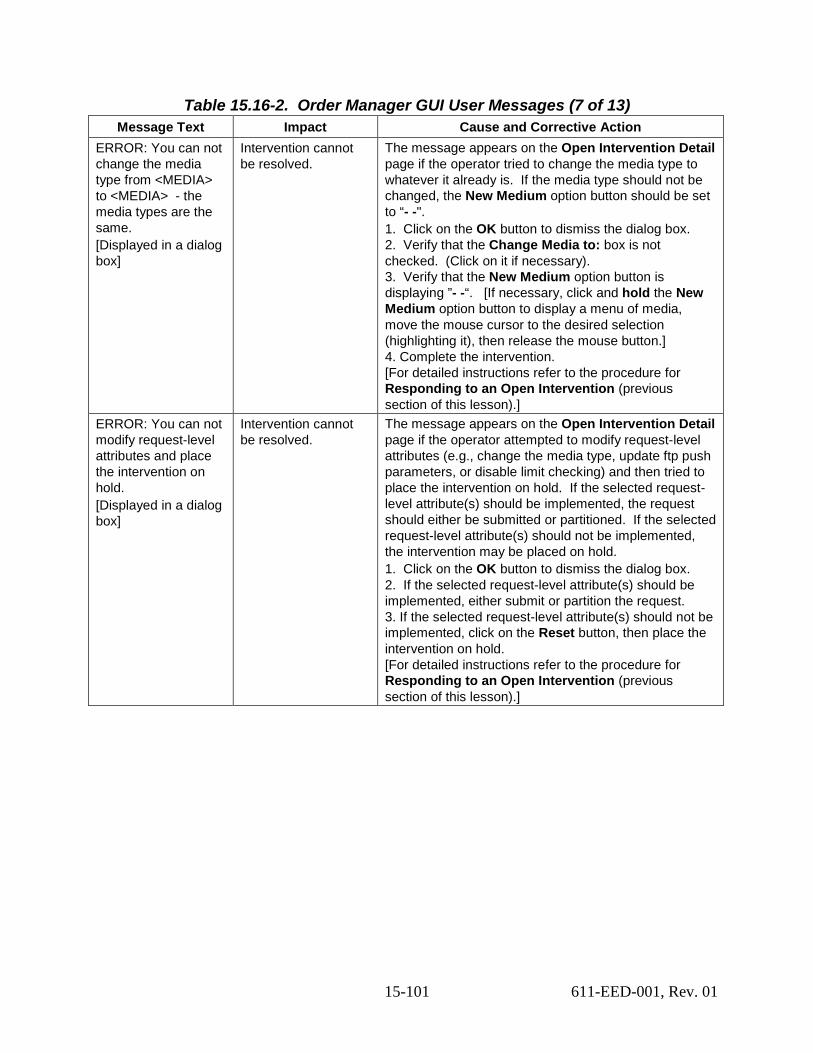
15-101 611-EED-001, Rev. 01
Table 15.16-2. Order Manager GUI User Messages (7 of 13) Message Text Impact Cause and Corrective Action
ERROR: You can not change the media type from <MEDIA> to <MEDIA> - the media types are the same. [Displayed in a dialog box]
Intervention cannot be resolved.
The message appears on the Open Intervention Detail page if the operator tried to change the media type to whatever it already is. If the media type should not be changed, the New Medium option button should be set to “- -". 1. Click on the OK button to dismiss the dialog box. 2. Verify that the Change Media to: box is not checked. (Click on it if necessary). 3. Verify that the New Medium option button is displaying ”- -“. [If necessary, click and hold the New Medium option button to display a menu of media, move the mouse cursor to the desired selection (highlighting it), then release the mouse button.] 4. Complete the intervention. [For detailed instructions refer to the procedure for Responding to an Open Intervention (previous section of this lesson).]
ERROR: You can not modify request-level attributes and place the intervention on hold. [Displayed in a dialog box]
Intervention cannot be resolved.
The message appears on the Open Intervention Detail page if the operator attempted to modify request-level attributes (e.g., change the media type, update ftp push parameters, or disable limit checking) and then tried to place the intervention on hold. If the selected request-level attribute(s) should be implemented, the request should either be submitted or partitioned. If the selected request-level attribute(s) should not be implemented, the intervention may be placed on hold. 1. Click on the OK button to dismiss the dialog box. 2. If the selected request-level attribute(s) should be implemented, either submit or partition the request. 3. If the selected request-level attribute(s) should not be implemented, click on the Reset button, then place the intervention on hold. [For detailed instructions refer to the procedure for Responding to an Open Intervention (previous section of this lesson).]

15-102 611-EED-001, Rev. 01
Table 15.16-2. Order Manager GUI User Messages (8 of 13) Message Text Impact Cause and Corrective Action
ERROR: You can not modify request-level attributes if you are failing the request. [Displayed in a dialog box]
Intervention cannot be resolved.
The message appears on the Open Intervention Detail page if the operator attempted to modify request-level attributes (e.g., change the media type, update ftp push parameters, or disable limit checking), then tried to fail the entire request. If the request should be failed, the request-level attribute changes should be deselected, then the request can be failed. 1. Click on the OK button to dismiss the dialog box. 2. If the selected request-level attribute(s) should be implemented, either submit or partition the request. 3. If the request should be failed, first deselect the request-level attribute(s), then fail the request. [For detailed instructions refer to the procedure for Responding to an Open Intervention (previous section of this lesson).]
ERROR: You must assign a worker to this intervention before proceeding. [Displayed in a dialog box]
Actions cannot be taken on an intervention.
The message appears on the Open Intervention Detail page if the operator attempted to take an action on an open intervention before assigning a name in the Worked by: text box. (No worker name is required to view the intervention without taking any action.) A real name or a user ID must be entered in the field. Numbers and spaces are allowed. 1. Click on the OK button to dismiss the dialog box. 2. Enter a valid name in the Worked by: text entry box on the Open Intervention Detail page. [For detailed instructions refer to the procedure for Responding to an Open Intervention (previous section of this lesson).]
ERROR: You must enter a name into the Worked by field before proceeding. [Displayed in a dialog box]
Actions cannot be taken on an intervention.
The message appears on the Open Intervention Detail page if the operator attempted to take an action on an open intervention before assigning a name in the Worked by: text box. (No worker name is required to view the intervention without taking any action.) A real name or a user ID must be entered in the field. Numbers and spaces are allowed. 1. Click on the OK button to dismiss the dialog box. 2. Enter a valid name in the Worked by: text entry box on the Open Intervention Detail page. [For detailed instructions refer to the procedure for Responding to an Open Intervention (previous section of this lesson).]
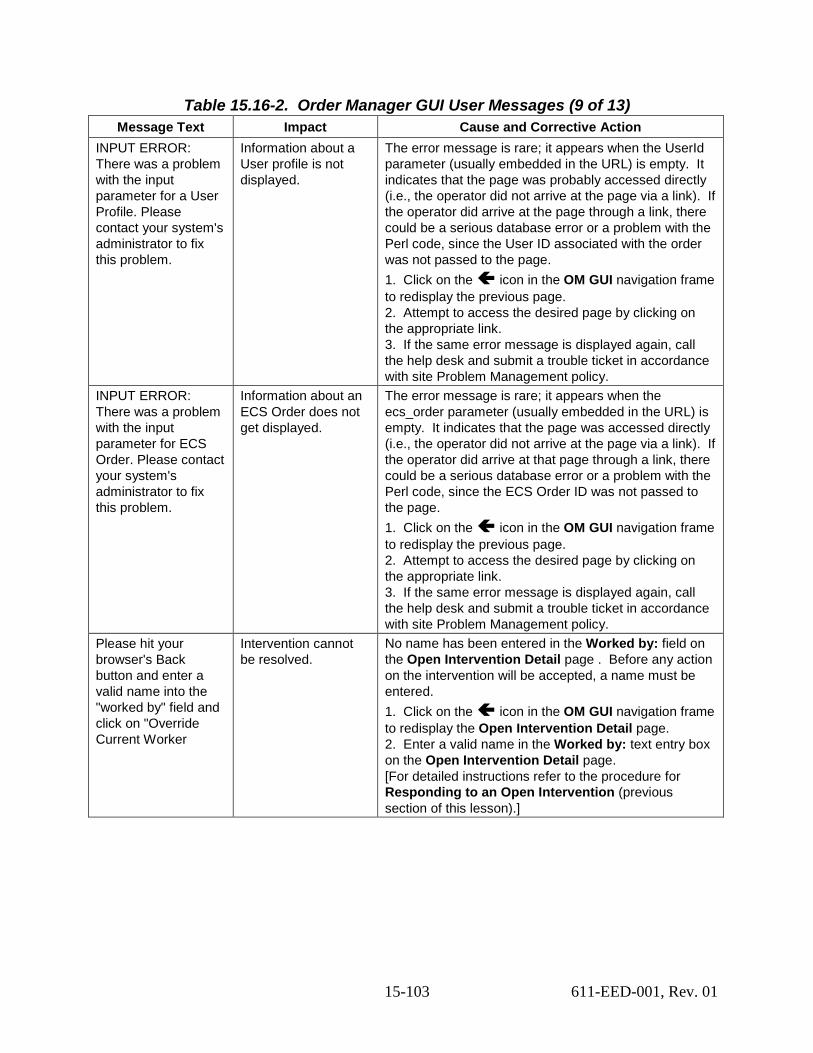
15-103 611-EED-001, Rev. 01
Table 15.16-2. Order Manager GUI User Messages (9 of 13) Message Text Impact Cause and Corrective Action
INPUT ERROR: There was a problem with the input parameter for a User Profile. Please contact your system's administrator to fix this problem.
Information about a User profile is not displayed.
The error message is rare; it appears when the UserId parameter (usually embedded in the URL) is empty. It indicates that the page was probably accessed directly (i.e., the operator did not arrive at the page via a link). If the operator did arrive at the page through a link, there could be a serious database error or a problem with the Perl code, since the User ID associated with the order was not passed to the page. 1. Click on the icon in the OM GUI navigation frame to redisplay the previous page. 2. Attempt to access the desired page by clicking on the appropriate link. 3. If the same error message is displayed again, call the help desk and submit a trouble ticket in accordance with site Problem Management policy.
INPUT ERROR: There was a problem with the input parameter for ECS Order. Please contact your system's administrator to fix this problem.
Information about an ECS Order does not get displayed.
The error message is rare; it appears when the ecs_order parameter (usually embedded in the URL) is empty. It indicates that the page was accessed directly (i.e., the operator did not arrive at the page via a link). If the operator did arrive at that page through a link, there could be a serious database error or a problem with the Perl code, since the ECS Order ID was not passed to the page. 1. Click on the icon in the OM GUI navigation frame to redisplay the previous page. 2. Attempt to access the desired page by clicking on the appropriate link. 3. If the same error message is displayed again, call the help desk and submit a trouble ticket in accordance with site Problem Management policy.
Please hit your browser's Back button and enter a valid name into the "worked by" field and click on "Override Current Worker
Intervention cannot be resolved.
No name has been entered in the Worked by: field on the Open Intervention Detail page . Before any action on the intervention will be accepted, a name must be entered. 1. Click on the icon in the OM GUI navigation frame to redisplay the Open Intervention Detail page. 2. Enter a valid name in the Worked by: text entry box on the Open Intervention Detail page. [For detailed instructions refer to the procedure for Responding to an Open Intervention (previous section of this lesson).]
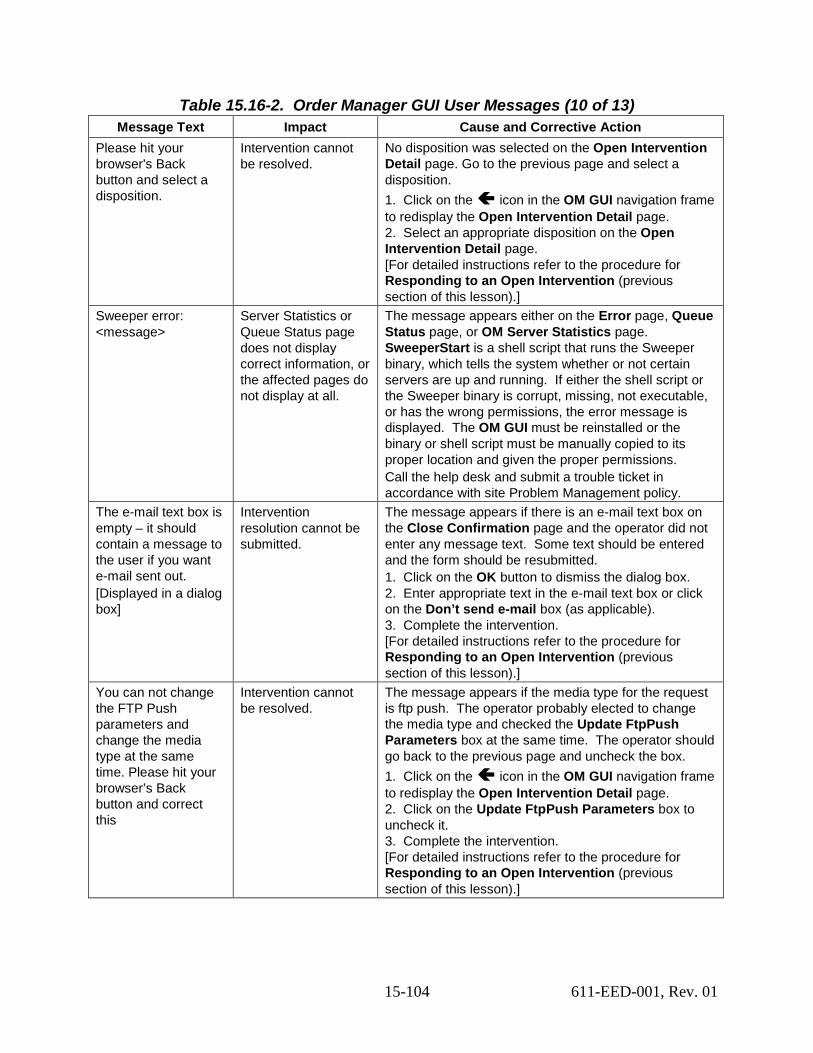
15-104 611-EED-001, Rev. 01
Table 15.16-2. Order Manager GUI User Messages (10 of 13) Message Text Impact Cause and Corrective Action
Please hit your browser's Back button and select a disposition.
Intervention cannot be resolved.
No disposition was selected on the Open Intervention Detail page. Go to the previous page and select a disposition. 1. Click on the icon in the OM GUI navigation frame to redisplay the Open Intervention Detail page. 2. Select an appropriate disposition on the Open Intervention Detail page. [For detailed instructions refer to the procedure for Responding to an Open Intervention (previous section of this lesson).]
Sweeper error: <message>
Server Statistics or Queue Status page does not display correct information, or the affected pages do not display at all.
The message appears either on the Error page, Queue Status page, or OM Server Statistics page. SweeperStart is a shell script that runs the Sweeper binary, which tells the system whether or not certain servers are up and running. If either the shell script or the Sweeper binary is corrupt, missing, not executable, or has the wrong permissions, the error message is displayed. The OM GUI must be reinstalled or the binary or shell script must be manually copied to its proper location and given the proper permissions. Call the help desk and submit a trouble ticket in accordance with site Problem Management policy.
The e-mail text box is empty – it should contain a message to the user if you want e-mail sent out. [Displayed in a dialog box]
Intervention resolution cannot be submitted.
The message appears if there is an e-mail text box on the Close Confirmation page and the operator did not enter any message text. Some text should be entered and the form should be resubmitted. 1. Click on the OK button to dismiss the dialog box. 2. Enter appropriate text in the e-mail text box or click on the Don’t send e-mail box (as applicable). 3. Complete the intervention. [For detailed instructions refer to the procedure for Responding to an Open Intervention (previous section of this lesson).]
You can not change the FTP Push parameters and change the media type at the same time. Please hit your browser’s Back button and correct this
Intervention cannot be resolved.
The message appears if the media type for the request is ftp push. The operator probably elected to change the media type and checked the Update FtpPush Parameters box at the same time. The operator should go back to the previous page and uncheck the box. 1. Click on the icon in the OM GUI navigation frame to redisplay the Open Intervention Detail page. 2. Click on the Update FtpPush Parameters box to uncheck it. 3. Complete the intervention. [For detailed instructions refer to the procedure for Responding to an Open Intervention (previous section of this lesson).]

15-105 611-EED-001, Rev. 01
Table 15.16-2. Order Manager GUI User Messages (11 of 13) Message Text Impact Cause and Corrective Action
You can not update the FTP Push parameters for this request because the media type is <old media>. Please hit your browser’s Back button and correct this.
Intervention cannot be resolved.
This message appears if the operator inadvertently checked the Update FtpPush Parameters box, even though the media type for the request is not ftp push. The operator should go back and uncheck this box. The error message should be quite rare, because normally the Update FtpPush Parameters box does not appear if the media type is not ftp push. 1. Click on the icon in the OM GUI navigation frame to redisplay the Open Intervention Detail page. 2. Click on the Update FtpPush Parameters box to uncheck it. 3. Complete the intervention. [For detailed instructions refer to the procedure for Responding to an Open Intervention (previous section of this lesson).]
You have entered partitioning days/hours, but have not indicated that you want to spread the request over this time period! (you probably forgot to check the AND box). Hit your browser's Back button to correct this.
Intervention cannot be resolved.
The operator probably intended to partition the request but forgot to check the “and” box. The redundancy is intended to ensure that the correct action is taken. 1. Click on the icon in the OM GUI navigation frame to redisplay the Open Intervention Detail page. 2. Click on the box in front of and spread request over. 3. Complete the intervention. [For detailed instructions refer to the procedure for Responding to an Open Intervention (previous section of this lesson).]
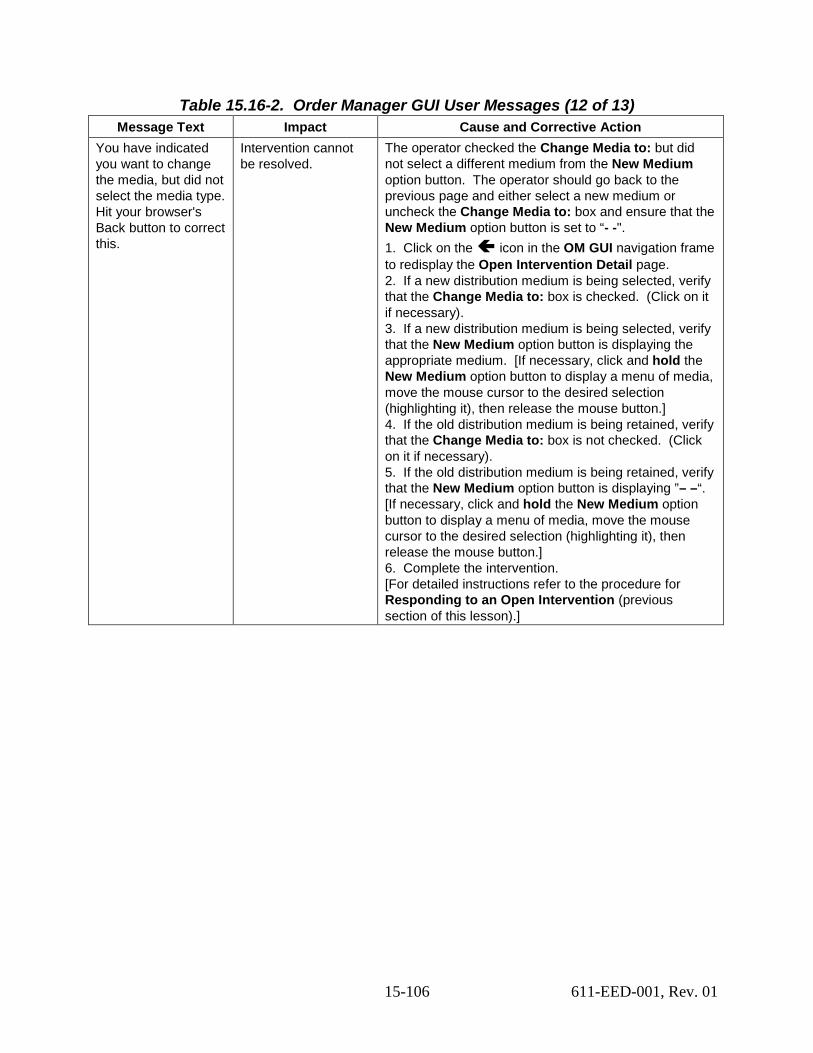
15-106 611-EED-001, Rev. 01
Table 15.16-2. Order Manager GUI User Messages (12 of 13) Message Text Impact Cause and Corrective Action
You have indicated you want to change the media, but did not select the media type. Hit your browser's Back button to correct this.
Intervention cannot be resolved.
The operator checked the Change Media to: but did not select a different medium from the New Medium option button. The operator should go back to the previous page and either select a new medium or uncheck the Change Media to: box and ensure that the New Medium option button is set to “- -". 1. Click on the icon in the OM GUI navigation frame to redisplay the Open Intervention Detail page. 2. If a new distribution medium is being selected, verify that the Change Media to: box is checked. (Click on it if necessary). 3. If a new distribution medium is being selected, verify that the New Medium option button is displaying the appropriate medium. [If necessary, click and hold the New Medium option button to display a menu of media, move the mouse cursor to the desired selection (highlighting it), then release the mouse button.] 4. If the old distribution medium is being retained, verify that the Change Media to: box is not checked. (Click on it if necessary). 5. If the old distribution medium is being retained, verify that the New Medium option button is displaying ”– –“. [If necessary, click and hold the New Medium option button to display a menu of media, move the mouse cursor to the desired selection (highlighting it), then release the mouse button.] 6. Complete the intervention. [For detailed instructions refer to the procedure for Responding to an Open Intervention (previous section of this lesson).]
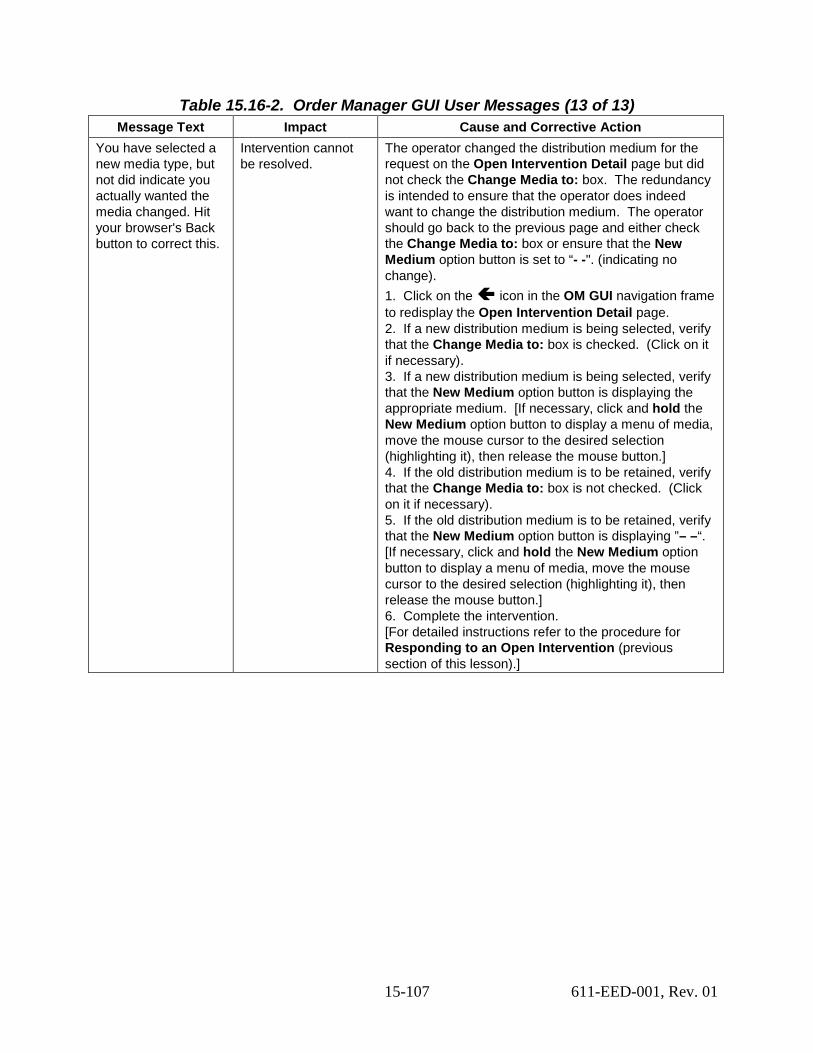
15-107 611-EED-001, Rev. 01
Table 15.16-2. Order Manager GUI User Messages (13 of 13) Message Text Impact Cause and Corrective Action
You have selected a new media type, but not did indicate you actually wanted the media changed. Hit your browser's Back button to correct this.
Intervention cannot be resolved.
The operator changed the distribution medium for the request on the Open Intervention Detail page but did not check the Change Media to: box. The redundancy is intended to ensure that the operator does indeed want to change the distribution medium. The operator should go back to the previous page and either check the Change Media to: box or ensure that the New Medium option button is set to “- -". (indicating no change). 1. Click on the icon in the OM GUI navigation frame to redisplay the Open Intervention Detail page. 2. If a new distribution medium is being selected, verify that the Change Media to: box is checked. (Click on it if necessary). 3. If a new distribution medium is being selected, verify that the New Medium option button is displaying the appropriate medium. [If necessary, click and hold the New Medium option button to display a menu of media, move the mouse cursor to the desired selection (highlighting it), then release the mouse button.] 4. If the old distribution medium is to be retained, verify that the Change Media to: box is not checked. (Click on it if necessary). 5. If the old distribution medium is to be retained, verify that the New Medium option button is displaying ”– –“. [If necessary, click and hold the New Medium option button to display a menu of media, move the mouse cursor to the desired selection (highlighting it), then release the mouse button.] 6. Complete the intervention. [For detailed instructions refer to the procedure for Responding to an Open Intervention (previous section of this lesson).]
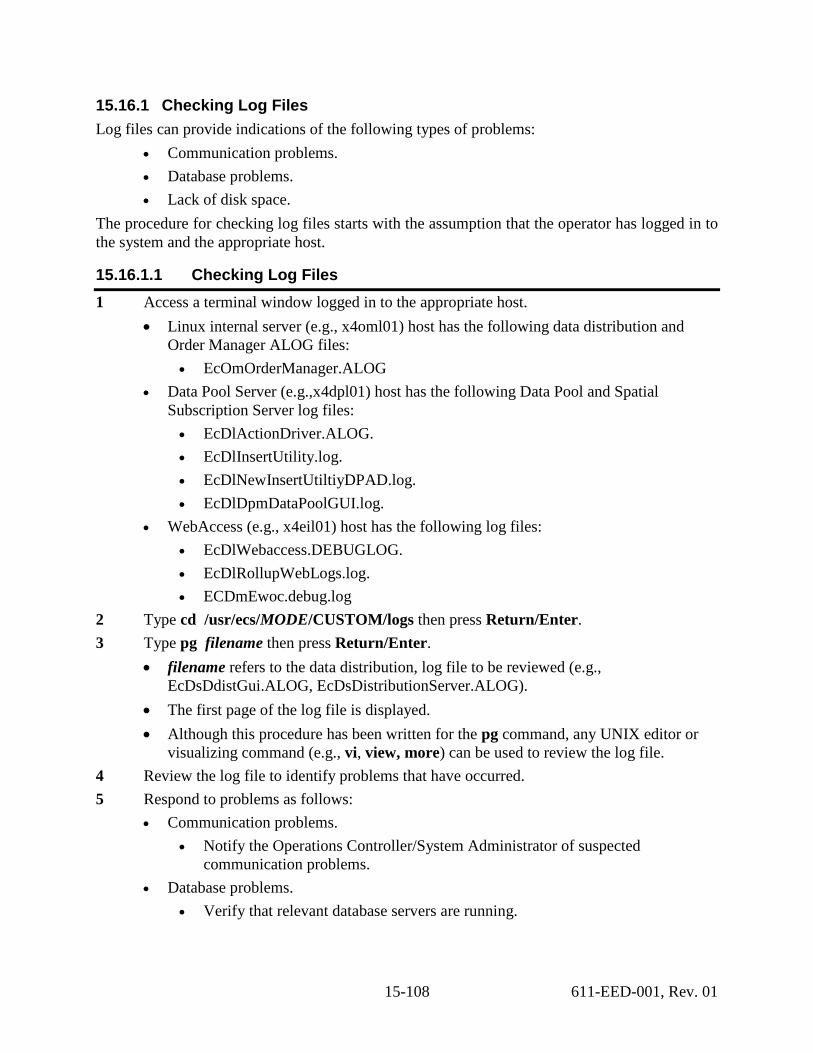
15-108 611-EED-001, Rev. 01
15.16.1 Checking Log Files Log files can provide indications of the following types of problems:
• Communication problems. • Database problems. • Lack of disk space.
The procedure for checking log files starts with the assumption that the operator has logged in to the system and the appropriate host.
15.16.1.1 Checking Log Files 1 Access a terminal window logged in to the appropriate host.
• Linux internal server (e.g., x4oml01) host has the following data distribution and Order Manager ALOG files: • EcOmOrderManager.ALOG
• Data Pool Server (e.g.,x4dpl01) host has the following Data Pool and Spatial Subscription Server log files: • EcDlActionDriver.ALOG. • EcDlInsertUtility.log. • EcDlNewInsertUtiltiyDPAD.log. • EcDlDpmDataPoolGUI.log.
• WebAccess (e.g., x4eil01) host has the following log files: • EcDlWebaccess.DEBUGLOG. • EcDlRollupWebLogs.log. • ECDmEwoc.debug.log
2 Type cd /usr/ecs/MODE/CUSTOM/logs then press Return/Enter. 3 Type pg filename then press Return/Enter.
• filename refers to the data distribution, log file to be reviewed (e.g., EcDsDdistGui.ALOG, EcDsDistributionServer.ALOG).
• The first page of the log file is displayed. • Although this procedure has been written for the pg command, any UNIX editor or
visualizing command (e.g., vi, view, more) can be used to review the log file. 4 Review the log file to identify problems that have occurred. 5 Respond to problems as follows:
• Communication problems. • Notify the Operations Controller/System Administrator of suspected
communication problems. • Database problems.
• Verify that relevant database servers are running.
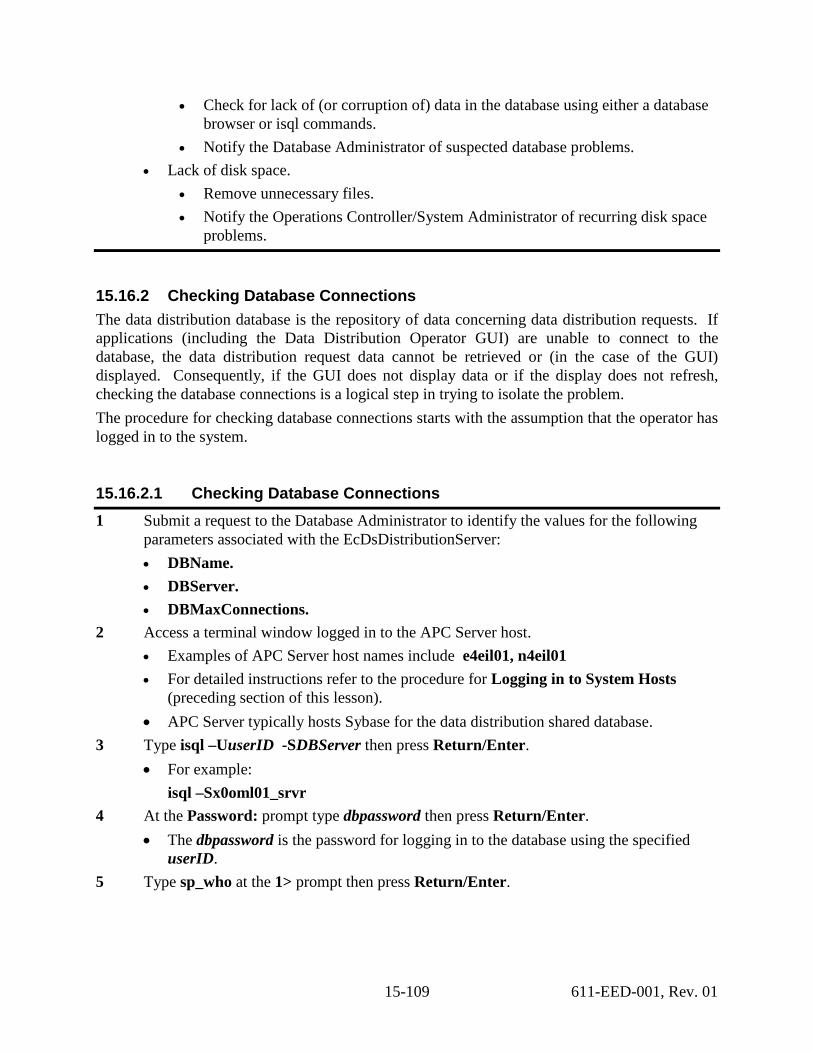
15-109 611-EED-001, Rev. 01
• Check for lack of (or corruption of) data in the database using either a database browser or isql commands.
• Notify the Database Administrator of suspected database problems. • Lack of disk space.
• Remove unnecessary files. • Notify the Operations Controller/System Administrator of recurring disk space
problems.
15.16.2 Checking Database Connections The data distribution database is the repository of data concerning data distribution requests. If applications (including the Data Distribution Operator GUI) are unable to connect to the database, the data distribution request data cannot be retrieved or (in the case of the GUI) displayed. Consequently, if the GUI does not display data or if the display does not refresh, checking the database connections is a logical step in trying to isolate the problem. The procedure for checking database connections starts with the assumption that the operator has logged in to the system.
15.16.2.1 Checking Database Connections 1 Submit a request to the Database Administrator to identify the values for the following
parameters associated with the EcDsDistributionServer: • DBName. • DBServer. • DBMaxConnections.
2 Access a terminal window logged in to the APC Server host. • Examples of APC Server host names include e4eil01, n4eil01 • For detailed instructions refer to the procedure for Logging in to System Hosts
(preceding section of this lesson). • APC Server typically hosts Sybase for the data distribution shared database.
3 Type isql –UuserID -SDBServer then press Return/Enter. • For example:
isql –Sx0oml01_srvr 4 At the Password: prompt type dbpassword then press Return/Enter.
• The dbpassword is the password for logging in to the database using the specified userID.
5 Type sp_who at the 1> prompt then press Return/Enter.
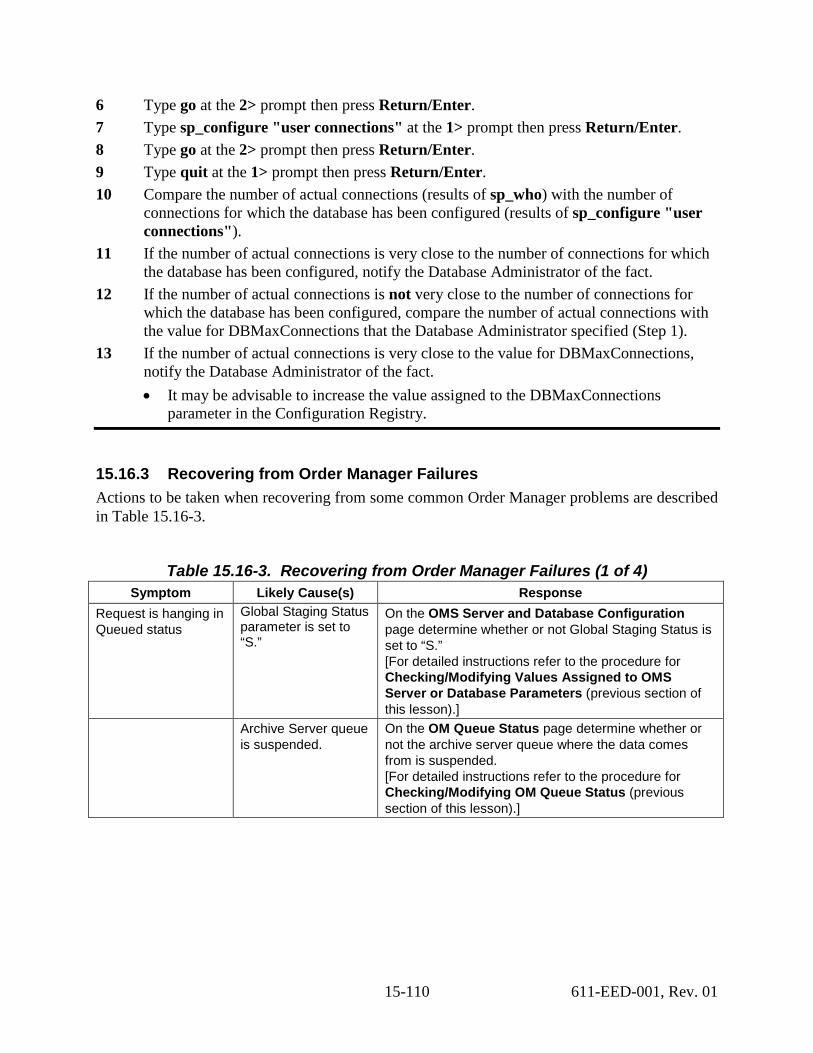
15-110 611-EED-001, Rev. 01
6 Type go at the 2> prompt then press Return/Enter. 7 Type sp_configure "user connections" at the 1> prompt then press Return/Enter. 8 Type go at the 2> prompt then press Return/Enter. 9 Type quit at the 1> prompt then press Return/Enter. 10 Compare the number of actual connections (results of sp_who) with the number of
connections for which the database has been configured (results of sp_configure "user connections").
11 If the number of actual connections is very close to the number of connections for which the database has been configured, notify the Database Administrator of the fact.
12 If the number of actual connections is not very close to the number of connections for which the database has been configured, compare the number of actual connections with the value for DBMaxConnections that the Database Administrator specified (Step 1).
13 If the number of actual connections is very close to the value for DBMaxConnections, notify the Database Administrator of the fact. • It may be advisable to increase the value assigned to the DBMaxConnections
parameter in the Configuration Registry.
15.16.3 Recovering from Order Manager Failures Actions to be taken when recovering from some common Order Manager problems are described in Table 15.16-3.
Table 15.16-3. Recovering from Order Manager Failures (1 of 4) Symptom Likely Cause(s) Response
Request is hanging in Queued status
Global Staging Status parameter is set to “S.”
On the OMS Server and Database Configuration page determine whether or not Global Staging Status is set to “S.” [For detailed instructions refer to the procedure for Checking/Modifying Values Assigned to OMS Server or Database Parameters (previous section of this lesson).]
Archive Server queue is suspended.
On the OM Queue Status page determine whether or not the archive server queue where the data comes from is suspended. [For detailed instructions refer to the procedure for Checking/Modifying OM Queue Status (previous section of this lesson).]
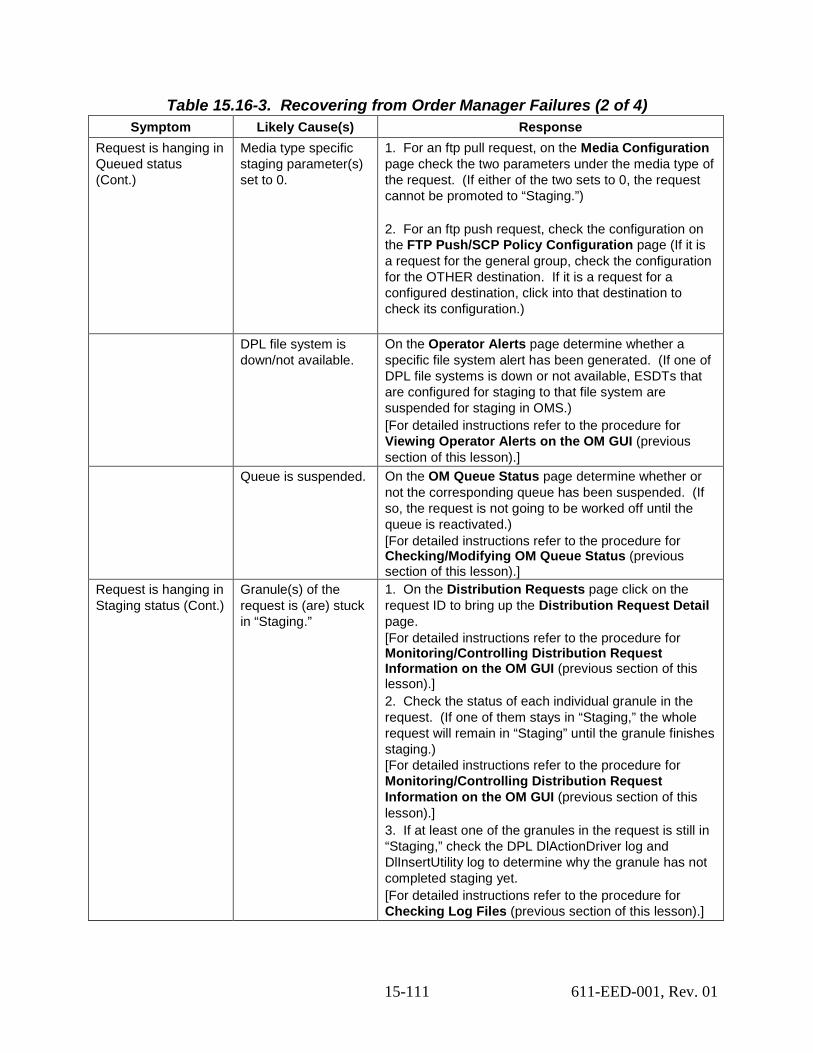
15-111 611-EED-001, Rev. 01
Table 15.16-3. Recovering from Order Manager Failures (2 of 4) Symptom Likely Cause(s) Response
Request is hanging in Queued status (Cont.)
Media type specific staging parameter(s) set to 0.
1. For an ftp pull request, on the Media Configuration page check the two parameters under the media type of the request. (If either of the two sets to 0, the request cannot be promoted to “Staging.”) 2. For an ftp push request, check the configuration on the FTP Push/SCP Policy Configuration page (If it is a request for the general group, check the configuration for the OTHER destination. If it is a request for a configured destination, click into that destination to check its configuration.)
DPL file system is down/not available.
On the Operator Alerts page determine whether a specific file system alert has been generated. (If one of DPL file systems is down or not available, ESDTs that are configured for staging to that file system are suspended for staging in OMS.) [For detailed instructions refer to the procedure for Viewing Operator Alerts on the OM GUI (previous section of this lesson).]
Queue is suspended. On the OM Queue Status page determine whether or not the corresponding queue has been suspended. (If so, the request is not going to be worked off until the queue is reactivated.) [For detailed instructions refer to the procedure for Checking/Modifying OM Queue Status (previous section of this lesson).]
Request is hanging in Staging status (Cont.)
Granule(s) of the request is (are) stuck in “Staging.”
1. On the Distribution Requests page click on the request ID to bring up the Distribution Request Detail page. [For detailed instructions refer to the procedure for Monitoring/Controlling Distribution Request Information on the OM GUI (previous section of this lesson).] 2. Check the status of each individual granule in the request. (If one of them stays in “Staging,” the whole request will remain in “Staging” until the granule finishes staging.) [For detailed instructions refer to the procedure for Monitoring/Controlling Distribution Request Information on the OM GUI (previous section of this lesson).] 3. If at least one of the granules in the request is still in “Staging,” check the DPL DlActionDriver log and DlInsertUtility log to determine why the granule has not completed staging yet. [For detailed instructions refer to the procedure for Checking Log Files (previous section of this lesson).]
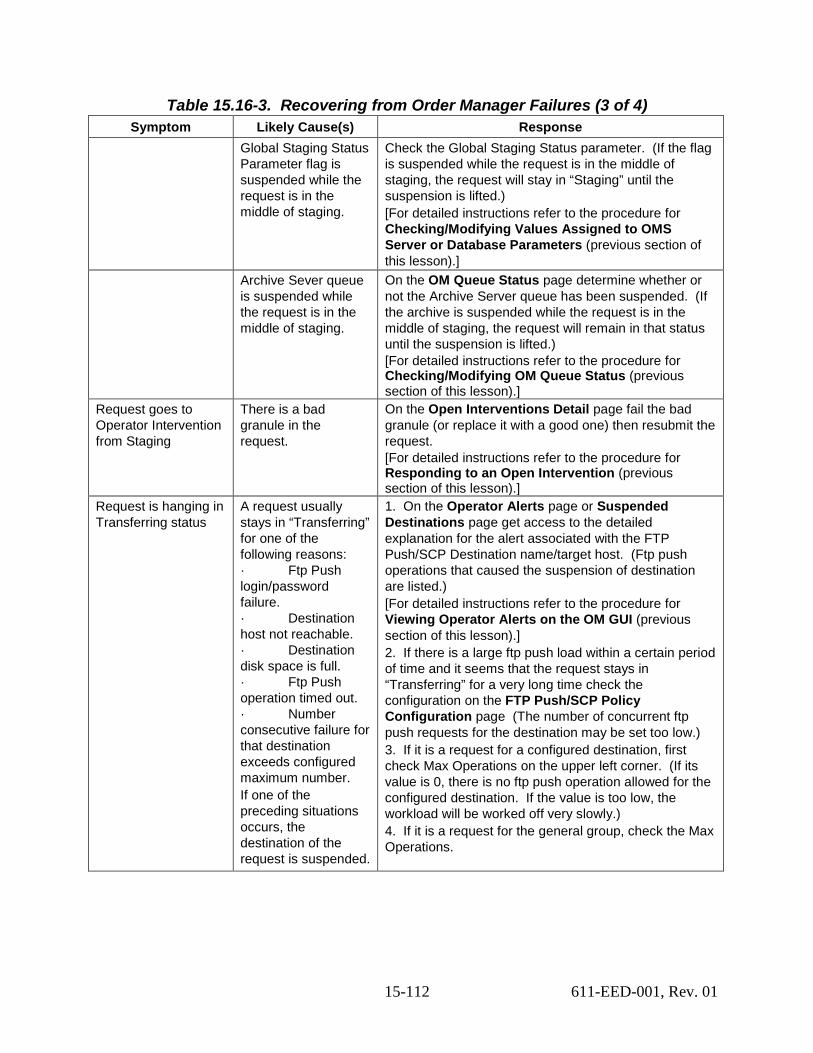
15-112 611-EED-001, Rev. 01
Table 15.16-3. Recovering from Order Manager Failures (3 of 4) Symptom Likely Cause(s) Response
Global Staging Status Parameter flag is suspended while the request is in the middle of staging.
Check the Global Staging Status parameter. (If the flag is suspended while the request is in the middle of staging, the request will stay in “Staging” until the suspension is lifted.) [For detailed instructions refer to the procedure for Checking/Modifying Values Assigned to OMS Server or Database Parameters (previous section of this lesson).]
Archive Sever queue is suspended while the request is in the middle of staging.
On the OM Queue Status page determine whether or not the Archive Server queue has been suspended. (If the archive is suspended while the request is in the middle of staging, the request will remain in that status until the suspension is lifted.) [For detailed instructions refer to the procedure for Checking/Modifying OM Queue Status (previous section of this lesson).]
Request goes to Operator Intervention from Staging
There is a bad granule in the request.
On the Open Interventions Detail page fail the bad granule (or replace it with a good one) then resubmit the request. [For detailed instructions refer to the procedure for Responding to an Open Intervention (previous section of this lesson).]
Request is hanging in Transferring status
A request usually stays in “Transferring” for one of the following reasons: · Ftp Push login/password failure. · Destination host not reachable. · Destination disk space is full. · Ftp Push operation timed out. · Number consecutive failure for that destination exceeds configured maximum number. If one of the preceding situations occurs, the destination of the request is suspended.
1. On the Operator Alerts page or Suspended Destinations page get access to the detailed explanation for the alert associated with the FTP Push/SCP Destination name/target host. (Ftp push operations that caused the suspension of destination are listed.) [For detailed instructions refer to the procedure for Viewing Operator Alerts on the OM GUI (previous section of this lesson).] 2. If there is a large ftp push load within a certain period of time and it seems that the request stays in “Transferring” for a very long time check the configuration on the FTP Push/SCP Policy Configuration page (The number of concurrent ftp push requests for the destination may be set too low.) 3. If it is a request for a configured destination, first check Max Operations on the upper left corner. (If its value is 0, there is no ftp push operation allowed for the configured destination. If the value is too low, the workload will be worked off very slowly.) 4. If it is a request for the general group, check the Max Operations.
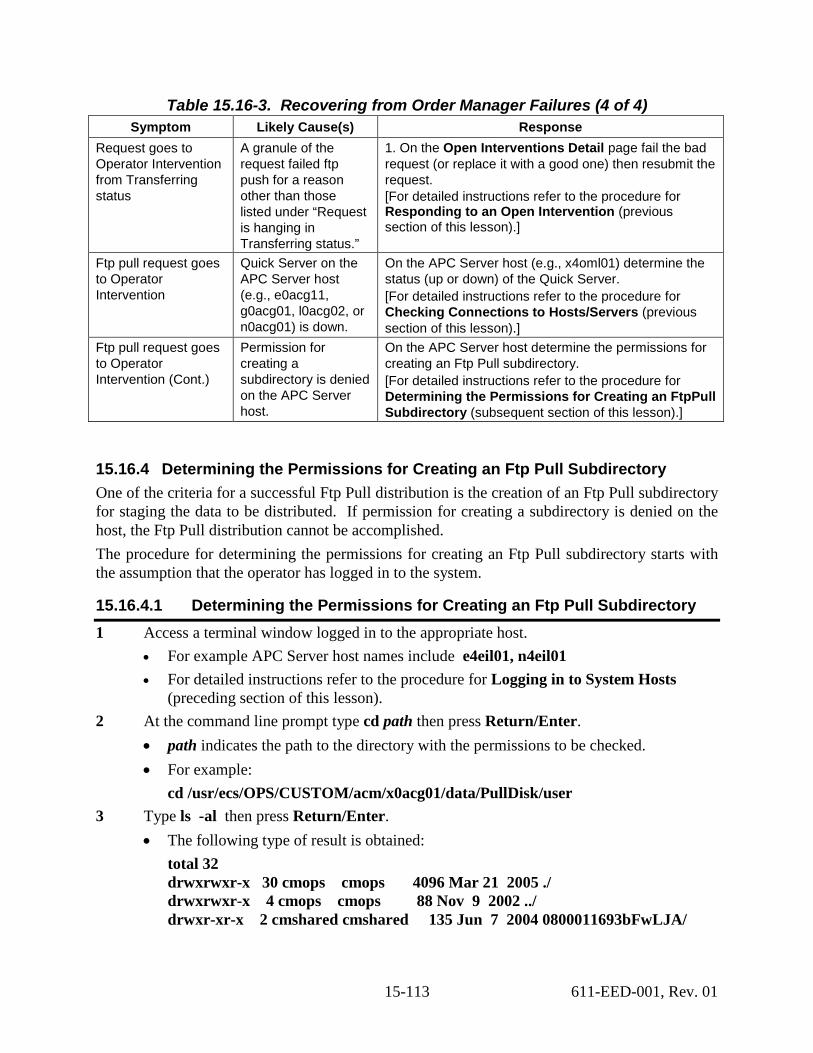
15-113 611-EED-001, Rev. 01
Table 15.16-3. Recovering from Order Manager Failures (4 of 4) Symptom Likely Cause(s) Response
Request goes to Operator Intervention from Transferring status
A granule of the request failed ftp push for a reason other than those listed under “Request is hanging in Transferring status.”
1. On the Open Interventions Detail page fail the bad request (or replace it with a good one) then resubmit the request. [For detailed instructions refer to the procedure for Responding to an Open Intervention (previous section of this lesson).]
Ftp pull request goes to Operator Intervention
Quick Server on the APC Server host (e.g., e0acg11, g0acg01, l0acg02, or n0acg01) is down.
On the APC Server host (e.g., x4oml01) determine the status (up or down) of the Quick Server. [For detailed instructions refer to the procedure for Checking Connections to Hosts/Servers (previous section of this lesson).]
Ftp pull request goes to Operator Intervention (Cont.)
Permission for creating a subdirectory is denied on the APC Server host.
On the APC Server host determine the permissions for creating an Ftp Pull subdirectory. [For detailed instructions refer to the procedure for Determining the Permissions for Creating an FtpPull Subdirectory (subsequent section of this lesson).]
15.16.4 Determining the Permissions for Creating an Ftp Pull Subdirectory One of the criteria for a successful Ftp Pull distribution is the creation of an Ftp Pull subdirectory for staging the data to be distributed. If permission for creating a subdirectory is denied on the host, the Ftp Pull distribution cannot be accomplished. The procedure for determining the permissions for creating an Ftp Pull subdirectory starts with the assumption that the operator has logged in to the system.
15.16.4.1 Determining the Permissions for Creating an Ftp Pull Subdirectory 1 Access a terminal window logged in to the appropriate host.
• For example APC Server host names include e4eil01, n4eil01 • For detailed instructions refer to the procedure for Logging in to System Hosts
(preceding section of this lesson). 2 At the command line prompt type cd path then press Return/Enter.
• path indicates the path to the directory with the permissions to be checked. • For example:
cd /usr/ecs/OPS/CUSTOM/acm/x0acg01/data/PullDisk/user 3 Type ls -al then press Return/Enter.
• The following type of result is obtained: total 32 drwxrwxr-x 30 cmops cmops 4096 Mar 21 2005 ./ drwxrwxr-x 4 cmops cmops 88 Nov 9 2002 ../ drwxr-xr-x 2 cmshared cmshared 135 Jun 7 2004 0800011693bFwLJA/
15-114 611-EED-001, Rev. 01
drwxr-xr-x 2 cmshared cmshared 135 Jul 7 2004 0800011693rPWeDb/ […]
4 Observe the results of the ls –al command. • In the example in Step 3 the permissions for the current directory (represented by./ at
the end of the end of the line) allow user cmops and other members of the same group (including cmshared, cmts1, and cmts2) but no others to write to the directory. So cmshared could create a subdirectory in the current directory.
• In the example that follows the permissions for the current directory allow the owner (i.e., cmops) only to write to the directory. So cmshared could not create a subdirectory in the current directory. total 960 drwxr-xr-x 5 cmops 4096 Jul 30 2004 . drwxr-xr-x 37 cmops 28672 Oct 7 10:48 .. -rw-r--r-- 1 cmops 20210 Jul 30 2004 MISR_AM1_AS_AEROSOL_P015_O008407_F06_0013.hdf -rw-r--r-- 1 cmops 78009 Jul 30 2004 MISR_AM1_AS_AEROSOL_P015_O008407_F06_0013.hdf.met […]
15.16.5 HEG Failures A common means of detecting a HEG failure is the appearance of an intervention on the OM GUI [refer to the procedure for Viewing Open HEG Intervention Information on the OM GUI (previous section of this lesson)]. Another means of detecting a HEG failure is receiving notification from a user (i.e., via User Services) that the order has not been shipped. In release 8.1 HEG request made through EWOC go through a separate path than those made through the DPL Web Access GUI. These requests are treated as regular requests (even though the Order Type is ‘DA’) and can be tracked through regular means. Any error results in a HEG Processing Error in the OMS GUI and the Order Manage Server or HegService log must be consulted to see the exact error.
15.16.5.1 Troubleshooting a HEG Failure 1 View information concerning the pertinent open HEG intervention on the OM GUI.
• For detailed instructions refer to the procedure for Viewing Open HEG Intervention Information on the OM GUI (previous section of this lesson).
• On the Open HEG Intervention Detail page there is a link for viewing the HEG processing instructions (XML file). − The XML processing instructions may provide indications as to why the request
could not be completed.

15-115 611-EED-001, Rev. 01
2 If review of the HEG information on the OM GUI indicates that there are no impediments to completing the HEG request, retry processing of the request. • For detailed instructions refer to the procedure for Responding to an Open HEG
Intervention (previous section of this lesson). 3 If additional information is needed before taking action, check the log files for error
codes. • Log files include the following files:
− HEG Server operations log (HegServer.ops.log). − HEG Server debug log (HegServer.debug.log). − HEG Server performance log (HegServer.perf.log), if available (typically turned
off in normal operations) • Log files are located in the /usr/ecs/MODE/CUSTOM/logs directory. • Error codes and the appropriate responses to them are described in Table 15.16-4. • For detailed instructions refer to the Checking HEG Server Log Files procedure
(subsequent section of this lesson). 4 If further information is needed before taking action, check the files in the HEG tempfiles
directory. • The tempfiles directory contains the following types of files:
− Converter logs. • resample.log. • swtif.log. • gdtif.log.
− Parameter file (.prm). − EcHgHEGConversion.log.
• If debug is on (HegServer.application.debugFlag = true in the EcHgServerConfig.properties file in the /usr/ecs/MODE/CUSTOM/cfg directory), a tempfiles directory containing pertinent files is created at the configurable location tempDirRoot/MODE/tempDirTop/outputdirectory/tempfiles. − tempDirRoot and tempDirTop are specified in the
EcHgServerConfig.properties file in the /usr/ecs/MODE/CUSTOM/cfg directory.
− outputdirectory is specified in the HEG request XML file. • For detailed instructions refer to the procedure for Checking Files in the HEG
Tempfiles Directory (subsequent section of this lesson). 5 If the problem cannot be identified and fixed without help within a reasonable period of
time, call the help desk and submit a trouble ticket in accordance with site Problem Management policy.
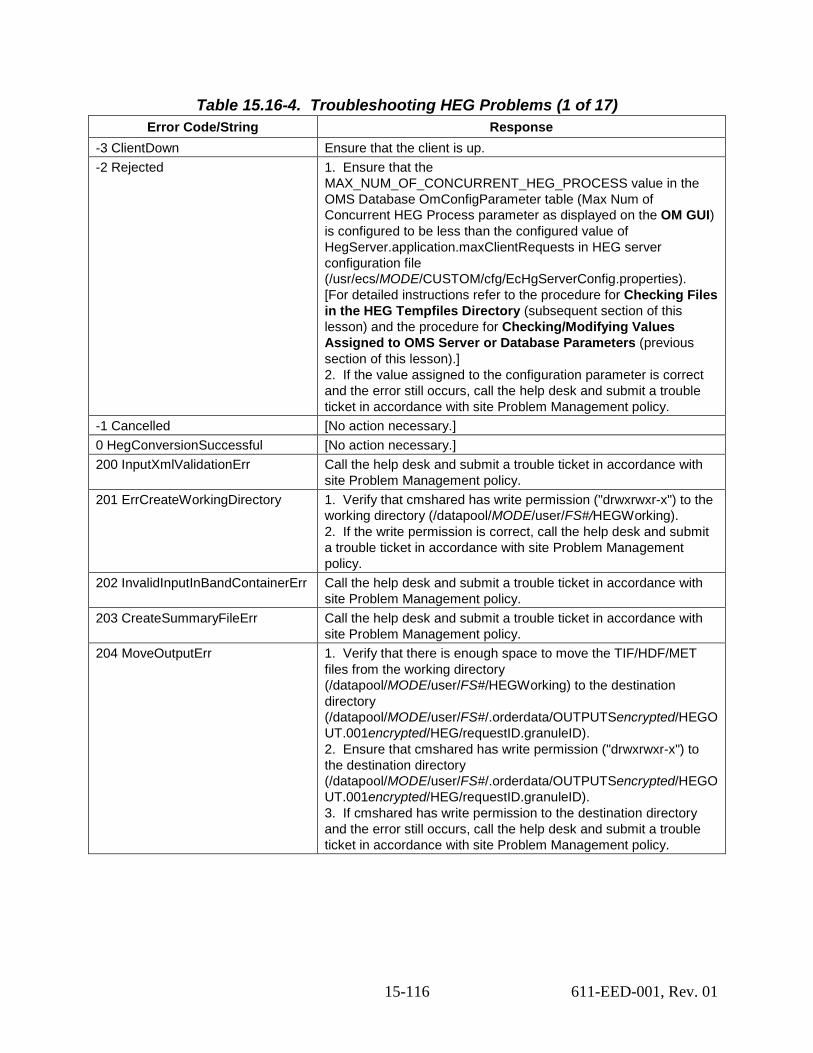
15-116 611-EED-001, Rev. 01
Table 15.16-4. Troubleshooting HEG Problems (1 of 17) Error Code/String Response
-3 ClientDown Ensure that the client is up. -2 Rejected 1. Ensure that the
MAX_NUM_OF_CONCURRENT_HEG_PROCESS value in the OMS Database OmConfigParameter table (Max Num of Concurrent HEG Process parameter as displayed on the OM GUI) is configured to be less than the configured value of HegServer.application.maxClientRequests in HEG server configuration file (/usr/ecs/MODE/CUSTOM/cfg/EcHgServerConfig.properties). [For detailed instructions refer to the procedure for Checking Files in the HEG Tempfiles Directory (subsequent section of this lesson) and the procedure for Checking/Modifying Values Assigned to OMS Server or Database Parameters (previous section of this lesson).] 2. If the value assigned to the configuration parameter is correct and the error still occurs, call the help desk and submit a trouble ticket in accordance with site Problem Management policy.
-1 Cancelled [No action necessary.] 0 HegConversionSuccessful [No action necessary.] 200 InputXmlValidationErr Call the help desk and submit a trouble ticket in accordance with
site Problem Management policy. 201 ErrCreateWorkingDirectory 1. Verify that cmshared has write permission ("drwxrwxr-x") to the
working directory (/datapool/MODE/user/FS#/HEGWorking). 2. If the write permission is correct, call the help desk and submit a trouble ticket in accordance with site Problem Management policy.
202 InvalidInputInBandContainerErr Call the help desk and submit a trouble ticket in accordance with site Problem Management policy.
203 CreateSummaryFileErr Call the help desk and submit a trouble ticket in accordance with site Problem Management policy.
204 MoveOutputErr 1. Verify that there is enough space to move the TIF/HDF/MET files from the working directory (/datapool/MODE/user/FS#/HEGWorking) to the destination directory (/datapool/MODE/user/FS#/.orderdata/OUTPUTSencrypted/HEGOUT.001encrypted/HEG/requestID.granuleID). 2. Ensure that cmshared has write permission ("drwxrwxr-x") to the destination directory (/datapool/MODE/user/FS#/.orderdata/OUTPUTSencrypted/HEGOUT.001encrypted/HEG/requestID.granuleID). 3. If cmshared has write permission to the destination directory and the error still occurs, call the help desk and submit a trouble ticket in accordance with site Problem Management policy.
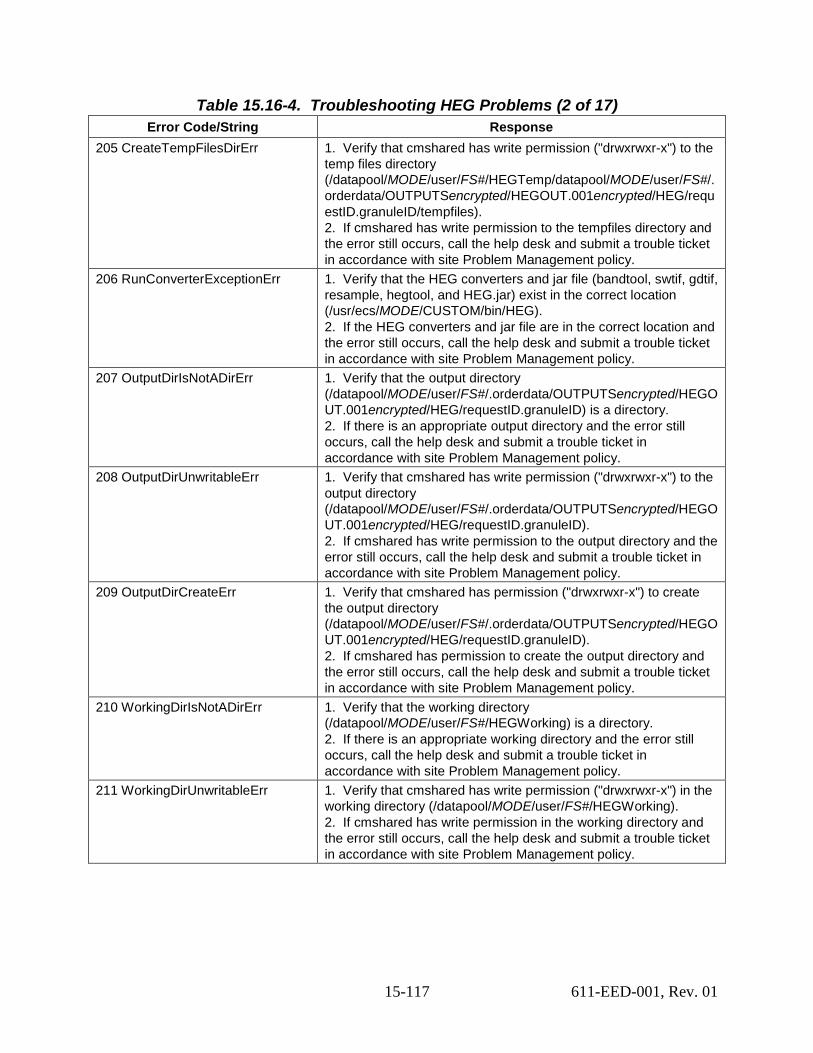
15-117 611-EED-001, Rev. 01
Table 15.16-4. Troubleshooting HEG Problems (2 of 17) Error Code/String Response
205 CreateTempFilesDirErr 1. Verify that cmshared has write permission ("drwxrwxr-x") to the temp files directory (/datapool/MODE/user/FS#/HEGTemp/datapool/MODE/user/FS#/.orderdata/OUTPUTSencrypted/HEGOUT.001encrypted/HEG/requestID.granuleID/tempfiles). 2. If cmshared has write permission to the tempfiles directory and the error still occurs, call the help desk and submit a trouble ticket in accordance with site Problem Management policy.
206 RunConverterExceptionErr 1. Verify that the HEG converters and jar file (bandtool, swtif, gdtif, resample, hegtool, and HEG.jar) exist in the correct location (/usr/ecs/MODE/CUSTOM/bin/HEG). 2. If the HEG converters and jar file are in the correct location and the error still occurs, call the help desk and submit a trouble ticket in accordance with site Problem Management policy.
207 OutputDirIsNotADirErr 1. Verify that the output directory (/datapool/MODE/user/FS#/.orderdata/OUTPUTSencrypted/HEGOUT.001encrypted/HEG/requestID.granuleID) is a directory. 2. If there is an appropriate output directory and the error still occurs, call the help desk and submit a trouble ticket in accordance with site Problem Management policy.
208 OutputDirUnwritableErr 1. Verify that cmshared has write permission ("drwxrwxr-x") to the output directory (/datapool/MODE/user/FS#/.orderdata/OUTPUTSencrypted/HEGOUT.001encrypted/HEG/requestID.granuleID). 2. If cmshared has write permission to the output directory and the error still occurs, call the help desk and submit a trouble ticket in accordance with site Problem Management policy.
209 OutputDirCreateErr 1. Verify that cmshared has permission ("drwxrwxr-x") to create the output directory (/datapool/MODE/user/FS#/.orderdata/OUTPUTSencrypted/HEGOUT.001encrypted/HEG/requestID.granuleID). 2. If cmshared has permission to create the output directory and the error still occurs, call the help desk and submit a trouble ticket in accordance with site Problem Management policy.
210 WorkingDirIsNotADirErr 1. Verify that the working directory (/datapool/MODE/user/FS#/HEGWorking) is a directory. 2. If there is an appropriate working directory and the error still occurs, call the help desk and submit a trouble ticket in accordance with site Problem Management policy.
211 WorkingDirUnwritableErr 1. Verify that cmshared has write permission ("drwxrwxr-x") in the working directory (/datapool/MODE/user/FS#/HEGWorking). 2. If cmshared has write permission in the working directory and the error still occurs, call the help desk and submit a trouble ticket in accordance with site Problem Management policy.
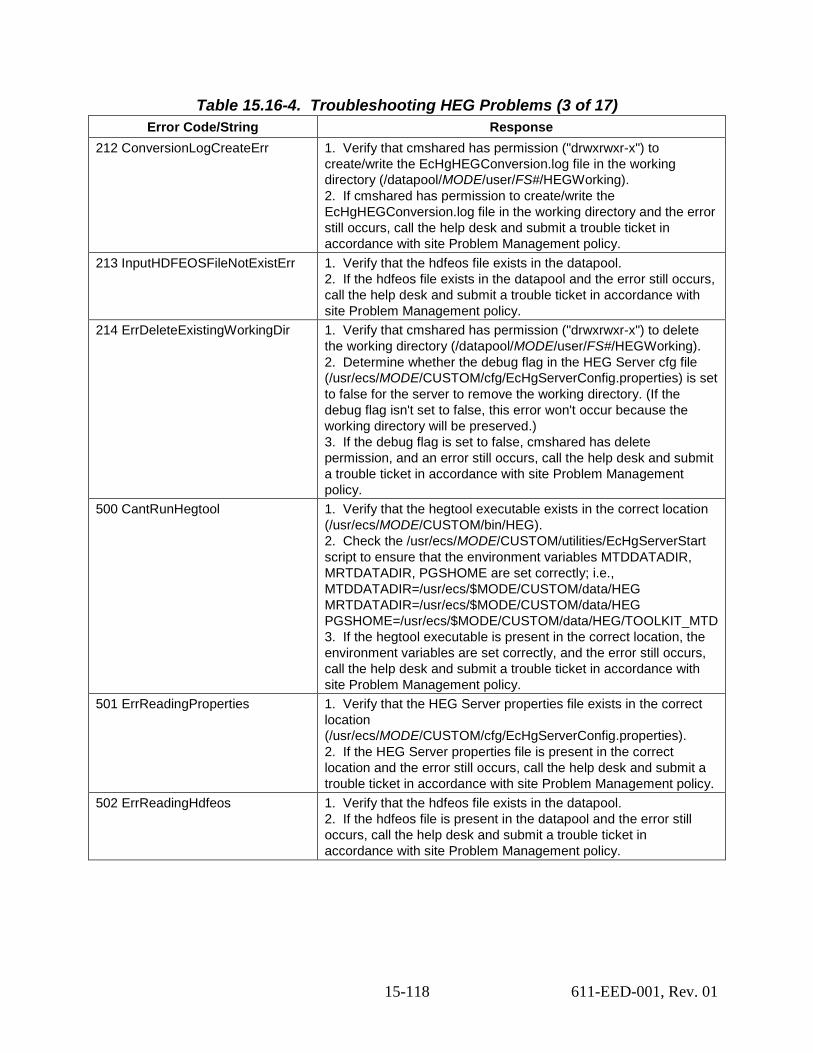
15-118 611-EED-001, Rev. 01
Table 15.16-4. Troubleshooting HEG Problems (3 of 17) Error Code/String Response
212 ConversionLogCreateErr 1. Verify that cmshared has permission ("drwxrwxr-x") to create/write the EcHgHEGConversion.log file in the working directory (/datapool/MODE/user/FS#/HEGWorking). 2. If cmshared has permission to create/write the EcHgHEGConversion.log file in the working directory and the error still occurs, call the help desk and submit a trouble ticket in accordance with site Problem Management policy.
213 InputHDFEOSFileNotExistErr 1. Verify that the hdfeos file exists in the datapool. 2. If the hdfeos file exists in the datapool and the error still occurs, call the help desk and submit a trouble ticket in accordance with site Problem Management policy.
214 ErrDeleteExistingWorkingDir 1. Verify that cmshared has permission ("drwxrwxr-x") to delete the working directory (/datapool/MODE/user/FS#/HEGWorking). 2. Determine whether the debug flag in the HEG Server cfg file (/usr/ecs/MODE/CUSTOM/cfg/EcHgServerConfig.properties) is set to false for the server to remove the working directory. (If the debug flag isn't set to false, this error won't occur because the working directory will be preserved.) 3. If the debug flag is set to false, cmshared has delete permission, and an error still occurs, call the help desk and submit a trouble ticket in accordance with site Problem Management policy.
500 CantRunHegtool 1. Verify that the hegtool executable exists in the correct location (/usr/ecs/MODE/CUSTOM/bin/HEG). 2. Check the /usr/ecs/MODE/CUSTOM/utilities/EcHgServerStart script to ensure that the environment variables MTDDATADIR, MRTDATADIR, PGSHOME are set correctly; i.e., MTDDATADIR=/usr/ecs/$MODE/CUSTOM/data/HEG MRTDATADIR=/usr/ecs/$MODE/CUSTOM/data/HEG PGSHOME=/usr/ecs/$MODE/CUSTOM/data/HEG/TOOLKIT_MTD 3. If the hegtool executable is present in the correct location, the environment variables are set correctly, and the error still occurs, call the help desk and submit a trouble ticket in accordance with site Problem Management policy.
501 ErrReadingProperties 1. Verify that the HEG Server properties file exists in the correct location (/usr/ecs/MODE/CUSTOM/cfg/EcHgServerConfig.properties). 2. If the HEG Server properties file is present in the correct location and the error still occurs, call the help desk and submit a trouble ticket in accordance with site Problem Management policy.
502 ErrReadingHdfeos 1. Verify that the hdfeos file exists in the datapool. 2. If the hdfeos file is present in the datapool and the error still occurs, call the help desk and submit a trouble ticket in accordance with site Problem Management policy.
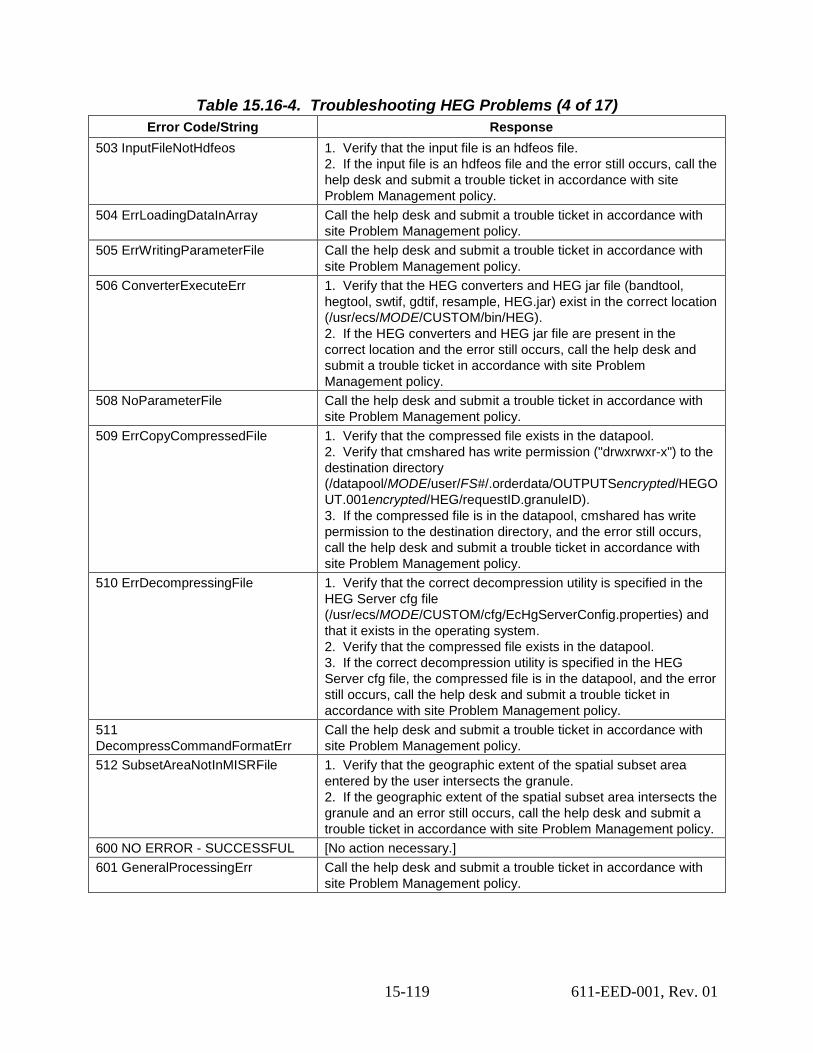
15-119 611-EED-001, Rev. 01
Table 15.16-4. Troubleshooting HEG Problems (4 of 17) Error Code/String Response
503 InputFileNotHdfeos 1. Verify that the input file is an hdfeos file. 2. If the input file is an hdfeos file and the error still occurs, call the help desk and submit a trouble ticket in accordance with site Problem Management policy.
504 ErrLoadingDataInArray Call the help desk and submit a trouble ticket in accordance with site Problem Management policy.
505 ErrWritingParameterFile Call the help desk and submit a trouble ticket in accordance with site Problem Management policy.
506 ConverterExecuteErr 1. Verify that the HEG converters and HEG jar file (bandtool, hegtool, swtif, gdtif, resample, HEG.jar) exist in the correct location (/usr/ecs/MODE/CUSTOM/bin/HEG). 2. If the HEG converters and HEG jar file are present in the correct location and the error still occurs, call the help desk and submit a trouble ticket in accordance with site Problem Management policy.
508 NoParameterFile Call the help desk and submit a trouble ticket in accordance with site Problem Management policy.
509 ErrCopyCompressedFile 1. Verify that the compressed file exists in the datapool. 2. Verify that cmshared has write permission ("drwxrwxr-x") to the destination directory (/datapool/MODE/user/FS#/.orderdata/OUTPUTSencrypted/HEGOUT.001encrypted/HEG/requestID.granuleID). 3. If the compressed file is in the datapool, cmshared has write permission to the destination directory, and the error still occurs, call the help desk and submit a trouble ticket in accordance with site Problem Management policy.
510 ErrDecompressingFile 1. Verify that the correct decompression utility is specified in the HEG Server cfg file (/usr/ecs/MODE/CUSTOM/cfg/EcHgServerConfig.properties) and that it exists in the operating system. 2. Verify that the compressed file exists in the datapool. 3. If the correct decompression utility is specified in the HEG Server cfg file, the compressed file is in the datapool, and the error still occurs, call the help desk and submit a trouble ticket in accordance with site Problem Management policy.
511 DecompressCommandFormatErr
Call the help desk and submit a trouble ticket in accordance with site Problem Management policy.
512 SubsetAreaNotInMISRFile 1. Verify that the geographic extent of the spatial subset area entered by the user intersects the granule. 2. If the geographic extent of the spatial subset area intersects the granule and an error still occurs, call the help desk and submit a trouble ticket in accordance with site Problem Management policy.
600 NO ERROR - SUCCESSFUL [No action necessary.] 601 GeneralProcessingErr Call the help desk and submit a trouble ticket in accordance with
site Problem Management policy.
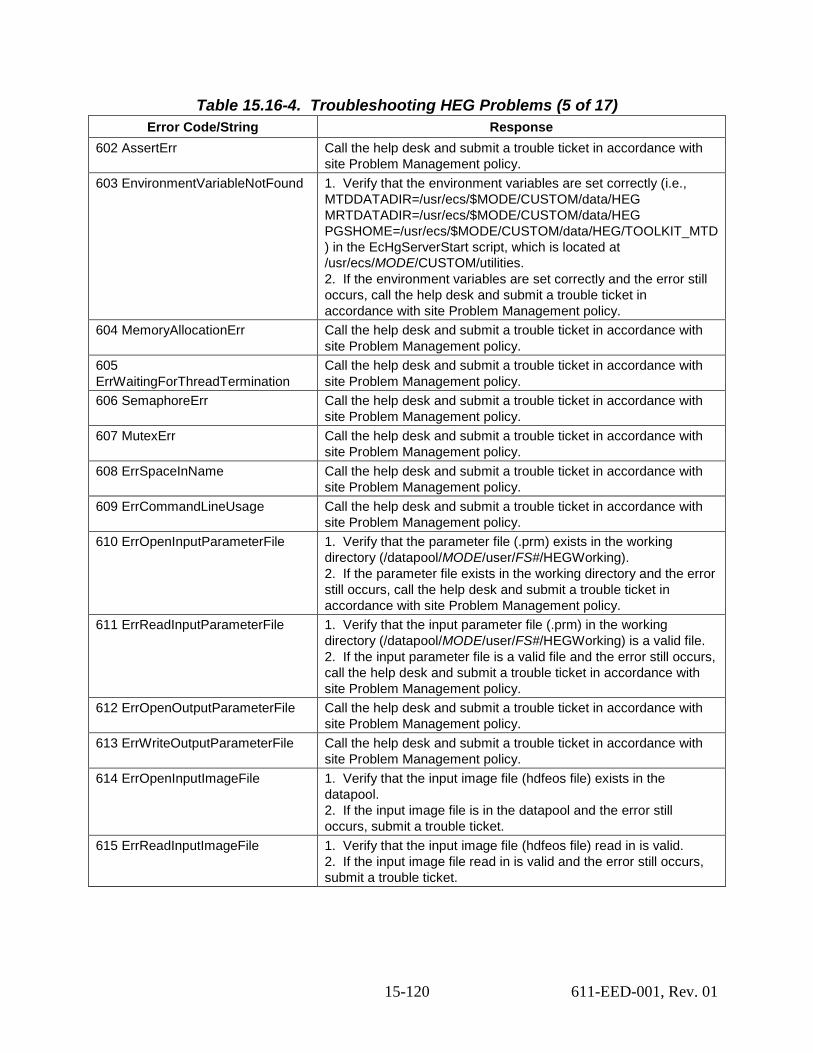
15-120 611-EED-001, Rev. 01
Table 15.16-4. Troubleshooting HEG Problems (5 of 17) Error Code/String Response
602 AssertErr Call the help desk and submit a trouble ticket in accordance with site Problem Management policy.
603 EnvironmentVariableNotFound 1. Verify that the environment variables are set correctly (i.e., MTDDATADIR=/usr/ecs/$MODE/CUSTOM/data/HEG MRTDATADIR=/usr/ecs/$MODE/CUSTOM/data/HEG PGSHOME=/usr/ecs/$MODE/CUSTOM/data/HEG/TOOLKIT_MTD) in the EcHgServerStart script, which is located at /usr/ecs/MODE/CUSTOM/utilities. 2. If the environment variables are set correctly and the error still occurs, call the help desk and submit a trouble ticket in accordance with site Problem Management policy.
604 MemoryAllocationErr Call the help desk and submit a trouble ticket in accordance with site Problem Management policy.
605 ErrWaitingForThreadTermination
Call the help desk and submit a trouble ticket in accordance with site Problem Management policy.
606 SemaphoreErr Call the help desk and submit a trouble ticket in accordance with site Problem Management policy.
607 MutexErr Call the help desk and submit a trouble ticket in accordance with site Problem Management policy.
608 ErrSpaceInName Call the help desk and submit a trouble ticket in accordance with site Problem Management policy.
609 ErrCommandLineUsage Call the help desk and submit a trouble ticket in accordance with site Problem Management policy.
610 ErrOpenInputParameterFile 1. Verify that the parameter file (.prm) exists in the working directory (/datapool/MODE/user/FS#/HEGWorking). 2. If the parameter file exists in the working directory and the error still occurs, call the help desk and submit a trouble ticket in accordance with site Problem Management policy.
611 ErrReadInputParameterFile 1. Verify that the input parameter file (.prm) in the working directory (/datapool/MODE/user/FS#/HEGWorking) is a valid file. 2. If the input parameter file is a valid file and the error still occurs, call the help desk and submit a trouble ticket in accordance with site Problem Management policy.
612 ErrOpenOutputParameterFile Call the help desk and submit a trouble ticket in accordance with site Problem Management policy.
613 ErrWriteOutputParameterFile Call the help desk and submit a trouble ticket in accordance with site Problem Management policy.
614 ErrOpenInputImageFile 1. Verify that the input image file (hdfeos file) exists in the datapool. 2. If the input image file is in the datapool and the error still occurs, submit a trouble ticket.
615 ErrReadInputImageFile 1. Verify that the input image file (hdfeos file) read in is valid. 2. If the input image file read in is valid and the error still occurs, submit a trouble ticket.
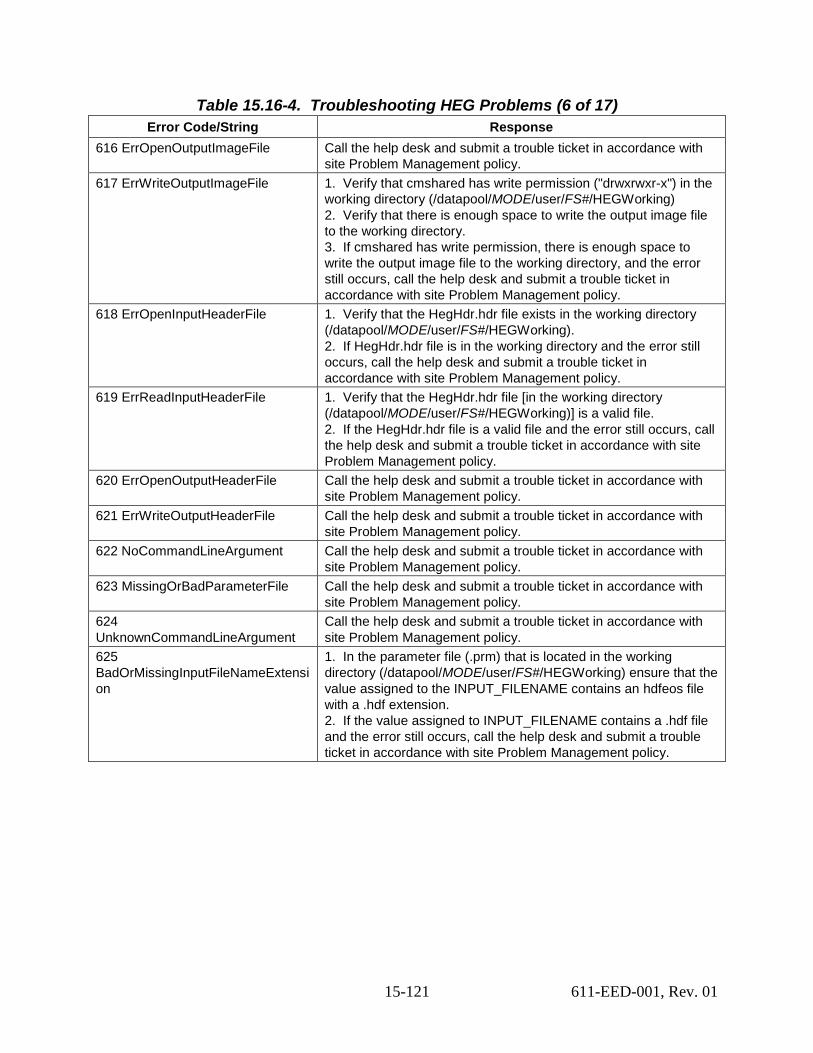
15-121 611-EED-001, Rev. 01
Table 15.16-4. Troubleshooting HEG Problems (6 of 17) Error Code/String Response
616 ErrOpenOutputImageFile Call the help desk and submit a trouble ticket in accordance with site Problem Management policy.
617 ErrWriteOutputImageFile 1. Verify that cmshared has write permission ("drwxrwxr-x") in the working directory (/datapool/MODE/user/FS#/HEGWorking) 2. Verify that there is enough space to write the output image file to the working directory. 3. If cmshared has write permission, there is enough space to write the output image file to the working directory, and the error still occurs, call the help desk and submit a trouble ticket in accordance with site Problem Management policy.
618 ErrOpenInputHeaderFile 1. Verify that the HegHdr.hdr file exists in the working directory (/datapool/MODE/user/FS#/HEGWorking). 2. If HegHdr.hdr file is in the working directory and the error still occurs, call the help desk and submit a trouble ticket in accordance with site Problem Management policy.
619 ErrReadInputHeaderFile 1. Verify that the HegHdr.hdr file [in the working directory (/datapool/MODE/user/FS#/HEGWorking)] is a valid file. 2. If the HegHdr.hdr file is a valid file and the error still occurs, call the help desk and submit a trouble ticket in accordance with site Problem Management policy.
620 ErrOpenOutputHeaderFile Call the help desk and submit a trouble ticket in accordance with site Problem Management policy.
621 ErrWriteOutputHeaderFile Call the help desk and submit a trouble ticket in accordance with site Problem Management policy.
622 NoCommandLineArgument Call the help desk and submit a trouble ticket in accordance with site Problem Management policy.
623 MissingOrBadParameterFile Call the help desk and submit a trouble ticket in accordance with site Problem Management policy.
624 UnknownCommandLineArgument
Call the help desk and submit a trouble ticket in accordance with site Problem Management policy.
625 BadOrMissingInputFileNameExtension
1. In the parameter file (.prm) that is located in the working directory (/datapool/MODE/user/FS#/HEGWorking) ensure that the value assigned to the INPUT_FILENAME contains an hdfeos file with a .hdf extension. 2. If the value assigned to INPUT_FILENAME contains a .hdf file and the error still occurs, call the help desk and submit a trouble ticket in accordance with site Problem Management policy.
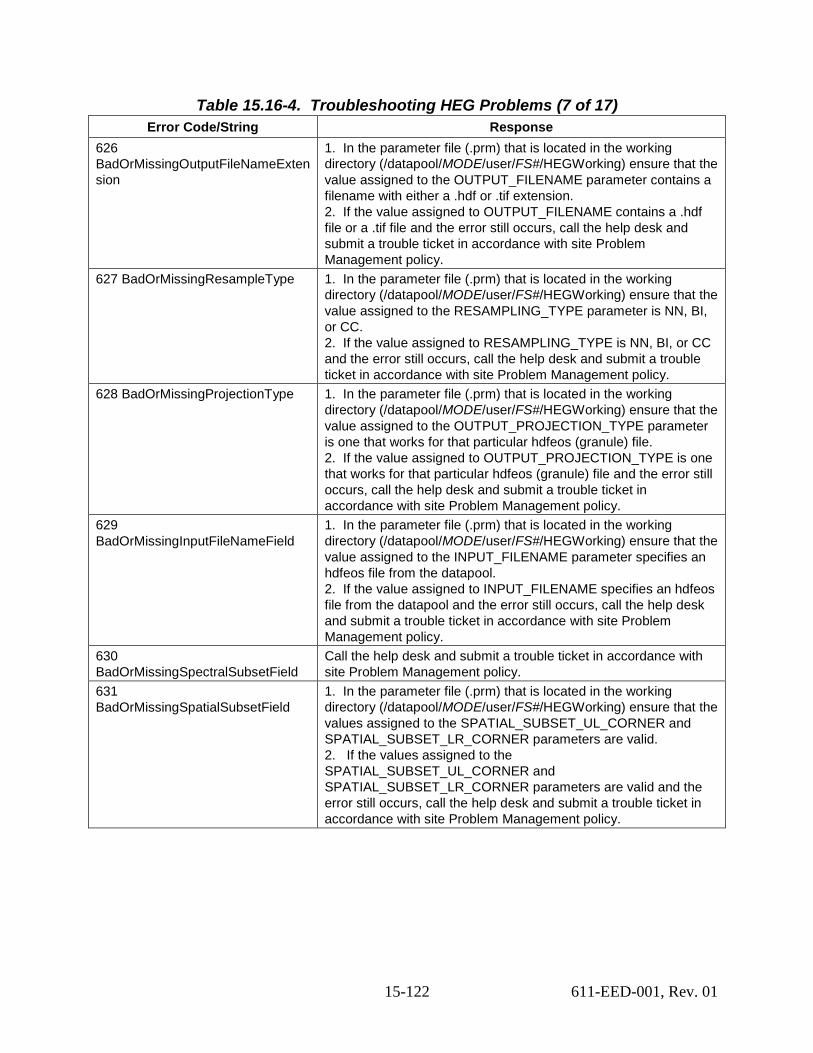
15-122 611-EED-001, Rev. 01
Table 15.16-4. Troubleshooting HEG Problems (7 of 17) Error Code/String Response
626 BadOrMissingOutputFileNameExtension
1. In the parameter file (.prm) that is located in the working directory (/datapool/MODE/user/FS#/HEGWorking) ensure that the value assigned to the OUTPUT_FILENAME parameter contains a filename with either a .hdf or .tif extension. 2. If the value assigned to OUTPUT_FILENAME contains a .hdf file or a .tif file and the error still occurs, call the help desk and submit a trouble ticket in accordance with site Problem Management policy.
627 BadOrMissingResampleType 1. In the parameter file (.prm) that is located in the working directory (/datapool/MODE/user/FS#/HEGWorking) ensure that the value assigned to the RESAMPLING_TYPE parameter is NN, BI, or CC. 2. If the value assigned to RESAMPLING_TYPE is NN, BI, or CC and the error still occurs, call the help desk and submit a trouble ticket in accordance with site Problem Management policy.
628 BadOrMissingProjectionType 1. In the parameter file (.prm) that is located in the working directory (/datapool/MODE/user/FS#/HEGWorking) ensure that the value assigned to the OUTPUT_PROJECTION_TYPE parameter is one that works for that particular hdfeos (granule) file. 2. If the value assigned to OUTPUT_PROJECTION_TYPE is one that works for that particular hdfeos (granule) file and the error still occurs, call the help desk and submit a trouble ticket in accordance with site Problem Management policy.
629 BadOrMissingInputFileNameField
1. In the parameter file (.prm) that is located in the working directory (/datapool/MODE/user/FS#/HEGWorking) ensure that the value assigned to the INPUT_FILENAME parameter specifies an hdfeos file from the datapool. 2. If the value assigned to INPUT_FILENAME specifies an hdfeos file from the datapool and the error still occurs, call the help desk and submit a trouble ticket in accordance with site Problem Management policy.
630 BadOrMissingSpectralSubsetField
Call the help desk and submit a trouble ticket in accordance with site Problem Management policy.
631 BadOrMissingSpatialSubsetField
1. In the parameter file (.prm) that is located in the working directory (/datapool/MODE/user/FS#/HEGWorking) ensure that the values assigned to the SPATIAL_SUBSET_UL_CORNER and SPATIAL_SUBSET_LR_CORNER parameters are valid. 2. If the values assigned to the SPATIAL_SUBSET_UL_CORNER and SPATIAL_SUBSET_LR_CORNER parameters are valid and the error still occurs, call the help desk and submit a trouble ticket in accordance with site Problem Management policy.
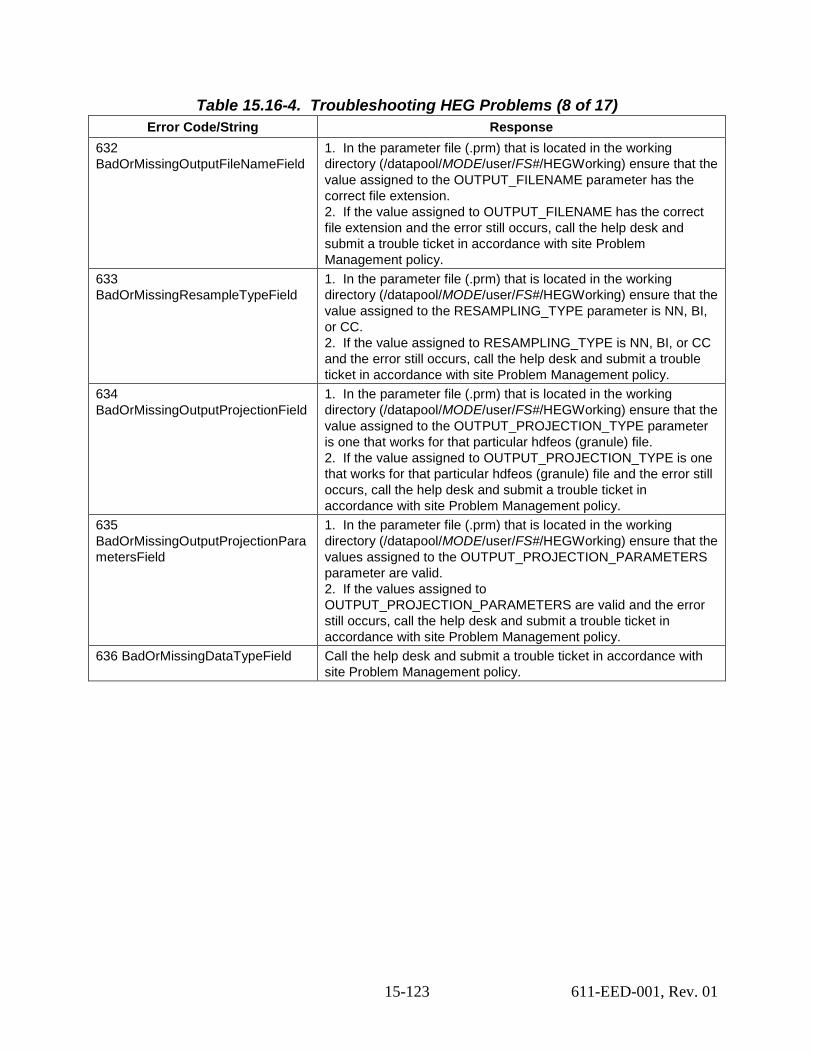
15-123 611-EED-001, Rev. 01
Table 15.16-4. Troubleshooting HEG Problems (8 of 17) Error Code/String Response
632 BadOrMissingOutputFileNameField
1. In the parameter file (.prm) that is located in the working directory (/datapool/MODE/user/FS#/HEGWorking) ensure that the value assigned to the OUTPUT_FILENAME parameter has the correct file extension. 2. If the value assigned to OUTPUT_FILENAME has the correct file extension and the error still occurs, call the help desk and submit a trouble ticket in accordance with site Problem Management policy.
633 BadOrMissingResampleTypeField
1. In the parameter file (.prm) that is located in the working directory (/datapool/MODE/user/FS#/HEGWorking) ensure that the value assigned to the RESAMPLING_TYPE parameter is NN, BI, or CC. 2. If the value assigned to RESAMPLING_TYPE is NN, BI, or CC and the error still occurs, call the help desk and submit a trouble ticket in accordance with site Problem Management policy.
634 BadOrMissingOutputProjectionField
1. In the parameter file (.prm) that is located in the working directory (/datapool/MODE/user/FS#/HEGWorking) ensure that the value assigned to the OUTPUT_PROJECTION_TYPE parameter is one that works for that particular hdfeos (granule) file. 2. If the value assigned to OUTPUT_PROJECTION_TYPE is one that works for that particular hdfeos (granule) file and the error still occurs, call the help desk and submit a trouble ticket in accordance with site Problem Management policy.
635 BadOrMissingOutputProjectionParametersField
1. In the parameter file (.prm) that is located in the working directory (/datapool/MODE/user/FS#/HEGWorking) ensure that the values assigned to the OUTPUT_PROJECTION_PARAMETERS parameter are valid. 2. If the values assigned to OUTPUT_PROJECTION_PARAMETERS are valid and the error still occurs, call the help desk and submit a trouble ticket in accordance with site Problem Management policy.
636 BadOrMissingDataTypeField Call the help desk and submit a trouble ticket in accordance with site Problem Management policy.
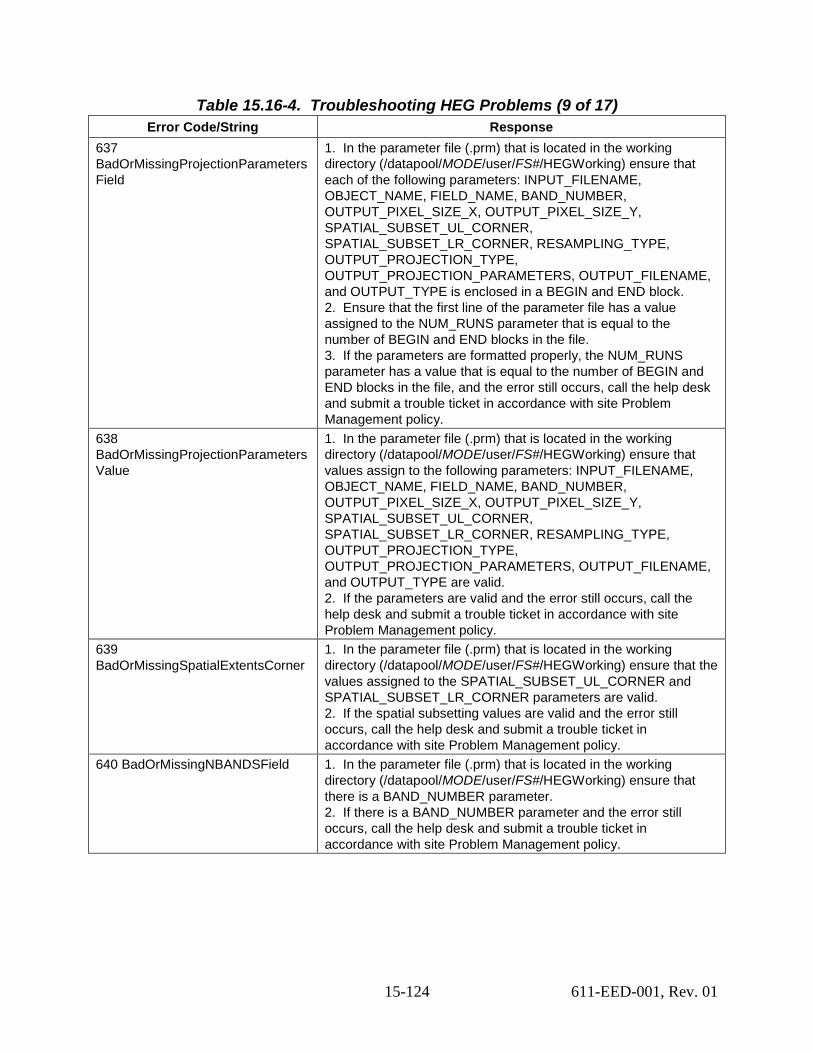
15-124 611-EED-001, Rev. 01
Table 15.16-4. Troubleshooting HEG Problems (9 of 17) Error Code/String Response
637 BadOrMissingProjectionParametersField
1. In the parameter file (.prm) that is located in the working directory (/datapool/MODE/user/FS#/HEGWorking) ensure that each of the following parameters: INPUT_FILENAME, OBJECT_NAME, FIELD_NAME, BAND_NUMBER, OUTPUT_PIXEL_SIZE_X, OUTPUT_PIXEL_SIZE_Y, SPATIAL_SUBSET_UL_CORNER, SPATIAL_SUBSET_LR_CORNER, RESAMPLING_TYPE, OUTPUT_PROJECTION_TYPE, OUTPUT_PROJECTION_PARAMETERS, OUTPUT_FILENAME, and OUTPUT_TYPE is enclosed in a BEGIN and END block. 2. Ensure that the first line of the parameter file has a value assigned to the NUM_RUNS parameter that is equal to the number of BEGIN and END blocks in the file. 3. If the parameters are formatted properly, the NUM_RUNS parameter has a value that is equal to the number of BEGIN and END blocks in the file, and the error still occurs, call the help desk and submit a trouble ticket in accordance with site Problem Management policy.
638 BadOrMissingProjectionParametersValue
1. In the parameter file (.prm) that is located in the working directory (/datapool/MODE/user/FS#/HEGWorking) ensure that values assign to the following parameters: INPUT_FILENAME, OBJECT_NAME, FIELD_NAME, BAND_NUMBER, OUTPUT_PIXEL_SIZE_X, OUTPUT_PIXEL_SIZE_Y, SPATIAL_SUBSET_UL_CORNER, SPATIAL_SUBSET_LR_CORNER, RESAMPLING_TYPE, OUTPUT_PROJECTION_TYPE, OUTPUT_PROJECTION_PARAMETERS, OUTPUT_FILENAME, and OUTPUT_TYPE are valid. 2. If the parameters are valid and the error still occurs, call the help desk and submit a trouble ticket in accordance with site Problem Management policy.
639 BadOrMissingSpatialExtentsCorner
1. In the parameter file (.prm) that is located in the working directory (/datapool/MODE/user/FS#/HEGWorking) ensure that the values assigned to the SPATIAL_SUBSET_UL_CORNER and SPATIAL_SUBSET_LR_CORNER parameters are valid. 2. If the spatial subsetting values are valid and the error still occurs, call the help desk and submit a trouble ticket in accordance with site Problem Management policy.
640 BadOrMissingNBANDSField 1. In the parameter file (.prm) that is located in the working directory (/datapool/MODE/user/FS#/HEGWorking) ensure that there is a BAND_NUMBER parameter. 2. If there is a BAND_NUMBER parameter and the error still occurs, call the help desk and submit a trouble ticket in accordance with site Problem Management policy.
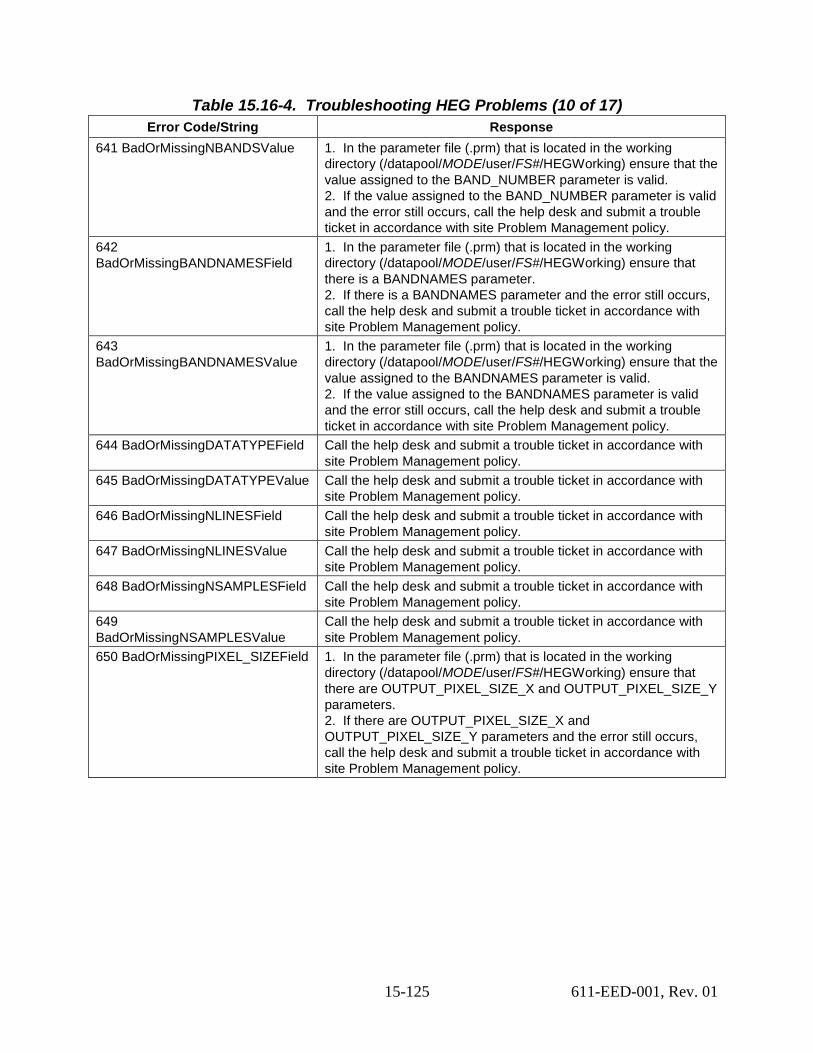
15-125 611-EED-001, Rev. 01
Table 15.16-4. Troubleshooting HEG Problems (10 of 17) Error Code/String Response
641 BadOrMissingNBANDSValue 1. In the parameter file (.prm) that is located in the working directory (/datapool/MODE/user/FS#/HEGWorking) ensure that the value assigned to the BAND_NUMBER parameter is valid. 2. If the value assigned to the BAND_NUMBER parameter is valid and the error still occurs, call the help desk and submit a trouble ticket in accordance with site Problem Management policy.
642 BadOrMissingBANDNAMESField
1. In the parameter file (.prm) that is located in the working directory (/datapool/MODE/user/FS#/HEGWorking) ensure that there is a BANDNAMES parameter. 2. If there is a BANDNAMES parameter and the error still occurs, call the help desk and submit a trouble ticket in accordance with site Problem Management policy.
643 BadOrMissingBANDNAMESValue
1. In the parameter file (.prm) that is located in the working directory (/datapool/MODE/user/FS#/HEGWorking) ensure that the value assigned to the BANDNAMES parameter is valid. 2. If the value assigned to the BANDNAMES parameter is valid and the error still occurs, call the help desk and submit a trouble ticket in accordance with site Problem Management policy.
644 BadOrMissingDATATYPEField Call the help desk and submit a trouble ticket in accordance with site Problem Management policy.
645 BadOrMissingDATATYPEValue Call the help desk and submit a trouble ticket in accordance with site Problem Management policy.
646 BadOrMissingNLINESField Call the help desk and submit a trouble ticket in accordance with site Problem Management policy.
647 BadOrMissingNLINESValue Call the help desk and submit a trouble ticket in accordance with site Problem Management policy.
648 BadOrMissingNSAMPLESField Call the help desk and submit a trouble ticket in accordance with site Problem Management policy.
649 BadOrMissingNSAMPLESValue
Call the help desk and submit a trouble ticket in accordance with site Problem Management policy.
650 BadOrMissingPIXEL_SIZEField 1. In the parameter file (.prm) that is located in the working directory (/datapool/MODE/user/FS#/HEGWorking) ensure that there are OUTPUT_PIXEL_SIZE_X and OUTPUT_PIXEL_SIZE_Y parameters. 2. If there are OUTPUT_PIXEL_SIZE_X and OUTPUT_PIXEL_SIZE_Y parameters and the error still occurs, call the help desk and submit a trouble ticket in accordance with site Problem Management policy.
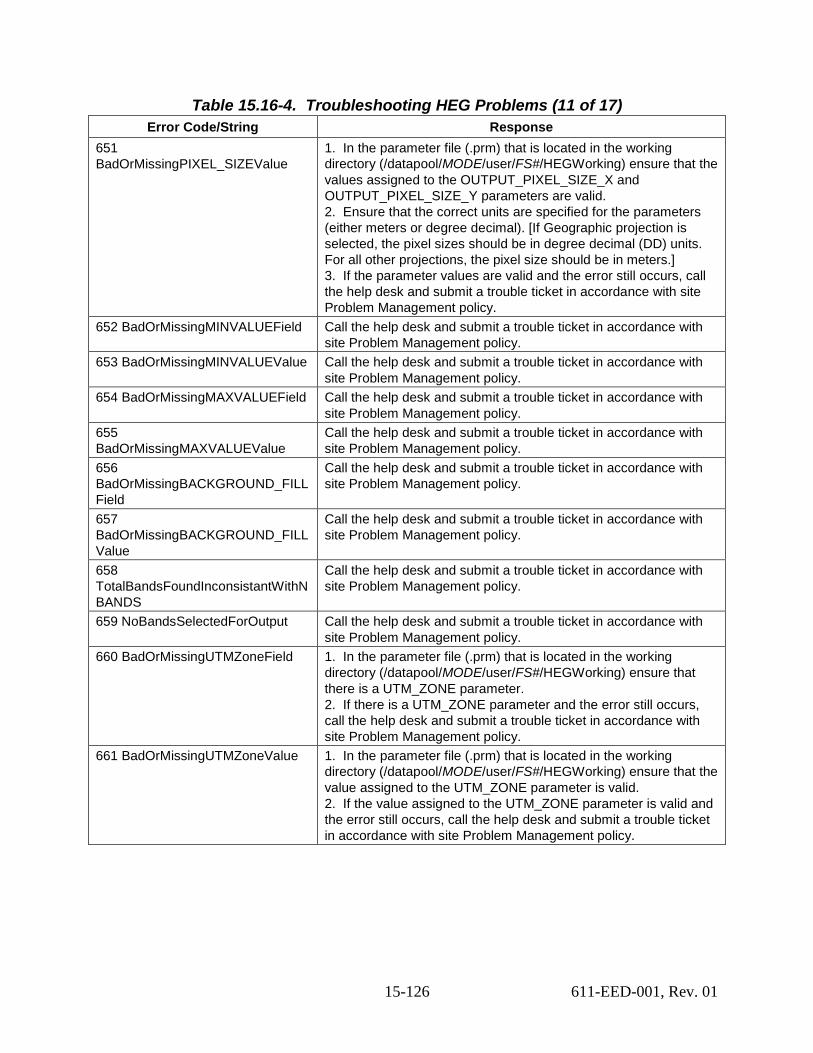
15-126 611-EED-001, Rev. 01
Table 15.16-4. Troubleshooting HEG Problems (11 of 17) Error Code/String Response
651 BadOrMissingPIXEL_SIZEValue
1. In the parameter file (.prm) that is located in the working directory (/datapool/MODE/user/FS#/HEGWorking) ensure that the values assigned to the OUTPUT_PIXEL_SIZE_X and OUTPUT_PIXEL_SIZE_Y parameters are valid. 2. Ensure that the correct units are specified for the parameters (either meters or degree decimal). [If Geographic projection is selected, the pixel sizes should be in degree decimal (DD) units. For all other projections, the pixel size should be in meters.] 3. If the parameter values are valid and the error still occurs, call the help desk and submit a trouble ticket in accordance with site Problem Management policy.
652 BadOrMissingMINVALUEField Call the help desk and submit a trouble ticket in accordance with site Problem Management policy.
653 BadOrMissingMINVALUEValue Call the help desk and submit a trouble ticket in accordance with site Problem Management policy.
654 BadOrMissingMAXVALUEField Call the help desk and submit a trouble ticket in accordance with site Problem Management policy.
655 BadOrMissingMAXVALUEValue
Call the help desk and submit a trouble ticket in accordance with site Problem Management policy.
656 BadOrMissingBACKGROUND_FILLField
Call the help desk and submit a trouble ticket in accordance with site Problem Management policy.
657 BadOrMissingBACKGROUND_FILLValue
Call the help desk and submit a trouble ticket in accordance with site Problem Management policy.
658 TotalBandsFoundInconsistantWithNBANDS
Call the help desk and submit a trouble ticket in accordance with site Problem Management policy.
659 NoBandsSelectedForOutput Call the help desk and submit a trouble ticket in accordance with site Problem Management policy.
660 BadOrMissingUTMZoneField 1. In the parameter file (.prm) that is located in the working directory (/datapool/MODE/user/FS#/HEGWorking) ensure that there is a UTM_ZONE parameter. 2. If there is a UTM_ZONE parameter and the error still occurs, call the help desk and submit a trouble ticket in accordance with site Problem Management policy.
661 BadOrMissingUTMZoneValue 1. In the parameter file (.prm) that is located in the working directory (/datapool/MODE/user/FS#/HEGWorking) ensure that the value assigned to the UTM_ZONE parameter is valid. 2. If the value assigned to the UTM_ZONE parameter is valid and the error still occurs, call the help desk and submit a trouble ticket in accordance with site Problem Management policy.
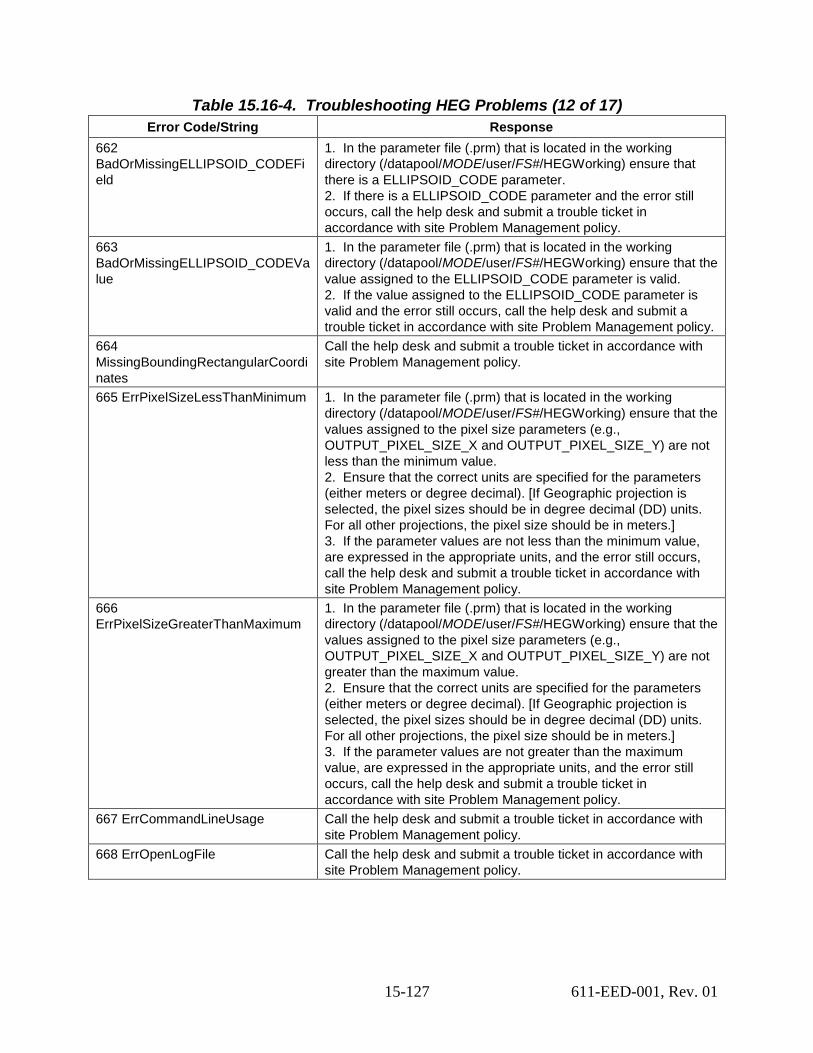
15-127 611-EED-001, Rev. 01
Table 15.16-4. Troubleshooting HEG Problems (12 of 17) Error Code/String Response
662 BadOrMissingELLIPSOID_CODEField
1. In the parameter file (.prm) that is located in the working directory (/datapool/MODE/user/FS#/HEGWorking) ensure that there is a ELLIPSOID_CODE parameter. 2. If there is a ELLIPSOID_CODE parameter and the error still occurs, call the help desk and submit a trouble ticket in accordance with site Problem Management policy.
663 BadOrMissingELLIPSOID_CODEValue
1. In the parameter file (.prm) that is located in the working directory (/datapool/MODE/user/FS#/HEGWorking) ensure that the value assigned to the ELLIPSOID_CODE parameter is valid. 2. If the value assigned to the ELLIPSOID_CODE parameter is valid and the error still occurs, call the help desk and submit a trouble ticket in accordance with site Problem Management policy.
664 MissingBoundingRectangularCoordinates
Call the help desk and submit a trouble ticket in accordance with site Problem Management policy.
665 ErrPixelSizeLessThanMinimum 1. In the parameter file (.prm) that is located in the working directory (/datapool/MODE/user/FS#/HEGWorking) ensure that the values assigned to the pixel size parameters (e.g., OUTPUT_PIXEL_SIZE_X and OUTPUT_PIXEL_SIZE_Y) are not less than the minimum value. 2. Ensure that the correct units are specified for the parameters (either meters or degree decimal). [If Geographic projection is selected, the pixel sizes should be in degree decimal (DD) units. For all other projections, the pixel size should be in meters.] 3. If the parameter values are not less than the minimum value, are expressed in the appropriate units, and the error still occurs, call the help desk and submit a trouble ticket in accordance with site Problem Management policy.
666 ErrPixelSizeGreaterThanMaximum
1. In the parameter file (.prm) that is located in the working directory (/datapool/MODE/user/FS#/HEGWorking) ensure that the values assigned to the pixel size parameters (e.g., OUTPUT_PIXEL_SIZE_X and OUTPUT_PIXEL_SIZE_Y) are not greater than the maximum value. 2. Ensure that the correct units are specified for the parameters (either meters or degree decimal). [If Geographic projection is selected, the pixel sizes should be in degree decimal (DD) units. For all other projections, the pixel size should be in meters.] 3. If the parameter values are not greater than the maximum value, are expressed in the appropriate units, and the error still occurs, call the help desk and submit a trouble ticket in accordance with site Problem Management policy.
667 ErrCommandLineUsage Call the help desk and submit a trouble ticket in accordance with site Problem Management policy.
668 ErrOpenLogFile Call the help desk and submit a trouble ticket in accordance with site Problem Management policy.
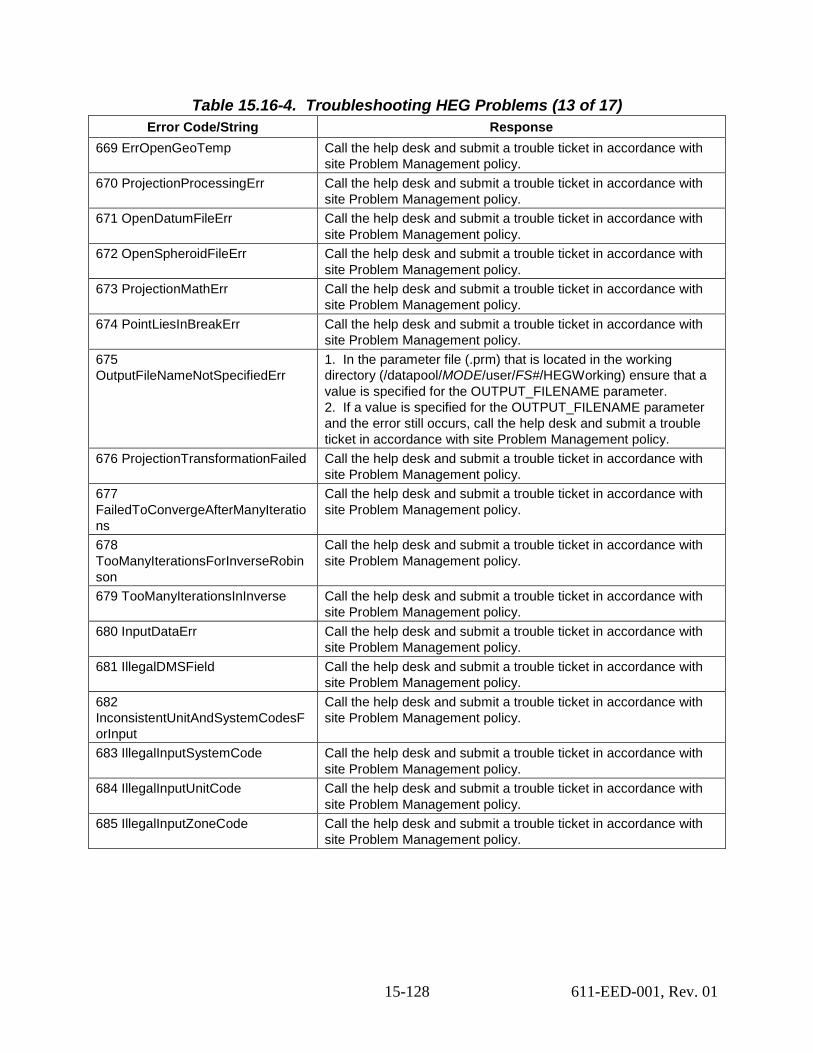
15-128 611-EED-001, Rev. 01
Table 15.16-4. Troubleshooting HEG Problems (13 of 17) Error Code/String Response
669 ErrOpenGeoTemp Call the help desk and submit a trouble ticket in accordance with site Problem Management policy.
670 ProjectionProcessingErr Call the help desk and submit a trouble ticket in accordance with site Problem Management policy.
671 OpenDatumFileErr Call the help desk and submit a trouble ticket in accordance with site Problem Management policy.
672 OpenSpheroidFileErr Call the help desk and submit a trouble ticket in accordance with site Problem Management policy.
673 ProjectionMathErr Call the help desk and submit a trouble ticket in accordance with site Problem Management policy.
674 PointLiesInBreakErr Call the help desk and submit a trouble ticket in accordance with site Problem Management policy.
675 OutputFileNameNotSpecifiedErr
1. In the parameter file (.prm) that is located in the working directory (/datapool/MODE/user/FS#/HEGWorking) ensure that a value is specified for the OUTPUT_FILENAME parameter. 2. If a value is specified for the OUTPUT_FILENAME parameter and the error still occurs, call the help desk and submit a trouble ticket in accordance with site Problem Management policy.
676 ProjectionTransformationFailed Call the help desk and submit a trouble ticket in accordance with site Problem Management policy.
677 FailedToConvergeAfterManyIterations
Call the help desk and submit a trouble ticket in accordance with site Problem Management policy.
678 TooManyIterationsForInverseRobinson
Call the help desk and submit a trouble ticket in accordance with site Problem Management policy.
679 TooManyIterationsInInverse Call the help desk and submit a trouble ticket in accordance with site Problem Management policy.
680 InputDataErr Call the help desk and submit a trouble ticket in accordance with site Problem Management policy.
681 IllegalDMSField Call the help desk and submit a trouble ticket in accordance with site Problem Management policy.
682 InconsistentUnitAndSystemCodesForInput
Call the help desk and submit a trouble ticket in accordance with site Problem Management policy.
683 IllegalInputSystemCode Call the help desk and submit a trouble ticket in accordance with site Problem Management policy.
684 IllegalInputUnitCode Call the help desk and submit a trouble ticket in accordance with site Problem Management policy.
685 IllegalInputZoneCode Call the help desk and submit a trouble ticket in accordance with site Problem Management policy.
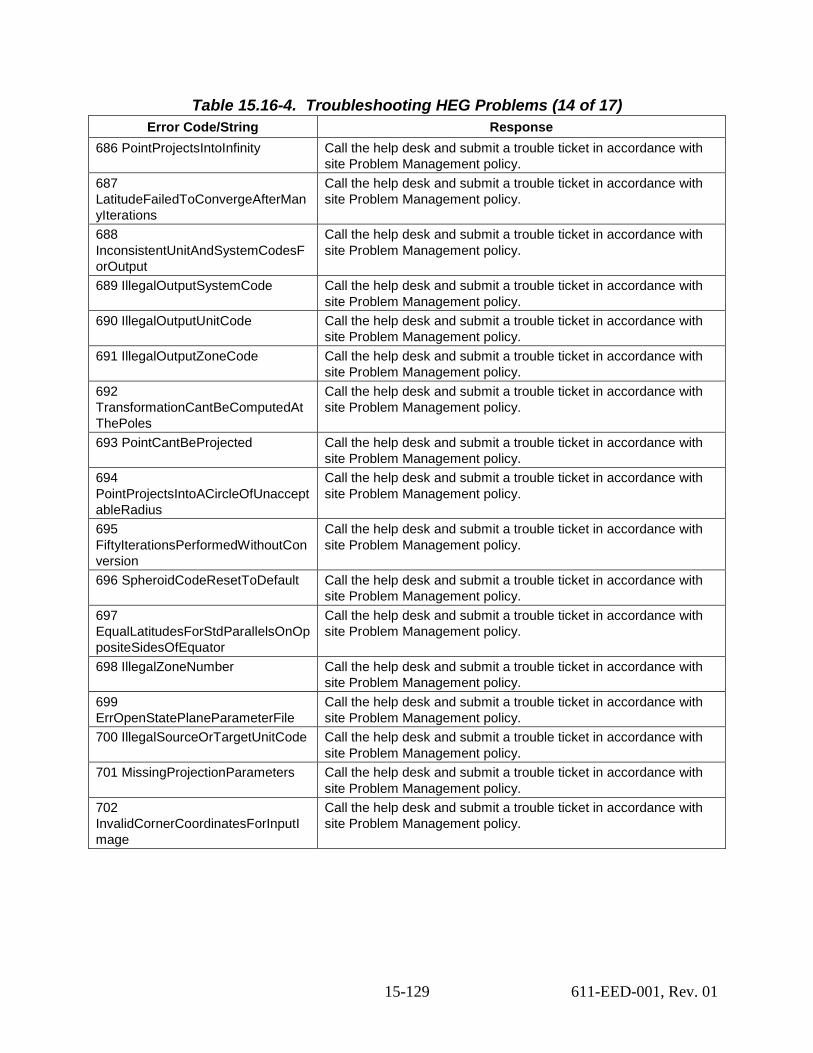
15-129 611-EED-001, Rev. 01
Table 15.16-4. Troubleshooting HEG Problems (14 of 17) Error Code/String Response
686 PointProjectsIntoInfinity Call the help desk and submit a trouble ticket in accordance with site Problem Management policy.
687 LatitudeFailedToConvergeAfterManyIterations
Call the help desk and submit a trouble ticket in accordance with site Problem Management policy.
688 InconsistentUnitAndSystemCodesForOutput
Call the help desk and submit a trouble ticket in accordance with site Problem Management policy.
689 IllegalOutputSystemCode Call the help desk and submit a trouble ticket in accordance with site Problem Management policy.
690 IllegalOutputUnitCode Call the help desk and submit a trouble ticket in accordance with site Problem Management policy.
691 IllegalOutputZoneCode Call the help desk and submit a trouble ticket in accordance with site Problem Management policy.
692 TransformationCantBeComputedAtThePoles
Call the help desk and submit a trouble ticket in accordance with site Problem Management policy.
693 PointCantBeProjected Call the help desk and submit a trouble ticket in accordance with site Problem Management policy.
694 PointProjectsIntoACircleOfUnacceptableRadius
Call the help desk and submit a trouble ticket in accordance with site Problem Management policy.
695 FiftyIterationsPerformedWithoutConversion
Call the help desk and submit a trouble ticket in accordance with site Problem Management policy.
696 SpheroidCodeResetToDefault Call the help desk and submit a trouble ticket in accordance with site Problem Management policy.
697 EqualLatitudesForStdParallelsOnOppositeSidesOfEquator
Call the help desk and submit a trouble ticket in accordance with site Problem Management policy.
698 IllegalZoneNumber Call the help desk and submit a trouble ticket in accordance with site Problem Management policy.
699 ErrOpenStatePlaneParameterFile
Call the help desk and submit a trouble ticket in accordance with site Problem Management policy.
700 IllegalSourceOrTargetUnitCode Call the help desk and submit a trouble ticket in accordance with site Problem Management policy.
701 MissingProjectionParameters Call the help desk and submit a trouble ticket in accordance with site Problem Management policy.
702 InvalidCornerCoordinatesForInputImage
Call the help desk and submit a trouble ticket in accordance with site Problem Management policy.
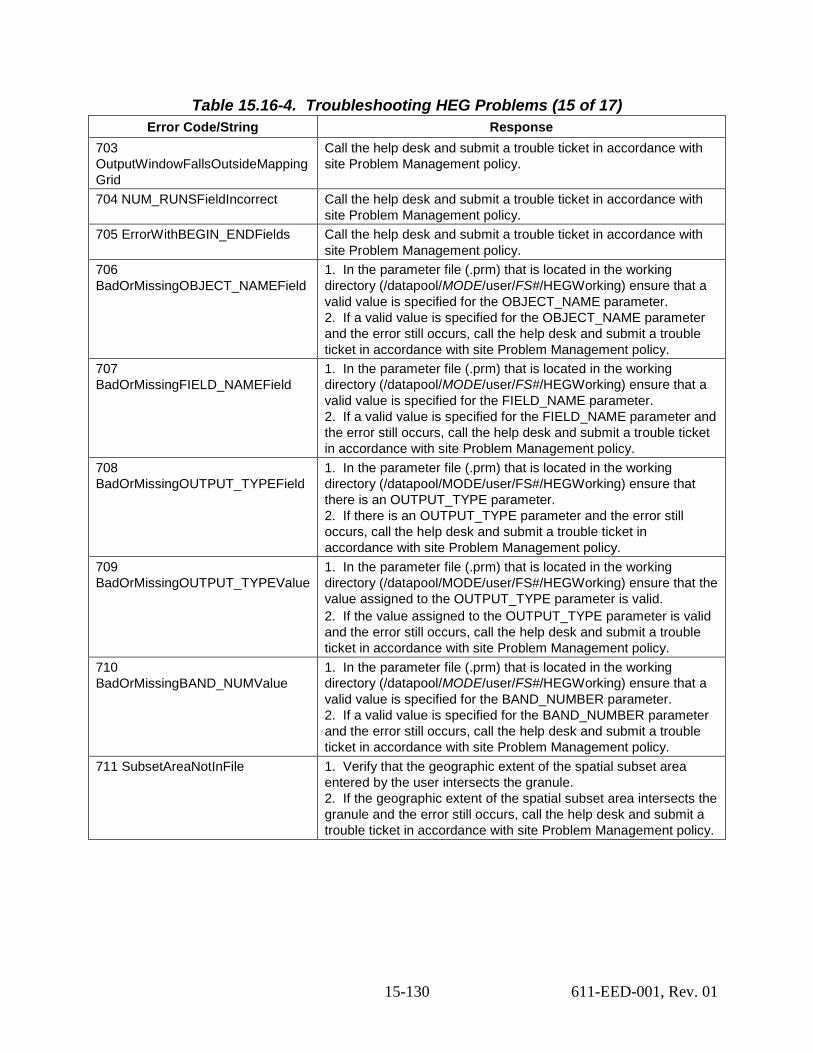
15-130 611-EED-001, Rev. 01
Table 15.16-4. Troubleshooting HEG Problems (15 of 17) Error Code/String Response
703 OutputWindowFallsOutsideMappingGrid
Call the help desk and submit a trouble ticket in accordance with site Problem Management policy.
704 NUM_RUNSFieldIncorrect Call the help desk and submit a trouble ticket in accordance with site Problem Management policy.
705 ErrorWithBEGIN_ENDFields Call the help desk and submit a trouble ticket in accordance with site Problem Management policy.
706 BadOrMissingOBJECT_NAMEField
1. In the parameter file (.prm) that is located in the working directory (/datapool/MODE/user/FS#/HEGWorking) ensure that a valid value is specified for the OBJECT_NAME parameter. 2. If a valid value is specified for the OBJECT_NAME parameter and the error still occurs, call the help desk and submit a trouble ticket in accordance with site Problem Management policy.
707 BadOrMissingFIELD_NAMEField
1. In the parameter file (.prm) that is located in the working directory (/datapool/MODE/user/FS#/HEGWorking) ensure that a valid value is specified for the FIELD_NAME parameter. 2. If a valid value is specified for the FIELD_NAME parameter and the error still occurs, call the help desk and submit a trouble ticket in accordance with site Problem Management policy.
708 BadOrMissingOUTPUT_TYPEField
1. In the parameter file (.prm) that is located in the working directory (/datapool/MODE/user/FS#/HEGWorking) ensure that there is an OUTPUT_TYPE parameter. 2. If there is an OUTPUT_TYPE parameter and the error still occurs, call the help desk and submit a trouble ticket in accordance with site Problem Management policy.
709 BadOrMissingOUTPUT_TYPEValue
1. In the parameter file (.prm) that is located in the working directory (/datapool/MODE/user/FS#/HEGWorking) ensure that the value assigned to the OUTPUT_TYPE parameter is valid. 2. If the value assigned to the OUTPUT_TYPE parameter is valid and the error still occurs, call the help desk and submit a trouble ticket in accordance with site Problem Management policy.
710 BadOrMissingBAND_NUMValue
1. In the parameter file (.prm) that is located in the working directory (/datapool/MODE/user/FS#/HEGWorking) ensure that a valid value is specified for the BAND_NUMBER parameter. 2. If a valid value is specified for the BAND_NUMBER parameter and the error still occurs, call the help desk and submit a trouble ticket in accordance with site Problem Management policy.
711 SubsetAreaNotInFile 1. Verify that the geographic extent of the spatial subset area entered by the user intersects the granule. 2. If the geographic extent of the spatial subset area intersects the granule and the error still occurs, call the help desk and submit a trouble ticket in accordance with site Problem Management policy.
15-131 611-EED-001, Rev. 01
Table 15.16-4. Troubleshooting HEG Problems (16 of 17) Error Code/String Response
712 BadOrMissingSTPZoneField 1. In the parameter file (.prm) that is located in the working directory (/datapool/MODE/user/FS#/HEGWorking) ensure that there is an STP_ZONE parameter. 2. If there is an STP_ZONE parameter and the error still occurs, call the help desk and submit a trouble ticket in accordance with site Problem Management policy.
713 BadOrMissingSTPZoneValue 1. In the parameter file (.prm) that is located in the working directory (/datapool/MODE/user/FS#/HEGWorking) ensure that the value assigned to the STP_ZONE parameter is valid. 2. If the value assigned to the STP_ZONE parameter is valid and the error still occurs, call the help desk and submit a trouble ticket in accordance with site Problem Management policy.
714 UnableToOpenSTPZoneFile Call the help desk and submit a trouble ticket in accordance with site Problem Management policy.
715 GranuleOutsideUSCantFindDefaultStatePlaneZone
Call the help desk and submit a trouble ticket in accordance with site Problem Management policy.
716 ErrorGettingAlaskanSTPZone Call the help desk and submit a trouble ticket in accordance with site Problem Management policy.
720 ErrorOpenInputHDFFile 1. Verify that the input hdf (granule) file exists in the datapool. 2. Ensure that cmshared has read permission on the input hdf file. 3. In the HEG Server debug log file (/usr/ecs/MODE/CUSTOM/logs/ HegServer.debug.log) verify that the hegtool is called correctly. [The hegtool call should look like this: /usr/ecs/MODE/CUSTOM/utilities/EcHgHEGStart MODE hegtool -h <location of the hdf file in the datapool>.] [For detailed instructions refer to the procedure for Checking HEG Server Log Files (subsequent section of this lesson).] 4. If the input hdf file is in the datapool, cmshared has read permission on the input hdf file, the hegtool was called correctly, and the error still occurs, call the help desk and submit a trouble ticket in accordance with site Problem Management policy.
721 ErrorReadingInputHDFFile 1. Verify that the input hdf (granule) file is in hdfeos format. 2. Ensure that cmshared has read permission on the input hdf file. 3. In the HEG Server debug log file (/usr/ecs/MODE/CUSTOM/logs/ HegServer.debug.log) verify that the hegtool is called correctly. [The hegtool call should look like this: /usr/ecs/MODE/CUSTOM/utilities/EcHgHEGStart MODE hegtool -h <location of the hdf file in the datapool>.] [For detailed instructions refer to the procedure for Checking HEG Server Log Files (subsequent section of this lesson).] 4. If the input hdf file is in hdfeos format, cmshared has read permission on the input hdf file, the hegtool was called correctly, and the error still occurs, call the help desk and submit a trouble ticket in accordance with site Problem Management policy.
15-132 611-EED-001, Rev. 01
Table 15.16-4. Troubleshooting HEG Problems (17 of 17) Error Code/String Response
722 UnableToOpenHeaderFile 1. Verify that there is a HegHdr.hdr file in the working directory (/datapool/MODE/user/FS#/HEGWorking). 2. If there is a HegHdr.hdr file in the working directory and the error still occurs, call the help desk and submit a trouble ticket in accordance with site Problem Management policy.
723 UnableToFindShortName Call the help desk and submit a trouble ticket in accordance with site Problem Management policy.
724 UnableToOpenGEOFile Call the help desk and submit a trouble ticket in accordance with site Problem Management policy.
15.16.6 Checking HEG Server Log Files HEG server log files show the activities involved in processing each HEG request. The following types of HEG server log files can be generated:
• HEG Server operations log (HegServer.ops.log). • HEG Server debug log (HegServer.debug.log). • HEG Server performance log (HegServer.perf.log), if available (typically turned off
in normal operations). The amount of information provided in logs varies with the type of log being viewed and the level of logging configured for the type of log. In general most of the entries in the operations log are duplicated in the debug log. The HEG Server logs can be set to record data at any of the following levels of detail (listed from most-detailed to no logging):
• XVERBOSE. • VERBOSE. • INFORMATION. • NONE.
In normal operation the HEG Server logs are typically set (in the EcHgServerConfig.properties file in the /usr/ecs/MODE/CUSTOM/cfg directory) to record data at the following levels of detail:
• HEG Server operations log (HegServer.ops.log) - INFORMATION. • HEG Server debug log (HegServer.debug.log) – INFORMATION. • HEG Server performance log (HegServer.perf.log) – NONE.
The HEG Server can manage several concurrent activities. This is accomplished through the use of threads. Information concerning HEG Server processing of requests (identified by thread) is recorded in the HEG Server logs (assuming some level of log recording is specified in the corresponding configuration file). The procedure for checking HEG server log files starts with the assumption that the operator has logged in to the system and the appropriate host.

15-133 611-EED-001, Rev. 01
15.16.6.1 Checking HEG Server Log Files 1 If the level of logging should be adjusted to assist in troubleshooting, notify the
Operations Controller/System Administrator to have the adjustment made. • Detailed levels of logging may have negative effects on system performance.
2 Access a terminal window logged in to the appropriate host. • HEG Server (e.g., x4hel01) host has the following HEG server log files:
• HegServer.ops.log. • HegServer.debug.log.
• For detailed instructions refer to the procedure for Logging in to System Hosts (preceding section of this lesson).
3 Type cd /usr/ecs/MODE/CUSTOM/logs then press Return/Enter. • Change directory to the directory containing the HEG server log files (e.g.,
HegServer.ops.log, HegServer.debug.log). 4 Type more filename then press Return/Enter.
• filename refers to the HEG log file to be reviewed (e.g., HegServer.ops.log, HegServer.debug.log).
• The first page of the log file is displayed. • Although this procedure has been written for the more command, other UNIX
visualizing commands (e.g., view) can be used to review the log file. • The following more commands (at the --More-- prompt) are useful:
− Return/Enter (go down one line). − nReturn/Enter (go down n number of lines). − nSpace bar (go down n number of lines). − Space bar (go down one screen). − z (go down one screen). − nz (go down n number of screens; n becomes the default for subsequent z
commands). − nb (go back n number of screens). − nCTRL-B (go back n number of screens). − nd (go down n number of lines; n becomes the default for subsequent d
commands). − nCTRL-D (go down n number of lines; n becomes the default for subsequent d
commands). − nf (skip n screens full and then display a screen). − ns (skip n lines and then display a screen). − h (help - display a description of all the more commands).
15-134 611-EED-001, Rev. 01
− CTRL-L (refresh the screen). − n/pattern (search forward for the nth occurrence of the pattern and display a
screen starting two lines before the line that contains the specified pattern match.
− nn (search for the nth occurrence of the last pattern entered. − v (drop into the vi editor at the current line of the current file). − = (display the current line number). − :f (display the name of the current file and the current line number). − q (exit from more). − Q (exit from more). − !command (invoke a shell to execute command).
5 At the --More-- prompt type /requestID then press Return/Enter: • requestID is the HEG Request ID from the OM GUI [refer to the procedure for
Viewing Pending HEG Granules or the procedure for Viewing Open HEG Intervention Information on the OM GUI (previous sections of this lesson)]. − The XML processing instructions for each HEG request are included in the
HEG Server debug log if the log.debug.level is set to XVERBOSE. • For example, type:
/0403300996 • The file is searched for the specified text.
• If the specified text is in the log file, the following type of response is displayed. ...skipping 12.14.2005 14:22:19.667 : Thread ID [21161] : XVERBOSE : Monitor thread created. 12.14.2005 14:22:19.680 : Thread ID [21161] : VERBOSE : input xml validation succeeded for Request 10576 12.14.2005 14:22:19.680 : Thread ID [21161] : INFORMATION : Incoming request from client: OMS with uid: 0403300996.85000004172274.3312040939 is assigned serverRequestId: 10576 […] --More--(16%)
• If the specified text is not in the log file, the following type of response is displayed. Pattern not found
• The Thread ID (21161 in the preceding example) and Server Request ID (10576 in the preceding example) can be used to track entries concerning the specific request in the log file.
NOTE: Thread IDs are reused frequently. There may be multiple processes with the same thread ID in any particular log file. It is important to follow the correct instance of the thread (i.e., the one with the desired Server Request ID).
15-135 611-EED-001, Rev. 01
NOTE: It is likely that HEG would try again to process a failed request. Subsequent request processing may use the same thread ID or a different thread ID. However, it could be found through the Order Manager (OM GUI) Request ID. 6 If checking the operations log file, at the --More-- prompt type /: 0 for Request:
ServerRequestID then press Return/Enter: • ServerRequestID is the Server Request ID discovered in Step 5. • For example, type:
/: 0 for Request: 10576 • The file is searched for the specified text.
• The following type of response is displayed. ...skipping 12.14.2005 14:22:34.138 : Thread ID [21178] : XVERBOSE : poller thread terminated for request: 10582 12.14.2005 14:22:34.139 : Thread ID [21161] : VERBOSE : Move output successfully for Request 10576 12.14.2005 14:22:34.139 : Thread ID [21161] : java.lang.String : INFORMATION : HEGConvProcessor.convert() returned status code: 0 for Request: 10576 12.14.2005 14:22:34.139 : Thread ID [21179] : XVERBOSE : poller thread terminated for request: 10576 […] --More--(18%)
• If the specified text is not in the log file, the following type of response is displayed. Pattern not found
• If a status code of 0 (zero) or 600 for a particular Server Request ID is found in the log, HEG processing was successful. This statement should be in the both the operations log and debug log regardless of the level of detail specified in the configuration file (unless logging is turned off; i.e., log level is NONE for a particular type of log). • Of course, there could still be problems with the request; e.g., failure to move
the output files to the output directory. • If a status code of 0 (zero) or 600 for a particular Server Request ID is not found in
the log, HEG processing was either unsuccessful or is incomplete. 7 If checking the debug log file, at the --More-- prompt type /: 0 for Request
ServerRequestID then press Return/Enter: • ServerRequestID is the Server Request ID discovered in Step 5. • For example, type:
/: 0 for Request 10576 • The file is searched for the specified text.
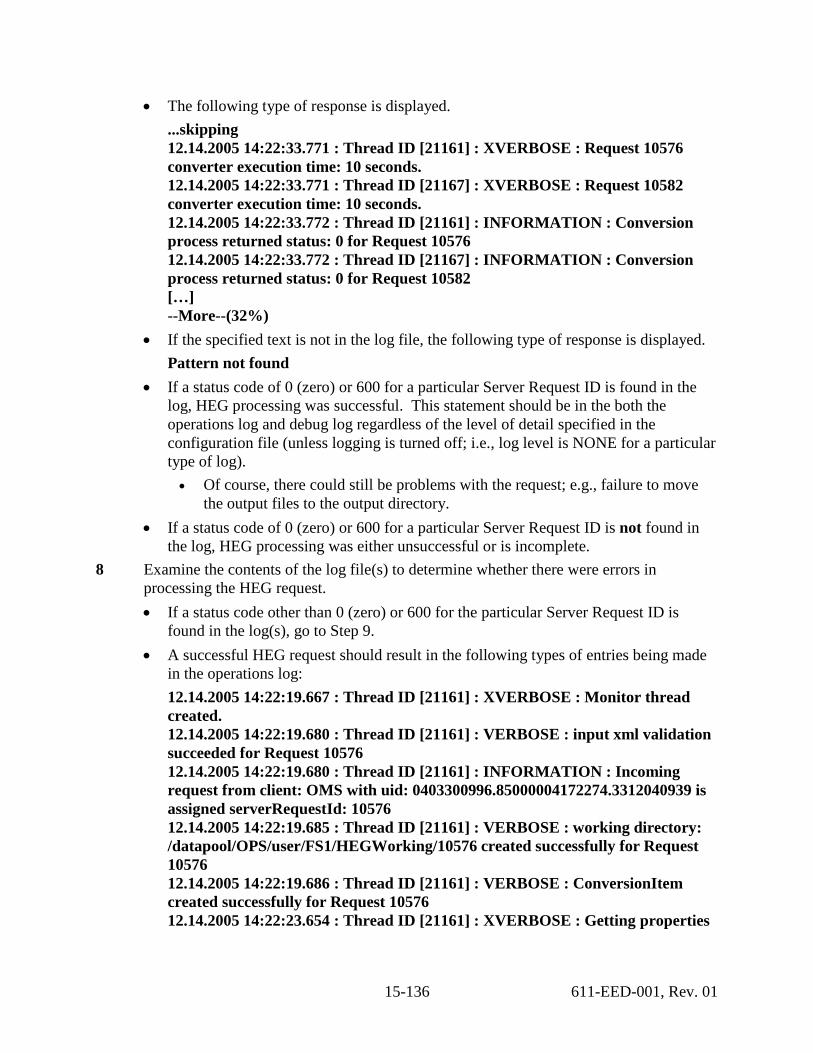
15-136 611-EED-001, Rev. 01
• The following type of response is displayed. ...skipping 12.14.2005 14:22:33.771 : Thread ID [21161] : XVERBOSE : Request 10576 converter execution time: 10 seconds. 12.14.2005 14:22:33.771 : Thread ID [21167] : XVERBOSE : Request 10582 converter execution time: 10 seconds. 12.14.2005 14:22:33.772 : Thread ID [21161] : INFORMATION : Conversion process returned status: 0 for Request 10576 12.14.2005 14:22:33.772 : Thread ID [21167] : INFORMATION : Conversion process returned status: 0 for Request 10582 […] --More--(32%)
• If the specified text is not in the log file, the following type of response is displayed. Pattern not found
• If a status code of 0 (zero) or 600 for a particular Server Request ID is found in the log, HEG processing was successful. This statement should be in the both the operations log and debug log regardless of the level of detail specified in the configuration file (unless logging is turned off; i.e., log level is NONE for a particular type of log). • Of course, there could still be problems with the request; e.g., failure to move
the output files to the output directory. • If a status code of 0 (zero) or 600 for a particular Server Request ID is not found in
the log, HEG processing was either unsuccessful or is incomplete. 8 Examine the contents of the log file(s) to determine whether there were errors in
processing the HEG request. • If a status code other than 0 (zero) or 600 for the particular Server Request ID is
found in the log(s), go to Step 9. • A successful HEG request should result in the following types of entries being made
in the operations log: 12.14.2005 14:22:19.667 : Thread ID [21161] : XVERBOSE : Monitor thread created. 12.14.2005 14:22:19.680 : Thread ID [21161] : VERBOSE : input xml validation succeeded for Request 10576 12.14.2005 14:22:19.680 : Thread ID [21161] : INFORMATION : Incoming request from client: OMS with uid: 0403300996.85000004172274.3312040939 is assigned serverRequestId: 10576 12.14.2005 14:22:19.685 : Thread ID [21161] : VERBOSE : working directory: /datapool/OPS/user/FS1/HEGWorking/10576 created successfully for Request 10576 12.14.2005 14:22:19.686 : Thread ID [21161] : VERBOSE : ConversionItem created successfully for Request 10576 12.14.2005 14:22:23.654 : Thread ID [21161] : XVERBOSE : Getting properties
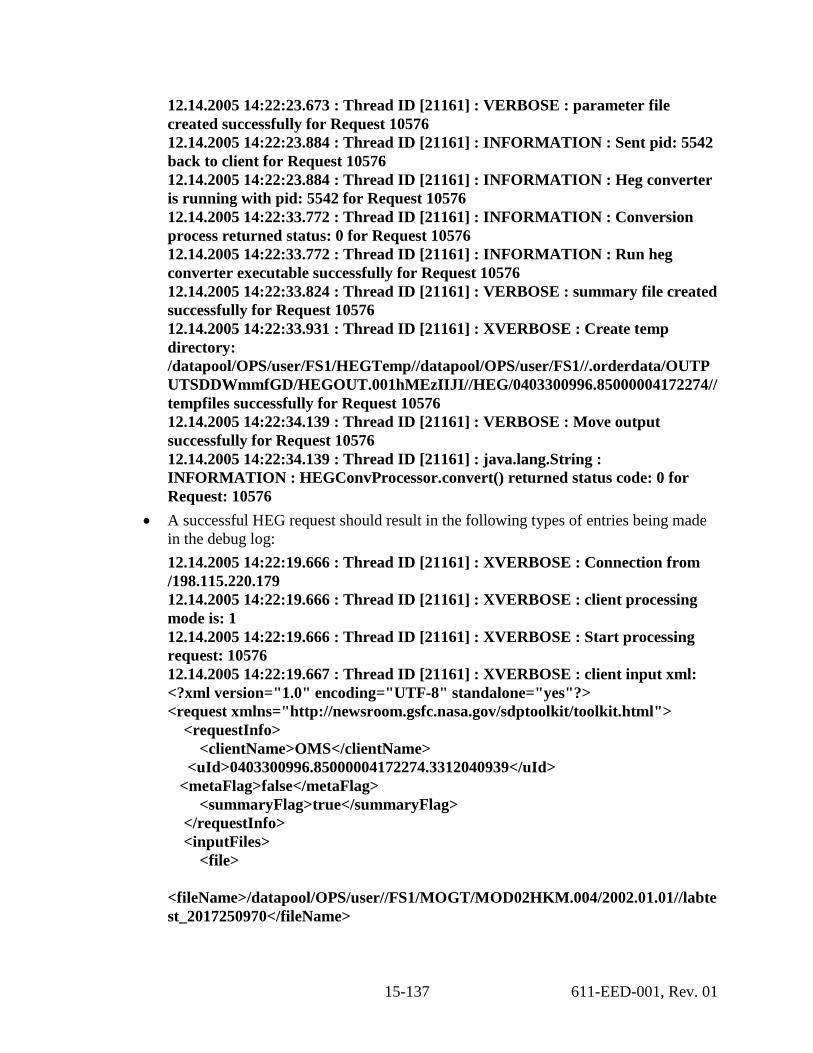
15-137 611-EED-001, Rev. 01
12.14.2005 14:22:23.673 : Thread ID [21161] : VERBOSE : parameter file created successfully for Request 10576 12.14.2005 14:22:23.884 : Thread ID [21161] : INFORMATION : Sent pid: 5542 back to client for Request 10576 12.14.2005 14:22:23.884 : Thread ID [21161] : INFORMATION : Heg converter is running with pid: 5542 for Request 10576 12.14.2005 14:22:33.772 : Thread ID [21161] : INFORMATION : Conversion process returned status: 0 for Request 10576 12.14.2005 14:22:33.772 : Thread ID [21161] : INFORMATION : Run heg converter executable successfully for Request 10576 12.14.2005 14:22:33.824 : Thread ID [21161] : VERBOSE : summary file created successfully for Request 10576 12.14.2005 14:22:33.931 : Thread ID [21161] : XVERBOSE : Create temp directory: /datapool/OPS/user/FS1/HEGTemp//datapool/OPS/user/FS1//.orderdata/OUTPUTSDDWmmfGD/HEGOUT.001hMEzIIJI//HEG/0403300996.85000004172274//tempfiles successfully for Request 10576 12.14.2005 14:22:34.139 : Thread ID [21161] : VERBOSE : Move output successfully for Request 10576 12.14.2005 14:22:34.139 : Thread ID [21161] : java.lang.String : INFORMATION : HEGConvProcessor.convert() returned status code: 0 for Request: 10576
• A successful HEG request should result in the following types of entries being made in the debug log: 12.14.2005 14:22:19.666 : Thread ID [21161] : XVERBOSE : Connection from /198.115.220.179 12.14.2005 14:22:19.666 : Thread ID [21161] : XVERBOSE : client processing mode is: 1 12.14.2005 14:22:19.666 : Thread ID [21161] : XVERBOSE : Start processing request: 10576 12.14.2005 14:22:19.667 : Thread ID [21161] : XVERBOSE : client input xml: <?xml version="1.0" encoding="UTF-8" standalone="yes"?> <request xmlns="http://newsroom.gsfc.nasa.gov/sdptoolkit/toolkit.html"> <requestInfo> <clientName>OMS</clientName> <uId>0403300996.85000004172274.3312040939</uId> <metaFlag>false</metaFlag> <summaryFlag>true</summaryFlag> </requestInfo> <inputFiles> <file> <fileName>/datapool/OPS/user//FS1/MOGT/MOD02HKM.004/2002.01.01//labtest_2017250970</fileName>
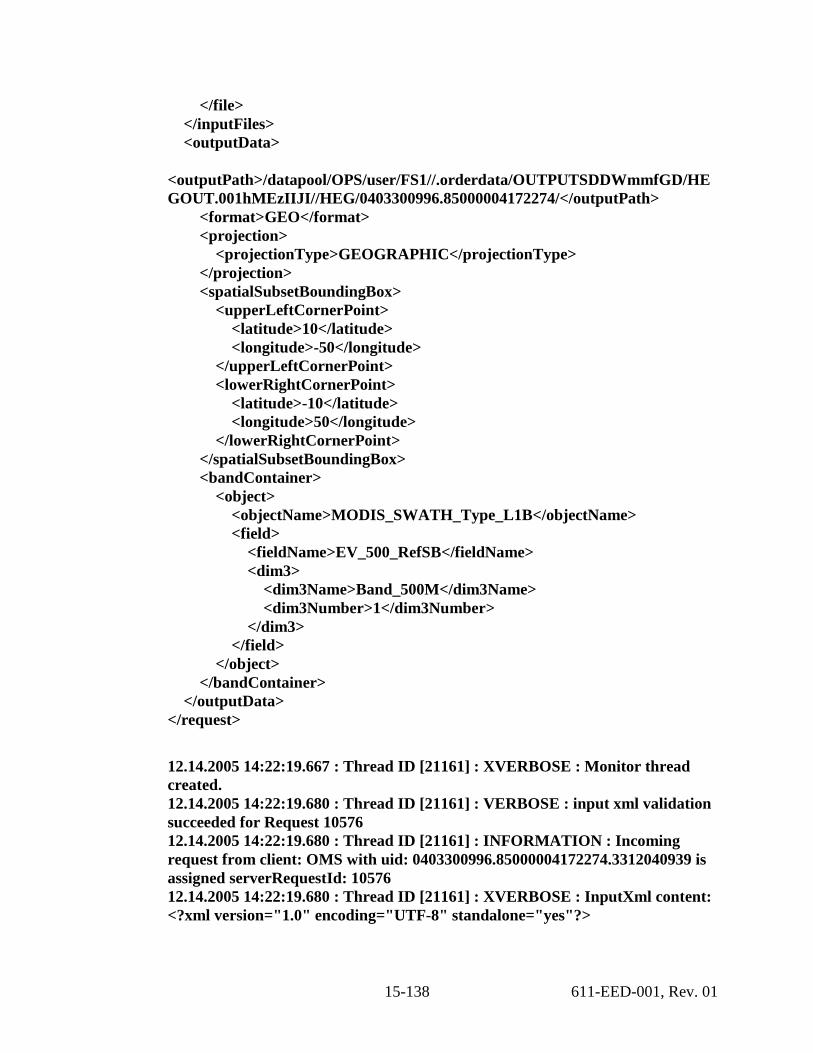
15-138 611-EED-001, Rev. 01
</file> </inputFiles> <outputData> <outputPath>/datapool/OPS/user/FS1//.orderdata/OUTPUTSDDWmmfGD/HEGOUT.001hMEzIIJI//HEG/0403300996.85000004172274/</outputPath> <format>GEO</format> <projection> <projectionType>GEOGRAPHIC</projectionType> </projection> <spatialSubsetBoundingBox> <upperLeftCornerPoint> <latitude>10</latitude> <longitude>-50</longitude> </upperLeftCornerPoint> <lowerRightCornerPoint> <latitude>-10</latitude> <longitude>50</longitude> </lowerRightCornerPoint> </spatialSubsetBoundingBox> <bandContainer> <object> <objectName>MODIS_SWATH_Type_L1B</objectName> <field> <fieldName>EV_500_RefSB</fieldName> <dim3> <dim3Name>Band_500M</dim3Name> <dim3Number>1</dim3Number> </dim3> </field> </object> </bandContainer> </outputData> </request> 12.14.2005 14:22:19.667 : Thread ID [21161] : XVERBOSE : Monitor thread created. 12.14.2005 14:22:19.680 : Thread ID [21161] : VERBOSE : input xml validation succeeded for Request 10576 12.14.2005 14:22:19.680 : Thread ID [21161] : INFORMATION : Incoming request from client: OMS with uid: 0403300996.85000004172274.3312040939 is assigned serverRequestId: 10576 12.14.2005 14:22:19.680 : Thread ID [21161] : XVERBOSE : InputXml content: <?xml version="1.0" encoding="UTF-8" standalone="yes"?>
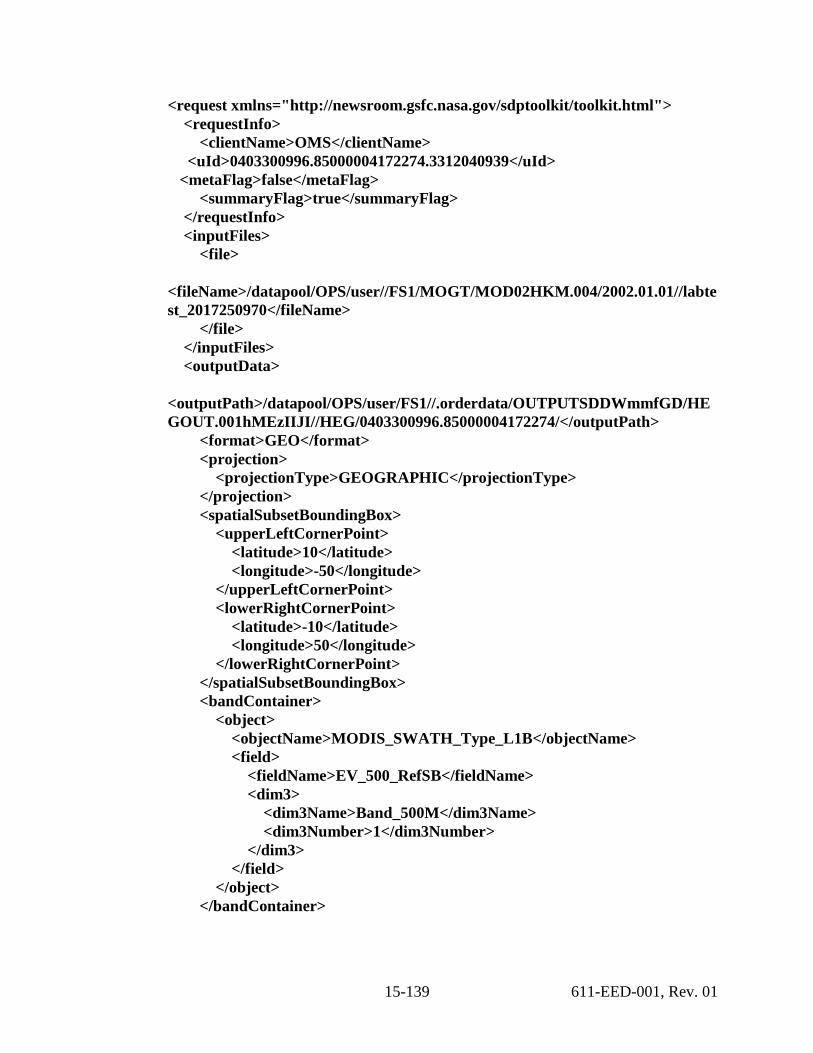
15-139 611-EED-001, Rev. 01
<request xmlns="http://newsroom.gsfc.nasa.gov/sdptoolkit/toolkit.html"> <requestInfo> <clientName>OMS</clientName> <uId>0403300996.85000004172274.3312040939</uId> <metaFlag>false</metaFlag> <summaryFlag>true</summaryFlag> </requestInfo> <inputFiles> <file> <fileName>/datapool/OPS/user//FS1/MOGT/MOD02HKM.004/2002.01.01//labtest_2017250970</fileName> </file> </inputFiles> <outputData> <outputPath>/datapool/OPS/user/FS1//.orderdata/OUTPUTSDDWmmfGD/HEGOUT.001hMEzIIJI//HEG/0403300996.85000004172274/</outputPath> <format>GEO</format> <projection> <projectionType>GEOGRAPHIC</projectionType> </projection> <spatialSubsetBoundingBox> <upperLeftCornerPoint> <latitude>10</latitude> <longitude>-50</longitude> </upperLeftCornerPoint> <lowerRightCornerPoint> <latitude>-10</latitude> <longitude>50</longitude> </lowerRightCornerPoint> </spatialSubsetBoundingBox> <bandContainer> <object> <objectName>MODIS_SWATH_Type_L1B</objectName> <field> <fieldName>EV_500_RefSB</fieldName> <dim3> <dim3Name>Band_500M</dim3Name> <dim3Number>1</dim3Number> </dim3> </field> </object> </bandContainer>
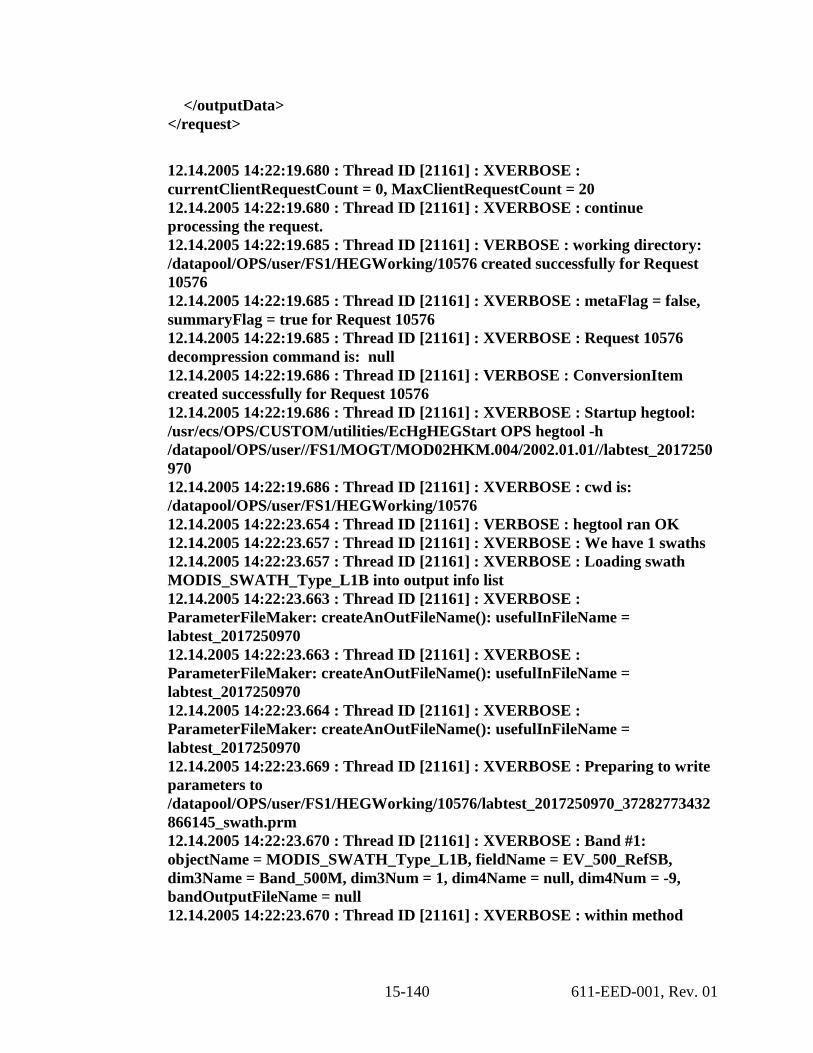
15-140 611-EED-001, Rev. 01
</outputData> </request> 12.14.2005 14:22:19.680 : Thread ID [21161] : XVERBOSE : currentClientRequestCount = 0, MaxClientRequestCount = 20 12.14.2005 14:22:19.680 : Thread ID [21161] : XVERBOSE : continue processing the request. 12.14.2005 14:22:19.685 : Thread ID [21161] : VERBOSE : working directory: /datapool/OPS/user/FS1/HEGWorking/10576 created successfully for Request 10576 12.14.2005 14:22:19.685 : Thread ID [21161] : XVERBOSE : metaFlag = false, summaryFlag = true for Request 10576 12.14.2005 14:22:19.685 : Thread ID [21161] : XVERBOSE : Request 10576 decompression command is: null 12.14.2005 14:22:19.686 : Thread ID [21161] : VERBOSE : ConversionItem created successfully for Request 10576 12.14.2005 14:22:19.686 : Thread ID [21161] : XVERBOSE : Startup hegtool: /usr/ecs/OPS/CUSTOM/utilities/EcHgHEGStart OPS hegtool -h /datapool/OPS/user//FS1/MOGT/MOD02HKM.004/2002.01.01//labtest_2017250970 12.14.2005 14:22:19.686 : Thread ID [21161] : XVERBOSE : cwd is: /datapool/OPS/user/FS1/HEGWorking/10576 12.14.2005 14:22:23.654 : Thread ID [21161] : VERBOSE : hegtool ran OK 12.14.2005 14:22:23.657 : Thread ID [21161] : XVERBOSE : We have 1 swaths 12.14.2005 14:22:23.657 : Thread ID [21161] : XVERBOSE : Loading swath MODIS_SWATH_Type_L1B into output info list 12.14.2005 14:22:23.663 : Thread ID [21161] : XVERBOSE : ParameterFileMaker: createAnOutFileName(): usefulInFileName = labtest_2017250970 12.14.2005 14:22:23.663 : Thread ID [21161] : XVERBOSE : ParameterFileMaker: createAnOutFileName(): usefulInFileName = labtest_2017250970 12.14.2005 14:22:23.664 : Thread ID [21161] : XVERBOSE : ParameterFileMaker: createAnOutFileName(): usefulInFileName = labtest_2017250970 12.14.2005 14:22:23.669 : Thread ID [21161] : XVERBOSE : Preparing to write parameters to /datapool/OPS/user/FS1/HEGWorking/10576/labtest_2017250970_37282773432866145_swath.prm 12.14.2005 14:22:23.670 : Thread ID [21161] : XVERBOSE : Band #1: objectName = MODIS_SWATH_Type_L1B, fieldName = EV_500_RefSB, dim3Name = Band_500M, dim3Num = 1, dim4Name = null, dim4Num = -9, bandOutputFileName = null 12.14.2005 14:22:23.670 : Thread ID [21161] : XVERBOSE : within method

15-141 611-EED-001, Rev. 01
loadARangeOfConversions(). 12.14.2005 14:22:23.673 : Thread ID [21161] : VERBOSE : parameter file created successfully for Request 10576 12.14.2005 14:22:23.673 : Thread ID [21161] : VERBOSE : Request 10576 constructed conversion command: /usr/ecs/OPS/CUSTOM/utilities/EcHgHEGStart OPS swtif -p /datapool/OPS/user/FS1/HEGWorking/10576/labtest_2017250970_37282773432866145_swath.prm -d -noMetadata 12.14.2005 14:22:23.684 : Thread ID [21161] : XVERBOSE : About to start heg converter execution for Request 10576 12.14.2005 14:22:23.884 : Thread ID [21161] : INFORMATION : Sent pid: 5542 back to client for Request 10576 12.14.2005 14:22:23.884 : Thread ID [21161] : INFORMATION : Heg converter is running with pid: 5542 for Request 10576 12.14.2005 14:22:33.771 : Thread ID [21161] : XVERBOSE : heg converter execution finished for Request 10576 12.14.2005 14:22:33.771 : Thread ID [21161] : XVERBOSE : Request 10576 converter execution time: 10 seconds. 12.14.2005 14:22:33.772 : Thread ID [21161] : INFORMATION : Conversion process returned status: 0 for Request 10576 12.14.2005 14:22:33.772 : Thread ID [21161] : INFORMATION : Run heg converter executable successfully for Request 10576 12.14.2005 14:22:33.825 : Thread ID [21161] : VERBOSE : summary file created successfully for Request 10576 12.14.2005 14:22:33.931 : Thread ID [21161] : XVERBOSE : Create temp directory: /datapool/OPS/user/FS1/HEGTemp//datapool/OPS/user/FS1//.orderdata/OUTPUTSDDWmmfGD/HEGOUT.001hMEzIIJI//HEG/0403300996.85000004172274//tempfiles successfully for Request 10576 12.14.2005 14:22:34.139 : Thread ID [21161] : VERBOSE : Move output successfully for Request 10576 12.14.2005 14:22:34.139 : Thread ID [21161] : java.lang.String : INFORMATION : HEGConvProcessor.convert() returned /datapool/OPS/user//FS1/MOGT/MOD02HKM.004/2002.01.01//labtest_2017250970|0|HegConversionSuccessful|/datapool/OPS/user/FS1//.orderdata/OUTPUTSDDWmmfGD/HEGOUT.001hMEzIIJI//HEG/0403300996.85000004172274//labtest_2017250970_0403300996_ConverterSynopsis.txt /datapool/OPS/user/FS1//.orderdata/OUTPUTSDDWmmfGD/HEGOUT.001hMEzIIJI//HEG/0403300996.85000004172274//labtest_2017250970_EV_500_RefSB__1_0403300996.tif for Request: 10576 12.14.2005 14:22:34.139 : Thread ID [21161] : XVERBOSE : About to send conversion result back to client. 12.14.2005 14:22:34.139 : Thread ID [21161] : INFORMATION : Finished sending conversion result back to client.
15-142 611-EED-001, Rev. 01
12.14.2005 14:22:34.139 : Thread ID [21161] : INFORMATION : Finish processing request: 10576
9 If a status code other than 0 (zero) or 600 for a particular Server Request ID is found in the log(s), take the appropriate action as indicated in Table 12, Troubleshooting HEG Problems.
10 If HEG request processing of a particular request is suspected of being incomplete (rather than failed), at the shell prompt type xterm -n ‘HEG Server Log’ -sl 5000 -sb & then press Return/Enter. • A new xterm window is opened.
11 If HEG request processing of a particular request is suspected of being incomplete (rather than failed), at the shell prompt in the new xterm window type tail -f filename | grep 'ServerRequestID' then press Return/Enter. • filename refers to the HEG log file to be reviewed (e.g., HegServer.ops.log,
HegServer.debug.log). • ServerRequestID is the Server Request ID discovered in Step 5. • For example:
tail -f HegServer.ops.log | grep '10576' • If new entries with the particular Server Request ID are being posted to the log, the
operation has not finished yet. • If the same entries continue to be repeated over and over, there could be a
problem with the server/converter. • Notify the Operations Controller/System Administrator of suspected server
problems. • If it is necessary to exit from a tailed log, type ^c [Ctrl c] then press Return/Enter.
12 If the operation has not finished yet, monitor the tailed log for a while. • If a status code other than 0 (zero) or 600 for the particular Server Request ID is
found in the log(s), go to Step 9. • If the operation does not seem to finish (i.e., if entries continue to be made to the
tailed log) after a reasonable period of time (e.g., 30 minutes), notify the Operations Controller/System Administrator of the problem.
• If it is necessary to exit from a tailed log, type ^c [Ctrl c] then press Return/Enter. 13 If errors/problems with HEG request processing of a particular request were detected in
the HEG Server log(s), check for a corresponding open HEG intervention (by HEG Request ID) on the OM GUI. • Go to the procedure for Viewing Open HEG Intervention Information on the OM
GUI. (previous section of this lesson).
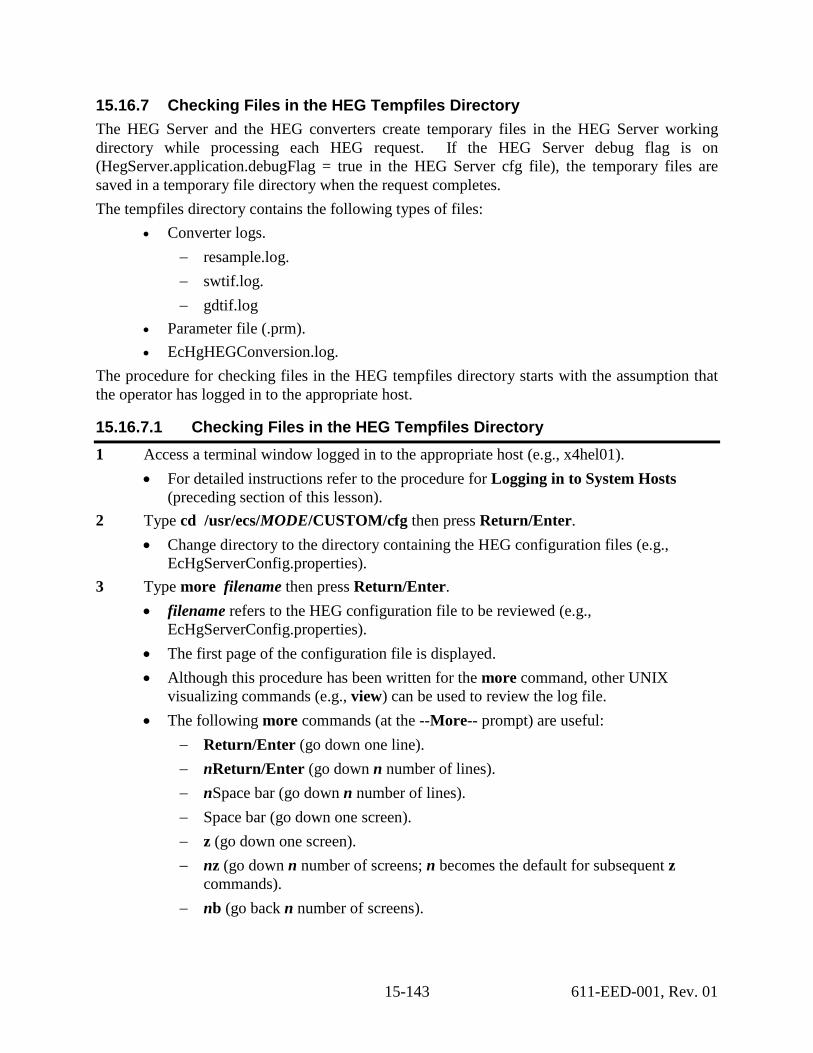
15-143 611-EED-001, Rev. 01
15.16.7 Checking Files in the HEG Tempfiles Directory The HEG Server and the HEG converters create temporary files in the HEG Server working directory while processing each HEG request. If the HEG Server debug flag is on (HegServer.application.debugFlag = true in the HEG Server cfg file), the temporary files are saved in a temporary file directory when the request completes. The tempfiles directory contains the following types of files:
• Converter logs. − resample.log. − swtif.log. − gdtif.log
• Parameter file (.prm). • EcHgHEGConversion.log.
The procedure for checking files in the HEG tempfiles directory starts with the assumption that the operator has logged in to the appropriate host.
15.16.7.1 Checking Files in the HEG Tempfiles Directory 1 Access a terminal window logged in to the appropriate host (e.g., x4hel01).
• For detailed instructions refer to the procedure for Logging in to System Hosts (preceding section of this lesson).
2 Type cd /usr/ecs/MODE/CUSTOM/cfg then press Return/Enter. • Change directory to the directory containing the HEG configuration files (e.g.,
EcHgServerConfig.properties). 3 Type more filename then press Return/Enter.
• filename refers to the HEG configuration file to be reviewed (e.g., EcHgServerConfig.properties).
• The first page of the configuration file is displayed. • Although this procedure has been written for the more command, other UNIX
visualizing commands (e.g., view) can be used to review the log file. • The following more commands (at the --More-- prompt) are useful:
− Return/Enter (go down one line). − nReturn/Enter (go down n number of lines). − nSpace bar (go down n number of lines). − Space bar (go down one screen). − z (go down one screen). − nz (go down n number of screens; n becomes the default for subsequent z
commands). − nb (go back n number of screens).

15-144 611-EED-001, Rev. 01
− nCTRL-B (go back n number of screens). − nd (go down n number of lines; n becomes the default for subsequent d
commands). − nCTRL-D (go down n number of lines; n becomes the default for subsequent d
commands). − nf (skip n screens full and then display a screen). − ns (skip n lines and then display a screen). − h (help - display a description of all the more commands). − CTRL-L (refresh the screen). − n/pattern (search forward for the nth occurrence of the pattern and display a
screen starting two lines before the line that contains the specified pattern match.
− nn (search for the nth occurrence of the last pattern entered. − v (drop into the vi editor at the current line of the current file). − = (display the current line number). − :f (display the name of the current file and the current line number). − q (exit from more). − Q (exit from more). − !command (invoke a shell to execute command).
4 Record (e.g., write down) the values corresponding to the following parameters in the configuration file:
HegServer.application.workDirRoot HegServer.application.workDirTop HegServer.application.tempDirRoot HegServer.application.tempDirTop
• For example: HegServer.application.workDirRoot = /datapool HegServer.application.workDirTop = user/FS1/HEGWorking HegServer.application.tempDirRoot = /datapool HegServer.application.tempDirTop = user/FS1/HEGTemp
5 Type cd /path then press Return/Enter. • Change directory to the HEG tempfiles directory for the HEG request.
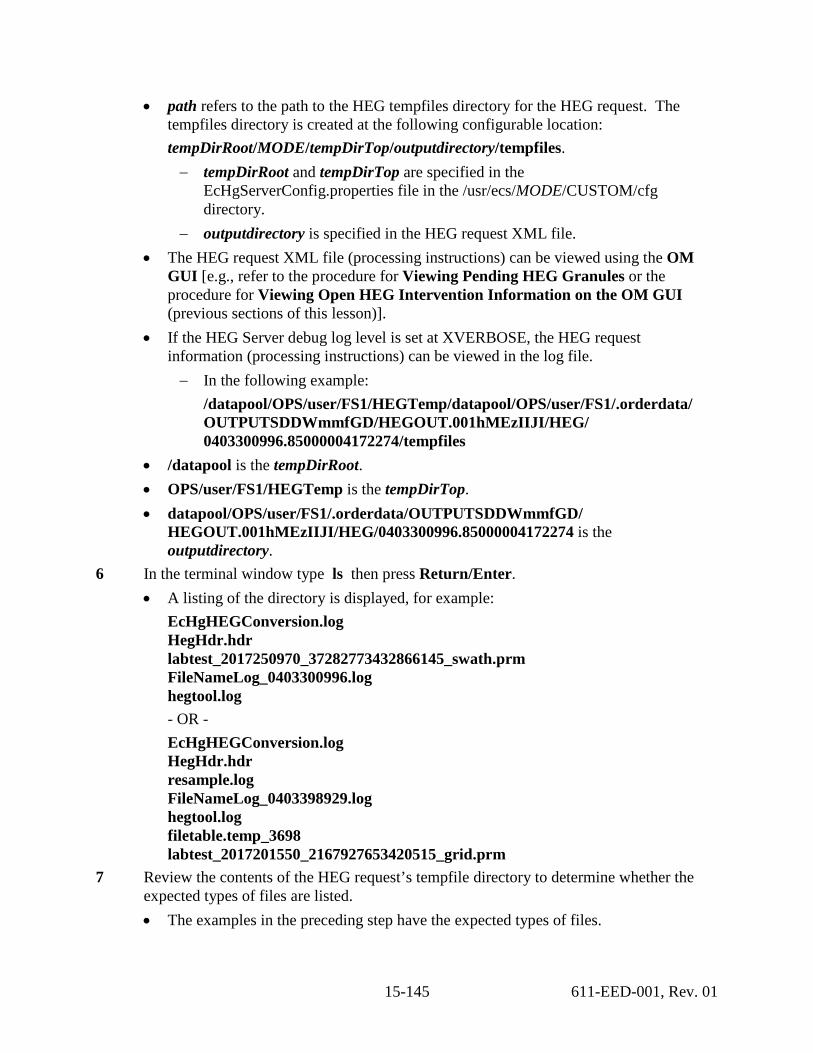
15-145 611-EED-001, Rev. 01
• path refers to the path to the HEG tempfiles directory for the HEG request. The tempfiles directory is created at the following configurable location: tempDirRoot/MODE/tempDirTop/outputdirectory/tempfiles. − tempDirRoot and tempDirTop are specified in the
EcHgServerConfig.properties file in the /usr/ecs/MODE/CUSTOM/cfg directory.
− outputdirectory is specified in the HEG request XML file. • The HEG request XML file (processing instructions) can be viewed using the OM
GUI [e.g., refer to the procedure for Viewing Pending HEG Granules or the procedure for Viewing Open HEG Intervention Information on the OM GUI (previous sections of this lesson)].
• If the HEG Server debug log level is set at XVERBOSE, the HEG request information (processing instructions) can be viewed in the log file. − In the following example:
/datapool/OPS/user/FS1/HEGTemp/datapool/OPS/user/FS1/.orderdata/ OUTPUTSDDWmmfGD/HEGOUT.001hMEzIIJI/HEG/ 0403300996.85000004172274/tempfiles
• /datapool is the tempDirRoot. • OPS/user/FS1/HEGTemp is the tempDirTop. • datapool/OPS/user/FS1/.orderdata/OUTPUTSDDWmmfGD/
HEGOUT.001hMEzIIJI/HEG/0403300996.85000004172274 is the outputdirectory.
6 In the terminal window type ls then press Return/Enter. • A listing of the directory is displayed, for example:
EcHgHEGConversion.log HegHdr.hdr labtest_2017250970_37282773432866145_swath.prm FileNameLog_0403300996.log hegtool.log - OR - EcHgHEGConversion.log HegHdr.hdr resample.log FileNameLog_0403398929.log hegtool.log filetable.temp_3698 labtest_2017201550_2167927653420515_grid.prm
7 Review the contents of the HEG request’s tempfile directory to determine whether the expected types of files are listed. • The examples in the preceding step have the expected types of files.
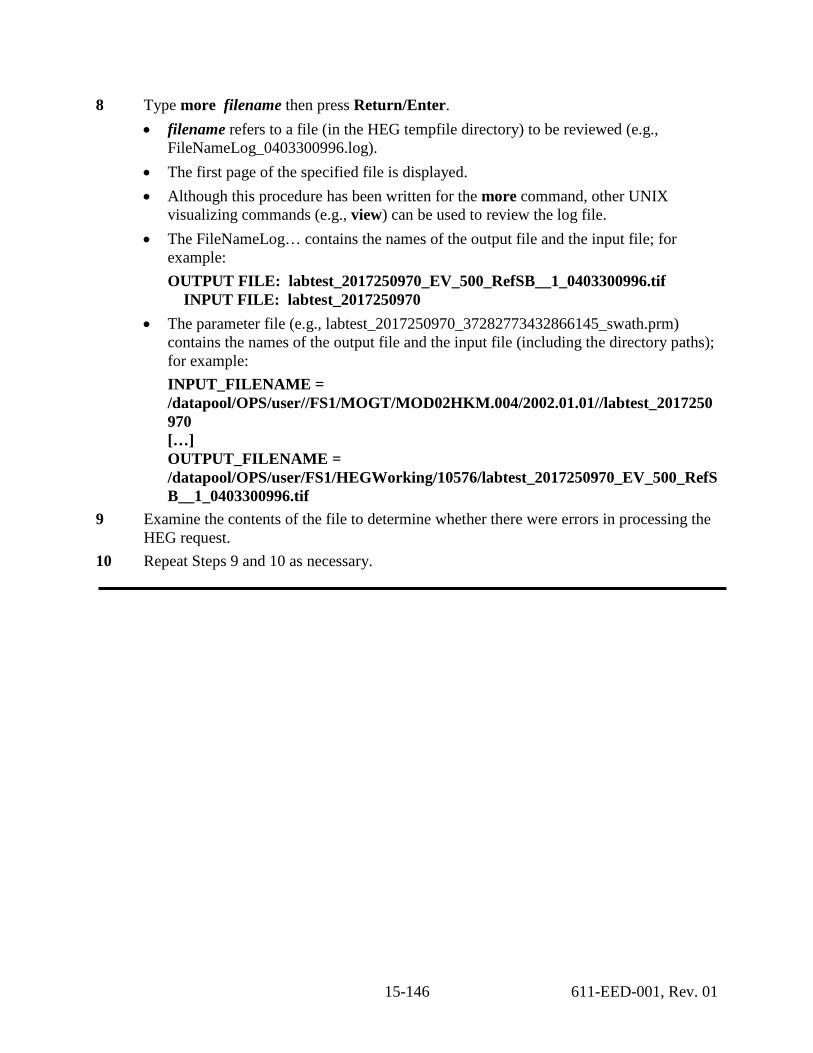
15-146 611-EED-001, Rev. 01
8 Type more filename then press Return/Enter. • filename refers to a file (in the HEG tempfile directory) to be reviewed (e.g.,
FileNameLog_0403300996.log). • The first page of the specified file is displayed. • Although this procedure has been written for the more command, other UNIX
visualizing commands (e.g., view) can be used to review the log file. • The FileNameLog… contains the names of the output file and the input file; for
example: OUTPUT FILE: labtest_2017250970_EV_500_RefSB__1_0403300996.tif INPUT FILE: labtest_2017250970
• The parameter file (e.g., labtest_2017250970_37282773432866145_swath.prm) contains the names of the output file and the input file (including the directory paths); for example: INPUT_FILENAME = /datapool/OPS/user//FS1/MOGT/MOD02HKM.004/2002.01.01//labtest_2017250970 […] OUTPUT_FILENAME = /datapool/OPS/user/FS1/HEGWorking/10576/labtest_2017250970_EV_500_RefSB__1_0403300996.tif
9 Examine the contents of the file to determine whether there were errors in processing the HEG request.
10 Repeat Steps 9 and 10 as necessary.
Related Documents