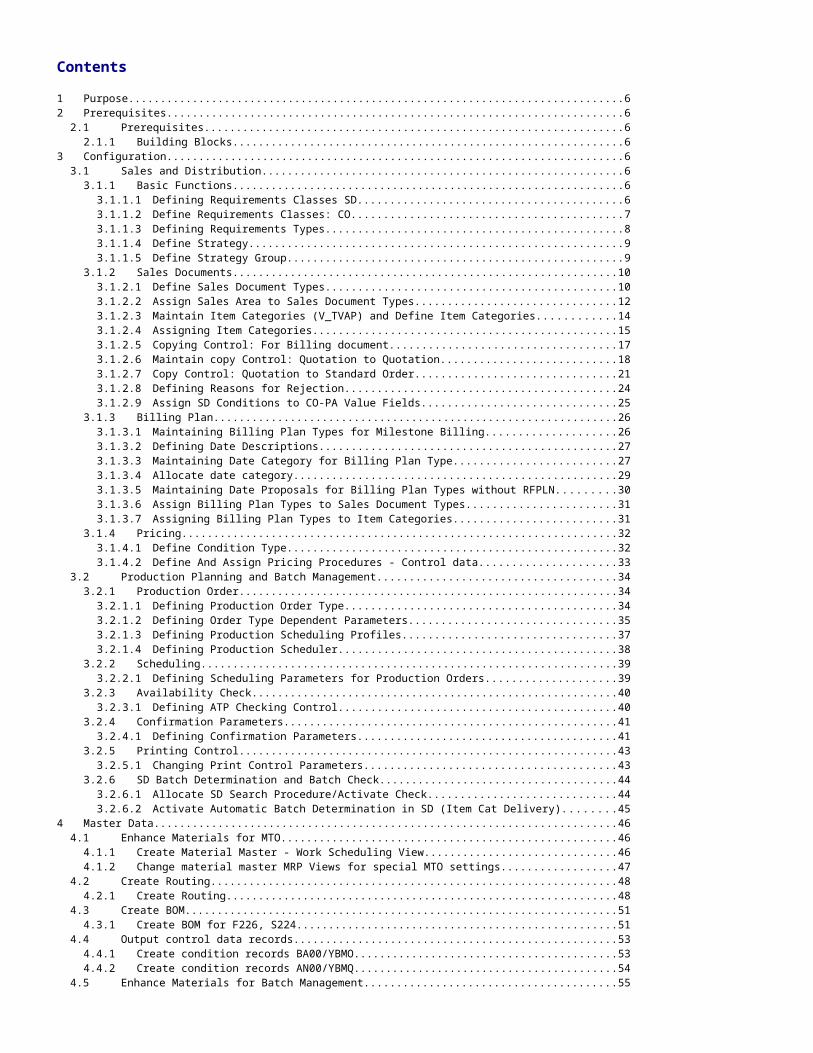
Contents 1 Purpose.............................................................................6 2 Prerequisites.......................................................................6 2.1 Prerequisites.................................................................6 2.1.1 Building Blocks.............................................................6 3 Configuration.......................................................................6 3.1 Sales and Distribution........................................................6 3.1.1 Basic Functions.............................................................6 3.1.1.1 Defining Requirements Classes SD.........................................6 3.1.1.2 Define Requirements Classes: CO..........................................7 3.1.1.3 Defining Requirements Types..............................................8 3.1.1.4 Define Strategy..........................................................9 3.1.1.5 Define Strategy Group....................................................9 3.1.2 Sales Documents............................................................10 3.1.2.1 Define Sales Document Types.............................................10 3.1.2.2 Assign Sales Area to Sales Document Types...............................12 3.1.2.3 Maintain Item Categories (V_TVAP) and Define Item Categories............14 3.1.2.4 Assigning Item Categories...............................................15 3.1.2.5 Copying Control: For Billing document...................................17 3.1.2.6 Maintain copy Control: Quotation to Quotation...........................18 3.1.2.7 Copy Control: Quotation to Standard Order...............................21 3.1.2.8 Defining Reasons for Rejection..........................................24 3.1.2.9 Assign SD Conditions to CO-PA Value Fields..............................25 3.1.3 Billing Plan...............................................................26 3.1.3.1 Maintaining Billing Plan Types for Milestone Billing....................26 3.1.3.2 Defining Date Descriptions..............................................27 3.1.3.3 Maintaining Date Category for Billing Plan Type.........................27 3.1.3.4 Allocate date category..................................................29 3.1.3.5 Maintaining Date Proposals for Billing Plan Types without RFPLN.........30 3.1.3.6 Assign Billing Plan Types to Sales Document Types.......................31 3.1.3.7 Assigning Billing Plan Types to Item Categories.........................31 3.1.4 Pricing....................................................................32 3.1.4.1 Define Condition Type...................................................32 3.1.4.2 Define And Assign Pricing Procedures - Control data.....................33 3.2 Production Planning and Batch Management.....................................34 3.2.1 Production Order...........................................................34 3.2.1.1 Defining Production Order Type..........................................34 3.2.1.2 Defining Order Type Dependent Parameters................................35 3.2.1.3 Defining Production Scheduling Profiles.................................37 3.2.1.4 Defining Production Scheduler...........................................38 3.2.2 Scheduling.................................................................39 3.2.2.1 Defining Scheduling Parameters for Production Orders....................39 3.2.3 Availability Check.........................................................40 3.2.3.1 Defining ATP Checking Control...........................................40 3.2.4 Confirmation Parameters....................................................41 3.2.4.1 Defining Confirmation Parameters........................................41 3.2.5 Printing Control...........................................................43 3.2.5.1 Changing Print Control Parameters.......................................43 3.2.6 SD Batch Determination and Batch Check.....................................44 3.2.6.1 Allocate SD Search Procedure/Activate Check.............................44 3.2.6.2 Activate Automatic Batch Determination in SD (Item Cat Delivery)........45 4 Master Data........................................................................46 4.1 Enhance Materials for MTO....................................................46 4.1.1 Create Material Master - Work Scheduling View..............................46 4.1.2 Change material master MRP Views for special MTO settings..................47 4.2 Create Routing...............................................................48 4.2.1 Create Routing.............................................................48 4.3 Create BOM...................................................................51 4.3.1 Create BOM for F226, S224..................................................51 4.4 Output control data records..................................................53 4.4.1 Create condition records BA00/YBMO.........................................53 4.4.2 Create condition records AN00/YBMQ.........................................54 4.5 Enhance Materials for Batch Management.......................................55

148_ERP606_BB_ConfigGuide_EN_CO.doc
Dec 12, 2015
Welcome message from author
This document is posted to help you gain knowledge. Please leave a comment to let me know what you think about it! Share it to your friends and learn new things together.
Transcript
Contents
1 Purpose.......................................................................................................................................................................62 Prerequisites................................................................................................................................................................6
2.1 Prerequisites...................................................................................................................................................62.1.1 Building Blocks...........................................................................................................................................6
3 Configuration...............................................................................................................................................................63.1 Sales and Distribution.....................................................................................................................................6
3.1.1 Basic Functions..........................................................................................................................................63.1.1.1 Defining Requirements Classes SD......................................................................................................63.1.1.2 Define Requirements Classes: CO.......................................................................................................73.1.1.3 Defining Requirements Types..............................................................................................................83.1.1.4 Define Strategy.....................................................................................................................................93.1.1.5 Define Strategy Group..........................................................................................................................9
3.1.2 Sales Documents.....................................................................................................................................103.1.2.1 Define Sales Document Types...........................................................................................................103.1.2.2 Assign Sales Area to Sales Document Types.....................................................................................123.1.2.3 Maintain Item Categories (V_TVAP) and Define Item Categories.......................................................143.1.2.4 Assigning Item Categories..................................................................................................................153.1.2.5 Copying Control: For Billing document...............................................................................................173.1.2.6 Maintain copy Control: Quotation to Quotation...................................................................................183.1.2.7 Copy Control: Quotation to Standard Order........................................................................................213.1.2.8 Defining Reasons for Rejection..........................................................................................................243.1.2.9 Assign SD Conditions to CO-PA Value Fields....................................................................................25
3.1.3 Billing Plan...............................................................................................................................................263.1.3.1 Maintaining Billing Plan Types for Milestone Billing............................................................................263.1.3.2 Defining Date Descriptions.................................................................................................................273.1.3.3 Maintaining Date Category for Billing Plan Type.................................................................................273.1.3.4 Allocate date category........................................................................................................................293.1.3.5 Maintaining Date Proposals for Billing Plan Types without RFPLN.....................................................303.1.3.6 Assign Billing Plan Types to Sales Document Types..........................................................................313.1.3.7 Assigning Billing Plan Types to Item Categories.................................................................................31
3.1.4 Pricing......................................................................................................................................................323.1.4.1 Define Condition Type........................................................................................................................323.1.4.2 Define And Assign Pricing Procedures - Control data.........................................................................33
3.2 Production Planning and Batch Management...............................................................................................343.2.1 Production Order......................................................................................................................................34
3.2.1.1 Defining Production Order Type.........................................................................................................343.2.1.2 Defining Order Type Dependent Parameters......................................................................................353.2.1.3 Defining Production Scheduling Profiles.............................................................................................373.2.1.4 Defining Production Scheduler...........................................................................................................38
3.2.2 Scheduling...............................................................................................................................................393.2.2.1 Defining Scheduling Parameters for Production Orders.....................................................................39
3.2.3 Availability Check.....................................................................................................................................403.2.3.1 Defining ATP Checking Control..........................................................................................................40
3.2.4 Confirmation Parameters.........................................................................................................................413.2.4.1 Defining Confirmation Parameters......................................................................................................41
3.2.5 Printing Control........................................................................................................................................433.2.5.1 Changing Print Control Parameters....................................................................................................43
3.2.6 SD Batch Determination and Batch Check..............................................................................................443.2.6.1 Allocate SD Search Procedure/Activate Check..................................................................................443.2.6.2 Activate Automatic Batch Determination in SD (Item Cat Delivery)....................................................45
4 Master Data...............................................................................................................................................................464.1 Enhance Materials for MTO..........................................................................................................................46
4.1.1 Create Material Master - Work Scheduling View......................................................................................464.1.2 Change material master MRP Views for special MTO settings................................................................47
4.2 Create Routing..............................................................................................................................................484.2.1 Create Routing.........................................................................................................................................48
4.3 Create BOM..................................................................................................................................................514.3.1 Create BOM for F226, S224....................................................................................................................51
4.4 Output control data records...........................................................................................................................534.4.1 Create condition records BA00/YBMO.....................................................................................................534.4.2 Create condition records AN00/YBMQ.....................................................................................................54
4.5 Enhance Materials for Batch Management...................................................................................................554.5.1 Create Material Master: Assigning Class (FIFO & EXP DATE)................................................................554.5.2 Change Material Master: Activate Batch Management............................................................................56
4.6 Batch Management Search Strategies Conditions........................................................................................564.6.1 Batch Search Strategy for Inventory Management (FIFO).......................................................................564.6.2 Batch Search Strategy for Production Order............................................................................................584.6.3 Batch Search Strategy for Sales and Distribution (FIFO).........................................................................59
Make to Order Production without Variant

1 PurposeThis configuration guide provides the information you need to set up the configuration of this building block manually.The technical objects associated to each configuration covered in this document, can be found on the Global Master List spreadsheet, matching according to the title of the activity.
2 Prerequisites2.1 Prerequisites
Before you start installing this building block, you must install prerequisite building blocks. For more information, see the Building Block Prerequisite Matrix located on the HTML DVD on the Technical à Content Library page.
2.1.1 Building BlocksBefore you start installing this building block, you must install prerequisite building blocks. For information on the prerequisite building blocks, see the Quick Guide for Installing Baseline Package.
3 Configuration3.1 Sales and Distribution
3.1.1 Basic Functions3.1.1.1 Defining Requirements Classes SDUse The purpose of this activity is to define requirements class.
Procedure 1. Access the activity using one of the following navigation options:
IMG Menu Sales and Distribution Basic Functions Availability Check and Transfer of Requirements Transfer of Requirements Define Requirements Classes
Menú IMG Comercial Funciones básicas Verificación de disponibilidad y transf.de necesidades Transferencia de necesidades Definir categorías de necesidades
Transaction OVZG
2. Choose New Entries and enter the following values:Field Description User action and valuesReqCl YB6Description MTO val. @STD w/o RARequirementsAvailability XRequirement Transfer XAllocation ind. 2AssemblySpecial Stock EAccount assignmentAcct Assgt Cat. MChangeable 0
3. Save your entries and go Back.
ResultYou have defined requirement class YB6.
3.1.1.2 Define Requirements Classes: COUse The purpose of this activity is to maintain the requirements class for account assignment.
Procedure 1. Access the activity using one of the following navigation options:
IMG Menu Sales and Distribution Basic Functions Account Assignment/Costing Maintain Requirement Classes For Costing/Account Assignment
Menú IMG Comercial Funciones básicas Imputación/Cálculo Actualizar clases de necesidad para cálculo e imputación
Transaction SPRO2. On the Change View “Requirements Class for Costing and Account Assignment”: O screen choose the Requirement Class YB6 and make a
double click.3. On the Change View “Requirements Class for Costing and Account Assignment”: D screen make the following settings:
Field Description User action and valuesReqCl YB6Description MTO val. @STD w/o RAAssembly/RequirementsAssembly type 0Account assignmentAcct Assgt Cat. MValuation MWithout Val. Strategy X
4. Save your entries and go Back.
ResultYou have maintained the requirement class YB6 for account assignment.

3.1.1.3 Defining Requirements Types Use The purpose of this activity is to define requirements type.
Procedure 1. Access the activity using one of the following navigation options:
IMG Menu Sales and Distribution Basic Functions Availability Check and Transfer of Requirements Transfer of Requirements Define Requirements Types
Menú IMG Comercial Funciones básicas Verificación de disponibilidad y transf.de necesidades Transferencia de necesidades Definir clases de necesidades
Transaction OVZH2. Choose New Entries and enter the following values:
Field Description User action and valuesReq.Type YB6Requirements type MTO val. @STD w/o RAReqClas YB6
3. Save your entries and go Back.
ResultYou have defined requirement type YB6.
3.1.1.4 Define StrategyUse The purpose of this activity is to define strategy.
Procedure 1. Access the activity using one of the following navigation options:
IMG Menu Production Production Planning Demand Management Planned Independent Requirements Planning Strategy Define Strategy
Menú IMG Producción Planificación de la producción Gestión de demanda Necesidades primarias planificadas Estrategia de planificación Fijar estrategia
Transaction SPRO2. Choose New Entries, enter the following values:
Field Description User action and valuesStrategy Y6Description Planning w/o final assy-MTO@STD
w/o RAReqs-DM VSEReqs-Cu. YB6
3. Save your entries and go Back.
ResultYou have defined a strategy.
3.1.1.5 Define Strategy GroupUse The purpose of this activity is to define strategy group.
Procedure 1. Access the activity using one of the following navigation options:
IMG Menu Production Production Planning Demand Management Planned Independent Requirements Planning Strategy Define Strategy Group
Menú IMG Producción Planificación de la producción Gestión de demanda Necesidades primarias planificadas Estrategia de planificación Fijar grupo estrategias
Transaction SPRO2. Choose New Entries, enter the following values:
Field Description User action and valuesStrategy Group Y6Description Planning w/o final assy-MTO@STD
w/o RAMaintain Strategy Y6
3. Save your entries and go Back.
ResultYou have defined strategy group Y6.
3.1.2 Sales Documents3.1.2.1 Define Sales Document TypesUseIn this step, you define the sales document types for MTO quotation and sales order processing. You define one document types for quotation, one for sales order.

Procedure 1. Access the activity using one of the following navigation options:
IMG Menu Sales and Distribution Sales Sales Documents Sales Document Header Define Sales Document Types
Menú IMG Comercial Ventas Documentos de ventas Cabecera de documento de ventas Definir clases de documento de ventas
Transaction Code VOV82. To create a new sales order, choose New entries. 3. Make the following entries:
Field name User action and values NoteSales document type YBMQ QuotationSD document categ. BNumber systemsNo. range int. assgt. 05Item no. increment 10No. range ext. assg. 90Sub-item increment 10General ControlProbability 70Read info record XCheck credit limitCredit groupOutput application V1Transaction flowScreen sequence grp. AGDisplay range UALLFCode for overv. scr. UER2Transaction group 2Doc. pric. procedure ABillingOrder-rel. bill. type F5Requested delivery date/pricing date/purchase order datePropose deliv. date XProp. f. pricing date BProp. valid-from date AContractSubseq. order type OR
4. Save your entries.5. Repeat steps 2 to 4 to create one sales order types with the following entries:
Field name User action and values NoteSales document type YBMO Standard OrderSD document categ. CNumber sytemsNo. range int. assgt. 01Item no. increment 10No. range ext. assg. 02Sub-item increment 10Check division 2Item division XRead info record XCheck credit limit CCredit groupOutput application V1Transaction flowScreen sequence grp. AUDisplay range UALLFCode for overv. scr. UER1Transaction group 0Doc. pric. procedure AProdAttr.messages AShippingDelivery type LFBillingDlv-rel.billing type F2Order-rel. bill. type F2CndType line items EK02Intercomp.bill.type IVPaymt guarant. proc. 01Paymt card plan type 03Checking group 01Propose deliv. date XContract
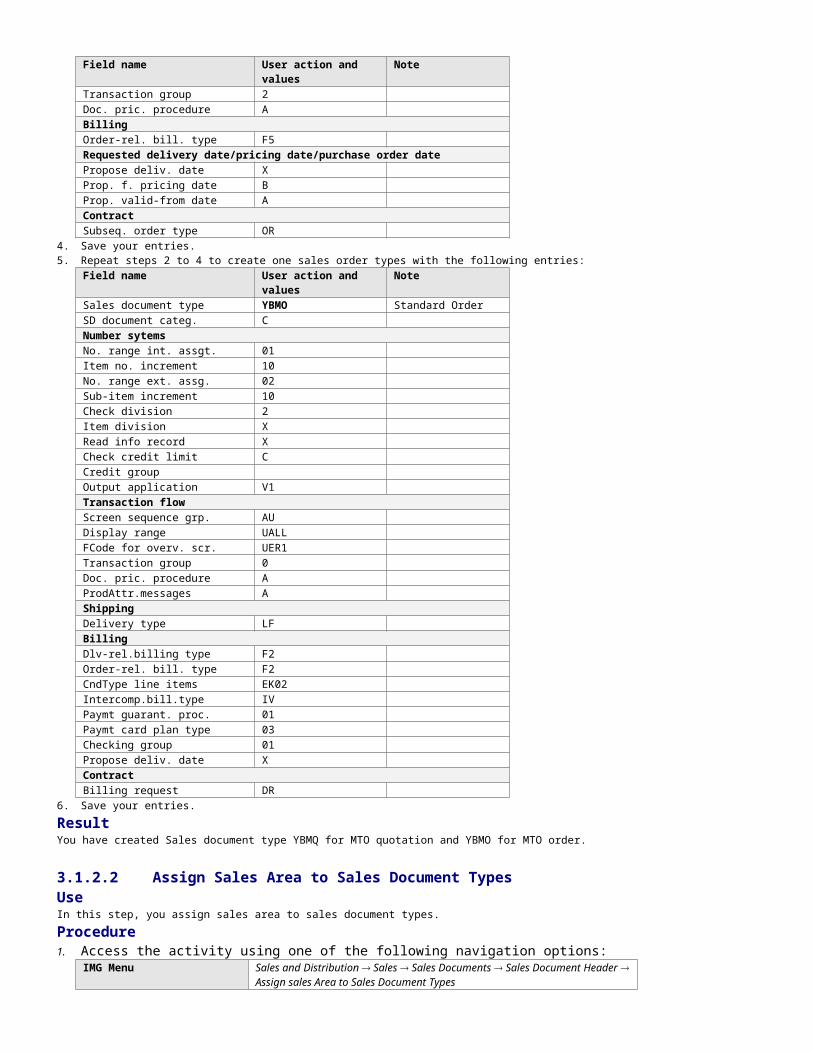
Field name User action and values NoteBilling request DR
6. Save your entries.
ResultYou have created Sales document type YBMQ for MTO quotation and YBMO for MTO order.
3.1.2.2 Assign Sales Area to Sales Document TypesUseIn this step, you assign sales area to sales document types.
Procedure 1. Access the activity using one of the following navigation options:
IMG Menu Sales and Distribution Sales Sales Documents Sales Document Header Assign sales Area to Sales Document Types
Menú IMG Comercial Ventas Documentos de ventas Cabecera de documento de ventas Asignación área de ventas a clases de documento de ventas
Transaction Code SPRO2. On the popup screen select item Assign sales order types permitted for sales areas.3. To create a new sales order, choose New Entries.4. Make the following entries:
Field name User action and values NoteRef.S 1000 Sales OrganizationRef.D Distribution ChannelDIV 10 DivisionSaTy YBMQ Quotation
5. Save your entries and go back.6. To create a new sales order, choose New Entries.7. Make the following entries:
Ref.S 1000 Sales OrganizationRef.D 10 Distribution ChannelDIV 10 DivisionSaTy YBMO Standard Order
8. Save your entries and go back.
ResultYou have assigned the sales area to the sales document types YBMQ (MTO quotation) and YBMO (MTO order).
3.1.2.3 Maintain Item Categories (V_TVAP) and Define Item CategoriesUseThe item categories influence price determination and the transfer of requirements, among other things. In this case, price determination takes place at component level. The item category controls the configuration of the material in a sales document.
Procedure1. Access the activity using one of the following navigation options:
IMG Menu Sales and Distribution Sales Sales Documents Sales Document Item Define Item Categories
Menú IMG Comercial Ventas Documentos de ventas Posición documento ventas Definir tipos de posición
Transaction Code SPRO2. On the Change View: “Maintenance Item Categories”, choose New Entries. 3. Make the following entries:
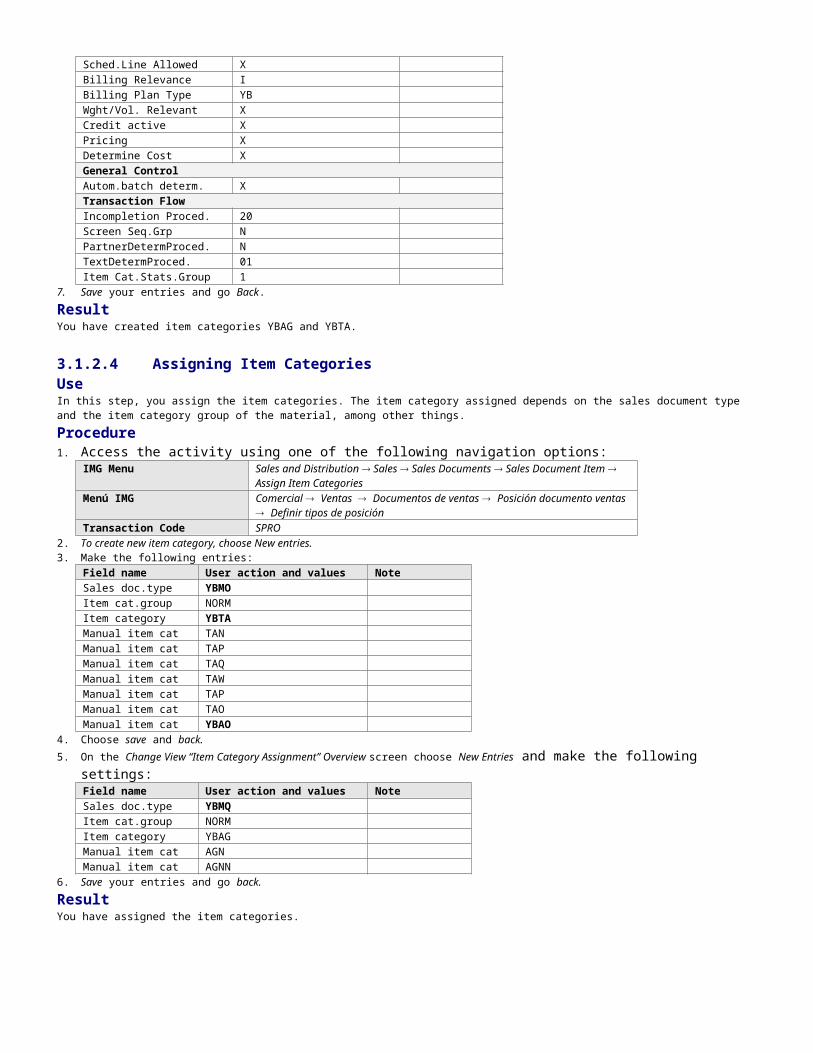
Field name User action and values NoteItem category YBAG Standard ItemBusiness DataBusiness Item XCompletion Rule BSched.line Allowed XWght/Vol. Relevant XDetermine Cost XPricinng XBilling Plan Type YBTransaction FlowIncompletion Proced. 20Screen Seq.Grp NPartnerDetermProced. NTextDetermProced. 01
4. Save your entries and go back.5. On the Change View: “Maintenance Item Categories”, choose New Entries. 6. Make the following entries:
Field name User action and values NoteItem Category YBTA Standard ItemBusiness DataBusiness item X

Completion RuleSched.Line Allowed XBilling Relevance IBilling Plan Type YBWght/Vol. Relevant XCredit active XPricing XDetermine Cost XGeneral ControlAutom.batch determ. XTransaction FlowIncompletion Proced. 20Screen Seq.Grp NPartnerDetermProced. NTextDetermProced. 01Item Cat.Stats.Group 1
7. Save your entries and go Back.
ResultYou have created item categories YBAG and YBTA.
3.1.2.4 Assigning Item CategoriesUseIn this step, you assign the item categories. The item category assigned depends on the sales document type and the item category group of the material, among other things.
Procedure1. Access the activity using one of the following navigation options:
IMG Menu Sales and Distribution Sales Sales Documents Sales Document Item Assign Item Categories
Menú IMG Comercial Ventas Documentos de ventas Posición documento ventas Definir tipos de posición
Transaction Code SPRO2. To create new item category, choose New entries. 3. Make the following entries:
Field name User action and values NoteSales doc.type YBMOItem cat.group NORMItem category YBTAManual item cat TANManual item cat TAPManual item cat TAQManual item cat TAWManual item cat TAPManual item cat TAOManual item cat YBAO
4. Choose save and back.5. On the Change View “Item Category Assignment” Overview screen choose New Entries and make the following settings:
Field name User action and values NoteSales doc.type YBMQItem cat.group NORMItem category YBAGManual item cat AGNManual item cat AGNN
6. Save your entries and go back.
ResultYou have assigned the item categories.
3.1.2.5 Copying Control: For Billing documentUseTo create down payment requests with reference to sales documents, you define the copy control for the sales document and the items.
Procedure 1. Access the activity using one of the following navigation options:
IMG Menu Sales and Distribution Billing Billing Documents Maintain Copying Control for Billing Documents Copying control: Sales document to billing document
Menú IMG Comercial Facturación Documentos de facturación Actualizar control de copia para facturas Control de copia: Documento venta a factura
Transaction Code VTFA
2. On the Display View “Header”: Overview screen, choose Display Change. 3. Choose New Entries and make the following entries:
Field name Description User action and values NoteTarget billing type FAZSource sls doc. type YBMOCopying requirements 001
4. Save your entries and choose Back. 5. Select the new entry and choose the Item folder in the left screen area.6. Choose New Entries and make the following settings:
Field name Description User action and values NoteTarget billing type FAZSource sls doc. Type YBMOItem category YBAGCopying requirements 020Billing quantity APos./neg. quantitiy +Pricing type G
8. Save your entries and go Back.7. On the New Entries: Details of Added Entries screen choose New Entries and make the following settings:
Field name Description User action and values NoteItem category YBTACopying requirements 020Billing quantity APos./neg. quantitiy +Pricing type G
9. Save your entries and go Back.
ResultYou have created the copy control for the billing document.
3.1.2.6 Maintain copy Control: Quotation to QuotationUseThe purpose of this activity is to create follow-on quotations with reference to an original quotation. You have to define the copy control for the header of the sales document, the items, and the schedule lines.
Procedure1. Access the activity using the following navigation options:
IMG Menu Sales and Distribution Sales Maintain Copy Control for Sales Documents Copying Control: Sales Document to Sales Document
Menú IMG Comercial Ventas Actualizar control de copia para documentos de ventas Control de copia: Documento de venta a documento de venta
Transaction Code VTAA2. On the Display View “Header” Overview screen choose Display Change and then choose New Entries and make the following settings:
Field name Description User action and values NoteTarget sls doc. type YBMQ QuotationSource sls doc. type YBMQ QuotationDataT (VBAK) 051DataT (VBKD) 101DataT (VBPA) 001Copying requirements 002
3. Double Click the Item folder in the dialog structure.4. On the Change View “Item” Overview screen, choose New Entries and make the following settings:
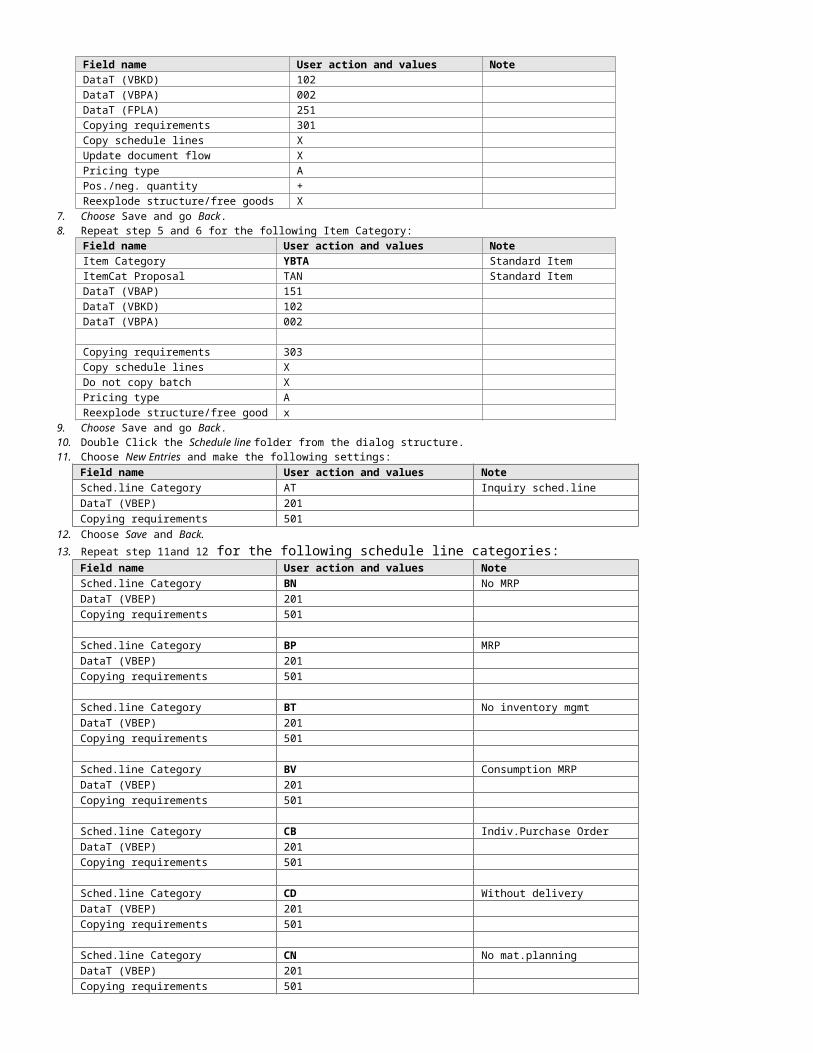
Field name User action and values NoteItem Category AGN ConfigurationDataT (VBAP) 151DataT (VBKD) 102DataT (VBPA) 002DataT (FPLA) 251Copying requirements 301Pos./neg. quantity +Copy schedule lines XUpdate document flow XPricing type D
5. Save your entries and go Back.6. On the Change View “Item”: Overview screen choose New Entries and make the following settings:
Field name User action and values NoteItem Category YBAGDataT (VBAP) 151DataT (VBKD) 102DataT (VBPA) 002DataT (FPLA) 251Copying requirements 301Pos./neg. quantity +

Copy schedule lines XUpdate document flow XPricing type D
7. Save your entries and go Back.8. On the Change View “Item”: Overview screen choose New Entries and make the following settings:
Field name User action and values NoteItem Category YBTADataT (VBAP) 151DataT (VBKD) 102DataT (VBPA) 002DataT (FPLA)Copying requirements 303Copy schedule lines XDo not copy batch XReexplode structure/free goods XPricing type A
9. Save your entries and go back.10. On the Change View “Item”: Overview screen make a double click on the Schedule line folder in the dialog structure.11. On the Change View “Schedule line”: Details screen, choose New Entries and make the following settings:
Field name User action and values NoteSched.line Category AT Inquiry sched.lineDataT (VBEP) 201Copying requirements 501
12. Choose save and Back13. On the Change View “Schedule line”: Overview screen repeat step 11 and 12 for the following Sched. Line Categories:
Field name User action and values NoteSched.line Category BN No MRPDataT (VBEP) 201Copying requirements 501
Sched.line Category CB Indiv.Purchase OrderDataT (VBEP) 201Copying requirements 501
Sched.line Category CD Without deliveryDataT (VBEP) 201Copying requirements 501
Sched.line Category CN No mat.planningDataT (VBEP) 201Copying requirements 501
Sched.line Category CP MRPDataT (VBEP) 201Copying requirements 501
Sched.line Category CS LegDataT (VBEP) 201Copying requirements 501
Sched.line Category CT No inv.mgmt/no GdsIsDataT (VBEP) 201Copying requirements 501
Sched.line Category CV Consumption MRPDataT (VBEP) 201Copying requirements 501
Sched.line Category CX No inventory mgmtDataT (VBEP) 201Copying requirements 501
14. Save your entries and go Back.
ResultYou have maintained the copy control for the quotation.
3.1.2.7 Copy Control: Quotation to Standard OrderUseThe purpose of this activity is to create standard orders with reference to a follow-on quotation. You have to define the copy control for the header of the sales document, the items, and the schedule lines.

Procedure1. Access the activity using the following navigation options:
IMG Menu Sales and Distribution Sales Maintain Copy Control for Sales Documents Copying Control: Sales Document to Sales Document
Menú IMG Comercial Ventas Actualizar control de copia para documentos de ventas Control de copia: Documento de venta a documento de venta
Transaction Code VTAA2. On the Display View “Header”: Overview screen, choose Display Change.3. To create a new entry for the copy control, choose New Entries.4. Make the following entries:
Field name User action and values NotesTarget sls doc. type YBMO Standard orderSource sls doc. type YBMQ QuotationDataT (VBAK) 051DataT (VBKD) 101DataT (VBPA) 001Copying requirements 002
5. Choose the Item folder in the dialog structure and choose New Entries.6. Make the following entries:
Field name User action and values NoteItem Category YBAG Standard ItemDataT (VBAP) 151DataT (VBKD) 102DataT (VBPA) 002DataT (FPLA) 251Copying requirements 301Copy schedule lines XUpdate document flow XPricing type APos./neg. quantity +Reexplode structure/free goods X
7. Choose Save and go Back.8. Repeat step 5 and 6 for the following Item Category:
Field name User action and values NoteItem Category YBTA Standard ItemItemCat Proposal TAN Standard ItemDataT (VBAP) 151DataT (VBKD) 102DataT (VBPA) 002
Copying requirements 303Copy schedule lines XDo not copy batch XPricing type AReexplode structure/free good x
9. Choose Save and go Back.10. Double Click the Schedule line folder from the dialog structure.11. Choose New Entries and make the following settings:
Field name User action and values NoteSched.line Category AT Inquiry sched.lineDataT (VBEP) 201Copying requirements 501
12. Choose Save and Back.13. Repeat step 11and 12 for the following schedule line categories:
Field name User action and values NoteSched.line Category BN No MRPDataT (VBEP) 201Copying requirements 501
Sched.line Category BP MRPDataT (VBEP) 201Copying requirements 501
Sched.line Category BT No inventory mgmtDataT (VBEP) 201Copying requirements 501
Sched.line Category BV Consumption MRPDataT (VBEP) 201Copying requirements 501

Sched.line Category CB Indiv.Purchase OrderDataT (VBEP) 201Copying requirements 501
Sched.line Category CD Without deliveryDataT (VBEP) 201Copying requirements 501
Sched.line Category CN No mat.planningDataT (VBEP) 201Copying requirements 501
Sched.line Category CP MRPDataT (VBEP) 201Copying requirements 501
Sched.line Category CS LegDataT (VBEP) 201Copying requirements 501
Sched.line Category CT No inv.mgmt/no GdsIsDataT (VBEP) 201Copying requirements 501
Sched.line Category CV Consumption MRPDataT (VBEP) 201Copying requirements 501
Sched.line Category CX No inventory mgmtDataT (VBEP) 201Copying requirements 501
14. Save your entries and go Back.
ResultYou have maintained the copy control.
3.1.2.8 Defining Reasons for RejectionUseIf a quotation is no longer relevant because a follow on quotation exists, the quotation item can be rejected. In this step, you define a reason for the rejection.
Procedure 1. Access the activity using one the following navigation options:
IMG Menu Sales and Distribution Sales Sales Documents Sales Document Item Define Reasons for Rejection
Menú IMG Comercial Ventas Documentos de ventas Posición documento ventas Definir motivos de rechazo
Transaction Code SPRO2. To create a new rejection reason, choose New entries. 3. Make the following entries for the new rejection reason:
Field name User action and values NoteRj 12NRPOLIBICStat. Description Technical Change
4. Save your entries and go Back.
ResultYou have created a rejection reason.
3.1.2.9 Assign SD Conditions to CO-PA Value FieldsUseAll revenues, sales deductions and other values (such as transfer prices) are defined as conditions in SD. In this step, you assign these conditions to the corresponding CO-PA value fields.
Procedure 1. Access the activity using one the following navigation options:
IMG Menu Controlling Profitability Analysis flows of Actual Values Transfer of Billing Documents Assign Value Fields Maintain Assignment of SD Conditions to CO-PA Value Fields
Menú IMG Controlling Cuenta de resultados Flujos de valores en el real Traspaso
de facturas Asignar campos de valor Actualizac.asignac.condiciones SD -> campos de valor COPA
Transaction Code SPRO2. If the Set Operating Concern popup screen appears, enter following data and press Continue.
Field name User action and values NoteOperation Concern 10COCosting-based X
3. To create a new data, choose New Entries. 4. Make the following entries for the new data:
Field name User action and values NoteCtype YB01Val.fld KWMKPR
5. Save your entries and go Back.
ResultYou have assigned the SD Conditions to CO-PA Value Fields.
3.1.3 Billing Plan3.1.3.1 Maintaining Billing Plan Types for Milestone BillingUseA down payment agreement is created as a deadline in a billing plan. You define a billing plan type for this in this activity.
Procedure 1. Access the activity using one of the following navigation options:
IMG Menu Sales and Distribution Billing Billing Plan Define Billing Plan Types Maintain billing plan types for milestone billing
Menú IMG Comercial Facturación Plan de facturación Definir clase de plan de facturación Actual.clases plan de facturación para facturación parcial
Transaction Code OVBO2. On the Change View “Maintaining Billing Plan Types for Milestone Billing” screen, choose New Entries.3. On the New Entries: Details of Added Entries screen, make the following entries:
Field name Description User action and values NoteBilling Plan Type YB Milestone billingStart date 01 Today’s dateOnline order YFcode-OvervScrn 0003
4. Choose Save and go Back.
ResultYou have defined the billing plan type YB for Milestone Billing.
3.1.3.2 Defining Date DescriptionsUseA milestone in a billing plan is the delivery. The purpose of this activity is to define an additional date description for this.
Procedure1. Access the activity using one of the following navigation options:
IMG Menu Sales and Distribution Billing Billing Plan Define Date DescriptionsMenú IMG Comercial Facturación Plan de facturación Definir denominaciones de
fechaTransaction Code SPRO
2. On the Change View “Date Description Maintenance”: Overview screen, choose New Entries.
3. Make the following entries:Field name Description User action and values NoteDtDs YB01Date description Delivery
4. Save your entries and go Back.
ResultYou defined a date description.
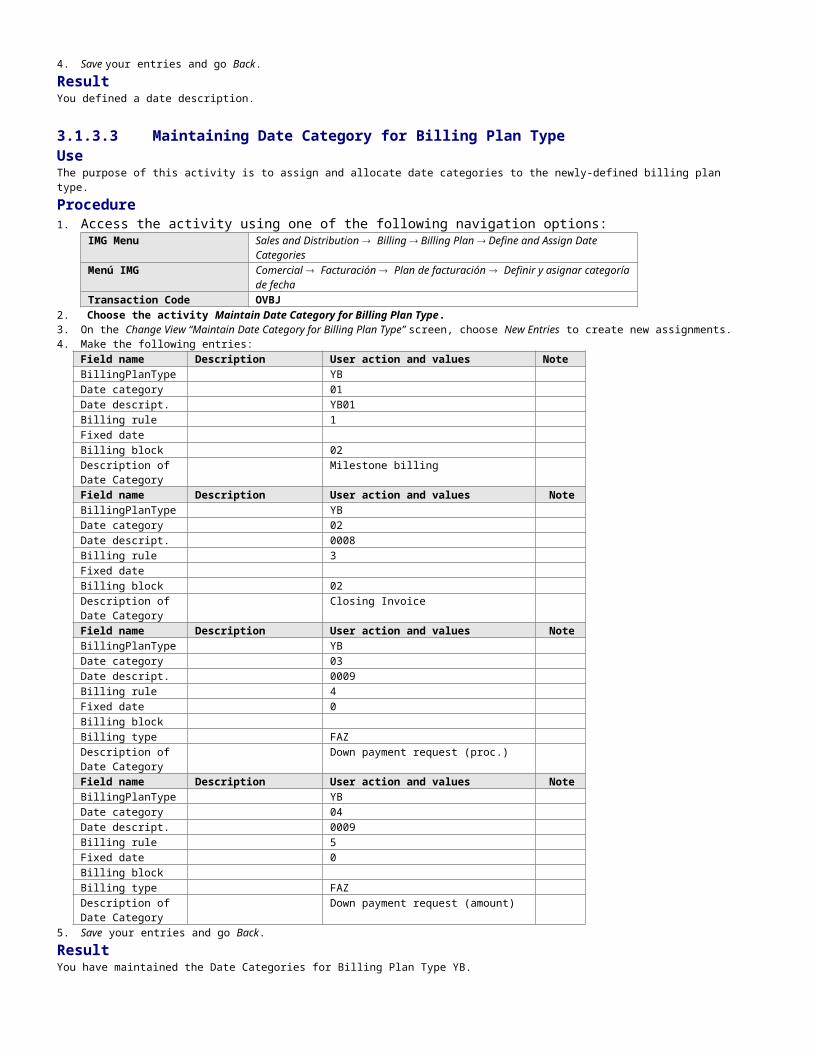
3.1.3.3 Maintaining Date Category for Billing Plan TypeUseThe purpose of this activity is to assign and allocate date categories to the newly-defined billing plan type.
Procedure1. Access the activity using one of the following navigation options:
IMG Menu Sales and Distribution Billing Billing Plan Define and Assign Date Categories
Menú IMG Comercial Facturación Plan de facturación Definir y asignar categoría de fecha

Transaction Code OVBJ2. Choose the activity Maintain Date Category for Billing Plan Type. 3. On the Change View “Maintain Date Category for Billing Plan Type” screen, choose New Entries to create new assignments.4. Make the following entries:
Field name Description User action and values NoteBillingPlanType YBDate category 01Date descript. YB01Billing rule 1Fixed dateBilling block 02Description of Date Category
Milestone billing
Field name Description User action and values NoteBillingPlanType YBDate category 02Date descript. 0008Billing rule 3Fixed dateBilling block 02Description of Date Category
Closing Invoice
Field name Description User action and values NoteBillingPlanType YBDate category 03Date descript. 0009Billing rule 4Fixed date 0Billing blockBilling type FAZDescription of Date Category
Down payment request (proc.)
Field name Description User action and values NoteBillingPlanType YBDate category 04Date descript. 0009Billing rule 5Fixed date 0Billing blockBilling type FAZDescription of Date Category
Down payment request (amount)
5. Save your entries and go Back.
ResultYou have maintained the Date Categories for Billing Plan Type YB.
3.1.3.4 Allocate date categoryUseThe purpose of this activity is to allocate the date category.
Procedure 1. Access the activity using one of the following navigation options:
IMG Menu Sales and Distribution Billing Billing Plan Define And Assign Date Categories
Menú IMG Comercial Facturación Plan de facturación Definir y asignar categoría de fecha
Transaction Code SPRO2. On the Choose Activity popup choose Allocate date category.3. On the New Entries: Details of Added Entries screen, make the following entries:
Field name Description User action and values NoteBilling Plan Type YB Milestone billingDD 03 Down payment request (proc.)
4. Choose Save and go Back.
ResultYou have allocated the date category.
3.1.3.5 Maintaining Date Proposals for Billing Plan Types without RFPLN UseThe purpose of this activity is to maintain the date proposals for billing plan types.

Procedure1. Access the activity using one of the following navigation options:
IMG Menu Sales and Distribution Billing Billing Plan Maintain Date Proposals for Billing Plan Types
Menú IMG Comercial Facturación Plan de facturación Actualizar propuesta de fecha p.clase plan de facturación
Transaction Code OVBM2. Select billing plan type YB and choose Details.3. On the Change View “Date Proposal Maintenance for Billing Plan Type”: Details screen press the Maintain date button.4. Confirm the Information popup with Continue.5. On the Change “Date Proposal Maintenance for Billing Plan Type”: Details screen make the following settings:
Billing Date DtDs % Block BR DCat Billing Type
Milestone no.
Fix
Today(e.g. 08.08.2007)
0009 30,00 4 03 FAZ 0 0
Today + 1 month(e.g. 08.09.2007)
YB01 40,00 02 1 01 0
Today + 2 month(e.g. 08.10.2007)
0008 02 3 02 0
6. Choose Back and Save.
ResultYou have maintained the date proposal for Billing Plan Type YB.
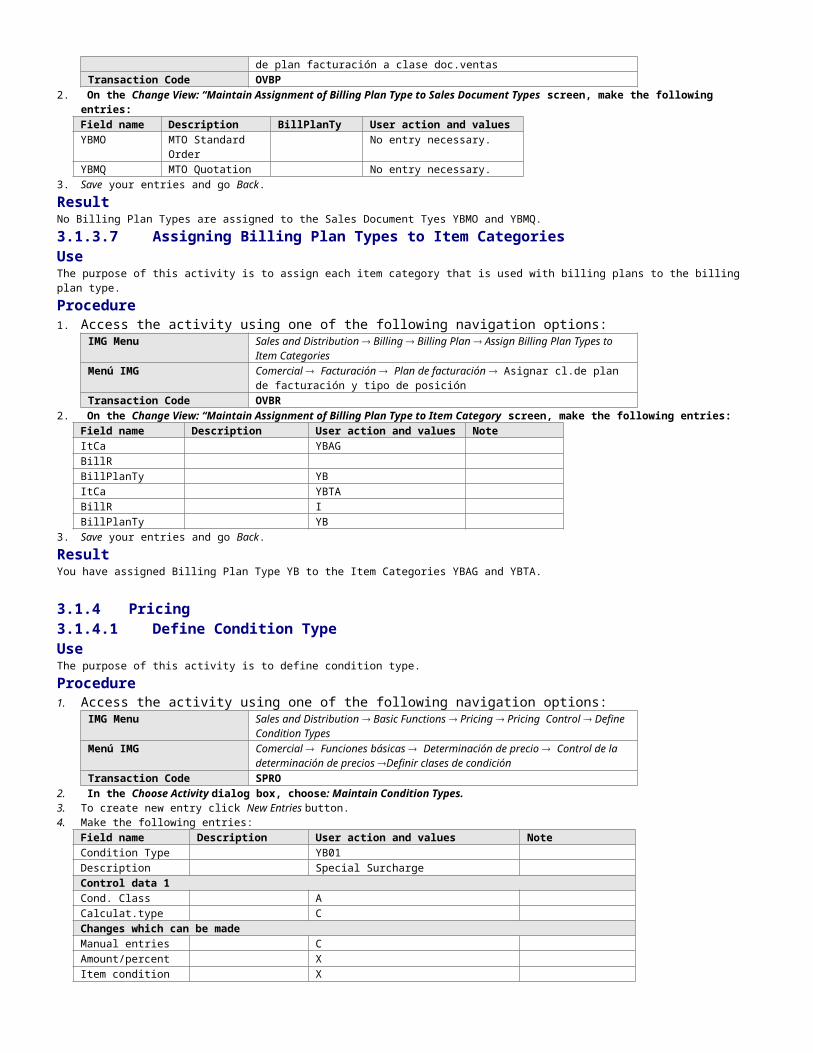
3.1.3.6 Assign Billing Plan Types to Sales Document TypesUseThe purpose of this activity is to the billing plan types to sales document types.
Procedure1. Access the activity using one of the following navigation options:
IMG Menu Sales and Distribution Billing Billing Plan Assign Billing Plan Types to Sales Document Types
Menú IMG Comercial Facturación Plan de facturación Asignación de clase de plan facturación a clase doc.ventas
Transaction Code OVBP2. On the Change View: “Maintain Assignment of Billing Plan Type to Sales Document Types screen, make the
following entries:Field name Description BillPlanTy User action and valuesYBMO MTO Standard
OrderNo entry necessary.
YBMQ MTO Quotation No entry necessary.3. Save your entries and go Back.
ResultNo Billing Plan Types are assigned to the Sales Document Tyes YBMO and YBMQ.
3.1.3.7 Assigning Billing Plan Types to Item CategoriesUseThe purpose of this activity is to assign each item category that is used with billing plans to the billing plan type.
Procedure1. Access the activity using one of the following navigation options:
IMG Menu Sales and Distribution Billing Billing Plan Assign Billing Plan Types to Item Categories
Menú IMG Comercial Facturación Plan de facturación Asignar cl.de plan de facturación y tipo de posición
Transaction Code OVBR2. On the Change View: “Maintain Assignment of Billing Plan Type to Item Category screen, make the following
entries:Field name Description User action and values NoteItCa YBAGBillRBillPlanTy YBItCa YBTABillR IBillPlanTy YB
3. Save your entries and go Back.
ResultYou have assigned Billing Plan Type YB to the Item Categories YBAG and YBTA.
3.1.4 Pricing3.1.4.1 Define Condition TypeUseThe purpose of this activity is to define condition type.
Procedure1. Access the activity using one of the following navigation options:
IMG Menu Sales and Distribution Basic Functions Pricing Pricing Control Define Condition Types
Menú IMG Comercial Funciones básicas Determinación de precio Control de la determinación de precios Definir clases de condición
Transaction Code SPRO2. In the Choose Activity dialog box, choose: Maintain Condition Types.3. To create new entry click New Entries button.4. Make the following entries:
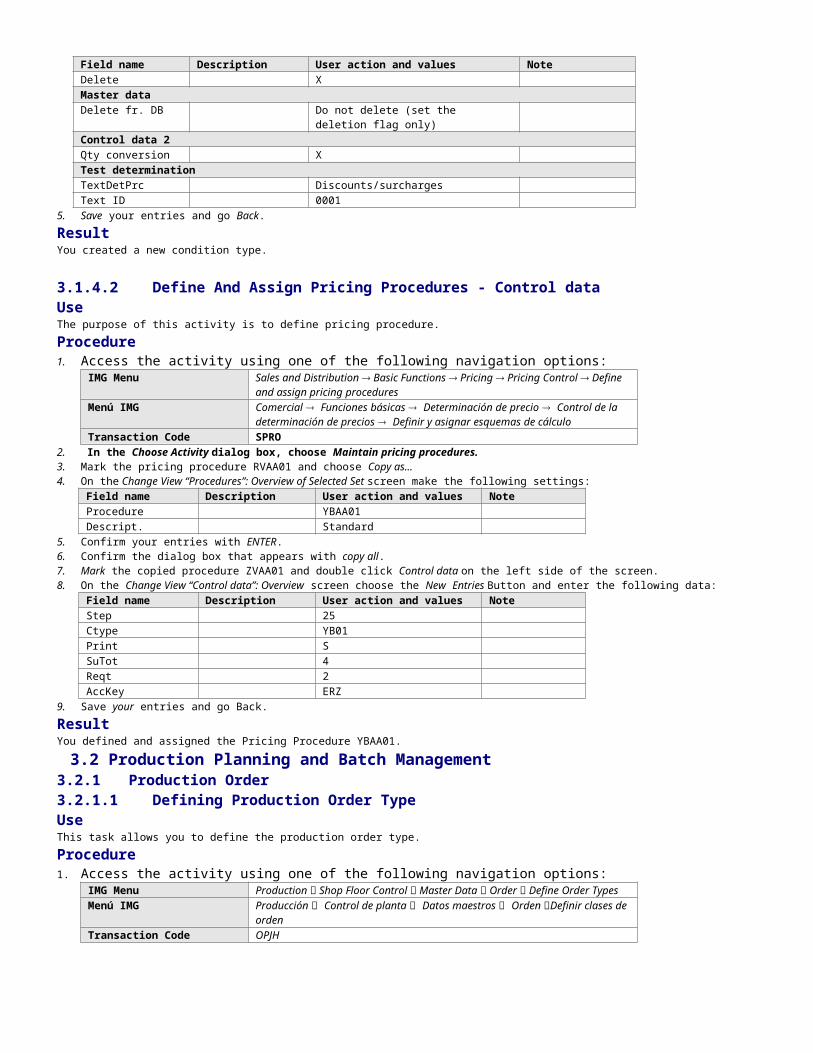
Field name Description User action and values NoteCondition Type YB01Description Special SurchargeControl data 1Cond. Class ACalculat.type CChanges which can be madeManual entries CAmount/percent XItem condition XDelete XMaster dataDelete fr. DB Do not delete (set the deletion flag only)Control data 2Qty conversion XTest determinationTextDetPrc Discounts/surchargesText ID 0001
5. Save your entries and go Back.
ResultYou created a new condition type.
3.1.4.2 Define And Assign Pricing Procedures - Control dataUseThe purpose of this activity is to define pricing procedure.
Procedure1. Access the activity using one of the following navigation options:
IMG Menu Sales and Distribution Basic Functions Pricing Pricing Control Define and assign pricing procedures
Menú IMG Comercial Funciones básicas Determinación de precio Control de la determinación de precios Definir y asignar esquemas de cálculo
Transaction Code SPRO2. In the Choose Activity dialog box, choose Maintain pricing procedures.3. Mark the pricing procedure RVAA01 and choose Copy as...4. On the Change View “Procedures”: Overview of Selected Set screen make the following settings:
Field name Description User action and values NoteProcedure YBAA01Descript. Standard
5. Confirm your entries with ENTER.6. Confirm the dialog box that appears with copy all.7. Mark the copied procedure ZVAA01 and double click Control data on the left side of the screen.8. On the Change View “Control data”: Overview screen choose the New Entries Button and enter the following data:
Field name Description User action and values NoteStep 25Ctype YB01Print SSuTot 4Reqt 2AccKey ERZ
9. Save your entries and go Back.
ResultYou defined and assigned the Pricing Procedure YBAA01.

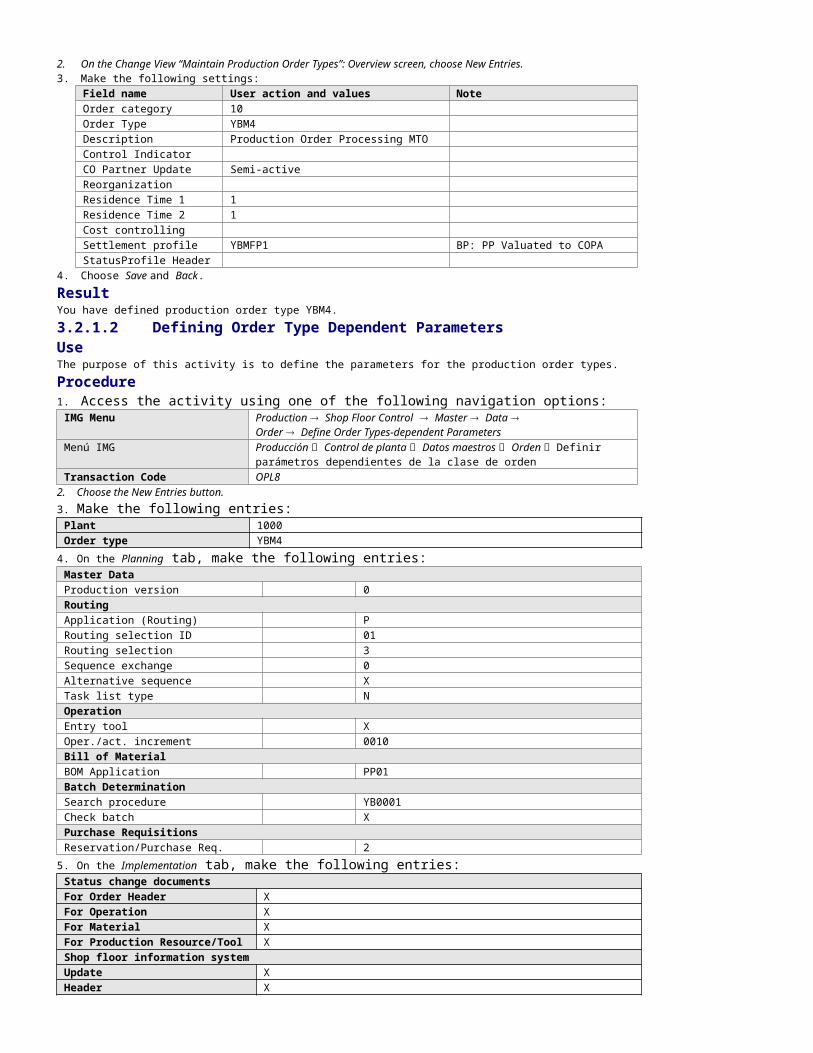
3.2 Production Planning and Batch Management3.2.1 Production Order3.2.1.1 Defining Production Order TypeUse This task allows you to define the production order type.
Procedure 1. Access the activity using one of the following navigation options:
IMG Menu Production Shop Floor Control Master Data Order Define Order TypesMenú IMG Producción Control de planta Datos maestros Orden Definir clases de
ordenTransaction Code OPJH
2. On the Change View “Maintain Production Order Types”: Overview screen, choose New Entries.3. Make the following settings:
Field name User action and values NoteOrder category 10Order Type YBM4Description Production Order Processing MTOControl IndicatorCO Partner Update Semi-activeReorganizationResidence Time 1 1Residence Time 2 1Cost controllingSettlement profile YBMFP1 BP: PP Valuated to COPAStatusProfile Header
4. Choose Save and Back.
ResultYou have defined production order type YBM4.
3.2.1.2 Defining Order Type Dependent ParametersUse The purpose of this activity is to define the parameters for the production order types.
Procedure 1. Access the activity using one of the following navigation options:
IMG Menu Production Shop Floor Control Master Data Order Define Order Types-dependent Parameters
Menú IMG Producción Control de planta Datos maestros Orden Definir parámetros dependientes de la clase de orden
Transaction Code OPL82. Choose the New Entries button.3. Make the following entries:
Plant 1000Order type YBM4
4. On the Planning tab, make the following entries:Master DataProduction version 0RoutingApplication (Routing) PRouting selection ID 01Routing selection 3Sequence exchange 0Alternative sequence XTask list type NOperationEntry tool XOper./act. increment 0010Bill of MaterialBOM Application PP01Batch DeterminationSearch procedure YB0001Check batch XPurchase RequisitionsReservation/Purchase Req. 2
5. On the Implementation tab, make the following entries:Status change documentsFor Order Header XFor Operation XFor Material XFor Production Resource/Tool XShop floor information system
Update XHeader XItemOperationDocumentation of goods movementsGR for Purchase Order XGR for Production Order XPlanned Goods Issue XUnplanned Goods Issue X
6. On the Controlling tab, make the following entries:ControllingCstg variant planned YPC1Cstg variant actual YPC2Results Analysis Key YBMF01Planned Cost Calcul. Determine Planned Cost When SavingDistribution RuleDefault Rule PP1
7. On the Display profiles tab, make the following entries:Collective order displayGraphics profile 000001GraphicGroup PPName StandardIndex 2Missing parts listProfMissPrtsLstOrdNo 000001Missing Parts Prof. 000002
8. Choose Save.
9. Choose Back.
ResultYou have defined order dependent parameters for order type YBM4.
3.2.1.3 Defining Production Scheduling ProfilesUse The purpose of this activity is to define production scheduling profiles.
Procedure 1. Access the activity using one of the following navigation options:
IMG Menu Production Shop Floor Control Master Data Define Production Scheduling Profile
Menú IMG Producción Control de planta Datos maestros Orden Definir perfil de control de fabricación
Transaction Code OPKP
2. On the Change View “Define Production Scheduling Profiles”: Overview screen, choose New Entries.
3. Make the following settings:Field name User action and valuesPlant 1000Prod. Sched. Profile YB0004Description (of prod. sched. Profile) MTO w/o VC – Val.Automatic ActionsOn ReleaseSchedule Order XMaterial Availability CheckConfirm Available Partial Qty XOrder TypeMake-to-Order Prod. YBM4
5. Choose Save and go Back.
ResultYou have defined the production scheduling profile YB0004.
3.2.1.4 Defining Production Scheduler Use The purpose of this activity is to define the production scheduler.
Procedure 1. Access the activity using one of the following navigation options:
IMG Menu Production Shop Floor Control Master Data Define Production Scheduler
Menú IMG Producción Control de planta Datos maestros Orden Definir responsable de control de producción
Transaction Code OPJ92. On the Change View “Production Scheduler”: Overview screen, choose New Entries.3. Make the following settings:
Field name User action and valuesPlant 1000Prod.Sched. YB4Description MTO w/o VC – Val.ProdProfile YB0004
5. Choose Save and Back.
ResultYou have defined the production scheduler YB1
3.2.2 Scheduling3.2.2.1 Defining Scheduling Parameters for Production OrdersUse The purpose of this activity is to specify scheduling parameters.
Procedure 1. Access the activity using one of the following navigation options:
IMG Menu Production Shop Floor Control Operations Scheduling Define Scheduling Parameters for Production Orders
Menú IMG Producción Control de planta Operaciones Programación Especificar parámetros programación órdenes fabricación
Transaction Code SPRO2. On the Change View “Specify Scheduling Parameters”: Overview screen, choose New Entries.3. Make the following settings:
Field name User action and valuesPlant 1000Order type YBM4ProdScheduler *Detailed SchedulingScheduling XGenerate Capacity Reqs. XAdjust DatesAdjust Dates Adjust basic dates, adjust dep. reqmts to operation dateScheduling control for detailed schedulingScheduling Type BackwardsAutomatic Scheduling XStart in the Past 5Requirements Date Determination for ComponentsOperation Segment SetupReductionReduction type All operations in the order will be reducedMaximum reduction level Do not reduce% reduction in floats
4. Choose Save and Back.
ResultYou have defined the scheduling parameter for production order type YBM4.
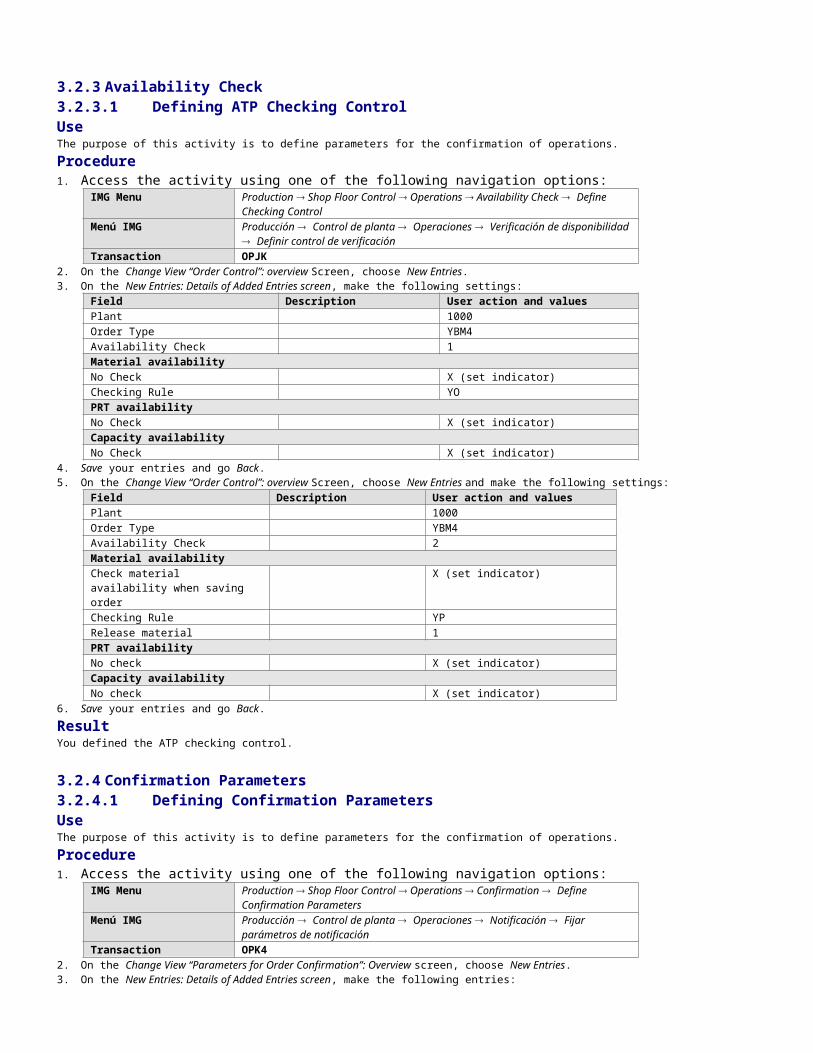
3.2.3 Availability Check3.2.3.1 Defining ATP Checking ControlUse The purpose of this activity is to define parameters for the confirmation of operations.
Procedure 1. Access the activity using one of the following navigation options:
IMG Menu Production Shop Floor Control Operations Availability Check Define Checking Control
Menú IMG Producción Control de planta Operaciones Verificación de disponibilidad Definir control de verificación
Transaction OPJK2. On the Change View “Order Control”: overview Screen, choose New Entries.3. On the New Entries: Details of Added Entries screen, make the following settings:
Field Description User action and valuesPlant 1000Order Type YBM4Availability Check 1Material availabilityNo Check X (set indicator)Checking Rule YOPRT availabilityNo Check X (set indicator)
Capacity availabilityNo Check X (set indicator)
4. Save your entries and go Back.5. On the Change View “Order Control”: overview Screen, choose New Entries and make the following settings:
Field Description User action and valuesPlant 1000Order Type YBM4Availability Check 2Material availabilityCheck material availability when saving order
X (set indicator)
Checking Rule YPRelease material 1PRT availabilityNo check X (set indicator)Capacity availabilityNo check X (set indicator)
6. Save your entries and go Back.
ResultYou defined the ATP checking control.
3.2.4 Confirmation Parameters3.2.4.1 Defining Confirmation Parameters Use The purpose of this activity is to define parameters for the confirmation of operations.
Procedure 1. Access the activity using one of the following navigation options:
IMG Menu Production Shop Floor Control Operations Confirmation Define Confirmation Parameters
Menú IMG Producción Control de planta Operaciones Notificación Fijar parámetros de notificación
Transaction OPK42. On the Change View “Parameters for Order Confirmation”: Overview screen, choose New Entries.3. On the New Entries: Details of Added Entries screen, make the following entries:
Field Description User action and valuesPlant 1000 1000Order Type YBM4 YBM4Control dataGenerated confirmations w/o quantity adjustment
X
Generally valid settings tap pageChecksOperating sequence Warning when operation
sequence is not adhered toUnderdelivery Underdelivery tolerance is not
checkedOverdelivery Error when overdelivery
tolerance is exceededResults Rec. (QM) Message if no inspection
results existSelectionOpen orders XPropose time unitsAutomatic Optimization XGoods movementsAll components blankGeneral Individual Entry tab pageConfirmation type Automatic final confirmation Automatic final condirmationAct.cost X XGoods movements X XOperation indiv. Entry using initial scrn tab pageQuantitiesPropose XDisplay confirmed quantities XDisplay defaults XDatesDisplay confirmed dates XDisplay defaults XScreen control for time ticketQuantity/activity XServices

Propose XDisplay confirmed services XDisplay defaults XHR DataDisplay defaults XSelection+ Confirmable operations X
4. Save your entries and go Back.
ResultYou have defined confirmation parameter for order type YBM4.
3.2.5 Printing Control3.2.5.1 Changing Print Control ParametersUse In this step you make the settings, necessary for printing shop floor papers from the production order.
Procedure 1. Access the activity using one of the following navigation options:
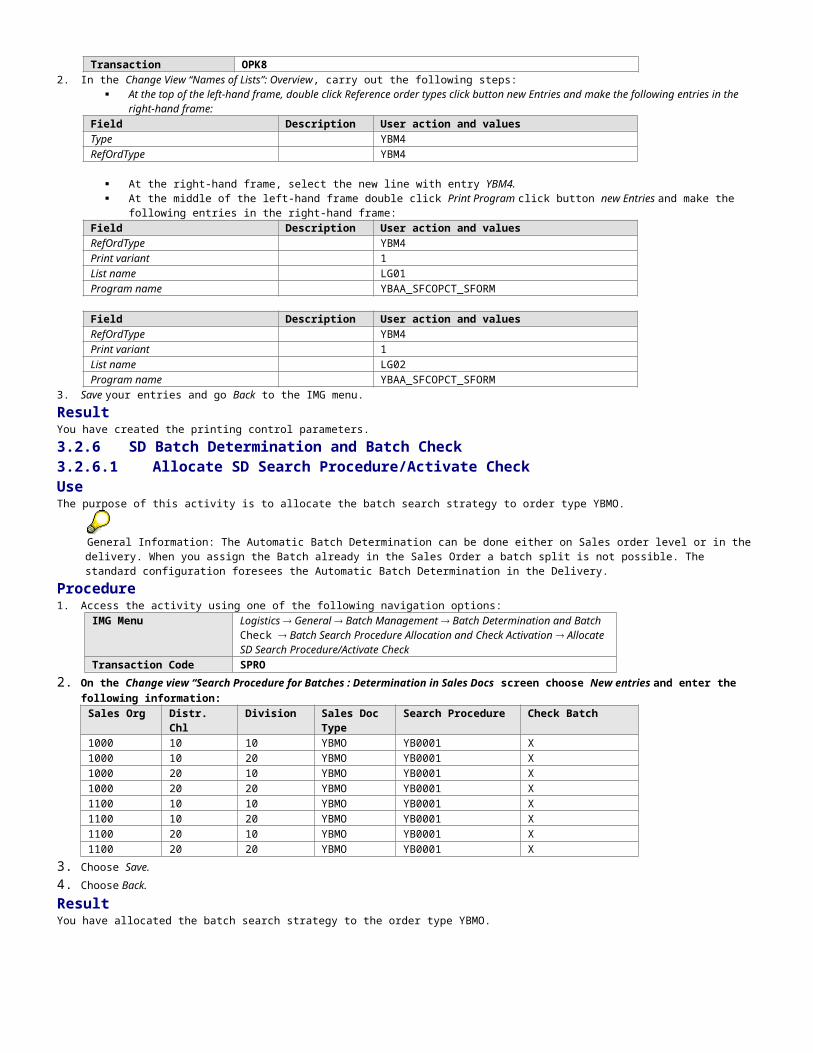
IMG Menu Production -> Shop Floor Control -> Operations -> Define Print Control Menú IMG Producción -> Control de planta -> Operaciones -> Fijar control de impresión Transaction OPK8
2. In the Change View “Names of Lists”: Overview, carry out the following steps: At the top of the left-hand frame, double click Reference order types click button new Entries and make the following entries in the
right-hand frame:Field Description User action and valuesType YBM4RefOrdType YBM4
At the right-hand frame, select the new line with entry YBM4. At the middle of the left-hand frame double click Print Program click button new Entries and make the following entries in the right-
hand frame: Field Description User action and valuesRefOrdType YBM4Print variant 1List name LG01Program name YBAA_SFCOPCT_SFORM
Field Description User action and valuesRefOrdType YBM4Print variant 1List name LG02Program name YBAA_SFCOPCT_SFORM
3. Save your entries and go Back to the IMG menu.
ResultYou have created the printing control parameters.
3.2.6 SD Batch Determination and Batch Check3.2.6.1 Allocate SD Search Procedure/Activate CheckUseThe purpose of this activity is to allocate the batch search strategy to order type YBMO.
General Information: The Automatic Batch Determination can be done either on Sales order level or in the delivery. When you assign the Batch already in the Sales Order a batch split is not possible. The standard configuration foresees the Automatic Batch Determination in the Delivery.
Procedure1. Access the activity using one of the following navigation options:
IMG Menu Logistics General Batch Management Batch Determination and Batch Check Batch Search Procedure Allocation and Check Activation Allocate SD Search Procedure/Activate Check
Transaction Code SPRO
2. On the Change view “Search Procedure for Batches : Determination in Sales Docs screen choose New entries and enter the following information:
Sales Org Distr. Chl Division Sales Doc Type
Search Procedure Check Batch
1000 10 10 YBMO YB0001 X1000 10 20 YBMO YB0001 X1000 20 10 YBMO YB0001 X1000 20 20 YBMO YB0001 X1100 10 10 YBMO YB0001 X1100 10 20 YBMO YB0001 X1100 20 10 YBMO YB0001 X1100 20 20 YBMO YB0001 X
3. Choose Save.

4. Choose Back.
ResultYou have allocated the batch search strategy to the order type YBMO.
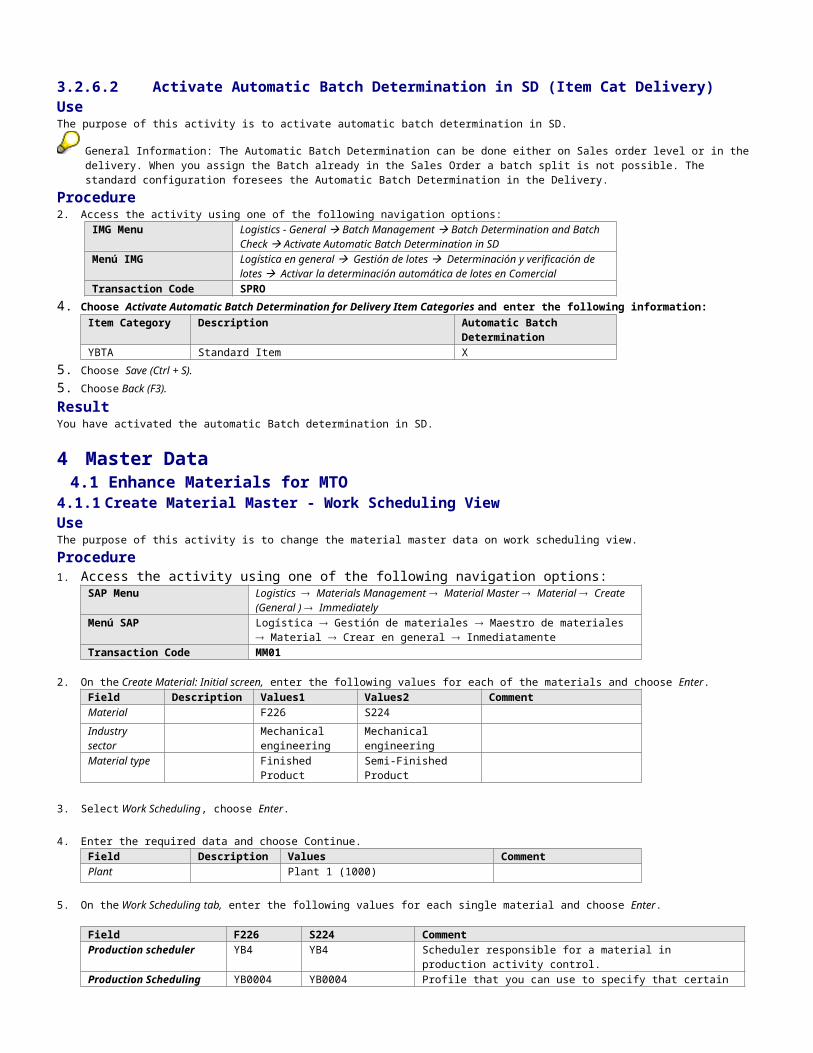
3.2.6.2 Activate Automatic Batch Determination in SD (Item Cat Delivery)UseThe purpose of this activity is to activate automatic batch determination in SD.
General Information: The Automatic Batch Determination can be done either on Sales order level or in the delivery. When you assign the Batch already in the Sales Order a batch split is not possible. The standard configuration foresees the Automatic Batch Determination in the Delivery.
Procedure2. Access the activity using one of the following navigation options:
IMG Menu Logistics - General à Batch Management à Batch Determination and Batch Check à Activate Automatic Batch Determination in SD
Menú IMG Logística en general à Gestión de lotes à Determinación y verificación de lotes à Activar la determinación automática de lotes en Comercial
Transaction Code SPRO
4. Choose Activate Automatic Batch Determination for Delivery Item Categories and enter the following information:
Item Category Description Automatic Batch Determination
YBTA Standard Item X
5. Choose Save (Ctrl + S).
5. Choose Back (F3).
ResultYou have activated the automatic Batch determination in SD.
4 Master Data4.1 Enhance Materials for MTO
4.1.1 Create Material Master - Work Scheduling ViewUse The purpose of this activity is to change the material master data on work scheduling view.
Procedure 1. Access the activity using one of the following navigation options:
SAP Menu Logistics Materials Management Material Master Material Create (General ) Immediately
Menú SAP Logística Gestión de materiales Maestro de materiales Material Crear en general Inmediatamente
Transaction Code MM01
2. On the Create Material: Initial screen, enter the following values for each of the materials and choose Enter.Field Description Values1 Values2 CommentMaterial F226 S224Industry sector
Mechanical engineering
Mechanical engineering
Material type Finished Product Semi-Finished Product
3. Select Work Scheduling, choose Enter.
4. Enter the required data and choose Continue.Field Description Values CommentPlant Plant 1 (1000)
5. On the Work Scheduling tab, enter the following values for each single material and choose Enter.
Field F226 S224 CommentProduction scheduler YB4 YB4 Scheduler responsible for a material in
production activity control.Production Scheduling Profile
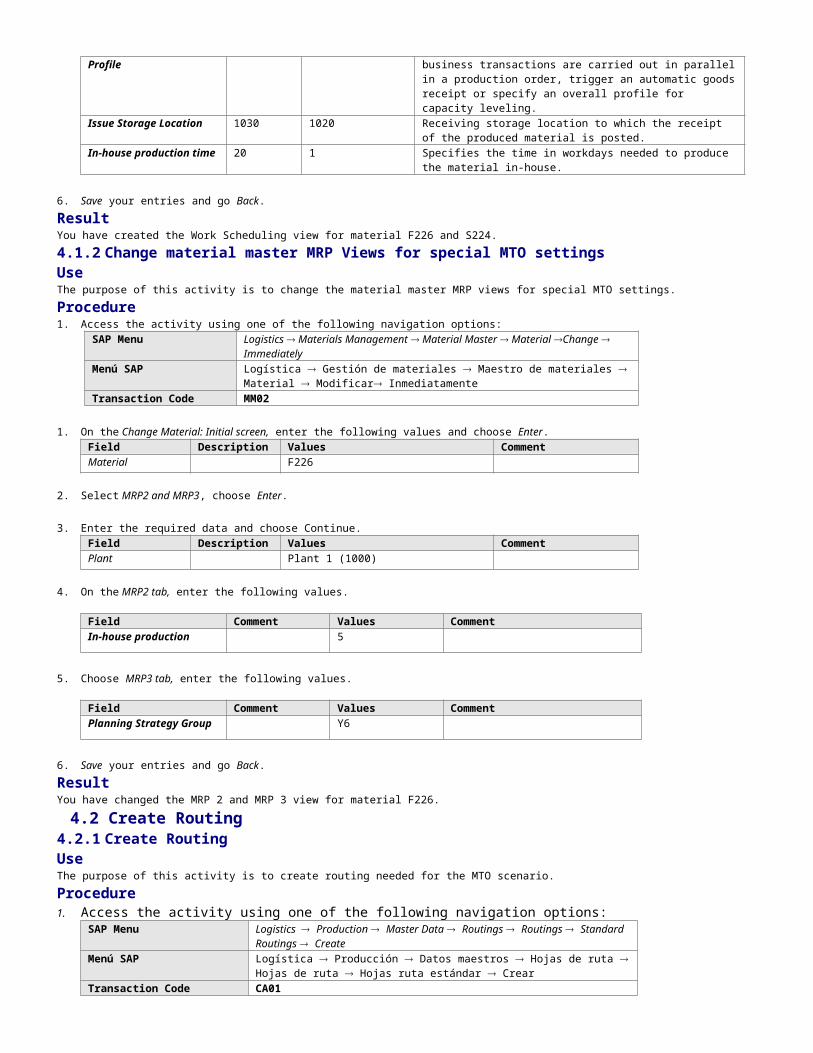
YB0004 YB0004 Profile that you can use to specify that certain business transactions are carried out in parallel in a production order, trigger an automatic goods receipt or specify an overall profile for capacity leveling.
Issue Storage Location 1030 1020 Receiving storage location to which the receipt of the produced material is posted.
In-house production time 20 1 Specifies the time in workdays needed to produce the material in-house.
6. Save your entries and go Back.
ResultYou have created the Work Scheduling view for material F226 and S224.
4.1.2 Change material master MRP Views for special MTO settingsUse The purpose of this activity is to change the material master MRP views for special MTO settings.
Procedure1. Access the activity using one of the following navigation options:
SAP Menu Logistics Materials Management Material Master Material Change Immediately
Menú SAP Logística Gestión de materiales Maestro de materiales Material Modificar Inmediatamente
Transaction Code MM02
1. On the Change Material: Initial screen, enter the following values and choose Enter.Field Description Values CommentMaterial F226
2. Select MRP2 and MRP3, choose Enter.
3. Enter the required data and choose Continue.Field Description Values CommentPlant Plant 1 (1000)
4. On the MRP2 tab, enter the following values.
Field Comment Values CommentIn-house production 5
5. Choose MRP3 tab, enter the following values.
Field Comment Values CommentPlanning Strategy Group Y6
6. Save your entries and go Back.
ResultYou have changed the MRP 2 and MRP 3 view for material F226.
4.2 Create Routing4.2.1 Create RoutingUse The purpose of this activity is to create routing needed for the MTO scenario.
Procedure1. Access the activity using one of the following navigation options:
SAP Menu Logistics Production Master Data Routings Routings Standard Routings Create
Menú SAP Logística Producción Datos maestros Hojas de ruta Hojas de ruta Hojas ruta estándar Crear
Transaction Code CA01
2. On the Create Routing: Initial screen, enter the following values and choose Enter.Field Description Values CommentMaterial number F226Plant 1000Key Date <Today´s Date>Group 50000000
3. Choose Header Details, on the Create Routing: Header Details screen, enter the following values.Field Description Values CommentTask list usage 1 ProductionStatus 4 Released (general)
4. Choose Operation Overview, on the Create Routing: Operation Overview screen, enter the following values for each single Operation/Activity Number.
Field Values1 Values2 Values3 Values4Operation/Activity Number
010 020 030 040
Work center ASSEMBLY TESTING PACK01 TESTING

Plant Plant 1 (1000)
Plant 1 (1000) Plant 1 (1000)
Plant 1 (1000)
Control Key YBP1 YBP1 YBP1 YBP1Operation short text Assembly Final
AcceptancePackaging Posting GR
(optional with SerialNo assig)
Base Quantity 1 1 1 1Unit of Measure for Operation
PC PC PC PC
5. Double-click on the table to move to the Operation Details, on the Create Routing: Operation Details screen, enter the following.Field Description Values CommentSetup 30Unit of measure for Setup MINActivity Type 3Machine 10Unit of measure for Setup MINActivity Type 1Labor 10Unit of measure for Setup MINActivity Type 11
6. Save your entries and go Back.
7. On the Create Routing: Initial screen, enter the following values and choose Enter.Field Description Values CommentMaterial number S224Plant Plant1 (1000)Key Date <Today’s date>
8. Choose Header Details, on the Create Routing: Header Details screen, enter the following values.Field Description Values CommentGroup Counter 1Task list description SF SubassemblyTask list usage 1Status 4
9. Choose Operation Overview, on the Create Routing: Operation Overview screen, enter the following values for each single Operation/Activity Number.
Field Description Values2 CommentOperation/Activity Number 020Work center TESTINGPlant Plant 1 (1000)Control Key YBP1Operation short text TestingBase Quantity 1Unit of Measure for Operation PC
10. Double-click on the table to move to the Operation Details, on the Create Routing: Operation Details screen, enter the following.Field Description Values CommentSetup 30Unit of measure for Setup minActivity Type 3Machine 10Unit of measure for Setup minActivity Type 1Labor 10Unit of measure for Setup minActivity Type 11
11. Save your entries and go Back.
ResultYou have created the routings necessary for MTO production for material finished material F226 and semi finished material S224.
4.3 Create BOM4.3.1 Create BOM for F226, S224Use The purpose of this activity is to create BOM for finished material F226 and semi finished material S224.
Procedure1. Access the activity using one of the following navigation options:
SAP Menu Logistics → Production → Master Data → Bills of Material → Bill of Material → Material BOM → Create

Menú SAP Logística Producción Datos maestros Listas de materiales Listas de materiales Lista materiales p.material Crear
Transaction code CS01
2. On the Create material BOM: Initial screen, enter the following values and choose Enter.Field Description Values CommentMaterial number S224Plant Plant 1 (1000)BOM usage Production (1)Valid From <Today’s date>
3. On the Create material BOM: General Item Overview screen, choose Header (F6) and enter the following values.Field Description Values CommentBase quantity 100BOM Status Active (1)
4. Choose Item Overview (F5), enter the following values.BOM Item Number Item Category (Bill of Material) BOM
ComponentComponent quantity
Component unit of measure
010 Stock item (L) R124 100 PC
5. Save your entries and go Back.
6. On the Create material BOM: Initial screen, enter the following values and choose Enter.Field Description Values CommentMaterial number F226Plant Plant 1 (1000)BOM usage Production (1)Valid From <Today’s date>
7. On the Create material BOM: General Item Overview screen, choose Header (F6) and enter the following values.Field Description Values CommentBase quantity 100BOM Status Active (1)
8. Choose Item Overview (F5), enter the following values.BOM Item Number Item Category (Bill of Material) BOM
ComponentComponent quantity
Component unit of measure
010 Stock item (L) S21 100 PC
020 Stock item (L) S22 100 PC
030 Stock item (L) R122 100 PC
040 Stock item (L) R128 100 PC
050 Stock item (L) R120 100 PC
060 Stock item (L) S23 100 PC
070 Stock item (L) S25 100 PC
080 Stock item (L) S224 100 PC
090 Stock item (L) R27 100 PC
9. Save your entries and go Back.
ResultYou have created the BOM for subassembly semi finished good S224 and finished good F226.
4.4 Output control data records4.4.1 Create condition records BA00/YBMOUse The purpose of this activity is to create output control data record BA00 for order type YBMO.
Procedure
1. Access the activity using one of the following navigation options: SAP Menu Logistics Sales and Distribution Master Data Output Sales Document
CreateMenú SAP Logística Comercial Datos maestros Mensajes Documento venta
CrearTransaction VV11
2. On the Create Output – Condition Records: Sales screen, enter the output type BA00 and choose Enter.3. On the Create Condition Records (Order Confirmation): Fast Entry screen, make the following entries:
Field name Description User action and values CommentSales Organization 1000Sales Document Type YBMOFunction SPPartnerMedium 1Date/Time 4Language EN
4. Confirm your entries with Enter.5. Choose the Select (F9) button.6. Choose the Communication (F2) button.7. On the Create Condition Records (Order Confirmation): Communication screen make the following entries:
Field name Description User action and values CommentPrint immediately XRelease after output XOutput Device Select your printerNumber of messages 1
8. Choose Save and go Back to the Easy Access Menu.
Result You have created the output condition record for output type BA00 and sales document type YBMO.
4.4.2 Create condition records AN00/YBMQUse The purpose of this activity is to create output control data record AN00 for order type YBMQ.
Procedure1. Access the activity using one of the following navigation options:
SAP Menu Logistics Sales and Distribution Master Data Output Sales Document Create
Menú SAP Logística Comercial Datos maestros Mensajes Documento venta Crear
Transaction VV11
2. On the Create Output – Condition Records: Sales screen, enter the output type AN00 and choose Enter.3. On the Create Condition Records (Order Confirmation): Fast Entry screen, make the following entries:
Field name Description User action and values CommentSales Organization 1000Sales Document Type YBMQFunction SPPartnerMedium 1Date/Time 4Language EN
4. Confirm your entries with Enter.5. Choose the Select (F9) button.6. Choose the Communication (F2) button.7. On the Create Condition Records (Order Confirmation): Communication screen make the following entries:
Field name Description User action and values CommentPrint immediately XRelease after output XOutput Device Select your printerNumber of messages 1
8. Choose Save and go Back to the Easy Access Menu.
Result You have created the output condition record for output type AN00 and sales document type YBMQ.
4.5 Enhance Materials for Batch Management4.5.1 Create Material Master: Assigning Class (FIFO & EXP DATE)UseThe purpose of this activity is to create the classification view for batch managed Finished good F226 and Raw material R122.Class YB_BATCH is used for FIFO searched batches.
Procedure 1. Access the activity using one of the following navigation options:
SAP Menu Logistics à Materials Management à Material Master à Material à Create (General) à Immediately
Menú SAP Logística Gestión de materiales Maestro de materiales Material Crear en general Inmediatamente
Transaction Code MM012. On the Create Material (Initial Screen) enter F226 in input field Material and press Enter.3. Press Enter to confirm the information message.4. On the Select view(s) screen mark the view Classification and press Enter.5. On the Class type (1) screen select class type 023 and double click.6. On the Classification screen enter class YB_BATCH (FIFO) in input field Class and press Enter.7. Choose Save (Ctrl + S).8. Repeat steps 1 to 7 using material R122.
ResultYou have created the classification view for batch managed Finished good F226 and Raw material R122.
4.5.2 Change Material Master: Activate Batch ManagementUseThe purpose of this activity is to activate batch management for finished good F226 and raw material R122.
Prerequisite The materials F226 and R122 must be virgin, that means they must not have stocks and must not be used in any documents, to be able to make them relevant to batch management.
Procedure 1. Access the activity using one of the following navigation options:
SAP Menu Logistics à Materials Management à Material Master à Material à Change à Immediately
Menú SAP Logística Gestión de materiales Maestro de materiales Material Modificar Inmediatamente
Transaction Code MM022. On the Change Material (Initial Screen) screen, enter Finished good F226 in input field Material and choose Select view(s).3. On the Select view(s) screen mark view General Plant Data / Storage 1 and choose Organizational levels.4. On the Organizational levels screen enter 1000 in input field Plant and press Enter.5. On the Change Material F226 (Finished Good) screen select the checkbox Batch management (checkbox must be flagged).6. Choose Save (Ctrl + S).7. Repeat steps 1-6 with raw material R122.
ResultYou have activated the batch management for finished good F226 and raw material R122.
4.6 Batch Management Search Strategies Conditions4.6.1 Batch Search Strategy for Inventory Management (FIFO)UseThe purpose of this activity is to create batch search strategies for inventory management for finished good F226 and raw materials R122 included in the MTO scenario.
Procedure 1. Access the activity using one of the following navigation options:
SAP Menu Logistics à Central functions à Batch Management à Batch Determination à Batch Search Strategy à For Inventory Management
Menú SAP Logística Funciones centrals Gestión de lotes Determinación de lotes Estrategia búsqueda de lotes P.gestión de stocks Crear Crear
Transaction Code MBC12. On the Create Batch Search Strategy: Initial Screen enter YB11 in input field Strategy type and choose Enter.3. On the Create BP: Batch Number (YB11): Fast Entry screen, enter 601 in input field Movement Type, todays date as Valid From date and
31.12.9999 as Valid to date.4. Make the following entries for Movement Type/Material:
Material No. batch splits
Changes allowed
Dialog batch de-termination
Dialog UoM
Quantity proposal
Overdelivery allowed
SelectionType
F226 99 X X A 1 X OR122 99 X X A 1 X O
5. Press Enter.6. Ignore any warning messages.7. Select the entered lines and choose Selection criteria.8. The batch class YB_BATCH assigned to the material and the characteristics of the class are shown. Confirm the data by choosing Enter and
Back (F3).9. On the Create BP: Batch Number (YB11): Fast Entry screen, select the entered lines again and choose Sort.10. On the Create BP: Batch Number (YB11): Sort Rule screen, enter YB_FIFO_SORT in input field Sort rule.11. Choose Enter and Back (F3).12. Save your entries and go Back.13. Repeat steps 3 to 12 for all materials (listed in step 3) and all of the following movement types:
Movement Type Description601 (already done) GI for sales order 201 GI for cost center231 GI for sales order
Movement Type Description251 GI for sales291 GI all acc. assigmts301 TF trfr plnt to plnt303 TF rem.fm stor.to pl311 TF trfr within plant313 TF rem.fm str.toSLoc451 GI returns551 GI scrapping553 GI scrapping QI555 GI scrapping blocked557 GI adjust. Transit603 TF rem.fm stor.to pl
ResultYou have created the batch search strategies for inventory management for all finished goods and raw materials included in the MTO scenario.
4.6.2 Batch Search Strategy for Production OrderUseThe purpose of this activity is to create batch search strategies for production order type YBM4 for materials F226 and R122.
Procedure 1. Access the activity using one of the following navigation options:
SAP Menu Logistics à Central functions à Batch Management à Batch Determination à Batch Search Strategy à For Production Order
Menú SAP Logística Funciones centrals Gestión de lotes Determinación de lotes Estrategia búsqueda de lotes P.orden de fabricación Crear
Transaction Code COB12. On the Create Batch Search Strategy: Initial Screen enter YB11 in input field Strategy type and choose Enter.3. On the Create BP: Batch number YB11: Fast Entry screen, enter YBM4 in input field Order Type and 1000 in input field Plant.4. Make the following entries for Order Type/Plant/Component:
Material No. batch splits
Changes allowed
Dialog batch determination
Dialog UoM
Quantity proposal
Overdelivery allowed
SelectionType
F226 99 X X A 1 X OR122 99 X X A 1 X O
5. Press Enter.6. Ignore any warning messages.7. Select both entries and choose Selection criteria.8. The batch class YB_BATCH assigned to the material and the characteristics of the class are shown. Confirm the data by choosing Enter and
Back (F3).9. On the Create BP: Batch number (YB11): Fast Entry screen, select both entries again and choose Sort.10. On the Create BP: Batch number (YB11): Sort Rule screen, enter YB_FIFO_SORT in the Sort rule input field.11. Choose Enter and Back (F3).12. Save your entries and go Back.
ResultYou have created the batch search strategies for production order type YBM4 for materials F226 and R122.
4.6.3 Batch Search Strategy for Sales and Distribution (FIFO)UseThe purpose of this activity is to create batch search strategies for sales and distribution for material Finished Good (F226).
Procedure 1. Access the activity using one of the following navigation options:
SAP Menu Logistics à Central functions à Batch Management à Batch Determination à Batch Search Strategy à For Sales and Distribution
Menú SAP Logística Funciones centrals Gestión de lotes Determinación de lotes Estrategia búsqueda de lotes Para Comercial Crear
Transaction Code VCH12. On the Create Batch Search Strategy: Initial Screen enter YB11 in input field Strategy type 3. Choose Key combination and select Material.4. Choose Enter.5. On the Create BP: Batch Number (YB11): Fast Entry screen, enter the following information:
Material No. batch splits
Changes allowed
Dialog batch determination
Dialog UoM
Quantity proposal
Over-delivery allowed
Selection Type
F226 99 X X A 1 X O

6. Press Enter.7. Ignore any warning messages.8. Select the entered line and choose Selection criteria.9. The batch class YB_BATCH assigned to the material and the characteristics of the class are shown. Confirm the data by choosing Enter and
Back (F3).10. On the Create BP: Batch Number (YB11): Fast Entry screen, select the entered line again and choose Sort.11. On the Create BP: Batch Number (YB11): Sort Rule screen, enter YB_FIFO_SORT in input field sort rule.12. Choose Enter and Back (F3).13. Save your entries and go Back.
ResultYou have created the batch search strategies for sales and distribution for material Finished Good (F226).