Hardware Connection ● For Windows 2000 or Windows XP Operating System, please comply with following steps to set up. First, please setup your PC. Second, please setup the extender. ● For Windows Vista or Windows 7 Operating System, please comply with following steps to set up. Right-click “My Network Places”, click “Properties” Right-click “Local Area Connection”, click “Properties” Double-click “Internet Protocol (TCP/IP)” Configure the IP address manually: IP Address: 192.168.1. x (x can be ranged from 1~253) Subnet mask: 255.255.255.0 Default gateway: 192.168.1.254 Click OK. Configure the IP address manually: IP Address: 192.168.1. x (x can be ranged from 1~253) Subnet mask: 255.255.255.0 Default gateway: 192.168.1.254 Click OK. Click “Start— Control Panel— Network and Internet— Network Connection”, right-click “Local Area Connection”, and choose “Properties”. Double-click “Internet Protocol Version 4 (TCP/IPv4)” Quick Installation Guide Wireless N Range Extender Name Power Rst/WPS LAN Description This button can turn on/off the device. Press the button for about 10 seconds, the device will restore to factory default settings. WPS push button for secured easy connection to a wireless network. Press the button for about 5 seconds, it is WPS working. This port is used to connect to PC. Button and Port Description Establish Connection Wireless Network Connection Right-click “My Network Places”, click “Properties” Right-click “Wireless Network Connection”, and click “View Available Wireless Networks” Confirm the wireless network SSID name, choose one that you would like to connect, then click “Connect” Input the encrytion key and click “Connect” Have connected wireless network, you can access Internet through wireless mode. For more information, please go to www.totolink.net Information in this document is subject to change without prior notice. Copyrights 2013 by TOTOLINK All rights reserved. Website: http://www.totolink.net Extension Socket Power Connect the LAN port to your computer’s network interface. Plug the extender into a wall outlet. Press the power ON/OFF button to start the device. Method two: Connecting by Web Setting_Part A Method two: Connecting by Web Setting_Part B Typing 192.168.1.254 in the address field of Web Browser. Then press Enter key. Click Setup T ool: Enter User Name and Password. Both are admin in lower case letters. Click Extender Setup, choose Start to enable repeater function. Click Search AP . 5 Select one SSID, click Select AP . 6 Enter the right Encryption key to connect. Then click Apply. 8 If the SSID you selected is encrypted, it will pop up below window reminding you to input the network key to connect. Click OK. 7 The Status line will show you whether connected successfully. 2-1 Establish Connection 2-2 3 Press the Rst/WPS button on EX300. Press the Rst/WPS button on wireless router for about 5 seconds at the same time. After 5 seconds, a secure connection will be established automatically. Method One: Connected by button The default Network Name (SSID) of EX300 is TOTOLINK EX300 (No encryption). After repeater with other Router/AP successfully, the SSID and password of the extender will change to the connected router/AP’s SSID and password. So before following operation, please make sure you have the SSID and password of the router/AP you need this extender to connect. Besides, TOTOLINK Extender can repeater with many other brands routers/APs. WPS Button Rst/WPS Button EX300 LED Indicators Names WiFi LAN Description WiFi is on but no data transmitting exists Successful wireless connection with data transmitting Status Blink Blink Off Extending On Blink Off On Connection with upper AP has been completed Connecting with upper AP No connection with upper AP Successfully connected with the LAN port and no data transmitting exists Successfully connected with the LAN port with data transmitting There is no device linked to the LAN port On

Welcome message from author
This document is posted to help you gain knowledge. Please leave a comment to let me know what you think about it! Share it to your friends and learn new things together.
Transcript
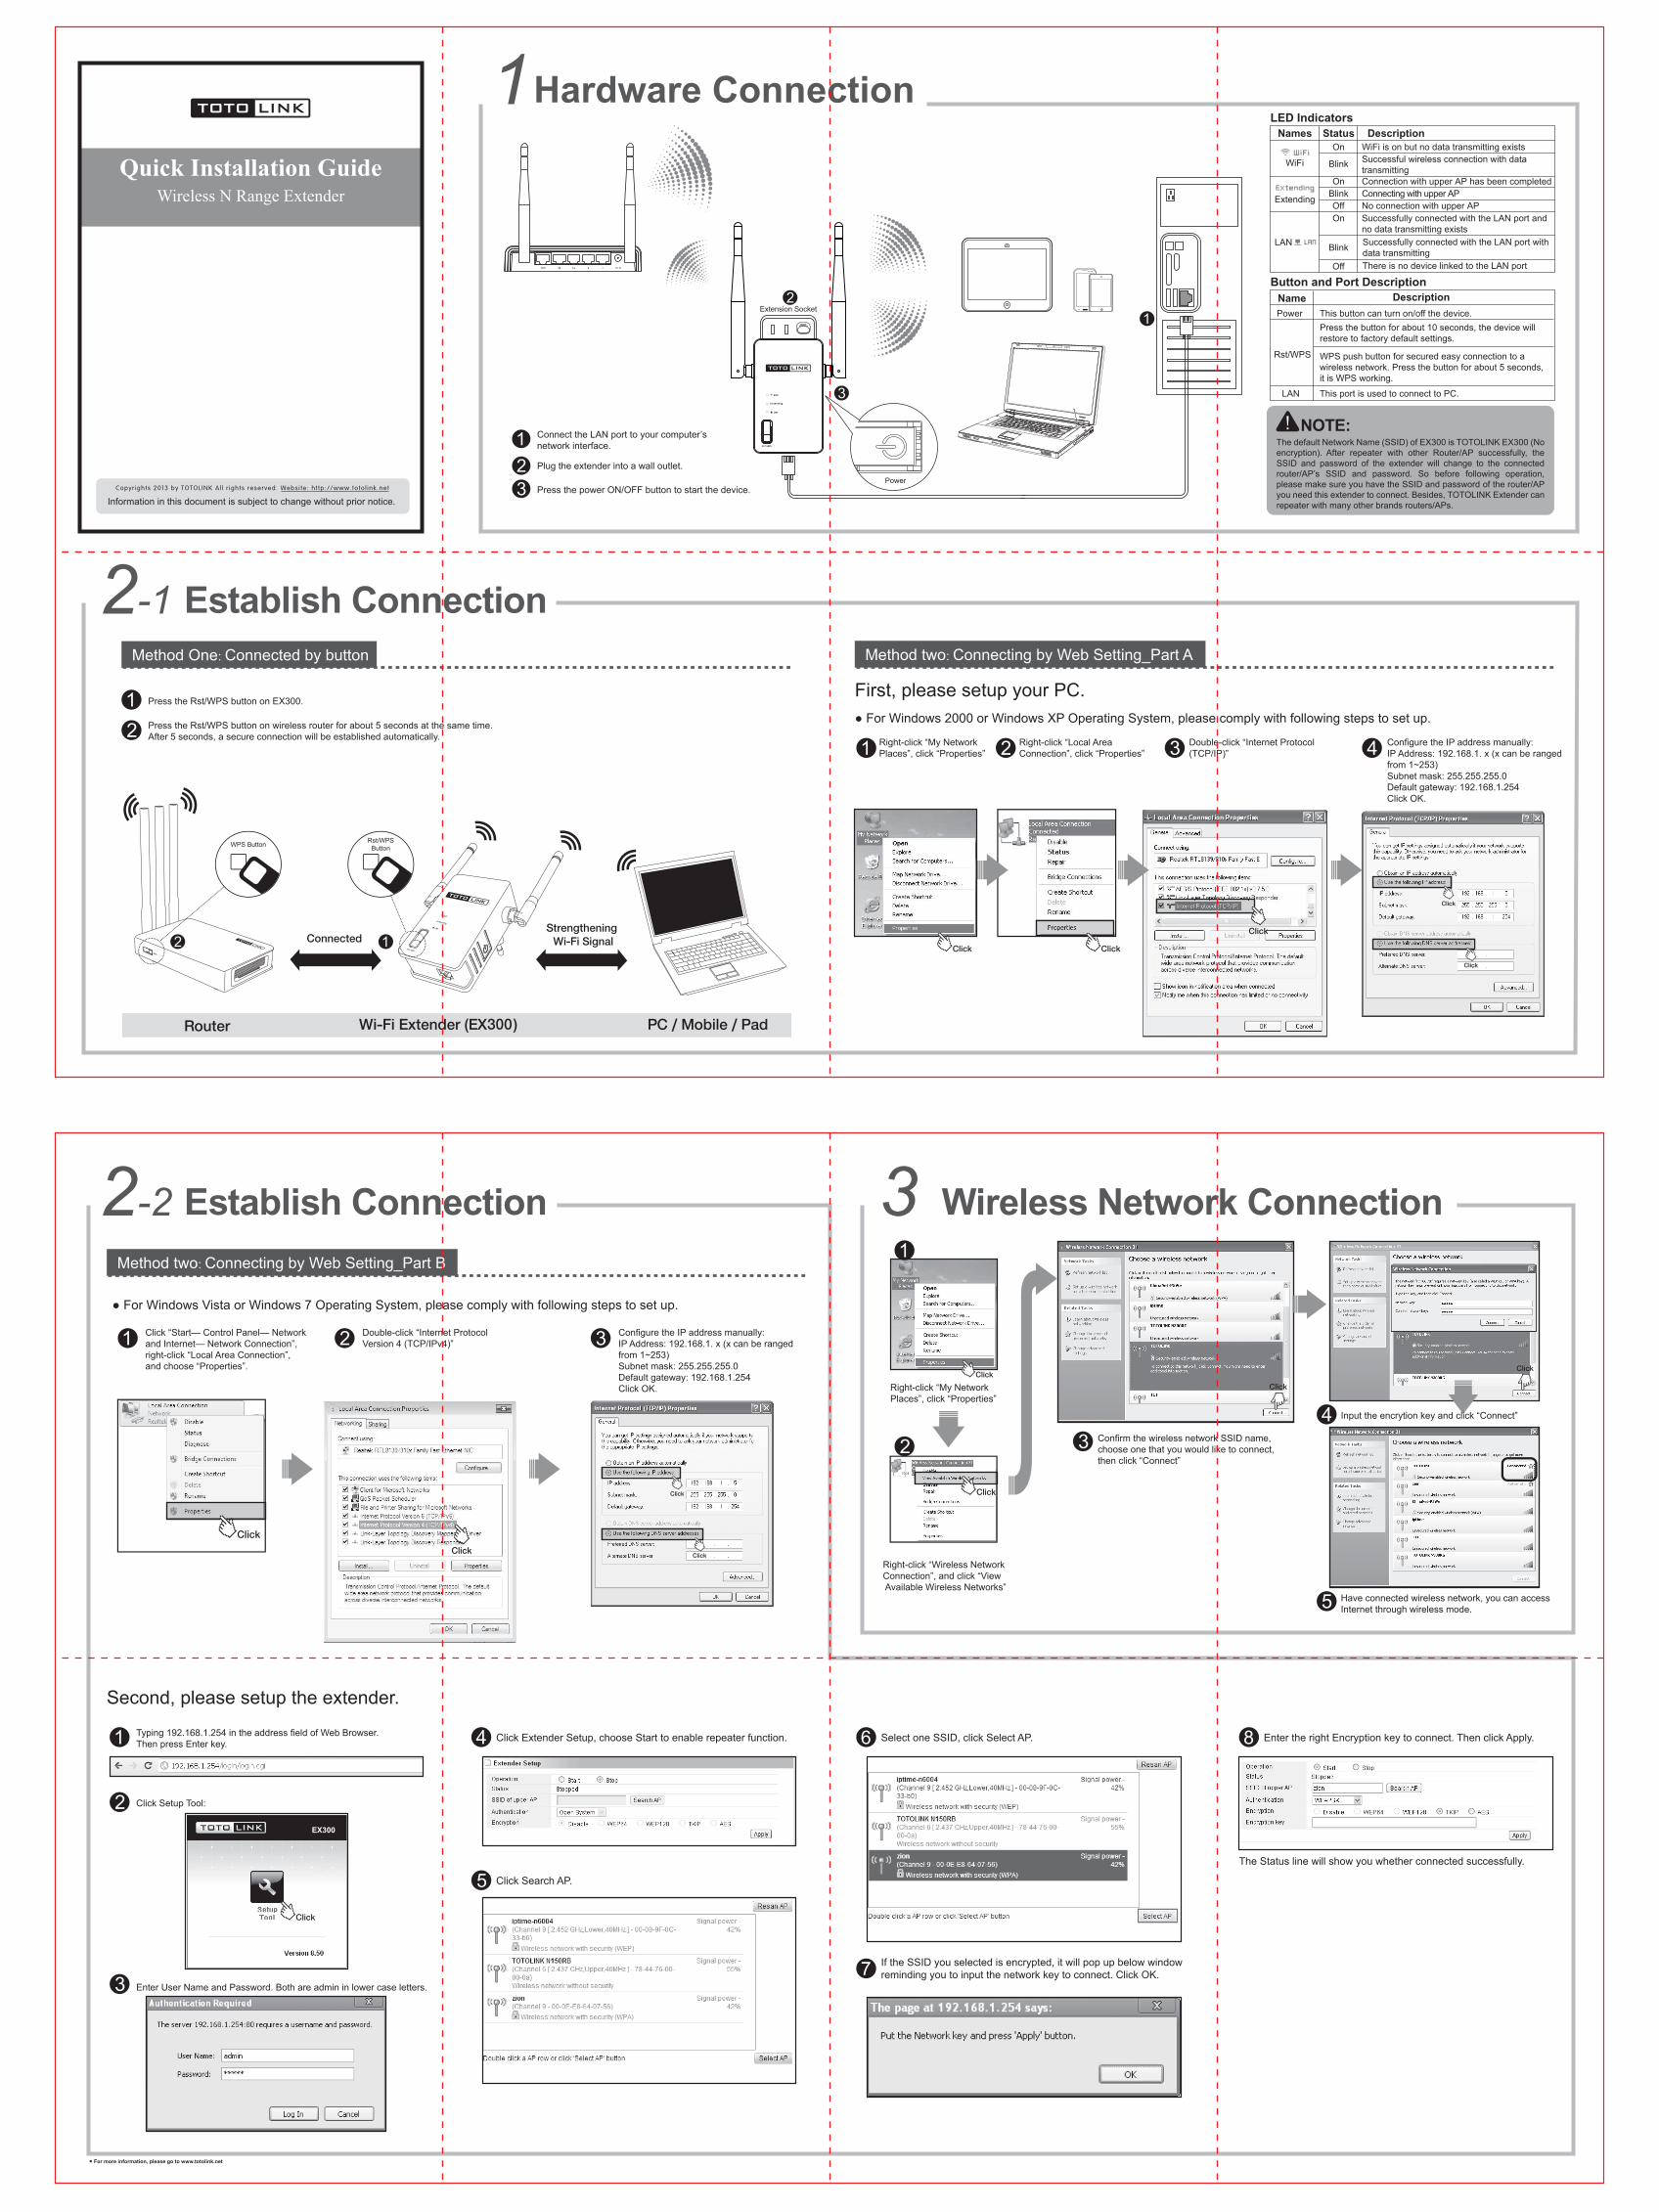
Hardware Connection
● For Windows 2000 or Windows XP Operating System, please comply with following steps to set up.
First, please setup your PC.
Second, please setup the extender.
● For Windows Vista or Windows 7 Operating System, please comply with following steps to set up.
Right-click “My Network Places”, click “Properties”
Right-click “Local Area Connection”, click “Properties”
Double-click “Internet Protocol (TCP/IP)”
Configure the IP address manually:IP Address: 192.168.1. x (x can be ranged from 1~253)Subnet mask: 255.255.255.0Default gateway: 192.168.1.254Click OK.
Configure the IP address manually:IP Address: 192.168.1. x (x can be ranged from 1~253)Subnet mask: 255.255.255.0Default gateway: 192.168.1.254Click OK.
Click “Start— Control Panel— Network and Internet— Network Connection”, right-click “Local Area Connection”, and choose “Properties”.
Double-click “Internet Protocol Version 4 (TCP/IPv4)”
Quick Installation GuideWireless N Range Extender
NamePower
Rst/WPS
LAN
Description
This button can turn on/off the device.Press the button for about 10 seconds, the device will restore to factory default settings.
WPS push button for secured easy connection to a wireless network. Press the button for about 5 seconds, it is WPS working.
This port is used to connect to PC.
Button and Port Description
Establish Connection
Wireless Network Connection
Right-click “My Network Places”, click “Properties”
Right-click “Wireless NetworkConnection”, and click “View Available Wireless Networks”
Confirm the wireless network SSID name, choose one that you would like to connect, then click “Connect”
Input the encrytion key and click “Connect”
Have connected wireless network, you can access Internet through wireless mode.
For more information, please go to www.totolink.net
Information in this document is subject to change without prior notice. Copyr ights 2013 by TOTOLINK Al l r ights reserved. Websi te: ht tp://www.toto l ink.net
Extension Socket
Power
Connect the LAN port to your computer’s network interface.
Plug the extender into a wall outlet.
Press the power ON/OFF button to start the device.
Method two: Connecting by Web Setting_Part A
Method two: Connecting by Web Setting_Part B
Typing 192.168.1.254 in the address field of Web Browser. Then press Enter key.
Click Setup Tool:
Enter User Name and Password. Both are admin in lower case letters.
Click Extender Setup, choose Start to enable repeater function.
Click Search AP.5
Select one SSID, click Select AP.6 Enter the right Encryption key to connect. Then click Apply.8
If the SSID you selected is encrypted, it will pop up below window reminding you to input the network key to connect. Click OK.7
The Status line will show you whether connected successfully.
2-1
Establish Connection2-2 3
Press the Rst/WPS button on EX300.
Press the Rst/WPS button on wireless router for about 5 seconds at the same time. After 5 seconds, a secure connection will be established automatically.
Method One: Connected by button
The default Network Name (SSID) of EX300 is TOTOLINK EX300 (No encryption). After repeater with other Router/AP successfully, the SSID and password of the extender will change to the connected router/AP’s SSID and password. So before following operation, please make sure you have the SSID and password of the router/AP you need this extender to connect. Besides, TOTOLINK Extender can repeater with many other brands routers/APs.
WPS Button Rst/WPSButton
EX300
LED IndicatorsNames
WiFi
LAN
DescriptionWiFi is on but no data transmitting existsSuccessful wireless connection with data transmitting
Status
Blink
BlinkOff
Extending
On
Blink
Off
On
Connection with upper AP has been completedConnecting with upper APNo connection with upper APSuccessfully connected with the LAN port and no data transmitting existsSuccessfully connected with the LAN port with data transmittingThere is no device linked to the LAN port
On
Related Documents