Informatica ® 10.5 Reference Data Guide

Welcome message from author
This document is posted to help you gain knowledge. Please leave a comment to let me know what you think about it! Share it to your friends and learn new things together.
Transcript

Informatica®
10.5
Reference Data Guide

Informatica Reference Data Guide10.5March 2021
© Copyright Informatica LLC 2013, 2021
This software and documentation are provided only under a separate license agreement containing restrictions on use and disclosure. No part of this document may be reproduced or transmitted in any form, by any means (electronic, photocopying, recording or otherwise) without prior consent of Informatica LLC.
U.S. GOVERNMENT RIGHTS Programs, software, databases, and related documentation and technical data delivered to U.S. Government customers are "commercial computer software" or "commercial technical data" pursuant to the applicable Federal Acquisition Regulation and agency-specific supplemental regulations. As such, the use, duplication, disclosure, modification, and adaptation is subject to the restrictions and license terms set forth in the applicable Government contract, and, to the extent applicable by the terms of the Government contract, the additional rights set forth in FAR 52.227-19, Commercial Computer Software License.
Informatica and the Informatica logo are trademarks or registered trademarks of Informatica LLC in the United States and many jurisdictions throughout the world. A current list of Informatica trademarks is available on the web at https://www.informatica.com/trademarks.html. Other company and product names may be trade names or trademarks of their respective owners.
Portions of this software and/or documentation are subject to copyright held by third parties. Required third party notices are included with the product.
The information in this documentation is subject to change without notice. If you find any problems in this documentation, report them to us at [email protected].
Informatica products are warranted according to the terms and conditions of the agreements under which they are provided. INFORMATICA PROVIDES THE INFORMATION IN THIS DOCUMENT "AS IS" WITHOUT WARRANTY OF ANY KIND, EXPRESS OR IMPLIED, INCLUDING WITHOUT ANY WARRANTIES OF MERCHANTABILITY, FITNESS FOR A PARTICULAR PURPOSE AND ANY WARRANTY OR CONDITION OF NON-INFRINGEMENT.
Publication Date: 2021-04-01

Table of Contents
Preface . . . . . . . . . . . . . . . . . . . . . . . . . . . . . . . . . . . . . . . . . . . . . . . . . . . . . . . . . . . . . . . . . . . . . . 7Informatica Resources. . . . . . . . . . . . . . . . . . . . . . . . . . . . . . . . . . . . . . . . . . . . . . . . . . . 7
Informatica Network. . . . . . . . . . . . . . . . . . . . . . . . . . . . . . . . . . . . . . . . . . . . . . . . . 7
Informatica Knowledge Base. . . . . . . . . . . . . . . . . . . . . . . . . . . . . . . . . . . . . . . . . . . . 7
Informatica Documentation. . . . . . . . . . . . . . . . . . . . . . . . . . . . . . . . . . . . . . . . . . . . . 7
Informatica Product Availability Matrices. . . . . . . . . . . . . . . . . . . . . . . . . . . . . . . . . . . . 8
Informatica Velocity. . . . . . . . . . . . . . . . . . . . . . . . . . . . . . . . . . . . . . . . . . . . . . . . . . 8
Informatica Marketplace. . . . . . . . . . . . . . . . . . . . . . . . . . . . . . . . . . . . . . . . . . . . . . . 8
Informatica Global Customer Support. . . . . . . . . . . . . . . . . . . . . . . . . . . . . . . . . . . . . . 8
Chapter 1: Introduction to Reference Data. . . . . . . . . . . . . . . . . . . . . . . . . . . . . . . . . . . . 9Reference Data Overview. . . . . . . . . . . . . . . . . . . . . . . . . . . . . . . . . . . . . . . . . . . . . . . . . 9
Informatica Reference Data. . . . . . . . . . . . . . . . . . . . . . . . . . . . . . . . . . . . . . . . . . . . . . . 10
User-Defined Reference Data. . . . . . . . . . . . . . . . . . . . . . . . . . . . . . . . . . . . . . . . . . . . . . 10
Reference Tables. . . . . . . . . . . . . . . . . . . . . . . . . . . . . . . . . . . . . . . . . . . . . . . . . . . . . . 11
Reference Table Structure. . . . . . . . . . . . . . . . . . . . . . . . . . . . . . . . . . . . . . . . . . . . . 11
Reference Data Warehouse Privileges. . . . . . . . . . . . . . . . . . . . . . . . . . . . . . . . . . . . . 12
Parameters and Reference Tables. . . . . . . . . . . . . . . . . . . . . . . . . . . . . . . . . . . . . . . . 12
Reference Data Objects and Version Control. . . . . . . . . . . . . . . . . . . . . . . . . . . . . . . . . . . . 12
Chapter 2: Reference Tables in the Analyst Tool. . . . . . . . . . . . . . . . . . . . . . . . . . . . . 13Analyst Tool Reference Tables Overview. . . . . . . . . . . . . . . . . . . . . . . . . . . . . . . . . . . . . . . 13
Reference Table Properties. . . . . . . . . . . . . . . . . . . . . . . . . . . . . . . . . . . . . . . . . . . . . . . 13
Reference Table General Properties. . . . . . . . . . . . . . . . . . . . . . . . . . . . . . . . . . . . . . . 14
Reference Table Column Properties. . . . . . . . . . . . . . . . . . . . . . . . . . . . . . . . . . . . . . . 14
Creating a Reference Table in the Reference Table Editor. . . . . . . . . . . . . . . . . . . . . . . . . . . . 15
Create a Reference Table from Profile Data. . . . . . . . . . . . . . . . . . . . . . . . . . . . . . . . . . . . . 16
Creating a Reference Table from Profile Column Data. . . . . . . . . . . . . . . . . . . . . . . . . . . 16
Creating a Reference Table from Value Patterns. . . . . . . . . . . . . . . . . . . . . . . . . . . . . . . 17
Create a Reference Table From a Flat File. . . . . . . . . . . . . . . . . . . . . . . . . . . . . . . . . . . . . . 18
Analyst Tool Flat File Properties. . . . . . . . . . . . . . . . . . . . . . . . . . . . . . . . . . . . . . . . . 18
Creating a Reference Table from a Flat File. . . . . . . . . . . . . . . . . . . . . . . . . . . . . . . . . . 19
Create a Reference Table from a Database Table. . . . . . . . . . . . . . . . . . . . . . . . . . . . . . . . . 20
Creating a Reference Table from a Database Table. . . . . . . . . . . . . . . . . . . . . . . . . . . . . 20
Working with Reference Tables in a Versioned Model Repository. . . . . . . . . . . . . . . . . . . . . . . 21
Reference Table Updates. . . . . . . . . . . . . . . . . . . . . . . . . . . . . . . . . . . . . . . . . . . . . . . . . 21
Managing Columns. . . . . . . . . . . . . . . . . . . . . . . . . . . . . . . . . . . . . . . . . . . . . . . . . 22
Managing Rows. . . . . . . . . . . . . . . . . . . . . . . . . . . . . . . . . . . . . . . . . . . . . . . . . . . . 22
Finding and Replacing Values. . . . . . . . . . . . . . . . . . . . . . . . . . . . . . . . . . . . . . . . . . . 23
Exporting Reference Table Data. . . . . . . . . . . . . . . . . . . . . . . . . . . . . . . . . . . . . . . . . 23
Table of Contents 3

Enable and Disable Edits in an Unmanaged Reference Table. . . . . . . . . . . . . . . . . . . . . . . 24
Refresh the Reference Table Values. . . . . . . . . . . . . . . . . . . . . . . . . . . . . . . . . . . . . . . 24
Audit Trail Events. . . . . . . . . . . . . . . . . . . . . . . . . . . . . . . . . . . . . . . . . . . . . . . . . . . . . . 25
Viewing Audit Trail Events. . . . . . . . . . . . . . . . . . . . . . . . . . . . . . . . . . . . . . . . . . . . . 25
Rules and Guidelines for Reference Tables. . . . . . . . . . . . . . . . . . . . . . . . . . . . . . . . . . . . . 26
Chapter 3: Reference Data in the Developer Tool. . . . . . . . . . . . . . . . . . . . . . . . . . . . . 27Developer Tool Reference Data Overview. . . . . . . . . . . . . . . . . . . . . . . . . . . . . . . . . . . . . . 27
Reference Data and Transformations. . . . . . . . . . . . . . . . . . . . . . . . . . . . . . . . . . . . . . . . . 28
Working with Reference Data Objects in a Versioned Model Repository. . . . . . . . . . . . . . . . . . . 28
Checking Out Reference Data Objects. . . . . . . . . . . . . . . . . . . . . . . . . . . . . . . . . . . . . . 28
Checking in Reference Data Objects. . . . . . . . . . . . . . . . . . . . . . . . . . . . . . . . . . . . . . . 29
Reference Tables. . . . . . . . . . . . . . . . . . . . . . . . . . . . . . . . . . . . . . . . . . . . . . . . . . . . . . 29
Reference Table Data Properties. . . . . . . . . . . . . . . . . . . . . . . . . . . . . . . . . . . . . . . . . 30
Creating a Reference Table Object. . . . . . . . . . . . . . . . . . . . . . . . . . . . . . . . . . . . . . . . 30
Creating a Reference Table from a Flat File. . . . . . . . . . . . . . . . . . . . . . . . . . . . . . . . . . 31
Create a Reference Table from a Relational Source. . . . . . . . . . . . . . . . . . . . . . . . . . . . . 32
Content Sets. . . . . . . . . . . . . . . . . . . . . . . . . . . . . . . . . . . . . . . . . . . . . . . . . . . . . . . . . 33
Character Sets. . . . . . . . . . . . . . . . . . . . . . . . . . . . . . . . . . . . . . . . . . . . . . . . . . . . 34
Classifier Models. . . . . . . . . . . . . . . . . . . . . . . . . . . . . . . . . . . . . . . . . . . . . . . . . . . 34
Pattern Sets. . . . . . . . . . . . . . . . . . . . . . . . . . . . . . . . . . . . . . . . . . . . . . . . . . . . . . 35
Probabilistic Models. . . . . . . . . . . . . . . . . . . . . . . . . . . . . . . . . . . . . . . . . . . . . . . . . 35
Regular Expressions. . . . . . . . . . . . . . . . . . . . . . . . . . . . . . . . . . . . . . . . . . . . . . . . . 35
Token Sets. . . . . . . . . . . . . . . . . . . . . . . . . . . . . . . . . . . . . . . . . . . . . . . . . . . . . . . 36
Rules and Guidelines for Probabilistic Models and Classifier Models. . . . . . . . . . . . . . . . . . 38
Creating a Content Set. . . . . . . . . . . . . . . . . . . . . . . . . . . . . . . . . . . . . . . . . . . . . . . 39
Creating a Reference Data Object in a Content Set. . . . . . . . . . . . . . . . . . . . . . . . . . . . . 39
Chapter 4: Classifier Models. . . . . . . . . . . . . . . . . . . . . . . . . . . . . . . . . . . . . . . . . . . . . . . . 40Classifier Models Overview. . . . . . . . . . . . . . . . . . . . . . . . . . . . . . . . . . . . . . . . . . . . . . . 40
Classifier Model Structure. . . . . . . . . . . . . . . . . . . . . . . . . . . . . . . . . . . . . . . . . . . . . . . . 41
Classifier Scores. . . . . . . . . . . . . . . . . . . . . . . . . . . . . . . . . . . . . . . . . . . . . . . . . . . . . . 41
Classifier Transformation Example. . . . . . . . . . . . . . . . . . . . . . . . . . . . . . . . . . . . . . . . . . 41
Classifier Model Options. . . . . . . . . . . . . . . . . . . . . . . . . . . . . . . . . . . . . . . . . . . . . . . . . 42
Classifier Model Reference Data. . . . . . . . . . . . . . . . . . . . . . . . . . . . . . . . . . . . . . . . . . . . 43
Classifier Model Label Data. . . . . . . . . . . . . . . . . . . . . . . . . . . . . . . . . . . . . . . . . . . . . . . 44
Classifier Model Label Management. . . . . . . . . . . . . . . . . . . . . . . . . . . . . . . . . . . . . . 44
Classifier Model Configuration. . . . . . . . . . . . . . . . . . . . . . . . . . . . . . . . . . . . . . . . . . . . . 45
Creating a Classifier Model. . . . . . . . . . . . . . . . . . . . . . . . . . . . . . . . . . . . . . . . . . . . 45
Appending Data from a Data Source to a Classifier Model . . . . . . . . . . . . . . . . . . . . . . . . 46
Adding a Reference Data Row to a Classifier Model. . . . . . . . . . . . . . . . . . . . . . . . . . . . . 47
Adding a Label to a Classifier Model. . . . . . . . . . . . . . . . . . . . . . . . . . . . . . . . . . . . . . 47
Assigning a Label to Reference Data Rows. . . . . . . . . . . . . . . . . . . . . . . . . . . . . . . . . . 47
4 Table of Contents

Identifying Unused Label Values. . . . . . . . . . . . . . . . . . . . . . . . . . . . . . . . . . . . . . . . . 48
Deleting Rows from a Classifier Model. . . . . . . . . . . . . . . . . . . . . . . . . . . . . . . . . . . . . 48
Deleting a Label from a Classifier Model. . . . . . . . . . . . . . . . . . . . . . . . . . . . . . . . . . . . 48
Compiling a Classifier Model. . . . . . . . . . . . . . . . . . . . . . . . . . . . . . . . . . . . . . . . . . . 48
Filter Operations and Find Operations. . . . . . . . . . . . . . . . . . . . . . . . . . . . . . . . . . . . . . . . . 49
Using a Data Value to Filter the Reference Data Rows. . . . . . . . . . . . . . . . . . . . . . . . . . . 49
Using a Label Value to Filter the Reference Data Rows. . . . . . . . . . . . . . . . . . . . . . . . . . . 49
Finding a Value in a Reference Data Row. . . . . . . . . . . . . . . . . . . . . . . . . . . . . . . . . . . . 49
Copy and Paste Operations. . . . . . . . . . . . . . . . . . . . . . . . . . . . . . . . . . . . . . . . . . . . . . . 50
Copying a Classifier Model to Another Content Set. . . . . . . . . . . . . . . . . . . . . . . . . . . . . 50
Importing a Classifier Model from Another Content Set. . . . . . . . . . . . . . . . . . . . . . . . . . 50
Chapter 5: Probabilistic Models. . . . . . . . . . . . . . . . . . . . . . . . . . . . . . . . . . . . . . . . . . . . . 51Probabilistic Models Overview. . . . . . . . . . . . . . . . . . . . . . . . . . . . . . . . . . . . . . . . . . . . . 51
Probabilistic Model Structure. . . . . . . . . . . . . . . . . . . . . . . . . . . . . . . . . . . . . . . . . . . . . . 52
Labeler Transformation Example. . . . . . . . . . . . . . . . . . . . . . . . . . . . . . . . . . . . . . . . . . . . 52
Parser Transformation Example. . . . . . . . . . . . . . . . . . . . . . . . . . . . . . . . . . . . . . . . . . . . 53
Probabilistic Model Options. . . . . . . . . . . . . . . . . . . . . . . . . . . . . . . . . . . . . . . . . . . . . . . 54
Probabilistic Model Data View. . . . . . . . . . . . . . . . . . . . . . . . . . . . . . . . . . . . . . . . . . 54
Probabilistic Model Label View. . . . . . . . . . . . . . . . . . . . . . . . . . . . . . . . . . . . . . . . . . 56
Probabilistic Model Reference Data. . . . . . . . . . . . . . . . . . . . . . . . . . . . . . . . . . . . . . . . . . 57
Probabilistic Model Label Data. . . . . . . . . . . . . . . . . . . . . . . . . . . . . . . . . . . . . . . . . . . . . 57
Overflow Label. . . . . . . . . . . . . . . . . . . . . . . . . . . . . . . . . . . . . . . . . . . . . . . . . . . . 58
Probabilistic Model Properties. . . . . . . . . . . . . . . . . . . . . . . . . . . . . . . . . . . . . . . . . . . . . 58
Probabilistic Model Configuration. . . . . . . . . . . . . . . . . . . . . . . . . . . . . . . . . . . . . . . . . . . 59
Creating an Empty Probabilistic Model. . . . . . . . . . . . . . . . . . . . . . . . . . . . . . . . . . . . . 59
Creating a Probabilistic Model from a Data Object. . . . . . . . . . . . . . . . . . . . . . . . . . . . . . 60
Appending Data from a Data Source to a Probabilistic Model. . . . . . . . . . . . . . . . . . . . . . . 60
Adding a Reference Data Row to a Probabilistic Model. . . . . . . . . . . . . . . . . . . . . . . . . . . 61
Adding a Label to a Probabilistic Model. . . . . . . . . . . . . . . . . . . . . . . . . . . . . . . . . . . . 61
Assigning a Label to a Reference Data Value. . . . . . . . . . . . . . . . . . . . . . . . . . . . . . . . . 62
Assigning a Label to Multiple Data Values . . . . . . . . . . . . . . . . . . . . . . . . . . . . . . . . . . 62
Deleting Rows from a Probabilistic Model. . . . . . . . . . . . . . . . . . . . . . . . . . . . . . . . . . . 63
Deleting a Label from a Probabilistic Model. . . . . . . . . . . . . . . . . . . . . . . . . . . . . . . . . . 63
Compiling the Probabilistic Model. . . . . . . . . . . . . . . . . . . . . . . . . . . . . . . . . . . . . . . . 63
Finding Data Rows in a Probabilistic Model. . . . . . . . . . . . . . . . . . . . . . . . . . . . . . . . . . 64
Filtering Reference Data Values by Label Assignment. . . . . . . . . . . . . . . . . . . . . . . . . . . 64
Finding Unused Label Values. . . . . . . . . . . . . . . . . . . . . . . . . . . . . . . . . . . . . . . . . . . 64
Copy and Paste Operations. . . . . . . . . . . . . . . . . . . . . . . . . . . . . . . . . . . . . . . . . . . . . . . 65
Copying a Probabilistic Model to Another Content Set. . . . . . . . . . . . . . . . . . . . . . . . . . . 65
Importing a Probabilistic Model from Another Content Set. . . . . . . . . . . . . . . . . . . . . . . . 65
Copying Reference Data Rows to the Clipboard. . . . . . . . . . . . . . . . . . . . . . . . . . . . . . . 65
Table of Contents 5

Appendix A: Reference Data and Informatica Data Engineering Integration. . . 66Reference Data and Informatica Data Engineering Integration. . . . . . . . . . . . . . . . . . . . . . . . . 66
Reference Data for Address Validation. . . . . . . . . . . . . . . . . . . . . . . . . . . . . . . . . . . . . 66
Installing the Address Reference Data Files. . . . . . . . . . . . . . . . . . . . . . . . . . . . . . . . . . 67
Index. . . . . . . . . . . . . . . . . . . . . . . . . . . . . . . . . . . . . . . . . . . . . . . . . . . . . . . . . . . . 68
6 Table of Contents

PrefaceRead the Informatica Reference Data Guide to learn about the reference data objects and files that you can use in Informatica Developer and Informatica Analyst. You can use reference data to identify, analyze, enhance, or remove values in your source data based on your business needs.
Informatica ResourcesInformatica provides you with a range of product resources through the Informatica Network and other online portals. Use the resources to get the most from your Informatica products and solutions and to learn from other Informatica users and subject matter experts.
Informatica NetworkThe Informatica Network is the gateway to many resources, including the Informatica Knowledge Base and Informatica Global Customer Support. To enter the Informatica Network, visit https://network.informatica.com.
As an Informatica Network member, you have the following options:
• Search the Knowledge Base for product resources.
• View product availability information.
• Create and review your support cases.
• Find your local Informatica User Group Network and collaborate with your peers.
Informatica Knowledge BaseUse the Informatica Knowledge Base to find product resources such as how-to articles, best practices, video tutorials, and answers to frequently asked questions.
To search the Knowledge Base, visit https://search.informatica.com. If you have questions, comments, or ideas about the Knowledge Base, contact the Informatica Knowledge Base team at [email protected].
Informatica DocumentationUse the Informatica Documentation Portal to explore an extensive library of documentation for current and recent product releases. To explore the Documentation Portal, visit https://docs.informatica.com.
If you have questions, comments, or ideas about the product documentation, contact the Informatica Documentation team at [email protected].
7

Informatica Product Availability MatricesProduct Availability Matrices (PAMs) indicate the versions of the operating systems, databases, and types of data sources and targets that a product release supports. You can browse the Informatica PAMs at https://network.informatica.com/community/informatica-network/product-availability-matrices.
Informatica VelocityInformatica Velocity is a collection of tips and best practices developed by Informatica Professional Services and based on real-world experiences from hundreds of data management projects. Informatica Velocity represents the collective knowledge of Informatica consultants who work with organizations around the world to plan, develop, deploy, and maintain successful data management solutions.
You can find Informatica Velocity resources at http://velocity.informatica.com. If you have questions, comments, or ideas about Informatica Velocity, contact Informatica Professional Services at [email protected].
Informatica MarketplaceThe Informatica Marketplace is a forum where you can find solutions that extend and enhance your Informatica implementations. Leverage any of the hundreds of solutions from Informatica developers and partners on the Marketplace to improve your productivity and speed up time to implementation on your projects. You can find the Informatica Marketplace at https://marketplace.informatica.com.
Informatica Global Customer SupportYou can contact a Global Support Center by telephone or through the Informatica Network.
To find your local Informatica Global Customer Support telephone number, visit the Informatica website at the following link: https://www.informatica.com/services-and-training/customer-success-services/contact-us.html.
To find online support resources on the Informatica Network, visit https://network.informatica.com and select the eSupport option.
8 Preface

C h a p t e r 1
Introduction to Reference DataThis chapter includes the following topics:
• Reference Data Overview, 9
• Informatica Reference Data, 10
• User-Defined Reference Data, 10
• Reference Tables, 11
• Reference Data Objects and Version Control, 12
Reference Data OverviewInformatica transformations can use reference data to analyze and update data. You can create reference data objects in the Developer tool and the Analyst tool. You can also import reference data objects and files to the Model repository and to the file system.
You can create and edit the following types of reference data:
Reference tables
A reference table contains the standard version and alternative versions of a set of data values. You add a reference table to a transformation in the Developer tool to verify that source data values are accurate and correctly formatted.
Most reference tables contain at least two columns. One column contains the standard or preferred version of a value, and other columns contain alternative versions. When you add a reference table to a transformation, the transformation searches the input port data for values that also appear in the table. You can create tables with any data that is useful to the data project that you work on.
Content sets
A content set is a Model repository object that specifies reference data values in the repository or in a file. When you add a content set to a transformation, the transformation searches the input data for values that match the data patterns in the content set.
You can download and install the following types of reference data from Informatica:
Address reference data files
Reference data files that contain data for the deliverable addresses in a country. The Address Validator transformation reads the reference data. You cannot create or edit address reference data files.
Address reference data is current for a defined period and you must refresh your data regularly, for example every quarter.
9

Identity population files
Reference data files that contain information on personal, household, and corporate identities. The Match transformation and the Comparison transformation use population files to find potential identities in input data. You cannot create or edit identity population files.
Informatica Reference DataYou can purchase and download address reference data and identity population data from Informatica.
You download and install the reference data separately from the Informatica applications. Contact your administrator for information about the reference data to install on your system
You purchase address data files on a subscription basis for the countries whose addresses you will verify. You can download the latest address data from Informatica at any time during the subscription period.
User-Defined Reference DataYou can use the values in a data object to create a reference data object.
For example, you can select a data object or profile column that contains values that are specific to a project or organization. Create custom reference data objects from the column values.
You can build a reference data object from a data column to verify the following:
• The data rows in the column contain the same type of information.
• A source value is valid. The reference object might contains a list of the valid values, or the reference object might contain a list of values that are not valid.
The following table lists common examples of project data columns that can contain reference data:
Information Reference Data Example
Stock Keeping Unit (SKU) codes
Use an SKU column to create a reference table of valid SKU code for an organization. Use the reference table to find correct or incorrect SKU codes in a data set.
Employee codes Use an employee code or employee ID column to create a reference table of valid employee codes. Use the reference table to find errors in employee data.
Customer account numbers
Run a profile on a customer account column to identify account number patterns. Use the profile to create a token set of incorrect data patterns. Use the token set to find account numbers that do not conform to the correct account number structure.
Customer names When a customer name column contains first, middle, and last names, you can create a probabilistic model that defines the expected structure of the strings in the column. Use the probabilistic model to find data strings that do not belong in the column.
10 Chapter 1: Introduction to Reference Data

Reference TablesCreate and update reference tables in the Analyst tool and the Developer tool.
Reference tables store metadata in the Model repository. Reference tables can store column data in the reference data warehouse or in another database. When the reference data warehouse stores the column data, the Informatica services identify the table as a managed reference table. When another database stores the column data, the Informatica services identify the table as an unmanaged reference table.
When you import data to the reference data warehouse from another database, use a native connection or an ODBC connection to import the data. When you specify an unmanaged database as the data source for a reference table, use a native connection to connect to the database.
Reference Data Warehouse Options on the Content Management Service
The Content Management Service is an application service that stores the connection to the reference data warehouse. You can specify an IBM DB2 database, a Microsoft SQL Server database, or an Oracle database as a reference data warehouse. You can optionally specify the schema for the reference tables in the reference data warehouse as a property on the Content Management Service.
Consider the following rules and guidelines for the reference data warehouse and schema:
• Establish the database and the schema that the Content Management Service will use for reference data before you create a managed reference table.
• If you do not specify a reference table schema on the Content Management Service, the service uses the schema that the database connection specifies. If you do not specify a schema on the Content Management Service or on the database connection, the service uses the default database schema.
Reference Table StructureMost reference tables contain at least two columns. One column contains the correct or required versions of the data values. Other columns contain different versions of the values, including alternative versions that may appear in the source data.
The column that contains the correct or required values is called the valid column. When a transformation reads a reference table in a mapping, the transformation looks for values in the non-valid columns. When the transformation finds a non-valid value, it returns the corresponding value from the valid column. You can also configure a transformation to return a single common value instead of the valid values.
The valid column can contain data that is formally correct, such as ZIP codes. It can contain data that is relevant to a project, such as stock keeping unit (SKU) numbers that are unique to an organization. You can also create a valid column from bad data, such as values that contain known data errors that you want to search for.
For example, you create a reference table that contains a list of valid SKU numbers in a retail organization. You add the reference table to a Labeler transformation and create a mapping with the transformation. You run the mapping with a product database table. When the mapping runs, the Labeler creates a column that identifies the product records that do not contain valid SKU numbers.
Reference Tables and the Parser Transformation
Create a reference table with a single column to use the table data in a pattern-based parsing operation. You configure the Parser transformation to perform pattern-based parsing, and you import the reference data to the transformation configuration.
Reference Tables 11

Reference Data Warehouse PrivilegesThe Content Management Service uses privileges to restrict user actions on reference tables. Use the Security options in the Administrator tool to review or update the service privileges.
To work with reference tables, you must have the following privileges in the Content Management Service:
• Create Reference Tables
• Edit Reference Table Data
• Edit Reference Table Metadata
To edit data in an unmanaged reference table, verify also that you configured the reference table object to permit edits.
Note: If you edit the metadata for an unmanaged reference table in a database application, use the Analyst tool to synchronize the Model repository with the table. You must synchronize the Model repository and the table before you use the unmanaged reference table in the Developer tool.
Parameters and Reference TablesYou can use parameters to identify reference tables in the Model repository. You can create a parameter in the Developer tool that identifies the reference table. Or, you can add the reference table location to a parameter file.
When you create a parameter in the Developer tool, you add it to a transformation in a mapping. When you add the reference table location to a parameter file, you specify the file when you run a mapping at the command prompt. In each case, the Data Integration Service reads the reference table that parameter identifies when you run the mapping.
You can add a parameter that identifies a reference table to the following transformations:
• Case Converter transformation
• Labeler transformation
• Parser transformation in token parsing mode
• Standardizer transformation
Note: Use the infacmd ms runMapping command to run a mapping at the command prompt.
Reference Data Objects and Version ControlIf the Model repository that stores the reference data objects integrates with a version control application, you can apply version control to the objects. You can apply version control to reference tables and content sets.
You can check in and check out reference data objects from a Model repository that supports version control. You can undo a checkout, retrieve an earlier version of an object, and restore an object to an earlier version. When the reference data objects are not under version control, the Model repository locks a reference data object that you edit. Other users cannot edit a locked object that you work on. When you close the object, the Model repository releases the lock and other users can edit the object.
Note: Version control applies to the metadata that the Model repository stores for an unmanaged reference table object. Version control does not apply to the data in an unmanaged reference table. You cannot view or restore the reference data from an earlier version of an unmanaged reference table.
12 Chapter 1: Introduction to Reference Data

C h a p t e r 2
Reference Tables in the Analyst Tool
This chapter includes the following topics:
• Analyst Tool Reference Tables Overview, 13
• Reference Table Properties, 13
• Creating a Reference Table in the Reference Table Editor, 15
• Create a Reference Table from Profile Data, 16
• Create a Reference Table From a Flat File, 18
• Create a Reference Table from a Database Table, 20
• Working with Reference Tables in a Versioned Model Repository, 21
• Reference Table Updates, 21
• Audit Trail Events, 25
• Rules and Guidelines for Reference Tables, 26
Analyst Tool Reference Tables OverviewCreate reference tables in the Design workspace of the Analyst tool.
You can create a reference table from a flat file, from a data source in the Model repository, and from a table in another database.
You can create a reference table from a profile column or a subset of the data in a profile column. You can also create a reference table from the column patterns that you choose from a profile.
When you create or update a reference table, you configure the properties on the table and the data columns that it contains.
Reference Table PropertiesYou can view and update reference table properties in the Analyst tool. A reference table displays general properties and column properties. The general properties include the reference table name, creation date,
13
database connection name, and valid column name. The column properties include the column names, precision values, and scale values.
You can view the properties in read-only mode. To update the properties, edit or check out the reference table.
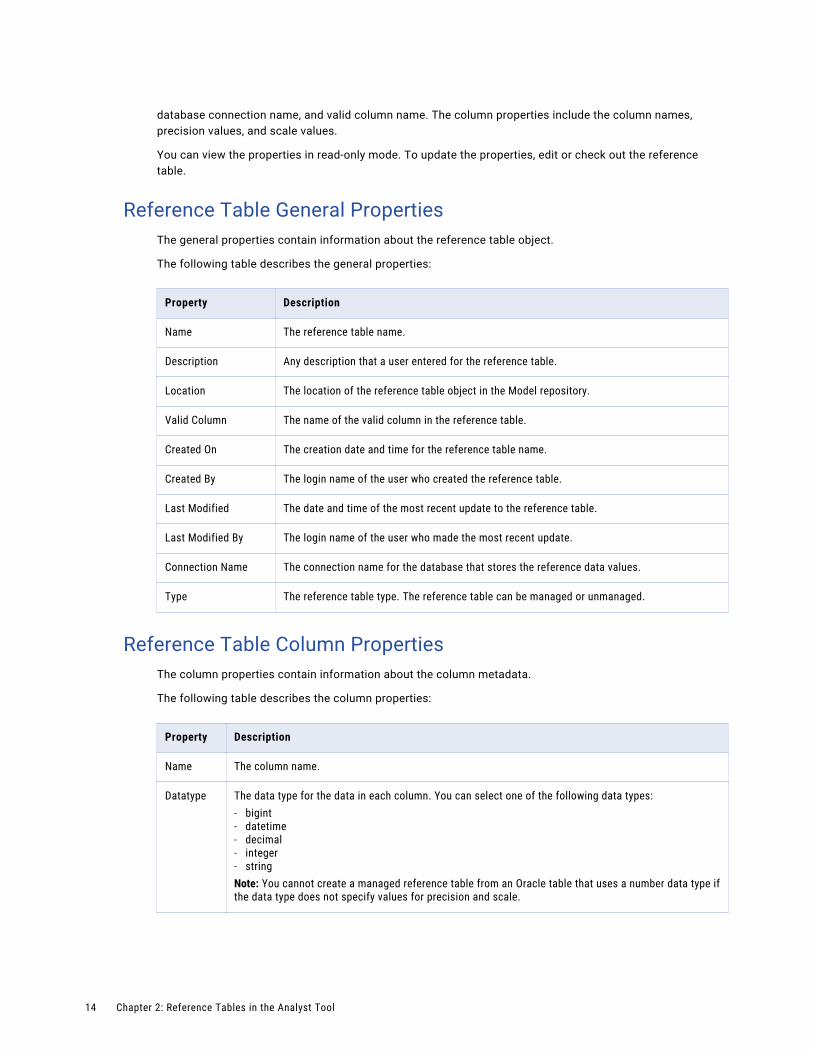
Reference Table General PropertiesThe general properties contain information about the reference table object.
The following table describes the general properties:
Property Description
Name The reference table name.
Description Any description that a user entered for the reference table.
Location The location of the reference table object in the Model repository.
Valid Column The name of the valid column in the reference table.
Created On The creation date and time for the reference table name.
Created By The login name of the user who created the reference table.
Last Modified The date and time of the most recent update to the reference table.
Last Modified By The login name of the user who made the most recent update.
Connection Name The connection name for the database that stores the reference data values.
Type The reference table type. The reference table can be managed or unmanaged.
Reference Table Column PropertiesThe column properties contain information about the column metadata.
The following table describes the column properties:
Property Description
Name The column name.
Datatype The data type for the data in each column. You can select one of the following data types:- bigint- datetime- decimal- integer- stringNote: You cannot create a managed reference table from an Oracle table that uses a number data type if the data type does not specify values for precision and scale.
14 Chapter 2: Reference Tables in the Analyst Tool

Property Description
Precision The precision for each column. Precision is the maximum number of digits or the maximum number of characters that the column can accommodate.The precision values you configure depend on the data type.
Scale The scale for each column. Scale is the maximum number of digits that a column can accommodate to the right of the decimal point. Applies to decimal columns.The scale values you configure depend on the data type.
Description An optional description for each column.
Nullable Indicates if the column can contain null values.
Key Identifies a primary key column in a table that you import from a database source.If you update an unmanaged reference table, you cannot add duplicate values to a column that originates from a primary key column in the source database. You can add duplicate values to any column in a managed reference table.
Creating a Reference Table in the Reference Table Editor
Define the table structure and add data to a reference table in the reference table editor.
1. Click New > Reference Table.
The New Reference Table wizard opens.
2. Select the option to Use the reference table editor, and click Next.
3. Use the Add New Column option to add columns to the table.
4. Configure the properties for each column.
The properties include the column name, data type, precision, and scale.
If the column contains data that a transformation can return in a reference data search, select the Valid option.
5. Optionally, add a column to include low-level descriptions as metadata in the reference table.
6. Optionally, enter an audit note for the table.
The audit note appears in the audit trail log.
7. Click Next.
8. Enter a name for the reference table, and select a location for the reference table object in the Model repository.
9. Click Finish.
Creating a Reference Table in the Reference Table Editor 15

Create a Reference Table from Profile DataYou can use profile data to create reference tables that relate to the source data in the profile. Use the reference tables to find different types of information in the source data.
You can use a profile to create or update a reference table in the following ways:
• Select a column in the profile and add it to a reference table.
• Browse a profile column and add a subset of the column data to a reference table.
• Select a column in the profile and add the pattern values for that column to a reference table.
Creating a Reference Table from Profile Column DataYou can create a reference table from one or more values in a profile data column. Select a column in a profile, and select the column values to add to the reference table.
1. Open the Library workspace in the Analyst tool.
2. Select the Profiles asset category.
The library displays a list of the profiles in the Model repository.
3. Open the profile that contains the column to add to a reference table.
The profile overview lists the profile column names.
4. Review the column data.
To view the column data, click the column name.
5. In the detailed profile view, select the data values to add to the reference table. You can select values one by one, or you can select all.
6. Right-click the column name and select Add to Reference Table.
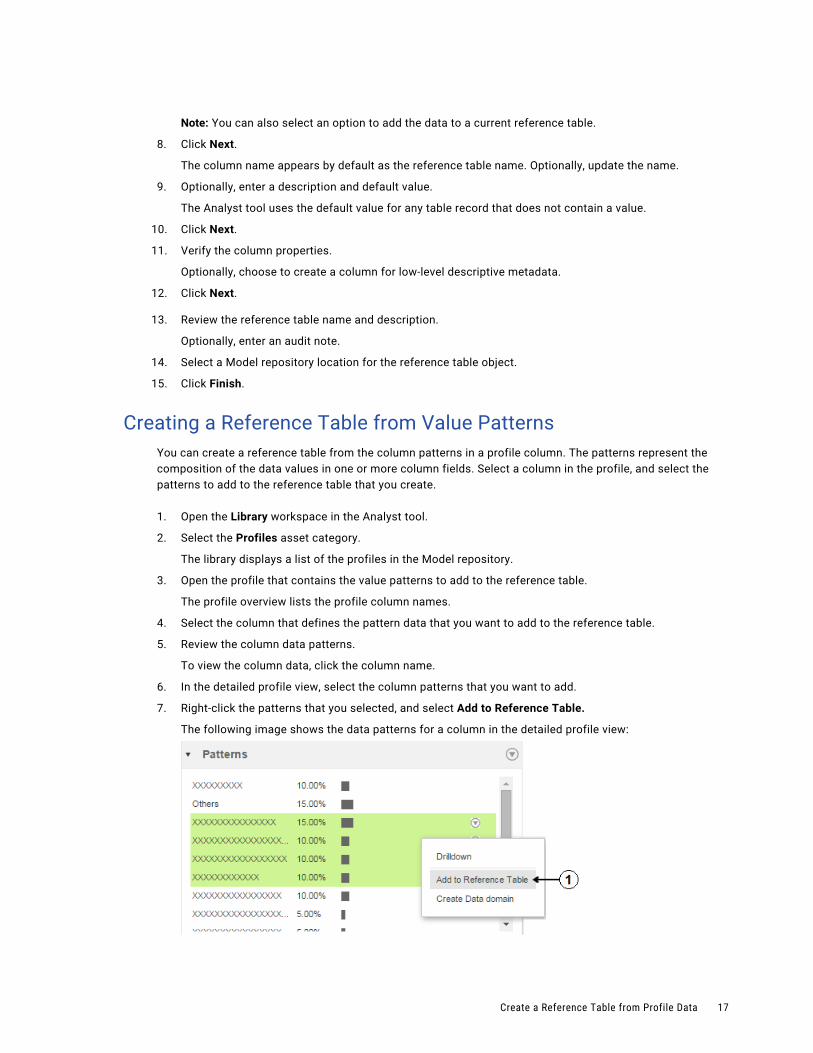
The following image shows a data column in the detailed profile view:
The number 1 identifies the Add to Reference Table option in the image.
7. The Add to Reference Table wizard opens.
Select the option to Create a reference table.
16 Chapter 2: Reference Tables in the Analyst Tool
Note: You can also select an option to add the data to a current reference table.
8. Click Next.
The column name appears by default as the reference table name. Optionally, update the name.
9. Optionally, enter a description and default value.
The Analyst tool uses the default value for any table record that does not contain a value.
10. Click Next.
11. Verify the column properties.
Optionally, choose to create a column for low-level descriptive metadata.
12. Click Next.
13. Review the reference table name and description.
Optionally, enter an audit note.
14. Select a Model repository location for the reference table object.
15. Click Finish.
Creating a Reference Table from Value PatternsYou can create a reference table from the column patterns in a profile column. The patterns represent the composition of the data values in one or more column fields. Select a column in the profile, and select the patterns to add to the reference table that you create.
1. Open the Library workspace in the Analyst tool.
2. Select the Profiles asset category.
The library displays a list of the profiles in the Model repository.
3. Open the profile that contains the value patterns to add to the reference table.
The profile overview lists the profile column names.
4. Select the column that defines the pattern data that you want to add to the reference table.
5. Review the column data patterns.
To view the column data, click the column name.
6. In the detailed profile view, select the column patterns that you want to add.
7. Right-click the patterns that you selected, and select Add to Reference Table.
The following image shows the data patterns for a column in the detailed profile view:
Create a Reference Table from Profile Data 17

The number 1 identifies the Add to Reference Table option in the image.
8. The Add to Reference Table Wizard opens.
Select the option to Create a reference table.
Note: You can also select an option to add the data to a current reference table.
9. Click Next.
The column name appears by default as the reference table name. Optionally, update the name.
10. Optionally, enter a description and default value.
The Analyst tool uses the default value for any table record that does not contain a value.
11. Click Next.
12. Verify the column properties.
Optionally, choose to create a column for low-level descriptive metadata.
13. Click Next.
14. Review the reference table name and description.
Optionally, enter an audit note.
15. Select a Model repository location for the reference table object.
16. Click Finish.
Create a Reference Table From a Flat FileYou can import reference data from a CSV file. Use the New Reference Table wizard to import the file data.
You must configure the properties for each flat file that you use to create a reference table.
Analyst Tool Flat File PropertiesWhen you import a flat file as a reference table, you must configure the properties for each column in the file. The options that you configure determine how the Analyst tool reads the data from the file.
The following table describes the properties you can configure when you import file data for a reference table:
Properties Description
Delimiters Character used to separate columns of data. Use the Other field to enter a different delimiter.Delimiters must be printable characters and must be different from the escape character and the quote character if selected.You cannot select non-printing multibyte characters as delimiters.
Text Qualifier Quote character that defines the boundaries of text strings.Choose No Quote, Single Quote, or Double Quotes.If you select a quote character, the wizard ignores delimiters within pairs of quotes.
18 Chapter 2: Reference Tables in the Analyst Tool

Properties Description
Column Names Imports column names from the first line. Select this option if column names appear in the first row.The wizard uses data in the first row in the preview for column names.Default is not enabled.
Values Option to start value import from a line. Indicates the row number in the preview at which the wizard starts reading when it imports the file.
Creating a Reference Table from a Flat FileWhen you create a reference table data from a flat file, the table uses the column structure of the file and imports the file data.
1. Click New > Reference Table.
The New Reference Table Wizard appears.
2. Select the option to Import a flat file.
3. Click Next.
4. Click Choose File to select the flat file.
5. Select a code page that matches the data in the flat file.
6. Click Upload to upload the file data.
7. Click Next.
8. Configure the flat file properties.
The properties identify the delimiter that the file uses and whether the first line of the file contains column names.
9. To preview the properties that you configured, refresh the Preview pane.
10. Click Next.
11. Configure the properties for each column.
The properties include the column name, data type, precision, and scale.
If the column contains data that a transformation can return in a reference data search, select the Valid option.
12. Optionally, add a column to include low-level descriptions as metadata in the reference table.
13. Optionally, enter an audit note for the table.
The audit note appears in the audit trail log.
14. Click Next.
15. Enter a name for the reference table, and select a location for the reference table object in the Model repository.
16. Optionally, enter a description of the table.
17. Click Finish.
Create a Reference Table From a Flat File 19

Create a Reference Table from a Database TableWhen you create a reference table from a database table, you create a metadata object in the Model repository. You optionally import the table data to the reference data warehouse.
When you create a managed reference table, you import the column data to the reference data warehouse. When you create an unmanaged reference table, you identify the database table that stores the column data. You can create a managed reference table from an OBDC connection or a native connection. You can create an unmanaged reference table from a native connection.
Before you create the reference table, verify that the Informatica domain contains a connection to the database that contains the reference data. If the domain does not contain a connection to the database, you can define one in the Analyst tool.
To define a database connection, click Manage > Connections.
Creating a Reference Table from a Database TableTo create the reference table, connect to a database and select the table that contains the reference data.
1. Select New > Reference Table.
The New Reference Table wizard appears.
2. Select the option to Connect to a relational table.
To create a reference table that does not store data in the reference data warehouse, select Unmanaged table.
To enable users to edit an unmanaged reference table, select the Editable option.
Click Next.
3. Select the database connection from the list of connections.
Click Next.
4. On the Tables panel, select a table.
5. Review the table properties in the Properties panel.
Optionally, click Data Preview to view the table data.
Click Next.
6. On the Column Attributes panel, select the Valid column.
If you create a managed reference table, you can perform the following actions on the Column Attributes panel:
• Edit the reference table column names.
• Add a metadata column for row-level descriptions.
7. Optionally, add a column to include low-level descriptions as metadata in the reference table.
8. Optionally, enter an audit note for the table.
The audit note appears in the audit trail log.
9. Click Next.
10. Enter a name for the reference table, and select a location for the reference table object in the Model repository.
11. Optionally, enter a description for the reference table.
12. Click Finish.
20 Chapter 2: Reference Tables in the Analyst Tool

Working with Reference Tables in a Versioned Model Repository
You open a reference table in read-only mode. To work on the reference table, you must enter edit mode or you must check out the reference table from the Model repository.
1. On the Informatica toolbar, click Open.
The asset library opens.
2. Select the Reference Tables asset category, and select a reference table name.
The reference table opens in read-only mode.
3. To edit the current version of the reference table, click Edit.
To edit the reference table in a versioned Model repository, check out the reference table.
4. When you complete work on the reference table, click Finish. The Analyst tool saves your changes to the reference table.
If you checked out the reference table from a versioned Model repository, check in the object. A versioned Model repository does not update the reference table version until you check in the object.
Reference Table UpdatesThe business data that a reference table contains can change over time. Review and update the data and metadata in a reference table to verify that the table contains accurate information. You update reference tables in the Analyst tool. You can update the data and metadata in a managed reference table and an unmanaged reference table.
You can perform the following operations on reference table data and metadata:
Manage columns
You can add columns, delete columns, and edit column properties.
Manage rows
You can add rows of data to a reference table.
Edit reference data values
You can edit a reference data value.
Replace data values
Use the Find and Replace option to replace data values that are no longer accurate or relevant to the organization. You can find a value in a column and replace it with another value. You can replace all values in a column with a single value.
Export a reference table
Export a reference table to a comma-separated values (CSV) file, dictionary file, or Excel file.
Enable or disable edits on an unmanaged table
Update an unmanaged reference table to enable or disable edits to table data and metadata.
Refresh the reference table data
Reload the reference table data to the Analyst tool to view the latest changes to the data.
Working with Reference Tables in a Versioned Model Repository 21

Managing ColumnsYou can add columns to a reference table and update the column properties. You can also update the editable status of an unmanaged reference table.
1. Click Open.
The asset library opens.
2. Select the Reference Tables asset category, and select a reference table name.
The reference table opens in read-only mode.
3. To edit the current version of the reference table, click Edit.
To edit the reference table in a versioned Model repository, check out the reference table.
4. Open the Actions menu and select Alter Column Properties.
The Alter column properties dialog box opens. Use the dialog box options to perform the following operations:
• Add a column.
• Change the valid column in the table.
• Change a column name.
• Update the descriptive text for a column.
• Update the editable status of an unmanaged reference table.
• Update the audit note for the table.
5. When you complete the operations, click OK.
Managing RowsYou can add, edit, or delete rows in a reference table.
1. Click Open.
The asset library opens.
2. Select the Reference Tables asset category, and select a reference table name.
The reference table opens in read-only mode.
3. To edit the current version of the reference table, click Edit.
To edit the reference table in a versioned Model repository, check out the reference table.
4. Edit the data rows. You can edit the data rows in the following ways:
• To add a row, select Actions > Add Row.
In the Add Row dialog box, enter a value in the valid column and at least one other column. Optionally, enter an audit note.
Click OK to add the row.
• To update a single data value, click the value and update the data.
After you update the data, use the row-level options to accept or reject the data. You cannot enter an audit note when you enter data directly in the data row.
• To update the data values in a row, select Actions > Edit Row.
In the Edit Row dialog box, enter a value in one or more columns. Optionally, enter an audit note.
Click Apply to update the data in the columns that you selected.
22 Chapter 2: Reference Tables in the Analyst Tool

• To update the values in multiple rows, select the rows to edit and select Actions > Edit Row.
In the Edit Multiple Rows dialog box, enter a value in one or more columns. Optionally, enter an audit note.
Click OK to update the data in the columns that you selected.
• To delete rows, select the rows to delete and click Actions > Delete.
In the Delete Rows dialog box, optionally enter an audit note.
Click OK to delete the rows.
Note: Use the Developer tool to edit row data in a large reference table. For example, if a reference table contains more than 500 rows, edit the table in the Developer tool.
Finding and Replacing ValuesYou can find and replace data values in a reference table. Use the find and replace options when a table contains one or more instances of a data value that you must update.
1. Click Open.
The asset library opens.
2. Select the Reference Tables asset category, and select a reference table name.
The reference table opens in read-only mode.
3. To edit the current version of the reference table, click Edit.
To edit the reference table in a versioned Model repository, check out the reference table.
4. Click Actions > Find and Replace.
The Find and Replace toolbar appears.
5. Enter the search criteria on the toolbar:
• Enter a data value in the Find field.
• Select the columns to search. By default, the operation searches all columns.
• Enter a data value in the Replace with field.
6. Use the following options to replace values one by one or to replace all values:
• Use the Next and Previous options to find values one by one.
• To replace a value, select Replace.
• To display all instances of the value, select Highlight All.
• To replace all instances of the value, select Replace All.
Exporting Reference Table DataExport the data in a reference table to a comma-separated file, dictionary file, or Microsoft Excel file. You can export the data in read-only mode.
1. Click Open.
The asset library opens.
2. Select the Reference Tables asset category, and select a reference table name.
The reference table opens in read-only mode.
Reference Table Updates 23

3. Click Actions > Export Data.
The Export data to a file dialog box opens.
The following table describes the dialog box options:
Option Description
File Name Name of the file to contain the data. The export operation creates the file.
File Format Format of the file to contain the data. Select one the following formats:
• csv. Comma-separated file. Default format.• xls. Microsoft Excel file.• dic. Informatica dictionary file.
Export field names as first row
Column name option. Select the option to indicate that the first row of the file contains the column names.
Code Page Code page of the reference data. The default code page is UTF-8.
4. Click OK to export the file.
Enable and Disable Edits in an Unmanaged Reference TableYou can enable or disable updates to the data values and columns in an unmanaged reference table.
Before you change the editable status of the reference table, save the table.
1. Click Open.
The asset library opens.
2. Select the Reference Tables asset category, and select a reference table name.
The reference table opens in read-only mode.
3. To edit the current version of the reference table, click Edit.
To edit the reference table in a versioned Model repository, check out the reference table.
4. Open the Actions menu and select Alter Column Properties.
The Alter column properties dialog box opens.
5. Select or clear the Editable option.
Note: The following conditions apply to an unmanaged reference table that permits user updates:
• The reference table must use simple data types such as string and number.
• Do not define any constraint on the reference table metadata or specify a default value for any column.
Refresh the Reference Table ValuesYou might need to refresh the values that the Analyst tool displays for the reference table.
To reload the reference table values, click Actions > Refresh. The Analyst tool retrieves the current versions of the data values from database.
24 Chapter 2: Reference Tables in the Analyst Tool

Audit Trail EventsYou can view an audit trail of the changes that users made to a reference table. Use the Audit Trail view on the reference table to view the audit trail events. You can filter the audit trail events that the Analyst tool displays.
The following table describes the filter options that you can specify:
Option Description
Date Start and end dates for the actions to display. Use the calender options to set the dates.
Type Type of audit trail event. You can view the following event types:- Data. Events that relate to the data values in the reference table. Events include
operations to add a row, to delete a row, and to update a row.- Metadata. Events that relate to the reference table metadata. Events include operations
to create the reference table, add or delete a column, and check in the reference table.Note: You cannot view data and metadata events concurrently.
User User who edited the reference table. The filter displays the full name and the login name of the user.
Status Status of the audit trail log events. The status corresponds to the action that you performed in the reference table editor. For example, the status might indicate that a user created the reference table or added a row.
The audit trail log events also include the audit trail comments and the column values that you inserted, updated, or deleted.
Viewing Audit Trail EventsView audit trail events to find out about the updates that users made to a reference table. You can view the audit trail events in read-only mode.
1. Click Open.
The asset library opens.
2. Select the Reference Tables asset category, and select a reference table name.
The reference table opens in read-only mode.
3. Click the Audit Trail.
4. Configure the filter options.
You can filter by the date of the update, the update type, the update status, and the name of the user who performed the update.
5. Click Show.
The log events appear for the filter options that you specified.
Audit Trail Events 25

Rules and Guidelines for Reference TablesUse the following rules and guidelines while working with reference tables in the Analyst tool:
• When you import a reference table from an Oracle, IBM DB2, or Microsoft SQL Server database, the Analyst tool cannot display the preview if the table, view, schema, synonym, or column names contain mixed case or lowercase characters.
To preview data in tables that reside in case-sensitive databases, set the Support Mixed Case Identifiers attribute on the database connection to true.
• When you create a reference table from inferred column patterns in one format, the Analyst tool populates the reference table with column patterns in a different format.
For example, when you create a reference table for the column pattern X(5), the Analyst tool displays the following format for the column pattern in the reference table: XXXXX.
• When you import an Oracle database table, verify the length of any VARCHAR2 column in the table. The Analyst tool cannot import an Oracle database table that contains a VARCHAR2 column with a length greater than 1000.
• To read a reference table, you need execute permissions on the connection to the database that stores the table data values. For example, if the reference data warehouse stores the data values, you need execute permissions on the connection to the reference data warehouse. You need execute permissions to access the reference table in read or write mode. The database connection permissions apply to all reference data in the database.
• When you run a mapping with a transformation that specifies a reference table, the mapping uses the current version of the reference table in the Model repository. You cannot select an historical version of the reference table when you configure the transformation.
If another user restores the reference table to an earlier version in a concurrent Developer tool session, the reference table versions are no longer identical across the sessions. If you configure and run a mapping that uses the reference table, the mapping might fail, because the current session does not identify the current reference table version. To ensure that the mapping uses the current reference table, refresh the Model repository before you run the mapping.
• When you configure an unmanaged reference table to permit edits, verify that the reference table uses simple data types such as string and number. Also, verify that the reference table does not define any constraint on the reference table metadata or make use of default values for columns.
• All microsecond values must be zero in any reference table data value that uses the timestamp datatype.
26 Chapter 2: Reference Tables in the Analyst Tool
C h a p t e r 3
Reference Data in the Developer Tool
This chapter includes the following topics:
• Developer Tool Reference Data Overview, 27
• Reference Data and Transformations, 28
• Working with Reference Data Objects in a Versioned Model Repository, 28
• Reference Tables, 29
• Content Sets, 33
Developer Tool Reference Data OverviewYou can create, update, and view the configuration properties for reference data objects in the Developer tool.
Use the Developer tool to create and update the following types of object:
Reference tables
A reference table contains the standard version and alternative versions of a set of data values. You add a reference table to a transformation in the Developer tool to verify that source data values are accurate and correctly formatted.
Content Sets
A content set is a Model repository object that specifies reference data values in the repository or in a file. A content set contains different types of reference data that you can use to perform search operations in data quality transformations.
You can also work with address reference data files and identity population files in the Developer tool. You select address reference data files when you configure an Address Validator transformation. You select identity population files when you configure a Match transformation for identity match analysis.
27

Reference Data and TransformationsMultiple transformations read reference data to perform data quality tasks.
The following transformations can read reference data:
• Address Validator. Reads address reference data to verify the accuracy of addresses.
• Case Converter. Reads reference data tables to identify strings that must change case.
• Classifier. Reads content set data to identify the type of information in a string.
• Comparison. Reads identity population data during duplicate analysis.
• Labeler. Reads content set data to identify and label strings.
• Match. Reads identity population data during duplicate analysis.
• Parser. Reads content set data to parse strings based on the information the contain.
• Standardizer. Reads reference data tables to standardize strings to a common format.
The Data Quality Content Installer file set includes Informatica reference data objects that you can import.
Working with Reference Data Objects in a Versioned Model Repository
If you work with reference tables or content sets in a versioned Model repository, the repository might apply version control to the objects. To apply version control to an object, a user checks the object in to the Model repository.
If a reference table or a content set is not under version control, you can open and update the object outside the version control system. When you open the object, the Model repository locks the object so that another user cannot work on it.
If a reference table or a content set is under version control, you open the object in read-only mode. To work on the object, check out the object from the Model repository. Alternatively, check out the object and then open it. Check in the object to create a version of the object that contains your latest changes.
Checking Out Reference Data ObjectsTo work on a reference table or a content set that a user checked in to the Model repository, check out the object from the repository.
1. In Object Explorer, browse to a reference table or a content set.
2. Right-click the object name and click Open.
The object opens in read-only mode.
3. Right-click the object name and click Check Out.
You can edit the object.
28 Chapter 3: Reference Data in the Developer Tool

Checking in Reference Data ObjectsWhen you finish work on a reference table or a content set that you checked out from the Model repository, check in the object.
To view the list of currently checked-out objects, open the Checked Out Objects tab below the reference table editor.
1. Save any change that you made to the reference table or the content set.
2. In Object Explorer, browse to the reference table or the content set.
3. Right-click the object name and click Check In.
The Check In dialog box opens.
The following image shows the dialog box:
4. Select one or more objects to check in to the repository.
Note: You can check in an object that is not open in the current session. You can check in any object in a checked-out state.
5. Optionally, enter a description for the operation.
6. Click Check In.
The check-in operation updates the object version number. If you check in the object for the first time, the Model repository creates version one (1) of the object.
Reference TablesYou add a reference table to a transformation in the Developer tool. You configure the transformation to find reference table values in input data and to write the corresponding valid values from the reference table as output.
To create a reference table in the Developer tool, use one of the following methods:
• Create an empty reference table and enter the data values.
• Create a reference table from data in a flat file.
• Create a reference table from data in a database table, synonym, or view.
Reference Tables 29

Reference Table Data PropertiesYou can view properties for reference table data and metadata in the Developer tool. The Developer tool displays the properties when you open the reference table from the Model repository.
A reference table displays general properties and column properties. You can view reference table properties in the Developer tool. You can view and edit reference table properties in the Analyst tool.
The following table describes the general properties of a reference table:
Property Description
Name Name of the reference table.
Description Optional description of the reference table.
The following table describes the column properties of a reference table:
Property Description
Valid Identifies the column that contains the valid reference data.
Name Name of each column.
Data Type Data type of the data in each column.
Precision Precision of each column.
Scale Scale of each column.
Description Description of the contents of the column. You can optionally add a description when you create the reference table.
Include a column for low-level descriptions
Indicates that the reference table contains a column for descriptions of column data.
Default value Default value for the fields in the column. You can optionally add a default value when you create the reference table.
Connection Name Name of the connection to the database that contains the reference table data values.
Creating a Reference Table ObjectChoose this option when you want to create an empty reference table and add values by hand.
1. Select File > New > Reference Table from the Developer tool menu.
2. In the new table wizard, select Reference Table as empty.
3. Enter a name for the table.
4. Select a project to store the table metadata.
At the Location field, click Browse. The Select Location dialog box opens and displays the projects in the repository. Select the project you need.
Click Next.
5. Add one or more columns to the table. Click the New option to create a column.
30 Chapter 3: Reference Data in the Developer Tool

The following table lists the column properties that you can set:
Property Default Value
Valid Cleared. Select the column that contains the valid values.
Name column
Data Type string
Precision 10
Scale 0
Description Empty. Optionally enter a description for the column.
The following table lists properties that you can set for the reference table:
Property Default Value
Include a column for row-level descriptions Cleared
Description Empty
Default Value Empty
Audit Note Empty
6. Click Finish.
Creating a Reference Table from a Flat FileYou can create a reference table from data stored in a flat file.
1. Select File > New > Reference Table from the Developer tool menu.
2. In the new table wizard, select Reference Table from a Flat File.
3. Browse to the file you want to use as the data source for the table.
4. Enter a name for the table.
5. Select a project to store the table metadata.
At the Location field, click Browse. The Select Location dialog box opens and displays the projects in the repository. Select the project you need.
Click Next.
6. Set UTF-8 as the code page.
7. Specify the delimiter that the flat file uses.
8. If the flat file contains column names, select the option to import column names from the first line of the file.
Reference Tables 31

9. The following table describes optional table properties:
Property Default Value
Text qualifier No quotation marks
Start import at line Line 1
Row Delimiter \012 LF (\n)
Treat consecutive delimiters as one Cleared
Escape character Empty
Retain escape character in data Cleared
Maximum rows to preview 500
Click Next.
10. Select the column that contains the valid values.
11. The following table describes optional properties:
Property Default Value
Include a column for row-level descriptions Cleared
Audit note Empty
Default value Empty
Maximum rows to preview 500
Click Finish.
The reference table opens in the Developer tool workspace.
Create a Reference Table from a Relational SourceYou can create a reference table from a relational table, synonym, or view.
When you create a managed reference table, you import the column data to the reference data warehouse. When you create an unmanaged reference table, you identify the database table that stores the column data. You can create a managed reference table from an OBDC connection or a native connection. You can create an unmanaged reference table from a native connection.
Before you create the reference table, verify that the Informatica domain contains a connection to the database that contains the reference data.
You can configure a database connection in the Connection Explorer. If the Developer tool does not show the Connection Explorer, select Window > Show View > Connection Explorer from the Developer tool menu.
Creating a Reference Table from a Relational SourceTo create the reference table, connect to a database and select the table that contains the reference data.
1. Select File > New > Reference Table from the Developer tool menu.
32 Chapter 3: Reference Data in the Developer Tool

2. In the table creation wizard, select Reference Table from a Relational Source.
Click Next.
3. Select a database connection.
At the Connection field, click Browse. The Choose Connection dialog box opens and displays the available database connections.
Click OK when you select a connection.
4. Select a database resource.
At the Resource field, click Browse. The Select a Resource dialog box opens and displays the resources on the database connection. Explore the database and select a database table, synonym, or view.
You can optionally preview the entity information on the resource.
5. Enter a name for the table.
6. Select a location for the reference table object.
At the Location field, click Browse. The Select Location dialog box opens and displays the projects in the repository.
Select a location and click Next.
7. To create a reference table that does not store data in the reference data warehouse, select Unmanaged table.
To enable users to edit an unmanaged reference table, select the Editable option.
Click Next.
8. Select the column that contains the valid values.
9. The following table describes optional properties that you can specify:
Property Default Value
Include a column for row-level descriptions Cleared
Description Cleared
Default value Empty
Audit note Empty
Maximum rows to preview 500
10. Click Finish.
Content SetsA content set is a Model repository object that stores data or metadata for other reference data objects. A content set can include character sets, pattern sets, token sets, regular expressions, probabilistic models, and classifier models. Use a content set to define and organize reference data objects that relate to a single project, information type, or business purpose.
The Developer tool includes system-defined character sets and token sets that do not appear in the Model repository. To view and use the system-defined objects, configure a strategy in the Labeler transformation, Parser transformation, or Standardizer transformation.
Content Sets 33

Character SetsA character set contains expressions that identify specific characters and character ranges. You can use character sets in Labeler transformations that use character labeling mode.
Character ranges specify a sequential range of character codes. For example, the character range "[A-C]" matches the uppercase characters "A," "B," and "C." This character range does not match the lowercase characters "a," "b," or "c."
Use character sets to identify a specific character or range of characters as part of labeling operations. For example, you can label all numerals in a column that contains telephone numbers. After labeling the numbers, you can identify patterns with a Parser transformation and write problematic patterns to separate output ports.
Character Set PropertiesConfigure properties that determine character labeling operations for a character set.
The following table describes the properties for a user-defined character set:
Property Description
Label Defines the label that a Labeler transformation applies to data that matches the character set.
Standard Mode Enables a simple editing view that includes fields for the start range and end range.
Start Range Specifies the first character in a character range.
End Range Specifies the last character in a character range. For a range with a single character, leave this field blank.
Advanced Mode Enables an advanced editing view where you can manually enter character ranges using range characters and delimiter characters.
Range Character Temporarily changes the symbol that signifies a character range. The range character reverts to the default character when you close the character set.
Delimiter Character
Temporarily changes the symbol that separates character ranges. The delimiter character reverts to the default character when you close the character set.
Classifier ModelsA classifier model analyzes input strings and determines the types of information that the strings are most likely to contain. You use a classifier model in a Classifier transformation.
A classifier model contains reference data rows and label values. The rows represent the input data on the port that you might connect to the Classifier transformation. The label values describe the types of information that the data rows contain. When you configure a classifier model, you assign a label to each reference data row in the model.
To link the reference data rows to the labels in a classifier model, you compile the model. The compilation process generates a series of logical associations between the data rows and the label values. When you run a mapping that reads the model, the Data Integration Service applies the model logic to the Classifier transformation input data. The Data Integration Service returns the labels that most accurately describe the information in each input data field.
34 Chapter 3: Reference Data in the Developer Tool

You create a classifier model in the Developer tool. The Model repository stores the classifier model object. The Developer tool writes the data rows, the labels, and the compilation data to a file in the Informatica directory structure.
Pattern SetsA pattern set contains expressions that identify data patterns in the output of a token labeling operation. You can use pattern sets to analyze the Tokenized Data output port and write matching strings to one or more output ports. Use pattern sets in Parser transformations that use pattern parsing mode.
For example, you can configure a Parser transformation to use pattern sets that identify names and initials. This transformation uses the pattern sets to analyze the output of a Labler transformation in token labeling mode. You can configure the Parser transformation to write names and initials in the output to separate ports.
Pattern Set PropertiesConfigure properties that determine the patterns in a pattern set.
The following table describes the property for a user-defined pattern set:
Property Description
Pattern Defines the patterns that the pattern parser searches for. You can enter multiple patterns for one pattern set. You can enter patterns constructed from a combination of wildcards, characters, and strings.
Probabilistic ModelsA probabilistic model analyzes input data values and determines the types of information that the values are most likely to contain. Use a probabilistic model in a Labeler transformation and a Parser transformation.
A probabilistic model contains reference data values and label values. The reference data values represent the data on an input port that you connect to the transformation. The label values describe the types of information that the reference data values contain. You assign a label to each reference data value in the model.
To link the reference data values to the labels in a probabilistic model, you compile the model. The compilation process generates a series of logical associations between the data values and the labels. When you run a mapping that reads the model, the Data Integration Service applies the model logic to the transformation input data. The Data Integration Service returns the label that most accurately describes the input data values.
You create a probabilistic model in the Developer tool. The Model repository stores the probabilistic model object. The Developer tool writes the data values, the labels, and the compilation data to a file in the Informatica directory structure.
Regular ExpressionsIn the context of content sets, a regular expression is an expression that you can use in parsing and labeling operations. Use regular expressions to identify one or more strings in input data. You can use regular
Content Sets 35

expressions in Parser transformations that use token parsing mode. You can also use regular expressions in Labeler transformations that use token labeling mode.
Parser transformations use regular expressions to match patterns in input data and parse all matching strings to one or more outputs. For example, you can use a regular expression to identify all email addresses in input data and parse each email address component to a different output.
Labeler transformations use regular expressions to match an input pattern and create a single label. Regular expressions that have multiple outputs do not generate multiple labels.
Regular Expression PropertiesConfigure properties that determine how a regular expression identifies and writes output strings.
The following table describes the properties for a user-defined regular expression:
Property Description
Number of Outputs Defines the number of output ports that the regular expression writes.
Regular Expression Defines a pattern that the Parser transformation uses to match strings.
Test Expression Contains data that you enter to test the regular expression. As you type data in this field, the field highlights strings that matches the regular expression.
Next Expression Moves to the next string that matches the regular expression and changes the font of that string to bold.
Previous Expression Moves to the previous string that matches the regular expression and changes the font of that string to bold.
Token SetsA token set contains expressions that identify specific tokens. You can use token sets in Labeler transformations that use token labeling mode. You can also use token sets in Parser transformations that use token parsing mode.
Use token sets to identify specific tokens as part of labeling and parsing operations. For example, you can use a token set to label all email addresses that use that use an "AccountName@DomainName" format. After labeling the tokens, you can use the Parser transformation to write email addresses to output ports that you specify.
Token Set PropertiesConfigure properties that determine the labeling operations for a token set.
The following table describes the properties for a user-defined character set:
Property Token Set Mode Description
Name N/A Defines the name of the token set.
Description N/A Describes the token set.
36 Chapter 3: Reference Data in the Developer Tool

Property Token Set Mode Description
Token Set Options N/A Defines whether the token set uses regular expression mode or character mode.
Label Regular Expression Defines the label that a Labeler transformation applies to data that matches the token set.
Regular Expression Regular Expression Defines a pattern that the Labeler transformation uses to match strings.
Test Expression Regular Expression Contains data that you enter to test the regular expression. As you type data in this field, the field highlights strings that match the regular expression.
Next Expression Regular Expression Moves to the next string that matches the regular expression and changes the font of that string to bold.
Previous Expression Regular Expression Moves to the previous string that matches the regular expression and changes the font of that string to bold.
Label Character Defines the label that a Labeler transformation applies to data that matches the character set.
Standard Mode Character Enables a simple editing view that includes fields for the start range and end range.
Start Range Character Specifies the first character in a character range.
End Range Character Specifies the last character in a character range. For single-character ranges, leave this field blank.
Advanced Mode Character Enables an advanced editing view where you can manually enter character ranges using range characters and delimiter characters.
Content Sets 37

Property Token Set Mode Description
Range Character Character Temporarily changes the symbol that signifies a character range. The range character reverts to the default character when you close the character set.
Delimiter Character Character Temporarily changes the symbol that separates character ranges. The delimiter character reverts to the default character when you close the character set.
Rules and Guidelines for Probabilistic Models and Classifier Models
Each probabilistic model and classifier model in the Model repository identifies a file in the Informatica directory structure. The files contain the data values and the labels that you add to the model in the Developer tool. The files also contain the compilation logic that defines the associations between the data values and the labels.
Consider the following rules and guidelines when you work with probabilistic models or classifier models:
• When you run a mapping that includes a model, the Data Integration Service applies the compiled model logic to the transformation input data. The Data Integration Service does not read the data values or the labels in the model when the mapping runs.
• You can optionally remove the data values and the labels from a probabilistic model or a classifier model. For example, you might decide to remove sensitive data or proprietary data from a model. You can remove individual data values and labels in the Developer tool. You can remove all data values and labels when you export a model from the Model repository.
Note: If you remove all data values and labels from a model, you cannot compile the model.
• When you remove one or more data values or labels from a model, the compiled model logic no longer represents the current data in the model file. To synchronize the model logic and the data values and labels, compile the model again. Do not compile the model if you want to maintain the current model logic.
• To protect the data in a classifier model or a probabilistic model, back up the model file in the Informatica directory structure. Back up the file before you remove all the data values and labels from a model.
• Find the model files in the Content Management Service host machine.
Probabilistic model files have the following default location and file name extension:
<Informatica_Installation_Directory>/tomcat/bin/ner/<filename>.nerClassifier model files have the following default location and file name extension:
<Informatica_Installation_Directory>/tomcat/bin/classifier/<filename>.classifier• If you upgrade the Informatica installation, you might need to compile the probabilistic models and
classifier models before you use the models in a mapping. If a model does not contain any data, replace the current file in the Informatica directory structure with the backup file that contains the data.
38 Chapter 3: Reference Data in the Developer Tool

Managing Labels in Classifier Models and Probabilistic ModelsTo review and update the labels in a probabilistic model or a classifier model, use the Manage Labels dialog box.
1. Open the content set that contains the classifier model.
2. Select the model name, and click Edit.
3. Open the Manage Labels dialog box.
The dialog box lists the labels in the model.
Related Topics:• “Classifier Model Label Management” on page 44
• “Probabilistic Model Configuration” on page 59
Creating a Content SetCreate a content set to manage reference data objects that refer to a single project, information type, or business purpose.
1. In the Object Explorer view, select a project or folder to store the content set.
2. Click File > New > Content Set.
3. Enter a name for the content set.
4. Optionally, select Browse to change the Model repository location for the content set.
5. Click Finish.
Creating a Reference Data Object in a Content SetYou can create a character set, pattern set, token set, regular expression, probabilistic model, and classifier model in a content set.
1. Open a content set in the editor and select the Content view.
2. Select a reference data object type.
3. Click Add.
4. Enter a name for the reference data object.
Optionally, enter a description of the object.
5. Configure the reference data object properties.
6. Click Finish.
Tip: You can copy reference data objects from one content set to another. Use the Copy To and Paste From options to create a copy of an object in a content set. Use the CTRL key to select multiple content set objects.
Content Sets 39

C h a p t e r 4
Classifier ModelsThis chapter includes the following topics:
• Classifier Models Overview, 40
• Classifier Model Structure, 41
• Classifier Scores, 41
• Classifier Transformation Example, 41
• Classifier Model Options, 42
• Classifier Model Reference Data, 43
• Classifier Model Label Data, 44
• Classifier Model Configuration, 45
• Filter Operations and Find Operations, 49
• Copy and Paste Operations, 50
Classifier Models OverviewA classifier model is a reference data object in a content set. Use a classifier model to analyze long text strings that contain multiple values. A classifier model identifies the most common type of information in each string.
You add a classifier model to a Classifier transformation. The transformation searches for common values between the classifier model data and the data in each input row. The transformation uses the common values to categorize the type of information that each row represents.
You use a classifier model when the input data has the following characteristics:
• The input data contains text. Classifier models apply natural language processes to text data to identify the types of information in the text. Natural language processes detect relevant words in the input string. Natural language processes disregard words that are not relevant.
• The input data strings contain multiple values. For example, you can create a data column that contains the contents of an email message in each field.
The Classifier transformation reads string datatypes. The transformation imposes no limit on the length of the input strings.
You compile classifier models in the Developer tool. When you compile a model, you create associations between similar data values in the model. The Classifier transformation uses the compiled data to search for information in the input data.
40

Classifier Model StructureA classifier model contains reference data values and label values. The reference data values represent the data that you want to classify. The label values specify the types of information that a Classifier transformation can identify in the data.
A classifier model also contains compilation data. The Classifier transformation uses the compilation data to measure the similarities between the reference data in the model and the transformation input data. When you compile a classifier model, you create or update the compilation data. When a Classifier transformation compares the input data to the model data, the transformation returns the label values that describe each row of input data.
The Developer tool writes the reference data values, the label values, and the compilation data to a file in the Informatica directory structure. The classifier model object in the Model repository stores the file name. When you save a classifier model, you write the current reference data values and the label values to the file. When you compile the model, you update the compilation data in the file. You can read the file name from the model properties in the Developer tool.
Classifier ScoresA Classifier transformation compares each row of input data with every row of reference data in a classifier model. The transformation calculates a score for each comparison. The scores represent the degrees of similarity between the input row and the reference data rows.
When you run a mapping that contains a Classifier transformation, the mapping returns the label that identifies the reference data row with the highest score. The score range is 0 through 1. A high score indicates a strong match between the input data and the model data.
Review the classifier scores to verify that the label output accurately describes each row of input data. You can also review the scores to verify that the classifier model is appropriate to the input data. If the transformation output contains a large percentage of low scores, the classifier model might be inappropriate. To improve the comparisons, compile the model again. If the compiled model does not improve the scores, replace the model in the transformation.
Classifier Transformation ExampleYou can use a classifier model and a Classifier transformation to categorize email messages based on the text that they contain.
For example, you are a data steward in the customer support center of a software manufacturer. You review the email messages that the support center receives from customers. The organization has customers in many countries, and the support center receives emails in many languages. You decide to sort the emails by language, so that you can send each email to the department that can best reply to the customer.
To sort the emails, perform the following steps:
1. Write the email messages to a single file or a database table.
2. Create a data object in the Model repository that reads the file or the database table.
3. Create data objects in the Model repository for each language that a message uses.
Classifier Model Structure 41

4. Create a classifier model that contains sample text for each language.
Note: You can use sample data from the email messages data as source data for the model.
5. Add the classifier model to a reusable Classifier transformation.
6. Configure a mapping to apply the Classifier transformation to the message data.
To configure the mapping, perform the following steps:
• Add the Classifier transformation and the data objects to the mapping.
• Connect a Classifier transformation input port to the source data object.
• Connect the Classifier transformation output ports to the target data objects.
When you run the mapping, the Classifier transformation analyzes the email messages and writes the email text to the correct data target. You can share the data targets with the team members in each department.
Classifier Model OptionsThe Developer tool displays the classifier model data in an editor with an upper pane and a lower pane. The upper pane displays each row of reference data and any label that you assign to the data. The lower pane displays the contents of a row that you select.
Use the upper pane to review the reference data rows and to identify any row that does not use a label. Use the lower pane to review the contents of a row and to assign a label to the row. The upper pane displays approximately 100 characters of data on each row. The lower pane displays all of the data in the row that you select.
The following image shows the classifier model editor:
42 Chapter 4: Classifier Models

The editor includes the following options:
1. Filter field
Filters the list of reference data rows based on the data value or the label that you specify.
2. Add Row
Inserts a blank reference data row.
3. Append data
Imports data from a data object in the Model repository.
4. Delete
Deletes the reference data rows that you select. Use the check boxes to select the rows.
5. Assign Label
Assigns a label to one or more reference data rows that you select. Use the check boxes to select the rows.
6. Edit Properties
Displays the classifier model properties.
7. Manage Labels
Opens the Manage Labels dialog box. Use the dialog box to add or delete label values from the classifier model.
8. Compile
Compiles the classifier model.
9. Total records
Indicates the number of reference data rows in the classifier model.
10. Label field
Displays a label value that you can apply to the current reference data row.
11. Find field
Finds a data value that you specify in the current reference data row.
Classifier Model Reference DataA classifier model contains a reference data column that can include sentences, paragraphs, or pages of text. The reference data represents the different types of text input that a Classifier transformation can read in a mapping. When you create a model, verify that the reference data includes the types of text that you expect to find when you run the mapping.
You can use the mapping source data to create a classifier model. Select a sample of the source data and copy the data sample to the model.
Consider the following rules and guidelines when you work with classifier model reference data:
• A reference data field can be of any length. You can enter pages of text into each data field.
• You import reference data from a data object.
• You cannot edit reference data values. However, you can delete a data row.
• When you compile a classifier model, the compilation process disregards any number values in the reference data.
Classifier Model Reference Data 43

Classifier Model Label DataA classifier model contains one or more descriptive labels that summarize the types of information in the reference data rows. Assign a label to each reference data row.
When you add data from a data source to a classifier model, you can specify a column as a label data column. You can also create labels in the model.
Labels are independent of the reference data values that they describe. If you delete the reference data rows that use a label, you do not delete the label from the model. If you delete a label, you do not delete the reference data values that you associated with the label.
Classifier Model Label ManagementUse the Manage Labels dialog box to review and update the label values in a classifier model. You can also sort and update the label values.
The following image shows the Manage Labels dialog box:
The Manage Labels dialog box contains the following elements:
1. Name column.
Contains the label values that the Classifier transformation can apply to the input data rows. You can sort the labels by name.
2. Type column.
Identifies the source of the label values. The classifier model identifies all labels as user-defined values.
3. Usage column.
Indicates the number of reference data rows that use each label. You can sort the labels by the number of rows.
4. Add button.
Adds a label to the classifier model. Enter a label value in the Name column on the row.
44 Chapter 4: Classifier Models

Note: To update a label value, double-click the value and enter the value that you need.
5. Delete button.
Deletes a label from the classifier model.
6. Up arrow.
Moves the label up a single row in the dialog box.
7. Down arrow.
Moves the label down a single row in the dialog box.
Classifier Model ConfigurationThe steps to configure a classifier model begin with the data that you want to classify. The content of the reference data that you add to the model must reflect the data that you connect to the Classifier transformation. The transformation compares the data values and patterns in the input data to the data values and patterns in the classifier model.
To create a classifier model that you can use in a Classifier transformation, perform the following tasks:
1. Identify the reference data values and the label values to add to the model.
You can use a fragment of the data that you want to classify. Create a data object in the Model repository that reads the data fragment.
2. Create a content set, and add a classifier model to the content set.
3. Add the reference data values to the model.
4. Add the label values to the model.
You can import the data from the data object in the Model repository. You can also enter a single row of reference data or a single label.
5. Assign a label to each row of reference data.
You can assign a label to multiple rows in a single operation.
6. Compile the model.
After you compile the classifier model, you can use the model in a Classifier transformation.
Creating a Classifier ModelUse a data object as the source for the classifier model data.
A classifier model performs optimally when you use the input data to the Classifier transformation as the source for the model reference data.
1. In Object Explorer, open or create a content set.
2. Select the Content view.
3. Select Classifier Models, and click Add.
The Classifier Model wizard opens.
4. Enter a name for the classifier model.
Optionally, enter a text description of the model.
5. Browse the Model repository and select the data object that contains the data to import.
Classifier Model Configuration 45

Do not select a social media data object.
Click Next.
6. Review the columns on the data object, and select one or more columns to add to the model. You can add reference data columns and a label column in the same operation.
• To import a column of data as reference data, select the column name and click Data.
You can select multiple data columns. The Developer tool merges the contents of the columns that you select to a single column.
• To import a column of data as label values, select the column name and click Label.
When you import reference data and label values, the Developer tool assigns the label on each row to the reference data string on the same row. You can preview the data before you select the columns. You can change the label assignments after you create the model.
Click Next.
7. Select the number of rows to import from the data source.
By default, the Developer tool imports all rows from the data source. If you enter a number, the model counts the rows from the start of the data set.
8. Click Finish, and save the model.
After you create the model, verify the label assignments and compile the model.
Appending Data from a Data Source to a Classifier ModelYou can import multiple rows of reference data values or label values to a classifier model in a single operation.
1. Open the content set that contains the classifier model.
2. Select the model name, and click Edit.
3. Click Append Data.
The Classifier Model wizard opens.
4. Browse the Model repository and select the data object that contains the data to import.
Do not select a social media data object.
Click Next.
5. Review the columns on the data object, and select one or more columns to add to the model. You can add reference data columns and a label column in the same operation.
• To import a column of data as reference data, select the column name and click Data.
You can select multiple data columns. The Developer tool merges the contents of the columns that you select to a single column.
• To import a column of data as label values, select the column name and click Label.
When you import reference data and label values, the Developer tool assigns the label on each row to the reference data string on the same row. You can preview the data before you select the columns. You can change the label assignments after you create the model.
Click Next.
6. Select the number of rows to import from the data source.
By default, the Developer tool imports all rows from the data source. If you enter a number, the model counts the rows from the start of the data set.
7. Click Finish, and save the model.
46 Chapter 4: Classifier Models

Adding a Reference Data Row to a Classifier ModelYou can add a single row of reference data to a classifier model.
1. Open the content set that contains the classifier model.
2. Select the model name, and click Edit.
3. Click Add Row.
The Developer tool adds a row below the current row in the reference data.
4. Enter the reference data values to the row.
You can use Windows shortcuts to paste data to the row.
Adding a Label to a Classifier ModelYou can add a single label to a classifier model.
1. Open the content set that contains the classifier model.
2. Select the model name, and click Edit.
3. Open the Manage Labels dialog box.
The dialog box lists the labels in the model.
4. Click New.
The Developer tool adds a row at the bottom of the list of labels.
5. Double-click the default value in the Name column, and enter a label name.
6. Click OK.
After you create the label, you can assign the label to one or more rows of reference data. The Usage column in the Manage Labels dialog box indicates the number of rows that use the label.
Assigning a Label to Reference Data RowsYou can assign a label to one or more reference data rows in a single operation.
1. Open the content set that contains the model.
2. Select the model name, and click Edit.
3. Select one or more reference data rows. Use the check box options to select the rows.
Note: You can use the filter option to show all of the rows that contain a data value that you specify. Use the Select All check box option to select all of the rows that contain the value.
4. Click Assign Label.
The Developer tool displays the list of labels in the classifier model.
5. Select a label value, and click Assign.
The Developer tool updates the reference data rows that you selected with the label value.
Optionally, compile the model to add the label names to the classifier model logic.
Classifier Model Configuration 47

Identifying Unused Label ValuesUse the Manage Labels dialog box to find any label value that remains unused in the classifier model. The Manage Labels dialog box displays usage data for the label values in the classifier model. Use the usage data to verify the number of reference data rows that use a label value and to find unused label values.
1. Open the content set that contains the classifier model.
2. Select the model name, and click Edit.
3. Open the Manage Labels dialog box. The dialog box lists the labels in the classifier model.
4. Review the Usage column data for each label.
The Usage column lists the number of reference data rows that use the label. If a label value is unused, the Usage column has a value of zero.
Deleting Rows from a Classifier ModelYou can delete one or more reference data rows from a classifier model in a single action.
1. Open the content set that contains the model.
2. Select the model name, and click Edit.
3. Select one or more reference data rows. Use the check box options to select the rows.
4. Click Delete.
The Developer tool removes the rows that you selected from the classifier model.
To undo the operation, press the Ctrl + Z keys on the keyboard.
Deleting a Label from a Classifier ModelUse the Manage Labels dialog box to delete a label from a classifier model.
1. Open the content set that contains the model.
2. Select the model name, and click Edit.
3. Open the Manage Labels dialog box.
4. Click Delete.
5. Click Yes to confirm the operation.
The Developer tool deletes the label from the model. The Developer tool does not delete any reference data row that uses the label.
6. Click OK to close the dialog box.
To undo the operation, press the Ctrl + Z keys on the keyboard.
Compiling a Classifier ModelEach time you edit a label value or reference data value in a classifier model, you must compile the model. When you compile the model, you update the compilation data in the model.
u To update the compilation data, open the model in the Developer tool and click Compile.
48 Chapter 4: Classifier Models

Filter Operations and Find OperationsUse the filter options to show or hide the reference data rows that meet the criteria that you specify. When you apply a filter, you can perform additional actions on the data rows that the classifier model displays. For example, you can apply a label value to all of the data rows.
Use the filter option to perform the following tasks:
• Find the reference data rows that contain a value that you enter.
• Find the reference data rows that use a label that you select.
• Find the reference data rows that do not use a label.
You can also search for a data value within a row of reference data.
Using a Data Value to Filter the Reference Data RowsUse the filter to verify that one or more reference data rows contain the data values you expect.
1. Open the content set that contains the classifier model.
2. Select the model name, and click Edit.
3. Enter a value in the Filter field.
You can include wildcard characters in the value that you enter.
The Developer tool displays the reference data rows that contain the filter text.
Using a Label Value to Filter the Reference Data RowsUse the filter to show or hide the reference data rows that use a label that you select.
1. Open the content set that contains the model.
2. Select the model name, and click Edit.
3. Select a label value from the Filter menu.
The Developer tool displays the reference data rows that use the label value.
Note: To find any reference data row that does not use a label, select the No Label option from the Filter menu.
Finding a Value in a Reference Data RowUse the Find field to search for a data value in a row that you select.
1. Open the content set that contains the model.
2. Select the model name, and click Edit.
3. Select a row of reference data.
4. Enter a value in the Find field.
The model highlights the instances of the value in the reference data row.
5. Use the Up arrow or the Down arrow to find additional instances of the value in the row.
Filter Operations and Find Operations 49
Copy and Paste OperationsYou can copy a classifier model from one content set to another in a Model repository. Copy a classifier model to share resources with other Developer tool users.
You can copy a model to another content set, or you can import a model to the current content set. You can import multiple models from multiple content sets in the repository in a single operation.
When you copy a model, the Content Management Service creates a copy of the model data file on the service machine. Each model uses a different data file.
Copying a Classifier Model to Another Content SetYou can copy a classifier model from one content set to another in a Model repository. When you copy a classifier model, you specify the model object and the source and destination content sets.
1. Open the content set that contains the classifier model.
2. Select a classifier model and click Copy To.
3. Browse the Model repository and select a content set.
You can copy the classifier model to a content set in the current project or another project.
4. Click OK.
The Developer tool copies the classifier model to the selected content set.
Importing a Classifier Model from Another Content SetYou can import a classifier model from one content set to another in a Model repository. When you import a classifier model, you specify one or more model objects and the source and destination content sets.
1. Open the content set to contain the classifier model.
2. Select a classifier model and click Paste From.
3. Browse the Model repository and select a classifier model.
You can paste the classifier model from a content set in the current project or another project.
4. Click OK.
The Developer tool pastes the classifier model to the current content set.
50 Chapter 4: Classifier Models

C h a p t e r 5
Probabilistic ModelsThis chapter includes the following topics:
• Probabilistic Models Overview, 51
• Probabilistic Model Structure, 52
• Labeler Transformation Example, 52
• Parser Transformation Example, 53
• Probabilistic Model Options, 54
• Probabilistic Model Reference Data, 57
• Probabilistic Model Label Data, 57
• Probabilistic Model Properties, 58
• Probabilistic Model Configuration, 59
• Copy and Paste Operations, 65
Probabilistic Models OverviewA probabilistic model is a reference data object that you create in a content set. Use a probabilistic model to analyze a data string that contains multiple data values. A probabilistic model identifies the type of information in each value in the string. You can add a probabilistic model to a Labeler transformation and a Parser transformation.
Use a probabilistic model in a Labeler transformation to apply a descriptive label to each value in an input string. The Labeler transformation writes the labels to a single output port. Use a probabilistic model in a Parser transformation to write each value in an input string to a port that represents the information in the value. The Parser transformation creates an output port for each type of information.
You design and compile a probabilistic model in the Developer tool. When you define a probabilistic model, you add a series of data rows to the model and you assign a label to each value in each row. When you compile a probabilistic model, the Developer tool creates associations between the data values and the labels that you added. The Labeler transformation and Parser transformation use natural language processes to compare the probabilistic model data to the input port data.
Natural language processes use the following techniques to identify the types of information in data values:
• Natural language processes can recognize similar data values and apply the same label to the values.
• Natural language processes can compare a data value to the adjacent values in the string. Natural language processes analyze the sequence of values to understand the usage of each string and to verify the types of information that the strings represent.
51

Probabilistic Model StructureA probabilistic model contains rows of reference data values and label values. The reference data values represent the different values that might appear in the transformation input data. The label values identify the types of information that you expect the input data to contain.
A probabilistic model also contains compilation data. The Labeler transformation and the Parser transformation use the compilation data to measure the similarities between the reference data in the model and the transformation input data. When you compile a probabilistic model, you create or update the compilation data.
A data row can contain a single value or multiple values. Each data row can have a different structure. You can assign the same label to different values in a data row. Alternatively, you can assign a different label to identical values that appear in different positions on a row. The Data Integration Service considers the relative positions of the values in the input string when the mapping runs. Assign each label to at least one data value before you compile the probabilistic model.
The Developer tool writes the reference data values, the label values, and the compilation data to a file in the Informatica directory structure. The probabilistic model object in the Model repository stores the file name. When you save a probabilistic model, you write the current reference data values and the label values to the file. When you compile the model, you update the compilation data in the file. You can read the file name from the model properties in the Developer tool.
Note: To optimize the capabilities of the probabilistic model, verify that each data row contains multiple reference data values. The order of the values in each row must correspond as closely as possible to the order in which the values occur in the transformation input data. If the data rows contain single reference data values, the Labeler transformation or the Parser transformation cannot apply natural language processes during the probabilistic analysis.
Labeler Transformation ExampleThe customer database at an insurance organization contains multiple data entry errors. You are a data steward at the insurance organization. You configure a mapping with a Labeler transformation to determine the different types of data that each column contains.
The following table describes sample data from the customer database:
Row ID Field 1 Field 2 Field 3
1 19132954 AIM SECURITIES PETRIE TAYBRO
2 10110169 JASE TRAPANI BANK OF NEW YORK
3 10111786 WANGER ASSET MANAGEMENT, LLP JAN SEEDORF
4 10112299 FELIX LEVENGER HARVARD MAGAZINE
5 10112036 DESCHÊNES & FILS LTÉE (QUEBEC) RICHARD TREMBLAY
6 BERGER ASSOCIATES 10111101 DAREEN HULSMAN
52 Chapter 5: Probabilistic Models

Row ID Field 1 Field 2 Field 3
7 19131385 EAGLE FINANCIAL GROUP INC PATRICK MCKINNIE
8 LAKENYA PASKETT WHITEHALL FINANCIAL GROUP 15954710
When you run the mapping, the Labeler transformation compares the input data with the probabilistic model reference data. The Labeler transformation selects a label for the data on each input port. The transformation writes the labels to an output port. Each output row contains a set of labels that defines the data structure on the corresponding input row.
The following table describes the labels that the Labeler transformation adds to the output port:
Row ID Output Labels
1 number organization contact
2 number contact organization
3 number organization contact
4 number contact organization
5 number organization contact
6 organization number contact
7 organization number contact
8 contact organization number
Parser Transformation ExampleA supermarket stores product descriptions in a single column in a database table. The product descriptions contain multiple data values that represent different types of information. You are a data steward at the supermarket. You want to create columns for the different types of information in the product descriptions.
You configure a mapping with a Parser transformation to organize the data values into the correct fields.
The following data fragment contains the product description for orange juice:
Sunnydream Orange Juice Unsweetened 12 oz
The following table describes the output data that the Parser transformation creates from the input data:
Product Name Product Type Product Details Product Size
Sunnydream Orange Juice Unsweetened 12 oz
Parser Transformation Example 53

Probabilistic Model OptionsWhen you edit a probabilistic model, you can work in the Data view or the Label view.
Use the Data view to add reference data rows to the model and to assign the labels to the data values in each row. Use the Label view to review detailed information about the use of the label values in the model. You can add labels to the probabilistic model in the Data view and in the Label view.
Probabilistic Model Data ViewThe Data view displays the reference data rows in the probabilistic model and the number of label values that you assign to each row. The Data view also displays the total number of labels that you assigned to the values in the current model.
When you select a reference data row, the values in the row appear in an editor below the Find field. To assign a label to a reference data value in a row, right-click the value in the editor and select a label value.
The following image shows the probabilistic model options that you can use when you select the Data view:
The Data view includes the following options:
1. Add Row
Inserts a blank data row.
2. Append data.
Imports data from a data object in the Model repository.
3. Cut
Removes a data row from the probabilistic model and adds the data row to the clipboard.
54 Chapter 5: Probabilistic Models

4. Copy
Copies a data row to the clipboard.
5. Paste
Pastes a data row from the clipboard to the probabilistic model.
6. Delete
Deletes a data row from the probabilistic model.
7. Manage Labels
Opens the Manage Labels dialog box. Use the dialog box to add or delete label values from the probabilistic model.
8. Assign Label
Assigns a label to one or more reference data values that you select. You can use the option to assign a label to all instances of a reference data value in the model.
9. Edit Properties
Displays the probabilistic model properties.
10. Compile
Compiles the probabilistic model.
11. Find field
Finds rows in the model that contain the reference data value that you enter. Use the Up arrow and Down arrow to move to the rows that contain the value.
12. Forward and back arrows
Moves forwards and backwards through the rows of data values in the model.
13. Total number of labeled values
Indicates the number of reference data values that use a label.
14. Label field
Displays a label value that you can apply to the reference data value that you select.
15. Label menu
Displays a list of options that you can use to assign a label to one or more reference data values. To open the menu, right-click a reference data value in the reference data editor.
Probabilistic Model Options 55

Probabilistic Model Label ViewThe Label view lists the labels that you define in the probabilistic model. When you select a label, the Label view shows the data values that you assigned to the label in each row.
The following image shows the probabilistic model options that you can use when you select the Data view:
The Label view includes the following options:
1. Manage Labels
Opens the Manage Labels dialog box. Use the dialog box to add or delete label values from the probabilistic model.
2. Assign Label
Assigns a label to one or more reference data values that you select.
You can assign a label to a single data value, or you can assign a label to multiple values in a single operation.
3. Edit Properties
Displays the probabilistic model properties.
4. Compile
Compiles the probabilistic model.
5. List of label values
Lists the labels that you can assign to the reference data values in the model.
6. Assignment filter
Filters the list of reference data values that use the label that you select. The filter options show or hide the reference data values based on the method that you used to assign the label to the data values.
When you apply a filter, the total number of labeled values in the Label view reflects the number of values that satisfy the filter condition.
7. Reference data value column
Lists the reference data values that use the current label.
56 Chapter 5: Probabilistic Models

8. Total number of labeled values
Indicates the number of reference data values that use the current label.
Probabilistic Model Reference DataThe reference data values in a probabilistic model represent the types of input data that you might connect to a transformation in a mapping.
You can add, edit, and delete reference data rows in the Developer tool. You can paste data from the clipboard, and you can import data from a data source. After you add the reference data values, assign a label to each data value in each row.
Probabilistic Model Label DataThe label values in a probabilistic model represent the types of information that the reference data values might contain. When you add reference data rows to a model, assign a label to each value in each row. The labels that you add to the model appear in the Label view and in the menu options in the Data view.
You can assign any label in the model to any reference data value. If the same value has different meanings in different rows of reference data, you can assign a different label to each value in each row.
The range of label values can correspond to the range of input ports that the Labeler transformation or the Parser transformation reads during probabilistic analysis. The probabilistic model must contain at least one label value that the transformation can apply to the data values on each input port.
For example, a warehouse might store inventory data in a comma-delimited file that defines eight columns. You design a mapping that parses the inventory data to a database table. You create a probabilistic model with a label value for each data column. When you run the mapping, the Parser transformation writes each value in the input data to the correct column in the target table.
The following table shows the columns of inventory data and the label values that you might create in a probabilistic model:
Inventory Column Name Label Name
Product_Name Product_Name
Quantity Quantity
Location Location
Barcode Barcode
SKU Stock_Keeping_Unit
Arrival_Date Arrival_Date
Cost_Price Cost_Price
Probabilistic Model Reference Data 57

Note: You can use the input column names, or you can use other names. The names do not need to match.
Overflow LabelWhen a transformation cannot apply a label to an input data value, the transformation treats the data value as overflow data. The Labeler transformation applies an overflow label to any data value that it cannot identify. The Parser transformation writes any data value that it cannot identify to an overflow port.
The following table shows how a Parser transformation might use an overflow port to parse address data elements that a probabilistic model does not recognize:
Input Data Street_Name port Street_Descriptor port Overflow port
Park Place Park Place No overflow data
Park Avenue Park Avenue No overflow data
Madison Avenue Madison Avenue No overflow data
Central Park Central Park No overflow data
Washington Square Park Washington Square Park
Madison Square Garden Madison Square Garden
The Parser transformation also writes values to an overflow port when the number of input values is greater than the number of labels in the model. Before you use a probabilistic model in a transformation, review the input data and verify that the model contains the correct number of label values.
Probabilistic Model PropertiesYou can review the general properties and the advanced properties for a probabilistic model.
To open the properties editor, select the Edit Properties option on the Data view or the Label view.
The general properties show the name of the probabilistic model, any description of the model, and the name of the model data file. The advanced properties display the computational properties that the Developer tool uses to compile the probabilistic model.
The basic element in the compilation of probabilistic models is the n-gram. An n-gram is a series of letters that follow or precede other letters to complete a word. When a mapping runs, the Labeler transformation or Parser transformation creates multiple n-grams for each value in the reference data column of the probabilistic model. The transformation compares the input data values with the reference data values and the n-grams. The advanced properties on a probabilistic model determine how the probabilistic model handles n-grams and other model features.
Note: The default values on the advanced properties represent the preferred settings for probabilistic analysis and probabilistic model compilation. If you edit an advanced property, you might adversely affect the accuracy of the probabilistic analysis. Do not edit the advanced properties unless you understand the effects of the changes you make.
58 Chapter 5: Probabilistic Models

Related Topics:• “Rules and Guidelines for Probabilistic Models and Classifier Models” on page 38
Probabilistic Model ConfigurationThe steps to configure a probabilistic model begin with the type of analysis that you want to perform. Use a probabilistic model in a Labeler transformation to identify the types of information in each value in an input string. Use a probabilistic model in a Parser transformation to parse the data values in an input string to different output ports.
You can use the same probabilistic model to label data and to parse data. When you use the model in a Labeler transformation, the transformation creates a single output port for each input port that you select. When you use the model in a Parser transformation, the transformation creates an output port for each type of input data that it identifies.
To create a probabilistic model, perform the following tasks:
1. Identify the reference data values and the label values to add to the model.
You can use a fragment of the data that you want to analyze. Create a data object in the Model repository that reads the data fragment.
2. Create a content set, and add a probabilistic model to the content set.
3. Add the reference data values to the model.
4. Add the label values to the model.
You can import the data from the data object in the Model repository. You can also enter a single row of reference data or a single label.
To use the probabilistic model to parse data, verify that the model contains a label value for each output port that the transformation must create.
5. Assign a label to reference each data value in each row.
You can assign a label to multiple reference data values in a single operation.
6. Compile the model.
After you compile the probabilistic model, you can use the model in a transformation.
Creating an Empty Probabilistic ModelYou can create a probabilistic model object that does not contain reference data or label data. Create the empty model, and add data or import data to the model.
1. In Object Explorer, open or create a content set.
2. Select the Content view.
3. Select Probabilistic Models, and click Add.
The Probabilistic Model wizard opens.
4. Select the Probabilistic Model option.
Click Next.
5. Enter a name for the probabilistic model.
Optionally, enter a text description of the model.
6. Click Finish.
Probabilistic Model Configuration 59

Creating a Probabilistic Model from a Data ObjectYou can use a data object as a source for probabilistic model data.
A probabilistic model performs optimally when you use the input data to the Labeler or Parser transformation as the source for the model reference data.
1. In Object Explorer, open or create a content set.
2. Select the Content view.
3. Select Probabilistic Models, and click Add.
The Probabilistic Model wizard opens.
4. Select the Probabilistic Model from Data Objects option.
Click Next.
5. Enter a name for the probabilistic model.
Optionally, enter a text description of the model.
6. Browse the Model repository and select the data object that contains the data to import.
Do not select a social media data object.
Click Next.
7. Review the columns on the data object, and select one or more columns to add to the model. You can add reference data columns and a label column in the same operation.
• To import a column of data as reference data, select the column name and click Data.
You can select multiple data columns. The Developer tool merges the contents of the columns that you select to a single column.
• To import a column of data as label values, select the column name and click Label.
When you import reference data and label values, the Developer tool assigns the label on each row to the reference data string on the same row. You can preview the data before you select the columns. You can change the label assignments after you create the model.
Click Next.
8. Select the number of rows to import from the data source.
By default, the Developer tool imports all rows from the data source. If you enter a number, the model counts the rows from the start of the data set.
9. Specify the delimiters for the data values that you import.
You can specify different delimiters for reference data values and label values. The default delimiter is a character space.
10. Click Finish, and save the model.
After you create the probabilistic model, verify the label assignments and compile the model.
Appending Data from a Data Source to a Probabilistic ModelYou can import multiple rows of reference data values and label values to a probabilistic model in a single operation.
1. Open the content set that contains the probabilistic model.
2. Select the model name, and click Edit.
3. Click Append Data.
The Probabilistic Model wizard opens.
60 Chapter 5: Probabilistic Models

4. Browse the Model repository and select the data object that contains the data to import.
Do not select a social media data object.
Click Next.
5. Review the columns on the data object, and select one or more columns to add to the model. You can add reference data columns and a label column in the same operation.
• To import a column of data as reference data, select the column name and click Data.
You can select multiple data columns. The Developer tool merges the contents of the columns that you select to a single column.
• To import a column of data as label values, select the column name and click Label.
When you import reference data and label values, the Developer tool assigns the label on each row to the reference data string on the same row. You can preview the data before you select the columns. You can change the label assignments after you create the model.
Click Next.
6. Select the number of rows to import from the data source.
By default, the Developer tool imports all rows from the data source. If you enter a number, the model counts the rows from the start of the data set.
7. Specify the delimiters for the data values that you import.
You can specify different delimiters for reference data values and label values. The default delimiter is a character space.
8. Click Finish, and save the model.
Adding a Reference Data Row to a Probabilistic ModelUse the Data view to add an empty row to a probabilistic model.
1. Open the content set that contains the model.
Select the model name, and click Edit.
2. Select the Data view.
3. To add an empty row to the model, click New.
4. Select the row that you added, and enter one or more reference data values to the row.
5. Save the probabilistic model.
After you save the model, assign a label to each value in the row. Optionally, compile the model.
Adding a Label to a Probabilistic ModelYou can add a single label to a probabilistic model. Add a label for every type of information that the model data values represent. If you use the probabilistic model in a Parser transformation, add a label for each output port that you expect the transformation to create.
1. Open the content set that contains the model.
2. Select the model name, and click Edit.
3. In the Data view or the Label view, click Manage Labels.
The Manage Labels dialog box appears.
4. In the Manage Labels dialog box, click New.
A label appears in the first empty row in the dialog box.
Probabilistic Model Configuration 61

5. Edit the label name. Optionally, update the color for the label.
6. Click OK to add the label to the model.
7. Save the probabilistic model.
After you add the label, assign the label to at least one data value.
Assigning a Label to a Reference Data ValueYou can assign a label to a single data value in a reference data row.
You can assign different labels to the same data value if the data value appears in different locations in the row or in different rows.
1. Open the content set that contains the model.
2. Select the model name, and click Edit.
3. Select the Data view.
4. Find a data value that does not have a label or that has an incorrect label. Data values that use a label are color-coded.
5. Select the data row that contains the data value.
The row appears in the editor.
6. Right-click a data value in the editor and select a label from the context menu.
The Developer tool assigns the label to the data value.
7. Save the probabilistic model.
After you save the probabilistic model, optionally compile the model.
Assigning a Label to Multiple Data ValuesYou can assign a label to multiple reference data values in a single operation.
1. Open the content set that contains the model.
2. Select the model name, and click Edit.
3. Click Assign Label.
The Assign a Label to Multiple Values dialog box opens.
4. Enter one or more characters in the Find field.
You can enter wildcard characters in the Find field.
5. Optionally, select additional search criteria.
You can select or clear the following options:
• Match case.
Specifies that the search operation is case sensitive. Do not use wildcard characters with the option.
• Match full string. Specifies that the search operation looks for a complete match between the characters in the reference data value and the characters that you enter. Do not use wildcard characters with the option.
• Ignore labeled values.
Specifies that the search operation skips any reference data value that uses a label.
6. Select a label to assign to the reference data values that match the search criteria.
62 Chapter 5: Probabilistic Models

You can also select the No Label option. Select the option to remove the label from the reference data values that include the characters that you enter.
7. Click Start.
The Developer tool assigns the label to all reference data values that match the search criteria that you define.
Note: To view the reference data values that you labeled in a single operation, use the Assigned by bulk filter in the Label view.
Deleting Rows from a Probabilistic ModelYou can delete one or more reference data rows from a probabilistic model in a single action.
1. Open the content set that contains the model.
2. Select the model name, and click Edit.
3. In the Data view, select one or more reference data rows.
4. Click Delete.
The Developer tool removes the rows that you selected from the classifier model.
To undo the operation, press the Ctrl + Z keys on the keyboard.
Deleting a Label from a Probabilistic ModelWhen you delete a label value from a model, any reference data value that used the label remains in the model. Assign another label value to each reference data value.
1. Open the content set that contains the model.
2. Select the model name, and click Edit.
3. In the Data view or the Label view, click Manage Labels.
4. In the Manage Labels dialog box, select a label value.
5. Click Delete.
6. Click OK to delete the label.
7. Save the probabilistic model.
Note: A label is a structural element in a probabilistic model. If you add or remove a label after you add the model to a transformation, you invalidate the operation that uses the model. To use the model that you updated, delete and re-create the transformation operation.
Compiling the Probabilistic ModelWhen you update the data or the label assignments in a probabilistic model, you can compile the model. Compile the model to update the model logic with the associations between the current reference data values and the current label values.
Before you compile the probabilistic model, verify that each label value identifies at least one reference data value.
u To compile the model, open the model in the Developer tool and click Compile.
Probabilistic Model Configuration 63

Finding Data Rows in a Probabilistic ModelUse the Data view to find the reference data rows that contain a value that you enter.
1. Open the content set that contains the probabilistic model.
2. Select the model name, and click Edit.
3. Select the Data view.
4. Enter one or more characters in the Find field.
The Data view displays the first row in the model that contains the value that you entered.
5. Use the Up arrow or Down arrow to move to other rows that contain the value.
Filtering Reference Data Values by Label AssignmentUse the Label view to find the reference data values that use a label that you specify. Filter the results based on the method that you used to assign the label.
1. Open the content set that contains the probabilistic model.
2. Select the model name, and click Edit.
3. In the Label view, select a label value.
The probabilistic model displays a list of the reference data values that use the label. The model also shows the number of data values that use the label.
4. Apply a filter to the list of reference data values that use the label.
Select one of the following filters:
• All. Displays the reference data values that use the label. All is the default option.
• Assigned by user. Displays any reference data value that you selected individually when you assigned the label.
• Assigned by bulk. Displays the reference data values to which you assigned a label as part of a bulk assignment operation.
The probabilistic model displays the reference data values that satisfy the filter condition.
Finding Unused Label ValuesUse the Label view to find any label value that you did not assign to a reference data value. You must assign each label to at least one reference data value.
1. Open the content set that contains the probabilistic model.
2. Select the model name, and click Edit.
3. In the Label view, select a label value.
The probabilistic model displays a list of the reference data values that use the label. The model also shows the total number of data values that use the label.
If the total number of data values is zero, you did not assign the label to any reference data value in the probabilistic model.
64 Chapter 5: Probabilistic Models

Copy and Paste OperationsYou can copy a probabilistic model from one content set to another in a Model repository. Copy a probabilistic model to share resources with other Developer tool users.
You can copy a model to another content set, or you can import a model to the current content set. You can import multiple models from multiple content sets in the repository in a single operation.
When you copy a model, the Content Management Service creates a copy of the model data file on the Informatica services host machine. Each model uses a different data file.
Copying a Probabilistic Model to Another Content SetYou can copy a probabilistic model from one content set to another in a Model repository. When you copy a probabilistic model, you specify the model object and the source and destination content sets.
1. Open the content set that contains the probabilistic model.
2. Select a probabilistic model and click Copy To.
3. Browse the Model repository and select a content set.
You can copy the probabilistic model to a content set in the current project or another project.
4. Click OK.
The Developer tool copies the probabilistic model to the selected content set.
Importing a Probabilistic Model from Another Content SetYou can import a probabilistic model from one content set to another in a Model repository. When you import a probabilistic model, you specify one or more model objects and the source and destination content sets.
1. Open the content set to contain the probabilistic model.
2. Select a probabilistic model and click Paste From.
3. Browse the Model repository and select a probabilistic model.
You can paste the probabilistic model from a content set in the current project or another project.
4. Click OK.
The Developer tool pastes the probabilistic model to the current content set.
Copying Reference Data Rows to the ClipboardYou can copy one or more rows of reference data from a probabilistic model to the clipboard. You can paste the rows to another probabilistic model.
1. Open the content set that contains the probabilistic model.
2. Select the model name, and click Edit.
3. In the Data view, select one or more rows of reference data.
4. Use the Ctrl + C keys to copy the rows to the clipboard.
The operation copies the reference data and the label values that you assigned to the reference data.
You can use the Ctrl + V keys to paste the rows to a text editor or to the Data view of another probabilistic model.
Copy and Paste Operations 65

A p p e n d i x A
Reference Data and Informatica Data Engineering Integration
This appendix includes the following topic:
• Reference Data and Informatica Data Engineering Integration, 66
Reference Data and Informatica Data Engineering Integration
Informatica Data Engineering Integration combines an Informatica domain and Informatica client applications with a Hadoop cluster. You can push a mapping from the Developer tool down to the cluster and run the mapping on the nodes in the cluster.
The pushdown operation copies any reference table data, content set data, and identity population data that the mapping reads to the cluster. After the mapping runs, the cluster deletes the reference data that the pushdown operation copies with the mapping.
The pushdown operation does not copy address validation reference data. If you push a mapping that performs address validation, you must install the address validation reference data files on each node that runs the mapping. The cluster does not delete the address validation reference data files after the address validation mapping runs.
Reference Data for Address ValidationWhen you run an address validation mapping in a Hadoop environment, the address reference data files must reside on each DataNode on which the mapping runs. Informatica Data Engineering Integration installs with a shell script that you can use to install the files on the DataNodes.
Use the shell script to install the address reference data files on the DataNodes in a single operation. The script reads a file that contains the names or IP addresses of the nodes. The script copies the address reference data files to each node that the file identifies.
The script name is copyRefDataToComputeNodes.sh.
Find the script in the following directory in the Data Engineering Integration installation:
<Informatica installation directory>/tools/dq/av
66

The following table describes the options that the script uses:
Option Description
-n The file that contains the list of names or IP addresses of the DataNodes in the Hadoop cluster. Enter each node name or IP address on a separate line in the file.By default, the script reads the file from the $BASEDIR/HadoopDataNodes directory, where $BASEDIR is the location of the shell script.
-p A prompt to confirm that you want to install the address reference data files.By default, the script displays a prompt to confirm that you want to copy the files from the source directory to the target directories on the DataNodes. if you run the shell script on a schedule, you can disable the prompt.The default option value is Y. To disable the prompt, set the value to N.
-s The source directory for the address reference data files that the script copies to the nodes.By default, the script reads the files from the /reference_data directory on the local machine.Note: Address reference data files use the file name extension .MD. The source directory must contain the address reference data files and no other files.
-t The directory on each node to which the script copies the address reference data files.By default, the script copies the files to the /reference_data directory on each node.
-u The user name of the user who runs the script. The user must have passwordless secure shell access to the nodes.
Installing the Address Reference Data FilesTo install address reference data files on the DataNodes in a Hadoop cluster, run the copyRefDataToComputeNodes.sh shell script. Or, define a job to run the shell script in a job scheduler application at time intervals that you specify.
Before you run the script or define the job, review the option values that you specify for the script. You can accept the default values or update the values.
Installing the Address Reference Data Files at the Command Prompt
To install the files at the command prompt, perform the following steps:
1. At the command prompt, open the following directory:<Informatica installation directory>/tools/dq/av
2. Run copyRefDataToComputeNodes.sh.Optionally, enter one or more values for the script options. If you do not enter a value for an option, the script runs with the default value for the option.
By default, the script prompts you to confirm the installation of the files. To install the files, enter Y.
Installing the Address Reference Data Files with a Scheduled Job
You can define a job to run the shell script at time intervals that you specify. Add the job to a job scheduler application. If you define a job to install the files, you must disable the prompt to confirm installation.
To disable the prompt, set the following option on the shell script:
-p n
Reference Data and Informatica Data Engineering Integration 67

I n d e x
AAnalyst tool
find and replace reference data values 23
Ccharacter sets 34classifier models
in content sets 34rules and guidelines 38
Content Management Service reference data warehouse 11reference table privileges 12
content sets character sets 34classifier models 34pattern sets 35probabilistic models 35regular expressions 36token sets 36version control 12, 21, 28
creating a reference table from column patterns reference tables 17
creating a reference table from profile column data reference tables 16
creating a reference table manually reference tables 15
DData Engineering Integration
address reference data installation script 66installing address reference data 67reference data requirements 66
Eexporting a reference table
reference tables 23
HHadoop environment
address reference data installation script 66installing address reference data 67reference data requirements 66
Iimporting a reference table
reference tables 19
Mmanaged reference tables 11managing columns
reference tables 22managing rows
reference tables 22
Ppattern sets 35privileges
Content Management Service 12probabilistic models
in content sets 35rules and guidelines 38
Rreference tables
Analyst tool overview 13Content Management Service 11creating a reference table from column patterns 17creating a reference table from profile columns 16creating a reference table manually 15Developer tool overview 29exporting a reference table 23finding and replacing values in the Analyst tool 23importing a reference table 19in pattern-based parsing 11managed and unmanaged 11managed reference tables 11managing columns 22managing rows 22privileges 12properties in the Analyst tool 14properties in the Developer tool 30reference data warehouse 11refreshing in Analyst tool 24unmanaged reference tables 11version control 12, 21, 28viewing audit trail tables 25
regular expressions 36
Ttoken sets 36
68

Uunmanaged reference tables
definition 11enable and disable edits 24synchronizing with the Model repository 12
Vversion control
content sets 12, 28
version control (continued)reference tables 12reference tables in the Analyst tool 21reference tables in the Developer tool 28
viewing audit table events reference tables 25
Index 69
Related Documents