1 As Class Gets Started Pick up your First Day Materials Find a table and take a seat! (please, no more than four students per table) Bring up your computer Introduce yourself to the other students at the table Peruse the First Day Materials

1 As Class Gets Started u Pick up your First Day Materials u Find a table and take a seat! (please, no more than four students per table) u Bring up your.
Dec 22, 2015
Welcome message from author
This document is posted to help you gain knowledge. Please leave a comment to let me know what you think about it! Share it to your friends and learn new things together.
Transcript

1
As Class Gets Started Pick up your First Day Materials Find a table and take a seat!
(please, no more than four students per table)
Bring up your computer Introduce yourself to the other
students at the table Peruse the First Day Materials

2
Today’s Goals Achieve awareness about the course
Instructors Obtain some knowledge about the
Educational Goals of ECE 300 Obtain some knowledge about course
expectations Obtain knowledge about the course
electronic environment Obtain knowledge about features in Word
3
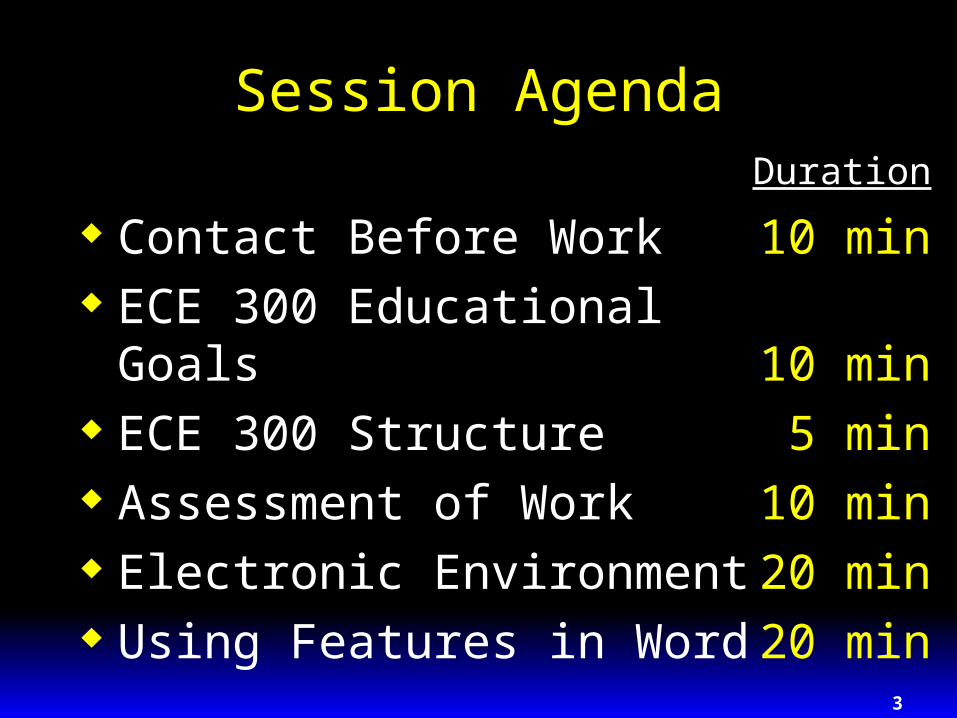
Session AgendaDuration
Contact Before Work 10 min ECE 300 Educational
Goals 10 min ECE 300 Structure 5 min Assessment of Work 10 min Electronic Environment 20 min Using Features in Word 20 min

4
Course Educational Outcomes Turn to Table 1 in First Day materials and
Table 1 for course assessment (green pages)
In pairs:– discuss outcomes 1.1 (specifications) and 1.2
(generate concepts)– decide on the relative importance of outcome
1.1 with respect to outcome 1.2 (more important, about the same, etc.)
– enter a number (9, 3, 1, 1/3, 1/9) that defines the relative importance of 1.1 vs 1.2 in Table 1 at intersection of Row 1 and Column 2.

5
DesignProject
ECE 300 Intermediate Engineering Design
Reports
Oral Presentations
A Prototype
DesignNotebook
Engineering Communication

7
ECE 300 Course Structure
ramping up Aug 27 to Sept 5
becoming an expert
Sept 5 to Oct 8
working on project
Oct 8 to Dec 3
ramping down Dec 3 to Dec 10
8
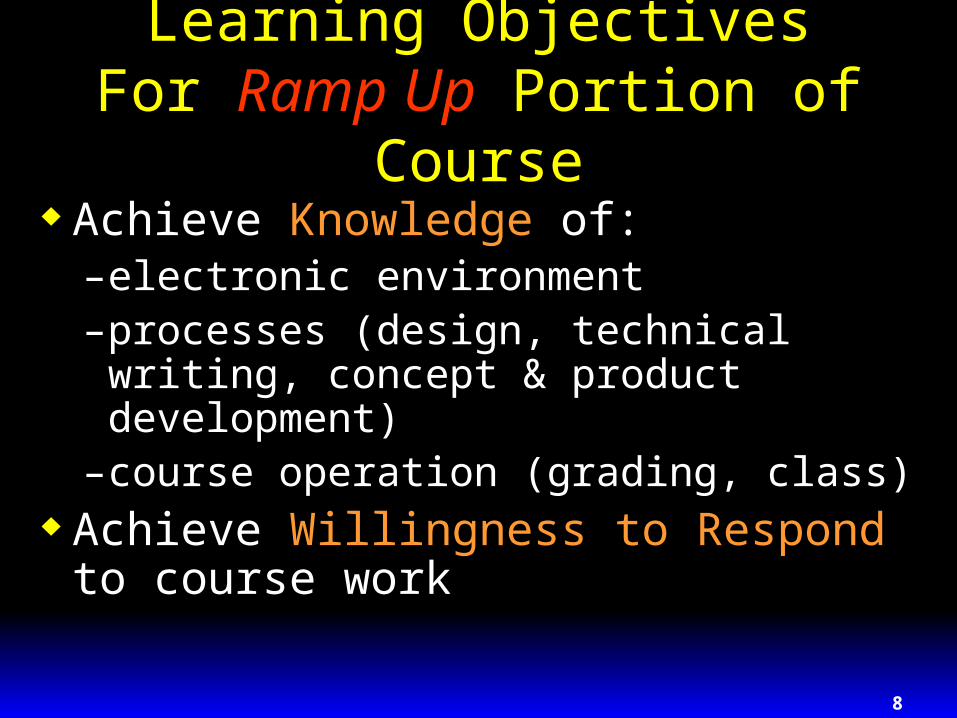
Learning Objectives For Ramp Ramp UpUp Portion of Course
Achieve Knowledge of:–electronic environment–processes (design, technical writing,
concept & product development)–course operation (grading, class)
Achieve Willingness to Respond to course work

Prepare Assigned Work Products
Self Assess the Work Products
YESExceeds
ExpectationsE
NO
Correct / Improvethe Work Products
Self Assess the Work Products
External Assessmentof Work Products
MeetsExpectations
NONeeds
ImprovementNI
Meets Expectations
M
NO
Meets Expectations
M
YES
EstablishExpectations
Assessment ProcessT
ime
Student FacultyGrader / Faculty
MeetsExpectations
External Assessmentof Work Products
ExceedsExpectations
YES

10
Checklist Structure
Turn to page 6 in First Day materials
There are five sections–Self Regulation–Expected Features–Revealed Features–Exciting Features–Results of Assessment

14
Two Areas of Assessment Cognitive Behavior
–typically what is assessed
–what you have learned Affective Behavior
–your attitude
–self regulation

15
Cognitive Assessment
Individual Team

16
Affective Assessment
Earn Self Regulation Points (page 7 & Table 3 of First Day materials)–submitting work on time–coming to class on time–participating in class
Determine % of total SR Points earned during the semester

17
Determining Course Grade
A function of both Cognitive Assessment and Affective Assessment
The mapping of cognitive & affective assessments into a grade is shown in Table 6 in First Day materials

18
ECE 300 Web Pages
Course Web Site– engineering server– http://ceaspub.eas.asu.edu/ece300mcneill– course information and documents
MYASU Web Site– university server– http://my.asu.edu– course communications– you should all already be enrolled

19
Course Web Site
Log onto the Course Web site at http://ceaspub.eas.asu.edu/ece300mcneill
Click on Complete Site What do you find when you select Schedules? Check out the calendar (what is going on on
October 15th?) What do you find when you select class? What do you find when you select Course
Documents?

20
Next Class Assignments
Reading–Woolever: 46-51, 170/172,
332/333–Orange Workbook: Part I of
Section J Submission: IE0

21
Using Word To:
highlight changes create heading styles create ToC insert and format page numbers divide the document into
sections
22
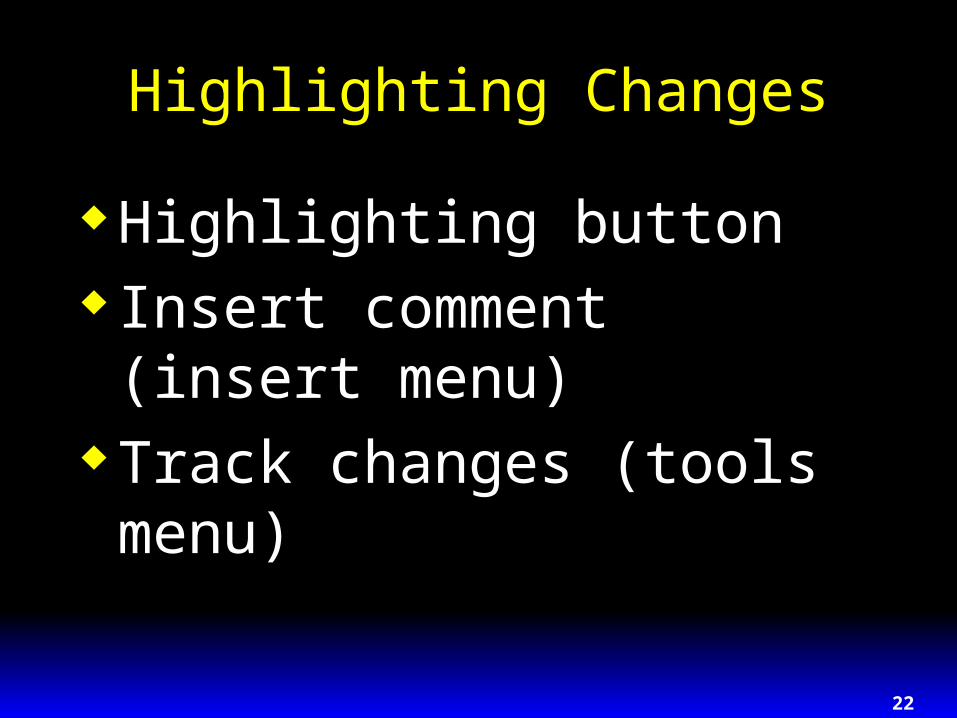
Highlighting Changes
Highlighting button Insert comment (insert
menu) Track changes (tools menu)

23
Assignment
Define and mark all headings using heading styles
Create ToC Insert centered page numbers Divide your document into
sections Create a list of items

24
Heading Levels & Styles
The following slides show how to define heading styles for the various heading levels

25
Defining Heading Styles
Go to a first level heading and highlight the entire heading, including the paragraph marker
Open up Style pull-down menu and select Heading 1
Re-format heading to your desired format

26
Headings (alternative) Go to a first level heading and highlight the
entire heading Reformat the heading as desired Reselect the heading including the
paragraph marker Open Style pull-down menu and select
Heading 1 From the pop-up menu that appears select
OK You have now defined the Heading 1 style
the way you want it to look

27
Headings (continued)
Once you change the heading style all headings previously defined will change to the newly defined style.
If you did not use the heading style for earlier headings you will need to:– find your next first level heading and highlight it– select Heading 1 from Style pull-down menu– repeat until you have finished with all your first
level headings

28
Table of Contents
The following slides show how to create a Table of Contents using the headings

29
Creating a Table of Contents Scroll to the top of your document
and place your cursor at the location you want your Table of Contents to be located.
If there is no ToC title, enter “Table of Contents”, centered and bolded and hit Return (Enter) key

30
ToC (continued)
From Insert menu select –Index and Tables
–Table of Contents Tab
–Classic Style
–OK

31
ToC (continued)
You should now have a Table of Contents, showing each heading and the page the heading can be found
Note: you can change the format of the ToC entries just as was done for the heading formats

32
ToC (concluded)
Note: double clicking on the page number in the ToC will take you to the heading
Note: you can update the ToC by highlighting the ToC and then hitting F9

33
Page Numbers
The following slides show how to insert page numbers in the Footer and how to make the page numbers start at 1

34
Opening Up the Footer
From View menu select Header and Footer
From Pop-up Header and Footer tool bar select switch between Header and Footer (left most button)
35
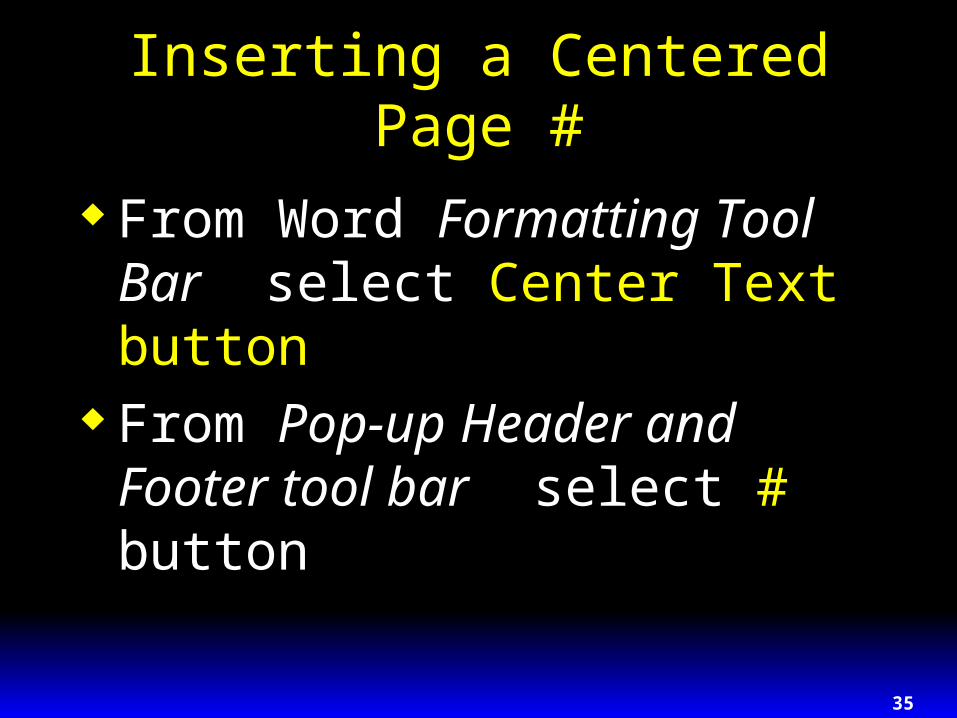
Inserting a Centered Page #
From Word Formatting Tool Bar select Center Text button
From Pop-up Header and Footer tool bar select # button

36
Formatting Page Numbers
From Pop-up Header and Footer tool bar select format page # button
Make the desired changes (e.g., change from numbers to letters or Roman Numerals or start at 1)

37
Division Into Sections
The following slides show how to divide the document up into different Sections

38
Inserting Sections
Place the cursor at the beginning of the line immediately following your Title Page
From Insert menu select– Break,– New Page (Section Breaks) and– OK

39
Inserting Section Breaks (concluded)
Continue to insert New Page Section breaks at each place in the document where a new page is required (e.g., after Table of Contents, Reference Pages, Appendix, etc.)

40
Ordered Lists
The following slides show how to create and format ordered lists.

41
Creating a List
Find a set of items in your document that you want to make into a list of items and highlight all the items
From the Word Formatting Tool Bar select Numbering button

42
Lists (continued)
You should now have a list of items, starting at 1.
Note: new items may be inserted into the list and the list will automatically renumber itself

43
Formatting Lists
Highlight the list From Format menu select
–Bullets and Numbering,
–Numbered tab
–Desired format (e.g., a), etc.)
–OK
Related Documents


![01 ALBUM COM FOTO LXII.ppt [Modo de compatibilidad]sitllxii.diputados.gob.mx/album_foto_tc.pdfCOMPOSICIÓN POLÍTICA POR ENTIDA POR FEDERATIVA UP UP U P U P U P UP UP U P U P U P Aguascalientes](https://static.cupdf.com/doc/110x72/5f5b92a542d4827c9d1faa51/01-album-com-foto-lxiippt-modo-de-compatibilidad-composicin-poltica-por-entida.jpg)