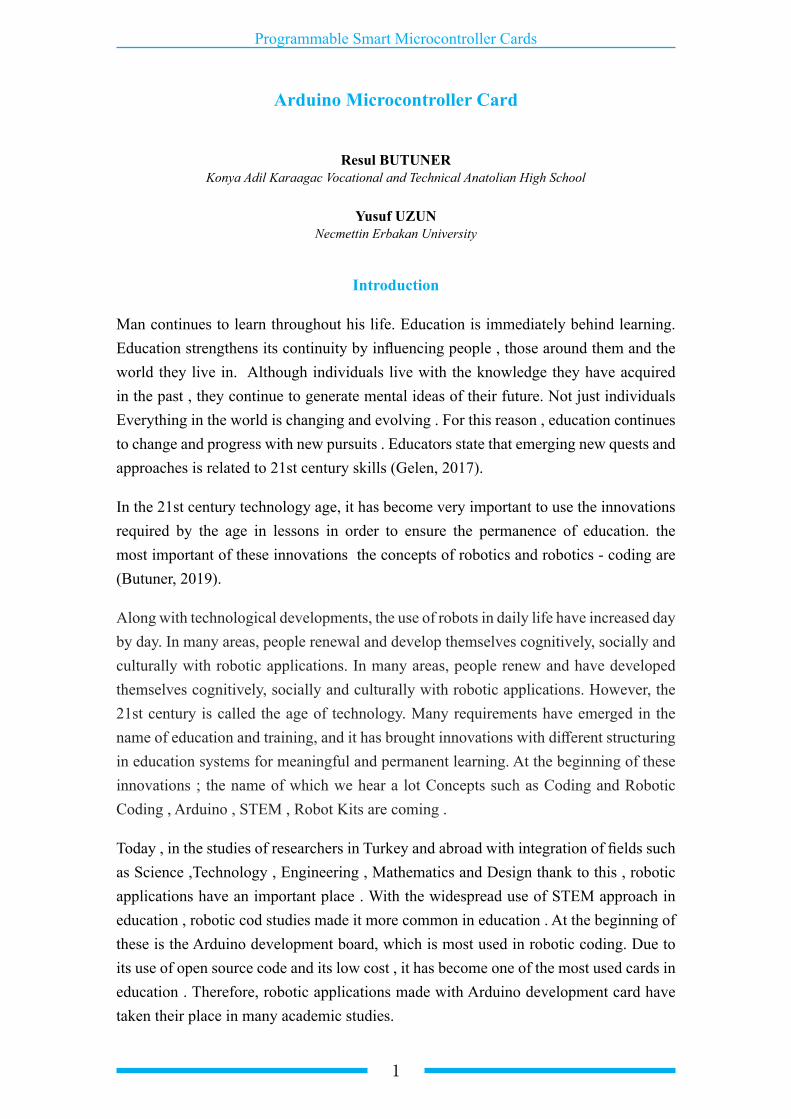
1 Programmable Smart Microcontroller Cards Arduino Microcontroller Card Resul BUTUNER Konya Adil Karaagac Vocational and Technical Anatolian High School Yusuf UZUN Necmettin Erbakan University Introduction Man continues to learn throughout his life. Education is immediately behind learning. Education strengthens its continuity by influencing people , those around them and the world they live in. Although individuals live with the knowledge they have acquired in the past , they continue to generate mental ideas of their future. Not just individuals Everything in the world is changing and evolving . For this reason , education continues to change and progress with new pursuits . Educators state that emerging new quests and approaches is related to 21st century skills (Gelen, 2017). In the 21st century technology age, it has become very important to use the innovations required by the age in lessons in order to ensure the permanence of education. the most important of these innovations the concepts of robotics and robotics - coding are (Butuner, 2019). Along with technological developments, the use of robots in daily life have increased day by day. In many areas, people renewal and develop themselves cognitively, socially and culturally with robotic applications. In many areas, people renew and have developed themselves cognitively, socially and culturally with robotic applications. However, the 21st century is called the age of technology. Many requirements have emerged in the name of education and training, and it has brought innovations with different structuring in education systems for meaningful and permanent learning. At the beginning of these innovations ; the name of which we hear a lot Concepts such as Coding and Robotic Coding , Arduino , STEM , Robot Kits are coming . Today , in the studies of researchers in Turkey and abroad with integration of fields such as Science ,Technology , Engineering , Mathematics and Design thank to this , robotic applications have an important place . With the widespread use of STEM approach in education , robotic cod studies made it more common in education . At the beginning of these is the Arduino development board, which is most used in robotic coding. Due to its use of open source code and its low cost , it has become one of the most used cards in education . Therefore, robotic applications made with Arduino development card have taken their place in many academic studies.

Welcome message from author
This document is posted to help you gain knowledge. Please leave a comment to let me know what you think about it! Share it to your friends and learn new things together.
Transcript
1
Programmable Smart Microcontroller Cards
Arduino Microcontroller Card
Resul BUTUNERKonya Adil Karaagac Vocational and Technical Anatolian High School
Yusuf UZUN Necmettin Erbakan University
Introduction
Man continues to learn throughout his life. Education is immediately behind learning. Education strengthens its continuity by influencing people , those around them and the world they live in. Although individuals live with the knowledge they have acquired in the past , they continue to generate mental ideas of their future. Not just individuals Everything in the world is changing and evolving . For this reason , education continues to change and progress with new pursuits . Educators state that emerging new quests and approaches is related to 21st century skills (Gelen, 2017).
In the 21st century technology age, it has become very important to use the innovations required by the age in lessons in order to ensure the permanence of education. the most important of these innovations the concepts of robotics and robotics - coding are (Butuner, 2019).
Along with technological developments, the use of robots in daily life have increased day by day. In many areas, people renewal and develop themselves cognitively, socially and culturally with robotic applications. In many areas, people renew and have developed themselves cognitively, socially and culturally with robotic applications. However, the 21st century is called the age of technology. Many requirements have emerged in the name of education and training, and it has brought innovations with different structuring in education systems for meaningful and permanent learning. At the beginning of these innovations ; the name of which we hear a lot Concepts such as Coding and Robotic Coding , Arduino , STEM , Robot Kits are coming .
Today , in the studies of researchers in Turkey and abroad with integration of fields such as Science ,Technology , Engineering , Mathematics and Design thank to this , robotic applications have an important place . With the widespread use of STEM approach in education , robotic cod studies made it more common in education . At the beginning of these is the Arduino development board, which is most used in robotic coding. Due to its use of open source code and its low cost , it has become one of the most used cards in education . Therefore, robotic applications made with Arduino development card have taken their place in many academic studies.
2
Programmable Smart Microcontroller Cards
Today , coding education means preparing software , websites and mobile applications through a code editor in any programming language .As learning and teaching strategy , it is shown as the use from easy about difficult and project based robots in programming education. (Akinci & Tuzun, 2016). In the use of robots in coding training, by loading certain tasks to the robot, the results are seen on the working system.
It is thought that arduino and similar cards for robotic coding will provide an important solution in concretizing abstract concepts and will help in physically observing the code (Ersoy et al., 2011).
Educational systems are tried to be developed by children learning coding-based robotic applications of an early age (Goksoy & Yılmaz, 2018).
In Turkey The information technologies and software lesson, which has been compulsory for the 5th and 6th grades since 2013, aims to enable students to start learning coding at an early age.(MEB, 2018).
In secondary school , the education program aimed for the student to acquire “ Level 1 “ and “ Level 2 “ robotic programming skills in applied computer lesson . (MEB, 2018).
Learning to code means by learned the working principles of existing technological devices and using them and producing for the better. By giving robotics and coding education to the students this is a very important step the technology developers of the future will be trained (Yildız et al., 2020).
In education, students need to be introduced science, mathematics, art, electronics, coding and mechanical skills.With Arduino and other electronic prototyping tools, it is easier and less costly to teach students science, mathematics, electronics, coding and mechanics.
Since the Arduino microcontroller board has a multidisciplinary structure, it is very useful for integrating it into education.
With Arduino training, students gain some skills. These;
• Analytical thinking ability,
• Design-oriented thinking,
• Teamwork,
• Giving and receiving feedback from peers,
• Problem solving with the help of project-based learning,
3
Programmable Smart Microcontroller Cards
• Computational skills,
Thus, students can solve their own problems and become productive individuals rather than consuming. The Students, improve themselves on the subjects and applications they encounter at school with the robotic coding education given with Arduino microcontroller card and other robotic products.
These trainings enable them to achieve success in their future lives. The softwares aims to increase the motivation and interest of students who use and learn coding tools, rather than teaching coding directly. In the 21st century, coding software is ready for use of students from pre-school to university education today (Baz, 2018).
What is Arduino and Its History
Arduino, which is the most preferred for robotic studies, is a development board developed with 5 friends in Italy in 2005. It is a microcontroller board that started as university project. Name Arduino is named an from Italian medieval king. From this development card were produced Only 200 pieces for students. When the first 50 Arduino boards are bought by the students, five friends form a new company to sell the remaining 150. This company, which became famous for the name Arduino, has turned into one of the largest microcontroller companies in the world today.
Arduino’s; There are varieties such as Arduino Uno, Arduino Mega, Arduino Nano, Arduino Leonardo. Called Arduino Shield There are also parts that can be easily attached and removed from Arduino’s pins (Barman, 2014).
Arduino Cards and Features
Arduino Uno
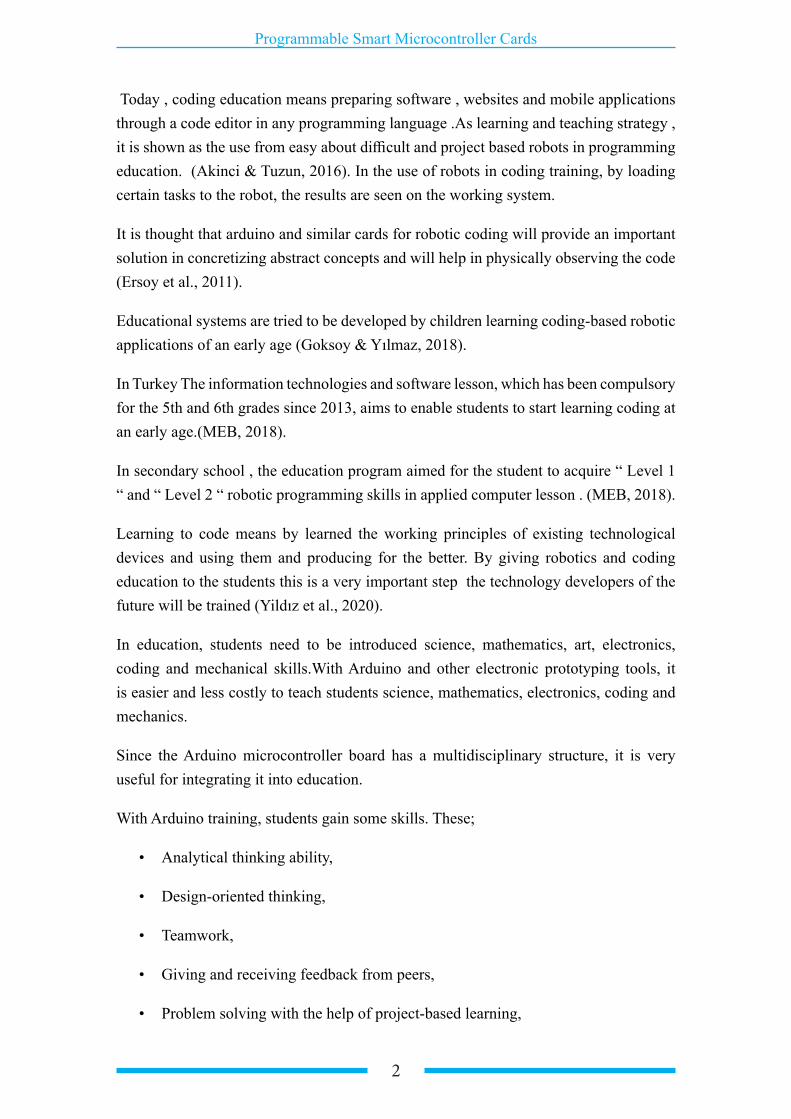
Arduino has open source code. It has input and output units and microcontroller memory. The Arduino development card has been used in the development of robotic studies for many fields from education to engineering, making it popular. Arduino is a development board that has application developments in many different fields due to its wide library and continuous development. Due to the continuous development of the development card, varieties with different features have been developed according to different needs. At Figure 1 shows the Arduino development card and the description of the pins on it.
4
Programmable Smart Microcontroller Cards
Figure 1. Arduino Development Card
There are 8 and 32 bit microcontrollers of Atmega company on Arduino card. for Arduino It provides the opportunity to easily program microcontrollers with ready-made libraries. Thanks to its analog and digital inputs, analog and digital data can be processed. Data from sensors can be used. According to the incoming data, sound, light, movement, etc. outputs can be produced. With the Arduino development board, many applications such as led circuits, automation systems, robotic projects, projects that interacts with the environment can be made. All Arduino models need a power supply. The Arduino microcontroller card provides its power via USB or from the power supply port, as in Figure 1. The pins on the Arduino development card are connected to the breadboard with the help of jumper cables. Each pin has different functions.
Pins and Indicators on Arduino Development Card
5V and 3.3V : Output voltages of 5 volts and 3.3 volts are taken from these pins.
GND: It is the abbreviation for ground. It is the grounding connection.
Analog pins: There are 6 analog pins including A0, A1, A2, A3, A4, A5. These pins can receive and give a total of 1024 numerical values between 0 and 1023. Figure 2 shows the line graph of the analog signal.
Figure 2. Analog Signal Line Graph

5
Programmable Smart Microcontroller Cards
Digital pins: There are 14 digital pins between 0-13. These pins receive and gives high and low values. Front of them can be receivable Analog outputs from digital pins with a “~” sign in. These pins are called PWM pins. Figure 3 shows the digital signal line graph.
Figure 3. Digital Signal Line Graph
Aref pin: It is an analog reference pin. The Arduino regulator has 1023 steps. For a voltage of 3 volts, a voltage step with an accuracy of 3V/1023 = 0.00293V can be obtained.
Power indicator: This led shows whether the Arduino development board is working or not. There is a problem when this led is not lit even though there is a power connection. The circuit needs to be checked.
TX and RX LEDs:These led are blinking in the process of uploading software to the processor. It refers to serial communication. From the leds, TX means transmitter and RX means receiver.
0 and 1 pins: The letters with the TX and RX leds are seen on the 0 and 1 pins. These pins can be used for serial communication with the help of bluetooth module.
Processor: Atmega processor of ATMEL firm. Programs written are sent and run to this processor.
Regulator: It is used for protection from voltage values that may damage the circuit.
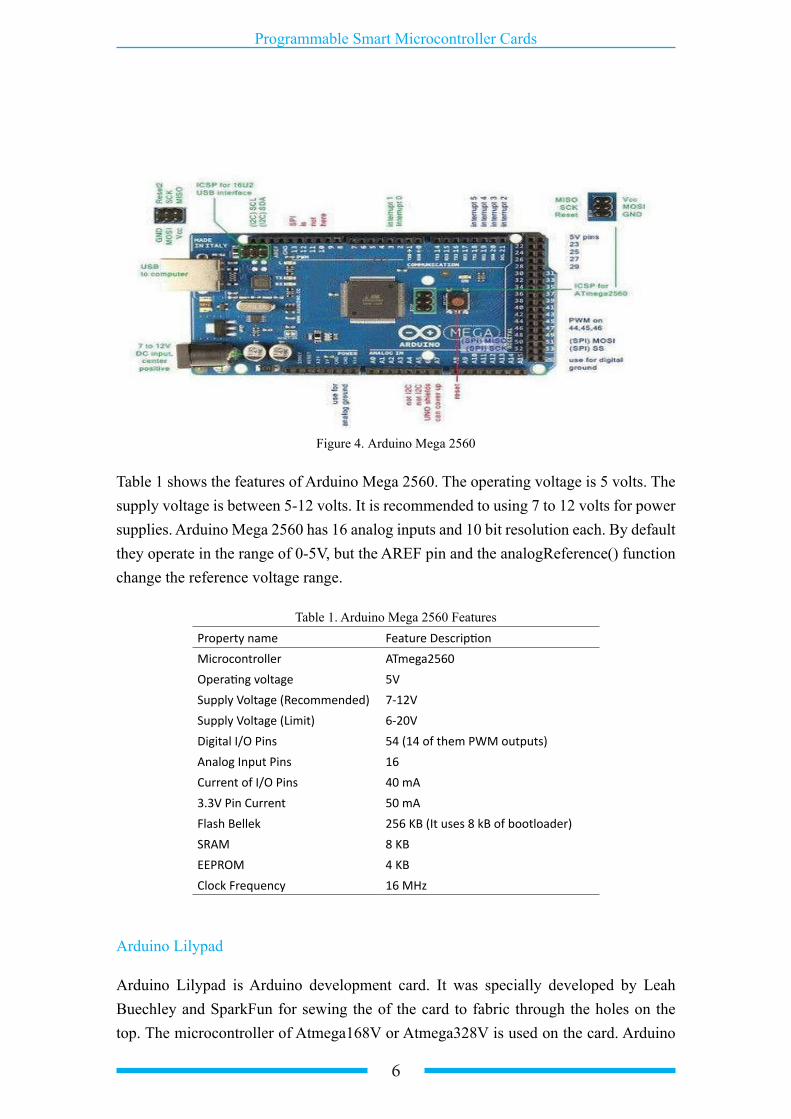
Arduino Mega 2560
Arduino Mega is a microcontroller card based on Atmega2560. Arduino Mega has 54 digital input/output pins. 15 of them can be used as PWM outputs. There are 16 analog inputs, 4 UARTs, 16Mhz crystal, usb socket, power socket, ICSP connector and reset button.
6
Programmable Smart Microcontroller Cards
Figure 4. Arduino Mega 2560
Table 1 shows the features of Arduino Mega 2560. The operating voltage is 5 volts. The supply voltage is between 5-12 volts. It is recommended to using 7 to 12 volts for power supplies. Arduino Mega 2560 has 16 analog inputs and 10 bit resolution each. By default they operate in the range of 0-5V, but the AREF pin and the analogReference() function change the reference voltage range.
Table 1. Arduino Mega 2560 FeaturesProperty name Feature DescriptionMicrocontroller ATmega2560Operating voltage 5VSupply Voltage (Recommended) 7-12VSupply Voltage (Limit) 6-20VDigital I/O Pins 54 (14 of them PWM outputs)Analog Input Pins 16Current of I/O Pins 40 mA3.3V Pin Current 50 mAFlash Bellek 256 KB (It uses 8 kB of bootloader)SRAM 8 KBEEPROM 4 KBClock Frequency 16 MHz
Arduino Lilypad
Arduino Lilypad is Arduino development card. It was specially developed by Leah Buechley and SparkFun for sewing the of the card to fabric through the holes on the top. The microcontroller of Atmega168V or Atmega328V is used on the card. Arduino

7
Programmable Smart Microcontroller Cards
Lilypad specifications are given in Table 2.
Table 2. Arduino Lilypad FeaturesProperty name Feature DescriptionMicrocontroller ATmega168V or ATmega328VOperating voltage 2.7-5.5 VInput voltage 2.7-5.5 V
Digital I/O Pins14 (6 of them can be used as PWM out-put.)
Analog Input Pins 6DC current of I/Os 40 mAFlash Bellek 16 KB (2 KB of it is using bootloader.)SRAM 1 KBEEPROM 512 byte
Clock Frekansı 8 MHz
As seen in Figure 5, there are 6 analog inputs and 14 digital outputs on the Arduino Lilypad board. Arduino Lilypad card is mostly used in projects prepared for wearable technologies. The reason why it is called wearable technology is that Lilypad card is sewn with used on clothes, fabric and anywhere desired with conductive wire.
Figure 5. Arduino Lilypad
LilyPad has an ATmega328 processor on it. On the card Arduino bootloader is installed. Therefore, it is programmed as other Arduino boards are programmed. It can be coded from Arduino’s own program using an USB cable from A to B. These entrances the use of products that can be sewn to with conductive wire make things easier. The parts whose input pins can be connected to the first model of the same LilyPad are used in the same way. LilyPad is a circular development card. Its diameter is 50 mm and its thickness is 0.8 mm. One of the biggest features of the LilyPad is that it can come into contact with water if the power is disconnected.
8
Programmable Smart Microcontroller Cards
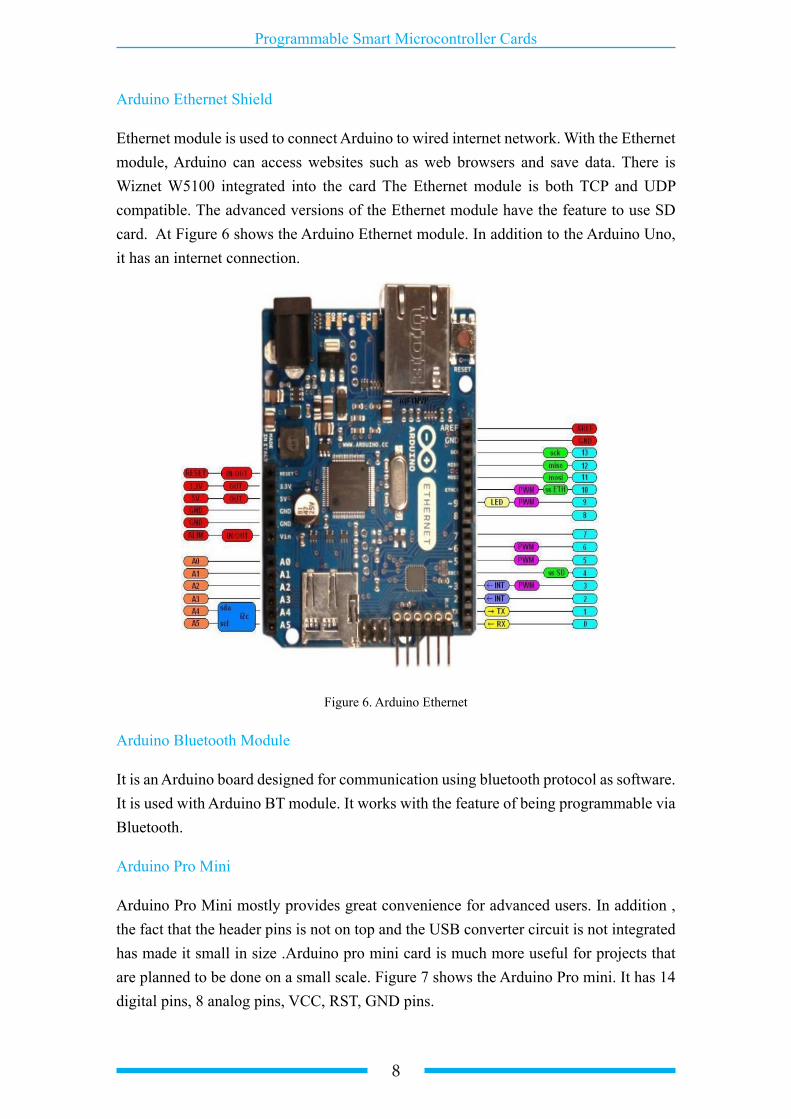
Arduino Ethernet Shield
Ethernet module is used to connect Arduino to wired internet network. With the Ethernet module, Arduino can access websites such as web browsers and save data. There is Wiznet W5100 integrated into the card The Ethernet module is both TCP and UDP compatible. The advanced versions of the Ethernet module have the feature to use SD card. At Figure 6 shows the Arduino Ethernet module. In addition to the Arduino Uno, it has an internet connection.
Figure 6. Arduino Ethernet
Arduino Bluetooth Module
It is an Arduino board designed for communication using bluetooth protocol as software. It is used with Arduino BT module. It works with the feature of being programmable via Bluetooth.
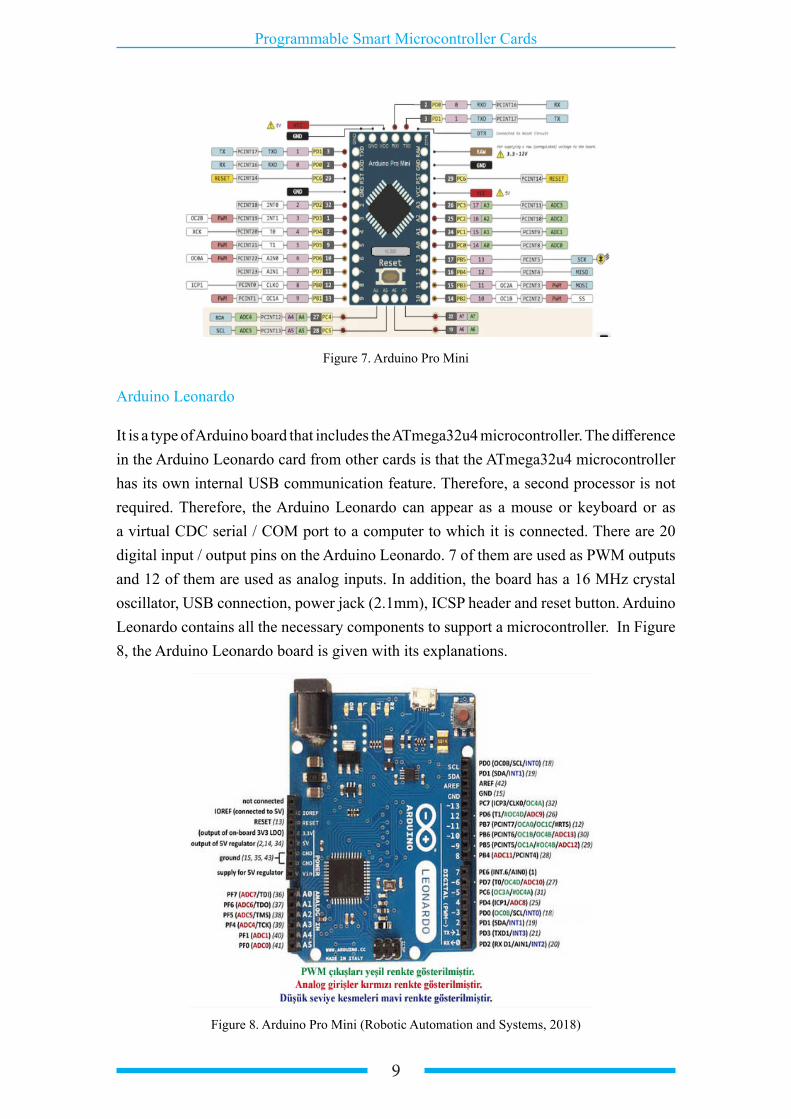
Arduino Pro Mini
Arduino Pro Mini mostly provides great convenience for advanced users. In addition , the fact that the header pins is not on top and the USB converter circuit is not integrated has made it small in size .Arduino pro mini card is much more useful for projects that are planned to be done on a small scale. Figure 7 shows the Arduino Pro mini. It has 14 digital pins, 8 analog pins, VCC, RST, GND pins.
9
Programmable Smart Microcontroller Cards
Figure 7. Arduino Pro Mini
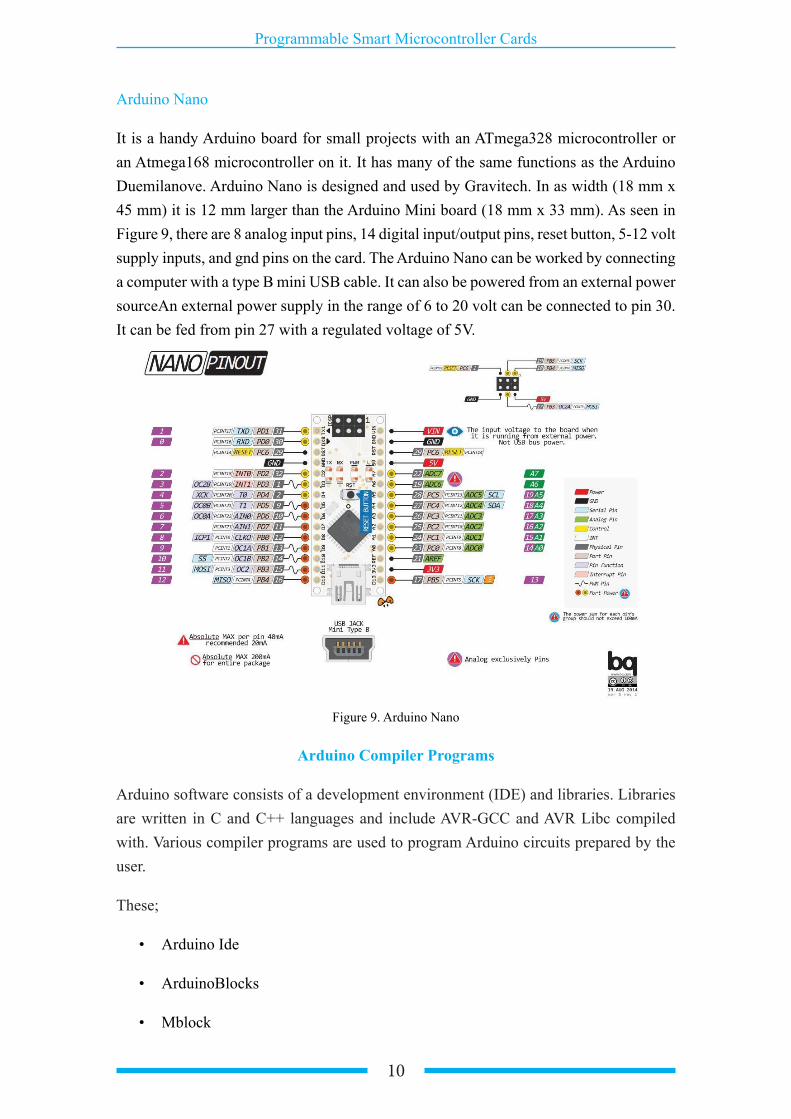
Arduino Leonardo
It is a type of Arduino board that includes the ATmega32u4 microcontroller. The difference in the Arduino Leonardo card from other cards is that the ATmega32u4 microcontroller has its own internal USB communication feature. Therefore, a second processor is not required. Therefore, the Arduino Leonardo can appear as a mouse or keyboard or as a virtual CDC serial / COM port to a computer to which it is connected. There are 20 digital input / output pins on the Arduino Leonardo. 7 of them are used as PWM outputs and 12 of them are used as analog inputs. In addition, the board has a 16 MHz crystal oscillator, USB connection, power jack (2.1mm), ICSP header and reset button. Arduino Leonardo contains all the necessary components to support a microcontroller. In Figure 8, the Arduino Leonardo board is given with its explanations.
Figure 8. Arduino Pro Mini (Robotic Automation and Systems, 2018)
10
Programmable Smart Microcontroller Cards
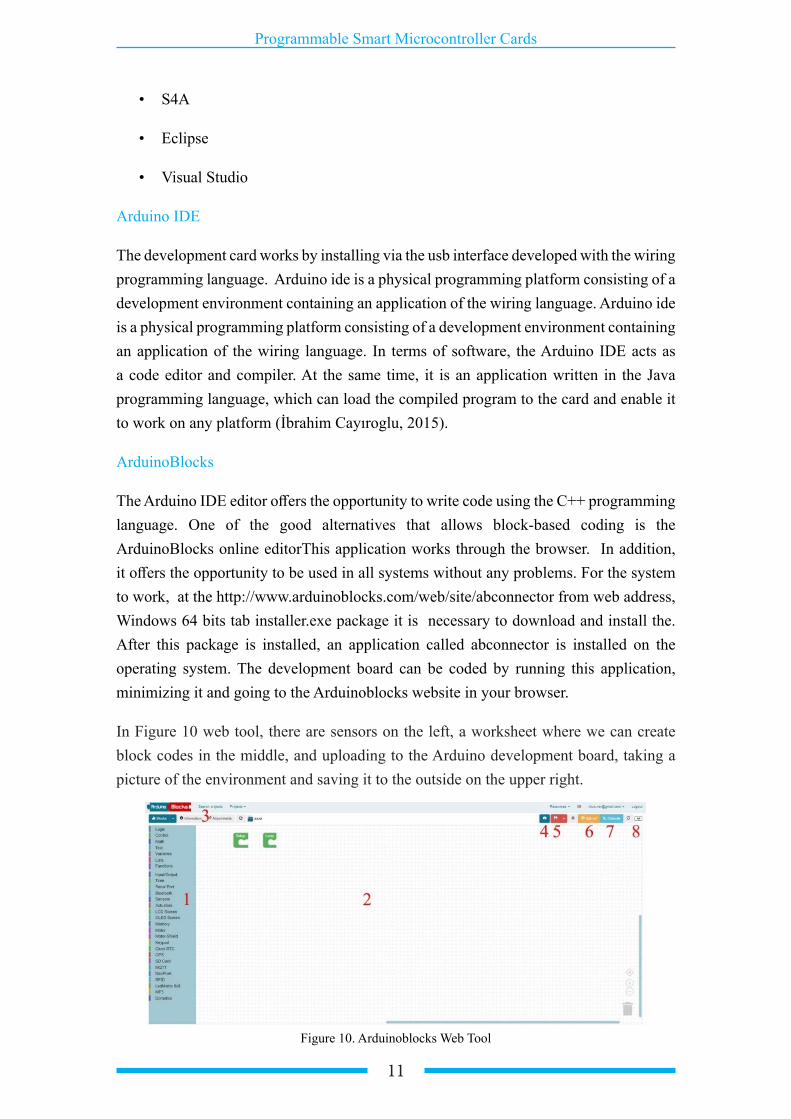
Arduino Nano
It is a handy Arduino board for small projects with an ATmega328 microcontroller or an Atmega168 microcontroller on it. It has many of the same functions as the Arduino Duemilanove. Arduino Nano is designed and used by Gravitech. In as width (18 mm x 45 mm) it is 12 mm larger than the Arduino Mini board (18 mm x 33 mm). As seen in Figure 9, there are 8 analog input pins, 14 digital input/output pins, reset button, 5-12 volt supply inputs, and gnd pins on the card. The Arduino Nano can be worked by connecting a computer with a type B mini USB cable. It can also be powered from an external power sourceAn external power supply in the range of 6 to 20 volt can be connected to pin 30. It can be fed from pin 27 with a regulated voltage of 5V.
Figure 9. Arduino Nano
Arduino Compiler Programs
Arduino software consists of a development environment (IDE) and libraries. Libraries are written in C and C++ languages and include AVR-GCC and AVR Libc compiled with. Various compiler programs are used to program Arduino circuits prepared by the user.
These;
• Arduino Ide
• ArduinoBlocks
• Mblock
11
Programmable Smart Microcontroller Cards
• S4A
• Eclipse
• Visual Studio
Arduino IDE
The development card works by installing via the usb interface developed with the wiring programming language. Arduino ide is a physical programming platform consisting of a development environment containing an application of the wiring language. Arduino ide is a physical programming platform consisting of a development environment containing an application of the wiring language. In terms of software, the Arduino IDE acts as a code editor and compiler. At the same time, it is an application written in the Java programming language, which can load the compiled program to the card and enable it to work on any platform (İbrahim Cayıroglu, 2015).
ArduinoBlocks
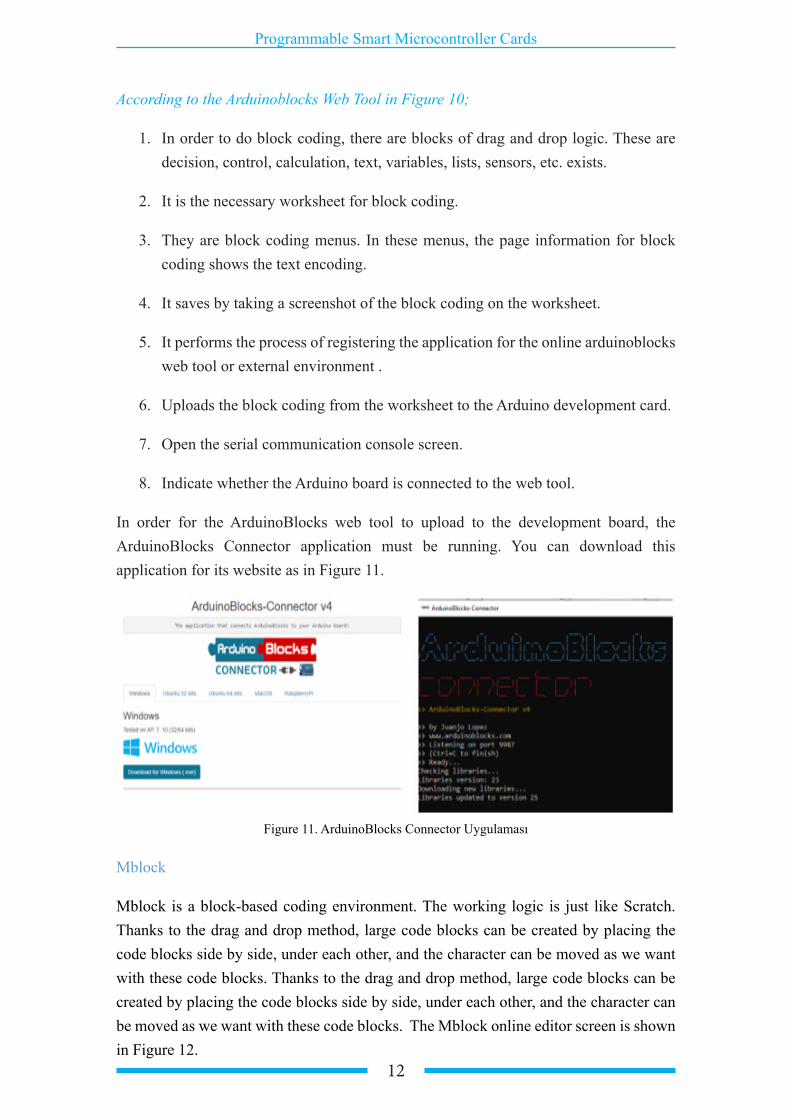
The Arduino IDE editor offers the opportunity to write code using the C++ programming language. One of the good alternatives that allows block-based coding is the ArduinoBlocks online editorThis application works through the browser. In addition, it offers the opportunity to be used in all systems without any problems. For the system to work, at the http://www.arduinoblocks.com/web/site/abconnector from web address, Windows 64 bits tab installer.exe package it is necessary to download and install the. After this package is installed, an application called abconnector is installed on the operating system. The development board can be coded by running this application, minimizing it and going to the Arduinoblocks website in your browser.
In Figure 10 web tool, there are sensors on the left, a worksheet where we can create block codes in the middle, and uploading to the Arduino development board, taking a picture of the environment and saving it to the outside on the upper right.
Figure 10. Arduinoblocks Web Tool
12
Programmable Smart Microcontroller Cards
According to the Arduinoblocks Web Tool in Figure 10;
1. In order to do block coding, there are blocks of drag and drop logic. These are decision, control, calculation, text, variables, lists, sensors, etc. exists.
2. It is the necessary worksheet for block coding.
3. They are block coding menus. In these menus, the page information for block coding shows the text encoding.
4. It saves by taking a screenshot of the block coding on the worksheet.
5. It performs the process of registering the application for the online arduinoblocks web tool or external environment .
6. Uploads the block coding from the worksheet to the Arduino development card.
7. Open the serial communication console screen.
8. Indicate whether the Arduino board is connected to the web tool.
In order for the ArduinoBlocks web tool to upload to the development board, the ArduinoBlocks Connector application must be running. You can download this application for its website as in Figure 11.
Figure 11. ArduinoBlocks Connector Uygulaması
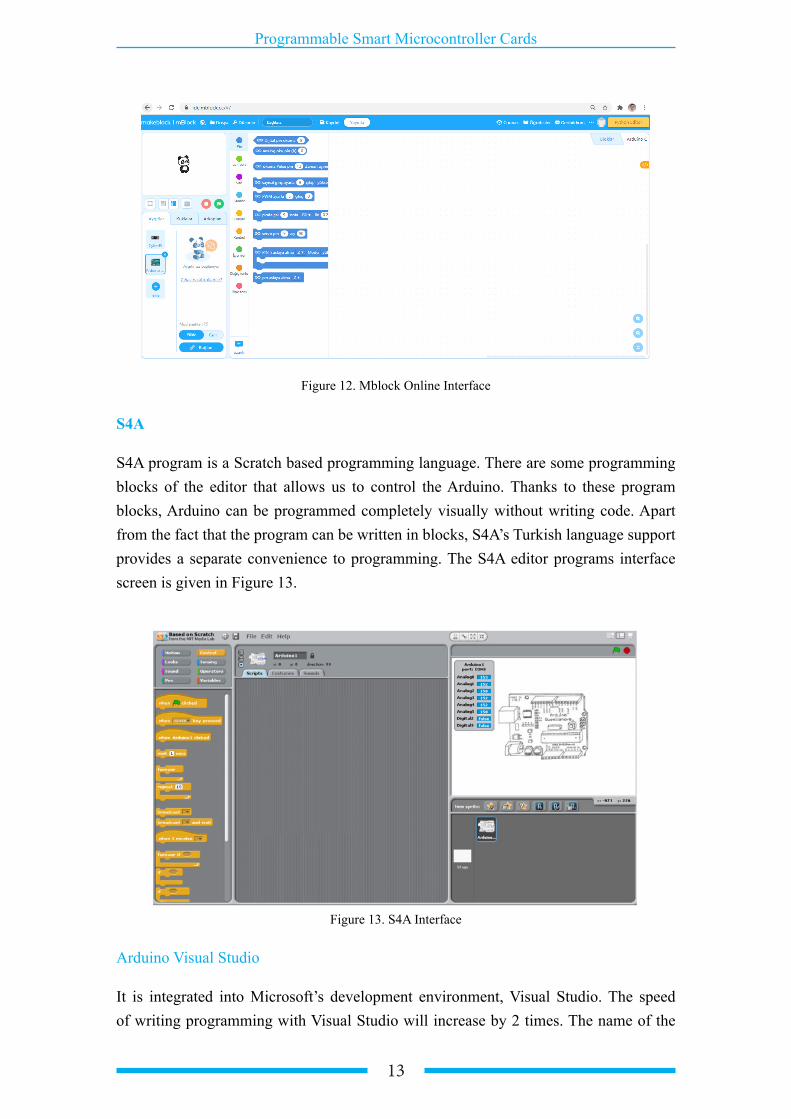
Mblock
Mblock is a block-based coding environment. The working logic is just like Scratch. Thanks to the drag and drop method, large code blocks can be created by placing the code blocks side by side, under each other, and the character can be moved as we want with these code blocks. Thanks to the drag and drop method, large code blocks can be created by placing the code blocks side by side, under each other, and the character can be moved as we want with these code blocks. The Mblock online editor screen is shown in Figure 12.
13
Programmable Smart Microcontroller Cards
Figure 12. Mblock Online Interface
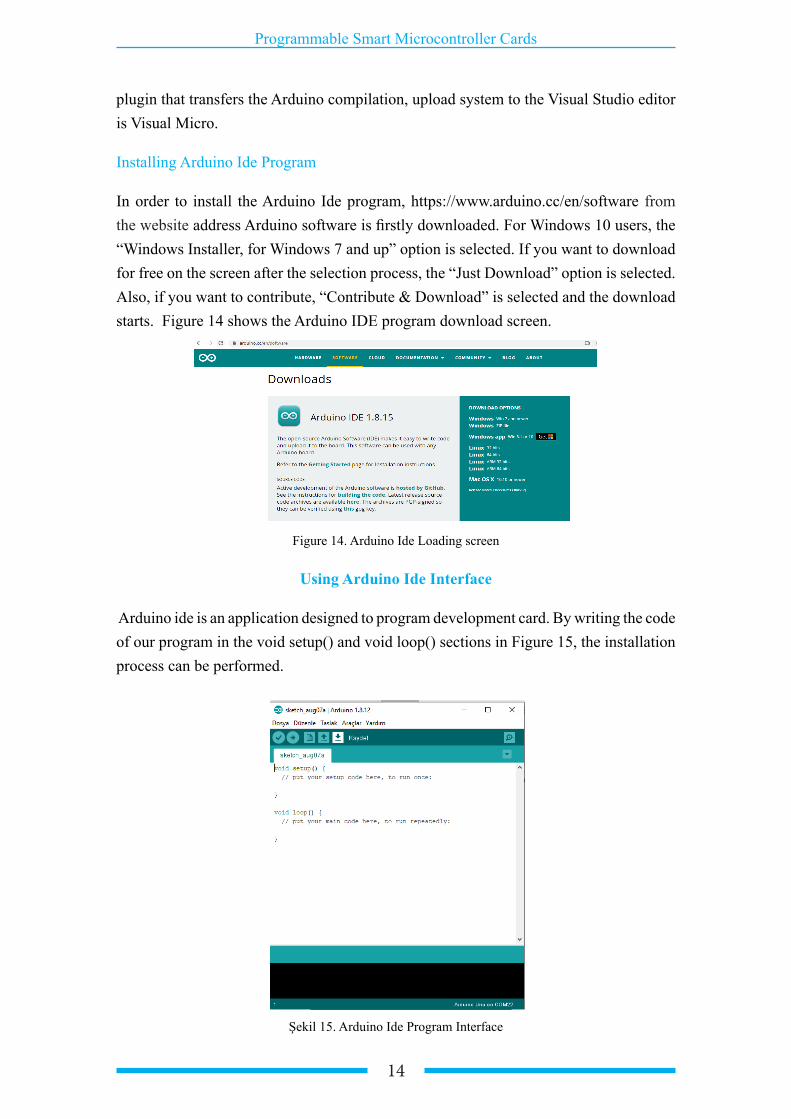
S4A
S4A program is a Scratch based programming language. There are some programming blocks of the editor that allows us to control the Arduino. Thanks to these program blocks, Arduino can be programmed completely visually without writing code. Apart from the fact that the program can be written in blocks, S4A’s Turkish language support provides a separate convenience to programming. The S4A editor programs interface screen is given in Figure 13.
Figure 13. S4A Interface
Arduino Visual Studio
It is integrated into Microsoft’s development environment, Visual Studio. The speed of writing programming with Visual Studio will increase by 2 times. The name of the
14
Programmable Smart Microcontroller Cards
plugin that transfers the Arduino compilation, upload system to the Visual Studio editor is Visual Micro.
Installing Arduino Ide Program
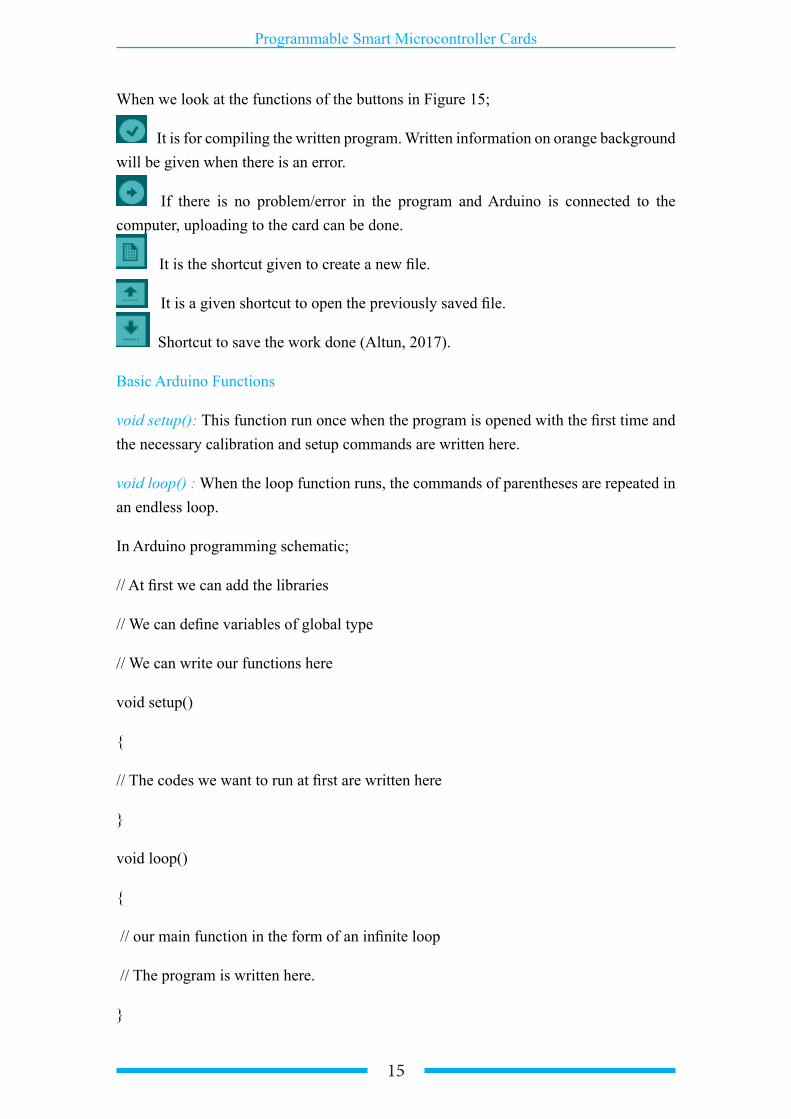
In order to install the Arduino Ide program, https://www.arduino.cc/en/software from the website address Arduino software is firstly downloaded. For Windows 10 users, the “Windows Installer, for Windows 7 and up” option is selected. If you want to download for free on the screen after the selection process, the “Just Download” option is selected. Also, if you want to contribute, “Contribute & Download” is selected and the download starts. Figure 14 shows the Arduino IDE program download screen.
Figure 14. Arduino Ide Loading screen
Using Arduino Ide Interface
Arduino ide is an application designed to program development card. By writing the code of our program in the void setup() and void loop() sections in Figure 15, the installation process can be performed.
Şekil 15. Arduino Ide Program Interface
15
Programmable Smart Microcontroller Cards
When we look at the functions of the buttons in Figure 15;
It is for compiling the written program. Written information on orange background will be given when there is an error.
If there is no problem/error in the program and Arduino is connected to the computer, uploading to the card can be done.
It is the shortcut given to create a new file.
It is a given shortcut to open the previously saved file.
Shortcut to save the work done (Altun, 2017).
Basic Arduino Functions
void setup(): This function run once when the program is opened with the first time and the necessary calibration and setup commands are written here.
void loop() : When the loop function runs, the commands of parentheses are repeated in an endless loop.
In Arduino programming schematic;
// At first we can add the libraries
// We can define variables of global type
// We can write our functions here
void setup()
{
// The codes we want to run at first are written here
}
void loop()
{
// our main function in the form of an infinite loop
// The program is written here.
}
16
Programmable Smart Microcontroller Cards
Adding a Library
In order to add a new library to the Arduino ide application, the files of the library are moved to the ‘libraries’ folder under the Arduino program installed directory. After adding the library, the following code is used to call our Arduino ide program.
#include <libraryname.h> is in the form. After that, the functions of the library can be used.
PinMode: It is used to set the input and output status of the pins in Arduino. The pins to be used in the setup are set.
pinMode(10,OUTPUT); //Pin 10 is defined as output,
pinMode(11,INPUT); //Pin 11 is defined as input,
DigitalWrite: It is used to energize or stop energizing the pins defined as outputs. A value of 1 is given to energize the desired pin and 0 to stop it.
digitalWrite(9, HIGH); //Logic 1 is set to pin 9, or
digitalWrite(9,1); //Logic 1 has been made to pin 9,
AnalogWrite: It enables the PWM signal to be generated on the selected pin, and the duty time of the PWM signal is determined by the value given to the function. When we think that the led is connected on the seventh pin, it is used to adjust the brightness of the led light with the PWM signal.
analogWrite(7, 180); // A 180 value analog signal is given to pin 7.
digitalRead: Logically reads the specified pin status. If the pin is logic 1, it returns 1, and if it is logic 0, it returns zero integer value.
int deger1= digitalRead(5); // Read pin 5 and assign to variable value1
int değer2= digitalRead(8); // Read pin 9 and assign to variable value2
delay(): It is used to give a wait between two codes . The value written into the delay function is milliseconds. The value 1000 must be written to the function of an one second wait.
delay(500); // Gives half a second pause,
Serial.begin(9600); // serial communication is started,
Serial.print(“merhaba”); // The expression in quotes is sent to the serial monitor. The
17
Programmable Smart Microcontroller Cards
data is printed side by side on the screen.
References
Akinci, A., & Tuzun, H. (2016). Student Views on the Use of Robots in Programming Education.10th International Computer . Instructional Technologies Symposium, 135. Rize.
Altun, S. (2017). Adim Adim Arduino. Mardin.
Barman, G. (2014). Gorme Engellilere Yardimci Ultrasonik Cihaz. Trabzon: Karadeniz Technical University Computer Engineering Department.
Baz, F. (2018). A Comparative Analysis of Coding Software for Children. Curr Res Educ, 4(1),36-47.
Butuner, R. (2019). Effect of Coding and Robotic Coding Training on Students. Journal of Information Systems and Management Research, 24-30
Ersoy, H.,Gulbahar, Y., & Madran, R. O. (2011). A Model Proposal for Teaching Programming Languages: Robot Programming. XIII. Academic Informatics Conference,731-735. Malatya: Inonu University.
Gelen, I. (2017). P21- 21st Century Skill Frameworks in Curriculum and Instruction(USA Practices). Journal of Interdisciplinary Educational Research, 15-29.
Goksoy, S., & Yilmaz, I. (2018). The Opinions Of Information Relations Teacher And Their Students Wıth Regard To Lessons Of Robots And Coding. Duzce University Journal of Social Sciences Institute,8(1), 178-196.
Cayiroglu I. (2015). Arduino ile Park Sensoru Uygulamasi, http://www.ibrahimcayiroglu.com/Dokumanlar/MekatronikProjeUygulamasi/37-Makale-Arduino_Ile_Park_Sensoru_Uygulamasi-Mehmet_CIKAN.pdf
MEB. (2018). Bilgisayar bilimi dersi kur 1-2 ögretim programi. MEB Ogretim Programlarini Izleme ve Degerlendirme Sistemi: Access Adress: http://mufredat.meb.gov.tr/Dosyalar/2018120203611364
Robotic Automation and Systems. (2018). Arduıno Leonardo. Robotic Systems: Access Adress:http://www.robotiksistem.com/arduino_leonardo_ozellikleri.html
Yildız, R., Talaslioglu, S. S., & Yildirim, M. (2020). Determination of Situations of Extra-curricular Practices Carried About Robotics, Coding and Electronics. IBAD Journal of Social Sciences, 193-208.
Copyright © 2021 by ISRES Publishing
18
Programmable Smart Microcontroller Cards
Zohra, B. (2015). Arduino Ile Sensor Uygulamalari. Tokat: Gaziosmanpasa University.
About the Authors
Resul BUTUNER,i s a Computer Teacher at Adil Karaagac Vocational and Technical Anatolian High School in Konya, Turkey. He has a master’s degree in Computer Engineering from Necmettin Erbakan University. His main areas of interest are artificial intelligence, robotic coding, data mining and augmented reality applications. He is an instructor in the field of Robotic coding within TUBITAK. He continues to write a book in the field of robotic coding at the Ministry of National Education. He worked as a coordinator in budgeted projects related to student education.
E-mail: rbutuner@gmail. com, Orcid: 0000-0002-9778-2349
Yusuf UZUN, PhD, is an Assistant Professor of Computer Engineering at Necmettin Erbakan University in Konya, Turkey. He holds a PhD in Mechanical Engineering from Necmettin Erbakan University. His main areas of interest are artificial intelligence, autonomous systems and augmented reality applications. He also works as the Rector’s Advisor at Selcuk University.
E-mail: [email protected], Orcid: 0000-0002-7061-8784.
Similarity Index
The similarity index obtained from the plagiarism software for this book chapter is 9%.
To Cite This Chapter:
Butuner, R. & Uzun, Y. (2021). Arduino Microcontroller Card. In S. Kocer, O. Dundar & R. Butuner (Eds .), Programmable Smart Microcontroller Cards (pp. 1–18). ISRES Publishing.
Related Documents