Multi-Unit Charger RLN5795 (CP125) Accessories

Welcome message from author
This document is posted to help you gain knowledge. Please leave a comment to let me know what you think about it! Share it to your friends and learn new things together.
Transcript

Multi-Unit Charger
RLN5795 (CP125)
Accessories
09U38-A_MUC_Cover.fm Page 1 Thursday, May 28, 2009 7:00 PM

09U38-A_MUC_Cover.fm Page 2 Thursday, May 28, 2009 7:00 PM

1
IMPORTANTSAFETY INSTRUCTIONS
SAVE THESE INSTRUCTIONS
This document contains important safety and operating instructions. Please read these instructions carefully and save them for future reference.Before using the battery charger, read all the instructions and cautionary markings on (1) the charger, (2) the battery, and (3) on the radio using the battery.
1. To reduce risk of injury, charge only the rechargeable Motorola authorized batteries listed in Table 1. Other batteries may explode, causing personal injury and damage.
2. Use of accessories not recommended by Motorola may result in risk of fire, electric shock, or injury.
!WARNING
09U38-B_MUC_eng.fm Page 1 Wednesday, June 3, 2009 3:09 PM

2
WARNINGS (continued)
3. To reduce the risk of damage to the electric plug and cord, pull by the plug rather than the cord when disconnecting the charger.
4. An extension cord should not be used unless absolutely necessary. Use of an
improper extension cord could result in risk of fire and electric shock. If an extension cord must be used, make sure that the cord size is 18 AWG for lengths up to 100 feet (30.48 m) and 16 AWG for lengths up to 150 feet (45.72 m).
5. To reduce risk of fire, electric shock, or injury, do not operate the charger if it has been broken or damaged in any way. Take it to a qualified Motorola service representative.
6. Do not disassemble the charger; it is not repairable and replacement parts are not available. Disassembly of the charger may result in risk of electrical shock or fire.
7. To reduce risk of electric shock, unplug the charger from the AC outlet before attempting any maintenance or cleaning.
!WARNING
09U38-B_MUC_eng.fm Page 2 Wednesday, June 3, 2009 3:09 PM

3
OPERATIONAL SAFETY GUIDELINES
• Turn radio off when charging battery.
• This equipment is not suitable for outdoor use. Use only in dry locations/conditions.
• Connect equipment only to an appropriately fused and wired supply of the correct voltage (as specified on the product).
• Disconnect from line voltage by removing mains plug.
• The socket outlet to which this equipment is connected should be close by and easily accessible.
• In equipment using fuses, replacements must comply with the type and rating specified in the equipment instructions.
• Maximum ambient temperature around the power supply unit must not exceed 40 °C (104 °F).
• Output power from the power supply unit must not exceed the ratings stated on the product label located on the bottom of the charger.
• Make sure the cord is located where it will not be stepped on, tripped over, or subjected to water, damage, or stress.
09U38-B_MUC_eng.fm Page 3 Wednesday, June 3, 2009 3:09 PM
4
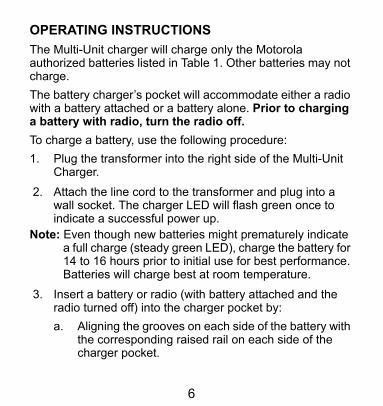
MOTOROLA AUTHORIZED BATTERIESThe batteries listed in Table 1 are approved for use with the RLN5795 Multi-Unit Charger.
Table 1 Motorola Authorized BatteriesKit (part)Number Battery Chemistry/Description
PMNN4061 NiMH Battery, 1300 mAhPMNN4063 NiMH Battery, 1500 mAhPMNN4078 Li-Ion Battery, 1500 mAh
09U38-B_MUC_eng.fm Page 4 Wednesday, June 3, 2009 3:09 PM

5
POWER SOURCES AND MOTOROLA AUTHORIZEDTRANSFORMERSThis Multi-Unit charger should be used with the direct plug-in, Motorola authorized transformer and line cord listed in Table 2.
DESCRIPTIONThe Multi-Unit Charger allows you to charge up to six NiMH, and Li-Ion batteries at one time. The kit contains:
• 1 Multi-Unit Charger (with six Rapid Charger Pockets)• 1 Universal Switching Transformer• 1 Line Cord• 1 User Guide
Table 2 Kit ConfigurationsKit Part Number Description Transformer Line CordRLN5795 Multi-Unit Charger – NA 2580427B10 3060665A04
09U38-B_MUC_eng.fm Page 5 Wednesday, June 3, 2009 3:09 PM
6
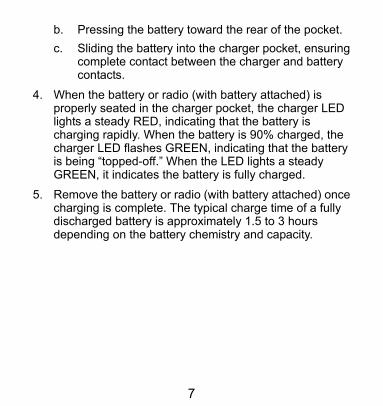
OPERATING INSTRUCTIONSThe Multi-Unit charger will charge only the Motorola authorized batteries listed in Table 1. Other batteries may not charge.The battery charger’s pocket will accommodate either a radio with a battery attached or a battery alone. Prior to charging a battery with radio, turn the radio off. To charge a battery, use the following procedure:1. Plug the transformer into the right side of the Multi-Unit
Charger.
2. Attach the line cord to the transformer and plug into a wall socket. The charger LED will flash green once to indicate a successful power up.
Note: Even though new batteries might prematurely indicate a full charge (steady green LED), charge the battery for 14 to 16 hours prior to initial use for best performance. Batteries will charge best at room temperature.
3. Insert a battery or radio (with battery attached and the radio turned off) into the charger pocket by: a. Aligning the grooves on each side of the battery with
the corresponding raised rail on each side of the charger pocket.
09U38-B_MUC_eng.fm Page 6 Wednesday, June 3, 2009 3:09 PM
7
b. Pressing the battery toward the rear of the pocket.c. Sliding the battery into the charger pocket, ensuring
complete contact between the charger and battery contacts.
4. When the battery or radio (with battery attached) is properly seated in the charger pocket, the charger LED lights a steady RED, indicating that the battery is charging rapidly. When the battery is 90% charged, the charger LED flashes GREEN, indicating that the battery is being “topped-off.” When the LED lights a steady GREEN, it indicates the battery is fully charged.
5. Remove the battery or radio (with battery attached) once charging is complete. The typical charge time of a fully discharged battery is approximately 1.5 to 3 hours depending on the battery chemistry and capacity.
09U38-B_MUC_eng.fm Page 7 Wednesday, June 3, 2009 3:09 PM

8
TROUBLESHOOTING
Problem SolutionCharger LED status does not turn on when radio or battery is inserted
1. Verify no foreign objects or debris under charging pocket or in contacts.
2. Verify radio or battery is properly inserted into pocket.
Charger LED status changes unexpectedly or is inconsistent
Charger function and LED status may appear inconsistent if a radio is operated in or near the charger. Discontinue use of radio. The charger will automatically resume proper operation.
Charger LED operates erratically after loss of AC power
Unplug power supply line cord from AC outlet, wait 30 seconds and plug power supply line cord back into the AC outlet.
Charge time appears longer than usual
1. Ensure all radios are turned off.2. The typical charge time of a fully
discharged battery is approximately 1.5 to 3 hours depending on the battery chemistry and capacity.
Radio or battery is not charged
1. Radio or battery is not seated properly into pocket. Reinstall and verify charge status 15 seconds after insertion into charger.
2. Ensure radio is turned off.
09U38-B_MUC_eng.fm Page 8 Wednesday, June 3, 2009 3:09 PM

09U38-A_MUC_Cover.fm Page 3 Thursday, May 28, 2009 7:00 PM

m
MOTOROLA and the Stylized M Logo are registered in the US Patent & Trademark Office.All other product or service names are the property of their respective owners.© 2009 by Motorola, Inc. All Rights Reserved.
*6880309U38*6880309U38-B
09U38-A_MUC_Cover.fm Page 4 Thursday, May 28, 2009 7:00 PM
Related Documents