2003 & 2004 EXCALIBUR® and VIKING™ MANUAL DEC 06 VERSION 3.1 Table of Contents: Introduction I. Safety Guidelines & Instructions II. Specifications III. Operating instructions A. Power Supply B. Compressed Air/Nitrogen Supply C. Turning “ON & FIRING” the Marker D. Velocity Adjustment IV. Electronics V. Maintenance A. Cleaning B. Sidewinder and 2-Liter Plus Dual C. Ball Detents D. SCM™ E. Tornado Valve F. Lightning bolt G. Excalibur Hammer H. Viking Hammer I. Excalibur Ram J. Trigger Frame K. Solenoid valves VI. Troubleshooting VII. Schematics A. 2004 Excalibur® B. 2004 Viking™ VIII. Warranty, Liability and Contact Information Introduction: Congratulations on purchasing an EXCALIBUR® or VIKING™ paintball marker. We hope you enjoy using this marker. Please read the information in the manual and get familiar with your marker before use. This manual covers both the EXCALIBUR® and VIKING™ series of paintball markers as well as covering the SIDEWINDER® regulator and the SCM™ low pressure pneumatics regulator. This manual includes information for both the 2000-2003 and the 2004 models of EXCALIBUR® and VIKING™. The specifications and photographs in this material are for information and general guidance purpose only. Our products are continually updated and changes may be made to specification, design or appearance from time to time.

Welcome message from author
This document is posted to help you gain knowledge. Please leave a comment to let me know what you think about it! Share it to your friends and learn new things together.
Transcript

2003 & 2004 EXCALIBUR® and VIKING™ MANUALDEC 06 VERSION 3.1
Table of Contents:
IntroductionI. Safety Guidelines & InstructionsII. SpecificationsIII. Operating instructions
A. Power SupplyB. Compressed Air/Nitrogen SupplyC. Turning “ON & FIRING” the MarkerD. Velocity Adjustment
IV. ElectronicsV. Maintenance
A. CleaningB. Sidewinder and 2-Liter Plus DualC. Ball DetentsD. SCM™E. Tornado ValveF. Lightning boltG. Excalibur HammerH. Viking HammerI. Excalibur RamJ. Trigger FrameK. Solenoid valves
VI. TroubleshootingVII. Schematics
A. 2004 Excalibur®B. 2004 Viking™
VIII. Warranty, Liability and Contact Information
Introduction:
Congratulations on purchasing an EXCALIBUR® or VIKING™ paintball marker.We hope you enjoy using this marker. Please read the information in the manualand get familiar with your marker before use.
This manual covers both the EXCALIBUR® and VIKING™ series of paintballmarkers as well as covering the SIDEWINDER® regulator and the SCM™ lowpressure pneumatics regulator. This manual includes information for both the2000-2003 and the 2004 models of EXCALIBUR® and VIKING™.
The specifications and photographs in this material are for information andgeneral guidance purpose only. Our products are continually updated andchanges may be made to specification, design or appearance from time to time.

These changes are subject to change without notice. AKALMP reserves the rightto revise and improve its products as it sees fit.
EXCALIBUR®, VIKING™, TORNADO® VALVE (pat#5791328), LIGHTNINGBOLT®, SODA CAN MOD/SCM™ and SIDEWINDER®(pat 6675791) areTrademarks or Registered Trademarks of AKALMP, Inc. Design rights and allrights reserved. All patterns, drawings, photographs, instructions or manualsremain the intellectual property of the manufacturer. Covered under US Patent5791328 and other Patents Pending. All rights will be strictly enforced.
I. SAFETY GUIDELINES &INSTRUCTIONS.
SAFETY GUIDELINES & INSTRUCTIONS FOR SAFE HANDLING OFEXCALIBUR® & VIKING™ MARKERS.• The EXCALIBUR® and VIKING™ are not toys.
• Careless or improper use, including failure to follow instructions in the
operators manual, could cause serious injury or death.
• Paintball industry standard head/face/throat/eye/ear protection designed
specifically for paintball meeting ASTM standard F1776 must be worn by userand any person within range of any paintball marker.
• Do not shoot at a person at close range.
• Observe all local laws, regulations and guidelines.
• Use only on paintball fields where safety rules are strictly enforced.
• You must be at least 18 years of age to purchase the EXCALIBUR® or
VIKING™.
• Individuals under 18 years of age must have adult supervision when using or
handling the EXCALIBUR® or VIKING™.
• Use only nitrogen and compressed air from approved storage bottle. Use CO2
only if you double regulate.
• Do not exceed 850 psi input pressure.
• Read operator's manual before use and comply with all safety instructions.
• Use .68 caliber paintballs only.

• Always keep EXCALIBUR® or VIKING™ turned off when not in use.
• Always switch gas source off when EXCALIBUR® or VIKING™ is not in use.
• Treat every EXCALIBUR® or VIKING™ as if it is loaded.
• Never point the EXCALIBUR® or VIKING™ at anyone or anything you do not
intend to shoot.
• Use approved barrel blocking devices on the EXCALIBUR® or VIKING™ when
not in use.
• Never shoot at velocities in excess of 300 FPS or field limit.
• Never put fingers or any foreign objects into the paintball feed tube.
• Always remove all paintballs from the EXCALIBUR® or VIKING™ when not in
use on or off the field.
• Regulators and LPR’s can store gas after the bottle has been removed. Always
degas EXCALIBUR® or VIKING™ when not in use or before working on themarkers.
• When adjusting, servicing or using the Excalibur, ALWAYS WEAR EYE
PROTECTION
• Before doing any work to the Excalibur® or VIKING™, make sure it is turned
off, the air source has been removed, and all paintballs have been removed.
• Seek professional assistance for advice if you are unsure of procedures.
II. SPECIFICATIONS.
2004 EXCALIBUR® SPECIFICATIONS:• Model: Excalibur®
• Version: B
• Caliber: . 68
• Action: Closed Bolt Electro-pneumatic Operation
• Gas Source: Compressed air or Nitrogen, CO2 only if double-regulated with a
bottom line• Power Supply: 9 Volt battery
• ROF (Cyclic Rate): 13+ BPS (unlimited ROF with EYE’s)
• Standard Barrel Length: 12.0" Javelin (AC Threads)
• Length: 7.25 inches

• Height: 8.3 inches (Top of feed tube to bottom of grip)
• Width: 1.75 inches
• Weight: 3 lbs (Without battery & barrel)
• Operating Pressure: 140-180 PSI @ 280 FPS (depending on paint size)
• Input PSI to SIDEWINDER or 2-LITER: 400-900 PSI
• Pneumatics Pressure: 65-85 PSI
Features:• Tornado® Valve(Pat. #5791328)
• Lightning® Bolt (Delrin) with Quick Release Pin
• Javelin™ Barrel
• 45 Grip
• Dual ball Detent for centering the ball in the breech
• Built-In Vertical Mount
• SIDEWINDER® Vertical Pressure Reg.
• AKA Threaded Clamping Feed Tube
• Adjustable Trigger (3 adjustment points)
• Adjustable Pandora circuit board
• Anti-chop eyes.
• Adjustable SCM - III™ Low Pressure Regulator (LPR).
• Pull Through Cleaning
• Easy Disassembly & Low Maintenance
2004 VIKING™ SPECIFICATIONS:• Model: Viking™
• Version:B
• Caliber: .68
• Action: Open Bolt Electro-pneumatic Operation
• Gas Source: Compressed air or Nitrogen
• Power Supply: 9 Volt battery
• ROF (Cyclic Rate): 13+BPS (unlimited ROF with EYE’s)
• Standard Barrel Length: 12.0" Javelin (AC Threads)
• Length: 7.5 inches
• Height: 8.3 inches (Top of feed tube to bottom of grip)
• Width: 1.75 inches
• Weight: 3. lbs (Without battery & barrel)
• Operating Pressure: 140-180 PSI @ 280 FPS (depending on paint size)
• Input PSI to SIDEWINDER or 2-Liter: 400-850 PSI
• Pneumatics Pressure: 65-85 PSI
Features:• Tornado® Valve
• Lightning® Bolt (Delrin) with Quick Release Pin
• Javelin™ Barrel

• 45 Grip
• Dual ball Detent for centering the ball in the breech
• Built-In Vertical Mount
• SIDEWINDER® Vertical Pressure Reg.
• AKA Threaded Clamping Feed Tube
• Adjustable Trigger (3 adjustment points)
• Adjustable Pandora circuit board
• Anti-chop eyes.
• Adjustable SCM - III™ Low Pressure Regulator (LPR).
• Pull Through Cleaning
• Easy Disassembly & Low Maintenance
2000-2003 EXCALIBUR SPECIFICATIONS:• Model: Excalibur®
• Version: A
• Caliber: .68
• Action: Closed Bolt Electro-pneumatic Operation
• Gas Source: Compressed air or Nitrogen, CO2 only when double regulated
with a bottom line• Power Supply: 9 Volt battery
• ROF (Cyclic Rate): 13+BPS
• Standard Barrel Length: 12.0" Javelin (AC Threads)
• Length: 8.0 inches
• Height: 8.4 inches (Top of feed tube to bottom of grip)
• Width: 1.75 inches
• Weight: 3. lbs (Without battery & barrel)
• Operating Pressure: 140-180 PSI @ 280 FPS (depending on paint size)
• Input PSI to SIDEWINDER or 2-Liter: 400-850 PSI
• Pneumatics Pressure: 65-85 PSI
Features:• Tornado® Valve
• Lightning® Bolt (Delrin) with Quick Release Pin
• Javelin™ Barrel
• 45 Grip
• Wire Ball Detent
• Built-In Vertical Mount
• SIDEWINDER® Vertical Pressure Reg.
• Threaded Vertical Feed tube
• Adjustable Trigger (3 adjustment points)
• Adjustable WAS circuit board
• Adjustable Pneumatics Low Pressure Regulator (LPR).
• Pull Through Cleaning
• Easy Disassembly & Low Maintenance
• Rugged Design
• Barrel Plug
• Carrying Case
2001-2003 VIKING™ SPECIFICATIONS:• Model: Viking™
• Version: A
• Caliber: . 68
• Action: Open Bolt Electro-pneumatic Operation
• Gas Source: Compressed air or Nitrogen , CO2 only if double regulated with a
bottom line• Power Supply: 9 Volt battery
• ROF (Cyclic Rate): 13+BPS (unlimited ROF with EYE’s)
• Standard Barrel Length: 12.0" Javelin (AC Threads)
• Length: 8.0 inches
• Height: 8.4 inches (Top of feed tube to bottom of grip)
• Width: 1.75 inches
• Weight: 3. lbs (Without battery & barrel)
• Operating Pressure: 140-180 PSI @ 280 FPS (depending on paint size)
• Input PSI to SIDEWINDER or 2-Liter: 400-850 PSI
• Pneumatics Pressure: 65-85 PSI
Features:• Tornado®Valve
• Lightning® Bolt(Delrin) with Quick Release Pin
• Javelin™ Barrel
• 45 Grip
• Wire Ball Detent
• Built-In Vertical Mount
• SIDEWINDER® Vertical Pressure Reg.
• Threaded Vertical Feed tube
• Adjustable Trigger (3 adjustment points)
• Adjustable Equalizer circuit board
• Adjustable Pneumatics Low Pressure Regulator (LPR).
• Pull Through Cleaning
• Easy Disassembly & Low Maintenance
• Rugged Design
• Barrel Blocking Device
• Carrying Case
III. OPERATING INSTRUCTIONS.

A. POWER SUPPLY:
Installing a Battery:Step 1: Make sure the marker is unloaded, de-gassed and turned off. Removeone of the two screws holding the grip panel on the left side of the marker. Rotatethe panel out of the way. Remove the 9-volt battery from the battery cable. Donot to pull the battery cable apart.
Step 2: Install the new 9-volt battery on the battery cable and place it back intothe grip frame. Make sure no wires on the battery cable are pinched. Gently loopthe wiring and lay it on the side of the battery.
Step 3: Rotate the grip panel back into place. Then replace the grip panel screw.
B. COMPRESSED AIR/NITROGEN SUPPLY.
The EXCALIBUR® and VIKING™ are designed to operate on nitrogen orcompressed air. It requires a high flow of CLEAN gas. Most adjustable nitrogen
systems or preset bottle systems, will work fine. The EXCALIBUR® andVIKING™ are supplied with a SIDEWINDER® regulator which has beendesigned to work at the low pressure range in which the EXCALIBUR® andVIKING™ operate. The input pressure to the SIDEWINDER® regulator should be400 to 500psi if you have an adjustable nitrogen system. If you have a presetbottle then the 850 psi input is okay but the Low Pressure 450 nitrogen bottlesare better.
CO2 may be used but only when double regulated using a bottom line.
CAUTIONS:Electronic markers are extremely vulnerable to dirt. For this reason, werecommend a portable filter such as the GUARDIAN™ for filling your nitrogensystem or a nitrogen system with a built-in filter
Most metal fittings and steel braided hoses are nickel-plated brass which canleave metal shavings in your marker when you install a hose. Always run airthrough the hoses and fittings before attaching them to a marker to insure the airline is clear of debris. Metal shavings can damage the internals of the marker.
Use only steel braided hose and stainless steel quick disconnects or Macro-line.Micro-line restricts airflow.
Do not use pro-connects and fittings like those, they restrict airflow which cancause a drop in efficiency or can cause drop off problems while firing theEXCALIBUR® or VIKING™.
C. Turning "ON" the marker.
1. After making sure the marker is unloaded and de-gassed and you haveinstalled the battery:
2. Turn on the air source. On the EXCALIBUR®, if the bolt is not in its forwardposition it will now move forward closing the breech. The bolt on the VIKING™will move to the rear of the marker.
3. Pointing the marker in a safe direction away from you and others. Turn themarker "ON" using the recessed power switch on the side of the marker or in theback of the marker. When the LED starts blinking the marker is ready to fire. Usea barrel cover if not on the paintball field.
4. Simply point in a safe direction and pull the trigger. Always keep your fingerout of the trigger guard when you are not firing the paintball marker.

D. Velocity adjustment.
The velocity of the EXCALIBUR® and VIKING™ is controlled directly through theregulator mounted vertically in front of the trigger frame. When making velocityadjustments you should use extremely fine adjustments so as not to go past thedesired velocity. If you are unsure where your operating pressure is, simply turnthe pressure down until the velocity drops to about 200 fps then slowly turn thepressure back up.
Do not exceed a velocity of 300 FPSor field limit.
If using a Sidewinder®:
1. Turning the adjuster screw clockwise will lower the pressure, thus lowering thevelocity.I
2. Turning the adjuster screw counter-clockwise will increase the pressure raisingthe velocity.
If using a 2-Liter™:
Follow the + and – signs on the regulator adjuster cap.
IV. ELECTRONICS:
Excaliburs® and Vikings™ have been supplied from the factory with Nelson ,Wicked Air Sports, and Pandora circuit boards. For instructions regardingchanging settings and operation, please go to their respective web sites.TheTadao and other circuit boards were never factory authorized boards. As aresult the factory cannot give technical assistance with their operation.
V. MAINTENANCE.
A. CLEANING.
The bolt can be field-stripped from the EXCALIBUR® and VIKING™ while themarker is pressurized with gas. This allows you to clean the marker and oil thebolt when needed.
The Excalibur® and VIKING™ should be cleaned externally using a cotton cloth.
All external and internal moving parts should be lubricated using Extreme Lubeonly. Internals can be lubed by placing 1 or 2 drops in the input quick disconnecton your regulator and then dry firing the gun. A few drops should also be placedon the o-rings on the Lightning bolt. This should be done every time you play,and the bolt should be oiled throughout the day of play.
Recommended lubricants: Extreme-lube from AKALMP. Under nocircumstances should you use Vaseline, WD-40, Grease of any kind (ie. NODOW 33), Engine Oil, 3-in-1, gun oils, and any similar oils. We do notrecommend other lubricants because we do not know what is in them.
The electronics are protected against moisture, but the EXCALIBUR® andVIKING™ electronic components should never be immersed in water or damagemay occur.
All the threads on the EXCALIBUR® and VIKING™ are American threads. Allsetscrews are American sizes.
If the EXCALIBUR® is to be stored for more then a few months, remove thevalve spring. This will increase the spring's lifespan.
B. REGULATORS.
The SIDEWINDER® regulator was originally designed specifically for use on theEXCALIBUR® because of its extremely low operating pressure of approximately140-180 psi. This regulator will work well on other guns also. The design of theregulator permits the air hose to be connected to the gun in any location the userwishes within a 360 degree circle around the base of the regulator, while stillallowing the regulator to be externally adjusted from the bottom. The top end capof the regulator can be replaced with different length ones to allow the user toadjust total length of the reg.
The 2-Liter Plus Dual™ is a pressure-compensating regulator which helpseliminate drop-off during rapid fire.
For technical information on the Sidewinder™ or 2-Liter Plus™, please go theSidewinder ™ or 2-Liter™ Instruction pages.
C. BALL DETENTS.
2004 EXCALIBUR® & VIKING™ BALL DETENT.The ’04 EXCALIBUR® and ’04 VIKING™ have been supplied with a dual balldetent to keep paintballs from double feeding and to keep paintballs centereddirectly in the breech for better detection by eyes when installed.
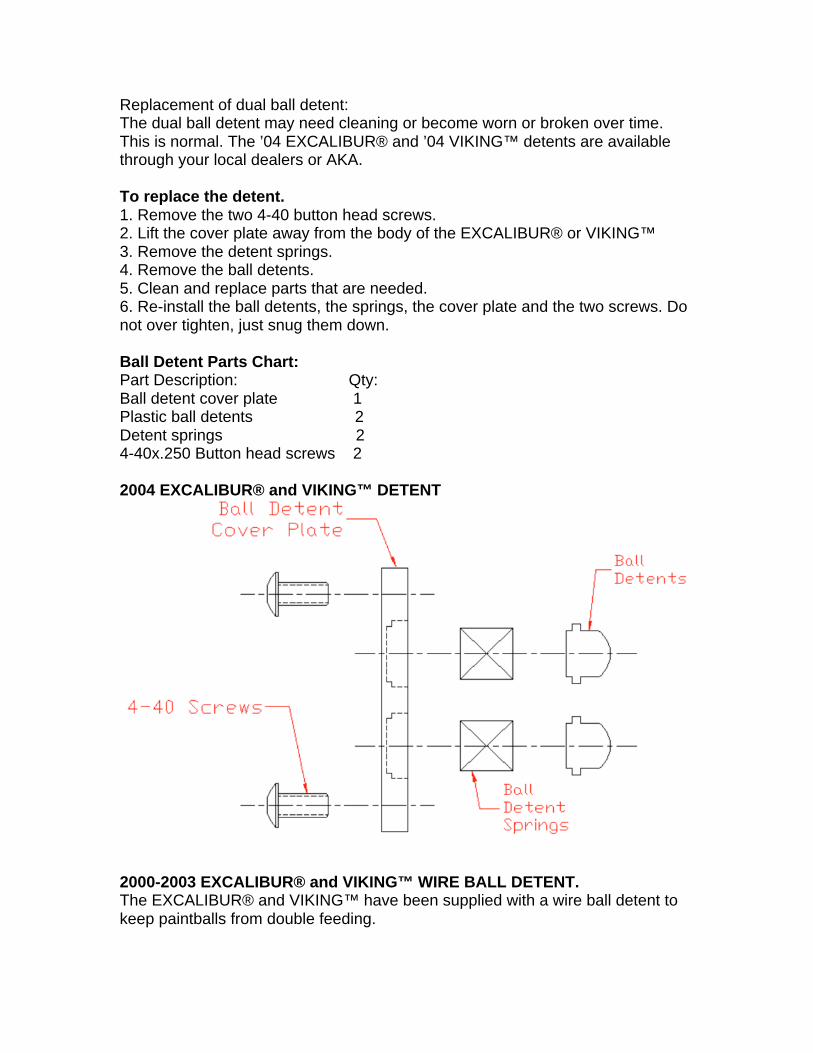
Replacement of dual ball detent:The dual ball detent may need cleaning or become worn or broken over time.This is normal. The ’04 EXCALIBUR® and ’04 VIKING™ detents are availablethrough your local dealers or AKA.
To replace the detent.1. Remove the two 4-40 button head screws.2. Lift the cover plate away from the body of the EXCALIBUR® or VIKING™3. Remove the detent springs.4. Remove the ball detents.5. Clean and replace parts that are needed.6. Re-install the ball detents, the springs, the cover plate and the two screws. Donot over tighten, just snug them down.
Ball Detent Parts Chart:Part Description: Qty:Ball detent cover plate 1Plastic ball detents 2Detent springs 24-40x.250 Button head screws 2
2004 EXCALIBUR® and VIKING™ DETENT
2000-2003 EXCALIBUR® and VIKING™ WIRE BALL DETENT.The EXCALIBUR® and VIKING™ have been supplied with a wire ball detent tokeep paintballs from double feeding.
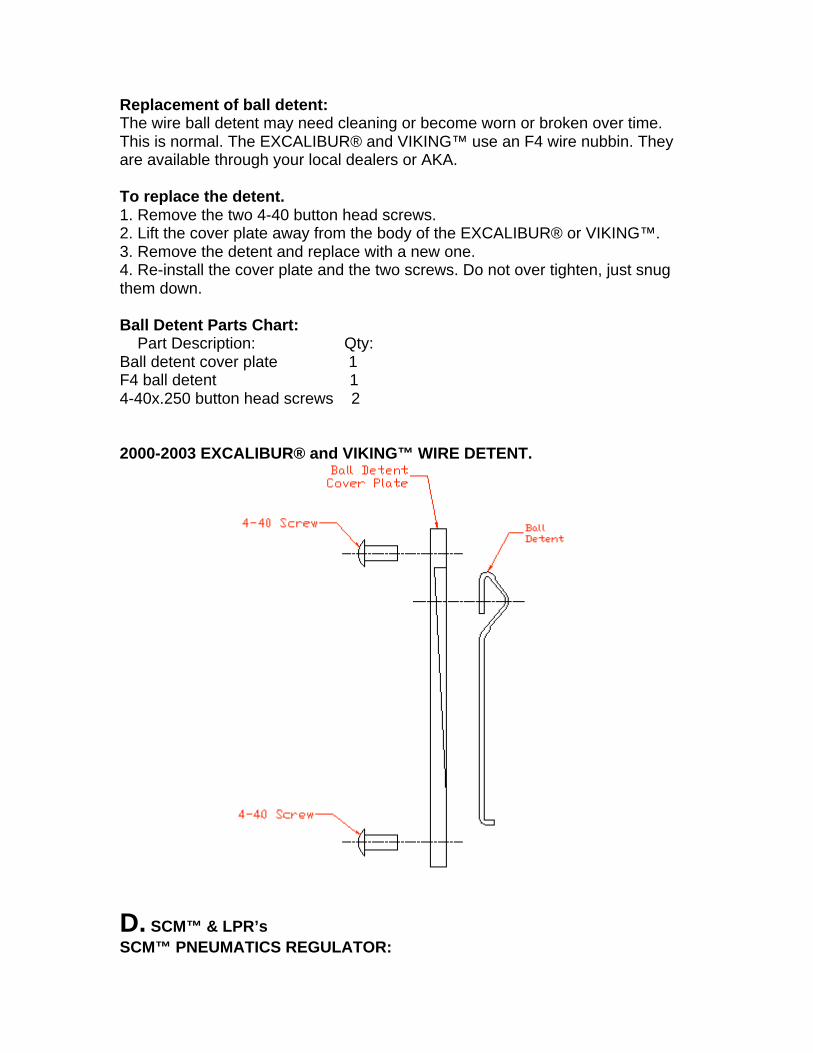
Replacement of ball detent:The wire ball detent may need cleaning or become worn or broken over time.This is normal. The EXCALIBUR® and VIKING™ use an F4 wire nubbin. Theyare available through your local dealers or AKA.
To replace the detent.1. Remove the two 4-40 button head screws.2. Lift the cover plate away from the body of the EXCALIBUR® or VIKING™.3. Remove the detent and replace with a new one.4. Re-install the cover plate and the two screws. Do not over tighten, just snugthem down.
Ball Detent Parts Chart: Part Description: Qty:Ball detent cover plate 1F4 ball detent 14-40x.250 button head screws 2
2000-2003 EXCALIBUR® and VIKING™ WIRE DETENT.
D. SCM™ & LPR’s
SCM™ PNEUMATICS REGULATOR:
(SODA CAN MOD)The SCM™ is a modular pressure compensating low pressure regulator thatsupplies air for the pneumatics of the paintball markers. It can fit a large numberof different paintball markers.
The SCM™ pneumatics regulator controls the air pressure fed to the solenoidvalves, which in turn operate the rest of the marker. The maximum operatingpressure of the solenoid valves is 100 psi., but the components of theEXCALIBUR® and VIKING™ needs only 60-85 psi to operate. Use of the SCM™pneumatics regulator keeps the solenoid valves from receiving too high apressure.
The SCM™ pneumatics regulator is preset to 75 psi at the factory and should leftat this setting when the marker is brand new. Once the marker is broken in theSCM™ pneumatics regulator can be adjusted down to a lower pressure settingranging from 60 to 70 psi. If a replacement regulator is installed you need tocheck the pressure. The regulator cartridge can be removed from theEXCALIBUR® and VIKING™ without causing the pressure settings to change.The adjuster screw is on the front side of the regulator and should never beadjusted on the field or by a non-qualified person.
Do not adjust the pressure without a gauge, you can easily over- pressurizethe system and damage the solenoid valves.
To adjust the SCM™ regulator:1. De-gas the marker.2. Unscrew the hammer cartridge or end cap from the back of the marker.3. Install the pneumatics regulator test chamber into either the hammer tube orthe pnuematics tube depending on what marker you are testing. Then install thelow pressure gauge on the test chamber.4. Gas up the marker, set the SIDEWINDER™ regulator to an output of 200 psi.5. Adjust the SCM™ to the desired pressure. Once the correct pressure isachieved, turn the air on and off and cycle the marker several times to make surethe pneumatics regulator stays at the new setting.
Troubleshooting:Air leaking from the front of the regulator:1. Check the o-ring around the piston.
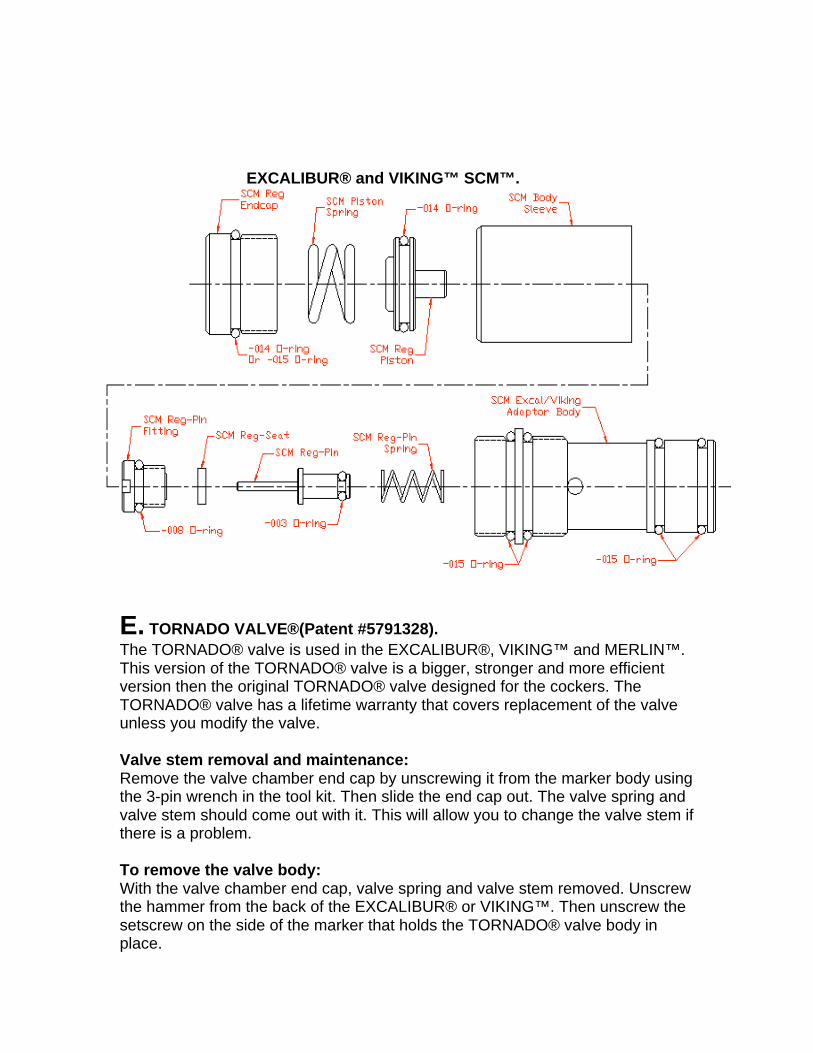
EXCALIBUR® and VIKING™ SCM™.
E. TORNADO VALVE®(Patent #5791328).
The TORNADO® valve is used in the EXCALIBUR®, VIKING™ and MERLIN™.This version of the TORNADO® valve is a bigger, stronger and more efficientversion then the original TORNADO® valve designed for the cockers. TheTORNADO® valve has a lifetime warranty that covers replacement of the valveunless you modify the valve.
Valve stem removal and maintenance:Remove the valve chamber end cap by unscrewing it from the marker body usingthe 3-pin wrench in the tool kit. Then slide the end cap out. The valve spring andvalve stem should come out with it. This will allow you to change the valve stem ifthere is a problem.
To remove the valve body:With the valve chamber end cap, valve spring and valve stem removed. Unscrewthe hammer from the back of the EXCALIBUR® or VIKING™. Then unscrew thesetscrew on the side of the marker that holds the TORNADO® valve body inplace.

Using a plastic dowel rod, gently push the valve body out either end of themarker. When reinstalling the valve body, use a drop of BLUE Loctite on thesetscrew that holds the valve body in the marker.
Troubleshooting:Air leaking down the barrel:1. Check the valve stem, it may need to be replaced.2. Air may be leaking by the o-ring on the valve body. Take a 5/32 allen wrenchand loosen the valve retaining setscrew about a 1/8 of a turn. If the leak stops,tighten the screw back. What happens is that the o-ring sometimes shifts just alittle and loosening the screw allows it to shift back.
F. LIGHTNING® BOLT.
The only part on the EXCALIBUR® and VIKING™ that may experience anypossibility of wear is the LIGHTNING® bolt and pull pin. The LIGHTNING® bolt ismade of Delrin to help save wear and tear on the gun body. Paintball gelatin isvery abrasive and can cause wear on the bolt. The pull pin is designed with twoflats milled on it. These two flats fit into the H-bar on the ram or hammer, thisdesign reduces wear on the pin.
To remove the bolt:Pull the bolt pull pin knob straight up from the bolt and gun body. The pin isdesigned to stay in the bolt. Then, slide the bolt out the back of the marker. Toinstall the bolt, slide it into the bolt bore to the location of the hammer or H-bar.Then push the bolt pull pin down until it latches into the hammer or H-bar.
The setscrew in the back of the bolt adjusts the tension and locking of the boltpull pin. You can adjust this to suit your feel. BUT, if you do adjust the tension, donot adjust the tension too loose or the pin may not lock into the hammer or H-bar.
Troubleshooting:Pull Pin stuck:1. Check the tension on the ball bearing or ball plunger in the back of the bolt, itmay be adjusted to tight.
Bolt not sliding smoothly:1. Check the o-rings on the bolt to make sure they are not swollen. Replace themor properly lube them. Make sure bolt and bolt bore are clean.
G. 2004 EXCALIBUR HAMMER.
Mechanical Hammer adjustment:There is no mechanical adjustment to the hammer itself. Simply screw the
hammer cartridge in until it stops against the body.
Hammer maintenance:The ’04 EXCALIBUR® hammer uses 2 quad-rings instead of o-rings. This givesthe hammer a smoother action. It is important to keep the quad-ring on thehammer in good working order and properly oiled when needed.
Troubleshooting:Air leaking from solenoid:1. Check the solenoid valve, it may need to be replaced.2. Check the hammer piston quad-ring. Air may be leaking around it. If air isleaking around it, replace the cartridge.
Air leaking around the front of the hammer:1. Check the quad-ring seal around the hammer shaft. Replace cartridge.2. Check the o-rings on the outside of the cartridge.
2000-2003 EXCALIBUR HAMMER.Mechanical Hammer adjustment:There is no mechanical adjustment to the hammer itself. Simply screw thehammer cartridge in until it stops against the body.
Hammer maintenance:The o-ring on the hammer piston is sized to maintain a constant friction to theinside of the bore of the hammer cartridge. Keeping a constant friction on thebore is important to keep a consistent velocity. If the o-ring wears out, the frictionwill change and in turn change the consistency of force with which the hammerstrikes the valve. So, it is important to keep that o-ring lubed.
To pull the hammer cartridge out of the marker: Use the pneumatics reg removalwrench and unscrew the hammer cartridge. Then gently pull it out the back of theEXCALIBUR®.
Troubleshooting:Air leaking from solenoid:1. Check the solenoid valve, it may need to be replaced.2. Check the hammer piston o-ring. Air may be leaking around it. If air is leakingaround it, replace the hammer cartridge.
Air leaking around the front of the hammer:1. Check the o-ring seal around the hammer shaft. Cartridge may need to bereplaced.2. Check the o-rings on the outside of the cartridge.
H. 2004 VIKING™ HAMMER.

Mechanical Hammer adjustment:There is no mechanical adjustment to the hammer itself. Simply screw thehammer cartridge in until it stops against the body.
Hammer maintenance:The ’04 VIKING™ hammer uses 2 quad-rings instead of o-rings. This gives thehammer a smoother action. It is important to keep the quad-ring on the hammerin good working order and properly oiled when needed.
Troubleshooting:Air leaking from solenoid:1. Check the solenoid valve, it may need to be replaced.2. Check the hammer piston o-ring. Air may be leaking around it. If air is leakingaround it, replace the hammer cartridge.
Air leaking around the front of the hammer:1. Replace cartridge if leaking.2. Check the o-rings on the outside of the cartridge.
2002-2003 VIKING™ HAMMER.
Mechanical Hammer adjustment:There is no mechanical adjustment to the hammer itself. Simply screw thehammer cartridge in until it stops against the body.
Hammer maintenance:The o-ring on the hammer piston is sized to maintain a constant friction to theinside of the bore of the hammer cartridge. Keeping a constant friction on thebore is important to keep a consistent velocity. If the o-ring wears out, the frictonwill change and in turn change the consistency of force with which the hammerstrikes the valve. So, it is important to keep that o-ring lubed.
To pull the hammer cartridge out of the marker: Use the pneumatics reg removalwrench and unscrew the hammer cartridge. Then gently pull it out the back of theViking™.
Replace cartridge if leaking.
Troubleshooting:Air leaking from solenoid:1. Check the solenoid valve, it may need to be replaced.2. Replace cartridge.
Air leaking around the front of the hammer:1. Check the u-cup or o-ring seal around the hammer shaft. Replace cartridge.

I. 2004 EXCALIBUR® RAM.
Removal of Ram:De-gas the marker and remove all paint. Remove the bolt, the body end cap, andSCM™ pneumatics regulator. Then remove the ram retaining pin that holds theram in place. Using a plastic dowel rod, gently push the ram out through the backof the marker body.
Troubleshooting:Air leaking from solenoid:1. Check the solenoid valve, it may need to be replaced.2. Check the ram piston quad-ring. Air may be leaking around it. If air is leakingaround it, replace cartridge.
2000-2003 EXCALIBUR RAM.Removal of Pneumatic Cylinder (ie: the Ram):De-gas the marker and remove all paint. Remove the bolt, the body end cap, andpneumatics regulator. Then remove the ram retaining pin that holds the ram inplace. Using a plastic dowel rod, gently push the ram out through the back of themarker body.
Troubleshooting:Air leaking from solenoid:1. Check the solenoid valve, it may need to be replaced.2. Check the ram piston o-ring. Air may be leaking around it. If air is leaking around it, replace the cartridge.
J. TRIGGER FRAME.
Adjusting the trigger pull:There are 3 set screws for adjusting the total trigger movement: (1) forward stop,(1) rearward stop and (1) micro-switch activation screw.
When adjusting the trigger, start with the forward and rearward trigger stops.Adjust the trigger until you have the amount of movement you want. Then adjustthe micro-switch screw until it activates the micro-switch during the trigger pull.Make sure to use a small amount of BLUE Loctite to keep the setscrews fromcoming loose. Whenever you make any adjustments to the trigger you shouldalways make sure the micro-switch activates when you pull the trigger and re-sets when you release the trigger.
When adjusting the spring tension on the trigger, it is best to leave some springtension so normal movement during play will not accidentally activate the trigger.The spring can be interchanged with those used on AC™ triggers so you canpersonalize it to your own spring tension.

**Do not cut the trigger guard off.**
Troubleshooting:The electronics are on but the gun won't fire.1. Check to make sure that none of the trigger setscrews have moved out ofadjustment.
K. SOLENOID VALVES.
2004 EXCALIBUR® and VIKING™ SOLENOID VALVES.Removal of the solenoid valves:Remove the grip frame and grip plate as one piece. Carefully pull the grip andgrip plate straight away from the body. The grip plate locates on two pins in themarker body.
Carefully unplug the solenoid valves from the circuit board. Using an allenwrench, remove the screws holding solenoid valve you want to replace. Lift thevalve and manifold straight out of the marker body. Be careful not to lose thesmall o-rings that seal the solenoid to the body.
Place the o-rings back into the o-ring grooves on the body. Place the correctsolenoid valve on the solenoid valve mounting bosses and tighten down screws.The hammer solenoid valve cannot be installed in the bolt socket and the boltsolenoid valve cannot be installed in the hammer socket. Do not over tightenthe screws.
Plug the solenoid valve back into the circuit board and gently put the grip frameback onto the marker making sure not to pinch any wires. Re-install the gripframe screws.
Do not try to work on the solenoid valves. Do not try to exchange parts from onesolenoid to another. The parts on the solenoid valves are matched to each otherwhen they are assembled at the factory and can not be mixed with other valves.If the solenoid valves parts are mixed they may not work properly.
Troubleshooting:Air leaking from the solenoid valve:1. Check the o-rings sealing the valve to the body.2. Check to see if the air is leaking through the solenoid valve. If air is leakingthrough the valve, replace the valve or check the o-rings of the hammer or ram.
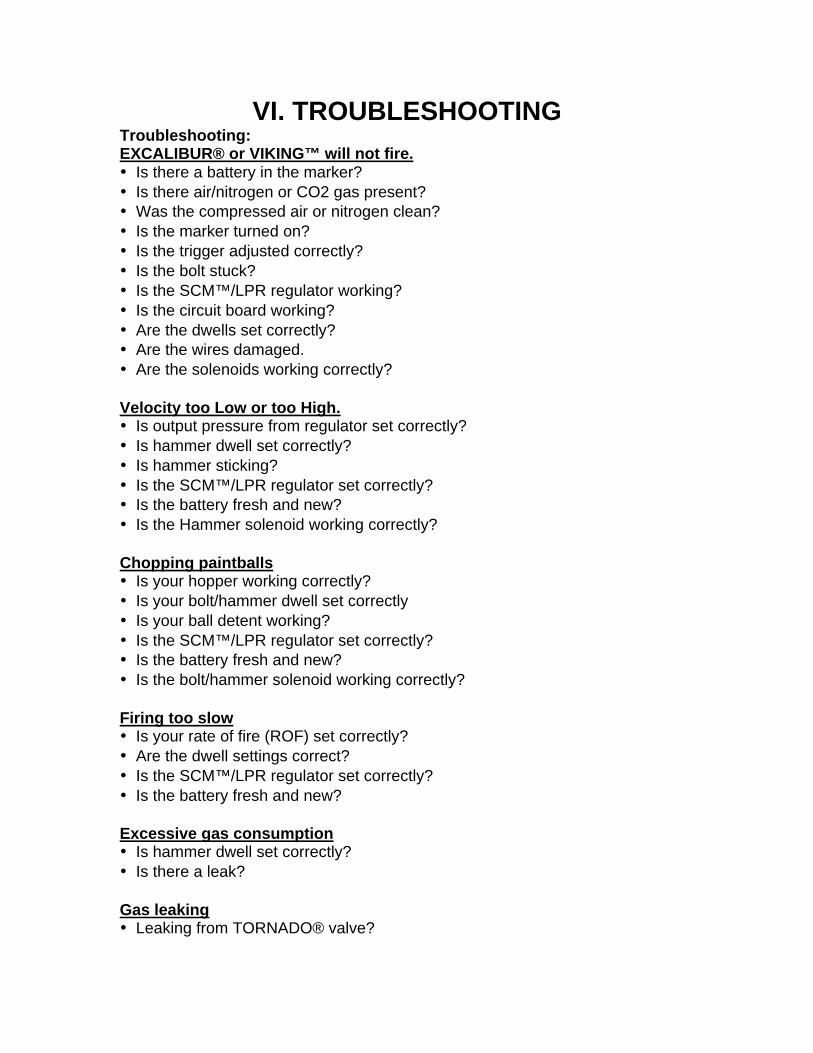
VI. TROUBLESHOOTINGTroubleshooting:EXCALIBUR® or VIKING™ will not fire.• Is there a battery in the marker?
• Is there air/nitrogen or CO2 gas present?
• Was the compressed air or nitrogen clean?
• Is the marker turned on?
• Is the trigger adjusted correctly?
• Is the bolt stuck?
• Is the SCM™/LPR regulator working?
• Is the circuit board working?
• Are the dwells set correctly?
• Are the wires damaged.
• Are the solenoids working correctly?
Velocity too Low or too High.• Is output pressure from regulator set correctly?
• Is hammer dwell set correctly?
• Is hammer sticking?
• Is the SCM™/LPR regulator set correctly?
• Is the battery fresh and new?
• Is the Hammer solenoid working correctly?
Chopping paintballs• Is your hopper working correctly?
• Is your bolt/hammer dwell set correctly
• Is your ball detent working?
• Is the SCM™/LPR regulator set correctly?
• Is the battery fresh and new?
• Is the bolt/hammer solenoid working correctly?
Firing too slow• Is your rate of fire (ROF) set correctly?
• Are the dwell settings correct?
• Is the SCM™/LPR regulator set correctly?
• Is the battery fresh and new?
Excessive gas consumption• Is hammer dwell set correctly?
• Is there a leak?
Gas leaking• Leaking from TORNADO® valve?

• Leaking from ram (Excalibur®)?
• Leaking from hammer (Excalibur® & Viking™)?
• Leaking from SCM™/LPR regulator?
• Leaking from Regulator?
• Leaking from solenoid valves?
Electronic problems• Check battery power level.
• Check for damaged wiring.
• Check circuit board dwell settings.
VII. SchematicsA. 2004 EXCALIBUR®
2004 EXCALIBUR® BODY BACK
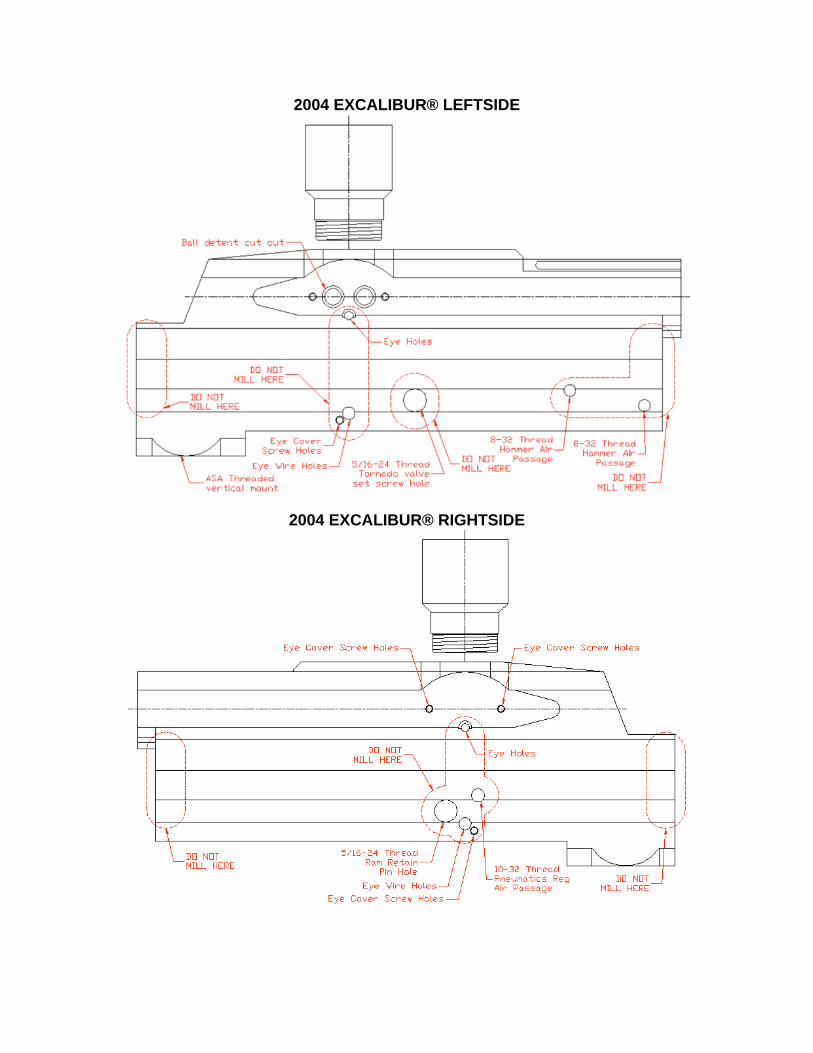
2004 EXCALIBUR® LEFTSIDE
2004 EXCALIBUR® RIGHTSIDE
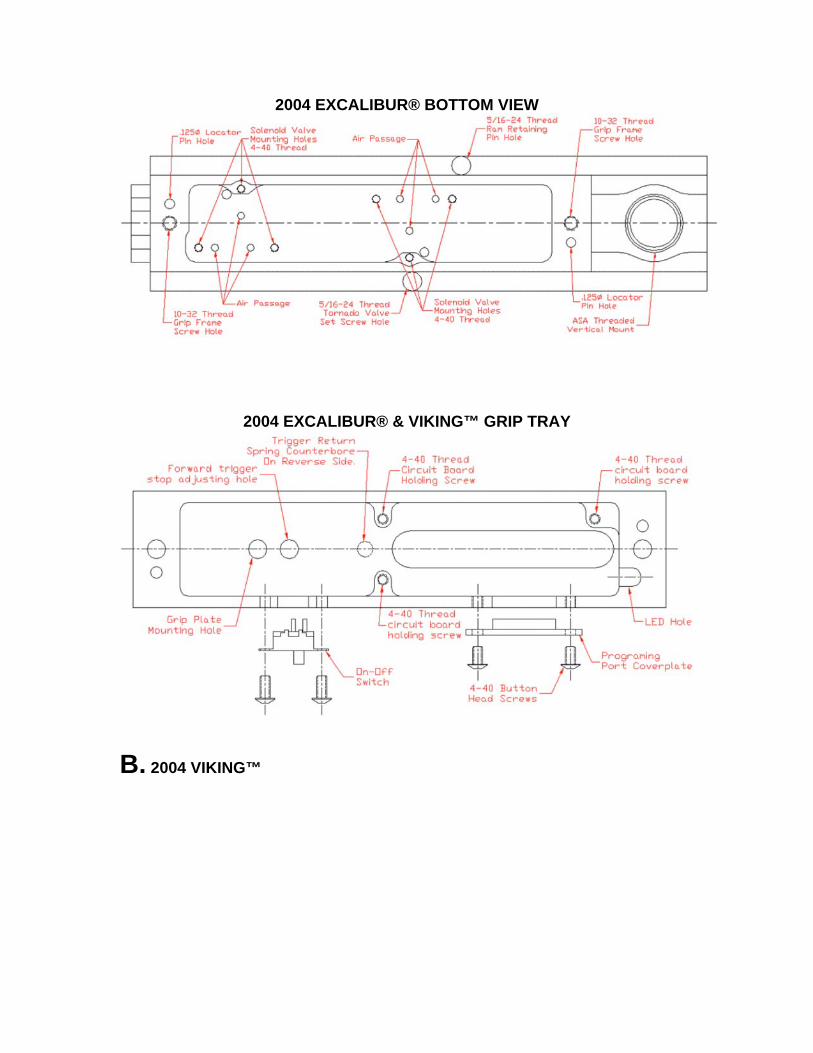
2004 EXCALIBUR® BOTTOM VIEW
2004 EXCALIBUR® & VIKING™ GRIP TRAY
B. 2004 VIKING™

2004 VIKING™ BODY BACK
2004 VIKING™ LEFTSIDE

2004 VIKING™ RIGHTSIDE
2004 VIKING™ BOTTOM VIEW
VIII. Warranty, Liability and Contact Information
THIS WARRANTY WILL NOT BE HONOREDWITHOUT A COMPLETED PRODUCT WARRANTY
REGISTRATION CARD ON FILE WITH AKALMP,INC. PRIOR TO A WARRANTY CLAIM.
The EXCALIBUR® or VIKING™ is warranted to be free from manufacturingdefects for life. AKALMP, Inc. expressly excludes coverage of defects and/ordamage as a result of normal wear and tear, accidents, additions, alterations,inadequate maintenance, misuse, modifications, or other factors not directlyrelated to the original manufacture of the EXCALIBUR® or VIKING™ marker.
Circuit Boards and Solenoids are warranted by the originalmanufacturer.
Customer is responsible for all shipping costs, duties andtaxes.
This warranty is extended to the original owner and is nottransferable.
BUYER assumes the risk of damages, including but not limited to bodily injury,from the use of this product. AKALMP, Inc. expressly disclaims any and allliability for any direct, indirect, incidental, or consequential damages of any kindor nature arising from the use of this product.
Contact Information:
AKALMP, INC.Phone: (317)-631-7200Fax: (317)-631-0325E-mail: [email protected]: akapaintball.com
MAILBOX:PO Box 441167Indianapolis, IN 46244-1167
SHIPPING ADDRESS:16 South Keystone AveIndianapolis IN, 46201
Related Documents