NINTENDO 3DS SOFTWARE INSTRUCTION BOOKLET(CONTAINS IMPORTANT HEALTH AND SAFETY INFORMATION)MAA-CTR-ACCP-UKV

[0311/UKV/CTR]
This seal is your assurance that Nintendo has reviewed this product and that it has met our standards for excellence in workmanship, reliability and entertainment value. Always look for this seal when buying games and accessories to ensure complete com patibility with your Nintendo Product.
Thank you for selecting the Super Pokémon™ Rumble Game Card for Nintendo 3DS™.
IMPORTANT: Please carefully read the important health and safety information included in this booklet before using your Nintendo 3DS system, Game Card or accessory. Please read this Instruction Booklet thoroughly to ensure maximum enjoyment of your new game. Important warranty and hotline information can be found in the separate Age Rating, Software Warranty and Contact Information Leaflet (Important Information Leaflet). Always save these documents for future reference.
This Game Card will work only with the European/Australian version of the Nintendo 3DS system.
WARNING! This video game is protected by intellectual property rights! The unauthorized copying and/or distribution of this game may lead to criminal and/or civil liability.
© 2011 Pokémon. © 1995–2011 Nintendo/Creatures Inc./GAME FREAK inc. Developed by Ambrella. Trademarks are property of their respective owners.Nintendo 3DS is a trademark of Nintendo. © 2011 Nintendo.
TM
Local PlaySupports multiplayer games via local wireless communication. Each player must have a copy of the software.
StreetPass™Supports automatic search and information exchange with other Nintendo 3DS systems via local wireless communication.
The in-game language depends on the one that is set on the system. This game supports five different languages: English, German, French, Spanish and Italian. If your Nintendo 3DS™ system language is set to one of these, the same language will be displayed in the game. If your Nintendo 3DS system is set to another language, the in-game default language will be English. For instructions about how to change the system language, please refer to the Operations Manual, “System Settings”.
3
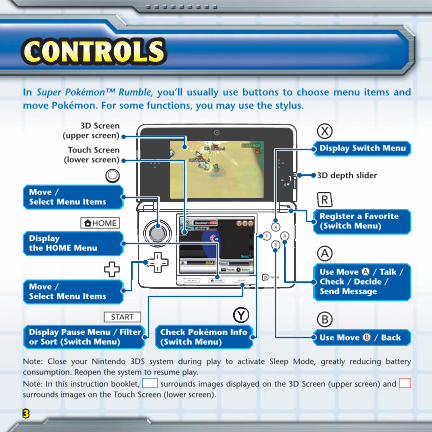
CONTROLSIn Super Pokémon™ Rumble, you’ll usually use buttons to choose menu items and move Pokémon. For some functions, you may use the stylus.
Move /Select Menu Items
Display Switch Menu
Use Move / Talk / Check / Decide /Send Message
Use Move / Back
Register a Favorite (Switch Menu)
Move /Select Menu Items
Display Pause Menu / Filter or Sort (Switch Menu)
3D Screen (upper screen)
Touch Screen (lower screen)
3D depth slider
Note: Close your Nintendo 3DS system during play to activate Sleep Mode, greatly reducing battery consumption. Reopen the system to resume play.Note: In this instruction booklet, surrounds images displayed on the 3D Screen (upper screen) and surrounds images on the Touch Screen (lower screen).
Display the HOME Menu
Check Pokémon Info (Switch Menu)

4
GETTING STARTEDTouch the Super Pokémon Rumble icon on the HOME Menu, then touch OPEN to start the game. The title menu will be displayed.Note: Please see the Nintendo 3DS Operations Manual for details about starting a game.
Title Menu
The first time you play the game, select NEW GAME. If you have saved data, select CONTINUE. When the game resumes, you’ll be at the gate of a town (see page 11).
Saving and Quitting the Game
Your progress in the game is saved automatically at certain points. There is only one saved data file. Please do not turn the Nintendo 3DS system off while “Saving...” is displayed on screen. When you want to quit playing, press to display the pause menu and choose SAVE AND QUIT before closing the software or turning off the power.Note: No matter where you were when the game was saved, you will be at the gate of a town when you continue the game.
Deleting Saved Data
To delete saved data, press and hold , , , and simultaneously while the game is starting up.Note: Deleted saved data can’t be recovered.
Field Area
5
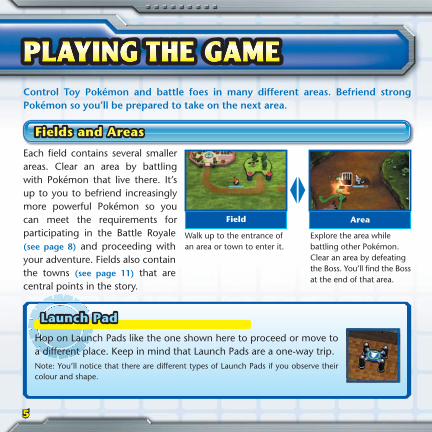
PLAYING THE GAMEControl Toy Pokémon and battle foes in many different areas. Befriend strong Pokémon so you’ll be prepared to take on the next area.
Fields and Areas
Each field contains several smaller areas. Clear an area by battling with Pokémon that live there. It’s up to you to befriend increasingly more powerful Pokémon so you can meet the requirements for participating in the Battle Royale (see page 8) and proceeding with your adventure. Fields also contain the towns (see page 11) that are central points in the story.
Launch Pad
Hop on Launch Pads like the one shown here to proceed or move to a different place. Keep in mind that Launch Pads are a one-way trip.Note: You’ll notice that there are different types of Launch Pads if you observe their colour and shape.
Walk up to the entrance of an area or town to enter it.
Explore the area while battling other Pokémon. Clear an area by defeating the Boss. You’ll find the Boss at the end of that area.
6
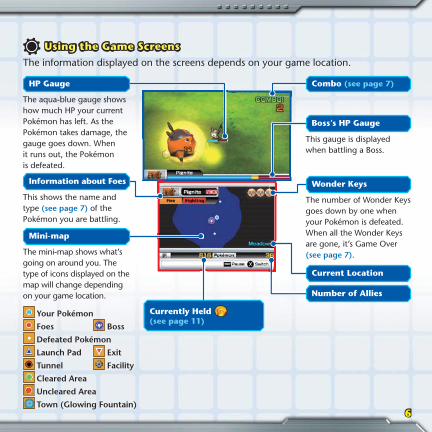
The number of Wonder Keys goes down by one when your Pokémon is defeated. When all the Wonder Keys are gone, it’s Game Over (see page 7).
This gauge is displayed when battling a Boss.
This shows the name and type (see page 7) of the Pokémon you are battling.
The mini-map shows what’s going on around you. The type of icons displayed on the map will change depending on your game location.
Information about Foes
Mini-map
Combo (see page 7)HP Gauge
Wonder Keys
Boss’s HP Gauge
Number of Allies
Current Location
Currently Held (see page 11)
Using the Game Screens
The information displayed on the screens depends on your game location.
The aqua-blue gauge shows how much HP your current Pokémon has left. As the Pokémon takes damage, the gauge goes down. When it runs out, the Pokémon is defeated.
Your Pokémon
Foes Boss
Defeated Pokémon
Launch Pad Exit
Tunnel Facility
Cleared Area
Uncleared Area
Town (Glowing Fountain)

7
Moves and Types
Press to use the move assigned to , and press to use the move assigned to . Some Pokémon only know one move. Every move has a type, and the damage the move does depends on how it matches up with other Pokémon types.
Befriend Pokémon
When a Pokémon you defeated tips over and falls to the ground, touch the Pokémon to befriend it.
Switch Pokémon
When you press , the switch menu (see page 9) appears, and you can switch the Pokémon you’re controlling (your current Pokémon). With the switch menu, you can switch to one of your other befriended Pokémon whenever you want.
Wonder Keys and Game Over
When your current Pokémon loses all of its HP, it faints, and you’ll lose a Wonder Key . Choose another Pokémon with the switch menu. If you lose all of your Keys or have no Pokémon left to switch to, it’s Game Over. You’ll then be returned to a town.
Combo
The Combo shows the number of Pokémon you’ve defeated in a row. As the Combo number increases, it will become slightly easier to make foes tip over. The Combo will end if you don’t attack Pokémon for a while.
8
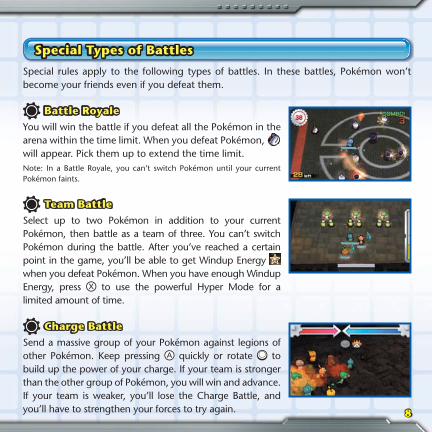
Special Types of Battles
Special rules apply to the following types of battles. In these battles, Pokémon won’t become your friends even if you defeat them.
Battle Royale
You will win the battle if you defeat all the Pokémon in the arena within the time limit. When you defeat Pokémon, will appear. Pick them up to extend the time limit.Note: In a Battle Royale, you can’t switch Pokémon until your current Pokémon faints.
Team Battle
Select up to two Pokémon in addition to your current Pokémon, then battle as a team of three. You can’t switch Pokémon during the battle. After you’ve reached a certain point in the game, you’ll be able to get Windup Energy when you defeat Pokémon. When you have enough Windup Energy, press to use the powerful Hyper Mode for a limited amount of time.
Charge Battle
Send a massive group of your Pokémon against legions of other Pokémon. Keep pressing quickly or rotate to build up the power of your charge. If your team is stronger than the other group of Pokémon, you will win and advance. If your team is weaker, you’ll lose the Charge Battle, and you’ll have to strengthen your forces to try again.

9
SWITCH MENUPress to display the switch menu. In this menu, you can switch your current Pokémon or look at information about the Pokémon in your Collection.Note: The game will be paused when you display the switch menu.
Switch Menu Screen
The Pokémon in your Collection will be displayed in a list. The “Power” number indicates the overall strength of each Pokémon. You can switch your current Pokémon by selecting a Pokémon from the list and pressing .Note: If your current Pokémon is attacked while switching, it won’t be switched out.
Filter and Sort
Press in the switch menu to filter the list of displayed Pokémon or sort the order by name, type, and so on.
Favorites
You can register a selected Pokémon as one of your “Favorites” by pressing in the switch menu. Your Favorite Pokémon will have a symbol and be displayed at the top of the list after your currently selected Pokémon.
10
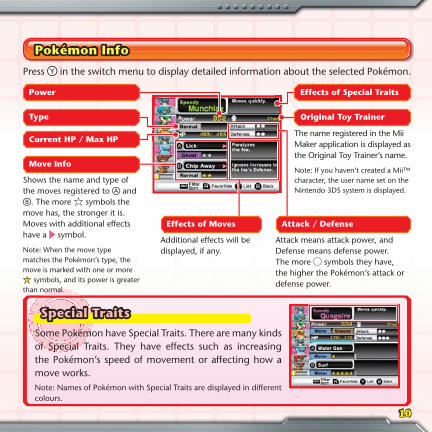
Power
Type
Move Info
Shows the name and type of the moves registered to and
. The more symbols the move has, the stronger it is. Moves with additional effects have a symbol.
Note: When the move type matches the Pokémon’s type, the move is marked with one or more
symbols, and its power is greater than normal.
Effects of Moves
Pokémon Info
Press in the switch menu to display detailed information about the selected Pokémon.
Special Traits
Some Pokémon have Special Traits. There are many kinds of Special Traits. They have effects such as increasing the Pokémon’s speed of movement or affecting how a move works.Note: Names of Pokémon with Special Traits are displayed in different colours.
The name registered in the Mii Maker application is displayed as the Original Toy Trainer’s name.
Note: If you haven’t created a Mii™ character, the user name set on the Nintendo 3DS system is displayed.
Attack / Defense
Attack means attack power, and Defense means defense power. The more symbols they have, the higher the Pokémon’s attack or defense power.
Additional effects will be displayed, if any.
Original Toy Trainer
Effects of Special Traits
Current HP / Max HP

11
Towns are the setting-off points of your adventure. You can use Launch Pads and tunnels to travel to various places. Towns also have many different facilities to help you on your journey.Note: Some facilities are available outside of towns as well.Note: As you progress through the game, more and more facilities will become available.
Glowing Fountain
Restores the HP of all of your Pokémon, including any Pokémon that fainted.
Move-a-majig
You can spend to teach your current Pokémon a random move. If the Pokémon already knows two moves, you’ll have to make it forget one before it can learn a new move.
About
When you defeat foes or become the Battle Royale champion, will appear. Touch them to pick them up. You can spend
p at the
Move-a-majig, Move Vendor, and so on.
IN TOWNS
12
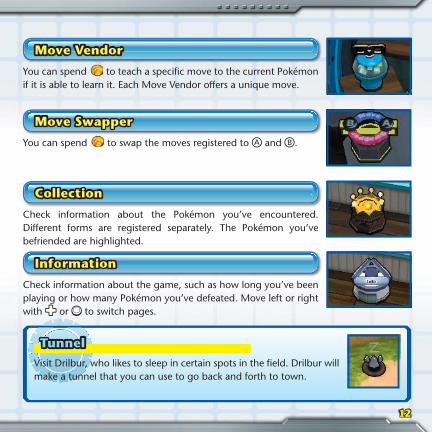
Move Vendor
You can spend to teach a specific move to the current Pokémon if it is able to learn it. Each Move Vendor offers a unique move.
Move Swapper
You can spend to swap the moves registered to and .
Collection
Check information about the Pokémon you’ve encountered. Different forms are registered separately. The Pokémon you’ve befriended are highlighted.
Information
Check information about the game, such as how long you’ve been playing or how many Pokémon you’ve defeated. Move left or right with or to switch pages.
Tunnel
Visit Drilbur, who likes to sleep in certain spots in the field. Drilbur will make a tunnel that you can use to go back and forth to town.
13
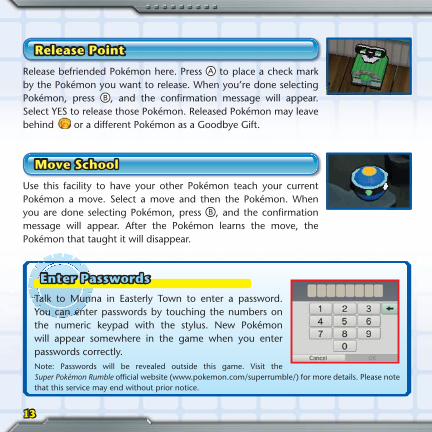
Release Point
Release befriended Pokémon here. Press to place a check mark by the Pokémon you want to release. When you’re done selecting Pokémon, press , and the confirmation message will appear. Select YES to release those Pokémon. Released Pokémon may leave behind or a different Pokémon as a Goodbye Gift.
Move School
Use this facility to have your other Pokémon teach your current Pokémon a move. Select a move and then the Pokémon. When you are done selecting Pokémon, press , and the confirmation message will appear. After the Pokémon learns the move, the Pokémon that taught it will disappear.
Enter Passwords
Talk to Munna in Easterly Town to enter a password. You can enter passwords by touching the numbers on the numeric keypad with the stylus. New Pokémon will appear somewhere in the game when you enter passwords correctly.Note: Passwords will be revealed outside this game. Visit the Super Pokémon Rumble official website (www.pokemon.com/superrumble/) for more details. Please note that this service may end without prior notice.
14
Two Player
Local Play
This software allows you to take on a variety of areas with a friend via Nintendo 3DS Local Play and befriend more Pokémon than usual.Note: Two-Player mode becomes available after you clear the first Battle Royale.Note: In Two-Player mode, the game will not be paused when the switch menu is displayed.
Here is an explanation of how to play using Nintendo 3DS Local Play.
You Will Need
Nintendo 3DS system . . . . . . . . . . . . . . . . . . . . . . . . . . . . . . . . . . . One for each playerSuper Pokémon Rumble Game Card . . . . . . . . . . . . . . . . . . . . . . . . . One for each player
Connection Procedures
1. Make sure that the power is turned off on all systems, and insert the Game Card into each system.
2. Turn the power on. The HOME Menu will be displayed.3. Touch the Super Pokémon Rumble icon, then touch OPEN.4. Follow the instructions on pages 14–15.
How to Play with a Friend
The host selects RECRUIT, and the player who joins (the guest) selects SEARCH FOR A PLAYER. When communication succeeds, the guest’s screen shows the name of the host. When the guest selects the host’s name, both players will proceed to the lobby for Two-Player games. The host then uses the Launch Pad to select an area.Note: You can only go to areas that both of you have already cleared. Battle Royale arenas, Team Battles, and Charge Battles are not available.
15
Shopscope
StreetPass
This software supports visits to your Toy Shop by other players’ Mii characters, and battles with other players’ Toy Pokémon Collections. To communicate using this feature, all players must activate StreetPass for this software.Note: The Shopscope becomes available after you clear the first Battle Royale.
Activating StreetPass
1. Make sure that the power is turned off and insert the Game Card into the system.2. Turn the power on. The HOME Menu will be displayed.3. Touch the Super Pokémon Rumble icon, then touch OPEN.4. Follow the instructions on pages 16–17.
Wonder Keys are shared between you and your friend. If the HP of a friend’s Pokémon reaches 0, you can restore some of its HP by having your current Pokémon stand next to it. Even if there are no Wonder Keys left, the game will continue as long as one player’s current Pokémon still has HP. Tipped-over Pokémon will befriend the first player to reach them. When you’ve cleared an area, you’ll go back to the lobby. To quit Two-Player mode, go to the End Connection facility.
Gift Exchange
If both of you have cleared the game, you and your friend can give Pokémon to each other by using the Gift Exchange in the Two-Player lobby. Pokémon you give away will no longer be in your Collection.
PLAYER CARDS
Look at information about other players who pass by, and battle against their Collections.
CHECK TOY SHOP
Check on current customers. To invite a new customer to your Toy Shop, select INVITE A CUSTOMER. It costs 10 Play Coins earned in your Nintendo 3DS system.
You must have at least two Mii characters on your Nintendo 3DS system in order to invite customers.
SETTINGSCheck your Collection, use the stylus to edit your greeting, and more. You can also turn StreetPass on or off.
RETURN TO TOWN Leave the Toy Shop and return to town.
16
When StreetPass is successful, customers can visit your Toy Shop and shop there. You’ll receive when they visit!
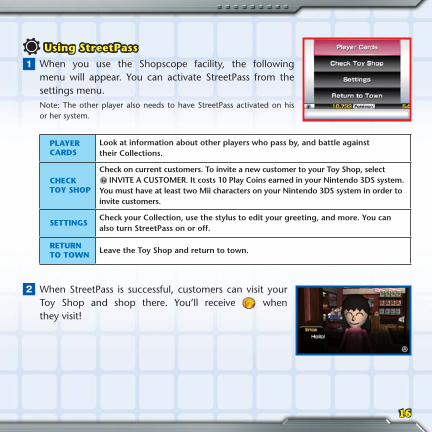
Using StreetPass
When you use the Shopscope facility, the following menu will appear. You can activate StreetPass from the settings menu.Note: The other player also needs to have StreetPass activated on his or her system.
17
Deactivating StreetPass
In the System Settings:To deactivate StreetPass, open the System Settings and select DATA MANAGEMENT, then “StreetPass MANAGEMENT”.
Touch the icon for this software title, then select “DEACTIVATE StreetPass”.Note: You can disable StreetPass functionality via Parental Controls. For more information, refer to the Operations Manual.
In the game:Select “StreetPass SETTINGS” under SETTINGS in the Toy Shop menu. When you press , you’ll see “Deactivate StreetPass for Super Pokémon Rumble?” Select YES to stop StreetPass communication.
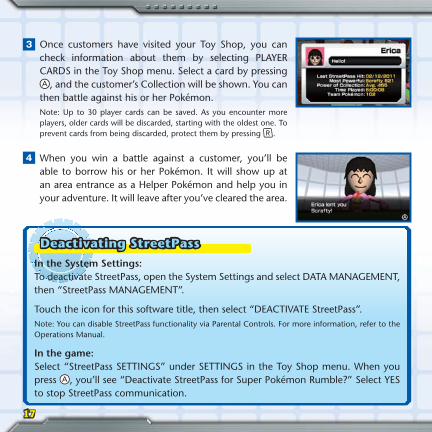
Once customers have visited your Toy Shop, you can check information about them by selecting PLAYER CARDS in the Toy Shop menu. Select a card by pressing
, and the customer’s Collection will be shown. You can then battle against his or her Pokémon.Note: Up to 30 player cards can be saved. As you encounter more players, older cards will be discarded, starting with the oldest one. To prevent cards from being discarded, protect them by pressing .
When you win a battle against a customer, you’ll be able to borrow his or her Pokémon. It will show up at an area entrance as a Helper Pokémon and help you in your adventure. It will leave after you’ve cleared the area.
18
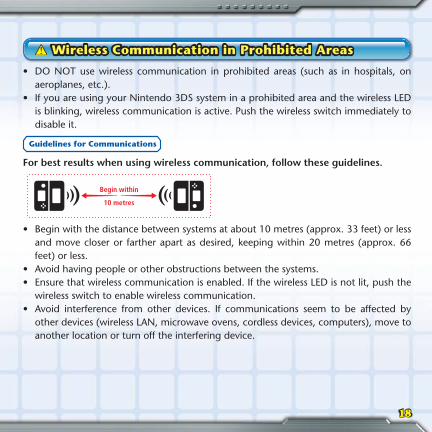
Wireless Communication in Prohibited Areas
aeroplanes, etc.).
is blinking, wireless communication is active. Push the wireless switch immediately to disable it.
Guidelines for Communications
For best results when using wireless communication, follow these guidelines.
and move closer or farther apart as desired, keeping within 20 metres (approx. 66 feet) or less.
wireless switch to enable wireless communication.
other devices (wireless LAN, microwave ovens, cordless devices, computers), move to another location or turn off the interfering device.
Begin within
10 metres
19
Backup Function
This software title contains a backup function which saves records and game progress.
Do not turn the power off and on repeatedly or remove the Game Card while saving. Be careful not to use incorrect controls (e.g., resetting the system) or get dirt in the terminals. These actions can cause data to be irrevocably lost.
Do not use external accessories or software to modify your save data, as this can lead to an inability to progress or loss of save data. Any modification is permanent, so be careful.
If you cannot save for reasons other than the above, please refer to the separate Important Information Leaflet for contact information.
NOTES
20
[0511/UKV/CTR]
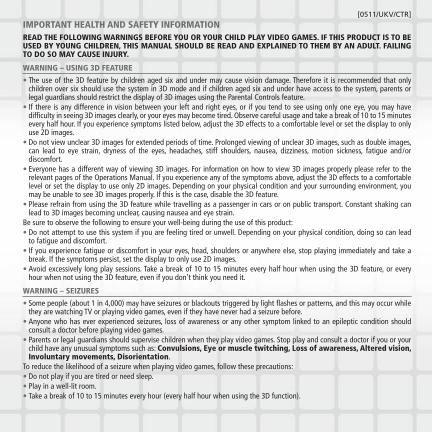
IMPORTANT HEALTH AND SAFETY INFORMATIONREAD THE FOLLOWING WARNINGS BEFORE YOU OR YOUR CHILD PLAY VIDEO GAMES. IF THIS PRODUCT IS TO BE USED BY YOUNG CHILDREN, THIS MANUAL SHOULD BE READ AND EXPLAINED TO THEM BY AN ADULT. FAILING TO DO SO MAY CAUSE INJURY.
WARNING – USING 3D FEATURE
The use of the 3D feature by children aged six and under may cause vision damage. Therefore it is recommended that only children over six should use the system in 3D mode and if children aged six and under have access to the system, parents or legal guardians should restrict the display of 3D images using the Parental Controls feature. If there is any difference in vision between your left and right eyes, or if you tend to see using only one eye, you may have difficulty in seeing 3D images clearly, or your eyes may become tired. Observe careful usage and take a break of 10 to 15 minutes every half hour. If you experience symptoms listed below, adjust the 3D effects to a comfortable level or set the display to only use 2D images. Do not view unclear 3D images for extended periods of time. Prolonged viewing of unclear 3D images, such as double images, can lead to eye strain, dryness of the eyes, headaches, stiff shoulders, nausea, dizziness, motion sickness, fatigue and/or discomfort. Everyone has a different way of viewing 3D images. For information on how to view 3D images properly please refer to the relevant pages of the Operations Manual. If you experience any of the symptoms above, adjust the 3D effects to a comfortable level or set the display to use only 2D images. Depending on your physical condition and your surrounding environment, you may be unable to see 3D images properly. If this is the case, disable the 3D feature. Please refrain from using the 3D feature while travelling as a passenger in cars or on public transport. Constant shaking can lead to 3D images becoming unclear, causing nausea and eye strain.
Be sure to observe the following to ensure your well-being during the use of this product: Do not attempt to use this system if you are feeling tired or unwell. Depending on your physical condition, doing so can lead to fatigue and discomfort. If you experience fatigue or discomfort in your eyes, head, shoulders or anywhere else, stop playing immediately and take a break. If the symptoms persist, set the display to only use 2D images. Avoid excessively long play sessions. Take a break of 10 to 15 minutes every half hour when using the 3D feature, or every hour when not using the 3D feature, even if you don’t think you need it.
WARNING – SEIZURES
Some people (about 1 in 4,000) may have seizures or blackouts triggered by light flashes or patterns, and this may occur while they are watching TV or playing video games, even if they have never had a seizure before. Anyone who has ever experienced seizures, loss of awareness or any other symptom linked to an epileptic condition should consult a doctor before playing video games. Parents or legal guardians should supervise children when they play video games. Stop play and consult a doctor if you or your child have any unusual symptoms such as: Convulsions, Eye or muscle twitching, Loss of awareness, Altered vision, Involuntary movements, Disorientation.
To reduce the likelihood of a seizure when playing video games, follow these precautions: Do not play if you are tired or need sleep. Play in a well-lit room. Take a break of 10 to 15 minutes every hour (every half hour when using the 3D function).
WARNING – EYESTRAIN AND MOTION SICKNESS
Playing video games can make your eyes hurt after a sustained period of time, and perhaps sooner if using the 3D feature. Playing video games can also cause motion sickness in some players. Follow these precautions to avoid eyestrain, dizziness or nausea:
Avoid excessively long play sessions. Parents or legal guardians should monitor children for appropriate play. Take a break of 10 to 15 minutes every half hour when using the 3D feature, or every hour when not using the 3D feature, even if you don’t think you need it. If your eyes become tired or sore while playing, or if you feel dizzy or nauseated, stop and rest for several hours before playing again. If you continue to have any of the above symptoms or other discomfort during or after play, stop playing and see a doctor.
WARNING – REPETITIVE MOTION INJURIES
Playing video games can make your muscles, joints or skin hurt after a few hours. Follow these precautions to avoid problems such as tendonitis, carpal tunnel syndrome or skin irritation:
Avoid excessively long play sessions. Parents or legal guardians should monitor children for appropriate play. Take a break of 10 to 15 minutes every half hour when using the 3D feature, or every hour when not using the 3D feature, even if you don’t think you need it. When using the stylus, you do not need to grip it tightly or press it hard against the screen. Doing so may cause fatigue or discomfort. If your hands, wrists, or arms become tired or sore while playing, or if you feel symptoms such as tingling, numbness, burning or stiffness, stop and rest them for several hours before playing again. If you continue to have any of the above symptoms or other discomfort during or after play, stop playing and see a doctor.
FOR FURTHER HEALTH AND SAFETY INFORMATION, PLEASE REFER TO THE OPERATIONS MANUAL INCLUDED WITH YOUR NINTENDO 3DS SYSTEM.

PRINTED IN THE EU


![,QIRUPD]LRQLLPSRUWDQWL &RQGLYLVLRQHGLFRQWHQXWL · Nintendo 3DS. In seguito all'aggiornamento della console Nintendo 3DS o di un software, qualsiasi modifica tecnica presente o futura](https://static.cupdf.com/doc/110x72/5fb5d05e9ae0c748842e3863/qirupdlrqllpsruwdqwl-rqglylvlrqhglfrqwhqxwl-nintendo-3ds-in-seguito-allaggiornamento.jpg)