1
Main Laptop Parts Explained - PartII
Screen backlight lamp
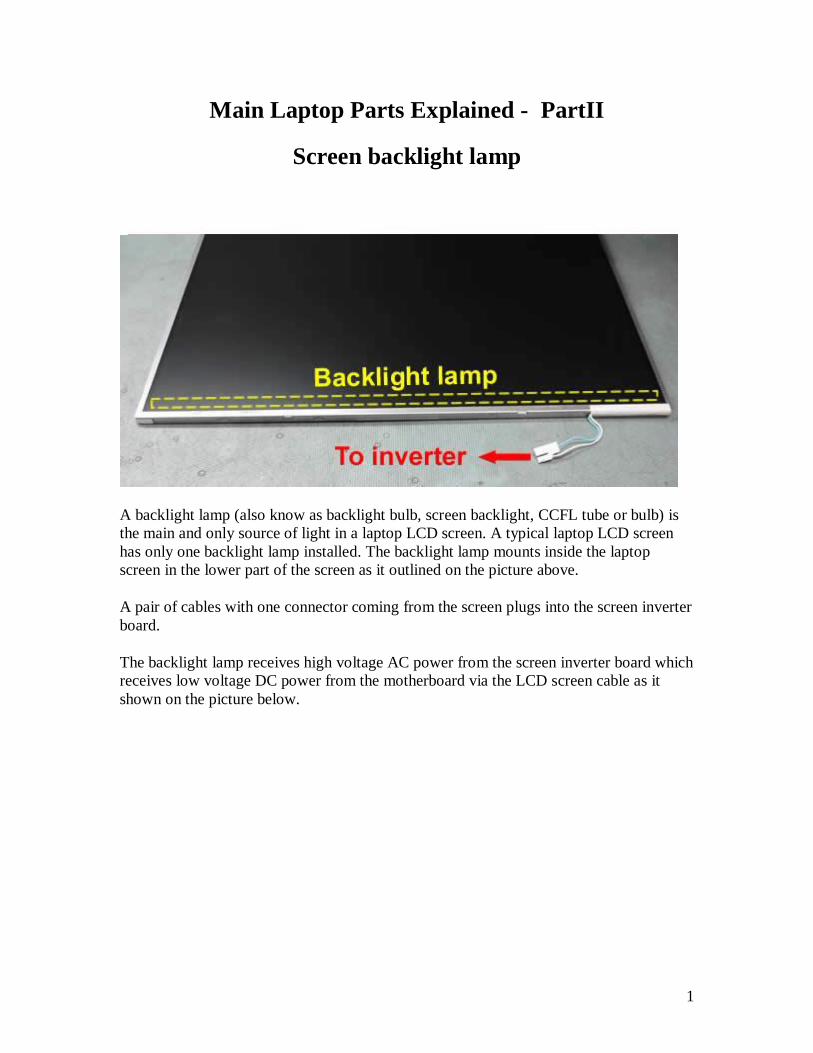
A backlight lamp (also know as backlight bulb, screen backlight, CCFL tube or bulb) is the main and only source of light in a laptop LCD screen. A typical laptop LCD screen has only one backlight lamp installed. The backlight lamp mounts inside the laptop screen in the lower part of the screen as it outlined on the picture above.
A pair of cables with one connector coming from the screen plugs into the screen inverter board.
The backlight lamp receives high voltage AC power from the screen inverter board which receives low voltage DC power from the motherboard via the LCD screen cable as it shown on the picture below.
2
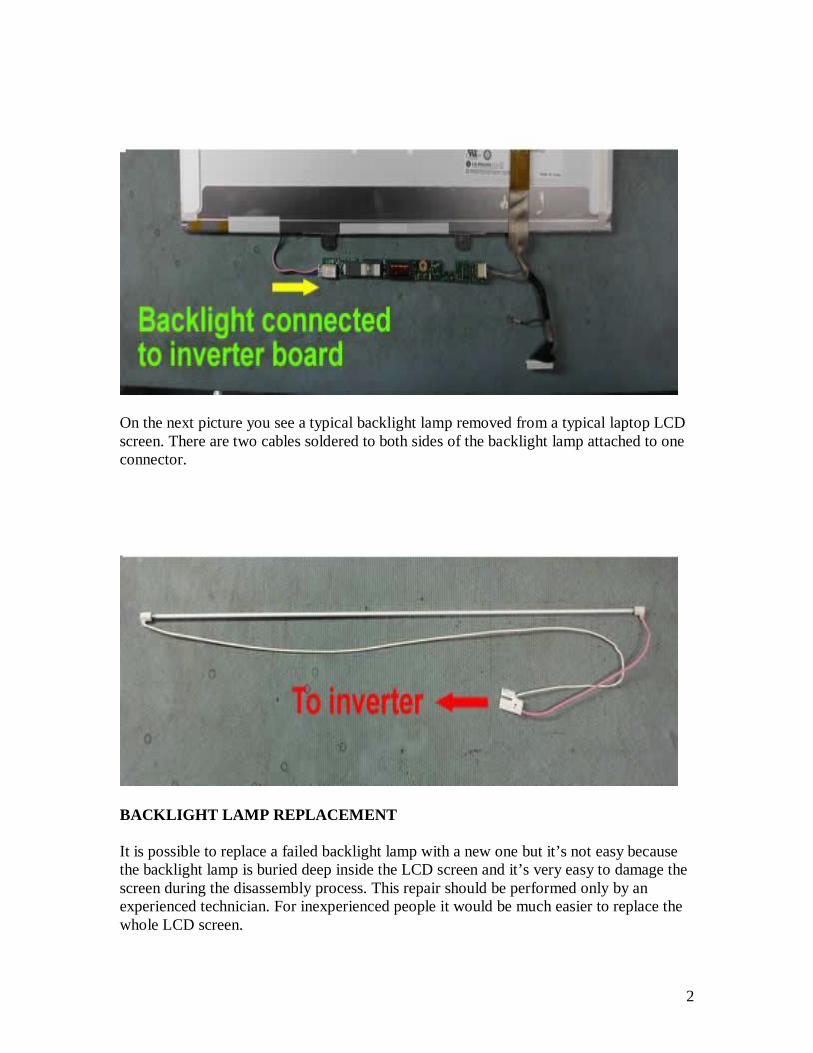
On the next picture you see a typical backlight lamp removed from a typical laptop LCD screen. There are two cables soldered to both sides of the backlight lamp attached to one connector.
BACKLIGHT LAMP REPLACEMENT
It is possible to replace a failed backlight lamp with a new one but it’s not easy because the backlight lamp is buried deep inside the LCD screen and it’s very easy to damage the screen during the disassembly process. This repair should be performed only by an experienced technician. For inexperienced people it would be much easier to replace the whole LCD screen.
3
BACKLIGHT LAMP FAILURE SYMPTOMS
1. The laptop screen lights up only for a short period of time or will not light up at all. The image on the screen is so dim that you can barely see it. At the same time, an external monitor attached to the laptop works fine.
2. When you turn on the laptop, the screen works fine for a while, then start flickering and the light turns off. Again, there is a very faint image on the laptop screen and external video output works fine.
3. The screen works but the image has a reddish/pink tone. External video output works fine.
The backlight lamp failure symptoms are very similar to the inverter board failure symptoms. If you have to guess which one is causing the problem, try replacing the inverter board first.
Screen inverter board
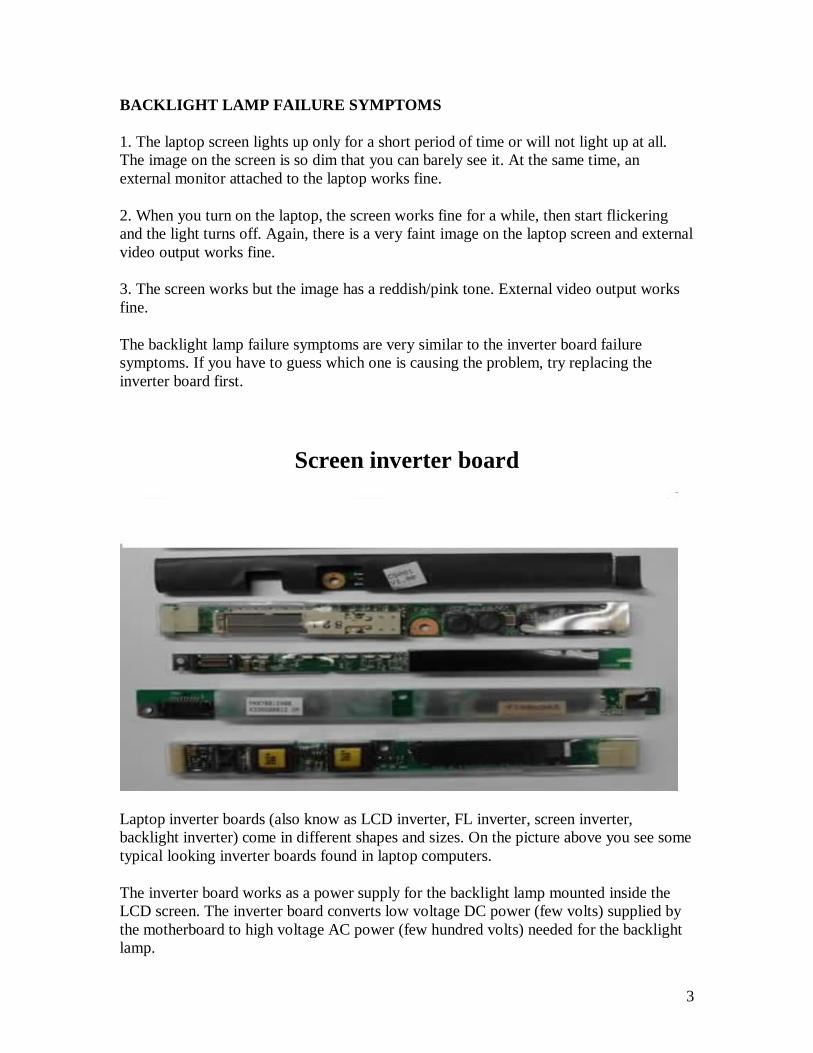
Laptop inverter boards (also know as LCD inverter, FL inverter, screen inverter, backlight inverter) come in different shapes and sizes. On the picture above you see some typical looking inverter boards found in laptop computers.
The inverter board works as a power supply for the backlight lamp mounted inside the LCD screen. The inverter board converts low voltage DC power (few volts) supplied by the motherboard to high voltage AC power (few hundred volts) needed for the backlight lamp.
4
When the inverter board works properly, the backlight lamp gets power and the LCD screen lights up. As a result, the image on the screen is bright.
HOW INVERTER CONNECTED TO LDC SCREEN
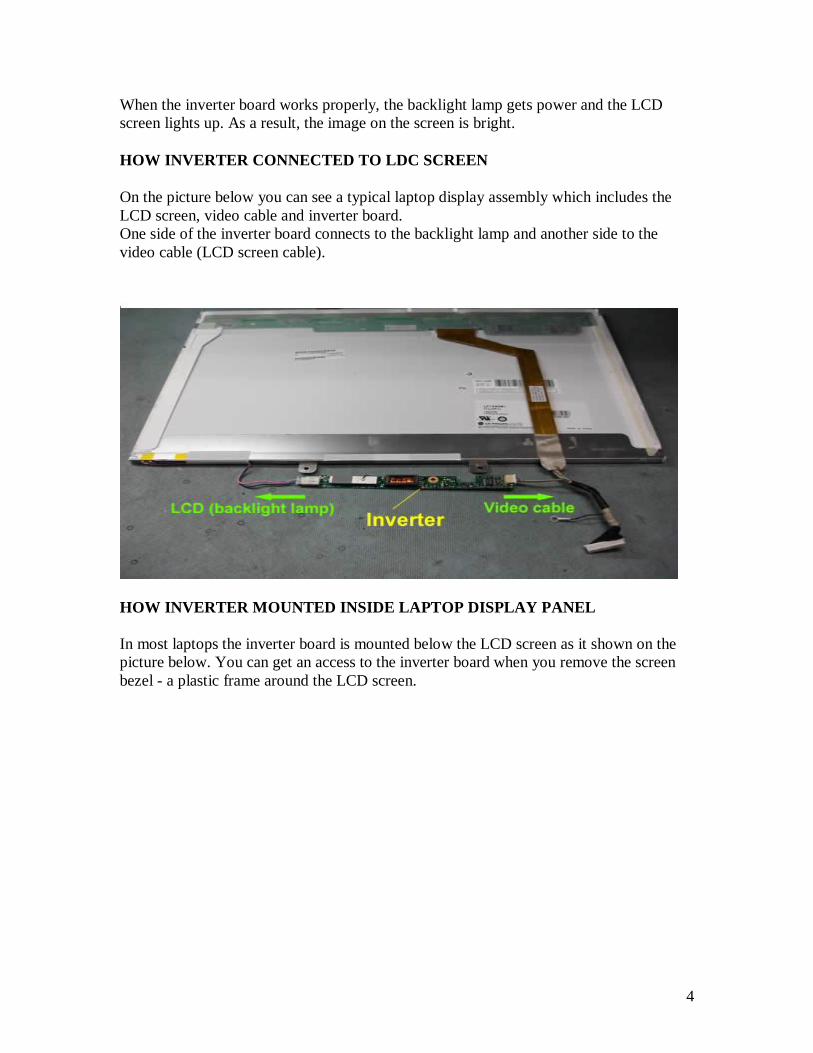
On the picture below you can see a typical laptop display assembly which includes the LCD screen, video cable and inverter board. One side of the inverter board connects to the backlight lamp and another side to the video cable (LCD screen cable).
HOW INVERTER MOUNTED INSIDE LAPTOP DISPLAY PANEL
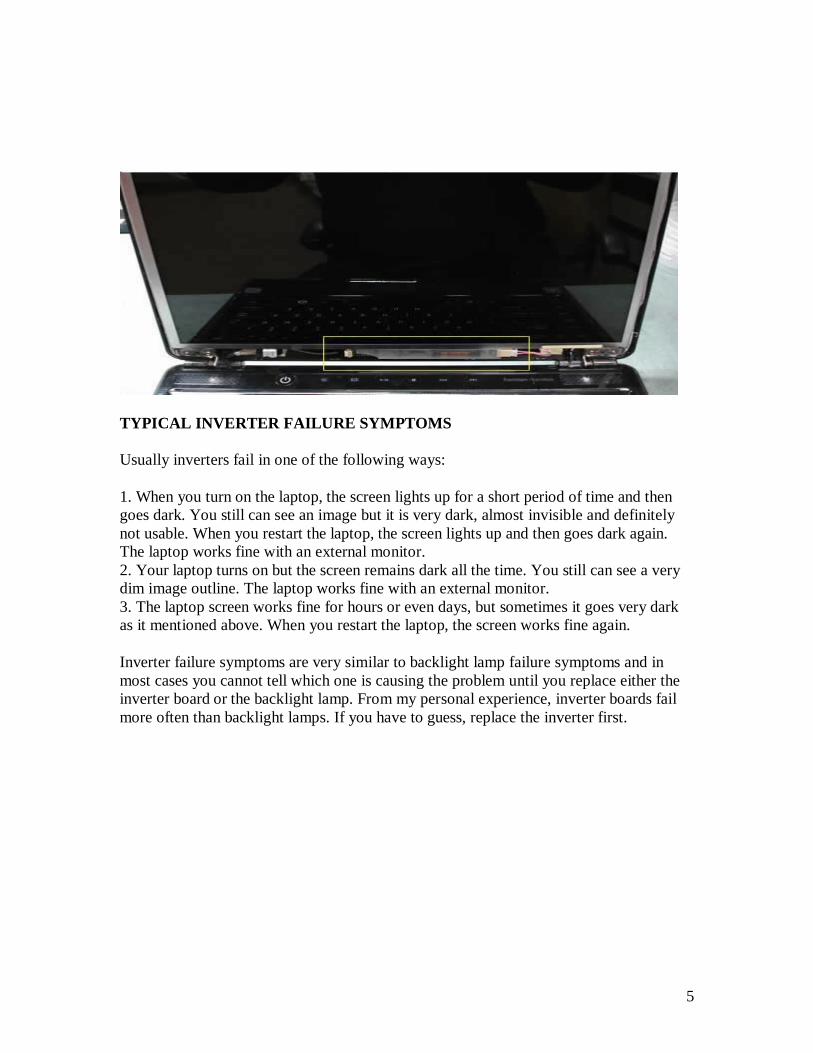
In most laptops the inverter board is mounted below the LCD screen as it shown on the picture below. You can get an access to the inverter board when you remove the screen bezel - a plastic frame around the LCD screen.
5
TYPICAL INVERTER FAILURE SYMPTOMS
Usually inverters fail in one of the following ways:
1. When you turn on the laptop, the screen lights up for a short period of time and then goes dark. You still can see an image but it is very dark, almost invisible and definitely not usable. When you restart the laptop, the screen lights up and then goes dark again. The laptop works fine with an external monitor. 2. Your laptop turns on but the screen remains dark all the time. You still can see a very dim image outline. The laptop works fine with an external monitor. 3. The laptop screen works fine for hours or even days, but sometimes it goes very dark as it mentioned above. When you restart the laptop, the screen works fine again.
Inverter failure symptoms are very similar to backlight lamp failure symptoms and in most cases you cannot tell which one is causing the problem until you replace either the inverter board or the backlight lamp. From my personal experience, inverter boards fail more often than backlight lamps. If you have to guess, replace the inverter first.
6
LCD screen cable
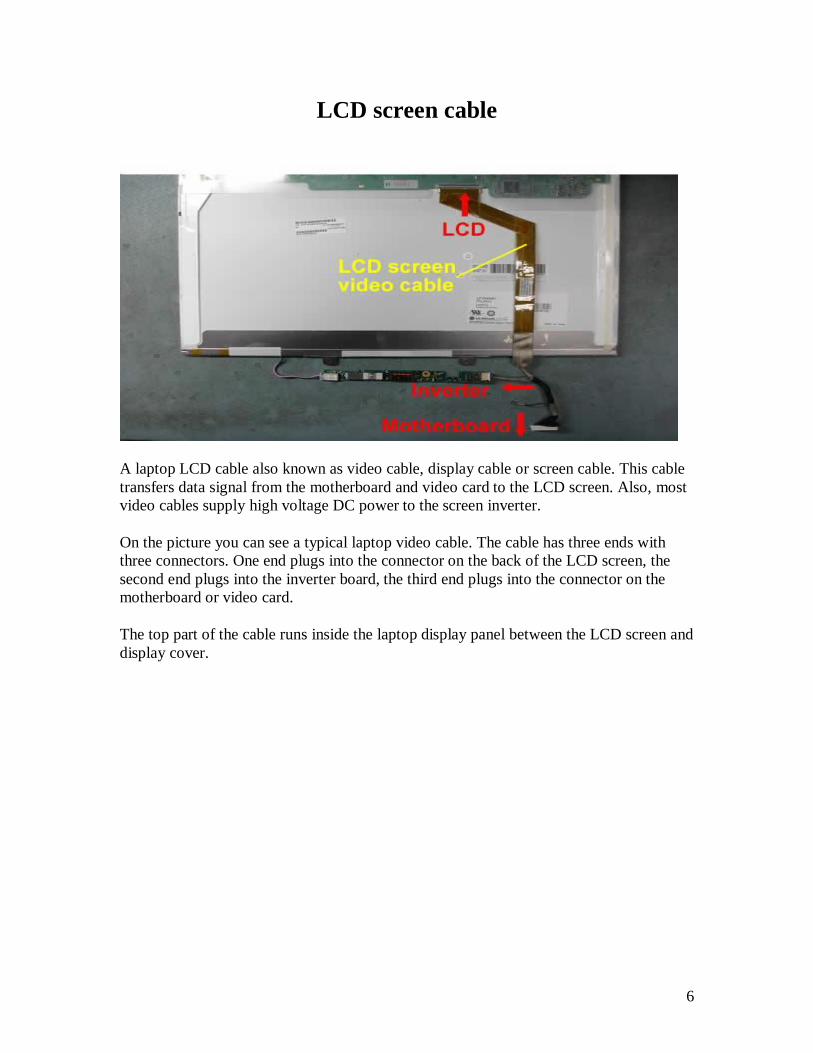
A laptop LCD cable also known as video cable, display cable or screen cable. This cable transfers data signal from the motherboard and video card to the LCD screen. Also, most video cables supply high voltage DC power to the screen inverter.
On the picture you can see a typical laptop video cable. The cable has three ends with three connectors. One end plugs into the connector on the back of the LCD screen, the second end plugs into the inverter board, the third end plugs into the connector on the motherboard or video card.
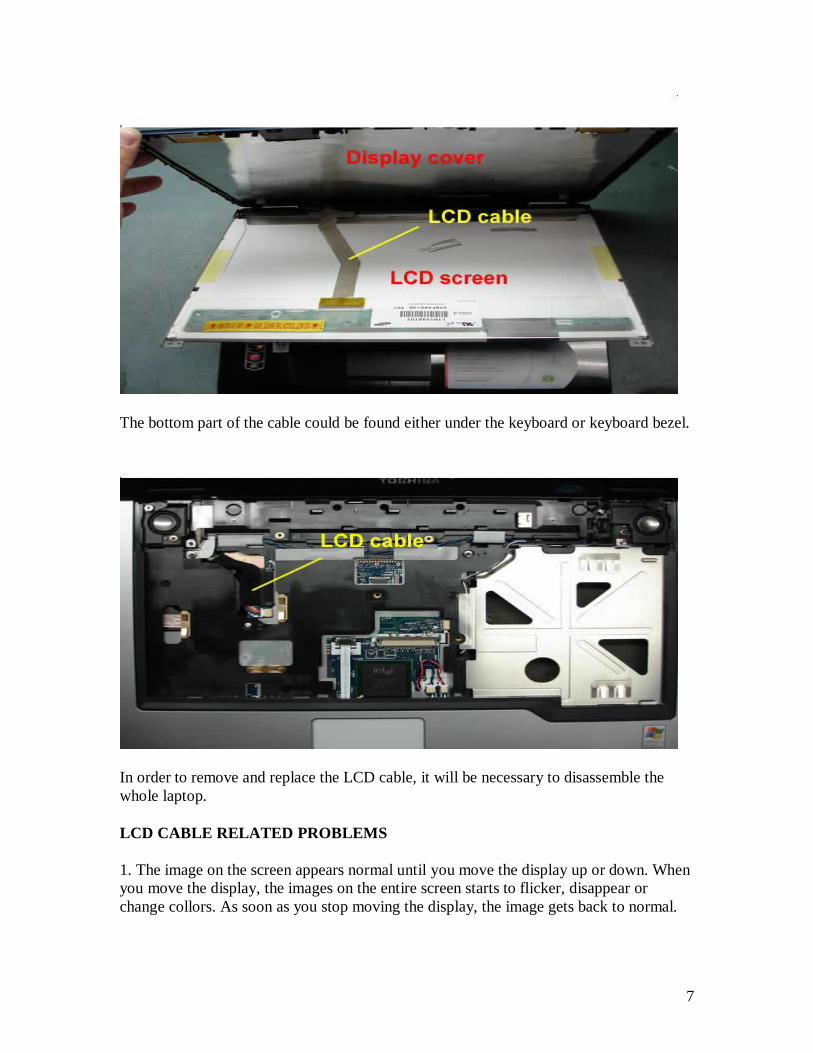
The top part of the cable runs inside the laptop display panel between the LCD screen and display cover.
7
The bottom part of the cable could be found either under the keyboard or keyboard bezel.
In order to remove and replace the LCD cable, it will be necessary to disassemble the whole laptop.
LCD CABLE RELATED PROBLEMS
1. The image on the screen appears normal until you move the display up or down. When you move the display, the images on the entire screen starts to flicker, disappear or change collors. As soon as you stop moving the display, the image gets back to normal.
8
2. The LCD screen lights up but there is no image at all. The entire screen is blank. An external monitor connected to the laptop VGA port works fine, there is no problems with the external video output at all.
3. Image on the entire LCD screen is garbled. An external monitor works fine.
In many cases the video cable failures are very similar to the LCD screen failures.
Display hinges
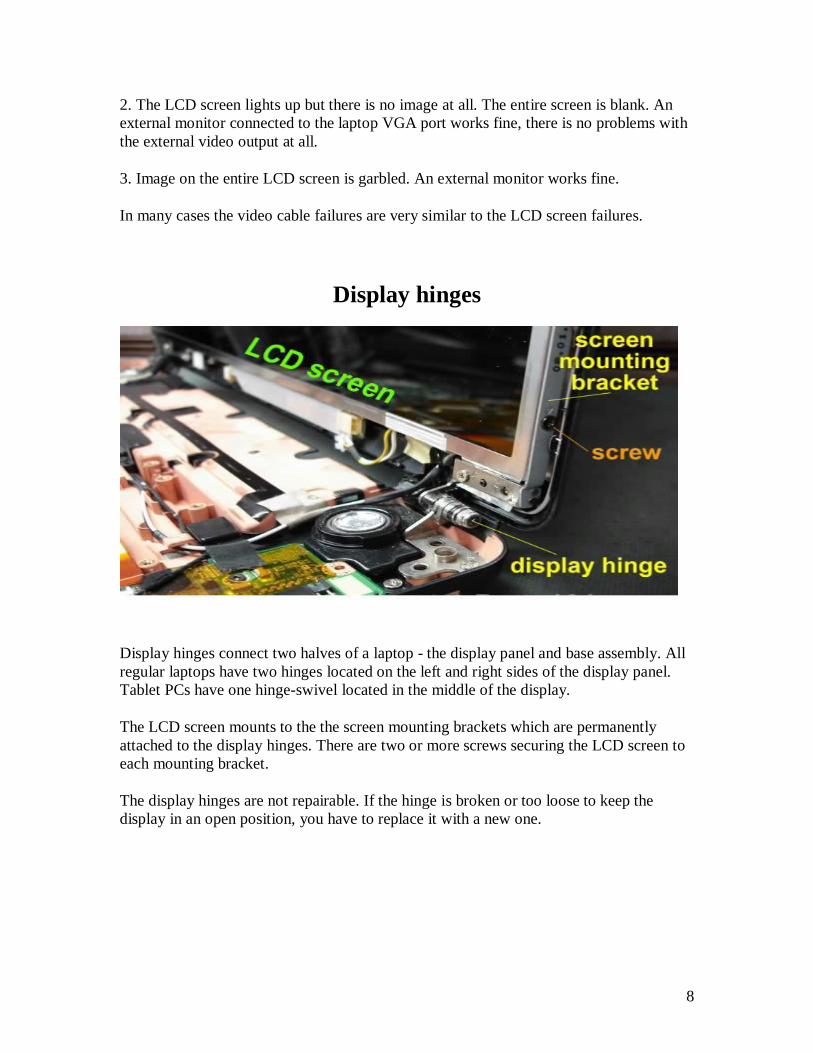
Display hinges connect two halves of a laptop - the display panel and base assembly. All regular laptops have two hinges located on the left and right sides of the display panel. Tablet PCs have one hinge-swivel located in the middle of the display.
The LCD screen mounts to the the screen mounting brackets which are permanently attached to the display hinges. There are two or more screws securing the LCD screen to each mounting bracket.
The display hinges are not repairable. If the hinge is broken or too loose to keep the display in an open position, you have to replace it with a new one.

9
On the picture below you see a laptop with removed LCD screen.
In order to remove and replace hinges, you’ll have to disassemble both, the display panel and laptop base.
HINGE RELATED PROBLEMS
1. The laptop display feels loose. It will stay in the up position, but when you move the display it feels floppy.
10
First of all, try tightening screws securing both hinges to the laptop base and display cover. If tightening screws doesn’t help, apparently your hinges are worn out and will have to be replaced soon.
2. The display will not stat in the up position. When you open the display and leave it in the up position, it falls back.
Most likely one or both hinges are broken and have to be replaced. Even if only one hinge is broken, I would recommend replacing both hinges because the second one is worn out and could break too in the near future.
Keyboard
In laptops, a keyboard is the main input device. It’s interface between a user and a laptop.
In most laptops the keyboard is connected directly to the motherboard via a flat ribbon cable.
KEYBOARD REMOVAL STEPS.
In most laptops you can remove the keyboard as it explained in the following three steps.
STEP 1.
Remove keyboard bezel.
11
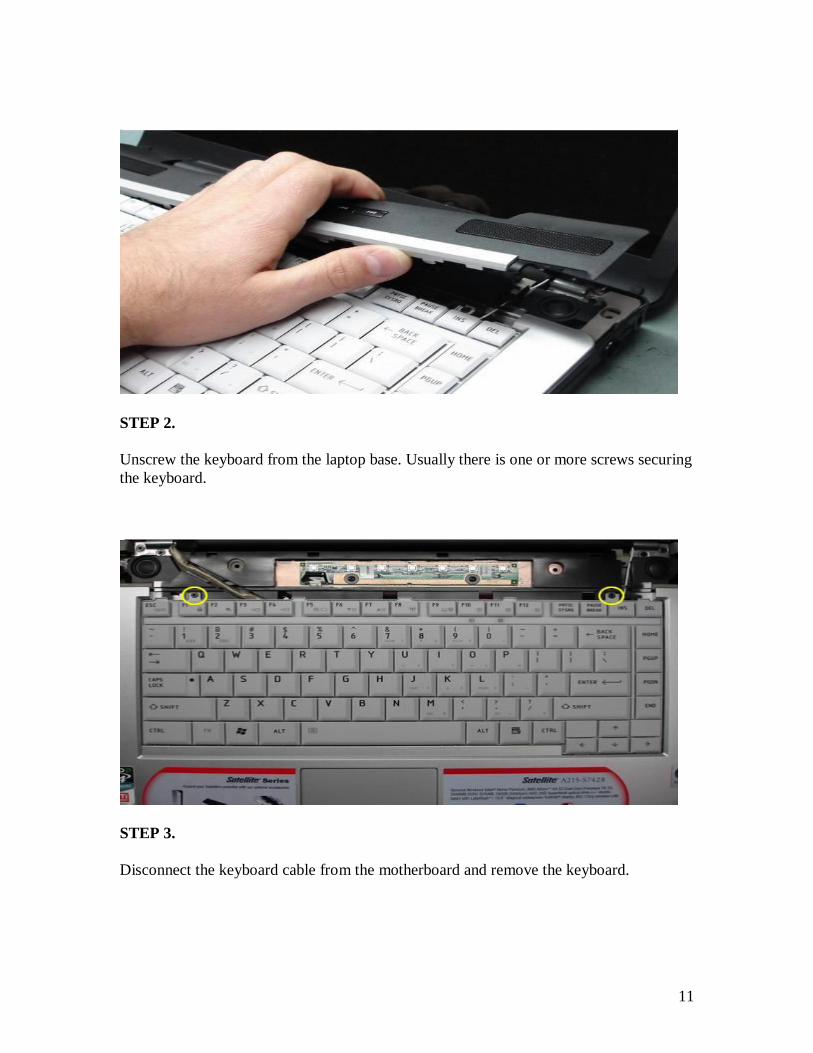
STEP 2.
Unscrew the keyboard from the laptop base. Usually there is one or more screws securing the keyboard.
STEP 3.
Disconnect the keyboard cable from the motherboard and remove the keyboard.

12
KEYBOARD RELATED PROBLEMS.
1. Here’s a very common “keyboard related problem”. When you press on keys U, I, O, J, K, L, M the keyboard types 4, 5, 6, 1, 2, 3, 0. It happens because the “Number Lock” function is enabled. You can turn this function off via a shortcut on the keyboard. Hold down the Fn key and at the same time press once on the NumLk key.
2. One or more keyboard keys came off. You can install these keys back on the keyboard using this method.
3. When you press on one key it types two letters. For example, you press on W but it types WE, you press on T and it types TY, etc… Most likely this problem is related to the keyboard and it has to be replaced.
4. Some keys in horizontal or diagonal row stopped working at all. Again, most likely there is a problem with the keyboard and it has to be replaced.
ATTENTION! If you still have the same issue after replacing the keyboard, there could be a problem with the keyboard controller on the motherboard. It means the whole motherboard has to be replaced.
A laptop keyboard is not repairable. If it stopped working, you have to replace the whole unit.
13
CD/DVD-RW optical drive
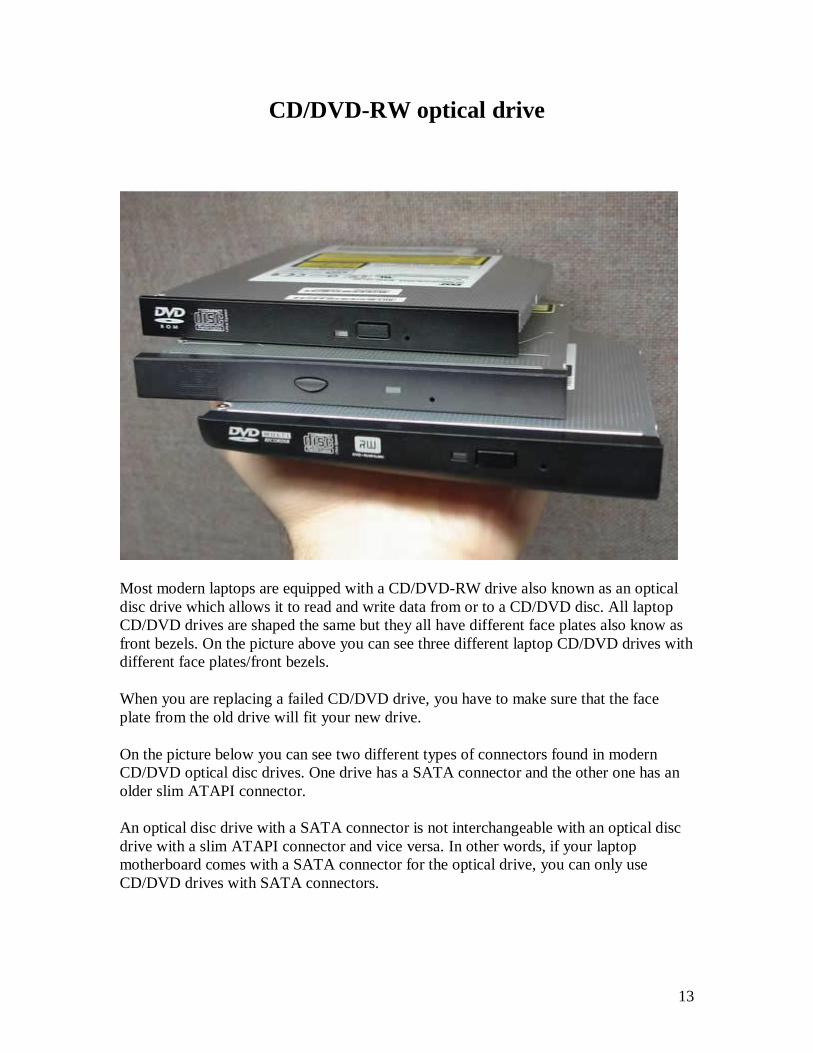
Most modern laptops are equipped with a CD/DVD-RW drive also known as an optical disc drive which allows it to read and write data from or to a CD/DVD disc. All laptop CD/DVD drives are shaped the same but they all have different face plates also know as front bezels. On the picture above you can see three different laptop CD/DVD drives with different face plates/front bezels.
When you are replacing a failed CD/DVD drive, you have to make sure that the face plate from the old drive will fit your new drive.
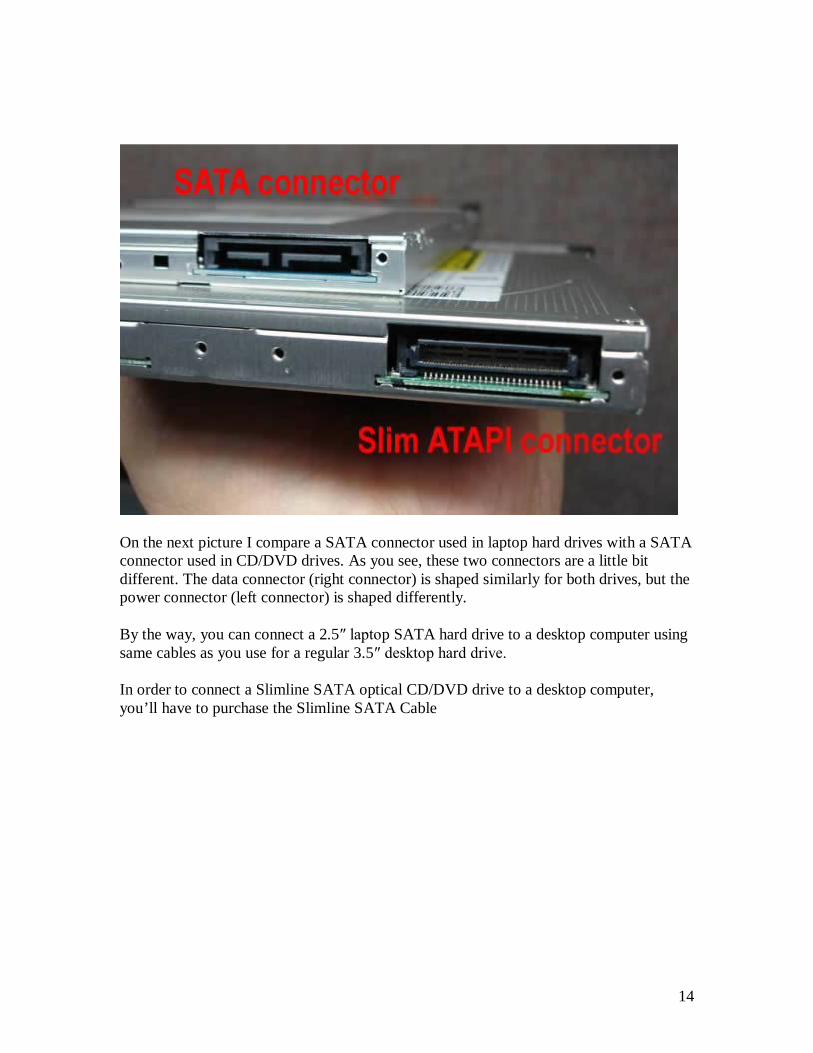
On the picture below you can see two different types of connectors found in modern CD/DVD optical disc drives. One drive has a SATA connector and the other one has an older slim ATAPI connector.
An optical disc drive with a SATA connector is not interchangeable with an optical disc drive with a slim ATAPI connector and vice versa. In other words, if your laptop motherboard comes with a SATA connector for the optical drive, you can only use CD/DVD drives with SATA connectors.
14
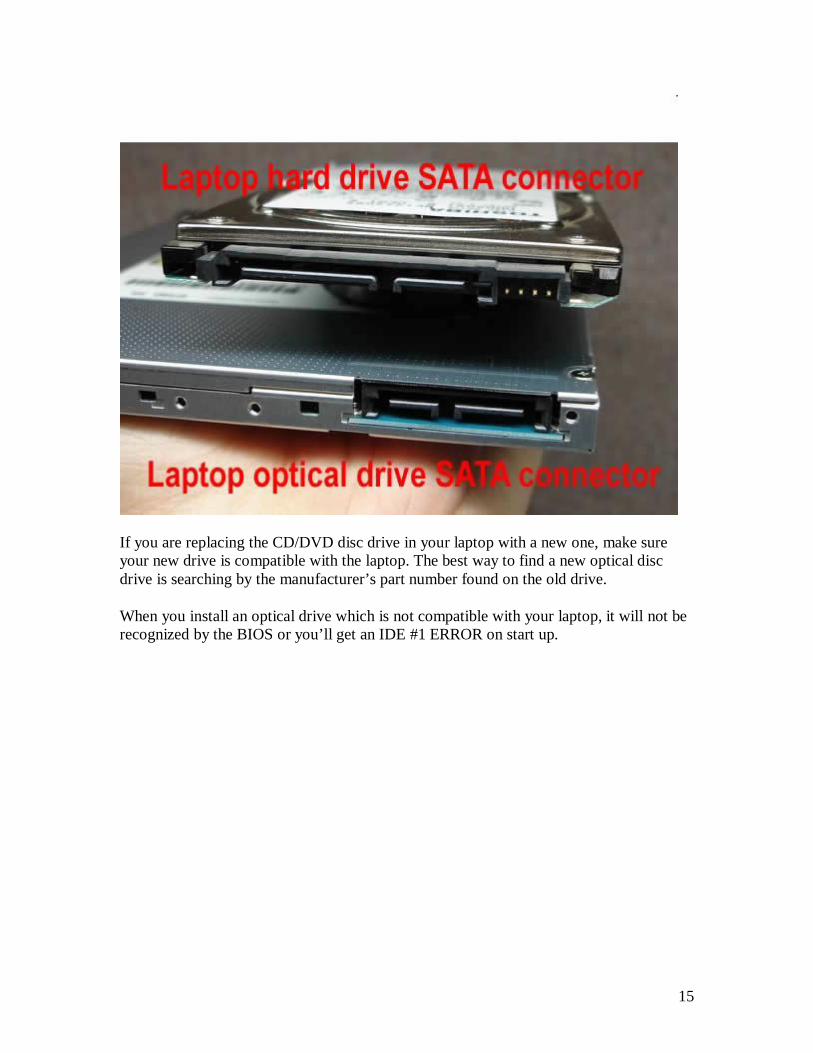
On the next picture I compare a SATA connector used in laptop hard drives with a SATA connector used in CD/DVD drives. As you see, these two connectors are a little bit different. The data connector (right connector) is shaped similarly for both drives, but the power connector (left connector) is shaped differently.
By the way, you can connect a 2.5″ laptop SATA hard drive to a desktop computer using same cables as you use for a regular 3.5″ desktop hard drive.
In order to connect a Slimline SATA optical CD/DVD drive to a desktop computer, you’ll have to purchase the Slimline SATA Cable
15
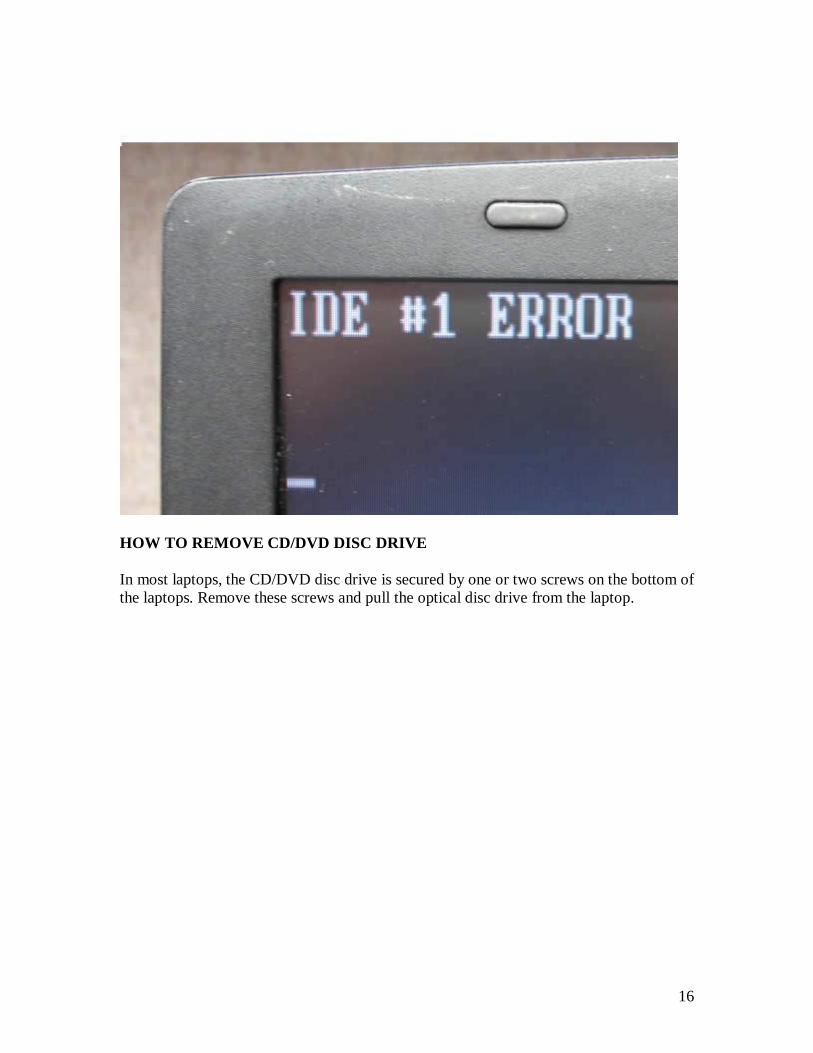
If you are replacing the CD/DVD disc drive in your laptop with a new one, make sure your new drive is compatible with the laptop. The best way to find a new optical disc drive is searching by the manufacturer’s part number found on the old drive.
When you install an optical drive which is not compatible with your laptop, it will not be recognized by the BIOS or you’ll get an IDE #1 ERROR on start up.
16
HOW TO REMOVE CD/DVD DISC DRIVE
In most laptops, the CD/DVD disc drive is secured by one or two screws on the bottom of the laptops. Remove these screws and pull the optical disc drive from the laptop.
17
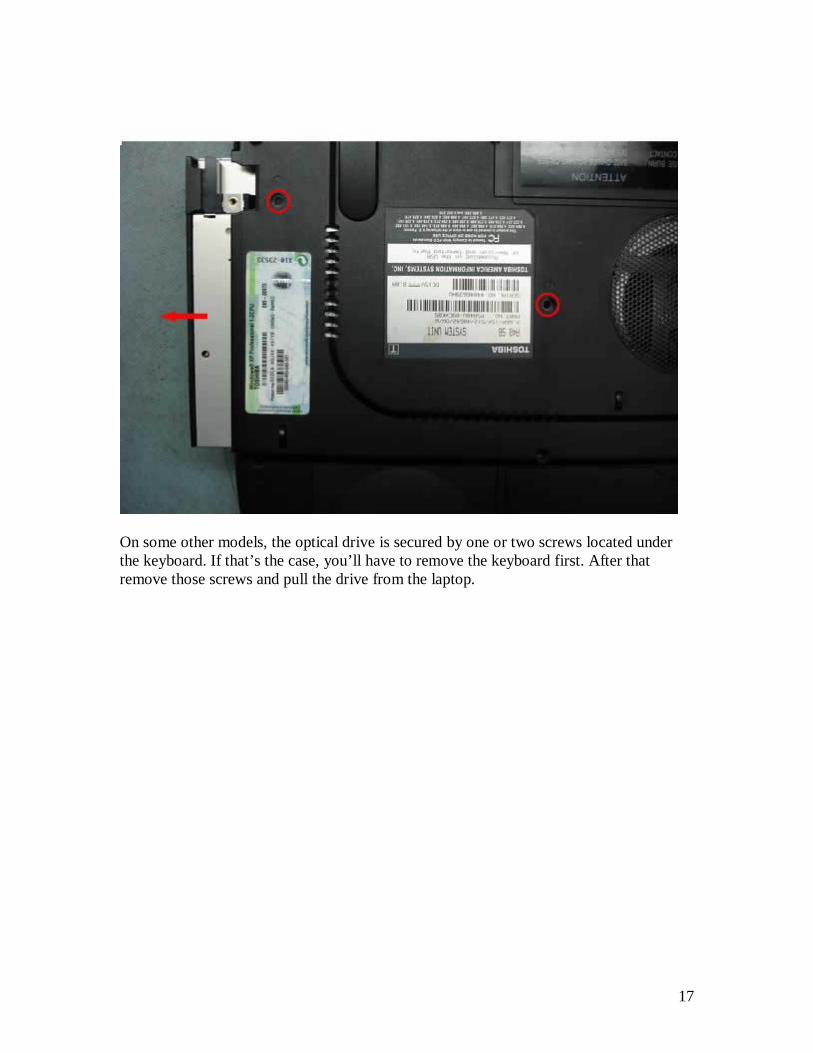
On some other models, the optical drive is secured by one or two screws located under the keyboard. If that’s the case, you’ll have to remove the keyboard first. After that remove those screws and pull the drive from the laptop.
18
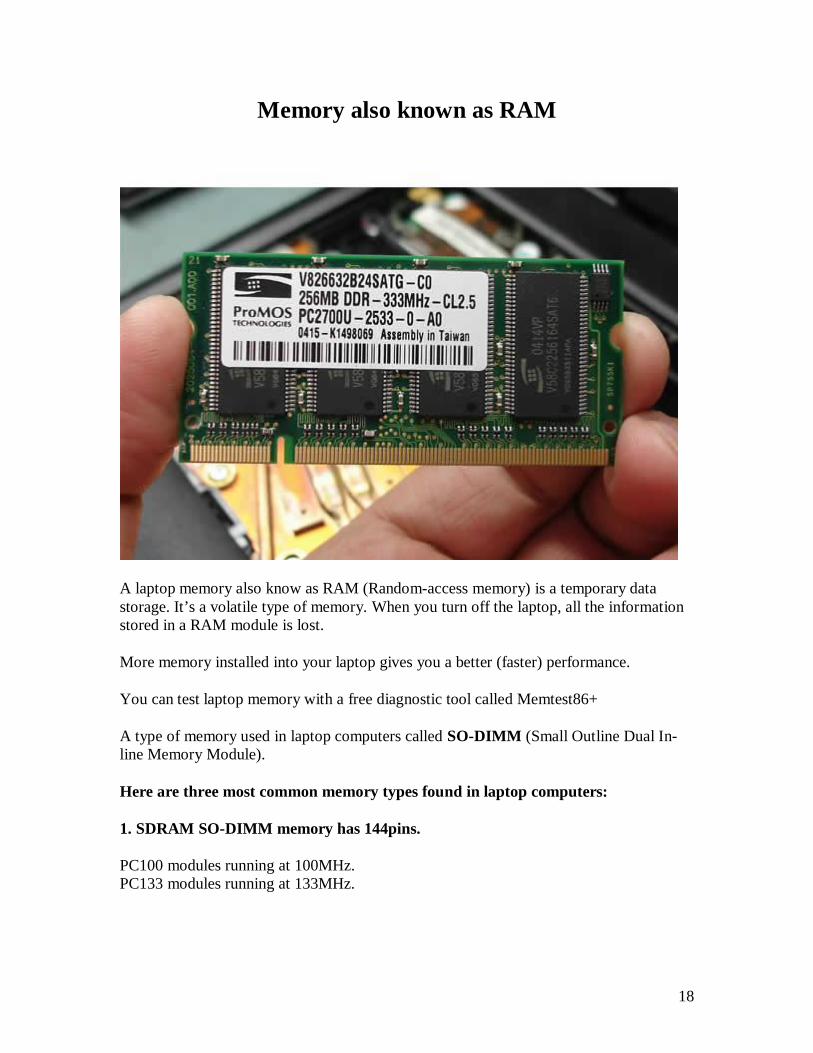
Memory also known as RAM
A laptop memory also know as RAM (Random-access memory) is a temporary data storage. It’s a volatile type of memory. When you turn off the laptop, all the information stored in a RAM module is lost.
More memory installed into your laptop gives you a better (faster) performance.
You can test laptop memory with a free diagnostic tool called Memtest86+
A type of memory used in laptop computers called SO-DIMM (Small Outline Dual In-line Memory Module).
Here are three most common memory types found in laptop computers:
1. SDRAM SO-DIMM memory has 144pins.
PC100 modules running at 100MHz. PC133 modules running at 133MHz.
19
PC133 modules are backward compatible with PC100 modules. If your laptop requires a PC100 memory module, you can safely use a PC133 module but it will run at PC100 speed.
2. DDR SO-DIMM memory has 200 pins.
PC2100 (DDR266) modules running at 266MHz. PC2700 (DDR333) modules running at 333MHz.
PC2700 memory is backward compatible with PC2100 memory. If your laptop requires a PC2100 module, you can safely use a PC2700 module but it will run at PC2100 speed.
DDR memory modules are not backward compatible with SDRAM modules.
3. DDR2 SO-DIMM memory has 200 pins.
PC2-3200 (DDR2-400) running at 200MHz. PC2-4200 (DDR2-533) running at 266MHz. PC2-5300 (DDR2-667) running at 333MHz. PC2-6400 (DDR2-800) running at 400MHz.
Faster DDR2 memory modules are backward compatible with slower DDR2 memory modules. For example, if your laptop requires a PC2-4200 memory module you can safely use a PC2-5300 module but it will run at PC2-4200 speed.
DDR2 memory modules are not backward compatible with DDR modules. The notch on DDR2 is located in a different position from DDR.
WHERE MEMORY MODULES ARE LOCATED.
In a laptop computer memory slots could be found in a few different locations, it depends on the brand and model of the laptop.
1. Both memory slots can be accessed from the door on the bottom. 2. One slot is located on the bottom and another one under the keyboard. 3. Both memory slots are located under the keyboard. 4. There is only one memory slot available for upgrades. The main memory is integrated into the motherboard.
HOW TO REMOVE MEMORY MODULE FROM THE SLOT.
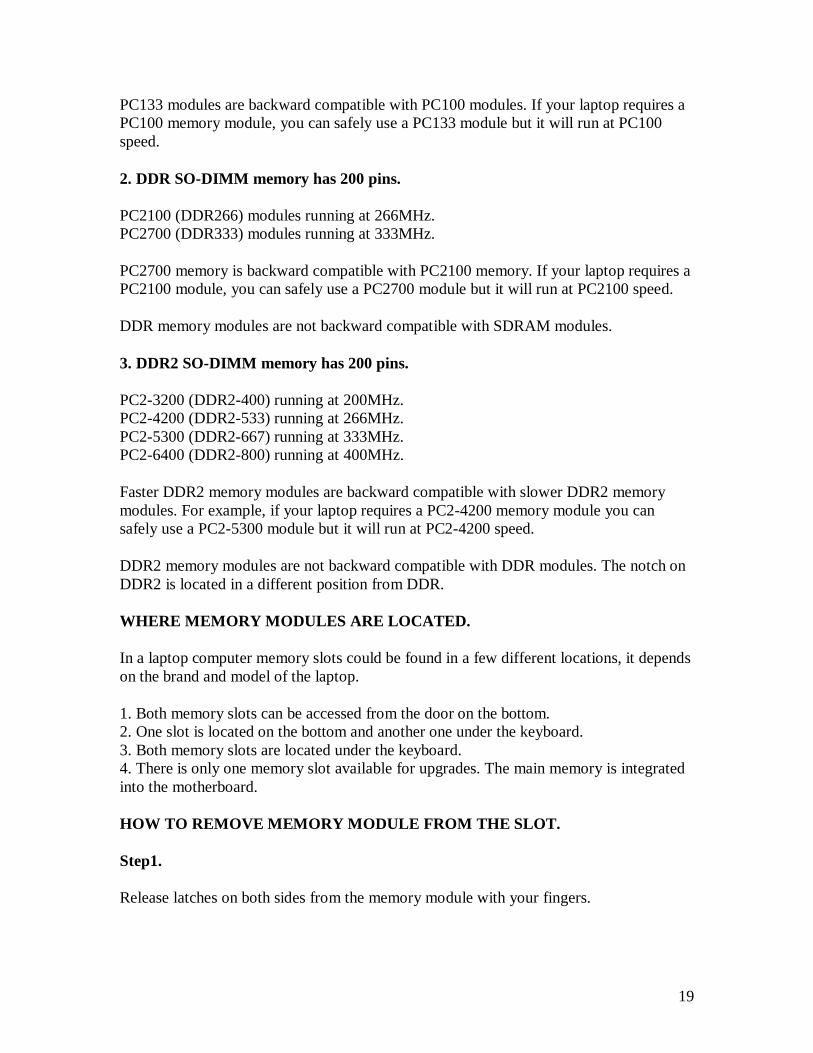
Step1.
Release latches on both sides from the memory module with your fingers.
20
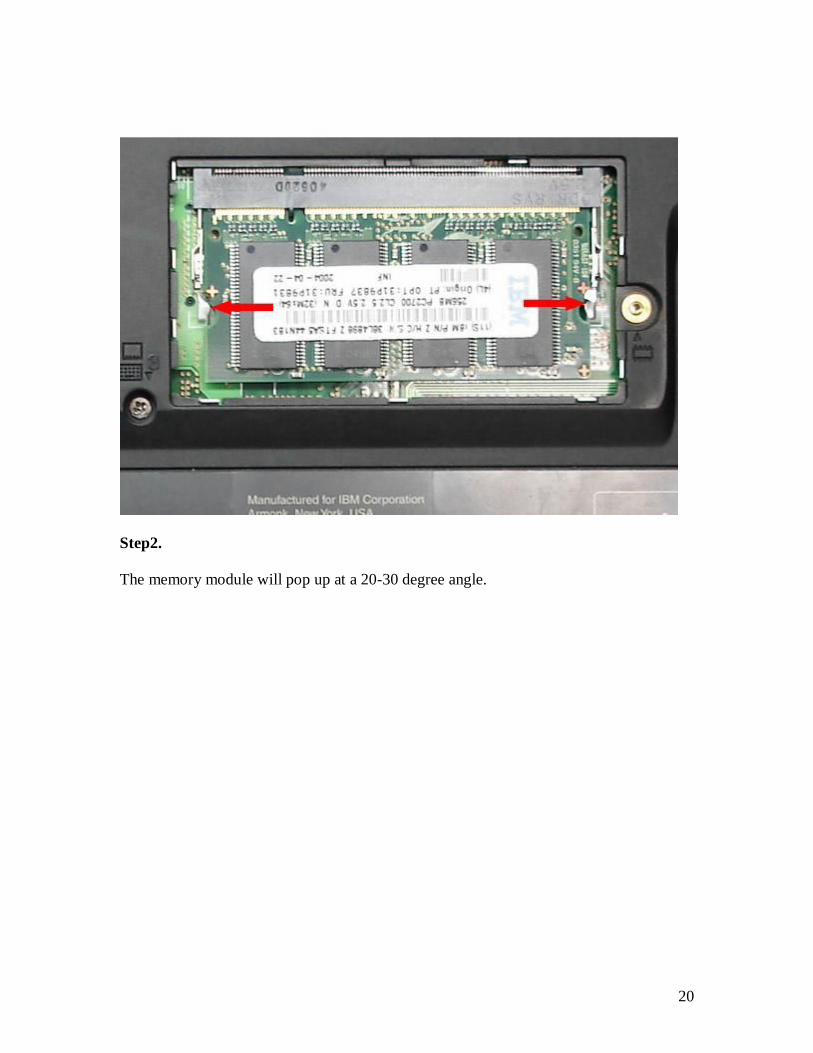
Step2.
The memory module will pop up at a 20-30 degree angle.
21
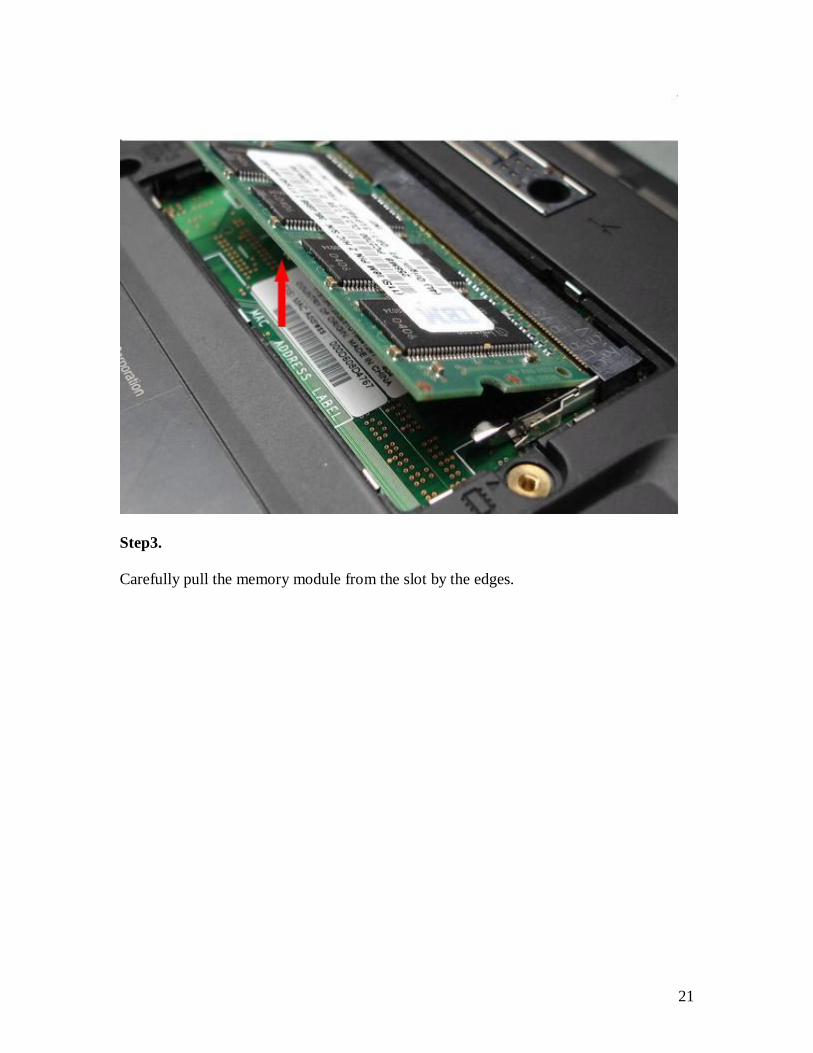
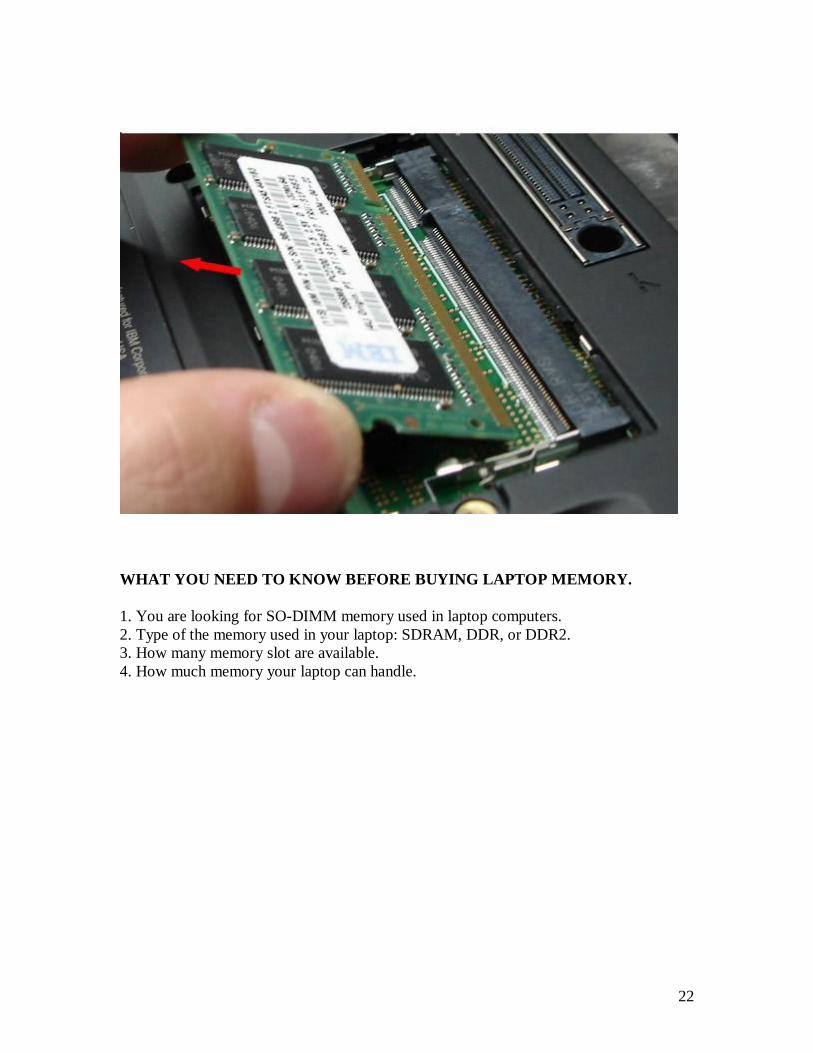
Step3.
Carefully pull the memory module from the slot by the edges.
22
WHAT YOU NEED TO KNOW BEFORE BUYING LAPTOP MEMORY.
1. You are looking for SO-DIMM memory used in laptop computers. 2. Type of the memory used in your laptop: SDRAM, DDR, or DDR2. 3. How many memory slot are available. 4. How much memory your laptop can handle.
23
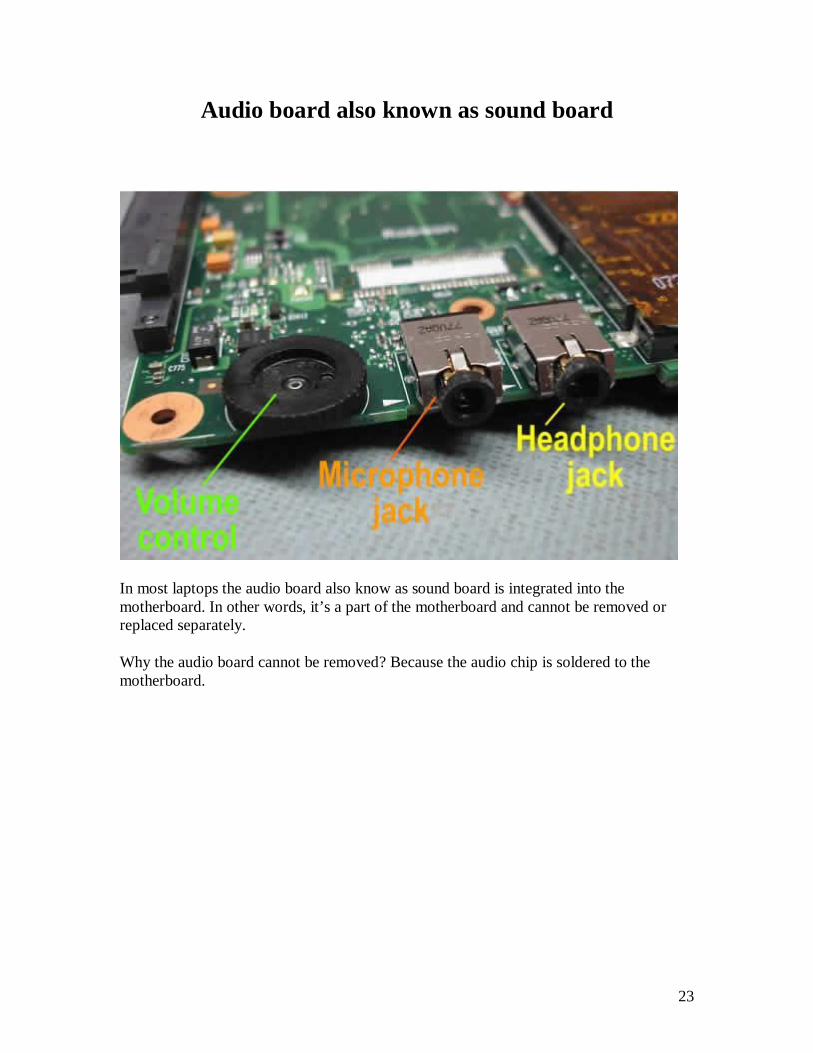
Audio board also known as sound board
In most laptops the audio board also know as sound board is integrated into the motherboard. In other words, it’s a part of the motherboard and cannot be removed or replaced separately.
Why the audio board cannot be removed? Because the audio chip is soldered to the motherboard.

24
If the audio board fails, you’ll have to replace the whole motherboard.
AUDIO BOARD FAILURE SYMPTOMS AND TROUBLESHOOTING TIPS.
1. There is no sound from internal speakers or headphones.
Make sure the volume level is not set to minimum. Make sure the volume is not muted. If the volume is not mutes and volume level is not set to minimum, but you still
have no sound, try reinstalling the audio driver. If reinstalling the audio driver doesn’t help, try reinstalling the operating system. If nothing helps, it’s possible you have a problem with the audio board.
2. Headphones are working fine but there is no sound coming from the laptop speakers.
Try fix the problem using this method.
25
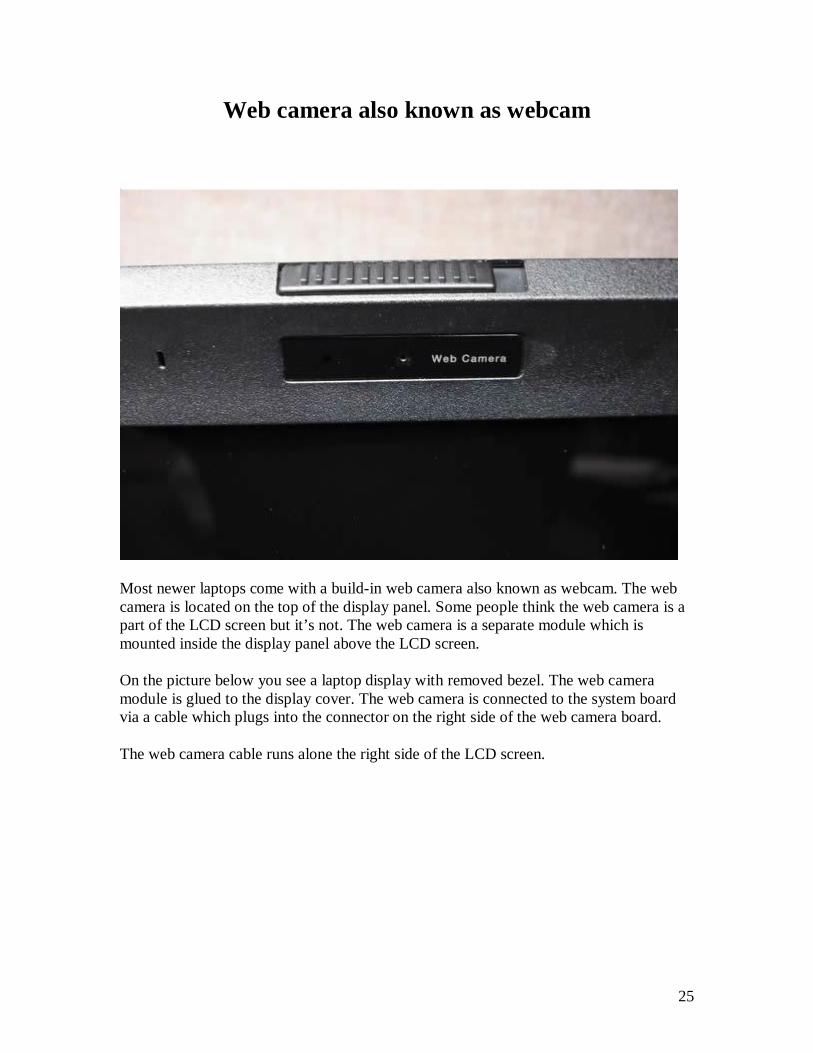
Web camera also known as webcam
Most newer laptops come with a build-in web camera also known as webcam. The web camera is located on the top of the display panel. Some people think the web camera is a part of the LCD screen but it’s not. The web camera is a separate module which is mounted inside the display panel above the LCD screen.
On the picture below you see a laptop display with removed bezel. The web camera module is glued to the display cover. The web camera is connected to the system board via a cable which plugs into the connector on the right side of the web camera board.
The web camera cable runs alone the right side of the LCD screen.
26
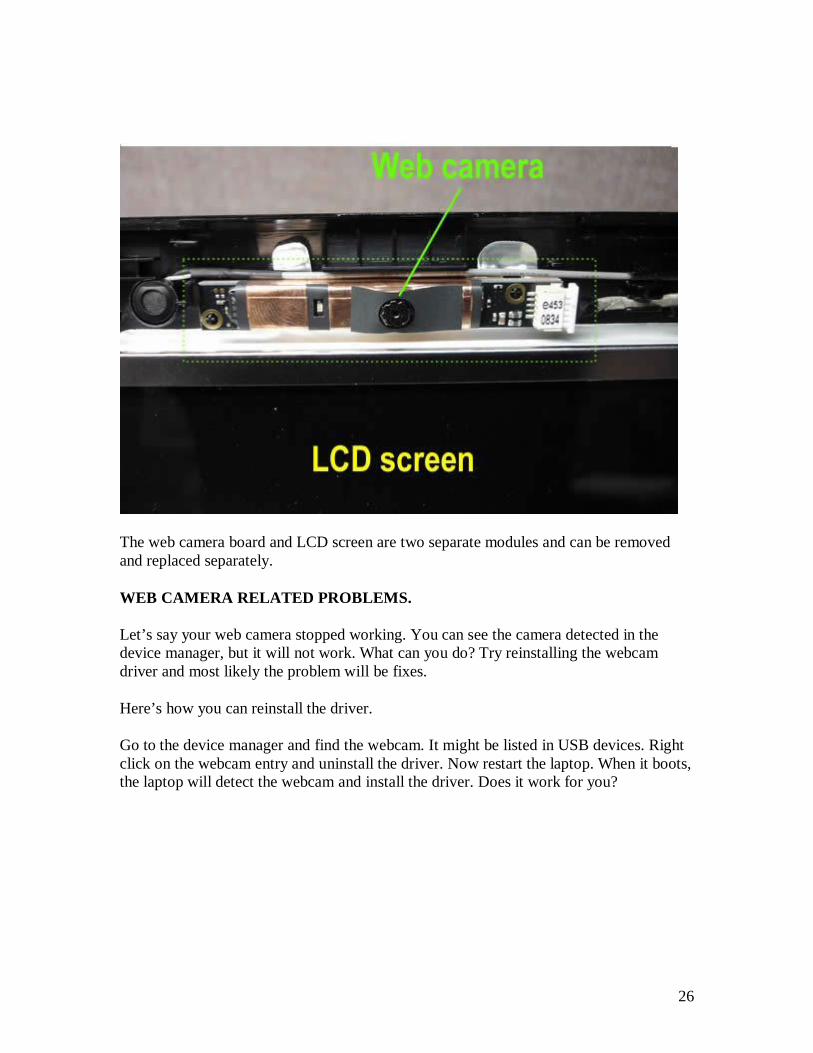
The web camera board and LCD screen are two separate modules and can be removed and replaced separately.
WEB CAMERA RELATED PROBLEMS.
Let’s say your web camera stopped working. You can see the camera detected in the device manager, but it will not work. What can you do? Try reinstalling the webcam driver and most likely the problem will be fixes.
Here’s how you can reinstall the driver.
Go to the device manager and find the webcam. It might be listed in USB devices. Right click on the webcam entry and uninstall the driver. Now restart the laptop. When it boots, the laptop will detect the webcam and install the driver. Does it work for you?
27
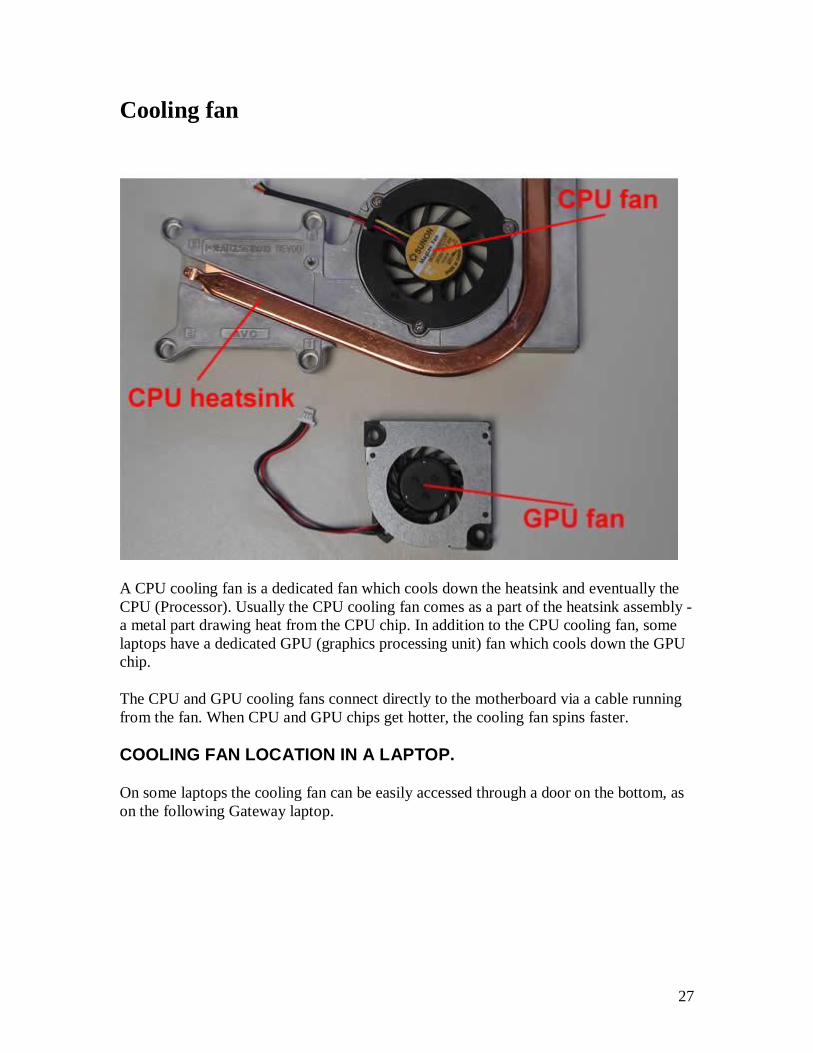
Cooling fan
A CPU cooling fan is a dedicated fan which cools down the heatsink and eventually the CPU (Processor). Usually the CPU cooling fan comes as a part of the heatsink assembly - a metal part drawing heat from the CPU chip. In addition to the CPU cooling fan, some laptops have a dedicated GPU (graphics processing unit) fan which cools down the GPU chip.
The CPU and GPU cooling fans connect directly to the motherboard via a cable running from the fan. When CPU and GPU chips get hotter, the cooling fan spins faster.
COOLING FAN LOCATION IN A LAPTOP.
On some laptops the cooling fan can be easily accessed through a door on the bottom, as on the following Gateway laptop.
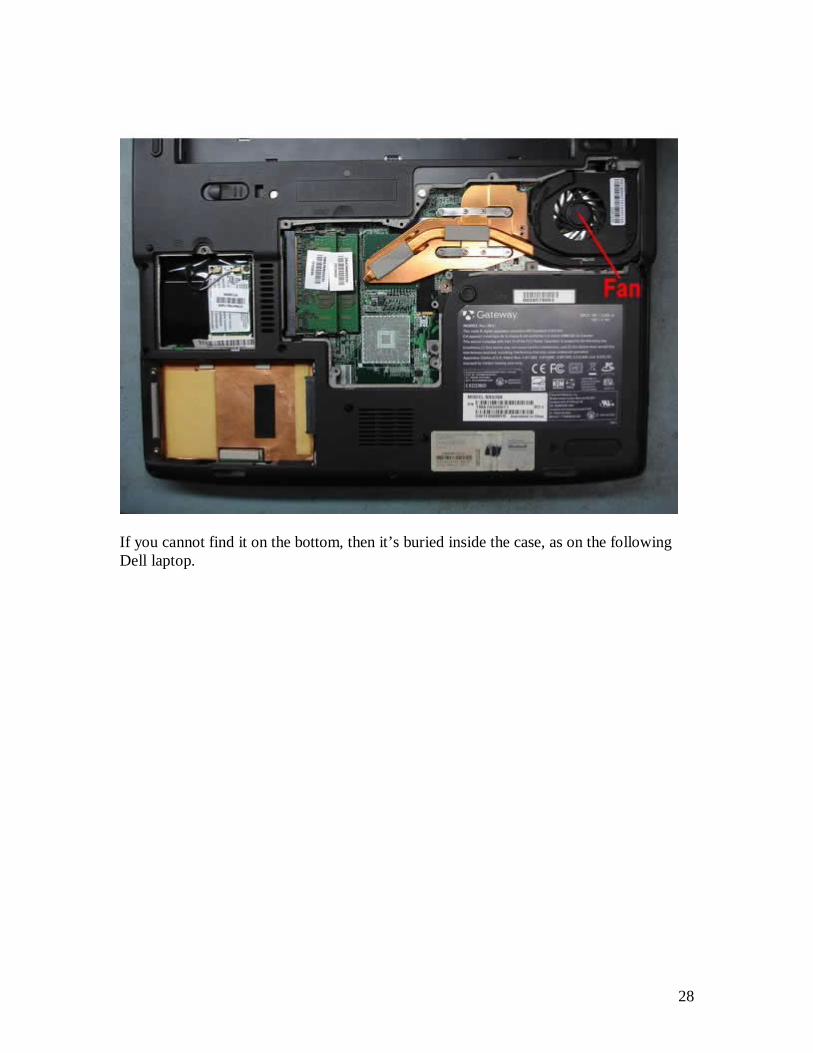
28
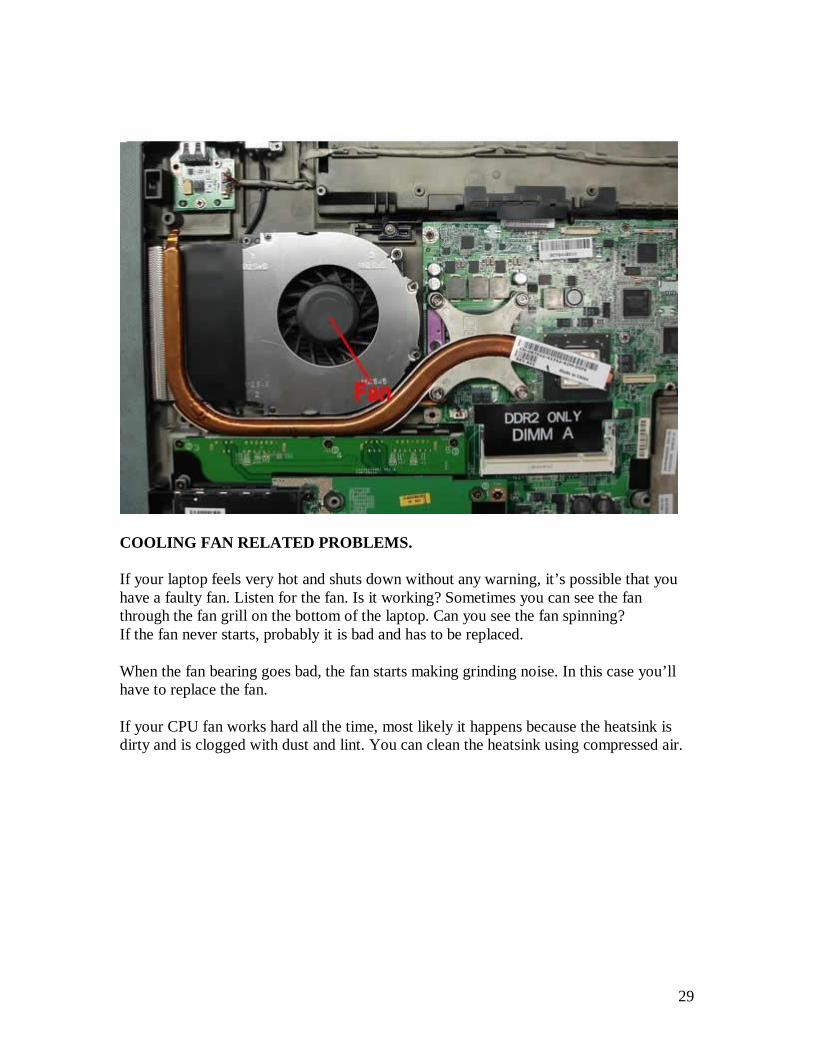
If you cannot find it on the bottom, then it’s buried inside the case, as on the following Dell laptop.
29
COOLING FAN RELATED PROBLEMS.
If your laptop feels very hot and shuts down without any warning, it’s possible that you have a faulty fan. Listen for the fan. Is it working? Sometimes you can see the fan through the fan grill on the bottom of the laptop. Can you see the fan spinning? If the fan never starts, probably it is bad and has to be replaced.
When the fan bearing goes bad, the fan starts making grinding noise. In this case you’ll have to replace the fan.
If your CPU fan works hard all the time, most likely it happens because the heatsink is dirty and is clogged with dust and lint. You can clean the heatsink using compressed air.
30
CMOS battery also know as RTC battery Any laptop computer has a CMOS battery also known as RTC battery. The CMOS battery connects directly to the laptop system board and helps to retain important BIOS settings such as system time, date, BIOS configuration while the laptop is turned off or even when the main battery is removed.
The CMOS battery is rechargeable and it’s getting charged when the laptop is plugged into the mains.
CMOS batteries come in different shapes ans sizes.
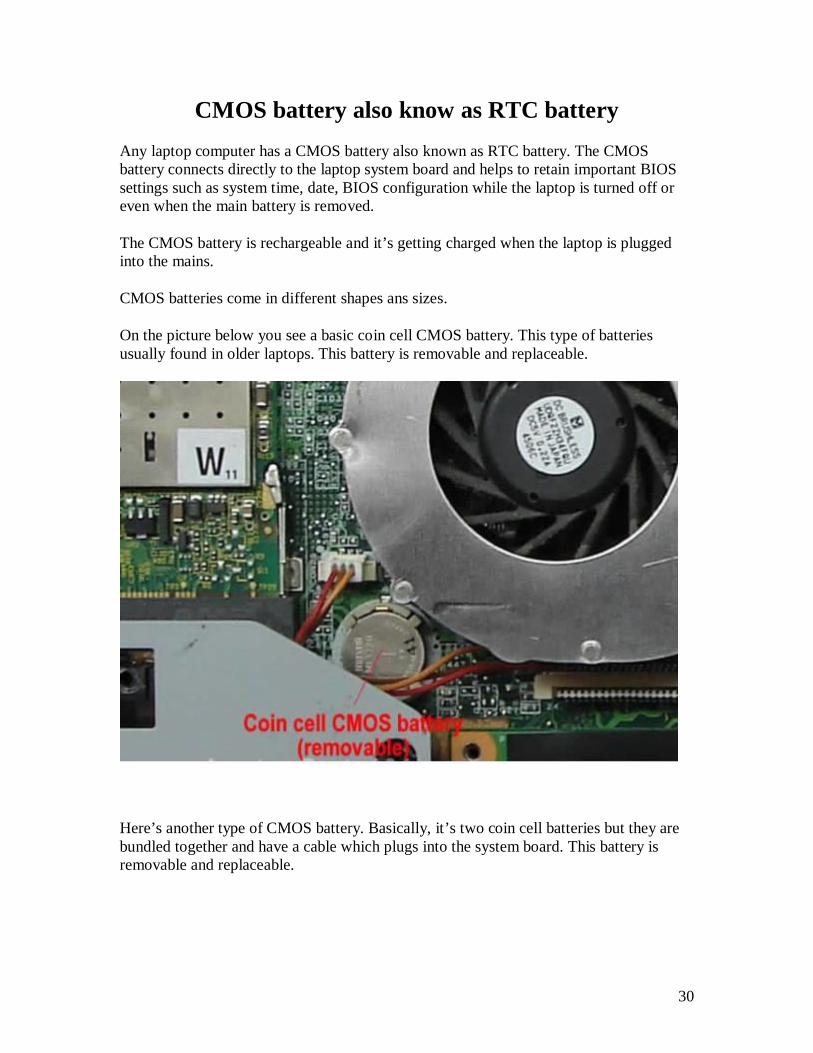
On the picture below you see a basic coin cell CMOS battery. This type of batteries usually found in older laptops. This battery is removable and replaceable.
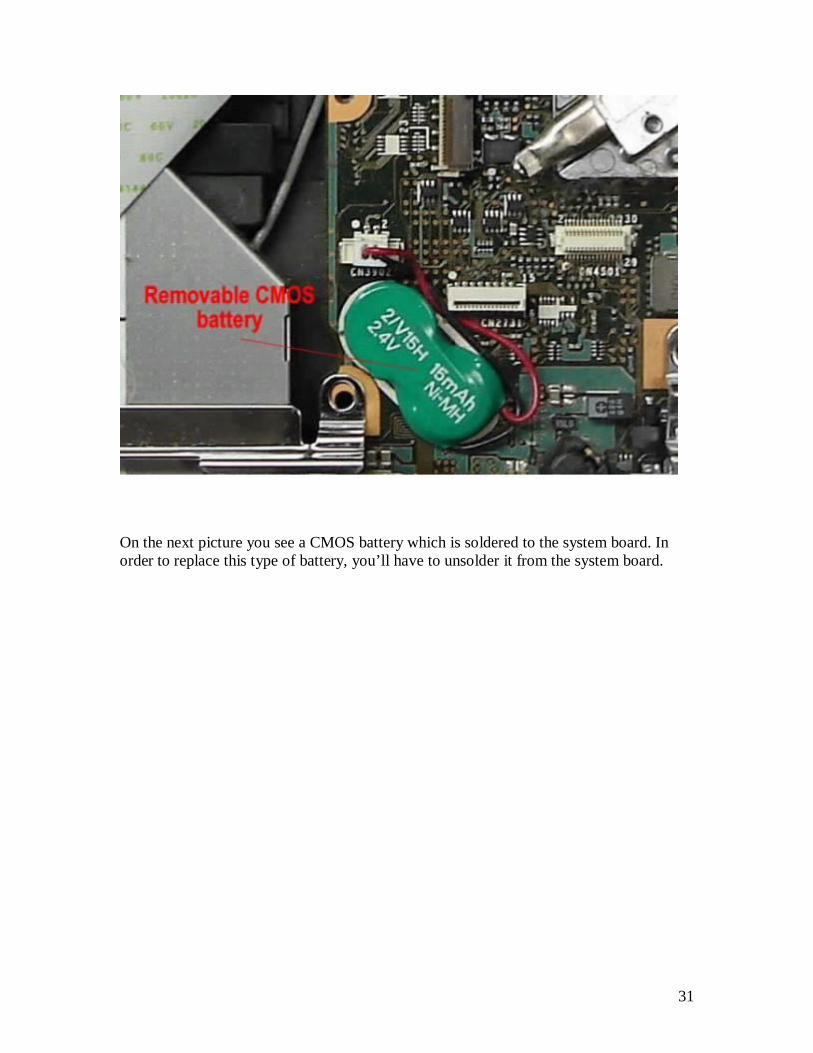
Here’s another type of CMOS battery. Basically, it’s two coin cell batteries but they are bundled together and have a cable which plugs into the system board. This battery is removable and replaceable.
31
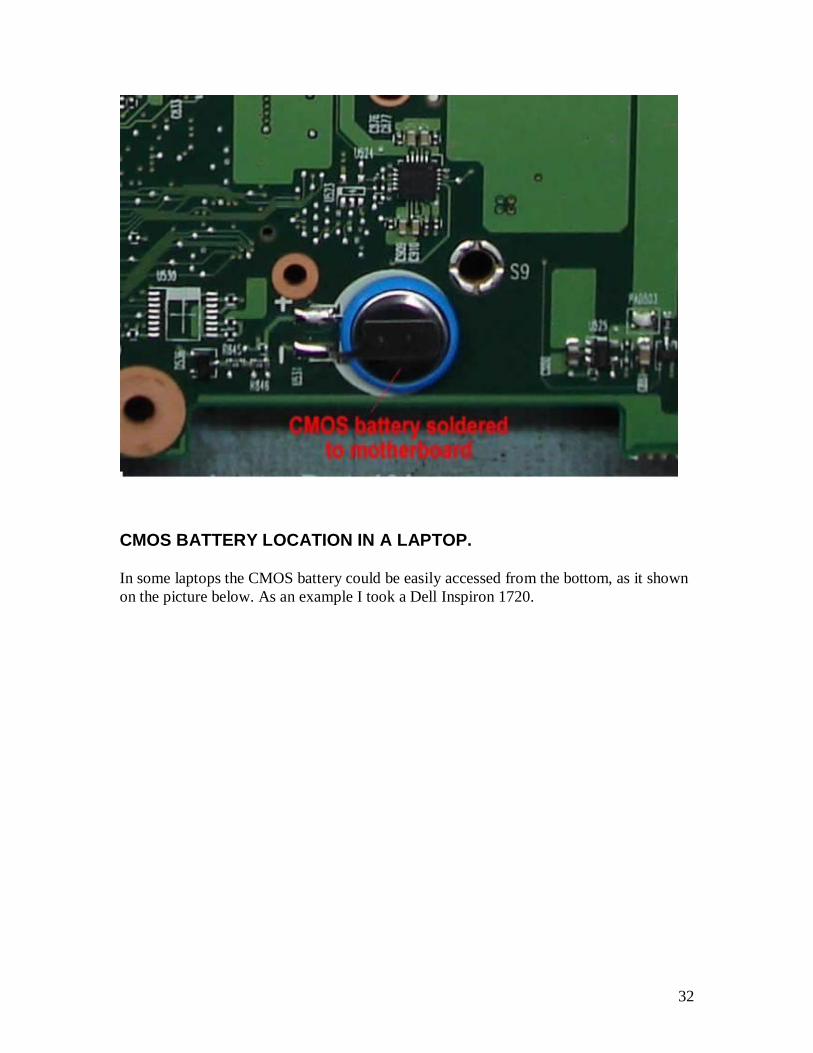
On the next picture you see a CMOS battery which is soldered to the system board. In order to replace this type of battery, you’ll have to unsolder it from the system board.
32
CMOS BATTERY LOCATION IN A LAPTOP.
In some laptops the CMOS battery could be easily accessed from the bottom, as it shown on the picture below. As an example I took a Dell Inspiron 1720.
33
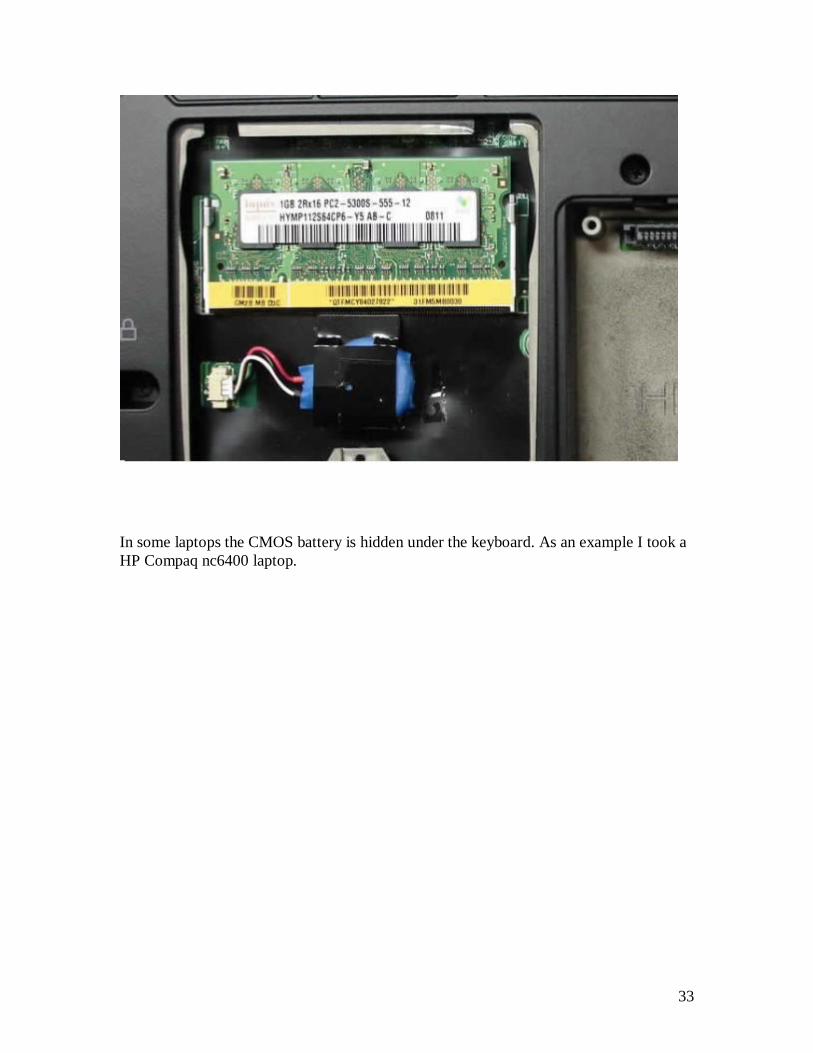
In some laptops the CMOS battery is hidden under the keyboard. As an example I took a HP Compaq nc6400 laptop.
34
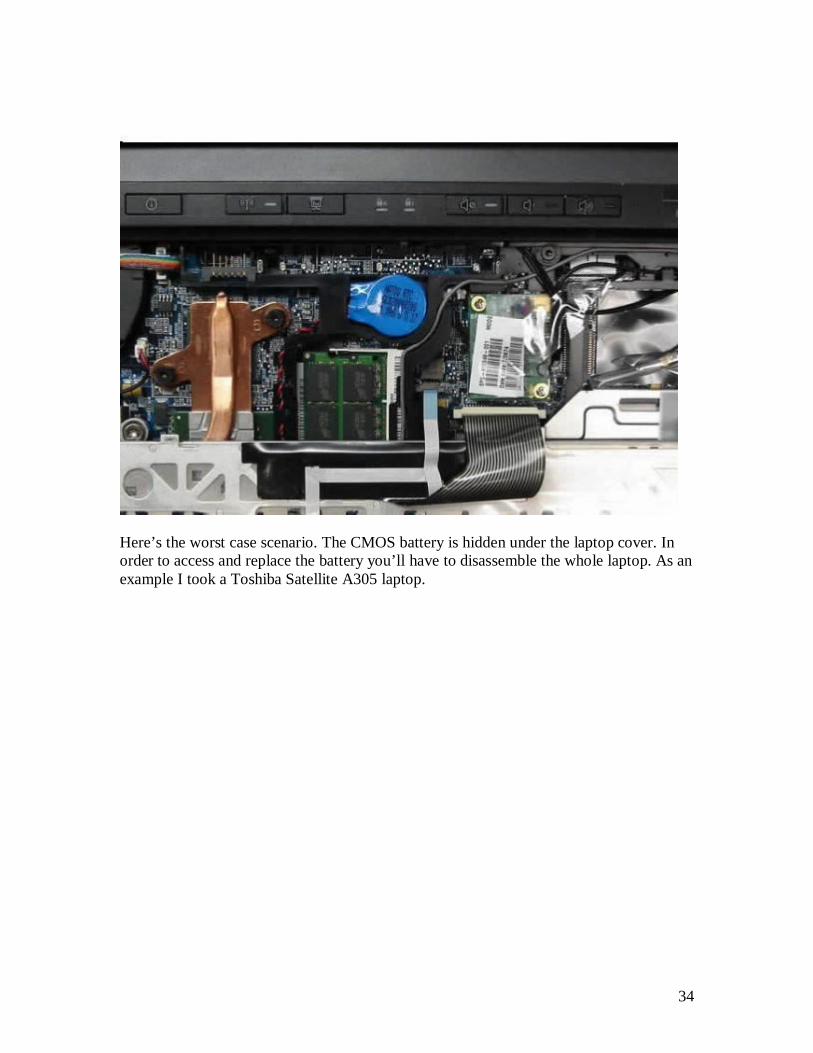
Here’s the worst case scenario. The CMOS battery is hidden under the laptop cover. In order to access and replace the battery you’ll have to disassemble the whole laptop. As an example I took a Toshiba Satellite A305 laptop.
35
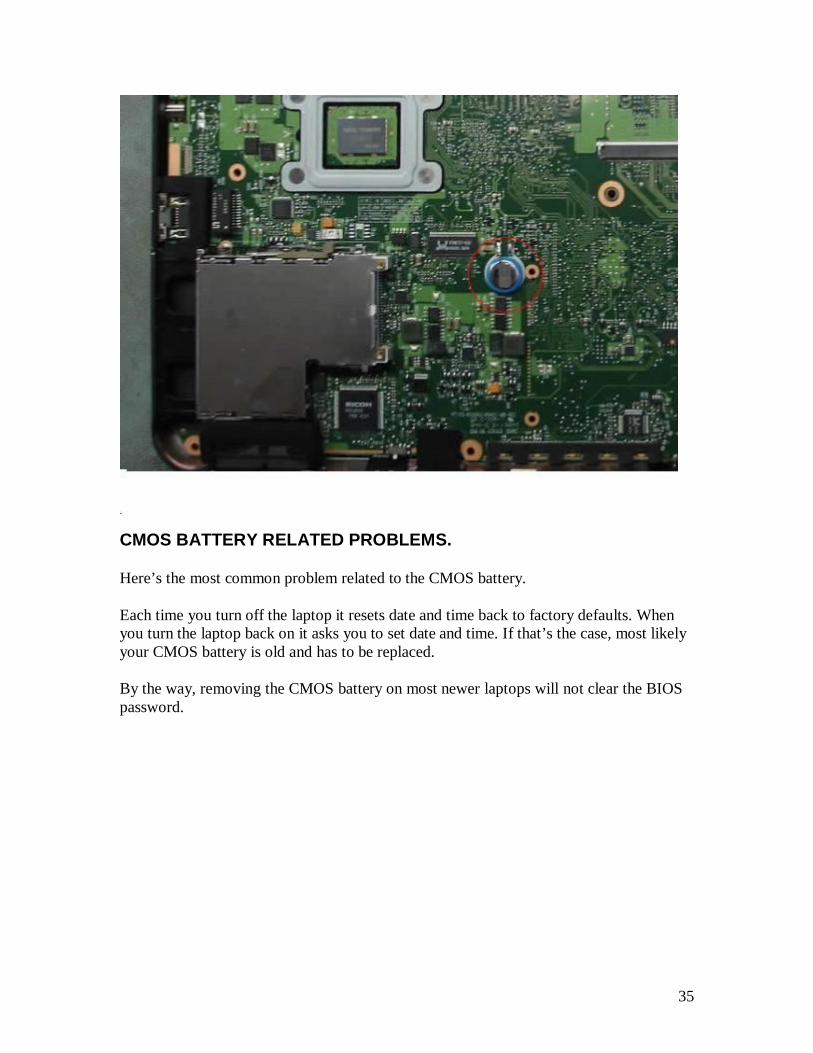
CMOS BATTERY RELATED PROBLEMS.
Here’s the most common problem related to the CMOS battery.
Each time you turn off the laptop it resets date and time back to factory defaults. When you turn the laptop back on it asks you to set date and time. If that’s the case, most likely your CMOS battery is old and has to be replaced.
By the way, removing the CMOS battery on most newer laptops will not clear the BIOS password.


![Power Amplifiers PartII[1]](https://static.cupdf.com/doc/110x72/577d24611a28ab4e1e9c5708/power-amplifiers-partii1.jpg)