Issue 20 | Feb 2009
Blender learning made easy
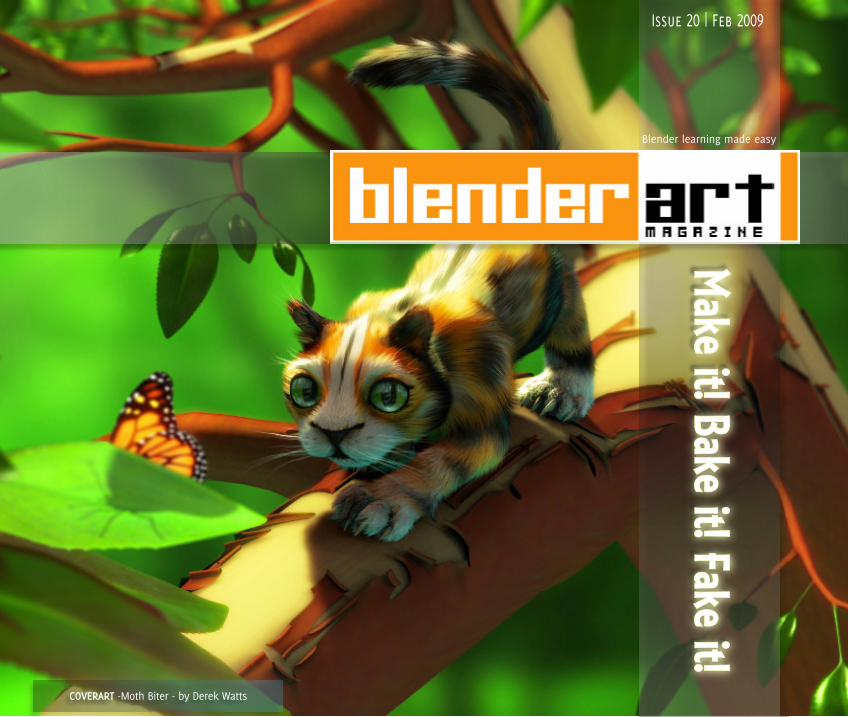
COVERART -Moth Biter - by Derek Watts
EDITORGaurav Nawani [email protected]
MANAGING EDITORSandra Gilbert [email protected]
WEBSITENam Pham [email protected]
DESIGNERGaurav, Sandra, Alex
PROOFERKevin BraunPhillip RyalsBruce WestfallJoshua LeungLynda SchemanskyEric PranauskNoah SummersJoshua ScottonMark WarrenWade BickPatrick O'DonnellBrian C. TreacyScott HillHenriel Veldtmann
WRITERSKen BeyerClaas KuhnenLance FlavellDwayne FergusonBenno WagnerGiancarlo NgSandra Gilbert
COVER ARTMothBiter - by Derek [email protected]
CONTENTS
www.blenderart.org Issue 20 | Feb 2009 - Make it! Bake it! Fake it!
2
Tutorial - Baking normal maps from a high poly model.
Tutorial - Big Bobby Car (Organic Surface Modeling)
Tutorial - Normal Mapping in Blender
Tutorial - Lighting and Film Making Tricks: Conveying
MAKING OF: ‘A Cassette Tape’
MAKING OF: ‘Dusting Off A Surprise’
Bookreview - INTERVIEW: David Hickson - Blenducation
6
12
20
23
27
31
35

One thing I have always loved about CG artis that there is no "one right way" to dothings. For any given task, there are a
number of methods, techniques and tools to getit done.
And while Blender has a powerful selection oftools, sometimes the "fake" or "cheat" is oftenpreferred for various reasons. Time and hard-ware limitations are generally the biggest rea-sons for using a "fake" or "cheat".
And then sometimes the tool actually helps cre-ate the "fake", as in the case of normal maps.Once set up, a normal helps you "fake" geome-try and details that would take too long torender or cause time delay and memory issuesfor game models.
Well enough chattering from me, after the longwait for this issue, I'm sure you want to dive inand get your Blenderart fix.
Have fun!
Sandra GilbertManaging Editor
EDITORIAL 3
www.blenderart.org Issue 20 | Feb 2009 - Make it! Bake it! Fake it!
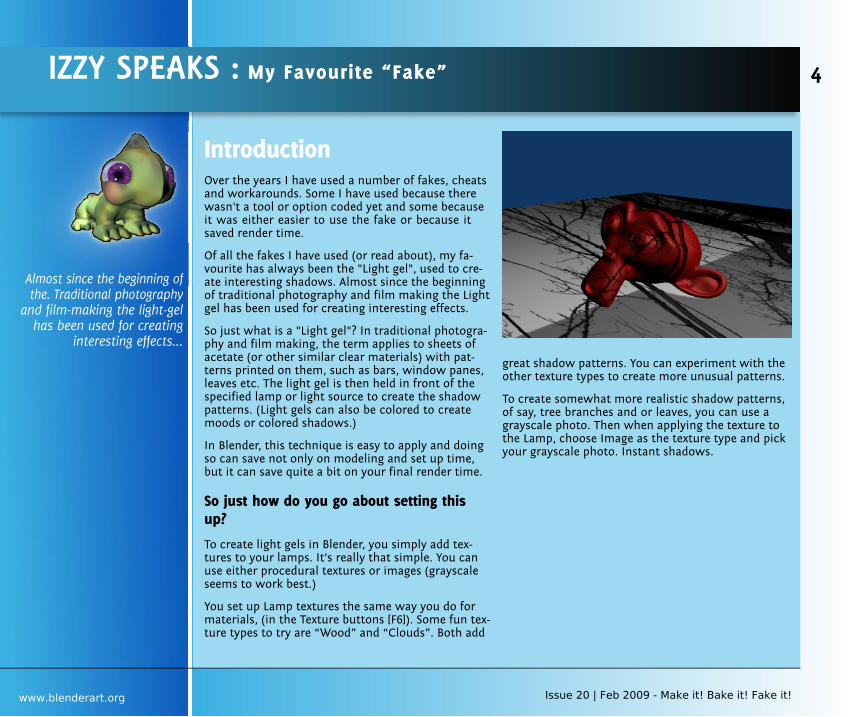
IntroductionOver the years I have used a number of fakes, cheatsand workarounds. Some I have used because therewasn't a tool or option coded yet and some becauseit was either easier to use the fake or because itsaved render time.
Of all the fakes I have used (or read about), my fa-vourite has always been the "Light gel", used to cre-ate interesting shadows. Almost since the beginningof traditional photography and film making the Lightgel has been used for creating interesting effects.
So just what is a "Light gel"? In traditional photogra-phy and film making, the term applies to sheets ofacetate (or other similar clear materials) with pat-terns printed on them, such as bars, window panes,leaves etc. The light gel is then held in front of thespecified lamp or light source to create the shadowpatterns. (Light gels can also be colored to createmoods or colored shadows.)
In Blender, this technique is easy to apply and doingso can save not only on modeling and set up time,but it can save quite a bit on your final render time.
So just how do you go about setting thisup?
To create light gels in Blender, you simply add tex-tures to your lamps. It's really that simple. You canuse either procedural textures or images (grayscaleseems to work best.)
You set up Lamp textures the same way you do formaterials, (in the Texture buttons [F6]). Some fun tex-ture types to try are “Wood” and “Clouds”. Both add
great shadow patterns. You can experiment with theother texture types to create more unusual patterns.
To create somewhat more realistic shadow patterns,of say, tree branches and or leaves, you can use agrayscale photo. Then when applying the texture tothe Lamp, choose Image as the texture type and pickyour grayscale photo. Instant shadows.
IZZY SPEAKS : My Favourite “Fake” 4
Almost since the beginning ofthe. Traditional photography
and film-making the light-gelhas been used for creating
interesting effects...
www.blenderart.org Issue 20 | Feb 2009 - Make it! Bake it! Fake it!
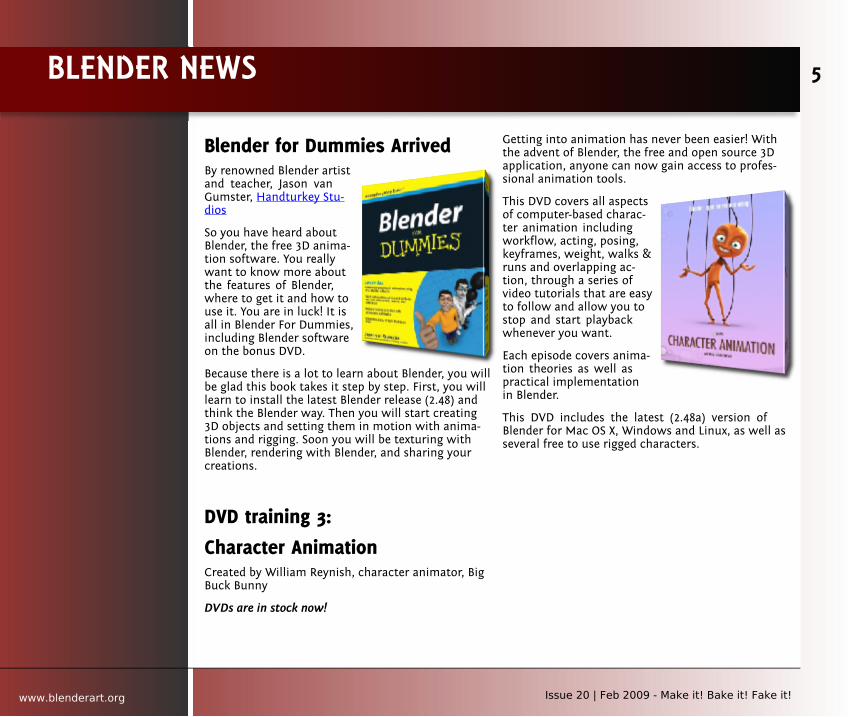
Blender for Dummies ArrivedBy renowned Blender artistand teacher, Jason vanGumster, Handturkey Stu-dios
So you have heard aboutBlender, the free 3D anima-tion software. You reallywant to know more aboutthe features of Blender,where to get it and how touse it. You are in luck! It isall in Blender For Dummies,including Blender softwareon the bonus DVD.
Because there is a lot to learn about Blender, you willbe glad this book takes it step by step. First, you willlearn to install the latest Blender release (2.48) andthink the Blender way. Then you will start creating3D objects and setting them in motion with anima-tions and rigging. Soon you will be texturing withBlender, rendering with Blender, and sharing yourcreations.
DVD training 3:
Character AnimationCreated by William Reynish, character animator, BigBuck Bunny
DVDs are in stock now!
Getting into animation has never been easier! Withthe advent of Blender, the free and open source 3Dapplication, anyone can now gain access to profes-sional animation tools.
This DVD covers all aspectsof computer-based charac-ter animation includingworkflow, acting, posing,keyframes, weight, walks &runs and overlapping ac-tion, through a series ofvideo tutorials that are easyto follow and allow you tostop and start playbackwhenever you want.
Each episode covers anima-tion theories as well aspractical implementationin Blender.
This DVD includes the latest (2.48a) version ofBlender for Mac OS X, Windows and Linux, as well asseveral free to use rigged characters.
BLENDER NEWS 5
www.blenderart.org Issue 20 | Feb 2009 - Make it! Bake it! Fake it!
IntroductionThere are generally regarded to betwo ways to generate normal mapsfrom 3D content; “renderbump” and“renderbumpflat”. The following tu-torial discusses the creation of nor-mal maps in the context of“renderbump”, that is, using Blender3D's own internal ability to 'bake' the
topology and physical characteristics of a high reso-lution, highly detailed 3D object to an image called a"normal map" (#).
An understanding of Blender's basics is required, sobeing able to move objects, change views and ma-nipulate objects will be necessary. It's also assumedthere are assets available and ready for use - the in-formation below won't discuss how to make highresolution 3D models.
Baking normal maps, what's needed?
To successfully bake normal maps using Blender 3Da number of items are required before anything canbe done;
A low poly 'game' mesh
A high poly 'art' mesh
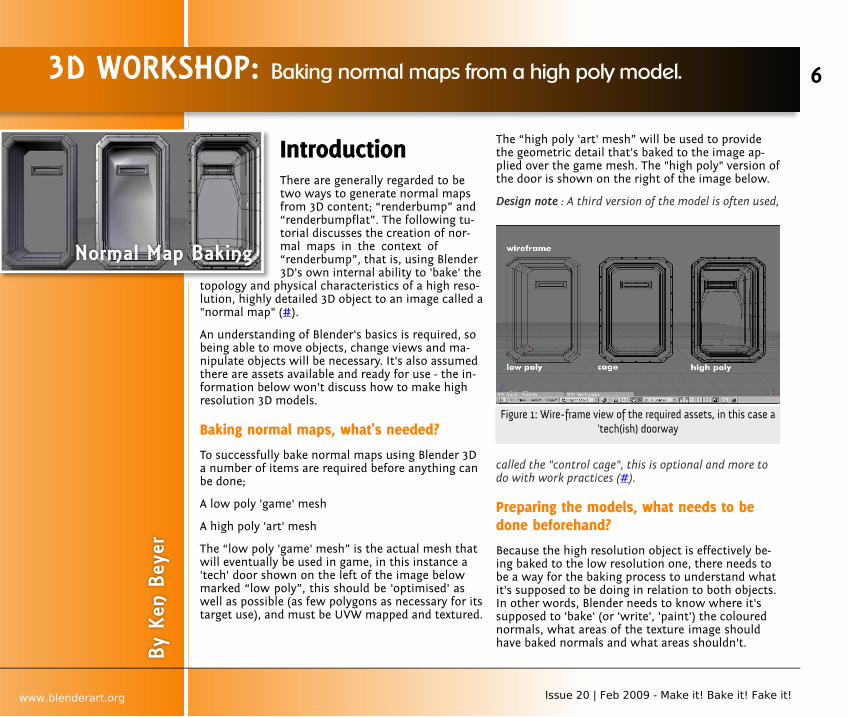
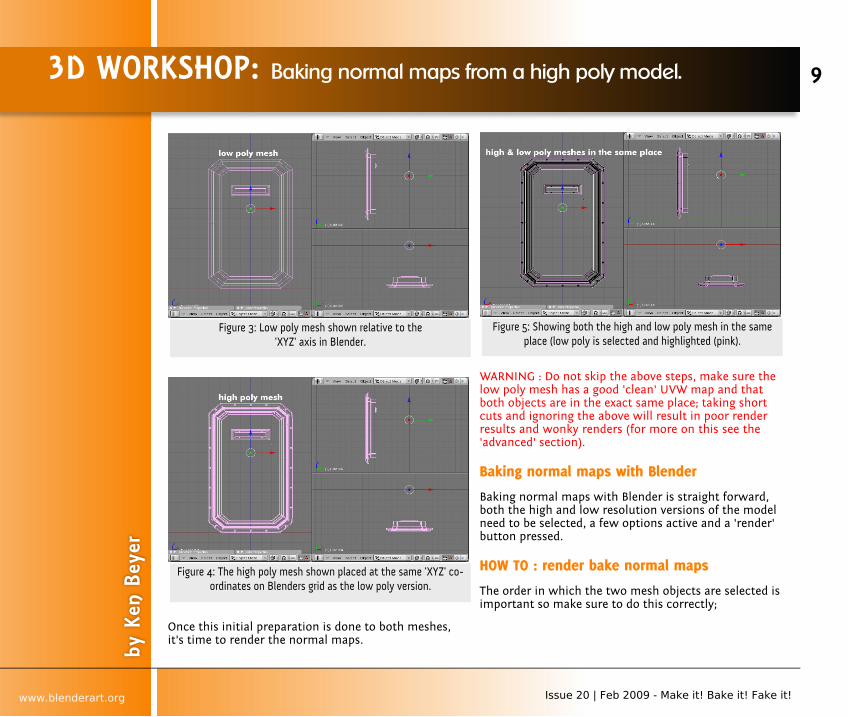
The “low poly 'game' mesh” is the actual mesh thatwill eventually be used in game, in this instance a'tech' door shown on the left of the image belowmarked “low poly”, this should be 'optimised' aswell as possible (as few polygons as necessary for itstarget use), and must be UVW mapped and textured.
The “high poly 'art' mesh” will be used to providethe geometric detail that's baked to the image ap-plied over the game mesh. The "high poly" version ofthe door is shown on the right of the image below.
Design note : A third version of the model is often used,
called the "control cage", this is optional and more todo with work practices (#).
Preparing the models, what needs to bedone beforehand?
Because the high resolution object is effectively be-ing baked to the low resolution one, there needs tobe a way for the baking process to understand whatit's supposed to be doing in relation to both objects.In other words, Blender needs to know where it'ssupposed to 'bake' (or 'write', 'paint') the colourednormals, what areas of the texture image shouldhave baked normals and what areas shouldn't.
3D WORKSHOP: Baking normal maps from a high poly model.
By K
en B
eyer
6
www.blenderart.org Issue 20 | Feb 2009 - Make it! Bake it! Fake it!
Figure 1: Wire-frame view of the required assets, in this case a'tech(ish) doorway
Normal Map Baking
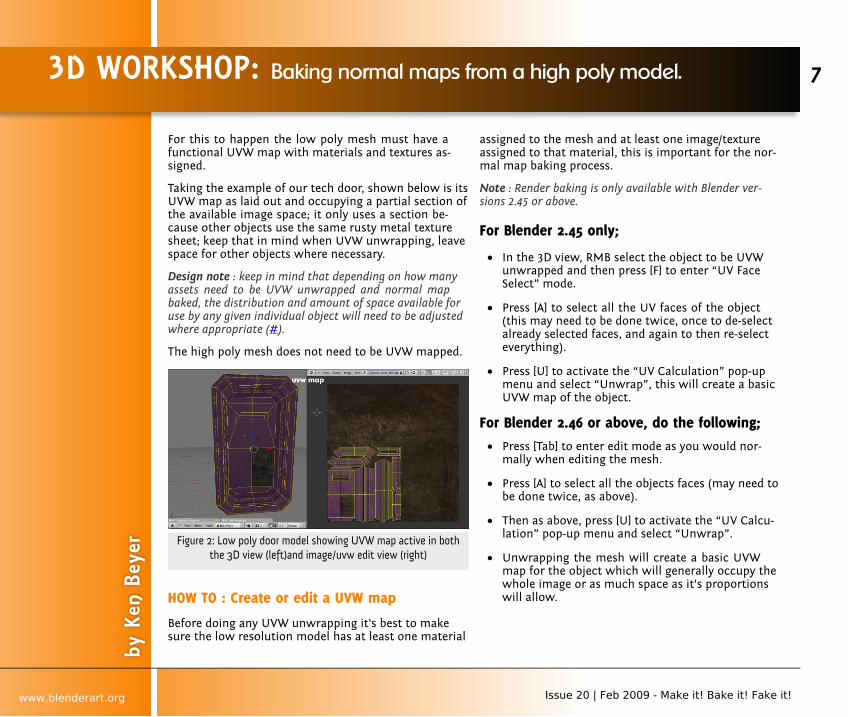
For this to happen the low poly mesh must have afunctional UVW map with materials and textures as-signed.
Taking the example of our tech door, shown below is itsUVW map as laid out and occupying a partial section ofthe available image space; it only uses a section be-cause other objects use the same rusty metal texturesheet; keep that in mind when UVW unwrapping, leavespace for other objects where necessary.
Design note : keep in mind that depending on how manyassets need to be UVW unwrapped and normal mapbaked, the distribution and amount of space available foruse by any given individual object will need to be adjustedwhere appropriate (#).
The high poly mesh does not need to be UVW mapped.
HOW TO : Create or edit a UVW map
Before doing any UVW unwrapping it's best to makesure the low resolution model has at least one material
assigned to the mesh and at least one image/textureassigned to that material, this is important for the nor-mal map baking process.
Note : Render baking is only available with Blender ver-sions 2.45 or above.
For Blender 2.45 only;
In the 3D view, RMB select the object to be UVWunwrapped and then press [F] to enter “UV FaceSelect” mode.
Press [A] to select all the UV faces of the object(this may need to be done twice, once to de-selectalready selected faces, and again to then re-selecteverything).
Press [U] to activate the “UV Calculation” pop-upmenu and select “Unwrap”, this will create a basicUVW map of the object.
For Blender 2.46 or above, do the following; Press [Tab] to enter edit mode as you would nor-
mally when editing the mesh.
Press [A] to select all the objects faces (may need tobe done twice, as above).
Then as above, press [U] to activate the “UV Calcu-lation” pop-up menu and select “Unwrap”.
Unwrapping the mesh will create a basic UVWmap for the object which will generally occupy thewhole image or as much space as it's proportionswill allow.
3D WORKSHOP: Baking normal maps from a high poly model.
by K
en B
eyer
7
www.blenderart.org Issue 20 | Feb 2009 - Make it! Bake it! Fake it!
Figure 2: Low poly door model showing UVW map active in boththe 3D view (left)and image/uvw edit view (right)
Note : It is also beyond the scope of this tutorial to cover,in any great length or detail, the various aspects and fea-tures of UVW mapping available.
If the model shares the texture sheet applied to it withother objects, that usually means the new UVW mapwill need to be scaled back to a more reasonable size toallow or compensate for the presence of other subse-quent objects on the same texture.
So, for all versions of Blender 2.45 or above, do the fol-lowing;
Either divide the interface ([RMB] on a windowedge divider, select “Split”) so a separate“UVW/Image Editor” is available, or, switch to thatview [Shift+F10]; the newly created UVW mapshould appear superimposed over the top of theimage that's assigned to the material - press [Alt+Z]to toggle the display of the texture on the model tocheck.
In the “UV/Image edit” view, press [A] to select UVfaces (may need to be done twice as mentionedabove), and then [S] to initiate “Scale”, simply movethe mouse to scale the selected UVW map up ordown, [LMB] to set the move.
This should result in a UVW map similar to the imageabove, where the map itself occupies an appropriateamount of space on the image.
Preparing the models, where to put them
It's important to note at this point that baking normalmaps in this way is a "like for like" process, it's not ex-plicitly a 'projection' - one object being 'projected' ontoanother - but rather relies on the objects occupying theexact same co-ordinate in 'XYZ' space. In other words,
the objects have to sit on top of each other in order forthis process to work correctly.
Shown below are both the high and low poly meshesplaced at the exact same 'XYZ' co-ordinates on Blendersgrid. It's important, at this point, to make sure thatboth objects are placed exactly on top of each other -it's helpful here if both objects have the same POO('point of origin' - the little pink spot around which thecursor is usually placed when objects are selected).
HOW TO : precision position control
Assuming that both objects are using the same POO, inorder to move or position them with precision doeither/or of the following;
RMB click to select and object and hold [Ctrl]whilst moving, this will 'snap' the object to thegrid as it's moved.
And/or
Press [N] to open the “Transform Properties” panel,in the “LocX”, “LocY” and “LocZ” text fields, enteror edit the numbers shown so that both objectsuse the same values; this ensures both objects arein the same place 'numerically'.
This should put both the high and low objects into thesame place; usually confirmed by the presence of some-thing called “z-fighting” - this is the 'flicker' often seenas a result of your graphics card trying to draw copla-nar surfaces at the same time (surfaces that occupy thesame surface at the same time), as it can't do that, itswitches or swaps the rendering of one surface withthe other as the object is moved and rendered to themonitor screen.
3D WORKSHOP: Baking normal maps from a high poly model.
by K
en B
eyer
8
www.blenderart.org Issue 20 | Feb 2009 - Make it! Bake it! Fake it!
Once this initial preparation is done to both meshes,it's time to render the normal maps.
WARNING : Do not skip the above steps, make sure thelow poly mesh has a good 'clean' UVW map and thatboth objects are in the exact same place; taking shortcuts and ignoring the above will result in poor renderresults and wonky renders (for more on this see the'advanced' section).
Baking normal maps with Blender
Baking normal maps with Blender is straight forward,both the high and low resolution versions of the modelneed to be selected, a few options active and a 'render'button pressed.
HOW TO : render bake normal maps
The order in which the two mesh objects are selected isimportant so make sure to do this correctly;
3D WORKSHOP: Baking normal maps from a high poly model.
by K
en B
eyer
9
www.blenderart.org Issue 20 | Feb 2009 - Make it! Bake it! Fake it!
Figure 3: Low poly mesh shown relative to the'XYZ' axis in Blender.
Figure 4: The high poly mesh shown placed at the same 'XYZ' co-ordinates on Blenders grid as the low poly version.
Figure 5: Showing both the high and low poly mesh in the sameplace (low poly is selected and highlighted (pink).
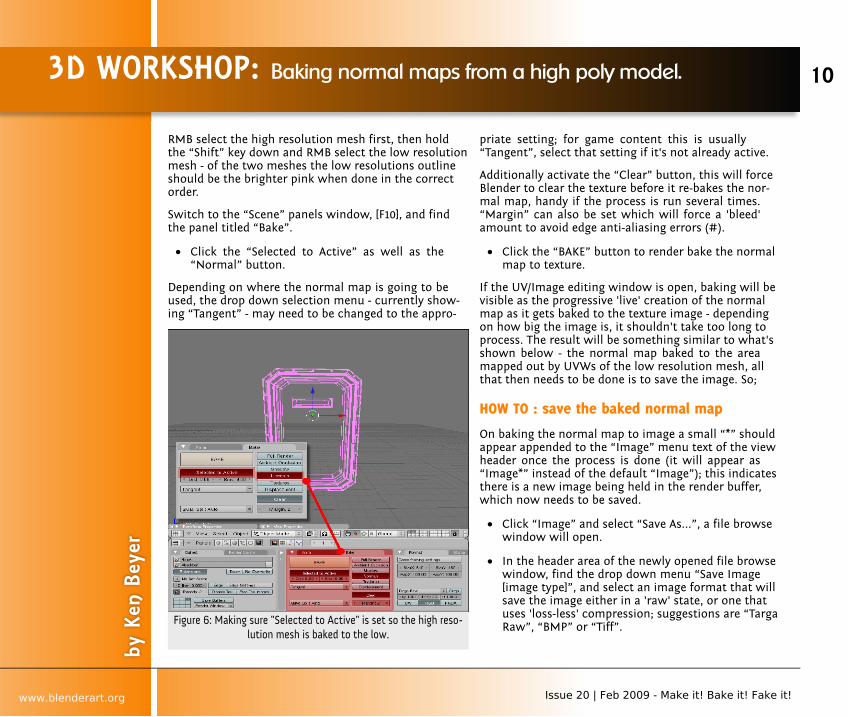
RMB select the high resolution mesh first, then holdthe “Shift” key down and RMB select the low resolutionmesh - of the two meshes the low resolutions outlineshould be the brighter pink when done in the correctorder.
Switch to the “Scene” panels window, [F10], and findthe panel titled “Bake”.
Click the “Selected to Active” as well as the“Normal” button.
Depending on where the normal map is going to beused, the drop down selection menu - currently show-ing “Tangent” - may need to be changed to the appro-
priate setting; for game content this is usually“Tangent”, select that setting if it's not already active.
Additionally activate the “Clear” button, this will forceBlender to clear the texture before it re-bakes the nor-mal map, handy if the process is run several times.“Margin” can also be set which will force a 'bleed'amount to avoid edge anti-aliasing errors (#).
Click the “BAKE” button to render bake the normalmap to texture.
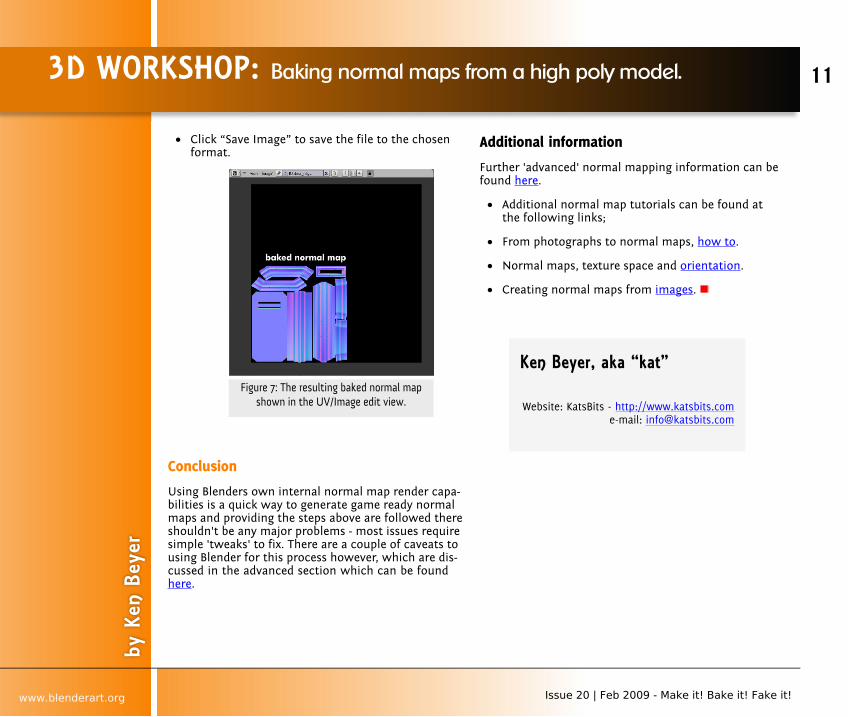
If the UV/Image editing window is open, baking will bevisible as the progressive 'live' creation of the normalmap as it gets baked to the texture image - dependingon how big the image is, it shouldn't take too long toprocess. The result will be something similar to what'sshown below - the normal map baked to the areamapped out by UVWs of the low resolution mesh, allthat then needs to be done is to save the image. So;
HOW TO : save the baked normal map
On baking the normal map to image a small “*” shouldappear appended to the “Image” menu text of the viewheader once the process is done (it will appear as“Image*” instead of the default “Image”); this indicatesthere is a new image being held in the render buffer,which now needs to be saved.
Click “Image” and select “Save As...”, a file browsewindow will open.
In the header area of the newly opened file browsewindow, find the drop down menu “Save Image[image type]”, and select an image format that willsave the image either in a 'raw' state, or one thatuses 'loss-less' compression; suggestions are “TargaRaw”, “BMP” or “Tiff”.
3D WORKSHOP: Baking normal maps from a high poly model.
by K
en B
eyer
10
www.blenderart.org Issue 20 | Feb 2009 - Make it! Bake it! Fake it!
Figure 6: Making sure "Selected to Active" is set so the high reso-lution mesh is baked to the low.
Click “Save Image” to save the file to the chosenformat.
Conclusion
Using Blenders own internal normal map render capa-bilities is a quick way to generate game ready normalmaps and providing the steps above are followed thereshouldn't be any major problems - most issues requiresimple 'tweaks' to fix. There are a couple of caveats tousing Blender for this process however, which are dis-cussed in the advanced section which can be foundhere.
Additional information
Further 'advanced' normal mapping information can befound here.
Additional normal map tutorials can be found atthe following links;
From photographs to normal maps, how to.
Normal maps, texture space and orientation.
Creating normal maps from images.
3D WORKSHOP: Baking normal maps from a high poly model.
by K
en B
eyer
11
www.blenderart.org Issue 20 | Feb 2009 - Make it! Bake it! Fake it!
Figure 7: The resulting baked normal mapshown in the UV/Image edit view.
Ken Beyer, aka “kat”
Website: KatsBits - http://www.katsbits.come-mail: [email protected]
IntroductionModeling an object efficiently is often aquestion of understanding its basic geo-metric shapes and imagining a wiremesh over that surface. How far is anobject a cube, a cylinder, where couldparts be extruded from, and in which or-der do you start working? Those ques-tions should be asked first before anyserious attempt is started because it cansave the time needed to model the sur-
face and prevent time consuming re-tries.
The original Blend file is also accessible viaBlenderart.org and includes all the following mode-ling steps and objects.
The Big Bobby Car was in particular a good object todemonstrate that type of approach.
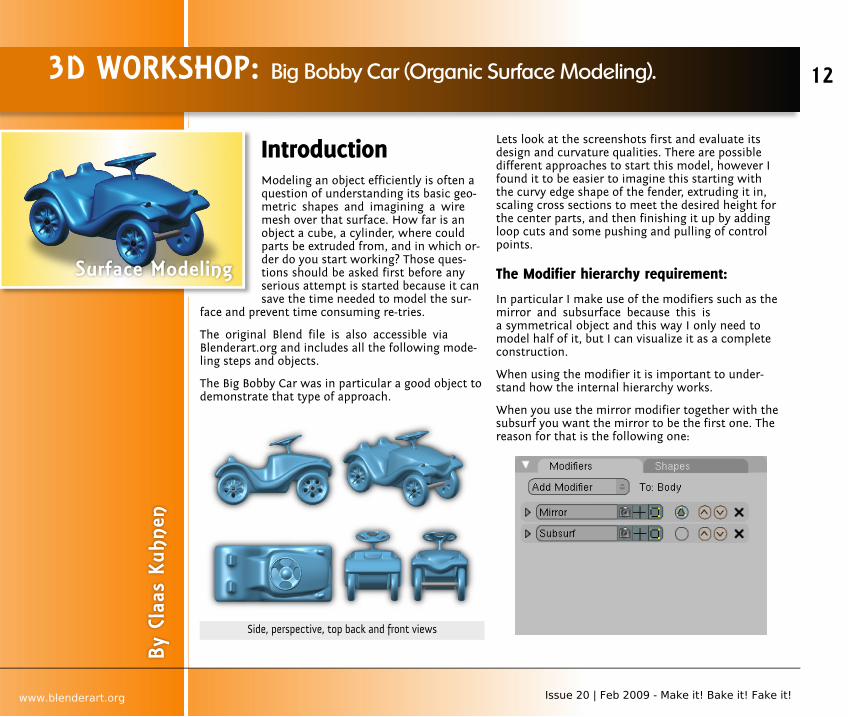
Lets look at the screenshots first and evaluate itsdesign and curvature qualities. There are possibledifferent approaches to start this model, however Ifound it to be easier to imagine this starting withthe curvy edge shape of the fender, extruding it in,scaling cross sections to meet the desired height forthe center parts, and then finishing it up by addingloop cuts and some pushing and pulling of controlpoints.
The Modifier hierarchy requirement:
In particular I make use of the modifiers such as themirror and subsurface because this isa symmetrical object and this way I only need tomodel half of it, but I can visualize it as a completeconstruction.
When using the modifier it is important to under-stand how the internal hierarchy works.
When you use the mirror modifier together with thesubsurf you want the mirror to be the first one. Thereason for that is the following one:
3D WORKSHOP: Big Bobby Car (Organic Surface Modeling).
By C
laas
Kuh
nen
12
www.blenderart.org Issue 20 | Feb 2009 - Make it! Bake it! Fake it!
Side, perspective, top back and front views
Surface Modeling
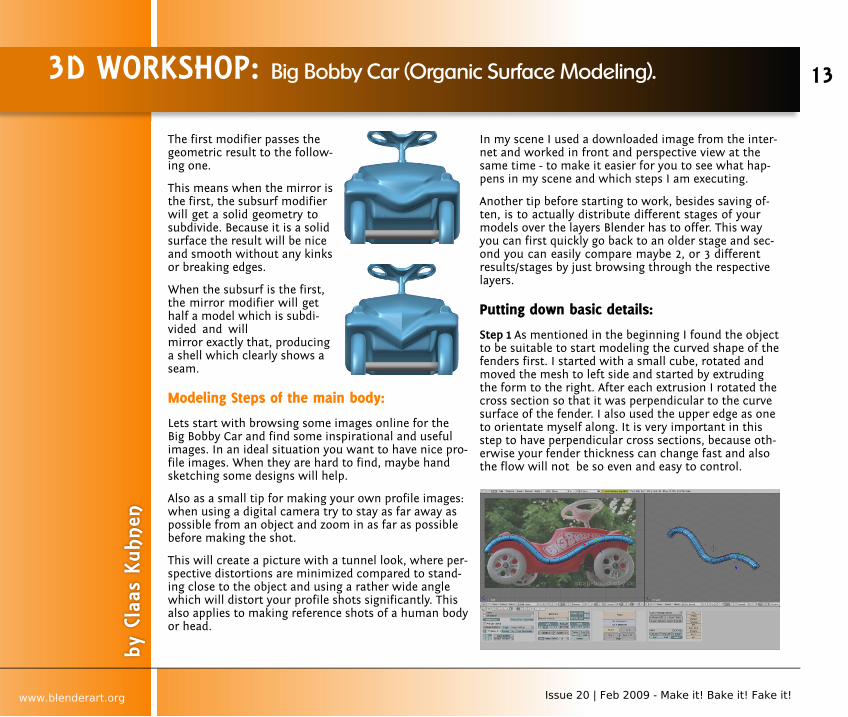
The first modifier passes thegeometric result to the follow-ing one.
This means when the mirror isthe first, the subsurf modifierwill get a solid geometry tosubdivide. Because it is a solidsurface the result will be niceand smooth without any kinksor breaking edges.
When the subsurf is the first,the mirror modifier will gethalf a model which is subdi-vided and willmirror exactly that, producinga shell which clearly shows aseam.
Modeling Steps of the main body:
Lets start with browsing some images online for theBig Bobby Car and find some inspirational and usefulimages. In an ideal situation you want to have nice pro-file images. When they are hard to find, maybe handsketching some designs will help.
Also as a small tip for making your own profile images:when using a digital camera try to stay as far away aspossible from an object and zoom in as far as possiblebefore making the shot.
This will create a picture with a tunnel look, where per-spective distortions are minimized compared to stand-ing close to the object and using a rather wide anglewhich will distort your profile shots significantly. Thisalso applies to making reference shots of a human bodyor head.
In my scene I used a downloaded image from the inter-net and worked in front and perspective view at thesame time - to make it easier for you to see what hap-pens in my scene and which steps I am executing.
Another tip before starting to work, besides saving of-ten, is to actually distribute different stages of yourmodels over the layers Blender has to offer. This wayyou can first quickly go back to an older stage and sec-ond you can easily compare maybe 2, or 3 differentresults/stages by just browsing through the respectivelayers.
Putting down basic details:
Step 1 As mentioned in the beginning I found the objectto be suitable to start modeling the curved shape of thefenders first. I started with a small cube, rotated andmoved the mesh to left side and started by extrudingthe form to the right. After each extrusion I rotated thecross section so that it was perpendicular to the curvesurface of the fender. I also used the upper edge as oneto orientate myself along. It is very important in thisstep to have perpendicular cross sections, because oth-erwise your fender thickness can change fast and alsothe flow will not be so even and easy to control.
3D WORKSHOP: Big Bobby Car (Organic Surface Modeling).
by C
laas
Kuh
nen
13
www.blenderart.org Issue 20 | Feb 2009 - Make it! Bake it! Fake it!
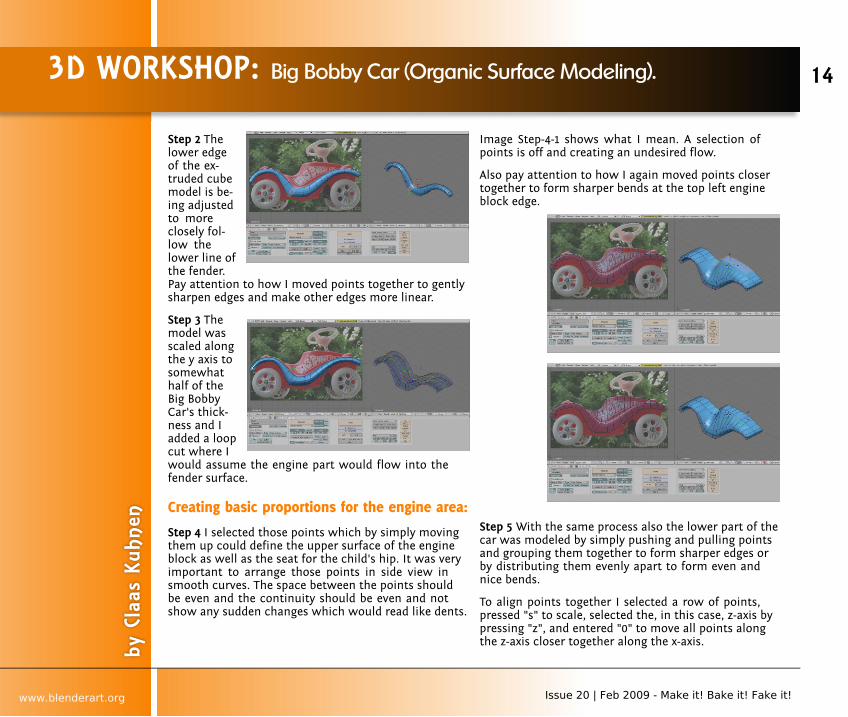
Step 2 Thelower edgeof the ex-truded cubemodel is be-ing adjustedto moreclosely fol-low thelower line ofthe fender.Pay attention to how I moved points together to gentlysharpen edges and make other edges more linear.
Step 3 Themodel wasscaled alongthe y axis tosomewhathalf of theBig BobbyCar's thick-ness and Iadded a loopcut where Iwould assume the engine part would flow into thefender surface.
Creating basic proportions for the engine area:
Step 4 I selected those points which by simply movingthem up could define the upper surface of the engineblock as well as the seat for the child's hip. It was veryimportant to arrange those points in side view insmooth curves. The space between the points shouldbe even and the continuity should be even and notshow any sudden changes which would read like dents.
Image Step-4-1 shows what I mean. A selection ofpoints is off and creating an undesired flow.
Also pay attention to how I again moved points closertogether to form sharper bends at the top left engineblock edge.
Step 5 With the same process also the lower part of thecar was modeled by simply pushing and pulling pointsand grouping them together to form sharper edges orby distributing them evenly apart to form even andnice bends.
To align points together I selected a row of points,pressed "s" to scale, selected the, in this case, z-axis bypressing "z", and entered "0" to move all points alongthe z-axis closer together along the x-axis.
3D WORKSHOP: Big Bobby Car (Organic Surface Modeling).
by C
laas
Kuh
nen
14
www.blenderart.org Issue 20 | Feb 2009 - Make it! Bake it! Fake it!
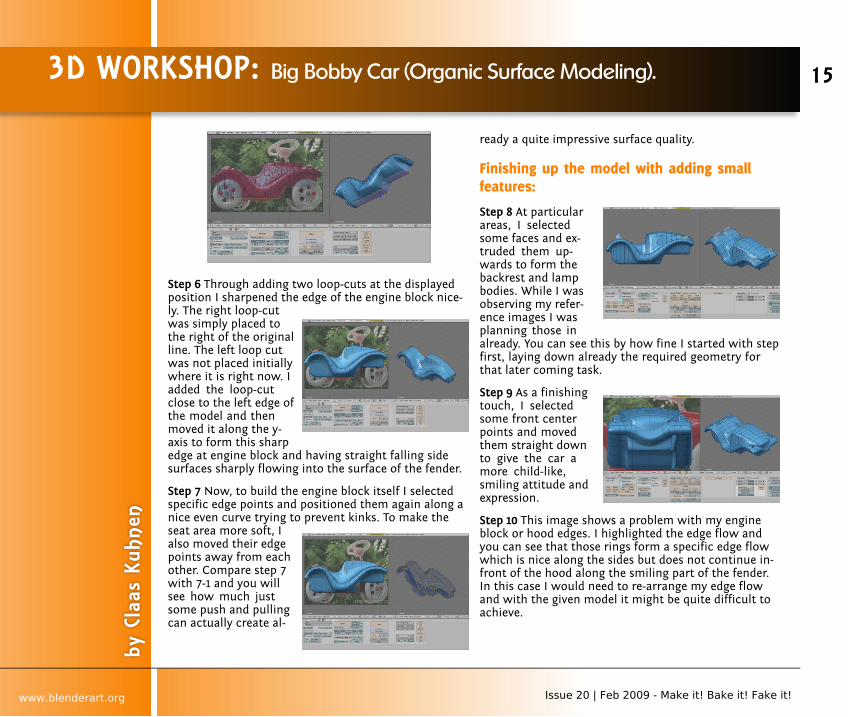
Step 6 Through adding two loop-cuts at the displayedposition I sharpened the edge of the engine block nice-ly. The right loop-cutwas simply placed tothe right of the originalline. The left loop cutwas not placed initiallywhere it is right now. Iadded the loop-cutclose to the left edge ofthe model and thenmoved it along the y-axis to form this sharpedge at engine block and having straight falling sidesurfaces sharply flowing into the surface of the fender.
Step 7 Now, to build the engine block itself I selectedspecific edge points and positioned them again along anice even curve trying to prevent kinks. To make theseat area more soft, Ialso moved their edgepoints away from eachother. Compare step 7with 7-1 and you willsee how much justsome push and pullingcan actually create al-
ready a quite impressive surface quality.
Finishing up the model with adding smallfeatures:
Step 8 At particularareas, I selectedsome faces and ex-truded them up-wards to form thebackrest and lampbodies. While I wasobserving my refer-ence images I wasplanning those inalready. You can see this by how fine I started with stepfirst, laying down already the required geometry forthat later coming task.
Step 9 As a finishingtouch, I selectedsome front centerpoints and movedthem straight downto give the car amore child-like,smiling attitude andexpression.
Step 10 This image shows a problem with my engineblock or hood edges. I highlighted the edge flow andyou can see that those rings form a specific edge flowwhich is nice along the sides but does not continue in-front of the hood along the smiling part of the fender.In this case I would need to re-arrange my edge flowand with the given model it might be quite difficult toachieve.
3D WORKSHOP: Big Bobby Car (Organic Surface Modeling).
by C
laas
Kuh
nen
15
www.blenderart.org Issue 20 | Feb 2009 - Make it! Bake it! Fake it!
However this is a minor problem.
Wheel Styling and efficient distribution:
The wheel or more accurately, the rim and spoke de-sign is quite a challenge when you look at the referenceimage and try to imagine the steps it would take tomodel it.
For a more detailed instruction, I would suggest thatyou follow my online video tutorial which explains allthe steps taken in detail. In this text tutorial I wouldlike to focus on some basics and the application of thearray modifier in conjunction with the clone tool.
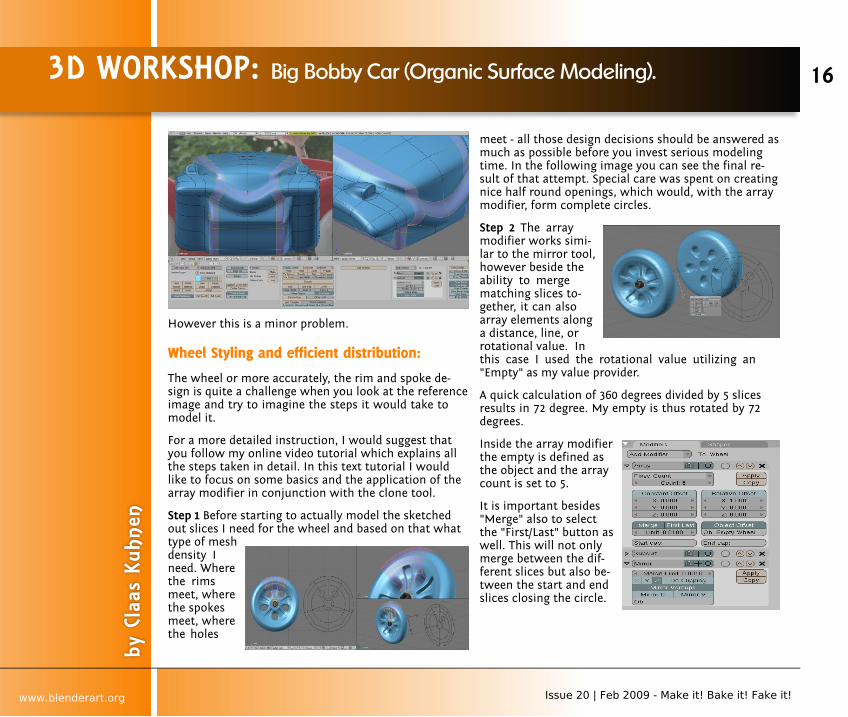
Step 1 Before starting to actually model the sketchedout slices I need for the wheel and based on that whattype of meshdensity Ineed. Wherethe rimsmeet, wherethe spokesmeet, wherethe holes
meet - all those design decisions should be answered asmuch as possible before you invest serious modelingtime. In the following image you can see the final re-sult of that attempt. Special care was spent on creatingnice half round openings, which would, with the arraymodifier, form complete circles.
Step 2 The arraymodifier works simi-lar to the mirror tool,however beside theability to mergematching slices to-gether, it can alsoarray elements alonga distance, line, orrotational value. Inthis case I used the rotational value utilizing an"Empty" as my value provider.
A quick calculation of 360 degrees divided by 5 slicesresults in 72 degree. My empty is thus rotated by 72degrees.
Inside the array modifierthe empty is defined asthe object and the arraycount is set to 5.
It is important besides"Merge" also to selectthe "First/Last" button aswell. This will not onlymerge between the dif-ferent slices but also be-tween the start and endslices closing the circle.
3D WORKSHOP: Big Bobby Car (Organic Surface Modeling).
by C
laas
Kuh
nen
16
www.blenderart.org Issue 20 | Feb 2009 - Make it! Bake it! Fake it!
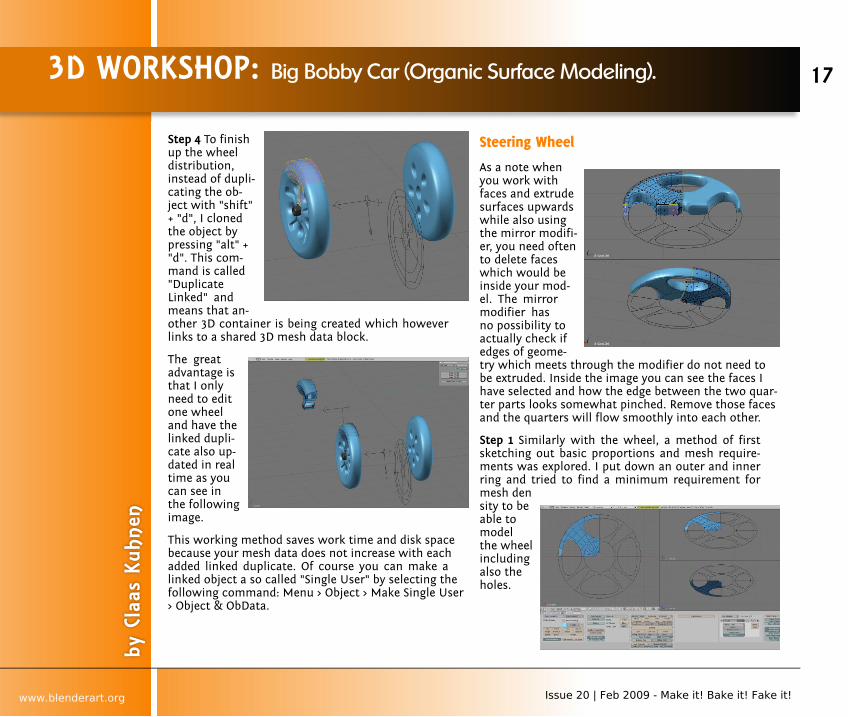
Step 4 To finishup the wheeldistribution,instead of dupli-cating the ob-ject with "shift"+ "d", I clonedthe object bypressing "alt" +"d". This com-mand is called"DuplicateLinked" andmeans that an-other 3D container is being created which howeverlinks to a shared 3D mesh data block.
The greatadvantage isthat I onlyneed to editone wheeland have thelinked dupli-cate also up-dated in realtime as youcan see inthe followingimage.
This working method saves work time and disk spacebecause your mesh data does not increase with eachadded linked duplicate. Of course you can make alinked object a so called "Single User" by selecting thefollowing command: Menu > Object > Make Single User> Object & ObData.
Steering Wheel
As a note whenyou work withfaces and extrudesurfaces upwardswhile also usingthe mirror modifi-er, you need oftento delete faceswhich would beinside your mod-el. The mirrormodifier hasno possibility toactually check ifedges of geome-try which meets through the modifier do not need tobe extruded. Inside the image you can see the faces Ihave selected and how the edge between the two quar-ter parts looks somewhat pinched. Remove those facesand the quarters will flow smoothly into each other.
Step 1 Similarly with the wheel, a method of firstsketching out basic proportions and mesh require-ments was explored. I put down an outer and innerring and tried to find a minimum requirement formesh density to beable tomodelthe wheelincludingalso theholes.
3D WORKSHOP: Big Bobby Car (Organic Surface Modeling).
by C
laas
Kuh
nen
17
www.blenderart.org Issue 20 | Feb 2009 - Make it! Bake it! Fake it!
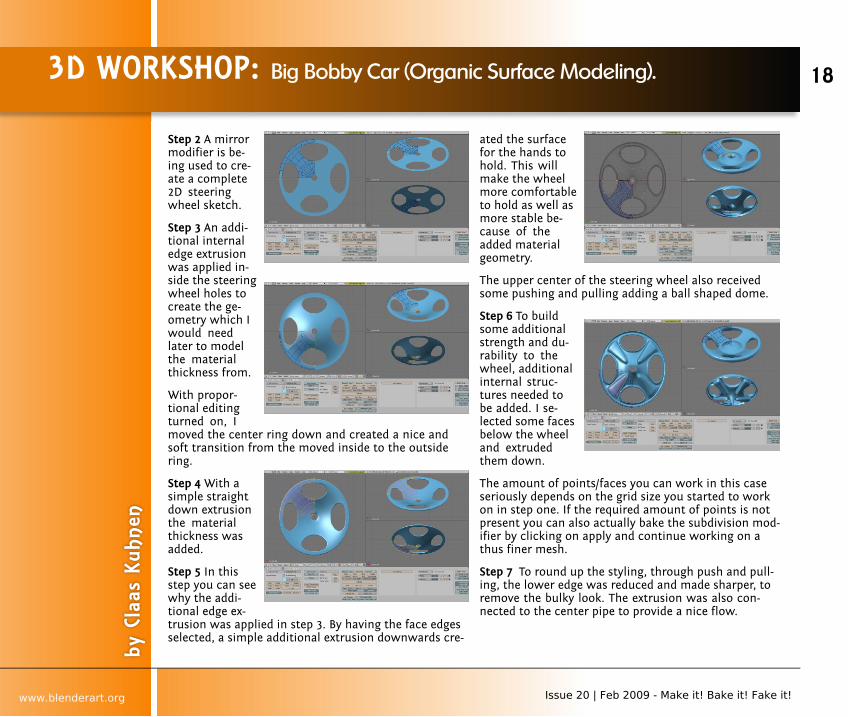
Step 2 A mirrormodifier is be-ing used to cre-ate a complete2D steeringwheel sketch.
Step 3 An addi-tional internaledge extrusionwas applied in-side the steeringwheel holes tocreate the ge-ometry which Iwould needlater to modelthe materialthickness from.
With propor-tional editingturned on, Imoved the center ring down and created a nice andsoft transition from the moved inside to the outsidering.
Step 4 With asimple straightdown extrusionthe materialthickness wasadded.
Step 5 In thisstep you can seewhy the addi-tional edge ex-trusion was applied in step 3. By having the face edgesselected, a simple additional extrusion downwards cre-
ated the surfacefor the hands tohold. This willmake the wheelmore comfortableto hold as well asmore stable be-cause of theadded materialgeometry.
The upper center of the steering wheel also receivedsome pushing and pulling adding a ball shaped dome.
Step 6 To buildsome additionalstrength and du-rability to thewheel, additionalinternal struc-tures needed tobe added. I se-lected some facesbelow the wheeland extrudedthem down.
The amount of points/faces you can work in this caseseriously depends on the grid size you started to workon in step one. If the required amount of points is notpresent you can also actually bake the subdivision mod-ifier by clicking on apply and continue working on athus finer mesh.
Step 7 To round up the styling, through push and pull-ing, the lower edge was reduced and made sharper, toremove the bulky look. The extrusion was also con-nected to the center pipe to provide a nice flow.
3D WORKSHOP: Big Bobby Car (Organic Surface Modeling).
by C
laas
Kuh
nen
18
www.blenderart.org Issue 20 | Feb 2009 - Make it! Bake it! Fake it!
Conclusion
I hope that thiswas an interest-ing read anduseful to ex-plore for thosewho like to trythem out intransportationdesign with sub-divided surface modeling.
At this point, I would also like to present a growing col-lection of entry level video tutorials which I started torecord and present at Blip.TV asa supplemental resource for my CAD students. Pleasefeel free to take a look at them. You can actually sub-scribe to the shows via the RSS feeds and have themdownloaded right into iTunes, each time I upload anew one.
Please bear in mind that I made those in English -which is not my native language.
Rhino Modeling:
http://modelingwithrhino.blip.tv/
Blender Modeling:
http://modelingwithblender.blip.tv/
Blender Rendering:
http://renderingwithblende.blip.tv/
Menu Advanced > Subscribe to Podcast
To subscribe to Podcast enter the RSS feed url.
itpc://modelingwithrhino.blip.tv/rss/itunes/
Blender Modeling RSS Feed
itpc://modelingwithblender.blip.tv/rss/itunes/
Blender Rendering
itpc://renderingwithblende.blip.tv/rss/itunes/
Or click on the iTunes icon inside Blip.TV ShowPage
3D WORKSHOP: Big Bobby Car (Organic Surface Modeling).
by C
laas
Kuh
nen
19
www.blenderart.org Issue 20 | Feb 2009 - Make it! Bake it! Fake it!
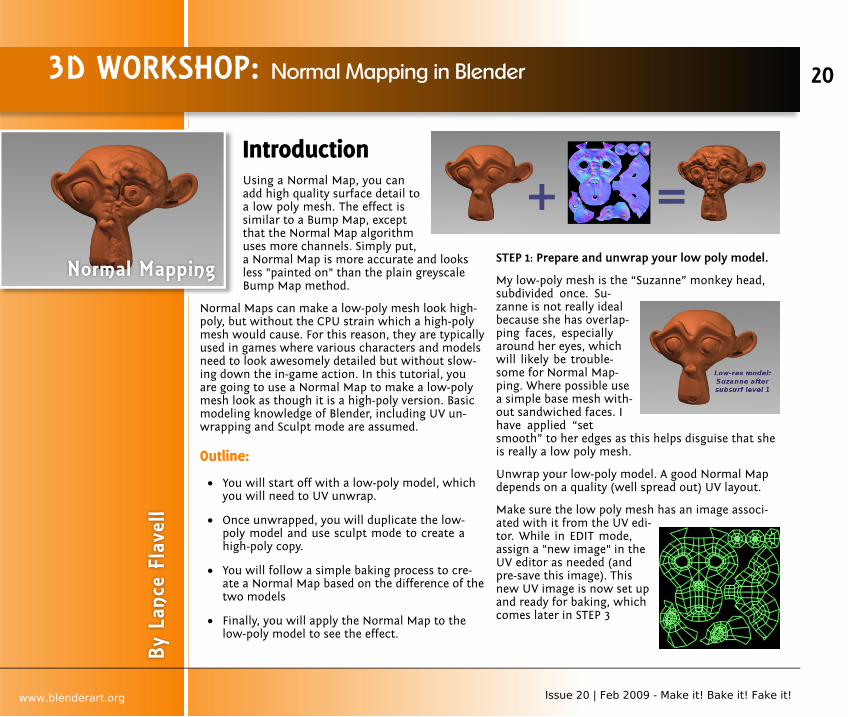
IntroductionUsing a Normal Map, you canadd high quality surface detail toa low poly mesh. The effect issimilar to a Bump Map, exceptthat the Normal Map algorithmuses more channels. Simply put,a Normal Map is more accurate and looksless "painted on" than the plain greyscaleBump Map method.
Normal Maps can make a low-poly mesh look high-poly, but without the CPU strain which a high-polymesh would cause. For this reason, they are typicallyused in games where various characters and modelsneed to look awesomely detailed but without slow-ing down the in-game action. In this tutorial, youare going to use a Normal Map to make a low-polymesh look as though it is a high-poly version. Basicmodeling knowledge of Blender, including UV un-wrapping and Sculpt mode are assumed.
Outline:
You will start off with a low-poly model, whichyou will need to UV unwrap.
Once unwrapped, you will duplicate the low-poly model and use sculpt mode to create ahigh-poly copy.
You will follow a simple baking process to cre-ate a Normal Map based on the difference of thetwo models
Finally, you will apply the Normal Map to thelow-poly model to see the effect.
STEP 1: Prepare and unwrap your low poly model.
My low-poly mesh is the “Suzanne” monkey head,subdivided once. Su-zanne is not really idealbecause she has overlap-ping faces, especiallyaround her eyes, whichwill likely be trouble-some for Normal Map-ping. Where possible usea simple base mesh with-out sandwiched faces. Ihave applied “setsmooth” to her edges as this helps disguise that sheis really a low poly mesh.
Unwrap your low-poly model. A good Normal Mapdepends on a quality (well spread out) UV layout.
Make sure the low poly mesh has an image associ-ated with it from the UV edi-tor. While in EDIT mode,assign a "new image" in theUV editor as needed (andpre-save this image). Thisnew UV image is now set upand ready for baking, whichcomes later in STEP 3
3D WORKSHOP: Normal Mapping in Blender
By L
ance
Fla
vell
20
www.blenderart.org Issue 20 | Feb 2009 - Make it! Bake it! Fake it!
Normal Mapping
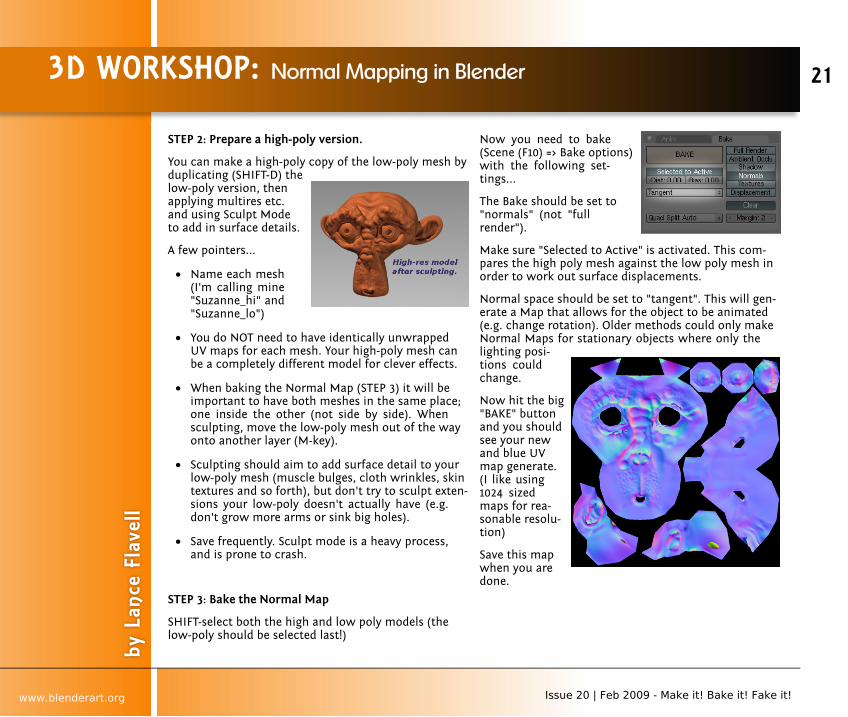
STEP 2: Prepare a high-poly version.
You can make a high-poly copy of the low-poly mesh byduplicating (SHIFT-D) thelow-poly version, thenapplying multires etc.and using Sculpt Modeto add in surface details.
A few pointers...
Name each mesh(I'm calling mine"Suzanne_hi" and"Suzanne_lo")
You do NOT need to have identically unwrappedUV maps for each mesh. Your high-poly mesh canbe a completely different model for clever effects.
When baking the Normal Map (STEP 3) it will beimportant to have both meshes in the same place;one inside the other (not side by side). Whensculpting, move the low-poly mesh out of the wayonto another layer (M-key).
Sculpting should aim to add surface detail to yourlow-poly mesh (muscle bulges, cloth wrinkles, skintextures and so forth), but don't try to sculpt exten-sions your low-poly doesn't actually have (e.g.don't grow more arms or sink big holes).
Save frequently. Sculpt mode is a heavy process,and is prone to crash.
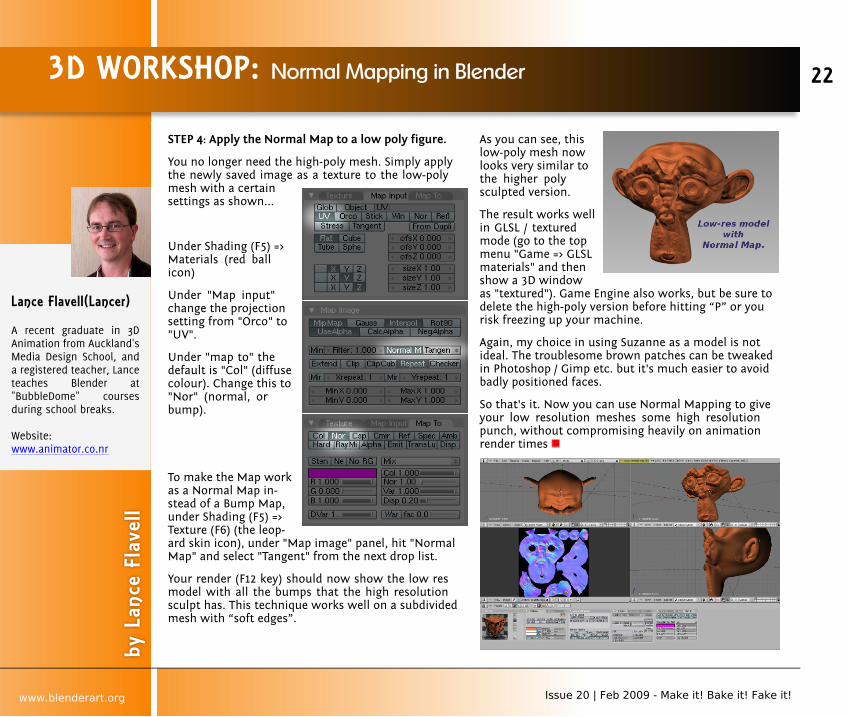
STEP 3: Bake the Normal Map
SHIFT-select both the high and low poly models (thelow-poly should be selected last!)
Now you need to bake(Scene (F10) => Bake options)with the following set-tings...
The Bake should be set to"normals" (not "fullrender").
Make sure "Selected to Active" is activated. This com-pares the high poly mesh against the low poly mesh inorder to work out surface displacements.
Normal space should be set to "tangent". This will gen-erate a Map that allows for the object to be animated(e.g. change rotation). Older methods could only makeNormal Maps for stationary objects where only thelighting posi-tions couldchange.
Now hit the big"BAKE" buttonand you shouldsee your newand blue UVmap generate.(I like using1024 sizedmaps for rea-sonable resolu-tion)
Save this mapwhen you aredone.
3D WORKSHOP: Normal Mapping in Blender
by L
ance
Fla
vell
21
www.blenderart.org Issue 20 | Feb 2009 - Make it! Bake it! Fake it!
STEP 4: Apply the Normal Map to a low poly figure.
You no longer need the high-poly mesh. Simply applythe newly saved image as a texture to the low-polymesh with a certainsettings as shown...
Under Shading (F5) =>Materials (red ballicon)
Under "Map input"change the projectionsetting from "Orco" to"UV".
Under "map to" thedefault is "Col" (diffusecolour). Change this to"Nor" (normal, orbump).
To make the Map workas a Normal Map in-stead of a Bump Map,under Shading (F5) =>Texture (F6) (the leop-ard skin icon), under "Map image" panel, hit "NormalMap" and select "Tangent" from the next drop list.
Your render (F12 key) should now show the low resmodel with all the bumps that the high resolutionsculpt has. This technique works well on a subdividedmesh with “soft edges”.
As you can see, thislow-poly mesh nowlooks very similar tothe higher polysculpted version.
The result works wellin GLSL / texturedmode (go to the topmenu "Game => GLSLmaterials" and thenshow a 3D windowas "textured"). Game Engine also works, but be sure todelete the high-poly version before hitting “P” or yourisk freezing up your machine.
Again, my choice in using Suzanne as a model is notideal. The troublesome brown patches can be tweakedin Photoshop / Gimp etc. but it's much easier to avoidbadly positioned faces.
So that's it. Now you can use Normal Mapping to giveyour low resolution meshes some high resolutionpunch, without compromising heavily on animationrender times
3D WORKSHOP: Normal Mapping in Blender
by L
ance
Fla
vell
22
www.blenderart.org Issue 20 | Feb 2009 - Make it! Bake it! Fake it!
Lance Flavell(Lancer)
A recent graduate in 3DAnimation from Auckland'sMedia Design School, anda registered teacher, Lanceteaches Blender at"BubbleDome" coursesduring school breaks.
Website:www.animator.co.nr
IntroductionI’ve always been a big horror fan and remem-ber the black and white movies from wayback in the day. There were movies likeThem, From Hell it Came, and Nosferatu, allof which really made an impression on me.In the case of Nosferatu, the lighting and useof shadow became as important as the titlecharacter himself.
Lighting and color always play major roles inour work as artists and film makers, whether
we work in 2D or in 3D. When I art directed the TVanimated series Mutant League, we had to conveyteamwork and optimism in a bleak world so thelighting and colors, though muted, were oftencheerful and upbeat. My studio produced a shortanimated film called Black Zero: Mercenary Ant, fea-turing a heroiccovert operativewho rescues peo-ple. For Black Ze-ro, shadowsplayed a majorrole in hiding thehero as he infil-trates an off-shore oilplatform to res-cue a hostage.
Today’s current crop of horror films, particularlythose from Japan, like the Ring, the Grudge and OneMissed Call got me all hot and bothered to makeone of my own. I’m currently working on an adapta-tion of the Edgar Allan Poe classic short story, the"Tell-Tale Heart: Larynx Edition". I thought it might
be fun to kick upthe spooky a fewnotches.
The very first thingthat came to mind,once I decided todo this short film,was lighting andmood. We allknow the story butsince I plan to make it creepier and scarier allaround, I really need to think about lights, shadowsand ways to make the viewer feel like they’re in aclaustrophobic situation.
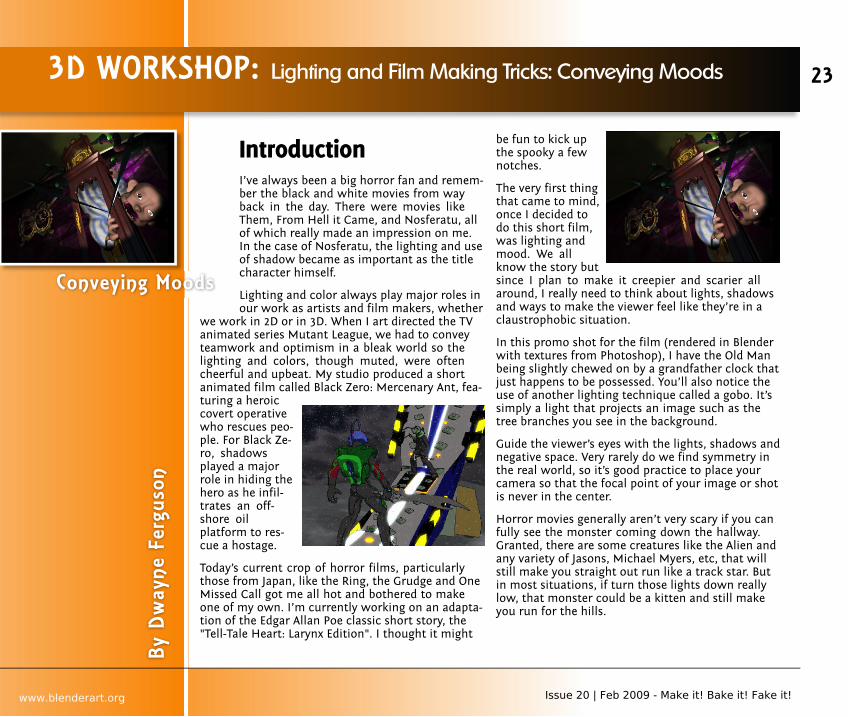
In this promo shot for the film (rendered in Blenderwith textures from Photoshop), I have the Old Manbeing slightly chewed on by a grandfather clock thatjust happens to be possessed. You’ll also notice theuse of another lighting technique called a gobo. It’ssimply a light that projects an image such as thetree branches you see in the background.
Guide the viewer’s eyes with the lights, shadows andnegative space. Very rarely do we find symmetry inthe real world, so it’s good practice to place yourcamera so that the focal point of your image or shotis never in the center.
Horror movies generally aren’t very scary if you canfully see the monster coming down the hallway.Granted, there are some creatures like the Alien andany variety of Jasons, Michael Myers, etc, that willstill make you straight out run like a track star. Butin most situations, if turn those lights down reallylow, that monster could be a kitten and still makeyou run for the hills.
3D WORKSHOP: Lighting and Film Making Tricks: Conveying Moods
By D
way
ne F
ergu
son
23
www.blenderart.org Issue 20 | Feb 2009 - Make it! Bake it! Fake it!
Conveying Moods
Lighting can also be used to great effect when com-bined with proper staging, The goal is to cover up acreature even further, thus creating the effect of dread.Take a look at films like The Grudge–the main attrac-tion; a ghost name Kayako is typically only partially vis-ible due to the long black hair covering her face. Railson the staircase, a bathroom stall, her sticking halfwaythrough a wall, etc., also often obscure her. In the raretimes we do see her fully, she is in or surrounded byshadow (the hallway in the hospital in Grudge 2, forexample).
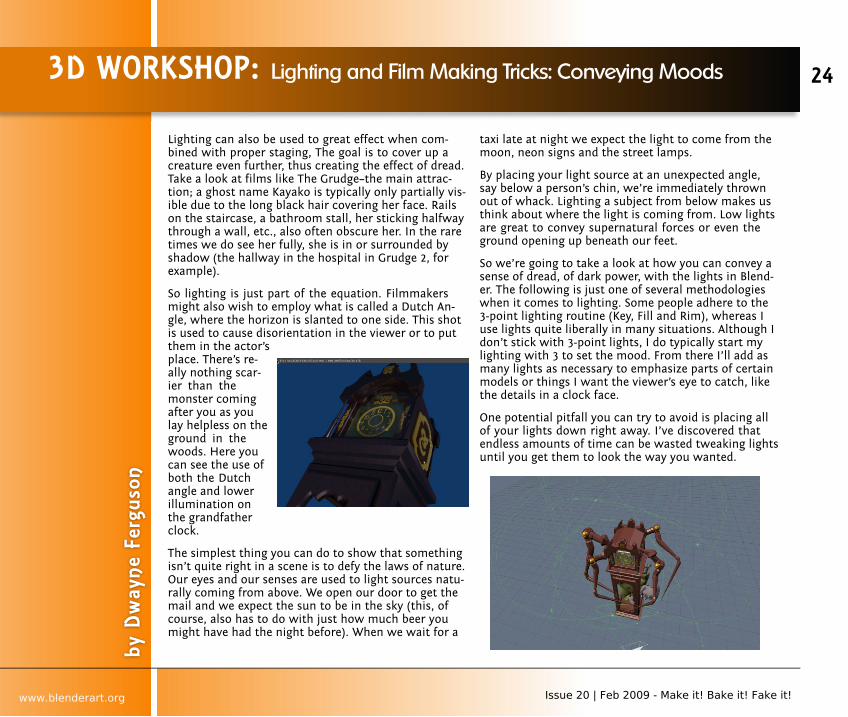
So lighting is just part of the equation. Filmmakersmight also wish to employ what is called a Dutch An-gle, where the horizon is slanted to one side. This shotis used to cause disorientation in the viewer or to putthem in the actor’splace. There’s re-ally nothing scar-ier than themonster comingafter you as youlay helpless on theground in thewoods. Here youcan see the use ofboth the Dutchangle and lowerillumination onthe grandfatherclock.
The simplest thing you can do to show that somethingisn’t quite right in a scene is to defy the laws of nature.Our eyes and our senses are used to light sources natu-rally coming from above. We open our door to get themail and we expect the sun to be in the sky (this, ofcourse, also has to do with just how much beer youmight have had the night before). When we wait for a
taxi late at night we expect the light to come from themoon, neon signs and the street lamps.
By placing your light source at an unexpected angle,say below a person’s chin, we’re immediately thrownout of whack. Lighting a subject from below makes usthink about where the light is coming from. Low lightsare great to convey supernatural forces or even theground opening up beneath our feet.
So we’re going to take a look at how you can convey asense of dread, of dark power, with the lights in Blend-er. The following is just one of several methodologieswhen it comes to lighting. Some people adhere to the3-point lighting routine (Key, Fill and Rim), whereas Iuse lights quite liberally in many situations. Although Idon’t stick with 3-point lights, I do typically start mylighting with 3 to set the mood. From there I’ll add asmany lights as necessary to emphasize parts of certainmodels or things I want the viewer’s eye to catch, likethe details in a clock face.
One potential pitfall you can try to avoid is placing allof your lights down right away. I’ve discovered thatendless amounts of time can be wasted tweaking lightsuntil you get them to look the way you wanted.
3D WORKSHOP: Lighting and Film Making Tricks: Conveying Moods
by D
way
ne F
ergu
son
24
www.blenderart.org Issue 20 | Feb 2009 - Make it! Bake it! Fake it!

What I tend to do is to start with just one lamp andmodify it until I’m happy. I’ll move the lamp. Then I’lladd the next lamp and put the original one on its ownlayer.
I add one lamp to the scene and modify its settings un-til I can make out the edges of the models. This type oflight is called a Rim or Back light because its role is topush the models away from the background so theydon’t blend with other background objects. I normallystart with the Rim since its usually the most difficultfor me to adjust in a way that makes me happy.
Anyone who’s familiar with the original story knowsthere’s an old man with a crazy eye, but there sure asheck ain’t a clock that will eat your face off. It was im-portant that the clock’s arms had a very otherworldlyfeel to them so I placed them and their lights on theirown layer. With these lamps set to only illuminate theitems on the same layer, I avoided having these lightsaffect any other objects in the scene. You may find
placing specific ele-ments and theirlamps on separatelayers a very benefi-cial way to achieveotherwise difficultillumination scenari-os. I chose colorsthat one would nottypically use to illu-minate a room sothey would feel out of place.
3D WORKSHOP: Lighting and Film Making Tricks: Conveying Moods
by D
way
ne F
ergu
son
25
www.blenderart.org Issue 20 | Feb 2009 - Make it! Bake it! Fake it!
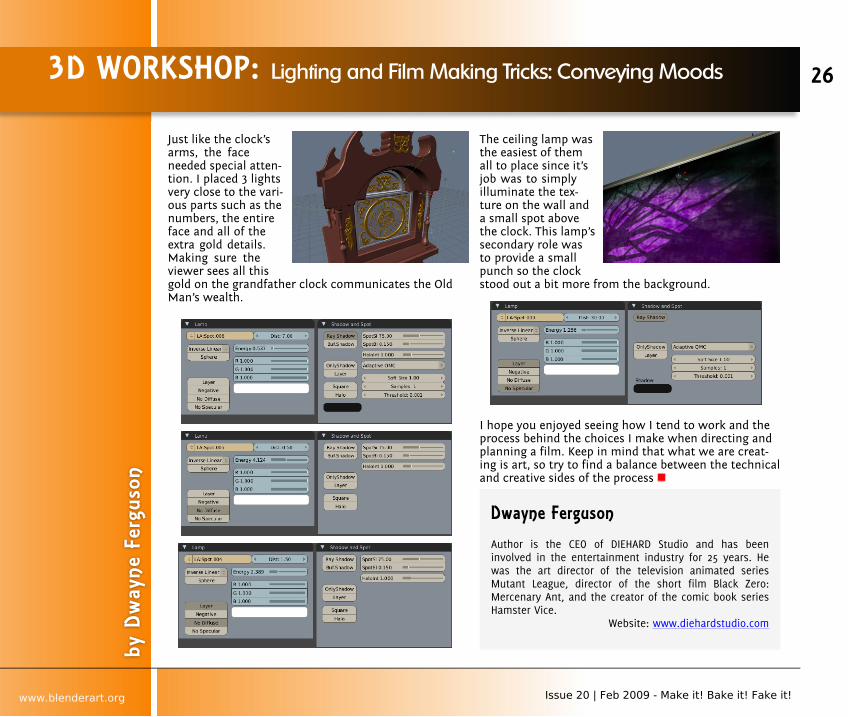
Just like the clock’sarms, the faceneeded special atten-tion. I placed 3 lightsvery close to the vari-ous parts such as thenumbers, the entireface and all of theextra gold details.Making sure theviewer sees all thisgold on the grandfather clock communicates the OldMan’s wealth.
The ceiling lamp wasthe easiest of themall to place since it’sjob was to simplyilluminate the tex-ture on the wall anda small spot abovethe clock. This lamp’ssecondary role wasto provide a smallpunch so the clockstood out a bit more from the background.
I hope you enjoyed seeing how I tend to work and theprocess behind the choices I make when directing andplanning a film. Keep in mind that what we are creat-ing is art, so try to find a balance between the technicaland creative sides of the process
3D WORKSHOP: Lighting and Film Making Tricks: Conveying Moods
by D
way
ne F
ergu
son
26
www.blenderart.org Issue 20 | Feb 2009 - Make it! Bake it! Fake it!
Dwayne Ferguson
Author is the CEO of DIEHARD Studio and has beeninvolved in the entertainment industry for 25 years. Hewas the art director of the television animated seriesMutant League, director of the short film Black Zero:Mercenary Ant, and the creator of the comic book seriesHamster Vice.
Website: www.diehardstudio.com
IntroductionAs technology develops further andfurther, some objects that are be-ing used every day by millions ofpeople suddenly become function-less. Then, all of a sudden, they be-come symbols, artifacts of acertain episode of time. That’swhat happened to the good oldcassette. It reminds one of youth,good music, mix-tapes, being onthe road and hanging around infront of a radio waiting for somespecial song with your finger on
the record button…
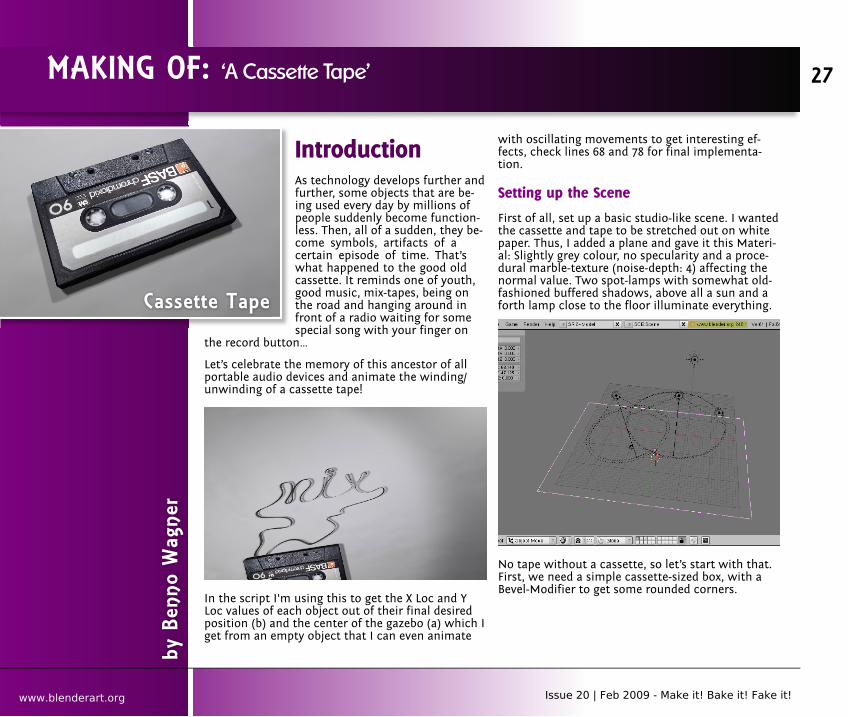
Let’s celebrate the memory of this ancestor of allportable audio devices and animate the winding/unwinding of a cassette tape!
In the script I'm using this to get the X Loc and YLoc values of each object out of their final desiredposition (b) and the center of the gazebo (a) which Iget from an empty object that I can even animate
with oscillating movements to get interesting ef-fects, check lines 68 and 78 for final implementa-tion.
Setting up the Scene
First of all, set up a basic studio-like scene. I wantedthe cassette and tape to be stretched out on whitepaper. Thus, I added a plane and gave it this Materi-al: Slightly grey colour, no specularity and a proce-dural marble-texture (noise-depth: 4) affecting thenormal value. Two spot-lamps with somewhat old-fashioned buffered shadows, above all a sun and aforth lamp close to the floor illuminate everything.
No tape without a cassette, so let’s start with that.First, we need a simple cassette-sized box, with aBevel-Modifier to get some rounded corners.
MAKING OF: ‘A Cassette Tape’
by B
enno
Wag
ner
27
Cassette Tape
www.blenderart.org Issue 20 | Feb 2009 - Make it! Bake it! Fake it!
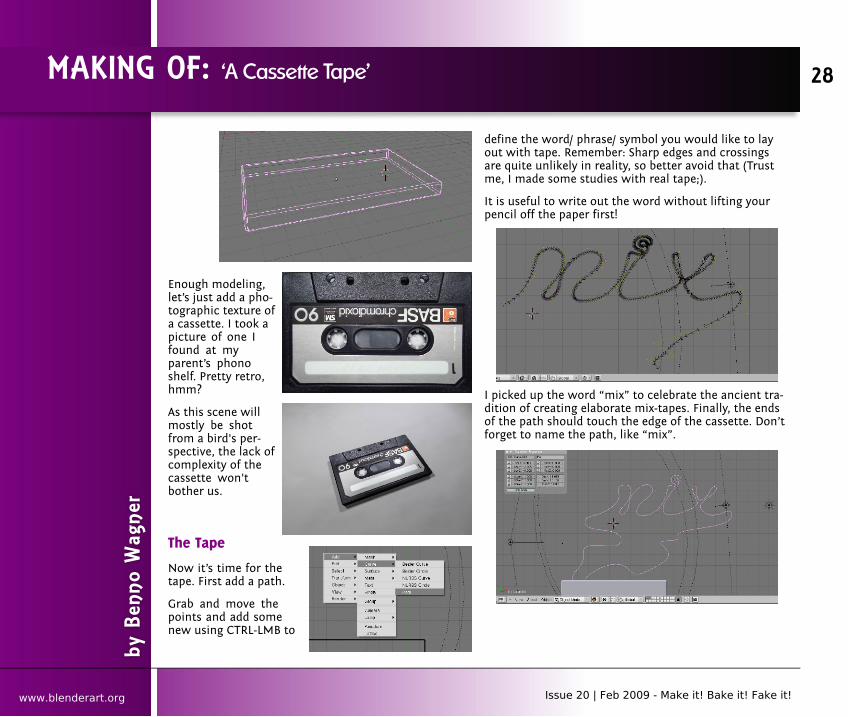
Enough modeling,let’s just add a pho-tographic texture ofa cassette. I took apicture of one Ifound at myparent’s phonoshelf. Pretty retro,hmm?
As this scene willmostly be shotfrom a bird's per-spective, the lack ofcomplexity of thecassette won'tbother us.
The Tape
Now it’s time for thetape. First add a path.
Grab and move thepoints and add somenew using CTRL-LMB to
define the word/ phrase/ symbol you would like to layout with tape. Remember: Sharp edges and crossingsare quite unlikely in reality, so better avoid that (Trustme, I made some studies with real tape;).
It is useful to write out the word without lifting yourpencil off the paper first!
I picked up the word “mix” to celebrate the ancient tra-dition of creating elaborate mix-tapes. Finally, the endsof the path should touch the edge of the cassette. Don’tforget to name the path, like “mix”.
MAKING OF: ‘A Cassette Tape’
by B
enno
Wag
ner
28
www.blenderart.org Issue 20 | Feb 2009 - Make it! Bake it! Fake it!
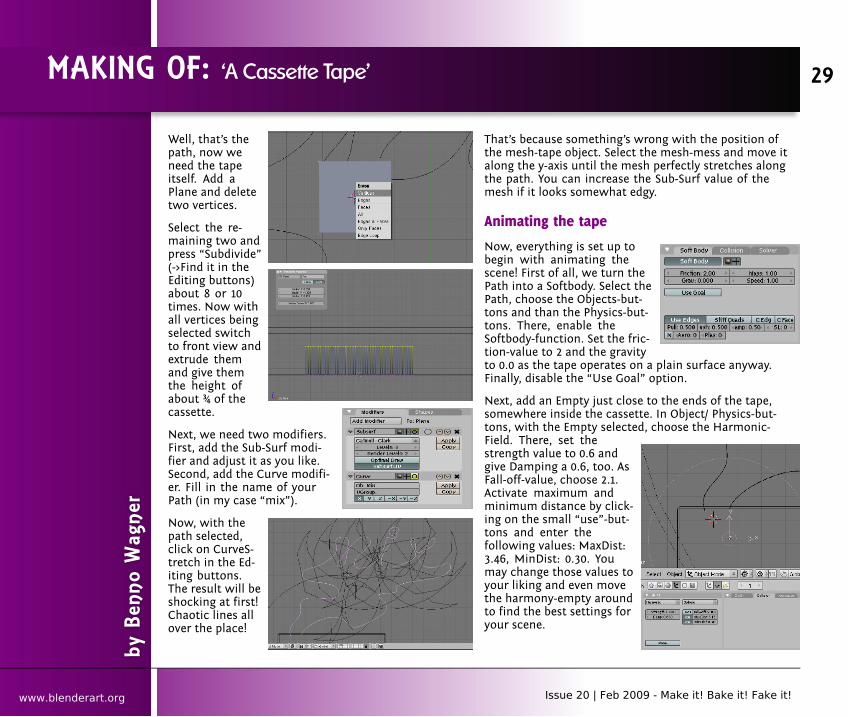
Well, that’s thepath, now weneed the tapeitself. Add aPlane and deletetwo vertices.
Select the re-maining two andpress “Subdivide”(->Find it in theEditing buttons)about 8 or 10times. Now withall vertices beingselected switchto front view andextrude themand give themthe height ofabout ¾ of thecassette.
Next, we need two modifiers.First, add the Sub-Surf modi-fier and adjust it as you like.Second, add the Curve modifi-er. Fill in the name of yourPath (in my case “mix”).
Now, with thepath selected,click on CurveS-tretch in the Ed-iting buttons.The result will beshocking at first!Chaotic lines allover the place!
That’s because something’s wrong with the position ofthe mesh-tape object. Select the mesh-mess and move italong the y-axis until the mesh perfectly stretches alongthe path. You can increase the Sub-Surf value of themesh if it looks somewhat edgy.
Animating the tape
Now, everything is set up tobegin with animating thescene! First of all, we turn thePath into a Softbody. Select thePath, choose the Objects-but-tons and than the Physics-but-tons. There, enable theSoftbody-function. Set the fric-tion-value to 2 and the gravityto 0.0 as the tape operates on a plain surface anyway.Finally, disable the “Use Goal” option.
Next, add an Empty just close to the ends of the tape,somewhere inside the cassette. In Object/ Physics-but-tons, with the Empty selected, choose the Harmonic-Field. There, set thestrength value to 0.6 andgive Damping a 0.6, too. AsFall-off-value, choose 2.1.Activate maximum andminimum distance by click-ing on the small “use”-but-tons and enter thefollowing values: MaxDist:3.46, MinDist: 0.30. Youmay change those values toyour liking and even movethe harmony-empty aroundto find the best settings foryour scene.
MAKING OF: ‘A Cassette Tape’
by B
enno
Wag
ner
29
www.blenderart.org Issue 20 | Feb 2009 - Make it! Bake it! Fake it!
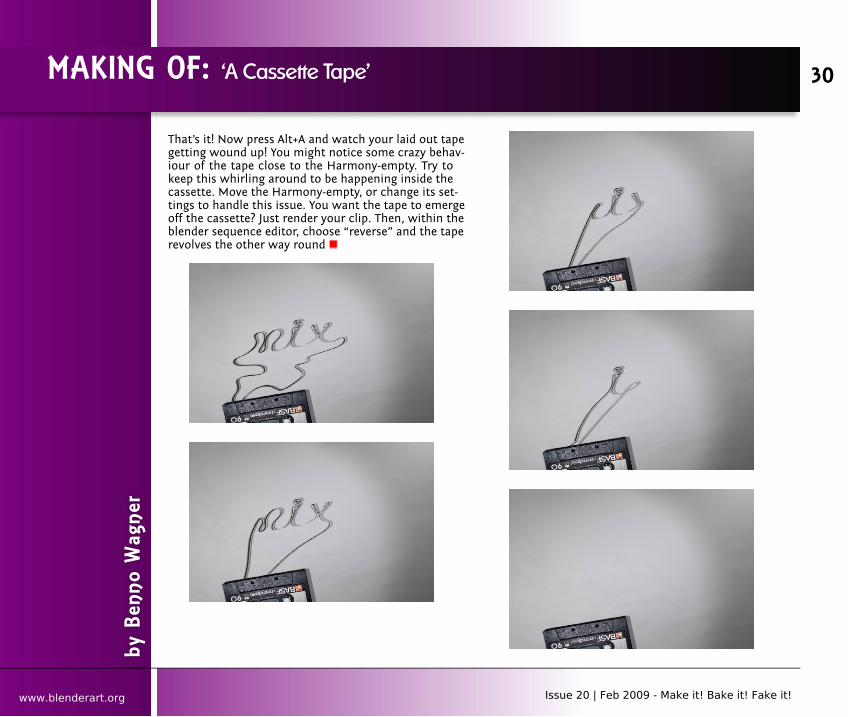
That’s it! Now press Alt+A and watch your laid out tapegetting wound up! You might notice some crazy behav-iour of the tape close to the Harmony-empty. Try tokeep this whirling around to be happening inside thecassette. Move the Harmony-empty, or change its set-tings to handle this issue. You want the tape to emergeoff the cassette? Just render your clip. Then, within theblender sequence editor, choose “reverse” and the taperevolves the other way round
MAKING OF: ‘A Cassette Tape’
by B
enno
Wag
ner
30
www.blenderart.org Issue 20 | Feb 2009 - Make it! Bake it! Fake it!
IntroductionIt has been told time and againthat it is the little things that willhelp make an event more accepta-ble to your audience. To that effect,applications like Blender havecome equipped with many simula-tions, material settings, and nodesto create things like smoke, fog,and lighting that audiences canfind acceptable for a scene or eventin a story. Sometimes though,these effects require resources thatare above what the general hobby-
ist can put together.
But that rarely stops the audience from asking for "alittle extra."
One such requirement for "a little something extra"occurred when we were making a short reel called"The Surprise Attack." The animated demo was in-tended to be short, depicting just one "awesome"moment in time in a larger concept.
Specifically, the moment depicts an event of unex-pected danger when a seemingly normal helicopterflies into view of a lone human person only for thesaid vehicle to shift and change into a metallicmonster that literally takes on weight and falls outof the sky, landing on a rooftop helipad and actinggenerally menacing.
The reel looked fine but a little extra something wasmissing.
"There should be dust. When it comes down. That'sa lot of weight so it would be nice for dust to getkicked up from the floor." said one member of mytest audience.
I agreed of course with the assessment. It madesense. The artist in me definitely felt the sameabout that single piece of action. But it was nosooner than I had agreed to add dust, that I beganassessing how tricky it could be to simulate it.
Traditionally, Blender comes equipped with thingslike Volumetrics and Particle simulations. I had seena few clouds and fog done to good effect with thesesystems. But in almost all cases the render timeswere very significant. As a novice with only mid-range equipment and no render farm, doing it thisway was out of the question.
But I really wanted that cloud of dust. I alreadyknew some members of the potential audiencewould notice the need for it and I didn't want todisappoint. I also knew that if I could somehowsolve this concern, the same method could be usedto derive other similar effects in future projects.
Having ruled out using Volumetrics or Particles, Idecided the dust would have to be done with somegood old-fashioned Texture Projection. This wassomething I had seen used for explosions andsmoke in old video games from quite a few yearsago, but getting it right was still kind of tricky. I wastrying to pass off a cardboard cut-out for what hadto appear as an effect with volume.
To achieve the effect I used some old clouds texturemaps I had made in my stock and UV mapped it to aset of curved sub-surfed meshes that were modeledto appear like waves with their mid sections slightlyprotruding outwards.
MAKING OF: ‘Dusting Off A Surprise’
by G
ianc
arlo
Ng
31
Dusting off a Surprise
www.blenderart.org Issue 20 | Feb 2009 - Make it! Bake it! Fake it!
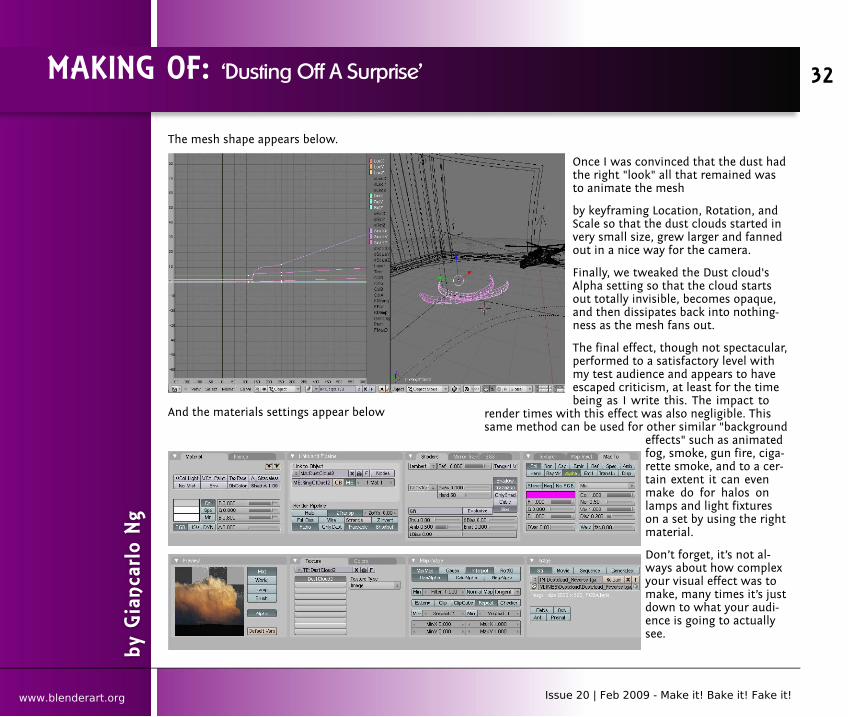
The mesh shape appears below.
And the materials settings appear below
Once I was convinced that the dust hadthe right "look" all that remained wasto animate the mesh
by keyframing Location, Rotation, andScale so that the dust clouds started invery small size, grew larger and fannedout in a nice way for the camera.
Finally, we tweaked the Dust cloud'sAlpha setting so that the cloud startsout totally invisible, becomes opaque,and then dissipates back into nothing-ness as the mesh fans out.
The final effect, though not spectacular,performed to a satisfactory level withmy test audience and appears to haveescaped criticism, at least for the timebeing as I write this. The impact to
render times with this effect was also negligible. Thissame method can be used for other similar "background
effects" such as animatedfog, smoke, gun fire, ciga-rette smoke, and to a cer-tain extent it can evenmake do for halos onlamps and light fixtureson a set by using the rightmaterial.
Don’t forget, it’s not al-ways about how complexyour visual effect was tomake, many times it’s justdown to what your audi-ence is going to actuallysee.
MAKING OF: ‘Dusting Off A Surprise’
by G
ianc
arlo
Ng
32
www.blenderart.org Issue 20 | Feb 2009 - Make it! Bake it! Fake it!
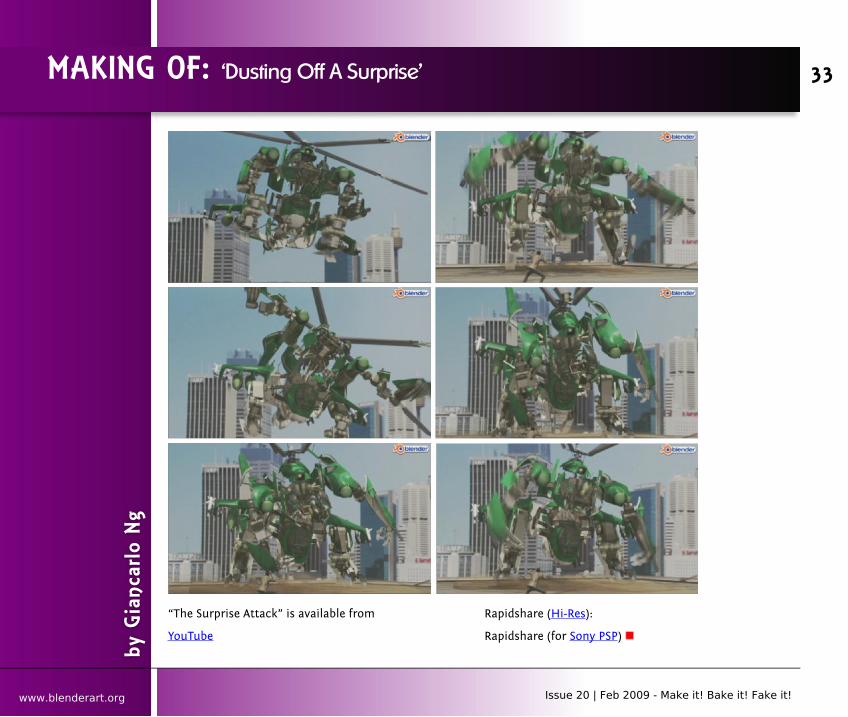
“The Surprise Attack” is available from
YouTube
Rapidshare (Hi-Res):
Rapidshare (for Sony PSP)
MAKING OF: ‘Dusting Off A Surprise’
by G
ianc
arlo
Ng
33
www.blenderart.org Issue 20 | Feb 2009 - Make it! Bake it! Fake it!
Over the years, my obsessive search forBlender related information and resourceshas led me to discover an amazing amount of
resources. These resources I then compulsively saveto CD and DVD to add to my personal Blenderknowledge base for future reference.
What I have always enjoyed most, are those re-sources that let me see how an artist achievedsomething. It never ceases to delight me just howmany ways Blender can be used and the sheernumber of different work flows that are possible.
Which brings me to my latest find, Blenducation. Ihave wandered by their site a few times before; theyhave a nice series of video tutorials. And now, Blen-ducation has started offering online real-time class-es.
Blenducation puts the personal touch, which onlyseems to come from a classroom type setting intolearning Blender. Which we all know from experi-ence can sometimes be a little difficult on yourown. So just how do you get started at Blenduca-tion?
First off, you need to register at the site and thenyou can sign up for offered classes. (There are com-plete instructions on the site explaining the sign up
process). Knowing that interested participants arein a number of different time zones, David includeda time zone setting on his site, that once set to yourtime zone, allows you to see when the classes areoffered in “your time”. Very handy indeed for thoselike me who are forever trying to make time conver-sion more complicated than it really is.
Once you have signed up, you receive an email invi-tation (on the day of the class) with a link to join a“net meeting” room. That is where your class willtake place. After you join the class, you see theinstructor’s desktop and watch the lesson in realtime as it is being taught. There is even a chatroom, where you can talk to the other students aswell as the instructor.
Of course, being too curious for my own good, Ihave attended several classes already, and had somuch fun that I plan on becoming a permanent stu-dent at Blenducation. In fact I haven't had thatmuch fun in ages. Not only do I get to see how oth-ers work, I learn new things and get a chance tochat with fellow Blenderheads.
I can see enormous potential for this project. Theability to hold classes’ real time is a great way to getstudents from all over together in an interactive en-vironment. And as most of the classes at this timeare being offered for free, it is a wonderful way toexpand your Blender knowledge and skills
KnowHow: Blenducation: A new way to improve your Blender skills
by S
andr
a G
ilber
t
34
www.blenderart.org Issue 20 | Feb 2009 - Make it! Bake it! Fake it!
1- What inspired / or led you to start Blenduca-tion?
In retrospect, it seems like my entire life has pre-pared me for this endeavor.
Identifying the Problem…
I started working with Blender and found lots ofgreat tutorials in PDF, video and HTML format bysome amazing people. When I watched Bassam'sChicken Chair (Can be viewed here) I was hooked.I had to learn more. The problem was getting an-swers to a particular problem. It was such alengthy and almost impossible task.
I thought, “Wouldn’t it be great if I could just askthe person that made that tutorial? It would saveme so much time and effort.” I am still waiting forGrayBeard to reply to me.
The Birth of the Idea…
I attended the Siggraph show in Boston 2006 afterbegging Ton to let me work the booth at theshow. With David Millets help, Ton agreed to letme. After meeting Ton, Bassam, Andy, David Milletand the many other BlenderHeads at the BostonSiggraph, I discovered that Blender was not justabout the 3D graphics, it was a community of peo-ple from all over the world with the same passionto create and help others create.
During that show I spoke with Bassam at lengthabout starting a Blender User Group. From thatdiscussion Blenducation was born. Though it wasjust a seed of an idea, it had legs. The name Blend-ucation was coined by Petri Rantanen AKA Falgor.After many hours of talking with the great folks inthe IRC channels I was able to fine-tune the idea toLive Blender classes via a Web Browser. Now aftertwo years of very hard work and many hundreds ofhours, it's here.
2- Introduce yourself and tell us a little about yourBlender experience?
My name is David Hickson. I have been learningBlender from the community for the last 3 years,and I am still learning new things every day.
How I found Blender…
I came across an article in a Mac World Magazineissue a few years ago and it had some informationabout Blender. I immediately went to the web site,downloaded the application and jumped right in. Isoon realized that I was spending more timesearching for resources to learn how to do the sim-plest processes than actually working in the pro-gram.
There are tons of good tutorials out there, but forevery one good tutorial, you must weed throughlayers and layers of bad ones (at the time I had afull time job and you just can’t be surfing the en-tire Internet looking for new tutorials when youhave a real job). So anyway, once you have foundone that covers the topic, it’s usually incomplete orsome small part has been over looked with the pre-sumption that, “you should know that”. Thisproved to be very unproductive and frustrating. Ifound myself saying, ”I just want to model!” And tomake matters worse I would jump from one sub-ject to the next and miss huge parts of what wasimportant.
INTERVIEW: David Hickson - Blenducation 35
www.blenderart.org Issue 20 | Feb 2009 - Make it! Bake it! Fake it!
During one of my Blender Ninja quests for knowl-edge, Bart pointed me in the direction of IRC andwhat a great resource that was. So many amazingartists just sitting there waiting to help, except myunderstanding of Blender was so bad I didn’t evenknow how to ask good questions. Without know-ing the basic terms of what I was doing and doingwrong I only frustrated people in IRC (I still do attimes, sorry ZanQdo). I have since put away mypaintbrushes and clay and now hold a mouse orWacom pen instead.
3- Classes are currently being offered for free. Willthere be fees for future classes, and if so how muchare you expecting to be charging? Will there still befree courses as well?
There will always be FREE classes offered at Blend-ucation to introduce people to Blender and to getthem started with Blender. Think of it as the wel-coming committee to the Blender Community.These classes will have an open question and an-swer period throughout the class to help peoplefind great resources and new challenges.
There will also be a pay-per-seat program set up foradvanced classes. The prices will be set up on atiered system. The more advanced the class, themore it will cost.
Tier one classes will be $5US and $10US per seat.
Tier two will be $10 and $15US per seat.
Tier three classes will be $15 and $20US per seat.
If a class runs three nights and is a tier three class,it will be offered at a discounted seat rate.
4- Not only are you offering Blender classes, but youhave extended an invitation to interested instruc-tors to use Blenducation to teach/offer classes aswell. Can you tell us a little about how to get in-volved as an instructor at Blenducation?
Yes, I have begun to invite some power Blender us-ers to become instructors at Blenducation andmany of them have become part of the team.Among them is David Millet (US), an amazinglyskilled gentleman and a great mentor.
Sebastian Koenig (Germany), whose works aretruly amazing. He makes it look so effortless.
Then there is Mr. (Jonathan Williamson) Bomb(US), who’s human anatomy could have landedhim a gig as a Doctor, but the difference is thatdoctors only know the parts and Jonathan canmake them.
OOPz AKA OOPz (England) is a very well knownBlender artist that specializes in the world ofBlender's Game Engine. His expertise in the BGEwill be a key area of interest to many Blender art-ists.
Daniel Salazar AKA ZanQdo is a straight shoot, nofluff educator, if you are lucky enough to get intoone of his classes you will come out a better artist.
Do I have more time? Ok, there is Goeland86 (US),who long ago invited me to join him on a projectof recreating a historic air battle. He is a very gra-cious person with extreme patience.
And then there is Jean-Sébastien (Canada (AKAECKS)) who has few equals when it comes to me-chanicals, like cars and bikes.
Also there is another good friend of mine that isknown as Super3Boy (US) infamous in YouTubeworld as the boy prodigy of the Blender communi-ty. Let me assure you his skills and knowledgedon’t end at Blender, have you checked out hiswebsite?
The list goes on to include our most influentialBlender rigger Mr. Mancandy himself, Bassam Kur-dali (US).
INTERVIEW: David Hickson - Blenducation 36
www.blenderart.org Issue 20 | Feb 2009 - Make it! Bake it! Fake it!
I was testing some stuff one day and invited him into check it out and it froze up his laptop. If he for-gives me he may do a couple classes.
What would this list be if I had not contacted andasked Roland Hess? That is correct, I am so excitedthat Roland has offered to give a couple of lecturesfor us.
Also on the team is; FWEEB, MFOXDOGG, Paulo Cri-tovao, Templa Edhel, and many others joining us tohelp the community grow.
A more accurate and updated list is on the site athttp://blenducation.org/wordpress/presenters/ . It istheir commitment that strengthens my resolvethat the Blender community truly does care,thanks guys.
Qualifications…
You don’t need to have a degree to teach classes atthis point, although most of the very advancedclasses or Tier three classes will be taught byBlender Foundation Certified Trainers (BFCT). Thefree classes are great way to learn how to teach anonline class.
Just submit a few renders and tell us why youwould like to be on the team. If you are selectedyou will be notified and we will set you up yourvery own blog Page. In addition to the blog pageand your own gallery, all the instructors at Blendu-cation are offered free passes to other instructor’sclasses. This allows the presenters to grow theirskills and sharpen their Blender knowledge fromone another.
5- You mentioned setting up Certified trainingguidelines along with the BF Certified trainer pro-gram. Has any progress been made on that?
Yes in fact, I have spoken with a couple of key peo-ple on the BFCT board and we actually have a fewinstructors that have the BFCT credentials now.
I am waiting to see what happens in the next cou-ple of months with the BFCT program, I have beentold that some changes may take place. My hope isto layout a “Direct path to Becoming BFCT” pro-gram that will provide all the criteria one needs toknow in order to submit your work with confi-dence to the BFCT board and become accepted. Iam working closely with them in order to designthis learning path. Obviously, not everyone will ob-tain their BFCT nor will they want to. Some peoplejust want to learn more at their leisure. So there isno pressure.
6- What are your future goals for Blenducation?
The short-term goal is to add to our team of in-structors so we can help users all over the worldbecome more marketable in the industry. It has tostart somewhere. It is true that a person with nodegree gave the very first diploma.
Next we hope to add a testing center that will helpthose of you that wonder where you need to studymore in order to go after your BFCT certificate orjust to brush up on those rusty skills
INTERVIEW: David Hickson - Blenducation 37
www.blenderart.org Issue 20 | Feb 2009 - Make it! Bake it! Fake it!
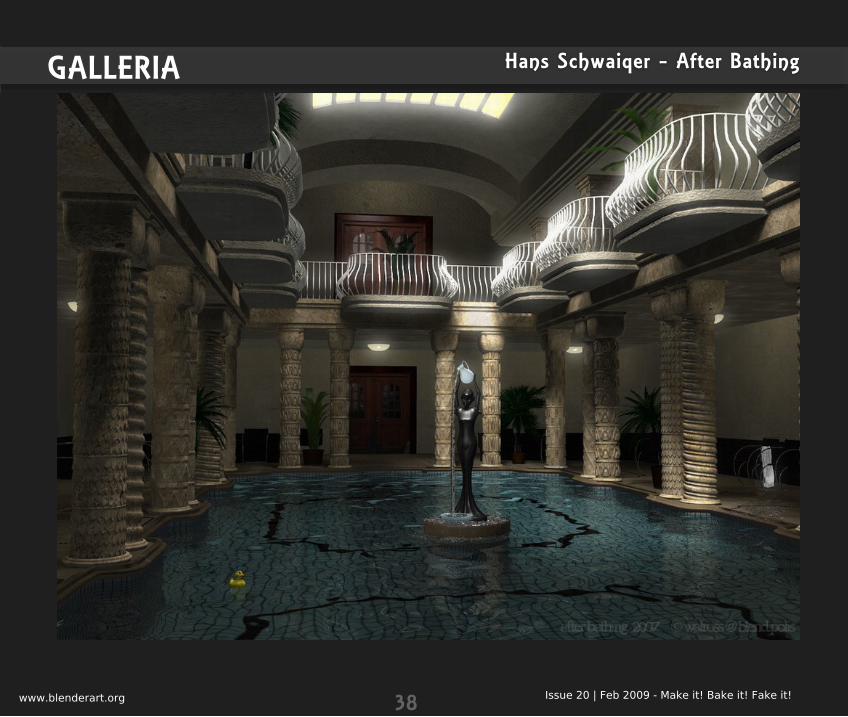
Hans Schwaiqer - After BathingGALLERIA
38www.blenderart.org Issue 20 | Feb 2009 - Make it! Bake it! Fake it!
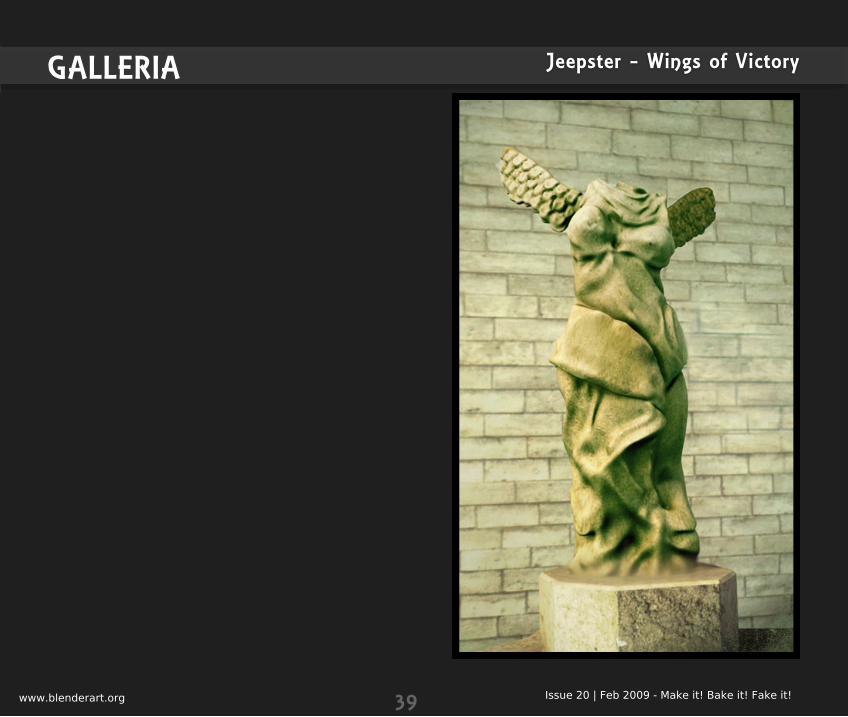
Jeepster - Wings of VictoryGALLERIA
39www.blenderart.org Issue 20 | Feb 2009 - Make it! Bake it! Fake it!
1. We accept the following: Tutorials explaining new Blender features, 3dconcepts, techniques or articles based on currenttheme of the magazine.
Reports on useful Blender events throughout the world. Cartoons related to blender world.
2. Send submissions to [email protected]. Send us a notification onwhat you want to write and we can follow up from there. (Some guidelinesyou must follow)
Images are preferred in PNG but good quality JPG can also do. Images should be separate fromthe text document.
Make sure that screenshots are clear and readable and the renders should be at least 800px,but not more than 1600px at maximum.
Sequential naming of images like, image 001.png... etc. Text should be in either ODT, DOC, TXT or HTML. Archive them using 7zip or RAR or less preferably zip.
3. Please include the following in your email: Name: This can be your full name or blenderartist avtar. Photograph: As PNG and maximum width of 256Px. (Only if submitting the article for the firsttime )
About yourself: Max 25 words . Website: (optional)
Note: All the approved submissions can be placed in the final issue or subsequent issue ifdeemed fit. All submissions will be cropped/modified if necessary. For more details see the blend-erart website.
40
www.blenderart.org Issue 20 | Feb 2009 - Make it! Bake it! Fake it!
Want to write for BlenderArt Magazine?
Here is how!
blenderart.org does not takes any responsibility both expressed or implied for the material andits nature or accuracy of the information which is published in this PDF magazine. All the ma-terials presented in this PDF magazine have been produced with the expressed permission oftheir respective authors/owners. blenderart.org and the contributors disclaim all warranties,expressed or implied, including, but not limited to implied warranties of merchantability orfitness for a particular purpose. All images and materials present in this document areprinted/re-printed with expressed permission from the authors/owners.
This PDF magazine is archived and available from the blenderart.org website. The blenderartmagazine is made available under Creative Commons‘ Attribution-NoDerivs 2.5’ license.
COPYRIGHT© 2008 ‘BlenderArt Magazine’, ‘blenderart’ and BlenderArt logo are copyright ofGaurav Nawani. ‘Izzy’ and ‘Izzy logo’ are copyright Sandra Gilbert. All products and companynames featured in the publication are trademark or registered trade marks of their respectiveowners.
41Upcoming Issue ‘Theme’
Issue 19
Disclaimer
Look What I Can DO!!!
A look at various artists and their current projects, showcasing what is possi-ble in Blender.
Still Images, Animations, Games.
Python Scripts.
Coding Contributions.
Both commercial and/or personal projects welcome.
www.blenderart.org Issue 20 | Feb 2009 - Make it! Bake it! Fake it!