WORKGROUP NETWORKING Workgroup networking allows us to share file, devices, internet between the computers. Microsoft is making networking easier in each of new window version. Setting of workgroup networking in Window 7 is much easier then setting of workgroup networking in XP. This section is written for beginning to intermediate window users and organized such that simple topics are presented first, with the subjects becoming increasingly complex as you progress. The latter parts cover more specific and complex networking topics. Beginning users should start at the beginning of this section to get the most out of it. The section Builds on previous knowledge, so if you skip the earlier articles, you might need to go back to read about terms, processes, or procedures. Intermediate users can use this section as a reference. If you’re familiar with networking basics but want to share internet on or your own intranet, for example, you can go directly to the relevant article to find out how. From window 7 Microsoft include a nice feature home Group for networking. In our first section we would use this feature for networking. Later we would include other version of windows in networking. Window 7 Workgroup Networking WINDOW 7 WORKGROUP NETWORKING Windows automatically creates a workgroup and gives it a name, when we set up a network, we can join an existing workgroup on a network or create a new one. Workgroups provide a basis for file and printer sharing, but do not actually set up sharing for us. In window 7 to enable sharing we need to create or join a home group, which automatically turns on file and printer sharing on home networks. Home Group is a new feature in Windows 7 that allows us to connect two or more PCs running Windows 7 and easily share our Music, Pictures, Video, and Document as well as printers with others in your home. In this section we would use this feature for workgroup networking between window 7 computers. For this section we assume you have all window 7 computers. If you have earlier operating system like Vista, XP, then check our advance workgroup networking section All versions of the Windows 7 Client Operating System can participate in a home Group. Only Windows 7 Home Premium, Professional, Enterprise or Ultimate can create a home group. All versions of Windows 7 can join a home group that has already been created on your home network What is Home Group Difference between Home Group and Workgroup Auto initiating of Home Group Create home Group from Windows Explorer Create home Group from control panel Create home Group from Network and Sharing Center How to join home Group How to leave a home Group

Workgroup Networking
Dec 13, 2015
Welcome message from author
This document is posted to help you gain knowledge. Please leave a comment to let me know what you think about it! Share it to your friends and learn new things together.
Transcript
WORKGROUP NETWORKING Workgroup networking allows us to share file, devices, internet between the computers. Microsoft is making
networking easier in each of new window version. Setting of workgroup networking in Window 7 is much easier
then setting of workgroup networking in XP.
This section is written for beginning to intermediate window users and organized such that simple topics are
presented first, with the subjects becoming increasingly complex as you progress. The latter parts cover more
specific and complex networking topics.
Beginning users should start at the beginning of this section to get the most out of it. The section Builds on
previous knowledge, so if you skip the earlier articles, you might need to go back to read about terms,
processes, or procedures.
Intermediate users can use this section as a reference. If you’re familiar with networking basics but want to
share internet on or your own intranet, for example, you can go directly to the relevant article to find out how.
From window 7 Microsoft include a nice feature home Group for networking. In our first section we would use
this feature for networking. Later we would include other version of windows in networking.
Window 7 Workgroup Networking
WINDOW 7 WORKGROUP NETWORKING Windows automatically creates a workgroup and gives it a name, when we set up a network, we can join an
existing workgroup on a network or create a new one.
Workgroups provide a basis for file and printer sharing, but do not actually set up sharing for us. In window 7 to
enable sharing we need to create or join a home group, which automatically turns on file and printer sharing on
home networks.
Home Group is a new feature in Windows 7 that allows us to connect two or more PCs running Windows 7 and
easily share our Music, Pictures, Video, and Document as well as printers with others in your home.
In this section we would use this feature for workgroup networking between window 7 computers. For this
section we assume you have all window 7 computers. If you have earlier operating system like Vista, XP, then
check our advance workgroup networking section
All versions of the Windows 7 Client Operating System can participate in a home Group.
Only Windows 7 Home Premium, Professional, Enterprise or Ultimate can create a home group. All versions of
Windows 7 can join a home group that has already been created on your home network
What is Home Group
Difference between Home Group and Workgroup
Auto initiating of Home Group
Create home Group from Windows Explorer
Create home Group from control panel
Create home Group from Network and Sharing Center
How to join home Group
How to leave a home Group
Disjoin home Group Technical Overview
How to view home Group Password
How to change home Group Password
How to share in home Group
How to share Internet in home Group
How to share printer in Window 7 home Group
What is home Group
Home Group is a collection of two or more computers that are automatically set up for easy file sharing,
document, as well as any connected printers with others.
File and printer sharing service is included in window from its earlier version. But discovering and successfully
using these services have remained challenging for most users.
Home Group achieves this by reducing the steps and technical knowledge required for configuring file sharing
and network printing on each PC within the home to one simple step. This one step is user friendly and does
not require any networking specific skills. Users are provided with a single password which they can give others
in the home to also join the home Group.
Home Group automatically sets up sharing so that all media shared with the home Group is accessible from
Windows Media Player, Windows Media Center, and other compatible media devices in the home.
To make sharing more easily with home Group Window 7 have included new "Share with" menu in Windows
Explorer. With this feature you could to share additional libraries, files and folders.
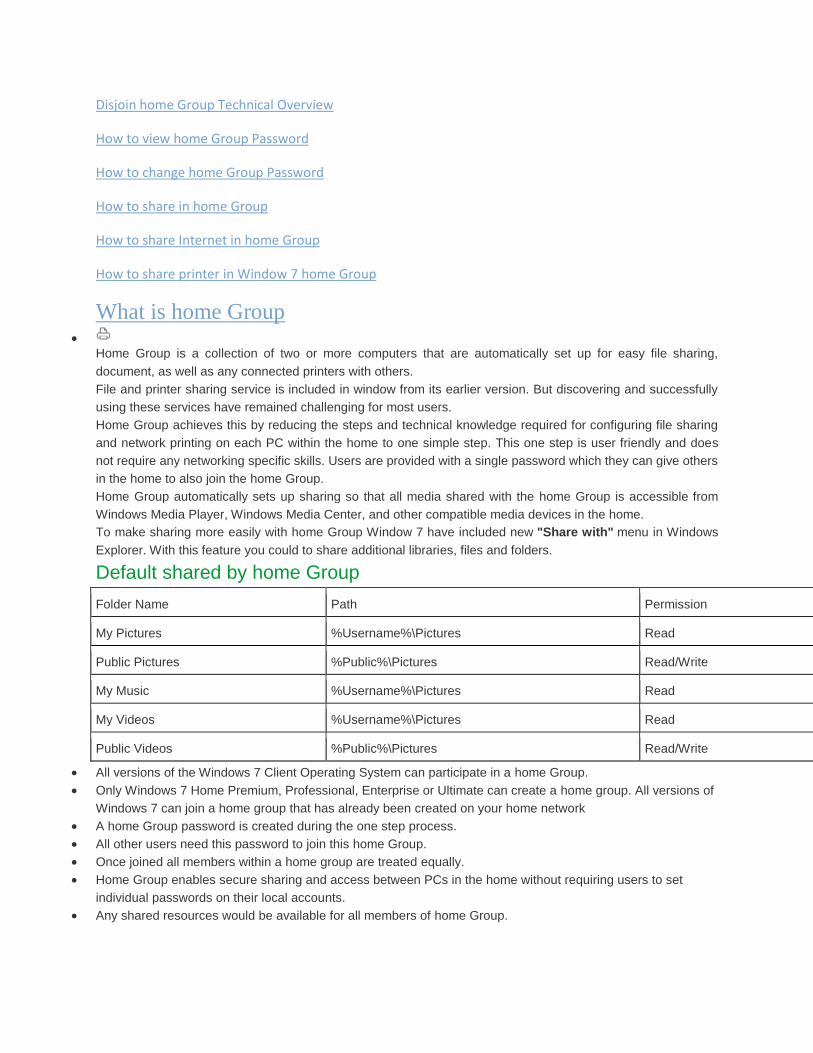
Default shared by home Group
Folder Name Path Permission
My Pictures %Username%\Pictures Read
Public Pictures %Public%\Pictures Read/Write
My Music %Username%\Pictures Read
My Videos %Username%\Pictures Read
Public Videos %Public%\Pictures Read/Write
All versions of the Windows 7 Client Operating System can participate in a home Group.
Only Windows 7 Home Premium, Professional, Enterprise or Ultimate can create a home group. All versions of
Windows 7 can join a home group that has already been created on your home network
A home Group password is created during the one step process.
All other users need this password to join this home Group.
Once joined all members within a home group are treated equally.
Home Group enables secure sharing and access between PCs in the home without requiring users to set
individual passwords on their local accounts.
Any shared resources would be available for all members of home Group.
Members of the home group will be able to view all content within each of those individual libraries by default
but will not be able to modify or delete any content in them.
The Public folders are always shared with the Home group with 'Read/Write' privileges.
Guest User Account on a PC is not considered to be a member of the home group and cannot access any
content shared within the home group other than a shared printer.
Difference between home Group and WorkGroup
Home Group is a new feature of Window 7. Before Window 7 workgroup was used for networking. In this article
we will check the key difference between Home group and workgroup.
Workgroup
All computers are equal no computer has control over another computer.
Workgroup have a limit of twenty computers.
Workgroup cannot be password protected.
On workgroup every computer need its set of user accounts. To log on to any computer in the workgroup, you
must have an account on that computer.
There are typically no more than twenty computers.
A workgroup is not protected by a password.
All computers must be on the same local network or subnet.
Workgroup works on all window versions.
Workgroup works fine on both IPv4 and IPv6.
In workgroup every computer requires same workgroup name.
Workgroups require security and sharing permissions to be set. This make workgroup configuration harder for
a non-technical person.
Home Group
In home Group you can join as much computers you want.
Home Group is password protected.
Home Group only works on Window7 or higher versions of window.
Home group requires IPv6 to work.
A home group makes it easy to share pictures, music, videos, documents, and printers with other people on a
home network. No additional configuration is required. All sharing options are enabled automatically.
Computers can be span over the subnet.
Auto initiating of home Group
Home Group can be created in 4 ways. In this article we would use first method to create home Group. Before
initiating home Group we suggest you to make sure all system have window 7 or higher version of window.
Home Group is a new feature of window 7 and it would work with window 7 or window 8.
Auto initiating of home Group
When a Window7 PC first time connects with internet or network it would automatically launch Network
Location Wizard.

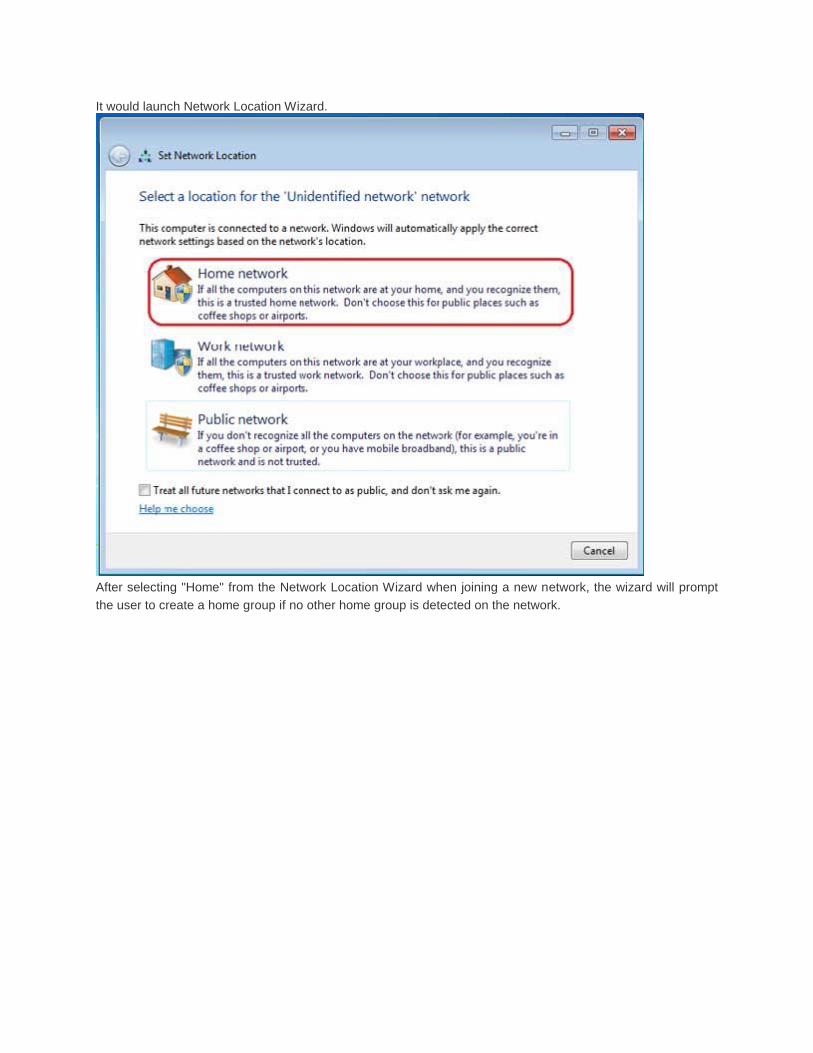
After selecting "Home" from the Network Location Wizard when joining a new network, the wizard will prompt
the user to create a home group if no other home group is detected on the network.

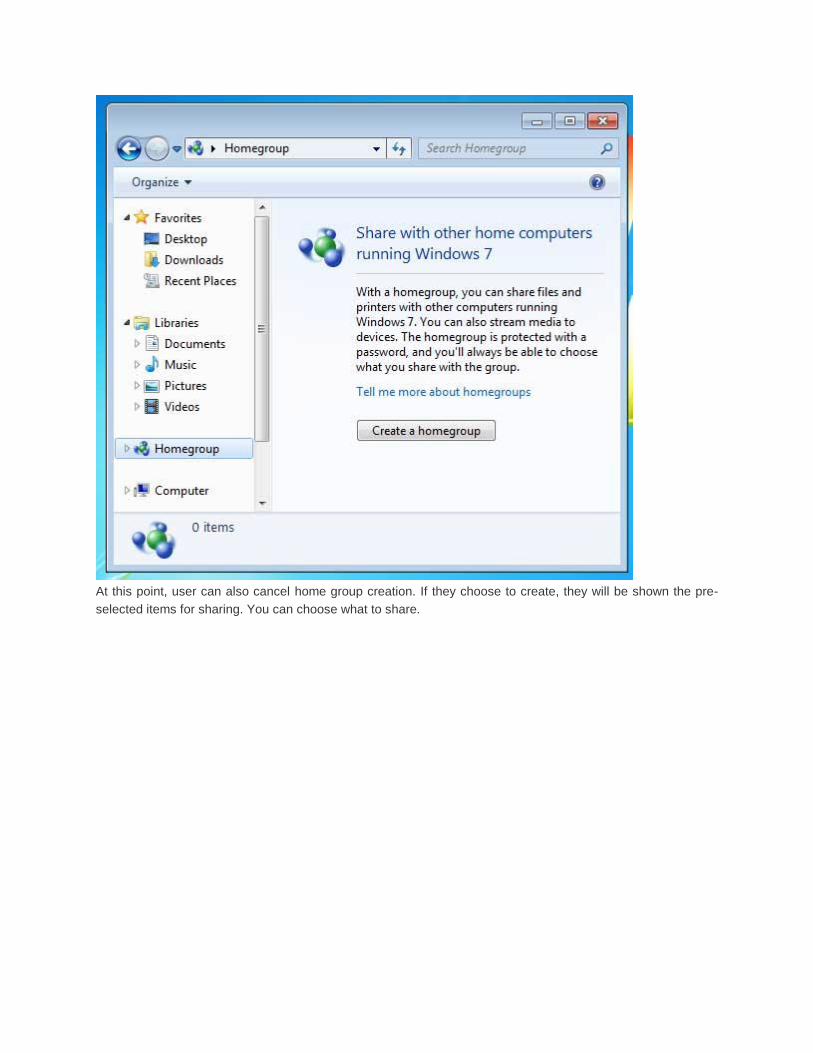
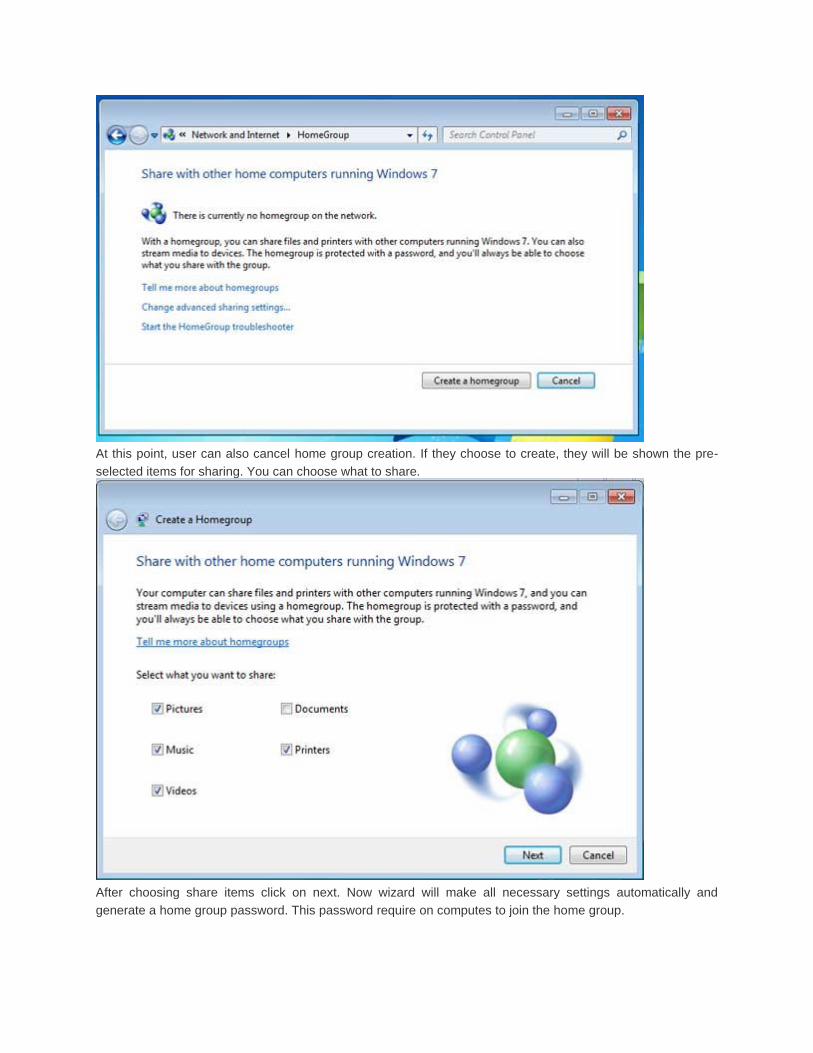
At this point, user can also cancel home group creation. If they choose to create, they will be shown the pre-
selected items for sharing. You can choose what to share.
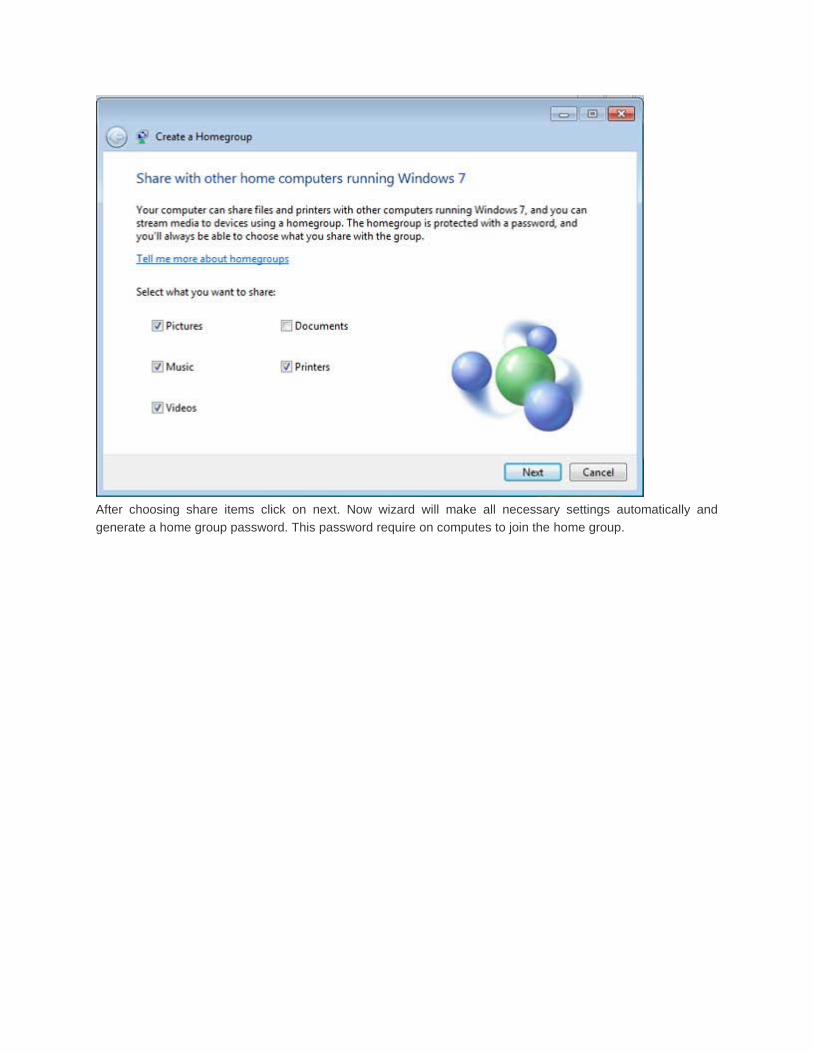
After choosing share items click on next. Now wizard will make all necessary settings automatically and
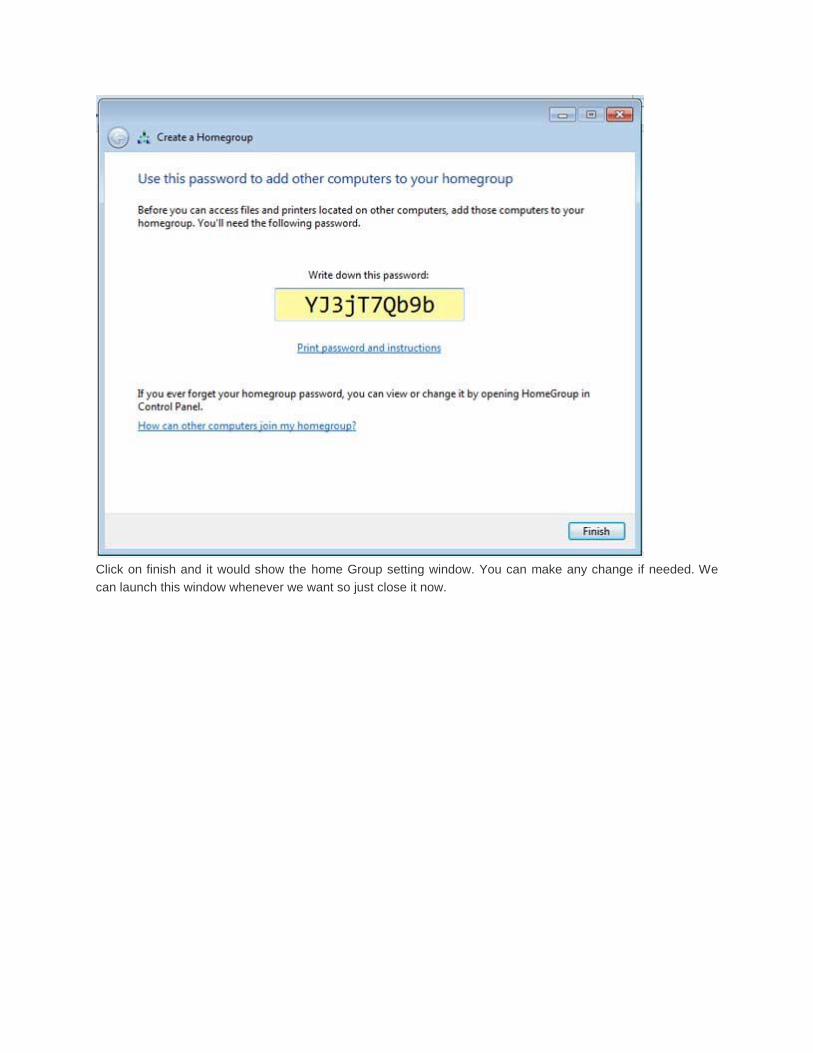
generate a home group password. This password require on computes to join the home group.

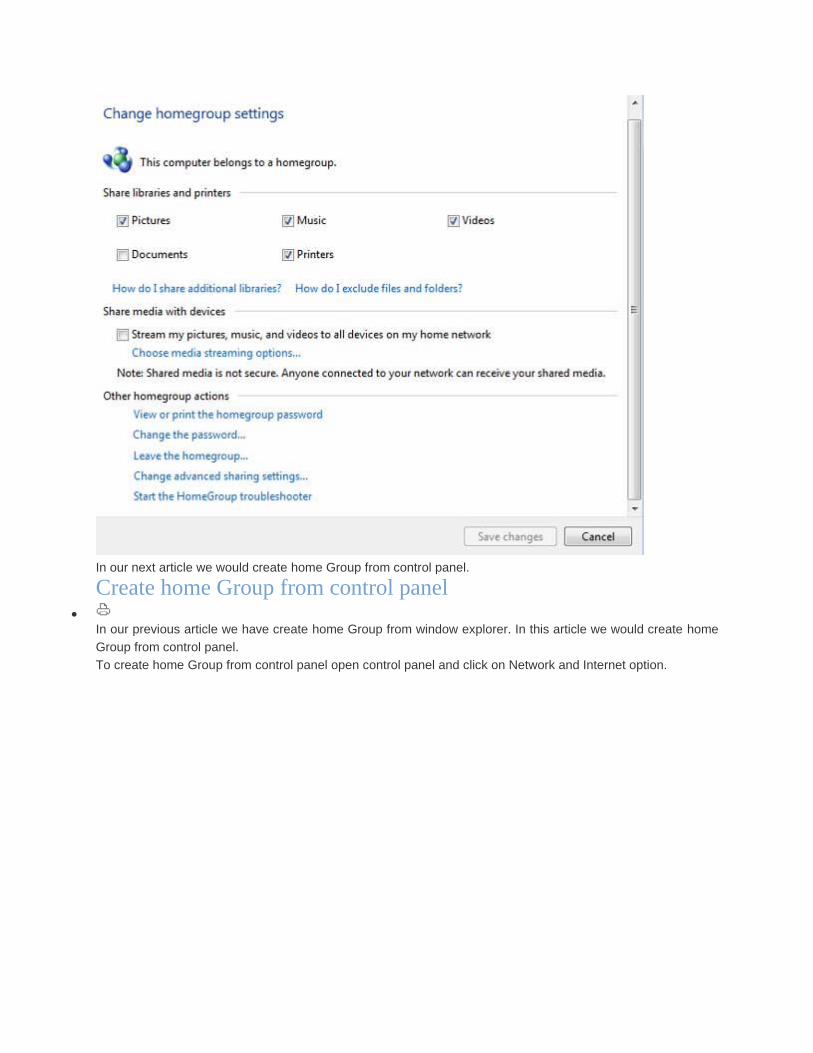
Click on finish and it would show the home Group setting window. You can make any change if needed. We
can launch this window whenever we want so just close it now.
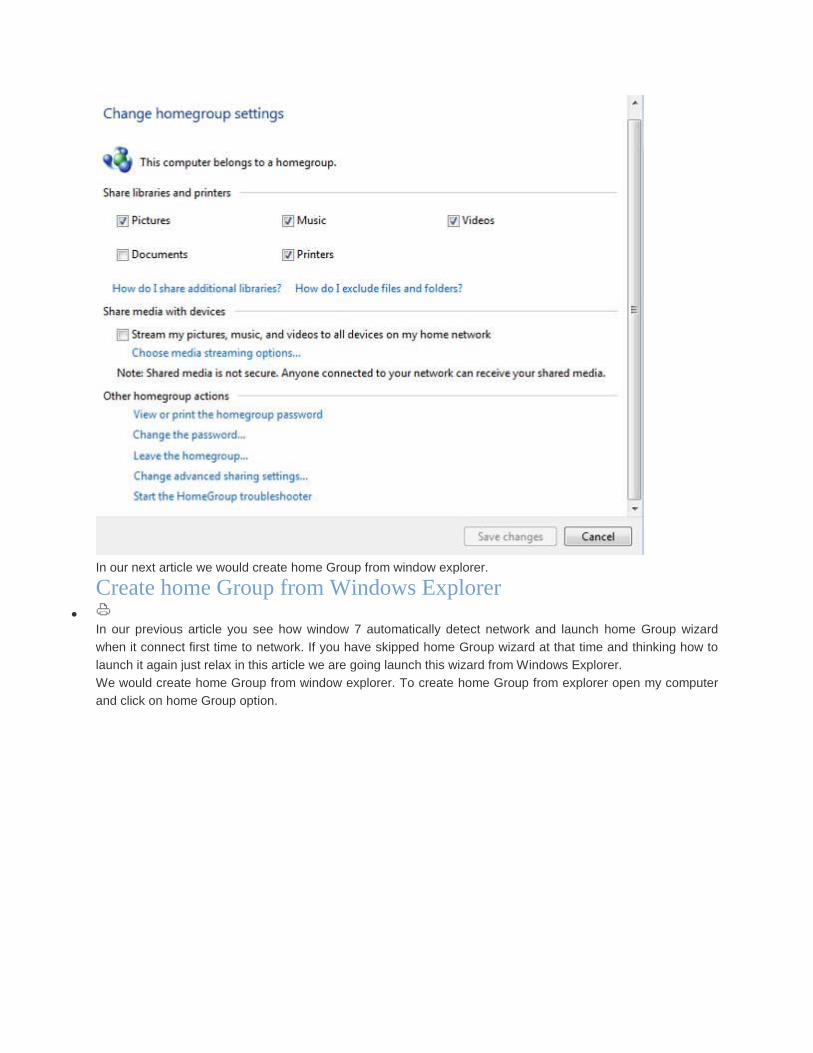
In our next article we would create home Group from window explorer.
Create home Group from Windows Explorer
In our previous article you see how window 7 automatically detect network and launch home Group wizard
when it connect first time to network. If you have skipped home Group wizard at that time and thinking how to
launch it again just relax in this article we are going launch this wizard from Windows Explorer.
We would create home Group from window explorer. To create home Group from explorer open my computer
and click on home Group option.

"Create a home group" will be presented to the user if no other home group is detected on that home network.
At this point, user can also cancel home group creation. If they choose to create, they will be shown the pre-
selected items for sharing. You can choose what to share.
After choosing share items click on next. Now wizard will make all necessary settings automatically and
generate a home group password. This password require on computes to join the home group.

Click on finish and it would show the home Group setting window. You can make any change if needed. We
can launch this window whenever we want so just close it now.
In our next article we would create home Group from control panel.
Create home Group from control panel
In our previous article we have create home Group from window explorer. In this article we would create home
Group from control panel.
To create home Group from control panel open control panel and click on Network and Internet option.
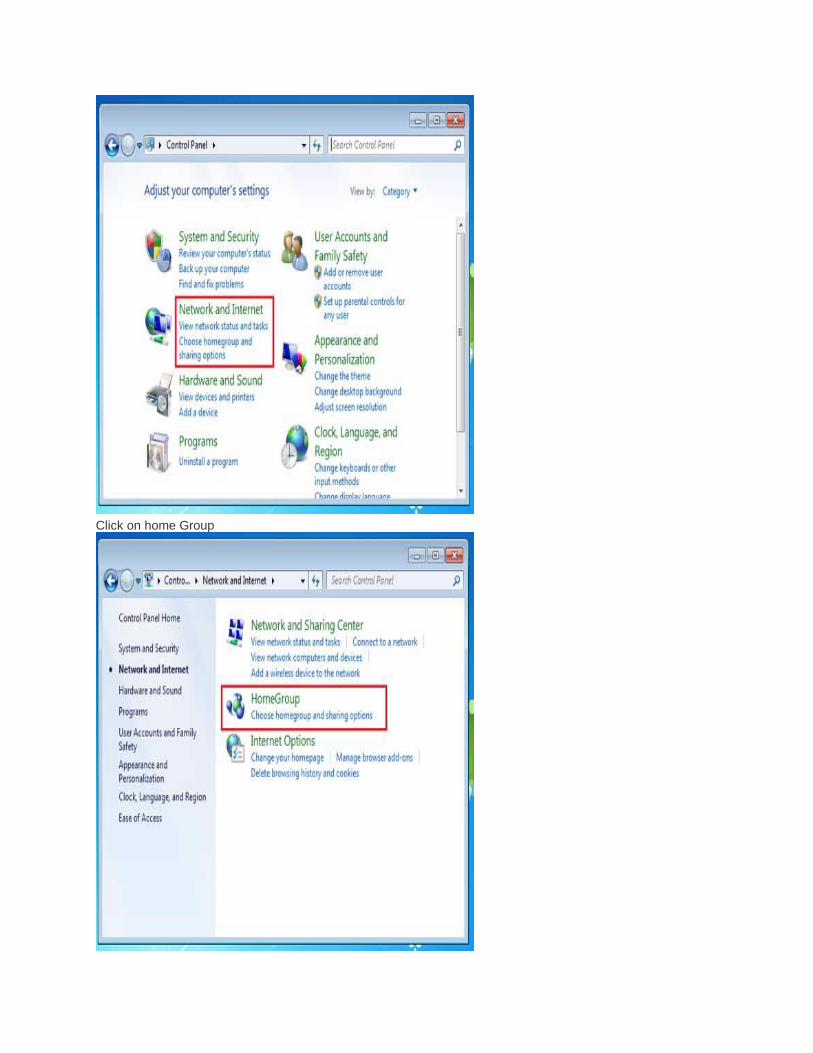
Click on home Group
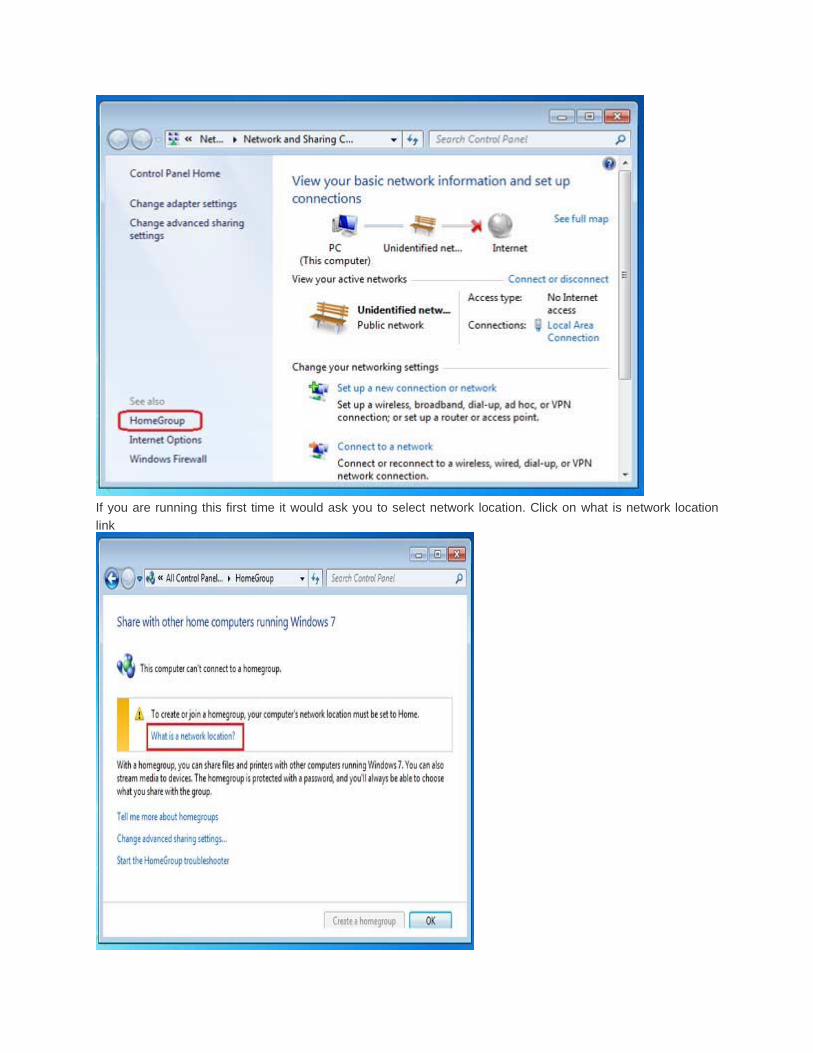
If you are running this first time it would ask you to select network location. Click on what is network location
link
It would launch Network Location Wizard.
After selecting "Home" from the Network Location Wizard when joining a new network, the wizard will prompt
the user to create a home group if no other home group is detected on the network.

At this point, user can also cancel home group creation. If they choose to create, they will be shown the pre-
selected items for sharing. You can choose what to share.
After choosing share items click on next. Now wizard will make all necessary settings automatically and
generate a home group password. This password require on computes to join the home group.

Click on finish and it would show the home Group setting window. You can make any change if needed. We
can launch this window whenever we want so just close it now.
In our next article we would create home Group from Network and Sharing Center.
Create home Group from Network and Sharing Center
In our earlier articles you have seen three method of creating home Group. In this article we would create home
Group from Network and Sharing Center.
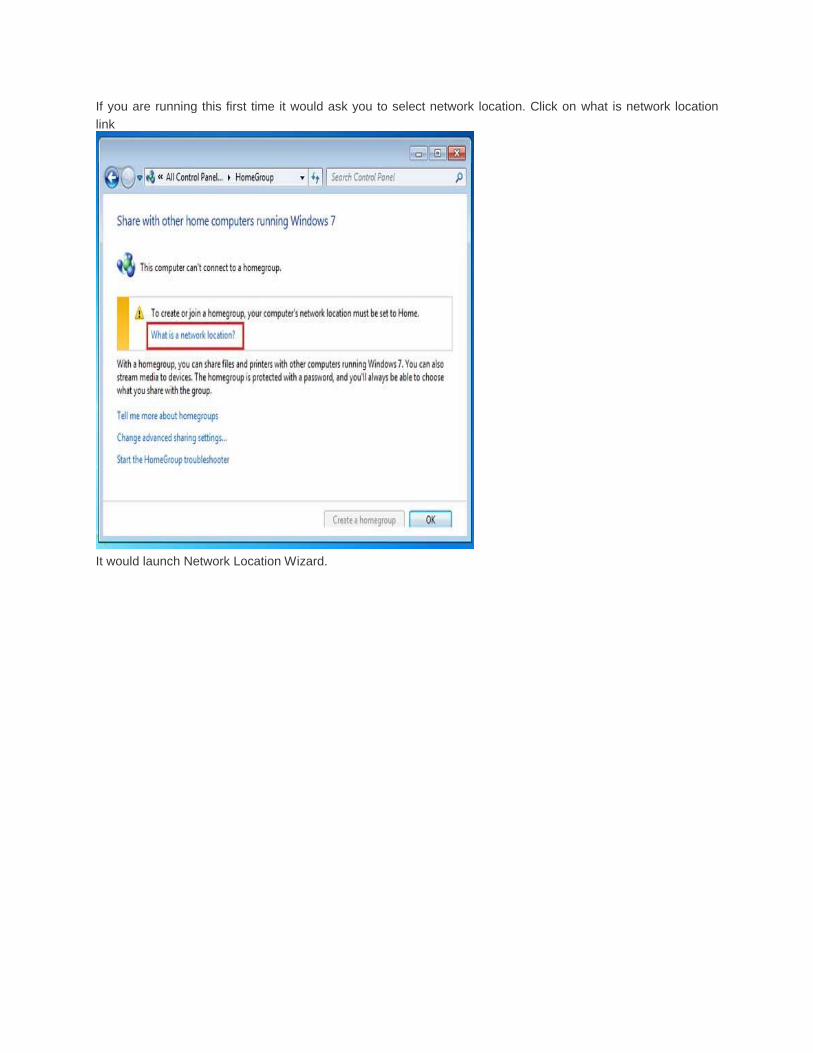
To launch home Group from Network and Sharing Center open Network and Sharing Center and Click on
home Group
If you are running this first time it would ask you to select network location. Click on what is network location
link
It would launch Network Location Wizard.
After selecting "Home" from the Network Location Wizard when joining a new network, the wizard will prompt
the user to create a home group if no other home group is detected on the network.
At this point, user can also cancel home group creation. If they choose to create, they will be shown the pre-
selected items for sharing. You can choose what to share.
After choosing share items click on next. Now wizard will make all necessary settings automatically and
generate a home group password. This password require on computes to join the home group.
Click on finish and it would show the home Group setting window. You can make any change if needed. We
can launch this window whenever we want so just close it now.
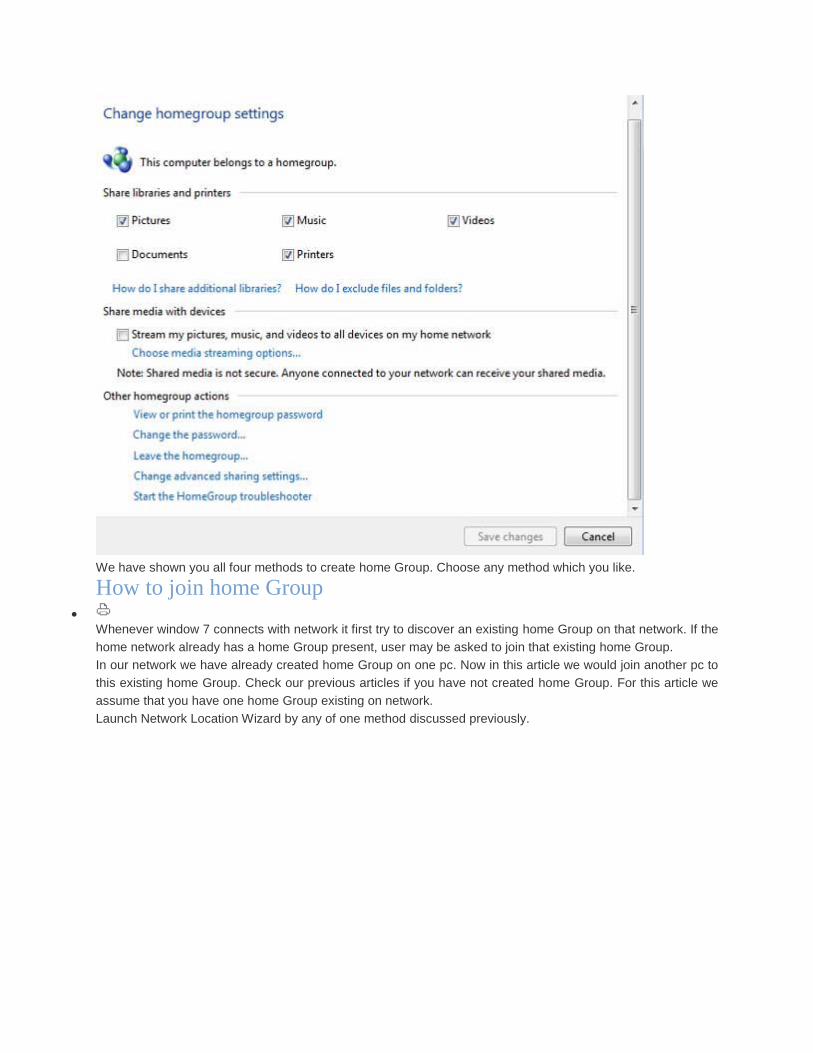
We have shown you all four methods to create home Group. Choose any method which you like.
How to join home Group
Whenever window 7 connects with network it first try to discover an existing home Group on that network. If the
home network already has a home Group present, user may be asked to join that existing home Group.
In our network we have already created home Group on one pc. Now in this article we would join another pc to
this existing home Group. Check our previous articles if you have not created home Group. For this article we
assume that you have one home Group existing on network.
Launch Network Location Wizard by any of one method discussed previously.
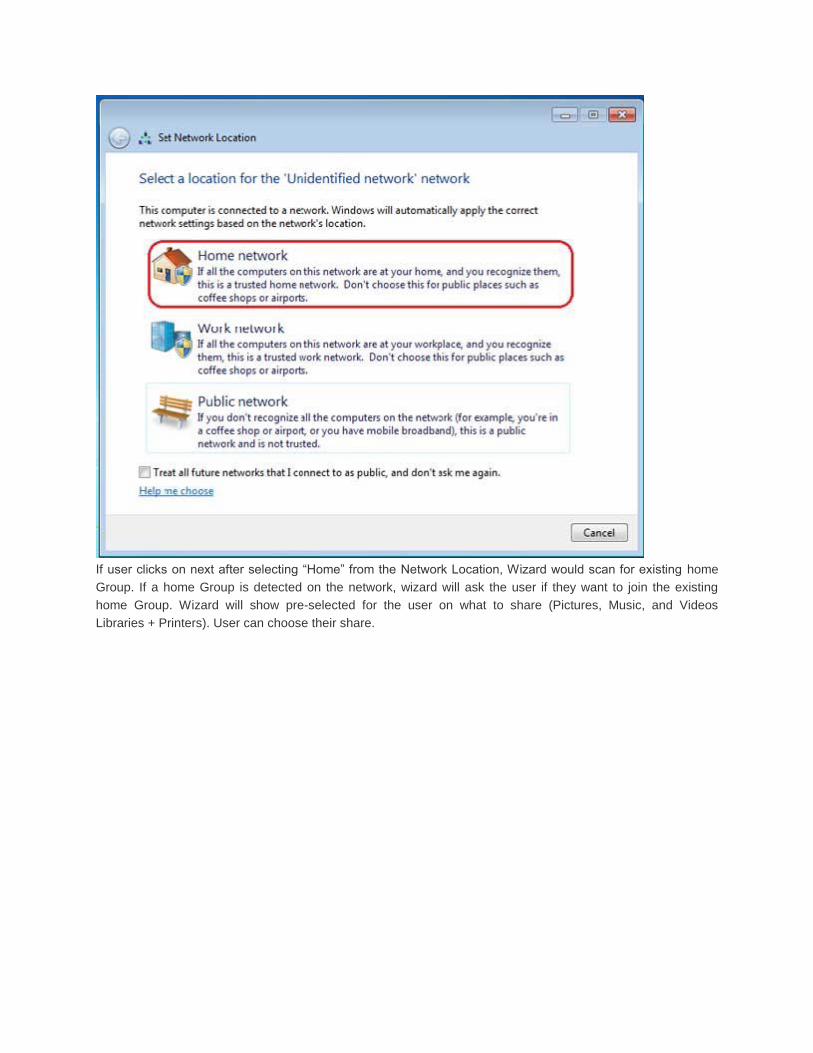
If user clicks on next after selecting “Home” from the Network Location, Wizard would scan for existing home
Group. If a home Group is detected on the network, wizard will ask the user if they want to join the existing
home Group. Wizard will show pre-selected for the user on what to share (Pictures, Music, and Videos
Libraries + Printers). User can choose their share.
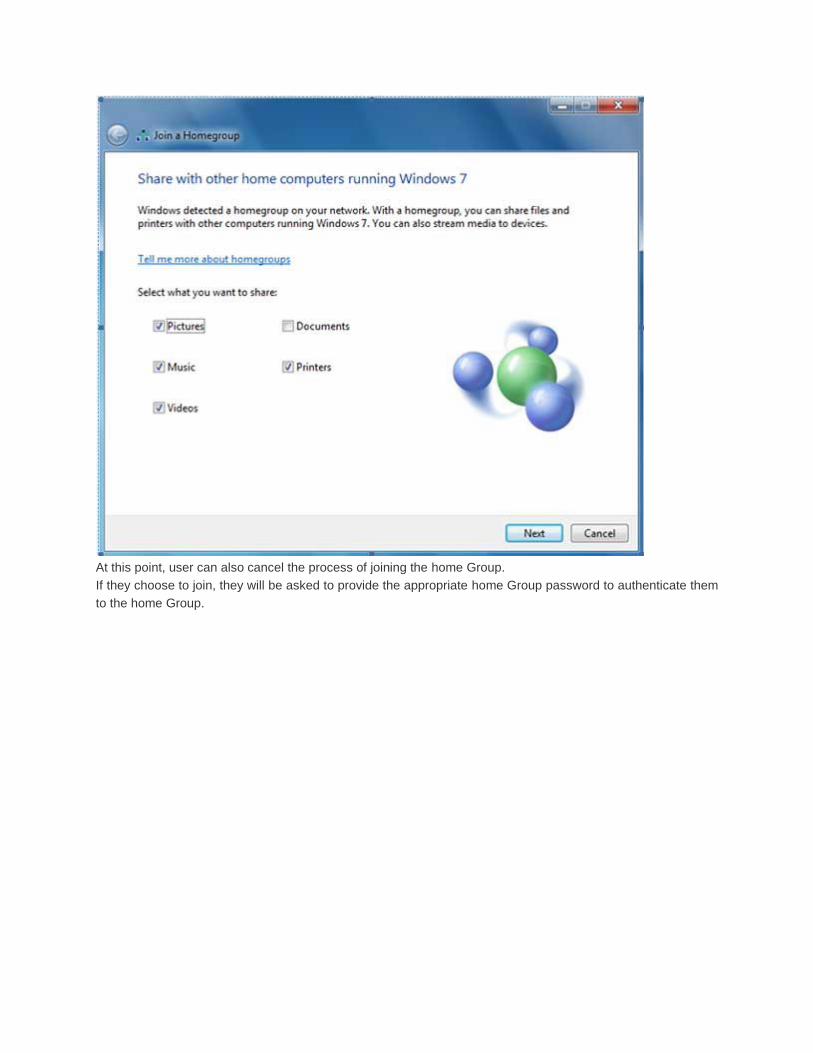
At this point, user can also cancel the process of joining the home Group.
If they choose to join, they will be asked to provide the appropriate home Group password to authenticate them
to the home Group.

Type home Group password. This password is randomly generated while we create home Group network.
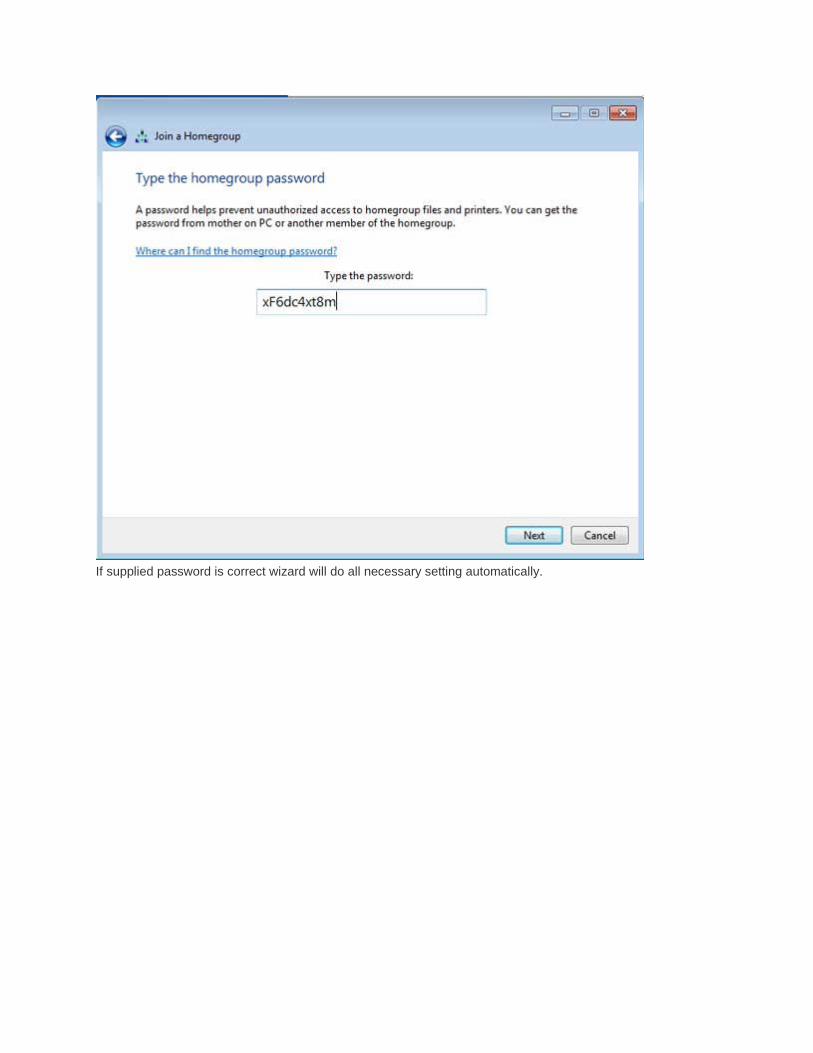
If supplied password is correct wizard will do all necessary setting automatically.

Click on finish to close wizard. In next article we would share files between home Group computers.
How to leave a home Group
You can leave home Group at any time. When you leave home Group several actions are performed to ensure
that members can no longer access the content of this PC.
Before you leave home Group make sure that home Group departs the entire PC and all other users from
home Group not just the individual user who performed the depart action.
Depending on scenario if you have decided to leave the home Group follow these steps
Step 1 Launch home Group Settings
To leave home Group we need to access home Group settings. We can access these settings via either
clicking on network icon from task bar or from My Computer. To access these from taskbar click on Network
icon and from open menu click on Open Network and Sharing Center
Now either click on home Group option or click on joined icon
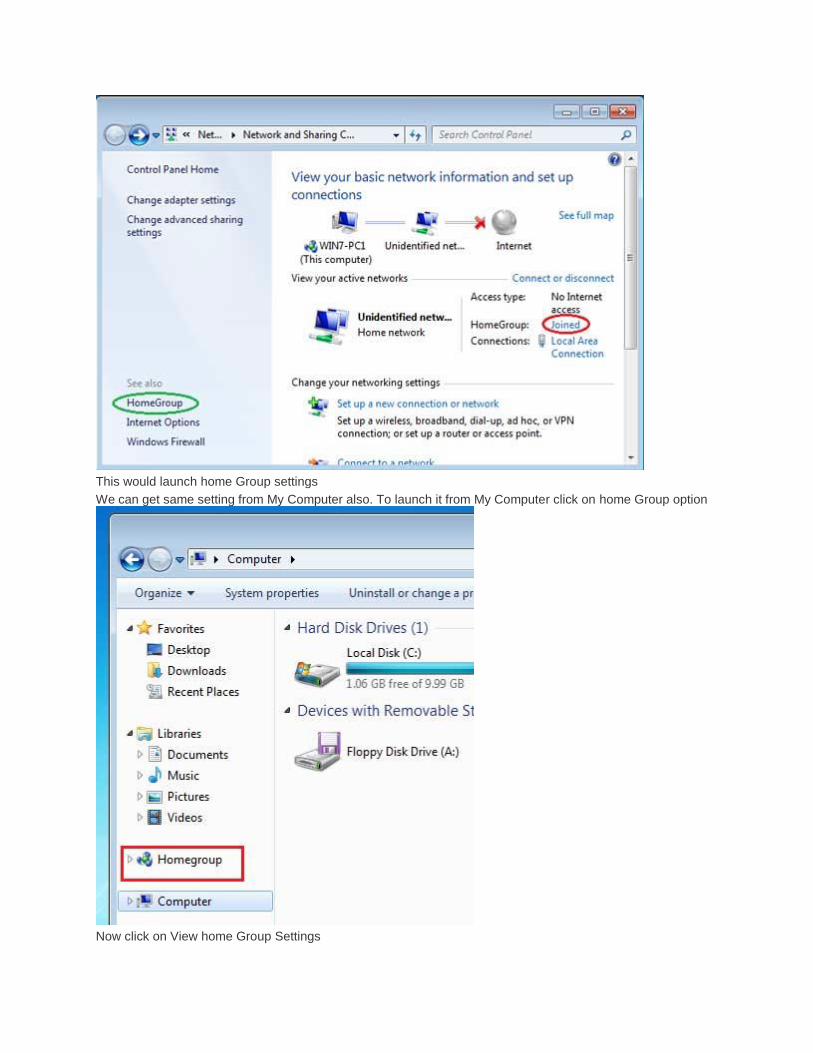
This would launch home Group settings
We can get same setting from My Computer also. To launch it from My Computer click on home Group option
Now click on View home Group Settings
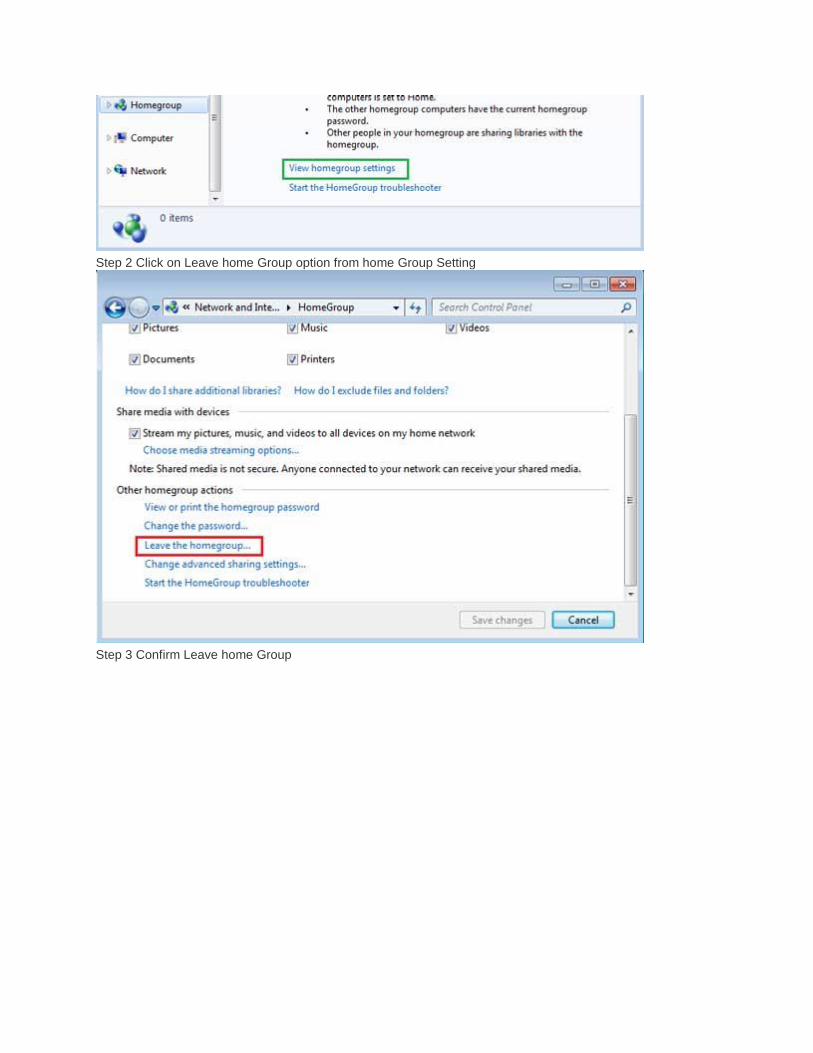
Step 2 Click on Leave home Group option from home Group Setting
Step 3 Confirm Leave home Group
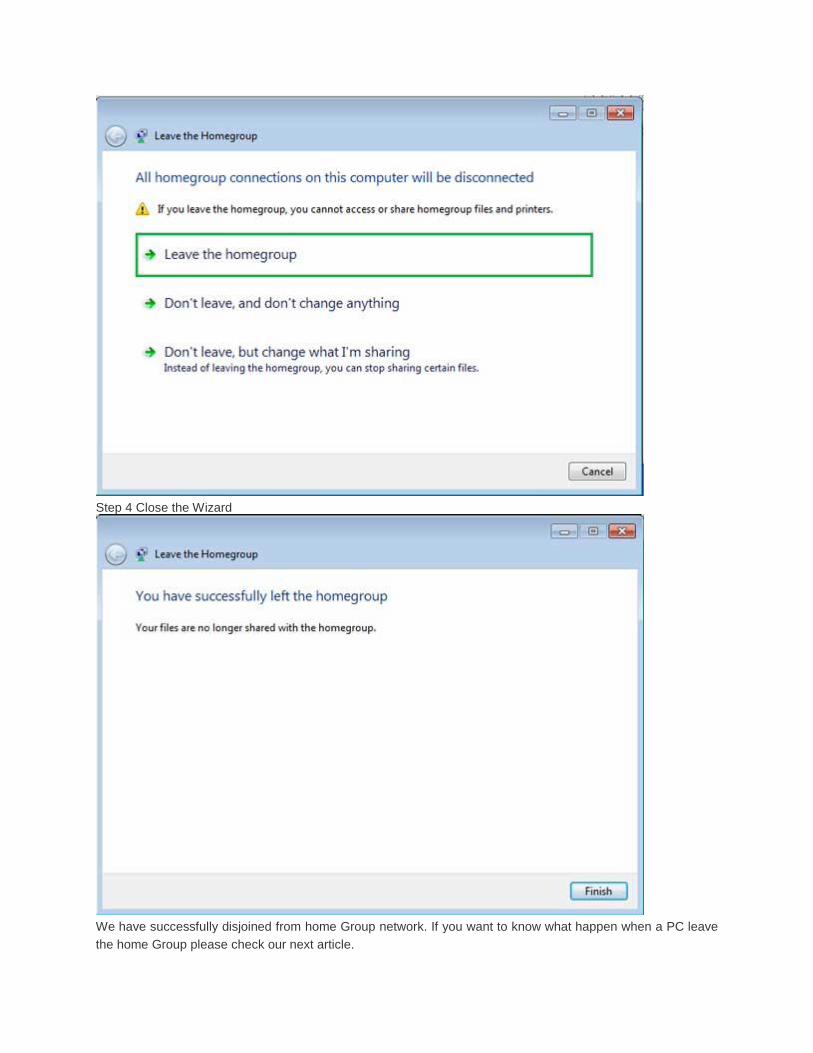
Step 4 Close the Wizard
We have successfully disjoined from home Group network. If you want to know what happen when a PC leave
the home Group please check our next article.
Disjoin home Group Technical Overview
In previous article we leave the home Group. Several technical actions are automatically performed by Window
7 when we leave home Group.
If you are not a technical person and just looking for the process of how to leave home Group please check our
previous article.
Go throw this article if you are from IT industry and looking for technical steps taken by Window 7 when it
departs from home Group.
Disjoin home Group Technical Overview
Window 7 takes following actions when it leaves home Group
Close firewall ports for Peer to Peer Grouping services
Close firewall ports for Peer Name Resolution Name Protocol services
Close firewall ports for SMB (File/Printer Sharing) services
Delete the home Group account (HomeGroupUser$)
Delete the home Group local security group (HomeUsers)
Remove all previously added home Group entries from the credential manager
Disconnect all open home Group SMB connections
Home Group departs the entire PC and all other users from home Group not just the individual user who
performed the depart action.
De-authorize MAC addresses and UDNs of previous home Group members to prevent them from accessing
streamed media content
Stop publishing all home Group-related messages on the home network including those for previously shared
content for all users on that PC
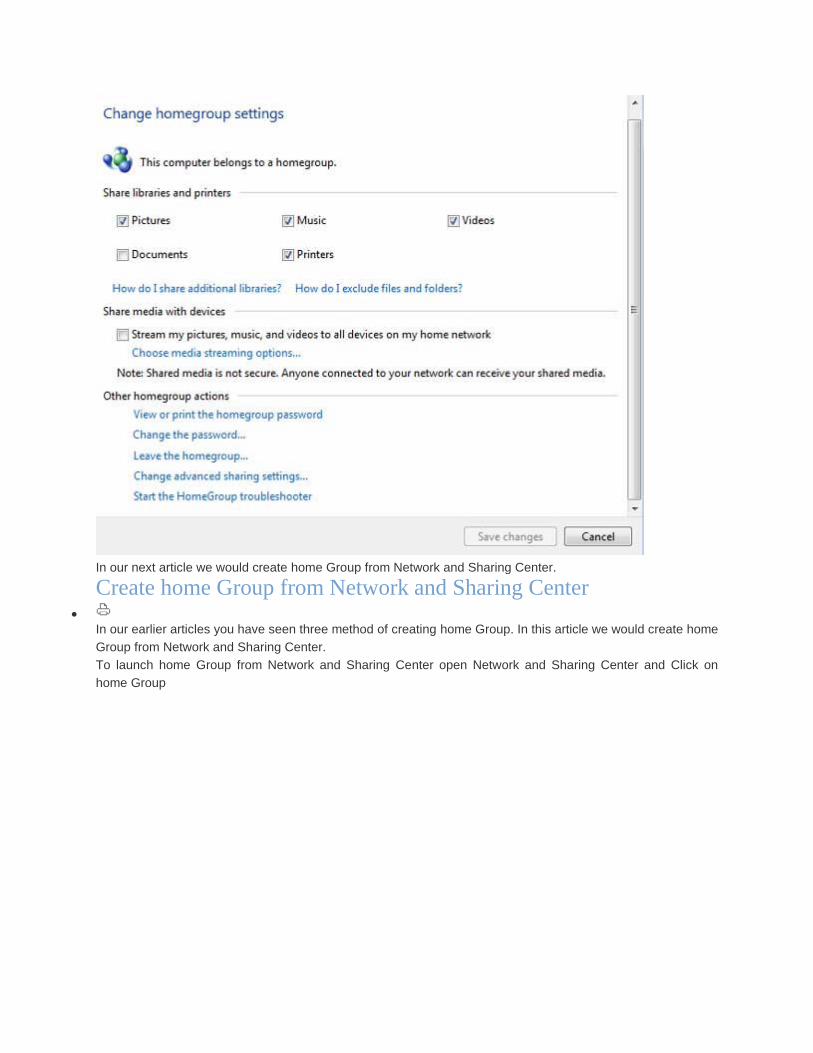
How to view home Group Password
During the home Group creation process wizard automatically generate a home Group password. Home Group
uses a strong shared password of random letters and numbers to secure the group.
This password is fairly complex and hard to memorize. You have to store this password somewhere or have to
write down. During the creation wizard we have no option to type password. This password require on every
computer that want to join this home Group network.
You can view this password at any time if you have lost or forget it.
To view home Group passwords follow these steps
Open My Computer and click on home Group
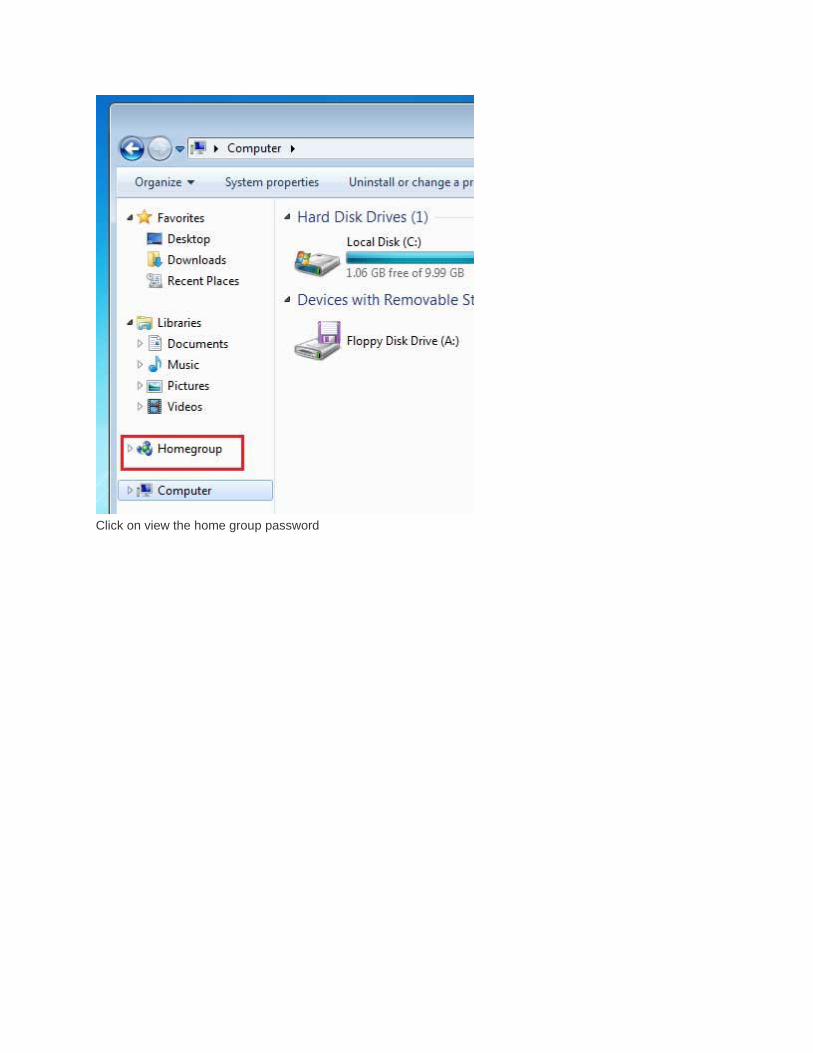
Click on view the home group password
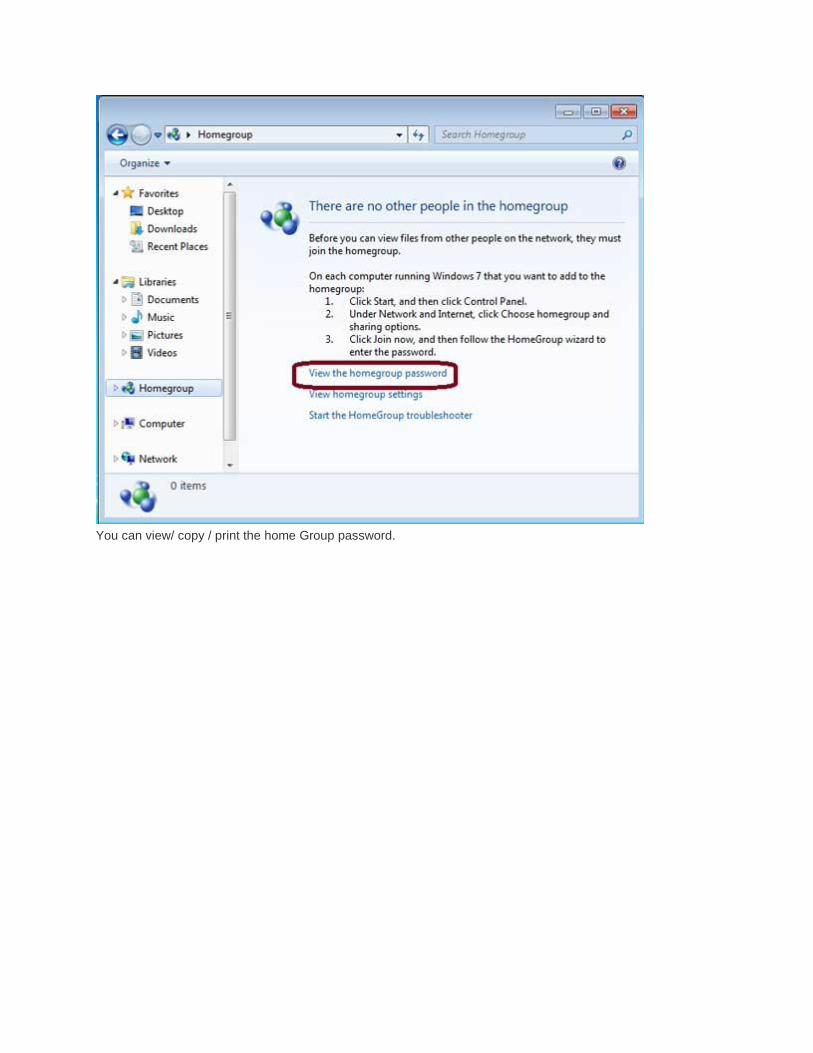
You can view/ copy / print the home Group password.
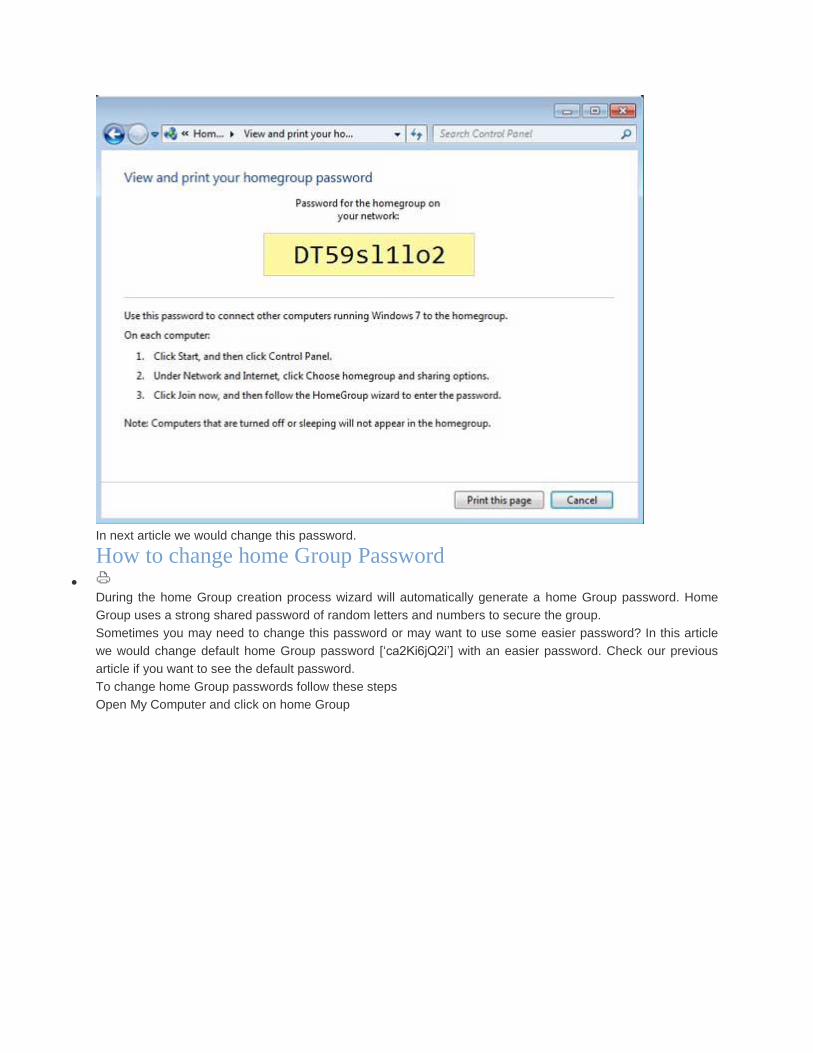
In next article we would change this password.
How to change home Group Password
During the home Group creation process wizard will automatically generate a home Group password. Home
Group uses a strong shared password of random letters and numbers to secure the group.
Sometimes you may need to change this password or may want to use some easier password? In this article
we would change default home Group password [‘ca2Ki6jQ2i’] with an easier password. Check our previous
article if you want to see the default password.
To change home Group passwords follow these steps
Open My Computer and click on home Group
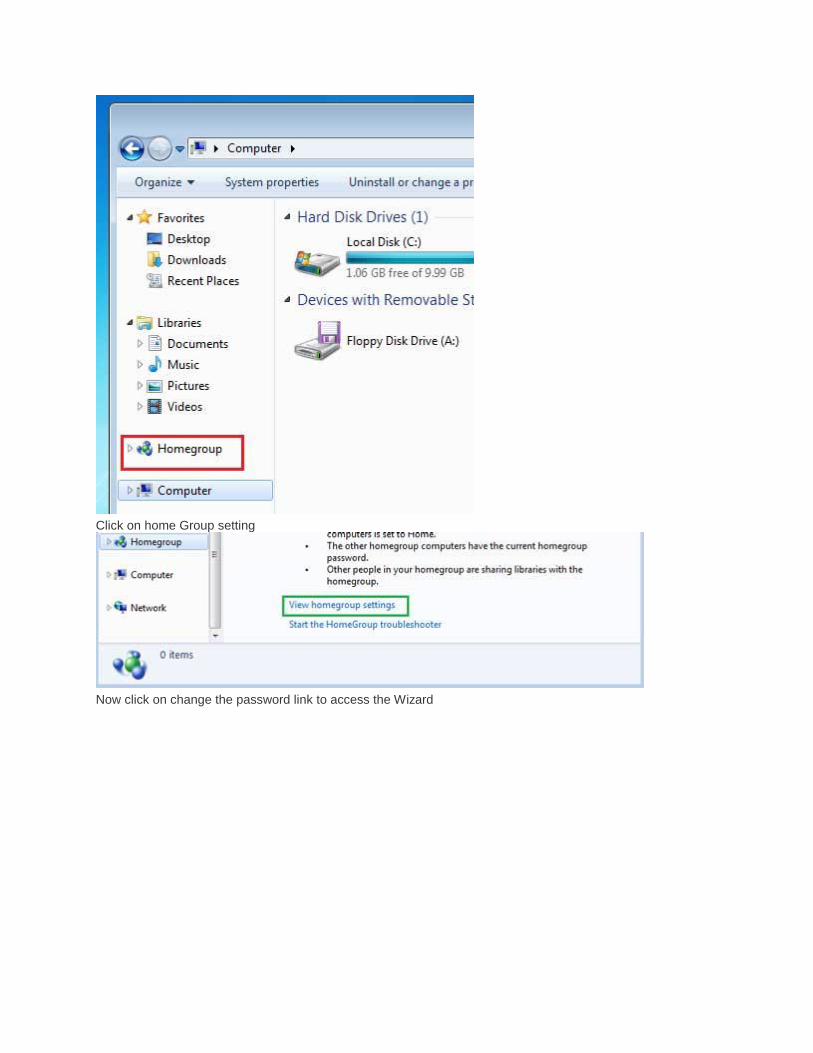
Click on home Group setting
Now click on change the password link to access the Wizard
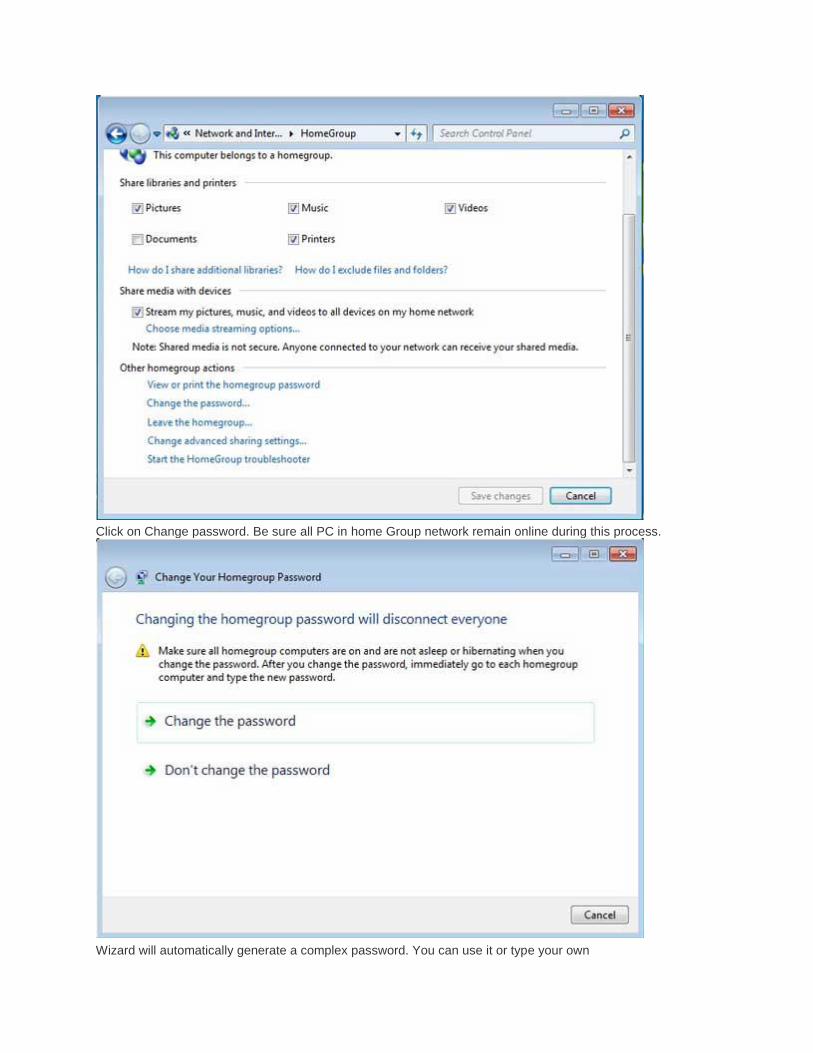
Click on Change password. Be sure all PC in home Group network remain online during this process.
Wizard will automatically generate a complex password. You can use it or type your own
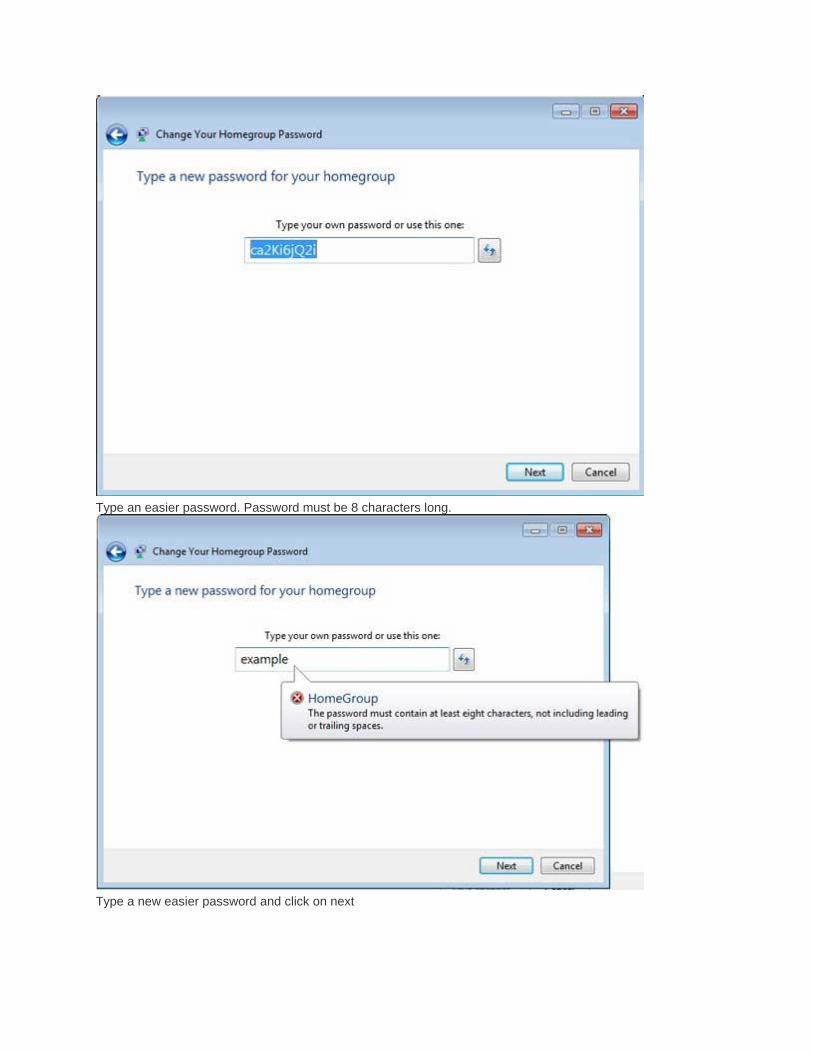
Type an easier password. Password must be 8 characters long.
Type a new easier password and click on next
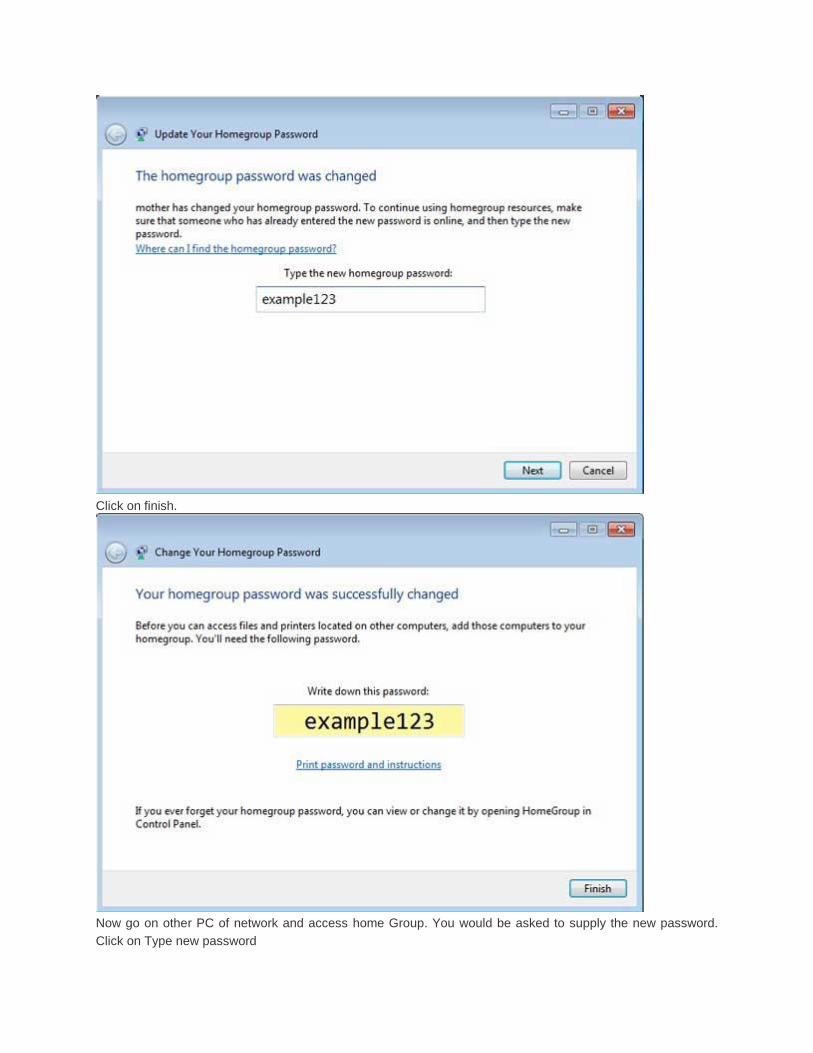
Click on finish.
Now go on other PC of network and access home Group. You would be asked to supply the new password.
Click on Type new password
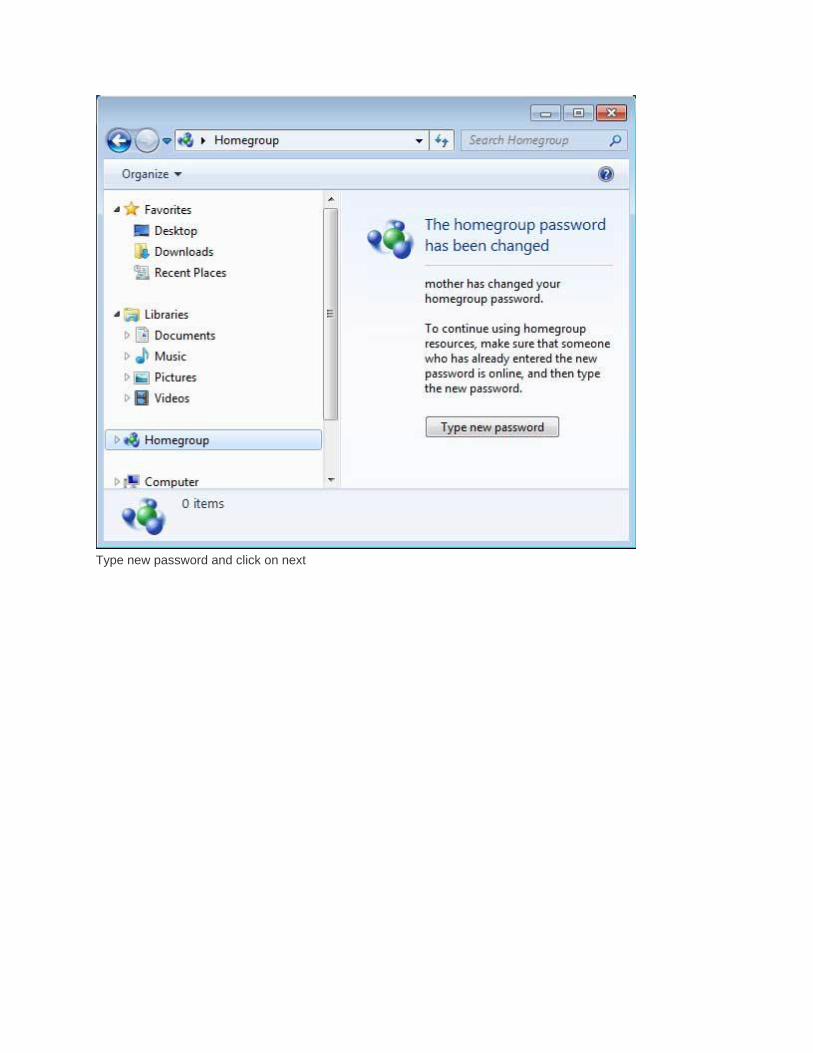
Type new password and click on next
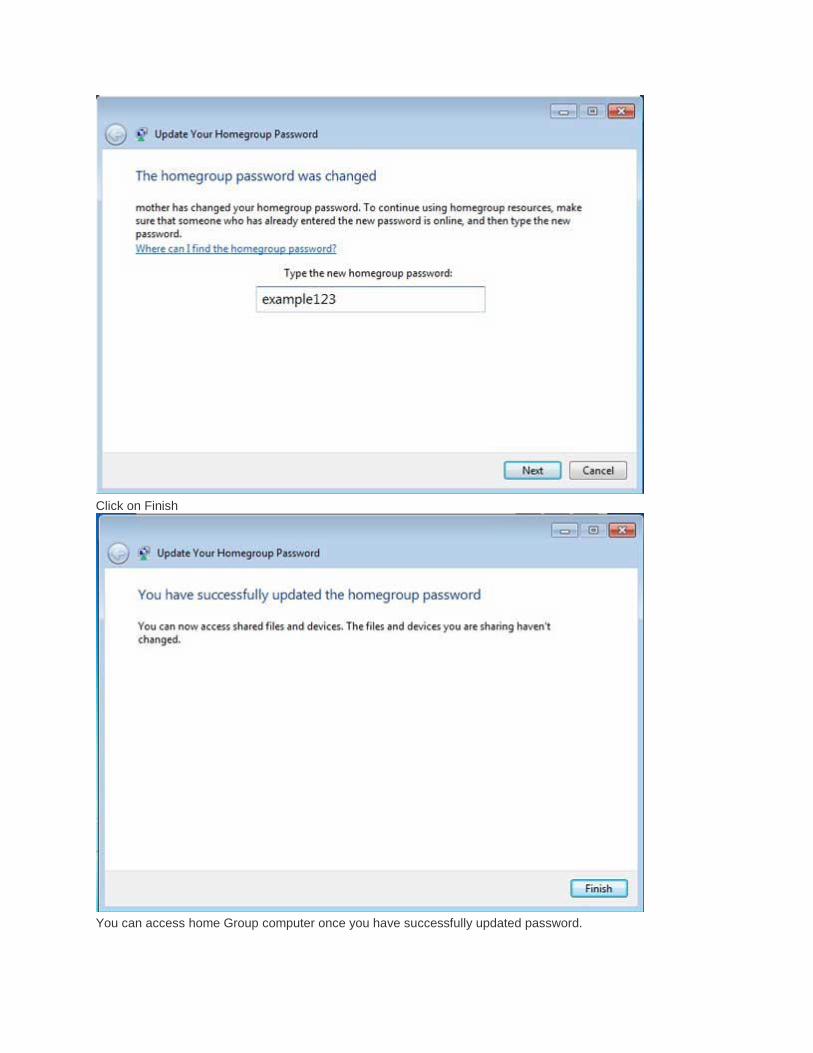
Click on Finish
You can access home Group computer once you have successfully updated password.
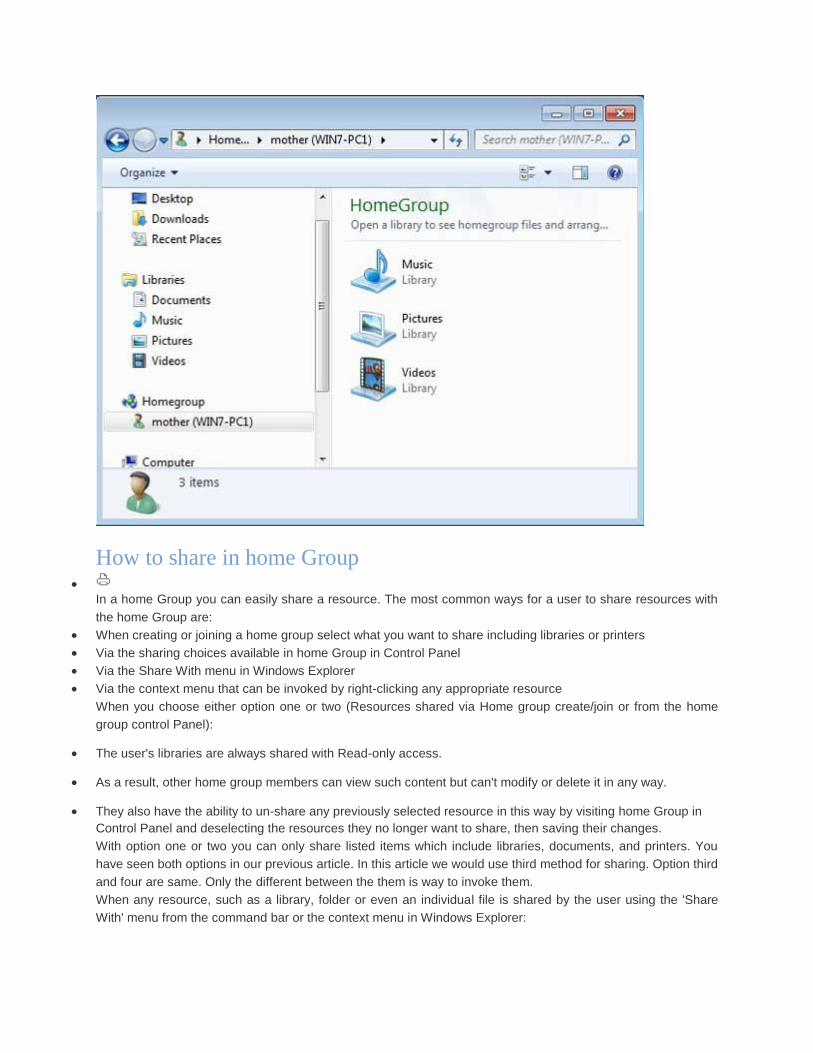
How to share in home Group
In a home Group you can easily share a resource. The most common ways for a user to share resources with
the home Group are:
When creating or joining a home group select what you want to share including libraries or printers
Via the sharing choices available in home Group in Control Panel
Via the Share With menu in Windows Explorer
Via the context menu that can be invoked by right-clicking any appropriate resource
When you choose either option one or two (Resources shared via Home group create/join or from the home
group control Panel):
The user's libraries are always shared with Read-only access.
As a result, other home group members can view such content but can't modify or delete it in any way.
They also have the ability to un-share any previously selected resource in this way by visiting home Group in
Control Panel and deselecting the resources they no longer want to share, then saving their changes.
With option one or two you can only share listed items which include libraries, documents, and printers. You
have seen both options in our previous article. In this article we would use third method for sharing. Option third
and four are same. Only the different between the them is way to invoke them.
When any resource, such as a library, folder or even an individual file is shared by the user using the 'Share
With' menu from the command bar or the context menu in Windows Explorer:
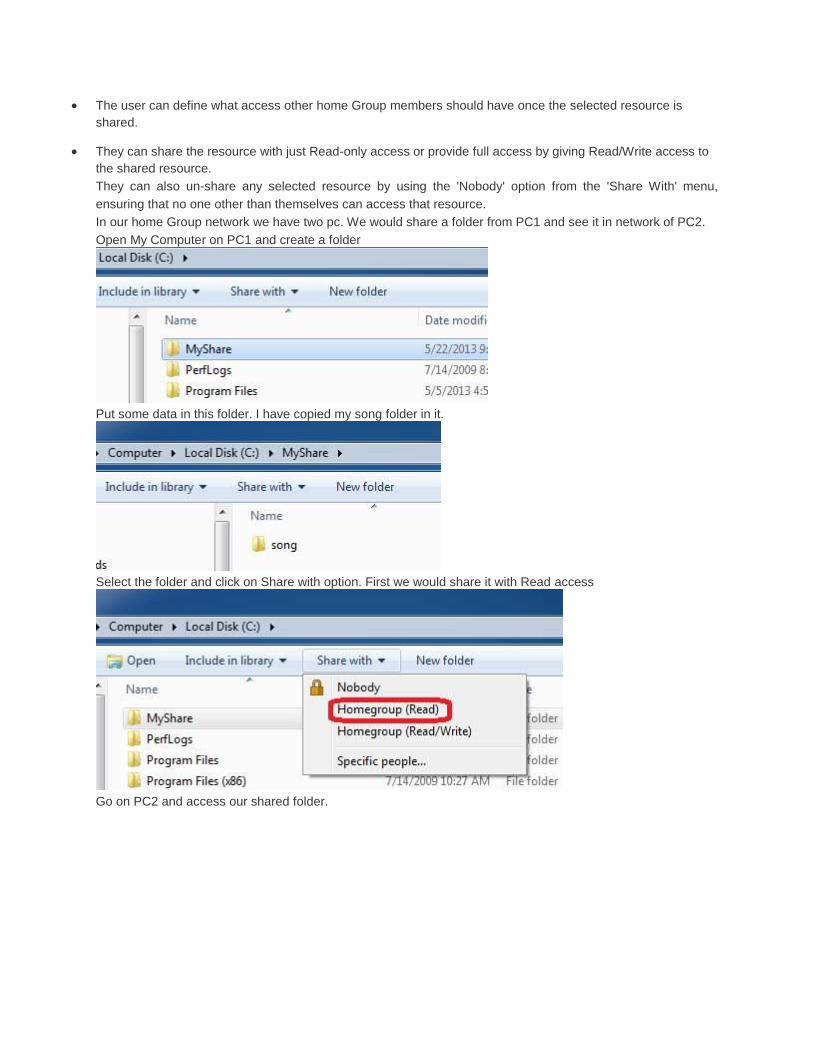
The user can define what access other home Group members should have once the selected resource is
shared.
They can share the resource with just Read-only access or provide full access by giving Read/Write access to
the shared resource.
They can also un-share any selected resource by using the 'Nobody' option from the 'Share With' menu,
ensuring that no one other than themselves can access that resource.
In our home Group network we have two pc. We would share a folder from PC1 and see it in network of PC2.
Open My Computer on PC1 and create a folder
Put some data in this folder. I have copied my song folder in it.
Select the folder and click on Share with option. First we would share it with Read access
Go on PC2 and access our shared folder.
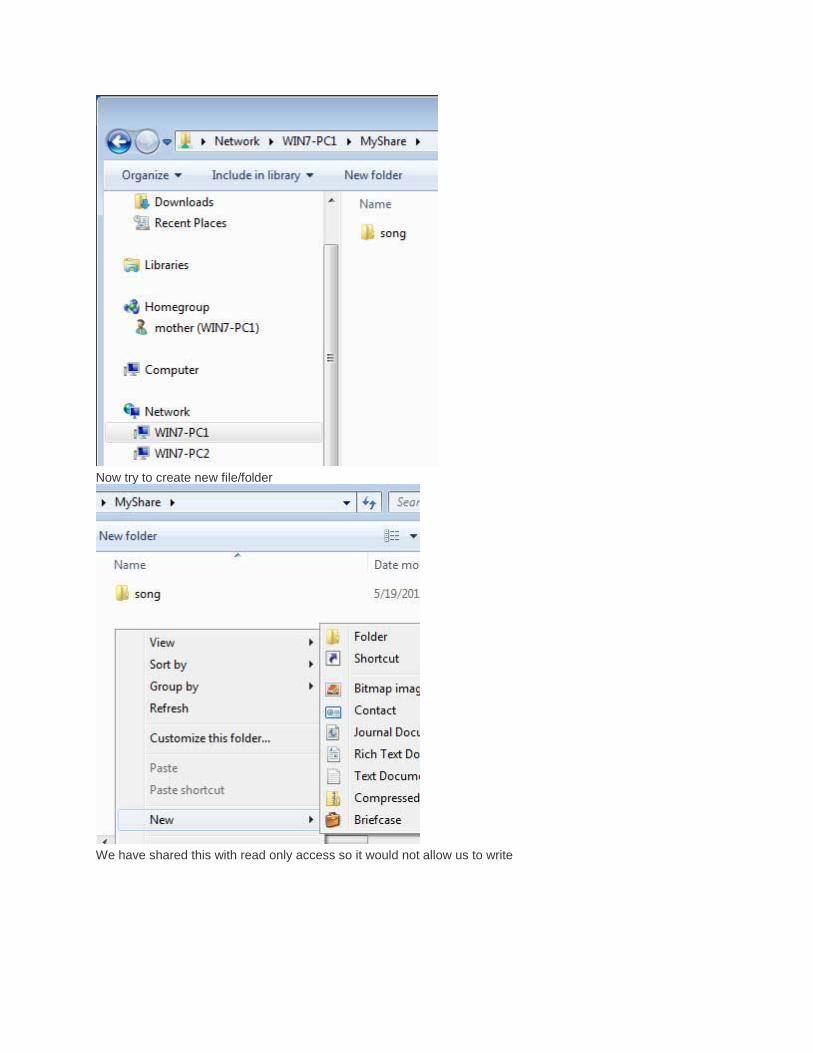
Now try to create new file/folder
We have shared this with read only access so it would not allow us to write
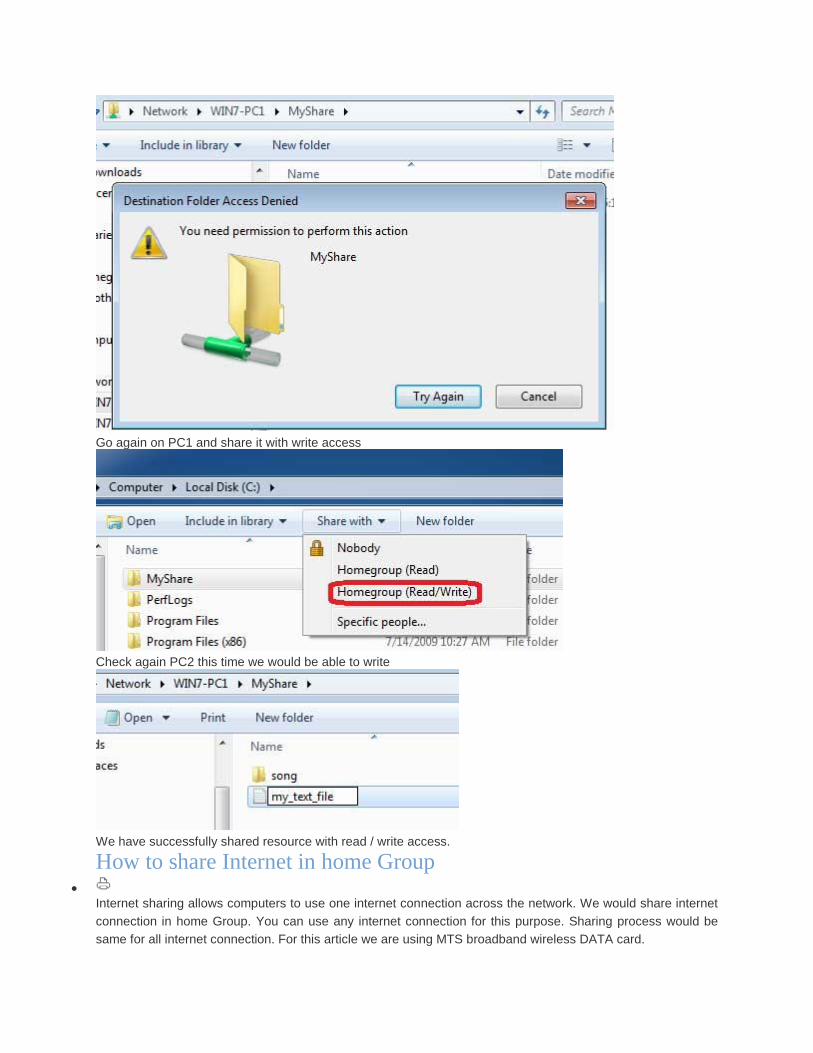
Go again on PC1 and share it with write access
Check again PC2 this time we would be able to write
We have successfully shared resource with read / write access.
How to share Internet in home Group
Internet sharing allows computers to use one internet connection across the network. We would share internet
connection in home Group. You can use any internet connection for this purpose. Sharing process would be
same for all internet connection. For this article we are using MTS broadband wireless DATA card.
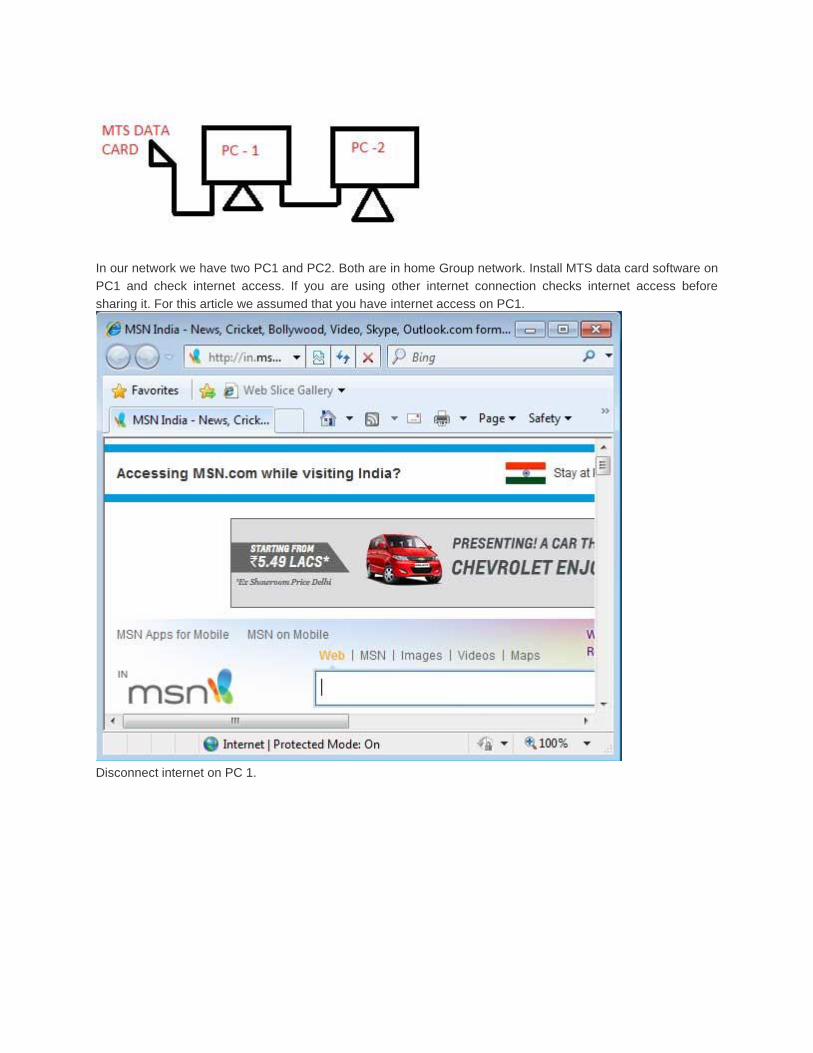
In our network we have two PC1 and PC2. Both are in home Group network. Install MTS data card software on
PC1 and check internet access. If you are using other internet connection checks internet access before
sharing it. For this article we assumed that you have internet access on PC1.
Disconnect internet on PC 1.
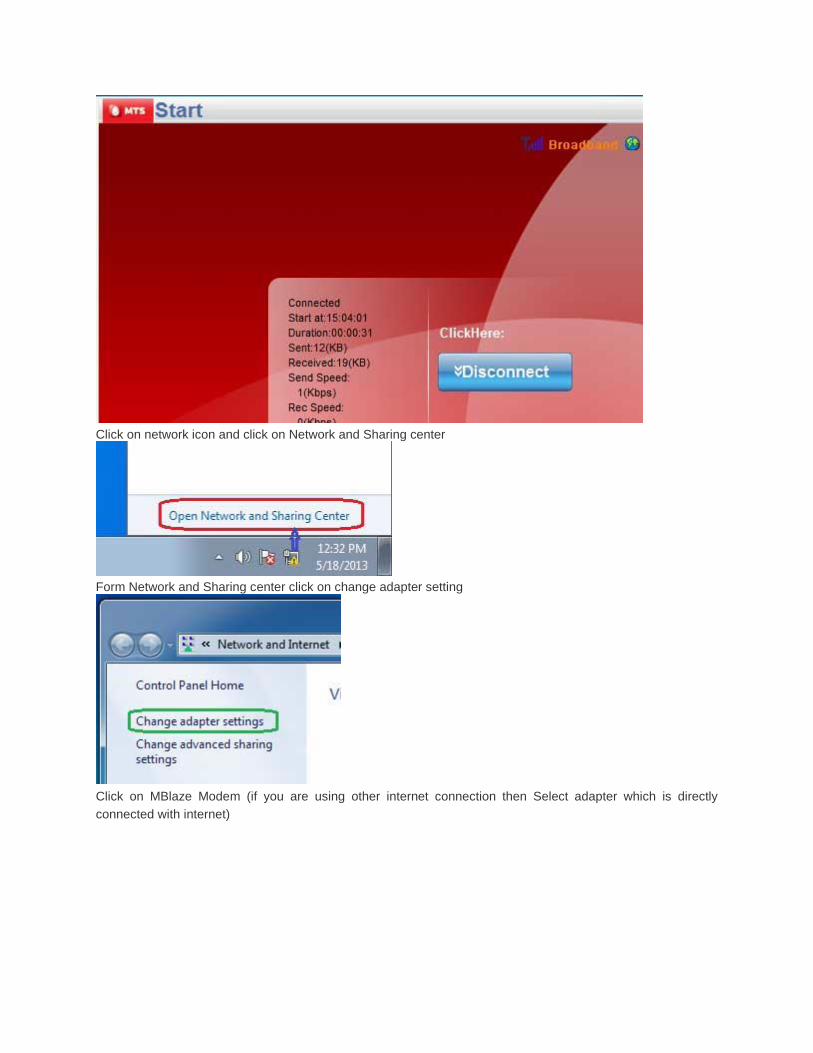
Click on network icon and click on Network and Sharing center
Form Network and Sharing center click on change adapter setting
Click on MBlaze Modem (if you are using other internet connection then Select adapter which is directly
connected with internet)
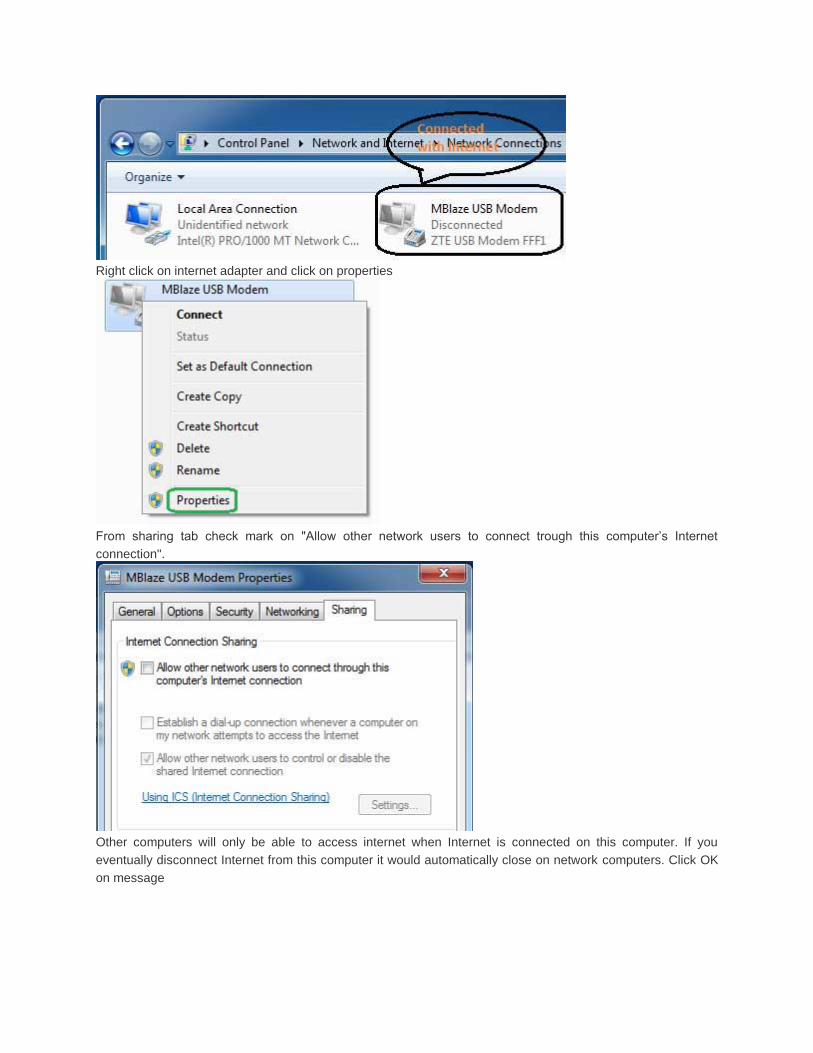
Right click on internet adapter and click on properties
From sharing tab check mark on "Allow other network users to connect trough this computer’s Internet
connection".
Other computers will only be able to access internet when Internet is connected on this computer. If you
eventually disconnect Internet from this computer it would automatically close on network computers. Click OK
on message
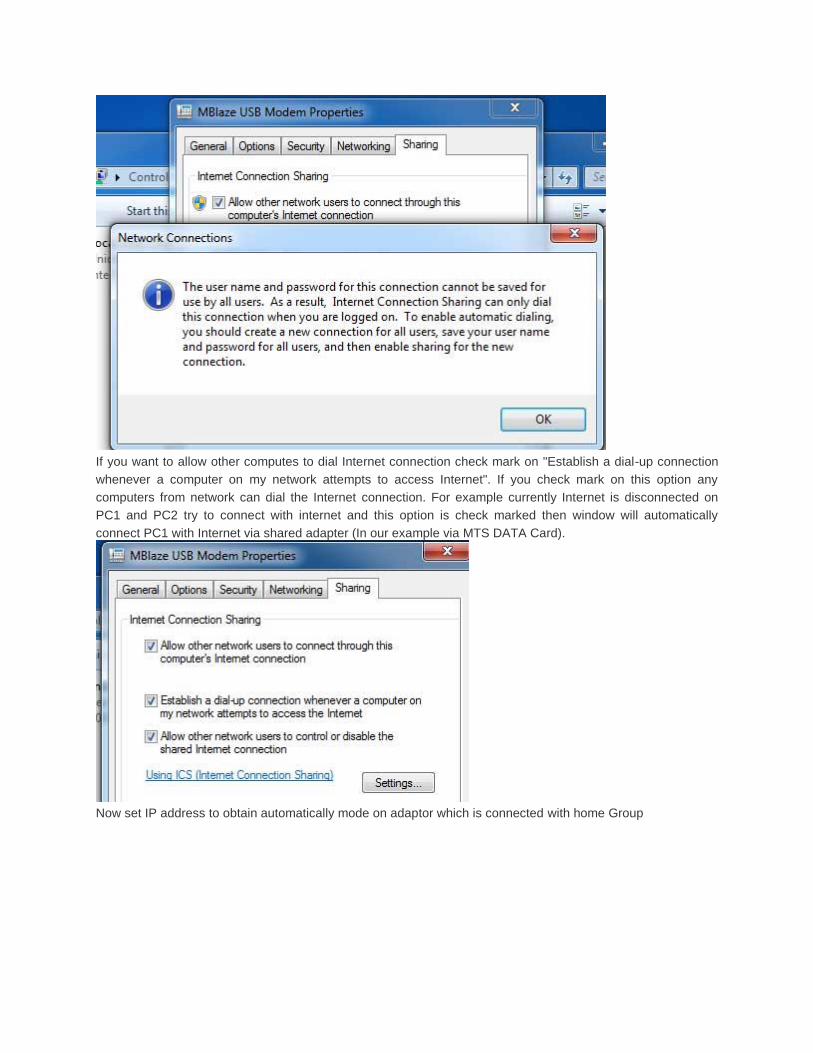
If you want to allow other computes to dial Internet connection check mark on "Establish a dial-up connection
whenever a computer on my network attempts to access Internet". If you check mark on this option any
computers from network can dial the Internet connection. For example currently Internet is disconnected on
PC1 and PC2 try to connect with internet and this option is check marked then window will automatically
connect PC1 with Internet via shared adapter (In our example via MTS DATA Card).
Now set IP address to obtain automatically mode on adaptor which is connected with home Group
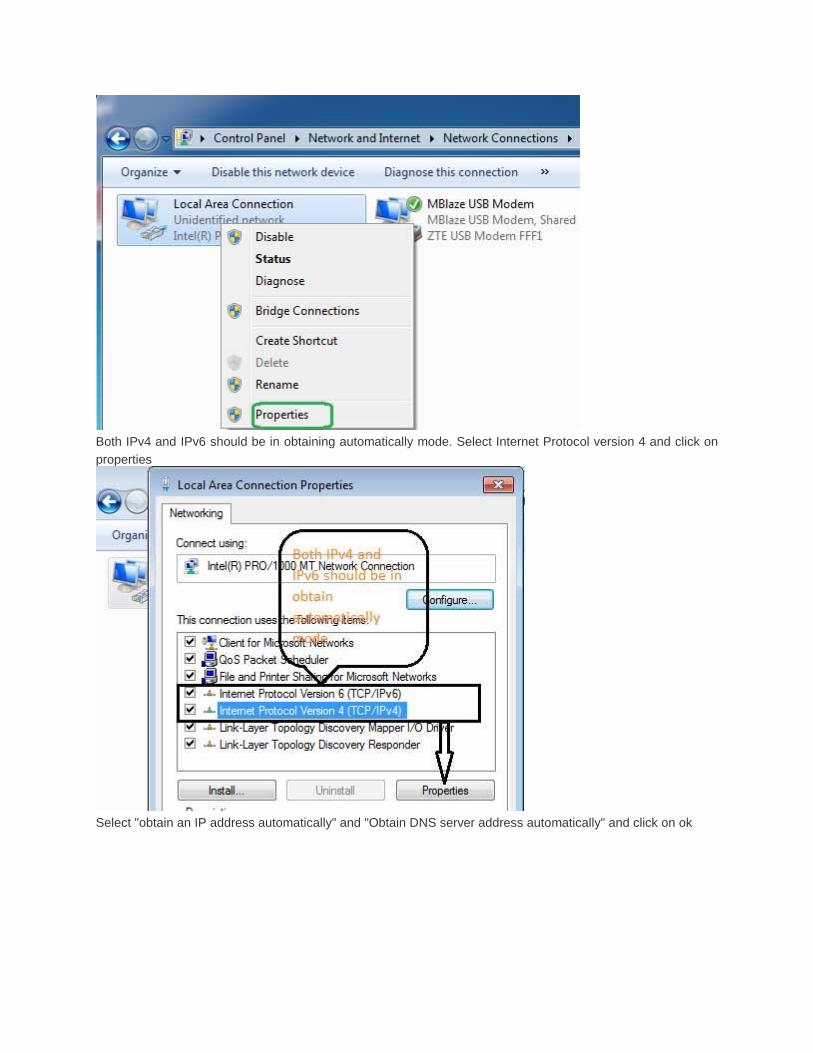
Both IPv4 and IPv6 should be in obtaining automatically mode. Select Internet Protocol version 4 and click on
properties
Select "obtain an IP address automatically" and "Obtain DNS server address automatically" and click on ok
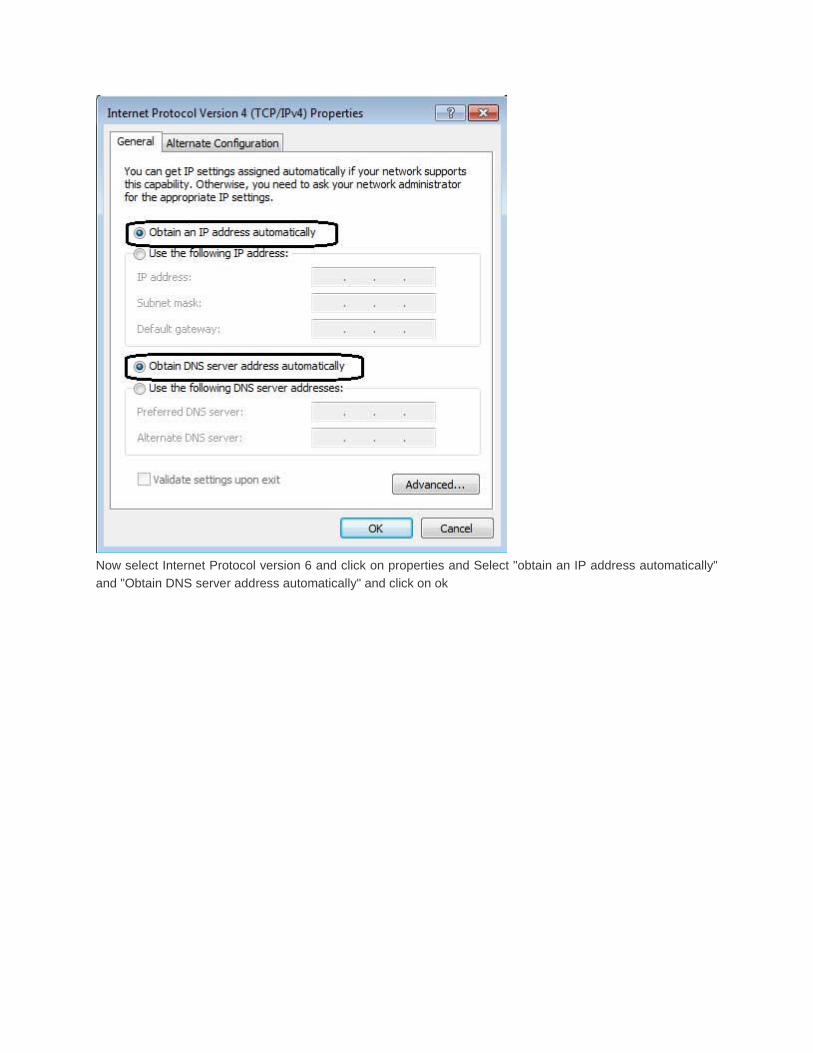
Now select Internet Protocol version 6 and click on properties and Select "obtain an IP address automatically"
and "Obtain DNS server address automatically" and click on ok
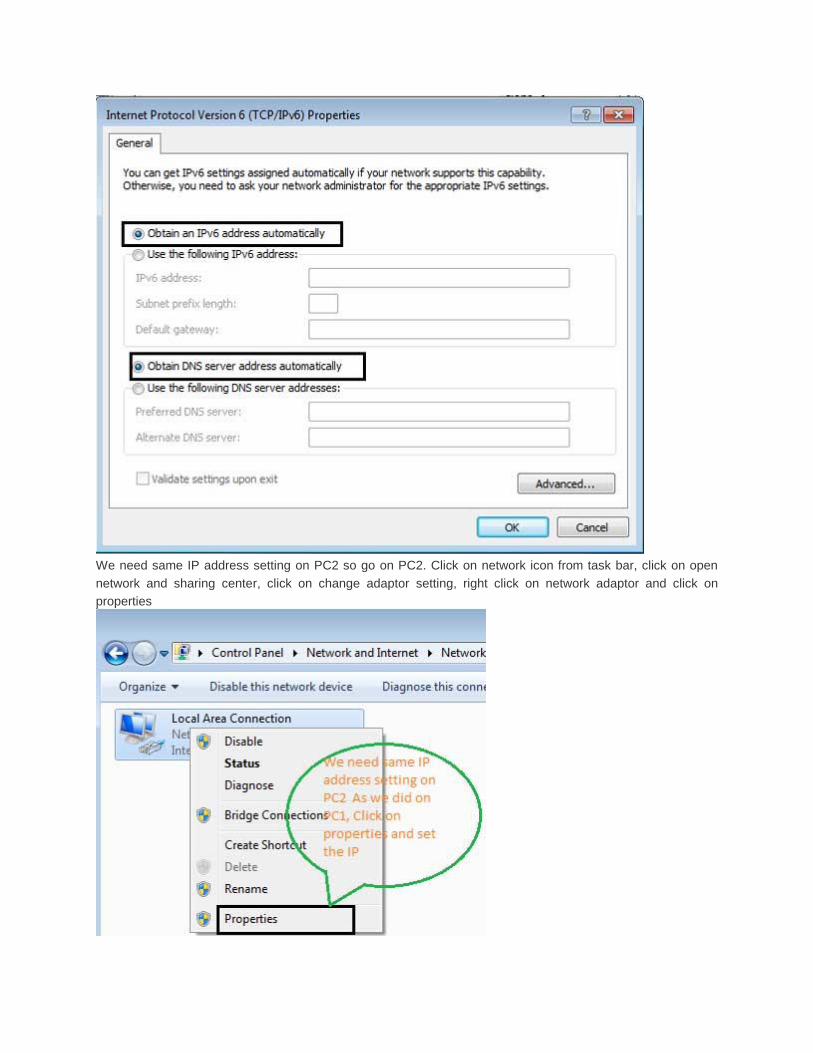
We need same IP address setting on PC2 so go on PC2. Click on network icon from task bar, click on open
network and sharing center, click on change adaptor setting, right click on network adaptor and click on
properties
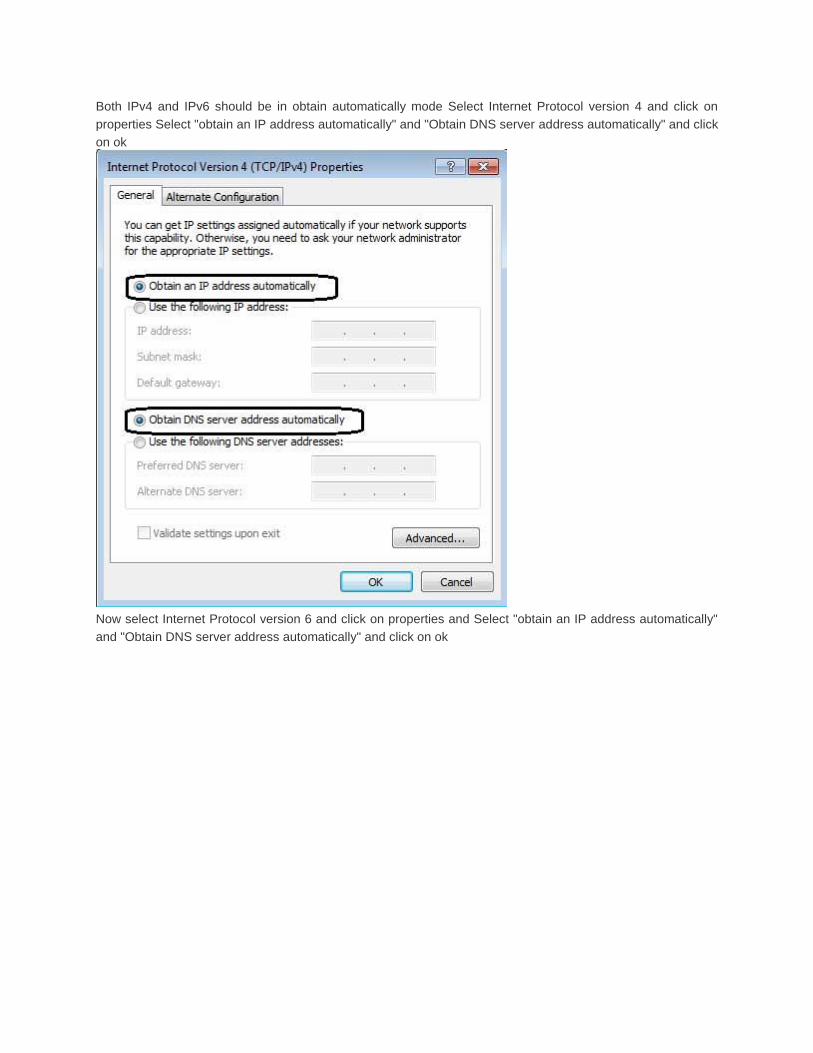
Both IPv4 and IPv6 should be in obtain automatically mode Select Internet Protocol version 4 and click on
properties Select "obtain an IP address automatically" and "Obtain DNS server address automatically" and click
on ok
Now select Internet Protocol version 6 and click on properties and Select "obtain an IP address automatically"
and "Obtain DNS server address automatically" and click on ok
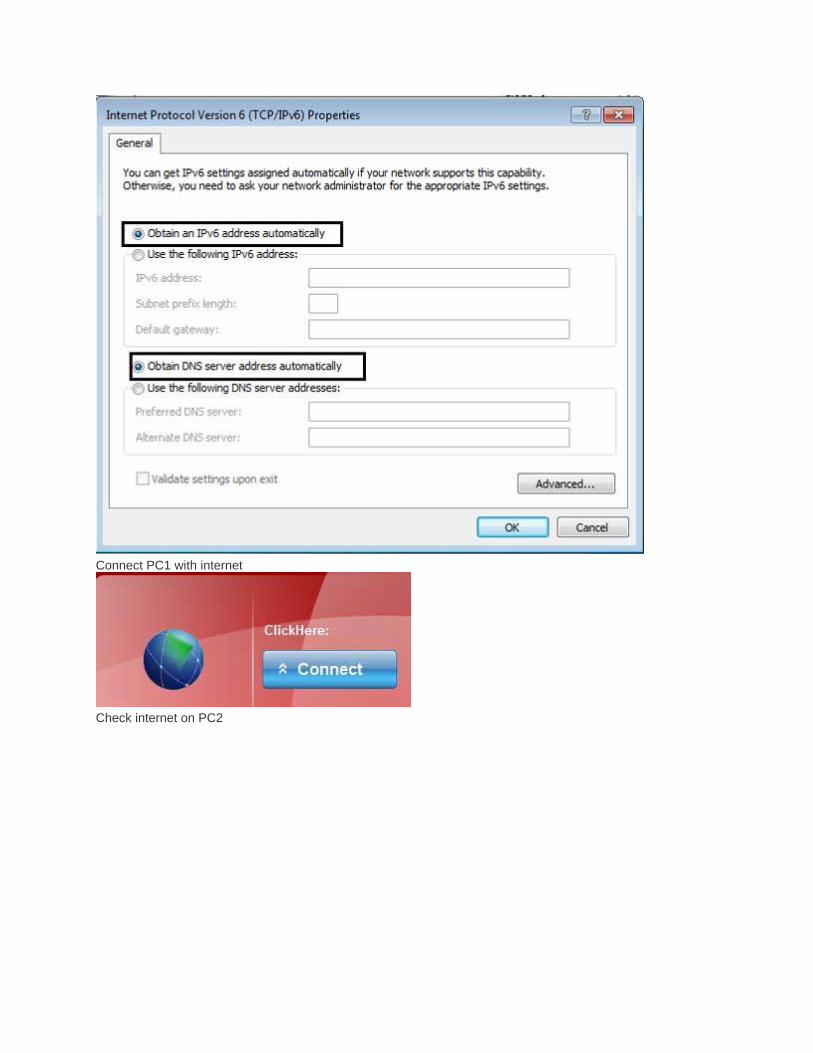
Connect PC1 with internet
Check internet on PC2
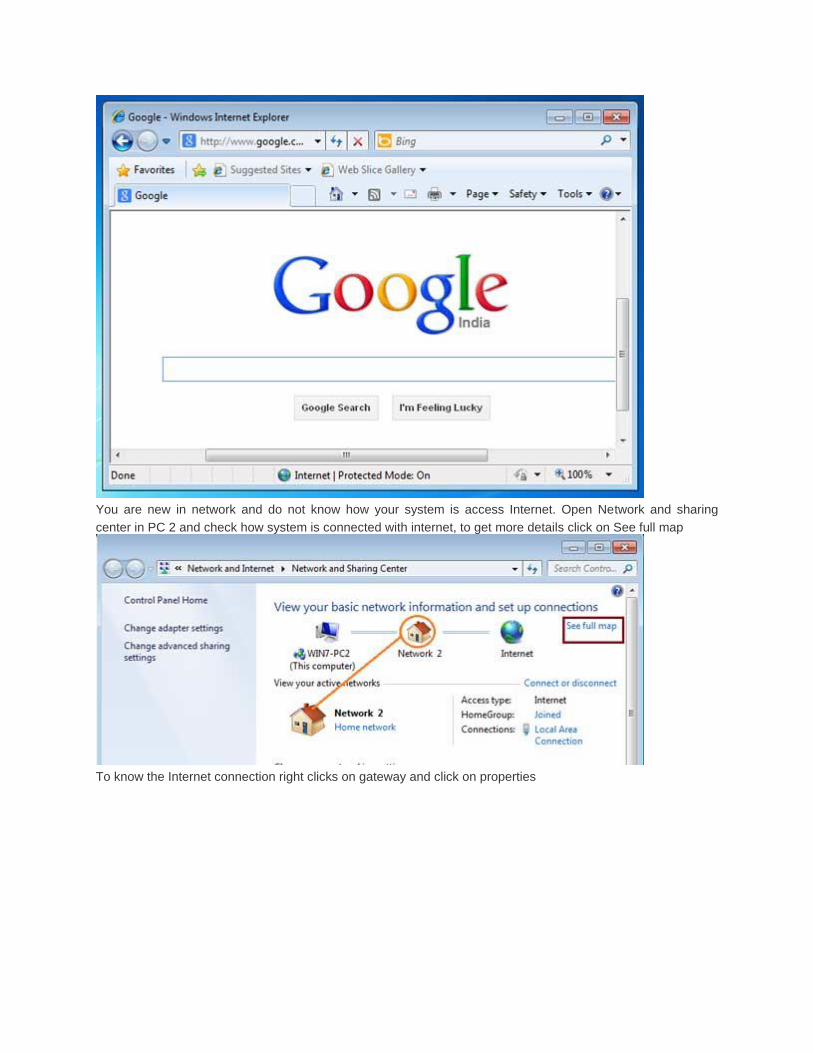
You are new in network and do not know how your system is access Internet. Open Network and sharing
center in PC 2 and check how system is connected with internet, to get more details click on See full map
To know the Internet connection right clicks on gateway and click on properties
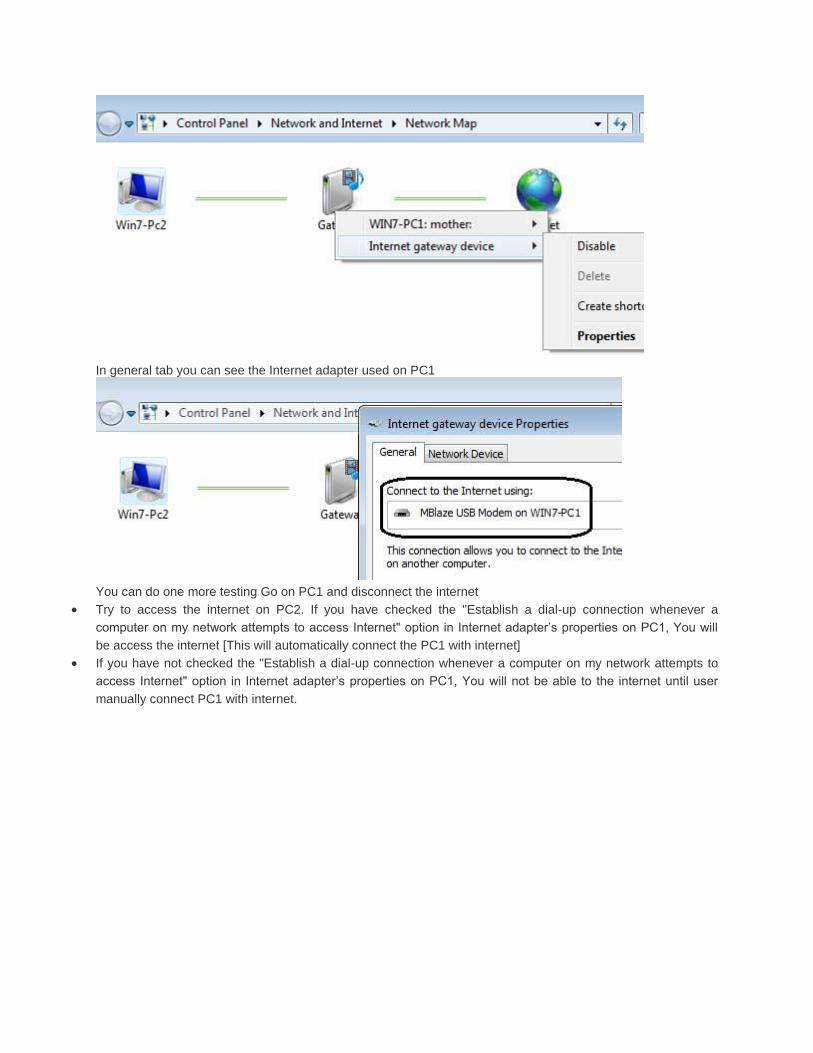
In general tab you can see the Internet adapter used on PC1
You can do one more testing Go on PC1 and disconnect the internet
Try to access the internet on PC2. If you have checked the "Establish a dial-up connection whenever a
computer on my network attempts to access Internet" option in Internet adapter’s properties on PC1, You will
be access the internet [This will automatically connect the PC1 with internet]
If you have not checked the "Establish a dial-up connection whenever a computer on my network attempts to
access Internet" option in Internet adapter’s properties on PC1, You will not be able to the internet until user
manually connect PC1 with internet.
Related Documents