Welch Allyn ® OAE Hearing Screener Directions for use

Welcome message from author
This document is posted to help you gain knowledge. Please leave a comment to let me know what you think about it! Share it to your friends and learn new things together.
Transcript

Welch Allynreg OAE HearingScreener
Directions for use
copy 2014 Welch Allyn All rights are reserved To support the intended use of the product described in this publication thepurchaser of the product is permitted to copy this publication for internal distribution only from the media provided byWelch Allyn No other use reproduction or distribution of this publication or any part of it is permitted without writtenpermission from Welch Allyn Welch Allyn assumes no responsibility for any injury to anyone or for any illegal or improperuse of the product that may result from failure to use this product in accordance with the instructions cautions warningsor statement of intended use published in this manual
For patent information please visit wwwwelchallyncompatents
For information about any Welch Allyn product contact Welch Allyn Technical Support wwwwelchallyncomaboutcompanylocationshtm
GSI is an ISO 13485 certified corporation
39411-1 (CD)Material Number 105889 DIR 80019028 Ver C
39404 (printed copy)
Material Number 105762 DIR 80019028 Ver C
GSI 8104589 Rev B
Manufactured for Welch Allyn Inc4341 State Street RoadSkaneateles Falls NY 13153-0220 USA
Grason-Stadler7625 Golden Triangle DriveEden Prairie Minnesota 55344USA
wwwwelchallyncom
Contents
Symbols 1
About warnings and cautions 3Warnings and cautions 3Customer responsibility 4Safety precautions 4StatusError messages 6
Introduction 9Introduction 9OAE functionality 10Distortion product otoacoustic emissions 11OAE emission results 11Frequency Range tested 11Results storage and reporting 11Sensitivity and specificity 11
Setup 13Unpack the system 13Cradle 14Charge the battery 14Install the probe 15Attach the probe tube 16Eartips 16Probe holder 17Clock settings 18
Device settings 21Control panel 21Access menus 21Device settings 22Bluetoothreg device pairing 23Clear test results 24Minimum amplitude 24Change the language 24Reset to default 25
Operating instructions 27Turn on the screener 27Automatic shutdown interval 27Main menu 28Select the test protocol 29Prepare the patient for testing 29
iii
Start a test 29AutoStart probe check 29
Test results 31Test phase 31Graph styles 31Test techniques 32Noise sources 33View results 33
Manage results 35Results storage and reporting 35SaveStore test results mode 35Delete test results 37Connect the screener to a computer 37Connect the screener cradle to a computer 38Connect the screener to a computer using Bluetooth 38Pair the screener and Bluetooth device 38Print to a thermal printer 39
Understand printed results 41DPOE printout 41Rounding results 41
Clean and disinfect 43Clean and disinfect 43
Maintenance 45General maintenance 45Calibrate the screener 45Replace the probe tube 45Troubleshooting 46Repairs 48
Standards and compliance 49General compliance and standards 49
Appendices 51Appendix A Specifications 51Appendix B Flowchart Measurement 53Appendix C Test sequence 54Appendix D PassRefer criteria 55Appendix E Configurations and test protocols 56Appendix F Approved options 57
iv Contents Welch Allynreg OAE Hearing Screener
Symbols
Documentation symbolsWARNING The warning statements in this manual identify conditions or practices that couldlead to illness injury or death
CAUTION The caution statements in this manual identify conditions or practices that couldresult in damage to the equipment or other property or loss of data This definition applies toboth yellow and black and white symbols
Regulatory symbolsSymbol Description Symbol Description
Serial number Transport and storagetemperature range
Date of manufacture Keep dry
Manufacturer B Patient Applied Part Accordingto IEC60601-1
Return to AuthorizedRepresentative Special DisposalRequired
Mandatory reading
Reorder number Single use do not reuse
1
Symbol Description Symbol Description
Regulatory Product Identifier(RPI) number
Not made with natural latexrubber
Global Trade Item Number Consult Operating Instructions
2 Symbols Welch Allynreg OAE Hearing Screener
About warnings and cautions
Warning and caution statements can appear on the Welch Allyn OAE screener(screener) on the packaging on the shipping container or in this directions for use
The screener is safe for patients and clinicians when used in accordance with theinstructions and the warning and caution statements presented in this directions for use
Before using the device you must familiarize yourself with all warnings and cautionswith the steps to power up the screener and with the sections of this directions for usethat pertain to your use of the screener In addition to reviewing the general warningsand cautions presented in the next section you must also review the more specificwarnings and cautions that appear throughout the manual in conjunction with setupstartup screener operation patient monitoring and maintenance tasks
bull Failure to understand and observe any warning statement in this manual could leadto patient injury illness or death
bull Failure to understand and observe any caution statement in this manual could lead todamage to the equipment or other property or loss of patient data
Warnings and cautions
WARNING Use only the provided power supply to charge the screenerInjury to personnel or damage to the screener can result when a three-prong to two-prong adaptor is connected between the screener powersupply and a mains outlet
WARNING No modifications to the screener are allowed by anyone otherthan a qualified Welch Allyn service representative Modification of thescreener could be hazardous to patients and personnel
WARNING The screener has been verified by an independent laboratory toconform to international standards for electromagnetic emissions andimmunity (EMC) The user is advised to avoid installation and use of thisscreener in proximity to other products or equipment that may emit or besusceptible to electromagnetic interference including cellular phones Ifthe screener is used adjacent to other products or equipment you areinstructed to verify that no disturbance is found in the operation of this orother equipment in proximity
WARNING Any program aimed at obtaining reliable measurements ofotoacoustic emissions should be staffed and supervised by appropriatelytrained individuals
3
Customer responsibilityWARNING The screener and its components will perform reliably onlywhen operated and maintained in accordance with the instructionscontained in this directions for use accompanying labels and inserts Adefective product should not be used Make sure all connections toexternal accessories are tight and secured properly Parts which may bebroken or missing or are visibly worn distorted or contaminated should bereplaced immediately with clean genuine replacement parts manufacturedby or available from Welch Allyn
WARNING This product should not be used in the presence of fluid thatcan come into contact with any of the electronic components or wiringShould the user suspect fluids have contacted the system components oraccessories the unit should not be used until deemed safe by a WelchAllyn certified service technician
WARNING Do NOT use the screenr in the presence of flammablegaseous mixtures There is the possibility of explosions or fire when usedin close proximity to flammable anesthetic gases
WARNING Do NOT use the screener in a highly oxygen-enrichedenvironment such as a hyperbaric chamber oxygen tent and the like
WARNING Equipment is not user repairable Repairs and batteryreplacement must be performed only by a qualified service representative
CAUTION Use and store the screener indoors only Operate the screenerwithin an ambient temperature range of 15degC 59degF to 35degC 95degF and inrelative humidity between 30 and 90 (non-condensing)
CAUTION Transport and store the screener in temperatures between+5degC 41deg F to 40degC 104deg F
CAUTION Annual calibration is recommended Have an authorized WelchAllyn service technician perform electrical safety checks on the unit in orderto maintain continued compliance with IEC and UL 60601-1
Safety precautionsWARNING Do not open the case of the screener Only Welch Allynservice personnel or an authorized repair center are authorized to performwarranty service Performing unauthorized service on a screener that iswithin warranty may void the warranty
WARNING Do not touch the contacts on the bottom of the screener andthe patient at the same time
WARNING Do not connect the instrument to the patient and the computerat the same time
WARNING In case of emergency disconnect the screener from thesupply mains by removing the micro-USB cable from the connector asdescribed in the ldquoCharge Batteryrdquo section
4 About warnings and cautions Welch Allynreg OAE Hearing Screener
WARNING This screener contains a rechargeable lithium-ion battery Thebattery is not user-replaceable and must be returned to an authorizedWelch Allyn service location for repair
WARNING Fire and explosion hazard Do not operate the screener in thepresence of a flammable anesthetic mixture with air oxygen or nitrousoxide in oxygen-enriched environments or in any other potentiallyexplosive environment
WARNING Proper use of this screener depends on your careful reading ofall instructions
WARNING Safety risk When handling and storing lithium-ion batteriesavoid mechanical or electrical abuse Batteries may explode or cause burnsif disassembled crushed or exposed to fire or high temperatures Do notshort or install the battery with incorrect polarity
CAUTION If the system is not functioning properly do not operate it untilall necessary repairs are made Test and calibrate the screener for properfunctionality in accordance with Welch Allyn published specificationsbefore using
CAUTION Use only the disposable eartips designed for use with thescreener
CAUTION Never insert the probe tube into the ear canal without aproperly attached eartip
CAUTION The eartips are disposable and for single patient use only Donot clean and reuse eartips
CAUTION Do not drop or otherwise cause undue impact to the screenerIf the screener is dropped or otherwise damaged return it to Welch Allynfor repair and calibration Do not use the screener if any damage issuspected
CAUTION Recycle batteries whenever possible In the United States call1-800-8-BATTERY for information about recycling your lithium-ion battery orgo to the RBRC website at wwwrbrcorg for additional information
Directions for use About warnings and cautions 5
StatusError messages
Display messages
Message Definition
Attach Probe No probe is detected at the start of a test
Device not Responding The printer is not responding to queries from the instrument
BT Device Not Found The paired Bluetoothreg device cannot be detected by thescreener The screener may be turned off or too far away
BT Error xxx There is an error condition with the Bluetoothreg device Checkthe status
BT Not Configured The screener is not paired with any Bluetoothreg device
Fit Error Cannot Obtain P For a DP test the desired intensity level (L1 or L2) cannot beobtained within allowable limits Refit the eartip and probe andattempt the test
Fit Error Too High The level of the calibration tone is too high Refit the eartip andprobe and retry the test
Fit Error Too Low The level of the calibration tone is too low Refit the eartip andprobe and retry the test
Limit Error Overflow error during the calculation of the DFTs for a DP testRepeat the test
Memory Almost Full Saved tests are within 5 tests of the 250 maximum limit
Memory Full The maximum saved test limit of 250 is reached Clear thememory before any additional tests can be performed
Power Low The battery charge level is too low for operation Charge thebattery in order to administer additional tests
Printer Error There is a problem with the printer Check the printer status
Printer Paper Out The printer paper has run out Load printer paper
TimeDate Error The clock is checked during power on to ensure it has not losttime and been reset In the case of clock reset this message isshown Set the correct datetime
6 About warnings and cautions Welch Allynreg OAE Hearing Screener
Indicator lights (LEDs)
Message Definition
NOISEOrange The indicator labeled lsquoNOISErsquo displays an amber light when thenoise level measured during the test exceeds a nominalthreshold It also is used to indicate some error conditions andwhen the outcome of test is REFER NOISY or NO SEAL
TESTYellow The indicator labeled lsquoTESTrsquo displays a yellow light when theselected test is being performed A steady yellow lightindicates that a test is in progress
READYGreen The indicator labeled lsquoREADYrsquo displays a steady green lightindicating that no test is being administer and that the screeneris ready to be used for testing
CHARGEBlue The indicator labeled lsquoCHARGErsquo displays a steady blue lightwhen the battery is charging The intensity of the blue lightindicates the progress of the battery charging
Directions for use About warnings and cautions 7
8 About warnings and cautions Welch Allynreg OAE Hearing Screener
Introduction
IntroductionThis directions for use describes the capabilities and operation of the Welch Allyn OAEScreener (screener)
The purpose of the screener is to provide rapid screening of Distortion ProductOtoacoustic Emissions (DPOAEs) at several frequencies
The screener is indicated for testing of cochlear function in infants children and adultsby measuring otoacoustic emissions (OAEs) This device is suitable for use in allsettings including hospitals schools and physicians offices Factory defined protocolsallow for simple screening measurements
The screener is intended to be used by physicians technicians neonatal nurses andschool nurses who have been trained by a healthcare professional
Before using the screener you must familiarize yourself with all warnings and cautionswith the steps to power up the screener and with the sections of this directions for usethat pertain to your use of the screener
Note Some product features described in this publication might not be availablein your country
For information about any Welch Allyn product contact Welch Allyn Technical Supportwwwwelchallyncomaboutcompanylocationshtm
9
OAE functionality
Item number Description
1 Probe connector
2 Test status indicators
3 Charge status indicator
4 Control panel
5 Micro-USB Connector
6 Display
The system consists of the screener probe printer single-use eartips replaceable probetubes and other accessories The screener contains the hardware and software forgenerating the test stimuli measuring and displaying the OAEs and storing the resultsuntil they are printed The plastic housing contains circuit boards that provide the signalprocessing and display the test results
The screener also contains a rechargeable lithium-ion battery The screener displays thetest status using a liquid-crystal display (LCD) and three light-emitting diodes (LEDs) Youcontrol testing printing and test protocol resets using four keypad push buttons
The probe contains the speaker and microphone which produce test stimuli and measurethe sound pressure level (SPL) present in the sealed ear canal Interface of theinstrument to the ear canal is accomplished through disposable eartips which fit onto theprobe tube The disposable eartips are color coded by size for easy selection
10 Introduction Welch Allynreg OAE Hearing Screener
Distortion product otoacoustic emissionsDistortion product otoacoustic emissions (DPOAEs) are acoustic signals that can bedetected in the ear canal of a person with normal outer hair cell function subsequent tostimulation of the auditory system with a pair of pure tones at frequencies f1 and f2 Theresulting emission of interest is the distortion product tone at the frequency 2f1-f2
The screener generates a series of test tones directs them into the ear canal and thenmeasures the level of the DPOAE tone generated by the cochlea By using different testfrequencies the screener provides an estimate of outer hair cell function over a widerange of frequencies
OAE emission resultsThe presence of otoacoustic emissions suggests normal outer hair cell function which inturn correlates to normal hearing However a passing result using this device is not anindication that the full auditory system is normal Therefore a PASS result should not beallowed to override other indications that hearing is not normal A full audiologicevaluation should be administered if concerns about hearing sensitivity persist A REFERtest result should not be assumed to be an indicator of a lack of auditory function or thepresence of pathology however a full audiologic diagnostic testing or medical evaluationshould be performed as appropriate
Frequency Range testedThe frequency range tested is approximately 2 kHz to 5 kHz
Results storage and reportingWhen the screener is set in its default settings the instrument stores the results fromone patient (left and right ears) in its non-volatile memory for subsequent printing Thescreener is capable of storing up to 250 test results
The results are displayed on the LCD on the front of the device and are stored in thedevicersquos internal memory After testing is complete results can be printed using theprinter or exported to a computer
Sensitivity and specificitySensitivity and specificity in the screener are based on the test characteristics that youdefine and may vary depending on environmental and operating conditions Thepresence of otoacoustic emissions suggests normal outer hair cell function which inturn correlates to normal hearing However a passing result using the screener is not anindication that the full auditory system is normal Thus a PASS result should not beallowed to override other indications that hearing is not normal A full audiologicevaluation should be administered if concerns about hearing sensitivity persist A REFERtest result should not be assumed to be an indicator of a lack of auditory functionhowever it should be followed with full audiologic diagnostic testing
Directions for use Introduction 11
12 Introduction Welch Allynreg OAE Hearing Screener
Setup
Unpack the systemThe following parts are shipped standard with each screener system
Number of items Description
1 Welch Allyn OAE Screener Unit
1 Welch Allyn OAE Screener Probe
1 Welch Allyn OAE Screener Data Manager Kit
1 OAE Screener Cradle
1 Single Use Eartip Kit
1 Communications Cable USB AMicro-B
1 Communications Cable USB AB
1 Charging Cable PSU 5VMicro-B
1 Welch Allyn OAE Screener User Manual
1 Welch Allyn OAE Screener Quick Reference Guide
1 Calibration Certificate
If any part is missing contact Welch Allyn Technical Support wwwwelchallyncomaboutcompanylocationshtm We recommend that you save the shipping box andpacking materials in case you need to store or ship the system
13
Cradle
NOISE TEST READY
You can place the screener in the cradle to charge the device or to connect to acomputer for communication with the Welch Allyn Data Manager (data manager) Youcan also charge the device or connect to a computer directly from the screener Theremainder of this directions for use assumes that you are charging the device orcommunicating with a computer from the screener
Charge the batteryThe screener is powered by an integrated rechargeable lithium-ion battery providing 15hours of operation between full charging The battery status is indicated by the batteryicon shown in the upper right corner of the Main Menu Full battery charge isrepresented by a full battery symbol on the display and reduces to an empty battery inincrements corresponding to the discharge of the battery
Note Misalignment of the Micro-USB plug and socket can cause damage Theplug and socket should be visually inspected prior to each installation of thecharging cable If you see damage contact Welch Allyn Technical Supportwwwwelchallyncomaboutcompanylocationshtm
Battery status indicatorA blue battery status indicator light located to the right of the screen lights up when thebattery is charging and indicates the charging progress
The indicator light appears whenever the Micro-USB connector is engaged and poweredThe illumination behavior identifies the status of the charging function and is defined asfollows
bull Steady the battery is fully charged This identifies that the charging cycle iscomplete If the indicator is steady when you plug in the screener the battery is fullycharged
bull Slow blink the battery is charging
14 Setup Welch Allynreg OAE Hearing Screener
bull Fast blink a fault condition Return the screener to Welch Allyn for service or repairFor information about returning any device to Welch Allyn see Repairs andReturning products
When you use the screener you are warned that the battery charge is low by two fastblinks followed by a pause and then two fast blinks This sequence is repeated until youplace the battery in the charge mode
Charge the battery using the USB portThe screener is powered by an integrated rechargeable lithium-ion battery providing 15hours of operation between full charging The battery status is indicated by the batteryicon shown in the upper right corner of the Main menu A lighted battery icon indicates afully charged battery The battery icon segments turn off as the battery chargedecreases
1 Insert the Micro-USB plug into the Micro-USB port on the bottom of the screener
2 Insert the wall charger into the mains outlet
Charge the battery using the cradle
Note The Micro-USB port on the cradle does not support data transfer
1 Insert the Micro-USB plug into the Micro-USB port on the back of the cradle
2 Insert the wall charger into the mains outlet
Install the probeInsert the probersquos HDMI connector firmly into the socket on the top of the screenerThe plug fits only in one direction
CAUTION Misalignment of the HDMI connector and socketcan cause damage The plug and socket should be visuallyinspected prior to each installation of the probe If you seedamage contact Welch Allyn Technical Supportwwwwelchallyncomaboutcompanylocationshtm
Directions for use Setup 15
Attach the probe tubeA clear probe tube must be attached to the probe head before an eartip is applied
1 Insert a new probe tube into the probe head until it is fully seated
A properly inserted probe tube snaps securely into place when it is fully seated in theprobe head
2 To remove a probe tube grasp the tube and pull gently away from the probe headwith a slight twist
It is not necessary to replace the probe tube with each eartip the tube is reusable aslong as the probe tube is clear
EartipsThe screener comes with a box of disposable single-use eartips that fit a variety of earcanal sizes The eartip must seal the ear canal The best test results are obtained whenthe eartip is inserted into the ear canal instead of flush with the ear canal opening
Attach and remove the eartips
WARNING Safety risk A clear probe tube must be applied to the probehead before an eartip is applied
WARNING Safety risk The eartips are disposable and must be replacedafter each patient
WARNING Safety risk The screener probe must have a probe tube and aneartip attached before inserting the screener probe into the ear canal
WARNING Safety risk A person with proper training and experience mustdetermine the appropriate eartip size
WARNING Safety risk Ensure that the eartip does not extend too deeplyinto the ear canal
WARNING Safety risk If the probe tube becomes dirty or clogged it mustbe replaced
CAUTION Safety risk Use only the eartips approved for use with thescreener
16 Setup Welch Allynreg OAE Hearing Screener
1 Select the appropriate-sized eartip
2 Push and slightly twist the eartip onto the probe tube
Ensure that the eartip is fully seated on the probe There should be no gaps betweenthe eartip and the collar of the probe head
3 To remove the eartip grasp the probe tube gently at the base and slightly twist itwhile pulling the eartip off of the probe tube
Grasping the base of the probe tube will prevent it from being inadvertently pulledout of the probe head along with the eartip
Probe holderThe probe holder is a receptacle attached to the HDMI cable that secures the probewhen you are not using the screener Placing the probe into the probe holder protectsthe probe head Welch Allyn recommends that you insert the probe into the probe holderwhen the screener is not in use such as when it is on a counter top or table or whenthe screener is placed in the screener cradle
Attach the probe holder1 Place the probe holder near the end of the probe cable at the HDMI connector end
2 Gently press the probe cable into the probe holder close to the point of the probehead
Directions for use Setup 17
Clock settingsSet the date and time before using the screener The clock should be set prior to testingbecause changing the date and time after tests are saved will not change the date on theprintout
Seasonal time changes such as Daylight Saving Time also require resetting the clock
Note If the screener is being powered on for the first time or if the battery iscompletely discharged and is not charged within approximately one houran Error Reference source not found may appear If this messageappears reset the date and time
Access the clock menu1 While viewing the MAIN menu press the DOWN control panel button
The PROTOCOL menu appears
2 While viewing the PROTOCOL menu press the DOWN control panel button
The clock menu appears with the current date and time
Change the clock modeThe Clock Mode menu enables you to change the clock from a 24 hour mode to a 12hour mode
1 See Access menus for how to access menus
2 On the control panel press the DOWN button to advance to the CLOCK MODEmenu
18 Setup Welch Allynreg OAE Hearing Screener
3 Press either the LEFT or RIGHT control panel button to change from the 12 to 24hour mode or from the 24 to 12 hour mode
4 Press the UP control panel button repeatedly to return to the MAIN menu
Change the date and time1 If the date and time are correct press the UP control panel button to return to the
main menu If either the date or time are not correct go to Step 2
2 If the month is incorrect from the Main menu press the DOWN control panel buttonthree (3) times to advance to the Month menu
3 Press the LEFT or RIGHT control panel button to advance to the correct month
4 Press the DOWN control panel button to advance to the Day menu
5 Press the LEFT or RIGHT control panel button to advance to the correct day
6 Continue Steps 4ndash5 to correct the year hour and minute settings
7 When the year and hour settings are correct press the UP control panel buttonrepeatedly to return to the Main menu
8 If you are at the Minute menu press the DOWN control panel button to return to theMain menu
Directions for use Setup 19
20 Setup Welch Allynreg OAE Hearing Screener
Device settings
Control panelNote The UP key always brings the screener back to either the previous menu or
the main menu The UP key will also access the print command from theMain menu
The screener uses four (4) buttons to control all functions These buttons are arranged ina clock face configuration with arrows at 1200 300 600 and 900 The arrows on thekeypad (LEFT RIGHT UP and DOWN) correspond to the arrows that are used on thescreen Push the button that corresponds to the highlighted arrow on the screen in orderto move through tasks
Access menus1 While viewing the MAIN menu press the down control panel button on the control
panel
The PROTOCOL menu appears
2 While viewing the PROTOCOL menu press the down control panel button on thecontrol panel
21
The Clock menu appears with the current date and time
3 While viewing the CLOCK menu press the down control panel button on the controlpanel until the green LED READY light on the screener turns off
4 Release the down control panel button
When you release the down button the New BT Device screen appears and themenus are accessible
5 Press the down control panel button to advance to other device settings
Device settingsThe screener menus enable you to change many of the screener settings or functionsThese settings include
bull Bluetooth device pairing
bull Clear test results
bull Automatic shutdown interval
bull Save mode
bull Minimum amplitude value
bull Clock Mode
bull Graph style
bull Language
bull Reset to default settings
22 Device settings Welch Allynreg OAE Hearing Screener
Bluetoothreg device pairingThe Bluetooth pairing menu enables you to pair the screener with a Bluetooth devicesuch as a thermal printer or computer for printing test results and data transferHowever you can only pair one device with the screener at any given time
Pair the screener and Bluetooth device
Note When pairing to a computer for use with the data manager confirm thecomputer has Bluetooth availability or a Bluetooth dongle will be requiredConfirm the Bluetooth settings of the computer lsquoAllow Bluetooth devicesto find this PClsquo
1 Turn on the device to be paired with the screener
2 On the screener navigate to the New BT Device menu
3 Press the LEFT or RIGHT control panel button to initiate discovery of availableBluetooth devices
The screener searches for available Bluetooth devices for approximately 15 secondsDuring this time the message Please Wait appears on the screen The yellow LEDlight flashes
4 When the correct computer appears on the screen press the DOWN control panelbutton to pair the screener and computer
The message Add a device appears on the computer
5 Select this notice and then enter PIN 1234
6 The first time the data manager software is launched select Detect Com Port tofinalize the screener and computer connection
7 To cancel the pairing process press the CANCEL control panel button
The screener returns to the Main menu
Select a Bluetooth deviceWhen discovery is complete all discovered devices appear in the order in which they arefound A compatible thermal printer appears as ldquo PRT--rdquo (for example PRT-0a-de)Other devices appear by their name These name configurations vary depending on thedevice
1 See Access menus for how to access menus
2 On the NEW BT DEVICE menu press either the LEFT or RIGHT control panel buttonto select the desired device
3 Press the PAIR control panel button to pair the screener with the selected device
The screen confirms pairing with the message ldquoBT DEVICE PAIREDrdquo
4 Press the MainMenu control panel button to exit the Bluetooth pairing menu
5 See ldquoTroubleshootingrdquo in the Maintenance section if Bluetooth pairing isunsuccessful or if any error messages appear
Directions for use Device settings 23
Clear test resultsThe Test Results menu enables you to clear the test results stored in the screenerwithout printing them
1 See Access menus for how to access menus
2 Press the DOWN control panel button to advance to the TEST RESULTS menu
3 Press the LEFT or RIGHT control panel button to clear the results
4 Press the LEFT or RIGHT control panel button to select Yes or No to clear theresults
5 Press the NEXT control panel button to advance to the next screen without clearingthe results
After printing results or transferring data to your computer all tests saved in memoryare marked for deletion and are permanently deleted when a new test is started It isnot necessary to manually clear these results
6 Press the UP control panel button repeatedly to return to the MAIN menu
Minimum amplitudeThe Minimum Amplitude setting enables you to set the screening device to includeminimum amplitude values in the PASSREFER criterion The minimum DistortionProduct (DP) amplitude is -5 dB SPL If the MIN VALUE is set to ON a result is notconsidered a pass unless the amplitude at each frequency is equal to or greater than theminimum value programmed into the screener This is in addition to meeting the otherpass criteria including the minimum SNR and the number of passing frequencies for anoverall test PASS
This feature is set to OFF when it is shipped from the factory
Change the languageThe LANGUAGE menu enables you to select the language used in the screener
1 See Access menus for how to access menus
2 Press the DOWN control panel button to advance to the LANGUAGE menu
3 Press either the LEFT or RIGHT control panel button to scroll to the desiredanguage
24 Device settings Welch Allynreg OAE Hearing Screener
4 Press the UP control panel button repeatedly to return to the MAIN menu
Reset to defaultThe RESET TO DEFAULT menu returns all screener settings to its original factorydefaults
Reset to default settings1 See Access menus for how to access menus
2 Press the DOWN control panel button and advance to the RESET TO DEFAULTmenu
3 Press the LEFT or RIGHT control panel button
4 Press the LEFT or RIGHT control panel button to select Yes or No to verify the resetor cancel your request
Resetting to the factory default settings disconnects any Bluetooth device clears thetest results and resets all system settings
5 Press the UP control panel button to return to the Main menu
Directions for use Device settings 25
26 Device settings Welch Allynreg OAE Hearing Screener
Operating instructions
Turn on the screenerPress the DOWN control panel button located below the display screen
A yellow TEST light appears briefly above the display The green READY lightremains constant indicating that the screener is ready to use A Flash Screenappears briefly displaying the software version serial number calibration date andtype of instrument such as SCR Screener with DP
Automatic shutdown intervalThe screener has an automatic shutdown feature designed to prolong battery life Thescreener automatically shuts down after two (2) minutes of inactivity but the interval canbe adjusted
The interval choices are
bull 30 seconds
bull 1 minute
bull 2 minutes
bull 4 minutes
See ldquoChange the automatic shutdown intervalrdquo for directions on how to select adifferent interval
Note To power on the screener from the MAIN menu press the DOWN controlpanel button To power off the screener manually from the MAIN menupress the UP control panel button
Change the automatic shutdown intervalThe POWER OFF menu enables you to change the automatic shutdown interval
1 See Access menus for how to access menus
2 Press the DOWN control panel button to advance to the POWER OFF menu
27
3 Press either the LEFT or RIGHT control panel button to change to the desiredinterval
4 Press the UP control panel button repeatedly to return to the MAIN menu
Main menuThe main menu has six regions Starting at the top-left corner of the menu and movingclock-wise they are
Number Item Definition
1 Date and time The daymonth time and AMPM
2 Battery status Displays the amount of charge remaining or the charging statuswhen plugged into a mains outlet with the Micro-USB cable
3 Selected protocol Displays one of two protocol options DP 4s and DP 2s
4 Start right ear test Press to start a right ear test
5 Change protocol and settings Press to change a protocol or screener settings See InstrumentSettings for more information
6 Start left ear test Press to start a left ear test
28 Operating instructions Welch Allynreg OAE Hearing Screener
Select the test protocolThe OAE screener provides two (2) protocol options DP 4smdashtesting at a maximum timeof 4 seconds per frequency and DP 2smdashtesting at a maximum time of 2 seconds perfrequency The last protocol that was used is shown on the Main menu
1 Press the LEFT or RIGHT control panel button on the Main menu
The Change Protocol menu appears
2 Press the LEFT or RIGHT contorl panel button to select the desired protocol
3 Press the UP control panel button repeatedly to return to the Main menu and begintesting
4 Press the Down control panel button to access the device menus
See ldquoAppendix E Configurations and test protocolsrdquo for further information on protocolsettings
Prepare the patient for testingOtoscopic examination of the patientrsquos ear canals is recommended prior to testingExcessive cerumen or vernix in the ear canals may interfere with the test and give invalidor incomplete results Patients with excessive cerumen vernix debris or foreign bodiesin the ear canals should be referred to a physician or other qualified health careprofessional for removal of the blockage prior to testing
1 Place the patient in a position that will allow easy access to the ear canal
2 Instruct the patient to remain quiet and still during the test
Start a test1 See Access menus for how to access menus
2 Gently pull up and back on the outer ear during eartip insertion to straighten the earcanal and ensure proper placement and seal
3 Gently insert the eartip into the ear canal It should fit snuggly and comfortably
Note The best test results are obtained when an eartip is insertedinto the ear canal instead of flush with the ear canal
4 Press either the LEFT or RIGHT control panel button for the TEST menu to selectwhich ear is tested
After the ear to be tested is selected the AutoStart Probe Check beginsautomatically
5 Repeat steps 1ndash3 to test the opposite ear
AutoStart probe checkThe Probe Check display shows a cone larger at the left and tapering toward the rightrepresenting the ear canal volumemdashfrom left to rightmdashfrom very large (blue area) to verysmall (orange area)
Where the vertical white bar appears indicates the measured ear canal volume
Directions for use Operating instructions 29
Ear canal volume Explanation
BlueThe ear canal volume is too large for the test to begin The probe is not in the ear orthere is a large leak
GreenThe ear canal volume is in the target range for testing The test will begin automaticallyif the probe fit is stable
OrangeThe ear canal volume is too small for the test begin The eartip may be pressed againstthe ear canal wall or the probe tube may be completely clogged
Troubleshoot the AutoStart probe checkAppropriate adjustments of the eartip position and size selection should be made untilthe indicator falls within the green area and remains stable If the test will not progresspast the AutoStart probe check stage
1 Change the probe tube
2 Confirm that the probe connector is fully seated in the socket
3 Run the AutoStart probe check again
30 Operating instructions Welch Allynreg OAE Hearing Screener
Test results
Test phase
The screener automatically performs a calibration at the start of each test Duringcalibration a series of tones are sent to the ear canal to calibrate the levels of thefrequencies to be tested Following calibration of the test tones the test phase beginsautomatically
Note Press the UP control panel button to abort a test in progress No record ofan aborted test is saved in memory
Graph stylesThe results of a test are displayed as a graph The graph is generated and shown duringthe test and can be viewed after the test is complete
There are two graph options for viewing the results
bull The default view is a signal-to-ratio (SNR) bar graph It displays the SNR for each DPtest frequency
bull The value graph view displays the absolute emission and noise levels for each DPtest frequency
SNR bar graph view
The default SNR bar graph view displays the emissions and noise floor (NF) as they aremeasured Each column represents one DP test frequency The height of each columnrepresents the SNR being measured
The horizontal green line at the decibel level corresponding to the SNR indicates the levelrequired for a PASS A green bar indicates a PASS and a yellow bar indicates a REFER
See ldquoChange graph stylerdquo for instructions on how to switch the graph views betweenSNR bar graph and value graph
31
Value graph view
The value graph view uses different colors and symbols to differentiate the DP testfrequency for the left and right ear tests
bull Left ear Dark blue line with ldquoxrdquo symbols indicate the DP test frequencies
bull Right ear Red line with circles indicate the DP test frequencies
On both the left and right ear value graphs inverted triangles on a light blue linerepresent the NF at each DP test frequency
See ldquoChange graph stylerdquo for instructions on how to switch the graph views betweenSNR bar graph and value graph
Change graph styleThe Graph menu enables you to change between the SNR and value graph views
1 See Access menus for how to access menus
2 Press the DOWN control panel button to access the GRAPH menu
3 Press the LEFT or RIGHT control panel button to change between the SNR andvalue graph views
Test techniquesAs with other OAE test instruments there are techniques to learn when using thescreener especially when screening infants Experience with existing OAE systemssuggests that it may take up to three (3) months to become completely proficient inscreening infants
Test an infant
Note The best test results are obtained when an eartip is inserted into the earcanal instead of flush with the ear canal
When testing an infant with the screener the infant has to be relatively quiet and calm itis preferable that the infant be sleeping If the infant is awake
32 Test results Welch Allynreg OAE Hearing Screener
1 Use a pacifier to calm the infant however sucking adds noise to the test anddecreases the likelihood of a PASS result
2 Press either the LEFT or RIGHT control panel button to select which ear is tested
3 Pull gently down and back on the pinna to straighten the ear canal
4 Gently insert the eartip into the ear canal It should fit snuggly and comfortably
5 Repeat steps 2ndash4 to test the opposite ear
Test children with pressure equalizer tubesDisable the AutoStart probe check when testing children with pressure equalizer (PE)tubes
1 Pull gently up and back on the outer ear to straighten the ear canal
2 Insert the probe with the appropriate eartip into the ear canal and obtain a properseal
3 Press and hold the arrow key that corresponds to the ear being tested until thegreen READY light turns off
4 Release the arrow key
The screener calibrates and tests as before applying the appropriate in-the-earstimulus intensity levels for patients with PE tubes
5 Repeat steps 1-4 to test the opposite ear
Noise sources
When the noise level exceeds the noise rejection limit of the screener the red NOISElight appears It is common for the red NOISE light to appear while testing The lightappears infrequently if the noise level in the ear canal is low and it appear morefrequently if the noise level in the ear canal is high
OAEs are very low-level sounds Any noise in the ear canal at the time of testing canmask this emission This noise can come from a variety of sources
The largest source of noise usually comes from the patient This is biological noise suchas movement coughing sucking talking and the like The patient must be calm and notmove or talk Ambient noise in the testing environment also can be a large source ofnoise during the test A properly sealed eartip blocks much of this noise but performingthe testing in a relatively quiet environment is recommended
View resultsWhen testing is complete the green ldquoREADYrdquo light is illuminated and the results for theear tested appears The results screen indicates the test ear and gives the results of thetest
The results are automatically saved in memory as soon as the test completes Theresults are saved even if the screener is turned off or the battery is depleted
Note When the screener is operating in the Save LR Mode the screener savesonly the last test for each ear Starting a new test for the same earoverwrites the existing test
Directions for use Test results 33
The possible test results are
bull PASS The ear tested passed screening
bull REFER The ear tested did not pass screening
bull NOISY Excessive noise was present during the test
bull NO SEAL A seal was not maintained throughout the test
bull FIT ERR Inadequate probe placement in the ear canal to produce target stimulusintensities
See ldquoManage test resultsrdquo for more information on managing results and how to print ortransfer those results to the Welch Allyn Data Manager
See ldquoSave resultsrdquo for more information on the screener save mode options
Repeat an inconclusive testA conclusive test has a PASS or REFER result Repeat the test if the test result isNOISY NO SEAL or FIT ERR
1 Reposition the probe selecting a different size eartip if necessary
2 Follow the directions that begin in ldquoSelect a protocolrdquo to retest the patient
3 To review the results press the DOWN control panel button to return to the bargraph
4 After reviewing the results press the DOWN control panel button to return to theResults screen or the UP control panel button to return to the Main menu
34 Test results Welch Allynreg OAE Hearing Screener
Manage results
Results storage and reportingWhen the screener is set in its default settings the instrument stores the results fromone patient (left and right ears) in its non-volatile memory for subsequent printing Thescreener is capable of storing up to 250 test results
The results are displayed on the LCD on the front of the device and are stored in thedevicersquos internal memory After testing is complete results can be printed using theprinter or exported to a computer
SaveStore test results modeThe screener automatically saves the results of completed tests in the non-volatilememory even if the battery is temporarily discharged However the screener is notintended for long-term storage of test results
Note You are strongly encouraged to print or transfer all test results at thecompletion of testing to avoid potential loss of data
The screener has two operating modes for saving and storing test results
bull SAVE LR
bull SAVE 250
SAVELR is the default operating mode
SAVE LR modeWhen operating in the default SAVE LR mode the screener saves the most recent testresults for each ear and prints or transfers only these results This allows you to retest apatient after a REFER result and to print or transfer only the most recent test result foreach ear
Welch Allyn recommends that you print the results after each patient when using thedefault mode
SAVE 250 modeWhen operating in the SAVE 250 mode the screener can save up to 250 tests There aretwo methods of using the SAVE 250 mode
35
bull When not used with the Welch Allyn Data Manager (data manager) the screenerautomatically numbers each test from 1 to 250 When using the SAVE 250 testmode for numbered tests keep a record of the test number for each patient in orderto synchronize the numbered test with the correct patient
bull When used with the data manager the data manager transfers patient names to thescreener and the screener displays the names
When not used with the data manager each test is automatically incremented startingwith test number 1
When the screener is used with the data manager the patient names are displayed onthe screener in the same order as they are displayed in the data manager See ldquoViewpatient namesrdquo for directions on how to scroll between patient names
Welch Allyn recommends that you go to the Test Results clear screen to clear anyprevious memory locations after you change the save mode setting See ldquoClear testresultsrdquo for directions
When the screener reaches 245 saved tests you are warned that the memory is almostfull When the screener reaches 250 saved tests the memory is full and no further testscan be done Do one of the following
bull Print the results
bull Transfer the results to the PC software
bull Clear the results from memory
Change the SAVE mode between SAVE LR and SAVE 250
1 See Access menus for how to access menus
2 Press the DOWN control panel button to advance to the the SAVE LR screen
3 Press the LEFT OR RIGHT control panel button to change between the SAVE LR(single) setting and SAVE 250 (multiple) setting
4 Press the UP control panel button repeatedly to return to the MAIN menu
View patient namesWhen patient names are uploaded from the data manager to the screener the patientnames are displayed on the screener in the same order that they are displayed in thedata manager The first name shown is labeled Unnamed to allow tests to beconducted on patients whose names have not been transferred
To move to a different patient name than the one displayed on the screener pressthe LEFT or RIGHT control panel button to advance through the names until thedesired patient name appears
36 Manage results Welch Allynreg OAE Hearing Screener
Delete test resultsThe screener holds data in non-volatile memory The data stays in the memory evenafter data is printed on the thermal printer or downloaded to the data manager The savemode determines how data is deleted
Delete results in SAVE LR modeThe most recent test for the left ear and the most recent test for the right ear is held inmemory Data is deleted when a new test for the left or right ear is completed
1 See Access menus for how to access menus
2 Press the DOWN control panel button to advance to the X TEST RESULTS menu Xrepresents the number of tests held in memory in the screener
3 Press the LEFT or RIGHT control panel button
4 Press the LEFT or RIGHT control panel button and then press the appropriate LEFTor RIGHT control panel button to select YES or NO to verify or cancel your choice
If you select YES the data is cleared from the screener After printing results ortransferring data to your PC software all tests saved in memory are marked fordeletion and are permanently deleted when a new test is started It is not necessaryto manually clear these results
Delete results in SAVE 250 modeData is deleted when new Patient Names are uploaded from the data manager to thescreener A warning is provided that data will be deleted Data can be deleted in thescreener from the data manager when the screener is connected to the data manager bythe USB cable orby bluetooth When Names is selected the window allows data to bedeleted using the Clear Instrument button
To delete data using the TEST RESULTS menu
1 See Access menus for how to access menus
2 Press the DOWN control panel button to advance to the TEST RESULTS screen
3 Press the LEFT or RIGHT control panel button
4 Press the LEFT or RIGHT control panel button and then press the appropriate LEFTor RIGHT control panel button to select YES or NO to verify or cancel your choice
If you select YES the data is cleared from the screener After printing results ortransferring data to your PC software all tests saved in memory are marked fordeletion and are permanently deleted when a new test is started It is not necessaryto manually clear these results
Connect the screener to a computer1 Power on the screener and ensure that the screener is charged
2 Plug the micro-USB connector into the port on the bottom of the screener
3 Plug the USB connector into a USB port on the computer
4 Power on the computer and then launch the data manager
The message ldquoWaiting on computerrdquo appears on the screener
Directions for use Manage results 37
5 Begin data or name transfers
Connect the screener cradle to a computerUse a standard USB-A to USB-B cable to connect the screener cradle to a computer
1 Power on the screener and ensure that the screener is charged
2 Plug the USB-B connector into the port on the back of the screener cradle
The cradle does not need to be connected to a mains outlet for data transfer
3 Plug the USB-A connector into a USB port on the computer
4 Place the screener in the cradle
5 Power on the computer and then launch the data manager
The message ldquoWaiting on computerrdquo appears on the screener
6 Begin data or name transfers
You must use a USB-A to USB-B cable between the cradle and the computer for datatransfer The micro-USB port on the cradle does not support data transfer Use the cradlefor recharging the screener when power is supplied to the either the micro-USB or theUSB-B port Use the micro-USB port on the bottom of the screener for both data transferand recharging
Connect the screener to a computer using Bluetooth1 Power on the screener and ensure that the screener is charged
2 Power on the computer and then launch the data manager
The message ldquoWaiting on computerrdquo appears on the screener
3 If this is the first time the screener is being connected using Bluetooth then on theTransfer section of the Home tab click Detect Com Port
4 Ensure that the screener is paired to your computer
Pairing is only required upon initial data transfer
5 On the Main menu of the screener press the UP control panel button
The BT menu appears
6 Press the LEFT or RIGHT control panel button to begin data or name transfers
Pair the screener and Bluetooth deviceNote When pairing to a computer for use with the data manager confirm the
computer has Bluetooth availability or a Bluetooth dongle will be requiredConfirm the Bluetooth settings of the computer lsquoAllow Bluetooth devicesto find this PClsquo
1 Turn on the device to be paired with the screener
2 On the screener navigate to the New BT Device menu
3 Press the LEFT or RIGHT control panel button to initiate discovery of availableBluetooth devices
The screener searches for available Bluetooth devices for approximately 15 secondsDuring this time the message Please Wait appears on the screen The yellow LEDlight flashes
38 Manage results Welch Allynreg OAE Hearing Screener
4 When the correct computer appears on the screen press the DOWN control panelbutton to pair the screener and computer
The message Add a device appears on the computer
5 Select this notice and then enter PIN 1234
6 The first time the data manager software is launched select Detect Com Port tofinalize the screener and computer connection
7 To cancel the pairing process press the CANCEL control panel button
The screener returns to the Main menu
Print to a thermal printerYou must have an optional Bluetooth-enabled thermal printer to print from the screenerSee ldquoPair the screener and Bluetooth devicerdquo for directions You can only pair onedevice with the screener at any given time
1 Confirm that the printer is on and ready for printing
2 Confirm that the screener is paired with the printer
3 From the main menu press the UP control panel button
The CONNECT TO PRT screen appears
4 Press the LEFT or RIGHT control panel button to connect to the printer
The screener searches for the paired printer when the screener pairs with theprinter all stored results print All printed test results are marked for deletion but arestored in memory until a new test is started This enables you to reprint the tests ifprinting was unsuccessful due to the paper running out or other issue This alsoallows you to transfer test data to the data manager for long term storage before youstart a new test When a new test is started all tests in the screener memory areerased The screener turns off automatically when printing is complete
Directions for use Manage results 39
40 Manage results Welch Allynreg OAE Hearing Screener
Understand printed results
DPOE printoutThe following information is provided for each test
bull The time and date of the test based on the setting of the internal clock if the clockis set correctly this time and date will be correct
bull The test number (if operating in SAVE 250 mode)
bull The protocol selected (for example DP 2S)
bull The averaging time used for this test (for example 2 sec avg)
bull InstrumentProbe serial number (SN)
bull The software version number (for example V10101)
bull The ear selected (Right or Left)
bull A PASSREFER indication
bull The f2 frequency in kHz (for example 20 30 40 50)
bull The NF in dB SPL
bull The emission level (DP) intime dB SPL
bull The SNRmdashDP level minus the NFmdashin dB
Rounding resultsThe SNR and single PASS criterion are calculated from the full internal precision of thescreener and not from the rounded values shown in the printout for the emission (DP)and NF estimates
This approach is used to preserve the full precision of the test results but can result insome apparent errors in the printout due to the effects of rounding Assume that theactual values at a given frequency were DP = 55 dB and NF = -04 dB which results in aSNR = 59 dB The printout values are rounded up to the nearest integer and are shownas DP = 6 NF = 0 and SNR = 6 This can result in what appears to be an error based onthe PASS criterion If the PASS criterion is 6 dB while the actual SNR is 59 the printedvalue will be 6 but the frequency will not be judged as a PASS with a ldquoPrdquo printed
41
42 Understand printed results Welch Allynreg OAE Hearing Screener
Clean and disinfect
Clean and disinfectWARNING Eartips are for single patient use only
WARNING Use a new eartip for each patient
External parts of the screener and probe can be cleaned to remove visible particulatecontamination
CAUTION Do not insert any object into probe
CAUTION Do not immerse the instrument or probe in fluids or attempt tosterilize the instrument or any of its accessories
CAUTION Do not allow any fluid to enter the device
CAUTION Do not use autoclave sterilization
CAUTION Do not use alcohol-based disinfectants
CAUTION Do not put excessive pressure on the clear display window
CAUTION Do not puncture the display window or control panel
CAUTION Long-term exposure to disinfecting agents has the potential toalter the material properties of the plastic housing and labeling of thedevice
CAUTION Always follow the safety and disposal guidelines for cleaningand disinfectant chemicals provided by the manufacturer
Note The probe tube which does not make direct contact with the patientshould be replaced if there is any sign of contamination or if the test willnot progress past the AutoStart phase You do not need to disinfect theprobe tube between patients
This instrument is not designated as a lsquosterilersquo device Welch Allyn believes low-leveldisinfecting is appropriate for this type of instrument External parts of the screener and
43
probe can be cleaned to remove visible particulate contamination Wiping the housingand probe exterior with a mild non-alcohol based disinfecting solution using a clean clothor towel provides a suitable form of cleaning and low-level disinfecting Perform thisprocess weekly or as often as conditions warrant to prevent a build-up of dirt fromnormal handling and use
The disinfecting materials and procedures applied in your facility may be more stringentfor your circumstances than the methods outlined above The frequency of cleaning anddisinfecting is dependent on your facilityrsquos risk assessment usage and testenvironment
44 Clean and disinfect Welch Allynreg OAE Hearing Screener
Maintenance
General maintenanceCAUTION A defective screener should not be used Confirm that allconnections to external accessories are seated and secured properly Partswhich may be broken or missing or are visibly worn distorted orcontaminated should be replaced immediately with clean genuinereplacement parts manufactured by or available from Welch Allyn
The screener requires no regular maintenance beyond routine cleaning and annualcalibration Replace the probe tube if it becomes clogged
The screener is not user repairable Repairs and battery replacement must be performedonly by a qualified Welch Allyn service representative
Annual calibration is recommended An authorized service technician should performelectrical safety checks in order to maintain continued compliance with IEC and UL60601-1
Calibrate the screenerCalibrate your screener every 12 months for measurement accuracy
Replace the probe tubeProbe tubes are disposable and should be replaced when they become cloggedReplacement probe tubes are included with the screener
1 Grasp the probe head with the fingertips of one hand
2 Use the eartip to grasp the clear plastic probe tube with the fingertips of your otherhand
3 Twist the probe head slightly while pulling the eartip and probe tube straight out ofthe probe head
4 Dispose of the used probe tube immediately to avoid confusing used tubes and newtubes
5 Insert a new probe tube into the probe head until it is fully seated
A properly inserted probe tube snaps securely into place when it is fully seated in theprobe head
45
CAUTION Do not attempt to clean probe tubes This maycause damage to the probe head
TroubleshootingProblem Solutions
Instrument does not turn on bull Press the DOWN arrow until the Yellow LED light appearsbull Connect the charger Confirm that blue Charging LED is illuminating in a slow
blink pattern Wait at least 10 minutes and then attempt to turn on the screenerbull If the problem persists contact Welch Allyn Technical Support
wwwwelchallyncomaboutcompanylocationshtm
The test will not start bull Select a different sized eartip
bull Reposition the probe
bull Be sure the probe cable is secured with the shirt clip
bull Change the probe tube
bull Verify from the probe check during AUTOSTART that the eartip is sealed in theear canal
bull Check that the instrument will start in your own ear using the proper eartip foryour ear If the test will not start or if the AutoStart tones sound unusual replacethe probe tube
bull If the problem persists across several patients contact Welch Allyn TechnicalSupport wwwwelchallyncomaboutcompanylocationshtm
The results will not print bull Check the printer status Turn the printer on or wake from sleep mode
bull If the printer does not turn on plug in the power supply to charge the battery
bull Confirm that the printer has paper
bull If paper comes out of the printer but there is no text on the paper then the paperis inserted backwards
bull Rapidly press the large printer button twice to run a demonstration print
bull If the problem persists contact Welch Allyn Technical Supportwwwwelchallyncomaboutcompanylocationshtm
Display is frozen and instrumentwill not respond to buttonpresses
bull Press and hold the UP arrow for 10 seconds to force the instrument to power offPowering the instrument on should resetrestore normal function
bull If the problem persists contact Welch Allyn Technical Supportwwwwelchallyncomaboutcompanylocationshtm
46 Maintenance Welch Allynreg OAE Hearing Screener
Message Solutions
Attach Probe bull Probe not detectedbull Check that the probe connector is fully seated in the socketbull Disconnect and reconnect the probebull Cycle instrument power
BT Device Not Found bull Paired to Printer Check that the printer is turned on Move closer to the printer Try again
bull Paired to PC Computer or Bluetooth dongle Check that the serial port is open Establishing the serial port is handled by the PC
andor the software not by the Welch Allyn OAE Screener
BT Error xxx bull Check BT device (printer or PC) statusbull Attempt to connect to BT device againbull If the problem persists contact Welch Allyn Technical Support wwwwelchallyncom
aboutcompanylocationshtm
BT Not Configured bull Printing has been attempted but no BT device is paired with the Welch Allyn OAEScreener Establish Bluetooth pairing
Device Not Responding bull The printer is not responding to queries from the instrument Check printer status
Due for service Verify Device date time is set correctly
Annual calibration is due Reminder message will re-appear every 24-hour period until re-calibrated Contact Welch Allyn to schedule annual calibration
Fit Error Cannot Obtain bull The desired intensity level (L1 or L2) cannot be obtained within allowable limits Usershould refit the probe and retry the test
bull Replace the probe tubebull If the problem persists across several patients contact Welch Allyn Technical Support
wwwwelchallyncomaboutcompanylocationshtm
Fit Error Too High bull The level of the calibration tone is too high Refit the probe and retry the testbull Replace the probe tubebull If the problem persists across several patients contact Welch Allyn Technical Support
wwwwelchallyncomaboutcompanylocationshtm
Fit Error Too Low bull The level of the calibration tone is too low User should refit the probe and retry the testbull Replace the probe tubebull If the problem persists across several patients contact Welch Allyn Technical Support
wwwwelchallyncomaboutcompanylocationshtm
Limit Error bull Overflow error during the calculation of the DFTs for a DP test Repeat the testbull Cycle instrument powerbull If the problem persists contact Welch Allyn Technical Support wwwwelchallyncom
aboutcompanylocationshtm
Directions for use Maintenance 47
Message Solutions
Memory almost full bull Saved tests are within 5 tests of the maximum limit Print or transfer test results to avoidinterruption in testing
Memory Full bull The maximum number of saved tests has been reached Clear the memory in order toperform additional tests
Power Low bull The battery charge level is too low for operation Charge the battery in order to performadditional tests
Printer Error bull Indicates a problem with the printerbull Check the printer statusbull Reset the printer or cycle the printer power
Printer Paper Out bull Replace the paper roll
TimeDate Error bull The clock is checked during power on to ensure it has not lost time and been reset In thecase of clock reset this message is shown Set the correct datetime
RepairsA Welch Allyn Service Center must perform all repairs on products under warrantyunless you have purchased a Welch Allyn Partners in Care Biomed agreement allowingyou to service the device while under warranty
CAUTION Unauthorized repairs will void the product warranty
Qualified service personnel or a Welch Allyn Service Center should repair products out ofwarranty
If you are advised to return a product to Welch Allyn for repair or routine maintenanceschedule the repair with the service center nearest you
Welch Allyn Technical Support
If you have a problem with the device that you cannot resolve call the Welch AllynTechnical Support Center nearest you for assistance A representative will assist you introubleshooting the problem and will make every effort to solve the problem over thephone potentially avoiding an unnecessary return
If your product requires warranty extended warranty or non-warranty repair service aWelch Allyn Technical Support representative will record all necessary information toissue a RMA number The support representative will provide you with the address ofthe Welch Allyn Service Center to send your device to
Technical support is available during local business hours
48 Maintenance Welch Allynreg OAE Hearing Screener
Standards and compliance
General compliance and standardsThe Welch Allyn OAE screener complies with the following standards
Standard Issue Date Title
ANSIASA 36 2010 Specification for Audiometers
IEC 60601-1 2005 Medical Electrical Equipment ndash GeneralRequirements for Basic Safety andEssential Performance Ed 3
IEC 60645-1 2004 Electroacoustics - Audiologicalequipment -- Part 1 Pure-toneaudiometers
IEC 60645-3 2007 Electroacoustics - Audiometricequipment -- Part 3 Test signals ofshort duration
IEC 60645-6 2010 Electroacoustics ndash AudiometricEquipment ndash Part 6 Instruments for themeasurement of otoacoustic emissions
ISO 14971 2007 Application of Risk Management toMedical Devices
ISO 10993 2009 Biological Evaluation of MedicalDevices
EN 60601-1-2 2007 Medical electrical equipment -- Part1-2 General requirements for basicsafety and essential performance -Collateral standard Electromagneticcompatibility - Requirements and Tests
FCC Part 15 FCC 47CFR Part 15247 amp 15249(Bluetooth)
IEC 60601-1 2005 Clause 8918 Pollution DegreeClassification 2
49
Directive 200296EC-WEEEDisposal of noncontaminated electrical and electronic equipment
Many local laws and regulations require special procedures to recycle or dispose ofelectrical equipment-related waste including batteries printed circuit boards electroniccomponents wiring and other elements of electronic devices Follow all of yourrespective local laws and regulations for the proper disposal of batteries and any otherparts of this system Do not dispose of this product as unsorted municipal wastePrepare this product for reuse or separate collection as specified by Directive 200296EC of the European Parliament and the Council of the European Union on WasteElectronic and Electrical Equipment (WEEE) If this product is contaminated thisdirective does not apply
For specific disposal or compliance information contact contact Welch Allyn TechnicalSupport wwwwelchallyncomaboutcompanylocationshtm
WARNING Batteries may explode or cause burns if disassembledcrushed or exposed to fire or high temperatures
50 Standards and compliance Welch Allynreg OAE Hearing Screener
Appendices
Appendix A Specifications
Probe specificiations
Item Specification
Measurement type Distortion Product Otoacoustic Emissions (DPOAE)
Frequency range 20 to 50 kHz
Stimulus intensity 6555 dB SPL
Microphone system noise bull -20 dB SPL 2 kHz (1 Hz bandwidth)bull -13 dB SPL 1 kHz (1 Hz bandwidth)
Dimensions and weight bull Length 40 in (10 meter)bull Weight 100 oz (28 gm)
Connector HDMI
Instrument specifications
Item Specification
Power supply Lithium-Ion rechargeable battery
Battery life 15 hours on-time
Dimensions and weight Instrument Weight 64 oz (180 gm)
User interface bull OLED Display to provide user information and progress of measurementbull 4-button keypad to control instrument functions
ConnectorsCommunications bull Integrated USB communication capability for battery charging andcommunication with PC-based database programs or an optional PCprinter
51
Item Specification
bull HDMI Connector for connection to the Probebull Integrated Bluetooth Class 2 + EDR with SPP Protocol for communication
with printer
Power supply specifications
CAUTION Use only approved power supply
Item Specification
Model No UE08WCP-050160SPA
Output 50V DC 16A
Input 100-240V AC 50-60Hz 400 mA
Environmental requirements
Item Specification
Operating temperature 59degF to 95degF (15degC to 35degC)
Operating relative humidity 30 to 90 (non-condensing)
Maximum operating altitude 6000 feet (2000 meters)
Transport and storagetemperature
41degF to 104degF (5degC to 40degC)
52 Appendices Welch Allynreg OAE Hearing Screener
Appendix B Flowchart Measurement
Directions for use Appendices 53
Appendix C Test sequence
A complete test sequence consists of an
bull AutoStart
bull Calibration
bull Test phase
AutoStart phaseThe AutoStart phase determines when the calibration phase should proceed Artifactrejection is employed during the test phase to reduce the effect of transient noisebursts
Immediately after you press the test button the AutoStart phase begins AutoStartchecks both the quality and stability of the seal by measuring the response obtainedfrom a sequence of test tones The stability of the seal is determined by comparing theresponses obtained over time When the level of the response is within an acceptablerange and is stable over time the unit proceeds to the calibration phase
Calibration phaseThe calibration phase calibrates the level of the tones that will be applied during theactual test phase The calibration phase automatically measures the response obtainedfrom a sequence of calibration tones and calculates the voltage needed to obtain thedesired intensity levels If the desired peak pressure cannot be obtained the unit will usethe maximum voltage A successful calibration leads to the actual test phase
Test phaseThe test phase consists of measuring the response obtained from the pairs of testfrequencies (f1 f2) applied to the receivers Two receivers are used with each receivergenerating one frequency in order to reduce intermodulation distortion Frequencydomain estimates of the actual L1 L2 distortion (DP) and noise floor (NF) are obtainedvia the discrete Fourier Transform with a bin resolution of approximately 31 Hz The NFestimate is obtained by averaging the power in the 4 closest (+-2) bins to the DP bin
Variations in the SNR EstimateBe aware that the SNR estimate has an inherent statistical variation due to the effects ofrandom noise especially when no emission is actually present If you perform a test withthe instrumentrsquos probe placed in a test cavity theoretically the SNR will be greater than6 dB approximately 7 times out of 100 This is not a limitation of the instrument but afundamental property of the method used to estimate the SNR in all emission testing Inorder to reduce the occurrence of this ldquofalserdquo emission the instrument limits theminimum value of NF which has the effect of reducing the SNR for tests that have a lownoise floor As the noise level of the test increases the user will notice that moreldquofalserdquo emissions will appear which is to be expected
54 Appendices Welch Allynreg OAE Hearing Screener
Appendix D PassRefer criteriaThe decision that a DPOAE exists is based on detecting a signal whose level issignificantly above the background noise level This requires a statistical decision sincethe random noise level in the DPOAE filter channel can be expected to exceed theaverage of the random noise levels in the four adjacent filter channels mdash used as thereference for comparison mdash roughly 50 of the time
Extended measurements of the noise distributions in both the DPOAE filter channel ldquoDPlevelrdquo and the rms average of the 4 adjacent channels ldquoN levelrdquo indicate that the SNRratio (the difference between DP and N) has a standard deviation of 55 dB This impliesa 10 probability of seeing a 7 dB SNR simply from the variability of the noise levels inthe 2 filter sets
Requiring an SNR of 6 dB in three out of four frequencies drops the probability ofpassing an ear with significant hearing loss to 1 or less
Note By the binomial distribution two of three frequencies at gt84 dB or three ofsix frequencies at gt7 dB should also ensure less than 1 probability ofpassing a moderately-severe hearing-impaired infant
Preliminary trials with infants indicate that the testerrsquos technique is the single mostimportant variable in the pass rate on normal-hearing infants Some testers pick up thetechnique (see ldquoPrepare patient for testingrdquo ) with only a couple of daysrsquo practiceproducing pass rates comparable to those for other DPOAE equipment they have usedfor months other testers take longer
Occasional claims of extraordinarily low probabilities of not detecting an ear with hearingloss appear to be based on poor statistics As discussed by Gorga (Mayo ClinicTeleconference 1998) since the incidence of significant hearing loss is roughly 2 per 1000 verifying 997 accuracy would require testing hundreds of thousands of babieswith a given system To demonstrate that only 3 babies out of 1000 with hearing losswere not detected would require follow-up testing of 500000 babies To our knowledgeno one has performed such tests to date
Directions for use Appendices 55
Appendix E Configurations and test protocolsNote The protocols Included are DP 4s (default) and DP 2s
Name No ofFrequencies
F2 Frequency L1L2 Maximum AverageTime
PassSNR
PassingFrequency forTest Pass
DP 4s 4 20 30 40 50 kHz 6555 4 seconds 6 dB 3
DP 2s 4 6555 2 seconds 6 dB 3
Note The DPOAE protocols differ in the amount of averaging time per frequencyThe DP 4s protocol is the default This averaging time is the time thescreener uses to render a decision on that frequency The DP 2s (2 second)protocol uses 2 seconds per frequency and results in faster test times at aminimum of 8 seconds However it may increase the false referral rateThe DP 4s (4 second) protocol uses 4 seconds averaging time perfrequency and results in slower test time at a minimum of 16 seconds pertes However it may reduce the false referral rate
56 Appendices Welch Allynreg OAE Hearing Screener
Appendix F Approved optionsItem
Wireless Thermal Printer Kit
Directions for use Appendices 57
- Contents
- Symbols
-
- Documentation symbols
- Regulatory symbols
-
- About warnings and cautions
-
- Warnings and cautions
- Customer responsibility
- Safety precautions
- StatusError messages
-
- Display messages
- Indicator lights (LEDs)
-
- Introduction
-
- Introduction
- OAE functionality
- Distortion product otoacoustic emissions
- OAE emission results
- Frequency Range tested
- Results storage and reporting
- Sensitivity and specificity
-
- Setup
-
- Unpack the system
- Cradle
- Charge the battery
-
- Battery status indicator
- Charge the battery using the USB port
- Charge the battery using the cradle
-
- Install the probe
- Attach the probe tube
- Eartips
-
- Attach and remove the eartips
-
- Probe holder
-
- Attach the probe holder
-
- Clock settings
-
- Access the clock menu
- Change the clock mode
- Change the date and time
-
- Device settings
-
- Control panel
- Access menus
- Device settings
- Bluetoothreg device pairing
-
- Pair the screener and Bluetooth device
- Select a Bluetooth device
-
- Clear test results
- Minimum amplitude
- Change the language
- Reset to default
-
- Reset to default settings
-
- Operating instructions
-
- Turn on the screener
- Automatic shutdown interval
-
- Change the automatic shutdown interval
-
- Main menu
- Select the test protocol
- Prepare the patient for testing
- Start a test
- AutoStart probe check
-
- Troubleshoot the AutoStart probe check
-
- Test results
-
- Test phase
- Graph styles
-
- SNR bar graph view
- Value graph view
- Change graph style
-
- Test techniques
-
- Test an infant
- Test children with pressure equalizer tubes
-
- Noise sources
- View results
-
- Repeat an inconclusive test
-
- Manage results
-
- Results storage and reporting
- SaveStore test results mode
-
- SAVE LR mode
- SAVE 250 mode
- Change the SAVE mode between SAVE LR and SAVE 250
- View patient names
-
- Delete test results
-
- Delete results in SAVE LR mode
- Delete results in SAVE 250 mode
-
- Connect the screener to a computer
- Connect the screener cradle to a computer
- Connect the screener to a computer using Bluetooth
- Pair the screener and Bluetooth device
- Print to a thermal printer
-
- Understand printed results
-
- DPOE printout
- Rounding results
-
- Clean and disinfect
-
- Clean and disinfect
-
- Maintenance
-
- General maintenance
- Calibrate the screener
- Replace the probe tube
- Troubleshooting
- Repairs
-
- Standards and compliance
-
- General compliance and standards
-
- Appendices
-
- Appendix A Specifications
-
- Probe specificiations
- Instrument specifications
- Power supply specifications
- Environmental requirements
-
- Appendix B Flowchart Measurement
- Appendix C Test sequence
-
- AutoStart phase
- Calibration phase
- Test phase
- Variations in the SNR Estimate
-
- Appendix D PassRefer criteria
- Appendix E Configurations and test protocols
- Appendix F Approved options
-
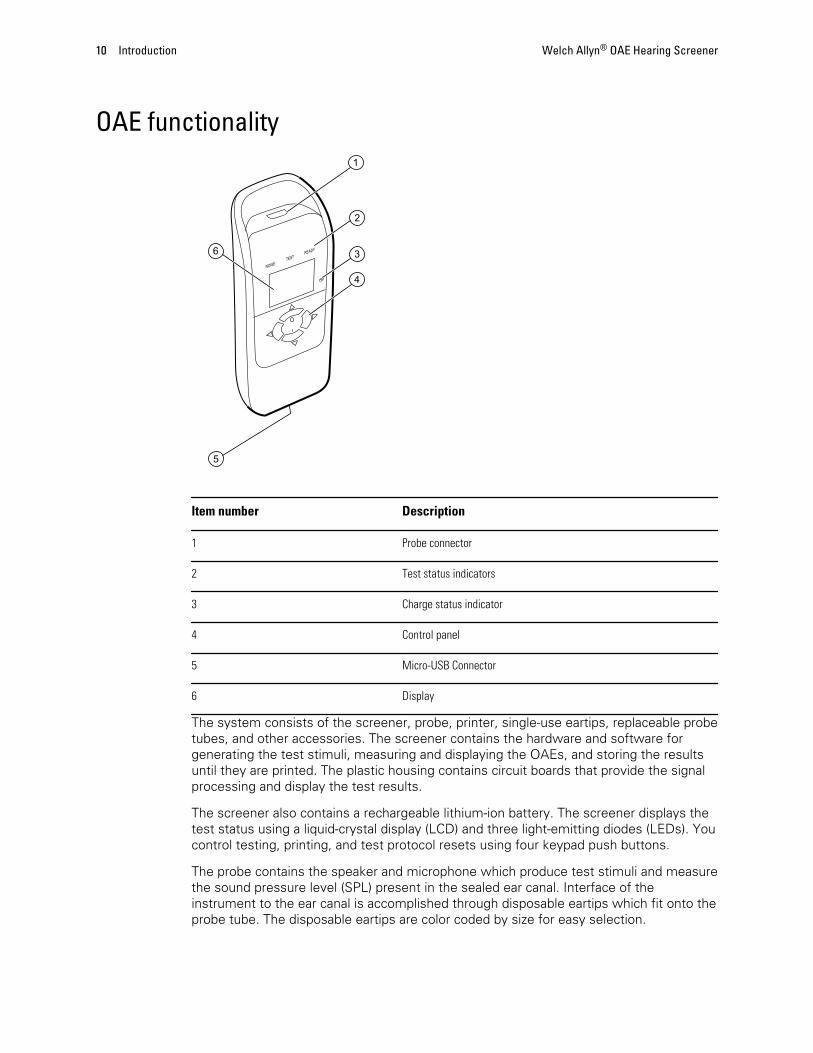
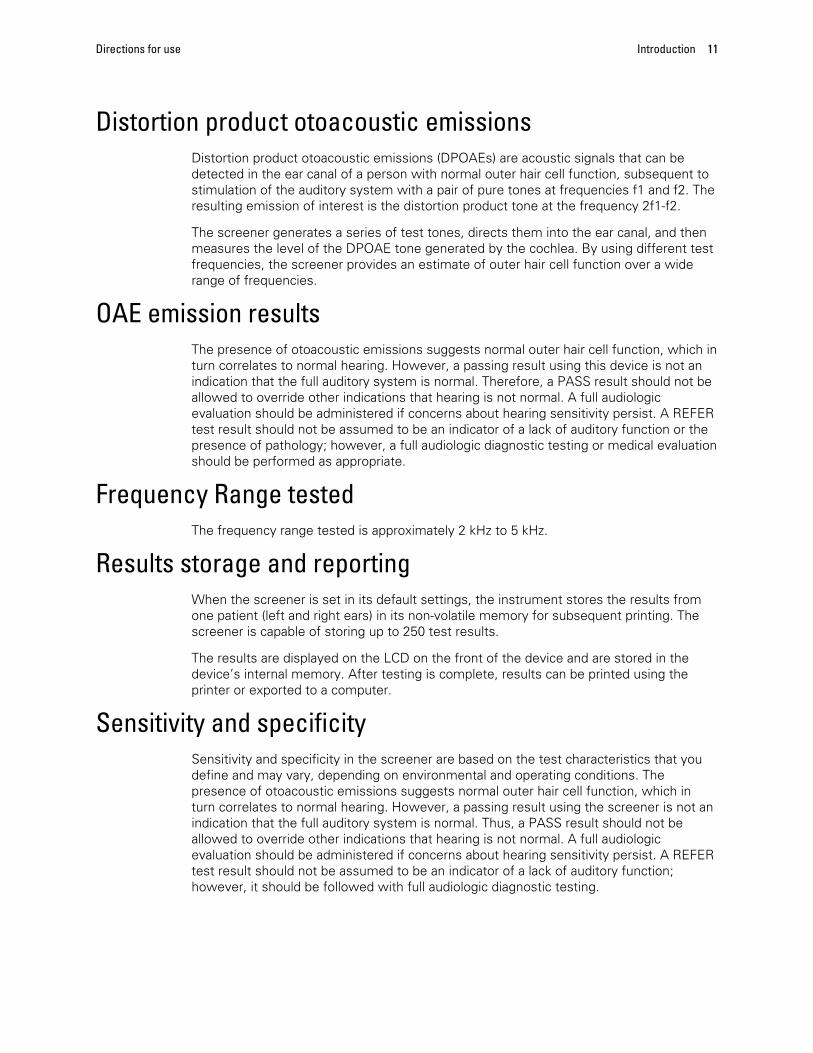
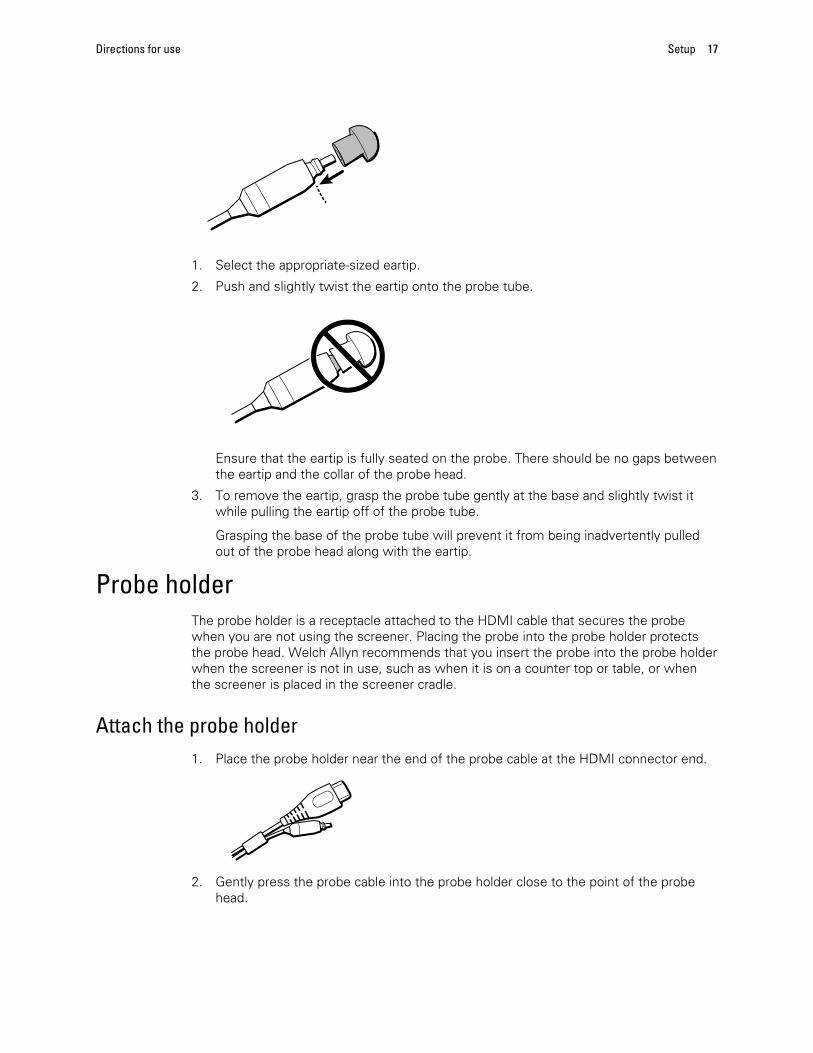
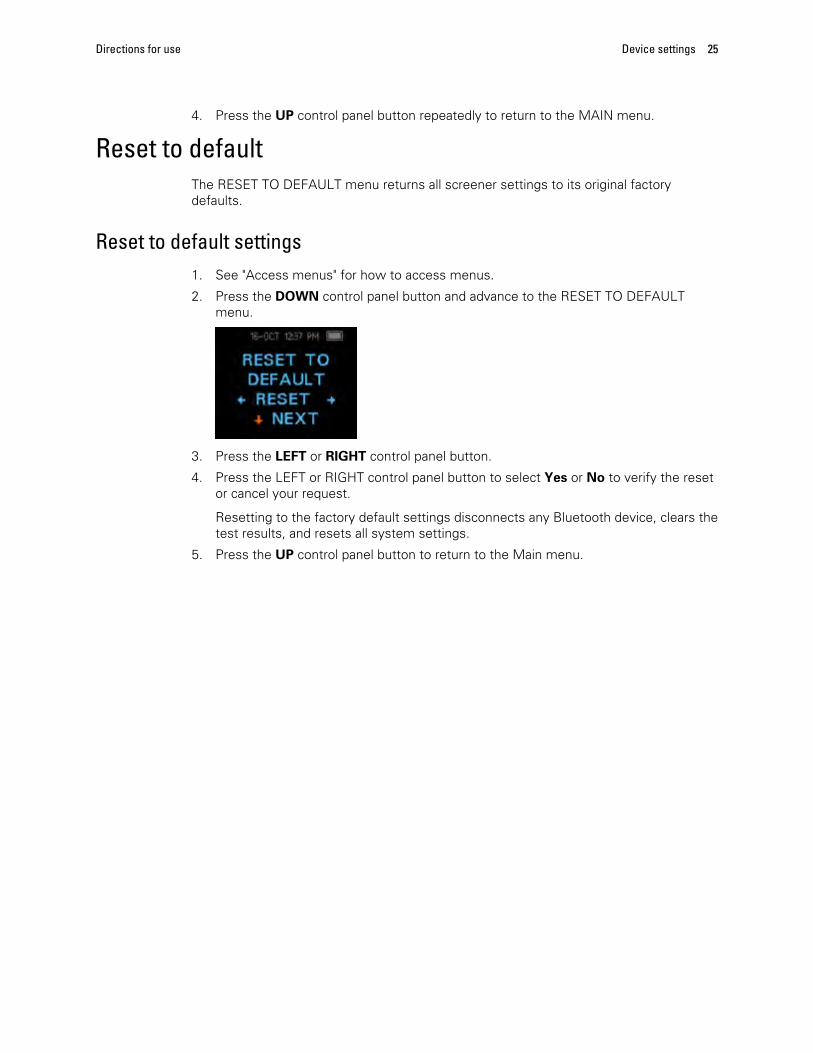
4 Press the UP control panel button repeatedly to return to the MAIN menu
Reset to defaultThe RESET TO DEFAULT menu returns all screener settings to its original factorydefaults
Reset to default settings1 See Access menus for how to access menus
2 Press the DOWN control panel button and advance to the RESET TO DEFAULTmenu
3 Press the LEFT or RIGHT control panel button
4 Press the LEFT or RIGHT control panel button to select Yes or No to verify the resetor cancel your request
Resetting to the factory default settings disconnects any Bluetooth device clears thetest results and resets all system settings
5 Press the UP control panel button to return to the Main menu
Directions for use Device settings 25
26 Device settings Welch Allynreg OAE Hearing Screener
Operating instructions
Turn on the screenerPress the DOWN control panel button located below the display screen
A yellow TEST light appears briefly above the display The green READY lightremains constant indicating that the screener is ready to use A Flash Screenappears briefly displaying the software version serial number calibration date andtype of instrument such as SCR Screener with DP
Automatic shutdown intervalThe screener has an automatic shutdown feature designed to prolong battery life Thescreener automatically shuts down after two (2) minutes of inactivity but the interval canbe adjusted
The interval choices are
bull 30 seconds
bull 1 minute
bull 2 minutes
bull 4 minutes
See ldquoChange the automatic shutdown intervalrdquo for directions on how to select adifferent interval
Note To power on the screener from the MAIN menu press the DOWN controlpanel button To power off the screener manually from the MAIN menupress the UP control panel button
Change the automatic shutdown intervalThe POWER OFF menu enables you to change the automatic shutdown interval
1 See Access menus for how to access menus
2 Press the DOWN control panel button to advance to the POWER OFF menu
27
3 Press either the LEFT or RIGHT control panel button to change to the desiredinterval
4 Press the UP control panel button repeatedly to return to the MAIN menu
Main menuThe main menu has six regions Starting at the top-left corner of the menu and movingclock-wise they are
Number Item Definition
1 Date and time The daymonth time and AMPM
2 Battery status Displays the amount of charge remaining or the charging statuswhen plugged into a mains outlet with the Micro-USB cable
3 Selected protocol Displays one of two protocol options DP 4s and DP 2s
4 Start right ear test Press to start a right ear test
5 Change protocol and settings Press to change a protocol or screener settings See InstrumentSettings for more information
6 Start left ear test Press to start a left ear test
28 Operating instructions Welch Allynreg OAE Hearing Screener
Select the test protocolThe OAE screener provides two (2) protocol options DP 4smdashtesting at a maximum timeof 4 seconds per frequency and DP 2smdashtesting at a maximum time of 2 seconds perfrequency The last protocol that was used is shown on the Main menu
1 Press the LEFT or RIGHT control panel button on the Main menu
The Change Protocol menu appears
2 Press the LEFT or RIGHT contorl panel button to select the desired protocol
3 Press the UP control panel button repeatedly to return to the Main menu and begintesting
4 Press the Down control panel button to access the device menus
See ldquoAppendix E Configurations and test protocolsrdquo for further information on protocolsettings
Prepare the patient for testingOtoscopic examination of the patientrsquos ear canals is recommended prior to testingExcessive cerumen or vernix in the ear canals may interfere with the test and give invalidor incomplete results Patients with excessive cerumen vernix debris or foreign bodiesin the ear canals should be referred to a physician or other qualified health careprofessional for removal of the blockage prior to testing
1 Place the patient in a position that will allow easy access to the ear canal
2 Instruct the patient to remain quiet and still during the test
Start a test1 See Access menus for how to access menus
2 Gently pull up and back on the outer ear during eartip insertion to straighten the earcanal and ensure proper placement and seal
3 Gently insert the eartip into the ear canal It should fit snuggly and comfortably
Note The best test results are obtained when an eartip is insertedinto the ear canal instead of flush with the ear canal
4 Press either the LEFT or RIGHT control panel button for the TEST menu to selectwhich ear is tested
After the ear to be tested is selected the AutoStart Probe Check beginsautomatically
5 Repeat steps 1ndash3 to test the opposite ear
AutoStart probe checkThe Probe Check display shows a cone larger at the left and tapering toward the rightrepresenting the ear canal volumemdashfrom left to rightmdashfrom very large (blue area) to verysmall (orange area)
Where the vertical white bar appears indicates the measured ear canal volume
Directions for use Operating instructions 29
Ear canal volume Explanation
BlueThe ear canal volume is too large for the test to begin The probe is not in the ear orthere is a large leak
GreenThe ear canal volume is in the target range for testing The test will begin automaticallyif the probe fit is stable
OrangeThe ear canal volume is too small for the test begin The eartip may be pressed againstthe ear canal wall or the probe tube may be completely clogged
Troubleshoot the AutoStart probe checkAppropriate adjustments of the eartip position and size selection should be made untilthe indicator falls within the green area and remains stable If the test will not progresspast the AutoStart probe check stage
1 Change the probe tube
2 Confirm that the probe connector is fully seated in the socket
3 Run the AutoStart probe check again
30 Operating instructions Welch Allynreg OAE Hearing Screener
Test results
Test phase
The screener automatically performs a calibration at the start of each test Duringcalibration a series of tones are sent to the ear canal to calibrate the levels of thefrequencies to be tested Following calibration of the test tones the test phase beginsautomatically
Note Press the UP control panel button to abort a test in progress No record ofan aborted test is saved in memory
Graph stylesThe results of a test are displayed as a graph The graph is generated and shown duringthe test and can be viewed after the test is complete
There are two graph options for viewing the results
bull The default view is a signal-to-ratio (SNR) bar graph It displays the SNR for each DPtest frequency
bull The value graph view displays the absolute emission and noise levels for each DPtest frequency
SNR bar graph view
The default SNR bar graph view displays the emissions and noise floor (NF) as they aremeasured Each column represents one DP test frequency The height of each columnrepresents the SNR being measured
The horizontal green line at the decibel level corresponding to the SNR indicates the levelrequired for a PASS A green bar indicates a PASS and a yellow bar indicates a REFER
See ldquoChange graph stylerdquo for instructions on how to switch the graph views betweenSNR bar graph and value graph
31
Value graph view
The value graph view uses different colors and symbols to differentiate the DP testfrequency for the left and right ear tests
bull Left ear Dark blue line with ldquoxrdquo symbols indicate the DP test frequencies
bull Right ear Red line with circles indicate the DP test frequencies
On both the left and right ear value graphs inverted triangles on a light blue linerepresent the NF at each DP test frequency
See ldquoChange graph stylerdquo for instructions on how to switch the graph views betweenSNR bar graph and value graph
Change graph styleThe Graph menu enables you to change between the SNR and value graph views
1 See Access menus for how to access menus
2 Press the DOWN control panel button to access the GRAPH menu
3 Press the LEFT or RIGHT control panel button to change between the SNR andvalue graph views
Test techniquesAs with other OAE test instruments there are techniques to learn when using thescreener especially when screening infants Experience with existing OAE systemssuggests that it may take up to three (3) months to become completely proficient inscreening infants
Test an infant
Note The best test results are obtained when an eartip is inserted into the earcanal instead of flush with the ear canal
When testing an infant with the screener the infant has to be relatively quiet and calm itis preferable that the infant be sleeping If the infant is awake
32 Test results Welch Allynreg OAE Hearing Screener
1 Use a pacifier to calm the infant however sucking adds noise to the test anddecreases the likelihood of a PASS result
2 Press either the LEFT or RIGHT control panel button to select which ear is tested
3 Pull gently down and back on the pinna to straighten the ear canal
4 Gently insert the eartip into the ear canal It should fit snuggly and comfortably
5 Repeat steps 2ndash4 to test the opposite ear
Test children with pressure equalizer tubesDisable the AutoStart probe check when testing children with pressure equalizer (PE)tubes
1 Pull gently up and back on the outer ear to straighten the ear canal
2 Insert the probe with the appropriate eartip into the ear canal and obtain a properseal
3 Press and hold the arrow key that corresponds to the ear being tested until thegreen READY light turns off
4 Release the arrow key
The screener calibrates and tests as before applying the appropriate in-the-earstimulus intensity levels for patients with PE tubes
5 Repeat steps 1-4 to test the opposite ear
Noise sources
When the noise level exceeds the noise rejection limit of the screener the red NOISElight appears It is common for the red NOISE light to appear while testing The lightappears infrequently if the noise level in the ear canal is low and it appear morefrequently if the noise level in the ear canal is high
OAEs are very low-level sounds Any noise in the ear canal at the time of testing canmask this emission This noise can come from a variety of sources
The largest source of noise usually comes from the patient This is biological noise suchas movement coughing sucking talking and the like The patient must be calm and notmove or talk Ambient noise in the testing environment also can be a large source ofnoise during the test A properly sealed eartip blocks much of this noise but performingthe testing in a relatively quiet environment is recommended
View resultsWhen testing is complete the green ldquoREADYrdquo light is illuminated and the results for theear tested appears The results screen indicates the test ear and gives the results of thetest
The results are automatically saved in memory as soon as the test completes Theresults are saved even if the screener is turned off or the battery is depleted
Note When the screener is operating in the Save LR Mode the screener savesonly the last test for each ear Starting a new test for the same earoverwrites the existing test
Directions for use Test results 33
The possible test results are
bull PASS The ear tested passed screening
bull REFER The ear tested did not pass screening
bull NOISY Excessive noise was present during the test
bull NO SEAL A seal was not maintained throughout the test
bull FIT ERR Inadequate probe placement in the ear canal to produce target stimulusintensities
See ldquoManage test resultsrdquo for more information on managing results and how to print ortransfer those results to the Welch Allyn Data Manager
See ldquoSave resultsrdquo for more information on the screener save mode options
Repeat an inconclusive testA conclusive test has a PASS or REFER result Repeat the test if the test result isNOISY NO SEAL or FIT ERR
1 Reposition the probe selecting a different size eartip if necessary
2 Follow the directions that begin in ldquoSelect a protocolrdquo to retest the patient
3 To review the results press the DOWN control panel button to return to the bargraph
4 After reviewing the results press the DOWN control panel button to return to theResults screen or the UP control panel button to return to the Main menu
34 Test results Welch Allynreg OAE Hearing Screener
Manage results
Results storage and reportingWhen the screener is set in its default settings the instrument stores the results fromone patient (left and right ears) in its non-volatile memory for subsequent printing Thescreener is capable of storing up to 250 test results
The results are displayed on the LCD on the front of the device and are stored in thedevicersquos internal memory After testing is complete results can be printed using theprinter or exported to a computer
SaveStore test results modeThe screener automatically saves the results of completed tests in the non-volatilememory even if the battery is temporarily discharged However the screener is notintended for long-term storage of test results
Note You are strongly encouraged to print or transfer all test results at thecompletion of testing to avoid potential loss of data
The screener has two operating modes for saving and storing test results
bull SAVE LR
bull SAVE 250
SAVELR is the default operating mode
SAVE LR modeWhen operating in the default SAVE LR mode the screener saves the most recent testresults for each ear and prints or transfers only these results This allows you to retest apatient after a REFER result and to print or transfer only the most recent test result foreach ear
Welch Allyn recommends that you print the results after each patient when using thedefault mode
SAVE 250 modeWhen operating in the SAVE 250 mode the screener can save up to 250 tests There aretwo methods of using the SAVE 250 mode
35
bull When not used with the Welch Allyn Data Manager (data manager) the screenerautomatically numbers each test from 1 to 250 When using the SAVE 250 testmode for numbered tests keep a record of the test number for each patient in orderto synchronize the numbered test with the correct patient
bull When used with the data manager the data manager transfers patient names to thescreener and the screener displays the names
When not used with the data manager each test is automatically incremented startingwith test number 1
When the screener is used with the data manager the patient names are displayed onthe screener in the same order as they are displayed in the data manager See ldquoViewpatient namesrdquo for directions on how to scroll between patient names
Welch Allyn recommends that you go to the Test Results clear screen to clear anyprevious memory locations after you change the save mode setting See ldquoClear testresultsrdquo for directions
When the screener reaches 245 saved tests you are warned that the memory is almostfull When the screener reaches 250 saved tests the memory is full and no further testscan be done Do one of the following
bull Print the results
bull Transfer the results to the PC software
bull Clear the results from memory
Change the SAVE mode between SAVE LR and SAVE 250
1 See Access menus for how to access menus
2 Press the DOWN control panel button to advance to the the SAVE LR screen
3 Press the LEFT OR RIGHT control panel button to change between the SAVE LR(single) setting and SAVE 250 (multiple) setting
4 Press the UP control panel button repeatedly to return to the MAIN menu
View patient namesWhen patient names are uploaded from the data manager to the screener the patientnames are displayed on the screener in the same order that they are displayed in thedata manager The first name shown is labeled Unnamed to allow tests to beconducted on patients whose names have not been transferred
To move to a different patient name than the one displayed on the screener pressthe LEFT or RIGHT control panel button to advance through the names until thedesired patient name appears
36 Manage results Welch Allynreg OAE Hearing Screener
Delete test resultsThe screener holds data in non-volatile memory The data stays in the memory evenafter data is printed on the thermal printer or downloaded to the data manager The savemode determines how data is deleted
Delete results in SAVE LR modeThe most recent test for the left ear and the most recent test for the right ear is held inmemory Data is deleted when a new test for the left or right ear is completed
1 See Access menus for how to access menus
2 Press the DOWN control panel button to advance to the X TEST RESULTS menu Xrepresents the number of tests held in memory in the screener
3 Press the LEFT or RIGHT control panel button
4 Press the LEFT or RIGHT control panel button and then press the appropriate LEFTor RIGHT control panel button to select YES or NO to verify or cancel your choice
If you select YES the data is cleared from the screener After printing results ortransferring data to your PC software all tests saved in memory are marked fordeletion and are permanently deleted when a new test is started It is not necessaryto manually clear these results
Delete results in SAVE 250 modeData is deleted when new Patient Names are uploaded from the data manager to thescreener A warning is provided that data will be deleted Data can be deleted in thescreener from the data manager when the screener is connected to the data manager bythe USB cable orby bluetooth When Names is selected the window allows data to bedeleted using the Clear Instrument button
To delete data using the TEST RESULTS menu
1 See Access menus for how to access menus
2 Press the DOWN control panel button to advance to the TEST RESULTS screen
3 Press the LEFT or RIGHT control panel button
4 Press the LEFT or RIGHT control panel button and then press the appropriate LEFTor RIGHT control panel button to select YES or NO to verify or cancel your choice
If you select YES the data is cleared from the screener After printing results ortransferring data to your PC software all tests saved in memory are marked fordeletion and are permanently deleted when a new test is started It is not necessaryto manually clear these results
Connect the screener to a computer1 Power on the screener and ensure that the screener is charged
2 Plug the micro-USB connector into the port on the bottom of the screener
3 Plug the USB connector into a USB port on the computer
4 Power on the computer and then launch the data manager
The message ldquoWaiting on computerrdquo appears on the screener
Directions for use Manage results 37
5 Begin data or name transfers
Connect the screener cradle to a computerUse a standard USB-A to USB-B cable to connect the screener cradle to a computer
1 Power on the screener and ensure that the screener is charged
2 Plug the USB-B connector into the port on the back of the screener cradle
The cradle does not need to be connected to a mains outlet for data transfer
3 Plug the USB-A connector into a USB port on the computer
4 Place the screener in the cradle
5 Power on the computer and then launch the data manager
The message ldquoWaiting on computerrdquo appears on the screener
6 Begin data or name transfers
You must use a USB-A to USB-B cable between the cradle and the computer for datatransfer The micro-USB port on the cradle does not support data transfer Use the cradlefor recharging the screener when power is supplied to the either the micro-USB or theUSB-B port Use the micro-USB port on the bottom of the screener for both data transferand recharging
Connect the screener to a computer using Bluetooth1 Power on the screener and ensure that the screener is charged
2 Power on the computer and then launch the data manager
The message ldquoWaiting on computerrdquo appears on the screener
3 If this is the first time the screener is being connected using Bluetooth then on theTransfer section of the Home tab click Detect Com Port
4 Ensure that the screener is paired to your computer
Pairing is only required upon initial data transfer
5 On the Main menu of the screener press the UP control panel button
The BT menu appears
6 Press the LEFT or RIGHT control panel button to begin data or name transfers
Pair the screener and Bluetooth deviceNote When pairing to a computer for use with the data manager confirm the
computer has Bluetooth availability or a Bluetooth dongle will be requiredConfirm the Bluetooth settings of the computer lsquoAllow Bluetooth devicesto find this PClsquo
1 Turn on the device to be paired with the screener
2 On the screener navigate to the New BT Device menu
3 Press the LEFT or RIGHT control panel button to initiate discovery of availableBluetooth devices
The screener searches for available Bluetooth devices for approximately 15 secondsDuring this time the message Please Wait appears on the screen The yellow LEDlight flashes
38 Manage results Welch Allynreg OAE Hearing Screener
4 When the correct computer appears on the screen press the DOWN control panelbutton to pair the screener and computer
The message Add a device appears on the computer
5 Select this notice and then enter PIN 1234
6 The first time the data manager software is launched select Detect Com Port tofinalize the screener and computer connection
7 To cancel the pairing process press the CANCEL control panel button
The screener returns to the Main menu
Print to a thermal printerYou must have an optional Bluetooth-enabled thermal printer to print from the screenerSee ldquoPair the screener and Bluetooth devicerdquo for directions You can only pair onedevice with the screener at any given time
1 Confirm that the printer is on and ready for printing
2 Confirm that the screener is paired with the printer
3 From the main menu press the UP control panel button
The CONNECT TO PRT screen appears
4 Press the LEFT or RIGHT control panel button to connect to the printer
The screener searches for the paired printer when the screener pairs with theprinter all stored results print All printed test results are marked for deletion but arestored in memory until a new test is started This enables you to reprint the tests ifprinting was unsuccessful due to the paper running out or other issue This alsoallows you to transfer test data to the data manager for long term storage before youstart a new test When a new test is started all tests in the screener memory areerased The screener turns off automatically when printing is complete
Directions for use Manage results 39
40 Manage results Welch Allynreg OAE Hearing Screener
Understand printed results
DPOE printoutThe following information is provided for each test
bull The time and date of the test based on the setting of the internal clock if the clockis set correctly this time and date will be correct
bull The test number (if operating in SAVE 250 mode)
bull The protocol selected (for example DP 2S)
bull The averaging time used for this test (for example 2 sec avg)
bull InstrumentProbe serial number (SN)
bull The software version number (for example V10101)
bull The ear selected (Right or Left)
bull A PASSREFER indication
bull The f2 frequency in kHz (for example 20 30 40 50)
bull The NF in dB SPL
bull The emission level (DP) intime dB SPL
bull The SNRmdashDP level minus the NFmdashin dB
Rounding resultsThe SNR and single PASS criterion are calculated from the full internal precision of thescreener and not from the rounded values shown in the printout for the emission (DP)and NF estimates
This approach is used to preserve the full precision of the test results but can result insome apparent errors in the printout due to the effects of rounding Assume that theactual values at a given frequency were DP = 55 dB and NF = -04 dB which results in aSNR = 59 dB The printout values are rounded up to the nearest integer and are shownas DP = 6 NF = 0 and SNR = 6 This can result in what appears to be an error based onthe PASS criterion If the PASS criterion is 6 dB while the actual SNR is 59 the printedvalue will be 6 but the frequency will not be judged as a PASS with a ldquoPrdquo printed
41
42 Understand printed results Welch Allynreg OAE Hearing Screener
Clean and disinfect
Clean and disinfectWARNING Eartips are for single patient use only
WARNING Use a new eartip for each patient
External parts of the screener and probe can be cleaned to remove visible particulatecontamination
CAUTION Do not insert any object into probe
CAUTION Do not immerse the instrument or probe in fluids or attempt tosterilize the instrument or any of its accessories
CAUTION Do not allow any fluid to enter the device
CAUTION Do not use autoclave sterilization
CAUTION Do not use alcohol-based disinfectants
CAUTION Do not put excessive pressure on the clear display window
CAUTION Do not puncture the display window or control panel
CAUTION Long-term exposure to disinfecting agents has the potential toalter the material properties of the plastic housing and labeling of thedevice
CAUTION Always follow the safety and disposal guidelines for cleaningand disinfectant chemicals provided by the manufacturer
Note The probe tube which does not make direct contact with the patientshould be replaced if there is any sign of contamination or if the test willnot progress past the AutoStart phase You do not need to disinfect theprobe tube between patients
This instrument is not designated as a lsquosterilersquo device Welch Allyn believes low-leveldisinfecting is appropriate for this type of instrument External parts of the screener and
43
probe can be cleaned to remove visible particulate contamination Wiping the housingand probe exterior with a mild non-alcohol based disinfecting solution using a clean clothor towel provides a suitable form of cleaning and low-level disinfecting Perform thisprocess weekly or as often as conditions warrant to prevent a build-up of dirt fromnormal handling and use
The disinfecting materials and procedures applied in your facility may be more stringentfor your circumstances than the methods outlined above The frequency of cleaning anddisinfecting is dependent on your facilityrsquos risk assessment usage and testenvironment
44 Clean and disinfect Welch Allynreg OAE Hearing Screener
Maintenance
General maintenanceCAUTION A defective screener should not be used Confirm that allconnections to external accessories are seated and secured properly Partswhich may be broken or missing or are visibly worn distorted orcontaminated should be replaced immediately with clean genuinereplacement parts manufactured by or available from Welch Allyn
The screener requires no regular maintenance beyond routine cleaning and annualcalibration Replace the probe tube if it becomes clogged
The screener is not user repairable Repairs and battery replacement must be performedonly by a qualified Welch Allyn service representative
Annual calibration is recommended An authorized service technician should performelectrical safety checks in order to maintain continued compliance with IEC and UL60601-1
Calibrate the screenerCalibrate your screener every 12 months for measurement accuracy
Replace the probe tubeProbe tubes are disposable and should be replaced when they become cloggedReplacement probe tubes are included with the screener
1 Grasp the probe head with the fingertips of one hand
2 Use the eartip to grasp the clear plastic probe tube with the fingertips of your otherhand
3 Twist the probe head slightly while pulling the eartip and probe tube straight out ofthe probe head
4 Dispose of the used probe tube immediately to avoid confusing used tubes and newtubes
5 Insert a new probe tube into the probe head until it is fully seated
A properly inserted probe tube snaps securely into place when it is fully seated in theprobe head
45
CAUTION Do not attempt to clean probe tubes This maycause damage to the probe head
TroubleshootingProblem Solutions
Instrument does not turn on bull Press the DOWN arrow until the Yellow LED light appearsbull Connect the charger Confirm that blue Charging LED is illuminating in a slow
blink pattern Wait at least 10 minutes and then attempt to turn on the screenerbull If the problem persists contact Welch Allyn Technical Support
wwwwelchallyncomaboutcompanylocationshtm
The test will not start bull Select a different sized eartip
bull Reposition the probe
bull Be sure the probe cable is secured with the shirt clip
bull Change the probe tube
bull Verify from the probe check during AUTOSTART that the eartip is sealed in theear canal
bull Check that the instrument will start in your own ear using the proper eartip foryour ear If the test will not start or if the AutoStart tones sound unusual replacethe probe tube
bull If the problem persists across several patients contact Welch Allyn TechnicalSupport wwwwelchallyncomaboutcompanylocationshtm
The results will not print bull Check the printer status Turn the printer on or wake from sleep mode
bull If the printer does not turn on plug in the power supply to charge the battery
bull Confirm that the printer has paper
bull If paper comes out of the printer but there is no text on the paper then the paperis inserted backwards
bull Rapidly press the large printer button twice to run a demonstration print
bull If the problem persists contact Welch Allyn Technical Supportwwwwelchallyncomaboutcompanylocationshtm
Display is frozen and instrumentwill not respond to buttonpresses
bull Press and hold the UP arrow for 10 seconds to force the instrument to power offPowering the instrument on should resetrestore normal function
bull If the problem persists contact Welch Allyn Technical Supportwwwwelchallyncomaboutcompanylocationshtm
46 Maintenance Welch Allynreg OAE Hearing Screener
Message Solutions
Attach Probe bull Probe not detectedbull Check that the probe connector is fully seated in the socketbull Disconnect and reconnect the probebull Cycle instrument power
BT Device Not Found bull Paired to Printer Check that the printer is turned on Move closer to the printer Try again
bull Paired to PC Computer or Bluetooth dongle Check that the serial port is open Establishing the serial port is handled by the PC
andor the software not by the Welch Allyn OAE Screener
BT Error xxx bull Check BT device (printer or PC) statusbull Attempt to connect to BT device againbull If the problem persists contact Welch Allyn Technical Support wwwwelchallyncom
aboutcompanylocationshtm
BT Not Configured bull Printing has been attempted but no BT device is paired with the Welch Allyn OAEScreener Establish Bluetooth pairing
Device Not Responding bull The printer is not responding to queries from the instrument Check printer status
Due for service Verify Device date time is set correctly
Annual calibration is due Reminder message will re-appear every 24-hour period until re-calibrated Contact Welch Allyn to schedule annual calibration
Fit Error Cannot Obtain bull The desired intensity level (L1 or L2) cannot be obtained within allowable limits Usershould refit the probe and retry the test
bull Replace the probe tubebull If the problem persists across several patients contact Welch Allyn Technical Support
wwwwelchallyncomaboutcompanylocationshtm
Fit Error Too High bull The level of the calibration tone is too high Refit the probe and retry the testbull Replace the probe tubebull If the problem persists across several patients contact Welch Allyn Technical Support
wwwwelchallyncomaboutcompanylocationshtm
Fit Error Too Low bull The level of the calibration tone is too low User should refit the probe and retry the testbull Replace the probe tubebull If the problem persists across several patients contact Welch Allyn Technical Support
wwwwelchallyncomaboutcompanylocationshtm
Limit Error bull Overflow error during the calculation of the DFTs for a DP test Repeat the testbull Cycle instrument powerbull If the problem persists contact Welch Allyn Technical Support wwwwelchallyncom
aboutcompanylocationshtm
Directions for use Maintenance 47
Message Solutions
Memory almost full bull Saved tests are within 5 tests of the maximum limit Print or transfer test results to avoidinterruption in testing
Memory Full bull The maximum number of saved tests has been reached Clear the memory in order toperform additional tests
Power Low bull The battery charge level is too low for operation Charge the battery in order to performadditional tests
Printer Error bull Indicates a problem with the printerbull Check the printer statusbull Reset the printer or cycle the printer power
Printer Paper Out bull Replace the paper roll
TimeDate Error bull The clock is checked during power on to ensure it has not lost time and been reset In thecase of clock reset this message is shown Set the correct datetime
RepairsA Welch Allyn Service Center must perform all repairs on products under warrantyunless you have purchased a Welch Allyn Partners in Care Biomed agreement allowingyou to service the device while under warranty
CAUTION Unauthorized repairs will void the product warranty
Qualified service personnel or a Welch Allyn Service Center should repair products out ofwarranty
If you are advised to return a product to Welch Allyn for repair or routine maintenanceschedule the repair with the service center nearest you
Welch Allyn Technical Support
If you have a problem with the device that you cannot resolve call the Welch AllynTechnical Support Center nearest you for assistance A representative will assist you introubleshooting the problem and will make every effort to solve the problem over thephone potentially avoiding an unnecessary return
If your product requires warranty extended warranty or non-warranty repair service aWelch Allyn Technical Support representative will record all necessary information toissue a RMA number The support representative will provide you with the address ofthe Welch Allyn Service Center to send your device to
Technical support is available during local business hours
48 Maintenance Welch Allynreg OAE Hearing Screener
Standards and compliance
General compliance and standardsThe Welch Allyn OAE screener complies with the following standards
Standard Issue Date Title
ANSIASA 36 2010 Specification for Audiometers
IEC 60601-1 2005 Medical Electrical Equipment ndash GeneralRequirements for Basic Safety andEssential Performance Ed 3
IEC 60645-1 2004 Electroacoustics - Audiologicalequipment -- Part 1 Pure-toneaudiometers
IEC 60645-3 2007 Electroacoustics - Audiometricequipment -- Part 3 Test signals ofshort duration
IEC 60645-6 2010 Electroacoustics ndash AudiometricEquipment ndash Part 6 Instruments for themeasurement of otoacoustic emissions
ISO 14971 2007 Application of Risk Management toMedical Devices
ISO 10993 2009 Biological Evaluation of MedicalDevices
EN 60601-1-2 2007 Medical electrical equipment -- Part1-2 General requirements for basicsafety and essential performance -Collateral standard Electromagneticcompatibility - Requirements and Tests
FCC Part 15 FCC 47CFR Part 15247 amp 15249(Bluetooth)
IEC 60601-1 2005 Clause 8918 Pollution DegreeClassification 2
49
Directive 200296EC-WEEEDisposal of noncontaminated electrical and electronic equipment
Many local laws and regulations require special procedures to recycle or dispose ofelectrical equipment-related waste including batteries printed circuit boards electroniccomponents wiring and other elements of electronic devices Follow all of yourrespective local laws and regulations for the proper disposal of batteries and any otherparts of this system Do not dispose of this product as unsorted municipal wastePrepare this product for reuse or separate collection as specified by Directive 200296EC of the European Parliament and the Council of the European Union on WasteElectronic and Electrical Equipment (WEEE) If this product is contaminated thisdirective does not apply
For specific disposal or compliance information contact contact Welch Allyn TechnicalSupport wwwwelchallyncomaboutcompanylocationshtm
WARNING Batteries may explode or cause burns if disassembledcrushed or exposed to fire or high temperatures
50 Standards and compliance Welch Allynreg OAE Hearing Screener
Appendices
Appendix A Specifications
Probe specificiations
Item Specification
Measurement type Distortion Product Otoacoustic Emissions (DPOAE)
Frequency range 20 to 50 kHz
Stimulus intensity 6555 dB SPL
Microphone system noise bull -20 dB SPL 2 kHz (1 Hz bandwidth)bull -13 dB SPL 1 kHz (1 Hz bandwidth)
Dimensions and weight bull Length 40 in (10 meter)bull Weight 100 oz (28 gm)
Connector HDMI
Instrument specifications
Item Specification
Power supply Lithium-Ion rechargeable battery
Battery life 15 hours on-time
Dimensions and weight Instrument Weight 64 oz (180 gm)
User interface bull OLED Display to provide user information and progress of measurementbull 4-button keypad to control instrument functions
ConnectorsCommunications bull Integrated USB communication capability for battery charging andcommunication with PC-based database programs or an optional PCprinter
51
Item Specification
bull HDMI Connector for connection to the Probebull Integrated Bluetooth Class 2 + EDR with SPP Protocol for communication
with printer
Power supply specifications
CAUTION Use only approved power supply
Item Specification
Model No UE08WCP-050160SPA
Output 50V DC 16A
Input 100-240V AC 50-60Hz 400 mA
Environmental requirements
Item Specification
Operating temperature 59degF to 95degF (15degC to 35degC)
Operating relative humidity 30 to 90 (non-condensing)
Maximum operating altitude 6000 feet (2000 meters)
Transport and storagetemperature
41degF to 104degF (5degC to 40degC)
52 Appendices Welch Allynreg OAE Hearing Screener
Appendix B Flowchart Measurement
Directions for use Appendices 53
Appendix C Test sequence
A complete test sequence consists of an
bull AutoStart
bull Calibration
bull Test phase
AutoStart phaseThe AutoStart phase determines when the calibration phase should proceed Artifactrejection is employed during the test phase to reduce the effect of transient noisebursts
Immediately after you press the test button the AutoStart phase begins AutoStartchecks both the quality and stability of the seal by measuring the response obtainedfrom a sequence of test tones The stability of the seal is determined by comparing theresponses obtained over time When the level of the response is within an acceptablerange and is stable over time the unit proceeds to the calibration phase
Calibration phaseThe calibration phase calibrates the level of the tones that will be applied during theactual test phase The calibration phase automatically measures the response obtainedfrom a sequence of calibration tones and calculates the voltage needed to obtain thedesired intensity levels If the desired peak pressure cannot be obtained the unit will usethe maximum voltage A successful calibration leads to the actual test phase
Test phaseThe test phase consists of measuring the response obtained from the pairs of testfrequencies (f1 f2) applied to the receivers Two receivers are used with each receivergenerating one frequency in order to reduce intermodulation distortion Frequencydomain estimates of the actual L1 L2 distortion (DP) and noise floor (NF) are obtainedvia the discrete Fourier Transform with a bin resolution of approximately 31 Hz The NFestimate is obtained by averaging the power in the 4 closest (+-2) bins to the DP bin
Variations in the SNR EstimateBe aware that the SNR estimate has an inherent statistical variation due to the effects ofrandom noise especially when no emission is actually present If you perform a test withthe instrumentrsquos probe placed in a test cavity theoretically the SNR will be greater than6 dB approximately 7 times out of 100 This is not a limitation of the instrument but afundamental property of the method used to estimate the SNR in all emission testing Inorder to reduce the occurrence of this ldquofalserdquo emission the instrument limits theminimum value of NF which has the effect of reducing the SNR for tests that have a lownoise floor As the noise level of the test increases the user will notice that moreldquofalserdquo emissions will appear which is to be expected
54 Appendices Welch Allynreg OAE Hearing Screener
Appendix D PassRefer criteriaThe decision that a DPOAE exists is based on detecting a signal whose level issignificantly above the background noise level This requires a statistical decision sincethe random noise level in the DPOAE filter channel can be expected to exceed theaverage of the random noise levels in the four adjacent filter channels mdash used as thereference for comparison mdash roughly 50 of the time
Extended measurements of the noise distributions in both the DPOAE filter channel ldquoDPlevelrdquo and the rms average of the 4 adjacent channels ldquoN levelrdquo indicate that the SNRratio (the difference between DP and N) has a standard deviation of 55 dB This impliesa 10 probability of seeing a 7 dB SNR simply from the variability of the noise levels inthe 2 filter sets
Requiring an SNR of 6 dB in three out of four frequencies drops the probability ofpassing an ear with significant hearing loss to 1 or less
Note By the binomial distribution two of three frequencies at gt84 dB or three ofsix frequencies at gt7 dB should also ensure less than 1 probability ofpassing a moderately-severe hearing-impaired infant
Preliminary trials with infants indicate that the testerrsquos technique is the single mostimportant variable in the pass rate on normal-hearing infants Some testers pick up thetechnique (see ldquoPrepare patient for testingrdquo ) with only a couple of daysrsquo practiceproducing pass rates comparable to those for other DPOAE equipment they have usedfor months other testers take longer
Occasional claims of extraordinarily low probabilities of not detecting an ear with hearingloss appear to be based on poor statistics As discussed by Gorga (Mayo ClinicTeleconference 1998) since the incidence of significant hearing loss is roughly 2 per 1000 verifying 997 accuracy would require testing hundreds of thousands of babieswith a given system To demonstrate that only 3 babies out of 1000 with hearing losswere not detected would require follow-up testing of 500000 babies To our knowledgeno one has performed such tests to date
Directions for use Appendices 55
Appendix E Configurations and test protocolsNote The protocols Included are DP 4s (default) and DP 2s
Name No ofFrequencies
F2 Frequency L1L2 Maximum AverageTime
PassSNR
PassingFrequency forTest Pass
DP 4s 4 20 30 40 50 kHz 6555 4 seconds 6 dB 3
DP 2s 4 6555 2 seconds 6 dB 3
Note The DPOAE protocols differ in the amount of averaging time per frequencyThe DP 4s protocol is the default This averaging time is the time thescreener uses to render a decision on that frequency The DP 2s (2 second)protocol uses 2 seconds per frequency and results in faster test times at aminimum of 8 seconds However it may increase the false referral rateThe DP 4s (4 second) protocol uses 4 seconds averaging time perfrequency and results in slower test time at a minimum of 16 seconds pertes However it may reduce the false referral rate
56 Appendices Welch Allynreg OAE Hearing Screener
Appendix F Approved optionsItem
Wireless Thermal Printer Kit
Directions for use Appendices 57
- Contents
- Symbols
-
- Documentation symbols
- Regulatory symbols
-
- About warnings and cautions
-
- Warnings and cautions
- Customer responsibility
- Safety precautions
- StatusError messages
-
- Display messages
- Indicator lights (LEDs)
-
- Introduction
-
- Introduction
- OAE functionality
- Distortion product otoacoustic emissions
- OAE emission results
- Frequency Range tested
- Results storage and reporting
- Sensitivity and specificity
-
- Setup
-
- Unpack the system
- Cradle
- Charge the battery
-
- Battery status indicator
- Charge the battery using the USB port
- Charge the battery using the cradle
-
- Install the probe
- Attach the probe tube
- Eartips
-
- Attach and remove the eartips
-
- Probe holder
-
- Attach the probe holder
-
- Clock settings
-
- Access the clock menu
- Change the clock mode
- Change the date and time
-
- Device settings
-
- Control panel
- Access menus
- Device settings
- Bluetoothreg device pairing
-
- Pair the screener and Bluetooth device
- Select a Bluetooth device
-
- Clear test results
- Minimum amplitude
- Change the language
- Reset to default
-
- Reset to default settings
-
- Operating instructions
-
- Turn on the screener
- Automatic shutdown interval
-
- Change the automatic shutdown interval
-
- Main menu
- Select the test protocol
- Prepare the patient for testing
- Start a test
- AutoStart probe check
-
- Troubleshoot the AutoStart probe check
-
- Test results
-
- Test phase
- Graph styles
-
- SNR bar graph view
- Value graph view
- Change graph style
-
- Test techniques
-
- Test an infant
- Test children with pressure equalizer tubes
-
- Noise sources
- View results
-
- Repeat an inconclusive test
-
- Manage results
-
- Results storage and reporting
- SaveStore test results mode
-
- SAVE LR mode
- SAVE 250 mode
- Change the SAVE mode between SAVE LR and SAVE 250
- View patient names
-
- Delete test results
-
- Delete results in SAVE LR mode
- Delete results in SAVE 250 mode
-
- Connect the screener to a computer
- Connect the screener cradle to a computer
- Connect the screener to a computer using Bluetooth
- Pair the screener and Bluetooth device
- Print to a thermal printer
-
- Understand printed results
-
- DPOE printout
- Rounding results
-
- Clean and disinfect
-
- Clean and disinfect
-
- Maintenance
-
- General maintenance
- Calibrate the screener
- Replace the probe tube
- Troubleshooting
- Repairs
-
- Standards and compliance
-
- General compliance and standards
-
- Appendices
-
- Appendix A Specifications
-
- Probe specificiations
- Instrument specifications
- Power supply specifications
- Environmental requirements
-
- Appendix B Flowchart Measurement
- Appendix C Test sequence
-
- AutoStart phase
- Calibration phase
- Test phase
- Variations in the SNR Estimate
-
- Appendix D PassRefer criteria
- Appendix E Configurations and test protocols
- Appendix F Approved options
-
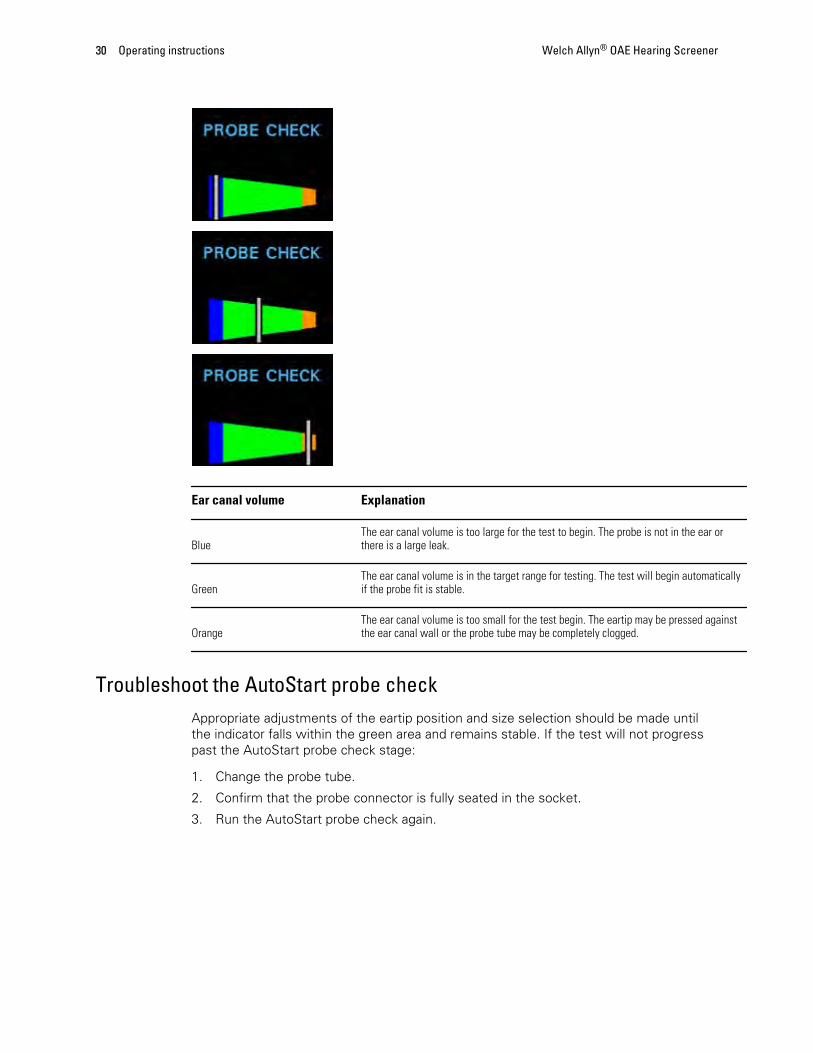
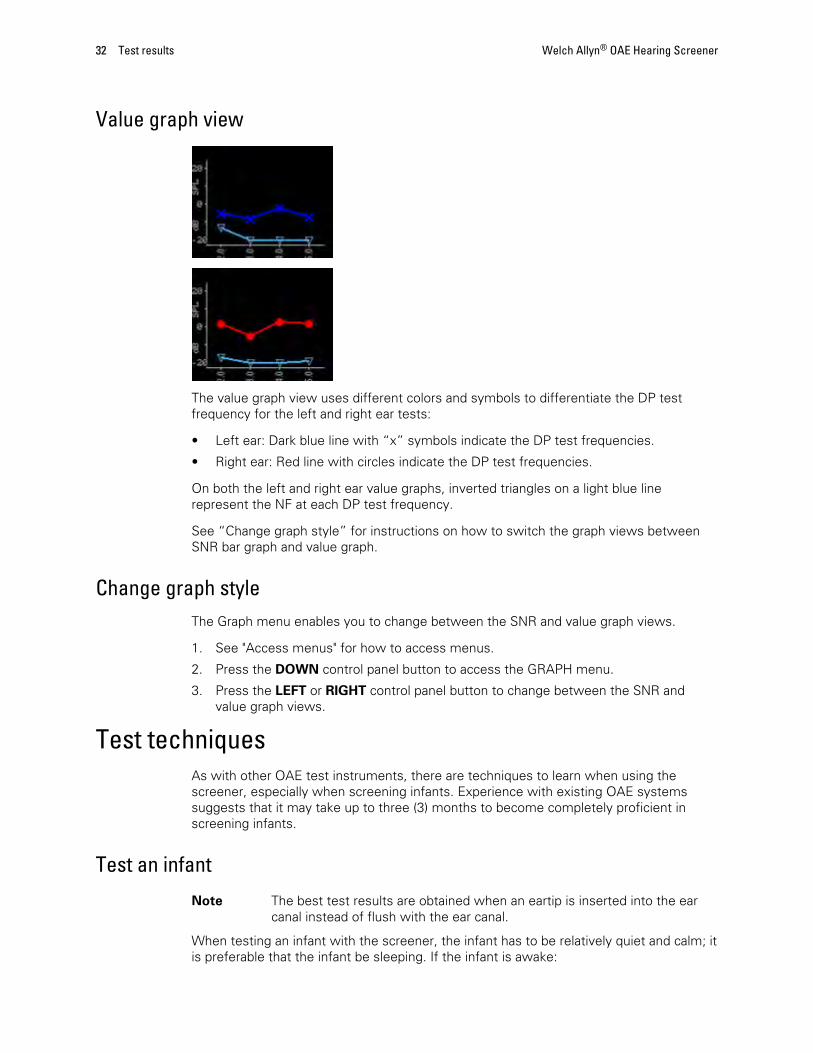
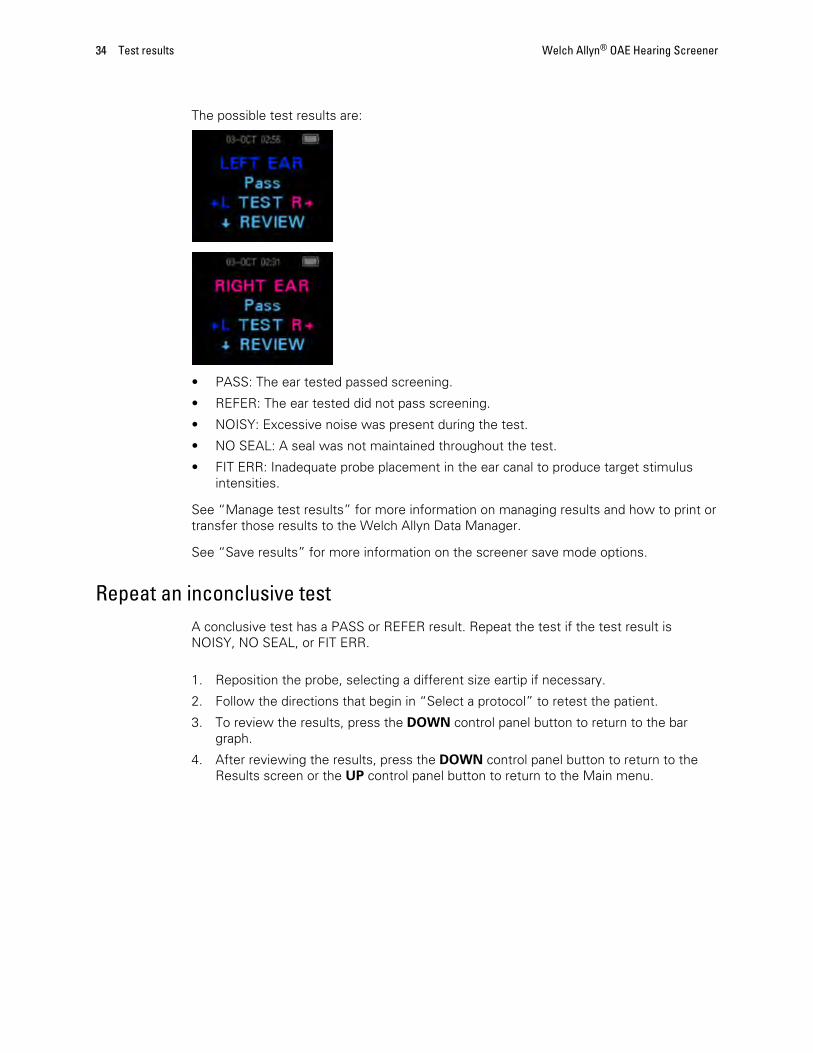
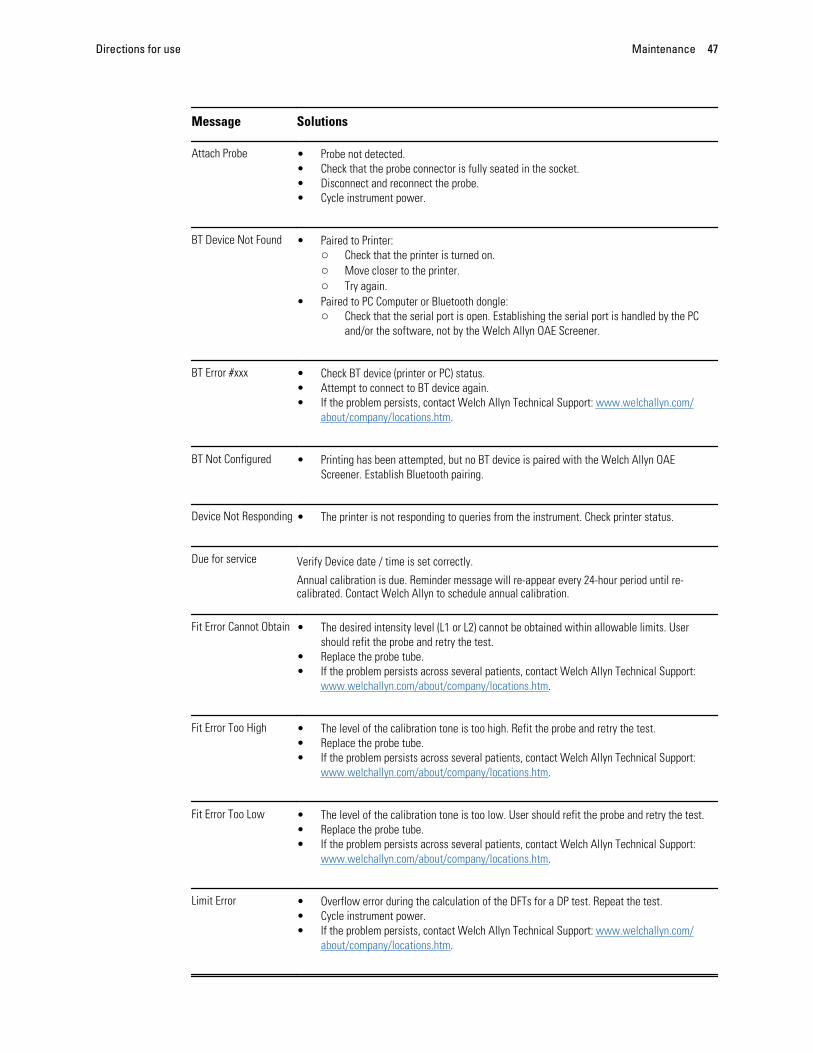
Message Solutions
Attach Probe bull Probe not detectedbull Check that the probe connector is fully seated in the socketbull Disconnect and reconnect the probebull Cycle instrument power
BT Device Not Found bull Paired to Printer Check that the printer is turned on Move closer to the printer Try again
bull Paired to PC Computer or Bluetooth dongle Check that the serial port is open Establishing the serial port is handled by the PC
andor the software not by the Welch Allyn OAE Screener
BT Error xxx bull Check BT device (printer or PC) statusbull Attempt to connect to BT device againbull If the problem persists contact Welch Allyn Technical Support wwwwelchallyncom
aboutcompanylocationshtm
BT Not Configured bull Printing has been attempted but no BT device is paired with the Welch Allyn OAEScreener Establish Bluetooth pairing
Device Not Responding bull The printer is not responding to queries from the instrument Check printer status
Due for service Verify Device date time is set correctly
Annual calibration is due Reminder message will re-appear every 24-hour period until re-calibrated Contact Welch Allyn to schedule annual calibration
Fit Error Cannot Obtain bull The desired intensity level (L1 or L2) cannot be obtained within allowable limits Usershould refit the probe and retry the test
bull Replace the probe tubebull If the problem persists across several patients contact Welch Allyn Technical Support
wwwwelchallyncomaboutcompanylocationshtm
Fit Error Too High bull The level of the calibration tone is too high Refit the probe and retry the testbull Replace the probe tubebull If the problem persists across several patients contact Welch Allyn Technical Support
wwwwelchallyncomaboutcompanylocationshtm
Fit Error Too Low bull The level of the calibration tone is too low User should refit the probe and retry the testbull Replace the probe tubebull If the problem persists across several patients contact Welch Allyn Technical Support
wwwwelchallyncomaboutcompanylocationshtm
Limit Error bull Overflow error during the calculation of the DFTs for a DP test Repeat the testbull Cycle instrument powerbull If the problem persists contact Welch Allyn Technical Support wwwwelchallyncom
aboutcompanylocationshtm
Directions for use Maintenance 47
Message Solutions
Memory almost full bull Saved tests are within 5 tests of the maximum limit Print or transfer test results to avoidinterruption in testing
Memory Full bull The maximum number of saved tests has been reached Clear the memory in order toperform additional tests
Power Low bull The battery charge level is too low for operation Charge the battery in order to performadditional tests
Printer Error bull Indicates a problem with the printerbull Check the printer statusbull Reset the printer or cycle the printer power
Printer Paper Out bull Replace the paper roll
TimeDate Error bull The clock is checked during power on to ensure it has not lost time and been reset In thecase of clock reset this message is shown Set the correct datetime
RepairsA Welch Allyn Service Center must perform all repairs on products under warrantyunless you have purchased a Welch Allyn Partners in Care Biomed agreement allowingyou to service the device while under warranty
CAUTION Unauthorized repairs will void the product warranty
Qualified service personnel or a Welch Allyn Service Center should repair products out ofwarranty
If you are advised to return a product to Welch Allyn for repair or routine maintenanceschedule the repair with the service center nearest you
Welch Allyn Technical Support
If you have a problem with the device that you cannot resolve call the Welch AllynTechnical Support Center nearest you for assistance A representative will assist you introubleshooting the problem and will make every effort to solve the problem over thephone potentially avoiding an unnecessary return
If your product requires warranty extended warranty or non-warranty repair service aWelch Allyn Technical Support representative will record all necessary information toissue a RMA number The support representative will provide you with the address ofthe Welch Allyn Service Center to send your device to
Technical support is available during local business hours
48 Maintenance Welch Allynreg OAE Hearing Screener
Standards and compliance
General compliance and standardsThe Welch Allyn OAE screener complies with the following standards
Standard Issue Date Title
ANSIASA 36 2010 Specification for Audiometers
IEC 60601-1 2005 Medical Electrical Equipment ndash GeneralRequirements for Basic Safety andEssential Performance Ed 3
IEC 60645-1 2004 Electroacoustics - Audiologicalequipment -- Part 1 Pure-toneaudiometers
IEC 60645-3 2007 Electroacoustics - Audiometricequipment -- Part 3 Test signals ofshort duration
IEC 60645-6 2010 Electroacoustics ndash AudiometricEquipment ndash Part 6 Instruments for themeasurement of otoacoustic emissions
ISO 14971 2007 Application of Risk Management toMedical Devices
ISO 10993 2009 Biological Evaluation of MedicalDevices
EN 60601-1-2 2007 Medical electrical equipment -- Part1-2 General requirements for basicsafety and essential performance -Collateral standard Electromagneticcompatibility - Requirements and Tests
FCC Part 15 FCC 47CFR Part 15247 amp 15249(Bluetooth)
IEC 60601-1 2005 Clause 8918 Pollution DegreeClassification 2
49
Directive 200296EC-WEEEDisposal of noncontaminated electrical and electronic equipment
Many local laws and regulations require special procedures to recycle or dispose ofelectrical equipment-related waste including batteries printed circuit boards electroniccomponents wiring and other elements of electronic devices Follow all of yourrespective local laws and regulations for the proper disposal of batteries and any otherparts of this system Do not dispose of this product as unsorted municipal wastePrepare this product for reuse or separate collection as specified by Directive 200296EC of the European Parliament and the Council of the European Union on WasteElectronic and Electrical Equipment (WEEE) If this product is contaminated thisdirective does not apply
For specific disposal or compliance information contact contact Welch Allyn TechnicalSupport wwwwelchallyncomaboutcompanylocationshtm
WARNING Batteries may explode or cause burns if disassembledcrushed or exposed to fire or high temperatures
50 Standards and compliance Welch Allynreg OAE Hearing Screener
Appendices
Appendix A Specifications
Probe specificiations
Item Specification
Measurement type Distortion Product Otoacoustic Emissions (DPOAE)
Frequency range 20 to 50 kHz
Stimulus intensity 6555 dB SPL
Microphone system noise bull -20 dB SPL 2 kHz (1 Hz bandwidth)bull -13 dB SPL 1 kHz (1 Hz bandwidth)
Dimensions and weight bull Length 40 in (10 meter)bull Weight 100 oz (28 gm)
Connector HDMI
Instrument specifications
Item Specification
Power supply Lithium-Ion rechargeable battery
Battery life 15 hours on-time
Dimensions and weight Instrument Weight 64 oz (180 gm)
User interface bull OLED Display to provide user information and progress of measurementbull 4-button keypad to control instrument functions
ConnectorsCommunications bull Integrated USB communication capability for battery charging andcommunication with PC-based database programs or an optional PCprinter
51
Item Specification
bull HDMI Connector for connection to the Probebull Integrated Bluetooth Class 2 + EDR with SPP Protocol for communication
with printer
Power supply specifications
CAUTION Use only approved power supply
Item Specification
Model No UE08WCP-050160SPA
Output 50V DC 16A
Input 100-240V AC 50-60Hz 400 mA
Environmental requirements
Item Specification
Operating temperature 59degF to 95degF (15degC to 35degC)
Operating relative humidity 30 to 90 (non-condensing)
Maximum operating altitude 6000 feet (2000 meters)
Transport and storagetemperature
41degF to 104degF (5degC to 40degC)
52 Appendices Welch Allynreg OAE Hearing Screener
Appendix B Flowchart Measurement
Directions for use Appendices 53
Appendix C Test sequence
A complete test sequence consists of an
bull AutoStart
bull Calibration
bull Test phase
AutoStart phaseThe AutoStart phase determines when the calibration phase should proceed Artifactrejection is employed during the test phase to reduce the effect of transient noisebursts
Immediately after you press the test button the AutoStart phase begins AutoStartchecks both the quality and stability of the seal by measuring the response obtainedfrom a sequence of test tones The stability of the seal is determined by comparing theresponses obtained over time When the level of the response is within an acceptablerange and is stable over time the unit proceeds to the calibration phase
Calibration phaseThe calibration phase calibrates the level of the tones that will be applied during theactual test phase The calibration phase automatically measures the response obtainedfrom a sequence of calibration tones and calculates the voltage needed to obtain thedesired intensity levels If the desired peak pressure cannot be obtained the unit will usethe maximum voltage A successful calibration leads to the actual test phase
Test phaseThe test phase consists of measuring the response obtained from the pairs of testfrequencies (f1 f2) applied to the receivers Two receivers are used with each receivergenerating one frequency in order to reduce intermodulation distortion Frequencydomain estimates of the actual L1 L2 distortion (DP) and noise floor (NF) are obtainedvia the discrete Fourier Transform with a bin resolution of approximately 31 Hz The NFestimate is obtained by averaging the power in the 4 closest (+-2) bins to the DP bin
Variations in the SNR EstimateBe aware that the SNR estimate has an inherent statistical variation due to the effects ofrandom noise especially when no emission is actually present If you perform a test withthe instrumentrsquos probe placed in a test cavity theoretically the SNR will be greater than6 dB approximately 7 times out of 100 This is not a limitation of the instrument but afundamental property of the method used to estimate the SNR in all emission testing Inorder to reduce the occurrence of this ldquofalserdquo emission the instrument limits theminimum value of NF which has the effect of reducing the SNR for tests that have a lownoise floor As the noise level of the test increases the user will notice that moreldquofalserdquo emissions will appear which is to be expected
54 Appendices Welch Allynreg OAE Hearing Screener
Appendix D PassRefer criteriaThe decision that a DPOAE exists is based on detecting a signal whose level issignificantly above the background noise level This requires a statistical decision sincethe random noise level in the DPOAE filter channel can be expected to exceed theaverage of the random noise levels in the four adjacent filter channels mdash used as thereference for comparison mdash roughly 50 of the time
Extended measurements of the noise distributions in both the DPOAE filter channel ldquoDPlevelrdquo and the rms average of the 4 adjacent channels ldquoN levelrdquo indicate that the SNRratio (the difference between DP and N) has a standard deviation of 55 dB This impliesa 10 probability of seeing a 7 dB SNR simply from the variability of the noise levels inthe 2 filter sets
Requiring an SNR of 6 dB in three out of four frequencies drops the probability ofpassing an ear with significant hearing loss to 1 or less
Note By the binomial distribution two of three frequencies at gt84 dB or three ofsix frequencies at gt7 dB should also ensure less than 1 probability ofpassing a moderately-severe hearing-impaired infant
Preliminary trials with infants indicate that the testerrsquos technique is the single mostimportant variable in the pass rate on normal-hearing infants Some testers pick up thetechnique (see ldquoPrepare patient for testingrdquo ) with only a couple of daysrsquo practiceproducing pass rates comparable to those for other DPOAE equipment they have usedfor months other testers take longer
Occasional claims of extraordinarily low probabilities of not detecting an ear with hearingloss appear to be based on poor statistics As discussed by Gorga (Mayo ClinicTeleconference 1998) since the incidence of significant hearing loss is roughly 2 per 1000 verifying 997 accuracy would require testing hundreds of thousands of babieswith a given system To demonstrate that only 3 babies out of 1000 with hearing losswere not detected would require follow-up testing of 500000 babies To our knowledgeno one has performed such tests to date
Directions for use Appendices 55
Appendix E Configurations and test protocolsNote The protocols Included are DP 4s (default) and DP 2s
Name No ofFrequencies
F2 Frequency L1L2 Maximum AverageTime
PassSNR
PassingFrequency forTest Pass
DP 4s 4 20 30 40 50 kHz 6555 4 seconds 6 dB 3
DP 2s 4 6555 2 seconds 6 dB 3
Note The DPOAE protocols differ in the amount of averaging time per frequencyThe DP 4s protocol is the default This averaging time is the time thescreener uses to render a decision on that frequency The DP 2s (2 second)protocol uses 2 seconds per frequency and results in faster test times at aminimum of 8 seconds However it may increase the false referral rateThe DP 4s (4 second) protocol uses 4 seconds averaging time perfrequency and results in slower test time at a minimum of 16 seconds pertes However it may reduce the false referral rate
56 Appendices Welch Allynreg OAE Hearing Screener
Appendix F Approved optionsItem
Wireless Thermal Printer Kit
Directions for use Appendices 57
- Contents
- Symbols
-
- Documentation symbols
- Regulatory symbols
-
- About warnings and cautions
-
- Warnings and cautions
- Customer responsibility
- Safety precautions
- StatusError messages
-
- Display messages
- Indicator lights (LEDs)
-
- Introduction
-
- Introduction
- OAE functionality
- Distortion product otoacoustic emissions
- OAE emission results
- Frequency Range tested
- Results storage and reporting
- Sensitivity and specificity
-
- Setup
-
- Unpack the system
- Cradle
- Charge the battery
-
- Battery status indicator
- Charge the battery using the USB port
- Charge the battery using the cradle
-
- Install the probe
- Attach the probe tube
- Eartips
-
- Attach and remove the eartips
-
- Probe holder
-
- Attach the probe holder
-
- Clock settings
-
- Access the clock menu
- Change the clock mode
- Change the date and time
-
- Device settings
-
- Control panel
- Access menus
- Device settings
- Bluetoothreg device pairing
-
- Pair the screener and Bluetooth device
- Select a Bluetooth device
-
- Clear test results
- Minimum amplitude
- Change the language
- Reset to default
-
- Reset to default settings
-
- Operating instructions
-
- Turn on the screener
- Automatic shutdown interval
-
- Change the automatic shutdown interval
-
- Main menu
- Select the test protocol
- Prepare the patient for testing
- Start a test
- AutoStart probe check
-
- Troubleshoot the AutoStart probe check
-
- Test results
-
- Test phase
- Graph styles
-
- SNR bar graph view
- Value graph view
- Change graph style
-
- Test techniques
-
- Test an infant
- Test children with pressure equalizer tubes
-
- Noise sources
- View results
-
- Repeat an inconclusive test
-
- Manage results
-
- Results storage and reporting
- SaveStore test results mode
-
- SAVE LR mode
- SAVE 250 mode
- Change the SAVE mode between SAVE LR and SAVE 250
- View patient names
-
- Delete test results
-
- Delete results in SAVE LR mode
- Delete results in SAVE 250 mode
-
- Connect the screener to a computer
- Connect the screener cradle to a computer
- Connect the screener to a computer using Bluetooth
- Pair the screener and Bluetooth device
- Print to a thermal printer
-
- Understand printed results
-
- DPOE printout
- Rounding results
-
- Clean and disinfect
-
- Clean and disinfect
-
- Maintenance
-
- General maintenance
- Calibrate the screener
- Replace the probe tube
- Troubleshooting
- Repairs
-
- Standards and compliance
-
- General compliance and standards
-
- Appendices
-
- Appendix A Specifications
-
- Probe specificiations
- Instrument specifications
- Power supply specifications
- Environmental requirements
-
- Appendix B Flowchart Measurement
- Appendix C Test sequence
-
- AutoStart phase
- Calibration phase
- Test phase
- Variations in the SNR Estimate
-
- Appendix D PassRefer criteria
- Appendix E Configurations and test protocols
- Appendix F Approved options
-
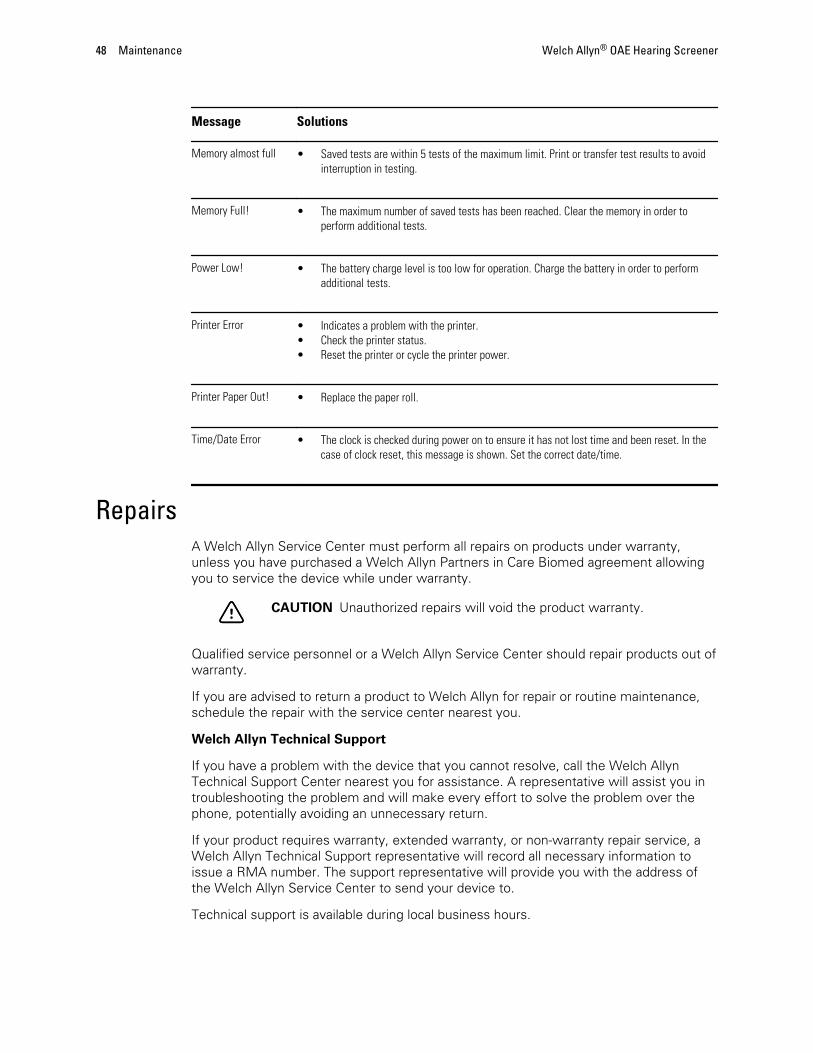
Message Solutions
Memory almost full bull Saved tests are within 5 tests of the maximum limit Print or transfer test results to avoidinterruption in testing
Memory Full bull The maximum number of saved tests has been reached Clear the memory in order toperform additional tests
Power Low bull The battery charge level is too low for operation Charge the battery in order to performadditional tests
Printer Error bull Indicates a problem with the printerbull Check the printer statusbull Reset the printer or cycle the printer power
Printer Paper Out bull Replace the paper roll
TimeDate Error bull The clock is checked during power on to ensure it has not lost time and been reset In thecase of clock reset this message is shown Set the correct datetime
RepairsA Welch Allyn Service Center must perform all repairs on products under warrantyunless you have purchased a Welch Allyn Partners in Care Biomed agreement allowingyou to service the device while under warranty
CAUTION Unauthorized repairs will void the product warranty
Qualified service personnel or a Welch Allyn Service Center should repair products out ofwarranty
If you are advised to return a product to Welch Allyn for repair or routine maintenanceschedule the repair with the service center nearest you
Welch Allyn Technical Support
If you have a problem with the device that you cannot resolve call the Welch AllynTechnical Support Center nearest you for assistance A representative will assist you introubleshooting the problem and will make every effort to solve the problem over thephone potentially avoiding an unnecessary return
If your product requires warranty extended warranty or non-warranty repair service aWelch Allyn Technical Support representative will record all necessary information toissue a RMA number The support representative will provide you with the address ofthe Welch Allyn Service Center to send your device to
Technical support is available during local business hours
48 Maintenance Welch Allynreg OAE Hearing Screener
Standards and compliance
General compliance and standardsThe Welch Allyn OAE screener complies with the following standards
Standard Issue Date Title
ANSIASA 36 2010 Specification for Audiometers
IEC 60601-1 2005 Medical Electrical Equipment ndash GeneralRequirements for Basic Safety andEssential Performance Ed 3
IEC 60645-1 2004 Electroacoustics - Audiologicalequipment -- Part 1 Pure-toneaudiometers
IEC 60645-3 2007 Electroacoustics - Audiometricequipment -- Part 3 Test signals ofshort duration
IEC 60645-6 2010 Electroacoustics ndash AudiometricEquipment ndash Part 6 Instruments for themeasurement of otoacoustic emissions
ISO 14971 2007 Application of Risk Management toMedical Devices
ISO 10993 2009 Biological Evaluation of MedicalDevices
EN 60601-1-2 2007 Medical electrical equipment -- Part1-2 General requirements for basicsafety and essential performance -Collateral standard Electromagneticcompatibility - Requirements and Tests
FCC Part 15 FCC 47CFR Part 15247 amp 15249(Bluetooth)
IEC 60601-1 2005 Clause 8918 Pollution DegreeClassification 2
49
Directive 200296EC-WEEEDisposal of noncontaminated electrical and electronic equipment
Many local laws and regulations require special procedures to recycle or dispose ofelectrical equipment-related waste including batteries printed circuit boards electroniccomponents wiring and other elements of electronic devices Follow all of yourrespective local laws and regulations for the proper disposal of batteries and any otherparts of this system Do not dispose of this product as unsorted municipal wastePrepare this product for reuse or separate collection as specified by Directive 200296EC of the European Parliament and the Council of the European Union on WasteElectronic and Electrical Equipment (WEEE) If this product is contaminated thisdirective does not apply
For specific disposal or compliance information contact contact Welch Allyn TechnicalSupport wwwwelchallyncomaboutcompanylocationshtm
WARNING Batteries may explode or cause burns if disassembledcrushed or exposed to fire or high temperatures
50 Standards and compliance Welch Allynreg OAE Hearing Screener
Appendices
Appendix A Specifications
Probe specificiations
Item Specification
Measurement type Distortion Product Otoacoustic Emissions (DPOAE)
Frequency range 20 to 50 kHz
Stimulus intensity 6555 dB SPL
Microphone system noise bull -20 dB SPL 2 kHz (1 Hz bandwidth)bull -13 dB SPL 1 kHz (1 Hz bandwidth)
Dimensions and weight bull Length 40 in (10 meter)bull Weight 100 oz (28 gm)
Connector HDMI
Instrument specifications
Item Specification
Power supply Lithium-Ion rechargeable battery
Battery life 15 hours on-time
Dimensions and weight Instrument Weight 64 oz (180 gm)
User interface bull OLED Display to provide user information and progress of measurementbull 4-button keypad to control instrument functions
ConnectorsCommunications bull Integrated USB communication capability for battery charging andcommunication with PC-based database programs or an optional PCprinter
51
Item Specification
bull HDMI Connector for connection to the Probebull Integrated Bluetooth Class 2 + EDR with SPP Protocol for communication
with printer
Power supply specifications
CAUTION Use only approved power supply
Item Specification
Model No UE08WCP-050160SPA
Output 50V DC 16A
Input 100-240V AC 50-60Hz 400 mA
Environmental requirements
Item Specification
Operating temperature 59degF to 95degF (15degC to 35degC)
Operating relative humidity 30 to 90 (non-condensing)
Maximum operating altitude 6000 feet (2000 meters)
Transport and storagetemperature
41degF to 104degF (5degC to 40degC)
52 Appendices Welch Allynreg OAE Hearing Screener
Appendix B Flowchart Measurement
Directions for use Appendices 53
Appendix C Test sequence
A complete test sequence consists of an
bull AutoStart
bull Calibration
bull Test phase
AutoStart phaseThe AutoStart phase determines when the calibration phase should proceed Artifactrejection is employed during the test phase to reduce the effect of transient noisebursts
Immediately after you press the test button the AutoStart phase begins AutoStartchecks both the quality and stability of the seal by measuring the response obtainedfrom a sequence of test tones The stability of the seal is determined by comparing theresponses obtained over time When the level of the response is within an acceptablerange and is stable over time the unit proceeds to the calibration phase
Calibration phaseThe calibration phase calibrates the level of the tones that will be applied during theactual test phase The calibration phase automatically measures the response obtainedfrom a sequence of calibration tones and calculates the voltage needed to obtain thedesired intensity levels If the desired peak pressure cannot be obtained the unit will usethe maximum voltage A successful calibration leads to the actual test phase
Test phaseThe test phase consists of measuring the response obtained from the pairs of testfrequencies (f1 f2) applied to the receivers Two receivers are used with each receivergenerating one frequency in order to reduce intermodulation distortion Frequencydomain estimates of the actual L1 L2 distortion (DP) and noise floor (NF) are obtainedvia the discrete Fourier Transform with a bin resolution of approximately 31 Hz The NFestimate is obtained by averaging the power in the 4 closest (+-2) bins to the DP bin
Variations in the SNR EstimateBe aware that the SNR estimate has an inherent statistical variation due to the effects ofrandom noise especially when no emission is actually present If you perform a test withthe instrumentrsquos probe placed in a test cavity theoretically the SNR will be greater than6 dB approximately 7 times out of 100 This is not a limitation of the instrument but afundamental property of the method used to estimate the SNR in all emission testing Inorder to reduce the occurrence of this ldquofalserdquo emission the instrument limits theminimum value of NF which has the effect of reducing the SNR for tests that have a lownoise floor As the noise level of the test increases the user will notice that moreldquofalserdquo emissions will appear which is to be expected
54 Appendices Welch Allynreg OAE Hearing Screener
Appendix D PassRefer criteriaThe decision that a DPOAE exists is based on detecting a signal whose level issignificantly above the background noise level This requires a statistical decision sincethe random noise level in the DPOAE filter channel can be expected to exceed theaverage of the random noise levels in the four adjacent filter channels mdash used as thereference for comparison mdash roughly 50 of the time
Extended measurements of the noise distributions in both the DPOAE filter channel ldquoDPlevelrdquo and the rms average of the 4 adjacent channels ldquoN levelrdquo indicate that the SNRratio (the difference between DP and N) has a standard deviation of 55 dB This impliesa 10 probability of seeing a 7 dB SNR simply from the variability of the noise levels inthe 2 filter sets
Requiring an SNR of 6 dB in three out of four frequencies drops the probability ofpassing an ear with significant hearing loss to 1 or less
Note By the binomial distribution two of three frequencies at gt84 dB or three ofsix frequencies at gt7 dB should also ensure less than 1 probability ofpassing a moderately-severe hearing-impaired infant
Preliminary trials with infants indicate that the testerrsquos technique is the single mostimportant variable in the pass rate on normal-hearing infants Some testers pick up thetechnique (see ldquoPrepare patient for testingrdquo ) with only a couple of daysrsquo practiceproducing pass rates comparable to those for other DPOAE equipment they have usedfor months other testers take longer
Occasional claims of extraordinarily low probabilities of not detecting an ear with hearingloss appear to be based on poor statistics As discussed by Gorga (Mayo ClinicTeleconference 1998) since the incidence of significant hearing loss is roughly 2 per 1000 verifying 997 accuracy would require testing hundreds of thousands of babieswith a given system To demonstrate that only 3 babies out of 1000 with hearing losswere not detected would require follow-up testing of 500000 babies To our knowledgeno one has performed such tests to date
Directions for use Appendices 55
Appendix E Configurations and test protocolsNote The protocols Included are DP 4s (default) and DP 2s
Name No ofFrequencies
F2 Frequency L1L2 Maximum AverageTime
PassSNR
PassingFrequency forTest Pass
DP 4s 4 20 30 40 50 kHz 6555 4 seconds 6 dB 3
DP 2s 4 6555 2 seconds 6 dB 3
Note The DPOAE protocols differ in the amount of averaging time per frequencyThe DP 4s protocol is the default This averaging time is the time thescreener uses to render a decision on that frequency The DP 2s (2 second)protocol uses 2 seconds per frequency and results in faster test times at aminimum of 8 seconds However it may increase the false referral rateThe DP 4s (4 second) protocol uses 4 seconds averaging time perfrequency and results in slower test time at a minimum of 16 seconds pertes However it may reduce the false referral rate
56 Appendices Welch Allynreg OAE Hearing Screener
Appendix F Approved optionsItem
Wireless Thermal Printer Kit
Directions for use Appendices 57
- Contents
- Symbols
-
- Documentation symbols
- Regulatory symbols
-
- About warnings and cautions
-
- Warnings and cautions
- Customer responsibility
- Safety precautions
- StatusError messages
-
- Display messages
- Indicator lights (LEDs)
-
- Introduction
-
- Introduction
- OAE functionality
- Distortion product otoacoustic emissions
- OAE emission results
- Frequency Range tested
- Results storage and reporting
- Sensitivity and specificity
-
- Setup
-
- Unpack the system
- Cradle
- Charge the battery
-
- Battery status indicator
- Charge the battery using the USB port
- Charge the battery using the cradle
-
- Install the probe
- Attach the probe tube
- Eartips
-
- Attach and remove the eartips
-
- Probe holder
-
- Attach the probe holder
-
- Clock settings
-
- Access the clock menu
- Change the clock mode
- Change the date and time
-
- Device settings
-
- Control panel
- Access menus
- Device settings
- Bluetoothreg device pairing
-
- Pair the screener and Bluetooth device
- Select a Bluetooth device
-
- Clear test results
- Minimum amplitude
- Change the language
- Reset to default
-
- Reset to default settings
-
- Operating instructions
-
- Turn on the screener
- Automatic shutdown interval
-
- Change the automatic shutdown interval
-
- Main menu
- Select the test protocol
- Prepare the patient for testing
- Start a test
- AutoStart probe check
-
- Troubleshoot the AutoStart probe check
-
- Test results
-
- Test phase
- Graph styles
-
- SNR bar graph view
- Value graph view
- Change graph style
-
- Test techniques
-
- Test an infant
- Test children with pressure equalizer tubes
-
- Noise sources
- View results
-
- Repeat an inconclusive test
-
- Manage results
-
- Results storage and reporting
- SaveStore test results mode
-
- SAVE LR mode
- SAVE 250 mode
- Change the SAVE mode between SAVE LR and SAVE 250
- View patient names
-
- Delete test results
-
- Delete results in SAVE LR mode
- Delete results in SAVE 250 mode
-
- Connect the screener to a computer
- Connect the screener cradle to a computer
- Connect the screener to a computer using Bluetooth
- Pair the screener and Bluetooth device
- Print to a thermal printer
-
- Understand printed results
-
- DPOE printout
- Rounding results
-
- Clean and disinfect
-
- Clean and disinfect
-
- Maintenance
-
- General maintenance
- Calibrate the screener
- Replace the probe tube
- Troubleshooting
- Repairs
-
- Standards and compliance
-
- General compliance and standards
-
- Appendices
-
- Appendix A Specifications
-
- Probe specificiations
- Instrument specifications
- Power supply specifications
- Environmental requirements
-
- Appendix B Flowchart Measurement
- Appendix C Test sequence
-
- AutoStart phase
- Calibration phase
- Test phase
- Variations in the SNR Estimate
-
- Appendix D PassRefer criteria
- Appendix E Configurations and test protocols
- Appendix F Approved options
-

Item Specification
bull HDMI Connector for connection to the Probebull Integrated Bluetooth Class 2 + EDR with SPP Protocol for communication
with printer
Power supply specifications
CAUTION Use only approved power supply
Item Specification
Model No UE08WCP-050160SPA
Output 50V DC 16A
Input 100-240V AC 50-60Hz 400 mA
Environmental requirements
Item Specification
Operating temperature 59degF to 95degF (15degC to 35degC)
Operating relative humidity 30 to 90 (non-condensing)
Maximum operating altitude 6000 feet (2000 meters)
Transport and storagetemperature
41degF to 104degF (5degC to 40degC)
52 Appendices Welch Allynreg OAE Hearing Screener
Appendix B Flowchart Measurement
Directions for use Appendices 53
Appendix C Test sequence
A complete test sequence consists of an
bull AutoStart
bull Calibration
bull Test phase
AutoStart phaseThe AutoStart phase determines when the calibration phase should proceed Artifactrejection is employed during the test phase to reduce the effect of transient noisebursts
Immediately after you press the test button the AutoStart phase begins AutoStartchecks both the quality and stability of the seal by measuring the response obtainedfrom a sequence of test tones The stability of the seal is determined by comparing theresponses obtained over time When the level of the response is within an acceptablerange and is stable over time the unit proceeds to the calibration phase
Calibration phaseThe calibration phase calibrates the level of the tones that will be applied during theactual test phase The calibration phase automatically measures the response obtainedfrom a sequence of calibration tones and calculates the voltage needed to obtain thedesired intensity levels If the desired peak pressure cannot be obtained the unit will usethe maximum voltage A successful calibration leads to the actual test phase
Test phaseThe test phase consists of measuring the response obtained from the pairs of testfrequencies (f1 f2) applied to the receivers Two receivers are used with each receivergenerating one frequency in order to reduce intermodulation distortion Frequencydomain estimates of the actual L1 L2 distortion (DP) and noise floor (NF) are obtainedvia the discrete Fourier Transform with a bin resolution of approximately 31 Hz The NFestimate is obtained by averaging the power in the 4 closest (+-2) bins to the DP bin
Variations in the SNR EstimateBe aware that the SNR estimate has an inherent statistical variation due to the effects ofrandom noise especially when no emission is actually present If you perform a test withthe instrumentrsquos probe placed in a test cavity theoretically the SNR will be greater than6 dB approximately 7 times out of 100 This is not a limitation of the instrument but afundamental property of the method used to estimate the SNR in all emission testing Inorder to reduce the occurrence of this ldquofalserdquo emission the instrument limits theminimum value of NF which has the effect of reducing the SNR for tests that have a lownoise floor As the noise level of the test increases the user will notice that moreldquofalserdquo emissions will appear which is to be expected
54 Appendices Welch Allynreg OAE Hearing Screener
Appendix D PassRefer criteriaThe decision that a DPOAE exists is based on detecting a signal whose level issignificantly above the background noise level This requires a statistical decision sincethe random noise level in the DPOAE filter channel can be expected to exceed theaverage of the random noise levels in the four adjacent filter channels mdash used as thereference for comparison mdash roughly 50 of the time
Extended measurements of the noise distributions in both the DPOAE filter channel ldquoDPlevelrdquo and the rms average of the 4 adjacent channels ldquoN levelrdquo indicate that the SNRratio (the difference between DP and N) has a standard deviation of 55 dB This impliesa 10 probability of seeing a 7 dB SNR simply from the variability of the noise levels inthe 2 filter sets
Requiring an SNR of 6 dB in three out of four frequencies drops the probability ofpassing an ear with significant hearing loss to 1 or less
Note By the binomial distribution two of three frequencies at gt84 dB or three ofsix frequencies at gt7 dB should also ensure less than 1 probability ofpassing a moderately-severe hearing-impaired infant
Preliminary trials with infants indicate that the testerrsquos technique is the single mostimportant variable in the pass rate on normal-hearing infants Some testers pick up thetechnique (see ldquoPrepare patient for testingrdquo ) with only a couple of daysrsquo practiceproducing pass rates comparable to those for other DPOAE equipment they have usedfor months other testers take longer
Occasional claims of extraordinarily low probabilities of not detecting an ear with hearingloss appear to be based on poor statistics As discussed by Gorga (Mayo ClinicTeleconference 1998) since the incidence of significant hearing loss is roughly 2 per 1000 verifying 997 accuracy would require testing hundreds of thousands of babieswith a given system To demonstrate that only 3 babies out of 1000 with hearing losswere not detected would require follow-up testing of 500000 babies To our knowledgeno one has performed such tests to date
Directions for use Appendices 55
Appendix E Configurations and test protocolsNote The protocols Included are DP 4s (default) and DP 2s
Name No ofFrequencies
F2 Frequency L1L2 Maximum AverageTime
PassSNR
PassingFrequency forTest Pass
DP 4s 4 20 30 40 50 kHz 6555 4 seconds 6 dB 3
DP 2s 4 6555 2 seconds 6 dB 3
Note The DPOAE protocols differ in the amount of averaging time per frequencyThe DP 4s protocol is the default This averaging time is the time thescreener uses to render a decision on that frequency The DP 2s (2 second)protocol uses 2 seconds per frequency and results in faster test times at aminimum of 8 seconds However it may increase the false referral rateThe DP 4s (4 second) protocol uses 4 seconds averaging time perfrequency and results in slower test time at a minimum of 16 seconds pertes However it may reduce the false referral rate
56 Appendices Welch Allynreg OAE Hearing Screener
Appendix F Approved optionsItem
Wireless Thermal Printer Kit
Directions for use Appendices 57
- Contents
- Symbols
-
- Documentation symbols
- Regulatory symbols
-
- About warnings and cautions
-
- Warnings and cautions
- Customer responsibility
- Safety precautions
- StatusError messages
-
- Display messages
- Indicator lights (LEDs)
-
- Introduction
-
- Introduction
- OAE functionality
- Distortion product otoacoustic emissions
- OAE emission results
- Frequency Range tested
- Results storage and reporting
- Sensitivity and specificity
-
- Setup
-
- Unpack the system
- Cradle
- Charge the battery
-
- Battery status indicator
- Charge the battery using the USB port
- Charge the battery using the cradle
-
- Install the probe
- Attach the probe tube
- Eartips
-
- Attach and remove the eartips
-
- Probe holder
-
- Attach the probe holder
-
- Clock settings
-
- Access the clock menu
- Change the clock mode
- Change the date and time
-
- Device settings
-
- Control panel
- Access menus
- Device settings
- Bluetoothreg device pairing
-
- Pair the screener and Bluetooth device
- Select a Bluetooth device
-
- Clear test results
- Minimum amplitude
- Change the language
- Reset to default
-
- Reset to default settings
-
- Operating instructions
-
- Turn on the screener
- Automatic shutdown interval
-
- Change the automatic shutdown interval
-
- Main menu
- Select the test protocol
- Prepare the patient for testing
- Start a test
- AutoStart probe check
-
- Troubleshoot the AutoStart probe check
-
- Test results
-
- Test phase
- Graph styles
-
- SNR bar graph view
- Value graph view
- Change graph style
-
- Test techniques
-
- Test an infant
- Test children with pressure equalizer tubes
-
- Noise sources
- View results
-
- Repeat an inconclusive test
-
- Manage results
-
- Results storage and reporting
- SaveStore test results mode
-
- SAVE LR mode
- SAVE 250 mode
- Change the SAVE mode between SAVE LR and SAVE 250
- View patient names
-
- Delete test results
-
- Delete results in SAVE LR mode
- Delete results in SAVE 250 mode
-
- Connect the screener to a computer
- Connect the screener cradle to a computer
- Connect the screener to a computer using Bluetooth
- Pair the screener and Bluetooth device
- Print to a thermal printer
-
- Understand printed results
-
- DPOE printout
- Rounding results
-
- Clean and disinfect
-
- Clean and disinfect
-
- Maintenance
-
- General maintenance
- Calibrate the screener
- Replace the probe tube
- Troubleshooting
- Repairs
-
- Standards and compliance
-
- General compliance and standards
-
- Appendices
-
- Appendix A Specifications
-
- Probe specificiations
- Instrument specifications
- Power supply specifications
- Environmental requirements
-
- Appendix B Flowchart Measurement
- Appendix C Test sequence
-
- AutoStart phase
- Calibration phase
- Test phase
- Variations in the SNR Estimate
-
- Appendix D PassRefer criteria
- Appendix E Configurations and test protocols
- Appendix F Approved options
-
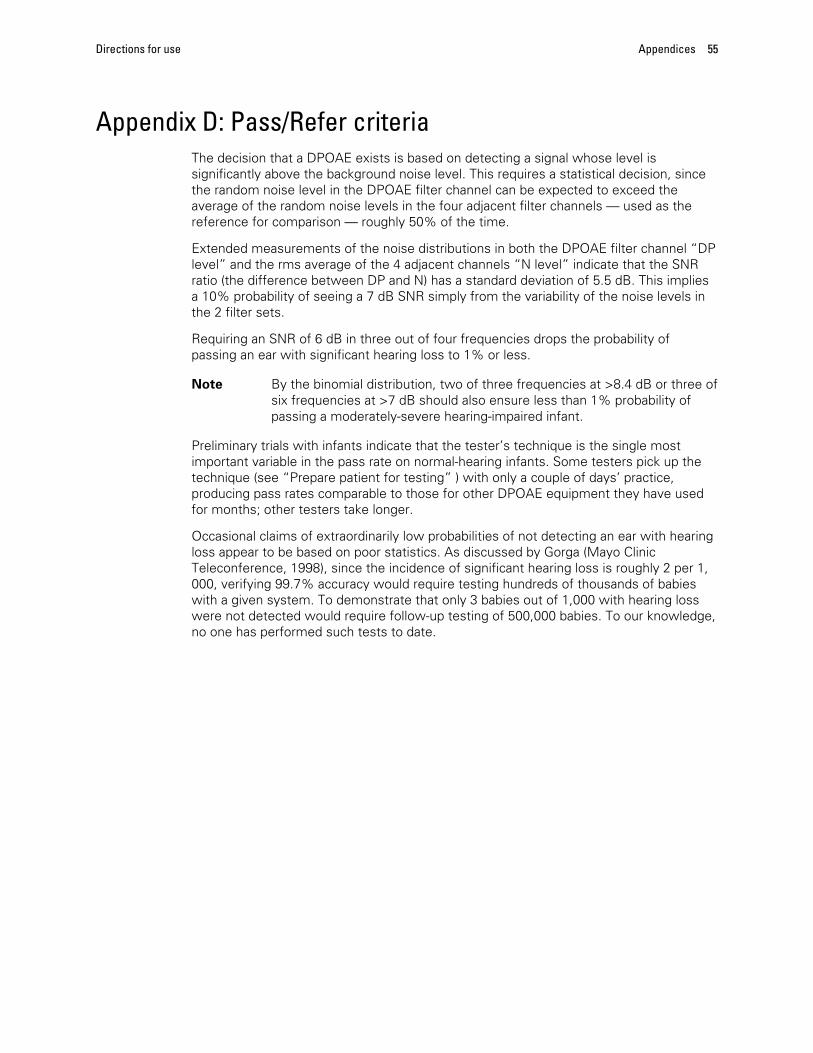
Related Documents