VirtualDrive Pro 14 User’s Guide

Welcome message from author
This document is posted to help you gain knowledge. Please leave a comment to let me know what you think about it! Share it to your friends and learn new things together.
Transcript
VirtualDrive Pro 14
User’s Guide
Copyright Notice
No part of this publication may be copied, transmitted, stored in a retrieval system or translated into any language in any form or by any means without the expressed written permission of FarStone Technology, Inc.
FarStone grants you the right to use one copy of the enclosed software program (“SOFTWARE”) on a single computer. If the SOFTWARE is installed on a network, or more than one user can run the SOFTWARE at the same time, you must purchase an additional license for each additional user or computer.
Trademark
FarStone® is a trademark of FarStone Technology, Inc. Microsoft, Windows® and MS-DOS® are registered trademarks of Microsoft Corporation. Other product names mentioned in this User’s Guide may be trademarks or registered trademarks of their respective companies.
FarStone Technology, Inc. U.S. Headquarters: 10415 Slusher Drive, Unit 1, Santa Fe Springs, CA 90670, USA Phone: +1-562-373-5370 Fax: +1-562-946-6030 www.farstone.com Technical Support
Answers to frequently asked questions are posted on our website at www.farstone.com/support/product-support.htm. For other support issues, please contact FarStone Technical Support at www.farstone.com/support.
Copyright© 2000-2011 FarStone Technology, Inc. All rights reserved.
Software License Agreement
FARSTONE TECHNOLOGY, INC. (FARSTONE) END USER LICENSE AGREEMENT FOR RESTOREIT®, HEREAFTER REFERRED TO AS THE “SOFTWARE”
PLEASE READ CAREFULLY: THE USE OF THIS “SOFTWARE” IS SUBJECT TO THE “SOFTWARE” LICENSE TERMS OF FARSTONE AND OTHER LICENSORS WHO’S SOFTWARE MAY BE BUNDLED WITH THIS PRODUCT.
BY YOUR USE OF THE “SOFTWARE” INCLUDED WITH THIS PRODUCT YOU AGREE TO THE LICENSE TERMS REQUIRED BY THE LICENSOR OF THE “SOFTWARE”, AS SET FORTH BELOW. IF YOU DO NOT AGREE TO THE LICENSE TERMS APPLICABLE TO THE “SOFTWARE”, YOU MAY RETURN THE ENTIRE UNUSED PRODUCT FOR A FULL REFUND.
LICENSE AND WARRANTY:
The software that accompanies this license (the “Software”) is the property of FARSTONE or its licensors and is protected by copyright law. While FARSTONE continues to own the Software, you will have certain rights to use the Software after your acceptance of this license. Except as may be modified by a license addendum which accompanies this license, your rights and obligations with respect to the use of this Software are as follows:
A. Single User License:
(a) Use the “Software” on a single computer system or network, and only by a single user at a time. If you wish to use the “Software” for more users, you will need an additional License for each user.
(b) Make one copy of the “Software” in machine-readable form solely for back-up purposes provided you reproduce FarStone’s copyright proprietary legends. Notwithstanding the foregoing, the “Software” may be used on the home, laptop or other secondary computer of the principal user of the “Software”, and an additional copy of the “Software” may be made to support such use. As used in this License, the “Software” is “in use” when it is either loaded into RAM or installed on a hard disk or other permanent memory device. The “Software” may be “in use” on only one computer at any given time. (Different License terms and fees are applicable for networked or multiple user applications.) As a specific condition of this License, you agree to use the “Software” in compliance with all applicable laws, including copyright laws, and that you will not copy, transmit, perform or distribute any audio or other content using the “Software” without obtaining all necessary Licenses or permissions from the owner of the content.
B. Multiple User License:
Make one copy of the “Software” in machine-readable form solely for back-up purposes, provided you reproduce FarStone’s copyright proprietary legends.
You must acquire and dedicate a License for each separate computer on which any part or portion of the “Software” is installed or run As used in this License, the “Software” or any part or portion of the “Software” is “in use” when it is either loaded into RAM or installed on a hard disk or other permanent memory device including any networked or shared environment where either direct or indirect connections are made through software or hardware which pools or aggregates connections.
As a specific condition of this License, you agree to use the “Software” in compliance with all applicable laws, including copyright laws, and that you will not copy, transmit, perform or distribute any audio or other content using the “Software” without obtaining all necessary Licenses or permissions from the owner of the content.
C. Restrictions:
You may not distribute copies of the “Software” to others or electronically transfer the “Software” from one computer to another over a network. You may not post or otherwise make available the “Software”, or any portion thereof, in any form, on the Internet. You may not use the “Software” in a computer service business, including in time-sharing applications. The “Software” contains trade secrets and, in order to protect them, you may not decompile, reverse engineer, disassemble, or otherwise reduce the “Software” to a human-perceivable form. YOU MAY NOT MODIFY, ADAPT, TRANSLATE, RENT, LEASE, LOAN, RESELL FOR PROFIT, DISTRIBUTE, NETWORK OR CREATE DERIVATIVE WORKS BASED UPON THE “SOFTWARE” OR ANY PART THEREOF.
D. Limited Warranty:
FarStone warrants that the media on which the Software is distributed will be free from defects for a period of fourteen (14) days from the date of delivery of the Software to you. Your sole remedy in the event of a breach of this warranty will be that FarStone will, at its option, replace any defective media returned to FarStone within the warranty period or refund the money you paid for the Software. FarStone does not warrant that the Software will meet your requirements or that operation of the Software will be uninterrupted or that the Software will be error-free.
THE ABOVE WARRANTY IS EXCLUSIVE AND IN LIEU OF ALL OTHER WARRANTIES, WHETHER EXPRESS OR IMPLIED, INCLUDING THE IMPLIED WARRANTIES OF MERCHANTABILITY, FITNESS FOR A PARTICULAR PURPOSE AND NONINFRINGEMENT. THIS WARRANTY GIVES YOU SPECIFIC
LEGAL RIGHTS. YOU MAY HAVE OTHER RIGHTS, WHICH VARY FROM STATE TO STATE.
E. Limitation of Liability:
IN NO EVENT WILL FARSTONE OR ITS LICENSORS BE LIABLE TO YOU FOR ANY INCIDENTAL, CONSEQUENTIAL OR INDIRECT DAMAGES, INCLUDING ANY LOST PROFITS, LOST SAVINGS, OR LOSS OF DATA, EVEN IF FARSTONE OR A LICENSOR HAS BEEN ADVISED OF THE POSSIBILITY OF SUCH DAMAGES, OR FOR ANY CLAIM BY ANY OTHER PARTY. Some states do not allow the exclusion or limitation of special, incidental, or consequential damages, so the above limitation or exclusion may not apply to you.
F. General:
You acknowledge that you have read this Agreement, understand it, and that by using the “Software” you agree to be bound by its terms and conditions. You further agree that it is the complete and exclusive statement of the agreement between FarStone and you, and supersedes any proposal or prior agreement, oral or written, and any other communication between FarStone and you relating to the subject matter of this Agreement. No additional or any different terms will be enforceable against FarStone unless FarStone gives its express consent, including an express waiver of the terms of this Agreement, in writing signed by an officer of FarStone. You assume full responsibility for the use of the “Software” and agree to use the “Software” legally and responsibly.
Should any provision of this Agreement be declared unenforceable in any jurisdiction, and then such provision shall be deemed severable from this Agreement and shall not affect the remainder hereof. FarStone reserves all rights in the “Software” not specifically granted in this Agreement.
Additional Terms and Conditions:
In addition to the above agreement, the following terms and conditions will also apply to Your use of the Software: A. You may use the Software on one Device to clone, or apply an image of a hard drive on that Device, or to another hard drive on the same Device, a replacement Device, secondary media, or network drive. B. You may use the Software on a Device to create an image file of a hard drive on that Device and store the image file on fixed or removable media for disaster recovery purposes. C. You may use the Software as a boot disk to re-apply the hard drive image that was created for
disaster recovery purposes to the hard drive on the Device from which the disaster recovery image was made or on a replacement Device provided that the software has been removed from the original Device. D. You may use the Software to clone a hard drive from a Device to a replacement Device, in the manner described in the Software documentation and to use the Software on the replacement Device provided that the Software has been removed from the original Device. E. You may not use the Software commercially or non-commercially for the purpose of creating an image on multiple Devices or hard drives, except for multiple hard drives installed in or attached directly to the original Device. F. For the purposes of this License Agreement, a virtual device is considered the same as a physical device. G. If the Software you have licensed includes the Pre-OS the following uses and restrictions apply to the Software: (i) The Pre-OS contains Windows® software licensed from Microsoft Corporation. Microsoft Corporation has no liability to You for the Component. Any support for the Component will be provided by FarStone in accordance with FarStone’s then-current support guidelines. (ii) THE PRE-OS CONTAINS A TIME-OUT FEATURE THAT WILL AUTOMATICALLY RE-BOOT THE DEVICE AFTER SEVENTY-TWO HOURS OF CONTINUOUS USE. THIS TIME-OUT FEATURE WILL RESET EACH TIME THE COMPONENT IS RE-LAUNCHED. (iii) The Pre-OS may be used as a boot, diagnostic, disaster recovery, setup, restoration, emergency service, installation, test, and configuration utility program. Use of the Component as a general purpose operating system or as a substitute for a fully functional version of any operating system product is strictly prohibited. Windows® is a registered trademark of Microsoft Corporation.
Should you have any questions concerning this Agreement, you may contact FarStone by writing to:
FarStone Technology, Inc. Legal Department 10415 Slusher Drive, Unit 1, Santa Fe Springs, CA 90670, USA
Contents
Copyright Notice ............................................................................................................ 2
Software License Agreement ........................................................................................... 3
Chapter 1: Product Overview ........................................................................................... 9
1.1 Product Features .................................................................................................. 9
Chapter 2 Installation ..................................................................................................... 9
2.1 System Requirements ........................................................................................... 9
2.2 Installing VirtualDrive Pro ................................................................................... 10
2.3 Uninstalling VirtualDrive Pro .................................................................................. 11
Chapter 3: Getting Started in VirtualDrive Pro .................................................................. 11
3.1 Launching VirtualDrive Pro .................................................................................. 11 3.1.1 Create image from CD, DVD or Blu-ray .............................................................. 11 3.1.2 Advanced setting ............................................................................................ 13
3.2 VirtualDrive Pro Main Console ................................................................................ 14
3.3 Creating new image ............................................................................................. 16 3.3.1 Create image from CD/DVD or Blue-ray ............................................................. 17 3.3.2 Building an Image from files or folders .............................................................. 17 3.3.3 Creating an image from project ........................................................................ 20 3.3.4 Custom virtual CD .......................................................................................... 23
3.4 Burn image ......................................................................................................... 24 3.4.1 Burn CD/DVD ................................................................................................ 24 3.4.2 Burn custom disc ........................................................................................... 26 3.4.3 Burn MP3 disc ................................................................................................ 27 3.4.4 Burn audio disc .............................................................................................. 28 3.4.5 Burn image from project ................................................................................. 29
3.5 Cloning CD/DVD or BD ......................................................................................... 30
3.6 The VCD Manager ................................................................................................ 32 3.6.1 Using Virtual Drives in the VCD Manager ............................................................ 33 3.6.2 Using Physical Drives in the VCD Manager .......................................................... 34 3.6.3 Adding VCDs to the VCD Manager ..................................................................... 34 3.6.4 Organizing VCDs in Cabinets ............................................................................ 35 3.6.5 Searching for VCDs ........................................................................................ 36 3.6.6 Extracting Files from a VCD ............................................................................. 36 3.6.7 Inserting a VCD into a Virtual Drive .................................................................. 36 3.6.8 Ejecting a VCD from a Virtual Drive ................................................................... 36 3.6.9 Importing and Exporting a VCD List .................................................................. 37
3.7 Converting VCDs and ISO 9660 Images .................................................................. 37

Chapter 4: Technical Support and Product Updates ........................................................... 38
Chapter 5: Glossary ..................................................................................................... 39
Chapter 6: Frequently Asked Questions ........................................................................... 40
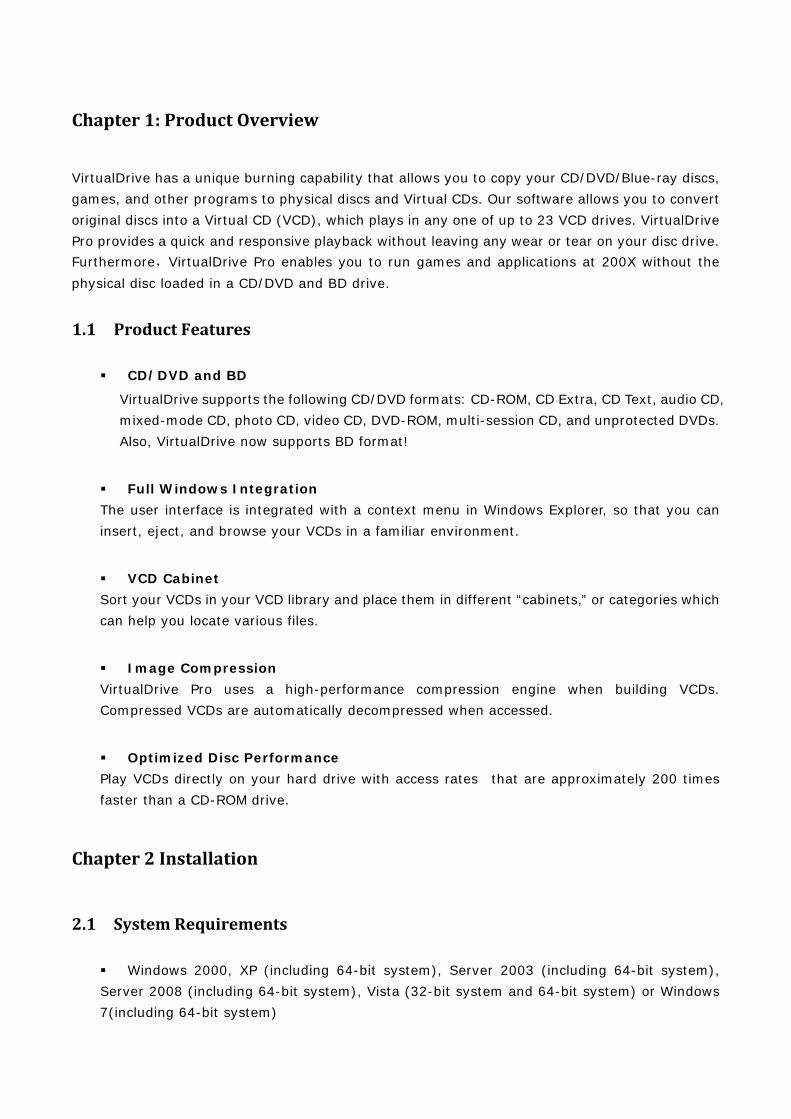
Chapter 1: Product Overview
VirtualDrive has a unique burning capability that allows you to copy your CD/DVD/Blue-ray discs, games, and other programs to physical discs and Virtual CDs. Our software allows you to convert original discs into a Virtual CD (VCD), which plays in any one of up to 23 VCD drives. VirtualDrive Pro provides a quick and responsive playback without leaving any wear or tear on your disc drive. Furthermore,VirtualDrive Pro enables you to run games and applications at 200X without the physical disc loaded in a CD/DVD and BD drive.
1.1 Product Features
CD/DVD and BD
VirtualDrive supports the following CD/DVD formats: CD-ROM, CD Extra, CD Text, audio CD, mixed-mode CD, photo CD, video CD, DVD-ROM, multi-session CD, and unprotected DVDs. Also, VirtualDrive now supports BD format!
Full Windows Integration The user interface is integrated with a context menu in Windows Explorer, so that you can insert, eject, and browse your VCDs in a familiar environment.
VCD Cabinet Sort your VCDs in your VCD library and place them in different “cabinets,” or categories which can help you locate various files.
Image Compression VirtualDrive Pro uses a high-performance compression engine when building VCDs. Compressed VCDs are automatically decompressed when accessed.
Optimized Disc Performance Play VCDs directly on your hard drive with access rates that are approximately 200 times faster than a CD-ROM drive.
Chapter 2 Installation
2.1 System Requirements
Windows 2000, XP (including 64-bit system), Server 2003 (including 64-bit system), Server 2008 (including 64-bit system), Vista (32-bit system and 64-bit system) or Windows 7(including 64-bit system)
CD/DVD/BD drive or recorder
512 MB RAM
70 MB of hard drive space
Intel Pentium (or compatible) 233MHz processor or better
2.2 Installing VirtualDrive Pro
1. Close any running applications.
2. Click on the VirtualDrive Pro executable file (setup).
3. If you accept the terms of the license agreement, select I Accept the License Agreement and click Next.
4. Enter your Name, Organization (optional), and serial number. Click Next. You can also install the trial version without entering the serial number.
5. The installation wizard will recommend a default folder for VirtualDrive Pro program files. If you would like to store program files in another location, select Change to open the file browser and designate a new folder.
6. Confirm the setup configuration and click Next.
7. Select the appropriate checkbox to place a program shortcut on your desktop.
8. Select Finish. You do not need to reboot your computer before you launch VirtualDrive Pro.
Upgrade/Update Center
http://www.farstone.com/upgrade/
If you have purchased our product before, you may want to upgrade/update your program. Please
enter our upgrade center. The version you purchased is not under the same large version of the latest
version, please refer to Upgrade. Otherwise, refer to Update. EX: Version 7, version 8, the version with only integer is large version; version 7.1, version
7.1.1, the version with decimals is small version. It means the integer part of the version is the same
under the same large version.
Note Before installing new version product, users must uninstall the old one first.
2.3 Uninstalling VirtualDrive Pro
1. Close all other running programs. If the VirtualDrive Pro icon is displayed in the System Tray, right click on the icon and select Exit to close VirtualDrive Pro.
2. To launch the VirtualDrive Pro uninstall wizard:
a. In the Windows taskbar, select Start All Programs VirtualDrive Pro Uninstall VirtualDrive Pro. Or:
b. Select Start Control Panel and double click the Add or Remove Programs icon to open the Add or Remove Programs screen. Select VirtualDrive Pro from the list, and then select Add/Remove.
The uninstall program will remove all files created by VirtualDrive Pro, except image files (VCDs with the “VCD” or “D00…” extension), project files (“CIF” extension) and some log files that keep a record of the VCD list in your VCD library. These files are located in the VirtualDrive Pro install path and can be accessed or deleted in Windows Explorer.
Note You can select the checkbox to delete the VCD List or VCD files in the VCD Cabinets while uninstalling VirtualDrive Pro. However, the VCD files you delete will never be restored unless you have backed them up. We recommend you back up your VCD files before deleting.
Chapter 3: Getting Started in VirtualDrive Pro
3.1 Launching VirtualDrive Pro
To launch VirtualDrive Pro, double click the program icon on the desktop, or select Start
All Programs VirtualDrive Pro VirtualDrive Pro Manager.
3.1.1 Create image from CD, DVD or Blu-ray
After launching, If you install Virtual Drive Pro for the first time, you will first see a pop up box to create a Virtual CD/DVD and BD from a physical disc. If you are not use Virtual Drive Pro for the first time, you can click Create then select Create a Virtual CD from CD/DVD/Blu-ray Disc or select Create a Virtual CD from CD/DVD/Blu-ray Disc in drop down menu of Create to enter following interface.
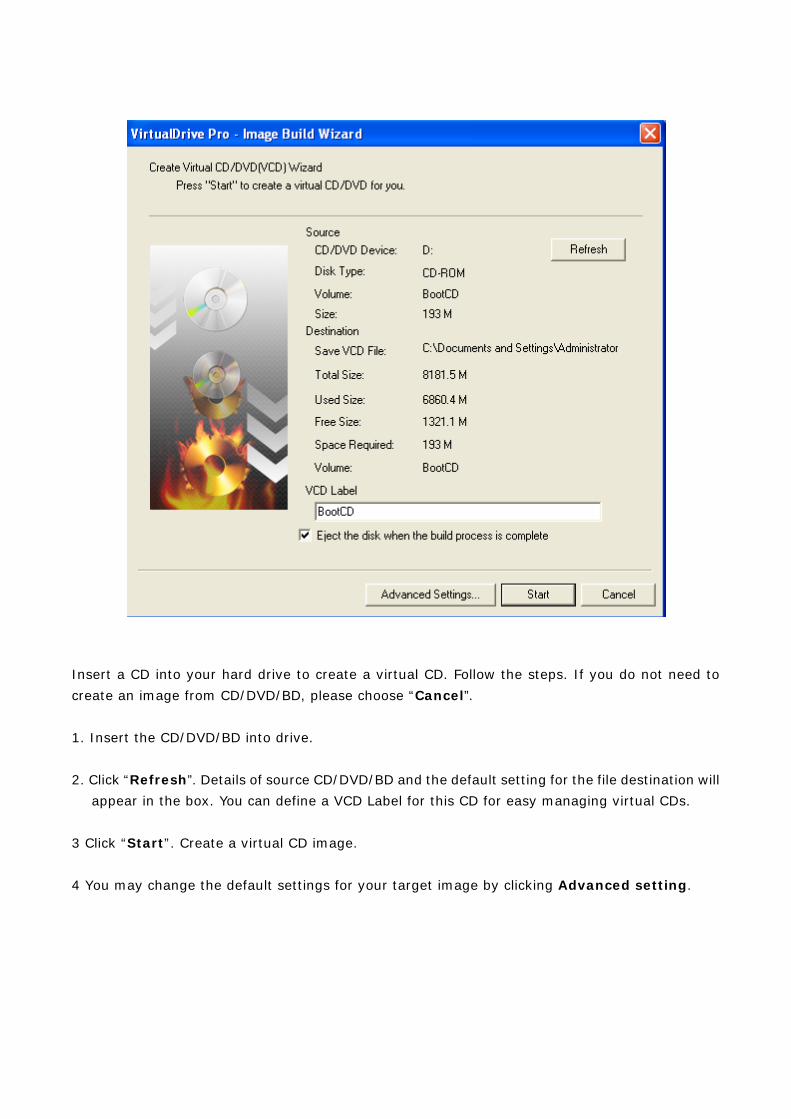
Insert a CD into your hard drive to create a virtual CD. Follow the steps. If you do not need to create an image from CD/DVD/BD, please choose “Cancel”.
1. Insert the CD/DVD/BD into drive.
2. Click “Refresh”. Details of source CD/DVD/BD and the default setting for the file destination will appear in the box. You can define a VCD Label for this CD for easy managing virtual CDs.
3 Click “Start”. Create a virtual CD image.
4 You may change the default settings for your target image by clicking Advanced setting.
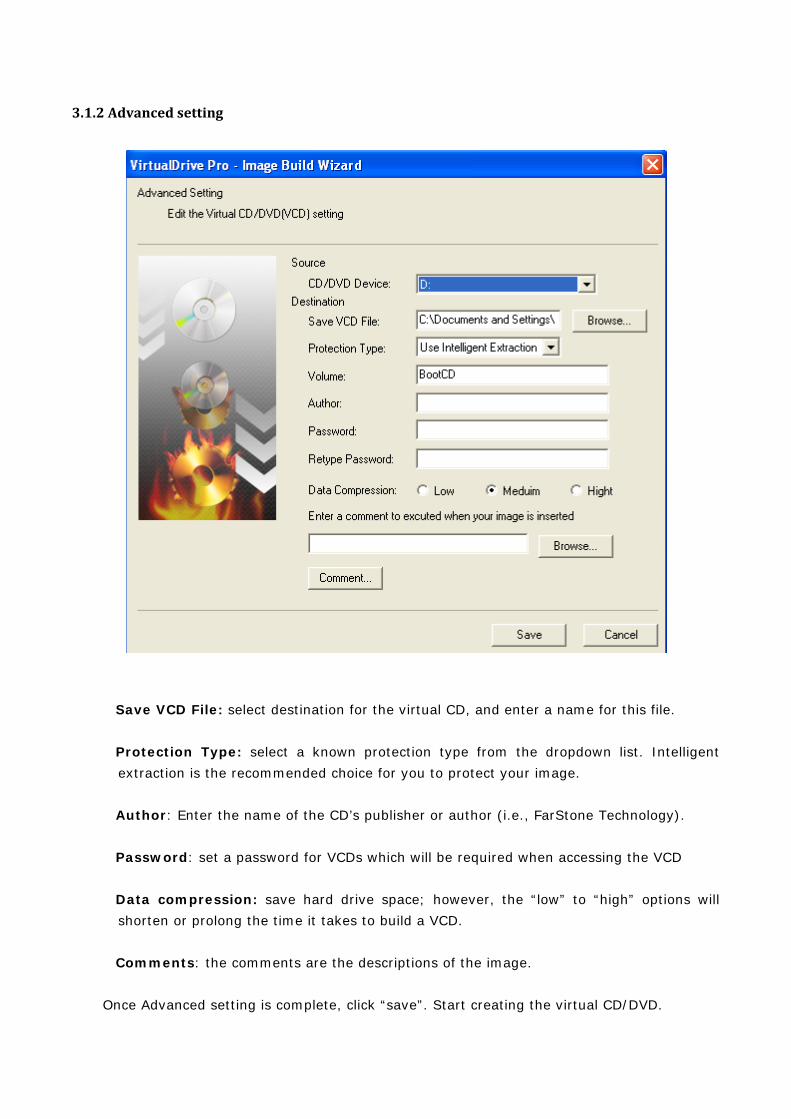
3.1.2 Advanced setting
Save VCD File: select destination for the virtual CD, and enter a name for this file.
Protection Type: select a known protection type from the dropdown list. Intelligent extraction is the recommended choice for you to protect your image.
Author: Enter the name of the CD’s publisher or author (i.e., FarStone Technology).
Password: set a password for VCDs which will be required when accessing the VCD
Data compression: save hard drive space; however, the “low” to “high” options will shorten or prolong the time it takes to build a VCD.
Comments: the comments are the descriptions of the image.
Once Advanced setting is complete, click “save”. Start creating the virtual CD/DVD.
3.2 VirtualDrive Pro Main Console
The main console directly lists the functions of programs. You may click the buttons to complete your tasks. Above the Main Console are buttons to the following program components:
1 Create (new image)
In this option, you can perform the following functions:
Create a virtual CD from CD/DVD and Blu-ray
Create a virtual CD from files and folders
Create a virtual CD from a project
2 Burn(image)
In this option, you can perform the functions as follows:
Burn a CD/DVD/BD from a virtual CD
Burn a custom disc
Burn an MP3 disc
Burn an Audio disc
Burn a CD/DVD/BD from a project
3 Clone
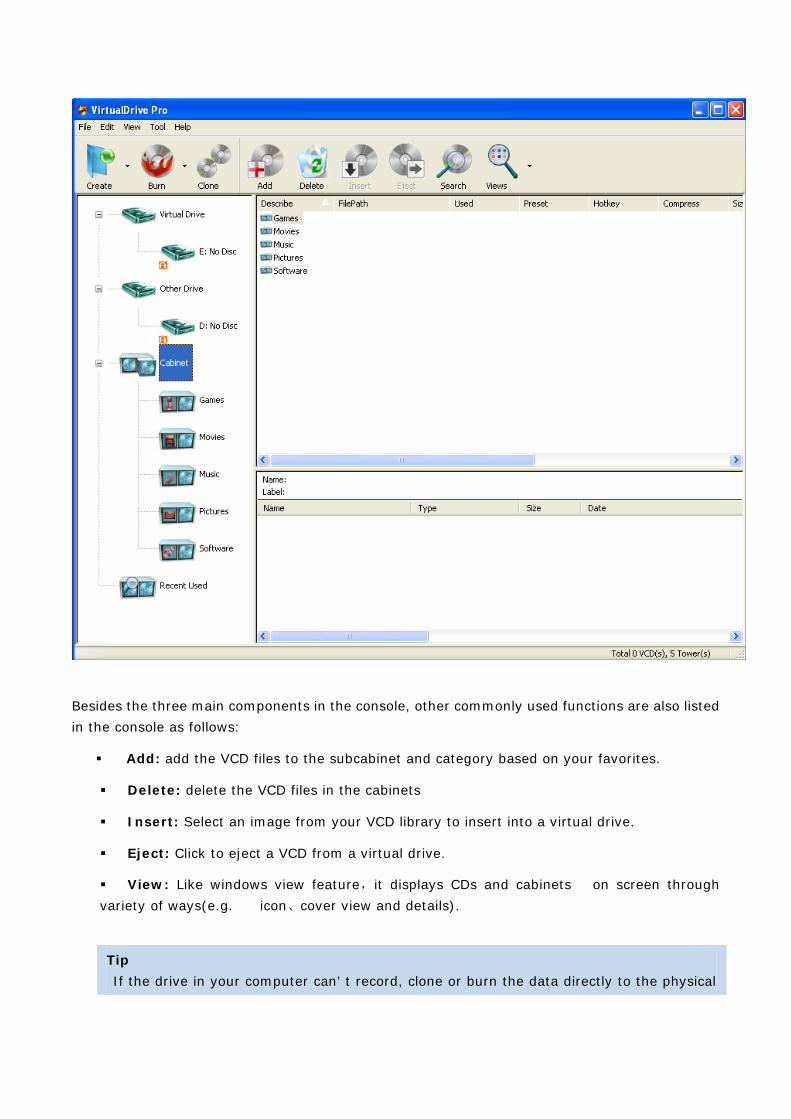
Besides the three main components in the console, other commonly used functions are also listed in the console as follows:
Add: add the VCD files to the subcabinet and category based on your favorites.
Delete: delete the VCD files in the cabinets
Insert: Select an image from your VCD library to insert into a virtual drive.
Eject: Click to eject a VCD from a virtual drive.
View: Like windows view feature,it displays CDs and cabinets on screen through variety of ways(e.g. icon、cover view and details).
Tip If the drive in your computer can’ t record, clone or burn the data directly to the physical
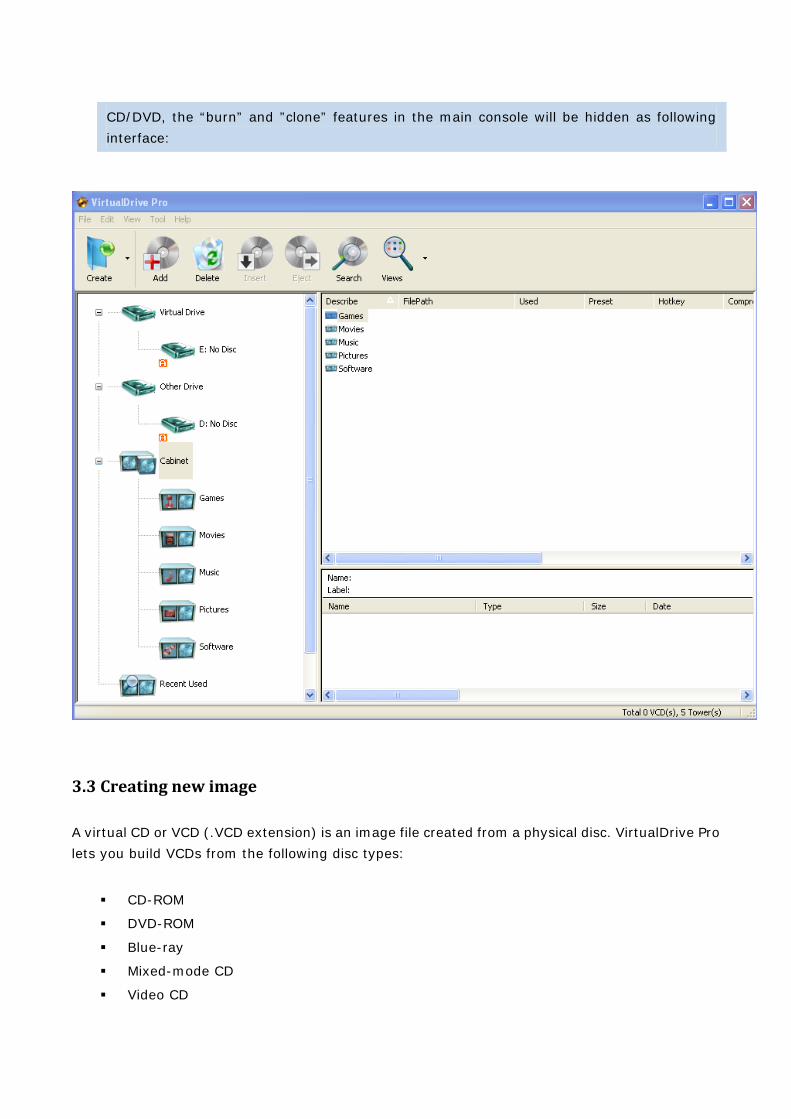
CD/DVD, the “burn” and ”clone” features in the main console will be hidden as following interface:
3.3 Creating new image
A virtual CD or VCD (.VCD extension) is an image file created from a physical disc. VirtualDrive Pro lets you build VCDs from the following disc types:
CD-ROM
DVD-ROM
Blue-ray
Mixed-mode CD
Video CD
Unprotected (non-CSS) video DVD
CD Extra
CD-Cops
Audio CD
Photo CD
Multi-Session CD
CD-Text
UDF CD
Data BD
VirtualDrive Pro supports many (but not all) DVD-ROM games, encyclopedias, multimedia content, and other large file formats. After you create image with VirtualDrive Pro successfully, you can open this image with Virtual Drive, and if your image is music or video files, you can play it with play software.
3.3.1 Create image from CD/DVD or Blue-ray
You must first insert your prepared physical CD into the drive to make the virtual image. (The details refer to 3.1.1)
3.3.2 Building an Image from files or folders
You can burn a project of selected files to CD/DVD and BD or save it as a virtual CD (VirtualDrive Image file). Because disc types are created using the same method, we describe how to make them here.
3.3.2.1 Creating a CD/DVD/BD project
You can create various types of projects in the utility by clicking New. To start a new Data CD/DVD/BD project, select any of the following options from the CD/DVD/BD Burning Manager:
1. Click “create virtual CD/DVD from files/folders”. You may directly enter into the interface of the project.
2. New Data CD/Data DVD/UDF CD/data BD to select different disc format to create or;
3. Click the small triangle to the right of the New button, then select Data CD/Data DVD/UDF CD/data BD, or;
4. Right-click in the Project Pane and select New Data CD/Data DVD/UDF CD/data BD.
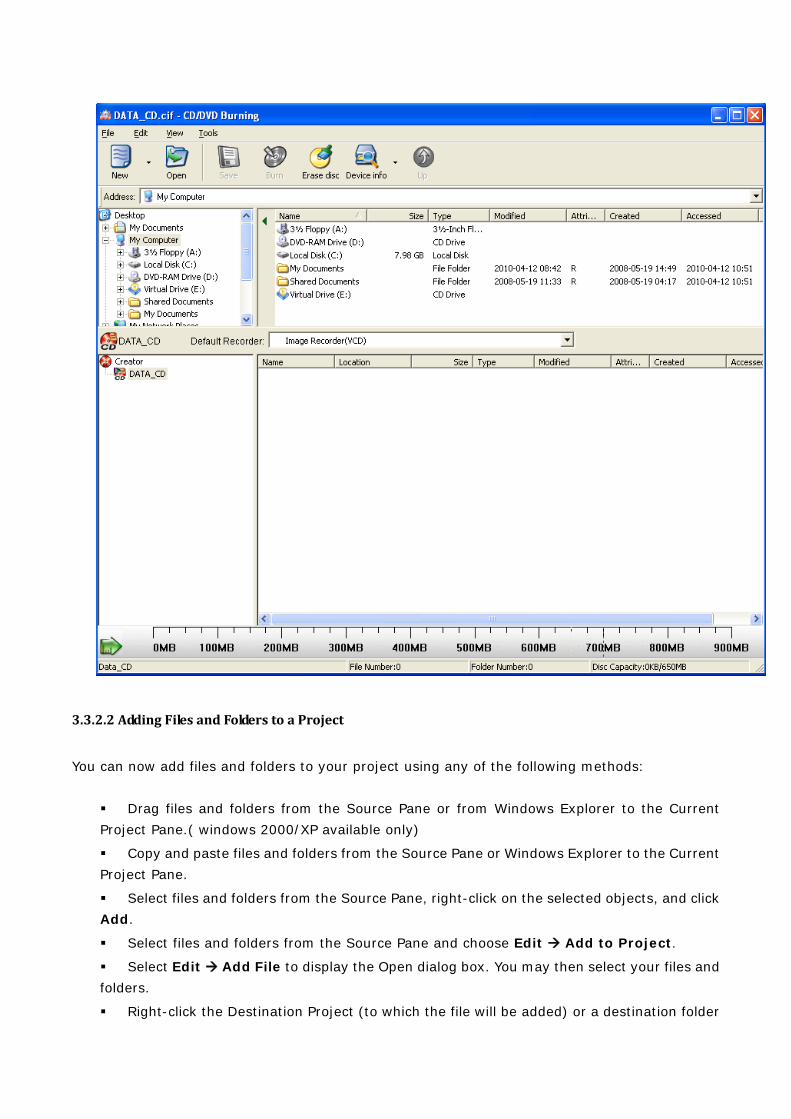
3.3.2.2 Adding Files and Folders to a Project
You can now add files and folders to your project using any of the following methods:
Drag files and folders from the Source Pane or from Windows Explorer to the Current Project Pane.( windows 2000/XP available only)
Copy and paste files and folders from the Source Pane or Windows Explorer to the Current Project Pane.
Select files and folders from the Source Pane, right-click on the selected objects, and click Add.
Select files and folders from the Source Pane and choose Edit Add to Project.
Select Edit Add File to display the Open dialog box. You may then select your files and folders.
Right-click the Destination Project (to which the file will be added) or a destination folder
from the Project Pane and choose Add File. This will display the Open dialog box, where you can select your files and folders.
Right-click on any blank area of the Current Project Pane and select Add File to display the Open dialog box. Select your files and folders.
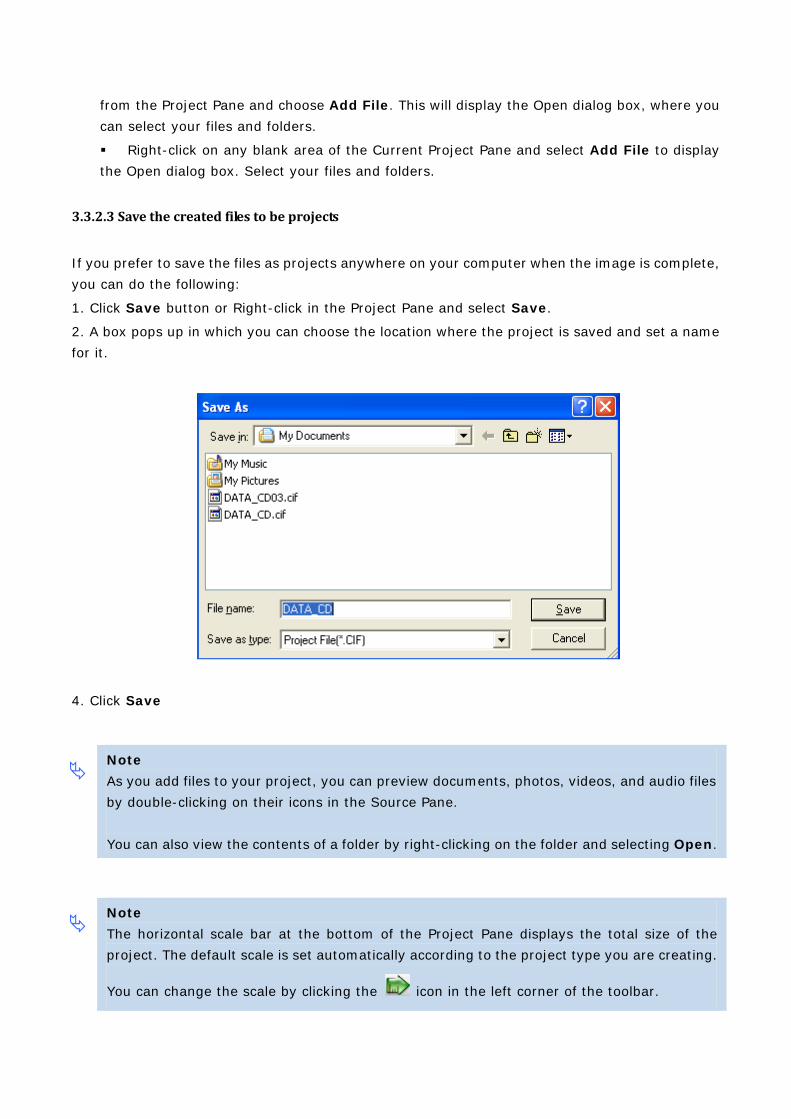
3.3.2.3 Save the created files to be projects
If you prefer to save the files as projects anywhere on your computer when the image is complete, you can do the following:
1. Click Save button or Right-click in the Project Pane and select Save.
2. A box pops up in which you can choose the location where the project is saved and set a name for it.
4. Click Save
Note As you add files to your project, you can preview documents, photos, videos, and audio files by double-clicking on their icons in the Source Pane. You can also view the contents of a folder by right-clicking on the folder and selecting Open.
Note The horizontal scale bar at the bottom of the Project Pane displays the total size of the project. The default scale is set automatically according to the project type you are creating.
You can change the scale by clicking the icon in the left corner of the toolbar.

3.3.3 Creating an image from project
Whether do you have previously created a project or it is your first time to create, the feature can help you customize the project by following these steps:
1. Click Create, then Select Create a Virtual CD from a Project, choose a project which you previously created or create a project now (details refer to 3.3.2.2).
2. Select the project you want to customize.
3. Click “open”. Customize the files or folders.
4. Right click in the project pane, you can add, delete and rename the files to customize the virtual CD.
5. After customization is complete, choose the default location. There are two conditions for you to choose which are:
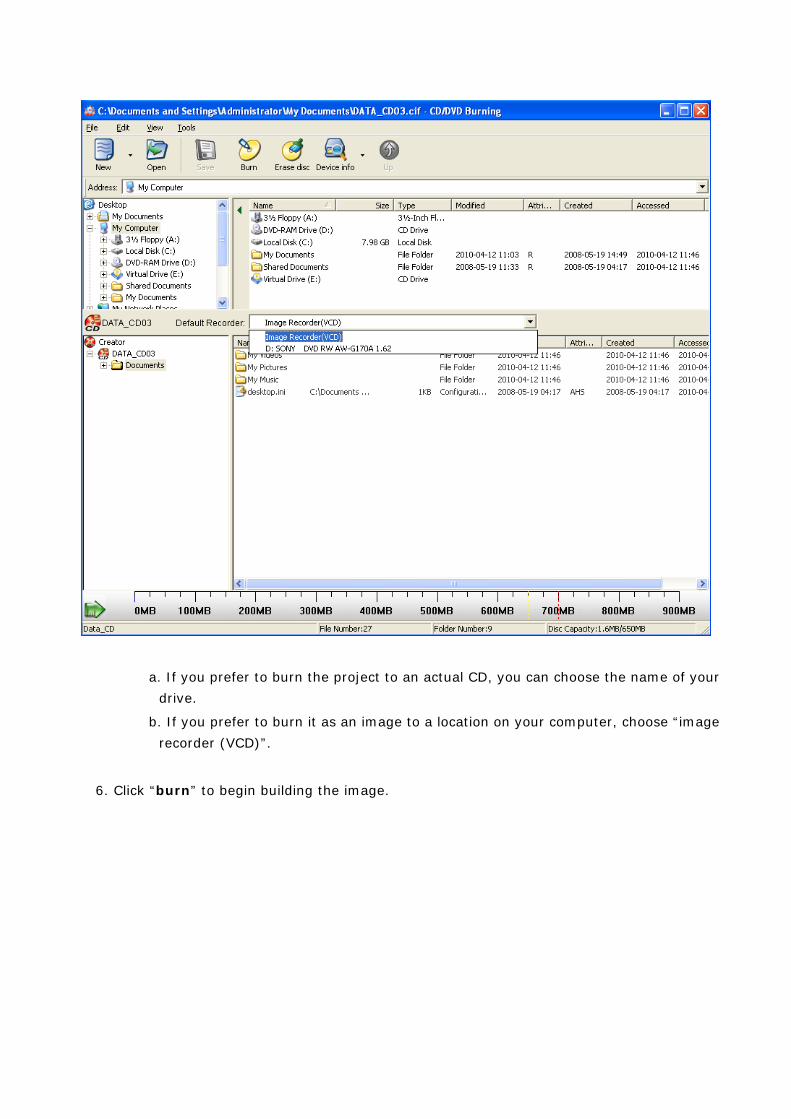
a. If you prefer to burn the project to an actual CD, you can choose the name of your drive.
b. If you prefer to burn it as an image to a location on your computer, choose “image recorder (VCD)”.
6. Click “burn” to begin building the image.
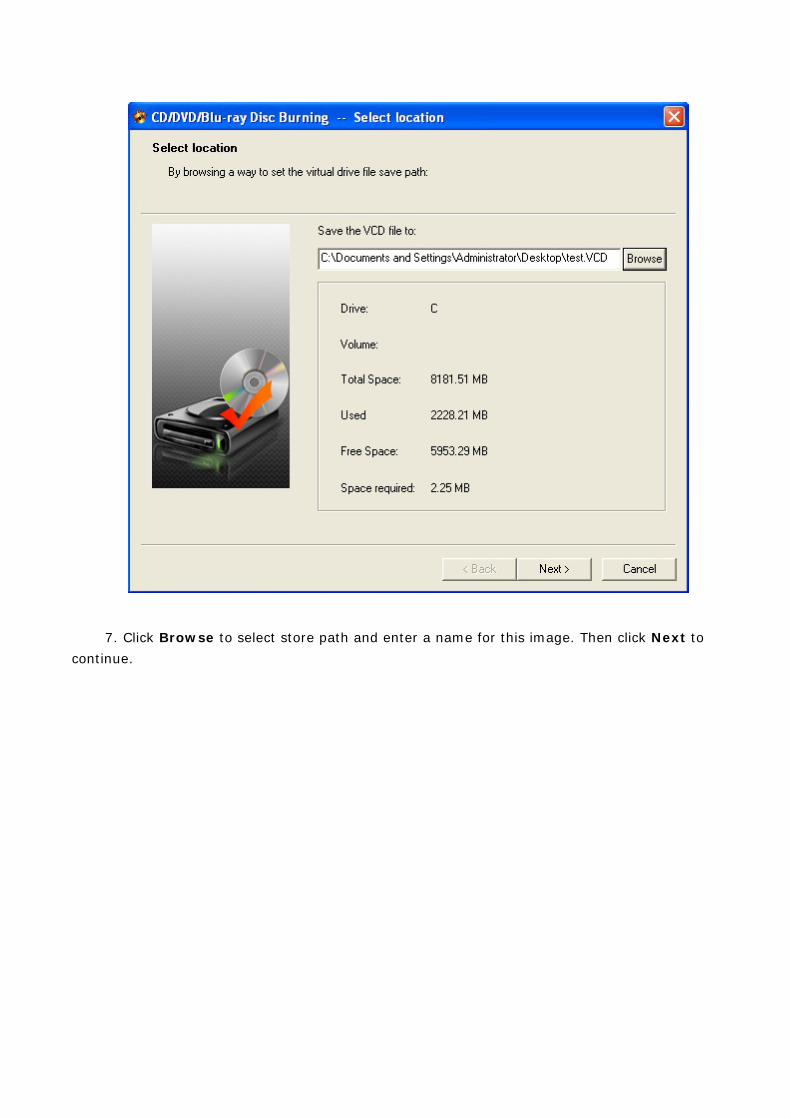
7. Click Browse to select store path and enter a name for this image. Then click Next to continue.
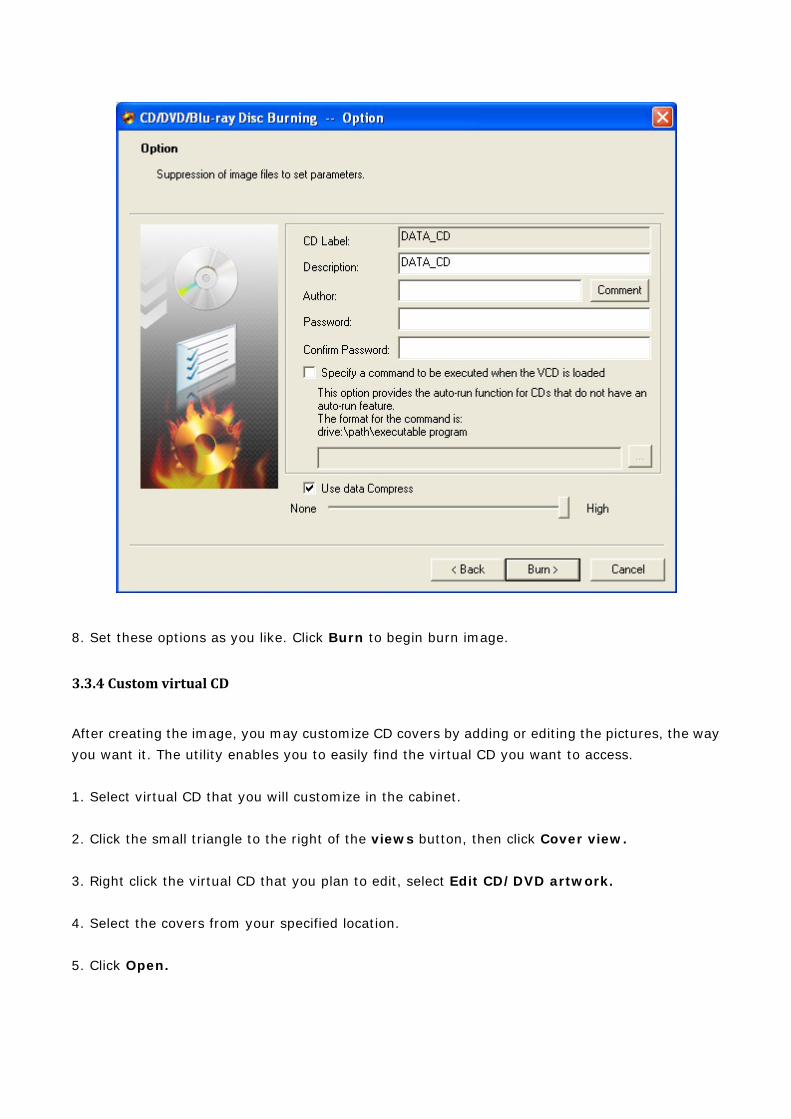
8. Set these options as you like. Click Burn to begin burn image.
3.3.4 Custom virtual CD
After creating the image, you may customize CD covers by adding or editing the pictures, the way you want it. The utility enables you to easily find the virtual CD you want to access.
1. Select virtual CD that you will customize in the cabinet.
2. Click the small triangle to the right of the views button, then click Cover view.
3. Right click the virtual CD that you plan to edit, select Edit CD/DVD artwork.
4. Select the covers from your specified location.
5. Click Open.
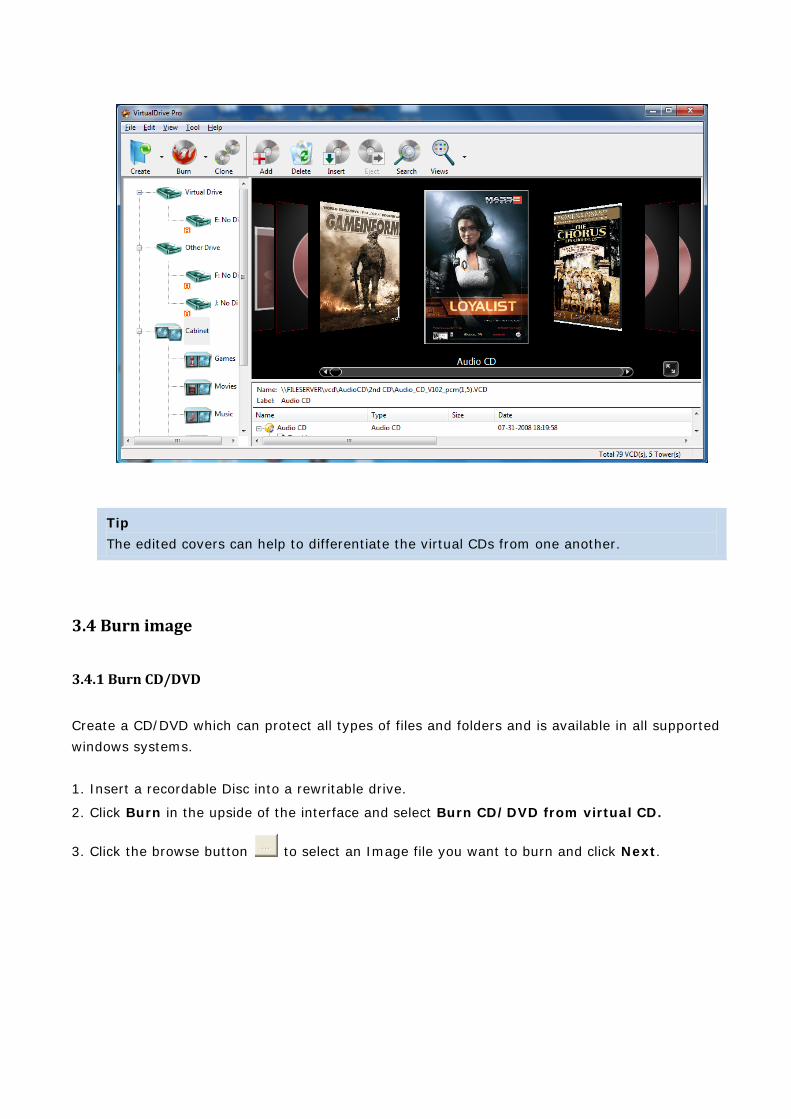
Tip The edited covers can help to differentiate the virtual CDs from one another.
3.4 Burn image
3.4.1 Burn CD/DVD
Create a CD/DVD which can protect all types of files and folders and is available in all supported windows systems. 1. Insert a recordable Disc into a rewritable drive.
2. Click Burn in the upside of the interface and select Burn CD/DVD from virtual CD.
3. Click the browse button to select an Image file you want to burn and click Next.
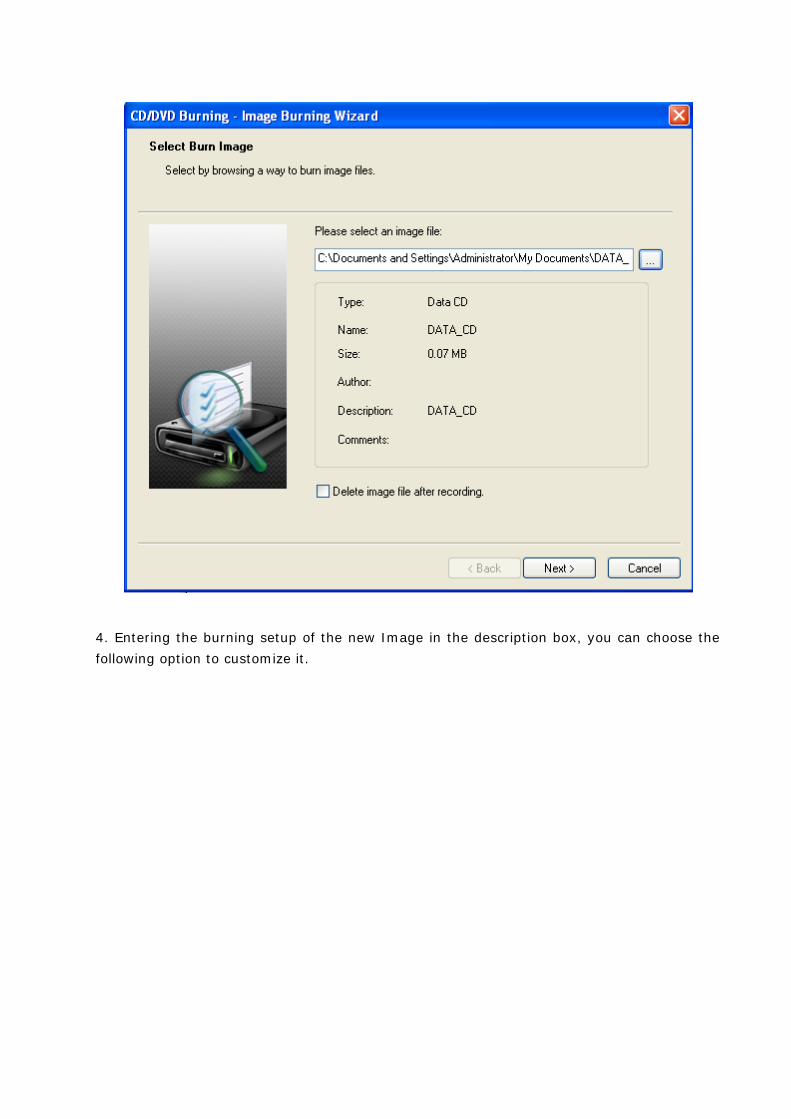
4. Entering the burning setup of the new Image in the description box, you can choose the following option to customize it.
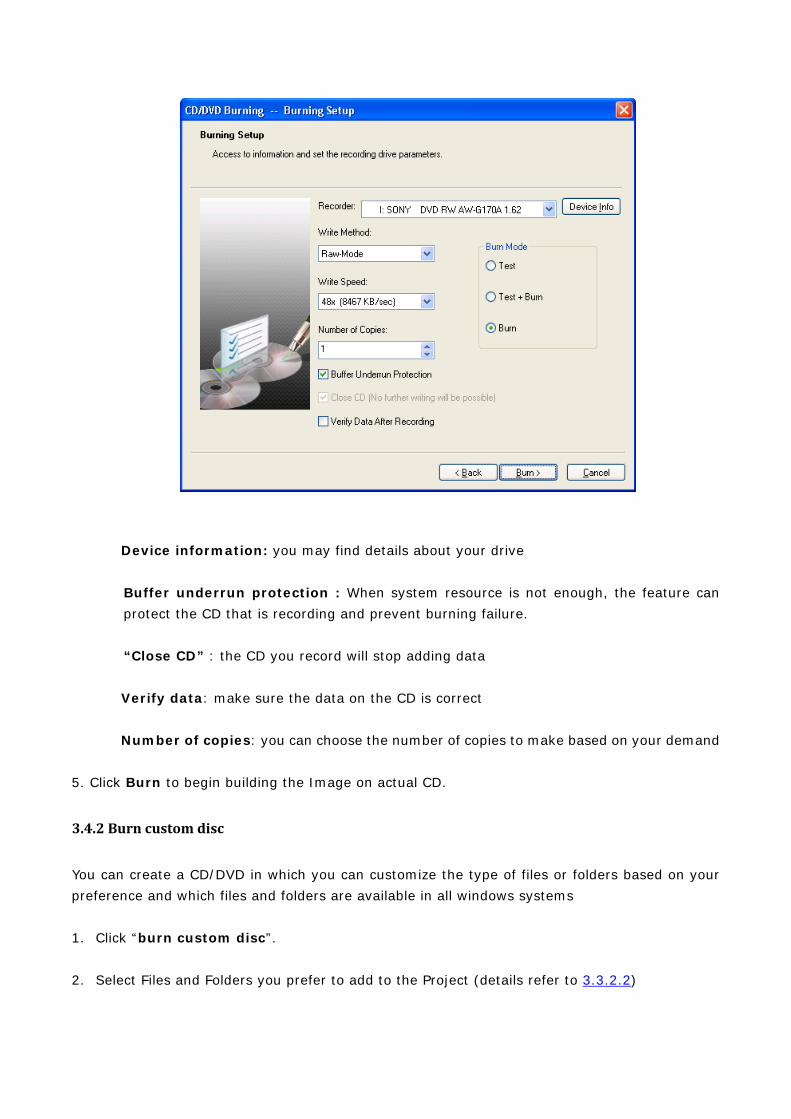
Device information: you may find details about your drive
Buffer underrun protection : When system resource is not enough, the feature can protect the CD that is recording and prevent burning failure.
“Close CD” : the CD you record will stop adding data
Verify data: make sure the data on the CD is correct
Number of copies: you can choose the number of copies to make based on your demand
5. Click Burn to begin building the Image on actual CD.
3.4.2 Burn custom disc
You can create a CD/DVD in which you can customize the type of files or folders based on your preference and which files and folders are available in all windows systems
1. Click “burn custom disc”.
2. Select Files and Folders you prefer to add to the Project (details refer to 3.3.2.2)
3. Right click in the project pane. You may add, delete and rename the files to customize the virtual CD.
4. After customization is complete, choose the default location. There are two options for you to choose:
a. If you would like to directly burn the project to an actual CD, you can choose the name of your hard drive
b. If you would like to burn the project as an image to a preferred location on the computer, choose “image recorder (VCD)”.
5. Click “burn” to begin building the image.
3.4.3 Burn MP3 disc
Burn all your collective MP3 files onto a CD/DVD. The CD/DVD can be played on any computer or player that supports MP3. It can store more music files than a typical CD.
1. Choose MP3 files or folders and add them to the project.
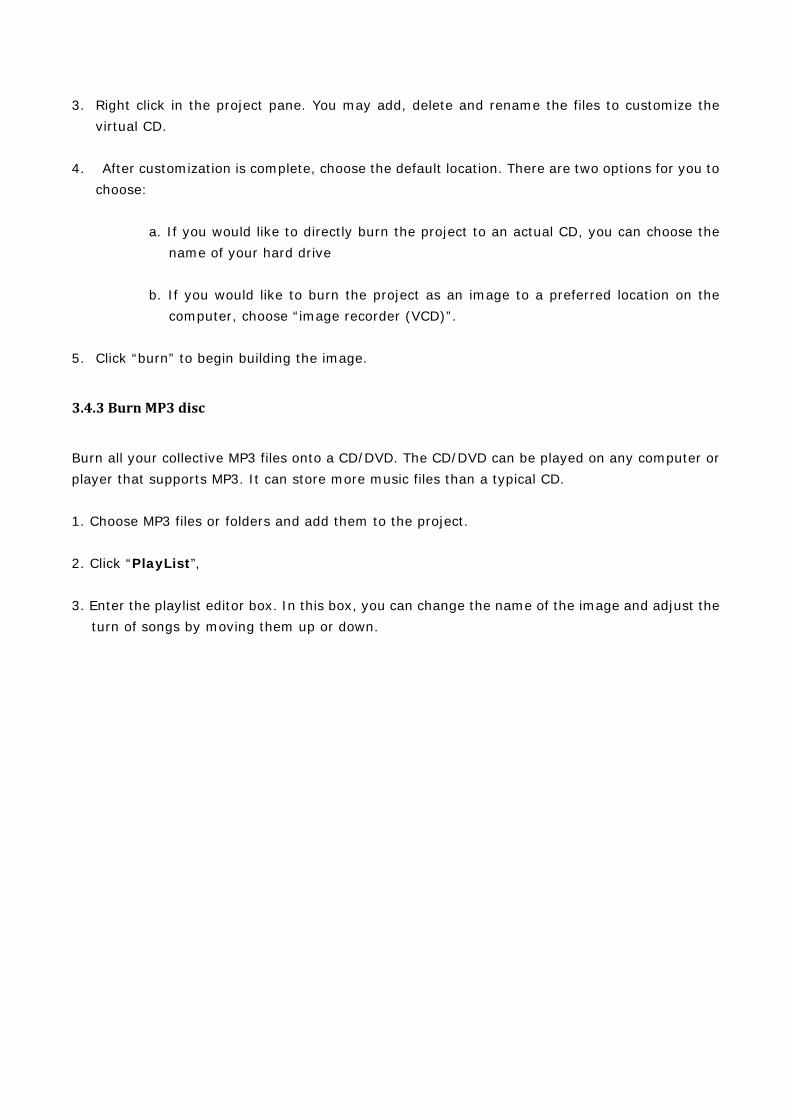
2. Click “PlayList”,
3. Enter the playlist editor box. In this box, you can change the name of the image and adjust the turn of songs by moving them up or down.
4. You can save them as a project to the location you want or burn them directly onto the CD.
(Details refer to 3.4.5) 5. Click “Burn” to begin building image.
3.4.4 Burn audio disc
Create a standard music CD which can be played on any audio player. When creating, you can select any music from your hard drive.
1. Select audio files or folders and add them to the project. The program will automatically determine which files are audio files.
2. You can save them as the project to the location where you want or burn them directly into the CD. (Details refer to 3.4.5)
3. Click “burn” to begin building image.
Tip If you burn the WAVE files to audios, it is recommended to use files of WAV Digitization Quality, 44.1 K, 16-bit sound depth (bit rate=705 kbps).
3.4.5 Burn image from project
1. Click burn image burn image from project or Click the small triangle to the right of the burn image button, then select burn image from project.
2. A pop up box will appear. Choose which project to burn.
3. Before burning, there are two default recorders for you to choose:
If you would like to directly burn the project to an actual CD, set the default recorder to be hard drive.
a. Insert a recordable CD into the hard drive.
b. Click the Burn button in the optional menu.
c. The burning setup box pops up and you can custom it by following options.
Device information: you may find details about your drive
Buffer underrun protection : When system resource is not enough, the feature can protect the CD that is recording and prevent burning failure.
“Close CD”: the CD you record will stop adding data.
Verify data: make sure the data on CD is correct.
Number of copies: you can choose the number of copies to make based on your demand.
d. Click burn
If you would like to burn it as an image to a preferred location on the computer, choose “image recorder (VCD)” as the default recorder.

a. Click “Burn”
b. Enter a description of the new Image in the description box. Click the browse button to set an image name for your VCD file and save it to the default location C:
c. A dialog box will display the attributes of the Image that will be created.
d. Click Next.
e. Enter the option box.
Description: define the file type
Author: Enter the name of the CD’s publisher or author (i.e., FarStone Technology).
Comments: The comments are the descriptions of the image.
(Optional) You can set a password for Image files. The password will be required if you attempt to insert the Image or view the content of the Image.
(Optional) If the CD does not have an Auto-run file, you can specify a program to run it when the Image is inserted.
Using data compression will save hard drive space but will also require more time to build the Image.
f. Click “Burn” to begin building image.
3.5 Cloning CD/DVD or BD
You can make an identical copy of an existing CD/DVD/BD onto another recordable disc.
In the Main Console, select Clone CD/DVD/Blue-ray. The way you clone your disc will depend on the number of CD/DVD/BD drives connected to your computer.
Cloning a Disc with Two CD/DVD or BD Drives
Insert a blank disc into one CD/DVD/BD recorder, and then insert the source disc into your other CD/DVD/BD-ROM drive.
From the drop-down menu in the dialog box, select the drive containing the source disc.
Other options in this dialog box include:
Disc Information: View disc type, number of sectors, disc size, time, sessions, tracks, start sector, and end sector of the source disc.
Read Speed: Select a read speed from the dropdown menu. It is recommended to choose the Best Speed option.
Ignore read errors: Checking this box will set the burner to ignore read errors from the source disc.
On-the-fly: Checking this option enables quick cloning.
Note
If the on-the-fly option is checked, data will be taken directly from the source disc and burned on the target disc. If on-the-fly is not checked, data from the source disc will first be compressed as an Image and stored in a temporary files folder. The original contents of the source disc will then be burned to the target disc. This option is not available if there is only one CD/DVD or BD drive in your computer.
Click Next to display a dialog box. Choose your burning settings and click Burn.
Cloning a Disc when there is only One CD/DVD Drive
1. Insert the source disc into your CD/DVD-ROM recorder.
2. Select the source disc from the drop-down menu in the dialog box.
3. Choose your burning settings and click Record in the dialog box.
Note The next two steps are settings for making an Image.
4. Select a CD/DVD read method. The default read method of “Intelligent Extraction” works with most CD formats. If you know what protection type is used on the CD, you may want to select the Other Protected CD type option.
5. Using Data Compression will save hard disc space but will also require a longer build time.
6. Enter a description for the Image in the description field. Optional: If the CD does not have an Auto-run file, you can specify for a program to run it when the Image is inserted into a virtual drive.
7. Click Next. The image of the source disc will begin creating. When complete, the disc will automatically eject.
8. Replace the source disc with a writable disc and click OK to continue.
3.6 The VCD Manager
To launch the VCD Manager, click the VCD Manager tab in the upper left-hand corner of the software interface.
The left window will display a directory tree of:
All CD/DVD drives on your system, physical and virtual
All VCD cabinets, in which you can organize your virtual CDs
Select a VCD to view its contents in the bottom window. Right click on a VCD to view its properties, password information, to rename a VCD, etc.
3.6.1 Using Virtual Drives in the VCD Manager
You can access your virtual drives in the left window of the VCD Manager. Right click on a Virtual Drive icon to view the following options:
Eject All: From the top-level Virtual Drives icon, you can eject all VCDs from all your virtual drives.
Eject: Eject an inserted VCD from the selected virtual drive.
Browse: View the contents of an inserted VCD.
Autorun: Play an inserted VCD automatically from the selected virtual drive.
Edit Drive: Change the drive letter of the selected virtual drive.
3.6.2 Using Physical Drives in the VCD Manager
You can access your physical CD/DVD-ROM drives in the left window of the VCD Manager. Right-clicking on a CD/DVD-ROM drive will present you with the following options.
Eject All: From the top-level Other Drives icon, you can eject all physical discs from all your CD/DVD-ROM drives.
Eject: Eject a CD or DVD from a select CD/DVD-ROM drive.
Close: Close a select CD/DVD-ROM drive.
Autorun: Play an inserted CD/DVD automatically from the selected CD/DVD-ROM drive.
Edit Drive: Change the drive letter of a select CD/DVD-ROM drive.
Build: Enter the Create Virtual CD interface.
3.6.3 Adding VCDs to the VCD Manager
Before you play a VCD, you must first add it to the VCD Manager.
1. Click the Add VCD button to import a VCD from your hard drive, another computer, or from a local network; or
2. Right click in the upper right window of the VCD Manager. Select Add to open the Add VCD dialog box and browse for an image; or
3. Click Add Internet image in the File drop-down list to open the dialog box.
Type in or paste in the URL of the image. You must first make sure the VCD is a shared file.
3.6.4 Organizing VCDs in Cabinets
A cabinet is similar to a folder in Windows Explorer and stores multiple images by category. As your library grows, organizing your images in cabinets will reduce the time it takes to locate your VCDs. VirtualDrive Pro creates several default cabinets: Music, Games, Software, Photos, Movies, and Recently Used. To add a new cabinet category:
Select any cabinet icon in the left window of the VCD Manager. Click New cabinet in the File drop-down list.
Or:
Right click on any cabinet icon in the left window of the VCD Manager and select New Cabinet to open the New Cabinet window. You may rename or delete your cabinet by right-clicking the icon.
You can create a new cabinet within a sub-cabinet. To add a VCD to a cabinet, please refer to the methods described in the preceding section. You can delete a cabinet by right clicking on it and selecting Delete, or selecting a cabinet and clicking the delete button at the bottom of the left window. Deleting a cabinet will remove all image icons and sub-cabinets. This will not delete VCD files from their physical locations
3.6.5 Searching for VCDs
1. Click the Search button to open the Search VCD dialog box.
2. In the Path field, specify a drive to search. To select a custom path, click the Browse button
and click Search.
3. Located files will be displayed in the bottom right window.
3.6.6 Extracting Files from a VCD
In the VCD Manager, you can click on a VCD icon to view its contents in the bottom right window. In the bottom right window, right click on the file you wish to extract.
3.6.7 Inserting a VCD into a Virtual Drive
In the VCD Manager:
1. Select a VCD icon in the upper right window and drag it to an available virtual drive; or
2. Double click a VCD icon in the upper right window. This will insert your VCD into the default virtual drive, or the first available virtual drive; or
3. Select a VCD icon in the upper right window and click the Insert button; or
4. Open Windows Explorer, right click on a virtual drive, and choose Insert from the popup menu.
5. Open the VCD Manager, right click on a virtual CD, and select Shortcut to create a desktop shortcut. Double-click the desktop shortcut to insert the virtual CD into the first Virtual Drive listed.
3.6.8 Ejecting a VCD from a Virtual Drive
In the VCD Manager:
1. Click the Eject button on the menu bar. From the dropdown menu, select the VCD you wish to eject; or
2. In the left window, right click on a loaded virtual drive and select Eject; or
3. Open Windows Explorer, right click on a loaded virtual drive and select Eject from the popup menu.
3.6.9 Importing and Exporting a VCD List
To export a VCD list:
1. From the menu bar, select File Export VCD List.
2. Select a location to save the VCD list and enter a name for it. Click Save.
Importing a VCD List:
1. From the top menu bar, select File Import VCD List.
2. Browse to select any saved VCD list you wish to import. Click Open.
3.7 Converting VCDs and ISO 9660 Images
You can convert an ISO 9660 image file into a VCD file, or conversely convert a VCD file into an ISO 9660 CD file.
1. From the top menu bar, select Tools Convert VCD/ISO.
2. Click Browse to locate the ISO or VCD file.
3. Select the VCD or ISO 9660 image you would like to convert and click OK.
4. Click Convert to start the conversion process.
Note Audio, DVD, and compressed VCD files cannot be converted into ISO files.
Chapter 4: Technical Support and Product Updates
Should you encounter a technical issue with our products, please contact your vendor or use the FarStone online support system at www.farstone.com/support. Answers to frequently asked questions (FAQs) about FarStone products are posted on the corporate web site at http://www.farstone.com/support/product-support.htm. Upgrade/Update Center
http://www.farstone.com/upgrade/
If you have purchased our product before, you may want to upgrade/update your program. Please enter our upgrade center. The version you purchased is not under the same large version of the latest version, please refer to Upgrade. Otherwise, refer to Update. EX: Version 7, version 8, the version with only integer is large version; version 7.1, version 7.1.1, the version with decimals is small version. It means the integer part of the version is the same under the same large version.
Chapter 5: Glossary
Blu-ray disc: The optical disc storage is for storing high-definition video, PlayStation 3 video games, and other data, with up to 25 GB per single-layered, and 50 GB per dual-layered disc. 200 GB discs are available, and 100 GB discs are readable without extra equipment or modified firmware. CD Emulator: A program that imitates a physical CD-ROM device, creating MP3-like files out of game, application, and data discs. CD Extra: A multi-session disc containing both music tracks and computer data. CD-ROM: A disc format that holds text, graphics, and hi-fidelity stereo sound. It uses a different format for recording data than the audio CD (CD-DA) from which it evolved. An audio CD player cannot play CD-ROMs, but CD-ROM players can play audio discs. CD-Text: There is extra information added to a disc, like CD-Text for audio discs. It is stored in the disc subchannel. Data CD/DVD: A CD/ DVD containing all types of files, including data files and audio files. ISO 9660: A file system standard for discs which can be read on all operating systems. ISO9660 supports file names in 8.3 formats (8 characters for the file name and 3 characters for the file extension). Mixed-Mode CD: A single-session CD containing both computer data and music tracks. It is typically used for entertainment and educational programs. Multi-session CD: A CD containing several sessions with a 30MB space between two successive sessions. Each session has a table of contents linking to the next free area of the disc until the final track is closed. If a CD-R/CD-RW disc is left unclosed, you can append data to it. Virtual CD/DVD: An image file created from the digital contents of a physical CD or DVD. A virtual CD runs directly on a computer’s hard drive, but must be inserted into a virtual drive created by your CD emulation software. Virtual Drive: A CD emulation device that emulates the functionality of a CD/DVD-ROM drive, and appears as a drive letter in Windows Explorer.
Chapter 6: Frequently Asked Questions
Q. What are the differences between VirtualDrive Pro 12 and 14?
A. There are additional features included in VirtualDrive Pro 14. The new version uses FarStone's latest technology containing innovative display mode. highly-efficient drive module, blu-ray disk support, touch screen support and more. The concise operating process makes it easier to complete the operation. See more differences under the "Compare Editions" tab.
Q. What is VirtualDrive Pro?
A. VirtualDrive Pro 14 CD emulator converts CDs and unprotected DVDs into compressed images, or “virtual discs,” which it plays in any one ofup to 23 “virtual drives.” These virtual drives, created in the software, show up as drive letters in Windows® Explorer and run directly on the hard drive with access rates up to 200 times faster the CD/DVD-ROM drives. The result is more responsive, quieter playback, less wear and tear on a computer’s hardware, and complete freedom from physical discs, which can then be left at home, safe from theft or damage.
Q. How does VirtualDrive work?
A. VirtualDrive converts game and application discs into MP3-like files, or “virtual discs.” It also creates up to 23 "virtual drives" and fools Windows into treating them as physical CD/DVD-ROM drives. These virtual drives appear as drive letters in Windows Explorer. You can run several virtual CDs simultaneously (one virtual CD (VCD) per virtual drive), swapping them out via hot keys. Since virtual CDs play directly on your hard drive, they have much faster access rates than physical CDs in a CD/DVD-ROM drive.
Q. What exactly is a virtual drive?
A. It is a CD emulation device that emulates the functionality of a CD/DVD-ROM drive, and appears as a drive letter in Windows Explorer. A virtual drive runs Virtual CDs (or VCDs) at faster speeds than a physical disc.
Q. How many VCDs can VirtualDrive operate?
A.Users can operate several VCDs simultaneously in up to 23 “virtualdrives,” swapping them out for a seamless transition between volumes of a game. VirtualDrive’s simple, user-friendly GUI makes it easy to create unlimited VCDs, modify them with custom tracks and documentation, and manage them in a searchable virtual CD library.
Q. How do I create a virtual drive?
A. virtual drive emulates the functionality of a physical drive and appears as a drive letter in A. Windows Explorer. To create a virtual drive: Right click icon of VirtualDrive Pro on the right corner of your computer, click New Virtual Drive. Then check drive letter as you like to create new virtual drive.
Q. Does VirtualDrive support compression?
Yes. VirtualDrive’s average compression ratio is usually about 10-30%. For the uncompressed CD titles, the compression ratio can be as high as 50%.
Q. How much memory does VirtualDrive use?
A. VirtualDrive is a new device for your system. It uses 64 KB of memory to cache the most recently used data for each VirtualDrive.
Q. Can I build a VCD from selected files on my computer, network server or CD-ROM disc?
A. Yes. You create an ISO9660 CD-ROM image file from the selected files by using a CD-R burning software (for example, Adaptec Easy CD Creator). And then use the "Convert ISO9660 image to VCD" function of VDN admin program, to import it into the VDN file CD jukeboxes.
Q. Where may I purchase FarStone software?
A. FarStone Technology products may be from our online product pages or from any of our reseller partners. If you originally purchased Virtual Drive from an authorized FarStone Technology Value Added Reseller (VAR), you may wish to purchase any additional licenses through that reseller.
Q. What are the latest prices?
A. The latest prices (MSRP) for FarStone Technology software are posted on the website.
Q. How are your products licensed?
A. Each product is licensed per machine, unless otherwise stated (i.e, purchasing a multiple license bundle). If you wish to install and activate the product on multiple machines, you will need to purchase additional licenses.
Q. If I purchase VirtualDrive software, do I download it, or will you send me official product CDs in the mail?
A. You will have the option during the purchase to request a VirtualDrive downloaded product CD by mail (for a small shipping fee), or you may choose to download the software. The download comes in the form of a small installer to install the software in Windows.

Q. When deal with UDF higher version (such as 2.4 or 2.6), I can not use Virtual Drive normally. How to solve?
A. To solve the problem, you can use following method to covert ISO: 1. Open such an ISO with open source tool 7-zip, and uncompress all files into a local temporary folder. 2. Enter "Create a Virtual CD from files/folders", and add all the uncompressed files in step 1. Please make sure to keep the directory structure of original CD/DVD. 3. After that, use function "Create a Virtual CD from files/folders" to create virtual CD. 4. Add virtual CD to cabinet. Note: This solution is invalid to some some Encryption CD or speical format CD.
Related Documents