Welcome message from author
This document is posted to help you gain knowledge. Please leave a comment to let me know what you think about it! Share it to your friends and learn new things together.
Transcript

276 Section C • Chapter 8 – Victim Disentanglement and Extrication
Chapter Contents
Victim Entrapment ............................279 Victim Locations ....................................................... 279
Points of Entrapment ............................................... 280
Dynamics of Disentanglement ................................. 281
Multiple Vehicle Incidents ........................................ 285
Minimizing Hazards to Victims ................................. 287
Passenger Vehicle Access and Egress Points ............................287 Passenger Vehicle Access and Egress Routes ......... 288
Passenger Vehicle Entry Points ............................... 288
Passenger Vehicle Disentanglement and Extrication Operations ................. 290 Techniques for Creating Access and Egress Openings on
Passenger Vehicles ............................................... 290
Alternative Techniques for Creating Access and Egress
Openings on Passenger Vehicles
with Advanced Steel ............................................. 301
Techniques for Disentangling Victims from
Passenger Vehicles .............................................. 303
Chapter Review .............................. 308Discussion Questions ....................... 308Skill Sheets ................................... 309
Victim Disentanglement and Extrication

Section C • Chapter 8 – Victim Disentanglement and Extrication 277
8Key Terms
Access ......................................................288Disentanglement .....................................279Egress .......................................................288Entrapment ...............................................280Mass Casualty Incidentals (MCI) ............285
JPRs addressed in this chapter
This chapter provides information that addresses the following job performance requirements of NFPA 1006, Standard for Technical Rescuer Professional Qualifications (2017).
8.2.1
8.2.2
8.2.3
8.2.5
8.2.6
8.2.7
Victim Disentanglement and Extrication
278 Section C • Chapter 8 – Victim Disentanglement and Extrication
1. Identify common victim locations and points of entrapment. [8.2.5]
2. Explain how different types of vehicle collisions affect victim location and injury. [8.2.5]
3. Describe operational considerations at a multiple vehicle incident. [8.2.1, 8.2.2, 8.2.3, 8.2.6, 8.2.7]
4. Explain how to minimize hazards to victims. [8.2.6, 8.2.7]
5. Identify common passenger vehicle access and egress points. [8.2.5, 8.2.6]
6. Describe methods used to create access and egress points on passenger vehicles. [8.2.6]
7. Describe techniques for disentangling victims. [8.2.7]
8. Skill Sheet 8-1: Determine passenger vehicle access and egress points. [8.2.5]
9. Skill Sheet 8-2: Remove glass by removing the seal. [8.2.6]
10. Skill Sheet 8-3: Remove laminated vehicle glass. [8.2.6]
11. Skill Sheet 8-4: Remove tempered vehicle glass. [8.2.6]
12. Skill Sheet 8-5: Remove alternate types of vehicle glass. [8.2.6]
13. Skill Sheet 8-6: Open a door with a manually operated Hi-Lift® jack. [8.2.6]
14. Skill Sheet 8-7: Open or remove a door with a power ratchet, power impact wrench, or manual socket sets. [8.2.6]
15. Skill Sheet 8-8: Open or remove a door with hydraulic tools. [8.2.6]
16. Skill Sheet 8-9: Remove a sliding side door. [8.2.6]
17. Skill Sheet 8-10: Remove the side of a vehicle (total sidewall removal). [8.2.6]
18. Skill Sheet 8-11: Create an alternate (third-door) opening in a two-door vehicle. [8.2.6]
19. Skill Sheet 8-12: Create an alternate (fourth-door) opening in a vehicle (such as a panel van). [8.2.6]
20. Skill Sheet 8-13: Remove the roof of a wheel-resting passenger vehicle. [8.2.6]
21. Skill Sheet 8-14: Flap or remove the roof of a side-resting passenger vehicle. [8.2.6]
22. Skill Sheet 8-15: Create an access opening in the roof of a side-resting passenger vehicle. [8.2.6]
23. Skill Sheet 8-16: Remove the kick panel of a passenger vehicle. [8.2.6]
24. Skill Sheet 8-17: Create an access opening through the floor of a passenger vehicle. [8.2.6]
25. Skill Sheet 8-18: Tunnel through a trunk. [8.2.6]
26. Skill Sheet 8-19: Remove a windshield from around a victim.[8.2.7]
27. Skill Sheet 8-20: Displace a steering column. [8.2.7]
28. Skill Sheet 8-21: Displace a dashboard. [8.2.7]
29. Skill Sheet 8-22: Drop the floor pan of a vehicle. [8.2.7]
30. Skill Sheet 8-23: Displace or remove a front seat in a vehicle. [8.2.7]
Learning Objectives
Victim Disentanglement and Extrication
Section C • Chapter 8 – Victim Disentanglement and Extrication 279
Chapter 8Victim Disentanglement
and Extrication
Vehicle collisions and other emergencies involving entrapped victims can present challenges to responders. Entrapment occurs when some part of a vehicle restrains the victim or part of the victim inside a vehicle. Rescuers attending to entrapped victims need proficient training in modern extrica-tion techniques and need to provide highly skilled and competent medical care. These extrication techniques will disentangle the victim from whatever entraps them. Disentanglement, also known as removing the vehicle from the victim, relates to the removal and/or manipulation of vehicle components to allow the removal of a properly packaged victim from the vehicle.
Victim Entrapment Once rescuers obtain access to trapped victims they can begin disentanglement procedures. Regardless of the trapped victims’ location within the vehicle, rescuers must focus their efforts on disentangling the victims — removing the vehicle from the victims — and they must do so in a way that will not aggravate the victim’s injuries. The extrication team must closely coordinate their efforts with the team that is stabilizing and packaging the victims.
Victim Locations Upon arrival, rescuers may encounter vehicles resting in many different posi-tions and in various states of destruction. Several factors influence the final location of the victim within the wreckage:
• Collision damage
• Speed
• Vehicle construction
• Vehicle orientation (wheel-resting, side-resting, roof-resting)
In addition, rescuers may find victims who failed to wear proper restraints at any location within the passenger compartment. Unrestrained victims may get partially or fully ejected from the vehicle. Rescuers should conduct a thorough search in and around the area of the incident for these victims.
Rescuers may face challenges when disentangling and extricating victims from a side-resting vehicle. However, rescuers may face even greater difficul-ties in attempting to stabilize and package trapped victims in these vehicles. Rescuers may find these victims still belted into their seats or piled on top of each other at the bottom of the wreckage.
Victim Disentanglement and Extrication
Disentanglement — Aspect of vehicle extrication relating to the removal and/or manipulation of vehicle components to allow a properly packaged patient to be removed from the vehicle.
280 Section C • Chapter 8 – Victim Disentanglement and Extrication
CAUTIONSide- and roof-resting vehicles have a greater possibility of catching fire than wheel-resting
vehicles.
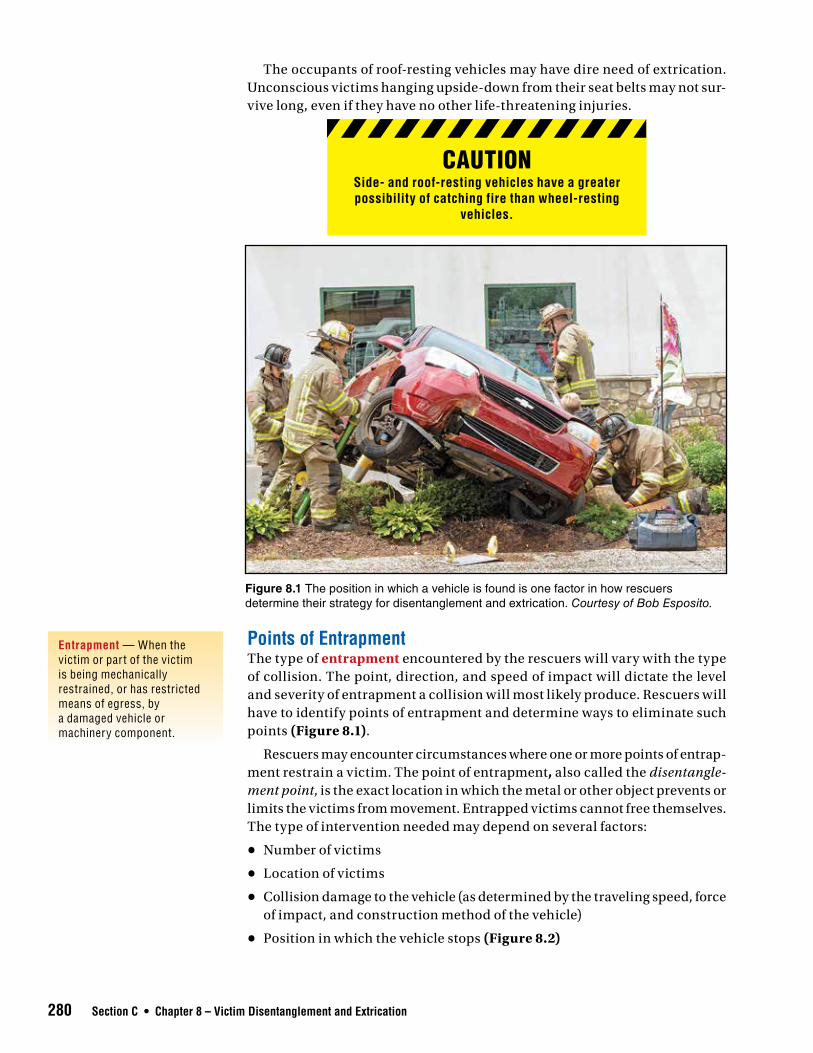
Figure 8.1 The position in which a vehicle is found is one factor in how rescuers determine their strategy for disentanglement and extrication. Courtesy of Bob Esposito.
The occupants of roof-resting vehicles may have dire need of extrication. Unconscious victims hanging upside-down from their seat belts may not sur-vive long, even if they have no other life-threatening injuries.
Entrapment — When the victim or part of the victim is being mechanically restrained, or has restricted means of egress, by a damaged vehicle or machinery component.
Points of EntrapmentThe type of entrapment encountered by the rescuers will vary with the type of collision. The point, direction, and speed of impact will dictate the level and severity of entrapment a collision will most likely produce. Rescuers will have to identify points of entrapment and determine ways to eliminate such points (Figure 8.1).
Rescuers may encounter circumstances where one or more points of entrap-ment restrain a victim. The point of entrapment, also called the disentangle-ment point, is the exact location in which the metal or other object prevents or limits the victims from movement. Entrapped victims cannot free themselves. The type of intervention needed may depend on several factors:
• Number of victims
• Location of victims
• Collision damage to the vehicle (as determined by the traveling speed, force of impact, and construction method of the vehicle)
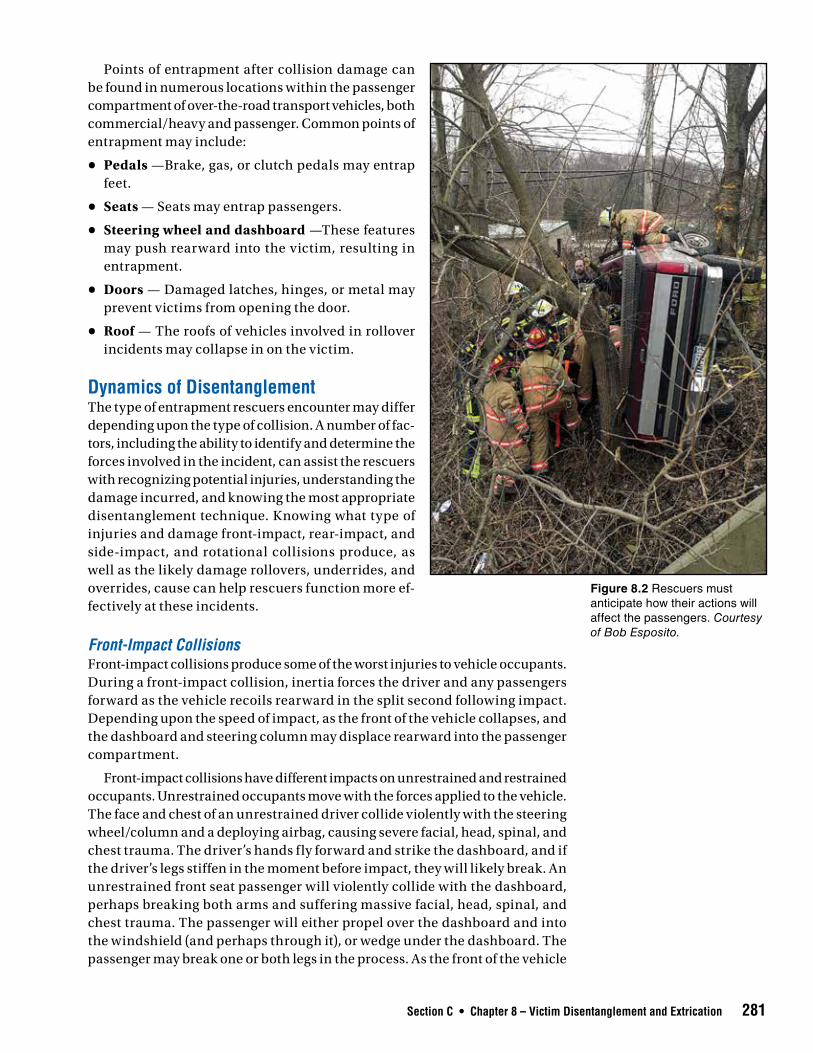
• Position in which the vehicle stops (Figure 8.2)
Section C • Chapter 8 – Victim Disentanglement and Extrication 281
Points of entrapment after collision damage can be found in numerous locations within the passenger compartment of over-the-road transport vehicles, both commercial/heavy and passenger. Common points of entrapment may include:
• Pedals —Brake, gas, or clutch pedals may entrap feet.
• Seats — Seats may entrap passengers.
• Steering wheel and dashboard —These features may push rearward into the victim, resulting in entrapment.
• Doors — Damaged latches, hinges, or metal may prevent victims from opening the door.
• Roof — The roofs of vehicles involved in rollover incidents may collapse in on the victim.
Dynamics of DisentanglementThe type of entrapment rescuers encounter may differ depending upon the type of collision. A number of fac-tors, including the ability to identify and determine the forces involved in the incident, can assist the rescuers with recognizing potential injuries, understanding the damage incurred, and knowing the most appropriate disentanglement technique. Knowing what type of injuries and damage front-impact, rear-impact, and side-impact, and rotational collisions produce, as well as the likely damage rollovers, underrides, and overrides, cause can help rescuers function more ef-fectively at these incidents.
Front-Impact CollisionsFront-impact collisions produce some of the worst injuries to vehicle occupants. During a front-impact collision, inertia forces the driver and any passengers forward as the vehicle recoils rearward in the split second following impact. Depending upon the speed of impact, as the front of the vehicle collapses, and the dashboard and steering column may displace rearward into the passenger compartment.
Front-impact collisions have different impacts on unrestrained and restrained occupants. Unrestrained occupants move with the forces applied to the vehicle. The face and chest of an unrestrained driver collide violently with the steering wheel/column and a deploying airbag, causing severe facial, head, spinal, and chest trauma. The driver’s hands f ly forward and strike the dashboard, and if the driver’s legs stiffen in the moment before impact, they will likely break. An unrestrained front seat passenger will violently collide with the dashboard, perhaps breaking both arms and suffering massive facial, head, spinal, and chest trauma. The passenger will either propel over the dashboard and into the windshield (and perhaps through it), or wedge under the dashboard. The passenger may break one or both legs in the process. As the front of the vehicle
Figure 8.2 Rescuers must anticipate how their actions will affect the passengers. Courtesy of Bob Esposito.
282 Section C • Chapter 8 – Victim Disentanglement and Extrication
collapses further, the kick panels, firewall, and tilt steering columns may col-lapse and entrap the feet, legs, and any other body parts wedged under the dashboard. The doors may crumple and jam or both front doors may f ly open and occupants may eject from the vehicle through the doors.
Unrestrained rear seat passengers may be propelled forward into the backs of the front seats, perhaps slipping between the front seats and colliding with the dashboard. The forces generated by their weight impacting the backs of the front seats will contribute to the already tremendous forces acting on those in the front seats.
However, if the vehicle was equipped with airbags, and the occupants wear seat belts, the results could vary dramatically. Depending upon the speed of impact, a properly belted driver may survive the crash virtually unscathed or with only minor injuries. If one of the driver’s hands rested at the top of the steering wheel when the airbag deployed, the force of the inflation could push that hand back into the driver’s face. This may result in a broken nose and perhaps facial lacerations if the driver wore glasses. If a knee bolster airbag protects the driver’s lower legs as the front of the vehicle collapses, the driver may suffer little if any injury.
Properly restrained front seat passengers could expect similar protection in a vehicle equipped with passenger airbags. Their extremities may f lail about until the vehicle comes to rest, but they will likely sustain relatively minor injuries. Properly restrained rear seat passengers may also f lail about some, but will similarly sustain relatively minor injuries.
Rear-Impact CollisionsRear-impact collisions can create unique problems for vehicle occupants and rescuers, depending upon the speed of impact. In relatively low speed impacts, the rear-end structure of large sedans and station wagons act as a crumple zone and soften the impact on those inside. In higher speed impacts, those inside may suffer whiplash trauma resulting in spinal injuries. Rear-impact collisions can throw unrestrained and improperly restrained occupants up-ward, causing them to make violent contact with the roof of the vehicle. Ad-ditionally, the impact can cause the seatbacks to collapse, complicating the injuries sustained by the occupants. Also, since the rear of most passenger vehicles is lighter than the front, a rear-end collision can raise the rear of the vehicle off the ground while pushing the vehicle forward. This can result in the rear-ended vehicle rolling over. When this happens, it adds the physical effects of being thrown about inside the passenger compartment to any other rear-impact injuries.
Side-Impact (Lateral) CollisionsSide-impact collisions can also produce serious injuries. Side-impact collisions have the same result whether the impact results from a T-bone collision, or the vehicle slides sideways into a tree or other solid object. T-bone collisions can also result in the struck vehicle rolling over. A vehicle that is struck in the side tends to fold itself around the point of impact. This type of impact may pro-duce intrusion into the passenger compartment and may cause more injuries to the occupants. High-speed impacts may cause side-impacted vehicles to tear completely apart, causing significant injury to anyone inside the vehicle.
Section C • Chapter 8 – Victim Disentanglement and Extrication 283
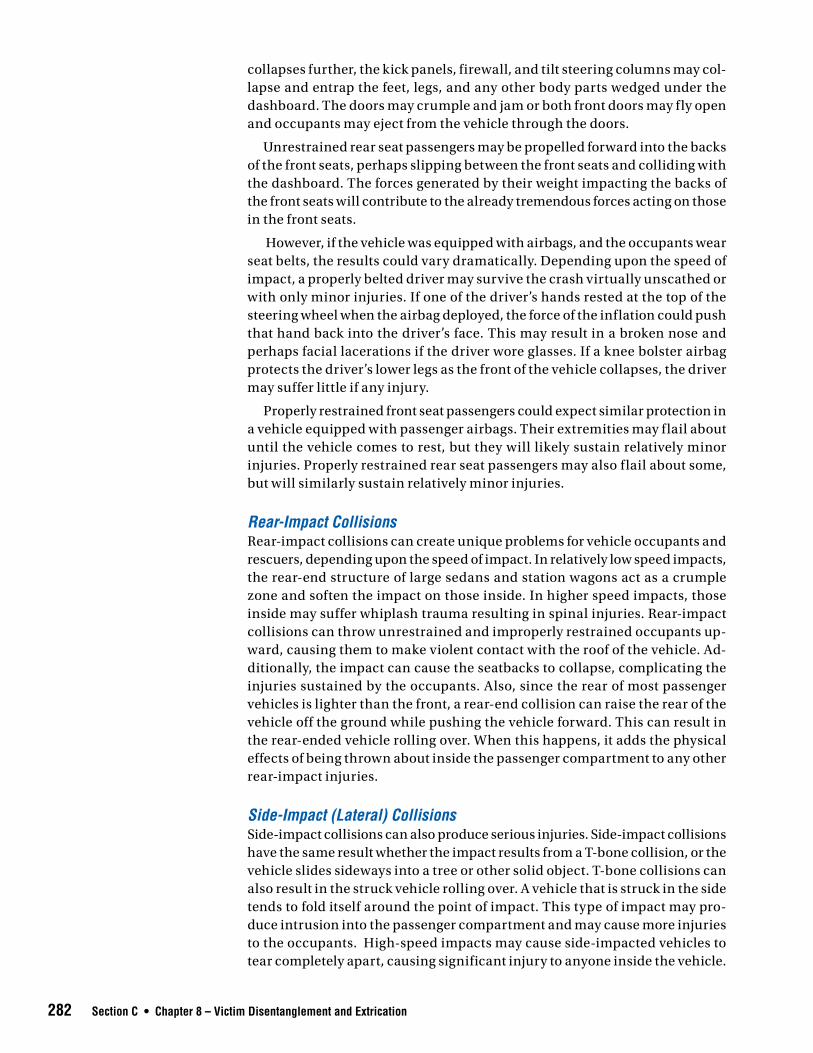
Figure 8.3 Rollover accidents can become more serious if the roof collapses. Courtesy of Bob Esposito.
While side-impact airbags and head protections systems may prevent or reduce side-impact injuries, many passenger vehicles still do not have these safety features. Vehicle occupants on the impacted side may suffer head, spi-nal, chest, abdominal/pelvic, and extremity injuries from the intrusion into the passenger compartment.
Rotational CollisionsRotational collisions occur when off-center front or side impacts forcefully turn the impacted vehicle horizontally inducing a spin to one or more of the accident vehicles. Collisions of this nature occur when a vehicle strikes a stationary object (such as a tree, guardrail, or post) or is struck by another vehicle. Generally, occupants in rotational collisions experience the kinds of injuries associated with front, rear, and side impacts.
RolloversWhen vehicles roll over one or more times, vehicle occupants typically sus-tain a variety of serious injuries. The most common type of rollover involves a vehicle rolling sideways —onto its side and perhaps continuing to roll onto its roof, its other side, and back onto its wheels. Depending upon the terrain, the speed at which the vehicle was traveling, and other variables, a vehicle may roll several times before coming to rest. If the vehicle occupants are prop-erly restrained by their seat belts, they may survive a rollover with relatively minor injuries — provided that the roof does not collapse (Figure 8.3). If the occupants are unrestrained and/or the roof of the vehicle collapses on them, the occupants will likely suffer much more serious, perhaps fatal injuries. In addition to being tumbled over and over inside the vehicle, unrestrained oc-cupants can be thrown out of the vehicle openings.
Less common, although not rare, are incidents involving a vehicle rolling end-over-end. Vehicles must travel at a high rate of speed to generate the force necessary to flip end-over-end repeatedly. However, the environment in which
284 Section C • Chapter 8 – Victim Disentanglement and Extrication
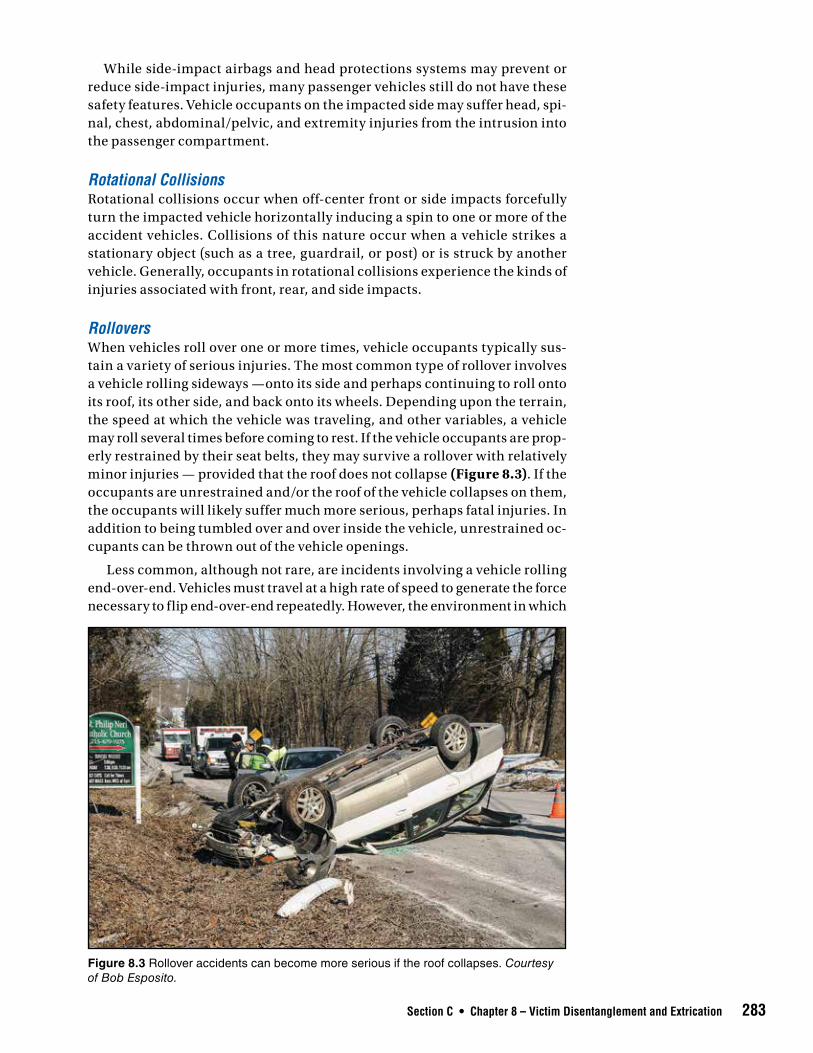
Figure 8.4 An example of an override/underride collision. Courtesy of Bob Esposito.
the rollover occurs can contribute to this type of incident. For example, if a vehicle traveling at normal highway speed plunges down a steep slope and strikes a boulder or other solid object, inertia may cause it to f lip once and the effects of gravity and the angle of the slope may cause it to continue to f lip until it reaches the bottom of the slope. Because the roof of a vehicle involved in this type of incident will likely collapse, even properly restrained occupants may suffer head and spinal injuries.
Underride and Override Underride and override incidents occur when a passenger vehicle is forced underneath another vehicle that sits higher off the ground than the passenger vehicle. For example, the front end of most passenger vehicles is typically lower than the bottom of commercial/heavy vehicles (Figure 8.4). Consequently, when a passenger vehicle crashes into a truck’s trailer, the bed of the trailer typically enters the vehicle’s passenger compartment. Without the front end of the car to absorb any impact from the collision, these accidents often cause severe injuries to the occupants of the passenger vehicle.
Underride incidents can occur in a number of ways, including both rear-end collisions and collisions with the side of a truck’s trailer. Rear underride inci-dents occur when a passenger vehicle rear-ends a commercial/heavy vehicle. The passenger vehicle may become wedged underneath the commercial/heavy vehicle and present occupant access difficulties. Side underride incidents oc-cur when a passenger vehicle strikes the side of a commercial/heavy vehicle, and becomes wedged underneath the side of the commercial/heavy vehicle.
Section C • Chapter 8 – Victim Disentanglement and Extrication 285
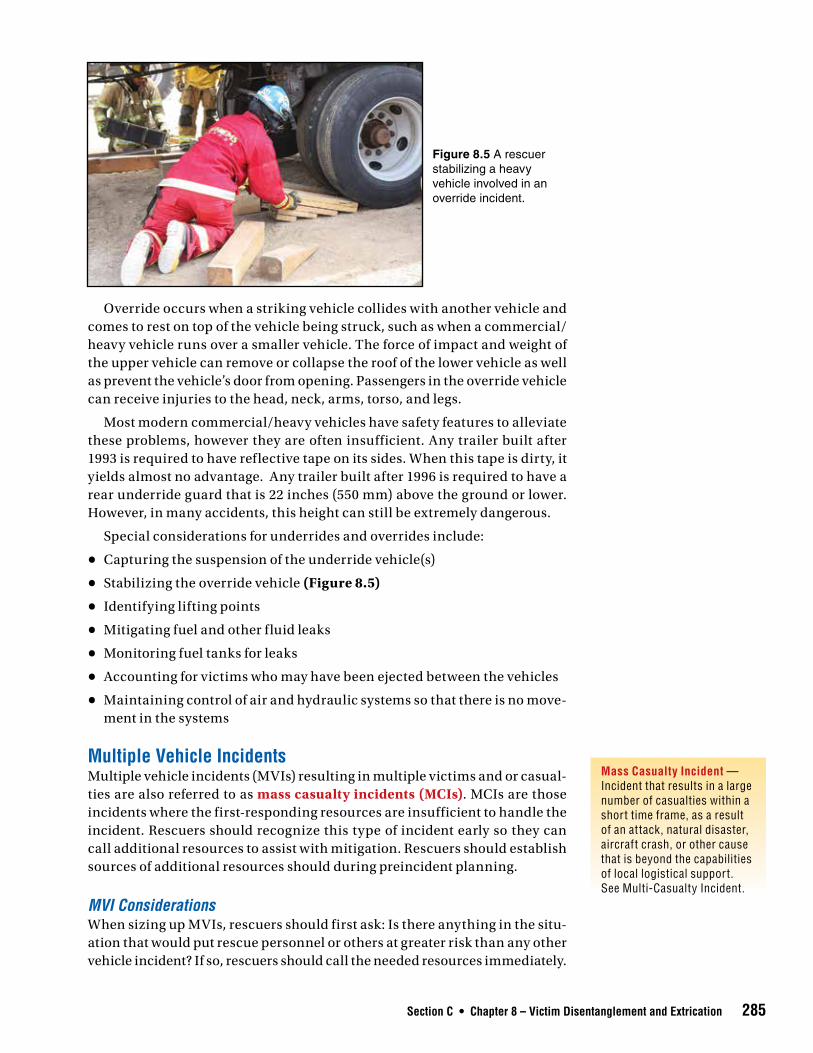
Override occurs when a striking vehicle collides with another vehicle and comes to rest on top of the vehicle being struck, such as when a commercial/heavy vehicle runs over a smaller vehicle. The force of impact and weight of the upper vehicle can remove or collapse the roof of the lower vehicle as well as prevent the vehicle’s door from opening. Passengers in the override vehicle can receive injuries to the head, neck, arms, torso, and legs.
Most modern commercial/heavy vehicles have safety features to alleviate these problems, however they are often insufficient. Any trailer built after 1993 is required to have reflective tape on its sides. When this tape is dirty, it yields almost no advantage. Any trailer built after 1996 is required to have a rear underride guard that is 22 inches (550 mm) above the ground or lower. However, in many accidents, this height can still be extremely dangerous.
Special considerations for underrides and overrides include:
• Capturing the suspension of the underride vehicle(s)
• Stabilizing the override vehicle (Figure 8.5)
• Identifying lifting points
• Mitigating fuel and other f luid leaks
• Monitoring fuel tanks for leaks
• Accounting for victims who may have been ejected between the vehicles
• Maintaining control of air and hydraulic systems so that there is no move-ment in the systems
Multiple Vehicle Incidents Multiple vehicle incidents (MVIs) resulting in multiple victims and or casual-ties are also referred to as mass casualty incidents (MCIs). MCIs are those incidents where the first-responding resources are insufficient to handle the incident. Rescuers should recognize this type of incident early so they can call additional resources to assist with mitigation. Rescuers should establish sources of additional resources should during preincident planning.
MVI ConsiderationsWhen sizing up MVIs, rescuers should first ask: Is there anything in the situ-ation that would put rescue personnel or others at greater risk than any other vehicle incident? If so, rescuers should call the needed resources immediately.
Figure 8.5 A rescuer stabilizing a heavy vehicle involved in an override incident.
Mass Casualty Incident — Incident that results in a large number of casualties within a short time frame, as a result of an attack, natural disaster, aircraft crash, or other cause that is beyond the capabilities of local logistical support. See Multi-Casualty Incident.
286 Section C • Chapter 8 – Victim Disentanglement and Extrication
While waiting for the additional resources to arrive, on-scene personnel should be used to establish and maintain control of the scene, and perform any other duties for which they have the resources and training.
The problems associated with assessing the condition of multiple vehicles involved in an incident have less to do with the environment and more to do with the number of vehicles involved. Vehicular triage — a sorting of the ve-hicles into categories of damage — is the first step of this type of rescue. Some vehicles may have superficial damage to the front and rear; others may have suffered significant structural damage and deformation that will require major manipulation to provide access to their occupants. These types of collisions present a greater than normal threat of fires due to the uncontrolled release of f lammable liquids close to a variety of ignition sources. Fire crews with por-table fire extinguishers and charged hoselines (1½-inch [38 mm] minimum) with foam capability should stand ready.
A multiple-vehicle incident will likely involve multiple casualties. This may indicate a need for several medical teams working at once. Depending upon the number of vehicles involved, weather conditions, visibility, and other factors, rescuers may have a challenge identifying the exact number of trapped victims may be a challenge, especially at night. It is critical that the IC organize and conduct MCI operations using the ICS to reduce the chances of overlooking any victims.
MVI OperationsThe prospect of stabilizing a large number of damaged vehicles at the same time can be daunting. Making decisions based on the results of the vehicular triage can make the process organized and efficient. Each team should stabi-lize one vehicle at a time.
Because these incidents often involve a series of rear-end collisions, rescuers may have extremely limited access to the front and rear of the vehicles. Other-wise, the tools and techniques rescuers will use to access into many vehicles are the same as those used to gain access into a single passenger vehicle.
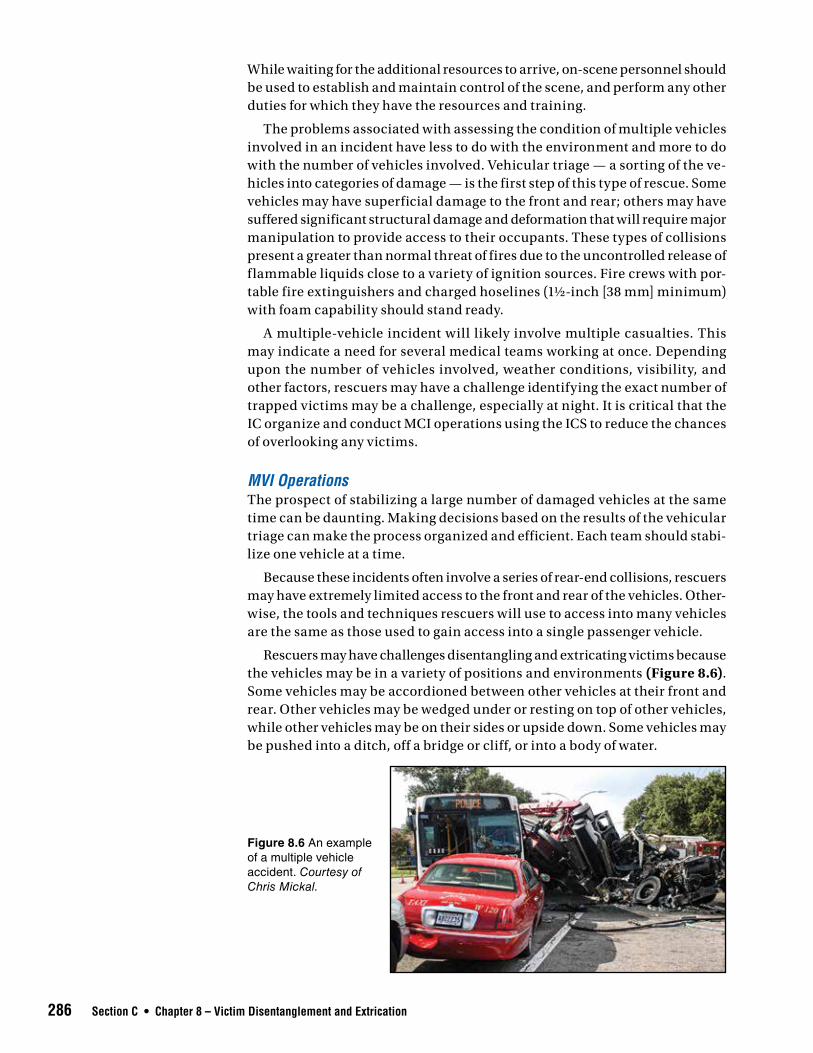
Rescuers may have challenges disentangling and extricating victims because the vehicles may be in a variety of positions and environments (Figure 8.6). Some vehicles may be accordioned between other vehicles at their front and rear. Other vehicles may be wedged under or resting on top of other vehicles, while other vehicles may be on their sides or upside down. Some vehicles may be pushed into a ditch, off a bridge or cliff, or into a body of water.
Figure 8.6 An example of a multiple vehicle accident. Courtesy of Chris Mickal.
Section C • Chapter 8 – Victim Disentanglement and Extrication 287
Each extrication team must focus on one vehicle at a time. Based on the condition of the victims and the vehicle, the team must determine the best way to remove the vehicle from around the victims and to remove the victims from the wreckage.
Minimizing Hazards to VictimsContact victims prior to any extrication activity. If any victims are conscious, tell them what is happening and what is about to happen. Informing victims of the activities, sounds, and smells that will occur during extrication may decrease their anxiety level.
Stabilizing the vehicle increases the safety of the emergency responders and the victims. Shifting loads or movement can transfer negative energy into the passenger compartment, creating a potential for further injury.
Provide victims with respiratory protection and cover them with fire retar-dant protective coverings before performing any glass management activity. When possible, break the glass furthest away from victims to minimize ex-posure to glass particles.
Make every effort to protect accident victims from inclement weather con-ditions. This may involve using salvage covers or rapidly erected canopies to shelter victims from precipitation or the sun. Use blankets and heating or cooling packs to control the temperature directly around the victim(s). In many circumstances, leaving windows and roofs intact and in place will provide victims with protection from inclement weather conditions.
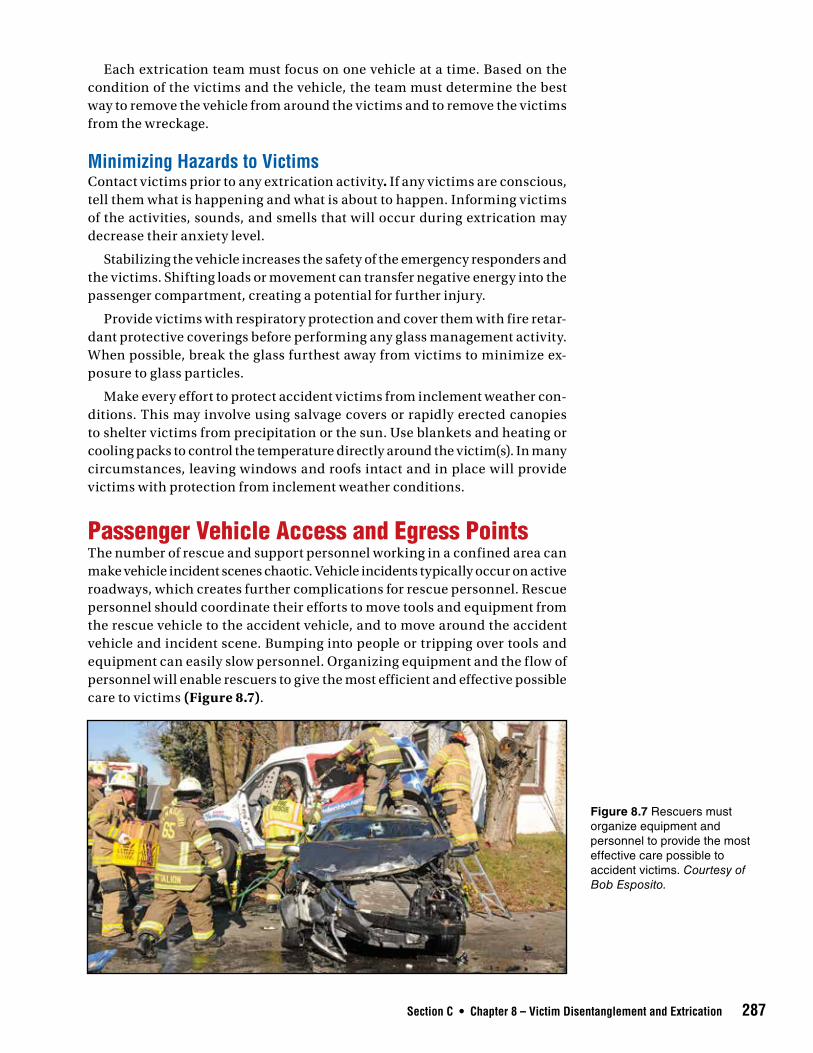
Passenger Vehicle Access and Egress PointsThe number of rescue and support personnel working in a confined area can make vehicle incident scenes chaotic. Vehicle incidents typically occur on active roadways, which creates further complications for rescue personnel. Rescue personnel should coordinate their efforts to move tools and equipment from the rescue vehicle to the accident vehicle, and to move around the accident vehicle and incident scene. Bumping into people or tripping over tools and equipment can easily slow personnel. Organizing equipment and the f low of personnel will enable rescuers to give the most efficient and effective possible care to victims (Figure 8.7).
Figure 8.7 Rescuers must organize equipment and personnel to provide the most effective care possible to accident victims. Courtesy of Bob Esposito.
288 Section C • Chapter 8 – Victim Disentanglement and Extrication
CAUTIONWhen accessing and egressing vehicles,
rescuers should watch out for sharp objects such as broken glass or jagged metals. Identify, cover,
and/or remove these objects from the vehicle whenever possible.
When vehicle incidents leave passengers trapped in their vehicles, rescu-ers will have to identify the appropriate victim access and egress points on a vehicle. This operation is all part of passenger vehicle extrication and will require a level of coordination between rescue personnel, tools and equipment, and the victim(s). Rescuers must follow the local AHJ policies and procedures for identifying passenger vehicle access and egress points. This section will cover passenger vehicle access and egress routes as well as the various vehicle entry points.
Passenger Vehicle Access and Egress RoutesThe rescuer must survey the vehicles in which victims are trapped to determine how best to gain access to and remove the victims. This may mean deciding between several possible actions, including:
• Removing one or more doors
• Removing or penetrating the roof
• Making entry/egress through a rear hatch
Rescuers’ decision making will also need to take into account the vehicle’s location and position, the number and location of victims, the known and unknown hazards, available tools and equipment, and the skill set of the res-cue personnel. Rescuers should make all personnel aware of the influencing factors and the decided-upon access and egress route. For example, rescuers may decide that the most effective way to access a vehicle and extricate a victim is to perform a third-door conversion. After making this decision, rescuers should inform all personnel of the decision so that everyone present focuses all efforts on coordinating the f low of personnel, tools and equipment, and, eventually, the victim(s) to support the operation.
Access — (1) Place or means of entering a structure or vehicle. (2) Roadways allowing fire apparatus to travel to an emergency. See Egress.
Egress — Place or means of exiting a structure or vehicle.
Passenger Vehicle Entry PointsThe easiest way for rescuers to access passenger vehicles is to use the existing entry points. These points include:
• Windows
• Doors
• Roofs
• Floor panels
WindowsIf the doors are locked or jammed, rescuers may need to remove the side win-dows to allow access to the door locks/handles. Rescuers may attempt to lower the window prior to attempting removal of the window to minimize potential
Section C • Chapter 8 – Victim Disentanglement and Extrication 289
WARNING!Rescuers should look out for undeployed airbags
when reaching through open windows.
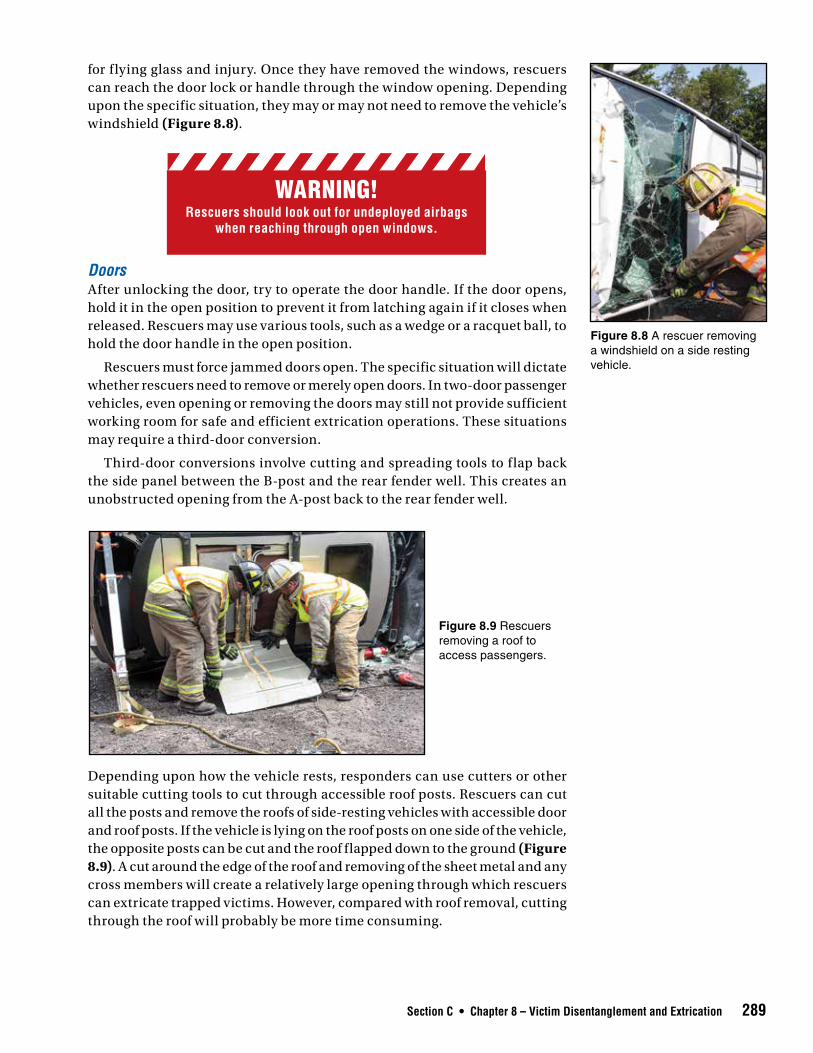
Figure 8.8 A rescuer removing a windshield on a side resting vehicle.
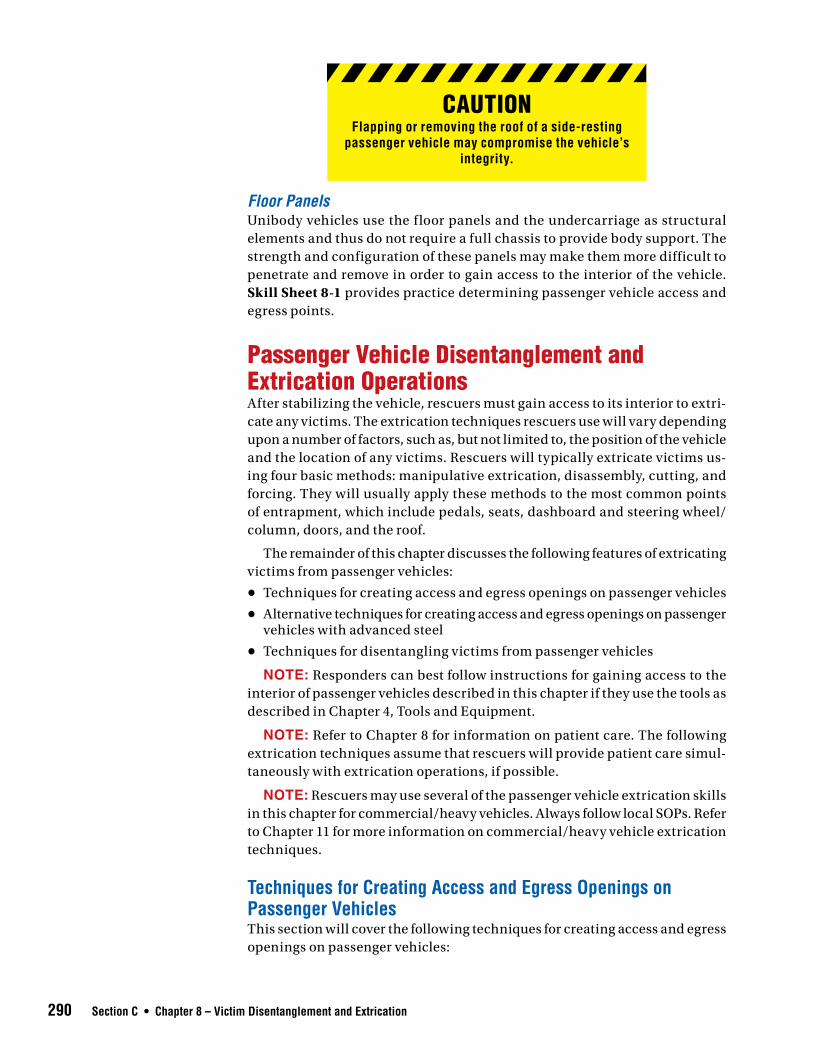
Figure 8.9 Rescuers removing a roof to access passengers.
for f lying glass and injury. Once they have removed the windows, rescuers can reach the door lock or handle through the window opening. Depending upon the specific situation, they may or may not need to remove the vehicle’s windshield (Figure 8.8).
DoorsAfter unlocking the door, try to operate the door handle. If the door opens, hold it in the open position to prevent it from latching again if it closes when released. Rescuers may use various tools, such as a wedge or a racquet ball, to hold the door handle in the open position.
Rescuers must force jammed doors open. The specific situation will dictate whether rescuers need to remove or merely open doors. In two-door passenger vehicles, even opening or removing the doors may still not provide sufficient working room for safe and efficient extrication operations. These situations may require a third-door conversion.
Third-door conversions involve cutting and spreading tools to f lap back the side panel between the B-post and the rear fender well. This creates an unobstructed opening from the A-post back to the rear fender well.
Roofs
Depending upon how the vehicle rests, responders can use cutters or other suitable cutting tools to cut through accessible roof posts. Rescuers can cut all the posts and remove the roofs of side-resting vehicles with accessible door and roof posts. If the vehicle is lying on the roof posts on one side of the vehicle, the opposite posts can be cut and the roof flapped down to the ground (Figure 8.9). A cut around the edge of the roof and removing of the sheet metal and any cross members will create a relatively large opening through which rescuers can extricate trapped victims. However, compared with roof removal, cutting through the roof will probably be more time consuming.
290 Section C • Chapter 8 – Victim Disentanglement and Extrication
Floor PanelsUnibody vehicles use the f loor panels and the undercarriage as structural elements and thus do not require a full chassis to provide body support. The strength and configuration of these panels may make them more difficult to penetrate and remove in order to gain access to the interior of the vehicle. Skill Sheet 8-1 provides practice determining passenger vehicle access and egress points.
Passenger Vehicle Disentanglement and Extrication Operations After stabilizing the vehicle, rescuers must gain access to its interior to extri-cate any victims. The extrication techniques rescuers use will vary depending upon a number of factors, such as, but not limited to, the position of the vehicle and the location of any victims. Rescuers will typically extricate victims us-ing four basic methods: manipulative extrication, disassembly, cutting, and forcing. They will usually apply these methods to the most common points of entrapment, which include pedals, seats, dashboard and steering wheel/column, doors, and the roof.
The remainder of this chapter discusses the following features of extricating victims from passenger vehicles:
• Techniques for creating access and egress openings on passenger vehicles
• Alternative techniques for creating access and egress openings on passenger vehicles with advanced steel
• Techniques for disentangling victims from passenger vehicles
NOTE: Responders can best follow instructions for gaining access to the interior of passenger vehicles described in this chapter if they use the tools as described in Chapter 4, Tools and Equipment.
NOTE: Refer to Chapter 8 for information on patient care. The following extrication techniques assume that rescuers will provide patient care simul-taneously with extrication operations, if possible.
NOTE: Rescuers may use several of the passenger vehicle extrication skills in this chapter for commercial/heavy vehicles. Always follow local SOPs. Refer to Chapter 11 for more information on commercial/heavy vehicle extrication techniques.
Techniques for Creating Access and Egress Openings on Passenger VehiclesThis section will cover the following techniques for creating access and egress openings on passenger vehicles:
CAUTIONFlapping or removing the roof of a side-resting
passenger vehicle may compromise the vehicle’s integrity.
Section C • Chapter 8 – Victim Disentanglement and Extrication 291
• Glass removal
• Door removal
• Factory third and fourth doors
• Total sidewall removal
• Third-door conversion
• Fourth-door conversion
• Roof displacement and removal
• Kick panel removal
• Entry through the f loor
• Trunk tunneling
Glass RemovalRescuers can remove glass from a passenger vehicle to quickly and easily gain access to a vehicle’s interior. Removing the glass may be necessary if rescuers cannot operate or unlock the doors, cannot retract, lower or otherwise open the glass or need to remove or f lap the roof. Rescuers should protect vehicle occupants from any glass dust and chips that the removal process produces. To protect themselves, rescue personnel should wear full PPE to include eye and respiratory protection. If rescuers need to break a window to access a victim, they should choose a window as far away from the victims as possible.
Vehicles use multiple types of window materials. Rescuers should know how to remove the following types of window materials:
• Laminated safety glass
• Tempered glass
• Polycarbonate
• Transparent armor
• Enhanced protective glass (EPG)
NOTE: Rescuers should continuously monitor new developments in au-tomotive glass.
Removing laminated safety glass. Removing windshields and other lami-nated windows is more complicated and time-consuming than removing tempered side or rear windows. During many extrication operations, rescuers may decide to leave the windshield in place. Skill Sheet 8-2 lists the steps for removing the window seal to remove vehicle glass.
Windshields and other windows constructed of laminated safety glass do not shatter and fall out. Rescuers can use the following hand tools to remove or cut laminated glass:
• Reciprocating saw
• Commercial glass removal tools
• Air chisel
• Axe
• Long-handled hook

292 Section C • Chapter 8 – Victim Disentanglement and Extrication
In most modern vehicles, the windshield, the two A-posts, and the forward edge of the roof compose part of the structural integrity of the vehicle body and should remain in place unless they hinder rescue and extrication efforts. If rescuers must remove the windshield, they should remove the glass while leaving the A-posts and roof edge intact to maintain structural integrity. If rescuers need to remove the windshield or other laminate glass, they may need to cut the glass on all four sides. Skill Sheet 8-3 lists the steps for removing laminated vehicle glass.
Under some circumstances, rescuers may remove the windshield with the roof. To perform this operation, rescuers should make a single cut along the bottom of the windshield from A-post to A-post, and then make the roof re-moval cuts. Rescuers can then remove the roof and the windshield together.
Removing tempered glass. To break and remove side and rear tempered glass windows, rescuers should strike them with a sharp, pointed object such as a glass hammer (Figure 8.10). They may also press a spring-loaded center punch against the glass. Rescuers should usually apply these tools at a lower corner of the glass but they may work at any point on the glass surface. When using a spring-loaded center punch, rescuers should brace the hand holding the tool with the other hand to increase control of the tool. Having control prevents the rescuer’s hand from going into the glass when it breaks. It also prevents the center punch from pushing through the window opening and possibly striking any vehicle occupant located near the window. Rescuers may also use a standard center punch or Phillips head screwdriver. They must drive both of these tools into the glass with a hammer or other striking tool. A controlled strike with the pick end of a pick-head axe or Halligan tool in the corner of the window will also work if rescuers have no other available tools.
To control the glass fragments, rescuers may apply a sheet of self-adhering contact paper to the surface of the glass. Once broken, the glass adheres to the contact paper. Alternatively, rescuers may place duct tape on the windows and then spray the glass surface with an aerosol adhesive that forms a coating on the glass. This coating sets up in seconds and allows rescuers to break the glass and retain it in a sheet. Then rescuers can remove the glass in sheets instead of tiny pieces. Skill Sheet 8-4 lists the steps for removing tempered glass.
Figure 8.10 A glass hammer is sometimes used to remove vehicle glass.
CAUTIONDo not use hands to clear glass from the window.

Section C • Chapter 8 – Victim Disentanglement and Extrication 293
WARNING!Keep rescuers, victims, and loose objects
(including seat belt buckles) out of the deployment path of any airbags, head protection
systems, or seat belt pretensioners.
Some rear windows are tempered glass and some are laminated. If a window does not respond to removal techniques for tempered glass, rescuers must treat it as laminated glass and remove it in the same way as a windshield.
Removing alternative types of glass. Rescuers should know how to remove other types of glass such as enhanced protective glass, polycarbonates and transparent armor. Skill Sheet 8-5 lists the steps for removing alternative types of vehicle glass.
Door RemovalWhen removing the glass from a crashed vehicle does not allow sufficient access to those inside the vehicle, rescuers must use other means. In some situations, rescuers can open the vehicle’s doors to provide this access. If the doors will not open because they are locked, rescuers can reach the interior door lock release through the window opening. If unlocking the doors does not allow them to open when using both the inside and outside latches simul-taneously, rescuers must either force the doors open or remove them from the vehicle entirely. Rescuers can unintentionally deploy frontal airbags, side-impact airbags, head protection systems, and seat belt pretensioners can be unintentionally deployed when forcibly opening or removing doors.
If rescuers cannot open the doors, they will have to force or remove them. Opening the door makes its eventual removal easier. Rescuers can implement a number of methods to force open or remove a door.
• Use spreaders and/or cutters (fastest and most common)
• Total sidewall removal or side out (the removal of both doors and the B-post along one side of the vehicle)
• Remove the bolts on the door’s hinges using power ratchets, power impact wrenches, or manual socket sets
• Third door conversion (create a wider door opening on two-door vehicles)
(Figure 8.11)
• Fourth door conversion (create another door in a panel or work van)
Prior to conducting any door removal operation, rescuers should peel away any trim or plastic components on the vehicle’s interior around the area to be removed. This operation, commonly known as peel and peek, helps rescuers identify the location of any seat belt pretensioners, airbag gas cylinders, or other safety devices. It also helps prevent the trim and plastic pieces from breaking loose and striking victims or rescuers during extrication operations.
Figure 8.11 A rescuer performing a third door conversion.
294 Section C • Chapter 8 – Victim Disentanglement and Extrication
WARNING!Always peel back the interior trim along the
roof rails and all pillars to expose supplemental restraint system compressed gas cylinders, pretensioners, and other devices that could
cause injury. If accidentally cut, these devices can cause severe injury and death.
WARNING!Do not lose control of a door while trying to open
or remove it.
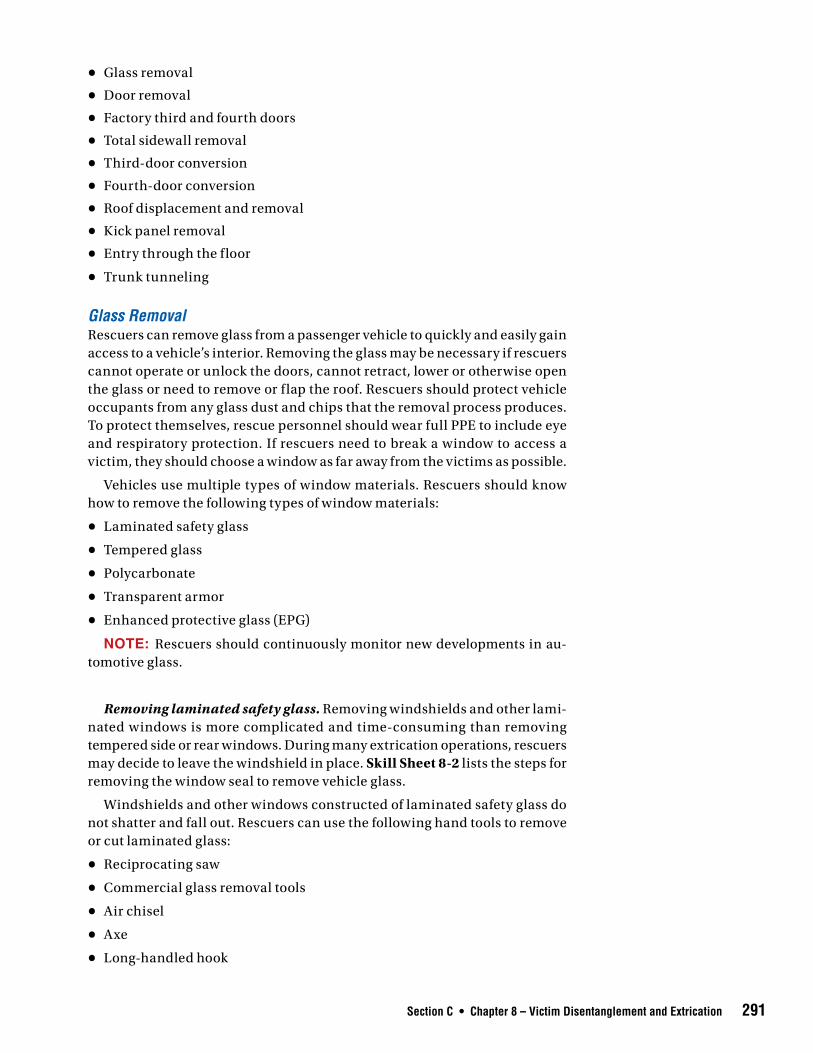
Rescue personnel should always maintain control over a door they are at-tempting to open or remove to prevent injury to victims and rescuers. To ac-complish this, rescuers should attach webbing, straps, rope, chains, or other materials to the door and maintain tension on the material and door to prevent it from striking personnel (Figure 8.12).
Figure 8.12 Webbing can be attached to a door to maintain control of the door while it is being opened or removed.
Section C • Chapter 8 – Victim Disentanglement and Extrication 295
WARNING!All undeployed airbags must be considered live, and rescuers should be aware of their potential
for sudden deployment.
If the vehicle door contains an airbag, rescuers will expose a cable (pos-sibly yellow) between the door and the A-post when they remove the door is removed. If rescuers must cut the wires between the door and the A-post, after the battery has been disconnected and the reserve power dissipatedif at all possible the rescuers should cut and separate the wires one at a time with handheld cutters. Cutting the yellow wire in these situations may deploy supplemental restraint systems.
When removing a door from a vehicle, rescuers must first determine whether to start on the hinge side or the latch side. Conditions of the incident, such as vehicle damage and victim location, will dictate which side rescuers start on first.
Whichever side rescue personnel plan to start with, they must first gain a purchase point to use the tools selected to open the door. Rescuers can use several tools to gain purchase points, including:
• Hydraulic spreaders
• Halligan tools or pry bars
• Hydra rams or rabbit tools
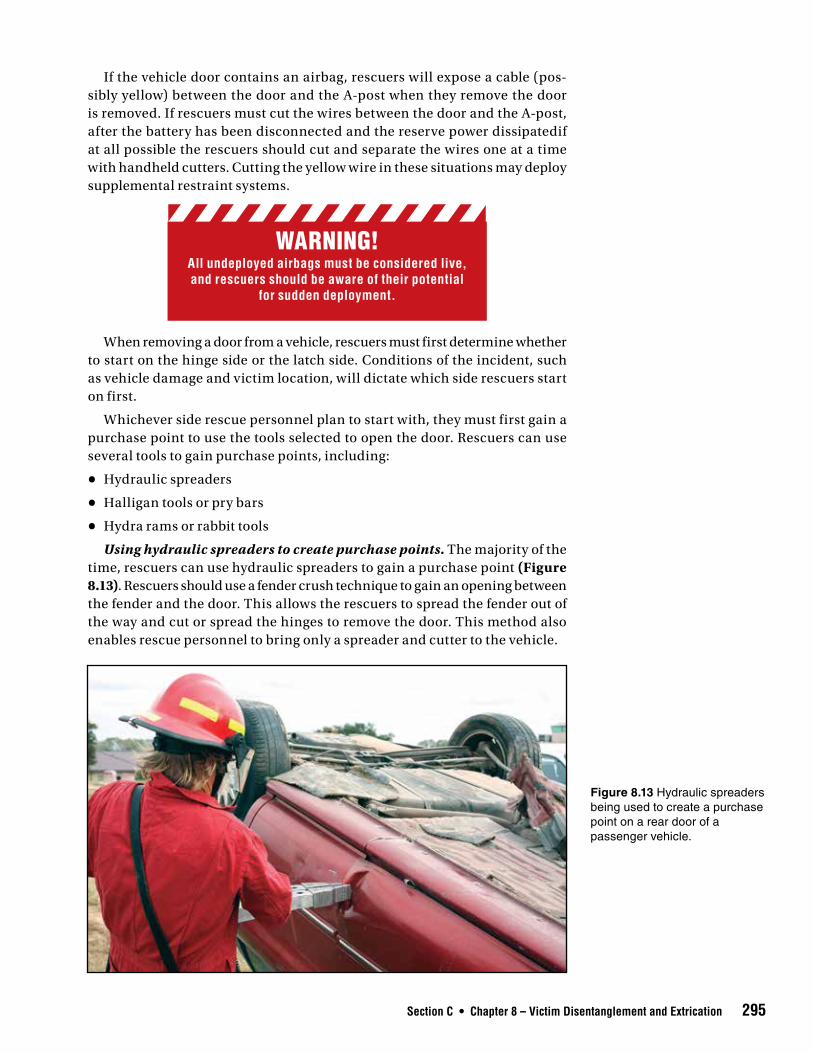
Using hydraulic spreaders to create purchase points. The majority of the time, rescuers can use hydraulic spreaders to gain a purchase point (Figure 8.13). Rescuers should use a fender crush technique to gain an opening between the fender and the door. This allows the rescuers to spread the fender out of the way and cut or spread the hinges to remove the door. This method also enables rescue personnel to bring only a spreader and cutter to the vehicle.
Figure 8.13 Hydraulic spreaders being used to create a purchase point on a rear door of a passenger vehicle.
296 Section C • Chapter 8 – Victim Disentanglement and Extrication
CAUTIONAvoid rocking the victims when using hand tools
to make purchase points.
To use this technique, a rescuer should open the spreaders and place one arm in the wheel well on the front fender behind the shock/strut tower. The rescuer should place the other arm on top of the fender and then close the spreaders. Closing the spreaders will crush the fender and create an opening between the door and the fender. This action will compromise the front fender/support to allow for future dashboard displacement, if needed.
Rescuers must practices this method before using it during an actual ex-trication. When trying this for the first time, the spreader often slides off the top of the fender before it crushes the fender. When this happens it makes it difficult for rescuers to make a second attempt at the same location, so rescuers will need to move to another spot on the fender and attempt to crush it again.
To avoid this error, rescuers can fit the spreader tip edge into the space be-tween the fender and the hood. If rescuers can fit this tip edge into this space, the spreader arms will not slide off the hood and instead will bite down onto the fender and crush. Raising the back end of the spreader slightly above a 90-degree angle will help prevent the tool from slipping.
Rescuers can also use a spreader in the window opening to spread the upper and lower parts of the door away from the roof rail and pillars. Many leading rescue technicians recommend using this vertical spread technique to create purchase points and even pop open doors. This method forces the door away from the victim and often pops open a door without needing to reposition the spreader or use any other tools, thus making it quicker to extricate the victims.
Rescuers should make safety a concern when performing extrication, es-pecially with the latest technology. Always exercise caution when operating around airbags.
Using a Halligan tool or pry bar to create purchase points. Place the adz end of the Halligan either between the door and the fender for the hinge side or the door and the post for the latch side and rotate the tool up and down vertically to create an opening to use the tool to open the door. When using the pry bar, place the bar in the same place as the Halligan, and move the bar left to right to create an opening to use the tool to open the door.
Using a hydra ram or rabbit tool to create purchase points. Rescuers can use these manually operated hydraulic spreaders to create purchase points. Agencies use these tools often for forcible entry on residential and commercial doors, but they are also good for gaining purchase points on doors, hoods, and trunks. To use this tool, rescuers place the spreader tips into the space between the door and the fender and/or post and manually pump the handle until they increase the size of the opening.
Using tools to remove doors. Rescuers can use a Hi-Lift® jack to crush or weaken the door’s collision bar and then open a door. Once rescuers crush the collision bar, they should reposition the jack over the latching mechanism to
Section C • Chapter 8 – Victim Disentanglement and Extrication 297
roll the door down and off the latching mechanism. Skill Sheet 8-6 describes the steps for using a Hi-Lift® jack to open a door. Use caution with Hi-Lift® jacks. If not deployed properly, they can slip easily and be dangerous.
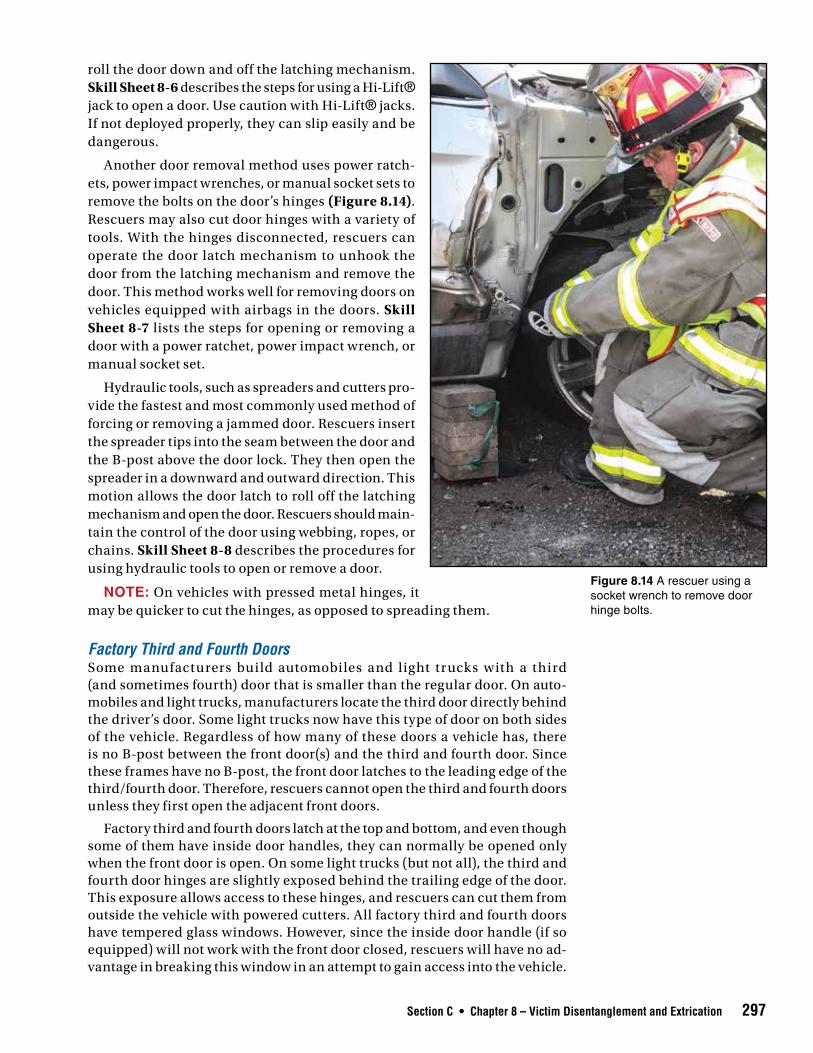
Another door removal method uses power ratch-ets, power impact wrenches, or manual socket sets to remove the bolts on the door’s hinges (Figure 8.14). Rescuers may also cut door hinges with a variety of tools. With the hinges disconnected, rescuers can operate the door latch mechanism to unhook the door from the latching mechanism and remove the door. This method works well for removing doors on vehicles equipped with airbags in the doors. Skill Sheet 8-7 lists the steps for opening or removing a door with a power ratchet, power impact wrench, or manual socket set.
Hydraulic tools, such as spreaders and cutters pro-vide the fastest and most commonly used method of forcing or removing a jammed door. Rescuers insert the spreader tips into the seam between the door and the B-post above the door lock. They then open the spreader in a downward and outward direction. This motion allows the door latch to roll off the latching mechanism and open the door. Rescuers should main-tain the control of the door using webbing, ropes, or chains. Skill Sheet 8-8 describes the procedures for using hydraulic tools to open or remove a door.
NOTE: On vehicles with pressed metal hinges, it may be quicker to cut the hinges, as opposed to spreading them.
Factory Third and Fourth DoorsSome manufacturers build automobiles and light trucks w ith a third (and sometimes fourth) door that is smaller than the regular door. On auto-mobiles and light trucks, manufacturers locate the third door directly behind the driver’s door. Some light trucks now have this type of door on both sides of the vehicle. Regardless of how many of these doors a vehicle has, there is no B-post between the front door(s) and the third and fourth door. Since these frames have no B-post, the front door latches to the leading edge of the third/fourth door. Therefore, rescuers cannot open the third and fourth doors unless they first open the adjacent front doors.
Factory third and fourth doors latch at the top and bottom, and even though some of them have inside door handles, they can normally be opened only when the front door is open. On some light trucks (but not all), the third and fourth door hinges are slightly exposed behind the trailing edge of the door. This exposure allows access to these hinges, and rescuers can cut them from outside the vehicle with powered cutters. All factory third and fourth doors have tempered glass windows. However, since the inside door handle (if so equipped) will not work with the front door closed, rescuers will have no ad-vantage in breaking this window in an attempt to gain access into the vehicle.
Figure 8.14 A rescuer using a socket wrench to remove door hinge bolts.
298 Section C • Chapter 8 – Victim Disentanglement and Extrication
Minivans also come with factory third and fourth doors. Minivans also have a sliding door, or dual sliding doors, that extend outward/away from the vehicle and then slide along a track, usually toward the rear of the vehicle. Rescuers may encounter manual or powered versions of these doors. If rescuers cannot open these doors manually, or the door is blocked, rescuers may have to create an alternate opening to access the vehicle’s passengers. Skill Sheet 8-9 lists the steps for removing a vehicle’s sliding side door.
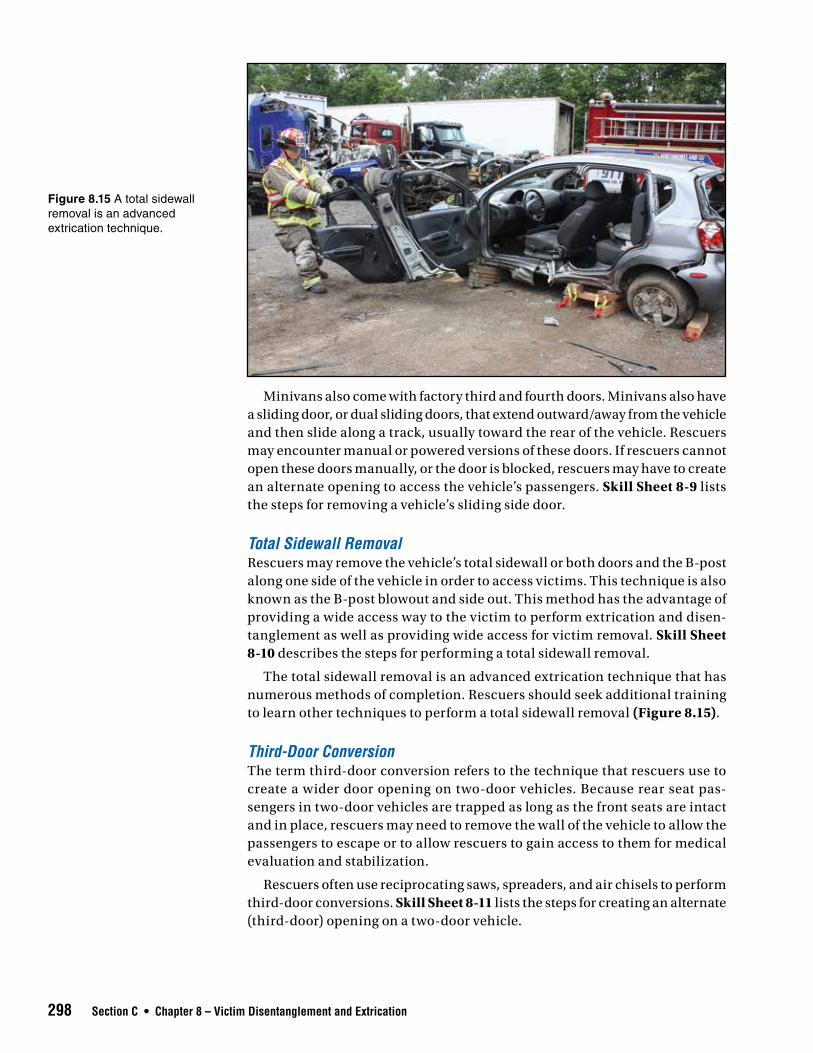
Total Sidewall RemovalRescuers may remove the vehicle’s total sidewall or both doors and the B-post along one side of the vehicle in order to access victims. This technique is also known as the B-post blowout and side out. This method has the advantage of providing a wide access way to the victim to perform extrication and disen-tanglement as well as providing wide access for victim removal. Skill Sheet 8-10 describes the steps for performing a total sidewall removal.
The total sidewall removal is an advanced extrication technique that has numerous methods of completion. Rescuers should seek additional training to learn other techniques to perform a total sidewall removal (Figure 8.15).
Third-Door ConversionThe term third-door conversion refers to the technique that rescuers use to create a wider door opening on two-door vehicles. Because rear seat pas-sengers in two-door vehicles are trapped as long as the front seats are intact and in place, rescuers may need to remove the wall of the vehicle to allow the passengers to escape or to allow rescuers to gain access to them for medical evaluation and stabilization.
Rescuers often use reciprocating saws, spreaders, and air chisels to perform third-door conversions. Skill Sheet 8-11 lists the steps for creating an alternate (third-door) opening on a two-door vehicle.
Figure 8.15 A total sidewall removal is an advanced extrication technique.

Section C • Chapter 8 – Victim Disentanglement and Extrication 299
Fourth-Door ConversionThe term fourth-door conversion refers to the technique that creates an al-ternate opening on a panel van or work van that only has one operating door for cargo loading and off-loading. Rescuers make cuts between the B- and C-posts in the side panel, creating a large opening for rescue access and victim removal. Skill Sheet 8-12 lists the steps for creating an alternate (fourth-door) opening in a vehicle.
Roof Displacement and RemovalRescuers frequently remove part, or all, of a vehicle’s roof to gain access to trapped victims. Flapping or removing the roof also eliminates the possibil-ity of Side Impact Protection Systems (SIPS) or inflatable window curtains deploying. The roof of a vehicle may collapse or compress as a result of the collision or a rollover event. These vehicles may come to rest on their wheels, sides, or roofs. When roofs are the point of entrapment, rescuers may have to displace or remove the roof to access the victim(s).
Rescuers may perform most roof-removal techniques with cutters, recip-rocating saws, or air chisels. The needs of the victim and access for the res-cuers will ultimately determine the technique used. Rescuers can use rams or spreaders to expand an opening and create more space in the passenger compartment. Wheel resting vehicles may require total roof removal or the roof to be f lapped. If the vehicle is side resting, a roof f lap or removal prob-ably will provide the best option for creating a clear opening through which rescuers can extricate the victims.
Rescuers should peel and peek prior to cutting to avoid cutting into the seat belt pretensioners or side airbag gas cylinders. They should make cuts at the most advantageous place to access the victim(s) and avoid SRS components.
Roof removal. Engineers design unibody vehicles to function as a unit; therefore, removing the doors and roof can seriously compromise the vehicle’s structural integrity. Therefore, rescuers should place a step chock or other support under the B-post of unibody vehicles before removing the roof. The windshields, A-posts, and forward edge of the roof on modern cars compose the structural integrity of the vehicle body, so they should remain intact and rescuers should cut the roof just behind the A-posts. Rescuers can then cut the remaining door posts and lift the entire roof off as a unit (Figure 8.16).
Rescuers may have difficulty cutting through larger rear posts with hydraulic cutters because the posts are often wider than the opening of the cutters. When res-cuers encounter wide posts, they can cut and remove a triangular section from one side of the post. This allows rescuers to insert the cutters deeper to make additional cuts. Rescuers can also compress and compact the posts into a smaller size with spreaders. Skill Sheet 8-13 lists the steps to remove the roof from a wheel-resting vehicle. Figure 8.16 Rescuers removing a roof from a passenger
vehicle to access the victim. Courtesy of Bob Esposito.
300 Section C • Chapter 8 – Victim Disentanglement and Extrication
Flapping a roof. Historically, some agencies folded the roof back onto the trunk or forward onto the hood rather than remove it. These procedures were sometimes called making a roof f lap or simply f lapping the roof.
Rescuers sometimes need to flap a roof because of the complications involved in removing the roof on some vehicles. Rescuers also f lap a roof when they cannot access all areas of the roof to perform total roof removal. In addition, the materials used in the construction of some newer vehicles may prevent rescuers from folding the roof. Rescuers will have to determine whether to f lap the roof forward or backward, make applicable cuts, then f lap the cut section of the roof.
Entry through the roof of side-resting vehicles. Rescuers can gain access to the passenger compartment through the roof of a side-resting vehicle. Skill Sheet 8-14 lists the steps for f lapping or removing the roof of a side-resting vehicle. Rescuers may need to add cribbing under the roof f lap, between the f lap and ground, to create a stable and secure platform and to reduce move-ment caused by a void space.
To gain entry through the roof, rescuers can use an air chisel or reciprocat-ing saw. Skill Sheet 8-15 lists the steps to create an access opening in the roof of a side-resting vehicle.
Kick Panel RemovalWhen the pedals pin a vehicle driver’s feet and legs, rescuers often need to move the kick panel out of the way to allow access to the victim’s feet. Skill Sheet 8-16 lists the steps for removing the kick panel from a passenger vehicle.
CAUTIONRescuers should avoid cutting the fuse box panel
when performing kick panel removal.
Entry through the FloorRescuers may need to gain access through the f loor of roof-resting vehicles that allow limited access to the windows. In these situations, entry through the sides of the vehicle is difficult if not impossible.
Prior to cutting, rescuers should identify the locations of any fuel and hy-draulic lines. On hybrid cars, rescuers should look for high-voltage cables that run from the high-voltage batteries (usually in the rear of the vehicle) forward to the engine compartment. Battery packs on electric vehicles may consume the entire f loor area underneath the vehicle, making entry through the f loor impossible.
Rescuers should check the interior of the vehicle before cutting to ensure that victims are not in contact with the portion of the f loor that is about to be cut. If rescuers cannot determine the location of victims through conventional openings, they should remove the drain plugs in the bottom of the f loor pan. They may see the victims through the resulting holes. Do not use cutting torches to gain entry because of the fire hazard presented by f loor covering materials and any fuel that may have spilled.
Section C • Chapter 8 – Victim Disentanglement and Extrication 301
WARNING!Do not use cutting torches to make entry through
the floor of a vehicle.
Rescuers can use two methods to enter a vehicle through its floor. The choice of entry is best determined by the type of vehicle, the number of trapped oc-cupants, their locations within the vehicle, and their conditions. Skill Sheet 8-17 lists two methods of creating an access opening through the f loor of a passenger vehicle.
Trunk TunnelingDue to the position and condition of the vehicle, rescuers may need to tunnel through the trunk area of a passenger vehicle to gain access to the passenger compartment. Rescuers may need this technique after a rear or side underride or when they encounter obstructions to both sides and the top of the vehicle, making door and roof removal impossible. Skill Sheet 8-18 lists the steps for tunneling through a trunk.
CAUTIONTrunks or other vehicle compartments may
contain hazards.
Alternative Techniques for Creating Access and Egress Openings on Passenger Vehicles with Advanced SteelImproved crashworthiness in newer passenger vehicles has resulted from changes in the Federal Motor Vehicle Safety Standards designed to improve side impact and roof crush resistance. Vehicle manufacturers have responded to this engineering challenge in two basic ways. Some manufacturers reinforce the side and roof structure areas of a vehicle with more layers or thicker layers of steel. Other manufacturers make areas such as B-posts, roof rails, and rocker panels of ultra-high-strength steels otherwise known as advanced steels.
With increasing frequency, some fire departments, especially those with outdated or older tools, cannot cut through structural areas such as the B-posts of late model vehicles. The tools that have worked well for so many years may not cut the steel found in new model vehicles produced within recent years. This section will describe several alternative techniques that rescuers have successfully used to gain access to passenger vehicles with advanced steels, such as:
• Pie cut
• B-pillar lift
• Cross ramming
• Ramming the roof off
• Partial or total sunroof
302 Section C • Chapter 8 – Victim Disentanglement and Extrication
Pie CutOften times, only the B-posts contain advanced steel and not the roof rail. In these situations, rescuers may cut the roof rail at the top of the B-Post, on both sides, in a pie cut fashion and lay the pillar down.
B-Post LiftIn contrast to the above maneuver, sometimes the B-posts and the entire roof rail consist of advanced steel that the rescue team cannot cut through. Rescu-ers should attempt to cut all along the roof rail first, just in case the structure contains soft steel somewhere. However, if those attempts fail, rescuers may succeed with efforts to cut through the post at the bottom, near the rocker panel. One popular manufacturer’s structural design has mild steel at the bot-tom of the B-post, spot-welded to the main portion of the pillar. Once rescuers detach the B-post at the bottom, they can lift it up and away from the vehicle, creating access to the victim(s).
Cross RammingIf rescuers cannot cut through the advanced steel B-posts or rescuers en-counter increased intrusion into the passenger compartment from a lateral/side impact, they can ram the B-post away from the trapped occupants. With this technique, rescuers will push the post out and away from the passenger compartment of the vehicle using a hydraulic ram placed on the transmission tunnel/hump and extending to the vehicle’s B-post. Additionally, if rescuers have a long enough hydraulic ram, they can use a spread from B-post to B-post to move a crash-damaged pillar off the victims trapped inside. Rescuers should monitor roof movement because the roof may begin to lower into the vehicle as the B-posts move outward.
Ramming the Roof OffWhen a rescue team cannot cut through a B-post or roof rail that contains advanced steel, they may attempt to ram the roof off the top of the B-post. Even though advanced steel may be present, a powerful ram may be able to push the roof rail up until it begins to tear at the spot welds. After an initial push behind the B-post, a second push along the front side may completely tear the B-post from the roof rail. Rescuers will need to place cribbing beneath the rocker panel to support the push of the ram.
Partial or Total SunroofWhen rescuers encounter a passenger vehicle with advanced steel located in key locations of the roof pillars, roof rail, and rocker panel, they can attempt a partial sunroof or total sunroof evolution. The partial sunroof technique is similar to a roof f lap; however, the roof hinges on the side as opposed to the front or back. First, rescuers cut the roof from the front windshield header to the rear window, inside the roof rail. They make a relief cut at the front and rear on the hinge side of the roof and lift the entire roof panel up and away from the victim(s). Rescuers may accomplish a rapid extrication once they open the partial sunroof. If needed, rescuers can make a second cut on the opposite side from the windshield header to the rear window and can remove the entire roof panel, creating a total sunroof.
Section C • Chapter 8 – Victim Disentanglement and Extrication 303
WARNING!Steering columns that contain a knuckle (tilt
steering wheels) may break and strike a victim.
Techniques for Disentangling Victims from Passenger VehiclesRescuers may need to disentangle victims from passenger vehicles. Depending on the circumstances, they may find the following techniques useful when performing these operations:
• Removing a windshield from around a victim
• Displacing a steering column
• Displacing a dashboard
• Dropping a f loor pan
• Displacing a B-post
• Displacing and removing seats
• Removing pedals
Removing a Windshield from Around a VictimSometimes a vehicle occupant impacts the windshield and rescuers must remove the windshield from around the victim. Skill Sheet 8-19 describes two methods for removing a windshield from around a victim. Rescuers must exercise extreme care when performing this operation.
Displacing a Steering ColumnFront-end collisions can cause victims to become entrapped under the dash-board and/or steering wheel/column. To free such victims, rescuers must displace the dashboard and/or steering wheel/column. Rescuers can perform a dashboard push/roll using a ram in the door jamb along with the appropriate relief cuts. They can use the spreaders in the kick board to perform a dashboard lift; this technique also requires appropriate relief cuts.
Rescuers will displace a steering column in order to lift the steering col-umn off a victim. Rescuers pierce the windshield and wrap a rescue hook or chain around the steering column. They place the hook or chain as close to the dashboard as possible, in order to prevent the steering wheel from flying into the victim. Rescuers can then lift steering column, allowing them to dis-entangle the victim. This process can relieve respiratory compromise safely and in much less time than other methods. Skill Sheet 8-20 lists the steps for displacing a steering column.
Displacing a DashboardDisplacing a dashboard lifts the dashboard up and away from victims in the front seat. Rescuers may use several methods to displace a dashboard. Each method depends upon the vehicle’s condition, the available tools, and the local policies and procedures.
304 Section C • Chapter 8 – Victim Disentanglement and Extrication
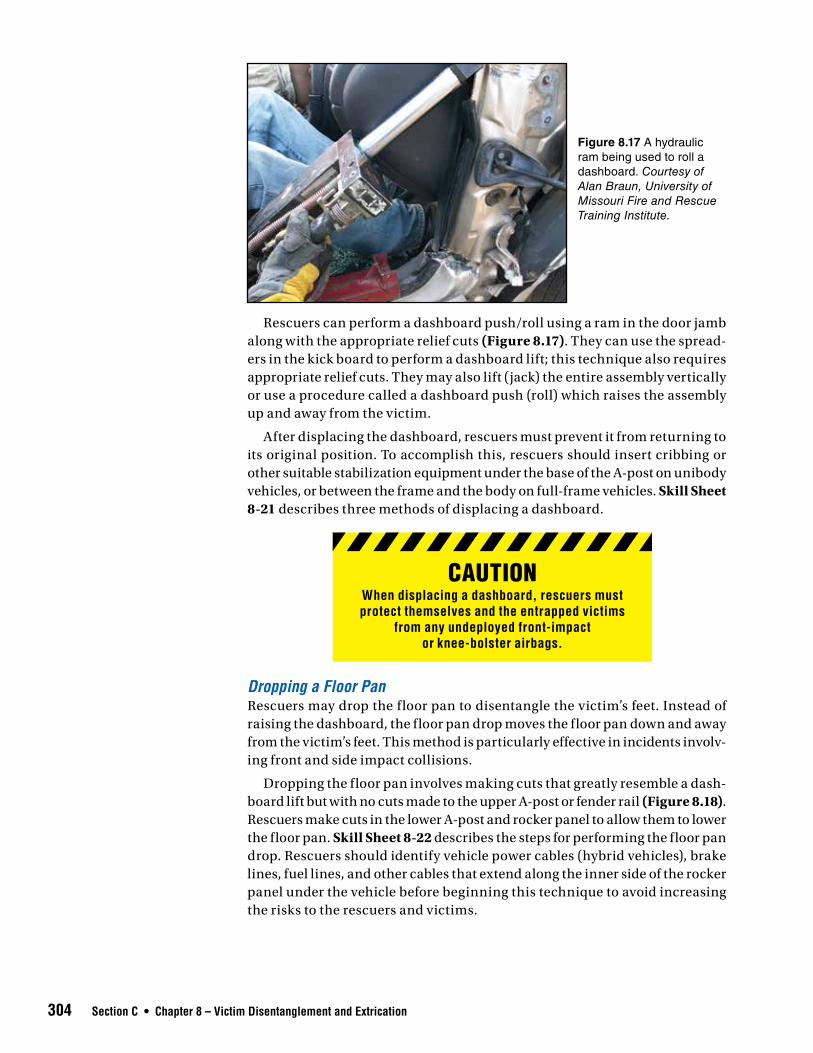
Rescuers can perform a dashboard push/roll using a ram in the door jamb along with the appropriate relief cuts (Figure 8.17). They can use the spread-ers in the kick board to perform a dashboard lift; this technique also requires appropriate relief cuts. They may also lift (jack) the entire assembly vertically or use a procedure called a dashboard push (roll) which raises the assembly up and away from the victim.
After displacing the dashboard, rescuers must prevent it from returning to its original position. To accomplish this, rescuers should insert cribbing or other suitable stabilization equipment under the base of the A-post on unibody vehicles, or between the frame and the body on full-frame vehicles. Skill Sheet 8-21 describes three methods of displacing a dashboard.
Figure 8.17 A hydraulic ram being used to roll a dashboard. Courtesy of Alan Braun, University of Missouri Fire and Rescue Training Institute.
CAUTIONWhen displacing a dashboard, rescuers must protect themselves and the entrapped victims
from any undeployed front-impact or knee-bolster airbags.
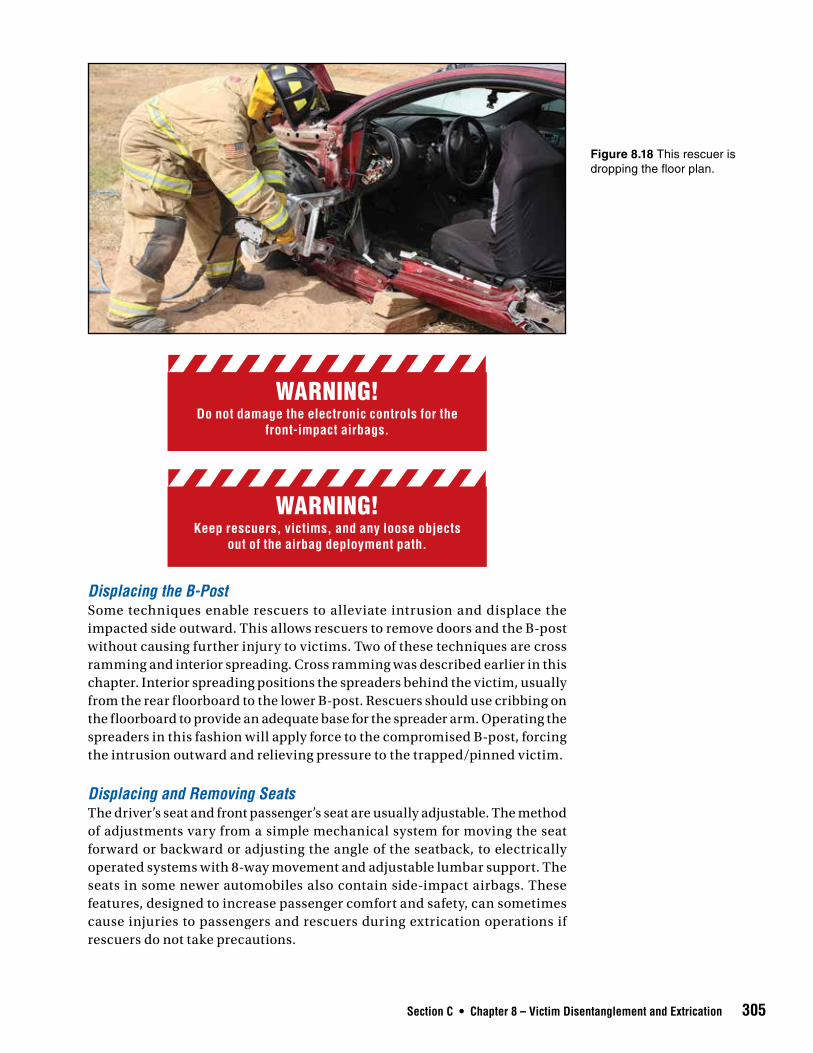
Dropping a Floor PanRescuers may drop the f loor pan to disentangle the victim’s feet. Instead of raising the dashboard, the floor pan drop moves the floor pan down and away from the victim’s feet. This method is particularly effective in incidents involv-ing front and side impact collisions.
Dropping the f loor pan involves making cuts that greatly resemble a dash-board lift but with no cuts made to the upper A-post or fender rail (Figure 8.18). Rescuers make cuts in the lower A-post and rocker panel to allow them to lower the floor pan. Skill Sheet 8-22 describes the steps for performing the floor pan drop. Rescuers should identify vehicle power cables (hybrid vehicles), brake lines, fuel lines, and other cables that extend along the inner side of the rocker panel under the vehicle before beginning this technique to avoid increasing the risks to the rescuers and victims.
Section C • Chapter 8 – Victim Disentanglement and Extrication 305
WARNING!Do not damage the electronic controls for the
front-impact airbags.
WARNING!Keep rescuers, victims, and any loose objects
out of the airbag deployment path.
Displacing the B-PostSome techniques enable rescuers to alleviate intrusion and displace the impacted side outward. This allows rescuers to remove doors and the B-post without causing further injury to victims. Two of these techniques are cross ramming and interior spreading. Cross ramming was described earlier in this chapter. Interior spreading positions the spreaders behind the victim, usually from the rear f loorboard to the lower B-post. Rescuers should use cribbing on the floorboard to provide an adequate base for the spreader arm. Operating the spreaders in this fashion will apply force to the compromised B-post, forcing the intrusion outward and relieving pressure to the trapped/pinned victim.
Displacing and Removing SeatsThe driver’s seat and front passenger’s seat are usually adjustable. The method of adjustments vary from a simple mechanical system for moving the seat forward or backward or adjusting the angle of the seatback, to electrically operated systems with 8-way movement and adjustable lumbar support. The seats in some newer automobiles also contain side-impact airbags. These features, designed to increase passenger comfort and safety, can sometimes cause injuries to passengers and rescuers during extrication operations if rescuers do not take precautions.
Figure 8.18 This rescuer is dropping the floor plan.
306 Section C • Chapter 8 – Victim Disentanglement and Extrication
WARNING!All undeployed airbags must be considered live, and rescuers should be aware of their potential
for sudden deployment.
Adjustable vehicle seats slide forward and back in tracks mounted on the f loor of the vehicle. Small metal teeth hold the seats in the desired position in the tracks. However, the inertial forces generated by a high-speed impact often break the teeth of these mechanisms, allowing the seats to move rap-idly forward and carrying the seat occupants with them. If the vehicle lacks front-impact and knee-bolster airbags, the driver may submarine under the dashboard — become wedged under the dashboard and/ or entangled in the steering wheel and brake pedal. In these cases, rescuers may need to move the seats to access the victims.
In many vehicles, the seatbacks on bucket seats can recline several degrees. On bucket seats that do not recline, rescuers will need to cut the seat frame on both sides in order to lower the seatback. Rescuers should use caution when cutting or pushing off seats because of the hazards presented by the SRS systems.
Rescuers can eliminate seat entrapment by using spreaders to displace the front seat. To lay the seat back to a horizontal position, rescuers must cut the seat frame at its base on both sides of the seat. It is sometimes necessary to remove a front seat entirely — such as to provide room to work on a rear seat passenger. In this case, rescuers can cut the seat mounts at the point of attachment to the tracks with hydraulic cutters. If rescuers can properly pack-age and monitor the victim they can move the seat to facilitate removing the victim from the vehicle.
Before moving a seat, rescuers must properly package any victims as dic-tated by their injuries and closely monitor them during the seat movement. If a rescuer cannot package a victim without moving the seat, rescuers must leave the seat must in position and remove the vehicle from around the victim. In general, rescuers should try to displace or roll dashboard to disentangle a victim instead of moving the seat. If rescuers can properly package and monitor the victim, they can move the seat to facilitate removing the victim from the vehicle. Skill Sheet 8-22 lists the methods for displacing or removing a front seat in a passenger vehicle.
Displacing or Removing PedalsPedals commonly pin the driver’s feet in a vehicle crash. To free a trapped victim, rescuers must either move the pedal away from the victim’s foot or remove the pedal entirely. Once rescuers gain access to the pedal area — either through the door opening or after a kick panel roll-up — they can either cut the pedals or move them out of the way. Rescuers may use hydraulic spreaders, cutters, straps, or ropes to move the pedals away from the victim’s foot or completely remove the pedals. When the brake and/or clutch pedal pins a vehicle driver’s legs rescuers may need to move the kick panel out of the way to allow access to the victim’s feet and legs. Rescuers may instead perform a f loor pan drop. Instead of raising the dash, the f loor pan drop moves the f loor pan down and away from the victim’s feet and legs.
Section C • Chapter 8 – Victim Disentanglement and Extrication 307
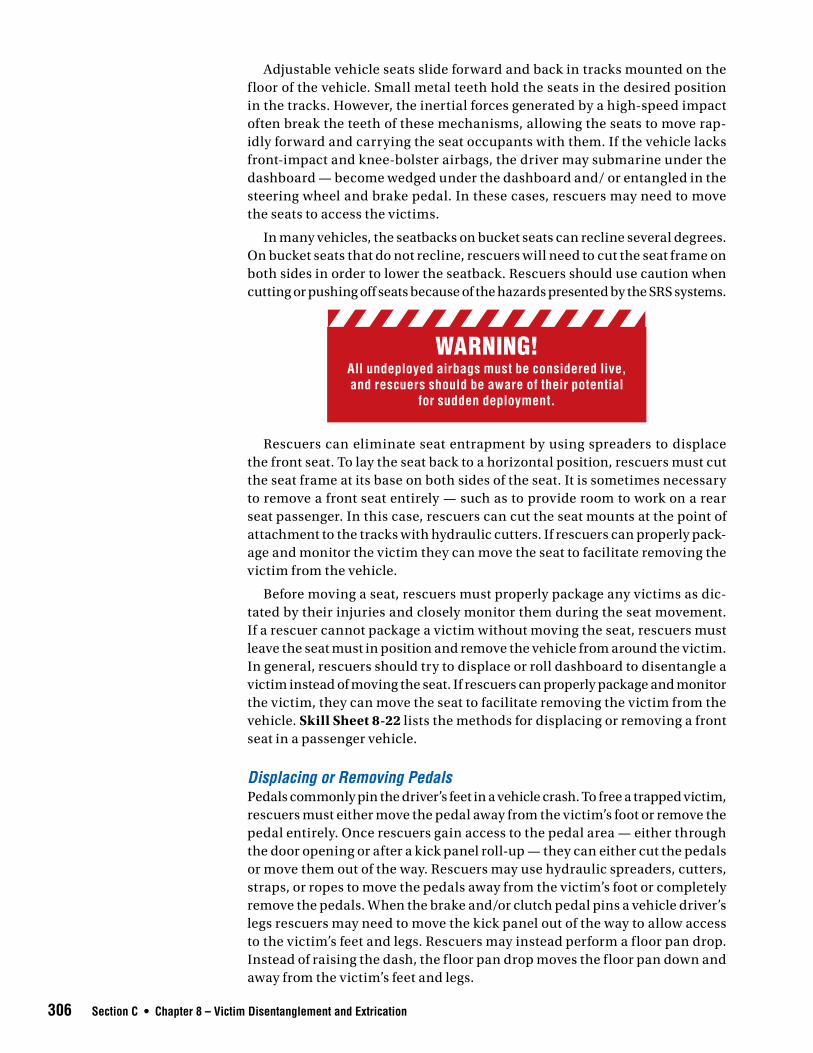
Figure 8.19 Rescuers can use webbing to pull vehicle door pedals away from a victim’s feet. Courtesy of Alan Braun, University of Missouri Fire and Rescue Training Institute.
CAUTIONWhen cutting pedals, the pedals may break or
shatter and turn into projectiles because they are often made of cast materials.
Cutting pedals. If available, rescuers can use a hydraulic pedal cutter to quickly cut the pedal arms and free the victim’s feet (Figure 8.19). Extrica-tion personnel should exercise caution when operating hydraulic pedal cut-ters around a victim’s legs and feet to avoid causing injury to the victim. The tool may roll during the cutting operation, causing further injury. To prevent a pedal from twisting and pinching the victim’s leg or foot, rescuers should wrap a web strap around the pedal and place tension on the strap to pull the pedal away from the victim’s extremities. To cut the pedals, rescuers should cut the pedal arm as needed with the cutting tool and then remove the pedal from the area around the victim’s leg or foot.
Displacing pedals. Rescuers can use one of the following methods to dis-place pedals:
• Bending the pedals with a hydraulic spreader
• Attaching a chain, web strap, or rope around the pedal arm near the foot pad and pulling laterally:
308 Section C • Chapter 8 – Victim Disentanglement and Extrication
— Rescuers can pull manually
— Rescuers can form the attachment into a short loop, slip one end of the loop over a spreader tip, place the other tip against the rocker panel near the A-post, and spread the tips to move the pedal
• Strapping the pedal to a functional, partially opened door and fully opening the door
• Strapping the pedal to the steering wheel and then turning the wheel to bend the pedal upwards
• Using the same tools used in jacking or lifting the steering column and dash-board to move the pedals.
Chapter Review 1. What are common points of entrapment in passenger vehicles?
2. What kinds of injuries are victims involved in rollovers likely to sustain?
3. What special considerations must rescuers make for underride/override incidents?
4. What factors must be taken into consideration when working at a multiple vehicle incident?
5. What actions can rescuers take to protect victims during extrication operations?
6. W hat must rescuers take into account when determining access and egress points on a vehicle?
7. What are four common existing entry points on passenger vehicles?
8. What methods exist for removing different types of vehicle glass?
9. What safety precautions must be taken before and during door removal?
10. How can rescuers create purchase points in vehicles in order to better facilitate extrication?
11. Describe three methods for gaining access to victims through the roof of a passenger vehicle.
12. What alternate methods may be used to gain access to victims if rescuers are unable to cut through thick steel components of a passenger vehicle?
13. What methods may be used to disentangle victims who are trapped by the steering column?
14. How can rescuers disentangle victims who are trapped by the pedals of the vehicle?
Discussion Questions 1. You arrive at the scene of a side-impact collision. The driver of the vehicle that was impacted is trapped by the steering column, and the door is jammed. What methods can you use to access and disentangle the victim?
2. What protocols does your jurisdiction have in place for multiple vehicle incidents (MVIs) or mass casualty incidents (MCIs)?
Section C • Chapter 8 – Victim Disentanglement and Extrication 309
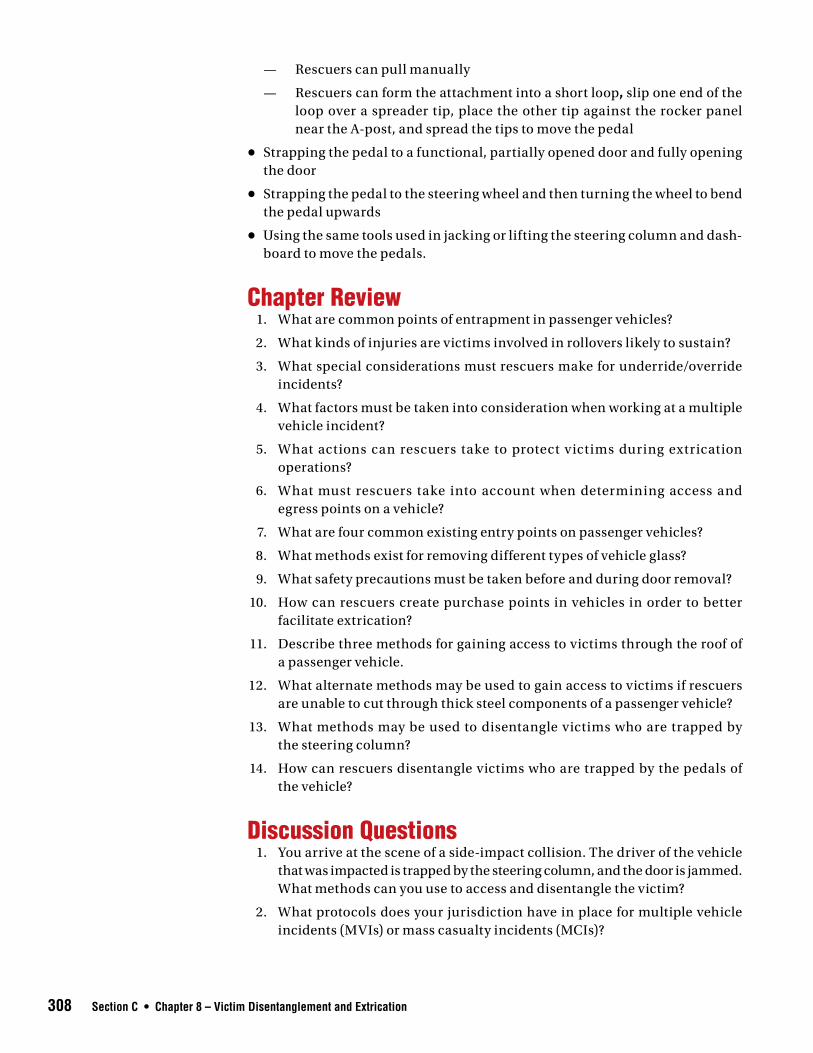
8-1Determine passenger vehicle access and egress points.
Directions: Read each scenario and study the accompanying diagram. Complete the steps below for each scenario.NOTE: There may be multiple access locations and methods for each scenario. Refer to local SOPs to determine the method used in
your jurisdiction.
Step 1: Identify probable victim locations and points of entrapment.
Step 2: Determine the appropriate locations for rescuer and equipment access and for victim removal.
a. Factor in time constraints and available resources. b. Ensure that vehicle stability will not be
compromised.
ON
EW
AY
Scenario 1You respond to the scene of a two-vehicle incident involving a pickup truck and a van. The pickup truck was driving west on a one-way street. The van was travelling north on an intersecting two-way street, and it failed to stop at the intersection. As it was turning left, the van struck the front of the pickup on the driver’s side and pushed it into a row of cars parallel parked at the curb. There are two victims pinned inside each vehicle. The driver’s side door of the van is inoperable, and the passenger door and sliding door allow minimal space for access. The cars parked at the curb are unoccupied but sustained considerable damage.
Step 3: Assess the impact that the vehicle’s stability and position will have on the victim(s) and on rescue operations.
Step 4: Describe the safety precautions that must be taken before extrication can begin.
Step 5: Describe the method of stabilization that will be used.
Child
Driver
Scenario 2You respond to an incident involving a single-car rollover. A midsize car was traveling on a two-lane highway when it hit a patch of ice as it came around a bend. The car rolled several times and came to rest on its side. A driver and a small child are trapped inside the car. No other cars were involved.
310 Section C • Chapter 8 – Victim Disentanglement and Extrication 310 Section C • Chapter 8 – Victim Disentanglement and Extrication
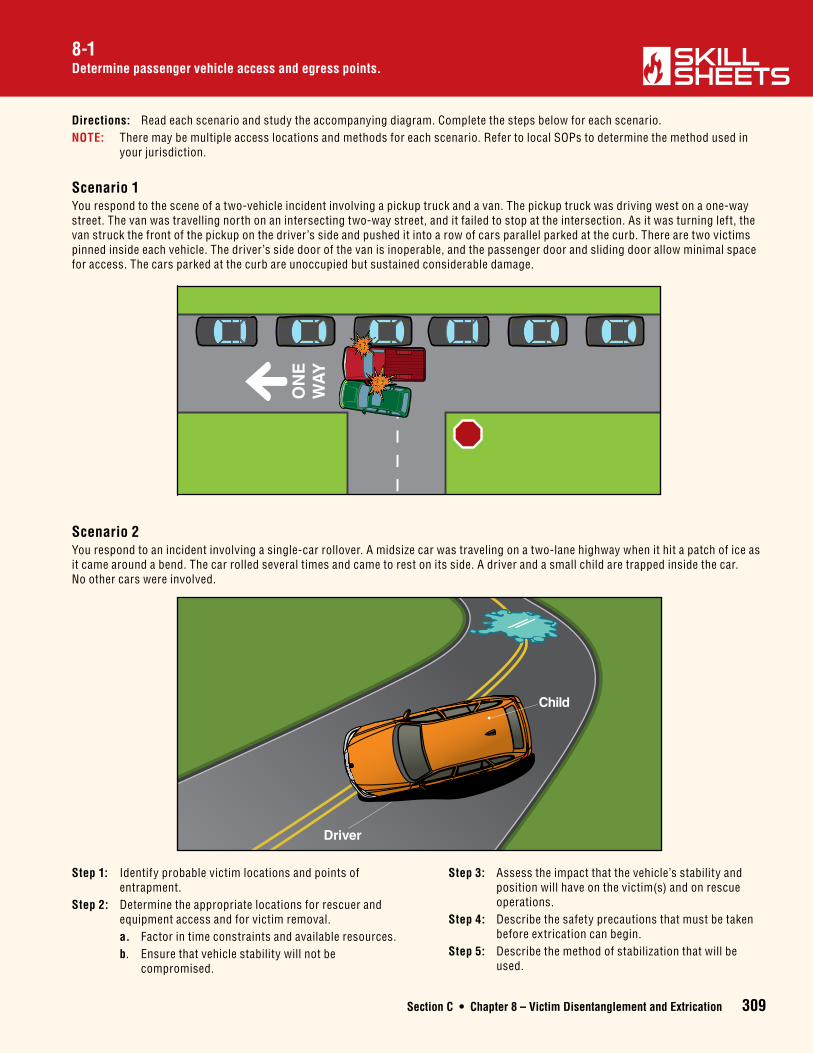
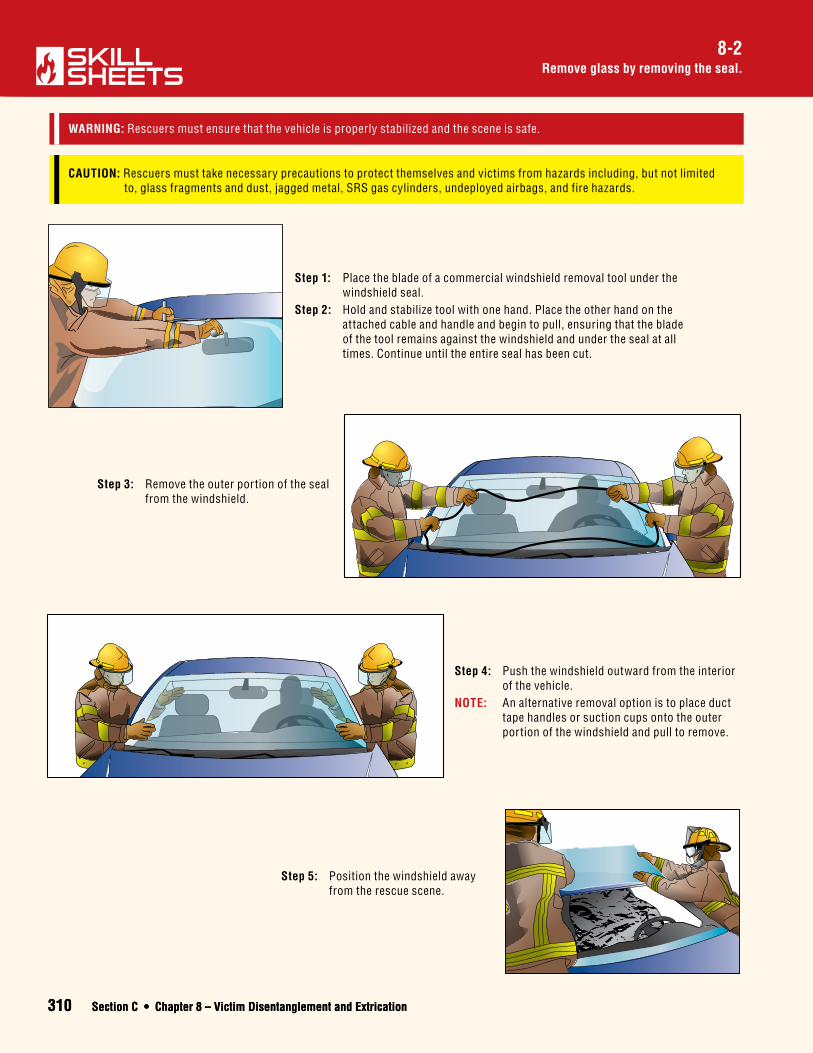
Remove glass by removing the seal.8-2
CAUTION: Rescuers must take necessary precautions to protect themselves and victims from hazards including, but not limited to, glass fragments and dust, jagged metal, SRS gas cylinders, undeployed airbags, and fire hazards.
WARNING: Rescuers must ensure that the vehicle is properly stabilized and the scene is safe.
Step 1: Place the blade of a commercial windshield removal tool under the windshield seal.
Step 2: Hold and stabilize tool with one hand. Place the other hand on the attached cable and handle and begin to pull, ensuring that the blade of the tool remains against the windshield and under the seal at all times. Continue until the entire seal has been cut.
Step 4: Push the windshield outward from the interior of the vehicle.
NOTE: An alternative removal option is to place duct tape handles or suction cups onto the outer portion of the windshield and pull to remove.
Step 5: Position the windshield away from the rescue scene.
Step 3: Remove the outer portion of the seal from the windshield.
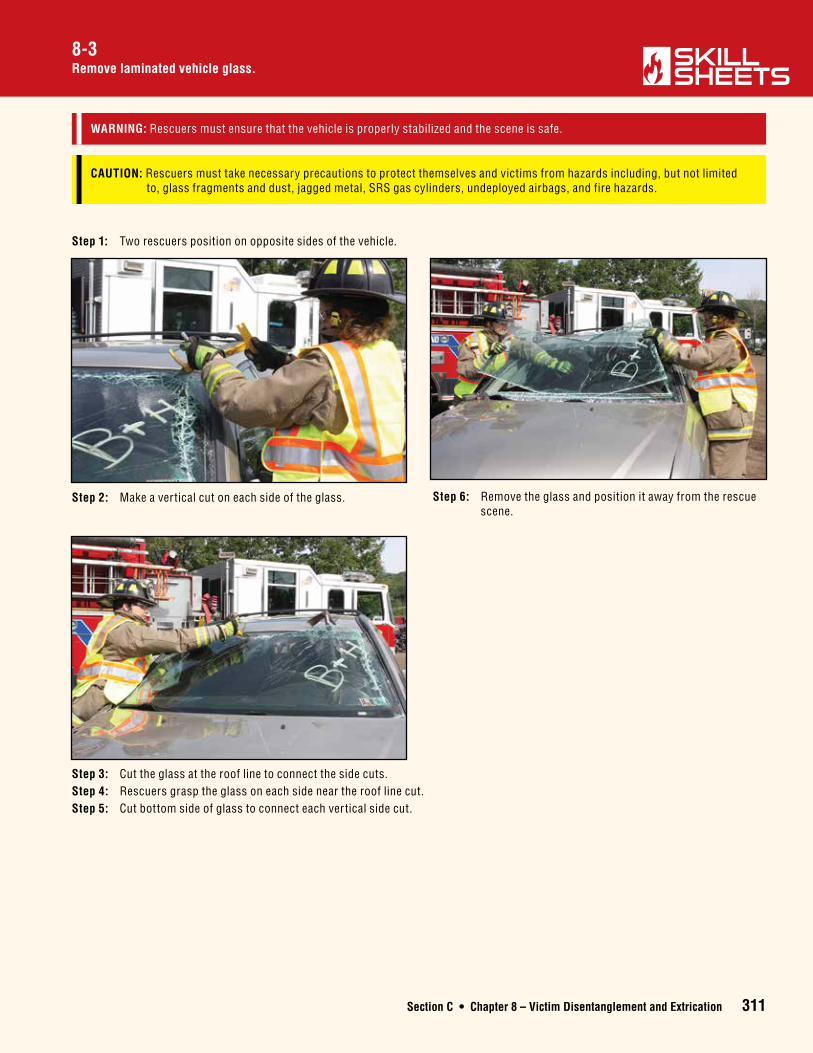
Section C • Chapter 8 – Victim Disentanglement and Extrication 311
8-3Remove laminated vehicle glass.
CAUTION: Rescuers must take necessary precautions to protect themselves and victims from hazards including, but not limited to, glass fragments and dust, jagged metal, SRS gas cylinders, undeployed airbags, and fire hazards.
WARNING: Rescuers must ensure that the vehicle is properly stabilized and the scene is safe.
Step 1: Two rescuers position on opposite sides of the vehicle.
Step 2: Make a vertical cut on each side of the glass.
Step 3: Cut the glass at the roof line to connect the side cuts. Step 4: Rescuers grasp the glass on each side near the roof line cut.Step 5: Cut bottom side of glass to connect each vertical side cut.
Step 6: Remove the glass and position it away from the rescue scene.
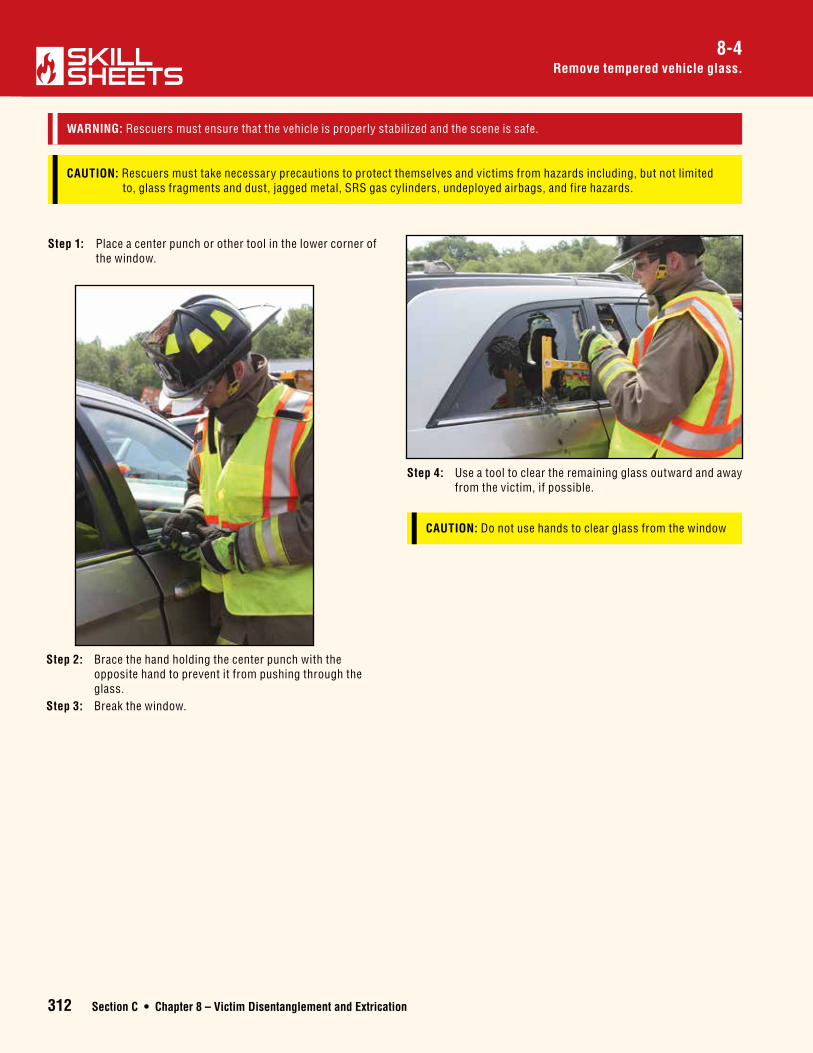
312 Section C • Chapter 8 – Victim Disentanglement and Extrication
Remove tempered vehicle glass.8-4
CAUTION: Rescuers must take necessary precautions to protect themselves and victims from hazards including, but not limited to, glass fragments and dust, jagged metal, SRS gas cylinders, undeployed airbags, and fire hazards.
WARNING: Rescuers must ensure that the vehicle is properly stabilized and the scene is safe.
Step 1: Place a center punch or other tool in the lower corner of the window.
Step 2: Brace the hand holding the center punch with the opposite hand to prevent it from pushing through the glass.
Step 3: Break the window.
Step 4: Use a tool to clear the remaining glass outward and away from the victim, if possible.
CAUTION: Do not use hands to clear glass from the window
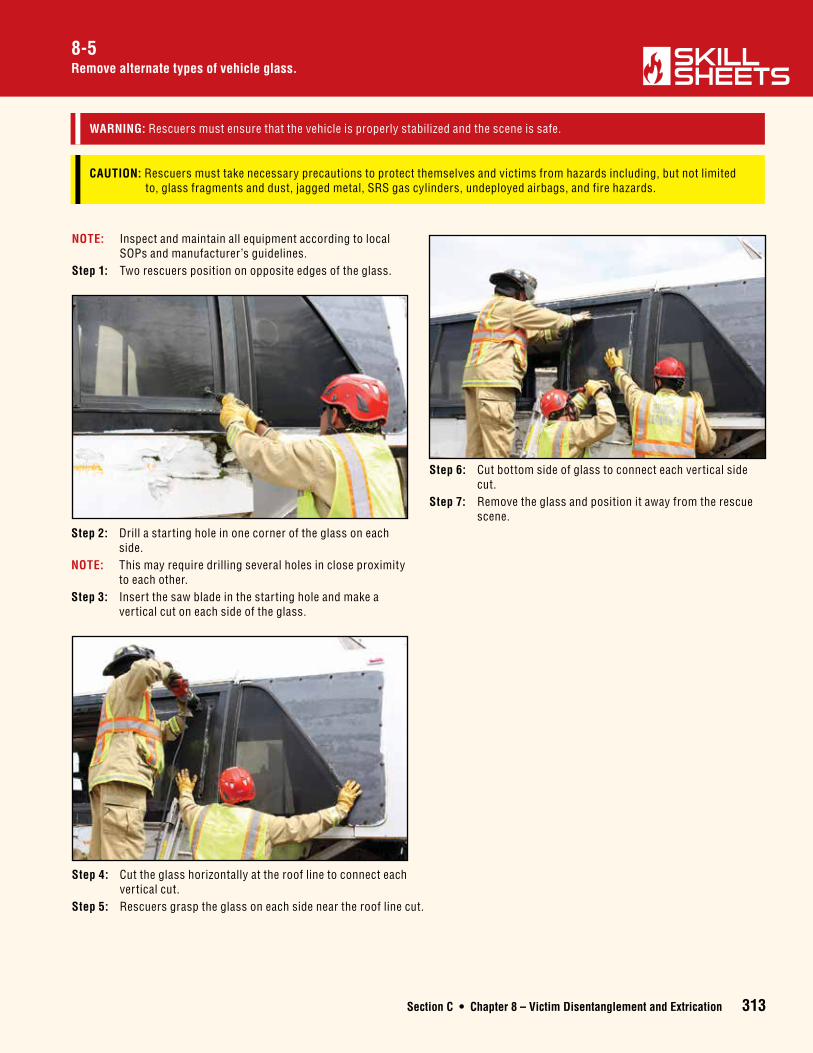
Section C • Chapter 8 – Victim Disentanglement and Extrication 313
Remove alternate types of vehicle glass.8-5
CAUTION: Rescuers must take necessary precautions to protect themselves and victims from hazards including, but not limited to, glass fragments and dust, jagged metal, SRS gas cylinders, undeployed airbags, and fire hazards.
WARNING: Rescuers must ensure that the vehicle is properly stabilized and the scene is safe.
NOTE: Inspect and maintain all equipment according to local SOPs and manufacturer’s guidelines.
Step 1: Two rescuers position on opposite edges of the glass.
Step 2: Drill a starting hole in one corner of the glass on each side.
NOTE: This may require drilling several holes in close proximity to each other.
Step 3: Insert the saw blade in the starting hole and make a vertical cut on each side of the glass.
Step 4: Cut the glass horizontally at the roof line to connect each vertical cut.
Step 5: Rescuers grasp the glass on each side near the roof line cut.
Step 6: Cut bottom side of glass to connect each vertical side cut.
Step 7: Remove the glass and position it away from the rescue scene.
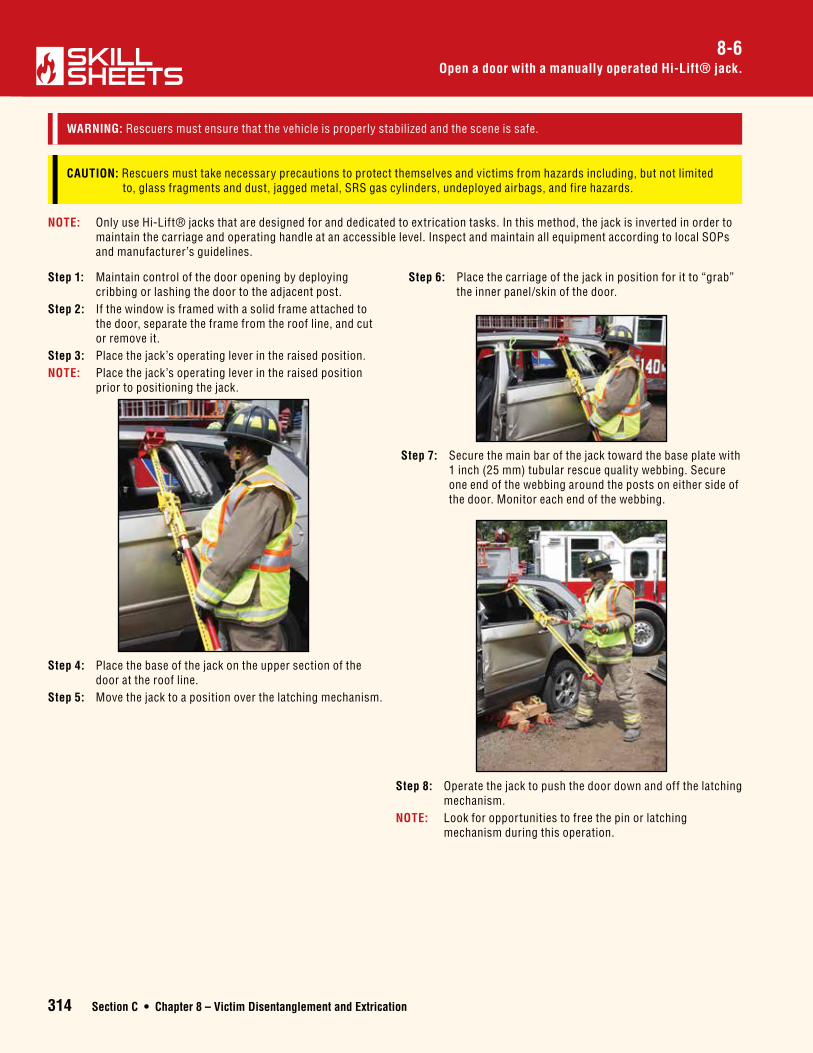
314 Section C • Chapter 8 – Victim Disentanglement and Extrication
Open a door with a manually operated Hi-Lift® jack.8-6
CAUTION: Rescuers must take necessary precautions to protect themselves and victims from hazards including, but not limited to, glass fragments and dust, jagged metal, SRS gas cylinders, undeployed airbags, and fire hazards.
WARNING: Rescuers must ensure that the vehicle is properly stabilized and the scene is safe.
NOTE: Only use Hi-Lift® jacks that are designed for and dedicated to extrication tasks. In this method, the jack is inverted in order to maintain the carriage and operating handle at an accessible level. Inspect and maintain all equipment according to local SOPs and manufacturer’s guidelines.
Step 1: Maintain control of the door opening by deploying cribbing or lashing the door to the adjacent post.
Step 2: If the window is framed with a solid frame attached to the door, separate the frame from the roof line, and cut or remove it.
Step 3: Place the jack’s operating lever in the raised position.NOTE: Place the jack’s operating lever in the raised position
prior to positioning the jack.
Step 4: Place the base of the jack on the upper section of the door at the roof line.
Step 5: Move the jack to a position over the latching mechanism.
Step 6: Place the carriage of the jack in position for it to “grab” the inner panel/skin of the door.
Step 7: Secure the main bar of the jack toward the base plate with 1 inch (25 mm) tubular rescue quality webbing. Secure one end of the webbing around the posts on either side of the door. Monitor each end of the webbing.
Step 8: Operate the jack to push the door down and off the latching mechanism.
NOTE: Look for opportunities to free the pin or latching mechanism during this operation.
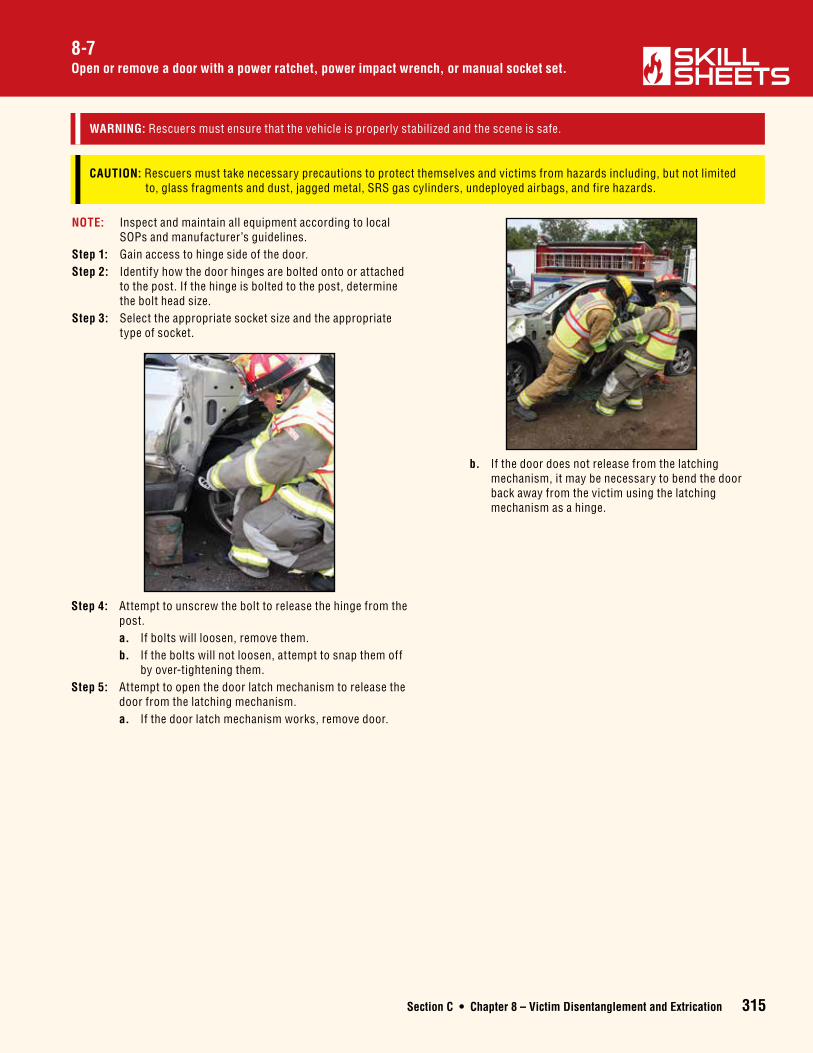
Section C • Chapter 8 – Victim Disentanglement and Extrication 315
Open or remove a door with a power ratchet, power impact wrench, or manual socket set.8-7
CAUTION: Rescuers must take necessary precautions to protect themselves and victims from hazards including, but not limited to, glass fragments and dust, jagged metal, SRS gas cylinders, undeployed airbags, and fire hazards.
WARNING: Rescuers must ensure that the vehicle is properly stabilized and the scene is safe.
NOTE: Inspect and maintain all equipment according to local SOPs and manufacturer’s guidelines.
Step 1: Gain access to hinge side of the door.Step 2: Identify how the door hinges are bolted onto or attached
to the post. If the hinge is bolted to the post, determine the bolt head size.
Step 3: Select the appropriate socket size and the appropriate type of socket.
Step 4: Attempt to unscrew the bolt to release the hinge from the post.
a. If bolts will loosen, remove them. b. If the bolts will not loosen, attempt to snap them off
by over-tightening them.Step 5: Attempt to open the door latch mechanism to release the
door from the latching mechanism. a. If the door latch mechanism works, remove door.
b. If the door does not release from the latching mechanism, it may be necessary to bend the door back away from the victim using the latching mechanism as a hinge.
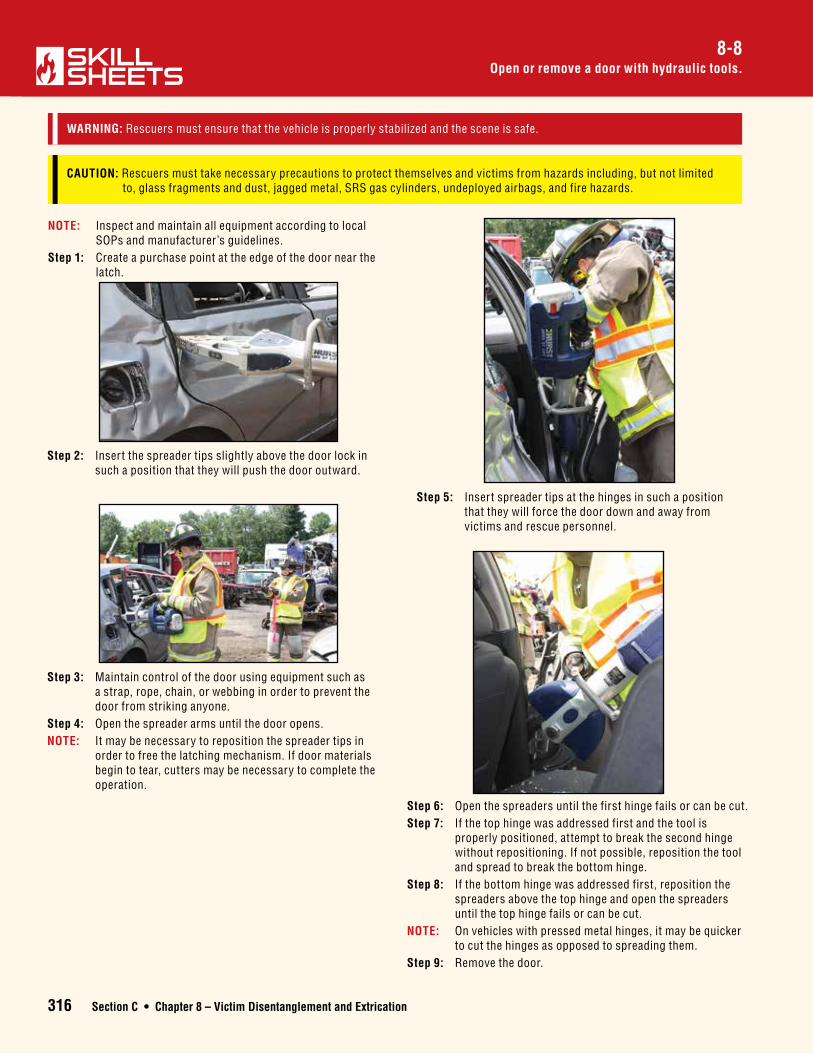
316 Section C • Chapter 8 – Victim Disentanglement and Extrication
Open or remove a door with hydraulic tools.8-8
CAUTION: Rescuers must take necessary precautions to protect themselves and victims from hazards including, but not limited to, glass fragments and dust, jagged metal, SRS gas cylinders, undeployed airbags, and fire hazards.
WARNING: Rescuers must ensure that the vehicle is properly stabilized and the scene is safe.
NOTE: Inspect and maintain all equipment according to local SOPs and manufacturer’s guidelines.
Step 1: Create a purchase point at the edge of the door near the latch.
Step 2: Insert the spreader tips slightly above the door lock in such a position that they will push the door outward.
Step 3: Maintain control of the door using equipment such as a strap, rope, chain, or webbing in order to prevent the door from striking anyone.
Step 4: Open the spreader arms until the door opens. NOTE: It may be necessary to reposition the spreader tips in
order to free the latching mechanism. If door materials begin to tear, cutters may be necessary to complete the operation.
Step 5: Insert spreader tips at the hinges in such a position that they will force the door down and away from victims and rescue personnel.
Step 6: Open the spreaders until the first hinge fails or can be cut.Step 7: If the top hinge was addressed first and the tool is
properly positioned, attempt to break the second hinge without repositioning. If not possible, reposition the tool and spread to break the bottom hinge.
Step 8: If the bottom hinge was addressed first, reposition the spreaders above the top hinge and open the spreaders until the top hinge fails or can be cut.
NOTE: On vehicles with pressed metal hinges, it may be quicker to cut the hinges as opposed to spreading them.
Step 9: Remove the door.
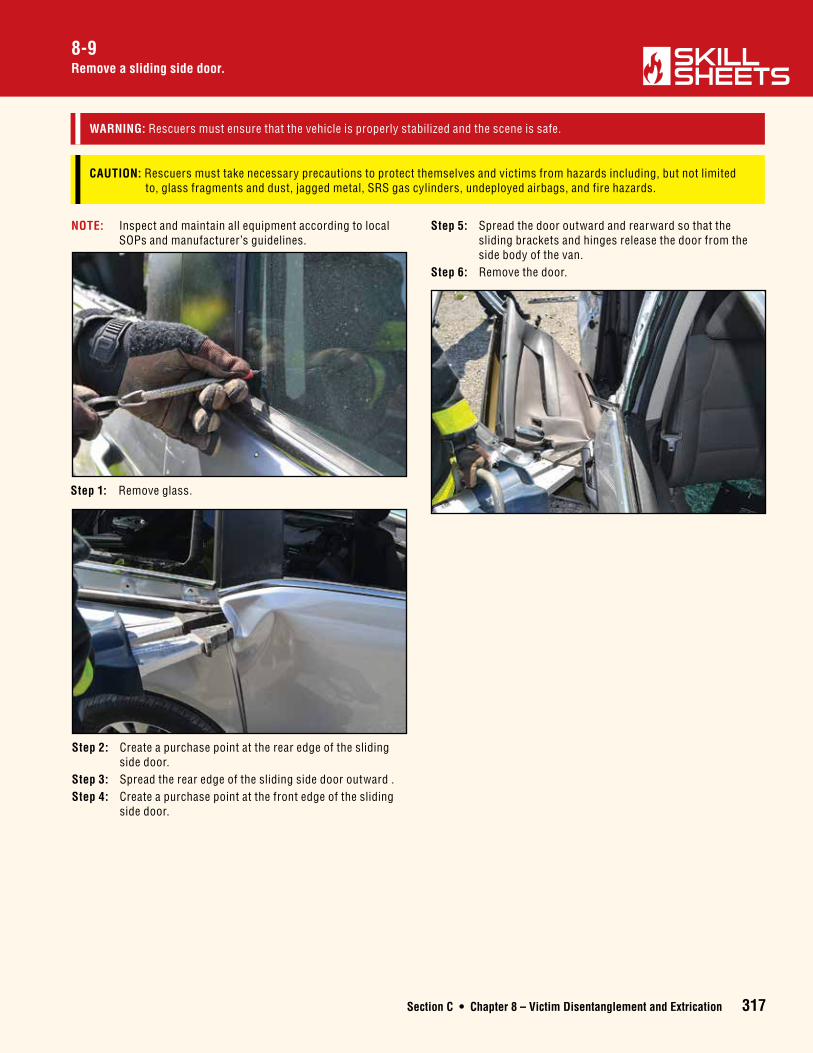
Section C • Chapter 8 – Victim Disentanglement and Extrication 317
Remove a sliding side door.8-9
CAUTION: Rescuers must take necessary precautions to protect themselves and victims from hazards including, but not limited to, glass fragments and dust, jagged metal, SRS gas cylinders, undeployed airbags, and fire hazards.
WARNING: Rescuers must ensure that the vehicle is properly stabilized and the scene is safe.
NOTE: Inspect and maintain all equipment according to local SOPs and manufacturer’s guidelines.
Step 1: Remove glass.
Step 2: Create a purchase point at the rear edge of the sliding side door.
Step 3: Spread the rear edge of the sliding side door outward .Step 4: Create a purchase point at the front edge of the sliding
side door.
Step 5: Spread the door outward and rearward so that the sliding brackets and hinges release the door from the side body of the van.
Step 6: Remove the door.
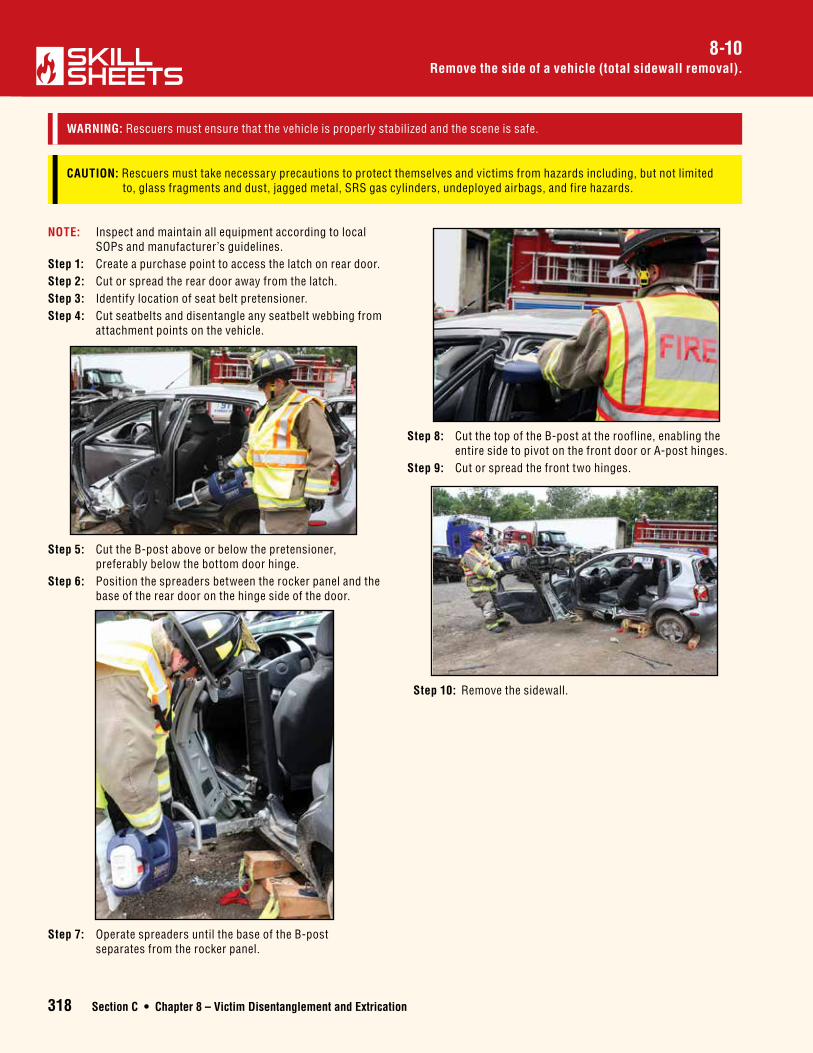
318 Section C • Chapter 8 – Victim Disentanglement and Extrication
Remove the side of a vehicle (total sidewall removal). 8-10
CAUTION: Rescuers must take necessary precautions to protect themselves and victims from hazards including, but not limited to, glass fragments and dust, jagged metal, SRS gas cylinders, undeployed airbags, and fire hazards.
WARNING: Rescuers must ensure that the vehicle is properly stabilized and the scene is safe.
NOTE: Inspect and maintain all equipment according to local SOPs and manufacturer’s guidelines.
Step 1: Create a purchase point to access the latch on rear door.Step 2: Cut or spread the rear door away from the latch. Step 3: Identify location of seat belt pretensioner.Step 4: Cut seatbelts and disentangle any seatbelt webbing from
attachment points on the vehicle.
Step 5: Cut the B-post above or below the pretensioner, preferably below the bottom door hinge.
Step 6: Position the spreaders between the rocker panel and the base of the rear door on the hinge side of the door.
Step 7: Operate spreaders until the base of the B-post separates from the rocker panel.
Step 8: Cut the top of the B-post at the roofline, enabling the entire side to pivot on the front door or A-post hinges.
Step 9: Cut or spread the front two hinges.
Step 10: Remove the sidewall.
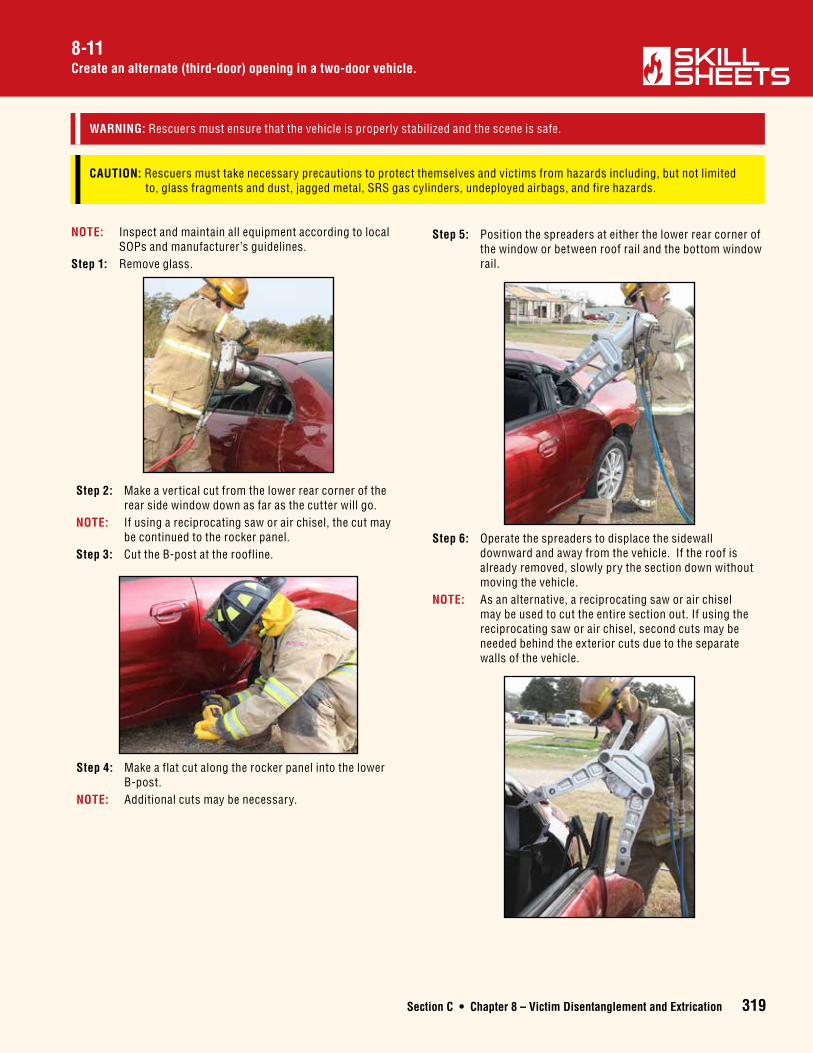
Section C • Chapter 8 – Victim Disentanglement and Extrication 319
Create an alternate (third-door) opening in a two-door vehicle.8-11
CAUTION: Rescuers must take necessary precautions to protect themselves and victims from hazards including, but not limited to, glass fragments and dust, jagged metal, SRS gas cylinders, undeployed airbags, and fire hazards.
WARNING: Rescuers must ensure that the vehicle is properly stabilized and the scene is safe.
NOTE: Inspect and maintain all equipment according to local SOPs and manufacturer’s guidelines.
Step 1: Remove glass.
Step 2: Make a vertical cut from the lower rear corner of the rear side window down as far as the cutter will go.
NOTE: If using a reciprocating saw or air chisel, the cut may be continued to the rocker panel.
Step 3: Cut the B-post at the roofline.
Step 4: Make a flat cut along the rocker panel into the lower B-post.
NOTE: Additional cuts may be necessary.
Step 5: Position the spreaders at either the lower rear corner of the window or between roof rail and the bottom window rail.
Step 6: Operate the spreaders to displace the sidewall downward and away from the vehicle. If the roof is already removed, slowly pry the section down without moving the vehicle.
NOTE: As an alternative, a reciprocating saw or air chisel may be used to cut the entire section out. If using the reciprocating saw or air chisel, second cuts may be needed behind the exterior cuts due to the separate walls of the vehicle.
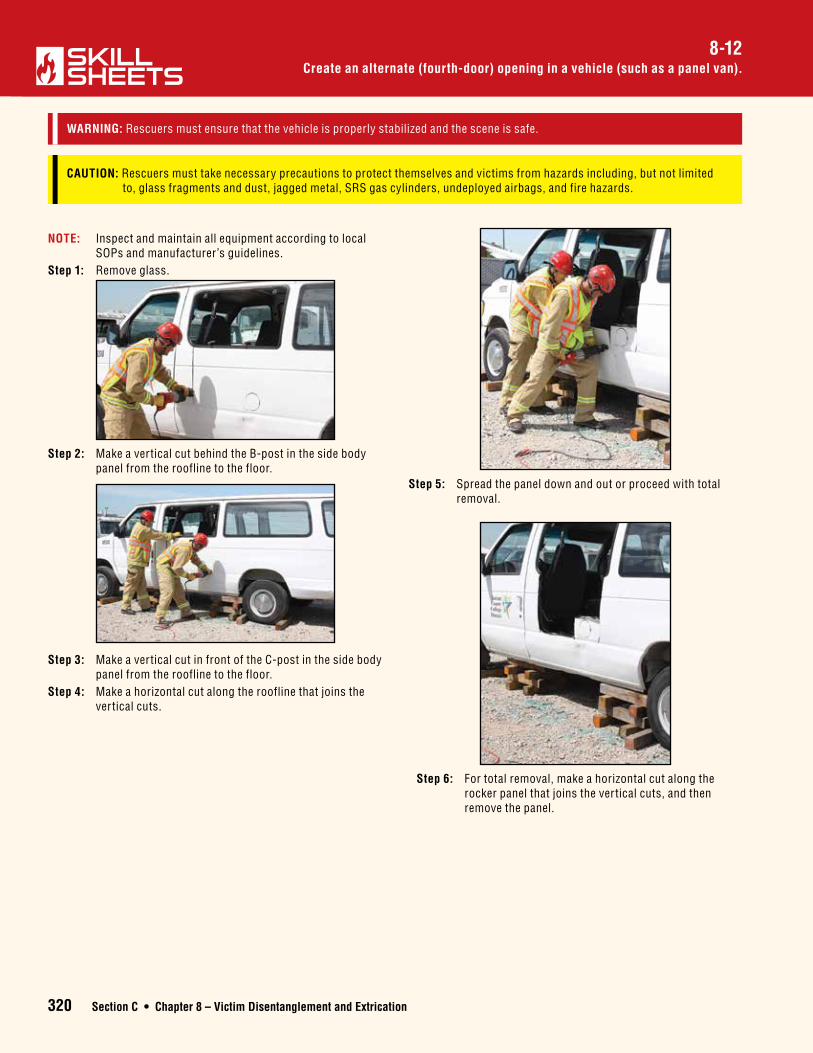
320 Section C • Chapter 8 – Victim Disentanglement and Extrication
Create an alternate (fourth-door) opening in a vehicle (such as a panel van).8-12
CAUTION: Rescuers must take necessary precautions to protect themselves and victims from hazards including, but not limited to, glass fragments and dust, jagged metal, SRS gas cylinders, undeployed airbags, and fire hazards.
WARNING: Rescuers must ensure that the vehicle is properly stabilized and the scene is safe.
NOTE: Inspect and maintain all equipment according to local SOPs and manufacturer’s guidelines.
Step 1: Remove glass.
Step 2: Make a vertical cut behind the B-post in the side body panel from the roofline to the floor.
Step 3: Make a vertical cut in front of the C-post in the side body panel from the roofline to the floor.
Step 4: Make a horizontal cut along the roofline that joins the vertical cuts.
Step 5: Spread the panel down and out or proceed with total removal.
Step 6: For total removal, make a horizontal cut along the rocker panel that joins the vertical cuts, and then remove the panel.
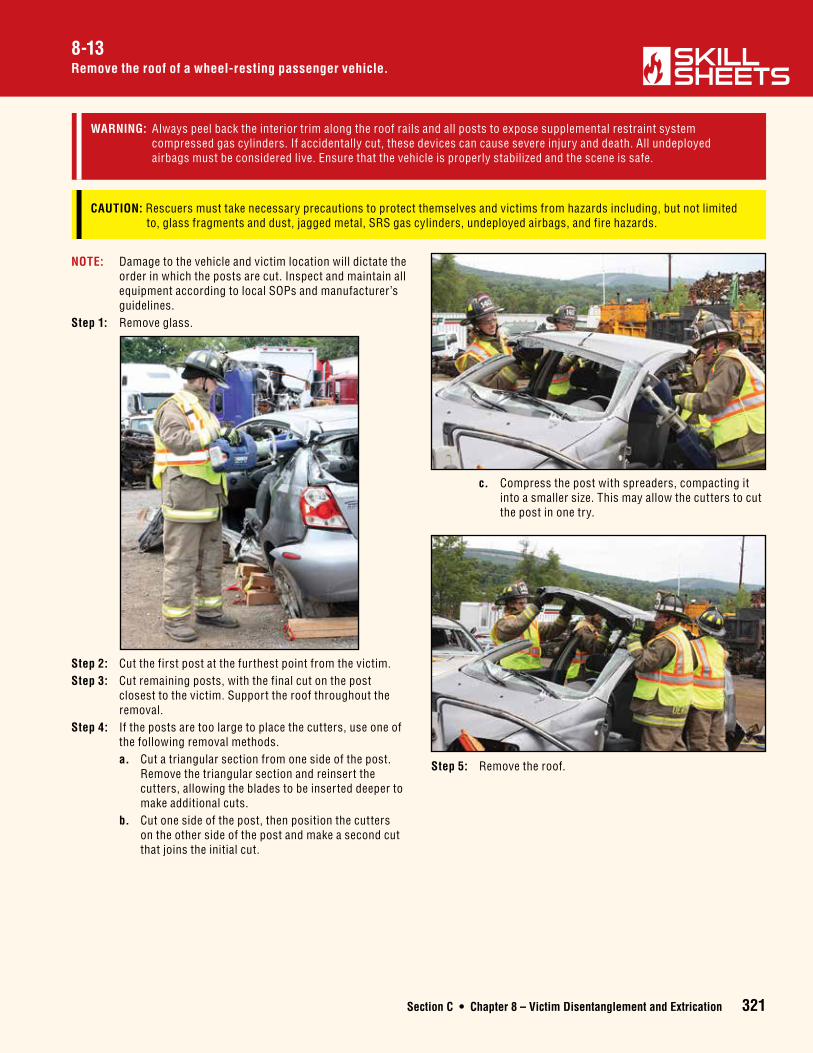
Section C • Chapter 8 – Victim Disentanglement and Extrication 321
8-13Remove the roof of a wheel-resting passenger vehicle.
CAUTION: Rescuers must take necessary precautions to protect themselves and victims from hazards including, but not limited to, glass fragments and dust, jagged metal, SRS gas cylinders, undeployed airbags, and fire hazards.
WARNING: Always peel back the interior trim along the roof rails and all posts to expose supplemental restraint system compressed gas cylinders. If accidentally cut, these devices can cause severe injury and death. All undeployed airbags must be considered live. Ensure that the vehicle is properly stabilized and the scene is safe.
NOTE: Damage to the vehicle and victim location will dictate the order in which the posts are cut. Inspect and maintain all equipment according to local SOPs and manufacturer’s guidelines.
Step 1: Remove glass.
Step 2: Cut the first post at the furthest point from the victim. Step 3: Cut remaining posts, with the final cut on the post
closest to the victim. Support the roof throughout the removal.
Step 4: If the posts are too large to place the cutters, use one of the following removal methods.
a. Cut a triangular section from one side of the post. Remove the triangular section and reinsert the cutters, allowing the blades to be inserted deeper to make additional cuts.
b. Cut one side of the post, then position the cutters on the other side of the post and make a second cut that joins the initial cut.
c. Compress the post with spreaders, compacting it into a smaller size. This may allow the cutters to cut the post in one try.
Step 5: Remove the roof.
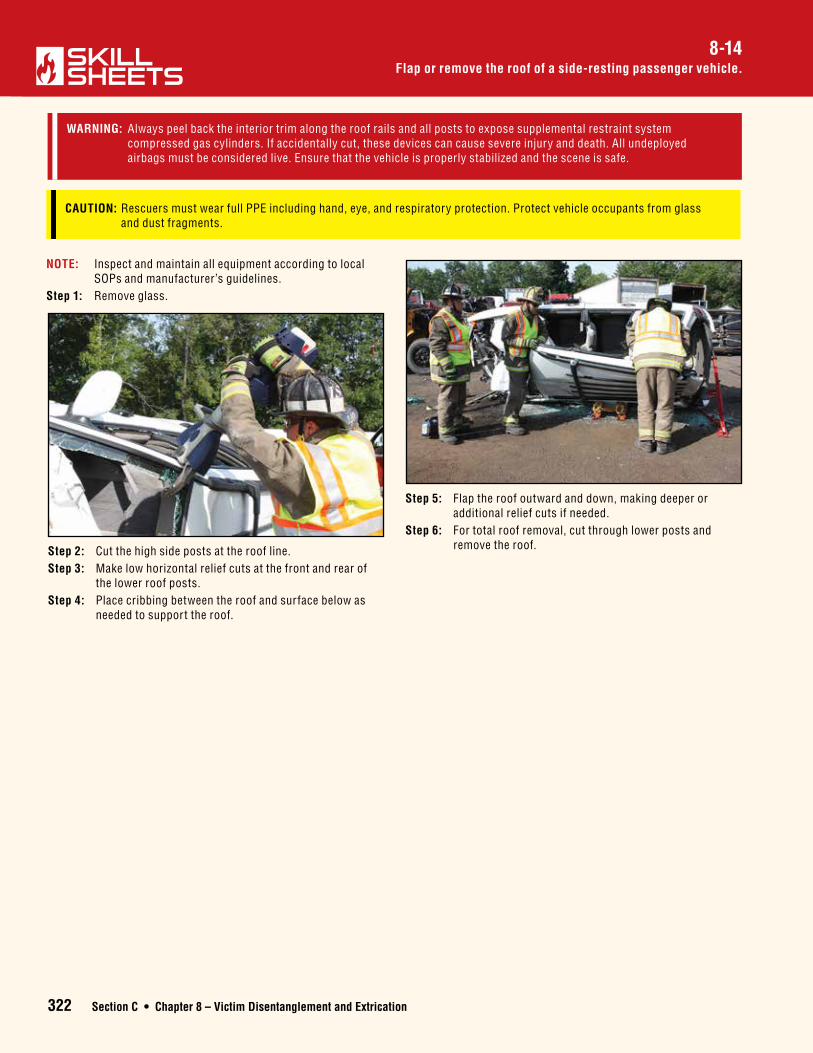
322 Section C • Chapter 8 – Victim Disentanglement and Extrication
Flap or remove the roof of a side-resting passenger vehicle.8-14
CAUTION: Rescuers must wear full PPE including hand, eye, and respiratory protection. Protect vehicle occupants from glass and dust fragments.
NOTE: Inspect and maintain all equipment according to local SOPs and manufacturer’s guidelines.
Step 1: Remove glass.
WARNING: Always peel back the interior trim along the roof rails and all posts to expose supplemental restraint system compressed gas cylinders. If accidentally cut, these devices can cause severe injury and death. All undeployed airbags must be considered live. Ensure that the vehicle is properly stabilized and the scene is safe.
Step 2: Cut the high side posts at the roof line.Step 3: Make low horizontal relief cuts at the front and rear of
the lower roof posts.Step 4: Place cribbing between the roof and surface below as
needed to support the roof.
Step 5: Flap the roof outward and down, making deeper or additional relief cuts if needed.
Step 6: For total roof removal, cut through lower posts and remove the roof.
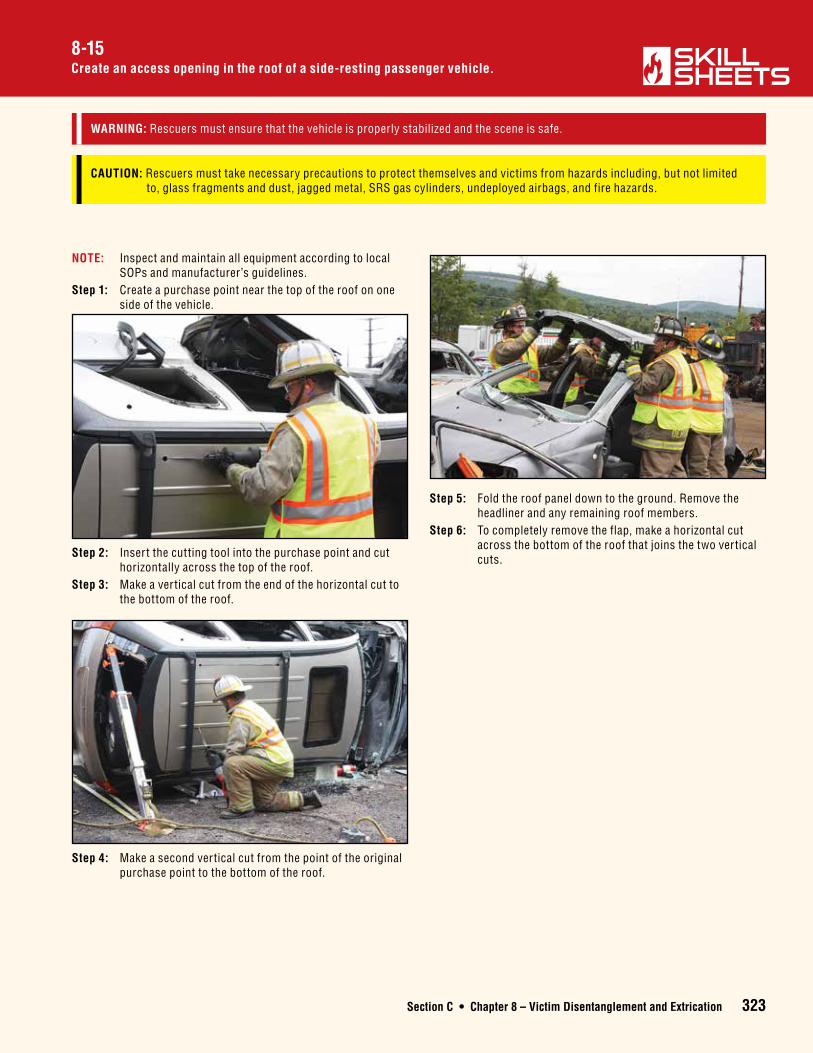
Section C • Chapter 8 – Victim Disentanglement and Extrication 323
8-15Create an access opening in the roof of a side-resting passenger vehicle.
CAUTION: Rescuers must take necessary precautions to protect themselves and victims from hazards including, but not limited to, glass fragments and dust, jagged metal, SRS gas cylinders, undeployed airbags, and fire hazards.
WARNING: Rescuers must ensure that the vehicle is properly stabilized and the scene is safe.
NOTE: Inspect and maintain all equipment according to local SOPs and manufacturer’s guidelines.
Step 1: Create a purchase point near the top of the roof on one side of the vehicle.
Step 2: Insert the cutting tool into the purchase point and cut horizontally across the top of the roof.
Step 3: Make a vertical cut from the end of the horizontal cut to the bottom of the roof.
Step 4: Make a second vertical cut from the point of the original purchase point to the bottom of the roof.
Step 5: Fold the roof panel down to the ground. Remove the headliner and any remaining roof members.
Step 6: To completely remove the flap, make a horizontal cut across the bottom of the roof that joins the two vertical cuts.
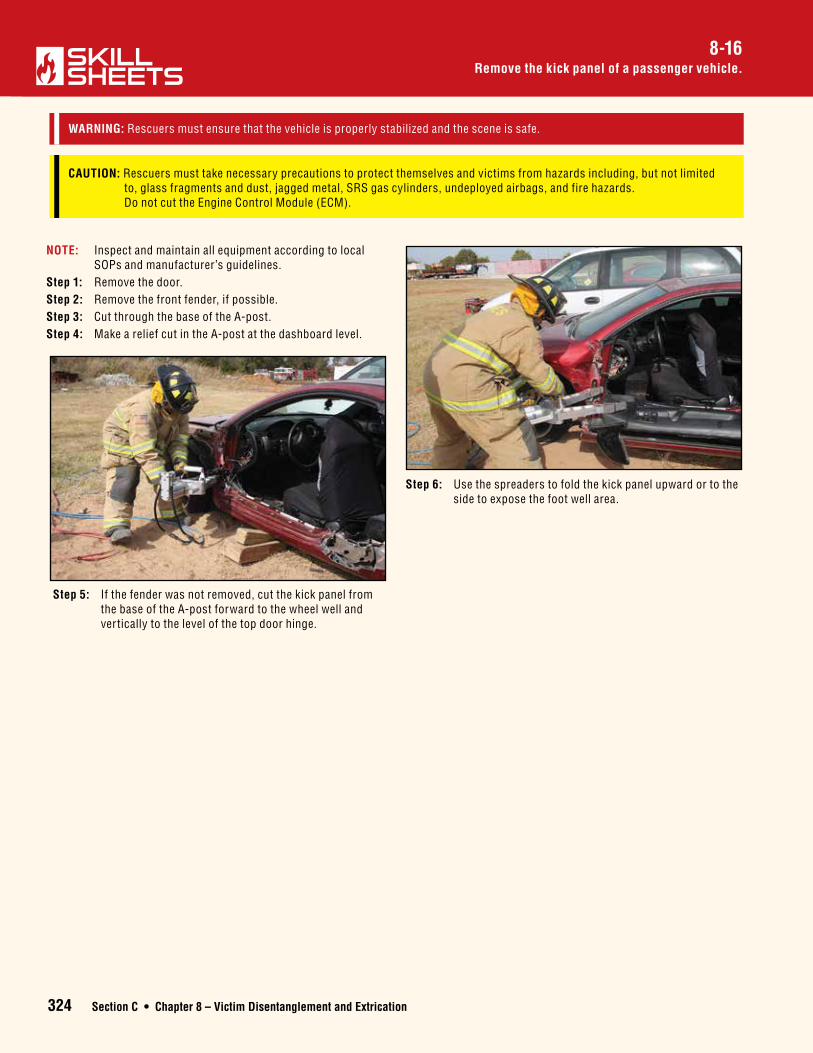
324 Section C • Chapter 8 – Victim Disentanglement and Extrication
Remove the kick panel of a passenger vehicle.8-16
CAUTION: Rescuers must take necessary precautions to protect themselves and victims from hazards including, but not limited to, glass fragments and dust, jagged metal, SRS gas cylinders, undeployed airbags, and fire hazards. Do not cut the Engine Control Module (ECM).
WARNING: Rescuers must ensure that the vehicle is properly stabilized and the scene is safe.
NOTE: Inspect and maintain all equipment according to local SOPs and manufacturer’s guidelines.
Step 1: Remove the door.Step 2: Remove the front fender, if possible.Step 3: Cut through the base of the A-post. Step 4: Make a relief cut in the A-post at the dashboard level.
Step 5: If the fender was not removed, cut the kick panel from the base of the A-post forward to the wheel well and vertically to the level of the top door hinge.
Step 6: Use the spreaders to fold the kick panel upward or to the side to expose the foot well area.
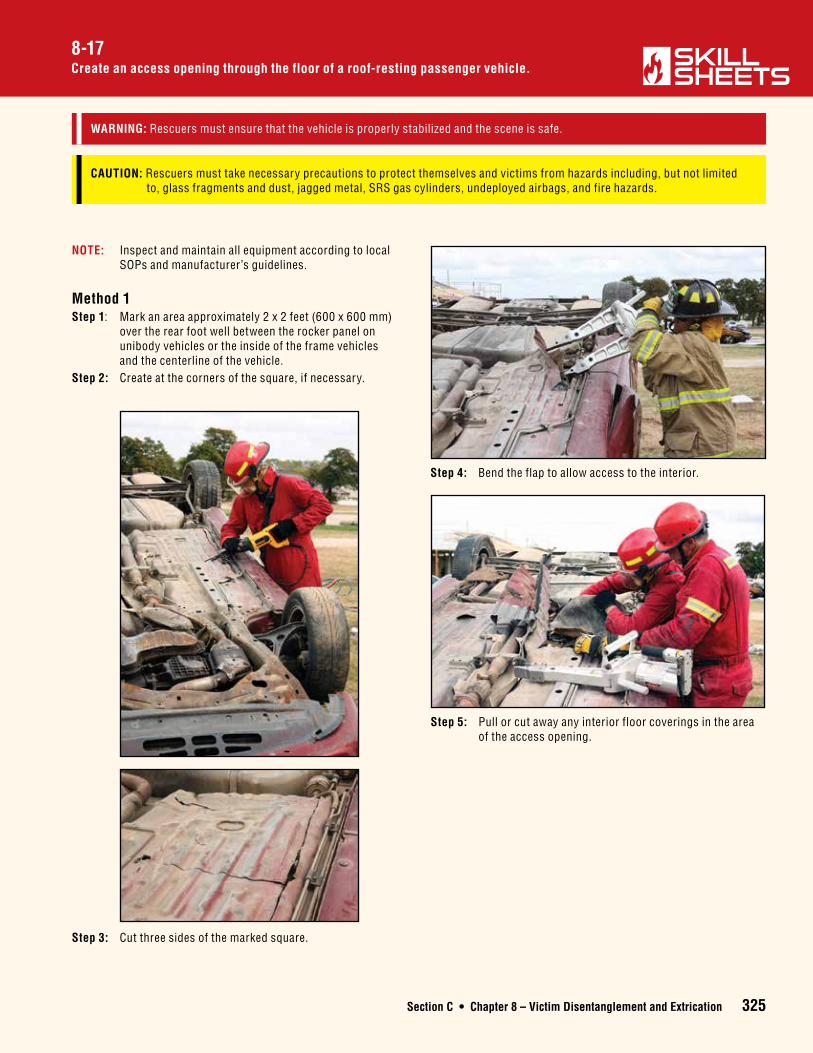
Section C • Chapter 8 – Victim Disentanglement and Extrication 325
8-17Create an access opening through the floor of a roof-resting passenger vehicle.
CAUTION: Rescuers must take necessary precautions to protect themselves and victims from hazards including, but not limited to, glass fragments and dust, jagged metal, SRS gas cylinders, undeployed airbags, and fire hazards.
WARNING: Rescuers must ensure that the vehicle is properly stabilized and the scene is safe.
NOTE: Inspect and maintain all equipment according to local SOPs and manufacturer’s guidelines.
Method 1Step 1: Mark an area approximately 2 x 2 feet (600 x 600 mm)
over the rear foot well between the rocker panel on unibody vehicles or the inside of the frame vehicles and the centerline of the vehicle.
Step 2: Create at the corners of the square, if necessary.
Step 3: Cut three sides of the marked square.
Step 4: Bend the flap to allow access to the interior.
Step 5: Pull or cut away any interior floor coverings in the area of the access opening.
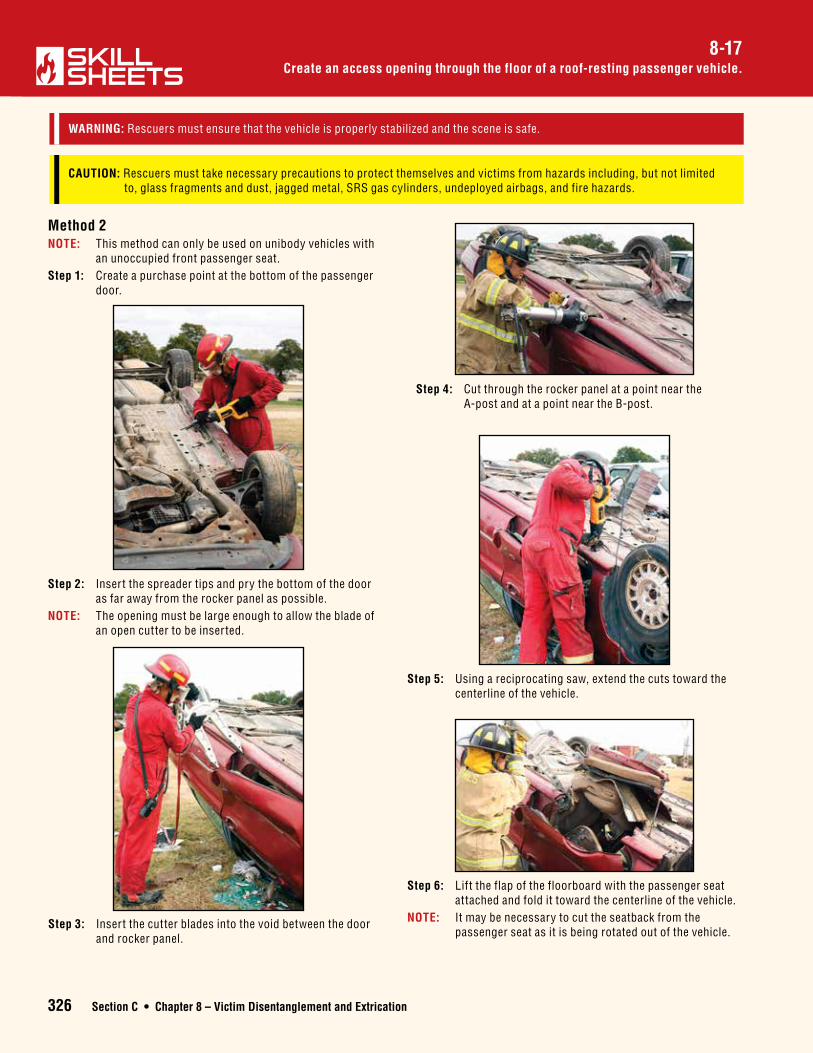
326 Section C • Chapter 8 – Victim Disentanglement and Extrication
Create an access opening through the floor of a roof-resting passenger vehicle.8-17
CAUTION: Rescuers must take necessary precautions to protect themselves and victims from hazards including, but not limited to, glass fragments and dust, jagged metal, SRS gas cylinders, undeployed airbags, and fire hazards.
WARNING: Rescuers must ensure that the vehicle is properly stabilized and the scene is safe.
Method 2NOTE: This method can only be used on unibody vehicles with
an unoccupied front passenger seat.Step 1: Create a purchase point at the bottom of the passenger
door.
Step 2: Insert the spreader tips and pry the bottom of the door as far away from the rocker panel as possible.
NOTE: The opening must be large enough to allow the blade of an open cutter to be inserted.
Step 3: Insert the cutter blades into the void between the door and rocker panel.
Step 4: Cut through the rocker panel at a point near the A-post and at a point near the B-post.
Step 5: Using a reciprocating saw, extend the cuts toward the centerline of the vehicle.
Step 6: Lift the flap of the floorboard with the passenger seat attached and fold it toward the centerline of the vehicle.
NOTE: It may be necessary to cut the seatback from the passenger seat as it is being rotated out of the vehicle.
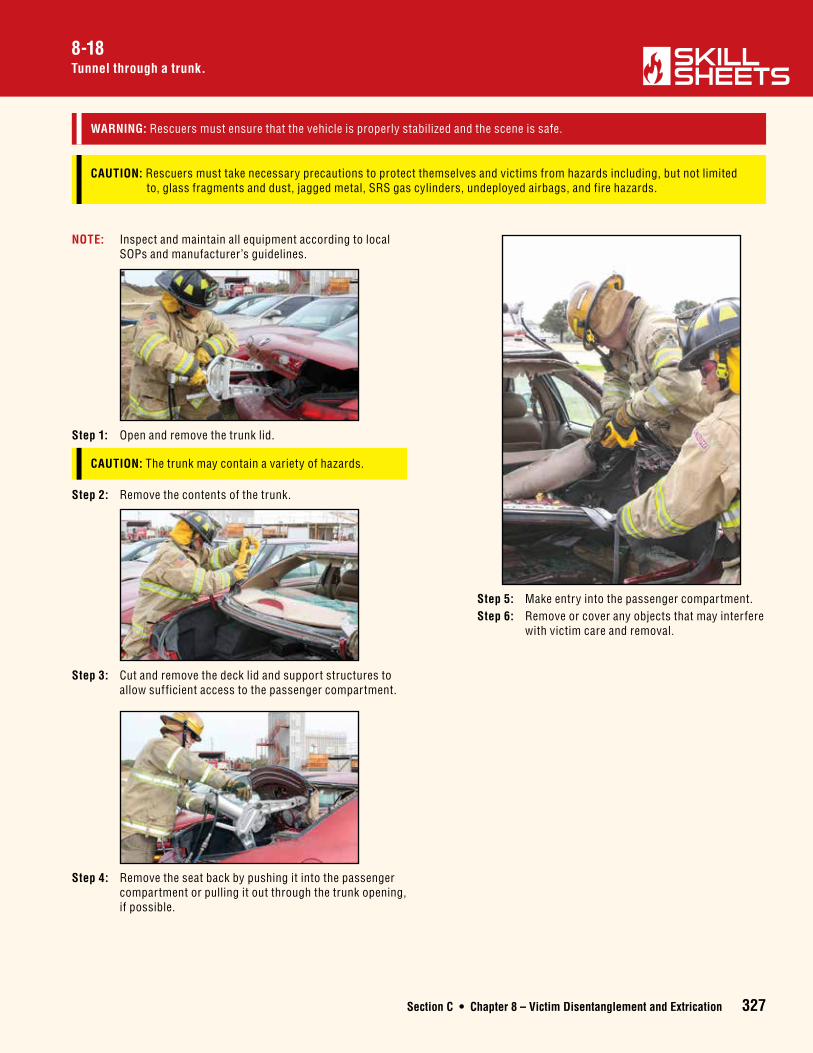
Section C • Chapter 8 – Victim Disentanglement and Extrication 327
8-18Tunnel through a trunk.
CAUTION: Rescuers must take necessary precautions to protect themselves and victims from hazards including, but not limited to, glass fragments and dust, jagged metal, SRS gas cylinders, undeployed airbags, and fire hazards.
WARNING: Rescuers must ensure that the vehicle is properly stabilized and the scene is safe.
NOTE: Inspect and maintain all equipment according to local SOPs and manufacturer’s guidelines.
CAUTION: The trunk may contain a variety of hazards.
Step 1: Open and remove the trunk lid.
Step 2: Remove the contents of the trunk.
Step 3: Cut and remove the deck lid and support structures to allow sufficient access to the passenger compartment.
Step 4: Remove the seat back by pushing it into the passenger compartment or pulling it out through the trunk opening, if possible.
Step 5: Make entry into the passenger compartment. Step 6: Remove or cover any objects that may interfere
with victim care and removal.
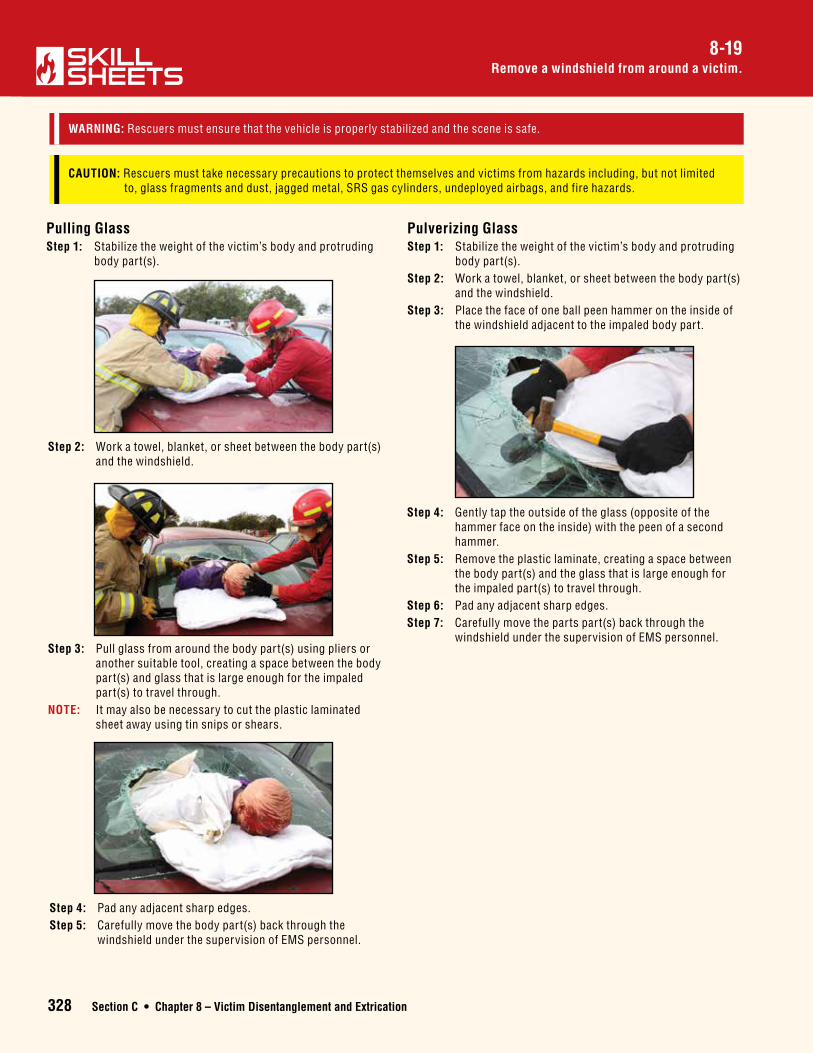
328 Section C • Chapter 8 – Victim Disentanglement and Extrication
Remove a windshield from around a victim.8-19
CAUTION: Rescuers must take necessary precautions to protect themselves and victims from hazards including, but not limited to, glass fragments and dust, jagged metal, SRS gas cylinders, undeployed airbags, and fire hazards.
WARNING: Rescuers must ensure that the vehicle is properly stabilized and the scene is safe.
Pulling GlassStep 1: Stabilize the weight of the victim’s body and protruding
body part(s).
Step 2: Work a towel, blanket, or sheet between the body part(s) and the windshield.
Step 3: Pull glass from around the body part(s) using pliers or another suitable tool, creating a space between the body part(s) and glass that is large enough for the impaled part(s) to travel through.
NOTE: It may also be necessary to cut the plastic laminated sheet away using tin snips or shears.
Step 4: Pad any adjacent sharp edges.Step 5: Carefully move the body part(s) back through the
windshield under the supervision of EMS personnel.
Pulverizing GlassStep 1: Stabilize the weight of the victim’s body and protruding
body part(s). Step 2: Work a towel, blanket, or sheet between the body part(s)
and the windshield.Step 3: Place the face of one ball peen hammer on the inside of
the windshield adjacent to the impaled body part.
Step 4: Gently tap the outside of the glass (opposite of the hammer face on the inside) with the peen of a second hammer.
Step 5: Remove the plastic laminate, creating a space between the body part(s) and the glass that is large enough for the impaled part(s) to travel through.
Step 6: Pad any adjacent sharp edges.Step 7: Carefully move the parts part(s) back through the
windshield under the supervision of EMS personnel.

Section C • Chapter 8 – Victim Disentanglement and Extrication 329
8-20Displace a steering column.
CAUTION: Rescuers must take necessary precautions to protect themselves and victims from hazards including, but not limited to, glass fragments and dust, jagged metal, SRS gas cylinders, undeployed airbags, and fire hazards.
WARNING: Rescuers must ensure that the vehicle is properly stabilized and the scene is safe.
Step 1: Pierce the windshield above the steering column.
Step 2: Hook a rescue hook or wrap a chain around the steering column as close to the dash as possible.
Step 3: Place a bridge device across the windshield, extending from the firewall to the top of the roof.
Step 4: Place a lifting device on the bridge in line with the steering column and dash.
Step 5: Connect the hook or chain to the lifting device. Step 6: Lift the steering column and wheel enough to create
sufficient space for disentanglement.NOTE: A piece of webbing can also be wrapped around the
pedals to lift them at the same time.
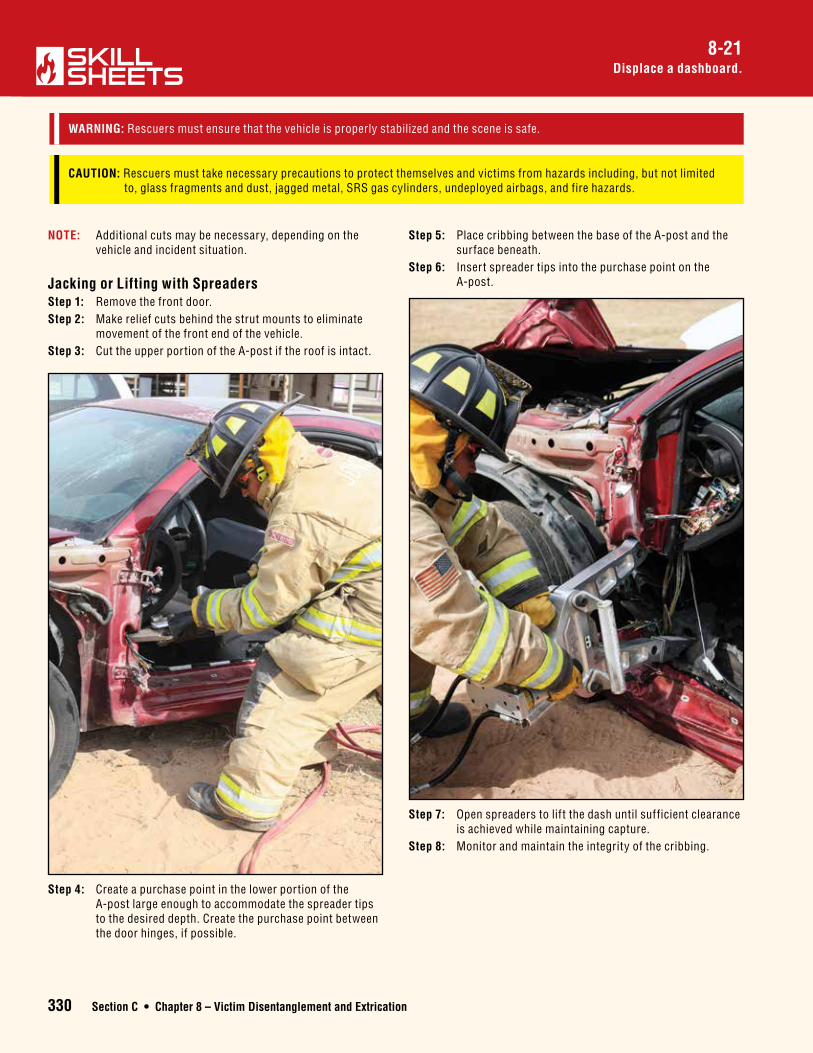
330 Section C • Chapter 8 – Victim Disentanglement and Extrication
Displace a dashboard.8-21
CAUTION: Rescuers must take necessary precautions to protect themselves and victims from hazards including, but not limited to, glass fragments and dust, jagged metal, SRS gas cylinders, undeployed airbags, and fire hazards.
WARNING: Rescuers must ensure that the vehicle is properly stabilized and the scene is safe.
NOTE: Additional cuts may be necessary, depending on the vehicle and incident situation.
Jacking or Lifting with Spreaders Step 1: Remove the front door.Step 2: Make relief cuts behind the strut mounts to eliminate
movement of the front end of the vehicle.Step 3: Cut the upper portion of the A-post if the roof is intact.
Step 4: Create a purchase point in the lower portion of the A-post large enough to accommodate the spreader tips to the desired depth. Create the purchase point between the door hinges, if possible.
Step 5: Place cribbing between the base of the A-post and the surface beneath.
Step 6: Insert spreader tips into the purchase point on the A-post.
Step 7: Open spreaders to lift the dash until sufficient clearance is achieved while maintaining capture.
Step 8: Monitor and maintain the integrity of the cribbing.
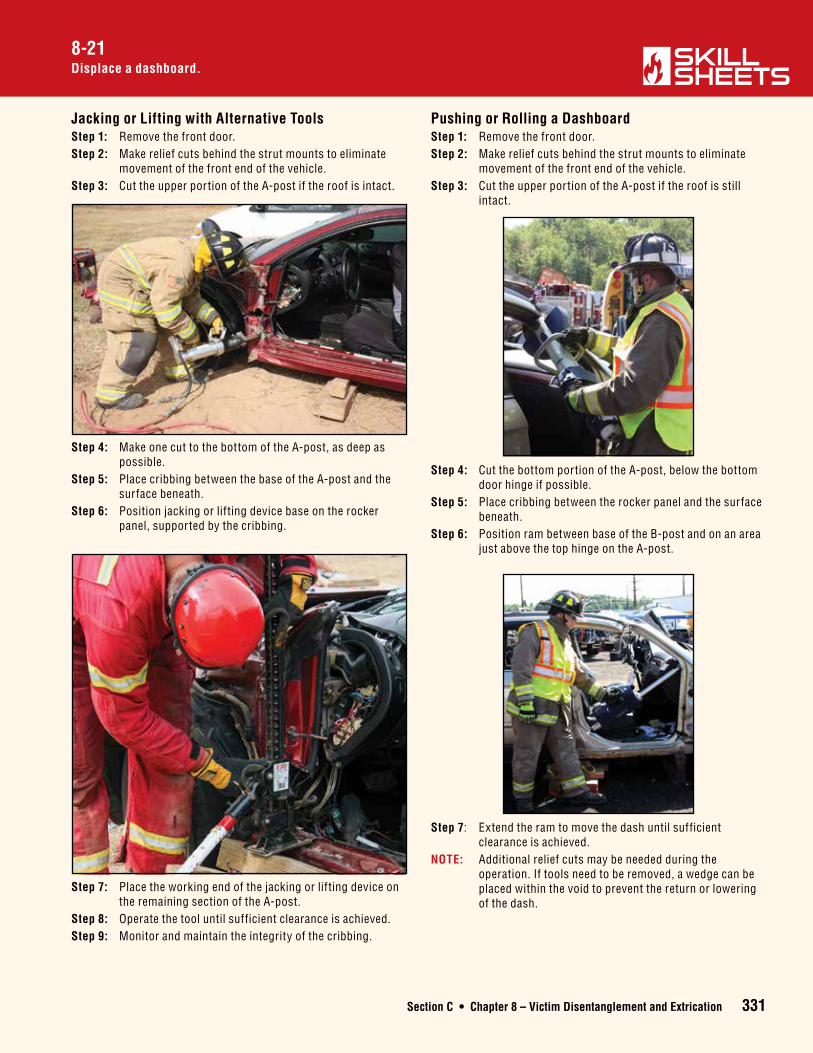
Section C • Chapter 8 – Victim Disentanglement and Extrication 331
8-21Displace a dashboard.
Jacking or Lifting with Alternative Tools Step 1: Remove the front door.Step 2: Make relief cuts behind the strut mounts to eliminate
movement of the front end of the vehicle.Step 3: Cut the upper portion of the A-post if the roof is intact.
Step 4: Make one cut to the bottom of the A-post, as deep as possible.
Step 5: Place cribbing between the base of the A-post and the surface beneath.
Step 6: Position jacking or lifting device base on the rocker panel, supported by the cribbing.
Pushing or Rolling a DashboardStep 1: Remove the front door.Step 2: Make relief cuts behind the strut mounts to eliminate
movement of the front end of the vehicle.Step 3: Cut the upper portion of the A-post if the roof is still
intact.
Step 4: Cut the bottom portion of the A-post, below the bottom door hinge if possible.
Step 5: Place cribbing between the rocker panel and the surface beneath.
Step 6: Position ram between base of the B-post and on an area just above the top hinge on the A-post.
Step 7: Place the working end of the jacking or lifting device on the remaining section of the A-post.
Step 8: Operate the tool until sufficient clearance is achieved.Step 9: Monitor and maintain the integrity of the cribbing.
Step 7: Extend the ram to move the dash until sufficient clearance is achieved.
NOTE: Additional relief cuts may be needed during the operation. If tools need to be removed, a wedge can be placed within the void to prevent the return or lowering of the dash.
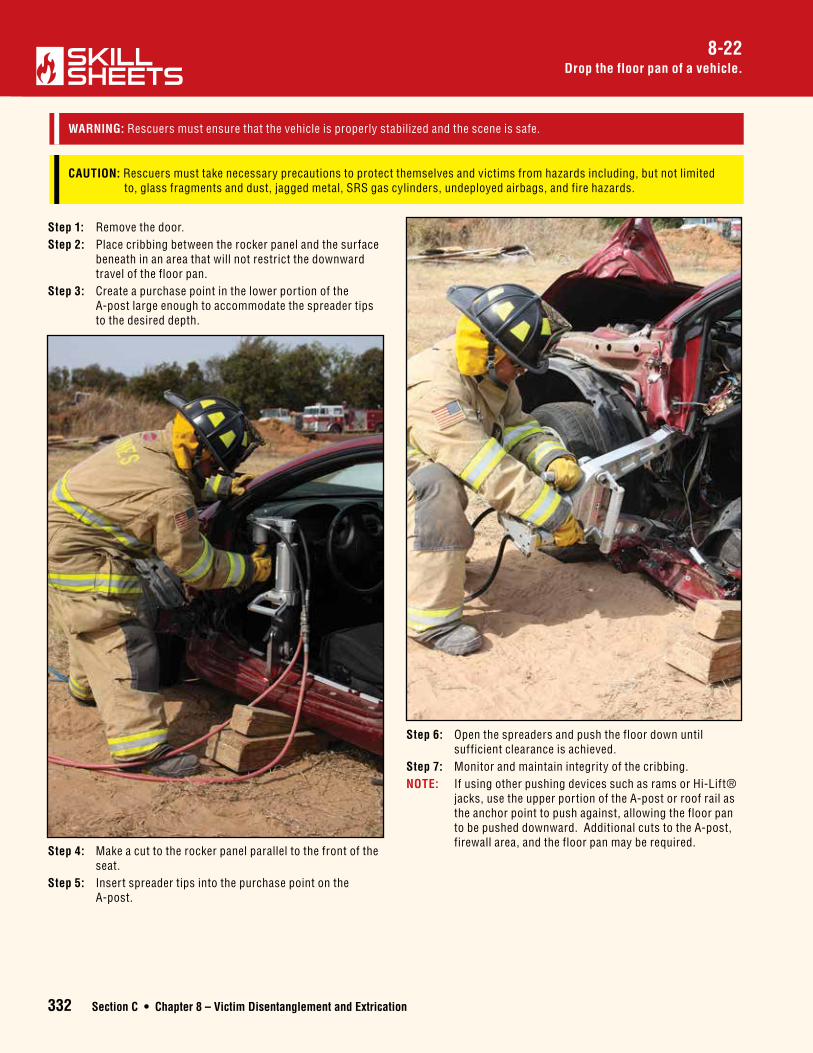
332 Section C • Chapter 8 – Victim Disentanglement and Extrication
Drop the floor pan of a vehicle.8-22
CAUTION: Rescuers must take necessary precautions to protect themselves and victims from hazards including, but not limited to, glass fragments and dust, jagged metal, SRS gas cylinders, undeployed airbags, and fire hazards.
WARNING: Rescuers must ensure that the vehicle is properly stabilized and the scene is safe.
Step 1: Remove the door. Step 2: Place cribbing between the rocker panel and the surface
beneath in an area that will not restrict the downward travel of the floor pan.
Step 3: Create a purchase point in the lower portion of the A-post large enough to accommodate the spreader tips to the desired depth.
Step 6: Open the spreaders and push the floor down until sufficient clearance is achieved.
Step 7: Monitor and maintain integrity of the cribbing.NOTE: If using other pushing devices such as rams or Hi-Lift®
jacks, use the upper portion of the A-post or roof rail as the anchor point to push against, allowing the floor pan to be pushed downward. Additional cuts to the A-post, firewall area, and the floor pan may be required.
Step 4: Make a cut to the rocker panel parallel to the front of the seat.
Step 5: Insert spreader tips into the purchase point on the A-post.
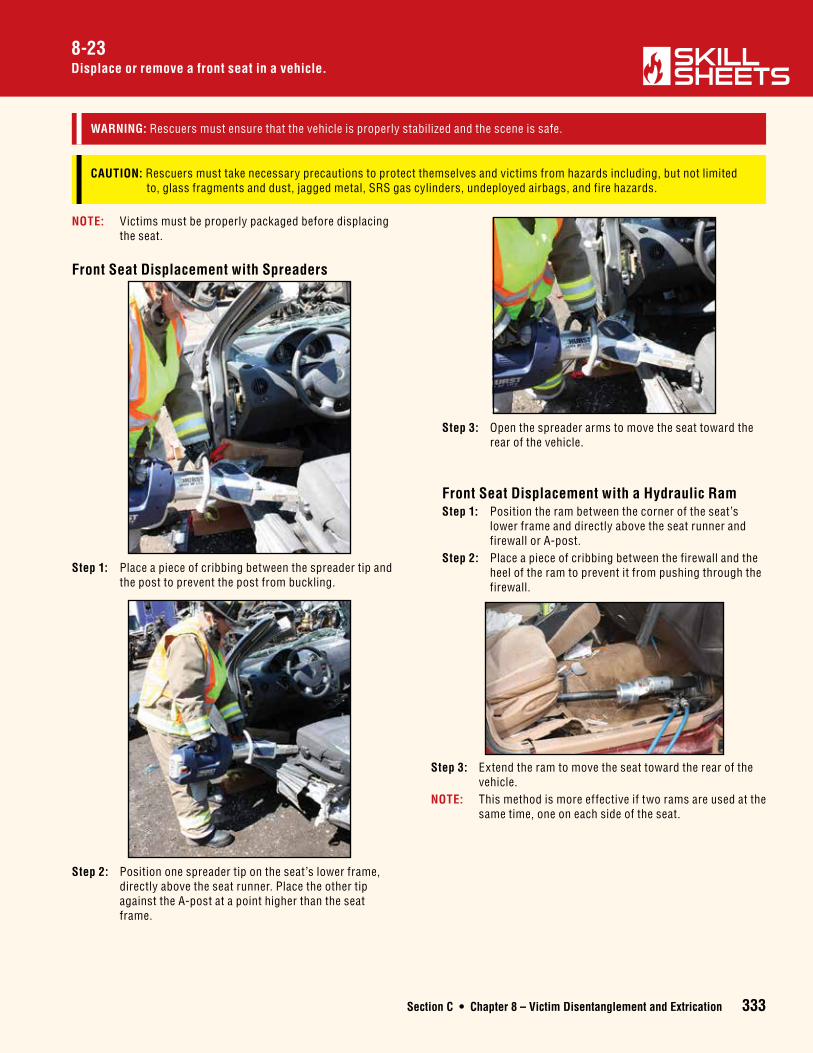
Section C • Chapter 8 – Victim Disentanglement and Extrication 333
8-23Displace or remove a front seat in a vehicle.
CAUTION: Rescuers must take necessary precautions to protect themselves and victims from hazards including, but not limited to, glass fragments and dust, jagged metal, SRS gas cylinders, undeployed airbags, and fire hazards.
WARNING: Rescuers must ensure that the vehicle is properly stabilized and the scene is safe.
NOTE: Victims must be properly packaged before displacing the seat.
Front Seat Displacement with Spreaders
Step 3: Open the spreader arms to move the seat toward the rear of the vehicle.
Front Seat Displacement with a Hydraulic RamStep 1: Position the ram between the corner of the seat’s
lower frame and directly above the seat runner and firewall or A-post.
Step 2: Place a piece of cribbing between the firewall and the heel of the ram to prevent it from pushing through the firewall.
Step 1: Place a piece of cribbing between the spreader tip and the post to prevent the post from buckling.
Step 2: Position one spreader tip on the seat’s lower frame, directly above the seat runner. Place the other tip against the A-post at a point higher than the seat frame.
Step 3: Extend the ram to move the seat toward the rear of the vehicle.
NOTE: This method is more effective if two rams are used at the same time, one on each side of the seat.
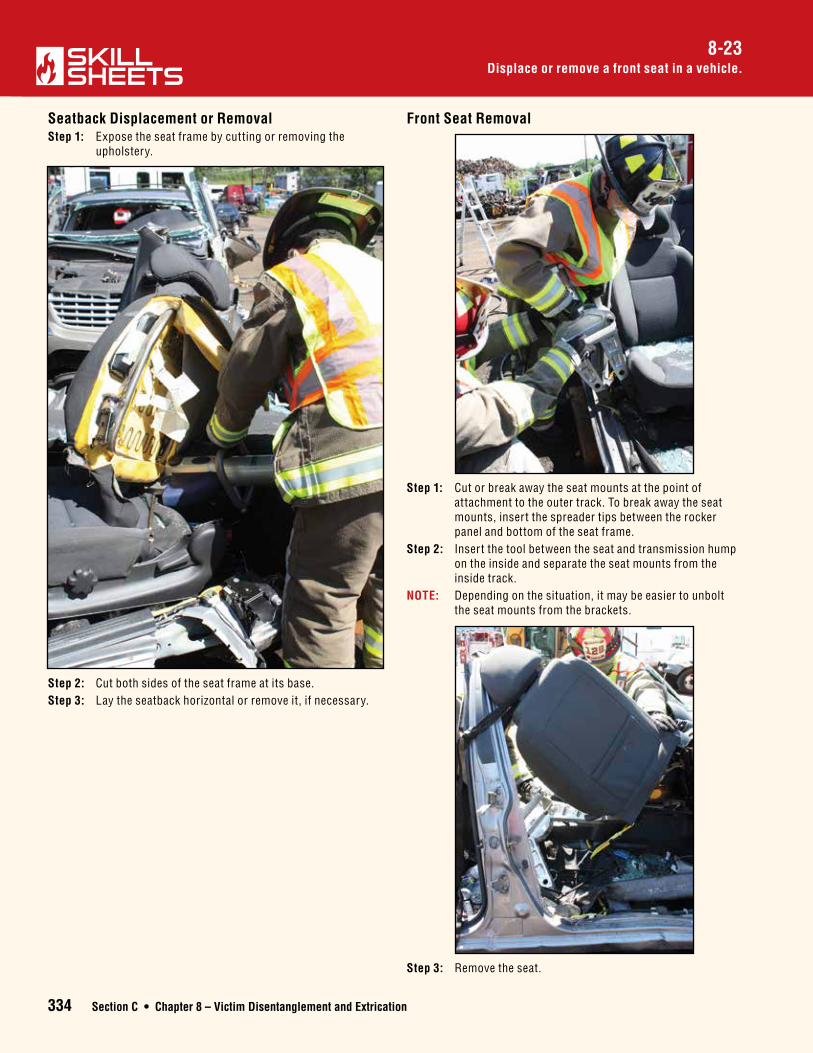
334 Section C • Chapter 8 – Victim Disentanglement and Extrication
Displace or remove a front seat in a vehicle.8-23
Seatback Displacement or RemovalStep 1: Expose the seat frame by cutting or removing the
upholstery.
Front Seat Removal
Step 2: Cut both sides of the seat frame at its base. Step 3: Lay the seatback horizontal or remove it, if necessary.
Step 1: Cut or break away the seat mounts at the point of attachment to the outer track. To break away the seat mounts, insert the spreader tips between the rocker panel and bottom of the seat frame.
Step 2: Insert the tool between the seat and transmission hump on the inside and separate the seat mounts from the inside track.
NOTE: Depending on the situation, it may be easier to unbolt the seat mounts from the brackets.
Step 3: Remove the seat.
Related Documents