User’s Guide Printer Controller

Welcome message from author
This document is posted to help you gain knowledge. Please leave a comment to let me know what you think about it! Share it to your friends and learn new things together.
Transcript

User’s Guide
Printer Controller

Contents
Contents
1 Welcome1.1 Product Overview..........................................................................1-1
1.2 Trademarks and Copyrights ........................................................1-2
2 Before Using the Controller2.1 Operating Environment ................................................................2-1
2.2 Accessories ...................................................................................2-1
2.3 Password for Administrator Mode ..............................................2-2
2.4 About This Manual ........................................................................2-2
3 Connecting to a Computer3.1 Using a Network Connection .......................................................3-1
3.2 Using a Parallel Connection.........................................................3-3
3.2.1 Specifying the Interface Settings ................................................3-4
4 Installing the Printer Driver4.1 When This Machine and the Computer are Connected
Using a Network Connection .......................................................4-2
4.1.1 Installing the Printer Driver Using the Add Printer Wizard..........4-2
4.2 When This Machine and the Computer are Connected Using a Parallel Connection.........................................................4-7
4.2.1 Installing the Printer Driver Using Plug and Play........................4-7
4.2.2 Installing the Printer Driver Using the Add Printer Wizard........4-11
4.3 Uninstalling the Printer Driver ...................................................4-15
5 Setting Up the Printer Driver5.1 Displaying the Printer Driver Setup Dialog Box.........................5-1
5.1.1 Displaying the Printer Driver Setup Dialog Box in Windows 98/Me ..........................................................................5-1
5.1.2 Displaying the Printer Driver Setup Dialog Box in Windows 2000/NT 4.0 ................................................................5-2
5.1.3 Displaying the Printer Driver Setup Dialog Box in Windows XP/Server 2003...........................................................5-2
C350 i
Contents
5.2 Common Controls ........................................................................ 5-3
5.3 Settings ......................................................................................... 5-5
5.3.1 Setup Tab .................................................................................. 5-5
5.3.2 Paper Tab .................................................................................. 5-5
5.3.3 Quality Tab................................................................................. 5-5
5.3.4 Device Option Setting Tab ......................................................... 5-6
5.3.5 Job Management Tab ................................................................ 5-6
5.4 Setting Device Options ................................................................ 5-7
5.5 Printing Multiple Pages on One Page......................................... 5-8
5.6 Printing Pages With Watermarks ................................................ 5-9
5.6.1 Editing the Watermark ............................................................. 5-10
5.6.2 Specifying Detailed Settings for the Watermark ...................... 5-11
5.7 Specifying Duplex/Booklet Printing.......................................... 5-13
5.8 Stapling Documents................................................................... 5-15
5.9 Hole Punching Documents........................................................ 5-16
5.10 Folding Documents .................................................................... 5-17
5.11 Adding a Cover and/or Interleaf When Printing....................... 5-18
5.12 Printing to Suit the Paper Size .................................................. 5-19
5.13 Items That Cannot Be Set Simultaneously .............................. 5-20
6 Network Printing in a Windows Environment6.1 Network Connection Methods That Can Be Selected in Each
Windows OS.................................................................................. 6-1
6.2 Setting the IP Address for This Machine.................................... 6-2
6.3 Accessing PageScope Web Connection.................................... 6-3
6.4 Windows Printing ......................................................................... 6-4
6.4.1 Operations on This Machine ...................................................... 6-4
6.4.2 Printer Driver Settings................................................................ 6-5
6.5 LPR Printing (Windows 2000/XP/NT 4.0/Server 2003)............... 6-6
6.5.1 Operations on This Machine ...................................................... 6-6
6.5.2 Printer Driver Settings................................................................ 6-6
6.6 IPP Printing (Windows 2000/XP/Server 2003) ............................ 6-8
6.6.1 Operations on This Machine ...................................................... 6-8
6.6.2 Installing the Printer Driver....................................................... 6-10
ii C350

Contents
6.7 Setting Up a Print Service in NetWare ......................................6-12
6.7.1 For Remote Printer Mode With NetWare 4.x Bindery Emulation..................................................................................6-12
6.7.2 For Print Server Mode With NetWare 4.x Bindery Emulation..................................................................................6-14
6.7.3 For NetWare 4.x Remote Printer Mode (NDS) .........................6-16
6.7.4 For NetWare 4.x/5.x/6 Print Server Mode (NDS) .....................6-18
6.7.5 For NetWare 5.x/6 Novell Distributed Print Services (NDPS) .....................................................................................6-20
6.7.6 Setting Up a Client (Windows) Settings When Using the NetWare Server........................................................................6-21
6.8 Checking Printer Driver Operation After Installation...............6-22
6.8.1 Test Printing From the Computer .............................................6-22
7 Specifying Printer Settings From the Control Panel7.1 “Printer Setting” Screen in Utility Mode .....................................7-1
7.1.1 “Default Setting” Screen .............................................................7-2
7.1.2 “Report Types” Screen ...............................................................7-7
7.2 “Printer Setting” Screen in Administrator Mode........................7-8
8 Using the Scan Functions8.1 Overview ........................................................................................8-1
8.1.1 Environment Required for the Scan Functions...........................8-2
8.1.2 Supported File Formats ..............................................................8-3
8.1.3 File Name ...................................................................................8-4
8.1.4 Scan to E-mail ............................................................................8-5
8.1.5 Scan to FTP Server ....................................................................8-6
8.1.6 Scan to PC .................................................................................8-7
8.1.7 Scan to HDD...............................................................................8-8
8.1.8 Scan to Internet FAX ..................................................................8-9
8.1.9 Internet FAX Reception ............................................................8-10
8.2 Basic Setup of the Scan Functions...........................................8-11
8.3 Settings for Scanning.................................................................8-13
8.3.1 Scan Mode Screen ...................................................................8-14
8.3.2 Address Screen ........................................................................8-15
8.3.3 Original Setting Screen.............................................................8-16
C350 iii
Contents
8.3.4 MISC. Screen........................................................................... 8-17
8.3.5 Registering the Scan Mode Default Settings ........................... 8-21
8.4 Checking the Transmission Settings ....................................... 8-22
8.5 URL Notification Using E-mail................................................... 8-23
8.6 Registering Destinations in Advance ....................................... 8-25
8.6.1 One-Touch Key Registration.................................................... 8-25
8.6.2 Temporary Registration ........................................................... 8-29
8.6.3 Registering Recipient E-Mail Addresses Using LDAP Search ........................................................................... 8-33
8.7 Performing Scan to E-Mail Operations..................................... 8-40
8.7.1 Flow of Scan Operation ........................................................... 8-40
8.7.2 Specifying Scan to E-mail Settings .......................................... 8-41
8.7.3 Setting the E-mail Subject and Text......................................... 8-44
8.7.4 Setting the Destination............................................................. 8-45
8.7.5 Error Notification ...................................................................... 8-45
8.8 Performing Scan to FTP Server Operations ............................ 8-46
8.8.1 Flow of Scan Operation ........................................................... 8-46
8.8.2 Registering FTP Servers.......................................................... 8-48
8.8.3 Setting the Proxy Server .......................................................... 8-51
8.8.4 Setting the Destination............................................................. 8-52
8.9 Performing Scan to PC Operations .......................................... 8-53
8.9.1 Flow of Scan Operation ........................................................... 8-53
8.9.2 Setting the FTP Application ..................................................... 8-54
8.9.3 Setting the Destination............................................................. 8-54
8.10 Performing Scan to HDD Operations........................................ 8-55
8.10.1 Flow of Scan Operation ........................................................... 8-55
8.10.2 Creating User Boxes................................................................ 8-57
8.10.3 Setting the Storage Period of the Scanned Data ..................... 8-59
8.10.4 Setting the Destination............................................................. 8-60
8.10.5 Retrieving the Scanned Data from the Hard Disk .................... 8-61
8.11 Performing Scan to Internet FAX Operations .......................... 8-64
8.11.1 Flow of Scan Operation ........................................................... 8-65
8.11.2 Setting the E-mail Transmission .............................................. 8-66
8.11.3 Setting the E-mail Subject and Text......................................... 8-69
iv C350
Contents
8.11.4 Setting the Destination .............................................................8-70
8.11.5 Error Notification.......................................................................8-71
8.12 Performing Internet FAX Reception Operations ......................8-72
8.12.1 Flow of Operation .....................................................................8-72
8.12.2 Setting the Internet FAX Reception ..........................................8-73
8.12.3 Set the Internet FAX Print.........................................................8-75
9 Scanning Images Using TWAIN (PC Scanning Function)9.1 Operating Environment ................................................................9-1
9.2 Installing the TWAIN Driver..........................................................9-1
9.3 Setting the Panel Lock Timeout for TWAIN................................9-2
9.4 Retrieving Images Using TWAIN .................................................9-3
9.4.1 Setting the Option Dialog Box ....................................................9-5
9.4.2 Searching the Scanner ...............................................................9-6
10 Using the Box Functions10.1 Overview ......................................................................................10-1
10.1.1 Environment Required for the Box Functions...........................10-2
10.2 Using the Box Functions............................................................10-3
10.3 Selecting the File to be Forwarded............................................10-4
10.4 Specifying the Forward Destination..........................................10-5
10.5 Specifying Settings on the MISC. Screen.................................10-6
10.6 Checking the Transmission Settings ........................................10-9
10.7 URL Notification Using E-mail .................................................10-10
10.8 Performing Forward to E-mail Operations..............................10-12
10.8.1 Flow of Forwarding Operation ................................................10-12
10.8.2 Error Notification.....................................................................10-13
10.9 Performing Forward to FTP Server Operations .....................10-14
10.9.1 Flow of Forwarding Operation ................................................10-14
10.10 Performing Forward to PC Operations ...................................10-16
10.10.1 Flow of Forwarding Operation ................................................10-16
C350 v
Contents
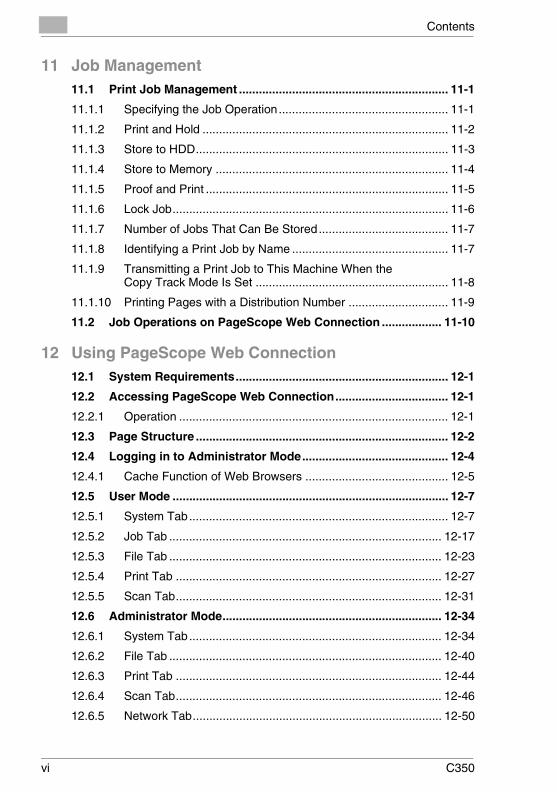
11 Job Management11.1 Print Job Management ............................................................... 11-1
11.1.1 Specifying the Job Operation................................................... 11-1
11.1.2 Print and Hold .......................................................................... 11-2
11.1.3 Store to HDD............................................................................ 11-3
11.1.4 Store to Memory ...................................................................... 11-4
11.1.5 Proof and Print ......................................................................... 11-5
11.1.6 Lock Job................................................................................... 11-6
11.1.7 Number of Jobs That Can Be Stored....................................... 11-7
11.1.8 Identifying a Print Job by Name ............................................... 11-7
11.1.9 Transmitting a Print Job to This Machine When the Copy Track Mode Is Set .......................................................... 11-8
11.1.10 Printing Pages with a Distribution Number .............................. 11-9
11.2 Job Operations on PageScope Web Connection .................. 11-10
12 Using PageScope Web Connection12.1 System Requirements................................................................ 12-1
12.2 Accessing PageScope Web Connection.................................. 12-1
12.2.1 Operation ................................................................................. 12-1
12.3 Page Structure ............................................................................ 12-2
12.4 Logging in to Administrator Mode............................................ 12-4
12.4.1 Cache Function of Web Browsers ........................................... 12-5
12.5 User Mode ................................................................................... 12-7
12.5.1 System Tab.............................................................................. 12-7
12.5.2 Job Tab .................................................................................. 12-17
12.5.3 File Tab .................................................................................. 12-23
12.5.4 Print Tab ................................................................................ 12-27
12.5.5 Scan Tab................................................................................ 12-31
12.6 Administrator Mode.................................................................. 12-34
12.6.1 System Tab............................................................................ 12-34
12.6.2 File Tab .................................................................................. 12-40
12.6.3 Print Tab ................................................................................ 12-44
12.6.4 Scan Tab................................................................................ 12-46
12.6.5 Network Tab........................................................................... 12-50
vi C350

Contents
13 Using the BOX Utility13.1 System Requirements ................................................................13-1
13.2 Supported File Formats..............................................................13-2
13.3 Installing the BOX Utility ............................................................13-2
13.4 Using the Box Functions............................................................13-3
13.5 Registering the Copier................................................................13-4
13.6 Connecting the Copier................................................................13-6
13.7 Main Window ...............................................................................13-7
13.7.1 Changing the Display Mode .....................................................13-7
13.7.2 Common Operations in the Main Window ................................13-9
13.8 Image Display Window .............................................................13-13
13.9 Backing Up and Restoring Image Data ...................................13-16
13.9.1 Backing Up Image Data..........................................................13-16
13.9.2 Restoring Image Data.............................................................13-17
13.10 Creating Compact PDFs...........................................................13-19
13.11 If an Error Is Displayed.............................................................13-20
14 Troubleshooting14.1 Unable To Print............................................................................14-1
14.2 Unable To Specify Desired Settings or Unable To Print as Specified ......................................................................................14-2
15 Specifications
16 Index
C350 vii

Contents
viii C350
Welcome 1
1 Welcome
This manual describes the printing and scanning functions and operations of the printer controller for the Konica Minolta digital color copier C350.
1.1 Product OverviewThe printer controller is a device used for adding printing, network printing, scanning and box functions to the C350 copier.
Available printer controller functions
� Printing from a computer (using the PCL5c printer driver)
� Support of network protocols including TCP/IP, NetBEUI, and IPX/SPX
� Direct printing over the network using Windows, LPR, or IPP printing
� Transfer and notification over the network of image data scanned with this machine
� Fax operations using the Internet (Internet fax transmission/reception)
� Forwarding image data stored in the hard disk of this machine
� Specify settings for this machine and the printer controller from a client computer over the network (using a Web browser)
� Capture images using software installed on a computer (using the TWAIN driver)
C350 1-1

1 Welcome
1.2 Trademarks and CopyrightsTrademarks
� KONICA MINOLTA, the KONICA MINOLTA logo, and PageScope are trademarks of KONICA MINOLTA HOLDINGS, INC.
� Ethernet is a registered trademark of Xerox Corporation.
� Microsoft, Windows and Windows NT are either registered trademarks or trademarks of Microsoft Corporation in the United States and/or other countries.
� Novell and NetWare are registered trademarks of Novell, Inc.
� PCL is a registered trademark of Hewlett-Packard Company Limited.
� Netscape Communications, the Netscape Communications logo, Netscape Navigator, Netscape Communicator, and Netscape are trademarks of Netscape Communications Corporation.
� All other product and brand names are trademarks or registered trademarks of their respective companies or organizations.
BOX Utility:
� This software is based in part on the work of the Independent JPEG Group.
Compact-VJECopyright 1986-2003 VACS Corp.
Copyright © 2004 KONICA MINOLTA BUSINESS TECHNOLOGIES, INC.
Please note that the display screens used in this manual may differ from the actual screens that appear on your computer display. Also, specifications and other information contained in this manual are subject to change without notice.
1-2 C350
Before Using the Controller 2
2 Before Using the Controller
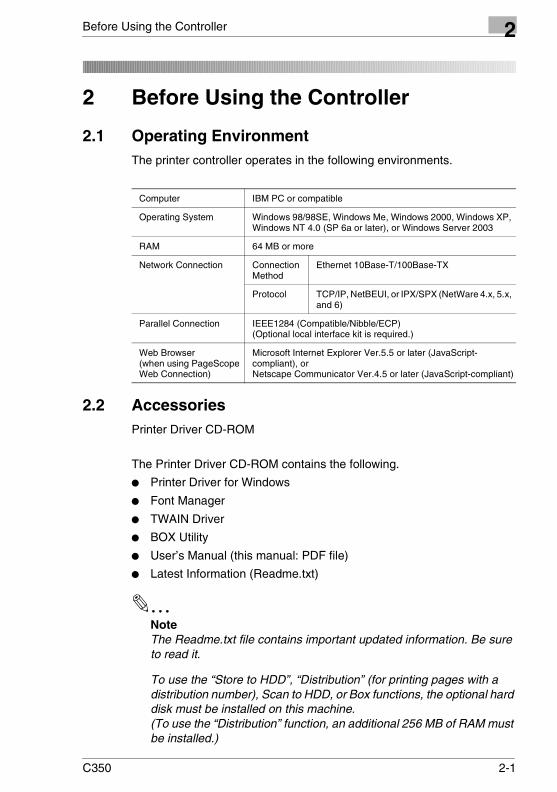
2.1 Operating EnvironmentThe printer controller operates in the following environments.
2.2 AccessoriesPrinter Driver CD-ROM
The Printer Driver CD-ROM contains the following.
� Printer Driver for Windows
� Font Manager
� TWAIN Driver
� BOX Utility
� User’s Manual (this manual: PDF file)
� Latest Information (Readme.txt)
✎NoteThe Readme.txt file contains important updated information. Be sure to read it.
To use the “Store to HDD”, “Distribution” (for printing pages with a distribution number), Scan to HDD, or Box functions, the optional hard disk must be installed on this machine.(To use the “Distribution” function, an additional 256 MB of RAM must be installed.)
Computer IBM PC or compatible
Operating System Windows 98/98SE, Windows Me, Windows 2000, Windows XP, Windows NT 4.0 (SP 6a or later), or Windows Server 2003
RAM 64 MB or more
Network Connection Connection Method
Ethernet 10Base-T/100Base-TX
Protocol TCP/IP, NetBEUI, or IPX/SPX (NetWare 4.x, 5.x, and 6)
Parallel Connection IEEE1284 (Compatible/Nibble/ECP)(Optional local interface kit is required.)
Web Browser(when using PageScope Web Connection)
Microsoft Internet Explorer Ver.5.5 or later (JavaScript-compliant), or Netscape Communicator Ver.4.5 or later (JavaScript-compliant)
C350 2-1

2 Before Using the Controller
2.3 Password for Administrator ModeA password (administrator access code) is required to enter the Administrator mode described in this manual.
Ask the administrator of this machine for the password.
2.4 About This ManualThis manual is divided into chapters that describe how to connect the device to a computer, printing functions, network printing functions, scanning functions, box functions, job management functions, how to specify machine settings from the computer, and other operations.
Depending on the operation that you want to perform, refer to the corresponding page listed below.
Operation Refer to
Using this machine from a computer(printing functions, scanning functions, and machine setting from a computer)
“3 Connecting to a Computer”
Using this machine as a printer “4 Installing the Printer Driver”“5 Setting Up the Printer Driver”
Connecting this machine to a network and performing network printing
“6 Network Printing in a Windows Environment”
Specifying printer settings with this machine “7 Specifying Printer Settings From the Control Panel”
Using this machine as a scanner (scanning functions)
“8 Using the Scan Functions”
Capturing images using software installed on a computer (PC scanning functions)
“9 Scanning Images Using TWAIN (PC Scanning Function)”
Forwarding the image data stored in the hard disk of this machine (Box functions)
“10 Using the Box Functions”
Managing print and scan jobs “11 Job Management”
Specifying machine settings from the computer
“12 Using PageScope Web Connection”
Using the BOX Utility “13 Using the BOX Utility”
When problems occur “14 Troubleshooting”
2-2 C350
Connecting to a Computer 3
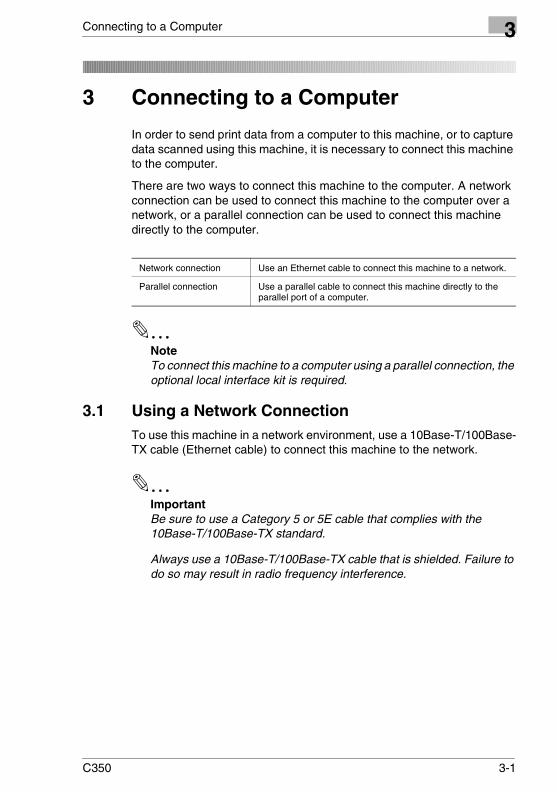
3 Connecting to a Computer
In order to send print data from a computer to this machine, or to capture data scanned using this machine, it is necessary to connect this machine to the computer.
There are two ways to connect this machine to the computer. A network connection can be used to connect this machine to the computer over a network, or a parallel connection can be used to connect this machine directly to the computer.
✎NoteTo connect this machine to a computer using a parallel connection, the optional local interface kit is required.
3.1 Using a Network ConnectionTo use this machine in a network environment, use a 10Base-T/100Base-TX cable (Ethernet cable) to connect this machine to the network.
✎ImportantBe sure to use a Category 5 or 5E cable that complies with the 10Base-T/100Base-TX standard.
Always use a 10Base-T/100Base-TX cable that is shielded. Failure to do so may result in radio frequency interference.
Network connection Use an Ethernet cable to connect this machine to a network.
Parallel connection Use a parallel cable to connect this machine directly to the parallel port of a computer.
C350 3-1
3 Connecting to a Computer
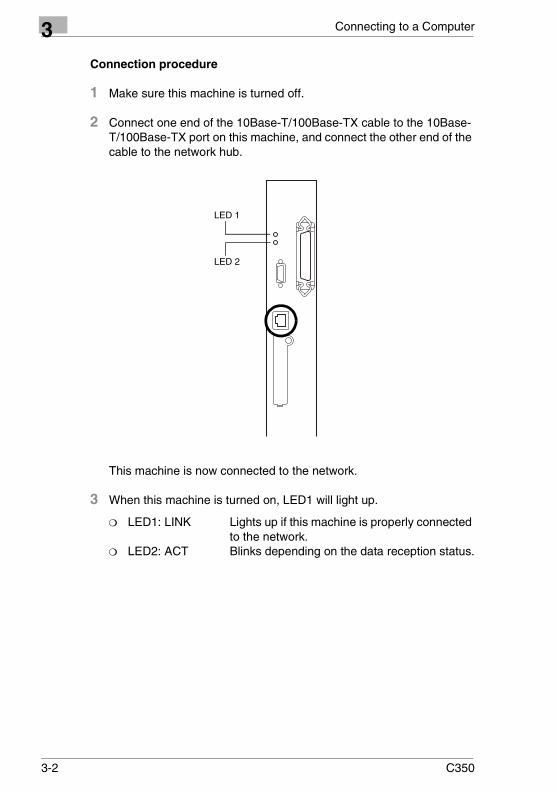
Connection procedure
1 Make sure this machine is turned off.
2 Connect one end of the 10Base-T/100Base-TX cable to the 10Base-T/100Base-TX port on this machine, and connect the other end of the cable to the network hub.
This machine is now connected to the network.
3 When this machine is turned on, LED1 will light up.
❍ LED1: LINK Lights up if this machine is properly connected to the network.
❍ LED2: ACT Blinks depending on the data reception status.
LED 1
LED 2
3-2 C350
Connecting to a Computer 3
3.2 Using a Parallel ConnectionUse a parallel cable (IEEE 1284, Centronics) to connect the parallel port on this machine to the parallel port on the computer.
The parallel port on this machine supports IEEE 1284 Type B.
✎NoteTo connect this machine to the computer using a parallel connection, the optional local interface kit is required.
Always use a parallel cable that is shielded. Failure to do so may result in radio frequency interference.
✎MemoTo install the printer driver using Plug and Play, use the parallel cable to connect this machine to the computer when you install the printer driver (refer to “Installing the Printer Driver Using Plug and Play” on page 4-7).
Connection procedure
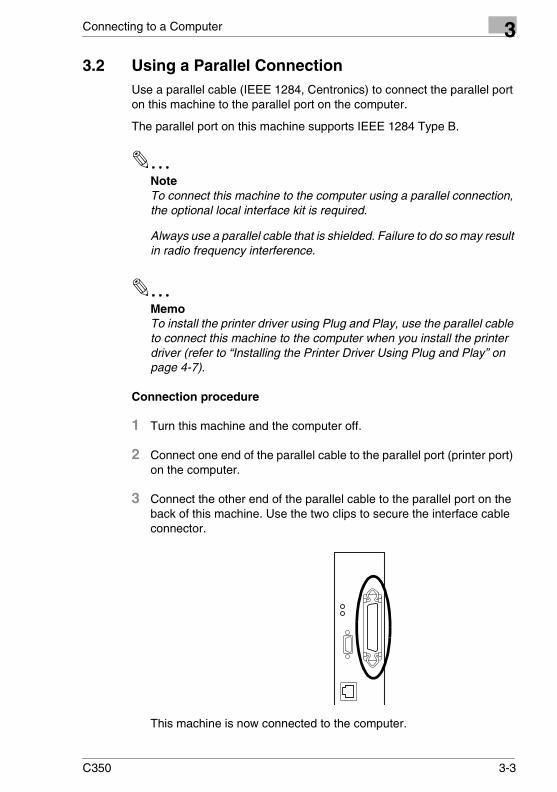
1 Turn this machine and the computer off.
2 Connect one end of the parallel cable to the parallel port (printer port) on the computer.
3 Connect the other end of the parallel cable to the parallel port on the back of this machine. Use the two clips to secure the interface cable connector.
This machine is now connected to the computer.
C350 3-3

3 Connecting to a Computer
3.2.1 Specifying the Interface SettingsIf necessary, specify the parallel interface settings from this machine’s control panel.
Parallel interface setting
1 Press the [Utility] key on this machine’s control panel, touch [Admin. Mode], and then enter the administrator access code.
2 Touch [Printer Setting], then [Common Setting].
3 Specify settings for the following.
❍ I/O Timeout: Set the communication timeout. (10 to 300 seconds)
❍ Parallel Interface: Set the mode to be used with the parallel interface. (“Compatible”, “Nibble”, or “ECP”)
3-4 C350
Installing the Printer Driver 4
4 Installing the Printer Driver
This chapter describes how to install the printer driver from the supplied CD-ROM.
The installation procedure differs depending on how this machine is connected to the computer. If this machine is connected to the computer using a parallel connection, the printer driver can be installed using Plug and Play or the Add Printer Wizard.
The installation method also differs depending on the version of Windows that you are using. Refer to the table below for the appropriate procedure for installing the printer driver on your computer.
✎NoteTo connect this machine to a computer using a parallel connection, the optional local interface kit is required.
Connection method Refer to
Network connection “When This Machine and the Computer are Connected Using a Network Connection” on page 4-2“For Windows 98/Me/2000/NT 4.0” on page 4-2“For Windows XP/Server 2003” on page 4-4
Parallel connection “Installing the Printer Driver Using Plug and Play” on page 4-7“For Windows 98” on page 4-7“For Windows Me” on page 4-8“For Windows 2000” on page 4-9“For Windows XP/Server 2003” on page 4-10
“Installing the Printer Driver Using the Add Printer Wizard” on page 4-11“For Windows 98/Me/2000/NT 4.0” on page 4-11“For Windows XP/Server 2003” on page 4-13
C350 4-1
4 Installing the Printer Driver
4.1 When This Machine and the Computer are Connected Using a Network Connection
4.1.1 Installing the Printer Driver Using the Add Printer Wizard
✎NoteIn order to perform IPP printing operations, the printer driver must be installed so that IPP printing can be set up when the printer driver is installed. For further details on IPP printing, refer to “IPP Printing (Windows 2000/XP/Server 2003)” on page 6-8.
For Windows 98/Me/2000/NT 4.0
1 While Windows is running, load the CD-ROM into the computer’s CD-ROM drive.
2 In Windows, click the [Start] button, point to “Settings”, and then click “Printers”.
3 Double-click the “Add Printer” icon.
The Add Printer Wizard starts up.
4 Follow the on-screen instructions.
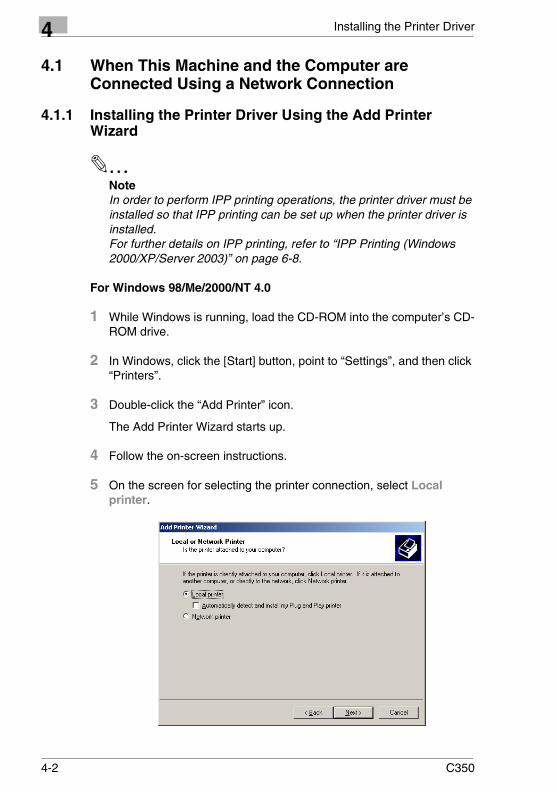
5 On the screen for selecting the printer connection, select Local printer.
4-2 C350

Installing the Printer Driver 4
✎NoteFor details on installing the printer driver in a network environment, refer to “6 Network Printing in a Windows Environment”. Because it is necessary to specify other network settings in advance when installing the printer driver using a network connection, install it using a local connection at this time.
6 Click the [Next] button.
7 Click the [Have Disk] button.
8 Click the [Browse] button.
9 Depending on the version of Windows that you are using, specify the directory on the CD-ROM that contains the printer driver, and then click the [OK] button.
❍ For Windows 98: (CD-ROM)\Driver\English\Printer\Win9xME❍ For Windows Me: (CD-ROM)\Driver\English\Printer\Win9xME❍ For Windows 2000: (CD-ROM)\Driver\English\Printer\Win2KXP❍ For Windows NT 4.0: (CD-ROM)\Driver\English\Printer\WinNT40
10 Click the [OK] button.
The Printers list appears.
11 Click the [Next] button.
12 Specify the connection port. Select LPT1 here.
C350 4-3
4 Installing the Printer Driver
13 Follow the on-screen instructions to perform the installation.
✎NoteDo not perform a test print at this point.Perform the test print after the network settings have been specified.
14 When installation is complete, make sure that the icon of the installed printer appears in the “Printers” window.
15 Remove the CD-ROM from the CD-ROM drive.
This completes the printer driver installation.
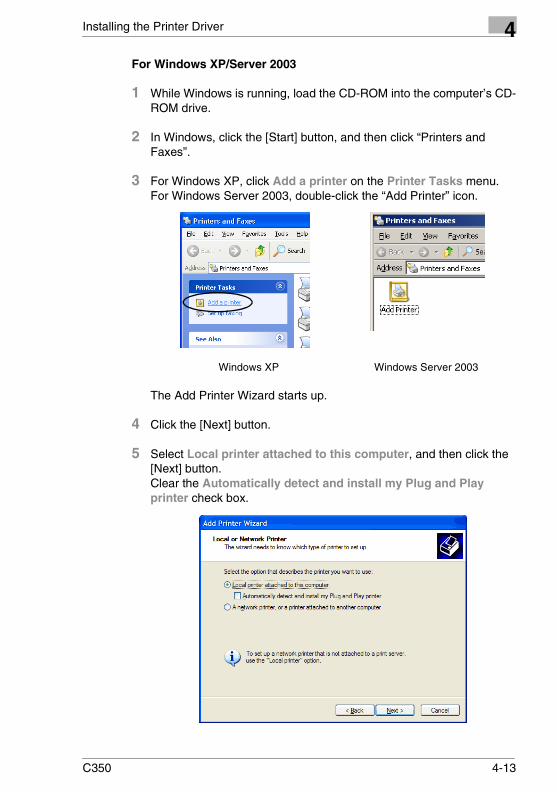
For Windows XP/Server 2003
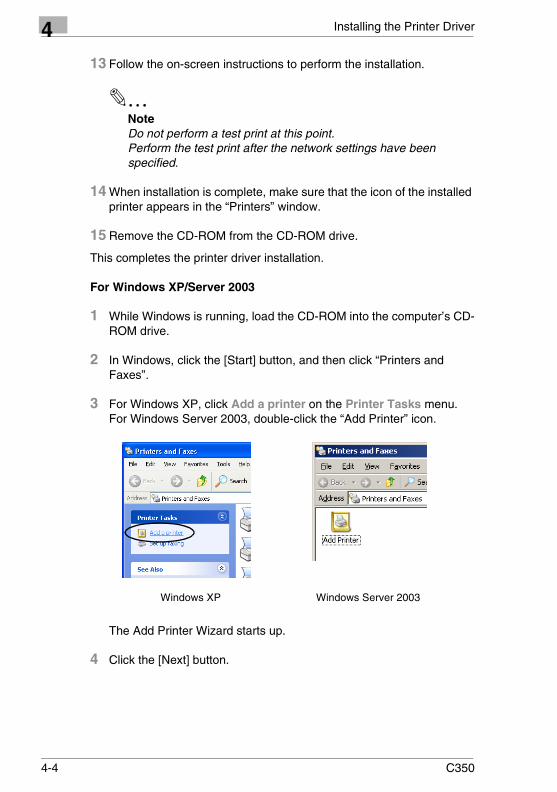
1 While Windows is running, load the CD-ROM into the computer’s CD-ROM drive.
2 In Windows, click the [Start] button, and then click “Printers and Faxes”.
3 For Windows XP, click Add a printer on the Printer Tasks menu.For Windows Server 2003, double-click the “Add Printer” icon.
The Add Printer Wizard starts up.
4 Click the [Next] button.
Windows XP Windows Server 2003
4-4 C350
Installing the Printer Driver 4
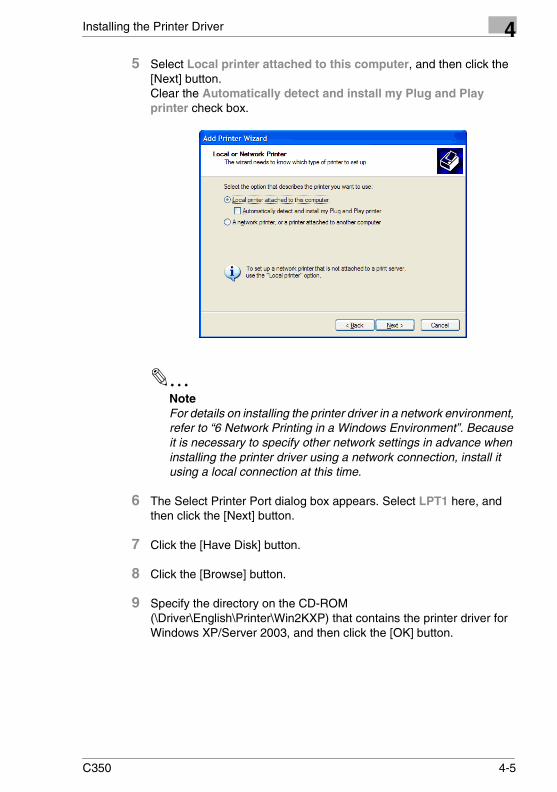
5 Select Local printer attached to this computer, and then click the[Next] button.Clear the Automatically detect and install my Plug and Play printer check box.
✎NoteFor details on installing the printer driver in a network environment, refer to “6 Network Printing in a Windows Environment”. Because it is necessary to specify other network settings in advance when installing the printer driver using a network connection, install it using a local connection at this time.
6 The Select Printer Port dialog box appears. Select LPT1 here, and then click the [Next] button.
7 Click the [Have Disk] button.
8 Click the [Browse] button.
9 Specify the directory on the CD-ROM (\Driver\English\Printer\Win2KXP) that contains the printer driver for Windows XP/Server 2003, and then click the [OK] button.
C350 4-5

4 Installing the Printer Driver
10 Click the [OK] button.
The Printers list appears.
11 Click the [Next] button.
12 Follow the on-screen instructions to start the installation.
✎NotePerform a test print after the network settings have been specified.
13 When installation is complete, make sure that the icon of the installed printer appears in the “Printers and Faxes” window.
14 Remove the CD-ROM from the CD-ROM drive.
This completes the printer driver installation.
4-6 C350

Installing the Printer Driver 4
4.2 When This Machine and the Computer are Connected Using a Parallel Connection
✎NoteTo connect this machine to a computer using a parallel connection, the optional local interface kit is required.
4.2.1 Installing the Printer Driver Using Plug and PlayFor Windows NT 4.0, Plug and Play cannot be used to install the printer driver. Refer to the procedure for installing the printer driver using the Add Printer Wizard. If you are using Windows NT 4.0, exit the Add Printer Wizard started by Plug and Play, click the “Add Printer” icon, and then install the printer driver (refer to “Installing the Printer Driver Using the Add Printer Wizard” on page 4-11).
For Windows 98
1 After using a parallel cable to connect this machine to the computer, turn on the computer.
✎NoteDo not disconnect and connect the cable while the computer is starting up.
2 Insert the CD-ROM into the computer’s CD-ROM drive.
3 Turn this machine on.
The Add New Hardware Wizard dialog box appears.
4 Click the [Next] button.
5 Select Search for the best driver for your device (Recommended), and then click the [Next] button.
6 Select Specify a location, and then click the [Browse] button.
7 Specify the directory on the CD-ROM (\Driver\English\Printer\Win9xME) that contains the printer driver for Windows 98, and then click the [OK] button.
C350 4-7

4 Installing the Printer Driver
8 Click the [Next] button, and then proceed according to the on-screen instructions.
9 The Add New Hardware Wizard dialog box appears again. Repeat steps 4 through 8.
10 When installation is complete, make sure that the icon of the installed printer appears in the “Printers” window.
11 Remove the CD-ROM from the CD-ROM drive.
This completes the printer driver installation.
For Windows Me
1 After using a parallel cable to connect this machine to the computer, turn on the computer.
✎NoteDo not disconnect and connect the cable while the computer is starting up.
2 Insert the CD-ROM into the computer’s CD-ROM drive.
3 Turn this machine on.
The Add New Hardware Wizard dialog box appears.
4 Select Automatic search for a better driver (Recommended), and then click the [Next] button.
5 Select Specify a Location, and then click the [Browse] button.
6 Specify the directory on the CD-ROM (\Driver\English\Printer\Win9xME) that contains the printer driver for Windows Me, and then click the [OK] button.
7 Click the [Next] button, and then proceed according to the on-screen instructions until the [Finish] button is displayed.
8 Click the [Finish] button.
9 When installation is complete, make sure that the icon of the installed printer appears in the “Printers” window.
4-8 C350
Installing the Printer Driver 4
10 Remove the CD-ROM from the CD-ROM drive.This completes the printer driver installation.
For Windows 2000
1 After using a parallel cable to connect this machine to the computer, turn on the computer.
✎NoteDo not disconnect and connect the cable while the computer is starting up.
2 Insert the CD-ROM into the computer’s CD-ROM drive.
3 Turn this machine on.
The Found New Hardware Wizard dialog box appears.
4 In the Install Hardware Device Drivers dialog box, select Search for a suitable driver for my device (recommended), and then click the [Next] button.
The Locate Driver Files dialog box appears.
5 Select Specify a location, and then click the [Next] button.
6 Specify the directory on the CD-ROM (\Driver\English\Printer\Win2KXP) that contains the printer driver for Windows 2000, and then click the [OK] button.
7 Click the [OK] button, and then proceed according to the on-screen instructions until the Completing the Found New Hardware Wizard dialog box is displayed.
8 Click the [Finish] button.
9 When installation is complete, make sure that the icon of the installed printer appears in the “Printers” window.
10 Remove the CD-ROM from the CD-ROM drive.
This completes the printer driver installation.
C350 4-9

4 Installing the Printer Driver
For Windows XP/Server 2003
1 After using a parallel cable to connect this machine to the computer, turn on the computer.
✎NoteDo not disconnect and connect the cable while the computer is starting up.
2 Insert the CD-ROM into the computer’s CD-ROM drive.
3 Turn this machine on.
The Found New Hardware Wizard dialog box appears.
4 Select Install from a list or specific location (Advanced), and then click the [Next] button.
5 Under Search for the best driver in these locations, select Include this location in the search, and then click the [Browse] button.
6 Specify the directory on the CD-ROM (\Driver\English\Printer\Win2KXP) that contains the printer driver for Windows XP/Server 2003, and then click the [OK] button.
7 Click the [Next] button. The Completing the Found New Hardware Wizard dialog box appears.
8 Click the [Finish] button.
9 When installation is complete, make sure that the icon of the printer installed printer appears in the “Printers and Faxes” window.
10 Remove the CD-ROM from the CD-ROM drive.
This completes the printer driver installation.
4-10 C350

Installing the Printer Driver 4
4.2.2 Installing the Printer Driver Using the Add Printer Wizard
For Windows 98/Me/2000/NT 4.0
1 While Windows is running, load the CD-ROM into the computer’s CD-ROM drive.
2 In Windows, click the [Start] button, point to “Settings”, and then click “Printers”.
The “Printers” window appears.
3 Double-click the “Add Printer” icon.
The Add Printer Wizard starts up.
4 Proced according to the on-screen instructions.
5 In the screen for selecting the printer connection, select Local printer.
6 Click the [Next] button.
7 Click the [Have Disk] button.
8 Click the [Browse] button.
C350 4-11
4 Installing the Printer Driver
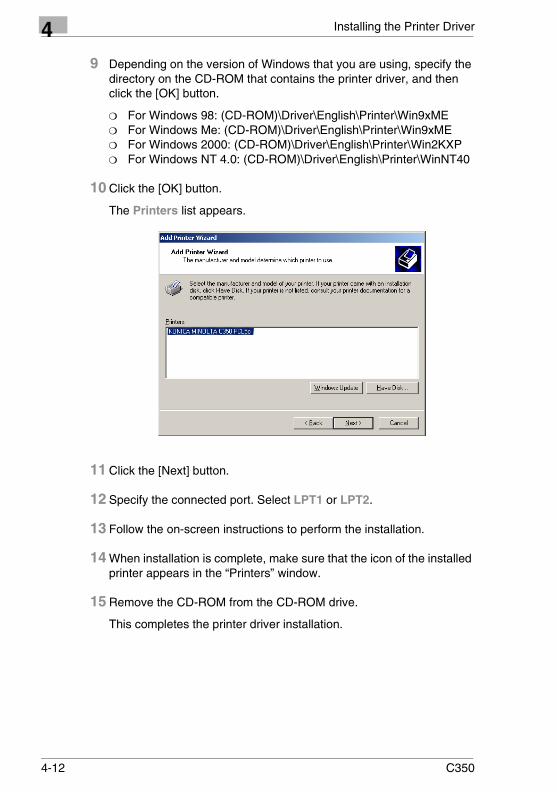
9 Depending on the version of Windows that you are using, specify the directory on the CD-ROM that contains the printer driver, and then click the [OK] button.
❍ For Windows 98: (CD-ROM)\Driver\English\Printer\Win9xME❍ For Windows Me: (CD-ROM)\Driver\English\Printer\Win9xME❍ For Windows 2000: (CD-ROM)\Driver\English\Printer\Win2KXP❍ For Windows NT 4.0: (CD-ROM)\Driver\English\Printer\WinNT40
10 Click the [OK] button.
The Printers list appears.
11 Click the [Next] button.
12 Specify the connected port. Select LPT1 or LPT2.
13 Follow the on-screen instructions to perform the installation.
14 When installation is complete, make sure that the icon of the installed printer appears in the “Printers” window.
15 Remove the CD-ROM from the CD-ROM drive.
This completes the printer driver installation.
4-12 C350
Installing the Printer Driver 4
For Windows XP/Server 20031 While Windows is running, load the CD-ROM into the computer’s CD-ROM drive.
2 In Windows, click the [Start] button, and then click “Printers and Faxes”.
3 For Windows XP, click Add a printer on the Printer Tasks menu.For Windows Server 2003, double-click the “Add Printer” icon.
The Add Printer Wizard starts up.
4 Click the [Next] button.
5 Select Local printer attached to this computer, and then click the [Next] button.Clear the Automatically detect and install my Plug and Play printer check box.
Windows XP Windows Server 2003
C350 4-13

4 Installing the Printer Driver
6 The Select Printer Port dialog box appears. Select the connected port, and then click the [Next] button.
7 Click the [Have Disk] button.
8 Click the [Browse] button.
9 Specify the directory on the CD-ROM (\Driver\English\Printer\Win2KXP) that contains the printer driver for Windows XP/Server 2003, and then click the [OK] button.
10 Click the [OK] button.
11 Click the [Next] button.
12 Follow the on-screen instructions to perform the installation.
13 When installation is complete, make sure that the icon of the installed printer appears in the “Printers and Faxes” window.
14 Remove the CD-ROM from the CD-ROM drive.
This completes the printer driver installation.
4-14 C350
Installing the Printer Driver 4
4.3 Uninstalling the Printer DriverIf it becomes necessary to delete the printer driver, for example, when you want to reinstall the printer driver, follow the procedure below to delete the driver.
Uninstalling the printer driver
1 For Windows 98/Me/2000/NT, click the [Start] button, point to “Settings”, and then click “Printers”.For Windows XP/Server 2003, click the [Start] button, and then click “Printers and Faxes”.
2 In the “Printers” (for Windows XP/Server 2003, “Printers and Faxes”) window, select the icon of the printer that you want to delete.
3 Press the [Delete] key on the computer keyboard to delete the printer driver.
4 Follow the on-screen instructions to perform the uninstallation.
When the printer driver has been deleted, the printer icon will disappear from the “Printers” (for Windows XP/Server 2003, “Printers and Faxes”) window.
This completes the uninstallation procedure.
C350 4-15

4 Installing the Printer Driver
4-16 C350

Setting Up the Printer Driver 5
5 Setting Up the Printer Driver
The printer driver setup dialog box can be displayed from the “Printers” (for Windows XP/Server 2003, “Printers and Faxes”) window of the Windows. Settings specified in the printer driver setup dialog box displayed using the procedure described below will be applied when printing from any application.
✎MemoTo specify custom settings, click “Print” in the menu of the application, and then click the [Properties] button next to the printer name in the Print dialog box. Settings specified here apply only to the current file.
5.1 Displaying the Printer Driver Setup Dialog Box
5.1.1 Displaying the Printer Driver Setup Dialog Box in Windows 98/Me
Display procedure
1 In Windows, click the [Start] button, point to “Settings”, and then click “Printers”.
2 Select the “KONICA MINOLTA C350 PCL5c” icon.
3 On the “File” menu, click “Properties”.
The printer driver setup dialog box shown below appears.
C350 5-1
5 Setting Up the Printer Driver
✎NoteUse the settings on the 5 tabs at the top of the dialog box to set up the printer driver.
5.1.2 Displaying the Printer Driver Setup Dialog Box in Windows 2000/NT 4.0
Display procedure
1 In Windows, click the [Start] button, point to “Settings”, and then click “Printers”.
2 Select the “KONICA MINOLTA C350 PCL5c” icon.
3 To display the “Device Option Setting” tab, click “Properties” on the “File” menu.
4 To display the “Setup”, “Paper”, “Quality”, or “Job Management” tab, perform the following procedures after selecting the icon in step 2.
❍ For Windows 2000: On the “File” menu, click “Printing Preferences”.
❍ For Windows NT 4.0: On the “File” menu, click “Document Defaults”.
5.1.3 Displaying the Printer Driver Setup Dialog Box in Windows XP/Server 2003
Display procedure
1 In Windows, click the [Start] button, and then click “Printers and Faxes”.
2 Select the “KONICA MINOLTA C350 PCL5c” icon.
3 To display the “Device Option Setting” tab, click “Properties” on the “File” menu.
4 To display the “Setup”, “Paper”, “Quality”, or “Job Management” tab, click “Printing Preferences” on the “File” menu after selecting the icon in step 2.
5-2 C350
Setting Up the Printer Driver 5
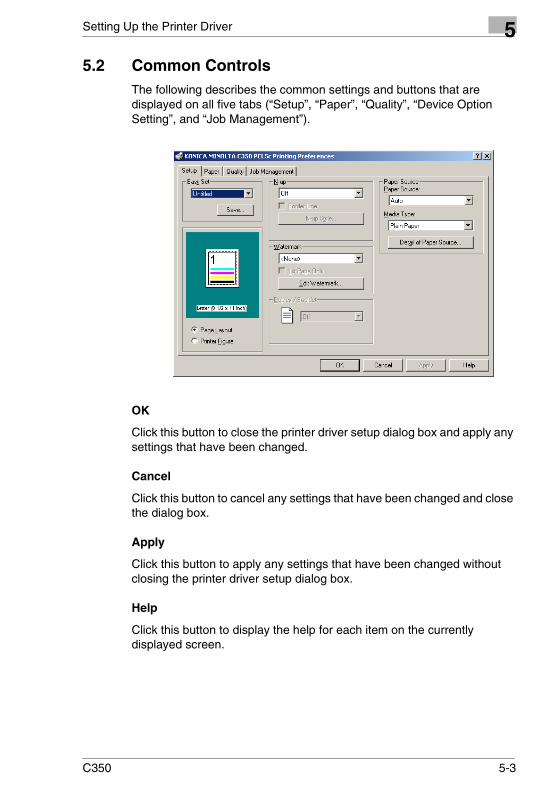
5.2 Common ControlsThe following describes the common settings and buttons that are displayed on all five tabs (“Setup”, “Paper”, “Quality”, “Device Option Setting”, and “Job Management”).
OK
Click this button to close the printer driver setup dialog box and apply any settings that have been changed.
Cancel
Click this button to cancel any settings that have been changed and close the dialog box.
Apply
Click this button to apply any settings that have been changed without closing the printer driver setup dialog box.
Help
Click this button to display the help for each item on the currently displayed screen.
C350 5-3
5 Setting Up the Printer Driver
Easy Set
The current settings on each tab can be saved as a set and retrieved when you want to use them again.
To save the current settings, click the [Save] button. The Save Easy Set Name dialog box appears. Enter the name of the set (10 characters or less), and then click the [OK] button.
After the settings have been saved as a set, they can be retrieved by selecting the appropriate set name from the drop-down list.
Select “Default” from the drop-down list to restore the tab’s default settings.
When an existing set of settings is selected from the drop-down list, the button changes to the [Delete] button. Click the [Delete] button to delete the currently selected set.
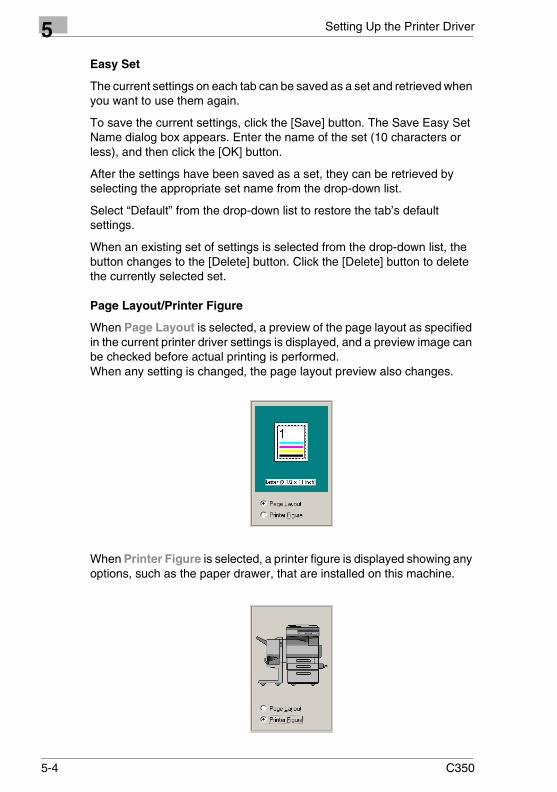
Page Layout/Printer Figure
When Page Layout is selected, a preview of the page layout as specified in the current printer driver settings is displayed, and a preview image can be checked before actual printing is performed.When any setting is changed, the page layout preview also changes.
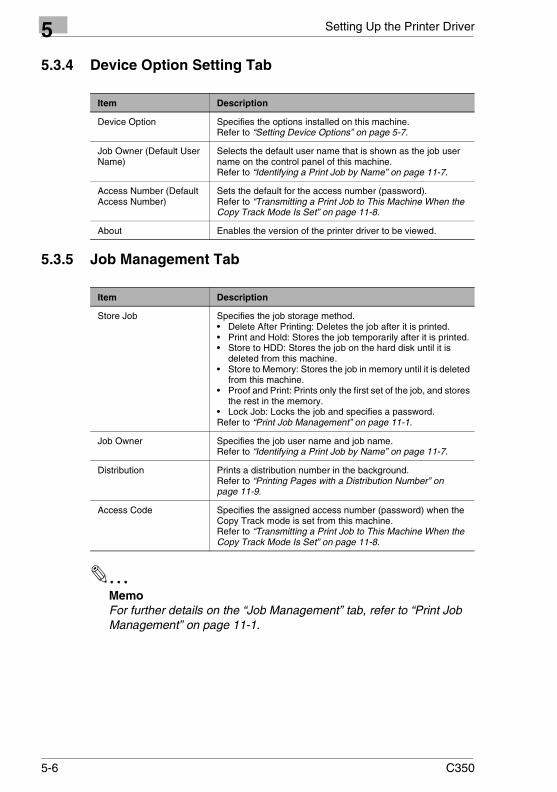
When Printer Figure is selected, a printer figure is displayed showing any options, such as the paper drawer, that are installed on this machine.
5-4 C350
Setting Up the Printer Driver 5
C350 5-5
5.3 Settings
5.3.1 Setup Tab
5.3.2 Paper Tab
5.3.3 Quality Tab
Item Description
N-up Prints multiple pages on one page.Refer to “Printing Multiple Pages on One Page” on page 5-8.
Watermark Prints a watermark on the pages. The watermark text can be changed or edited.Refer to “Printing Pages With Watermarks” on page 5-9.
Duplex/Booklet Selects the duplex or booklet printing setting.Refer to “Specifying Duplex/Booklet Printing” on page 5-13.
Paper Source Specifies the paper source and the type of paper.The paper source for the front cover, the back cover or for OHP interleaving can also be specified.Select a paper type specified with this machine.Refer to “Adding a Cover and/or Interleaf When Printing” on page 5-18.
Output Setting Specifies an output setting such as stapling, hole punching, or folding.Refer to “Stapling Documents” on page 5-15, “Hole Punching Documents” on page 5-16, and “Folding Documents” on page 5-17.
Item Description
Original Document Size
Specifies the size of the original document. Custom paper sizes can also be specified.
Output Paper Size Specifies the output paper size.An enlargement or reduction ratio can also be specified.Refer to “Printing to Suit the Paper Size” on page 5-19.
Copies Specifies the number of copies to be made.
Collate Specifies that the pages be output in sets.
Orientation Specifies the printing orientation.
Item Description
Select Color or Grayscale
Selects the color mode. If “Color (Manual)” is selected, clicking the [Detail of Color Settings] button displays the Detail of Color Settings dialog box, where detailed color settings can be specified.
Exposure Modes Selects the color matching mode. Text: Text mode, Photo: Photo mode
Use Printer Font Sets whether to use the printer font.
Resolution Specifies the print resolution (600 × 600 dpi fixed).
Download as Bitmap
Selects whether the font is downloaded as a bitmap or program (vector font).
Glossy Mode Sets the glossy mode.
5 Setting Up the Printer Driver
5.3.4 Device Option Setting Tab
5.3.5 Job Management Tab
✎MemoFor further details on the “Job Management” tab, refer to “Print Job Management” on page 11-1.
Item Description
Device Option Specifies the options installed on this machine.Refer to “Setting Device Options” on page 5-7.
Job Owner (Default User Name)
Selects the default user name that is shown as the job user name on the control panel of this machine.Refer to “Identifying a Print Job by Name” on page 11-7.
Access Number (Default Access Number)
Sets the default for the access number (password).Refer to “Transmitting a Print Job to This Machine When the Copy Track Mode Is Set” on page 11-8.
About Enables the version of the printer driver to be viewed.
Item Description
Store Job Specifies the job storage method.• Delete After Printing: Deletes the job after it is printed.• Print and Hold: Stores the job temporarily after it is printed.• Store to HDD: Stores the job on the hard disk until it is
deleted from this machine.• Store to Memory: Stores the job in memory until it is deleted
from this machine.• Proof and Print: Prints only the first set of the job, and stores
the rest in the memory.• Lock Job: Locks the job and specifies a password.Refer to “Print Job Management” on page 11-1.
Job Owner Specifies the job user name and job name.Refer to “Identifying a Print Job by Name” on page 11-7.
Distribution Prints a distribution number in the background.Refer to “Printing Pages with a Distribution Number” on page 11-9.
Access Code Specifies the assigned access number (password) when the Copy Track mode is set from this machine.Refer to “Transmitting a Print Job to This Machine When the Copy Track Mode Is Set” on page 11-8.
5-6 C350
Setting Up the Printer Driver 5
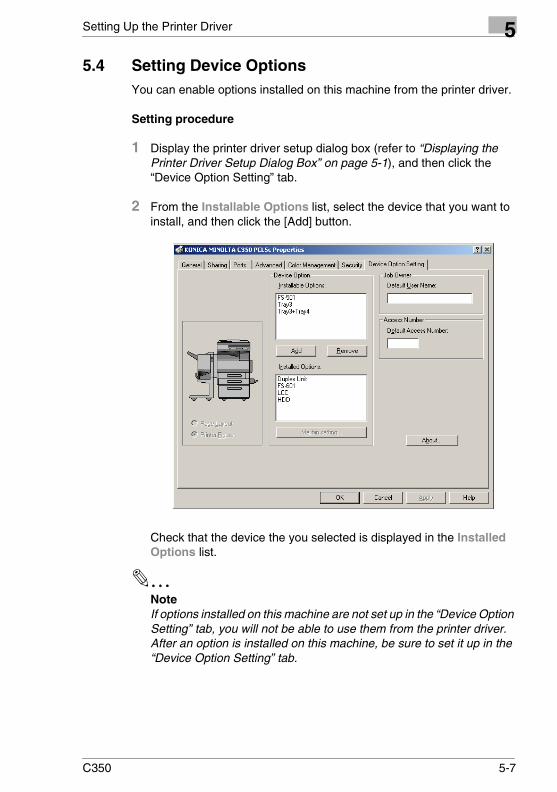
5.4 Setting Device OptionsYou can enable options installed on this machine from the printer driver.
Setting procedure
1 Display the printer driver setup dialog box (refer to “Displaying the Printer Driver Setup Dialog Box” on page 5-1), and then click the “Device Option Setting” tab.
2 From the Installable Options list, select the device that you want to install, and then click the [Add] button.
Check that the device the you selected is displayed in the Installed Options list.
✎NoteIf options installed on this machine are not set up in the “Device Option Setting” tab, you will not be able to use them from the printer driver. After an option is installed on this machine, be sure to set it up in the “Device Option Setting” tab.
C350 5-7

5 Setting Up the Printer Driver
5.5 Printing Multiple Pages on One PageYou can print multiple-page documents on one page. This comes in handy when you want to reduce the number of output pages.
Setting procedure
1 Click the “Setup” tab.
2 From the N-up drop-down list, select the number of pages to be printed on one page.
❍ When the Border Line check box is selected, borders will be printed around each page.
3 To change the printing order when an N-up setting is selected, click the [N-up Style] button. Then, in the dialog box that appeared, select one of the following modes.
Selecting “Page Layout” allows you to check the page layout and printing order.
✎NoteWhen printing a job that contains pages of different sizes and orientations, images may be missing or overlapping when the document is printed.
2 pages 4 pages 9 pages 16 pages
Horiz.Ascending
Horiz.Descending
Vert.Ascending
Vert.Descending
5-8 C350

Setting Up the Printer Driver 5
5.6 Printing Pages With WatermarksYou can print specific text in the background as a watermark.
Setting procedure
1 Click the “Setup” tab.
2 Under Watermark, specify the necessary settings.
❍ Text: Select the text to be printed as the watermark.<None>, CONFIDENTIAL, TOP SECRET, COPY, DO NOT COPY, DRAFT, FINAL, or PROOF
❍ 1st Page Only: Select this check box to print the watermark only on the first page.
❍ Edit Watermark: Edit the text and position of the watermark.
When the text for the watermark is selected, a preview of the watermark is displayed in the “Page Layout” preview box.
Printing pages with watermarks
C350 5-9
5 Setting Up the Printer Driver
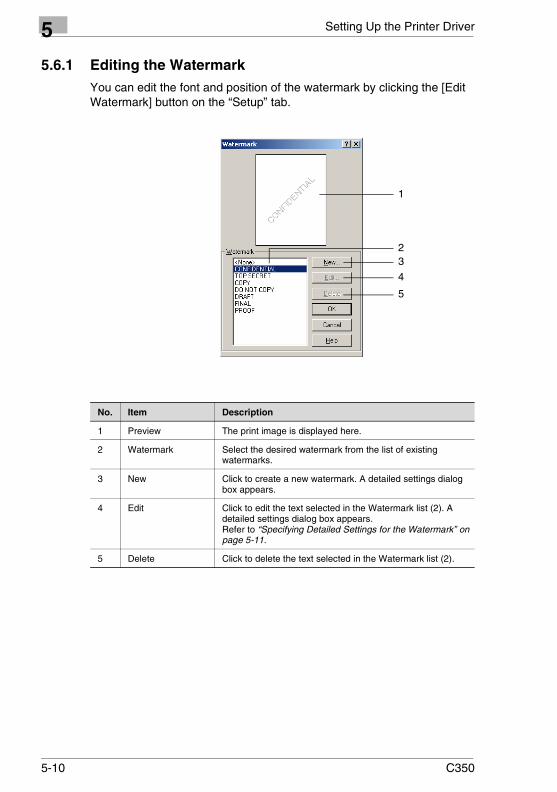
5.6.1 Editing the WatermarkYou can edit the font and position of the watermark by clicking the [Edit Watermark] button on the “Setup” tab.
1
23
4
5
No. Item Description
1 Preview The print image is displayed here.
2 Watermark Select the desired watermark from the list of existing watermarks.
3 New Click to create a new watermark. A detailed settings dialog box appears.
4 Edit Click to edit the text selected in the Watermark list (2). A detailed settings dialog box appears.Refer to “Specifying Detailed Settings for the Watermark” on page 5-11.
5 Delete Click to delete the text selected in the Watermark list (2).
5-10 C350

Setting Up the Printer Driver 5
5.6.2 Specifying Detailed Settings for the WatermarkClick the [New] button or the [Edit] button in the dialog box for editing the watermark in order to display a dialog box where you can specify detailed settings for the watermark.
1
567
9
234
8
No. Item Description
1 Name Enter the name of the new watermark (up to 20 characters).
2 String Enter the text to be printed as the watermark (up to 255 characters).
3 Type Face Select the font for the text to be printed as the watermark from the fonts installed on the computer.
4 Size Specify the size of the text.Settings: 8 points to 200 points
5 Style Specify the style of the text.Bold: Text will be printed in bold.Italic: Text will be printed in italics.
6 Color Set the color of the text.
7 Shading Specify the density of the text.Settings: 10 to 100% (in 1% increments)
C350 5-11
5 Setting Up the Printer Driver
A preview of the settings is displayed.
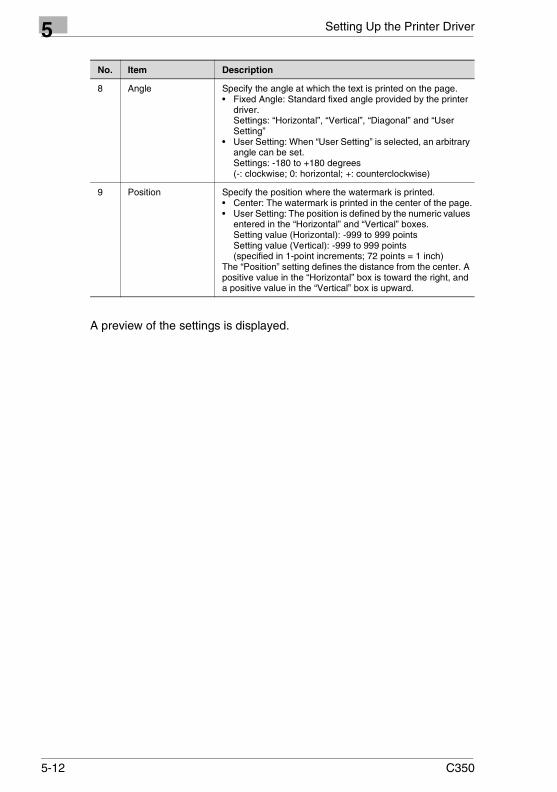
8 Angle Specify the angle at which the text is printed on the page.• Fixed Angle: Standard fixed angle provided by the printer
driver.Settings: “Horizontal”, “Vertical”, “Diagonal” and “User Setting”
• User Setting: When “User Setting” is selected, an arbitrary angle can be set.Settings: -180 to +180 degrees(-: clockwise; 0: horizontal; +: counterclockwise)
9 Position Specify the position where the watermark is printed.• Center: The watermark is printed in the center of the page.• User Setting: The position is defined by the numeric values
entered in the “Horizontal” and “Vertical” boxes.Setting value (Horizontal): -999 to 999 pointsSetting value (Vertical): -999 to 999 points(specified in 1-point increments; 72 points = 1 inch)
The “Position” setting defines the distance from the center. A positive value in the “Horizontal” box is toward the right, and a positive value in the “Vertical” box is upward.
No. Item Description
5-12 C350
Setting Up the Printer Driver 5
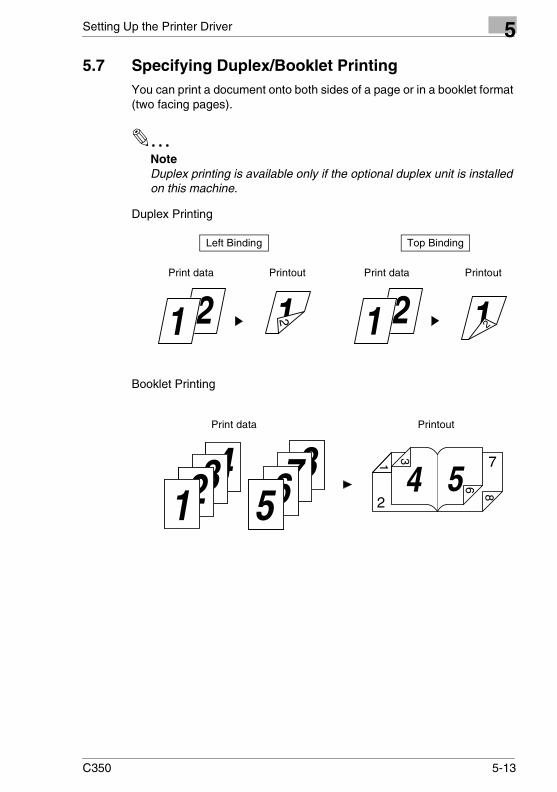
5.7 Specifying Duplex/Booklet PrintingYou can print a document onto both sides of a page or in a booklet format (two facing pages).
✎NoteDuplex printing is available only if the optional duplex unit is installed on this machine.
Duplex Printing
Booklet Printing
Print data Printout
Left Binding Top Binding
Print data Printout
Print data Printout
C350 5-13

5 Setting Up the Printer Driver
Setting procedure
1 Click the “Setup” tab.
2 Select one of the following duplex printing settings from the Duplex/Booklet drop-down list.
Selecting “Page Layout” allows you to check the duplex/booklet printing layout.
✎NoteWhen printing a job that contains pages of different sizes and orientations, images may be missing or overlapping when the document is printed.
Off The function is disabled.
Top Binding The print images are printed on both sides of a single page so that the file margin is at the top.
Left Binding The print images are printed on both sides of a single page so that the file margin is at the left edge.
Booklet Left Binding The print images for 4 pages are printed on both sides of a single page so that the printout may be folded at its center to form a booklet bound at its left edge.
Booklet Right Binding The print images of 4 pages are printed on both sides of a single page so that the printout may be folded at its center to form a booklet bound at its right edge.
5-14 C350

Setting Up the Printer Driver 5
5.8 Stapling Documents
✎NoteThe staple function is available only if the optional finisher FS-501 or FS-601 is installed on this machine.
Setting procedure
1 Click the “Setup” tab.
2 Click the [Detail of Output Setting] button to display the detailed settings dialog box.
3 From the Staple drop-down list, select one of the following settings.
❍ If the FS-501 is installed on this machine:“OFF” or “Corner”
❍ If the FS-601 is installed on this machine:“OFF”, “Corner”, “Top Side 2 Points”, “Left Side 2 Points”, or “Auto 2 Points”
✎MemoIf the FS-501 is installed on this machine, up to 30 pages can be stapled at a time.
If the FS-601 is installed on this machine, up to 50 pages of Letter/A4 or smaller paper, or 25 pages of Legal/B4 or larger paper can be stapled at a time.
C350 5-15

5 Setting Up the Printer Driver
5.9 Hole Punching Documents
✎NoteThe hole punch function is available only when optional finisher FS-601 is installed on this machine.
Setting procedure
1 Click the “Setup” tab.
2 Click the [Detail of Output Setting] button to display the detailed settings dialog box.
3 From the Punch and Punch Holes drop-down lists, select one of the following settings.
❍ Punch: “OFF”, “Top Side Punch”, “Left Side Punch”, or “Auto Punch”
❍ Punch Holes: “2”, “3”, or “4”
✎NoteWhen using the hole punch function, always select “2” or “3” from the Punch Holes drop-down list.No holes will be punched if “4” is selected.
5-16 C350
Setting Up the Printer Driver 5
5.10 Folding DocumentsThe folding function is used in combination with a booklet printing setting to produce booklets that are folded and stapled at the center.
✎NoteThe folding function is available only if optional finisher FS-601 is installed on this machine.
Setting procedure
1 Click the “Setup” tab.
2 Click the [Detail of Output Setting] button to display the detailed settings dialog box.
3 From the Folding drop-down list, select one of the following settings.
❍ OFF: The folding function is disabled.❍ Crease + Center Staple:
Produces booklets that are folded and stapled at the center.
✎MemoUp to 10 pages can be folded at a time.
C350 5-17

5 Setting Up the Printer Driver
5.11 Adding a Cover and/or Interleaf When PrintingA front cover and/or back cover can be added to each of the copy sets.Also, when printing on overhead projector transparencies, an interleaf can be inserted between the transparencies.
Setting procedure
1 Click the “Setup” tab.
2 Click the [Detail of Paper Source] button under Paper Source to display the detailed settings dialog box.
3 Specify the desired settings.
Cover Page
A front cover and/or back cover can be added to each of the copy sets. You can also select to print data on the covers or leave them blank.
OHP Interleaving
When printing on overhead projector transparencies, interleaves can be inserted between the transparencies.
✎NoteWhen using the “OHP Interleaving” function, specify “1” in Copies box.When printing on overhead projector transparencies, only the multiple bypass tray or the 1st drawer can be set as the paper source.The “OHP Interleaving” function cannot be used in combination with duplex printing.
For details on loading overhead projector transparencies into the paper source, refer to the User’s Manual supplied with this machine.
Front Cover Page Adds a front cover.
With Image Prints data on the front cover.
Front Cover Page Source Specifies the paper source for the front cover. (Tray 1 to 4, or LCC)
Back Cover Page Adds a back cover.
With Image Prints data on the back cover.
Back Cover Page Source Specifies the paper source for the back cover. (Tray 1 to 4, or LCC)
OHP Interleaving Enables the “OHP Interleaving” function.
OHP Interleaving Paper Source Specifies the paper source for the interleaves. (Tray 2 to 4, or LCC)
5-18 C350

Setting Up the Printer Driver 5
5.12 Printing to Suit the Paper SizeYou can enlarge or reduce documents created with an application when printing to match the output paper size.
Setting procedure
1 Click the “Paper” tab.
2 Check that the size specified in the Original Document Size box is the same as that of the document created with the application.
3 Select the Output Paper Size check box, and then specify the size of the paper to be printed.
4 When the Fit to Paper check box is selected, the size of the document is automatically adjusted to the size of the paper selected for printing.
✎NoteMake sure that paper of the size set in in the Output Paper Size box is loaded in this machine.
Print data Printout
C350 5-19
5 Setting Up the Printer Driver
5.13 Items That Cannot Be Set Simultaneously
Limitations on Paper Size and Function Combinations
Paper Source Paper Type Output Setting
Tra
y 1
Tra
y 2,
3, 4
LCC
Man
ual F
eed
Tra
y
Pla
in P
aper
Thi
ck 1
Thi
ck 2
Thi
ck 3
Tra
nspa
renc
y
Env
elop
e
Dup
lex
Boo
klet
N-u
p
Sta
ple
Pun
ch
Fol
ding
Orig
inal
Doc
umen
t Siz
e A3 Wide x x x x x x
A3 x x
JIS B4 x x
A4 x
JIS B5 x x
A5 x x x x
JIS B6 x x x x x x x x
A6 x x x x x x x x
Postcard x x x x x x x x x
203 x 330 mm x x x
210 x 330 mm x x x
216 x 330 mm x x x
220 x 330 mm x x x
Legal x x x
Letter x
Executive x x x x
Invoice x x x x x
Ledger x x
11 x 14 x x x
Envelope B5 x x x x x x x x
Envelope Com 10 x x x x x x x x
Envelope C5 x x x x x x x x
Envelope DL x x x x x x x x
Envelope Monarch x x x x x x x x
K16 x x x x
K8 x x x
Custom size x x x x x x x x x
Blank: Possible combinationx: Not possible to combine
5-20 C350
Setting Up the Printer Driver 5
Limitations on Function CombinationsPaper Type Output Setting
Pla
in P
aper
Thi
ck 1
Thi
ck 2
Thi
ck 3
Tra
nspa
renc
y
Env
elop
e
OH
P In
terle
avin
g
Dup
lex
Boo
klet
N-u
p
Fol
ding
Cov
er P
age
Pap
er S
ourc
e Manual Feed Tray x
Tray 1
Tray 2 x x x x x x
Tray 3, 4 x x x x x x
LCC x x x x x x x
Out
put S
ettin
g OHP Interleaving x x x x x x x x
Duplex x x x x x x
Booklet x x x x x x x x
Staple x x x x x x x x
Punch x x x x x x
Folding x x x x x x x
Glossy Mode x x x x x x x
Blank: Possible combinationx: Not possible to combine
C350 5-21

5 Setting Up the Printer Driver
Limitations on Other Combinations
Tab Function 1 Tab Function 2
1 Setup N-up Paper Scaling
2 Setup N-up Quality Download as Bitmap
3 Setup Booklet Quality Download as Bitmap
4 Setup OHP Interleaving Paper Copies
5 Setup OHP Interleaving Job Management
Distribution Number
6 Setup Staple - Top Side 2 Points
Setup Left Side Punch
7 Setup Staple Paper Uncollated
8 Setup Folding Paper Uncollated
9 Paper Output Paper Size Quality Download as Bitmap
10 Paper Scaling Quality Download as Bitmap
11 Paper Uncollated Job Management
Proof and Print
12 Paper Uncollated Job Management
Distribution Number
13 Quality Grayscale Quality Exposure Modes
14 Quality Use Printer Font Quality Download as Bitmap
5-22 C350

Network Printing in a Windows Environment 6
6 Network Printing in a Windows Environment
6.1 Network Connection Methods That Can Be Selected in Each Windows OSThis chapter describes the settings that must be specified for network printing.
Setting procedures differ depending on the method of network printing used (Windows, LPR, or IPP printing). Select the best method of network printing for your Windows environment.
Network Printing from a Windows OS
✎NoteTo perform Windows printing, the NetBEUI protocol must be installed on your computer.
Before setting up network printing, refer to the procedure described in “4 Installing the Printer Driver” and install the printer driver.To perform network printing, change the printer port for the installed printer driver to one for a network connection, and then change the settings on this machine as necessary.For an IPP connection, it is necessary to start with the step for installing the printer driver.
Network Printing in a NetWare Environment
Protocol Used
Windows 98/98SE
Windows Me
Windows 2000
Windows XP
Windows NT 4.0
Windows Server 2003
Windows Printing
NetBEUI ❍ ❍ ❍ ❍ ❍ ❍
LPR Printing TCP/IP ❍ ❍ ❍ ❍
IPP Printing TCP/IP ❍ ❍ ❍
NetWare Version Protocol Used Emulation Service Mode
NetWare 4.x IPX NDS/Bindery PServer/NPrinter
NetWare 5.x/6 IPX NDS PServer
TCP/IP NDPS(lpr)
C350 6-1
6 Network Printing in a Windows Environment
6.2 Setting the IP Address for This MachineFirst, use this machine’s control panel to assign an IP address to this machine.
✎NoteWhen specifying network settings, follow the instructions of the network administrator.
Setting procedure
1 Press the [Utility] key on this machine’s control panel, touch [Admin. Mode], and then enter the administrator access code.
2 Touch [Network Setting], [Common Setting], then [TCP/IP].
3 Specify settings for the following.
❍ IP Address: Set the IP address of this machine.❍ Subnet Mask: Set the subnet mask for the network to which
you are connecting.❍ Gateway Address:
Set the default gateway address for the network to which you are connecting.
✎NoteAlthough the IP address is entered without using the DHCP server in the procedure described here, it is also possible to automatically assign the IP address from the DHCP server. When “DHCP” is set to “Enable”, the IP address, subnet mask, and gateway address settings are automatically assigned from the DHCP server on the network, so it is not necessary to assign them manually. However, note the following when setting “DHCP” to “Enable”.
6-2 C350
Network Printing in a Windows Environment 6
Check with the network administrator that the DHCP server exists. If the DHCP server does not exist, be sure to specify settings for “IP Address”, “Subnet Mask”, and “Gateway Address”.If the settings for the IP address and other items have been assigned using the DHCP server, there is a possibility that they may be automatically changed. When the settings for the IP address and other items are changed, if the IP address has been used to specify a printer on the network for printing, there is a possibility that printing may not be possible because this machine cannot communicate with the network. If “DHCP” has been set to “Enable”, it is recommended that the IP address assigned to this machine be fixed in the DHCP server settings.
4 To apply the settings, restart this machine (turn it off, then on again).
Turn this machine back on to enable the IP address.
6.3 Accessing PageScope Web ConnectionSetting the IP address for this machine enables you to access PageScope Web Connection.
Use your Web browser to directly access PageScope Web Connection.
Access procedure
1 Start up the Web browser.
2 In the URL field, enter the IP address for this machine as shown below, and then press the [Enter] key.
❍ http://<IP_address_for_the_copier>/Example: If the IP address for this machine is 192.168.0.10http://192.168.0.10/
The initial page of PageScope Web Connection appears.
For further details on PageScope Web Connection, refer to “12 Using PageScope Web Connection”.
C350 6-3
6 Network Printing in a Windows Environment
6.4 Windows PrintingYou can use Windows printing to print directly over the Microsoft network.
✎NoteTo perform Windows printing, the NetBEUI protocol must be installed on your computer.
6.4.1 Operations on This MachineSet the IP address on this machine. For the setting procedure, refer to “Setting the IP Address for This Machine” on page 6-2.
Specify the settings described below for Windows printing in PageScope Web Connection.
Setting procedure
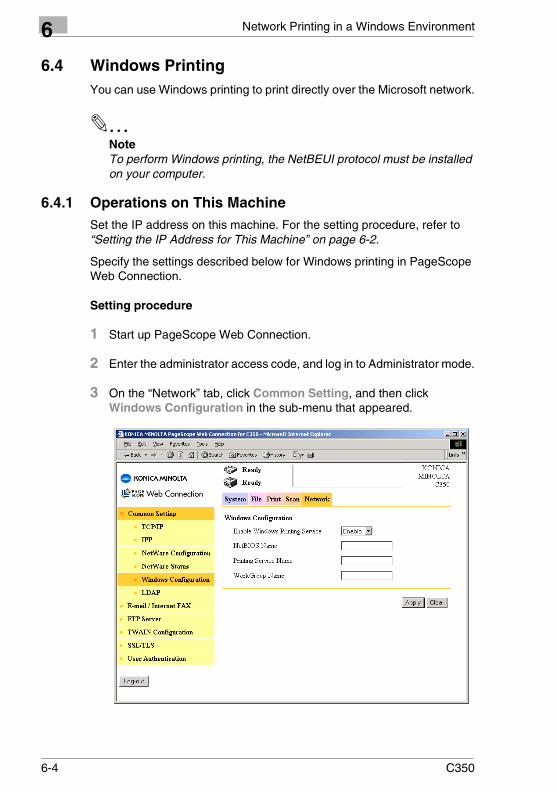
1 Start up PageScope Web Connection.
2 Enter the administrator access code, and log in to Administrator mode.
3 On the “Network” tab, click Common Setting, and then click Windows Configuration in the sub-menu that appeared.
6-4 C350

Network Printing in a Windows Environment 6
4 Specify settings for the following.❍ Enable Windows Printing Service:Set whether to use the Windows printing service. Select “Enable” here.
❍ NetBIOS Name: Specify the NetBIOS name (up to 15 alphanumeric characters).
❍ Printing Service Name:Specify the printing service name (up to 13 alphanumeric characters).
❍ WorkGroup Name: Specify the work group name (up to 15 alphanumeric characters).
5 To apply the settings, restart this machine (turn it off, then on again).
6.4.2 Printer Driver SettingsFor Windows 98/Me
1 Click the [Start] button, point to “Settings”, and then click “Printers”.
2 Right-click the icon for the installed printer, and then click “Properties”.
3 On the “Details” tab, click the [Add Port] button.
4 Select Network, and then click the [Browse] button. In the network configuration window that appeared, select the appropriate printer icon.
For Windows 2000/XP/NT 4.0/Server 2003
1 For Windows 2000/NT 4.0, click the [Start] button, point to “Settings”, and then click “Printers”.For Windows XP/Server 2003, click the [Start] button, and then click “Printers and Faxes”.
2 Right-click the icon of the installed printer, and then click “Properties”.
3 Click the [Add Port] button on the “Ports” tab, double-click “Local Port” or select “Local Port” and click the [New Port] button, and then enter \\NetBIOS name\Printing Service name.
✎NoteEnter the same NetBIOS name and printing service name that you entered in PageScope Web Connection (refer to “Operations on This Machine” on page 6-4).
4 Click the [Close] button to apply the setting.
C350 6-5
6 Network Printing in a Windows Environment
6.5 LPR Printing (Windows 2000/XP/NT 4.0/Server 2003)The LPR print service is supported as standard in Windows 2000/XP/NT 4.0. TCP/IP is used as the network protocol.
6.5.1 Operations on This MachineSpecify the IP address for this machine. For the setting procedure, refer to “Setting the IP Address for This Machine” on page 6-2.
6.5.2 Printer Driver Settings
For Windows 2000/XP/Server 2003
1 For Windows 2000, click the [Start] button, point to “Settings”, and then click “Printers”.For Windows XP/Server 2003, click the [Start] button, and then click “Printers and Faxes”.
2 Right-click the icon of the installed printer, and then click “Properties”.
3 On the “Ports” tab, click the [Add Port] button.
4 In the Available Printer Ports list, select Standard TCP/IP Port, and then click the [New Port] button.
5 When the Add Standard TCP/IP Printer Port Wizard starts up, click the [Next] button.
6 In the Name of printer or IP address box, enter the IP address for this machine, and then click the [Next] button.
7 Select Custom, and then click the [Settings] button.
8 Select LPR, enter “Print” in the Queue Name box, and then click the [OK] button.
9 Click the [Next] button, and then click the [Finish] button to apply the setting.
6-6 C350
Network Printing in a Windows Environment 6
For Windows NT 4.01 Click the [Start] button, point to “Settings”, and then click “Printers”.
2 Right-click the icon of the installed printer, and then click “Properties”.
3 On the “Ports” tab, click the [Add Port] button.
4 In the Available Printer Ports list, select LPR Port, and then click the [New Ports] button.
✎NoteIf “LPR Port” is not in the list, click the [Start] button, point to “Control Panel”, and then click “Network”. Then, on the “Service” tab, click the [Add] button and install the Microsoft TCP/IP printing service.
5 In the Name or address of server providing lpd box on the Add LPR Compatible Printer dialog box, enter the IP address for this machine.
6 In the Name of printer or print queue on that server box, enter “Print”.
7 Click the [OK] button to apply the setting.
C350 6-7
6 Network Printing in a Windows Environment
6.6 IPP Printing (Windows 2000/XP/Server 2003)The IPP (Internet Printing Protocol) print service is supported as a standard in Windows 2000/XP/Server 2003. TCP/IP is used as the network protocol.
6.6.1 Operations on This MachineSpecify the IP address for this machine. For the setting procedure, refer to “Setting the IP Address for This Machine” on page 6-2.
Also, specify the IPP printing settings in PageScope Web Connection. (Printing can be performed with the default settings.)
Setting procedure
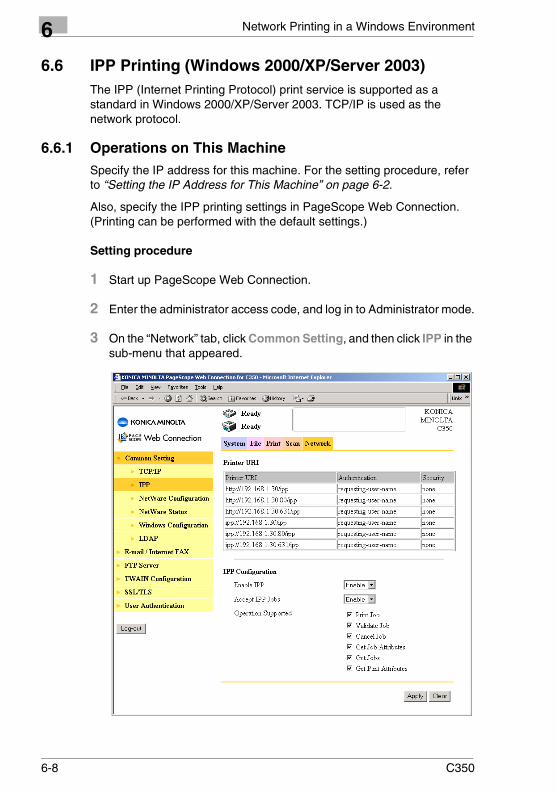
1 Start up PageScope Web Connection.
2 Enter the administrator access code, and log in to Administrator mode.
3 On the “Network” tab, click Common Setting, and then click IPP in the sub-menu that appeared.
6-8 C350
Network Printing in a Windows Environment 6
4 Specify settings for the following.❍ Printer URI: The URL of the printer that can be used for IPP printing is displayed.
❍ Enable IPP: Set whether to perform IPP printing. Select “Enable” here.
❍ Accept IPP Jobs: Set whether to use the IPP reception function.❍ Operation Supported:
Specify print operations supported by IPP.
Then, on the “Print” tab of PageScope Web Connection, specify the settings for IPP printing.
Setting procedure
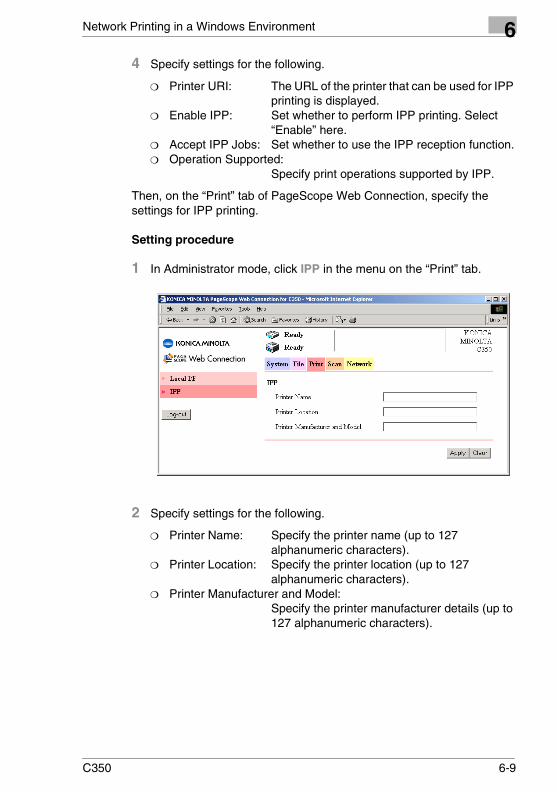
1 In Administrator mode, click IPP in the menu on the “Print” tab.
2 Specify settings for the following.
❍ Printer Name: Specify the printer name (up to 127 alphanumeric characters).
❍ Printer Location: Specify the printer location (up to 127 alphanumeric characters).
❍ Printer Manufacturer and Model:Specify the printer manufacturer details (up to 127 alphanumeric characters).
C350 6-9
6 Network Printing in a Windows Environment
6.6.2 Installing the Printer DriverFor IPP printing, reinstall the printer driver.
Installation procedure
1 Load the supplied CD-ROM into the computer’s CD-ROM drive.
2 For Windows 2000, click the [Start] button, point to “Settings”, and then click “Printers”.For Windows XP/Server 2003, click the [Start] button, and then click “Printers and Faxes”.
3 For Windows 2000/Server 2003, double-click “Add Printer”.For Windows XP, click Add a printer on the Printer Tasks menu.
The Add Printer Wizard starts up.
4 Click the [Next] button.
5 In the Local or Network Printer dialog box, select Network printer, and then click the [Next] button.
6 In the Locate Your Printer dialog box, select Connect to a printer on the Internet or on your intranet.
7 In the URL field, enter the URL for this machine in the following format, and then click the [Next] button.
❍ http://<IP_address_for_the_copier>/ippExample: If the IP address for this machine is 192.168.0.10http://192.168.0.10/ipp
8 When the confirmation dialog box appears, click the [OK] button.
9 Click the [Have Disk] button.
10 Click the [Browse] button, specify the directory on the CD-ROM that contains the printer driver (\Driver\English\Printer\Win2KXP), and then click the [OK] button.
6-10 C350

Network Printing in a Windows Environment 6
11 Check that “KONICA MINOLTA C350 PCL5c” is displayed in thePrinters list, and then click the [Next] button.
12 Select whether to set the printer as the default printer, and then click the [Next] button.
13 Click the [Finish] button to exit the Add Printer Wizard.
Once the settings for the printer have been specified, you can use the printer in the same way as a default local printer. Also, if you set up the printer for sharing in Windows, it can be used as a network printer by other Windows computers over the network.
C350 6-11
6 Network Printing in a Windows Environment
6.7 Setting Up a Print Service in NetWareThe printer controller supports the following environments.
Network Printing in a NetWare Environment
6.7.1 For Remote Printer Mode With NetWare 4.x Bindery Emulation
✎NoteBefore using bindery emulation, check that bindery emulation is compatible with the NetWare Server.
Setting procedure
1 From a client computer, log on with Supervisor permissions to access the NetWare server where the PServer is registered.
2 Start up Pconsole.
3 From the Available Options list, select “Quick Setup”, and then click the [Enter] button.
4 Enter the appropriate names in the Print server, New printer, New print queue and Print queue volume fields, select Other/Unknown from the Printer type field, and then save the specified settings.
5 Click the [Esc] button to quit Pconsole.
6 Use the NetWare Server console to load PSERVER.NLM.
✎NoteFor the queue user privileges, printer notification option, assignment of multiple queues, and passwords, refer to the NetWare documentation, and specify settings as necessary.
NetWare Version Protocol Used Emulation Service Mode
NetWare 4.x IPX NDS/Bindery PServer/NPrinter
NetWare 5.x/6 IPX NDS PServer
TCP/IP NDPS(lpr)
6-12 C350
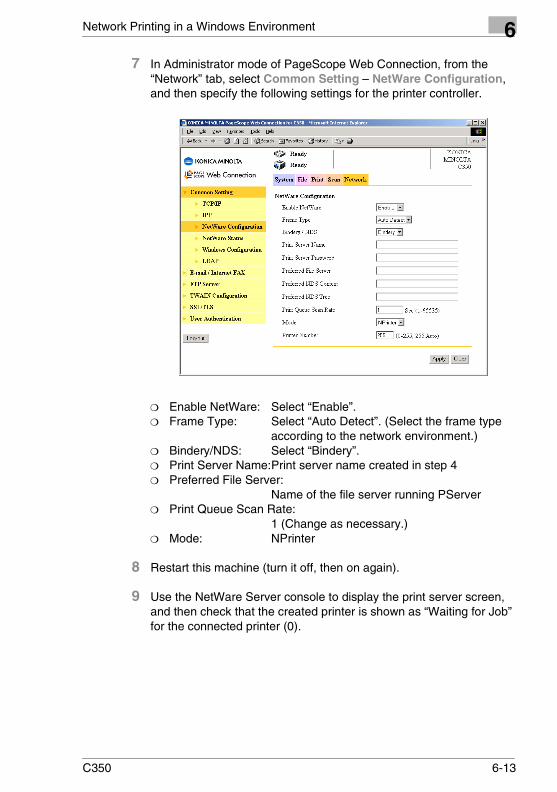
Network Printing in a Windows Environment 6
7 In Administrator mode of PageScope Web Connection, from the“Network” tab, select Common Setting – NetWare Configuration, and then specify the following settings for the printer controller.
❍ Enable NetWare: Select “Enable”.❍ Frame Type: Select “Auto Detect”. (Select the frame type
according to the network environment.)❍ Bindery/NDS: Select “Bindery”.❍ Print Server Name:Print server name created in step 4❍ Preferred File Server:
Name of the file server running PServer❍ Print Queue Scan Rate:
1 (Change as necessary.)❍ Mode: NPrinter
8 Restart this machine (turn it off, then on again).
9 Use the NetWare Server console to display the print server screen, and then check that the created printer is shown as “Waiting for Job” for the connected printer (0).
C350 6-13
6 Network Printing in a Windows Environment
6.7.2 For Print Server Mode With NetWare 4.x Bindery Emulation
✎NoteBefore using bindery emulation, check that bindery emulation is compatible with the NetWare Server.
Setting procedure
1 From a client computer, log on with Supervisor permissions to access the NetWare server where the PServer is registered.
2 Start up Pconsole.
3 From the Available Options list, select “Quick Setup”, and then click the [Enter] button.
4 Enter the appropriate names in the Print server, New printer, New print queue and Print queue volume fields, select Other/Unknown from the Printer type field, and then save the specified settings.
5 Click the [Esc] button to quit Pconsole.
6-14 C350
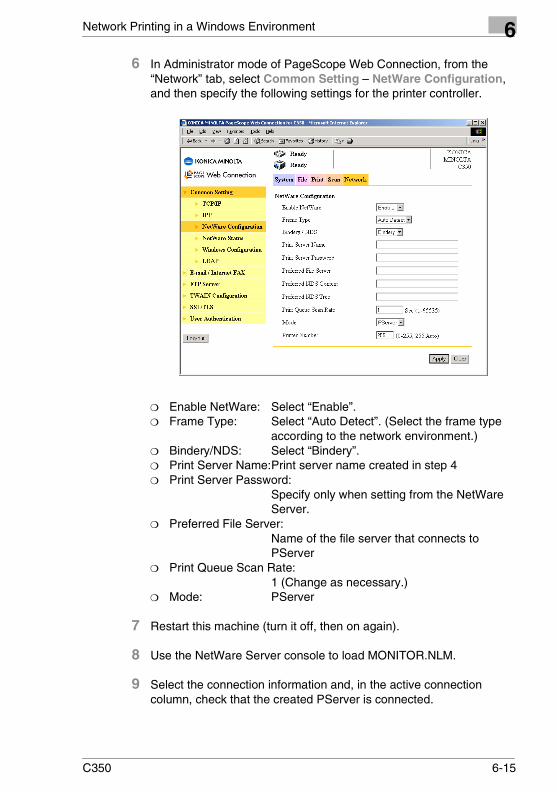
Network Printing in a Windows Environment 6
6 In Administrator mode of PageScope Web Connection, from the“Network” tab, select Common Setting – NetWare Configuration, and then specify the following settings for the printer controller.
❍ Enable NetWare: Select “Enable”.❍ Frame Type: Select “Auto Detect”. (Select the frame type
according to the network environment.)❍ Bindery/NDS: Select “Bindery”.❍ Print Server Name:Print server name created in step 4❍ Print Server Password:
Specify only when setting from the NetWare Server.
❍ Preferred File Server:Name of the file server that connects to PServer
❍ Print Queue Scan Rate:1 (Change as necessary.)
❍ Mode: PServer
7 Restart this machine (turn it off, then on again).
8 Use the NetWare Server console to load MONITOR.NLM.
9 Select the connection information and, in the active connection column, check that the created PServer is connected.
C350 6-15
6 Network Printing in a Windows Environment
6.7.3 For NetWare 4.x Remote Printer Mode (NDS)
Setting procedure
1 Log on to NetWare as an administrator from a client computer.
2 Start up NWadmin.
3 Select either the organization or organizational unit container that offers the print service, and then click “Print Services Quick Setup” on the “Tools” menu.
4 Enter the appropriate names in the Print Server name, Printer Name, Print Queue Name, and Print Queue Volume fields, select Other/Unknown from the Printer Type field, and then save the settings.
✎NoteFor settings for the queue user rights, printer notification option, assignment of multiple queues, and password items, refer to the NetWare documentation, and then specify settings as necessary.
6-16 C350

Network Printing in a Windows Environment 6
5 In Administrator mode of PageScope Web Connection, click NetWareConfiguration in the sub-menu that appeared after clicking Common Setting on the “Network” tab, and then specify the settings for this machine.
❍ Enable NetWare: Select “Enable”.❍ Frame Type: Select “Auto Detect”. (Selects the frame type
according to the network environment.)❍ Bindery/NDS: Select “NDS”.❍ Print Server Name:
Print server name created in step 4❍ Print Server Password:
Set only if set on the NetWare Server.❍ Preferred NDS Context:
Name of the tree node that PServer loads❍ Preferred NDS Tree:
Enter “1”. (Change as necessary.)❍ Mode: Select “NPrinter”.
❍ Printer Number: 255(Set the number assigned to the printer (0 to 254) or 255.)
C350 6-17
6 Network Printing in a Windows Environment
6 To apply the settings, restart this machine (turn it off, then on again).
7 Use the NetWare Server console to load PSERVER.NLM.
8 Use the NetWare Server console to display the print server screen, and check that “C350” (created printer) is shown as “Waiting for Job” for the connected printer (0).
6.7.4 For NetWare 4.x/5.x/6 Print Server Mode (NDS)
✎NoteTo use the Print Server mode, IPX protocol must be loaded on the NetWare server.
Setting procedure
1 Log on to NetWare as an administrator from a client computer.
2 Start up NWadmin.
3 Select either the organization or organizational unit container that offers the print service, and then click “Print Services Quick Setup (non-NDPS)” on the “Tools” menu.
4 Enter the appropriate names in the Print Server name, Printer Name, Print Queue Name, and Print Queue Volume fields, select Other/Unknown from the Printer Type field, and then click the [Create] button.
✎NoteFor settings for the queue user rights, printer notification option, assignment of multiple queues, and password items, refer to the NetWare documentation, and set them as necessary.
6-18 C350
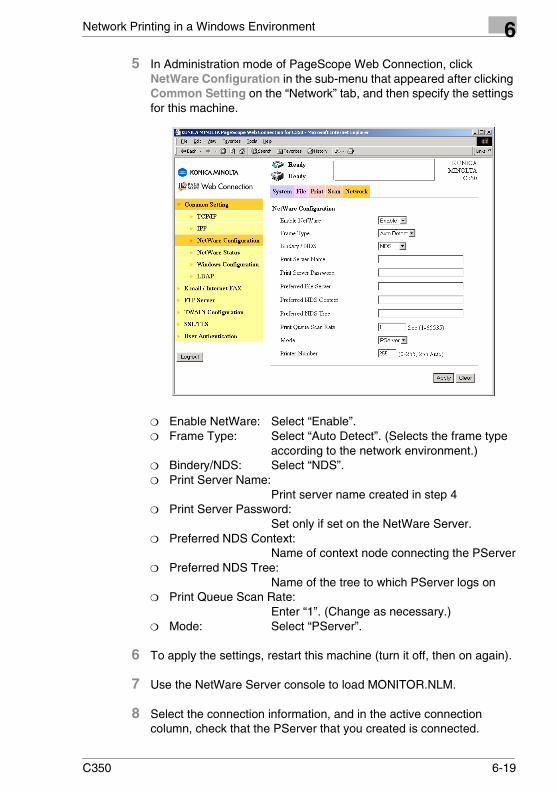
Network Printing in a Windows Environment 6
5 In Administration mode of PageScope Web Connection, clickNetWare Configuration in the sub-menu that appeared after clicking Common Setting on the “Network” tab, and then specify the settings for this machine.
❍ Enable NetWare: Select “Enable”.❍ Frame Type: Select “Auto Detect”. (Selects the frame type
according to the network environment.)❍ Bindery/NDS: Select “NDS”.❍ Print Server Name:
Print server name created in step 4❍ Print Server Password:
Set only if set on the NetWare Server.❍ Preferred NDS Context:
Name of context node connecting the PServer❍ Preferred NDS Tree:
Name of the tree to which PServer logs on❍ Print Queue Scan Rate:
Enter “1”. (Change as necessary.)❍ Mode: Select “PServer”.
6 To apply the settings, restart this machine (turn it off, then on again).
7 Use the NetWare Server console to load MONITOR.NLM.
8 Select the connection information, and in the active connection column, check that the PServer that you created is connected.
C350 6-19
6 Network Printing in a Windows Environment
6.7.5 For NetWare 5.x/6 Novell Distributed Print Services (NDPS)
✎NoteBefore specifying settings for NDPS, check that the NDPS broker and NDPS manager have been created and loaded.
Also, before performing the following procedure, check that the TCP/IP protocol has been set in the NetWare server, and check that the IP address has been set for this machine and that this machine is on.
Creating an NDPS printer agent
1 Log on to NetWare as an administrator from a client computer.
2 Start up NWadmin.
3 Right-click the organization or organizational unit container where you will create the printer agent, and then click “NDPS Printer” on the “Create” sub-menu.
4 In the NDPS Printer Name box, enter the printer name.
5 In the Printer Agent Source column, select Create a New Printer Agent, and then click the [Create] button.
6 Check the printer agent name, and then in the NDPS Manager Name box, browse through the NDPS manager names, and register one.
7 In Gateway Types, select Novell Printer Gateway, and then register it.
8 In the “Configure Novell PDS for Printer Agent” window, select “(None)” for the printer type, and “Novell Port Handler” for the port handler type, and then register the settings.
9 In Connection type, select Remote (LPR on IP), and then register it.
10 Enter the IP address set for this machine as the host address, enter “Print” as the printer name, and then click [Finish] to register the settings.
11 The printer driver registration screen appears. Select “None” for each OS to complete the registration.
6-20 C350
Network Printing in a Windows Environment 6
✎NoteFor settings for the queue user rights, printer notification option, assignment of multiple queues, and password items, refer to the NetWare documentation, and set them as necessary.
6.7.6 Setting Up a Client (Windows) Settings When Using the NetWare Server
Setting procedure
1 For Windows 98/Me/2000/NT 4.0, click the [Start] button, point to “Settings”, and then click “Printers”.For Windows XP/Server 2003, click the [Start] button, and then click “Printers and Faxes”.
2 For Windows 98/Me/2000/NT 4.0/Server 2003, double-click “Add printer”.For Windows XP, click Add a printer on the Printer Tasks menu.
The Add Printer Wizard starts up.
3 In the port settings, browse the network, and specify the name of the created queue (or NDPS printer name).
4 In the Printer Model list, specify the directory on the CD-ROM that contains the printer driver for the environment to be used.
❍ For Windows 98: (CD-ROM)\Driver\English\Printer\Win9xME❍ For Windows Me: (CD-ROM)\Driver\English\Printer\Win9xME❍ For Windows 2000: (CD-ROM)\Driver\English\Printer\Win2KXP❍ For Windows XP: (CD-ROM)\Driver\English\Printer\Win2KXP❍ For Windows NT 4.0: (CD-ROM)\Driver\English\Printer\WinNT40❍ For Windows Server 2003:
(CD-ROM)\Driver\English\Printer\Win2KXP
5 Follow the on-screen instructions to complete the installation.
C350 6-21
6 Network Printing in a Windows Environment
6.8 Checking Printer Driver Operation After Installation
6.8.1 Test Printing From the ComputerPrint a test page to check that the printer driver has been properly installed.
Test printing procedure
1 For Windows 98/Me/2000/NT 4.0, click the [Start] button, point to “Settings”, and then click “Printers”.For Windows XP/Server 2003, click the [Start] button, and then click “Printers and Faxes”.
2 Right-click the icon for the installed printer, and then click “Properties”.
3 In the dialog box that appeared, click the [Print Test] button or the [Print Test Page] button.
6-22 C350
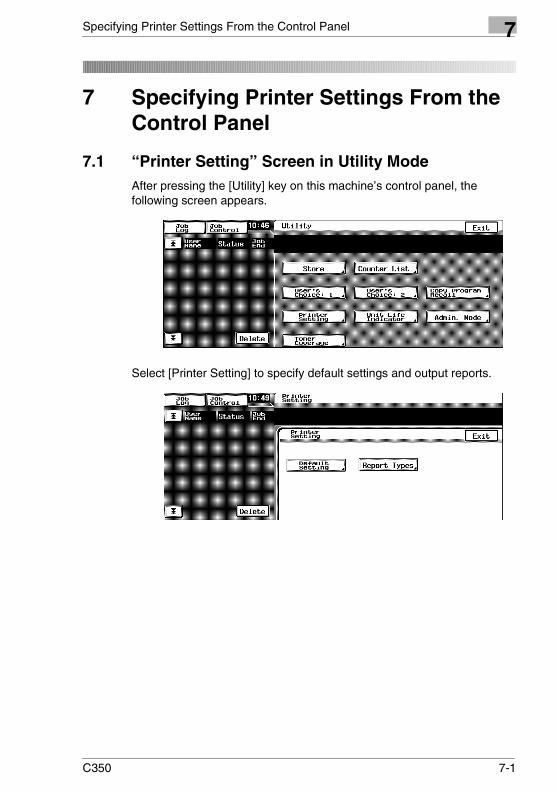
Specifying Printer Settings From the Control Panel 7
7 Specifying Printer Settings From the Control Panel
7.1 “Printer Setting” Screen in Utility ModeAfter pressing the [Utility] key on this machine’s control panel, the following screen appears.
Select [Printer Setting] to specify default settings and output reports.
C350 7-1
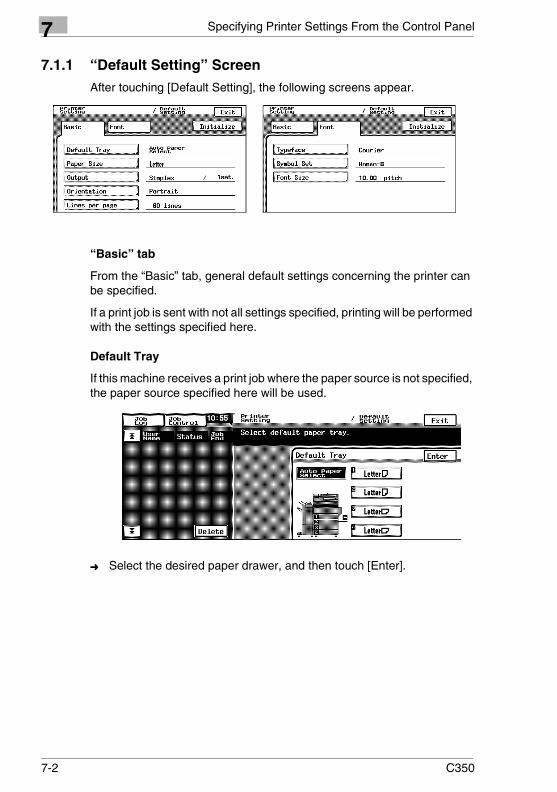
7 Specifying Printer Settings From the Control Panel
7.1.1 “Default Setting” ScreenAfter touching [Default Setting], the following screens appear.
“Basic” tab
From the “Basic” tab, general default settings concerning the printer can be specified.
If a print job is sent with not all settings specified, printing will be performed with the settings specified here.
Default Tray
If this machine receives a print job where the paper source is not specified, the paper source specified here will be used.
➜ Select the desired paper drawer, and then touch [Enter].
7-2 C350
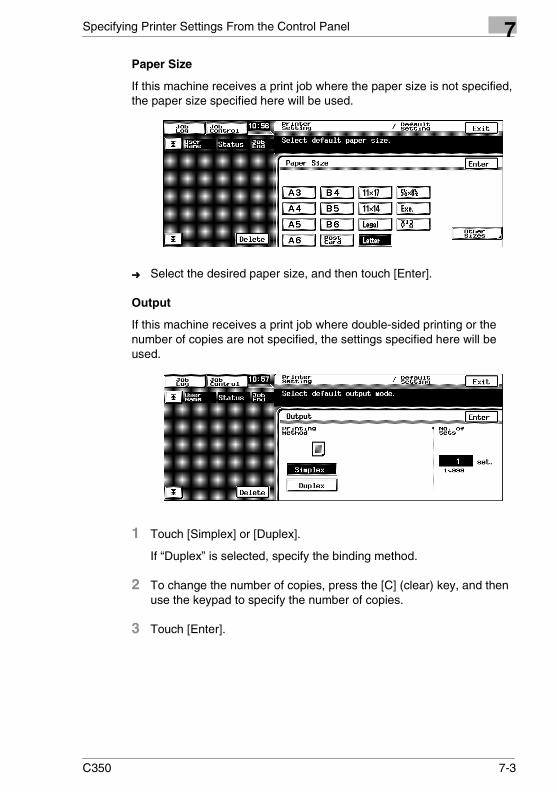
Specifying Printer Settings From the Control Panel 7
Paper SizeIf this machine receives a print job where the paper size is not specified, the paper size specified here will be used.
➜ Select the desired paper size, and then touch [Enter].
Output
If this machine receives a print job where double-sided printing or the number of copies are not specified, the settings specified here will be used.
1 Touch [Simplex] or [Duplex].
If “Duplex” is selected, specify the binding method.
2 To change the number of copies, press the [C] (clear) key, and then use the keypad to specify the number of copies.
3 Touch [Enter].
C350 7-3
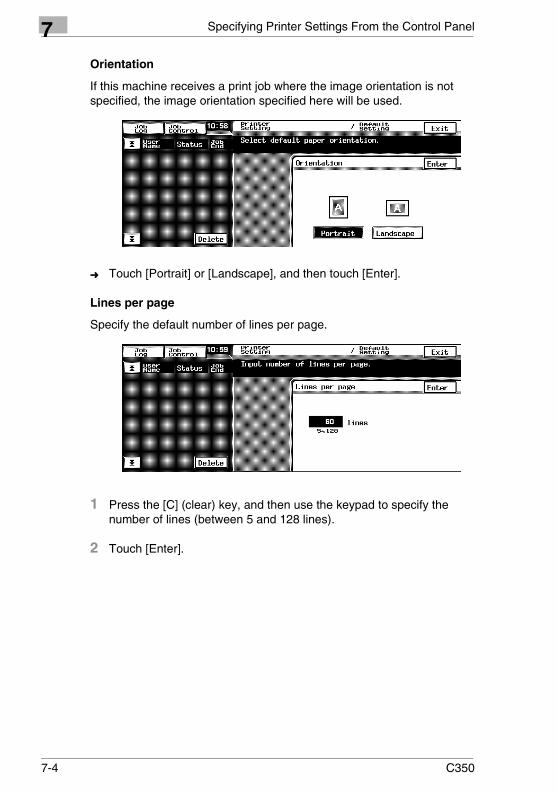
7 Specifying Printer Settings From the Control Panel
Orientation
If this machine receives a print job where the image orientation is not specified, the image orientation specified here will be used.
➜ Touch [Portrait] or [Landscape], and then touch [Enter].
Lines per page
Specify the default number of lines per page.
1 Press the [C] (clear) key, and then use the keypad to specify the number of lines (between 5 and 128 lines).
2 Touch [Enter].
7-4 C350
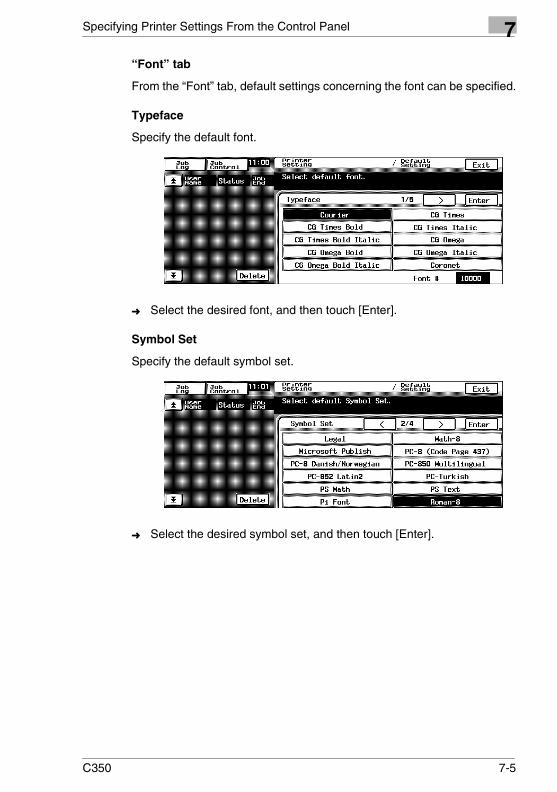
Specifying Printer Settings From the Control Panel 7
“Font” tabFrom the “Font” tab, default settings concerning the font can be specified.
Typeface
Specify the default font.
➜ Select the desired font, and then touch [Enter].
Symbol Set
Specify the default symbol set.
➜ Select the desired symbol set, and then touch [Enter].
C350 7-5
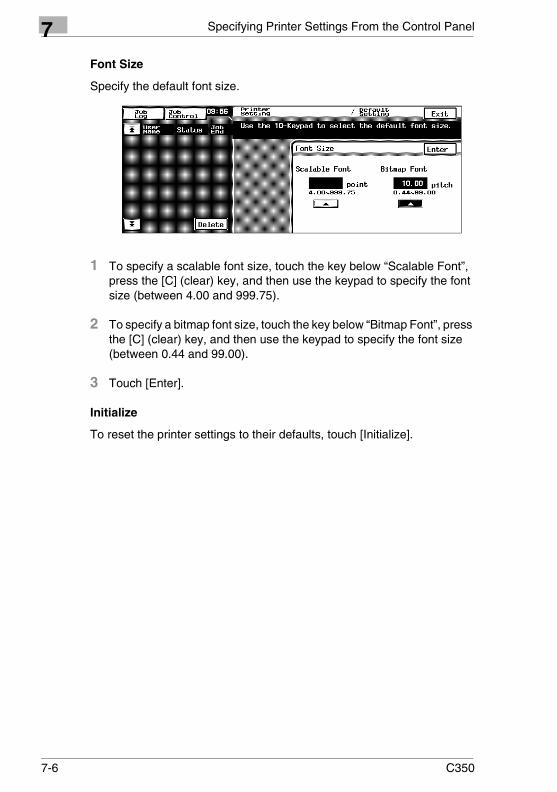
7 Specifying Printer Settings From the Control Panel
Font Size
Specify the default font size.
1 To specify a scalable font size, touch the key below “Scalable Font”, press the [C] (clear) key, and then use the keypad to specify the font size (between 4.00 and 999.75).
2 To specify a bitmap font size, touch the key below “Bitmap Font”, press the [C] (clear) key, and then use the keypad to specify the font size (between 0.44 and 99.00).
3 Touch [Enter].
Initialize
To reset the printer settings to their defaults, touch [Initialize].
7-6 C350

Specifying Printer Settings From the Control Panel 7
7.1.2 “Report Types” ScreenFrom this screen, configuration information for this machine and a test page can be printed.
After touching [Report Types], the following screen appears.
Operating procedure
1 Select the report that you wish to print.
2 Press the [Start] key in this machine’s control panel.
The selected report is printed.
C350 7-7

7 Specifying Printer Settings From the Control Panel
7.2 “Printer Setting” Screen in Administrator ModeAfter pressing the [Utility] key on this machine’s control panel, touching [Admin. Mode], then entering the administrator access code, the following screen appears.
After touching [Printer Setting], the following screens appear.
“Common Setting” tab
From the “Common Setting” tab, various settings concerning the printer can be specified.
PDL Setting
If the printer language only supports PCL, this key is not available.
7-8 C350

Specifying Printer Settings From the Control Panel 7
I/O TimeoutThe transmission timeout can be specified.
➜ Use the keypad to specify the length of time (in seconds) until a connection times out (between 10 and 300 seconds), and then touch [Enter].
Parallel Interface
The mode for using a parallel interface can be specified.
➜ Select the parallel interface mode, and then touch [Enter].
C350 7-9

7 Specifying Printer Settings From the Control Panel
Screen Pattern Setting
The screen pattern setting for printing from a computer can be specified.
➜ Touch [Gradation] or [Resolution], and then touch [Enter].
“PCL Setting” tab
From the “PCL Setting” tab, settings concerning PCL can be specified.
Overwrite A4 ← → Letter
If Letter (or A4) size is selected, but paper of the specified size is not loaded, printing can continue with A4 (or Letter) size paper.
➜ Touch [Yes] or [No], and then touch [Enter].
7-10 C350

Using the Scan Functions 8
8 Using the Scan Functions
This chapter describes the setup and operating procedures of the scan functions.
This machine’s control panel or PageScope Web Connection is used to set up the scan functions. For details on the startup procedure of PageScope Web Connection and the procedure for logging in to Administrator mode, refer to “12 Using PageScope Web Connection”.
8.1 OverviewThe following types of scan functions are available on this machine. Use the appropriate type that matches your network environment and application.
Scan to E-mail Sends scanned data as an attachment to an e-mail.Refer to “Scan to E-mail” on page 8-5 and “Performing Scan to E-Mail Operations” on page 8-40.
Scan to FTP Server Sends scanned data to an FTP server.Refer to “Scan to FTP Server” on page 8-6 and “Performing Scan to FTP Server Operations” on page 8-46.
Scan to PC Sends scanned data to a computer using FTP.Refer to “Scan to PC” on page 8-7 and “Performing Scan to PC Operations” on page 8-53.
Scan to HDD Sends scanned data to the optional hard disk.Refer to “Scan to HDD” on page 8-8 and “Performing Scan to HDD Operations” on page 8-55.
Internet FAX Attaches the scanned data to an e-mail and sends it to a device that supports Internet faxing. In addition, received image data can be printed.Refer to “Scan to Internet FAX” on page 8-9, “Internet FAX Reception” on page 8-10, “Performing Scan to Internet FAX Operations” on page 8-64, and “Performing Internet FAX Reception Operations” on page 8-72.
C350 8-1

8 Using the Scan Functions
8.1.1 Environment Required for the Scan FunctionsThe following environment is required to send image data (send and receive for Internet faxing) using the scan functions.
✎NoteAll scan functions can only be used under a TCP/IP network environment.
Environment Required to Send Image Data
Environment Required to Receive Image Data
Other Limitations
Scan to E-mail Mail server (on the network)
Mail client computer A maximum file size may be specified on the mail server.
Scan to FTP server
FTP server (on the network)
FTP client computer
Scan to PC FTP server application (on the receiving computer)
Client computer
Scan to HDD Optional hard disk (installed into this machine)
Web browser or BOX Utility
Scan to Internet FAX
Mail server (on the network)
The destination must have a device that can receive Internet faxes. A maximum file size may be specified on the mail server.
Internet FAX reception
Mail server
8-2 C350
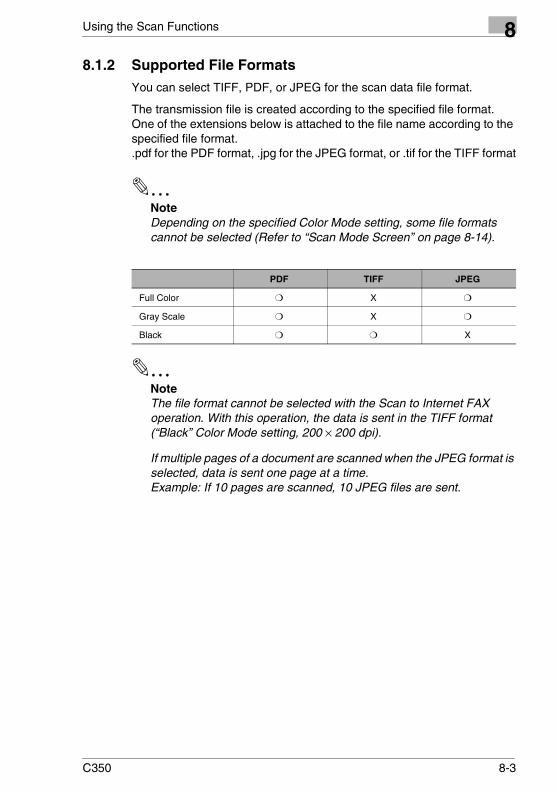
Using the Scan Functions 8
8.1.2 Supported File FormatsYou can select TIFF, PDF, or JPEG for the scan data file format.
The transmission file is created according to the specified file format.One of the extensions below is attached to the file name according to the specified file format..pdf for the PDF format, .jpg for the JPEG format, or .tif for the TIFF format
✎NoteDepending on the specified Color Mode setting, some file formats cannot be selected (Refer to “Scan Mode Screen” on page 8-14).
✎NoteThe file format cannot be selected with the Scan to Internet FAX operation. With this operation, the data is sent in the TIFF format (“Black” Color Mode setting, 200 × 200 dpi).
If multiple pages of a document are scanned when the JPEG format is selected, data is sent one page at a time.Example: If 10 pages are scanned, 10 JPEG files are sent.
PDF TIFF JPEG
Full Color ❍ X ❍
Gray Scale ❍ X ❍
Black ❍ ❍ X
C350 8-3
8 Using the Scan Functions
8.1.3 File NameThe file name of the image data is automatically assigned by the printer controller.
The file name is assigned in the following format.
<device_name><date/time><automatic_number>.<extension>
✎MemoIf the e-mail message is divided for transmission, the pages that are included in the attached files are used as a portion of the file names. For example, if a ten-page document is divided into two files and the files include pages 1 through 7 and pages 8 through 10, the two file names are assigned as follows:
<device_name><date/time><automatic_number>P.1-7.<extension><device_name><date/time><automatic_number>P.8-10.<extension>
Setting the device name
1 Start up PageScope Web Connection.
2 Enter the administrator access code, and log in to Administrator mode.
3 On the “Scan” tab, click Scan in the menu.
4 The name entered in the Device Name box becomes the <device_name> portion of the file name.
✎NoteThe first nine characters of the name entered in the Device Name box are used for the <device_name> portion of the file name.
8-4 C350
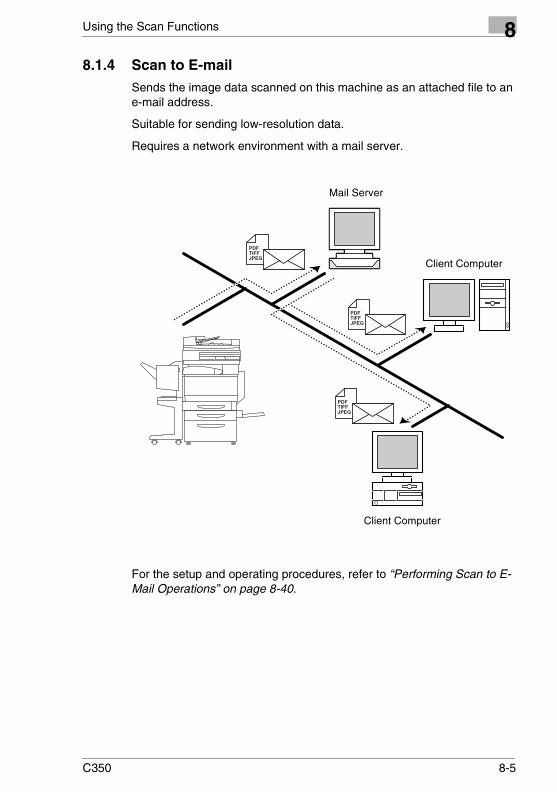
Using the Scan Functions 8
8.1.4 Scan to E-mailSends the image data scanned on this machine as an attached file to an e-mail address.
Suitable for sending low-resolution data.
Requires a network environment with a mail server.
For the setup and operating procedures, refer to “Performing Scan to E-Mail Operations” on page 8-40.
Mail Server
Client Computer
Client Computer
C350 8-5
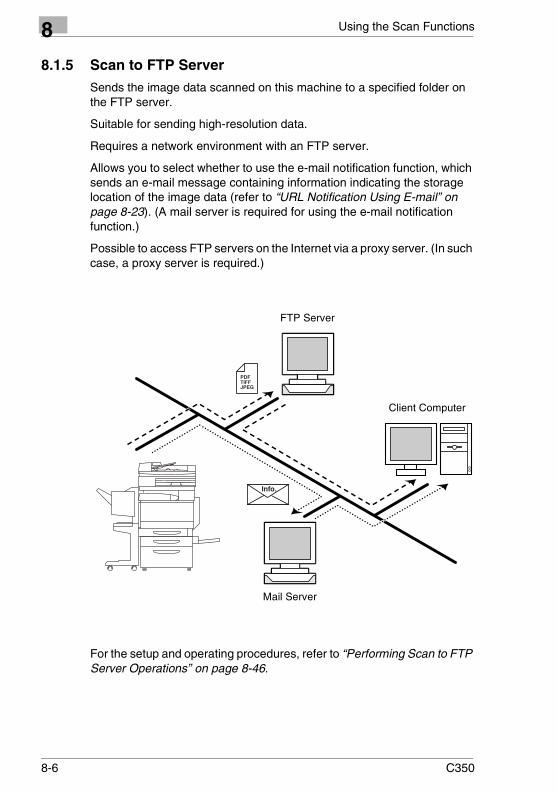
8 Using the Scan Functions
8.1.5 Scan to FTP ServerSends the image data scanned on this machine to a specified folder on the FTP server.
Suitable for sending high-resolution data.
Requires a network environment with an FTP server.
Allows you to select whether to use the e-mail notification function, which sends an e-mail message containing information indicating the storage location of the image data (refer to “URL Notification Using E-mail” on page 8-23). (A mail server is required for using the e-mail notification function.)
Possible to access FTP servers on the Internet via a proxy server. (In such case, a proxy server is required.)
For the setup and operating procedures, refer to “Performing Scan to FTP Server Operations” on page 8-46.
FTP Server
Client Computer
Mail Server
8-6 C350

Using the Scan Functions 8
8.1.6 Scan to PCSends the image data scanned on this machine directly to a computer using FTP.
Requires an FTP server application on the computer and the application must be running when receiving the image data.
For the setup and operating procedures, refer to “Performing Scan to PC Operations” on page 8-53.
FTP server application
Client Computer
C350 8-7
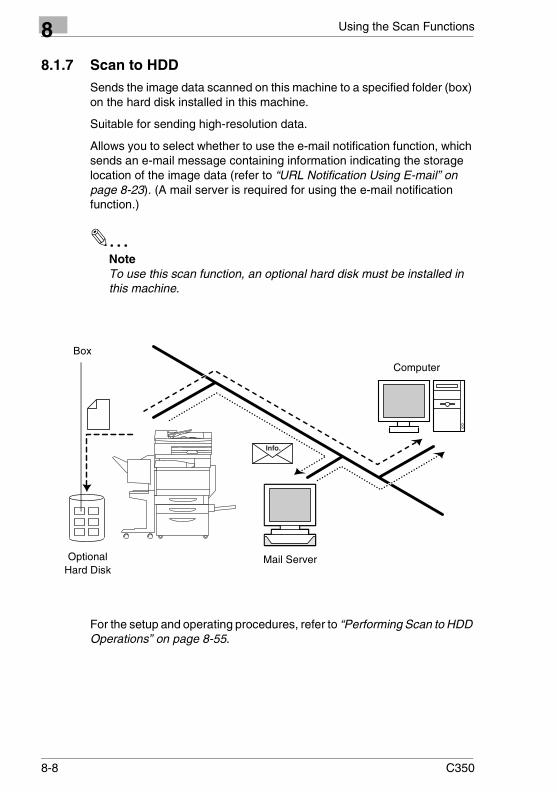
8 Using the Scan Functions
8.1.7 Scan to HDDSends the image data scanned on this machine to a specified folder (box) on the hard disk installed in this machine.
Suitable for sending high-resolution data.
Allows you to select whether to use the e-mail notification function, which sends an e-mail message containing information indicating the storage location of the image data (refer to “URL Notification Using E-mail” on page 8-23). (A mail server is required for using the e-mail notification function.)
✎NoteTo use this scan function, an optional hard disk must be installed in this machine.
For the setup and operating procedures, refer to “Performing Scan to HDD Operations” on page 8-55.
Mail Server
Computer
Optional Hard Disk
Box
8-8 C350

Using the Scan Functions 8
8.1.8 Scan to Internet FAXAttaches the image data scanned on this machine to an e-mail and sends it to a device that supports Internet faxing.
The image data is sent with the “Black” Color Mode setting in the TIFF format at 200 × 200 dpi.
✎MemoBefore sending document data using Internet faxing, check in advance whether the receiving side is capable of receiving Internet faxes.
For the setup and operating procedures, refer to “Performing Scan to Internet FAX Operations” on page 8-64.
Mail Server
Device that supportsInternet faxing
BlackTIFF format
200 × 200 dpi
Printout
C350 8-9
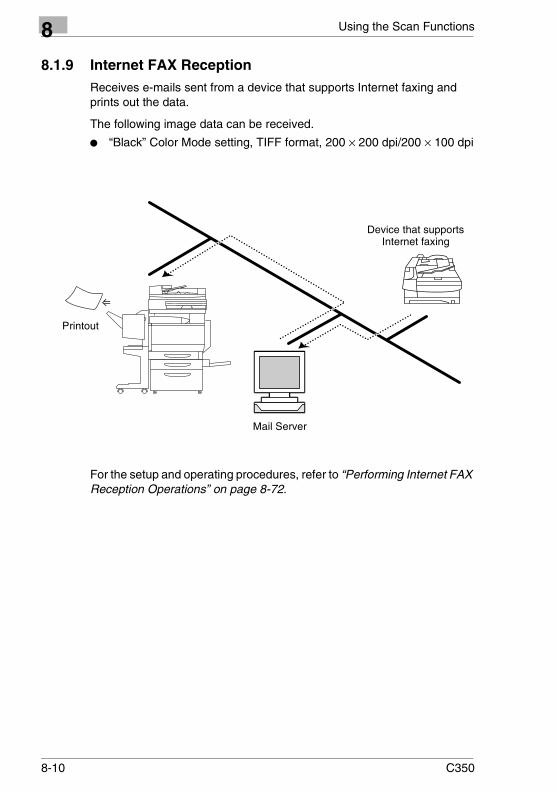
8 Using the Scan Functions
8.1.9 Internet FAX ReceptionReceives e-mails sent from a device that supports Internet faxing and prints out the data.
The following image data can be received.
� “Black” Color Mode setting, TIFF format, 200 × 200 dpi/200 × 100 dpi
For the setup and operating procedures, refer to “Performing Internet FAX Reception Operations” on page 8-72.
Mail Server
Device that supportsInternet faxing
Printout
8-10 C350

Using the Scan Functions 8
8.2 Basic Setup of the Scan FunctionsUsing PageScope Web Connection or this machine’s control panel, enter the basic settings for the scan functions.
✎MemoFor details on the startup procedure for PageScope Web Connection and the procedure for logging in to Administrator mode, refer to “12 Using PageScope Web Connection”.
Using PageScope Web Connection
1 Start up PageScope Web Connection.
2 Enter the administrator access code, and log in to Administrator mode.
3 On the “Scan” tab, click Scan in the menu.
4 Specify settings for the following.
Scan
Device Name Enter the device name of this machine (up to 36 characters). The name entered here is the character string that is attached to the front of the image file name that is created by the scan function.Refer to “File Name” on page 8-4.
C350 8-11

8 Using the Scan Functions
Using this machine’s control panel
Settings for the “Device Name”, “Color/Grayscale Compression Level”, and “Pri. Comp. Method for Monochrome” parameters can also be set from this machine’s control panel.
1 On this machine’s control panel, press the [Utility] key, touch [Admin. Mode], and then enter the administrator access code.
2 Touch [Scan Setting].
3 Specify settings for the “Device Name”, “Color/Grayscale Compression Level”, and “Pri. Comp. Method for Monochrome” parameters.
Color/Grayscale Compression Level
Set the image compression mode to high resolution, standard, or low resolution.
Priority Compression Method for Monochrome (PDF)
Set the priority compression method of PDF files to MH or MMR.
Priority Compression Method for Monochrome (TIFF)
Set the priority compression method of TIFF files to MH or MMR.
Send
Scanned File Separation Set the division method (in units of pages) when the maximum size is exceeded for Scan to E-mail and Scan to Internet FAX operations.For e-mail transmission, refer to “Binary Division and Scanned File Separation” on page 8-43.For Scan to Internet FAX, refer to “Binary Division and Scanned File Separation” on page 8-68.
E-mail Address (From:) Specify the sender’s e-mail address (From address) that is used for e-mail messages sent from this machine. This is the sender’s e-mail address that appears for Scan to E-mail and Scan to Internet FAX operations, and for URL notification by e-mail.For e-mail transmission, refer to “Error Notification” on page 8-45.For Scan to Internet FAX, refer to “Error Notification” on page 8-71.For URL notification by e-mail, refer to “URL Notification Using E-mail” on page 8-23.
8-12 C350

Using the Scan Functions 8
8.3 Settings for ScanningWhen sending image data using a scan function, the following parameters can be entered from this machine’s control panel.
Displaying the setup screen
1 On this machine’s control panel, press the [Scan] key.
2 If network user authentication is enabled, a login screen appears. In this case, enter the network user name and password, and then touch [Login].
✎MemoFor details on specifying settings for network user authentication, refer to “User Authentication” on page 12-71.
3 Touch the button for the desired screen ([Scan Mode], [Address], [Original Setting], and [MISC.]).
C350 8-13

8 Using the Scan Functions
8.3.1 Scan Mode ScreenYou can specify settings for scanning the image data.
Color/File
Specify the color mode and compression method.
Available settings
� Color Mode: “Auto Color”, “Full Color”, “Gray Scale”, or “Black”
� File Format: “PDF”, “TIFF”, or “JPEG”
✎MemoWith the Scan to Internet FAX operation, the settings are fixed to “Black” and “TIFF”.
When “Auto Color” or “Full Color” is selected, the file format cannot be set to “TIFF”.
When “Black” is selected, the file format cannot be set to “JPEG”.
Resolution
Specify the scan resolution.
Settings: 200 dpi, 300 dpi, 400 dpi, or 600 dpi
✎MemoWith the Scan to Internet FAX operation, the resolution is set to 200 dpi.
Background Removal
Enter the background removal settings for the scanned document.
Settings: “Auto” or manual (-5 (maximum removal) to +2 (minimum removal): 8 levels)
Scan Size
Specify the scan size of the document.You can also specify an arbitrary size (in inches).
In addition, you can also specify the position and width settings for the “Edge/Frame Erase” function.
✎MemoSelect “11 × 17”, “Legal”, or “Letter” for Scan to Internet FAX.
8-14 C350
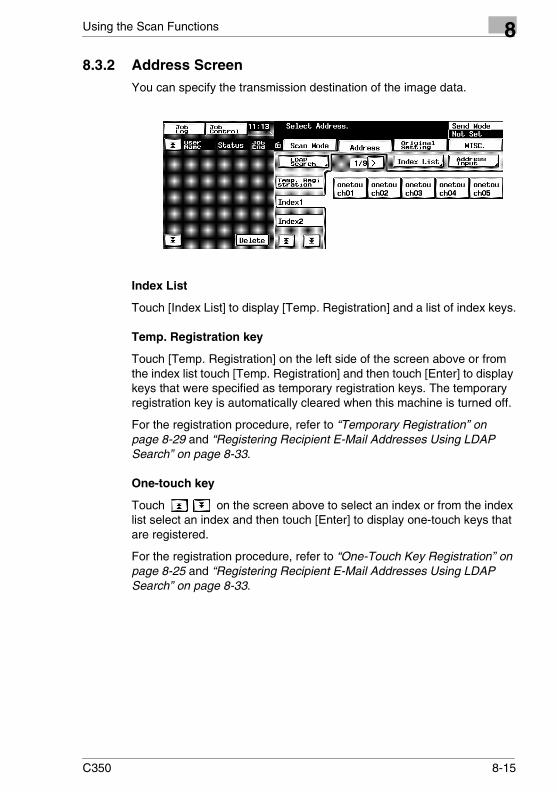
Using the Scan Functions 8
8.3.2 Address ScreenYou can specify the transmission destination of the image data.
Index List
Touch [Index List] to display [Temp. Registration] and a list of index keys.
Temp. Registration key
Touch [Temp. Registration] on the left side of the screen above or from the index list touch [Temp. Registration] and then touch [Enter] to display keys that were specified as temporary registration keys. The temporary registration key is automatically cleared when this machine is turned off.
For the registration procedure, refer to “Temporary Registration” on page 8-29 and “Registering Recipient E-Mail Addresses Using LDAP Search” on page 8-33.
One-touch key
Touch on the screen above to select an index or from the index list select an index and then touch [Enter] to display one-touch keys that are registered.
For the registration procedure, refer to “One-Touch Key Registration” on page 8-25 and “Registering Recipient E-Mail Addresses Using LDAP Search” on page 8-33.
C350 8-15
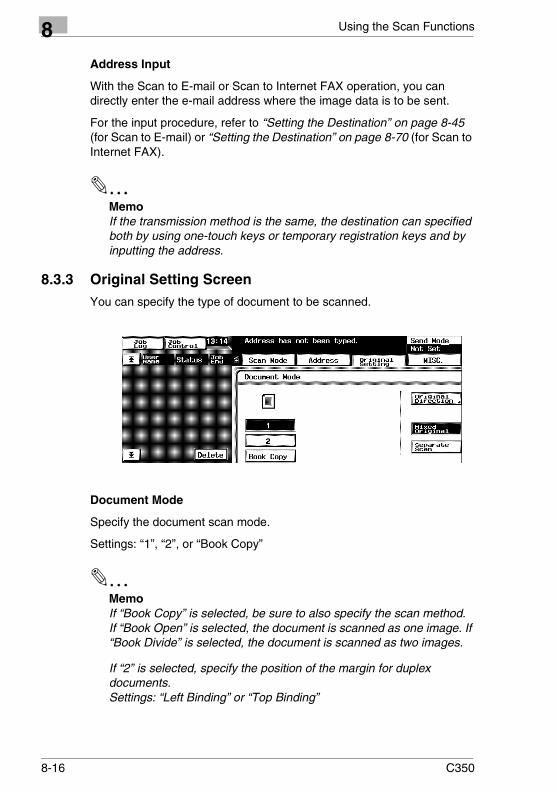
8 Using the Scan Functions
Address Input
With the Scan to E-mail or Scan to Internet FAX operation, you can directly enter the e-mail address where the image data is to be sent.
For the input procedure, refer to “Setting the Destination” on page 8-45 (for Scan to E-mail) or “Setting the Destination” on page 8-70 (for Scan to Internet FAX).
✎MemoIf the transmission method is the same, the destination can specified both by using one-touch keys or temporary registration keys and by inputting the address.
8.3.3 Original Setting ScreenYou can specify the type of document to be scanned.
Document Mode
Specify the document scan mode.
Settings: “1”, “2”, or “Book Copy”
✎MemoIf “Book Copy” is selected, be sure to also specify the scan method.If “Book Open” is selected, the document is scanned as one image. If “Book Divide” is selected, the document is scanned as two images.
If “2” is selected, specify the position of the margin for duplex documents.Settings: “Left Binding” or “Top Binding”
8-16 C350
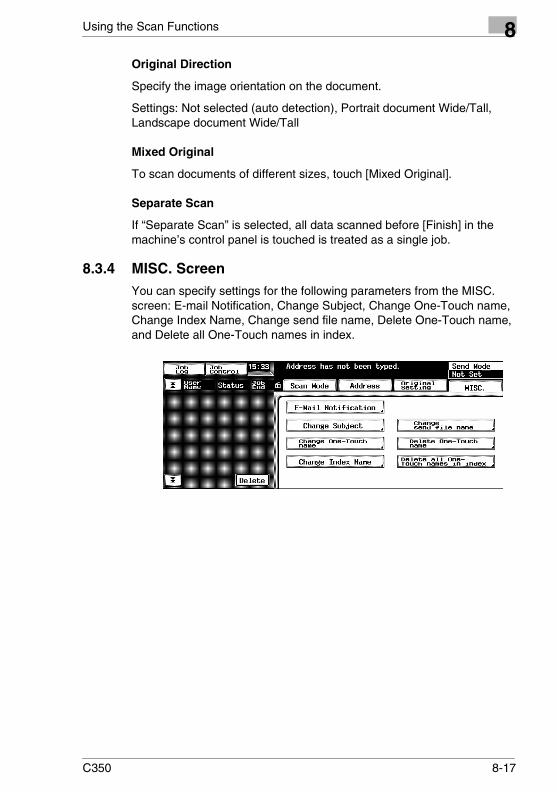
Using the Scan Functions 8
Original DirectionSpecify the image orientation on the document.
Settings: Not selected (auto detection), Portrait document Wide/Tall, Landscape document Wide/Tall
Mixed Original
To scan documents of different sizes, touch [Mixed Original].
Separate Scan
If “Separate Scan” is selected, all data scanned before [Finish] in the machine’s control panel is touched is treated as a single job.
8.3.4 MISC. ScreenYou can specify settings for the following parameters from the MISC. screen: E-mail Notification, Change Subject, Change One-Touch name, Change Index Name, Change send file name, Delete One-Touch name, and Delete all One-Touch names in index.
C350 8-17

8 Using the Scan Functions
E-mail notification
When using Scan to FTP Server or Scan to HDD, the e-mail notification function can be used to send an e-mail notification containing information on the storage location (URL or box name) of the image data that was scanned. The image data is not attached to the e-mail. The recipient can refer to the information written in the e-mail message in order to access the storage location of the image data.
When transmitting image data by selecting a one-touch key (refer to “One-Touch Key Registration” on page 8-25) that has been registered for Scan to FTP Server or Scan to HDD operation and is assigned a notification address, an e-mail notification is transmitted.
If a notification address has not been assigned to the one-touch key, you can set the address with the “E-mail Notification” function on the MISC. screen.
1 Touch [E-mail Notification] on the MISC. screen in Scan mode.
2 Select the desired index (index number or [Temp. Registration]), and then touch the key for the desired notification address.
✎NoteThe URL notification destination must be registered to a one-touch key.Only one-touch keys that have e-mail addresses registered can be used to specify the destination.
For details, refer to “URL Notification Using E-mail” on page 8-23.
Changing the subject
You can change the subject of an e-mail only when the transmission method is Scan to E-mail or Scan to Internet FAX.
1 Touch [Change Subject] on the MISC. screen in Scan Mode.
2 Enter the subject (up to 64 characters) and then touch [Enter].
The subject for Scan to E-mail and Scan to Internet FAX is changed.
8-18 C350

Using the Scan Functions 8
Changing a one-touch nameYou can change the name of the registered one-touch keys.
1 Touch [Change One-Touch name] on the MISC. screen in Scan mode.
An index list is displayed.
2 Select the index containing the one-touch key that you wish to rename, and then touch [Enter].
3 Select the one-touch key that you wish to rename.
4 Change the one-touch key name (up to 12 characters), and then touch [Enter].
The name of the one-touch key is changed.
Changing an index name
You can change the name of an index.
1 Touch [Change Index Name] on the MISC. screen in Scan mode.
An index list is displayed.
2 Select the index containing the name that you wish to change, and then touch [Enter].
3 Change the index name (up to 10 characters), and then touch [Enter].
The name of the index is changed.
Changing the name of the transmission file
You can change the name of the file to be transmitted.
1 Touch [Change send file name] on the MISC. screen in Scan Mode.
2 Enter the file name (up to 21 characters) and then touch [Enter].
The name of the file to be transmitted is changed.
C350 8-19

8 Using the Scan Functions
Deleting a one-touch name
You can delete one-touch keys that are registered.
1 Touch [Delete One-Touch name] on the MISC. screen in Scan mode.
An index list is displayed.
2 Select the index containing the one-touch key that you wish to delete, and then touch [Enter].
3 Select the one-touch key that you wish to delete, and then touch [Enter].
4 On the confirmation screen, touch [Yes], and then touch [Enter].
The one-touch key is deleted.
Deleting all one-touch names in an index
You can delete all one-touch keys in a specified index.
1 Touch [Delete all One-Touch names in index] on the MISC. screen in Scan mode.
An index list is displayed.
2 Select the index containing the data that you wish to delete entirely, and then touch [Enter].
3 On the confirmation screen, touch [Yes], and then touch [Enter].
All one-touch keys in the index are deleted.
8-20 C350

Using the Scan Functions 8
8.3.5 Registering the Scan Mode Default SettingsYou can customize the default settings for Scan mode.
Registration procedure
1 Press the [Scan] key on this machine’s control panel to enter Scan mode.
2 Set the default values in the Scan mode.
3 On this machine’s control panel, press the [Utility] key.
4 Touch [Store].
5 Touch [Reset Mode].
6 Touch [Current Mode] in Scan mode.
7 Touch [Enter].
If you select “Factory Default” and touch [Enter], you can reset the default settings of Scan mode to the factory default settings.
C350 8-21

8 Using the Scan Functions
8.4 Checking the Transmission SettingsYou can check the transmission settings by pressing the [Mode Check] key on this machine’s control panel.
Touch [Change] beside “File Name” to change the name of the transmission file. Enter the file name (up to 21 characters) and then touch [Enter].
When using Scan to E-mail or Scan to Internet FAX, three tabs are displayed, as shown below.
On the Send screen, you can check the file name and destination. Touch [Detail] to check the e-mail address of the destination. For Internet FAX, touch [Set], and then select a Reply-to address from the one-touch keys.
On the Subject/From screen, you can check the subject of the e-mail and the sender’s address (From address).Touch [Change] beside “Subject” to change the subject of the e-mail. Enter the subject (up to 64 characters) and then touch [Enter].
On the Message screen, you can check the contents of the e-mail.
8-22 C350
Using the Scan Functions 8
8.5 URL Notification Using E-mailURL notification using e-mail is a function used to send an e-mail notification containing information on the storage location of the image data that was created when the Scan to E-mail, Scan to FTP Server, or Scan to HDD operation was performed. The image data is not attached to the URL notification mail. The recipient of the URL notification mail can refer to the URL information in the e-mail in order to access the storage location of the image data.
✎NoteTo send a URL notification by e-mail, a network environment with a mail server is required.
✎MemoYou may need to enter a user name and a password to access the FTP server or box on the hard disk.The user name and password are not provided in the e-mail notification.If you need additional information for access, check with your administrator.
A URL notification mail is sent for the following scan operations.
� When Scan to E-mail is used and the mail size exceeds the maximum allowed by “Maximum E-mail Size” (refer to “Specifying Scan to E-mail Settings” on page 8-41).In this case, the image data is saved to the hard disk installed in this machine, and a URL indicating the storage location is sent by e-mail.
� When the Scan to FTP Server operation is performed
� When the Scan to HDD operation is performed
✎MemoIf “Binary Division” (refer to “Specifying Scan to E-mail Settings” on page 8-41 and “Setting the E-mail Transmission” on page 8-66) is set to “Yes” when using Scan to E-mail and the mail upper limit specified by “Maximum E-mail Size” is exceeded, the e-mail is sent in segments. In this case, the URL notification mail is not sent.
C350 8-23
8 Using the Scan Functions
The URL notification mail destination is an e-mail address registered to a one-touch key or temporary registration key. It is specified using the parameters below during one-touch key registration or temporary registration. For the setup procedure, refer to “Registering Destinations in Advance” on page 8-25.
� Scan to E-mail: Address (To:)
� Scan to FTP Server: URL Notification E-mail Address
� Scan to HDD: URL Notification E-mail Address
Setting the mail destination from this machine’s control panel
When using Scan to FTP Server or Scan to HDD, the URL information is sent to the address registered for “URL Notification E-mail Address” in the specified one-touch key or temporary registration key. However, you can specify a mail destination separately from this machine’s control panel.
Setup procedure
1 On this machine’s control panel, press the [Scan] key.
2 On the Address screen, select the destination for which the transmission method is set to Scan to FTP Server or Scan to HDD.
3 Touch [E-mail Notification] on the MISC. screen.
4 Select the desired index (index number or [Temp. Registration]), and then touch the key for the desired notification address.
✎NoteThe URL notification destination must be registered to the one-touch key.Only one-touch keys that have e-mail addresses registered can be used to specify the destination.
8-24 C350

Using the Scan Functions 8
8.6 Registering Destinations in AdvanceWhen using a scan function, it is convenient if the transmission destinations are registered in advance from this machine’s control panel.
Some of the items that you can register are different for one-touch keys and temporary registration keys. For Scan to E-mail, you can specify the destination and the destination e-mail address from the one-touch key registration screen. On the temporary registration screen, you can specify the destination, destination e-mail address, and the scan mode.
You can use the LDAP server search function and register the search result to one-touch keys and temporary keys from this machine’s control panel. For the operating procedure, refer to “Registering Recipient E-Mail Addresses Using LDAP Search” on page 8-33.
8.6.1 One-Touch Key RegistrationIf the one-touch key is registered in advance, you can immediately recall the transmission destination. Since you do not have to enter the transmission destination for every transmission, it is convenient if you register destinations to which you frequently transmit image data.
Registration procedure
1 Start up PageScope Web Connection.
2 On the “Scan” tab in User mode, click One-Touch Key Registration in the menu.
3 A list of registered one-touch keys appears. Select an index.
C350 8-25
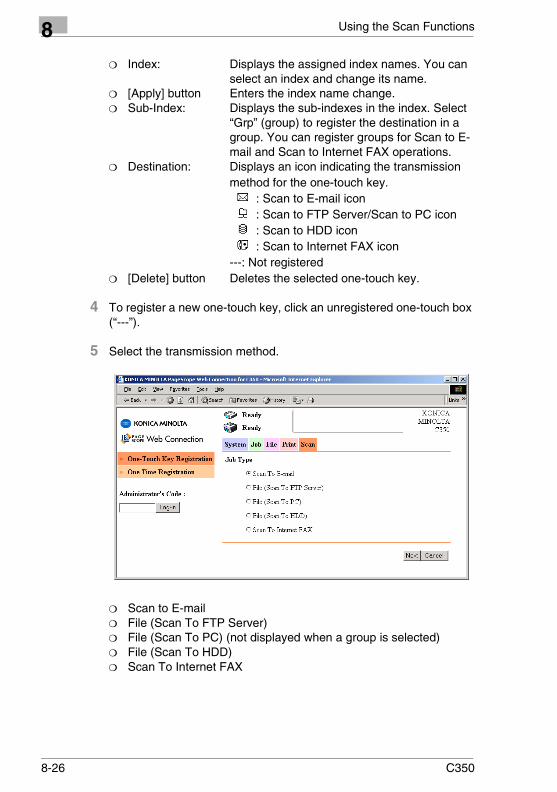
8 Using the Scan Functions
❍ Index: Displays the assigned index names. You can select an index and change its name.
❍ [Apply] button Enters the index name change.❍ Sub-Index: Displays the sub-indexes in the index. Select
“Grp” (group) to register the destination in a group. You can register groups for Scan to E-mail and Scan to Internet FAX operations.
❍ Destination: Displays an icon indicating the transmission method for the one-touch key.
: Scan to E-mail icon: Scan to FTP Server/Scan to PC icon: Scan to HDD icon: Scan to Internet FAX icon
---: Not registered❍ [Delete] button Deletes the selected one-touch key.
4 To register a new one-touch key, click an unregistered one-touch box (“---”).
5 Select the transmission method.
❍ Scan to E-mail❍ File (Scan To FTP Server)❍ File (Scan To PC) (not displayed when a group is selected)❍ File (Scan To HDD)❍ Scan To Internet FAX
8-26 C350

Using the Scan Functions 8
✎MemoFor a group registration, the transmission destination address can contain up to 1800 characters. Use a comma or semicolon to separate the addresses.For registrations other than for groups, a maximum of 72 characters are allowed in the transmission destination address.
6 Click the [Next] button.
7 Specify settings for the following parameters for each transmission method.
When “Scan to E-mail” is selected
When “File (Scan To FTP Server)” is selected
When “File (Scan To PC)” is selected
Destination Name Enter the name of the one-touch key (up to 12 characters).
Address (To:) Enter the transmission destination address.To register multiple mail addresses in a group registration, separate each address with a comma.Settings: Up to 72 characters or up to 1800 characters when registering a group
Destination Name Enter the name of the one-touch key (up to 12 characters).
Destination Server Select the FTP server that is used for Scan to FTP Server. The drop-down list displays FTP servers that were registered in “Registering FTP Servers” .Refer to “Registering FTP Servers” on page 8-48.
URL Notification Set whether to send an e-mail notification containing information on the storage location of the scanned data.Settings: “Yes” or “No”
URL Notification E-mail Address
Set the destination address for the URL notification. To register multiple e-mail addresses, separate the addresses with a comma.Settings: Up to 72 characters or up to 1800 characters when registering a group
Destination Name Enter the name of the one-touch key (up to 12 characters).
IP Address Enter the IP address of the destination computer (a computer running an FTP application).
C350 8-27
8 Using the Scan Functions
When “File (Scan To HDD)” is selected
When “Scan To Internet FAX” is selected
✎MemoTo register multiple e-mail addresses, separate the addresses with a comma.
The number of one-touch keys that can be registered in an index is 120 for individuals and 15 for groups. However, the total number of 60 group registrations cannot be exceeded.
Destination Name Enter the name of the one-touch key (up to 12 characters).
User Directory Select the box that is used for Scan to HDD. The drop-down list displays boxes that are registered.Refer to “Creating User Boxes” on page 8-57.
Password Enter the password assigned to the selected user box (up to 64 characters). If the “PUBLIC” box is selected, a password is not necessary.
URL Notification Set whether to send an e-mail notification containing information on the storage location of the scanned data.Settings: “Yes” or “No”
URL Notification E-mail Address
Set the destination address for the URL notification. To register multiple e-mail addresses, separate the addresses with a comma.Settings: Up to 72 characters or up to 1800 characters when registering a group
Destination Name Enter the name of the one-touch key (up to 12 characters).
Address (To:) Set the destination e-mail address for Internet faxing. To register multiple mail addresses in a group registration, separate each address with a comma.Settings: Up to 72 characters or up to 1800 characters when registering a group
E-mail Address (Reply-To:)
Set the sender’s e-mail address (up to 72 characters).
8-28 C350
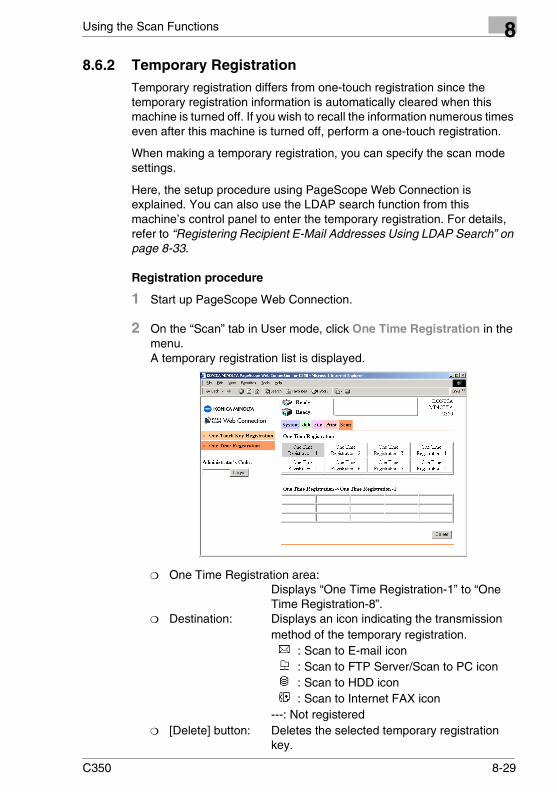
Using the Scan Functions 8
8.6.2 Temporary RegistrationTemporary registration differs from one-touch registration since the temporary registration information is automatically cleared when this machine is turned off. If you wish to recall the information numerous times even after this machine is turned off, perform a one-touch registration.
When making a temporary registration, you can specify the scan mode settings.
Here, the setup procedure using PageScope Web Connection is explained. You can also use the LDAP search function from this machine’s control panel to enter the temporary registration. For details, refer to “Registering Recipient E-Mail Addresses Using LDAP Search” on page 8-33.
Registration procedure
1 Start up PageScope Web Connection.
2 On the “Scan” tab in User mode, click One Time Registration in the menu.A temporary registration list is displayed.
❍ One Time Registration area:Displays “One Time Registration-1” to “One Time Registration-8”.
❍ Destination: Displays an icon indicating the transmission method of the temporary registration.
: Scan to E-mail icon: Scan to FTP Server/Scan to PC icon: Scan to HDD icon: Scan to Internet FAX icon
---: Not registered❍ [Delete] button: Deletes the selected temporary registration
key.
C350 8-29
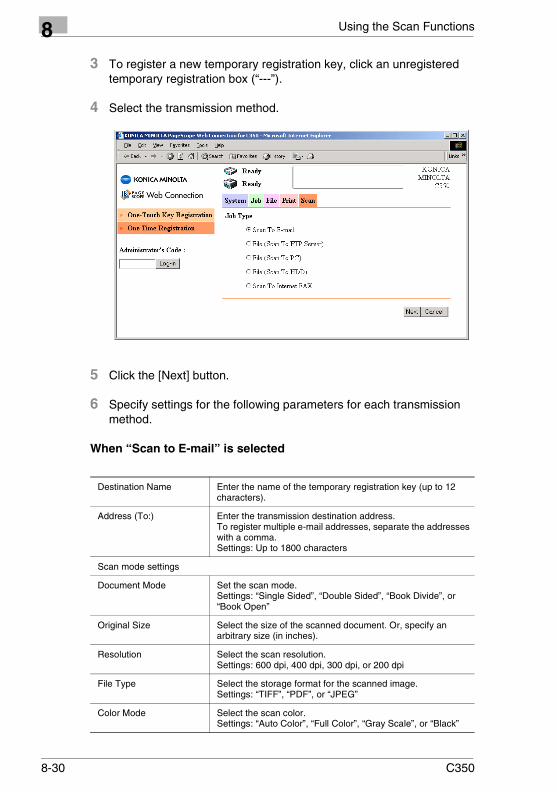
8 Using the Scan Functions
3 To register a new temporary registration key, click an unregistered temporary registration box (“---”).
4 Select the transmission method.
5 Click the [Next] button.
6 Specify settings for the following parameters for each transmission method.
When “Scan to E-mail” is selected
Destination Name Enter the name of the temporary registration key (up to 12 characters).
Address (To:) Enter the transmission destination address.To register multiple e-mail addresses, separate the addresses with a comma.Settings: Up to 1800 characters
Scan mode settings
Document Mode Set the scan mode.Settings: “Single Sided”, “Double Sided”, “Book Divide”, or “Book Open”
Original Size Select the size of the scanned document. Or, specify an arbitrary size (in inches).
Resolution Select the scan resolution.Settings: 600 dpi, 400 dpi, 300 dpi, or 200 dpi
File Type Select the storage format for the scanned image.Settings: “TIFF”, “PDF”, or “JPEG”
Color Mode Select the scan color.Settings: “Auto Color”, “Full Color”, “Gray Scale”, or “Black”
8-30 C350
Using the Scan Functions 8
When “File (Scan To FTP Server)” is selected
When “File (Scan To PC)” is selected
When “File (Scan To HDD)” is selected
Background Remove Set background remove.Settings: “Auto”, -5 (light) to +2 (dark)
Orientation Select the document direction.Settings: “Auto”, “Portrait”, or “Landscape”
Margin Select the position of the margin.Settings: “Left Binding” or “Top Binding”
Erase Select the method of erasing the specified location.Settings: “No”, “Left Erase”, “Top Erase”, or “Frame Erase”When using the erase function, set the erase width in inches.
Destination Name Enter the name of the temporary registration key (up to 12 characters).
Destination Server Select the FTP server that is used for Scan to FTP Server. The drop-down list displays FTP servers that were registered in “Registering FTP Servers” .Refer to “Registering FTP Servers” on page 8-48.
URL Notification Set whether to notify information indicating the storage location of the scanned data using e-mail.Settings: “Yes” or “No”
URL Notification E-mail Address
Set the destination address for the URL notification. To register multiple e-mail addresses, separate the addresses with a comma.Settings: Up to 1800 characters
Scan mode settings (same as if “Scan to E-mail” is selected)
Destination Name Enter the name of the temporary registration key (up to 12 characters).
IP Address Enter the IP address of the destination computer (a computer running an FTP application).
Scan mode settings (same as if “Scan to E-mail” is selected)
Destination Name Enter the name of the temporary registration key (up to 12 characters).
User Directory Select the box that is used for Scan to HDD. The drop-down list displays boxes that are registered.Refer to “Creating User Boxes” on page 8-57.
Password Enter the password assigned to the selected user box (up to 64 characters). If the “PUBLIC” box is selected, a password is not necessary.
C350 8-31
8 Using the Scan Functions
When “Scan To Internet FAX” is selected
✎NoteYou may be able to enter more characters than the limit from the Web browser. However, only the characters up to the limit are valid.
✎MemoTemporary registrations can be registered in the areas of “One Time Registration-1” to “One Time Registration-8”. Up to 15 destinations can be registered in each area.
URL Notification Set whether to send an e-mail notification containing information on the storage location of the scanned data.Settings: “Yes” or “No”
URL Notification E-mail Address
Set the destination address for the URL notification. To register multiple e-mail addresses, separate the addresses with a comma.Settings: Up to 1800 characters
Scan mode settings (same as if “Scan to E-mail” is selected)
Destination Name Enter the name of the temporary registration key (up to 12 characters).
Address (To:) Set the destination mail address for Internet faxing. To register multiple e-mail addresses, separate the addresses with a comma.Settings: Up to 1800 characters
E-mail Address (Reply-To:)
Set the reply-to address for Internet faxing (up to 72 characters).
Scan Mode Settings
Document Mode Set the scan mode.Settings: “Single Sided”, “Double Sided”, “Book Divide”, or “Book Open”
Original Size Select the scan size of the document. Or, specify an arbitrary size (in inches).
Orientation Select the document direction.
Margin Select the position of the margin.Settings: “Left Binding” or “Top Binding”
Erase Select the method of erasing the specified location.Settings: “No”, “Left Erase”, “Top Erase”, or “Frame Erase”When using the erase function, set the erase width in inches.
8-32 C350

Using the Scan Functions 8
8.6.3 Registering Recipient E-Mail Addresses Using LDAP SearchYou can search for e-mail addresses on the LDAP server, then register the search result as a one-touch key or temporary key on this machine.
✎NoteIn order to use this function, e-mail addresses must have already been registered on the LDAP server (LDAP v3.0).
Using the LDAP search function
To use the LDAP search function, you must enable the LDAP search function from this machine’s control panel.
Setup procedure
1 On this machine’s control panel, press the [Utility] key, touch [Admin. Mode], and then enter the administrator access code.
2 Touch [Admin. Set.], then [LDAP Search] (page 2/4).
3 Touch [Permit], and then touch [Enter].
Setting the LDAP server
To use the LDAP function, you must set the LDAP server using either PageScope Web Connection or this machine’s control panel.
Using PageScope Web Connection
1 Start up PageScope Web Connection.
2 Enter the administrator access code, and log in to Administrator mode.
C350 8-33

8 Using the Scan Functions
3 On the “Network” tab, click Common Setting, and then click LDAP in the sub-menu that appeared.
4 Specify settings for the following.
LDAP Set whether to use the LDAP search function. Select “Enable” here.
LDAP Server Address Enter the IP address or server name (host name) to set the LDAP server address (alphanumeric characters, the first character cannot be a number for the server name).
SSL/TLS Set whether to perform communications with the LDAP server using SSL/TLS.
Port Number Set the port number used to communicate with the LDAP server.
Search Root Set the search start point of the LDAP search.Settings: Up to 255 characters
Connection timeout Set the connection timeout for the LDAP server.Settings: 5 to 300 (seconds)
Max. No. of E-mail Searches
Set the search upper limit of the LDAP search.Settings: 5 to 120
8-34 C350
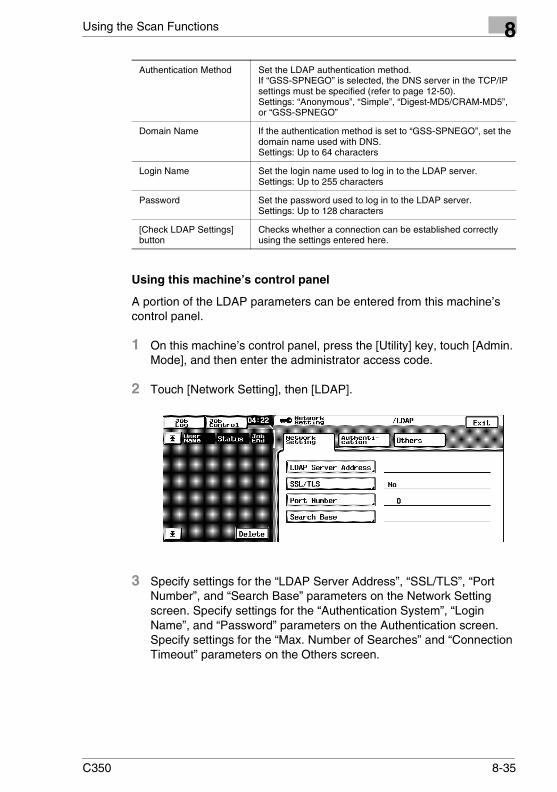
Using the Scan Functions 8
Using this machine’s control panel
A portion of the LDAP parameters can be entered from this machine’s control panel.
1 On this machine’s control panel, press the [Utility] key, touch [Admin. Mode], and then enter the administrator access code.
2 Touch [Network Setting], then [LDAP].
3 Specify settings for the “LDAP Server Address”, “SSL/TLS”, “Port Number”, and “Search Base” parameters on the Network Setting screen. Specify settings for the “Authentication System”, “Login Name”, and “Password” parameters on the Authentication screen. Specify settings for the “Max. Number of Searches” and “Connection Timeout” parameters on the Others screen.
Authentication Method Set the LDAP authentication method.If “GSS-SPNEGO” is selected, the DNS server in the TCP/IP settings must be specified (refer to page 12-50).Settings: “Anonymous”, “Simple”, “Digest-MD5/CRAM-MD5”, or “GSS-SPNEGO”
Domain Name If the authentication method is set to “GSS-SPNEGO”, set the domain name used with DNS.Settings: Up to 64 characters
Login Name Set the login name used to log in to the LDAP server.Settings: Up to 255 characters
Password Set the password used to log in to the LDAP server.Settings: Up to 128 characters
[Check LDAP Settings] button
Checks whether a connection can be established correctly using the settings entered here.
C350 8-35

8 Using the Scan Functions
Registering the LDAP search result
You can perform an LDAP search and register the result to one-touch keys and temporary keys from this machine’s control panel.
Performing a standard search
1 On this machine’s control panel, press the [Scan] key.
This machine enters Scan mode.
2 Touch [Address].
3 Touch [LDAP Search].
The LDAP search screen appears.
✎MemoFor the operating procedures of a detailed search, refer to “Performing a detailed search” on page 8-38.
For the procedure to display the previous search result, refer to “Displaying the previous search results” on page 8-39.
4 Using the keypad and the keyboard in the touch panel, enter the characters that you wish to search for (up to 20 characters).
❍ CAPS: Switches between uppercase and lowercase.❍ Del.: Deletes the previous character.
8-36 C350

Using the Scan Functions 8
5 Touch [Start Search].The search result is displayed.
6 Select the registration method from the following:
❍ To add the result to the destination of the current transmission, touch [Add to destination].
❍ To register the selected destinations to one-touch keys/temporary keys, touch [Create one-touch].
❍ To register all selected destinations to the keys in a single index, touch [Add addr. to single index].
7 Select the destination to be registered. You can select multiple destinations. Touch a selected destination to deselect it.You can also make selections using the following methods.
❍ More Info: Displays detailed information about the destination.
❍ Arrows beside the page number:Displays the previous or next page.
❍ Select All: Selects all destinations in the search result.❍ Cancel All: Deselects all destinations.
C350 8-37
8 Using the Scan Functions
8 Touch [Enter].
❍ If “Add to destination” was selected, the selected destination is assigned as the transmission destination.
❍ If “Create one-touch” was selected, an index list is displayed. Select the index in which you wish to register the key, and then touch [Enter].Select the key to be registered, select the transmission mode (“E-Mail Input” or “FAX Input”), and then touch [Save]. If multiple destinations were selected, specify the key to be registered for each destination. Each destination is registered to a one-touch key/temporary key.
❍ If “Add addr. to single index” was selected, an index list is displayed. Select the index in which you wish to register all of hte keys, select the transmission mode (“E-Mail Input” or “FAX Input”), and then touch [Save]. All selected destinations are registered as one-touch keys/temporary keys in the index.
Performing a detailed search
You can also perform a detailed search by specifying search conditions for the “Full Name”, “E-mail”, “Last Name”, and “First Name” fields.
1 On this machine’s control panel, press the [Scan] key.
2 Touch [Address].
3 Touch [LDAP Search].
The LDAP search screen appears.
4 Touch [Detail Search].
✎MemoTouch [Standard Search] to return to the standard search screen.
8-38 C350
Using the Scan Functions 8
5 Touch the “Key Word” item to display the character input screen. Enterthe characters to be searched, and then touch [Enter].
6 Specify the search conditions.
❍ Includes: Searches for destinations that include the specified character string.
❍ Identical: Searches for destinations that match the specified character string.
❍ Begins: Searches for destinations that start with the specified character string.
❍ Ends: Searches for destinations that end with the specified character string.
❍ Don’t use: Searches for destinations that do not include the specified character string.
7 As necessary, specify information for the “Full Name”, “E-mail”, “Last Name”, and “First Name” fields.
8 Touch [Start Search].
The search result is displayed.
9 The rest of the procedure is the same as the procedure starting with step 6 in “Performing a standard search” on page 8-36.
Displaying the previous search results
If you have performed an LDAP search before, you can display the previous search results.
1 Touch [LDAP Search] on the Address screen in Scan mode.
The LDAP search screen appears.
2 Touch [Previous Result].
C350 8-39

8 Using the Scan Functions
8.7 Performing Scan to E-Mail OperationsThe Scan to E-mail operation is used to send images scanned on this machine to an e-mail address as an attachment.
✎MemoIf a limitation exists in the attachment file size of an e-mail, the file can be divided into smaller files (binary level) to be sent. For details on the e-mail segmentation, refer to “Specifying Scan to E-mail Settings” on page 8-41.
8.7.1 Flow of Scan Operation
Procedure
1 Specify the e-mail settings, and enter the subject and text of the e-mail.� “Specifying Scan to E-mail Settings” on page 8-41 and “Setting the E-mail Subject and Text” on page 8-44
2 Using PageScope Web Connection or this machine’s control panel, perform one-touch key registration or temporary key registration.(You can also enter the e-mail address directly from this machine’s control panel in step 3.)� “Registering Destinations in Advance” on page 8-25
3 Using this machine’s control panel, specify the destination for the scanned data.� “Setting the Destination” on page 8-45
4 Using this machine’s control panel, set the scan mode and document designation.� “Scan Mode Screen” on page 8-14 and “Original Setting Screen” on page 8-16
5 Set the document, and then press the [Start] key on this machine.
The document is scanned. The scanned data is sent to the mail server.
6 The e-mail message is received by the computer.Check the image data file that is attached to the e-mail.
✎MemoIf the e-mail settings, the setting of the subject and text of the e-mail, and the registration of the destination are already done, perform only steps 3 through 6.
8-40 C350

Using the Scan Functions 8
8.7.2 Specifying Scan to E-mail SettingsUsing PageScope Web Connection or this machine’s control panel, set the mail server (SMTP server) that will be used for mail transmission.
Using PageScope Web Connection
1 Start up PageScope Web Connection.
2 Enter the administrator access code, and log in to Administrator mode.
3 On the “Network” tab, click E-mail / Internet FAX, and then click Send in the sub-menu that appeared.
4 Specify settings for the following.
SMTP Server Set the IP address of the SMTP server.
Port Number Set the port number of the SMTP server.(Normally, use the default value of 25.)
SMTP Connection Timeout
Set the connection timeout for the SMTP server.
Maximum E-mail Size Set the maximum size of the transmitted mail.Settings: “No Limitation”, 100 to 3000 KB (in units of 100 KB)
Binary Division Set whether to divide the e-mail into multiple e-mails (binary level) when the e-mail size exceeds the maximum e-mail size.Refer to “Binary Division and Scanned File Separation” on page 8-43.
C350 8-41

8 Using the Scan Functions
Using this machine’s control panel
Settings for the “SMTP Server”, “Timeout of SMTP Server”, and “Mail Separation” parameters can also be entered from this machine’s control panel.
1 On this machine’s control panel, press the [Utility] key, touch [Admin. Mode], and then enter the administrator access code.
2 Touch [Network Setting], [E-Mail/Internet], then [Send].
3 Specify settings for the “SMTP Server”, “Timeout of SMTP Server”, and “Mail Separation” parameters.
8-42 C350
Using the Scan Functions 8
Binary Division and Scanned File SeparationThe behavior of e-mail transmission varies depending on the combination of the Binary Division and the Scanned File Separation (refer to “Basic Setup of the Scan Functions” on page 8-11) settings.
✎NoteIf multiple pages are scanned when a hard disk is not installed, the mail is sent in units of pages regardless of the Scanned File Separation setting.
Combining (restoring) binary divided data
When scanned data that has been binary divided is received, the data can be combined using an e-mail client software that has a function to do this.
For details, refer to the manual or help for your e-mail client software.
Scanned File Separation: Yes and Binary Division: Yes
If the scanned data exceeds the Maximum E-mail Size setting, the data is divided in units of pages. If the data size of each page after page division exceeds the Maximum E-mail Size setting, the data is divided further at the binary level so that the maximum size is not exceeded.
Scanned File Separation: Yes andBinary Division: No
If the scanned data exceeds the Maximum E-mail Size setting, the data is divided in units of pages. If the data size of each page after page division exceeds the Maximum E-mail Size setting, the data is discarded.
Scanned File Separation: No and Binary Division: Yes
If the scanned data exceeds the Maximum E-mail Size setting, the data is divided at the binary level so that the maximum size is not exceeded.
Scanned File Separation: No andBinary Division: No
If the scanned data exceeds the Maximum E-mail Size setting, the data is discarded.
C350 8-43

8 Using the Scan Functions
8.7.3 Setting the E-mail Subject and TextUsing PageScope Web Connection, set the subject and the text message of the e-mail to be transmitted.
Setup procedure
1 Start up PageScope Web Connection.
2 Enter the administrator access code, and log in to Administrator mode.
3 On the “Network” tab, click E-mail / Internet FAX, and then click E-mail in the sub-menu that appeared.
4 Specify settings for the following.
Subject Enter the subject of the e-mail (up to 64 characters).
Description Enter the text of the e-mail (up to 256 characters).
8-44 C350

Using the Scan Functions 8
8.7.4 Setting the DestinationYou can specify the destination using a one-touch key or temporary registration key or by directly entering the e-mail address from this machine’s control panel.
Using a one-touch key or temporary key
1 On this machine’s control panel, press the [Scan] key.
2 Touch [Address].
3 Select the desired index (index number or [Temp. Registration]) to display a one-touch key list or temporary registration list.
4 Touch the one-touch key or temporary registration key to which the destination is assigned.
❍ Only the settings whose transmission method was set to “Scan To E-mail” during registration can be used.
❍ Multiple destinations can be selected.
✎MemoFor the registration procedure of one-touch keys and temporary keys, refer to “Registering Destinations in Advance” on page 8-25.
Directly entering the e-mail address
You can also enter the mail transmission destination address directly from this machine’s control panel without using one-touch keys or temporary registration keys.
1 On this machine’s control panel, press the [Scan] key.
2 Touch [Address].
3 Touch [Address Input].
4 Touch [E-Mail].
5 Using the keypad and the keyboard in the touch panel, enter the destination e-mail address (up to 72 characters).
6 Touch [Enter].
8.7.5 Error NotificationIf an error occurs due to a mistake in the destination, an error notification mail is sent to the sender’s address (From address).
The sender’s address (From address) is set using PageScope Web Connection. (Refer to “Basic Setup of the Scan Functions” on page 8-11.)
C350 8-45

8 Using the Scan Functions
8.8 Performing Scan to FTP Server OperationsThe Scan to FTP Server operation is used to send the image data scanned on this machine to an FTP server.
✎NoteTo perform Scan to FTP Server operations, a network environment with an FTP server is required.
8.8.1 Flow of Scan Operation
Procedure
1 Using PageScope Web Connection, register FTP servers (up to five).� “Registering FTP Servers” on page 8-48
2 If “Use Proxy” was set to “Yes” on the FTP Server Registration page, set the proxy server.� “Setting the Proxy Server” on page 8-51
3 Using PageScope Web Connection, perform one-touch key registration or temporary key registration.� “Registering Destinations in Advance” on page 8-25
4 Using this machine’s control panel, specify the destination of the scanned data.� “Setting the Destination” on page 8-52
5 Using this machine’s control panel, set the scan mode and document designation.� “Scan Mode Screen” on page 8-14 and “Original Setting Screen” on page 8-16
6 Set the document, and then press the [Start] key on this machine’s control panel.
The document is scanned. The scanned data is sent to the FTP server.If a URL notification destination was specified, information indicating the storage location of the scanned data is sent by e-mail.
8-46 C350

Using the Scan Functions 8
7 Using an FTP client application, retrieve the scanned data from theFTP server.
❍ If URL notification was not specifiedUse your FTP client application to directly access the FTP server and download the data from the folder containing the scanned data. You may need to enter a user name and a password to access the FTP server.
❍ If URL notification was specifiedRefer to the information written in the e-mail message and access the storage location of the scanned data. You may need to enter a user name and a password to access the FTP server.
✎MemoEven if the URL notification destination was not specified when one-touch keys or temporary registration keys were registered using PageScope Web Connection, you can specify the URL notification destination from this machine’s control panel. (Refer to “URL Notification Using E-mail” on page 8-23.)
If the FTP server registration, proxy server configuration, and the registration of the destination are already done, perform steps 4 through 7.
C350 8-47
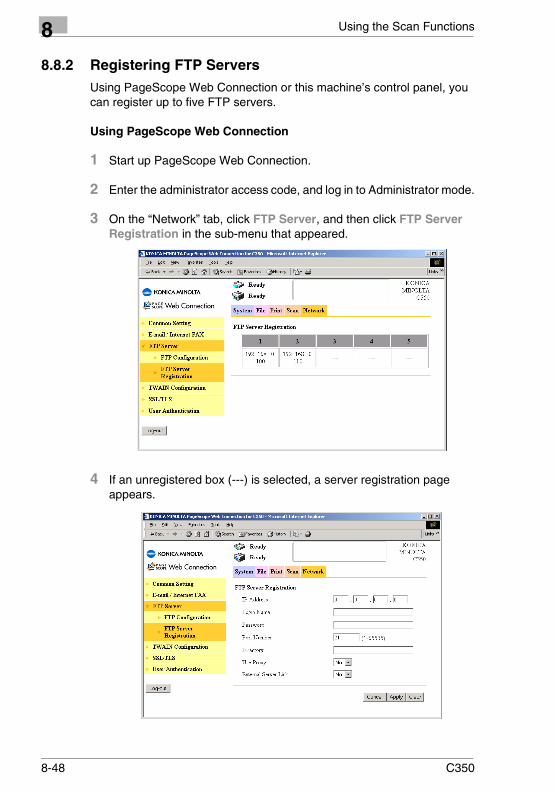
8 Using the Scan Functions
8.8.2 Registering FTP ServersUsing PageScope Web Connection or this machine’s control panel, you can register up to five FTP servers.
Using PageScope Web Connection
1 Start up PageScope Web Connection.
2 Enter the administrator access code, and log in to Administrator mode.
3 On the “Network” tab, click FTP Server, and then click FTP Server Registration in the sub-menu that appeared.
4 If an unregistered box (---) is selected, a server registration page appears.
8-48 C350
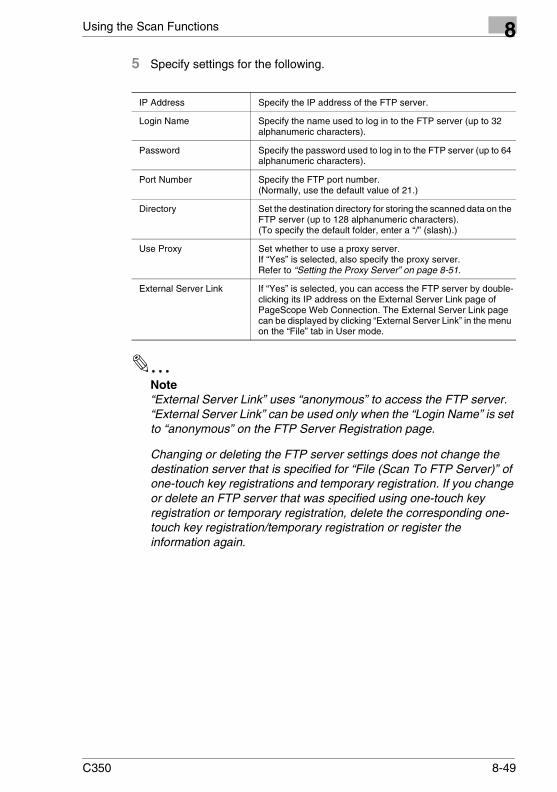
Using the Scan Functions 8
5 Specify settings for the following.✎Note“External Server Link” uses “anonymous” to access the FTP server. “External Server Link” can be used only when the “Login Name” is set to “anonymous” on the FTP Server Registration page.
Changing or deleting the FTP server settings does not change the destination server that is specified for “File (Scan To FTP Server)” of one-touch key registrations and temporary registration. If you change or delete an FTP server that was specified using one-touch key registration or temporary registration, delete the corresponding one-touch key registration/temporary registration or register the information again.
IP Address Specify the IP address of the FTP server.
Login Name Specify the name used to log in to the FTP server (up to 32 alphanumeric characters).
Password Specify the password used to log in to the FTP server (up to 64 alphanumeric characters).
Port Number Specify the FTP port number.(Normally, use the default value of 21.)
Directory Set the destination directory for storing the scanned data on the FTP server (up to 128 alphanumeric characters).(To specify the default folder, enter a “/” (slash).)
Use Proxy Set whether to use a proxy server.If “Yes” is selected, also specify the proxy server.Refer to “Setting the Proxy Server” on page 8-51.
External Server Link If “Yes” is selected, you can access the FTP server by double-clicking its IP address on the External Server Link page of PageScope Web Connection. The External Server Link page can be displayed by clicking “External Server Link” in the menu on the “File” tab in User mode.
C350 8-49

8 Using the Scan Functions
Using this machine’s control panel
The settings for the “IP Address”, “Login Name”, “PIN #”, and “Directory” parameters can also be entered from this machine’s control panel.
1 On this machine’s control panel, press the [Utility] key, touch [Admin. Mode], and then enter the administrator access code.
2 Touch [Network Setting], then [FTP Server].
3 For servers 1 to 5, enter settings for the “IP Address”, “Login Name”, “PIN #”, and “Directory” parameters.
8-50 C350
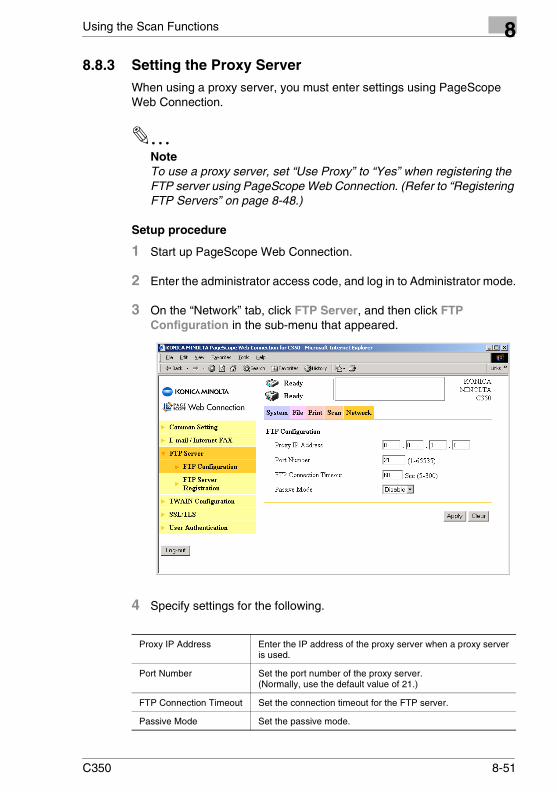
Using the Scan Functions 8
8.8.3 Setting the Proxy ServerWhen using a proxy server, you must enter settings using PageScope Web Connection.
✎NoteTo use a proxy server, set “Use Proxy” to “Yes” when registering the FTP server using PageScope Web Connection. (Refer to “Registering FTP Servers” on page 8-48.)
Setup procedure
1 Start up PageScope Web Connection.
2 Enter the administrator access code, and log in to Administrator mode.
3 On the “Network” tab, click FTP Server, and then click FTP Configuration in the sub-menu that appeared.
4 Specify settings for the following.
Proxy IP Address Enter the IP address of the proxy server when a proxy server is used.
Port Number Set the port number of the proxy server.(Normally, use the default value of 21.)
FTP Connection Timeout Set the connection timeout for the FTP server.
Passive Mode Set the passive mode.
C350 8-51
8 Using the Scan Functions
8.8.4 Setting the DestinationSet the destination using one-touch keys or temporary registration keys.
Setup procedure
1 On this machine’s control panel, press the [Scan] key.
2 Touch [Address].
3 Select the desired index (index number or [Temp. Registration]) to display a one-touch key list or temporary registration list.
4 Touch the one-touch key or temporary registration key to which the destination is assigned.
❍ Only the settings whose transmission method was set to “File (Scan To FTP Server)” during registration can be used.
✎MemoFor the registration procedure of one-touch keys and temporary keys, refer to “Registering Destinations in Advance” on page 8-25.
8-52 C350

Using the Scan Functions 8
8.9 Performing Scan to PC OperationsThe Scan to PC operation is used to send the image data scanned on this machine directly to a computer using FTP.
✎NoteAn FTP server application must be installed on the computer in advance.
8.9.1 Flow of Scan Operation
Procedure
1 Using PageScope Web Connection, perform one-touch key registration or temporary key registration.� “Registering Destinations in Advance” on page 8-25
2 Set the FTP application.� “Setting the FTP Application” on page 8-54
3 Start up the FTP application on the computer.
4 Using this machine’s control panel, specify the destination of the scanned data.� “Setting the Destination” on page 8-54
5 Using this machine’s control panel, set the scan mode and document designation.� “Scan Mode Screen” on page 8-14 and “Original Setting Screen” on page 8-16
6 Set the document, and then press the [Start] key on this machine’s control panel.
The document is scanned. The scanned data is sent to an application that receives the data using FTP.
7 Check the scanned data on the recipient computer.
✎MemoIf the registration of the destination and the FTP application configuration are already done, perform steps 3 through 7.
The transmission destination to the computer is the root folder specified by the application. The destination cannot be specified from this machine.
C350 8-53
8 Using the Scan Functions
8.9.2 Setting the FTP ApplicationIn Scan to PC, the data is sent by FTP using the following settings.
As necessary, specify the following settings from the FTP application on the recipient computer.
8.9.3 Setting the DestinationSet the destination using one-touch keys or temporary registration keys.
Setup procedure
1 On this machine’s control panel, press the [Scan] key.
2 Touch [Address].
3 Select the desired index (index number or [Temp. Registration]) to display a one-touch key list or temporary registration list.
4 Touch the one-touch key or temporary registration key to which the destination is assigned.
❍ Only the settings whose transmission method was set to “File (Scan To PC)” during registration can be used.
✎MemoFor the registration procedure of one-touch keys and temporary keys, refer to “Registering Destinations in Advance” on page 8-25.
Login Name anonymous
Port Number 21
8-54 C350

Using the Scan Functions 8
8.10 Performing Scan to HDD OperationsThe Scan to HDD operation is used to save the scanned image data to a box on the hard disk installed in this machine. The image data saved to the hard disk can be downloaded to the computer using PageScope Web Connection.
✎NoteTo use this scan function, an optional hard disk must be installed in this machine.
✎MemoThe data scanned and saved to the hard disk here can also be transferred. For details, refer to “10 Using the Box Functions”.
8.10.1 Flow of Scan Operation
Procedure
1 Using PageScope Web Connection, create a user box for saving the scanned data.� “Creating User Boxes” on page 8-57
2 As necessary, set the storage period for scanned data.� “Setting the Storage Period of the Scanned Data” on page 8-59
3 Using PageScope Web Connection, perform one-touch key registration or temporary key registration.� “Registering Destinations in Advance” on page 8-25
4 Using this machine’s control panel, specify the destination of the scanned data.� “Setting the Destination” on page 8-60
5 Using this machine’s control panel, set the scan mode and document designation.� “Scan Mode Screen” on page 8-14 and “Original Setting Screen” on page 8-16
C350 8-55

8 Using the Scan Functions
6 Set the document, and then press the [Start] key on this machine’s control panel.
The document is scanned. The scanned data is saved to the hard disk of this machine.If a URL notification destination is specified, information indicating the storage location of the scanned data is sent by e-mail.
7 Retrieve the scanned data from the hard disk.� “Retrieving the Scanned Data from the Hard Disk” on page 8-61
❍ If URL notification was not specifiedUsing PageScope Web Connection, access the specified user box and download the data from the hard disk. You will need a password to access the user box. (A password is not required for the “PUBLIC” box.)
❍ If URL notification was specifiedRefer to the information written in the e-mail message and access the storage location for the scanned data. You will need a password to access the user box. (A password is not required for the “PUBLIC” box.)
✎MemoEven if the URL notification destination was not specified when one-touch keys or temporary registration keys were registered using PageScope Web Connection, you can specify the URL notification destination from this machine’s control panel. (Refer to “URL Notification Using E-mail” on page 8-23.)
If the user box creation, the configuration of the storage period of the scanned data, and the registration of the destination are already done, perform steps 4 through 7.
8-56 C350
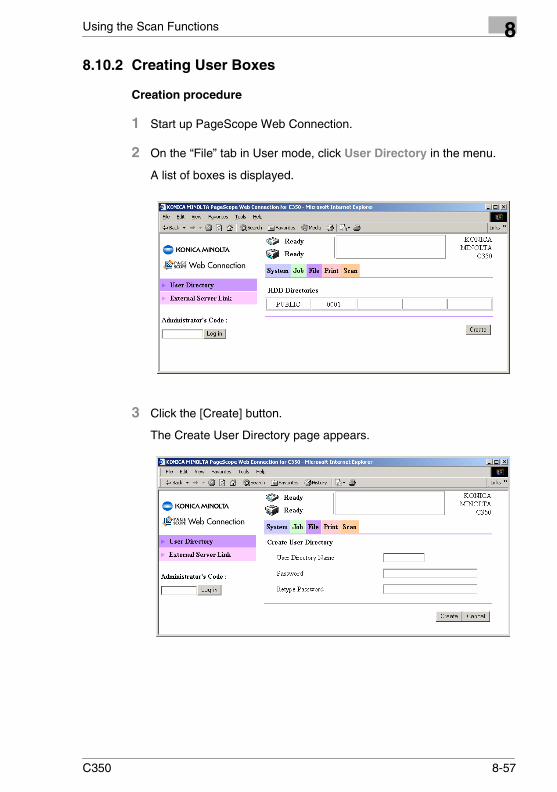
Using the Scan Functions 8
8.10.2 Creating User Boxes
Creation procedure
1 Start up PageScope Web Connection.
2 On the “File” tab in User mode, click User Directory in the menu.
A list of boxes is displayed.
3 Click the [Create] button.
The Create User Directory page appears.
C350 8-57

8 Using the Scan Functions
4 Enter settings into the User Directory Name (up to 8 characters), Password (4 digits or more), and Retype Password boxes, and then click the [Create] button.
✎NoteUse uppercase characters when entering the user box name (User Directory Name).box1: Cannot be registeredBOX1: OK
The following symbols and characters cannot be used.\ / : ; * " < > | + = , . ? ADMIN BOXLIST
Up to 199 user boxes can be created.
PUBLIC box and user box
A user box is a storage location for scanned data created with the Scan to HDD operation. The box name can be assigned arbitrarily.The contents of a user box can only be viewed by entering the password that was specified at the time of registration. A user box can be created arbitrarily using PageScope Web Connection.
The public box is a storage location for scanned data created with the Scan to HDD operation. It is a location where anyone can view the contents without a password. The box name is “PUBLIC”.
8-58 C350
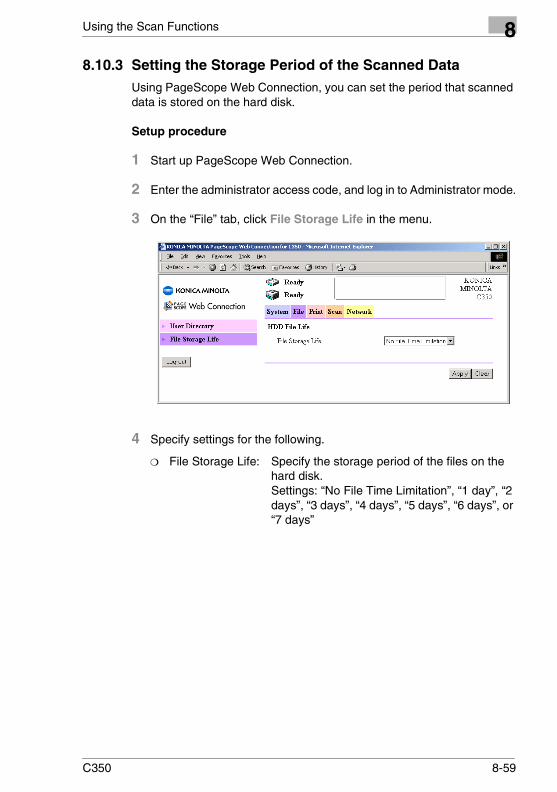
Using the Scan Functions 8
8.10.3 Setting the Storage Period of the Scanned DataUsing PageScope Web Connection, you can set the period that scanned data is stored on the hard disk.
Setup procedure
1 Start up PageScope Web Connection.
2 Enter the administrator access code, and log in to Administrator mode.
3 On the “File” tab, click File Storage Life in the menu.
4 Specify settings for the following.
❍ File Storage Life: Specify the storage period of the files on the hard disk.Settings: “No File Time Limitation”, “1 day”, “2 days”, “3 days”, “4 days”, “5 days”, “6 days”, or “7 days”
C350 8-59

8 Using the Scan Functions
8.10.4 Setting the DestinationSet the destination using one-touch keys or temporary registration keys.
Setup procedure
1 On this machine’s control panel, press the [Scan] key.
2 Touch [Address].
3 Select the desired index (index number or [Temp. Registration]) to display a one-touch key list or temporary registration list.
4 Touch the one-touch key or temporary registration key to which the destination is assigned.
❍ Only the settings whose transmission method was set to “File (Scan To HDD)” during registration can be used.
✎MemoFor the registration procedure of one-touch keys and temporary keys, refer to “Registering Destinations in Advance” on page 8-25.
8-60 C350
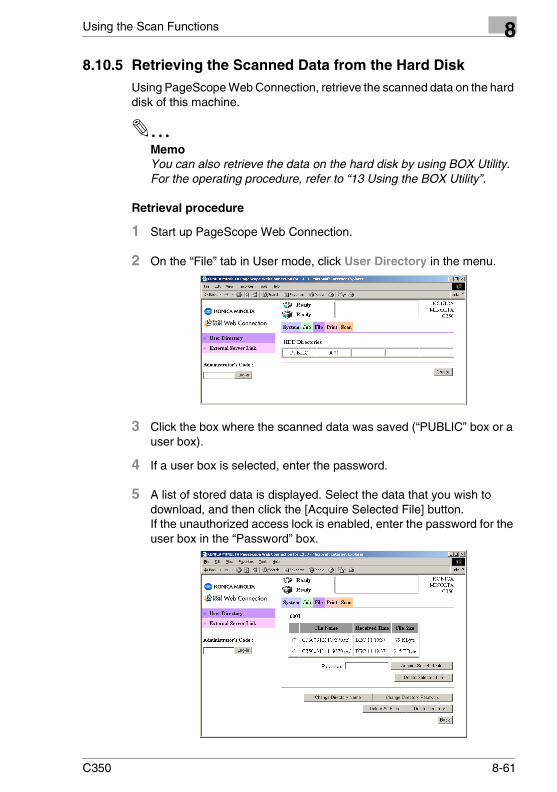
Using the Scan Functions 8
8.10.5 Retrieving the Scanned Data from the Hard DiskUsing PageScope Web Connection, retrieve the scanned data on the hard disk of this machine.
✎MemoYou can also retrieve the data on the hard disk by using BOX Utility. For the operating procedure, refer to “13 Using the BOX Utility”.
Retrieval procedure
1 Start up PageScope Web Connection.
2 On the “File” tab in User mode, click User Directory in the menu.
3 Click the box where the scanned data was saved (“PUBLIC” box or a user box).
4 If a user box is selected, enter the password.
5 A list of stored data is displayed. Select the data that you wish to download, and then click the [Acquire Selected File] button.If the unauthorized access lock is enabled, enter the password for the user box in the “Password” box.
C350 8-61
8 Using the Scan Functions
❍ File Name: Displays the file names stored in the box.
❍ Received Time: Displays the time when the file was stored in the box.
❍ File Size: Displays the size of the file stored in the box.
❍ [Previous], [Next] button:Up to 20 files are displayed on a page. If there are more than 20 files, these keys are used to move between pages.
❍ [Acquire Selected File] button:Downloads the selected files to the computer.If the unauthorized access lock is enabled, enter the password for the user box in the “Password” box.(Internet Explorer 6 SP1 or later recommended)
❍ [Delete Selected File] button:Deletes the selected files from the hard disk of this machine.
❍ [Delete All Files] button:Deletes all of the files currently displayed. When this button is clicked, a confirmation page appears. If the [OK] button is clicked, the files are deleted.
❍ [Change Directory Name] button (user box only):Changes the name assigned to the user box. When this button is clicked, a page for changing the box name appears.
❍ [Change Directory Password] button (user box only):Changes the password assigned to the user box. When this button is clicked, a page for changing the password appears.
❍ [Delete Directory] button (user box only):Deletes the user box currently displayed. When this button is clicked, a confirmation page appears. If the [OK] button is clicked, the user box is deleted.
6 Click the [Acquire Selected File] button to open the confirmation dialog box.Specify the handling of the file and save the file to the computer’s hard disk if necessary.
8-62 C350
Using the Scan Functions 8
✎NoteIf the unauthorized access lock is enabled on this machine’s control panel and you enter a wrong administrator’s code three times, the login is determined to be invalid and you will no longer be able to access the user box. To enable access, this machine must be restarted (turned off, then on again) or release the access lock on this machine’s control panel.
The files may not appear in some cases, such as when backup or restore is in progress using BOX Utility.
While a user box or file is being accessed from PageScope Web Connection, BOX Utility, or the control panel, you cannot acquire files, delete boxes/files, change the user box names, or change passwords.
Even if you change the user box name or delete the box, a user box specified as “File (Scan To HDD)” during one-touch registration or temporary registration does not change. If necessary, change the one-touch registration or temporary registration settings.If a user box specified using one-touch key registration or temporary registration is deleted and you check the registration information on PageScope Web Connection, it will appear as though the “PUBLIC” box is selected. However, the actual registration has not been changed. Register the information again.
C350 8-63

8 Using the Scan Functions
8.11 Performing Scan to Internet FAX OperationsWith the Scan to Internet FAX operation, the scanned image data is sent as an attachment to an e-mail address. This operation differs from Scan to E-mail since the format of the attached file is standardized. The image data can be transferred between devices supporting the Internet FAX standard.
The image data is sent with the “Black” Color Mode setting in the TIFF format at 200 × 200 dpi.
Transmission is carried out using a procedure similar to Scan to E-mail.
✎MemoWhen sending document data by Internet fax, you must check in advance whether the recipient is capable of receiving Internet faxes.
✎NoteIf “Scanned File Separation” (refer to “Basic Setup of the Scan Functions” on page 8-11) is enabled and multiple pages of the document are sent using Internet fax, the data is divided in units of pages for transmission regardless of the maximum e-mail size setting.
If a limitation exists in the attachment file size of an e-mail, the file can be divided into smaller files (binary level) to be sent. For details on the mail segmentation setting, refer to “Setting the E-mail Transmission” on page 8-66.
However, if the Internet fax data is binary divided, the receiving Internet fax device may not be able to receive the data. Check that the receiving device can receive such data in advance.
8-64 C350
Using the Scan Functions 8
8.11.1 Flow of Scan Operation
Procedure
1 Using PageScope Web Connection, specify the e-mail settings, and enter the subject and text of the e-mail.� “Setting the E-mail Transmission” on page 8-66 and “Setting the E-mail Subject and Text” on page 8-69
2 Using PageScope Web Connection, perform one-touch key registration or temporary key registration.(You can also enter the e-mail address directly from this machine’s control panel in step 3.)� “Registering Destinations in Advance” on page 8-25
3 Using this machine’s control panel, specify the destination of the scanned data.� “Setting the Destination” on page 8-70
4 Using this machine’s control panel, set the scan mode and document designation.� “Scan Mode Screen” on page 8-14 and “Original Setting Screen” on page 8-16
5 Set the document, and then press the [Start] key on this machine’s control panel.
The document is scanned. The scanned data is sent using Internet fax.
✎MemoIf the e-mail settings, the setting of the subject and text of the e-mail, and the registration of the destination are already done, perform steps 3 through 5.
C350 8-65

8 Using the Scan Functions
8.11.2 Setting the E-mail TransmissionUsing PageScope Web Connection or this machine’s control panel, set the mail server (SMTP server) to perform e-mail transmissions.
Using PageScope Web Connection
1 Start up PageScope Web Connection.
2 Enter the administrator access code, and log in to Administrator mode.
3 On the “Network” tab, click E-mail / Internet FAX, and then click Send in the sub-menu that appeared.
4 Specify settings for the following.
SMTP Server Set the IP address of the SMTP server.
Port Number Set the port number of the SMTP server.(Normally, use the default value of 25.)
SMTP Connection Timeout
Set the connection timeout for the SMTP server.
Maximum E-mail Size Set the maximum size of the transmitted mail.Settings: “No Limitation”, 100 to 3000 KB (in units of 100 KB)
Binary Division Set whether to divide the e-mail into multiple e-mails (binary level) when the e-mail size exceeds the maximum e-mail size.However, the receiving Internet fax device may not support binary division.Refer to “Binary Division and Scanned File Separation” on page 8-68.
8-66 C350
Using the Scan Functions 8
Using this machine’s control panelSettings for the “SMTP Server”, “Timeout of SMTP Server”, and “Mail Separation” parameters can also be entered from this machine’s control panel.
1 On this machine’s control panel, press the [Utility] key, touch [Admin. Mode], and then enter the administrator access code.
2 Touch [Network Setting], [E-Mail/Internet], then [Send].
3 Specify settings for the “SMTP Server”, “Timeout of SMTP Server”, and “Mail Separation” parameters.
C350 8-67

8 Using the Scan Functions
Binary Division and Scanned File Separation
The behavior of e-mail transmission varies depending on the combination of the Binary Division and Scanned File Separation (refer to “Basic Setup of the Scan Functions” on page 8-11) settings.
✎NoteIf multiple pages are scanned when a hard disk is not installed, the mail is sent in units of pages regardless of the “Scanned File Separation” setting.
However, if the Internet FAX data is binary divided (refer to “Setting the E-mail Transmission” on page 8-66), the receiving Internet fax device may not be able to receive the data. Check that the receiving device can receive such data in advance.
Scanned File Separation: Yes and Binary Division: Yes
If the scanned data exceeds the Maximum E-mail Size setting, the file is divided in units of pages. If the data size of each page after page division exceeds the Maximum E-mail Size setting, the data is divided further at the binary level so that the maximum size is not exceeded.
Scanned File Separation: Yes andBinary Division: No
If the scanned data exceeds the Maximum E-mail Size setting, the file is divided in units of pages. If the data size of each page after page division exceeds the Maximum E-mail Size setting, the data is discarded.
Scanned File Separation: No and Binary Division: Yes
If the scanned data exceeds the Maximum E-mail Size setting, the file is divided at the binary level so that the maximum size is not exceeded.
Scanned File Separation: No andBinary Division: No
If the scanned data exceeds the Maximum E-mail Size setting, the data is discarded.
8-68 C350
Using the Scan Functions 8
8.11.3 Setting the E-mail Subject and TextUsing PageScope Web Connection, set the subject and the text message of the e-mail to be transmitted using Internet fax.
Setup procedure
1 Start up PageScope Web Connection.
2 Enter the administrator access code, and log in to Administrator mode.
3 On the “Network” tab, click E-mail / Internet FAX, and then click Internet FAX in the sub-menu that appeared.
4 Specify settings for the following.
Subject Enter the subject of the e-mail (up to 64 characters).
Description Enter the text of the e-mail (up to 256 characters).
C350 8-69
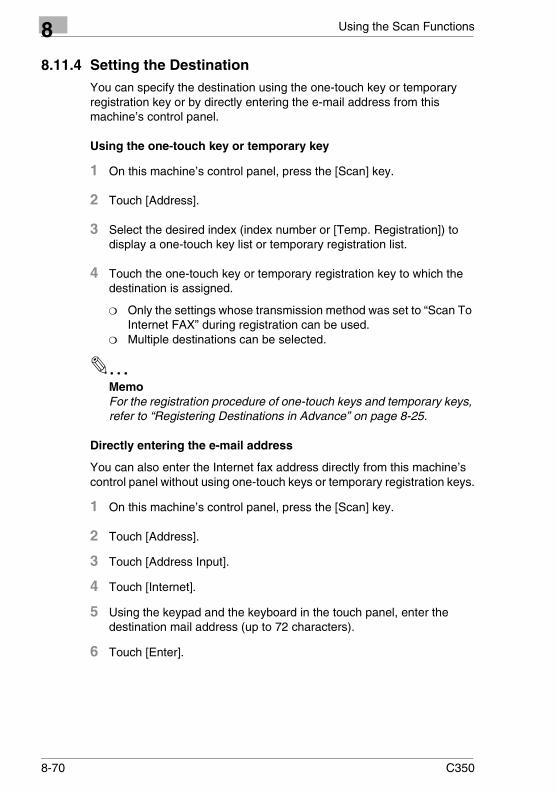
8 Using the Scan Functions
8.11.4 Setting the DestinationYou can specify the destination using the one-touch key or temporary registration key or by directly entering the e-mail address from this machine’s control panel.
Using the one-touch key or temporary key
1 On this machine’s control panel, press the [Scan] key.
2 Touch [Address].
3 Select the desired index (index number or [Temp. Registration]) to display a one-touch key list or temporary registration list.
4 Touch the one-touch key or temporary registration key to which the destination is assigned.
❍ Only the settings whose transmission method was set to “Scan To Internet FAX” during registration can be used.
❍ Multiple destinations can be selected.
✎MemoFor the registration procedure of one-touch keys and temporary keys, refer to “Registering Destinations in Advance” on page 8-25.
Directly entering the e-mail address
You can also enter the Internet fax address directly from this machine’s control panel without using one-touch keys or temporary registration keys.
1 On this machine’s control panel, press the [Scan] key.
2 Touch [Address].
3 Touch [Address Input].
4 Touch [Internet].
5 Using the keypad and the keyboard in the touch panel, enter the destination mail address (up to 72 characters).
6 Touch [Enter].
8-70 C350

Using the Scan Functions 8
8.11.5 Error NotificationIf an error occurs due to a mistake in the destination, an error notification mail is sent to the Reply-To address or the sender’s address (From address). If both the Reply-To address and the sender’s address are specified, the reply-to address has priority. If either address is entered, the entered address is valid.
The sender’s address (From address) and Reply-To address are set using PageScope Web Connection.For the Sender’s address (From address), refer to “Basic Setup of the Scan Functions” on page 8-11.For the Reply-To address, refer to “Registering Destinations in Advance” on page 8-25.
C350 8-71
8 Using the Scan Functions
8.12 Performing Internet FAX Reception OperationsSince this machine supports Internet faxing, data sent from a device supporting Internet faxing (file attachment to an e-mail) can be received and printed.
The following types of data can be received.
✎MemoThe print jobs of data received using Internet fax are not listed in the job log of this machine.
8.12.1 Flow of Operation
Procedure
1 Configure Internet FAX reception and Internet FAX print.� “Setting the Internet FAX Reception” on page 8-73 and “Set the Internet FAX Print” on page 8-75
2 If an Internet fax e-mail is received, the attached image data is printed.
The received Internet fax e-mails on the mail server are collectively retrieved from the mail server and temporarily stored in this machine. The stored data is printed one job at a time when all other ongoing jobs have been completed. The e-mails on the mail server are not cleared until the normal completion of printing is confirmed.
Data whose image has been printed is cleared. The data is not kept in the memory or hard disk of this machine.
Internet FAX reception is carried out by periodically querying the POP3 server. For details on the querying interval setting, refer to “Setting the Internet FAX Reception” on page 8-73.
Size Letter, A4, legal, B4, and A3
Color Mode Black
Compression MH, MR, and MMR
8-72 C350
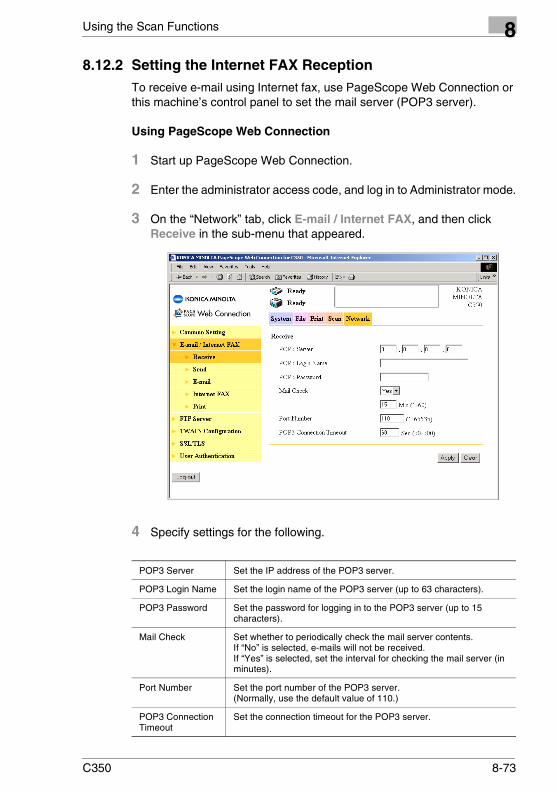
Using the Scan Functions 8
8.12.2 Setting the Internet FAX ReceptionTo receive e-mail using Internet fax, use PageScope Web Connection or this machine’s control panel to set the mail server (POP3 server).
Using PageScope Web Connection
1 Start up PageScope Web Connection.
2 Enter the administrator access code, and log in to Administrator mode.
3 On the “Network” tab, click E-mail / Internet FAX, and then click Receive in the sub-menu that appeared.
4 Specify settings for the following.
POP3 Server Set the IP address of the POP3 server.
POP3 Login Name Set the login name of the POP3 server (up to 63 characters).
POP3 Password Set the password for logging in to the POP3 server (up to 15 characters).
Mail Check Set whether to periodically check the mail server contents.If “No” is selected, e-mails will not be received.If “Yes” is selected, set the interval for checking the mail server (in minutes).
Port Number Set the port number of the POP3 server.(Normally, use the default value of 110.)
POP3 Connection Timeout
Set the connection timeout for the POP3 server.
C350 8-73

8 Using the Scan Functions
Using this machine’s control panel
The settings for the “POP3 Server”, “POP3 Login Name”, “POP3 Password”, and “Mail Check” parameters can also be entered from this machine’s control panel.
1 On this machine’s control panel, press the [Utility] key, touch [Admin. Mode], and then enter the administrator access code.
2 Touch [Network Setting], [E-Mail/Internet], then [Receive].
3 Specify settings for the “POP3 Server”, “POP3 Login Name”, “POP3 Password”, and “Mail Check” parameters.
8-74 C350

Using the Scan Functions 8
8.12.3 Set the Internet FAX PrintUsing PageScope Web Connection or this machine’s control panel, enter settings related to the printing of the Internet fax reception data.
Using PageScope Web Connection
1 Start up PageScope Web Connection.
2 Enter the administrator access code and log in to Administrator mode.
3 On the “Network” tab, click E-mail / Internet FAX, and then click Print in the sub-menu that appeared.
4 Specify settings for the following.
Text Print Set whether to print the mail text when this machine receives an Internet fax e-mail.
Internet FAX Print Size Set the print size for printing the received data.Reduced (default): Select this setting when you wish to slightly reduce the size of the received data.Full Size: Select this setting to print the received data in full size.A4/Letter: Select this setting when you wish to fit the received data in A4- or Letter-size paper.
C350 8-75
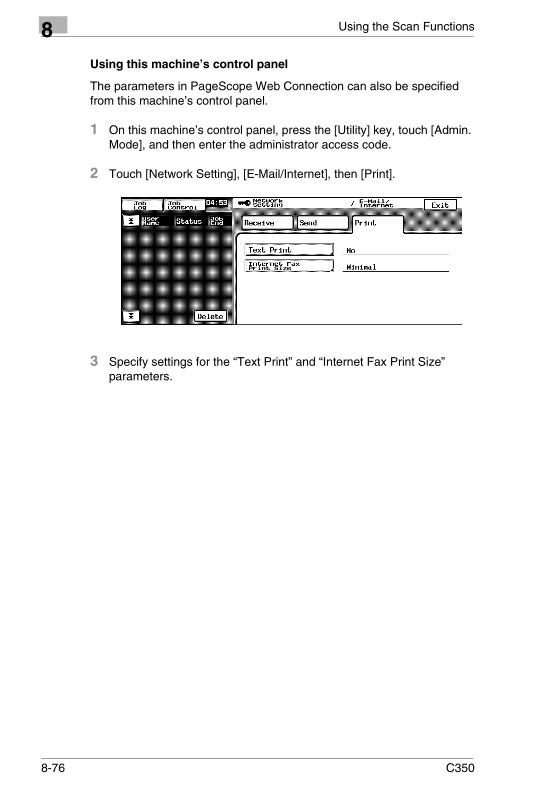
8 Using the Scan Functions
Using this machine’s control panel
The parameters in PageScope Web Connection can also be specified from this machine’s control panel.
1 On this machine’s control panel, press the [Utility] key, touch [Admin. Mode], and then enter the administrator access code.
2 Touch [Network Setting], [E-Mail/Internet], then [Print].
3 Specify settings for the “Text Print” and “Internet Fax Print Size” parameters.
8-76 C350
Scanning Images Using TWAIN (PC Scanning Function) 9
9 Scanning Images Using TWAIN (PC Scanning Function)
TWAIN is an interface used to import images scanned on a certain device onto different computer platforms. Here, TWAIN refers to controlling this machine’s scanner and importing the scanned data into the application. To use TWAIN, a TWAIN driver must be installed on the computer and TWAIN configuration is required in this machine. This function is available only when it is used over a network.
9.1 Operating EnvironmentThe TWAIN driver operates in the following environments.
9.2 Installing the TWAIN Driver
Installation
1 On the supplied CD-ROM, open the folder (\Driver\English\TWAIN) containing the TWAIN driver.
2 Double-click the “Setup.exe” file to run the installation program.
3 Carry out the installation by following the instructions on the screen.
Computer IBM PC or compatible
Operating System Windows 98/98SE, Windows Me, Windows 2000, Windows XP, or Windows NT 4.0 (SP 6a or later)
C350 9-1

9 Scanning Images Using TWAIN (PC Scanning Function)
9.3 Setting the Panel Lock Timeout for TWAINUsing PageScope Web Connection or this machine’s control panel, set the panel lock timeout for using TWAIN to import images onto the computer.
Using PageScope Web Connection
1 Start up PageScope Web Connection.
2 Enter the administrator access code, and log in to Administrator mode.
3 On the “Network” tab, click TWAIN Configuration in the menu.
4 Specify settings for the following.
❍ Operation Lock Time:Set the panel lock timeout for performing TWAIN scan operations from the computer.
Using this machine’s control panel
1 On this machine’s control panel, press the [Utility] key, touch [Admin. Mode], and then enter the administrator access code.
2 Touch [Network Setting], then [Twain].
3 Specify the setting for the “Operation Lock Time for TWAIN” parameter.
9-2 C350
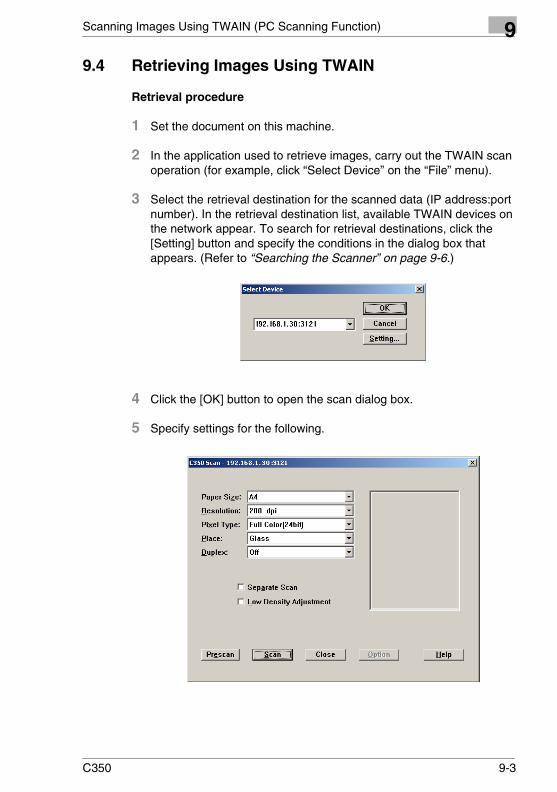
Scanning Images Using TWAIN (PC Scanning Function) 9
9.4 Retrieving Images Using TWAIN
Retrieval procedure
1 Set the document on this machine.
2 In the application used to retrieve images, carry out the TWAIN scan operation (for example, click “Select Device” on the “File” menu).
3 Select the retrieval destination for the scanned data (IP address:port number). In the retrieval destination list, available TWAIN devices on the network appear. To search for retrieval destinations, click the [Setting] button and specify the conditions in the dialog box that appears. (Refer to “Searching the Scanner” on page 9-6.)
4 Click the [OK] button to open the scan dialog box.
5 Specify settings for the following.
C350 9-3

9 Scanning Images Using TWAIN (PC Scanning Function)
❍ Paper Size: Set the paper size to be scanned.❍ Resolution: Set the resolution.
Settings: 600 dpi, 400 dpi, 300 dpi, or 200 dpi❍ Pixel Type: Specify the type of data to be scanned.
Settings: “Full Color”, “Gray Scale”, or “Black & White”
❍ Place: Sets the scan mode of the document.If “Duplex” is set to “On”, “Place” is set to “ADF”.Settings: “Glass” or “ADF”
❍ Duplex: Set whether the scanned document is a duplex document.Settings: “On” or “Off”
❍ Separate Scan: Specify the processing of multiple documents.❍ Low Density Adjustment:
Specify whether to remove the background.❍ [Prescan] button: Perform a test scan.
❍ [Scan] button: Scan the data and import the data into the application.
❍ [Option] button: Open the Option dialog box.Refer to “Setting the Option Dialog Box” on page 9-5.
6 Click the [Scan] button.
The document is scanned, and the scanned data is imported into the application.
9-4 C350
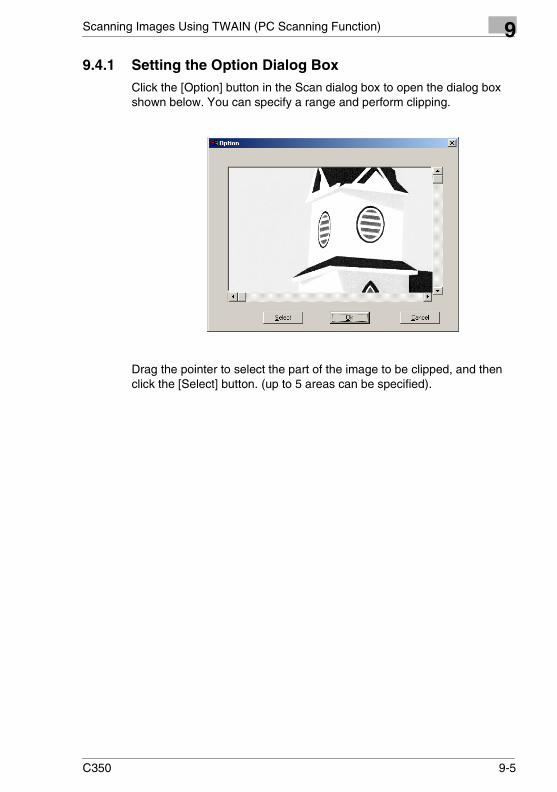
Scanning Images Using TWAIN (PC Scanning Function) 9
9.4.1 Setting the Option Dialog BoxClick the [Option] button in the Scan dialog box to open the dialog box shown below. You can specify a range and perform clipping.
Drag the pointer to select the part of the image to be clipped, and then click the [Select] button. (up to 5 areas can be specified).
C350 9-5

9 Scanning Images Using TWAIN (PC Scanning Function)
9.4.2 Searching the ScannerClick the [Setting] button in the dialog box used to select the retrieval destination of the scanned data to open a dialog box used to search the scanners.
You can specify the following search conditions.
Broadcast
Searches using the broadcast protocol.
Multicasting
Searches using the multicasting protocol.
IP Port Base Specify the port number to be searched.
Broadcast Execute the search.
Max Hop for Search The number of hops to be searched is fixed at 0. You cannot change this value.
IP Port Base Specify the port number to be searched.
Multicasting Execute the search.
9-6 C350
Using the Box Functions 10
10 Using the Box Functions
This chapter describes the procedure for forwarding the image data stored in boxes on this machine’s hard disk using the Box functions.
✎NoteTo use these box functions, an optional hard disk must be installed in this machine.
✎MemoFor the procedure of saving the image data in the box on the hard disk, refer to “Performing Scan to HDD Operations” on page 8-55.
10.1 OverviewThe following box functions are available on this machine. Use the appropriate type that matches your network environment and application.
Forward to E-mail Forwards the image data in the box by attaching the data to an e-mail message.Refer to “Performing Forward to E-mail Operations” on page 10-12.
Forward to FTP Server Forwards the image data in the box to an FTP server.Refer to “Performing Forward to FTP Server Operations” on page 10-14.
Forward to PC Forwards the image data in the box to a computer using FTP.Refer to “Performing Forward to PC Operations” on page 10-16.
C350 10-1
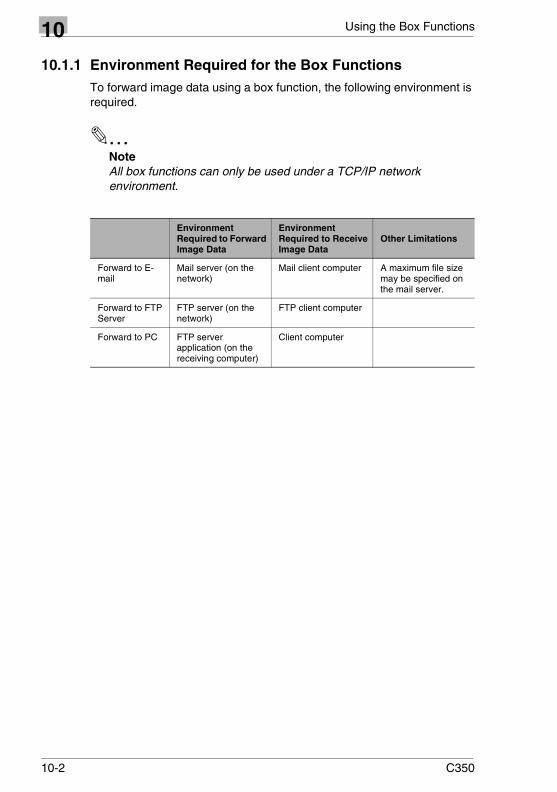
10 Using the Box Functions
10.1.1 Environment Required for the Box FunctionsTo forward image data using a box function, the following environment is required.
✎NoteAll box functions can only be used under a TCP/IP network environment.
Environment Required to Forward Image Data
Environment Required to Receive Image Data
Other Limitations
Forward to E-mail
Mail server (on the network)
Mail client computer A maximum file size may be specified on the mail server.
Forward to FTP Server
FTP server (on the network)
FTP client computer
Forward to PC FTP server application (on the receiving computer)
Client computer
10-2 C350
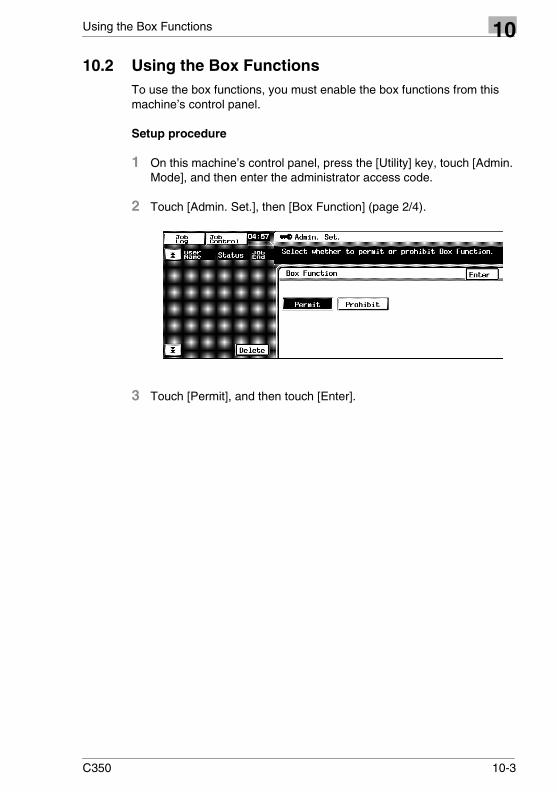
Using the Box Functions 10
10.2 Using the Box FunctionsTo use the box functions, you must enable the box functions from this machine’s control panel.
Setup procedure
1 On this machine’s control panel, press the [Utility] key, touch [Admin. Mode], and then enter the administrator access code.
2 Touch [Admin. Set.], then [Box Function] (page 2/4).
3 Touch [Permit], and then touch [Enter].
C350 10-3
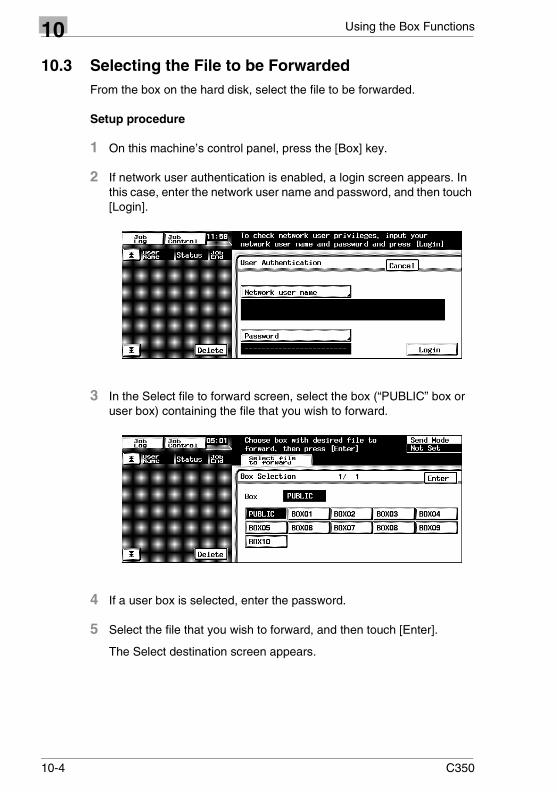
10 Using the Box Functions
10.3 Selecting the File to be ForwardedFrom the box on the hard disk, select the file to be forwarded.
Setup procedure
1 On this machine’s control panel, press the [Box] key.
2 If network user authentication is enabled, a login screen appears. In this case, enter the network user name and password, and then touch [Login].
3 In the Select file to forward screen, select the box (“PUBLIC” box or user box) containing the file that you wish to forward.
4 If a user box is selected, enter the password.
5 Select the file that you wish to forward, and then touch [Enter].
The Select destination screen appears.
10-4 C350
Using the Box Functions 10
10.4 Specifying the Forward DestinationSelect the destination for forwarding the selected file.
You can specify the destination using the one-touch key or temporary registration key or by directly entering the mail address from this machine’s control panel.
Using the one-touch key or temporary key
1 In the Select destination screen, select the desired index (index number or [Temp. Registration]) to display a one-touch key list or temporary registration list.
2 Touch the one-touch key or temporary registration key to which the destination is assigned.
❍ Only the settings whose transmission method matches the forwarding method can be used.
❍ Multiple forward destinations can be selected with the Forward to E-mail operation.
✎MemoThe registration procedure of one-touch keys and temporary keys is the same as in Scan mode. For the registration procedure, refer to “Registering Destinations in Advance” on page 8-25. The LDAP search function can also be used in Box mode.
Directly entering the mail address
Only with the Forward to E-mail operation, you can also enter the forward destination address directly from this machine’s control panel without using one-touch keys or temporary registration keys.
1 In the Select destination screen, touch [Address Input].
2 Using the keypad and the keyboard in the touch panel, enter the destination mail address (up to 72 characters).
3 Touch [Enter].
C350 10-5
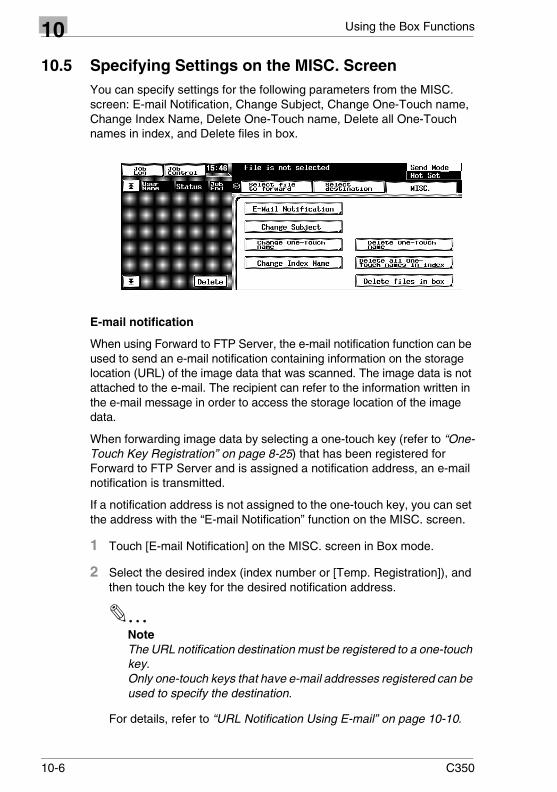
10 Using the Box Functions
10.5 Specifying Settings on the MISC. ScreenYou can specify settings for the following parameters from the MISC. screen: E-mail Notification, Change Subject, Change One-Touch name, Change Index Name, Delete One-Touch name, Delete all One-Touch names in index, and Delete files in box.
E-mail notification
When using Forward to FTP Server, the e-mail notification function can be used to send an e-mail notification containing information on the storage location (URL) of the image data that was scanned. The image data is not attached to the e-mail. The recipient can refer to the information written in the e-mail message in order to access the storage location of the image data.
When forwarding image data by selecting a one-touch key (refer to “One-Touch Key Registration” on page 8-25) that has been registered for Forward to FTP Server and is assigned a notification address, an e-mail notification is transmitted.
If a notification address is not assigned to the one-touch key, you can set the address with the “E-mail Notification” function on the MISC. screen.
1 Touch [E-mail Notification] on the MISC. screen in Box mode.
2 Select the desired index (index number or [Temp. Registration]), and then touch the key for the desired notification address.
✎NoteThe URL notification destination must be registered to a one-touch key.Only one-touch keys that have e-mail addresses registered can be used to specify the destination.
For details, refer to “URL Notification Using E-mail” on page 10-10.
10-6 C350

Using the Box Functions 10
Changing the subjectYou can change the subject of an e-mail only when the transmission method is Scan to E-mail.
1 Touch [Change Subject] on the MISC. screen in Box Mode.
2 Enter the subject (up to 64 characters) and then touch [Enter].
The subject for Forward to E-mail is changed.
Changing a one-touch name
You can change the name of the registered one-touch keys.
1 Touch [Change One-Touch name] on the MISC. screen in Box mode.
An index list is displayed.
2 Select the index containing the one-touch key that you wish to rename, and then touch [Enter].
3 Select the one-touch key that you wish to rename.
4 Change the one-touch key name (up to 12 characters), and then touch [Enter].
The name of the one-touch key is changed.
Changing an index name
You can change the name of an index.
1 Touch [Change Index Name] on the MISC. screen in Box mode.
An index list is displayed.
2 Select the index containing the name that you wish to change, and then touch [Enter].
3 Change the index name (up to 10 characters), and then touch [Enter].
The name of the index is changed.
C350 10-7
10 Using the Box Functions
Deleting a one-touch name
You can delete one-touch keys that are registered.
1 Touch [Delete One-Touch name] on the MISC. screen in Box mode.
An index list is displayed.
2 Select the index containing the one-touch key that you wish to delete, and then touch [Enter].
3 Select the one-touch key that you wish to delete, and then touch [Enter].
4 On the confirmation screen, touch [Yes], and then touch [Enter].
The one-touch key is deleted.
Deleting all one-touch names in an index
You can delete all one-touch keys in a specified index.
1 Touch [Delete all One-Touch names in index] on the MISC. screen in Box mode.
An index list is displayed.
2 Select the index containing the data that you wish to delete entirely, and then touch [Enter].
3 On the confirmation screen, touch [Yes], and then touch [Enter].
All one-touch keys in the index are deleted.
Deleting files in the box
You can delete the files in the boxes on the hard disk.Up to four files can be deleted at the same time.
1 Touch [Delete files in box] on the MISC. screen in Box mode.
A box list is displayed.
2 Select the box (“PUBLIC” box or user box) containing the file that you wish to delete.
3 If a user box is selected, enter the password.
4 Select the file that you wish to delete, and then touch [Enter].
If the files are on the same page, you can select multiple files.
5 In the confirmation screen, touch [Yes], and then touch [Enter].
The selected files are deleted.
10-8 C350
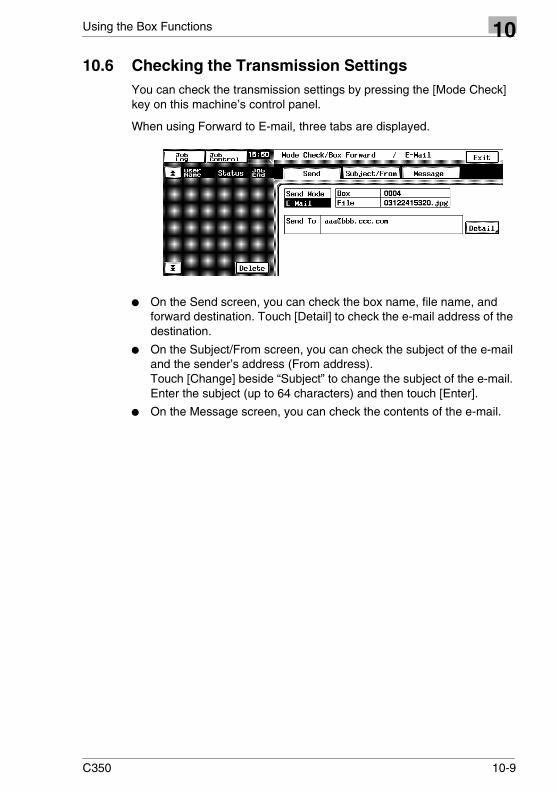
Using the Box Functions 10
10.6 Checking the Transmission SettingsYou can check the transmission settings by pressing the [Mode Check] key on this machine’s control panel.
When using Forward to E-mail, three tabs are displayed.
� On the Send screen, you can check the box name, file name, and forward destination. Touch [Detail] to check the e-mail address of the destination.
� On the Subject/From screen, you can check the subject of the e-mail and the sender’s address (From address).Touch [Change] beside “Subject” to change the subject of the e-mail. Enter the subject (up to 64 characters) and then touch [Enter].
� On the Message screen, you can check the contents of the e-mail.
C350 10-9

10 Using the Box Functions
10.7 URL Notification Using E-mailURL notification using e-mail is a function used to send an e-mail notification containing information on the storage (box) location of the image data created when the Forward to E-mail or Forward to FTP Server operation is performed. The image data is not attached to the URL notification mail. The recipient the URL notification mail can refer to the URL information in the e-mail in order to access the storage location of the image data.
✎NoteTo send a URL notification by e-mail, a network environment with a mail server is required.
✎MemoYou may need to enter a user name and a password to access the FTP server.The user name and password are not provided in the e-mail notification.If you need additional information for access, check with your administrator.
A URL notification mail is sent for the following data forwarding operations.
� When Forward to E-mail is used and the mail size exceeds the maximum allowed by “Maximum E-mail Size” (refer to “Specifying Scan to E-mail Settings” on page 8-41).In this case, the image data is saved to the hard disk installed in this machine, and a URL indicating the storage location (a box on the hard disk) is sent by e-mail.
� When Forward to FTP Server is performed
✎MemoIf “Binary Division” (refer to “Specifying Scan to E-mail Settings” on page 8-41) is set to “Yes” when using Forward to E-mail and the mail upper limit specified by “Maximum E-mail Size” is exceeded, the e-mail is sent in segments. In this case, the URL notification mail is not sent.
10-10 C350

Using the Box Functions 10
The URL notification mail destination is an e-mail address registered to a one-touch key or temporary registration key. It is specified using the paramters below during one-touch key registration or temporary registration. For the setup procedure, refer to “Registering Destinations in Advance” on page 8-25.� Forward to E-mail: Address (To:)
� Forward to FTP Server: URL Notification E-mail Address
Setting the mail destination from this machine’s control panel
When using Forward to FTP Server, the URL information is sent to the address registered for “URL Notification E-mail Address” in the specified one-touch key or temporary registration key. However, you can specify mail destinations separately from this machine’s control panel.
Setup procedure
1 On this machine’s control panel, press the [Box] key.
2 Select the file to be forwarded.
3 On the Select destination screen select the destination for which the transmission method is set to Scan to FTP Server.
4 Touch [E-mail Notification] on the MISC. screen.
5 Select the desired index (index number or [Temp. Registration]), and then touch the key for the desired notification address.
✎NoteThe URL notification destination must be registered to the one-touch key.Only one-touch keys that have e-mail addresses registered can be used to specify the destination.
C350 10-11
10 Using the Box Functions
10.8 Performing Forward to E-mail OperationsThe image data in the box on the hard disk is forwarded as an attachment to an e-mail address.
✎MemoIf a limitation exists in the attachment file size of an e-mail, the file can be divided into smaller files (binary level) to be sent. For details on the mail segmentation setting, refer to “Specifying Scan to E-mail Settings” on page 8-41.
10.8.1 Flow of Forwarding Operation
Procedure
1 Specify the e-mail settings, and enter the subject and text of the e-mail.� “Specifying Scan to E-mail Settings” on page 8-41 and “Setting the E-mail Subject and Text” on page 8-44
2 Using PageScope Web Connection or this machine’s control panel, perform one-touch key registration or temporary key registration.(You can also enter the e-mail address directly from this machine’s control panel in step 3.)� “Registering Destinations in Advance” on page 8-25
3 Using this machine’s control panel select the files to be forwarded.� “Selecting the File to be Forwarded” on page 10-4
4 Using this machine’s control panel, specify the forwarding destination of the image data.� “Specifying the Forward Destination” on page 10-5
5 On this machine’s control panel, press the [Start] key.
The specified image data is forwarded to the mail server.
6 The e-mail message is received by the computer.
Check the image data file that is attached to the e-mail.
✎MemoIf the e-mail settings, the setting of the subject and text of the e-mail, and the registration of the destination are already done, perform steps 3 through 6.
10-12 C350

Using the Box Functions 10
10.8.2 Error NotificationIf an error occurs due to a mistake in the destination, an error notification mail is sent to the sender’s address (From address).
The sender’s address (From address) is set using PageScope Web Connection. (Refer to “Basic Setup of the Scan Functions” on page 8-11.)
C350 10-13
10 Using the Box Functions
10.9 Performing Forward to FTP Server OperationsThe image data in the box on the hard disk of this machine is forwarded to a specified folder on the FTP server.
✎NoteTo perform Forward to FTP Server operations, a network environment with an FTP server is required.
10.9.1 Flow of Forwarding Operation
Procedure
1 Using PageScope Web Connection, register FTP servers (up to five).� “Registering FTP Servers” on page 8-48
2 If “Use Proxy” was set to “Yes” in the FTP Server Registration page, set the proxy server.� “Setting the Proxy Server” on page 8-51
3 Using PageScope Web Connection, perform one-touch key registration or temporary key registration.� “Registering Destinations in Advance” on page 8-25
4 Using this machine’s control panel, select the files to be forwarded.� “Selecting the File to be Forwarded” on page 10-4
5 Using this machine’s control panel, specify the forward destination of the image data.� “Specifying the Forward Destination” on page 10-5
6 On this machine’s control panel, press the [Start] key.
The image data in the box is forwarded to the FTP server.If a URL notification destination is specified, information indicating the storage location of the image data is sent by e-mail.
10-14 C350

Using the Box Functions 10
7 Using an FTP client application, retrieve the image data from the FTPserver.
❍ If URL notification was not specifiedUse your FTP client application to directly access the FTP server and download the data from the folder containing the image data. You may need to enter a user name and a password to access the FTP server.
❍ If URL notification was specifiedRefer to the information written in the e-mail message and access the storage location of the image data. You may need to enter a user name and a password to access the FTP server.
✎MemoEven if the URL notification destination was not specified when one-touch keys or temporary registration keys were registered using PageScope Web Connection, you can specify the URL notification destination from this machine’s control panel. (Refer to “URL Notification Using E-mail” on page 10-10.)
If the FTP server registration, proxy server configuration, and the registration of the destination are already done, perform steps 4 through 7.
C350 10-15
10 Using the Box Functions
10.10 Performing Forward to PC OperationsThe image data in the box on the hard disk of this machine is forwarded to a computer using FTP.
✎NoteAn FTP server application must be installed on the computer and the application must be running when the image data is being received.
10.10.1Flow of Forwarding Operation
Procedure
1 Using PageScope Web Connection, perform one-touch key registration or temporary key registration.� “Registering Destinations in Advance” on page 8-25
2 Set the FTP application.� “Setting the FTP Application” on page 8-54
3 Start up the FTP application on the computer.
4 Using this machine’s control panel, select the files to be forwarded.� “Selecting the File to be Forwarded” on page 10-4
5 Using this machine’s control panel, specify the forward destination of the image data.� “Specifying the Forward Destination” on page 10-5
6 On this machine’s control panel, press the [Start] key.
The image data in the box is forwarded to the application that receives the data using FTP.
7 Check the image data on the recipient computer.
✎MemoIf the registration of the destination and the FTP application configuration are already done, perform steps 3 through 7.
The forward destination to the computer is the root folder specified by the application. The destination cannot be specified from this machine.
10-16 C350
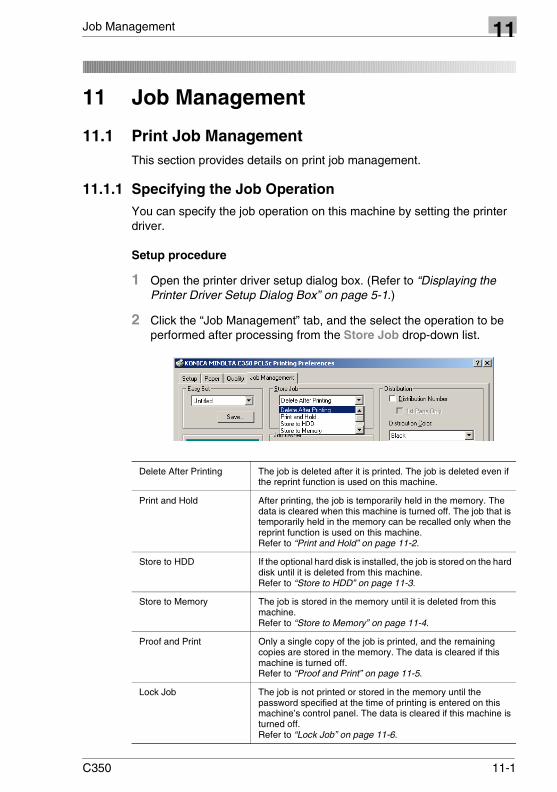
Job Management 11
11 Job Management
11.1 Print Job ManagementThis section provides details on print job management.
11.1.1 Specifying the Job OperationYou can specify the job operation on this machine by setting the printer driver.
Setup procedure
1 Open the printer driver setup dialog box. (Refer to “Displaying the Printer Driver Setup Dialog Box” on page 5-1.)
2 Click the “Job Management” tab, and the select the operation to be performed after processing from the Store Job drop-down list.
Delete After Printing The job is deleted after it is printed. The job is deleted even if the reprint function is used on this machine.
Print and Hold After printing, the job is temporarily held in the memory. The data is cleared when this machine is turned off. The job that is temporarily held in the memory can be recalled only when the reprint function is used on this machine.Refer to “Print and Hold” on page 11-2.
Store to HDD If the optional hard disk is installed, the job is stored on the hard disk until it is deleted from this machine. Refer to “Store to HDD” on page 11-3.
Store to Memory The job is stored in the memory until it is deleted from this machine.Refer to “Store to Memory” on page 11-4.
Proof and Print Only a single copy of the job is printed, and the remaining copies are stored in the memory. The data is cleared if this machine is turned off. Refer to “Proof and Print” on page 11-5.
Lock Job The job is not printed or stored in the memory until the password specified at the time of printing is entered on this machine’s control panel. The data is cleared if this machine is turned off.Refer to “Lock Job” on page 11-6.
C350 11-1

11 Job Management
11.1.2 Print and HoldIf “Print and Hold” is specified and a job is printed, the job is temporarily held in this machine’s memory after it is printed. The job can be recalled if the reprint function is used on this machine.
The data held in the memory is cleared when this machine is turned off.
Setting the printer driver
1 In the printer driver setup dialog box, click the “Job Management” tab.
2 Select “Print and Hold” from the Store Job drop-down list.
Operations on this machine
1 From the control panel, touch [Job Control], then [Reprint] to display the list of jobs held in the memory.
2 Select the job that you wish to recall from the job list, and then touch [OK].
The job status changes to “Waiting Print”, and the job is queued to be printed.
For details, refer to the User’s Manual of this machine.You can check the status of the job from the Job Log screen.
11-2 C350
Job Management 11
11.1.3 Store to HDDIf “Store to HDD” is specified and a job is printed, the job is saved on this machine’s hard disk. The job is not printed until it is recalled to the memory from the hard disk using this machine’s control panel, and its storage is cancelled after it is changed to a “Job Stored” job.
The data held on the hard disk is not cleared, even if this machine is turned off.
✎NoteTo use the “Store to HDD” setting, an optional hard disk must be installed in this machine.
Setting the printer driver
1 In the printer driver setup dialog box, click the “Job Management” tab.
2 Select “Store to HDD” from the Store Job drop-down list.
Operations on this machine
1 From the control panel, touch [Job Control], then [HDD] to display the list of jobs stored on the hard disk.
2 From the job list, select the job that you wish to recall from the hard disk to the memory, and then touch [Open Job].
The job is recalled to the memory, and its status is set to “Job Stored”.
3 From the control panel, touch [Job Control], then [Hold Job] to display the stored job.
4 Select the job you wish to print, and then touch [OK].
The job status changes to “Waiting Print”, and the job is queued to be printed.
For details, refer to the User’s Manual of this machine.You can check the status of the job from the Job Log screen.
C350 11-3
11 Job Management
11.1.4 Store to MemoryIf “Store to Memory” is specified and a job is printed, the job is temporarily stored in this machine’s memory and is not printed until its storage is cancelled from this machine’s control panel.
The data held in the memory is cleared when this machine is turned off.
Setting the printer driver
1 In the printer driver setup dialog box, click the “Job Management” tab.
2 Select “Store to Memory” from the Store Job drop-down list.
Operations on this machine
1 From the control panel, touch [Job Control], then [Hold Job] to display the stored job.
2 Select the job you wish to print, and then touch [OK].
The job status changes to “Waiting Print”, and the job is queued to be printed.
For details, refer to the User’s Manual of this machine.You can check the status of the job from the Job Log screen.
11-4 C350

Job Management 11
11.1.5 Proof and PrintIf “Proof and Print” is selected when printing is set, a single copy is printed and the remaining copies of the job are stored in the memory. The remaining copies are not printed until job storage is cancelled from this machine’s control panel.
Setting the printer driver
1 In the printer driver setup dialog box, click the “Job Management” tab.
2 Select “Proof and Print” from the Store Job drop-down list.
Operations on this machine
1 Touch [Job Control], then [Hold Job] on this machine’s control panel to display the list of stored jobs.
2 Check the printing of the proof copy.If you wish to print the remaining copies, select the job set to “Proof and Print” from the stored job list that appeared, and then touch [OK]. If you wish to cancel the remaining copies, touch [Delete].
C350 11-5

11 Job Management
11.1.6 Lock JobIf “Lock Job” is selected when printing is set, the job is not printed until the password specified at the time of printing is entered from this machine’s control panel. This setting is useful when printing important or confidential documents.
Operations on the computer
1 In the printer driver setup dialog box, click the “Job Management” tab.
2 Select “Lock Job” from the Store Job drop-down list.
3 Enter the unlocking code (four-digit number between 0000 and 9999) in the Password box.
Operations on this machine
After sending a job with “Lock Job” selected, unlock the job from this machine to start printing it. For details, refer to the User’s Manual of this machine.
1 From the control panel, touch [Job Control], then [Locked Jobs] to display a list of locked jobs.
2 From the list of locked jobs, select the job that you wish to unlock.
3 Using the keypad, enter the 4-digit password for unlocking the locked job.
The job status changes to “Waiting Print”, and the job is queued to be printed.
✎MemoTouch [Increase Priority] to print the job ahead of others in the print queue. For details, refer to the User’s Manual of this machine.
You can check the status of the job on the Job Log screen.
11-6 C350

Job Management 11
11.1.7 Number of Jobs That Can Be StoredA maximum of 50 jobs (specified using the copy, print, and scan functions) can be stored on this machine.
✎MemoUp to five scan jobs can be stored.
Up to 49 print jobs can be stored. The remaining job is used by any operating copy or scan functions.
Jobs sent with the “Lock Job” setting selected are not included in the 50 job limit.
11.1.8 Identifying a Print Job by NameYou can assign names to jobs that are to be printed. The job names are displayed on this machine’s control panel and in PageScope Web Connection.
Setup procedure
1 In the printer driver setup dialog box, click the “Job Management” tab.
2 Enter the user name in the User Name box under Job Owner (up to 31 alphanumeric characters).
3 Enter the job name in the Job Name box under Job Owner (up to 31 alphanumeric characters).
Setting the default user name
A default user name can be registered and used rather than entering a user name for each job.
1 In the printer driver setup dialog box (refer to “Displaying the Printer Driver Setup Dialog Box” on page 5-1), click the “Device Option Setting” tab.
2 Enter the user name in the Default User Name box under Job Owner (up to 31 alphanumeric characters).
C350 11-7
11 Job Management
11.1.9 Transmitting a Print Job to This Machine When the Copy Track Mode Is SetIf the Copy Track mode is set on this machine, you must enter the access number (password) when printing a job. For the procedure on using the Copy Track functions to specify access numbers on this machine, refer to the User’s Manual of this machine.
Transmission procedure
1 In the printer driver setup dialog box, click the “Job Management” tab.
2 Select the Access Code check box, and then enter the access number (password) in the Access Number box (8 digits between 00000001 and 99999998).
❍ A default access number can be registered and used rather than entering an access number for each job.
3 Send the job.
If the entered access number is a valid number on this machine, the job is printed and counted as a job for the account.
If an error occurs
If a print job is sent using an access number that is not available with the Copy Track mode of this machine or if a job is sent without the Access Code check box selected, proceed as follows.
1 The message “Job has been done improperly. Check the record.” appears on this machine’s control panel. The job is cancelled.
2 Touch [Job Log] in this machine’s control panel, touch [Print Log], and then check the log.
11-8 C350

Job Management 11
11.1.10Printing Pages with a Distribution NumberTo identify each print job, a distribution number can be printed in the background.
✎NoteTo use the distribution number function, the optional hard disk and 256 MB memory must be installed on this machine.
Procedure
1 In the printer driver setup dialog box, click the “Job Management” tab.
2 Select the Distribution Number check box under Distribution.
3 To print the distribution number only on the first page, select the 1st Page Only check box.
4 Specify the color of the distribution number (red, blue, or black) from the Distribution Color list.
5 Enter the starting distribution number in the Starting Number box (1 to 999).
C350 11-9

11 Job Management
11.2 Job Operations on PageScope Web ConnectionYou can also check the status of the job being processed by this machine from PageScope Web Connection. You can also delete jobs and perform other operations.
For details, refer to the following pages.
� “Active Job – Print” on page 12-17
� “Active Job – Scan” on page 12-19
� “Job History – Print” on page 12-20
� “Job History – Scan” on page 12-22
11-10 C350

Using PageScope Web Connection 12
12 Using PageScope Web Connection
PageScope Web Connection is a device control utility program provided by the HTTP server built into the printer controller. Start up a Web browser on a computer on the network and access PageScope Web Connection to easily change the copier settings.
12.1 System Requirements
12.2 Accessing PageScope Web ConnectionPageScope Web Connection can be accessed directly from a Web browser.
Procedure
1 Start up the Web browser.
2 In the Address bar, enter the IP address of this machine as shown below. Then, press the [Enter] key.http://<IP_address_for_copier>/Example: If the IP address of this machine is 192.168.0.10
http://192.168.0.10/
The initial page of PageScope Web Connection appears.
✎MemoBelow is the URL after SSL/TLS is enabled.https://<IP_address_for_copier>/
For the procedure to set the IP address of this machine, refer to “Setting the IP Address for This Machine” on page 6-2.
12.2.1 OperationPageScope Web Connection operation is identical to that for Internet Web pages. You can click a link on the page to jump to the link destination, or click the [Back] (or [Forward]) button to display the previous (or next) page.
Network Ethernet network and TCP/IP protocol
Computer application program
Web browser:Microsoft Internet Explorer Ver. 5.5 or later (JavaScript enabled)Netscape Communicator Ver. 4.5 or later (JavaScript enabled)
C350 12-1

12 Using PageScope Web Connection
12.3 Page StructureThe page that appears immediately after PageScope Web Connection is accessed is called the User mode page. All users can view this page. By entering the appropriate access code in the Administrator’s Code box on the User mode page, you can display the Administrator mode page. (Refer to “Logging in to Administrator Mode” on page 12-4.)
The configuration of the PageScope Web Connection page is shown below.
✎MemoIf you wish to change the display language of PageScope Web Connection, log in to Administrator mode, and change the setting using “PageScope Web Connection Setting” in the menu.
1. KONICA MINOLTA Logo
Click the logo to jump to the following Web site (KONICA MINOLTA Web site).
http://konicaminolta.net
Click the PageScope Web Connection logo to display the version information.
1
4
6
5
3
2
12-2 C350
Using PageScope Web Connection 12
2. Status DisplayThe statuses of this machine’s printer section and this machine’s scanner section are displayed using icons and text.
The message “Ready” appears when this machine is operating normally.
If an error has occurred in this machine, the status of the problem/error and other error information are shown.
3. Tabs
The categories that can be controlled by PageScope Web Connection are displayed. The following tabs are displayed in User mode.
� System
� Job
� File
� Scan
For details on each tab, refer to the following sections.
4. Menus
Information and settings for the selected tab are listed. The menus that appear vary depending on the tab that is selected.
5. Information and Settings Display
Details of the item selected from the menu are displayed.
6. Administrator’s Code
Enter the administrator access code to log in to Administrator mode.
C350 12-3

12 Using PageScope Web Connection
12.4 Logging in to Administrator ModeYou can switch between User mode and Administrator mode. However, you must enter Administrator mode to specify system configurations or network configurations.
Login procedure
➜ In the Administrator’s Code box on the User mode page, enter the administrator password (administrator access code) of this machine, and then click the [Log-in] button.
The Administrator mode page appears.
To return to User mode, click the [Log-out] button.
✎NoteWhen logged in to Administrator mode, the control panel of this machine is locked and cannot be used.
Depending on the status of this machine, you may not be able to log in to Administrator mode.
When logged in to Administrator mode, if no operation is performed for a set length of time, a timeout occurs and you will automatically be logged out from Administrator mode. The timeout time is the time that is specified by the “Time (Panel Reset Timer)” item on the “Administrator Settings” page (page 12-36). If the time is set within the range of 1 to 5 minutes, the timeout time is set to 5 minutes. If “Panel Reset Timer” is set to “No”, the timeout time is 10 minutes.
If the unauthorized access lock is enabled on this machine’s control panel and you enter a wrong administrator’s code three times, the login is determined to be invalid and you will no longer be able to log in to Administrator mode. To enable access, this machine must be restarted (turned off, then on again).
12-4 C350
Using PageScope Web Connection 12
12.4.1 Cache Function of Web Browsers
Disabling the cache function of the Web browser
The newest information may not appear on the PageScope Web Connection screen due to the cache function of the Web browser. In addition, problems indicated in the next section can occur when the cache function is used.
To prevent these problems from occurring, disable the cache function of the Web browser by carrying out the procedure below.
✎NoteThe menus and commands may vary depending on the Web browser version, in which case refer to the help for the Web browser.
On Internet Explorer
1 From the “Tools” menu, choose “Internet Options”.
2 In the “General” tab, click [Settings] under “Temporary Internet files”.
3 Select “Every visit to the page” and click [OK].
On Netscape
1 From the “Edit” menu, choose “Preferences”.
2 In the “Category” box, choose “Advanced” and then “Cache”.
3 Under “Compare the page in the cache to the page on the network”, select “Every time I view the page”.
Problems that occur when using the cache function
If the cache function of the Web browser is used, problems may occur under the following conditions.
1 After logging into Administrator mode of PageScope Web Connection, timeout time is not configured.
2 Then, try to access any menu.
The timeout message screen appears.
3 Click [OK].
The User mode page appears.
C350 12-5

12 Using PageScope Web Connection
4 Log into Administrator mode of PageScope Web Connection again.
5 Access the menu that you tried to access in step 2.
Since the cache function is activated, the timeout screen appears again.Clicking [OK] here causes the screen to enter User mode, but this machine’s control panel is locked. In addition, you cannot log into Administrator mode of PageScope Web Connection.
If this occurs, you can correct the problem by carrying out any of the procedures below.
� Wait until the actual timeout time elapses.
� Restart this machine (turn it off and back on).
To prevent this problem from occurring, disable the cache function of the Web browser by carrying out the procedure above or delete the temporary files by carrying out the procedure below.
Deleting temporary files
You can avoid the problem by deleting temporary files using the procedure below after step 3 (before logging into Administrator mode of PageScope Web Connection again).
✎NoteThe menus and commands may vary depending on the Web browser version, in which case refer to the help for the Web browser.
On Internet Explorer
1 From the “Tools” menu, choose “Internet Options”.
2 In the “General” tab, click [Delete Files] under “Temporary Internet files”.
3 Click the [OK] button.
On Netscape
1 From the “Edit” menu, choose “Preferences”.
2 In the “Category” box, choose “Advanced” and then “Cache”.
3 Click the [Clear Cache] button.
12-6 C350

Using PageScope Web Connection 12
12.5 User Mode
12.5.1 System TabOn the “System” tab, information concerning the system configuration of this machine and its settings are displayed.
Summary
This is the initial page that appears when you access http://<IP_address_for_copier>/ with your Web browser. You can also display this page by clicking Summary in the menu on the “System” tab. The Summary page shows the current system configuration and status of this machine.
Device Status This area uses graphics and text to show the configuration of options installed in this machine.
C350 12-7
12 Using PageScope Web Connection
Detail – Input Tray
You can check the status of the paper drawers for this machine.
Procedure
➜ Click the “System” tab, click Detail, and then click Input Tray in the sub-menu that appeared.
Input Tray Displays the paper drawer names.“Tray 1”, “Tray 2”, “Tray 3”, “Tray 4”, “LCT”, or “Bypass”
Paper Size Displays the paper size that is set.The feed direction is displayed as “LEF” or “SEF”.Standard paper sizes: A3, A4, A5, A6, B4, B5, B6, 11 × 17, 11 × 14, Legal, Letter, 5.5 × 8.5, Executive, 12 × 18*, postcard, 4 × 6, 8K, or 16KNon-standard paper sizes: Displayed in inches* You can specify the paper size using “Over size paper selection.” on the Administrator Settings page (page 12-36) in Administrator mode.
Paper Type Displays the paper type that is set.Plain Paper, Thick 1, Thick 2, Thick 3, Envelope, OHP, 2nd side Plain Paper, Thick 1 2nd-Side, Thick 2 2nd-Side, or Thick 3 2nd-SideIn addition, if the paper properties are specified, “Plain Paper” (“Specialty”, etc.) is indicated.“Single Sided Only”, “High Quality Paper”, or “Specialty”
Capacity Displays the capacity of the paper drawer in terms of the maximum capacity for plain paper.
Paper Displays the amount of paper remaining in the paper drawer with the three levels shown below.“Ready”, “Near Empty”, or “Empty”
12-8 C350

Using PageScope Web Connection 12
Detail – Output TrayYou can check the status the output trays of this machine.
✎NoteThis page can be displayed only if an optional output tray is installed on this machine.
Procedure
➜ Click the “System” tab, click Detail, and then click Output Tray in the sub-menu that appeared.
Output Tray Displays the trays for the option that is installed.If FS-501 is installed: “Top Tray”, “Elevator Tray”, or “Third Tray”If FS-601 is installed: “Saddle Stack Tray” or “Elevator Tray”
Capacity Displays the capacity in terms of the number of pages of plain paper of the A4/Letter size.
Paper Displays the status of each tray as either “Ready” or “Full”.
C350 12-9
12 Using PageScope Web Connection
Detail – Hard Disk
You can check the status of the hard disk of this machine.
✎NoteThis page can be displayed only if the optional hard disk is installed on this machine.
Procedure
➜ Click the “System” tab, click Detail, and then click Hard Disk in the sub-menu that appeared.
Total Space Displays the size of the installed hard disk.
System Resource Displays the amount of hard disk space used by the system.
User’s Resource Displays the amount of hard disk space used by the user.
Free Space Displays the amount of free hard disk space.
12-10 C350

Using PageScope Web Connection 12
Detail – Interface InfoYou can check the interface information for this machine.
Procedure
➜ Click the “System” tab, click Detail, and then click Interface Info in the sub-menu that appeared.
Interface Info
Type Displays the network type that can be used.“Ethernet 10Base-T/100Base-TX”
IP Address Displays the assigned IP address.
MAC Address Displays the MAC address of this machine.
Local I/F(This item appears only if the optional local interface kit is installed in this machine.)
Type Displays the local interface (IEEE1284) that can be used on this machine.
C350 12-11

12 Using PageScope Web Connection
Detail – Consumable
You can check the consumable information for this machine.
Procedure
➜ Click the “System” tab, click Detail, and then click Consumable in the sub-menu that appeared.
Imaging Unit (C, M, Y, and Bk)
Displays imaging unit information.“Ready”, “Near Life”, or “Life”
Paper Cleaner/Ozone Filter
Displays the paper cleaner and ozone filter information.“Ready”, “Near Life”, or “Life”
Fusing Unit Displays fusing unit information.“Ready”, “Near Life”, or “Life”
Transfer Roller Displays the transfer roller unit information.“Ready”, “Near Life”, or “Life”
Image Transfer Belt Unit Displays the image transfer belt unit information.“Ready”, “Near Life”, or “Life”
Toner Cartridge (C, M, Y, and Bk)
Displays the toner cartridge information for each color.“Ready”, “Near Empty”, or “Empty”
Waste Toner Bottle Displays the waste toner bottle information.“Ready”, “Near Full”, or “Full”
12-12 C350

Using PageScope Web Connection 12
✎NoteThe status may not be displayed correctly if the consumables are not installed.
Staple Cartridge Displays the staple cartridge information only when a finisher with a staple function is installed.“Ready” or “Empty”
Dust Box Displays the dust box information only when a finisher with a hole punch function is installed.“Ready” or “Full”
C350 12-13

12 Using PageScope Web Connection
Counter List
You can check the counters that this machine manages.
Procedure
➜ Click the “System” tab, and then click Counter List in the menu.
Copy/Printer
Copy Displays copy counter values for each color mode (Black, Full Color, Mono Color, and Two-Color) and for the duplex mode (2-Sided Total).
Printer Displays print counter values for each color mode (Black, Full Color, Mono Color, and Two-Color) and for the duplex mode (2-Sided Total).
Copy + Printer Displays copy and print counter values for each color mode (Black and Color).
Total Displays the total output counter value (copy and print).
Copy Size/Printer Size
Copy Size Displays copy counter values for each color mode (Black, Full Color, Mono Color, and Two-Color) printed on large-sized paper.
Printer Size Displays print counter values for each color mode (Black, Full Color, and Two-Color) printed on large-sized paper.
Scan
Scan Displays the scan counter.
12-14 C350
Using PageScope Web Connection 12
Toner CoverageYou can check the total usage ratio of each color of toner.
Procedure
➜ Click the “System” tab, and then click Toner Coverage in the menu.
Copy Displays the total average usage ratio for each color of toner during copying with each color mode.
Printer Displays the total average usage ratio for each color of toner during printing with each color mode.
Copy + Printer Displays the total average usage ratio for each color of toner during copying and printing with each color mode.
C350 12-15
12 Using PageScope Web Connection
Online Assistance
You can check support information concerning the product.
Procedure
➜ Click the “System” tab, and then click Online Assistance in the menu.
Contact Displays the contact for directing inquiries about the product.
Contact Information Phone
Displays the phone number that can be called for information on the product.
Internet Product Help Displays the URL of the Web page concerning the product.
Corporate Web Site Displays the URL of the manufacturer’s Web site.
Supplies and Accessories Displays information about the contact for ordering consumables.
12-16 C350
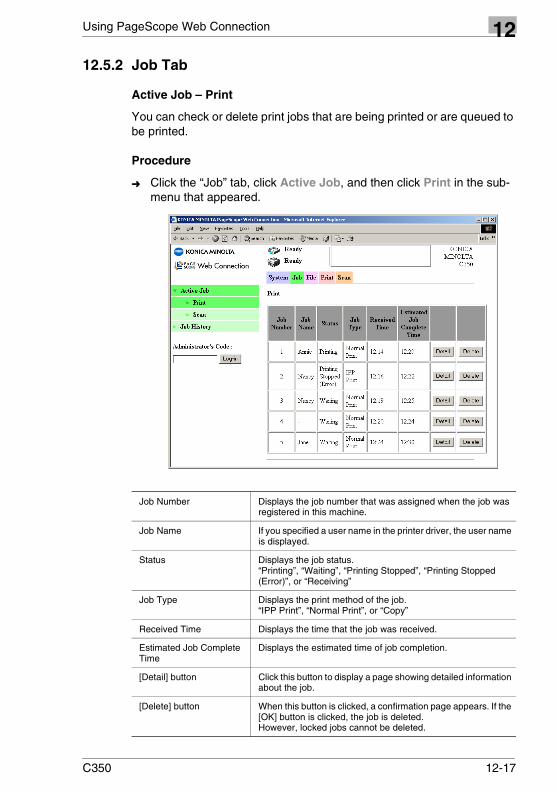
Using PageScope Web Connection 12
12.5.2 Job Tab
Active Job – Print
You can check or delete print jobs that are being printed or are queued to be printed.
Procedure
➜ Click the “Job” tab, click Active Job, and then click Print in the sub-menu that appeared.
Job Number Displays the job number that was assigned when the job was registered in this machine.
Job Name If you specified a user name in the printer driver, the user name is displayed.
Status Displays the job status.“Printing”, “Waiting”, “Printing Stopped”, “Printing Stopped (Error)”, or “Receiving”
Job Type Displays the print method of the job.“IPP Print”, “Normal Print”, or “Copy”
Received Time Displays the time that the job was received.
Estimated Job Complete Time
Displays the estimated time of job completion.
[Detail] button Click this button to display a page showing detailed information about the job.
[Delete] button When this button is clicked, a confirmation page appears. If the [OK] button is clicked, the job is deleted.However, locked jobs cannot be deleted.
C350 12-17
12 Using PageScope Web Connection
Information displayed when the [Detail] button is clicked
Account Number If the Copy Track mode is set, the access code is displayed.
Error Information Displays the detailed status of the job. If the job status is “Printing” or “Waiting”, “-” is displayed. If the job status is “Printing Stopped (Error)”, the error information is displayed.If an error has occurred in this machine, the error information is displayed.
Destination Displays the output tray of the job.If FS-501 is installed: “Top Tray”, “Elevator Tray”, or “Third Tray”If FS-601 is installed: “Saddle Stack Tray” or “Elevator Tray”
File Name For a print job, the file name is displayed.
Number of Pages Displays the number of pages per copy in the job.
Copy Displays the number of output copies in the job.
[Delete] button When this button is clicked, a confirmation page appears. If the [OK] button is clicked, the job is deleted.
12-18 C350
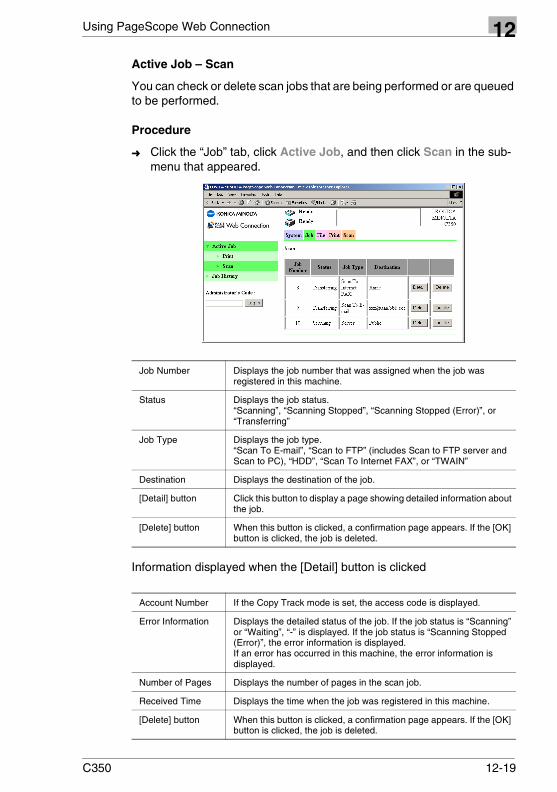
Using PageScope Web Connection 12
Active Job – ScanYou can check or delete scan jobs that are being performed or are queued to be performed.
Procedure
➜ Click the “Job” tab, click Active Job, and then click Scan in the sub-menu that appeared.
Information displayed when the [Detail] button is clicked
Job Number Displays the job number that was assigned when the job was registered in this machine.
Status Displays the job status.“Scanning”, “Scanning Stopped”, “Scanning Stopped (Error)”, or “Transferring”
Job Type Displays the job type.“Scan To E-mail”, “Scan to FTP” (includes Scan to FTP server and Scan to PC), “HDD”, “Scan To Internet FAX”, or “TWAIN”
Destination Displays the destination of the job.
[Detail] button Click this button to display a page showing detailed information about the job.
[Delete] button When this button is clicked, a confirmation page appears. If the [OK] button is clicked, the job is deleted.
Account Number If the Copy Track mode is set, the access code is displayed.
Error Information Displays the detailed status of the job. If the job status is “Scanning” or “Waiting”, “-” is displayed. If the job status is “Scanning Stopped (Error)”, the error information is displayed.If an error has occurred in this machine, the error information is displayed.
Number of Pages Displays the number of pages in the scan job.
Received Time Displays the time when the job was registered in this machine.
[Delete] button When this button is clicked, a confirmation page appears. If the [OK] button is clicked, the job is deleted.
C350 12-19
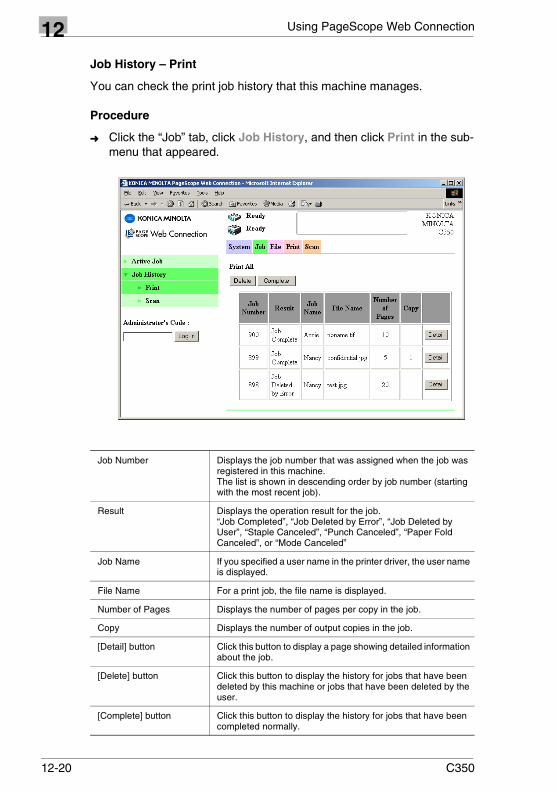
12 Using PageScope Web Connection
Job History – Print
You can check the print job history that this machine manages.
Procedure
➜ Click the “Job” tab, click Job History, and then click Print in the sub-menu that appeared.
Job Number Displays the job number that was assigned when the job was registered in this machine.The list is shown in descending order by job number (starting with the most recent job).
Result Displays the operation result for the job.“Job Completed”, “Job Deleted by Error”, “Job Deleted by User”, “Staple Canceled”, “Punch Canceled”, “Paper Fold Canceled”, or “Mode Canceled”
Job Name If you specified a user name in the printer driver, the user name is displayed.
File Name For a print job, the file name is displayed.
Number of Pages Displays the number of pages per copy in the job.
Copy Displays the number of output copies in the job.
[Detail] button Click this button to display a page showing detailed information about the job.
[Delete] button Click this button to display the history for jobs that have been deleted by this machine or jobs that have been deleted by the user.
[Complete] button Click this button to display the history for jobs that have been completed normally.
12-20 C350

Using PageScope Web Connection 12
Information displayed when the [Detail] button is clickedAccount Number If the Copy Track mode is set, the access code is displayed.
Error Information Displays the detailed status of the job. If the job status is “Job Completed”, “-” is displayed. If the job status is “Staple Canceled”, “Punch Canceled”, “Paper Fold Canceled”, or “Mode Canceled”, the error information is displayed.If the job ended due to an error, the error information is displayed.
Destination Displays the output tray of the job.If FS-501 is installed: “Top Tray”, “Elevator Tray”, or “Third Tray”If FS-601 is installed: “Saddle Stack Tray” or “Elevator Tray”
Received Time Displays the time when the job was registered in this machine.
Completed Time Displays the time when the job was completed.
File Type For a print job, the output data format of the job is displayed.
C350 12-21
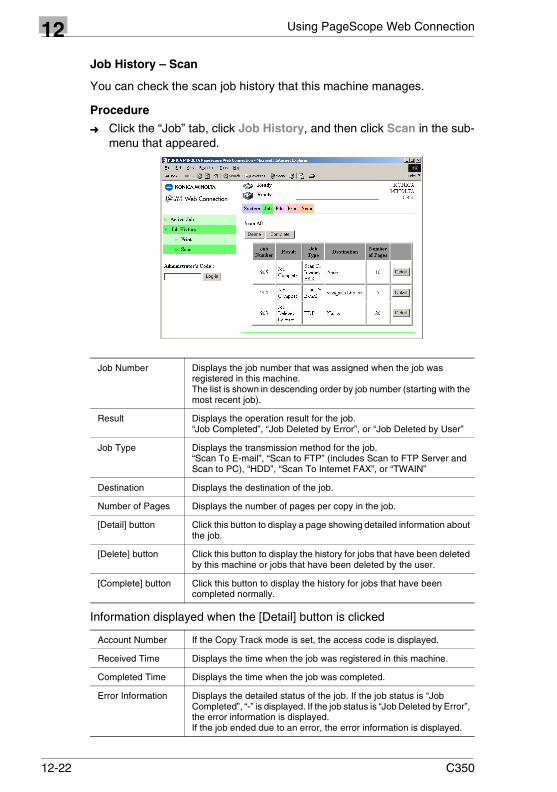
12 Using PageScope Web Connection
Job History – Scan
You can check the scan job history that this machine manages.
Procedure
➜ Click the “Job” tab, click Job History, and then click Scan in the sub-menu that appeared.
Information displayed when the [Detail] button is clicked
Job Number Displays the job number that was assigned when the job was registered in this machine.The list is shown in descending order by job number (starting with the most recent job).
Result Displays the operation result for the job.“Job Completed”, “Job Deleted by Error”, or “Job Deleted by User”
Job Type Displays the transmission method for the job.“Scan To E-mail”, “Scan to FTP” (includes Scan to FTP Server and Scan to PC), “HDD”, “Scan To Internet FAX”, or “TWAIN”
Destination Displays the destination of the job.
Number of Pages Displays the number of pages per copy in the job.
[Detail] button Click this button to display a page showing detailed information about the job.
[Delete] button Click this button to display the history for jobs that have been deleted by this machine or jobs that have been deleted by the user.
[Complete] button Click this button to display the history for jobs that have been completed normally.
Account Number If the Copy Track mode is set, the access code is displayed.
Received Time Displays the time when the job was registered in this machine.
Completed Time Displays the time when the job was completed.
Error Information Displays the detailed status of the job. If the job status is “Job Completed”, “-” is displayed. If the job status is “Job Deleted by Error”, the error information is displayed.If the job ended due to an error, the error information is displayed.
12-22 C350
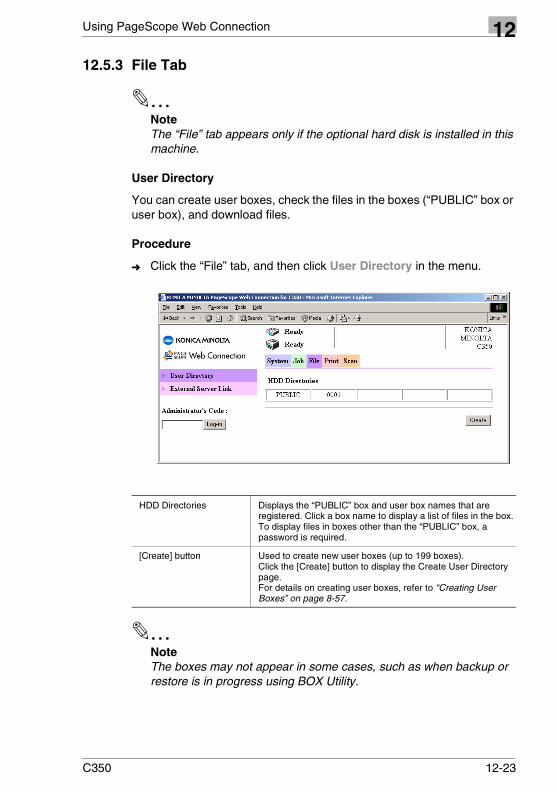
Using PageScope Web Connection 12
12.5.3 File Tab
✎NoteThe “File” tab appears only if the optional hard disk is installed in this machine.
User Directory
You can create user boxes, check the files in the boxes (“PUBLIC” box or user box), and download files.
Procedure
➜ Click the “File” tab, and then click User Directory in the menu.
✎NoteThe boxes may not appear in some cases, such as when backup or restore is in progress using BOX Utility.
HDD Directories Displays the “PUBLIC” box and user box names that are registered. Click a box name to display a list of files in the box.To display files in boxes other than the “PUBLIC” box, a password is required.
[Create] button Used to create new user boxes (up to 199 boxes). Click the [Create] button to display the Create User Directory page.For details on creating user boxes, refer to “Creating User Boxes” on page 8-57.
C350 12-23
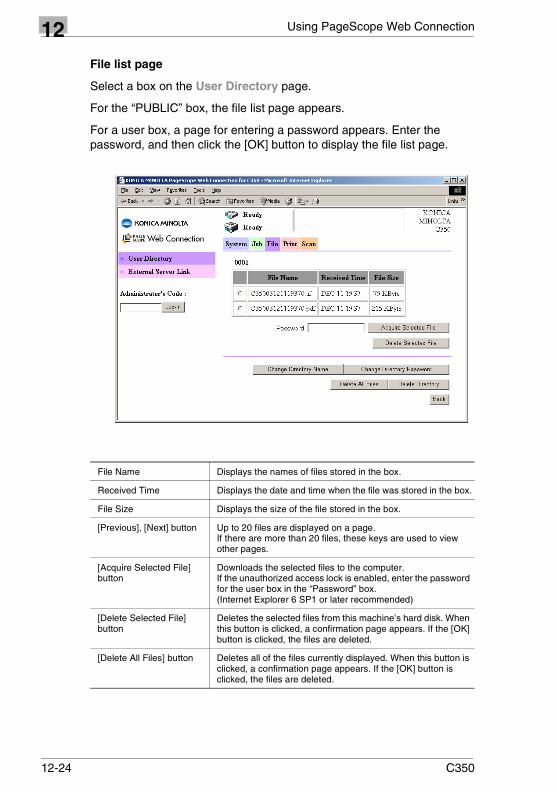
12 Using PageScope Web Connection
File list page
Select a box on the User Directory page.
For the “PUBLIC” box, the file list page appears.
For a user box, a page for entering a password appears. Enter the password, and then click the [OK] button to display the file list page.
File Name Displays the names of files stored in the box.
Received Time Displays the date and time when the file was stored in the box.
File Size Displays the size of the file stored in the box.
[Previous], [Next] button Up to 20 files are displayed on a page. If there are more than 20 files, these keys are used to view other pages.
[Acquire Selected File] button
Downloads the selected files to the computer.If the unauthorized access lock is enabled, enter the password for the user box in the “Password” box.(Internet Explorer 6 SP1 or later recommended)
[Delete Selected File] button
Deletes the selected files from this machine’s hard disk. When this button is clicked, a confirmation page appears. If the [OK] button is clicked, the files are deleted.
[Delete All Files] button Deletes all of the files currently displayed. When this button is clicked, a confirmation page appears. If the [OK] button is clicked, the files are deleted.
12-24 C350
Using PageScope Web Connection 12
✎NoteIf the unauthorized access lock is enabled on this machine’s control panel and you enter a wrong administrator’s code three times, the login is determined to be invalid and you will no longer be able to access the user box. To enable access, this machine must be restarted (turned off, then on again) or release the access lock on this machine’s control panel.
The files may not appear in some cases, such as when backup or restore is in progress using BOX Utility.
While a user box or file is being accessed from PageScope Web Connection, BOX Utility, or the control panel, you cannot acquire files, delete boxes/files, change the user box names, or change passwords.
Even if you change the user box name or delete the box, a user box specified as “File (Scan To HDD)” during one-touch registration or temporary registration does not change. If necessary, change the one-touch registration or temporary registration settings.If a user box specified using one-touch key registration or temporary registration is deleted and you check the registration information on PageScope Web Connection, it will appear as though the “PUBLIC” box is selected. However, the actual registration has not been changed. Register the information again.
In a file list for a user box, the following buttons also appear.
[Change Directory Name] button
Changes the name assigned to the user box. If this button is clicked, a page for changing the box name appears.
[Change Directory Password] button
Changes the password assigned to the user box. If this button is clicked, a page for changing the password appears.
[Delete Directory] button Deletes the user box currently displayed. When this button is clicked, a confirmation page appears. If the [OK] button is clicked, the user box is deleted.
C350 12-25
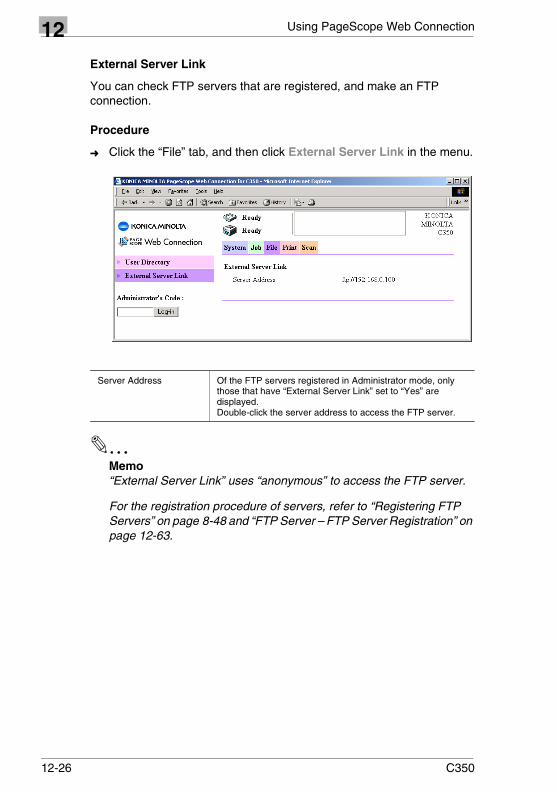
12 Using PageScope Web Connection
External Server Link
You can check FTP servers that are registered, and make an FTP connection.
Procedure
➜ Click the “File” tab, and then click External Server Link in the menu.
✎Memo“External Server Link” uses “anonymous” to access the FTP server.
For the registration procedure of servers, refer to “Registering FTP Servers” on page 8-48 and “FTP Server – FTP Server Registration” on page 12-63.
Server Address Of the FTP servers registered in Administrator mode, only those that have “External Server Link” set to “Yes” are displayed.Double-click the server address to access the FTP server.
12-26 C350

Using PageScope Web Connection 12
12.5.4 Print Tab
Default Set – Setting
You can specify general default settings for the printer.
If a print job whose settings are not specified is received, the settings specified here are used for printing.
Procedure
➜ Click the “Print” tab, click Default Set, and then click Setting in the sub-menu that appeared.
Page Size The default paper size specified here is used when this machine receives a print job with no paper size specified.Settings: “A3”, “A4”, “A5”, “A6”, “B4”, “B5”, “B6”, “11 × 17”, “11 × 14”, “Legal”, “Letter”, “Executive”, “5 1/2 × 8 1/2”, “Post Card”, “8 × 13”, “16K”, “8K”, “envelope B5”, “envelope Com10”, “envelope C5”, “envelope DL”, or “envelope Monarch”
Input Tray If this machine receives a print job with no specified input tray, the default input tray specified here is used.Settings: “Auto”, “Tray 1”, “Tray 2”, “Tray 3”, “Tray 4”, or “LCT”
Orientation If this machine receives a print job with no specified orientation, the default orientation specified here is used.Settings: “Portrait” or “Landscape”
Output If this machine receives a print job with no specified duplex setting, the default duplex setting specified here is used.Settings: “Single Sided”, “Long Edge Binding” or “Short Edge Binding” (“Single Sided” is available only if the duplex print unit is not installed.)
Copy If this machine receives a print job with no specified number of copies, the default number of copies specified here is used.Settings: 1 to 999
C350 12-27
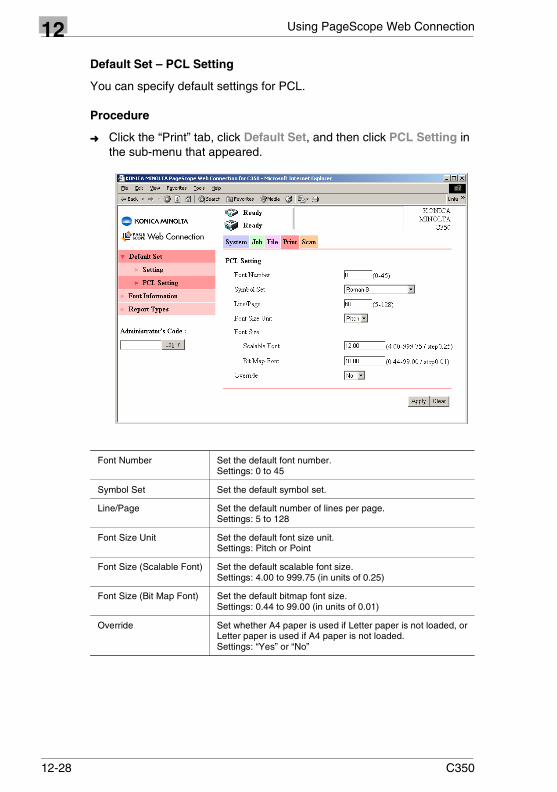
12 Using PageScope Web Connection
Default Set – PCL Setting
You can specify default settings for PCL.
Procedure
➜ Click the “Print” tab, click Default Set, and then click PCL Setting in the sub-menu that appeared.
Font Number Set the default font number.Settings: 0 to 45
Symbol Set Set the default symbol set.
Line/Page Set the default number of lines per page.Settings: 5 to 128
Font Size Unit Set the default font size unit.Settings: Pitch or Point
Font Size (Scalable Font) Set the default scalable font size.Settings: 4.00 to 999.75 (in units of 0.25)
Font Size (Bit Map Font) Set the default bitmap font size.Settings: 0.44 to 99.00 (in units of 0.01)
Override Set whether A4 paper is used if Letter paper is not loaded, or Letter paper is used if A4 paper is not loaded.Settings: “Yes” or “No”
12-28 C350

Using PageScope Web Connection 12
Font InformationYou can check the list of PCL fonts.
Procedure
➜ Click the “Print” tab, and then click Font Information in the menu.
A list of PCL fonts is displayed.
C350 12-29
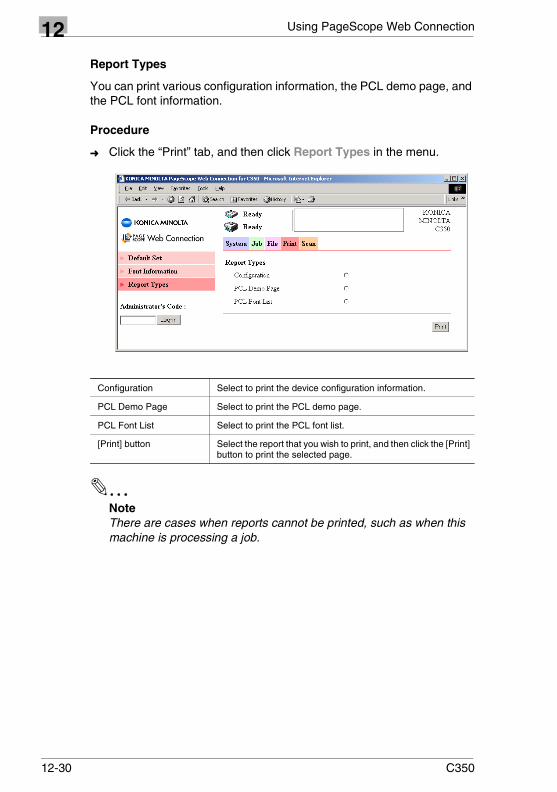
12 Using PageScope Web Connection
Report Types
You can print various configuration information, the PCL demo page, and the PCL font information.
Procedure
➜ Click the “Print” tab, and then click Report Types in the menu.
✎NoteThere are cases when reports cannot be printed, such as when this machine is processing a job.
Configuration Select to print the device configuration information.
PCL Demo Page Select to print the PCL demo page.
PCL Font List Select to print the PCL font list.
[Print] button Select the report that you wish to print, and then click the [Print] button to print the selected page.
12-30 C350

Using PageScope Web Connection 12
12.5.5 Scan Tab
One-Touch Key Registration
You can specify one-touch registration settings.
Procedure
➜ Click the “Scan” tab, and then click One-Touch Key Registration in the menu.
Index Displays the assigned index names. You can select an index and change the name.
[Apply] button Applies the index name change.
Sub-Index Displays sub-indexes in the index.Select “Grp” (group) to register the destination in a group. You can register groups for Scan to E-mail and Internet FAX operations.
C350 12-31
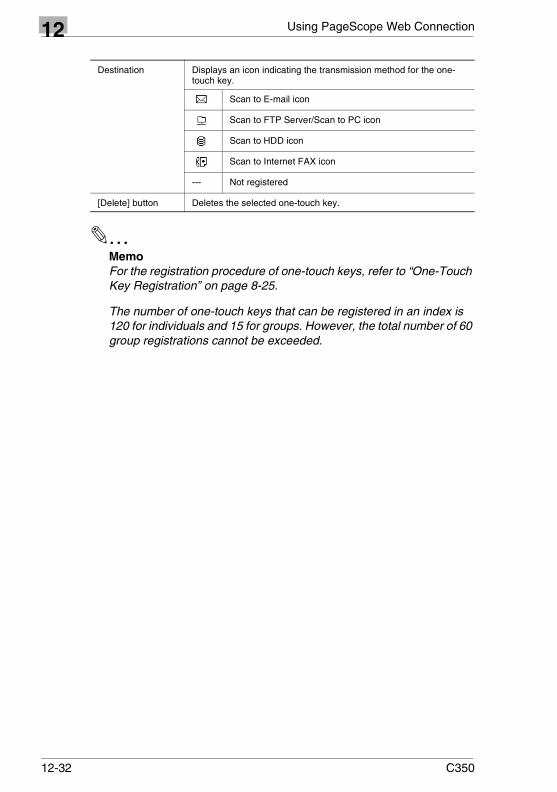
12 Using PageScope Web Connection
✎MemoFor the registration procedure of one-touch keys, refer to “One-Touch Key Registration” on page 8-25.
The number of one-touch keys that can be registered in an index is 120 for individuals and 15 for groups. However, the total number of 60 group registrations cannot be exceeded.
Destination Displays an icon indicating the transmission method for the one-touch key.
Scan to E-mail icon
Scan to FTP Server/Scan to PC icon
Scan to HDD icon
Scan to Internet FAX icon
--- Not registered
[Delete] button Deletes the selected one-touch key.
12-32 C350
Using PageScope Web Connection 12
One Time RegistrationYou can specify settings for temporary registration keys.
Procedure
➜ Click the “Scan” tab, and then click One Time Registration in the menu.
✎MemoFor the temporary registration procedure, refer to “Temporary Registration” on page 8-29.
Temporary registrations can be registered in the areas of “One Time Registration-1” to “One Time Registration-8”. Up to 15 destinations can be registered in each area.
One Time Registration area
Displays “One Time Registration-1” to “One Time Registration-8”.
Destination Displays an icon indicating the transmission method for the temporary registration.
Scan to E-mail icon
Scan to FTP Server/Scan to PC icon
Scan to HDD icon
Scan to Internet FAX icon
--- Not registered
[Delete] button Deletes the selected temporary registration key.
C350 12-33
12 Using PageScope Web Connection
12.6 Administrator ModeIn Administrator mode, you can configure the system for this machine.
For the procedure for logging in to Administrator mode, refer to “Logging in to Administrator Mode” on page 12-4.
12.6.1 System Tab
User’s Choice – User’s Choice 1
You can specify settings for this machine.
Procedure
➜ Click the “System” tab, click User’s Choice, and then click User’s Choice 1 in the sub-menu that appeared.
Time (Auto Low Power) Set the time until this machine enters Low Power (Power Save) mode.Settings: 10 to 240 (minutes)
Disable Auto Low Power and Sleep mode when job is in memory.
Set whether this machine will enter Low Power (Power Save) mode if there are locked jobs or jobs in the memory.Settings: “Yes” or “No”
Sleep Set whether this machine will enter Sleep mode. Displayed only when the “Disable Sleep Mode” function on this machine is set to “Yes”.Settings: “Yes” or “No”
Time (Sleep) Set the time until this machine enters sleep mode.Settings: 15 to 240 (minutes)
Disable Auto Low Power and Sleep mode when job is in memory.
Set whether this machine will enter Sleep mode if there are locked jobs or jobs in the memory.Settings: “Yes” or “No”
12-34 C350

Using PageScope Web Connection 12
User’s Choice – User’s Choice 2
You can specify settings for this machine.
Procedure
➜ Click the “System” tab, click User’s Choice, and then click User’s Choice 2 in the sub-menu that appeared.
Account Change Auto Reset
If set to “Yes”, this machine determines that the user has changed when the optional key counter is removed, and clears the specified settings.Settings: “Yes” or “No”
Priority Exit Tray Set the output tray that is given priority when FS-501 is installed.Copy: “Top Tray”, “Elevator Tray”, or “Third Tray”Print: “Top Tray”, “Elevator Tray”, or “Third Tray”Internet FAX: “Top Tray”, “Elevator Tray”, or “Third Tray”
Intelligent Sorting Set the function that automatically selects Sort or Non-Sort.Settings: “Yes” or “No”
Criss Cross Set the function that performs crisscross sorting, where the direction of each copy of the document is stacked alternately when paper in both the portrait and landscape orientations are loaded.Settings: “Yes” or “No”
Priority Device Set the print operation start time when a computer print job is received.Settings: “Printer” or “Copier”
2in1/4in1/Booklet Copy Zoom
Set the function that automatically selects the zoom ratio when a 2in1 or 4in1 setting is selected.Settings: “Yes” or “No”
C350 12-35
12 Using PageScope Web Connection
Administrator Settings
You can specify administrator settings for this machine.
Procedure
➜ Click the “System” tab, and then click Administrator Settings in the menu.
Disable Sleep Mode Set whether to disable Sleep mode.Settings: “Yes” or “No”
Over size paper selection.
Set the paper size that this machine identifies as over size paper.Settings: 12 1/4 * 18 or 12 * 18
Auto Lock Job Delete Set whether to delete locked jobs when the time specified in the “Lock Job Deletion Time” box is reached.Settings: “Yes” or “No”
Lock Job Deletion Time Set the time until locked jobs are deleted.Settings: 1 to 99 (hours)
Allow printing after Copy Track error.
Set whether the job can be processed with another access number when the copy limit has been reached.Settings: “Yes” or “No”
12-36 C350
Using PageScope Web Connection 12
Screen Pattern Set the screen pattern that is used when printing data from a computer.Settings: “Gradation” or “Resolution”
Date & Time Setting Set the date and time by entering the appropriate values in the “Year”, “Month”, “Day”, “Time”, and “Time Zone” boxes.
Reprint Set whether to enable the reprint function. Displayed only when the reprint function is enabled on this machine.Settings: “Yes” or “No”
Panel Reset Timer Set whether the auto panel reset operation is performed for this machine.Settings: “Yes” or “No”
Time (Panel Reset Timer)
Set the time until the auto panel reset operation is performed for this machine.Settings: 1 to 9 (minutes)
C350 12-37

12 Using PageScope Web Connection
PageScope Web Connection Setting
You can specify PageScope Web Connection settings.
Procedure
➜ Click the “System” tab, and then click PageScope Web Connection Setting in the menu.
Refresh Rate Set the refresh rate for PageScope Web Connection pages.Settings: 30 to 7200 (seconds)
Language Selection Set the display language of PageScope Web Connection.Settings: “US-English”, “UK-English”, “German”, “French”, “Italian”, “Dutch”, “Spanish”, “Danish”, “Czech”, or “Japanese”
12-38 C350
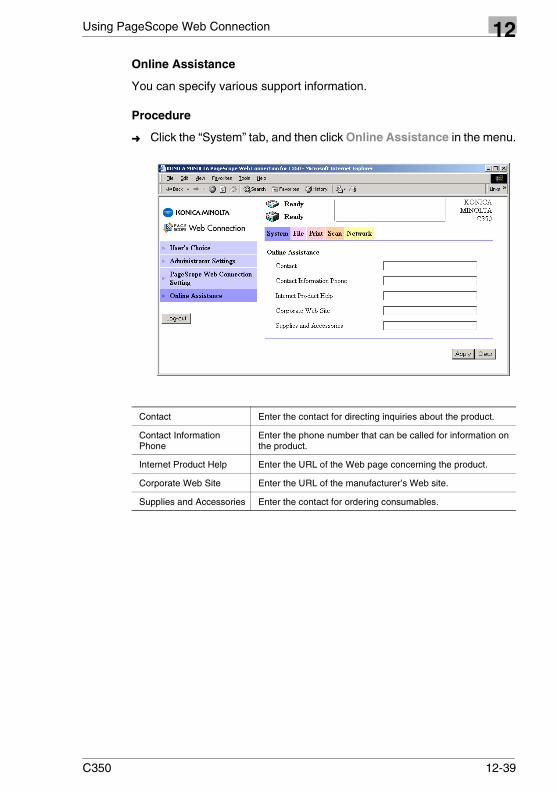
Using PageScope Web Connection 12
Online AssistanceYou can specify various support information.
Procedure
➜ Click the “System” tab, and then click Online Assistance in the menu.
Contact Enter the contact for directing inquiries about the product.
Contact Information Phone
Enter the phone number that can be called for information on the product.
Internet Product Help Enter the URL of the Web page concerning the product.
Corporate Web Site Enter the URL of the manufacturer’s Web site.
Supplies and Accessories Enter the contact for ordering consumables.
C350 12-39
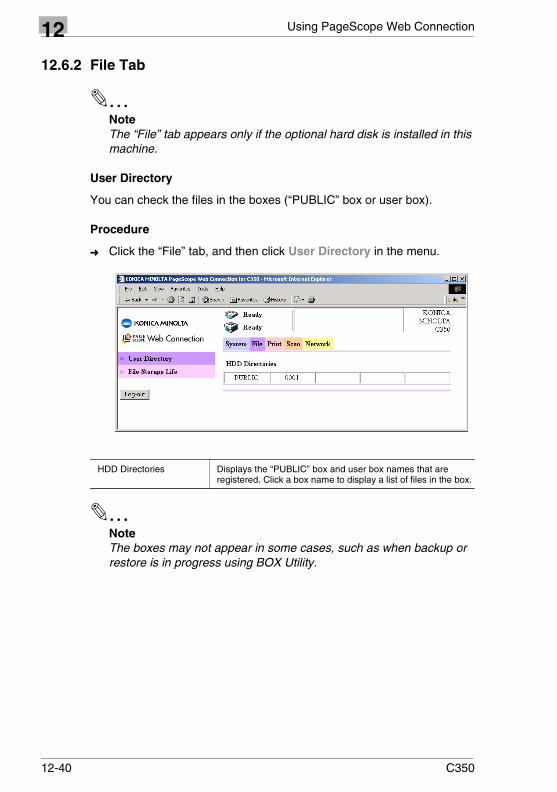
12 Using PageScope Web Connection
12.6.2 File Tab
✎NoteThe “File” tab appears only if the optional hard disk is installed in this machine.
User Directory
You can check the files in the boxes (“PUBLIC” box or user box).
Procedure
➜ Click the “File” tab, and then click User Directory in the menu.
✎NoteThe boxes may not appear in some cases, such as when backup or restore is in progress using BOX Utility.
HDD Directories Displays the “PUBLIC” box and user box names that are registered. Click a box name to display a list of files in the box.
12-40 C350

Using PageScope Web Connection 12
File list pageSelect a box on the User Directory page.
For the “PUBLIC” box, the file list page appears.
For a user box, a page for entering a password appears. Enter the password, and then click the [OK] button to display the file list page.
File Name Displays the names of files stored in the box.
Received Time Displays the date and time when the file was stored in the box.
File Size Displays the size of the file stored in the box.
[Previous], [Next] button Up to 20 files are displayed on a page. If there are more than 20 files, these keys are used to view other pages.
[Delete Selected File] button
Deletes the selected files from this machine’s hard disk. When this button is clicked, a confirmation page appears. If the [OK] button is clicked, the files are deleted.
[Delete All Files] button Deletes all of the files currently displayed. When this button is clicked, a confirmation page appears. If the [OK] button is clicked, the files are deleted.
C350 12-41
12 Using PageScope Web Connection
✎NoteThe files may not appear in some cases, such as when backup or restore is in progress using BOX Utility.
While a user box or file is being accessed from PageScope Web Connection, BOX Utility, or the control panel, you cannot delete boxes/files, change the user box names, or change passwords.
Even if you change the user box name or delete the box, a user box specified as “File (Scan To HDD)” during one-touch registration or temporary registration does not change. If necessary, change the one-touch registration or temporary registration settings.If a user box specified using one-touch key registration or temporary registration is deleted and you check the registration information on PageScope Web Connection, it will appear as though the “PUBLIC” box is selected. However, the actual registration has not been changed. Register the information again.
For a file list for a user box, the following buttons are also displayed.
[Change Directory Name] button
Changes the name assigned to the user box. If this button is clicked, a page for changing the box name appears.
[Change Directory Password] button
Changes the password assigned to the user box. If this button is clicked, a page for changing the password appears.
[Delete Directory] button Deletes the user box that is currently displayed. When this button is clicked, a confirmation page appears. If the [OK] button is clicked, the user box is deleted.
12-42 C350
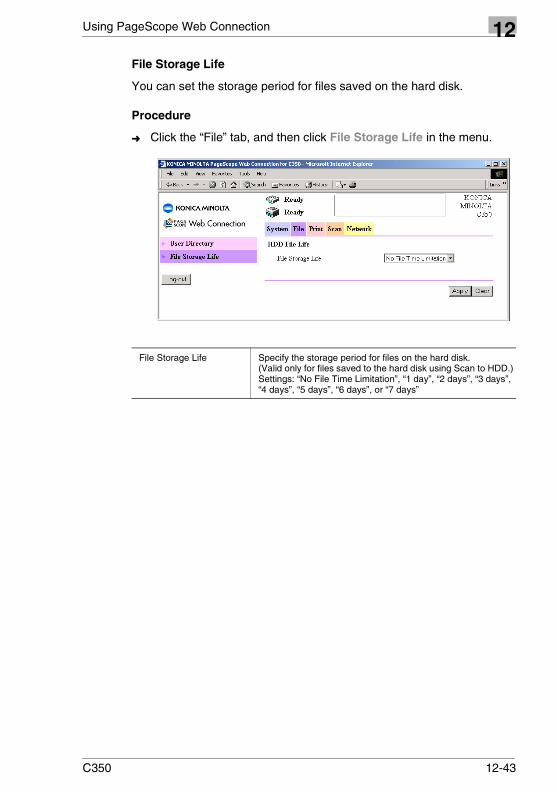
Using PageScope Web Connection 12
File Storage LifeYou can set the storage period for files saved on the hard disk.
Procedure
➜ Click the “File” tab, and then click File Storage Life in the menu.
File Storage Life Specify the storage period for files on the hard disk.(Valid only for files saved to the hard disk using Scan to HDD.)Settings: “No File Time Limitation”, “1 day”, “2 days”, “3 days”, “4 days”, “5 days”, “6 days”, or “7 days”
C350 12-43

12 Using PageScope Web Connection
12.6.3 Print Tab
Local I/F
You can specify local interface settings.
Procedure
➜ Click the “Print” tab, and then click Local I/F in the menu.
Parallel Interface Set the communication mode.This only appears when the optional local interface kit is installed in this machine.Settings: “Compatible”, “Nibble”, or “ECP”
I/O Timeout Set the connection timeout.Settings: 10 to 300 (seconds)
12-44 C350

Using PageScope Web Connection 12
IPPYou can specify IPP print settings.
Procedure
➜ Click the “Print” tab, and then click IPP in the menu.
Printer Name Set the printer name.Settings: Up to 127 characters (alphanumeric characters only)
Printer Location Set the printer location.Settings: Up to 127 characters (alphanumeric characters only)
Printer Manufacturer and Model
Set the printer manufacturer information.Settings: Up to 127 characters (alphanumeric characters only)
C350 12-45
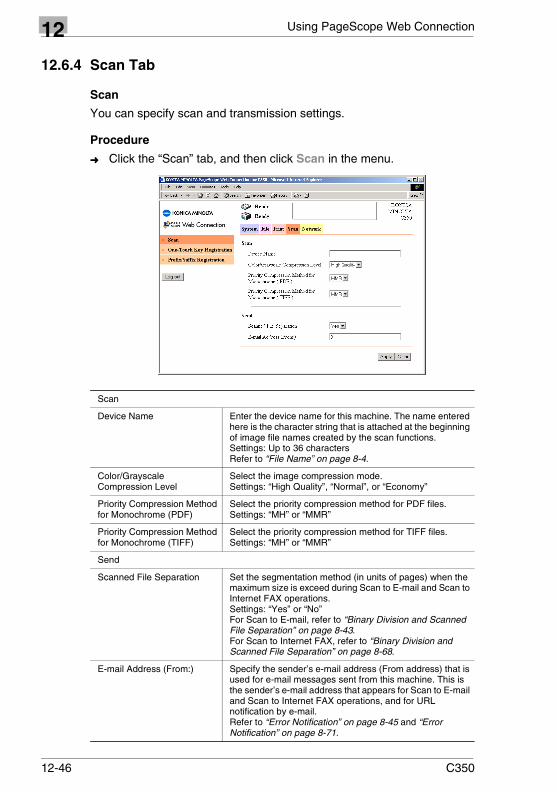
12 Using PageScope Web Connection
12.6.4 Scan Tab
Scan
You can specify scan and transmission settings.
Procedure
➜ Click the “Scan” tab, and then click Scan in the menu.
Scan
Device Name Enter the device name for this machine. The name entered here is the character string that is attached at the beginning of image file names created by the scan functions.Settings: Up to 36 charactersRefer to “File Name” on page 8-4.
Color/Grayscale Compression Level
Select the image compression mode.Settings: “High Quality”, “Normal”, or “Economy”
Priority Compression Method for Monochrome (PDF)
Select the priority compression method for PDF files.Settings: “MH” or “MMR”
Priority Compression Method for Monochrome (TIFF)
Select the priority compression method for TIFF files.Settings: “MH” or “MMR”
Send
Scanned File Separation Set the segmentation method (in units of pages) when the maximum size is exceed during Scan to E-mail and Scan to Internet FAX operations.Settings: “Yes” or “No”For Scan to E-mail, refer to “Binary Division and Scanned File Separation” on page 8-43.For Scan to Internet FAX, refer to “Binary Division and Scanned File Separation” on page 8-68.
E-mail Address (From:) Specify the sender’s e-mail address (From address) that is used for e-mail messages sent from this machine. This is the sender’s e-mail address that appears for Scan to E-mail and Scan to Internet FAX operations, and for URL notification by e-mail.Refer to “Error Notification” on page 8-45 and “Error Notification” on page 8-71.
12-46 C350
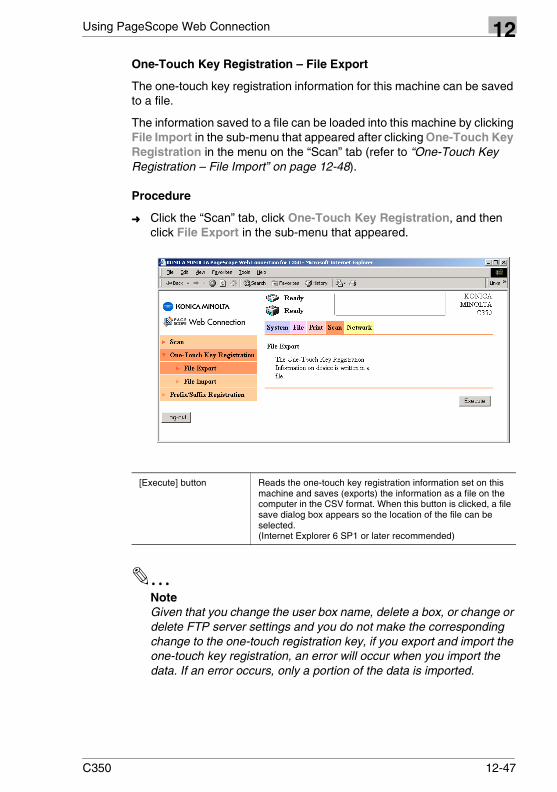
Using PageScope Web Connection 12
One-Touch Key Registration – File ExportThe one-touch key registration information for this machine can be saved to a file.
The information saved to a file can be loaded into this machine by clicking File Import in the sub-menu that appeared after clicking One-Touch Key Registration in the menu on the “Scan” tab (refer to “One-Touch Key Registration – File Import” on page 12-48).
Procedure
➜ Click the “Scan” tab, click One-Touch Key Registration, and then click File Export in the sub-menu that appeared.
✎NoteGiven that you change the user box name, delete a box, or change or delete FTP server settings and you do not make the corresponding change to the one-touch registration key, if you export and import the one-touch key registration, an error will occur when you import the data. If an error occurs, only a portion of the data is imported.
[Execute] button Reads the one-touch key registration information set on this machine and saves (exports) the information as a file on the computer in the CSV format. When this button is clicked, a file save dialog box appears so the location of the file can be selected.(Internet Explorer 6 SP1 or later recommended)
C350 12-47
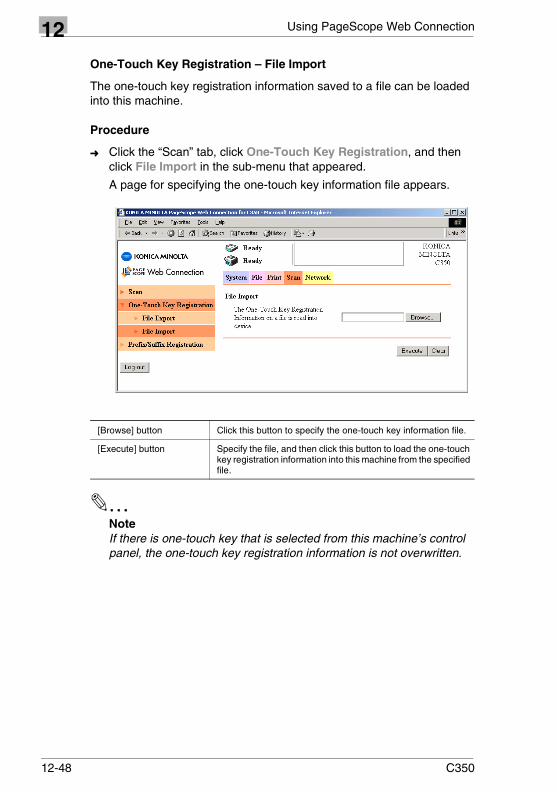
12 Using PageScope Web Connection
One-Touch Key Registration – File Import
The one-touch key registration information saved to a file can be loaded into this machine.
Procedure
➜ Click the “Scan” tab, click One-Touch Key Registration, and then click File Import in the sub-menu that appeared.
A page for specifying the one-touch key information file appears.
✎NoteIf there is one-touch key that is selected from this machine’s control panel, the one-touch key registration information is not overwritten.
[Browse] button Click this button to specify the one-touch key information file.
[Execute] button Specify the file, and then click this button to load the one-touch key registration information into this machine from the specified file.
12-48 C350
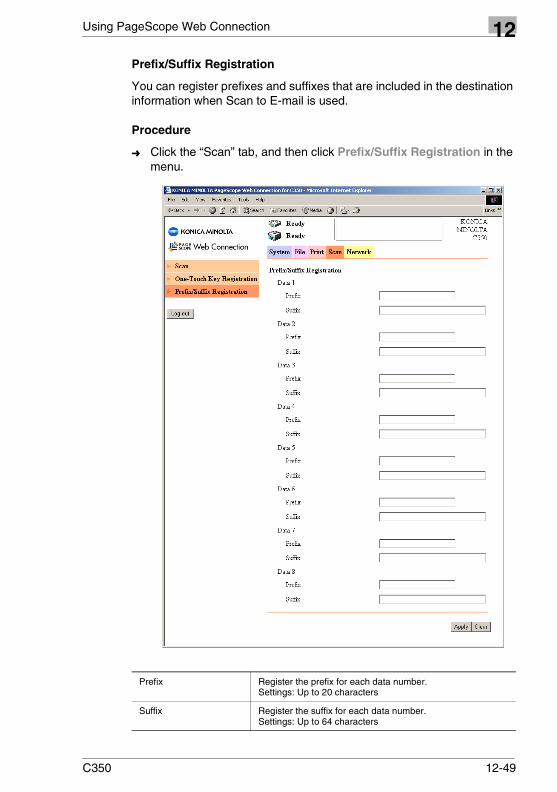
Using PageScope Web Connection 12
Prefix/Suffix RegistrationYou can register prefixes and suffixes that are included in the destination information when Scan to E-mail is used.
Procedure
➜ Click the “Scan” tab, and then click Prefix/Suffix Registration in the menu.
Prefix Register the prefix for each data number.Settings: Up to 20 characters
Suffix Register the suffix for each data number.Settings: Up to 64 characters
C350 12-49
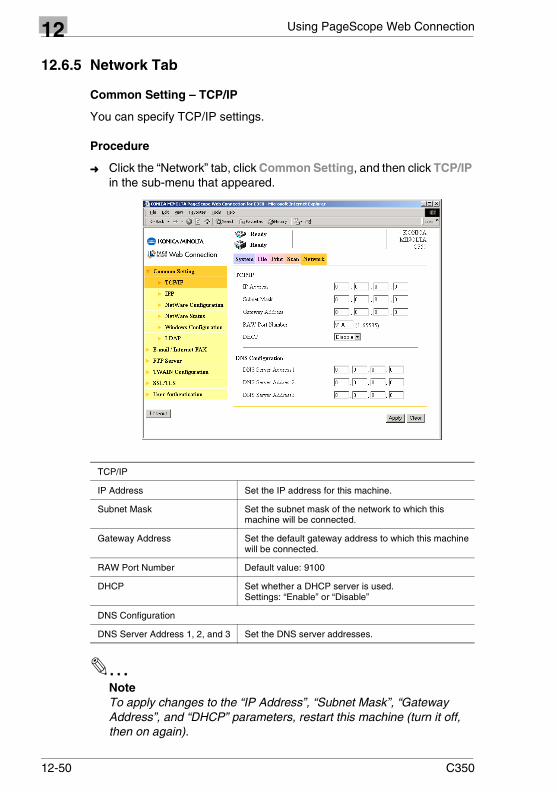
12 Using PageScope Web Connection
12.6.5 Network Tab
Common Setting – TCP/IP
You can specify TCP/IP settings.
Procedure
➜ Click the “Network” tab, click Common Setting, and then click TCP/IP in the sub-menu that appeared.
✎NoteTo apply changes to the “IP Address”, “Subnet Mask”, “Gateway Address”, and “DHCP” parameters, restart this machine (turn it off, then on again).
TCP/IP
IP Address Set the IP address for this machine.
Subnet Mask Set the subnet mask of the network to which this machine will be connected.
Gateway Address Set the default gateway address to which this machine will be connected.
RAW Port Number Default value: 9100
DHCP Set whether a DHCP server is used.Settings: “Enable” or “Disable”
DNS Configuration
DNS Server Address 1, 2, and 3 Set the DNS server addresses.
12-50 C350

Using PageScope Web Connection 12
Common Setting – IPPYou can specify IPP print settings.
Procedure
➜ Click the “Network” tab, click Common Setting, and then click IIP in the sub-menu that appeared.
Printer URI Displays the URL of the printer with which data can be printed using IPP.
Enable IPP Set whether to perform IPP printing.Settings: “Enable” or “Disable”
Accept IPP Jobs Set whether to use the IPP reception function.Settings: “Enable” or “Disable”
Operation Supported Specify the print operations to be supported by IPP.Settings: “Print Job”, “Validate Job”, “Cancel Job”, “Get Job Attributes”, “Get Jobs”, or “Get Print Attributes”
C350 12-51
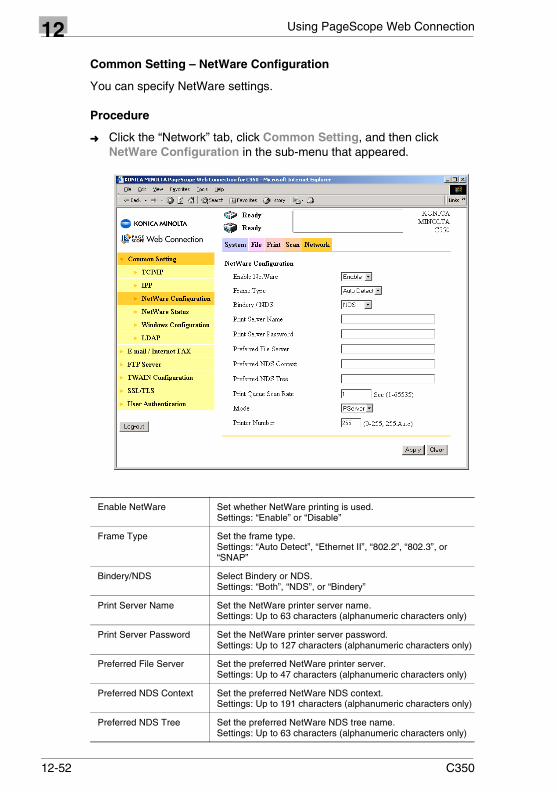
12 Using PageScope Web Connection
Common Setting – NetWare Configuration
You can specify NetWare settings.
Procedure
➜ Click the “Network” tab, click Common Setting, and then click NetWare Configuration in the sub-menu that appeared.
Enable NetWare Set whether NetWare printing is used.Settings: “Enable” or “Disable”
Frame Type Set the frame type.Settings: “Auto Detect”, “Ethernet II”, “802.2”, “802.3”, or “SNAP”
Bindery/NDS Select Bindery or NDS.Settings: “Both”, “NDS”, or “Bindery”
Print Server Name Set the NetWare printer server name.Settings: Up to 63 characters (alphanumeric characters only)
Print Server Password Set the NetWare printer server password.Settings: Up to 127 characters (alphanumeric characters only)
Preferred File Server Set the preferred NetWare printer server.Settings: Up to 47 characters (alphanumeric characters only)
Preferred NDS Context Set the preferred NetWare NDS context.Settings: Up to 191 characters (alphanumeric characters only)
Preferred NDS Tree Set the preferred NetWare NDS tree name.Settings: Up to 63 characters (alphanumeric characters only)
12-52 C350
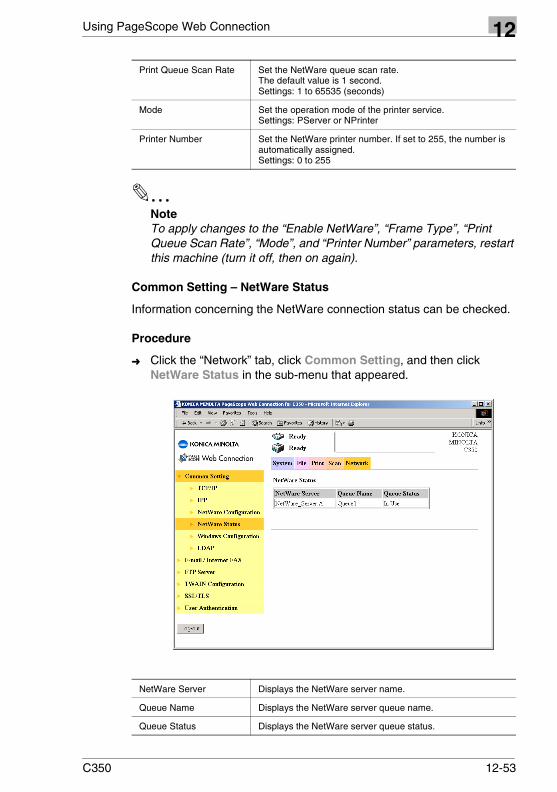
Using PageScope Web Connection 12
✎NoteTo apply changes to the “Enable NetWare”, “Frame Type”, “Print Queue Scan Rate”, “Mode”, and “Printer Number” parameters, restart this machine (turn it off, then on again).
Common Setting – NetWare Status
Information concerning the NetWare connection status can be checked.
Procedure
➜ Click the “Network” tab, click Common Setting, and then click NetWare Status in the sub-menu that appeared.
Print Queue Scan Rate Set the NetWare queue scan rate.The default value is 1 second.Settings: 1 to 65535 (seconds)
Mode Set the operation mode of the printer service.Settings: PServer or NPrinter
Printer Number Set the NetWare printer number. If set to 255, the number is automatically assigned.Settings: 0 to 255
NetWare Server Displays the NetWare server name.
Queue Name Displays the NetWare server queue name.
Queue Status Displays the NetWare server queue status.
C350 12-53
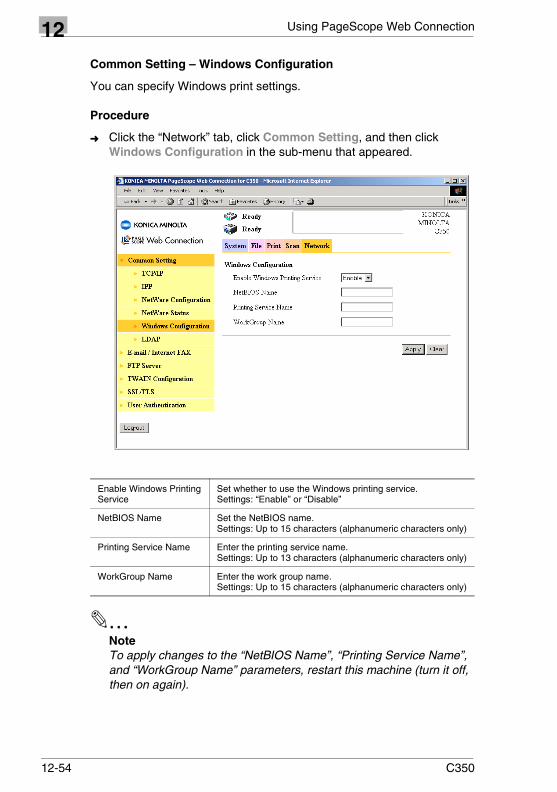
12 Using PageScope Web Connection
Common Setting – Windows Configuration
You can specify Windows print settings.
Procedure
➜ Click the “Network” tab, click Common Setting, and then click Windows Configuration in the sub-menu that appeared.
✎NoteTo apply changes to the “NetBIOS Name”, “Printing Service Name”, and “WorkGroup Name” parameters, restart this machine (turn it off, then on again).
Enable Windows Printing Service
Set whether to use the Windows printing service.Settings: “Enable” or “Disable”
NetBIOS Name Set the NetBIOS name.Settings: Up to 15 characters (alphanumeric characters only)
Printing Service Name Enter the printing service name.Settings: Up to 13 characters (alphanumeric characters only)
WorkGroup Name Enter the work group name.Settings: Up to 15 characters (alphanumeric characters only)
12-54 C350
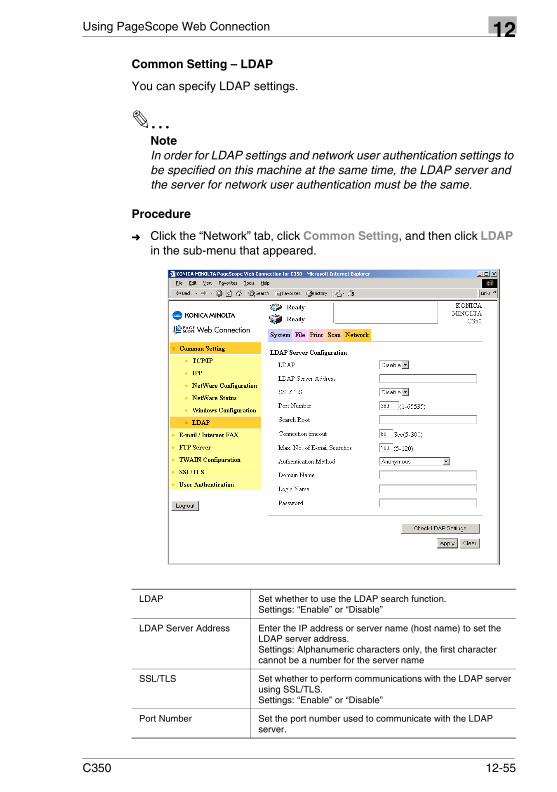
Using PageScope Web Connection 12
Common Setting – LDAPYou can specify LDAP settings.
✎NoteIn order for LDAP settings and network user authentication settings to be specified on this machine at the same time, the LDAP server and the server for network user authentication must be the same.
Procedure
➜ Click the “Network” tab, click Common Setting, and then click LDAP in the sub-menu that appeared.
LDAP Set whether to use the LDAP search function.Settings: “Enable” or “Disable”
LDAP Server Address Enter the IP address or server name (host name) to set the LDAP server address.Settings: Alphanumeric characters only, the first character cannot be a number for the server name
SSL/TLS Set whether to perform communications with the LDAP server using SSL/TLS.Settings: “Enable” or “Disable”
Port Number Set the port number used to communicate with the LDAP server.
C350 12-55
12 Using PageScope Web Connection
✎MemoThe items that must be entered vary depending on the authentication method.For “Anonymous”, the domain name, login name, and password are not required.For “Simple”, the domain name is not required, but the login name is. The password may not be required.For “Digest-MD5/CRAM-MD5”, the domain name is not required, but the login name is. The password may not be required.For “GSS-SPNEGO”, the domain name and login name are required. The password may not be required.
Search Root Set the search start point for the LDAP search.Settings: Up to 255 characters
Connection timeout Set the connection timeout for the LDAP server.Settings: 5 to 300 (seconds)
Max. No. of E-mail Searches
Set the search upper limit for the LDAP search.Settings: 5 to 120
Authentication Method Set the authentication method.If “GSS-SPNEGO” is selected, the DNS server in the TCP/IP settings must be specified (refer to page 12-50).Settings: “Anonymous”, “Simple”, “Digest-MD5/CRAM-MD5”, or “GSS-SPNEGO”
Domain Name If the authentication method is set to “GSS-SPNEGO”, set the domain name used with DNS.Settings: Up to 64 characters
Login Name Set the login name used to log in to the LDAP server.Settings: Up to 255 characters
Password Set the password used to log in to the LDAP server.Settings: Up to 128 characters
[Check LDAP Settings] button
Checks whether a connection can be established correctly using the settings entered here.
12-56 C350
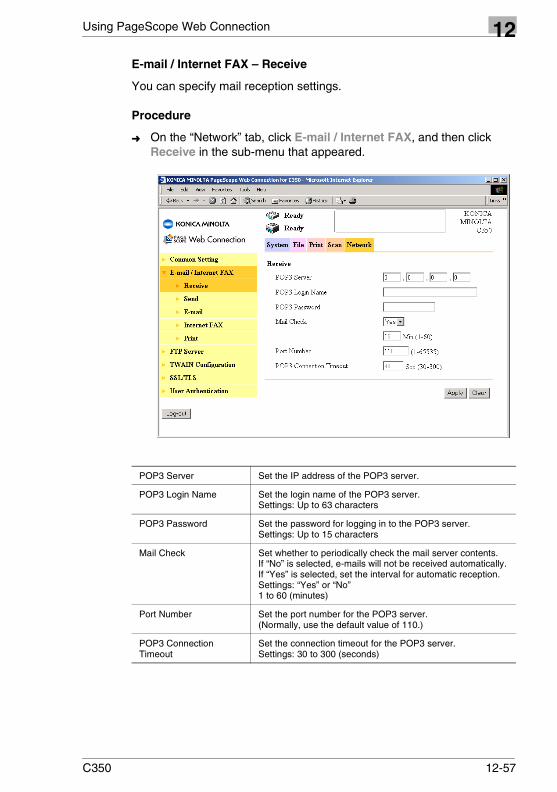
Using PageScope Web Connection 12
E-mail / Internet FAX – ReceiveYou can specify mail reception settings.
Procedure
➜ On the “Network” tab, click E-mail / Internet FAX, and then click Receive in the sub-menu that appeared.
POP3 Server Set the IP address of the POP3 server.
POP3 Login Name Set the login name of the POP3 server.Settings: Up to 63 characters
POP3 Password Set the password for logging in to the POP3 server.Settings: Up to 15 characters
Mail Check Set whether to periodically check the mail server contents.If “No” is selected, e-mails will not be received automatically.If “Yes” is selected, set the interval for automatic reception.Settings: “Yes” or “No”1 to 60 (minutes)
Port Number Set the port number for the POP3 server.(Normally, use the default value of 110.)
POP3 Connection Timeout
Set the connection timeout for the POP3 server.Settings: 30 to 300 (seconds)
C350 12-57
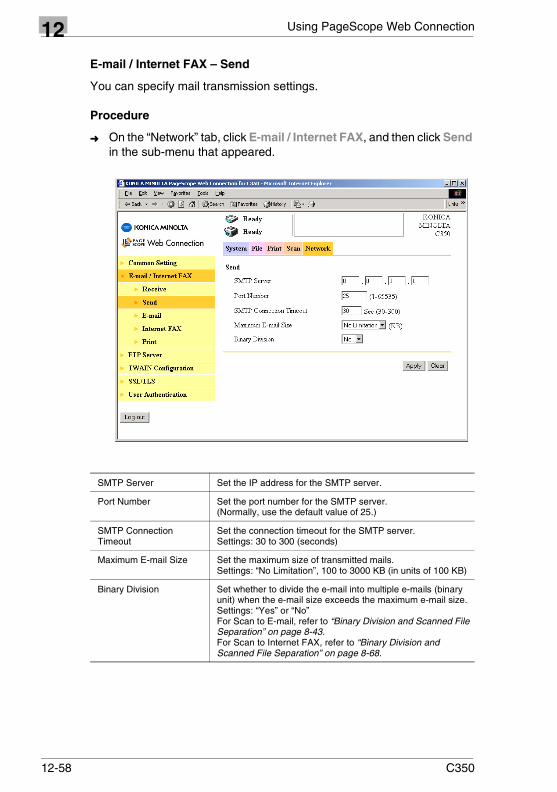
12 Using PageScope Web Connection
E-mail / Internet FAX – Send
You can specify mail transmission settings.
Procedure
➜ On the “Network” tab, click E-mail / Internet FAX, and then click Send in the sub-menu that appeared.
SMTP Server Set the IP address for the SMTP server.
Port Number Set the port number for the SMTP server.(Normally, use the default value of 25.)
SMTP Connection Timeout
Set the connection timeout for the SMTP server.Settings: 30 to 300 (seconds)
Maximum E-mail Size Set the maximum size of transmitted mails.Settings: “No Limitation”, 100 to 3000 KB (in units of 100 KB)
Binary Division Set whether to divide the e-mail into multiple e-mails (binary unit) when the e-mail size exceeds the maximum e-mail size.Settings: “Yes” or “No”For Scan to E-mail, refer to “Binary Division and Scanned File Separation” on page 8-43.For Scan to Internet FAX, refer to “Binary Division and Scanned File Separation” on page 8-68.
12-58 C350

Using PageScope Web Connection 12
E-mail / Internet FAX – E-mailSpecify the subject and text of the e-mail message for Scan to E-mail operations.
Procedure
➜ On the “Network” tab, click E-mail / Internet FAX, and then click E-mail in the sub-menu that appeared.
Subject Enter the subject of the mail.Settings: Up to 64 characters
Description Enter the text of the mail.Settings: Up to 256 characters
C350 12-59
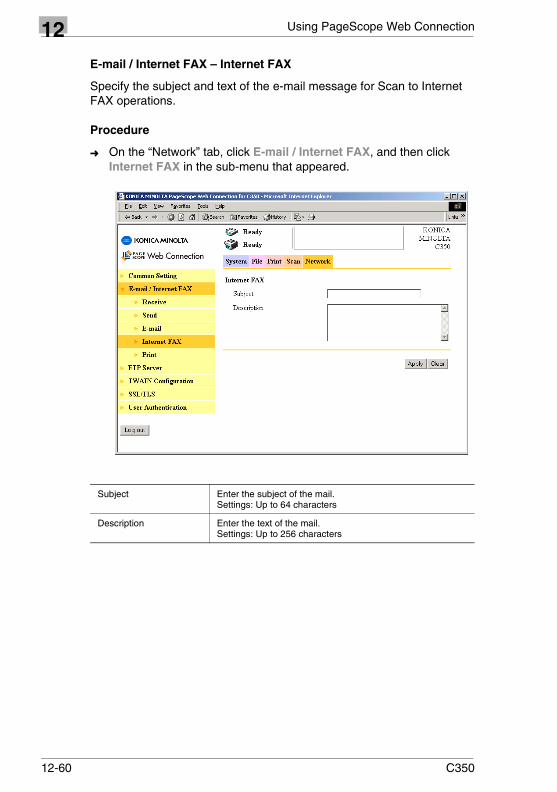
12 Using PageScope Web Connection
E-mail / Internet FAX – Internet FAX
Specify the subject and text of the e-mail message for Scan to Internet FAX operations.
Procedure
➜ On the “Network” tab, click E-mail / Internet FAX, and then click Internet FAX in the sub-menu that appeared.
Subject Enter the subject of the mail.Settings: Up to 64 characters
Description Enter the text of the mail.Settings: Up to 256 characters
12-60 C350

Using PageScope Web Connection 12
E-mail / Internet FAX – PrintYou can set the print settings for Internet FAX reception.
Procedure
➜ On the “Network” tab, click E-mail / Internet FAX, and then click Print in the sub-menu that appeared.
Text Print Set whether to print the mail text when this machine receives an Internet fax e-mail.Settings: “Yes” or “No”
Internet FAX Print Size Set the print size for printing the received data.Settings: “Reduced”, “Full Size”, or “A4/Letter”Reduced (default): Select this setting when you wish to slightly reduce the size the received data.Full Size: Select this setting to print the received data in full size.A4/Letter: Select this setting when you wish to fit the received data in A4- or Letter-size paper.
C350 12-61

12 Using PageScope Web Connection
FTP Server – FTP Configuration
You can specify FTP proxy server and FTP server settings.
Procedure
➜ On the “Network” tab, click FTP Server, and then click FTP Configuration in the sub-menu that appeared.
Proxy IP Address Enter the IP address of the proxy server when one is used.
Port Number Set the port number of the proxy server.(Normally, use the default value of 21.)
FTP Connection Timeout Set the connection timeout for the FTP server.Settings: 5 to 300 (seconds)
Passive Mode Set the passive mode.Settings: “Enable” or “Disable”
12-62 C350

Using PageScope Web Connection 12
FTP Server – FTP Server RegistrationYou can register FTP servers.
Procedure
1 On the “Network” tab, click FTP Server, and then click FTP Server Registration in the sub-menu that appeared.
2 To register a new FTP server, click an unregistered box (---).To change the settings for an FTP server that is already registered, click it.
C350 12-63
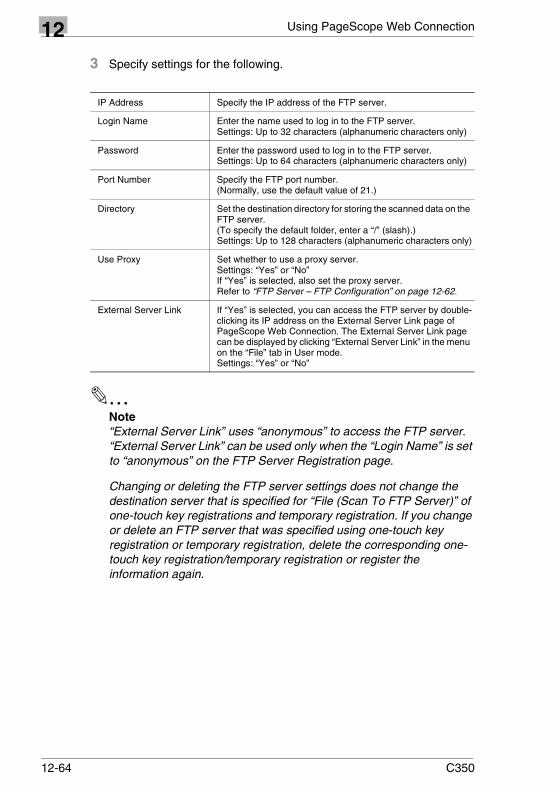
12 Using PageScope Web Connection
3 Specify settings for the following.
✎Note“External Server Link” uses “anonymous” to access the FTP server. “External Server Link” can be used only when the “Login Name” is set to “anonymous” on the FTP Server Registration page.
Changing or deleting the FTP server settings does not change the destination server that is specified for “File (Scan To FTP Server)” of one-touch key registrations and temporary registration. If you change or delete an FTP server that was specified using one-touch key registration or temporary registration, delete the corresponding one-touch key registration/temporary registration or register the information again.
IP Address Specify the IP address of the FTP server.
Login Name Enter the name used to log in to the FTP server.Settings: Up to 32 characters (alphanumeric characters only)
Password Enter the password used to log in to the FTP server.Settings: Up to 64 characters (alphanumeric characters only)
Port Number Specify the FTP port number.(Normally, use the default value of 21.)
Directory Set the destination directory for storing the scanned data on the FTP server.(To specify the default folder, enter a “/” (slash).)Settings: Up to 128 characters (alphanumeric characters only)
Use Proxy Set whether to use a proxy server.Settings: “Yes” or “No”If “Yes” is selected, also set the proxy server.Refer to “FTP Server – FTP Configuration” on page 12-62.
External Server Link If “Yes” is selected, you can access the FTP server by double-clicking its IP address on the External Server Link page of PageScope Web Connection. The External Server Link page can be displayed by clicking “External Server Link” in the menu on the “File” tab in User mode.Settings: “Yes” or “No”
12-64 C350
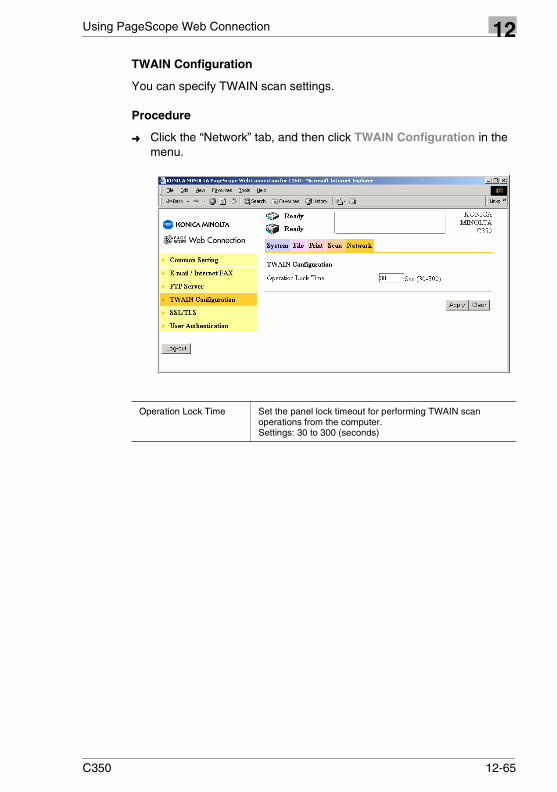
Using PageScope Web Connection 12
TWAIN ConfigurationYou can specify TWAIN scan settings.
Procedure
➜ Click the “Network” tab, and then click TWAIN Configuration in the menu.
Operation Lock Time Set the panel lock timeout for performing TWAIN scan operations from the computer.Settings: 30 to 300 (seconds)
C350 12-65
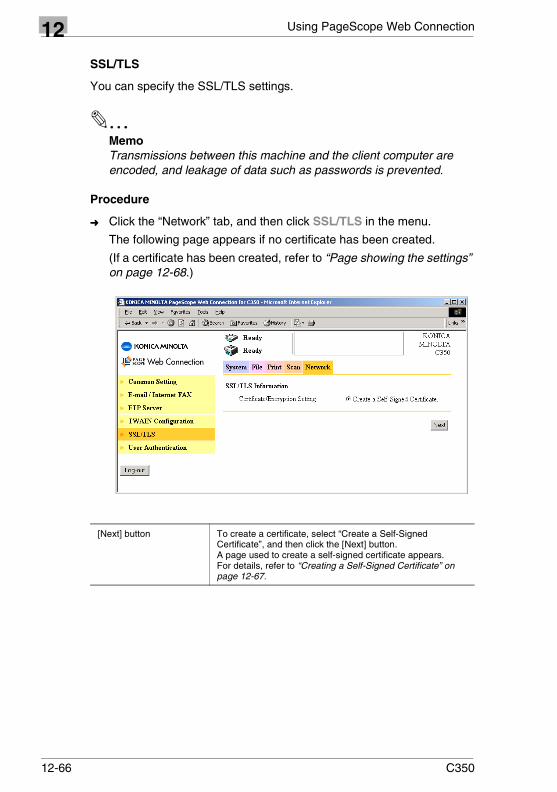
12 Using PageScope Web Connection
SSL/TLS
You can specify the SSL/TLS settings.
✎MemoTransmissions between this machine and the client computer are encoded, and leakage of data such as passwords is prevented.
Procedure
➜ Click the “Network” tab, and then click SSL/TLS in the menu.
The following page appears if no certificate has been created.
(If a certificate has been created, refer to “Page showing the settings” on page 12-68.)
[Next] button To create a certificate, select “Create a Self-Signed Certificate”, and then click the [Next] button.A page used to create a self-signed certificate appears.For details, refer to “Creating a Self-Signed Certificate” on page 12-67.
12-66 C350
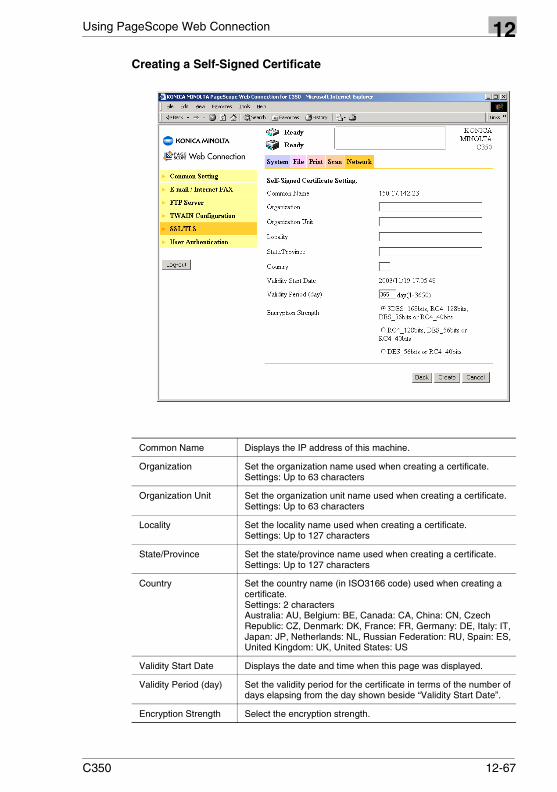
Using PageScope Web Connection 12
Creating a Self-Signed CertificateCommon Name Displays the IP address of this machine.
Organization Set the organization name used when creating a certificate.Settings: Up to 63 characters
Organization Unit Set the organization unit name used when creating a certificate.Settings: Up to 63 characters
Locality Set the locality name used when creating a certificate.Settings: Up to 127 characters
State/Province Set the state/province name used when creating a certificate.Settings: Up to 127 characters
Country Set the country name (in ISO3166 code) used when creating a certificate. Settings: 2 charactersAustralia: AU, Belgium: BE, Canada: CA, China: CN, Czech Republic: CZ, Denmark: DK, France: FR, Germany: DE, Italy: IT, Japan: JP, Netherlands: NL, Russian Federation: RU, Spain: ES, United Kingdom: UK, United States: US
Validity Start Date Displays the date and time when this page was displayed.
Validity Period (day) Set the validity period for the certificate in terms of the number of days elapsing from the day shown beside “Validity Start Date”.
Encryption Strength Select the encryption strength.
C350 12-67
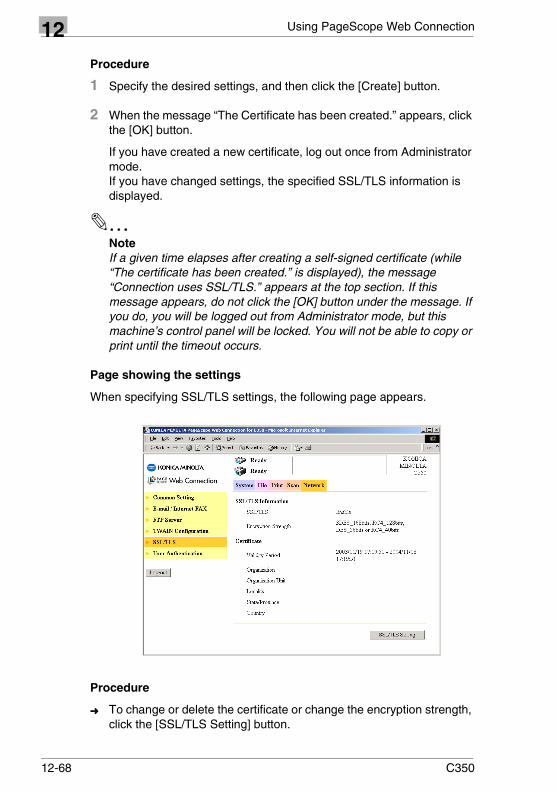
12 Using PageScope Web Connection
Procedure
1 Specify the desired settings, and then click the [Create] button.
2 When the message “The Certificate has been created.” appears, click the [OK] button.
If you have created a new certificate, log out once from Administrator mode.If you have changed settings, the specified SSL/TLS information is displayed.
✎NoteIf a given time elapses after creating a self-signed certificate (while “The certificate has been created.” is displayed), the message “Connection uses SSL/TLS.” appears at the top section. If this message appears, do not click the [OK] button under the message. If you do, you will be logged out from Administrator mode, but this machine’s control panel will be locked. You will not be able to copy or print until the timeout occurs.
Page showing the settings
When specifying SSL/TLS settings, the following page appears.
Procedure
➜ To change or delete the certificate or change the encryption strength, click the [SSL/TLS Setting] button.
12-68 C350
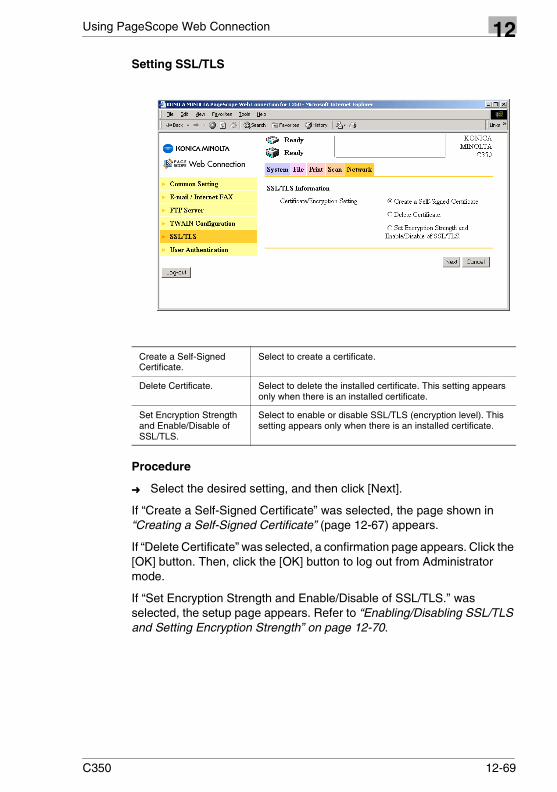
Using PageScope Web Connection 12
Setting SSL/TLSProcedure
➜ Select the desired setting, and then click [Next].
If “Create a Self-Signed Certificate” was selected, the page shown in “Creating a Self-Signed Certificate” (page 12-67) appears.
If “Delete Certificate” was selected, a confirmation page appears. Click the [OK] button. Then, click the [OK] button to log out from Administrator mode.
If “Set Encryption Strength and Enable/Disable of SSL/TLS.” was selected, the setup page appears. Refer to “Enabling/Disabling SSL/TLS and Setting Encryption Strength” on page 12-70.
Create a Self-Signed Certificate.
Select to create a certificate.
Delete Certificate. Select to delete the installed certificate. This setting appears only when there is an installed certificate.
Set Encryption Strength and Enable/Disable of SSL/TLS.
Select to enable or disable SSL/TLS (encryption level). This setting appears only when there is an installed certificate.
C350 12-69

12 Using PageScope Web Connection
Enabling/Disabling SSL/TLS and Setting Encryption Strength
Procedure
➜ To change the settings, specify the desired settings, and then click the [Apply] button.
If enable/disable condition of SSL/TLS was changed, click the [OK] button and log out once from Administrator mode.
If the enable/disable condition of SSL/TLS was not changed, the specified SSL/TLS information is displayed.
SSL/TLS Select whether to enable or disable the SSL/TLS function.Settings: “Enable” or “Disable”
Encryption Strength Select the encryption strength.
12-70 C350

Using PageScope Web Connection 12
User AuthenticationNetwork user authentication settings for scan functions and box functions can be specified.
✎NoteIn order for LDAP settings and network user authentication settings to be specified on this machine at the same time, the LDAP server and the server for network user authentication must be the same.
Procedure
➜ Click the “Network” tab, and then click User Authentication in the menu.
User Authentication Set whether to perform user authentication.Settings: “Enable” or “Disable”
Server Type Select the server type.Settings: “Active Directory” or “SMB (NTLM)”
Domain Name If “User Authentication” is set to “Enable”, set the domain name of the selected server type.Settings (for Active Directory): Up to 64 charactersSettings (for SMB (NTLM)): Up to 15 characters (alphanumeric characters and the following symbols: ! @ # $ % ^ & ( ) - _ ' { } . ~)
C350 12-71

12 Using PageScope Web Connection
✎MemoIf user authentication is enabled, a page for entering the network user name and password appears when the [Scan] or [Box] key on this machine is pressed in order to enter Scan mode or Box mode.
12-72 C350
Using the BOX Utility 13
13 Using the BOX Utility
The BOX Utility is a program used to retrieve, print, or send as an e-mail attachment the image data that has been stored on the hard disk using the Scan to HDD operation. The data is exchanged with the copier using FTP.
✎NoteTo use this utility program, an optional hard disk must be installed in this machine.
The main features of the BOX Utility are as follows:
� Display a list of image data that is stored on the hard disk installed in this machine.
� View and check the image data on the hard disk. The image can be expanded or reduced.
� Display a list of thumbnails of the image data.
� Print the selected image data.
� Easily send image data using e-mail, FTP, or SMB.
� Collectively back up or restore images (administrator only).
13.1 System Requirements
Computer IBM PC or compatiblePentium II 450 MHz with 128 MB or more(Pentium III 1 GHz with 256 MB or more recommended)
Operating System Windows 98SE, Windows Me, Windows 2000, Windows XP, or Windows NT 4.0 (SP 6a or later)
Network Environment A TCP/IP network is required.
Driver The printer driver must be installed to print the images.
Applications Adobe Acrobat Reader or Adobe Acrobat (to display PDF files*)Adobe Acrobat 5.0 (to display thumbnails of PDF files)
* PDF files can be displayed if a different application that can display PDF files is installed and the extension is assigned to the application.
C350 13-1

13 Using the BOX Utility
13.2 Supported File FormatsThe BOX Utility supports the following file formats.
13.3 Installing the BOX Utility
✎NoteIf other application programs are running, close them before starting the installation. If another application is running, the program may not be installed correctly.
Procedure
1 Open the folder that contains BOX Utility on the supplied CD-ROM (the “BoxUtility” folder).
2 Double-click the “Setup.exe” file to run the installation program.
3 Complete the installation according to the instructions that appear.
4 If a computer restart confirmation screen appears, restart the computer.
File Format Supported Functions
JPEG Color mode: Full color or grayscaleYou can specify the compression ratio.
TIFF Color mode: BlackPriority compression method for monochrome: MH or MMR
PDF Color mode: Full color, grayscale, or blackPriority compression method for monochrome: MH or MMR
13-2 C350

Using the BOX Utility 13
13.4 Using the Box FunctionsTo use BOX Utility, you must enable the box functions from this machine’s control panel.
Setup procedure
1 On this machine’s control panel, press the [Utility] key, touch [Admin. Mode], and then enter the administrator access code.
2 Touch [Admin. Set.], then [Box Function] (page 2/4).
3 Touch [Permit], and then touch [Enter].
C350 13-3

13 Using the BOX Utility
13.5 Registering the CopierTo retrieve image data on the copier hard disk, the copier must be registered in the utility program. Up to 10 copiers can be registered.
Registration procedure
1 Click the [Start] button, and then click “Programs” – “KONICA MINOLTA” – “BOX Utility” – “BOX Utility” to start up the BOX Utility.
2 On the “Setup” menu, click “Register MFP Controller”.
The setup dialog box below appears.
3 Click the [New Registration] button.
4 Enter the registration name in the Name box (up to 16 characters) and the IP address of the copier in the Host box.
✎MemoThe following symbols cannot be used in the box name.\ / : * ? " < > |
For the procedure to set the IP address of this machine, refer to “Setting the IP Address for This Machine” on page 6-2.
5 Press the computer keyboard’s [Enter] key and click the [OK] button.
The registration is saved.
13-4 C350
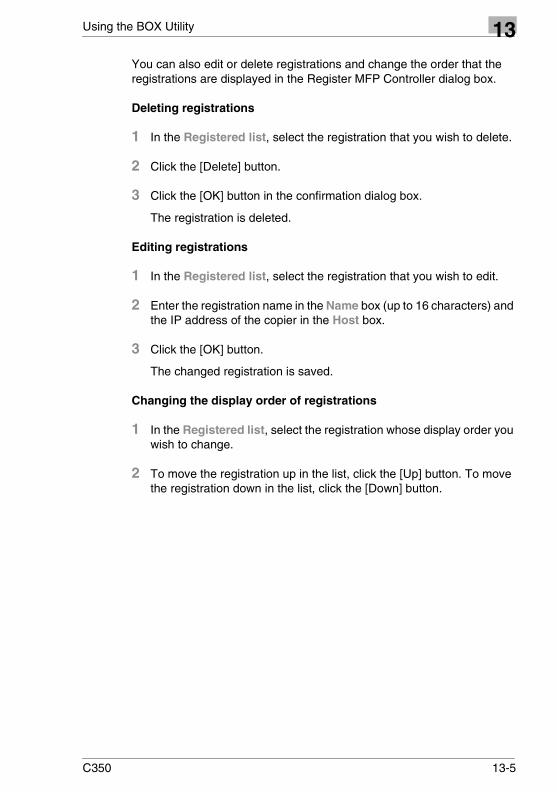
Using the BOX Utility 13
You can also edit or delete registrations and change the order that the registrations are displayed in the Register MFP Controller dialog box.Deleting registrations
1 In the Registered list, select the registration that you wish to delete.
2 Click the [Delete] button.
3 Click the [OK] button in the confirmation dialog box.
The registration is deleted.
Editing registrations
1 In the Registered list, select the registration that you wish to edit.
2 Enter the registration name in the Name box (up to 16 characters) and the IP address of the copier in the Host box.
3 Click the [OK] button.
The changed registration is saved.
Changing the display order of registrations
1 In the Registered list, select the registration whose display order you wish to change.
2 To move the registration up in the list, click the [Up] button. To move the registration down in the list, click the [Down] button.
C350 13-5
13 Using the BOX Utility
13.6 Connecting the CopierConnect the copier to access the image data on the copier hard disk.
Connection procedure
1 On the “Communicate” menu, click “Connect”. You can also click on the toolbar.
A dialog box used to select the destination appears.
2 If multiple copiers are registered, select the copier to be connected from the Connecting MFP drop-down list.
The Connecting MFP drop-down list displays the registration names that were entered in “Registering the Copier” (refer to “Registering the Copier” on page 13-4).
3 Click the [Connect] button.
The connection is established and the boxes on the copier hard disk appear.
4 Select the box containing the image data that you wish to view. If a user box is selected, enter the password for the box in the Password box.
5 Click the [Connect] button.
A list of image data in the selected box appears.
Disconnecting from the copier
➜ To disconnect from the copier, click “Disconnect” on the “Communicate” menu, or click on the toolbar.
13-6 C350

Using the BOX Utility 13
13.7 Main WindowAfter connecting the copier and selecting a box, a list of image data is displayed.
13.7.1 Changing the Display ModeYou can change the display mode of the main window.
Procedure
There are three image data display modes: icon display mode, detailed display mode, and thumbnail display mode.
➜ Select the display mode (“Icons”, “Details”, or “Thumbnails”) from the “View” menu.Or, click the display mode icon on the toolbar.
❍ : Icon display mode
❍ : Detailed display mode
❍ : Thumbnail display mode
Icon display mode
In icon display mode, the image data files are displayed as icons.
� Move the mouse pointer over an icon to display its file name, file format, file size, and date of registration.
� From the menu that appears when a file is right-clicked, you can open, rename, or delete the file. (You can perform the same operations as those on the “Command” menu.)
C350 13-7
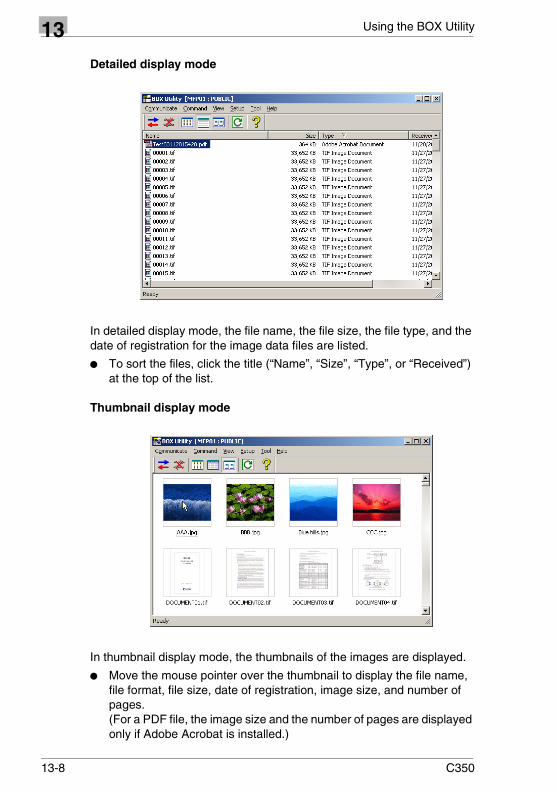
13 Using the BOX Utility
Detailed display mode
In detailed display mode, the file name, the file size, the file type, and the date of registration for the image data files are listed.
� To sort the files, click the title (“Name”, “Size”, “Type”, or “Received”) at the top of the list.
Thumbnail display mode
In thumbnail display mode, the thumbnails of the images are displayed.
� Move the mouse pointer over the thumbnail to display the file name, file format, file size, date of registration, image size, and number of pages.(For a PDF file, the image size and the number of pages are displayed only if Adobe Acrobat is installed.)
13-8 C350
Using the BOX Utility 13
� You can specify the size of the thumbnails from the “Thumbnail Size”sub-menu of the “View” menu.
✎MemoTo display thumbnails of PDF files, Adobe Acrobat 5.0 must be installed. Otherwise, default images are displayed.
13.7.2 Common Operations in the Main WindowYou can perform the operations described below in all display modes.
Opening the image data file
You can select a file in the list and display the image in another window.
➜ Select the file that you wish to view, and then click “Open” on the “Command” menu.
The image is displayed in the image display window.
For details on the operation of the image display window, refer to “Image Display Window” on page 13-13.
✎MemoPDF files are displayed using Adobe Acrobat or Adobe Acrobat Reader.
Opening the file using the assigned application
You can open a file in the list using another application program.
➜ Select the file that you wish to view, and then click “Open With” on the “Command” menu.
The application program assigned to the file name extension starts up, and the image is displayed.
C350 13-9
13 Using the BOX Utility
Dragging and dropping the file to another application
➜ You can drag and drop the file from the main window onto another application.
By dragging and dropping the file onto an FTP application, e-mail transmission application, or Explorer, you can perform FTP transmission, e-mail transmission, or SMB transmission.
✎NoteYou cannot drag and drop multiple files at the same time.
Some application programs do not support drag and drop.
Sorting the image data
You can sort the order of the displayed image data.
➜ On the “Arrange Icons” sub-menu of the “View” menu, select the order in which the image data is to be sorted.
The list is sorted as specified.
Refreshing
You can refresh the list information for the image data.
➜ On the “View” menu, click “Refresh”.You can also click on the toolbar.
The image data list is refreshed.
Changing the file name of the image data
You can change the name of the file on the copier hard disk.
1 Select the file that you wish to rename, and then click “Rename” on the “Command” menu.
A dialog box appears.
2 Enter the new file name (up to 26 alphanumeric characters).You cannot change the extension.
3 Click the [OK] button to change the file name.
13-10 C350
Using the BOX Utility 13
Deleting the image data fileYou can delete the file on the copier hard disk.
1 Select the file that you wish to delete, and then click “Delete” on the “Command” menu.Or, press the [Delete] key on the computer keyboard.
2 In the confirmation dialog box, click the [OK] button.
The selected file is deleted.
Setting a temporary file
The BOX Utility creates a temporary file when displaying thumbnails or the image display window.You can specify the storage location of the temporary file, set the cache, or delete the temporary file.
✎NoteYou cannot open the setup dialog box while connected to a copier. Drop the connection to copier and open the setup dialog box.
1 On the “Setup” menu, click “Temporary File Setting”.
The Temporary Files Setting dialog box appears.
2 Specify settings for the following.
[Delete] button Deletes all temporary files that the utility program created.
Path For Temporary Files Specify the storage location of the temporary files. You can also specify the storage location by clicking the [Browse] button.
C350 13-11
13 Using the BOX Utility
✎NoteIf the cache function is enabled, images will be displayed faster. However, since the image is displayed using a temporary file, the image may not be displayed correctly if the image has been changed. In such cases, delete the temporary file or turn off the cache function.
Setting the display
You can specify not to display PDF files of a large size.
➜ On the “Setup” menu, click “Display Setting”.Set the display in the setup dialog box.
Amount of disk space to use.
Specify the upper limit for the file size of temporary files (in MB).
Enable cache setting. Set whether to use the image downloaded from the copier as a cache file. If it is used as a cache file, images that have been opened before will open faster.
Use cache for the next startup as well.
Set whether to use the temporary file of the downloaded image as a cache file the next time the utility program is started.
[Reset Values] button Click this button to reset the settings in the dialog box to their defaults.
13-12 C350

Using the BOX Utility 13
13.8 Image Display WindowAn image display window opens when you select a file from the main window, then click “Open” on the “Command” menu.
You can perform the operations described below in the image display window.
Saving the image file
➜ On the “File” menu, click “Save As”.
The file save dialog box appears.
Displaying the print preview
You can display a preview sample before printing the displayed image.
➜ On the “File” menu, click “Print Preview”.
The print preview screen appears.
C350 13-13

13 Using the BOX Utility
Printing the image
You can print the displayed image.
1 On the “File” menu, click “Print”.
The Print dialog box appears.
2 Select the printer, print range, the number of copies, and then click the [OK] button.
The image is printed on the specified printer.
✎NoteIf you print the image on paper that is smaller than the scanned image, only a portion of the image will be printed.
Displaying image information
➜ On the “Edit” menu, click “Show Image Information”.
Detailed information including the file name, file type, size, date of creation, and resolution is displayed.
Expanding or reducing the image
You can expand or reduce the displayed image.
➜ On the “View” menu, click an expansion/reduction setting (“Zoom In”, “Zoom Out”, “Fit in Window”, “Fit Width”, or an expansion/reduction ratio).
Displaying images containing multiple pages
TIFF files may contain multiple pages of images.For these files, only the first page is displayed in the main window. However, in the image display window, other pages can be displayed.
➜ On the “View” menu, click “Go To Page”.
A dialog box for specifying the page number appears. Enter the page number, and then click the [OK] button to display the page.
13-14 C350
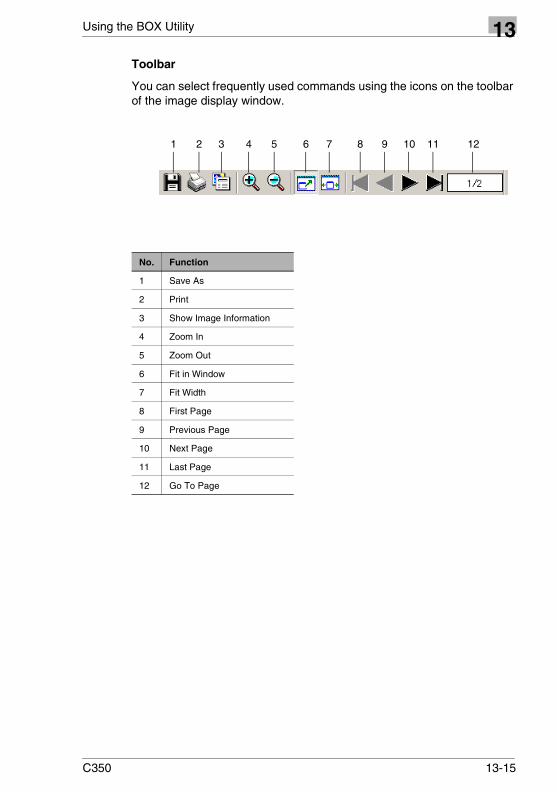
Using the BOX Utility 13
ToolbarYou can select frequently used commands using the icons on the toolbar of the image display window.
No. Function
1 Save As
2 Print
3 Show Image Information
4 Zoom In
5 Zoom Out
6 Fit in Window
7 Fit Width
8 First Page
9 Previous Page
10 Next Page
11 Last Page
12 Go To Page
1 2 3 4 5 6 7 8 9 10 11 12
C350 13-15
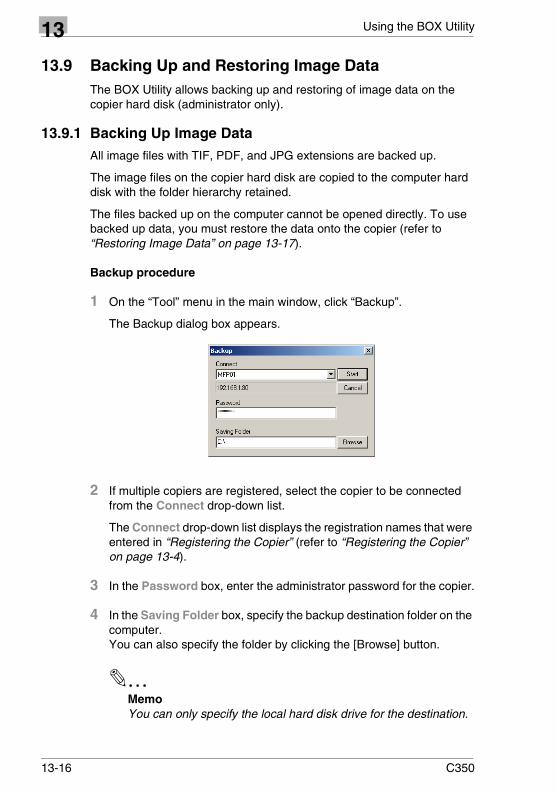
13 Using the BOX Utility
13.9 Backing Up and Restoring Image DataThe BOX Utility allows backing up and restoring of image data on the copier hard disk (administrator only).
13.9.1 Backing Up Image DataAll image files with TIF, PDF, and JPG extensions are backed up.
The image files on the copier hard disk are copied to the computer hard disk with the folder hierarchy retained.
The files backed up on the computer cannot be opened directly. To use backed up data, you must restore the data onto the copier (refer to “Restoring Image Data” on page 13-17).
Backup procedure
1 On the “Tool” menu in the main window, click “Backup”.
The Backup dialog box appears.
2 If multiple copiers are registered, select the copier to be connected from the Connect drop-down list.
The Connect drop-down list displays the registration names that were entered in “Registering the Copier” (refer to “Registering the Copier” on page 13-4).
3 In the Password box, enter the administrator password for the copier.
4 In the Saving Folder box, specify the backup destination folder on the computer.You can also specify the folder by clicking the [Browse] button.
✎MemoYou can only specify the local hard disk drive for the destination.
13-16 C350
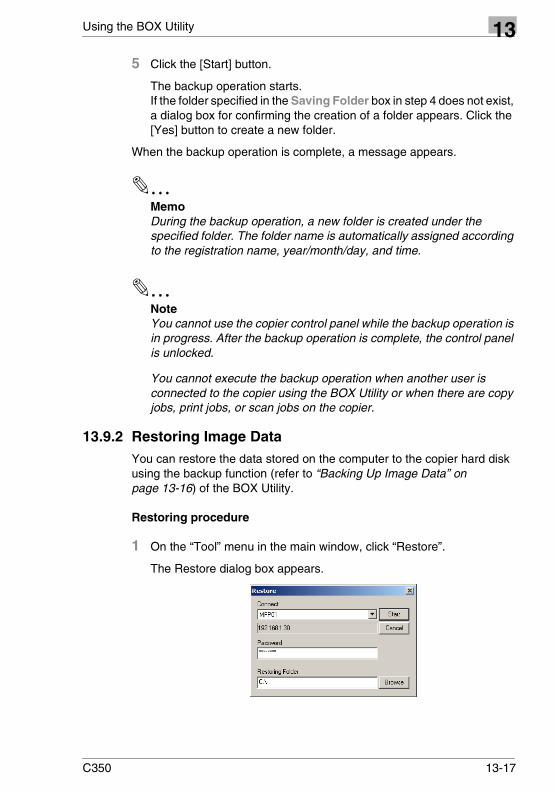
Using the BOX Utility 13
5 Click the [Start] button.The backup operation starts.If the folder specified in the Saving Folder box in step 4 does not exist, a dialog box for confirming the creation of a folder appears. Click the [Yes] button to create a new folder.
When the backup operation is complete, a message appears.
✎MemoDuring the backup operation, a new folder is created under the specified folder. The folder name is automatically assigned according to the registration name, year/month/day, and time.
✎NoteYou cannot use the copier control panel while the backup operation is in progress. After the backup operation is complete, the control panel is unlocked.
You cannot execute the backup operation when another user is connected to the copier using the BOX Utility or when there are copy jobs, print jobs, or scan jobs on the copier.
13.9.2 Restoring Image DataYou can restore the data stored on the computer to the copier hard disk using the backup function (refer to “Backing Up Image Data” on page 13-16) of the BOX Utility.
Restoring procedure
1 On the “Tool” menu in the main window, click “Restore”.
The Restore dialog box appears.
C350 13-17

13 Using the BOX Utility
2 If multiple copiers are registered, select the copier to be connected from the Connect drop-down list.
The Connect drop-down list displays the registration names that were entered in “Registering the Copier” on page 13-4.
3 Enter the administrator password for the copier in the Password box.
4 In the Restore Folder box, specify the computer folder where the backup file is stored.You can also specify the folder by clicking the [Browse] button.
5 Click the [Start] button.
The restore operation starts.
When the restore operation is complete, a message appears.
✎NoteIf image data files with same file names exist on the copier, the files are overwritten during the restore operation.
The date/time of creation of image data files that have been restored are set to the date/time when the restore operation was performed.
You cannot execute the restore operation when another user is connected to the copier using the BOX Utility or when there are copy jobs, print jobs, or scan jobs on the copier.
After executing the restore operation, the password for the box is reset to the box name. If the box name is less than four digits, add 0s after the box name to create four digits.(Example: If the box name is “U1”, the password is “U100”.)
13-18 C350

Using the BOX Utility 13
13.10 Creating Compact PDFsThe BOX Utility allows you to convert PDF files on the copier hard disk to compact PDFs and save them to your computer.
✎About Compact PDFsCompact PDF is a proprietary technology of KONICA MINOLTA that determines the text and picture areas of scan data and applies the optimal compression on each area.Because the file size is reduced when a file is converted into compact PDF, it can reduce the load on the network or hard disk when the file is sent as an e-mail attachment or when the file is saved to your computer.
Procedure
1 On the main window, select a PDF file you wish to convert into compact PDF.You can do this from any display mode (icons, details, or thumbnails).
2 On the “Command” menu, click “Convert To CompactPDF”.
The file save dialog box opens.
3 Specify the destination and file name and click [Save].
The PDF file on the copier hard disk is downloaded and converted into compact PDF.
C350 13-19

13 Using the BOX Utility
13.11 If an Error Is DisplayedIf an error occurs while using the BOX Utility, an error message and an error code are displayed.
For details on the error codes, see the table below.
Error Code Action
101-104 Check the name of the copier.
105-107 Check the name of host.
108-112, 404-406, 415, 502-508, 604, 611-625, 629-671, 674, 721-738, 820-937, 941, 943-953, 955, 1001, 1002, 1015-1017, 1019, 1022, 20000-20018, 24000-24002
An error occurred during communication. Please try again after a while.
113, 127, 128, 201-204, 250, 251, 271-273, 938, 939, 942, 954, 1112-1118, 1201-1204, 1215-1218
Change the setting, then try again.
114-117, 274-275, 416-423, 501, 1018, 1020, 1021, 1205, 10105, 10106, 10201, 10301-10305, 10403-10405, 10502, 10505-10512, 10525-10530
Not enough memory. Please close other applications.
118, 119, 126, 10104 BOX Utility setting is incorrect. Please install again.
120-122 Link the file to your selected application.
123 Cannot open because the file format is incorrect.
125 Cannot use BOX Utility with this operating system.
252 The number of registered copiers has reached its maximum. Please delete unused copiers from the registrations.
609, 610, 628 Please ask your administrator.
626, 627, 801-810 Another user is using this user box. Please try again after a while.
672 Not enough free disk space on the copier. Please delete unused files.
673 The number of user boxes has reached its maximum.
751-759, 940 User box has been deleted.
1013 Not enough free disk space on the computer. Please delete unused files.
1101-1111 An error occurred during the backup operation. Please try again.
1206-1214 An error occurred during the restore operation. Please try again.
13-20 C350
Using the BOX Utility 13
1301-1308, 1401-1403, 10001, 10002, 10101, 10102, 10501, 10503, 10504, 10515-10524, 10701, 21000-21011, 22000-22024, 23000-23013, 25001-25200
The operation did not succeed. Please try again.
Error Code Action
C350 13-21

13 Using the BOX Utility
13-22 C350
Troubleshooting 14
14 Troubleshooting
14.1 Unable To PrintThis chapter explains the troubleshooting procedures for possible malfunctions.
Perform the troubleshooting procedures given below when this machine does not print, even after you have executed the print command from your computer.
If the problem persists after all of these procedures have been performed, read the User’s Manual of this machine.
Symptom Probable Cause Action
A message appears, stating that “no printers are connected”, “no paper is loaded”, or “LPT1 write error”.
An error has occurred in this machine.
Check this machine’s control panel.
The network cable or printer cable is disconnected.
Check that the printer cable or network cable is connected properly.
This machine does not start printing although processing of the print job was completed on the computer.
An error has occurred in this machine.
Check this machine’s control panel.
The network cable or printer cable is disconnected.
Check that the printer cable or network cable is connected properly.
The printer driver selected for printing is not compatible with the printer controller.
Check the printer name selected in the Print dialog box.
A print job is queued in this machine, delaying printing.
Check the job order on the Active Jobs screen of this machine’s control panel.
The print job is locked. Check if the print job is locked on the Locked Jobs screen of this machine’s control panel. If it is, unlock it.
The connection of this machine to the network is not yet established (while connecting to a network).
Consult with the network administrator.
If the Copy Track mode is set, an illegal access number (password) may have been entered.
Enter the correct access number (password).
C350 14-1
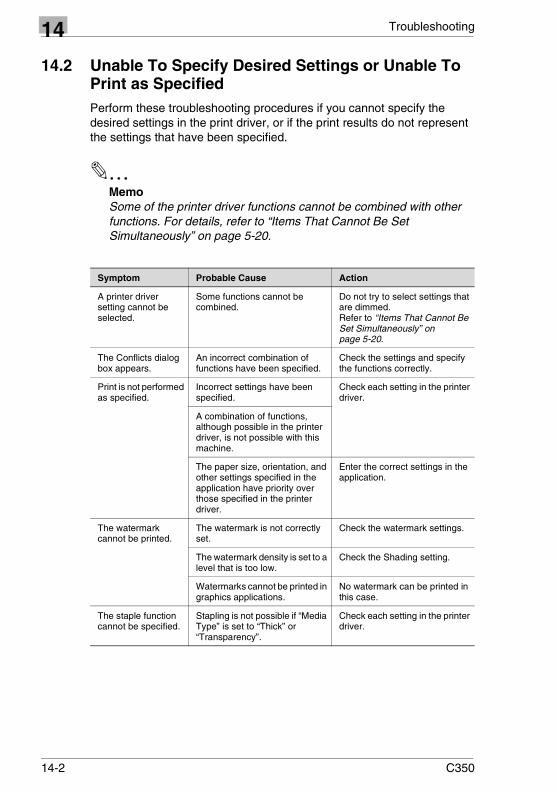
14 Troubleshooting
14.2 Unable To Specify Desired Settings or Unable To Print as SpecifiedPerform these troubleshooting procedures if you cannot specify the desired settings in the print driver, or if the print results do not represent the settings that have been specified.
✎MemoSome of the printer driver functions cannot be combined with other functions. For details, refer to “Items That Cannot Be Set Simultaneously” on page 5-20.
Symptom Probable Cause Action
A printer driver setting cannot be selected.
Some functions cannot be combined.
Do not try to select settings that are dimmed.Refer to “Items That Cannot Be Set Simultaneously” on page 5-20.
The Conflicts dialog box appears.
An incorrect combination of functions have been specified.
Check the settings and specify the functions correctly.
Print is not performed as specified.
Incorrect settings have been specified.
Check each setting in the printer driver.
A combination of functions, although possible in the printer driver, is not possible with this machine.
The paper size, orientation, and other settings specified in the application have priority over those specified in the printer driver.
Enter the correct settings in the application.
The watermark cannot be printed.
The watermark is not correctly set.
Check the watermark settings.
The watermark density is set to a level that is too low.
Check the Shading setting.
Watermarks cannot be printed in graphics applications.
No watermark can be printed in this case.
The staple function cannot be specified.
Stapling is not possible if “Media Type” is set to “Thick” or “Transparency”.
Check each setting in the printer driver.
14-2 C350
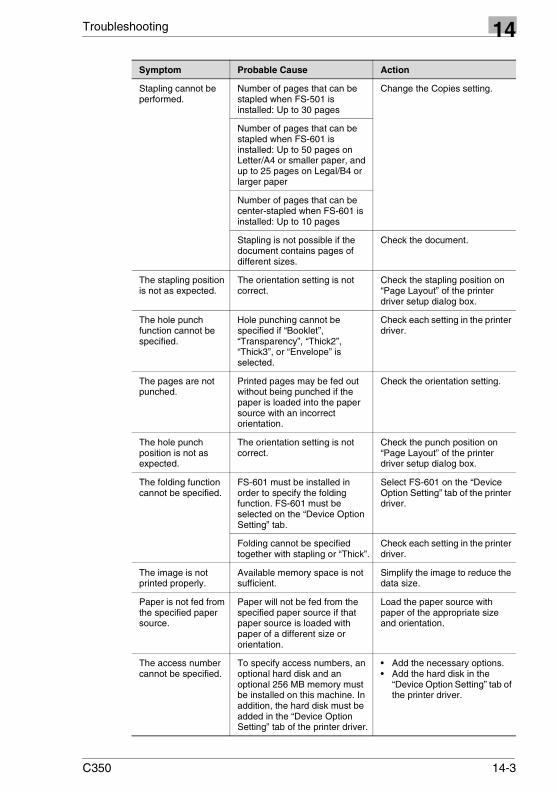
Troubleshooting 14
Stapling cannot be performed.
Number of pages that can be stapled when FS-501 is installed: Up to 30 pages
Change the Copies setting.
Number of pages that can be stapled when FS-601 is installed: Up to 50 pages on Letter/A4 or smaller paper, and up to 25 pages on Legal/B4 or larger paper
Number of pages that can be center-stapled when FS-601 is installed: Up to 10 pages
Stapling is not possible if the document contains pages of different sizes.
Check the document.
The stapling position is not as expected.
The orientation setting is not correct.
Check the stapling position on “Page Layout” of the printer driver setup dialog box.
The hole punch function cannot be specified.
Hole punching cannot be specified if “Booklet”, “Transparency”, “Thick2”, “Thick3”, or “Envelope” is selected.
Check each setting in the printer driver.
The pages are not punched.
Printed pages may be fed out without being punched if the paper is loaded into the paper source with an incorrect orientation.
Check the orientation setting.
The hole punch position is not as expected.
The orientation setting is not correct.
Check the punch position on “Page Layout” of the printer driver setup dialog box.
The folding function cannot be specified.
FS-601 must be installed in order to specify the folding function. FS-601 must be selected on the “Device Option Setting” tab.
Select FS-601 on the “Device Option Setting” tab of the printer driver.
Folding cannot be specified together with stapling or “Thick”.
Check each setting in the printer driver.
The image is not printed properly.
Available memory space is not sufficient.
Simplify the image to reduce the data size.
Paper is not fed from the specified paper source.
Paper will not be fed from the specified paper source if that paper source is loaded with paper of a different size or orientation.
Load the paper source with paper of the appropriate size and orientation.
The access number cannot be specified.
To specify access numbers, an optional hard disk and an optional 256 MB memory must be installed on this machine. In addition, the hard disk must be added in the “Device Option Setting” tab of the printer driver.
• Add the necessary options.• Add the hard disk in the
“Device Option Setting” tab of the printer driver.
Symptom Probable Cause Action
C350 14-3

14 Troubleshooting
14-4 C350

Specifications 15
15 Specifications
Printer Controller
Print Functions
Item Specifications Notes
CPU MPC8245-350 MHz The CPU of the main body is used.
Power Supply Common with the main body
Emulation PCL5c
Interface Ethernet 10Base-T/100Base-TX RJ45 (auto detection)
IEEE 1284 (Compatible/Nibble/ECP) Optional local interface kit is required.
Frame Type Ethernet 802.2Ethernet 802.3Ethernet IIEthernet SNAP
Supported protocols TCP/IPIPX/SPXNetBEUI
Compatible Computers
IBM PC or compatible
Compatible Operating Systems
Windows 98, 98SE, Me, 2000, XP, NT 4.0, or Server 2003
Compatible Web Browsers
Internet Explorer 5.5 or later (JavaScript enabled)Netscape Communicator 4.5 or later (JavaScript enabled)
Utility PageScope Web Connection Built into the printer controller
Item Specifications Remark
Print Speed 16 pages/minute (for color)35 pages/minute (for monochrome)
1-to-1 printing with the printer controller
Resolution 600 × 600 dpi
C350 15-1

15 Specifications
Scan Functions
Item Specifications Remark
Scan Speed 35 pages/minute
Resolution 600 × 600 dpiColor RGB 256 variationsGrayscale 256 variations
Scan File Formats TIFF, PDF (MH, MMR, and JPEG), and JPEG
15-2 C350
Index 16
16 Index
Numerics10Base-T/100Base-TX cable ..............................................................3-1
1st Page Only ............................................................................ 5-9, 11-9
AAbout ...................................................................................................5-6
Accept IPP Jobs ..................................................................................6-9
Access Code ............................................................................. 5-6, 11-8
Access Number ......................................................................... 5-6, 11-8
accessing PageScope Web Connection ...........................................12-1
accessories ..........................................................................................2-1
Acquire Selected File ............................................................... 8-61, 8-62
Active Job
Print ............................................................................................12-17Scan ...........................................................................................12-19
Add addr. to single index ...................................................................8-37
Add Port ................................................................................6-5, 6-6, 6-7
Add Printer Wizard .................................................................... 4-2, 4-11
Add to destination ..............................................................................8-37
Address .............................................................................................8-13
Address Input .................................................................8-16, 8-70, 10-5
Address screen ..................................................................................8-15
Admin. Set.
Box Function ...................................................................... 10-3, 13-3LDAP Search ...............................................................................8-33
Administrator mode ............................................................... 12-4, 12-34
Administrator Settings .....................................................................12-36
Administrator’s Code ............................................................... 12-3, 12-4
Authentication Method .......................................................................8-35
Authentication screen ........................................................................8-35
Authentication System .......................................................................8-35
Auto Color ..........................................................................................8-14
C350 16-1
16 Index
BBackground Removal ........................................................................ 8-14
backing up image data .................................................................... 13-16
Backup ............................................................................................ 13-16
basic setup of the scan functions ...................................................... 8-11
Binary Division ..................................................... 8-41, 8-43, 8-66, 8-68
Black ................................................................................................. 8-14
Book Copy ........................................................................................ 8-16
booklet printing .................................................................................. 5-13
Border Line ......................................................................................... 5-8
Box Function ............................................................................10-3, 13-3
Box functions ...........................................................................10-1, 13-3
Box key ............................................................................................. 10-4
BOX Utility ......................................................................................... 13-1
Install ........................................................................................... 13-2Broadcast ............................................................................................ 9-6
Ccache function ................................................................................... 12-5
Change Directory Name ................................................................... 8-62
Change Directory Password ............................................................. 8-62
Change Index Name ................................................................8-19, 10-7
Change One-Touch name .......................................................8-19, 10-7
Change send file name ..................................................................... 8-19
Change Subject .......................................................................8-18, 10-7
Check LDAP Settings ....................................................................... 8-35
Collate ................................................................................................. 5-5
Color Mode ....................................................................................... 8-14
Color/File ........................................................................................... 8-14
Color/Grayscale Compression Level ................................................. 8-12
Common Setting ..........................................................................3-4, 6-2
IPP ......................................................................................6-8, 12-51LDAP ................................................................................8-34, 12-55NetWare Configuration .............................................................. 12-52NetWare Status ......................................................................... 12-53TCP/IP ....................................................................................... 12-50Windows Configuration ......................................................6-4, 12-54
compact PDF .................................................................................. 13-19
16-2 C350
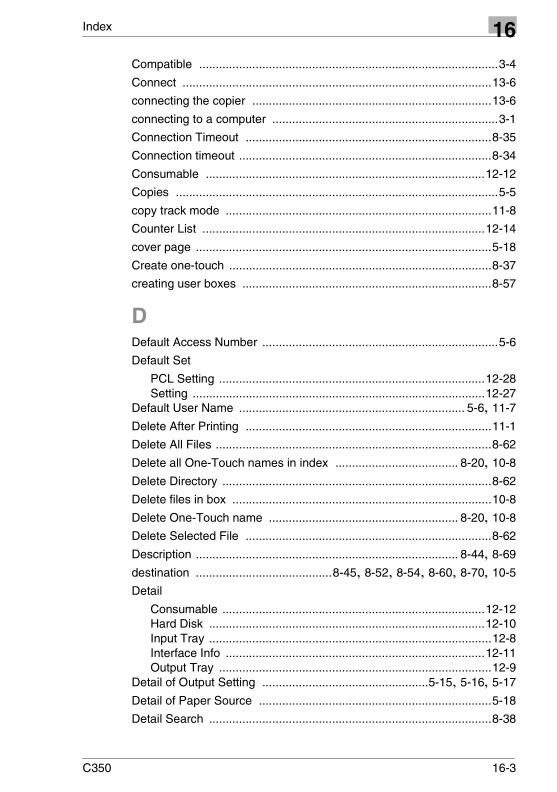
Index 16
Compatible ..........................................................................................3-4Connect .............................................................................................13-6
connecting the copier ........................................................................13-6
connecting to a computer ....................................................................3-1
Connection Timeout ..........................................................................8-35
Connection timeout ............................................................................8-34
Consumable ....................................................................................12-12
Copies .................................................................................................5-5
copy track mode ................................................................................11-8
Counter List .....................................................................................12-14
cover page .........................................................................................5-18
Create one-touch ...............................................................................8-37
creating user boxes ...........................................................................8-57
DDefault Access Number .......................................................................5-6
Default Set
PCL Setting ................................................................................12-28Setting ........................................................................................12-27
Default User Name .................................................................... 5-6, 11-7
Delete After Printing ..........................................................................11-1
Delete All Files ...................................................................................8-62
Delete all One-Touch names in index ..................................... 8-20, 10-8
Delete Directory .................................................................................8-62
Delete files in box ..............................................................................10-8
Delete One-Touch name ......................................................... 8-20, 10-8
Delete Selected File ..........................................................................8-62
Description ............................................................................... 8-44, 8-69
destination .........................................8-45, 8-52, 8-54, 8-60, 8-70, 10-5
Detail
Consumable ...............................................................................12-12Hard Disk ...................................................................................12-10Input Tray .....................................................................................12-8Interface Info ..............................................................................12-11Output Tray ..................................................................................12-9
Detail of Output Setting ..................................................5-15, 5-16, 5-17
Detail of Paper Source ......................................................................5-18
Detail Search .....................................................................................8-38
C350 16-3
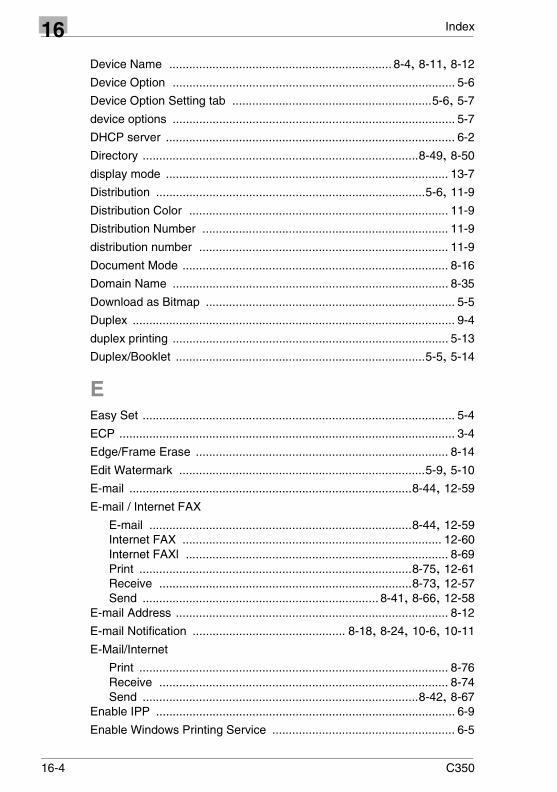
16 Index
Device Name ................................................................... 8-4, 8-11, 8-12
Device Option ..................................................................................... 5-6
Device Option Setting tab ............................................................5-6, 5-7
device options ..................................................................................... 5-7
DHCP server ....................................................................................... 6-2
Directory ...................................................................................8-49, 8-50
display mode ..................................................................................... 13-7
Distribution .................................................................................5-6, 11-9
Distribution Color .............................................................................. 11-9
Distribution Number .......................................................................... 11-9
distribution number ........................................................................... 11-9
Document Mode ................................................................................ 8-16
Domain Name ................................................................................... 8-35
Download as Bitmap ........................................................................... 5-5
Duplex ................................................................................................. 9-4
duplex printing ................................................................................... 5-13
Duplex/Booklet ...........................................................................5-5, 5-14
EEasy Set .............................................................................................. 5-4
ECP ..................................................................................................... 3-4
Edge/Frame Erase ............................................................................ 8-14
Edit Watermark ..........................................................................5-9, 5-10
E-mail .....................................................................................8-44, 12-59
E-mail / Internet FAX
E-mail ...............................................................................8-44, 12-59Internet FAX .............................................................................. 12-60Internet FAXl ............................................................................... 8-69Print ..................................................................................8-75, 12-61Receive ............................................................................8-73, 12-57Send ....................................................................... 8-41, 8-66, 12-58
E-mail Address .................................................................................. 8-12
E-mail Notification .............................................. 8-18, 8-24, 10-6, 10-11
E-Mail/Internet
Print ............................................................................................. 8-76Receive ....................................................................................... 8-74Send ...................................................................................8-42, 8-67
Enable IPP .......................................................................................... 6-9
Enable Windows Printing Service ....................................................... 6-5
16-4 C350
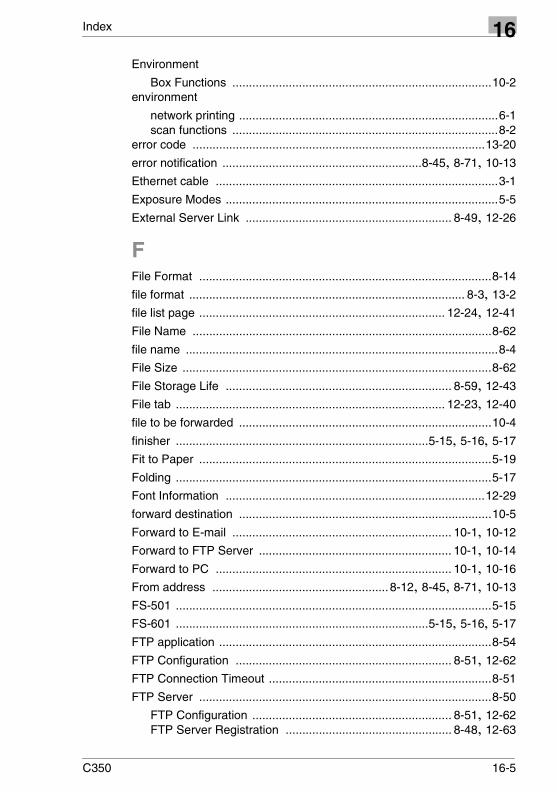
Index 16
EnvironmentBox Functions ..............................................................................10-2environment
network printing ..............................................................................6-1scan functions ................................................................................8-2
error code ........................................................................................13-20
error notification ............................................................8-45, 8-71, 10-13
Ethernet cable .....................................................................................3-1
Exposure Modes ..................................................................................5-5
External Server Link .............................................................. 8-49, 12-26
FFile Format ........................................................................................8-14
file format ................................................................................... 8-3, 13-2
file list page .......................................................................... 12-24, 12-41
File Name ..........................................................................................8-62
file name ..............................................................................................8-4
File Size .............................................................................................8-62
File Storage Life .................................................................... 8-59, 12-43
File tab ................................................................................. 12-23, 12-40
file to be forwarded ............................................................................10-4
finisher ............................................................................5-15, 5-16, 5-17
Fit to Paper ........................................................................................5-19
Folding ...............................................................................................5-17
Font Information ..............................................................................12-29
forward destination ............................................................................10-5
Forward to E-mail .................................................................. 10-1, 10-12
Forward to FTP Server .......................................................... 10-1, 10-14
Forward to PC ....................................................................... 10-1, 10-16
From address .....................................................8-12, 8-45, 8-71, 10-13
FS-501 ...............................................................................................5-15
FS-601 ............................................................................5-15, 5-16, 5-17
FTP application ..................................................................................8-54
FTP Configuration ................................................................. 8-51, 12-62
FTP Connection Timeout ...................................................................8-51
FTP Server ........................................................................................8-50
FTP Configuration ............................................................ 8-51, 12-62FTP Server Registration .................................................. 8-48, 12-63
C350 16-5
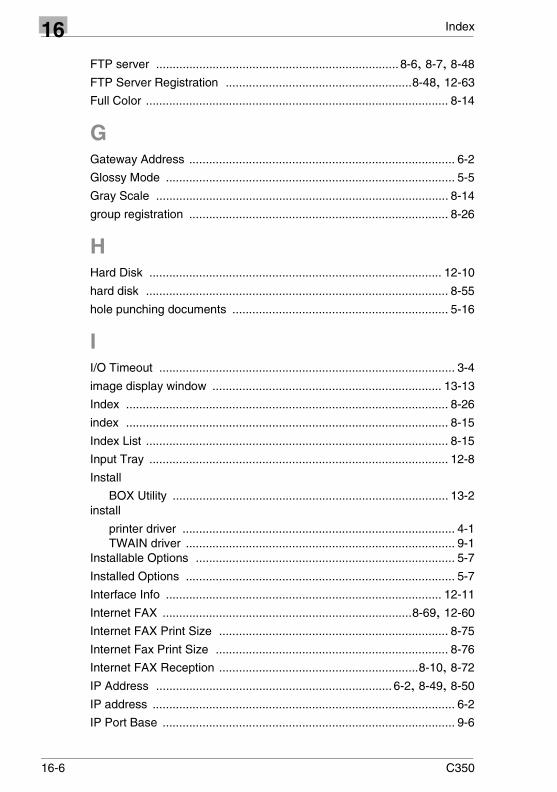
16 Index
FTP server ......................................................................... 8-6, 8-7, 8-48
FTP Server Registration ........................................................8-48, 12-63
Full Color ........................................................................................... 8-14
GGateway Address ................................................................................ 6-2
Glossy Mode ....................................................................................... 5-5
Gray Scale ........................................................................................ 8-14
group registration .............................................................................. 8-26
HHard Disk ........................................................................................ 12-10
hard disk ........................................................................................... 8-55
hole punching documents ................................................................. 5-16
II/O Timeout ......................................................................................... 3-4
image display window ..................................................................... 13-13
Index ................................................................................................. 8-26
index ................................................................................................. 8-15
Index List ........................................................................................... 8-15
Input Tray .......................................................................................... 12-8
Install
BOX Utility ................................................................................... 13-2install
printer driver .................................................................................. 4-1TWAIN driver ................................................................................. 9-1
Installable Options .............................................................................. 5-7
Installed Options ................................................................................. 5-7
Interface Info ................................................................................... 12-11
Internet FAX ...........................................................................8-69, 12-60
Internet FAX Print Size ..................................................................... 8-75
Internet Fax Print Size ...................................................................... 8-76
Internet FAX Reception ............................................................8-10, 8-72
IP Address ....................................................................... 6-2, 8-49, 8-50
IP address ........................................................................................... 6-2
IP Port Base ........................................................................................ 9-6
16-6 C350

Index 16
IPP ........................................................................6-8, 6-9, 12-45, 12-51IPP printing ..........................................................................................6-8
JJob History
Print ............................................................................................12-20Scan ...........................................................................................12-22
job management ................................................................................11-1
Job Management tab ...........................................................................5-6
Job Name ..........................................................................................11-7
job operations ..................................................................................11-10
Job Owner ................................................................................. 5-6, 11-7
Job tab .............................................................................................12-17
JPEG ................................................................................8-3, 8-14, 13-2
KKONICA MINOLTA logo ....................................................................12-2
LLDAP ............................................................................8-34, 8-35, 12-55
LDAP Search ........................................................8-33, 8-36, 8-38, 8-39
LDAP search .....................................................................................8-33
LDAP server ......................................................................................8-33
LDAP Server Address ............................................................. 8-34, 8-35
Limitations on Function Combinations ...............................................5-21
Limitations on Other Combinations ...................................................5-22
Limitations on Paper Size and Function Combinations .....................5-20
Local I/F ...........................................................................................12-44
local interface kit ..................................................................................3-3
Lock Job .................................................................................. 11-1, 11-6
logging in to Administrator mode .......................................................12-4
Log-in .................................................................................................12-4
Login Name ....................................................................8-35, 8-49, 8-50
Log-out ..............................................................................................12-4
Low Density Adjustment ......................................................................9-4
LPR Port ..............................................................................................6-7
LPR printing .........................................................................................6-6
C350 16-7

16 Index
MMail Check ...............................................................................8-73, 8-74
Mail Separation ........................................................................8-42, 8-67
main window ..................................................................................... 13-7
margin ............................................................................................... 8-16
Max Hop for Search ............................................................................ 9-6
Max. No. of E-mail Searches ............................................................ 8-34
Max. Number of Searches ................................................................ 8-35
Maximum E-mail Size ..............................................................8-41, 8-66
menus ............................................................................................... 12-3
Message screen .......................................................................8-22, 10-9
MISC. ................................................................................................ 8-13
MISC. screen ...........................................................................8-17, 10-6
Mixed Original ................................................................................... 8-17
Mode Check key ......................................................................8-22, 10-9
Multicasting ......................................................................................... 9-6
NNetBEUI .............................................................................................. 6-4
NetBIOS Name ................................................................................... 6-5
NetWare ............................................................................................ 6-12
NetWare 4.x bindery emulation ................................................6-12, 6-14
NetWare 4.x remote printer mode ..................................................... 6-16
NetWare 4.x/5.x/6 print server mode ................................................ 6-18
NetWare 5.x/6 Novell Distributed Print Services (NDPS) ................. 6-20
NetWare Configuration ................................................................... 12-52
NetWare Status ............................................................................... 12-53
network connection ......................................................................3-1, 4-2
network printing ................................................................................... 6-1
Network Setting
Common Setting ............................................................................ 6-2E-Mail/Internet ................................................ 8-42, 8-67, 8-74, 8-76FTP Server .................................................................................. 8-50LDAP ........................................................................................... 8-35Twain ............................................................................................. 9-2
Network Setting screen ..................................................................... 8-35
Network tab ..................................................................................... 12-50
16-8 C350

Index 16
Nibble ..................................................................................................3-4number of jobs ...................................................................................11-7
N-up ............................................................................................. 5-5, 5-8
N-up Style ............................................................................................5-8
OOHP interleaving ...............................................................................5-18
One Time Registration ........................................................... 8-29, 12-33
one-touch key ....................................................................................8-15
One-Touch Key Registration ................................................. 8-25, 12-31
File Export ..................................................................................12-47File Import ..................................................................................12-48
one-touch key registration .................................................................8-25
Online Assistance ................................................................ 12-16, 12-39
operating environment ................................................................. 2-1, 9-1
Operation Lock Time ...........................................................................9-2
Operation Lock Time for TWAIN .........................................................9-2
Operation Supported ...........................................................................6-9
Option ..................................................................................................9-4
Option dialog box .................................................................................9-5
Orientation ...........................................................................................5-5
Original Direction ...............................................................................8-17
Original Document Size ............................................................. 5-5, 5-19
Original Setting ..................................................................................8-13
Original Setting screen ......................................................................8-16
Others screen ....................................................................................8-35
Output Paper Size ..................................................................... 5-5, 5-19
Output Setting ......................................................................................5-5
Output Tray ........................................................................................12-9
PPage Layout ........................................................................................5-4
PageScope Web Connection ............................................................12-1
PageScope Web Connection Setting ..............................................12-38
Paper Size ...........................................................................................9-4
paper size ..........................................................................................5-19
Paper Source .......................................................................................5-5
C350 16-9
16 Index
Paper tab ............................................................................................ 5-5
parallel connection .......................................................................3-3, 4-7
Parallel Interface ................................................................................. 3-4
Passive Mode ................................................................................... 8-51
Password ....................................................................... 8-35, 8-49, 8-58
PC Scanning function ......................................................................... 9-1
PCL Setting ..................................................................................... 12-28
PDF .................................................................................. 8-3, 8-14, 13-2
PIN # ................................................................................................. 8-50
Pixel Type ........................................................................................... 9-4
Place ................................................................................................... 9-4
Plug and Play ...................................................................................... 4-7
POP3 Connection Timeout ............................................................... 8-73
POP3 Login Name ...................................................................8-73, 8-74
POP3 Password .......................................................................8-73, 8-74
POP3 Server ............................................................................8-73, 8-74
Port Number .............................8-34, 8-35, 8-41, 8-49, 8-51, 8-66, 8-73
Prefix/Suffix Registration ................................................................. 12-49
Prescan ............................................................................................... 9-4
Previous Result ................................................................................. 8-39
Pri. Comp. Method for Monochrome ................................................. 8-12
Print .......................................................8-75, 8-76, 12-17, 12-20, 12-61
Print and Hold ..........................................................................11-1, 11-2
print job management ....................................................................... 11-1
Print tab ................................................................................12-27, 12-44
Print Test ........................................................................................... 6-22
Print Test Page ................................................................................. 6-22
printer controller .................................................................................. 1-1
printer driver
common controls ........................................................................... 5-3install ............................................................................................. 4-1setup dialog box ............................................................................ 5-1uninstall ....................................................................................... 4-15
Printer Figure ...................................................................................... 5-4
Printer Location ................................................................................... 6-9
Printer Manufacturer and Model ......................................................... 6-9
Printer Name ....................................................................................... 6-9
Printer Setting ..................................................................................... 7-1
16-10 C350

Index 16
Common Setting ............................................................................3-4Printer URI ...........................................................................................6-9
printing multiple pages on one page ....................................................5-8
Printing Service Name .........................................................................6-5
Priority Compression Method for Monochrome .................................8-12
product overview .................................................................................1-1
Proof and Print ......................................................................... 11-1, 11-5
Proxy IP Address ...............................................................................8-51
PUBLIC box .......................................................................................8-58
Punch ................................................................................................5-16
Punch Holes ......................................................................................5-16
QQuality tab ...........................................................................................5-5
RReceive .........................................................................8-73, 8-74, 12-57
Received Time ...................................................................................8-62
Register MFP Controller ....................................................................13-4
registering destinations in advance ...................................................8-25
registering FTP servers .....................................................................8-48
registering the copier .........................................................................13-4
Reply-To address ..............................................................................8-71
Report Types ...................................................................................12-30
Reset Mode .......................................................................................8-21
Resolution ...........................................................................5-5, 8-14, 9-4
Restore ............................................................................................13-17
restoring image data ........................................................................13-17
retrieving images using TWAIN ...........................................................9-3
retrieving the scanned data ...............................................................8-61
Retype Password ..............................................................................8-58
SScan ................................................8-4, 8-11, 9-4, 12-19, 12-22, 12-46
scan function .......................................................................................8-1
Scan Mode ........................................................................................8-13
Scan Mode screen .............................................................................8-14
C350 16-11
16 Index
Scan Setting ...................................................................................... 8-12
Scan Size .......................................................................................... 8-14
Scan tab ...............................................................................12-31, 12-46
Scan to E-Mail ................................................................................... 8-40
Scan to E-mail ..................................................................................... 8-5
Scan to FTP Server ...................................................................8-6, 8-46
Scan to HDD ..............................................................................8-8, 8-55
Scan to Internet FAX ..................................................................8-9, 8-64
Scan to PC .................................................................................8-7, 8-53
Scanned File Separation ................................................ 8-12, 8-43, 8-68
Search Base ..................................................................................... 8-35
Search Root ...................................................................................... 8-34
searching the scanner ......................................................................... 9-6
Select Color or Grayscale ................................................................... 5-5
Select destination screen .................................................................. 10-5
Select file to forward screen .............................................................. 10-4
Send ..........................................................8-41, 8-42, 8-66, 8-67, 12-58
Send screen .............................................................................8-22, 10-9
Separate Scan ...........................................................................8-17, 9-4
Setting ............................................................................................. 12-27
setting device options ......................................................................... 5-7
Setup tab ............................................................................................. 5-5
SMTP Connection Timeout ......................................................8-41, 8-66
SMTP Server ....................................................... 8-41, 8-42, 8-66, 8-67
specifications .................................................................................... 15-1
SSL/TLS ....................................................................... 8-34, 8-35, 12-66
standard search ................................................................................ 8-36
Standard TCP/IP Port ......................................................................... 6-6
stapling documents ........................................................................... 5-15
Starting Number ................................................................................ 11-9
status display .................................................................................... 12-3
Store ................................................................................................. 8-21
Store Job ....................................................................................5-6, 11-1
Store to HDD ............................................................................11-1, 11-3
Store to Memory ......................................................................11-1, 11-4
Sub-Index .......................................................................................... 8-26
Subject .....................................................................................8-44, 8-69
16-12 C350
Index 16
Subject/From screen ............................................................... 8-22, 10-9Subnet Mask ........................................................................................6-2
Summary ...........................................................................................12-7
system requirements
BOX Utility ....................................................................................13-1PageScope Web Connection .......................................................12-1
System tab ............................................................................. 12-7, 12-34
Ttabs ....................................................................................................12-3
TCP/IP ....................................................................6-2, 8-2, 10-2, 12-50
Temp. Registration ............................................................................8-15
temporary registration ........................................................................8-29
Text ......................................................................................................5-9
Text Print ................................................................................. 8-75, 8-76
TIFF ..................................................................................8-3, 8-14, 13-2
Timeout of SMTP Server ......................................................... 8-42, 8-67
Toner Coverage ...............................................................................12-15
troubleshooting ..................................................................................14-1
TWAIN .................................................................................................9-1
Twain ...................................................................................................9-2
TWAIN Configuration ............................................................... 9-2, 12-65
TWAIN driver .......................................................................................9-1
install ..............................................................................................9-1
Uuninstall
printer driver .................................................................................4-15URL notification using e-mail ................................................. 8-23, 10-10
Use Printer Font ..................................................................................5-5
Use Proxy ..........................................................................................8-49
User Authentication .........................................................................12-71
user authentication ............................................................................8-13
user box ................................................................................... 8-57, 8-58
User Directory ................................................... 8-57, 8-61, 12-23, 12-40
User Directory Name .........................................................................8-58
User mode ............................................................................... 12-2, 12-7
C350 16-13
16 Index
User Name ........................................................................................ 11-7
User’s Choice
User’s Choice 1 ......................................................................... 12-34User’s Choice 2 ......................................................................... 12-35
User’s Choice 1 ............................................................................... 12-34
User’s Choice 2 ............................................................................... 12-35
WWatermark .......................................................................................... 5-5
watermark ........................................................................................... 5-9
Web browser ..................................................................................... 12-5
Windows Configuration ............................................................6-4, 12-54
Windows printing ................................................................................. 6-4
WorkGroup Name ............................................................................... 6-5
16-14 C350

Copyright
2004 2004.14036-7708-01E
www.konicaminolta.net
Related Documents